You’ve probably heard the hype: “Fish oil will make you smarter, healthier, and live longer!”—or, more skeptically, “It’s just another overhyped supplement.” As with most health trends, the truth is somewhere in the middle.
Whether you’re thinking about fish oil for heart health, joint pain, mental focus, or simply “being healthier,” this deep dive will give you practical, real-world guidance based on the latest science and actual user experiences in 2025.
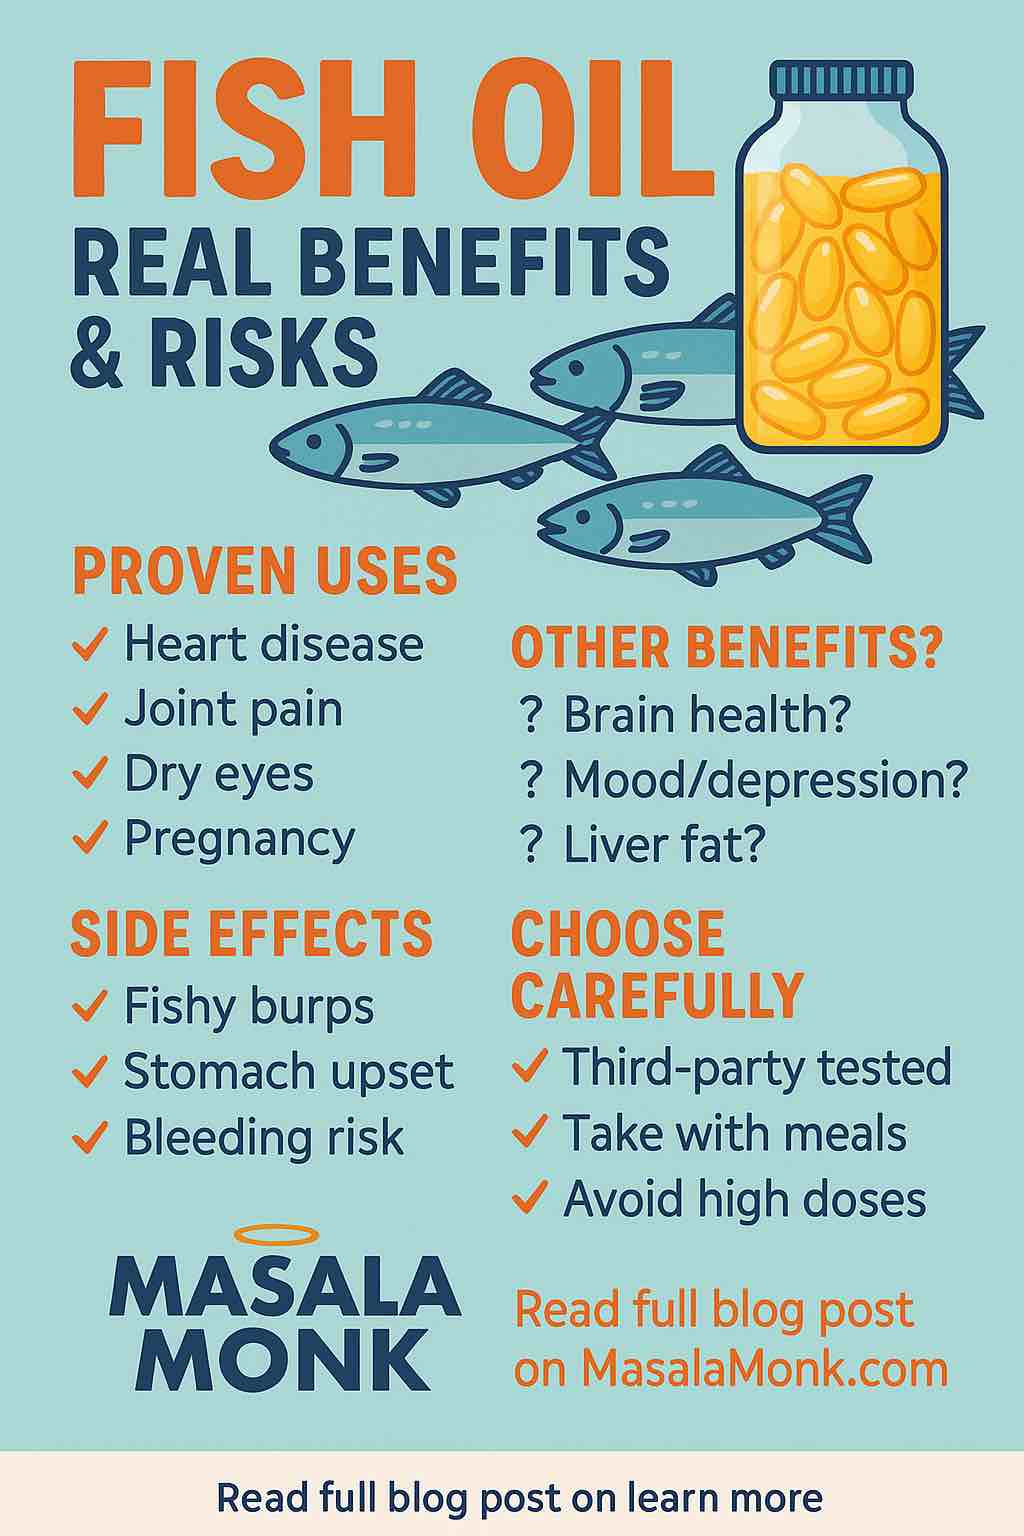
What Is Fish Oil, Anyway?
Fish oil is derived from the tissues of oily fish like salmon, mackerel, sardines, and anchovies. The magic ingredients? Two omega-3 fatty acids: EPA (eicosapentaenoic acid) and DHA (docosahexaenoic acid). These aren’t just “good fats”—they’re critical to our brains, eyes, and cells.
Fish oil comes in liquid, softgel, and even chewable forms. While you can get omega-3s from flaxseed or chia, EPA and DHA are only abundant in marine sources—and they’re more potent than the plant-based version (ALA).
The Science: Who Actually Benefits From Fish Oil?
1. Heart Health: The Real Story
- Strongest Evidence: People with high triglycerides or existing heart disease, especially those prescribed high-dose EPA (like Vascepa/icosapent ethyl).
- What You Might Actually Notice: Lower triglycerides, possibly less risk of heart attack if you’re already at high risk.
- For Everyone Else: If you’re generally healthy and eat fish a couple of times a week, supplements probably won’t add much—and might even slightly increase your risk of irregular heartbeat (atrial fibrillation) if you overdo it.
2. Joint Pain & Inflammation
- What Research Says: Modest, real benefit for people with rheumatoid arthritis and sometimes for those with general joint stiffness. Effects build slowly—think months, not days.
- User Voices: “Taking fish oil and glucosamine means I can walk without extreme discomfort…” (Reddit, r/Supplements)
3. Brain Power & Mood
- Reality Check: Fish oil may help with mood—especially as an add-on for depression (not as a sole treatment). Memory improvements? Most healthy people notice little, but there are anecdotal exceptions.
- User Voices: “My memory and mental clarity improved…” vs. “No change at all for me.”
- For Cognitive Decline: No strong evidence that fish oil prevents or slows Alzheimer’s if dementia is already present.
4. Dry Eyes & Skin
- Some of the Happiest Users: People with dry eyes, eczema, or psoriasis. Relief can be noticeable—if you’re in this camp, it might be worth trying.
- User Voices: “Fish oil completely got rid of my pre-arthritis symptoms and dry eyes. … my skin looks young.”
5. Pregnancy & Child Development
- Solid Evidence: DHA is crucial for developing babies’ brains and eyes, especially in the third trimester. Many prenatal supplements now include it.
6. Metabolic Health & Fatty Liver
- Emerging Area: Some improvement in metabolic markers (like insulin resistance, liver fat) in those with metabolic syndrome or nonalcoholic fatty liver disease (MASLD).
Here you might want to take a look at this comparison of Popular Fish Oil Brands and Makes available on Amazon in India : Best Fish Oil Supplements on Amazon India
Side Effects: The Honest List
No supplement is risk-free—fish oil included.
- Fishy burps and aftertaste: The #1 complaint. Enteric-coated or “burpless” capsules help.
- Stomach upset/diarrhea: Especially if you take it on an empty stomach.
- Increased bleeding risk: At high doses (>2–3g/day EPA+DHA), especially if you’re on blood thinners or prepping for surgery.
- Atrial fibrillation: Risk increases at high dose, especially for people with heart issues.
- Mood changes: A minority report drowsiness or low mood.
- Quality issues: Some supplements are contaminated or oxidized (rancid), which can be harmful.
Quality Matters: How to Choose a Fish Oil Supplement
This is where a lot of people get it wrong. Many brands on store shelves are underdosed, oxidized, or full of cheap fillers.
Look for:
- Third-party tested products: IFOS, ConsumerLab, or USP certification.
- No fishy smell: If it smells rancid, it’s probably oxidized—throw it out!
- Concentration: Aim for 250–1000 mg combined EPA+DHA per daily serving (higher only if prescribed).
- No unnecessary additives: Avoid products with artificial colors, magnesium stearate, or carrageenan.
- Transparency: Companies that share lab reports are best.
Practical Tips for Taking Fish Oil
- Take with meals: Reduces GI upset and improves absorption.
- Store in the fridge: Slows oxidation and keeps them fresh.
- Watch the dose: More isn’t always better! Follow label instructions or doctor’s advice.
- Cycle off before surgery: Stop fish oil at least a week prior due to bleeding risk.
- Try food first: 2–3 servings of fatty fish per week is often better than any pill.
Who Should NOT Take Fish Oil Without Talking to a Doctor?
- People with seafood allergies
- Anyone on blood thinners or with bleeding/clotting disorders
- Those with a history of heart rhythm problems (arrhythmia/AFib)
- People planning surgery soon
- Pregnant or nursing women (unless guided by a healthcare provider)
- Anyone with liver disease or on certain meds (check interactions!)
User Experiences: What Real People Are Saying
Fish oil is not a miracle cure, but real-world reports are revealing:
Positive:
- “My dry eyes are gone, joint pain is much better, and my skin looks great.”
- “I feel less anxious and my memory is sharper.”
Neutral/Negative:
- “I didn’t notice any difference, even after three months.”
- “Gave me diarrhea and a fishy aftertaste.”
- “Made me sleepy and down.”
- “I only take it because my doctor said so—no real benefit yet.”
Key Takeaway:
If you don’t notice a benefit after a few months, you’re probably not missing out by stopping—unless your doctor says otherwise.
Myths, Hype, and Reality
- “Fish oil prevents heart attacks for everyone!”
Not true—most healthy people see little to no effect. - “It’s natural so it’s always safe.”
False—high doses and poor-quality products carry real risks. - “More is better.”
Definitely not! The benefits plateau, but side effects rise with dose. - “Plant-based omega-3s (ALA) are just as good.”
Not really—EPA/DHA from marine sources are more effective for most proven benefits.
The Bottom Line: Should You Take Fish Oil?
- If you have specific needs (high triglycerides, dry eyes, joint pain, pregnant): Fish oil may be worth it—with guidance and the right product.
- If you’re healthy and eat fish regularly: You likely don’t need a supplement.
- If you’re curious: Try a high-quality brand for 2–3 months. Track how you feel. No benefit? No harm in stopping.
- ALWAYS check with your healthcare provider if you have underlying conditions or take medications.
Also Read: Fish Oil and Cortisol: Can Omega-3 Help You Manage Stress Hormones?
Final Word
Fish oil is neither a cure-all nor a scam. Used wisely, it can help the right people. But it’s not a shortcut to health—real food, exercise, and regular checkups still matter most.
Know your goals. Know your risks. Be skeptical of hype—and demand quality.
Questions? Personal experiences? Drop them in the comments below!
1. What is the best time of day to take fish oil?
Answer: Take fish oil with a meal, preferably one containing fat (like lunch or dinner), to enhance absorption and reduce the risk of stomach upset or “fish burps.”
2. How much fish oil should I take daily?
Answer: For general health, most experts recommend 250–500 mg of combined EPA and DHA daily. Higher doses (up to 4 g/day) are only for specific medical conditions and should be supervised by a healthcare professional.
3. Can I get enough omega-3s from food alone?
Answer: Yes—two to three servings of fatty fish (like salmon, mackerel, sardines) per week usually provide adequate EPA and DHA for most healthy adults.
4. What are the signs that fish oil is working for me?
Answer: Common signs include reduced joint pain or stiffness, relief from dry eyes, smoother skin, and sometimes improved mood. Benefits are subtle and may take a few weeks to months to appear.
5. What should I look for in a high-quality fish oil supplement?
Answer: Look for third-party tested brands (IFOS, ConsumerLab, USP), clear EPA/DHA content on the label, no strong fishy odor (a sign of rancidity), and minimal unnecessary additives.
6. Are there side effects or risks I should be aware of?
Answer: Mild side effects include fishy aftertaste, nausea, or diarrhea. High doses increase the risk of bleeding and irregular heartbeat, especially in people with certain medical conditions or those on blood thinners.
7. Can fish oil interact with my medications?
Answer: Yes. Fish oil can interact with blood thinners, antiplatelet drugs, and certain blood pressure medications. Always check with your doctor before starting fish oil if you’re on prescription meds.
8. Is fish oil safe during pregnancy?
Answer: Fish oil (DHA in particular) is beneficial for fetal brain and eye development. However, pregnant or nursing women should use purified supplements and consult their doctor to ensure safety.
9. Do plant-based omega-3s (like flaxseed oil) offer the same benefits?
Answer: Plant-based omega-3s (ALA) do not provide the same benefits as marine-derived EPA and DHA. The body only converts a small amount of ALA to EPA/DHA.
10. How can I avoid the “fishy burps” or aftertaste?
Answer: Choose enteric-coated or “burpless” capsules, store your supplement in the fridge, and always take fish oil with food to minimize aftertaste and burps.