Posted on Leave a comment

How to Make Banana Pudding? 5 Healthy Breakfast Twists

BANANA PUDDING TWISTS FOR YOUR MORNING BOOST

Banana pudding is more than just a Southern dessert classic. With the right ingredients and a little creativity, it can be transformed into a nourishing, energy-packed breakfast. Whether you’re rushing out the door or looking for a slow, satisfying morning, these five healthy twists on banana pudding bring all the comfort and sweetness you crave without the sugar crash.


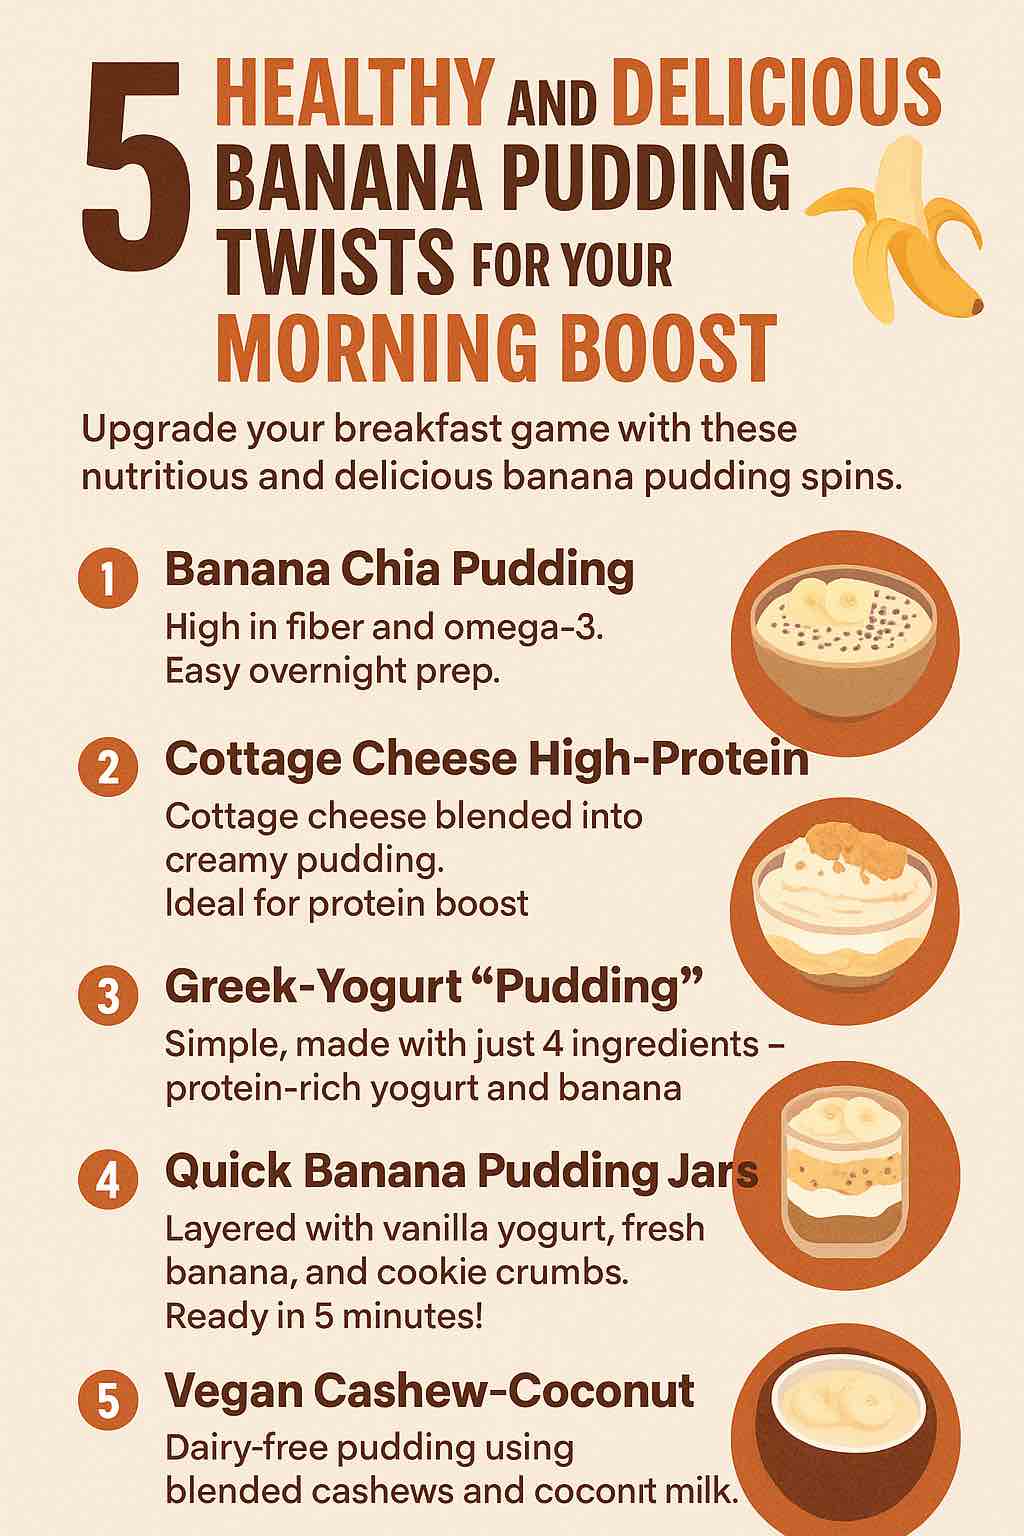
1. Banana-Chia Power Pudding

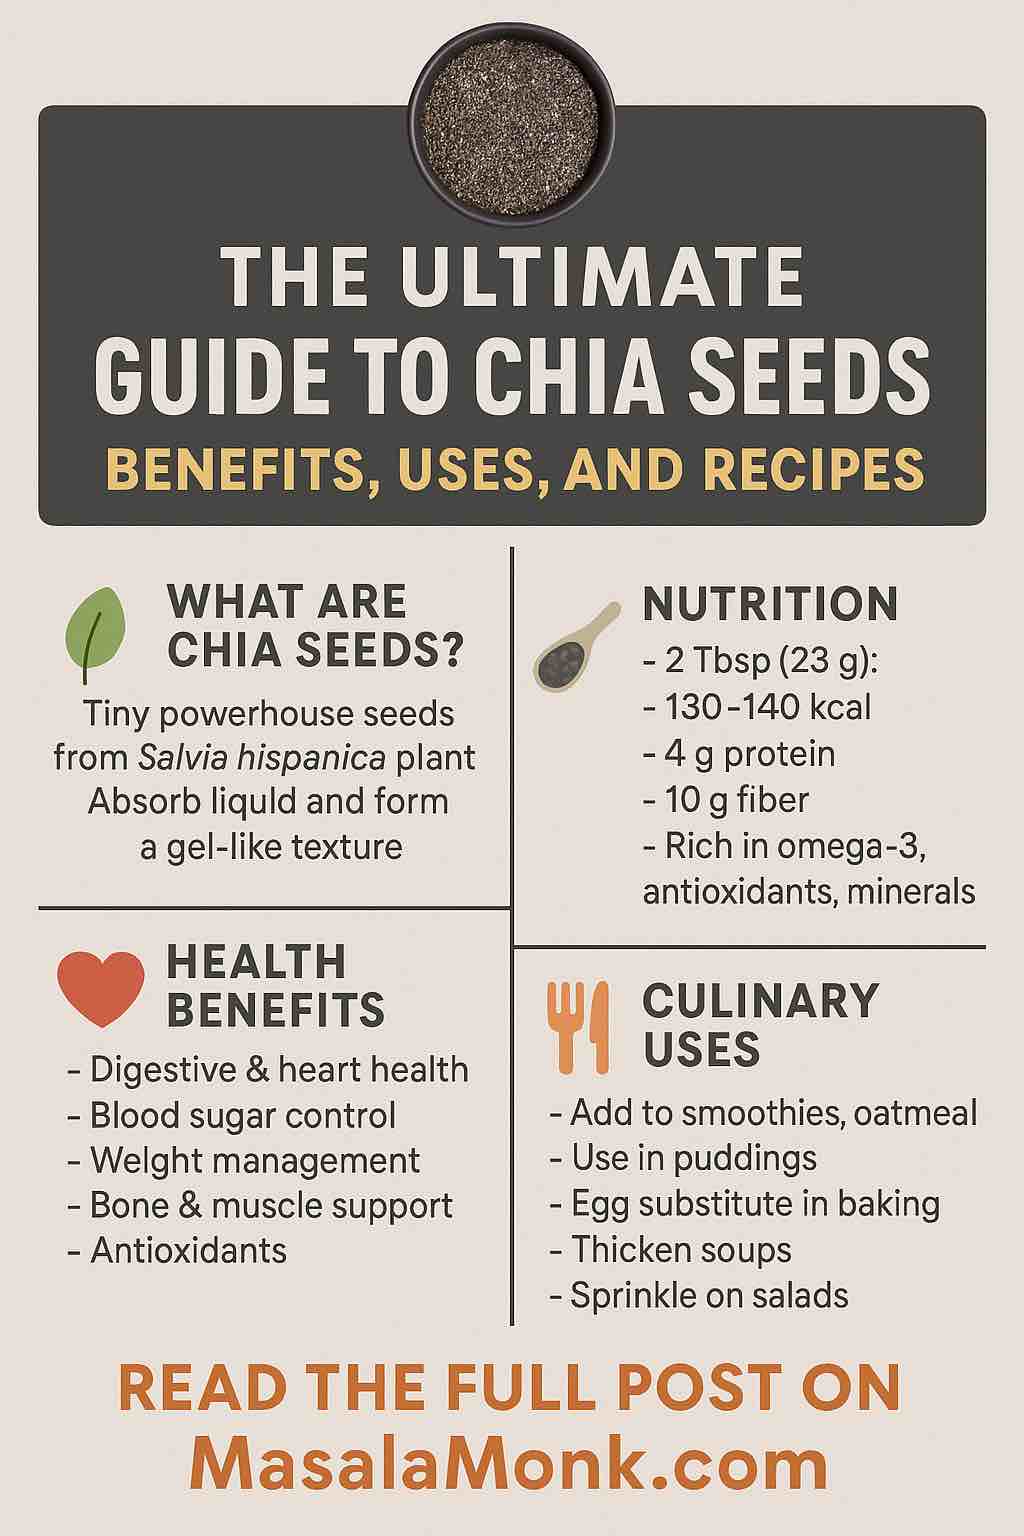
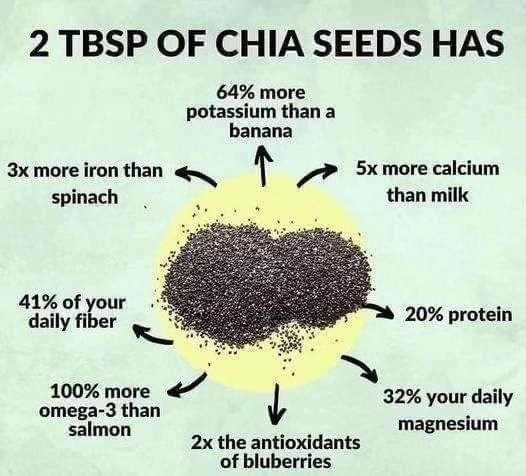
Why it works: Packed with fiber, omega-3s, and antioxidants, chia seeds pair beautifully with bananas to create a naturally sweet, pudding-like breakfast that feels indulgent but is totally guilt-free.

Ingredients:

  • 2 ripe bananas (mashed)
  • 2 cups unsweetened almond or oat milk
  • 6 tbsp chia seeds
  • 1 tsp vanilla extract
  • Optional: pinch of cinnamon or nutmeg

Instructions:

  1. Mash bananas in a bowl until smooth.
  2. Stir in milk, chia seeds, and vanilla extract.
  3. Let sit for 15 minutes, stir again to prevent clumps.
  4. Cover and refrigerate overnight.
  5. Serve with berries or crushed nuts in the morning.

Prep Tip: Stir again after 30 minutes to help the chia gel evenly.

Nutrition Per Serving: Approx. 180 calories, 6g protein, 9g fiber


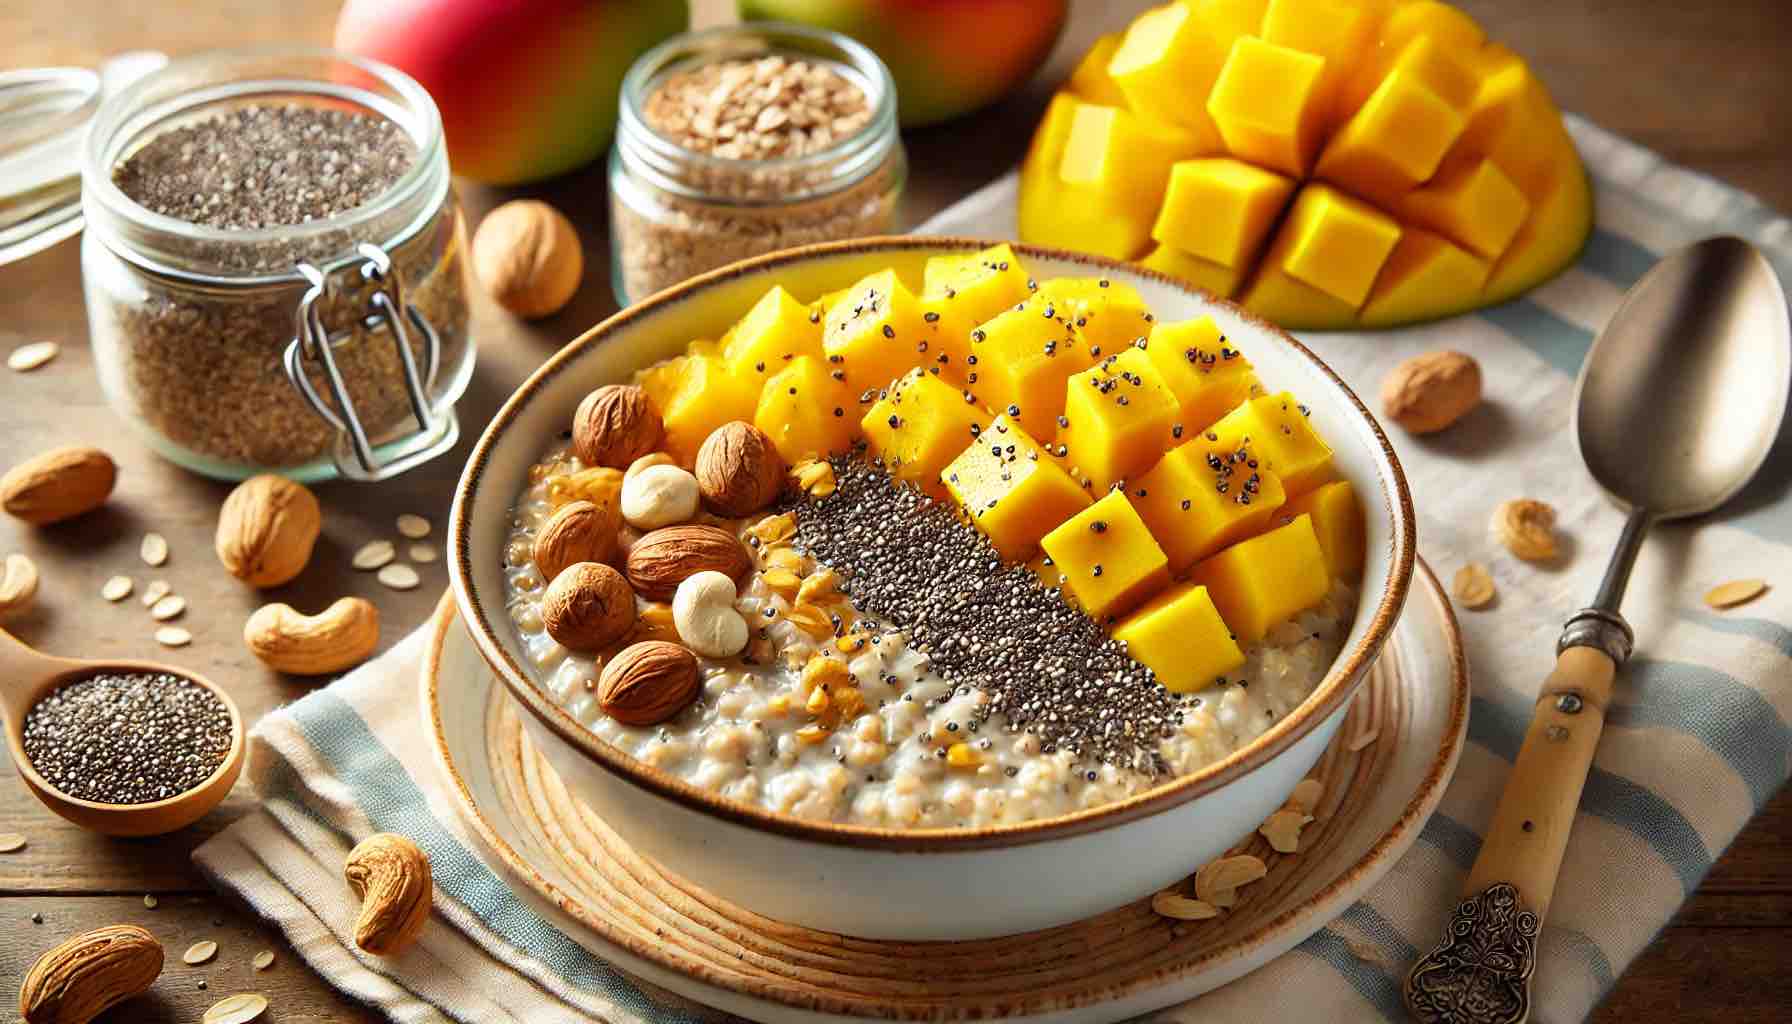
2. Banana Pudding Overnight Oats

Why it works: Oats make this a hearty, slow-digesting option that keeps you full all morning. The banana and vanilla combo adds natural sweetness, and layering gives it that pudding parfait feel.

Ingredients:

  • 1 ripe banana (mashed)
  • 1/2 cup rolled oats
  • 1/2 cup Greek yogurt or plant-based yogurt
  • 1/2 cup almond milk
  • 1 tsp vanilla extract
  • Optional: chopped walnuts, honey, or cinnamon

Instructions:

  1. Mix all ingredients together in a mason jar or container.
  2. Refrigerate overnight.
  3. In the morning, stir and add desired toppings.

Meal Prep Friendly: Make 2–3 jars ahead for the week.

Nutrition Per Serving: Approx. 250 calories, 10g protein, 5g fiber


3. High-Protein Cottage Cheese Banana Pudding

Why it works: This twist brings a creamy texture and a big protein punch. Perfect post-workout or when you’re craving something richer without being heavy.

Ingredients:

  • 1 cup low-fat cottage cheese
  • 1 ripe banana
  • 1/2 tsp vanilla extract
  • 1 scoop vanilla protein powder (optional)
  • Optional: sweetener of choice (e.g. maple syrup, stevia)

Instructions:

  1. Blend all ingredients until smooth.
  2. Chill for 30 minutes for a thicker consistency.
  3. Top with crushed whole-grain wafers, sliced bananas, or nuts.

Quick Hack: No blender? Just mash banana and stir in the rest.

Nutrition Per Serving: Approx. 300 calories, 20–25g protein


4. Vegan Cashew-Coconut Banana Pudding

Why it works: This creamy, dairy-free version uses healthy fats from cashews and coconut milk for richness and a subtle tropical flavor.

Ingredients:

  • 1/2 cup soaked cashews (4–6 hours)
  • 1 ripe banana
  • 1/2 cup coconut milk
  • 1 tbsp maple syrup
  • 1/2 tsp vanilla extract
  • 1 tsp lemon juice

Instructions:

  1. Blend all ingredients until creamy.
  2. Chill for 1 hour or overnight.
  3. Top with toasted coconut flakes or berries.

Vegan Delight: A crowd-pleaser for plant-based diets.

Nutrition Per Serving: Approx. 290 calories, 4g protein, healthy fats


5. Banana Pudding Breakfast Jars (5-Minute Meal Prep)

Why it works: The fastest, most customizable version. Use Greek yogurt or Skyr, banana, and crunchy toppings for a pudding-meets-parfait hybrid.

Ingredients:

  • 1/2 cup Greek yogurt or Skyr
  • 1 ripe banana (sliced or mashed)
  • 1 tbsp nut butter (optional)
  • Crushed whole-grain crackers, seeds, or granola

Instructions:

  1. Layer yogurt, banana, and crunch toppings in a jar.
  2. Eat immediately or refrigerate for up to 2 days.

On-the-Go Bonus: Great for kids and adults alike.

Nutrition Per Serving: Approx. 250–300 calories, depending on toppings


Final Thoughts

Banana pudding doesn’t need to be a sugar-laden dessert. With these five variations, you can turn this comforting favorite into a nutritious, protein-rich, and fiber-packed breakfast. From overnight oats to vegan delights, there’s a banana pudding twist for every palate and dietary need.

Tip: Always use ripe bananas—they’re sweeter and easier to digest. Add texture with nuts, seeds, and spices like cinnamon or cardamom.

Let breakfast be something you look forward to, not just another task. Try one of these banana pudding twists tomorrow morning—and fuel your day with something as good for your body as it is for your taste buds.


Have a favorite banana pudding recipe or twist? Share it in the comments below or tag us with your creations! #BananaPuddingBreakfast

FAQs

  1. Can I make these banana pudding breakfasts ahead of time?
    Yes! Most of these recipes (especially chia pudding and overnight oats) are ideal for meal prep. They stay fresh in the fridge for 3–5 days.
  2. Are these recipes suitable for kids?
    Absolutely. Kids love the natural sweetness of bananas. Just skip added sweeteners if desired and use nut-free toppings for school safety.
  3. Can I use frozen bananas?
    Yes, thaw them first. Frozen bananas work great for blended recipes like the cottage cheese or vegan cashew pudding.
  4. How ripe should the bananas be?
    Use ripe bananas with brown spots—they’re sweeter, easier to mash/blend, and better for digestion.
  5. What can I substitute for chia seeds if I don’t have them?
    You can use ground flaxseed or just skip them and increase oats or thick yogurt depending on the recipe.
  6. Are these recipes gluten-free?
    Most are naturally gluten-free—just ensure toppings (like granola or wafers) are certified gluten-free if needed.
  7. Which recipe is highest in protein?
    The Cottage Cheese Banana Pudding (with optional protein powder) and Greek Yogurt Jars offer 20g+ protein per serving.
  8. What non-dairy milk works best?
    Unsweetened almond, oat, or coconut milk are great options depending on your flavor preference.
  9. Can I use these recipes for weight loss?
    Yes. They are high in fiber, protein, and healthy fats—great for satiety. Portion control and balanced toppings help optimize them for weight goals.
  10. How can I add crunch or texture to these puddings?
    Add nuts, seeds (like pumpkin or sunflower), toasted coconut, granola, or crushed crackers for contrast and extra nutrients.
Posted on Leave a comment

The Ultimate Guide to Chia Seeds: Benefits, Uses, and Recipes

GUIDE TO CHIA SEEDS BENEFITS, USES, AND RECIPES

Whether you’re a wellness enthusiast, a curious foodie, or someone simply trying to eat healthier, chia seeds are a tiny superfood worth knowing. This guide explores everything you need to know about chia seeds: their origins, health benefits, practical uses, and easy-to-make recipes that fit into any lifestyle.


🌱 What Are Chia Seeds?

Chia seeds are the edible seeds of Salvia hispanica, a flowering plant native to Mexico and Guatemala. Historically consumed by Aztec and Mayan cultures, chia was prized for its energy-boosting properties. Today, it’s known for being rich in fiber, omega-3 fatty acids, protein, and essential minerals.


🧪 Nutritional Powerhouse

In just two tablespoons (28g), chia seeds offer:

  • Fiber: 10-11g
  • Protein: 4-5g (with all 9 essential amino acids)
  • Fat: 8-9g (mainly ALA omega-3s)
  • Calcium: 18% of RDI
  • Magnesium: 30% of RDI
  • Phosphorus: 27% of RDI
  • Antioxidants: Quercetin, chlorogenic acid, and caffeic acid

Chia seeds are naturally gluten-free and suitable for vegan, keto, and paleo diets.


❤️ Health Benefits

1. Supports Heart Health

The high content of omega-3 fatty acids (ALA) helps reduce inflammation, lower blood pressure, and improve cholesterol levels.

2. Improves Digestion

With 40% fiber by weight, chia seeds promote gut health, regular bowel movements, and help prevent constipation.

3. Regulates Blood Sugar

The soluble fiber in chia forms a gel-like consistency that slows digestion, helping to prevent blood sugar spikes.

4. Aids in Weight Management

The gel-like consistency when soaked provides a feeling of fullness, reducing overeating.

5. Boosts Bone Health

Rich in calcium, phosphorus, and magnesium—critical nutrients for maintaining strong bones.

6. Antioxidant Protection

Chia’s antioxidant compounds help combat oxidative stress and may support aging and chronic disease prevention.


⚠️ Potential Side Effects & Safety Tips

  • Choking hazard: Dry chia seeds expand in liquid. Always soak before consuming.
  • Digestive discomfort: Introduce gradually and drink plenty of fluids.
  • Drug interactions: Monitor if on blood pressure or diabetes meds.
  • Prostate/Kidney caution: High ALA and mineral levels may need moderation in sensitive individuals.

🍴 Practical Ways to Use Chia Seeds

💧 Hydration & Energy

  • Chia Fresca: Mix 1 tbsp chia seeds in a glass of water with lemon juice. Great for pre-workout hydration.
  • Fennel Chia Water: Soak chia with crushed fennel seeds overnight; drink in the morning for digestion.

🍽 Breakfasts

  • Overnight Oats: Mix oats, milk, chia seeds, and fruit; refrigerate overnight.
  • Smoothie Booster: Add a tablespoon of soaked chia to any smoothie.
  • Chia Yogurt Bowl: Mix with Greek yogurt, berries, and a drizzle of honey.

🍰 Baking & Cooking

  • Egg Substitute: Mix 1 tbsp chia + 3 tbsp water = 1 egg in baking recipes.
  • Breads & Muffins: Add a few tablespoons into batter for a nutrition upgrade.
  • Thickener: Use in soups or sauces instead of cornstarch.

🥗 Salads & Snacks

  • Granola Mix: Include in granola bars or homemade trail mix.
  • Salad Topper: Sprinkle raw over salads for crunch.

🍓 Easy & Delicious Recipes

1. Coconut Chia Pudding

Ingredients:

  • 1/2 cup chia seeds
  • 2 cups coconut milk
  • 1 tsp vanilla extract
  • 1 tbsp maple syrup
  • Fruit, nuts for topping

Instructions: Mix ingredients, refrigerate for 6+ hours. Top with fruits and nuts before serving.


2. Strawberry Banana Chia Smoothie

Ingredients:

  • 1 banana
  • 1/2 cup strawberries
  • 1 tbsp soaked chia seeds
  • 1 cup almond milk
  • Ice (optional)

Instructions: Blend until smooth and creamy. Serve immediately.


3. Savory Avocado Toast with Chia

Ingredients:

  • 2 slices of whole grain bread
  • 1 ripe avocado
  • Lemon juice, chili flakes, salt
  • 1 tsp chia seeds

Instructions: Mash avocado with seasoning, spread on toast, and sprinkle with chia.


4. Indian-Inspired Chia Bowl (Mango Turmeric)

Ingredients:

  • 1/2 cup chia seeds
  • 1.5 cups coconut milk
  • 1/4 tsp turmeric
  • 1/2 cup mango puree
  • Cardamom, jaggery to taste

Instructions: Soak chia in coconut milk overnight. Mix in turmeric, mango, and sweetener before serving.


✅ Final Tips for Everyday Use

  • Stick to 1-2 tablespoons/day.
  • Soak for at least 10–15 minutes before consuming.
  • Pair with foods rich in vitamin C or calcium to improve mineral absorption.
  • Store in a cool, dry place in an airtight container.

🧭 Conclusion

Chia seeds offer an easy, versatile, and nutrient-dense way to enhance your diet. From boosting heart health to supporting digestion, these tiny seeds are a worthy pantry staple. With countless ways to enjoy them—from puddings to smoothies to savory dishes—chia can be effortlessly integrated into any lifestyle.

Ready to give chia a try? Start small, stay hydrated, and get creative in your kitchen!

🔍 Frequently Asked Questions (FAQs)

1. Do chia seeds need to be soaked before eating?

Yes. Soaking chia seeds prevents potential choking and enhances digestibility. When dry, they absorb 10–12x their weight in liquid, which can cause discomfort if eaten without fluid. Soak for at least 10–15 minutes.


2. How much chia should I eat daily?

1 to 2 tablespoons (15–30 grams) per day is generally safe and effective for most people. Start with 1 tablespoon and increase gradually while ensuring good hydration.


3. Can chia seeds help with weight loss?

They may help indirectly. The fiber and gel-forming nature of soaked chia seeds promote satiety, which can reduce calorie intake. However, chia alone won’t cause weight loss—it should be part of a balanced diet and active lifestyle.


4. Are there any side effects of chia seeds?

In excess or without enough water, chia may cause bloating, gas, or constipation. Dry seeds can pose a choking risk. Also, people on blood pressure, blood sugar, or blood thinner medications should consult a doctor due to chia’s bioactive properties.


5. Can I cook chia seeds?

Yes. You can bake them into muffins, breads, and pancakes. Cooking won’t destroy most of their nutrients, but soaking or grinding preserves the omega-3 content better.


6. What’s the difference between black and white chia seeds?

Nutritionally, they are nearly identical. The main difference is cosmetic—white chia may be preferred in lighter-colored dishes like puddings or smoothies for visual appeal.


7. How do chia seeds support heart health?

Chia seeds are rich in ALA, a plant-based omega-3 fatty acid shown to reduce inflammation, lower blood pressure, and improve cholesterol levels—all beneficial for cardiovascular health.


8. Are chia seeds good for people with diabetes?

Yes. The soluble fiber slows carbohydrate absorption, helping to stabilize blood sugar. However, they may enhance the effects of diabetes medications, so monitor levels closely if adjusting your diet.


9. Can children or elderly people eat chia seeds?

Yes, but always ensure they are fully soaked to avoid choking. Start with small amounts and mix into soft foods like yogurt or porridge.


10. How should I store chia seeds?

Keep them in an airtight container in a cool, dark place. Properly stored, they can last up to 2 years. For maximum freshness, refrigerate after opening, especially in humid climates.

Posted on 4 Comments

How to make Mango Chia Pudding? 5 Creative Ideas

MANGO CHIA PUDDING

A Tropical Superfood Adventure That’s Anything But Ordinary

If you’re craving a tropical escape in a jar, mango chia pudding is your golden ticket. Creamy, naturally sweet, and bursting with nutrients, this little jar of sunshine is more than just a pretty breakfast—it’s a versatile, customizable superfood dessert that adapts to your mood and taste.

But let’s go beyond the basic recipe.

This post is for those who want to elevate the classic mango chia pudding into something creative, healthy, and visually irresistible. Whether you’re meal-prepping for the week, hosting a brunch, or looking for a nutrient-packed dessert, these five exclusive ideas will take your chia pudding game to the next level.


🍧 First, The Foundation: Perfect Mango Chia Pudding

Before we dive into our wild creations, here’s the perfect base recipe that holds up to any toppings, layers, or flavors:

🌿 Ingredients:

  • 1 large ripe mango (peeled and diced)
  • 1 cup coconut milk (or almond milk for a lighter option)
  • ¼ cup chia seeds
  • 1–2 tablespoons maple syrup (optional, depending on sweetness of mango)
  • ½ teaspoon vanilla extract
  • Pinch of sea salt

🌀 Instructions:

  1. Make the Mango Purée: Blend the mango until smooth.
  2. Mix: In a mixing bowl, whisk together the purée, coconut milk, maple syrup, vanilla, and salt.
  3. Add Chia Seeds: Stir in the chia seeds, making sure they’re well distributed.
  4. Rest & Thicken: Cover and refrigerate for at least 2 hours (or overnight), stirring once after 30 minutes to avoid clumping.
  5. Serve: Spoon into jars or bowls and add your favorite toppings—or explore the creative twists below.

🌟 5 Unique Mango Chia Pudding Creations

Let’s remix the classic with inventive flavor combos, layered textures, and superfood boosts. Each version below builds on the base pudding, transforming it into something spectacular.


1. 🥭💚 Matcha Mango Marble Swirl

Why You’ll Love It:

A dynamic duo—tropical mango meets earthy matcha for a nutrient-packed breakfast that wakes up your senses.

What You’ll Need:

  • ½ teaspoon ceremonial-grade matcha powder
  • ¼ cup almond milk
  • 1 teaspoon honey or agave
  • Mango chia pudding base

How to Make It:

  1. Whisk matcha, almond milk, and honey until smooth.
  2. Layer your jar with mango chia pudding and drizzle matcha blend in between for a marbled look.
  3. Top with sliced kiwi, hemp seeds, and a sprinkle of coconut flakes.

Pro Tip:

Matcha contains caffeine—perfect for a morning energy boost.


2. 🧡🌶️ Mango Lassi Chia Pudding with Turmeric & Cardamom

Why You’ll Love It:

Inspired by the classic Indian lassi, this variation has cooling yogurt, warming spices, and just the right touch of tang.

What You’ll Need:

  • ½ cup plain Greek yogurt or plant-based yogurt
  • ⅛ teaspoon ground turmeric
  • ¼ teaspoon cardamom
  • Splash of lemon juice
  • Mango chia pudding base

How to Make It:

  1. Stir yogurt, turmeric, cardamom, and lemon into the mango chia base.
  2. Garnish with pomegranate seeds, crushed pistachios, and a mint sprig.

Pro Tip:

The turmeric adds anti-inflammatory benefits—and a gorgeous golden hue.


3. 🥥🍫 Tropical Dessert Jar with Toasted Coconut & Cacao Nibs

Why You’ll Love It:

Imagine a tropical sundae—but healthy. This layered jar brings crunch, creaminess, and just enough chocolate to feel indulgent.

What You’ll Need:

  • Toasted shredded coconut
  • Cacao nibs or dark chocolate shavings
  • Coconut whipped cream
  • Chopped dried pineapple (optional)

How to Make It:

  1. Spoon mango chia pudding into a glass.
  2. Add a layer of toasted coconut and cacao nibs.
  3. Repeat, then finish with coconut whipped cream and pineapple.

Pro Tip:

Toast your coconut in a dry pan for 2-3 minutes for deeper flavor.


4. 🥭🥜 Peanut Butter Mango Crunch Parfait

Why You’ll Love It:

The sweet-salty combo of peanut butter and mango creates a flavor bomb, while granola brings satisfying crunch.

What You’ll Need:

  • 1 tablespoon natural peanut butter (or almond butter)
  • ½ banana, mashed
  • Crunchy granola
  • Mango chia pudding base

How to Make It:

  1. Mix mashed banana and peanut butter into the mango chia base.
  2. Layer with granola and more mango chunks.
  3. Optional: Drizzle with more nut butter and a pinch of flaky sea salt.

Pro Tip:

Make this in a mason jar and take it on-the-go for an afternoon pick-me-up.


5. 🌈🥭 Fruit Rainbow Chia Bowl with Superfood Toppings

Why You’ll Love It:

A colorful bowl that turns your breakfast into a full-spectrum vitamin boost. Ideal for kids or a weekend treat.

What You’ll Need:

  • Mango, blueberries, kiwi, strawberries, dragon fruit, and pomegranate
  • Goji berries, chia seeds, flax meal, or spirulina powder (optional)
  • Mango chia pudding base

How to Make It:

  1. Spoon mango chia pudding into a wide bowl.
  2. Arrange fruits in rainbow stripes.
  3. Sprinkle with superfoods like goji berries or spirulina powder.

Pro Tip:

Instagrammable AND nutrient-dense—what more could you ask?


🧠 Final Thoughts: Chia Pudding, Elevated

Mango chia pudding is more than just a trendy breakfast. It’s a canvas for creativity, a nutrient-dense delight, and an easy way to feel like you’re treating yourself—while staying on track with your health goals.

These five variations blend global inspiration, seasonal ingredients, and bold textures to keep your taste buds excited and your routine fresh.

So tell me: Which one will you try first?

Let’s keep the mango magic going! Drop your favorite twist in the comments, or tag your pudding creations on Instagram with #MangoChiaMasterpiece.

📌 Frequently Asked Questions (FAQs)

1. How long does mango chia pudding last in the fridge?

Mango chia pudding lasts up to 5 days in an airtight container in the refrigerator. For best texture, stir it once a day to prevent clumping.


2. Can I use frozen mango instead of fresh?

Yes! Just thaw the mango fully and blend it into a smooth purée. Frozen mango tends to be sweeter and juicier, which works great for pudding.


3. What’s the best plant-based milk to use?

It depends on your texture preference:

  • Coconut milk for creamy richness
  • Almond milk for a lighter version
  • Oat milk for a neutral, subtly sweet taste

4. How do I make the pudding thicker or thinner?

  • For a thicker texture, use more chia seeds (up to ⅓ cup per 1 cup of liquid).
  • For a thinner consistency, add more liquid or blend the pudding after it thickens.

5. Is mango chia pudding suitable for weight loss?

Yes, when made with unsweetened milk and no added sugar, it’s high in fiber, omega-3s, and keeps you full longer—great for healthy snacking or breakfast.


6. Can I meal prep this for the whole week?

Absolutely! Prepare it in individual jars and store in the fridge. Add fresh toppings (like fruit or granola) right before eating to maintain texture.


7. Can kids eat mango chia pudding?

Yes! It’s a kid-friendly, naturally sweet option—just be mindful of any allergies (especially to seeds, nuts, or coconut). You can also blend it smooth if your child dislikes the texture of chia seeds.


8. Can I make this without a blender?

Yes, use store-bought mango purée or mash the mango thoroughly with a fork for a rustic texture. A whisk will help mix everything evenly.


9. What if my chia pudding doesn’t set properly?

Ensure the chia seeds are fresh and fully mixed in (stir again after 30 minutes). If it still doesn’t thicken, add 1–2 extra tablespoons of seeds and let it sit a few more hours.


10. Is chia pudding safe to eat daily?

Yes, chia seeds are packed with nutrients, but start with 2–3 tablespoons per serving to avoid digestive discomfort. Stay hydrated, as chia absorbs a lot of water.

Posted on 5 Comments

Chia Pudding – Steel Cut Oats, Mango, Chia Seeds, Fox Nuts

Lately, I’ve developed a deep affection for steel-cut oats. It’s surprising how quickly they’ve become a comfort food for me—something I genuinely look forward to eating, unlike many so-called ‘healthy’ alternatives. Of course, ‘healthy’ is subjective and should be defined by individual needs and preferences. Here is something that my git finds to be extremely healthy maybe something you might want to try as well.

Why Steel-Cut Oats?

Steel-cut oats offer a wholesome bowl of nourishment, combining whole, natural foods with a delicious taste. Their texture, fiber, and smoothness are simply amazing. Steel-cut oats are a fantastic source of fiber and essential nutrients, which can support digestion and overall wellness. If you haven’t tried them yet, I highly recommend giving them a go.

My Go-To Recipe

Here’s a basic recipe that I follow:

  1. Roast the Oats: Start by roasting the steel-cut oats to enhance their flavor.
  2. Cook the Oats: Boil the roasted oats in a pressure cooker until they are tender.
  3. Add Milk: Once the oats are cooked, stir in some milk and refrigerate them to chill. I usually let them sit overnight to allow the milk and flavors to meld together.

Flavor Boost: Mango Magic

A major reason I’ve fallen for this dish is the mango season. I add a mango or two, chopped into bits. The natural sweetness of the mangoes is so satisfying that I skip any added sugar or sweeteners. Instead, I let the mangoes infuse their sweetness into the oats as they soak overnight.

Nutritional Enhancements

To add more texture and nutritional value, I also include:

  • Chia Seeds: About a tablespoon or two.
  • Fox Nuts (Makhane): Or other nuts, berries, or seeds.

This combination works wonderfully and provides a super prebiotic boost for my system. After experimenting with different ingredients, I found that chia seeds and makhane made a significant difference, prompting me to share this recipe.

Serving Suggestions

For an extra touch of flavor, consider adding:

  • Roohafza: A splash on top.
  • Cinnamon: A sprinkle for added warmth.

Feel free to experiment with different fruits, like berries or apples, depending on the season.

Personal Note

When I mention the ‘result,’ I’m not only referring to the taste but also how it makes my stomach feel the next day. The combination of steel-cut oats, mangoes, chia seeds, and makhane seems to act as a super prebiotic for my system, which is probably complemented by a kombucha tasting session later in the day. This dish fits perfectly into my daily routine, providing a satisfying and nutritious start to my day.

Posted on 3 Comments

Fermented RAGI (Finger Millet) IDLIS- Gluten Free | Gut Friendly | Breakfast Recipe

At home Idlis is our favourite breakfast. Ragi idli is a nutritious wholesome South Indian meal. They are light, easy on stomach and have tremendous health benefits. Idlis are like steamed cakes made with lentils and idli rice. Ragi idli is just another variation where ragi is replaced by rice. The batter of these ragi idlis will also be beneficial for making dosas the next day. I like to serve these millet idlis with Coconut Chutney or Kara Chutney.

Ragi idli is made using idli rice, flattened rice (poha), ragi flour, urad dal and fenugreek seeds. The ingredients are first soaked and then the batter is prepared by grinding the ingredients followed by fermentation, then the batter is steamed to make idlis. This batter yields consistent results. The idlis will always be pillowy soft and totally melt in mouth.

Not just Ragi idlis or dosas, if you are a pancake lover, you can also try these, Ragi Pancakes or these Millet Cutlets which you can easily make at home in 10 minutes using minimal oil. They come out absolutely delicious and are so healthy.

Given the health benefits of ragi, these steamed cakes become a superfood which not only has benefits of whole grains, but it is also fermented. 

Why fermented food is good for you? 

Fermented foods like idli, dhokla, dosa are a fabulous addition to your diet.

  • It helps in increasing immunity and improves digestion. 
  • It also increases the bio availability of minerals. It breaks down proteins, carbohydrates and other minerals in a way making it easily available to our body. 
  • Also a lot of good bacterias are at play when your food is fermenting. All fermented foods are natural probiotic. It’ll strengthen your immune system making you disease resistant.
  • The lactic acid bacteria which helps in fermentation also creates omega 3 fatty acids, essential for the immune system. It will help to remove toxins and helps your body build a healthy gut flora. 

Here are 5 excellent reasons why this millet should be in your diet.

  1. High fibre content: Ragi is high in dietary fibre which will help to promote proper digestion and keep your bowel movements in check. 
  2. Rich in Calcium: It is an ultimate non-dairy source of calcium. Just 100 grams of Ragi can give you 344 mg of calcium.
  3. Supports Gluten- Free Diet: Ragi is a great choice if you are on a gluten-free diet – it’s naturally gluten-free! No need to worry about hidden gluten as it’s a safe and delicious way to enjoy your meals.
  4. Child Nutrition: It helps to fulfil child’s nutritional needs. It is rich in protein, calcium, iron, zinc and other essential nutrients.
  5. Treats Anaemia: Since Ragi is an excellent source of iron too, which is essential for producing red blood cells, it helps to fight off anaemia.

With all such goodness and nutrition packed in this humble dish, let’s get to the recipe now

Recipe: serves 4

Ingredients: measuring cup size 250 ml

  1. Ragi flour: 1 cup
  2. Idli Rice/Parboiled Rice or Broken Rice: 1 cup
  3. White Split Urad dal: 1/2 cup
  4. Flattened Rice/Poha: 1/4th cup
  5. Fenugreek seeds/Methi dana: 1/4th tsp
  6. Rock Salt or any non-iodised salt: As per taste
  7. Oil/ghee for greasing
  8. Water as required for making batter and steaming 

Method: 

  • Wash rice and poha 3 to 4 times. Soak them in enough water for 5 hours. 
  • Wash urad dal and fenugreek seeds 3 to 4 times and soak for 5 hours. 
  • Drain the water from dal and rice. First grind urad dal to a smooth and fluffy batter. Add little water at a time to get a smooth paste. Do not add too much water in one go. 
  • Then grind rice and poha to a smooth batter using water as required. Again, don’t add too much water. Add little at a time. 
  • In large steel bowl, mix together both dal and rice batter. 
  • Add roughly 3/4th cup of water to ragi flour and make a smooth consistency batter. Make sure there are no lumps. 
  • Mix Ragi batter with rice and dal batter till it completely incorporates. 
  • Add rock salt as per taste. Cover the bowl with a lid and keep the batter in dark warm place for 9 hours or more. I had to keep it for 12 hours.
  • The batter will double and become fluffy and airy. Give a gentle mix before making the idlis. Do not mix rigorously or you will lose the airiness of the batter. 
  • In an idli maker, bring water (roughly 3″ above) to boil. Grease idli moulds with oil/ghee. Fill in the cavities with the batter.
  • Now, steam the idlis in idli maker for 10 to 12 minutes or till toothpick inserted at the centre comes out clean. It shouldn’t be sticky.

Tips for fermentation: – 

  1. Add rock salt to the batter before fermenting. Salt helps in fermentation. Do not use iodised salt. 
  2. Do not skip Fenugreek seeds. It helps the batter to get bubble like texture. Also, it’s makes dosa crispier. 
  3. Add enough water while grinding dal and rice to get smooth and fluffy batter. Do not add water in one go. Keep adding little at a time. This will give you soft idlis. 
  4. Mix the final batter with your hands for a minute and then keep it at a warm place. The warmth in your hand will help in fermentation. 

I hope you enjoyed reading this recipe and will give it a try. Do let me know if you do. I would love to hear from you guys. Here’s to healthy eating! 🙂