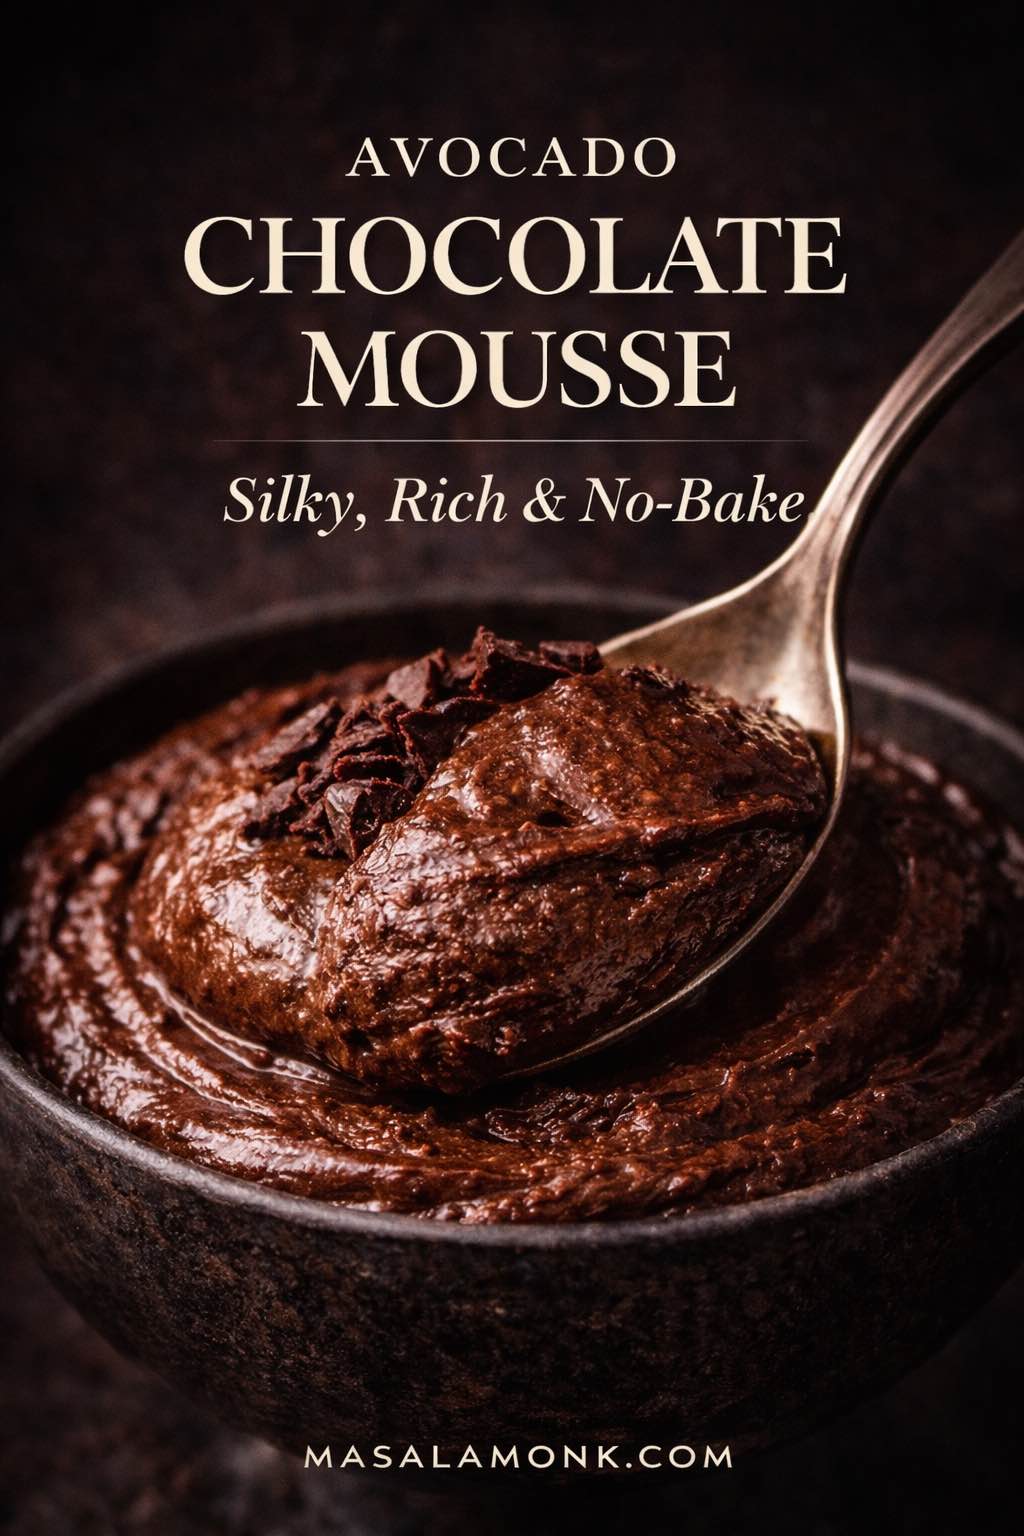
Avocado chocolate mousse has a way of sounding unexpected until the first spoonful makes the whole idea feel obvious. With avocado chocolate mousse, the avocado melts quietly into the chocolate, the texture turns almost impossibly smooth, and the dessert lands somewhere between a classic mousse, a rich pudding, and a dark chocolate cream that happens to come together with very little effort. Once you make it properly, it stops feeling like a novelty and starts feeling like one of those recipes you quietly return to whenever you want something deeply chocolatey without pulling out a mixer, turning on the oven, or building an elaborate dessert from scratch.
That ease, however, is only part of the appeal. What makes avocado chocolate mousse so satisfying is the balance between richness and restraint. It tastes luxurious, yet it is built from a short ingredient list. It feels indulgent, yet it can shift naturally into a healthy avocado chocolate mousse, a vegan avocado chocolate mousse, or a keto avocado chocolate mousse without losing the creamy, dessert-first character that makes it worth craving in the first place.
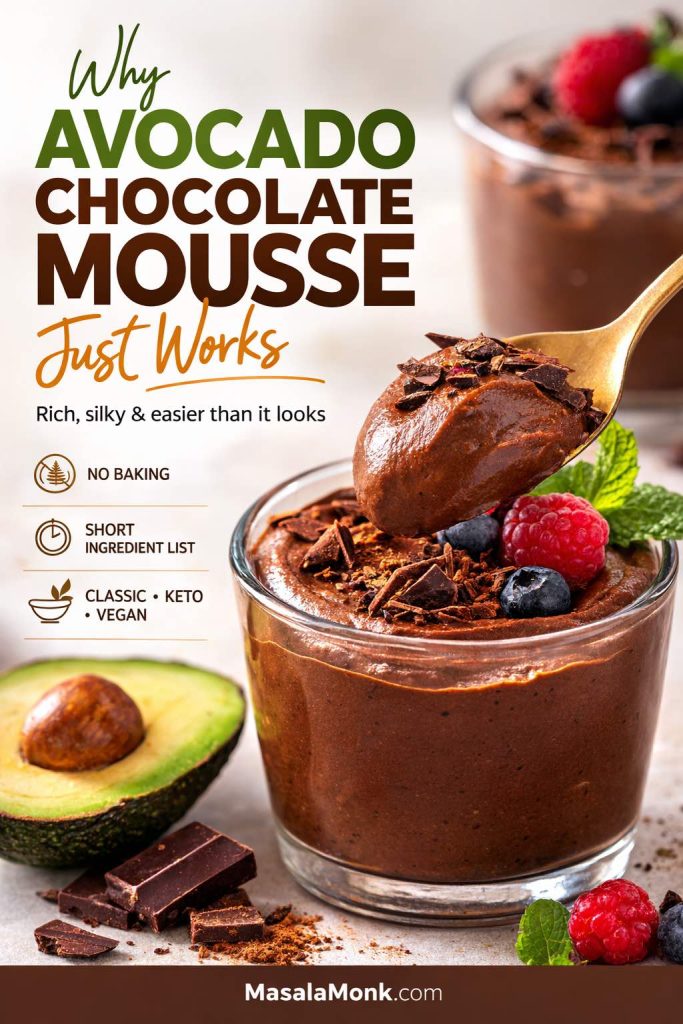
Why avocado chocolate mousse fits so many moods
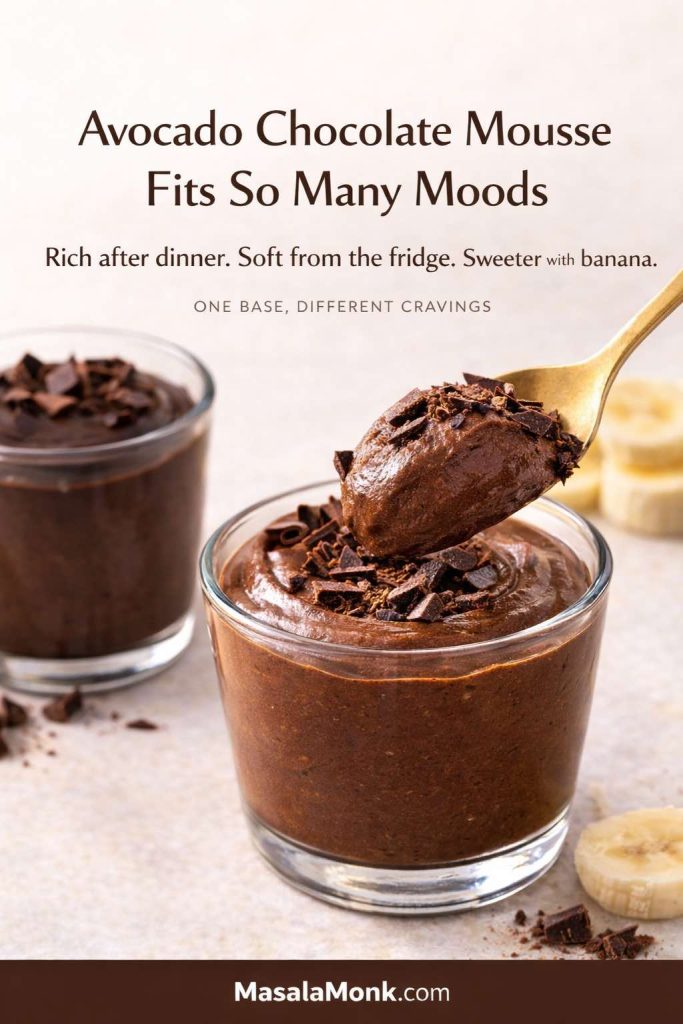
In one kitchen, it becomes a dark, bittersweet avocado mousse dessert served in little glasses after dinner. In another, it leans toward a softer avocado chocolate pudding for an afternoon sweet bite from the fridge. On another day, it turns into an avocado banana chocolate mousse that feels gentler, sweeter, and more familiar. That range is part of its charm. It can be polished enough for guests, easy enough for a weekday craving, and flexible enough to move with whatever kind of chocolate dessert feels right in the moment.
That adaptability is exactly why this recipe deserves more than a quick blend-and-hope approach. A rushed version can still taste good, but the best avocado chocolate mousse recipe depends on understanding a few quiet details: how ripe the avocado should be, how cocoa behaves differently from cacao or melted dark chocolate, why sweetness matters for more than sweetness alone, and how a tiny splash of liquid can shift the dessert from firm mousse into spoon-soft pudding. Once those details become clear, the entire recipe opens up.
Why the best avocado chocolate mousse recipe is more than a shortcut
Suddenly, you are not just following one formula. You are learning how to make avocado chocolate mousse in a way that suits your mood, your pantry, and the kind of dessert you actually want to eat. That difference matters because this is not merely a recipe to complete once. It is the kind of dessert structure you can return to and reshape depending on whether you want something darker, lighter, sweeter, silkier, firmer, or more relaxed.
There is another reason this recipe wins people over so quickly. It does not ask you to compromise on pleasure in order to feel clever about ingredients. The point of avocado and chocolate mousse is not to trick anyone into eating avocado. The point is to make something genuinely delicious. Ripe avocado simply happens to bring a buttery body that works beautifully with chocolate. It gives the dessert structure, fullness, and that velvety glide that makes each spoonful feel richer than the ingredient list would suggest.
Why it keeps surprising people
If you have ever wanted a chocolate dessert that feels lush without becoming heavy, this is where avocado mousse earns its place. It does not rely on spectacle. Instead, it wins on texture, balance, and the quiet satisfaction of a dessert that tastes more luxurious than its effort level suggests. That is why it tends to convert skeptics so quickly. The idea may sound unusual, yet the result feels familiar in all the best ways: creamy, dark, spoonable, and deeply comforting.
Also Read: Mango Margarita Recipe (Frozen or On the Rocks)
Why avocado chocolate mousse works so well
At first glance, avocado and chocolate may seem like an odd pair. Then again, when you think about what avocado really contributes, the pairing starts to make perfect sense. Avocado is mild, creamy, and full-bodied. Chocolate is bold, aromatic, and naturally suited to smooth textures. Put them together, and the avocado becomes less of a flavor and more of a structural advantage. That is why chocolate mousse using avocado can taste so complete even when the ingredient list stays relatively short.
It works because avocado supports rather than dominates
In other words, avocado is there to support the dessert rather than dominate it. When the fruit is ripe, it blends into something almost buttery, giving the mousse a dense silkiness that would otherwise require cream, egg yolks, or another rich base. Serious Eats makes a similar point in its avocado chocolate mousse recipe, noting that ripe avocados provide rich, buttery body while a small amount of liquid helps the mixture blend smoothly into a velvety dessert.
That is exactly the strength of this recipe: the avocado does not announce itself. Instead, it creates the texture that allows the chocolate to feel more luxurious. For that reason, the dessert often feels more familiar than people expect. You taste chocolate, depth, softness, and a gently creamy finish. The avocado is doing important work, yet it is doing it quietly.
Why it tastes fuller than many quick desserts
Moreover, avocado has enough fat to round out the sharper edges of cocoa. A cocoa-only dessert can sometimes feel dry on the palate or slightly harsh if the sweetness is low. By contrast, avocado and chocolate mousse tends to feel softer and fuller, with the bitterness of the cocoa tucked into a creamier frame. That is one reason even a simple avocado cocoa mousse can taste far more finished than its ingredient list might suggest.
That versatility is one of the biggest strengths of the dessert. In a healthy avocado chocolate mousse, the avocado keeps the texture creamy even when the sweetness is dialed back. A keto avocado chocolate mousse benefits from that same richness, especially when sugar is no longer doing part of the heavy lifting. Meanwhile, in a vegan avocado chocolate mousse, avocado gives the dessert body and silkiness without relying on cream or eggs. In every case, the same ingredient solves a slightly different problem.
The texture is its real secret
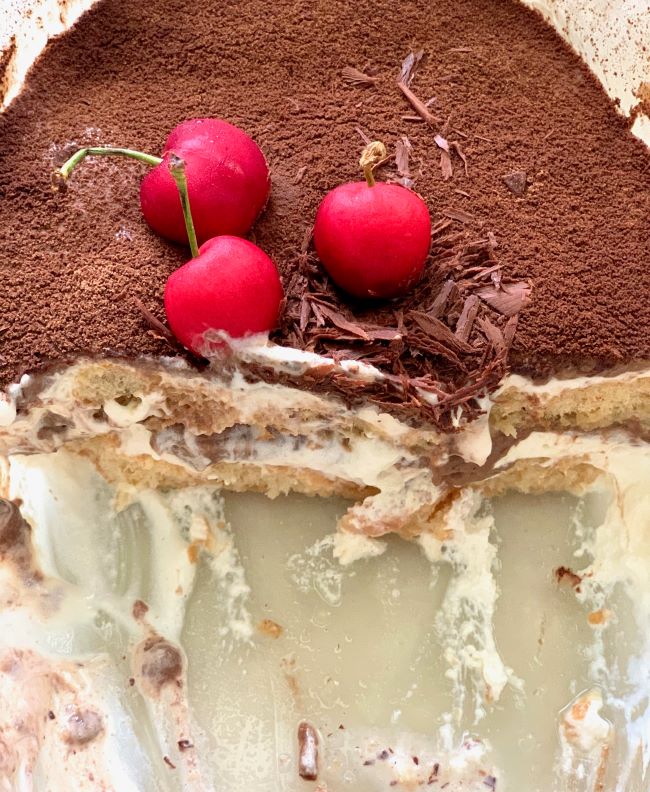
Texture matters every bit as much as flavor here. A classic mousse often depends on trapped air. Avocado mousse works differently. It is not airy in the same whipped sense, yet it still feels elegant because the texture is dense, glossy, and smooth rather than flat or stodgy. That difference is important. This is not trying to mimic a French mousse exactly. Instead, it offers its own style of richness—quietly thick, spoonable, and satisfying in a more immediate way.
Why it is such a practical dessert
There is also a practical reason the recipe works so well. Because avocado is already soft and creamy, the path from ingredients to dessert is short. You do not need to temper eggs, whip cream, or set gelatin. You do not even need a stovetop. With a blender or food processor, the mixture comes together in minutes. That ease is part of why avocado mousse recipe variations show up in so many kitchens, from quick weekday desserts to low-carb meal-prep sweets to plant-based chocolate treats that do not feel like substitutes.
Also Read: Sourdough Pizza Dough Recipe (Crispy Crust & Easy Pizza Base)
What avocado adds to chocolate mousse
Avocado brings three main gifts to this dessert: body, balance, and calm. Those gifts may sound understated, yet together they are exactly what make the dessert work. Without avocado, the mixture could still taste chocolatey. What it would lack is that quiet sense of completeness—the feeling that the mousse is not merely blended, but beautifully held together.
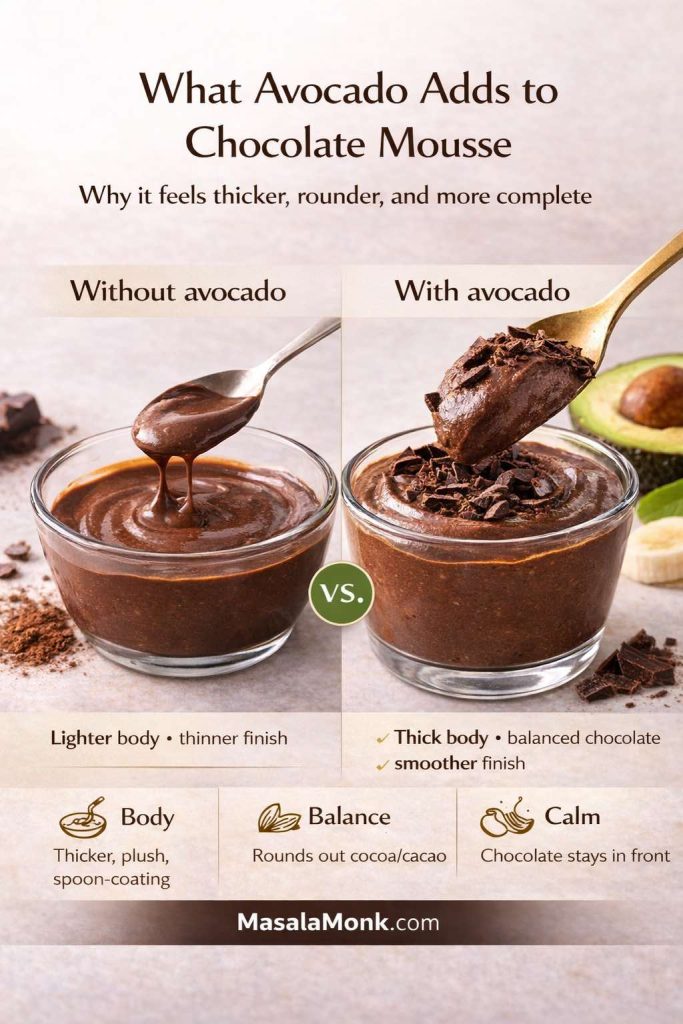
Body: why this mousse feels so plush
The body is obvious the moment the mixture starts blending. Ripe avocado thickens the dessert almost immediately. It gives the mousse that plush, spoon-coating texture that makes the chocolate linger rather than disappear too fast. Without it, cocoa and sweetener mixed with a little milk would taste more like a drinkable chocolate cream. With avocado, the mixture becomes mousse.
That body is also why avocado chocolate mousse can feel generous even in small portions. It does not need a huge bowl to satisfy. A few spoonfuls already feel rich, which makes it a particularly nice dessert when you want something intense but not overwhelming.
Balance: why avocado softens cocoa and cacao
Balance is the less visible part. Chocolate, especially dark cocoa or cacao, can sometimes feel one-dimensional when it is not paired with enough fat or enough sweetness. Avocado fills that gap. It softens the harsher notes and spreads the flavor more evenly across the palate. That is why even a healthy chocolate mousse can still feel lush when avocado is doing the heavy lifting.
This becomes especially useful when you start experimenting with avocado and cacao mousse or darker chocolate versions. The stronger the chocolate note becomes, the more helpful that avocado balance feels. It turns the dessert from merely intense into genuinely pleasurable.
Calm: why this recipe does not taste aggressively fruity
Then there is the calm avocado brings to the flavor. Avocado is gentle. It does not carry a strong perfume or a bright fruit acidity. It stays soft around the edges. That softness is exactly what allows chocolate to sit in front. In fact, when the avocado is ripe and the proportions are right, the dessert reads as chocolate first, avocado almost not at all.
Sugar Free Londoner makes the same reassurance central to its version, saying that you cannot taste the avocado when the ingredients are balanced properly. That promise sounds bold until you actually make a good batch and realize how true it is. The avocado is present, certainly, but more as texture and background than as a leading flavor.
A gentle nutrition bonus
From a nutrition standpoint, avocado also contributes fiber and unsaturated fat. Harvard’s avocado overview notes that avocados are rich in monounsaturated fat and fiber, two reasons they are often included in meals that aim to be both satisfying and balanced. The USDA’s avocado entries similarly show the fruit’s broader nutrient profile. Still, the real reason to choose avocado in this recipe is not to turn dessert into a lecture. It is to make the dessert creamy in a way that feels natural.
Why avocado chocolate mousse feels luxurious without becoming heavy
That last point matters because it gets to the heart of why this dessert is so appealing. Plenty of chocolate desserts are rich. Fewer manage to feel rich and light on effort at the same time. Avocado mousse finds that balance beautifully. It delivers the sensation of indulgence without the heaviness that can follow more cream-laden desserts. As a result, it feels both comforting and surprisingly clean on the palate.
Also Read: Balti Paneer Gravy (Restaurant-Style, Creamy + Bold Recipe)
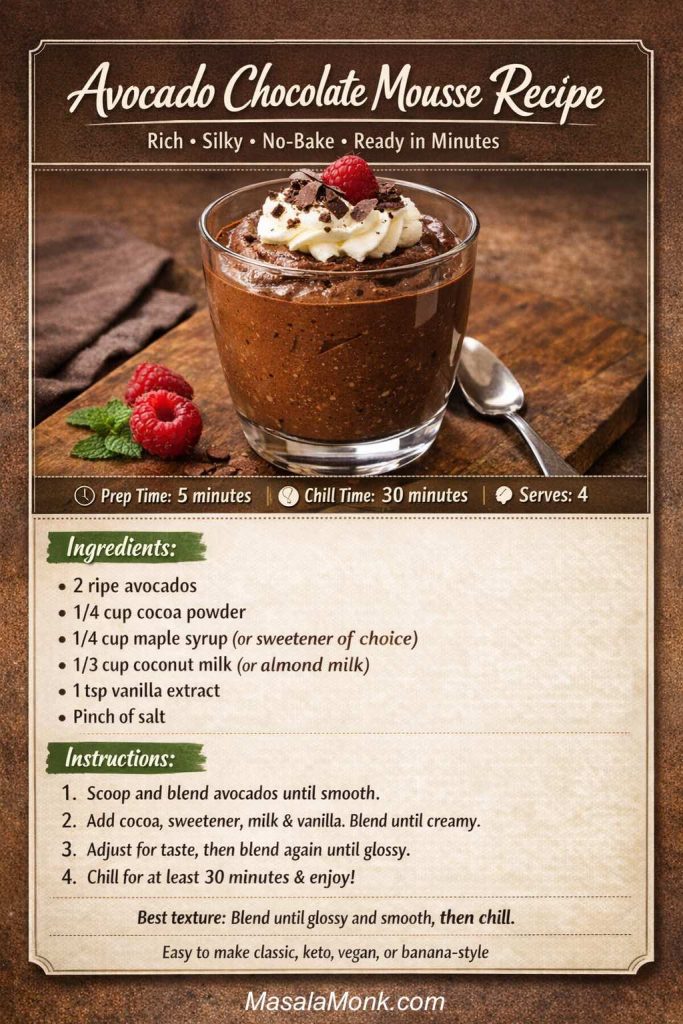
Ingredients for avocado chocolate mousse
The beauty of this dessert lies in how few ingredients it asks from you. Nonetheless, each one has a precise role. Remove one or choose carelessly, and the mousse can become dull, bitter, or oddly thick. Get them right, and the result is the kind of avocado chocolate mousse recipe you can memorize after one or two rounds.
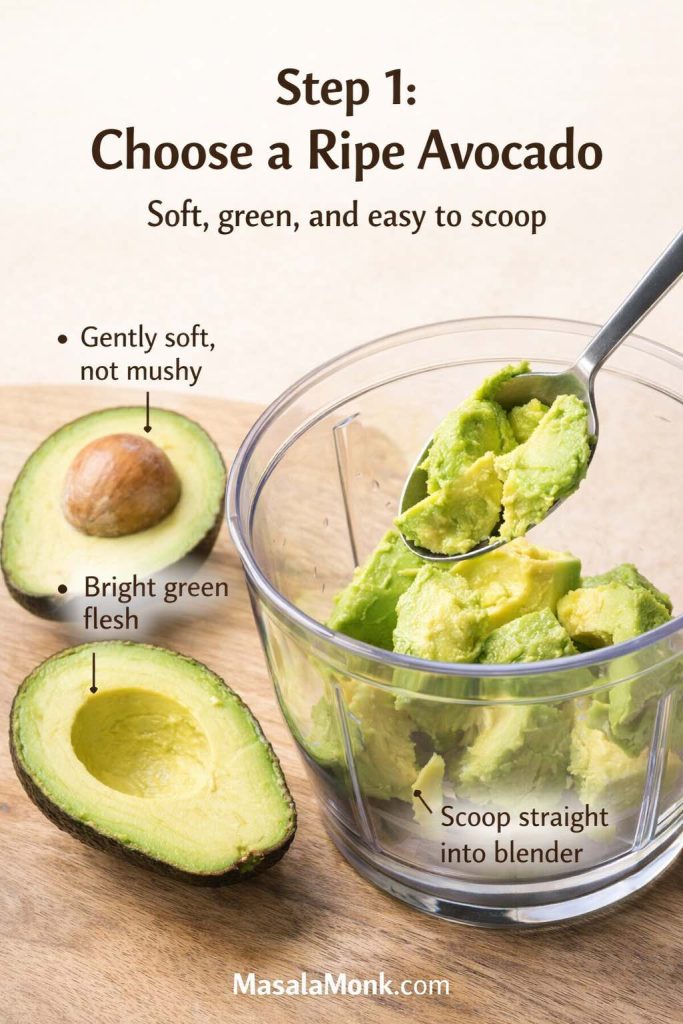
Ripe avocado
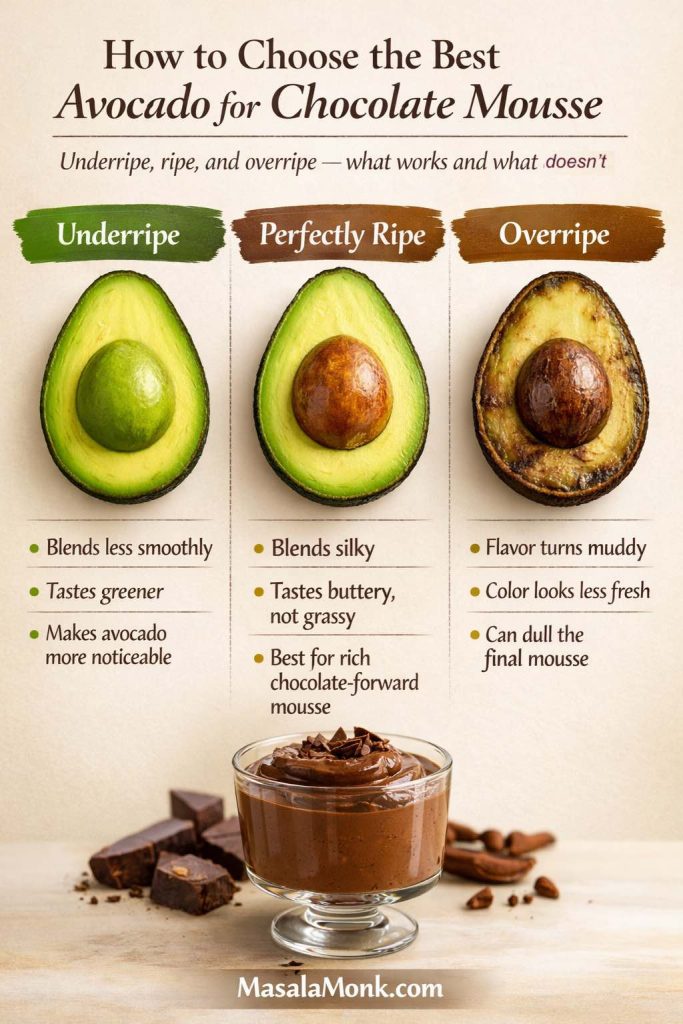
Everything begins with the avocado. It needs to be ripe, but not tired. When gently pressed, it should yield slightly rather than fight back. The flesh inside should look clean and mostly green, with no tough strings and no sour smell. If the avocado is underripe, the mousse will taste greener, blend less smoothly, and stubbornly hold onto a vegetable-like edge no amount of cocoa can completely hide. If it is overripe, the flavor becomes muddy and the freshness disappears.
The California Avocado Commission offers practical advice for choosing a ripe avocado, recommending fruit that yields to gentle pressure without feeling mushy. That is the exact sweet spot you want here. If you have ever wondered why one avocado mousse healthy recipe tastes elegant while another feels rough and vaguely grassy, ripeness is often the missing answer.
Cocoa, cacao, or dark chocolate
Next comes the chocolate element, and this is where the personality of the dessert starts to reveal itself. Cocoa powder gives the mousse a clean, direct chocolate character. It keeps the ingredient list short and lets the avocado handle the bulk of the texture. Cacao powder can be used in much the same way, although it often tastes a little earthier and more intense. That makes avocado and cacao mousse especially appealing if you like a darker, slightly less sweet finish.
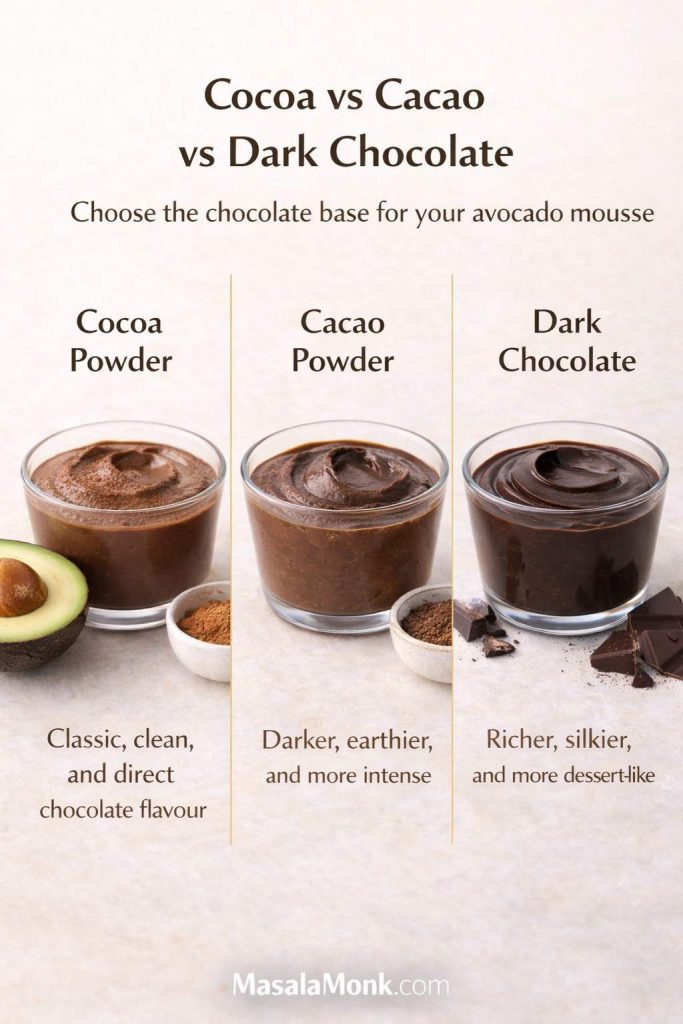
Melted dark chocolate, on the other hand, changes the entire mood. The mousse becomes fuller, smoother, and more dessert-shop-like. It reads as more decadent, more polished, and a touch less wholesome in the best possible sense. Feel Good Foodie takes that route by using melted dark chocolate in its version, creating a mousse that leans closer to a classic chocolate dessert while still relying on avocado for creaminess.
If you enjoy understanding the difference between these chocolate paths, the MasalaMonk guide on cacao vs chocolate vs dark chocolate is a useful companion. Likewise, homemade hot chocolate with cocoa powder is a good reminder that cocoa intensity can vary more than people expect. Serious Eats also has a helpful explanation of Dutch vs natural cocoa powder, which matters because cocoa type influences not only bitterness and depth but also the final color of the mousse.
Sweetener options for avocado chocolate mousse
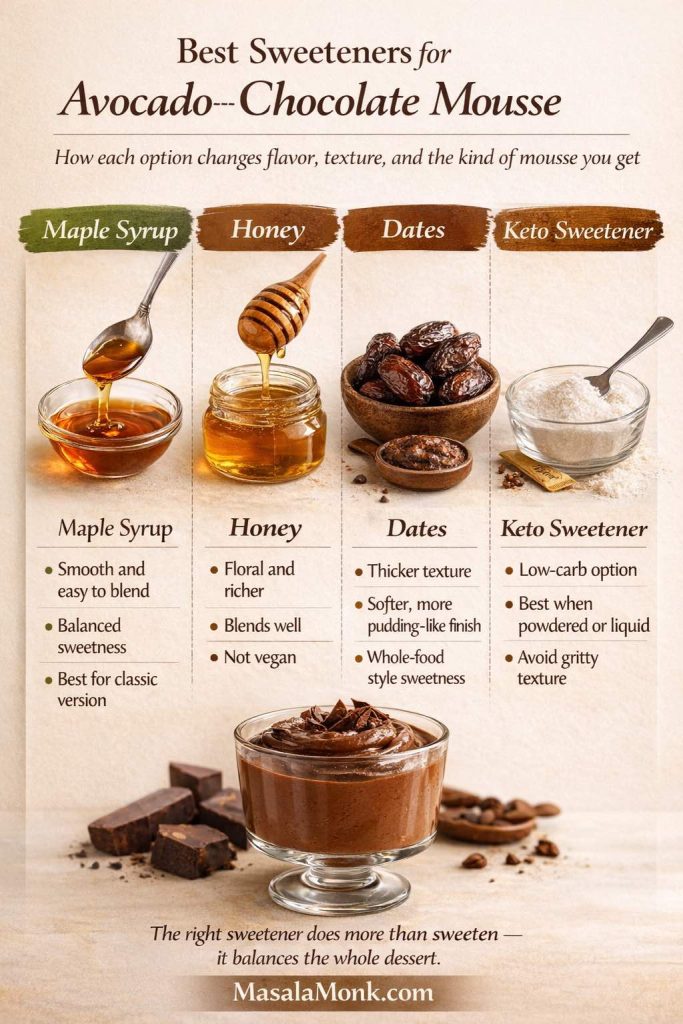
Sweetener does far more than make the mousse sweet. It balances bitterness, softens the green edge of the avocado, and helps determine whether the dessert feels sleek or heavy.
Maple syrup is one of the easiest choices because it blends smoothly and adds a gentle warmth. Honey works well if you are not making a vegan avocado chocolate mousse. Dates can be lovely in an avocado and chocolate pudding style version, although they pull the texture toward something thicker and more comfort-food-like. If you are aiming for keto avocado chocolate mousse, a powdered or liquid low-carb sweetener is usually better than a gritty granulated one.
This is one of those ingredients that deserves attention because under-sweetening is a common reason avocado chocolate mousse healthy versions disappoint people. The issue is not that they are healthier. The issue is that insufficient sweetness leaves bitterness unchecked and makes the avocado more noticeable. A mousse does not need to be sugary, but it does need balance.
Milk or another liquid
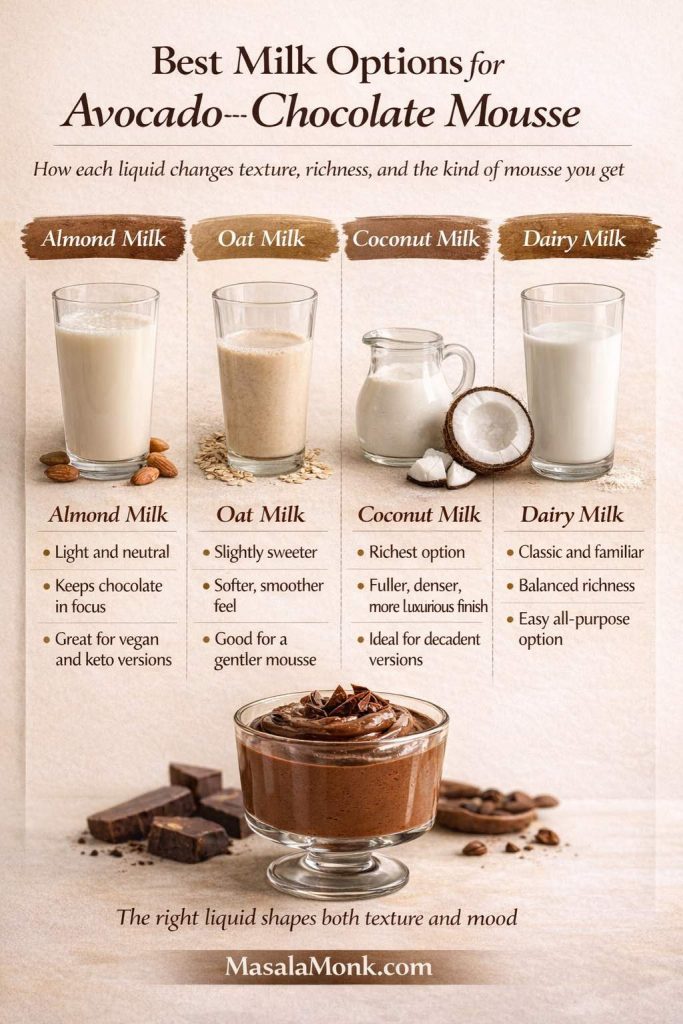
A small amount of liquid gives you control. Too little and the blender may struggle. Too much and the dessert slides from mousse toward pudding. Almond milk works beautifully in keto avocado mousse and vegan avocado mousse because it keeps the flavor clean. Coconut milk brings extra richness and makes the dessert feel more luxurious. Dairy milk works perfectly well if you are not trying to keep the recipe dairy-free.
The liquid choice also nudges the flavor. Almond milk stays neutral. Oat milk makes the mousse a little softer and slightly sweeter. Coconut milk makes everything feel fuller, almost truffle-like, especially when paired with dark chocolate.
Vanilla and salt
These seem minor, but they are not optional in spirit. Vanilla deepens the chocolate and softens the avocado. Salt sharpens everything into focus. Without them, even a technically correct avocado mousse recipe can taste flat. With them, the dessert becomes more complete.
Also Read: Mojito Recipe (Classic) + Ratios, Pitcher, Mocktail & Easy Variations
How to make avocado chocolate mousse
The actual method is uncomplicated, which is one reason this dessert is so easy to love. Even so, the best avocado chocolate mousse recipe comes from respecting the sequence rather than dumping everything in carelessly and hoping for the best.
Step 1: Choose and prep the avocado
Cut the avocado, remove the pit, and scoop the flesh into a blender or food processor. Before you move on, take a moment to inspect what you have. If there are dark strings, discolored spots, or a sour smell, it is worth starting with another fruit. A clean avocado gives the mousse a clean finish.
This may sound like a small point, yet it matters more than almost anything else. If you want to know how to make avocado chocolate mousse that tastes undeniably dessert-like, begin with fruit that tastes neutral and buttery rather than aggressively green.
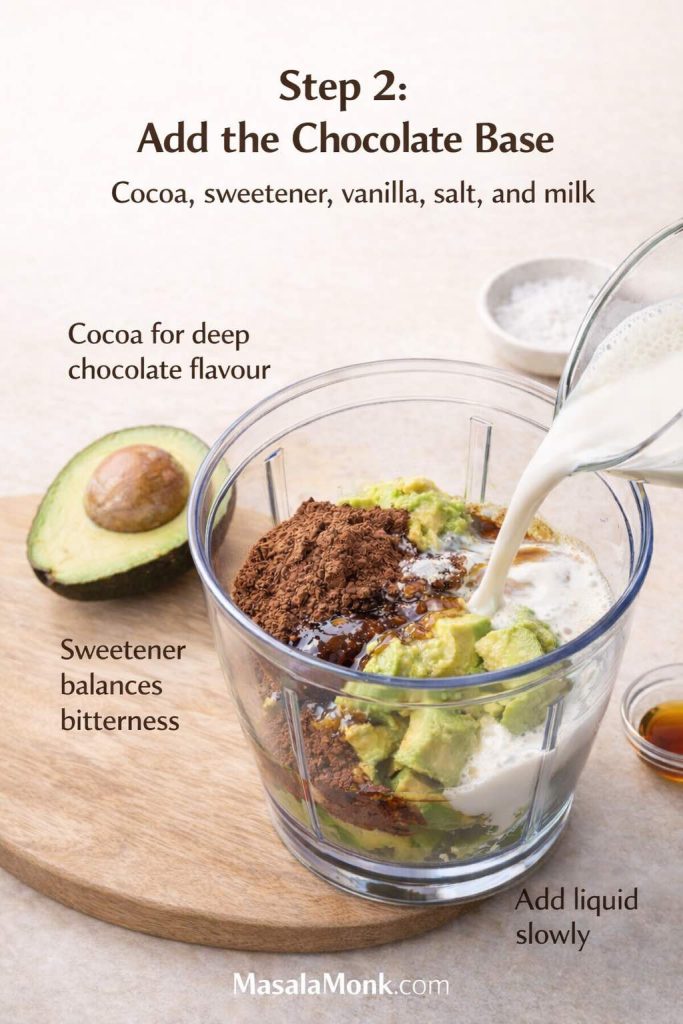
Step 2: Add cocoa, sweetener, vanilla, salt, and a little liquid
Add your cocoa powder, cacao, or melted dark chocolate, depending on the version you want. Then add your sweetener, vanilla, a pinch of salt, and just enough liquid to help the blender begin. Resist the urge to pour in too much milk at this stage. The mixture can always be loosened, but thickening it again is not so easy.
A simple avocado chocolate mousse recipe can be beautifully satisfying with nothing more than cocoa powder and maple syrup. If you want a deeper, more luxurious finish, avocado dark chocolate mousse made with melted chocolate is a lovely direction to take. For a keto chocolate mousse avocado version, unsweetened cocoa, almond milk, and a smooth low-carb sweetener create a strong, reliable base.
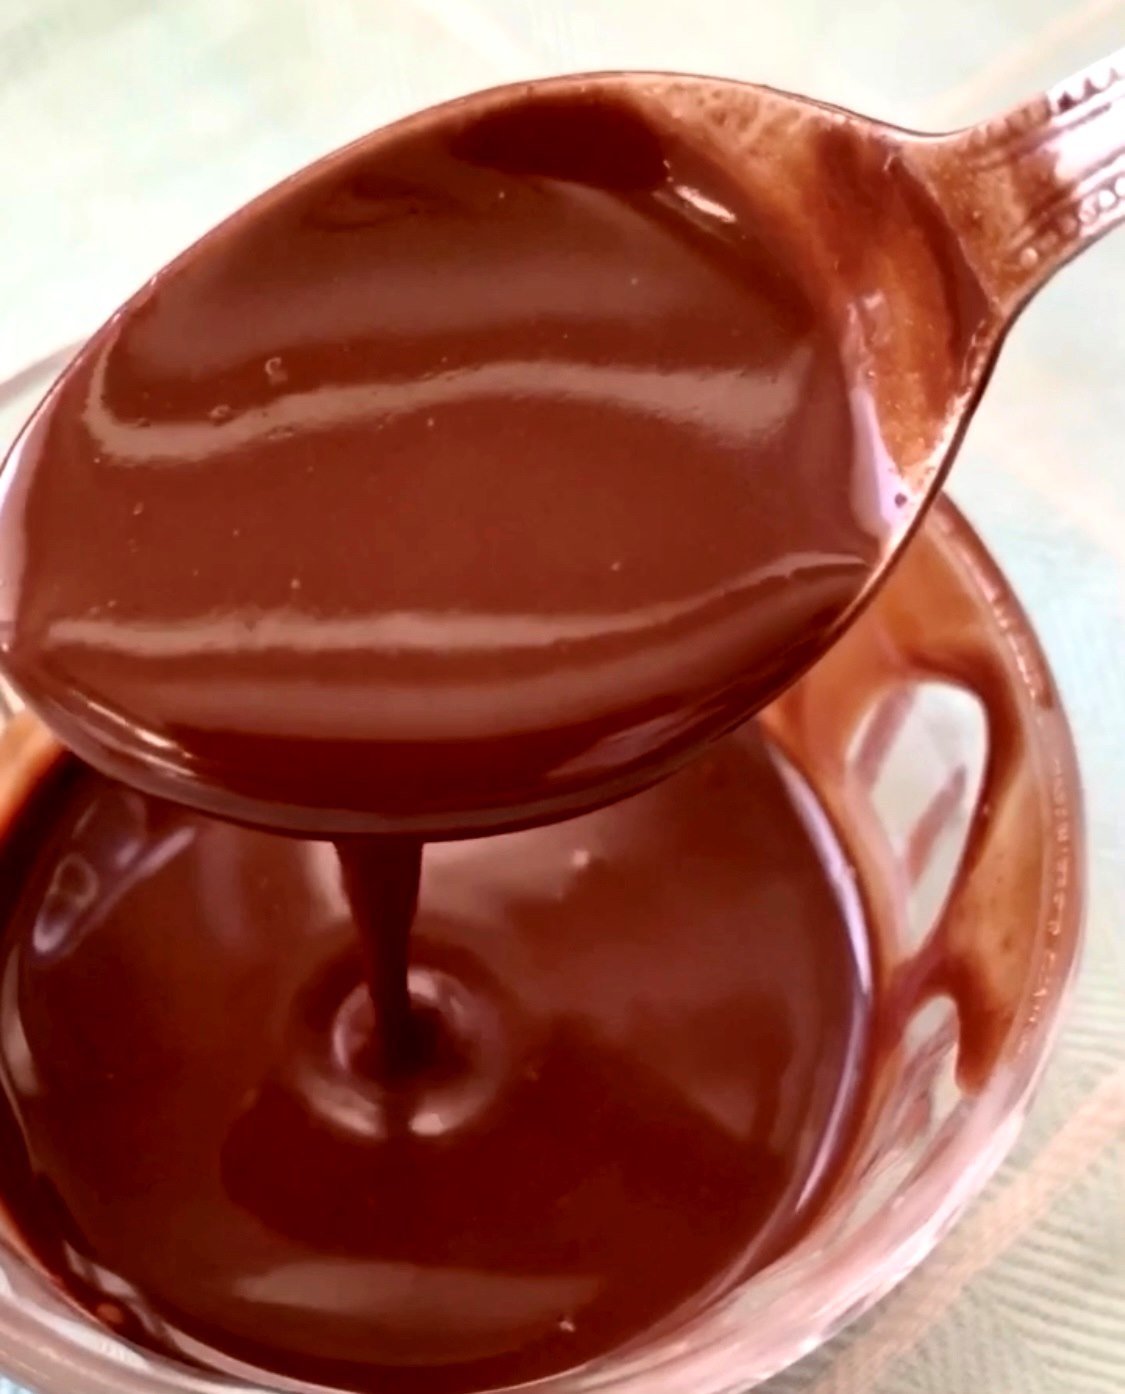
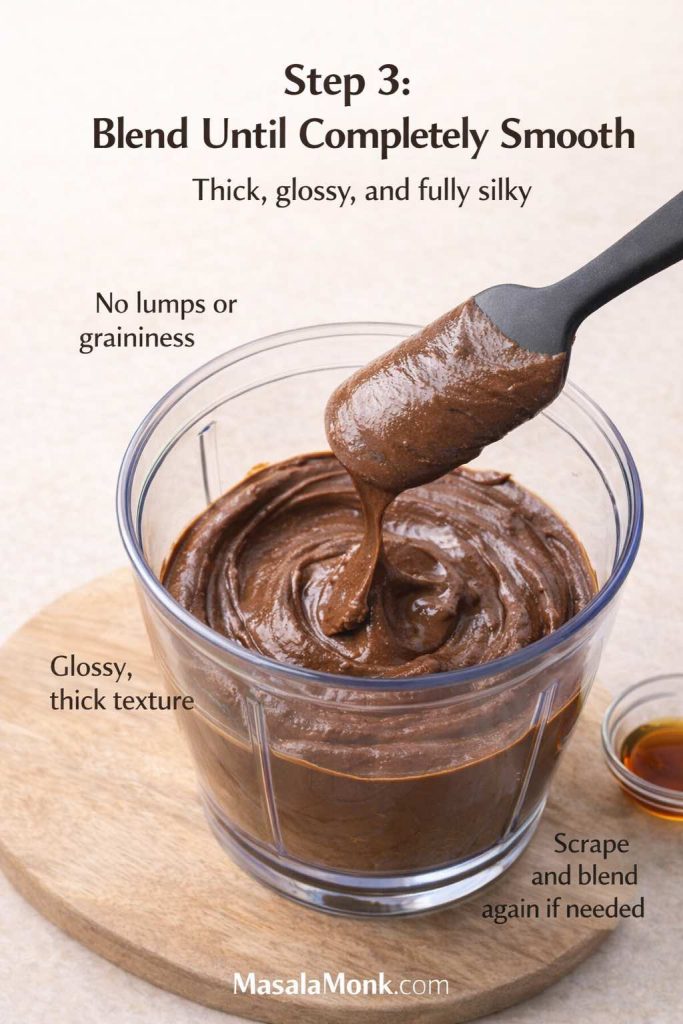
Step 3: Blend until completely smooth
Blend. Then blend more. Then scrape down the sides and blend again. The dessert becomes special only when the texture turns fully silky. Any graininess left in the bowl will feel more obvious after chilling.
If the blender struggles, add liquid a teaspoon at a time. This is where patience pays off. A small addition can transform the mixture. Too much, though, and the avocado mousse dessert shifts into pudding territory. That is not inherently a problem—avocado chocolate pudding is delicious in its own right—but the texture choice should be yours.
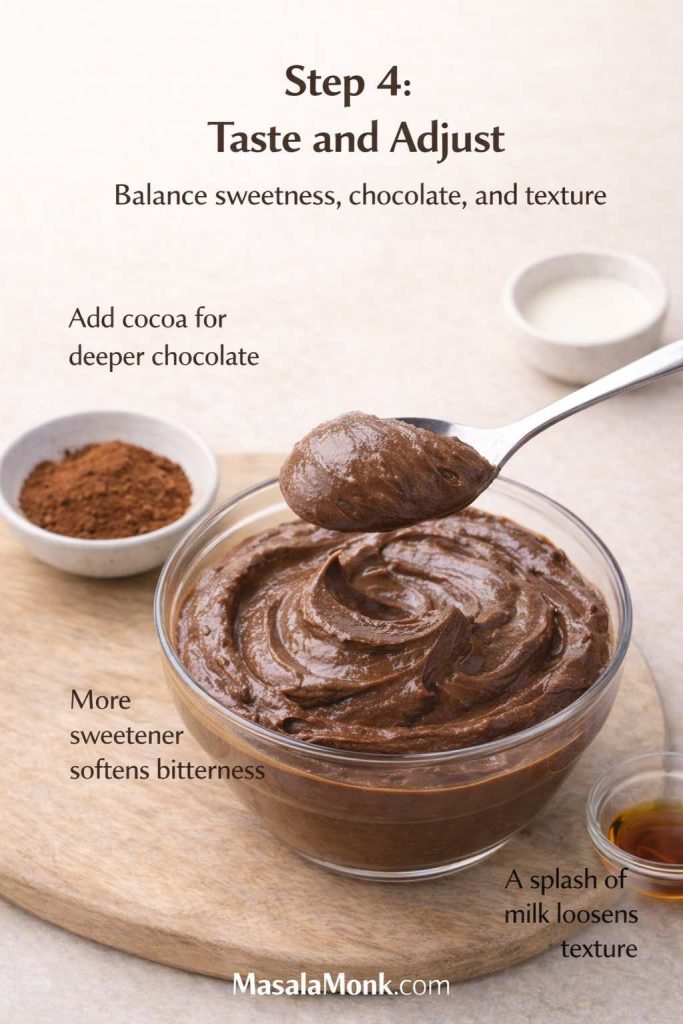
Step 4: Taste and adjust
This is the moment when the recipe starts to feel like your own. Taste the mixture before chilling and adjust it according to what it needs. More sweetener or a small pinch of salt usually helps if the flavor feels too bitter. When the avocado note stands out more than you want, a little extra cocoa, a touch more vanilla, or even some time in the fridge can bring it back into balance. Should the texture seem too dense, loosen it with a small amount of liquid. If it feels softer than expected, let it chill before assuming anything has gone wrong.
This adjustment stage is the difference between following a rigid avocado mousse recipe and understanding how the dessert works. Once you get comfortable here, you stop needing exact formulas.
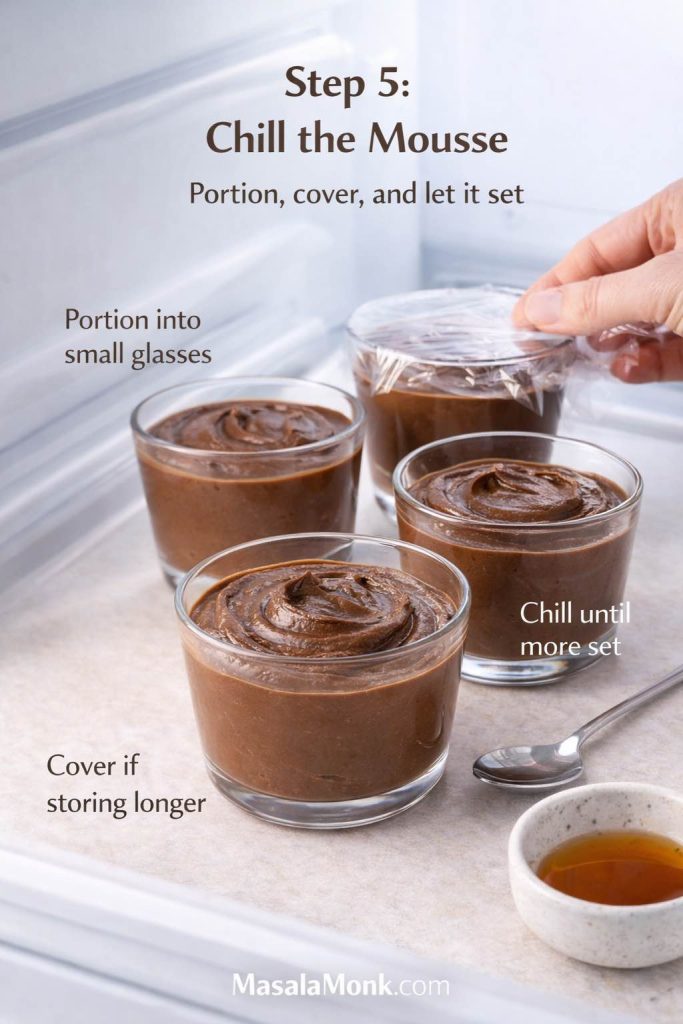
Step 5: Chill the mousse
Transfer the mixture into bowls or glasses and chill. The difference this makes is remarkable. The chocolate flavor settles in, the avocado note recedes even further, and the texture firms into a smoother, more elegant finish.
You can eat it immediately if you want a softer, more casual dessert. Still, avocado chocolate mousse almost always improves with a little cold time. That rest is what helps it become mousse rather than just a freshly blended chocolate cream.
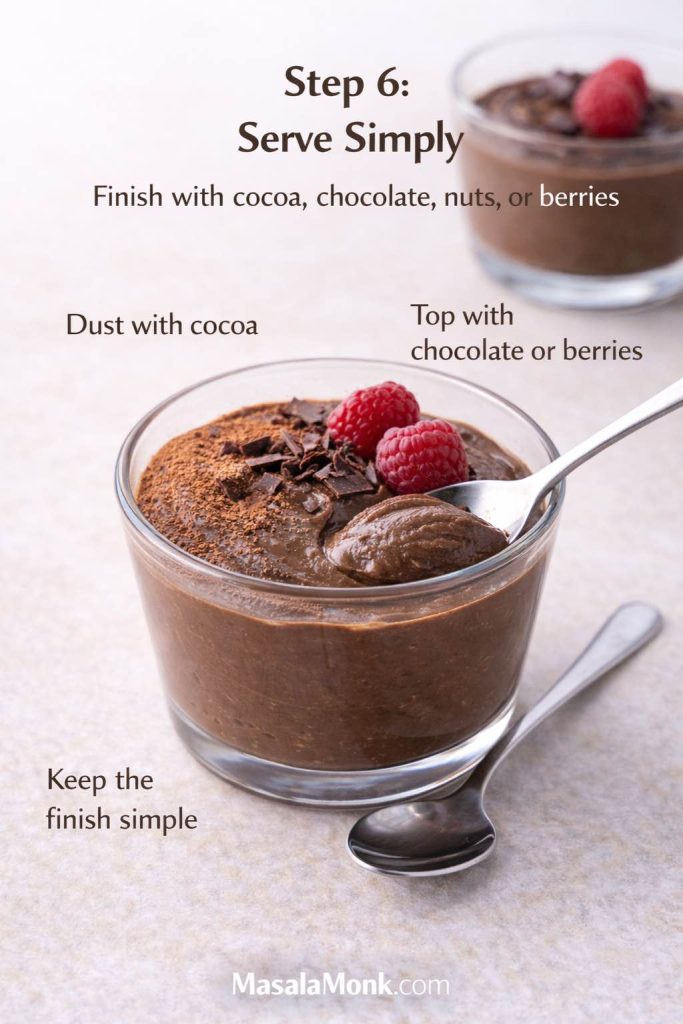
Step 6: Serve simply
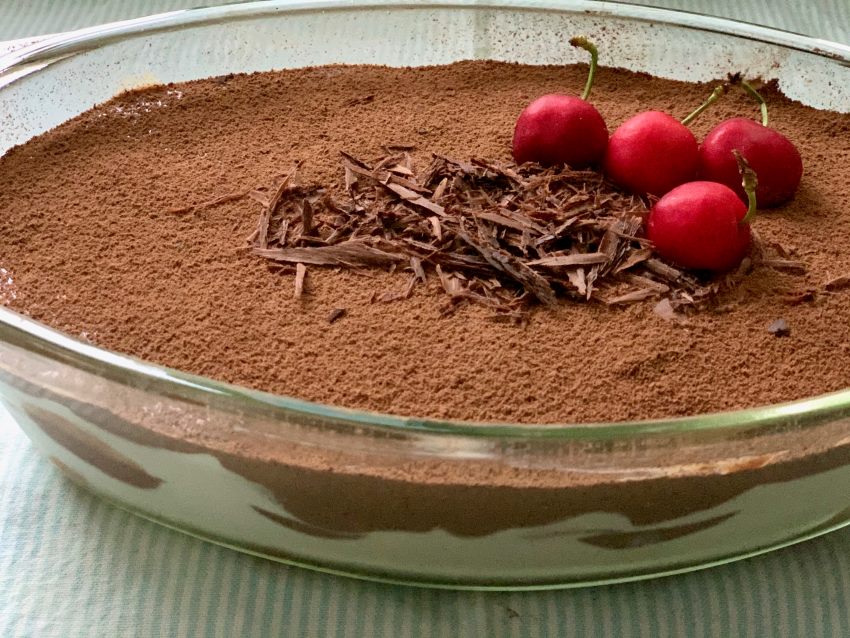
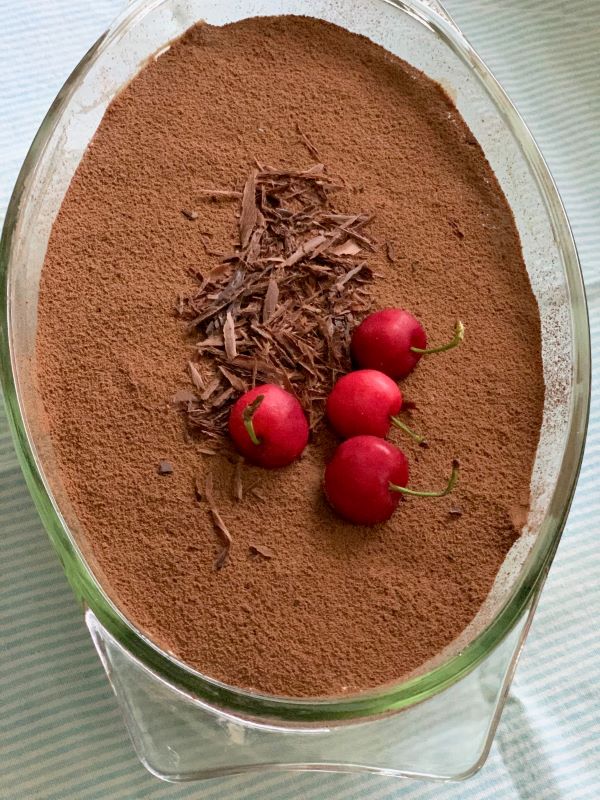
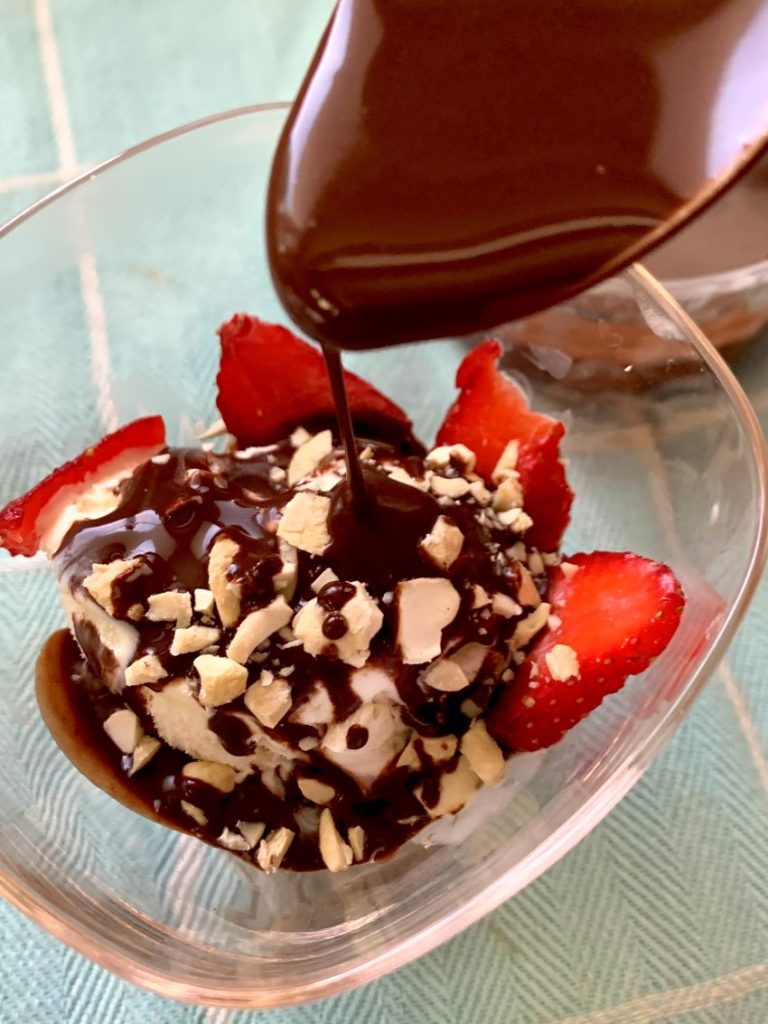
A dusting of cocoa, a few chocolate shavings, chopped nuts, or berries are all you need. The dessert is already doing a lot. A complicated garnish often adds less than people expect. Better to keep the finish clean and let the texture speak.
How smooth avocado chocolate mousse should look before chilling
Before it goes into the fridge, the mousse should look glossy and thick. It should move slowly off a spoon, neither sitting like frosting nor flowing like a drink. If you drag a spoon through it, the path should hold briefly before softening.
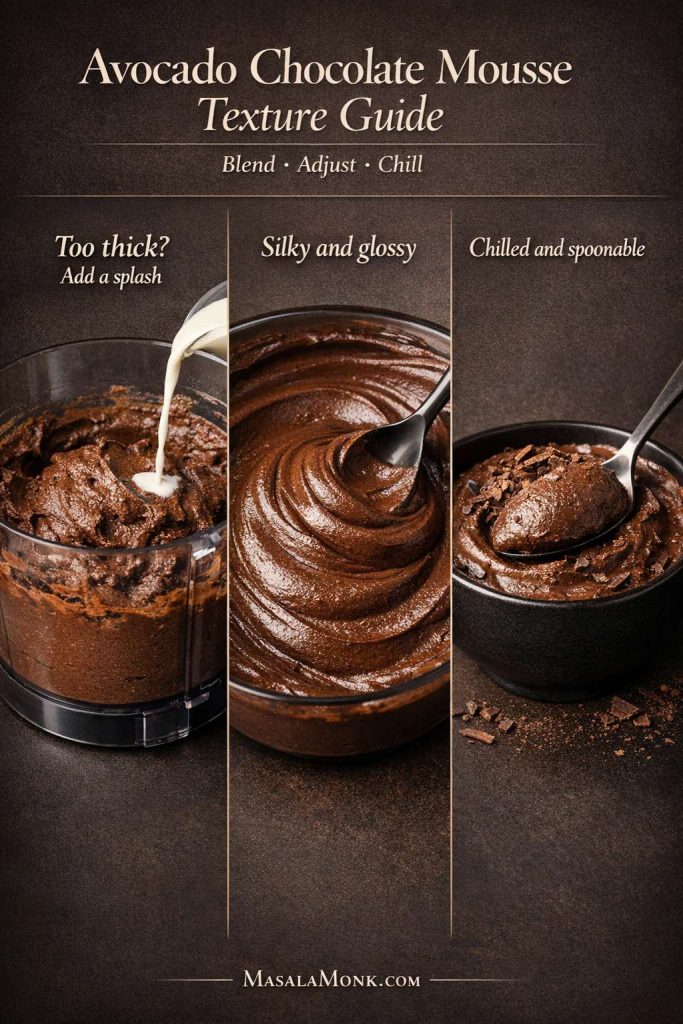
That visual cue matters because many people assume they need an extremely stiff mixture before chilling. In reality, the fridge will help the mousse set. On the other hand, if the mixture already pours easily like a milkshake, it is probably headed toward avocado and chocolate pudding instead of mousse.
There is nothing wrong with that softer result. In fact, recipe for avocado chocolate pudding variations can be wonderful, especially when banana, dates, or extra milk are involved. Yet if your goal is avocado chocolate mousse, aim for thickness with a little movement, not density without flow.
Why avocado chocolate mousse can taste better after chilling
This dessert has a quiet magic after time in the fridge. Freshly blended, it often tastes good. Chilled, it tastes finished. The cold firms the avocado, the cocoa settles, and the sweetness feels more integrated.
In addition, chilling gives the avocado’s mild flavor even less room to stand out. This is part of why people sometimes judge the mousse too early. A warm or room-temperature batch may still seem a little greener than they want. After chilling, that concern often fades dramatically.
Feel Good Foodie recommends chilling its version for exactly this reason, noting that the texture becomes thicker and more mousse-like after some time in the refrigerator. The same logic applies across almost every version of this dessert.
Also Read: Paloma Recipe: 12 Paloma Cocktail Drinks
Tips for the best avocado chocolate mousse
The best avocado mousse recipe is less about complexity and more about paying attention in the right places.
Start with a ripe avocado. Choose cocoa or chocolate you actually enjoy. Use enough sweetener to balance, not merely decorate. Blend thoroughly. Chill before judging. Season with salt and vanilla. These are not glamorous insights, yet they are exactly what separate a beautiful avocado chocolate mousse recipe from one that feels merely functional.
It is worth remembering that ingredients never behave in exactly the same way from batch to batch. One avocado may be larger and creamier than the next, while one cocoa powder may taste softer and another darker and more bitter. Sweeteners vary too, with some blending in cleanly and others leaving a more noticeable finish. Because of that, the smartest approach is not to force every version into one rigid expectation, but to understand the structure and adjust with confidence.
That flexibility is the secret strength of mousse made with avocado. Once you understand the moving parts, the recipe becomes easy to improvise. It can turn darker, softer, sweeter, firmer, more minimal, or more indulgent without losing what makes it special.
How to keep it from tasting like avocado
This is the question that hovers over nearly every first-time batch, and thankfully the answer is straightforward.
First, use a ripe avocado. This cannot be overstated. Underripe fruit tastes greener and more obvious. Second, use enough chocolate presence. That can mean cocoa powder, cacao powder, melted dark chocolate, or a combination. Third, add enough sweetener to round the bitterness and soften the avocado note. Fourth, do not skip the vanilla and salt. Finally, chill the dessert before deciding whether it tastes too much like avocado.
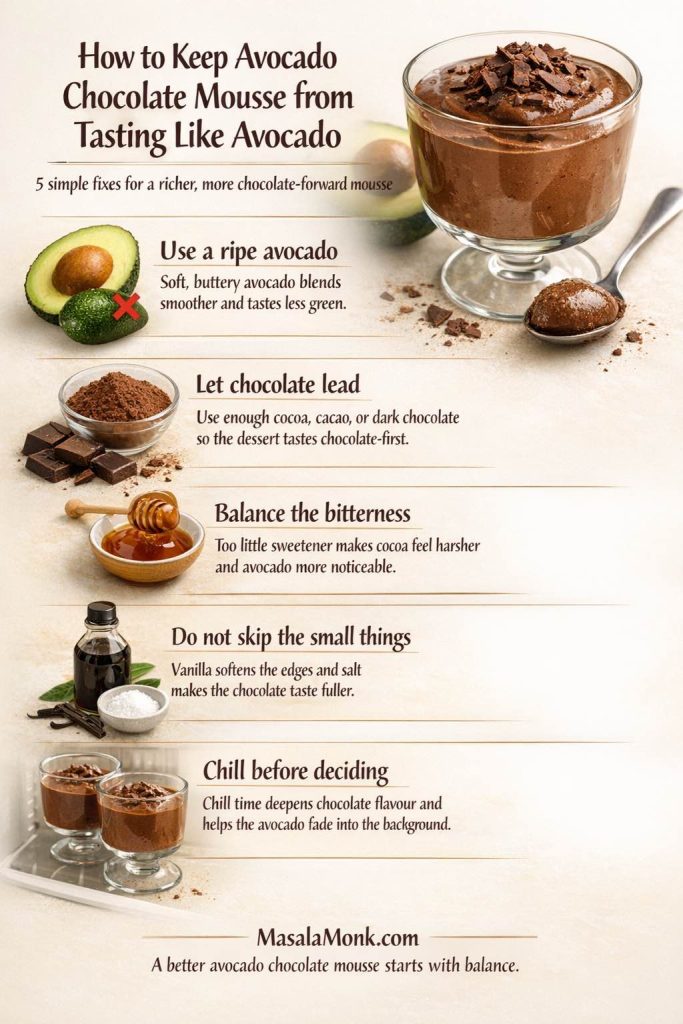
Chocolate Covered Katie also emphasizes that the avocado flavor should disappear beneath the chocolate when the dessert is made properly. That reassurance matters because the idea of avocado chocolate can sound stranger than it tastes. In practice, most people notice the texture far more than the fruit.
If a batch still reads too green, add more cocoa, a little more sweetener, and a drop more vanilla. Those small adjustments often fix the issue faster than adding more liquid ever could.
How to fix avocado chocolate mousse if it tastes bitter
Bitterness usually comes from strong cocoa, insufficient sweetness, or a lack of salt. Occasionally, it also comes from a cacao powder that is more intense than expected.
Start by increasing the sweetener a little. Then add a very small pinch of salt. Taste again. If the mousse still feels sharp, melted dark chocolate can help soften the edges and add a rounder finish. This is especially helpful in avocado cacao mousse versions, where the earthy notes of cacao can feel stern if the sweetness is kept very low.
That said, bitterness is not always a flaw. Some people prefer a darker, more adult finish in avocado dark chocolate mousse. The key is making sure the bitterness feels intentional rather than accidental.
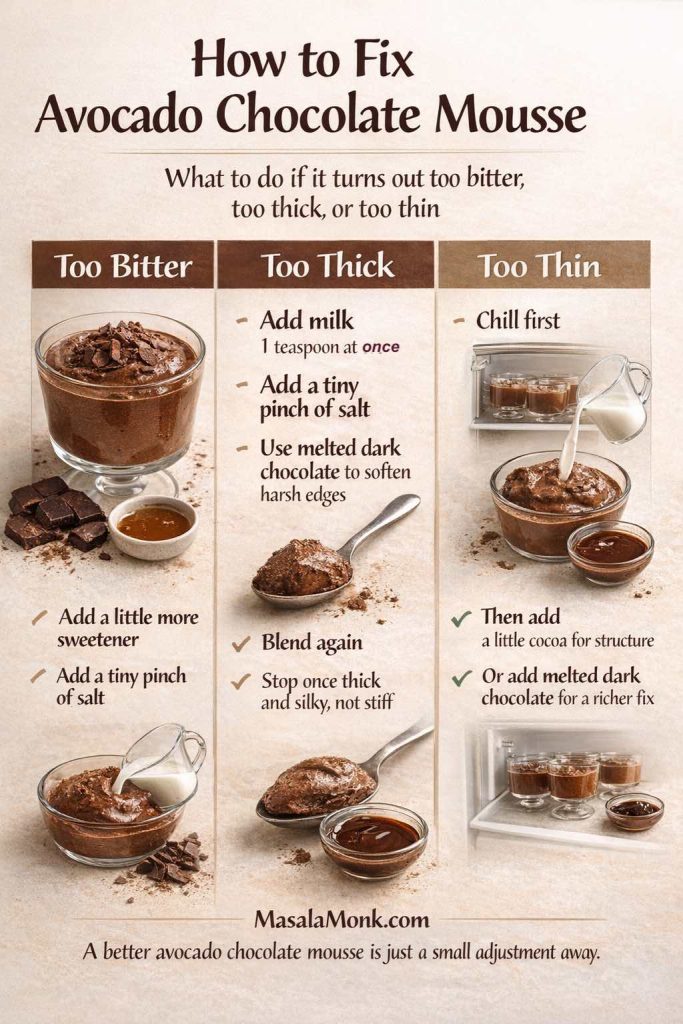
How to adjust avocado chocolate mousse if it is too thick
If the mousse looks heavy, refuses to blend, or feels pasty rather than silky, add liquid in very small increments. Almond milk, oat milk, coconut milk, or dairy milk can all work. What matters is moving slowly.
This is the moment where many recipes go wrong. A big splash of milk feels harmless, yet it can quickly turn mousse made with avocado into chocolate pudding avocado texture. Since the dessert will firm in the fridge, there is no need to chase final texture entirely in the blender. Stop when it feels smooth and thick, not when it seems already set.
Also Read: Tapas Recipe With a Twist: 5 Indian-Inspired Small Plates
How to fix this mousse if it is too thin
A thin mousse usually comes from too much liquid, an oversized avocado relative to the chocolate, or a sweetener that loosens the mixture more than expected.
The simplest fix is chilling. Quite often, the mousse thickens enough after resting. If that is not enough, add a little more cocoa powder or a small amount of melted dark chocolate and blend again. Either choice will strengthen the structure. Cocoa keeps the recipe lighter. Dark chocolate makes it richer.
This is also where the dessert begins to define itself. If the texture is soft but luscious, you may decide to embrace it as avocado chocolate pudding rather than force it into a firmer mousse identity.
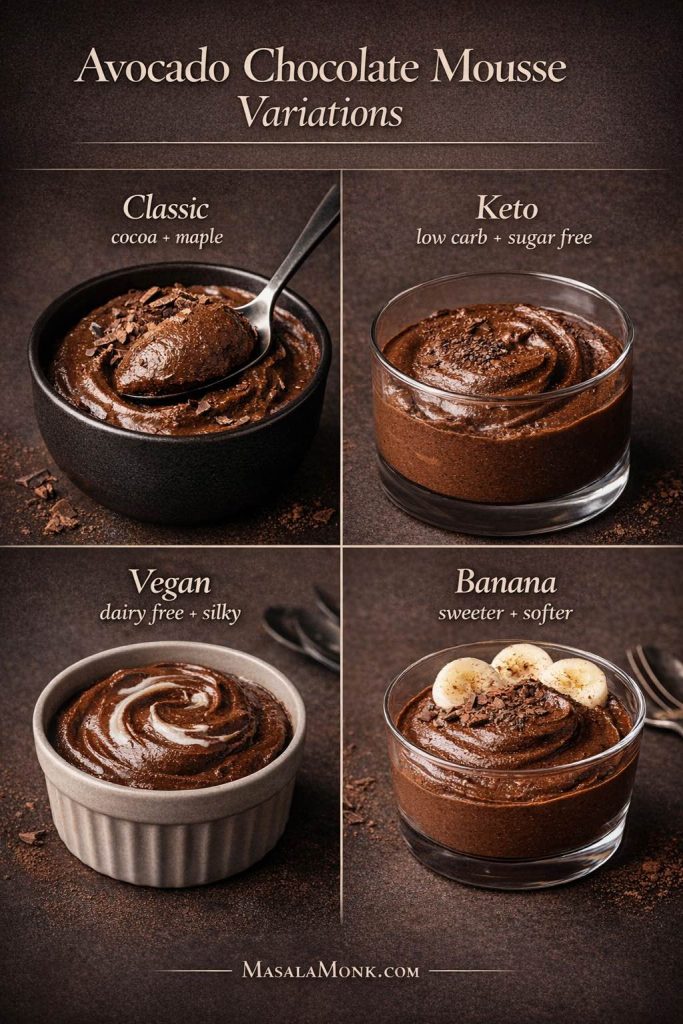
Keto avocado chocolate mousse
A keto avocado chocolate mousse can feel every bit as indulgent as the classic version, which is part of its charm. The avocado already supplies richness, so you do not need sugar to make the dessert satisfying. Instead, the focus shifts to choosing the right sweetener and keeping the texture smooth.
Use unsweetened cocoa or dark chocolate, a keto-friendly sweetener that dissolves cleanly, and a modest amount of unsweetened almond milk or coconut milk. That foundation creates a mousse that feels rich and chocolatey rather than compromise-driven. If you enjoy other low-carb chocolate comforts, recipes like keto hot chocolate or keto chia pudding with almond milk live in a similar neighborhood of satisfying, creamy simplicity.
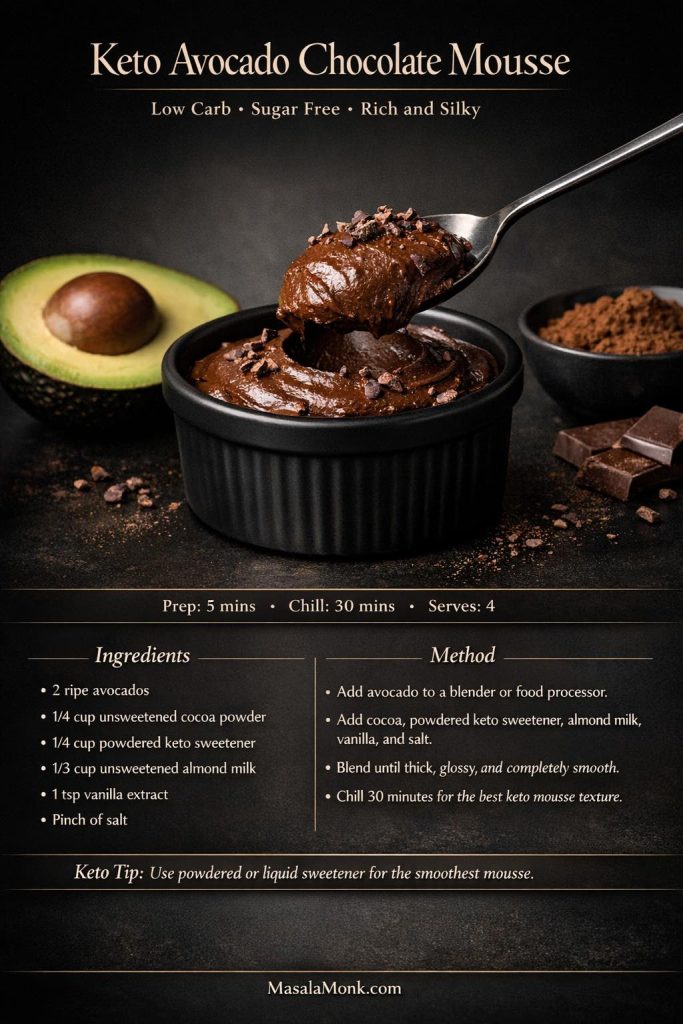
The most common pitfall in keto avocado mousse is a gritty texture from the sweetener. Powdered or liquid sweeteners tend to solve that immediately. Sugar Free Londoner leans into this low-carb direction, highlighting the recipe’s keto credentials and pudding-like creaminess while keeping the ingredient list compact. That overlap between mousse and pudding is actually useful because keto avocado chocolate mousse can drift either way depending on how much liquid you use.
Best milk options for keto version
Almond milk keeps the flavor neat and understated. Coconut milk makes the dessert thicker and richer, especially in a dark chocolate version. Neither is wrong. Almond milk suits a cleaner finish. Coconut milk suits a more luxurious one.
Also Read: Air Fryer Salmon Recipe (Time, Temp, and Tips for Perfect Fillets)
Healthy avocado chocolate mousse
Healthy avocado chocolate mousse can mean different things depending on the cook, and that flexibility is part of its appeal. For one person, it may mean using less refined sugar. For someone else, it may be a dairy-free chocolate dessert that still feels rich and satisfying. Another cook may define it through ingredients that feel more familiar, whole, or minimally processed. The beauty of the recipe is that it can comfortably hold all of those interpretations.
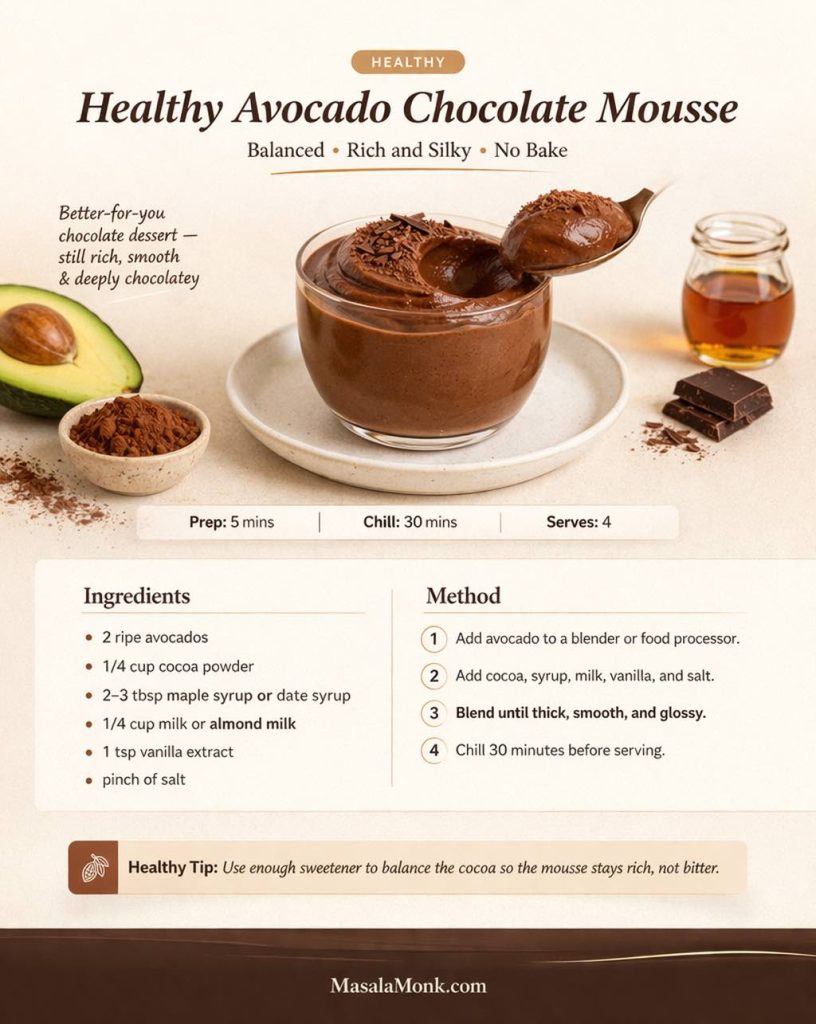
Maple syrup is a lovely option when you want sweetness without sharpness. Dates make the mousse feel more rustic and whole-food-driven, though they also thicken it and nudge it toward pudding. Cacao powder can make the flavor feel more robust and slightly less sweet, which some people love in a healthy avocado mousse. Meanwhile, dark chocolate can be used in moderation to create a richer dessert without abandoning that more wholesome spirit.
Harvard’s overview of dark chocolate explains that cocoa-rich chocolate contains flavanols, although the amount can vary depending on processing. Harvard Health also notes that cocoa powder is a source of beneficial compounds, though dessert should still be enjoyed with perspective rather than grand claims. That is the right tone for this recipe. A healthy chocolate mousse is still dessert. It just happens to be one that can fit beautifully into a balanced way of eating.
If you enjoy that broader better-for-you dessert lane, healthy oat protein bars and high-protein overnight oats offer different kinds of creamy or satisfying sweetness without leaving the comfort-food world behind.
Cocoa powder vs dark chocolate in healthy variant
Cocoa powder gives you a cleaner ingredient line and a sharper chocolate profile. Melted dark chocolate creates deeper richness and a more classic dessert feel. If you want the best of both, use cocoa as the main base and a little dark chocolate for depth. That combination often produces the best avocado chocolate mousse recipe for people who want both flavor and restraint.
Vegan avocado chocolate mousse
Vegan avocado chocolate mousse is one of the easiest versions to make because avocado does most of the work that dairy would normally do. Use maple syrup or another vegan sweetener, choose almond milk, oat milk, or coconut milk, and make sure your dark chocolate is dairy-free if you decide to use it.
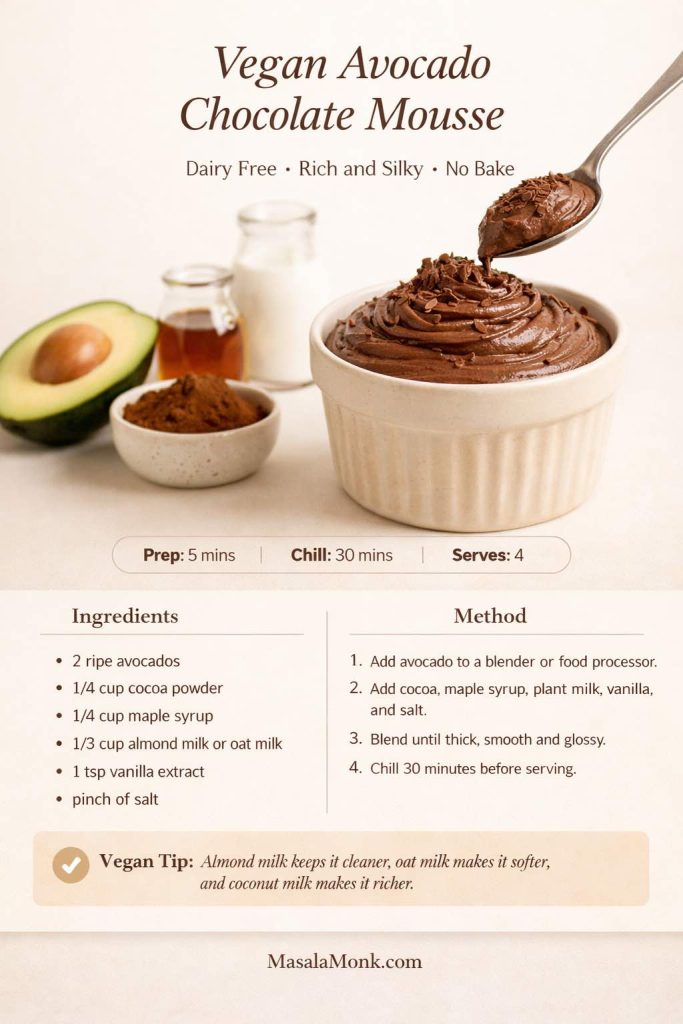
The result can be deeply satisfying, not merely acceptable. In fact, avocado mousse vegan versions often feel especially natural because nothing about the recipe depends on eggs or cream to begin with. The avocado already makes the dessert lush. The rest is simply a matter of balance.
For readers who enjoy dairy-free chocolate baking and desserts beyond mousse, vegan chocolate cake recipes offer another useful trail through that world. The relationship is not one-to-one, of course, but the same broader idea applies: plant-based chocolate desserts can feel rich, complete, and fully dessert-like when texture is handled properly.
Best dairy-free milk for vegan alternative
Almond milk is clean and neutral. Oat milk is softer and naturally a bit sweeter. Coconut milk makes the mousse richer and denser. Choose based on the finish you want rather than chasing a universal rule.
Also Read: Masterclass in Chai: How to Make the Perfect Masala Chai (Recipe)
Avocado chocolate pudding vs avocado chocolate mousse
This distinction matters more than it might seem. Some recipes live clearly in mousse territory. Others are really avocado chocolate pudding with a more elegant name. Still others sit right in the middle.
Mousse should hold shape on the spoon, feel thick and velvety, and become slightly firmer after chilling. Pudding should feel softer, looser, and more comfort-oriented. Neither is inherently better. They simply scratch different itches.
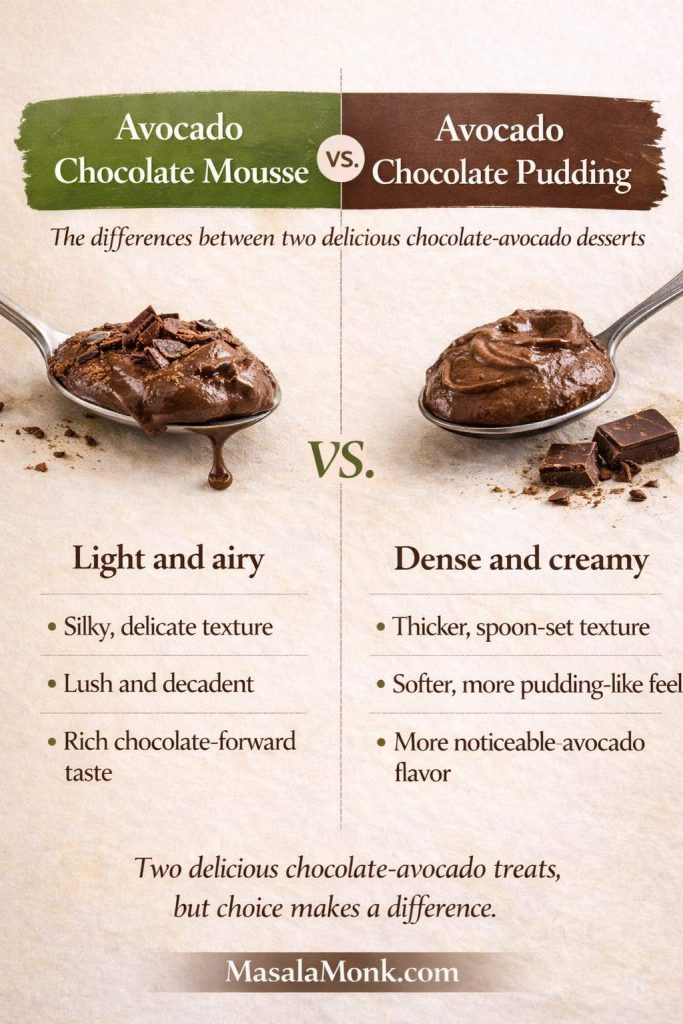
Sugar Free Londoner even uses pudding language within its mousse recipe, which reflects how fluid this boundary can be. Allrecipes, meanwhile, leans more directly into the pudding identity with its chocolate avocado pudding. That overlap is not confusion so much as a reminder that avocado-based chocolate desserts sit on a spectrum.
If you love that softer, spoonable family of desserts, creative chia pudding variations or no-bake banana pudding make sense as related pleasures. Avocado and chocolate pudding belongs to that same comforting lineage. Avocado chocolate mousse simply edges a little closer to elegance.
When avocado chocolate mousse feels more like pudding
This usually happens because there is too much liquid, the sweetener is especially dense, or the avocado is large relative to the chocolate. It can also happen when banana or dates are added. Again, that is not failure. It is simply a softer destination.
Also Read: Crock Pot Pork Chops and Sauerkraut (No Dry Chops Recipe)
Avocado banana chocolate mousse
Banana changes the character of the dessert more than almost any other variation. It brings sweetness, softness, and a familiar fruity dessert note that can make avocado and banana chocolate mousse feel instantly approachable.
If someone is hesitant about avocado chocolate mousse, banana can act as a gentle bridge. It smooths bitterness, adds natural sweetness, and gives the dessert a flavor profile that feels comforting rather than mysterious. That is why avocado banana chocolate mousse can be such a useful variation, especially when serving children or anyone unsure about avocado in dessert.

At the same time, banana absolutely announces itself. Unlike avocado, it is not a quiet ingredient here. So if your goal is the purest avocado chocolate mousse recipe, banana is not the move. If your goal is a softer, sweeter, more casual dessert, it is a wonderful addition.
Chocolate mousse with avocado and banana also tends to drift toward pudding texture. Banana adds body, but it adds a different kind of body—less sleek, more plush. That can be lovely, particularly if you enjoy the comfort-dessert direction of a banana pudding.
When to add banana
Add banana when you want more natural sweetness, when your cocoa tastes too intense, or when you want the dessert to feel more familiar and fruit-forward. Skip it when you want a darker, cleaner, more adult chocolate profile.
Also Read: Dirty Martini Recipe (Classic, Extra Dirty, No Vermouth, Spicy, Blue Cheese, Tequila + Batched)
Avocado and cacao mousse for a darker profile
Cacao powder changes the dessert in a subtle but noticeable way. The flavor tends to feel deeper, earthier, and slightly more intense than many supermarket cocoa powders. That makes avocado and cacao mousse a lovely option for people who enjoy dark chocolate flavors without needing a lot of sweetness.
Because cacao can feel more assertive, balance becomes especially important. A pinch of salt matters more. Sweetness matters more. Chilling matters more. When it all comes together, however, the result can be deeply satisfying—less like a sweet treat for everyone, more like a dark, quiet dessert you savor slowly.
If you prefer this direction, you may also find yourself leaning toward melted dark chocolate as a companion ingredient rather than using cacao alone. That mix preserves the intensity while giving the mousse a rounder, more luxurious finish.
4 ingredient avocado chocolate mousse
There is a certain appeal to keeping this dessert as stripped-down as possible. In its simplest form, a 4 ingredient avocado chocolate mousse might include avocado, cocoa powder, sweetener, and a splash of milk or other liquid. If the avocado is ripe and the cocoa is good, that can absolutely work.
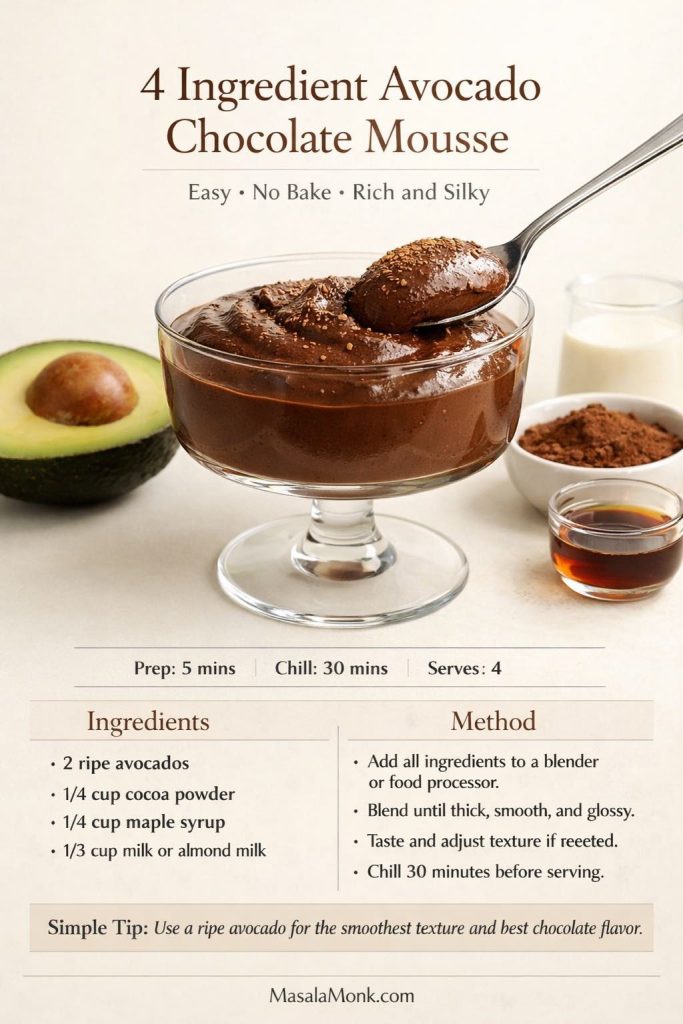
Still, the extra ingredients—especially vanilla and salt—do more than their small quantities suggest. A four-ingredient version is charming in its simplicity, yet the fuller version usually tastes more complete. That is why I think of the 4 ingredient avocado chocolate mousse as a useful starting point rather than the ultimate destination. It shows how easy the recipe can be. Then, once you understand the framework, you can decide where to add complexity for depth.
Also Read: Ravioli Recipe Reinvented: 5 Indian-Inspired Twists on the Italian Classic
Best avocado chocolate mousse recipe for guests
When you are making this for yourself, a cocoa-and-maple version may be all you need. When you are making it for guests, a slightly more luxurious path can be worth it.
Use a very ripe avocado, good cocoa, a little melted dark chocolate, vanilla, salt, and enough sweetener to keep the flavor smooth. Blend until the texture is flawless. Chill thoroughly. Serve in small glasses with a few chocolate shavings or a light dusting of cocoa.
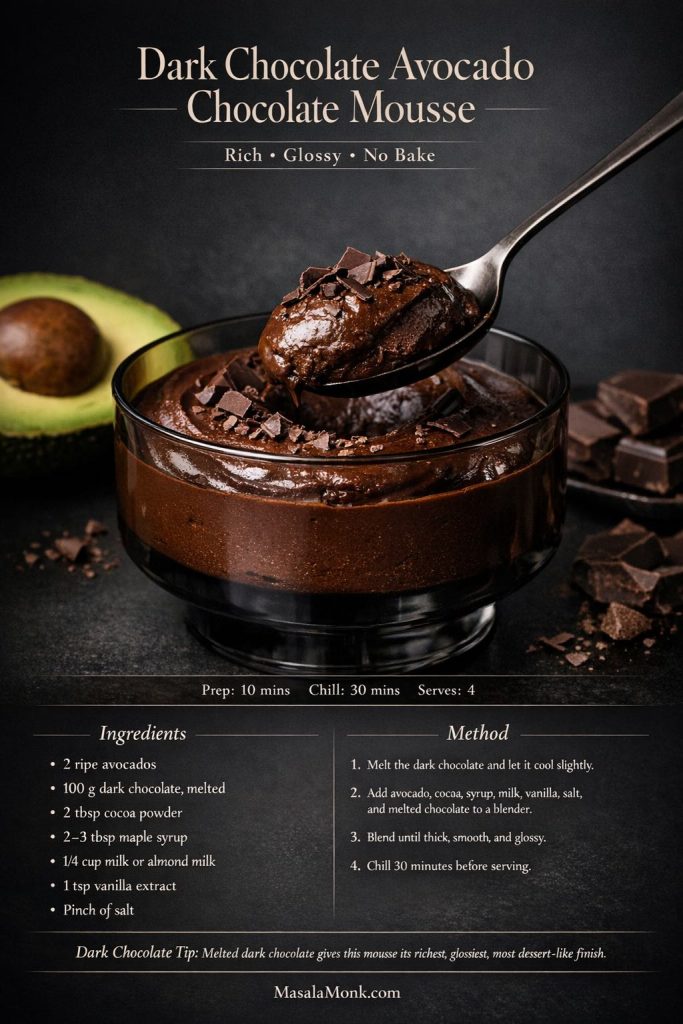
This is where avocado dark chocolate mousse really shines. The dessert looks deeper, tastes rounder, and feels more polished. It is also the version most likely to surprise people who hear “avocado chocolate” and expect compromise. Instead, they get something elegant and fully dessert-like.
What to serve with avocado chocolate mousse
Although the mousse stands beautifully on its own, a few companions can make it feel even more complete.
Fresh berries cut through the richness. Chopped toasted nuts add contrast. A little whipped coconut cream works well if you are serving a vegan avocado chocolate mousse. Thin slices of banana make sense if you are already leaning in that direction. If the mousse is especially dark, a tiny pinch of flaky salt on top can sharpen the chocolate.
That said, this is not a dessert that needs fuss. One of its strengths is how self-contained it feels. The texture is already the main event.
How to store the mousse
Store the mousse in individual servings or in one airtight container. Pressing a piece of wrap gently against the surface can help minimize air exposure if you are storing it a little longer. In general, the dessert is best within a day or two, when the flavor still feels fresh and the color remains appealing.
If you are dealing with avocados before making the mousse, the USDA SNAP-Ed avocado page offers simple guidance on ripening and storage, including leaving firm avocados at room temperature until they soften and then refrigerating them once ripe. That basic handling advice is useful because the quality of the fruit matters so much in the final dessert.
Once blended, avocado mousse is a naturally make-ahead-friendly sweet. That convenience is part of its enduring charm. You can make it in advance, chill it, and have dessert ready without last-minute drama.
Also Read: Fish and Chips Reimagined: 5 Indian Twists (Recipe + Method)
Why it keeps earning a place in real kitchens
Some recipes make an impression once and then quietly disappear. It usually works the other way around. What begins as a curiosity soon turns into something practical, reliable, and surprisingly elegant. It is quick to make, easy to adapt, and versatile enough to suit different ways of eating. On one evening, it answers a simple chocolate craving; on another, it becomes the final touch to a dinner where dessert needs to feel thoughtful without taking over the day.
Perhaps even more importantly, this dessert rewards repetition. The more often you make it, the less it feels like a fixed formula and the more it becomes a language you understand naturally. Over time, you start to notice how much liquid keeps it in mousse territory rather than drifting into pudding. You begin to sense when cocoa alone is enough and when dark chocolate will add the depth the dessert needs. Banana becomes a deliberate choice rather than an afterthought, useful in some versions and distracting in others. Eventually, the question stops being whether avocado belongs in dessert at all, because by then you are simply enjoying everything it does so well.
That is why this recipe has such staying power. It is not clever for the sake of being clever. It is simply useful, delicious, and adaptable in a way that fits real life.
A final spoonful
The best mousse recipe is not necessarily the most minimal one or the richest one or the strictest one. It is the one that understands what makes this dessert special: ripe avocado for texture, chocolate for depth, sweetener for balance, and enough patience to chill the mixture until it becomes silky, calm, and complete.
Once you understand the structure, the possibilities widen beautifully. The classic route with cocoa and maple syrup is always there when you want something simple. A keto avocado chocolate mousse can feel just as indulgent without relying on sugar, while a vegan avocado mousse made with almond or oat milk brings its own quiet richness. If a softer spoon dessert sounds better, the mixture can lean naturally toward avocado chocolate pudding. Beyond that, banana adds sweetness, cacao brings intensity, and dark chocolate gives the whole dessert a more luxurious finish.
So whether you came here looking for how to make avocado mousse, a healthy chocolate mousse, a vegan avocado chocolate mousse, recipe chocolate avocado mousse inspiration, or simply the best avocado mousse recipe you can make in minutes, the heart of the answer stays the same. Start with a ripe avocado. Let chocolate lead. Blend thoroughly. Adjust thoughtfully. Chill well.
Then take a spoonful and let the texture do the convincing.
Also Read: Falafel Recipe: Crispy Homemade, Air Fryer and Baked Falafel
Frequently Asked Questions
1. What is avocado chocolate mousse?
Avocado chocolate mousse is a smooth, spoonable chocolate dessert made by blending ripe avocado with cocoa powder, cacao, or dark chocolate along with a sweetener and a little liquid. Although it sounds unusual at first, the avocado mainly adds body and creaminess rather than a strong fruit flavor.
2. Can you taste avocado in avocado chocolate mousse?
When the avocado is properly ripe and the balance of chocolate, sweetener, vanilla, and salt is right, avocado chocolate mousse should taste mostly like chocolate rather than avocado. Even so, an underripe avocado or too little cocoa can make the avocado note more noticeable.
3. How do you make avocado chocolate mousse?
To make avocado chocolate mousse, blend ripe avocado with cocoa powder or melted dark chocolate, sweetener, vanilla, a pinch of salt, and just enough milk or dairy-free milk to help it turn silky. After that, taste, adjust, and chill until the texture becomes richer and more mousse-like.
4. What is the best avocado chocolate mousse recipe for beginners?
The best avocado chocolate mousse recipe for beginners is usually the simplest one: ripe avocado, cocoa powder, maple syrup, vanilla, salt, and a small splash of milk. That version is easy to balance, easy to blend, and easy to adjust if you want it sweeter, darker, or thicker.
5. Can I make a 4 ingredient avocado chocolate mousse?
Yes, a 4 ingredient avocado chocolate mousse can work very well. In most cases, that means avocado, cocoa powder, sweetener, and milk or another liquid. Still, vanilla and salt make the flavor noticeably rounder, so the fuller version often tastes more complete.
6. Is avocado chocolate mousse healthy?
Healthy avocado chocolate mousse can mean different things depending on how you make it. In general, it is often seen as a lighter-feeling dessert because avocado adds creaminess without heavy cream, and the sweetness can be adjusted to suit your preference. Even then, it is still meant to be enjoyed as dessert.
7. Can I make healthy avocado chocolate mousse with less sugar?
Yes, you can make healthy avocado chocolate mousse with less sugar, but the balance still matters. If the sweetness drops too low, the cocoa may taste bitter and the avocado may come forward more than you want. Therefore, it helps to reduce sweetener gradually rather than all at once.
8. Is avocado chocolate mousse keto?
Avocado chocolate mousse can be keto when made with unsweetened cocoa or dark chocolate and a suitable low-carb sweetener. In that version, almond milk or coconut milk usually works well, and the avocado helps maintain a rich texture without needing sugar.
9. What sweetener works best in keto avocado chocolate mousse?
For keto avocado chocolate mousse, powdered or liquid sweeteners usually work better than coarse granulated ones because they blend more smoothly. As a result, the mousse tastes creamier and avoids the gritty texture that can sometimes happen with low-carb desserts.
10. Is avocado chocolate mousse vegan?
Yes, avocado chocolate mousse can be naturally vegan if you use a plant-based sweetener such as maple syrup and a dairy-free milk like almond, oat, or coconut milk. If you add melted chocolate, just make sure the chocolate itself is dairy-free.
11. What milk is best for vegan avocado chocolate mousse?
Almond milk is a popular choice for vegan avocado chocolate mousse because it keeps the flavor clean and lets the chocolate stay in focus. Oat milk makes the dessert a bit softer, whereas coconut milk gives it a richer, fuller finish.
12. What is the difference between avocado chocolate mousse and avocado chocolate pudding?
Avocado chocolate mousse is usually thicker, firmer, and more set after chilling, while avocado chocolate pudding tends to be softer and looser. Even so, the line between the two can be fairly thin, especially if the recipe uses more liquid or a heavier sweetener.
13. Why is my avocado chocolate mousse too thin?
Avocado chocolate mousse can turn out too thin if there is too much liquid, if the avocado is especially large, or if the sweetener loosens the mixture more than expected. In many cases, chilling helps first. Otherwise, a little more cocoa powder or melted dark chocolate can bring the texture back into balance.
14. Why is my avocado chocolate mousse too thick?
If avocado chocolate mousse feels too thick, the mixture probably needs just a little more liquid to blend and soften properly. Add it slowly, though, because a small amount can make a big difference. Otherwise, the mousse can shift quickly toward pudding.
15. Why does my avocado chocolate mousse taste bitter?
Bitterness usually comes from strong cocoa, not enough sweetener, or too little salt. Sometimes cacao powder can also taste more intense than expected. In that case, a bit more sweetener, a pinch of salt, or some melted dark chocolate often helps smooth the flavor out.
16. Why does my avocado chocolate mousse taste like avocado?
That usually happens when the avocado is underripe, the chocolate flavor is too light, or the dessert has not been chilled long enough. More cocoa, a touch more vanilla, and a little extra sweetener often help. Most importantly, start with a ripe avocado whenever possible.
17. Can I use cacao instead of cocoa in avocado chocolate mousse?
Yes, you can use cacao instead of cocoa in avocado chocolate mousse. The flavor may taste a little darker or earthier, so you may want to adjust the sweetness slightly. Nevertheless, it can be a very good choice if you prefer a deeper chocolate profile.
18. Can I use dark chocolate instead of cocoa powder?
Yes, dark chocolate can be used instead of cocoa powder, or alongside it, in avocado chocolate mousse. Melted dark chocolate usually makes the dessert feel richer, smoother, and more luxurious, while cocoa powder keeps it a bit lighter and more direct in flavor.
19. Can I add banana to avocado chocolate mousse?
Absolutely. Avocado banana chocolate mousse is a softer, sweeter variation that can feel more familiar to people who are unsure about avocado in dessert. On the other hand, banana adds its own flavor clearly, so it changes the character of the mousse more than most other add-ins.
20. How long does avocado chocolate mousse last in the fridge?
Avocado chocolate mousse is usually best within one to two days in the refrigerator, when the flavor and color still feel fresh. Keep it in an airtight container, and try to limit air exposure as much as possible.
21. Can you freeze avocado chocolate mousse?
Yes, avocado chocolate mousse can be frozen, although the texture may change slightly after thawing. Because of that, it is usually best enjoyed fresh or chilled from the fridge. Still, freezing can work if you want to save leftovers rather than waste them.
22. Is avocado chocolate mousse a good make-ahead dessert?
Yes, avocado chocolate mousse is an excellent make-ahead dessert because chilling actually improves the texture. In fact, many versions taste better after some time in the fridge, once the chocolate settles and the mousse firms up.
23. What toppings go well with avocado chocolate mousse?
A light dusting of cocoa powder, dark chocolate shavings, chopped nuts, berries, or a little whipped coconut cream all work well. Since the mousse is already rich, simple toppings usually feel best.
24. Can I make avocado mousse without chocolate?
You can make avocado mousse without chocolate, but it becomes a different dessert altogether. Chocolate is what gives avocado chocolate mousse its depth and helps the avocado stay in the background. Without it, the avocado flavor will be much more noticeable.
25. What makes the best avocado mousse recipe turn out silky?
The best avocado mousse recipe turns silky when you use a ripe avocado, blend thoroughly, and add liquid gradually rather than all at once. In addition, tasting before chilling helps you correct bitterness, sweetness, and thickness before the texture sets.