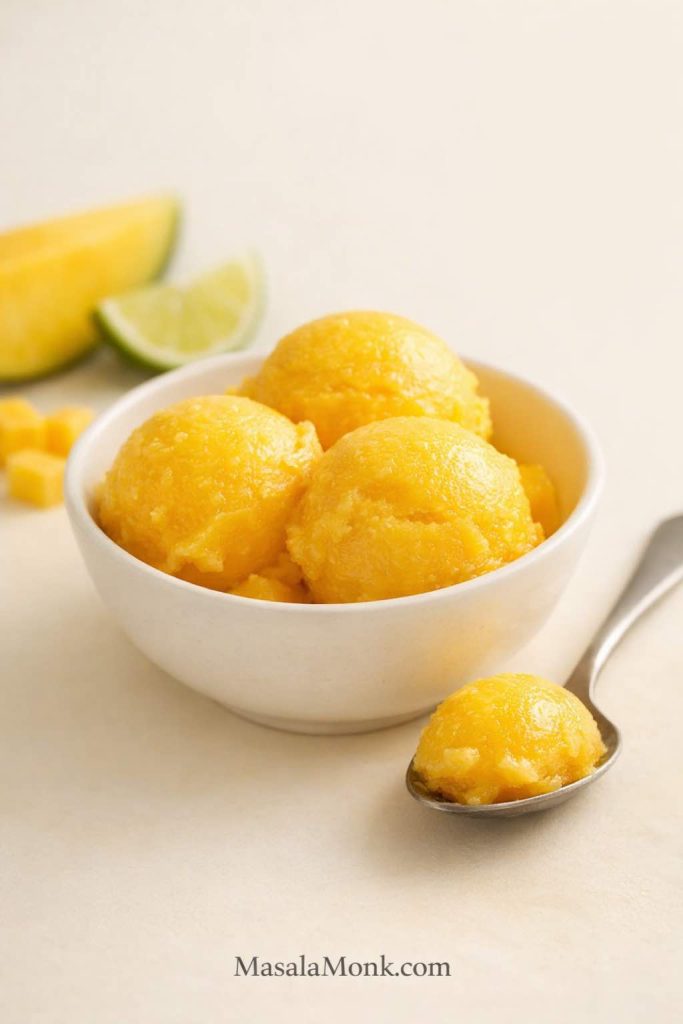
If you want a mango sorbet recipe that tastes vividly of mango, feels refreshing instead of icy, and works in an ordinary home kitchen, this is the version to make. It does not assume you own an ice cream maker, and it does not bury a naturally simple dessert under ingredients that do not meaningfully improve the result. It is built around what people actually want from homemade mango sorbet: bright fruit flavor, a smooth spoonable texture, and a finish that feels clean and cooling rather than sugary, heavy, or dull.
That sounds simple enough. Yet mango sorbet often goes wrong in familiar ways. One batch freezes into a hard block. Another turns watery. A third tastes good before freezing and then falls flat once cold because the mango weakens, the sweetness drops back, and the texture loses all charm. A really good mango sorbet recipe has to account for those problems before they happen.
That is what this version is designed to do. It works with fresh mango or frozen mango, gives you a reliable mango sorbet recipe without ice cream maker equipment first, and then shows you how to adapt the same base for a blender, food processor, ice cream maker, or Ninja Creami. It also covers the questions that matter once the fruit is in your kitchen: how sweet the base should taste before freezing, how thick it should look before you stop blending, how to make frozen mango sorbet without diluting it, how to vary the flavor without losing the mango, and how to store it so it still feels worth scooping later.
Why This Mango Sorbet Recipe Works
A lot of sorbet recipes are so minimal that they stop being helpful. They tell you to blend fruit, add something sweet, freeze it, and trust that it will all come together. That can work on a good day with good fruit. It does not give you a dependable result.
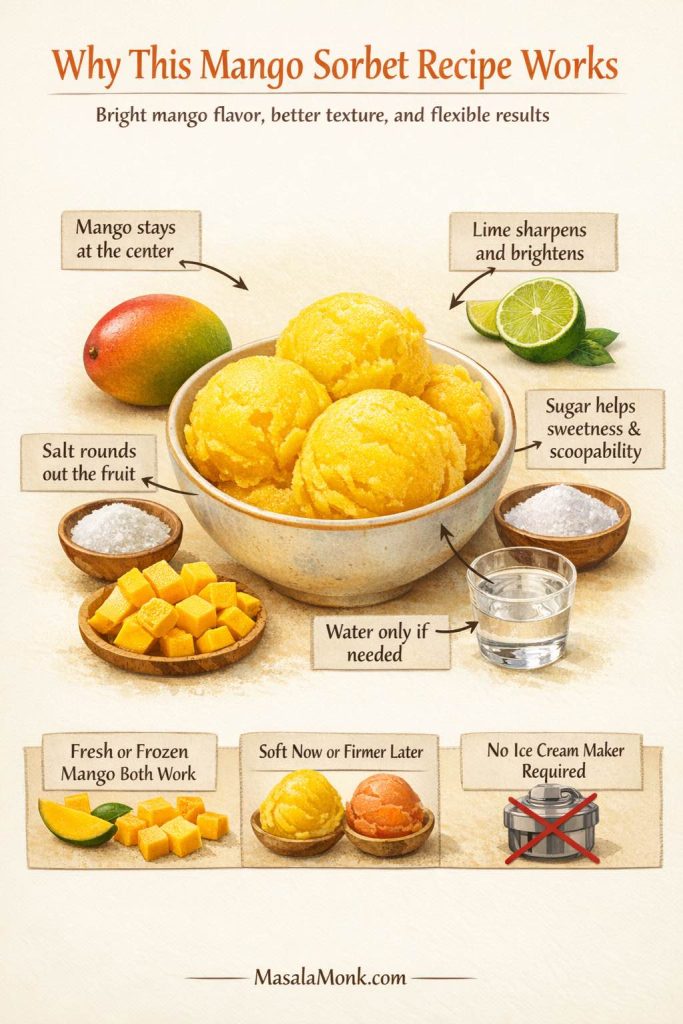
This recipe works because it keeps mango at the center while still respecting texture. Lime sharpens the fruit, sugar supports both flavor and freezing behavior, salt rounds everything out, and water is treated as a last resort rather than a standard ingredient. That matters because a good mango sorbet recipe should taste like ripe mango first, not like anonymous tropical coldness.
It also works because it stays flexible in the ways that actually matter. Fresh mango can give you a more layered result when the fruit is in season and deeply fragrant. Frozen mango is often the smarter route when fresh fruit is disappointing, expensive, or inconsistent. The same base also adapts well to different needs: it can give you a fast soft-sorbet texture for immediate serving or firmer make-ahead scoops for later. Just as importantly, it does not depend on special equipment. A very good mango sorbet recipe without ice cream maker equipment is completely realistic.
Also Read: Protein Ice Cream Recipe: 10 Creamy Homemade Recipes
Ingredients for This Mango Sorbet Recipe
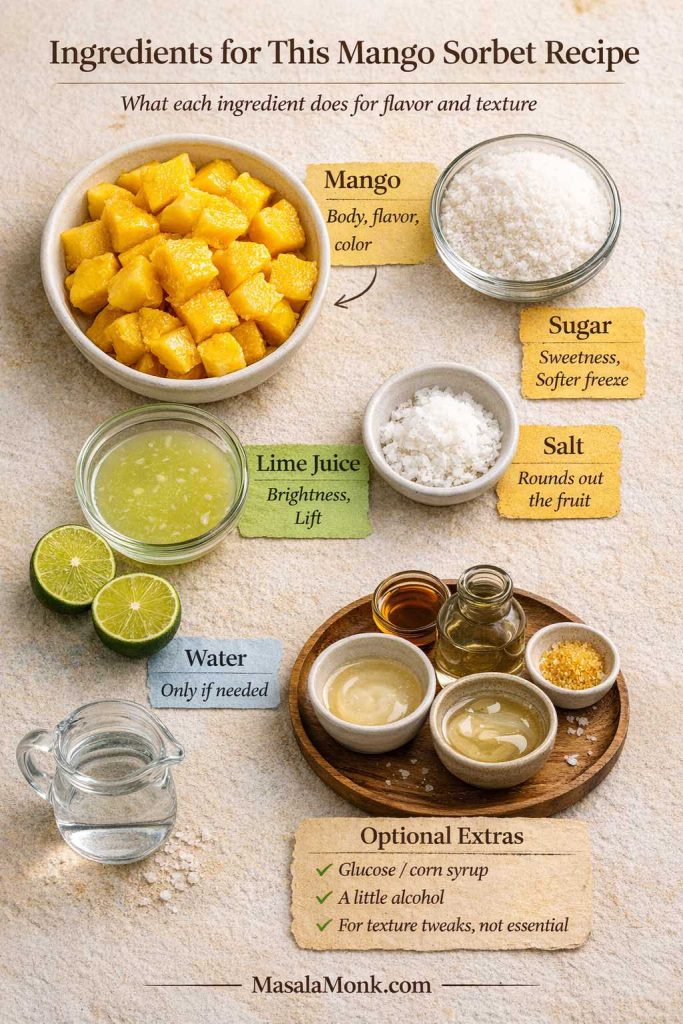
The ingredient list is short, which is exactly why each ingredient has to do real work. Sorbet is not the kind of dessert where weak fruit or casual proportions disappear behind cream, butter, eggs, or flour. Everything shows.
Mango
Mango provides the body, perfume, sweetness, color, and most of the character. For this recipe, you want about 4 cups mango flesh or frozen mango chunks, which usually means around 4 to 5 medium mangoes, depending on size and variety. If you are using frozen mango, measure it straight from the bag. If you are using fresh mango, peel it, remove the pit, dice the flesh, and then measure.
A useful rule is this: if the mango tastes merely decent at room temperature, it will usually taste less impressive once frozen. Strong sorbet begins with strong fruit.
Sugar
Sugar is not here only to make the sorbet sweet. It changes the way the mixture freezes. That is why a base can taste fine before chilling and then become hard and frustrating later if it does not contain enough sweetness.
Ordinary white sugar is the best default for a clean, fruit-forward result. It dissolves well and does not compete with the mango. Maple syrup and honey can work, but both bring more of their own flavor.
Lime Juice
Lime is what keeps mango from feeling sleepy. Without it, the sorbet can drift toward sweetness without enough lift. With it, the fruit tastes brighter, colder, and more alive.
Fresh lime juice is worth using here. Sorbet has nowhere to hide dull flavors. Even a simple mango sorbet recipe becomes noticeably more vivid when the citrus is fresh.
Salt
A small pinch of salt helps the fruit taste fuller. It should not announce itself. You are not trying to make the sorbet taste salty. You are simply helping the mango feel rounder and less one-note.
Water, Only If Needed
Some batches need none. Some need a small splash just to help the blender or food processor move. The important thing is to treat water as a tool, not a standard ingredient. Too much liquid is one of the quickest ways to make sorbet icy.
Optional Extras
Some recipes use glucose, corn syrup, or a spoonful of alcohol to soften freezer texture. Those tools can work, but a very good homemade version does not need to become complicated to succeed. For most readers, mango, sugar, lime, salt, and only as much water as necessary are enough.
If you want the deeper freezing-point explanation without turning dessert into a chemistry lecture, Serious Eats’ guide to the science of sorbet texture is a helpful outside reference.
Also Read: Homemade Mango Ice Cream Recipe
Best Mangoes for Mango Sorbet
The best fruit for a mango sorbet recipe is mango that tastes fully ripe, fragrant, and alive before it ever sees the freezer. Cold temperatures mute aroma and sweetness slightly, so the fruit has to start stronger than you think.
A mango for sorbet should smell fragrant, taste clearly sweet, and feel rich rather than watery. If it tastes merely acceptable at room temperature, it will rarely become impressive once frozen. Sorbet rewards perfume and concentration. It does not flatter weak produce.

This is one reason alphonso mango sorbet sounds so appealing. Rich, perfumed mangoes naturally lend themselves to sorbet. Still, you do not need one famous variety to make a successful batch. What matters most is not prestige, but flavor concentration. If you have access to excellent local mangoes, trust the fruit that actually tastes best rather than chasing a name.
Even less-than-perfect fruit can still make good sorbet, but it helps to adjust with some honesty. Watery mango needs little or no added liquid. Fibrous mango should be blended thoroughly and, if needed, strained before freezing. Bland mango can be lifted with sugar and lime, though they cannot replace fragrance that was never there. And when the fruit is very sweet yet still tastes flat, a little more lime and a pinch of salt can often bring it back into balance.
Also Read: Cookie Pie Recipe: 10 Best Flavors, Fillings and Variations
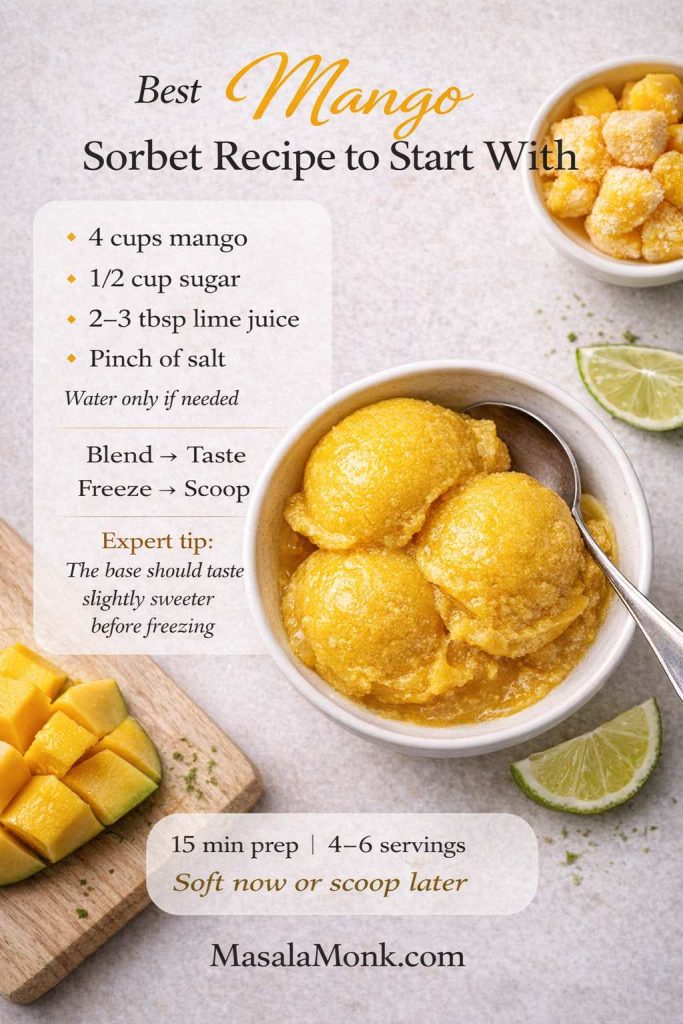
The Best Mango Sorbet Recipe to Start With
This is the version most readers should begin with. It works especially well with frozen mango, but it also works beautifully with good fresh mango. It does not require an ice cream maker, gives you a fast path to dessert, and still leaves room for firmer scoops later.
Yield: 4 to 6 servings
Prep time: 15 minutes
Freeze time: none for a soft texture with frozen mango, or 1 to 3 hours for firmer scoops
Total time: 15 minutes to 3 hours, depending on the texture you want
Ingredients
- 4 cups ripe mango flesh or frozen mango chunks
- 1/2 cup sugar
- 2 to 3 tablespoons fresh lime juice
- pinch of salt
- 2 to 4 tablespoons water, only if needed
This ratio gives you the widest margin for success. The flavor stays clean, the method stays approachable, and the texture is easy to judge before freezing. It is a better place to begin than a machine-first sorbet because it shows what the dessert should taste and feel like without asking for special equipment up front.
If your mango is especially sweet, start at the lower end of the lime range and taste before adding more sugar. If your mango is juicy or watery, be even more careful with added liquid. The strongest batches stay concentrated.
Also Read: Punjabi Mutton Bhuna – Amritsari Village-Style Gosht Recipe
How to Make Mango Sorbet
This is the central method for the mango sorbet recipe and the one that anchors the whole guide. Once you understand this base, the appliance-specific sections become much easier to adapt.
Step 1: Prepare the Mango
If you are using fresh mango, peel it, cut away the flesh, and dice it. Measure after cutting so you know you truly have 4 cups.
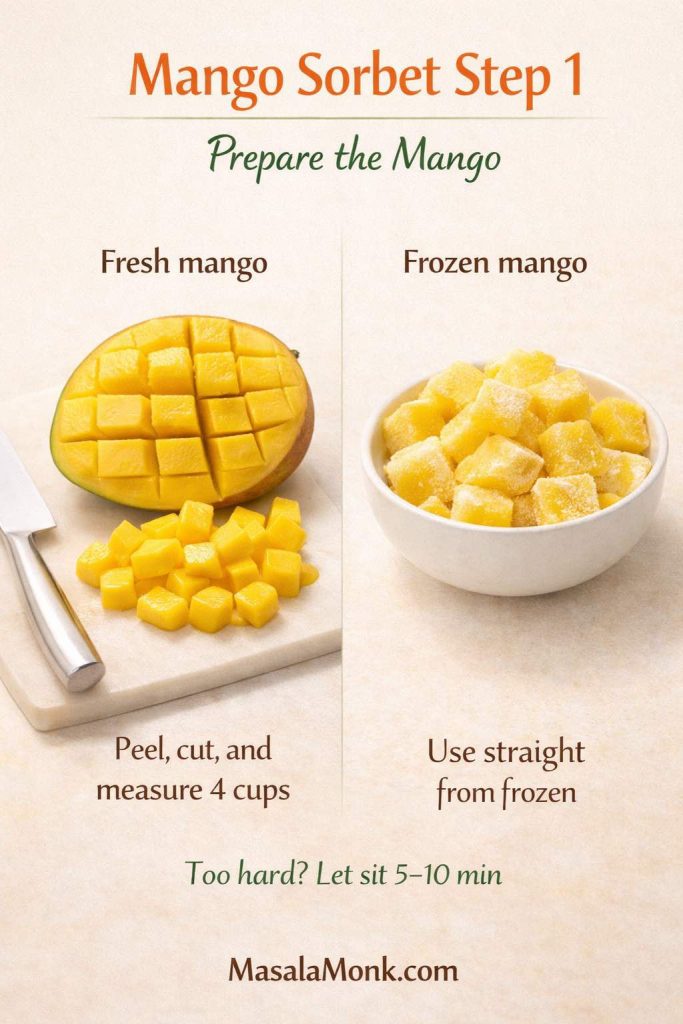
If you are using frozen mango, there is usually no need to thaw it fully. Let it sit for 5 to 10 minutes only if the pieces are rock hard and your machine struggles with very dense frozen fruit. The goal is not softness. The goal is simply to avoid making the blender fight a frozen brick.
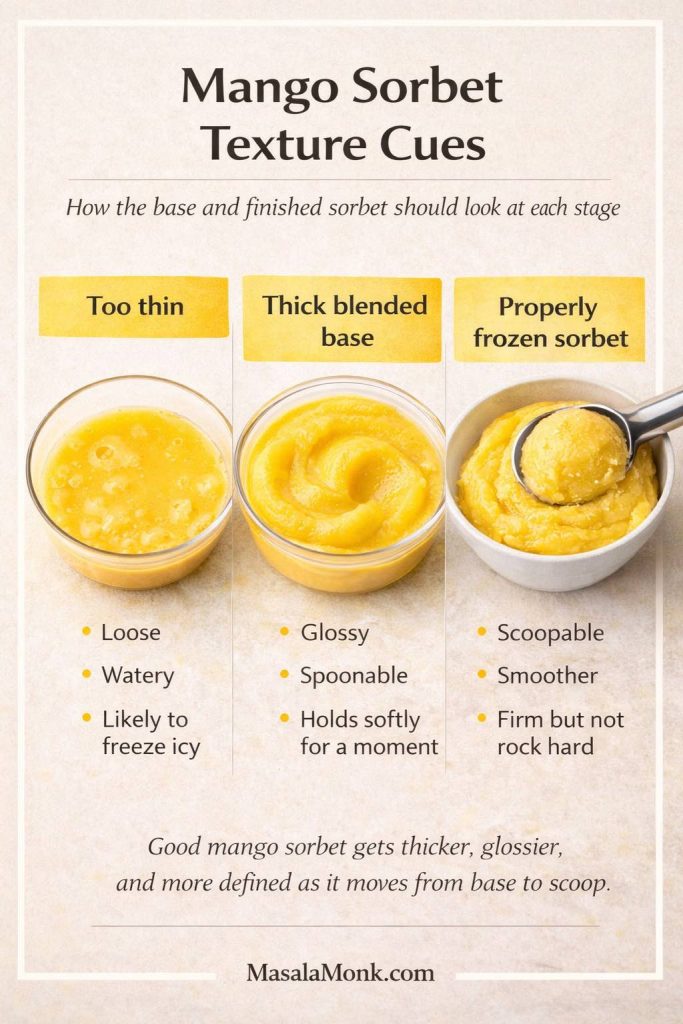
Step 2: Blend Until Thick, Smooth, and Concentrated
Add the mango, sugar, lime juice, and salt to a blender or food processor. Blend until completely smooth. If the mixture will not move, add water 1 tablespoon at a time.
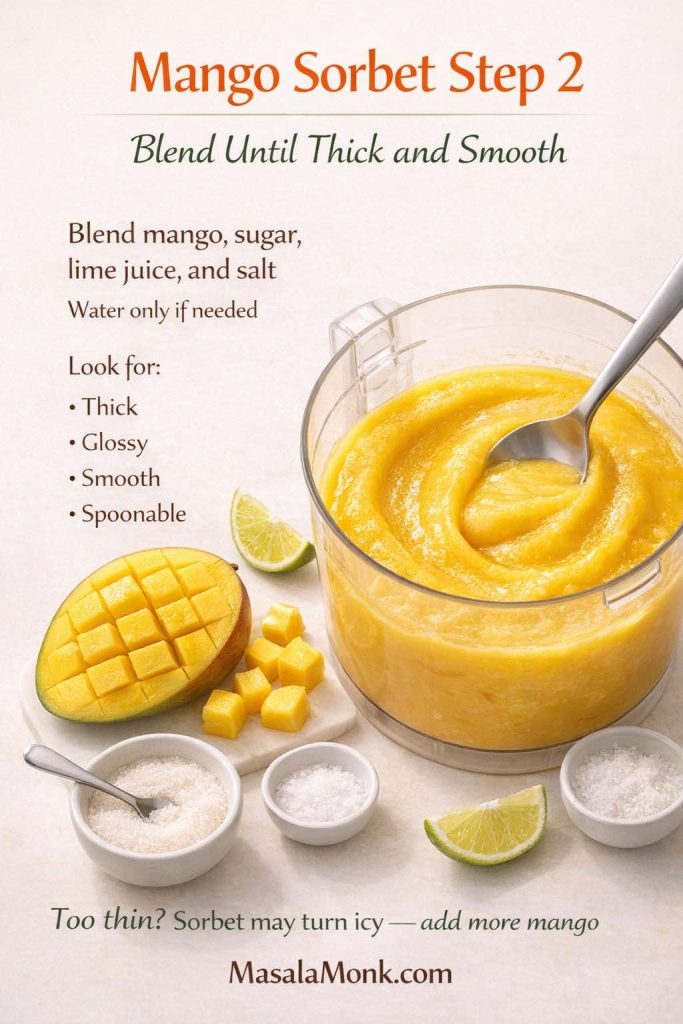
This is the most important texture checkpoint in the whole recipe. The base should look thick, glossy, smooth, spoonable, and almost creamy rather than juicy. If it pours like a loose smoothie, it is too thin and will usually freeze more icily than you want. If it is so stiff that the blades cannot move even after scraping down the sides and pulsing again, it needs only a touch more liquid.
A good base should hold its shape for a moment when you drag a spoon through it. It should mound softly rather than run immediately flat.
Step 3: Taste Before Freezing
Before the sorbet ever sees the freezer, taste it carefully. It should be a little sweeter than you think it needs to be, a little brighter than you think it needs to be, and strong enough in mango flavor that you would happily eat it by the spoonful even now.

If it tastes flat, add a little more lime or a tiny pinch more salt. And if it tastes too sharp, add a little more mango or sugar rather than trying to fix it with water. And then if it tastes diluted, stop adding liquid unless the machine truly needs help.
This is one of the real dividing lines between a thoughtful homemade mango sorbet and a bland frozen fruit purée.
Step 4: Decide Whether You Want Soft Sorbet Now or Scoopable Sorbet Later
If you used frozen mango, you may already have a thick, soft, almost instant sorbet that is ready to eat right away. That is one of the biggest pleasures of the frozen-fruit method.
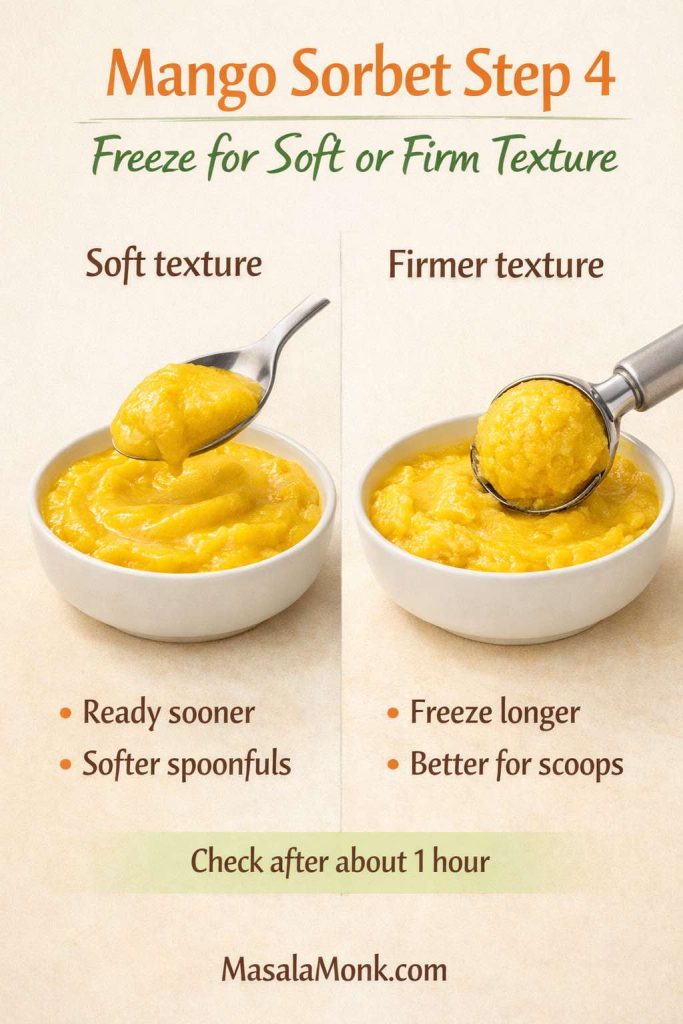
If you want firmer scoops, transfer the mixture to a chilled shallow container and freeze until it is more set. Start checking after about 1 hour. For a firmer dessert, it may need 2 to 3 hours.
Step 5: Serve at the Right Texture
For a softer result, stop when the sorbet feels firm around the edges but still easy to scoop through the center. For a make-ahead dessert, freeze until fully set, then let it soften briefly before serving.
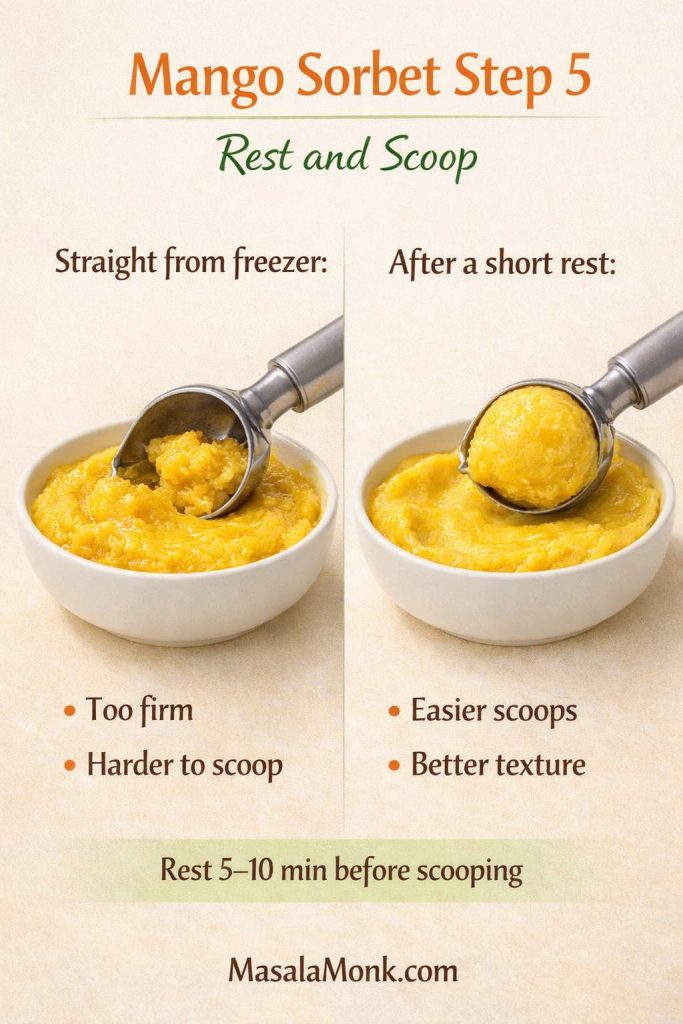
If the sorbet has been in the freezer for several hours or overnight, let it sit out for 5 to 10 minutes before scooping. That short rest can make a dramatic difference. Sorbet served too cold often tastes harder, flatter, and less fragrant than it should.
Also Read: Peach Cobbler with Canned Peaches (Dessert Recipe)
Fresh vs Frozen Mango for This Mango Sorbet Recipe
This choice changes the mango sorbet recipe more than it may seem at first.
Fresh mango is worth using when the fruit is truly excellent. If the mangoes are in season, fragrant, richly sweet, and not overly fibrous, fresh fruit often gives the most layered and expressive flavor. It is especially worth using when you are serving guests, when the fruit is at seasonal peak, when you want the most natural mango perfume possible, or when you do not mind a little more prep work.
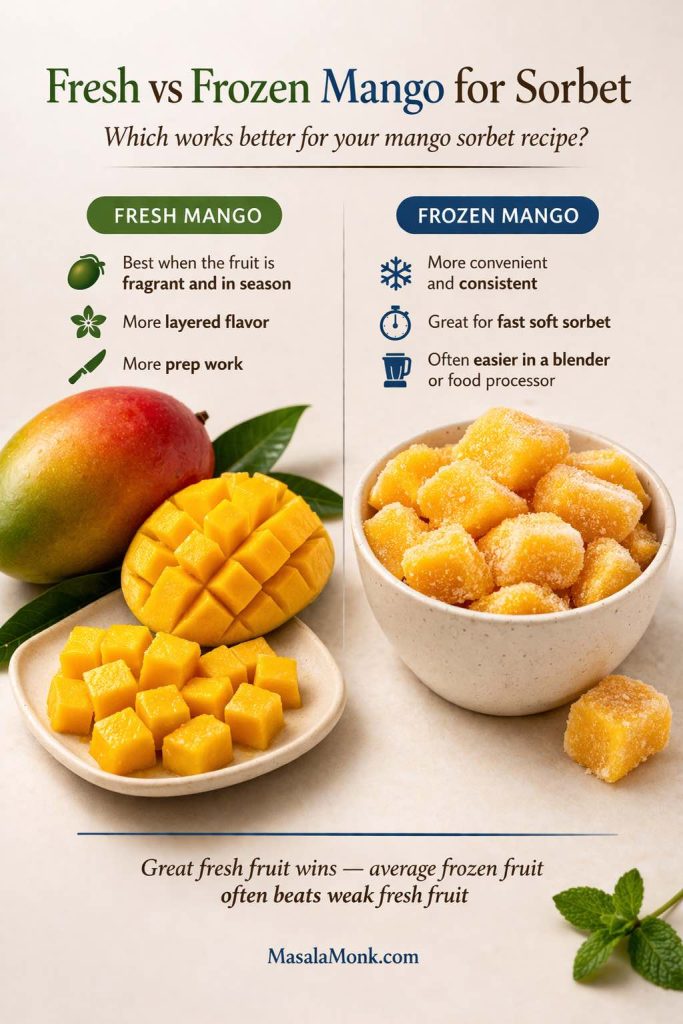
Frozen mango is often the smarter everyday route. It is already peeled and chopped, removes some of the guesswork, and works particularly well for quick sorbet because the fruit begins cold from the start. Frozen mango is ideal when fresh mango is inconsistent, convenience matters, you want a fast dessert, you are making sorbet in a blender or food processor, or you want an almost instant soft-sorbet texture.
In fact, frozen mango sorbet is often more reliable than sorbet made from mediocre fresh mango. Great fresh fruit beats frozen fruit. Average frozen fruit often beats weak fresh fruit.
Fresh mango can also be juicier and sometimes more fibrous. Frozen mango tends to be more consistent, though not always more aromatic. Either way, the same rule holds: add less liquid than you think you need, then increase only if necessary. And always taste the base before freezing. A fixed recipe is helpful, but the fruit gets the last word.
Also Read: Avocado Chocolate Mousse Recipe
Mango Sorbet Recipe Without an Ice Cream Maker
A lot of readers want a mango sorbet recipe without ice cream maker equipment, and the good news is that sorbet is especially friendly to that kind of kitchen.
The simplest no-machine method is to blend the mixture until smooth, transfer it to a shallow container, freeze it, and soften briefly before serving. This is the easiest route, and for many people it is the right one. It may not produce the most polished restaurant-style scoop on earth, but it produces a very good homemade dessert with very little effort.

If you want to improve the texture a little more without buying equipment, use a shallow metal or freezer-safe pan rather than a deep tub. As the edges begin to firm, scrape and stir the mixture, then return it to the freezer. Repeating this once or twice breaks up larger ice crystals and creates a more even texture.
Check it after about 30 to 45 minutes, depending on your freezer and container. If the edges are starting to set, stir or scrape it well. Then check once more after another 30 to 45 minutes. For most home cooks, one or two rounds are enough to improve the texture without turning dessert into a project.
If convenience matters most, use the direct freeze-and-temper method. If you want a slightly more polished texture and do not mind one or two quick interventions, use the shallow pan method. Neither is difficult. The better one is the one you are actually willing to repeat.
Also Read: Falafel Recipe: Crispy Homemade, Air Fryer and Baked Falafel
Blender, Food Processor, Ice Cream Maker, and Ninja Creami for Mango Sorbet
Different tools can take the same base in slightly different directions. The goal is not to pretend they all behave identically. The goal is to understand where each one helps.
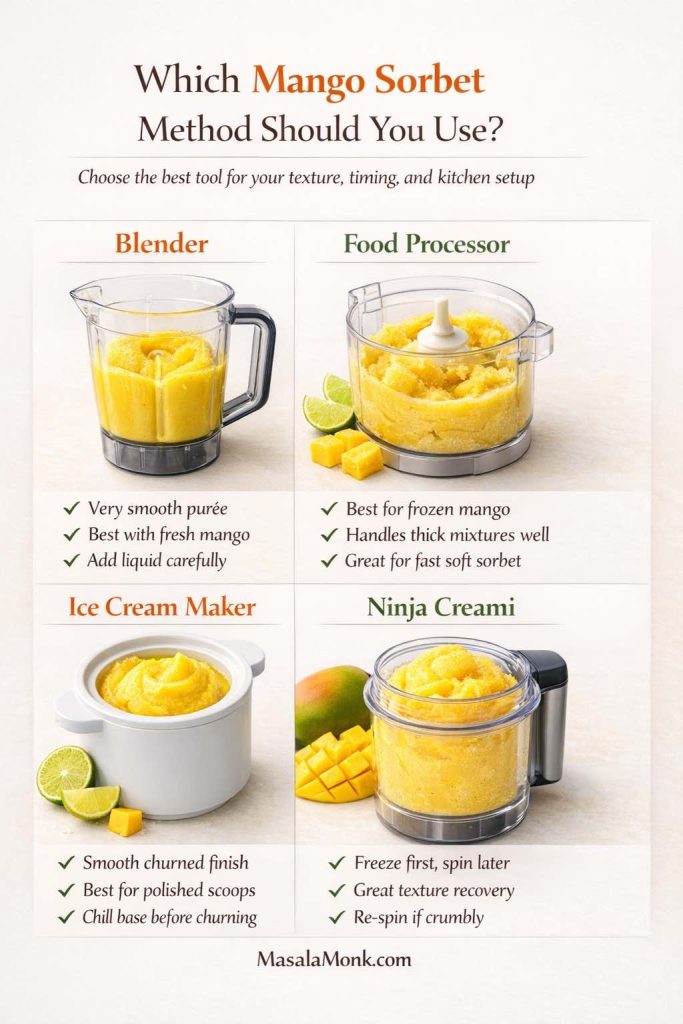
Blender vs Food Processor for Mango Sorbet
Many people search for how to make mango sorbet in a blender, but a food processor often deserves just as much attention.
A blender is excellent when you want a very smooth purée, you are using fresh mango, you own a high-powered model, or the mixture contains enough natural moisture to move well. With frozen mango, a blender can still work beautifully, but it usually needs more patience and a very controlled amount of added liquid.
A food processor often handles dense frozen fruit more comfortably than a standard blender. If you are making mango sorbet with frozen mango and want the least amount of struggle, it can be the easier route. It is especially helpful when the fruit is still very cold, the mixture is thick, and you want a soft-sorbet texture without diluting the base too much.
If the blender struggles, stop and scrape down the sides, pulse instead of running continuously, let the fruit sit briefly if it is rock hard, and add water only 1 tablespoon at a time. The usual mistake is not that the blender needs help. It is that the mixture gets diluted too quickly.
How to Use an Ice Cream Maker for Mango Sorbet
This recipe does not require an ice cream maker, but the machine can still be useful if you already own one and want a smoother, more worked finish.
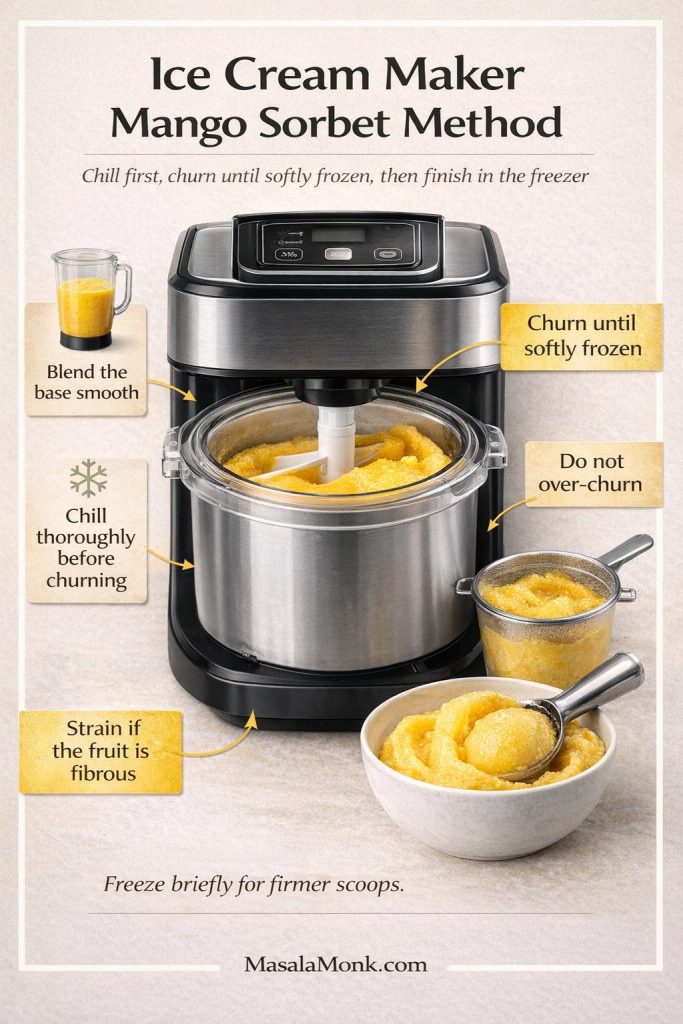
Use it when you want a more polished scoop, when you are serving guests, when you enjoy the classic churned sorbet feel, or when you already have the machine ready. Blend the base until very smooth, then chill it thoroughly before churning. A cold base freezes faster and more evenly in the machine, which helps keep the texture smooth. If you are using fresh mango and the purée still feels fibrous, strain it before chilling.
The sorbet is ready when it looks softly frozen and lighter than it did at the start. It should mound gently rather than run like liquid, but it will still be looser than the final texture you want in the bowl. Transfer it as soon as it reaches that stage. Do not leave it churning endlessly in the hope that it will finish itself into perfection.
If you enjoy homemade frozen desserts more broadly, MasalaMonk’s guide on how to make ice cream with a KitchenAid mixer is a useful companion read.
Ninja Creami Mango Sorbet Recipe Method
A ninja creami mango sorbet version deserves its own method because the machine works differently from both a blender and a classic churned setup.
Start with a concentrated base. Blend the mango, sugar, lime juice, salt, and only enough water to smooth everything out. The base should taste strong and stay fairly thick. A loose, diluted purée is not what you want here.
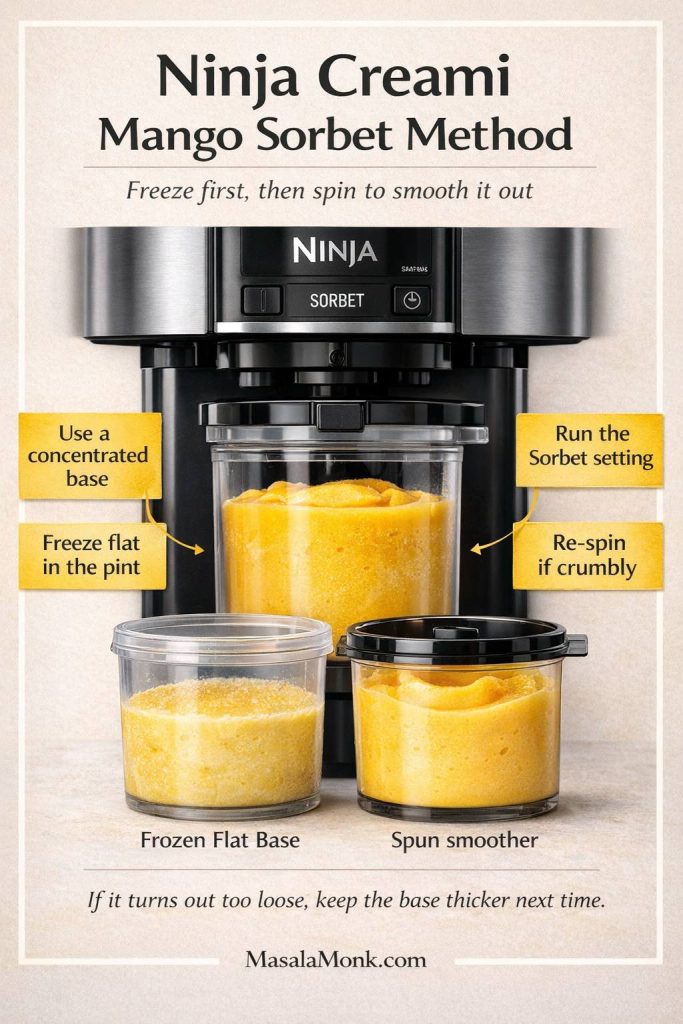
Pour the mixture into the Creami pint, level the surface, and freeze it completely according to the machine’s instructions. A flat, even freeze helps the spin work more consistently.
Run the sorbet setting. If the first spin looks crumbly, shaved, or slightly powdery, do not panic. That is common. A re-spin often transforms it into a much smoother texture. If it still looks too dry, re-spin. If it looks too loose, the base was probably too thin before freezing, so keep the next batch more concentrated.
Compared with the blender method, the Creami route takes longer because of the freeze time. In return, it often gives a more even, more worked final texture once the base is right.
Also Read: Mango Margarita Recipe (Frozen or On the Rocks)
3-Ingredient Mango Sorbet Recipe
There are days when you want the shortest possible path to dessert, and that is where a 3 ingredient mango sorbet version makes sense.
Yield: 2 to 4 servings
Prep time: about 10 minutes
Freeze time: none to 2 hours
Best texture: soft immediately, firmer after a short freeze
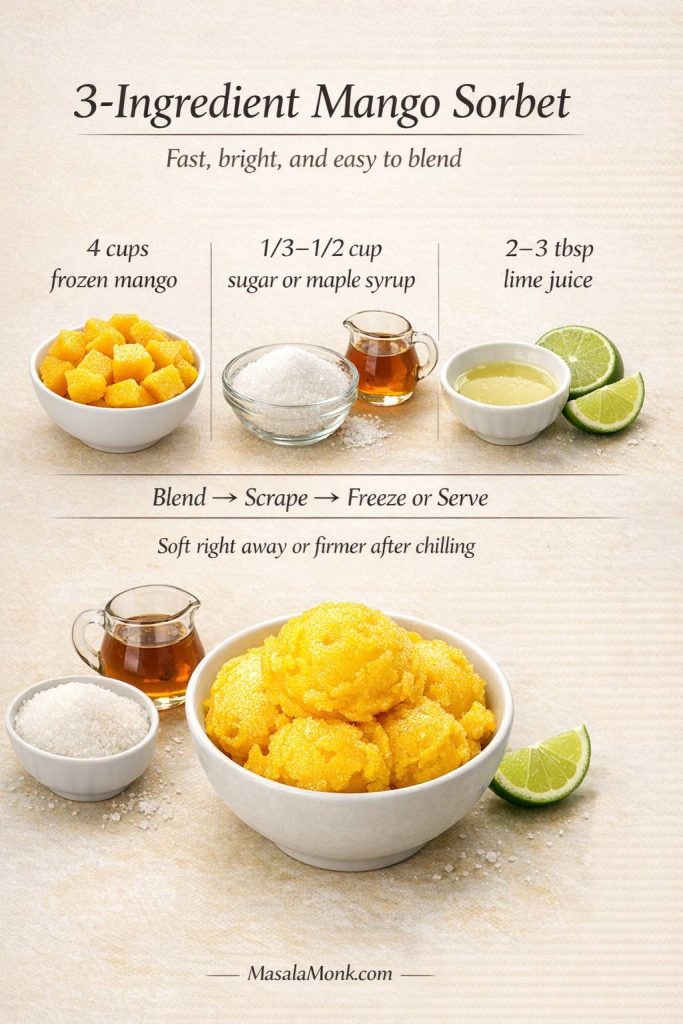
Ingredients
- 4 cups frozen mango
- 1/3 to 1/2 cup sugar or maple syrup
- 2 to 3 tablespoons lime juice
Method
Add the frozen mango, sweetener, and lime juice to a food processor or strong blender. Blend until thick and smooth, scraping down as needed. If the machine truly cannot move the fruit, let it sit for a few minutes before adding even a spoonful of liquid. Eat immediately for a soft sorbet texture, or freeze for 1 to 2 hours for firmer scoops.
This version is best for hot afternoons, last-minute dessert cravings, quick weeknight cooking, and days when the fruit already tastes good enough to carry everything. What it gives up is some control. Salt, careful liquid management, and a slightly more thoughtful build can give you a more balanced batch.
Also Read: Sourdough Pizza Dough Recipe (Crispy Crust & Easy Pizza Base)
Lighter Mango Sorbet Recipe
A lot of readers search for healthy mango sorbet because sorbet already sounds lighter than ice cream. In many cases, it is. But lighter should not become an excuse to strip away what makes the dessert worth eating.
Why a Lighter Mango Sorbet Recipe Can Still Work
A proper mango sorbet vegan version requires almost no special effort as long as you stick to plant-based sweeteners. Sorbet is already naturally dairy-free, which is one of its quieter strengths.
The smartest move is not to slash sugar aggressively. Sorbet that is not sweet enough often freezes harder and tastes less satisfying. A better strategy is to use excellent fruit, add only the sweetness the texture truly needs, keep portions sensible, and let brightness do some of the work.
Here is a lighter version that still behaves like dessert rather than a compromise.
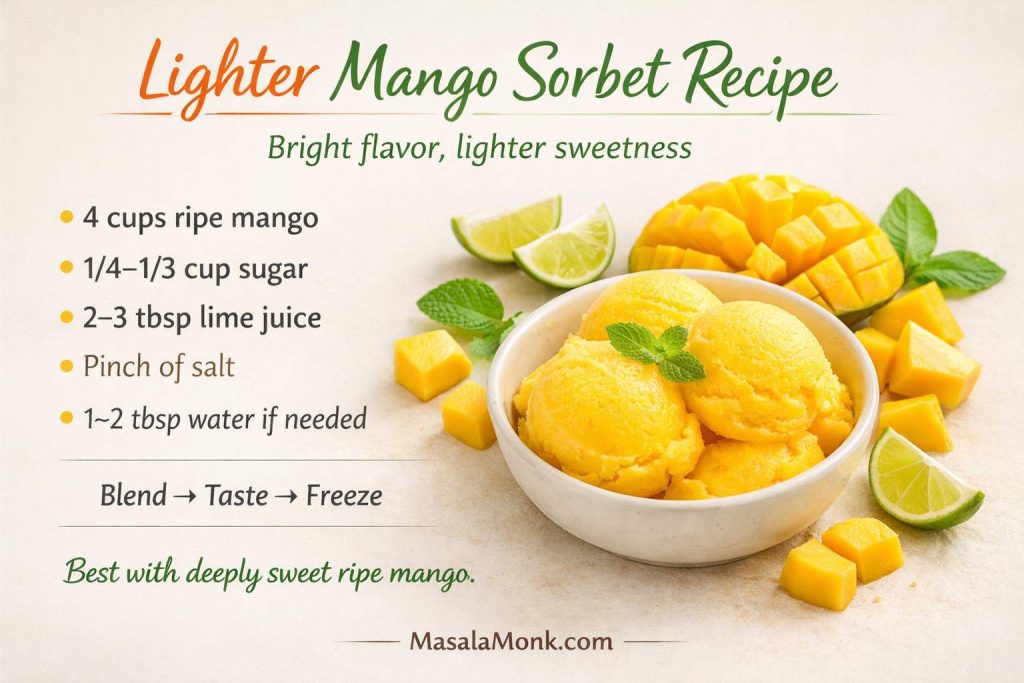
Recipe: Lighter Mango Sorbet
Yield: 4 servings
Prep time: about 15 minutes
Freeze time: 1 to 3 hours
Ingredients
- 4 cups ripe mango
- 1/4 to 1/3 cup sugar
- 2 to 3 tablespoons lime juice
- pinch of salt
- 1 to 2 tablespoons water if needed
Method
Blend all ingredients until thick and smooth. Taste carefully, because with lower sugar the balance matters even more. Freeze in a shallow container, scraping once if desired for a finer texture. Rest briefly at room temperature before serving.
This lighter mango sorbet recipe works best when the mango itself is deeply sweet and aromatic. If the fruit is mediocre, lower sugar will expose that weakness rather than hide it.
When Coconut Milk Helps
A small amount of coconut milk can soften the texture and add a tropical note. Used lightly, it can be lovely. Used heavily, it starts changing the dessert away from true sorbet and toward something creamier and less clean on the finish. If you want a richer chilled dessert in a completely different direction, avocado chocolate mousse makes a good contrast.
Also Read: Balti Paneer Gravy (Restaurant-Style, Creamy + Bold Recipe)
Easy Mango Sorbet Recipe Variations
Once the base recipe is right, variations become much more rewarding because you are building on something stable rather than trying to rescue a weak foundation. These are not vague flavor ideas. They are real usable versions.
Mango Lime Sorbet Recipe
Choose this when your mango is very sweet, very rich, or a little sleepy in flavor. Extra lime gives the dessert a colder, sharper finish and makes the fruit taste more awake.
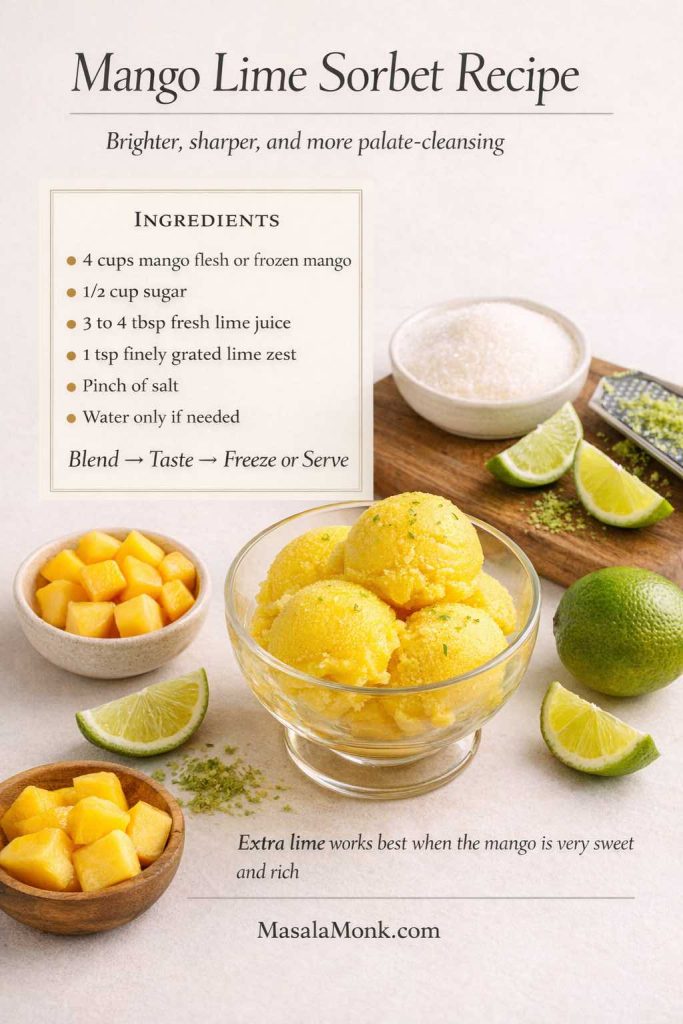
Yield: 4 to 6 servings
Prep time: about 15 minutes
Freeze time: none to 3 hours
Ingredients
- 4 cups mango flesh or frozen mango
- 1/2 cup sugar
- 3 to 4 tablespoons fresh lime juice
- 1 teaspoon finely grated lime zest
- pinch of salt
- 1 to 3 tablespoons water, only if needed
Method
Blend the mango, sugar, lime juice, zest, and salt until completely smooth. Add only enough water to help the machine move. Taste before freezing. The base should feel vividly bright, but mango should still lead. Serve immediately for a soft sorbet or freeze until scoopable.
This version feels sharper, cooler, and more palate-cleansing than the base recipe. Just do not let the lime push the mango aside.
Mango Coconut Sorbet Recipe
This version is for readers who want a more tropical profile and a slightly softer mouthfeel without fully crossing into sherbet territory.
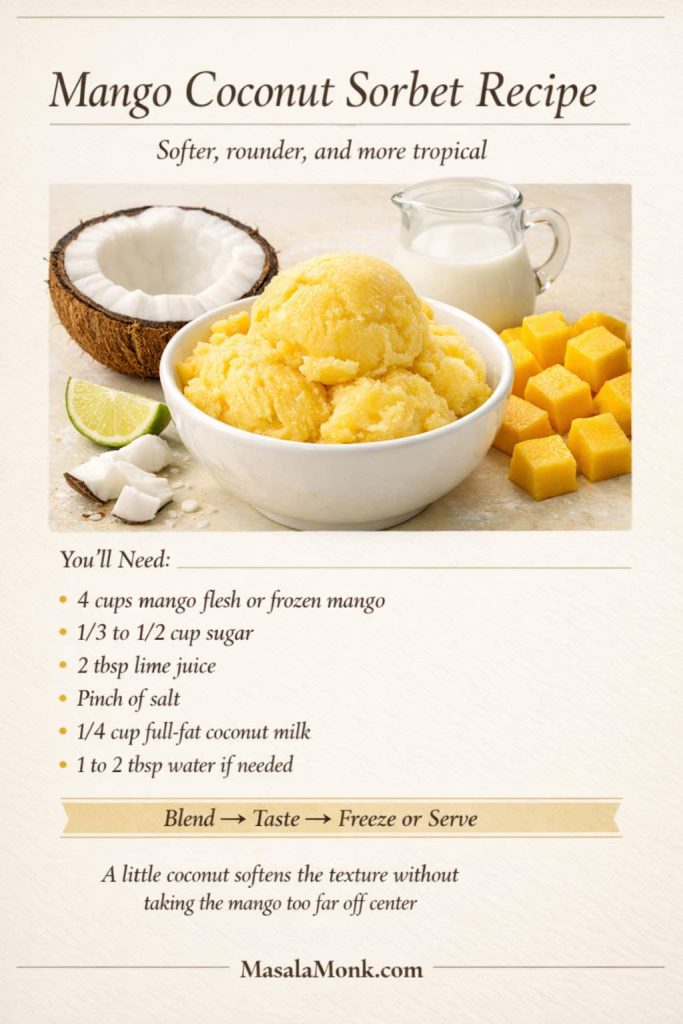
Yield: 4 to 6 servings
Prep time: about 15 minutes
Freeze time: 1 to 3 hours
Ingredients
- 4 cups mango flesh or frozen mango
- 1/3 to 1/2 cup sugar
- 2 tablespoons lime juice
- pinch of salt
- 1/4 cup full-fat coconut milk
- 1 to 2 tablespoons water if needed
Method
Blend the mango, sugar, lime juice, salt, and coconut milk until smooth. Add water only if needed to keep the machine moving. Taste and adjust with a touch more lime if the coconut makes the mixture feel too mellow. Freeze until softly scoopable or fully firm.
Coconut rounds the edges and makes the sorbet feel a little softer and more luxurious. Too much, however, turns the dessert away from true sorbet and toward something creamier and less fruit-led. If you enjoy that pairing, MasalaMonk’s piece on mango with coconut milk gives it more room.
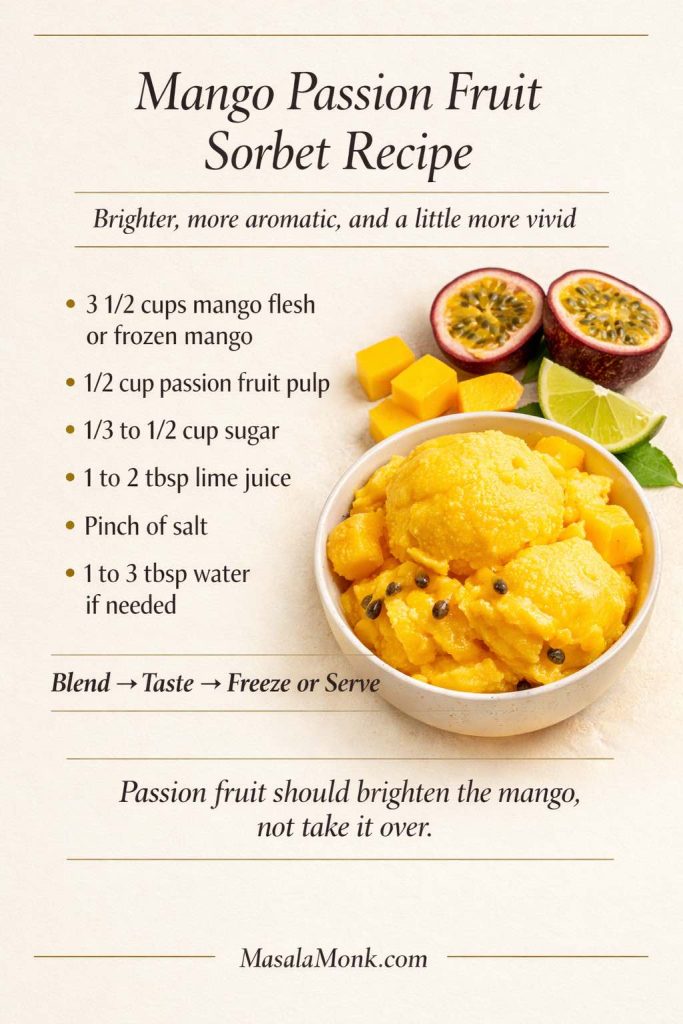
Mango Passion Fruit Sorbet Recipe
This is one of the best pairings for very sweet mango. Passion fruit brings acidity, perfume, and a little intensity that can make the whole batch feel more vivid and slightly more grown-up.
Yield: 4 to 6 servings
Prep time: about 15 minutes
Freeze time: 1 to 3 hours
Ingredients
- 3 1/2 cups mango flesh or frozen mango
- 1/2 cup passion fruit pulp
- 1/3 to 1/2 cup sugar
- 1 to 2 tablespoons lime juice
- pinch of salt
- 1 to 3 tablespoons water if needed
Method
Blend the mango, passion fruit pulp, sugar, lime juice, and salt until smooth. Taste before freezing. It should feel vivid and aromatic, but mango should still sit at the center. Freeze or churn as desired. Rest briefly before serving if fully frozen.
This variation often tastes especially bright and fragrant. Just do not let the passion fruit dominate. The goal is still a better mango sorbet recipe, not a passion fruit sorbet with some mango in the background.
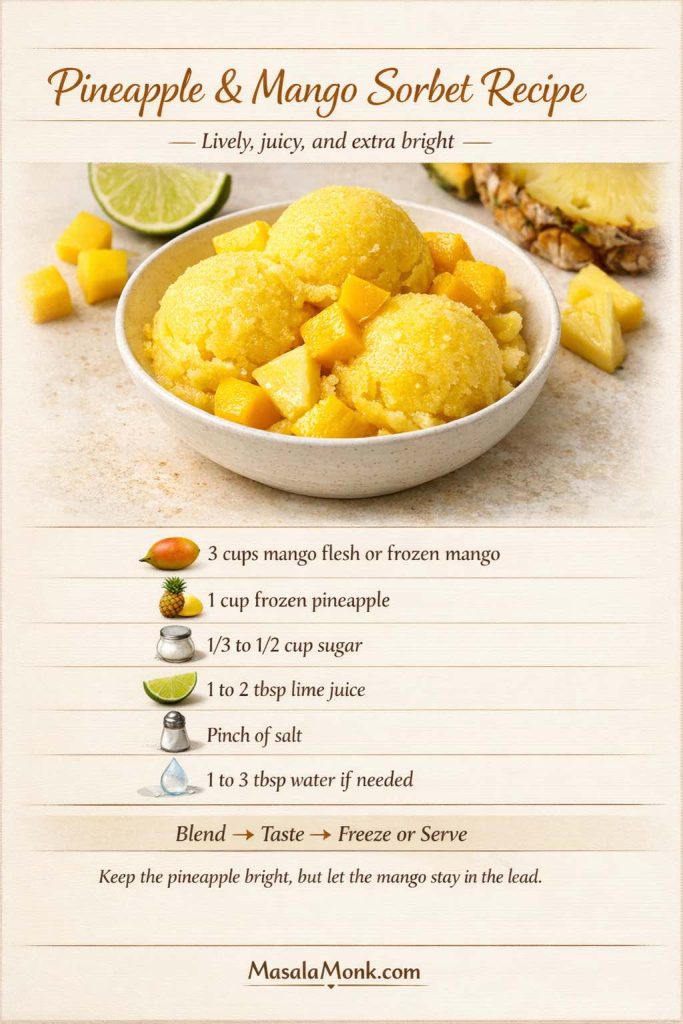
Pineapple & Mango Sorbet Recipe
Pineapple adds extra brightness and a little bite. It works best when you want something particularly lively and summery.
Yield: 4 to 6 servings
Prep time: about 15 minutes
Freeze time: none to 3 hours
Ingredients
- 3 cups mango flesh or frozen mango
- 1 cup frozen pineapple
- 1/3 to 1/2 cup sugar
- 1 to 2 tablespoons lime juice
- pinch of salt
- 1 to 3 tablespoons water if needed
Method
Blend all ingredients until thick and smooth. Taste before freezing to make sure the pineapple has not overtaken the mango. Adjust with a little more mango or sugar if the result feels too sharp. Serve soft or freeze for firmer scoops.
This one feels lively, juicy, and playful. Too much pineapple, however, can shift the whole flavor profile away from mango.
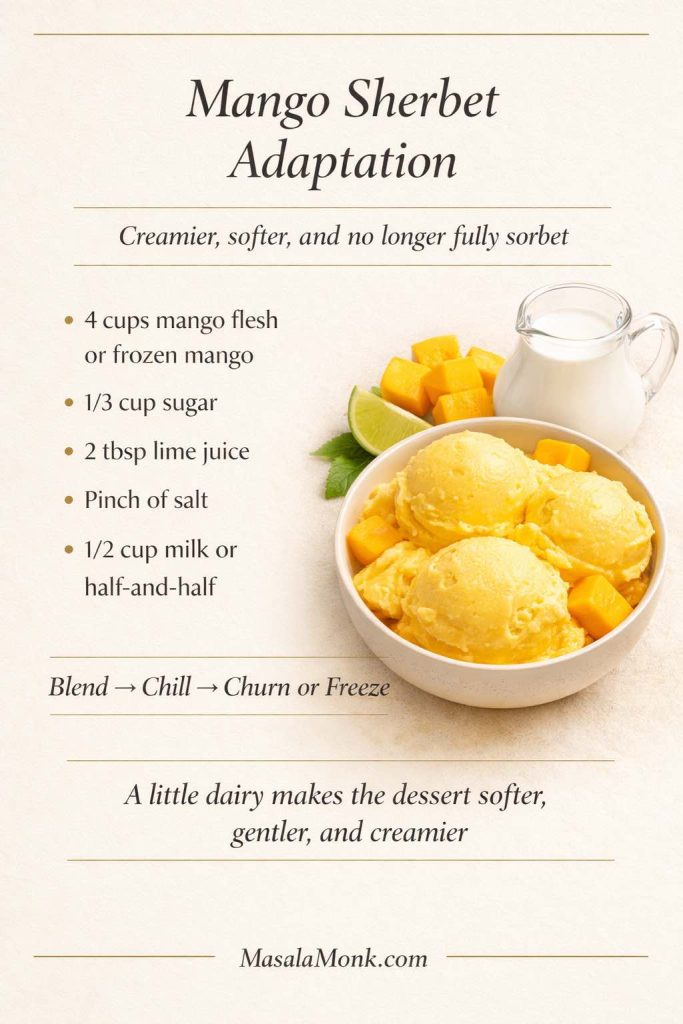
Mango Sherbet Adaptation
If what you want is not sorbet but something creamier, you can turn the same basic idea toward sherbet by introducing a small amount of dairy.
Yield: 4 to 6 servings
Prep time: about 15 minutes
Freeze time: 2 to 4 hours
Ingredients
- 4 cups mango flesh or frozen mango
- 1/3 cup sugar
- 2 tablespoons lime juice
- pinch of salt
- 1/2 cup milk or half-and-half
Method
Blend all ingredients until smooth. Chill thoroughly. Churn if using a machine, or freeze in a shallow pan and scrape once or twice. Let it soften briefly before serving.
The dairy makes the dessert softer, gentler, and creamier. Once dairy enters, it no longer behaves like a classic mango sorbet recipe. That is not a flaw. It is simply a different destination.
Also Read: Paloma Recipe: 12 Paloma Cocktail Drinks
Troubleshooting This Mango Sorbet Recipe
Sorbet is simple, but simplicity means the mistakes stay visible.
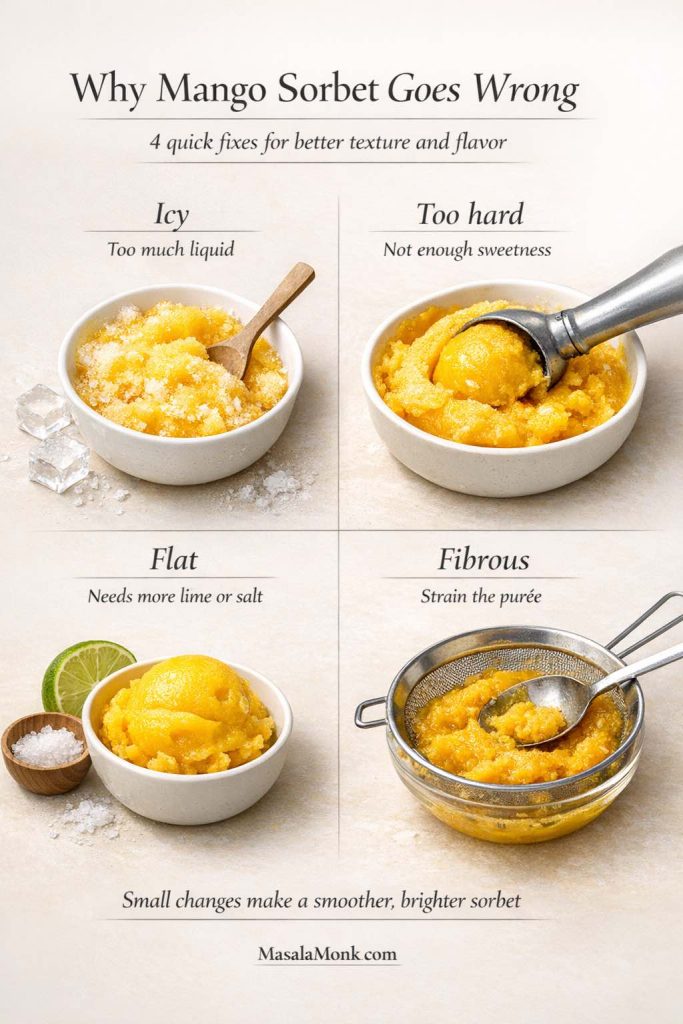
Why It Turned Icy
This usually happens because of too much added liquid, watery fruit, or not enough sugar for the amount of water present. Keep the next batch thicker and more concentrated. Resist the temptation to fix every blending problem with extra water.
Why It Froze Too Hard
The base was probably under-sweetened, over-frozen, or both. Let the sorbet soften before scooping and increase sweetness slightly next time if needed.
Why It Stayed Too Soft
If the sorbet never firms up enough, the base may contain too much sugar, too much added liquid, or a large amount of coconut milk or syrupy sweetener. Keep future batches a little leaner and more fruit-dense.
Why the Flavor Tastes Flat
Flat sorbet usually comes from weak mango, too little lime, not enough salt, too much water, or not tasting before freezing. A frozen dessert needs the unfrozen base to taste slightly stronger than the final target.
Why the Blender Struggled
The fruit may have been too hard, the batch may have been too small, or the mixture may have been too dry for the blades to catch. Let the fruit soften slightly, scrape down the sides, pulse again, and add liquid in tiny amounts rather than pouring recklessly.
Why It Feels Fibrous
Fresh mango can leave fibers behind, especially with certain varieties. Thorough blending helps. Straining helps even more if the texture still feels rough.
How to Rescue a Batch That Is Too Firm
Let it rest on the counter for several minutes, then scoop. If it is still too hard, cut it into chunks and briefly reprocess it in a food processor for a softer texture.
Also Read: Air Fryer Donuts Recipe (2 Ways): Glazed Homemade Donuts + Biscuit Donuts
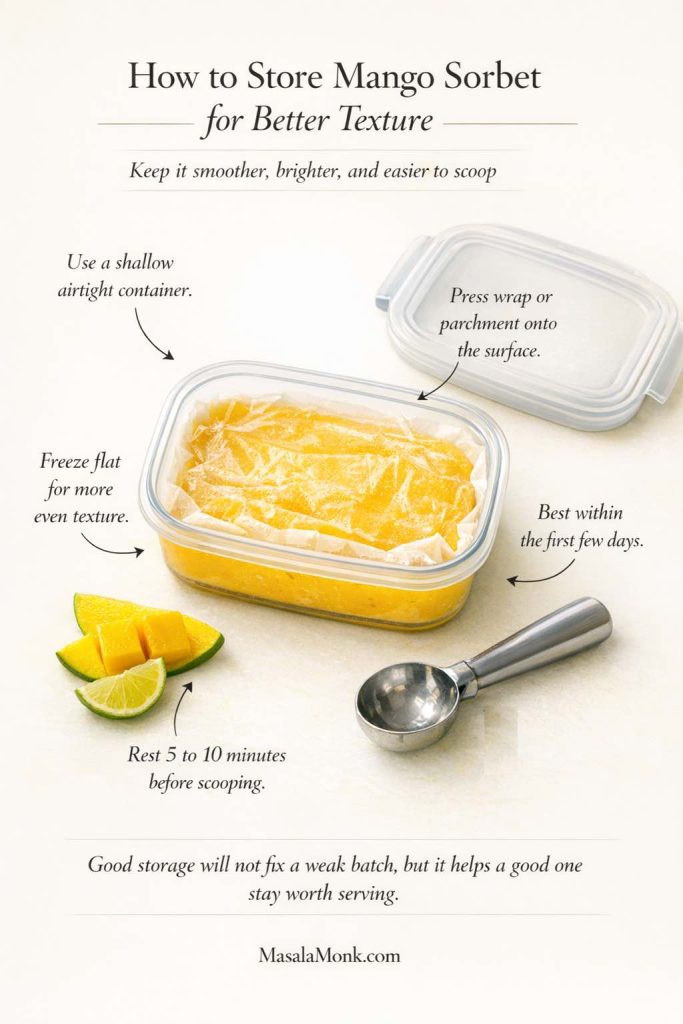
How to Store Mango Sorbet
Good storage will not rescue a weak batch, but it will preserve a good one much better.
Use a shallow airtight container rather than a deep one. A shallow container freezes and softens more evenly, and it makes scooping easier later. If you want to reduce surface crystals, press a layer of wrap or parchment directly against the top before sealing the container. Homemade sorbet is usually at its best within the first few days, when the mango still tastes especially vivid. And always give it a short rest before scooping. Even excellent sorbet benefits from 5 to 10 minutes on the counter before serving.
Mango Sorbet vs Sherbet
Readers often search for both, sometimes as though they are interchangeable. They are related, but they are not the same dessert.
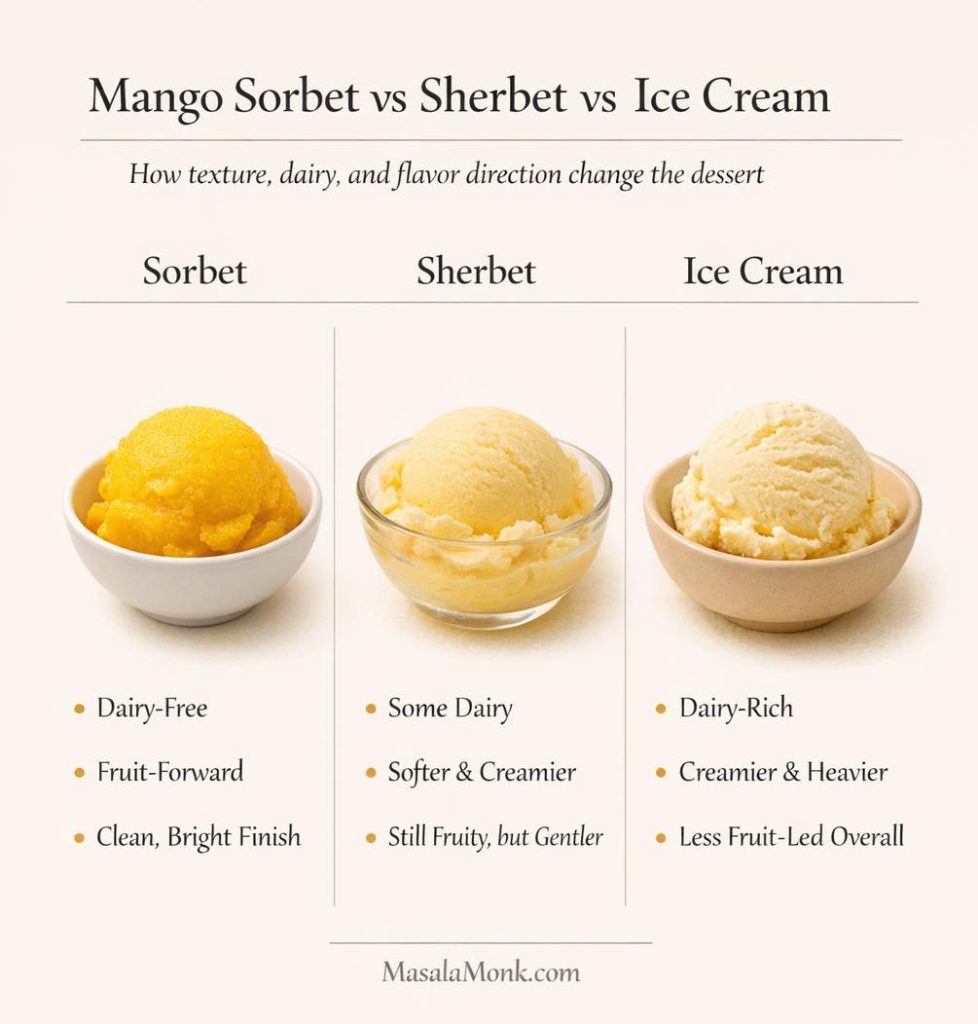
Sorbet is fruit-forward, dairy-free, and refreshing. The mango is meant to lead clearly, and the finish should feel clean. Sherbet usually includes some dairy, which gives it a softer, creamier texture. It still tastes fruity, but the fruit is no longer doing all the work alone.
If you want the fuller distinction, MasalaMonk’s guide to the difference between sorbet and sherbet explains it more directly.
Mango Sorbet vs Ice Cream vs Gelato
These desserts appear in the same search universe, but they are not trying to deliver the same thing.
Sorbet is bright, fruit-led, and dairy-free. Ice cream is richer, creamier, and more dairy-driven. Gelato is denser, smoother, and part of a different frozen dessert tradition. If what you really want is a creamier mango dessert, homemade mango ice cream is the better direction. This guide stays firmly in sorbet territory: bright, clean, and fruit-first.
Also Read: Tapas Recipe With a Twist: 5 Indian-Inspired Small Plates
What to Serve with Mango Sorbet
A bowl of mango sorbet can stand on its own, but it also fits beautifully into a larger warm-weather dessert spread.
Keep the pairings light. Simple butter cookies, crisp shortbread, and fresh fruit usually work better than anything too rich or sticky. For guests, a little lime zest, a few mint leaves, or a tiny pinch of chili salt can be a lovely contrast if used carefully. Sorbet also works especially well after a heavier meal because it refreshes the palate rather than weighing it down.

If you want another chilled dessert on the table, no-bake banana pudding offers a softer, creamier contrast. And if you are building out a brighter summer spread, watermelon desserts keep the mood light without repeating the same fruit.
Why This Mango Sorbet Recipe Is Worth Keeping
A really good mango sorbet recipe does not need to be flashy. It only needs to do a few things very well: let the mango speak clearly, balance sweetness with brightness, and freeze into something that still feels inviting when you come back with a spoon. When those pieces fall into place, sorbet stops feeling like a lighter substitute for ice cream and starts feeling complete on its own terms.
That is the real pleasure of it. One day, it can be a quick bowl of soft homemade mango sorbet made from frozen fruit and eaten almost immediately. Another day, it can be a firmer make-ahead dessert waiting in the freezer for a warm evening. It can stay simple with mango, sugar, and lime, or lean gently toward coconut or passion fruit without losing its center.
So start with the base method, taste before freezing, and trust the fruit. If the mango is good, the sorbet does not need much else. This mango sorbet recipe is worth keeping because it stays practical, flexible, and genuinely repeatable: good with fresh mango, smart with frozen mango, possible without special equipment, and strong enough to become the version you return to instead of the one you merely tried once.
Also Read: Air Fryer Salmon Recipe (Time, Temp, and Tips for Perfect Fillets)
Mango Sorbet Recipe FAQs
1. Can I make mango sorbet without an ice cream maker?
Yes. Mango sorbet is one of the easiest frozen desserts to make without an ice cream maker. If you start with frozen mango, a blender or food processor can give you a thick soft-sorbet texture almost immediately. If you want firmer scoops, freeze the blended mixture in a shallow container until more set. That flexibility is one of the biggest reasons homemade mango sorbet is so practical.
2. Is fresh or frozen mango better for mango sorbet?
It depends on the fruit and the result you want. Fresh mango can give you the most fragrant and layered flavor when the fruit is excellent. Frozen mango is often more reliable, more convenient, and especially helpful when you want a thick fast sorbet texture. Great fresh fruit wins, but average frozen fruit often beats weak fresh fruit.
3. Why did my mango sorbet turn icy?
Mango sorbet usually turns icy because the base was too thin, the fruit was watery, too much liquid was added, or there was not enough sugar for the amount of water in the mixture. Keep the base thick and concentrated, add water only in very small amounts, and store the sorbet well so the surface stays protected.
4. Why did my mango sorbet freeze too hard?
Homemade sorbet often freezes hard when the base is under-sweetened or the freezer is very cold. Sugar affects texture as well as sweetness, which is why low-sugar sorbet can become stubbornly firm. Let the sorbet rest briefly at room temperature before scooping, and make sure the base tastes slightly sweeter than the final result you want.
5. Should mango sorbet taste sweeter before freezing?
Yes, slightly. Cold temperatures mute sweetness and soften flavor, so the unfrozen base should taste a little sweeter and brighter than the finished sorbet should taste. If the base tastes merely balanced before freezing, the final sorbet can end up flatter than you want.
6. Can I reduce the sugar in mango sorbet?
You can reduce it somewhat, especially if your mangoes are naturally very sweet, but the texture usually becomes firmer and less scoopable as sugar drops. Sugar is not only a sweetener here. It also helps control how the sorbet freezes. That means it is better to reduce carefully than to remove it aggressively and expect the same result.
7. How long should I freeze mango sorbet?
That depends on the texture you want. If you are blending frozen mango, you can eat it immediately for a soft spoonable texture. If you want firmer scoops, a couple of hours in the freezer is usually enough for the first set. Churned versions often still need more freezing after the machine stage.
8. How long does homemade mango sorbet last in the freezer?
It will keep longer, but it is usually best while the texture still feels fresh and the mango still tastes vivid. In most home kitchens, homemade mango sorbet is at its best within the first several days. After that, it can still be good, but it is more likely to become firmer or more crystalline.
9. Can I make mango sorbet in a blender instead of a food processor?
Yes, but the method may need a little more care. A blender can work very well, especially with fresh mango or slightly softened frozen fruit, but a food processor often handles dense frozen fruit more comfortably. If you use a blender, add liquid very carefully and only when the machine truly needs help.
10. How do I make mango sorbet smoother?
Use ripe or high-quality frozen mango, keep the base concentrated, strain it if the fruit is fibrous, and store it in an airtight container with the surface protected from air. Those steps do more for smoothness than piling on extra ingredients. If your first batch is a little coarse, fruit quality and liquid balance are usually the first things to check.