Posted on Leave a comment

Scrambled Eggs with Cottage Cheese Recipe

Scrambled eggs with cottage cheese served on a plate with toast, chives, and black pepper.

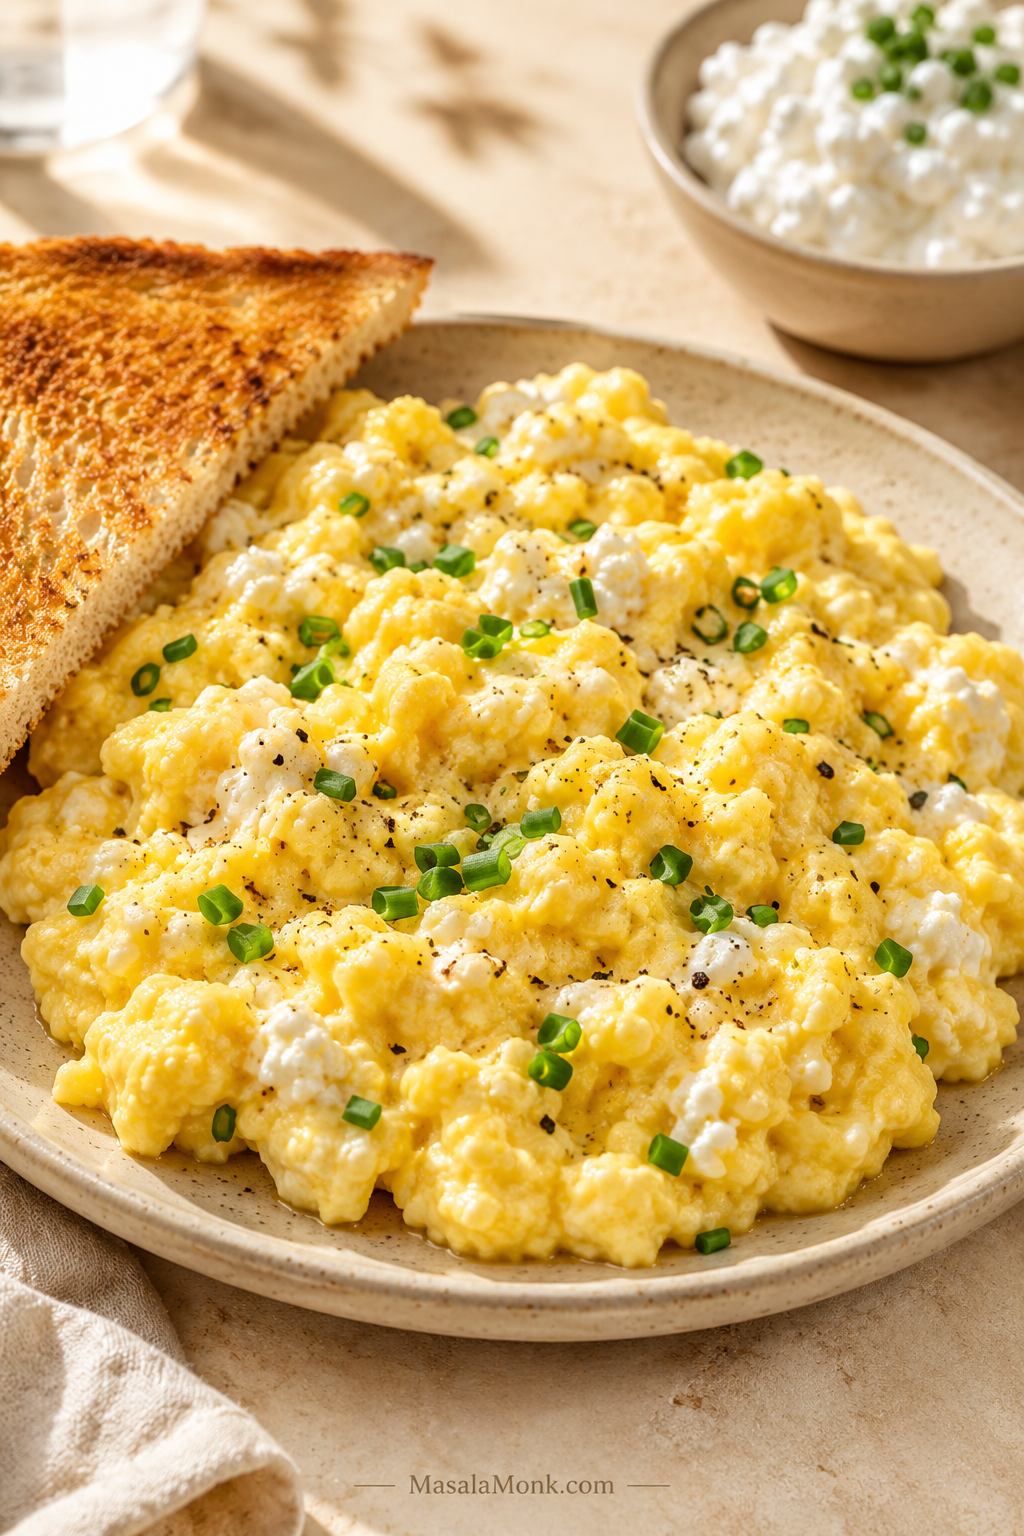
Scrambled eggs with cottage cheese can go one of two ways: creamy, soft, and surprisingly good, or loose and a little strange. The difference is not luck. It is the ratio, the cottage cheese you use, and how gently you cook the eggs.

This recipe is built for the good version: high-protein scrambled eggs that stay tender, creamy, and satisfying without turning wet or rubbery. It walks you through the ratio, the smoother blended option, the egg-white version, microwave method, add-ins, and the fixes that keep cottage cheese eggs from turning watery.

This is especially useful if you want a higher-protein breakfast but still want food that feels warm, familiar, and satisfying. It is not trying to turn eggs into a diet trick; it is just a better, creamier scramble with more staying power.

Quick Answer: How to Make Scrambled Eggs with Cottage Cheese

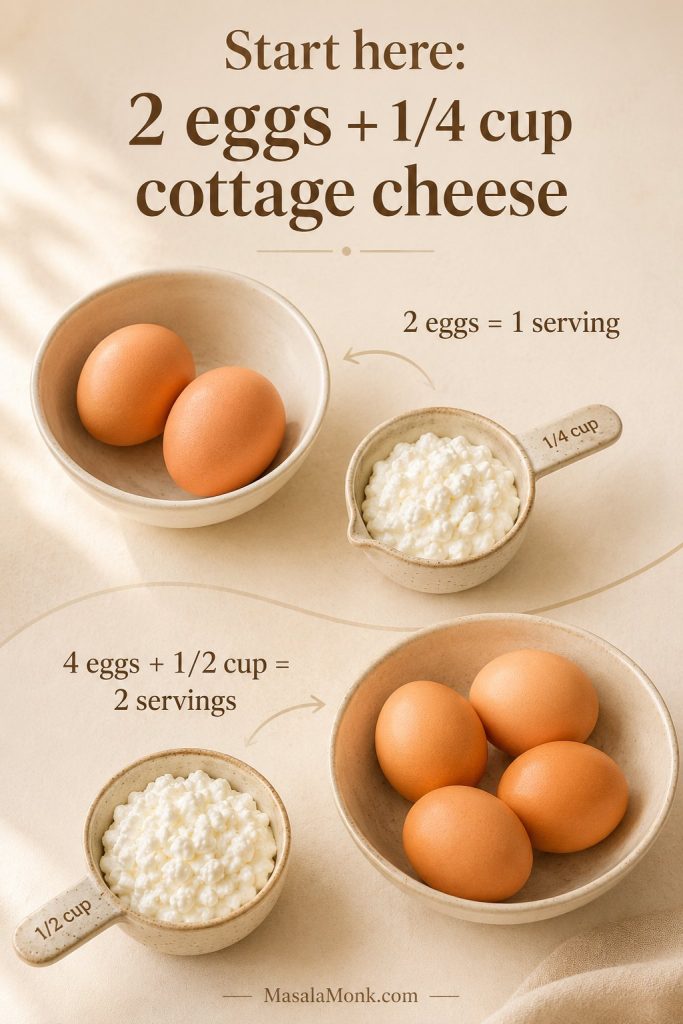
To make scrambled eggs with cottage cheese, whisk 2 large eggs with 1/4 cup cottage cheese, then cook the mixture gently in a nonstick skillet over medium-low heat. Push the eggs slowly with a silicone spatula until they are thickened, creamy, and just set through.

Best Starting Ratio

The best starting ratio is 1/4 cup cottage cheese for every 2 eggs. Small-curd 2% cottage cheese gives the most reliable texture, while full-fat cottage cheese tastes richer. If the eggs look loose in the pan, use less cottage cheese next time, drain very liquid cottage cheese, avoid high heat, and cook gently long enough for extra moisture to evaporate.

The full cottage cheese egg ratio guide below shows how to make the eggs subtler, creamier, or better suited to egg whites.

You do not need milk here. Cottage cheese already adds moisture and body, so milk can push the eggs toward watery instead of creamy.

If your last batch turned loose or watery, skip ahead to the watery cottage cheese egg fixes before you cook again.

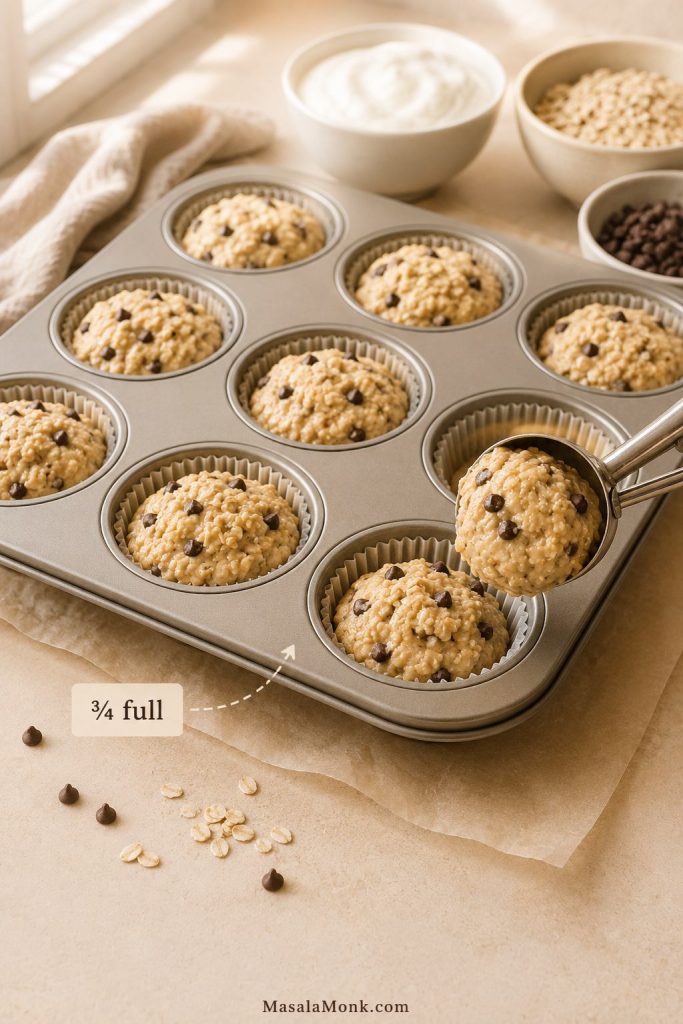
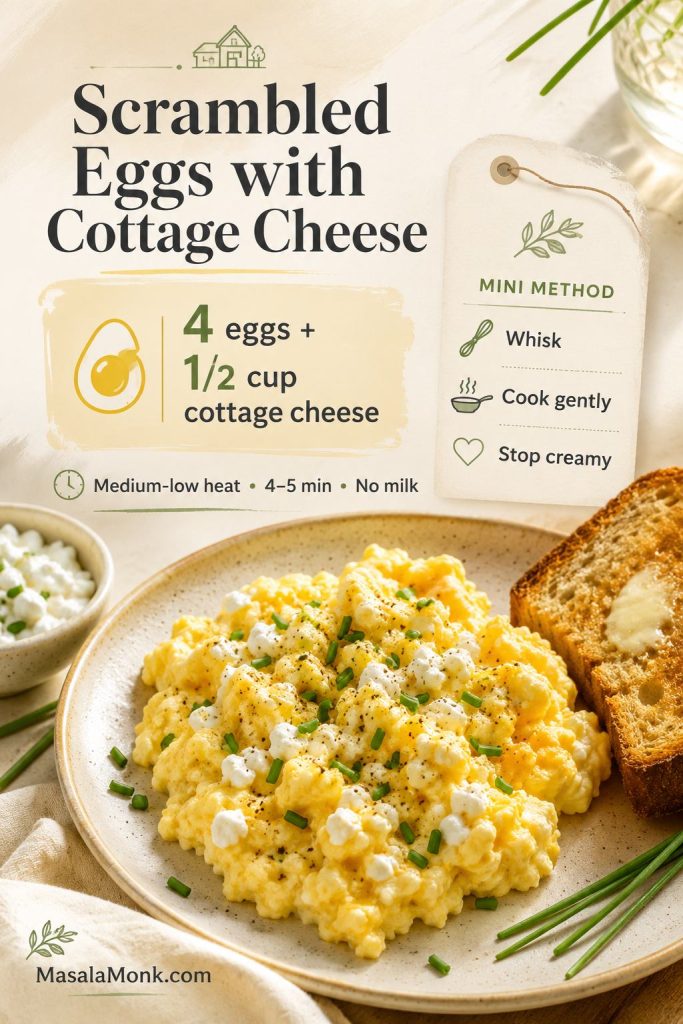
At a glance: Use 4 large eggs, 1/2 cup / 110–120g cottage cheese, and 1 tablespoon / 14g butter for 2 servings. Cook in a nonstick skillet over medium-low heat for 4–5 minutes. Most reliable cottage cheese: small-curd 2% or full-fat. Texture goal: creamy, soft, and fully set, not runny.

Ratio guide showing 2 eggs with 1/4 cup cottage cheese and 4 eggs with 1/2 cup cottage cheese.
For the easiest cottage cheese egg ratio, start with 1/4 cup cottage cheese for every 2 large eggs. Then adjust slightly if your cottage cheese is extra thick or watery.

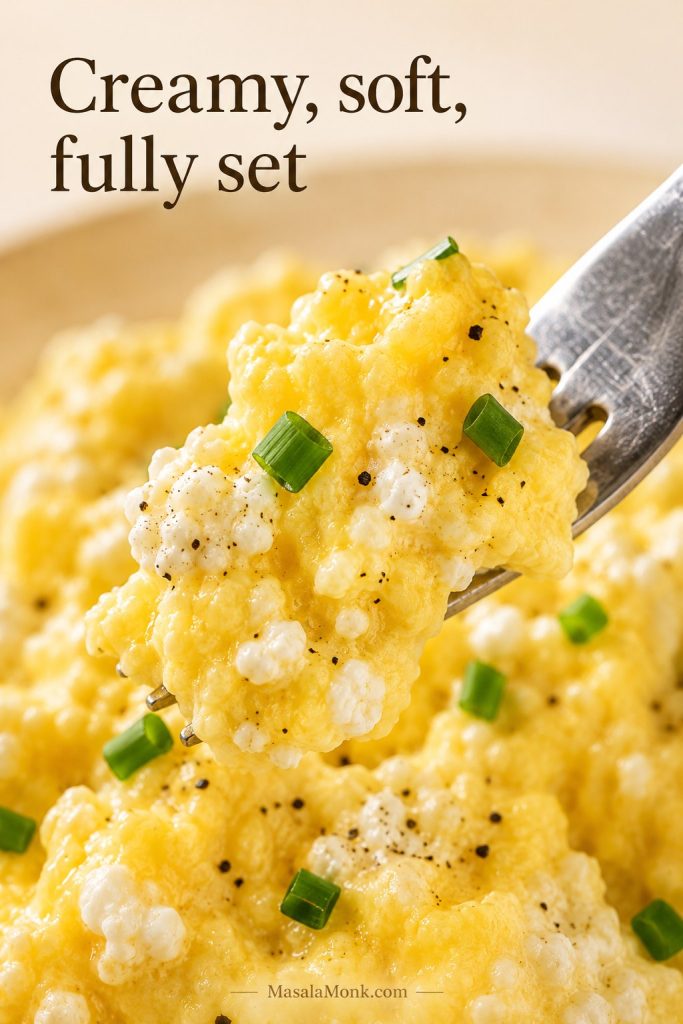
What the Texture Should Look Like

The goal is not a runny protein hack or a rubbery diet scramble. The best version should taste like soft scrambled eggs with a little extra creaminess, body, and staying power.

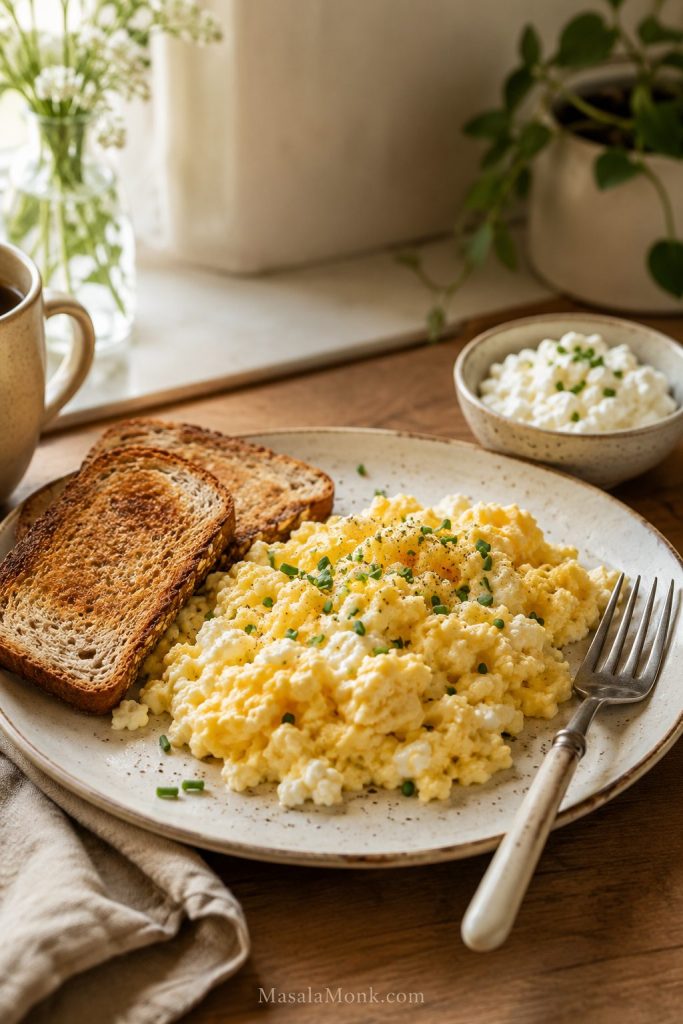
Done right, the eggs taste creamy and lightly savory, not aggressively cheesy. The curds soften into the scramble, the pepper gives it a little lift, and a handful of chives or scallions makes the whole plate feel fresher.

A good plate feels simple but a little upgraded: soft eggs, gentle creaminess from the cottage cheese, enough protein to hold you over, and a texture that still feels like breakfast instead of a food trend.

Close-up of creamy scrambled eggs with cottage cheese showing soft folds, chives, pepper, and no pooling liquid.
Look for soft folds that hold together on the fork. That texture means the eggs are creamy and set, rather than loose, wet, or overcooked.

Why Add Cottage Cheese to Scrambled Eggs?

Cottage cheese changes scrambled eggs in three useful ways: it adds protein, makes the eggs more satisfying, and gives them a creamy texture when cooked gently. It is also mild enough that the eggs still taste like eggs, especially if you use a balanced ratio and season them well.

More Protein Without Protein Powder

Eggs are already a strong breakfast ingredient, but cottage cheese makes them more filling. That is why cottage cheese eggs are popular with people looking for high-protein breakfasts, lighter brunch ideas, and quick post-workout meals.

The exact protein will depend on your eggs and cottage cheese brand. If you are tracking closely, use the nutrition label on your cottage cheese and a food database such as USDA FoodData Central.

For another breakfast built around everyday protein-rich ingredients, this protein oatmeal guide uses options like eggs, yogurt, cottage cheese, paneer, nuts, and seeds without relying only on protein powder.

Creamier Texture When Cooked Gently

Cottage cheese adds moisture and body to the eggs. With medium-low heat, the curds soften into the scramble and help the eggs stay tender. With high heat, the eggs can tighten too quickly and turn rubbery before the cottage cheese has a chance to settle into the mixture.

Mild Flavor, Easy Add-Ins

These eggs do not have to taste strongly of cottage cheese. If you use small-curd cottage cheese and whisk it in well, the flavor is mild, creamy, and lightly savory. Chives, scallions, black pepper, hot sauce, chili crisp, avocado, spinach, and toast all work well with the flavor.

Ingredients for Scrambled Eggs with Cottage Cheese

You only need a few ingredients, but each one affects the final texture. In a simple recipe like this, small choices matter: the cottage cheese style, pan heat, and amount of salt all change the result.
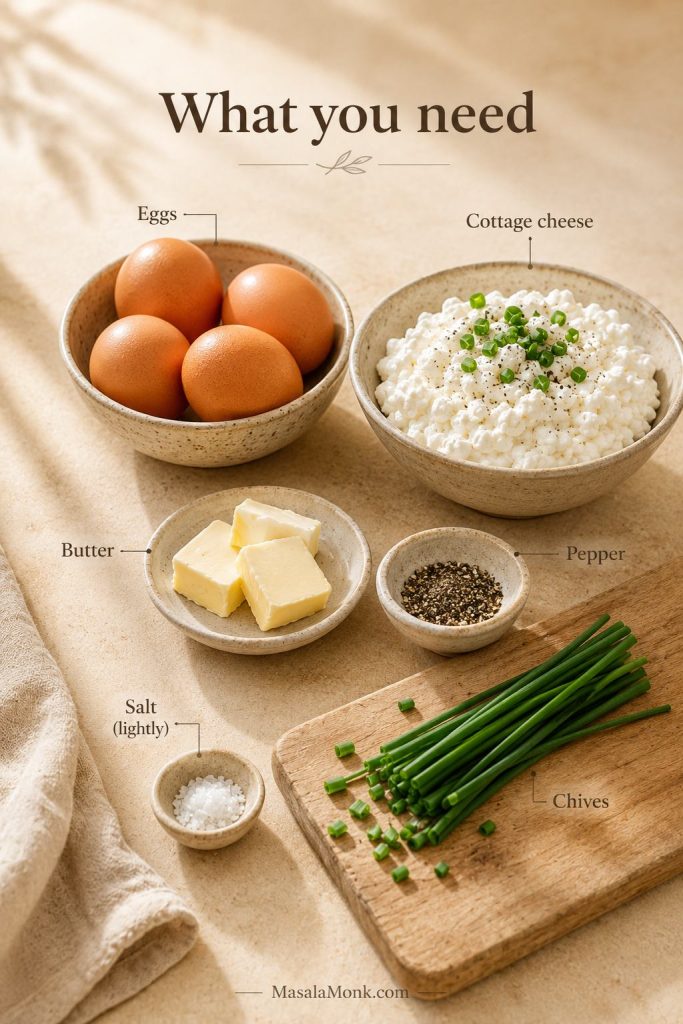
Ingredients for scrambled eggs with cottage cheese including eggs, cottage cheese, butter, pepper, salt, and chives.
Because this recipe uses only a few ingredients, each choice matters. Thick cottage cheese, light salt, black pepper, and fresh chives help the scramble taste balanced.

Eggs

Use large eggs. Four large eggs make two servings, while two large eggs plus 1/4 cup cottage cheese make a good single serving. Whole eggs give the best flavor, color, and structure. You can add egg whites for more protein, but an all-egg-white cottage cheese scramble is easier to overcook and can turn thin if the ratio is not controlled.

Cottage Cheese

Use 1/2 cup / about 4 oz / 110–120g cottage cheese for 4 eggs, or 1/4 cup / 55–60g cottage cheese for 2 eggs. Small-curd cottage cheese is the easiest choice because it blends into the eggs more naturally. Large-curd cottage cheese works, but the curds stay more visible.

For the most reliable texture, use 2% cottage cheese. Full-fat cottage cheese gives richer eggs. Fat-free cottage cheese can work, but it often contains more moisture, so it can make the eggs wetter if you use too much.

Butter, Oil, or Cooking Spray

Butter gives the richest flavor and helps the eggs cook into soft folds. Use 1 tablespoon / 1/2 oz / 14g butter for 4 eggs. Olive oil works well if you want something lighter; use 1–2 teaspoons / 5–10ml. Cooking spray is fine for a lower-calorie version, but use a truly nonstick pan and keep the heat gentle.

Salt, Pepper, and Herbs

Cottage cheese is already salty, so season carefully. Start with black pepper and only a tiny pinch of salt, then taste after cooking. Chives, scallions, dill, parsley, and cracked black pepper are especially good here.

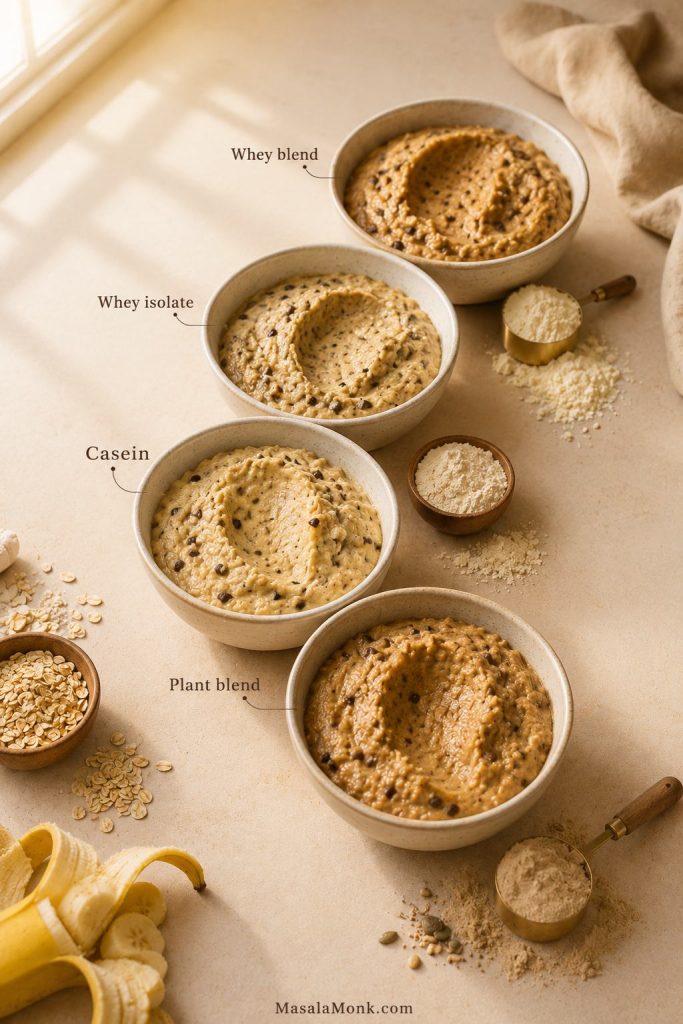
Best Cottage Cheese for Scrambled Eggs

The most reliable cottage cheese for scrambled eggs is small-curd 2% cottage cheese. It is creamy enough to soften into the eggs but not so rich that the scramble feels heavy. It also tends to behave better in the pan than watery fat-free cottage cheese.

Three bowls comparing small-curd, full-fat, and watery fat-free cottage cheese for scrambled eggs.
For most batches, 2% small-curd cottage cheese is the safest starting point because it softens into the eggs more evenly, while watery cottage cheese can loosen the scramble.

Small-Curd vs Large-Curd Cottage Cheese

The smaller curd disperses more evenly and gives a softer texture. Large-curd cottage cheese is fine if you like visible curds, but it can make the eggs look more uneven.

Small-curd and large-curd cottage cheese scrambled eggs compared side by side.
A smaller curd gives smoother scrambled eggs, while large-curd cottage cheese keeps more visible texture. Choose the one that matches how much curd you want to notice.

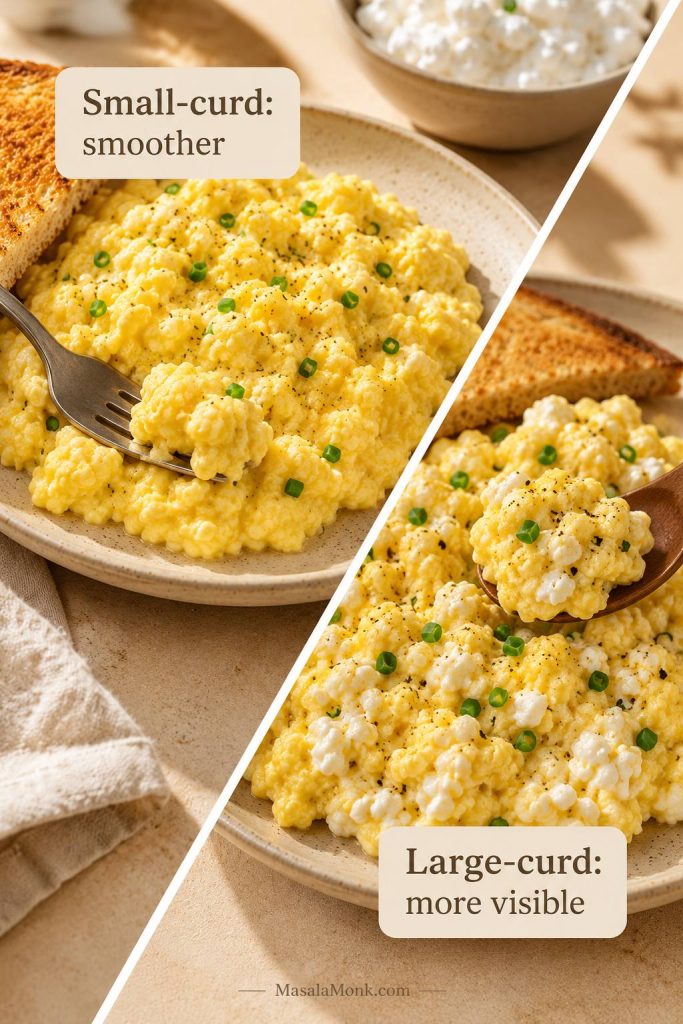
If you are cooking for someone who is skeptical of cottage cheese, use small-curd cottage cheese or blend the eggs and cottage cheese together for a smoother scramble.

For the full texture breakdown, compare the whisk, blend, and fold methods.

2%, Full-Fat, or Fat-Free?

Cottage Cheese Type Result in Scrambled Eggs Best Use
2% Creamy, balanced, reliable Best everyday choice
Full-fat Richest and softest Best for extra-creamy eggs
Low-fat Can work well, depending on brand Good if it is thick, not watery
Fat-free More likely to release moisture Use less and cook gently

If your cottage cheese looks especially liquidy, spoon off a little of the excess before adding it to the eggs. Thick, creamy cottage cheese gives you a much easier path to a soft scramble.

Should You Blend the Cottage Cheese First?

Blend the cottage cheese with the eggs if you want a smooth texture with no visible curds. Do not blend if you like the soft, slightly cheesy texture of cottage cheese eggs. For most people, whisking small-curd cottage cheese directly into the eggs is enough.

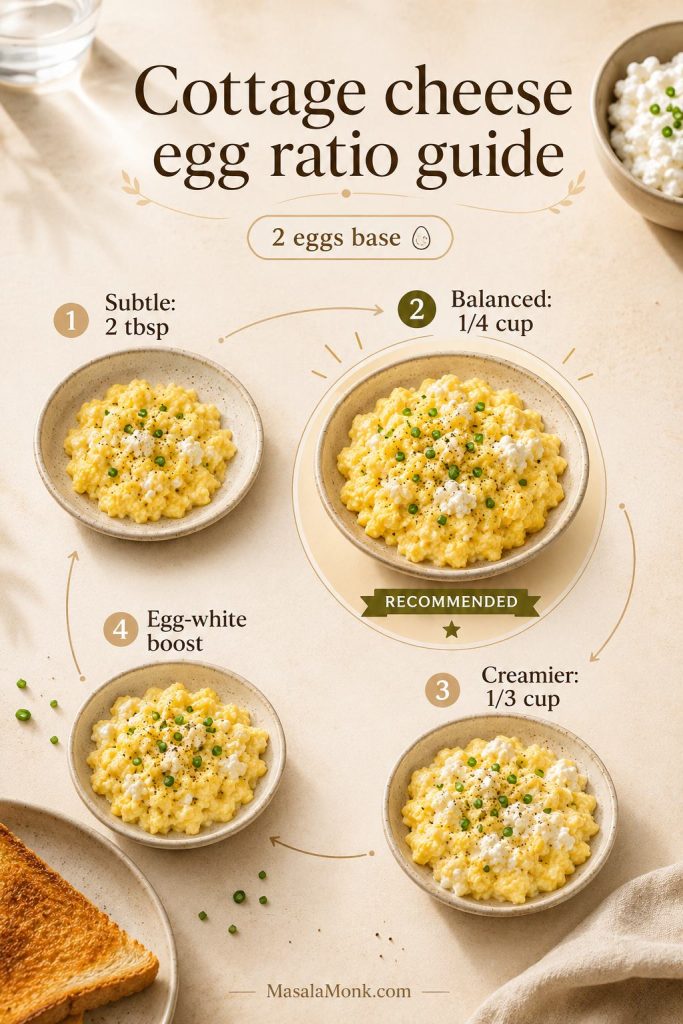
Scrambled Eggs with Cottage Cheese Ratio Guide

Start with the Balanced Ratio

The safest starting ratio is 1/4 cup cottage cheese for every 2 large eggs. Another way to think of it is about 1–2 tablespoons cottage cheese per egg, depending on how creamy or subtle you want the scramble.

If you are nervous about curds or wateriness, start with 2 tablespoons cottage cheese for 2 eggs. Then, if you love cottage cheese and want a creamier, more filling scramble, increase slightly without overloading the eggs.

Ratio Options by Texture

Style Eggs Cottage Cheese Metric Best For
Subtle / beginner 2 large eggs 2 tbsp 25–30g Less curdy, safer first try
Balanced default 2 large eggs 1/4 cup 55–60g Creamy, high-protein everyday eggs
Family batch 4 large eggs 1/2 cup / about 4 oz 110–120g Main recipe-card version
Extra creamy 2 large eggs 1/3 cup 75–80g More cottage-cheese-forward
Egg-white boosted 2 eggs + 1/4–1/3 cup egg whites 1/4 cup 60–80ml egg whites + 55–60g cottage cheese Higher-protein version
Cottage cheese scrambled eggs ratio guide showing subtle, balanced, extra creamy, and egg-white boosted versions.
The ratio changes the whole scramble. Start balanced, then go lighter for subtle cottage cheese flavor or creamier when you want a more filling breakfast.

What Testing Showed

After testing the whisked, blended, and folded versions, the tradeoff is simple: the whisked 2-eggs-to-1/4-cup cottage cheese ratio is the most reliable everyday balance. Blending makes the smoothest scramble, but it tastes a little less like classic soft eggs. Folding the cottage cheese in near the end gives the most visible curds and works only when the cottage cheese is thick, not watery.

For your first try, choose the balanced default. Once you know how your cottage cheese behaves in the pan, you can go lighter, smoother, or more cottage-cheese-forward next time.

Make this first: If this is your first time making scrambled eggs with cottage cheese, use 2 eggs, 1/4 cup / 55–60g cottage cheese, 1/2 tablespoon butter, black pepper, and medium-low heat. It is the safest balance of creamy, high-protein, and not too wet.

Once the ratio is set, use the gentle stovetop method to keep the eggs creamy instead of dry.

How to Make Scrambled Eggs with Cottage Cheese

The whole recipe comes down to gentle heat and patience. A few quiet minutes in the pan can turn the eggs into soft, creamy folds instead of dry curds or a loose scramble.

Step-by-step guide showing eggs being whisked, cottage cheese being added, eggs cooking gently, and the finished scramble.
The steps are simple, but the heat does the real work. Cook slowly so the eggs gather into soft folds instead of tightening into dry curds.

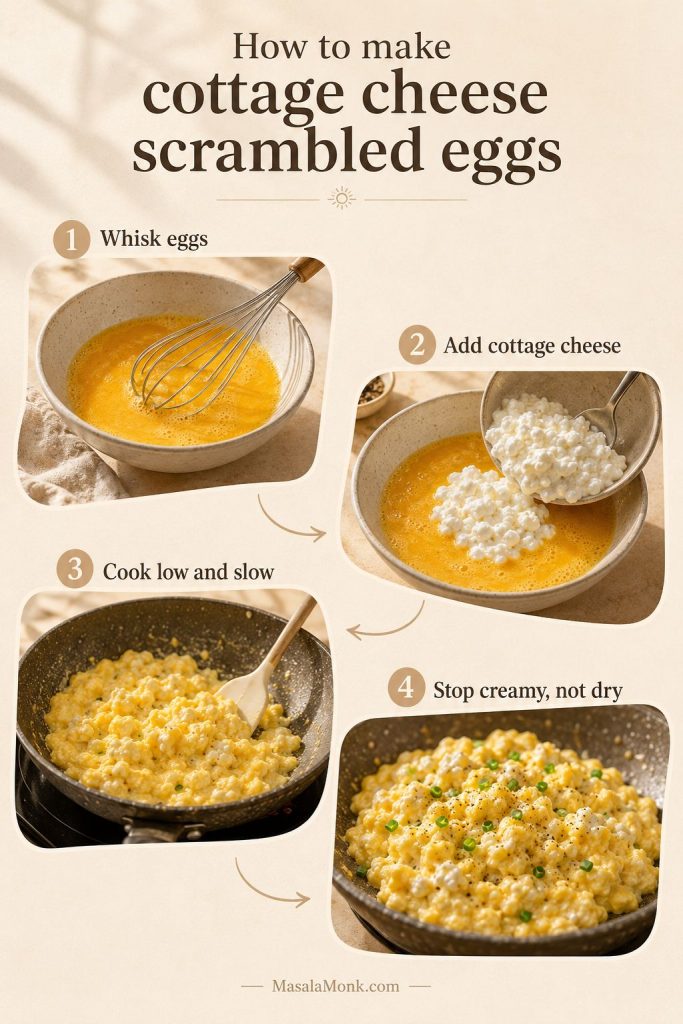
Step 1: Whisk the Eggs

Crack the eggs into a mixing bowl and whisk until the yolks and whites are fully combined. This helps the cottage cheese distribute evenly instead of sitting in pockets.

Step 2: Add the Cottage Cheese

Whisk in the cottage cheese, black pepper, and only a small pinch of salt. If you want smoother eggs, blend the eggs and cottage cheese for a few seconds instead of whisking by hand.

Step 3: Heat the Pan Gently

Warm a nonstick skillet over medium-low heat. For 2 eggs, an 8-inch skillet works well. For 4 eggs, use a 10-inch skillet. Add butter or oil and let it melt without browning.

Step 4: Cook Slowly Into Soft Folds

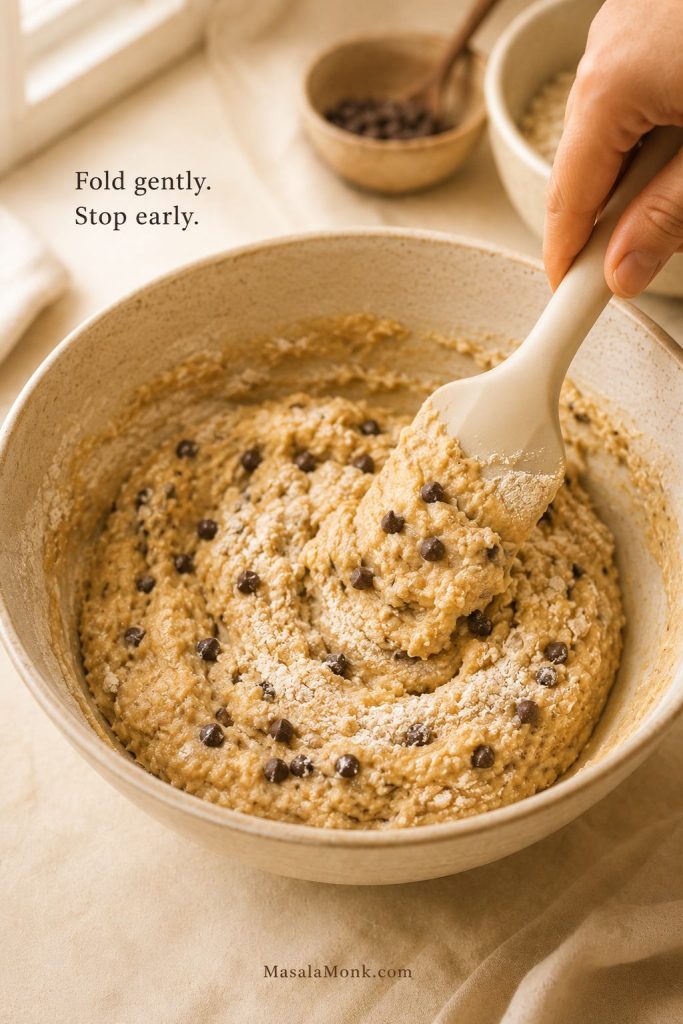
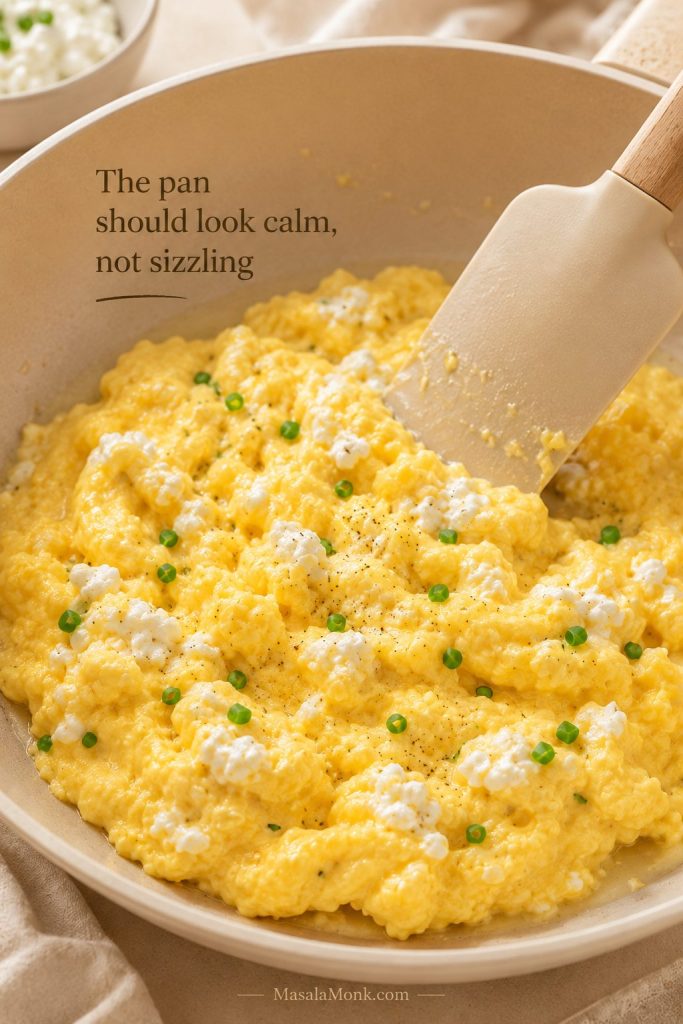
Pour in the egg mixture. Let the edges set for 10–20 seconds, then use a silicone spatula to slowly push the eggs from the outside of the pan toward the center. Keep moving gently so the eggs gather into soft, creamy folds instead of breaking into tiny dry curds. The pan should look calm, not sizzling.

Scrambled eggs with cottage cheese cooking gently in a nonstick pan with a silicone spatula.
A quiet pan is a good sign. When the eggs move slowly under the spatula, they have time to turn creamy before they dry out.

Step 5: Stop While Creamy, Not Runny

Remove the eggs from the heat when they are thickened, creamy, and set through. They will keep cooking slightly from residual heat, so do not wait until they look completely dry in the pan.

You will know they are ready when the eggs hold soft folds on the spatula, look creamy instead of shiny-wet, and slide onto the plate without liquid pooling behind them. If the eggs look glossy but hold together, they are usually ready; if liquid runs around them, give them a little more time over gentle heat.

Doneness guide for cottage cheese scrambled eggs showing too wet, just right, and too dry textures.
“Just right” is creamy but not runny. If the eggs still slide apart with liquid around them, keep them on gentle heat a little longer.

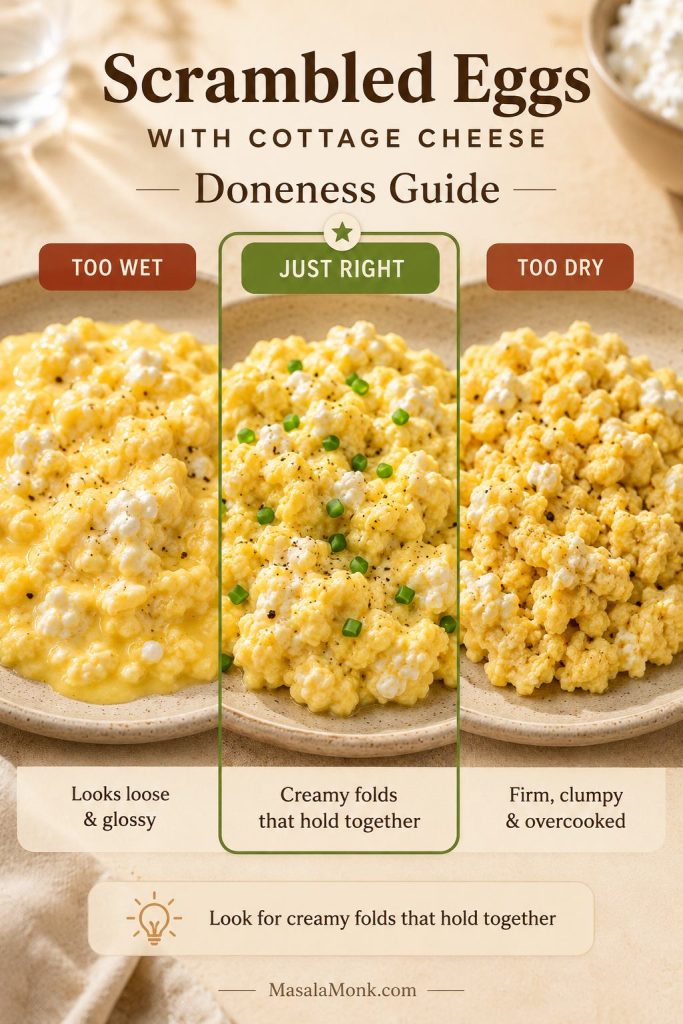
If the eggs still look shiny, separated, or loose, the troubleshooting section will help you fix the next batch.

For food safety, scrambled eggs should be cooked until they are not runny. The FDA’s egg safety guidance recommends cooking egg dishes thoroughly, especially when serving children, older adults, pregnant people, or anyone with a weakened immune system.

Whisk, Blend, or Fold? Three Texture Options

There is more than one way to add cottage cheese to scrambled eggs. The best method depends on whether you want the cottage cheese to disappear into the eggs or stay slightly visible.

Method How to Do It Texture Best For
Whisk Whisk cottage cheese into raw eggs Soft, lightly curdy, fluffy Best everyday version
Blend Blend eggs and cottage cheese briefly Smooth and creamy Cottage-cheese skeptics
Fold Cook eggs first, then fold cottage cheese near the end More visible curds People who like cottage cheese texture
Whisk, blend, and fold methods for adding cottage cheese to scrambled eggs.
Whisking is the everyday method, blending makes the smoothest cottage cheese eggs, and folding gives the most noticeable curd texture.

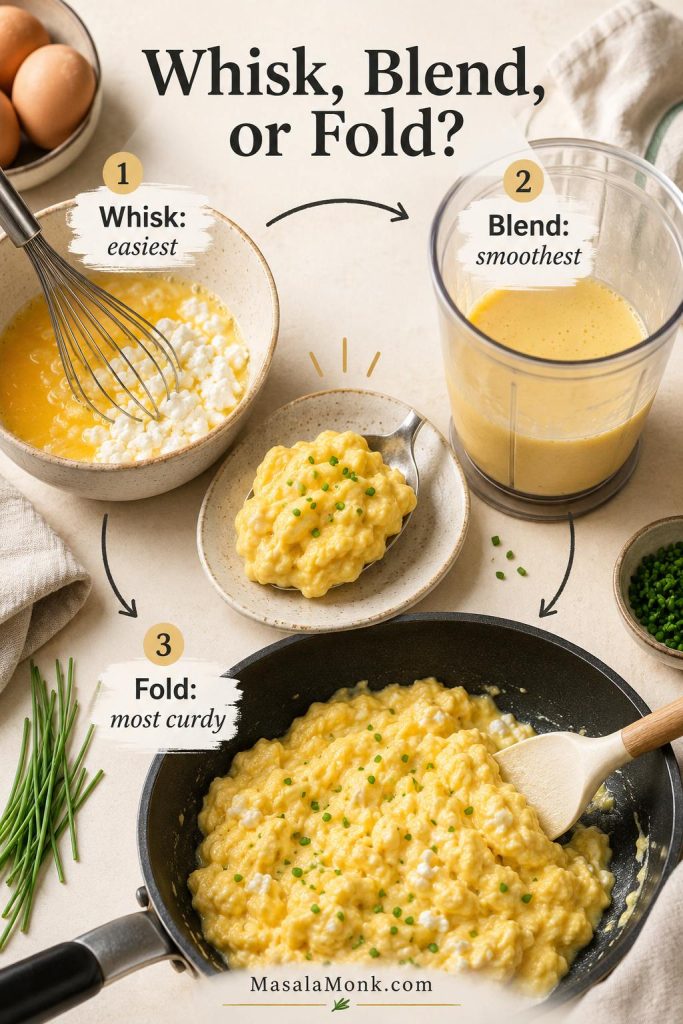
Choose blended if visible curds bother you, whisked for the easiest weekday scramble, and folded only if you actually enjoy the cottage cheese texture.

Using egg whites changes the texture, so check the egg-white version before swapping out too many yolks.

When Should You Add the Cottage Cheese?

Add cottage cheese before cooking for the whisked or blended versions. Fold it in near the end only if you want a more visible cottage cheese texture and your cottage cheese is thick enough not to loosen the eggs.

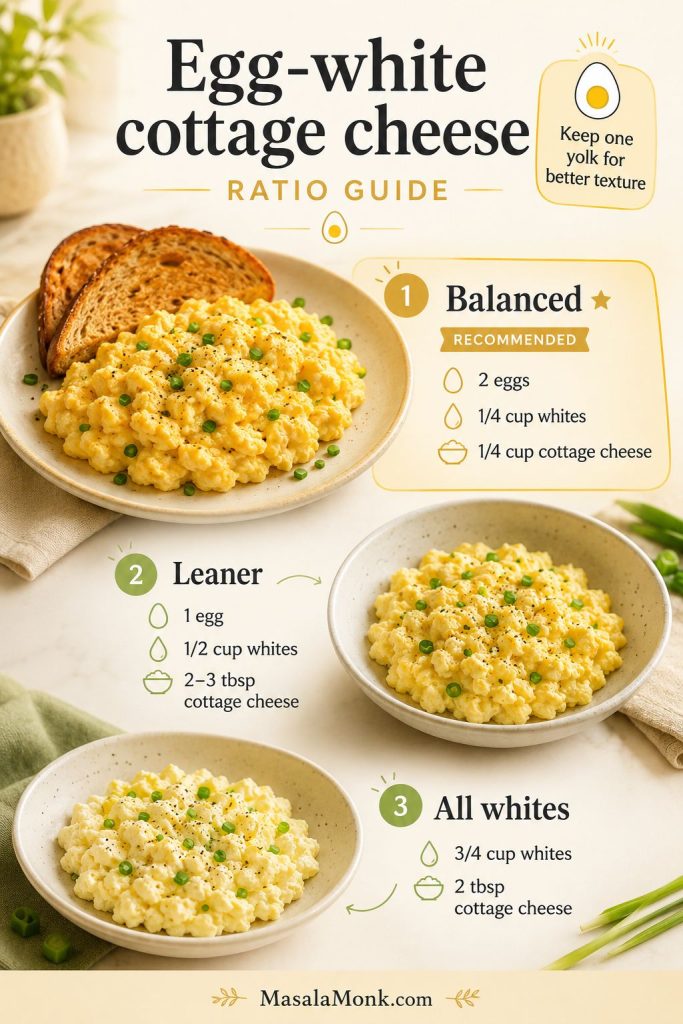
Egg Whites with Cottage Cheese

Egg whites with cottage cheese are useful if you want a lighter, higher-protein scramble, but the ratio matters. Because they contain more water than yolks, they need a little more care in the pan. Use too many whites with too much cottage cheese, and the eggs can turn thin.

Best Egg-White Ratio

For the creamiest texture, keep at least some whole egg in the scramble. The yolk adds flavor, color, and a little structure, which helps the egg whites feel less flat.

Version Use This Ratio Texture
Balanced egg-white boost 2 eggs + 1/4 cup / 60ml egg whites + 1/4 cup / 55–60g cottage cheese Creamy, lighter, still flavorful
Leaner version 1 egg + 1/2 cup / 120ml egg whites + 2–3 tbsp cottage cheese Lighter, less rich, more delicate
All egg whites 3/4 cup / 180ml egg whites + 2 tbsp cottage cheese Leanest, but easiest to overcook or make watery
Egg-white cottage cheese scrambled eggs ratio guide with balanced, leaner, and all-egg-white versions.
Egg whites add protein, but they also add water. Keeping one yolk in the mix helps cottage cheese eggs stay creamy, structured, and less likely to turn thin.

If your egg-white scramble turns thin, the watery egg fixes explain how to adjust the cottage cheese and heat.

Lighter High-Protein Version

For a lighter plate, use 1 whole egg, 1/2 cup / 120ml egg whites, and 2–3 tablespoons cottage cheese. Serve it with spinach, tomatoes on the side, or avocado toast depending on whether you want a lower-calorie breakfast or a more filling meal. It is not a shortcut or a promise; it is simply a protein-rich breakfast that can fit into many eating styles depending on what you serve with it.

How to Keep Egg-White Cottage Cheese Eggs from Getting Watery

Use a thick cottage cheese, skip the milk, and cook over medium-low heat until the eggs are set through. If liquid starts pooling in the pan, keep the heat gentle and give the eggs a little more time. Do not crank the heat up to rush them; that usually makes the eggs rubbery before the moisture cooks off.

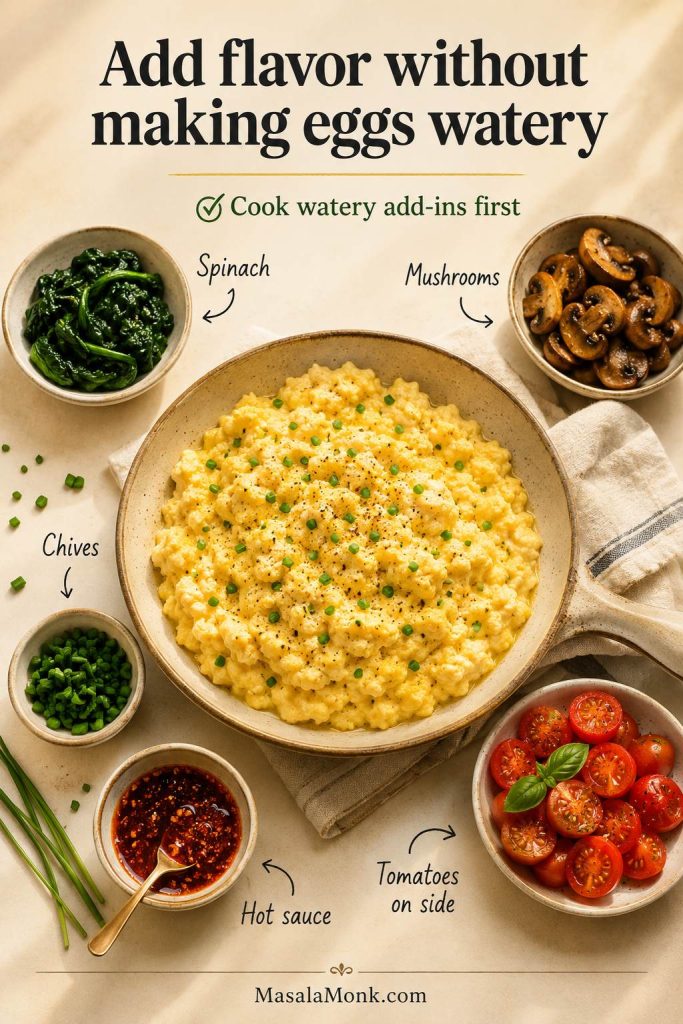
Macro-Friendly Add-Ins

Spinach, mushrooms, scallions, tomatoes on the side, hot sauce, and herbs all work well. If you are adding mushrooms, peppers, or vegetables that release moisture, cook them first so they do not loosen the eggs.

Microwave Cottage Cheese Scrambled Eggs

The skillet version tastes best, but microwave cottage cheese eggs are useful for busy mornings, office breakfasts, and quick solo meals. The texture will be firmer than stovetop scrambled eggs, so cook in short bursts and stir often.

Mug Method for One

Whisk 1 large egg with 1 tablespoon / about 15g cottage cheese in a large microwave-safe mug. Add black pepper and a tiny pinch of salt if needed. Microwave for 30 seconds, stir, then microwave in 15–30 second bursts until the egg is just set through.

Microwave cottage cheese scrambled eggs made in a mug with a whisked egg mixture and a finished bowl of eggs.
For microwave cottage cheese eggs, short bursts are safer than one long cook. Stirring between rounds helps the center set without turning spongy.

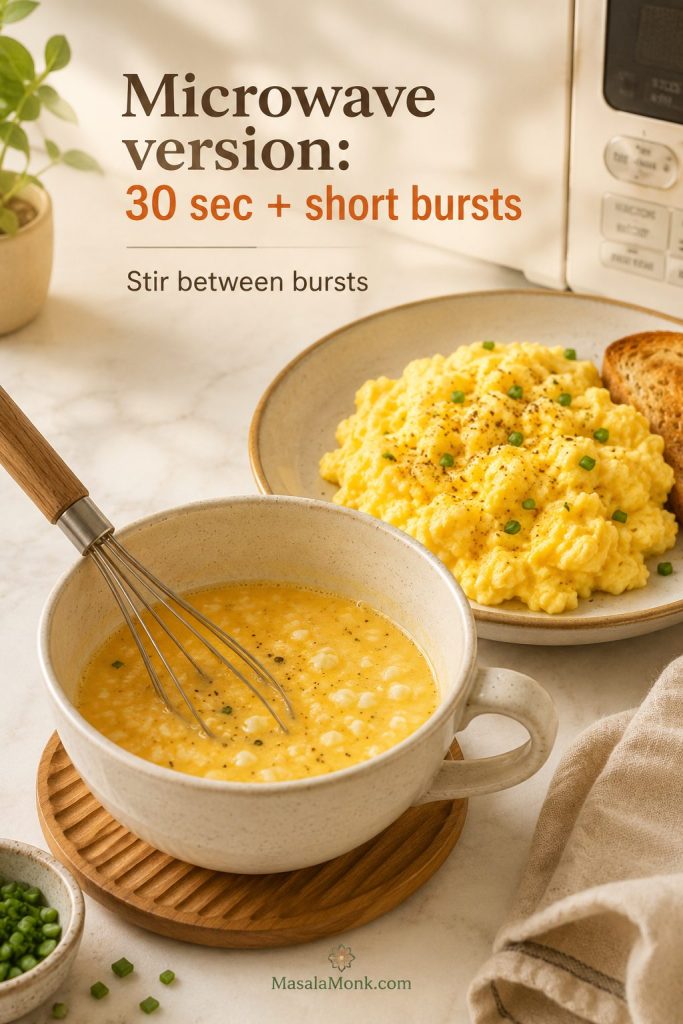
Microwave Texture Tips

  • Use a bigger mug than you think you need.
  • Stir between bursts so the egg cooks evenly.
  • Microwave power varies, so treat the final 15–30 seconds as flexible.
  • Stop when the egg is just set, then let it stand for 20–30 seconds before eating.
  • Add herbs, hot sauce, or chives after cooking.
  • For 2 eggs, use a small microwave-safe bowl instead of a narrow mug.

Add-Ins and Serving Ideas

Scrambled eggs with cottage cheese are mild enough to go savory, spicy, herby, or brunch-style. Avoid adding raw vegetables that release a lot of water directly to the pan in large amounts. Instead, cook them first or serve them on the side.

Best Add-Ins for the Eggs

Add-In How to Use It Notes
Spinach Wilt before or during cooking Adds volume and color
Mushrooms Cook first Prevents loose eggs
Bell pepper Dice small and sauté first Good for veggie scrambles
Scallions or chives Add near the end Fresh, simple, and not watery
Tomatoes Serve on the side or add cooked Raw tomatoes can release water
Chili crisp or hot sauce Add after cooking Best for flavor contrast
Everything bagel seasoning Sprinkle after cooking Use lightly because it is salty
Add-ins for cottage cheese scrambled eggs including cooked spinach, mushrooms, chives, tomatoes, and hot sauce.
Add-ins work best after the moisture is under control. Cook mushrooms, spinach, and peppers first, then finish with herbs, hot sauce, or chili crisp.

Three Easy Ways to Serve Them

  • Simple weekday plate: cottage cheese eggs, buttered toast, black pepper, and chives.
  • Avocado toast version: mashed avocado, creamy eggs, chili crisp, and scallions on sourdough.
  • Breakfast taco version: warm tortilla, cottage cheese eggs, potatoes, salsa, and hot sauce.
Three serving ideas for cottage cheese scrambled eggs with toast, avocado toast, and a breakfast taco.
Once the base scramble is right, it can go three ways: a simple toast plate, creamy avocado toast, or a breakfast taco with potatoes and salsa.

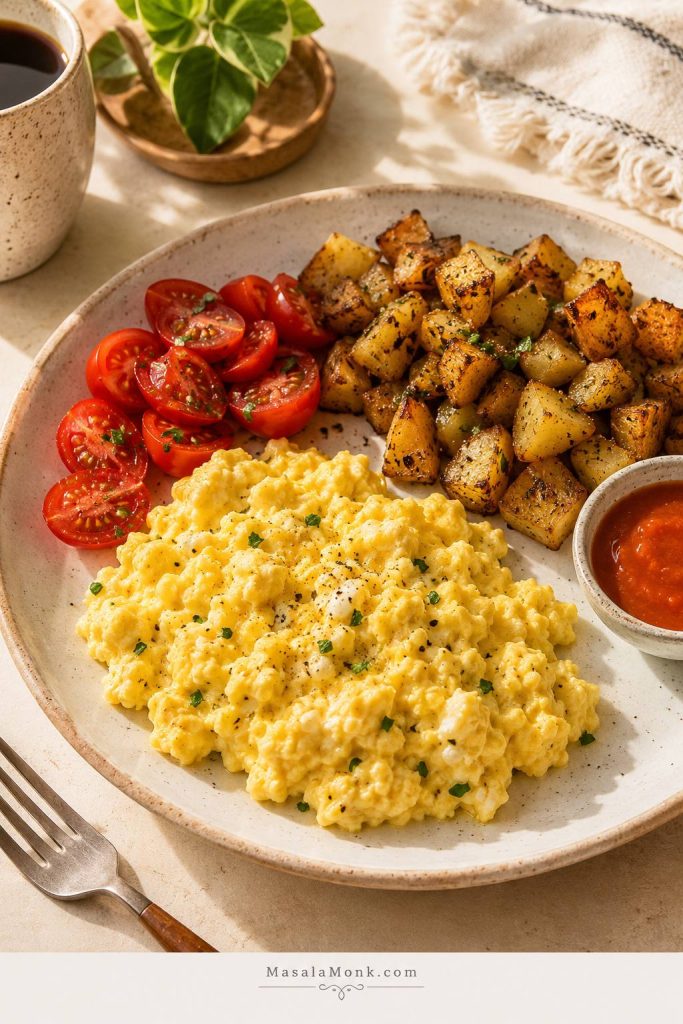
What to Serve with Cottage Cheese Eggs

  • Buttered sourdough toast
  • Avocado toast
  • Breakfast tacos
  • Roasted potatoes or air fryer hash browns
  • Sautéed spinach or mushrooms
  • Fresh tomatoes
  • Fruit on the side
  • Hot sauce, chili crisp, or salsa

For the easiest plate, keep it simple: creamy eggs, crisp toast, something fresh, and something sharp or spicy. A little hot sauce, salsa, chili crisp, or black pepper keeps the cottage cheese from making the plate taste too mild.

Cottage cheese scrambled eggs served with crispy potatoes, fresh tomatoes, and hot sauce.
A few sides make the eggs feel complete. Crisp potatoes add contrast, tomatoes add freshness, and hot sauce cuts through the creamy cottage cheese.

If you want to turn the eggs into a handheld breakfast, tuck them into a tortilla with potatoes, peppers, salsa, or avocado. This breakfast burrito recipe has more ideas for building a filling wrap without making it soggy.

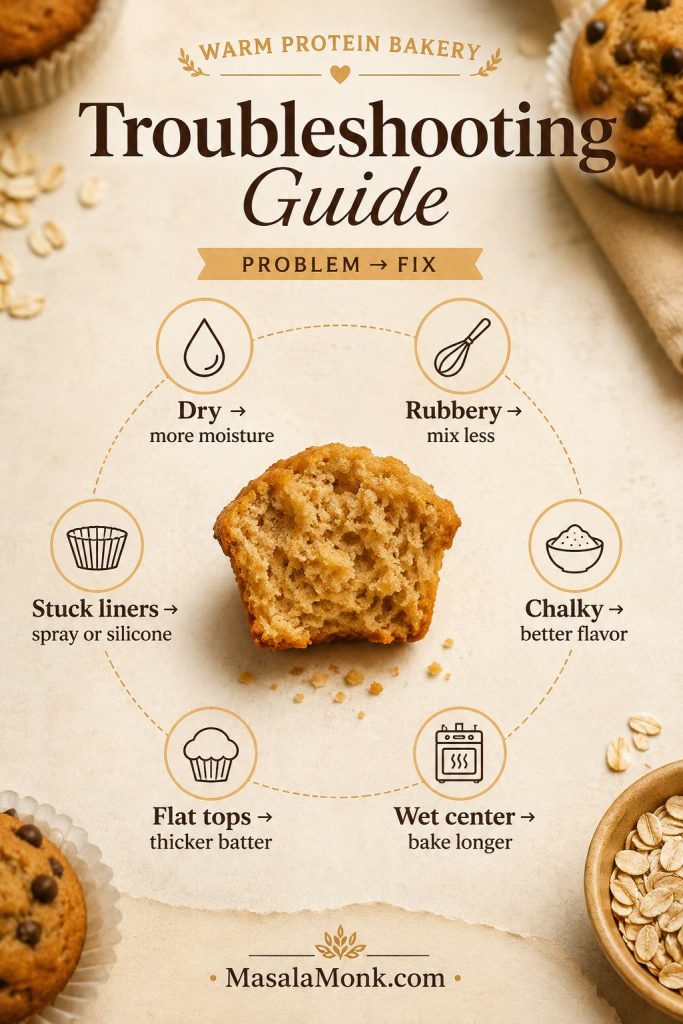
How to Fix Watery or Loose Cottage Cheese Eggs

If your first batch is not perfect, do not write off the recipe. Cottage cheese brands vary a lot, and one small ratio or heat adjustment usually fixes it.

This is the section to read if you tried cottage cheese eggs once and wondered why everyone else seemed to be getting a creamy scramble while yours looked loose, shiny, or separated.

If your eggs tasted good but looked loose, shiny, or a little separated, the recipe probably does not need to be abandoned. It usually just needs less liquid, thicker cottage cheese, or gentler heat.

Watery cottage cheese scrambled eggs compared with creamy set eggs in a troubleshooting guide.
Watery cottage cheese eggs usually come from too much liquid, high heat, or a loose cottage cheese brand. Fix those first before changing the whole recipe.

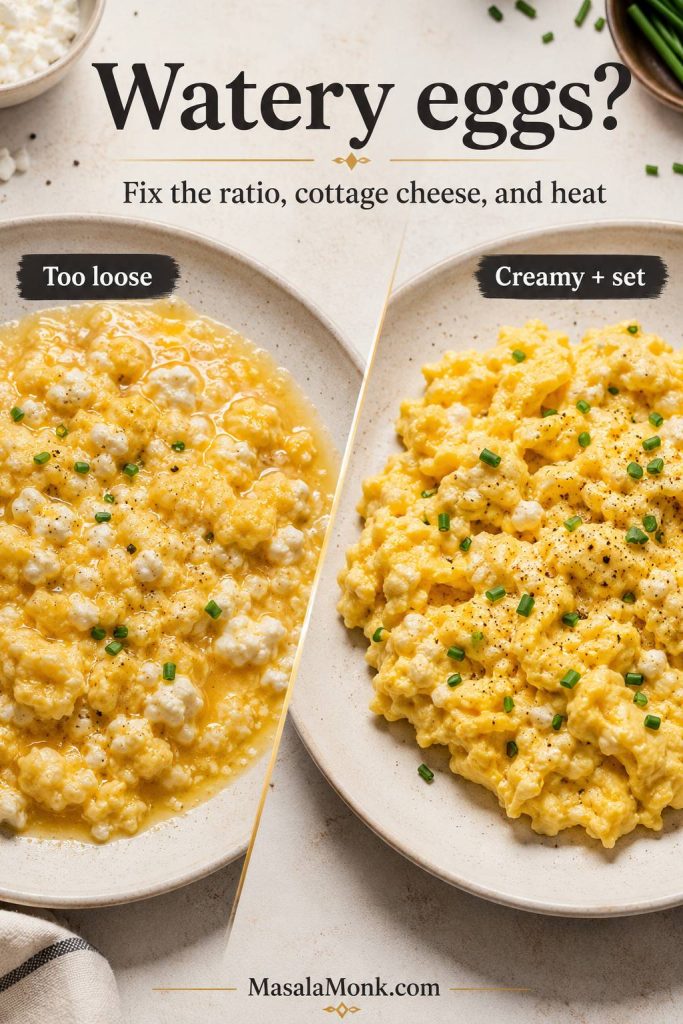
Why Cottage Cheese Eggs Turn Watery

  • Too much cottage cheese
  • Very liquid cottage cheese
  • Watery fat-free or low-fat cottage cheese
  • Heat that was too high
  • Not enough gentle cooking time
  • Raw mushrooms, tomatoes, or peppers
  • Too many egg whites
  • Added milk

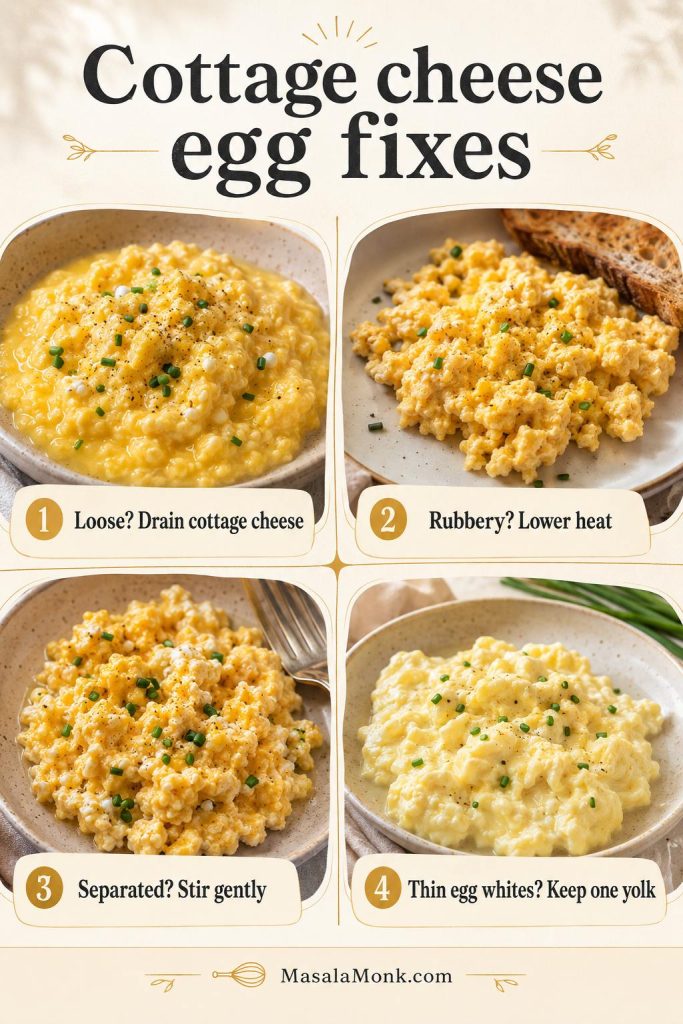
Troubleshooting Watery Cottage Cheese Eggs

What Happened Most Likely Cause Next Batch Fix
Eggs tasted good but looked loose Too much liquid in the cottage cheese Drain the cottage cheese or use 2 tbsp per 2 eggs
Eggs turned rubbery and wet Heat was too high Use medium-low heat and cook a little longer
Eggs looked separated Curds released moisture before the eggs set Whisk better, use thicker cottage cheese, and stir gently
Egg-white version turned thin Too much water from whites plus cottage cheese Keep one yolk or reduce cottage cheese to 2 tbsp
Diagnostic guide showing fixes for loose, rubbery, separated, and thin egg-white cottage cheese eggs.
Use the pan clues to fix the next batch: drain liquidy cottage cheese, lower the heat, stir gently, or keep one yolk when using egg whites.

Fixes Before Cooking

Problem to Prevent What to Do
Cottage cheese looks liquidy Spoon off excess liquid or use slightly less cottage cheese
You dislike curds Blend the cottage cheese with the eggs
You want less moisture Use 2 tbsp cottage cheese per 2 eggs
Using vegetables Cook moisture-heavy vegetables first
Using egg whites Keep at least one yolk or cook gently a little longer

Fixes While Cooking

What You See Fix
Liquid pooling in the pan Keep cooking gently and fold slowly until the extra moisture evaporates
Eggs setting too fast Lower the heat or remove the pan briefly
Curds separating Stir less aggressively and use lower heat
Eggs getting rubbery Pull from the heat sooner next time and use medium-low heat

What Not to Do

  • Skip the milk; cottage cheese already brings moisture.
  • Avoid high heat, which can make the eggs tighten before the moisture cooks off.
  • Do not start with an extra-heavy cottage cheese ratio on your first try.
  • Cook mushrooms, tomatoes, or peppers first if you are adding more than a small handful.
  • Once soft folds form, stir gently instead of aggressively breaking the eggs apart.

Once the ratio and heat are right, the recipe is simple: whisk, cook gently, stop while creamy, and serve while the eggs are still soft and warm.

Scrambled Eggs with Cottage Cheese Recipe

Soft, creamy scrambled eggs with cottage cheese for a protein-rich breakfast that feels cozy, filling, and ready in about 10 minutes.

Prep Time5 minutes
Cook Time4–5 minutes
Total Time10 minutes
Yield2 servings

Approximate nutrition: One serving, made with 2 large eggs, 1/4 cup cottage cheese, and 1/2 tablespoon butter, is usually around 220–270 calories with about 18–22g protein. Exact numbers depend on your cottage cheese brand and cooking fat. Because cottage cheese brands vary widely in protein, sodium, and moisture, treat these numbers as an estimate unless you calculate with your exact label.

Equipment

  • Mixing bowl
  • Whisk or fork
  • 10-inch nonstick skillet
  • Silicone spatula

Ingredients

  • 4 large eggs
  • 1/2 cup cottage cheese, about 4 oz / 110–120g, preferably small-curd 2% or full-fat
  • 1 tablespoon butter, about 1/2 oz / 14g, or 1–2 teaspoons / 5–10ml olive oil
  • 1/8 teaspoon fine salt, optional
  • Black pepper, to taste
  • 1 tablespoon chopped chives or scallions, optional

Method

  1. Crack the eggs into a mixing bowl and whisk until the yolks and whites are fully combined.
  2. Whisk in the cottage cheese, black pepper, and a tiny pinch of salt if using.
  3. Place a nonstick skillet over medium-low heat. Add the butter or oil and let it melt without browning.
  4. Pour in the egg mixture and let the edges begin to set for 10–20 seconds.
  5. Use a silicone spatula to slowly push the eggs from the outside of the pan toward the center, forming soft folds. The pan should look calm, not sizzling.
  6. Keep cooking gently until the eggs are thickened, creamy, and set through. If liquid runs around the eggs, give them another minute over gentle heat.
  7. Remove from the heat, sprinkle with chives or scallions if using, and serve immediately.

Notes

  • Blend the cottage cheese with the eggs first for a smoother texture.
  • Use 2 tablespoons cottage cheese per 2 eggs if you want less cottage cheese texture.
  • For an egg-white boosted version, use 2 eggs, 1/4 cup / 60ml egg whites, and 1/4 cup / 55–60g cottage cheese.
  • Salt lightly because cottage cheese is already salty.
  • Use medium-low heat. High heat can make the eggs rubbery.
  • Do not add milk; cottage cheese already adds moisture.
Saveable recipe card for scrambled eggs with cottage cheese showing the main ratio, cooking time, and method notes.
This saveable version keeps the formula simple: four eggs, half a cup of cottage cheese, medium-low heat, and no milk for a creamy two-serving scramble.

Once you make it once, adjust the ratio to match your cottage cheese and your pan. Some brands melt in softly, some release more liquid, and some taste saltier than others. The recipe gets easier after the first batch.

Storage and Reheating

These are absolutely best right from the pan, so treat leftovers as a backup breakfast rather than the main plan. Still, if you have extra, they can work if you cool and reheat them gently.

For the freshest texture, make the main recipe card version right before serving.

How Long Do They Keep?

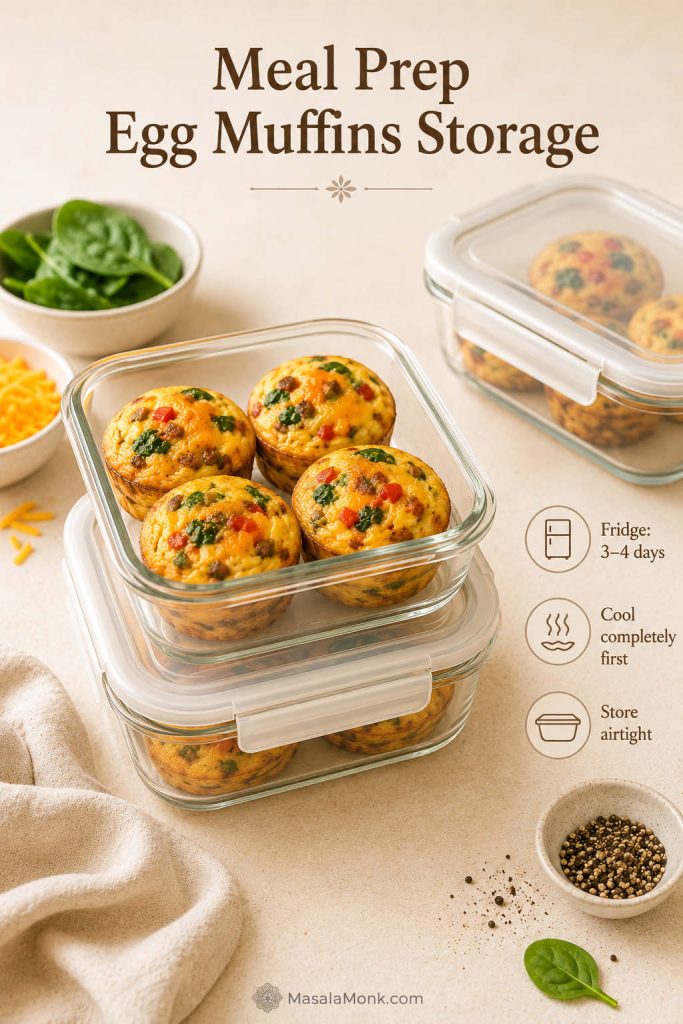
Store leftover cottage cheese scrambled eggs in an airtight container in the refrigerator for up to 2 days. Let them cool before closing the container so steam does not create extra moisture.

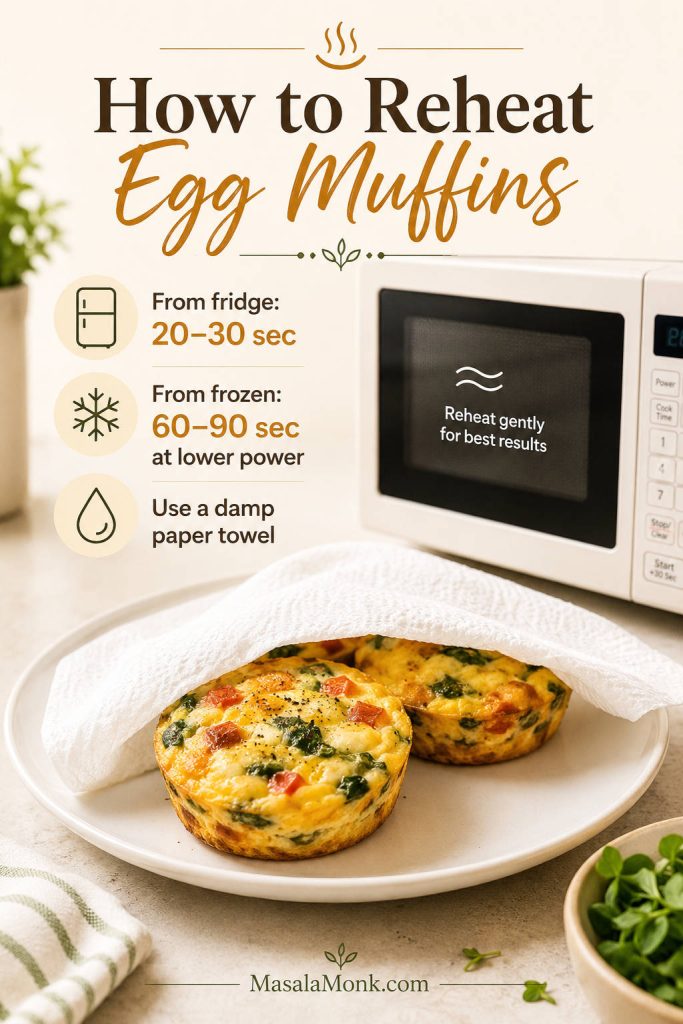
How to Reheat Without Making Them Rubbery

Reheat in the microwave at reduced power in 15–30 second bursts, stirring gently between bursts. Stop as soon as the eggs are warm. You can also reheat them in a nonstick skillet over low heat.

For a freezer-friendly breakfast instead of fresh scrambled eggs, use the same soft-cooked egg logic in meal prep breakfast burritos, where the eggs need to stay tender without making the tortilla soggy.

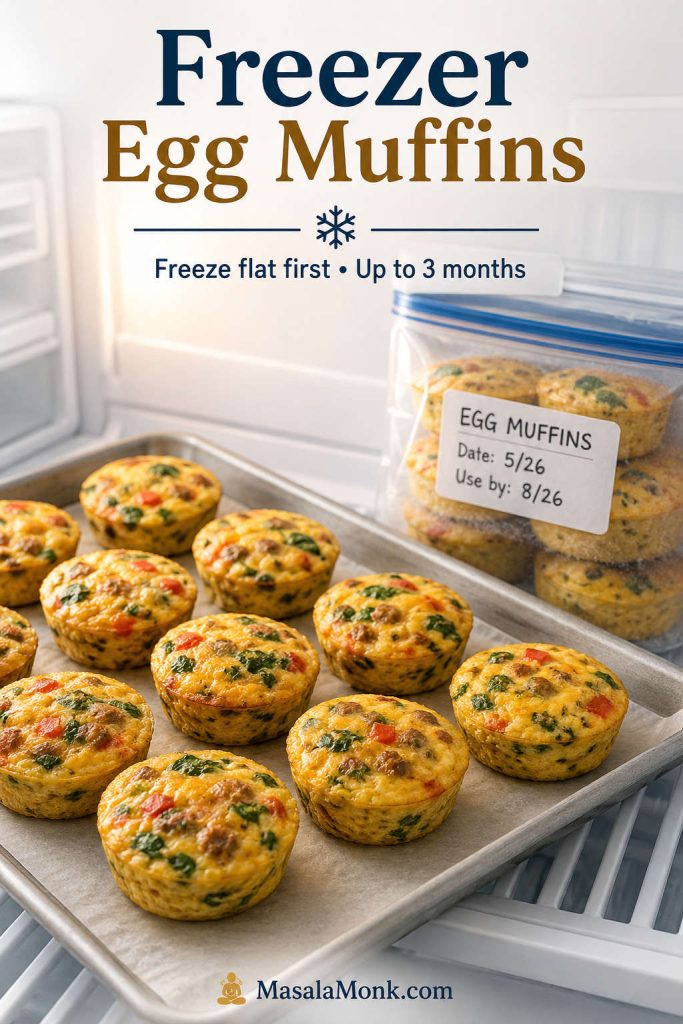
Can You Freeze Cottage Cheese Scrambled Eggs?

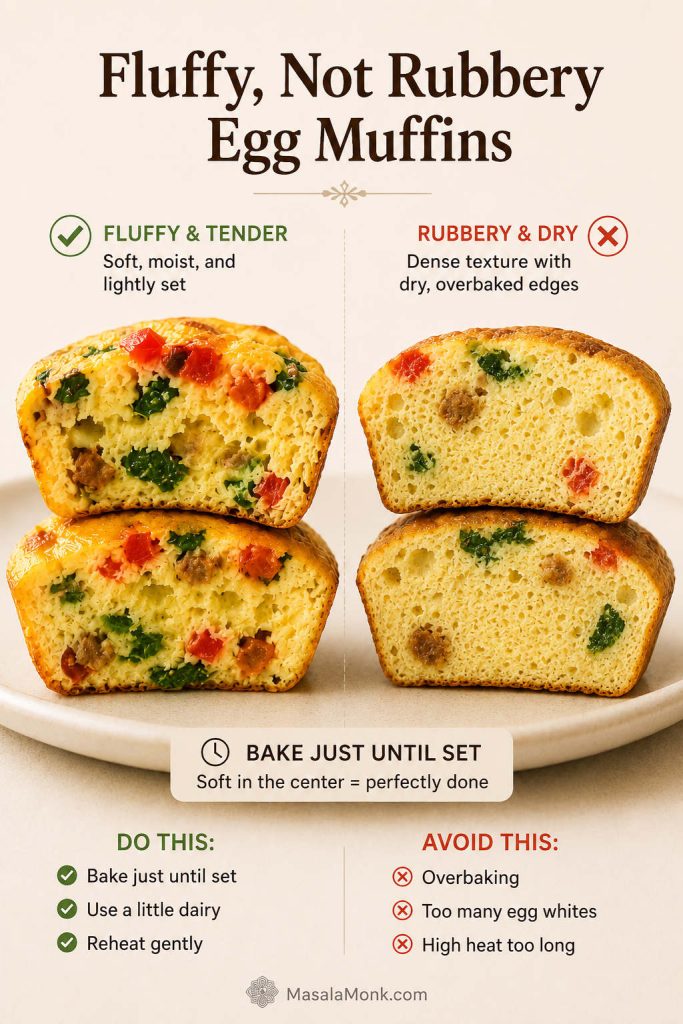
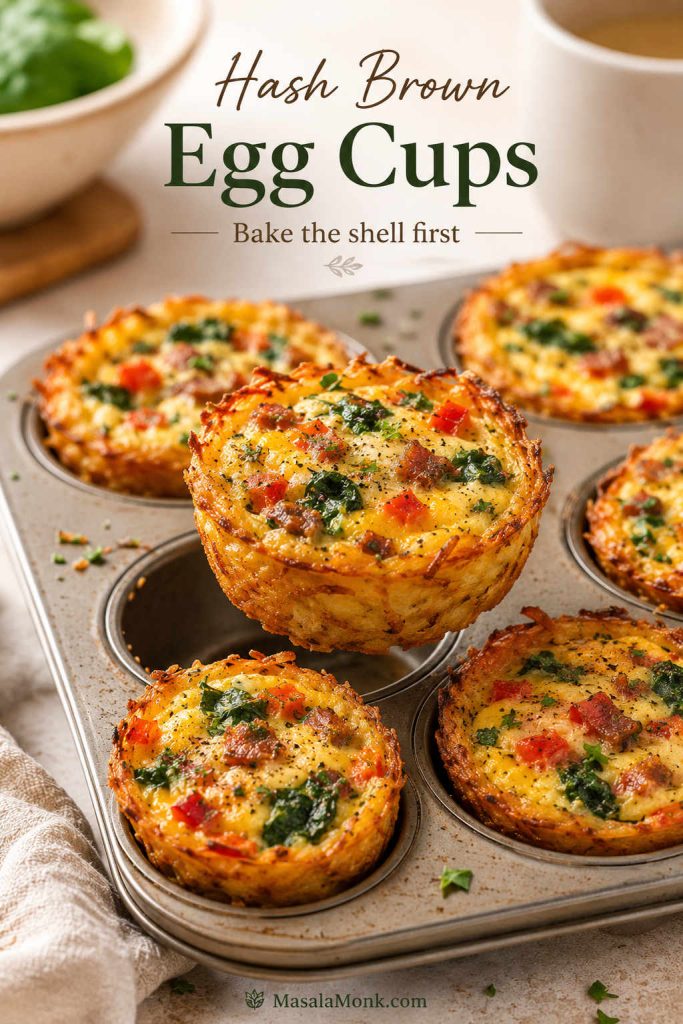
I would not freeze them. Eggs and cottage cheese can both release moisture after thawing, so the texture usually suffers. For a better make-ahead breakfast, try egg muffins or a sliceable frittata instead.

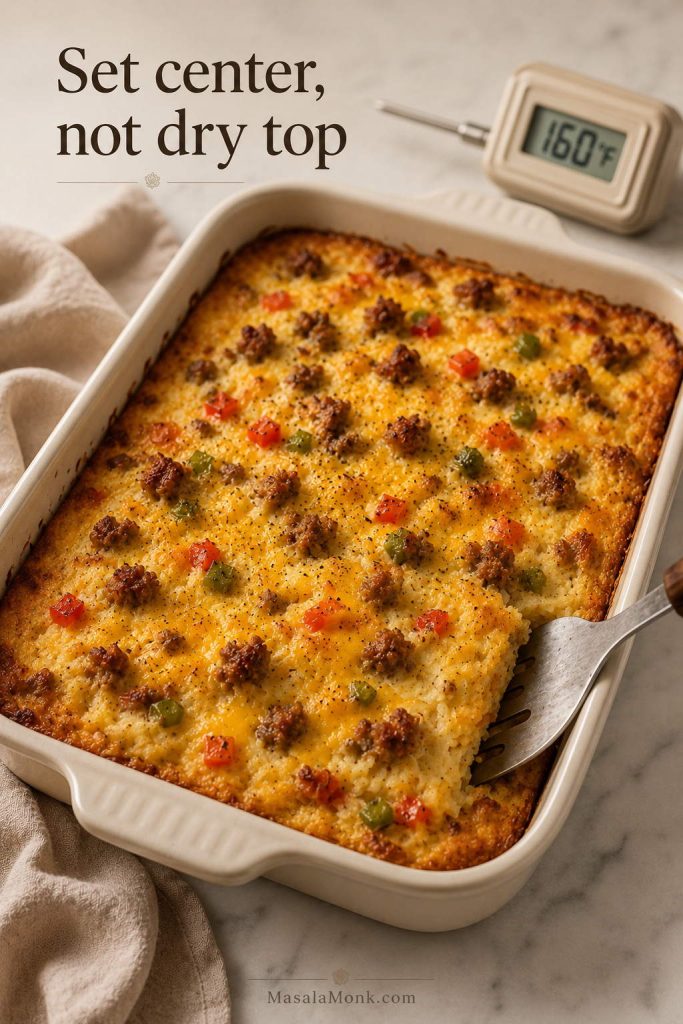
When you need breakfast for a table instead of one skillet, a breakfast casserole with hash browns is a better make-ahead option than stovetop scrambled eggs.

Final Serving Texture Cue

Before you leave the recipe, remember the main visual cue: the eggs should look creamy, softly folded, and set enough to hold together on the plate.

Final serving of scrambled eggs with cottage cheese with toast, a fork, cottage cheese, and a warm breakfast table setting.
A good cottage cheese scramble should feel warm and familiar, with enough protein and creaminess to make breakfast last longer than plain eggs.

FAQs About Scrambled Eggs with Cottage Cheese

What does cottage cheese do to scrambled eggs?

Cottage cheese adds protein, creaminess, and a mild savory flavor. When cooked gently, it softens into the eggs and makes them more filling without needing milk or cream.

Do scrambled eggs with cottage cheese taste like cottage cheese?

They taste creamy, lightly savory, and only a little tangy. With the balanced ratio, the eggs still taste like eggs; the cottage cheese mostly adds body and richness.

Is it better to blend cottage cheese into eggs?

Blend it if you want smooth eggs with no visible curds. This is the best choice for anyone who likes the protein boost but does not want the cottage cheese texture. Whisk it in if you like a soft, lightly curdy scramble.

Why did my cottage cheese scrambled eggs turn watery?

They probably had too much cottage cheese, a very liquidy brand, too many egg whites, raw watery vegetables, milk, or not enough gentle cooking time. Use 1/4 cup cottage cheese per 2 eggs, choose a thicker cottage cheese, and cook over medium-low heat until the eggs are set through.

What type of cottage cheese works best?

Small-curd 2% cottage cheese is the most reliable everyday choice. Full-fat cottage cheese gives richer eggs. Fat-free cottage cheese can work, but it is more likely to release moisture.

Should I add milk to cottage cheese scrambled eggs?

Skip the milk here. Cottage cheese already brings moisture and body, and adding milk can push the scramble from creamy into loose or wet.

Are cottage cheese eggs good for a high-protein breakfast?

They are a strong high-protein breakfast, especially if you use the balanced ratio of eggs plus cottage cheese instead of stretching the scramble with milk. The exact protein depends on your egg size and cottage cheese label.

Do egg whites work with cottage cheese?

Egg whites work, but the best texture usually comes from keeping at least one whole egg in the mixture. The yolk adds flavor, color, and structure, so the scramble feels creamy instead of thin.

Can I make cottage cheese scrambled eggs in the microwave?

Yes. For one serving, whisk 1 large egg with 1 tablespoon cottage cheese in a large microwave-safe mug. Microwave for 30 seconds, stir, then cook in 15–30 second bursts until set. Let it stand briefly before eating so the center finishes without becoming spongy.

What is the best ratio of cottage cheese to eggs?

The best balanced ratio is 1/4 cup cottage cheese for every 2 large eggs. Use 2 tablespoons for a subtler version, or up to 1/3 cup if you want a richer cottage-cheese-forward scramble.

Can I use boiled eggs with cottage cheese instead?

Yes, but that becomes a different kind of meal. Boiled eggs with cottage cheese work as a quick snack plate, while chopped boiled eggs mixed with blended cottage cheese become a high-protein cottage cheese egg salad.

Back to top

Posted on 1 Comment

High Protein Muffins That Stay Moist and Fluffy

High protein muffins on a cooling rack with one muffin split open to show a soft chocolate chip crumb.

Too many high protein muffins sound better than they taste. They promise easy breakfast meal prep and extra protein, then come out dry, rubbery, chalky, or heavy enough to feel like a compromise. This recipe is built the other way around: soft first, moist first, useful first.

The goal is a muffin you actually want to eat with coffee, not a “healthy” muffin you tolerate because it has protein. Greek yogurt, a reasonable amount of protein powder, oat flour or whole wheat flour, and banana or applesauce all work together to keep the crumb tender.

If you like make-ahead breakfasts in this same lane, you may also like these high protein overnight oats for a no-bake option.

Use the base recipe once, then make it fit your mornings: banana chocolate chip when you want cozy, blueberry lemon when you want fresh, pumpkin when you want softer and spiced, or cottage cheese when you want extra moisture without relying only on protein powder.

Soft Crumb, Not Chalky

Close-up of a high protein muffin torn open to show a soft moist crumb with chocolate chips.
The crumb tells you whether the recipe worked. Pull the muffins when they are just set, because they continue to firm up as they cool.

Already know you want to bake? Use the jump button to go straight to the recipe card. If you want to avoid dry protein muffins, read the batter and protein powder notes first.

Table of Contents

Use this guide to make soft protein muffins, choose the right protein base, fix texture problems, and store them for easy breakfasts or snacks.

Quick Answer: How Do You Make High Protein Muffins?

To make high protein muffins, combine flour or oat flour, protein powder, Greek yogurt, eggs, banana or applesauce, a little maple syrup or honey, leavening, and enough milk to make a sturdy muffin batter. After that, bake in a lined muffin tin until the tops spring back lightly and a toothpick comes out clean or with a few moist crumbs.

This recipe makes 12 muffins. The exact protein number depends on your protein powder, yogurt, flour, and mix-ins. Most batches land around 9–12 grams of protein per muffin, which makes them more filling without pushing the texture into dry, dense, or chalky territory.

Texture rule: the batter should be thick enough to scoop, but not dry or crumbly. When it looks stiff, loosen it gradually with milk before baking.

If you are ready to bake, jump to the recipe card. If your past protein muffins turned dry or rubbery, read the protein powder tips and troubleshooting guide first.

High Protein Muffins at a Glance

Yield12 muffins
Total timeAbout 30–35 minutes
ProteinAbout 9–12g per muffin, depending on protein powder, yogurt, flour, and mix-ins
TextureTender, lightly hearty, and muffin-like
Best first protein baseGreek yogurt + vanilla protein powder
Best no-powder pathGreek yogurt, cottage cheese, eggs, oats, nut butter, and seeds
Oven375°F / 190°C for 5 minutes, then 350°F / 175°C until done
StorageFridge 4–5 days, freezer up to 3 months
At-a-glance guide for high protein muffins showing yield, time, protein range, and freezer-friendly storage.
This 12-muffin batch is built for real meal prep: a realistic protein range, a soft crumb, and fridge-or-freezer flexibility for busy mornings.

What They Should Taste Like

These are not cupcake-style muffins, and they are not meant to taste like dry protein bars either. Instead, the crumb should be soft and lightly hearty, with enough moisture from Greek yogurt and banana or applesauce to keep each bite tender.

With banana, the muffins lean cozy and breakfast-like. Applesauce gives a more neutral base, which works better with blueberries, chocolate chips, lemon zest, or pumpkin spice. Either way, the muffin should feel satisfying without tasting like a protein powder project.

The best batch should feel like a real breakfast muffin first: warm, tender, lightly sweet, and satisfying enough that you would eat it even without counting the protein. If you add mini chocolate chips, they should give little sweet pockets in the crumb. If you choose blueberries, the muffin should feel fresher and brighter, not wet or gummy.

How Each Version Should Look Inside

Different mix-ins change the color and flavor of the crumb, but they should not change the goal: a tender muffin that still feels soft after cooling.

Crumb comparison of banana chocolate chip, blueberry lemon, and cottage cheese high protein muffins.
Banana chocolate chip is cozy, blueberry lemon is bright, and cottage cheese adds extra moisture. Every version should still bake up tender rather than chalky.

Choose Your Muffin Path

There is no single “right” way to make a higher-protein muffin. Some days you may want the extra boost from protein powder. Other times, you may want a more natural muffin built around Greek yogurt, cottage cheese, eggs, and oats. Use this table to choose the version that fits your kitchen and your taste.

PathBest forMain protein sourceTexture note
Protein powder muffinsHigher protein with simple ingredientsVanilla protein powder + Greek yogurtNeeds enough moisture so the crumb stays soft.
No-powder protein muffinsReaders who dislike protein powder tasteGreek yogurt, eggs, oats, hemp hearts, nut butterSofter and more natural, but usually lower in protein per muffin.
Cottage cheese protein muffinsMoist, filling breakfast muffinsBlended cottage cheese + eggsVery moist; needs proper baking and cooling so the centers set.
Decision guide showing protein powder, no-powder, and cottage cheese paths for high protein muffins.
Choose by texture and taste, not just protein. Protein powder gives the biggest boost; no-powder and cottage cheese versions lean more real-food and naturally moist.

Once you choose your path, use the protein powder notes for the main version, the no-powder section for real-food protein muffins, or the cottage cheese variation if you want extra moisture.

Why This High Protein Muffin Recipe Works

Greek yogurt keeps the crumb moist

Greek yogurt is one of the most useful ingredients here because it adds protein and moisture at the same time. It also helps balance the drying effect of protein powder, especially if you are using whey or a very absorbent plant-based powder.

Greek yogurt also gives the recipe a real-food protein base instead of making the entire muffin depend on powder. It is naturally protein-rich, and Harvard Health includes Greek yogurt among useful protein sources, which is why it works so well in breakfast recipes that need both moisture and staying power.

Greek yogurt being added to muffin batter ingredients to keep high protein muffins moist.
Greek yogurt helps twice: it adds protein and protects the crumb from drying out, which makes it one of the most useful ingredients in this batter.

Protein powder adds structure, but not too much

The fastest way to ruin protein muffins is to treat protein powder like regular flour. It absorbs liquid, changes the structure of the batter, and can make muffins firm when used too heavily. So this recipe uses enough protein powder to support the high-protein goal without letting it take over the texture.

A hotter oven start helps muffins rise

Start the muffins at a slightly higher oven temperature, then finish them lower. That short hot start encourages lift, while the gentler finish helps the center bake through without drying out the edges.

Banana or applesauce protects the texture

Mashed banana gives the muffins a naturally sweeter breakfast flavor. If you want a more neutral base, use unsweetened applesauce instead. Both add moisture, which is especially helpful in a protein-rich batter.

A little fat makes them taste like real muffins

Low-fat protein muffins often taste dry because too many softening ingredients are removed at once. That is why a modest amount of oil or melted butter helps the crumb stay tender, especially after refrigeration or freezing.

How Much Protein Should a Protein Muffin Have?

A realistic protein muffin can land anywhere from about 7g to 14g protein per muffin depending on the formula. Protein-powder versions can go higher, but the texture often becomes harder to protect. For this base recipe, the goal is about 9–12g protein per muffin with a soft, repeatable texture.

For exact numbers, use the labels on your own protein powder, yogurt, flour, and milk. Treat the nutrition estimate as a helpful range, not a fixed number. You can also look up individual ingredients in USDA FoodData Central if you want a more precise calculation.

That matters because a muffin with 20g protein is not automatically better if it tastes tough, chalky, or too lean. For most home bakers, the better target is a muffin that gives more protein than a regular muffin while still being enjoyable enough to make again.

Useful rule: a slightly lower-protein muffin that tastes good is more valuable than an ultra-high-protein muffin nobody wants to eat.

High protein muffin with a note showing a realistic 9 to 12 gram protein range and soft texture.
A realistic protein target protects texture. In practice, a softer 9–12g muffin is more useful than a dry batch chasing the biggest number.

Ingredients for High Protein Muffins

Best first version to make

Best first batch: start with oat flour, almond flour, vanilla protein powder, plain Greek yogurt, mashed banana, neutral oil, and mini chocolate chips. That version gives the easiest balance of flavor, moisture, and texture. Once you like the base, try applesauce, blueberries, pumpkin, or cottage cheese.

Ingredients for high protein muffins including oat flour, protein powder, Greek yogurt, banana, eggs, and chocolate chips.
Balance matters more than any one “healthy” add-in: flour gives body, Greek yogurt adds moisture, eggs set the crumb, and protein powder brings the boost.

Oat flour, white whole wheat flour, or all-purpose flour

Oat flour gives these muffins a wholesome breakfast feel. White whole wheat flour gives a slightly nutty but still soft muffin. All-purpose flour gives the most classic texture. For the base recipe, use 100g oat flour or 120g all-purpose or white whole wheat flour.

Comparison of oat flour, white whole wheat, and all-purpose flour textures in high protein muffins.
Flour choice changes the crumb: oat flour is heartier, white whole wheat adds soft nuttiness, and all-purpose flour gives the most classic muffin texture.

If oats are your favorite breakfast base, this guide to high protein oatmeal has more ideas for using oats with yogurt, protein powder, cottage cheese, seeds, and nut butter.

Almond flour or extra oat flour

A small amount of almond flour adds tenderness and helps keep the muffin from tasting too lean. If you do not want to use almond flour, use extra oat flour instead. Avoid replacing all the flour with almond flour unless you are using a recipe designed for that structure.

Protein powder

Vanilla protein powder is the easiest choice because it adds sweetness and flavor. Plain protein powder can work, but the muffins may need more vanilla, cinnamon, sweetener, or mix-ins. For example, chocolate protein powder works best in chocolate chip, double chocolate, or banana chocolate versions.

Greek yogurt

Use plain Greek yogurt. Full-fat or 2% yogurt gives the softest result, but nonfat Greek yogurt also works. If the batter looks too stiff after mixing, add a small splash of milk until it loosens.

Banana or applesauce

Use mashed ripe banana for a banana-forward muffin. If you want a more neutral base, use unsweetened applesauce instead. Banana gives more flavor and sweetness; applesauce keeps the muffin more flexible for blueberry, chocolate chip, or pumpkin variations.

Banana and applesauce high protein muffin comparison showing different moisture and flavor bases.
Banana makes the batch sweeter and more banana-bread-like. Applesauce keeps the base more neutral for blueberry, chocolate chip, or pumpkin variations.

Eggs, milk, and oil

Eggs give structure, milk adjusts the batter, and a little oil or melted butter keeps the crumb tender. Think of the milk as an adjustment, not a fixed amount. Start with less, then add only what the batter needs.

Mix-ins

Mini chocolate chips, blueberries, chopped walnuts, lemon zest, cinnamon, pumpkin spice, and diced strawberries can all work. Keep mix-ins to about ½–¾ cup so the muffins bake evenly.

Flavor and sweetness

Protein powder, oats, and Greek yogurt can mute sweetness once baked. If your protein powder is plain or lightly sweetened, use the full amount of maple syrup or honey and do not skip the vanilla, cinnamon, or salt. For a more treat-like muffin, mini chocolate chips usually help more than extra sweetener because they give little pockets of flavor in every bite.

Best Protein Powder for Muffins

Protein powder can make muffins better, but it can also make them dry if the batter is not balanced. Different powders absorb liquid differently, so use the batter texture as your final guide.

This is the part that decides whether your muffins taste like breakfast or like a protein bar in muffin form. The same recipe can turn out soft with one powder and dry with another, so the batter matters more than brand loyalty.

Four muffin batter bowls showing how whey, casein, and plant protein powders create different batter textures.
The same recipe can bake differently with whey, casein, or plant protein. Start with the formula, then adjust the batter before it goes into the pan.
Protein powder typeWhat to expect in muffinsBest adjustment
Whey isolateCan bake firm or dry if overused.Add extra yogurt or milk and check early for doneness.
Whey blendUsually easier than pure isolate and works well in muffin batter.Start with the recipe amount of milk, then adjust if needed.
CaseinAbsorbs a lot of liquid and can make the batter sturdy.Loosen gradually with milk until the batter is easy to scoop.
Pea proteinGood structure, but can become dense or earthy.Use enough flavor, moisture, and gentle mixing.
Plant protein blendOften reliable, but brands vary widely in absorption.Judge by batter texture, not just the printed amount of milk.
CollagenNot ideal as the only protein powder replacement.Use as a partial boost, not a full swap for flour or protein powder.

How protein powder changes batter moisture

Protein muffin batter absorption guide showing thick, just-right, and too-loose batter after adding milk.
A stiff batter does not always mean the recipe is wrong. Often, the protein powder simply needs a slower, splash-by-splash milk adjustment.

Protein powder rule: do not keep adding protein powder just to raise the number. Once protein powder becomes too large a share of the dry ingredients, muffins turn tough, dry, or heavy. A better muffin with 9–12g protein is more useful than a 20g muffin nobody wants to eat.

As a practical starting point, avoid replacing more than about one-third of the dry ingredient base with protein powder unless the recipe has been specifically built for that much powder. The more powder you add, the more moisture, fat, flavor, and careful baking you usually need.

Check the batter texture before baking

Before you bake: if the batter looks like cookie dough, it needs more milk. If it pours like pancake batter, it needs oat flour and a short rest. The sweet spot is thick, creamy, and scoopable.

Three bowls showing too-thick, just-right, and too-loose batter textures for high protein muffins.
This is the texture check that prevents most dry protein muffins. The batter should hold a scoop without crumbling or pouring.

If your batter already looks too stiff or too loose, fix it here before filling the pan. For finished muffins that came out dry, dense, or rubbery, jump to troubleshooting.

How to fix thick or loose batter

Muffin batter being fixed with milk for thick batter and oat flour for loose batter.
Most batter problems are fixable before baking. Use milk to loosen a stiff mix, or oat flour to tighten a loose one, then let the batter rest briefly.

This is the best moment to fix the batter. If it does not look scoopable, check the batter texture guide before filling the muffin tin.

Step-by-Step Method

1. Mix the dry ingredients

In a large bowl, whisk together the flour or oat flour, almond flour or extra oat flour, protein powder, baking powder, baking soda, salt, and cinnamon. Whisking first helps distribute the protein powder and leavening evenly.

2. Whisk the wet ingredients

In a separate bowl, whisk the Greek yogurt, eggs, mashed banana or applesauce, maple syrup or honey, oil or melted butter, milk, and vanilla. The mixture should look smooth and creamy.

3. Combine gently

Add the wet ingredients to the dry ingredients and fold with a spatula. Stop when no dry streaks remain. Do not worry if the mixture looks a little sturdier than regular muffin batter; that is normal here.

This is the point where the recipe either stays tender or starts getting tough. A few tiny lumps are fine; a perfectly smooth batter is not the goal.

High protein muffin batter being gently folded with a spatula before overmixing.
Stop folding as soon as the batter comes together. A few streaks are better than overmixing, which can make protein muffins dense or rubbery.

4. Check and fix the batter texture

The batter should be creamy, scoopable, and easy to portion. It should mound slightly on a spoon but still spread slowly when scooped into the muffin cup. If it looks dry or crumbly, add a small splash of milk. If it pours like pancake batter, add oat flour 1 tablespoon at a time and let it rest for 5 minutes.

5. Let the batter rest if needed

If using oat flour, casein, pea protein, or a thick plant protein blend, let the batter rest for 5 minutes before scooping. Some powders hydrate slowly, so a short rest can make the final texture more even. If it becomes too stiff after resting, loosen it with 1–2 tablespoons of milk.

6. Fold in mix-ins

Fold in chocolate chips, blueberries, nuts, or other mix-ins gently. Overmixing at this point can make the muffins dense.

7. Fill the muffin tin

Line a 12-cup muffin tin and lightly spray the liners. Fill each cup about ¾ full for regular muffins, or slightly fuller for taller tops.

High protein muffin batter scooped into a muffin tin with cups filled about three-quarters full.
Fill each muffin cup about three-quarters full. That gives the batter room to rise while still creating a generous, bakery-style top.

8. Bake and cool

Bake at the higher starting temperature first, then reduce the oven temperature without opening the door. After that, let the muffins cool in the pan for 10 minutes before moving them to a rack. A little patience here pays off because the centers continue to settle as they cool.

Bake Time, Temperature, and Doneness

For the best balance of lift and moisture, start the muffins at 375°F / 190°C for 5 minutes. Then reduce the oven to 350°F / 175°C and bake for another 12–17 minutes, depending on your oven, muffin tin, protein powder, and mix-ins.

High protein muffins baking with a hot-start oven cue of 375 degrees then 350 degrees.
A short hot start helps protein muffins lift before the lower temperature finishes the centers gently. This gives better rise without drying the edges.

How to check doneness

The muffins are done when the tops spring back lightly and a toothpick inserted in the center comes out clean or with a few moist crumbs. Do not wait until the tops feel hard. Instead, pull them when they are just set because they continue to firm up as they cool.

Toothpick test showing moist crumbs on a high protein muffin to indicate doneness.
Do not wait for a perfectly clean toothpick if you want a softer crumb. A few moist crumbs usually mean the muffins are done.

A good batch should rise slightly, feel soft when pressed, and smell warm and lightly sweet. The tops should not feel hard when they leave the oven. If they do, the batch likely baked a few minutes too long.

Cool before storing

Do not skip cooling: these muffins can seem slightly soft in the center when hot. Give them 10 minutes in the pan and more time on a rack before judging the final texture.

High protein muffins cooling on a wire rack with one muffin split open after cooling.
Cooling is part of the recipe, not an afterthought. Letting the muffins rest helps the centers settle and keeps extra steam out of the storage container.

After baking, let the muffins cool before judging the final crumb. Then use the storage and freezing tips if you are making them for meal prep.

Easy Muffin Variations

Use the base recipe as a flexible formula. The mixture should be sturdy enough to scoop, but still soft enough to settle into the muffin cups. Adjust with milk if your protein powder makes it too stiff.

Choose the version based on what you want the muffin to feel like: banana for cozy breakfast, blueberry for fresh and bright, chocolate chip for snack prep, oatmeal for a heartier morning muffin, and pumpkin for a softer fall batch.

Best first variation: banana chocolate chip is the easiest crowd-pleaser. Blueberry lemon is fresher, pumpkin is softer, and cottage cheese is best when you want extra moisture without relying only on protein powder.

For the easiest first batch, start with banana chocolate chip. For a brighter version, try blueberry lemon; for extra moisture, use the cottage cheese version.

Banana protein muffins

Choose this when you want the coziest version. Mashed ripe banana makes the muffins taste closer to banana bread, especially with cinnamon and mini chocolate chips.

Banana chocolate chip high protein muffins with one muffin split open to show a moist crumb.
Banana chocolate chip is the coziest variation: ripe banana adds sweetness, while mini chips spread little pockets of flavor through the crumb.

Blueberry protein muffins

Choose this when you want something fresher and brighter. Applesauce keeps the base neutral, while blueberries and lemon zest make the muffins feel more like a morning bakery muffin.

Blueberry lemon high protein muffins with one muffin split open to show a soft crumb and blueberry pockets.
Blueberry lemon gives the same protein muffin base a fresher, brighter flavor. Keep the batter thick enough so the berries stay suspended instead of sinking.

Chocolate chip protein muffins

Choose this when you want the batch to feel more like a snack than a strict breakfast. Mini chips spread through the crumb better, so you get chocolate in more bites without overloading the batter.

Chocolate chip high protein muffins served with Greek yogurt and fruit for snack prep.
For snack prep, mini chocolate chips make the muffins feel more satisfying without overloading the batter. Pair one with yogurt and fruit for a fuller bite.

Oatmeal protein muffins

For a heartier breakfast muffin, use oat flour and a small amount of rolled oats. Avoid steel-cut oats here because they will not soften properly in a standard muffin bake.

Pumpkin protein muffins

To make a fall-style batch, replace the banana or applesauce with pumpkin puree, add pumpkin pie spice, and use chocolate chips or walnuts. Because pumpkin adds a lot of moisture, these muffins may need the longer end of the bake window.

Pumpkin high protein muffins with a soft orange crumb and warm spice cues.
Pumpkin adds moisture, color, and warm spice, but it also softens the batter. Use the longer end of the bake window if the centers need more time.

Cottage cheese protein muffins

Choose this when you want extra moisture and a softer center. This is the best cottage cheese protein muffin direction if you want more real-food protein without making the batch depend only on powder. Blend the cottage cheese into the wet ingredients first so the batter bakes smooth instead of curdy.

Cottage cheese protein muffins with blended cottage cheese and a split muffin showing a smooth tender crumb.
Cottage cheese works best when blended into the wet ingredients first. That simple step adds moisture without leaving curdy pockets in the crumb.

For more breakfast ideas using the same ingredient, see cottage cheese for breakfast.

How to Make High Protein Muffins Without Protein Powder

You can make protein-rich muffins without protein powder, but the recipe needs a different strategy. For a no-powder batch, think in parts: a creamy protein base, eggs for structure, flour for body, and a little fat, seeds, or nut butter for staying power.

Important: this is not a direct one-for-one swap. If you simply remove the protein powder from the main recipe, the batter balance changes. Use the no-powder formula below instead.

If you are using protein powder after all, return to the main recipe card. If you want to avoid powder completely, follow the no-powder formula below rather than removing the powder from the main batter.

Best no-powder formula

For muffins without protein powder, start with a structure that balances moisture, lift, body, and staying power:

  • Creamy protein base: ¾–1 cup Greek yogurt or blended cottage cheese
  • Structure: 2 eggs
  • Body: 1 cup oat flour + 1 cup all-purpose or white whole wheat flour
  • Staying power: ¼–½ cup hemp hearts or nut butter
  • Moisture and flavor: banana or applesauce
  • Lift: 2 teaspoons baking powder + ½ teaspoon baking soda
  • Balance: ½ teaspoon salt
No-powder high protein muffin formula with Greek yogurt or cottage cheese, eggs, flour, seeds, nut butter, and a finished muffin.
A no-powder protein muffin needs its own structure. Build around yogurt or cottage cheese, eggs, flour, and seeds or nut butter instead of simply removing protein powder.

This will usually give less protein than a protein-powder muffin. The flavor is often more natural, though, and the texture can be softer.

The same idea works in other breakfast batters too. These oat pancakes use oats, cottage cheese, and high-protein options in a way that feels very similar: simple ingredients, better texture, and no need to rely only on protein powder.

Best real-food protein options

IngredientHow it helpsBest use
Cottage cheeseAdds protein and moisture.Blend with wet ingredients for a smooth muffin.
Greek yogurtAdds protein and keeps the crumb soft.Use in banana, blueberry, and chocolate chip muffins.
EggsAdd structure and protein.Useful in almost every muffin formula.
Oats or oat flourAdd breakfast texture and slow-digesting carbs.Best for oatmeal and banana protein muffins.
Nut butterAdds fat, flavor, and some protein.Best in banana, chocolate, and peanut butter muffins.
Hemp, flax, or chiaAdds protein, fiber, and texture.Use in small amounts so the muffins do not turn heavy.

For the best no-powder result, use cottage cheese or Greek yogurt as part of the wet base rather than treating them like simple add-ins. They help the batter stay moist while adding protein in a more natural way.

Troubleshooting: Why Are My Protein Muffins Dry, Dense, or Rubbery?

Most protein muffin problems are not disasters. They are signals. Dry muffins, sticky centers, flat tops, and chalky flavor usually mean the batter needed a little more moisture, less mixing, or a shorter bake.

If your first batch is not perfect, do not treat it like a failure. Protein muffin batter is more sensitive than regular muffin batter because protein powder, oats, yogurt, and cottage cheese all hold moisture differently. Most problems can be fixed by changing the liquid, mixing less, or pulling the muffins from the oven a little earlier.

The batter usually tells you what it needs. A stiff batter needs a little milk. A loose batter needs oat flour and a short rest. Finally, flat flavor usually needs more vanilla, cinnamon, salt, fruit, or chocolate next time.

Dry vs moist: read the crumb

Dry protein muffin crumb compared with soft moist protein muffin crumb for troubleshooting.
Dry protein muffins usually point back to the batter. More moisture, less overbaking, and a better powder-to-flour balance can change the result.

If the problem started before baking, go back to the batter texture cue. If the muffins looked fine going in but came out dry, check the bake time and doneness notes.

Protein muffin troubleshooting guide

Troubleshooting guide for high protein muffins showing fixes for dry, rubbery, chalky, wet, flat, and stuck muffins.
Most protein muffin problems have a simple cause. Once you know whether it is moisture, mixing, bake time, or liners, the next batch is easier to fix.

Use the tables below like a quick diagnosis: find what happened, then adjust the next batch before changing the whole recipe.

Texture problems

ProblemLikely reasonFix
Dry muffinsToo much protein powder, not enough moisture, or overbaking.Add more yogurt or milk next time and check the muffins earlier.
Rubbery textureThe batter was overmixed after the wet and dry ingredients were combined.Fold gently and stop as soon as the batter comes together.
Chalky tasteThe protein powder flavor is too strong or too much powder was used.Use a better-tasting powder, add cinnamon or vanilla, or reduce the powder slightly.
Wet centerToo much fruit, yogurt, or cottage cheese; muffins may also need more cooling.Bake 2–4 minutes longer and let the muffins cool fully before storing.

Baking and pan problems

ProblemLikely reasonFix
Flat topsThe oven was not hot enough at the start or the batter was too thin.Use the hot-start method and keep the batter thick enough to hold shape.
Muffins stick to linersLow-fat, high-protein batters often cling to paper liners.Spray the liners lightly or use silicone muffin cups.
Blueberries sinkThe berries were too wet, too large, or folded into thin batter.Toss berries with a little flour and keep the batter thick.

Batter and flavor fixes

ProblemLikely reasonFix
Batter too thickThe protein powder absorbed more liquid than expected.Add milk gradually until the batter softens.
Batter too thinToo much yogurt, fruit, or milk was added.Add oat flour 1 tablespoon at a time and let the batter rest for 5 minutes.
Muffins taste “healthy” in a bad wayNot enough flavor against the protein powder.Add cinnamon, vanilla, banana, chocolate chips, lemon zest, or a pinch more salt.

How to Store and Freeze Protein Muffins

These muffins are at their best once fully cooled, which makes them useful for breakfast prep. Bake a batch, cool them completely, then keep a few in the fridge and freeze the rest for mornings when you want something filling without cooking.

For another freezer-friendly breakfast that works well on busy mornings, these freezer-friendly breakfast burritos are a savory option to keep alongside muffins.

Storage guide for high protein muffins showing fridge storage, freezer storage, and reheating.
Store protein muffins only after they cool completely. Then refrigerate the week’s batch and freeze the rest so the texture stays fresher for longer.

Meal prep tip: save the base recipe once, then change only the fruit, mix-ins, and protein powder adjustment. The batter texture should stay the same even when the flavor changes.

Storage times

Storage methodHow longBest tip
Room temperatureSame day, or overnight if your kitchen is coolFor longer storage, refrigerate because these muffins are moist and yogurt-based.
Refrigerator4–5 daysStore in an airtight container with a paper towel to absorb moisture.
FreezerUp to 3 monthsFreeze individually, then move to a freezer bag or airtight container.
Reheating15–45 secondsMicrowave briefly until just warm, not hot and tough.

What to Serve with High Protein Muffins

These muffins work well as a quick breakfast, lunchbox item, pre-workout bite, or afternoon snack. For a fuller breakfast, serve one with Greek yogurt, fruit, boiled eggs, cottage cheese, nut butter, or a smoothie.

High protein muffins served with Greek yogurt, fruit, eggs, and coffee for breakfast meal prep.
One muffin can be a quick snack, but it becomes a fuller breakfast with Greek yogurt, fruit, eggs, cottage cheese, or coffee.

When you want a softer, bakery-style breakfast, warm one muffin briefly and split it with a little butter, peanut butter, or almond butter.

For snack prep, pair this recipe with healthy oat protein bars so you have both baked muffins and grab-and-go bars ready for the week.

Once you understand the batter, this becomes an easy recipe to repeat. Keep the base the same, change the fruit or mix-ins, and you have a breakfast muffin that can move from weekday meal prep to a weekend coffee plate without feeling like “diet food.”

For your own next batch, note the protein powder you used and how much milk the batter needed. Once you know that one detail, this recipe becomes easy to repeat with banana, blueberries, chocolate chips, pumpkin, or cottage cheese.

Ready to bake? The full recipe card below gives you the exact amounts, bake time, and adjustment notes. If your protein powder is very absorbent, start with the lower milk amount and add more only after mixing.

High Protein Muffins Recipe Card

A flexible, meal-prep friendly muffin base made with Greek yogurt, protein powder, oat flour or whole wheat flour, and banana or applesauce. Use the notes below to adjust the batter for your protein powder and favorite mix-ins.

Yield12 muffins

Prep Time10 minutes

Bake Time17–22 minutes

Total Time30–35 minutes

High protein muffins recipe card image with yield, time, protein range, and batter texture cue.
Save the texture cue along with the ingredient list: the batter should hold its shape, feel creamy, and scoop easily before it goes into the muffin tin.

Equipment

  • 12-cup muffin tin
  • Muffin liners or silicone muffin cups
  • Mixing bowls
  • Whisk
  • Rubber spatula
  • ¼ cup scoop or spoon
  • Wire cooling rack

Ingredients

Dry ingredients

  • 1 cup oat flour, 100g, for the default breakfast-style version
  • Flour swap: use 1 cup all-purpose or white whole wheat flour, 120g, for a softer classic muffin texture
  • ½ cup almond flour, about 50–55g, for extra tenderness
  • Almond-free swap: use ½ cup extra oat flour instead
  • ½ cup vanilla protein powder, about 50–60g
  • 2 teaspoons baking powder
  • ½ teaspoon baking soda
  • ½ teaspoon fine salt
  • 1 teaspoon cinnamon

Wet ingredients

  • ¾ cup plain Greek yogurt, about 180g
  • ½ cup mashed ripe banana or unsweetened applesauce, about 120g
  • 2 large eggs
  • ⅓ cup maple syrup or honey, about 80ml
  • 3 tablespoons neutral oil or melted butter, about 45ml
  • 3–6 tablespoons milk, about 45–90ml, starting with 3 tablespoons and adding more only if the batter looks too stiff
  • 2 teaspoons vanilla extract

Optional mix-ins

  • ½ cup mini chocolate chips
  • ½–¾ cup blueberries
  • ½ cup chopped walnuts or pecans
  • 1 tablespoon lemon zest for blueberry muffins
  • ½ teaspoon pumpkin pie spice for a warmer flavor

Instructions

  1. Preheat the oven. Preheat to 375°F / 190°C. Line a 12-cup muffin tin and lightly spray the liners.
  2. Mix the dry ingredients. In a large bowl, whisk together the flour, almond flour or extra oat flour, protein powder, baking powder, baking soda, salt, and cinnamon.
  3. Mix the wet ingredients. In a second bowl, whisk Greek yogurt, mashed banana or applesauce, eggs, maple syrup or honey, oil or melted butter, 3 tablespoons milk, and vanilla.
  4. Combine gently. Add the wet ingredients to the dry ingredients. Fold with a spatula until just combined.
  5. Adjust the batter. The batter should be sturdy but not dry. If it looks stiff, add a small splash of milk. If it looks too loose, add oat flour 1 tablespoon at a time and rest for 5 minutes.
  6. Rest if needed. If using oat flour, casein, pea protein, or a very absorbent plant protein powder, let the batter rest for 5 minutes before scooping.
  7. Add mix-ins. Fold in chocolate chips, blueberries, nuts, or other mix-ins. Do not overmix.
  8. Fill the muffin tin. Divide the batter between 12 muffin cups, filling each about ¾ full.
  9. Bake with a hot start. Bake at 375°F / 190°C for 5 minutes. Without opening the oven, reduce the temperature to 350°F / 175°C and bake for 12–17 more minutes.
  10. Check for doneness. The muffins are done when the tops spring back lightly and a toothpick comes out clean or with a few moist crumbs.
  11. Cool properly. Cool in the pan for 10 minutes, then transfer to a wire rack. Let the muffins cool before storing.

Recipe Notes

  • Best texture cue: the batter should mound on a spoon but still spread slowly in the muffin cup.
  • Protein powder varies: if your batter looks dry, add milk gradually before baking.
  • Banana version: use mashed ripe banana instead of applesauce.
  • Neutral base: use applesauce and vanilla protein powder.
  • Softer muffins: avoid overbaking and give the muffins enough cooling time.
  • Sticking prevention: use silicone liners or spray paper liners lightly.
  • Dairy-free batch: use thick dairy-free yogurt and a plant-based protein powder, then adjust the milk as needed.

Approximate Nutrition

Approximate per muffin, based on 12 muffins: 180–230 calories, 9–12g protein, 20–28g carbohydrates, 6–10g fat, and 2–4g fiber. Exact numbers vary by protein powder, yogurt, flour, sweetener, milk, and mix-ins.

Storage

Store fully cooled muffins in an airtight container in the refrigerator for 4–5 days, or freeze for up to 3 months. Reheat briefly in the microwave until just warm.

FAQs About High Protein Muffins

How much protein is in each muffin?

Each muffin has about 9–12 grams of protein depending on the protein powder, yogurt, flour, milk, eggs, and mix-ins you use. For the most accurate number, calculate using the exact brands and amounts in your kitchen.

What if I do not want to use protein powder?

A no-powder version needs a slightly different formula built around cottage cheese, Greek yogurt, eggs, oats, nut butter, or seeds. Simply removing the protein powder from this recipe will change the flour-to-liquid balance.

Which protein powder works best for muffins?

A vanilla whey blend or plant-based blend is the easiest starting point. Whey isolate can bake dry if used heavily, while casein and some plant powders may need extra milk because they absorb more liquid.

Why did my protein muffins turn dry?

Dry muffins usually come from too much protein powder, not enough liquid, overbaking, or using a powder that absorbs heavily. Next time, add more yogurt or milk and check the muffins earlier.

Why is my batter thicker than regular muffin batter?

Protein powder, oat flour, and Greek yogurt all make the batter sturdier than a classic muffin batter. It should still be scoopable, not dry. Let it rest for 5 minutes, then loosen with a small splash of milk if needed.

Does oat flour work in this recipe?

Oat flour works well and gives the muffins a breakfast-style flavor. The texture will be slightly heartier than all-purpose flour. If the batter gets too stiff, add a little more milk.

How should I freeze and reheat them?

Cool the muffins fully, freeze them individually, then move them to a freezer bag or airtight container for up to 3 months. To reheat, microwave briefly from frozen or thaw overnight in the fridge.

How do I make a dairy-free version?

Choose a thick dairy-free yogurt and a plant-based protein powder. Because plant-based powders often absorb more liquid, add milk gradually until the batter looks sturdy but workable.

Blueberries or chocolate chips: which works better?

Both work well, but they give different results. Blueberries make the muffins feel fresher and more breakfast-like, while mini chocolate chips make them feel more snackable. Keep mix-ins around ½–¾ cup so the muffins bake evenly.

How do I know when they are done?

The tops should spring back lightly, and a toothpick should come out clean or with a few moist crumbs. Pull them before they feel firm and dry because they continue to set as they cool.

Are these filling enough for breakfast?

They can be, especially when paired with fruit, Greek yogurt, cottage cheese, eggs, or coffee. On their own, they are more filling than a regular muffin because they include protein-rich ingredients and a more substantial crumb.

If you try these, leave a note with the protein powder you used, whether you chose banana or applesauce, and how much milk your batter needed. Those little details often help the next reader get a softer batch on the first try.

Back to top

Posted on 1 Comment

Breakfast Casserole with Hash Browns

Breakfast casserole with hash browns, sausage, eggs, cheese, peppers, and golden edges in a 9x13 baking dish.

This breakfast casserole with hash browns is the egg-based brunch bake to make when you want something hearty, cheesy, sliceable, and easy to prep ahead. Frozen shredded hash browns, eggs, sausage, cheese, and a creamy egg mixture bake together in a 9×13 pan until the center is softly set, the cheese melts into the potatoes, and the edges turn golden.

The key is moisture control. Hash brown breakfast casserole can turn watery, greasy, rubbery, or bland if the potatoes are too wet, the meat is not drained, or the vegetables go in raw. This version shows you how to avoid that, plus how to make it with bacon, ham, no meat, hash brown patties, or overnight prep.

It is the kind of casserole that makes sense when the morning already has enough going on, whether that means Christmas breakfast, Easter brunch, overnight guests, a weekend family breakfast, or a meal-prep Sunday where one pan needs to handle the eggs, potatoes, cheese, and sausage.

This pan is especially good for the kind of morning where people drift into the kitchen at different times, coffee is still being poured, and nobody wants to stand at the stove making eggs in batches. It comes out hot, cheesy, and ready to slice, and everyone can make it their own with hot sauce, scallions, salsa, or fruit on the side.

This is the egg-based breakfast version. If you were looking for the creamy cheesy potato side dish made with sour cream, cheddar, cream soup or homemade sauce, and a crunchy topping, use this hashbrown casserole recipe instead. That one is the dinner-side and potluck version; this one is the breakfast casserole with eggs.

Quick Answer: Breakfast Casserole with Hash Browns

To make breakfast casserole with hash browns, layer thawed and patted-dry frozen shredded hash browns in a greased 9×13-inch baking dish with cooked sausage, sautéed onion and bell pepper, and shredded cheese. Pour over a mixture of eggs, milk or half-and-half, sour cream or Greek yogurt, and seasoning. Bake at 350°F / 175°C for 45–55 minutes, or until the center is set and the edges are lightly golden.

The texture is much better when the hash browns are thawed and excess moisture is removed before baking. This keeps the casserole from turning watery and helps the eggs set more evenly. If that is your main concern, the watery casserole fixes below are worth reading before you assemble the pan. If you assemble it the night before, bake it cold from the fridge and add a few extra minutes as needed.

The finished bake should feel hearty but not heavy: tender eggs, savory sausage, melted cheese, and hash browns that taste like breakfast potatoes instead of a wet potato layer.

Best default formula: 30 oz / 850 g frozen shredded hash browns + 10 large eggs + 1 lb / 454 g cooked sausage + 2 cups / 225 g cheese + 1 cup / 240 ml milk or half-and-half + ½ cup / 120 g sour cream or Greek yogurt.

This is the version I would choose for a holiday breakfast, a brunch table, or a meal-prep pan because it is sturdy enough to slice but still soft and creamy in the center.

Lifted slice of hash brown breakfast casserole showing eggs, sausage, cheese, peppers, and shredded potato layers.
A clean slice tells you the casserole had enough eggs, the hash browns were not too wet, and the pan rested before cutting.

Hash Brown Breakfast Casserole at a Glance

Best pan 9×13-inch / 23×33 cm baking dish
Oven temperature 350°F / 175°C
Hash browns 30 oz / 850 g frozen shredded hash browns, thawed and patted dry
Eggs 10 large eggs for balanced texture; 12 for a taller egg bake
Default protein 1 lb / 454 g breakfast sausage, cooked and drained
Cheese 2 cups / about 225 g shredded cheddar, Colby Jack, Monterey Jack, or pepper Jack
Bake time 45–55 minutes, or 55–65 minutes if chilled overnight
Make-ahead Assemble overnight, or prep components separately for the cleanest texture

Breakfast Casserole vs Hashbrown Casserole

The phrase “hashbrown casserole” can mean two different dishes. This recipe is a breakfast casserole with hash browns, which means it has eggs, cheese, hash browns, and usually sausage, bacon, ham, or vegetables. It is baked like a brunch egg casserole and served in slices.

A classic side-dish hashbrown casserole is different. That version is usually a creamy potato bake with sour cream, cheddar, cream soup or homemade sauce, butter, and sometimes a crunchy topping. It is served with dinner, holiday meals, potlucks, and barbecue-style mains. This breakfast version stays in the egg-and-brunch lane.

Use this breakfast version when you want eggs and protein in the same pan. Use the side-dish version when you want a cheesy potato casserole to serve next to ham, chicken, barbecue, or a holiday dinner spread.

Split comparison of egg-based breakfast casserole with hash browns and creamy side-dish hashbrown casserole.
Although both dishes use hash browns, this breakfast casserole is built around eggs and protein, while the side-dish version is creamier, softer, and meant for dinner plates or potlucks.

Why This Hash Brown Breakfast Casserole Works

The best hash brown breakfast casseroles taste like a real breakfast plate baked into one pan: golden potatoes, savory sausage, soft eggs, sweet peppers, and melted cheese. This recipe works because each part is handled before it goes into the dish instead of asking the oven to fix everything at once.

Thawed, dried hash browns do not leak water into the eggs. Cooking and draining the sausage first keeps the casserole savory without making it greasy. A quick sauté gives the onion and bell pepper time to soften and lose some moisture before baking.

Milk or half-and-half keeps the eggs tender, while sour cream or Greek yogurt adds body and creaminess without making the center loose. Dry mustard or Dijon, garlic powder, pepper, and enough salt help season the potatoes, not just the eggs.

Resting is the quiet step that makes the slices look better. Like many egg bakes, this casserole firms as it sits, so cutting into it right away can make the center look looser than it really is.

Ingredients for Hash Brown Breakfast Casserole

The main version is a sausage breakfast casserole with hash browns, but the same base works with bacon, ham, or vegetables. If you are not sure which potatoes to use, jump to the hash brown comparison before you start. Here is what each ingredient does.

Ingredients for breakfast casserole with hash browns, including eggs, sausage, cheese, dairy, peppers, onion, seasonings, and thawed potatoes.
The best texture starts before baking: thawed potatoes, cooked sausage, sautéed vegetables, and a balanced egg mixture all help the casserole set evenly.

Hash Browns

Use 30 oz / 850 g frozen shredded hash browns for the most classic texture. Thaw them first, then pat them dry with paper towels or squeeze gently in a clean kitchen towel if they feel wet. This step is one of the biggest differences between a clean, sliceable casserole and a watery one.

Thawed shredded hash browns being pressed dry in a towel before making breakfast casserole.
Drying thawed hash browns is the easiest no-soggy step because it removes extra moisture before the eggs ever hit the pan.

For a more golden potato layer, see the crispy hash brown base option before layering the eggs.

If you are still deciding which kind of potatoes to use, this air fryer hash browns guide is useful because it explains frozen shredded hash browns, patties, diced potatoes, and homemade grated potatoes in more detail.

Eggs

Use 10 large eggs for a creamy, balanced 9×13 casserole. If you want a taller, more egg-forward breakfast bake, use 12 eggs. If you use fewer than 8 eggs in a 9×13 pan, the casserole becomes more potato-heavy and may not hold together as neatly.

Dairy

Use 1 cup / 240 ml whole milk or half-and-half plus ½ cup / 120 g sour cream or Greek yogurt. Whole milk keeps the casserole lighter; half-and-half makes it richer. Sour cream gives a softer, creamier texture and helps the egg layer feel less flat.

Cheese

Use 2 cups / about 225 g shredded cheese. Cheddar gives the most classic breakfast-casserole flavor, Colby Jack melts smoothly, Monterey Jack keeps things mild and creamy, and pepper Jack adds a little heat without changing the whole dish. Divide the cheese so some melts into the casserole and some goes on top.

Sausage, Bacon, Ham, or No Meat

The default is 1 lb / 454 g breakfast sausage, cooked and drained. You can replace it with cooked bacon, diced ham, or sautéed vegetables. For a bacon version, cook the bacon first and crumble it before adding it to the pan.

Vegetables and Seasoning

Onion and bell pepper are the safest default because they bring sweetness and color without overwhelming the casserole. Sauté them first. Raw vegetables can release water as they bake, especially mushrooms, spinach, zucchini, and peppers. For seasoning, use garlic powder, black pepper, dry mustard or Dijon, and enough salt to season the potatoes.

Egg-to-Dairy Ratio for a 9×13 Breakfast Casserole

The egg-to-dairy balance is what keeps the center creamy instead of wet. Use this table if you want to make the bake taller, richer, lighter, or more sliceable.

Texture Goal Eggs Dairy
Balanced and sliceable 10 large eggs 1 cup milk + ½ cup sour cream
Taller and more egg-forward 12 large eggs 1 cup milk or half-and-half
Richer and creamier 10 large eggs 1 cup half-and-half + ½ cup sour cream
Lighter 10 large eggs 1 cup whole milk only
Egg-to-dairy ratio guide for making hash brown breakfast casserole balanced, taller, richer, or lighter.
Once the base formula is right, small egg and dairy changes can make the casserole taller, richer, lighter, or easier to slice.

Best Hash Browns for Breakfast Casserole

Most breakfast casserole recipes use frozen shredded hash browns, but they are not the only option. The best choice depends on whether you want a soft, classic casserole, a chunkier potato bite, or a more defined potato layer.

Comparison of shredded hash browns, diced hash browns, hash brown patties, and fresh shredded potatoes for breakfast casserole.
Shredded hash browns give the classic soft breakfast casserole texture; patties create a more defined base, while diced potatoes make the bake chunkier.
Hash Brown Type Best For How to Use
Frozen shredded hash browns Classic breakfast casserole texture Thaw, pat dry, and layer into the pan.
Diced hash browns Chunkier, potato-forward casserole Thaw if frozen. Bake time may be slightly longer.
Hash brown patties Defined potato base or shortcut layer Arrange 8–10 patties in the bottom of a 9×13 pan.
Refrigerated shredded hash browns Fast prep, less thawing Pat dry if damp. Use the same amount by weight.
Fresh shredded potatoes Homemade version Rinse, drain, and squeeze very dry before using.

O’Brien-style hash browns, which usually include diced peppers and onions, also work. Because they already include vegetables, reduce or skip the fresh bell pepper and onion in the recipe, and make sure the potatoes are thawed so the casserole does not bake up watery.

Should You Thaw Hash Browns First?

For this recipe, yes. Thawing is the safer choice because frozen hash browns can release extra moisture into the egg mixture and extend the bake time. Longer bake time can make the edges overcook before the center sets.

The best method is to thaw the hash browns in the refrigerator overnight, then pat them dry. If they feel wet, squeeze them gently in a clean towel. They do not need to be bone-dry, but they should not be icy or dripping.

Can You Use Frozen Hash Browns Without Thawing?

You can bake this with frozen hash browns, but thawed and dried hash browns give a cleaner, less watery casserole. If speed matters more than sliceability, use them frozen and expect a softer center and a longer bake time.

Should You Brown the Hash Browns First?

You do not have to, but it gives the casserole better potato flavor and helps remove moisture. To do it, warm a little butter or oil in a large skillet, add the thawed hash browns, and cook for 5–8 minutes until some of the moisture evaporates and a few edges turn lightly golden. Then spread them into the baking dish.

Want a Crispier Hash Brown Base?

If you want the potato layer to taste more like diner-style breakfast potatoes, pre-bake it before adding the eggs. Spread the thawed hash browns in the greased baking dish, drizzle with 2 tablespoons melted butter or oil, and bake at 400°F / 200°C for 15–20 minutes. Then add the sausage, cheese, and egg mixture and bake as directed.

This step is optional, but it makes the edges more golden and gives the casserole a more memorable first bite.

Pre-baked crispy hash brown base in a baking dish before eggs, sausage, and cheese are added.
Pre-baking the hash brown layer is optional, but it adds golden edges and a more diner-style potato flavor underneath the eggs.

How to Keep It from Getting Watery

The biggest mistake with breakfast casserole with hash browns is adding too much hidden moisture. Hash browns, vegetables, sausage, bacon, and spinach can all release liquid into the eggs if they are not handled first.

Moisture Source What to Do Why It Helps
Frozen shredded hash browns Thaw and pat dry before layering. Prevents icy potatoes from watering down the egg mixture.
Bell peppers and onions Sauté for 3–5 minutes first. Softens the vegetables and cooks off extra water.
Mushrooms Cook until their liquid evaporates. Stops them from leaking water into the eggs.
Spinach Wilt and squeeze dry before adding. Keeps the casserole from turning loose or watery.
Sausage or bacon Cook and drain well. Prevents grease from pooling around the eggs.

The cleanest slices come from thawed hash browns, cooked vegetables, drained meat, and a wide 9×13-inch dish. For extra potato flavor, lightly brown the hash browns in a skillet before layering them into the casserole.

How to Make Breakfast Casserole with Hash Browns

This is the basic 9×13 method. It is simple, but the order matters. For exact amounts while you cook, use the recipe card.

Step-by-step guide showing dried potatoes, cooked sausage, sautéed vegetables, whisked eggs, layering, baking, and resting.
Follow the order for the best result: dry the potatoes, cook the filling, whisk the eggs, layer evenly, bake until set, then rest.

1. Prepare the Baking Dish

Grease a 9×13-inch / 23×33 cm baking dish with butter or nonstick spray. A 3-quart baking dish works well. Avoid a very deep smaller dish unless you are prepared to bake longer.

2. Thaw and Dry the Hash Browns

Thaw the frozen shredded hash browns, then pat them dry. Spread them evenly in the bottom of the prepared baking dish. Season this layer lightly because potatoes need more seasoning than eggs.

3. Cook the Sausage

Cook the sausage in a large skillet over medium heat, breaking it into small pieces. Drain off excess grease. If you are using bacon, cook it until crisp and crumble it. If you are using ham, it usually only needs to be diced.

4. Sauté the Vegetables

In the same skillet, cook the onion and bell pepper for a few minutes until slightly softened. This keeps them from releasing too much water into the casserole.

5. Whisk the Egg Mixture

In a large bowl, whisk the eggs, milk or half-and-half, sour cream or Greek yogurt, garlic powder, dry mustard or Dijon, black pepper, and salt. Whisk until the mixture looks smooth and evenly blended.

6. Layer the Casserole

Scatter the cooked sausage, sautéed vegetables, and most of the cheese over the hash browns. Pour the egg mixture evenly over the top. Use a spatula to gently nudge the filling so the eggs settle into the layers. Finish with the remaining cheese.

7. Bake Until Set

Bake at 350°F / 175°C for 45–55 minutes, or until the edges are puffed and lightly golden and the center no longer jiggles loosely. Do not wait for the whole top to look dry; the casserole will continue to firm as it rests. If it was refrigerated overnight, it may need 55–65 minutes.

Finished breakfast casserole with hash browns, golden edges, set center, sausage, peppers, cheese, and thermometer cue.
Stop baking when the center is set but the top still looks tender; a completely dry-looking surface usually means the eggs have gone too far.

8. Rest Before Slicing

Let the casserole rest for 10–15 minutes before cutting. This improves the texture and makes the slices cleaner.

If this is your first time making it, start with the sausage-and-cheddar version below. It gives you the cleanest baseline for texture, seasoning, and bake time, then the bacon, ham, spicy, vegetarian, and patty versions are easy to adjust later.

Recipe Card: Breakfast Casserole with Hash Browns

This make-ahead breakfast casserole bakes hash browns, eggs, sausage, and cheese into a creamy, savory 9×13 breakfast bake with golden edges and clean slices. It is hearty enough for brunch, holidays, or breakfast meal prep.

Servings
10–12
Prep Time
20 minutes
Cook Time
45–55 minutes
Total Time
About 1 hour 15 minutes

Equipment

  • 9×13-inch / 23×33 cm baking dish
  • Large skillet
  • Large mixing bowl
  • Whisk
  • Spatula
  • Foil, optional for overnight storage or if the top browns too quickly

Ingredients

  • 30 oz / 850 g frozen shredded hash browns, thawed and patted dry
  • 1 lb / 454 g breakfast sausage
  • ½ cup / 75 g diced onion
  • 1 cup / 120–150 g diced bell pepper
  • 10 large eggs
  • 1 cup / 240 ml whole milk or half-and-half
  • ½ cup / 120 g sour cream or plain Greek yogurt
  • 2 cups / about 225 g shredded cheddar, Colby Jack, or Monterey Jack, divided
  • 1 tsp kosher salt, or to taste depending on sausage and cheese
  • ½ tsp black pepper
  • ½ tsp garlic powder
  • ½ tsp dry mustard or 1 tsp Dijon mustard
  • Optional: ¼ tsp smoked paprika, a few dashes hot sauce, sliced scallions for serving

Instructions

  1. Preheat the oven to 350°F / 175°C. Grease a 9×13-inch baking dish.
  2. Thaw the hash browns and pat them dry. Spread them evenly in the prepared baking dish.
  3. Cook the sausage in a large skillet over medium heat until browned and fully cooked. Break it into small crumbles, then drain excess grease.
  4. Add the diced onion and bell pepper to the skillet and cook for 3–5 minutes, until slightly softened. Scatter the sausage and vegetables over the hash browns.
  5. Sprinkle about 1½ cups of the cheese over the potato and sausage layer. Save the remaining ½ cup for the top.
  6. In a large bowl, whisk the eggs, milk or half-and-half, sour cream or Greek yogurt, salt, pepper, garlic powder, and dry mustard or Dijon until smooth.
  7. Pour the egg mixture evenly over the casserole. Gently press the filling with a spatula so the egg mixture settles through the layers. Sprinkle the remaining cheese on top.
  8. Bake for 45–55 minutes, until the edges are lightly golden, the center is set, and the middle no longer sloshes when the dish is gently moved. If baking straight from the refrigerator, plan on 55–65 minutes.
  9. Rest for 10–15 minutes before slicing. Top with scallions or hot sauce if you like.

Notes

  • Use 12 eggs instead of 10 if you want a taller, more egg-forward casserole.
  • While you prep the sausage and vegetables, you can let the eggs sit out for 15–20 minutes so they blend more easily and bake a little more evenly.
  • Thaw and dry the hash browns before baking for the cleanest texture.
  • Replace the sausage with 2½–3 cups cooked vegetables for a no-meat version.
  • Use 1½ cups / 225 g diced ham instead of sausage for a ham version.
  • Use about 1 cup cooked crumbled bacon for a bacon version. For an easier prep option, cook the strips first using this air fryer bacon recipe, then crumble them into the casserole.
  • If using hash brown patties, use 8–10 patties in the bottom of the pan and expect a slightly longer bake.
  • To avoid a watery casserole, do not add raw mushrooms, raw spinach, or icy hash browns directly to the pan.
  • If the top browns before the center is set, loosely cover the dish with foil.
  • Egg-based casseroles should be cooked until set; for food safety, egg dishes are commonly cooked to 160°F / 71°C. See the FDA’s egg safety guidance for more detail: What You Need to Know About Egg Safety.
Recipe card for breakfast casserole with hash browns showing 30 ounces hash browns, 10 eggs, 1 pound sausage, 350°F, and 45 to 55 minutes.
Start with the dependable 9×13 formula: 30 ounces hash browns, 10 eggs, 1 pound sausage, cheese, dairy, and a 350°F bake.

Overnight Breakfast Casserole with Hash Browns

This casserole is ideal for making ahead because the ingredients are sturdy and the 9×13 format feeds a group. You have two good options: the easiest overnight method and the best-texture method.

If you are making this for guests, the overnight version is less about saving ten minutes and more about saving your morning. The sausage is cooked, the cheese is ready, the potatoes are handled, and breakfast can go into the oven before the kitchen gets busy.

Overnight breakfast casserole with hash browns being prepared in the refrigerator and baked the next morning.
Overnight prep is useful because the potatoes, sausage, cheese, and egg mixture are handled before the morning gets busy.

Easy Overnight Method

Assemble the entire casserole in the baking dish, cover tightly, and refrigerate overnight. In the morning, let the dish sit at room temperature while the oven preheats. Bake as directed, adding 5–10 minutes if the center is still loose.

Best-Texture Overnight Method

For the cleanest texture, prep the components separately. Cook and drain the sausage, sauté the vegetables, thaw and dry the hash browns, and whisk the egg mixture. Refrigerate everything separately, then assemble just before baking. This prevents the potatoes from sitting in the egg mixture all night and gives a neater slice.

Overnight tip: If your hash browns are very wet or your vegetables are raw, the casserole can turn watery by morning. Dry the potatoes well, cook the vegetables first, and drain the meat before assembling.

Can You Bake It Straight from the Fridge?

Yes. A cold casserole usually needs extra time. Start checking around 50 minutes, but do not be surprised if it takes 55–65 minutes. When the top browns quickly while the center is still soft, cover the dish loosely with foil and keep baking.

If you are baking from cold, use the doneness cues rather than the clock alone.

Sausage, Bacon, Ham, and No-Meat Hash Brown Breakfast Casserole

Once the base is set, this recipe becomes very flexible. Sausage is the classic choice, bacon makes it smoky, ham makes it perfect for leftovers, and the no-meat version works well when the vegetables are cooked first. Pick the version that fits your morning rather than changing the whole recipe.

For the most dependable first batch, use sausage, cheddar or Colby Jack, thawed shredded hash browns, and the 10-egg base. Bacon, ham, cream cheese, pepper Jack, and extra vegetables all work, but they change salt, moisture, richness, or bake time.

If you are using patties instead of shredded potatoes, go straight to the hash brown patty version because the setup and bake time are slightly different.

If your family already has a “usual” breakfast casserole version, this is the section to make it yours. Some houses are sausage-and-cheddar houses, some are bacon-and-pepper-Jack houses, and some are firmly leftover-ham-after-Easter houses.

Four hash brown breakfast casserole variations with sausage, bacon, ham, and vegetarian fillings on separate plates.
Sausage, bacon, ham, and vegetables all work in this hash brown breakfast casserole, but each one changes salt, moisture, richness, or bake time.

Sausage Version

This is the default version and the most classic. Use 1 lb / 454 g breakfast sausage, cooked and drained. Mild sausage gives a family-friendly flavor, while hot sausage adds more punch. If your sausage is very salty, reduce the added salt in the egg mixture.

Bacon Version

Replace the sausage with 8–12 oz raw bacon, cooked until crisp and crumbled, or about 1 cup cooked bacon pieces. Bacon is saltier than sausage, so go easy on extra salt. For a loaded version, use half sausage and half bacon.

Ham and Cheese Version

Use 1½ cups / about 225 g diced ham, or up to 12 oz / 340 g for a ham-heavy version. This is especially useful after Easter, Christmas, or any big breakfast where leftover ham is already in the fridge. Cheddar, Swiss, Monterey Jack, and Colby Jack all work well here.

Vegetarian Version

Skip the meat and add more vegetables. Good choices include sautéed mushrooms, bell peppers, onions, spinach, broccoli, and scallions. The key is to cook watery vegetables first. Spinach should be wilted and squeezed dry. Mushrooms should be sautéed until their liquid cooks off.

For a no-meat 9×13 casserole, use about 2½–3 cups cooked vegetables in place of the sausage. A good mix is 1 cup bell pepper, ¾ cup mushrooms, ½ cup onion, and 1 cup spinach that has been wilted and squeezed dry. Add an extra ½ cup cheese if you want the casserole to feel richer without meat.

Cream Cheese Version

A richer version starts with 4 oz / 115 g softened cream cheese stirred into the warm cooked sausage before it goes into the casserole. This makes the filling extra creamy and hearty. Keep the sour cream in the egg mixture or reduce it slightly if you prefer a lighter texture.

Spicy Version

Use pepper Jack cheese, hot breakfast sausage, diced jalapeño, and a few dashes of hot sauce in the egg mixture for a version that tastes warmer and sharper without losing the potato-and-egg comfort. A little smoked paprika or chili powder also works well.

Gluten-Free Notes

The casserole can be naturally gluten-free, but check labels carefully. Some sausage, frozen hash browns, seasoning blends, and shredded cheeses may include additives or cross-contact warnings. Use certified gluten-free ingredients if needed.

Breakfast Casserole with Hash Brown Patties

Hash brown patties make a more defined potato layer and are a useful shortcut. Instead of shredded hash browns, arrange 8–10 frozen hash brown patties in a single layer in the bottom of a greased 9×13-inch baking dish. They can overlap slightly if needed.

Frozen hash brown patties arranged in a 9×13 baking dish with sausage, cheese, and eggs nearby.
Hash brown patties are a useful shortcut because they create a clear potato base before the eggs, cheese, and sausage go on top.

Top the patties with cooked sausage, bacon, or ham, then add cheese and pour the egg mixture over everything. Because patties are denser than shredded hash browns, the bake time may land closer to 50–60 minutes. Let the casserole rest before slicing so the patty layer and egg layer hold together.

Patty Setup Amount for 9×13 Pan
Hash brown patties 8–10 frozen patties
Eggs 10 large eggs, or 9 if using fewer toppings
Milk or half-and-half 1 cup / 240 ml
Cheese 2 cups / 225 g
Protein 1 lb sausage or 1½ cups diced ham

For a more structured patty-style bake, cover the dish with foil for the first 25 minutes, then uncover and bake another 20–30 minutes until the edges are golden and the center is set. This helps the egg mixture cook through without drying out the cheese on top too early.

Slice of breakfast casserole with a defined hash brown patty base, eggs, sausage, cheese, and peppers.
The patty version slices differently from shredded hash browns because the potato layer stays more structured in each piece.

Patty version shortcut: Use 8–10 hash brown patties, 10 eggs, 1 cup / 240 ml milk or half-and-half, 2 cups / 225 g cheese, and 1½ cups diced ham or 1 lb cooked sausage. Use 9 eggs only if your pan is less loaded.

Can You Make It in a Slow Cooker?

You can make a breakfast casserole with hash browns in a slow cooker, but the texture will be softer and more scoopable than the oven version. It will not have the same golden edges or clean slices.

For a slow cooker version, layer thawed hash browns, cooked sausage or ham, vegetables, cheese, and egg mixture in a greased slow cooker. Cook on low until the eggs are set, and avoid holding it too long after cooking because eggs can turn rubbery.

Start checking around 3–4 hours on low, depending on your slow cooker size and how full it is. Avoid cooking on high if you want a softer egg texture; the edges can overcook before the center sets.

How to Tell When It’s Done

Breakfast casserole is done when the center is set, the edges are puffed, and the top is lightly golden. The middle should not slosh when you gently shake the dish. A knife inserted near the center should come out mostly clean, though a little melted cheese is normal.

If you use a food thermometer, the center of an egg-based casserole should reach 160°F / 71°C. This is especially helpful when baking a cold overnight casserole, a deeper pan, or a loaded version with extra meat and vegetables.

A good finished casserole should not look dry or stiff. The center should be set enough to slice after resting, but the eggs should still look tender and slightly creamy around the potatoes.

Try not to bake it until the top looks dry all the way across. A breakfast egg bake should look set, puffed, and lightly golden, but still moist inside. The rest time will finish the texture without drying out the eggs.

Troubleshooting: Watery, Rubbery, Bland, or Loose

Most problems come down to moisture, bake time, or balance. Use this table if your casserole is watery, greasy, bland, or hard to slice.

Troubleshooting guide for watery breakfast casserole showing drying potatoes, sautéing vegetables, draining meat, and covering a browning top.
Most watery casseroles start with hidden moisture, so dry the potatoes, sauté watery vegetables, drain the meat, and cover only if the top browns too fast.
Problem Likely Cause Fix
Watery casserole Wet hash browns, raw vegetables, or too much liquid Thaw and dry the hash browns. Sauté vegetables first. Drain spinach, mushrooms, sausage, and bacon well.
Rubbery eggs Overbaking or too little dairy Bake just until set. Use milk, half-and-half, sour cream, or Greek yogurt for tenderness.
Center not set Cold pan, deep dish, frozen potatoes, or too many add-ins Keep baking in 5–10 minute increments. Cover the top loosely with foil if it is browning too fast.
Greasy casserole Sausage or bacon was not drained Drain cooked meat before layering it into the dish.
Bland potatoes Hash browns were not seasoned Season the egg mixture well and lightly season the potato layer before adding toppings.
Casserole falls apart Cut too soon or too little egg for the amount of filling Rest 10–15 minutes before slicing. Use 10–12 eggs for a full 9×13 pan.
Top browns too quickly Oven runs hot or cheese is exposed too long Cover loosely with foil and continue baking until the center sets.

Storage, Freezing, and Reheating

Let the casserole cool, then store leftovers in an airtight container in the refrigerator. For best quality and food safety, cooked egg casseroles and leftovers are generally best used within 3–4 days. You can also freeze portions for longer storage. FoodSafety.gov’s cold storage chart is a useful reference for leftover timing: Cold Food Storage Charts.

Breakfast casserole slices stored in a glass container, wrapped for freezing, and served reheated on a plate.
After cooling, slice the casserole for easier breakfasts: refrigerate what you will eat soon, then freeze individual portions for later.

How to Refrigerate

Cool the casserole, cover the baking dish, or move slices to airtight containers. Refrigerate within 2 hours of baking.

How to Freeze

Freeze individual slices wrapped tightly, then place them in a freezer-safe bag or container. For easier breakfasts, freeze slices separately so you can reheat only what you need.

If you are building a bigger freezer breakfast rotation, these meal prep breakfast burritos use the same cooked-filling, no-soggy logic in a grab-and-go format.

How to Reheat

Reheat individual slices in the microwave in short intervals until hot. For better texture, reheat slices in a covered oven-safe dish at 325°F / 165°C until warmed through. Add a splash of milk before reheating if the casserole seems dry.

What to Serve with It

This casserole is hearty on its own, so the best sides are usually fresh, bright, or simple. Serve it with fruit salad, sliced avocado, toast, biscuits, salsa, hot sauce, or a green salad for brunch.

Breakfast casserole with hash browns served with fruit, salsa, greens, and coffee on a brunch plate.
Since the casserole is already rich with eggs, cheese, potatoes, and sausage, fresh sides like fruit, salsa, greens, and coffee keep the plate balanced.

For brunch, keep the plate balanced with fruit and something crisp or fresh so the casserole does not feel too heavy. For meal-prep mornings, simple sides work best because the eggs, potatoes, cheese, and sausage are already doing the filling work. To rotate in a cold make-ahead option, these overnight oats are a good opposite: creamy, chilled, and ready straight from the fridge.

FAQs

Do hash browns need to be thawed before breakfast casserole?

For the best texture, yes. Thawed hash browns bake more evenly and are easier to dry before adding to the casserole. This helps prevent a watery center.

What kind of hash browns work best?

Frozen shredded hash browns are the best all-purpose choice. They give the classic breakfast casserole texture and spread evenly through a 9×13 dish. Diced hash browns make the casserole chunkier, while hash brown patties create a more defined potato base.

Should I cook the hash browns before adding them?

You do not have to cook them first, but lightly browning thawed hash browns gives the casserole better flavor and helps remove moisture. If you are short on time, thawing and patting them dry is enough.

Can I use fresh potatoes instead of frozen hash browns?

Yes, but fresh shredded potatoes need more prep. Rinse them to remove excess starch, drain well, and squeeze very dry before using. If they go into the casserole wet, the egg mixture can turn loose.

Why is my breakfast casserole watery?

Usually, extra moisture sneaks in through the potatoes, vegetables, or meat. Thaw and dry the hash browns, cook watery vegetables first, squeeze spinach dry, and drain sausage or bacon before layering everything into the pan.

How many eggs do I need for a 9×13 hash brown breakfast casserole?

Use 10 large eggs for a balanced casserole or 12 eggs for a taller, more egg-forward bake. If you use fewer eggs, the casserole becomes more potato-heavy and may slice less cleanly.

Can I halve this recipe?

Yes. Use an 8×8-inch or 9×9-inch baking dish, about 15 oz / 425 g hash browns, 5–6 eggs, ½ lb / 225 g sausage, ½ cup milk or half-and-half, ¼ cup sour cream or Greek yogurt, and 1 cup cheese. Start checking around 30–35 minutes because a smaller casserole bakes faster.

Is this better with sausage, bacon, or ham?

Sausage gives the most classic breakfast casserole flavor. Bacon adds smoky crispness, while ham is a great option for leftover holiday ham. All three work, as long as cooked meats are drained before layering.

Can this breakfast casserole be made the night before?

Yes. Assemble the casserole, cover it tightly, and refrigerate overnight. Bake it in the morning, adding 5–10 extra minutes if it goes into the oven cold. For the cleanest texture, prep the components separately and assemble before baking.

How long does breakfast casserole with hash browns bake at 350°F?

Most 9×13 versions bake for 45–55 minutes at 350°F / 175°C. If the casserole is cold from the refrigerator, extra loaded, or made in a deeper dish, it may need closer to 55–65 minutes.

Can I use hash brown patties instead of shredded hash browns?

Yes. Arrange 8–10 hash brown patties in the bottom of a greased 9×13 pan, then layer the meat, cheese, and egg mixture over them. The casserole may need a slightly longer bake time.

How do I make it without meat?

Skip the sausage and use 2½–3 cups cooked vegetables such as mushrooms, peppers, onions, spinach, broccoli, or scallions. Cook watery vegetables first so they do not release liquid into the eggs.

Does hash brown breakfast casserole freeze well?

It freezes best in individual slices. Cool the casserole completely, wrap the portions tightly, and reheat only what you need. The texture is usually better when slices are thawed overnight in the refrigerator before reheating.

If you make this, I’d love to know which version became your house version: sausage, bacon, ham, vegetarian, or hash brown patties. Those little changes are often what make a breakfast casserole feel like it belongs on your table.

Back to top

Posted on 2 Comments

Egg Muffins Recipe: Easy Breakfast Egg Muffin Cups for Meal Prep

Golden breakfast egg muffins on a cream plate, with one muffin cut open to show egg, spinach, bell pepper, cheese, and cooked meat.

This egg muffins recipe is for the mornings when you want breakfast handled before the day gets loud. The muffins are soft, savory, protein-rich, and easy to reheat, with tender centers, lightly cheesy edges, and enough filling to feel like a real breakfast instead of plain baked eggs.

If your past egg muffins turned watery, rubbery, stuck to the pan, or collapsed into dense, disappointing little pucks, this version fixes the usual problems. The ratio is simple, the fillings are controlled, and the bake is gentle enough for meal prep.

If your last batch failed, jump straight to watery egg muffin fixes, rubbery texture fixes, or sticking and pan-release tips.

This recipe for breakfast egg muffins uses a reliable base formula: 10 eggs, a little dairy, controlled fillings, a 350°F oven, and a 3/4-full muffin cup. The main batch uses cheddar, bell pepper, cooked spinach, and your choice of cooked bacon, sausage, ham, or mushrooms. From there, you can change the fillings without changing the ratio.

Because they are naturally high in protein, these muffin tin eggs are especially useful when you want a savory breakfast before the morning rush. For another freezer-friendly breakfast that feels more filling, keep these in rotation with meal prep breakfast burritos.

Quick Answer: The Best Egg Muffin Cups Recipe

The best egg muffin cups recipe starts with 10 large eggs, 1/4 cup milk or cream, 3/4 cup cheese, and 1 to 1 1/2 cups cooked or well-drained fillings. Bake them in a greased muffin tin or silicone muffin pan at 350°F / 175°C for 18–22 minutes, until the centers are set and no longer wet or jiggly.

Egg muffin cups recipe ratio board showing eggs, dairy, cheese, cooked fillings, oven temperature, and bake time.
Start with the base ratio before changing flavors. Once the eggs, dairy, cheese, and fillings stay balanced, the recipe becomes much easier to customize.
Detail Start here
Yield 12 egg muffins
Oven temperature 350°F / 175°C
Bake time 18–22 minutes
Eggs 10 large eggs, about 500 g without shells
Dairy 1/4 cup / 60 ml milk, half-and-half, cream, or blended cottage cheese
Cheese 3/4 cup / 85 g shredded cheese
Add-ins 1 to 1 1/2 cups / about 140–225 g cooked or drained vegetables, meat, or both
Fill level About 3/4 full
Doneness cue Set centers, lightly puffed tops, no wet jiggle

Once you have the base formula, you can jump to the full ratio guide, the step-by-step method, or the meal prep storage tips.

The First Batch to Make

For the first batch, use cheddar, bell pepper, cooked spinach, and cooked bacon, sausage, ham, or mushrooms. It gives you color, savory flavor, protein, and a steady texture without pushing the filling too far.

Muffin tin filled with breakfast egg muffins made with cheddar, bell pepper, cooked spinach, and cooked bacon, sausage, ham, or mushrooms.
This first batch gives you color, protein, and savory flavor without overloading the muffin cups. After that, adjust one ingredient at a time so you know what changed the texture.

As a result, the finished egg muffins are savory, cheesy, and tender, with little pockets of vegetables and protein in every bite. They puff in the oven, settle slightly as they cool, and stay sturdy enough for meal prep without tasting dry when reheated gently.

Egg Muffins Recipe Card

These savory egg muffins bake up tender, cheesy, and sturdy enough for meal prep, with bell pepper, spinach, and your choice of cooked bacon, sausage, ham, or mushrooms in every bite. They are easy to customize, simple to reheat, and designed to stay soft instead of turning watery or rubbery.

Yield12 egg muffins
Prep Time12 minutes
Cook Time18–22 minutes
Total TimeAbout 35 minutes

Ingredients

  • 10 large eggs, about 500 g without shells
  • 1/4 cup / 60 ml milk, half-and-half, cream, or blended cottage cheese
  • 3/4 cup / 85 g shredded cheddar, Monterey Jack, mozzarella, Swiss, pepper jack, feta, or mixed cheese
  • 1/2 cup / 70–80 g finely diced bell pepper, raw for a little crunch or sautéed 2–3 minutes for softer, less watery muffins
  • 1/2 cup / 70–80 g cooked spinach, squeezed dry and chopped
  • 1/2 cup / 60–75 g cooked and drained bacon, sausage, ham, turkey sausage, chicken sausage, mushrooms, or extra vegetables
  • 3/4 teaspoon fine salt
  • 1/4 teaspoon black pepper
  • 1/4 teaspoon garlic powder, optional
  • 1/4 teaspoon onion powder, optional
  • Cooking spray, butter, or oil for greasing

Instructions

  1. Preheat the oven to 350°F / 175°C. Grease a 12-cup muffin pan generously, or use lightly greased silicone liners.
  2. Cook and drain any watery or greasy fillings. Mushrooms, onions, spinach, zucchini, bacon, sausage, turkey sausage, chicken sausage, and similar fillings should be cooked before adding.
  3. In a large bowl, whisk the eggs, dairy, salt, pepper, garlic powder, and onion powder until just combined.
  4. Divide the cooked fillings and cheese evenly among the muffin cups.
  5. Pour the egg mixture over the fillings, filling each cup about 3/4 full.
  6. Bake for 18–22 minutes, until the centers are set and the tops are lightly puffed.
  7. Cool in the pan for 5–10 minutes, then remove carefully.
  8. Serve warm, or cool completely before storing for meal prep.

Recipe Notes

  • Use silicone if you want the easiest release.
  • Do not overfill the cups; egg muffins puff while baking.
  • Cook and drain watery vegetables before baking.
  • If starting with fresh spinach, use about 2 packed cups, cook it down, then squeeze dry before measuring 1/2 cup cooked spinach.
  • Cook and drain meat before adding it to the egg mixture.
  • Reheat gently to avoid rubbery eggs.
  • For a softer, higher-protein version, blend cottage cheese into the egg base.
  • For a vegetarian batch, replace bacon, sausage, or ham with sautéed mushrooms, broccoli, peppers, or extra spinach.
Saveable egg muffins recipe card with yield, bake temperature, bake time, fill level, and meal prep reminders.
The quick formula matters: 12 egg muffins, 350°F, 18–22 minutes, and cups filled about 3/4 full. Together, those details help the batch bake evenly.

What Are Egg Muffins?

At their simplest, egg muffins are small baked egg cups made in a muffin pan. They are not sweet muffins, and they do not have a bread-like crumb. Instead, they are closer to mini frittatas: eggs are whisked with a little dairy, cheese, seasoning, and fillings, then baked until set.

Because these are muffins made with egg rather than flour, the recipe depends more on oven timing, moisture control, and the right pan than on traditional muffin mixing technique.

That muffin-tin shape is what makes them useful. Each cup becomes a single portion, so you can eat one or two for breakfast, pack them in a lunchbox, or store a batch in the fridge for busy mornings.

For more easy ways to build meals around eggs, this guide to egg dishes with 2 eggs gives you extra breakfast and brunch ideas beyond muffin tin eggs.

Are Egg Muffins the Same as Egg Cups?

Usually, yes. Many people use the names egg muffins, egg muffin cups, and egg cups for the same basic idea. The difference is that some egg cup recipes use a “cup” or shell made from bacon, hash browns, tortillas, or bread.

This version uses the classic whisked-egg muffin tin method. Later in the post, you will also find notes for bacon egg muffins, hash brown egg cups, cottage cheese egg muffins, and other variations.

Are Egg Muffins Mini Frittatas?

Yes, that is the easiest way to understand their texture. Egg muffins are basically small frittatas baked in a muffin tin. They should be set and tender, not wet in the middle and not dry like overcooked scrambled eggs.

What Texture Should Egg Muffins Have?

Good egg muffins should be set and tender, not wet in the middle and not dry or squeaky around the edges. They are usually firmer than café-style egg bites, but they should still reheat without turning tough.

Why This Recipe Works

What makes this recipe reliable is the balance between the egg base, fillings, cheese, dairy, and bake time. In other words, the goal is not just to make egg muffins that look good when they come out of the oven. The goal is to make breakfast egg muffins that still taste good after chilling and reheating.

The real win is that these egg muffins are not just good straight from the oven. They are built to survive the fridge, the microwave, and a busy weekday morning without turning wet, bland, or rubbery.

  • 10 eggs make fuller muffins. An 8-egg batch can work, but 10 eggs gives a steadier all-purpose texture for 12 muffin cups.
  • A little dairy keeps the eggs tender. Milk, half-and-half, cream, or blended cottage cheese helps soften the texture.
  • The add-ins are controlled. Too many vegetables or meats can make egg muffins watery, crumbly, or hard to remove.
  • Watery fillings are cooked or drained first. Spinach, mushrooms, onions, zucchini, and tomatoes need extra attention.
  • 350°F / 175°C is gentle enough for meal prep. A slightly lower oven temperature helps avoid rubbery edges.
  • The pan matters. Silicone or a very well-greased pan makes removal much easier.
  • A short cooling time helps. Resting the muffins for 5–10 minutes helps them finish setting and release more cleanly.

Ingredients for Breakfast Egg Muffins

The ingredients are simple, but they should taste like more than “eggs in a muffin tin.” Cheddar brings savory richness, bell pepper adds small sweet pops, spinach keeps the batch colorful, and bacon, sausage, ham, or mushrooms make each cup feel like a real breakfast. The key is keeping those add-ins flavorful without letting them make the muffins watery.

Already know your fillings? Skip ahead to how to prep vegetables and protein, or check the watery egg muffin fixes if your batches often release liquid after baking.

Ingredients for egg muffins arranged on a light surface, including eggs, dairy, cheese, bell pepper, cooked spinach, cooked protein, and seasonings.
Simple ingredients can still make flavorful breakfast egg muffins. For the best texture, cook and drain watery fillings before they go into the pan.

Eggs

Use 10 large eggs, about 500 g without shells, for the main batch. This amount fills a standard 12-cup muffin pan nicely when combined with dairy, cheese, and fillings.

  • 8 eggs make lighter, more filling-heavy muffins.
  • 10 eggs give the most reliable all-purpose balance.
  • 12 eggs make firmer, more egg-forward muffins.

If you are making egg white muffins, use extra seasoning and some cheese or cottage cheese for softness. Egg whites can turn rubbery faster than whole eggs, especially if they are overbaked.

Milk, Cream, Half-and-Half, or Cottage Cheese

Use 1/4 cup / 60 ml milk, cream, half-and-half, or blended cottage cheese for a standard batch. Milk gives a lighter texture, half-and-half makes the muffins a little softer, and cream gives a richer low-carb version.

Use 1/4 cup blended cottage cheese as a simple dairy swap in the standard recipe. However, use 3/4–1 cup blended cottage cheese only when you want a softer, higher-protein egg-bite-style version. If you want the cottage cheese to disappear into the egg base, blend it first until smooth.

For the softest, higher-protein version, cottage cheese works best when it is blended into the egg base instead of stirred in as curds.

Cottage cheese egg muffins with a soft interior and blended cottage cheese in the egg base.
Blended cottage cheese gives this version its softer, higher-protein texture. Stirring it in as curds can leave the egg base less smooth.

Dairy-Free Egg Muffins

For dairy-free egg muffins, use unsweetened dairy-free milk and skip the cheese, or use a dairy-free shredded cheese you already like. The muffins may be a little firmer without dairy or cheese, so avoid overbaking and add flavorful vegetables, herbs, salsa, or cooked sausage for balance.

This is still an egg-based breakfast. For high-protein breakfasts without eggs, these plant-based breakfast ideas are a better fit than trying to force this recipe into an egg-free version.

Cheese

Use 3/4 cup / 85 g shredded cheese for balanced egg muffins. Cheddar, Monterey Jack, mozzarella, Swiss, pepper jack, and feta all work.

  • 3/4 cup is balanced.
  • 1 cup is cheesier but still reasonable.
  • 1 1/2 cups is better reserved for richer bacon or sausage egg muffins.

Too much cheese can make the edges stick and the bottoms feel greasy, so start with 3/4 cup and increase only if you want a richer batch.

For a lighter batch, use more vegetables, lean meat, milk instead of cream, and a little less cheese. If you skip cheese completely, add extra herbs, seasoning, or salsa so the muffins still taste savory and balanced.

Vegetables and Protein Add-Ins

For the best texture, use 1 to 1 1/2 cups total cooked or well-drained add-ins, which is about 140–225 g depending on the ingredients. That could be vegetables, meat, or a mix of both.

Good options include bell pepper, spinach, mushrooms, onions, broccoli, tomatoes, bacon, sausage, ham, turkey sausage, chicken sausage, feta, cheddar, and herbs. Cook bacon, sausage, mushrooms, onions, spinach, zucchini, and other watery or greasy fillings before adding them to the muffin tin.

Cooked vegetables and drained meat for egg muffins, showing sautéed spinach, mushrooms, onions, and cooked bacon or sausage.
Cooked, drained fillings make a cleaner egg muffin cup. They prevent extra vegetable liquid and meat fat from pooling at the bottom.
Important: Do not add raw sausage, bacon, chicken, turkey, or other raw meat to the egg mixture. Cook meat fully, drain off excess fat, then divide it among the muffin cups.

Seasoning

Egg muffins need enough seasoning because eggs and vegetables can taste flat once chilled. Start with:

  • 3/4 teaspoon fine salt
  • 1/4 teaspoon black pepper
  • 1/4 teaspoon garlic powder, optional
  • 1/4 teaspoon onion powder, optional

You can also add smoked paprika, chili flakes, chopped herbs, curry powder, taco seasoning, or everything bagel seasoning depending on the flavor you want.

The Best Egg Muffin Ratio

Think of this as the formula that keeps the batch predictable. Once the egg base, cheese, and fillings stay in balance, you can change the flavor without gambling on the texture.

Best egg muffin ratio board showing lighter, most reliable, and cottage cheese batch styles with eggs, dairy, cheese, and fillings.
Your egg muffin ratio can change with the texture you want. Use the 10-egg version as the all-purpose batch, then shift lighter or softer once you know your preference.
Batch style Eggs Dairy Cheese Add-ins Works well for
Lighter 8 eggs 1/4 cup / 60 ml 1/2–3/4 cup 1 cup Veggie-heavy muffins
Most reliable 10 eggs 1/4 cup / 60 ml 3/4 cup / 85 g 1–1 1/2 cups Classic breakfast egg muffins
Extra egg-forward 12 eggs 1/4–1/3 cup 3/4–1 cup 1 cup Protein-heavy or low-carb muffins
Cottage cheese style 8–10 eggs 3/4–1 cup blended cottage cheese Optional 1 cup Softer, higher-protein egg muffins

If you are scaling the batch, go to how to scale the recipe. If your muffins overflow or stick around the edges, check how full to fill the cups before baking.

How to Scale the Recipe

You can scale the same ratio up or down without changing the method.

Batch size Eggs Dairy Cheese Add-ins
6 egg muffins 5 large eggs 2 tablespoons / 30 ml 6 tablespoons / about 40 g 1/2–3/4 cup
12 egg muffins 10 large eggs 1/4 cup / 60 ml 3/4 cup / 85 g 1–1 1/2 cups
24 egg muffins 20 large eggs 1/2 cup / 120 ml 1 1/2 cups / 170 g 2–3 cups
Egg muffins scaling guide showing 6 muffins, 12 muffins, and 24 muffins with matching egg amounts.
Scaling stays simple when the ratio stays the same. Therefore, a small batch or double batch can use the same method without guesswork.

How Full Should You Fill the Muffin Cups?

Fill each muffin cup about 3/4 full. If the cups are too low, the muffins look flat. If they are too full, the egg mixture can overflow, bake onto the edges, and stick to the pan.

As they bake, egg muffins puff and then settle slightly as they cool. That small deflation is normal and does not mean the recipe failed.

Three muffin cups showing too low, 3/4 full, and too full levels for egg muffin cups.
A 3/4-full cup gives the eggs space to rise while still baking into a full-looking muffin. As a result, the cups puff neatly without overflow or stuck edges.

How Much Filling Is Too Much?

For 12 egg muffins, 1 cup of add-ins is the safest amount, while 1 1/2 cups gives a more loaded breakfast muffin. You can push toward 2 cups, but only if the vegetables are cooked and drained very well. More than that usually makes the muffins watery, crumbly, or difficult to remove.

Equipment You Need

You do not need much equipment for egg muffins, but the pan matters more than it does for regular muffins. Eggs and cheese cling easily, so silicone or a very well-greased metal tin will save you cleanup later.

  • 12-cup muffin pan
  • Silicone muffin pan or silicone liners
  • Large mixing bowl
  • Whisk
  • Measuring cup with pour spout
  • Skillet for cooking vegetables or protein
  • Cooling rack
  • Airtight container for storage
  • Freezer-safe bag or container if freezing

If sticking is your biggest issue, skip to the full pan-release section before choosing liners or a muffin tin.

Best Pan for Egg Muffins: Silicone vs Metal vs Paper Liners

If egg muffins have ever welded themselves to your muffin tin, the pan is probably the reason. A good pan or liner can save you from broken muffins and a long cleanup.

Pan comparison for egg muffins showing silicone muffin pan, metal muffin tin, and paper liners.
Pan choice matters because baked eggs cling more than regular muffin batter. Silicone releases most easily, while metal pans need a generous coating of oil, butter, or spray.
Pan or liner Works well for Pros Watch out
Silicone muffin pan Regular meal prep Easiest release, less sticking, good for weekly batches Place it on a baking sheet for stability
Silicone liners in metal pan Easy cleanup Good shape, reusable, easier release Lightly grease them for extra safety
Nonstick metal muffin tin Defined edges Common, sturdy, easy to move Must be greased generously
Paper liners Not ideal Easy serving in theory Eggs often stick badly unless liners are sprayed
Parchment liners Occasional batches Easier release than plain paper Can wrinkle the muffin edges

How to Make Egg Muffins

This muffin tin eggs recipe gives you evenly filled cups with a tender texture and fewer sticking problems. The two biggest keys are cooking watery fillings first and not overbaking the eggs.

Step-by-step egg muffins guide showing pan prep, cooked fillings, whisked egg base, cups filled 3/4 full, and baking for 18 to 22 minutes.
Think of the method as a texture sequence: dry the fillings first, keep the egg base simple, fill evenly, and stop baking when the centers are just set.

Step 1: Prep the Pan and Preheat the Oven

Preheat the oven to 350°F / 175°C. Grease a 12-cup muffin pan very well with cooking spray, butter, or oil. If you are using a silicone muffin pan, place it on a sturdy baking sheet before filling so it is easier to move in and out of the oven.

Step 2: Cook and Drain Watery Fillings

Cook mushrooms, onions, spinach, zucchini, bacon, sausage, or any filling that releases water or fat. If the pan still looks wet after cooking mushrooms or onions, keep going for another minute or two. If using cooked spinach, squeeze it dry before adding it to the muffin cups.

This step keeps the final egg muffins from becoming watery after baking or after a night in the fridge.

Step 3: Whisk the Egg Base

In a large bowl, whisk the eggs, dairy, salt, pepper, garlic powder, and onion powder until combined. Do not beat the eggs until foamy. Too much trapped air can make the muffins puff dramatically and then sink more as they cool.

Step 4: Divide Fillings and Cheese

Add the cooked fillings and cheese directly to the muffin cups first. This gives you better portion control than mixing everything into the bowl, where heavier fillings can sink to the bottom.

Step 5: Fill 3/4 Full

Pour the egg mixture over the fillings until each cup is about 3/4 full. A measuring cup with a pour spout makes this cleaner and helps you fill each cup evenly.

Egg mixture being poured into a muffin tin with spinach, bell pepper, cheese, and cooked protein in the cups.
Dividing the fillings first gives every cup a balanced mix. Then the egg base can flow around the vegetables, cheese, and protein more evenly.

Step 6: Bake Until Just Set

Bake for 18–22 minutes, or until the centers are set and the tops are lightly puffed. Start checking around 18 minutes, especially if your muffin cups are not very full or if your oven runs hot.

Step 7: Cool Before Removing

Let the egg muffins cool in the pan for 5–10 minutes. This short rest helps them firm up and release more cleanly. If you are using a metal pan, gently run a thin knife around the edges before lifting them out.

How Long to Bake Egg Muffins

The best oven temperature for classic egg muffins is 350°F / 175°C. It is gentle enough to keep the texture soft, but still hot enough to set the centers in about 20 minutes.

Egg muffin bake-time guide showing wet, just-set, and overbaked textures with a 350°F and 18 to 22 minute cue.
Bake time is about doneness, not just the clock. Look for set centers and lightly puffed tops; if the edges look dry before the middle is done, the oven may be too hot.
Oven temp Approx. time Texture Works well for
350°F / 175°C 18–22 minutes Softer, less rubbery Default meal prep egg muffins
375°F / 190°C 15–20 minutes Faster, slightly firmer Smaller muffins or quick bake
325°F / 160°C 22–28 minutes Gentler, softer Cottage cheese or egg-bite-style versions
400°F / 200°C Not ideal for classic egg muffins Firmer edges Hash brown cups or bacon-shell cups

How Long to Bake Mini Egg Muffins

Mini egg muffins bake faster than standard muffin tin eggs. Start checking a mini muffin pan around 12–15 minutes at 350°F / 175°C. The exact time depends on the size of the cups, how full they are, and how many fillings you add.

How to Tell Egg Muffins Are Done

You will know they are done when the centers are set, the tops are lightly puffed, and there is no wet jiggle in the middle. If you use an instant-read thermometer, aim for 160°F / 71°C; egg dishes such as frittata and quiche are listed at that temperature on the FoodSafety.gov safe minimum temperature chart.

Why Egg Muffins Puff and Then Deflate

Egg muffins rise because steam and air expand in the oven. After they cool, they settle. Some deflation is normal. The goal is not to keep them tall forever; instead, the goal is to keep them tender, set, and not watery.

Egg muffins puffed in the oven and slightly settled after cooling, showing that a little deflation is normal.
As steam expands in the oven, the muffins puff; as they cool, they settle. That small deflation is normal, so focus on tender set texture rather than height.

How to Stop Egg Muffins from Sticking to the Pan

If your first batch has ever stuck to the pan, you are not doing anything unusual. Baked eggs cling more than regular muffin batter, especially when cheese melts onto the edges. The fix is mostly about pan choice, grease, and giving the muffins a short cooling time before you remove them.

Egg muffin sticking guide showing silicone cups, greased metal pan, and muffins being released from a muffin tin.
Sticking usually comes down to the pan, the grease, or removing the muffins too soon. Let them cool briefly before lifting them out so the edges can release cleanly.

Best Pan and Liner Tips

  • Use silicone if you make egg muffins often. A silicone muffin pan or silicone liners give the cleanest release.
  • Grease metal pans generously. Coat the bottom, sides, and upper rim of each cup because puffed egg and melted cheese can stick near the top.
  • Avoid plain paper liners. They often hold onto baked eggs unless they are sprayed first.
  • Let the muffins cool for 5–10 minutes. That short rest helps the eggs finish setting and makes removal easier.

How to Keep Egg Muffins from Getting Watery

Watery egg muffins usually come from watery fillings, too many add-ins, or storing the muffins while they are still warm. Fortunately, the fix is simple: control moisture before the egg mixture goes into the pan.

Watery egg muffins guide showing cooked and drained fillings compared with wet vegetables and excess liquid.
Watery batches usually start with fillings that were not cooked, squeezed, drained, or cooled. Fix the moisture before baking, and the finished cups will store much better.
Add-in Problem Prep first
Spinach Releases water Cook and squeeze dry
Mushrooms Release lots of moisture Sauté until the pan looks dry
Onion Can water out and taste sharp Sauté first
Bell pepper Mild moisture Dice small; sauté briefly if using a lot
Tomato Can make muffins soggy Use drained diced tomato or skip very juicy tomato
Zucchini Very watery Salt and squeeze, or sauté first
Broccoli Can be bulky Chop small and pre-cook
Bacon or sausage Grease can pool Cook and drain before adding

Cool Before Storing

Do not put hot egg muffins straight into an airtight container. Steam gets trapped, turns into condensation, and makes the muffins wet. Let them cool completely first.

Blot Before Reheating If Needed

Vegetable-heavy egg muffins can release a little liquid after chilling. If that happens, blot the bottom lightly with a paper towel before reheating. This is especially helpful with spinach, mushrooms, tomatoes, and zucchini.

How to Make Egg Muffins Fluffy, Not Rubbery

Rubbery egg muffins usually mean the eggs were pushed a little too far, either in the oven or during reheating. You want the centers fully set, but not dry, squeaky, or spongey.

Fluffy egg muffins compared with dry, rubbery egg muffins, with tips to bake just until set, use dairy, and reheat gently.
A tender center comes from stopping the bake as soon as the eggs are set. To avoid a rubbery texture, use a little dairy and reheat in short bursts.

Five Ways to Keep Egg Muffins Tender

  • Start checking at 18 minutes. Pull the muffins when the centers are just set and the tops are lightly puffed.
  • Use a little dairy. Milk, half-and-half, cream, or blended cottage cheese softens the egg texture.
  • Do not rely only on egg whites. Egg white muffins can turn rubbery faster, so add cheese, cottage cheese, or a few whole eggs if you want a softer bite.
  • Whisk until combined, not foamy. Too much trapped air can make the muffins puff dramatically and then collapse more as they cool.
  • Reheat gently. Use short microwave bursts or medium power, and cover the muffins with a damp paper towel so the edges do not dry out.

Egg Muffins Recipe: Storage, Freezing, and Reheating

The real test of egg muffins is not just how they taste warm from the oven. It is whether you still want to eat them on Wednesday morning. Cool them completely before packing, and reheat them gently for the best texture.

Meal prep egg muffins stored in an airtight glass container for refrigerator storage.
For meal prep, cool the egg muffins before packing them and avoid trapping steam in the container. That small pause helps protect the texture for the next few mornings.
Method How long / how to do it Texture tip
Refrigerate Store airtight for 3–4 days Cool completely before closing the container
Freeze Freeze airtight for up to 3 months for best texture Freeze flat first, then transfer to a bag or container
Reheat from fridge Microwave 20–30 seconds Cover with a damp paper towel
Reheat from frozen Microwave 60–90 seconds at 50–70% power Thaw overnight first if possible
Oven reheat 300–350°F for 5–10 minutes Good for reheating several at once
Air fryer reheat 325–350°F for 2–4 minutes Use a gentle setting to avoid drying the edges

For make-ahead planning, jump to freezing egg muffins or reheating without a rubbery texture.

How Long Do Egg Muffins Last in the Fridge?

Store cooked egg muffins in an airtight container in the refrigerator for 3–4 days. The USDA/FSIS refrigeration guidance lists cooked egg dishes with a refrigerator storage time of 3–4 days, which is the safest guideline to follow for meal prep.

A Simple Weekly Meal Prep Plan

For an easy workweek plan, bake 12 egg muffins on Sunday. Keep 6–8 in the fridge for the next 3–4 days, then freeze the rest. After that, reheat two at a time with a damp paper towel so they warm gently instead of turning rubbery.

If you like prepping eggs for the week, air fryer hard-boiled eggs are another easy option for salads, snack boxes, and quick breakfasts.

Can You Freeze Egg Muffins?

Yes. Cool them completely, then freeze in a single layer until firm. After that, transfer them to a freezer-safe bag or container. Use within about 3 months for the best texture.

Egg muffins arranged on a tray in the freezer with a freezer bag of stored egg muffins behind them.
Freeze the muffins flat first so they do not stick together. After they firm up, transfer them to a freezer-safe bag or container for easier grab-and-go breakfasts.

How to Reheat Egg Muffins from the Fridge

Microwave one egg muffin for 20–30 seconds, covered with a damp paper towel. Add more time only if needed. If your microwave runs hot, use medium power instead of full power.

Egg muffins on a plate under a damp paper towel beside a microwave, with reheating times for fridge and frozen muffins.
Reheating is where many egg muffins turn rubbery. Instead, use gentle heat, short bursts, and a damp paper towel so the centers warm before the edges dry out.

How to Reheat Egg Muffins from Frozen

For the best texture, thaw overnight in the refrigerator. To reheat straight from frozen, microwave at 50–70% power for 60–90 seconds, checking in short bursts.

When reheating leftovers, heat them until hot all the way through. Use short bursts so the centers warm without drying out the edges.

Can You Eat Egg Muffins Cold?

You can eat them cold if they have been stored safely, but the texture is better when they are gently warmed. A short reheat brings back the softer texture and makes the cheese taste better.

Egg Muffin Variations

This is where the recipe becomes your own. Keep the same base ratio, then choose the filling style that fits your morning: hearty, lighter, kid-friendly, low-carb, or brunch-ready.

Need a specific version? Jump to the classic cheddar batch, hash brown egg cups, or the egg muffins vs egg bites comparison.

Egg muffin variations arranged in a flavor wheel with lighter, hearty, kid-friendly, low-carb, and brunch-ready styles.
Flavor variations work best when the base ratio stays steady. Then you can change the style—hearty, lighter, kid-friendly, low-carb, or brunch-ready—without losing structure.

Choose Your Filling Style

If your morning needs… Choose… Key adjustment
Grab-and-go protein Bacon, sausage, or cottage cheese muffins Use cooked meat and keep the bake gentle
A lighter breakfast Peppers, spinach, mushrooms, and less cheese Cook watery vegetables first
A kid-friendly batch Ham and cheddar Keep seasonings mild
A brunch plate Spinach feta or mushroom Swiss Serve warm with salad or toast
Low-carb meal prep Eggs, cream, cheese, bacon, and spinach Skip potatoes and starchy add-ins

How to Customize Without Ruining the Texture

If this is your first time making the recipe, start with the easy classic cheddar version. It gives you the best read on the base texture before you experiment with cottage cheese, egg whites, hash browns, or heavier vegetable mixes.

After that, adjust one thing at a time: the cheese, the protein, or the vegetables. That way, you can tell what changed the texture and what changed the flavor.

Specific Egg Muffin Filling Ideas

If you already know the style you want, the table below gives you more specific filling combinations while keeping the same basic egg-to-filling ratio.

Variation Add-ins Special note
Bacon egg muffins Cooked bacon, cheddar, green onion Drain bacon well before adding
Sausage egg muffins Cooked sausage, cheddar, peppers Drain fat before adding
Ham and cheese egg muffins Diced ham, cheddar or Swiss Good for kids and meal prep
Spinach feta egg muffins Spinach, feta, herbs Squeeze spinach dry
Cottage cheese egg muffins Blended cottage cheese, eggs, spinach Softer, higher-protein texture
Egg white muffins Egg whites, vegetables, cheese Season well and do not overbake
Keto egg muffins Eggs, cream, cheese, bacon or sausage Skip starchy add-ins
Hash brown egg cups Hash brown shell, egg filling Different method; bake the shell first
Vegetarian egg muffins Peppers, spinach, mushrooms, cheese Cook watery vegetables first
Spicy egg muffins Jalapeño, pepper jack, onion Remove seeds for milder heat

Easy Classic Cheddar Version

Use cheddar, bell pepper, spinach, and cooked bacon, ham, or sausage. Cheddar melts into the edges, bell pepper gives small sweet pops, and the cooked meat makes the muffins feel breakfasty and satisfying. If you are using bacon, this is a good place to prep extra from your air fryer bacon batch.

Classic cheddar breakfast egg muffins with visible spinach, bell pepper, cheese, and cooked meat, including one muffin cut open.
This classic cheddar version is the safest first batch because it balances moisture, protein, color, and flavor before you start testing heavier or softer variations.

Higher-Protein Cottage Cheese Version

Use blended cottage cheese in the egg base and add turkey sausage, chicken sausage, or extra egg whites. Cottage cheese makes the texture softer and more café-style, but the bake should stay gentle so the eggs do not turn spongey. On days when you want a bowl instead of baked eggs, protein oatmeal gives you another high-protein breakfast option.

Low-Carb or Keto Version

Use eggs, cream, cheese, bacon or sausage, spinach, and mushrooms. Skip potatoes, hash browns, and sweet vegetables if you want a stricter low-carb version.

Vegetarian Spinach and Mushroom Version

Use spinach, bell peppers, mushrooms, onions, feta, cheddar, or herbs. Mushrooms bring savory depth, feta adds brightness, and spinach keeps the batch colorful. Cook the mushrooms and onions first so the muffins do not turn watery.

Hash Brown Egg Cups Version

Hash brown egg cups need a different method. Press seasoned hash browns into the muffin cups first, bake them until they begin to crisp, then add the egg filling and bake again. This gives you a potato shell instead of a classic egg muffin base. If you are starting with frozen shredded potatoes or patties, the timing notes in this air fryer hash browns guide can help you understand how moisture and crisp edges behave before you turn them into cups.

Hash brown egg cups in a muffin tin with crispy potato shells and set egg filling with spinach, pepper, cheese, and bacon.
Hash brown egg cups use a different method from classic egg muffins. Bake the potato shell first, then add the egg filling so the outside stays crisp.

What to Serve with Egg Muffins

Two breakfast egg muffins can be a full light breakfast on their own. Because egg muffins are soft and savory, they taste best with contrast: fruit for freshness, avocado for creaminess, salsa for brightness, toast for crunch, or roasted potatoes when you want the plate to feel more like brunch.

Breakfast egg muffins served with avocado, salsa, fruit, toast, and orange juice on a light breakfast plate.
Because egg muffins are soft and savory, they taste better with contrast. Add fruit for freshness, toast for crunch, avocado for creaminess, or salsa for brightness.

For a heartier plate, add an English muffin, hash browns, or a small breakfast sandwich. For sandwich-style ideas, this list of breakfast sandwich recipes can help you build a more filling morning meal.

Egg Muffins vs Egg Bites vs Mini Frittatas

These names are closely related, but the texture and method can be different. Knowing the difference helps you choose the right recipe style for your breakfast meal prep.

Comparison of egg muffins, egg bites, and mini frittatas on separate plates, labeled sturdy, custardy, and brunch-style.
Egg muffins, egg bites, and mini frittatas are related, but their textures are different. The muffin version is sturdier for meal prep, egg bites are softer and custardy, and mini frittatas feel more brunch-style.

Egg Muffins

Egg muffins are firm enough to pick up and meal prep easily. They are usually whisked, not blended, and baked in a muffin tin. This is the best version when you want a simple, sturdy, make-ahead breakfast.

As a baked egg cups recipe, this version is firmer and easier to store than custardy egg bites, which makes it better for grab-and-go breakfasts.

Egg Bites

Egg bites are softer and more custardy. They often use blended cottage cheese and a gentler baking method. If you want a Starbucks-style texture, make a cottage cheese egg bite version rather than a classic egg muffin.

For a softer egg-bite texture, blend the eggs with cottage cheese and bake more gently, around 325°F / 160°C. A water bath is not needed for classic egg muffins, but it can help egg bites cook more evenly and stay custardy. For that method, set a metal muffin tin or silicone-lined muffin tin inside a larger baking dish, pour hot water into the outer dish until it comes partway up the sides of the muffin tin, and move everything carefully so no water splashes into the eggs.

Mini Frittatas

Mini frittatas are very similar to egg muffins, but the name often appears in brunch-style recipes. They may be served fresh rather than packed for meal prep.

Which One Should You Make?

  • Easy meal prep: make classic egg muffins.
  • Softer café-style texture: make cottage cheese egg bites.
  • Brunch-style serving: call them mini frittatas and serve them warm.
  • Crispy base: make hash brown egg cups instead.
Three mistakes cause most bad egg muffins: overfilling the cups, using raw watery vegetables, and reheating too aggressively. Fix those three things and this recipe becomes much more reliable.

Troubleshooting Egg Muffins

If a batch turns out watery, rubbery, stuck, or bland, it usually comes down to one small step rather than the whole recipe failing. Use this table before your next batch, and the fix should be clear.

Not sure what went wrong? The most common fixes are also covered in the dedicated sections for watery egg muffins, rubbery texture, and sticking to the pan.

Egg muffins troubleshooting guide with fixes for watery, rubbery, stuck, bland, and greasy egg muffins.
Most egg muffin problems trace back to one of five things: wet fillings, too much heat, poor pan release, weak seasoning, or greasy protein. Fix the cause, not the whole recipe.
Problem Likely cause Fix next time
Watery egg muffins Raw watery vegetables, too many add-ins, or storing while warm Cook and drain vegetables; cool completely before storing
Rubbery texture Overbaked or reheated too aggressively Bake just until set and reheat gently
Stuck to pan Not enough grease, plain paper liners, or metal pan Use silicone or grease generously
Collapsed muffins Normal cooling, overmixed eggs, or watery filling Whisk gently and control moisture
Bland flavor Not enough salt, cheese, herbs, or savory fillings Season the egg base and use flavorful add-ins
Dry muffins Too long in the oven or too little dairy Reduce bake time and add milk, cream, or cottage cheese
Undercooked center Cups overfilled or oven runs cool Fill 3/4 full and bake a few minutes longer
Greasy bottoms Bacon or sausage not drained Cook and drain protein before adding
Spongey texture Overcooked eggs or too many egg whites Use whole eggs, dairy, and a gentler bake

FAQs About Egg Muffins

How many eggs do I need for 12 egg muffins?

Use 10 large eggs for the best all-purpose batch. That gives you enough egg mixture to fill a standard 12-cup muffin pan while still leaving room for cheese, vegetables, and protein.

What temperature is best for egg muffins?

350°F / 175°C is the best default temperature. It is hot enough to set the centers in about 20 minutes, but gentle enough to keep the edges from turning tough.

How long do egg muffins take to bake?

Most egg muffins take 18–22 minutes at 350°F / 175°C. Start checking around 18 minutes, especially if your cups are lightly filled or your oven runs hot.

How long do mini egg muffins take?

Mini egg muffins usually take about 12–15 minutes at 350°F / 175°C. Since mini muffin pans vary, check early and pull them when the centers are just set.

Why are my egg muffins watery?

Watery egg muffins usually come from raw watery vegetables, too many fillings, or storing the muffins before they cool. Cook and drain ingredients like spinach, mushrooms, onions, tomatoes, and zucchini before baking.

Why did my egg muffins turn rubbery?

Rubbery egg muffins usually mean the eggs were overbaked or reheated too aggressively. Pull them when the centers are just set, then reheat in short bursts with a damp paper towel.

What is the best pan for egg muffins?

A silicone muffin pan or silicone liners are the easiest options because baked eggs release more cleanly from silicone. A metal nonstick muffin tin also works, but it needs generous greasing.

Are egg muffins healthy?

They can be. Egg muffins are naturally high in protein, and you can make them lighter with vegetables, lean meat, cottage cheese, egg whites, or less cheese. The final nutrition depends on the fillings you choose.

Are egg muffins keto?

Yes, they can be keto if you use eggs, cream, cheese, bacon or sausage, and low-carb vegetables such as spinach, mushrooms, peppers, or zucchini. Skip potatoes, hash browns, and sweet starchy add-ins.

Do egg muffins freeze well?

They freeze well enough for meal prep, especially if you cool them completely and reheat them gently. The texture is usually best after an overnight thaw, but even from frozen, short microwave bursts work better than one long blast.

What is the difference between egg muffins and egg bites?

Egg muffins are usually firmer and more like mini frittatas. Egg bites are softer, smoother, and often blended with cottage cheese or cooked more gently for a custardy texture.

Frozen vegetables in egg muffins: what works best?

Thaw and drain frozen vegetables before adding them. Frozen spinach, broccoli, peppers, and mixed vegetables can all work, but they need a quick squeeze or blot first so they do not leak into the egg base.

Raw meat in egg muffins: why cook it first?

Cook sausage, bacon, chicken sausage, turkey sausage, or any other meat before adding it to the muffin cups. The eggs cook quickly, so raw meat will not cook evenly inside the cups; cooked and drained meat gives you safer, cleaner, less greasy muffins.

Final Tips for Better Egg Muffins

Once you know the basic ratio, this egg muffins recipe becomes easy to repeat. Keep the oven gentle, control moisture, fill the cups only 3/4 full, and reheat gently. After one or two batches, you will know which fillings taste best for your mornings and which ones reheat the cleanest.

Warm breakfast scene with egg muffin cups on a plate, one cut open, a glass storage container, and a cup of coffee.
The real test is whether breakfast egg muffin cups still taste good after chilling and reheating. When the texture stays tender, the batch earns its place in your week.

That is how you get tender centers, savory fillings, lightly cheesy edges, and breakfast egg muffin cups that are easy to store, easy to customize, and actually worth eating all week.

Posted on 1 Comment

Frittata Recipe: Easy Oven-Baked Egg Frittata

Finished oven-baked frittata in a skillet with a clean wedge lifted out, showing eggs, spinach, mushrooms, peppers, and cheese.

This frittata recipe is for the kind of breakfast that starts with a few eggs, a handful of cooked vegetables, and maybe a little cheese from the fridge. The goal is simple: a fluffy oven-baked egg frittata that slices cleanly, reheats well, and does not turn wet in the middle.

It works for brunch, meal prep, a quick dinner with salad, or a clean-out-the-fridge breakfast. Once you understand the egg-to-dairy ratio and how to handle the fillings, this frittata becomes one of those back-pocket meals you can repeat without measuring every single thing forever.

The best version feels generous without being heavy: tender eggs, sweet cooked vegetables, little pockets of cheese, and clean slices you can eat warm for brunch or chilled from the fridge the next morning.

Close-up slice of oven-baked egg frittata on a plate, showing a softly set center with vegetables and cheese.
A clean slice is the best texture clue: once the center sets and the frittata rests, the wedge should lift without wet egg pooling underneath.
At a glance: This frittata recipe uses 8 eggs, 1/3 cup dairy, 1 1/2–2 cups cooked fillings, and 3/4 cup cheese. Bake in a 10-inch oven-safe skillet at 375°F / 190°C for about 18–22 minutes, then rest 5–10 minutes before slicing.

Quick Answer: How to Make a Frittata

The easiest method is to cook your fillings first, pour the egg mixture into a greased oven-safe skillet, add cheese, and bake at 375°F / 190°C until the middle is just set. After a short rest, the frittata should slice cleanly without turning dry or rubbery.

The shortcut that saves most frittatas is simple: deal with the fillings before the eggs ever hit the pan. Mushrooms give off liquid, spinach collapses as it cooks, zucchini softens quickly, and breakfast meats can release extra fat. Taking care of that first gives the finished frittata a cleaner texture and deeper flavor.

A finished frittata should look softly firm through the middle, with no wet egg pooling on top. A little wobble is not a problem; loose, sloshy egg is. The clock helps, but the center tells the truth.

At-a-glance frittata guide showing 8 eggs, 1/3 cup dairy, 1 1/2 to 2 cups cooked fillings, 3/4 cup cheese, and 375°F bake temperature.
Use this quick formula as your starting point; then, once the base feels familiar, swap the vegetables, cheese, or herbs to match what you have.

Choose Your Frittata Method

The best method depends on your pan and how you want to serve it. A skillet frittata gives you the most flavor, a baking-dish frittata is easiest for meal prep, and mini frittatas are best when you want individual portions.

MethodBest forHow to cook it
Skillet frittataClassic wedges and better browned fillingsCook fillings in a 10-inch oven-safe skillet, add eggs, and bake at 375°F / 190°C for 18–22 minutes.
Baking-dish frittataNo-skillet cooking and square meal-prep slicesCook fillings separately, add to a greased pie dish or 8×8 dish, and bake at 350°F / 175°C until set.
Mini frittatasGrab-and-go breakfasts and lunchboxesDivide the mixture into greased muffin cups and bake at 350°F / 175°C until just set.
Frittata method comparison showing skillet frittata, baking-dish frittata, and mini frittatas in a muffin tin.
Before choosing a pan, decide how you want to serve the frittata: wedges for brunch, squares for meal prep, or mini portions for busy mornings.
Three mistakes to avoid: Do not add watery vegetables raw, do not over-whisk the eggs into foam, and do not wait for a deeply browned top. Cook the fillings first, whisk just until blended, and pull the frittata when the center is softly set.
Guide showing three frittata mistakes to avoid: watery vegetables, over-whisked foamy eggs, and overbaking.
Most frittata problems are preventable: first remove moisture from fillings, then whisk gently, and finally pull the pan before the top gets too brown.

What Is a Frittata?

A frittata is an Italian-style egg dish where beaten eggs are mixed with vegetables, cheese, herbs, or cooked meat, then cooked until set. Unlike an omelet, the fillings are mixed into the eggs instead of folded inside. Unlike quiche, a frittata usually has no crust and uses less dairy, so it is firmer, faster, and easier to slice.

That is what makes it so useful: it feels nicer than scrambled eggs, takes less work than quiche, and turns leftovers into something that looks intentional.

At home, it can feel like a weekend brunch dish, but it is also practical enough for leftovers, cooked greens, roasted vegetables, bits of cheese, or breakfast meats you already have. Think of it as a flexible egg bake with a little more elegance and a lot less fuss.

Comparison of a frittata wedge, folded omelet, quiche slice, and egg casserole square.
A frittata is the practical middle ground between everyday eggs and brunch food: simpler than quiche, sturdier than an omelet, and easier to slice.

Why This Recipe Works

The egg-to-dairy ratio keeps it tender

Eggs set firmly when they bake, so a little dairy helps soften the texture. The balance matters, though. Too little dairy can make the frittata firm and rubbery, while too much can make it loose, wet, or closer to a crustless quiche. For this frittata recipe, 1/3 cup / 80 ml dairy for 8 large eggs gives a tender center that still slices well.

Cooked fillings help the eggs set cleanly

Vegetables can quietly sabotage a frittata if they go in raw. Mushrooms release liquid, spinach shrinks dramatically, zucchini softens fast, and tomatoes can make the middle look underbaked. Cooking those ingredients first concentrates their flavor and keeps the eggs from turning loose in the oven.

Oven baking gives even slices

A skillet frittata usually starts with cooked fillings on the stovetop, then finishes in the oven. That oven finish helps the middle set more evenly, especially once vegetables and cheese are spread through the eggs. If you do not have an oven-safe skillet, a pie dish or square baking dish works too.

Resting keeps the slices clean

Resting is not just a polite suggestion. Give the frittata 5 to 10 minutes after baking and the center firms slightly, the cheese settles, and the slices come out cleaner. Cut too soon and even a properly baked frittata can look softer than it really is.

The finished frittata should be softly set, lightly creamy in the center, and sturdy enough to cut into wedges. It should not taste like dry scrambled eggs, and it should not leak liquid when sliced. When the fillings are cooked first and the eggs are pulled at the right time, the texture lands in that sweet spot between tender and sliceable.

This base version is intentionally simple: mushrooms, greens, onion, a little dairy, and cheese. Once you make it once, the ratio is easy to reuse with almost any cooked filling.

Saveable oven-baked frittata recipe card showing 8 eggs, 1/3 cup dairy, 1 1/2 to 2 cups cooked fillings, 3/4 cup cheese, 375°F, 18 to 22 minutes, and 5 to 10 minutes rest time.
Keep the ratio, bake time, and resting step together; those three details make this oven-baked frittata easier to repeat with different fillings.

Easy Oven-Baked Frittata Recipe Card

Prep Time 10 minutes
Cook Time 25–30 minutes
Rest Time 5–10 minutes
Yield 4–6 servings

Recipe name: Easy Oven-Baked Egg Frittata

Course: Breakfast, brunch, meal prep

Best pan: 10-inch / 25 cm oven-safe skillet

Oven temperature: 375°F / 190°C

Ingredients

  • 8 large eggs
  • 1/3 cup / 80 ml whole milk, half-and-half, or heavy cream
  • 1 tbsp / 15 ml olive oil or butter, plus more for greasing if needed
  • 1 small onion or shallot, finely chopped
  • 1–2 garlic cloves, minced
  • 1 cup sliced mushrooms
  • 1/2 cup chopped bell pepper or zucchini
  • 2 packed cups baby spinach or chopped kale
  • 3/4 cup / 75–90 g shredded or crumbled cheese
  • 1/2 tsp fine salt, plus more for vegetables if needed
  • 1/4 tsp black pepper
  • 2 tbsp chopped fresh herbs, optional

Base vegetable filling

For the easiest first version, use the onion or shallot, mushrooms, bell pepper or zucchini, and spinach or kale listed above. After cooking, the filling should reduce to about 1 1/2–2 cups total.

You can swap this mix with the same amount of cooked asparagus, broccoli, roasted potatoes, leftover vegetables, cooked bacon, ham, or sausage. Just keep the finished filling amount close to 1 1/2–2 cups so the eggs still set cleanly.

Cook the onion first, then add the mushrooms and bell pepper or zucchini. Add the spinach or kale at the end and cook just until wilted. If the pan looks wet, keep cooking for another minute before adding the eggs.

Method

  1. Preheat the oven to 375°F / 190°C. Grease a 10-inch oven-safe skillet if needed.
  2. Warm the olive oil or butter in the skillet over medium heat. Add the onion or shallot and cook until softened.
  3. Add the garlic, mushrooms, and bell pepper or zucchini. Cook until the vegetables soften and excess moisture reduces. Add the spinach or kale and cook just until wilted.
  4. In a bowl, whisk the eggs, dairy, salt, and pepper just until combined. Do not whisk the eggs into a very foamy mixture.
  5. Spread the cooked fillings evenly in the skillet. Pour the egg mixture over them, then sprinkle the cheese over the top. You can also stir some of the cheese directly into the eggs and reserve a little for the surface.
  6. Bake for 18–22 minutes, until the center is just set and no wet egg pools on top.
  7. Rest for 5–10 minutes before slicing. Finish with fresh herbs, black pepper, or a little extra cheese if desired.

Doneness

The center should look set, with only a slight wobble. For the safest check, egg dishes should reach 160°F / 71°C in the center.

Storage

Refrigerate cooled slices in an airtight container for 3–4 days, or freeze well-wrapped portions for up to 2–3 months.

Need to adjust the pan or timing? Check the bake-time guide. Not sure when it is done? Use the doneness cues.

Best Frittata Recipe Ratio

The easiest way to stop guessing is to use a frittata ratio. This frittata recipe is flexible, but the base balance is what keeps it reliable: enough egg for structure, enough dairy for tenderness, enough cooked fillings for flavor, and enough cheese to make each bite satisfying without weighing the eggs down.

For most home cooks, the most useful starting point is 8 eggs + 1/3 cup dairy + 1 1/2 to 2 cups cooked fillings + 3/4 cup cheese. That makes a full 10-inch skillet frittata that serves 4 hungry people or 6 lighter portions with sides. Think of the ratio as guardrails, not handcuffs.

Frittata ratio board showing eggs, dairy, cooked fillings, cheese, and the formula 8 eggs, 1/3 cup dairy, 1 1/2 to 2 cups fillings, and 3/4 cup cheese.
The best frittata recipe ratio keeps the eggs structured, the dairy balanced, and the cooked fillings flavorful without making the center loose.

Frittata Ratio by Egg Count

EggsDairyCooked fillingsCheeseBest pan
4 eggs2–3 tbsp / 30–45 ml3/4–1 cup1/3 cupSmall skillet or small baking dish
6 eggs1/4 cup / 60 ml1–1 1/2 cups1/2 cup8- or 9-inch skillet
8 eggs1/3 cup / 80 ml1 1/2–2 cups3/4 cup10-inch skillet
12 eggs1/2 cup / 120 ml2 1/2–3 cups1 cup9×13 dish or 12-inch skillet
Frittata scaling chart showing ratios for 4 eggs, 6 eggs, 8 eggs, and 12 eggs with dairy, cooked fillings, cheese, and pan size.
When scaling the recipe, adjust the pan along with the eggs; otherwise, a thicker frittata may need more time while the edges cook faster.

If you are cooking for one or only have a couple of eggs, this guide to 2-egg dishes has smaller breakfast ideas for days when you do not want a full pan.

A little more cheese is fine if you are using a salty, bold cheese in small amounts. A few extra vegetables are fine when they are already cooked and not watery. What you want to avoid is a pan overloaded with raw vegetables or a bowl of eggs thinned out with too much milk.

If you want a softer brunch-style frittata, use half-and-half or cream and a cheese with personality, like feta, goat cheese, Gruyère, or sharp cheddar. If you want cleaner meal-prep slices, stay closer to whole milk, cooked vegetables, and a moderate amount of cheese.

Ingredients for an Easy Egg Frittata

A frittata is forgiving, but it is not random. Each ingredient has a job: the eggs hold it together, the dairy softens it, the cheese adds depth, and the cooked fillings make it worth slicing into.

Overhead frittata ingredients including eggs, dairy, cooked vegetables, cheese, herbs, garlic, onion, salt, and pepper.
A flexible frittata still needs balance: eggs set the structure, dairy softens the texture, fillings add flavor, and cheese brings richness.

Eggs

Use large eggs for the most predictable result. If your eggs are very small, the frittata may have less structure. If they are extra-large, it may take a little longer to set. Either way, the visual cues matter more than the exact clock: the center should look set, not wet.

Dairy

Whole milk makes a lighter frittata, half-and-half gives a creamy but still sliceable texture, and heavy cream makes the richest version. Unsweetened dairy-free milk can work too, though the texture will usually be a little firmer and less custardy.

Cheese

Cheese is where the frittata starts to feel generous. Cheddar, Swiss, Gruyère, mozzarella, Monterey Jack, feta, goat cheese, Parmesan, ricotta, and cottage cheese can all work, but they do different jobs. Melting cheeses make the slices cozy and familiar, crumbly cheeses give salty pockets, and soft cheeses like ricotta or goat cheese are best dotted on top.

Vegetables and add-ins

The best vegetables have already done their messy work before they meet the eggs: mushrooms have given up their water, spinach has wilted down, potatoes are tender, and onions taste sweet instead of sharp. That gives the finished frittata better flavor and cleaner slices.

Side-by-side comparison of raw watery vegetables and cooked frittata fillings in a skillet.
Cook high-moisture fillings before they meet the eggs so mushrooms, greens, onions, and zucchini add flavor instead of leaking water.

Herbs and seasoning

Salt the eggs, but pay attention to salty fillings. Bacon, ham, feta, Parmesan, sausage, smoked salmon, and olives can all push the salt level up quickly. Fresh herbs like parsley, basil, dill, chives, cilantro, or green onion brighten the finished frittata, especially when added after baking.

Best Pan for Frittata

The best pan for a frittata depends on how you want to cook it. A 10-inch oven-safe skillet is the best all-purpose choice because you can cook the fillings in the same pan, pour in the eggs, and move it straight to the oven.

No oven-safe skillet? Use a greased pie dish, square baking dish, or casserole dish. The frittata will take longer because the egg mixture starts cold in the dish instead of warm from the skillet, but the method is simple and reliable.

Frittata pan guide showing a 10-inch skillet, 9-inch pie dish, 8x8 baking dish, and muffin tin.
The pan shapes the final result: a skillet gives browned wedges, a baking dish gives neat squares, and a muffin tin gives individual portions.
PanBest useWhat to watch
10-inch oven-safe skilletBest default for an 8-egg frittataHandle must be oven-safe.
12-inch oven-safe skilletThinner frittata with quicker bakingCheck early so it does not dry out.
9-inch pie dishNo-skillet oven-baked frittataUsually needs a lower temperature and longer bake.
8×8 or 9×9 baking dishThicker meal-prep slicesThe middle needs more time than the edges.
9×13 baking dishLarger brunch or meal-prep batchUse more eggs or expect thinner slices.
Muffin tinMini frittatas and breakfast meal prepGrease well and check early.
Important: If using a skillet, make sure both the pan and handle are oven-safe. When in doubt, use a greased pie dish or baking dish instead.

Once you choose the pan, check the matching bake time so the center sets without drying the edges.

Skillet Method vs Fully Oven-Baked Method

The skillet method gives the best flavor because the fillings cook in the same pan before the eggs go in. Use it when you want deeper browning and a classic wedge-shaped frittata.

The fully oven-baked method is simpler if you do not have an oven-safe skillet. Cook the fillings separately, spread them in a greased 9-inch pie dish or 8×8 baking dish, pour the egg mixture over the top, and bake at 350°F / 175°C until the center is set. This method is especially helpful for meal prep because square slices fit neatly into containers.

Comparison of skillet frittata wedges and baking-dish frittata squares.
Use the skillet method for browned flavor and a classic brunch look; choose a baking dish when easy make-ahead slices matter more.

How to Make a Frittata in the Oven

The method is simple: cook the fillings, whisk the eggs gently, combine everything in a greased pan, bake until just set, and rest before slicing. The small details are what keep the frittata from turning soggy, rubbery, or bland.

Step-by-step frittata method showing cooked fillings, whisked eggs, combined ingredients, baking, and resting before slicing.
The steps are simple, but the order matters: cook, whisk, combine, bake, and rest so the final frittata stays tender and sliceable.

Step 1: Cook the vegetables first

Warm the oil or butter in your skillet, then cook the onion or shallot until soft. Add garlic for the last 30 seconds so it does not burn. From there, add the vegetables that need cooking. Mushrooms should release their moisture and start to brown. Spinach should wilt down. Zucchini should soften and reduce. Potatoes, sweet potatoes, broccoli, and asparagus should already be tender before the eggs are added.

If you are using bacon, sausage, chicken, or another meat, cook it fully first. Drain excess fat if the pan looks greasy. A little fat is flavorful; too much can make the frittata heavy.

Step 2: Whisk the eggs gently

In a mixing bowl, whisk the eggs, dairy, salt, and pepper just until the yolks and whites are blended. You do not need to beat the eggs until they are foamy. Over-whisked eggs can puff dramatically in the oven, then collapse as they cool.

Step 3: Add the fillings and cheese

You can stir the cooked fillings and most of the cheese into the eggs, or you can spread the fillings evenly in the skillet and pour the egg mixture over the top. Both methods work. For the prettiest surface, reserve a little cheese and a few colorful vegetables to scatter on top before baking.

Step 4: Bake until just set

For the main recipe, bake in a 10-inch oven-safe skillet at 375°F / 190°C for 18–22 minutes. Start checking around 18 minutes. The edges may puff slightly and the center should no longer look wet. Instead of waiting for the top to turn deeply browned, pull the frittata when the middle is softly set.

Step 5: Rest before slicing

Finally, let the frittata rest for 5 to 10 minutes. This short pause gives the center time to finish settling and makes the slices cleaner. Add fresh herbs, cracked black pepper, or a little extra cheese just before serving.

How Long to Bake a Frittata

Frittata bake time changes with pan size, pan depth, oven temperature, and how much moisture is in the fillings. A shallow skillet frittata can finish quickly, while a thicker baking-dish frittata needs more time through the middle.

Frittata bake time guide showing different pans and approximate oven times for skillet, pie dish, baking dish, sheet pan, and muffin tin.
Because pan depth changes bake time, start checking early and trust the center more than the clock or the color of the top.
Pan or methodOven temperatureApproximate timeBest for
10-inch skillet375°F / 190°C18–22 minutesMain recipe
12-inch skillet375°F / 190°C14–18 minutesThinner frittata
10-inch skillet, fast finish400°F / 200°C8–15 minutesStovetop-start method
9-inch pie dish350°F / 175°C25–32 minutesNo-skillet method
8×8 baking dish350°F / 175°C28–38 minutesThicker meal-prep slices
9×13 baking dish350°F / 175°C25–35 minutesLarger batch
Sheet pan375°F / 190°C20–25 minutesBrunch or crowd servings
Standard muffin tin350°F / 175°C18–22 minutesMini frittatas
Mini muffin tin350–375°F / 175–190°C10–14 minutesBite-size egg cups

Use these times as a guide, then check the doneness cues before pulling the frittata from the oven.

For a sheet-pan frittata, use a well-greased or parchment-lined rimmed pan, spread the fillings evenly, and check early because the egg layer is usually thinner than a skillet or baking-dish frittata.

Every oven and pan behaves a little differently, so use the clock as a guide rather than the only test. A frittata with dry cooked vegetables may set faster than one with juicy tomatoes, zucchini, or extra cheese. Start checking a few minutes early, especially if your pan is wide or your oven runs hot.

350°F vs 375°F vs 400°F for Frittata

The oven temperature is not random. Different frittata recipes use different temperatures because they are usually using different pans and methods. Instead of treating one number as magic, choose the temperature based on the pan and texture you want.

TemperatureBest useWhat to watch
350°F / 175°CPie dishes, square baking dishes, muffin tins, and deeper frittatasGentler heat, but the middle takes longer.
375°F / 190°CBest default for a 10-inch skillet frittataBalanced speed and control.
400°F / 200°CFast stovetop-start skillet frittatasCheck early because edges can overcook.
Oven temperature guide for frittata comparing 350°F for deeper dishes, 375°F for skillet frittata, and 400°F for a fast finish.
Use 375°F for a classic skillet frittata. Deeper dishes usually need gentler heat so the middle sets before the edges dry out.

For most beginners, 375°F / 190°C is the most forgiving skillet temperature. Use 350°F / 175°C when the eggs are in a deeper dish, and use 400°F / 200°C only when you want a faster finish and are comfortable checking early.

Best Vegetables and Fillings for Frittata

The best frittata fillings are already cooked, seasoned, and not watery. That does not mean they need to be complicated. Leftover roasted vegetables, sautéed greens, cooked potatoes, bacon, ham, sausage, or bits of cheese can all turn into a good breakfast frittata.

Vegetable guide for frittata showing mushrooms, spinach, peppers, onions, potatoes, zucchini, tomatoes, and broccoli.
The best vegetables for frittata are not just tasty; they also cook down well and do not release too much water into the eggs.

Best Filling Prep Before Baking

Use the table below as a prep guide before adding fillings to your eggs.

FillingUse raw or cooked?Best prep
MushroomsCook firstSauté until moisture releases and the mushrooms start browning.
Spinach or kaleCook firstWilt, then squeeze or cook off extra moisture.
ZucchiniCook firstSauté until the pieces soften and excess water reduces.
Bell peppers and onionsCook firstSauté until softened and lightly sweet.
Potatoes or sweet potatoesFully cook firstRoast, boil, microwave, or pan-cook until tender.
Broccoli or asparagusParcook firstSteam, roast, or sauté until just tender.
TomatoesUse carefullyUse cherry tomatoes or seeded tomatoes so the frittata does not turn watery.
Bacon, sausage, ham, or chickenCook firstCook fully and drain excess fat if needed.
Fresh herbsAdd lateStir into the eggs or sprinkle after baking for brighter flavor.

If your frittata usually turns watery, check the troubleshooting guide before adding more dairy or extra fillings.

Best Frittata Filling Combinations

A spinach frittata is best with wilted, squeezed spinach and feta, goat cheese, cheddar, or Parmesan. A potato frittata works best when the potatoes are already tender and lightly browned. A mushroom frittata needs mushrooms that have cooked long enough to lose their water. For a vegetable frittata, two or three vegetables usually taste better than a full fridge clean-out: spinach and mushrooms work, peppers and onions work, and zucchini with tomatoes and basil works. Seven vegetables in one pan usually taste less intentional.

Can you use frozen vegetables in a frittata?

Yes, but do not add them icy or wet. Thaw frozen spinach, broccoli, peppers, or mixed vegetables first, then squeeze or cook off as much moisture as you can. Frozen spinach especially needs a good squeeze before it goes into the eggs.

Milk vs Cream vs Half-and-Half in Frittata

Milk, cream, and half-and-half all work in a frittata, but they create different textures. The main rule is simple: use enough dairy to soften the eggs, not so much that the center turns loose.

Comparison of milk, half-and-half, and cream for frittata texture.
Milk keeps the frittata lighter, cream makes it richer, and half-and-half sits in the middle with a creamy but still sliceable texture.
DairyTextureBest use
Whole milkLight and tenderEveryday frittata
Half-and-halfCreamier but still sliceableBest balanced choice
Heavy creamRich and softerBrunch-style frittata
Unsweetened dairy-free milkLighter and less richDairy-free variation
Cottage cheeseHigher protein, creamy pockets or blended textureHigh-protein frittata variation

Cheese has a second job beyond flavor: it helps make the frittata feel satisfying. Use a melting cheese when you want a classic breakfast texture, a salty cheese when you want punchier flavor, or a soft cheese when you want creamy pockets. If the cheese is bold, you do not need much. A little feta, Parmesan, or goat cheese can do more for the whole pan than a heavy layer of mild cheese.

Cheese guide for frittata showing melty cheeses like cheddar, Gruyère, Swiss, and Monterey Jack; salty cheeses like feta and Parmesan; and creamy cheeses like goat cheese, ricotta, and cottage cheese.
Cheese changes the whole character of a frittata: melty cheese feels cozy, salty cheese adds punch, and creamy cheese creates soft pockets.

How to Tell When a Frittata Is Done

A frittata is done when the center is set but not dried out. The mistake many people make is waiting for the top to brown deeply. By then, the edges may already be rubbery.

Do not wait for deep browning: A frittata is usually best when the center is just set. If you wait for a dark golden top, the edges may already be dry or rubbery.
Doneness guide for frittata showing a set center, slight wobble, knife test, and thermometer reading 160°F or 71°C.
Instead of waiting for a dark top, look for a set center, a slight wobble, and no wet egg when you test near the middle.
CheckWhat you want
VisualThe center looks set, not wet, shiny, or liquid.
JiggleA slight wobble is fine; loose sloshing egg is not.
TouchThe center feels lightly springy.
Knife testA knife inserted near the center should not bring up raw egg.
ThermometerThe center should reach 160°F / 71°C for egg dishes.

For food safety, egg dishes such as frittata and quiche should reach 160°F / 71°C in the center. You can check the current official chart at FoodSafety.gov.

Frittata Variations

Once the base ratio is comfortable, use this frittata recipe as a flexible starting point. Keep the same egg mixture, then change the vegetables, cheese, herbs, or cooked meat depending on what you have.

If you are making it for brunch, think creamy, herby, and a little richer. If you are making it for meal prep, think sturdy, sliceable, and easy to reheat. And if you are using leftovers, choose two or three good fillings instead of trying to fit the whole fridge into one pan.

For the safest first version, go with spinach, mushrooms, and cheddar or feta. The flavors are familiar, the vegetables are easy to manage, and the finished slices hold together well.

Spinach and mushroom frittata with a wedge served on a plate beside salad greens and crumbled cheese.
Spinach and mushroom is a smart first version because the flavors are familiar, the vegetables cook down well, and the slices hold together.

Not sure which version to make first? Start with one of these combinations, then adjust the vegetables and cheese based on what you have.

Frittata variations board showing spinach, mushroom, potato, vegetable, and high-protein frittatas.
Once the base method works, variations become easy: keep the egg mixture steady, then change the vegetables, cheese, herbs, or protein.
Frittata styleBest fillingsBest cheese
Spinach frittataWilted spinach, onion, herbsFeta, goat cheese, Parmesan, or cheddar
Mushroom frittataBrowned mushrooms, shallot, thymeGruyère, Swiss, goat cheese, or cheddar
Potato frittataCooked potatoes, onion, peppersCheddar, Monterey Jack, or Parmesan
Vegetable frittataPeppers, zucchini, broccoli, asparagus, or roasted vegetablesFeta, mozzarella, goat cheese, or cheddar
High-protein frittataSpinach, peppers, cooked turkey, herbsCottage cheese, cheddar, or Parmesan

Spinach frittata

For a spinach frittata that tastes bright instead of watery, wilt the spinach first, squeeze it well, then pair it with feta, goat cheese, dill, chives, or green onion.

Potato frittata

Potatoes should be fully cooked before the eggs go in. Roasted potatoes, boiled potatoes, leftover breakfast potatoes, or pan-fried cubes all work. For the best texture, let the potatoes brown lightly so they do not taste flat inside the eggs.

Vegetable frittata

Use a mix of cooked peppers, onions, mushrooms, zucchini, broccoli, asparagus, tomatoes, or leftover roasted vegetables. Two or three vegetables usually taste better than too many competing flavors in one pan.

Bacon, ham, or sausage frittata

Cook bacon or sausage first and drain excess fat. Ham is already cooked, but browning it briefly can deepen the flavor. Since breakfast meats and many cheeses are salty, reduce the added salt if needed. For an easy brunch plate, serve slices with air fryer bacon, toast, and fruit.

Egg white frittata

An egg white frittata is leaner, but it can turn firm faster than a whole-egg frittata. Use cooked vegetables, enough seasoning, and a little cheese or cottage cheese for better texture. Check early so the egg whites do not overbake.

Cottage cheese or high-protein frittata

For a higher-protein frittata, use about 1/2 cup cottage cheese with 8 eggs and reduce the milk or cream to 2 tablespoons. Leave the cottage cheese as is for creamy pockets, or blend it with the eggs for a smoother texture.

Dairy-free frittata

Use unsweetened dairy-free milk or skip the dairy and rely on cooked vegetables, herbs, and olive oil for flavor. The texture may be a little firmer without dairy, so avoid overbaking.

Keto or low-carb frittata

For a keto frittata, use eggs, cheese, cream or half-and-half, and low-carb vegetables such as spinach, mushrooms, zucchini, bell peppers, broccoli, asparagus, or cauliflower. Skip potatoes, sweet potatoes, and sweet vegetables if you are keeping carbs very low.

Mini frittatas or frittata muffins

For mini frittatas, divide the egg mixture among well-greased muffin cups and bake at 350°F / 175°C until just set. They are useful for breakfast meal prep, lunchboxes, and grab-and-go mornings. If meal prep is the goal, you may also like this freezer-friendly breakfast burrito recipe.

Mini frittatas baked in a muffin tin with a few served on a plate and packed in a container for meal prep.
Mini frittatas turn the same base recipe into portable portions, which makes them useful for lunchboxes, freezer breakfasts, and quick mornings.

Making these ahead? Use the storage and reheating guide so the texture stays tender.

How to Store, Freeze, and Reheat Frittata

Cool and Pack the Slices First

Frittata is excellent for meal prep because it holds its shape, reheats quickly, and tastes good warm or chilled from the fridge. If you serve it at room temperature for brunch, keep the timing in mind and do not leave it out too long.

For the cleanest meal-prep slices, let the frittata cool on a rack or cutting board before packing it away. If it sits hot in the pan or a closed container, steam can soften the bottom and make the slices damp.

Fridge, Freezer, and Reheat Times

Storage guide showing frittata slices in a container, wrapped freezer portions, and a reheated slice on a plate.
Cool the frittata before storing; otherwise, trapped steam can soften the slices even when the eggs were baked correctly.
MethodHow longBest practice
Refrigerator3–4 daysCool completely, then store slices in an airtight container.
Freezer2–3 monthsWrap individual slices well, then place in a freezer-safe bag or container.
MicrowaveShort burstsCover lightly and heat gently so the eggs do not turn rubbery.
Oven300–350°F until warmBest for texture; for food safety, reheat leftovers to 165°F / 74°C.
Air fryerLow heat, short timeUseful for small portions, but avoid drying the edges.

Food Safety for Stored Frittata

The FDA recommends refrigerating cooked egg leftovers and using them within 3–4 days. You can read more on the FDA egg safety page.

If serving frittata at room temperature for brunch, do not leave it out for more than 2 hours, or more than 1 hour in very hot weather.

When reheating a slice in the microwave, use short bursts instead of one long blast. Eggs can turn rubbery when overheated, so warm them gently when texture matters. Leftovers should be reheated to 165°F / 74°C before serving.

Frittata Meal Prep Boxes

To build a bigger breakfast-prep spread, pair frittata slices with overnight oats, fruit, toast, or a smoothie.

Meal-prep containers filled with frittata slices, fruit, toast, and greens.
Make-ahead frittata slices pack neatly, reheat quickly, and still taste good chilled from the fridge.

Serving leftovers for breakfast or brunch? See what to serve with frittata for easy plate ideas.

Frittata Troubleshooting: Watery, Rubbery, or Undercooked

When a frittata goes wrong, the trouble usually starts before it ever reaches the plate: the fillings were too wet, the pan was too deep, the eggs were beaten too aggressively, or the bake went a few minutes too long. Fortunately, most of those problems are easy to fix the next time.

Troubleshooting guide for watery frittata, rubbery texture, stuck frittata, and bland flavor with short fixes.
When a frittata goes wrong, check four things first: moisture, heat, pan prep, and seasoning. Fixing those usually fixes the next batch.
ProblemLikely causeFix next time
Watery frittataRaw watery vegetables or too much dairySauté or roast high-moisture fillings before adding the eggs, and keep the dairy ratio in check.
Rubbery textureOverbaking, high heat, or too little dairyPull it when just set and rest before slicing.
Wet center, dry edgesPan is too small/deep or oven is too hotUse a wider pan or lower the temperature for deeper dishes.
Frittata stuck to panNot enough fat or unsuitable panGrease well, use an oven-safe nonstick pan, or use a pie dish.
Bland flavorEggs and vegetables were underseasonedSeason the eggs and the cooked fillings.
Puffed then collapsedEggs were over-whisked or overbakedWhisk gently and bake only until set.
Too saltySalty cheese, bacon, ham, or smoked salmonReduce added salt when using salty fillings.

If the frittata is already watery, give it a few more minutes in the oven if the center is underbaked. If the liquid came from vegetables, it may not become perfect, but it can still be served. Next time, let the vegetables cook longer before the eggs go in.

What to Serve with Frittata

At breakfast, frittata works well with toast, fruit, potatoes, or bacon. At lunch or dinner, it feels more complete with a crisp salad, roasted vegetables, or a slice of good bread.

  • Toast, sourdough, English muffins, or flatbread
  • Simple green salad or tomato salad
  • Roasted potatoes, breakfast potatoes, or crispy air fryer hash browns
  • Fresh fruit or fruit salad
  • Bacon for a brunch plate
  • Overnight oats, smoothies, or yogurt for a breakfast spread
Frittata serving board with toast, fruit, potatoes, salad, smoothie, and a plated frittata wedge.
Build the plate with contrast: something crisp, something fresh, and something filling will carry frittata from breakfast to brunch or dinner.

A simple brunch plate could be warm frittata wedges, crispy potatoes, fruit, toast, and something fresh like a tomato salad. Meal prep can stay much simpler: one slice of frittata, fruit, and oats or toast is enough for a balanced breakfast.

For a fresher brunch plate, pair frittata with fruit or a creamy kiwi smoothie instead of adding another heavy side.

For a different savory breakfast on another morning, this soft poha recipe is another quick, pantry-friendly option that works well for busy mornings.

Frittata FAQs

What is the best ratio for a frittata?

For an 8-egg frittata, use 1/3 cup dairy, 1 1/2 to 2 cups cooked fillings, and about 3/4 cup cheese. That gives you enough egg to hold the frittata together without making it plain or dry.

Is a frittata better with milk or cream?

Milk makes a lighter frittata, cream makes a richer one, and half-and-half gives the best middle ground. The bigger issue is quantity: too much dairy can make the frittata loose, while a moderate amount keeps it tender and sliceable.

Should vegetables be cooked before adding them to a frittata?

Usually, yes. Mushrooms, spinach, zucchini, onions, peppers, potatoes, broccoli, asparagus, and most dense or juicy vegetables do better after a quick sauté, roast, steam, or parcook. The flavor gets better, and the egg mixture sets more cleanly.

Can I use frozen vegetables in a frittata?

Yes, but thaw and squeeze or cook off extra moisture first. Frozen spinach, broccoli, peppers, and mixed vegetables can work well as long as they are not added icy or wet.

Why is my frittata watery?

A watery frittata usually comes from raw watery vegetables, too much dairy, underbaking, or slicing before it has rested. Cook high-moisture fillings first, use the ratio table, bake until the center is set, and rest for 5 to 10 minutes before cutting.

What oven temperature is best for frittata?

For a skillet frittata, 375°F / 190°C is the best default. For deeper baking dishes or muffin tins, 350°F / 175°C is gentler and gives the center more time to set. A 400°F / 200°C oven can work for a fast finish, but it is easier to overbake the edges.

Do I need a cast-iron skillet for frittata?

No. Cast iron works well, but any oven-safe skillet can work. If your skillet is not oven-safe, use a greased pie dish or baking dish instead.

How do you know when a frittata is done?

The center should look set, not wet or shiny. A slight wobble is fine, but loose liquid egg is not. A knife inserted near the center should not bring up raw egg, and an instant-read thermometer should register 160°F / 71°C for egg dishes.

Why did my frittata puff up and then collapse?

A little puffing is normal. A dramatic rise and collapse usually comes from over-whisking the eggs or baking too long. Whisk just until blended and pull the frittata when the center is set.

Can frittata be made ahead?

Yes. Cool the frittata completely, slice it, and refrigerate it in an airtight container for 3 to 4 days. Reheat gently in the microwave or oven so the eggs stay tender.

What is the difference between a frittata, omelet, quiche, and egg casserole?

A frittata mixes eggs with fillings and is usually finished or fully baked in the oven. An omelet is cooked quickly on the stovetop and folded around fillings. A quiche is more custard-like, usually richer in dairy, and often baked in a crust. An egg casserole is usually thicker and may include bread, potatoes, or more heavy add-ins.

Final Tips for a Better Frittata

A great frittata is less about one exact filling and more about a dependable method. Use this frittata recipe as your base, give the add-ins a little attention before they meet the eggs, bake gently, and let the finished frittata rest before slicing. Once those pieces are in place, breakfast leftovers, cooked vegetables, herbs, and small bits of cheese can turn into a meal that feels planned even when it started with whatever was in the fridge.

What went into yours: spinach and feta, potato and cheddar, mushrooms and herbs, or whatever needed using from the fridge?

Back to frittata guide

“recipeInstructions”: [ { “@type”: “HowToStep”, “name”: “Preheat the oven and prepare the pan”, “url”: “https://masalamonk.com/frittata-recipe/#best-pan”, “text”: “Preheat the oven to 375°F / 190°C. Grease a 10-inch oven-safe skillet if needed.”, “image”: “https://masalamonk.com/wp-content/uploads/2026/05/best-pan-for-frittata.jpg” }, { “@type”: “HowToStep”, “name”: “Cook the vegetables first”, “url”: “https://masalamonk.com/frittata-recipe/#cook-fillings-first”, “text”: “Warm the olive oil or butter in the skillet over medium heat. Add the onion or shallot and cook until softened. Add the garlic, mushrooms, and bell pepper or zucchini. Cook until the vegetables soften and excess moisture reduces. Add the spinach or kale and cook just until wilted.”, “image”: “https://masalamonk.com/wp-content/uploads/2026/05/cook-fillings-first-for-frittata.jpg” }, { “@type”: “HowToStep”, “name”: “Whisk the eggs gently”, “url”: “https://masalamonk.com/frittata-recipe/#ingredients”, “text”: “In a bowl, whisk the eggs, dairy, salt, and pepper just until combined. Do not whisk the eggs into a very foamy mixture.”, “image”: “https://masalamonk.com/wp-content/uploads/2026/05/frittata-ingredients.jpg” }, { “@type”: “HowToStep”, “name”: “Add the fillings and cheese”, “url”: “https://masalamonk.com/frittata-recipe/#how-to-make”, “text”: “Spread the cooked fillings evenly in the skillet. Pour the egg mixture over them, then sprinkle the cheese over the top. You can also stir some of the cheese directly into the eggs and reserve a little for the surface.”, “image”: “https://masalamonk.com/wp-content/uploads/2026/05/how-to-make-a-frittata-step-by-step.jpg” }, { “@type”: “HowToStep”, “name”: “Bake until just set”, “url”: “https://masalamonk.com/frittata-recipe/#oven-times”, “text”: “Bake for 18 to 22 minutes, until the center is just set and no wet egg pools on top. Do not wait for a deeply browned top.”, “image”: “https://masalamonk.com/wp-content/uploads/2026/05/how-long-to-bake-a-frittata.jpg” }, { “@type”: “HowToStep”, “name”: “Rest before slicing”, “url”: “https://masalamonk.com/frittata-recipe/#doneness”, “text”: “Rest the frittata for 5 to 10 minutes before slicing. Finish with fresh herbs, black pepper, or a little extra cheese if desired.”, “image”: “https://masalamonk.com/wp-content/uploads/2026/05/oven-baked-egg-frittata-slice.jpg” } ]