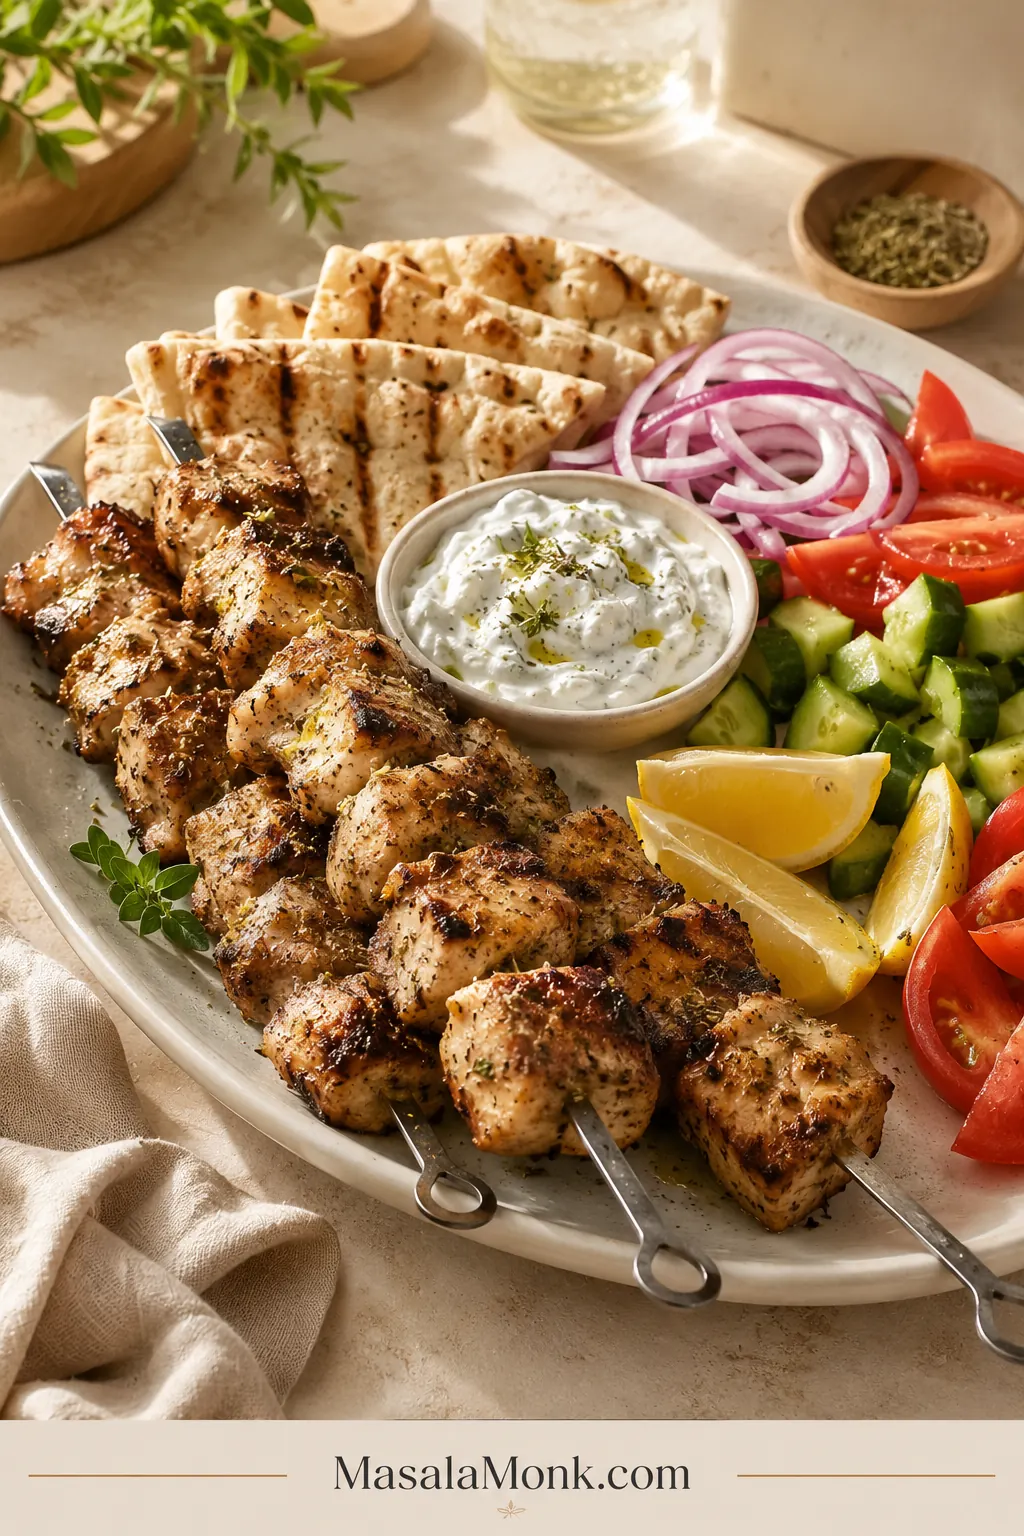
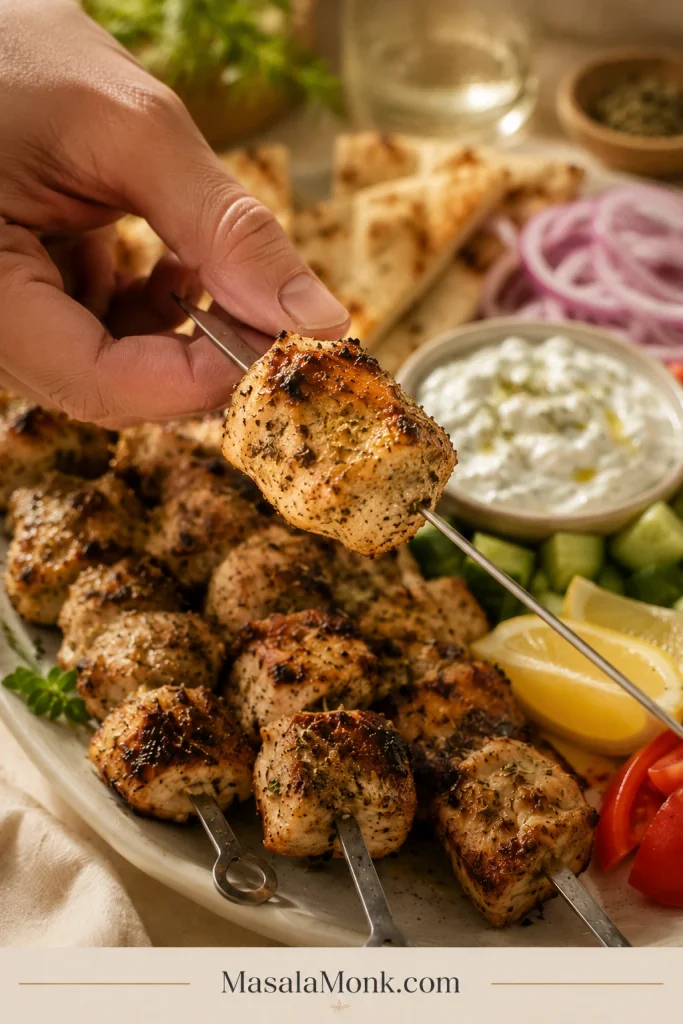
The first piece of chicken rarely makes it to the serving plate. It comes off the skewer hot, lemony and garlicky, with oregano clinging to the edges and just enough char to make waiting for the pita difficult.
That is the result this chicken souvlaki recipe is built around: juicy in the centre, browned in scattered patches, and bright without tasting sharply acidic. Boneless thighs are the most forgiving starting point. Chicken breast works too, but it needs a shorter marinade and an earlier temperature check.
Start here
The version to make first
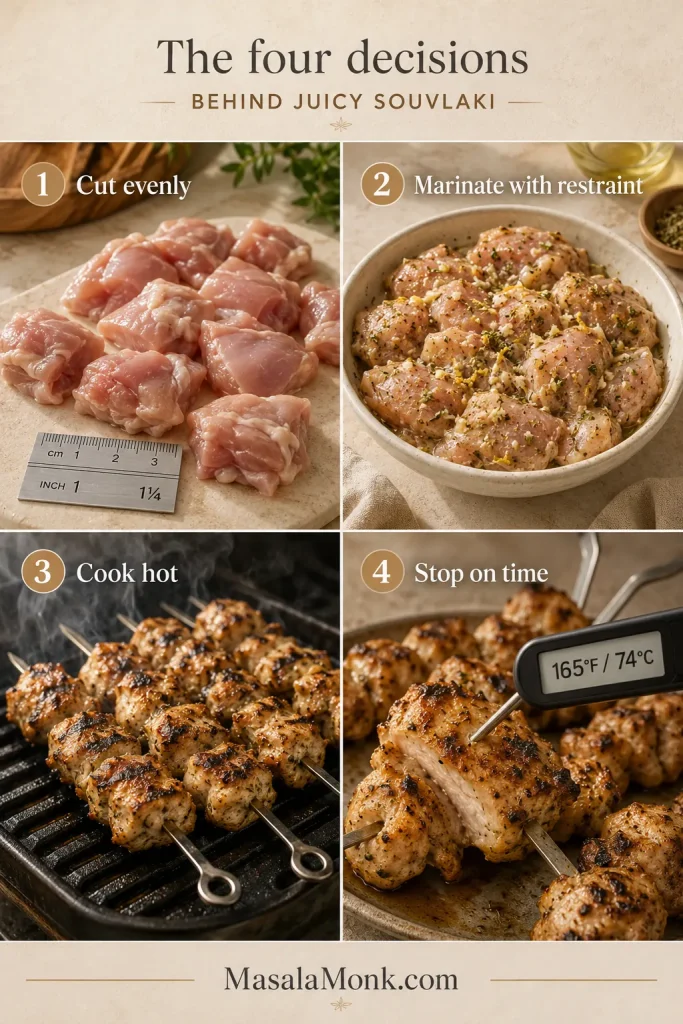
Use 750 g / 1 lb 10 oz boneless chicken thighs, cut into pieces around 3 cm / 1¼ inches thick. Marinate for 1 to 4 hours, then cook over medium-high heat until the edges are browned and the thickest piece reaches 165°F / 74°C.
The ingredient list is short. What matters is keeping the pieces even, the lemon restrained, the heat strong and taking the skewers off on time. Thighs give you more time to build colour; breast needs to leave the heat sooner.
Remember: Cut evenly, marinate with restraint, cook hot and stop on time.
Make it now
Chicken Souvlaki Recipe
The main method uses chicken thighs and an outdoor grill. Broiler, oven, air fryer and stovetop adjustments follow the grill instructions.
Recipe at a glance
- Serves: 4 as a pita or plated meal
- Yield: About 6 medium skewers
- Preparation: 20 minutes
- Marinating: 1 to 4 hours
- Grilling: About 8 to 12 minutes
- Piece size: Around 3 cm / 1¼ inches
- Doneness: 165°F / 74°C
Equipment that helps most
- Six flat metal skewers, or bamboo skewers soaked for at least 30 minutes
- Instant-read food thermometer
- Wire rack and rimmed sheet pan for oven or broiler cooking
Ingredients
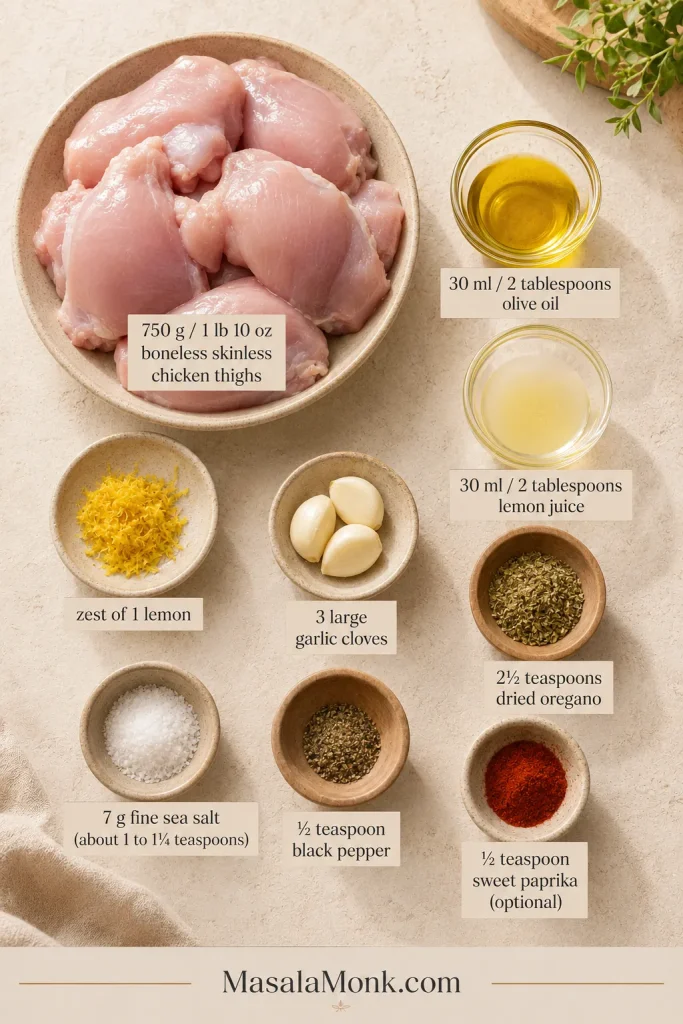
For the chicken and marinade
- 750 g / 1 lb 10 oz boneless, skinless chicken thighs
- 30 ml / 2 tablespoons extra-virgin olive oil
- 30 ml / 2 tablespoons fresh lemon juice
- Finely grated zest of 1 lemon
- 3 large garlic cloves, finely grated or minced
- 2½ teaspoons dried oregano
- 7 g fine sea salt, approximately 1 to 1¼ teaspoons depending on the salt
- ½ teaspoon freshly ground black pepper
- ½ teaspoon sweet paprika, optional
For serving
- 4 soft Greek-style pitas
- 120 to 160 g / about ½ to ⅔ cup thick tzatziki (opens in a new tab)
- 1 medium tomato, sliced or chopped
- ½ small red onion, very thinly sliced
- Lemon wedges
- Chopped parsley or fresh oregano, optional
- Cooked fries, shredded lettuce or crumbled feta, optional
Instructions

Prepare and thread
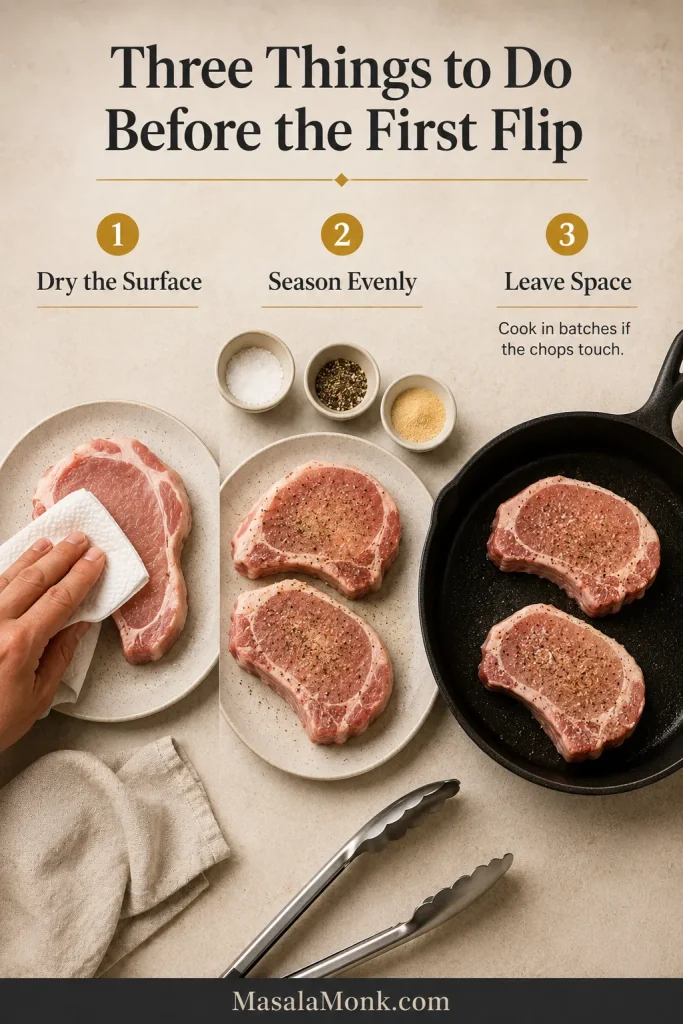
1. Cut the chicken. Trim away large pockets of fat and loose pieces. Cut the thighs into pieces around 3 cm / 1¼ inches thick. Fold thin sections over themselves so they cook at a similar rate. Similar thickness matters more than tidy cubes.
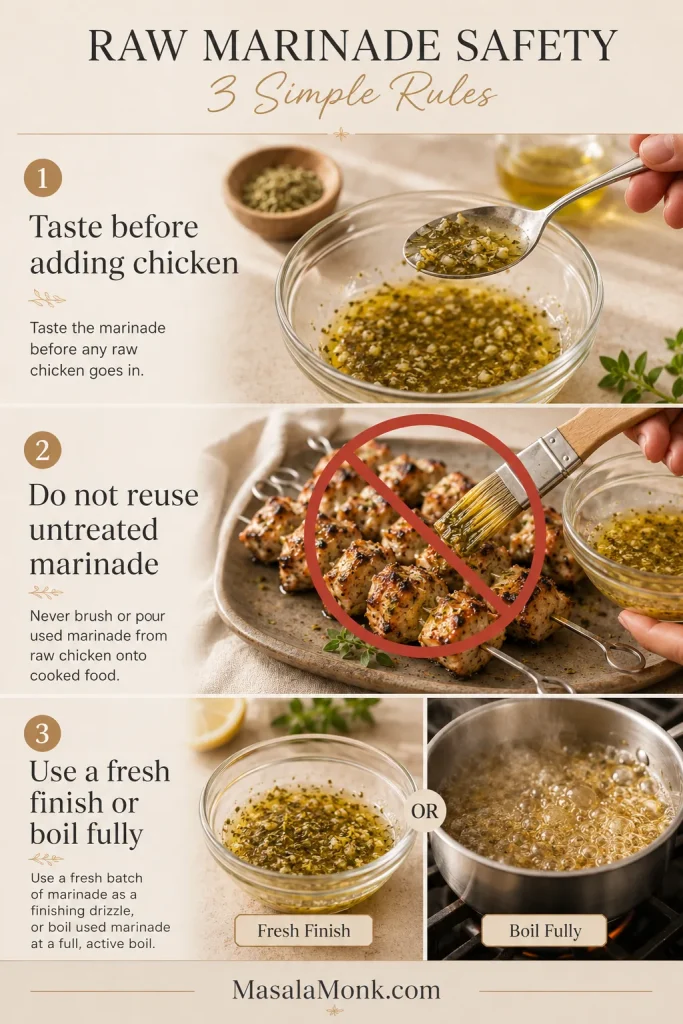
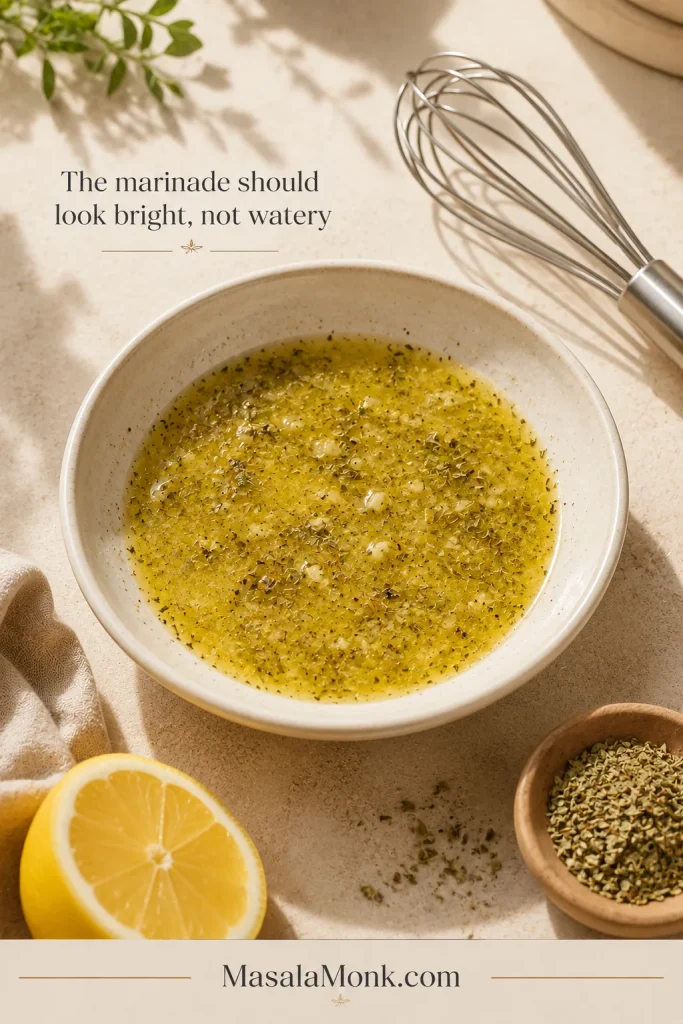
2. Mix and check the marinade. Whisk together the olive oil, lemon juice, zest, garlic, oregano, salt, pepper and optional paprika. Before adding the chicken, taste a little of the marinade. It should be well seasoned, clearly lemony and strongly herbal.
3. Marinate. Add the chicken and turn until every piece is coated. Cover and refrigerate for 1 to 4 hours.
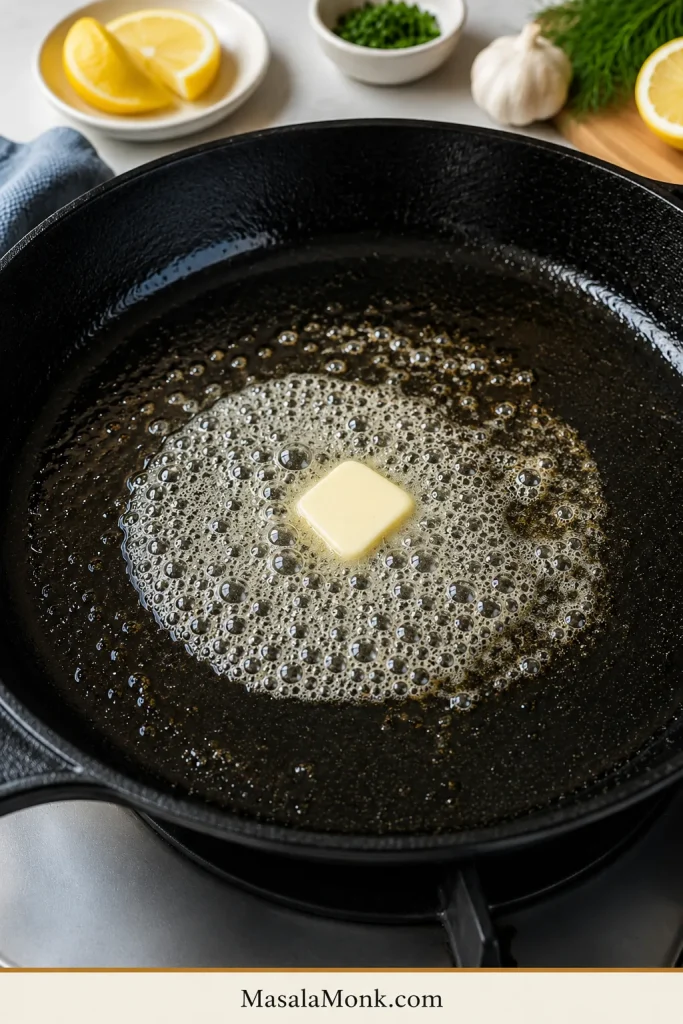
4. Thread and preheat. Let excess marinade drip back into the bowl, then thread five or six pieces onto each skewer. Preheat the grill with the lid closed to medium-high, approximately 400–450°F / 205–230°C on its built-in thermometer. Clean and lightly oil the grate.
Cook, check and serve
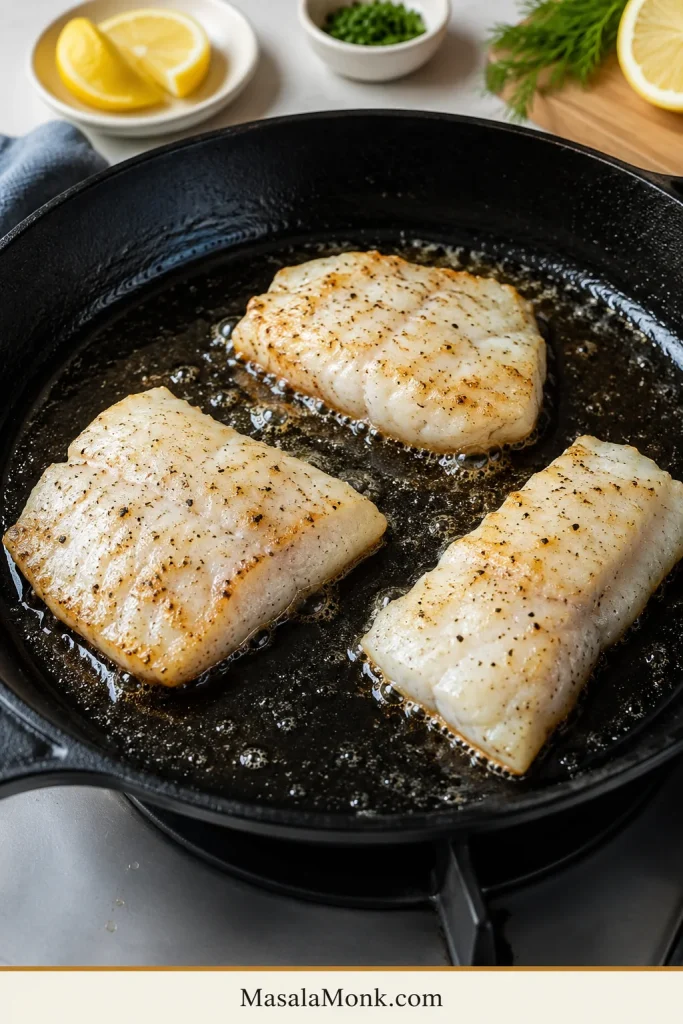
5. Begin grilling. Place the skewers over direct heat. They should sizzle immediately. Cook for 2 to 3 minutes before making the first turn.
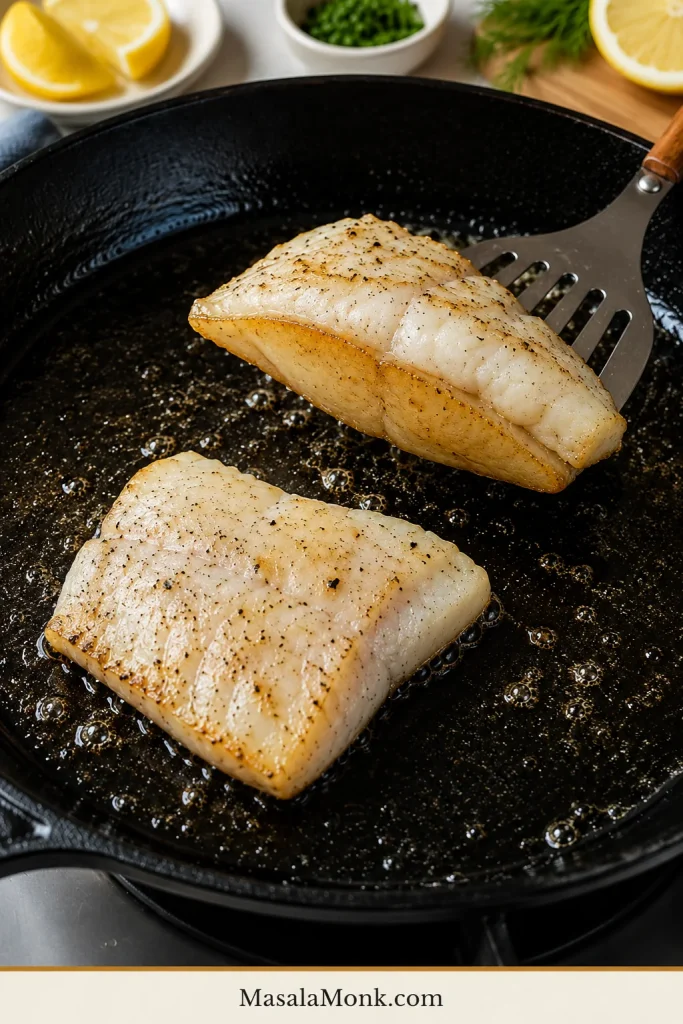
6. Turn and brown. Continue cooking for approximately 8 to 12 minutes in total, turning every 2 to 3 minutes. Move the skewers to a cooler area whenever dripping oil causes flames.
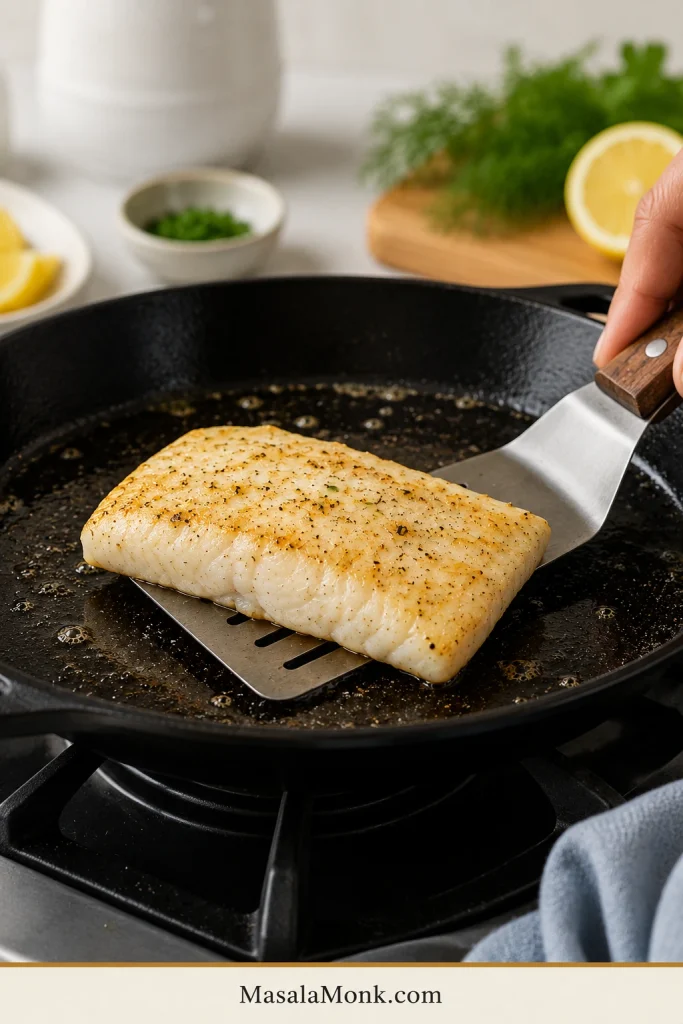
7. Check and rest. Begin checking the thickest piece after 7 to 8 minutes. Remove the skewers when the centre reaches 165°F / 74°C, then rest for 3 to 5 minutes.
8. Finish and serve. Add a squeeze of lemon, a small drizzle of olive oil and a pinch of oregano. Serve with warm pita, tzatziki, tomato and red onion.
Using chicken breast?
Replace the thighs with an equal weight of boneless, skinless breast. Keep the pieces around 3 cm / 1¼ inches thick, marinate for 30 to 60 minutes, and begin checking 2 to 3 minutes earlier. Put breast and thigh on separate skewers so each can leave the heat when ready.
Other cooking methods at a glance
| Method | Heat | Starting range | What matters most |
|---|---|---|---|
| Broiler | High | 8 to 12 minutes | Keep the pan about 5 to 6 inches below the element |
| Oven | 425°F / 220°C | 10 to 15 minutes depending on cut | Finish briefly under the broiler if the chicken needs colour |
| Air fryer | 390–400°F / 200–205°C | 9 to 14 minutes depending on cut | Use short skewers and leave room for air to circulate |
| Grill pan or skillet | Medium-high | 7 to 12 minutes depending on cut | Cook in batches with space between the pieces |
Raw-marinade safety
Do not taste the marinade after raw chicken has entered the bowl. Do not brush used marinade over nearly cooked or finished chicken unless it has first been brought to a full boil. This follows USDA poultry-marination guidance (opens in a new tab). Fresh lemon, olive oil and oregano make a simpler finishing mixture.
Chicken Souvlaki Guide
Use the contents below to jump to the chicken cut, marinade, cooking method, serving idea or troubleshooting help you need.
What Is Chicken Souvlaki?
Chicken souvlaki is made from small pieces of marinated chicken threaded onto skewers and cooked quickly over strong heat. It can be eaten directly from the skewer, served on a plate, or tucked into warm pita with sauce and vegetables.
You may also see it called Greek chicken skewers or Greek chicken kebabs. Names and serving styles vary across Greece and Cyprus; here, souvlaki means lemon-oregano chicken cooked on small skewers and served directly or in pita.
Souvlaki differs from gyro, which is cooked as a larger stack on a vertical rotisserie and shaved into slices.
Chicken Thighs or Chicken Breast?
Thighs stay juicy longer, while breast cooks leaner and faster and gives you less room to miss the moment.
| Chicken cut | What it does best | Marinating time | Watch for |
|---|---|---|---|
| Boneless thighs | Stay juicy and tolerate stronger heat | 1 to 4 hours | Uneven fatty or folded sections |
| Chicken breast | Gives a leaner, cleaner-tasting skewer | 30 to 60 minutes | Drying before deep colour develops |

Why thighs are the easiest first choice
Chicken thighs cope well with the strong heat needed for browning. Their fuller flavour also stands up to the citrus and oregano. Trim large pockets of fat and loose flaps, but leave the smaller seams that help the meat remain succulent.
How to keep chicken breast juicy
Cut breast into pieces around 3 cm / 1¼ inches thick and marinate for only 30 to 60 minutes. Begin checking early. The centre should remain moist and opaque, with modest browning around the edges.
Keep breast and thigh on separate skewers. Breast may be ready while thicker thigh pieces still need another minute.
Chicken Souvlaki Marinade: Lemon, Oregano and Timing
The marinade should smell strongly of oregano and garlic, with lemon brightening the mixture without taking over. Garlic, oregano, salt and black pepper form the core; zest adds fragrance, while paprika is optional.
- Lemon juice and zest: Juice sharpens the marinade; zest adds fragrance. Grate only the yellow outer layer because the white pith can taste bitter.
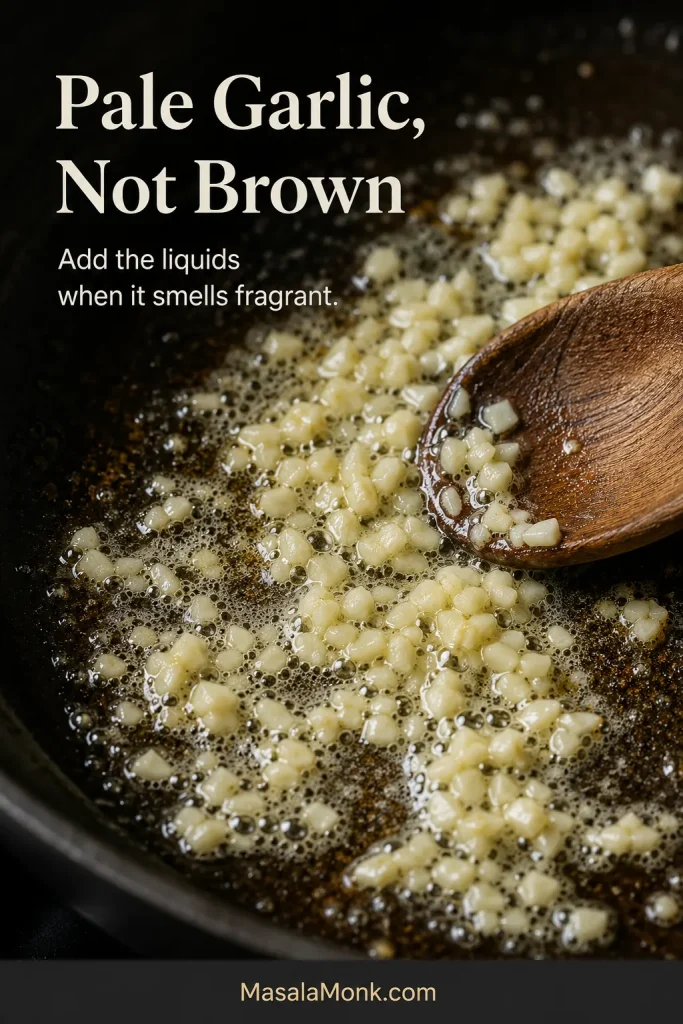
- Garlic: Finely grated or minced garlic coats the chicken evenly. Brush away any large loose pieces before intense broiling if they begin darkening too quickly.
- Oregano: Greek oregano is ideal, but any fragrant dried oregano works. Rub it briefly between your fingers to release more aroma.
- Salt: Seven grams gives a dependable starting point because different salts occupy different amounts of space.
- Paprika: Optional for gentle colour and sweetness.
How long should the chicken marinate?
Small pieces season quickly. Thighs can remain in the lemon-oregano marinade for 1 to 4 hours, while breast needs only 30 to 60 minutes.
Short on time? Thirty minutes still gives chicken thighs useful surface flavour. One to four hours produces a fuller lemon, garlic and oregano coating.

| Version | Best for | Marinating time |
|---|---|---|
| Classic lemon-oregano thighs | Grilling and a forgiving texture | 1 to 4 hours |
| Classic lemon-oregano breast | A leaner skewer | 30 to 60 minutes |
| Yogurt-coated breast | A thicker, gently tangy coating | 30 minutes to 2 hours |
| Yogurt-coated thighs | A softer exterior and fuller coating | 1 to 4 hours |
Overnight marination is unnecessary here and can affect the outside texture, particularly with breast. The lemon should brighten the chicken without making the surface feel cured or soft.
For a yogurt-coated version, add 60 g / ¼ cup thick Greek yogurt and reduce the lemon juice to 15 ml / 1 tablespoon. Keep the zest, garlic, oregano, salt and pepper unchanged.

For a little heat, add ¼ to ½ teaspoon chilli flakes or a small pinch of cayenne.
Cut and Thread the Chicken for Even Cooking
Cut by thickness, not perfect shape
Tiny cubes cook so quickly that they can dry before they develop good colour. Very large pieces protect the centre but may blacken outside before cooking through. Pieces around 3 cm / 1¼ inches sit between those two problems.

Fold thin thigh sections once
Cut by thickness and fold thin thigh sections over themselves. Even pieces finish at roughly the same time, allowing the edges to brown while the centres stay juicy.
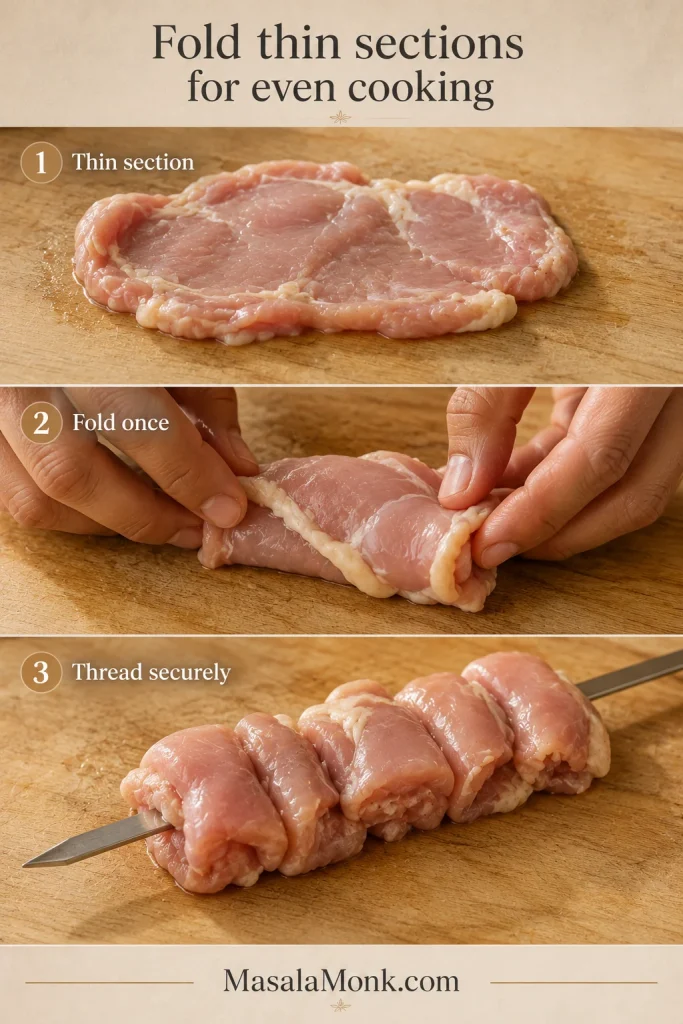
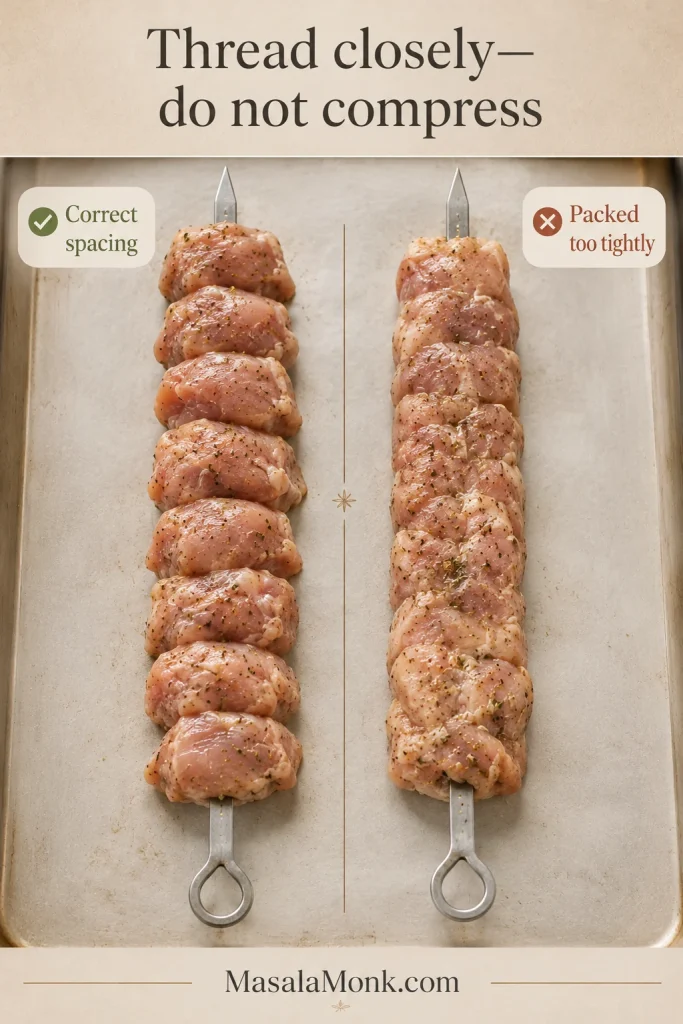
Thread closely without packing the pieces
Leave a little breathing room as you thread the chicken because tightly compressed pieces cook more slowly between the folds. Flat metal skewers are easiest to turn because the meat does not spin around the stick; when using bamboo, soak the skewers for at least 30 minutes to reduce scorching.
Thread peppers, onions, zucchini or mushrooms separately so the vegetables can continue cooking after the chicken is ready.
No skewers? Cook the marinated pieces loose in a skillet, air fryer or on a lined sheet pan. They still brown well and work especially nicely in bowls or pita.
The skewers can also be threaded several hours ahead and kept covered in the refrigerator until the grill, broiler or oven is hot.
Choose Your Cooking Method
Grill for the deepest char and a touch of smoke. Use the broiler for the closest indoor equivalent, the oven for a larger batch, the air fryer for a fast small batch, or a heavy skillet when you want to stay on the stovetop.

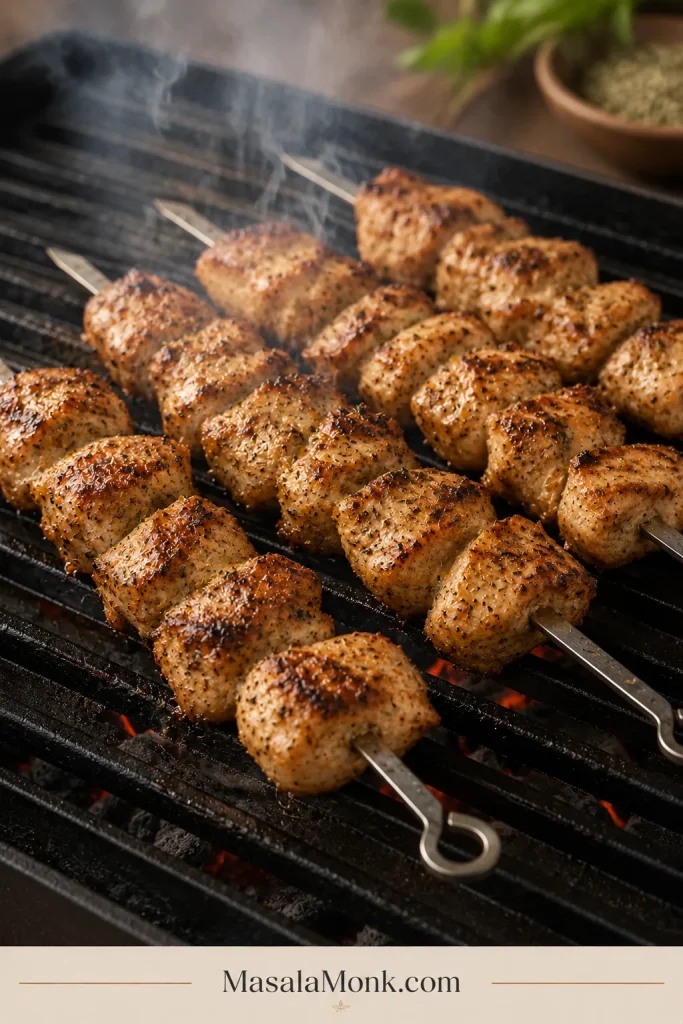
Grilled Chicken Souvlaki: Colour, Sizzle and Flare-Ups
Begin with a properly heated grate, then give each surface enough time to brown before turning.
Charcoal gives the deepest smoky flavour, while a fully heated gas grill offers easier temperature control and still produces excellent browning. On a gas grill, keep one burner lower or switched off so the skewers have somewhere to move during flare-ups.
Wait for the first side to release
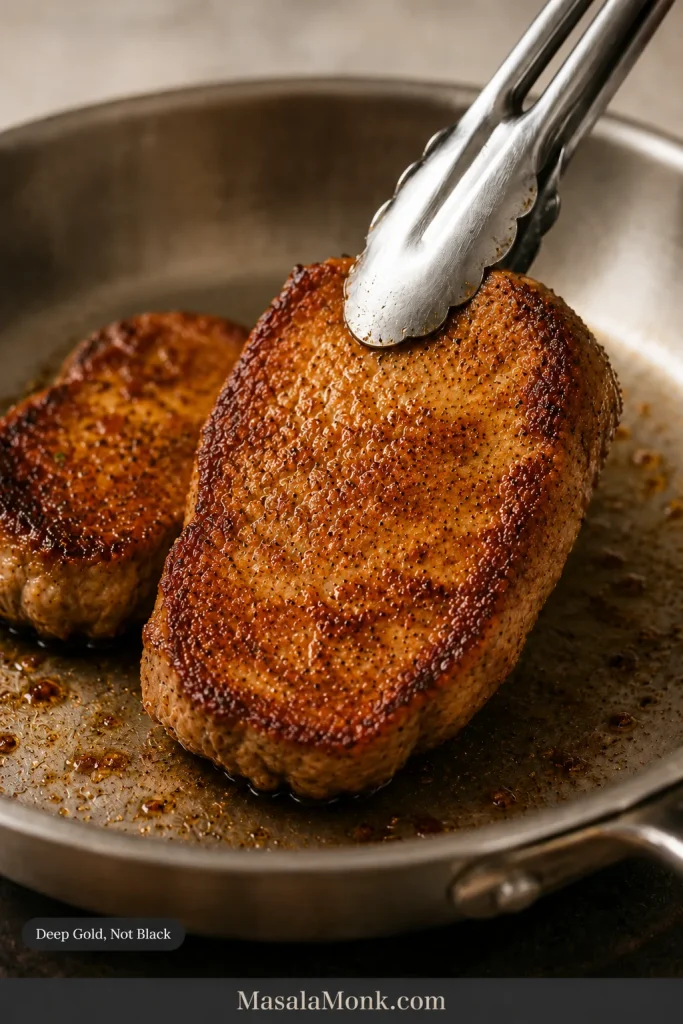
The chicken should sizzle as soon as it touches the grate. Give the first surface time to sear, then turn every 2 to 3 minutes so the irregular edges can pick up small patches of colour.
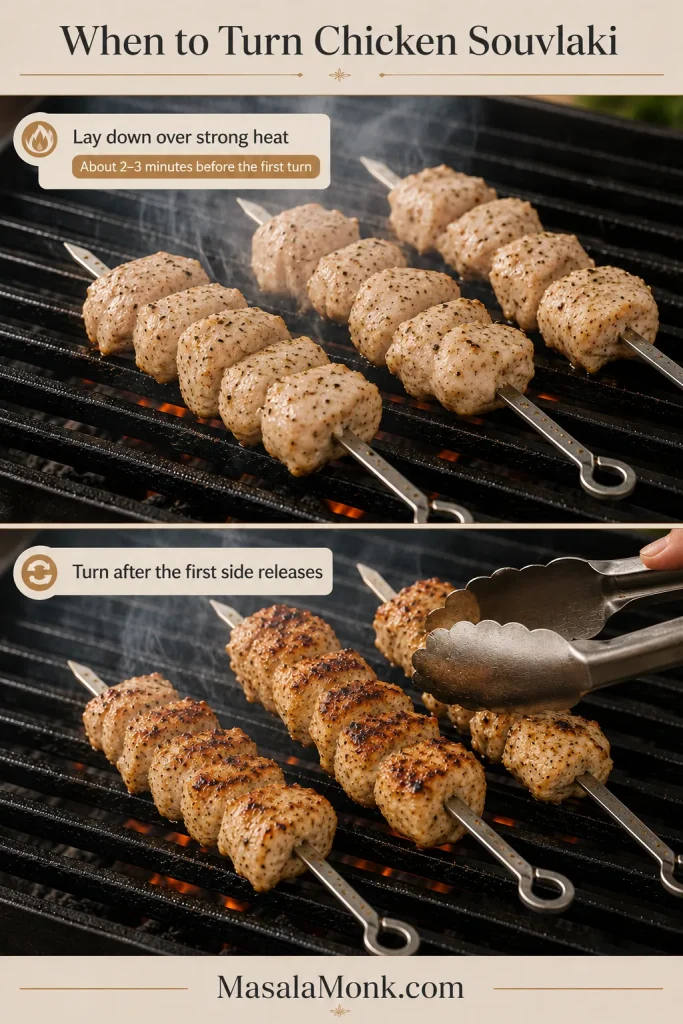
Chicken thighs give you some breathing room. Scattered char is enough; a thick black shell means the chicken has spent too long over strong heat.
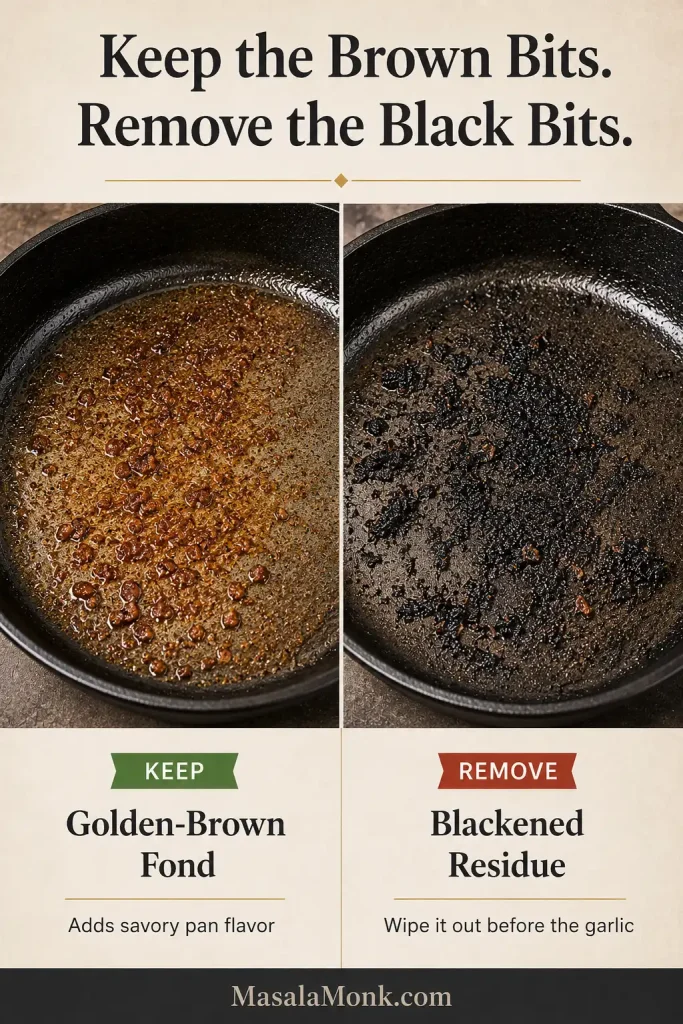
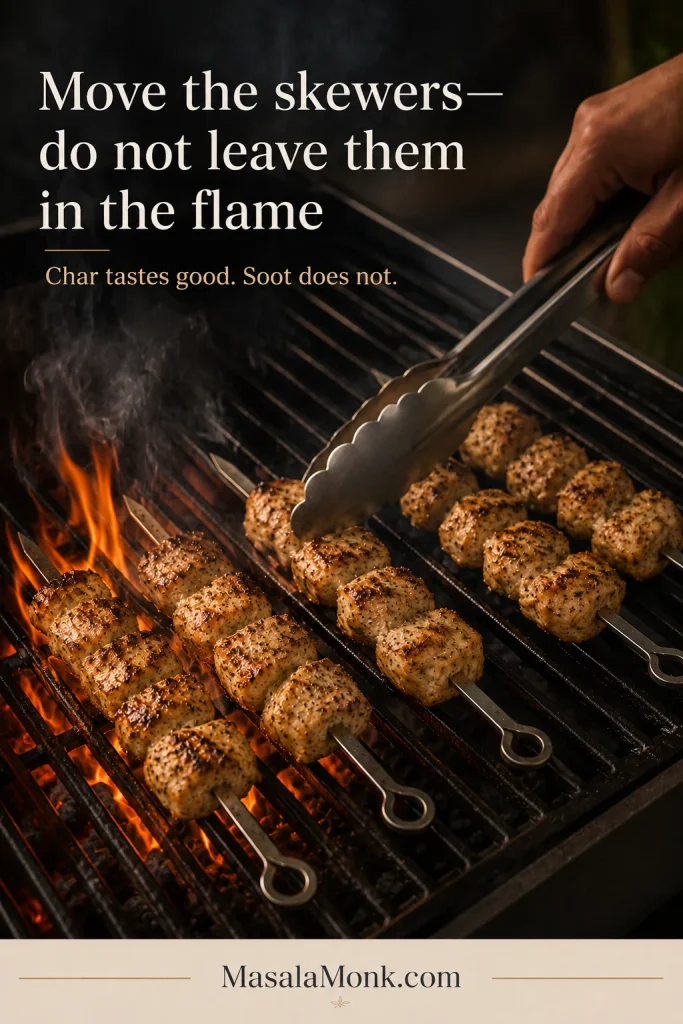
Move away from flare-ups
If flames rise, move the skewers briefly to the cooler part of the grill. Char from hot metal tastes good; soot from an uncontrolled flare-up does not.
Oven-Baked and Broiled Chicken Souvlaki
Broiler: the strongest indoor browning
Set a wire rack over a rimmed pan and position it about 5 to 6 inches below the upper element. Let the broiler become fully hot before adding the skewers.
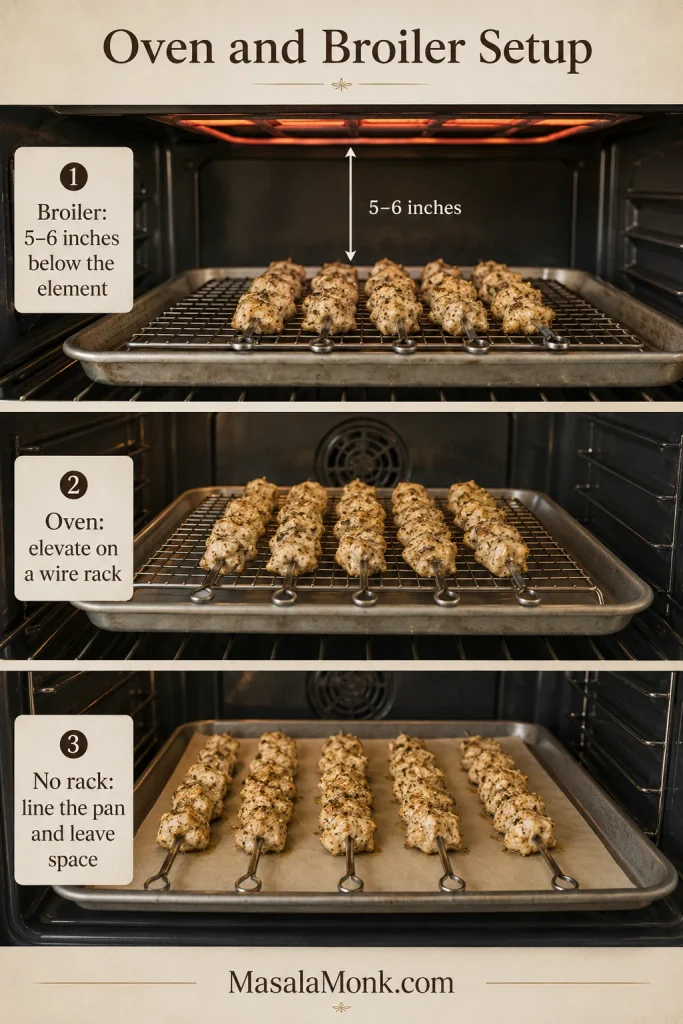
- Arrange the skewers with space between them.
- Broil for 4 to 5 minutes.
- Turn and continue for another 4 to 6 minutes.
- Check the thickest piece and remove the chicken at 165°F / 74°C.
As the upper edges bronze, the garlic and oregano should smell toasted. Stay beside the oven during the final minute because garlic can move quickly from golden to bitter.
Oven: the easiest larger batch
Use 425°F / 220°C in a conventional oven or about 400°F / 200°C with fan assistance.
- Arrange the skewers on a wire rack over a rimmed pan.
- Bake breast for 10 to 13 minutes or thighs for 12 to 15 minutes, turning once.
- Confirm doneness in the thickest piece.
- Move the cooked chicken under the broiler for 1 to 2 minutes if the surface needs more colour.
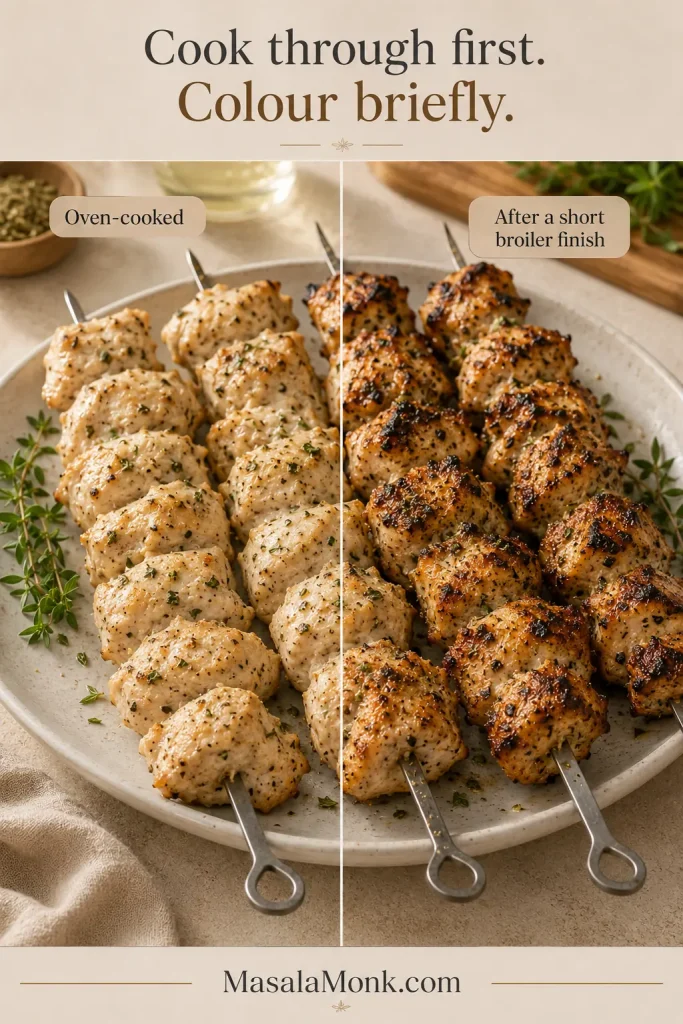
No wire rack? Line the pan, leave space between the skewers and turn them carefully halfway through. The underside will brown more lightly, but the brief broiler finish will colour the exposed edges.
Air Fryer Chicken Souvlaki
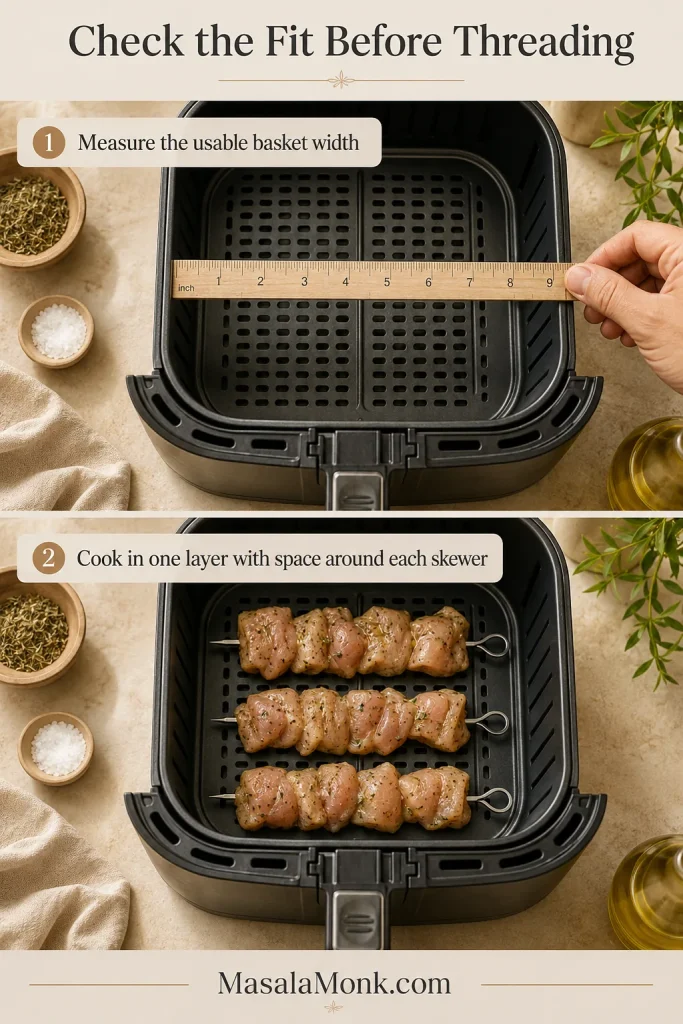
Measure the usable basket width before threading the chicken. Short bamboo or metal skewers should rest naturally inside without pressing against the sides.
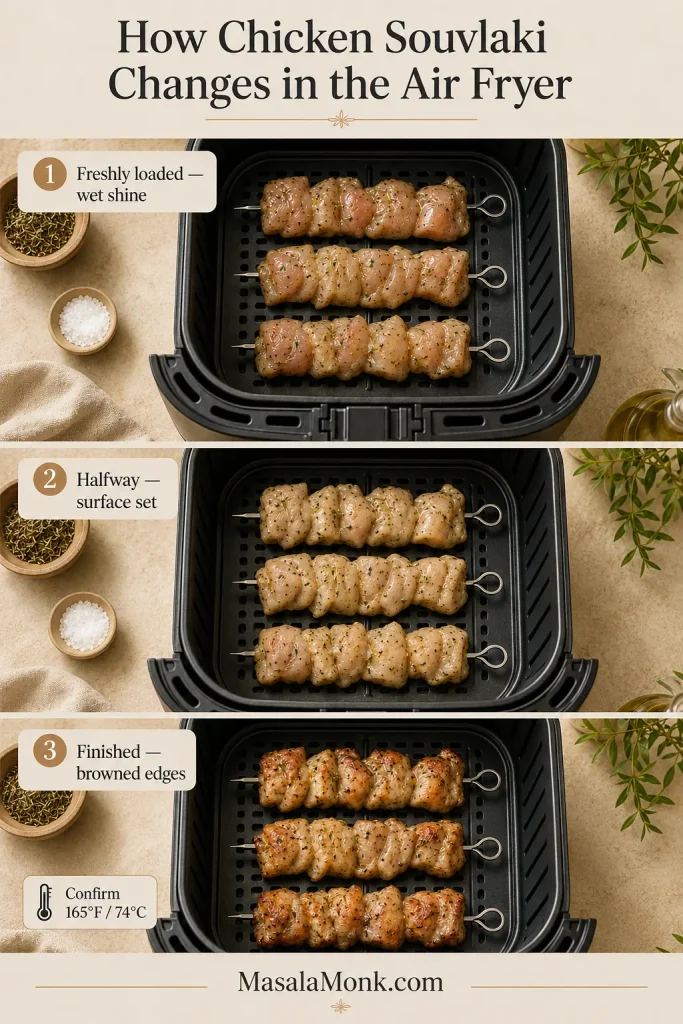
- Preheat the air fryer to 390–400°F / 200–205°C if your model benefits from preheating.
- Let excess marinade drip away.
- Arrange two or three skewers in one layer with visible space around them.
- Cook breast for 9 to 12 minutes or thighs for 11 to 14 minutes, turning halfway.
- Confirm that the thickest piece has reached 165°F / 74°C.
The surface will first lose its wet shine, then small browned edges will appear as the circulating heat reaches the spaces between the pieces.
If the skewers do not fit, cook the chicken as loose pieces. Avoid stacking or crowding. Trapped steam keeps the surface wet and leaves the chicken pale.
Stovetop Chicken Souvlaki
A heavy grill pan or cast-iron skillet works well when you have no grill and do not want to heat the oven. Open a window or use the extractor fan because the garlic and marinade can smoke in a very hot pan.
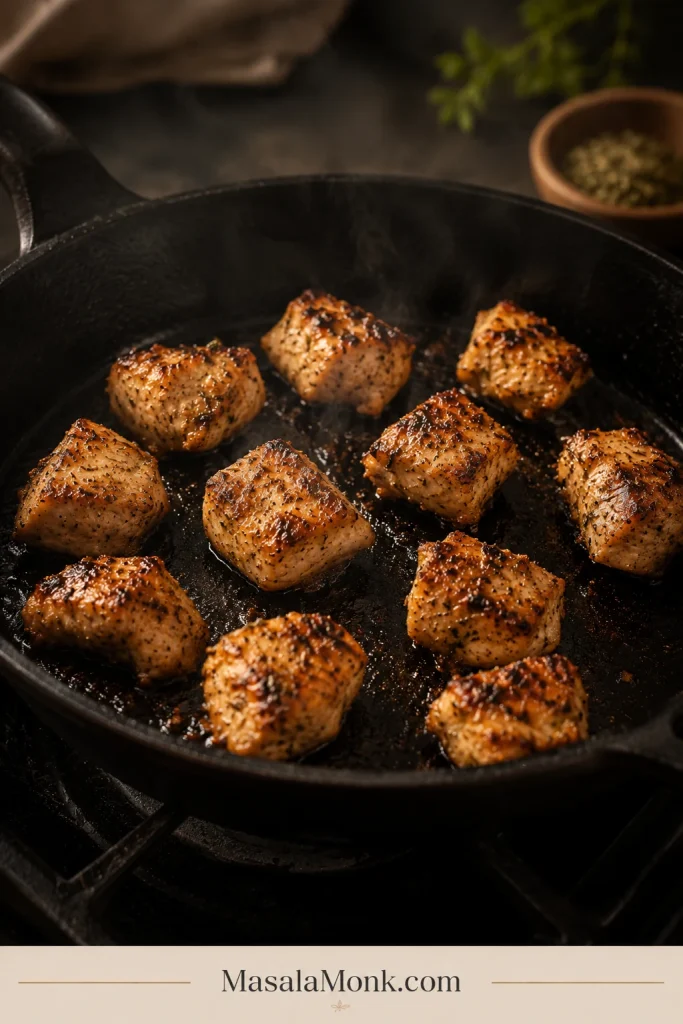
- Heat the pan over medium-high heat and add a thin film of oil.
- Cook breast for 7 to 10 minutes or thighs for 8 to 12 minutes.
- Turn every 2 to 3 minutes and work in batches if necessary.
- Check the thickest piece for 165°F / 74°C, then rest before serving.
The pan should answer with a clear sizzle. If the sound fades quickly and liquid begins collecting around the chicken, the batch is too crowded.
After cooking: Check time and doneness → Build a chicken souvlaki pita → Return to the recipe card ↑
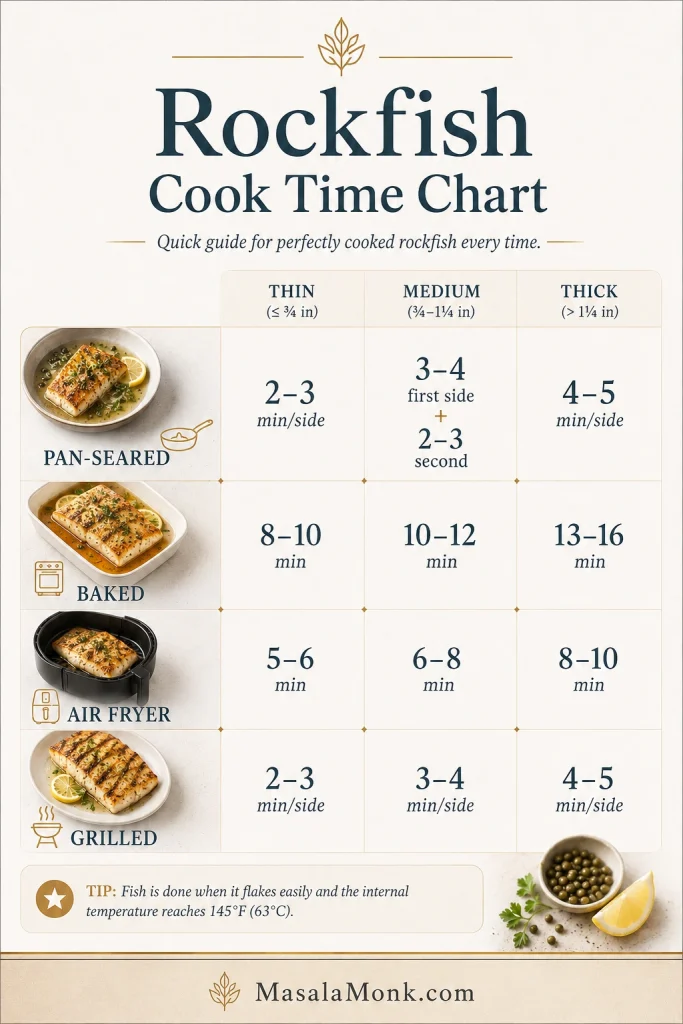
Chicken Souvlaki Time, Temperature and Doneness
The clock brings you close, but the thermometer lets you relax. Use this chart as a starting point for your chicken cut and cooking method.
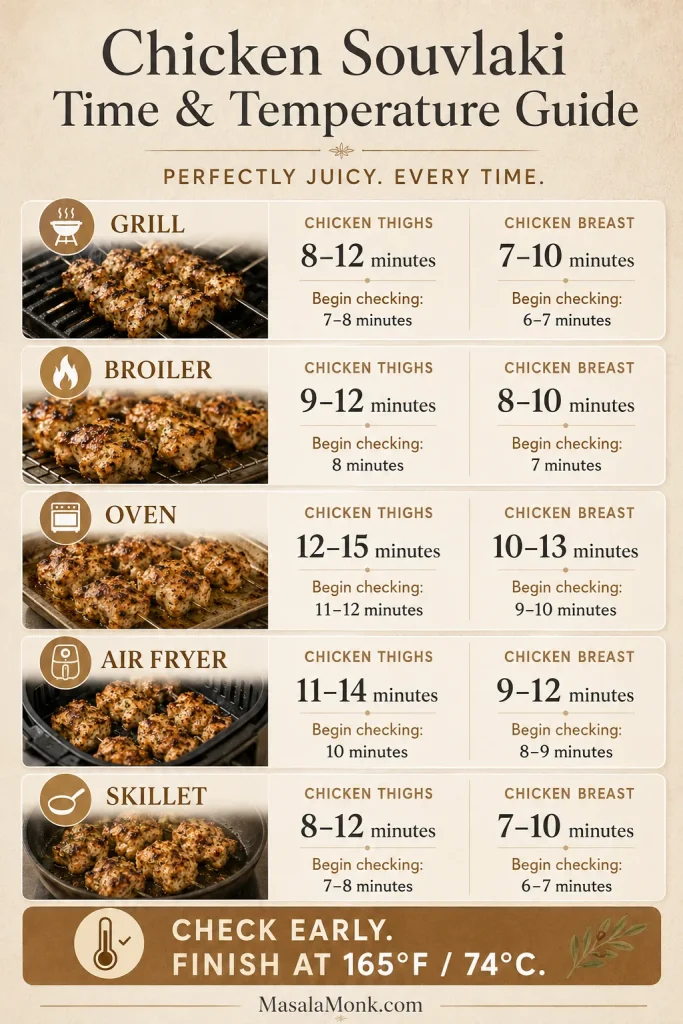
| Chicken and method | Approximate range | Earliest check |
|---|---|---|
| Thighs on an outdoor grill | 8 to 12 minutes | 7 to 8 minutes |
| Breast on an outdoor grill | 7 to 10 minutes | 6 to 7 minutes |
| Thighs under the broiler | 9 to 12 minutes | 8 minutes |
| Breast under the broiler | 8 to 10 minutes | 7 minutes |
| Thighs in the oven, before optional broiling | 12 to 15 minutes | 11 to 12 minutes |
| Breast in the oven, before optional broiling | 10 to 13 minutes | 9 to 10 minutes |
| Thighs in an air fryer | 11 to 14 minutes | 10 minutes |
| Breast in an air fryer | 9 to 12 minutes | 8 to 9 minutes |
| Thighs in a skillet | 8 to 12 minutes | 7 to 8 minutes |
| Breast in a skillet | 7 to 10 minutes | 6 to 7 minutes |
Check the thickest piece accurately
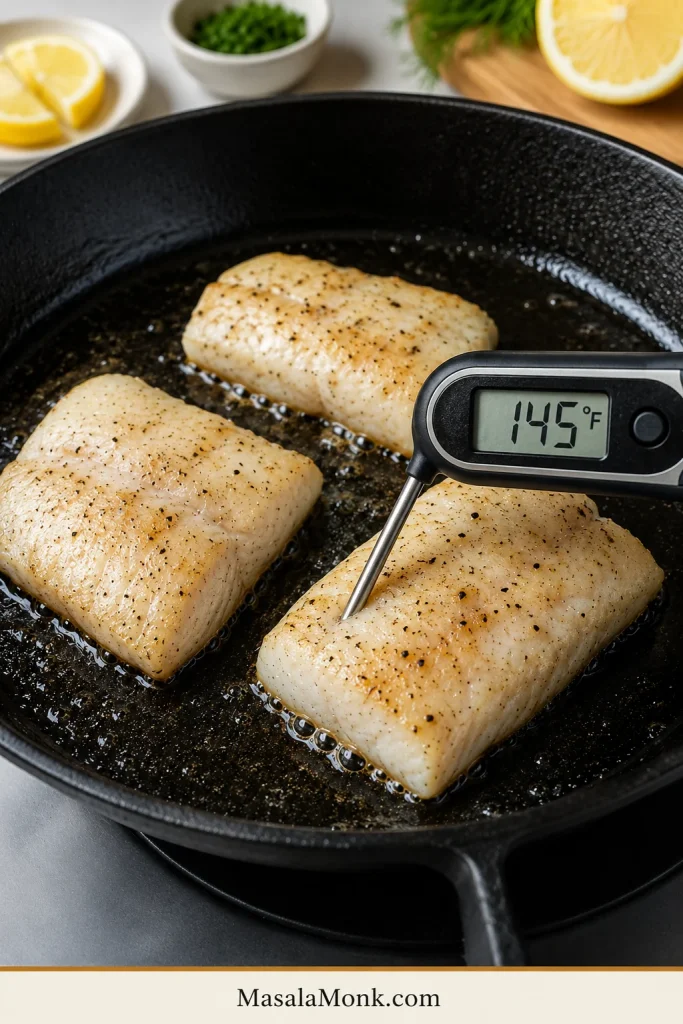
Insert an instant-read thermometer into the centre of the thickest piece without touching a metal skewer. Cook poultry to 165°F / 74°C. Official safe-minimum guidance is available from FoodSafety.gov (opens in a new tab).
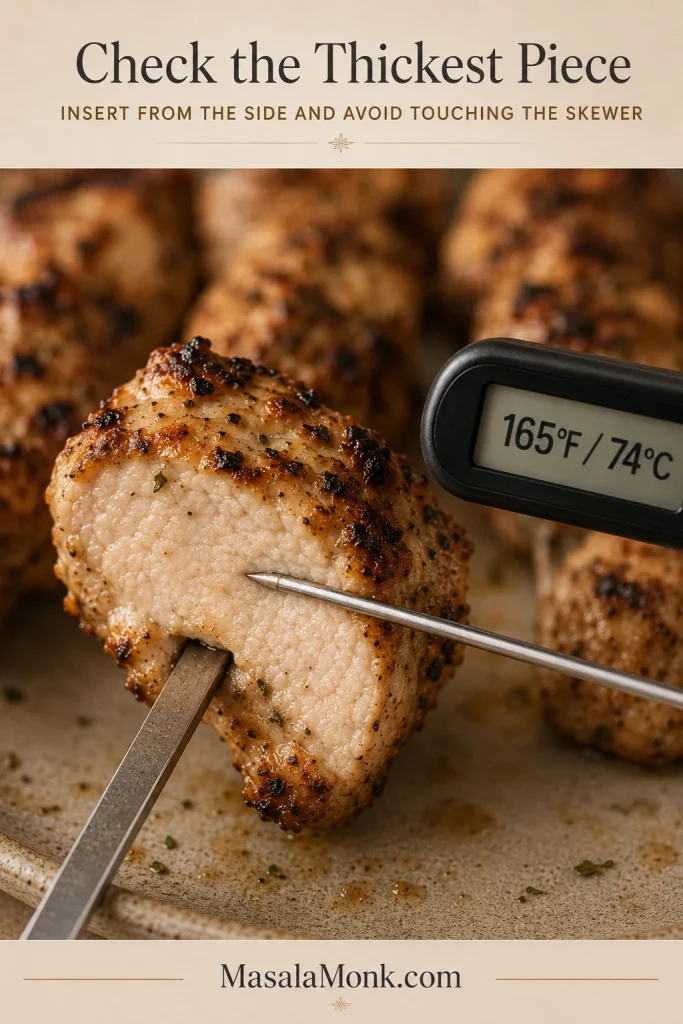
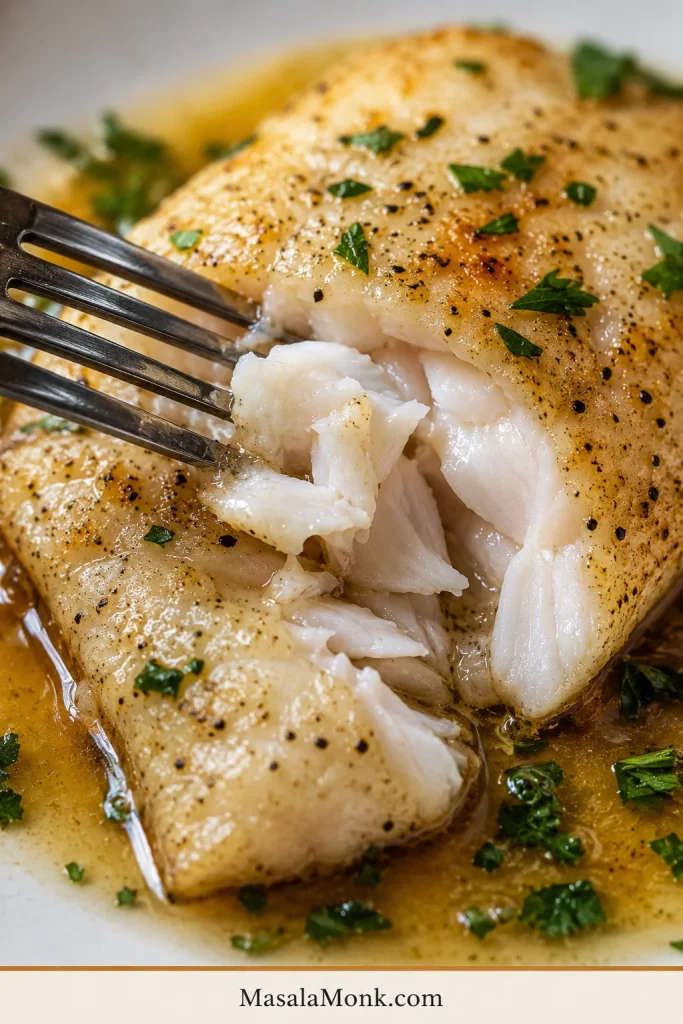
Properly cooked chicken has a browned surface that no longer looks wet, with a moist, opaque centre. Small charred spots are welcome. Breast should not look stringy or chalky, while thigh remains softer and slightly richer.
Once the chicken is resting, the technical part is over. Now it becomes dinner.
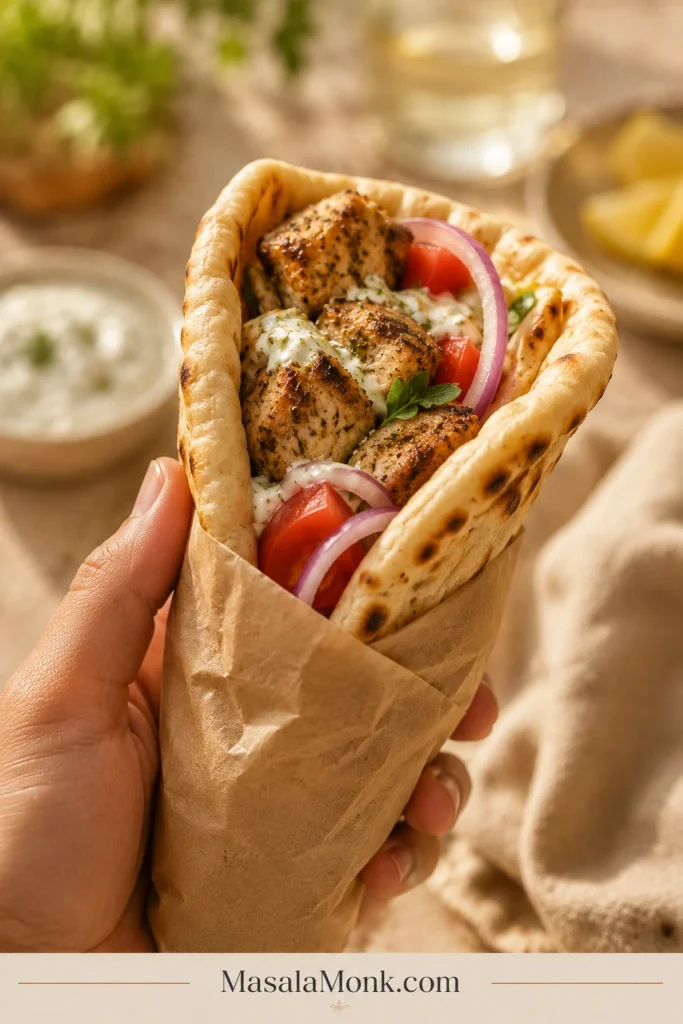
Build a Chicken Souvlaki Pita
The pita brings all the contrasts together: hot savoury chicken, cool tzatziki, juicy tomato and just enough sharp onion to wake everything up.
Choose the right pita
Look for a soft, pocketless Greek-style pita when possible. It is thicker and more flexible than thin pocket pita, so it folds around the chicken without splitting. When only pocket pita is available, warm it gently and fill the pocket.

For each pita
- 1 soft Greek-style pita, approximately 7 to 8 inches
- 100 to 120 g cooked chicken
- 30 to 40 g / about 2 tablespoons thick tzatziki
- 2 or 3 tomato slices, or a small handful of chopped tomato
- A small amount of very thinly sliced red onion
- A squeeze of lemon
- Optional shredded lettuce, crumbled feta or cooked fries
Warm the pita briefly in a dry skillet, on the grill or in a low oven, just until it becomes soft and flexible. A microwave also works in short bursts when the bread is wrapped in a barely damp kitchen towel.
Build and wrap
- Place the warm pita on parchment, foil or food-safe paper.
- Spread the tzatziki through the centre, leaving the lower edge clear.
- Slide 100 to 120 g chicken off the skewer and arrange it over the sauce.
- Add tomato, onion and any optional fillings.
- Fold the bottom upward, bring in the two sides and use the paper to hold the wrap together.
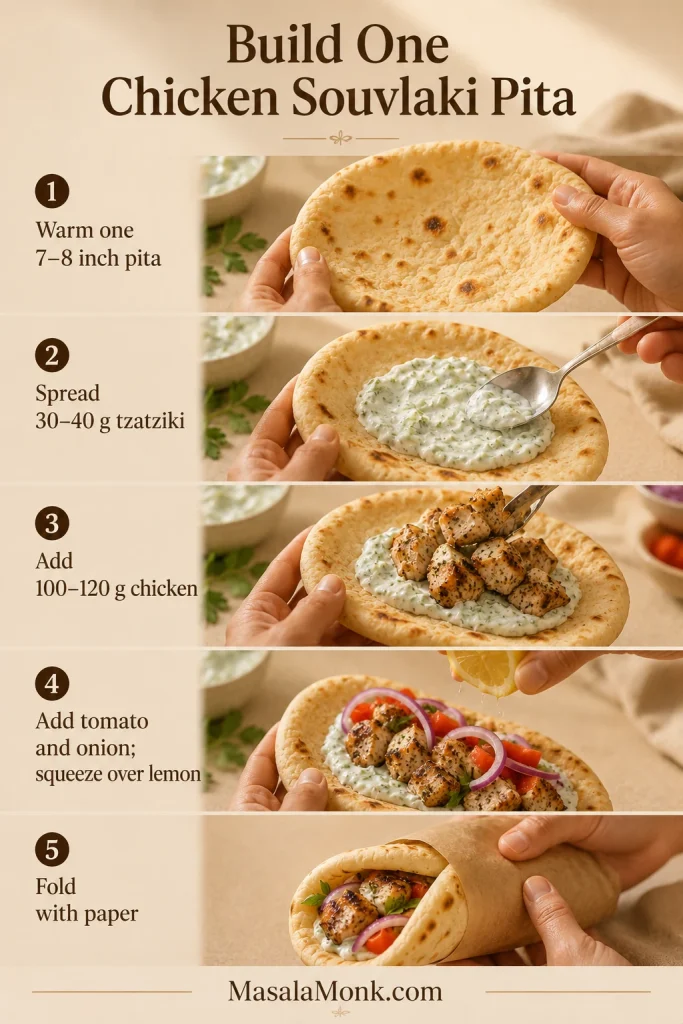
The pita does not need to close perfectly. The paper wrapper will do part of the work.
A small handful of fries makes the pita more substantial without pushing the chicken into the background. For fries that stay crisp enough to hold their own, follow the cutting, soaking and frying method (opens in a new tab).
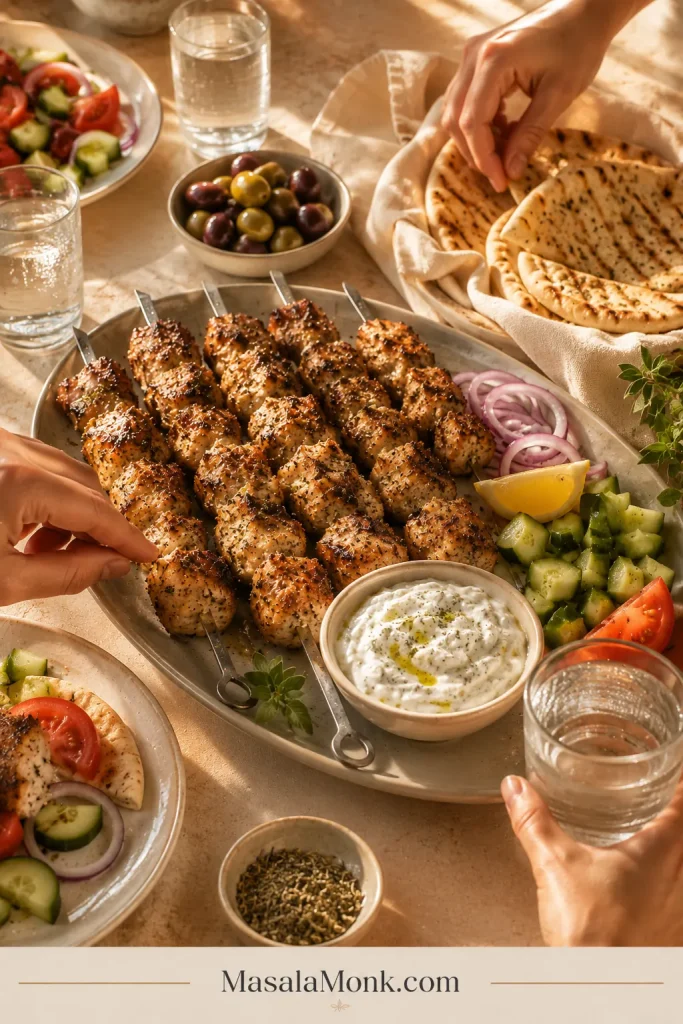
What to Serve with Chicken Souvlaki
Put the chicken in the middle of the table, still on its skewers, with warm bread wrapped in a towel, a cold bowl of tzatziki and lemon wedges within reach. That alone is enough. Everything else is optional.
Choose how to serve it
The same chicken can move from a hand-held wrap to a plated meal without changing the recipe. The base and fresh components determine how light, substantial or make-ahead-friendly it feels.

A simple dinner plate
Serve the skewers with pita wedges, tzatziki, olives and a crisp cucumber salad with red onion and herbs (opens in a new tab). Roast potatoes or rice can make the plate more substantial.
A rice or grain bowl
A bed of fluffy rice (opens in a new tab) turns the skewers into an easy bowl. Add cucumber, tomato, onion, olives, feta and tzatziki, then keep the cool vegetables and sauce separate from the warm chicken until serving.
A substantial salad
Slide the chicken off the skewers and serve it over cucumber, tomato, onion, olives and feta. Use tzatziki as a thick dressing or loosen a smaller amount with lemon and olive oil.
Prefer a more herb-forward side? This fresh tabbouleh with parsley, tomato, mint and lemon (opens in a new tab) pairs naturally with grilled chicken and warm pita.
To keep the plate gluten-free, serve the chicken over rice or salad. A dairy-free meal works with dairy-free yogurt sauce or a simple lemon-herb dressing in place of tzatziki.
Fix Dry, Pale or Uneven Chicken
A pale or dry batch is not necessarily a lost dinner. Save it first, then fix the cause before the next round of skewers.
The chicken is dry
Rescue this batch: Slice the chicken thinly and serve it immediately with extra tzatziki, chopped tomato and warm pita. A little olive oil helps the slices feel less dry, while fresh lemon zest brings back the aroma without adding more acid.
Prevent it next time: Use larger breast pieces, keep the marinade brief and begin checking sooner. Review the earliest checking times before the next batch; dry breast is usually a timing problem, not proof that the cut cannot work.

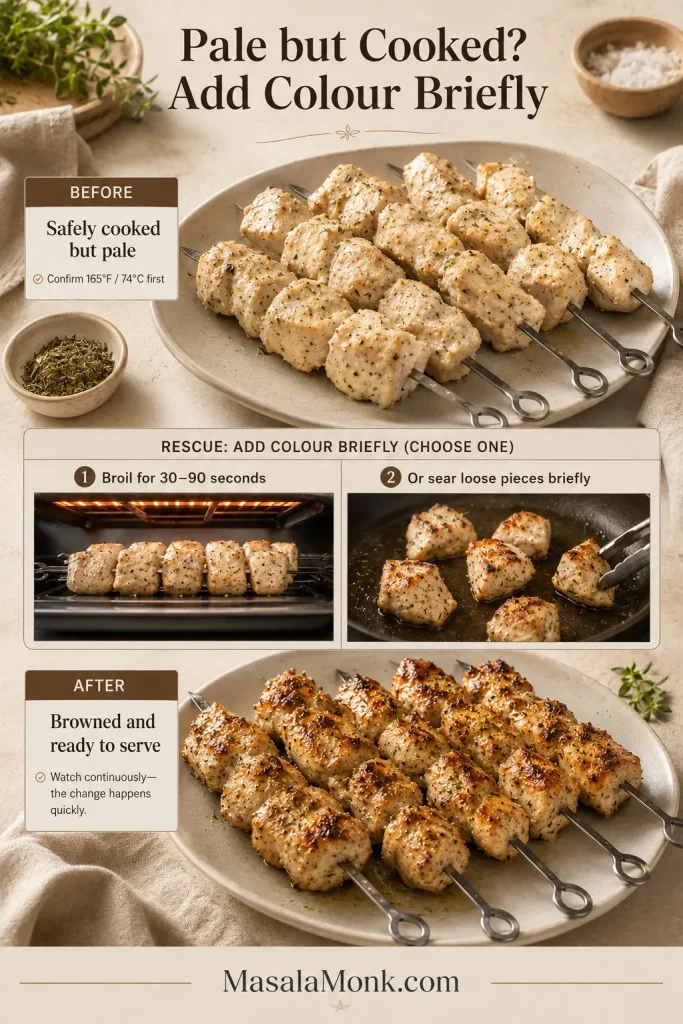
The chicken is pale but cooked
Rescue this batch: First confirm doneness with the thermometer guide. Then place the skewers under a fully heated broiler for 30 to 90 seconds, watching continuously; loose pieces can also be seared briefly in a hot skillet.
Prevent it next time: Let excess marinade drip away, preheat fully and leave more space between the pieces. Pale chicken usually reflects heat or surface moisture—not a bad marinade.
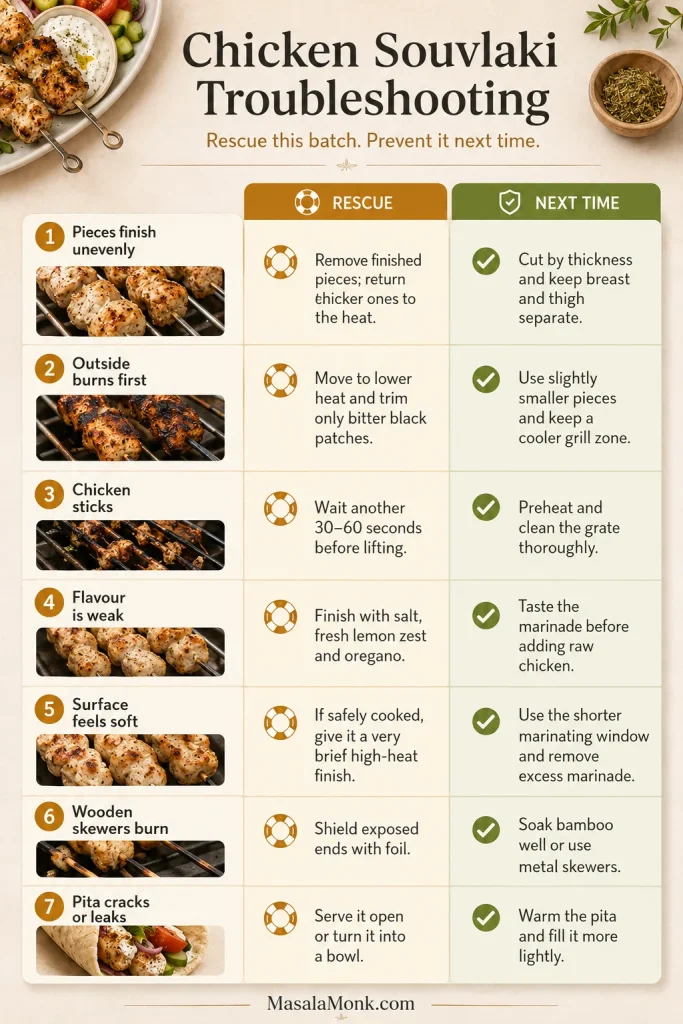
Quick fixes for other problems
| Problem | Rescue this batch | Prevent it next time |
|---|---|---|
| Pieces finish unevenly | Remove finished pieces and return thicker ones to the heat | Cut by thickness and keep breast and thigh separate |
| Outside burns first | Move to lower heat and trim only bitter black patches | Use slightly smaller pieces and keep a cooler grill zone |
| Chicken sticks | Wait another 30 to 60 seconds before lifting | Preheat and clean the grate thoroughly |
| Flavour is weak | Finish with salt, fresh lemon zest and oregano | Taste the marinade before adding raw chicken |
| Surface feels soft | If safely cooked, give it a very brief high-heat finish | Use the shorter marinating window and remove excess marinade |
| Wooden skewers burn | Shield the exposed ends with foil | Soak them well or use metal skewers |
| Pita cracks or leaks | Serve it as an open pita or turn it into a bowl | Warm the bread and fill it more lightly |
Dinner saved: Store and reheat leftovers → Return to the recipe card ↑ Return to the guide ↑
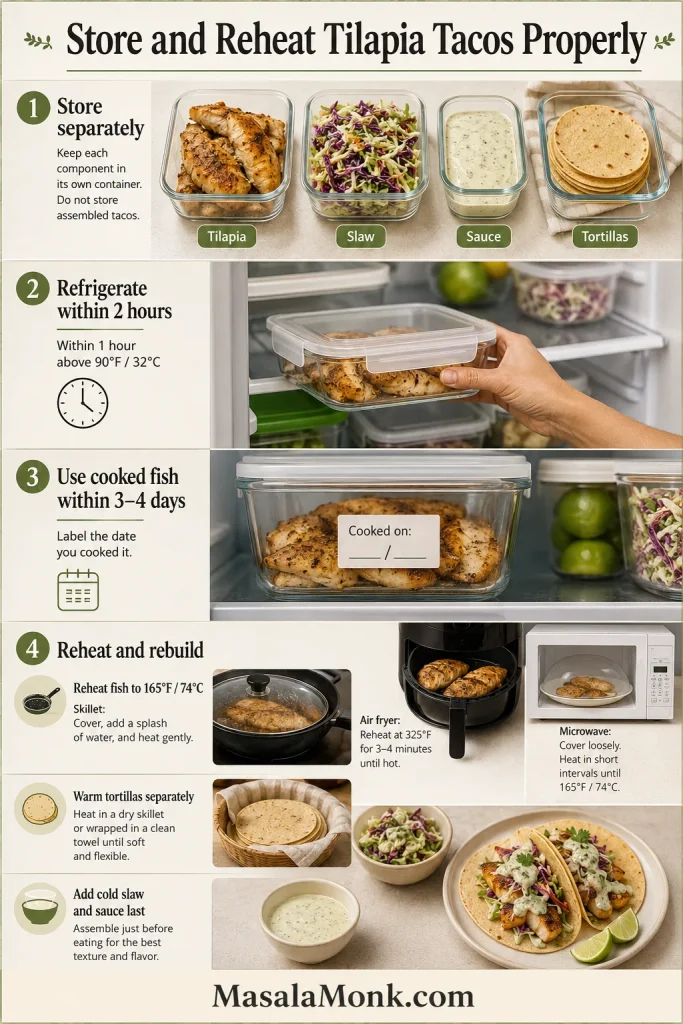
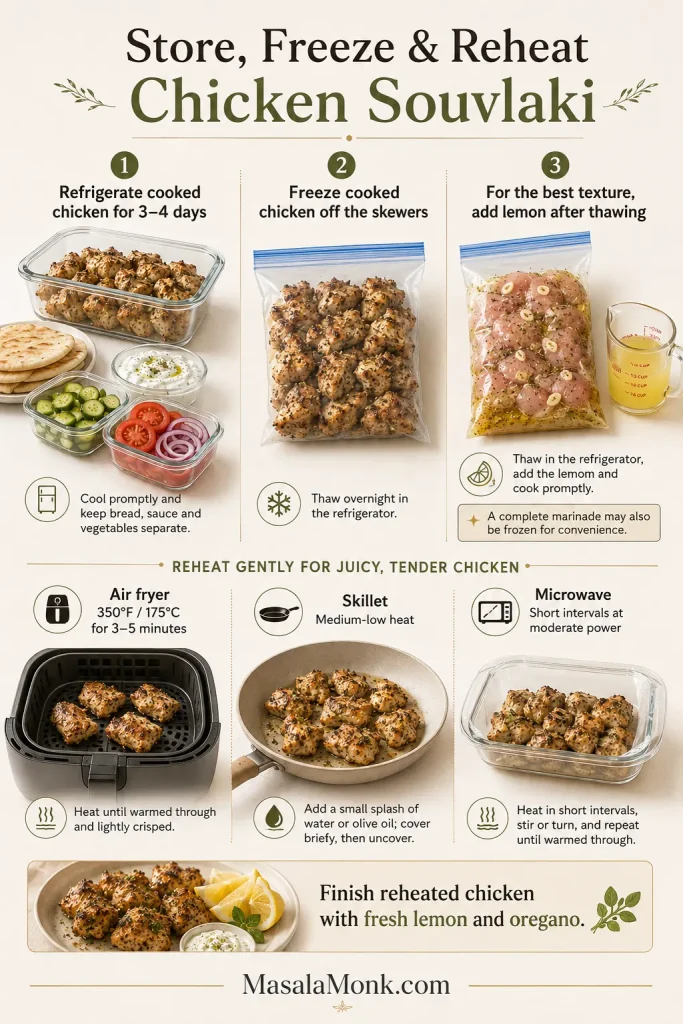
Storage, Reheating and Freezing
Remove cooked chicken from the skewers and refrigerate it in a covered container. Store pita, tzatziki and fresh vegetables separately. Cool the chicken promptly and use it within 3 to 4 days.
For a cold next-day lunch, slice the chicken over this Mediterranean chickpea salad (opens in a new tab), then add the tzatziki just before eating.
Reheating without drying it out
- Air fryer: Heat at about 350°F / 175°C for 3 to 5 minutes.
- Skillet: Warm over medium-low heat with a small splash of water or olive oil. Cover briefly, then uncover.
- Microwave: Cover and heat in short intervals at moderate power.
Finish reheated chicken with fresh lemon and a pinch of oregano. That small fresh note helps leftovers taste less like leftovers.
Freezing cooked or raw chicken
Freeze cooked chicken off the skewers in a well-sealed container. Thaw it overnight in the refrigerator and reheat gently. Do not freeze assembled pita wraps.
For raw meal preparation, freeze the chicken with the olive oil, zest, garlic, oregano, salt and pepper, then add the measured lemon juice after thawing. When freezing it in the complete marinade for convenience, thaw in the refrigerator and cook promptly.
The moment to aim for is simple: browned edges, a centre that still glistens when cut, and enough lemon to make the next bite feel fresh.
Warm the pita, spoon over the tzatziki and bring the skewers to the table while they are still hot. Then eat the first one before anyone has time to ask whether dinner is ready.