The air fryer is especially good for chicken thighs because the heat moves fast around the skin while the dark meat stays forgiving and juicy. When the timing is right, you get golden crisp edges, tender meat near the bone, and a dinner that feels much more satisfying than the effort it takes.
The easiest mistake is treating every chicken thigh the same. Bone-in, skin-on thighs need time for the skin to render. Boneless skinless thighs cook much faster. Frozen thighs need a slower start. BBQ sauce and sweet marinades need to go in late so they turn sticky instead of burnt.
Start with the best all-purpose version: bone-in, skin-on thighs with crisp skin and juicy meat. Bought boneless, frozen, sauced, skinless, tiny, or extra-large thighs? You are still covered. Use the recipe card for the classic crispy-skin version, then jump to the section that matches the chicken you actually have.
The goal is simple: no rubbery skin, no dry boneless pieces, and no guessing whether the thickest part is done. You should be able to open the basket and know what you are looking at: crisp skin where there is skin, juicy meat in the center, and no awkward cutting into every piece to check.
Jump to: Recipe Card · Time Chart · Boneless Skinless · Crispy Skin · Frozen Thighs · BBQ & Marinated · Troubleshooting · FAQs
Quick Answer: How Long to Cook Air Fryer Chicken Thighs
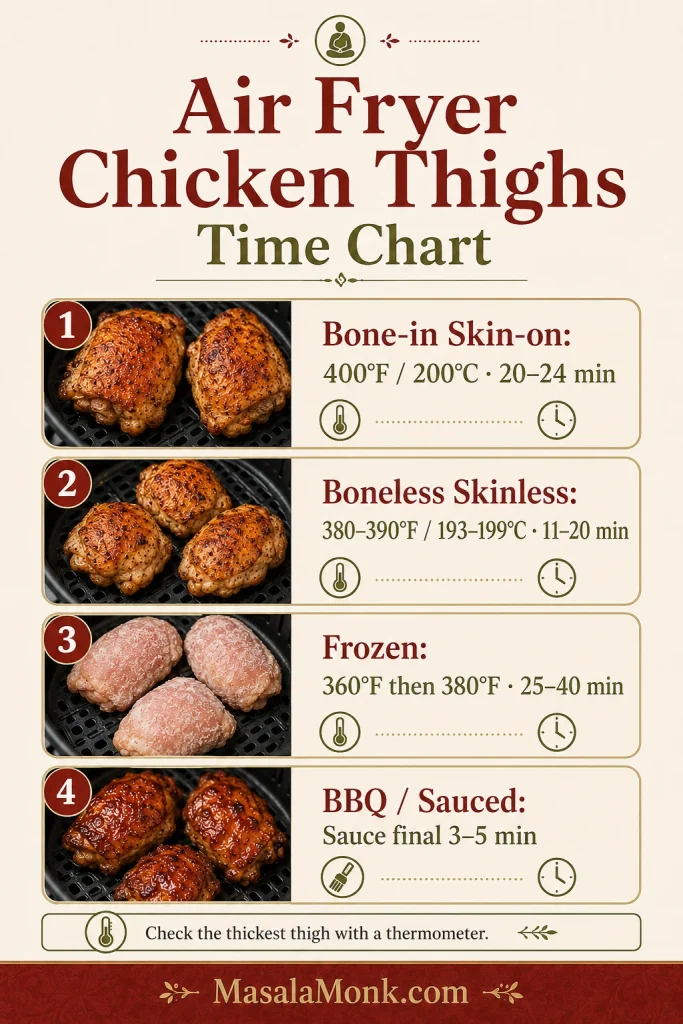
For bone-in, skin-on chicken thighs, air fry at 400°F / 200°C for 20 to 24 minutes, flipping once, until the center of the largest thigh reaches at least 165°F / 74°C. Many people prefer dark meat closer to 175°F / 79°C for a softer texture, while still using 165°F as the food-safety minimum.
Boneless skinless thighs need a shorter window. Thin pieces may take 11–13 minutes, average pieces usually take 14–17 minutes, and thick or folded pieces may need 18–20 minutes.
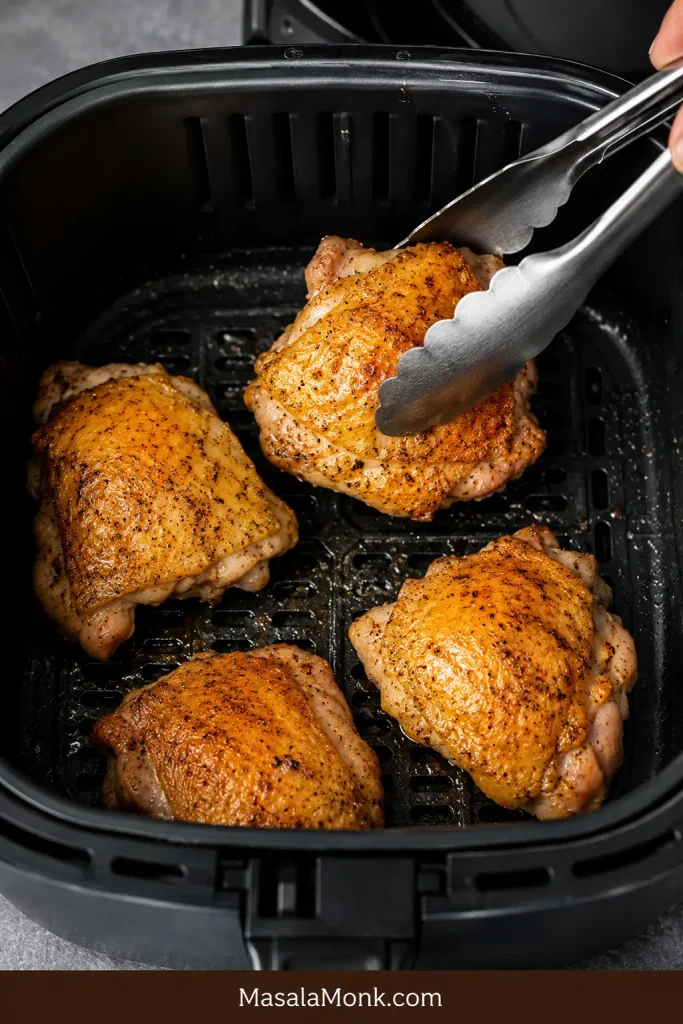
Skin-side up or down? Start skin-side down, then finish skin-side up. Starting skin-side down gives the fat under the skin time to render; finishing skin-side up gives the skin direct heat so it turns golden instead of rubbery.
Air fryers vary. A compact basket model may finish faster than a large oven-style model, so use the time range as a starting point and let the thermometer decide the final few minutes.
Choose Your Thighs
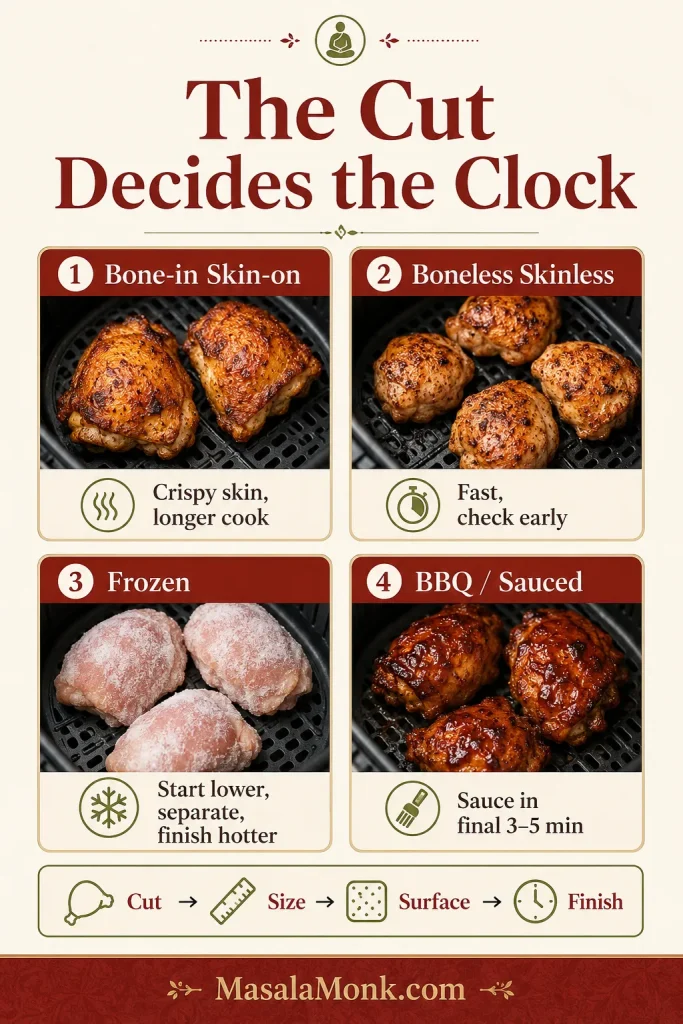
The cut decides the clock: bone-in needs time, boneless needs attention, frozen needs patience, and sauced chicken needs a late glaze. Match your pack of chicken to the right path before you cook.
Think of air fryer chicken thighs in four decisions: cut, size, surface, and finish. Cut gives you the basic timing, size tells you when to start checking, surface decides whether you get crisp skin, a browned coating, or a sticky glaze, and the thermometer confirms when dinner is actually done.
| What you have | Best for | Watch out for | Where to go |
|---|---|---|---|
| Bone-in, skin-on thighs | Crisp skin and juicy dinner plates | Needs enough time for the skin to render | Recipe Card |
| Boneless skinless thighs | Bowls, wraps, salads, tacos, noodles, meal prep | Cooks fast and can dry if ignored | Boneless Skinless |
| Skinless bone-in thighs | Juicy meat without skin | Less browning, no crispy skin | Time Chart |
| Frozen thighs | Rescue dinners when you forgot to thaw | Less predictable; must check temperature | Frozen Thighs |
| BBQ or sauced thighs | Sticky, glossy finish | Sugar can burn if added too early | BBQ & Marinated |
| Marinated thighs | Deeper flavor | Too much wet marinade prevents browning | BBQ & Marinated |
| Very small or very large thighs | Still usable with adjusted timing | Small pieces finish early; large pieces need more time | Time Chart |
Next step: Making the classic bone-in version? Jump to the recipe card. Need exact timing? Use the time chart. Bought a different pack? Go to boneless skinless, frozen thighs, or BBQ and marinated thighs.
Before You Start: The 3 Rules That Change the Result
1. Dry skin browns; wet skin steams
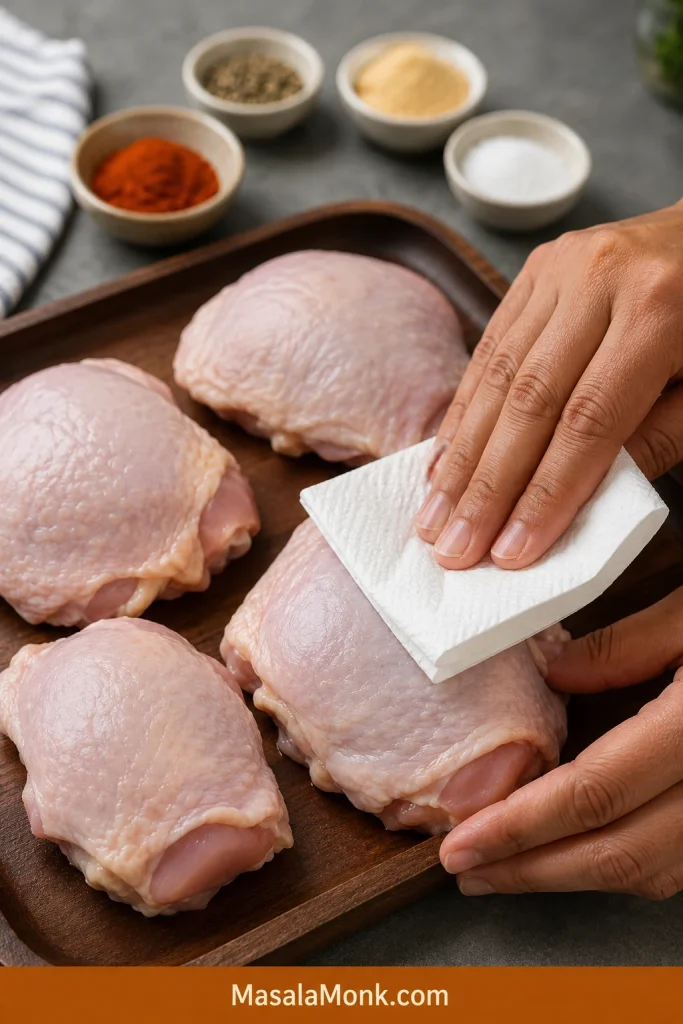
Pat the chicken dry before seasoning, especially on the skin side. If the skin still looks shiny-wet, it will steam before it crisps.
2. Airflow is what makes the edges crisp
The thighs can touch lightly at the edges, but they should not overlap or cover each other. If air cannot move around the chicken, the skin softens and the pieces cook unevenly. The same airflow issue is behind many common air fryer mistakes.
3. The biggest thigh decides when the batch is done
Chicken thighs vary in size, shape, and thickness. Use the time range to start, then check the center of the largest piece with a thermometer. That is the difference between guessing and knowing.
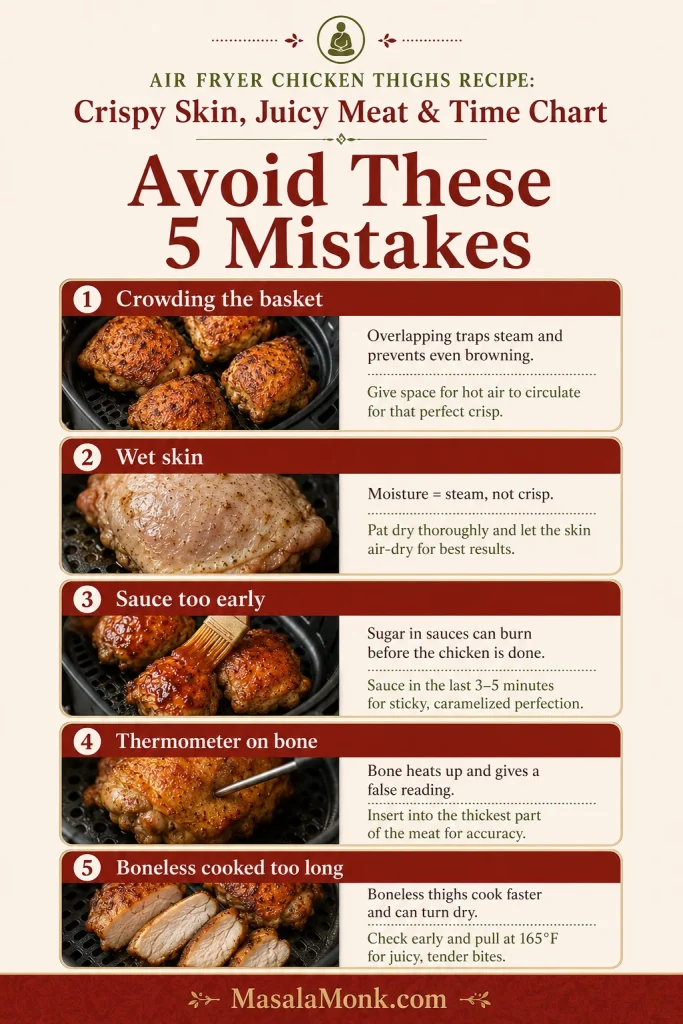
Avoid These 5 Mistakes
- Keep the thighs in one layer instead of stacking them.
- Brush BBQ sauce on near the end, not at the beginning.
- Use browned skin as a clue, not the final doneness test.
- Insert the thermometer into the meat without touching the bone.
- Give boneless thighs their own shorter timing instead of using the bone-in timing.
Ready to cook? Follow the recipe card for the classic version, or check the time chart first if your thighs are boneless, frozen, sauced, skinless, unusually small, or unusually large.
Air Fryer Chicken Thighs Recipe Card
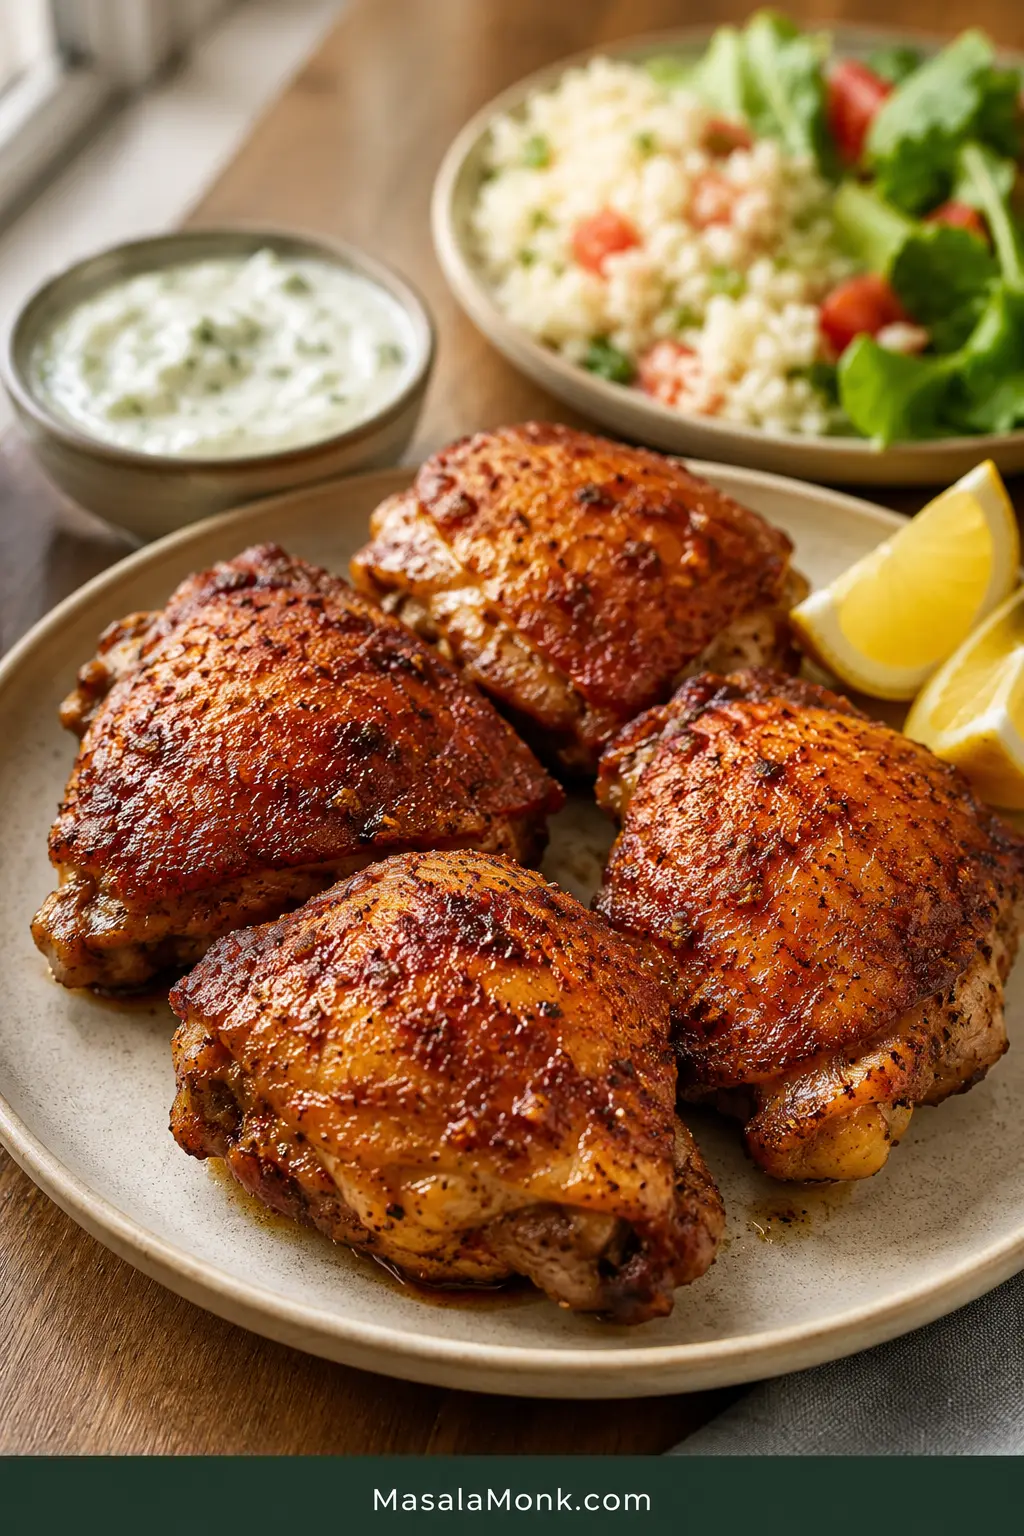
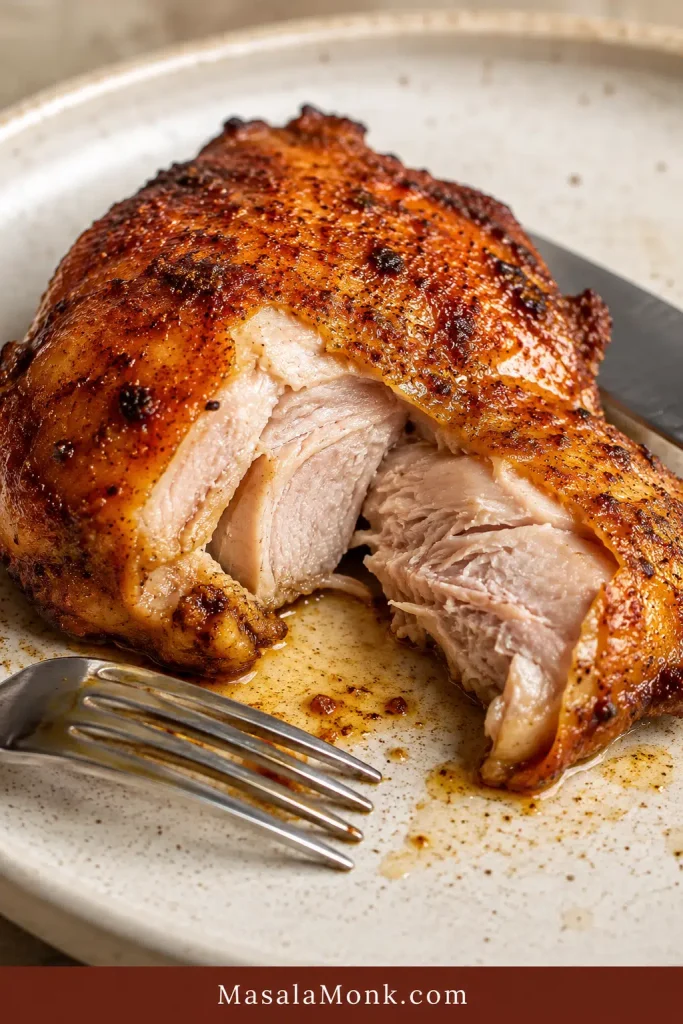
This is the everyday version: bone-in, skin-on thighs rubbed with smoked paprika, garlic, herbs, and a little oil, then air fried until the skin is golden and the dark meat stays juicy. The skin should smell like paprika and garlic as it browns, and the first cut should stay juicy instead of spilling everything onto the plate.
This is the kind of chicken that works on a tired weeknight: crisp enough to feel special, simple enough that you are not babysitting a pan.
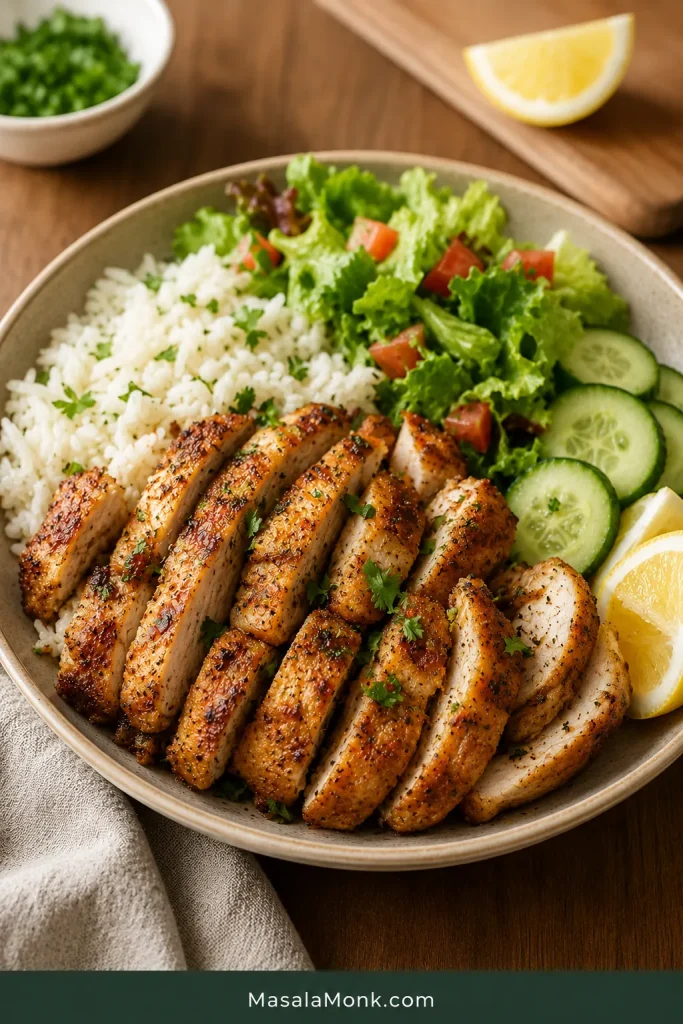
Serve it straight from the basket with lemon wedges, rice, salad, or a cool dip, and it feels like a proper dinner without much planning.
| Prep time | 5 minutes |
| Cook time | 20–24 minutes |
| Rest time | 5 minutes |
| Total time | 30–34 minutes |
| Servings | 4 |
| Main cut | 4 medium bone-in, skin-on chicken thighs |
| Temperature | 400°F / 200°C |
| Basket setup | Single layer, no overlapping |
Equipment
- 5–6 quart air fryer
- Instant-read thermometer
- Tongs
- Paper towels
- Small bowl for the seasoning
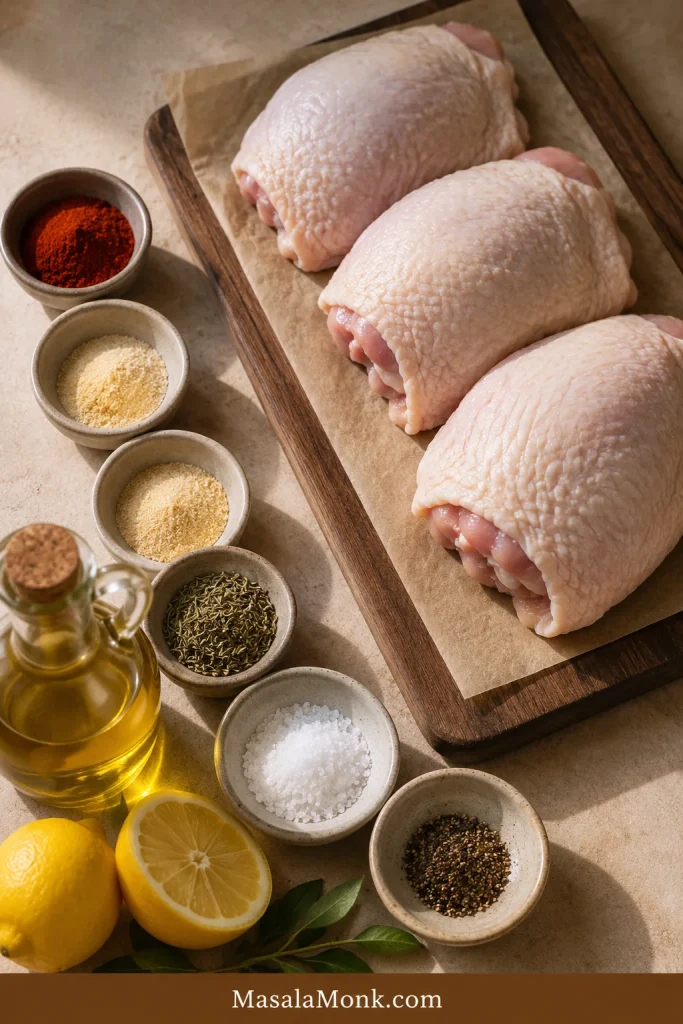
Ingredients
- 4 medium bone-in, skin-on chicken thighs, about 2–2.5 lb / 900–1130 g total
- 1 tablespoon / 15 ml olive oil or avocado oil
- 1 teaspoon smoked paprika
- 1 teaspoon garlic powder
- 1/2 teaspoon onion powder
- 1/2 teaspoon dried oregano or thyme
- 3/4 teaspoon fine salt, or about 1 teaspoon coarse kosher salt, plus more to taste
- 1/4 teaspoon black pepper
- Optional for extra-crisp skin: 1/4 teaspoon aluminum-free baking powder
- Lemon wedges, for serving
Instructions
- Dry the chicken well. Pat the thighs very dry with paper towels, especially on the skin side.
- Trim loose pieces. Remove large hanging pieces of skin or fat, but leave the skin attached. If the skin folds under itself, gently spread it back over the top.
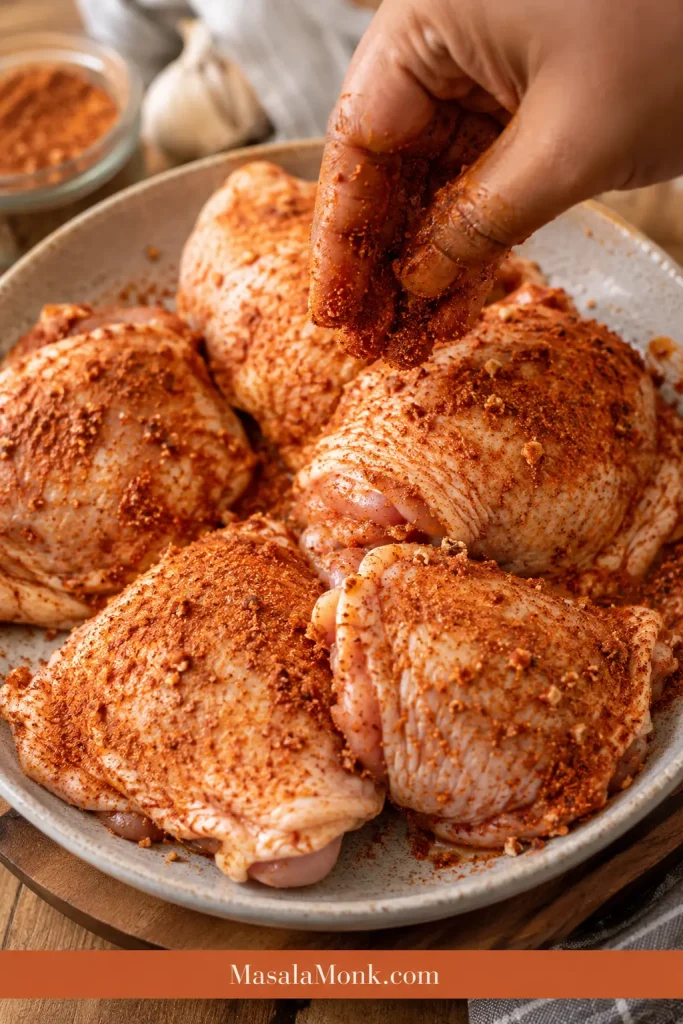
- Mix the seasoning. In a small bowl, combine smoked paprika, garlic powder, onion powder, oregano or thyme, salt, and pepper. For extra-crisp skin, add the baking powder.
- Season the thighs. Rub the chicken with oil, then coat both sides with the seasoning. Season the edges too.
- Preheat the air fryer. Set it to 400°F / 200°C for 3–5 minutes if your model recommends preheating.
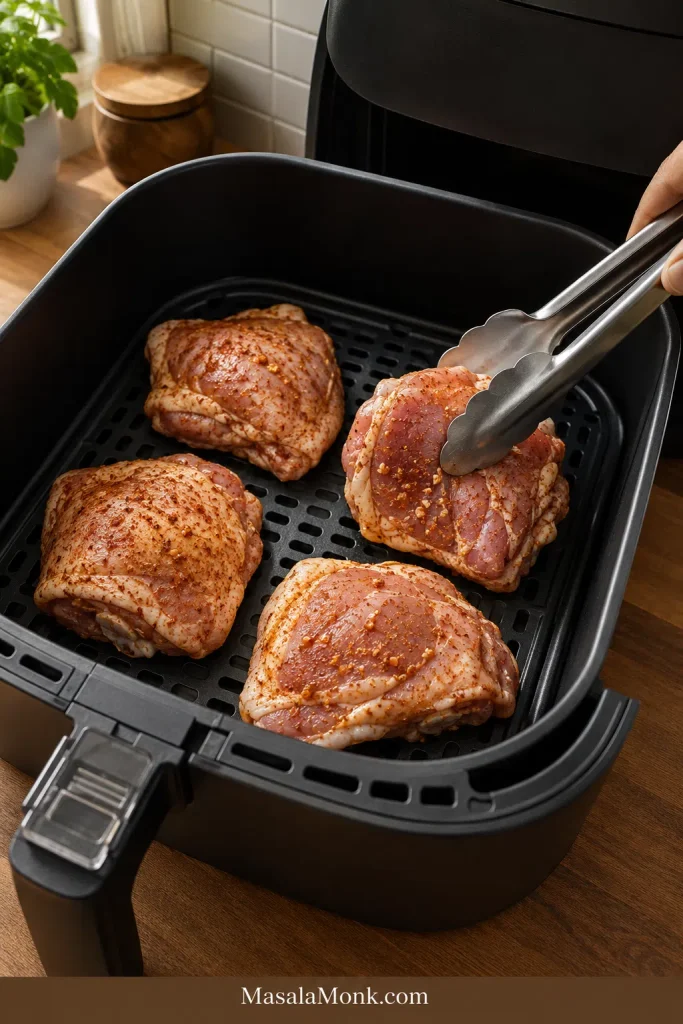
- Start skin-side down. Place the thighs in a single layer, skin-side down. Air fry for 10–12 minutes.
- Flip and finish skin-side up. Turn the thighs over and air fry for another 8–12 minutes, until the skin is golden and the chicken is cooked through.
- Check the temperature. Insert an instant-read thermometer into the center of the largest thigh without touching the bone. The safe minimum is 165°F / 74°C; for softer dark meat, cook closer to 175°F / 79°C.
- Rest before serving. Let the thighs rest for 5 minutes so the juices settle instead of running out as soon as you cut into the meat.
Recipe Notes
- The baking powder is optional, but it helps skin-on thighs crisp more deeply. Use only a tiny amount.
- With table salt, start slightly lighter. Coarse kosher salt may need a little more by volume.
- Small thighs may finish closer to 18–20 minutes. Large thighs may need 2–5 extra minutes.
- If the chicken is cooked but the skin is not crisp, air fry skin-side up for 2–4 more minutes.
- For boneless skinless thighs, use the boneless timing section instead of the main bone-in timing.
Using a different kind of thigh? See boneless skinless thighs, frozen thighs, or BBQ and marinated thighs before you cook.
Ingredients You Need
The recipe card gives you the amounts. These notes help you choose the right cut, seasoning, and crisping option before you cook.
Chicken thighs
Bone-in, skin-on thighs are best for the main recipe because they give you crisp skin and juicy meat. Boneless skinless thighs cook faster and are better for bowls, wraps, salads, tacos, noodles, and meal prep.
Oil
One tablespoon / 15 ml of oil is enough for 4 thighs. It helps the seasoning cling and encourages browning. Too much oil can make the basket smoky and the skin heavy.
Smoked paprika
Smoked paprika gives the chicken a warm color and a lightly smoky flavor, which helps the thighs taste roasted even though they cook quickly.
Garlic powder and onion powder
Powdered garlic and onion coat the chicken evenly and are less likely to burn than fresh garlic in the air fryer.
Dried herbs
Oregano or thyme adds a simple savory note. Crush dried herbs between your fingers before adding them to wake up the aroma. You can also use Italian seasoning, Cajun seasoning, ranch seasoning, lemon pepper, or a pinch of garam masala.
Salt
Fine salt seasons quickly and evenly. Table salt is stronger by volume, so start a little lighter. Coarse kosher salt may need a little more.
How to Make It
Here is what each stage should look and feel like, so you can adjust confidently even if your thighs are bigger, smaller, or shaped differently from mine.
1. Dry the chicken until the skin is no longer shiny
Blot both sides, then give the skin side a second pass. If the surface still looks wet, it will steam first and brown later.
2. Trim loose fat, but keep the skin attached
Trim large hanging pieces of skin or fat, but do not remove the skin completely. Spread folded skin back over the top instead of leaving it tucked underneath.
3. Coat the edges, not just the top
Rub the thighs with oil, then season both sides and around the edges. If the skin is loose, you can season lightly underneath it without pulling it off.
4. Start hot so the surface begins browning quickly
Preheating helps the chicken start cooking as soon as it hits the basket. If your air fryer does not require preheating, you can still run it empty for 3 minutes while you finish seasoning the chicken.
5. Give the skin time to render before the flip
Arrange the thighs in a single layer, skin-side down. Cook for 10–12 minutes. The pieces can touch lightly at the edges, but they should not overlap.
6. Finish skin-side up for color and texture
Turn the thighs over and finish cooking skin-side up for another 8–12 minutes. This final stage is where the skin gets its best color. If one thigh is much smaller than the others, check it early and pull it out if it is already done.
7. Check the thickest thigh, not the prettiest one
Insert the thermometer into the deepest part of the meat without touching the bone. The safe minimum for poultry is 165°F / 74°C; FoodSafety.gov lists that same minimum for chicken thighs and other poultry cuts.
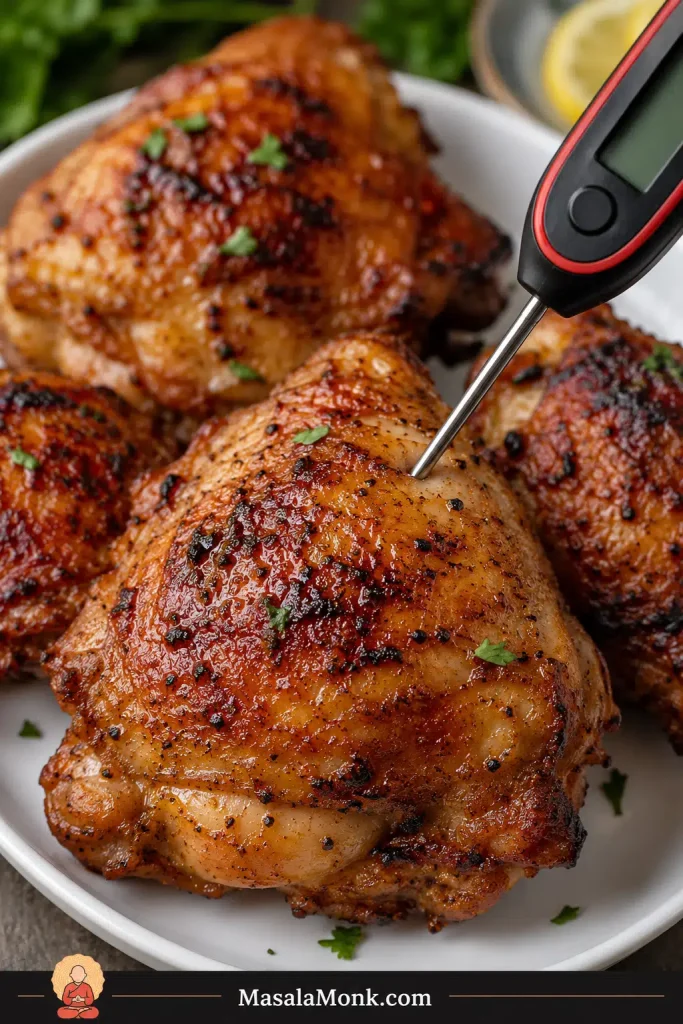
Think of 165°F / 74°C as the safety line. Going closer to 175°F / 79°C is a texture choice, not a safety rule; many people like dark meat better there because it turns softer instead of dry.
8. Rest before cutting so the juices stay in the meat
Rest the chicken for 5 minutes before serving. Resting keeps the first cut from sending all those juices onto the plate.
How to Tell When Chicken Thighs Are Done
Look for golden skin, browned seasoning around the edges, and juices that do not look pink when the thigh rests. Boneless thighs should feel springy but not tight. Bone-in thighs can still look slightly pink near the bone, so color alone is not enough.
Temperature is still the real check: 165°F / 74°C in the thickest part for safety, or closer to 175°F / 79°C if you prefer softer dark meat.
A compact, thick thigh usually needs more time than a flatter thigh of the same weight. Large pieces can look browned outside before the center is ready, so check the largest thigh in the basket before serving.
Why This Method Works
This method works because it gives the skin time to render before the final crisping stage. Starting skin-side down warms the fat under the skin; finishing skin-side up gives the surface direct heat. The thermometer check keeps the timing flexible, because a small boneless thigh and a large bone-in thigh can look similar outside but cook very differently inside.
Time and Temperature Chart
If you remember one thing, remember this: the cut decides the clock. Use the chart to get close, then use the thermometer to land the chicken exactly where you want it: safe, juicy, and not overcooked.
| Chicken thigh type | Temperature | Approx. time | Flip? | Doneness cue |
|---|---|---|---|---|
| Bone-in, skin-on | 400°F / 200°C | 20–24 min | Yes | Skin crisp, 165°F minimum inside |
| Small bone-in, skin-on | 400°F / 200°C | 18–20 min | Yes | Check early so they do not dry |
| Large bone-in, skin-on | 390–400°F / 199–200°C | 24–28 min | Yes | Continue in 3-minute bursts if needed |
| Boneless skinless, thin | 375–400°F / 190–200°C | 11–13 min | Optional | Edges browned, center 165°F |
| Boneless skinless, average | 380–390°F / 193–199°C | 14–17 min | Yes | Juicy center, browned surface |
| Boneless skinless, thick | 380–390°F / 193–199°C | 18–20 min | Yes | Check the thickest folded part |
| Bone-in, skinless | 390–400°F / 199–200°C | 18–22 min | Yes | Juicy but less browned |
| Frozen bone-in | 360°F then 380°F / 180°C then 190°C | 25–40 min | Yes | Separate once softened, check near bone |
| BBQ thighs | 380–400°F / 193–200°C | Normal time + 3–5 min glaze | Yes | Sauce sticky, not burned |
| Marinated thighs | 380–400°F / 193–200°C | Depends on cut | Yes | Pat dry if you want browning |
Need the full method? Return to the recipe card. For special cases, jump to boneless skinless thighs, frozen thighs, or BBQ and marinated thighs.
Boneless Skinless Air Fryer Chicken Thighs
Boneless skinless chicken thighs in the air fryer are the fast version: less dramatic than crisp skin, maybe, but incredibly useful for rice bowls, wraps, salads, tacos, noodles, and lunch boxes.
The texture is different from skin-on thighs. Boneless pieces can get browned edges and a roasted surface, but they will not have crispy chicken skin. For a better surface, pat them dry, use a little oil, and toss the seasoned thighs with 1 tablespoon / about 8 g cornstarch if you want a light crisp coating.
This is the version to make when you want cooked chicken you can actually use all week: slice it hot for dinner, then tuck leftovers into wraps, bowls, salads, noodles, or a filling chickpea salad with lemon, herbs, or a spoonful of yogurt dip.
Best method for boneless skinless thighs
- Pat the thighs dry.
- Open any folded pieces so the thickness is more even.
- Rub with oil and seasoning.
- Use cornstarch if you want a light browned coating.
- Air fry average pieces at 380–390°F / 193–199°C.
- Flip halfway for better browning.
- Check the center for 165°F / 74°C.
Thin boneless thighs may be ready in 11–13 minutes. Average pieces usually need 14–17 minutes. Thick pieces, folded pieces, or a crowded basket may need closer to 18–20 minutes. Start checking at the low end of the range if your air fryer runs hot.
How to Get Crispy Skin
Crisp skin is not luck. It is mostly dryness, space, and the final few minutes.
- Blot the skin very dry. Keep blotting until it no longer looks shiny.
- Give the thighs space. Light edge-touching is fine; overlapping traps steam.
- Start skin-side down, finish skin-side up. The first stage helps render fat; the second gives the skin direct heat.
- Use very little oil. Too much oil makes the surface heavy instead of crisp.
- Add wet or sweet things late. BBQ sauce, honey, and sugary marinades brown fast and can burn before the chicken is done.

For the crispiest version, season the thighs and refrigerate them uncovered for 1–8 hours before cooking. This dries the surface even more, but it is optional for a regular weeknight batch.
If the chicken is cooked through but the skin is still soft, air fry skin-side up for another 2–4 minutes. Watch closely near the end because spices can darken quickly. For another crisp chicken guide, see these air fryer chicken wings.
Frozen Chicken Thighs in the Air Fryer
You can cook frozen thighs in the air fryer, but treat them like a rescue dinner, not the crispiest version of the recipe. Begin gently, separate the pieces as soon as they loosen, and let the thermometer make the final call.
For frozen bone-in thighs, start at 360°F / 180°C for 20–30 minutes, flipping halfway, then finish hotter only after the pieces have separated and the centers are mostly cooked. When pieces are frozen into a solid block, do not force them apart with a knife; warm them until they loosen.
Frozen-together thighs cook unevenly because the center of the stack lags behind the outside pieces. Separate them as soon as they loosen, season any exposed surfaces, then continue cooking in a single layer.
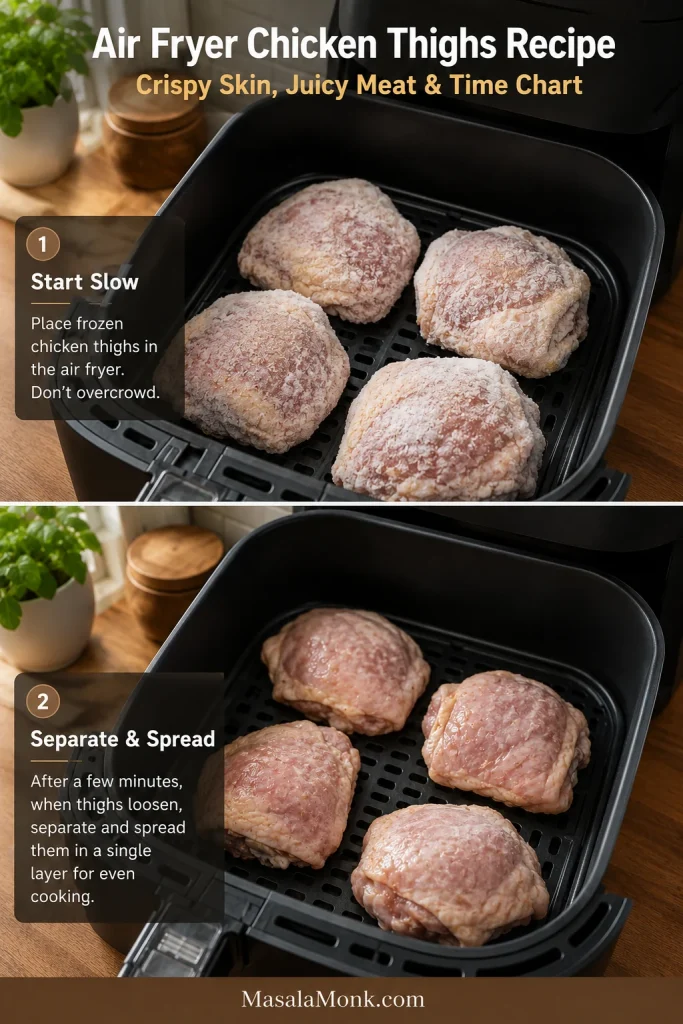
Once the chicken is mostly cooked through, increase to 380°F / 190°C for 3–5 minutes to improve browning and crisp the skin. Medium frozen thighs may take about 25–35 minutes total. Large frozen thighs can take 30–40 minutes. Check near the bone before serving.
The same staged approach works for other frozen chicken pieces too, including frozen chicken wings in the air fryer. Fresh or fully thawed thighs usually brown better and cook more predictably, but frozen thighs are useful when dinner needs to happen without a thawing plan.
Thawed thighs? Return to the classic recipe card or compare cuts in the time chart.
BBQ, Sauced, and Marinated Chicken Thighs
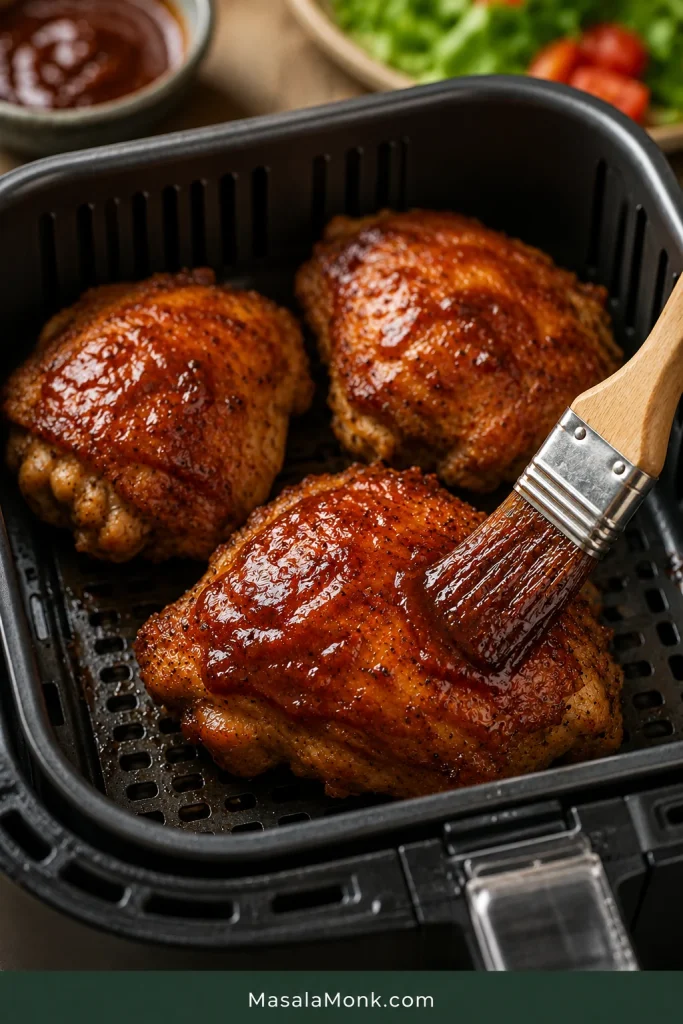
BBQ sauce and marinades can make the chicken taste deeper and more flavorful, but they also change how the surface cooks. Think dry rub early, sweet sauce late. That is the simple rule.
The best sauced thighs should look glossy and sticky at the edges, not blackened before the center is done.
For BBQ thighs
Air fry the thighs mostly plain or with a dry rub first. Sauce belongs near the end: brush it on during the final 3–5 minutes, then cook until it looks glossy at the edges, not blackened. Add a second light brush after cooking if you want a saucier finish. For very sugary sauces, use a thin layer first and add more after cooking.
Marinated thighs
Lift the chicken out of the marinade and wipe off excess liquid before air frying. Let the flavor stay, but leave the liquid behind. This is especially useful for soy-based marinades, honey garlic marinades, yogurt marinades, and tandoori-style marinades.
With sweet marinades, cook closer to 380°F / 193°C and watch the last few minutes carefully. Honey, sugar, and bottled sauces can darken quickly. For a glossy sweet-savory finish, brush on homemade teriyaki sauce near the end rather than at the start.
Flavor Variations
Once the cooking method is clear, flavor becomes the easy part. Keep the timing steady and adjust the seasoning around it.
- Lemon pepper: Use lemon pepper seasoning and finish with fresh lemon juice after cooking. For a saucier version, see this lemon pepper chicken.
- Garlic herb: Use garlic powder, onion powder, thyme, oregano, and black pepper.
- Cajun: Use Cajun seasoning and reduce added salt if the blend is already salty.
- Ranch: Use dry ranch seasoning lightly, then taste before adding extra salt.
- Teriyaki: Cook with a dry base seasoning, then glaze near the end.
- Honey garlic: Add honey garlic glaze during the final few minutes so it does not burn.
- Tandoori-style: Use a thick yogurt-spice marinade, wipe off excess, then air fry until cooked through.
- Garam masala: Add a small pinch of garam masala to the paprika-garlic rub for a warmer spice note.
- Green chutney: Serve with green chutney, or stir the chutney into yogurt for a quick herby dip.
- Spicy: Add cayenne, chili powder, crushed red pepper, or hot sauce after cooking. Serve sweet-hot versions with mango habanero sauce.
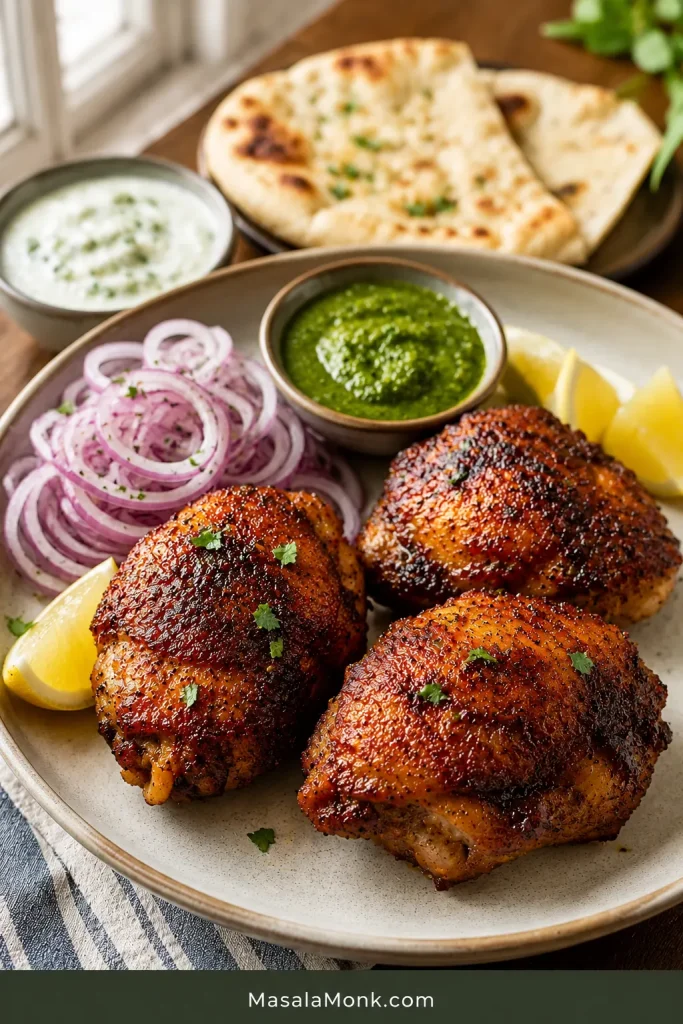
Bright, spicy serving idea
For a brighter plate, keep the thighs dry-rubbed and crisp, then serve them with sliced onions, lemon wedges, green chutney, and a quick yogurt-garlic dip. You get the crisp skin from the air fryer and the fresh, spicy contrast on the side.
Air Fryer Size, Basket Space, and Equipment
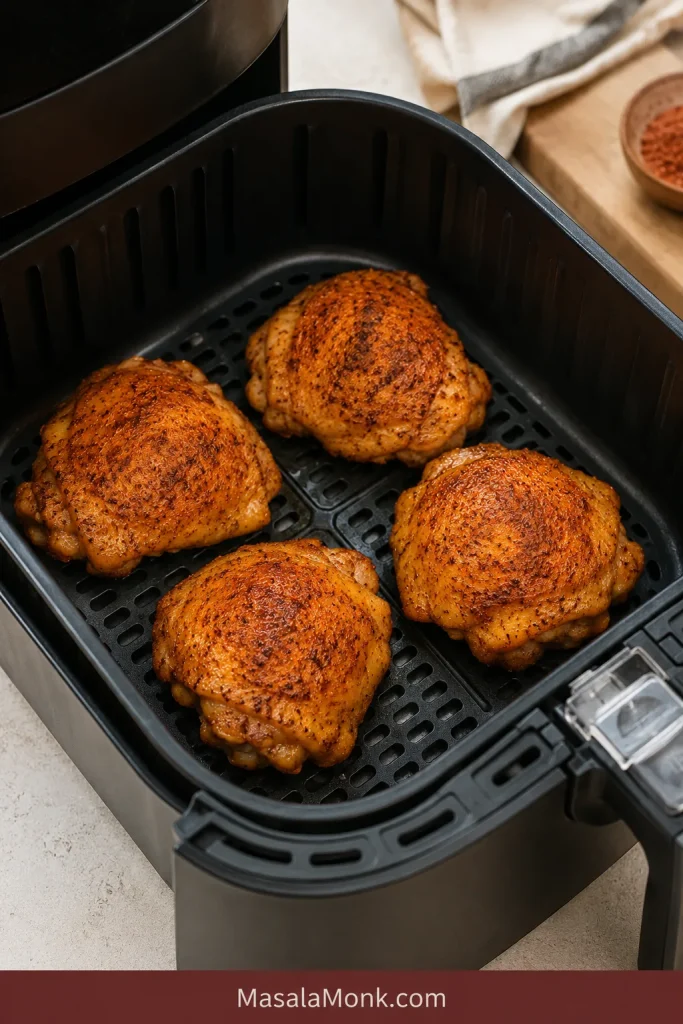
A 5–6 quart basket-style air fryer is ideal for 4 medium bone-in thighs. Smaller air fryers may only fit 2 or 3 at a time. Light edge-touching is fine; overlapping or stacking means you should cook in batches.
Basket-style air fryers often brown faster than oven-style air fryers. Larger oven-style models may need a few extra minutes because the food sits farther from the heating element. Ninja Foodi, Cosori, Instant, Philips, and similar models can all work, but basket shape and heating strength change the final few minutes more than the brand name does.
The most useful tool is an instant-read thermometer. It removes the guesswork, especially when the thighs are different sizes or when you are cooking frozen pieces.
Troubleshooting
Most air fryer chicken thigh problems are not recipe failures. They are usually surface problems, spacing problems, timing problems, or sauce problems. Once you know which one happened, the fix is usually simple.
Quick fixes by problem
| Problem | Likely reason | Fix |
|---|---|---|
| Skin is rubbery | The skin was wet, the basket was crowded, or the thighs did not finish skin-side up long enough | Pat dry, cook in a single layer, and add 2–4 minutes skin-side up |
| Chicken is dry | The thighs were small or cooked too long | Start checking earlier and rest for 5 minutes before serving |
| Outside is browned but inside is undercooked | The thighs are large, very cold, frozen, or crowded | Lower the temperature slightly and continue cooking in 3-minute bursts |
| Seasoning burned | Too much sugar, fresh garlic, or sauce went in too early | Use dry spices first and add sweet sauces near the end |
| Air fryer smoked | Too much oil, excess fat, old grease, or a dirty basket | Trim loose fat, use less oil, and check the drawer for old grease before starting |
| Chicken tastes bland | The surface was under-seasoned | Season both sides, including edges, and add a squeeze of lemon after cooking if the chicken tastes flat |
| Thighs cooked unevenly | Pieces were different sizes or folded under themselves | Use similar-sized thighs and open folded boneless pieces before cooking |
| Skin stuck to the basket | The basket was not clean, the skin was too wet, or the chicken was moved too early | Clean the basket, dry the skin well, and let the first side cook before flipping |
| Frozen thighs cooked unevenly | The pieces were stuck together or too thick | Separate once softened and check near the bone before serving |
When the skin is still soft
When the chicken is already cooked but the skin is disappointing, do not start over. Put it back skin-side up for a few minutes, then serve with lemon, chutney, sauce, or a cool dip.
Storage and Reheating
Store leftover chicken thighs in an airtight container in the refrigerator for 3–4 days. That matches USDA guidance for cooked leftovers, which gives a 3–4 day refrigerator window.
To reheat, air fry at 350°F / 175°C until hot in the center. The exact time depends on whether the thigh is bone-in or boneless. Reheating in the air fryer keeps the surface much better than microwaving.
For the best leftover texture, reheat only what you plan to eat and keep the rest chilled until needed.
The microwave works when speed matters, but the skin will soften. If you want the skin crisp again, microwave briefly to warm the center, then air fry for a few minutes to revive the outside.
Cooked thighs can also be frozen, though the skin will not be as crisp after thawing. For best results, remove the meat from the bone and use it later in rice bowls, wraps, soups, noodles, or salads.
What to Serve with Them
These thighs are flexible enough for a simple dinner, a meal prep box, or a more flavorful weekend plate. The best plate is usually hot chicken, something cool, something bright, and something that catches the juices.
- Plain rice, jeera rice, fried rice, or a bowl with sliced thighs and crunchy vegetables
- Mashed potatoes, roasted potatoes, or air fryer hash browns
- Steamed vegetables, roasted broccoli, green beans, carrots, or corn
- A cold cucumber salad for smoky, spicy, or BBQ-style thighs
- Garlic bread, dinner rolls, or naan
- Noodles with garlic, chili, or teriyaki-style sauce
- Cool yogurt-garlic dip, green chutney, ranch, aioli, hot sauce, or lemon wedges for squeezing over the hot skin
Creamy garlic mayo works well here, or you can build one from this homemade mayonnaise guide. For a tandoori-style version, serve the chicken with naan, rice, sliced onions, lemon wedges, and a cooling yogurt dip.
A lighter meal works well with sliced boneless thighs over salad. Tuck extras into wraps with crunchy vegetables.
FAQs
How long do chicken thighs take in the air fryer?
Bone-in, skin-on thighs usually take 20–24 minutes at 400°F / 200°C. Boneless skinless thighs cook faster, usually 11–20 minutes depending on thickness. Start checking at the low end of the range if your thighs are small or your air fryer runs hot.
What temperature works best?
For bone-in, skin-on thighs, 400°F / 200°C gives the best balance of golden skin and juicy meat. Boneless skinless thighs do better around 380–390°F / 193–199°C because the center can cook before the edges dry.
Do you need to preheat the air fryer?
Preheating helps the chicken start browning quickly, especially for skin-on thighs. If your air fryer does not require preheating, you can still run it empty for 3 minutes while you finish seasoning the chicken.
Should chicken thighs start skin-side up or down?
Start skin-side down, then flip skin-side up to finish. The first stage helps the fat begin to render, and the final stage gives the skin direct heat so it can crisp.
Are boneless skinless thighs faster?
Yes. Boneless skinless thighs cook much faster than bone-in thighs, especially when they are thin or opened flat. Start checking early so they stay juicy instead of tightening up.
How do you make the skin crispy?
Use skin-on thighs, blot the skin dry, preheat the air fryer, avoid overcrowding, and finish cooking skin-side up. A tiny amount of baking powder can also help the skin crisp more deeply.
Why is the skin not crispy?
The skin may have been too damp, the basket may have been crowded, or the chicken may have needed a few extra minutes skin-side up. Wet marinades and too much oil can also soften the surface.
Is 165°F enough for chicken thighs?
Yes. Chicken thighs are safe to eat once they reach 165°F / 74°C in the deepest part of the meat. Check the thickest thigh and keep the thermometer in the meat, not against the bone.
Why cook thighs closer to 175°F?
They do not have to reach 175°F for safety, but many people prefer dark meat around that temperature because it can taste softer and more tender. Thighs are more forgiving than chicken breast, so they can handle a slightly higher finish.
Can frozen thighs go straight in?
Yes, but give them a slower start and check the center carefully. Begin around 360°F / 180°C to cook through, then finish hotter around 380°F / 190°C to brown and crisp the outside. Separate pieces as soon as they loosen so the centers cook evenly.
How many thighs fit in an air fryer?
A 5–6 quart basket usually fits 4 medium bone-in thighs in a single layer. Smaller air fryers may fit only 2 or 3. The thighs can touch lightly, but they should not overlap.
Can you use BBQ sauce?
Yes. Brush BBQ sauce on during the final 3–5 minutes so it turns sticky without burning. If the sauce is very sugary, use a thin layer first and add more after cooking.
Can you air fry marinated thighs?
Yes, just do not move them straight from a dripping marinade into the basket. Let the flavor stay, but wipe away excess liquid so the surface can brown.
Need the short version again? Return to the Quick Answer or the Recipe Card.
Final Tip
Once you know what kind of thigh is in the basket, the recipe becomes simple. Give skin-on thighs time to render, check boneless pieces early, be patient with frozen pieces, and finish with something bright: lemon, chutney, yogurt dip, or a sticky glaze. The result is a low-effort dinner that still feels like you meant to make something good.


