
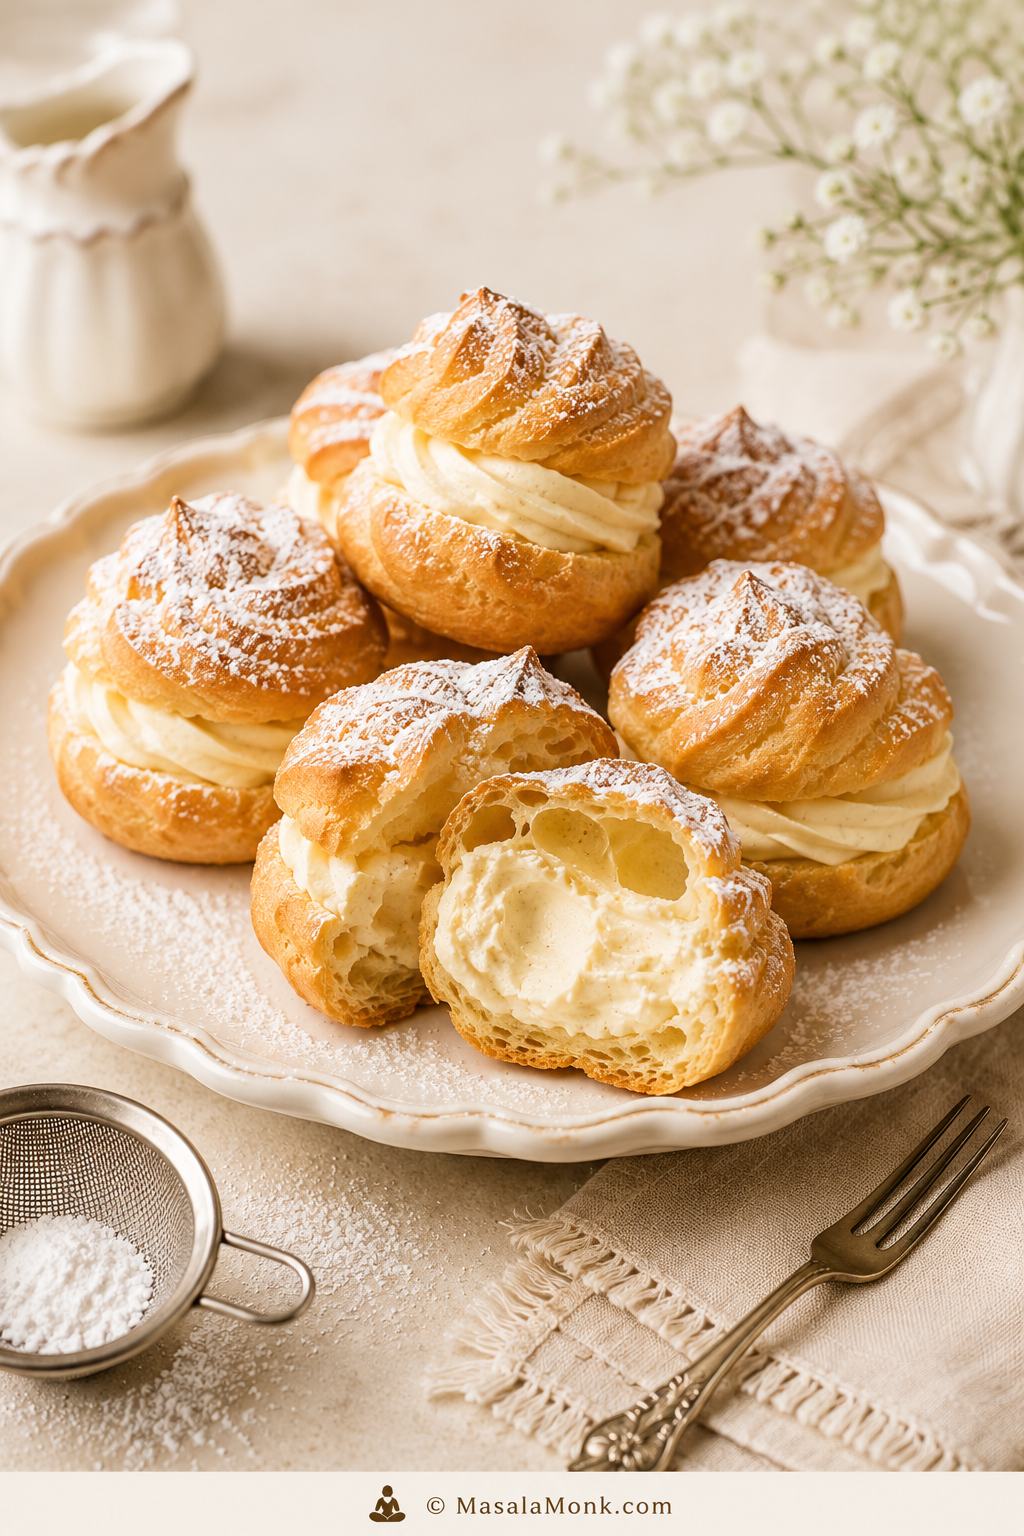
Cream puffs look like bakery-case magic, but the dough is built from simple ingredients: water, milk, butter, flour, eggs, and a little patience. The best cream puffs feel light and crisp when you pick them up, then give way to soft vanilla cream inside. The real secret is knowing what the choux pastry should look like before it goes into the oven.
This cream puff recipe gives you golden choux pastry shells, a vanilla cream filling, and the practical cues that help the puffs rise, hollow out, and stay crisp enough to fill. You will learn when the dough is ready, how dark the shells should bake, what cream to use inside, why cream puffs collapse, and how to make them ahead without ending up with soggy pastry.
The reward is the contrast: a crisp, airy shell on the outside and cool vanilla cream tucked into the center. The method may feel strange the first time, especially when the dough looks rough, then smooth, then briefly broken after the eggs go in. That is normal. Once you understand the texture cues, cream puffs become much less intimidating.
Table of Contents
Make the Cream Puffs
Quick Answer: How to Make This Cream Puff Recipe
Cream puffs are made from choux pastry, a cooked dough that rises because steam expands inside it. To make them, cook water, milk, butter, sugar, salt, and flour into a thick paste, then beat in eggs gradually until the dough is glossy, smooth, and ready for the piping bag.
Pipe the dough into small mounds, bake until the shells puff and turn golden, then vent and dry them so they stay hollow. Once the shells cool completely, fill them with whipped cream, pastry cream, diplomat cream, custard, or ice cream.
The biggest mistake is underbaking. The shells need enough time to dry and set, not just enough time to puff. If they come out pale and soft, they may look done for a moment, then collapse as they cool.
Cream Puff Recipe Snapshot
Whipped cream is the easiest filling for a first batch because it takes only a few minutes. Pastry cream gives a more classic pastry-shop result. Diplomat cream, which is pastry cream folded with whipped cream, tastes richer while still feeling soft and airy.
What Are Cream Puffs?
Cream puffs are round pastry shells made from choux pastry and filled after baking. Unlike cake batter or cookie dough, choux pastry is first cooked on the stovetop. That cooked flour paste is mixed with eggs, piped into mounds, and baked.
In the oven, the moisture in the dough turns into steam. That steam pushes the dough outward, creating a hollow center. Once the outside sets and dries, the shell can hold cream inside.
Cream puffs are often filled with sweetened whipped cream, vanilla pastry cream, custard, diplomat cream, chocolate cream, strawberry cream, or ice cream. The shell itself is only lightly sweet, so the filling gives the dessert most of its flavor.
Cream Puffs vs Profiteroles vs Éclairs
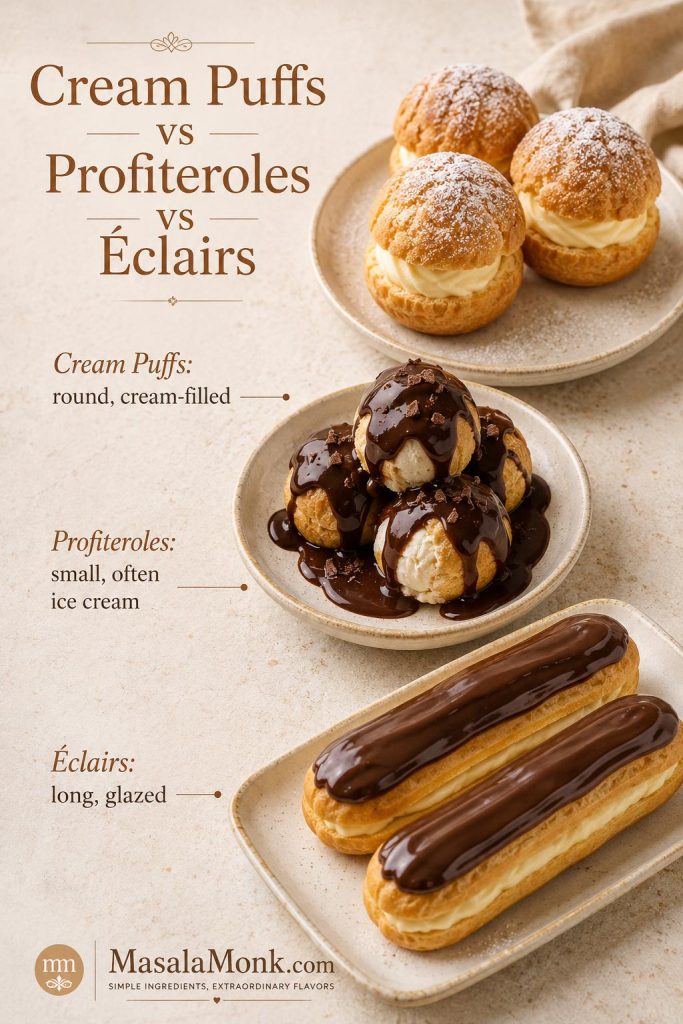
These desserts are closely related because they all use choux pastry, but they are not exactly the same.
| Dessert | Shape | Usual Filling | Common Finish |
|---|---|---|---|
| Cream puffs | Round, medium shells | Whipped cream, pastry cream, diplomat cream | Powdered sugar, chocolate, or ganache |
| Profiteroles | Small round puffs | Ice cream, pastry cream, or whipped cream | Chocolate sauce |
| Éclairs | Long choux shells | Pastry cream | Chocolate glaze |
| Croquembouche | Stacked cream puffs | Usually pastry cream | Caramel or spun sugar |
For this recipe, we are focusing on classic round cream puffs. However, once you understand the dough, the same choux pastry technique opens the door to profiteroles, éclairs, gougères, and croquembouche.
In other words, this is the base skill. Learn the shell once, and a whole family of bakery-style desserts becomes easier.
Are Cream Puffs Made with Puff Pastry?
Classic cream puffs are made with choux pastry, not puff pastry.
The names are easy to confuse, but the doughs behave very differently. Choux pastry is cooked on the stovetop, mixed with eggs, piped into mounds, and baked into hollow shells. Puff pastry is a laminated dough made with many layers of butter and dough, so it bakes into flaky layers instead of hollow centers.
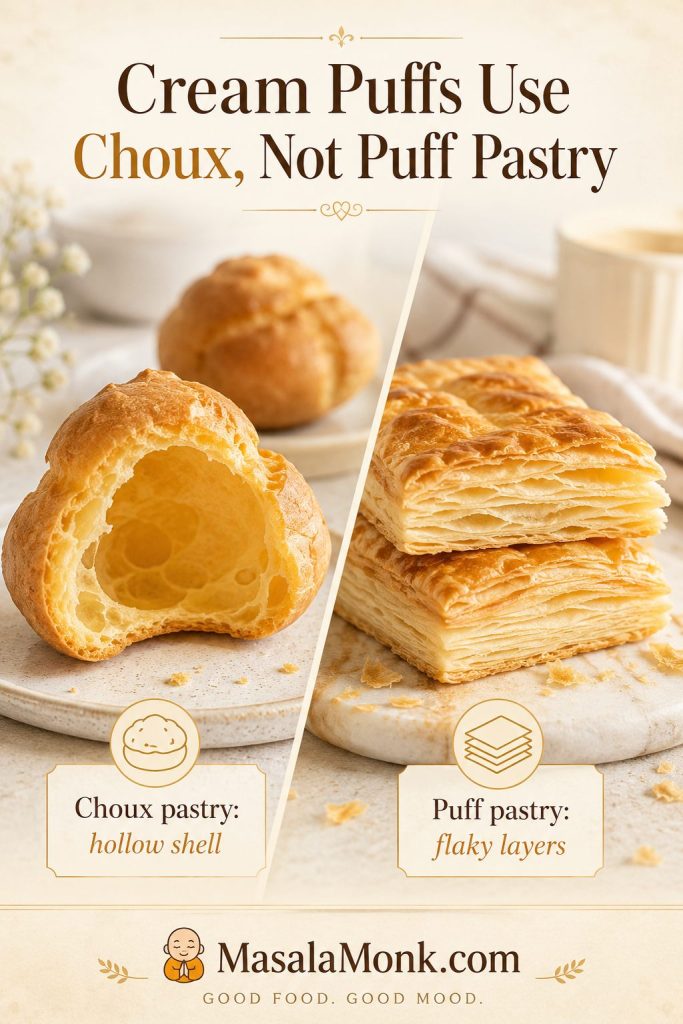
If you came here expecting flaky pastry filled with cream, you may be thinking of cream horns, mille-feuille, cream slices, or puff pastry danish. For classic bakery-style cream puffs, use choux pastry. For a different kind of buttery pastry dough, this apple pie crust recipe is a useful cold-butter comparison.
Cream Puff Recipe Ingredients
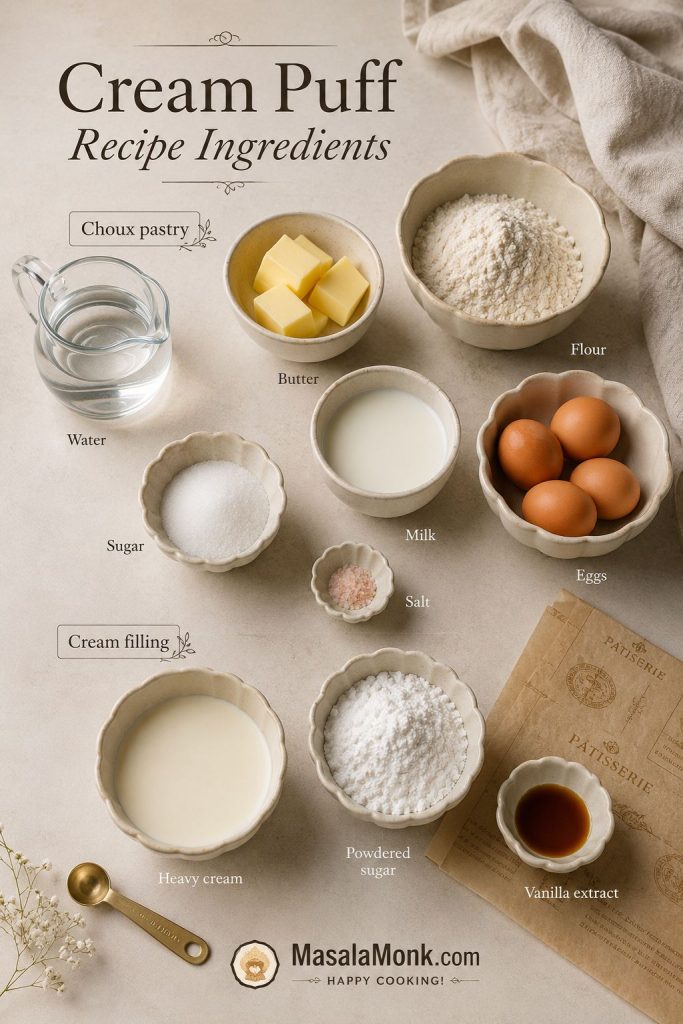
Cream puffs use everyday ingredients, but the measurements and order matter. Choux pastry is less forgiving than a casual cake batter because too much moisture or too much egg can make the shells spread instead of rise.
For the Choux Pastry Shells
- ½ cup / 120 ml water
- ½ cup / 120 ml whole milk
- ½ cup / 113 g unsalted butter, cut into pieces
- 1 tsp granulated sugar
- ¼ tsp fine salt
- 1 cup / 125 g all-purpose flour, spooned and leveled if using cups
- 4 large eggs, room temperature, beaten and added gradually
The water helps create steam, the milk adds flavor and color, and the eggs help the shells puff and set. The flour weight matters, so use a scale if you can. A loosely scooped cup and a packed cup can behave very differently in choux pastry, which is why 125 g is the safest target.
The egg amount also needs judgment. Egg size, flour measurement, and how much moisture cooks out of the paste can all change the final texture. Start with the recipe amount, but add the final egg slowly. You may not need every drop if the dough already passes the V-shape test.
If you are unsure where to stop, use the V-shape dough cue before adding the last bit of egg.
For the Whipped Cream Filling
- 2 cups / 480 ml cold heavy cream
- 3–4 Tbsp powdered sugar
- 1–2 tsp vanilla extract
- Pinch of salt, optional
Powdered sugar dissolves quickly and gives a smooth filling. Granulated sugar also works, but the cream may need a little more whipping time.
For the Pastry Cream Option
For a richer custard-filled version, make pastry cream ahead and chill it fully before piping.
- 2 cups / 480 ml whole milk
- 4 large egg yolks
- ½ cup / 100 g granulated sugar
- ¼ cup / 30 g cornstarch
- 2 Tbsp / 28 g unsalted butter
- 2 tsp vanilla extract or vanilla bean paste
- Pinch of salt
This gives a thick, pipeable custard-style filling. Pastry cream needs time to cool, so make it before the shells or several hours ahead.
Optional Toppings
- powdered sugar
- melted chocolate
- chocolate ganache
- caramel drizzle
- fresh berries
- sliced strawberries
- toasted almonds
For the cleanest first version, dust the filled puffs with powdered sugar just before they go to the table.
Equipment You Need
You do not need bakery equipment to make cream puffs, but a few tools make the process easier.
Must-Have Equipment
- medium saucepan
- wooden spoon or sturdy silicone spatula
- mixing bowl or stand mixer
- baking sheet
- parchment paper
- wire rack
Helpful Equipment
- piping bag
- ½-inch round piping tip or large star tip
- zip-top bag as a backup piping bag
- skewer, toothpick, or small knife for venting
- small scoop for even mounds
A piping bag gives the neatest shape, but you can still make cream puffs with a zip-top bag or two spoons. The shape may be less even, but the recipe will work as long as the dough texture and bake are right.
Best Cream for Cream Puffs
The shell gets the most attention, but the filling is what most people remember. The right cream for cream puffs depends on whether you want easy, classic, stable, rich, or light.
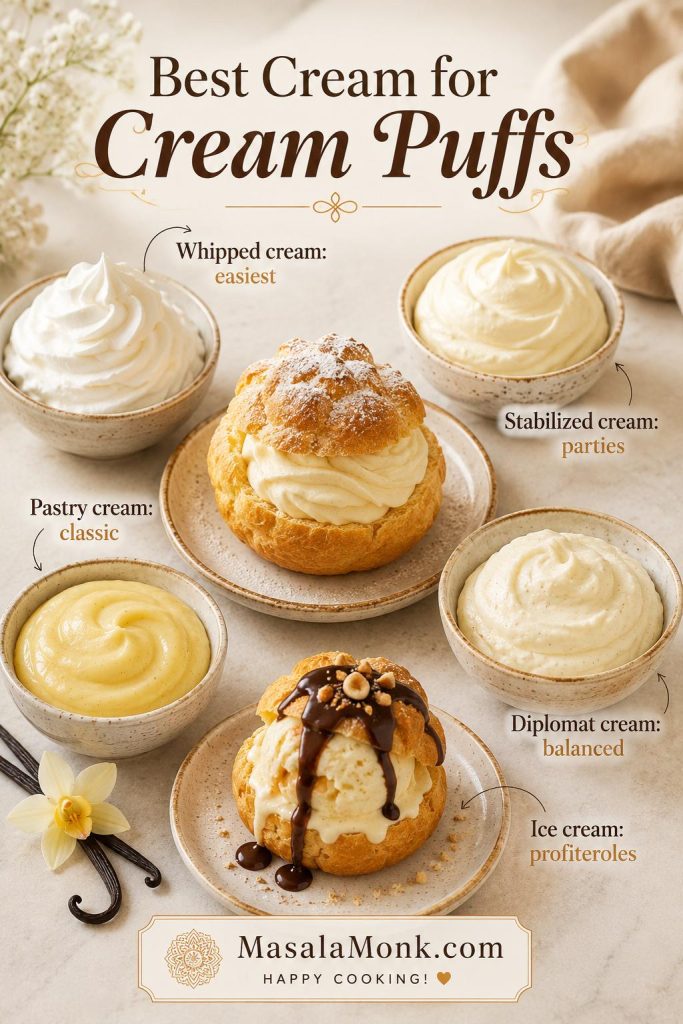
| Filling | Best For | Texture | Make-Ahead Strength |
|---|---|---|---|
| Whipped cream | First batch, easiest version | Light and airy | Short hold |
| Stabilized whipped cream / mascarpone cream | Parties and dessert trays | Light but firmer | Better hold |
| Pastry cream | Classic custard-filled cream puffs | Rich and custardy | Very good |
| Diplomat cream | Most balanced filling | Creamy, light, stable | Good |
| Pudding shortcut | Emergency easy filling | Sweet and thick | Decent |
| Ice cream | Profiterole-style dessert | Cold and creamy | Fill right before serving |
For a first batch, whipped cream is the easiest choice because it is quick, light, and does not need cooking. For a more classic pastry-shop result, pastry cream works better. When you want something rich but still soft and airy, diplomat cream is the best middle ground.
Still deciding? The cream puff filling comparison below shows how whipped cream, pastry cream, and diplomat cream behave differently.
Cream Puff Filling: Whipped Cream vs Pastry Cream vs Diplomat Cream
Keep the shell technique the same, then choose the filling based on the dessert you want. Whipped cream makes the puffs feel light and delicate; pastry cream gives them a richer bakery-style center.
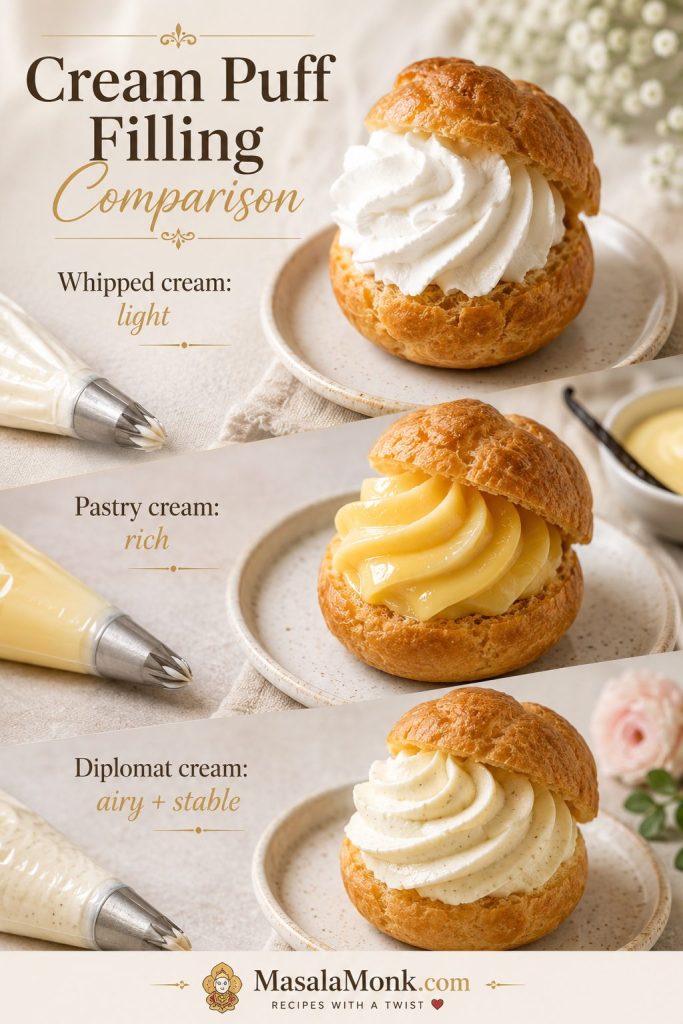
Whipped Cream Filling
Start with whipped cream when you want the simplest filling. It tastes light, sweet, and clean, and you can make it in a few minutes while the shells cool.
It is best for first-time cream puffs, light desserts, same-day serving, cut-and-fill cream puffs, berries, and powdered sugar finishes. Plain whipped cream softens faster than pastry cream, so assemble the puffs near serving time. A strawberry shortcake has the same serve-soon logic because whipped cream and fresh fruit soften as they sit.
Mascarpone or Cream Cheese Whipped Cream
For a cream filling that still tastes light but holds better, beat 2 cups / 480 ml cold heavy cream with 3–4 Tbsp powdered sugar, 1 tsp vanilla, and 4 oz / 113 g softened mascarpone or cream cheese. Beat the mascarpone or cream cheese first until smooth, then slowly add the cold cream and whip until the filling holds medium-stiff peaks.
Mascarpone gives a cleaner, creamier flavor. Cream cheese adds a light tang and a slightly thicker texture.
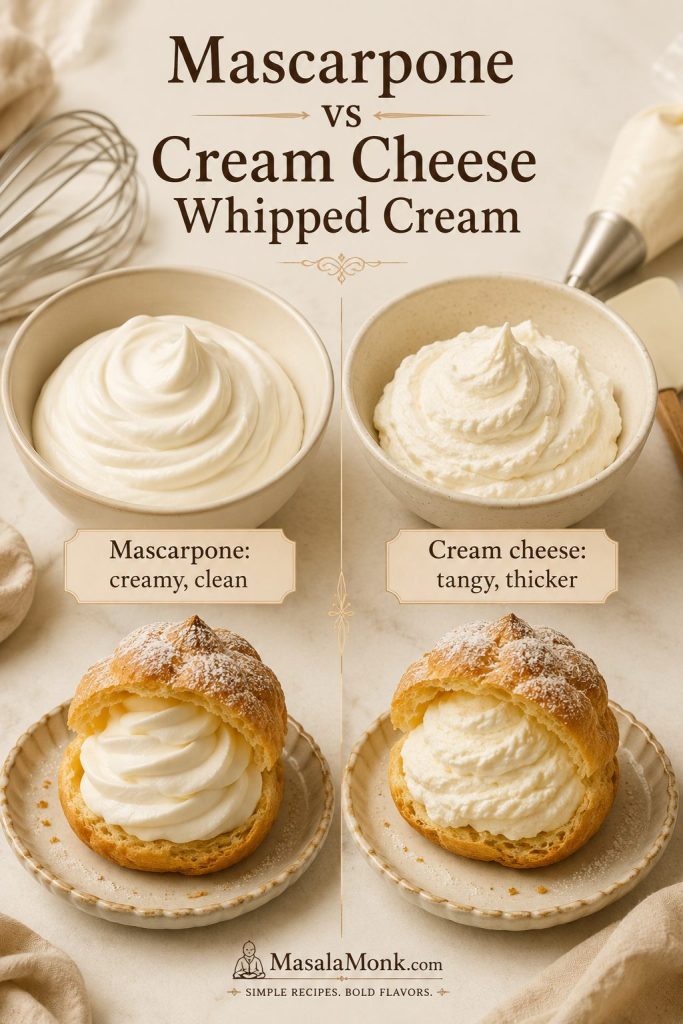
This is not as classic as pastry cream, but it is very practical for parties because it pipes well and holds longer than plain whipped cream.
Pastry Cream Filling
Pastry cream is a cooked custard-style filling made with milk, egg yolks, sugar, cornstarch, butter, and vanilla. It gives cream puffs a richer center and holds better than plain whipped cream.
To make it, heat the milk until steaming. In a separate bowl, whisk egg yolks, sugar, cornstarch, and salt until smooth. Slowly whisk some hot milk into the yolk mixture, then return everything to the saucepan. Cook, whisking constantly, until thick and bubbling. Off the heat, whisk in butter and vanilla. Cover with plastic wrap directly on the surface and chill until cold.
For more pastry cream technique, Sally’s Baking Addiction has a detailed pastry cream guide.
Diplomat Cream Filling
Diplomat cream is pastry cream folded with whipped cream. It tastes rich without feeling heavy, which makes it one of the nicest fillings for cream puffs you plan to share.
For a practical filling, use 2 cups chilled pastry cream and 1 cup / 240 ml cold heavy cream whipped to medium peaks. Whisk the chilled pastry cream until smooth, then gently fold in the whipped cream. The filling should be soft, creamy, and pipeable, not loose or runny.
Pudding Shortcut Filling
For the easiest shortcut, use thick vanilla pudding, chill it well, then fold in a little whipped cream for a lighter texture. It will not taste as fresh as homemade pastry cream, but it works when you need a fast, kid-friendly filling.
Cream Puff Filling Texture Guide
Before choosing a filling, look at how each option holds shape. Thicker fillings are easier to pipe and help the choux shells stay crisp longer.
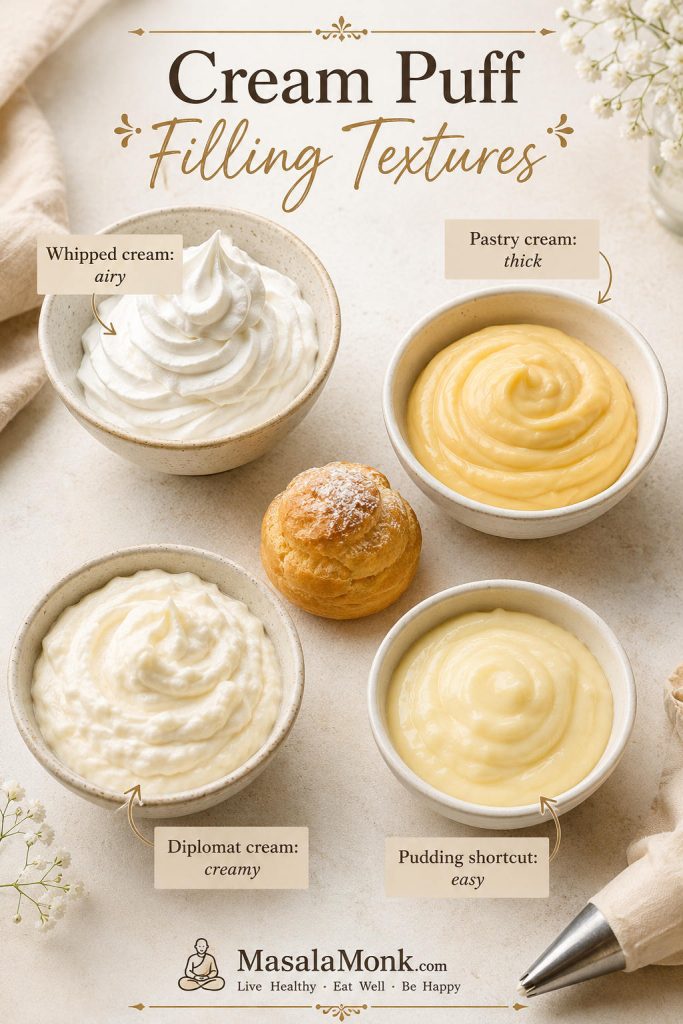
Which Filling Should You Choose?
- Easiest first batch: whipped cream
- Classic custard-style center: pastry cream
- Most balanced texture: diplomat cream
- Party tray: mascarpone whipped cream, stabilized whipped cream, or pastry cream
- Kid-friendly shortcut: whipped cream or pudding filling
- Profiterole-style dessert: ice cream
How to Make Choux Pastry for Cream Puffs
Choux pastry is the heart of this recipe. The dough starts on the stovetop, where the flour is cooked with hot liquid and butter. After that, eggs are added gradually to create a glossy, slow-moving dough. For a deeper technical look at why choux rises with steam, Serious Eats has a useful guide to choux pastry.
The method feels unusual the first time, but every stage has a clear cue.
Step 1: Melt the Butter with Water, Milk, Sugar, and Salt
Add the water, milk, butter, sugar, and salt to a medium saucepan. Warm over medium heat until the butter melts completely and the liquid reaches a boil.
Do not rush this step with high heat. You want the butter fully melted before the flour goes in, so the dough forms evenly.
Step 2: Add the Flour All at Once
Add the flour in one go and start stirring immediately. The mixture will look rough and lumpy at first. Keep stirring. Within a short time, it will come together into a thick paste.
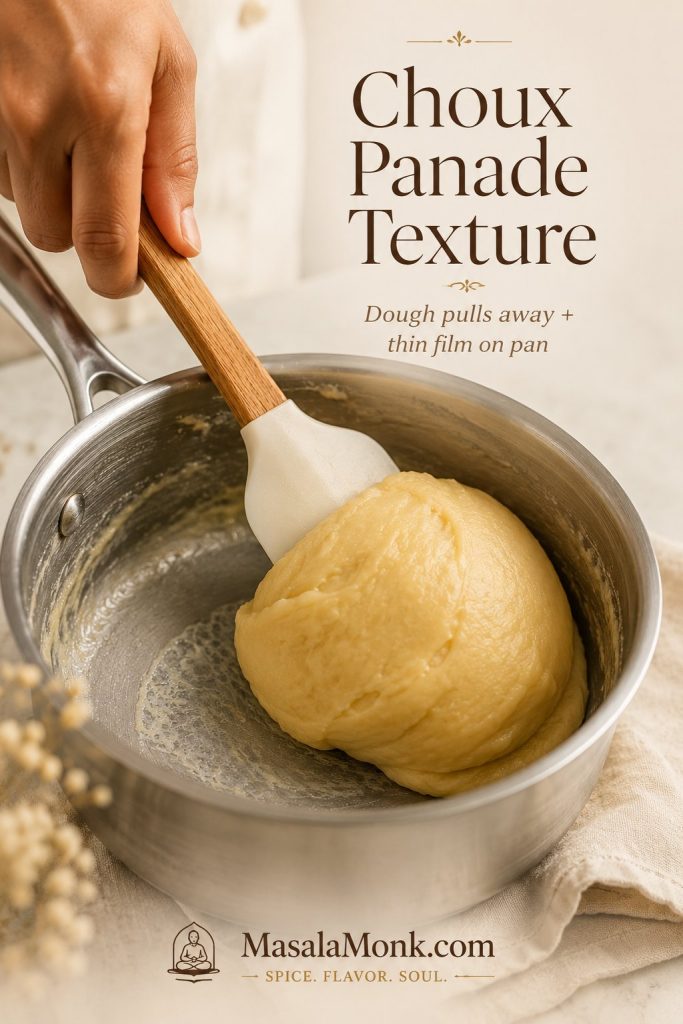
This paste is called the panade. It should pull away from the sides of the pan and begin forming a ball.
Step 3: Cook the Flour Paste
Keep cooking and stirring the paste for 1–3 minutes. A thin film may form on the bottom of the pan, and the dough should look cohesive rather than wet or greasy.
Cooking the paste for another minute or two drives off extra moisture before the eggs go in. If the paste stays too wet, the dough may become too loose and spread on the tray instead of puffing upward.
The panade is ready when it forms a smooth ball, pulls away from the sides, leaves a light film on the bottom, no longer looks wet with loose butter, and feels thick when stirred. At this point, the dough should feel sturdy and slightly resistant, not loose or oily.
Step 4: Cool Slightly Before Adding Eggs
Transfer the hot paste to a mixing bowl or the bowl of a stand mixer. Let it cool for a few minutes until it is warm but no longer steaming hot.
If the dough is too hot, it can scramble the eggs. You do not need it cold; just let the harsh heat come down.
Step 5: Add the Eggs Gradually
Beat the eggs lightly in a separate bowl if you want maximum control. Add about three eggs first, one at a time or in several additions, mixing well after each addition. Then add the final beaten egg a spoonful at a time.
At first, the dough may look broken, slippery, or curdled. Do not panic. Keep mixing and it will come back together. This is where patience matters more than speed.
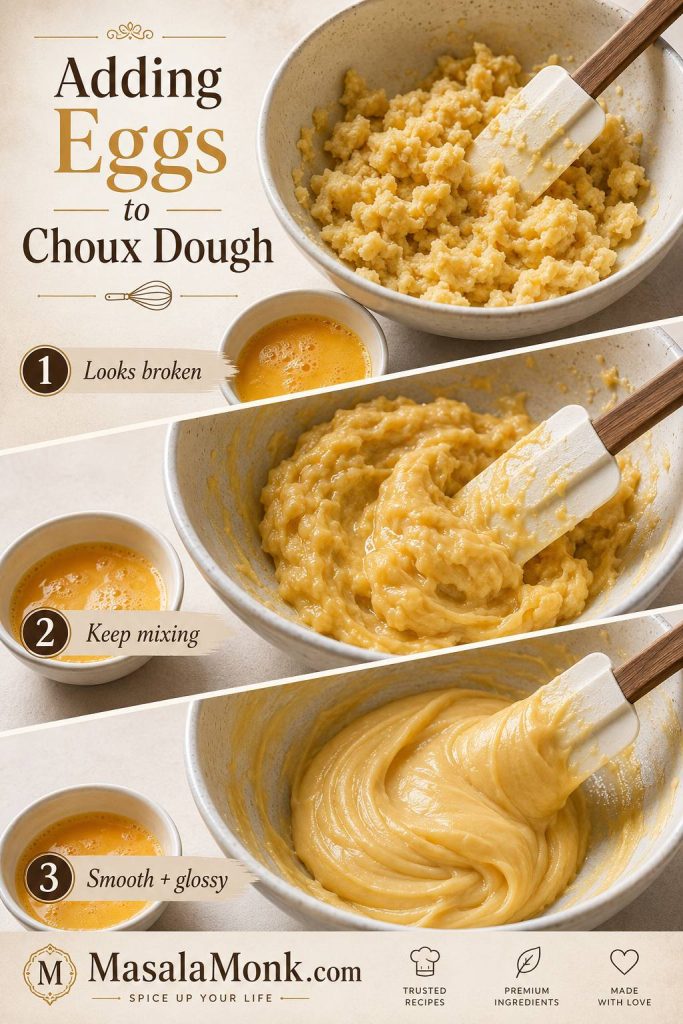
The final egg is where the texture can change quickly. You may not need every drop, so stop when the dough is glossy, smooth, thick, and able to hold a piped shape.
Before you pipe, check the V-shape dough cue; it is the easiest way to avoid loose cream puff dough.
How to Know Choux Dough Is Ready
This is the checkpoint that saves cream puffs from turning flat.
Finished choux dough should be smooth, glossy, thick, soft enough to fall slowly from a spatula, and firm enough to hold height on the baking sheet.
Choux Dough V-Shape Test
The best cue is the V-shape test. Lift the spatula from the dough. The dough should slowly fall and leave a thick V-shaped ribbon hanging from the spatula. Once you see that ribbon, the dough suddenly feels less mysterious.
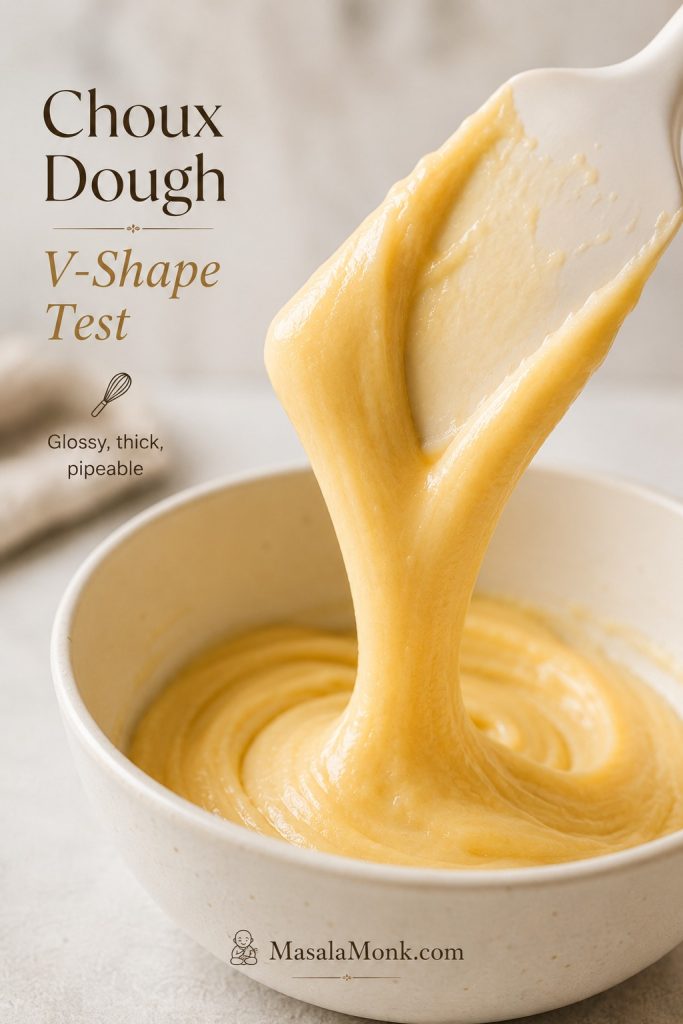
If the dough stands in a stiff peak and refuses to fall, it needs a little more egg. If it puddles or runs off the spatula like batter, it has gone too far.
Choux Dough Texture Guide
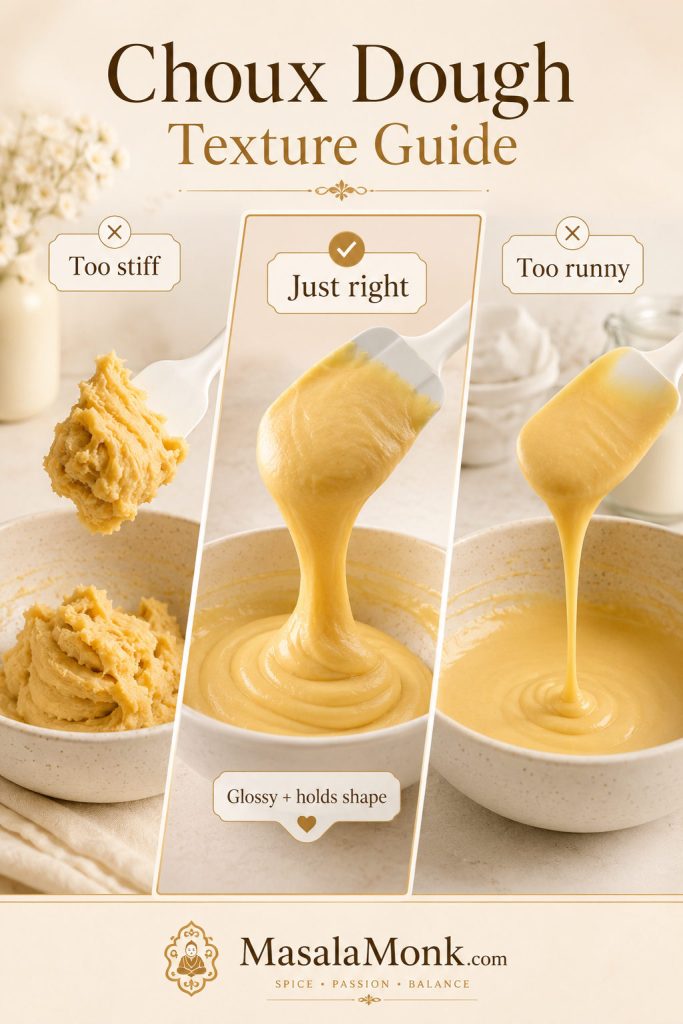
Use the visual differences below before adding more egg. The goal is dough that moves slowly, shines lightly, and still holds a mound when piped.
Just Right
The dough is glossy, smooth, and slow-moving. When piped, the mound holds its height and only relaxes slightly.
Too Stiff
The dough looks dry, rough, or heavy. It may hold a sharp peak and resist falling from the spatula. Add more beaten egg, one spoonful at a time.
Too Runny
The dough spreads quickly and cannot hold a piped mound. This usually means too much egg was added, the flour paste was not cooked enough, or the flour measurement was too low.
Runny choux is hard to fix perfectly. You can bake it, but the puffs may spread more. Next time, save the final egg for texture adjustment and stop at the V-shape stage.
Once the dough holds shape, move on to piping the cream puff shells.
How to Pipe Cream Puff Shells
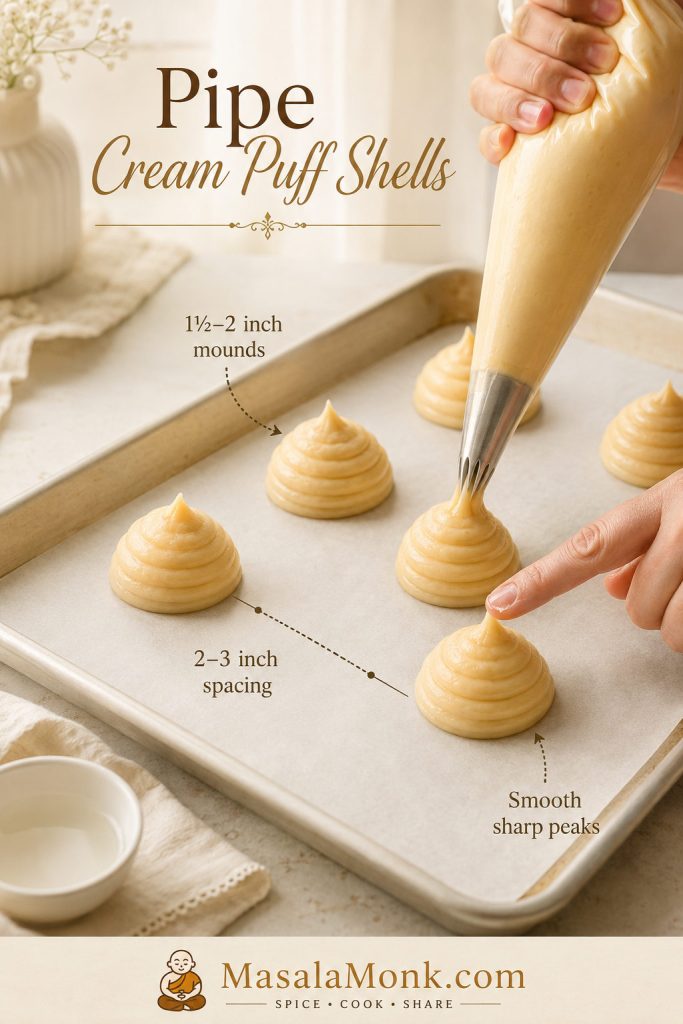
Line your baking sheets with parchment paper. Transfer the choux dough to a piping bag fitted with a ½-inch round tip or large star tip.
Pipe mounds about 1½–2 inches wide, leaving 2–3 inches of space between them. Cream puffs expand as they bake, and crowded dough can merge together.
If the tops have sharp peaks, smooth them gently with a damp fingertip. Peaks can burn before the rest of the shell finishes baking.
After the mounds are evenly spaced and the peaks are smoothed, the next important cue is baking the shells until they set.
No Piping Bag?
Use a zip-top bag with one corner snipped off, or use a small scoop and spoon. The puffs may look more rustic, but even mounds will still bake well.
The main goal is consistency. Similar-size puffs bake at the same rate. If some are tiny and others are huge, the small ones may dry out before the larger ones are fully hollow.
How to Bake Cream Puff Shells So They Rise and Stay Hollow
Cream puffs need heat for lift and enough time for structure. A shell that puffs beautifully but comes out too early can still collapse as it cools.
Before and After Baking Cream Puff Shells
Use the transformation from soft piped dough to puffed golden shells as a quick check that the oven heat is doing its job.
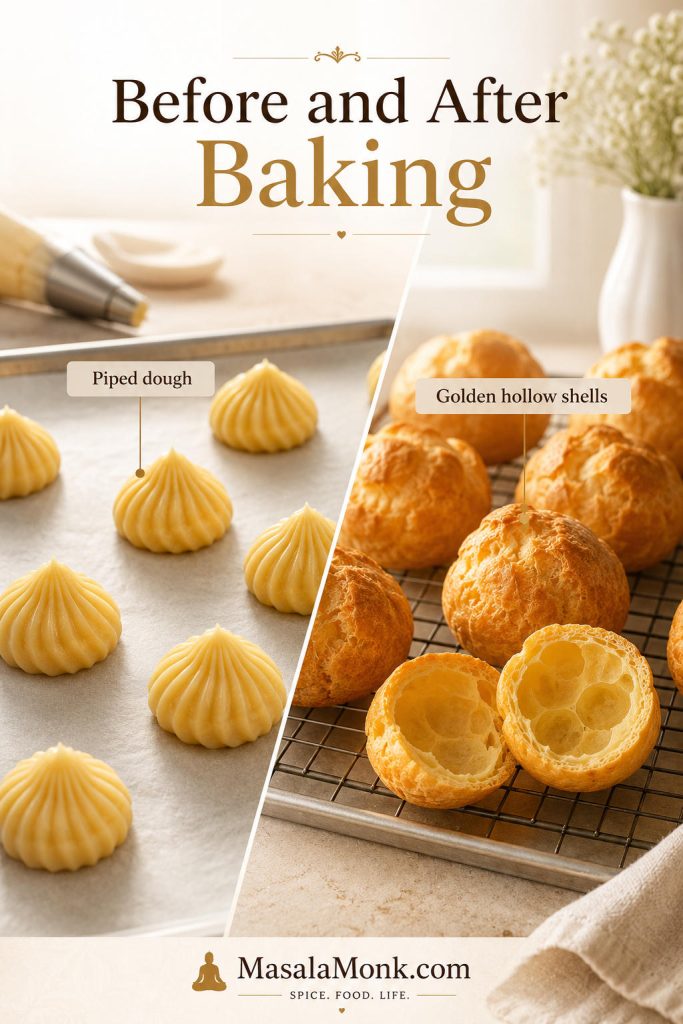
- Preheat the oven to 425°F / 218°C.
- Bake the piped shells for 10 minutes.
- Reduce the oven to 325°F / 163°C without opening the oven door.
- Bake for 20–25 minutes more, until the shells are golden, firm, and dry.
- Turn the oven off.
- Poke or slit each shell to release steam.
- Return the shells to the turned-off oven with the door cracked for 10–20 minutes.
- Cool completely before filling.
Do not open the oven during the early rise. A sudden drop in heat can collapse the structure before the outside sets.
Cream Puff Shell Color Guide
The shells are ready when they feel light, firm, dry, and hollow. If they still look pale or feel soft, give them more time. A properly baked shell usually has a deeper golden color than many first-time bakers expect.
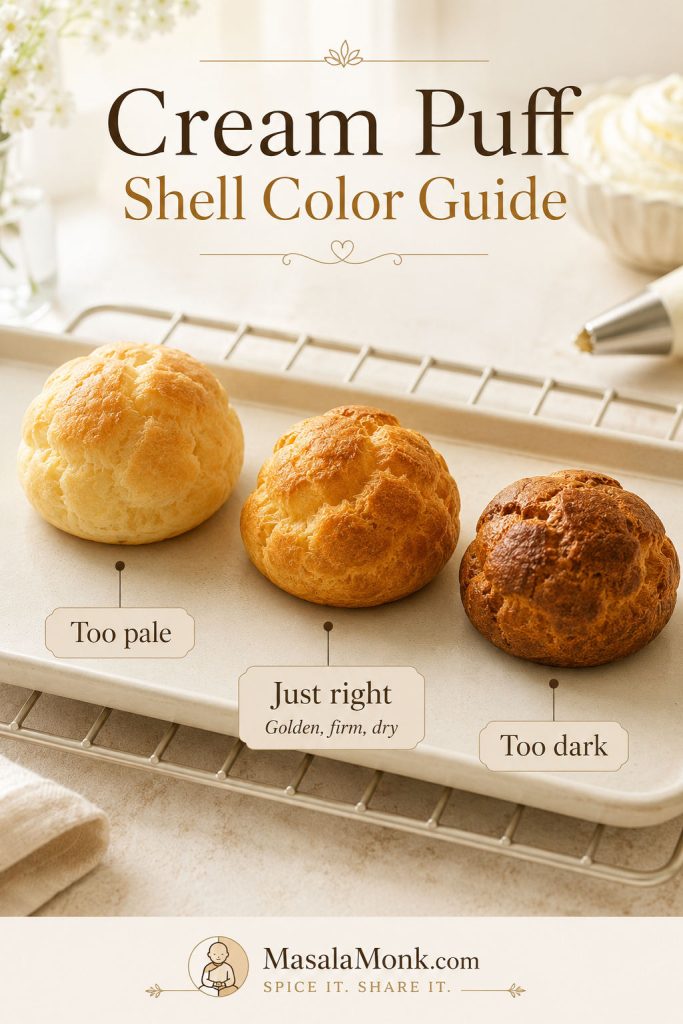
If the shells look pale, check this color guide before taking them out; underbaked choux is one of the most common reasons cream puffs collapse.
How to Check One Hollow Cream Puff Shell
If you are unsure, sacrifice one shell before removing the whole tray. Split it open. The inside should be mostly hollow and not wet or doughy. A little soft webbing is normal, but the shell should not feel raw.
If the center looks damp, bake a little longer or give the shells more drying time in the turned-off oven.
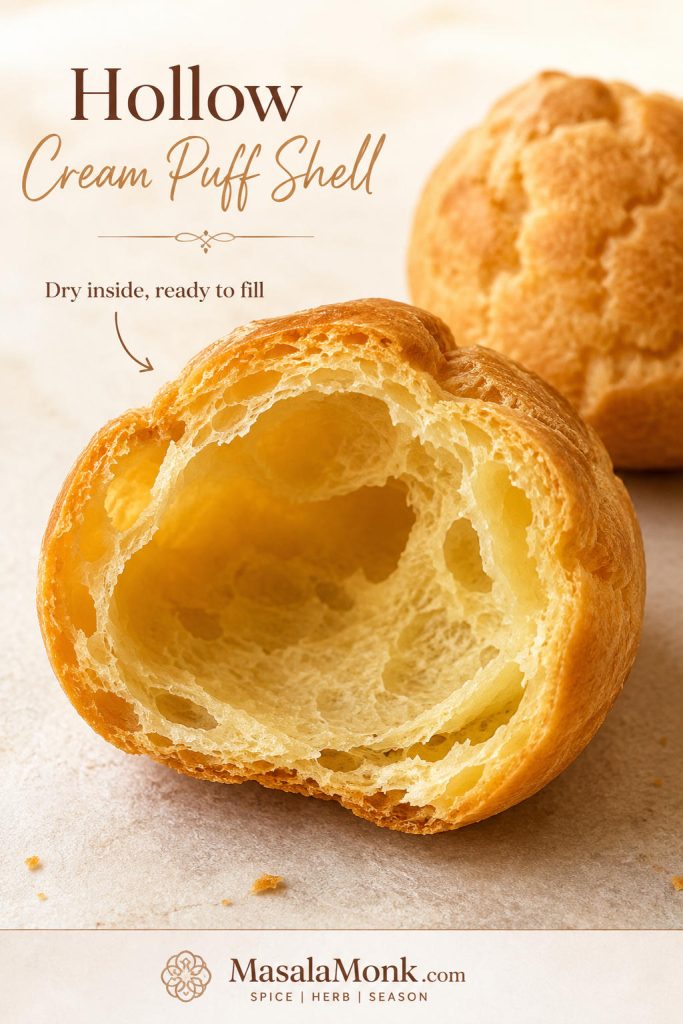
Once the shells are hollow and cool, continue to filling the cream puffs.
What Successful Cream Puffs Look and Feel Like
Successful cream puff shells should feel light when you lift them. The outside should be firm and dry, the inside should be hollow enough for filling, and the color should be golden rather than pale.
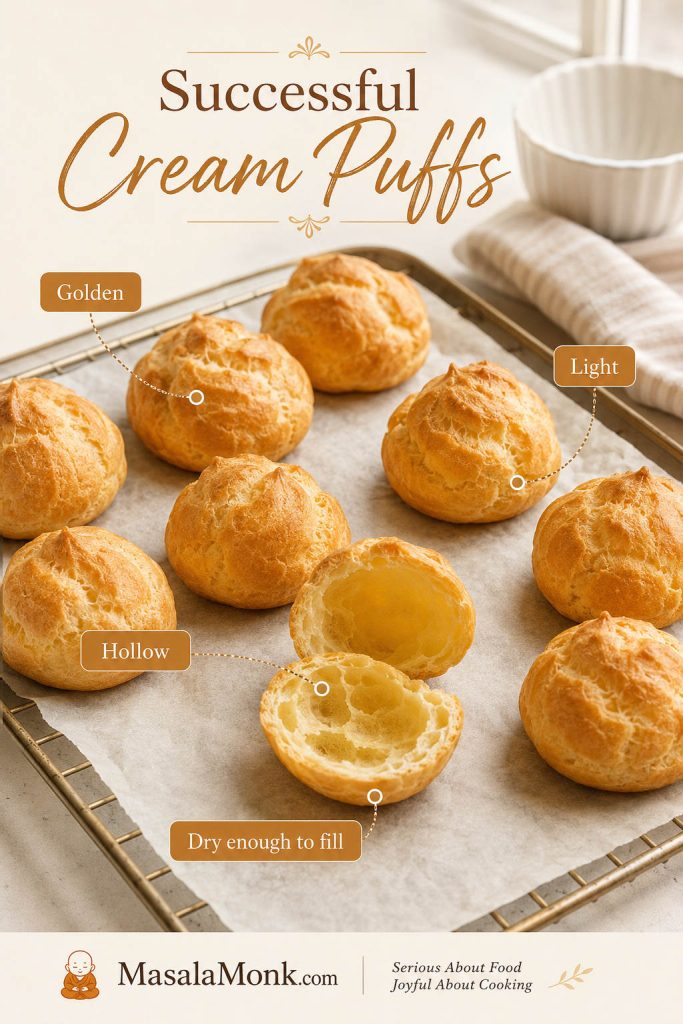
This is the moment where the recipe starts feeling like a real bakery project: a tray full of airy shells, ready for cold cream and a dusting of powdered sugar. Fill one, dust it, and taste it before serving the rest. That first crisp shell and cool cream center is the payoff for all the careful dough cues.
How to Fill Cream Puffs
Only fill cream puffs after the shells are fully cool. Warm shells melt the filling and create steam, which can make the pastry soft.
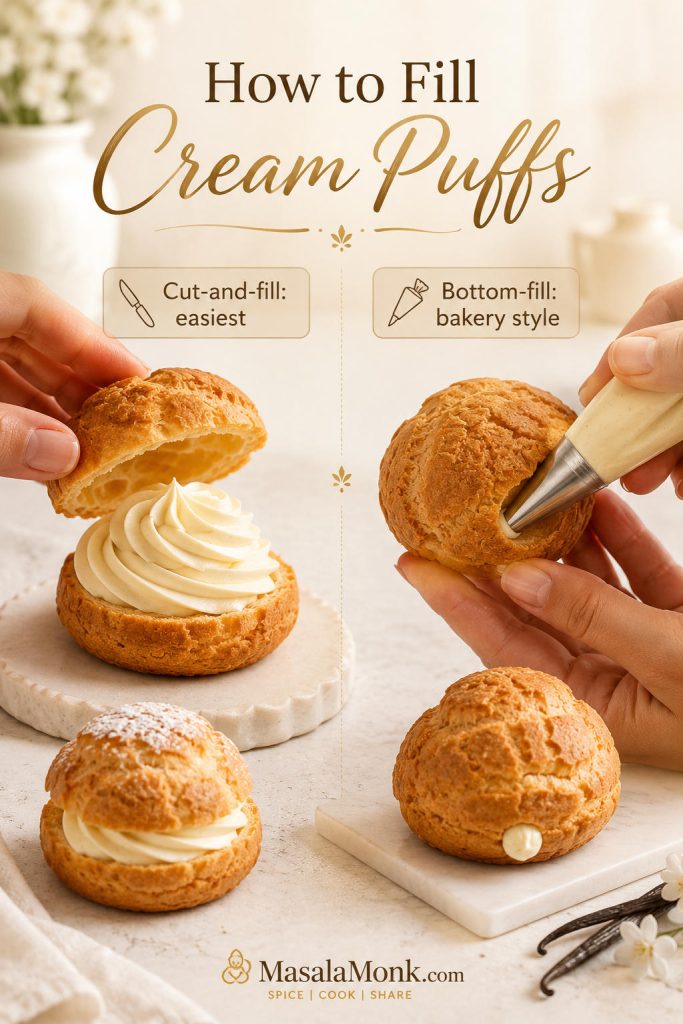
Cut-and-Fill Method
This is the easiest and prettiest method for home serving. Slice off the top third of each shell, pipe or spoon cream into the hollow center, then place the top back on. Dust with powdered sugar or drizzle with chocolate.
This method works especially well with whipped cream, diplomat cream, berries, and decorative swirls.
Bottom-Fill Method
For a cleaner pastry-shop look, make a small hole in the bottom of each shell with a knife, skewer, or piping tip. Pipe pastry cream or diplomat cream into the shell until it feels slightly heavier.
This method is best for pastry cream, custard, or thicker fillings.
When Should You Fill Cream Puffs?
For the crispest bite, wait until the shells are cool and the filling is ready before assembling. Once filled, they soften in the refrigerator because the cream slowly releases moisture into the pastry.
Planning for a party? Use the make-ahead cream puffs timeline so the shells stay crisp.
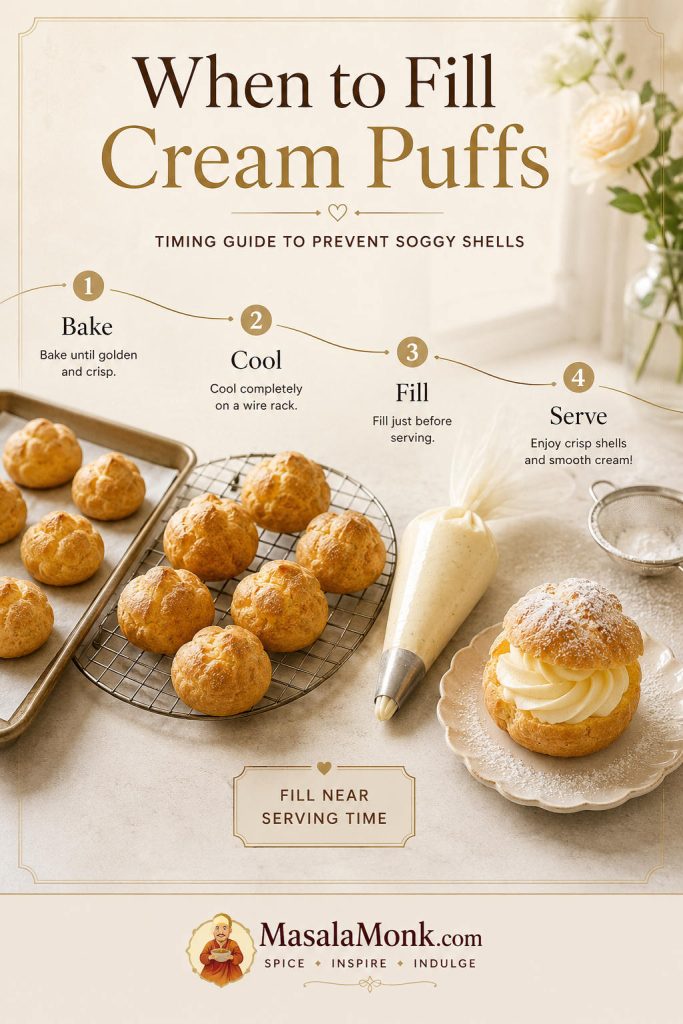
If you need to work ahead, bake the shells ahead and fill them later.
Mini Cream Puffs
Mini cream puffs use the same dough, but they are piped smaller and bake a little faster. They are perfect for parties, dessert trays, birthdays, brunch spreads, and bite-size holiday desserts.
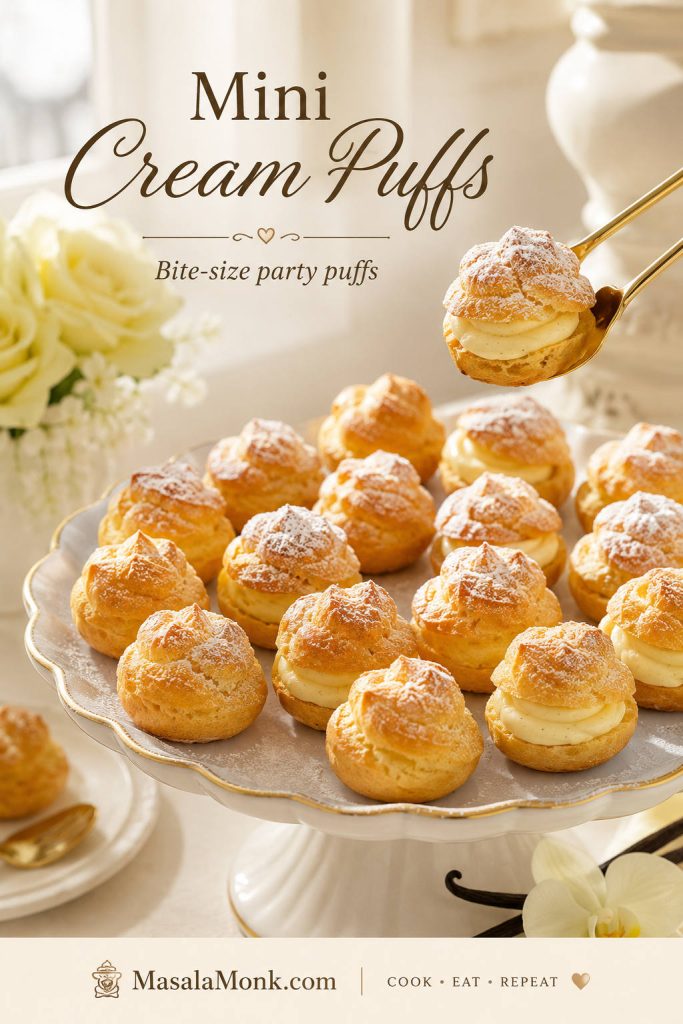
- Use the same dough and oven temperature.
- Pipe 1-inch mounds.
- Leave room between them.
- Start checking 4–6 minutes earlier than regular puffs.
- Keep the venting and drying step, even if the drying time is slightly shorter.
- Fill from the bottom with a small round tip.
- Assemble when you are ready to serve.
- Expect about 40–50 mini cream puffs, depending on size.
Mini puffs can dry faster because they are small, but they can also overbrown faster. Look for the same signs: golden color, firm sides, light weight, and a hollow interior.
Do not skip the drying step just because they are small. A mini puff can still collapse if it is underbaked or trapped with steam inside.
Cream Puff Variations
Once you understand the basic shell, the filling and topping can change easily.
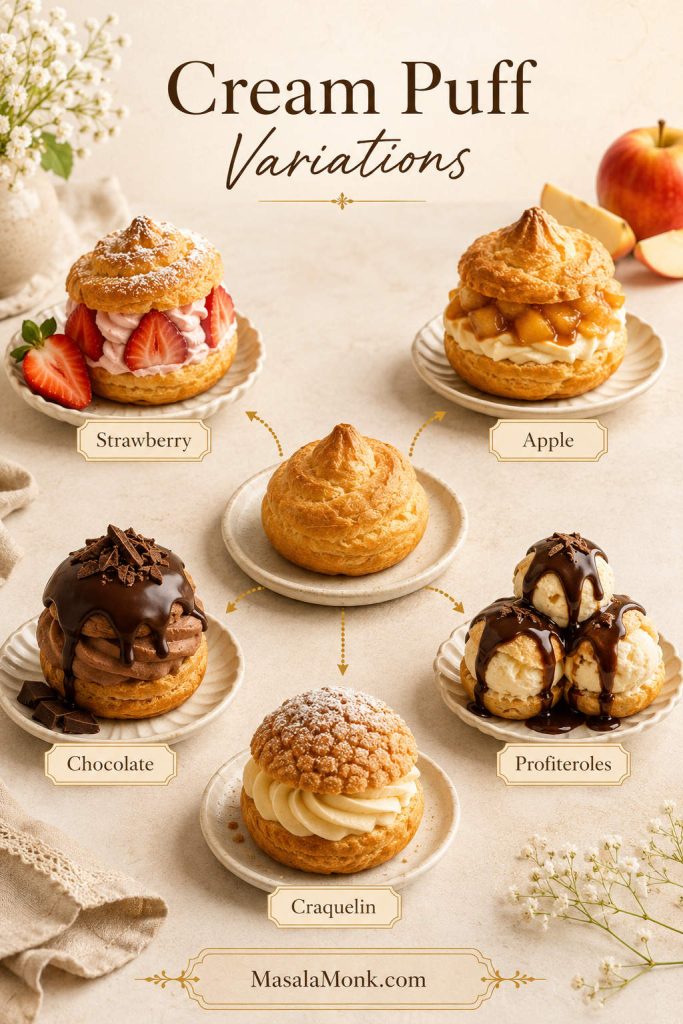
Strawberry Cream Puffs
Add sliced strawberries inside the cream puffs or fold finely chopped strawberries into whipped cream. You can also use strawberry pastry cream or strawberry diplomat cream. Fresh strawberries release juice, so assemble these just before the tray goes out.
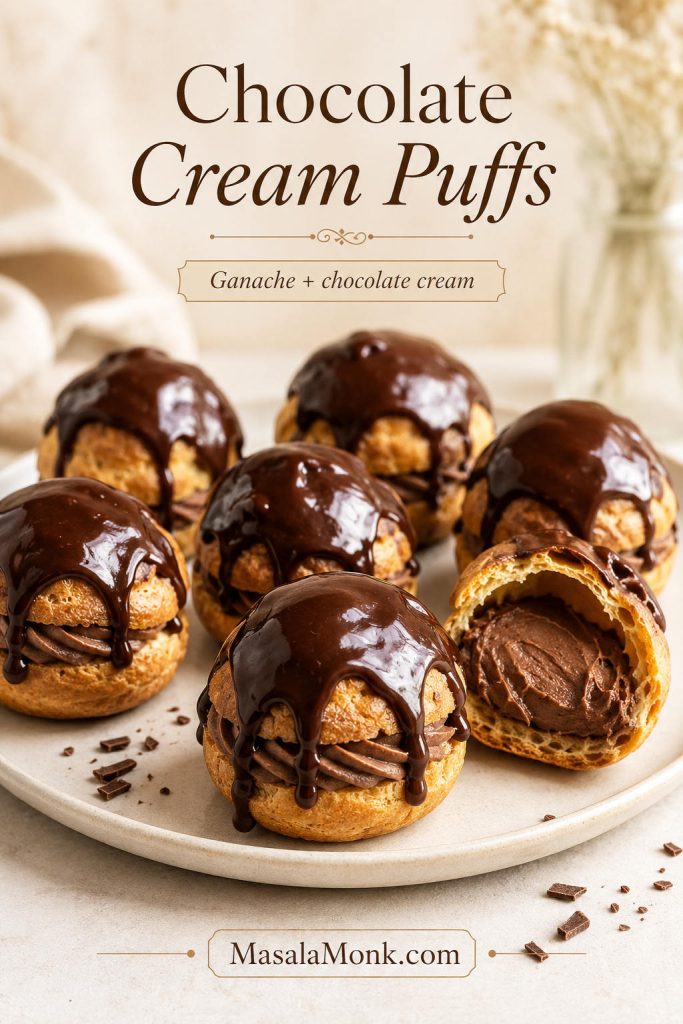
Chocolate Cream Puffs
Fill the shells with chocolate pastry cream, chocolate whipped cream, or vanilla cream with a chocolate ganache topping. Chocolate cream puffs are especially good with bottom-filled shells and a glossy chocolate finish.
Apple Cream Puffs
For an apple dessert version, keep the choux shells crisp and use a small spoonful of thick, cooled apple pie filling as a topping or plate sauce rather than packing the shell with wet fruit. Add the cream first, then spoon the apple filling over just before serving.
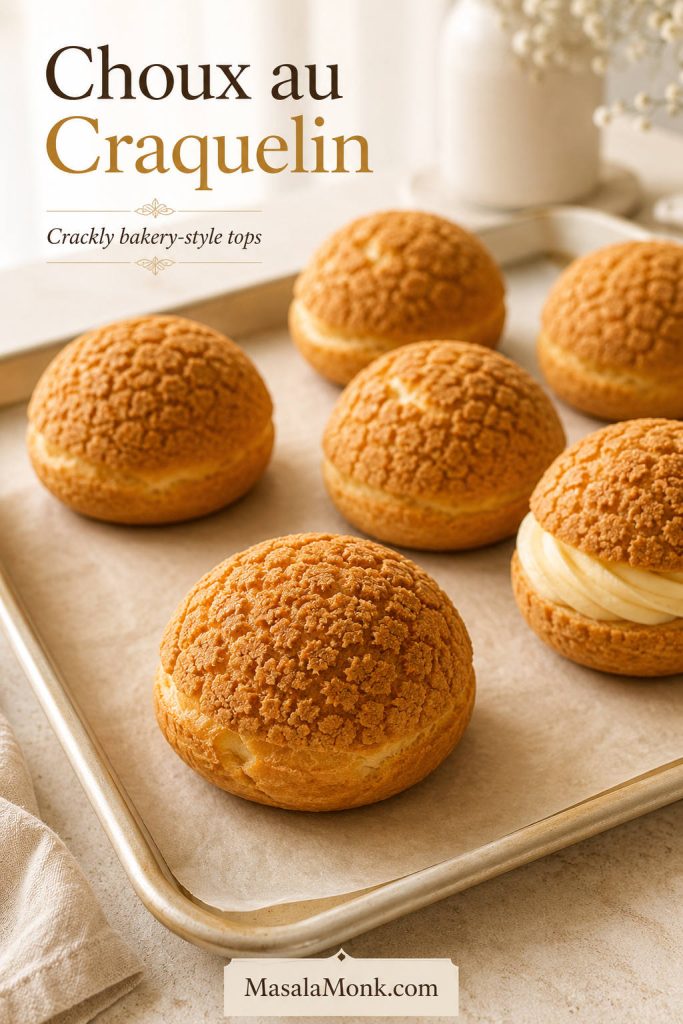
Choux au Craquelin
Choux au craquelin has a thin cookie-like dough placed on top of each choux mound before baking. It creates a crackly, more polished top and can help the puffs rise more evenly.
This is optional. You do not need craquelin for the base recipe, but it is a beautiful upgrade once you are comfortable with the dough.
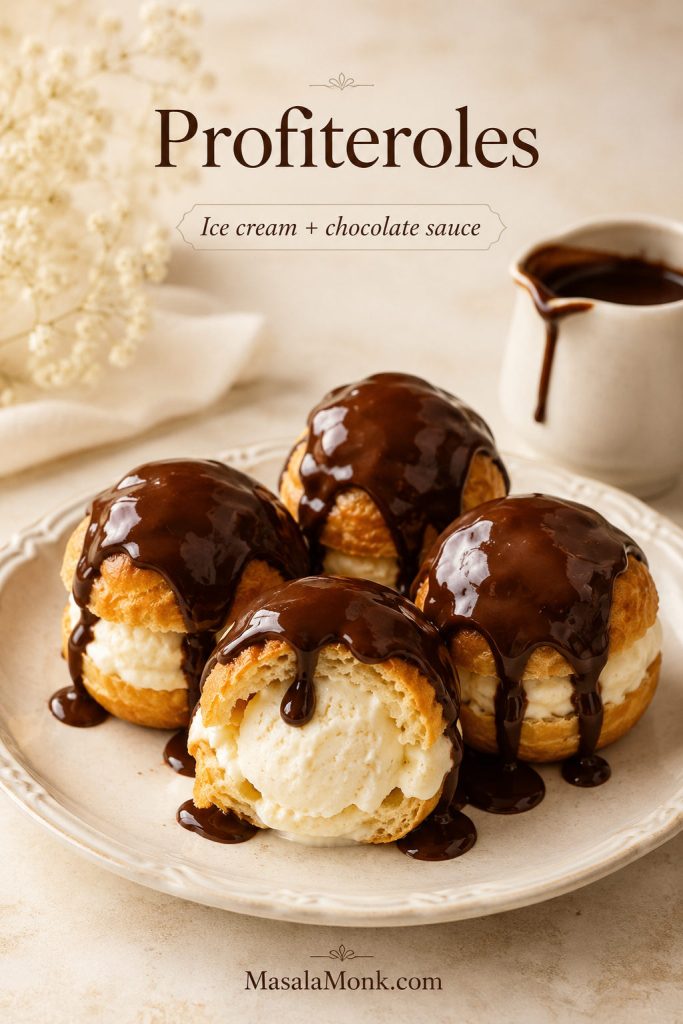
Ice Cream Puffs / Profiteroles
Fill cooled shells with small scoops of ice cream and top with warm chocolate sauce. Serve immediately, because the ice cream will soften the shells quickly. For a dairy-free tropical version, coconut ice cream makes a fun profiterole-style filling.
Croquembouche
Croquembouche is a tower of cream puffs held together with caramel. It is a separate advanced dessert, but it starts with the same basic choux pastry skill.
Cream Puff Recipe Troubleshooting
Most cream puff problems come back to moisture, egg quantity, oven timing, or assembling too early. Start with this quick diagnosis, then use the detailed fixes below.
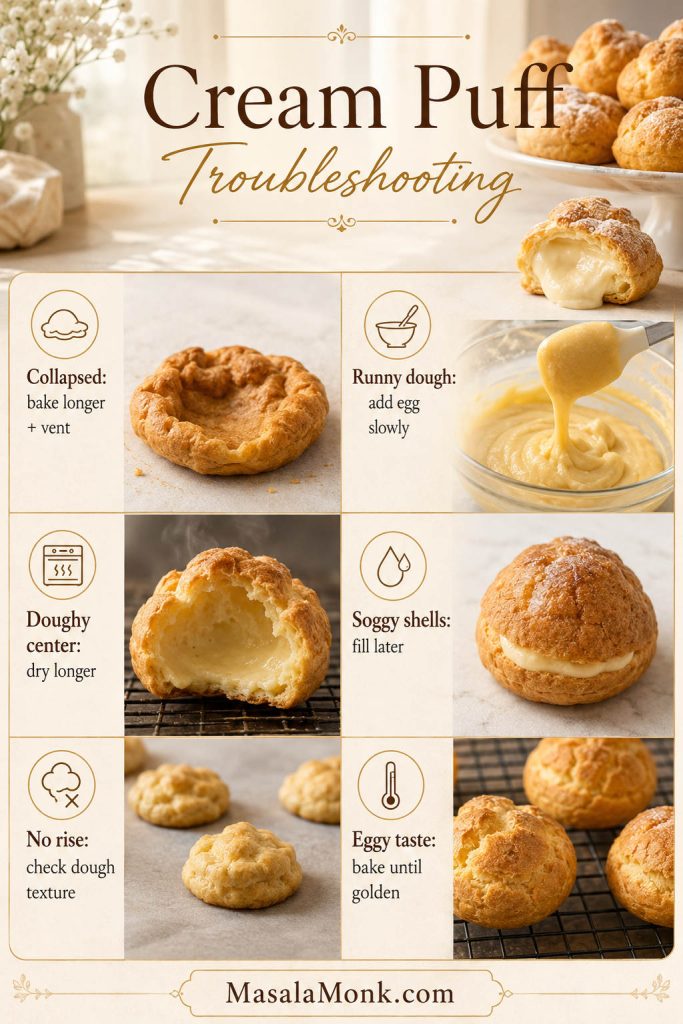
| Problem | Likely Cause | Fix Next Time |
|---|---|---|
| Cream puffs collapsed | Underbaked shells, oven opened early, trapped steam, or dough too wet | Bake until firm and dry, do not open early, vent shells, and dry in the turned-off oven |
| Dough is runny | Too much egg, panade not cooked enough, or too little flour | Save the final egg for texture adjustment and stop at the V-shape test |
| Puffs did not rise | Oven not hot enough, dough too loose, or panade too wet | Preheat fully, cook the paste properly, and use visual dough cues |
| Centers are doughy | Underbaked, shells too large, or not dried after baking | Bake longer, pipe evenly, vent, and dry in the oven |
| Shells are soggy after filling | Filled too early, filling too loose, or shells not fully cooled | Fill near serving time and use pastry cream or stabilized cream for longer hold |
| Shells taste eggy | Underbaked shells, too much egg, or pale pastry | Bake until dry and golden, and use the dough test before adding all the egg |
If your issue is dough texture, start with the choux dough test. If the shells collapse or taste eggy, go back to the shell color guide and baking cues.
Why Did My Cream Puffs Collapse?
Cream puffs usually collapse because they were underbaked, the oven was opened too early, the dough was too wet, or the shells were not vented and dried.
Fix it by baking until the shells are firm and dry, not just lightly colored. Vent steam with a small slit or hole, then let the shells dry in the turned-off oven with the door cracked.
A pale shell is usually an unstable shell.
Why Didn’t My Cream Puffs Rise?
If cream puffs do not rise, the dough may have been too runny, the panade may not have been cooked enough, or the oven may not have been hot enough at the start.
Make sure the liquid reaches a boil before adding flour, cook the flour paste for 1–3 minutes, and preheat the oven fully before baking. The piped dough should hold its mound shape before it goes into the oven.
Why Is My Choux Dough Runny?
Runny choux dough usually means too much egg was added or the flour paste stayed too wet. Egg size, humidity, and flour measurement can all affect the final texture.
The fix is prevention: add the last egg in small spoonfuls and stop when the dough is glossy, thick, and able to hold shape. If the dough already passes the V-shape test, do not force in the rest of the egg.
Why Are My Cream Puffs Doughy Inside?
Doughy centers mean the shells need more baking or drying time. Large puffs can also stay moist inside if they brown too quickly on the outside.
Bake until the shells feel light and firm, then vent and dry them in the turned-off oven. If one shell looks questionable, break it open and check the interior before removing the whole batch.
Why Are My Cream Puffs Soggy After Filling?
Filled cream puffs soften because cream adds moisture to the shell. This happens faster with plain whipped cream than with pastry cream or stabilized cream.
Fill near serving time, cool the shells fully before filling, and use a thicker filling if you need them to sit longer.
Why Do My Cream Puffs Taste Eggy?
An eggy taste often comes from underbaked shells, too much egg in the dough, or not enough filling balance. Cream puff shells should be baked until dry and golden, not pale and soft.
Adding vanilla to the filling and using the right amount of sugar also helps balance the egg-rich dough.
Make-Ahead, Storage, and Freezing for Cream Puffs
Cream puffs are best assembled close to serving, but the shells are very make-ahead friendly. The key is to store shells and filling separately whenever possible.
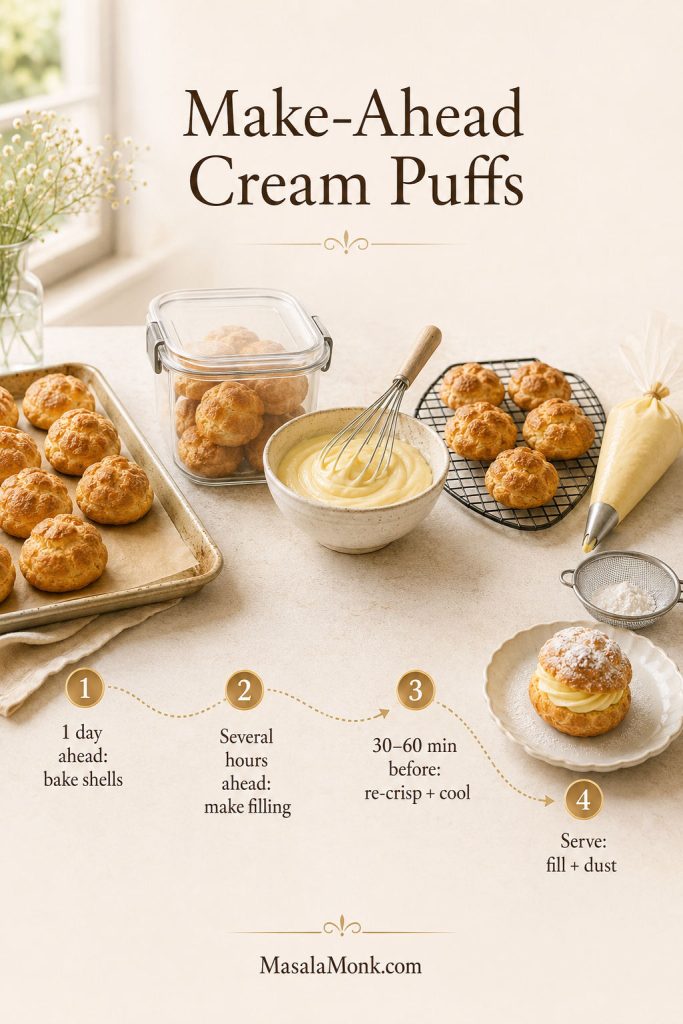
Best Make-Ahead Timeline for Cream Puffs
| When | What to Do |
|---|---|
| 1 day ahead | Bake the shells, cool them fully, and store them airtight. |
| Several hours ahead | Make pastry cream, diplomat cream, or stabilized whipped cream and chill it. |
| 30–60 minutes before serving | Re-crisp shells if needed, then let them cool completely. |
| Right before serving | Fill, dust with powdered sugar, and serve. |
Making Cream Puff Shells Ahead
This is the best way to work ahead. Bake the shells, cool them completely, and store them in an airtight container for up to 1 day. If they soften, re-crisp them briefly in the oven, then cool again before filling.
Making Choux Dough Ahead
Freshly piped and baked choux gives the most reliable rise. You can refrigerate the dough briefly, but it may stiffen and become harder to pipe evenly.
For best results, especially if you are new to choux pastry, bake the dough soon after mixing. If you want to work farther ahead, freezing piped mounds is usually more reliable than holding a bowl of finished dough in the fridge.
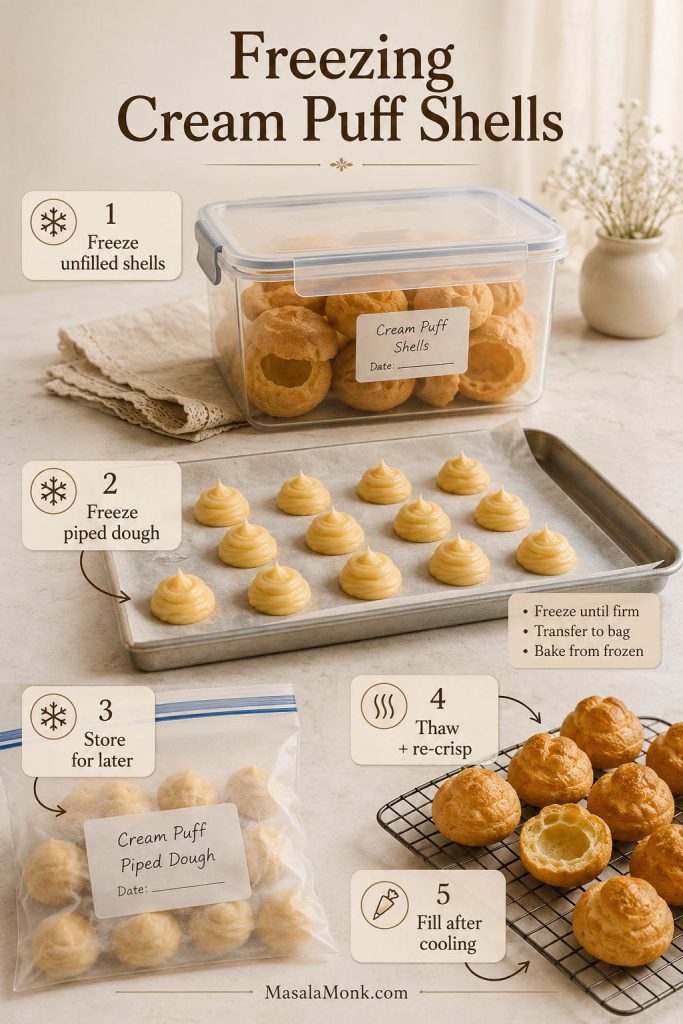
Freezing Cream Puff Shells and Piped Choux Dough
Piped unbaked choux can be frozen on a tray, then transferred to a freezer bag or container. Bake from frozen, adding a few extra minutes as needed.
This is useful for future batches, but the first time you make cream puffs, bake them fresh so you can learn how the dough behaves.
Refrigerating Filled Cream Puffs
Filled cream puffs should be refrigerated, but they taste best the same day. The longer they sit, the more the shells soften.
Pastry cream and diplomat cream hold better than plain whipped cream, but even those fillings will eventually soften the pastry.
Freezing Cream Puff Shells
Unfilled shells freeze better than filled cream puffs.
Freeze cooled, unfilled shells in an airtight container. Thaw at room temperature, re-crisp briefly in the oven if needed, cool completely, then fill.
How to Re-Crisp Cream Puff Shells
Place unfilled shells in a low oven until they feel dry again. Let them cool fully before filling. Do not fill warm shells, or the cream may melt and loosen.
Cream Puff Recipe
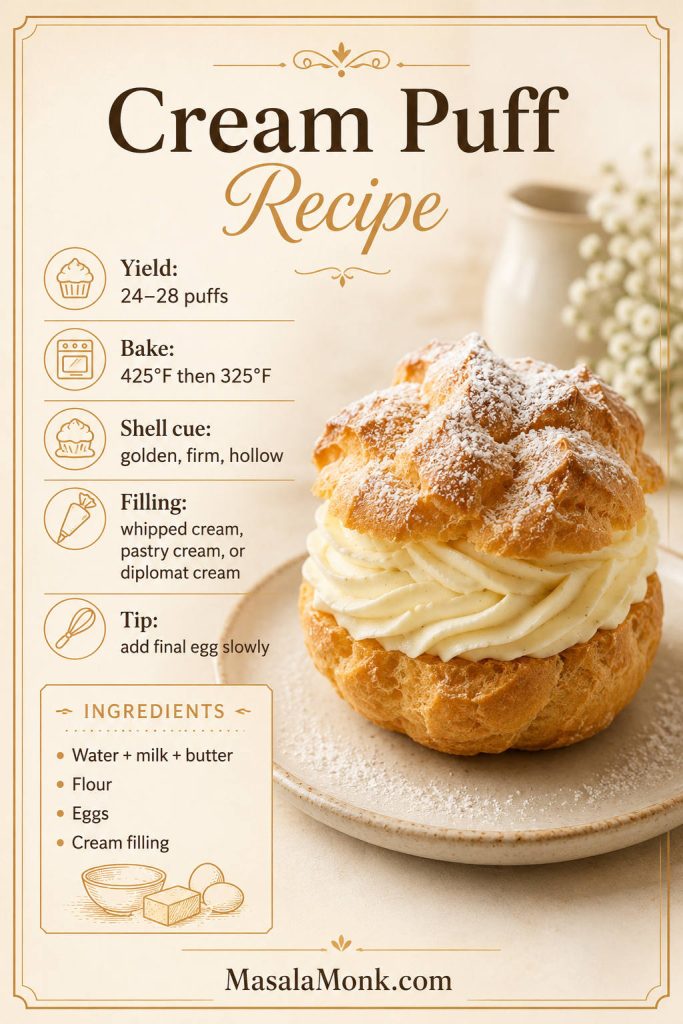
Recipe at a Glance
Cream Puff Recipe
Description: Golden choux pastry shells filled with vanilla cream. These cream puffs are crisp outside, hollow inside, and beginner-friendly when you follow the dough and baking cues.
Ingredients
For the Choux Pastry Shells
- ½ cup / 120 ml water
- ½ cup / 120 ml whole milk
- ½ cup / 113 g unsalted butter, cut into pieces
- 1 tsp granulated sugar
- ¼ tsp fine salt
- 1 cup / 125 g all-purpose flour, spooned and leveled if using cups
- 4 large eggs, room temperature, beaten; add gradually and use only as much as needed
For the Whipped Cream Filling
- 2 cups / 480 ml cold heavy cream
- 3–4 Tbsp powdered sugar
- 1–2 tsp vanilla extract
- Pinch of salt, optional
- Optional for a sturdier filling: 4 oz / 113 g mascarpone or softened cream cheese
Optional Pastry Cream Filling
- 2 cups / 480 ml whole milk
- 4 large egg yolks
- ½ cup / 100 g granulated sugar
- ¼ cup / 30 g cornstarch
- 2 Tbsp / 28 g unsalted butter
- 2 tsp vanilla extract or vanilla bean paste
- Pinch of salt
Optional Topping
- Powdered sugar, for dusting
- Melted chocolate or ganache, optional
Instructions
Make the Choux Dough
- Preheat the oven. Preheat to 425°F / 218°C. Line baking sheets with parchment paper.
- Start the choux base. Add water, milk, butter, sugar, and salt to a medium saucepan. Warm over medium heat until the butter melts and the liquid reaches a boil.
- Add the flour. Add the flour all at once and stir immediately with a wooden spoon or sturdy spatula.
- Cook the paste. Keep stirring for 1–3 minutes, until the dough forms a ball, pulls from the sides, and leaves a light film on the pan.
- Cool slightly. Transfer the dough to a mixing bowl or stand mixer bowl. Let it cool for a few minutes until warm but not steaming hot.
- Add most of the eggs. Mix in about 3 beaten eggs gradually, mixing well after each addition. The dough may look broken at first, then smooth out.
- Adjust with the last egg. Add the last beaten egg a spoonful at a time. Stop when the dough is smooth, glossy, thick, and falls from the spatula in a thick V shape. You may not need every drop.
Pipe and Bake the Shells
- Pipe the shells. Transfer dough to a piping bag and pipe 1½–2 inch mounds, spacing them 2–3 inches apart. Smooth sharp peaks with a damp fingertip.
- Bake hot first. Bake at 425°F / 218°C for 10 minutes. Do not open the oven.
- Lower the heat. Reduce oven temperature to 325°F / 163°C without opening the oven. Bake 20–25 minutes more, until shells are golden, firm, and dry.
- Vent and dry. Turn the oven off. Poke or slit each shell to release steam, then return shells to the turned-off oven with the door cracked for 10–20 minutes.
- Cool completely. Transfer shells to a wire rack and cool fully before filling.
Make the Filling
- Make the whipped cream filling. Beat cold heavy cream, powdered sugar, vanilla, and optional salt until medium-stiff to stiff peaks form. For a sturdier version, beat the mascarpone or cream cheese smooth first, then slowly add the cold cream and whip to medium-stiff peaks.
- Or make pastry cream. Heat milk until steaming. Whisk egg yolks, sugar, cornstarch, and salt in a bowl. Slowly whisk in some hot milk, then return everything to the saucepan. Cook, whisking constantly, until thick and bubbling. Off heat, whisk in butter and vanilla. Cover directly on the surface and chill fully before piping.
- For diplomat cream. Whisk 2 cups chilled pastry cream until smooth, then fold in 1 cup whipped cream until light and ready to pipe.
Fill and Serve
- Fill the cream puffs. Slice shells and pipe cream inside, or fill from the bottom with a piping bag.
- Finish and serve. Dust with powdered sugar or drizzle with chocolate. Serve soon after filling for the crispest texture.
Notes
- Do not open the oven during the early rise.
- Use the last egg as a texture adjustment. You may not need every drop.
- Golden, firm, dry shells hold better than pale shells.
- Assemble near serving time for the best texture.
- Use whipped cream for the easiest filling, pastry cream for classic custard-filled puffs, or diplomat cream for a richer but still airy center.
- For a more stable whipped cream filling, beat in 4 oz / 113 g mascarpone or softened cream cheese before slowly adding the cold cream.
- You may have a little pastry cream left over depending on how generously you fill the shells.
FAQs
What is the secret to good cream puffs?
Good cream puffs come from properly cooked choux dough, gradual egg addition, a hot oven start, and enough baking time for the shells to dry and set. The dough should be glossy and able to hold shape before baking, and the shells should be firm before cooling.
Why do cream puffs collapse after baking?
They usually collapse because they were underbaked, the oven was opened too early, the dough was too wet, or the shells were not vented and dried. Bake until the shells are firm, release steam, and let them dry before cooling fully.
Is whipped cream or pastry cream better for beginners?
Whipped cream is easier for a first batch because it does not need cooking. Pastry cream tastes more classic and holds better, but it needs extra time to cook and chill.
What should a baked cream puff look like inside?
The inside should be mostly hollow, dry enough to hold filling, and not wet or doughy. A little soft webbing inside the shell is normal, but it should not feel raw.
How far ahead can I fill cream puffs?
For the crispest texture, fill them just before the tray goes out. If you need to work ahead, bake the shells and prepare the filling separately, then assemble closer to the time you plan to serve them.
How do I keep cream puffs crisp for a party?
Bake and cool the shells ahead, store them airtight, re-crisp them if needed, and fill them shortly before the tray goes out. Pastry cream or stabilized whipped cream will hold better than plain whipped cream.
Can I make cream puffs without a piping bag?
A zip-top bag with the corner snipped works, and you can also use a spoon or scoop. A piping bag gives cleaner, more even shells, but the recipe can still work without one.
Are cream puffs and profiteroles the same?
They are closely related because both use choux pastry. Cream puffs are usually larger and filled with cream, while profiteroles are often smaller and served with ice cream or chocolate sauce.
Freezing Cream Puff Shells
Unfilled cream puff shells freeze well. Thaw them at room temperature, re-crisp briefly in the oven if needed, cool fully, then fill.
Why is my cream puff dough too runny?
Runny choux dough usually means too much egg was added, the flour paste was not cooked long enough, or the flour measurement was too low. Use the final egg as a texture adjustment and stop when the dough forms a thick V from the spatula.
Can I use puff pastry for cream puffs?
Classic cream puffs use choux pastry, not puff pastry. Puff pastry creates flaky layers, while choux pastry creates hollow shells that can be filled with cream.
Final Thoughts
Cream puffs feel intimidating until you understand the texture cues. Cook the dough long enough to remove extra moisture, add the eggs gradually, and give the shells enough oven time to dry and hold their shape.
Once the choux shells are hollow and dry, the rest is flexible. Fill them with whipped cream for the easiest version, pastry cream for a classic custard center, or diplomat cream when you want something light, rich, and stable.
Serve them soon after filling, and you get exactly what a good cream puff should be: crisp pastry, soft cream, and a dessert that feels far more impressive than the ingredient list suggests. Once you can make one batch of hollow choux shells, you can change the filling, size, topping, and finish without relearning the whole recipe.
That is the quiet confidence this recipe gives you: one reliable shell, many possible desserts.
Back to top ↑







