
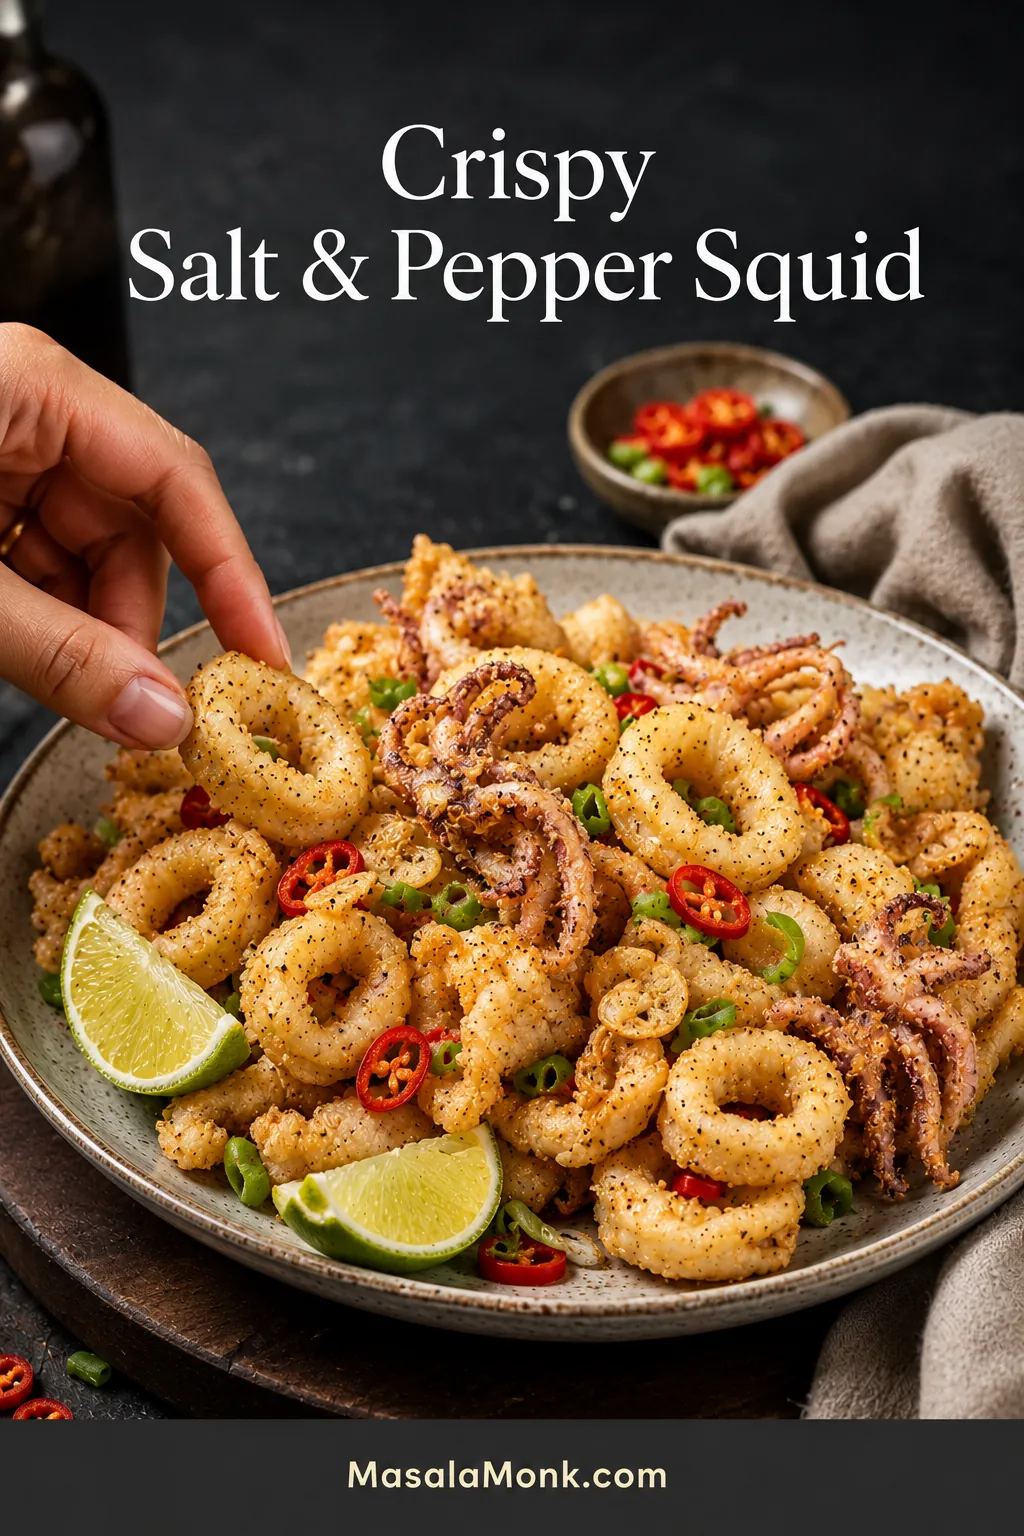
Salt and pepper squid is the plate people start picking at before it properly reaches the table. Curled calamari, a crisp peppery crust, fried garlic, fresh chilli and spring onion make the pile almost impossible to leave alone. The first bite should crack lightly, then give way to tender squid underneath.
That contrast is why the dish can feel risky at home. Squid cooks quickly, while the coating still needs enough heat to set. Wait for deep colour and the centre can turn rubbery; crowd the pot or coat damp squid and the crust can become greasy or patchy.
The first piece removes most of the uncertainty. From there, the method is easy to remember: dry the squid, test one piece, fry in small batches and keep the final toss brief.
This is a lighter Cantonese-style restaurant version, with a thin starch crust and a quick garlic-chilli finish rather than a heavy batter that hides the seafood. Here, calamari and squid refer to the same ingredient.
Quick Answer: How to Make Salt and Pepper Squid
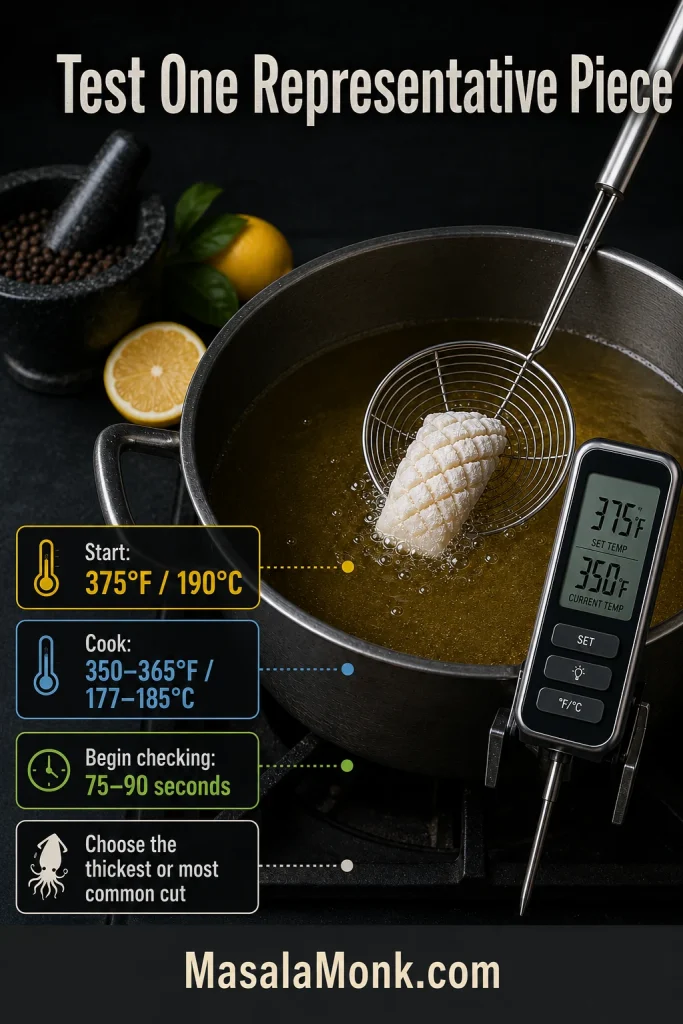
Dry 500 g / about 1 lb 2 oz cleaned squid thoroughly, add only enough egg white to make it lightly tacky, and dredge one batch at a time in a 2:1 starch-and-flour coating. Heat the oil to 375°F / 190°C, then keep it near 350–365°F / 177–185°C.
Test one representative piece and begin checking after 75–90 seconds. Remove the squid when it is opaque and the crust is dry and pale gold, drain it on a rack and let the oil recover. Toss through the cooked garlic, chilli and spring onion with the finishing seasoning for 5–15 seconds.
Crispy Chinese-Style Salt and Pepper Squid Recipe
Fresh cleaned squid and fully thawed raw frozen squid both work in this main method; if you are starting from frozen rings or pre-breaded calamari, use the frozen squid guide before choosing the coating.
| Prep time | About 20 minutes with cleaned squid; up to 30 minutes from whole squid |
|---|---|
| Cook time | About 15 minutes |
| Total time | About 35 minutes with cleaned squid; up to 45 minutes from whole squid |
| Yield | 4 starter servings or 2–3 main-course servings |
| Best cut | 1 cm / ⅜-inch rings or scored 5 × 2.5 cm / 2 × 1-inch pieces |
| Starting batch size | About one-quarter of the squid; use less if the oil falls below 350°F / 177°C |
| Oil start temperature | 375°F / 190°C |
| Oil temperature while frying | 350–365°F / 177–185°C |
Equipment
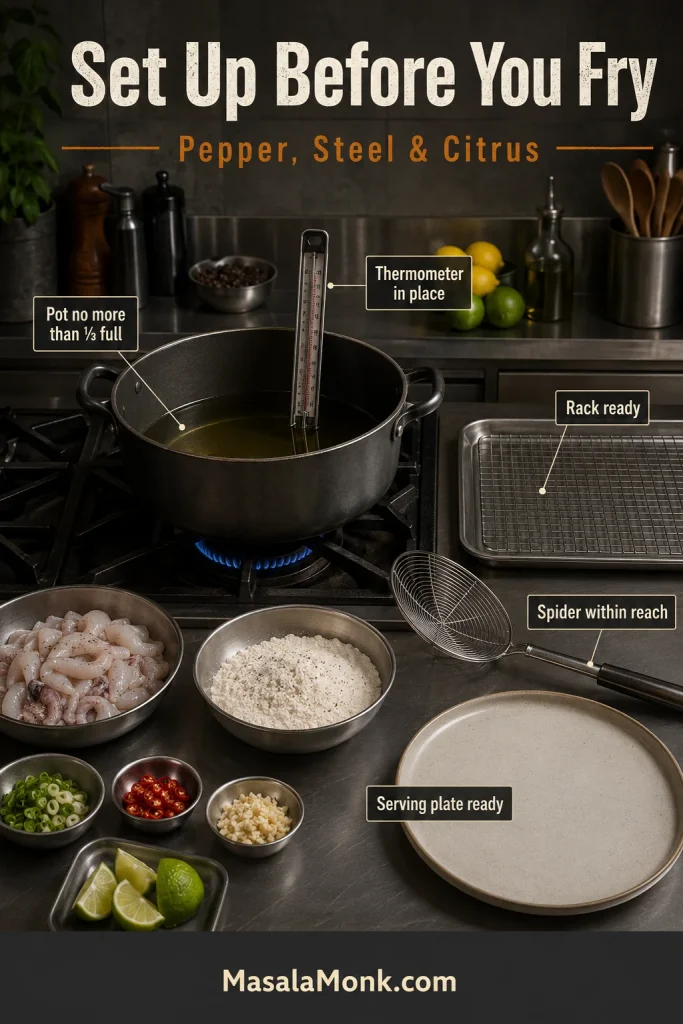
- Heavy deep pot or Dutch oven with generous headroom
- Frying thermometer; this is the most reliable way to judge the oil
- Spider strainer or long-handled slotted spoon
- Wire rack set over a rimmed tray, so escaping steam does not soften the crust
Ingredients
For the squid
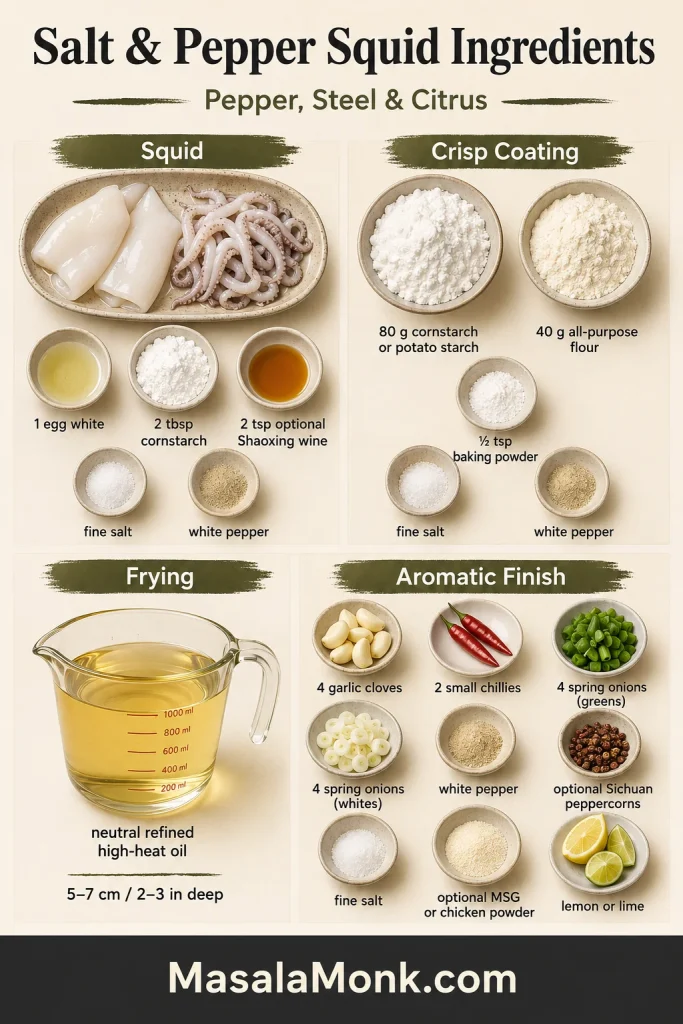
- 500 g / about 1 lb 2 oz cleaned raw squid tubes and tentacles, or roughly 700–800 g / about 1½–1¾ lb whole squid before cleaning
- 2 teaspoons / 10 ml Shaoxing wine, optional
- 1 large egg white, lightly beaten; add gradually as needed
- 2 tablespoons / about 16 g cornstarch
- ¼ teaspoon / about 1.5 g fine sea salt
- ¼ teaspoon ground white pepper
For the crisp coating
- 80 g cornstarch or potato starch; use weight for the most consistent coating
- 40 g / about ⅓ cup all-purpose flour
- ½ teaspoon baking powder
- ½ teaspoon / about 3 g fine sea salt
- ½ teaspoon ground white pepper
For frying
- Enough neutral refined high-heat oil, such as canola, sunflower or rice-bran oil, to reach 5–7 cm / 2–3 inches without filling the pot more than one-third full
For the garlic, chilli and spring onion finish
- 1 tablespoon / 15 ml neutral oil
- 4 garlic cloves, finely chopped
- 2 small red or green chillies, thinly sliced and dried if recently washed
- 4 spring onions/scallions, whites and greens separated
- ¼ teaspoon ground white pepper
- ¼ teaspoon toasted and finely ground Sichuan peppercorns, optional
- ¼ teaspoon / about 1.5 g fine sea salt, plus more only after tasting
- ¼ teaspoon MSG or halal-certified chicken powder, optional; if using chicken powder, hold back the finishing salt until tasting
- Lemon or lime wedges, for serving
Use clean, neutral-smelling oil; heavily reused oil can darken the crust and leave a stale flavour. Refined peanut oil also works, but check allergy requirements first.
Frying and Seafood Safety
Keep the pot no more than one-third full, turn handles inward and never leave frying oil unattended. If it smokes, turn off the heat and let it cool; never use water on burning oil. See the London Fire Brigade deep-frying guidance.
Wash hands and clean the knife, board, bowls and work surface before they touch cooked squid, garnishes or dips.
Instructions
Prep, Dry and Set Up
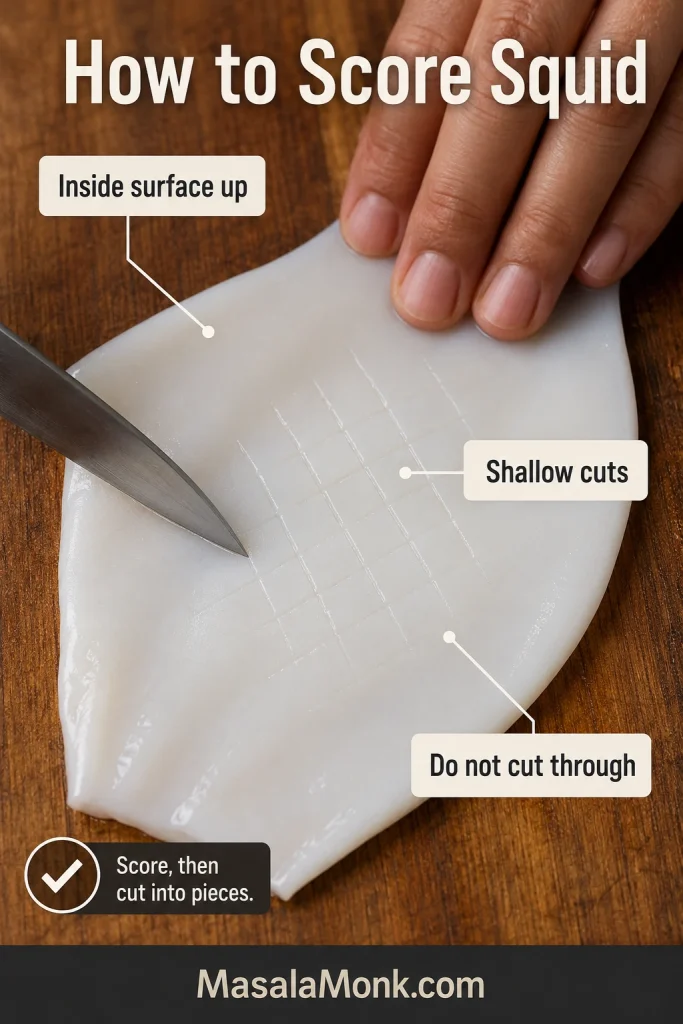
- Cut the squid evenly. Slice tubes crosswise into 1 cm / ⅜-inch rings. For scored pieces, cut each tube open, lay it inside-up, score shallow diamonds without cutting through, then divide it into roughly 5 × 2.5 cm / 2 × 1-inch pieces. Leave small tentacles whole and split large clusters.
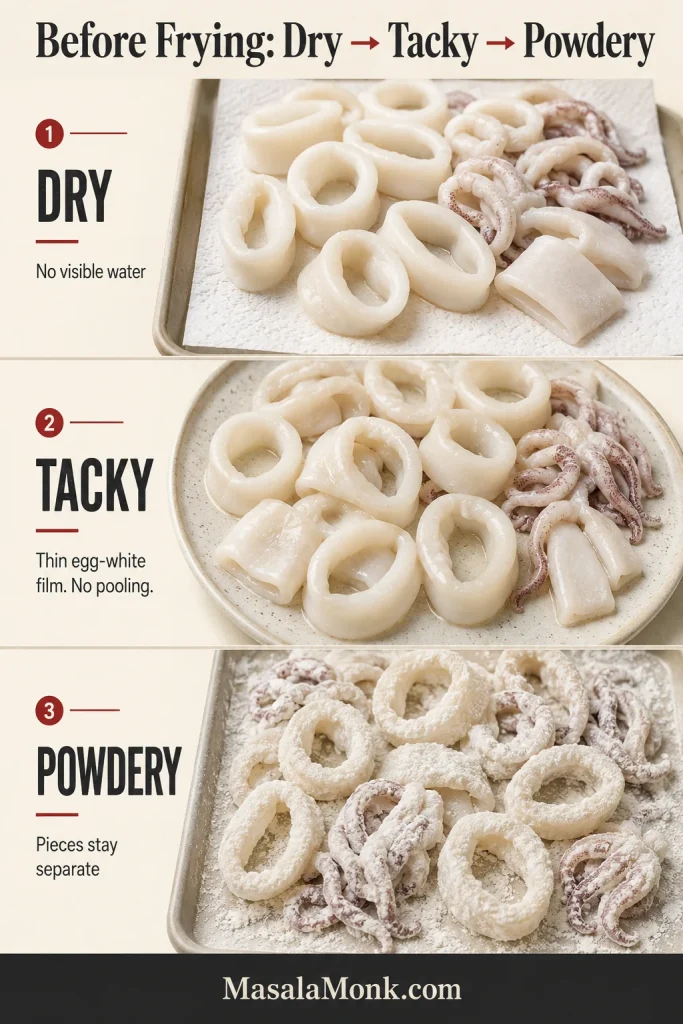
- Dry every surface. Drain the squid well and pat it dry, including inside the rings and between the tentacles. There should be no water collecting in the bowl.
- Prepare everything beside the stove. Chop the garlic, chillies and spring onions. Mix the finishing seasoning in a small bowl. Combine the dry-coating ingredients in another wide bowl, then set out the rack, spider and serving plate.
- Heat the oil safely. Add enough oil for a depth of 5–7 cm / 2–3 inches while keeping the pot no more than one-third full. Heat to 375°F / 190°C. A thermometer is best; without one, a clean wooden chopstick should release a steady stream of small bubbles when dipped into the oil. Smoking or violent bubbling means the oil is too hot.
Coat and Test
- Add the light egg-white layer. Mix the squid with the optional Shaoxing wine, cornstarch, salt and white pepper. Start with about half the beaten egg white, toss well, then add only enough for the pieces to feel lightly tacky; you may not need every drop. Drain any liquid that pools underneath.
- Check one piece first. Choose a piece that represents the thickest or most common cut. Dredge it, shake off the excess and fry it, checking from about 75 seconds. Remove it when the squid is opaque and tender and the crust is dry and set. Taste it, then adjust the timing or the amount of finishing seasoning before frying the full batch. A small correction is normal—that is what this piece is for.
Fry in Small Batches
- Coat one batch. Start with roughly one-quarter of the squid. Toss it in the dredge until the pieces look powdery and separate, then shake away loose excess. Coat only what is going into the oil now.
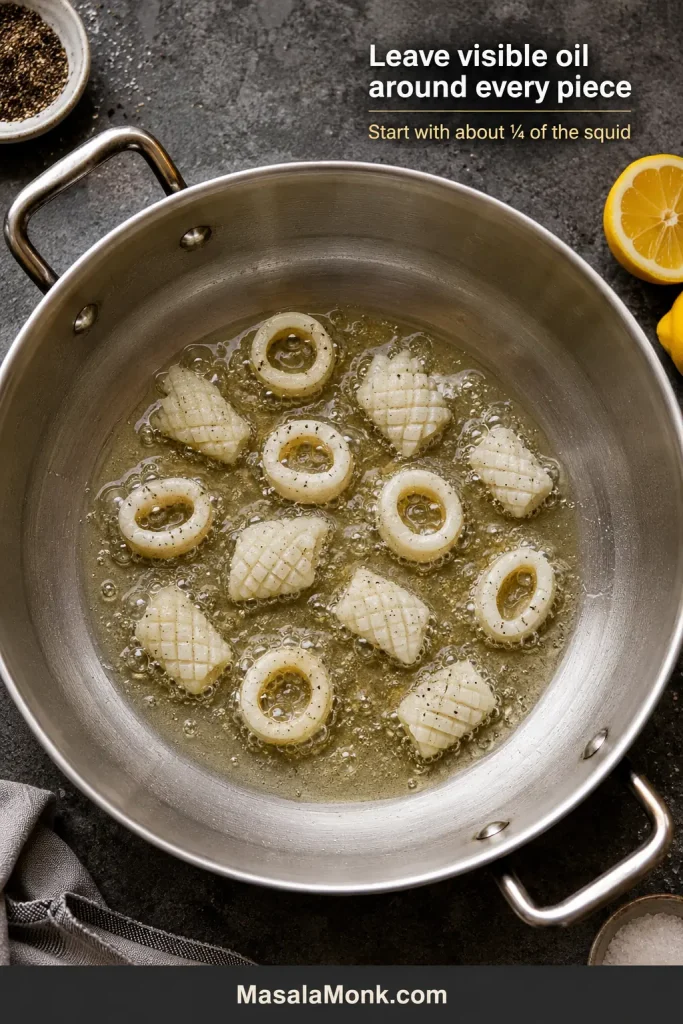
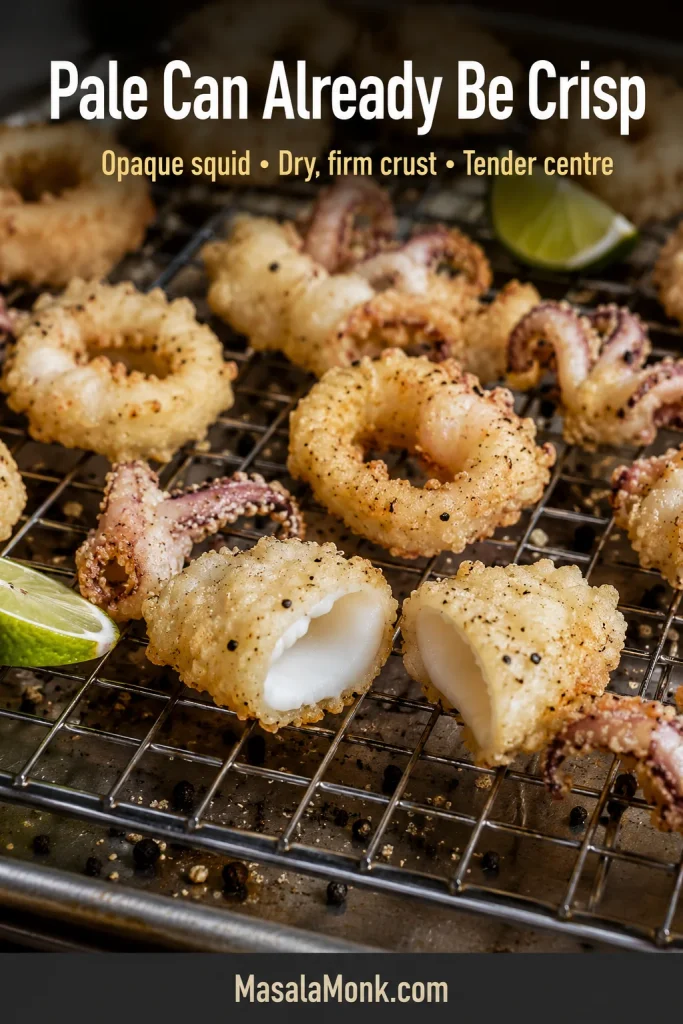
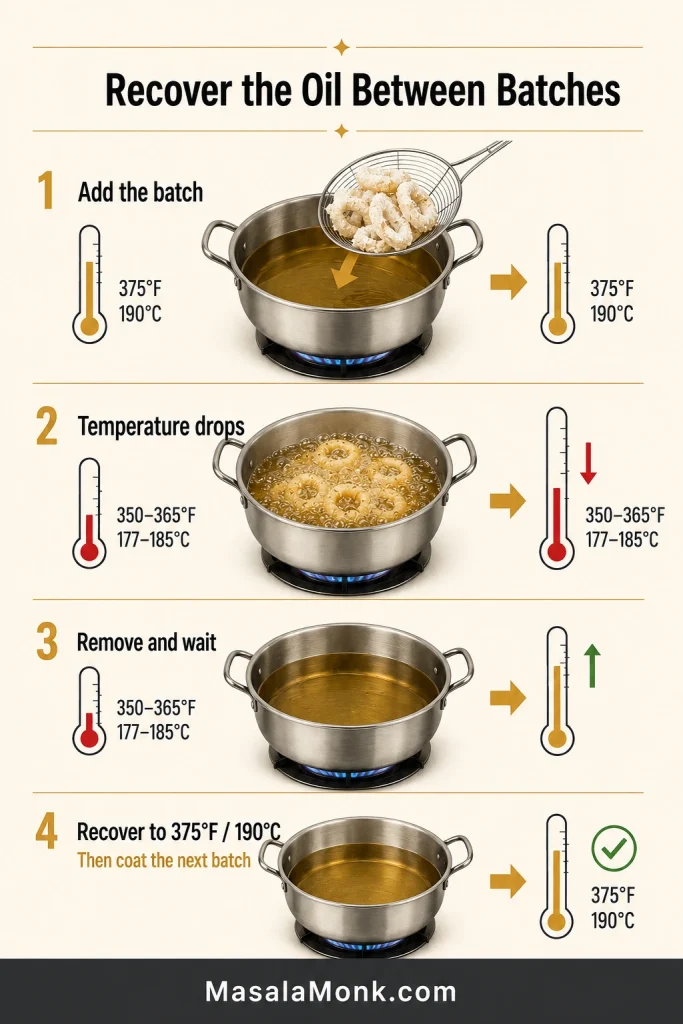
- Fry and drain. Lower the pieces separately and away from your body. Keep the oil near 350–365°F / 177–185°C and begin checking from 75 seconds; most pieces take about 90 seconds to 2½ minutes. Lift them when the squid is opaque and the crust is dry and firm, using the test-piece timing as your guide, then spread them on the rack.
- Recover between batches. Return the oil to 375°F / 190°C before coating the next batch. If it drops below the frying range or recovers slowly, make the next batch smaller.
Finish With Aromatics
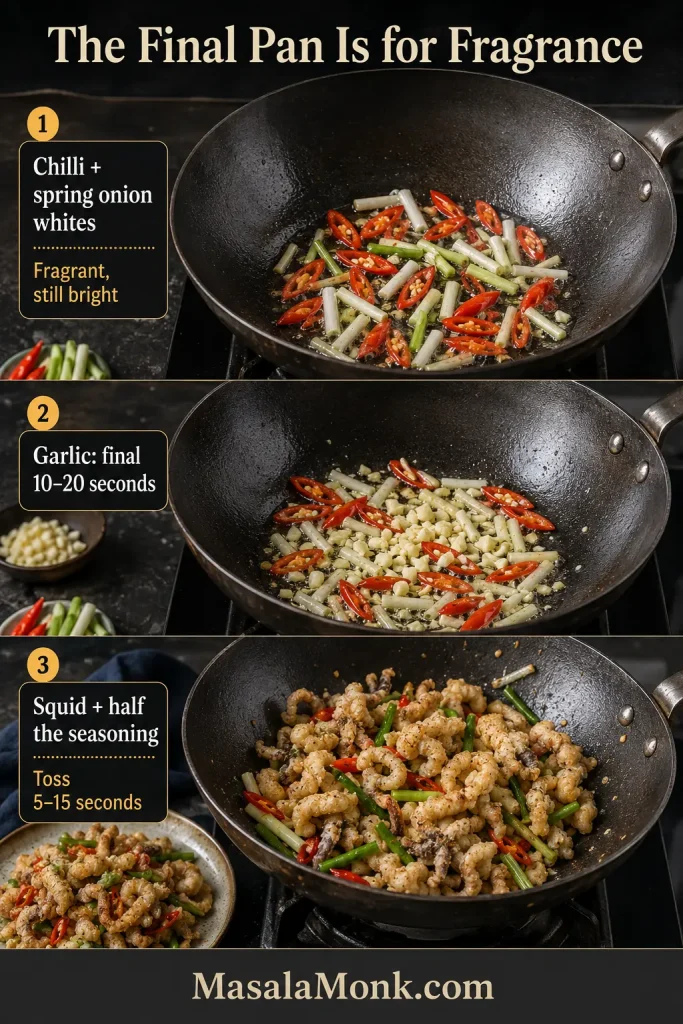
- Cook the aromatics. Heat 1 tablespoon oil in a wok or wide skillet over medium heat. Stir the chilli and spring onion whites until fragrant but still brightly coloured, then add the garlic for the final 10–20 seconds. Keep the garlic pale golden and have the serving plate ready.
- Finish with the aromatics. The squid is already cooked; this final pan is only for fragrance. Add the fried squid and half the finishing seasoning, toss for 5–15 seconds, then turn off the heat and add the spring onion greens. Taste before adding the rest, especially when using salty chicken powder. Serve immediately with lemon or lime and a cool dip.
Recipe Notes
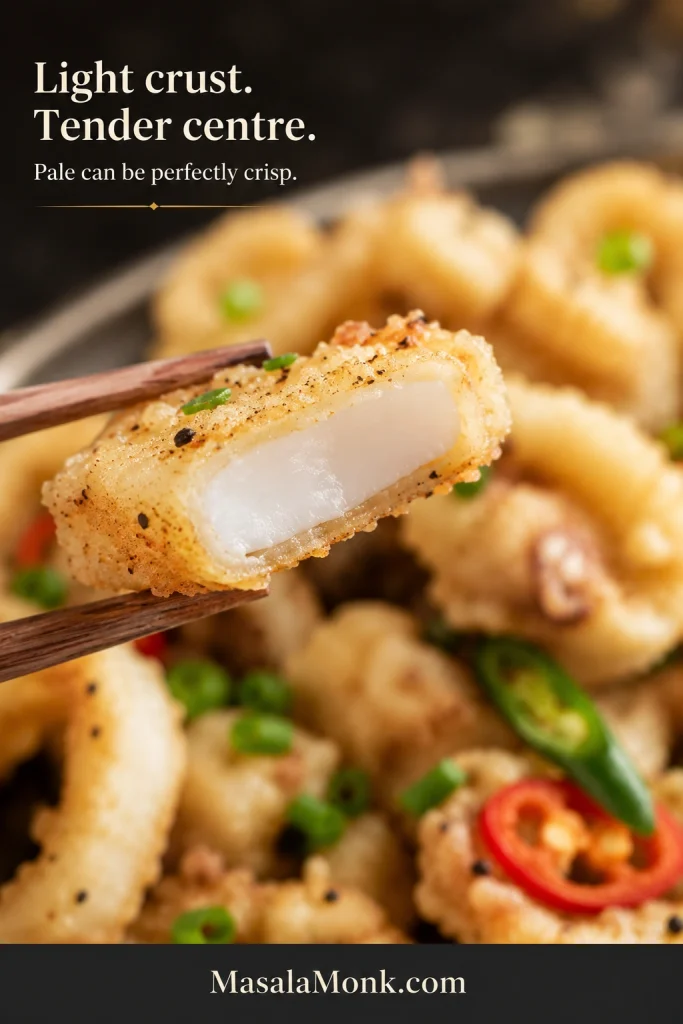
- A pale-golden starch crust can already be crisp. Rough or uneven edges are normal; the coating should look light rather than perfectly smooth.
- Dredge each batch only when the oil is ready; resting coated squid draws moisture back to the surface.
- The dredge is intentionally generous so the pieces can become evenly powdery instead of wet and clumped. Discard anything that has touched raw squid.
- For an alcohol-free version, omit the Shaoxing wine without replacing it with another liquid. Halal cooks can omit the wine and check that packaged seasonings meet their requirements.
- The main recipe contains squid (a mollusc), egg and wheat. Check packaged seasonings, sauces and frying oil when cooking for someone with an allergy.
The main recipe is the recommended route. The guide below explains ingredient choices, alternative methods and fixes if anything goes wrong.
More Help With Salt and Pepper Squid
- Why This Coating and Single-Fry Method Works
- Choosing, Cleaning and Cutting Squid
- Coating and Gluten-Free Options
- Time, Temperature and Doneness
- Salt and Pepper Seasoning
- Air Fryer Salt and Pepper Squid
- Frozen Squid and Breaded Calamari
- Troubleshooting
- Serving, Make-Ahead and Storage
- Frequently Asked Questions
Why This Coating and Single-Fry Method Works
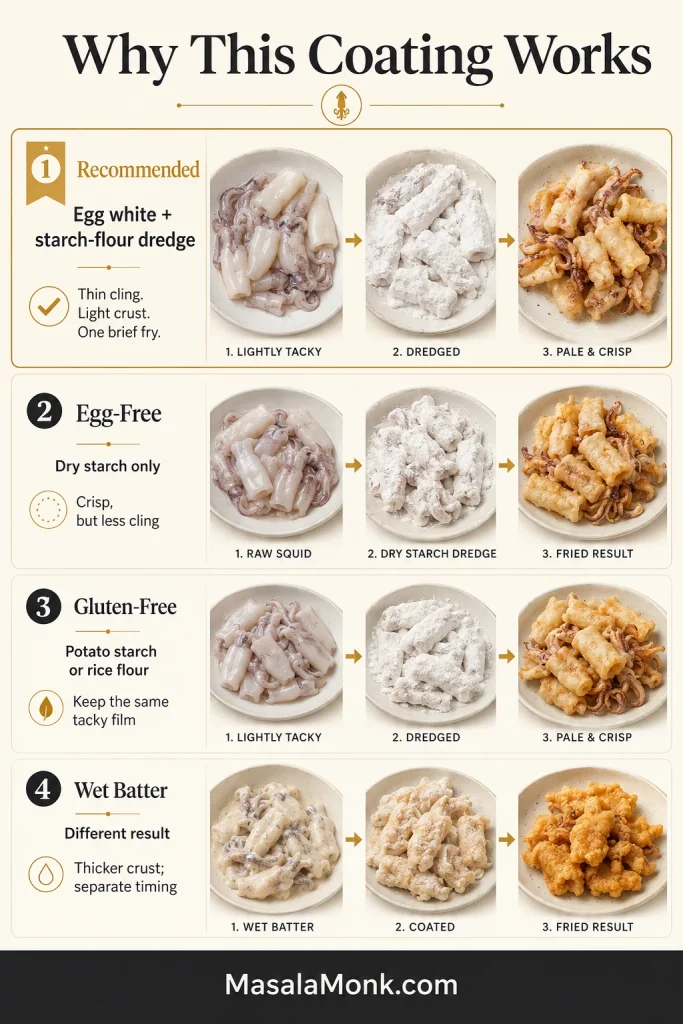
Salt and pepper squid recipes range from plain starch coatings to whole-egg dredges and chilled wet batters. This version uses only enough egg white to help a starch-dominant coating cling without the richer weight of yolk. Plain flour adds structure and colour without making the crust bready.
Brief seasoning avoids drawing extra moisture to the surface, so a long marinade is unnecessary. Double frying suits a thicker wet batter and a longer holding time; this lighter coating is designed for one brief fry and immediate serving. The short aromatic toss adds fragrance without steaming the crust.
Choosing, Cleaning and Cutting Squid
Good squid should smell mild, clean and briny—not sour, strongly fishy or ammonia-like. Good-quality raw frozen squid can be a dependable option, especially when fresh squid is unavailable. Choose another batch when the smell seems wrong; lemon and seasoning cannot restore seafood that is past its best.
Small to medium squid is the most forgiving for this quick-fry method. Cleaned tubes and tentacles offer the best balance of convenience and control; plain raw frozen rings are quick once fully thawed and dried. If the tubes are very large or thick, slice them more thinly and fry them separately from tentacles and thin rings.
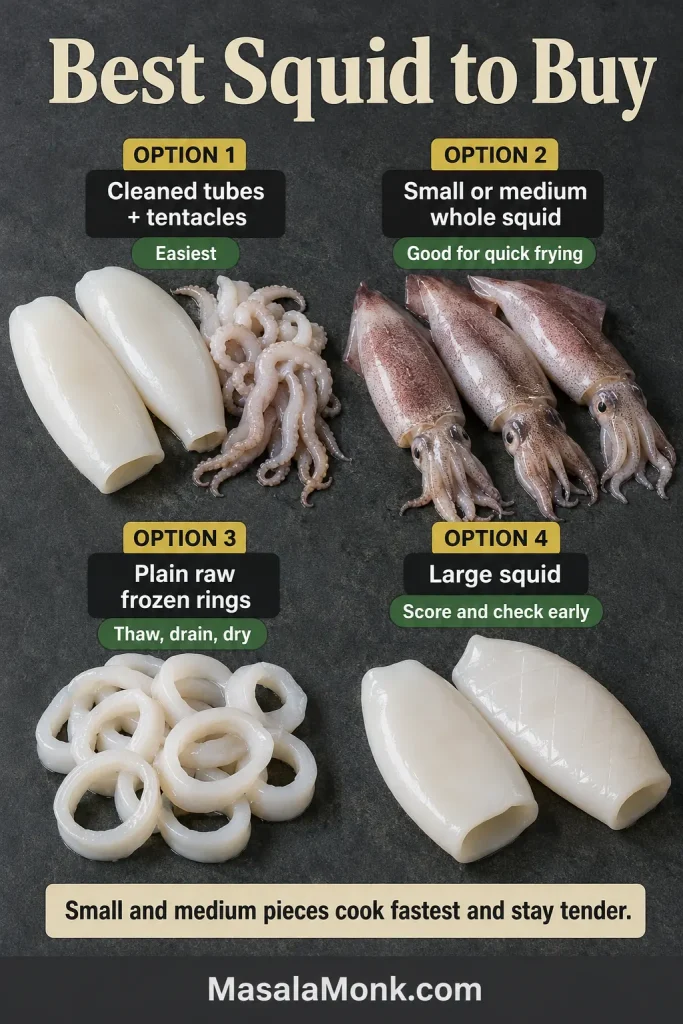
How much whole squid to buy: allow roughly 700–800 g / about 1½–1¾ lb whole squid for about 500 g / about 1 lb 2 oz cleaned seafood. Yield varies with the species, head-to-body ratio and how much of the fins and tentacles you keep.
How to Clean Whole Squid
Cleaning whole squid is mostly about removing the firm inner quill, beak and excess moisture before the pieces ever meet the coating.
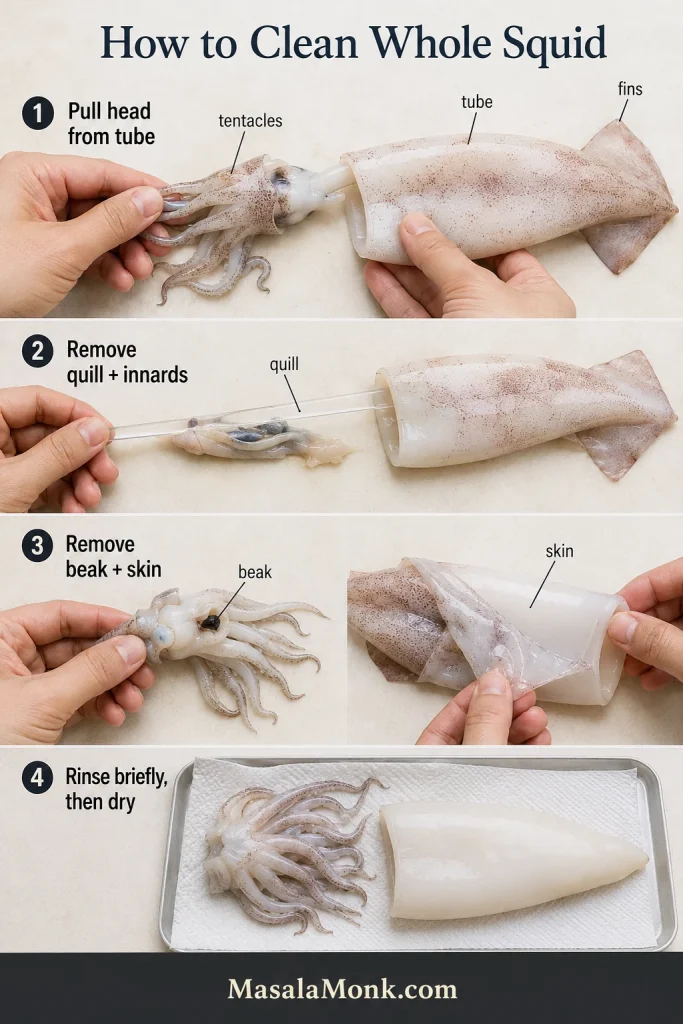
- Hold the body tube and pull the head and innards away.
- Remove the clear plastic-like quill from inside the tube.
- Peel off the thin skin for a more uniform appearance; leaving a little behind is harmless.
- Cut below the eyes to separate the tentacles from the head.
- Push out and discard the hard beak from the centre of the tentacles.
- Rinse briefly, drain thoroughly and dry before cutting.
Rings or Scored Pieces?
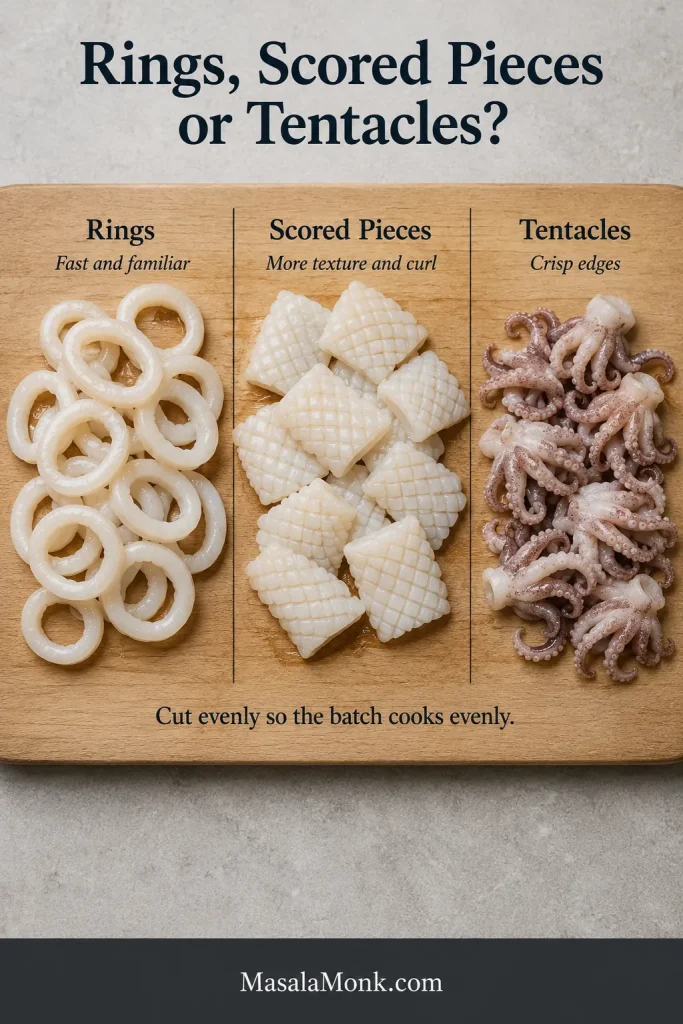
Use rings for the easiest cut. Slice across the tube into pieces about 1 cm / ⅜ inch thick. Keeping them even matters more than making them perfectly neat.
Scored pieces create more crisp edges. Cut the tube open, lay it inside-up and make shallow diagonal cuts in both directions without slicing through. The pattern helps the pieces curl and gives the seasoning more surface to cling to. Fry unusually thick pieces separately from thin rings and tentacles.
Choosing a Crisp Coating
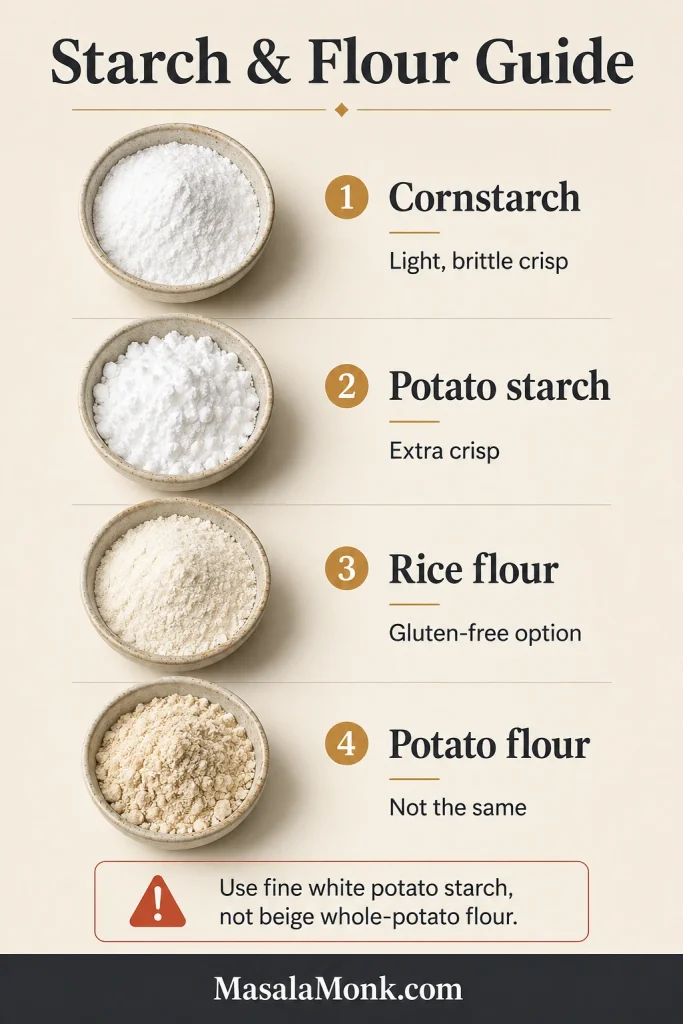
Cornstarch—the fine white powder called cornflour in the UK and Australia—creates a light, brittle crust. Potato starch can become even crisper, while a little plain flour adds colour and structure. Use fine white potato starch, not potato flour made from whole dried potatoes. Neither starch is the same as coarse cornmeal or polenta.
| Coating method | Result | When to use it |
|---|---|---|
| Dry starch only | Lightest, palest crust; egg-free but less secure adhesion | Simple alternative for very dry squid |
| Egg white plus starch-flour dredge | Reliable adhesion with a balanced crisp crust | Main Cantonese-style method |
| Egg white plus gluten-free starch blend | Pale, brittle and wheat-free | Gluten-free variation |
For a thicker pub-style crust, use a wet batter such as the one in the crispy fish batter guide.
Before dredging: squid should feel lightly tacky with no loose liquid underneath. After dredging: look for pieces that are dry, powdery and separate. Thick paste or rings glued together mean there is still too much moisture; use the troubleshooting table before changing the whole recipe.
Use baking powder. Do not substitute the same amount of bicarbonate of soda/baking soda, which is much stronger and can leave an alkaline taste.
Gluten-Free Salt and Pepper Calamari
Replace the 40 g plain flour in the main dredge with 40 g potato starch or certified gluten-free rice flour. Potato starch gives the most brittle crunch; rice flour is slightly drier and more structured. Weigh the replacement for consistency, and check baking powder, stock powder, spice blends, sauces and previously used frying oil when cooking for someone with an allergy.
Time, Temperature and Doneness
Cut and coating decide the timing together. Fry in 350–365°F / 177–185°C oil, or use 400°F / 200°C for the air fryer, then let opacity, tenderness and crust texture make the final decision.
| Method | First check | Typical finish |
|---|---|---|
| Thin rings, dry starch | 60–75 seconds | 75–120 seconds |
| Main egg-white coating | 75–90 seconds | 90 seconds–2½ minutes |
| Air fryer | 4 minutes | 5–7 minutes per batch |
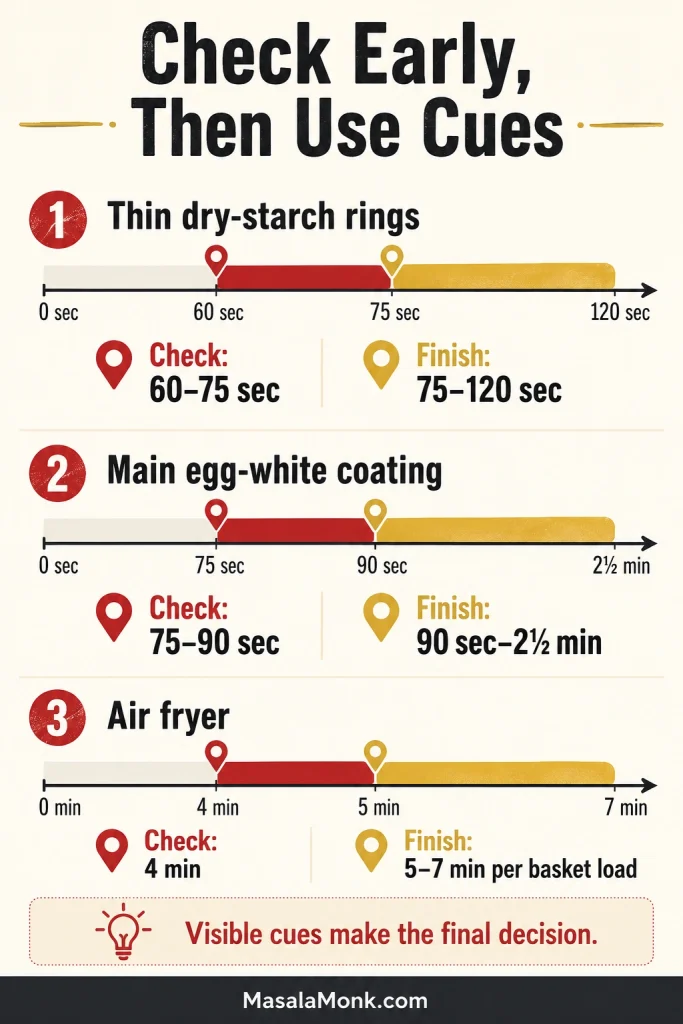
Fuller wet batters follow their own schedule and may use a second fry. Follow the packet timing for pre-breaded calamari.
Tentacle timing: Small tentacle clusters often crisp as quickly as thin rings. Watch them from the early end of the range and lift them before thicker tube pieces when necessary.
Seafood-safety guidance commonly uses an internal target of 145°F / 63°C. Small pieces are awkward to probe accurately, so pair temperature guidance with opaque flesh and the cues below. The FDA seafood-safety guide also covers safe thawing and handling.
The Three Cues That Matter Most
- Squid has turned opaque rather than translucent.
- Coating is dry and set instead of dusty, wet or pasty.
- A thick piece is cooked through but still tender.
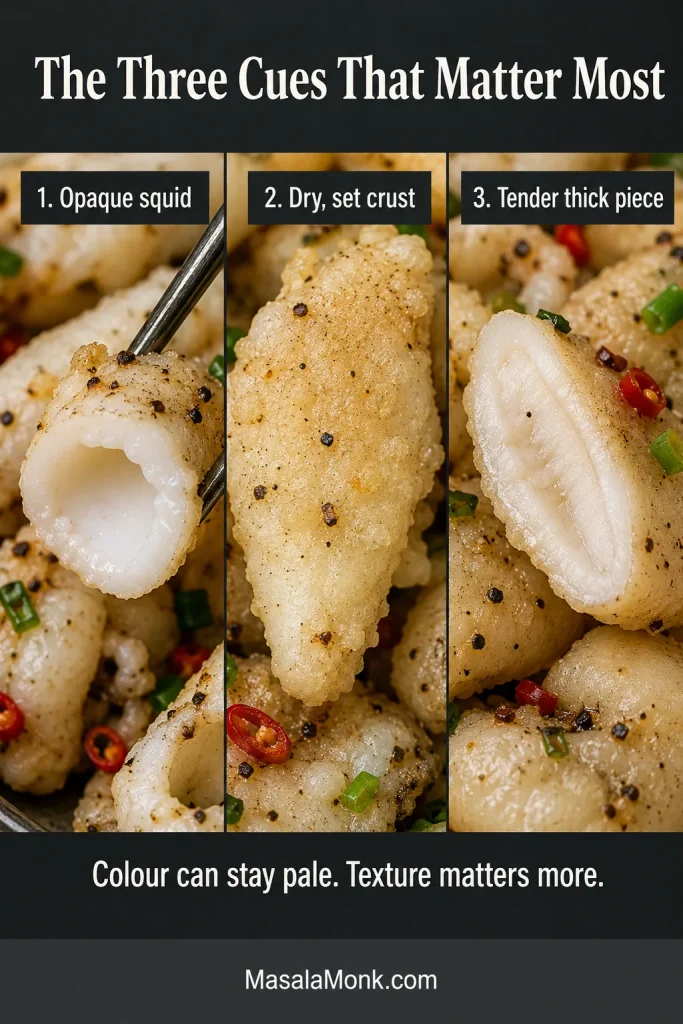
Curling and calmer bubbling are useful supporting signs, but they can happen at different speeds. Colour is the least reliable cue: a starch-heavy crust may remain pale gold even when it is fully crisp.
Building the Salt and Pepper Seasoning
White pepper gives the dish its sharp restaurant-style warmth. Black pepper tastes rounder and more familiar, while Sichuan pepper—also written as Szechuan pepper—adds a citrusy, lightly numbing edge.
For the full batch, use the measured finishing mix from the recipe: ¼ teaspoon white pepper, up to ¼ teaspoon toasted ground Sichuan pepper, ¼ teaspoon fine salt and optional ¼ teaspoon MSG or chicken powder. Add only half after the aromatic toss, taste, then add more if needed. When using salty chicken powder, leave out the finishing salt at first.
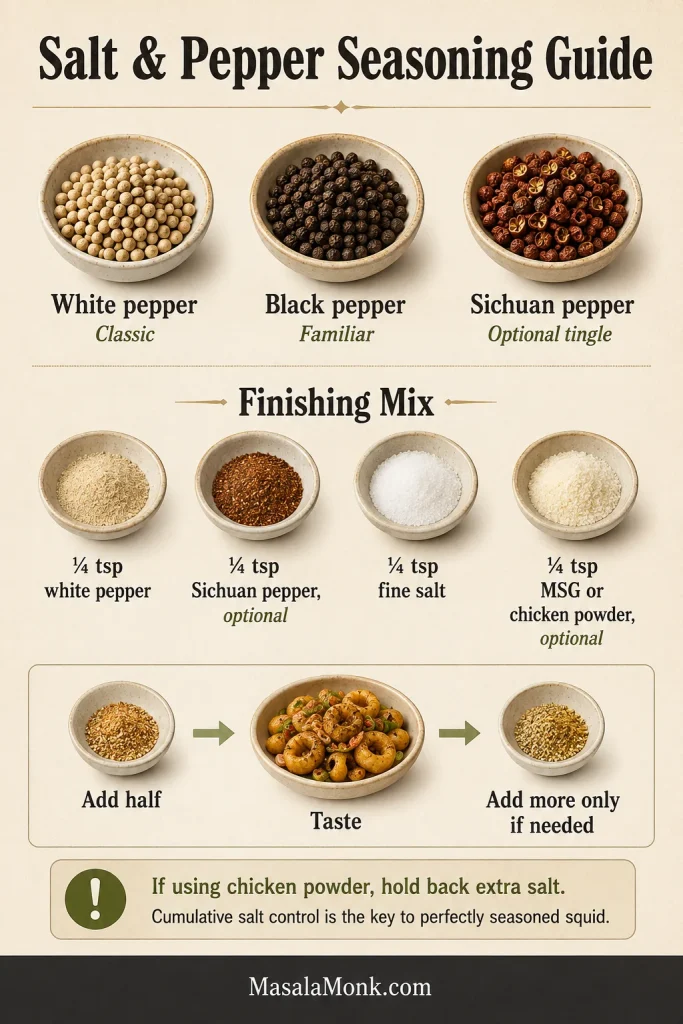
For a clean white-pepper profile, omit the Sichuan pepper. To make a familiar mixed-pepper finish, replace it with ¼ teaspoon freshly ground black pepper. The squid and dredge already contain salt, so add the finishing mix gradually rather than using all of it automatically. For a hotter table sauce, see the pepper sauce guide.
Air Fryer Salt and Pepper Squid
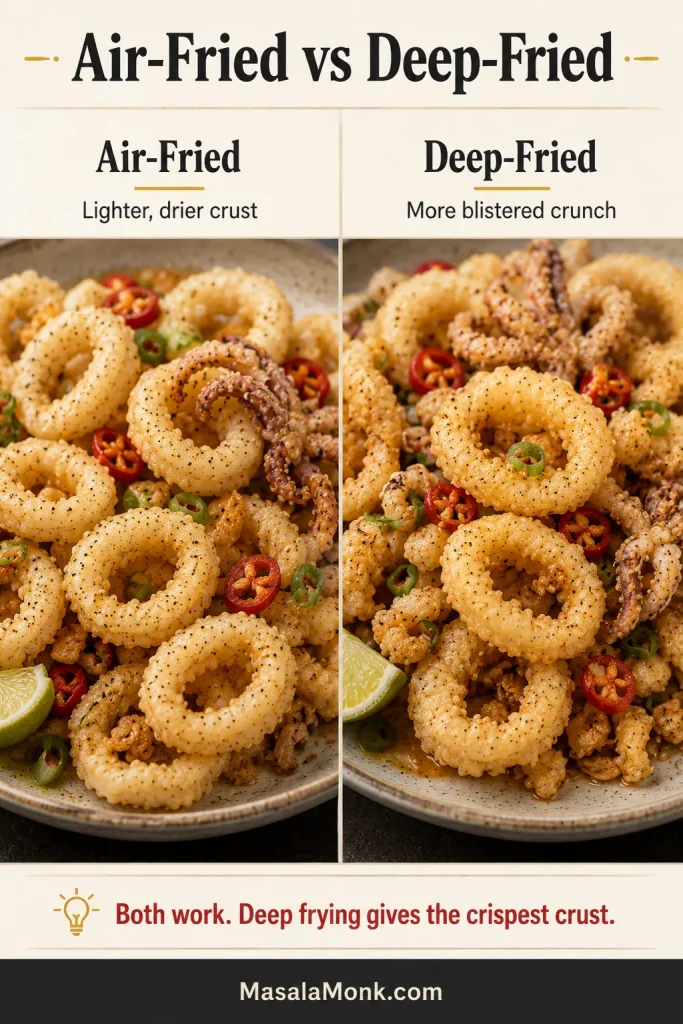
The air fryer works, but it will not mimic deep frying exactly. For the crispest crust, use the main fried method; use the air fryer when less mess and no pot of oil matter more than a deeply blistered crust. Stop when the coating is dry and the squid is just opaque; do not keep cooking merely to chase deeper colour. The 5–7-minute timing applies to each basket load, so allow additional time for multiple batches.
For the egg-white layer: mix 500 g / about 1 lb 2 oz dry squid with 16 g / 2 tablespoons cornstarch, ¼ teaspoon fine salt, ¼ teaspoon white pepper and the optional 2 teaspoons Shaoxing wine. Begin with half a beaten egg white, then add only enough for the squid to feel lightly tacky.
For the air-fryer dredge:
- 60 g / about ½ cup cornstarch
- 20 g plain flour, or 20 g certified gluten-free rice flour
- ½ teaspoon each baking powder, fine salt and white pepper
Use a thinner layer than in the deep-fried version so every powdery patch can be sprayed evenly.
How to Air-Fry the Squid
- Preheat the air fryer to 400°F / 200°C for about 3 minutes.
- Dredge only the first batch and arrange the pieces in a true single layer.
- Spray every powdery patch with neutral oil.
- Air-fry for 2–3 minutes, turn, spray again where needed and continue.
- Check at 4 minutes. Many small pieces finish around 5–7 minutes per batch, but thick squid, a fuller basket or a cooler-running appliance may need longer. Stop when the squid is opaque and the coating is dry and set, with no wet or floury patches.
- Cook in batches without stacking, then toss with separately cooked garlic, chilli and spring onion for only a few seconds.
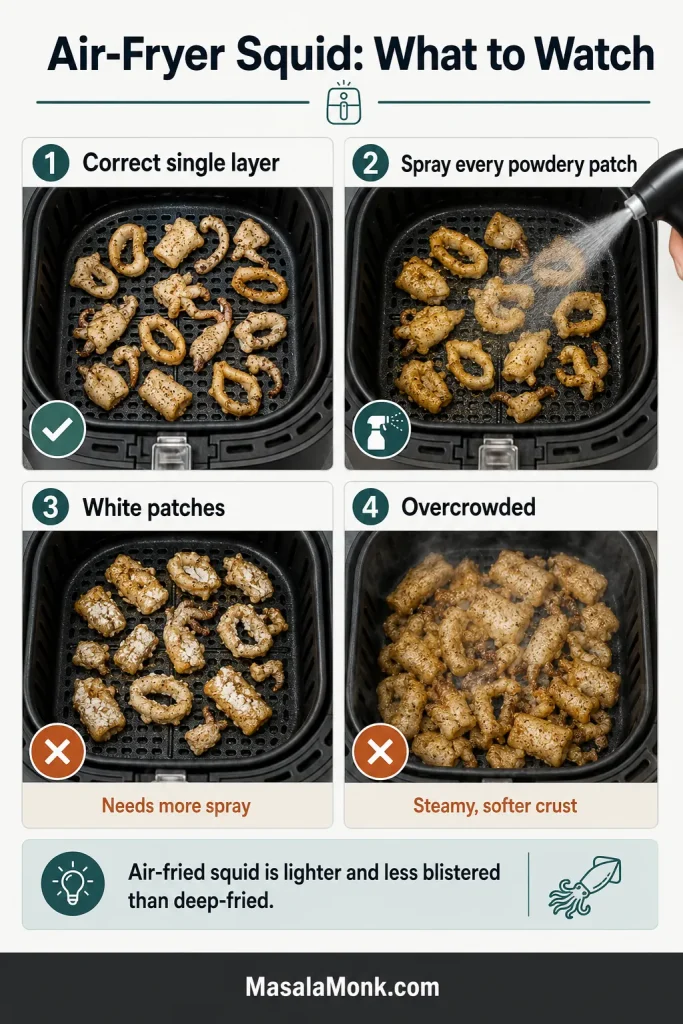
White dusty patches mean the coating needed more oil. Wet, steamy patches mean the squid needed more drying or more room. For a cool, slightly sweet dip, try homemade yum yum sauce.
Baking or pan-frying: an oven can cook the squid before the coating has time to become crisp, which is why the air fryer is the better low-oil option. For a skillet or griddle version, skip the dredge. Oil and season the squid lightly, then cook very quickly—roughly a minute per side depending on thickness. It will be tender and lightly charred rather than crisp.
Using Frozen Squid or Frozen Breaded Calamari
Plain raw frozen squid works well, but it needs completely different treatment from frozen breaded calamari. Check the package before choosing a method.
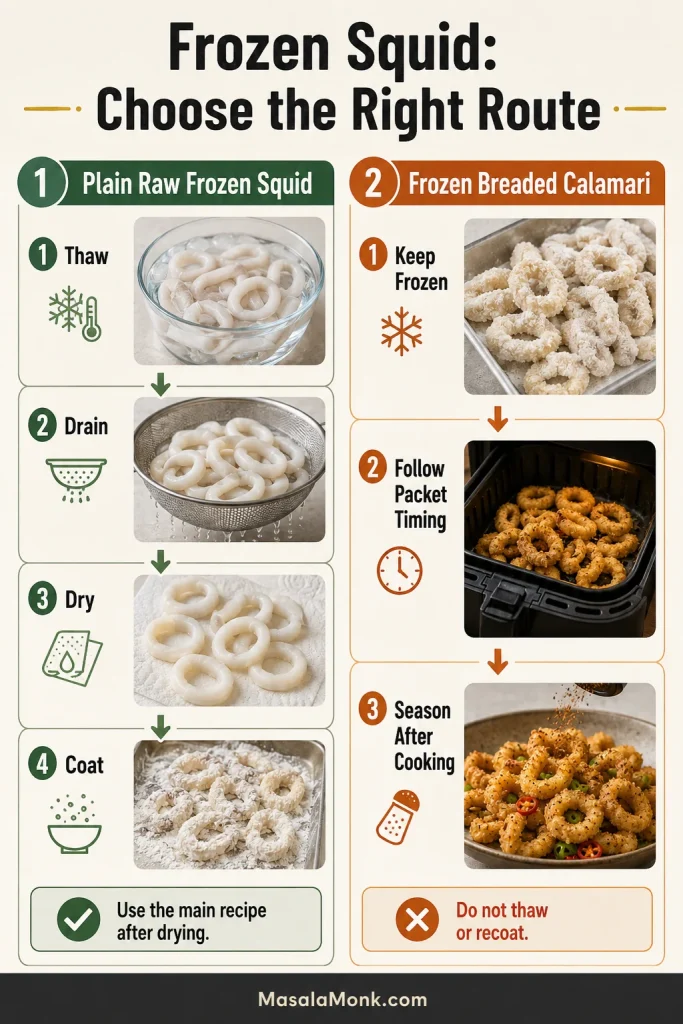
Plain raw frozen squid or rings: thaw overnight in the refrigerator. For a faster thaw, keep the squid in a leak-proof bag, submerge it in cold water, change the water every 30 minutes and cook it promptly once thawed. Never thaw squid on the counter; once it is drained and dry, continue with the main recipe.
- Drain thoroughly in a colander.
- Pat every surface dry, including inside the rings.
- Add the homemade egg-white layer and dredge only after the ice and surface water are gone.
- Never put partially frozen raw rings into hot oil; the water can cause violent splatter and a weak crust.
Frozen breaded or battered calamari: usually cook it directly from frozen unless the package says otherwise. Do not thaw it or add the raw-squid dredge. Follow the packet timing and safety directions, then add the salt-and-pepper seasoning and separately cooked aromatics once the pieces are hot and crisp. If you want the homemade starch coating instead, start with plain raw squid and return to the main recipe.
For a pub-style frozen calamari plate, keep the Chinese seasoning light and serve the rings with lemon and homemade tartar sauce.
Troubleshooting the Coating and Texture
If the first piece is not quite right, match what you see below before changing several things at once. For the root causes, recheck the coating guide and the time and temperature guide before frying another batch.
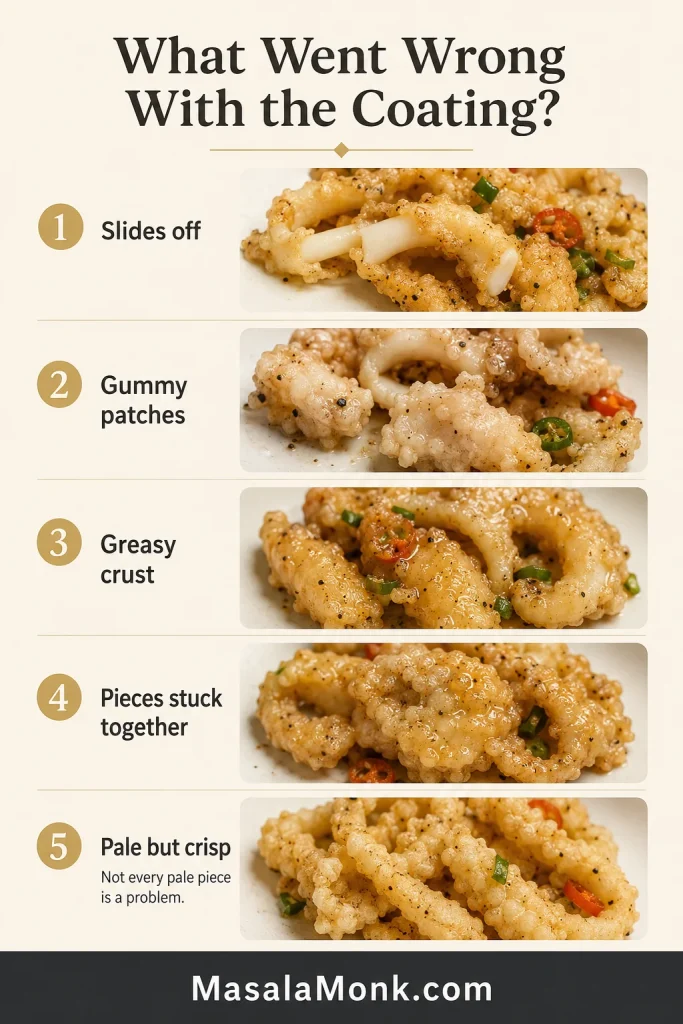
Texture and Coating Fixes
| Problem | Likely cause | Fix |
|---|---|---|
| Squid is rubbery | Too long in the oil or final pan | Check sooner, lift thin pieces first and keep the final toss brief |
| Coating falls off or turns gummy | Wet squid, pooled liquid or delayed frying | Dry thoroughly, drain pooled liquid, use only enough egg white for a tacky film and dredge immediately |
| Coating is soggy or greasy | Large batch or cool oil | Reduce the batch and let the oil recover |
| Crust is pale but crisp | Starch-heavy coating | Serve it; pale colour can be correct |
| Later batches become soft | Cool oil, large batches or accumulated crumbs | Recover the heat, reduce the batch and skim crumbs |
Seasoning, Garlic and Air-Fryer Fixes
| Problem | Likely cause | Fix |
|---|---|---|
| Squid tastes too salty | Salt added at several stages | Add finishing seasoning gradually; omit extra salt with chicken powder |
| Garlic burns | Added too early | Add it only for the final 10–20 seconds |
| Oil splatters aggressively | Water remained on the squid | Dry thoroughly and lower pieces away from the body |
| Pieces stick together | They touched before setting | Add separately and loosen gently with a spider |
| Air-fryer coating has white patches | Dry coating received too little oil | Spray every powdery area before and after turning |
Quick Rescue Rule
Use this rescue rule: change one variable at a time, then test the next piece before adjusting anything else.
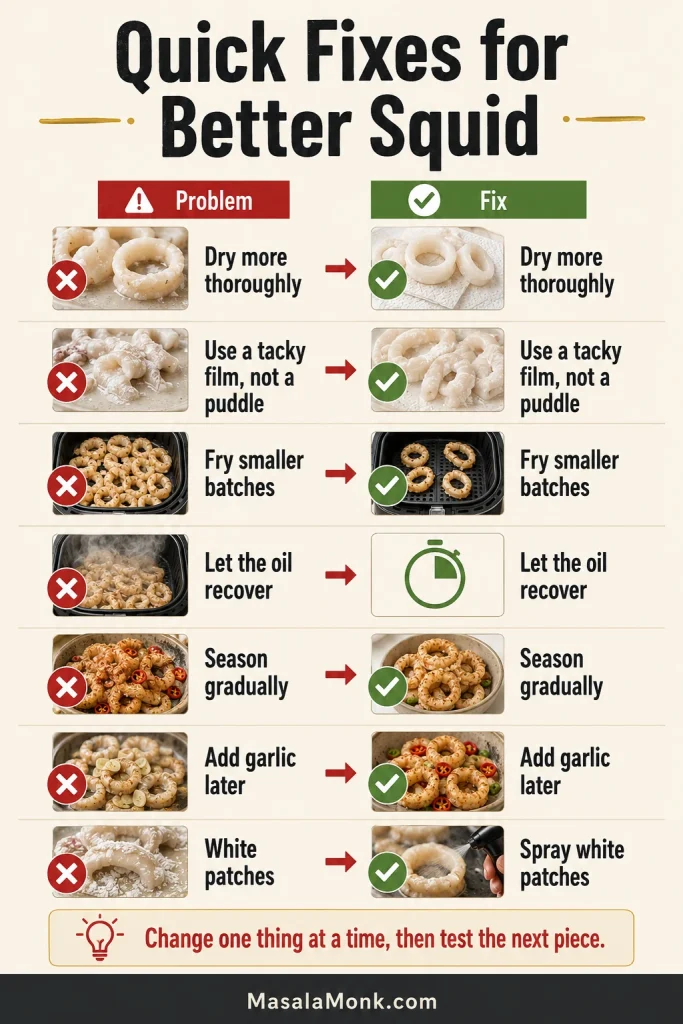
What to Do With the Frying Oil
Once frying is finished: let the oil cool completely. If it remains clean and smells neutral, strain it into a labelled covered container for another savoury frying session. Seal unwanted cooled oil for disposal according to local guidance—never pour it down the sink.
Serving, Make-Ahead and Storage
Bring the squid to the table while the crust is still crisp and the garlic and chilli are fragrant. Lemon or lime and something cool make a clean contrast with the peppery coating.
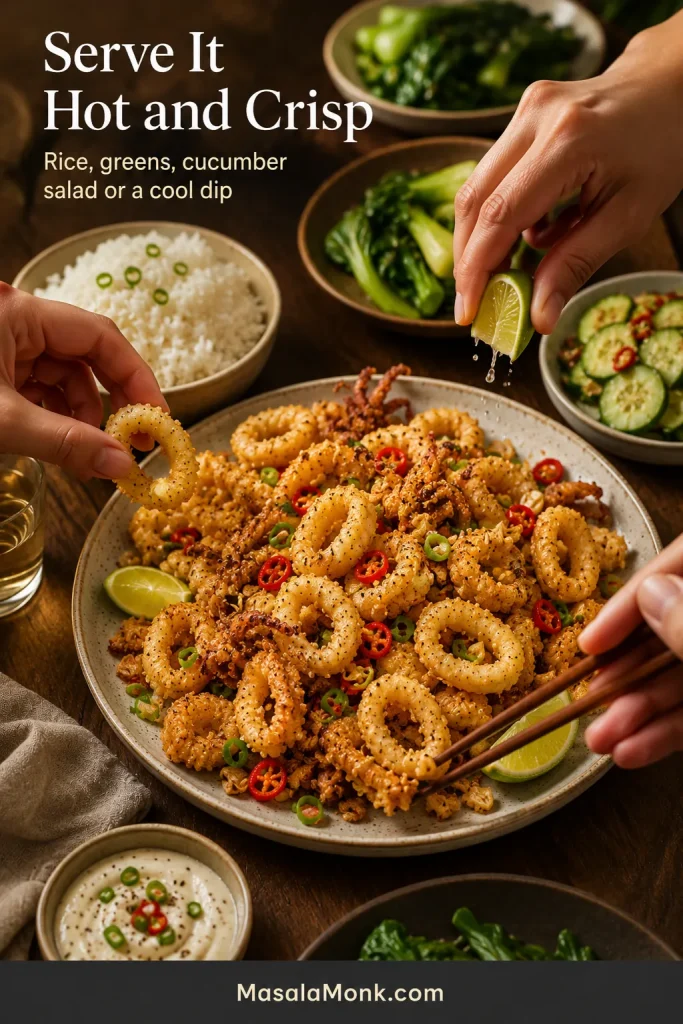
- For a Chinese-style meal: steamed jasmine rice or shrimp fried rice, stir-fried greens and cucumber salad.
- As a starter or pub-style plate: add lemon wedges, garlic aioli or yum yum sauce, with fries or vegetable spring rolls.
What You Can Prepare Ahead
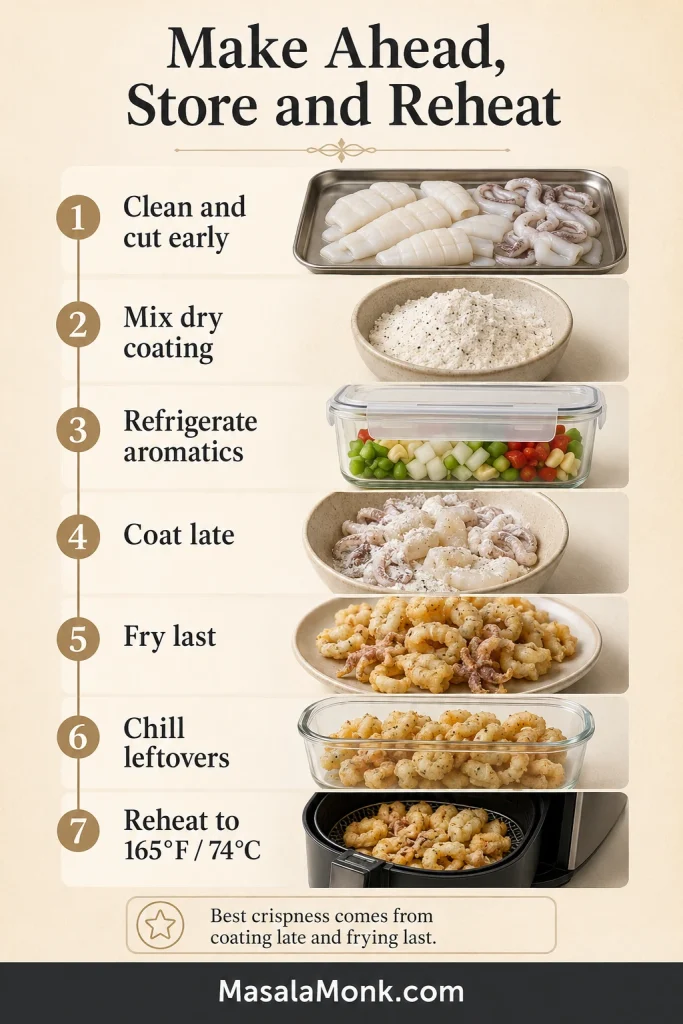
Almost everything except coating and frying can be organised before guests arrive: prepare early, coat late, fry last.
- Several hours ahead: clean and cut the squid, then refrigerate it covered and cold.
- Earlier the same day: mix the coating and seasoning; chop and dry the aromatics, then cover and refrigerate them until needed; make the dip and chill it separately.
- Just before frying: dry and season the squid, heat the oil and dredge only the next batch.
- At serving time: cook the aromatics, toss briefly and take the plate straight to the table.
For a larger group, use two racks and keep every batch in one layer. Do not cover the fried squid. A cucumber salad can be made earlier and chilled, leaving the final minutes free for frying. Turn on the extractor or open a window before the oil heats to reduce lingering frying smell.
Storing and Reheating Leftover Calamari
Freshly fried squid has the lightest crust, but leftovers can still be reheated. Refrigerate them within two hours in a shallow airtight container, keep wet dips separate and use within 1–2 days for the best quality.
Air fryer: heat at 375°F / 190°C and check after 2 minutes; most small portions need 3–4 minutes. Oven: spread the pieces on a rack at 400°F / 200°C and check after 5 minutes. Use the microwave only when speed matters more than crunch.
For food safety, reheat leftovers to 165°F / 74°C and remove them from the heat as soon as they reach that temperature. Longer reheating makes the squid firmer.
Frequently Asked Questions
Do I need to soak or tenderise squid first?
Small or medium squid usually needs no soaking or tenderising when cut evenly and fried quickly. Very large or unusually thick squid may need different preparation, but milk or bicarbonate of soda/baking soda is unnecessary for this main method.
Is salt and pepper squid the same as calamari?
Calamari is another name for squid. However, “fried calamari” often describes a thicker battered or crumbed pub-style dish, while salt and pepper squid usually has a lighter starch coating and a dry pepper seasoning.
Can I make it without egg?
Yes. Press well-drained squid directly into cornstarch or potato starch and fry immediately. The crust will be lighter and may shed more easily.
Which side of the squid should I score?
Score the inside surface of the opened tube. Shallow diagonal cuts in both directions help the piece curl without slicing it through.
Can I shallow-fry it?
You can, but the crust will be less even and the squid may need turning. Use a thin coating, a generous layer of hot oil and cook only a small number of pieces at once.
Saveable Salt and Pepper Squid Method
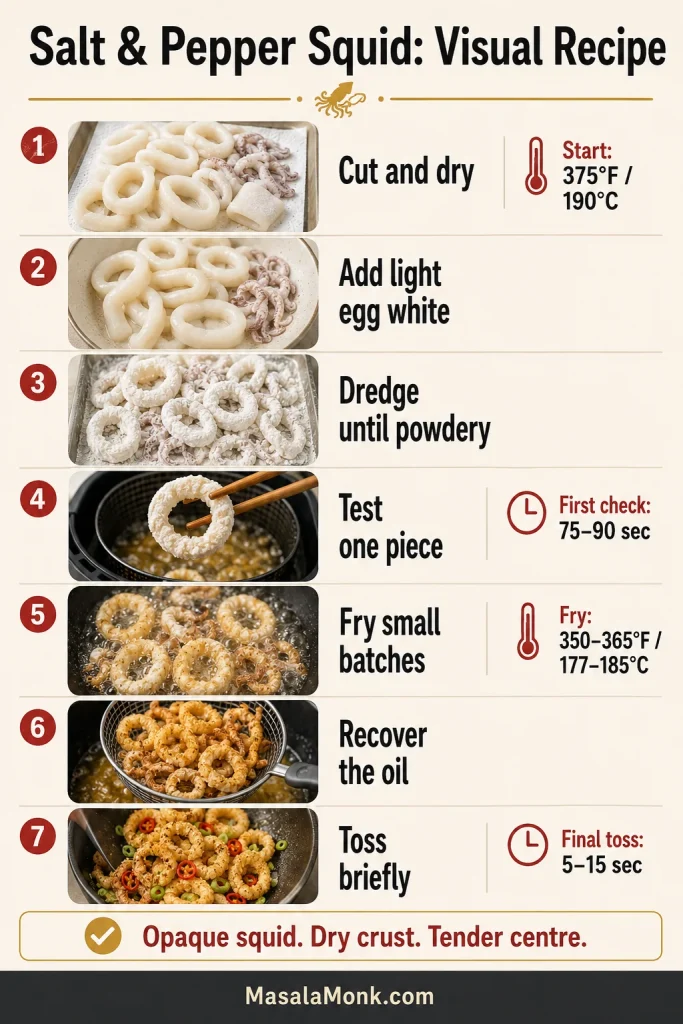
Salt and pepper squid stops feeling risky once you stop waiting for dark colour and begin trusting the dry crust and tender centre. Serve it while the garlic is fragrant, the spring onions are fresh and the pale-golden crust is still light and crisp.








