There’s a moment—right after the first shake—when mango and citrus perfume the air and the tin goes icy in your hands. That’s when a mango martini stops being just another summer drink recipe and becomes a small celebration. Because mango carries sunshine in its fibers and vodka carries clarity in its bones, they meet in the glass with effortless grace. However, the difference between a sweet, muddled fruit drink and a crisp, bar-quality cocktail is in the balance: just enough acid to lift, just enough orange liqueur to sparkle, and just enough dilution to glide.
Today, we’ll start with a classic Mango Martini recipe you can learn by heart. Then, we’ll move through five high-intent riffs people love making at home: Spicy, Passion Fruit (“Pornstar”-style), Frozen, Mango-Vodka, and Mango–Pineapple. Along the way, we’ll drop in helpful technique links, because sometimes you want a second opinion or a deeper dive. Moreover, you’ll find small upgrade notes inside each recipe so you can dial flavor exactly to your liking. And although these builds are quick, they’re not shortcuts; instead, they’re flexible frameworks that welcome your taste and your pantry.
If you’re picking fruit right now, choose mangoes you’d happily eat out of hand. For quick guidance on texture and sweetness, skim Best Mango for Aamras; it’s a handy companion when you’re puréeing for drinks. Similarly, if you prefer a published point of reference for the classic shape of this cocktail, both SAQ’s Mango Martini and this straightforward mango martini cocktail echo the same structure you’ll see below.
Also Read: Daiquiri Recipe (Classic, Strawberry & Frozen Cocktails).
Mango Martini Recipe (Classic, Five Minutes Flat)
A good mango martini is a study in contrast. On one hand, mango brings velvety body; on the other, lime juice cuts a clean path through the sweetness. Furthermore, a measured pour of orange liqueur adds a bright, candied orange aroma that reads as “cocktail” rather than “smoothie.” Finally, a hard shake and a fine strain give you that hotel-bar polish at home.
Ingredients (1 cocktail)
- 60 ml vodka
- 45 ml mango purée or 60 ml mango nectar
- 15 ml triple sec or Cointreau
- 10–15 ml fresh lime juice, to taste
- 0–10 ml simple syrup, only if the mango is shy on sweetness
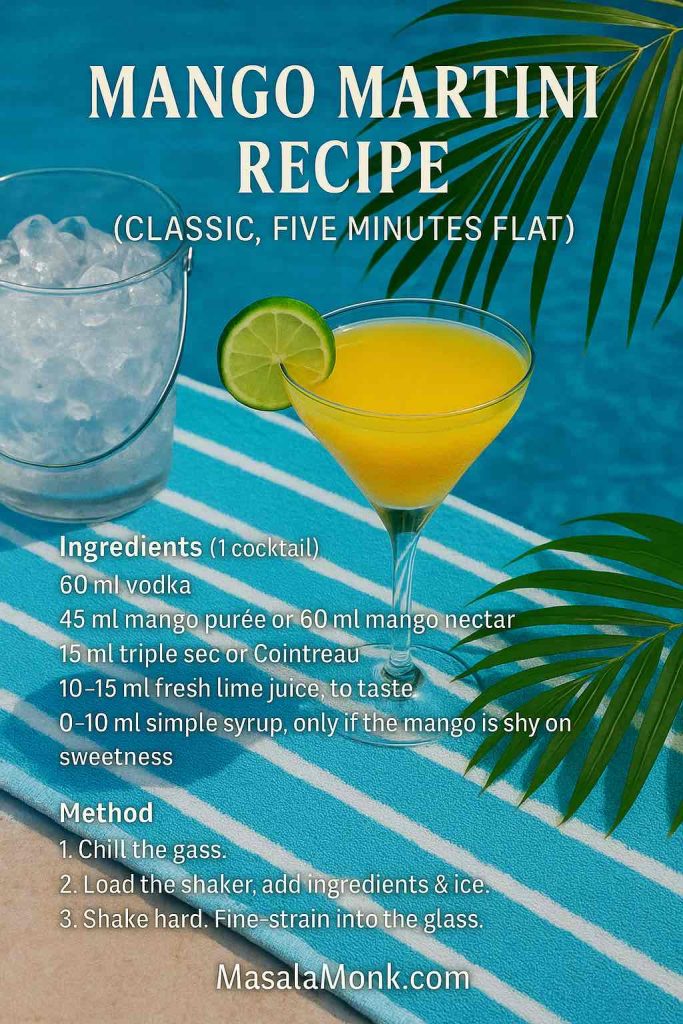
Method
- Chill the glass. Place a coupe or martini glass in the freezer while you prep.
- Load the shaker. Add vodka, mango, orange liqueur, lime, and—if needed—simple syrup to a shaker with plenty of ice.
- Shake hard. Go for 12–15 seconds until the tin frosts. Consequently, you’ll build proper dilution and a satiny texture.
- Fine-strain. Double-strain into the chilled glass to catch fibers and ice chips.
- Garnish. Express an orange peel over the surface or perch a mango slice on the rim.
Notes & Tiny Upgrades
- Purée vs nectar: Purée gives plush texture; nectar is lighter. Therefore, if you swap nectar in, reduce or skip simple syrup.
- Citrus balance: Limes vary wildly. Start at 10 ml; then taste and adjust. Likewise, if your mango is overripe, lean into the lime for lift.
- Technique reassurance: For another published baseline that mirrors this balance, check SAQ’s recipe and this home-kitchen mango martini cocktail.
Spicy Mango Martini Recipe (Jalapeño or Tajín Rim)
Spice wakes mango up. Nevertheless, you don’t need to set your mouth on fire; you just need enough heat to add rhythm. Because jalapeño brings grassy warmth and Tajín brings chile-lime electricity, you can customize the style two ways: in the glass with a gentle muddle, or on the rim with a neat, photogenic halo. Importantly, the rim-only route delivers aroma and a balanced first sip without the risk of over-infusing the drink itself.
Ingredients (1 cocktail)
- 60 ml vodka
- 40–45 ml mango purée
- 15 ml triple sec
- 15 ml fresh lime juice
- 2–3 thin jalapeño slices (optional, for in-glass heat)
- Tajín + lime wedge (for the rim)
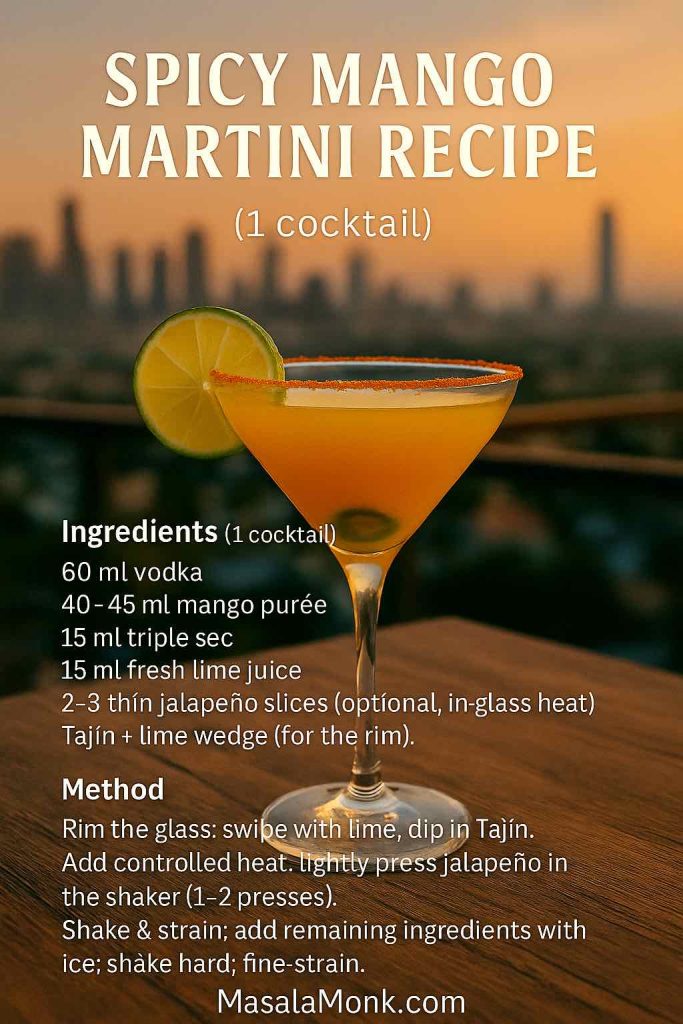
Method
- Rim the glass. Swipe the rim with a lime wedge, then dip into Tajín—see this quick guide to making a Tajín salt rim; for technique nuance, here’s a pro rimming walkthrough.
- Add controlled heat. If you want spice in the drink, lightly muddle jalapeño in the shaker—just one or two presses.
- Shake & strain. Add remaining ingredients and ice; shake hard; fine-strain into the rimmed glass.
- Garnish. Use a jalapeño coin or a lime wheel.
Try This Too
- Prefer fragrance without extra fire? Skip the muddle and rely solely on the rim. Conversely, if you love intensity, add a razor-thin sliver of habanero—then taste before you commit.
- For more chile-rim technique (with photos), browse our watermelon margarita variations; the same steps apply, even though the base spirit changes.
Passion Fruit + Mango Martini (“Pornstar”-Style Recipe)
This riff channels a modern classic: vanilla-tinted vodka, tangy passion fruit, and a side of bubbles for contrast. Because mango loves passion fruit, the pairing feels inevitable—lush meets zesty, tropical meets sparkling. For background and deeper technique notes, see Difford’s Porn Star Martini, Bon Appétit’s recent update, and BBC Good Food’s home version. Collectively, they confirm the essentials: passion fruit’s tartness, a hint of vanilla, and that playful prosecco companion.
Ingredients (1 cocktail)
- 45 ml vodka (vanilla vodka if available)
- 30 ml passion fruit liqueur or 30–45 ml passion fruit purée
- 20–30 ml mango purée
- 10–15 ml fresh lime juice
- 5–10 ml vanilla syrup (optional, to taste)
- Optional: 30–60 ml chilled prosecco on the side
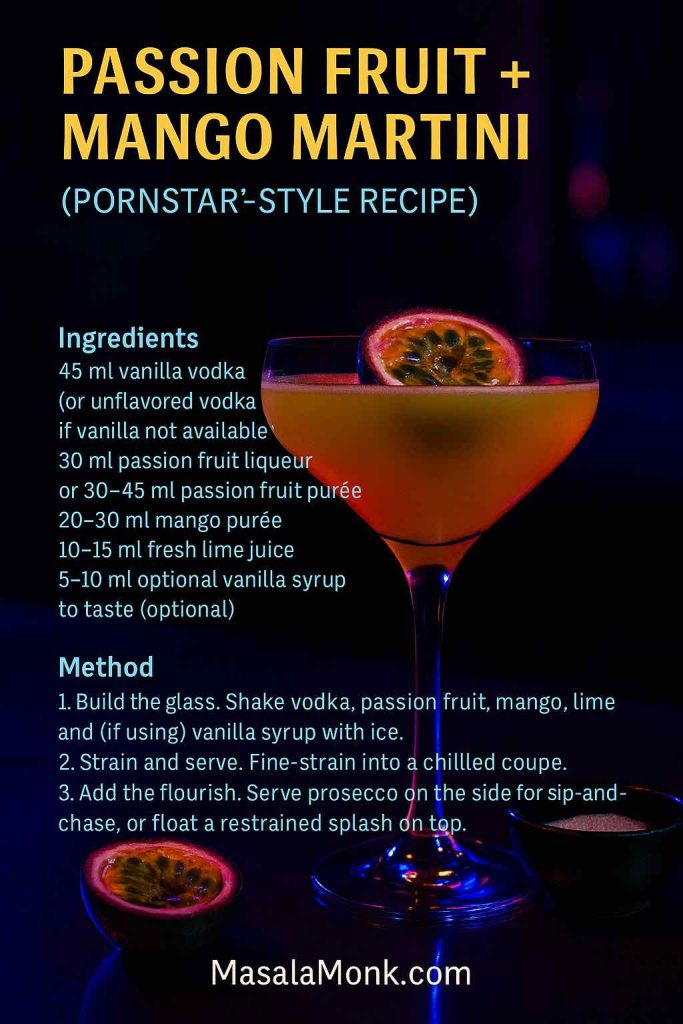
Method
- Build the core. Shake vodka, passion fruit, mango, lime, and (if using) vanilla syrup with ice.
- Strain and serve. Fine-strain into a chilled coupe.
- Add the flourish. Serve prosecco on the side for sip-and-chase, or float a restrained splash on top.
Try This Too
- Split the fruit evenly—mango = passion fruit—for a perfectly balanced tang. Alternatively, if you want a drier finish, drop the syrup and let the liqueur (or purée) speak.
- Vanilla doesn’t need to shout. Consequently, if you don’t have vanilla syrup, a scant pinch of vanilla sugar stirred in before shaking does the job beautifully.
Also Read: Piña Colada: Classic Recipe + 10 Variations (Virgin & On the Rocks)
Frozen Mango Martini (Blender, Summer-Ready Recipe)
Sometimes the air itself begs for a blender. Even so, a great frozen cocktail is more technique than guesswork. Because ice can drown flavor if you’re not careful, measure your frozen fruit and liquid, blend in stages, and taste as you go. Notably, the frozen daiquiri method popularized in serious cocktail writing explains why measured dilution matters; for a quick primer on that logic, read The Best Frozen Daiquiri and adapt the principles to mango.
Ingredients (1 large cocktail)
- 60 ml vodka
- 1 heaping cup frozen mango chunks (about 150–170 g)
- 20 ml triple sec
- 15–20 ml fresh lime juice
- 10–15 ml simple syrup (to taste)
- 60–90 ml very cold water (start low; add as needed)
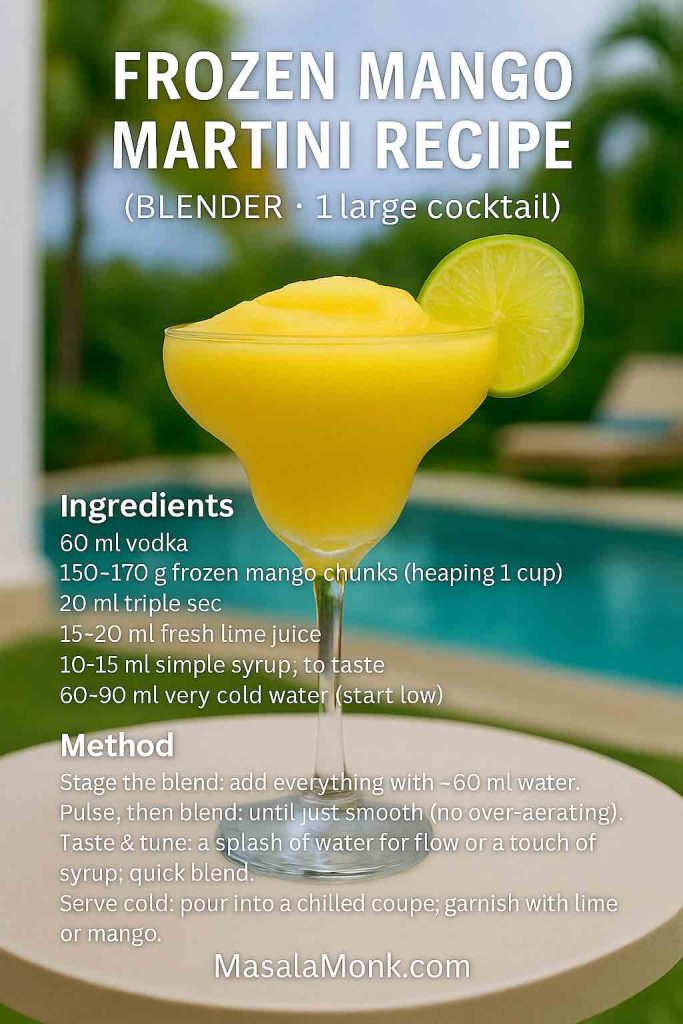
Method
- Stage the blend. Add everything to the blender with ~60 ml water.
- Pulse, then blend. Pulse a few times; then blend only until smooth. Therefore, you won’t over-aerate or over-dilute.
- Taste and tune. Add a splash more water for flow or a touch of syrup for ripeness; give it one short blend.
- Serve cold. Pour into a chilled coupe. Garnish with a lime wheel or a tiny mango slice.
Try This Too
- A pinch of salt brightens fruit, just as it does in good cooking. Likewise, swapping water for coconut water adds a gentle tropical hum without heaviness. For additional tropical ideas, wander through Coconut Water Cocktails.
Mango-Vodka Martini (Using Mango-Flavoured Vodka)
Flavoured vodkas can be divisive; nevertheless, mango versions have a devoted following, especially Absolut Mango and Cîroc Mango. Because those spirits already contribute fruit and aroma, the key is restraint elsewhere. Instead of piling on purée and liqueur, keep the structure lean so the drink stays elegant. For a spirit-forward template—and a sense of how dry vermouth can shape the edges—take a look at Difford’s Mango Vodka Martini.
Ingredients (1 cocktail)
- 45 ml mango-flavoured vodka
- 15 ml plain vodka (to dry the profile slightly)
- 20–25 ml mango purée (easy does it)
- 10–15 ml dry vermouth or 10–15 ml triple sec (choose one)
- 5–10 ml fresh lime juice
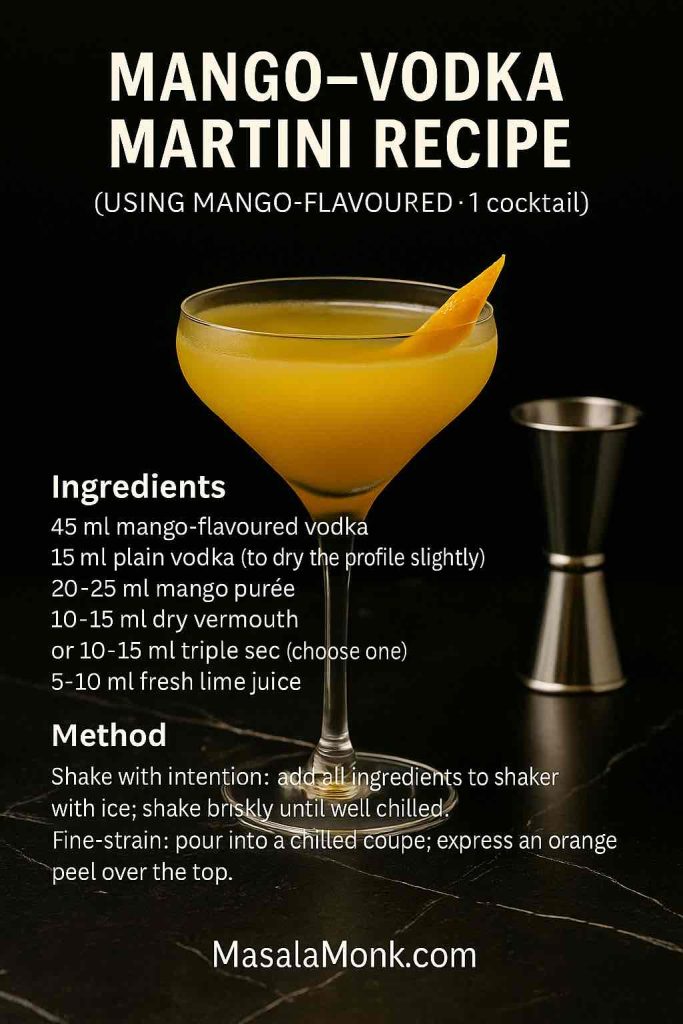
Method
- Shake with intention. Add everything to a shaker with ice; shake briskly until well chilled.
- Fine-strain. Pour into a chilled coupe; express an orange peel over the top.
Try This Too
- To steer closer to a classic “martini” posture, choose dry vermouth and keep purée at the low end. Conversely, if you’d like a fruitier party vibe, pick triple sec and nudge mango up by 5 ml.
- For readers who love this flavor lane, point them toward Mango Vodka Cocktail Drinks for additional ideas.
Mango–Pineapple Martini Recipe (Zippy & Crowd-Pleasing)
Pineapple is mango’s lively friend. Because it carries natural acidity and foam-friendly proteins, it both brightens the palate and gives a gentle froth when shaken hard. Moreover, the combo tastes like a beach afternoon while still behaving like a martini. Consequently, it’s the riff people keep making “just one more” of.
Ingredients (1 cocktail)
- 45 ml vodka
- 30 ml mango purée
- 30 ml fresh pineapple juice
- 15 ml triple sec
- 10 ml fresh lime juice
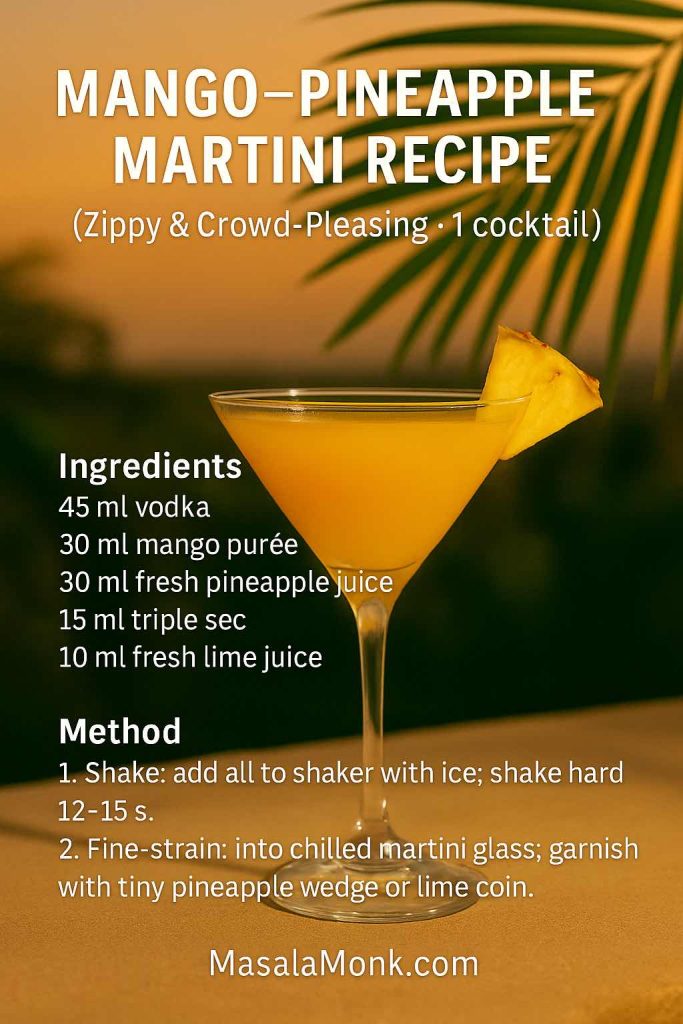
Method
- Build and shake. Add everything to a shaker with ice; shake hard for 12–15 seconds.
- Fine-strain and garnish. Strain into a chilled martini glass; garnish with a tiny pineapple wedge or a lime coin.
Try This Too
- Add a dash of coconut water for length and softness. Alternatively, micro-grate fresh nutmeg over the top for a quiet tiki nod.
- If you want to compare builds for fruit-forward “martini” structure, revisit SAQ’s mango martini and adjust ratios to suit your pineapple.
Also Read: What to Mix with Jim Beam: Best Mixers & Easy Cocktails
Technique Cheat-Sheet (Short, Practical, Reassuring)
Although recipes matter, technique carries the day. Therefore, here’s a compact list you can actually use while you shake.
- Chill everything. Cold glass, cold shaker, cold ingredients—everything tastes tighter and cleaner. Consequently, you’ll need less ice time to reach balance.
- Shake like you mean it. Ten gentle shakes won’t cut it. Instead, shake hard for 12–15 seconds to knit acids, alcohol, and fruit.
- Fine-strain always. Mango fibers and ice shards dull texture. Thus, double-straining gives that “why does this feel so smooth?” moment.
- Taste, then nudge. After the first sip, decide: one dash more lime for brightness, or one teaspoon of simple for roundness. Likewise, a pinch of salt often wakes up fruit without obvious “saltiness.”
- Rims: lime, not water. For chile-salt or Tajín rims, swipe with lime; then dip. Water turns rims drippy; citrus makes a tacky surface that stays put. For a quick visual, use this Tajín salt rim guide and this pro rimming guide.
- Frozen logic. Measured liquid + measured frozen fruit = repeatable texture. Consequently, you avoid bland, watery slush. For the “why” behind it, see Serious Eats’ frozen daiquiri method and borrow the ratios.
Also Read: Punch with Pineapple Juice: Guide & 9 Party-Perfect Recipes
Pantry & Substitutions (Because Real Life Happens)
Even with the best intentions, sometimes you don’t have the exact bottle or the perfect fruit. Fortunately, mango is forgiving, and so are these builds.
- Vodka: Any clean, mid-shelf vodka works. However, if you enjoy a little aromatic lift, a grain-based vodka often reads slightly sweeter, while a grape-based vodka reads softer.
- Mango purée vs nectar: Purée equals body and ripe impact; nectar equals convenience and consistency. Accordingly, drop or dial back simple syrup when using nectar.
- Orange liqueur: Triple sec is bright and linear; Cointreau is richer and a touch more bitter-orange. Either fits; therefore, pick the one that matches your mood.
- Citrus swap: No lime? Use lemon, but reduce slightly; then taste and adjust. Meanwhile, a micro-splash of orange juice can round sharp edges if your citrus is too aggressive.
- Heat source: Jalapeño is classic for approachable spice. Alternatively, serrano gives tighter heat, while habanero brings a floral blast—use a sliver, not a slice.
- Sweeteners: Standard simple syrup (1:1) keeps things quick; rich syrup (2:1) sweetens with less water, which can be helpful in the shaken versions. If you’re blending, either works—just taste before you pour.
Service & Garnish (Small Things, Big Payoff)
Great drinks often come down to finishing touches. Therefore, give yourself an extra minute for presentation.
- Glassware: A coupe feels classic and forgiving; a V-stem martini glass feels dramatic and photogenic. Nevertheless, use what you have; the liquid is the star.
- Garnish choices: Mango slice, lime coin, or orange twist all make sense. Similarly, edible flowers skimmed across the surface look graceful on the Passion Fruit riff.
- Ice management: Fast, vigorous shaking builds a tight texture quickly; conversely, lazy shaking melts more ice and blurs the flavors.
- Batching for friends: Multiply the non-citrus ingredients in a bottle and chill. Then, when guests arrive, measure into the shaker, add fresh citrus, and shake to order. Consequently, every glass tastes first-round fresh.
When to Choose Which Mango Martini Riff/Recipe
Admittedly, choosing is half the fun. Even so, here’s a quick guide for mood-pairing.
- Classic: Date night, starters, or when you want a clean read on the fruit you bought today.
- Spicy: Grilled shrimp, chaat, or anything salty and crunchy; the chile-lime halo makes flavors ping.
- Passion Fruit: Brunch, birthdays, or any moment that welcomes a side of sparkle; vanilla tucks the acidity into a plush pillow.
- Frozen: Poolside, balcony evenings, or after a hot afternoon; measured dilution keeps it vibrant, not watery.
- Mango-Vodka: Cocktail hour for the flavoured-vodka loyalists; dry vermouth makes it adult, not candy.
- Mango–Pineapple: Happy chaos: game nights, family cookouts, and lazy weekends; it’s friendly without being simple.
Helpful Links to Learn More (If You Like Rabbit Holes)
While you can make everything above with confidence right now, you may occasionally want to dive deeper. In that case, use these as touchstones:
- Classic structure patterns: SAQ’s Mango Martini and a friendly home build for comparison.
- Rims and chile technique: A concise Tajín salt rim tutorial and a rimming like a pro explainer; plus our photo-rich watermelon margarita variations.
- Frozen logic: Why measured ice and staged blending work, via Serious Eats’ frozen daiquiri method.
- Modern classic context: The DNA behind the Passion Fruit approach, at Difford’s Guide, Bon Appétit, and BBC Good Food.
- Flavoured vodka pathway: A spirit-forward template at Difford’s Mango Vodka Martini.
- Internal recipes to explore next: Best Mango for Aamras and Mango Vodka Cocktail Drinks.
A Warm Closing
Cocktails often feel like tiny theater: a few props, a few gestures, and suddenly the room sparkles. Yet the real magic in a mango martini is simple attention—cold glass, fresh citrus, ripe fruit, and a confident shake. Because you now have a classic you can throw together from memory, you also have a launchpad for evenings that want a twist. Therefore, pick the riff that fits your mood, rim a glass if you’re feeling festive, and trust your palate as you taste and tune.
And if mangoes are already perfuming the kitchen, you’re halfway there. Consequently, tonight’s the night: ice in the tin, lime at the ready, music on. Cheers.
FAQs
1) What’s the simplest Mango Martini Recipe I can memorize?
Start with a 2–1.5–0.5–0.25 pattern: 2 oz vodka, 1.5 oz mango purée, 0.5 oz orange liqueur, and 0.25–0.5 oz fresh lime juice. Shake hard, fine-strain, and garnish. Moreover, if your mango is super ripe, you can skip any extra sugar.
2) Mango purée, nectar, or juice—which one works best?
Purée gives body and that luxurious mouthfeel; nectar is lighter and convenient; juice is the most delicate. Consequently, when using nectar or juice, taste first and—if needed—add a touch of simple syrup to keep the Mango Martini Recipe balanced.
3) Can I make a Mango Martini Recipe without a shaker?
Yes. Although a shaker gives better texture, you can add ingredients to a jar with ice, seal tightly, and shake for 20–25 seconds. Then, strain through a fine sieve. Ultimately, colder and more dilution-controlled equals better flavor.
4) How do I get that bar-quality silky finish?
Two steps: shake vigorously and fine-strain through a small mesh strainer. Additionally, chill the glass first; colder service keeps flavors sharp and, therefore, more elegant.
5) What kind of vodka should I choose?
Any clean, mid-shelf vodka works. However, for a fruit-forward style, neutral grain or grape-based vodkas keep the mango in the spotlight. If you’re using mango-flavored vodka, reduce the purée slightly so the Mango Martini Recipe stays crisp, not candy-sweet.
6) How do I make a spicy Mango Martini Recipe without overpowering heat?
Do a Tajín rim for aromatic spice, and then skip muddling chiles in the shaker. Alternatively, if you want a gentle kick, lightly press 2–3 jalapeño slices—no more—before shaking. Meanwhile, taste and adjust; you can always add heat, but you can’t remove it.
7) Can I swap the spirit—say, gin or rum—instead of vodka?
Absolutely. Gin adds botanical snap, while white rum leans tropical and round. Therefore, when swapping, keep mango at 1–1.5 oz and nudge the citrus up by a barspoon if it tastes too sweet.
8) My drink tastes flat—what should I tweak first?
First, add a small squeeze of lime; brightness snaps flavors into focus. Next, if it’s still dull, stir in a pinch of salt (yes, really). Finally, if the fruit was underripe, add ¼ oz simple syrup and shake again. Consequently, you’ll find the sweet-acid balance that defines a great Mango Martini Recipe.
9) How do I batch a Mango Martini Recipe for a party?
Combine vodka, mango purée, and orange liqueur in a bottle and chill well. Just before serving, measure a portion into a shaker, add fresh lime, and shake with ice. In addition, always fine-strain so the last glass tastes as polished as the first.
10) Can I make a Frozen Mango Martini without it turning watery?
Yes—use frozen mango as the “ice,” add measured cold water (start small), and blend in short bursts. Besides, taste and adjust with tiny additions of water or syrup; that way, the texture stays lush and the flavor remains concentrated.
11) What garnishes pair best with a Mango Martini?
A thin mango slice, a lime coin, or an expressed orange peel all work beautifully. Moreover, for the passion-fruit riff, a vanilla sugar rim or a half passion fruit looks stunning without complicating the Mango Martini Recipe itself.
12) Do I need simple syrup—and if so, how much?
Often you don’t. However, if the mango isn’t very sweet (or you used juice), add ¼ oz simple syrup, shake, and retaste. Therefore, you’ll sweeten just enough to smooth edges while keeping the drink bright.
13) What’s the best way to rim the glass without mess?
Use citrus, not water. Rub the rim with a lime wedge, dip into your salt/sugar/Tajín mix, and tap off excess. Consequently, the rim sticks cleanly and doesn’t slide down the glass.
14) Any quick food pairings for a Mango Martini Recipe?
Think salty, crunchy, and fresh: sev puri, grilled prawns, chili-lime nuts, or even a mango-and-paneer skewer. Meanwhile, for the spicy version, add cooling sides—cucumber slices or yogurt-mint dip—to balance the heat.
15) How do I keep flavors consistent if my mangoes vary?
Standardize the process: after shaking, taste a small sip before straining. If it reads too tart, add a teaspoon of syrup; if it’s too sweet, add a teaspoon of lime and shake again. Ultimately, that tiny checkpoint is how every Mango Martini Recipe becomes reliably great at home.