Posted on — 3 Comments

Indian Falafel: 6 Masala, Palak, Aloo, Paneer & Curry Leaf Twists

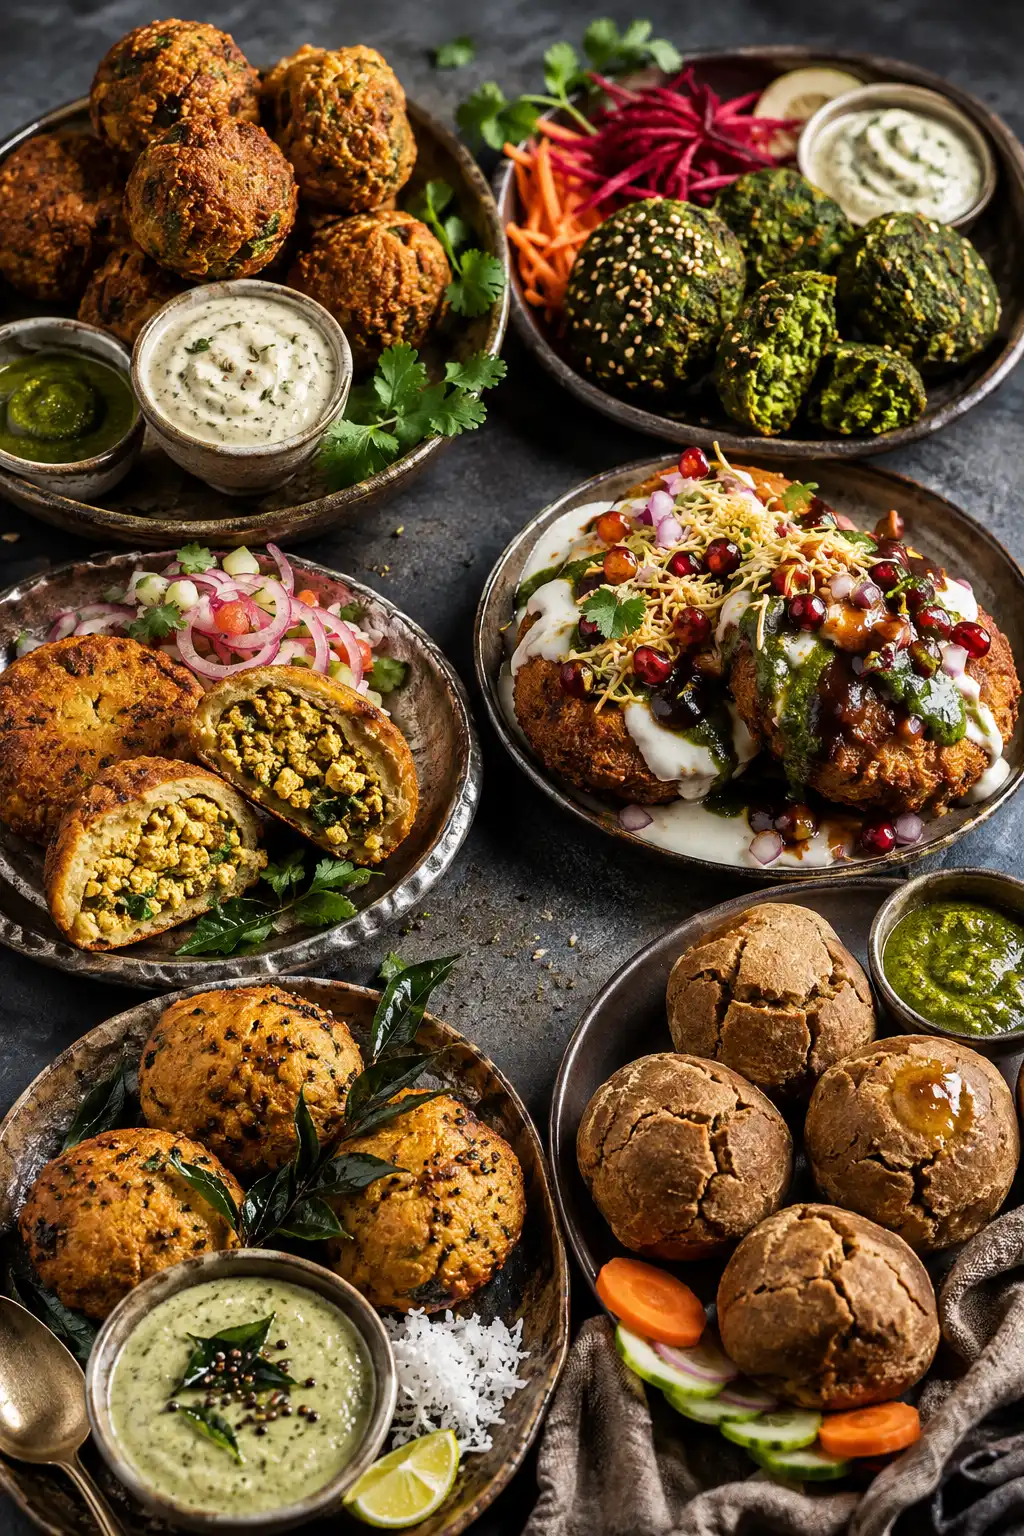
Six Indian falafel variations including Masala Chana, Methi-Palak, Aloo Tikki Chaat, Paneer Bhurji-Stuffed, Curry Leaf and Daal Bati Falafel.

At its most familiar, falafel starts with soaked chickpeas, herbs and spices, pulsed to a coarse crumb and cooked until the outside turns crisp while the middle stays tender. That basic idea fits surprisingly well into an Indian kitchen, where cumin, coriander, green chilli, ginger, amchur, chaat masala and chutneys already feel at home.

The recipes here take that starting point in six different directions. Masala Chana stays closest to classic falafel; Methi-Palak goes greener and softer; Aloo Tikki turns flat and chaat-ready; Paneer Bhurji becomes a filling rather than part of the shell; Curry Leaf brings mustard, ginger and coconut chutney into the picture; and Daal Bati deliberately leaves chickpea falafel furthest behind.

You do not need to cook them all the same way, either. Some want hot oil, one wants the broad crust of a frying pan, two sit happily in an appe/paniyaram pan, and the Daal Bati version belongs in the oven.

Table of Contents

Choose Your Indian Falafel

If you already know what sounds good, use the first column to jump straight to that recipe. If not, the texture and cooking method usually make the decision easier.

FalafelWhat it is likeBest methodBest with
Masala ChanaWarm, tangy and crisp, with a coarse chickpea centreFry or air-fryGreen chutney, cumin yogurt, pav or pita
Methi-PalakGreen, herbaceous and tender with a sesame crustAppe/paniyaram pan or air fryerCreamy dip, beet-carrot salad
Aloo TikkiCrisp outside, soft inside and built for chaatShallow-fryYogurt, green chutney, tamarind, sev
Paneer Bhurji-StuffedCrisp chickpea shell with a soft spiced paneer centreFryKachumber, pickled onion, roti
Curry LeafFragrant, peppery and coarse, with ginger and mustardFry or appe/paniyaram panCoconut-coriander chutney
Daal BatiEarthy, firm and rustic with a cracked bati-like crustBakeGreen chutney, onion, lemon, ghee

What Makes a Good Falafel Base?

For the Masala Chana, Methi-Palak, Paneer-Stuffed and Curry Leaf recipes, begin with dried chickpeas soaked in plenty of cold water for 8–12 hours or overnight in the refrigerator. Drain and rinse well before using. The Aloo Tikki version is different on purpose: cooked chickpeas suit the softer potato-based texture we want there.

Dry ingredients before adding more flour. Wet chickpeas or greens lead to more besan, and more besan can make falafel dense. This matters most with spinach: squeeze blanched palak until it feels almost surprisingly dry.

Pulse; do not purée. Falafel mixture should resemble coarse crumbs rather than hummus. A small handful may look loose in the bowl but should hold when firmly compressed.

Add besan cautiously. Start small and adjust only when the mixture genuinely needs help holding together.

For traditional falafel technique, classic serving ideas, baking and deeper air-fryer guidance, see our complete homemade falafel recipe.


1. Masala Chana Falafel

Masala Chana stays closest to familiar falafel: crisp outside, coarse within, but warmer with garam masala and cumin and a little sharper from amchur. Keep the garam masala measured so the chickpeas, coriander and garlic still come through.

Golden Masala Chana falafel balls with green chutney and cumin yogurt

Yield: about 14–16 falafel
Soaking: 8–12 hours or overnight in the refrigerator
Active prep: about 20 minutes
Chilling: 30 minutes
Cooking: about 15 minutes total, 4–5 minutes per fried batch

Ingredients

  • 1 cup (about 200 g) dried chickpeas
  • ½ medium onion, roughly chopped
  • 3 garlic cloves
  • ¾ cup loosely packed fresh coriander
  • 1 green chilli
  • 1 teaspoon ground cumin
  • 1 teaspoon ground coriander
  • ¾ teaspoon garam masala
  • ½ teaspoon amchur
  • ¼ teaspoon Kashmiri chilli powder, optional
  • 1 teaspoon fine salt, or to taste
  • 1 tablespoon besan, plus more only if needed
  • ½ teaspoon baking powder
  • Neutral oil, for frying

Method

  1. Soak the chickpeas as described above, then drain, rinse and pat away obvious surface moisture.
  2. Add chickpeas, onion, garlic, coriander and green chilli to a food processor. Pulse in short bursts until the mixture resembles coarse crumbs.
  3. Transfer to a bowl and mix in cumin, ground coriander, garam masala, amchur, chilli powder if using, salt and 1 tablespoon besan.
  4. Squeeze a spoonful firmly in your palm. It should hold together. If it is genuinely wet or still breaks after compression, add a little more besan.
  5. Cover and refrigerate for 30 minutes.
  6. Stir in the baking powder, then shape into 14–16 compact balls.
  7. Heat frying oil to about 170–175°C / 340–350°F. Fry one test falafel first. If it holds, cook the remaining falafel in small batches for about 4–5 minutes, until deeply golden and crisp.

Air-Fryer Option

Shape the falafel slightly flatter than perfect spheres, brush or spray the surfaces with oil and air-fry at 190°C / 375°F for about 12–15 minutes, turning halfway. Start checking early toward the end rather than relying only on the clock.

Serve with: coriander-mint green chutney and cumin yogurt. These also work beautifully in pav, pita or on a mezze plate with homemade hummus.


2. Methi-Palak Falafel with Mint & Coriander

Spinach turns these falafel unmistakably green, but methi is what gives them character. Mint and coriander keep the flavour fresh, while sesame adds nuttiness and a light crust around the outside.

The important step is simple: squeeze the spinach properly dry. Not casually dry. Not “I shook the colander twice” dry. Properly dry.
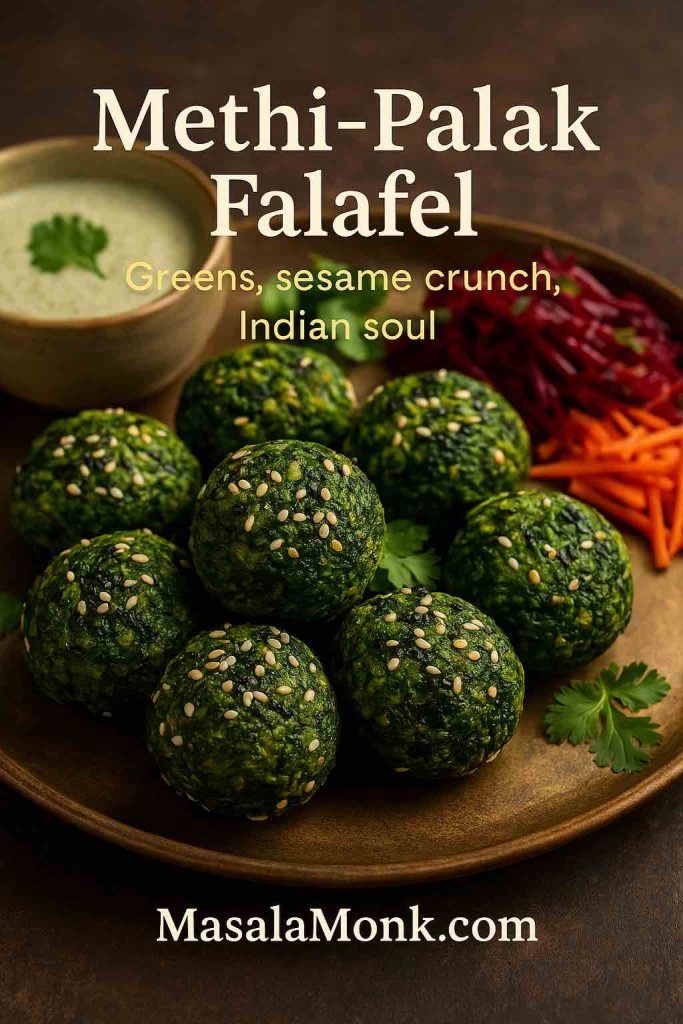
Green Methi-Palak falafel balls with sesame seeds, beetroot and carrot salad

Yield: about 14 small falafel
Soaking: 8–12 hours or overnight in the refrigerator
Active prep: about 25 minutes
Chilling: 30 minutes
Cooking: about 12 minutes

Ingredients

  • 1 cup (about 200 g) dried chickpeas
  • 60 g fresh spinach
  • ½ cup loosely packed fresh methi leaves
  • ½ cup fresh coriander
  • ¼ cup mint leaves
  • ¼ small onion
  • 2 garlic cloves
  • 1 green chilli
  • ¾ teaspoon ground cumin
  • ½ teaspoon ground coriander
  • ½ teaspoon amchur
  • Tiny pinch of nutmeg, optional
  • 1 teaspoon fine salt
  • 1 tablespoon besan, plus more only if required
  • ½ teaspoon baking powder
  • 2 tablespoons white sesame seeds
  • Oil, for cooking

Method

  1. Soak, drain and rinse the chickpeas as described above.
  2. Blanch the spinach for about 30–60 seconds, just until wilted. Cool immediately, then squeeze firmly until very little liquid comes out.
  3. Add chickpeas, squeezed spinach, methi, coriander, mint, onion, garlic and green chilli to a food processor. Pulse to a coarse green mixture rather than a paste.
  4. Mix in cumin, ground coriander, amchur, nutmeg if using, salt and 1 tablespoon besan.
  5. Chill for 30 minutes, then stir in the baking powder. Add a little more besan only if a firmly compressed portion will not hold.
  6. Shape into small round falafel and lightly roll or press each one in sesame seeds.

Appe/Paniyaram Pan Method

Brush the cavities lightly with oil. Add one falafel per cavity and cook over medium to medium-low heat, rotating as each surface firms. Cook until the falafel feels firm through the centre and no longer looks wet or pasty when one is broken open, usually around 10–12 minutes for small falafel.

Air-Fryer Option

Brush or mist lightly with oil and air-fry at 190°C / 375°F for about 12–14 minutes, turning once. Check early toward the end: small green falafel can dry out quickly.

Serve with: a creamy yogurt or coconut-yogurt dip, shredded beetroot, shredded carrot, coriander and lemon. That presentation also stays true to the vivid green falafel already shown in the article.


3. Aloo Tikki Falafel Chaat

Aloo tikki pulls this variation away from classic falafel in exactly the right direction. Cooked chickpeas keep the connection, potato gives the centre its softness, and ajwain, cumin, amchur and chaat masala take it straight toward North Indian street food.

Aloo Tikki falafel chaat with yogurt, green chutney, sev and pomegranate

Yield: 8 medium tikkis
Prep: about 25 minutes
Optional chilling: 20–30 minutes
Cooking: about 16 minutes total, around 8 minutes per batch

Ingredients for the Tikkis

  • 300 g boiled potatoes, cooled completely
  • 150 g cooked chickpeas, drained and dried well
  • 1 green chilli, finely chopped
  • 3 tablespoons chopped fresh coriander
  • ¾ teaspoon roasted cumin powder
  • ½ teaspoon ground coriander
  • ¾ teaspoon chaat masala
  • ½ teaspoon amchur
  • ¼ teaspoon ajwain, lightly crushed
  • ¼–½ teaspoon Kashmiri chilli powder, optional
  • ¾ teaspoon salt, or to taste
  • 2 tablespoons cornflour/cornstarch or rice flour
  • 1–2 tablespoons besan only if additional binding is needed
  • Oil, for shallow-frying

Method

  1. Use completely cooled potatoes. Coarsely crush the cooked chickpeas and mash the potatoes until mostly smooth but not gluey.
  2. Combine potatoes and chickpeas with green chilli, coriander, cumin, ground coriander, chaat masala, amchur, ajwain, chilli powder if using, salt and cornflour.
  3. Mix gently until the mixture holds together. Divide into eight portions and shape into broad patties about 1.5 cm thick.
  4. If the tikkis feel very soft, refrigerate for 20–30 minutes. If they are still too fragile after chilling, work a small amount of besan into the mixture.
  5. Heat a thin layer of oil in a heavy frying pan over medium heat.
  6. Cook the tikkis for about 3–4 minutes on the first side without constantly moving them. Flip once a proper crust has formed, then brown the second side.

Turn Them into Falafel Chaat

For all eight hot tikkis, have ready:

  • 1 cup plain yogurt, whisked smooth
  • 6 tablespoons green coriander-mint chutney
  • 4–6 tablespoons tamarind chutney
  • ½ small red onion, finely chopped
  • 4–6 tablespoons fine sev
  • 4 tablespoons pomegranate arils
  • Chaat masala
  • Chopped coriander

Arrange the hot tikkis on a plate, spoon over yogurt, then add green chutney and tamarind chutney. Finish with onion, sev, pomegranate, chaat masala and coriander. Serve immediately, while the tikki is still hot and crisp underneath the cool, tangy toppings.

Air-fryer option: brush both sides with oil and air-fry at 190°C / 375°F, turning once, until browned and firm. Start checking around 12 minutes. Shallow-frying still gives the more characteristic tikki crust.


4. Paneer Bhurji-Stuffed Falafel

Paneer works better here as a surprise in the centre than blended through the chickpea mixture. Keep the shell coarse and chickpea-heavy, then tuck a dry, fragrant paneer bhurji inside so the contrast is obvious when you cut one open.

Paneer bhurji-stuffed falafel cut open to show the spiced paneer filling

Yield: about 10–12 stuffed falafel
Soaking: 8–12 hours or overnight in the refrigerator
Active prep: about 30 minutes
Chilling: 30 minutes
Cooking: about 12 minutes total, 5–6 minutes per fried batch

For the Falafel Shell

  • 1 cup (about 200 g) dried chickpeas
  • ½ small onion
  • 3 garlic cloves
  • ½ cup fresh coriander
  • 1 green chilli
  • ¾ teaspoon ground cumin
  • ½ teaspoon ground coriander
  • ½ teaspoon garam masala
  • ¾ teaspoon fine salt
  • 1 tablespoon besan, plus more only if required
  • ½ teaspoon baking powder

For the Paneer Bhurji Filling

  • 100 g paneer, finely crumbled
  • 1 teaspoon oil or ghee
  • 1 teaspoon finely grated ginger
  • ½ green chilli, finely chopped
  • ¼ teaspoon turmeric
  • ½ teaspoon garam masala
  • ½ teaspoon kasuri methi, crushed
  • Small pinch of salt
  • 1 teaspoon lemon juice

Method

  1. Heat 1 teaspoon oil or ghee in a small pan. Add ginger and green chilli and cook briefly until aromatic.
  2. Add paneer, turmeric, garam masala, kasuri methi and salt. Cook for a few minutes until fragrant and deliberately fairly dry. Remove from the heat, stir in lemon juice and cool completely.
  3. Soak, drain and rinse the chickpeas as described above. Pulse them with onion, garlic, coriander and green chilli until coarse and crumbly.
  4. Mix in cumin, ground coriander, garam masala, salt and 1 tablespoon besan. Refrigerate for 30 minutes.
  5. Stir in the baking powder. If the shell mixture will not hold when firmly compressed, add a little more besan.
  6. Take roughly 2 tablespoons of falafel mixture and flatten it in your palm. Put about 1½–2 teaspoons of cooled paneer filling in the middle.
  7. Bring the chickpea mixture completely around the filling. Pinch any cracks closed and shape into a thick ball or slightly flattened oval. Keep the paneer completely enclosed.
  8. Fry at about 170–175°C / 340–350°F for roughly 5–6 minutes, until the shell is deeply golden and crisp.

Serve with: soft whole-wheat roti, kachumber, pickled red onion, coriander and lemony yogurt. If you want to make the filling from scratch, our guide to making paneer at home is useful here.


5. Curry Leaf Falafel with Mustard, Ginger & Green Chilli

Curry leaves change the aroma immediately. Ginger and green chilli bring a very different sort of heat from garam masala, while cumin, coriander and a small mustard tempering push the flavour toward South Indian pulse snacks without turning the recipe into a renamed vada.
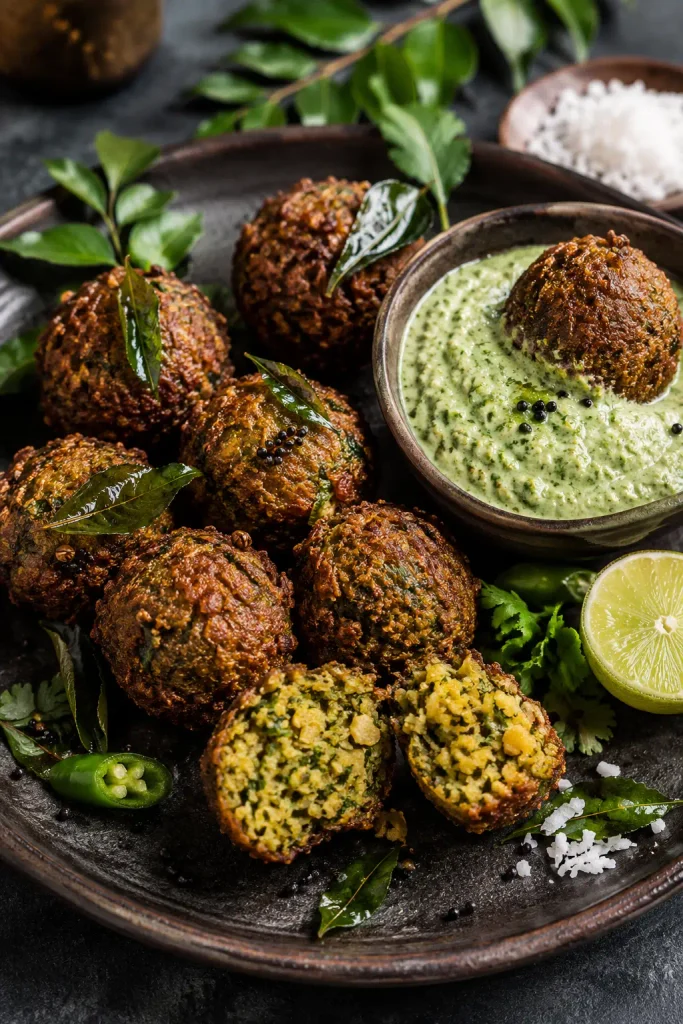
Curry leaf falafel with crisp curry leaves, mustard seeds and coconut-coriander chutney

Yield: about 14 falafel
Soaking: 8–12 hours or overnight in the refrigerator
Active prep: about 20 minutes
Chilling: 30 minutes
Cooking: about 10 minutes total, 4–5 minutes per fried batch

Ingredients

  • 1 cup (about 200 g) dried chickpeas
  • ½ small onion
  • 3 garlic cloves
  • 2.5 cm / 1 inch fresh ginger
  • 1–2 green chillies
  • 15 fresh curry leaves
  • ½ cup fresh coriander
  • ½ teaspoon cumin seeds
  • ½ teaspoon coriander seeds
  • ¼ teaspoon black mustard seeds
  • 1 teaspoon neutral oil, for tempering the mustard
  • ¼ teaspoon freshly ground black pepper
  • Small pinch of hing, optional
  • 1 teaspoon fine salt
  • 1 tablespoon besan, plus more only if needed
  • ½ teaspoon baking powder
  • 2 tablespoons desiccated coconut, optional
  • Neutral oil, for cooking

Method

  1. Soak, drain and rinse the chickpeas as described above.
  2. Toast the cumin and coriander seeds briefly in a dry pan until aromatic. Cool, then crush roughly.
  3. Heat 1 teaspoon neutral oil in the same small pan. Add the mustard seeds and let them crackle. Remove from the heat and cool.
  4. Add chickpeas, onion, garlic, ginger, green chilli, curry leaves and coriander to a food processor. Pulse until coarse.
  5. Mix through the toasted spices, cooled mustard tempering, black pepper, hing if using, salt, 1 tablespoon besan and desiccated coconut if using.
  6. Chill for 30 minutes, then stir in baking powder. Add a little more besan only if a compressed portion will not hold.
  7. Shape into about 14 compact falafel.
  8. Fry at 170–175°C / 340–350°F for about 4–5 minutes, until golden and crisp.

Appe/paniyaram pan option: oil the cavities lightly and cook over medium to medium-low heat, rotating the falafel as each side firms and browns.

Serve with: coconut-coriander chutney, lemon and a few crisp fried curry leaves. The creamy coconut softens the chilli and mustard without hiding the curry-leaf aroma.


6. Daal Bati Falafel

Daal Bati is the outlier of the six, and it should be. Instead of copying the coarse chickpea interior of classic falafel, it leans into lentils, atta, ajwain and ghee. The result is firmer and more rustic, with the cracked golden surface of a tiny bati.

Baked Daal Bati falafel with cracked golden crust, green chutney and onion salad

Yield: about 10–12 small bites
Prep: about 25 minutes
Resting: 15 minutes
Baking: about 25 minutes

Ingredients

  • ½ cup total dry dal, using roughly equal amounts moong dal, masoor dal and urad dal; cook and drain well, then measure 1 cup for the dough
  • 1 cup (about 120 g) whole-wheat flour, plus more if required
  • 2 tablespoons fine semolina/sooji
  • 2 tablespoons melted ghee or mustard oil
  • ½ teaspoon ajwain, lightly crushed
  • ¼ teaspoon cumin
  • Small pinch of hing
  • 1 green chilli, very finely chopped
  • ½ teaspoon grated ginger
  • ¼ teaspoon turmeric
  • ¾ teaspoon salt, or to taste
  • Water only if required
  • A little additional ghee for brushing, optional

Method

  1. Cook the ½ cup mixed dry dals until tender but not watery. Drain very thoroughly, then measure 1 cup of cooked dal for the dough. Reserve any extra.
  2. Mash the drained dal coarsely.
  3. Add whole-wheat flour, semolina, ghee or mustard oil, ajwain, cumin, hing, green chilli, ginger, turmeric and salt.
  4. Bring everything together into a firm dough. If sticky, add whole-wheat flour 1 tablespoon at a time. If too dry to hold, add water 1 tablespoon at a time.
  5. Rest for 15 minutes while the oven heats to 200°C / 400°F.
  6. Divide into 10–12 small balls. Leave a slightly rugged surface rather than smoothing every crack away.
  7. Arrange on a baking tray, brush lightly with ghee or oil and bake for 22–28 minutes, turning once, until browned and firm outside.
  8. If desired, brush the hot bites very lightly with ghee as soon as they leave the oven.

Serve with: green chutney, sliced onion, carrot or cucumber and lemon wedges. Because this recipe contains atta, it is not gluten-free. If finished with ghee, it is not vegan either; mustard oil keeps the bites themselves plant-based.


Which Cooking Method Works Best?

The best cooking method changes with the mixture. A chickpea ball wants something different from a soft potato tikki or an atta-and-dal bite.

MethodBest forWhat to expect
Deep-fryingMasala Chana, Paneer-Stuffed, Curry LeafDeepest colour and crispest falafel-style crust
Shallow-fryingAloo TikkiBroad golden crust with a soft potato-chickpea centre
Air fryerMasala Chana, Methi-Palak, Aloo TikkiGood browning with less oil; slightly drier than frying
Appe/paniyaram panMethi-Palak, Curry LeafSmall rounded bites with low oil and good support while cooking
OvenDaal BatiFirm, rustic, bati-like crust rather than a fried falafel shell

For the chickpea-heavy versions, frying gives the clearest contrast between crisp exterior and coarse interior. For Aloo Tikki, broad contact with a hot pan is the point. Methi-Palak benefits from the support of an appe/paniyaram pan, while Daal Bati belongs in the oven. Use the method that suits the texture of each variation rather than forcing every recipe into every appliance.

More Indian Ways to Serve Falafel

Falafel Chaat

Put several hot Masala Chana or Methi-Palak falafel on a plate and lightly crack them open. Add whisked yogurt, green chutney, tamarind chutney, finely chopped red onion, chaat masala, sev, pomegranate and coriander. Assemble just before eating so the base keeps some crunch.

Falafel Pav

Split and toast pav with a little butter or oil. Spread one side with green chutney and the other with tamarind chutney. Add a slightly flattened Masala Chana Falafel, sliced onion and something crisp such as cucumber or cabbage. A little chaat masala over the filling ties it together.

Paneer-Stuffed Falafel Roti Roll

Warm a soft roti and add sliced Paneer Bhurji-Stuffed Falafel, kachumber, pickled onion, coriander and lemony yogurt. Because the paneer is already inside, the wrap does not need another heavy filling.

Indian-Style Mezze Plate

Try Masala Chana Falafel with hummus, cucumber, kachumber, pickled onions, green chutney, lemon and warm flatbread. If you are making the bread too, use our homemade pita bread recipe. For a sharper mango-pickle note, a spoonful of amba sauce fits naturally beside falafel and hummus.

Falafel Bowl

Start with rice, millet, couscous or chopped salad. Add falafel, cucumber, tomato, onion and something creamy such as hummus or yogurt. Then choose one strong Indian accent—green chutney, tamarind, achar, chaat masala or coconut chutney—rather than using every condiment at once.

Fixing These Indian Falafel Variations

ProblemLikely causeFix
Masala or Curry Leaf falafel breaks in oilMixture too wet, too loose or oil too coolDrain thoroughly, compress firmly, fry one tester and add a little besan only if needed
Methi-Palak falafel is soggySpinach retained too much waterSqueeze blanched spinach much more thoroughly before processing
Paneer falafel cracks openWet filling, too much filling or paneer too close to the surfaceCook bhurji drier, cool completely and use a smaller amount
Aloo Tikki sticks or breaks when flippedTurned before the crust formedLeave it undisturbed longer and flip only when it releases more easily
Air-fried green falafel is dryToo little surface oil or too much cooking timeLightly oil and begin checking earlier
Daal Bati mixture is stickyCooked dal retained too much waterDrain longer and add atta gradually rather than dumping in a large amount

If the first chickpea falafel disintegrates, stop there. One tester is enough to tell you whether the mixture needs drying, firmer shaping or hotter oil.

Make Ahead, Store & Freeze

Masala Chana and Curry Leaf: the mixture can be prepared ahead and refrigerated, with baking powder stirred in shortly before shaping and cooking.

Methi-Palak: shorter holding is better because fresh greens continue releasing moisture as they sit.

Paneer-Stuffed: prepare the dry paneer bhurji and chickpea shell mixture separately, refrigerate them, then stuff closer to cooking.

Aloo Tikki: shape the patties, freeze in a single layer until firm, then transfer to a freezer-safe container with parchment between layers if stacking.

Daal Bati: bake, cool and refrigerate. Reheat in a hot oven or air fryer to restore the firmer exterior.

For broader freezing and reheating guidance for classic chickpea falafel, see the full falafel guide.

Indian Falafel FAQs

Can you put garam masala in falafel?

Yes. Classic falafel already uses spices such as cumin and coriander, so a restrained amount of garam masala fits naturally. In the Masala Chana version, it adds an Indian finish without masking the chickpeas and fresh herbs.

Which Indian chutney goes best with falafel?

Coriander-mint green chutney is the most versatile choice for Masala Chana, Methi-Palak and Paneer-Stuffed Falafel. Tamarind works particularly well with Aloo Tikki Falafel Chaat or falafel pav, while coconut chutney makes the most sense beside Curry Leaf Falafel.

Can I make falafel in an appe or paniyaram pan?

Yes. It is particularly useful for Methi-Palak and Curry Leaf Falafel because the cavities support the mixture while each surface cooks. Brush the cavities with a little oil and rotate the falafel as they firm and brown.

Why is my spinach falafel soggy?

Usually because the spinach contains too much water. After blanching, cool it and squeeze aggressively before adding it to the chickpeas. Removing moisture is preferable to compensating later with a large amount of besan.

Can falafel be made with moong dal?

Yes, but replacing chickpeas with another pulse changes both texture and technique. Whole or split moong can make excellent falafel-inspired fritters and patties, but it should be treated as its own formulation rather than a blind one-for-one substitution.

How do you make falafel chaat?

Put hot falafel or Aloo Tikki Falafel on a plate and add whisked yogurt, green chutney, tamarind chutney, onion, chaat masala, sev, pomegranate and coriander. Assemble just before serving so some of the crust stays crisp.

Can paneer be added to falafel?

Yes. Stuffing works particularly well because the paneer remains a distinct soft centre rather than changing the texture of the entire chickpea mixture. Keep the bhurji fairly dry and cool it completely before stuffing.

Which Indian falafel works best in an air fryer?

Masala Chana is the easiest starting point. Methi-Palak also works well, but check it early because small green falafel can dry out. Aloo Tikki can be air-fried, although shallow-frying gives the more characteristic crust. Daal Bati belongs in the oven, and frying remains the most reliable method for the stuffed paneer version.
Posted on — 1 Comment

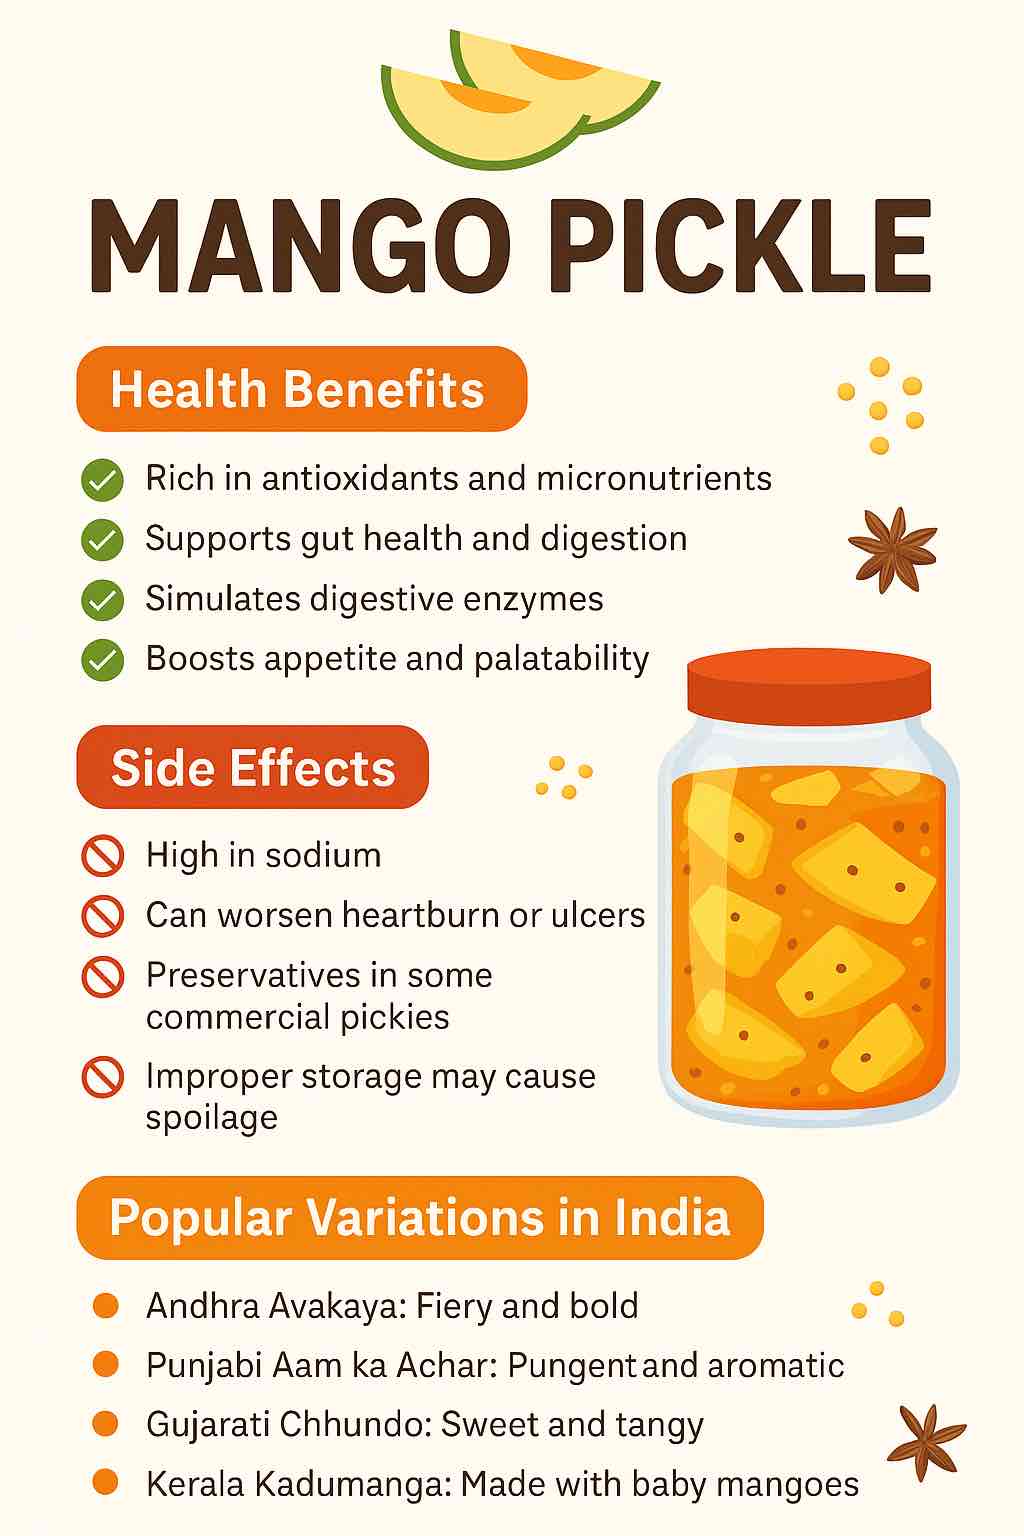
Mango Pickle -Benefits, Side Effects, Variations, & a lot more.

Mango Pickle -Benefits, Side Effects, Variations, & a lot more.

Few foods evoke as much nostalgia, flavor, and curiosity as mango pickle. Whether you grew up sneaking tangy bites from a glass jar in your grandma’s kitchen or recently discovered its punchy magic at a local Indian restaurant, mango pickle is a condiment like no other. But is it just a treat for the taste buds, or does it also have health benefits? Can it be harmful? And what makes the varieties across India and beyond so fascinating? This blog dives deep into the world of mango pickle—backed by the latest science, regional stories, and practical advice for anyone who loves (or is curious about) this spicy delight.


What is Mango Pickle?

At its core, mango pickle is a traditional preserve made from raw (unripe) mangoes, spices, oil, and salt. It’s a staple in Indian, Pakistani, Bangladeshi, and Sri Lankan homes, often accompanying rice, roti, paratha, or even humble khichdi. The beauty of mango pickle is in its infinite variations, each shaped by local traditions, climate, and the creativity of home cooks.


Why is Mango Pickle So Popular?

  • Flavor Explosion: Sour, salty, spicy, sometimes sweet—each bite is a sensory adventure.
  • Preservation: Before refrigeration, pickling was how families enjoyed mangoes all year round.
  • Cultural Ritual: Pickle-making is a time-honored family activity, often passed down through generations.

Health Benefits of Mango Pickle (Latest Insights)

1. Gut Health & Probiotics

If you’re eating a naturally fermented mango pickle (not one with vinegar or preservatives), you’re likely getting a dose of beneficial probiotics. These live bacteria can support gut health, aid digestion, reduce bloating, and may even help with nutrient absorption. Research in 2024 highlights that traditional, fermented pickles improve gut microbiome diversity, which is increasingly linked to overall wellness.

2. Digestive Enzyme Support

Spices like mustard seeds, fenugreek, asafoetida, and fennel aren’t just for flavor—they stimulate digestive enzymes, helping your body process food more efficiently. A teaspoon of mango pickle with a meal can genuinely aid digestion, which explains its classic role as a “side” on Indian thalis.

3. Rich in Antioxidants and Micronutrients

Raw mangoes provide Vitamin C, Vitamin A, and fiber, while spices like turmeric and fenugreek offer powerful antioxidants. These compounds fight free radicals, potentially slowing cell aging, reducing inflammation, and supporting immune health.

4. Boosts Appetite & Palatability

Pickle’s tangy and spicy flavors increase saliva secretion, making bland foods more appetizing. This is especially helpful for those recovering from illness or dealing with low appetite.

5. Potential Support for Skin, Heart, and Vision

  • Turmeric and mango antioxidants support skin repair and may have anti-inflammatory effects.
  • Potassium and magnesium (from mango and some spices) support healthy blood pressure.
  • Vitamin A and carotenoids in mango can help with vision and skin glow.

6. Aiding in Weight Control (In Moderation)

Recent research notes that some spices used in mango pickle—like mustard, chili, and fenugreek—may have thermogenic (metabolism-boosting) effects. But here’s the catch: the actual impact on weight is supportive, not transformative. In other words, pickle can add a metabolic edge to a balanced meal, but isn’t a weight-loss food by itself.


Potential Side Effects and Risks (What Science and Doctors Say)

1. High Sodium Content

Pickles are inherently salty—salt is what preserves them. Regular, excessive intake can contribute to high blood pressure, water retention, and kidney stress. If you have hypertension or kidney issues, keep intake very moderate.

2. Oil Overload

Traditional recipes use plenty of oil (often mustard or sesame), which aids preservation and taste. However, some commercial brands use cheaper, less healthy oils or even hydrogenated fats. Too much oil increases calories and can raise cholesterol if the oil quality is poor.

3. Acidic & Spicy: Not for All

If you have acid reflux, gastritis, ulcers, or IBS, the acidity and spice can aggravate symptoms. Fermented pickles can also cause mild GI upset in sensitive individuals, as per recent studies.

4. Preservatives, Additives, and Spoilage

Commercial pickles may contain artificial preservatives and colors. Home-pickled jars, if not handled or stored properly, can develop molds or harmful bacteria. Always use a clean, dry spoon and store in airtight containers.

5. Potential Carcinogenic Risk (Heavily Salted/Preserved Foods)

Some studies (especially from East Asia) have linked very high intake of heavily salted, preserved vegetables to increased risk of certain cancers. For typical, moderate mango pickle consumption, risk remains low—especially with clean, home-prepared versions.


Mango Pickle Variations Across India (and Beyond!)

1. Andhra Avakaya

  • Famous for: Intense heat, bold mustard flavor, and bright red color.
  • Key Ingredients: Raw mango, red chili powder, mustard powder, fenugreek, sesame oil.
  • Texture: Chunky, fiery, and deeply aromatic.

2. Punjabi Aam ka Achar

  • Famous for: Pungent aroma (from mustard oil), slightly bitter edge (from fenugreek), and robust spices.
  • Key Ingredients: Raw mango, mustard oil, fennel seeds, nigella seeds, asafoetida.

3. Gujarati Chhundo

  • Famous for: Sweetness and translucence.
  • Key Ingredients: Grated mango, sugar, mild spices.
  • Usage: Great with theplas and snacks.

4. Kerala Kadumanga

  • Famous for: Use of whole baby mangoes.
  • Key Ingredients: Tiny mangoes, mustard, chili, turmeric, coconut oil (sometimes).

5. Bengali Aam-er Achar

  • Famous for: Balance of tang and sweet.
  • Key Ingredients: Mango, sugar, panch phoron (five-spice blend).

Pro Tip: Each state—and often each family—has its own twist. Some add garlic, some add jaggery, some use sun-drying, others ferment for weeks. There are even fusion versions using olive oil or global spices!


How to Choose and Eat Mango Pickle for Health

  1. Opt for Homemade or Artisanal Brands: Less likely to use preservatives or poor-quality oil.
  2. Go Fermented if Possible: Naturally fermented pickles offer the added benefit of probiotics.
  3. Watch the Serving Size: 1–2 teaspoons per meal is plenty.
  4. Pair with Whole Foods: Enjoy with dal, rice, and veggies—not just with fried or heavy foods.
  5. Store Smart: Always use clean, dry utensils. Keep jars tightly closed, and refrigerate after opening if possible.

Practical Recipes: Try Your Own Mango Pickle!

Quick Mango Pickle (No Fermentation Needed)

Ingredients:

  • 2 cups raw mango, chopped
  • 2 tbsp salt
  • 1 tbsp chili powder
  • 1 tsp turmeric
  • 1 tbsp mustard seeds
  • 1 tbsp fenugreek seeds
  • 1 cup mustard or sesame oil

Instructions:

  1. Mix mango, salt, chili, and turmeric.
  2. Heat oil, add mustard and fenugreek seeds, let splutter, then cool.
  3. Combine oil and spices with mango. Store in a glass jar.
  4. Can be eaten after 24 hours—keeps in fridge for 2–3 weeks.

For Fermented Pickle:
Let the spiced mangoes sit in the jar (covered with muslin) at room temp for 5–7 days, stirring daily, before topping with oil and storing airtight.


Frequently Asked Questions

1. What is the healthiest way to eat mango pickle?
The healthiest way is in moderation—about 1–2 teaspoons per meal—alongside a balanced meal. Choose homemade or small-batch artisanal pickles that use natural oils, minimal salt, and avoid artificial preservatives.

2. Are store-bought mango pickles as good as homemade ones?
Homemade pickles are generally healthier, as you can control the quality of oil, salt, and spices. Many commercial brands use preservatives, artificial colors, or low-quality oils. Always check the label for clean, minimal ingredients.

3. Can mango pickle really help digestion?
Yes, mango pickle can stimulate digestive enzymes, thanks to spices like fennel, mustard, and asafoetida. Fermented pickles may also offer probiotic benefits, which support gut health.

4. Who should avoid eating mango pickle?
People with high blood pressure, kidney issues, acid reflux, gastritis, or ulcers should limit or avoid mango pickle due to its high salt, oil, and spice content.

5. How long does mango pickle last, and how should it be stored?
Properly prepared and stored in airtight, dry containers, mango pickle can last up to a year. Always use a dry spoon, avoid moisture, and refrigerate after opening if possible to prevent spoilage.

6. Is mango pickle suitable for children?
In small amounts, yes—provided it is not overly spicy or salty. Always introduce gradually and observe for any digestive discomfort.

7. Does mango pickle contain probiotics?
Only naturally fermented mango pickles (those not made with vinegar or preservatives) contain live probiotics. Most commercial pickles are not fermented and thus lack probiotic benefits.

8. Can eating mango pickle daily be harmful?
Eating small amounts daily is generally safe for healthy individuals, but overconsumption can lead to high sodium and fat intake, raising risks of hypertension or weight gain.

9. What are the different types of mango pickle found in India?
Popular varieties include Andhra Avakaya (spicy), Punjabi Aam ka Achar (aromatic and pungent), Gujarati Chhundo (sweet), Kerala Kadumanga (whole baby mangoes), and Bengali Aam-er Achar (sweet-tangy).

10. Can mango pickle help with weight loss?
Mango pickle can slightly boost appetite and digestion, but it is not a weight-loss food. The high oil and salt content mean moderation is crucial; it should be viewed as a flavorful condiment, not a health food.


In Conclusion

Mango pickle is a celebration of flavor, tradition, and yes—a little bit of science! Enjoyed in moderation, it can spice up your meals and may support digestive health, thanks to natural fermentation and healthful spices. Just remember: moderation is your friend, and homemade (or trusted small-batch) versions are usually best.

So next time you reach for that vibrant jar, know you’re savoring not just a condiment, but a slice of culinary history and well-being.


Do you have a family pickle recipe or a regional favorite? Share your story in the comments below!
Want more recipes, brand reviews, or science-backed tips? Let us know what you’d like to read next!


References:


Craving more food wisdom? Follow us for in-depth guides on traditional foods, modern health, and the joy of eating well!

Posted on — Leave a comment

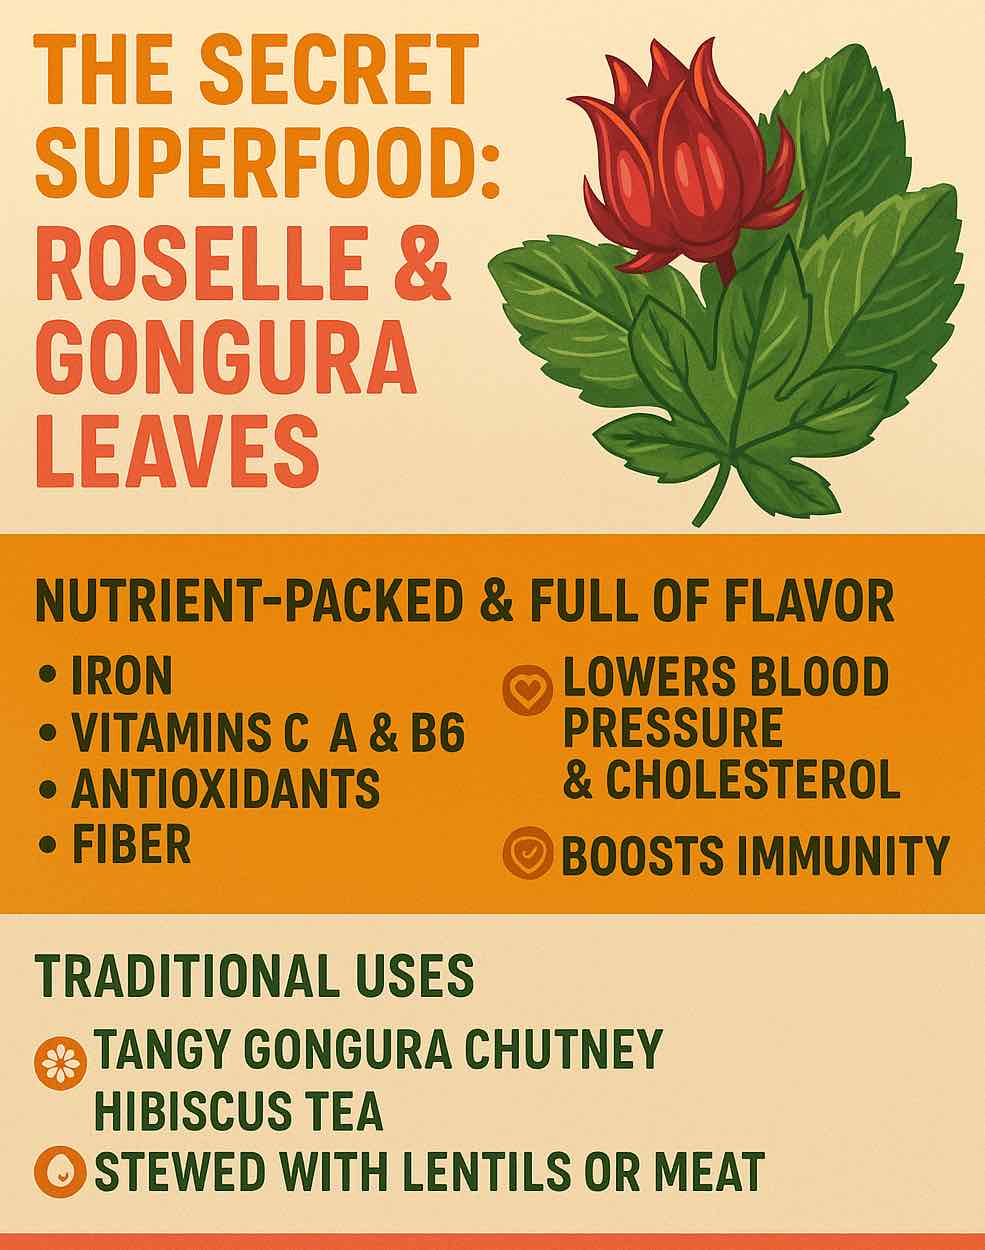
Secret Superfood: Roselle and Gongura Leaves

SECRET SUPERFOOD: ROSELLE & GONGURA LEAVES

Tangy. Nutritious. Ancient. Scientifically backed. Discover why Roselle and Gongura should be your next pantry staple!


Introduction

In a world obsessed with kale, avocados, and blueberries, an ancient leafy green quietly shines in home kitchens across India, Africa, and the Caribbean. Roselle (Hibiscus sabdariffa) and its leafy cousin, Gongura (popular in South India), are finally stepping into the global superfood spotlight. Their vibrant flavor, powerhouse nutrition, and now—cutting-edge science—make them an essential for anyone serious about health.

What Are Roselle and Gongura?

  • Roselle is a species of hibiscus, grown for its tart calyces (used in teas, jams, drinks) and nutritious leaves.
  • Gongura refers to the leaf variety of Roselle, famed in Andhra and Telangana cuisines (India) for its unique tang.

🌱 Nutrition & Phytochemistry: Why Are They So Special?

Both leaves and calyces (the red outer “fruits” used in hibiscus tea) pack an extraordinary nutritional punch:

Key Nutrients

  • Vitamins: C (immunity), A (vision/skin), B6 & B9 (energy, brain), riboflavin, niacin.
  • Minerals: Iron (higher than spinach!), calcium, magnesium, potassium, phosphorus, zinc.
  • Phytochemicals: Polyphenols, flavonoids (quercetin, kaempferol), anthocyanins (in calyces), protocatechuic acid.
  • Fiber: Supports gut health and satiety.
  • Antioxidants: Extremely high—neutralizes free radicals, reduces inflammation.

🧬 What Does the Science Say? Latest Research (2024–2025)

Forget the hype—what do clinical trials show?

1. Blood Pressure & Heart Health

  • Multiple recent meta-analyses and RCTs confirm:
    • Regular consumption of Hibiscus tea/capsules lowers systolic and diastolic blood pressure by 5–8 mmHg (comparable to some medications for mild hypertension!).
    • LDL cholesterol drops by 7 mg/dL; triglycerides improve as well.

2. Blood Sugar & Metabolic Syndrome

  • A 2025 Bangkok trial: Roselle extract in people with abdominal obesity and mild metabolic syndrome reduced fasting glucose, improved insulin sensitivity, and lowered triglycerides within weeks.
  • 2024 Tunisia pilot: 1 month of hibiscus tea dropped blood sugar by 47%, HbA1c by 9.5%, triglycerides by 60%, cholesterol by 39%, and BP by 17% (in type 2 diabetics and hypertensives).

3. Cognitive Boost

  • March 2025 study: A single dose of anthocyanin-rich hibiscus tea improved memory, executive function, and cardiovascular markers in healthy adults.

4. Other Emerging Benefits

  • Hepato- and nephro-protective: Supports liver and kidney health.
  • Antimicrobial & anti-inflammatory: Fights common bacteria, fungi; calms inflammation.
  • Potential anti-cancer effects: Inhibits tumor-promoting pathways (in animal studies).

5. Safety

  • Generally safe, with rare side effects (mild digestive upset at high doses).
  • No significant interactions reported with moderate intake.

🍲 How to Use Roselle & Gongura: Practical Kitchen Guide

Gongura (Roselle Leaves):

  • Chutney: South India’s iconic Gongura pachadi—tangy, spicy, pairs with rice or dosa.
  • Dal (Lentils): Add chopped leaves to dal for a tart, iron-rich boost.
  • Stir-fries: Sauté with garlic, chilies, and onions—treat like spinach but enjoy the tang!
  • Stews & Curries: Uplifts chicken, fish, or prawn curries.

Quick Recipe: Gongura Dal

  1. Boil 1 cup toor dal (split pigeon peas) until soft.
  2. Sauté onions, garlic, chilies, add 2 cups chopped gongura leaves, cook till wilted.
  3. Mix dal + sautéed leaves. Add salt, turmeric. Simmer 10 min. Top with cumin-mustard seed tempering.

Roselle Calyces:

  • Tea: Boil calyces in water 5–10 min, sweeten if desired—enjoy hot or iced (“sorrel” in the Caribbean).
  • Jam/Sauces: Calyces cook into brilliant crimson jam—great with toast or cheese.
  • Drinks: Blend with fruit juice or lemon for a tart, antioxidant-packed beverage.

🌍 Traditional Wisdom Meets Modern Science

  • Ayurveda & Folk: Used for fever, digestion, anemia, infections, skin health.
  • Africa & the Caribbean: Known for “sorrel” drinks, pickled calyces, medicinal teas.
  • Asia: Stews, chutneys, soups—especially for post-partum recovery.

Modern science is validating centuries of traditional use: Roselle and Gongura aren’t just flavorful—they’re functional.


🛒 Buying, Storing, and Using

  • Fresh: Buy from Indian, African, or Asian groceries; look for vibrant green (leaves) or red (calyces), avoid wilted or slimy.
  • Dried: Calyces are widely available online for tea; dried leaf powders are emerging in global health markets.
  • Storage:
    • Fresh leaves: Refrigerate in a loose bag, use within 4–5 days.
    • Calyces: Air-dry for long storage, or freeze.

💡 Pro Tips

  • Tartness varies: Red-stem Gongura is more sour than green-stem. Use accordingly.
  • Pairing: Acidic leaves replace tamarind or lemon in recipes.
  • Max nutrition: Steam or sauté lightly; boiling is fine but discard excess water if you want less tartness.
  • Chutney hack: Add sesame or peanuts for protein and texture.

⚡️ Who Should Try Roselle & Gongura?

  • Anyone with pre-hypertension or high BP
  • Those seeking more plant iron (esp. vegetarians)
  • People with metabolic syndrome or early diabetes
  • Anyone bored of spinach!
  • Note: Those with kidney stones or on potassium-sparing diuretics should consult their doctor (leaves are high in potassium and oxalates).

📈 Bottom Line

Roselle and Gongura leaves are among the world’s most underappreciated superfoods—delicious, versatile, and validated by cutting-edge science for real-world health benefits. They’re not a “magic cure,” but when added to a balanced diet, they can support heart, metabolic, and overall well-being.


🥄 Ready to Try?

  1. Pick up some Gongura leaves or Roselle calyces this week.
  2. Try a simple dal, tea, or chutney recipe.
  3. Notice how they add a lively tang and deep nutrition to your meals!

Have you tried Roselle or Gongura yet? Share your experience or questions in the comments below!

FAQs

1. What is the difference between Roselle and Gongura?
Roselle (Hibiscus sabdariffa) is the plant species; its tart red calyces are used for tea and jams worldwide. Gongura refers to the edible green leaves of Roselle, especially popular in Indian cuisine for their tangy taste.

2. Are Roselle and Gongura safe for daily consumption?
Yes, both are generally safe when eaten in normal food amounts. Most studies report no serious side effects. If you have kidney issues, consult a doctor before frequent use, as the leaves are high in potassium and oxalates.

3. Can I use Roselle leaves and calyces interchangeably in recipes?
No. The calyces are intensely tart and used for drinks, teas, and preserves. The leaves (Gongura) are used more like spinach or other greens in curries, stews, and chutneys.

4. Where can I buy Roselle or Gongura?
Check Indian, African, or Asian grocery stores for fresh leaves. Dried calyces for hibiscus tea are widely available online and in many supermarkets worldwide.

5. What are the key health benefits of these superfoods?
Scientific studies show they can help lower blood pressure, support heart health, improve lipid profiles, aid in blood sugar control, provide antioxidants, and support liver and kidney health.

6. Are there any side effects or contraindications?
Very rarely, some people may experience mild digestive upset. People prone to kidney stones or on potassium-restrictive diets should moderate intake or seek medical advice.

7. How should I store Roselle calyces and Gongura leaves?
Fresh leaves: refrigerate in a loose bag, use within a week. Calyces: air-dry or freeze for longer storage. Dried products should be kept in airtight containers away from moisture.

8. How much should I consume to get the health benefits?
Human studies use 1–3 cups of hibiscus tea daily or 2–3 servings of leaves weekly. For general health, including the leaves or tea a few times per week is a practical and safe approach.

9. Can pregnant or breastfeeding women eat Roselle/Gongura?
Traditionally, they are eaten by women in India (including postpartum). However, there is limited research on high-dose supplementation during pregnancy, so moderate, food-level consumption is considered safe.

10. Do these superfoods interact with any medications?
Large amounts of hibiscus/roselle can potentially lower blood pressure and blood sugar, so monitor if you’re on related medications. Always check with your healthcare provider for personal guidance.

Posted on — Leave a comment

Keto Butter Chicken Recipe: Rich, Silky Murgh Makhani

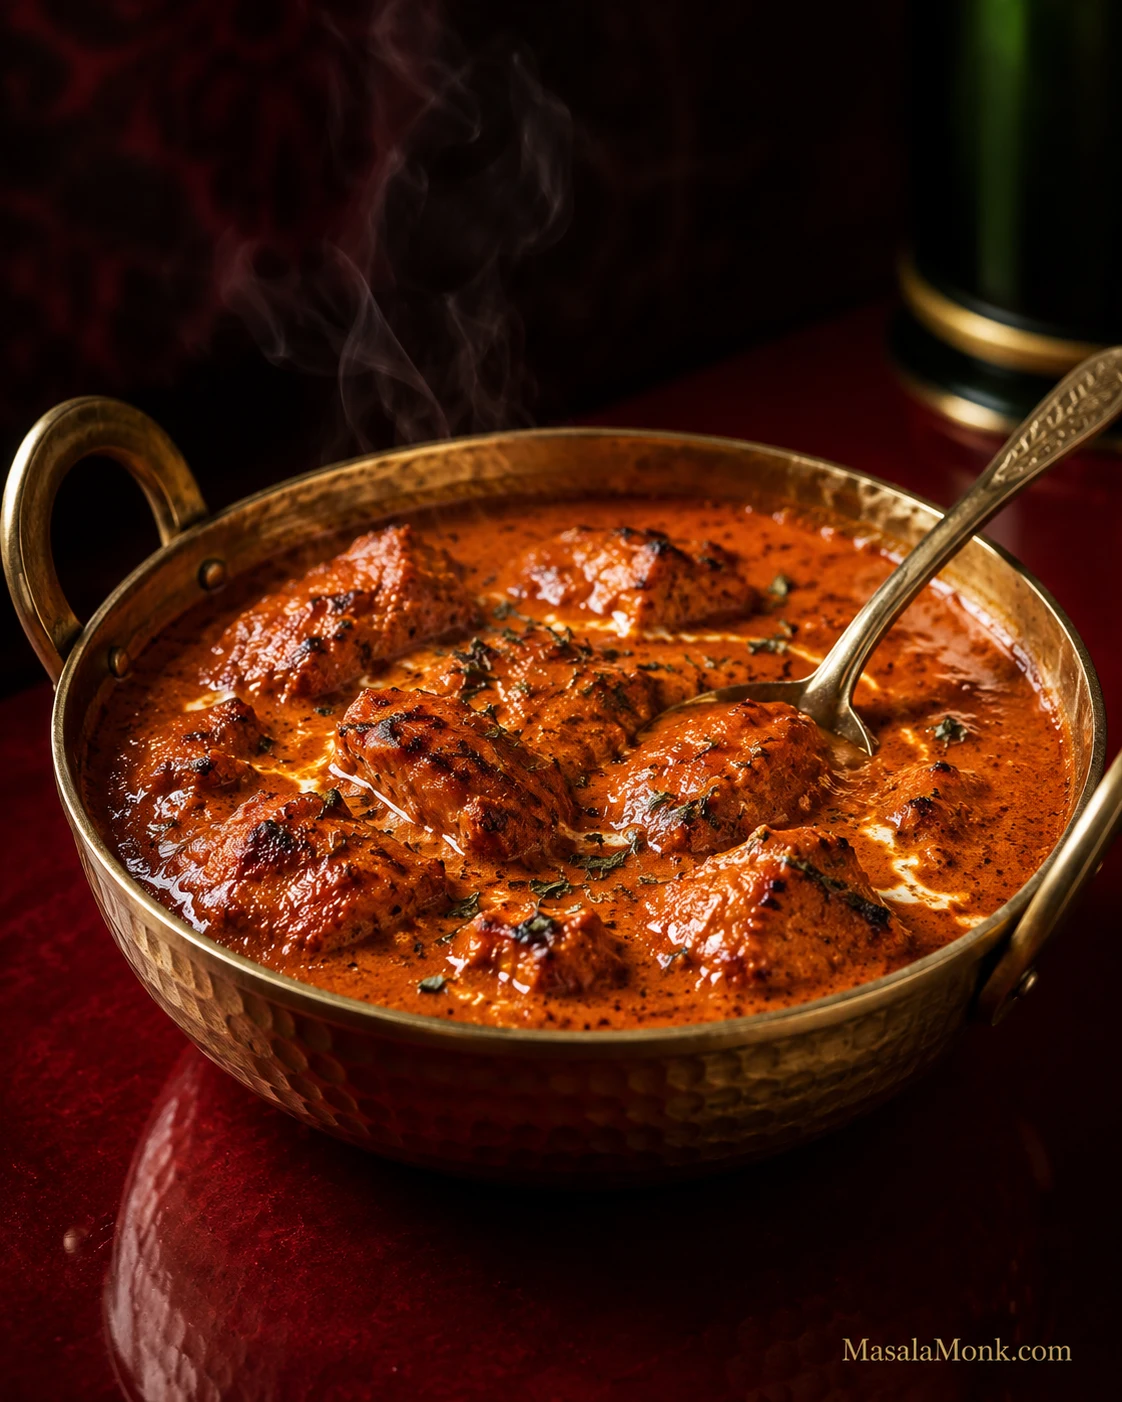
Bowl of keto butter chicken with browned boneless chicken pieces in glossy orange-red makhani gravy, finished with a little kasuri methi.

This post was last updated on:

A good butter chicken has contrast, and keto doesn’t change that.

The chicken should have browned, sometimes lightly charred edges. The gravy should cling to those pieces and still move around them, with a soft butter sheen. Tomato gives the sauce its backbone, cream smooths the acidity, and crushed kasuri methi leaves the aroma that makes the finished curry recognizably butter chicken.

If butter chicken is one of the dinners you’ve been missing since cutting back on carbs, most of what makes it worth eating can stay. Or maybe you’ve already tried a low-carb version and ended up with perfectly decent creamy tomato chicken that somehow never quite became butter chicken. This recipe is meant to solve both problems.

This version is savory and tomato-deep, with browned chicken, a smooth orange-red gravy, moderate cream and kasuri methi still noticeable after the bite. A favourite takeaway may be much sweeter or richer. If yours is, this will taste different—and nothing has gone wrong.

Butter chicken—murgh makhani—already starts with plenty of ingredients that fit naturally into a lower-carb meal. Most of the carb difference comes from added sugar, how much tomato and onion go into the gravy, cashews or starches, prepared sauces and, very often, the rice and naan served with it.

Keep the butter chicken. Change the carbs that matter.

Jump to: Recipe · The 5 Changes · Troubleshooting · Low-Carb Sides · Nutrition · Restaurant Butter Chicken

Quick Answer: Is Butter Chicken Keto-Friendly?

Yes. Homemade butter chicken can be keto-friendly. This version comes to roughly 7g net carbs per serving, with no added sugar, cashews or flour-based thickener.

Chicken, butter, ghee, cream and spices contribute relatively little carbohydrate in the amounts used here. Tomato, onion and plain yogurt contribute some. Restaurant and packaged gravies may add sugar, ketchup, flour, cornstarch, cashews or simply a much larger amount of sauce.

Homemade is easier to calculate because you know what went into the pan. Whether roughly 7g net carbs fits your day depends on the carbohydrate target you’re following.

Ready to cook? Jump to the keto butter chicken recipe →

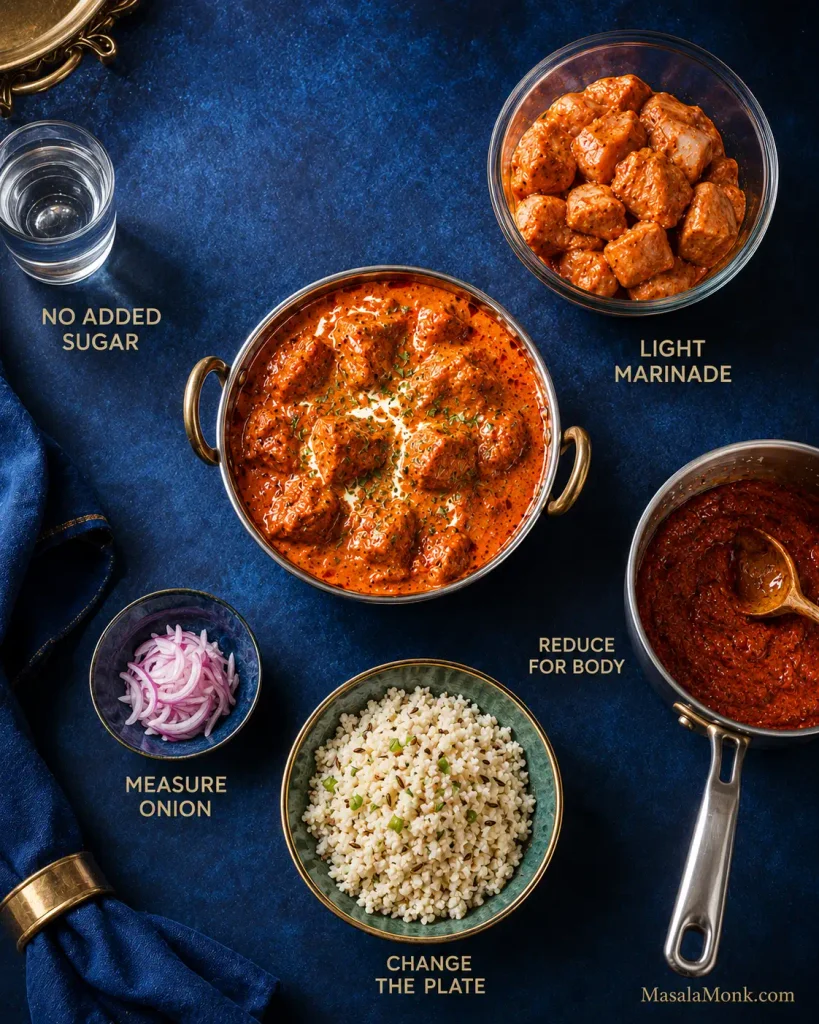
The 5 Changes That Matter

  1. Skip the added sugar. Give the tomato enough time to lose its raw, sharp edge before deciding the sauce needs sweetness.
  2. Keep the yogurt-and-lemon marinade. Leave only a light coating on the chicken before browning so the spices stay with the meat without flooding the pan.
  3. Let the gravy thicken through cooking. Tomato reduction and blending give this sauce plenty of body. Flour and specialty keto thickeners are unnecessary.
  4. Measure the onion; skip the cashews in this version. A modest amount of onion still gives the gravy body and sweetness, while the tomato, butter and cream supply enough richness.
  5. Look at the whole plate. Jeera cauliflower rice, greens and something crisp can save more carbohydrates than stripping character out of the curry itself.

That’s most of the keto work. From here, cook it like butter chicken.

Butter chicken surrounded by visual cues for no added sugar, a light yogurt marinade, reduced tomato gravy, measured onion and cauliflower rice.
No specialty keto thickeners are needed here: reduction, measured gravy ingredients and the plate do the work.

Keto Butter Chicken Recipe

The ingredient list looks long, but the cooking itself is straightforward. Most of the work is measuring, browning the chicken and giving the tomato enough time.

If other people at the table aren’t eating low-carb, you do not need a second curry. Put rice or naan on their side of the table and cauliflower rice or vegetables on yours.

At a Glance

DetailWhat to expect
Serves4 generous main-course portions
Chicken700g / 1½ lb boneless skinless thighs
PrepAbout 15 minutes
Marinating30 minutes minimum; 2–4 hours is better
CookAbout 30–40 minutes
Minimum elapsed timeAbout 1¼–1½ hours
Pan11–12in / 28–30cm wide, reasonably deep skillet or sauté pan
Heat levelMild to medium
Estimated net carbsAbout 7g per serving, before sides

Equipment

  • 11–12in / 28–30cm wide, reasonably deep skillet or sauté pan
  • mixing bowl
  • knife and cutting board
  • instant-read thermometer
  • immersion blender, recommended for a smoother gravy
  • digital kitchen scale, useful but not essential

A countertop blender works too. If the gravy is too shallow for an immersion blender to stay submerged, transfer it to a tall heatproof jug. Let very hot gravy settle briefly and follow your blender manufacturer’s guidance for hot liquids. A fine-mesh strainer is optional.

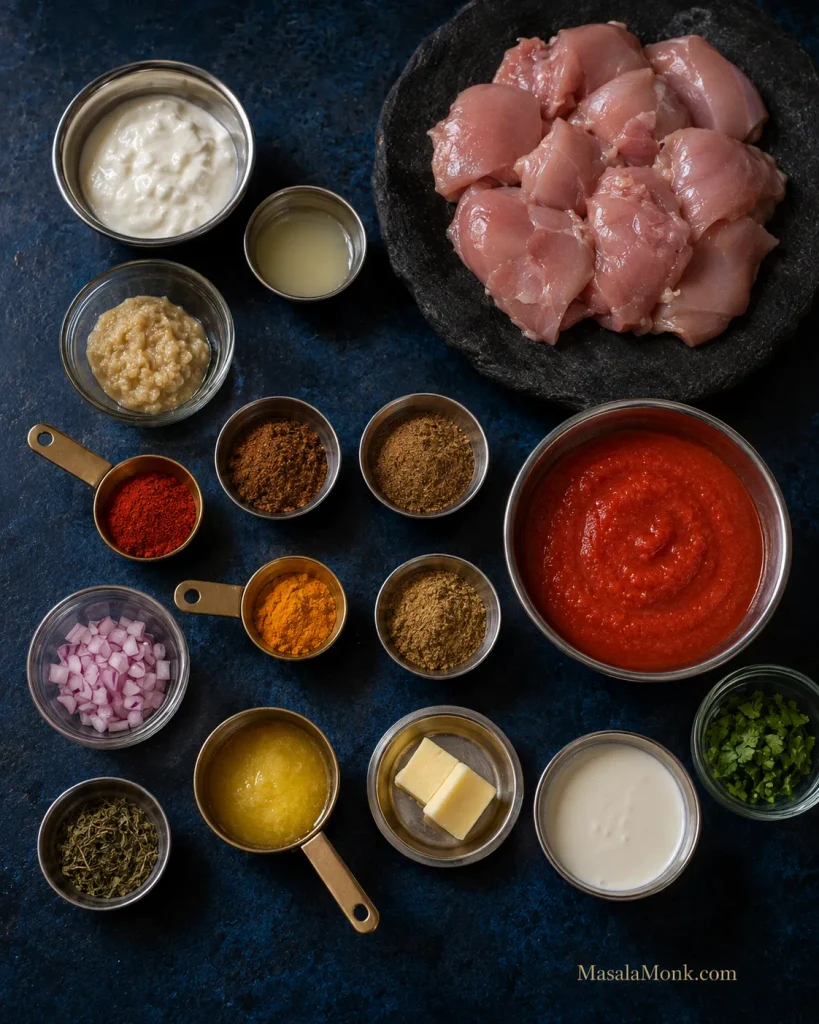
Overhead arrangement of chicken thighs, yogurt, passata, onion, cream, butter, ghee, ginger-garlic paste and spices for keto butter chicken.
For carb tracking, weigh the tomato and onion first; tiny spice differences matter far less.

Chicken and Marinade

  • 700g / 1½ lb boneless, skinless chicken thighs, cut into roughly 3cm / 1¼-inch pieces
  • 80g / ⅓ cup thick plain full-fat yogurt or dahi; mild full-fat Greek yogurt also works
  • 15ml / 1 tbsp lemon juice
  • 15g / 1 tbsp ginger-garlic paste
  • 1 tsp Kashmiri red chilli powder
  • 1 tsp garam masala
  • ½ tsp ground cumin
  • 4g / about ¾ tsp fine sea salt

Makhani Gravy

  • 14g / 1 tbsp ghee, for browning the chicken
  • 14g / 1 tbsp ghee or butter, for the gravy
  • 50g / roughly ½ small onion, finely chopped
  • 15g / 1 tbsp ginger-garlic paste
  • 1 tsp ground coriander
  • ½ tsp ground cumin
  • ½ tsp garam masala
  • ¼ tsp ground turmeric
  • ¼–½ tsp Kashmiri red chilli powder
  • 225g / 8oz / scant 1 cup plain passata or strained tomatoes, with no added sugar
  • 60ml / ¼ cup hot water or unsalted/lightly salted chicken stock, plus more if needed
  • 3g / about ½ tsp fine sea salt

To Finish

  • 120ml / ½ cup heavy or whipping cream
  • 14g / 1 tbsp butter
  • 1 tsp dried kasuri methi
  • fresh coriander/cilantro, optional

A fresh cream around 25% milk fat works too. The gravy will be slightly lighter and looser and may need another minute of gentle reduction. The nutrition estimate later in the post assumes heavier cream in roughly the 30–36% range.

Kashmiri chilli is being used mainly for colour and gentle warmth. Add cayenne or a hotter Indian chilli powder separately when you want more heat. For a mixed table, keeping the main pan mild and sharpening individual portions at the end is usually easier.

1. Marinate the Chicken

Mix the yogurt, lemon juice, ginger-garlic paste, Kashmiri chilli, garam masala, cumin and salt. Add the chicken and turn until every piece carries a light coating.

Cover and refrigerate for at least 30 minutes. Two to four hours works particularly well, and overnight is fine when that suits your schedule.

Before cooking, lift the chicken from the bowl and scrape or shake away the heavy excess marinade. Discard what remains after contact with the raw chicken. A little yogurt-spice coating should stay on the meat, but there should not be enough to form a puddle in the pan.

2. Brown the Chicken

Heat the pan over medium-high heat and add the ghee. If you’re cooking in two batches, divide that tablespoon between them. Arrange the chicken in a single layer with some room around the pieces.

At first you’ll hear a damp hiss as moisture leaves the surface. As the pan dries, the sound becomes sharper and the yogurt-spice coating begins catching and darkening around the edges. Give the first side roughly 2–3 minutes before checking it. Chicken that still grips the pan usually needs another few moments; once the surface has browned properly, it releases more easily.

Turn and colour the second side briefly, then transfer the chicken to a plate while the centre is still underdone. A few uneven dark patches are exactly what you want. The pieces do not need to look identical.

Pan filling with water? Stop adding chicken. Remove the pieces if necessary, let the excess liquid evaporate, add a touch of ghee once the pan is dry again and continue in smaller batches.

Step-by-step comparison showing lightly marinated chicken becoming damp, drying and browned, plus an overcrowded pan filled with excess moisture.
Between batches, let the pan get hot and dry again before adding more yogurt-marinated chicken. Otherwise, the next batch inherits the moisture from the last one.

For stronger tandoori-style edges, the marinated chicken can go under a very hot broiler/grill until a few spots blister, then finish cooking in the gravy.

3. Build the Makhani Base

Lower the heat to medium and add the second tablespoon of ghee or butter. Add the onion and measured salt and cook for about 4–6 minutes, until the onion softens and loses its sharp raw smell. A little gold around the edges is welcome.

Add the ginger-garlic paste and cook for roughly 30 seconds, until its raw aroma mellows. Stir in the coriander, cumin, garam masala, turmeric and Kashmiri chilli for another 20–30 seconds. Lower the heat if the spices begin sticking or darkening quickly.

4. Give the Tomato Enough Time

Pour in the passata and scrape the bottom of the pan to release the browned chicken and spice residue. Cook uncovered over medium to medium-low heat, stirring regularly.

Expect roughly 8–15 minutes, sometimes longer. Tomato products vary, and so do burners and pans. If yours needs 18 minutes, nothing has gone wrong.

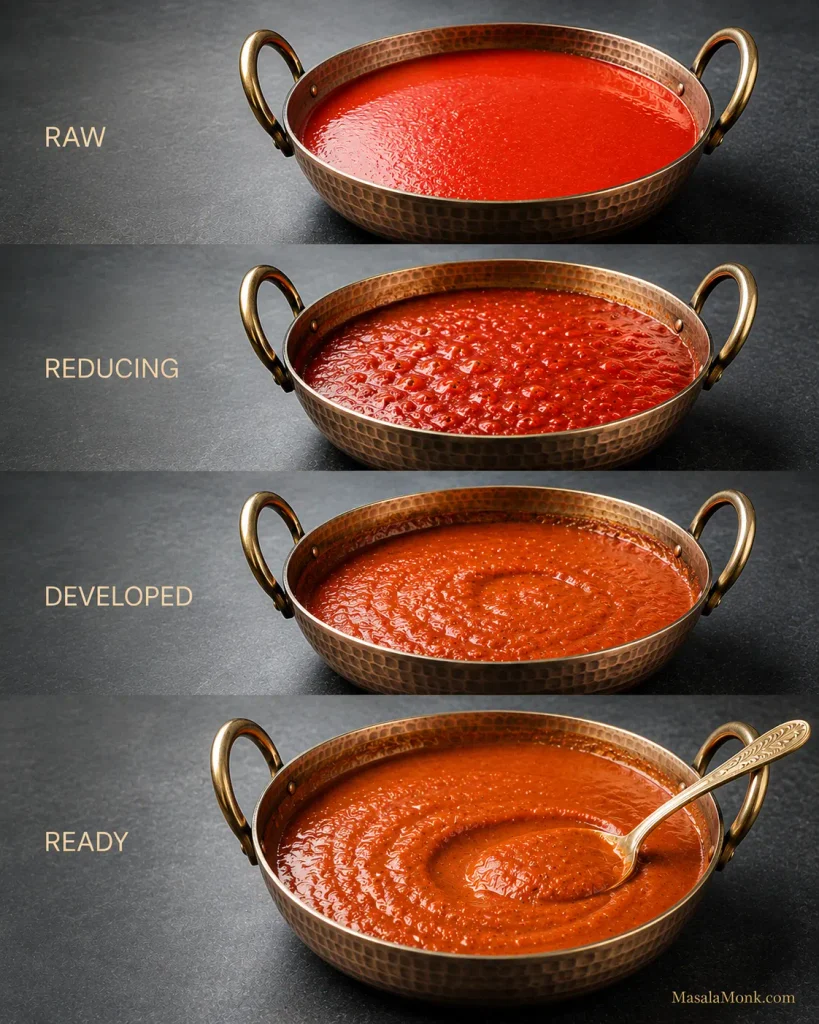
The sauce starts bright and loose. As water cooks away, the colour deepens, the texture tightens and the obvious bottled-tomato smell fades. Draw a spoon through the pan: the trail should remain visible briefly before the sauce flows back. Small beads or streaks of fat may appear near the edges; you do not need a dramatic oil layer.

Taste a little. A sharp, raw tomato flavour means it needs more cooking. Extra tomato paste makes the colour stronger, but it can push the gravy towards a concentrated pasta-sauce flavour. Use it only when the tomato product itself is unusually pale or weak.

Four stages of tomato gravy labeled raw, reducing, developed and ready, ending with thick orange-red sauce that holds a spoon trail.
A wide pan speeds evaporation, concentrating passata without flour, cornstarch or another gravy thickener.

5. Blend the Gravy, Then Finish the Chicken

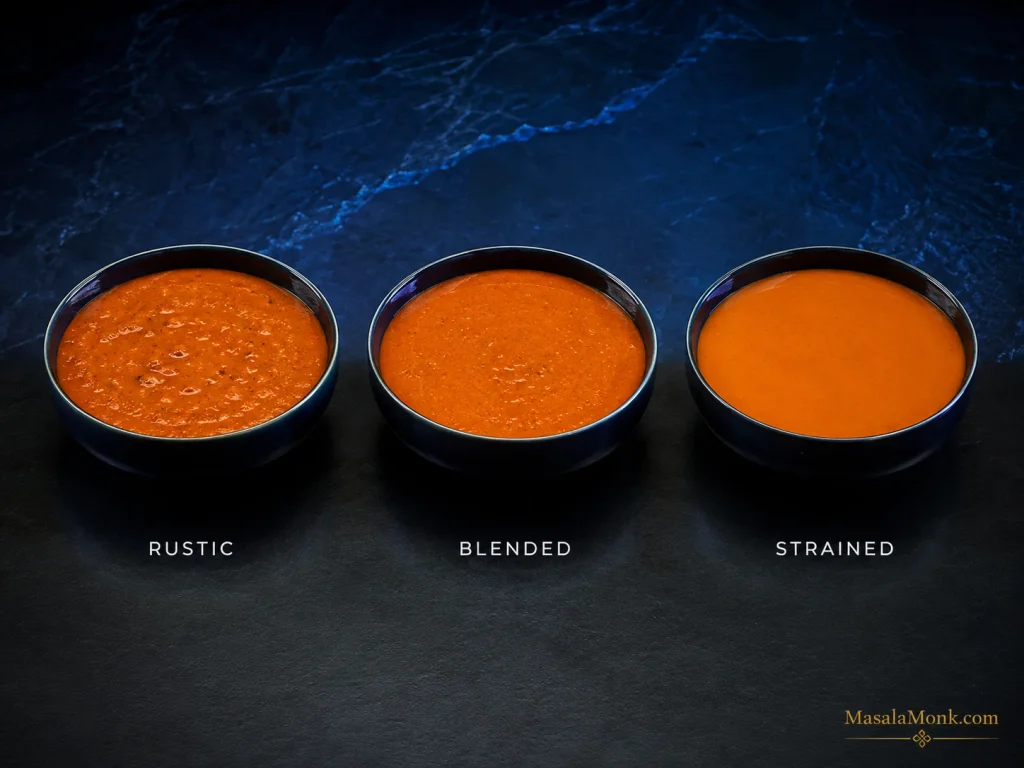
Pour in 60ml / ¼ cup hot water or stock and remove the pan briefly from the heat. Blend until smooth. For an especially silky gravy, strain it before returning it to the pan. Leaving it a little rustic is fine too.

Return the blended gravy to medium-low heat for 2–3 minutes, stirring as it comes back together and thickens slightly. Tiny beads of fat may appear around the edge.

Add the browned chicken and the juices collected on the plate. Simmer gently until the largest piece reaches 165°F / 74°C, generally another 4–7 minutes at this size. The USDA recommends 165°F as the safe minimum internal temperature for poultry.

If the gravy tightens before the chicken is ready, add hot water or stock 1 tbsp / 15ml at a time.

6. Finish With Cream, Butter and Kasuri Methi

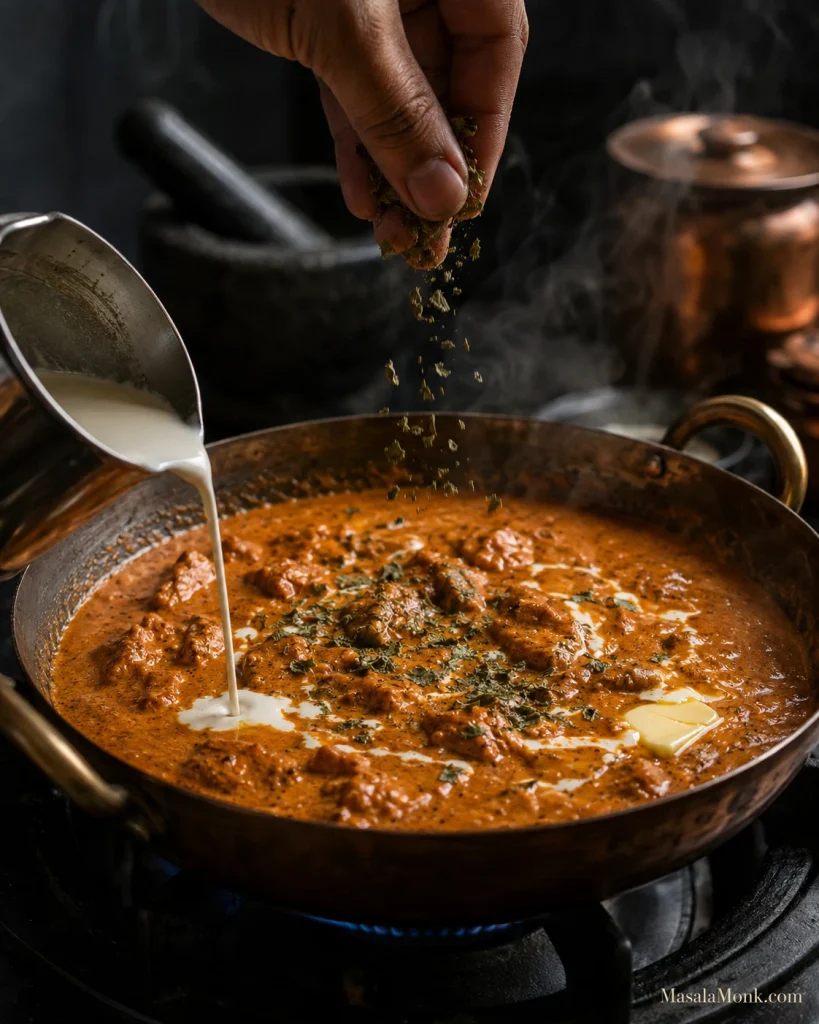
Reduce the heat to low and let hard bubbling settle. Stir in the cream, then crush 1 teaspoon kasuri methi between your palms over the pan and add it with the finishing butter. Warm everything gently for another minute.

Cream being poured into butter chicken as butter melts and dried kasuri methi is crushed over the pan.
Once the cream is in, keep the heat gentle. A hard boil can split the dairy, while prolonged cooking also softens the fresh aroma of butter and kasuri methi.

Taste and check the salt first. After that, make only the adjustment the gravy needs: another ¼ teaspoon methi, a touch more heat, a small finishing pinch of garam masala, a spoonful of water or perhaps one more spoonful of cream.

If the tomato is still sharply acidic after it has cooked fully and the salt, butter and cream are in place, a very small amount of your preferred low-carb sweetener can help. Add it only at the end and only if the sauce genuinely needs it.

Turn off the heat and let the curry rest for about 5 minutes.

The Finished Butter Chicken

Some of the yogurt-spice coating should have darkened around the chicken while the centre stays juicy. The gravy should settle naturally around the pieces, with no watery pool underneath. The raw tomato edge should be gone, but you should still taste tomato, ginger, chilli and spice after the cream goes in.

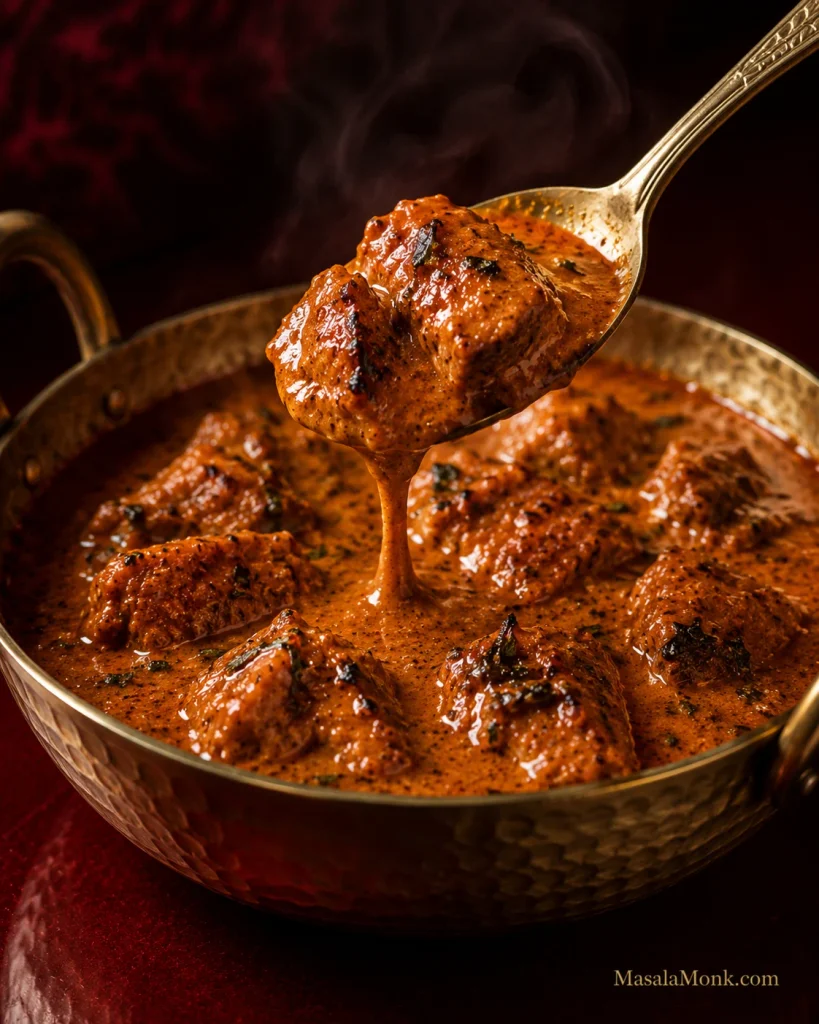
Kasuri methi should be easy to notice when you lean over the pan. Drag a spoon through the gravy; the line should stay open for a moment and then slowly close. Lift the spoon and the sauce should cling before falling back in a slow ribbon.

Too thick? Stir in 1 tbsp / 15ml hot water. Too loose? Give it another minute or two uncovered.

Spoon lifting a browned piece of butter chicken with thick glossy sauce clinging and dripping back into the pan in a slow ribbon.
Perfect texture can still mean too much sauce. Fix the ratio, not the chicken.

Then stop adjusting.

Spoon it over hot jeera cauliflower rice and get some browned chicken and gravy in the first bite. At that point, nobody needs to be thinking about what was removed.


If dinner is already on the table, stop here and eat. Everything below is for the question that comes next: why another recipe claims fewer carbs, why a gravy tastes wrong, what changes at a restaurant or how to make the next batch easier.

Need something specific? Troubleshoot the gravy · Build the low-carb plate · Order butter chicken at a restaurant

What Makes Butter Chicken Taste Like Butter Chicken?

The hardest butter chicken to diagnose is the one that isn’t bad. The chicken is tender, the sauce is creamy and the seasoning seems reasonable, yet the first bite still tastes like generic tomato curry.

Usually there isn’t one secret ingredient missing. Tomato that has cooked far enough, properly browned chicken, enough salt and a sensible amount of cream all matter. Kasuri methi adds one of the most recognizable aromas in the finished gravy, and even a small amount can change the character of the sauce.

If the curry tastes seasoned but still smells anonymous, smell the kasuri methi before reaching for another spoonful of spice.

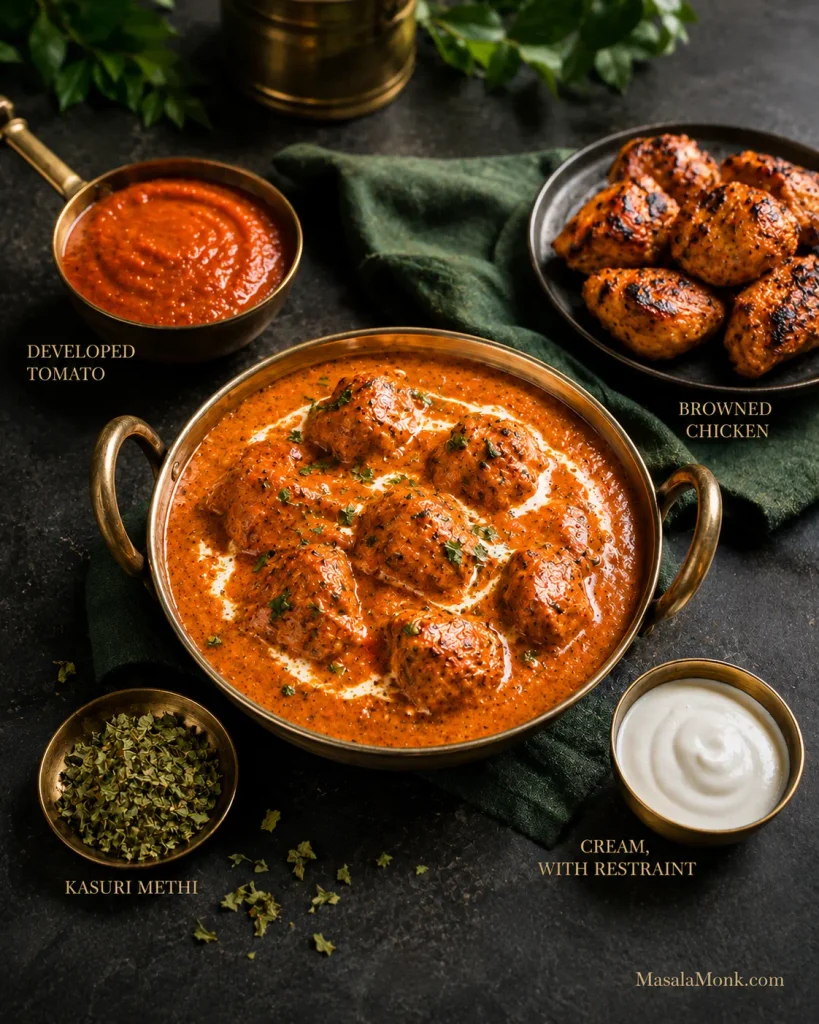
Butter chicken shown with developed tomato gravy, browned chicken, dried kasuri methi and a small bowl of cream as key flavour elements.
When butter chicken tastes almost right, change one variable at a time: check salt first, then char and kasuri methi before adding more cream or another spoonful of spice.

Where the Carbs in Butter Chicken Come From

Two bowls of butter chicken can look nearly identical and still produce very different nutrition numbers. Much of that variation comes from the gravy and from what somebody has decided counts as one serving.

VariableLower-carb directionHigher-carb direction
TomatoMeasured tomato baseLarge tomato-heavy gravy
OnionSmall measured amountOnion-heavy base
Added sweetnessNoneSugar, honey or ketchup
CashewsNone or a littleCashew-rich gravy
YogurtPlain and measuredSweetened or larger amounts
ThickeningReductionFlour or cornstarch
Prepared saucePlain/no-added-sugarSweetened commercial gravy
Serving sizeClearly definedTiny or vague
The plateVegetables or cauliflower riceRice plus naan

For this recipe, one serving means one-quarter of the finished curry.

The 225g / 8oz tomato gives the gravy enough acidity and fruitiness without making tomato the whole story. Once properly cooked, it tastes much less dominant than it does straight from the bottle.

Some butter chicken is sweet and some isn’t. This version starts without added sugar because cooked tomato, salt, butter and cream usually provide enough balance.

The 50g onion contributes body and natural sweetness while keeping the quantity predictable. Cashew paste can make a lovely rich butter chicken gravy, but this sauce does not need it.

Two butter chicken meals compared side by side, one with basmati rice and naan and the other with cauliflower rice, greens and cucumber.
Same curry, different plate: hold the portion steady and let the sides change the carb load.

Ingredient Notes That Change the Result

Thick yogurt helps the seasoning cling to the chicken, and lemon adds brightness. Moisture is the part to watch during browning: a heavy yogurt coating cools the pan, releases water and can leave pale coagulated clumps. Plain unsweetened yogurt or dahi works well. A particularly tangy Greek yogurt can make the finished curry noticeably more sour.

Chicken thighs are more forgiving through browning and the final simmer. Breast works too; keep the pieces evenly sized and avoid cooking them through during the first sear. MasalaMonk’s baked chicken breast recipe goes deeper into thickness, temperature and keeping lean breast meat juicy.

For the tomato, smooth plain passata is the easiest choice. Finely crushed tomatoes can be used too and may need more cooking and blending. Sweet pasta sauce, ketchup and seasoned marinara change the flavour substantially. Tomato paste is far more concentrated, so save it for the rare batch where the tomato itself seems unusually pale or weak.

Spices, Kasuri Methi and Cream

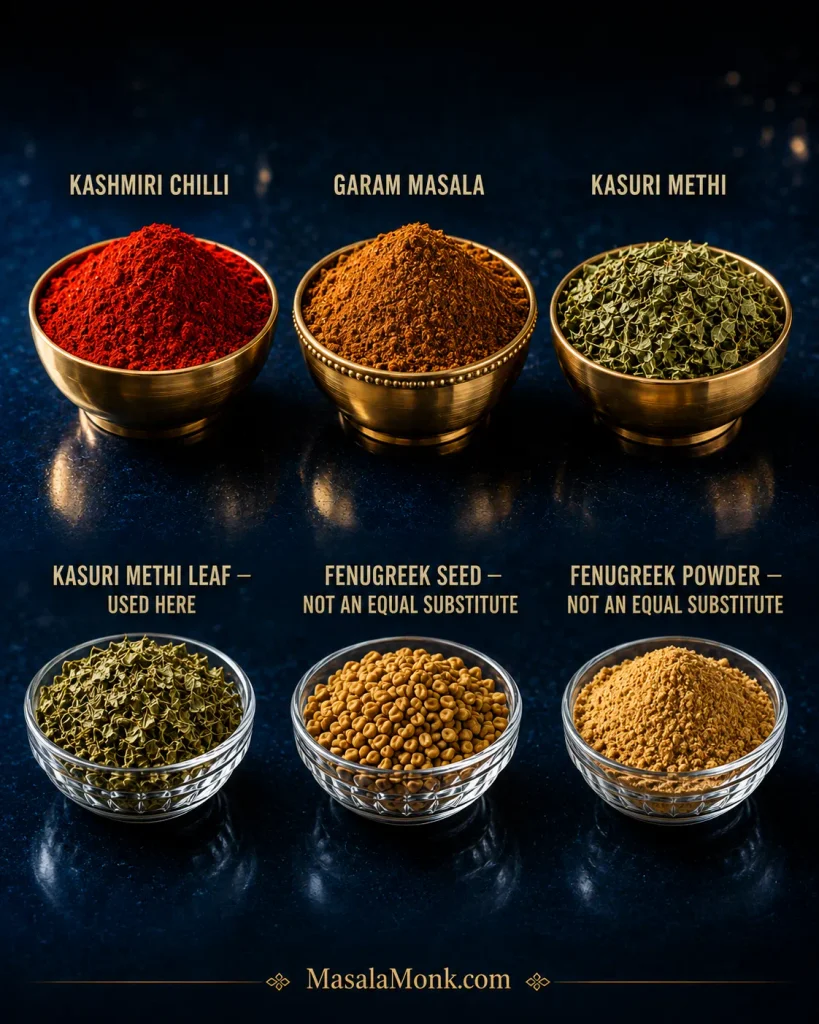
Kashmiri chilli gives deep colour with moderate heat. Paprika can provide much of that colour when Kashmiri chilli is unavailable, with stronger chilli added separately. Garam masala varies considerably from brand to brand, so a small finishing pinch can help when its aroma seems muted.

Kasuri methi is dried fenugreek leaf. Fenugreek seed and ground fenugreek are much stronger and should not replace it measure-for-measure. Start with 1 teaspoon of the leaves and increase in ¼-teaspoon steps only after tasting. If you cannot find kasuri methi, leaving it out is safer than substituting the same quantity of seed or powder.

Spice guide showing Kashmiri chilli, garam masala and kasuri methi, with dried fenugreek leaves compared with fenugreek seeds and powder.
At the shop, look for “kasuri methi” or “dried fenugreek leaves” on the packet. Then crush the leaves just before finishing the gravy to release more of their aroma.

The 120ml / ½ cup cream used here softens the tomato and carries the spices through the gravy. Add much more and the curry can turn pale while the ginger, chilli and methi recede into the background.

Want a Smoother, More Restaurant-Style Finish?

Restaurant butter chicken is not one fixed flavour. Some gravies are sweeter, some tangier and some substantially richer with cream or cashew. You can reproduce much of the char, silkiness and aroma at home, but a particular restaurant may still taste quite different.

A very hot broiler or grill gives the chicken darker blistered edges than most home pans can manage when they are full. A few charred spots are enough.

For the gravy, thorough blending makes the biggest difference. Straining takes the texture one step further when you specifically want the very smooth finish found in many restaurant versions.

Keep the butter and kasuri methi for the end so their aroma stays fresh. A brief dhungar smoke can add another layer when that is a technique you already use comfortably. Good chicken char gets you a long way without it.

Three identical bowls of orange butter chicken gravy labeled rustic, blended and strained, showing progressively smoother texture.
Blending gets you most of the silkiness; straining is optional polish.

Fix Your Butter Chicken

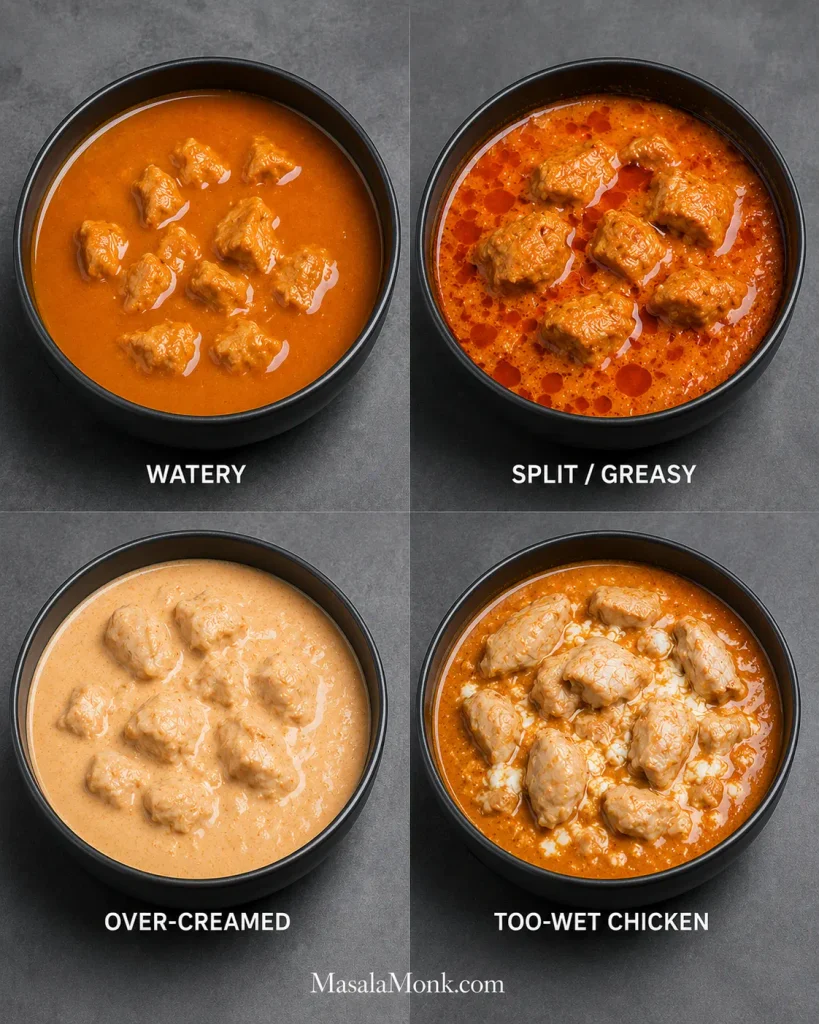
Butter chicken problems often sound alike. “Too tomatoey,” “bland” and “thin” can each describe more than one failure, and throwing more cream or spice at a confused gravy rarely helps. Work out what is actually wrong first.

ProblemLikely causeFirst move
Raw or harsh tomatoTomato base undercookedKeep reducing
Tastes like pasta sauceToo much concentrate or underdeveloped gravyCook the base further
BlandSalt, char or finishing aroma lackingCheck salt first
Too sourAcidic or undercooked tomatoCook, then balance
Too sweetToo much sweetenerRestore salt and spice balance
Generic creamy curryWeak char, little methi or rushed tomatoCorrect those elements
WateryToo much liquidRemove chicken and reduce
PastyOver-reducedAdd hot water 15ml at a time
Too much gravySauce volume drifted upwardRemove some sauce
Chicken released lots of waterWet coating, cool pan, crowding or high-water chickenDry the pan and brown smaller batches
White yogurt clumpsWet marinade or crowded/cool panLess coating, more heat, smaller batches
Greasy or splitExcess fat or hard boiling after dairyLower the heat
Dry chickenOvercooked during both stagesBrown first; finish only to 165°F / 74°C
Bitter methiToo much kasuri methiDilute if possible
Too spicyExcess hot chilliAdd a little cream
Too paleToo much creamUse less next time
Four butter chicken problems shown side by side: watery gravy, split greasy sauce, pale over-creamed curry and chicken with wet yogurt clumps.
Read the pan before changing the seasoning. Pooling liquid, separated fat, pale gravy and yogurt clumps describe four different failures—and therefore four different fixes.

Too Tomatoey or Too Sour

Bright, raw tomato needs more cooking. A heavy concentrated-tomato flavour is different and often comes from too much tomato paste. For sourness, make sure the tomato is fully cooked and then check the salt. Butter or a little more cream can soften what remains; sweetener comes last.

Bland—or Just Not Tasting Like Butter Chicken?

Flat flavour usually calls for salt first. A curry that is already seasoned but still tastes generic needs a different diagnosis: check the chicken browning, tomato development and kasuri methi. Smell the garam masala and methi straight from their containers too. Old spices can be present in the recipe and almost absent in the bowl.

Watery Sauce

Once the chicken reaches temperature, take it out. Reduce the gravy uncovered and return the chicken only long enough to coat and warm through.

Great Sauce, Wrong Ratio?

Sometimes the gravy is perfectly thick and there is simply too much of it. An oversized onion, extra tomato or accidentally scaled-up sauce can do that. Remove some and save it for another meal instead of continuing to cook the chicken.

White Yogurt Clumps

The pan was probably too cool, too crowded or carrying too much wet marinade. The curry is still edible. Next time, leave only a light coating on the chicken and give the pieces more space.

Bitter Kasuri Methi

Once too much methi is in the sauce, there is no clean way to remove it. Extra unsweetened gravy or a little cream can dilute the bitterness. Starting with the first teaspoon and increasing slowly is much easier than rescuing an over-methi’d pan.

← Back to the recipe · Build the low-carb dinner →

Build a Low-Carb Butter Chicken Dinner

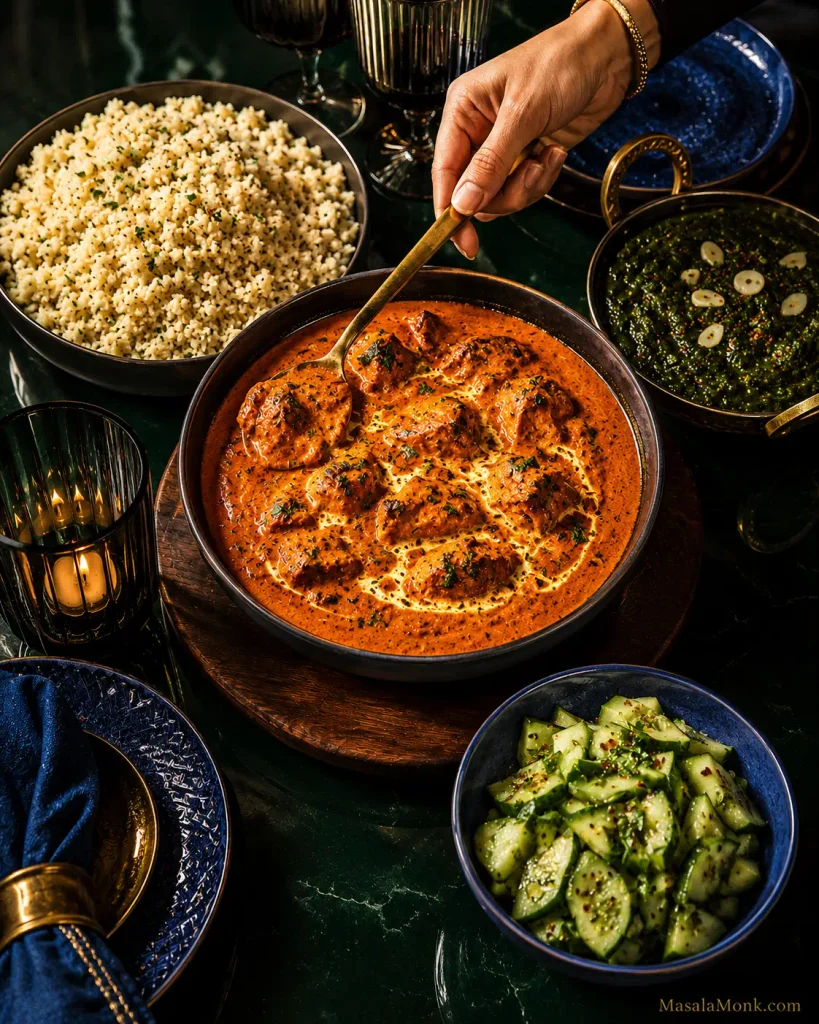
A lower-carb butter chicken dinner does not need to look like curry surrounded by substitutes you’re merely tolerating. Give the gravy something warm to sit on, something green to cut through the richness and something cold and crisp beside it.

Jeera Cauliflower Rice

Cumin makes cauliflower rice feel like part of dinner.

Serves 4

Ingredients: 600g / about 6 cups cauliflower rice, 1 tbsp ghee or butter, 1 tsp cumin seeds, ½–¾ tsp salt, plus coriander and a small squeeze of lemon if you like.

Heat a wide pan over medium heat and add the ghee. Let the cumin seeds sizzle for 20–30 seconds, until fragrant, then add the cauliflower rice and salt. Increase the heat to medium-high and cook uncovered for about 5–7 minutes.

There will be plenty of steam at first. As it eases, the cauliflower should become tender while the small grains remain separate. Stop before it turns soft and wet.

For more ways to use it, MasalaMonk’s guide to using cauliflower on keto goes beyond cauliflower rice.

Something Green

Garlic spinach is especially good here because its slight bitterness cuts through the buttery gravy. Roasted cauliflower, cabbage, broccoli and green beans are easy alternatives.

Something Cold and Crisp

Cucumber, coriander, mint and lemon bring crunch and acidity. MasalaMonk’s cucumber salad recipe gives you several ways to build that fresh side.

If You Miss Naan

A low-carb naan or roti can make the meal feel much closer to the dinner you were craving. With packaged low-carb breads, check the actual carbohydrate amount and serving size on the label.

Cauliflower rice, one green vegetable and something cold already make a generous plate.

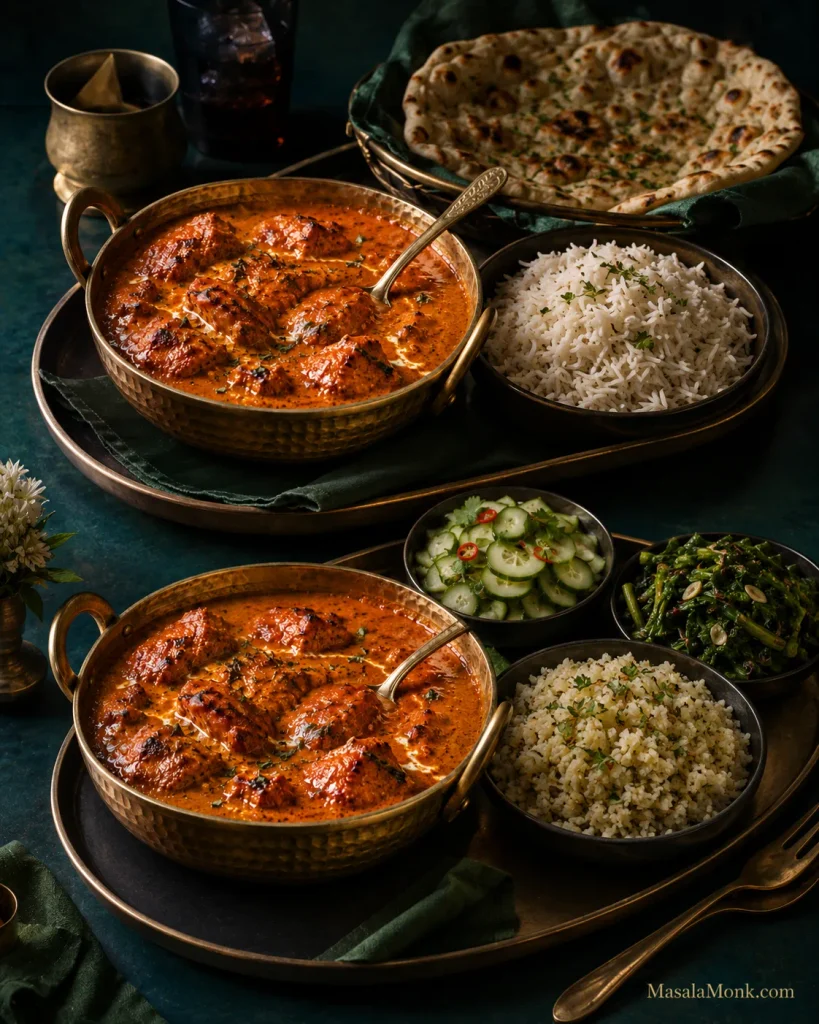
Low-carb butter chicken dinner with jeera cauliflower rice, dark green spinach and cucumber salad on a jewel-toned table.
Put the hot jeera cauliflower rice under the curry so it catches the makhani gravy; keep cucumber alongside it so the crunch, acidity and temperature contrast stay intact.

Is Restaurant Butter Chicken Keto?

Restaurant butter chicken is harder to calculate because the gravy has usually made most of its decisions before you sit down.

It may contain sugar or honey, ketchup, more onion, cashew paste, flour or cornstarch, sweetened tomato products or a premade curry base. Because that gravy is often prepared in a large batch, asking for “no sugar” may not change what is already in the pot.

The most useful question is simple: Does the butter chicken gravy contain added sugar or flour/cornstarch?

Can’t get a clear answer? Simpler grilled dishes are easier to judge when you’re keeping carbohydrates particularly low: tandoori chicken, chicken tikka, kebabs, grilled fish and some dry-style meat preparations. MasalaMonk’s green chutney recipe is a natural partner for those dishes.

Then look at the rest of the order. Rice, naan and sweet chutneys can change the meal far more than a measured amount of tomato in the curry.

Your favourite takeaway may taste quite different from this recipe even when both are good butter chicken. Some house gravies are much sweeter, saltier or richer. If that is exactly the butter chicken you love, a different result at home does not mean the recipe failed; you’re simply aiming at another style.

Butter chicken on a restaurant table beside a menu, with prompts asking about added sugar, flour or cornstarch, and side dishes.
Batch gravy may already contain sugar or starch; when it does, a simpler grilled dish is easier to estimate.

← Back to the recipe · Make ahead and reheat →

Shortcuts and Appliance Notes

A jarred butter chicken sauce can make dinner much faster. Check the total carbohydrates, added sugars, flour or starch, stated serving size and how much sauce you will actually use. A sauce that fits your numbers but tastes flat can often be improved with a little butter, cream and crushed kasuri methi.

The full recipe takes roughly 45–55 minutes of active work plus at least a short marinade. For a quicker weeknight, marinate the chicken first and use those 20–30 minutes to chop and measure everything else. Smooth passata and skipping the optional straining save time without giving up the chicken browning or tomato reduction.

For nights when fifteen minutes really is the limit, MasalaMonk’s 15-minute sesame ground chicken works well over cauliflower rice, sautéed cabbage or lettuce.

Instant Pot

Pressure cooking traps moisture, so the finished gravy tends to be thinner. Use Sauté for the aromatics, deglaze the pot thoroughly and follow the minimum-liquid requirement for your cooker. Once the chicken is cooked, remove it and reduce a loose sauce with Sauté uncovered before adding the chicken back with the cream, butter and kasuri methi.

Slow Cooker

Slow cooking gives tenderness but very little browning, so sear the marinated chicken first when you can. For boneless pieces, 2–3 hours on High or 4–6 hours on Low is a reasonable starting range; the chicken still needs to reach 165°F / 74°C. Add the cream and finishing butter near the end, and reduce a thin gravy separately.

Make Ahead, Store and Reheat

The chicken can be marinated the day before. The blended tomato gravy can also be cooked ahead. If dinner is for tomorrow, refrigerate the gravy before adding the final cream, butter and kasuri methi, then add those as you reheat it.

Cool leftovers promptly and refrigerate them in a covered container. Use them within 3–4 days, in line with USDA leftover-storage guidance.

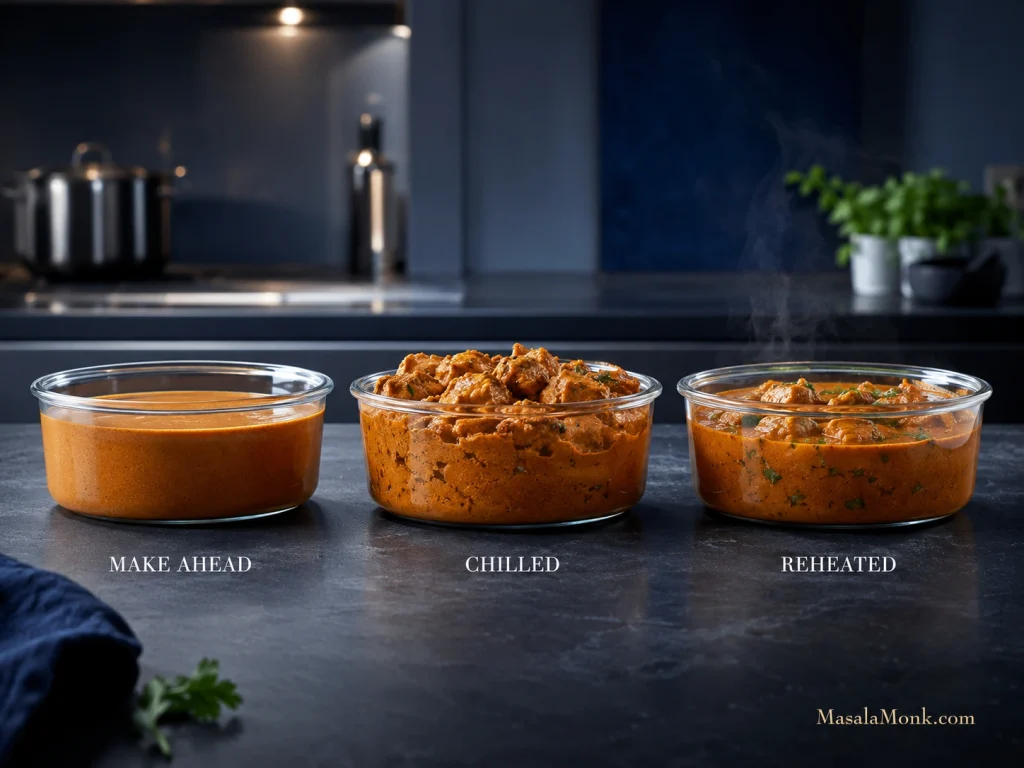
Cold butter chicken will look much thicker after a night in the refrigerator. That is normal. Warm it gently and add a splash of water or stock as the gravy loosens. Bring reheated leftovers back to 165°F / 74°C.

Butter chicken freezes well too. Portion it before freezing and aim to use it within about 3 months for best quality.

Three stages labeled make ahead, chilled and reheated, showing butter chicken gravy becoming thick when cold and looser again after reheating.
Reheat first, then thin only if needed; melted fats loosen chilled gravy naturally.

Keto Butter Chicken Nutrition

Based on typical nutrition values for the ingredients listed, one-quarter of the finished curry is approximately:

Per servingEstimated amount
CaloriesAbout 500 kcal
ProteinAbout 36g
FatAbout 36g
Total carbohydratesAbout 9g
FiberAbout 2g
Estimated net carbohydratesAbout 7g

Here, net carbs means total carbohydrate minus fiber. The estimate assumes full-fat plain yogurt and heavy/whipping cream in roughly the 30–36% fat range; a lighter fresh cream will lower the fat and calorie numbers somewhat.

The calculation includes the chicken, yogurt, lemon, onion, tomato, ginger, garlic, ghee, butter, cream and measured spices. It does not include cauliflower rice, bread, optional sweetener, extra cream at serving or other sides.

1 serving = ¼ of the finished curry. If you track carbohydrates closely, the labels on the ingredients in your own kitchen are the most relevant numbers.

Frequently Asked Questions

Does Butter Chicken Usually Contain Sugar?

Sometimes. Some home and restaurant versions add sugar or honey to soften tomato acidity; many others don’t. It isn’t required here. Cook the tomato fully and balance the gravy before deciding it needs sweetness.

Do I Really Need Kasuri Methi?

You can make good creamy tomato chicken without it, but kasuri methi contributes an aroma closely associated with butter chicken. Use dried fenugreek leaves, not the same quantity of fenugreek seed or powder. If the leaves are unavailable, omission is safer than an equal substitution.

Can I Make This Dairy-Free?

Yes, although the flavour will shift. Use plain unsweetened dairy-free yogurt in the marinade and full-fat coconut cream in the gravy, along with a suitable non-dairy cooking fat. The finished sauce becomes more coconut-forward and moves away from classic murgh makhani.

If you’re avoiding dairy because of a milk allergy, don’t assume ghee is automatically suitable.

Is This Butter Chicken Gluten-Free?

The recipe itself doesn’t use wheat flour. Stocks, packaged spice blends and prepared sauces can vary, so check labels when avoiding gluten strictly.

Can I Make It Without a Blender?

Absolutely. Use smooth passata, chop the onion finely and leave the gravy a little more rustic. You lose some silkiness, not dinner.

Keep the Butter Chicken

Once the bowl reaches the table, “keto” shouldn’t be the first thing you notice.

There should be a browned edge on the chicken and enough gravy to drag through whatever is underneath it. The tomato should taste deep and fully cooked, the cream should leave the spices easy to taste, and the butter should give the sauce a soft sheen.

The kasuri methi lingers after the bite.

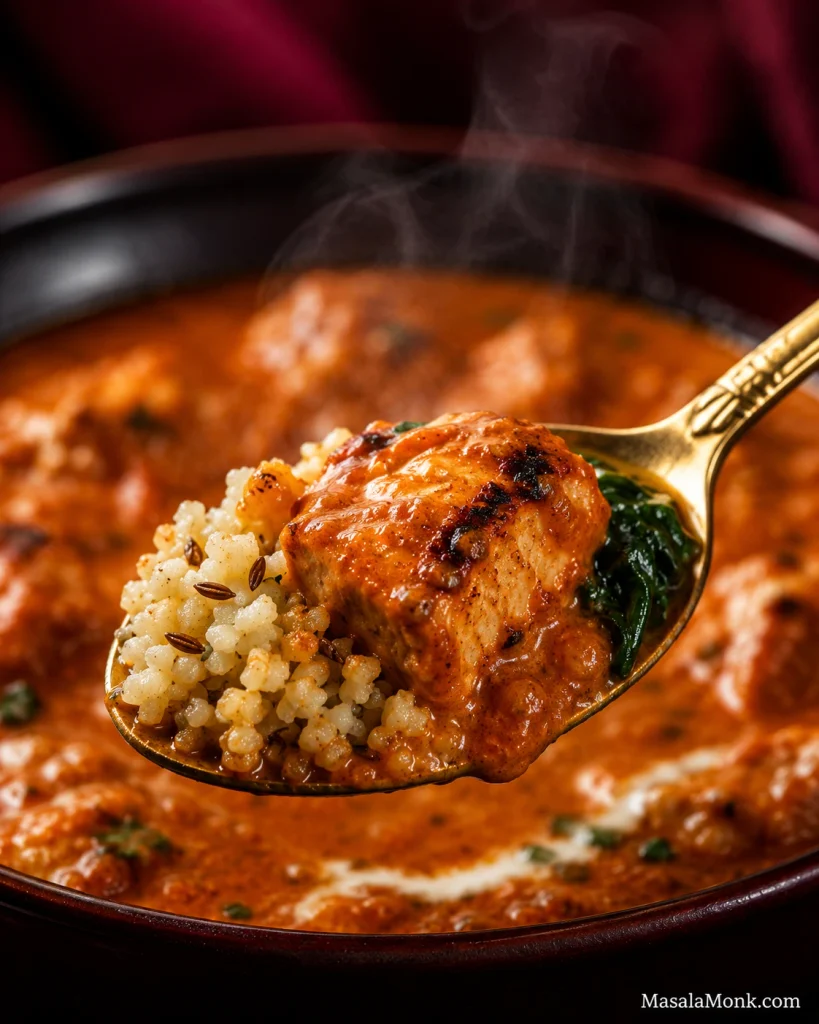
Close-up spoonful of browned butter chicken, glossy orange-red gravy, cumin-speckled cauliflower rice and a small piece of spinach.
Cauliflower rice does not need to impersonate basmati. Here its job is simpler: catch the silky makhani gravy and bring toasted cumin into the same bite as the charred chicken.

Keep the butter chicken. Change the carbs that matter.

← Back to the recipe · ↑ Back to top

Posted on — 2 Comments

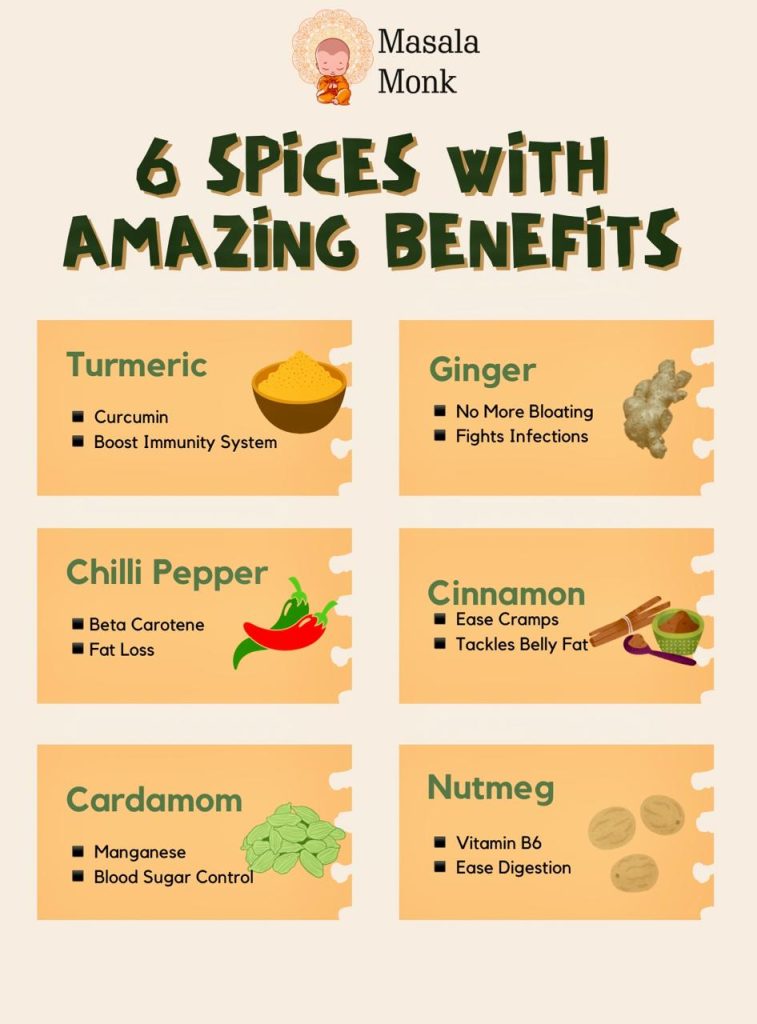
The Power of Six: Amazing Benefits of Common Indian Spices

BENEFITS OF INDIAN SPICES

When we think of Indian cuisine, the first thing that often comes to mind is its explosion of colors, aromas, and flavors. But behind these vibrant dishes lies a centuries-old tradition of using spices not just for taste but also for their powerful health benefits.

Indian spices have been a cornerstone of Ayurvedic medicine and holistic health practices for millennia. Today, modern science is validating many of these traditional uses, making Indian spices an essential part of global wellness conversations.

In this article, we explore the powerful health benefits of six common Indian spices, their uses, and why you should consider incorporating them into your daily routine.


Why Indian Spices Are Healthy

Before we dive into our list, let’s address a common question:
Are Indian spices healthy? Are Indian spices good for you?

Absolutely. Indian spices are rich in bioactive compounds, antioxidants, anti-inflammatory agents, and essential nutrients. They support digestion, boost immunity, fight chronic diseases, and promote overall well-being. What makes them even more special is that they are easily accessible and simple to incorporate into everyday meals.

Now, let’s take a deep dive into the six super spices you should know about.


1. Turmeric (Haldi) — The Golden Healer

Key Compound: Curcumin

Turmeric is often called the “golden spice” of India — and for good reason. It contains curcumin, a powerful antioxidant and anti-inflammatory compound that has been widely studied for its health benefits.

Health Benefits:

  • Anti-inflammatory powerhouse: Helps reduce chronic inflammation, which is linked to diseases like heart disease, cancer, and Alzheimer’s.
  • Antioxidant effects: Neutralizes free radicals, reducing oxidative stress.
  • Joint health: Alleviates symptoms of arthritis and joint pain.
  • Brain function: May enhance cognitive function and protect against neurodegenerative diseases.
  • Supports immune system: Strengthens the body’s natural defense mechanisms.
  • Heart health: Helps maintain healthy blood pressure and cholesterol levels.

Traditional Uses:

  • Curries, dals, rice dishes
  • Golden milk (turmeric latte)
  • Herbal teas and wellness shots
  • Skin care remedies (face masks)

Pro Tip: Pair turmeric with black pepper to enhance curcumin absorption significantly.


2. Cumin (Jeera) — The Digestive Aid

Key Compounds: Thymol, Cuminaldehyde

Cumin seeds have been used for centuries to aid digestion and improve gut health.

Health Benefits:

  • Digestive support: Stimulates the secretion of digestive enzymes, reducing bloating and indigestion.
  • Blood sugar regulation: May help lower blood sugar levels.
  • Weight management: Boosts metabolism and may aid in fat loss.
  • Rich in iron: Supports hemoglobin production and combats anemia.
  • Antimicrobial: Helps fight bacteria and parasites.

Traditional Uses:

  • Tadka (tempering) in dals and curries
  • Rice dishes like jeera rice
  • Roasted snacks
  • Herbal infusions (jeera water)

Pro Tip: Soak cumin seeds in water overnight and drink in the morning for digestive benefits.


3. Coriander (Dhaniya) — The Detoxifier

Key Compounds: Linalool, Quercetin

Both the seeds and leaves of coriander are widely used in Indian cooking, offering a fresh, citrusy flavor.

Health Benefits:

  • Heart health: Lowers bad cholesterol (LDL) and increases good cholesterol (HDL).
  • Antioxidant rich: Helps combat oxidative stress.
  • Anti-inflammatory: Reduces inflammation in the body.
  • Supports digestion: Relieves bloating and promotes gut health.
  • Detoxification: Helps the body eliminate heavy metals and toxins.
  • Antibacterial: Fights infections and supports oral health.

Traditional Uses:

  • Curries and gravies
  • Chutneys and sauces
  • Garnishing salads, soups, and snacks
  • Coriander seed tea for digestion

Pro Tip: Coriander seeds can be dry-roasted to enhance their flavor and medicinal properties.


4. Ginger (Adrak) — The Universal Remedy

Key Compounds: Gingerol, Shogaol

Ginger is a versatile spice known for its therapeutic effects across cultures.

Health Benefits:

  • Anti-nausea: Effective against motion sickness, morning sickness, and nausea.
  • Digestive aid: Stimulates digestion and relieves bloating.
  • Anti-inflammatory: Reduces joint pain and muscle soreness.
  • Boosts immunity: Helps ward off infections.
  • Cardiovascular support: Improves blood circulation and heart health.
  • May reduce cancer risk: Shown to inhibit the growth of certain cancer cells.

Traditional Uses:

  • Masala chai (spiced tea)
  • Curries and stir-fries
  • Soups and broths
  • Ginger shots and teas

Pro Tip: Fresh ginger juice with lemon and honey is an excellent natural remedy for colds.


5. Fenugreek (Methi) — The Hormone Balancer

Key Compounds: Saponins, Trigonelline

Fenugreek is a nutrient-dense spice often used for its hormone-balancing effects.

Health Benefits:

  • Blood sugar control: Lowers blood glucose levels, beneficial for diabetics.
  • Cholesterol reduction: Lowers LDL cholesterol and triglycerides.
  • Supports lactation: Increases milk production in breastfeeding mothers.
  • Digestive aid: Reduces constipation and bloating.
  • Anti-inflammatory: Alleviates arthritis symptoms.
  • Hormonal balance: May help manage symptoms of PCOS.

Traditional Uses:

  • Curries and dals
  • Methi paratha (flatbreads)
  • Pickles
  • Sprouted fenugreek salads

Pro Tip: Soak fenugreek seeds overnight and consume in the morning for metabolic benefits.


6. Black Pepper (Kali Mirch) — The Bioavailability Booster

Key Compound: Piperine

Black pepper, often called the “King of Spices,” not only adds heat to dishes but also enhances nutrient absorption.

Health Benefits:

  • Enhances bioavailability: Increases the absorption of nutrients like curcumin from turmeric.
  • Antioxidant effects: Fights oxidative stress.
  • Gut health: Stimulates digestive enzymes.
  • Respiratory support: Helps relieve congestion and respiratory issues.
  • Anti-inflammatory: Reduces inflammation and supports joint health.
  • Brain function: May help improve cognitive performance.

Traditional Uses:

  • Spice blends like garam masala
  • Soups, stews, and gravies
  • Marinades and salad dressings
  • Herbal teas with honey and ginger

Pro Tip: Add freshly ground black pepper at the end of cooking to preserve its health benefits.


How to Incorporate Indian Spices into Your Daily Routine

  • Start your day with warm water infused with turmeric and black pepper.
  • Use cumin and coriander in your everyday cooking.
  • Add ginger to your morning tea or smoothies.
  • Include fenugreek seeds in your salads or soak them overnight.
  • Finish your meals with freshly ground black pepper.

Moderation is key: While these spices offer many benefits, excessive consumption can cause side effects. Always consult with a healthcare professional if you have any underlying health conditions.


Conclusion: The Timeless Power of Indian Spices

Indian spices are far more than culinary ingredients — they are nature’s pharmacy, offering a wide array of health benefits that have been recognized for generations. By incorporating these six common spices — turmeric, cumin, coriander, ginger, fenugreek, and black pepper — into your diet, you can enjoy delicious flavors while supporting your overall health and well-being.

The power of six is simple, accessible, and profoundly effective.

Start small, explore new recipes, and let the ancient wisdom of Indian spices enhance your modern lifestyle.

10 FAQs with Answers

1️⃣ What are the most common Indian spices?

The most common Indian spices include turmeric (haldi), cumin (jeera), coriander (dhaniya), ginger (adrak), fenugreek (methi), and black pepper (kali mirch). These spices are staples in most Indian kitchens and offer a range of health benefits.

2️⃣ How do Indian spices improve digestion?

Many Indian spices like cumin, coriander, ginger, and fenugreek stimulate digestive enzymes, reduce bloating, prevent gas formation, and improve nutrient absorption, thereby promoting healthy digestion.

3️⃣ Can I consume turmeric daily?

Yes, consuming turmeric daily in moderate amounts is generally safe and beneficial due to its anti-inflammatory and antioxidant properties. However, high doses should be taken under medical supervision, especially if you are on blood thinners or have gallbladder issues.

4️⃣ Which Indian spices help with immunity?

Turmeric, ginger, black pepper, and cumin are particularly known to boost immunity by reducing inflammation, fighting infections, and enhancing the body’s natural defense mechanisms.

5️⃣ Do Indian spices have side effects?

In moderation, Indian spices are safe for most people. Overconsumption may cause side effects like heartburn, digestive upset, or interact with certain medications. Always consult your healthcare provider if unsure.

6️⃣ Can Indian spices help with weight loss?

Yes. Spices like cumin, turmeric, and fenugreek can support metabolism, blood sugar control, and appetite regulation, which may assist in healthy weight management when combined with a balanced diet and exercise.

7️⃣ Are Indian spices suitable for people with diabetes?

Many Indian spices such as fenugreek, cumin, and turmeric help regulate blood sugar levels, making them beneficial for people managing diabetes. Always consult your doctor for personalized guidance.

8️⃣ How can I start using Indian spices if I’m new to them?

Start by adding small amounts of turmeric, cumin, or coriander to soups, stews, and rice. Ginger and black pepper can be added to teas or salads. Gradually experiment with traditional Indian recipes to get familiar with flavors.

9️⃣ Do Indian spices lose their benefits when cooked?

Some heat-sensitive compounds may degrade with prolonged cooking. To retain maximum benefits, add spices like black pepper towards the end of cooking, while others like cumin and turmeric can handle heat better.

🔟 Are Indian spices the same as masala?

Masala refers to a blend of multiple spices, while individual spices like turmeric, cumin, and coriander are the building blocks. Masala mixes can offer a combination of health benefits depending on their ingredients.