Posted on Leave a comment

Discover 5 Costliest Mangoes Native to the USA – United States of America

Costliest Mangoes Native to the USA

If you think the world’s most exotic mangoes only come from India or the Caribbean, you’re in for a surprise! The United States—especially Florida—has quietly become a mango connoisseur’s paradise, with rare and expensive cultivars that rival anything grown overseas. Whether you’re a passionate fruit collector, a backyard gardener, or simply someone who dreams of the juiciest, most flavorful mangoes money can buy, this guide is for you.

Let’s dig deep into the five costliest mangoes native to the USA, exploring what makes them so special, what they taste like, how to find (or even grow) them, and why they command such high prices in 2025.


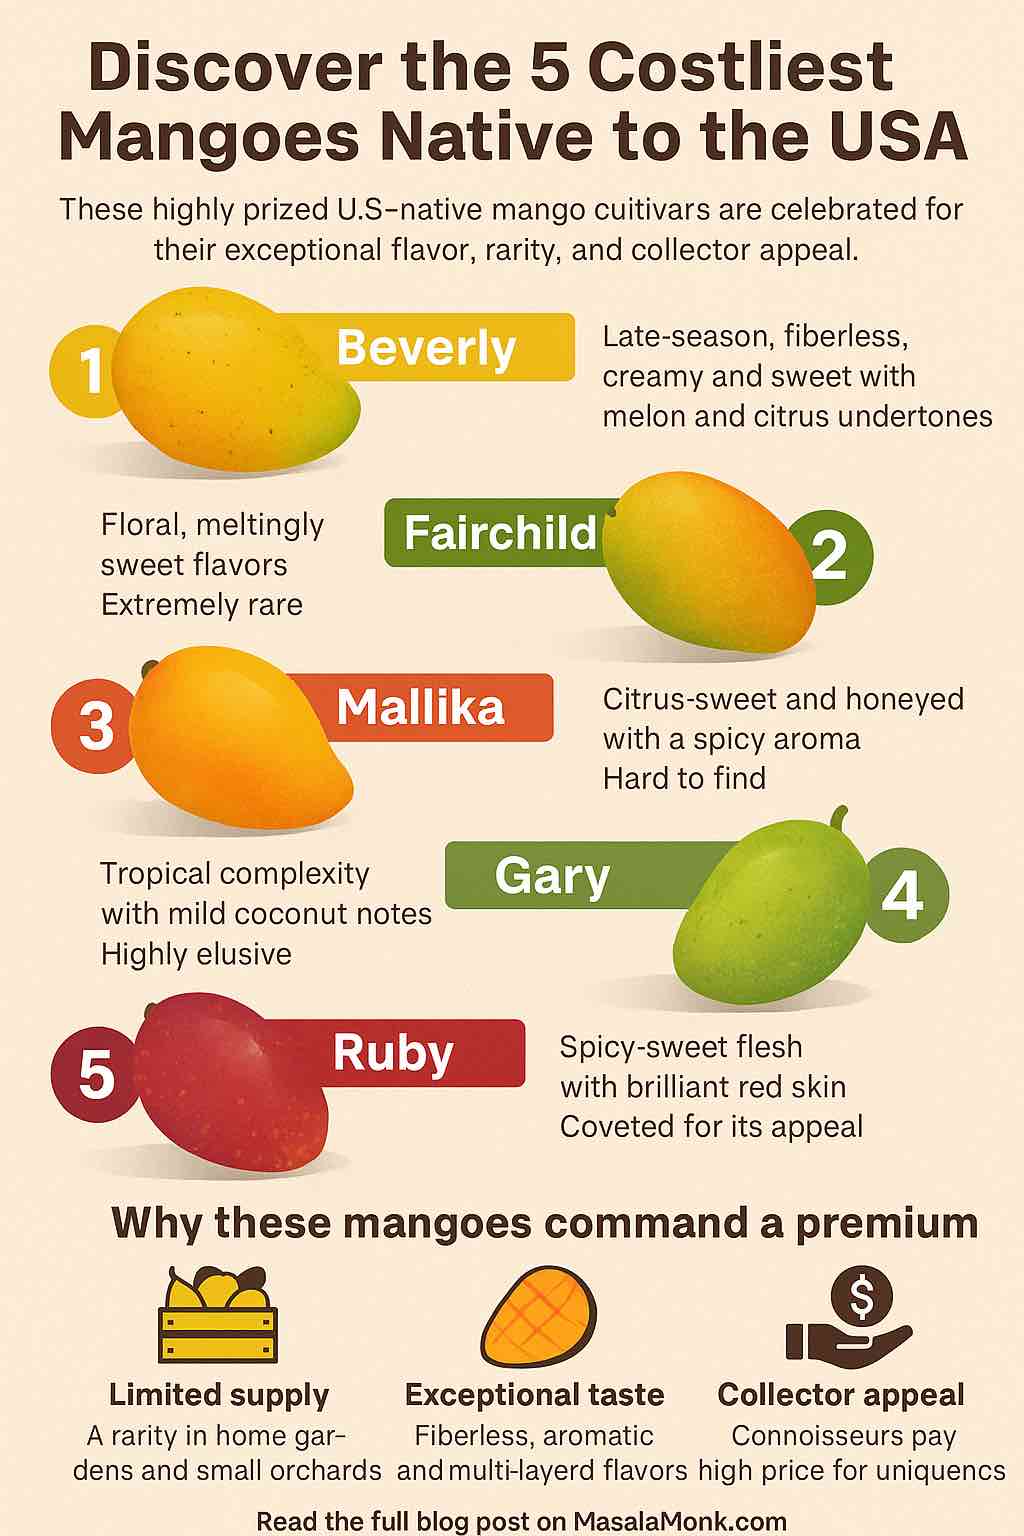
1. Beverly: The Late-Season Treasure

What Makes Beverly So Special?

Developed by the legendary Zill family in South Florida, Beverly mangoes are a cult favorite among collectors and boutique fruit markets. Unlike most commercial mangoes, Beverly’s magic is its late-season ripening—often available in August and September, when other varieties are long gone.

Flavor Experience

Beverly is famous for its:

  • Creamy, fiberless texture
  • Classic “Florida-mango” sweetness
  • Melon and citrus undertones

Why So Costly?

  • Rarity: Grown mainly in small orchards and home gardens; rarely available in supermarkets.
  • Premium pricing: In 2025, a 5-lb box from Glamorous Acres Farm runs $69, and an 8-lb box can go for $89.
  • Grafted trees: For backyard growers, expect to pay $90–$325, depending on size.

Practical Tip

To experience Beverly at its best, source directly from Florida boutique farms. For home growing, order a grafted tree from a reputable nursery and enjoy late-season mangoes when everyone else’s supply has run dry.


2. Fairchild: The Collector’s Delight

What Makes Fairchild Unique?

Named after the famed botanist David Fairchild, this mango is a piece of horticultural history. Prized for its unique floral notes and melting flesh, Fairchild is a true collector’s mango.

Flavor Experience

Expect:

  • Intensely aromatic, almost perfumed flesh
  • Melting, fiberless texture
  • Balanced sweetness

Why So Costly?

  • Extreme scarcity: Very little commercial cultivation; fruit is typically found at local Florida mango festivals or via private growers.
  • High per-fruit price: When available, often sold individually or by the pound at premium prices.

Practical Tip

Track down Fairchild at mango festivals (like the Fairchild Garden Mango Festival in Miami) or through fruit-sharing communities. If you’re a serious hobbyist, investing in a tree can pay dividends for years to come.


3. Mallika: The Citrus-Sweet Superstar

What Makes Mallika Stand Out?

Though its ancestry traces back to Indian cultivars, Mallika has become a Florida favorite due to its explosively sweet, citrus-honey flavor and its fiberless, silky flesh. It’s a winner at every taste test.

Flavor Experience

Mallika offers:

  • Bold citrus, honey, and melon notes
  • Zero fiber
  • Excellent aroma and juiciness

Why So Costly?

  • Limited production: Only a handful of specialty growers produce Mallika at scale.
  • Current pricing: In 2025, a 3-kg box (about 8–11 fruits) sells for around $50.
  • Popular with growers: Grafted trees are around $90.

Practical Tip

For the best flavor, let Mallika ripen fully off the tree—this “post-harvest ripening” is the secret to its extraordinary taste. Pre-order boxes from Florida specialty fruit vendors for the June–July season.


4. Gary: The Coconut-Kissed Rarity

What Makes Gary Coveted?

Another gem from the Zill breeding program, the Gary mango is almost mythical among mango lovers. It’s famous for its unique coconut undertones and rich, tropical complexity.

Flavor Experience

Gary is described as:

  • Mildly sweet, rich, with a hint of coconut
  • Smooth and creamy
  • A true “taster’s mango” for those who love subtlety

Why So Costly?

  • Ultra-low yields: Gary trees don’t produce heavily and are sensitive to disease.
  • Niche supply: Usually available only by special request, through mango festivals, or private orchards.

Practical Tip

Your best bet to taste Gary mangoes is to connect with Florida mango societies or attend fruit festivals where collectors trade and sell rare varieties. If you can find a tree, plant it for a unique homegrown treat.


5. Ruby: The Boutique Beauty

What Makes Ruby Rare?

Ruby mangoes live up to their name with their brilliant crimson skin and beautiful presentation. Originating from Miami, Ruby is beloved for both its looks and its spicy-sweet flavor.

Flavor Experience

Ruby delights with:

  • Spicy, sweet, aromatic flesh
  • Low fiber
  • Stunning color—perfect for fruit platters

Why So Costly?

  • Scarcity: Grown only by a handful of enthusiasts and boutique orchards.
  • Collector demand: When available, often commands prices of $10+ per fruit.

Practical Tip

Ruby trees are sometimes available from specialty nurseries. If you spot Ruby mangoes at a local farmer’s market or fruit festival, grab them—they’re usually gone in hours!


Why Are These Mangoes So Expensive?

  1. Scarcity: Most of these varieties are not grown commercially at scale. You’re buying something truly rare.
  2. Flavor Complexity: Each mango offers a unique, often multi-layered eating experience you simply can’t find in supermarket mangoes.
  3. Collector Value: Like rare wine or craft coffee, the rarity and reputation among mango enthusiasts drive prices up.
  4. Labor-Intensive: These mangoes are often hand-harvested and handled with care, further adding to their exclusivity.

How to Source or Grow These Mangoes in 2025

  • Boutique Farms & Orchards: Florida is the best source—look for direct-shipping from farms like Glamorous Acres or order trees from Everglades Farm and similar nurseries.
  • Mango Festivals: Time your visit to coincide with Florida’s annual mango festivals (Fairchild Garden’s festival is a must-visit!).
  • Online Nurseries: Many reputable sellers ship grafted trees nationwide—order early, as rare varieties sell out quickly.
  • Backyard Growing: If you live in USDA zones 9b–11, you can grow these mangoes at home. All require warm weather, well-drained soil, and some patience, but the payoff is huge.

Final Thoughts: For the True Mango Aficionado

Sampling America’s rarest and costliest mangoes is a revelation—once you taste a perfectly ripe Beverly, Mallika, or Ruby, you may never look at supermarket mangoes the same way again. These cultivars aren’t just fruit; they’re living treasures, each with its own history, flavor journey, and devoted following.

So whether you’re ready to track down a box of these delicacies or plant your own backyard orchard, remember: the best mango is the one you’ve waited for, paid a little extra for, and savored to the very last bite.


🍋 Ready to take your mango obsession to the next level?

  • Have a favorite mango memory or want to share tips for sourcing rare varieties? Drop a comment!
  • Need advice on starting your own mango grove? Reach out for personalized growing tips.
  • Looking for real-time info on fruit availability? Subscribe for seasonal alerts from Florida’s top mango growers.

Happy mango hunting!

FAQs

1. What makes these mango varieties so expensive compared to regular supermarket mangoes?
These mangoes are rare, often grown in small batches or private orchards, and offer complex flavors not found in commercial varieties. Their scarcity, flavor excellence, and collector demand drive up their price.


2. Where can I actually buy these mangoes in the United States?
Most are available from Florida-based specialty farms and nurseries, mango festivals, or boutique online sellers. Farms like Glamorous Acres and Everglades Farm offer fruit boxes or grafted trees when in season.


3. Can I grow these rare mangoes at home outside of Florida?
Yes, if you live in USDA zones 9b–11 (southern Florida, southern Texas, parts of California and Arizona). For colder climates, mangoes must be grown in large containers and protected from frost.


4. When is the best time to find and buy these mangoes?
Peak season for most Florida mangoes is May to September. Beverly ripens late (August–September), while Mallika and Fairchild are generally available in early to mid-summer.


5. Are these varieties available in supermarkets?
Almost never. They’re usually sold directly by growers, at farmer’s markets, or through pre-order. Some local specialty fruit stores in South Florida may carry a few.


6. How much does a box or tree of these mangoes cost?
Fresh fruit boxes typically range from $50 to $90 per box. Grafted trees can range from $60 for small pots to $325 for larger, mature trees.


7. Do these mangoes require special care if I want to grow them?
They thrive in full sun, well-drained soil, and warm, humid climates. Most are disease-resistant, but they do require regular watering and occasional fertilizer. Protect young trees from frost.


8. What’s the flavor difference between these varieties and common types like Tommy Atkins?
These premium mangoes are typically fiberless, sweeter, and much more aromatic, with unique notes like citrus, honey, spice, or coconut, compared to the blandness and fibrousness of commercial types.


9. Are these mangoes organic or non-GMO?
Most boutique farms use sustainable or organic practices, and all these varieties are non-GMO. However, always check with the seller for specific certifications.


10. How do I know when these mangoes are perfectly ripe?
Each variety has subtle signs—generally, look for a slight softness when pressed and a strong fruity aroma at the stem. Mallika is best ripened off the tree; Beverly and Fairchild should yield gently to pressure.

Posted on Leave a comment

Microgreens Magic: Top 5 Microgreens You Must Grow at Home

Microgreens You Must Grow at Home

Imagine harvesting a basket of super-nutritious greens in just 7–14 days, no matter the season, climate, or size of your home.
Welcome to the world of microgreens—a vibrant, health-boosting, and surprisingly easy indoor gardening revolution that’s taking over windowsills and kitchen counters worldwide.

Microgreens aren’t just a foodie trend; they’re a science-backed, space-saving, and delicious way to supercharge your meals. This 2025 guide explores the latest research, the five must-grow microgreens, and step-by-step advice to help you become a microgreen maestro—no green thumb required.


Why Microgreens?

  • Nutrient Powerhouses: Studies in 2025 confirm that microgreens can contain up to 40× more nutrients per gram than their mature counterparts (Nature, 2025).
  • Fast, Year-Round Harvest: Most are ready to eat within 1–2 weeks.
  • Minimal Space & Gear: A sunny window and a tray are all you need.
  • Flavors for Every Palate: From peppery to nutty to sweet—there’s a microgreen for everyone.

The Latest Science (2025 Update)

This year, microgreens have made headlines in scientific journals and urban kitchens alike:

  • Red Beet & Black Radish: A Scientific Reports study crowned red beet and black radish microgreens as leaders in flavonoids and antioxidants—key compounds for fighting inflammation, aging, and disease.
  • Gut & Heart Health: Microgreens like radish and mustard show promise in supporting the microbiome, reducing blood sugar spikes, and helping manage heart risk (Cleveland Clinic, 2025).
  • Biofortification: Growers are now using controlled environments to “supercharge” microgreens with extra vitamins and minerals, boosting their natural health benefits.

The Top 5 Microgreens to Grow at Home (2025 Edition)

1. Red Beet Microgreens

  • Why: Outrageous levels of flavonoids, vibrant color, earthy flavor.
  • Nutrition: The highest flavonoid content tested (1,625 mg/100g), plus iron and betalains.
  • Time to Harvest: 10–15 days.
  • How to Use: Add to salads, wraps, or as a colorful topping for rice bowls.

2. Black Radish Microgreens

  • Why: Antioxidant superstar with a spicy kick.
  • Nutrition: Rich in vitamin C, folate, and glucosinolates.
  • Time to Harvest: 6–8 days (one of the fastest).
  • How to Use: Perfect for adding zip to tacos, sandwiches, or savory pancakes.

3. Broccoli Microgreens

  • Why: Most beginner-friendly, with proven anticancer compounds (sulforaphane).
  • Nutrition: Up to 40× the sulforaphane of mature broccoli.
  • Time to Harvest: 7–10 days.
  • How to Use: Sprinkle on eggs, blend in smoothies, or layer in Buddha bowls.

4. Pak Choi (Bok Choy) or Kale Microgreens

  • Why: Easy to grow, very nutrient-dense, mild flavor.
  • Nutrition: Vitamins A, C, K, calcium, magnesium.
  • Time to Harvest: 10–14 days.
  • How to Use: Stir into stir-fries, soups, or use as a bed for grilled proteins.

5. Radish + Mustard Mix

  • Why: Super fast, zesty, and excellent for gut health.
  • Nutrition: Vitamin A, C, E, and microbiome-enhancing fibers.
  • Time to Harvest: 6–8 days.
  • How to Use: Mix into slaws, use as a pizza topping, or garnish noodle dishes.

Practical Guide: Growing Microgreens at Home—Step by Step

What You Need

  • Seeds: Purchase organic/non-GMO seeds (brands like Urban Platter, AllThatGrows, True Leaf Market).
  • Growing Trays: Shallow trays or upcycled containers (ice cream boxes, salad clamshells).
  • Growing Medium: Coconut coir, peat moss, or quality potting soil.
  • Spray Bottle: For gentle, even misting.
  • Light: A sunny windowsill (4–6 hours sunlight) or a basic LED grow light.

How to Grow Microgreens—The 7-Day Routine

  1. Prep Your Tray
    Fill your tray with 2–3 cm of moist growing medium. Level the surface.
  2. Sow Seeds Generously
    Scatter seeds thickly, almost like “carpet sowing.” Gently press them into the medium.
  3. Mist & Cover
    Mist seeds until moist but not soggy. Cover with another tray or a lid (blackout phase) for 2–3 days until most seeds sprout.
  4. Let There Be Light
    Remove the cover. Move tray to a sunny spot or under a grow light. Mist daily to keep soil moist (not wet).
  5. Airflow is Key
    Ensure good air movement to avoid mold—use a small fan if needed, or open a window nearby.
  6. Harvest at the Peak
    Once microgreens have their first true leaves (usually days 6–14), snip above the soil with clean scissors.
  7. Rinse & Store
    Store dry, unwashed in the fridge (in a container or ziplock), and rinse just before use for best shelf life.

Advanced Tips: Supercharge Your Microgreens

  • Rotate Varieties: Grow 2–3 kinds together for a nutritional and flavor boost.
  • Biofortification: Experiment by adding a pinch of Epsom salt or kelp to the water for extra magnesium and micronutrients.
  • Hydroponic Options: Try growing on coconut coir mats or hemp pads—no soil needed, less mess!
  • Troubleshooting: Yellow leaves? Add light. Mold? Increase airflow and lower watering. Slow growth? Check temperature (ideal: 20–24°C).

Real Stories & Urban Inspiration

“I started with radish microgreens in a repurposed sushi tray by my kitchen window. Now I have a full ‘microgreens bar’—every meal gets a fresh, crunchy upgrade.”
Aman S., Delhi

Urban micro-farms are thriving from New York to Bangalore, with chefs and home cooks using microgreens for vibrant, Instagram-worthy, and health-conscious cooking. You don’t need a garden—just a little curiosity and a bit of sunlight.


Conclusion: Your Microgreen Journey Starts Now

Microgreens are one of the most rewarding (and forgiving) ways to garden at home.
You’ll eat fresher, feel better, and impress friends with your new “indoor harvests.”
Start with red beet or broccoli for science-backed health, add a spicy radish mix for flavor, and let your kitchen become a green oasis—365 days a year.

Ready to sow your first tray?
Share your progress, questions, or recipe wins below.
Let’s grow!

10 Most Relevant FAQs About Growing Microgreens at Home

1. Can I grow microgreens without soil?
Yes. You can use soilless media like coconut coir, hemp mats, or even paper towels. Many growers prefer coconut coir for its cleanliness, water retention, and eco-friendliness.


2. How much light do microgreens really need?
Most microgreens thrive with 4–6 hours of bright, indirect sunlight per day. If you lack natural sunlight, a simple LED grow light will give you faster, greener, and more uniform results.


3. Which microgreens are the easiest for total beginners?
Broccoli, radish, sunflower, and pea shoots are the most forgiving. They germinate quickly, grow evenly, and have minimal issues with mold.


4. How do I avoid mold or fungus on my microgreens?
Use clean trays and tools, sow seeds in a single, even layer, ensure good air circulation (a small fan helps), and avoid overwatering. Remove trays from blackout as soon as seeds sprout.


5. How often should I water my microgreens?
Mist once or twice a day—enough to keep the medium moist but not soggy. Too much water is the main cause of mold and rot.


6. Can I reuse soil or grow mats for another crop?
It’s not recommended due to potential disease buildup. Compost spent soil/growing media and start each batch fresh for best results.


7. How long do microgreens last after harvesting?
Stored dry and unwashed in an airtight container in the refrigerator, most microgreens last 5–7 days. Wash them right before eating, not before storage.


8. Are microgreens safe to eat raw?
Yes, provided you use clean seeds and growing materials. Always rinse before eating. If you’re immunocompromised, consider giving them a quick dip in vinegar water.


9. Do I need special “microgreen” seeds or can I use regular seeds?
You can use regular seeds of edible plants, but always choose seeds labeled untreated and preferably organic. Avoid seeds intended for field crops (which may have chemical coatings).


10. Can I grow microgreens year-round—even during winter or rainy season?
Absolutely! Microgreens are perfect for year-round growing indoors. Just ensure steady temperature (18–24°C), humidity, and adequate light.


Posted on Leave a comment

The Power of Sprouts: Unleashing the Nutritional Potential for Weight Loss and Optimal Health

POWER OF SPROUTS

In the world of nutrition, few foods punch above their weight like sprouts. These tiny, humble powerhouses are often overlooked, yet they offer one of the most concentrated sources of vital nutrients, enzymes, and antioxidants nature has to offer. Whether you’re looking to shed pounds, support metabolic health, or simply boost your nutrient intake, incorporating sprouts into your diet is a practical, affordable, and highly effective strategy. Let’s dive into why sprouts deserve a prime spot on your plate.


What Are Sprouts?

Sprouts are seeds that have germinated and become young plants. Commonly sprouted seeds include broccoli, alfalfa, mung bean, lentil, radish, and chickpeas. The sprouting process typically takes 2–7 days and involves soaking, rinsing, and nurturing seeds until they develop tiny shoots. This simple transformation dramatically enhances their nutritional profile.


Nutritional Brilliance: Why Sprouts Are a Superfood

1. Enhanced Nutrient Profile

Sprouting increases the bioavailability of vitamins and minerals, particularly vitamin C, vitamin K, folate, magnesium, and B-vitamins. Some studies show that sprouting can boost antioxidant levels by 2 to 3 times compared to the original seed.

2. Rich in Digestive Enzymes

Sprouts are naturally rich in enzymes like amylase and protease, which aid digestion and reduce bloating. These enzymes break down complex carbs and proteins, making nutrients more absorbable.

3. High in Fiber and Plant-Based Protein

With their low calorie and high fiber content, sprouts promote satiety and digestive regularity. Lentil and mung bean sprouts, for example, offer up to 7 grams of protein per cup, making them a valuable plant protein source.

4. Blood Sugar Regulation

Sprouts have a low glycemic index and are rich in fiber, both of which help stabilize blood sugar. Recent clinical trials on broccoli sprouts reveal their sulforaphane content can reduce fasting blood glucose levels, especially in people with prediabetes.

5. Weight Loss Support

Thanks to their combination of fiber, protein, and micronutrients, sprouts help curb hunger hormones (like ghrelin) and increase satiety hormones (such as GLP-1 and PYY). They’re an ideal food for anyone aiming to reduce calorie intake without compromising nutrition.

6. Gut and Heart Health

Sprouts foster healthy gut bacteria and regular digestion. Additionally, their fiber and phytonutrients help lower LDL cholesterol and blood pressure, protecting cardiovascular health.


Top Sprouts to Include in Your Diet

  • Broccoli Sprouts: Packed with sulforaphane, a potent antioxidant and metabolism booster.
  • Mung Bean Sprouts: Great for blood sugar control and digestive health.
  • Lentil Sprouts: High in protein and fiber, excellent for weight management.
  • Alfalfa Sprouts: Rich in vitamins A, C, and K, with a mild taste perfect for salads.
  • Radish Sprouts: Spicy and full of antioxidants that support liver function and detox.
  • Chickpea Sprouts: Dense in protein and iron, great for plant-based diets.

How to Grow Sprouts at Home (Safely)

  1. Choose Organic Seeds: Make sure they are labeled for sprouting.
  2. Soak Seeds: 6–12 hours in clean water.
  3. Rinse and Drain: Twice daily in a mason jar or sprouting tray.
  4. Sprout in Indirect Light: Maintain room temperature (65–75°F).
  5. Harvest: Usually in 3–7 days when sprouts are 1–2 inches long.
  6. Refrigerate Immediately: Store in a breathable container and consume within 3–5 days.

Food Safety Tips:

  • Always wash hands, jars, and equipment thoroughly.
  • Avoid eating sprouts if you have a compromised immune system unless they are cooked.

Easy & Delicious Ways to Add Sprouts to Your Diet

  • Toss into Salads: Adds crunch and a burst of nutrients.
  • Layer in Sandwiches and Wraps: A flavorful alternative to lettuce.
  • Blend into Smoothies: Especially broccoli sprouts for a detoxifying boost.
  • Top Soups and Stir-Fries: Add just before serving to preserve nutrients.
  • Bake into Breads or Savory Muffins: For an earthy, nutty twist.

Final Thoughts: The Sprouting Edge

Sprouts are not a trend—they’re a timeless nutritional gem that deserves more attention. They offer a perfect storm of benefits: low-calorie density, high nutrient load, metabolic support, digestive aid, and unmatched versatility.

Whether you’re managing weight, enhancing athletic performance, or just eating cleaner, sprouts are an easy win. With just a few minutes of effort and a handful of seeds, you can unlock a world of health benefits right from your kitchen countertop.

Start sprouting. Start thriving.

FAQs: The Power of Sprouts

1. What are the health benefits of eating sprouts daily?
Sprouts are rich in vitamins, minerals, antioxidants, and enzymes. Daily consumption can aid digestion, support immune function, regulate blood sugar, and improve heart health, while also helping with satiety and weight control.

2. Can sprouts really help with weight loss?
Yes. Sprouts are low in calories but high in fiber and protein, which help you feel fuller for longer. They regulate appetite hormones and stabilize blood sugar, reducing cravings and overeating.

3. What is the best time to eat sprouts for maximum benefit?
Sprouts can be eaten any time, but consuming them during breakfast or lunch may offer better digestion and energy regulation throughout the day. Avoid eating large amounts late at night due to their fiber content.

4. Are raw sprouts safe to eat?
Raw sprouts can carry bacteria like E. coli or Salmonella if improperly handled. To reduce risk: buy seeds meant for sprouting, wash thoroughly, store in the fridge, and rinse twice daily. Immunocompromised individuals should lightly cook them.

5. How long do homegrown sprouts last in the refrigerator?
Typically, 3–5 days. Store them in a breathable container lined with paper towels to absorb moisture, which prevents spoilage.

6. Can I sprout any seeds at home?
Only use organic, untreated seeds labeled for sprouting. Some seeds, like kidney beans, can be toxic when raw and should not be sprouted.

7. Which sprouts are best for beginners?
Mung beans, lentils, and alfalfa sprouts are easy to grow, quick to sprout, and forgiving if you’re new to the process.

8. How often should I rinse sprouts during the growing process?
Rinse and drain sprouts twice a day—morning and evening—to prevent mold growth and promote healthy sprouting.

9. Are sprouted grains better than regular grains?
Yes. Sprouting grains like wheat, barley, or quinoa increases nutrient availability, reduces antinutrients (like phytic acid), and improves digestibility.

10. Can I eat sprouts during pregnancy?
Caution is advised. Due to the risk of bacterial contamination, pregnant individuals should eat only cooked sprouts. Consult your doctor before including them.

✅ What This Means for You in 2025

AreaWhat We Know
Broccoli Sprout SupplementsClinical evidence supports their use for reducing fasting glucose in prediabetes.
Weight Loss & MetabolismAnimal studies are compelling, but human trials on weight loss are still needed.
Brain & Cognitive HealthAnimal evidence points to neuroprotective benefits—promising, yet preliminary.
Safety & EffectivenessGenerally safe as food; personalized effects linked to gut microbiome diversity.
Sprout Types & ActionsMung, lentil, radish sprouts add fiber and nutrients, complementing broccoli sprout effects.
Posted on Leave a comment

Guide to Broccoli Sprouts

close up photo of a stethoscope

Welcome to the fascinating world of broccoli sprouts! These tiny, but mighty sprouts are not only packed with essential nutrients but are also easy to grow in the comfort of your own home. In this comprehensive guide, we will delve into the numerous health benefits of broccoli sprouts, provide a step-by-step guide on how to cultivate them, and share some delicious recipes that will make this superfood a delightful addition to your meals. So, let’s get started on this journey to better health and wellness!

Unleashing the Power of Broccoli Sprouts

Broccoli sprouts are the three to four-day-old immature broccoli plants that resemble alfalfa sprouts but taste like radishes. Despite their small size, they are a nutritional powerhouse, boasting a high concentration of sulforaphane, a compound renowned for its potential health benefits.

Sulforaphane: The Star Compound

Sulforaphane is a potent antioxidant and anti-inflammatory compound that has been extensively studied for its health-promoting properties. It is formed when the enzyme myrosinase transforms glucoraphanin, a compound found in cruciferous vegetables like broccoli, into sulforaphane upon damage to the plant (such as from chewing).

Health Benefits of Sulforaphane

The health benefits of sulforaphane are vast and varied. Here are some key benefits:

  • Cancer Prevention: Sulforaphane has been shown to have powerful anti-cancer properties. It works by enhancing the body’s detoxification enzymes and protecting the cells from DNA damage. It also inhibits the growth and proliferation of cancer cells and induces apoptosis (cell death) in cancerous cells.
  • Heart Health: Sulforaphane can help to reduce high blood pressure and improve heart health. It works by improving blood vessel function and reducing inflammation, which are key factors in preventing heart disease.
  • Brain Health: Sulforaphane has neuroprotective effects and can help to improve brain health. It has been shown to have potential benefits in a range of neurological conditions, including autism, neurodegenerative diseases, and brain injuries.
  • Gut Health: Sulforaphane can help to protect the gut lining, preventing leaky gut syndrome. It also has antimicrobial properties that can help to balance the gut microbiota.
  • Skin Health: Sulforaphane can protect the skin from UV radiation damage, reducing inflammation and redness. It can also help to repair skin damage and is being studied for its potential benefits in skin diseases like psoriasis and skin cancer.
  • Combating H. pylori Infections: Sulforaphane has been shown to be effective in eradicating Helicobacter pylori, a bacterium that causes stomach ulcers and is a major risk factor for stomach cancer.

Growing Your Own Broccoli Sprouts

One of the best things about broccoli sprouts is that they are incredibly easy to grow at home. All you need are some broccoli seeds, a sprouting jar or tray, and a little bit of patience. Here’s a simple guide to get you started:

  1. Choose Organic Broccoli Seeds: Start with high-quality, organic broccoli seeds. These are readily available online or at your local garden store. Organic seeds are free from pesticides and other chemicals, ensuring that your sprouts are as healthy as possible.
  2. Soak the Seeds: Place a tablespoon of seeds in a jar and cover with a few inches of water. Let them soak for 6-12 hours (or overnight).
  3. Rinse and Drain: After soaking, drain the water from the jar, rinse the seeds under running water, and drain again. It’s important to remove any remaining hulls or hard seed coats.
  4. Sprout the Seeds: Place the jar in a warm, dark place. Rinse and drain the seeds twice a day to keep them moist but not waterlogged.
  5. Harvest Your Sprouts: After about 5-7 days, your sprouts should be ready to harvest. They should be about 1-2 inches long and have yellow or light green leaves. Once they’re ready, give them a final rinse, drain, and let them dry before storing them in the refrigerator.
  6. Troubleshooting: If you notice a foul smell or mold growth, it means your sprouts have spoiled, and you should discard them. Always ensure your sprouting jar is clean, and your seeds are rinsed regularly to prevent spoilage.

From Garden to Table: How to Eat Broccoli Sprouts

Now that you’ve grown your sprouts, the next step is to incorporate them into your meals. Broccoli sprouts have a mild, slightly peppery flavor that can add a refreshing crunch to a variety of dishes. Here are some ideas:

  • Juicing: One of the simplest ways to consume broccoli sprouts is to juice them. You can combine them with other vegetables like carrots, celery, and cucumber for a nutrient-packed drink.
  • Smoothies: Add a handful of broccoli sprouts to your favorite smoothie. They blend well with fruits like bananas, apples, and berries, adding a nutrient boost without changing the flavor much.
  • Salads: Sprinkle broccoli sprouts on top of your salads for a crunchy texture and a nutritional upgrade.
  • Sandwiches and Wraps: Add broccoli sprouts to your sandwiches and wraps. They pair well with a variety of ingredients, from avocado and hummus to turkey and cheese.
  • Stir-fries: Sauté broccoli sprouts with other vegetables and your choice of protein for a quick and healthy stir-fry.
  • Fermented Foods: Fermenting broccoli sprouts can increase their health benefits even further. You can add them to homemade sauerkraut or kimchi, or ferment them on their own.

Buying Guide: Broccoli Sprouts and Seeds

If growing your own sprouts isn’t for you, don’t worry! There are plenty of options for buying fresh, organic broccoli sprouts and seeds. Here’s what to look for:

  • Freshness: Look for sprouts that are bright green and crisp. Avoid those that are yellow, brown, or slimy.
  • Organic: Choose organic sprouts and seeds whenever possible. They’re free from harmful pesticides and are often more nutrient-dense.
  • Reputable Sellers: Buy from reputable sellers to ensure you’re getting high-quality sprouts and seeds. Check reviews and ratings before making a purchase.
  • Local Stores: Many health food stores and supermarkets carry fresh broccoli sprouts. You can also check farmers’ markets and specialty stores.
  • Online: There are many online retailers that sell broccoli sprouts and seeds. This can be a convenient option, especially if you’re buying in bulk.

Frequently Asked Questions (FAQs)

1. What are broccoli sprouts? Broccoli sprouts are the three to four-day-old immature broccoli plants that resemble alfalfa sprouts but taste like radishes.

2. Why are broccoli sprouts good for you? Broccoli sprouts are packed with nutrients, including a compound called sulforaphane, which has been shown to have numerous health benefits, including cancer prevention, heart health, brain health, gut health, and skin health.

3. How do you grow broccoli sprouts at home? Growing broccoli sprouts at home is easy. All you need are some broccoli seeds, a sprouting jar or tray, and a little bit of patience. Soak the seeds, rinse and drain them, and then let them sprout in a warm, dark place.

4. How do you eat broccoli sprouts? Broccoli sprouts can be eaten raw or cooked. They can be added to salads, sandwiches, stir-fries, smoothies, or even juiced.

5. Where can I buy broccoli sprouts and seeds? You can buy broccoli sprouts and seeds at health food stores, supermarkets, farmers’ markets, and online. Always choose fresh, organic products from reputable sellers.

6. Can I eat broccoli sprouts every day? Yes, you can eat broccoli sprouts every day. They are a healthy addition to your diet and can be consumed in a variety of ways.

7. How long do broccoli sprouts last? Fresh broccoli sprouts can last up to two weeks in the refrigerator. Always store them in a sealed container to keep them fresh.

8. What are the benefits of broccoli sprouts? Broccoli sprouts are rich in nutrients, including a compound called sulforaphane, which has numerous health benefits. These include cancer prevention, heart health, brain health, gut health, and skin health. They also have antioxidant and anti-inflammatory properties.

9. How do you make broccoli sprouts? To make broccoli sprouts, you need to soak broccoli seeds in water, rinse and drain them, and then let them sprout in a warm, dark place. After about 5-7 days, the sprouts should be ready to harvest.

10. Is it safe to grow broccoli sprouts at home? Yes, it is safe to grow broccoli sprouts at home. Just make sure to use organic seeds, keep your sprouting jar or tray clean, and rinse the seeds regularly to prevent spoilage.

11. When should you not eat broccoli sprouts? You should not eat broccoli sprouts if they have a foul smell, show signs of mold growth, or have turned yellow or brown. These are signs of spoilage.

12. Is it safe to eat broccoli sprout seeds? Yes, it is safe to eat broccoli sprout seeds. However, they are usually sprouted before eating to increase their nutrient content and make them easier to digest.

13. Does cooking broccoli sprouts destroy nutrients? Cooking can reduce the nutrient content of broccoli sprouts, especially their sulforaphane content. To preserve their nutrients, it’s best to eat them raw or lightly steamed.

14. Should I wash my broccoli sprouts? Yes, you should wash your broccoli sprouts before eating them to remove any dirt or bacteria. However, make sure to dry them thoroughly to prevent spoilage.

15. Are broccoli sprouts good for skin? Yes, broccoli sprouts are good for the skin. They contain sulforaphane, which can protect the skin from UV radiation damage, reduce inflammation and redness, and help repair skin damage.

Conclusion

Broccoli sprouts are a fantastic addition to any diet. They’re packed with nutrients, easy to grow at home, and versatile in the kitchen. By incorporating these tiny but mighty sprouts into your meals, you’re taking a big step towards better health. So why wait? Start your broccoli sprout journey today and reap the benefits of this remarkable superfood!

Call to Action

Did you find our guide on broccoli sprouts helpful? Share it with your friends and family and spread the health! Don’t forget to leave a comment below with your favorite way to enjoy broccoli sprouts. Stay tuned for more health and wellness tips and guides!