Some days you want a dramatic crusty loaf that sings when it cools. Other days you just want a soft sandwich slice that behaves, a pan of dinner rolls that tear like cotton, or a chewy bagel that makes breakfast feel like a small win. This sourdough recipe guide is built for all of those moods—without forcing you to become a different person each time you bake.
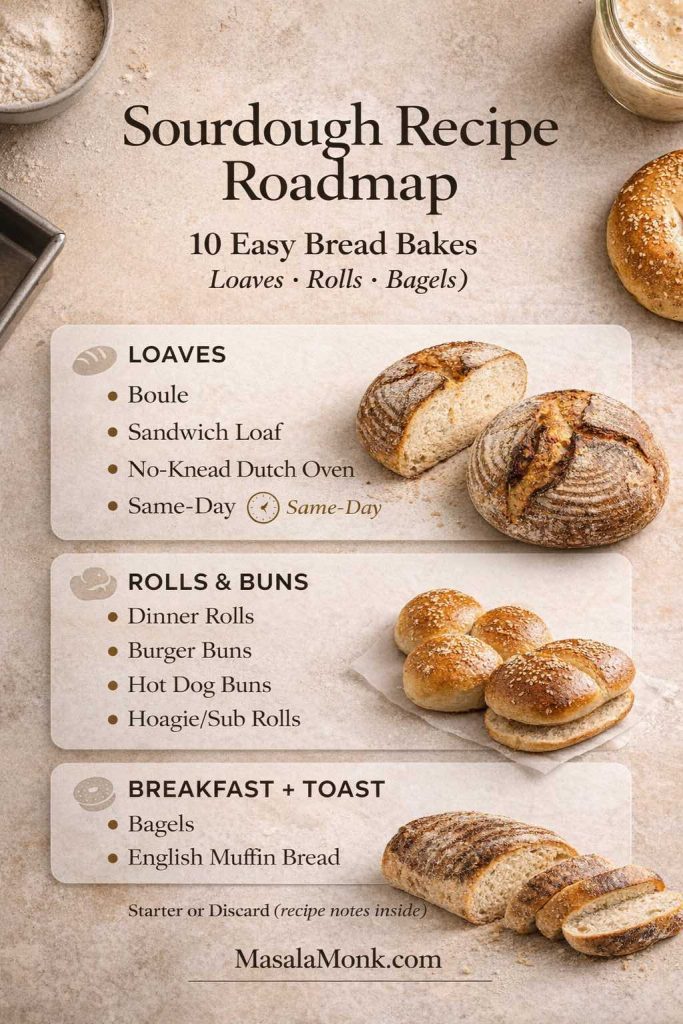
We’ll work in metric, lean on a single “house” starter, and then branch into ten bakes you can rotate through: a classic boule, a loaf-pan sandwich bread, a same-day loaf, a no-knead Dutch oven bread, English muffin bread, soft dinner rolls, burger buns, hot dog buns, hoagie/sub rolls, and sourdough bagels—plus one gluten-free vegan boule that still feels like real bread.
Along the way, you’ll also see where discard fits naturally, how to nudge your bread more sour when you want that tang, and how to choose equipment—cast iron, Dutch oven, bread pot, loaf pan, baking dish, stand mixer—without overthinking it.
For foundational starter and technique references, these are genuinely useful reads you can keep open in another tab:
- King Arthur’s beginner guide is calm and practical: The beginner’s guide to sourdough baking
- If you want exact maintenance ratios: Feeding and Maintaining Your Sourdough Starter
- For the “why” behind fermentation flavor: The Science of Sourdough Starters
- For shaping and handling without crushing your bubbles: How to Knead, Fold, and Shape Sourdough Bread
The starter you have vs the starter you need
A sourdough starter isn’t one thing—it’s a living culture that behaves differently depending on when you use it. Once you get that, the entire process becomes easier.
Active (ripe) starter
This is the starter that’s been fed and has risen predictably—bubbly, domed, and at or near peak. It has the strength to lift dough without help. Most “true sourdough bread” recipes use this version: boules, baguette-style loaves, bagels, and most rolls.
If your starter feels sluggish, it’s usually not “dead,” it’s just underfed, too cold, or too new. A steady feed schedule and a warmer spot often fixes it. King Arthur’s step-by-step method is a solid reference: Sourdough starter recipe.
Discard (unfed starter)
Discard is starter that hasn’t been fed recently—often pulled straight from the fridge. It brings flavor, but it doesn’t always bring the same lift. That’s why many discard-friendly doughs either:
- use a longer fermentation window, or
- add a small amount of commercial yeast (a common, perfectly valid approach for a same-day sourdough bread).

Discard also shines in recipes that don’t rely solely on fermentation for rise—crackers, pancakes, waffles, English muffins. Serious Eats has a great discard roundup if you like repurposing: What to do with sourdough discard.
Freezing or drying sourdough starter (so you always have a backup)
If you want a safety net, keep a backup starter in one of these forms:
- Freeze: spoon starter into small portions (ice-cube style), freeze solid, then store airtight. Thaw in the fridge, then feed 2–3 times until it rises predictably again.
- Dry: spread a thin layer of starter on parchment, air-dry until fully brittle, then crush and store airtight. Rehydrate with water and flour, then feed daily until active.
When to toss starter: mold, or pink/orange streaks and an unpleasant “off” smell. Otherwise, most “dead” starters are simply cold, underfed, or inconsistent.
Also Read: Peanut Butter Fudge: Recipes & Guide (8 Methods + Easy Variations)
Equipment that makes sourdough feel simpler
You can bake great sourdough with very little. Still, a few choices remove friction.
Dutch oven, cast iron, or “bread pot”
A preheated Dutch oven (including enameled cast iron like a Le Creuset-style bread pot) traps steam, which helps oven spring and crust. If you don’t have one, a heavy lidded pot works. If all you have is a sheet pan, you can still bake—steam becomes the puzzle instead of the pot.
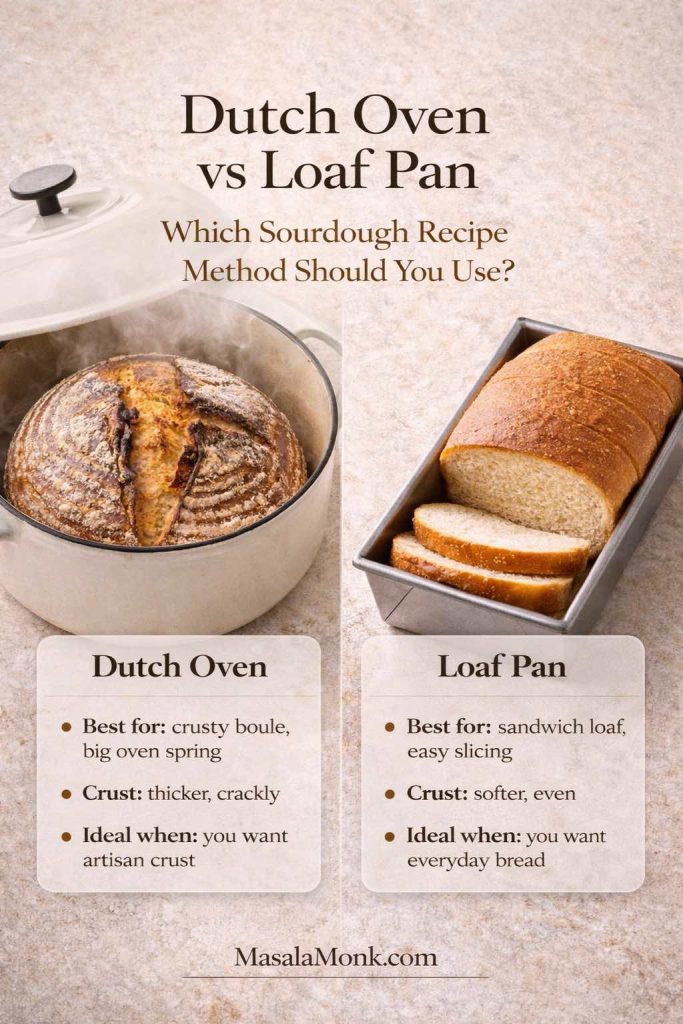
Loaf pan, bread tin, baking pan
Loaf-pan sourdough is underrated. It’s practical, it slices cleanly, and it turns “homemade bread” into “weekday bread” immediately. If you’re building a sourdough sandwich loaf routine, a loaf pan becomes your best friend.
Loaf pan size matters more than people think
A standard 9×5 in / 23×13 cm pan gives the most forgiving rise and clean slices. Smaller pans make taller loaves but can overproof faster; larger pans can look “short” unless you scale the dough up. When in doubt, use the 9×5 and proof until the dough crowns 2–3 cm above the rim.
Stand mixer (KitchenAid and friends)
A stand mixer can make softer enriched doughs—rolls, buns, sandwich loaves—feel effortless. Meanwhile, high-hydration boules still benefit from folds and time more than aggressive mixing. If you do use a mixer for rustic dough, keep it gentle and brief, then rely on folds to finish the job.
Bread makers and Bread machine sourdough: what it’s best for (and how to adapt)
Some machines include a sourdough setting, and many can handle mixing, kneading, and baking a loaf-pan style sourdough bread. The main limitation is crust and shape, not flavor. A bread machine is most useful for loaf-pan style sourdough—think sandwich bread, English muffin bread, and soft everyday loaves. The machine won’t mimic a Dutch-oven crust, yet it can still deliver excellent flavor.
A simple way to adapt any loaf-pan sourdough in this guide:
- Use active starter for the most reliable rise (discard can work, but timing gets unpredictable).
- Choose the machine’s “Dough” cycle to mix + knead, then let the dough rise in the pan until it’s puffy and close to the rim.
- If your kitchen is cool or your starter is young, a tiny pinch of instant yeast (like in the same-day loaf) keeps the schedule dependable without killing sourdough flavor.
- For a softer crust, remove the loaf promptly and cool on a rack; for a deeper crust, use the “dark crust” setting if available.
If your goal is consistent everyday sandwich bread, a bread maker can be the easiest “set it and forget it” sourdough routine.
King Arthur even builds machine options into their recipes, including a bread-machine note for their beginner-friendly loaf: Basic sourdough bread recipe.
Also Read: 10 Vegan Chocolate Cake Recipes (Easy, Moist, & Dairy-Free)
One base rhythm that makes every sourdough recipe easier
Before we dive into the ten bakes, it helps to know the three levers you can pull:
- Time: longer fermentation tends to build more flavor.
- Temperature: warmer ferments move faster, cooler ferments move slower and can deepen flavor.
- Hydration: wetter doughs can give a more open crumb, while tighter doughs (bagels!) give chew.
If you want to keep starter at a steady temperature—especially in a warm climate or a cold kitchen—temperature control helps. Serious Eats has a clear explanation of the “sweet spot” and cooler maintenance ranges in their review of a dedicated starter box: Brod & Taylor Sourdough Home review. Even without a device, that concept matters: warmer for activity, cooler for steadier, slower fermentation.
Now, let’s bake.
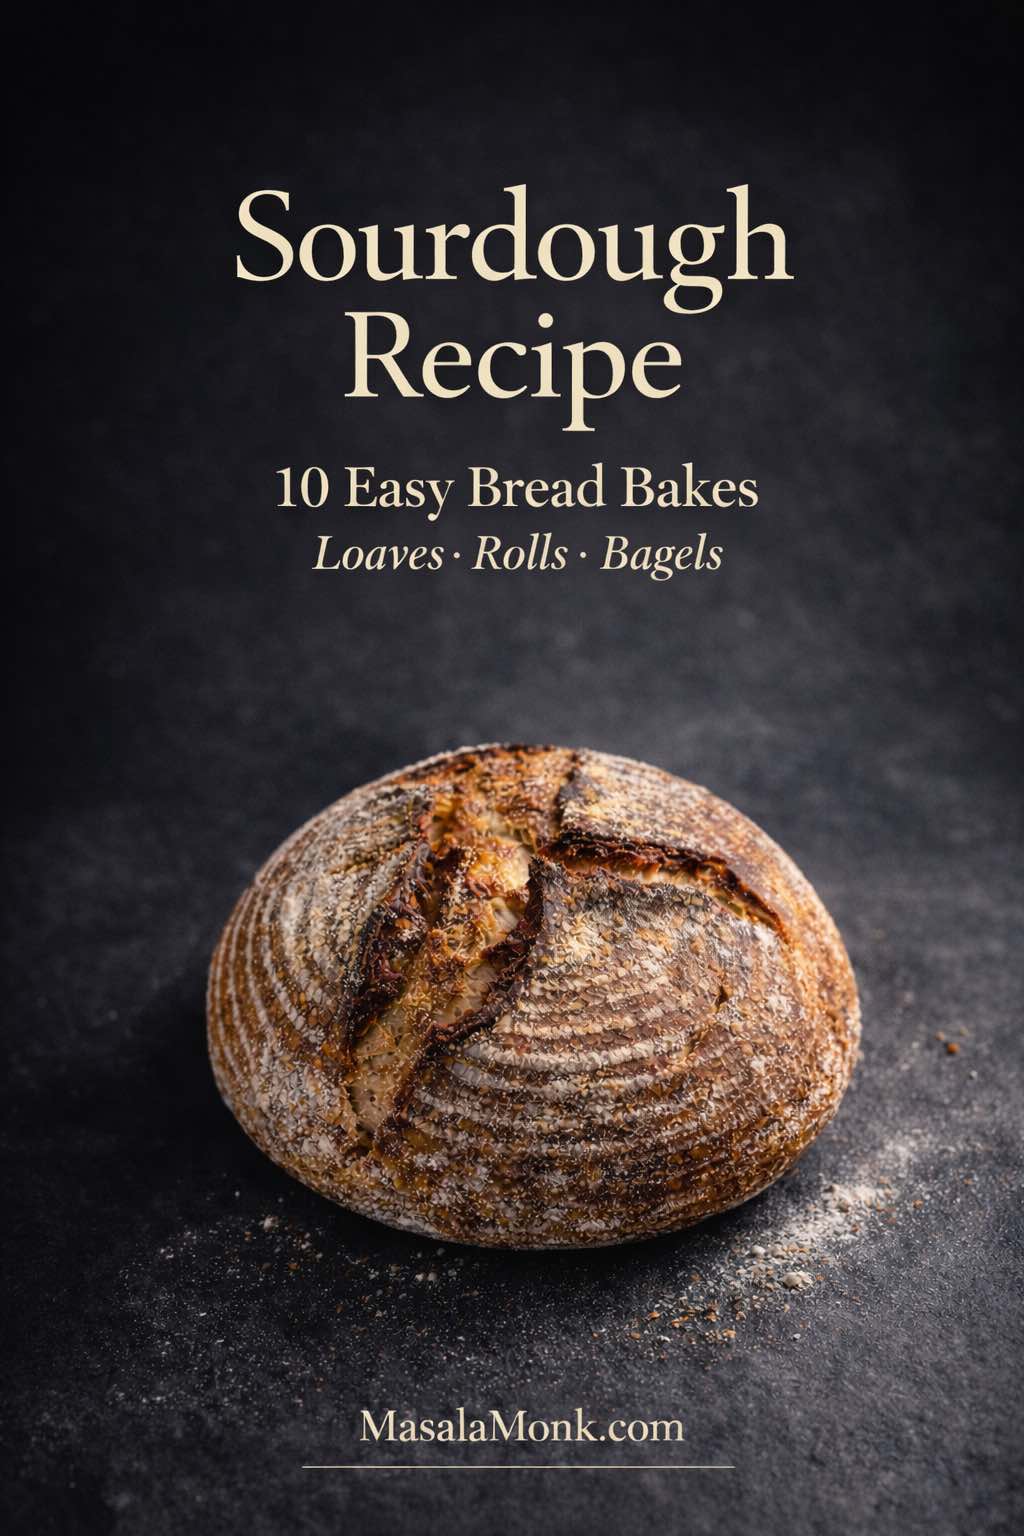
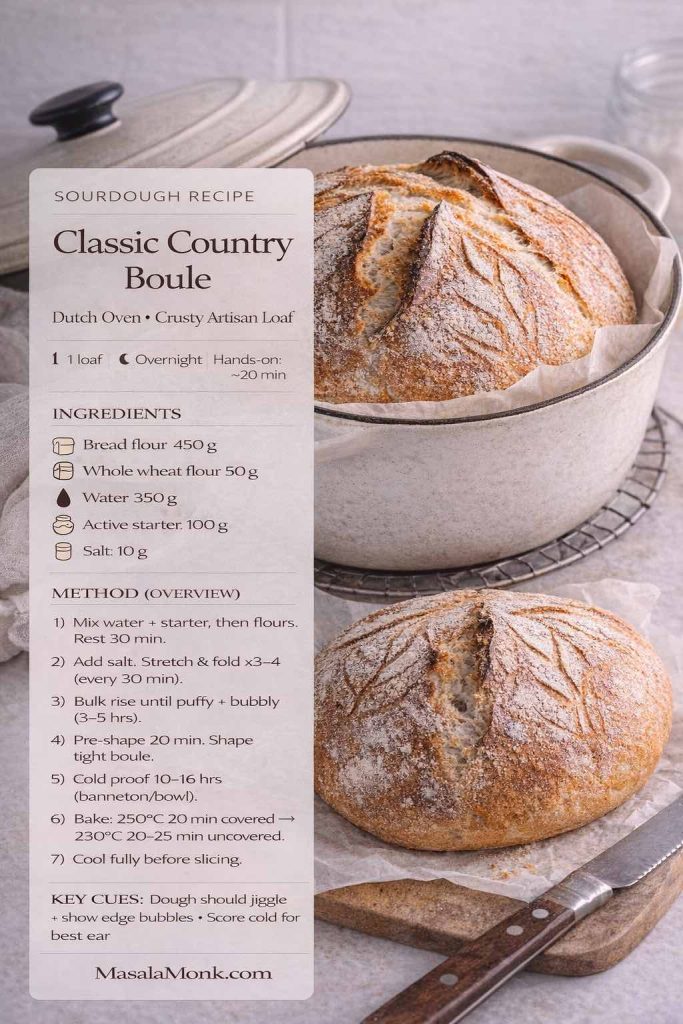
1) Classic Country Boule Recipe (crusty sourdough bread in a Dutch oven)
This is the loaf that anchors everything else. Once you can bake a confident sourdough boule, you can branch into rye, wholegrain, spelt, einkorn, seeded loaves, cinnamon raisin bread, cranberry walnut bread, and even mini sourdough bread bowls without changing your identity.
Ingredients (1 large boule)
- Bread flour: 450 g
- Whole wheat flour: 50 g
- Water: 350 g
- Active starter (100% hydration): 100 g
- Salt: 10 g
Method
Mix (evening works beautifully)
- Stir water and starter until milky.
- Add the flours and mix until no dry flour remains.
- Cover and rest 30 minutes. This pause makes the dough easier to strengthen later.
Build strength
4. Sprinkle salt over the dough and work it in with pinches and folds.
5. Over the next 2 hours, do 3–4 rounds of stretch-and-folds (every 30 minutes). Each round should feel easier as the dough tightens.
Bulk ferment
6. Let the dough rise until it looks puffier and lively—jiggly, with bubbles forming along the sides. Depending on room temperature, this can take 3–5 hours after your last fold.
Shape
7. Turn the dough onto a lightly floured surface. Pre-shape into a loose round, then rest 20 minutes.
8. Final shape into a tight boule: pull the dough toward you to create surface tension without tearing.
Cold proof
9. Place seam-side up in a floured banneton or cloth-lined bowl. Refrigerate 10–16 hours.
Bake
10. Preheat a Dutch oven to 250°C for 30–45 minutes.
11. Tip the dough onto parchment, score, and place it into the hot pot.
12. Bake 20 minutes covered, then reduce to 230°C and bake 20–25 minutes uncovered until deeply browned.
13. Cool fully. The crumb keeps setting as it cools, and slicing early can make it gummy.
Make it more sour (without making it dense)
If you want extra sour sourdough bread, the simplest shift is time and temperature: a longer cold proof often deepens tang. Another option is using a slightly lower hydration starter and letting the dough ferment a little longer before shaping. Serious Eats explains the microbial balance clearly in their deep dive on starter behavior: The Science of Sourdough Starters.
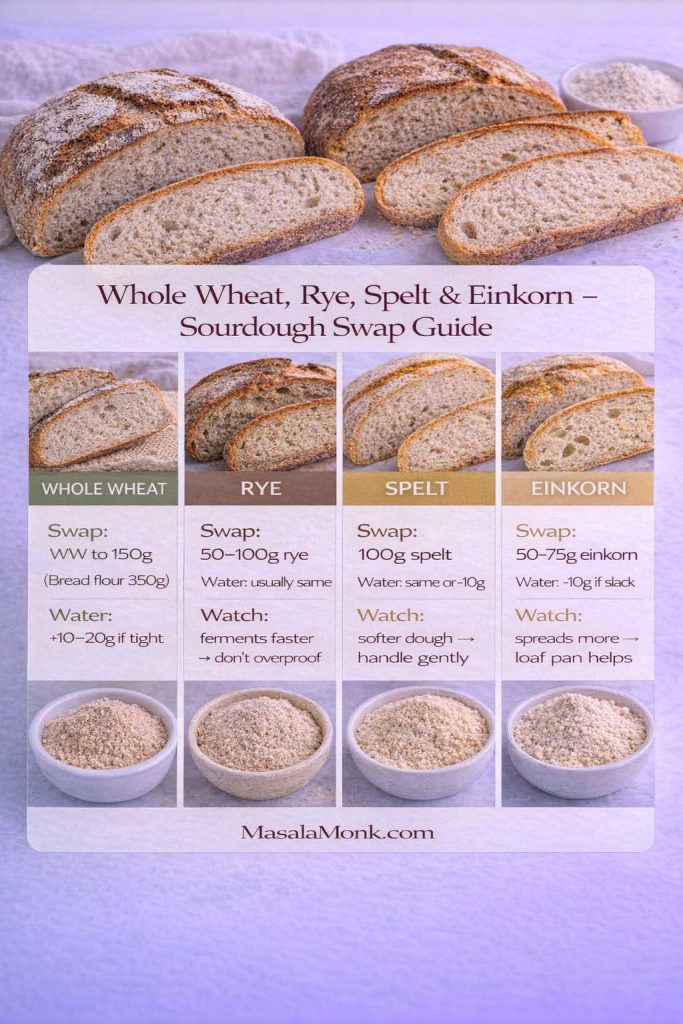
Wholegrain, spelt, rye, and einkorn variations
- For a whole wheat sourdough bread: increase whole wheat flour to 150 g and reduce bread flour to 350 g. Add 10–20 g extra water if the dough feels tight.
- For a rye sourdough or sourdough rye loaf: replace 50–100 g of bread flour with rye flour. Rye ferments enthusiastically, so watch the dough rather than the clock.
- For spelt sourdough: swap 100 g of bread flour with spelt. Spelt dough can feel softer, so handle gently and avoid over-proofing.
- For einkorn flour sourdough: start small—swap 50–75 g first. Einkorn’s gluten behaves differently, so the dough may spread more; a loaf pan version can be easier at first.
If you’re curious which flours help starters thrive, Serious Eats tested options and explains why rye and wholegrain often jump-start activity: The best flour for sourdough starters.
Easy add-ins: cinnamon raisin, cranberry orange, cranberry walnut, pumpkin
Once you’ve made the classic boule, add-ins become straightforward—keep the dough the same, then fold these in after the first fold set:
- Cinnamon raisin swirl: 120–150 g raisins + a thin cinnamon-sugar layer during shaping (don’t overdo sugar or the swirl can leak).
- Cranberry orange: 120 g dried cranberries + zest of 1 orange (add 10–15 g extra water if the dough tightens).
- Cranberry walnut: 100–120 g cranberries + 80–100 g toasted walnuts (toast first for better flavor).
- Pumpkin sourdough: replace 50–80 g of the water with pumpkin purée (pumpkin changes dough feel—watch texture, not the clock).
These small swaps help you hit a lot of “flavored sourdough bread” searches without writing full extra recipes.
Turn this boule dough into mini sourdough bread bowls
Instead of one boule, divide the dough into 4–6 pieces after bulk fermentation. Shape each piece tightly into a small round, cold proof on a tray, then bake on a preheated stone or heavy sheet with steam. Once cooled, slice the tops and hollow gently. These sourdough soup bowls are perfect with thick stews or creamy soups.
Also Read: Kahlua Drinks: 10 Easy Cocktail Recipes (Milk, Vodka, Coffee)

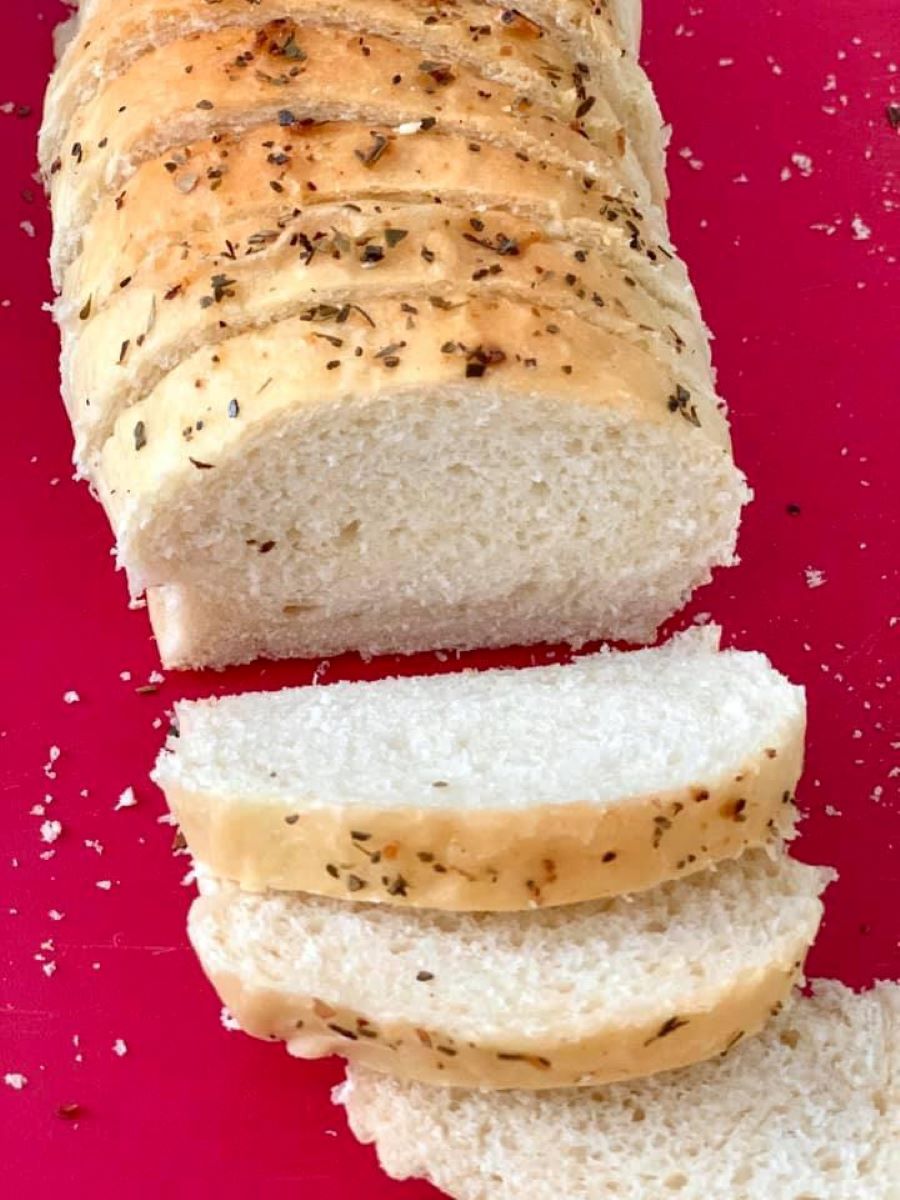
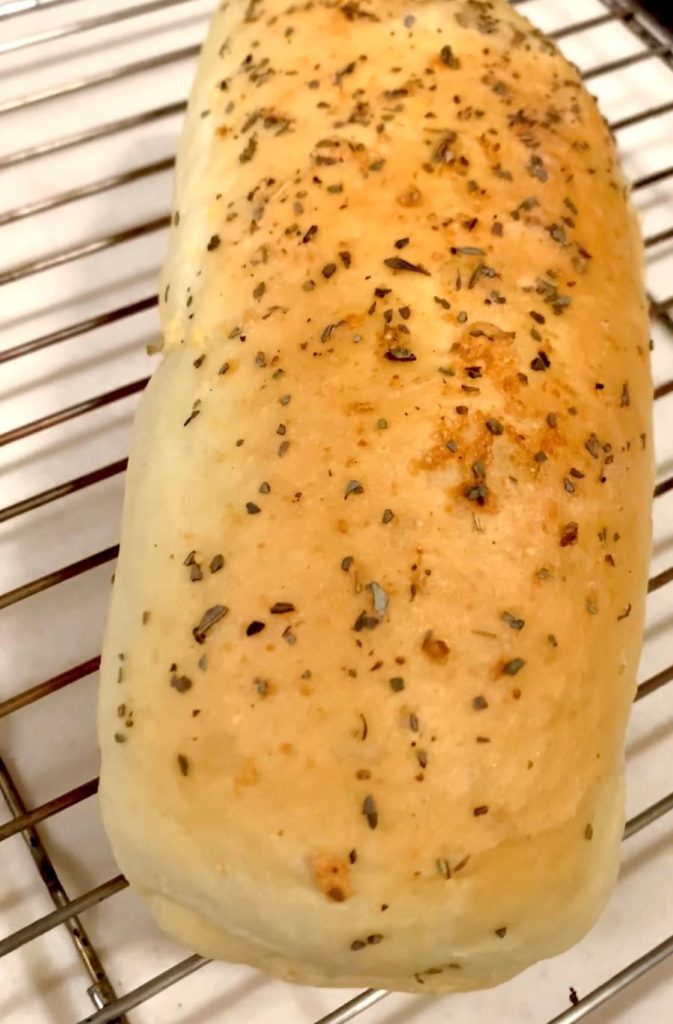
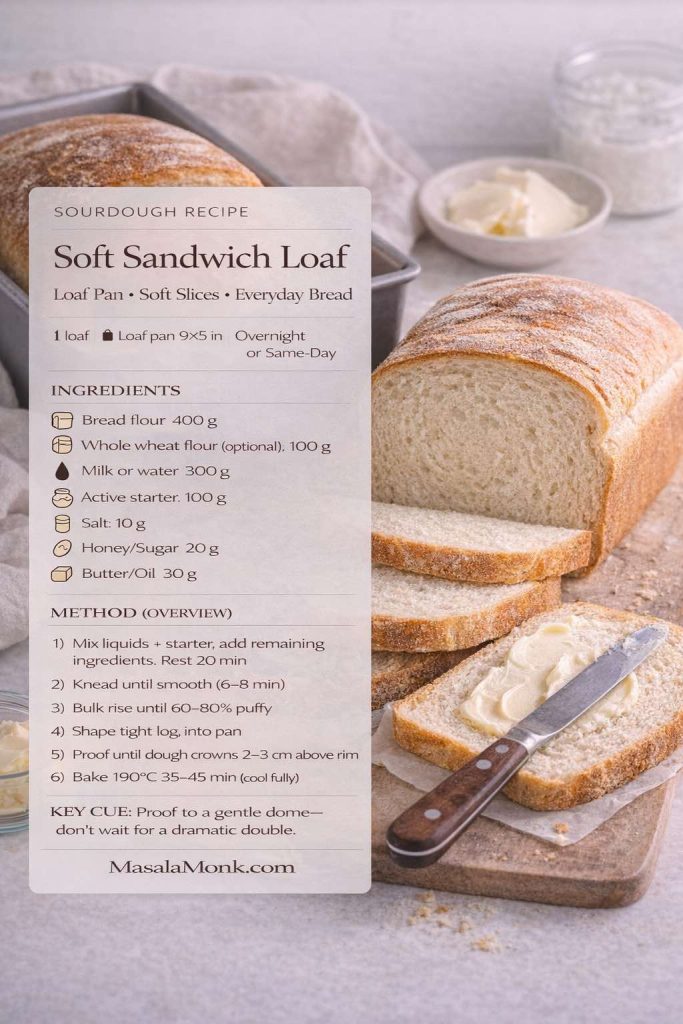
2) Soft Sandwich Loaf Recipe (loaf pan sourdough bread for everyday)
A sourdough sandwich bread recipe should slice cleanly, toast beautifully, and feel soft enough for breakfast and lunch. This is the bread you’ll reach for when you want peanut butter, grilled cheese, or a turkey sourdough sandwich without wrestling a crust.
Ingredients (1 loaf pan, about 23×13 cm / 9×5 in)
- Bread flour: 400 g
- Whole wheat flour: 100 g (optional; replace with bread flour for a whiter loaf)
- Milk or water: 300 g
- Active starter: 100 g
- Salt: 10 g
- Honey or sugar: 20 g
- Butter or neutral oil: 30 g
Method
- Mix milk and starter until combined.
- Add flours, honey/sugar, salt, and butter/oil. Mix to a shaggy dough, then rest 20 minutes.
- Knead until smoother and elastic—6–8 minutes by hand or 4–5 minutes in a stand mixer on low.
- Cover and let rise until noticeably puffy, about 60–80% increased in size.
- Shape into a log: flatten into a rectangle, roll tightly, pinch the seam.
- Place seam-side down in a greased loaf pan.
- Proof until the dough crowns 2–3 cm above the pan rim.
- Bake at 190°C for 35–45 minutes. Cool fully before slicing.
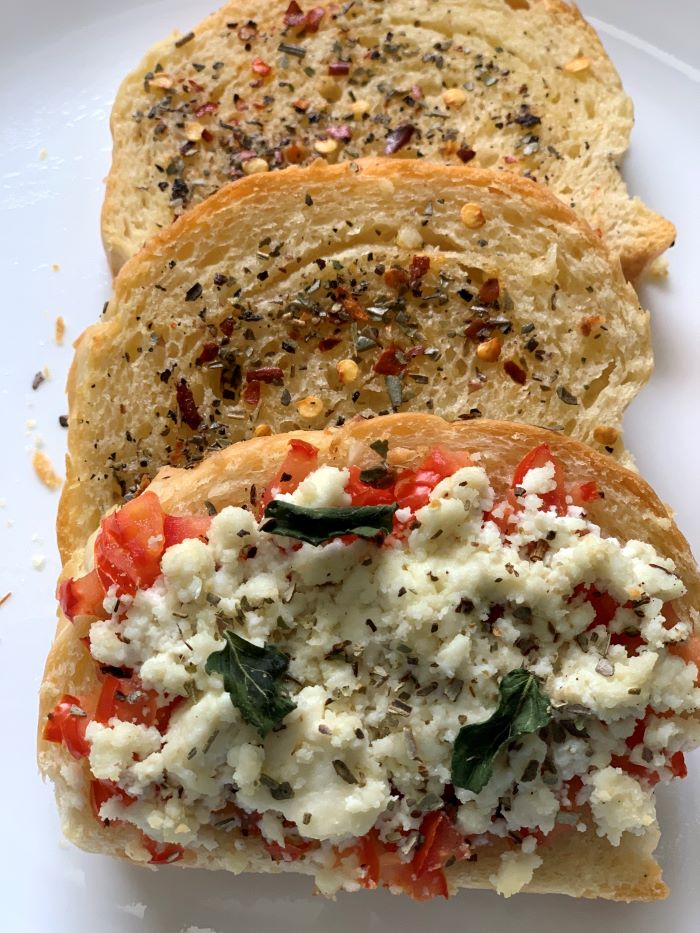
Make it sandwich-ready with MasalaMonk pairings
Once this loaf becomes routine, sandwiches become a rotating habit rather than a repetitive meal:
- For a creamy base that’s easy to vary, keep a jar of homemade mayonnaise with 15+ variations on hand.
- If you need an egg-free option, eggless mayonnaise plays the same role.
- For a bright, herby punch, a spoon of green chutney transforms even a plain grilled sandwich.
- When you want fillings mapped out, this chicken salad sandwich guide gives a base plus variations that work especially well with soft sourdough sandwich bread.
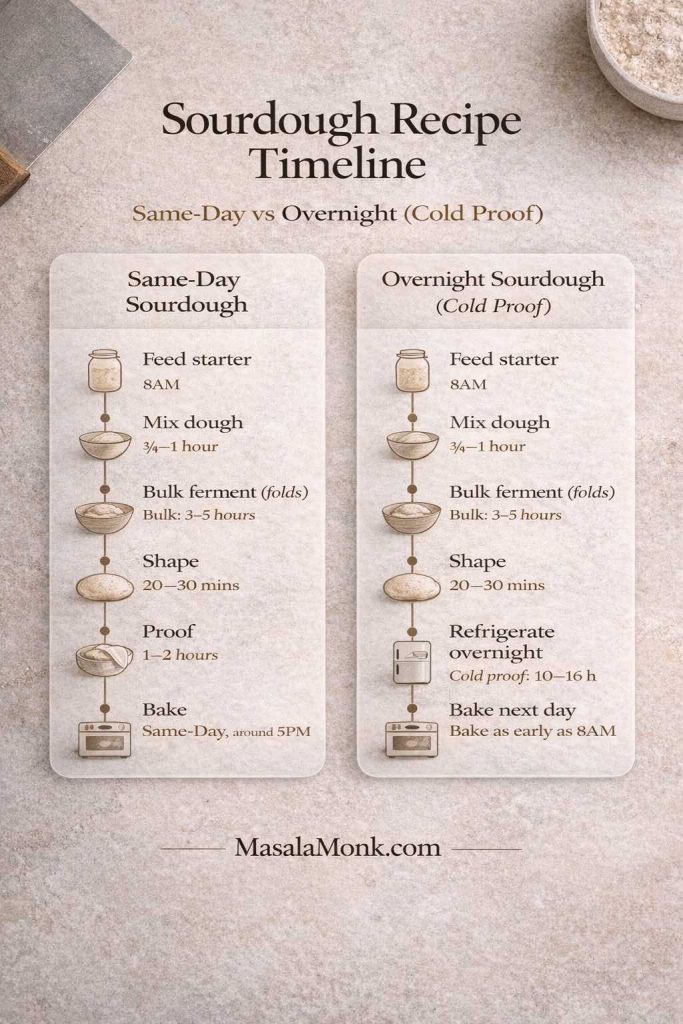
3) Same-Day Sourdough Bread Recipe (fast, reliable, still flavorful)
Some days you want fresh bread by dinner without the full overnight arc. This same day sourdough recipe borrows the best idea from “everyday sourdough” approaches: give the starter a head start, then use a tiny pinch of yeast as backup so the loaf rises on your schedule.
Ingredients (1 loaf)
- Bread flour: 500 g
- Water: 340 g
- Active starter: 120 g
- Salt: 10 g
- Instant yeast: 1 g (optional but extremely helpful)
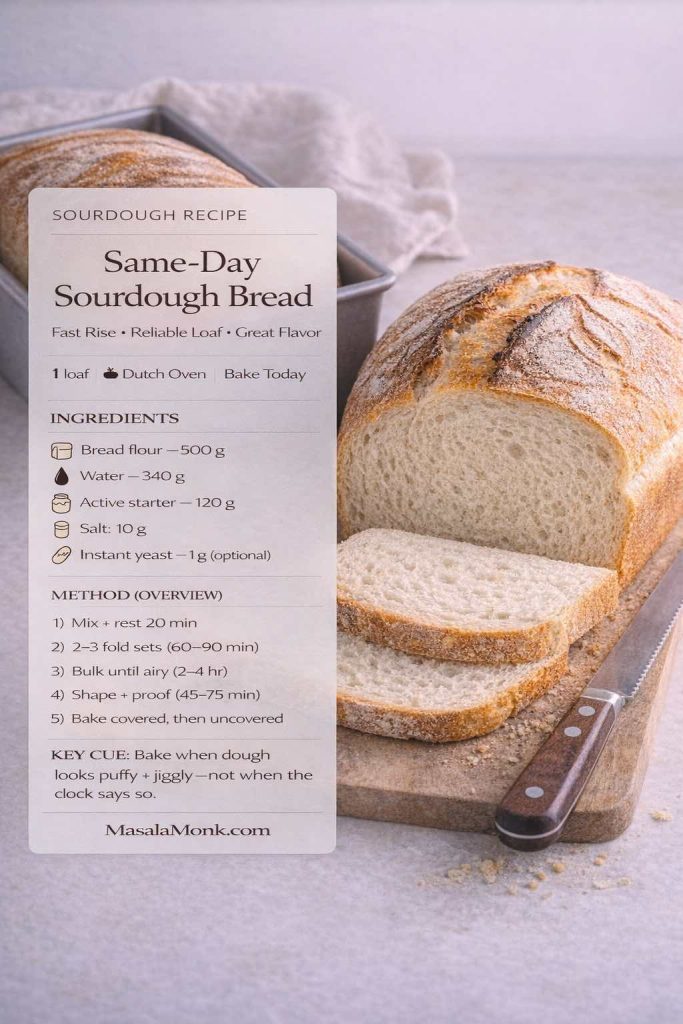
Method
- Mix water and starter, then add flour, salt, and yeast (if using). Mix until no dry flour remains. Rest 20 minutes.
- Over the next 60–90 minutes, do 2–3 sets of folds.
- Bulk ferment until the dough looks inflated and airy, typically 2–4 hours depending on warmth.
- Shape into a boule and proof 45–75 minutes while you preheat the oven and pot.
- Bake in a preheated Dutch oven at 250°C for 20 minutes covered, then 230°C for 20–25 minutes uncovered.
If you love this “forgiving but tasty” lane, King Arthur’s loaf-pan version is worth bookmarking because it’s built for success, even when your starter isn’t perfect: Easy everyday sourdough bread recipe.
Also Read: Hot Chocolate Coffee: 3 Easy Recipes (Cocoa, Mix, or Espresso)
4) No-Knead Dutch Oven Loaf Recipe (hands-off, overnight, crusty)
No knead sourdough is ideal when you want a rustic loaf without shaping drama. You mix, you wait, you fold a little, and time does the rest. It’s also a nice entry point when you’re still learning what “fermented enough” feels like.
Ingredients (1 loaf)
- Bread flour: 500 g
- Water: 375 g
- Active starter: 100 g
- Salt: 10 g
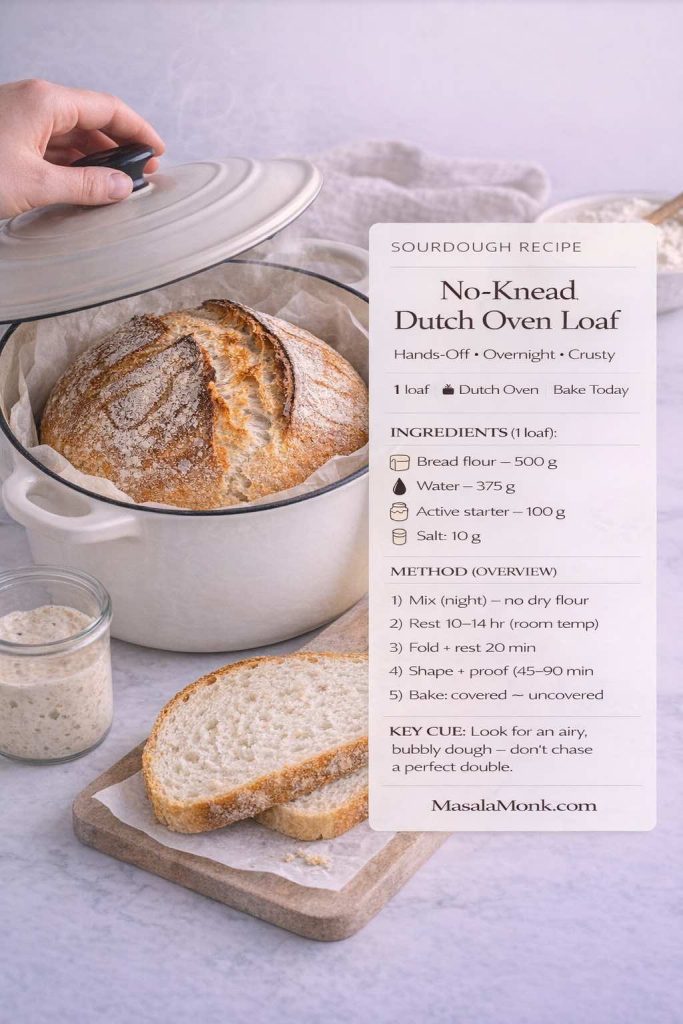
Method
- In the evening, mix everything until combined. Cover.
- Leave at room temperature 10–14 hours.
- In the morning, gently fold the dough over itself a few times to tighten it. Rest 20 minutes.
- Shape lightly into a round and proof 45–90 minutes.
- Bake in a preheated Dutch oven: 250°C for 20 minutes covered, then 230°C for 20–25 minutes uncovered.
If you like seeing the method explained step-by-step with visuals, King Arthur’s guide-style post is clear: How to make no-knead sourdough bread.
Also Read: Cappuccino Recipe: How to Make a Perfect Cappuccino at Home
5) English Muffin Bread Recipe (toaster-friendly sourdough, minimal effort)
English muffin bread is the bread you bake when you want nooks and crannies without shaping rounds or dealing with a stone. It’s especially good for breakfast—toast it hard, then let butter and jam do their thing.
Ingredients (1 loaf)
- Bread flour: 450 g
- Water or milk: 360 g
- Active starter: 120 g
- Salt: 10 g
- Honey or sugar: 15 g
- Baking soda: 2 g
- Cornmeal (for dusting): as needed
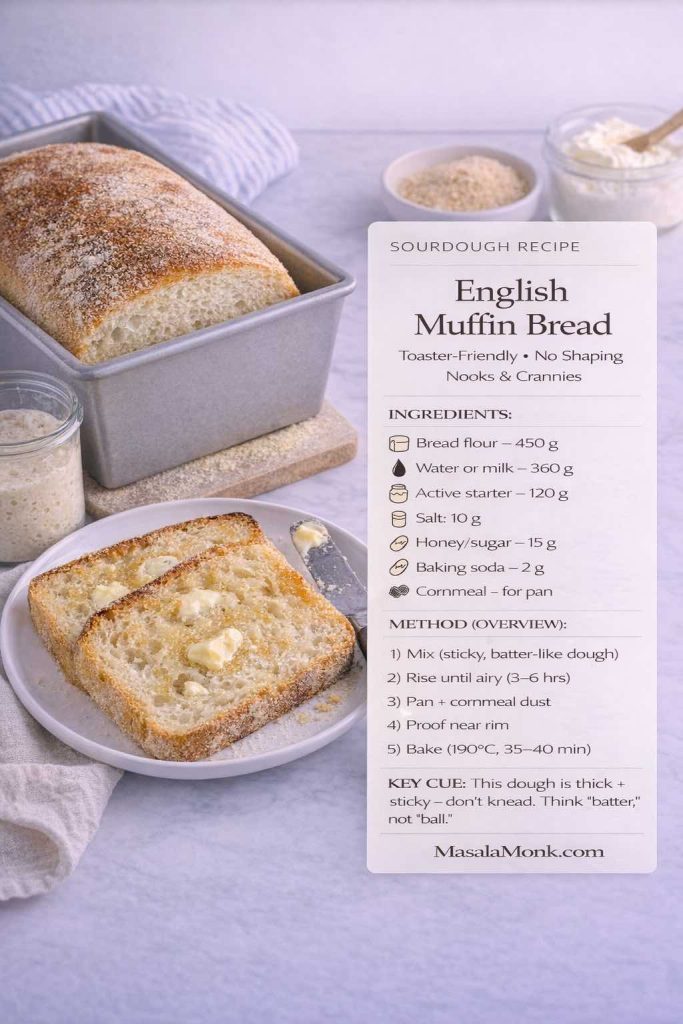
Method
- Mix liquids and starter, then add flour, salt, and honey/sugar. The dough will be sticky—closer to a thick batter than a kneadable dough.
- Cover and rise until noticeably airy, often 3–6 hours.
- Grease a loaf pan and dust lightly with cornmeal.
- Scrape in the dough, smooth the top with wet fingers, and proof until it nears the rim.
- Bake at 190°C for 35–40 minutes.
Breakfast ideas with this sourdough bread recipe
Once you have this loaf, breakfast becomes easy to repeat without feeling repetitive:
- Turn thick slices into a custardy weekend plate using eggless French toast.
- For a fully plant-based twist, the method in vegan French toast recipes adapts beautifully to sourdough.
- If you’re feeding a crowd or meal-prepping, crisp sticks are perfect: French toast sticks (air fryer + oven).
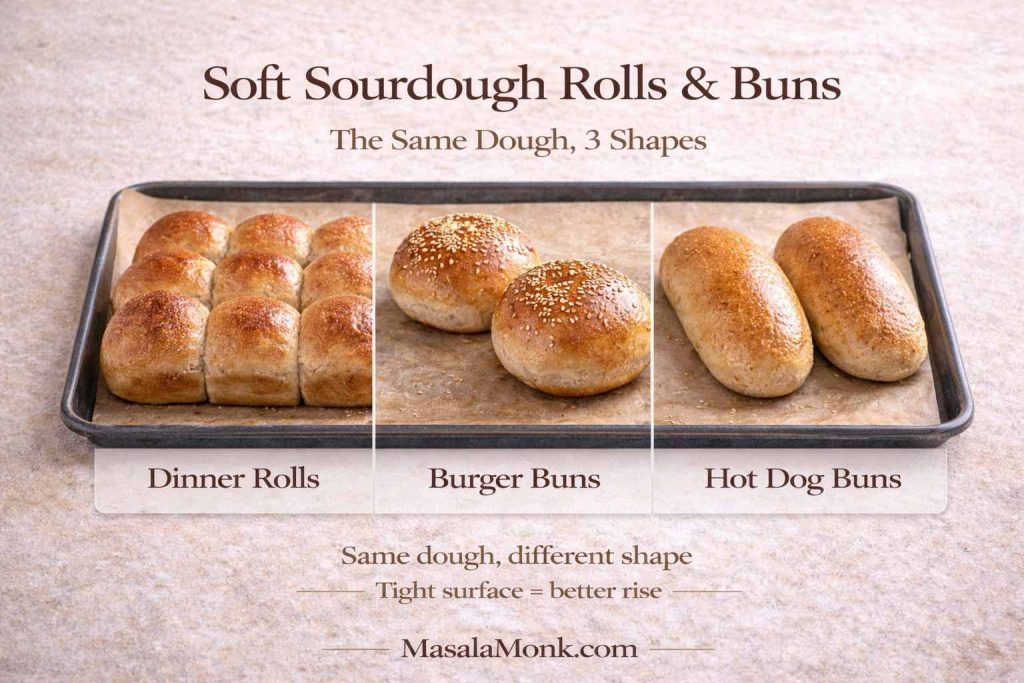
6) Soft Dinner Rolls Recipe (pull-apart sourdough rolls with starter)
Soft sourdough dinner rolls are a different kind of pleasure: tender crumb, gentle sweetness, a golden top, and a pan that disappears faster than you expect. They’re also forgiving, especially if you keep the dough enriched.
Ingredients (for recipe of 12 sourdough dinner rolls )
- Bread flour: 500 g
- Milk: 280 g
- Active starter: 120 g
- Salt: 10 g
- Sugar: 35 g
- Butter: 60 g
- Egg: 1 (about 50 g) — optional
- If skipping egg, add 30 g extra milk.
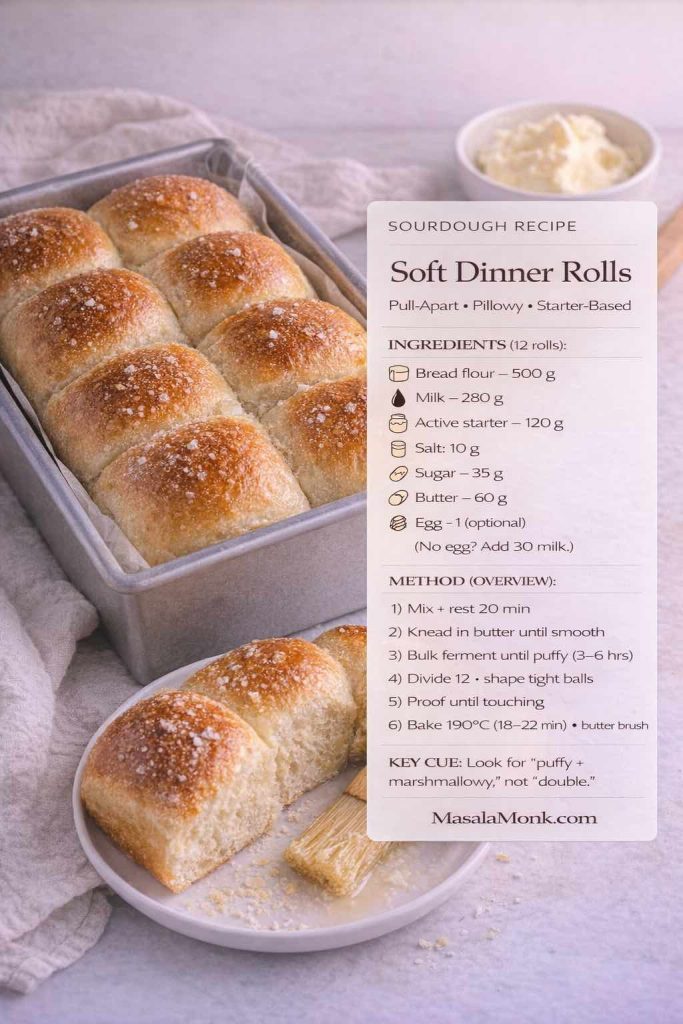
Method
- Mix milk and starter (plus egg, if using). Add flour, sugar, and salt. Mix until shaggy. Rest 20 minutes.
- Knead until smoother, then knead in butter until the dough is cohesive and elastic.
- Bulk ferment until it looks puffy and lighter, typically 3–6 hours depending on temperature.
- Divide into 12 pieces (about 85–90 g each). Shape into tight balls.
- Place in a greased pan, cover, and proof until the rolls are soft and touching.
- Bake at 190°C for 18–22 minutes. Brush with butter while warm.
If you like comparing your rolls to a well-tested benchmark, this recipe is excellent for technique and texture: Super soft sourdough rolls.
Also Read: Cranberry Moscow Mule Recipe: A Festive Holiday Cocktail With Easy Variations
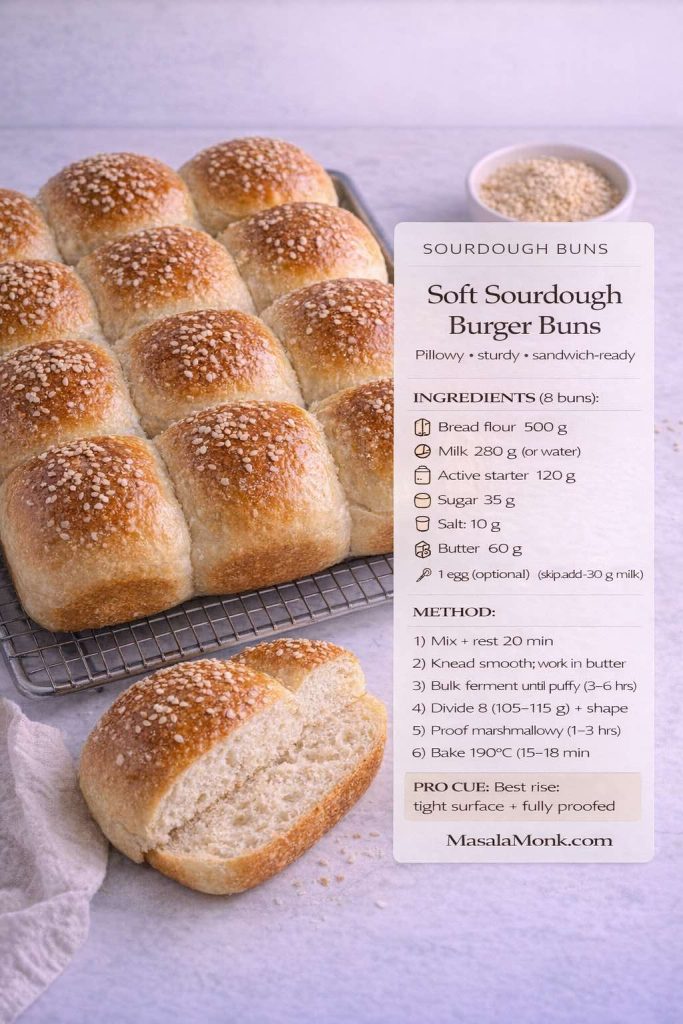
7) Burger Buns Recipe (soft sourdough buns for sandwiches)
A sourdough bun should be sturdy enough to hold sauces yet tender enough to bite through cleanly. This dough builds on the roll formula because it already has that soft, enriched structure.
Ingredients (for recipe of 8 sourdough buns for sandwiches)
Use the same dough as the Soft Dinner Rolls. After bulk fermentation, shape as buns instead of rolls.
Method
- Divide dough into 8 pieces (about 105–115 g each).
- Shape into tight balls, then gently flatten to a thick disc.
- Proof on a tray until puffy and marshmallowy.
- Brush with milk or egg wash if desired.
- Bake at 190°C for 15–18 minutes.
Sandwich pairings that make buns feel “planned”
- Build a spicy, street-style vibe with authentic grilled Bombay sandwich flavors adapted into bun form—chutney, potatoes, crisp veg, and heat.
- For a creamy upgrade, the base ideas in homemade mayo variations let you swing from garlic mayo to spicy mayo without changing the whole sandwich.
- If you want chicken options that don’t feel repetitive, chicken sandwich recipes gives multiple directions that work brilliantly in soft sourdough buns.
8) Hot Dog Buns Recipe (sourdough hotdog buns that stay soft)
Hot dog buns often dry out quickly. Sourdough can help them stay tender longer, especially when the dough includes milk and butter.
Ingredients (for recipe of 10 sourdough hotdog buns)
Use the same dough as Soft Dinner Rolls.
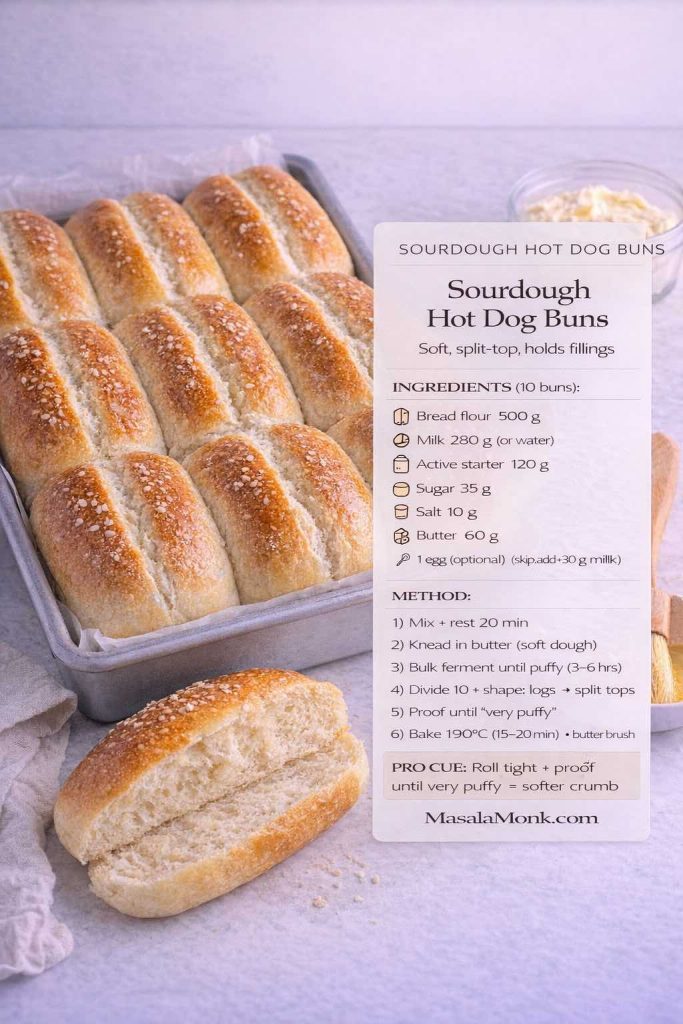
Method
- Divide into 10 pieces (about 85–90 g).
- Shape each piece into a tight ball, rest 10 minutes, then roll into a short log.
- Place seam-side down on a tray or in a bun pan.
- Proof until the logs look puffy and almost doubled.
- Bake at 190°C for 14–17 minutes.
If you want to keep buns soft for longer, cool them fully, then store airtight. For freezing, slice before freezing so you can toast from frozen without thawing.
Also Read: Baked Ziti Recipe Collection: 15 Easy Variations
9) Hoagie + Sub Rolls Recipe (sourdough sandwich rolls)
These are the rolls you bake when you want an honest-to-goodness sub: crisp edge, chewy bite, enough structure to handle fillings. They’re also the shape that makes leftover chicken, roasted vegetables, or paneer feel like an actual meal.
Ingredients (for recipe of 6 sourdough sandwich rolls)
- Bread flour: 500 g
- Water: 320 g
- Active starter: 120 g
- Salt: 10 g
- Sugar: 15 g
- Olive oil: 20 g
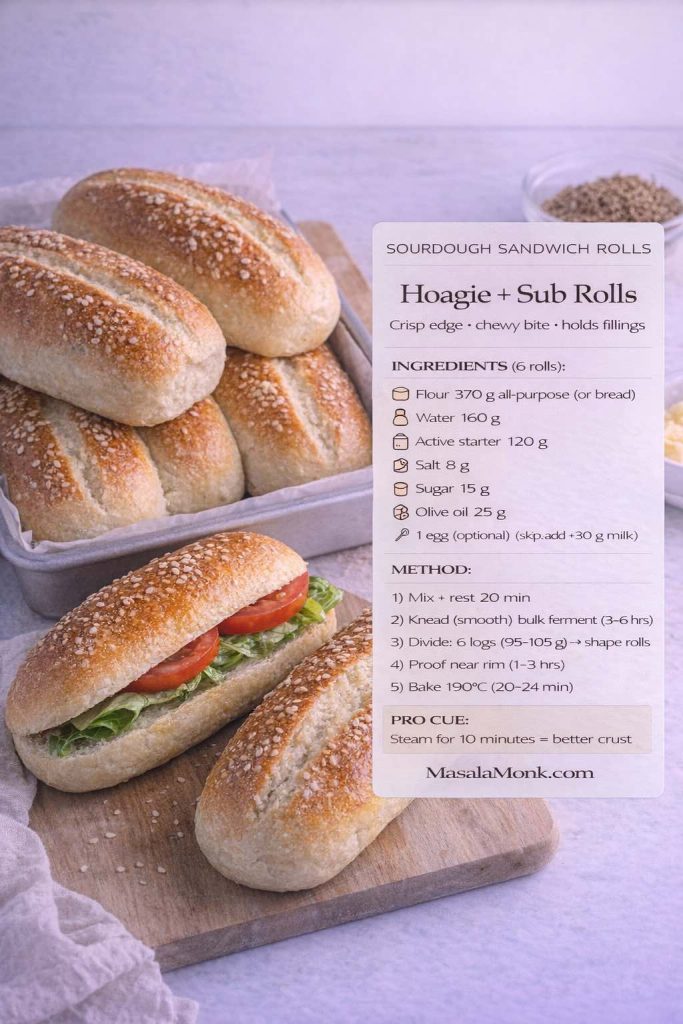
Method
- Mix water and starter, then add flour, sugar, salt, and oil. Mix until combined. Rest 20 minutes.
- Knead until smooth—6–8 minutes by hand or 4–5 minutes on low in a stand mixer.
- Bulk ferment until puffy, usually 3–5 hours depending on warmth.
- Divide into 6 pieces (about 160–170 g). Pre-shape into small logs, rest 15 minutes.
- Shape tightly into longer rolls: flatten gently, roll up firmly, pinch seam, then taper ends if you like.
- Proof seam-side down until the rolls feel lighter and look expanded.
- Bake at 220°C for 16–20 minutes. For better crust, create steam by placing a tray of hot water on the bottom rack during the first 10 minutes.
For a filling that’s simple but ridiculously satisfying, try a hot, melty build based on mushroom cheese sandwich flavors—sautéed mushrooms, spice, cheese, and a spread.
Also Read: Manhattan Cocktail Recipe (Classic + 6 Variations)
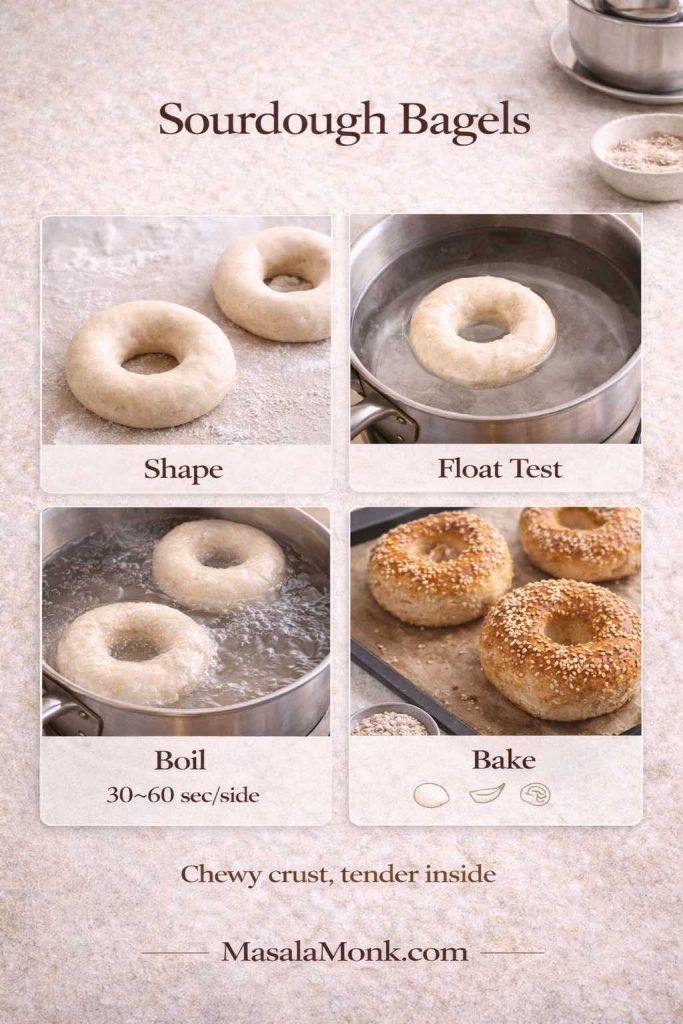
10) Chewy Sourdough Bagels Recipe (boil + bake, real bagel texture)
Sourdough bagels are a different animal: stiff dough, serious kneading, tight shaping, then a quick boil that sets the crust before baking. The payoff is huge—chew, shine, and that “real bagel” bite.
For a classic reference recipe with a proven method, King Arthur’s version is excellent: Sourdough bagels recipe. Here’s a streamlined metric approach that stays true to the technique.
Ingredients (for Recipe of 8 Sourdough bagels)
- Bread flour: 500 g
- Water: 250 g
- Active starter: 150 g
- Salt: 10 g
- Honey or sugar: 25 g
Water bath
- Water: 2000 g
- Honey: 20 g
- Salt: 3 g
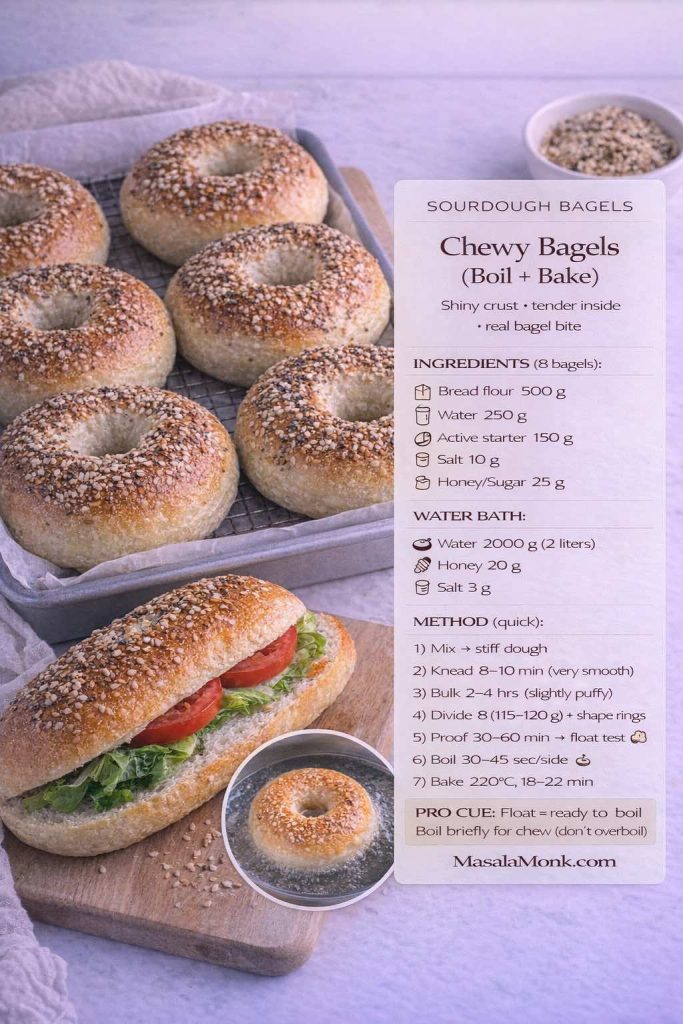
Method
- Mix everything into a stiff dough. Knead until very smooth, 8–10 minutes. A stand mixer helps here, although hand kneading works if you stay patient.
- Bulk ferment 2–4 hours. Bagel dough doesn’t need to double; it should simply look slightly puffier and smoother.
- Divide into 8 pieces (about 115–120 g). Rest 10 minutes.
- Shape: either poke a hole in the center and stretch, or roll into a rope and wrap around your hand.
- Proof 30–60 minutes. A quick float test helps: if a bagel floats in water, it’s ready to boil.
- Boil 30–45 seconds per side in the honey-salt water bath.
- Bake at 220°C for 18–22 minutes until deeply golden.
Bagels make breakfast feel effortless, especially when you pair them with a spread and something crunchy. For ideas that stay practical, this roundup is full of combinations: breakfast sandwich recipes.
Also Read: Classic Rum Punch + 9 Recipes (Pitcher & Party-Friendly)
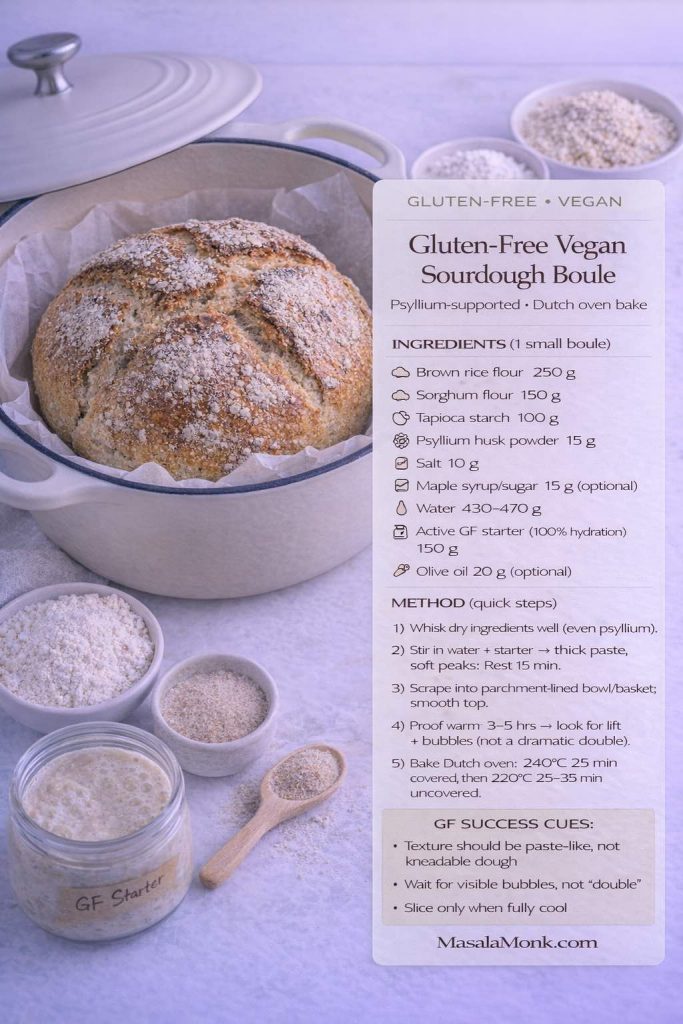
Bonus: Gluten-Free Vegan Sourdough Boule Recipe (a true gluten-free boule path)
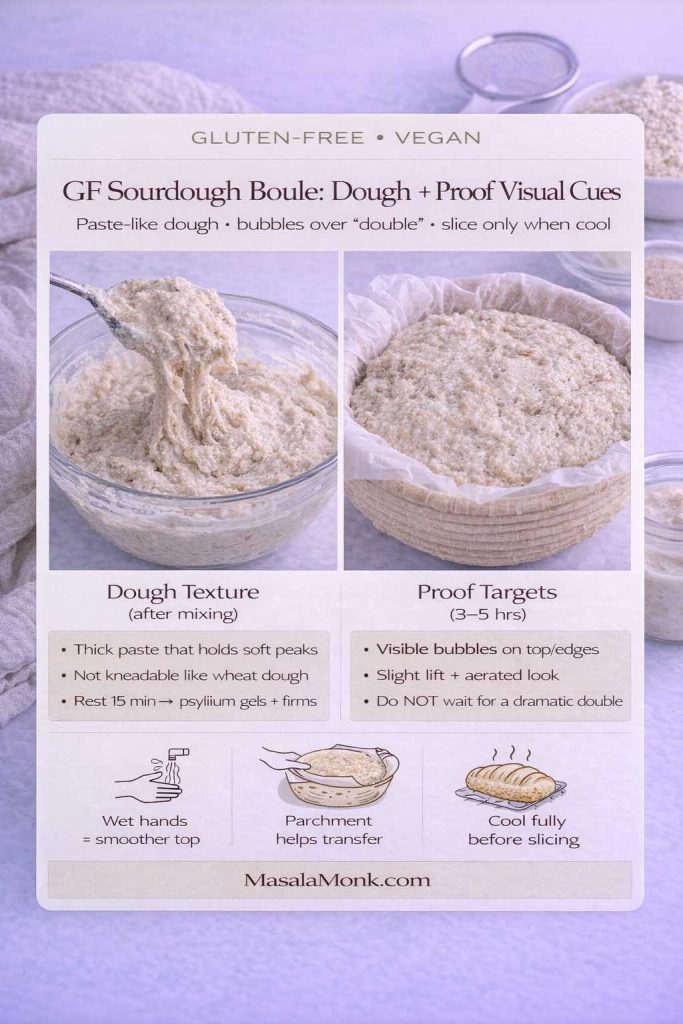
Gluten-free sourdough can be genuinely good—provided you treat it like its own category instead of pretending it will behave like wheat. The dough is usually more like a thick batter, structure often comes from psyllium husk, and baking in a pot helps hold shape.
This gluten-free vegan sourdough bread recipe uses a gluten-free starter (often built from brown rice flour). If you need a starter method, Serious Eats offers a clear baseline starter guide (wheat-based), and the fermentation logic still helps even when your flour changes: Sourdough starter basics.
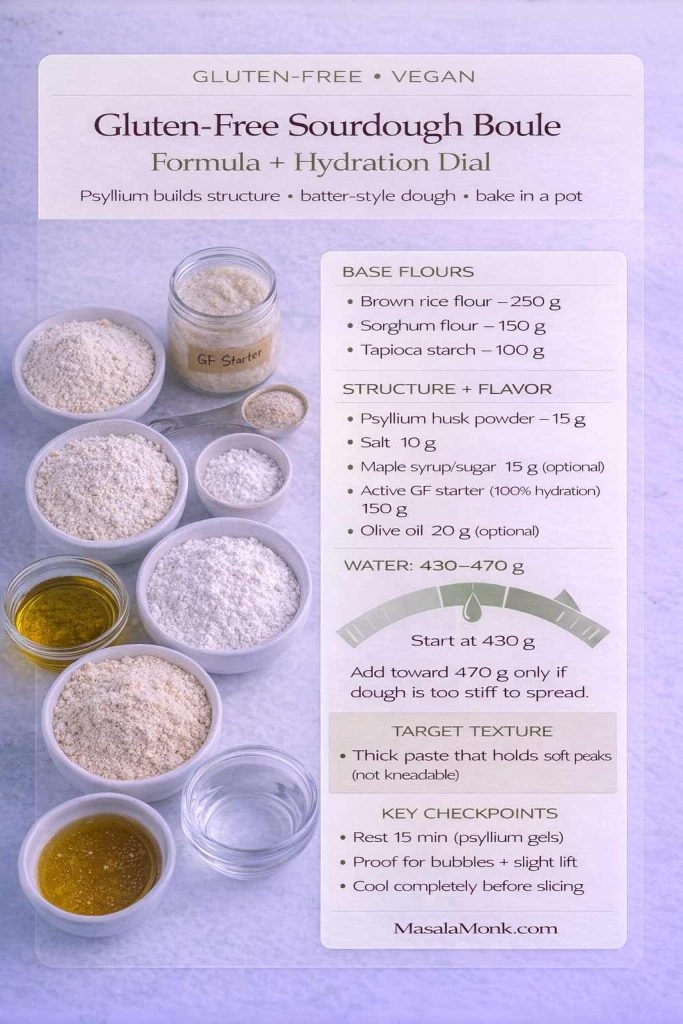
Ingredients (for 1 small Sourdough Boule Recipe)
- Brown rice flour: 250 g
- Sorghum flour: 150 g
- Tapioca starch: 100 g
- Psyllium husk powder: 15 g
- Salt: 10 g
- Maple syrup or sugar: 15 g (optional, helps fermentation)
- Water: 430–470 g (start with 430 g, add as needed)
- Active gluten-free starter (100% hydration): 150 g
- Olive oil: 20 g (optional, improves tenderness)
Method
- Whisk dry ingredients thoroughly so psyllium distributes evenly.
- Stir in water and starter. The dough should resemble a thick, sticky paste that holds soft peaks. Rest 15 minutes to let psyllium gel.
- Scrape into a parchment-lined bowl or proofing basket. Smooth the top with wet fingers.
- Proof at warm room temperature until slightly risen and aerated—often 3–5 hours. Don’t chase a dramatic double; aim for visible lift and bubbles.
- Bake in a preheated Dutch oven at 240°C for 25 minutes covered, then 220°C for 25–35 minutes uncovered.
- Cool completely before slicing. Gluten-free sourdough firms as it cools, and cutting early can make it feel gummy.
This loaf pairs beautifully with soups and sauces, because gluten-free crust loves something to soak up. If you want a simple sauce rotation for dipping and topping, keep these handy:
- Tomato sauce from fresh tomatoes
- Pizza sauce recipes (multiple styles)
- For a herby direction, pesto recipes and variations
A sourdough pizza detour that fits naturally (starter or discard)
Even if you’re not baking pizza weekly, sourdough pizza dough is one of the best ways to “use your starter without a ceremony.” It’s also a satisfying path for evenings when you want something baked, but not another loaf.
- For a home-oven starter-based dough with a thoughtful method: Sourdough pizza dough and recipes
- For an excellent discard option: Sourdough discard pizza crust
When pizza night happens, the dough is only half the story. A great sauce makes sourdough crust taste intentional—whether you want classic red, garlicky, spicy, or creamy. Start with your pizza sauce recipes for easy options that work on sourdough bases, then switch it up with a fresh, herby spread like pesto recipes and variations when you want something brighter.
Sourdough pizza dough: an easy base formula (starter or discard)
Sourdough pizza works because the dough doesn’t need a dramatic rise to taste great—fermentation does the heavy lifting for flavor.
Base formula (2 medium pizzas):
- Bread flour: 500 g
- Water: 325–350 g (start lower if your flour is weaker)
- Salt: 10 g
- Active starter: 100 g (or discard 150–200 g if you’re using it for flavor)
- Olive oil (optional): 10–20 g
Simple timeline options:
- Same-day: warm kitchen, starter at peak → mix → 2–3 fold sets → bulk until airy → divide → rest → stretch and bake.
- Overnight: mix → bulk partway → refrigerate → next day portion → warm up → stretch and bake.
If you want the crust more sour, choose the overnight path and give it more time cold.
Where this leaves you (and what to bake first)
If you want the most “foundational” two-bake pairing, start with the classic country boule and the soft sandwich loaf. You’ll get crust, crumb, shaping, and loaf-pan confidence in one week, and after that the rolls and buns feel like friendly variations rather than new projects.
Meanwhile, if you want quick wins, the same-day loaf plus English muffin bread makes sourdough feel useful immediately—toastable, sliceable, repeatable.
Whenever you’re ready to turn today’s bread into tomorrow’s meal, a few MasalaMonk staples make the rotation easy:
- A jar of green chutney for instant brightness
- A flexible spread from mayo variations or eggless mayo
- A filling playbook from chicken salad sandwich ideas and chicken sandwich recipes
- Breakfast pivots via eggless French toast, vegan French toast, and French toast sticks
FAQs: Sourdough Recipe Questions (Starter, Timing, Flavor, Tools)
1) What’s the difference between a sourdough recipe using active starter vs discard?
An active (ripe) starter has peak strength, so it can lift the dough on its own and gives you the most predictable rise for a true sourdough bread. By contrast, discard is older and usually less powerful; still, it brings flavor, and it works well in longer-fermented doughs or recipes designed for discard. In practice, if you want a classic sourdough bread recipe with a tall loaf and open crumb, use active starter. Meanwhile, if you want a faster, more flexible bake or you’re trying to reduce waste, a sourdough discard recipe can be the right fit.
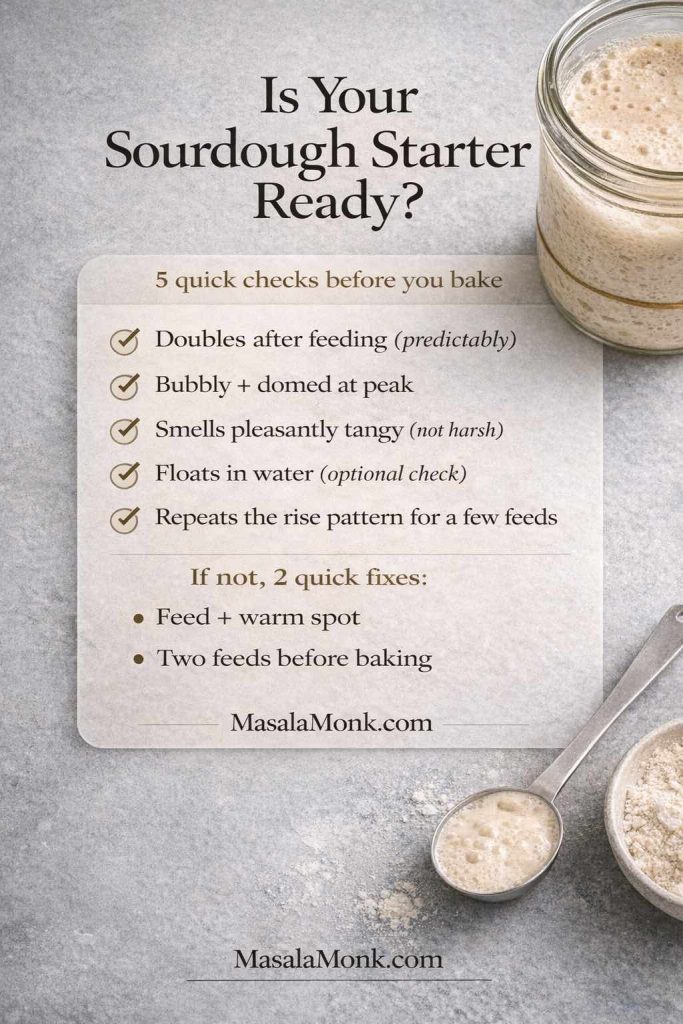
2) How do I know when my sourdough starter is ready to bake with?
Look for a starter that rises reliably after feeding, shows plenty of bubbles, and smells pleasantly tangy rather than harsh. Ideally, it should reach its peak in a predictable window in your kitchen. If it’s doubling, holding some structure at peak, and looks airy instead of watery, it’s generally ready. Even so, if your starter is new, it may still bake fine in a sandwich loaf recipe or same-day sourdough bread recipe before it’s strong enough for a lofty country boule.
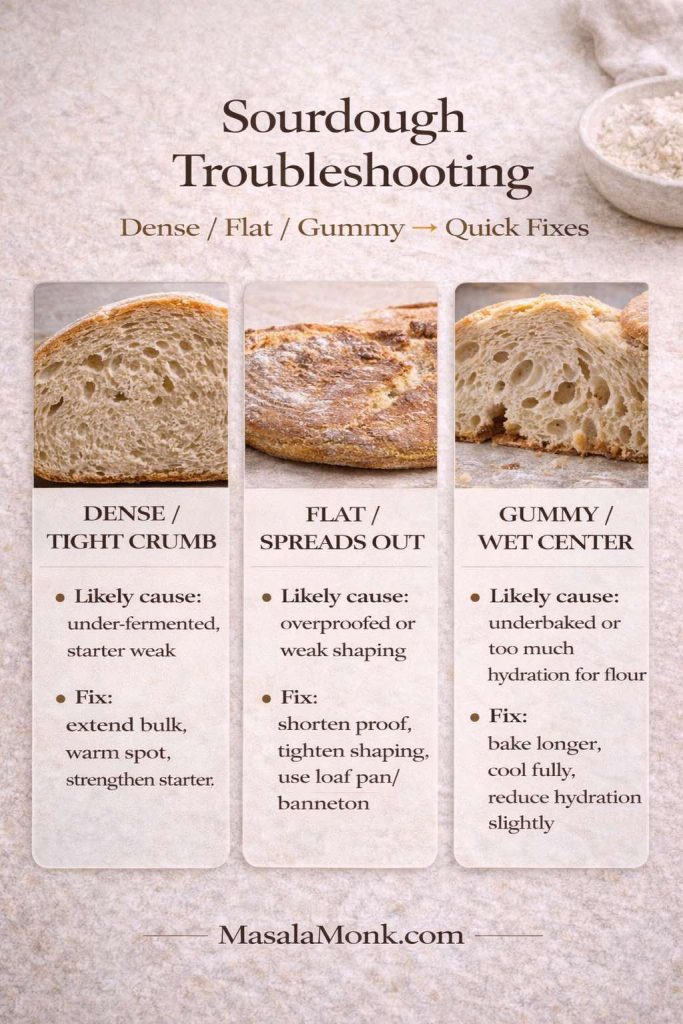
3) Why didn’t my sourdough bread rise?
Usually it’s one of three things: the starter wasn’t strong enough, the dough was under-fermented, or the dough was over-fermented. Under-fermentation can happen if your kitchen is cool or the dough didn’t get enough time. Over-fermentation can happen if the dough sat too long in warmth and lost strength before baking. Additionally, too much flour during shaping can prevent a good seal and weaken structure. When in doubt, aim for dough that feels lighter, looks puffier, and shows bubbles at the edges before you shape.
4) Why is my sourdough recipe turning out dense and tight?
Density often comes from either weak fermentation or insufficient gluten development. If the dough never becomes airy during bulk, the crumb stays tight. On the other hand, if the dough is handled roughly late in fermentation, you can knock out the gas that would have become lift in the oven. Also, very low hydration doughs tend to be tighter. If you want a more open crumb, choose a slightly higher hydration sourdough boule recipe and handle it more gently near the end.
5) How do I make my sourdough more sour?
To get extra sour sourdough bread, extend fermentation in cooler conditions. A longer cold proof in the fridge generally increases tang without sacrificing structure. Similarly, using more whole grain flour (especially rye) can boost flavor. Another approach is keeping the starter on a slightly stiffer feeding routine, which can shift acidity. However, if you push too far, the loaf can turn slack, so aim for “more sour” through time and temperature rather than simply letting dough sit forever.
6) How do I make my sourdough less sour?
If your loaf tastes sharper than you like, shorten the cold proof, reduce the total fermentation time, and keep the starter on a regular feeding rhythm so it stays mild. In addition, using more bread flour and less whole grain can soften acidity. Finally, bake sooner once the dough is properly fermented; waiting far past readiness can intensify sour notes.
7) What does “same-day sourdough” really mean?
Same-day sourdough usually means you bake within a single day rather than doing an overnight cold proof. Sometimes it’s a true starter-only approach in a warm kitchen with excellent timing. More often, it’s a hybrid sourdough bread recipe that uses starter for flavor plus a tiny amount of yeast for reliability. Either way, the goal is similar: a good loaf today, without needing to plan two days ahead.
8) Is a no-knead sourdough recipe actually better for beginners?
Often, yes. No-knead sourdough relies on time and folds rather than intensive kneading, which reduces the chance of overworking the dough. Additionally, the schedule can feel simpler: mix, rest, fold occasionally, then shape and bake. That said, even a no-knead method still needs fermentation awareness, so learning what “puffy and airy” looks like is more important than memorizing minutes.
9) Can I bake sourdough without a Dutch oven?
Absolutely. While a Dutch oven makes steam management easy, you can bake on a preheated tray or stone with a steam setup. For example, you can place a metal tray in the oven while it preheats, then pour hot water into it when the bread goes in. Alternatively, you can bake in a loaf pan to support shape and still get great results. The crust may be slightly different, yet the flavor can be just as good.
10) Can I bake sourdough in a loaf pan instead of shaping a boule?
Yes, and it’s one of the most practical ways to make sourdough bread for sandwiches. Loaf-pan sourdough is easier to slice, easier to store, and less sensitive to shaping technique. Additionally, if you’re working with higher whole grain content or softer dough, the pan provides helpful structure.
11) What’s the best flour for sourdough starter?
Bread flour works well, although many starters become more vigorous with some whole wheat or rye added to feedings. Rye flour, in particular, often boosts activity quickly. That said, the best flour for starter is ultimately the one you can feed consistently, because regular feeding rhythm matters more than chasing a “perfect” flour.
12) What’s the best flour for sourdough bread?
For a classic loaf with strong structure, bread flour is the easiest choice. Whole wheat flour adds flavor and nutrition but can reduce loft if you go too high without adjusting hydration. Rye flour increases fermentation activity and adds a deeper flavor. Spelt and einkorn bring character; however, they behave differently, so smaller substitutions are easier at first.
13) Why is my sourdough dough so sticky?
Stickiness can come from higher hydration, insufficient gluten development, or fermentation that has gone too far. First, use slightly wet hands for folds and shaping rather than dumping in extra flour. Next, add an extra fold set early to strengthen the dough. Finally, watch fermentation—if the dough becomes slack and puddly, it may be over-proofed.
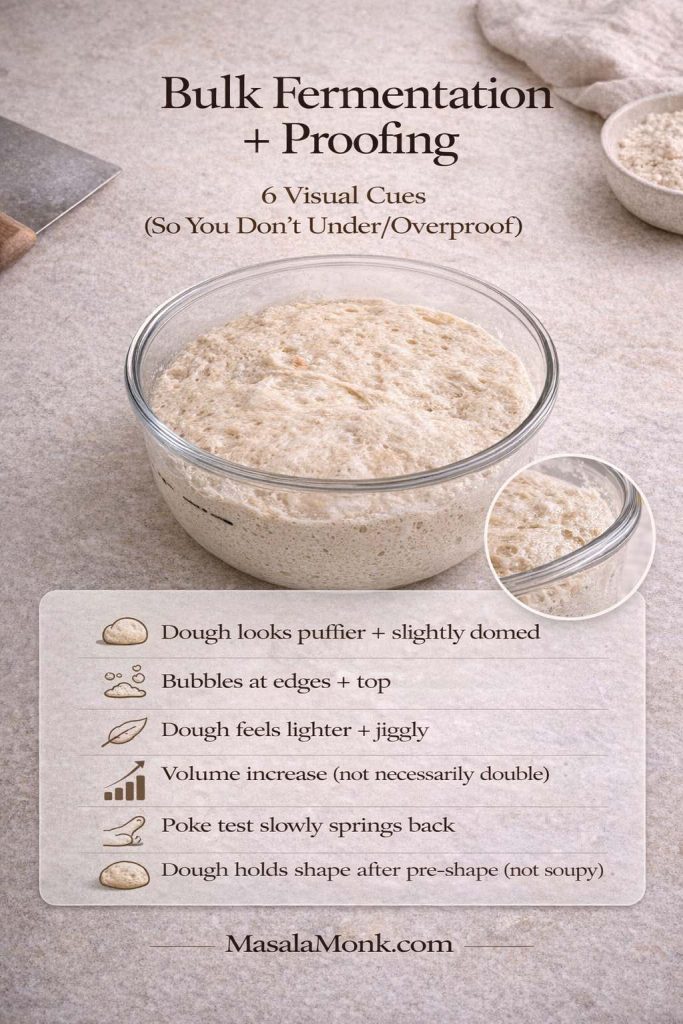
14) How do I know when bulk fermentation is done?
Instead of waiting for a perfect “double,” look for a dough that feels lighter, looks puffier, and shows bubbles along the edges. The surface should appear smoother and slightly domed rather than flat. If you gently shake the bowl, the dough should jiggle. Once those signs show up, shaping usually goes better and the crumb improves.
15) How long should I cold proof sourdough?
Most loaves do well with an overnight cold proof, roughly 10–16 hours. Shorter proofs can still work, especially for same-day sourdough bread. Longer proofs can increase sourness and improve scoring, although if you go too long the dough can weaken and lose oven spring.
16) Why did my sourdough spread out instead of rising up?
Spreading often happens when the dough is over-fermented, under-shaped, or too wet for your flour’s strength. Additionally, if the dough isn’t tightened enough during shaping, it won’t hold a tall profile. A banneton can help support the dough during proofing. Otherwise, using a loaf pan is a simple fix while you build shaping confidence.
17) Why did my sourdough crust go soft after cooling?
A soft crust usually means steam got trapped during cooling or the loaf wasn’t baked long enough to drive off moisture. Cool bread on a rack with airflow. Also, bake a bit longer until the crust is deeply browned. Finally, avoid storing the loaf in a sealed bag until it’s fully cool.
18) How do I score sourdough so it opens nicely?
Scoring works best when the dough is cold and the surface is slightly dry, which is why many bakers score after a fridge proof. Use a sharp blade, make confident cuts, and angle slightly to encourage an “ear.” Additionally, one clean primary cut usually performs better than many shallow decorative lines when you’re chasing oven spring.
19) Can I use a stand mixer for sourdough dough?
Yes, especially for sandwich loaf recipes, buns, and sourdough dinner rolls. For rustic boules, mixing briefly in a stand mixer can help, yet folds still matter for structure. Either way, avoid overheating the dough—if it warms too much, fermentation can race ahead before the dough is strong.
20) Can I make sourdough in a bread machine?
You can, particularly for loaf-pan style sourdough bread. Bread machines are great for mixing and baking a consistent sandwich loaf. However, if you want a crusty Dutch-oven boule with a bold ear, an oven bake is usually better. Still, a bread machine can be a practical everyday sourdough option when you value convenience.
21) What’s the easiest sourdough recipe for beginners?
A loaf-pan sourdough sandwich bread recipe is often the easiest place to start because the pan supports the dough and slicing is straightforward. Alternatively, a no-knead sourdough recipe can be beginner-friendly because it relies more on time than technique. If your starter is still maturing, those two styles tend to be forgiving.
22) How should I store sourdough starter?
If you bake often, keeping the starter at room temperature with regular feedings works well. If you bake occasionally, storing it in the fridge slows it down and reduces maintenance. Either way, try to feed it once or twice after refrigeration before you use it in a true sourdough bread recipe, especially for a boule or bagels.
23) How do I store sourdough bread so it stays fresh?
For crusty loaves, a paper bag or bread box helps maintain the crust better than plastic. For soft sandwich loaves and buns, airtight storage keeps them tender. And for longer storage, slice and freeze; then toast straight from frozen to revive texture.
24) Can I make sourdough rolls from starter without commercial yeast?
Yes. Soft sourdough rolls can rise solely from active starter, although they take longer and benefit from a warm proof. If your starter is young or your kitchen is cool, the dough may need extra time. Alternatively, a tiny amount of yeast can make timing easier without erasing sourdough flavor.
25) Why do my sourdough bagels turn out tough?
Bagels need a stiff dough, but if they ferment too long or bake too hard, they can become overly tough. Also, too much flour during shaping can dry the surface. Aim for a smooth, well-kneaded dough, proof until slightly puffy, then boil briefly rather than excessively. That balance keeps chew pleasant rather than jaw-breaking.
26) How do I revive a frozen or dried sourdough starter?
If your starter was frozen, thaw it in the fridge first, then give it a few patient feeds at room temperature. Start small: stir 20–30 g starter with equal parts water and flour (by weight), keep it warm, and feed again once it rises and begins to fall. Most starters need 2–4 feed cycles to regain predictable lift, especially if they were frozen for a while.
For a dried starter, crumble a small amount into water first and let it soften fully before adding flour. It may look sleepy for a day or two, so focus on signs of life—tiny bubbles and a mild tang—before you judge strength. Once it begins rising in a repeatable pattern after feeding, it’s ready to bake with. Until then, use it in loaf-pan breads or same-day methods rather than a tall country boule.
27) What’s the best hydration for a beginner sourdough loaf?
For most beginners, a “middle” hydration is the sweet spot: wet enough to get a tender crumb, but not so wet that shaping feels like wrestling. In practical terms, dough that feels tacky yet manageable usually performs better than dough that’s either stiff and dry or so loose it spreads instantly.
If you’re using strong bread flour, you can push hydration higher over time. Meanwhile, if you’re using more whole wheat, rye, spelt, or einkorn, the dough can feel stickier or softer even at the same hydration, so it helps to start slightly lower and add water only if the dough truly feels tight. The goal is not maximum water—it’s a dough you can strengthen with folds and shape with confidence.
28) Can I bake sourdough in a loaf pan without a banneton?
Yes—and it’s one of the easiest ways to make sourdough more consistent. A loaf pan supports the dough during proofing, which means you can get good height even if your shaping is still developing. It’s also the most practical path to sourdough you can slice neatly for toast and sandwiches.
To make it work smoothly, focus on one cue: proof until the dough crowns above the rim of the pan, looks aerated, and feels lighter. If you underproof, the loaf stays tight; if you overproof, it can collapse or bake up gummy. The pan won’t replace fermentation, but it does remove a lot of stress from the shaping stage.
29) What’s the easiest way to use sourdough discard every week without waste?
The easiest rhythm is to keep a small “discard jar” in the fridge and use it in one repeatable bake you actually enjoy—something that fits your week. For many people that’s English muffin bread (toaster-friendly), pancakes/waffles, quick flatbreads, or a simple discard pizza crust. Those options use discard for flavor and don’t demand perfect starter strength.
A good habit is portioning: if you know you’ll only bake once or twice, freeze discard in small amounts so you can thaw exactly what you need. Also, label the jar with the date so you’re not guessing. If the discard ever shows mold or pink/orange streaks, toss it—otherwise, most “old” discard is still perfectly useful for baking.
30) Why did my sourdough bagels fail the float test?
The float test is really a fermentation test: a bagel that sinks is usually underproofed, meaning there isn’t enough gas trapped inside yet. The fix is simple—give the shaped bagels a little more proofing time in a warm spot, then test again. Bagel dough is stiff, so it can look “fine” on the surface while still needing more time.
Less often, bagels fail the float test because the starter wasn’t strong enough, the dough was too cold, or the bagels were over-tightened and degassed during shaping. If your kitchen is cool, proofing takes longer. If your starter is young or sluggish, you’ll need more time—or you can choose a more forgiving schedule (like a longer fermentation or a small yeast assist) until your starter becomes reliably powerful.