
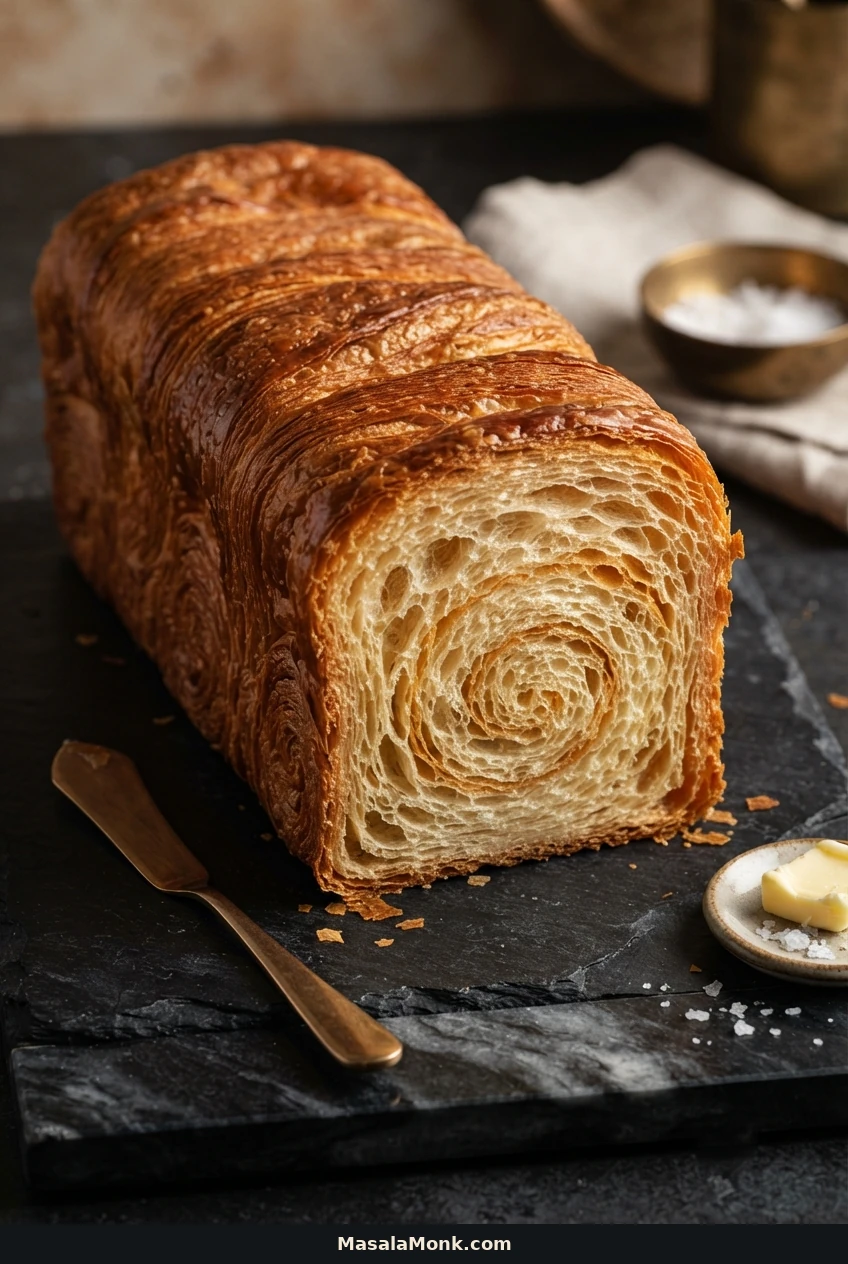
From the outside, it looks like an ordinary loaf. Cut into it, though, and you’ll find a spiral of buttery layers running through the soft center, with a golden crust that flakes beneath the knife. Toast a thick slice the next morning, and those edges turn crisp again.
This croissant bread recipe brings the flaky texture of a French croissant into a regular loaf pan. You’ll make a soft yeast dough, enclose a sheet of butter, fold it three times, and roll it into one long spiral. Once baked, the loaf has a delicate crust and a tender, layered center that’s lovely for breakfast, toast, or sandwiches.
Set aside a day for the process, although most of that time is spent letting the dough rise or rest in the refrigerator. The trickiest part isn’t making the folds. It’s keeping the butter flexible enough to roll without letting it melt into the dough. As you work, pay attention to how the butter bends, how the dough stretches, and how the loaf rises.
Jump to the croissant bread recipe | Troubleshooting | Timing and overnight preparation | Variations
Croissant Bread Recipe
| Yield | 1 loaf, approximately 10–12 slices |
|---|---|
| Difficulty | Intermediate |
| Hands-on preparation | About 75–120 minutes, spread across the process |
| Same-day total | Allow approximately 9–14 hours, including cooling; a slow final proof can extend this |
| Pan | 9 × 5 inches (23 × 13 cm) |
| Oven temperature | 350°F (175°C), conventional oven |
| Baking time | Approximately 50–65 minutes |
| Make-ahead option | Overnight refrigeration before lamination |
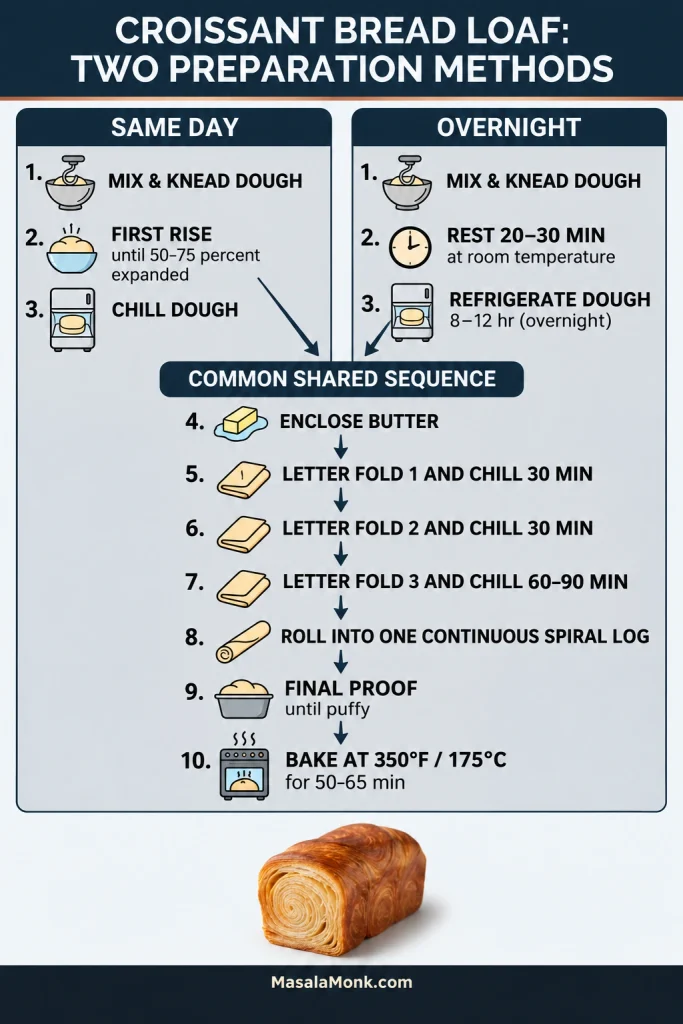
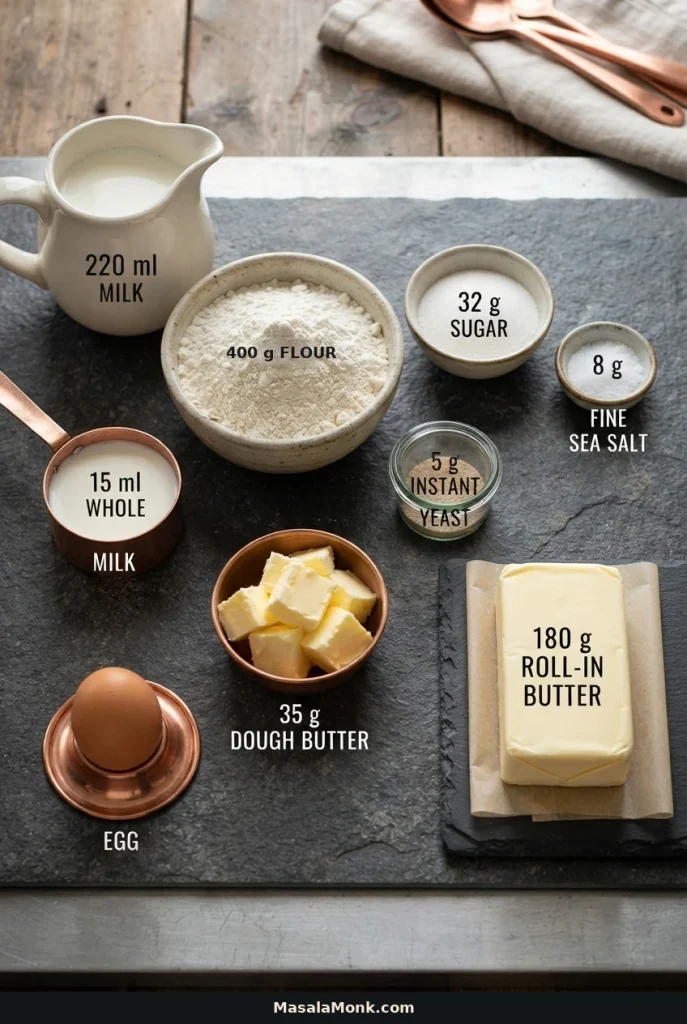
Choose your schedule before mixing: For a same-day loaf, follow the first rise and refrigerator rest below. For a two-day loaf, use the overnight fermentation instructions instead. The overnight rest replaces the same-day first rise and initial chill; you don’t need both.
Ingredients
For the yeast dough
- 400 g all-purpose flour (14.1 oz by weight; approximately 3⅓ US cups), preferably around 10–11.5% protein
- 220 ml whole milk (7.4 US fl oz; just under 1 US cup)
- 32 g granulated sugar (1.1 oz; approximately 2½ tablespoons)
- 8 g fine salt, preferably weighed
- 5 g instant yeast (approximately 1⅔ teaspoons)
- 35 g unsalted butter, softened (approximately 2½ tablespoons)
For the butter block
- 180 g unsalted butter (6.35 oz; approximately ¾ cup plus 2 teaspoons)
For finishing
- 1 large egg
- 15 ml (1 tablespoon) whole milk
- A little neutral oil or additional butter to grease the pan
- A small amount of flour for dusting the work surface
Use the metric measurements where possible. Flour measured by volume varies, and the butter quantities matter for lamination. Keep the 35 g dough butter separate from the 180 g butter block.
Equipment
- 9 × 5-inch (23 × 13-cm) loaf pan, preferably light-colored metal
- Digital kitchen scale, strongly recommended
- Large mixing bowl and sturdy rolling pin
- Bench scraper, helpful for lifting and straightening dough
- Parchment paper and a flat tray that fits in the refrigerator
- Plastic wrap or another cover to prevent drying
- Pastry brush and instant-read thermometer, recommended for checking doneness
- Cooling rack and sharp serrated knife
- Stand mixer with dough hook, optional
Clear enough counter space for a dough rectangle around 65 cm (25½ inches) long. You’ll also need refrigerator space to lay the folded dough flat between turns.
Recipe stages: Make the dough | Butter block | Three folds | Shaping | Proofing | Baking
Make the Croissant Dough
Mix and Knead the Dough
- Mix the dry ingredients. Stir together the flour, sugar, salt, and instant yeast in a large bowl.
- Add the milk. Warm it to approximately 25–30°C (77–86°F), then pour it into the flour mixture. Stir until no dry patches remain. The dough will look rough at first.
- Knead and add butter. Work the dough for 2–3 minutes, then add the 35 g softened butter in small portions. Continue kneading until smooth and elastic. Allow roughly 8–12 minutes of total kneading with a stand mixer or 12–18 minutes by hand, adjusting according to the dough’s development.
- Check the texture. The dough should feel supple and slightly tacky, not stiff or sticky enough to coat your hands. Stretch a small piece gently; it should extend before tearing. If it breaks apart immediately, continue kneading and check again.

By the end of kneading, the dough will resemble the soft, stretchy dough used for homemade cinnamon rolls. Here, though, the larger portion of butter is added as a separate sheet instead of being mixed in.
First Rise and Initial Chill
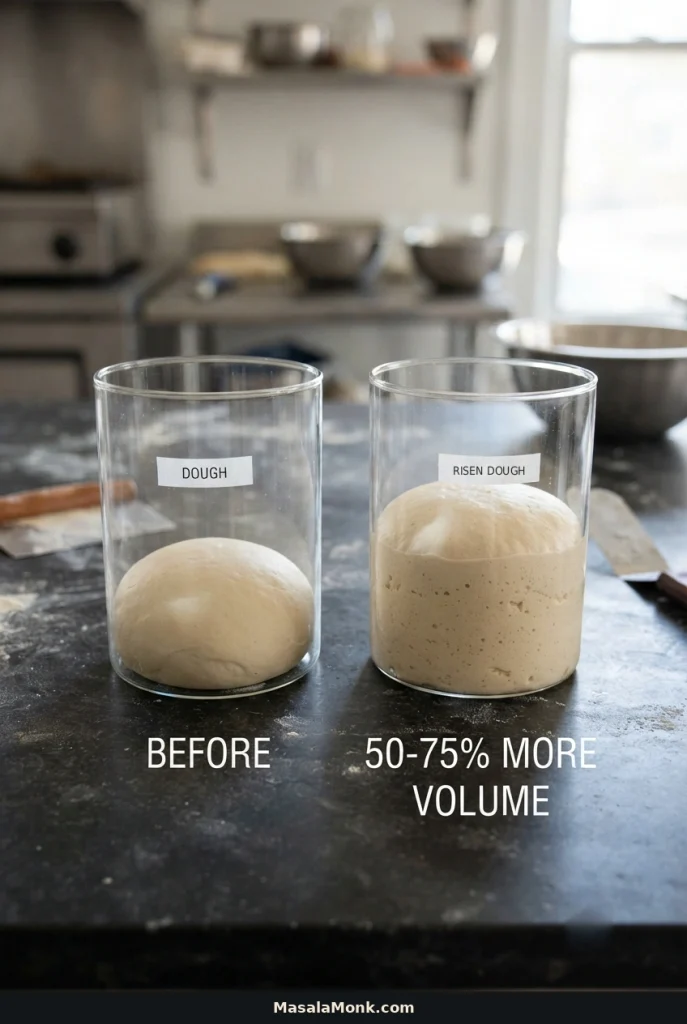
- First rise. Shape the dough into a ball, place it in a lightly greased bowl, and cover. Leave at 22–25°C (72–77°F) for approximately 75–120 minutes, until its volume increases by about 50–75%. To judge the rise more easily, use a straight-sided container and mark the starting height.
- Chill. Gently flatten the dough into a thick rectangle, releasing large gas pockets. Cover tightly and refrigerate for 45–60 minutes.
Prepare the Butter Block
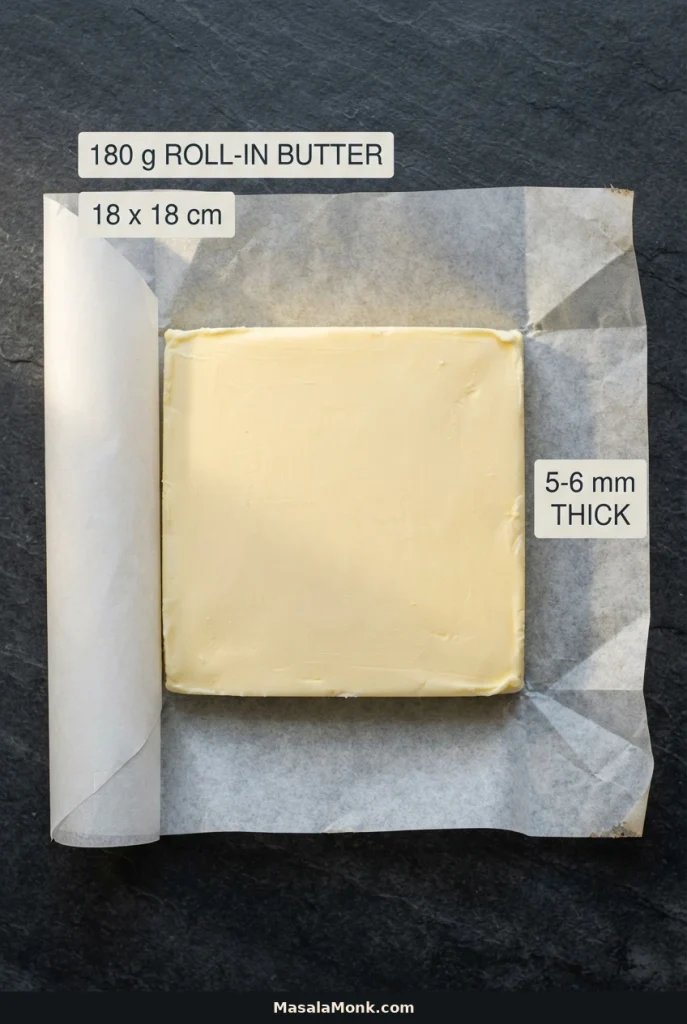
- Place the 180 g butter between two sheets of parchment paper.
- Tap it with the rolling pin to flatten it, then roll into an even 18 × 18 cm (7 × 7-inch) square, approximately 5–6 mm thick.
- Fold the parchment around the edges to square off the butter. Chill briefly if it has become too soft.
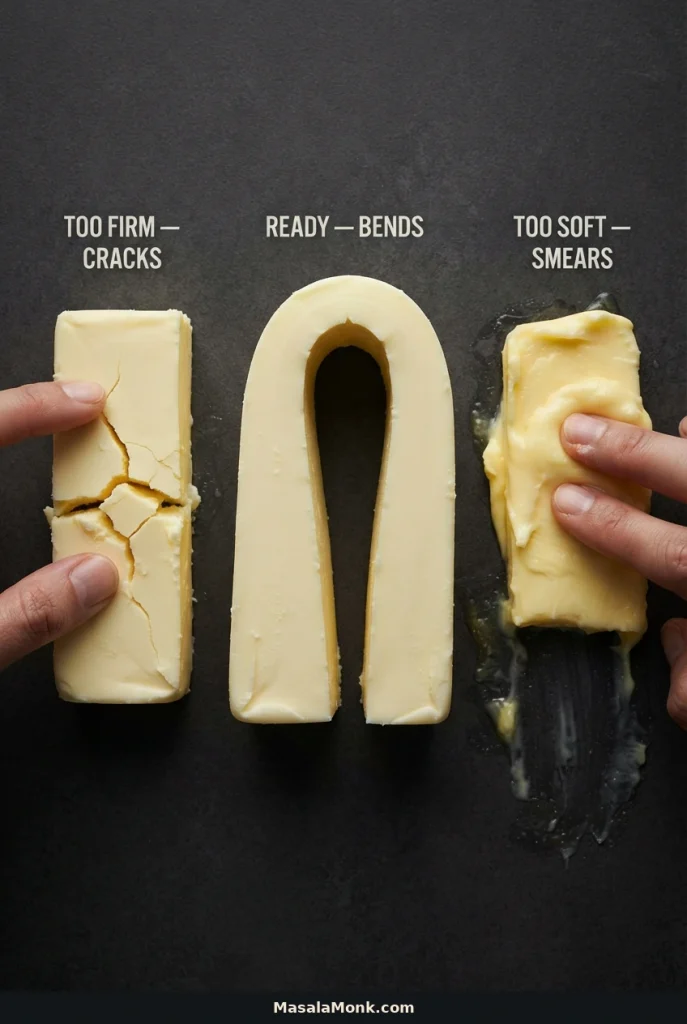
- Press a corner through the parchment. The butter should bend under gentle pressure without cracking or leaving a greasy mark.
After forming the butter block in parchment, feel across its surface for thick spots and underfilled corners. Correct obvious unevenness now; once butter is enclosed in dough, those differences are harder to detect.
Butter that snaps is too firm to roll smoothly. An oily mark, however, means the butter is too soft. Adjust it now, while the block is easy to handle: let firm butter become more pliable, or refrigerate butter that is starting to smear.
Enclose the Butter
Before enclosure, compare the chilled dough and butter through gentle pressure. They should be similarly pliable, so they flatten together rather than letting brittle butter crack inside softer dough.
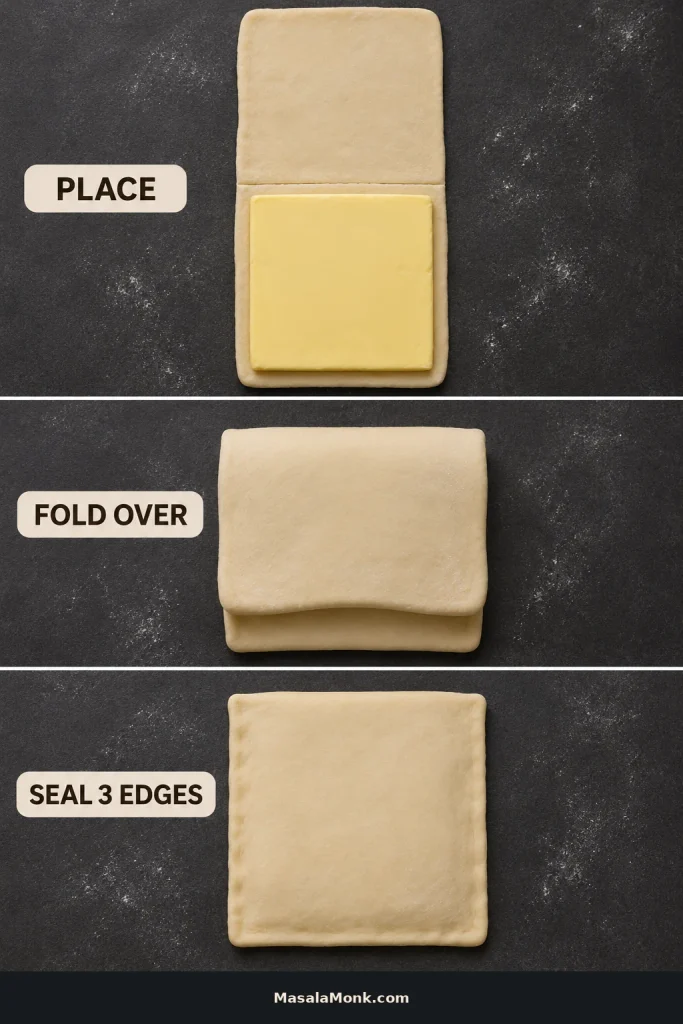
- Lightly flour the counter. Roll the chilled dough into a 20 × 40 cm (8 × 16-inch) rectangle.
- Place the 18 × 18 cm butter square on one half, leaving a narrow border of dough around its edges.
- Fold the uncovered half over the butter, aligning the edges.
- Press the three open sides closed with your fingertips. Seal the edges without squeezing the butter toward the seams.
You now have your first laminated packet: smooth dough on the outside, with the butter sealed inside. If a little butter shows at one corner, pinch the surrounding dough over the opening before rolling.
Laminate the Dough: Three Letter Folds
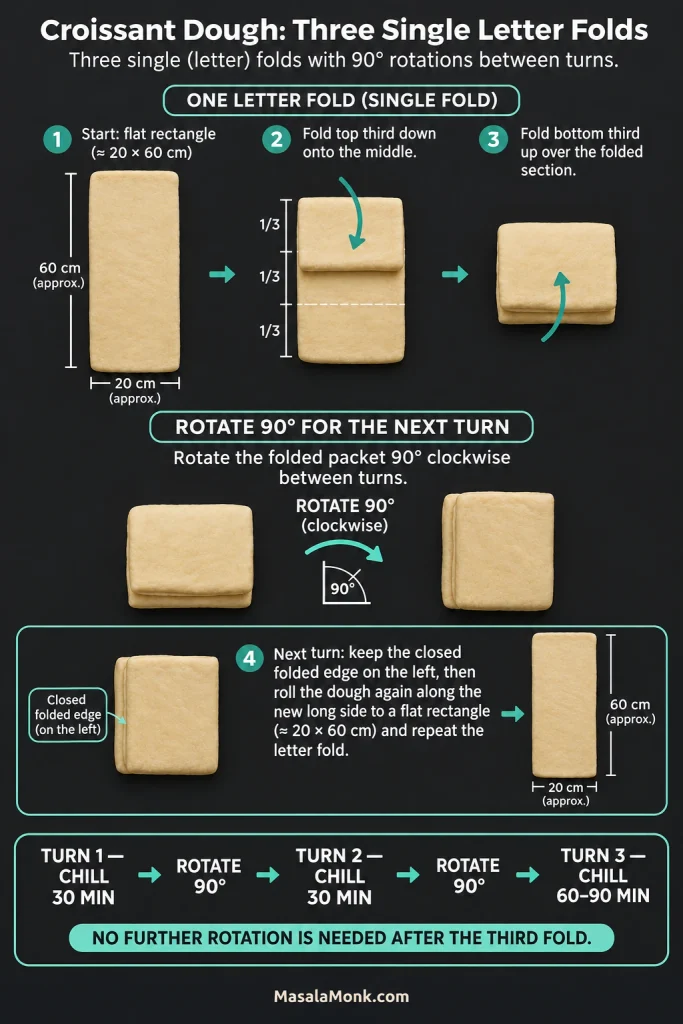
A letter fold means bringing one-third of a long rectangle over the middle, then folding the opposite third on top, like a letter going into an envelope. Each completed fold is called a turn. You’ll make three turns, changing the rolling direction by 90 degrees between them.
Before you begin: Dough that springs back needs a covered rest. Hard butter cracking beneath the pin needs time to become pliable; check that the dough and butter aren’t markedly different in firmness. If the packet becomes greasy or slippery, refrigerate it before continuing; see the butter-flexibility comparison if the cause is unclear. Keep the butter enclosed and aim for an even rectangle rather than forcing exact dimensions.
First turn
Place the butter-enclosed packet on a lightly floured counter. Tap across its surface with the rolling pin, then roll from the center toward the ends until it forms a rectangle approximately 20 × 60 cm (8 × 24 inches).
Keep a short edge nearest you. Lift the dough occasionally to prevent sticking and brush away loose flour.
Fold the far third toward the middle, then bring the near third over it. Align the edges. The packet will now be roughly square, with the butter enclosed and no large openings at the seams.
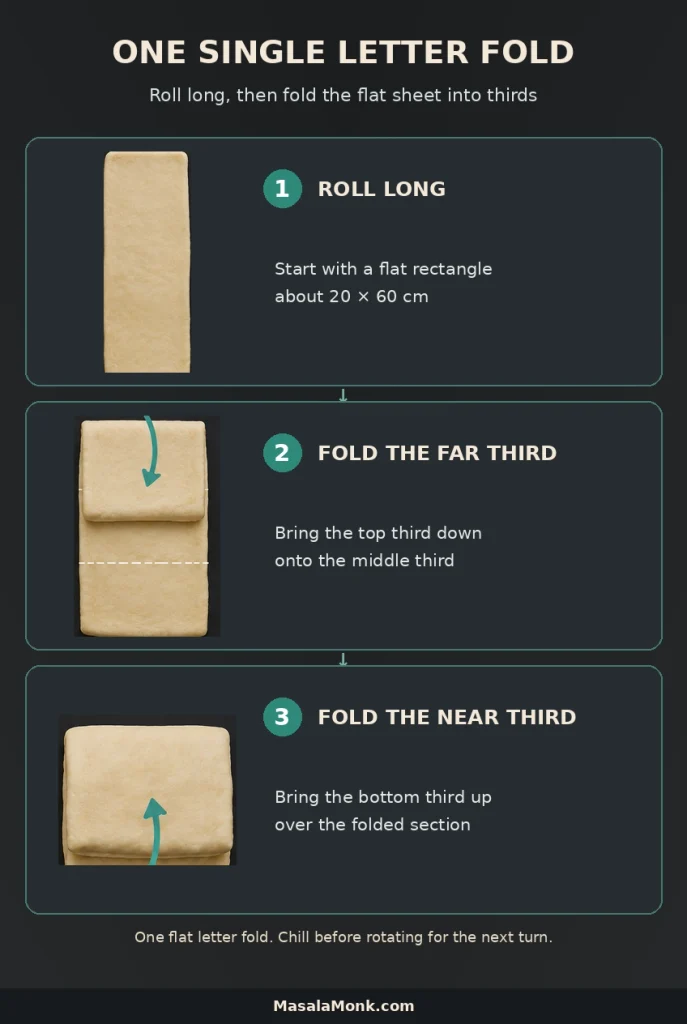
Cover and refrigerate for 30 minutes.
Second turn
Rotate the folded packet a quarter-turn from its previous rolling position. Arrange it with a closed folded edge on your left, so the next long roll runs across the direction used for the first turn.
Roll away from you into another rectangle approximately 20 × 60 cm. Brush off excess flour, then fold the far third toward the middle and the near third over it.
Cover and refrigerate for 30 minutes.
Third turn
Rotate the packet another quarter-turn, again arranging it with a closed folded edge on your left. Roll it away from you into a rectangle approximately 20 × 60 cm.
Brush away loose flour and complete the third letter fold. Wrap the packet securely and refrigerate for 60–90 minutes.
That’s the last fold. During this longer rest, the dough relaxes so you can roll the final sheet without pulling hard against the layers.
Shape the Croissant Loaf
Roll the dough into one long sheet and form a single spiral. The shorter side of the sheet becomes the loaf’s length; the longer side wraps into the spiral you’ll see when the bread is sliced.
Roll the Final Dough Sheet
- Prepare the pan. Lightly grease a 9 × 5-inch loaf pan. If desired, line the bottom and long sides with a parchment sling for easier removal.
- Measure the pan. Check its usable inside length near the base, where some loaf pans taper inward.
- Set the sheet width. Roll the dough to a width about 1 cm (⅜ inch) less than the pan’s measured inside length, so the finished log fits without being squeezed into the ends.
- Extend the sheet evenly. Aim for approximately 65 cm (25½ inches) long and roughly 6–8 mm thick. These are guides, not three measurements to force simultaneously. An even sheet and intact butter layers matter more than the final few centimeters.
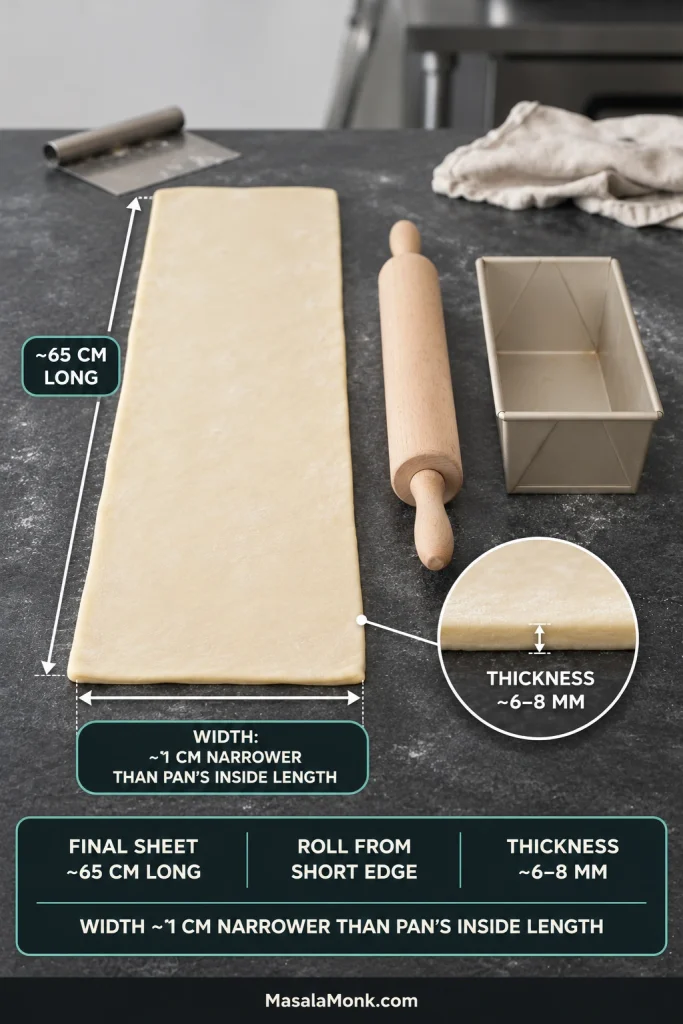
Roll and Position the Spiral
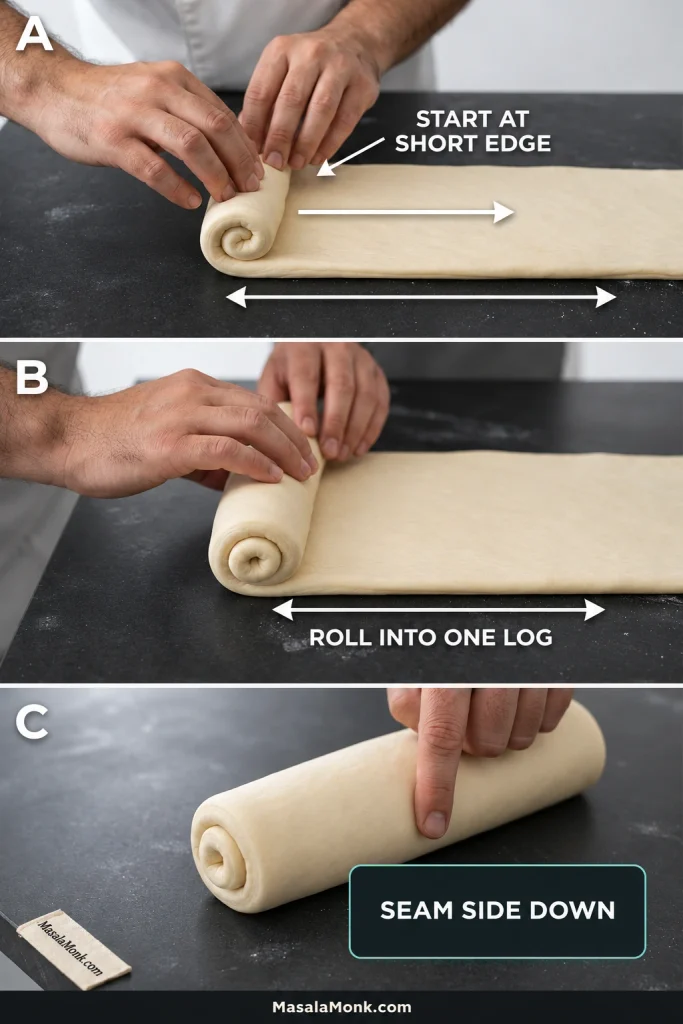
- Roll the spiral. Position one short edge closest to you. Starting there, roll toward the opposite short edge along the long dimension. Keep the tension even so the layers sit together in a snug spiral without being pulled tight.
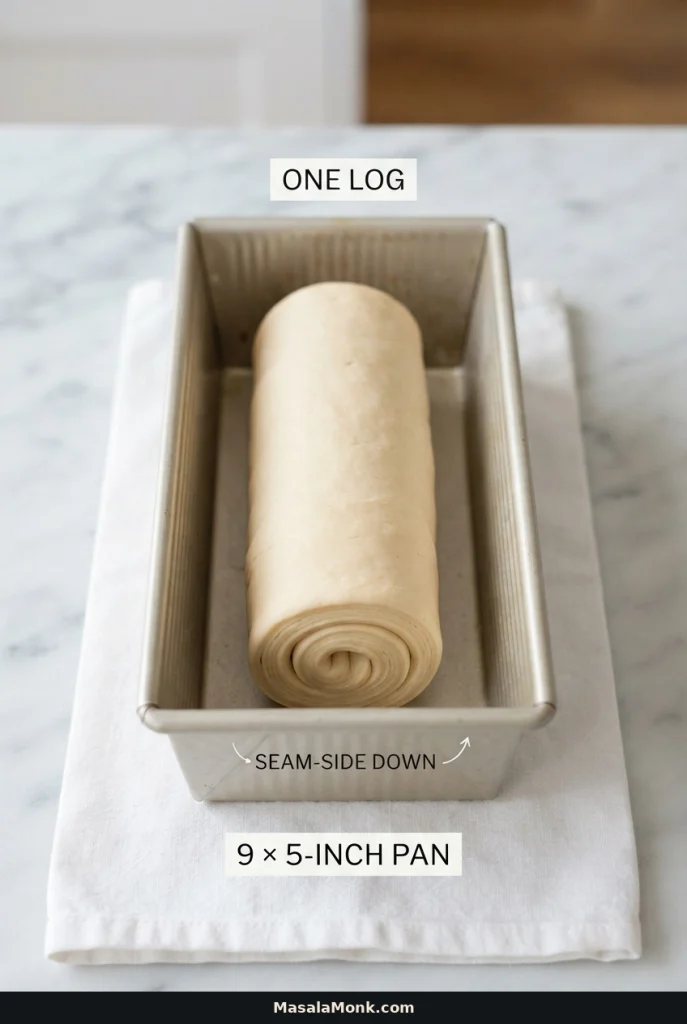
- Transfer. Lightly secure the final seam and place the log seam-side down in the prepared pan. It should fit comfortably between the ends.
Place the log straight in the pan, seam underneath, with a little clearance at either end. Before proofing, check that the spiral is reasonably even along its length and that no large gaps separate its turns.
Proof Until Light and Puffy
Cover and Allow the Loaf to Rise
- Cover. Loosely cover the pan with lightly oiled plastic wrap or another cover that won’t stick to the rising dough.
- Choose a cool place. Leave the loaf somewhere stable, ideally around 22–24°C (72–75°F).
- Allow time to rise. Begin checking after approximately 2 hours. Final proofing commonly takes 2–4 hours, but very cold dough may need longer.
Recognize a Ready-to-Bake Loaf
- Look for readiness. As the dough rises, the spiral expands and its tight ridges round out. When the loaf is visibly puffy and moves with a gentle wobble as you shift the pan, it’s ready to bake.
- Preheat the oven. As the loaf approaches readiness, preheat your conventional oven to 350°F (175°C). Let the dough finish rising while the oven heats.
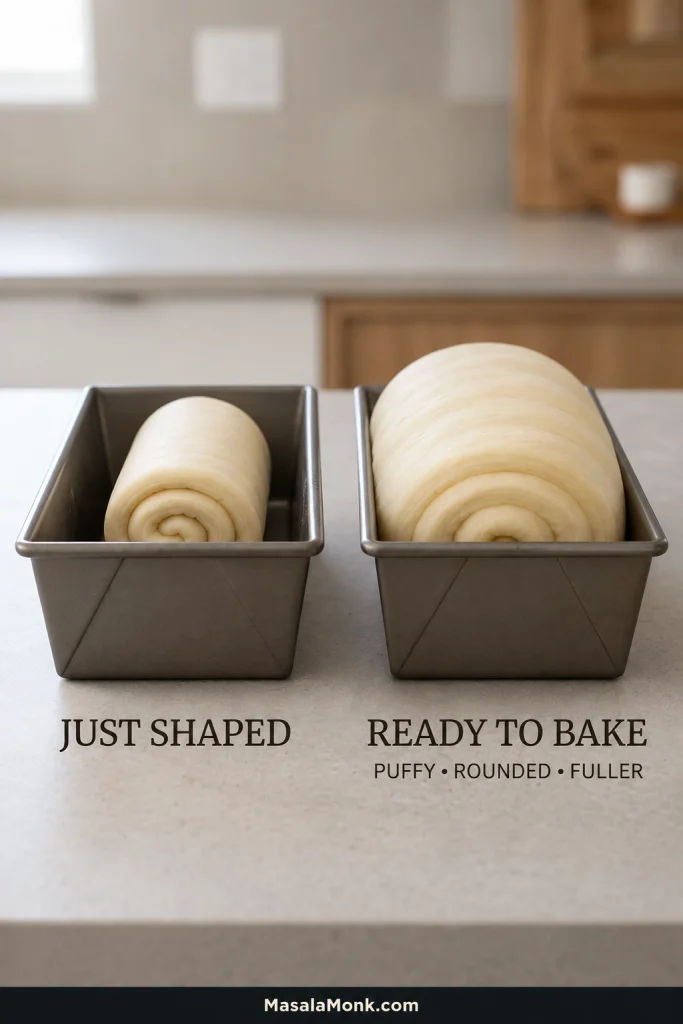
A cold loaf may take longer than four hours to proof. Judge its gradual expansion and gentle wobble rather than relying on the clock alone.
If the spiral remains compact but is still expanding, give it more time; the proofing-problems comparison later in this guide can help distinguish a slow rise from other failures. By contrast, if it begins sagging, losing definition, or collapsing after rising, don’t keep extending the proof. Excess fermentation, excessive warmth, or weakened structure may be responsible.
Avoid using a hot oven as a proofing box. The butter needs to remain largely solid while the yeast produces lift. In a warm kitchen, choose a cooler location where possible.
Egg Wash and Bake
Apply Egg Wash and Begin Baking
- Check the oven. It should be fully preheated to 350°F (175°C), with a rack in the lower-middle position.
- Brush the loaf. Beat the egg with 15 ml (1 tablespoon) milk. Apply a thin, even coating over the exposed dough without allowing egg wash to collect along the pan edges.
- Begin baking. Set the loaf pan on a rimmed baking sheet to catch butter drips. Bake for approximately 50–65 minutes.
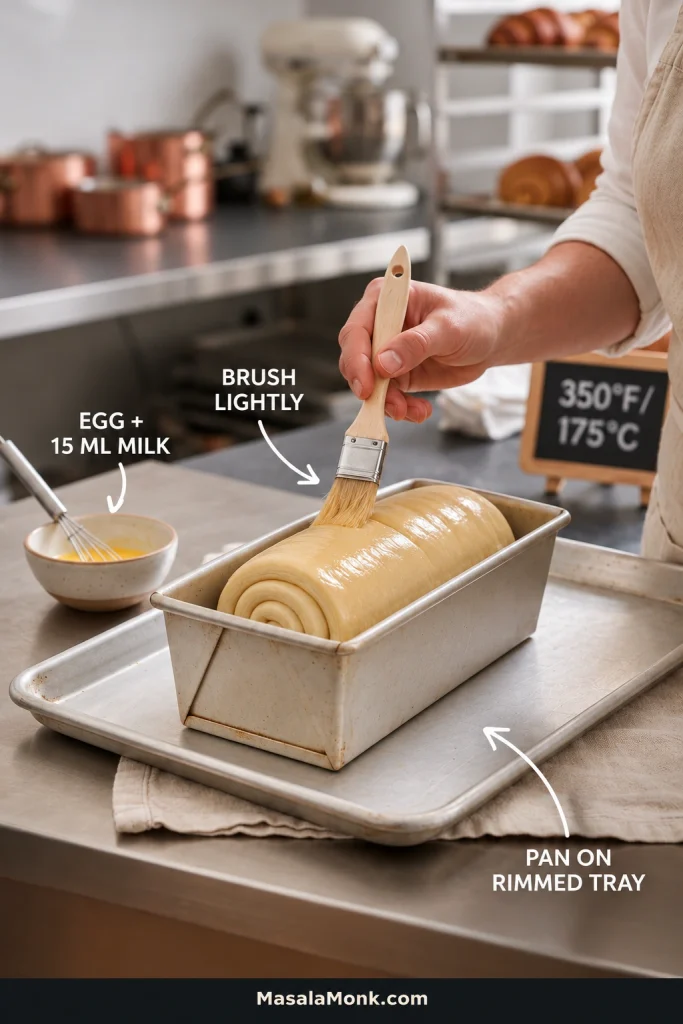
Check Browning and Doneness
- Check the crust after 35–40 minutes. If it is already deep golden, cover it loosely with foil and continue baking so the center can finish without the crust becoming too dark.
- Check the center near the end. Insert an instant-read thermometer into bread crumb near the middle, avoiding large air pockets. Use approximately 200–205°F (93–96°C) as a practical doneness reference. Take a second reading if the probe may have entered a gap. The loaf should be well browned and hold its structure; a temperature reading alone can’t guarantee the crumb has set. If the reading is below the reference range, continue baking, tenting the crust when needed.
- Notice any butter leakage. A little melted butter on the baking sheet or around the loaf isn’t automatically a problem. Heavy pooling together with poor lift can indicate damaged lamination or unsuitable baking conditions.
- Remove from the pan. Let the loaf stand for 10–15 minutes after baking, then carefully transfer it to a wire rack. If melted butter has collected at the bottom, avoid leaving the loaf sitting in it.
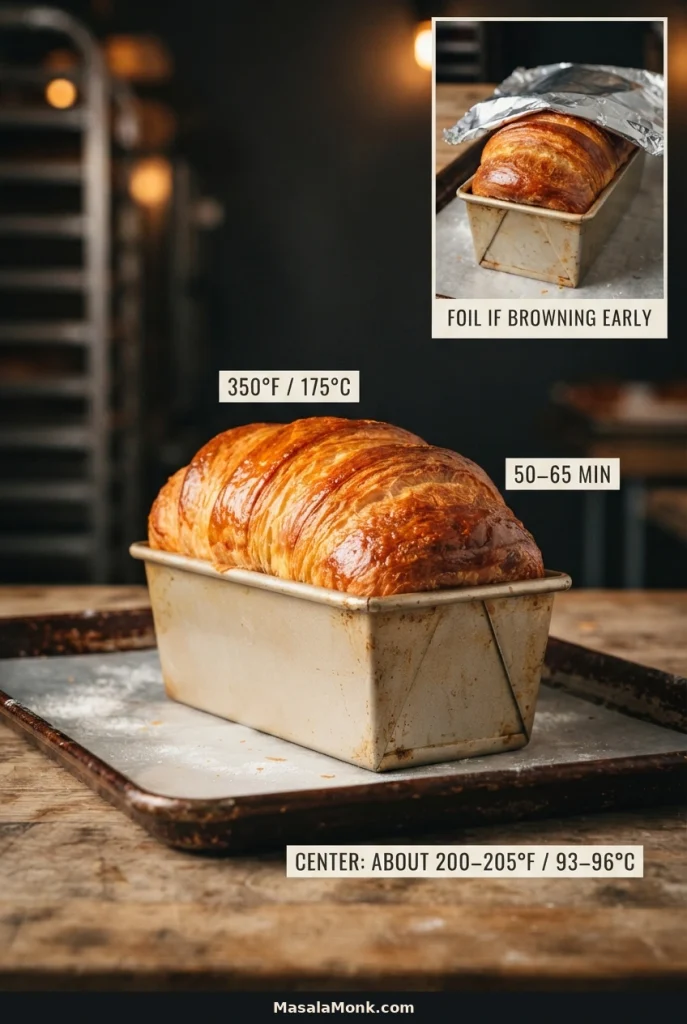
Cool, Slice, and Enjoy
Leave the loaf on the rack for at least another 45–60 minutes, preferably until the center is no longer hot. The tender crumb needs time to settle, and the layers cut more cleanly after cooling.
Use a sharp serrated knife and a gentle sawing motion. Slices around 2–2.5 cm (¾–1 inch) thick work particularly well for toast.
Cut across the cooled loaf and the spiral finally appears: curved bands running through the tender center, with thinner, more delicate layers near the golden crust. Every slice reveals a slightly different pattern. Some folds will be tighter, others more open, giving the loaf its own character.
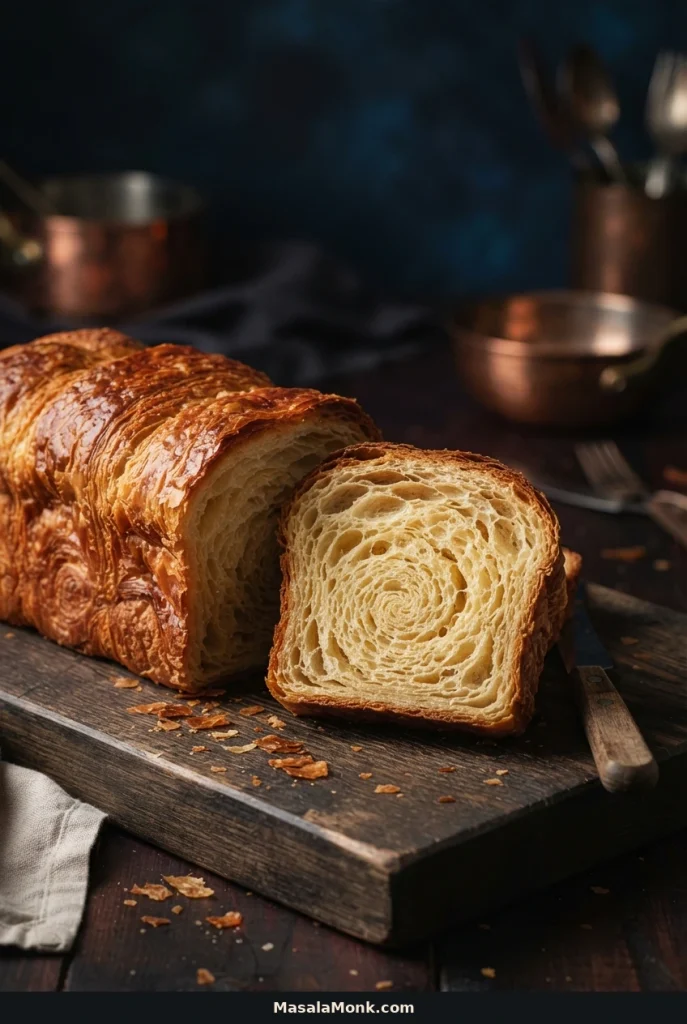
For ingredient substitutions, troubleshooting, and serving ideas, continue below after the main recipe.
What Is Croissant Bread?
Croissant bread is a yeast-raised loaf made with laminated dough. Thin sheets of butter remain between layers of dough, creating a flaky crust and a tender, layered interior as the bread bakes. It’s also called a croissant loaf, although recipes vary in how they arrange the laminated dough inside the pan.
Brioche gets much of its richness from butter and eggs mixed directly into the dough. Puff pastry also contains butter layers, but generally no yeast. Croissant bread brings yeast fermentation and lamination together, giving it some of the softness of bread and flakiness of pastry.
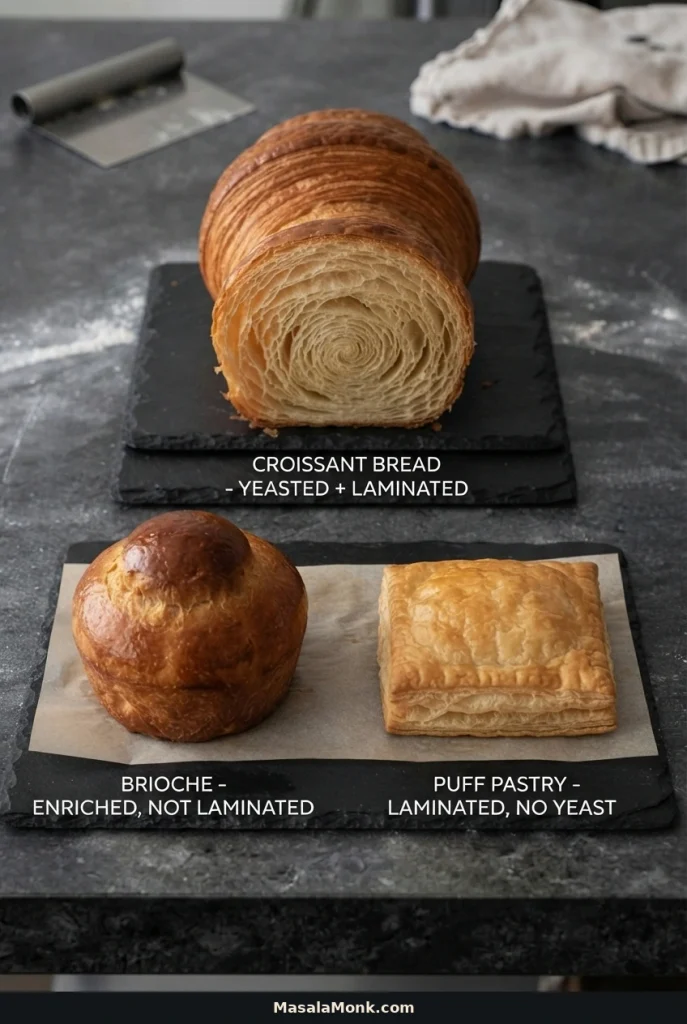
The loaf pan supports the dough as it rises, so there’s no need to shape individual croissants. If you’d prefer a simpler yeast-bread project, our homemade garlic bread loaf covers kneading and rising without lamination.
There are different ways to arrange laminated dough in a pan. King Arthur Baking’s big and buttery croissant bread recipe (opens in a new tab) uses folded sections rather than the continuous spiral here. A comparable continuous-log method appears in Buttermilk by Sam’s croissant loaf (opens in a new tab). The formulas, proofing schedules, and bake times differ, so follow one recipe from beginning to end rather than combining them.
Choosing Flour, Butter, and Yeast
What Flour Works Best for Croissant Bread?
All-purpose flour with approximately 10–11.5% protein provides a balance of strength and flexibility. Stronger bread flour may absorb more milk and resist stretching, while very weak flour can tear when rolled thin.
If you’re using Indian maida, look for flour suitable for yeast baking where that information is available. Protein content and absorption vary by brand. A little tackiness during kneading is normal; don’t automatically add handfuls of flour. The dough should become smooth and elastic while remaining soft enough to stretch.
For your first loaf, stick with the stated flour rather than making a large whole-wheat substitution. Bran changes water absorption and makes delicate laminated sheets harder to handle.
Why Does Croissant Bread Use Two Portions of Butter?
The 35 g butter incorporated during kneading softens the crumb. The 180 g roll-in butter creates the layers. Mixing all 215 g directly into the dough would produce a different kind of enriched bread.
Unsalted butter containing approximately 80–82% milk fat is a practical choice. Brands differ in firmness, so use the bending check in the butter-block instructions to judge whether it’s ready for lamination.
Can You Use Salted Butter?
Yes, but account for the salt in whichever portions of butter are salted. The recipe uses 215 g butter in total and 8 g added salt.
For example, if all 215 g butter contains 1.5 g salt per 100 g, it contributes about 3.2 g salt. Reducing the dough’s added salt to approximately 4.8 g makes a reasonable overall flavor adjustment. It isn’t a perfectly equivalent dough formula, however, because salt in the laminating butter isn’t distributed like salt incorporated during kneading.
Check the package for the actual salt content. If only one portion of butter is salted, calculate the adjustment using that portion alone. Unsalted butter remains the simplest choice.
Instant Yeast vs. Active Dry Yeast
You can generally replace the 5 g instant yeast with 5 g modern active dry yeast. Many current active dry yeasts can be mixed directly into flour, although some brands recommend dissolving them first. Follow package instructions, using milk from the recipe’s measured quantity if rehydration is required.
Active dry yeast may begin fermenting more slowly than instant yeast. Judge its progress by expansion rather than assuming both products follow identical timings.
How Lamination Makes Croissant Bread Flaky
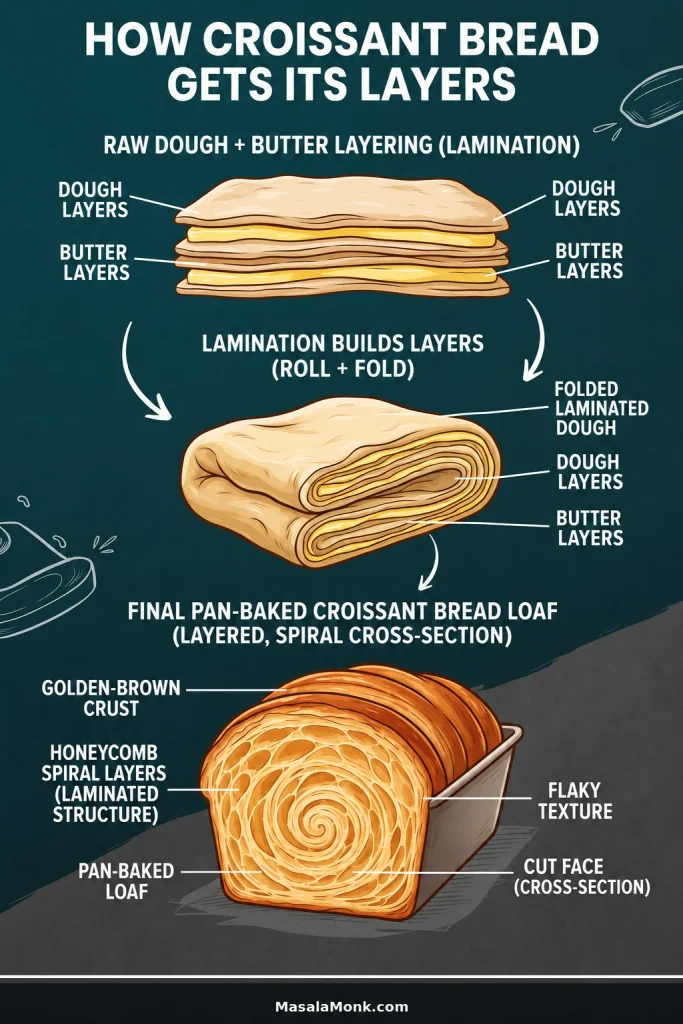
Each letter fold stacks alternating sheets of dough and butter. Rolling thins those sheets; the next fold multiplies them. During baking, steam and fermentation help the layers expand, leaving a more open structure than ordinary enriched bread. If the butter melts into the dough before baking, much of that separation is lost.
Why Does the Dough Shrink When Rolled?
Rolling stretches the gluten network. When the dough becomes tense, it pulls back toward its earlier shape. Cover it and let it rest. Forcing it longer can make the sheet uneven or tear the layers.
Why Can Butter Be Too Cold?
Very cold butter can fracture instead of spreading evenly under the rolling pin, leaving broken patches between the dough layers. For further explanation, see King Arthur Baking’s guide to butter temperature in pastry (opens in a new tab).
Croissant Bread Troubleshooting: What Can You Fix?
The stage at which a problem appears often points toward its cause. Butter cracking during rolling, melted butter during proofing, and a gummy center after baking need different responses.
Quick Visual Diagnosis
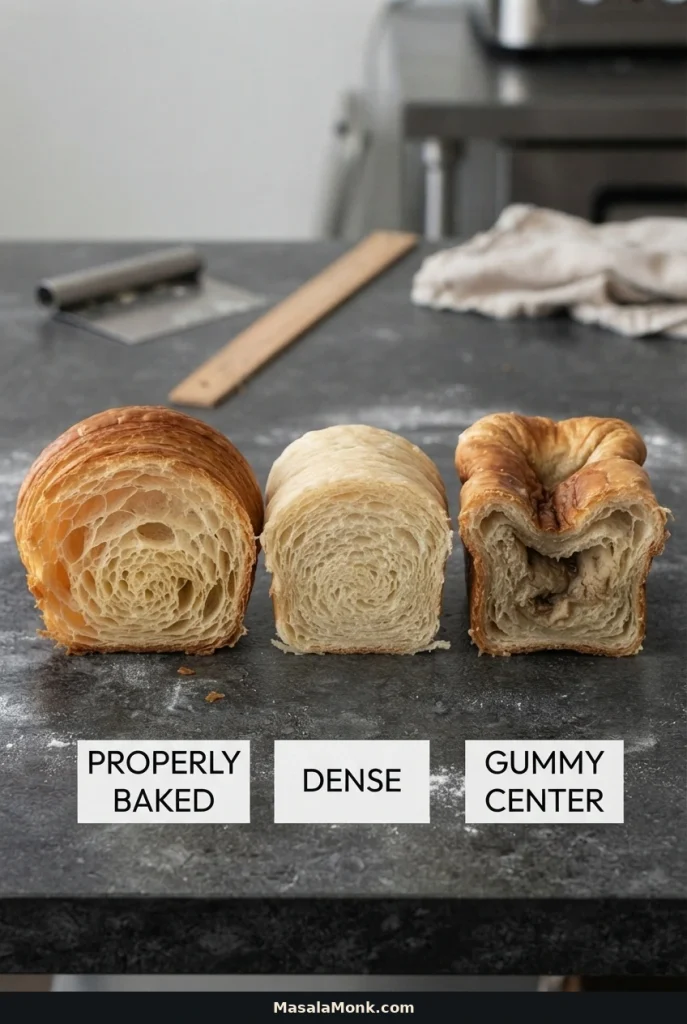
A compact, newly shaped spiral may simply need longer to rise. By contrast, a loaf that expanded and then sags can be overproofed, while a pool of softened butter suggests excessive warmth or damaged lamination. Compare these appearances before deciding whether to wait, cool the dough, or bake.
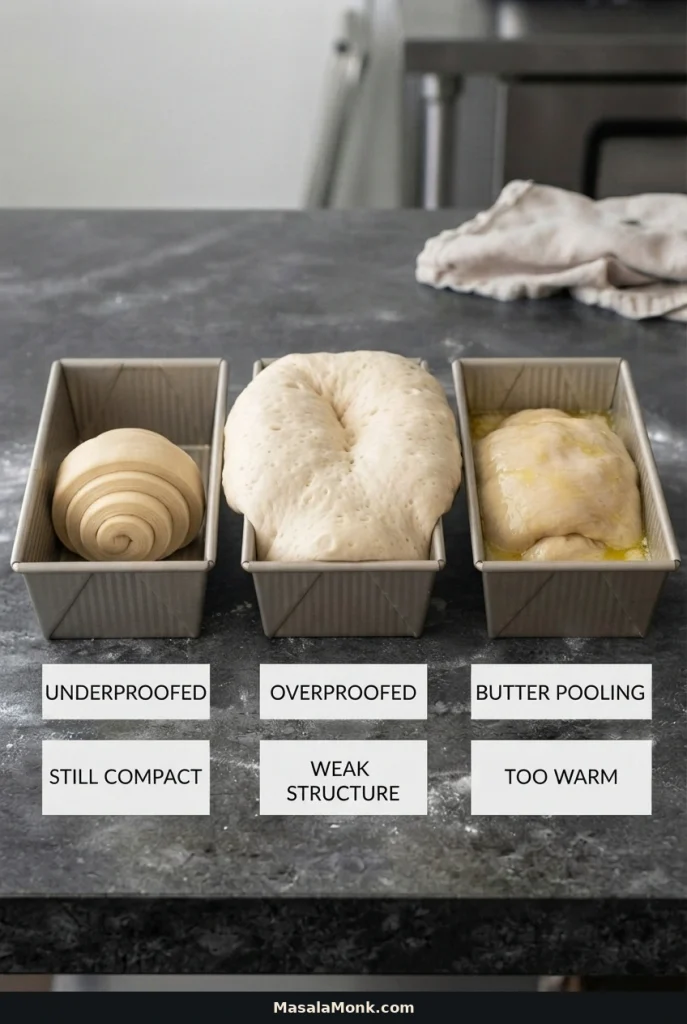
| Problem | Likely cause | What to do |
|---|---|---|
| Butter shatters while rolling | Butter too firm relative to dough | Pause; let the packet become pliable without getting greasy |
| A small butter patch appears | Thin or torn dough | Cover the exposed spot with surrounding dough |
| Butter smears extensively | Layers merging | Chill, then continue if workable; expect less flakiness |
| Dough keeps shrinking | Gluten tension | Cover and rest before rolling further |
| Loaf barely rises | Cold dough or weak fermentation | Check for gradual expansion and allow more time if progressing |
| Loaf begins collapsing during proofing | Overproofing, excess warmth, or weak structure | Stop waiting; bake promptly if it still holds together |
| Butter pools during proofing | Excess warmth or damaged layers | Move to a cooler place; bake when adequately proofed if stable |
| Crust browns too quickly | Top browning before center finishes | Tent loosely with foil and continue baking |
| Center is gummy after cooling | Underbaking or compromised structure | Do not serve raw crumb; review center temperature and bake duration next time |
| Slices fall apart | Large spiral gaps or hot slicing | Cool fully and use a serrated knife |
Why Isn’t My Croissant Loaf Flaky?
Flaky layers depend on keeping butter in thin sheets through rolling and proofing. A uniformly soft or heavy crumb can come from merged butter layers, damaged lamination, or insufficient rise. Identify the earliest stage where the dough changed: a greasy packet points toward softened butter, while a loaf that barely expanded points toward fermentation.
Butter Shattered During Rolling
Stop rolling and let the covered packet become pliable enough for the butter to bend, checking that the dough itself isn’t becoming too warm. A few fractures may create uneven layers, but they don’t automatically make the dough unusable.
Butter Leaked Through the Dough
A small tear can often be patched by bringing surrounding dough over the opening. Chill the packet if it has softened, then continue rolling.
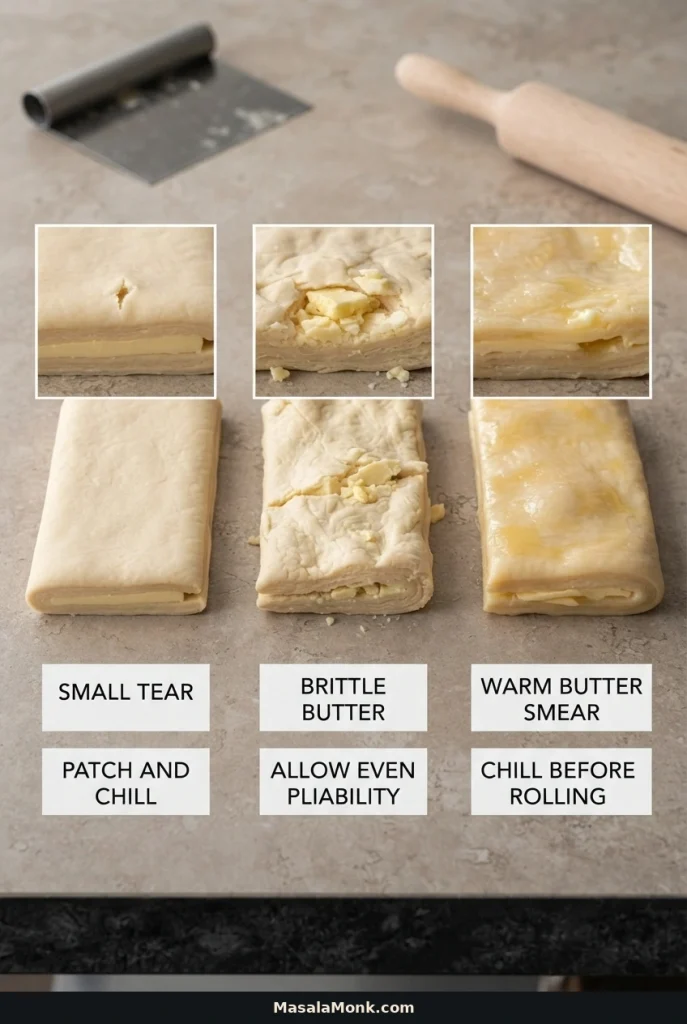
Extensive smearing is harder to recover. Once large areas of butter have blended into the dough, refrigeration cannot recreate separate sheets. The loaf may still bake, but it will probably be softer and less flaky.
The Shaped Loaf Barely Rose
Cold laminated dough can take several hours to expand. Compare the spiral with how it looked immediately after shaping. If it’s gradually becoming fuller, continue proofing under suitable conditions.
If there’s almost no change after an unusually long time, consider yeast freshness, the first rise, and the actual room temperature. Don’t try to rescue the rise with a hot oven or direct heat; the butter may melt first.
The Loaf Started Collapsing Before Baking
A loaf that rose well but begins sagging or losing definition may be overproofed, overheated, or weakened by earlier lamination problems. Stop extending the proof. If it still holds together, bake it rather than waiting for more expansion, although the crumb may be denser.
Butter Pooled During Proofing
A noticeable puddle of melted butter before baking suggests excessive warmth or damaged layers. Move the pan somewhere cooler. If the loaf is adequately risen and holds its shape, bake it; if still compact, let it continue proofing in cooler conditions rather than adding heat.
Golden Outside, Gummy Inside
A deeply browned crust can develop before the center finishes baking. While the loaf is still in the oven, tent the top loosely with foil and continue until the middle is properly baked.
If you sliced it hot, let the remaining loaf cool before judging the texture. A genuinely wet or raw center after cooling is underbaked and shouldn’t be served as finished bread. A fully baked but uniformly greasy crumb points more toward butter that merged into the dough.
The Slices Fall Apart
Large gaps between spiral turns can make slices fragile. Cool completely and cut with a serrated knife. Irregular pieces can still be used for toast, French toast, or bread pudding.
Finished diagnosing a problem? Return to the croissant bread recipe.
Making Croissant Bread in a Warm Kitchen
At 28–30°C (82–86°F) or warmer, butter can soften quickly during rolling. Prepare your work surface, rolling pin, scraper, and refrigerator tray before taking out the dough.

- Choose a cooler part of the day or work in an air-conditioned room where available.
- Keep dough covered during pauses so the surface doesn’t dry.
- Refrigerate the packet when it starts feeling slippery or leaves greasy marks.
- Use only enough flour to prevent sticking.
- Keep the shaped loaf away from sunlight, hot appliances, and direct heat.
If the room is around 27°C (81°F) or warmer during final proofing, a cooler location is preferable to rushing fermentation in the heat. A short refrigerator pause may help if butter is softening, but it also slows the rise. If butter cannot remain solid during lamination, work at a cooler time.
How Long Does Croissant Bread Take?
Allow approximately 9–14 hours for this same-day croissant bread recipe, including kneading, rising, refrigerator rests, shaping, baking, and cooling. Most of the time is hands-off; the final proof is the stage most likely to extend the schedule.
Same-Day Schedule
| Stage | Approximate time |
|---|---|
| Mixing and kneading | 20–30 minutes |
| First rise | 75–120 minutes |
| Initial refrigerator rest | 45–60 minutes |
| Butter block and enclosure | 15–25 minutes |
| First turn and rest | 40–45 minutes |
| Second turn and rest | 40–45 minutes |
| Third turn and longer rest | 70–105 minutes |
| Shaping | 10–20 minutes |
| Final proof | 2–4 hours, sometimes longer |
| Baking | 50–65 minutes |
| Cooling | At least 60 minutes |
Begin early if you want to serve the loaf the same day. Avoid scheduling something time-sensitive immediately after the expected final proof; a slow rise can shift the baking time.
Can You Make Croissant Bread Overnight?
Yes. Divide the recipe across two days by refrigerating the mixed dough before lamination. This replaces the full same-day first rise and initial short chill.
Day 1: Mix and knead the dough. Let it begin fermenting for 20–30 minutes at approximately 22–24°C (72–75°F). Flatten into a thick rectangle, cover securely, and refrigerate for approximately 8–12 hours at 3–4°C (37–39°F).
Day 2: The dough should be cool and cohesive, with some fermentation development but without excessive swelling or collapse. Begin by preparing the butter block, then follow the same enclosure, folding, shaping, proofing, baking, and cooling instructions.
Refrigeration slows fermentation rather than stopping it. Very swollen, fragile, or collapsed dough may be difficult to laminate cleanly. Check its condition before enclosing the butter instead of assuming a fixed number of hours always gives the same result.
Ready to begin the process? Return to the main recipe.
Croissant Bread Variations
Start with the plain loaf to learn how the butter layers behave. Once familiar with the method, add modest fillings during final shaping, after all three letter folds are complete. For that stage, return to rolling the final sheet.
Cinnamon-Sugar Croissant Loaf
Combine 20 g (approximately 1½ tablespoons) sugar with 1 teaspoon ground cinnamon. Sprinkle a thin layer over the final dough rectangle, leaving the sealing edge clear, then roll into the spiral.
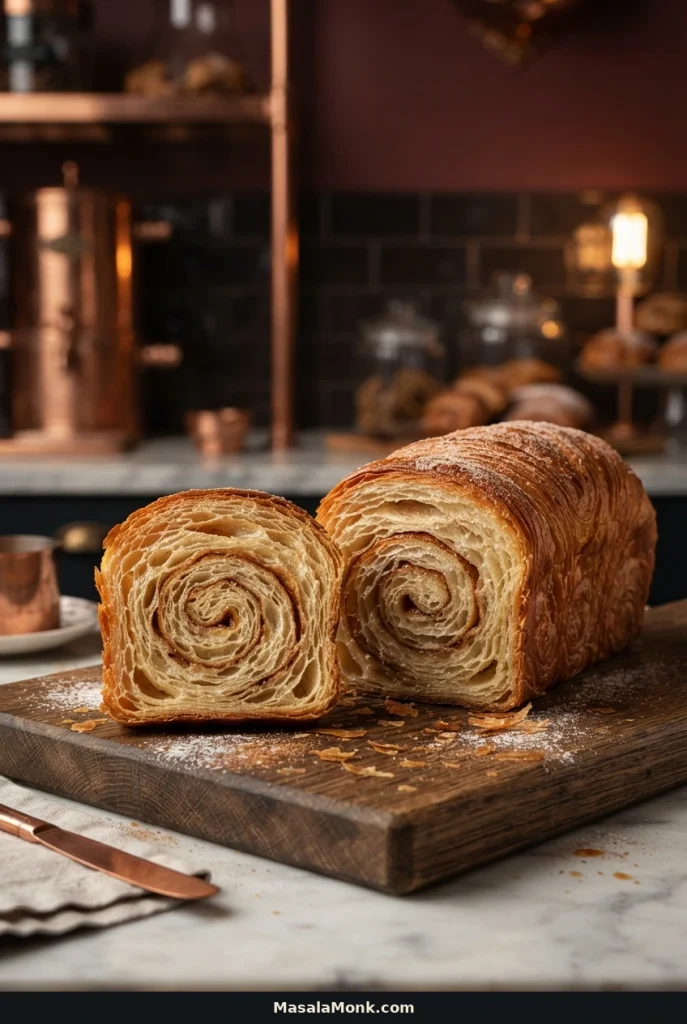
For a different spice note, replace a little cinnamon with homemade apple pie spice.
Keep the filling light. A thick layer of sugar can melt into syrup and collect between the turns.
Chocolate Croissant Bread
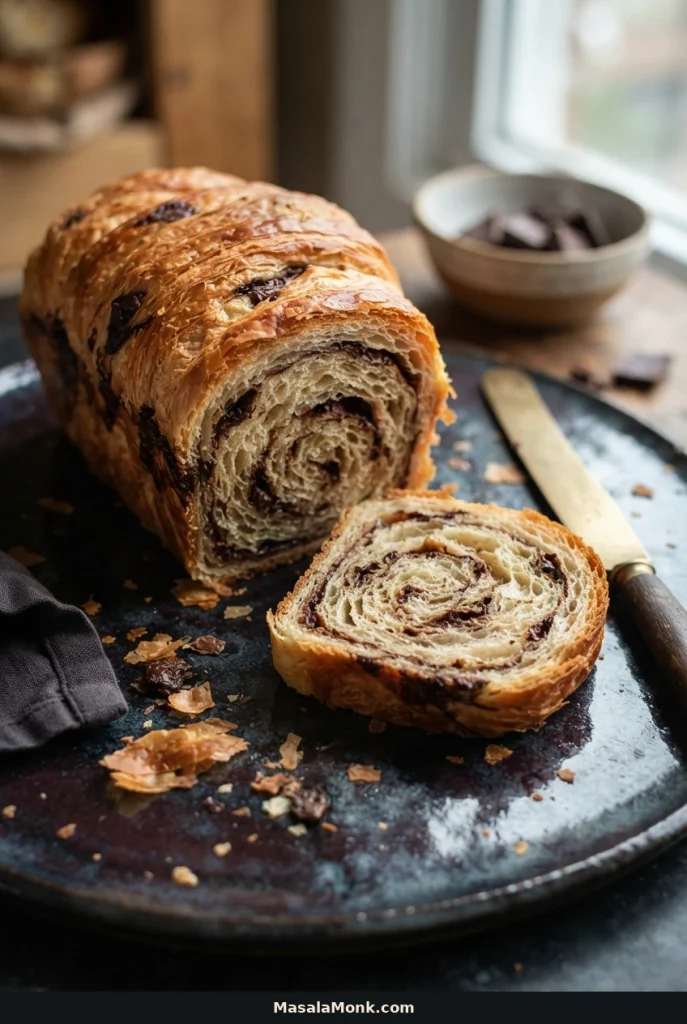
Scatter 50–60 g finely chopped dark chocolate over the final rectangle before rolling. Small pieces distribute more evenly and are less likely to create large gaps in the spiral.
Savory Croissant Loaf
A modest scattering of finely grated hard cheese or dried herbs can be added before the final roll. Choose dry, finely textured additions. Wet vegetables, thick sauces, and heavy fillings work better as sandwich fillings after baking.

For the basic technique, return to the croissant bread recipe.
How to Serve Croissant Bread
Toast thick slices until the outer folds crisp again. The tender center works well with berry jam, honey, or soft scrambled eggs. For something sweeter, drizzle warm slices with a little homemade chocolate syrup.
Day-old croissant bread makes rich homemade French toast. Dip each slice briefly in custard and cook over moderate heat; a long soak can make the delicate layers harder to handle.

For savory breakfasts, use the more cohesive slices for egg-and-cheese sandwiches or grilled cheese. The buttery crust browns readily, so moderate heat works best.
Storing, Freezing, and Reheating Croissant Bread
How Long Does Croissant Bread Stay Fresh?
Croissant bread is at its crispest on the day it’s baked. Once completely cool, store it covered in a cool, dry kitchen and aim to eat it within 1–2 days. Wrapping slows drying but softens the crust, so toast slices before serving.
In a hot or humid kitchen, freeze extra slices rather than leaving the loaf on the counter for several days.
What Can You Make With Leftover Croissant Bread?
Slightly stale croissant bread is excellent for custard-based desserts. Cube it for a rich pudding or use thick slices for French toast. Our bread pudding recipe explains how to balance bread and custard so the center sets without becoming soggy.

Since croissant bread is already rich in butter, a lighter custard may be preferable to the one you’d use for ordinary white bread.
Can You Freeze Croissant Bread?
Yes. Freeze completely cooled slices in a sealed freezer-safe bag or container, using parchment between them if needed. For the best texture, aim to use them within 1–2 months.
Freezing shaped, unproofed laminated dough requires a separate thawing and fermentation schedule; these instructions apply to bread that’s already baked.
Reheating Croissant Bread
Toast individual slices until their edges crisp. For thicker pieces, warm them in an oven around 325°F (160°C), checking after a few minutes. The outer folds turn crisp again while the middle stays soft.








