
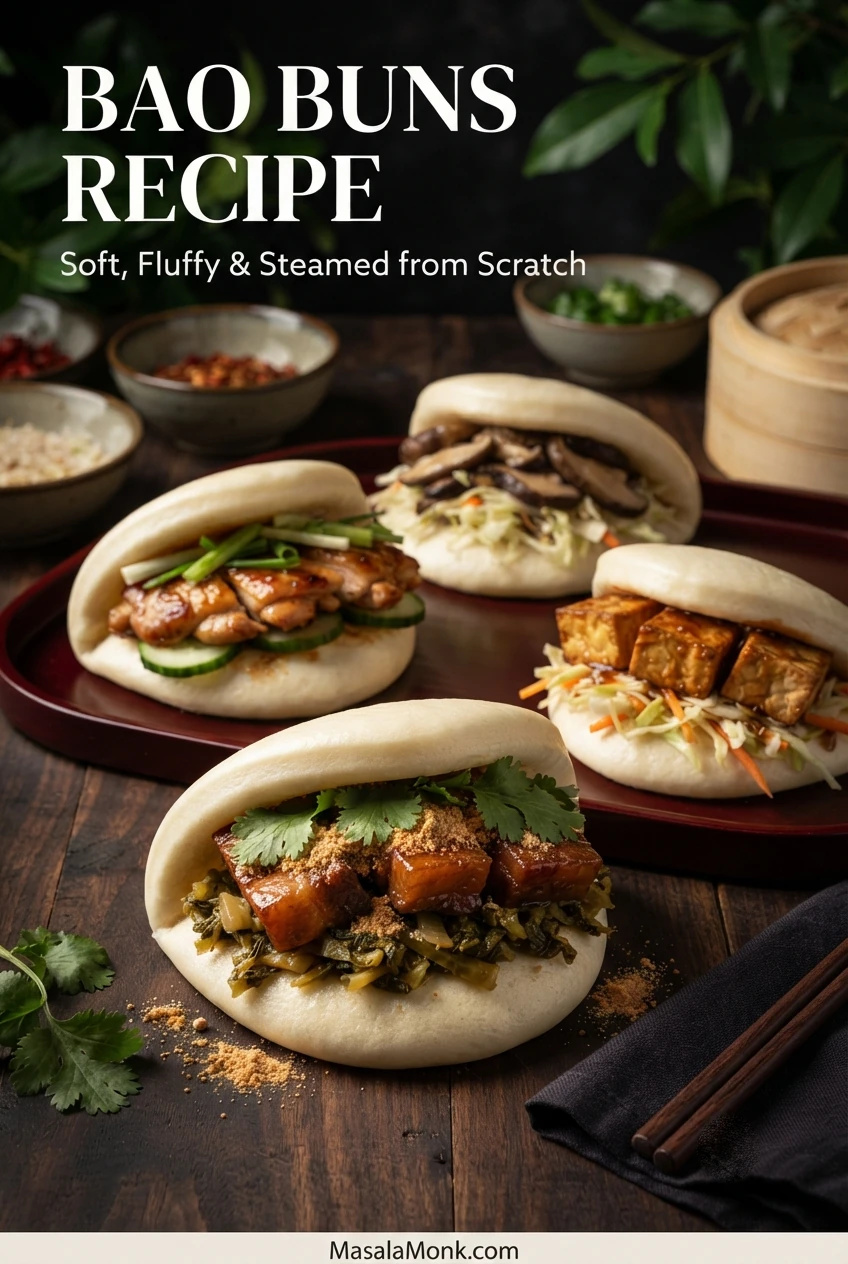
A good bao bun feels light in your hand, with a gently springy crumb and a rounded fold that opens into a pocket. The bread is mild and slightly sweet, ready for rich pork belly, glossy chicken, deeply browned mushrooms, or crisp-edged tofu. Sharp pickles, herbs, and crunchy vegetables make each bite more interesting.
This bao buns recipe makes 12 soft, fluffy steamed buns with plain flour, instant yeast, baking powder, water, sugar, salt, and oil. The dough has one main rise after shaping. A bamboo steamer is optional: a metal basket or stable covered-pot arrangement will work.
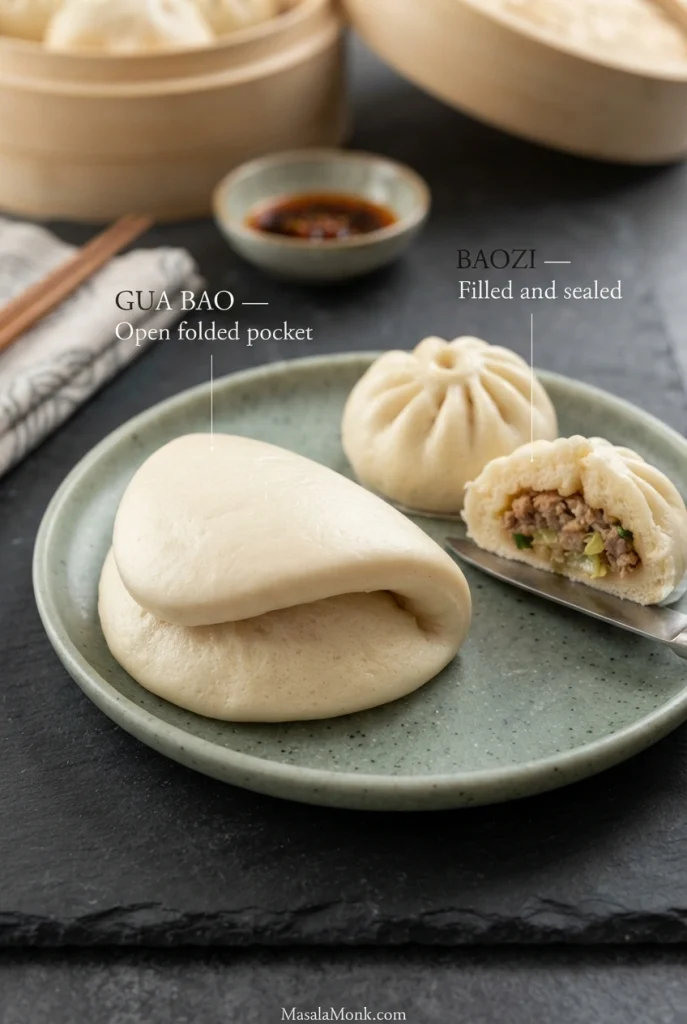
These are the open, folded buns associated with Taiwanese gua bao, rather than sealed baozi with fillings cooked inside. The bread is steamed first and filled while warm.
The shaping is straightforward: roll an oval, oil the surface, and fold without sealing. Three checkpoints guide the rest: smooth dough, puffy but stable folds, and a fully cooked, airy crumb.
Ready to cook? Jump to the complete bao buns recipe, or use the sections below for fillings, different steamers, troubleshooting, and make-ahead advice.
In This Guide
- Bao Buns Recipe: Ingredients and Method
- Four Bao Bun Fillings and Serving Ideas
- What Good Bao Dough Looks and Feels Like
- Rolling, Folding, and Proofing Bao Buns
- Steaming Equipment and Small-Batch Cooking
- Flour, Yeast, Baking Powder, and Substitutions
- Troubleshooting Dense, Wrinkled, or Collapsed Bao
- Freezing, Storing, and Reheating Bao Buns
- Frequently Asked Questions
Bao Buns Recipe: Soft, Fluffy Steamed Buns
Mix and knead a soft dough, divide it into 12 portions, roll each piece into an oval, then oil and fold it into a pocket. Let the shaped buns rise until puffy and steam them over boiling water. There is no separate bulk rise and no need to pleat raw dough around a filling.
Recipe at a Glance
- Yield: 12 medium folded bao buns
- Servings: 4–6 people, allowing two or three buns each
- Hands-on preparation: Approximately 30–40 minutes
- Shaped proof: Usually 35–60 minutes in a comfortably warm kitchen; longer when cool
- Steaming: 10–12 minutes per batch, then 2 minutes covered off the heat
- Total planning time: Roughly 1½–2 hours with a large steamer; allow around 2–2½ hours for three smaller batches
The total runs from mixing to finishing the last batch of buns and excludes filling preparation. Shaping, proofing, and cooking can overlap. Cooler conditions or re-proofing chilled dough may extend the schedule.
A small steamer needs a little advance planning. See the three-batch method before you begin if yours holds four buns at a time.
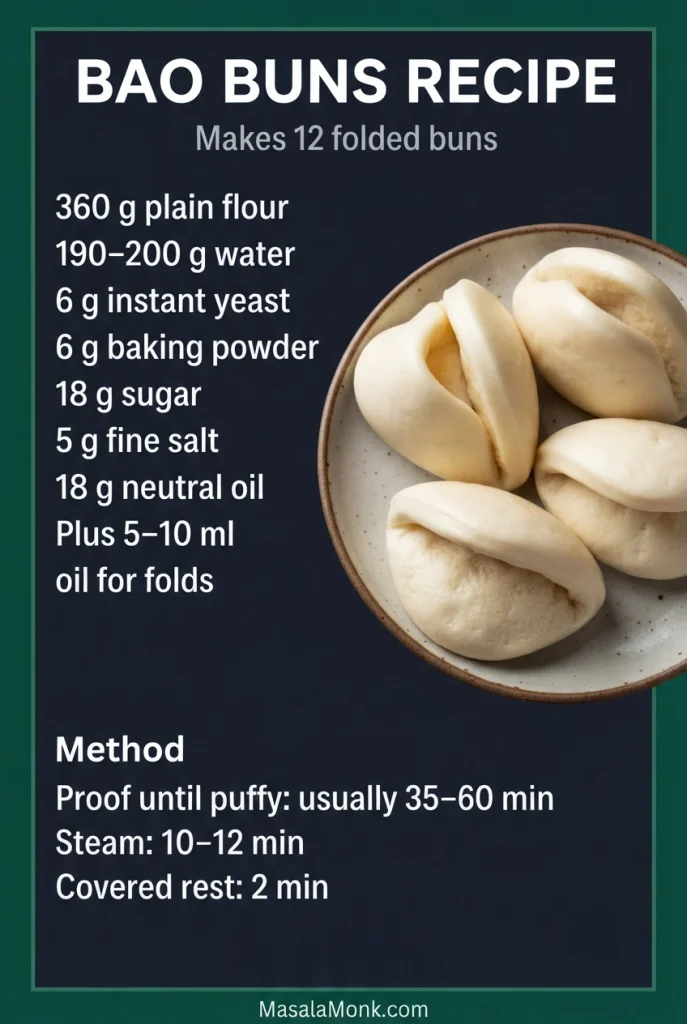
Ingredients for 12 Bao Buns
- 360 g (12.7 oz) plain/all-purpose flour — approximately 3 US cups at 120 g per cup
- 190–200 g (190–200 ml) lukewarm water — start with 190 g and reserve up to 10 g
- 6 g instant dry yeast — approximately 2 teaspoons, depending on brand
- 6 g baking powder — approximately 1½ teaspoons, depending on brand
- 18 g white sugar — approximately 1½ tablespoons
- 5 g fine salt — best weighed
- 18 g neutral vegetable oil — approximately 20 ml (4 teaspoons)
- 5–10 ml (1–2 teaspoons) extra neutral oil — for brushing inside the folds
- Extra flour for light dusting, only if needed
Use baking powder, not baking soda. Baking soda is not an equivalent replacement; it can alter the flavor, color, and texture. Weigh flour and water when possible. Cup measurements vary with how flour is scooped or packed.
Equipment
- Large mixing bowl and dough scraper or mixing spoon
- Kitchen scale and rolling pin
- Small brush or clean fingers for oiling
- Bamboo steamer, metal steaming basket, or stable raised steaming setup
- Compatible covered pot or wok
- 12 squares of food-safe, heat-resistant nonstick parchment, about 10 × 10 cm (4 × 4 inches) each
- Loose covering for resting and proofing dough
Each parchment square should support its folded bun without covering the entire steamer surface. Leave gaps for steam to circulate. Knead by hand or with a stand mixer and dough hook.
How to Make Bao Buns, Step by Step
Step 1: Mix the Dough
Combine 360 g flour, 6 g instant yeast, 6 g baking powder, 18 g sugar, and 5 g salt in a large bowl. Add 18 g oil and 190 g lukewarm water, around 30–35°C (86–95°F).
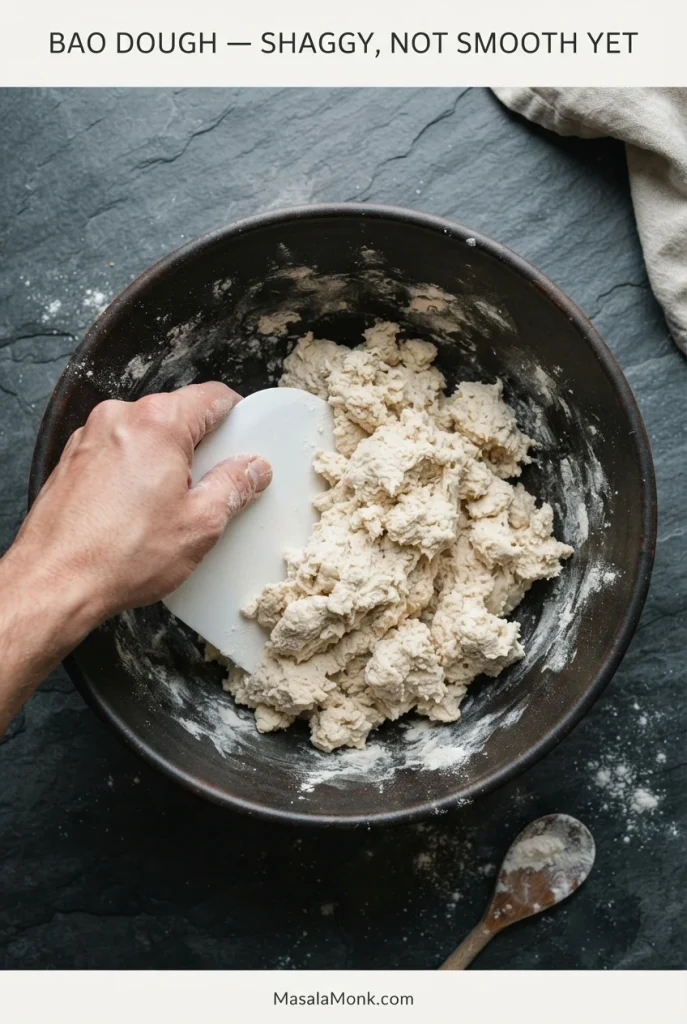
Mix until shaggy clumps form, then gather into a rough dough ball. If dry flour remains, add reserved water little by little, working each addition in before adding more. The dough should hold together and feel slightly tacky without leaving wet paste on your hands.
Step 2: Knead Until Smooth
Turn the dough onto a clean worktop. Push forward with the heel of your hand, fold back, rotate, and repeat for 4–5 minutes. Cover and rest for 10 minutes, then knead another 3–5 minutes. This short rest hydrates and relaxes the dough; it is not a separate bulk-rising stage.
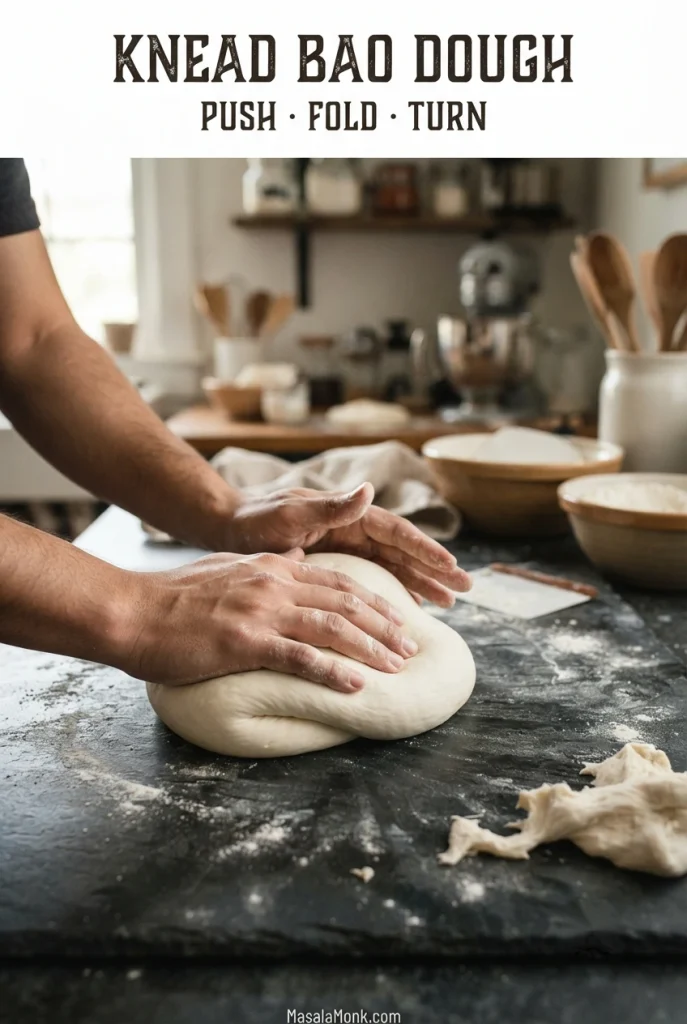
Ready to shape: The surface looks smooth and the dough feels supple, stretching without immediately tearing. Work in a few drops of water if it remains stiff and dry after resting. Use a light dusting of flour only if genuinely sticky.
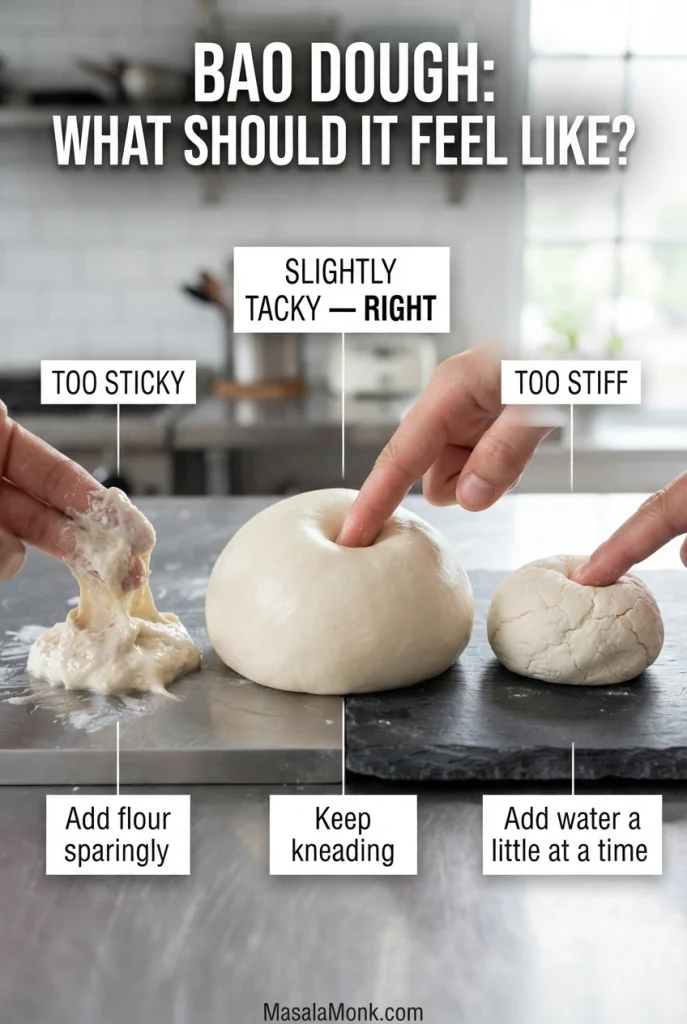
Stand mixer: Knead with a dough hook on low speed for about 6–9 minutes, checking the texture rather than relying entirely on the timer. If the dough is difficult to judge, compare the sticky, tacky, and stiff dough examples before shaping.
Step 3: Divide into 12 Portions
Divide into 12 pieces of approximately 50–51 g (1.8 oz) each. Roll into smooth balls and keep them covered as you work at a comfortable pace. Similar-sized pieces will shape and steam more evenly; a gram’s difference is unimportant.
Step 4: Roll, Oil, and Fold
Roll each dough ball into an oval about 11–13 cm long and 7–8 cm wide (roughly 4½–5 by 3 inches). Aim for 6–8 mm (about ¼ inch) at the center, allowing natural variations at the edges. The oval needs to be flexible and even, not geometrically perfect.
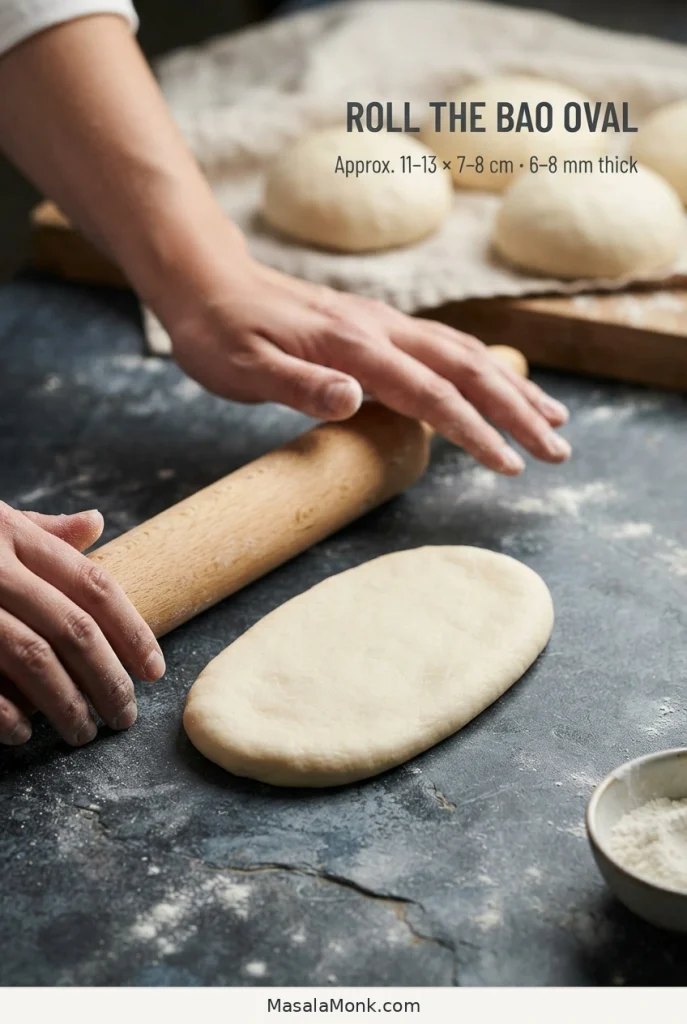
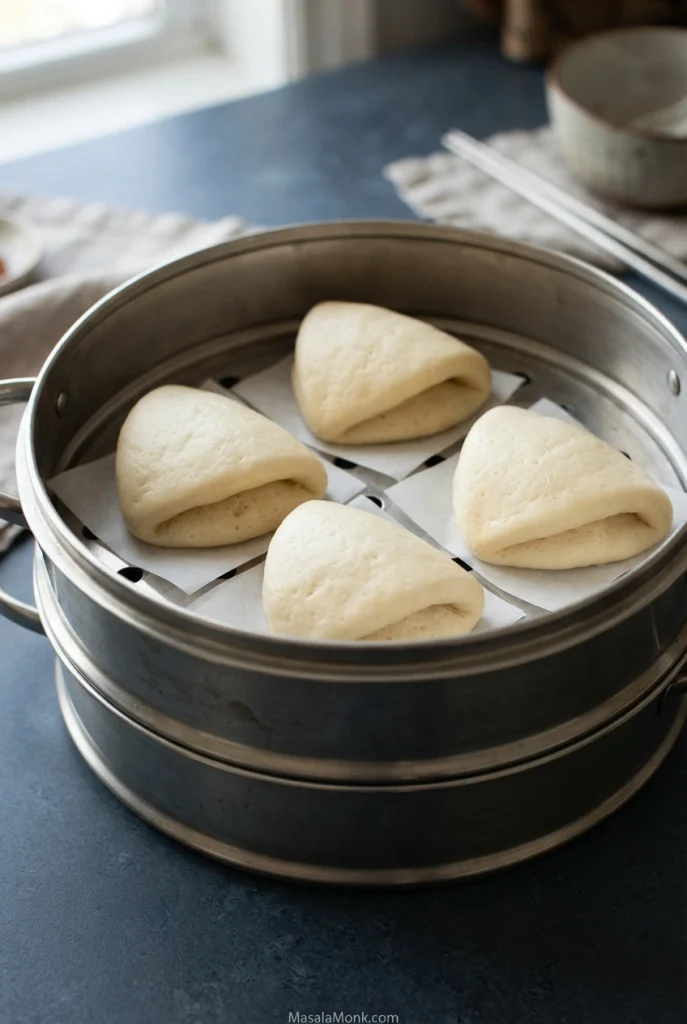
Brush its upper surface lightly with oil. Bring one short end toward the other to make a rounded pocket, without sealing or pressing the open edge shut. A lightly oiled chopstick across the middle helps make an even curve; slide it out after folding.
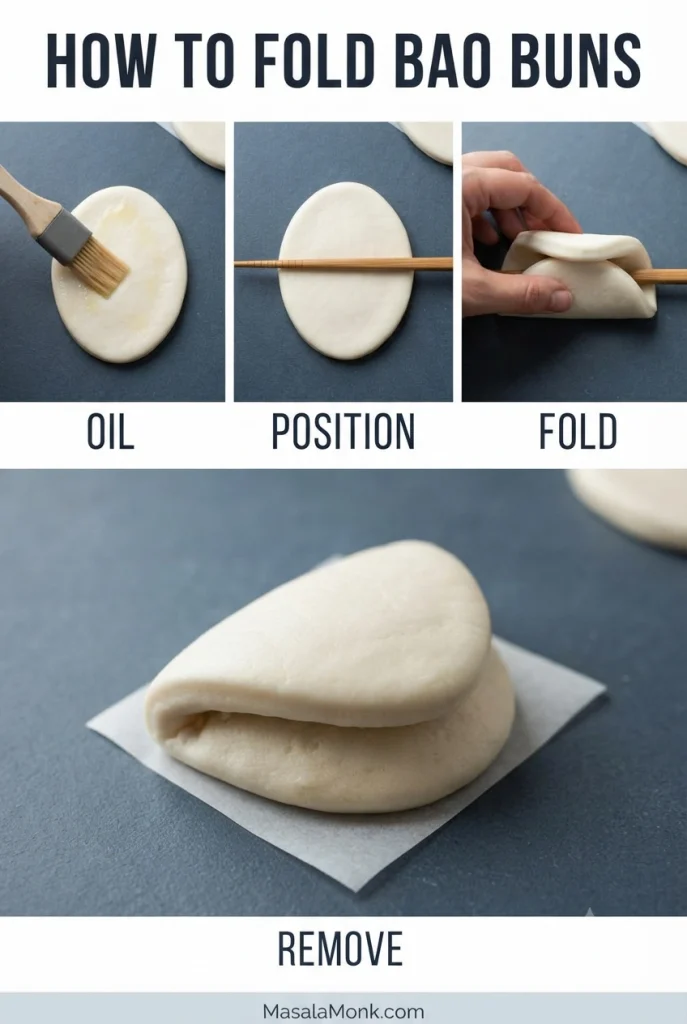
Set the bun on a parchment square. If the dough keeps shrinking, cover that piece and shape another. A short rest makes it easier to stretch.
Step 5: Proof Until Puffy
Arrange folded buns with room between them. Cover loosely with lightly oiled food-safe wrap or another suitable covering that will not stick to or compress rising dough. Leave in a warm, draft-free place until fuller, usually 35–60 minutes at about 24–27°C (75–81°F). Cooler kitchens may require longer.
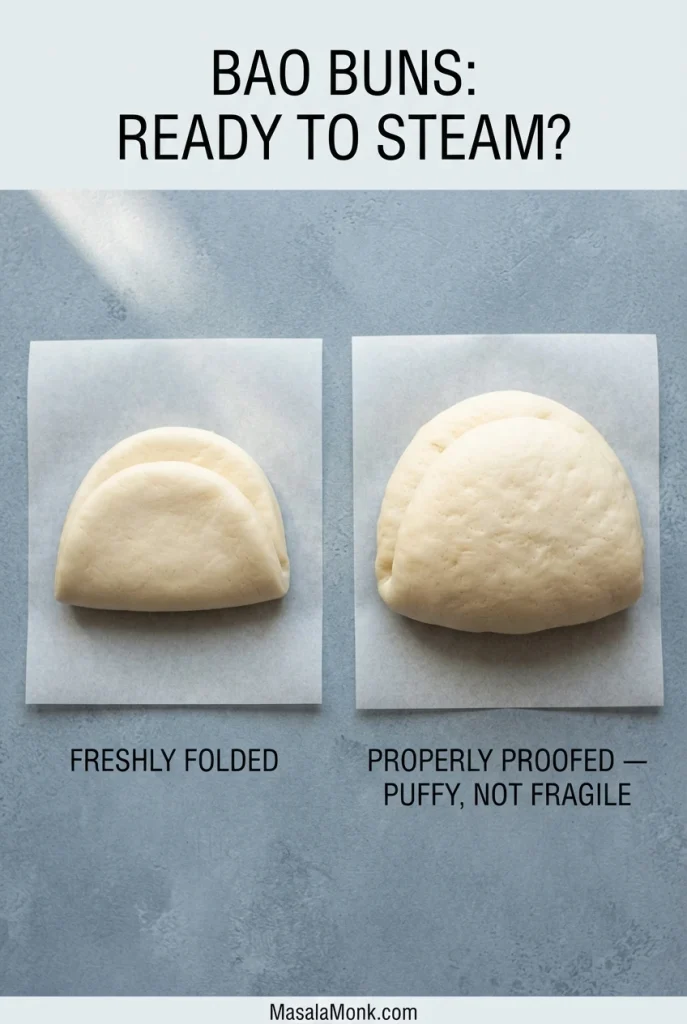
Look at the change: Flat ovals become rounder and lighter, but retain their folded outline. A gentle fingertip impression should recover gradually. Do not wait for dramatic doubling. The visible expansion matters more than a timer.
The first buns begin rising while the last ones are still being shaped. Assess each group before it enters the steamer. If a fold looks unusually flat or fragile, consult the proofing comparison before cooking.
Step 6: Steam the Bao Buns
Set up. Add sufficient water for continuous steam, keeping it below the basket. Around 2–3 cm (¾–1¼ inches) works in many pots, but follow the equipment’s water requirements. No basket? See the raised-plate steaming arrangement for a stable alternative.
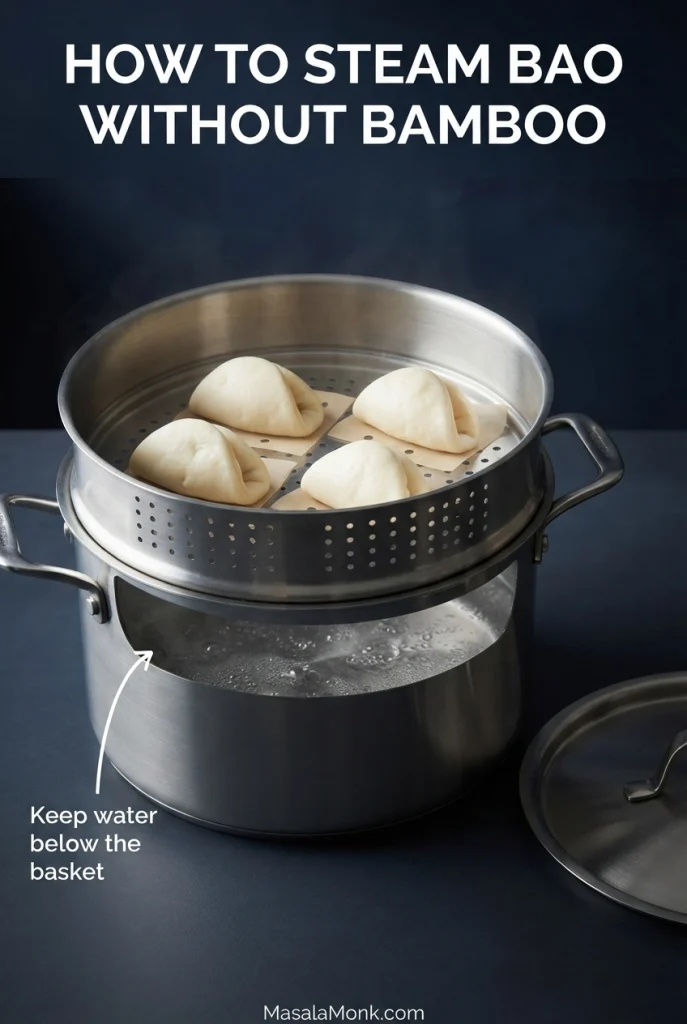
Steam. Bring the water to a steady boil. Arrange proofed buns on their parchment squares with room to expand. Cover and steam for 10–12 minutes, starting when the covered basket is positioned over actively boiling water. Maintain steady steam without splashing the dough.
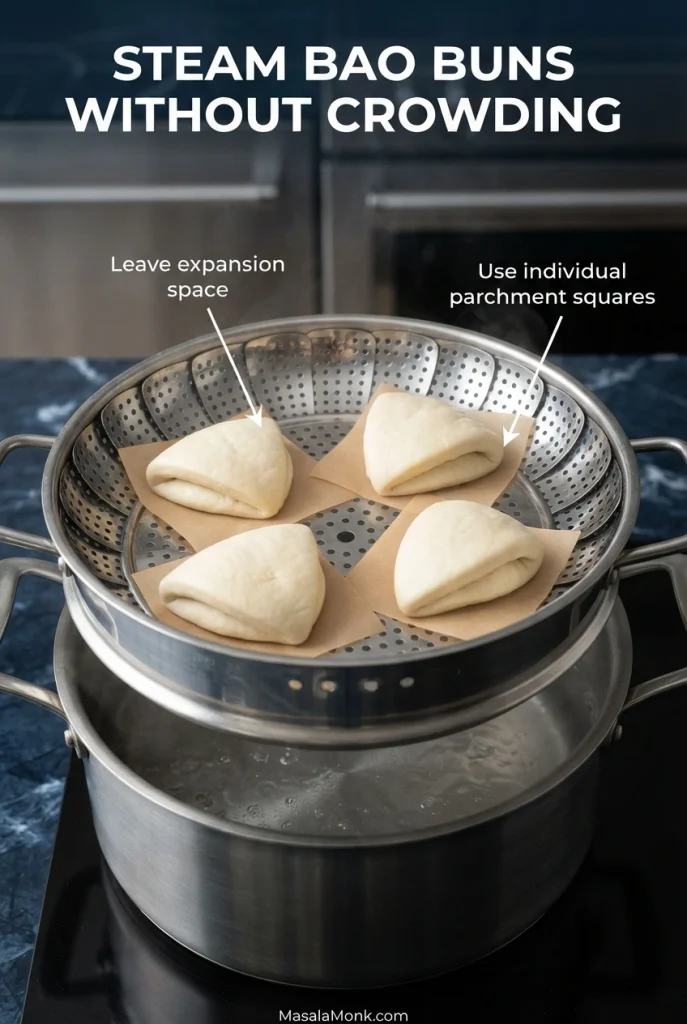
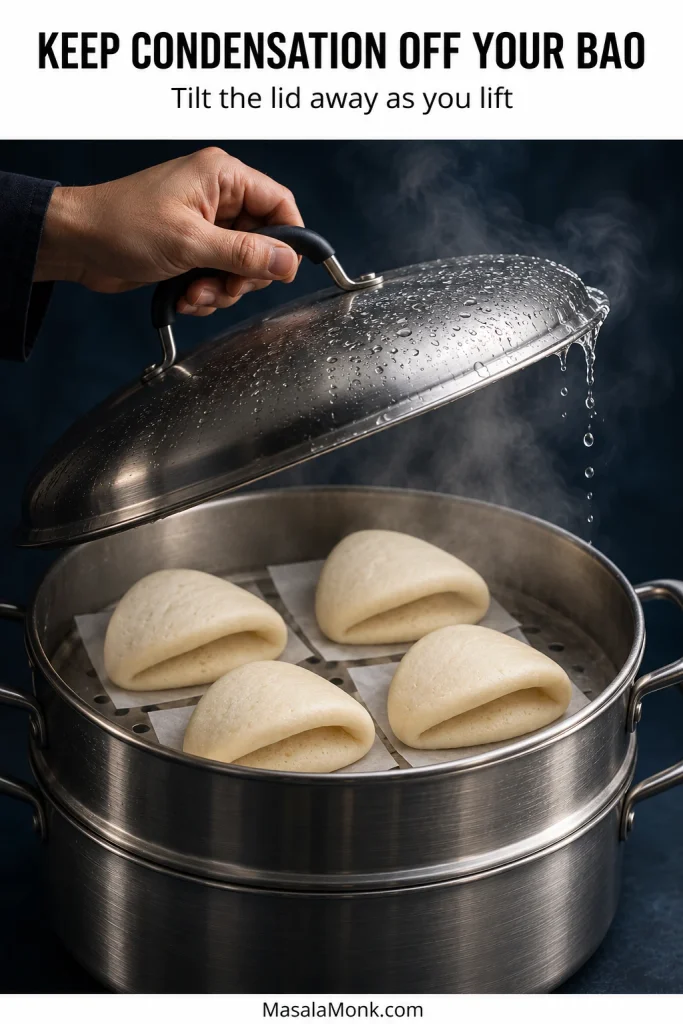
Rest. Turn off the heat and leave the steamer covered for about 2 minutes. Tilt the lid when lifting it so condensation drains away from the buns.
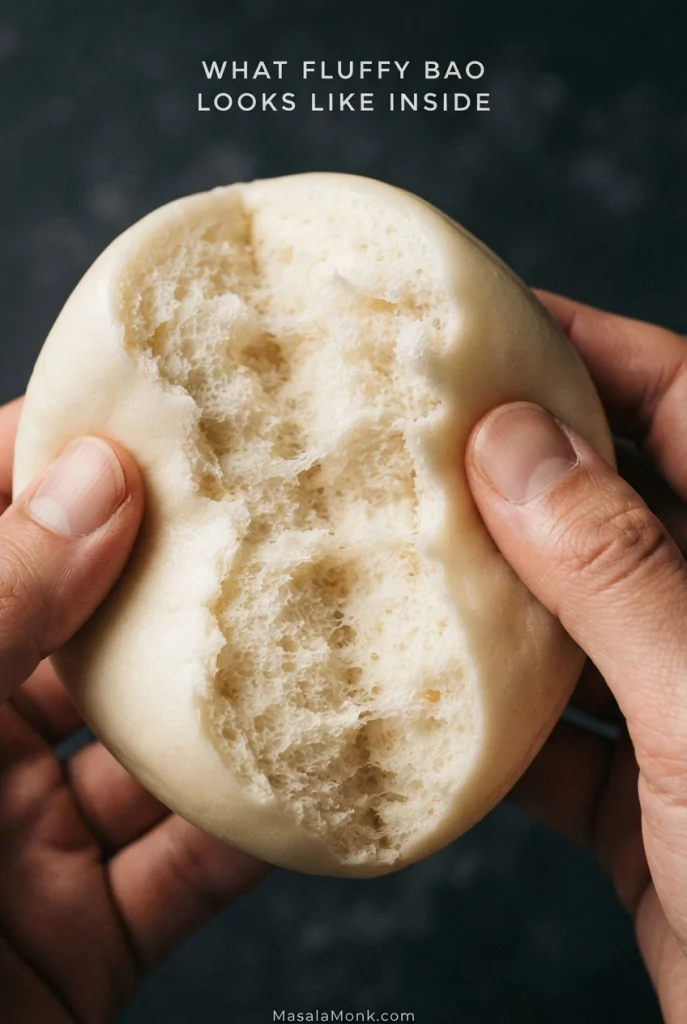
Check doneness. The buns should feel tender and spring back gently. Open one to examine the center: it should be soft and airy without wet, pasty, or raw-looking dough. Return the batch to steady steam if it needs more cooking.
Step 7: Open and Fill While Warm
Support each bun as you remove the parchment, gently open its fold, and add your prepared filling. Assemble close to eating so the bread stays soft and fresh toppings retain their crunch.
For a sharp topping with pork or chicken, the quick-pickled carrot and daikon from our bánh mì recipe work well. They are a Vietnamese-inspired variation, not a traditional Taiwanese gua bao garnish.
Four Bao Bun Fillings: Pork Belly, Chicken, Mushrooms, and Tofu
Mild, slightly sweet steamed bread suits rich, savory fillings balanced by something fresh or tangy. Crunch from vegetables, peanuts, or seeds is a bonus rather than a rule. Keep sauces thick enough to coat and drain watery toppings before assembling.
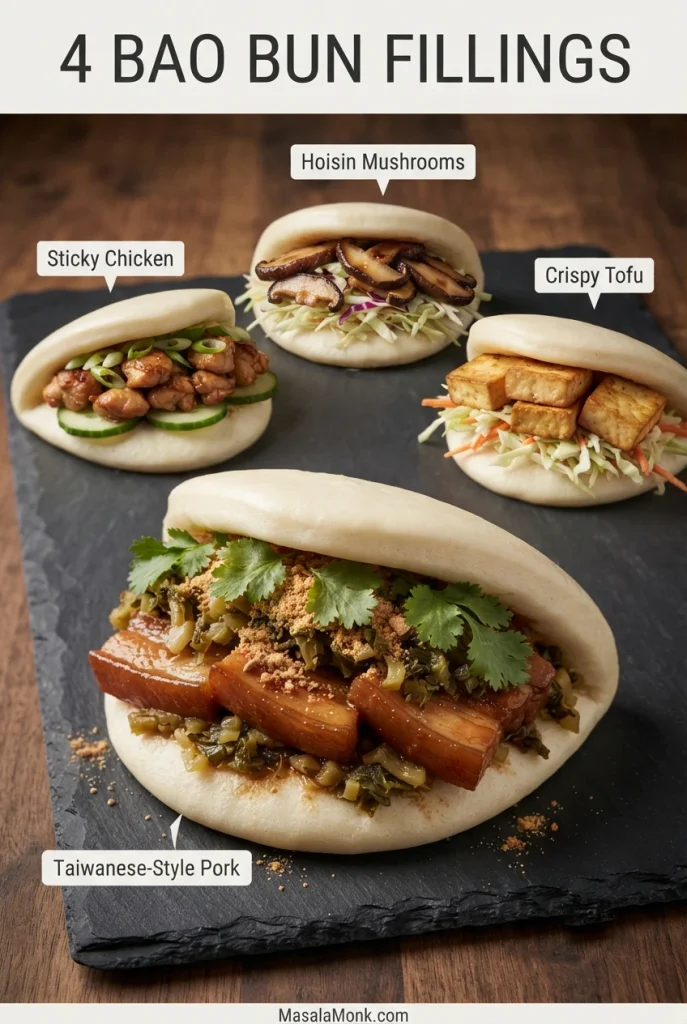
Each recipe below fills approximately three medium buns. Prepare all four for a mixed platter of 12 or multiply one filling by four. Chicken and mushrooms are relatively quick; tofu is best finished near serving; pork belly is ideal to braise ahead.
Allergen note: The buns contain wheat. Fillings and packaged sauces may also contain soy, peanuts, sesame, or other allergens. Check labels when cooking for someone with allergies. Tamari is not necessarily gluten-free unless labeled accordingly.
Taiwanese-Style Braised Pork Belly Bao
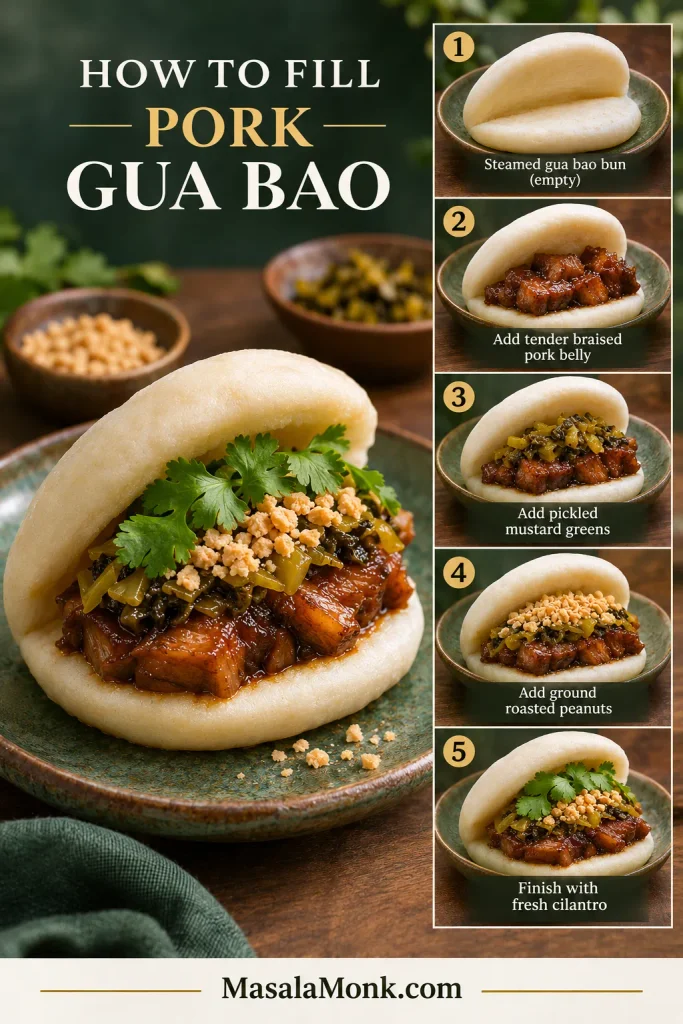
Pork belly, pickled mustard greens, peanut powder, and cilantro are a familiar Taiwanese gua bao combination. Sweet-salty pork meets the tart greens, and the roasted peanut powder provides a nutty finish. Some versions mix a little sugar into the peanuts.
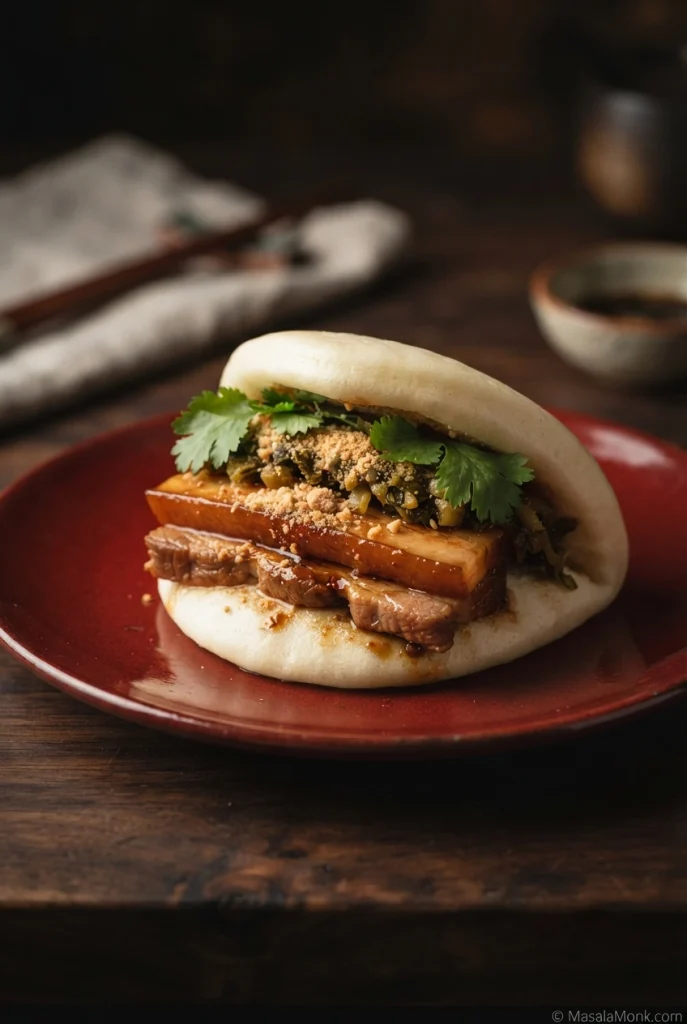
Pickled mustard greens are often sold as suan cai, although different products and regional preparations vary. Taste before using: rinse very salty greens briefly, squeeze out the water, and chop finely. Warm them in a dry skillet for a moment if they seem overly wet.
Make ahead: Braising commonly takes about 75–105 minutes, sometimes longer. The pork should be fork-tender yet still hold together in pieces that can be lifted into a bun.
Ingredients for Three Pork Belly Bao
- 250 g (8.8 oz) boneless pork belly, cut into pieces roughly 2–3 cm (¾–1¼ inches) across, or short thick slices that fit the buns
- 1 tbsp (15 ml) light soy sauce
- 1 tsp (5 ml) dark soy sauce, optional for color
- 2 tsp (about 8 g) sugar
- 10 g fresh ginger, sliced
- 1 star anise, optional
- 150–200 ml (5–6.8 US fl oz) water, plus more as needed
- 45 g (1.6 oz) pickled mustard greens, drained and prepared as above
- 1 tbsp finely crushed or ground roasted peanuts
- Optional pinch of sugar for the peanut powder
- Fresh cilantro leaves
How to Make the Pork Belly Filling
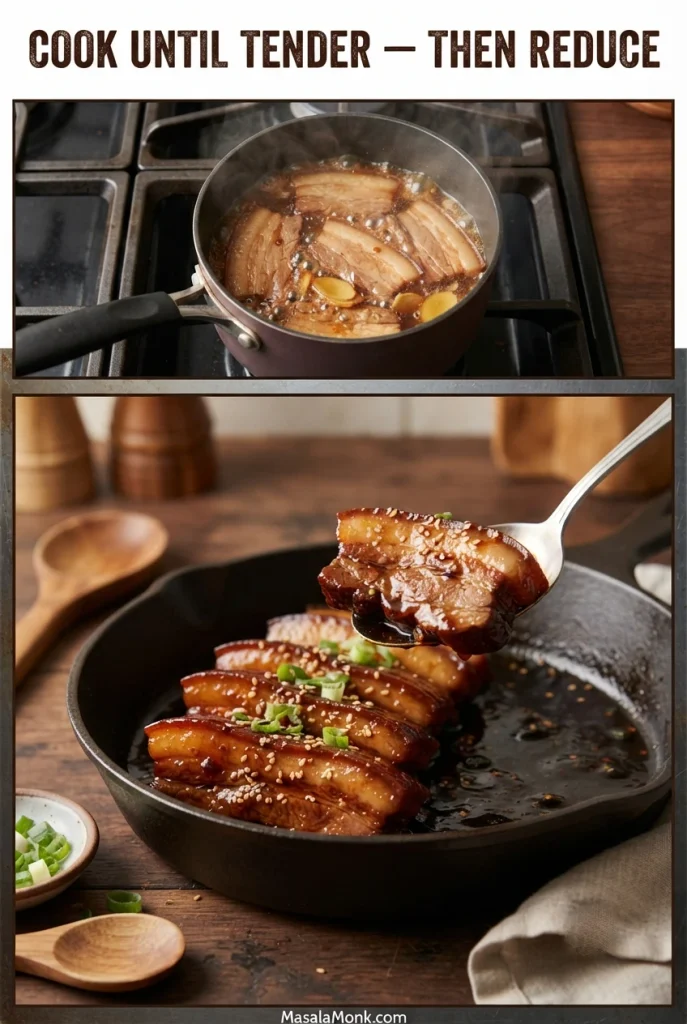
- Place pork belly, soy sauces, sugar, ginger, optional star anise, and water in a small saucepan.
- Bring to a gentle simmer, cover, and cook over low heat for approximately 75–105 minutes, adjusting for the thickness of the pork pieces. Maintain sufficient liquid for a moist braise and add hot water if the pan begins to dry; do not reduce to a glaze before the meat is tender.
- Once a fork enters easily and pieces remain tender but intact, uncover and reduce the cooking liquid until it lightly coats the meat. The sauce should be glossy, not thick enough to turn stiff as it cools. Remove ginger and star anise.
- Prepare the pickled greens. If using optional sugar with the peanut powder, mix them together.
- Divide the warm pork among three buns and finish with greens, peanuts, and cilantro.
Taste the pork together with the pickles. If the bite feels too rich, add a little more of the sharp greens rather than additional sauce. These are generously filled buns; smaller portions work too. This is a simplified Taiwanese-inspired braise, not a claim that all traditional versions use identical seasonings.
Sticky Chicken Bao Buns
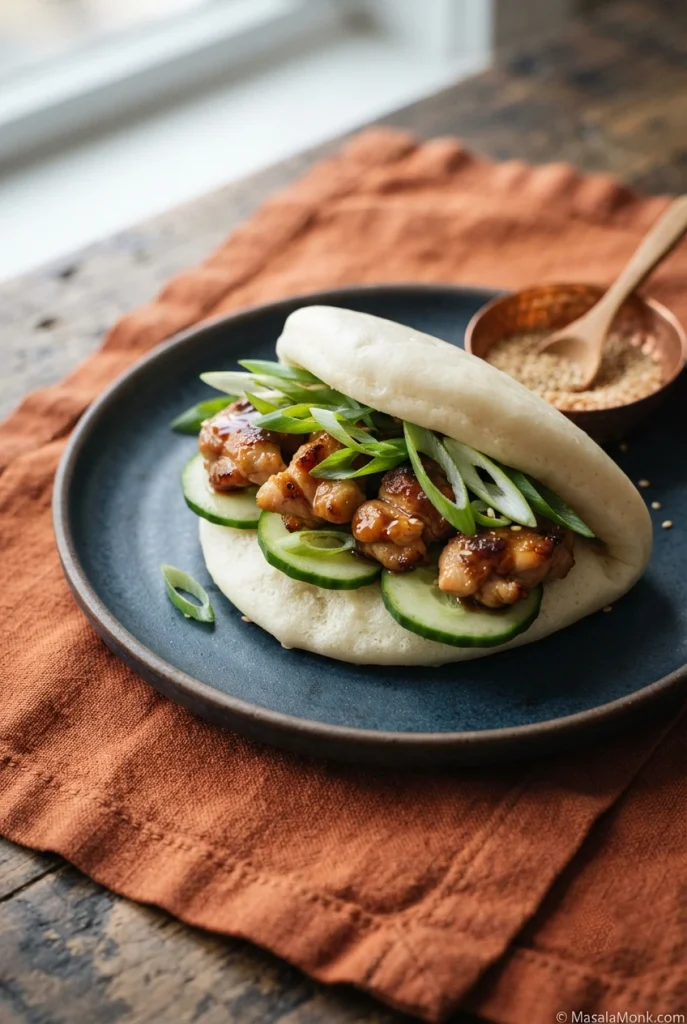
Chicken thigh browns in a skillet before being coated with a glossy hoisin-soy glaze. The combination is savory and lightly sweet, with enough rice vinegar to cut through it. Cool cucumber and scallions provide a fresh finish.
Ingredients for Three Chicken Bao
- 200 g (7 oz) boneless chicken thigh, cut into bite-sized pieces
- 1 tbsp (15 ml) hoisin sauce
- 1 tbsp (15 ml) soy sauce
- 1 tsp (5 ml) rice vinegar, plus a few drops to adjust
- 1 tsp (5 ml) neutral oil
- 30 g (1 oz) thinly sliced cucumber
- 1 scallion, thinly sliced
How to Make Sticky Chicken Bao
Heat the oil in a skillet over medium-high heat. Cook chicken in one layer, turning as needed, until browned and cooked through. Small pieces may take around 6–9 minutes depending on the pan and heat; the thickest piece must reach 74°C (165°F).
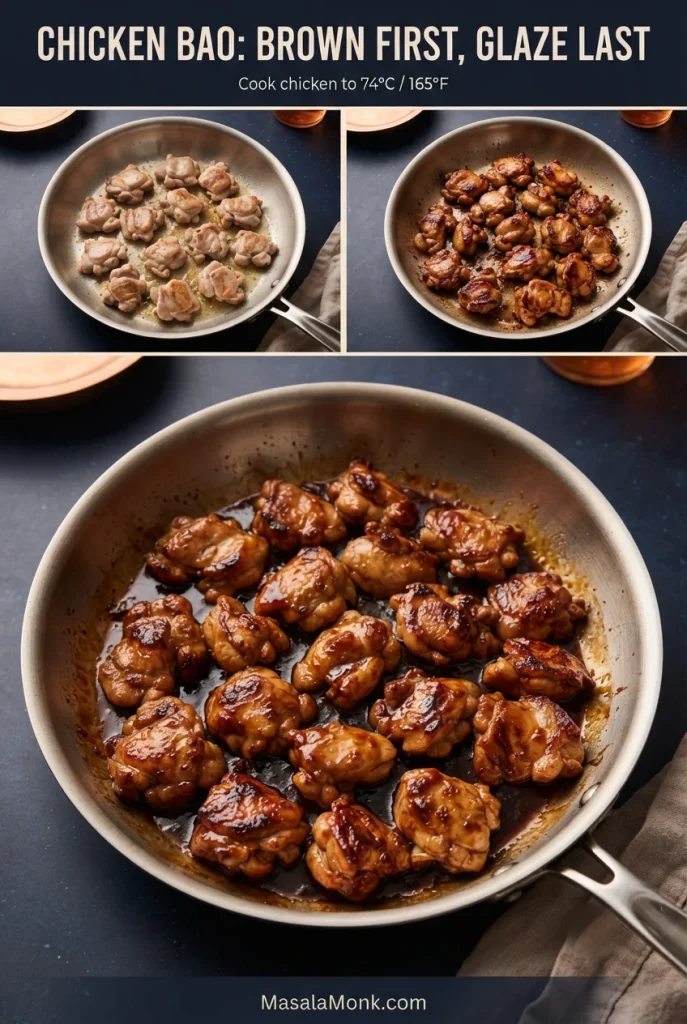
Add hoisin, soy sauce, and rice vinegar. Toss briefly until glossy and coating the chicken. Taste; a few extra drops of vinegar can balance an overly sweet glaze. Fill three buns with the chicken, cucumber, and scallions.
For a different finish, use homemade teriyaki sauce in place of the hoisin mixture, adjusting its quantity for sweetness and consistency.
Hoisin Mushroom Bao Buns
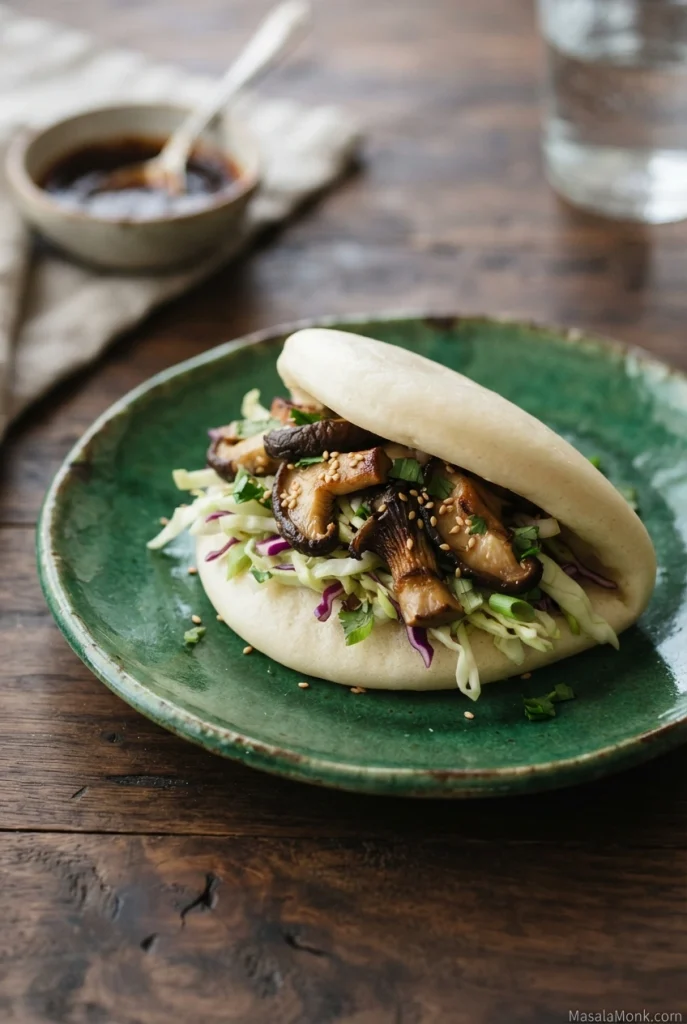
Oyster or shiitake mushrooms develop a deep, roasted savoriness once their released moisture cooks away and the edges brown. Hoisin goes in near the end, where it coats the mushrooms rather than turning into a thin sauce.
Ingredients for Three Mushroom Bao
- 220 g (7.8 oz) sliced oyster, shiitake, or mixed mushrooms
- 1 tbsp (15 ml) hoisin sauce
- Up to 1 tsp (5 ml) soy sauce, to taste
- 1 tsp (5 ml) rice vinegar, plus a few drops if needed
- 1 tsp (5 ml) neutral oil
- 40 g (1.4 oz) shredded cabbage
- Optional toasted sesame seeds
How to Make Hoisin Mushroom Bao
Heat oil in a wide skillet over medium-high heat. Spread out the mushrooms and cook until released moisture evaporates and some edges turn brown, roughly 6–9 minutes in an uncrowded pan. Use the browning, rather than the clock, as your cue.
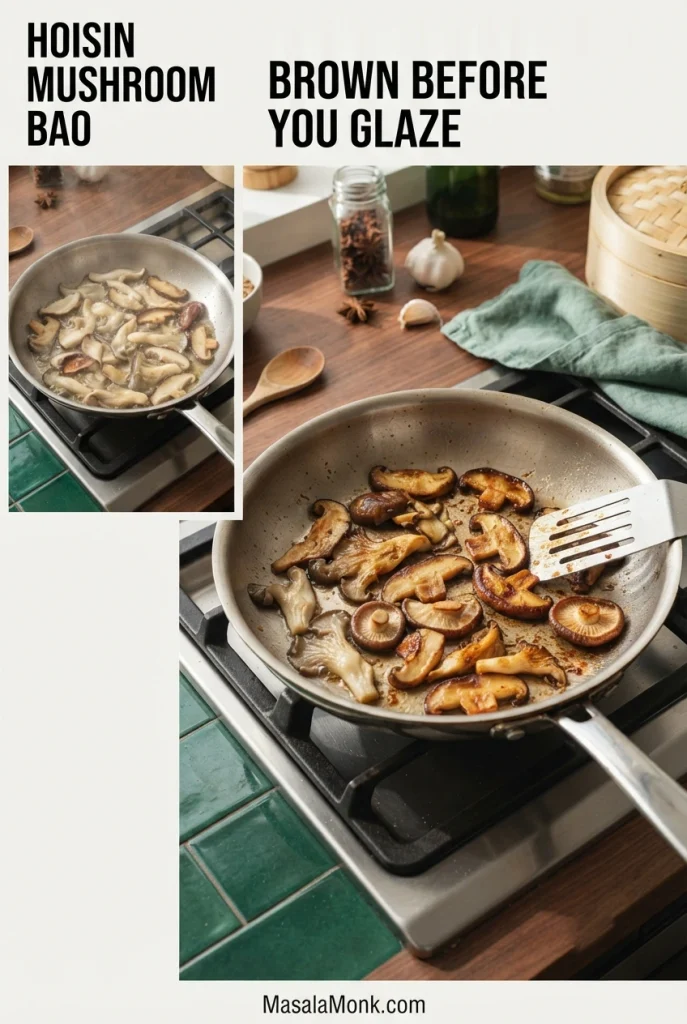
Add hoisin, vinegar, and about half the measured soy sauce. Toss until lightly glazed, then taste and use the remaining soy only if needed. Brands of hoisin differ in salt and sweetness; extra vinegar can sharpen an overly sweet glaze.
Spoon the mushrooms into three buns, add shredded cabbage, and finish with sesame seeds if desired.
Crispy Tofu Bao with Quick Slaw
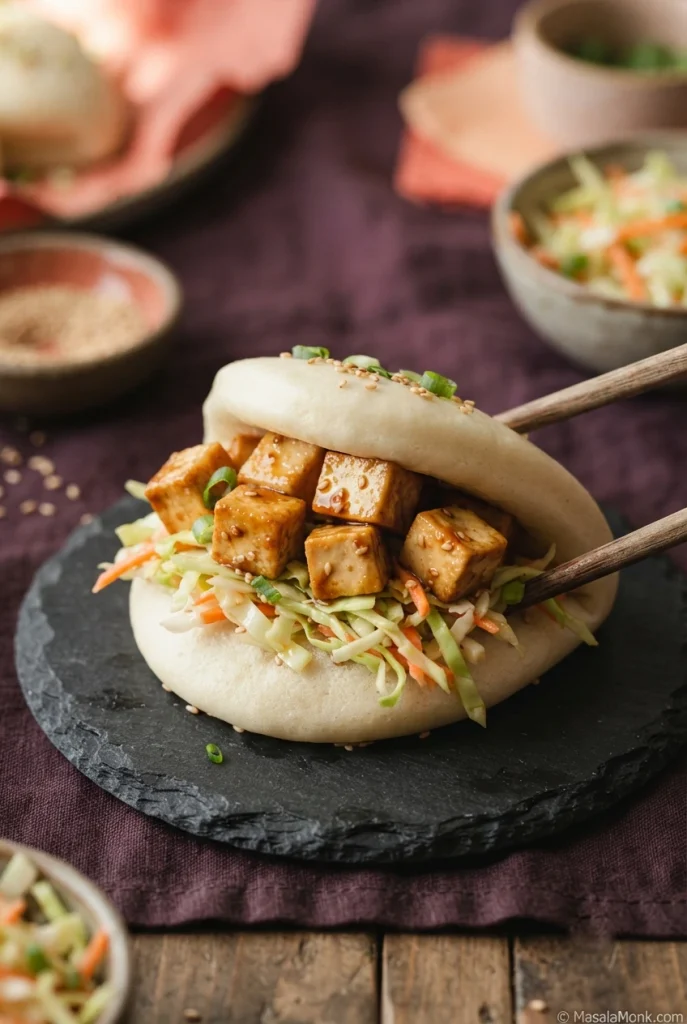
Golden tofu with lightly crisp edges, cool cabbage-carrot slaw, and soft steamed bread makes a particularly appealing combination. The coating will soften somewhat after glazing, so finish the tofu immediately before assembly rather than expecting deep-fried crunch to last.
Ingredients for Three Tofu Bao
- 200 g (7 oz) firm or extra-firm tofu, drained and patted dry
- 1 tbsp (8–10 g) cornstarch
- 1 tbsp (15 ml) neutral oil
- 1 tbsp (15 ml) soy sauce or tamari
- 1 tsp (5 ml) maple syrup
- 50 g (1.8 oz) shredded cabbage
- 25 g (0.9 oz) shredded carrot
- 1 tsp (5 ml) rice vinegar
- Optional tiny pinch of salt for the slaw
How to Make Crispy Tofu Bao
Mix cabbage, carrot, and rice vinegar. Toss until lightly dressed without liquid pooling; taste and add a tiny pinch of salt if needed.
Cut tofu into bite-sized pieces and coat lightly with cornstarch. Heat oil over medium heat and pan-fry, turning gently, until several sides are golden and lightly crisp, roughly 6–10 minutes depending on thickness and pan.
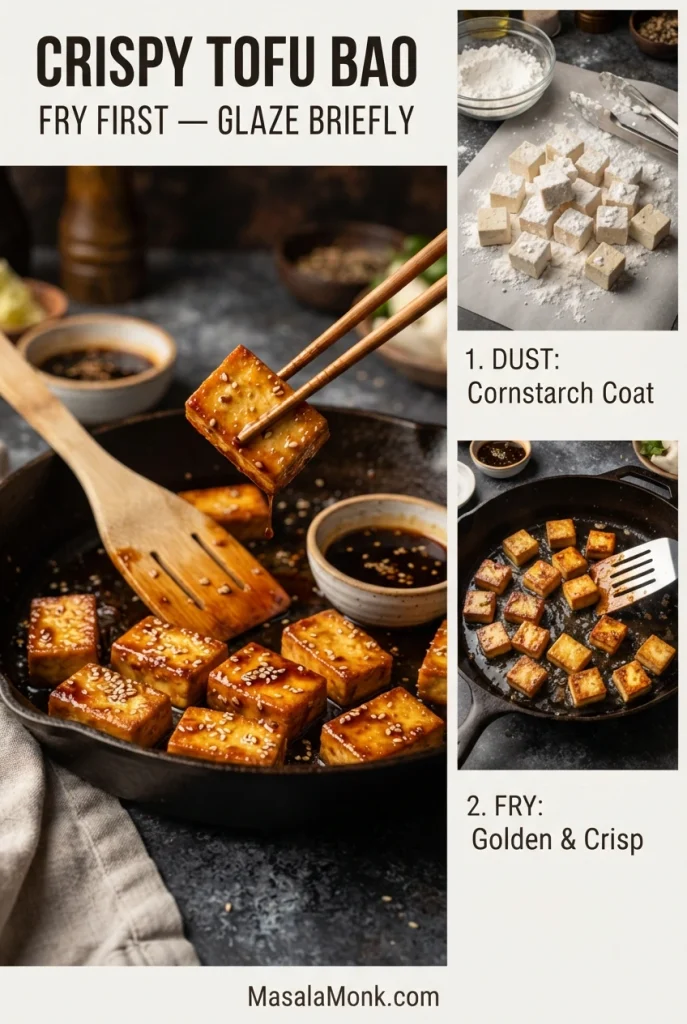
Mix soy sauce and maple syrup. Add to the pan and toss briefly, just until coated; remove the tofu promptly and assemble three buns with the slaw. A little homemade peanut sauce adds a nutty, creamy finish just before eating.
More Bao Fillings and Toppings
Bite-sized pieces of crispy Japanese chicken karaage work with shredded cabbage and spicy mayonnaise. Other choices include shredded cooked duck with cucumber and hoisin, or ginger-garlic shrimp with pickled vegetables.
Try broccoli slaw with a light dressing as a vegetable topping, or serve a cool vinegar-dressed cucumber salad beside pork belly bao. Toasted sesame seeds, scallions, herbs, and crushed peanuts can change the finish without requiring a different filling.
Serving Bao Buns for Family or Friends
Set the freshly warmed buns on a platter, with bowls of pork, chicken, mushrooms, or tofu and smaller dishes of mustard greens, cucumber, scallions, cilantro, peanut powder, and slaw. Pork and tart pickles make one rich combination; chicken and cucumber another; tofu and slaw give a lighter, crunchier bite.
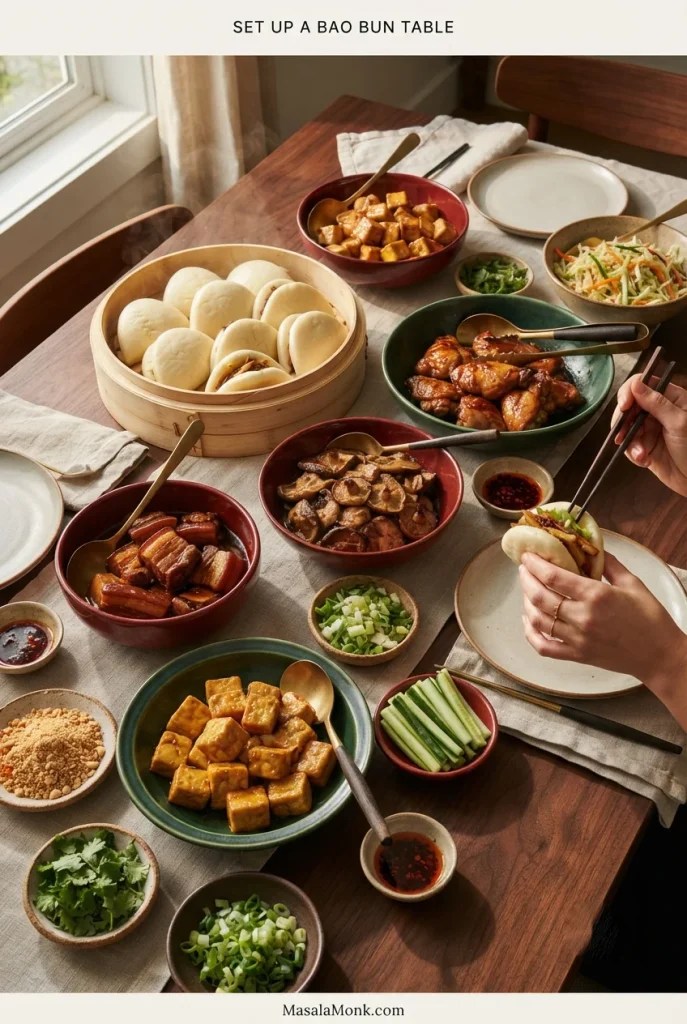
Keep perishable fillings safely hot or chilled until serving, then assemble the buns as they are eaten. For a larger meal, crispy vegetable spring rolls offer a different kind of crunch alongside the soft steamed bread.
The recipe above is enough to cook and serve the buns. The following reference sections go deeper into dough texture, proofing, equipment, substitutions, and the clues that help explain a troublesome batch. For a party planned ahead, the freezing and reheating guide can simplify serving.
What Good Bao Dough Looks and Feels Like
Bao dough should be medium-soft and flexible, with enough stretch to roll without cracking. A slightly tacky surface is normal. The distinctions below help when the dough doesn’t seem quite right.
| Stage | Look and feel | Next action |
|---|---|---|
| Mixed | Rough, cohesive, no loose flour | Add water only if dry |
| Kneaded | Smooth and flexible | Divide and shape |
| Rolled | Stretches without tearing | Rest if it shrinks |
| Folded | Rounded, open pocket | Keep covered |
| Proofed | Fuller, lighter, still stable | Steam when ready |
| Cooked | Soft, evenly airy crumb | Fill while warm |
Tacky, Sticky, or Stiff Dough?
Tacky dough briefly clings to your fingers, then releases with little residue. It can feel wrong if you are used to kneading firmer bread, but this is a useful starting texture for soft bao.
Sticky dough smears onto hands or the worktop and makes shaping difficult. Complete the kneading and resting time before reaching for extra flour; it often becomes easier to handle as it smooths out.
Stiff dough resists stretching and may crack at the edges. Rest it first, then work in a small amount of water if it remains genuinely dry.
What Should the Finished Bao Crumb Look Like?
Break open a cooked bun. The interior should have small, fairly even air pockets and bend easily without cracking. It should feel gently springy, not heavy, tough, or damp.
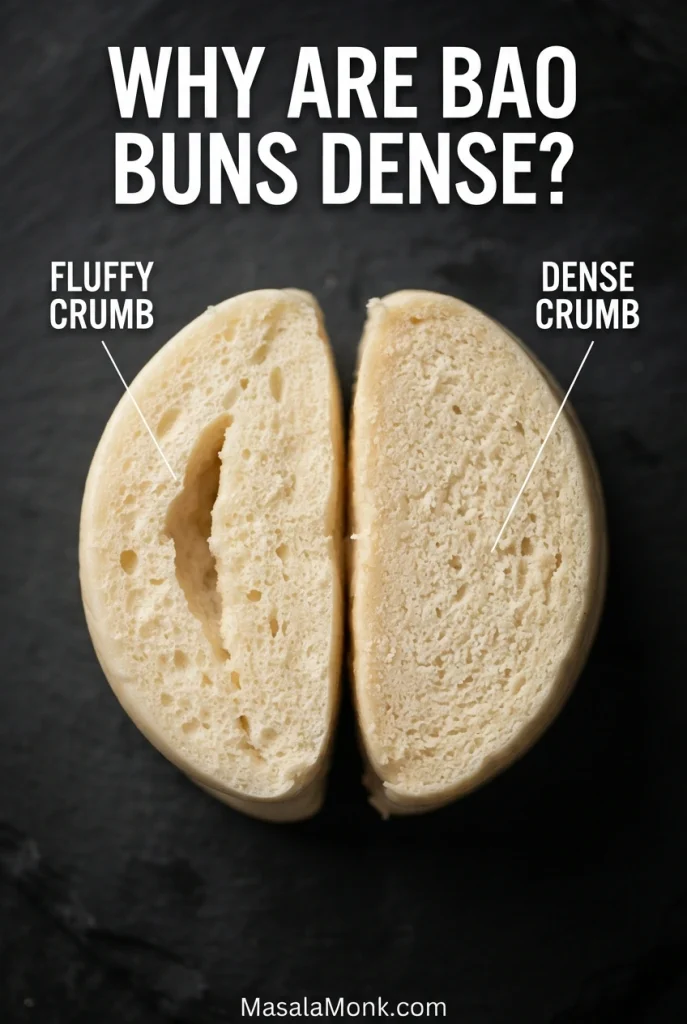
A compact center can point to insufficient expansion or stiff dough. Wet, pasty areas suggest incomplete cooking or gumminess. If the inside is light but the surface is chewy, inspect the steaming and reheating conditions before changing the dough formula.
Rolling, Folding, and Proofing Bao Buns
Individual ovals are straightforward for a dozen buns. You can also roll one large dough sheet and cut circles, although the scraps must be gathered and rolled again. Keep the dough thick enough to rise into bread rather than a thin wrapper.
In our homemade gyoza recipe, thin wrappers are sealed around the filling before cooking. Folded bao is steamed empty and opened afterward.
What If the Fold Sticks Shut?
A stuck fold suggests the inner surface received too little oil or the dough was pressed together firmly. Brush lightly and keep the curve loose next time. Let a cooked bun cool enough to handle before easing a stuck pocket open. For the shaping technique, return to rolling, oiling, and folding.
Under-Proofed Versus Over-Proofed Bao
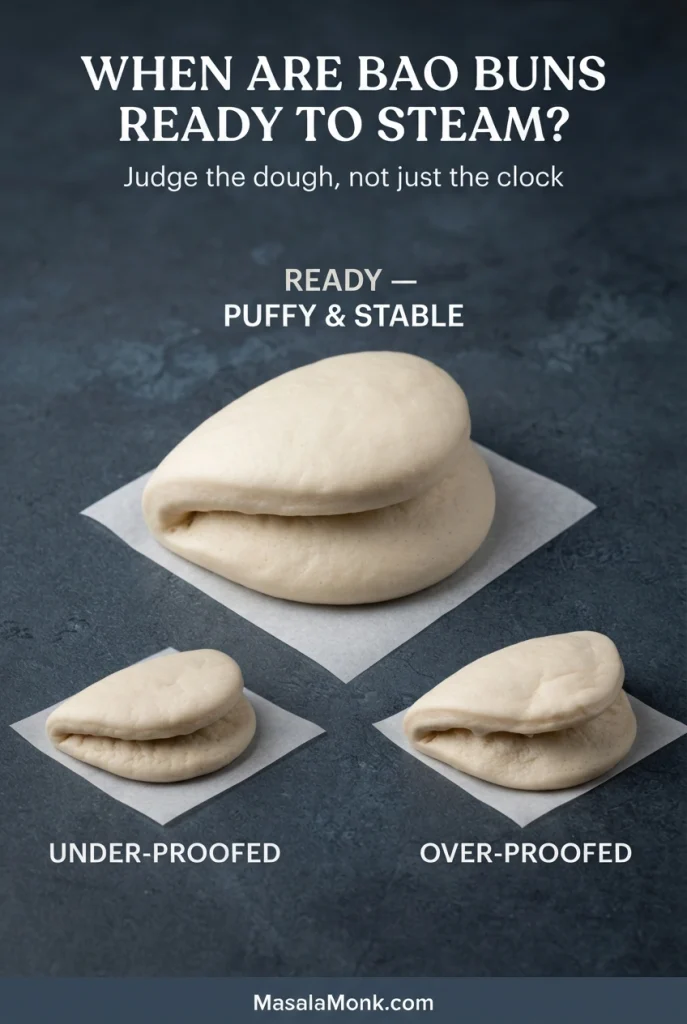
Under-proofed: A compact, relatively flat fold that has changed little since shaping. The cooked crumb may be tight and heavy.
Properly proofed: The curve becomes fuller and lighter, but the pocket stays clearly defined. Steam at this stage rather than waiting for dramatic doubling.
Over-proofed: The dough appears excessively swollen or fragile, sometimes losing the shape of its fold. It may wrinkle or collapse during cooking.
For another single-proof approach with process photographs, see Red House Spice’s folded bao guide. Its ingredients and steaming sequence differ from ours.
How to Steam Bao Buns Without a Bamboo Steamer
A metal steaming basket is a practical choice; an improvised covered pot can also work if it is stable and gives steam a clear pathway. The differences between setups are mainly condensation, clearance, and when the equipment begins producing steady steam.
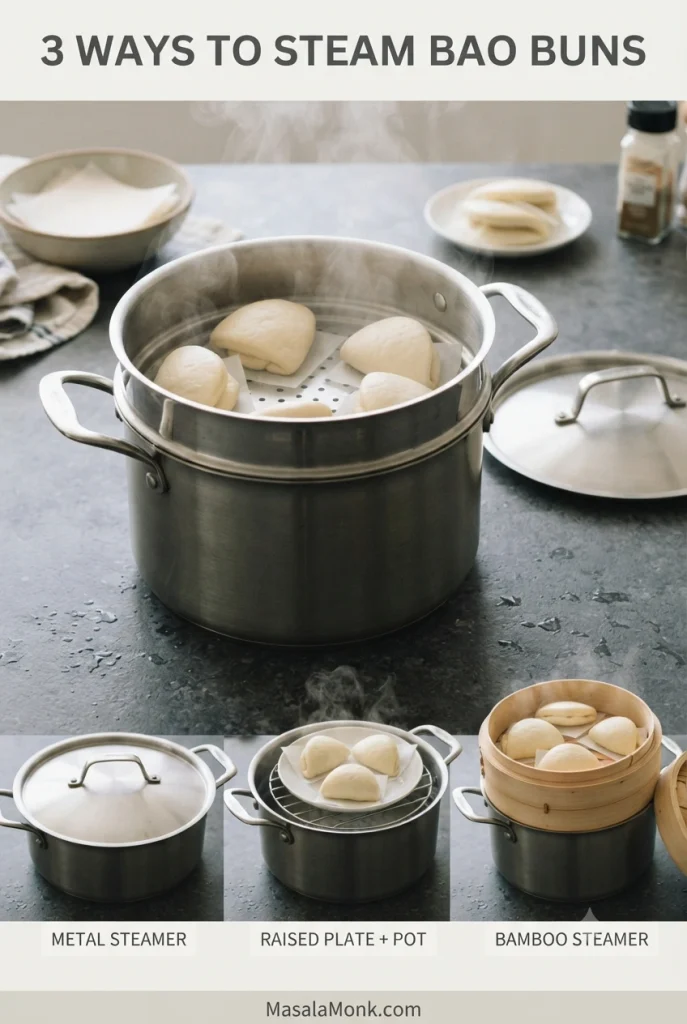
Metal Steamer
Condensation can collect beneath a stainless-steel lid. Tilt the lid away from the buns as you lift it so droplets do not fall onto their surfaces.
Some cooks secure a clean cloth beneath a suitable lid to catch moisture. Only use this arrangement if fabric stays completely clear of flames, burners, vents, heating elements, and pressure-release mechanisms. Otherwise, use the lid normally.
Covered Pot with a Raised Plate
A deep pot, stable heatproof rack, and heatproof plate can handle a small batch when there is no steaming basket.
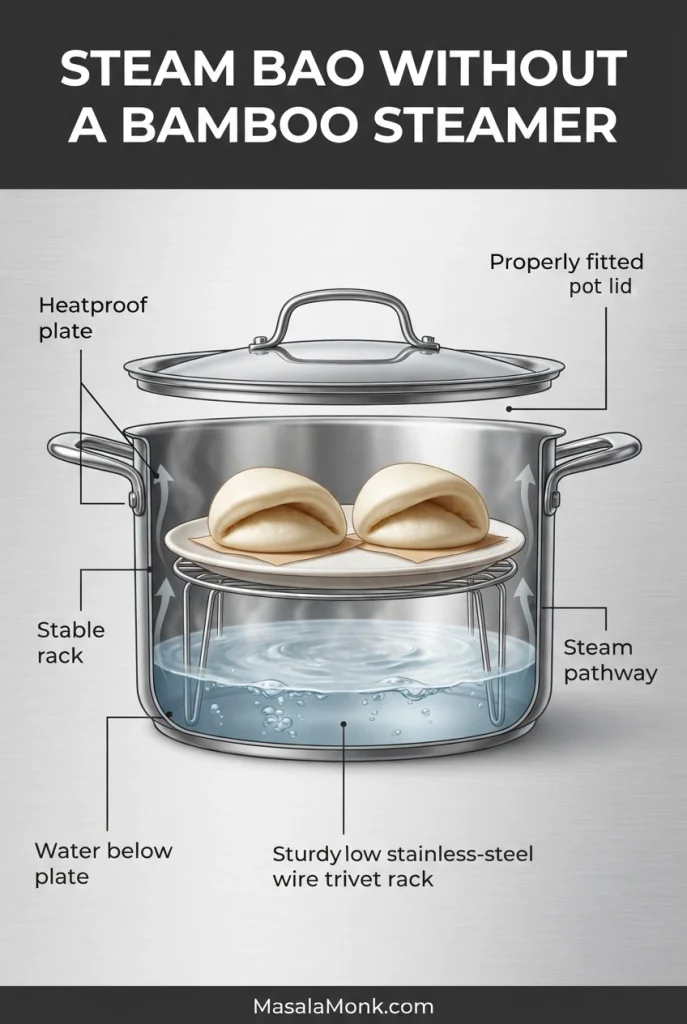
- Place the rack securely inside the pot.
- Add water below the top of the rack.
- Set the plate on the support, leaving a clear path around it for steam to rise.
- Arrange a few parchment-supported buns on the plate with room for expansion.
- Cover and steam over steadily boiling water, following the main recipe’s timing and doneness cues.
Check that the support cannot slip, the lid has clearance for expansion, and all components are suitable for steaming. Keep hands and face clear of escaping steam. Once the setup is ready, follow the main steaming and doneness instructions.
Bamboo Steamer
Set the basket securely over a compatible pot or wok. Keep the water below it and check the level between batches. Bamboo absorbs some condensation, though it still needs steady boiling water and room around the buns.
Electric Steamers and Steam Ovens
Follow the appliance’s water and loading instructions. Some electric steamers start timing before full steam develops; when that happens, the main recipe’s 10–12-minute estimate needs adjustment to the actual steaming period and doneness.
A dedicated steam oven may offer full steam around 100°C (212°F). Preheating and steam delivery still matter. A dry-heat air fryer will not give raw bao the same steamed surface.
How to Steam 12 Bao Buns in Three Batches
With a four-bun steamer, the first pieces begin rising while the last ones are being shaped. Refrigeration is optional: use it only when waiting buns are progressing faster than you can steam them. In a cool kitchen, covered buns may remain at room temperature until their turn.
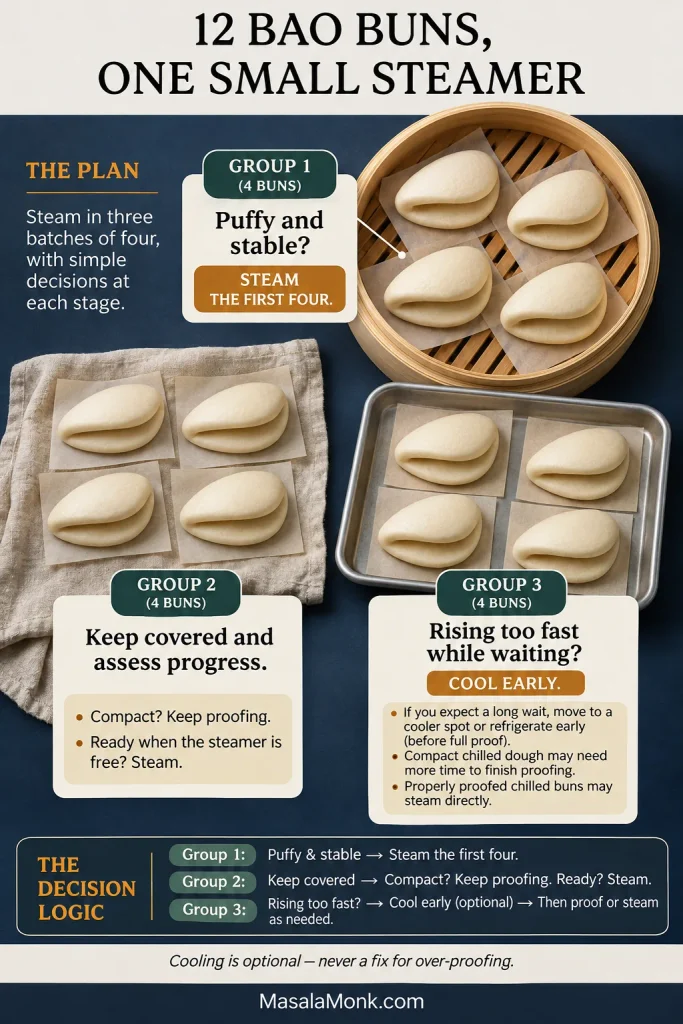
- Shape all 12 in order. Arrange into three groups of four and keep the dough covered.
- Steam the first four when puffy. Their folded shape should remain stable.
- Check the waiting groups early. If a group is rising quickly and faces a long delay, move it somewhere cooler or refrigerate it, covered, before full proof. Chilling gradually slows fermentation; it cannot rescue over-proofed dough.
- Check each group again before steaming. Compact pieces still need time to rise, including after refrigeration. Properly proofed chilled buns may be steamed directly.
- Check doneness. Chilled buns may require slightly longer; open one if the center is uncertain.
Between rounds, check water level and restore steady boiling. Keep steamed buns covered against drying. Three rounds often need around 40–50 minutes for steaming and handling, but extra proofing after refrigeration can lengthen the overall schedule. If the final batch turns out differently, the troubleshooting section helps narrow down why.
For a group meal, steaming the buns in advance and reheating them together is often simpler than managing three rounds as people sit down to eat.
Bao Flour, Yeast, Baking Powder, and Substitutions
What Flour Is Best for Bao Buns?
Ordinary all-purpose or plain flour is the simplest choice. In India, finely milled maida is the closest everyday equivalent. Specialist bao flour may yield a finer, paler crumb; strong bread flour can make the buns chewier.
Whatever flour you use, add the reserved water according to the dough’s softness. Brand and milling differences affect absorption.
Why Use Yeast and Baking Powder Together?
Yeast produces gas as the shaped buns rise; baking powder adds leavening during steaming. This combination supports the single-proof method. Other steamed-bun recipes use yeast alone with different fermentation schedules.
Can I Use Active Dry Yeast?
Yes. Follow the manufacturer’s instructions. If it needs dissolving first, use some of the water already measured for the dough. Look for the proper rise instead of relying on a fixed proofing time.
Can I Replace the Water with Milk?
Milk can give a slightly richer flavor and change tenderness. Replacing water by weight is a starting point; adjust according to dough consistency because milk contains solids. The base dough itself contains no milk, butter, or eggs.
Whole-Wheat, Gluten-Free, and Yeast-Free Bao
This recipe is designed around white plain flour. Replacing part of it with whole-wheat flour is possible, but bran changes absorption and tends to produce a heavier, darker bun. Treat that as a separate adjustment rather than assuming a one-for-one replacement will behave exactly like the base recipe.
Gluten-free and yeast-free buns need different dough formulas. Replacing all the flour or omitting yeast will not recreate this recipe’s flexible, airy structure.
Bao Bun Troubleshooting: Dense, Wrinkled, or Collapsed Buns
Start with two questions: When did the problem appear, and how many buns were affected? A whole-batch failure suggests a shared issue; a single affected bun suggests looking at its position or handling. Compare the clues below before changing the ingredient formula.
Quick Bao Troubleshooting Table
| Problem | First check | What to change |
|---|---|---|
| No rise | Yeast activity and temperature | Check freshness and proofing |
| Dense buns | Dough stiffness and expansion | Look for supple dough and visible puffiness |
| Collapsed buns | Over-proofing or weak structure | Steam while puffy but stable |
| Wet, wrinkled patches | Lid drips or splashing | Keep droplets off the buns |
| Unexpected yellowing | Leavener and ingredient balance | Verify baking powder type and amount |
| Fold stuck shut | Oil and pressure at the fold | Brush inside; avoid sealing |
| Last batch failed | Time spent rising while waiting | Cool waiting groups when necessary |
| Gummy after reheating | Uneven heating or moisture | Reheat thoroughly with steady steam |
Why Are My Bao Buns Dense?
If all buns feel heavy, revisit the dough and rise. Stiff dough can resist expansion, while pieces steamed before becoming puffy often cook into a tight crumb.
Longer steaming can finish an undercooked center, but it cannot create the air that should have developed during proofing.
Why Did My Bao Buns Collapse?
Over-proofing is one possible cause, especially when buns were excessively swollen or fragile before cooking. Weak dough development and unstable steam can also contribute. Compare their shapes just after folding and immediately before steaming.
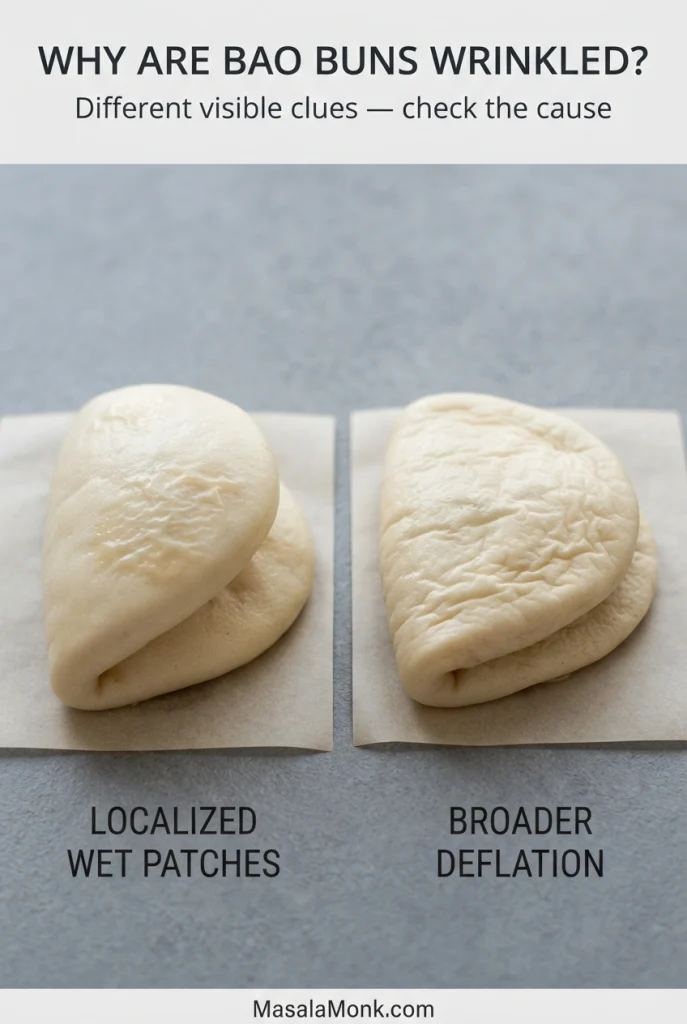
Why Are Some Bao Buns Wrinkled?
Localized wet patches suggest dripping condensation, splashing water, or contact with a wet surface. Widespread wrinkling or deflation points toward proofing, dough structure, or steaming conditions affecting the batch more broadly. These clues narrow the likely causes but do not prove a single explanation.
Why Is the Outside Rubbery but the Inside Fluffy?
A light interior suggests the dough expanded properly, so look at the surface and subsequent handling before changing flour quantities.
Wet or tacky patches: Examine condensation, splashing, and any soaked support. Uniformly tough or dry exterior: Consider overly long heating, exposure to air, or storage without a cover. Chewy only after microwaving: Reduce reheating duration and use shorter intervals or steam instead.
If the inside is also dense and chewy, revisit dough texture and proofing rather than treating it as a surface-only problem.
Why Did Only the Last Batch Fail?
If the first four buns were good but the final four collapsed, the later dough may have proofed too far while waiting. Compare the groups immediately before steaming, then check that water level and heat stayed consistent between rounds. Good early batches suggest the formula may be fine and the timing needs adjustment. For another attempt, return to the main bao buns recipe and adjust the batch schedule.
How to Freeze, Store, and Reheat Bao Buns
Store cooked buns unfilled. Keep cooked meat and other perishable fillings separately so each can be reheated or served appropriately.
Storing Freshly Steamed Bao Buns
Let excess steam escape, cool promptly, and pack airtight. Refrigerate at 4°C (40°F) or below and aim to use within 3–4 days. Bread firms more quickly in the refrigerator; freeze the buns if you need longer storage.
Refrigerate cooked meat and other perishable fillings within two hours, or one hour when the surrounding temperature exceeds 32°C (90°F). FoodSafety.gov’s safe food-handling guidance covers safe temperatures and cooling.
How to Freeze Bao Buns
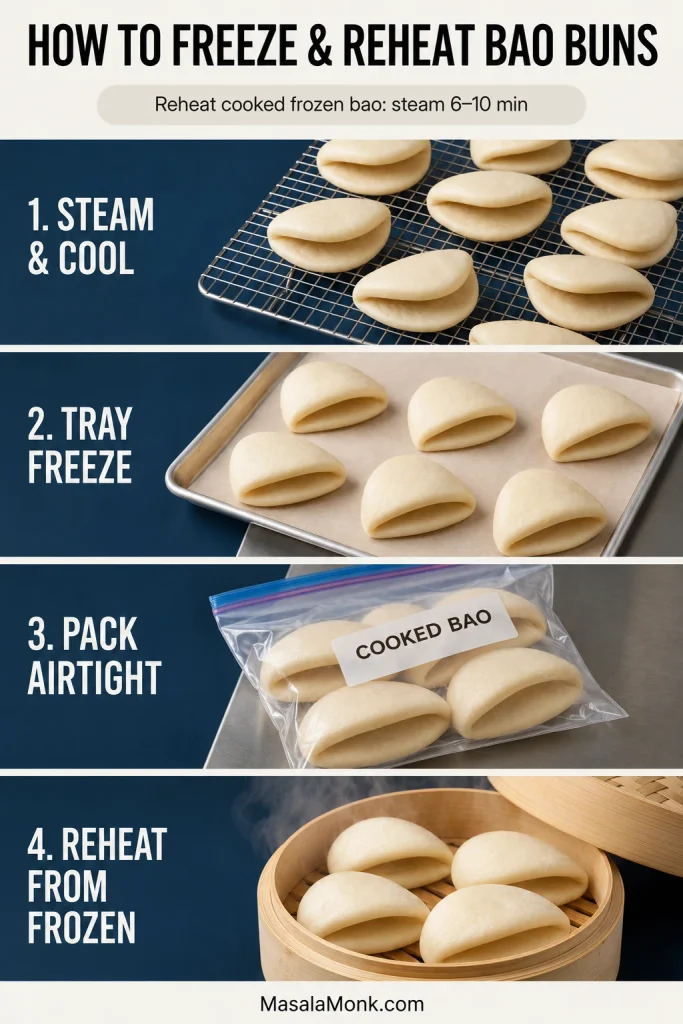
- Steam the buns completely and remove from the basket.
- Let excess surface steam escape and cool promptly.
- Place in one layer on a freezer-safe tray, preserving the fold.
- Freeze until firm, then transfer to airtight bags or containers.
- Label and store at approximately −18°C (0°F).
For the best texture, use within about 2–3 months. This is a quality guideline, not an absolute safety cutoff for food kept continuously frozen at a proper temperature.
How to Reheat Bao Buns in a Steamer
Refrigerated buns: Steam about 3–5 minutes until warm and soft. Frozen, fully cooked buns: Start with about 6–10 minutes, increasing as needed for larger buns or different steamers. Check the center.
Reheat cooked meat and other perishable leftovers thoroughly to 74°C (165°F). Heat bread and fillings separately, then assemble.
Can You Microwave Bao Buns?
Yes, although steaming is more forgiving. Place one or two cooked buns on a microwave-safe plate beneath a lightly damp paper towel or suitable microwave-safe cover. For one refrigerated bun, begin with 15–20 seconds at moderate power, check, and continue in short intervals if needed. Overheating can make the bread chewy as it cools.
Making Bao Ahead for Guests
Prepare the pork braise ahead; make the chicken or mushrooms nearer mealtime and finish tofu at the end to retain its lightly crisp edges. Reheat pre-steamed buns shortly before serving, then set out fresh garnishes. A light homemade wonton soup is an optional accompaniment for a larger meal.
Return to the bao buns recipe or browse the guide.
Bao Buns Recipe FAQs
What’s the Difference Between Bao, Baozi, and Gua Bao?
Bao is a broad term for Chinese buns. Baozi typically enclose filling before steaming; gua bao are folded buns filled after cooking, especially associated with Taiwanese cuisine.
Why Aren’t My Bao Buns Bright White?
Flour and other ingredients affect color. A cream-colored bun is normal with ordinary plain flour; the cooked crumb and texture matter more than a bright white appearance.
Can I Make Bao Buns Without Yeast?
Yeast-free steamed buns are possible but need a different dough formula. Simply omitting the yeast from this recipe will not provide the same rise or texture.
Can I Make Bao Buns the Day Before?
Yes. Steam fully, cool and store safely, then re-steam before serving. Freeze the cooked buns if preparing further ahead.








