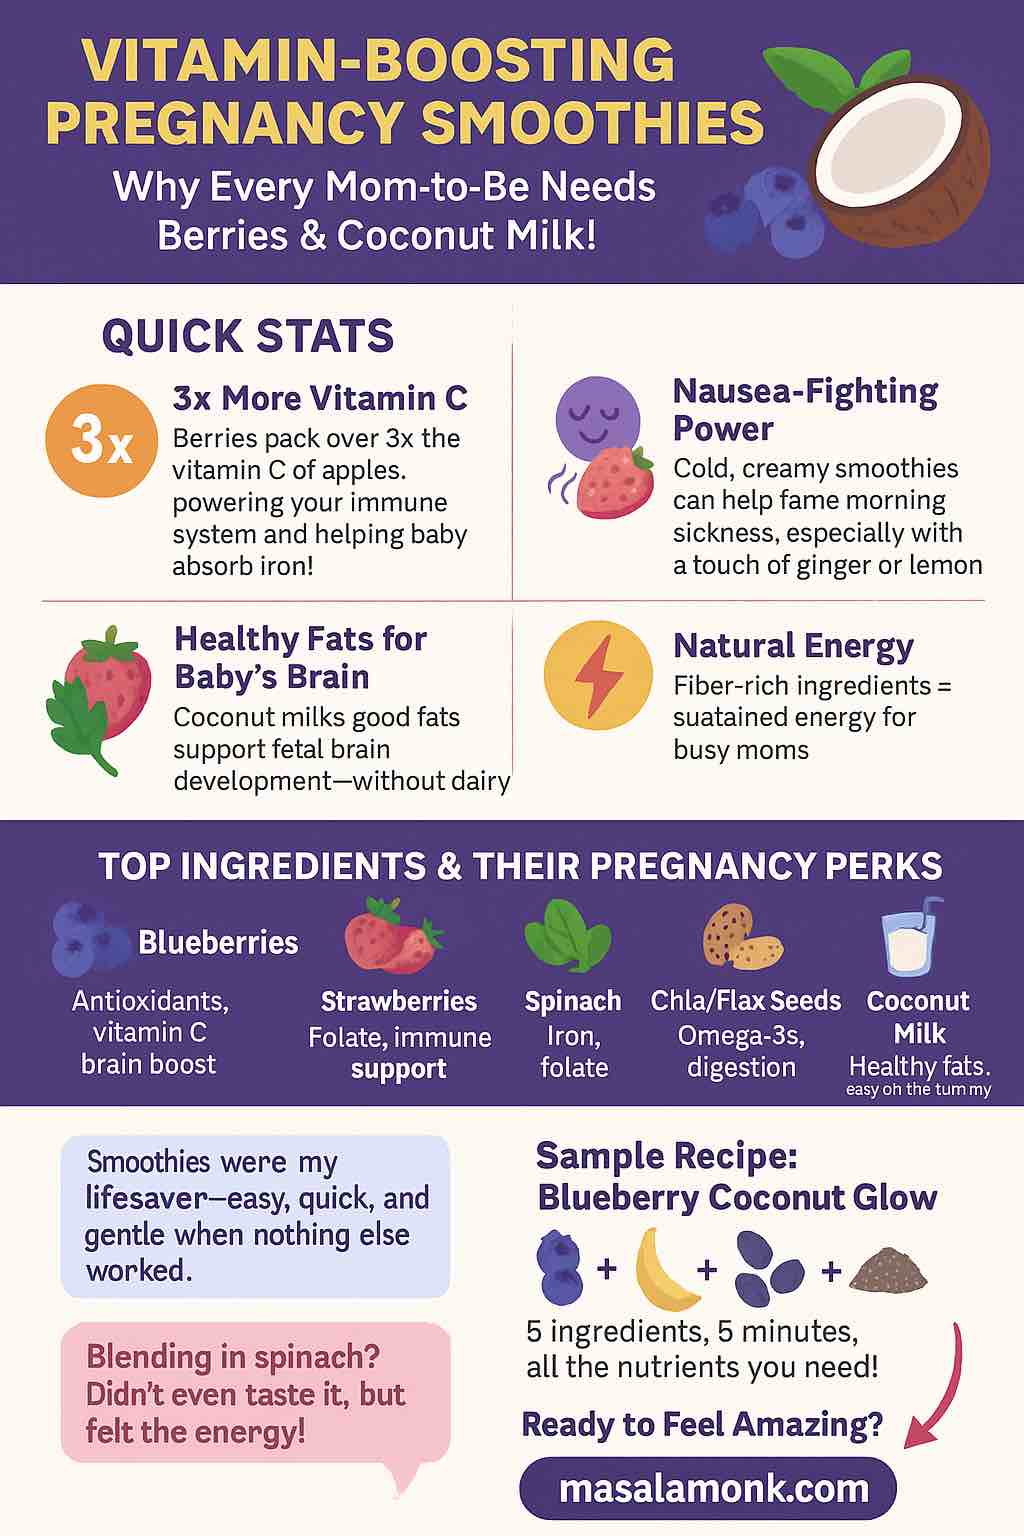
If you want to turn your Saturday night into a memory-making experience, there’s no better way than to gather your favorite people, warm up the room, and shake (or stir) a round of signature cinnamon cocktails. This post will show you how cinnamon—one humble spice—can bring your cocktails, your party, and your palate to a whole new level of excitement.
Why Cinnamon? The Allure Behind the Spice
Cinnamon is more than a kitchen staple. It’s a mood-setter, an aroma that sparks nostalgia and comfort, and—when mixed into cocktails—a game changer. While it’s often associated with holiday baking, the latest mixology trends are giving cinnamon a starring role in both classic and cutting-edge drinks. This spice offers warmth, complexity, and a subtle sweetness that plays beautifully with spirits, fruits, and even savory elements.
In 2025, cinnamon is trending for its versatility:
- It’s used in minimalist, ingredient-forward cocktails.
- Bartenders are embracing it for both alcoholic and zero-proof creations.
- It elevates presentation—think cinnamon stick swizzlers and golden sugar rims.
Setting the Scene: The Cinnamon Dreams Vibe
Before we get to the drinks, set the mood! Here’s how to create a Cinnamon Dreams atmosphere:
- Scentscape: Simmer water with cinnamon sticks, orange peels, and cloves on your stove.
- Warm Lighting: Use candles and fairy lights to bathe your space in a cozy golden glow.
- Inviting Table: Lay out wooden trays, gold-toned barware, and bowls of whole spices for guests to see and touch.
- Playlist: Queue up some mellow jazz, soul, or lo-fi beats to match the dreamy, sensual vibe.
The Foundation: Homemade Cinnamon Syrup
Cinnamon syrup is the magic elixir behind many signature drinks. Make it ahead for best results.
Recipe:
- 1 cup water
- 1 cup sugar (white or a blend with brown for depth)
- 3–4 cinnamon sticks
Simmer all ingredients for 10 minutes, cool, strain into a jar, and keep refrigerated (lasts up to 2 weeks).
Pro Tip: Add a few cloves or a strip of orange peel for extra dimension!
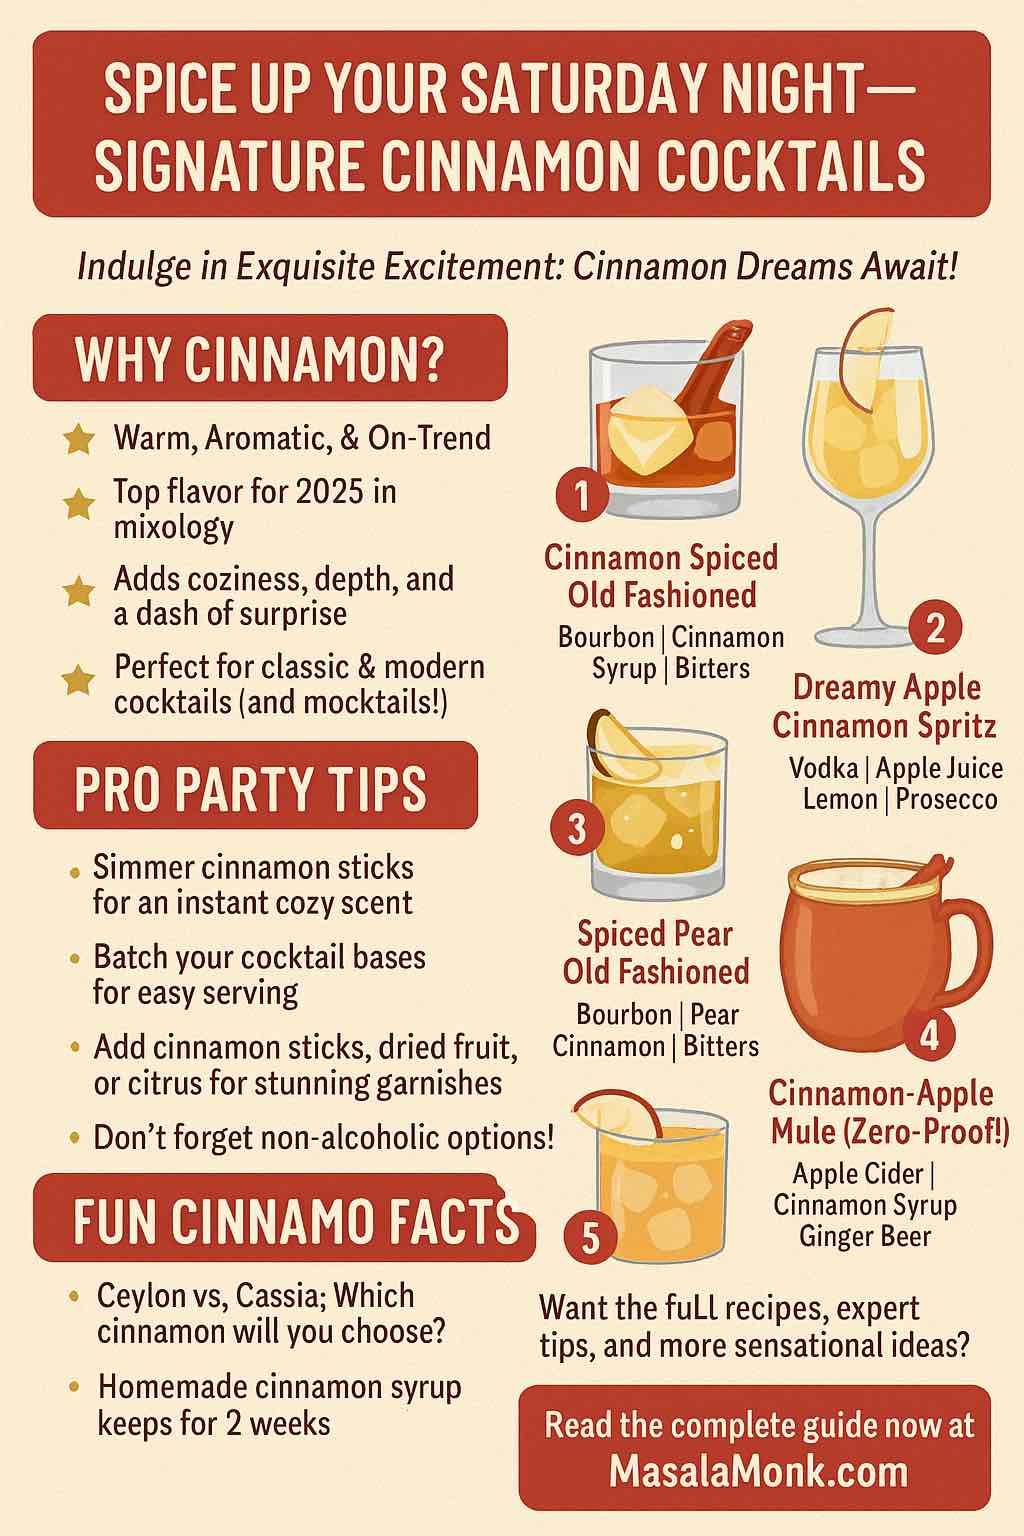
Five Signature Cinnamon Cocktails (and How to Make Them Shine)
1. Cinnamon Spiced Old Fashioned
Flavor Profile: Warm, classic, just sweet enough.
Ingredients:
- 2 oz bourbon or rye whiskey
- 0.5 oz cinnamon syrup
- 2 dashes Angostura bitters
- Orange peel
- Cinnamon stick (garnish)
Instructions:
- In a mixing glass, combine bourbon, syrup, and bitters with ice.
- Stir until chilled.
- Strain into a rocks glass over a large ice cube.
- Express an orange peel over the drink, then drop it in. Garnish with a cinnamon stick.
Hosting Hack: Set up a DIY Old Fashioned bar with various bitters and citrus peels for guests to customize.
2. Dreamy Apple Cinnamon Spritz
Flavor Profile: Light, fizzy, fruity, and spiced.
Ingredients:
- 1.5 oz cinnamon vodka (or regular vodka + pinch ground cinnamon)
- 2 oz cloudy apple juice or cider
- 1 oz fresh lemon juice
- Top with prosecco or sparkling water
Instructions:
- Shake vodka, apple juice, and lemon juice with ice.
- Strain into a wine glass over fresh ice.
- Top with prosecco or sparkling water.
- Garnish with a thin apple slice and a cinnamon-sugar rim.
Pro Touch: Chill your glasses and prep cinnamon sugar for rimming in advance.
3. Spiced Pear Old Fashioned (2025 Trend!)
Flavor Profile: Subtle sweetness, layered spice, seasonal sophistication.
Ingredients:
- 2 oz bourbon
- 0.75 oz spiced pear syrup (substitute: 0.5 oz cinnamon syrup + 0.25 oz pear nectar)
- 2 dashes aromatic bitters
- Pear slice and cinnamon stick (garnish)
Instructions:
- Mix bourbon, syrup, and bitters over ice.
- Stir and strain into a rocks glass with a big cube.
- Garnish with a fresh pear slice and cinnamon stick.
Serving Suggestion: Pair with a cheeseboard featuring blue or goat cheese—pears and cinnamon love creamy, tangy flavors.
4. Vanilla-Chai Bourbon Sour
Flavor Profile: Creamy, spiced, gently tart.
Ingredients:
- 2 oz bourbon
- 1 oz lemon juice
- 0.75 oz cinnamon syrup
- 0.5 oz chai concentrate (or strong chai tea, cooled)
- Egg white (optional, for foam)
Instructions:
- Dry shake all ingredients (no ice) to froth.
- Add ice, shake again, strain into a coupe glass.
- Garnish with a dusting of cinnamon and star anise.
Presentation Hack: Use a drop of food-safe vanilla extract in the foam for aromatic flair.
5. Cinnamon-Apple Mule (Zero-Proof Option Included)
Flavor Profile: Crisp, gingery, lively, inclusive.
Alcoholic Version:
- 1.5 oz vodka or cinnamon-infused rum
- 2 oz apple cider
- 0.5 oz cinnamon syrup
- Top with ginger beer
Mocktail Version:
- 3 oz apple cider
- 0.5 oz cinnamon syrup
- Top with ginger beer
Instructions:
- Build in a copper mug with ice.
- Stir gently.
- Garnish with a thin apple slice and cinnamon stick.
Mocktail Tip: Make a big batch for guests who want to skip the spirits but not the flavor.
Batch Cocktail Ideas & Bar Prep
- Pre-Batching: Make large batches of the base (spirit, syrup, citrus) ahead of time and keep chilled. Add fizzy elements (soda, prosecco) just before serving.
- Prep Garnishes: Slice apples/pears, set out cinnamon sticks, and pre-rim glasses with cinnamon sugar.
- Themed Signs: Label each drink with a fun description (e.g., “The Velvet Ember: Cinnamon Old Fashioned”).
- Engage Your Guests: Let guests try different cinnamon varieties (Ceylon vs. Cassia) or sample a cinnamon syrup flight!
Zero-Proof & Wellness-Driven
With wellness and inclusivity in mind, modern parties always offer delicious non-alcoholic options. Cinnamon’s warm, comforting notes make it a favorite for spirit-free cocktails. Try using kombucha, infused teas, or fresh juices as your base, and get creative with fruit and spice combinations.
The Final Touch: Presentation & Ambiance
- Glassware: Rocks glasses for Old Fashioneds, coupes for sours, copper mugs for mules, and wine glasses for spritzes.
- Garnishes: Whole cinnamon sticks, star anise, citrus wheels, dried apples/pears, edible flowers.
- Bar Decor: Sprinkle cinnamon sticks, cloves, and dried orange slices across your bar or table. Use wooden boards for rustic-chic vibes.
Ready for Your Sensational Saturday Night?
Signature cinnamon cocktails bring warmth, surprise, and sophistication to any gathering. Whether you’re crafting classics with a twist, exploring trendy seasonal flavors, or keeping it spirit-free, cinnamon is your key to memorable, crowd-pleasing drinks. With the right prep and a little creativity, your Saturday night will become a night to savor—and your guests will be talking about your Cinnamon Dreams long after the last glass is empty.
Cheers to exquisite excitement and cinnamon dreams!
Share Your Creations!
Tag your cocktails and party moments with #CinnamonDreamsNight or share your favorite cinnamon cocktail recipes in the comments below.
FAQs: Signature Cinnamon Cocktails for Your Sensational Saturday Night
1. What’s the best type of cinnamon to use in cocktails?
Ceylon cinnamon is lighter and more delicate, ideal for infusions and syrups. Cassia (common supermarket cinnamon) is bolder and spicier. Both work, but Ceylon is preferred for subtle, nuanced drinks.
2. How do I make cinnamon syrup, and how long does it last?
Simmer equal parts sugar and water with 3–4 cinnamon sticks for 10 minutes, cool, strain, and refrigerate. It lasts up to 2 weeks in a sealed jar.
3. Can I batch cocktails with cinnamon for a party?
Yes! Pre-mix the spirit, syrup, and citrus components. Add sparkling ingredients (like soda or prosecco) right before serving for best fizz.
4. What’s a good non-alcoholic (mocktail) cinnamon drink for adults?
Try a Cinnamon-Apple Mule with apple cider, cinnamon syrup, and ginger beer, garnished with apple slices and a cinnamon stick.
5. How do I create a cinnamon-sugar rim for glasses?
Mix equal parts ground cinnamon and sugar. Rub a citrus wedge on the rim of the glass, then dip the rim into the mixture for a sweet, spiced edge.
6. Can I use ground cinnamon instead of cinnamon sticks?
Whole sticks are best for infusions and syrups, as ground cinnamon can make drinks gritty. If using ground, strain well and use sparingly.
7. What spirits pair best with cinnamon in cocktails?
Bourbon, rye, spiced rum, vodka, and even gin work well. Cinnamon’s warmth also complements apple brandy and some liqueurs like Cointreau or amaro.
8. How do I infuse spirits with cinnamon?
Place 2–3 cinnamon sticks in a bottle of your chosen spirit for 1–3 days. Taste daily and remove the sticks when the flavor is right to avoid bitterness.
9. What garnishes go well with cinnamon cocktails?
Cinnamon sticks, citrus wheels, star anise, apple or pear slices, and dried orange rounds are all beautiful and aromatic options.
10. Can I make cinnamon cocktails ahead of time?
You can pre-mix non-fizzy drinks and store them in the fridge. Add ice and garnishes just before serving to keep them fresh and vibrant.