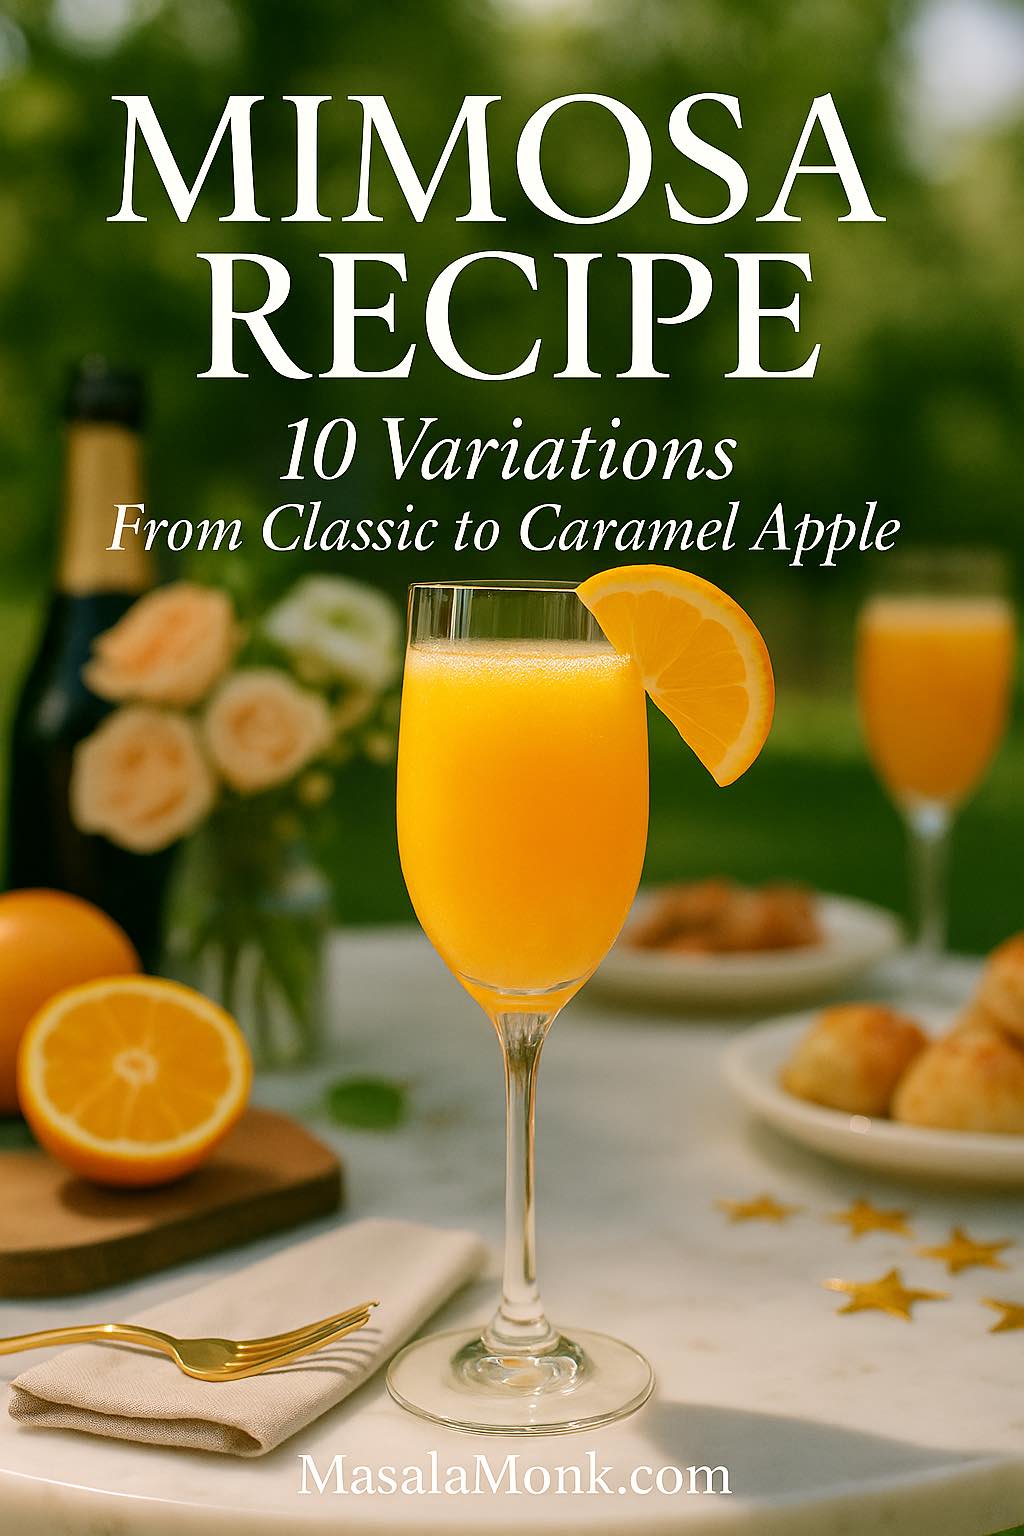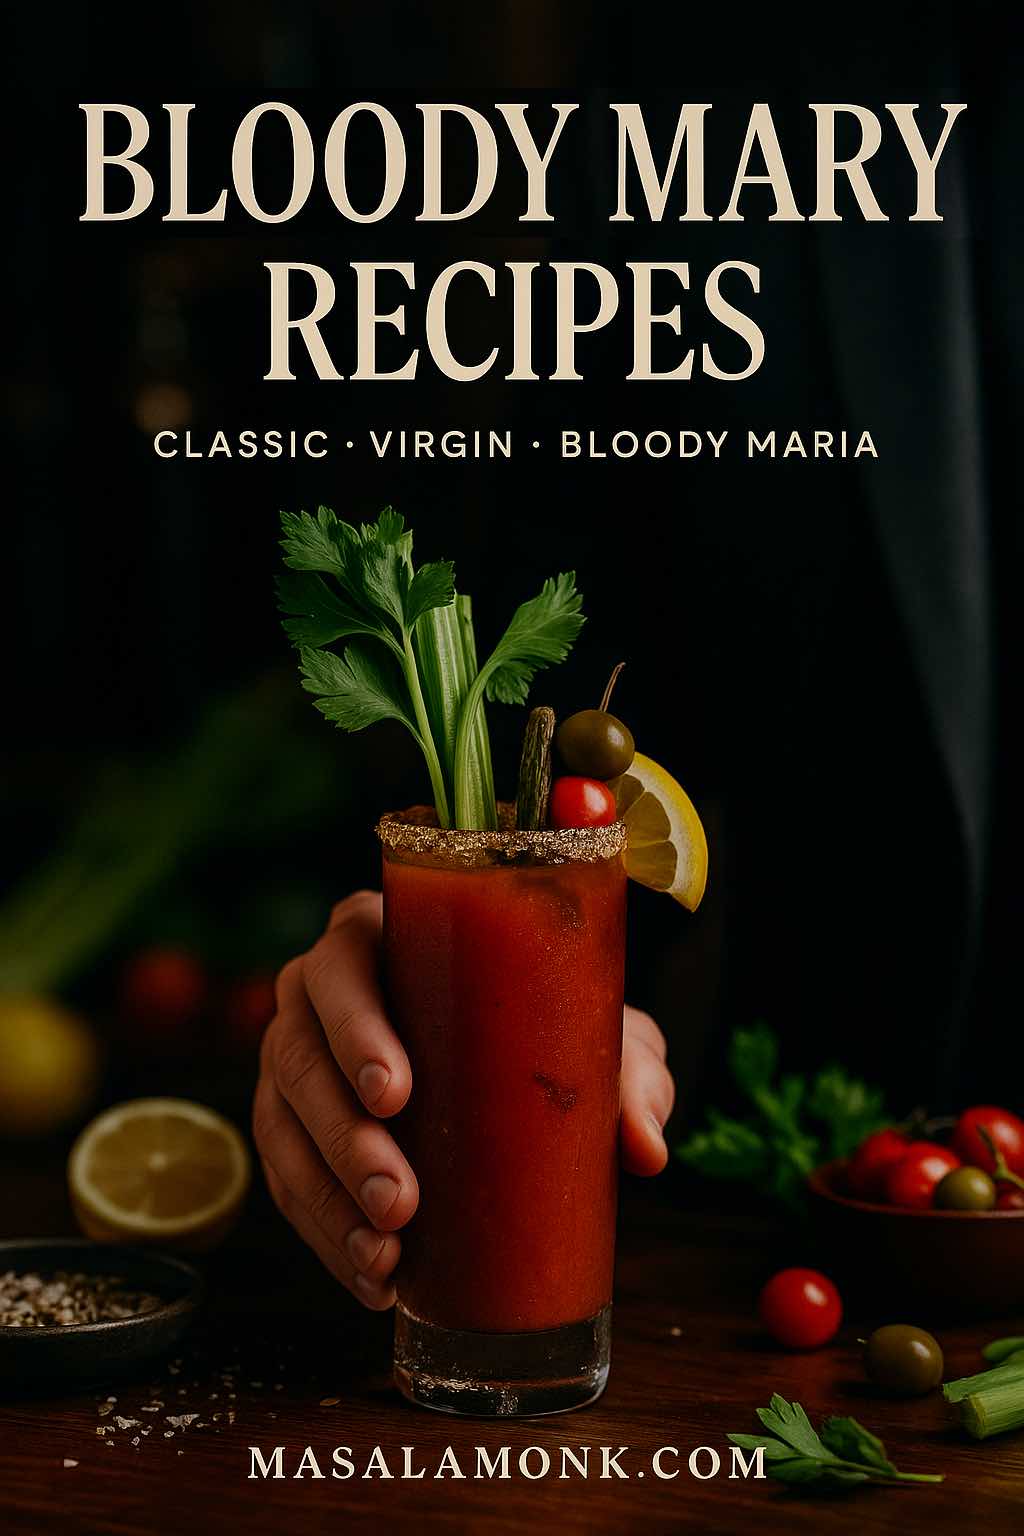
There are cocktails you sip and forget, and then there’s the Bloody Mary. One good Bloody Mary recipe can carry an entire weekend: it wakes you up, feeds you a little, and hangs out happily next to eggs, toast, or full-on brunch feasts. It’s breakfast, lunch, snack, and hangover cure, all in one tall glass.
At its simplest, the drink is just vodka and tomato juice with a few pantry friends. Yet the moment you start playing, it blooms into a whole family of drinks: Virgin Mary mocktails, tequila-based Bloody Marias, bourbon brunch riffs, fizzy beer hybrids, and briny clam-laced Caesars. This post pulls all of that into one place so you can mix a classic Bloody Mary recipe from scratch, then confidently branch out into seven main variations and a bunch of quick twists.
Along the way, you’ll see nods to bar-standard recipes from places like Liquor.com’s classic Bloody Mary and the Virgin Mary mocktail from The Spruce Eats, but everything here is written for a home kitchen, not a fancy bar.
What Makes a Great Bloody Mary Recipe?
Before we get into exact measurements, it helps to understand the bones of a Bloody Mary recipe. Once you see the structure, every variant becomes easier to improvise.
Underneath all the garnish and drama, you’ll almost always find:
- Base spirit – usually vodka, sometimes tequila, gin, rum, or whiskey
- Tomato base – tomato juice, sometimes mixed with clam juice or vegetable juice
- Citrus – lemon or lime for brightness
- Umami – Worcestershire sauce, sometimes soy or Maggi, occasionally clam or beef broth
- Heat – hot sauce, horseradish, chilli flakes or chilli salt
- Salt – table salt, celery salt, or salted rims
- Aromatic spices – black pepper, smoked paprika, celery seed, Old Bay, etc.
Once you understand that framework, everything else is customisation: change the spirit, switch lemon for lime, swap tomato juice for V8, or dial the heat up and down. At the same time, because the Bloody Mary recipe is so forgiving, you can tweak gently, taste, and correct as you go.
With that in mind, let’s start with a classic.
Also Read: Tres Leches – Mexican 3 Milk Cake Recipe
Classic Bloody Mary Recipe (Single Serving)
We’ll begin with a glass-by-glass Bloody Mary recipe that’s easy to memorise and adapt. It’s close to what you’ll find on Liquor.com and in other classic cocktail references, but stripped back just enough for a typical home bar.
Ingredients (1 drink)
- 60 ml (2 oz) vodka
- 120–150 ml (4–5 oz) tomato juice
- 15 ml (½ oz) fresh lemon juice
- 2–3 dashes Worcestershire sauce
- 2–4 dashes hot sauce (Tabasco, Cholula, etc.)
- 1 pinch celery salt
- 1 pinch smoked paprika (optional, but lovely)
- Freshly ground black pepper
To serve
- Ice cubes
- Tall glass (highball / Collins)
Garnish options
- Celery stalk
- Lemon wedge
- Green olives
- Pickled gherkins or onions
- Cherry tomatoes on a skewer
You don’t need all the garnishes at once, although it’s fun to treat the glass like a little edible bouquet.
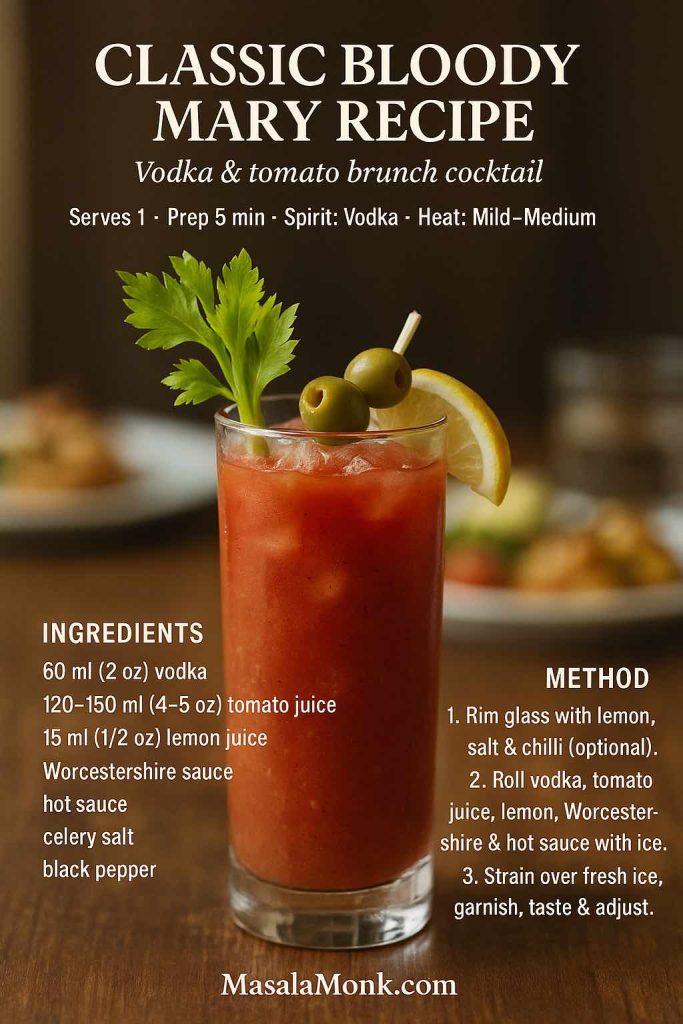
Method
- Rim the glass
First, run a lemon wedge around the rim of your glass. Dip it into a shallow plate of salt mixed with a little celery salt and chilli powder. This takes ten seconds, yet suddenly your Bloody Mary feels like it came from a bar menu. - Build the flavour base
Next, add vodka, tomato juice, lemon juice, Worcestershire, hot sauce, celery salt, smoked paprika and a good grind of black pepper to a mixing glass or shaker. - Roll instead of hard shaking
Then, add ice and “roll” the drink: pour it gently back and forth between two tins or glasses a few times. Rolling chills and aerates the mix without beating it into a foamy tomato smoothie. Classic bartenders swear by this technique, and once you try it, you’ll see why. - Serve over fresh ice
After that, fill your serving glass with fresh ice and strain (or simply pour) the drink over. Fresh ice keeps the Bloody Mary cold without making it watery. - Garnish and taste
Finally, add your chosen garnishes and take a sip. Want more heat? Add another dash of hot sauce. Need extra brightness? Squeeze in a little more lemon.
Once you’re happy with this basic Bloody Mary recipe, you can start multiplying it.
Also Read: Homemade Hot Chocolate with Cocoa Powder Recipe
Bloody Mary Recipe for a Crowd (Pitcher Brunch Version)
As soon as you make one good Bloody Mary, somebody will ask for another. Rather than building each glass individually, it’s much easier to mix a big jug and let people pour their own. At a brunch party, this approach saves you from being stuck shaking drinks while everyone else eats.
This pitcher version scales our Bloody Mary recipe up to about six servings and pairs beautifully with a table full of breakfast food. If you’re already thinking about what to serve alongside, recipes like 10 Most Popular Mediterranean Breakfasts are full of ideas for toast, eggs, beans and salads that sit perfectly next to a savoury drink.
Batch Ingredients (about 6 drinks)
- 360 ml (1½ cups) vodka
- 720–900 ml (3–3¾ cups) tomato juice
- 90 ml (6 tbsp) lemon juice
- 2 tbsp Worcestershire sauce
- 2–3 tsp hot sauce (start mild; you can always add more)
- 1½–2 tsp celery salt
- 1 tsp freshly ground black pepper
- 2–3 tsp prepared horseradish (optional, for serious spice fans)
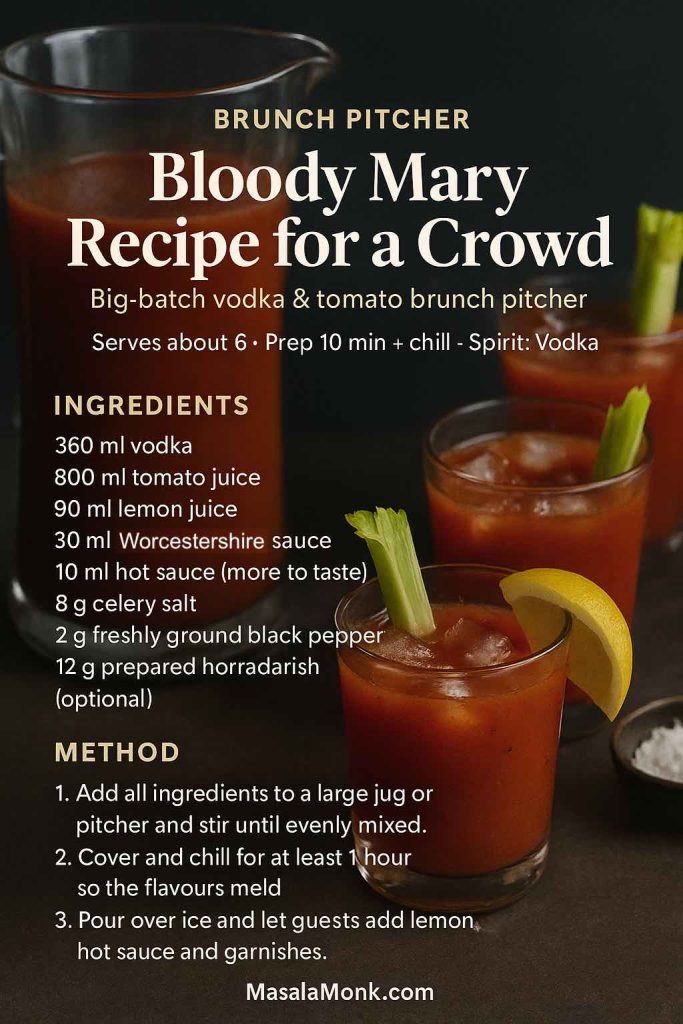
Method
- Stir everything together
Pour all the ingredients into a large jug or pitcher and stir thoroughly. Make sure the spices dissolve evenly, so no one gets a surprise spoonful of paprika. - Let the flavours settle
Cover and chill for at least an hour. Given a little time, the seasoning sinks into the tomato juice and the sharp edges smooth out. - Prepare a garnish tray
Meanwhile, set up a small station with celery sticks, lemon wedges, olives, pickles and maybe even crispy bacon strips. Treat this like a Bloody Mary salad bar. - Serve over ice
When guests arrive, fill their glasses with ice and pour the chilled mix three-quarters of the way up. Keep hot sauce and lemon wedges nearby for anyone who wants to doctor their own drink.
To round out the brunch, you could set a plate of French Toast Sticks (Air Fryer + Oven) in the centre of the table, or go for an eggless French Toast bake so there’s something sweet as well as savoury. A generous pitcher of this Bloody Mary recipe plus warm toast soldiers is hard to beat.
Homemade Bloody Mary Mix (Vodka-Free Base)
Instead of building from scratch every single time, you can take things one step further and treat the Bloody Mary recipe as a two-part system:
- A seasoned, vodka-free Bloody Mary mix
- A splash of whichever spirit you like at serving time
Home canning enthusiasts love this approach. Some even pressure-can large batches of tomato mix using tested recipes like the Bloody Mary mix directions from The Domestic Wildflower or other canning-safe formulas, then store them in the pantry for months. For everyday use, though, a simple fridge mix is more than enough.
Ingredients (makes about 8 drinks)
- 1 litre tomato juice
- 120 ml (½ cup) fresh lemon juice
- 3 tbsp Worcestershire sauce
- 1–2 tbsp hot sauce (adjust to taste)
- 2 tsp celery salt
- 1½ tsp freshly ground black pepper
- 1 tsp smoked paprika
- 1–2 tsp prepared horseradish (optional but highly recommended)
- Optional: a tiny pinch of ground cumin for extra warmth
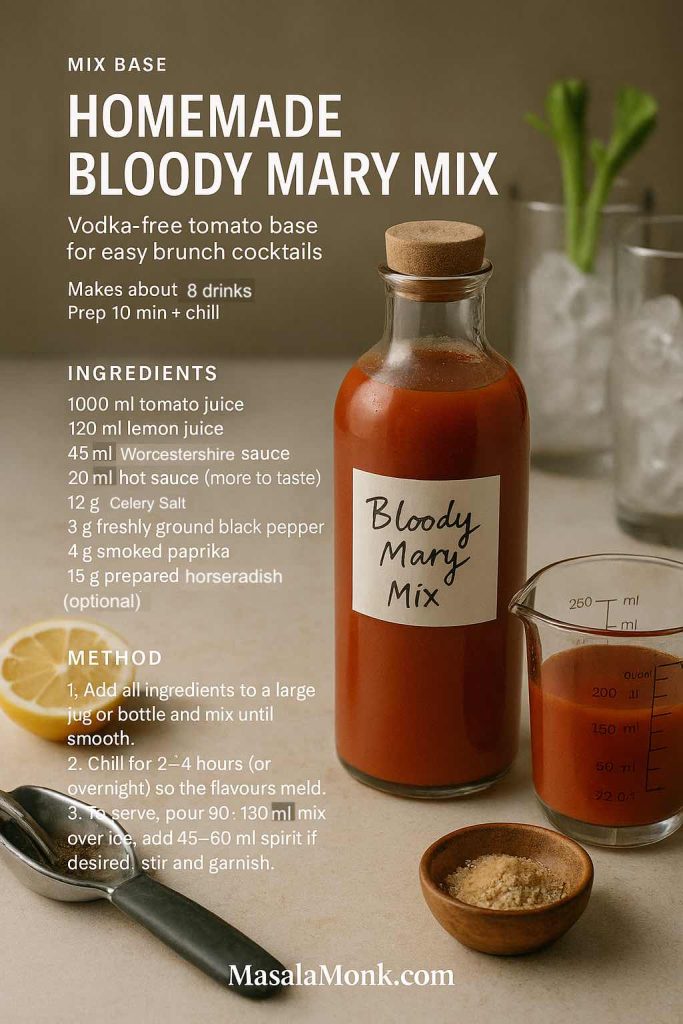
Method
- Combine in a jug or bottle
Pour all the ingredients into a large jug or, even better, a glass bottle with a tight lid. Shake or stir until everything is fully mixed. - Taste and balance
At this stage, the mix should taste slightly over-seasoned and zesty; remember, you’ll be diluting it with vodka and ice later. If it seems flat, nudge up the salt and lemon. If it feels sharp or too spicy, add a splash of extra tomato juice. - Chill and let it mature
Place the mix in the fridge and forget about it for at least 2–4 hours, preferably overnight. During this time, the ingredients meld, and the tomato base picks up the smoky, spicy notes beautifully. - Use as a base
When you’re ready to serve, pour 90–120 ml (3–4 oz) of mix over ice, add 45–60 ml (1½–2 oz) vodka (or another spirit), stir, and garnish. That’s it.
This vodka-free mix is brilliant for flexibility. One guest can have a full-strength Bloody Mary, another can have a light version, and a third can skip the alcohol entirely and enjoy the same mix as a Virgin Mary.
If you ever decide to preserve Bloody Mary mix in jars, it’s worth using a reputable, tested canning recipe such as this pressure-canning guide.
Also Read: Peanut Butter Cookies (Classic Recipe & 3 Variations)
Virgin Bloody Mary Recipe (Virgin Mary Mocktail)
Not everyone at the table will be drinking, yet almost everyone appreciates a drink that feels grown-up. That’s where a good Virgin Bloody Mary recipe comes in. It offers all the savoury, spicy satisfaction of a classic Bloody Mary, just without the vodka.
Mocktail round-ups regularly include this drink for good reason, and the Virgin Mary drink recipe from The Spruce Eats is a great example: tomato, lemon, Worcestershire, hot sauce, celery salt, black pepper, and plenty of crunch from garnishes. The version below follows the same spirit with a touch more tomato to make up for the missing alcohol.
Ingredients (1 drink)
- 180 ml (6 oz) tomato juice
- 15 ml (½ oz) fresh lemon juice
- 1–2 dashes Worcestershire sauce (vegan if you need it)
- 1–3 dashes hot sauce
- 1 pinch celery salt
- Freshly ground black pepper
- Ice
Garnish
- Celery stalk
- Pickle spear
- Lemon wedge
- Olives or cherry tomatoes
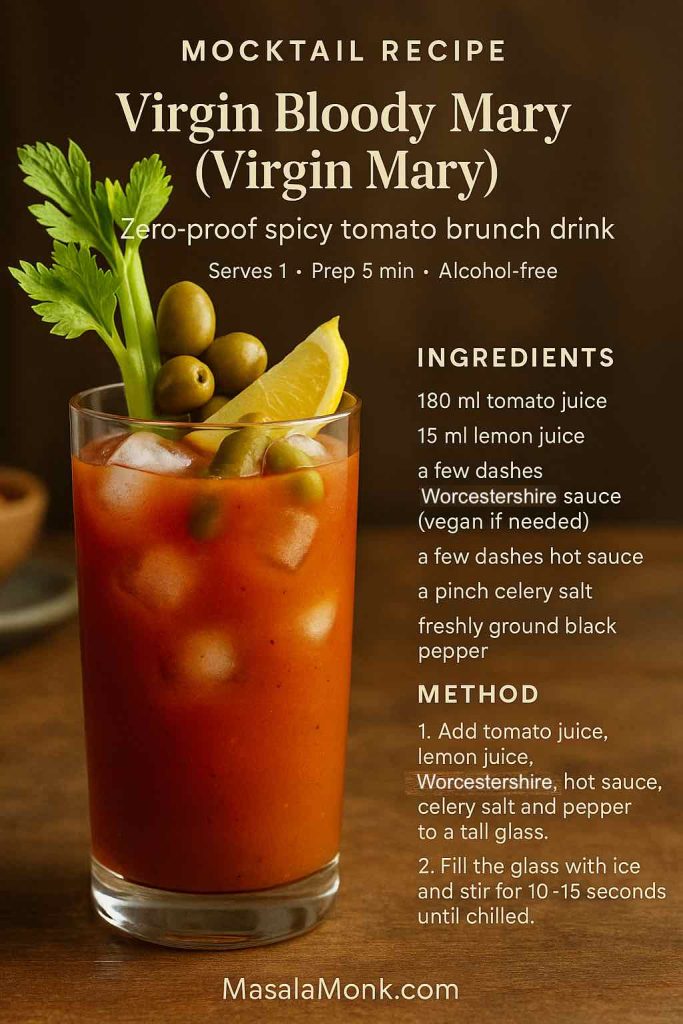
Method
- Add everything to the glass
Pour tomato juice, lemon juice, Worcestershire sauce, hot sauce, celery salt and pepper into a tall glass. - Fill with ice and stir
Add ice cubes until the glass is almost full, then stir for 10–15 seconds until chilled. - Taste and tweak
If it tastes too simple, drop in another dash of Worcestershire or hot sauce and stir again. If you overshoot with spice, add more tomato juice. - Load up the garnish
Slide in the celery, tuck a pickle or two along the side, and add a lemon wedge on the rim.
If you’re building a non-alcoholic menu, you can place this Virgin Mary beside other zero-proof ideas. For instance, colourful fruit drinks from MasalaMonk like apple juice mocktail recipes or tropical pineapple mojito mocktails give guests more than one option, while broader guides such as Mocktails with Grenadine cover even more playful combinations.
Bloody Maria (Tequila Bloody Mary Recipe)
Once you’re comfortable with the classic Bloody Mary recipe, changing the base spirit is the easiest way to explore new territory. Swapping vodka for tequila gives you the Bloody Maria: a drink that’s brighter, a little earthier, and a natural partner for Mexican-style brunch plates.
The Bloody Maria cocktail on Liquor.com keeps almost all the classic elements, simply trading lemon for lime and vodka for tequila. That’s exactly the direction we’ll take here.
Ingredients (1 drink)
- 60 ml (2 oz) tequila (blanco for freshness, reposado for more oak)
- 120–150 ml (4–5 oz) tomato juice
- 15 ml (½ oz) fresh lime juice
- 2–4 dashes Worcestershire sauce
- 2–4 dashes hot sauce
- 1 pinch celery salt
- Freshly ground black pepper
- Ice
Garnish
- Lime wedge
- Cucumber spear
- Pickled jalapeños
- Chilli-salt rim (Tajín works beautifully)
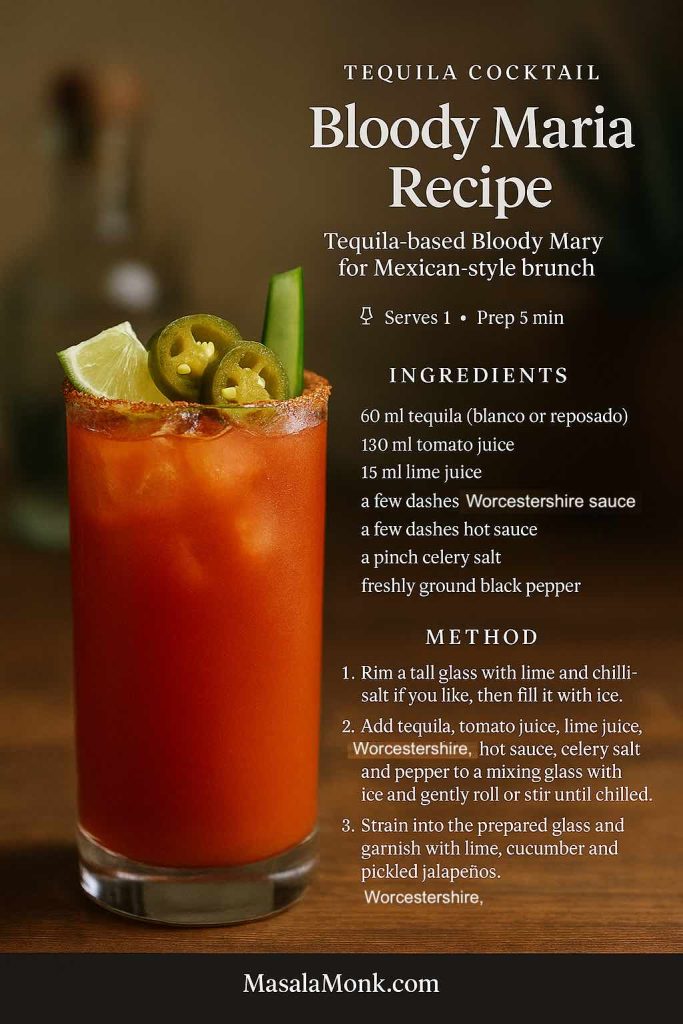
Method
- Prepare the glass
Run a lime wedge around the rim and dip it into chilli-salt. Fill the glass with ice. - Combine the ingredients
In a separate mixing glass or shaker, add tequila, tomato juice, lime juice, Worcestershire, hot sauce, celery salt and black pepper with ice. - Roll or stir
Roll the mixture gently between two tins, or stir until cold. - Serve and garnish
Strain or pour into the prepared glass, then garnish with lime, jalapeños and cucumber.
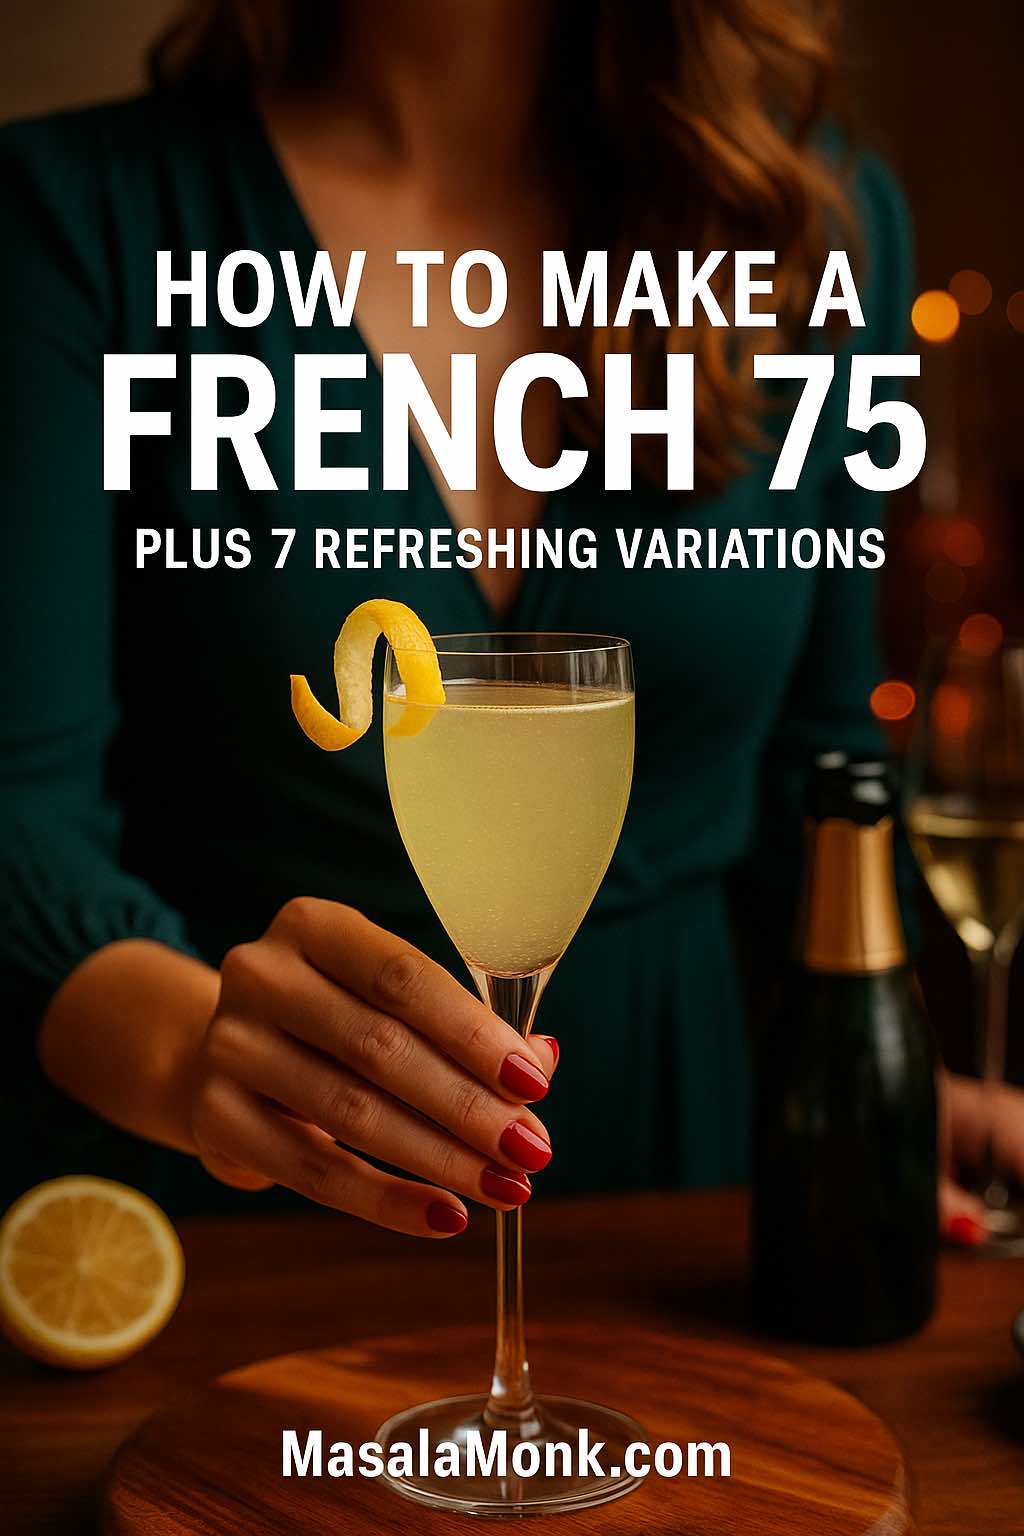
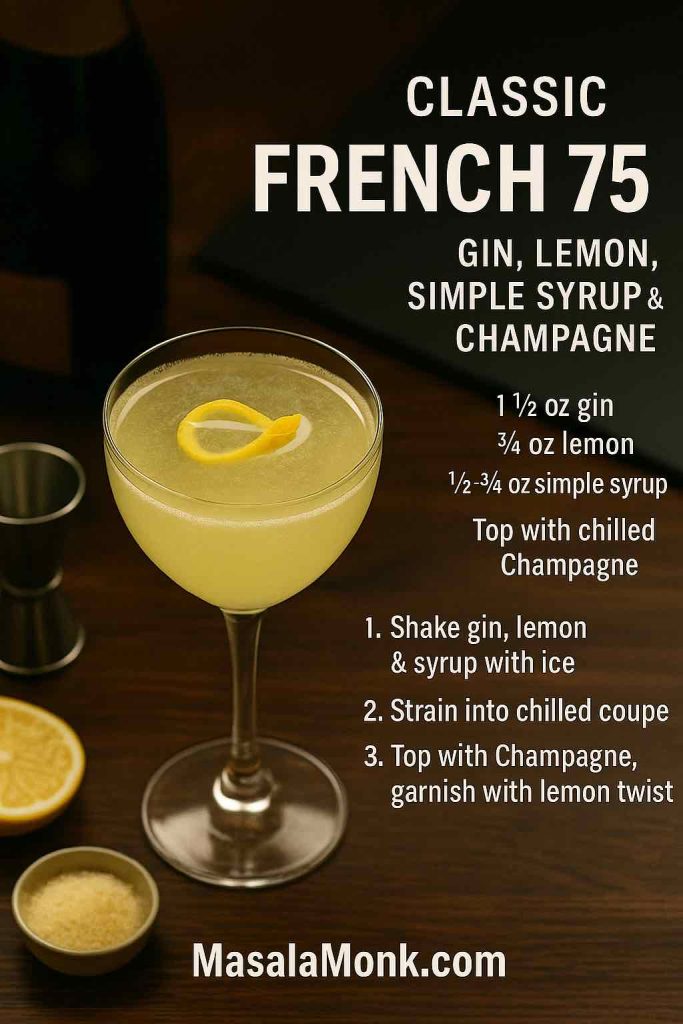
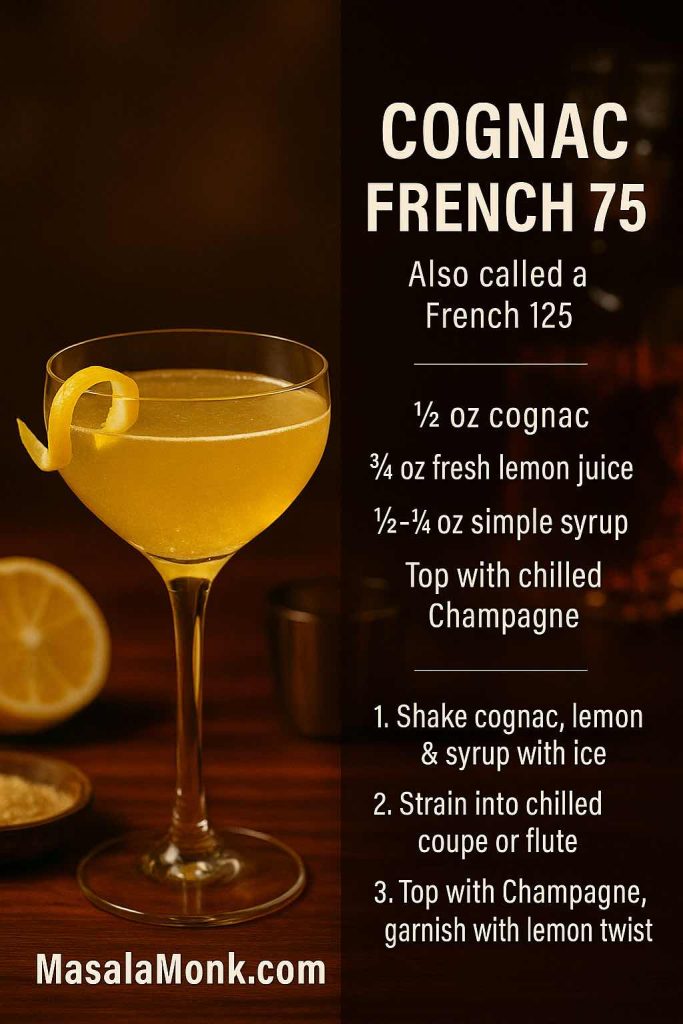
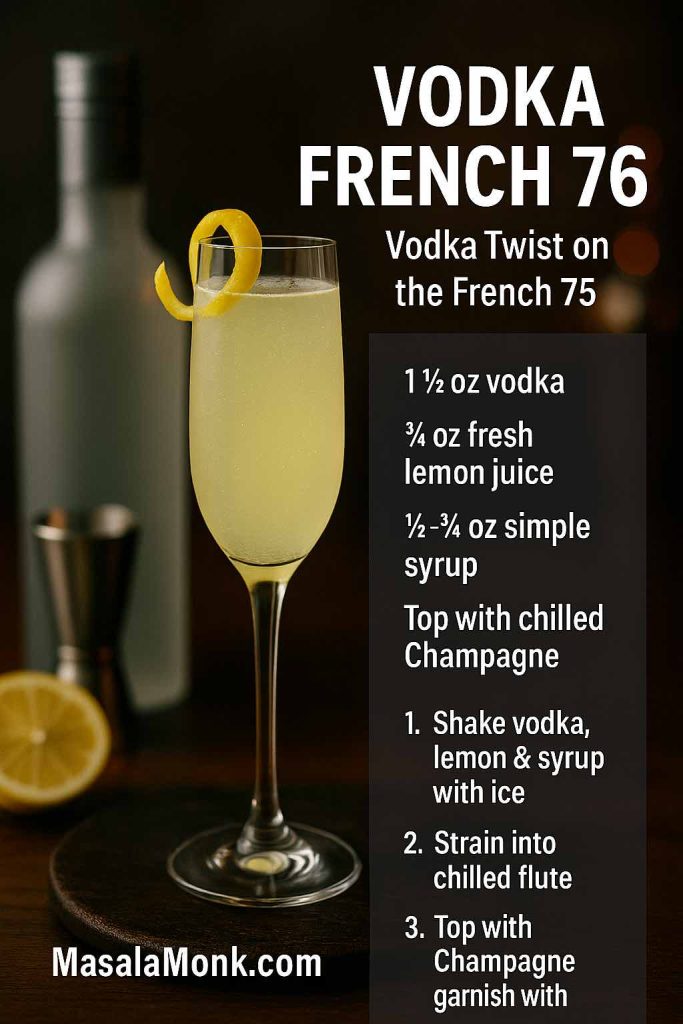
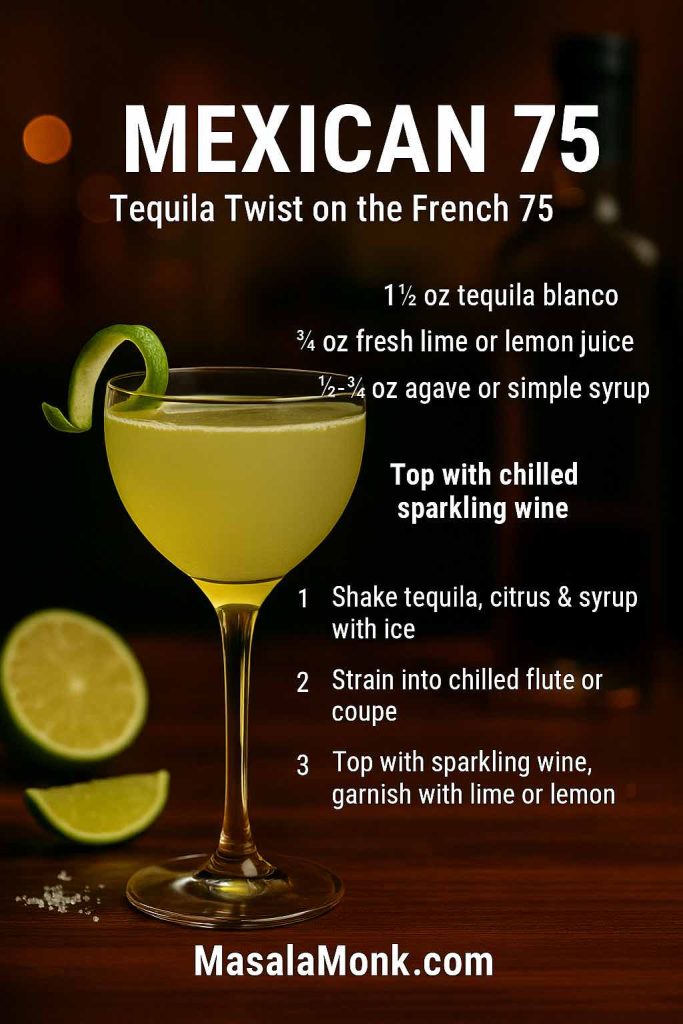
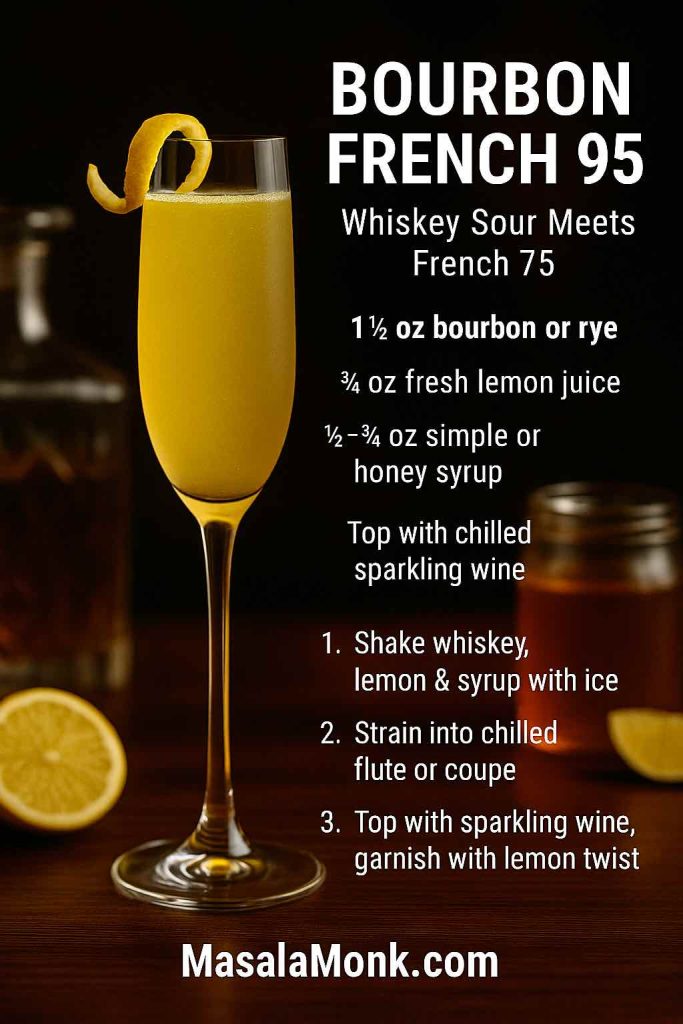
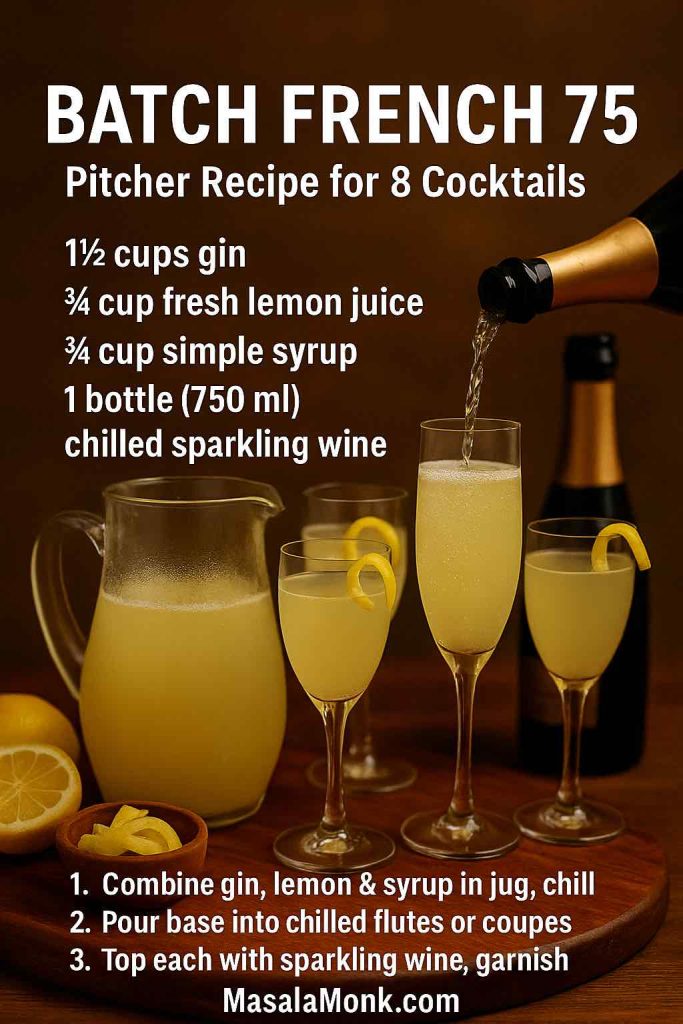
From here, you can slide easily into other tequila-centric brunch cocktails. If you love a bit of sparkle, a tequila twist on a French 75 (sometimes called a Mexican 75) is a fun follow-up—MasalaMonk’s French 75 cocktail recipe walks through the classic and several variations you can adapt.
Whiskey & Bourbon Bloody Mary Recipe
Changing gears again, let’s move from agave to grain. A Bloody Mary recipe made with bourbon or Irish whiskey lands somewhere between a savoury cocktail and a gentle smoke-kissed soup. It’s especially good in colder weather, or whenever there’s bacon on the table.
Ingredients (1 drink)
- 60 ml (2 oz) bourbon or Irish whiskey
- 120–150 ml (4–5 oz) tomato juice
- 15 ml (½ oz) fresh lemon juice
- 2–3 dashes Worcestershire sauce
- 2–3 dashes hot sauce
- 1 pinch celery salt
- Freshly ground black pepper
- Ice
Garnish
- Crispy bacon strip
- Grilled cherry tomatoes
- Pickled onion or gherkin
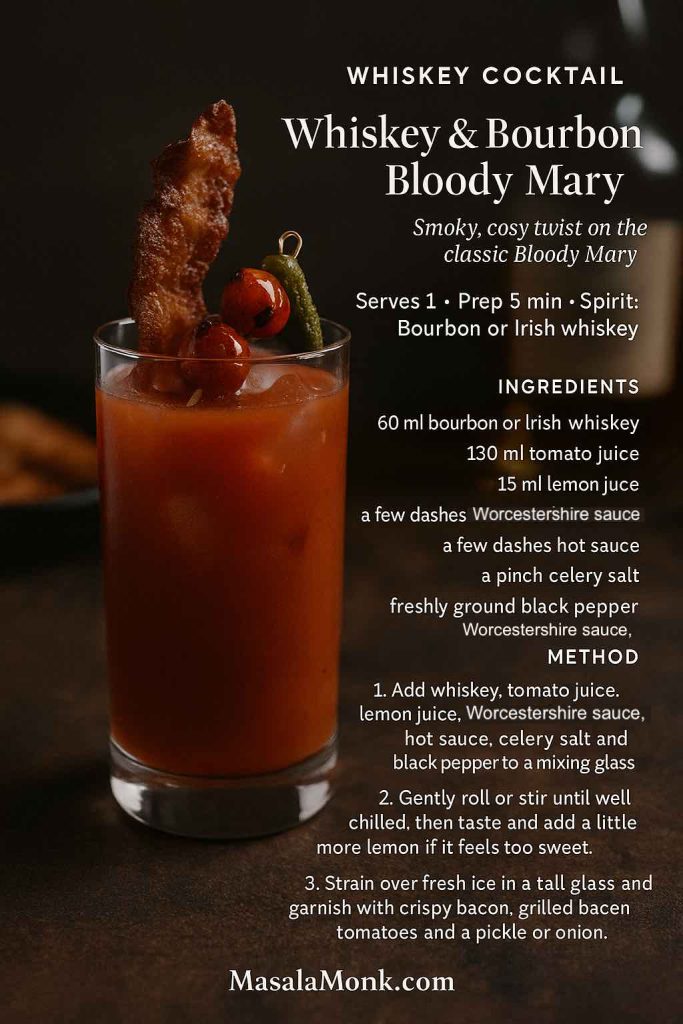
Method
- Mix as usual
Add whiskey, tomato juice, lemon juice, Worcestershire, hot sauce, celery salt and pepper to a mixing glass with ice. - Chill and dilute
Roll or stir the drink until cold. Check the balance: whiskey brings sweetness, so you may want slightly more lemon to keep the Bloody Mary recipe bright. - Serve over fresh ice
Pour into a tall glass filled with ice. - Lean into the smoke
Finish with a piece of bacon or grilled vegetables so the garnish speaks the same language as the spirit.
When brunch is over, you can keep the whiskey story going with more classic sour-style drinks. MasalaMonk’s recipe archives often feature whiskey and bourbon in different contexts, so your bottle will definitely not go to waste once the Bloody Marys are finished.
Also Read: Cottage Cheese Lasagna Recipe | Chicken, Spinach, & Ricotta
Beer Bloody Mary Recipe (Michelada-Style Twist)
So far, every Bloody Mary recipe in this post has been spirit-based. However, the tomato-and-spice core also plays nicely with beer. A tomato-beer hybrid sits somewhere between a Bloody Mary and a Michelada: fizzy, lighter, and incredibly refreshing when it’s hot outside.
There are two main ways to bring beer into the picture:
- A classic Bloody Mary served with a beer chaser
- A tomato mix topped by beer in the same glass
The second feels like the bigger departure, so let’s build that.
Ingredients (1 drink)
- 90 ml (3 oz) Bloody Mary mix (homemade or store-bought)
- 15–20 ml (½–⅔ oz) lime juice
- 1–2 dashes hot sauce
- Pinch of salt or celery salt
- 120–180 ml (4–6 oz) light lager or Mexican beer, well chilled
- Ice
Garnish
- Lime wedge
- Cucumber spear
- Chilli-salt rim
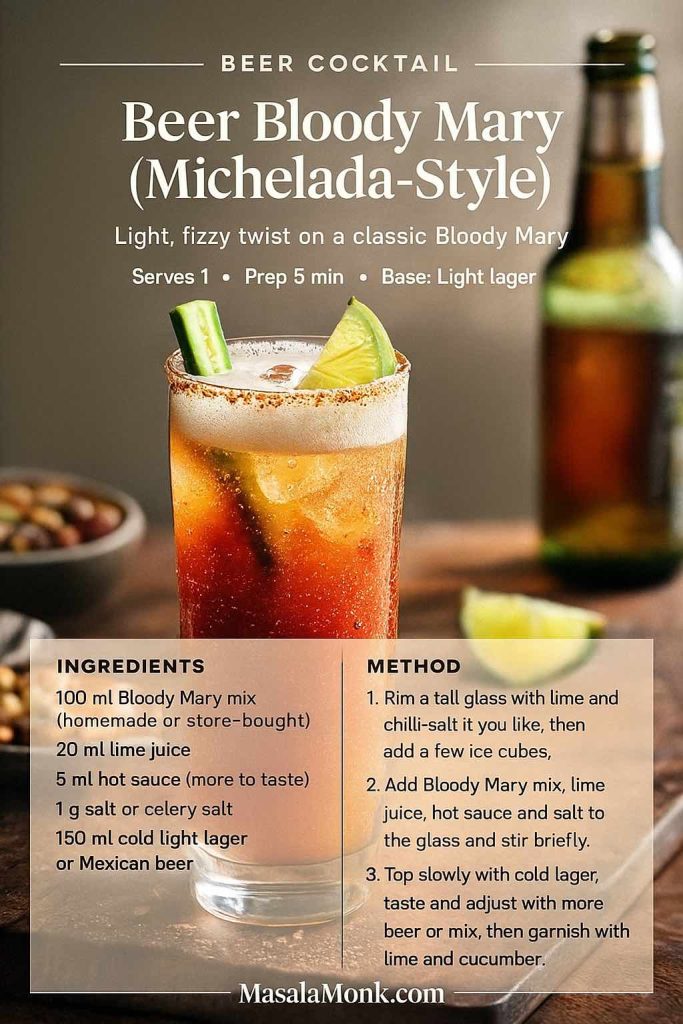
Method
- Salt and chill the glass
Run a wedge of lime around the rim of the glass, then dip into chilli-salt. Drop in a few cubes of ice. - Layer the base
Add Bloody Mary mix, lime juice, hot sauce and a pinch of salt directly into the glass. Stir briefly. - Top with beer
Pour the beer slowly over the back of a spoon or down the side of the glass to preserve the fizz. Watch as the tomato base and beer swirl together. - Adjust and garnish
Taste. If it feels too thick, add a little more beer; if it’s thin, add a splash more mix. Garnish with lime and cucumber.
This version is especially handy when you have leftover mix and a few extra beers in the fridge. Once the tomato glasses are empty, you can pivot into other refreshing drinks such as the long, easy sippers in MasalaMonk’s coconut water cocktails collection or straightforward highballs.
More Bloody Mary Recipe Twists: Caesar, Bull, Green & V8
By now you’ve covered the major branches: classic, pitcher, mix, Virgin Mary, Bloody Maria, whiskey and beer. Even so, the Bloody Mary recipe tree still has more interesting little offshoots worth mentioning. These don’t need full recipes to themselves; a few notes are enough to get you playing.
Bloody Caesar (Clam-Tomato Cousin)
In Canada, you’re more likely to see a Caesar on brunch menus than a straight Bloody Mary. The main twist is clam-tomato juice instead of plain tomato juice. According to cocktail histories and the Bloody Mary article on Wikipedia, this variation evolved into its own national favourite.
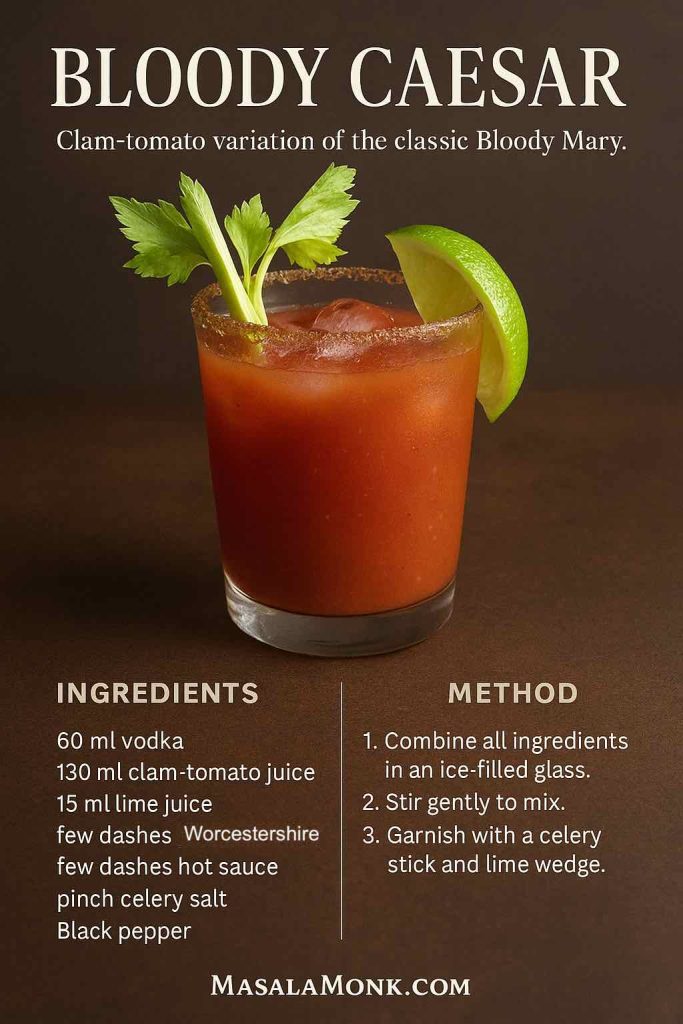
To try it:
- Use the classic Bloody Mary recipe as your base.
- Replace some or all of the tomato juice with clam-tomato juice.
- Garnish with celery, a lime wedge, and perhaps even a prawn or two.
The result is brinier and more ocean-y—like having a seafood bar in a glass.
Bloody Bull (Beef-Boosted Mary)
A Bloody Bull adds beef broth (or bouillon) to the equation. It shows up in lists of “Bloody Mary twists” alongside versions with rum, mezcal, or jerk seasoning, but this one is particularly cosy.
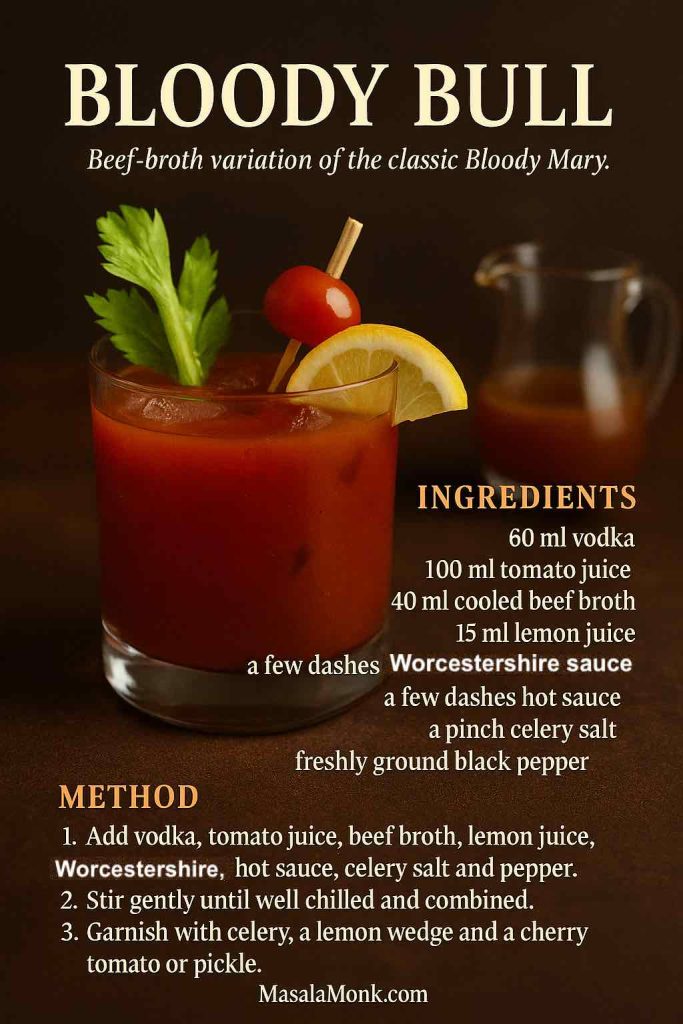
To make one:
- Add 30–45 ml (1–1½ oz) cooled beef broth to your classic Bloody Mary base.
- Reduce the tomato juice slightly so your drink doesn’t thin out.
- Taste; beef can dull acidity, so you may want extra lemon or hot sauce.
If you enjoy deep savoury flavours, this twist lands somewhere between a cocktail and a light, sip-able soup.
Green Bloody Mary
A Green Bloody Mary keeps the bones of the original Bloody Mary recipe but swaps out the red. Instead of tomato juice, you make a green vegetable blend and use that as your base.
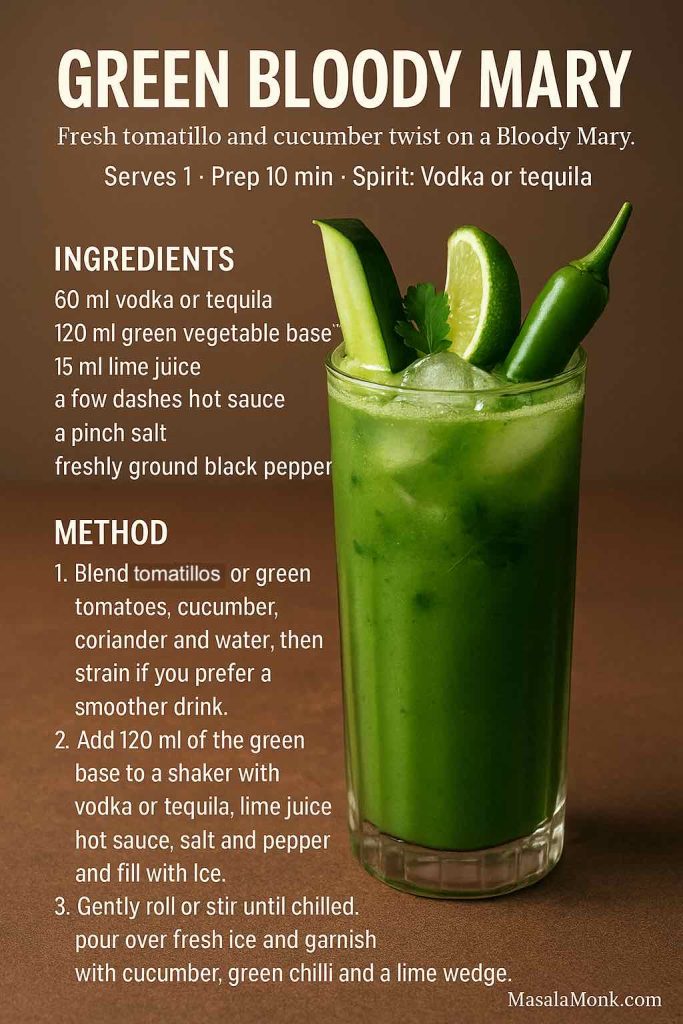
Rough guide:
- Blend tomatillos (or green tomatoes), cucumber, coriander, green chilli, lime juice, and a bit of water.
- Strain if you prefer, or leave slightly chunky.
- Season with salt and pepper, then treat it exactly like tomato juice: add vodka (or tequila), Worcestershire, hot sauce and celery salt, then roll with ice.
On the table, a Green Bloody Mary looks dramatic alongside traditional red ones. It also fits beautifully with Mediterranean-leaning brunch spreads and fresh vegetable dishes like those in What is the Mediterranean Diet? and 10 Plant-Based Meal Prep Ideas.
Spicy V8 Bloody Mary
Finally, there’s the vegetable-juice shortcut. Instead of pure tomato juice, you use a blend like V8. Because it already contains carrot, celery, beet and spices, it gives you a more complex Bloody Mary recipe without extra work.
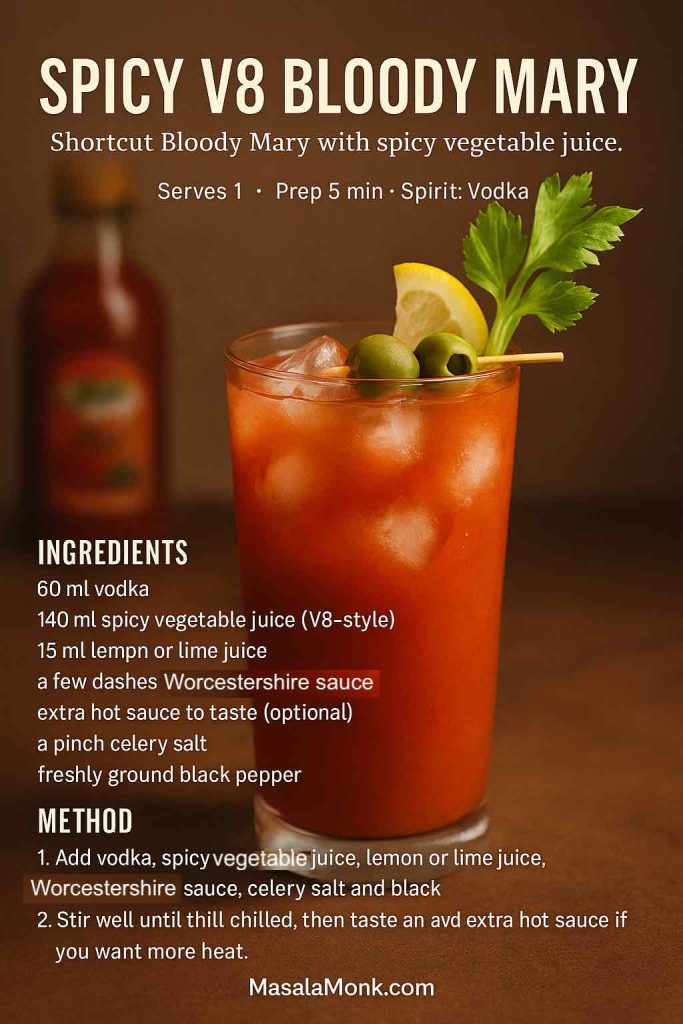
To build it:
- Swap tomato juice for spicy vegetable juice in the classic recipe.
- Reduce the added salt at first and adjust only after tasting.
- Keep lemon or lime for freshness and hot sauce for extra kick if needed.
Home cooks who like to can and preserve sometimes choose veg juice mixes as a base, then follow pressure-canning advice from resources like Make a Bloody Mary mix safely so they can store jars on the shelf.
Also read: Air Fryer Hard-Boiled Eggs (No Water, Easy Peel Recipe)
Building Your Own Bloody Mary Bar
Once you have several versions of a Bloody Mary recipe under your belt, the natural next step is to turn them into a full “Bloody Mary bar” experience. Instead of one person quietly drinking at the kitchen counter, you get an interactive, help-yourself station that can anchor a whole brunch.
Here’s one way to organise it.
Step 1: Pick Your Bases
Choose two or three jugs to start with:
- A classic vodka Bloody Mary
- A Virgin Mary for non-drinkers
- A Bloody Maria for tequila lovers
Optionally, keep a bottle of your homemade Bloody Mary mix in the fridge so you can pour fresh, super-cold drinks on demand and spike them glass by glass.
Label each jug so guests know which is which, or use coloured tags tied around the handles.
Step 2: Set Up Garnishes and Seasonings
Next, turn a corner of the table into a garnish playground. Place small bowls of:
- Lemon and lime wedges
- Celery sticks
- Cherry tomatoes
- Mixed olives
- Pickled vegetables (onions, gherkins, jalapeños)
- Crispy bacon strips for meat-eaters
Beside those, add little jars or bottles of:
- Hot sauces (different brands and heat levels)
- Worcestershire sauce
- Celery salt, chilli salt, and regular salt
- Black pepper
- Prepared horseradish
Now each person can dress their own Bloody Mary recipe to match their mood: mild and bright, or thick and fiery, or salty and snack-like.
Step 3: Add Brunch Food That Loves Tomato
A Bloody Mary feels better when there’s food nearby. You don’t need a complicated menu, yet a couple of thoughtful dishes go a long way.
You might, for instance:
- Put out a platter inspired by 10 Most Popular Mediterranean Breakfasts—think olives, feta, eggs, tomatoes and crusty bread.
- Bake a big tray of French Toast Sticks or soothe everyone with eggless French toast so sweet tooths are covered.
- Offer some lighter options from High Protein Overnight Oats or High Protein Plant-Based Breakfast Ideas for guests who care about macros as much as mimosas.
- Prepare a couple of easy egg dishes using ideas from 10 Examples of Egg Dishes, with 2 Eggs to turn eggs and Bloody Marys into a full brunch spread.
With even a few of those on the table, the drink stops being a gimmick and becomes part of a complete meal.
Step 4: Offer a “Second Round” That Isn’t Tomato
Eventually, even the biggest Bloody Mary fan might want to move on to something different. Rather than ending the party there, you can segue into another style of drink.
A few options that pair nicely:
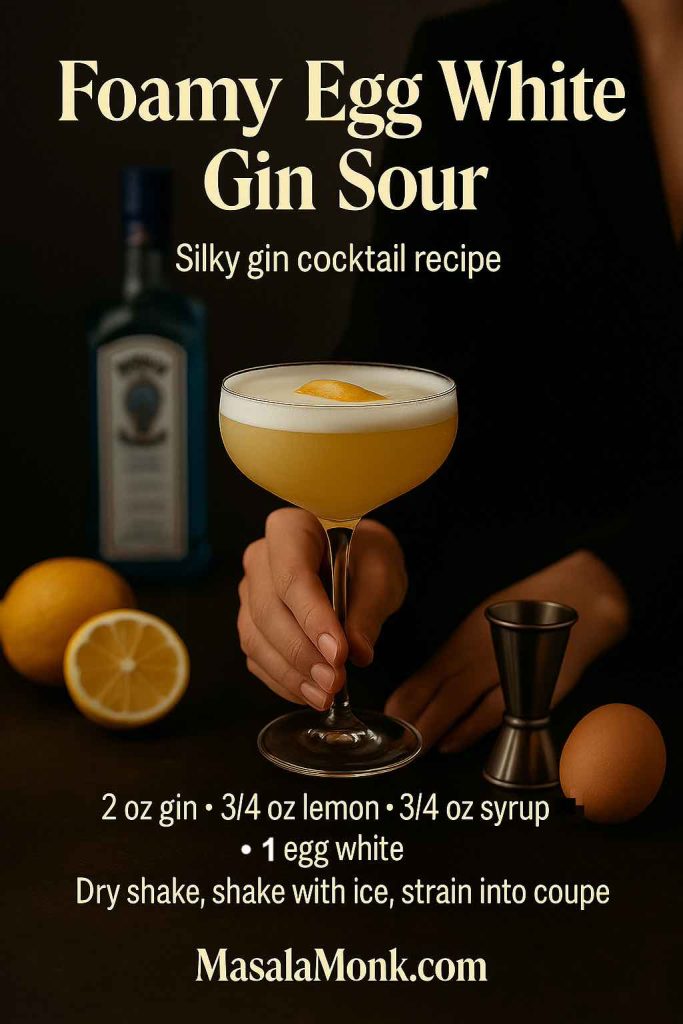
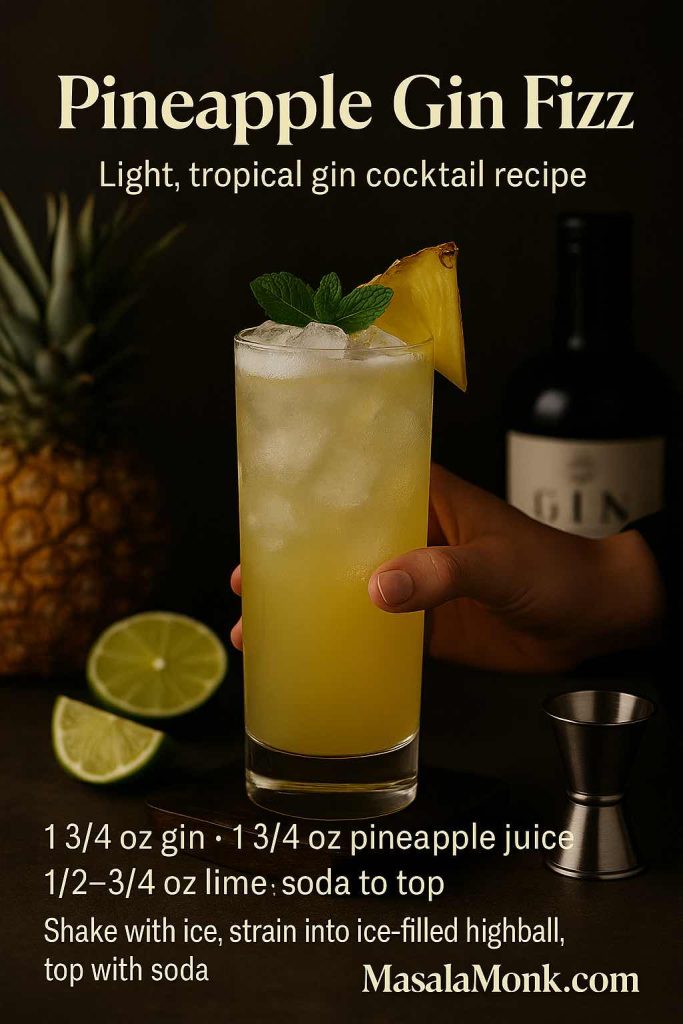
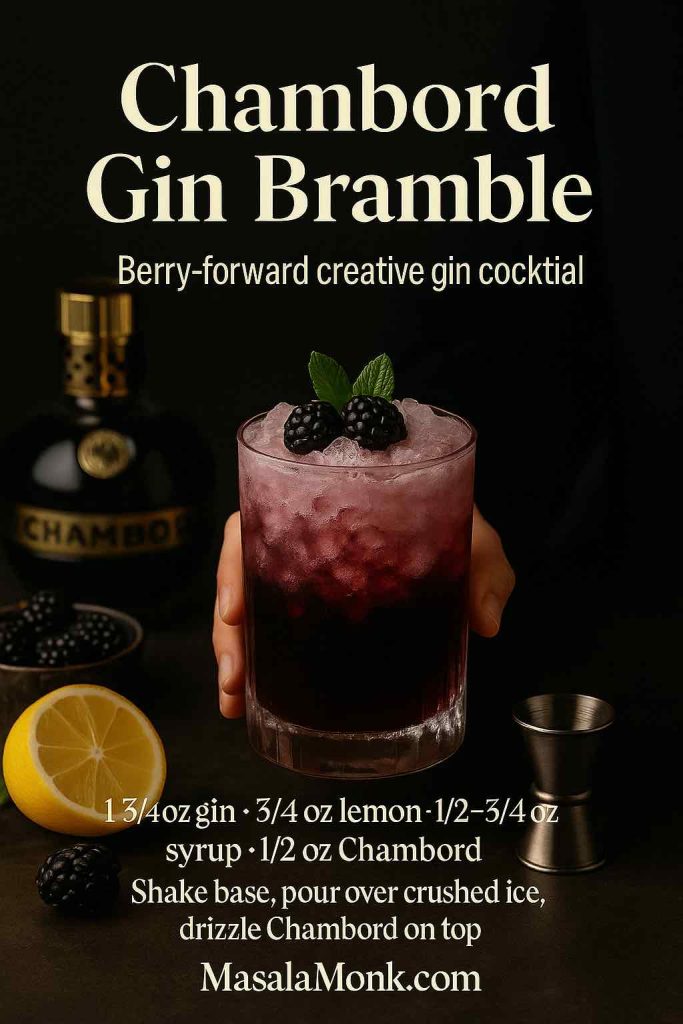
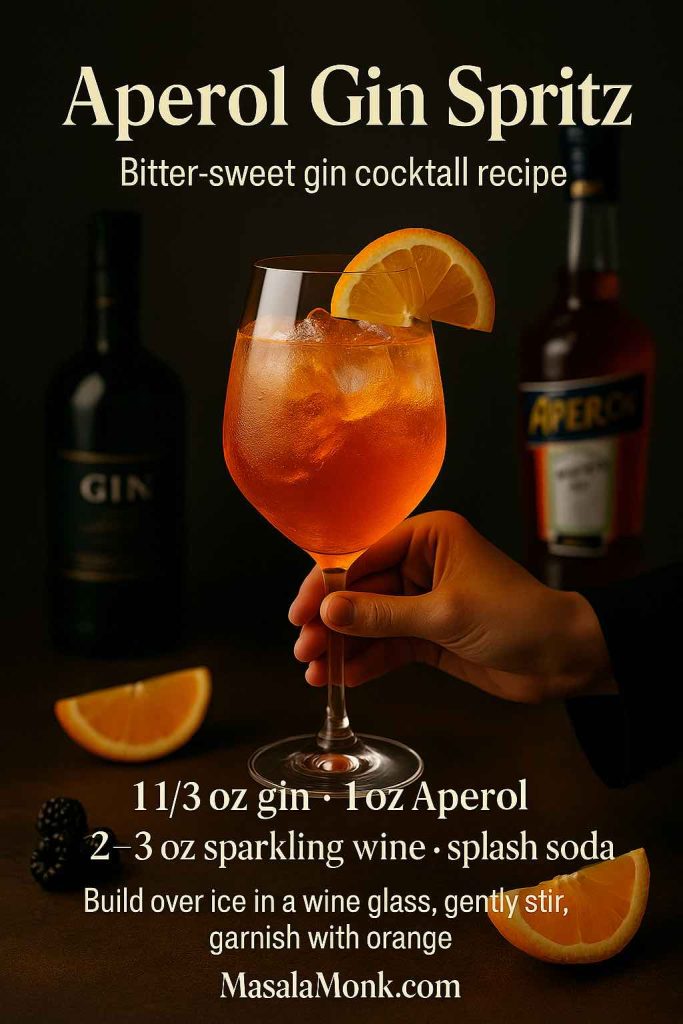
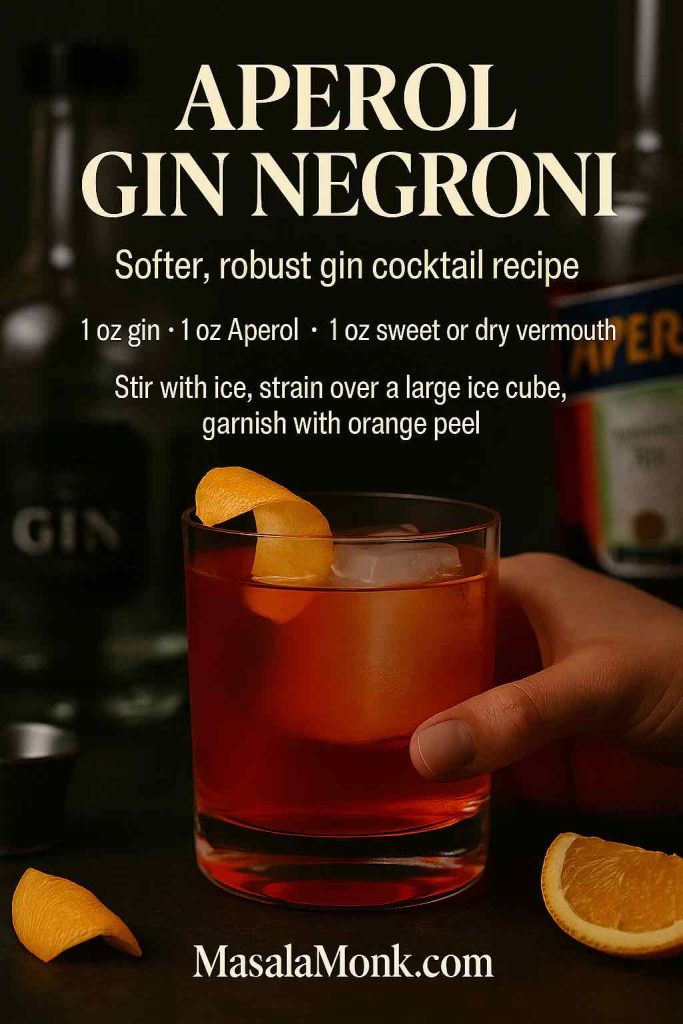
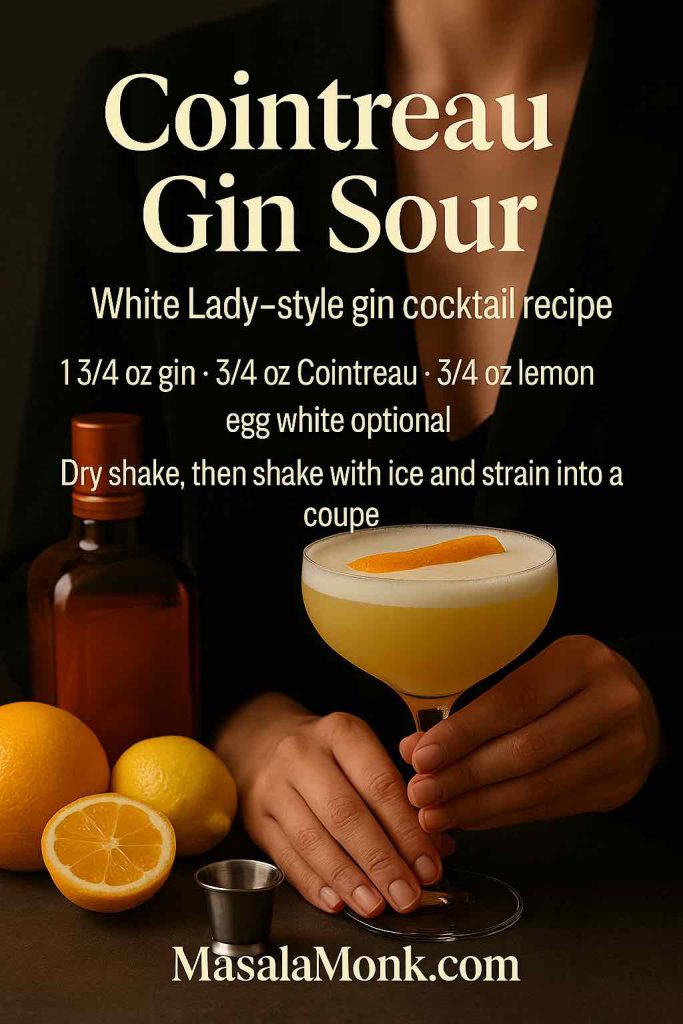
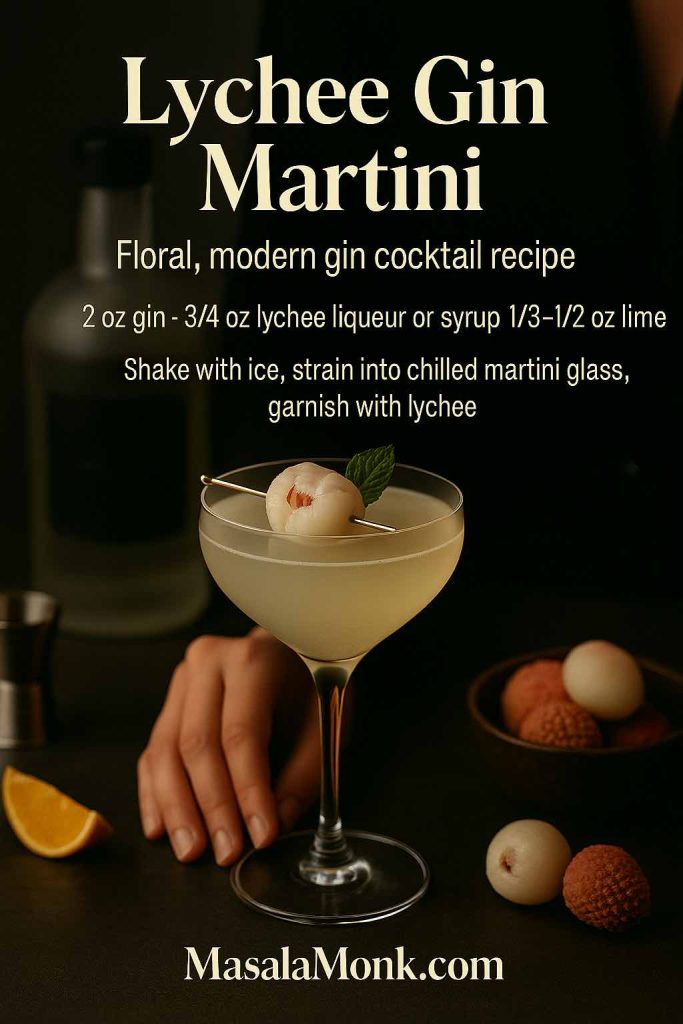
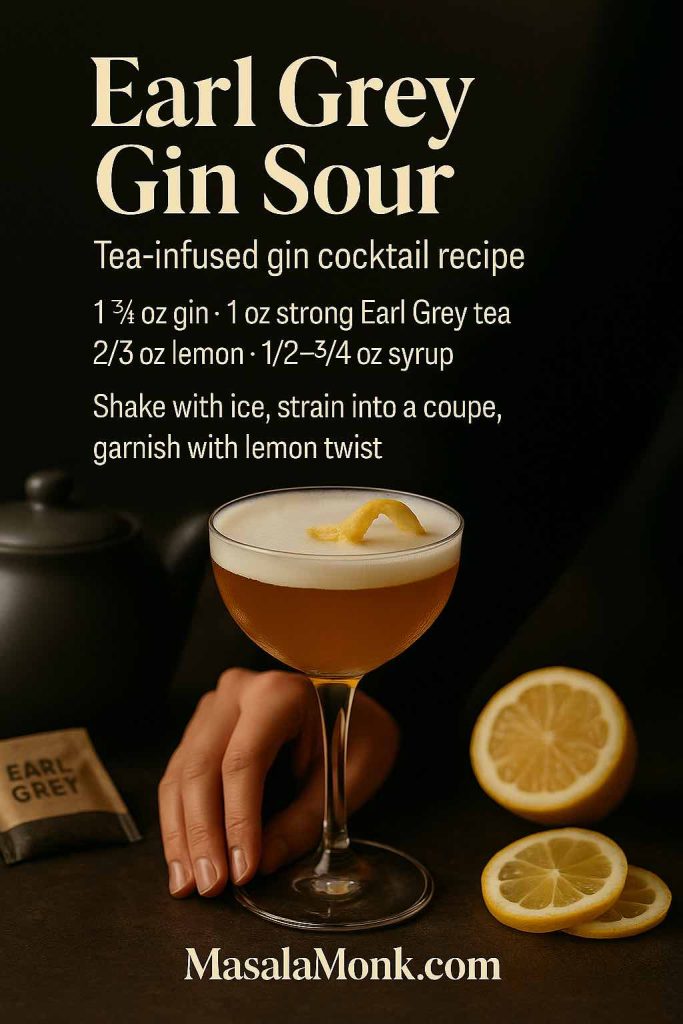
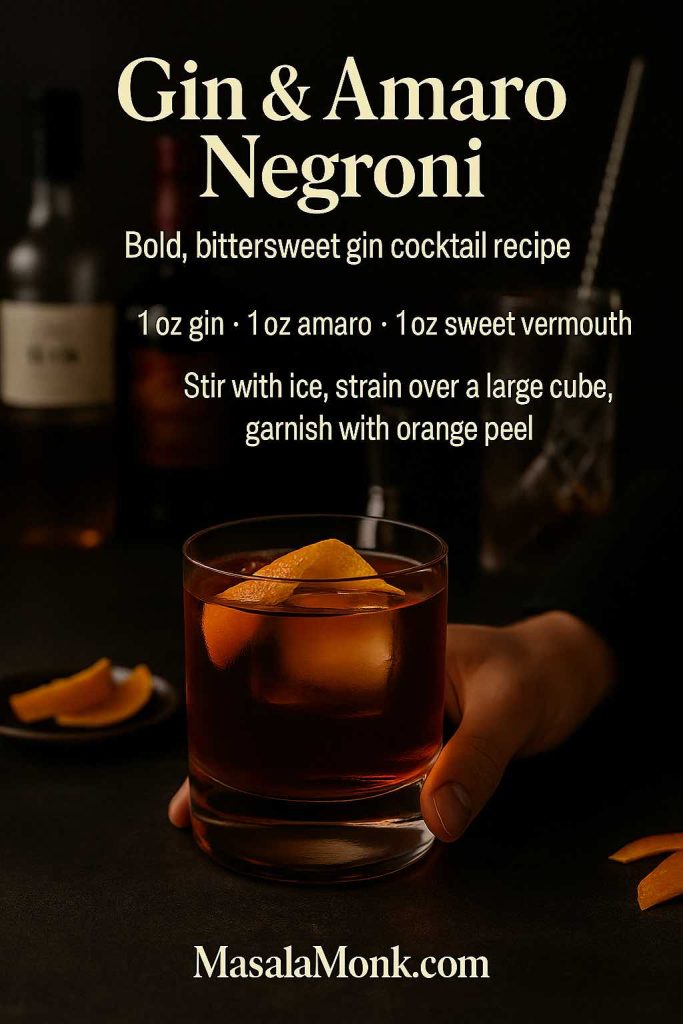
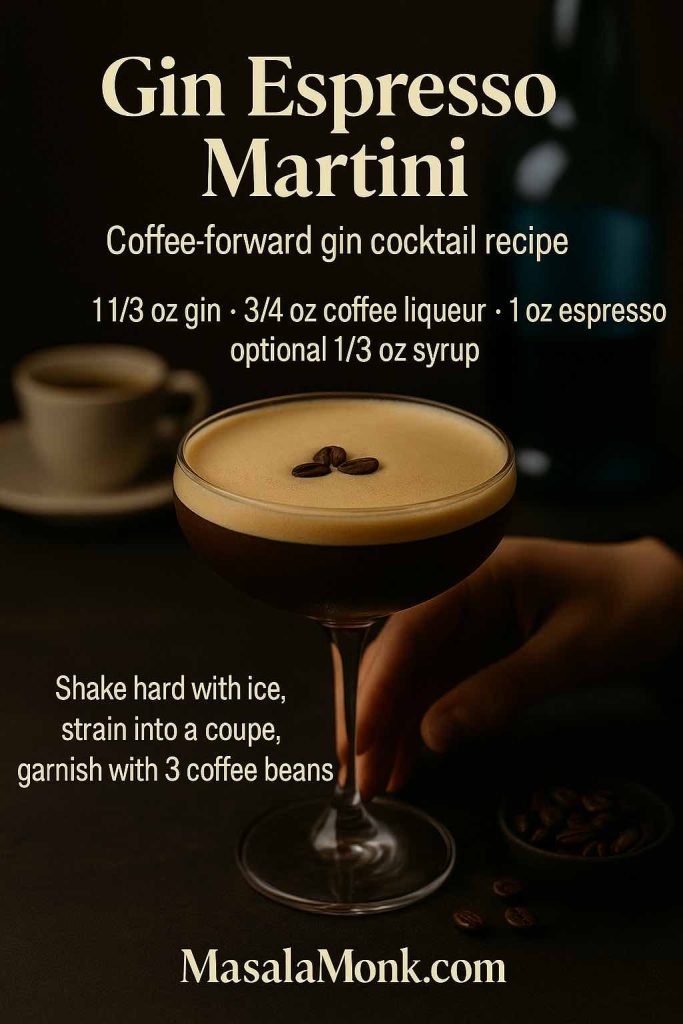
- Switch to creative gin cocktail recipes once the tomato glasses are empty. The structure-and-variation approach is similar, so the learning transfers.
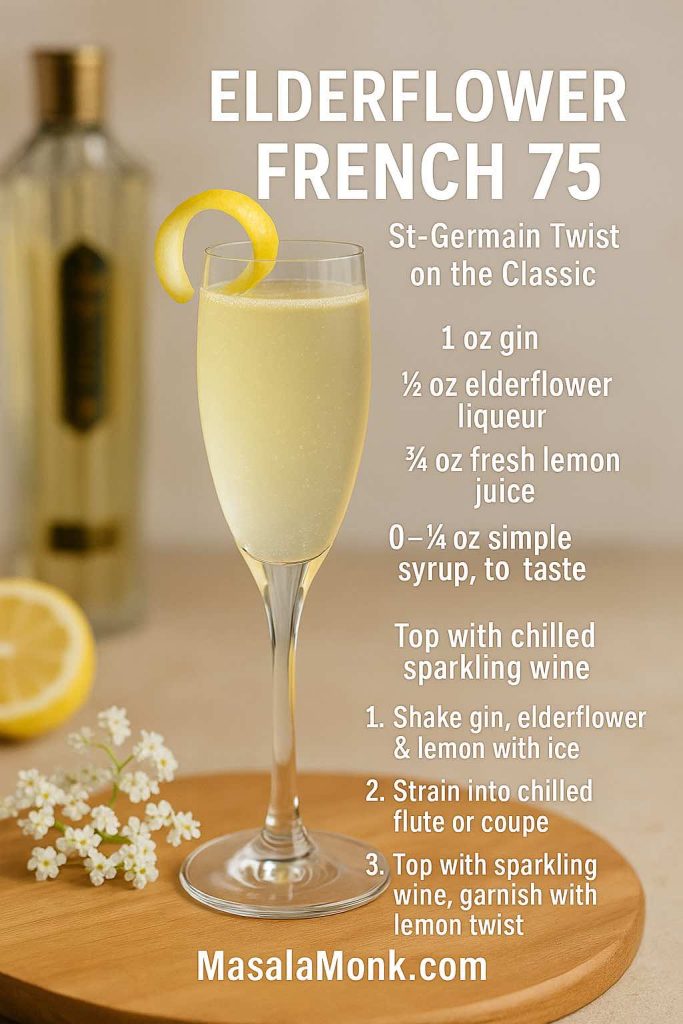
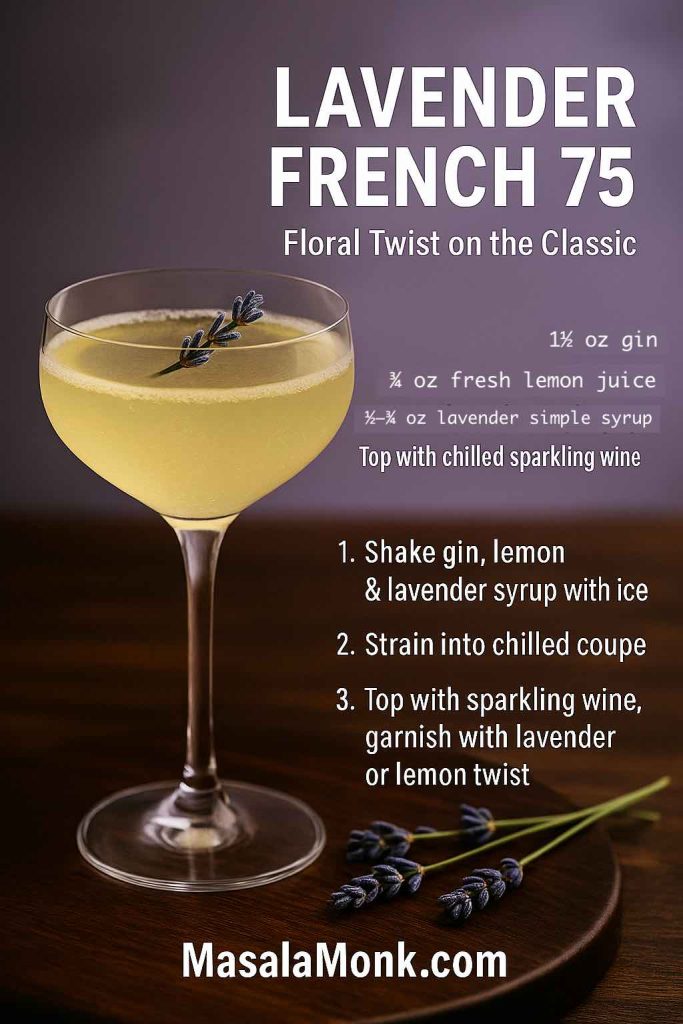
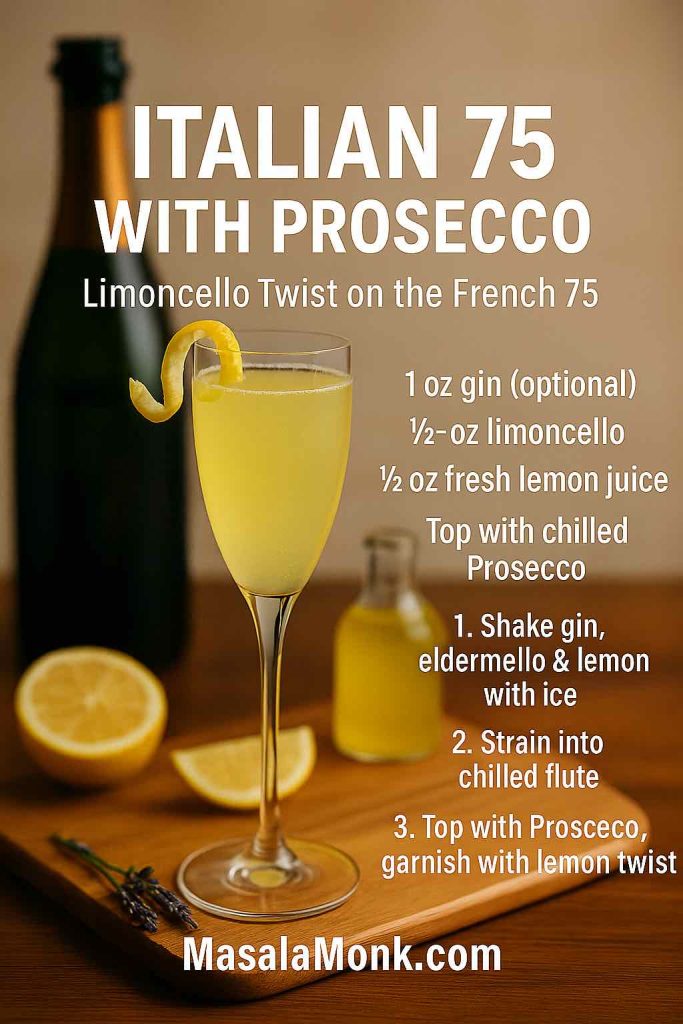
- Shake or stir sparkling citrus drinks using the French 75 cocktail recipe and its variations. They’re bright, bubbly, and feel like a natural continuation of brunch.
- For guests staying alcohol-free, offer a trio of mocktails with grenadine, apple juice mocktails, or other colourful concoctions so they’re never stuck with plain soda.
That way, your Bloody Mary bar becomes the starting act of a longer, more relaxed gathering.
Also Read: French 75 Cocktail Recipe: 7 Easy Variations
One Bloody Mary Recipe, Many Possibilities
It’s amazing how much variety hides inside one simple Bloody Mary recipe. Begin with vodka and tomato juice; add lemon, Worcestershire, hot sauce, salt and pepper; then adjust and taste. From that tiny foundation, you can:
- Stir up a classic single-serving drink
- Scale it into a crowd-pleasing pitcher
- Bottle a vodka-free mix for the week
- Serve a Virgin Mary that feels just as grown-up
- Swap tequila for a Bloody Maria
- Pour in bourbon for a smoky, bacon-friendly twist
- Blend it with beer for a lighter, fizzy version
- Wander into Caesar, Bull, Green and V8 territory
However you decide to pour it, the fun comes from understanding the framework and then playing. Once you’ve made one good Bloody Mary recipe, the rest are just small, deliberate changes—and each of those changes can turn the same basic idea into a completely new drink.
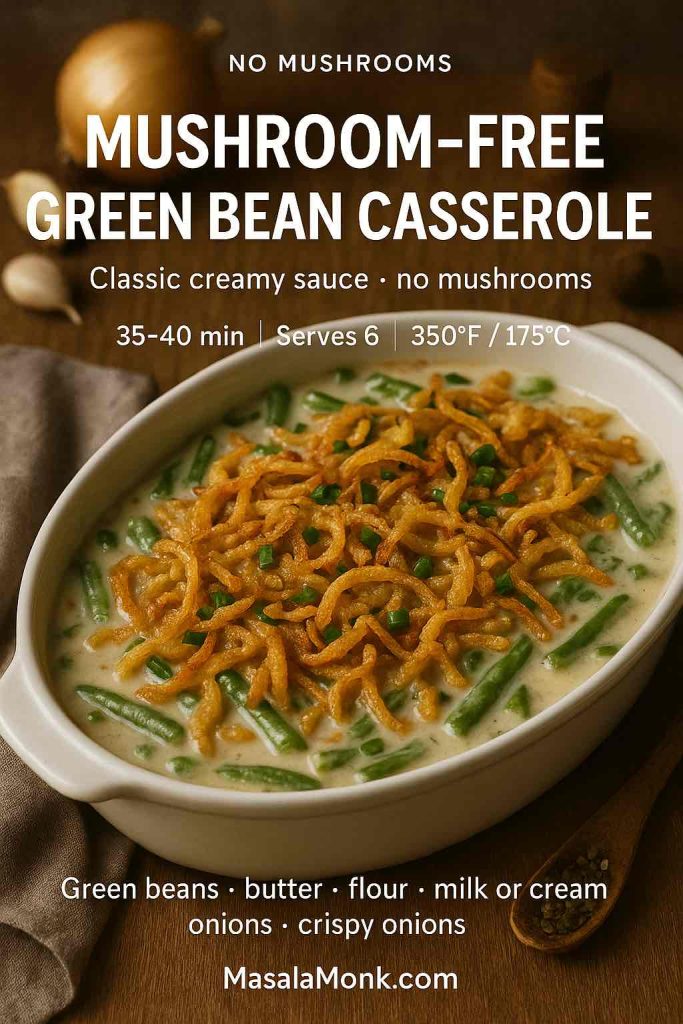
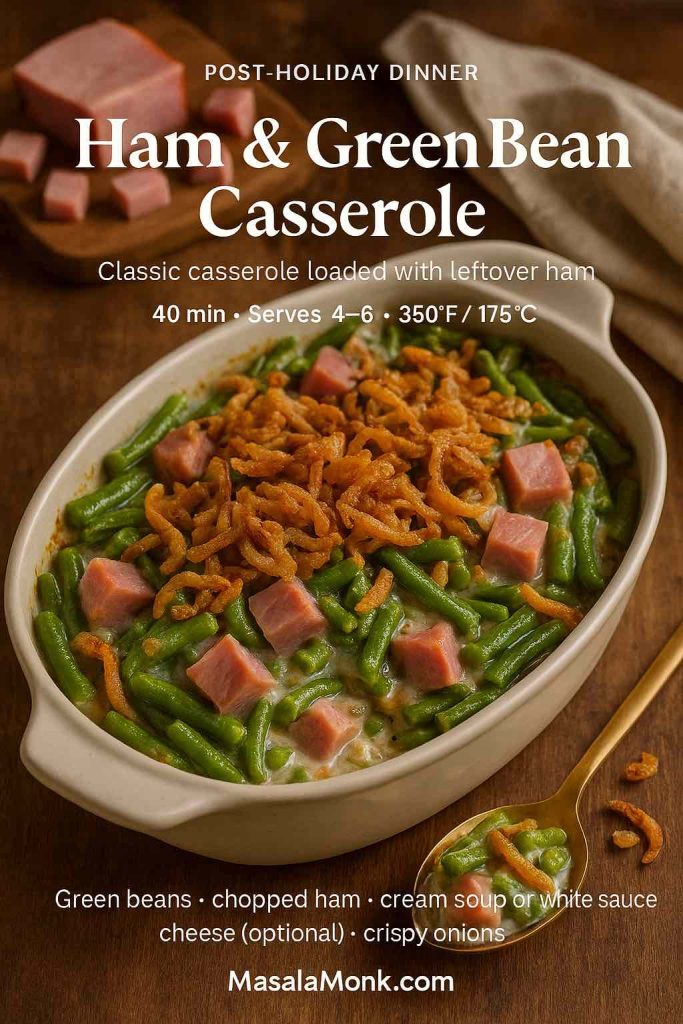
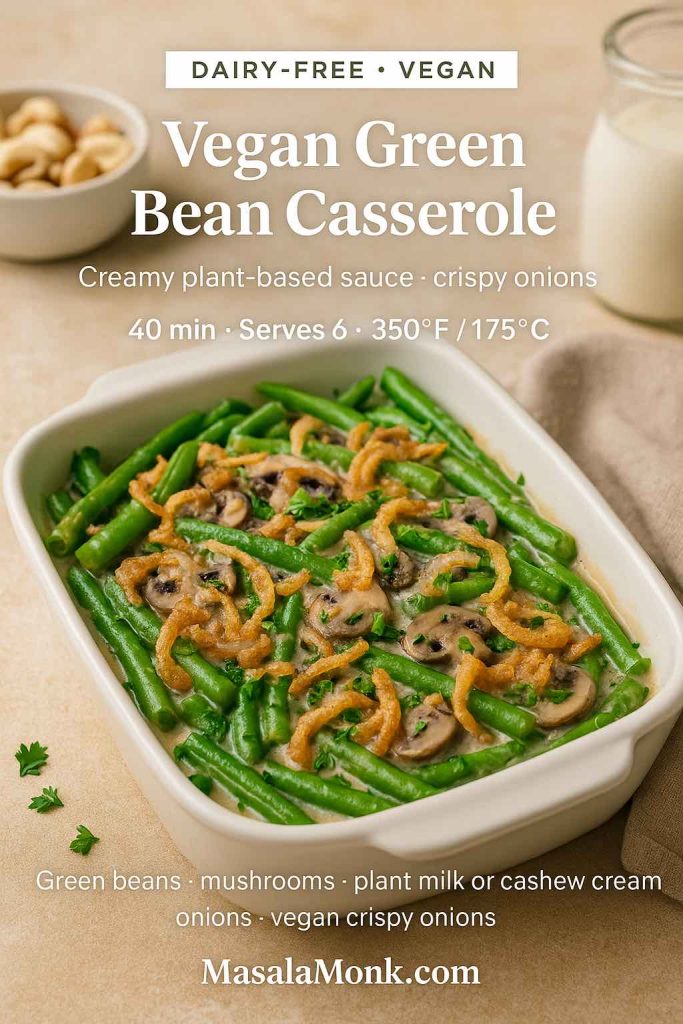
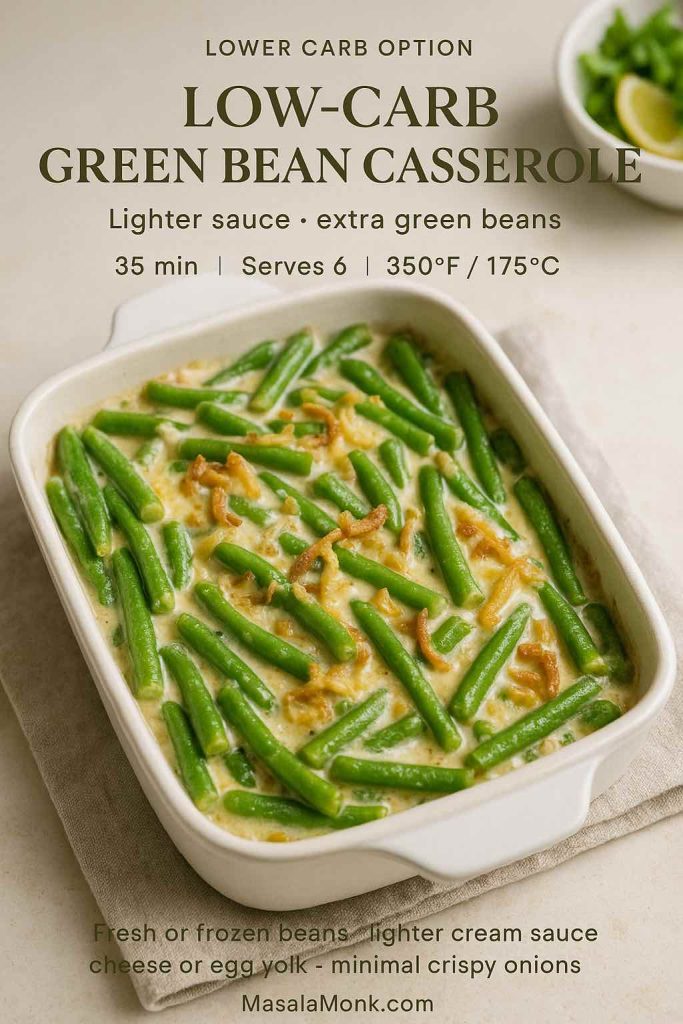
Also Read: Green Bean Casserole Recipe Ideas (Classic, Cheesy, Dairy-Free & More)
FAQs
1. What is a Bloody Mary cocktail?
A Bloody Mary is a savoury cocktail made from vodka and tomato juice, seasoned with citrus, Worcestershire sauce, hot sauce, salt, and pepper. A classic Bloody Mary recipe is usually served over ice in a tall glass and finished with bold garnishes like celery, olives, pickles, or even bacon.
2. What are the basic ingredients in a classic Bloody Mary recipe?
The basic Bloody Mary ingredients are vodka, tomato juice, lemon or lime juice, Worcestershire sauce, hot sauce, celery salt, and black pepper. After that, you can add extras like horseradish, smoked paprika, or Old Bay seasoning to personalise the recipe.
3. What is the simplest Bloody Mary recipe I can make at home?
For a very simple Bloody Mary recipe, combine 60 ml vodka, 120–150 ml tomato juice, 15 ml lemon juice, 2–3 dashes Worcestershire sauce, 2–3 dashes hot sauce, a pinch of celery salt, and black pepper over ice. Stir well, taste, and then adjust salt, heat, or citrus until it tastes balanced to you.
4. What is the usual vodka to tomato juice ratio in a Bloody Mary?
Most basic Bloody Mary recipes use roughly 1 part vodka to 2 or 2½ parts tomato juice. If you like a stronger drink, use more vodka; if you prefer a longer, lighter Bloody Mary drink, add extra tomato juice or even a splash of water or ice melt.
5. What is a Bloody Maria and how is it different from a Bloody Mary?
A Bloody Maria is a Bloody Mary recipe made with tequila instead of vodka. Typically it also uses lime instead of lemon and often leans into Mexican-style flavours with chilli-salt rims, jalapeños, and coriander, but the tomato base and savoury seasonings stay similar.
6. What do you call a vodka and tomato juice drink?
Most of the time, a vodka and tomato juice cocktail is simply called a Bloody Mary. If it is very plain—just vodka and tomato juice without spice—some people might just describe it as a “vodka tomato juice drink”, but once you add citrus, salt, and hot sauce, you’re essentially in Bloody Mary recipe territory.
7. How do I make a Virgin Bloody Mary or Virgin Mary drink?
To make a Virgin Bloody Mary (also called a Virgin Mary), skip the vodka and increase the tomato juice. Mix about 180 ml tomato juice with 15 ml lemon juice, a couple of dashes of Worcestershire sauce, a few drops of hot sauce, celery salt, and pepper over ice, then garnish just like the alcoholic version.
8. Can I use other spirits instead of vodka in a Bloody Mary recipe?
Yes, you can. Tequila gives you a Bloody Maria, gin creates a herbal gin and tomato juice twist, bourbon or Irish whiskey brings a smoky, sweet note, and even rum or mezcal can work for adventurous versions. The key is to keep the tomato, citrus, and savoury seasoning structure the same while changing only the base alcohol.
9. Can I make a Bloody Mary with beer?
You can absolutely make a beer Bloody Mary recipe. Either serve a classic Bloody Mary with a beer chaser, or build a Michelada-style drink by mixing tomato-based Bloody Mary mix with lime juice, hot sauce, salt, and topping it with chilled lager.
10. Can I make a Bloody Mary without alcohol but still keep it spicy?
Definitely. For a non-alcoholic Bloody Mary mocktail, use tomato juice, lemon or lime juice, Worcestershire sauce (or a vegan equivalent), hot sauce, celery salt, and pepper over ice. You can add horseradish or extra chilli to keep it as fiery as a full-strength cocktail, even though it’s alcohol-free.
11. How do I make Bloody Mary mix from scratch?
To make a homemade Bloody Mary mix recipe, stir together tomato juice, lemon juice, Worcestershire sauce, hot sauce, celery salt, black pepper, and optional horseradish or smoked paprika in a jug or bottle. Chill it for a few hours so the flavours meld, then pour over ice and add vodka (or another spirit) whenever you’re ready for a drink.
12. How long does homemade Bloody Mary mix last in the fridge?
As a general rule, a fresh Bloody Mary mix without alcohol keeps well in the fridge for about 3–5 days in a sealed container. Before using it, shake or stir, taste, and adjust lemon, salt, or hot sauce so the final Bloody Mary recipe still tastes bright and balanced.
13. Can I can or bottle Bloody Mary mix for long-term storage?
You can, but only if you follow a tested canning recipe with proper acidity and pressure-canning times. For most home cooks, it’s safer and easier to make smaller fridge batches of Bloody Mary mix recipe and use them within a few days rather than trying to invent a shelf-stable version.
14. What are the best garnishes and toppings for a Bloody Mary?
Classic Bloody Mary toppings include celery stalks, lemon or lime wedges, olives, pickles, and cherry tomatoes. Beyond that, many people enjoy bacon strips, prawns, cheese cubes, pickled jalapeños, or even mini sliders for over-the-top “crazy Bloody Mary drinks” that double as food.
15. What’s the best vodka or tequila for a Bloody Mary or Bloody Maria?
For a Bloody Mary recipe, a clean, mid-range vodka that you like the taste of is ideal; it doesn’t have to be the most expensive bottle, but it shouldn’t taste harsh. For a Bloody Maria, a smooth blanco or lightly aged reposado tequila works well, because it adds character without overpowering the tomato and spice.
16. Can I use Clamato, V8 or other juices instead of plain tomato juice?
Yes, you can swap the base liquid. Plain tomato juice gives you a classic Bloody Mary, clam-tomato juice produces a Caesar-style drink, and vegetable blends like V8 create a richer, spicier version. Whenever you change the juice, just taste before adding extra salt or hot sauce, because some blends are already seasoned.
17. How do I make a low-sodium or low-sugar Bloody Mary?
For a lower-sodium Bloody Mary recipe, choose low-salt tomato or vegetable juice, limit celery salt, and go easy on Worcestershire sauce, adding just enough for flavour. To keep sugar down, avoid sweet mixers, don’t add syrups, and rely on citrus, spice, and savoury notes instead of sweetness for balance.
18. Is a Bloody Mary gluten-free and vegan?
A basic vodka and tomato juice Bloody Mary can be gluten-free and vegan, but only if you check the labels. Some Worcestershire sauces contain anchovies (not vegan) and certain mixes or spice blends may include gluten or malt-based ingredients, so you’ll want to choose vegan Worcestershire and certified gluten-free mixes for a fully vegan, gluten-free Bloody Mary recipe.
19. How do I scale a Bloody Mary recipe for a crowd?
To scale up, multiply your favourite single-serve Bloody Mary recipe by the number of guests and mix everything except the ice in a large jug or dispenser. Chill the batch, then let everyone pour over ice and customise with extra hot sauce, lemon, or garnishes so one big mix can satisfy different tastes.
20. Is a Bloody Mary really a hangover cure?
A Bloody Mary drink feels like a hangover cure because it’s cold, salty, spicy, and hydrating, and sometimes includes a bit of “hair of the dog” alcohol. However, it doesn’t actually fix dehydration or fatigue by itself; water, rest, and food do that, while the Bloody Mary recipe mostly just makes the morning more tolerable and a lot tastier.
21. Why does my Bloody Mary taste bland, too salty, or too thick?
If your Bloody Mary tastes bland, increase lemon or lime, a pinch of salt, and a dash or two of hot sauce. When it’s too salty, add more tomato juice and citrus, and skip a salted rim next time; if it’s too thick, thin it with a splash of water, extra citrus, or a bit more ice so the texture feels drinkable instead of soupy.
22. What’s the difference between a classic Bloody Mary recipe and a spicy Bloody Mary recipe?
A classic Bloody Mary has gentle heat from a small amount of hot sauce and pepper, while a spicy Bloody Mary recipe increases that heat with extra hot sauce, horseradish, chilli-salt rims, or spicy vegetable juice. The core structure stays the same; you simply push the spice element higher for people who enjoy more burn.