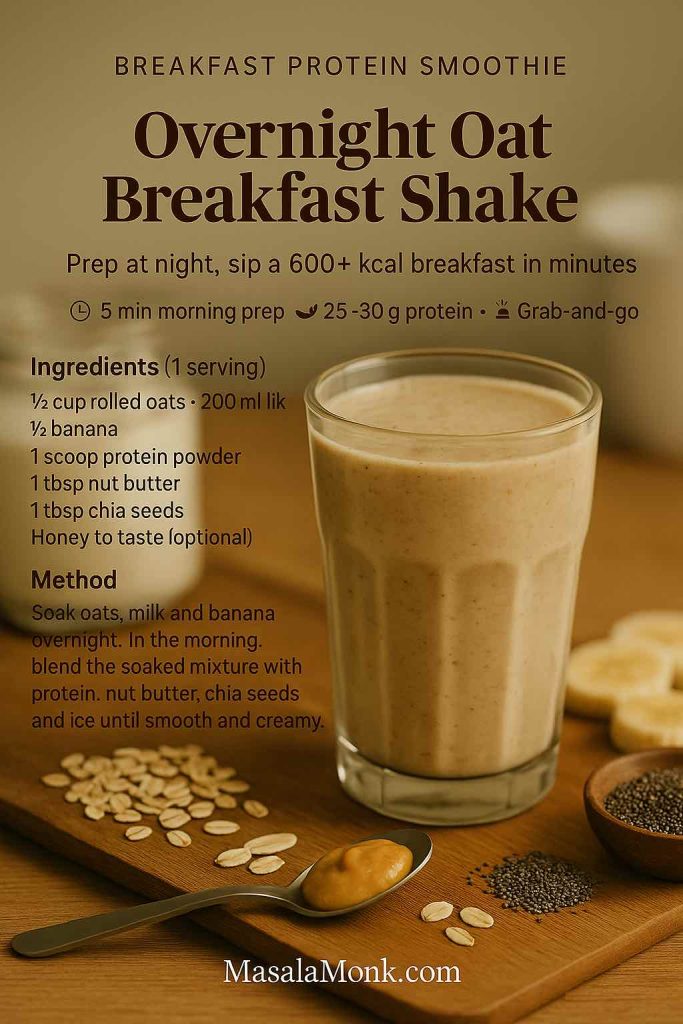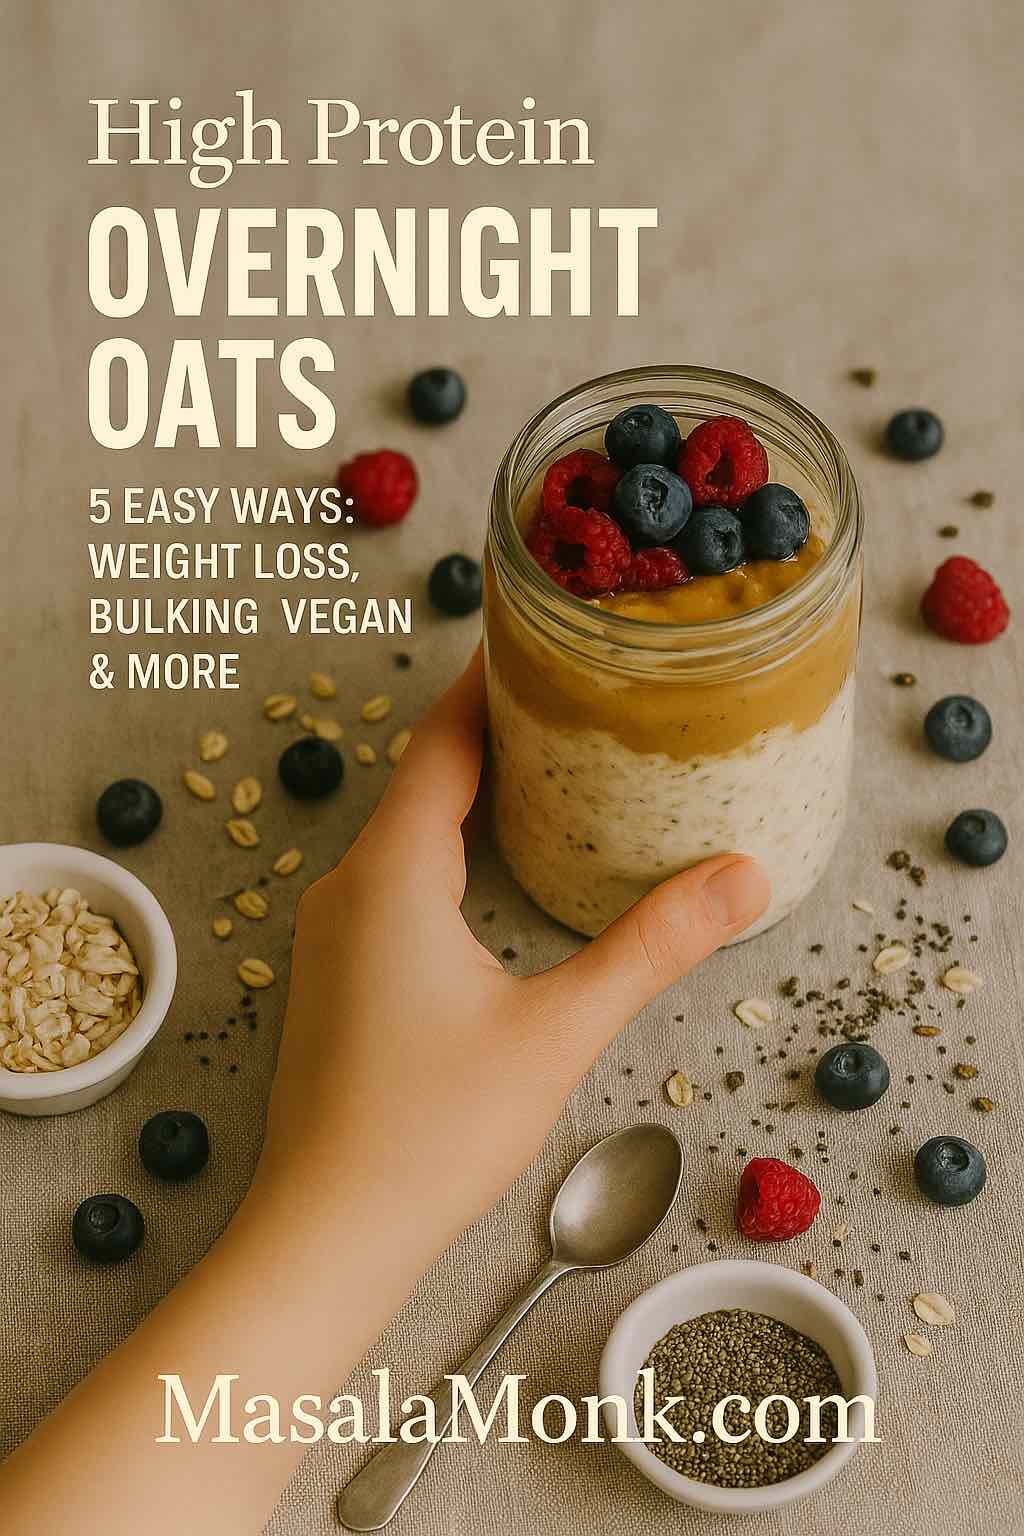
If you like the idea of breakfast quietly getting ready for you while you sleep, high protein overnight oats are one of the easiest wins you can build into your routine. You stir a few ingredients into a jar at night, tuck it into the fridge, and wake up to something cold, creamy, filling and actually useful for your goals—whether that’s dropping a bit of weight, building muscle, eating more plant-based, or simply avoiding chaos in the morning.
At their core, high protein overnight oats are just oats soaked in liquid with enough protein-rich ingredients added to push the bowl into the 20–30 gram range. Because oats already bring slow-digesting carbohydrates and fibre, you get a steady release of energy instead of a blood-sugar spike and crash. When you add protein and a few smart toppings, you end up with a breakfast that feels like dessert in a jar but behaves like something a dietitian would approve of.
In this guide, you’ll first see a flexible base recipe for high protein overnight oats. After that, we’ll walk through four simple variations: a low-calorie, weight-loss–friendly version, a bulking/bodybuilder version, a vegan and dairy-free version, and finally a no-protein-powder version for days when you want everything to come from regular foods. Along the way, you’ll find links to deeper resources on oats, chia, peanut butter and more so you can tweak things to perfectly fit your macros and taste.
What Makes High Protein Overnight Oats So Powerful?
Before getting into measurements and jars, it’s worth understanding why this basic idea has so much staying power.
Oats are one of those old-school ingredients that have quietly earned their place in modern nutrition. They provide complex carbohydrates, a decent amount of plant protein, and a type of soluble fibre called beta-glucan. That fibre forms a gentle gel in your digestive system, slowing the release of glucose into your bloodstream and helping you feel full for longer. If you want to geek out on the details, the Harvard overview of oats explains how they support heart health, cholesterol and digestion without being complicated to cook.
Because oats are a whole grain, they also bring B-vitamins and minerals along for the ride. The key, though, is not to drown them in sugar. A piece on oatmeal as a smart breakfast choice makes the point that the base is excellent; it’s the flavoured instant sachets and excessive sweeteners that usually cause problems. In overnight oats, you’re in control of every ingredient, which makes it easy to keep things balanced.
Now add protein to that picture. Breakfasts that contain around 20–30 grams of protein are consistently associated with better appetite control and fewer random cravings later in the day. If you’re aiming to manage weight or just avoid mid-morning snack attacks, that’s a big deal. A simple explainer on protein at breakfast and weight loss breaks down why that 20-gram mark is such a useful target. High protein overnight oats are basically a painless way to hit that threshold.
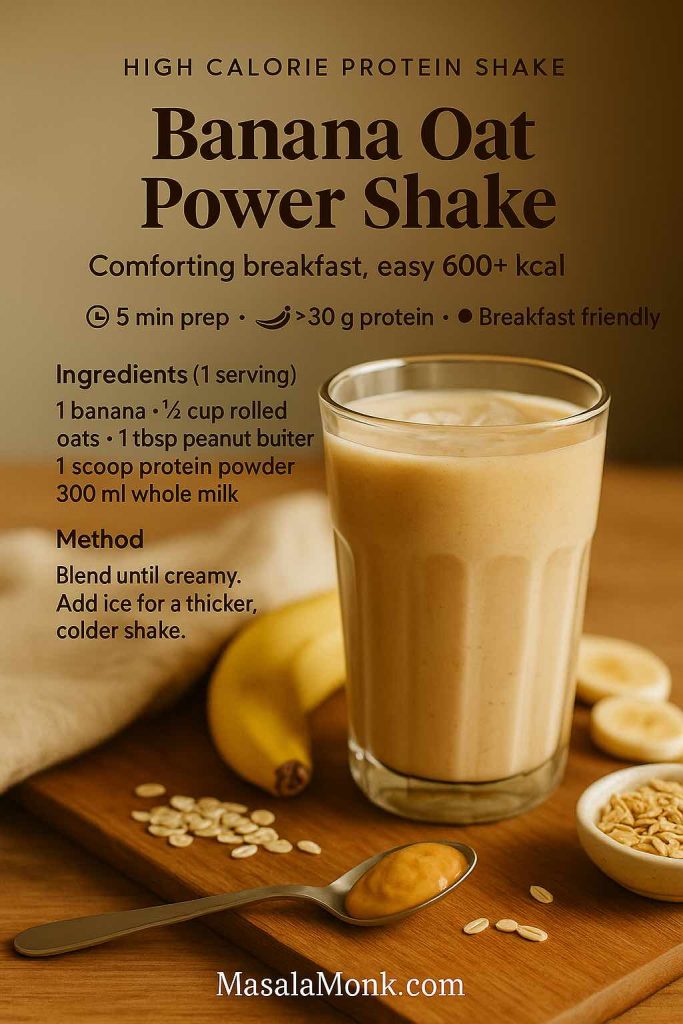
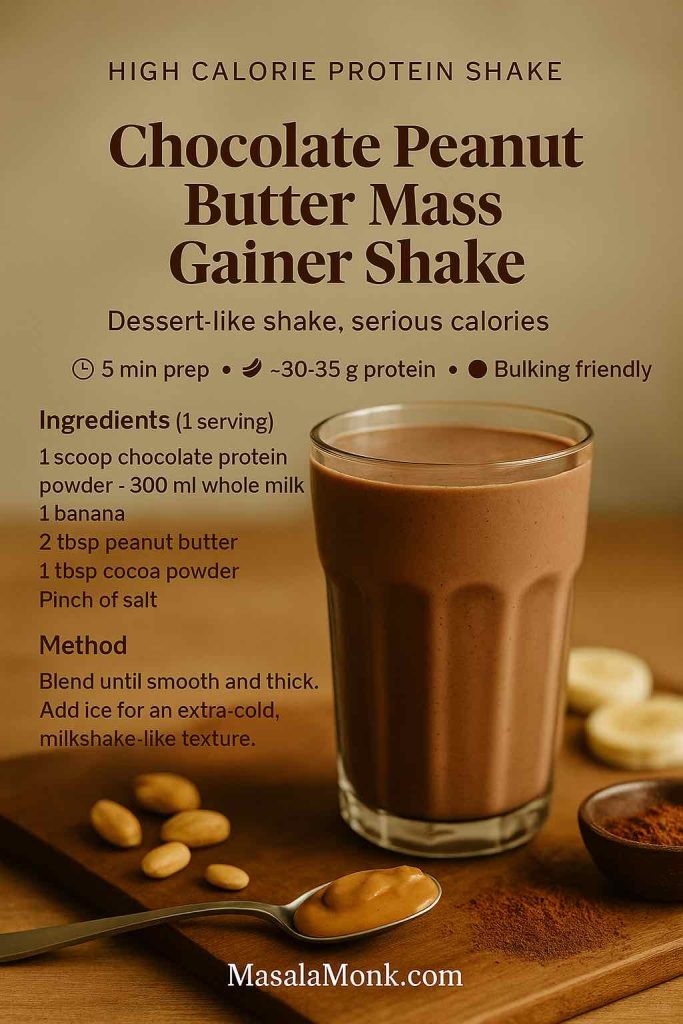
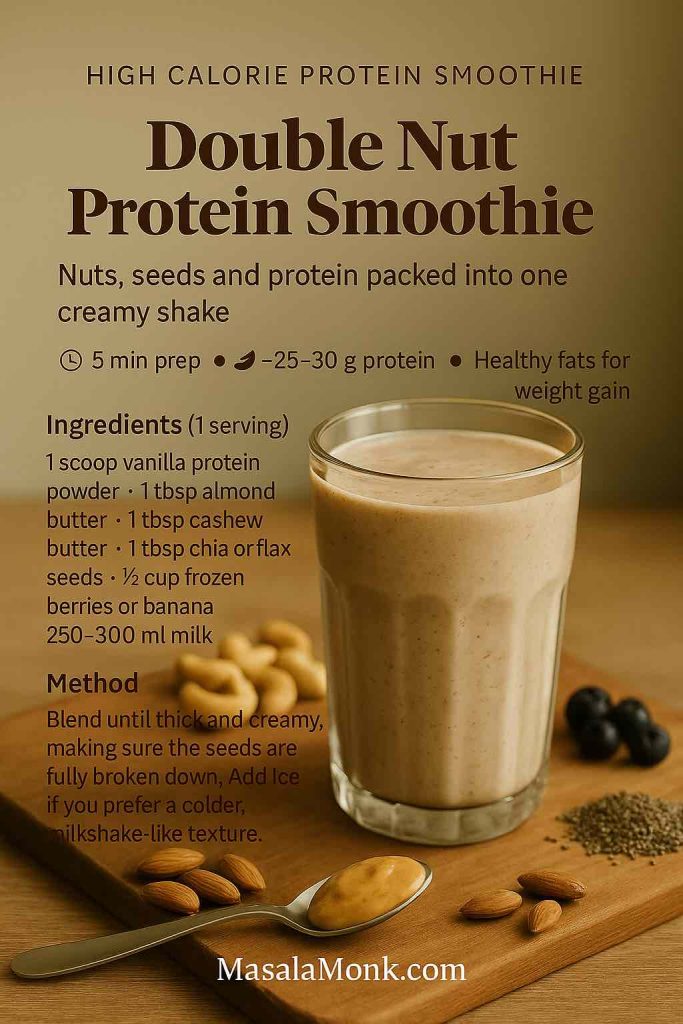
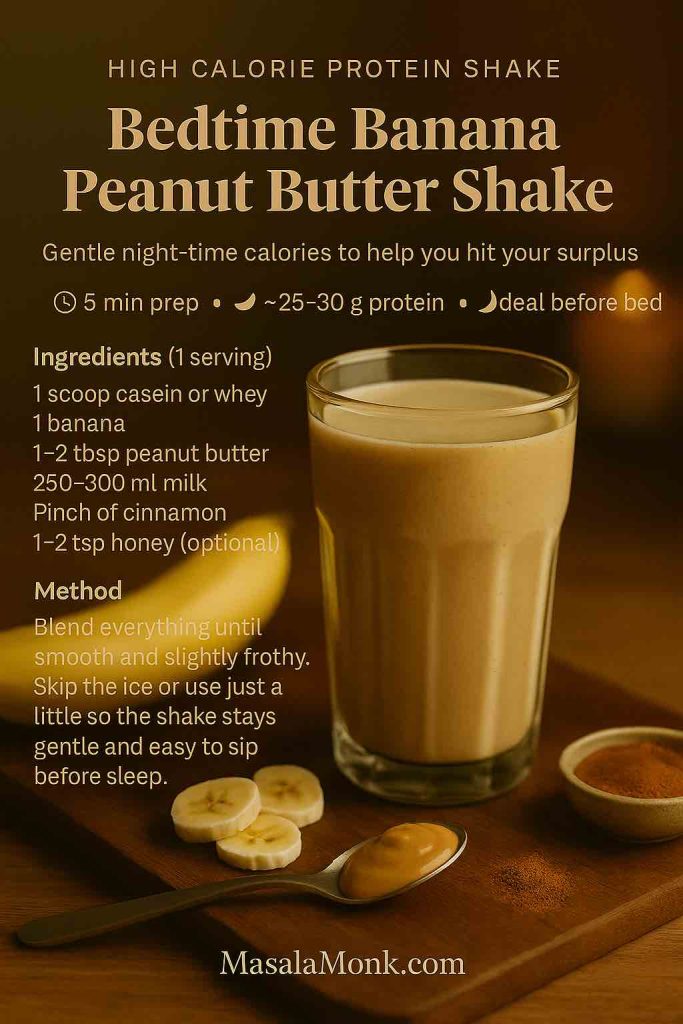
Also Read: 10 High Calorie Protein Shakes & Smoothie Recipes for Healthy Weight Gain
Toppings for Extra Protein
On top of all that, you have chia seeds, nuts and seeds, Greek yogurt, soy products and protein powders—each of which brings its own extra protein, fibre and healthy fats. A quick look at chia seeds and their benefits shows how much fibre and omega-3 fat you get from just a couple of spoonfuls. When you combine all these pieces inside one jar, you get a breakfast that’s easy to prepare, genuinely satisfying, and far more interesting than a plain bowl of porridge.
Choosing Your Oats and Other Building Blocks
Although “oats are oats” is a nice simple idea, the supermarket shelves tell a different story. You’ll see steel-cut, rolled, old-fashioned, quick-cooking and instant oats, plus flavoured packets and granola mixes. The good news is that most plain, unflavoured oat types can work in high protein overnight oats, as long as you adjust the liquid and soaking time.
If you’re a bit confused by the options, MasalaMonk has a detailed guide to oat types and nutrition that walks through steel-cut, rolled, quick and instant oats in simple language. Pair that with their breakdown of oats vs oatmeal and you’ll never stand in the cereal aisle unsure what to buy again.
For overnight oats specifically:
- Rolled or old-fashioned oats are the sweet spot. They soften nicely overnight and keep some texture.
- Quick oats will give you a softer, more pudding-like texture and tend to thicken faster.
- Steel-cut oats need more liquid and time; if you like a bit of chew, they can be great, but you may want to pre-soak or use slightly warm liquid.
If you want to see what happens when oats and chia get together specifically for weight loss and texture, take a look at MasalaMonk’s article on harnessing the power of oats and chia seeds for weight loss. It’s essentially a deep dive into the same idea we’re using here: using fibre and volume to keep hunger in check.
Beyond the oats themselves, you’ll be choosing:
- Liquid – milk, oat milk, soy milk, almond milk, coconut milk or a mix. If you enjoy DIY projects, the homemade oat milk tutorial at MasalaMonk gives you a one-ingredient version that works beautifully in jars.
- Protein source – Greek yogurt, skyr, cottage cheese, silken tofu, protein powder (whey or plant-based), or combinations of these.
- Thickeners and boosters – chia seeds, ground flax, nut butters, seeds.
- Flavour and sweetness – fruit, cocoa powder, vanilla, cinnamon, cardamom, a small amount of honey, jaggery or dates.
Once you see high protein overnight oats as a formula rather than a single strict recipe, it becomes much easier to customise them.
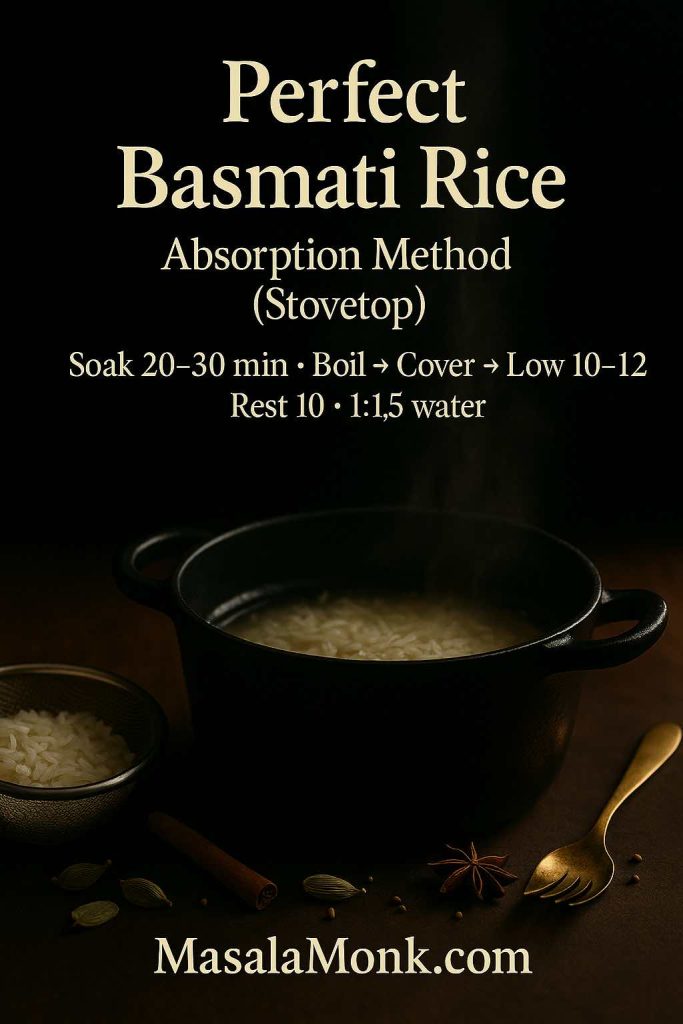
Also Read: How to Cook Perfect Rice Every Time (Recipe)
The Base High Protein Overnight Oats Recipe
Let’s start with a foundation you can come back to repeatedly. This base high protein overnight oats recipe is designed to land around the 22–28 gram protein mark for most people, depending on your protein powder and yogurt.
Ingredients for One Jar
- ½ cup (around 40 g) rolled oats
- ¾ cup (about 180 ml) milk of choice (dairy, soy, or another plant milk)
- ¼ cup (60 g) thick Greek yogurt or hung curd
- 1 scoop (20–25 g) protein powder
- 1 tablespoon chia seeds
- ½ medium banana, mashed or 1–2 teaspoons honey/jaggery powder
- A pinch of salt
- ½ teaspoon vanilla extract or ground cinnamon
- Optional toppings in the morning: berries, sliced banana, a few chopped nuts, a teaspoon of nut butter, extra seeds
If you’re sensitive to sweetness, err on the side of less banana or sweetener at first. You can always drizzle a bit of honey or maple syrup on top the next day.
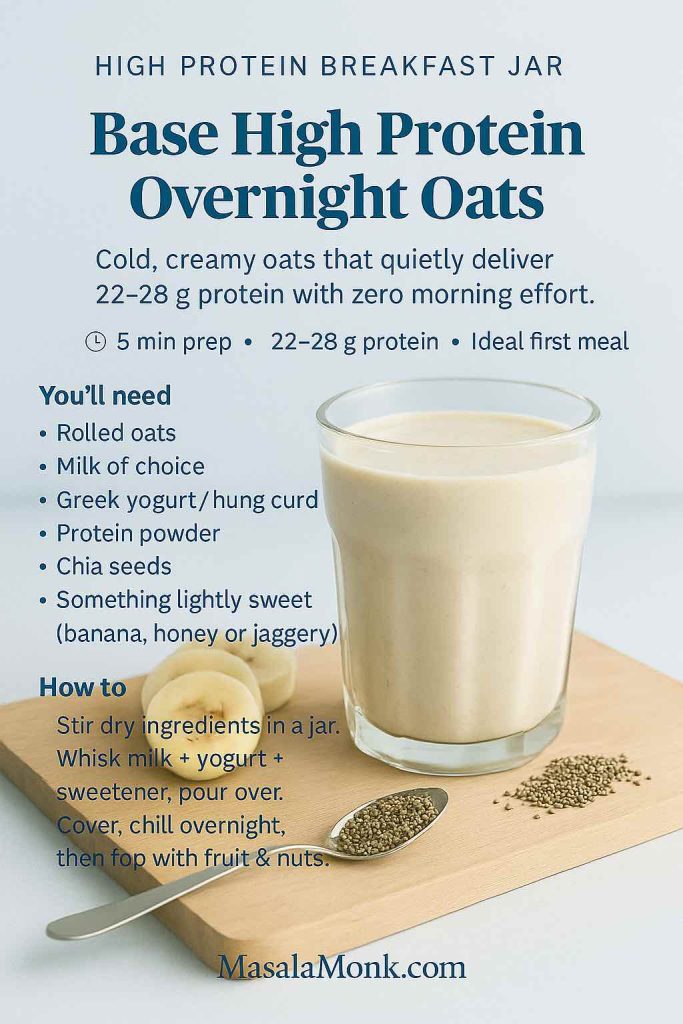
Step-by-Step Method
- Combine the dry ingredients.
Add oats, protein powder, chia seeds, salt and any spices into a jar or container. Stir them together so the powder and seeds are evenly distributed. - Whisk the wet ingredients.
In a small bowl, whisk milk, yogurt and mashed banana or liquid sweetener. This little step helps your protein powder dissolve more evenly and keeps clumps away. - Bring everything together.
Pour the wet mixture over the oats mixture. Stir thoroughly, scraping down the sides and bottom of the jar. If it looks very thick, add a splash more milk; if it looks thin, remember that chia and oats will thicken it overnight. - Let the fridge do the work.
Seal the jar and refrigerate it for at least 4 hours. Overnight (8–12 hours) is ideal. A simple overnight refrigerator oatmeal recipe from Mayo Clinic notes that this kind of mixture can keep for a couple of days if stored properly, which makes prepping multiple jars at once very practical. - Top and adjust in the morning.
When you’re ready to eat, open the jar and give your high protein overnight oats a quick stir. If it’s too thick, loosen it with a little extra milk or yogurt. Then add toppings: a handful of berries, a spoonful of chopped nuts, some seeds, or a drizzle of peanut butter.
If you enjoy this kind of “prepped once, ready for several days” breakfast, you’ll probably also like MasalaMonk’s healthy oat protein bars. Those bars use oats and protein in a portable, no-sugar way that pairs naturally with this overnight oats approach.
From this base, you can move in four directions depending on your goals and preferences.
Also Read: Homemade Hot Chocolate with Cocoa Powder Recipe
Low Calorie High Protein Overnight Oats for Weight Loss
Sometimes you want your breakfast to be filling and high in protein, but not too heavy on calories. In that case, the idea is to keep protein high while dropping the overall energy density and increasing fibre and water content.
A low calorie high protein overnight oats version is especially useful when:
- You’re in a fat-loss phase
- You tend to snack a lot mid-morning
- You’d rather save more calories for lunch and dinner
How to Lighten the Base Recipe
Starting from the base, you can make a few simple adjustments:
- Reduce oats to ⅓ cup instead of ½ cup.
- Use 1 cup unsweetened almond milk, oat milk or skimmed dairy milk instead of ¾ cup regular milk.
- Keep ¼ cup of low-fat Greek yogurt, or use a slightly smaller portion if you’re very calorie-conscious.
- Leave the protein powder scoop as-is so protein stays high.
- Increase chia seeds to 1½ tablespoons; they add fibre and volume for very few additional calories.
- Swap mashed banana for grated apple and cinnamon or use a zero-calorie sweetener if needed.
- Focus toppings on fruit and a few seeds rather than heavy nut butters.
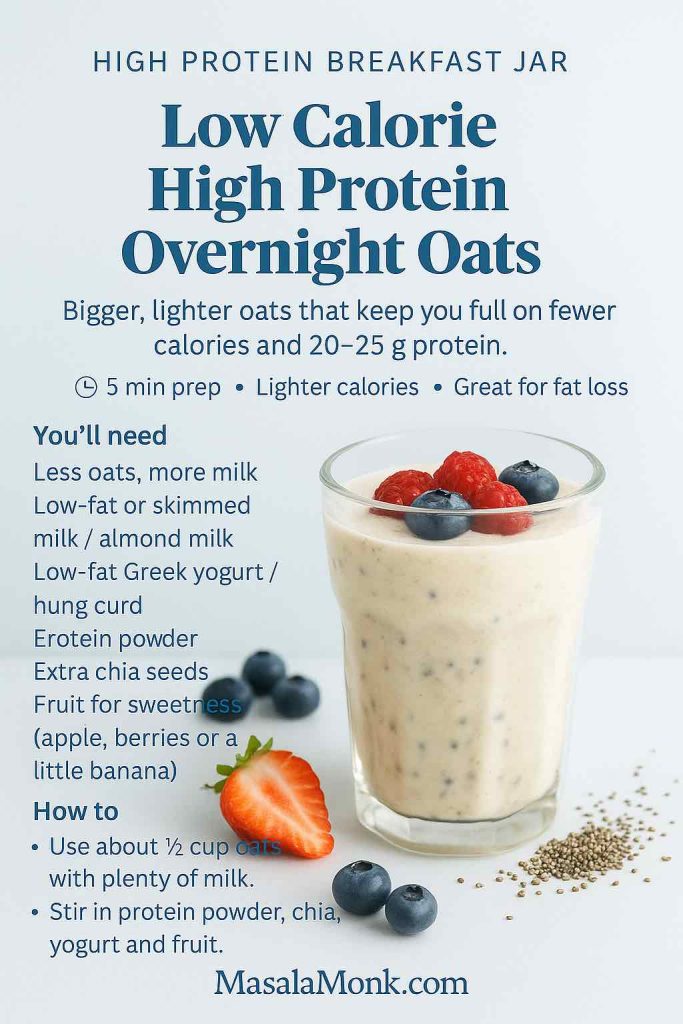
This gives you a jar of high protein overnight oats that feels generous in size, thanks to extra liquid and chia, but doesn’t eat up your entire calorie budget for the morning. If you like reading about how oats and chia can support fat loss specifically, the MasalaMonk post on oats and chia seeds for weight loss goes into both the science and practical tips.
Importance of Protein
On the protein side, starting your day with a substantial amount can help you feel satisfied for longer and spontaneously eat a little less later on. An accessible explainer on protein at breakfast and weight loss points out that aiming for around 20 grams or more can be particularly helpful for hunger and cravings. With this lighter jar, you remain in that target zone without feeling like you’re dieting.
If you’re building a broader plan around this approach, you might enjoy moving on to other whole-grain, high-protein options during the week, like oat-based snack bars or savoury legumes. The important thing is that this low calorie high protein overnight oats version gives you a stable, predictable base to fall back on during busy mornings.
Bulking and Bodybuilder High Protein Overnight Oats
Of course, not every phase is about eating less. When you’re trying to add muscle mass, train harder or simply maintain weight on an active schedule, you often need more calories in a compact, digestible form. That’s where a bulking version of high protein overnight oats shines.
Instead of nibbling on toast after toast, you can get a serious hit of calories and protein in one bowl or jar, without feeling like you’re stuffing yourself.
Also Read: Peanut Butter Cookies (Classic Recipe & 3 Variations)
Turning the Base Into a Bulking Jar
Using the base high protein overnight oats recipe, make the following changes:
- Increase oats to ¾ cup for more carbohydrates and volume.
- Use 1 cup whole milk or even add a splash of cream if you’re really struggling to get enough calories.
- Keep ¼ cup Greek yogurt, or go up to ⅓ cup if you enjoy the tang.
- Keep the full scoop of protein powder.
- Add 1–2 tablespoons peanut butter or almond butter into the mixture.
- Top with 1–2 tablespoons chopped nuts (almonds, walnuts, peanuts) and a spoon of seeds in the morning.
- If you tolerate sugar well, a small drizzle of honey or dates syrup can add pleasant sweetness and extra energy.
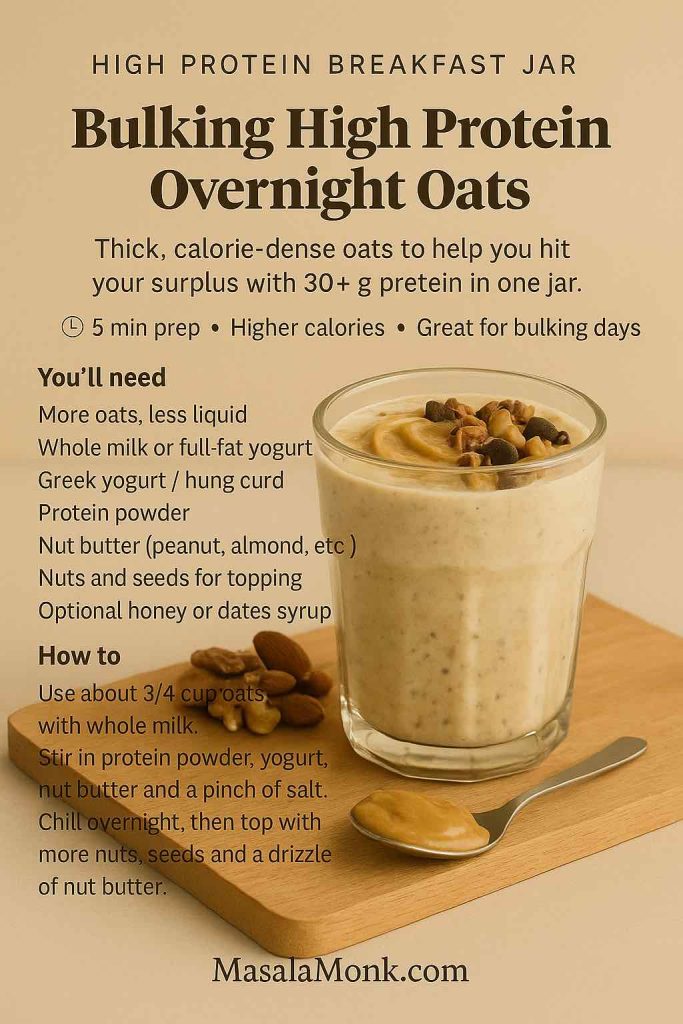
This kind of bodybuilder high protein overnight oats can easily reach the 500–700 kcal range depending on your exact ingredient choices, while still leaving you feeling comfortable rather than bloated. It’s the sort of breakfast that pairs nicely with heavy training days or long work mornings when lunch is far away.
Why this combination of Oats and Peanut Butter works
The combination of oats and peanut butter, in particular, is a classic for a reason. It brings complex carbohydrates, protein, fibre and healthy fats together in a simple package. MasalaMonk has a full article on oatmeal and peanut butter as a powerful combination that, while written with weight management in mind, also explains why the pairing is so effective for energy and satiety.
For extra protein and crunch, it’s worth looking at which nuts and seeds give you the most per serving. The MasalaMonk guide to protein-packed nuts and seeds breaks down the standouts, making it easier to choose toppings that aren’t just tasty but also macro-friendly for a bulking phase.
Also Read: Béchamel Sauce for Lasagna: Classic, Vegan & Ricotta Sauce Recipe
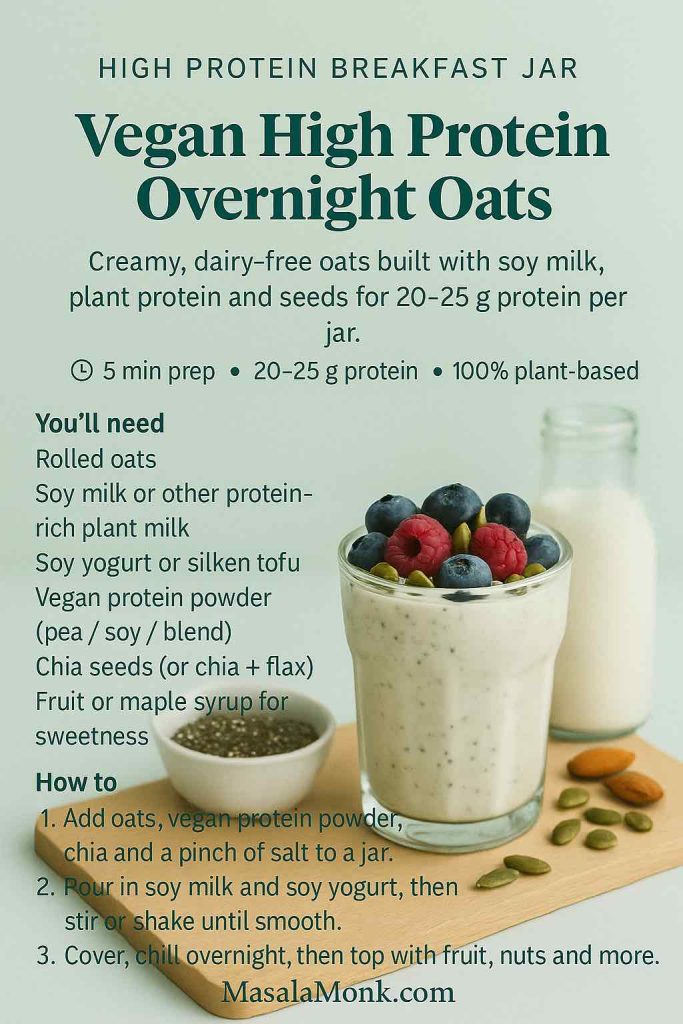
Vegan and Dairy-Free High Protein Overnight Oats
If you avoid dairy or just prefer a plant-based diet, you might wonder whether high protein overnight oats are still realistic. The good news is that they absolutely are. You simply shift the emphasis towards soy, pea protein and seeds instead of yogurt, cottage cheese or whey.
A vegan high protein overnight oats jar can still hit the same 20–25 gram range while feeling light and fresh.
Building a Plant-Based High Protein Jar
Here’s how you can adapt the base recipe without any dairy:
- Use ½ cup rolled oats, as usual.
- Swap dairy milk for 1 cup unsweetened soy milk; it’s one of the highest-protein plant milks.
- Replace Greek yogurt with ¼ cup soy yogurt or a few spoons of silken tofu blended into the liquid.
- Choose a plant-based protein powder, such as pea, soy or a rice-pea blend.
- Keep at least 1 tablespoon chia seeds, and consider adding some ground flax for extra omega-3 fats.
- Sweeten naturally with mashed banana, blended dates or a small spoonful of maple syrup.
Chia seeds play an especially important role in vegan high protein overnight oats, because they add both protein and fibre, helping you reach your targets without relying on dairy. For a deeper look at why these tiny seeds are often described as nutritional heavyweights, you can read a concise summary on chia seed nutrition and benefits, which explains their fibre, protein and omega-3 content in a straightforward way.
If you’re looking to generally increase your plant-based protein intake at breakfast, MasalaMonk’s article on high protein plant-based breakfast ideas fits nicely alongside this jar formula. You could rotate between tofu scrambles, chickpea patties and this vegan high protein overnight oats recipe throughout the week to keep things interesting.
Also Read: Cottage Cheese Lasagna Recipe | Chicken, Spinach, & Ricotta
High Protein Overnight Oats Without Protein Powder
Protein powders are convenient, versatile and usually taste good in overnight oats. Even so, you might prefer to get all your protein from “regular” foods, or you may occasionally run out of your favourite tub. In those situations, high protein overnight oats without protein powder are absolutely possible.
The key is to lean heavily on Greek yogurt, curd, cottage cheese or paneer, along with seeds and milk.
A Whole-Food, No-Powder Version
Use this pattern when you’d rather skip the scoop:
- ½ cup rolled oats
- ½–¾ cup milk or fortified plant milk
- ½ cup thick Greek yogurt or hung curd
- Optional: ¼ cup soft paneer or cottage cheese, crumbled finely
- 1–2 tablespoons chia seeds or a mix of chia and ground flax
- A little honey, jaggery or mashed fruit for sweetness
- Cinnamon, cardamom or vanilla for flavour
- Fruit and a small handful of chopped nuts on top
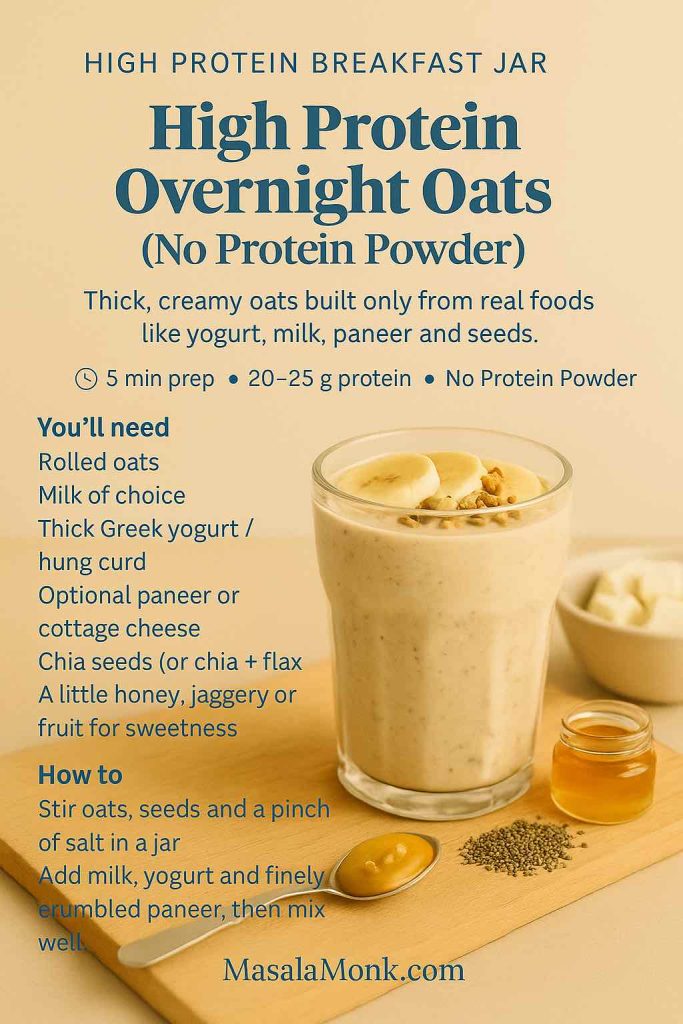
Greek yogurt can provide 8–10 grams of protein in just 100 grams, and cottage cheese or paneer adds even more. Between that, the milk and the seeds, you can still reach a meaningful protein intake without relying on any processed powders.
You might see recipes online that add raw egg whites straight into overnight oats to raise the protein. It’s best to be cautious there. If you do experiment, use pasteurised liquid egg whites and heat the mixture gently before serving rather than eating them fully raw from the fridge.
For the bigger picture—how this jar fits into your whole day—it’s worth checking out MasalaMonk’s article on how to eat 100 grams of protein a day. That guide shows you how a strong breakfast like high protein overnight oats can take some pressure off lunch and dinner, especially if you’re trying to hit more ambitious protein targets.
Also Read: French Toast Sticks (Air Fryer + Oven Recipe) — Crispy Outside, Custardy Inside
Flavour Ideas to Keep High Protein Overnight Oats Interesting
Once you understand the structure of high protein overnight oats, you can create an almost endless range of flavours without losing the macro balance. Keeping things exciting is important; even the healthiest recipe will get abandoned if it feels boring after three days.
Here are a few flavour profiles you can use across all four variations:
Chocolate Peanut Butter High Protein Overnight Oats
Stir cocoa powder into the base mixture along with a spoon of peanut butter. In the bulking version, you can be generous with both; in the low-calorie version, go lighter on the peanut butter and rely more on cocoa and a few crushed peanuts for flavour. A little chopped dark chocolate on top makes it feel like dessert.
If you want to understand why oats and peanut butter are such a satisfying combination, the MasalaMonk piece on oatmeal and peanut butter explores how they work together for fullness and nutrition.

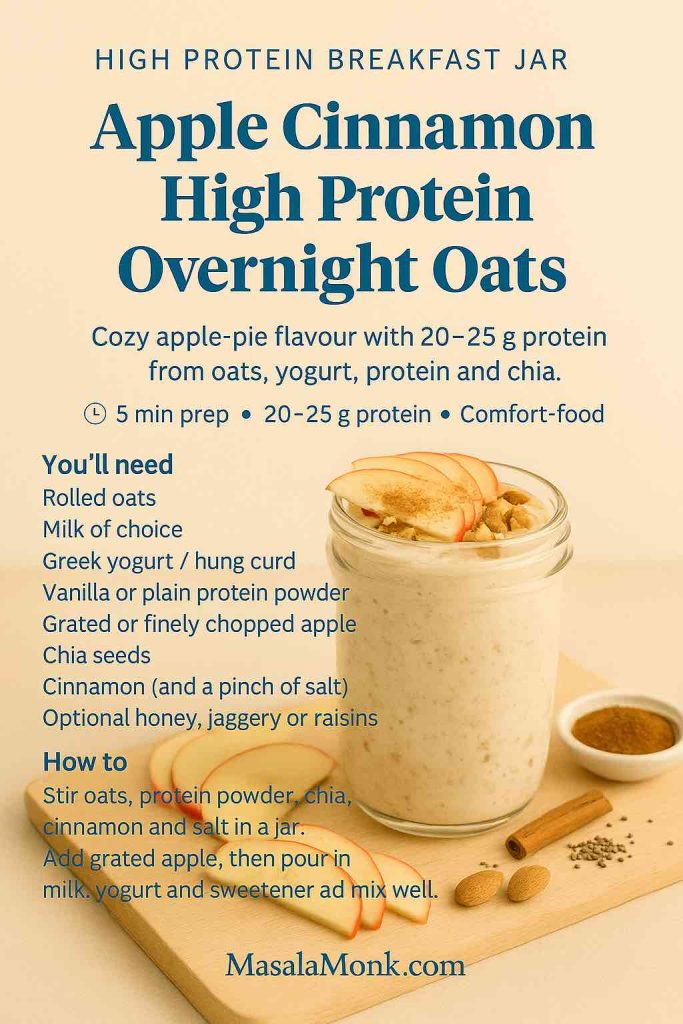
Apple Cinnamon High Protein Overnight Oats
Grate half an apple into the jar before refrigerating and add a generous pinch of cinnamon. The apple softens overnight, adding natural sweetness and volume. In the morning, you can top with a few raisins and a sprinkle of chopped walnuts to echo classic apple-pie flavours while still keeping the jar balanced.
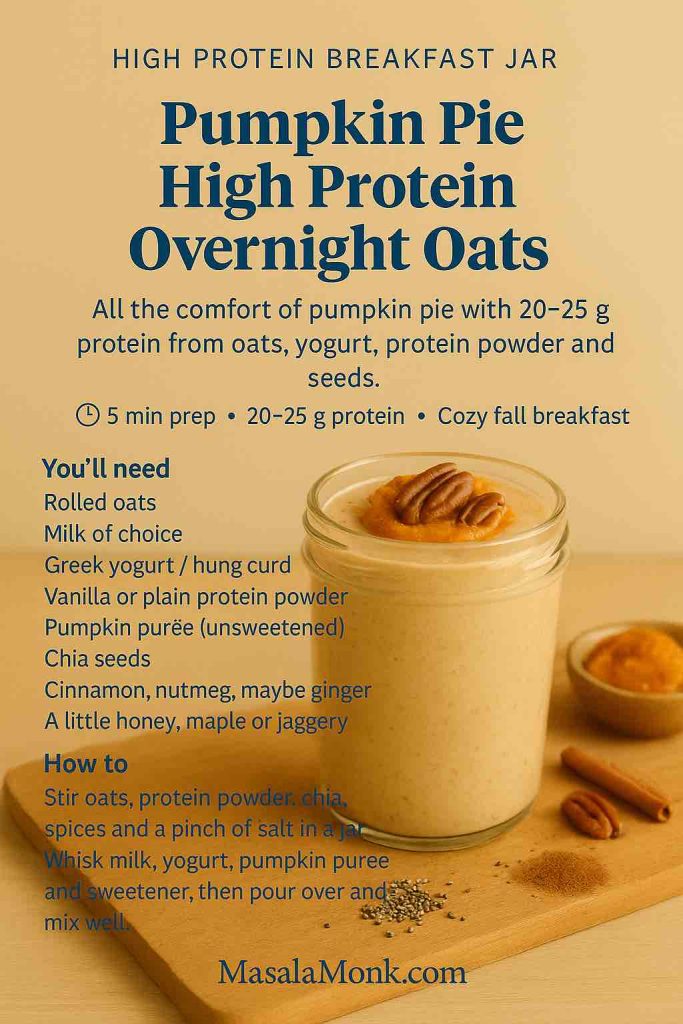
Pumpkin Pie High Protein Overnight Oats
For a seasonal twist, add a few spoons of pumpkin purée, cinnamon, nutmeg and a touch of sweetener. This works especially well with the no-powder or vegan versions, as the pumpkin adds thickness and comfort without much extra fat. A small handful of toasted pumpkin seeds on top brings extra crunch and protein.
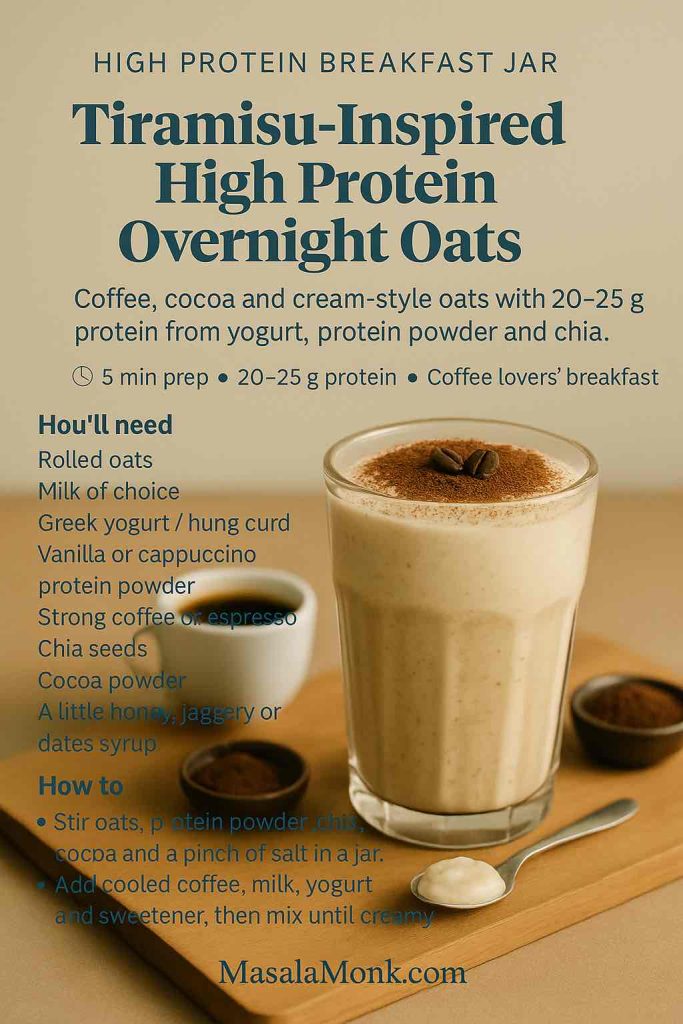
Tiramisu-Inspired High Protein Overnight Oats
Add a shot of strong coffee (or a spoonful of instant coffee dissolved in your milk), along with cocoa and vanilla. In the morning, dust the top with a little more cocoa powder and add a spoon of yogurt for a “cream” effect. This variation leans heavily on the idea that high protein overnight oats can feel like a treat rather than a chore.
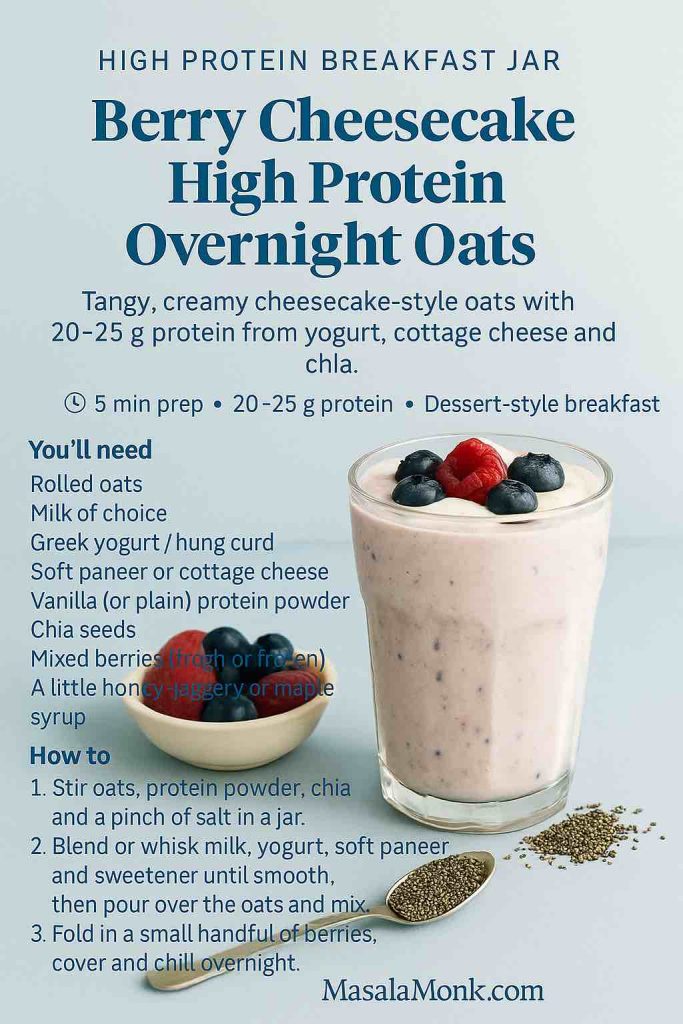
Berry Cheesecake High Protein Overnight Oats
Use a mix of Greek yogurt and cottage cheese in the base, plus a little vanilla and lemon zest. Top with a small handful of mixed berries. This flavour profile sits very naturally inside the no-powder version, because the dairy itself creates that cheesecake-like tang and creaminess.
You can also borrow ideas from other jar-style recipes. For instance, MasalaMonk’s chia pudding with steel-cut oats and mango uses layered textures and fruit in a way that translates beautifully to high protein overnight oats. The formats are similar; only the exact macro balance and ingredients change.
Also Read: 10 Best Chicken Sandwich Recipes (BBQ, Parm, Buffalo & More)
Making High Protein Overnight Oats Part of Your Week
A single jar is great, but where high protein overnight oats really shine is in repeatable meal prep. Because the ingredients are simple and inexpensive, you can batch-prepare several jars at once and line them up in the fridge.
A few practical strategies make life easier:
- Choose one or two base patterns for the week—perhaps the low calorie version on workdays and the bulking version on heavy training days.
- Prep 3–4 jars of the same base high protein overnight oats, then vary the toppings in the morning with different fruits, nuts and spices so you don’t get bored.
- Keep a small box of mixed nuts and seeds ready to sprinkle over the top; the guide to protein-rich nuts and seeds can help you stock up on the most efficient options.
- On days when you’re in the mood for something different, switch to a bar or baked format like the healthy oat protein bars or an oat-based snack, but keep the overall ingredients similar.
Overnight oats also sit comfortably inside a more general pattern of eating that emphasises whole grains, plenty of plants and adequate protein. If you enjoy exploring that style of eating, resources like the Harvard Healthy Eating Plate give a simple visual summary of how to balance your plate (or jar) without obsessing over exact numbers.
Also Read: Vegan French Toast: 6 Easy Recipes (Pan, Air Fryer, GF & High-Protein)
Bringing It All Together
High protein overnight oats are one of those rare habits that manage to be practical, enjoyable and nutritionally solid at the same time. Once you’re comfortable with the base method—mix, soak, top—you can adapt them in countless ways.
You’ve seen:
- A base recipe that can easily reach 20–30 grams of protein.
- A low-calorie version that supports weight loss and appetite control while still feeling generous.
- A bulking and bodybuilder version for days when you need more energy and strength.
- A vegan and dairy-free version that keeps everything plant-based without sacrificing protein.
- A no-powder version built entirely from regular foods like yogurt, paneer, milk and seeds.
From there, you can apply as many flavour layers as you like—chocolate peanut butter, apple cinnamon, pumpkin pie, tiramisu and beyond—while still respecting your macro goals. You can keep things simple on busy weekdays and get creative when you have more time, all without changing the underlying habit of prepping your high protein overnight oats the night before.
With a few jars, some rolled oats, a protein source you like and a handful of toppings, you’re only a five-minute stir away from a breakfast that quietly takes care of you every morning.
Also Read: Pumpkin Spice, Your Way: Master Blend, Variations & Real-World Recipes
FAQs
1. How much protein should be in high protein overnight oats?
For most people, high protein overnight oats make sense when each serving delivers at least 20 grams of protein. Plenty of bowls will land between 20–30 grams, depending on how much yogurt, milk and protein powder you use. That kind of overnight oats protein content is usually enough to support better appetite control and muscle repair after training.
To nudge your jar into the high end of that range, simply combine rolled oats with a scoop of protein powder, Greek yogurt and a little milk. Together, those ingredients turn regular oats into genuinely high protein overnight oats instead of just a carb-heavy breakfast.
2. Are high protein overnight oats good for weight loss?
Yes, high protein overnight oats can fit very well into a fat-loss plan, especially when you build low calorie high protein overnight oats on purpose. Protein and fibre help you feel full, which makes it easier to avoid random snacking later in the day. Meanwhile, the slow-digesting carbs from oats give you steady energy rather than a crash.
To keep your bowl helpful for weight loss, emphasise high protein low calorie overnight oats: reduce the amount of oats slightly, choose a lean protein source, increase chia seeds or fruit for volume, and be modest with nut butters and sugary toppings. In that way, you enjoy a big jar, satisfying texture and a proper hit of protein without blowing through your calorie budget.
3. Which oats are best for high protein overnight oats?
Rolled or old-fashioned oats tend to be the best choice for high protein overnight oats because they soften nicely overnight while still keeping some bite. Quick oats also work, particularly if you enjoy a smoother, pudding-like texture, although they can get a bit mushy if you leave the jar for several days.
Steel-cut oats are an option too, yet they usually need more liquid and a longer soak. If you like a chewier texture, you can mix a spoonful of steel-cut oats into rolled oats and adjust the liquid accordingly. In short, any plain oat variety can be used, but rolled oats give the most reliable texture for high protein overnight oats recipes.
4. What is the best protein powder for overnight oats and oatmeal?
There isn’t a single “best protein powder for overnight oats,” because it depends on your taste, digestion and dietary needs. Even so, there are a few reliable patterns. Whey concentrate or isolate dissolves easily and creates creamy whey protein overnight oats with a dessert-like texture. Casein, on the other hand, thickens the mixture a little more and keeps you full for longer.
If you prefer a plant-based option, pea, soy or a rice–pea blend often makes the best protein powder for oats and oatmeal because those powders usually mix smoothly without chalkiness. Flavours such as vanilla, chocolate or cinnamon roll pair especially well with oats. Regardless of which you choose, start with a small scoop and adjust the liquid until your high protein overnight oats feel just right.
5. Can I make high protein overnight oats without protein powder?
Absolutely. High protein overnight oats without protein powder are easy to build if you lean on whole foods. Thick Greek yogurt, hung curd, cottage cheese or paneer, plus milk and seeds, can all add meaningful protein. When you combine these with oats, it’s still simple to reach 20 grams of protein per serving.
To do this, simply increase your yogurt or curd to at least half a cup, keep a generous splash of milk, and include one or two tablespoons of chia or other seeds. That way, you end up with high protein overnight oats that rely entirely on familiar ingredients and still feel indulgent and creamy.
6. Can I use whey protein in overnight oats, or will it get gritty?
You can definitely use whey protein in overnight oats, and it usually blends in very well. To avoid any gritty texture, first whisk the whey with your milk and yogurt before pouring it over the oats. Once everything is smooth, stir in the oats and chia seeds. After chilling, whey protein overnight oats become thick, creamy and easy to eat straight from the jar.
Because whey tends to dissolve quickly, it is particularly good for people who want high protein overnight oats with a simple, milkshake-like flavour. If your scoop is very sweet, you may not need extra sugar, honey or banana at all.
7. Is it possible to make high protein overnight oats low carb?
It’s tricky to make overnight oats truly low carb, since oats themselves are a carbohydrate-rich grain. Nevertheless, you can move toward high protein low carb overnight oats by adjusting the ratios. For example, you can use a slightly smaller portion of oats, then increase protein sources such as Greek yogurt, protein powder and seeds.
In addition, focus on toppings like berries and nuts rather than bananas, dried fruit or large amounts of honey. The result will still contain some carbs from the oats, yet the overall balance shifts toward higher protein, more healthy fats and fewer sugars. As a result, your high protein overnight oats feel steadier on blood sugar while still being enjoyable.
8. Are high protein overnight oats suitable for vegans and people who are dairy-free?
Yes, it’s straightforward to make vegan high protein overnight oats. Instead of dairy milk and yogurt, choose soy milk, almond milk or oat milk and use a plant-based yogurt or silken tofu. Then add a scoop of vegan protein powder made from pea, soy or a blend, and finish with chia seeds, flaxseeds and nuts.
This approach gives you vegan high protein overnight oats that still reach a solid protein target, without any dairy at all. On top of that, you add extra fibre and good fats, which makes the jar satisfying and nutrient-dense even without animal products.
9. How long do high protein overnight oats last in the fridge?
Typically, high protein overnight oats keep well for around three days in the fridge when stored in a sealed container. The texture often improves on day two as the oats and chia seeds absorb more liquid. After that, the mixture can become very thick, and fruit mixed in from the beginning may start to soften too much.
If you want to meal prep several portions, it’s better to prepare the base high protein overnight oats in jars and then add fresh toppings on the day you plan to eat each one. In that manner, you get the convenience of batch-prep while keeping the flavours and textures bright.
10. Can high protein overnight oats really replace a full breakfast?
For most people, a well-balanced serving of high protein overnight oats can absolutely stand in for a complete breakfast. You’re getting complex carbohydrates from oats, a solid chunk of protein, and depending on your toppings, fibre, healthy fats and micronutrients from fruit, nuts and seeds. That combination tends to keep you full and focused for several hours.
To turn the jar into a more substantial meal, you can simply scale the recipe slightly upward or add an extra side such as a small piece of fruit or a handful of nuts. Consequently, high protein overnight oats become a flexible foundation that you can adjust up or down depending on your hunger, training schedule and goals.