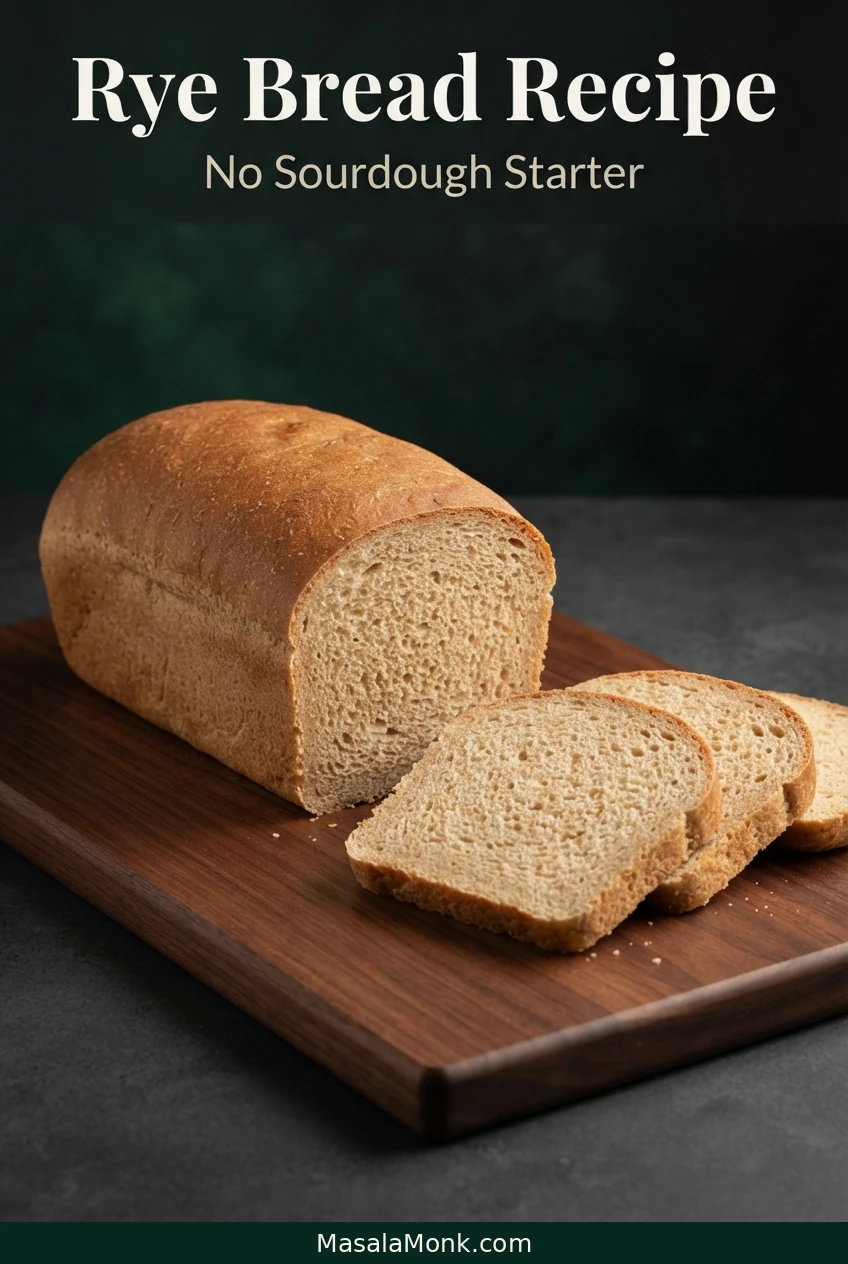
Homemade rye bread doesn’t need a sourdough starter or an overnight schedule. This rye bread recipe uses instant yeast, medium rye flour, and bread flour to make a sandwich loaf with a golden-brown crust, a tender, slightly chewy crumb, and the earthy flavor of rye. It’s delicious toasted with butter and sturdy enough for generous sandwich fillings.
Add caraway seeds for a familiar deli-style aroma, or leave them out for a milder everyday loaf. You’ll need an ordinary loaf pan and a mixing bowl. Most of the time is hands-off, including the important cooling period before that first slice.
If you’ve made white bread before, rye dough may surprise you: it can stay sticky even after kneading. It’s tempting to add flour until your hands come away clean. Resist that urge. This dough needs enough structure to hold together, not a dry surface.
Ready to bake? Jump to ingredients or go straight to the step-by-step instructions.
Easy Homemade Rye Bread Recipe
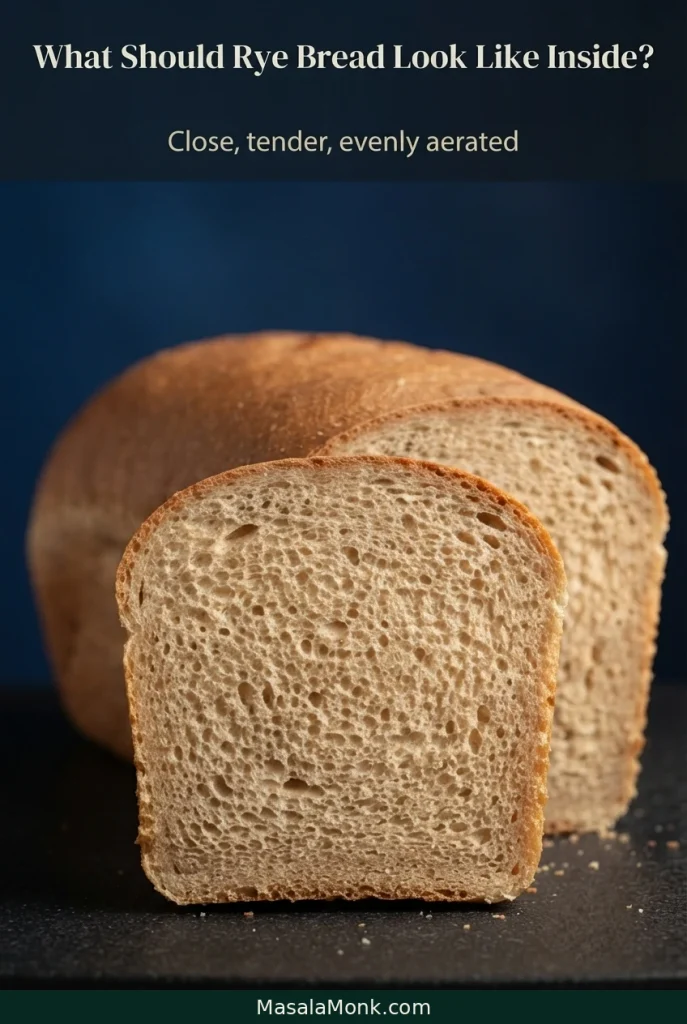
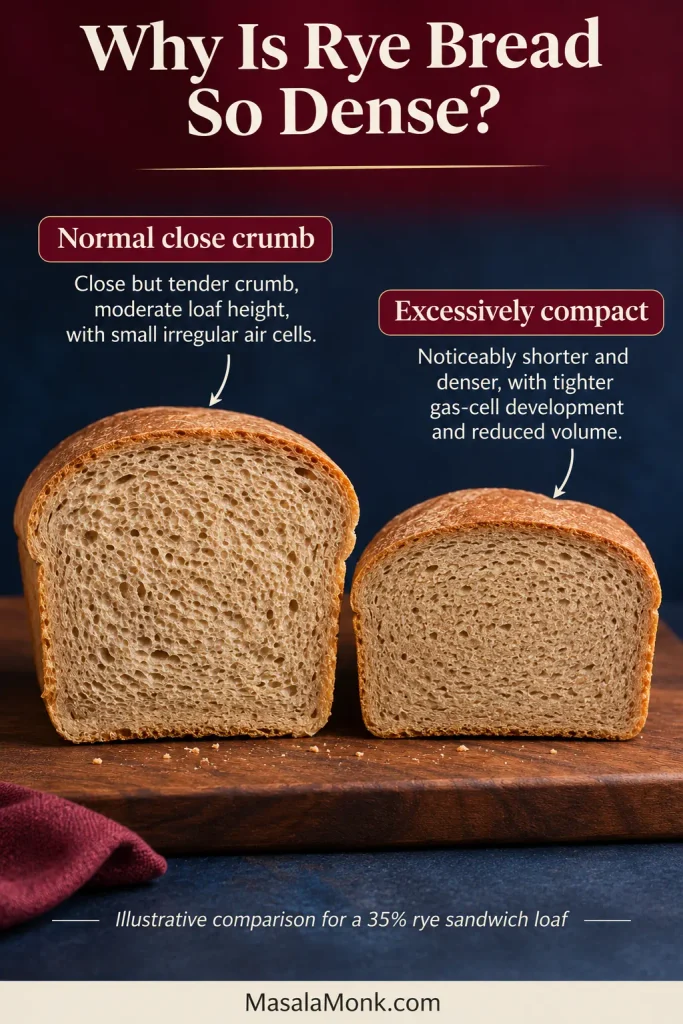
This same-day rye sandwich loaf uses 35% rye flour and 65% bread flour. That balance gives it recognizable rye flavor without the much denser texture of many high-percentage rye breads. Expect a tender, fairly close crumb that holds together when sliced, rather than the large, irregular holes associated with some rustic wheat sourdoughs.
- Yield: 1 loaf, approximately 12–14 medium slices
- Pan: 9 × 5 inches (23 × 13 cm)
- Hands-on preparation: approximately 20–30 minutes
- Dough rest: 15–20 minutes
- First rise: approximately 60–90 minutes
- Final proof: approximately 45–75 minutes
- Baking: 35–45 minutes at 375°F (190°C)
- Cooling: approximately 2 hours before slicing
Total planning time: approximately 5–6½ hours from mixing to slicing. This includes resting, both rises, baking, and cooling. Actual timing depends on how quickly the dough ferments, particularly in a cool kitchen.
Equipment: a large mixing bowl, sturdy spoon, 9 × 5-inch loaf pan, and cooling rack. A kitchen scale is strongly recommended; a bench scraper, stand mixer with dough hook, and instant-read thermometer are helpful but optional.
In this guide: Ingredients · Flour choices · Step-by-step method · Variations · Dough problems · Troubleshooting baked bread · FAQs · Storage and serving
Rye Bread Ingredients
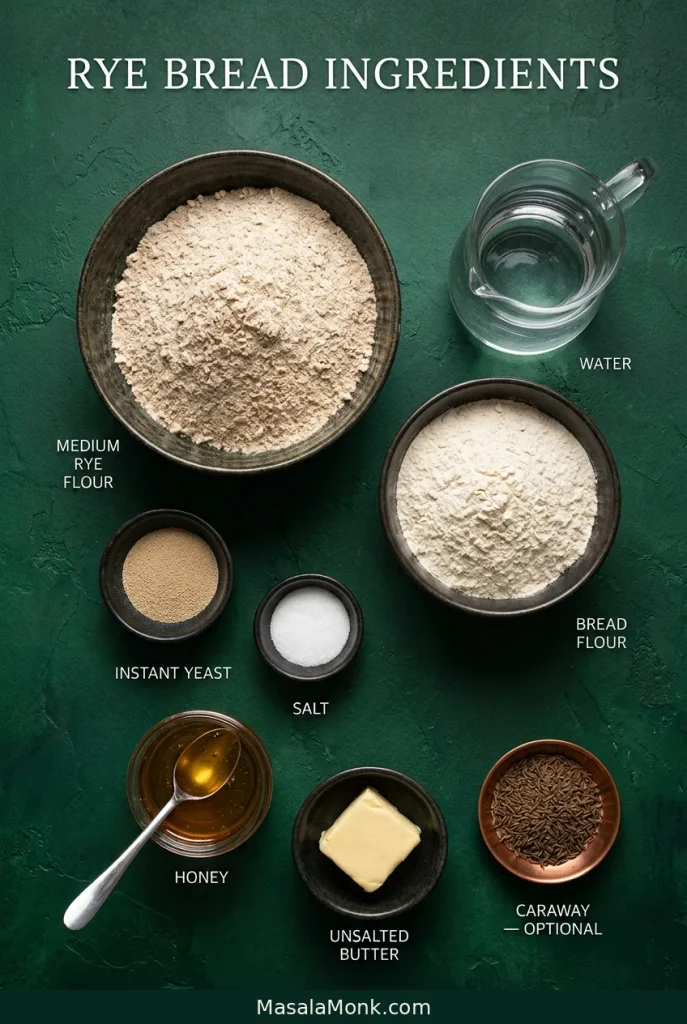
The ingredient table below gives the complete formula for one 9 × 5-inch rye sandwich loaf. The gram weights are the reference quantities; cups and spoons are approximate. Measure each flour separately, and start with the listed water quantity rather than adjusting it before mixing.
| Ingredient | Quantity |
|---|---|
| Medium rye flour | 175 g (about 1⅔ cups) |
| Bread flour | 325 g (about 2¾ cups) |
| Lukewarm water | 330 g / 330 ml (about 1⅓ cups + 1 tbsp) |
| Instant yeast | 7 g (about 2¼ tsp) |
| Fine table salt | 9 g (about 1½ tsp) |
| Honey | 20 g (about 1 tbsp) |
| Unsalted butter, softened | 25 g (about 1¾ tbsp) |
| Caraway seeds, optional | 5 g (about 2–2½ tsp) |
Measure the flour carefully. Scooping directly from the bag can compact flour into the cup and leave you with a heavier dough than intended. If you don’t have a scale, spoon flour into the cup and level it without pressing down.
Why Rye Dough Feels Different
Rye flour holds water differently from bread flour and doesn’t develop the same strong, stretchy gluten network as bread wheat. Its natural water-binding compounds, including arabinoxylans, contribute to the distinctive texture of rye dough.
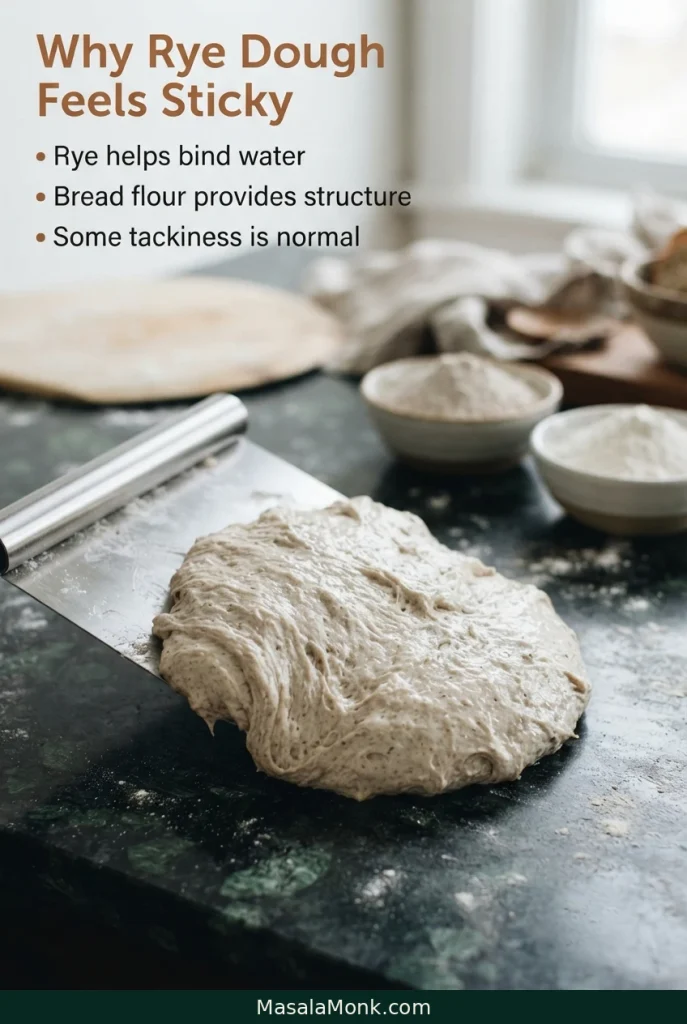
Here, the 65% bread-flour portion provides useful elasticity. The dough can become cohesive enough to knead and shape while remaining tacky. Adding extra flour merely to eliminate stickiness can make the finished loaf heavy.
The recipe contains 330 g water for 500 g total flour, or 66% hydration. In bread-making, hydration means water weight expressed as a percentage of flour weight. Start with the measured water and make any small adjustment after the dough has rested. Later, the kneading checkpoints show what workable rye dough should feel like.
Caraway is optional. Its gently anise-like flavor works well in deli-style rye. Without it, the bread is mild enough for fillings such as creamy homemade egg salad.
Which Rye Flour Can You Use?
Medium rye is the intended flour. If your store carries only light rye, dark rye, or whole-grain rye, use the comparison below to choose a starting substitute. Flour labels differ between countries and mills, so the color of a bag’s contents doesn’t tell the entire story.
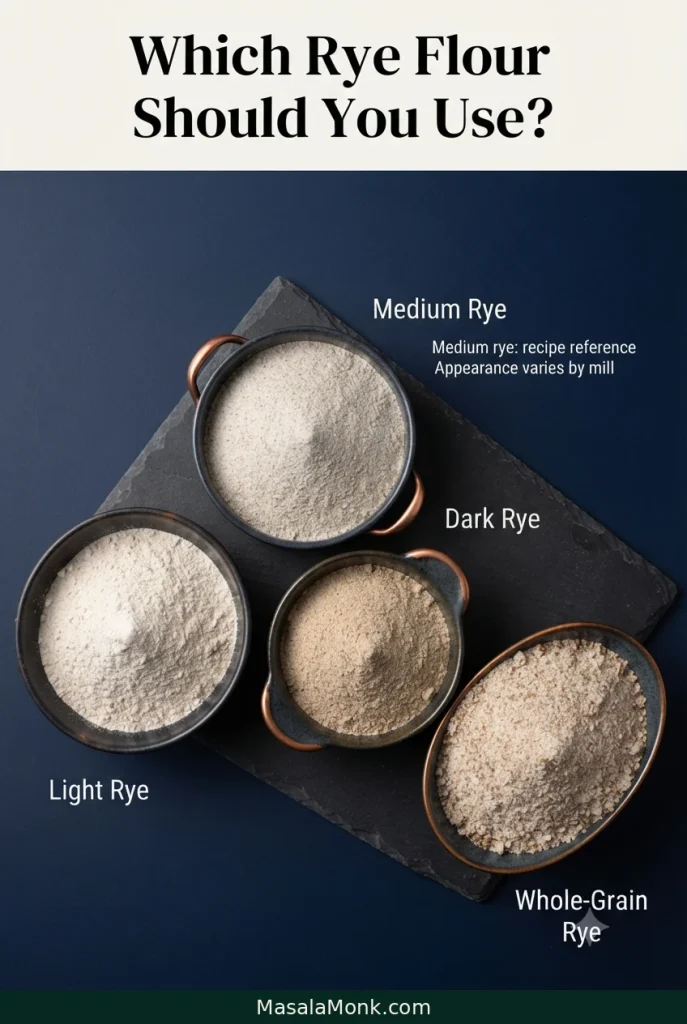
| Rye flour | What to expect |
|---|---|
| Light rye | Milder flavor and lighter color; a reasonable same-weight starting substitute. |
| Medium rye | Balanced flavor; the intended choice for this loaf. |
| Dark rye | Often darker and more robust; bran content and water absorption vary by mill. |
| Whole-grain rye | Contains bran and germ; milling fineness influences dough feel and texture. |
For an alternative rye flour, begin with the same 175 g weight and assess the dough after its rest. The result may differ in color, moisture absorption, and height. Dark rye and whole-grain rye aren’t necessarily identical products. For further background, see King Arthur Baking’s guide to making rye bread.
Can You Use All-Purpose Flour Instead of Bread Flour?
Yes. Replace the 325 g bread flour with the same weight of all-purpose flour, preferably one suitable for yeast baking. Lower-protein flour may produce a softer dough and a slightly shorter or less chewy loaf. Begin with the listed water and reassess after resting.
How to Make Rye Bread Step by Step
The method follows nine stages, from preparing the pan to cooling the finished loaf. Follow the visual signs as well as the clock, especially during the two rises. Rye dough can ferment at different speeds depending on room temperature.
Step 1: Prepare the Pan and Water
Lightly grease a 9 × 5-inch (23 × 13 cm) loaf pan with butter or neutral oil, or line its bottom and long sides with parchment for easier removal.
Warm the measured 330 g (330 ml) water until lukewarm. Around 95–105°F (35–41°C) is a convenient starting range, not a strict requirement. Cooler water can work but may slow the rise; avoid water hot enough to damage the yeast.
Measure the remaining ingredients and soften the butter so it mixes in easily.
Step 2: Mix the Rye Bread Dough
Combine the rye flour, bread flour, instant yeast, and salt in a large bowl. Stir to distribute the ingredients.
Add the water and honey. Mix with a sturdy spoon or a stand mixer on low speed until all the flour is moistened. Work in the softened butter, followed by caraway seeds if using.
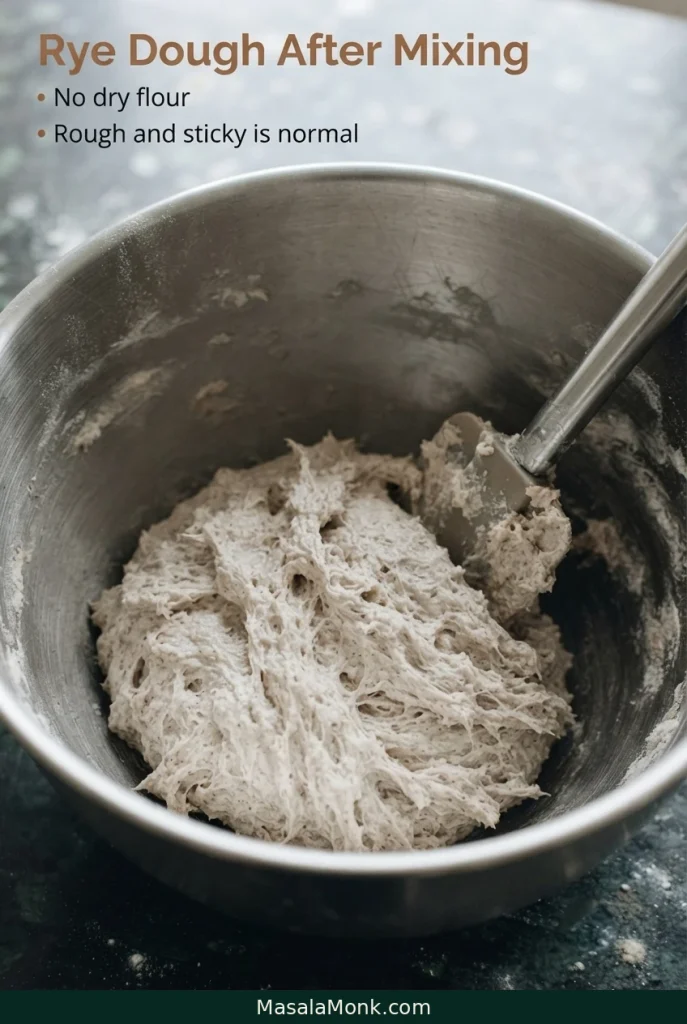
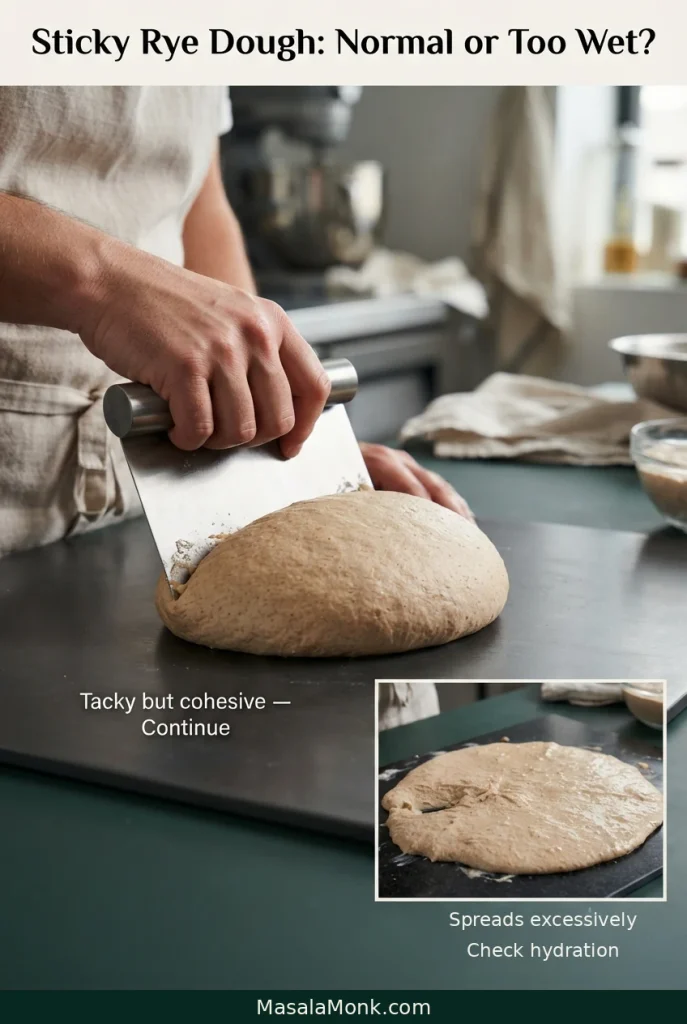
You should have a rough, sticky mass with no loose dry flour at the bottom of the bowl. A smooth surface comes later. If the dough still spreads like batter after resting and kneading, the sticky-versus-loose dough comparison will help you distinguish normal tackiness from a consistency problem.
Step 3: Rest the Dough for 15–20 Minutes
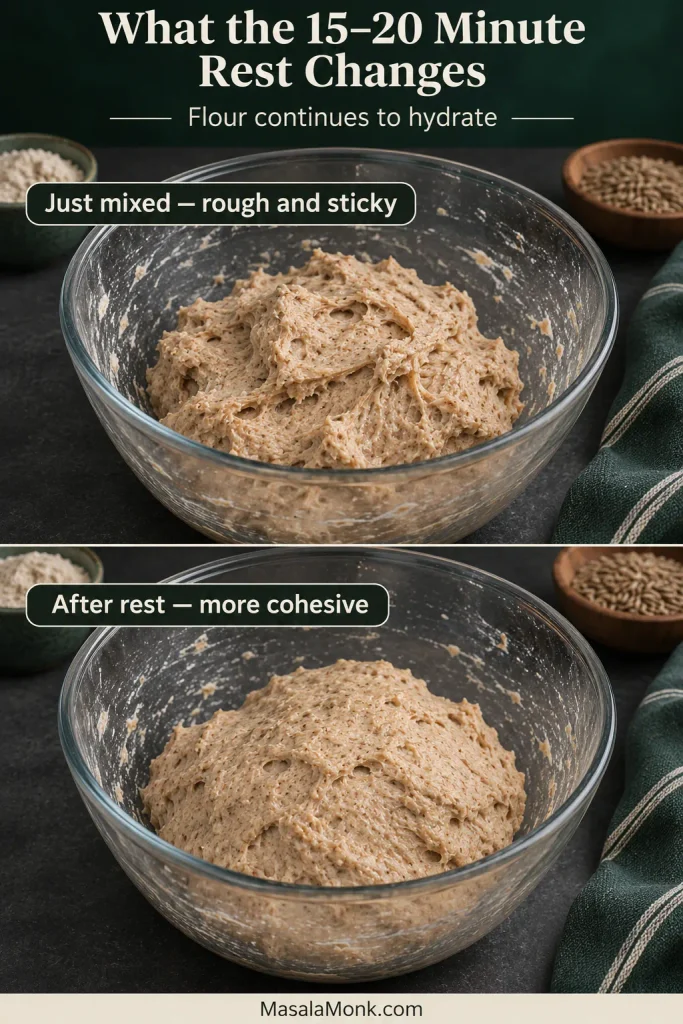
Cover the bowl and let the dough rest for 15–20 minutes. During this pause, the flour absorbs more water and the mixture should become easier to gather.
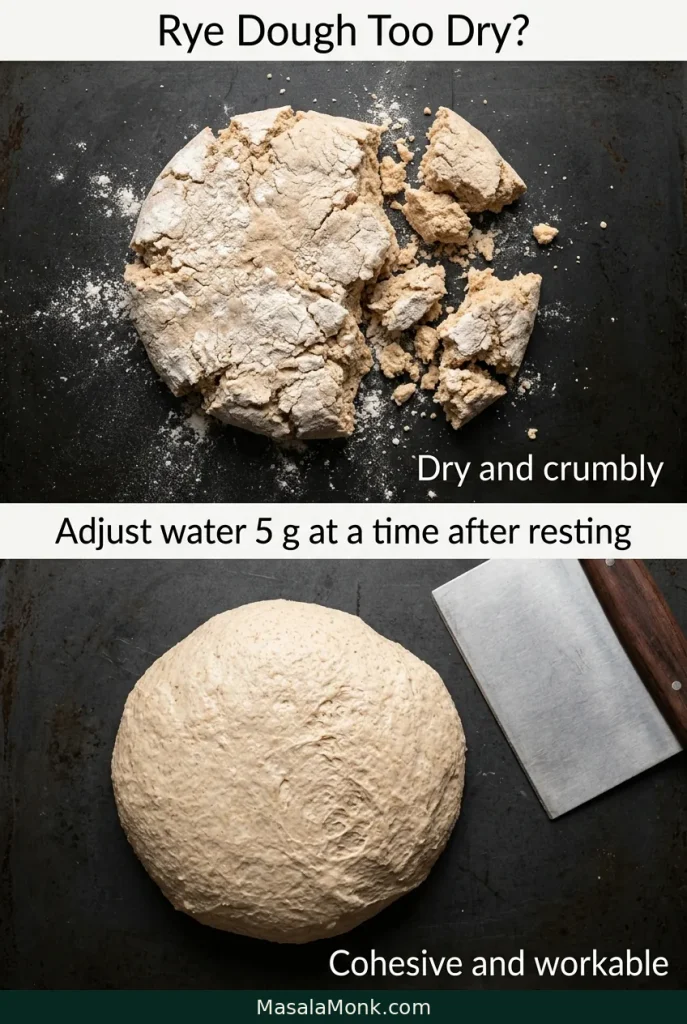
After resting, check for dry patches. If dry flour remains despite thorough mixing, add approximately 5 g water at a time, incorporating each addition before adding more. If the dough seems unusually loose, first confirm the measurements and assess its structure during kneading before adding extra flour.
Step 4: Knead Until the Dough Is Cohesive
With a stand mixer: Knead with the dough hook on a low to moderate, dough-safe setting for about 6–8 minutes, scraping down the bowl as needed.
By hand: Lightly oil your hands and work surface. Knead for approximately 8–10 minutes, pressing and folding the dough over itself. Lift sticky portions with a bench scraper instead of dusting repeatedly with flour.
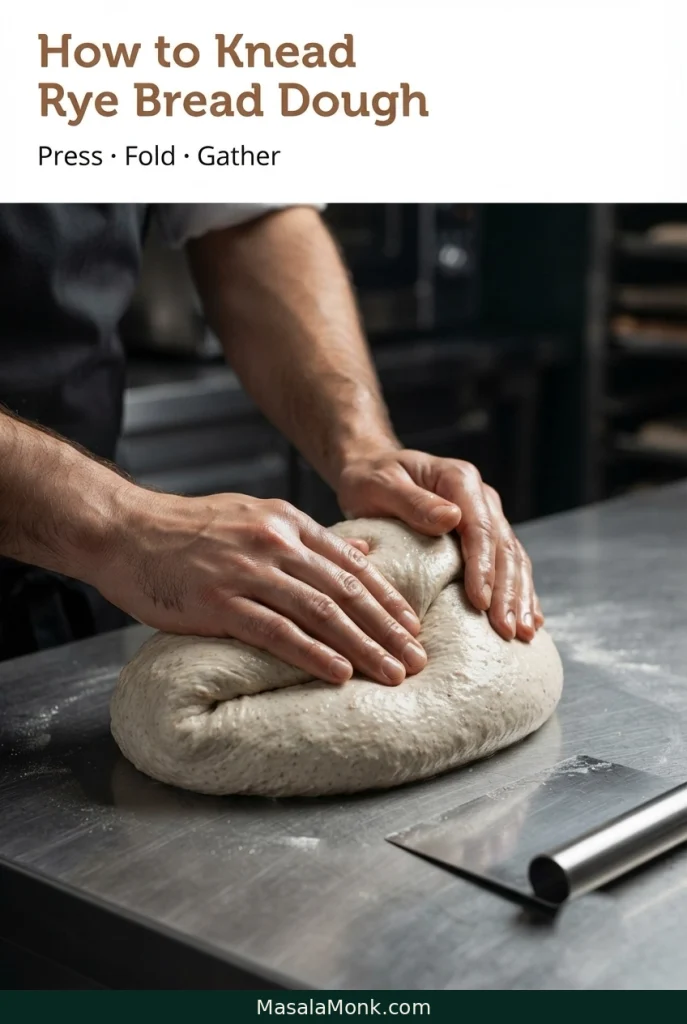
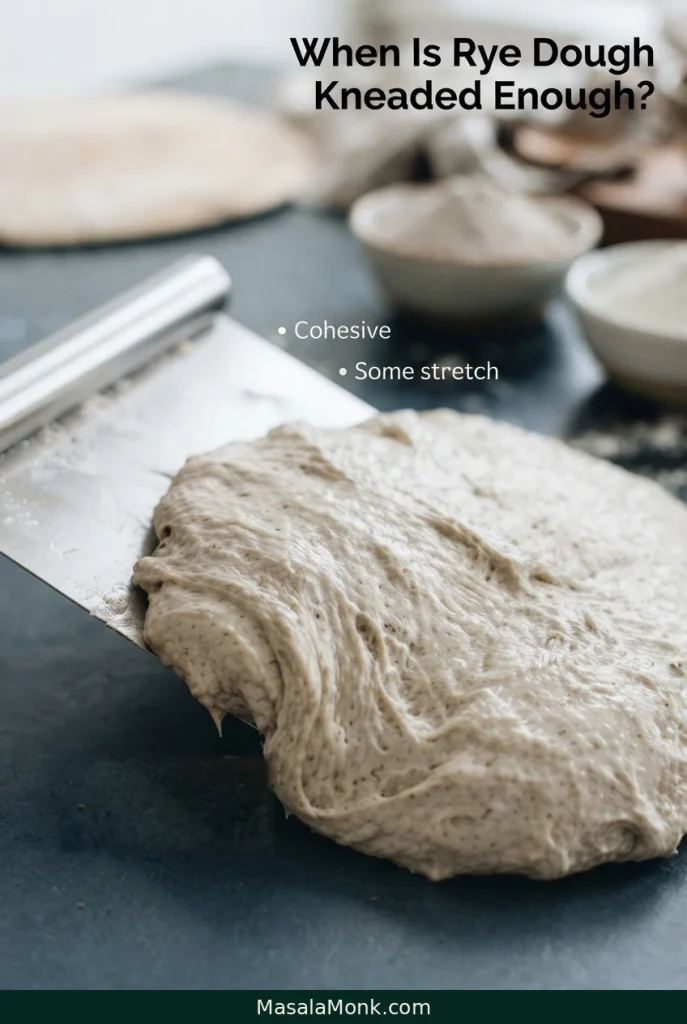
The dough should gradually gather into one connected, workable mass. Lift an edge with your scraper: it should offer some resistance and stretch without immediately falling apart. It may still cling to your fingers or relax when set down.
Don’t require a perfect windowpane—the thin, translucent sheet some well-developed wheat doughs form when stretched. That’s not a strict test for this rye-and-wheat mixture. Instead, look for a dough that gathers into one mass and can be handled without disintegrating.
Step 5: Let the Dough Rise Until Puffy
Lightly oil the mixing bowl, or use another bowl if that’s easier. Gather the dough into a loose ball, place it in the bowl, turn once to coat its surface, and cover.
Leave it in a comfortably warm, draft-free place for approximately 60–90 minutes. In a warm kitchen, start checking after 45 minutes. A room around 70–75°F (21–24°C) is a useful reference, but the dough itself tells you when it’s ready.
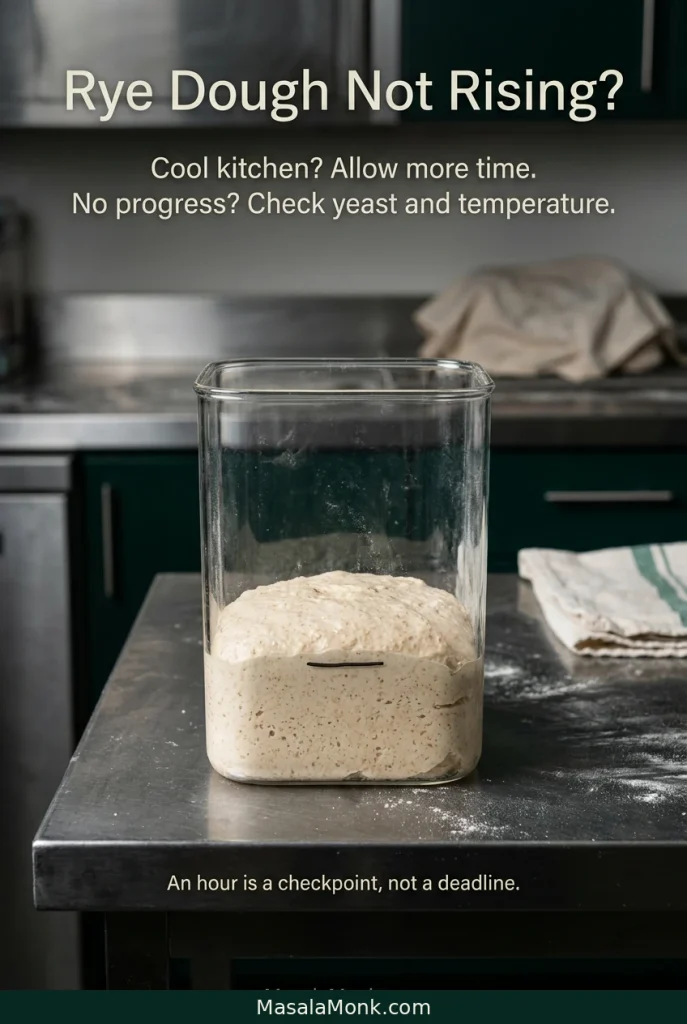
Notice the starting height or mark the level on a straight-sided container. Look for a substantial increase in volume, a puffier surface, and some visible signs of trapped gas. The dough may approach doubling; it doesn’t need to hit an exact percentage if it’s clearly expanded and still manageable for shaping.
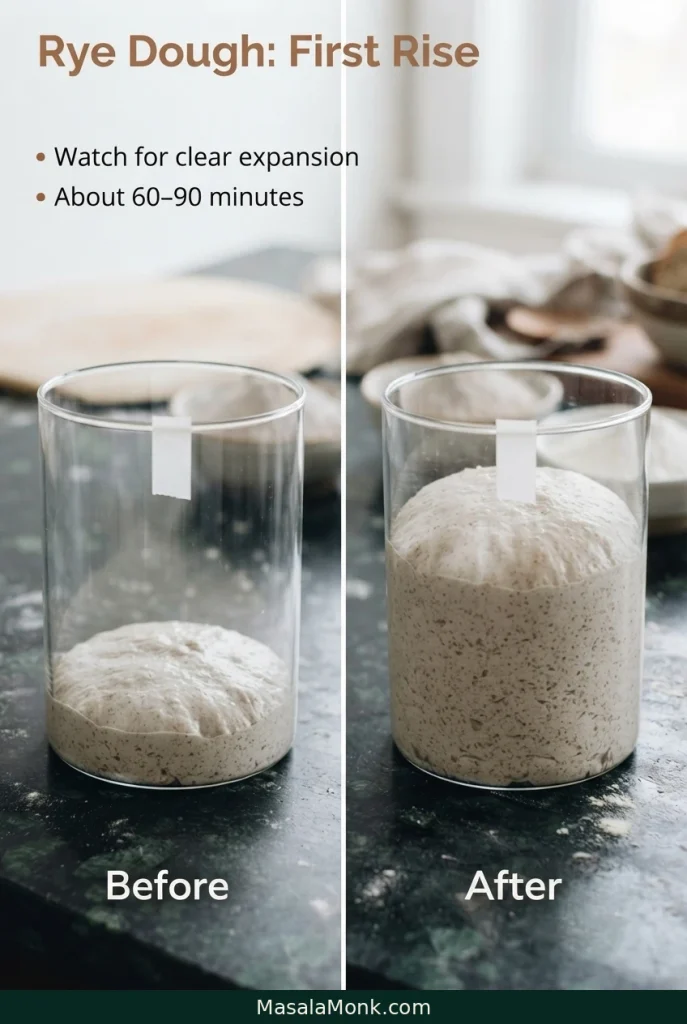
An hour is a checkpoint, not a deadline. If the dough is visibly growing but your kitchen is cool, allow more time. For almost no change, see the slow-rise troubleshooting section.
Step 6: Shape the Rye Bread Loaf
Lightly oil your work surface and turn out the risen dough. Gently press it into a rectangle with the edge nearest you about 8–8½ inches (20–22 cm) wide. Let the rectangle extend away from you.
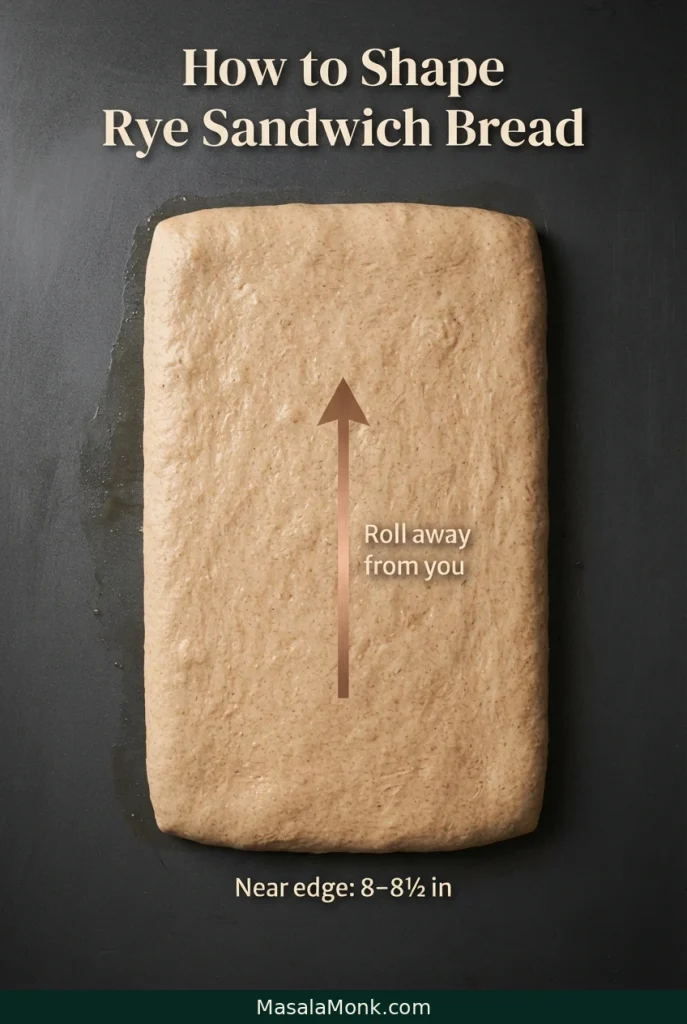
Roll from the near edge away from you into a snug log. The 8–8½-inch width becomes the length of the log, so it should sit along the pan without being folded or crowded. Roll firmly enough to keep the layers together, but don’t crush the dough.
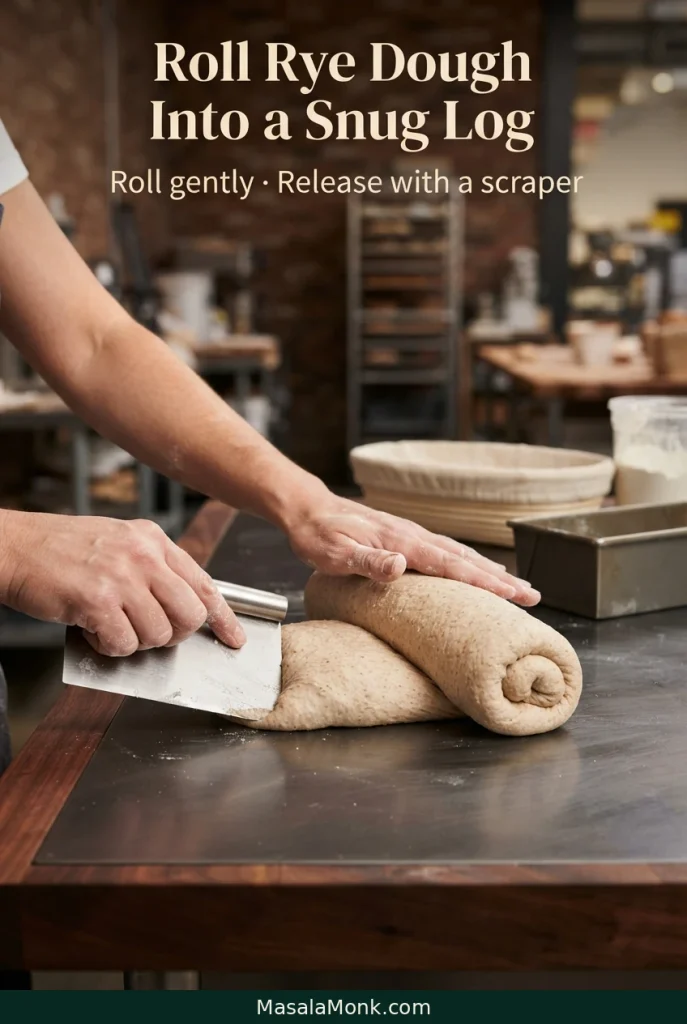
If the dough sticks while rolling, slide a scraper underneath to release it instead of pulling it apart. Pinch the seam closed, tuck in the ends, and lay the log seam-side down in the prepared pan, evenly along the bottom.
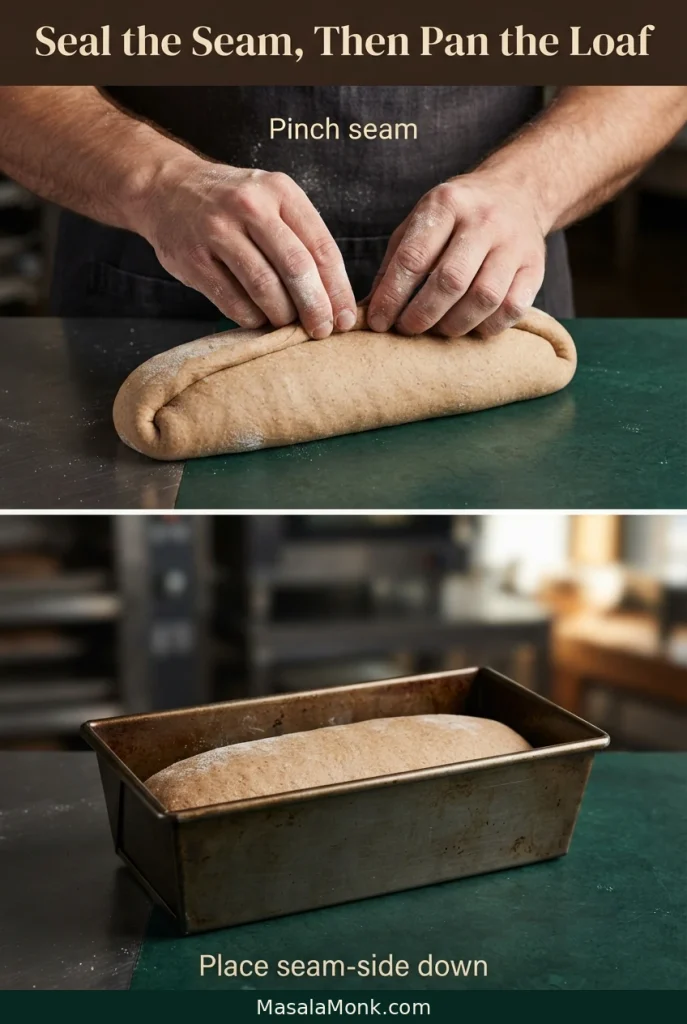
Step 7: Give the Shaped Loaf Its Final Proof
This final rise is different from the first. You’re watching the shaped dough fill out the pan while it still has the strength to hold its rounded top. A rye sandwich loaf doesn’t need the towering dome of commercial white bread.
Cover the pan loosely with lightly oiled plastic wrap or another nonstick cover. Proof for approximately 45–75 minutes, checking earlier in a warm kitchen. The loaf should grow fuller and gently rounded; depending on the pan, it may approach the rim or form a modest crown.
Use these visual signs rather than waiting for maximum height:
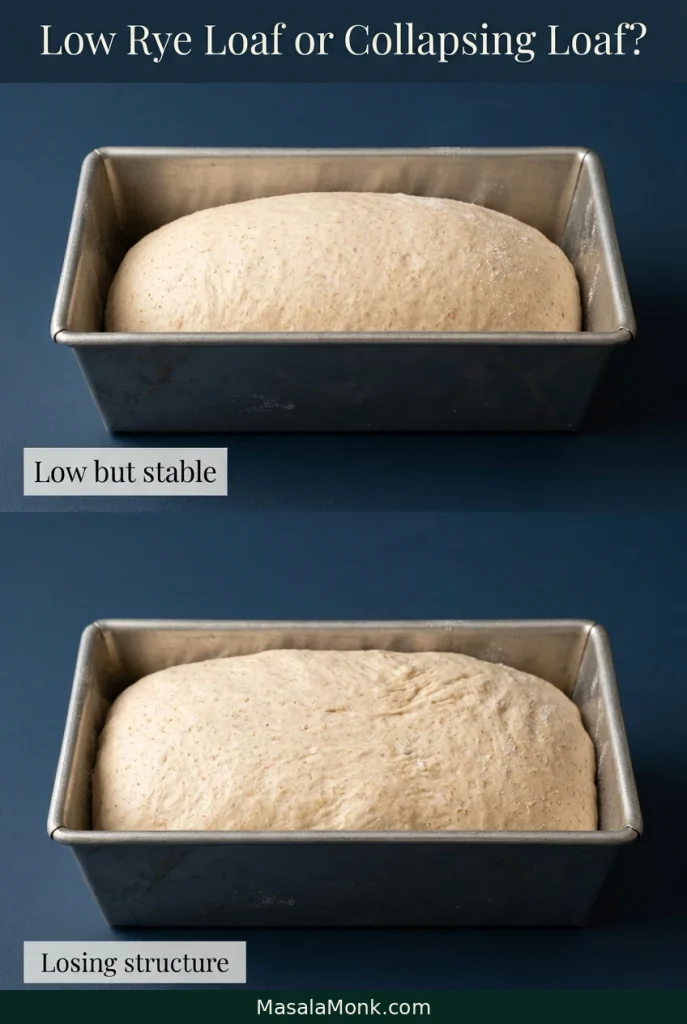
- Low, tight, barely expanded: Continue proofing while the dough is showing progress.
- Fuller, rounded, and stable: The loaf is approaching baking readiness. A light fingertip dent may return slowly and partly.
- Wrinkling, sagging, or losing height: The dough may have overproofed. Don’t wait for further expansion; bake promptly if it still holds together in the pan and the oven is ready.
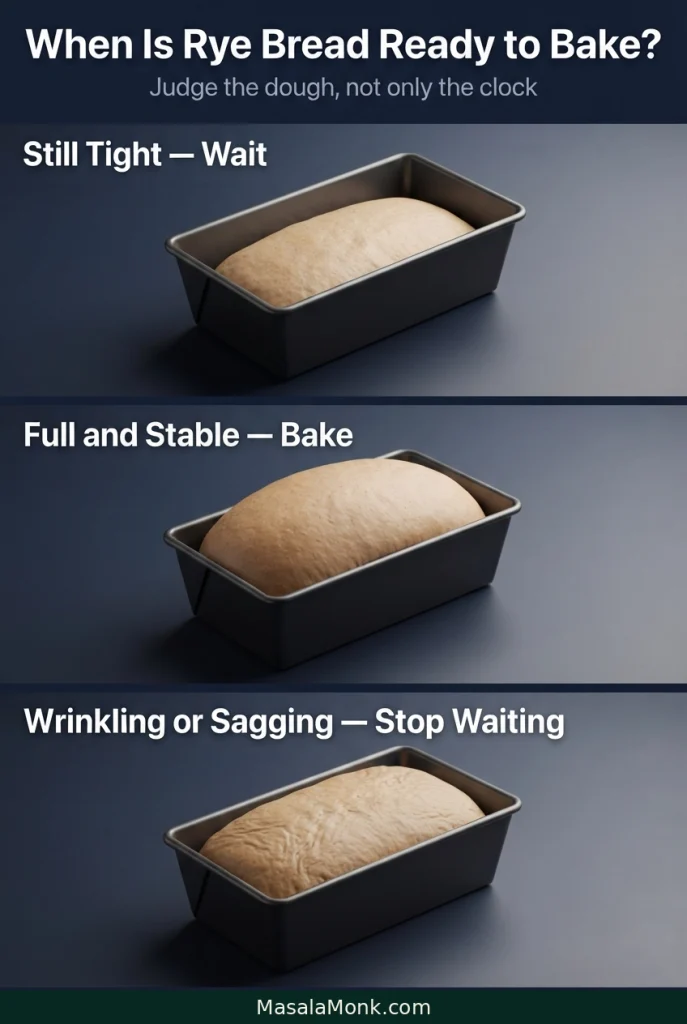
The fingertip test is only one clue with rye-containing dough. Consider it alongside expansion and the condition of the surface.
Before the loaf finishes proofing, set the oven rack in the lower-middle position and preheat to 375°F (190°C). Allow enough time for the oven to reach temperature. A fully proofed loaf shouldn’t have to wait while the oven warms up.
Step 8: Bake at 375°F (190°C)
With the conventional oven fully preheated to 375°F (190°C) and the rack already in the lower-middle position, gently uncover the loaf and place the pan in the oven. For a fan-assisted oven, approximately 350°F (175°C) is a reasonable starting setting.
Bake for approximately 35–45 minutes, checking from about the 35-minute mark. The crust should be golden to medium brown, and the loaf should feel firm and set.
For an additional doneness check, insert an instant-read thermometer into the center of the loaf without touching the pan. An internal temperature around 190°F (88°C) is a helpful reference for this mixed-flour sandwich loaf; also consider its firmness and overall appearance.
If the top browns too quickly while the center still needs time, loosely tent it with aluminum foil and continue baking. A dark crust alone doesn’t establish that the center has finished baking.
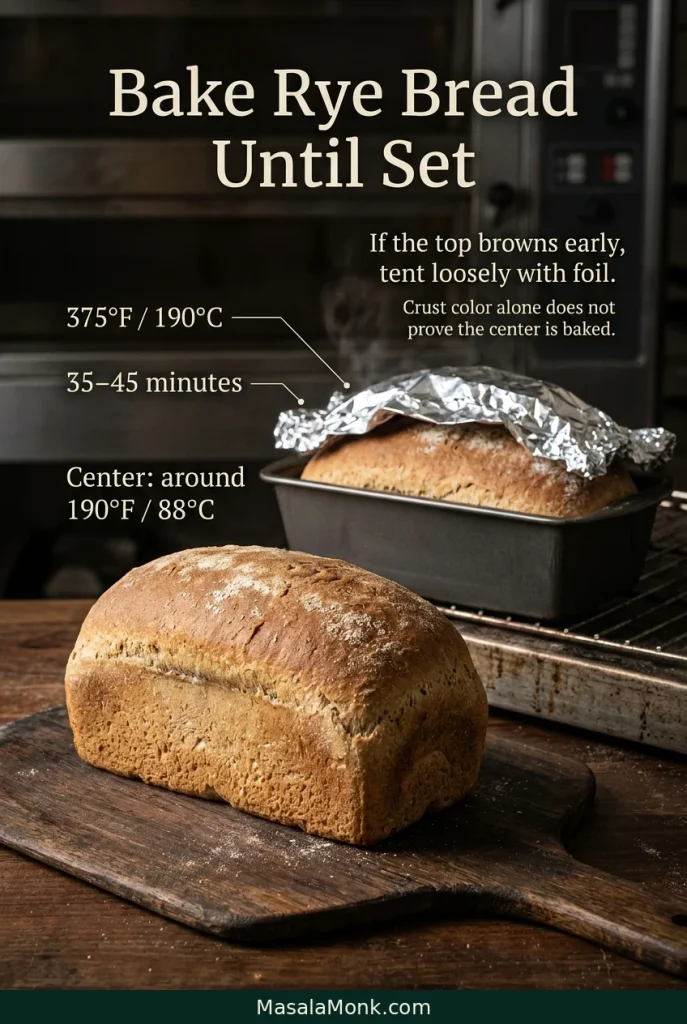
Step 9: Cool Completely Before Slicing
Leave the loaf in its pan for 5–10 minutes, then carefully transfer it to a wire rack.
Fresh rye bread smells wonderful, and cutting that first slice can be hard to resist. Give it approximately 2 hours to cool completely. The crumb firms as the bread cools, helping the slices hold their shape.
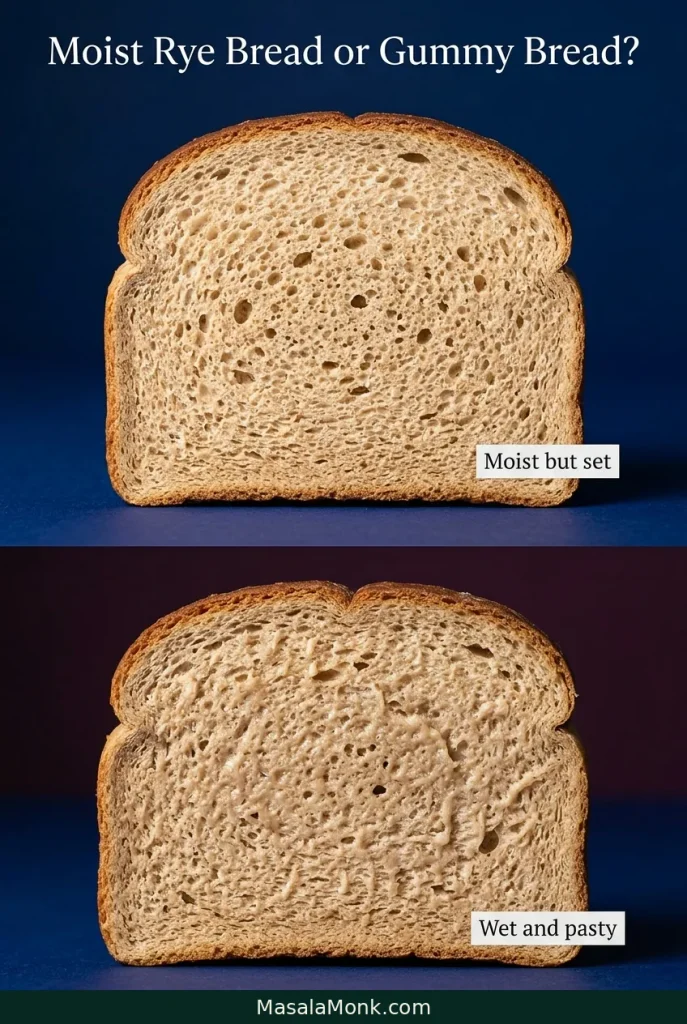
Use a serrated knife to cut medium slices. Expect a fairly close, even crumb with small to moderate air pockets rather than the large, irregular holes of some rustic wheat sourdoughs. A cooled slice should feel tender and slightly moist, not raw or pasty, and hold together when lifted.
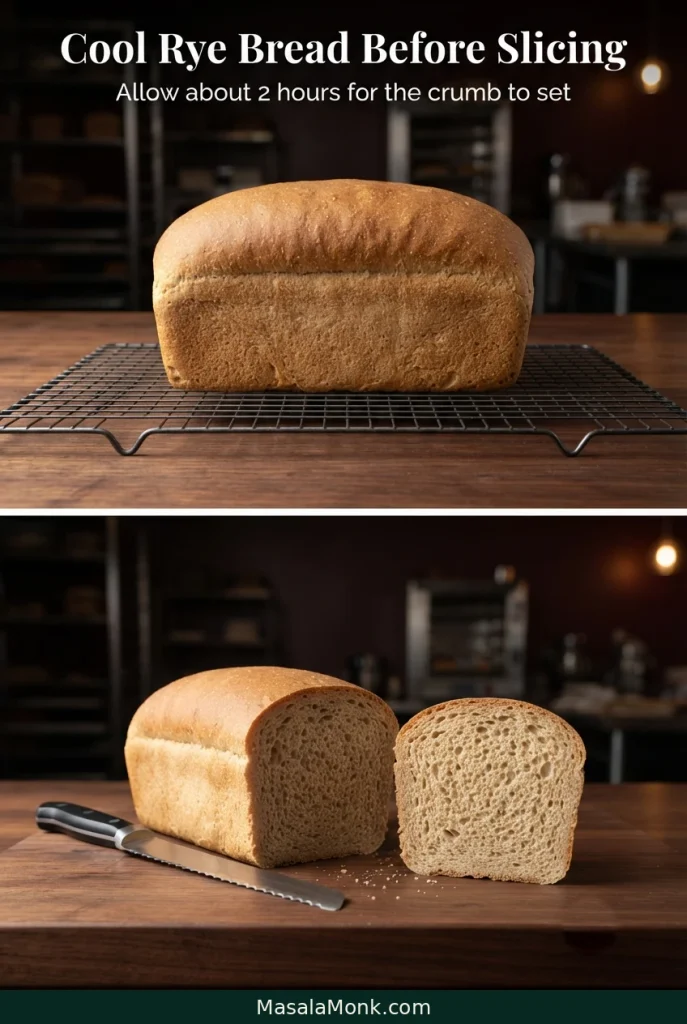
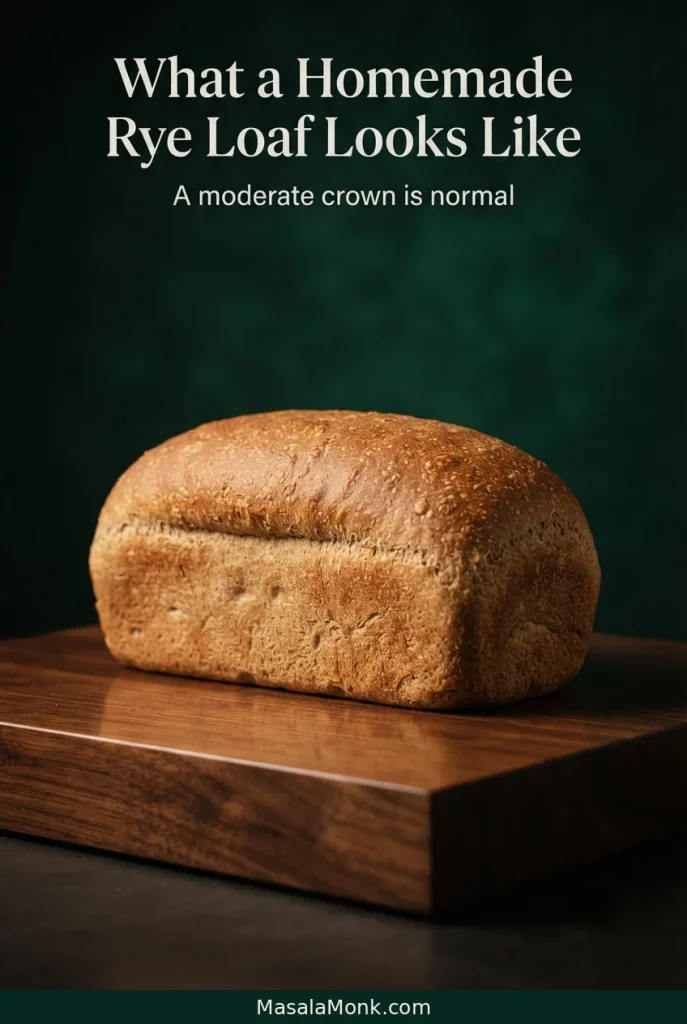
A finished rye sandwich loaf should hold its shape and produce sturdy, even slices. Its rounded top may be modest, particularly in a wider loaf pan.
Easy Rye Bread Variations
Once you’ve made the basic loaf, these small changes let you adjust the flavor or ingredients without turning it into a completely different bread.
Flavor and Seed Variations
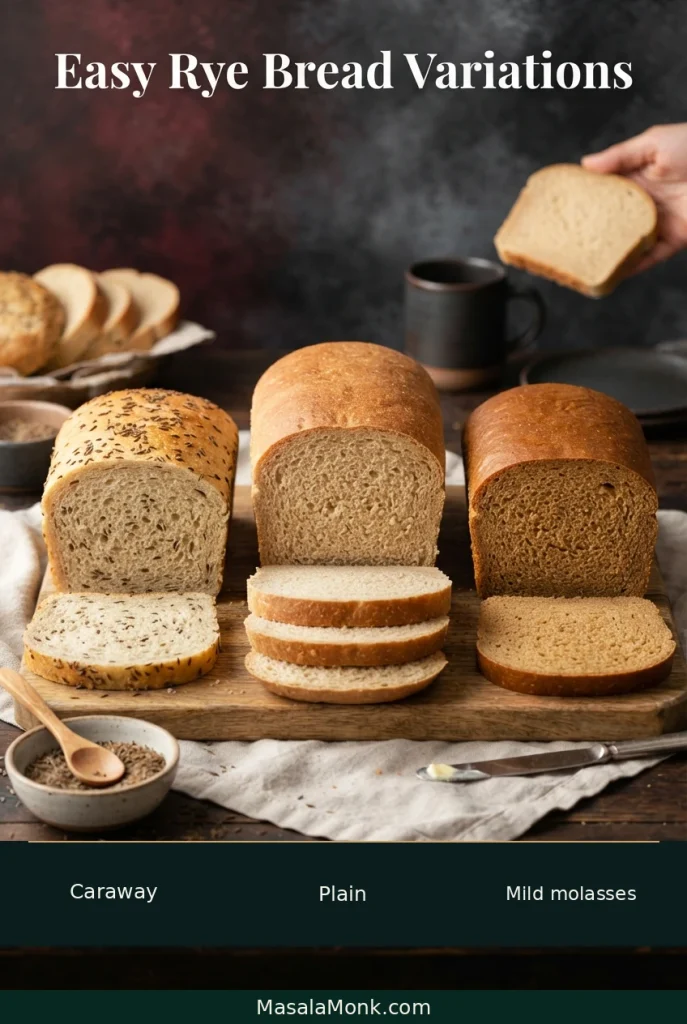
- Without caraway: Omit the optional seeds for a mild loaf.
- Stronger deli-style rye: Increase caraway to about 7 g, or lightly crush the seeds to release more aroma. A teaspoon of dried minced onion adds a savory note.
- Molasses rye: Substitute 20 g mild molasses for the 20 g honey for deeper sweetness and color.
Plain rye, caraway rye, and molasses rye provide three different flavor directions from the same basic dough. The choice depends largely on how you plan to serve the bread: delicate spreads benefit from a mild loaf, while savory deli fillings can stand up to more pronounced seasoning.
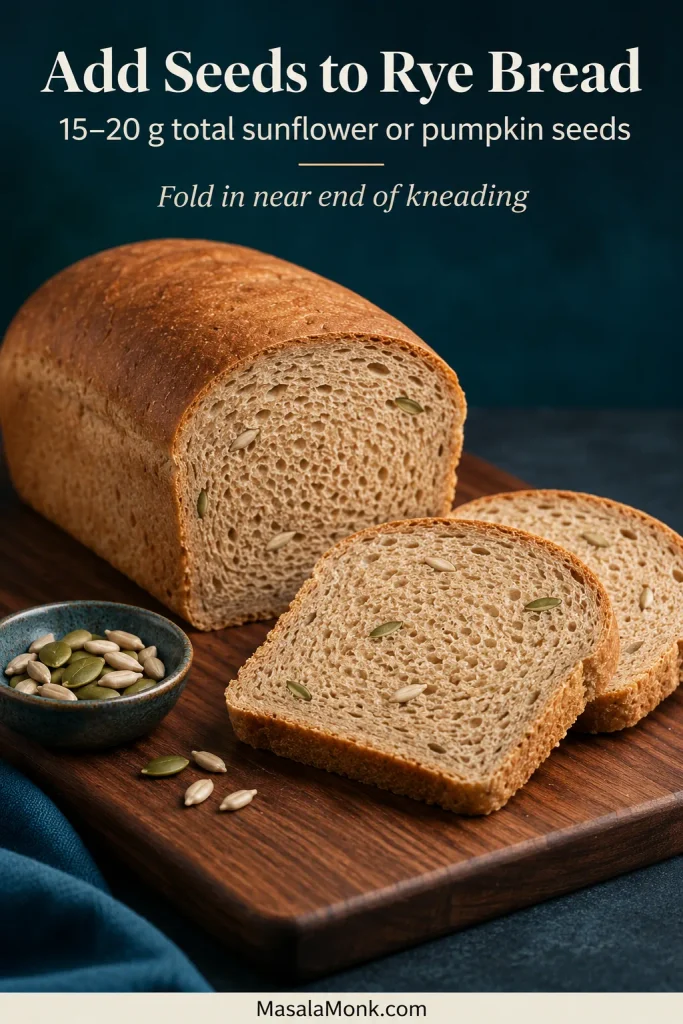
- Seeded rye: Add 15–20 g sunflower or pumpkin seeds near the end of kneading. Chia and flax bind more water and aren’t direct equivalents without hydration adjustments.
A modest quantity of sunflower or pumpkin seeds adds texture without overwhelming the natural rye flavor. Distribute the seeds through the dough so they appear throughout the crumb rather than only in a few concentrated areas.
Butter-Free and Yeast Substitutions
- Butter-free option: Substitute about 20 g neutral oil for the 25 g softened butter. For a fully plant-based loaf, also replace the honey with 20 g maple syrup or another appropriate plant-based sweetener.
- Active dry yeast: Use approximately 7 g. If the packet directs you to dissolve it first, take water from the measured 330 g rather than adding extra. Rising times may differ.
Using substantially more rye flour would require a different hydration and handling approach. Naturally leavened bread also follows its own fermentation schedule; our sourdough starter guide is a starting point for that style of baking.
Rye Dough Problems: When to Wait, Adjust, or Continue
Problems that appear before baking are often easier to correct than issues discovered in the finished loaf. Use these checks while the dough is still being mixed, kneaded, or proofed. For bread that’s already baked, go to the finished-loaf troubleshooting section.
My Rye Dough Is Sticky. Is That Normal?
Yes. If the rested and kneaded dough holds together and you can lift and fold it with a scraper, keep going. Sticky fingers alone don’t call for extra flour.
If the dough flows across the bowl like thick batter even after kneading, check the flour and water quantities. Make small corrections only if necessary: begin with about 5–10 g flour, work it in, and reassess before adding more. The aim is a workable dough, not a stiff one.
What If the Dough Is Dry and Crumbly?
Give it the complete 15–20-minute rest. If dry flour still remains after thorough mixing, add water in 5 g increments until the dry patches disappear. If this keeps happening, check whether your measuring method is packing too much flour into the cup.
What If the Dough Has Barely Risen After an Hour?
Compare its height with the starting level. Visible growth suggests fermentation is underway, even if the dough hasn’t doubled. A cool kitchen can slow the process, so allow more time when you can see progress.
If the dough remains almost unchanged well beyond the expected rise, check the room temperature, yeast age and storage, and whether the mixing water was too hot. For a future loaf, an activity check following the yeast packet’s instructions can help investigate a questionable supply; it won’t necessarily fix dough already mixed.
My Shaped Loaf Is Spreading. What Should I Do?
Still low in the pan but gradually getting fuller? Continue proofing. Actively flattening, wrinkling, or losing height after a good rise? Stop extending the proof and bake when the oven is ready, provided the dough can still hold together in the pan.
For next time, note when the spreading began. Dough that was loose immediately after shaping points toward handling or hydration. Dough that held a rounded shape and weakened only after substantial expansion points more toward overproofing.
Rye Bread Troubleshooting: Dense Loaves, Collapse, and Gummy Crumb
Once the bread has baked and cooled, its height, crumb texture, and crust can help narrow down what happened. Start with the symptoms you can actually observe rather than assuming one ingredient or technique caused the problem.
Why Is My Rye Bread Dense?
It barely rose at any stage: Check fermentation first. A cool kitchen, inadequate rising time, old or inactive yeast, or excessive flour can leave a tight crumb. Next time, make sure the dough expands appreciably before shaping and proofing. To identify that point, revisit the first-rise visual cues.
It rose well but baked up compact: Look for evidence that it lost volume during the final proof or baking, then review those stages. Some density is normal: this is a relatively close-crumbed rye sandwich loaf, not a very open white-wheat bread.
Why Did the Loaf Collapse?
It sank in the pan before baking: A wrinkled, fragile top after substantial expansion suggests overproofing. The covering may also have stuck and dragged down the dough when removed. Check the loaf earlier next time and use a well-oiled, loose cover.
It collapsed after entering the oven: Consider whether it was already weak before baking or whether the dough was excessively loose. A loaf that reached full volume and then became fragile should be baked earlier on the next attempt; merely adding more yeast isn’t the fix.
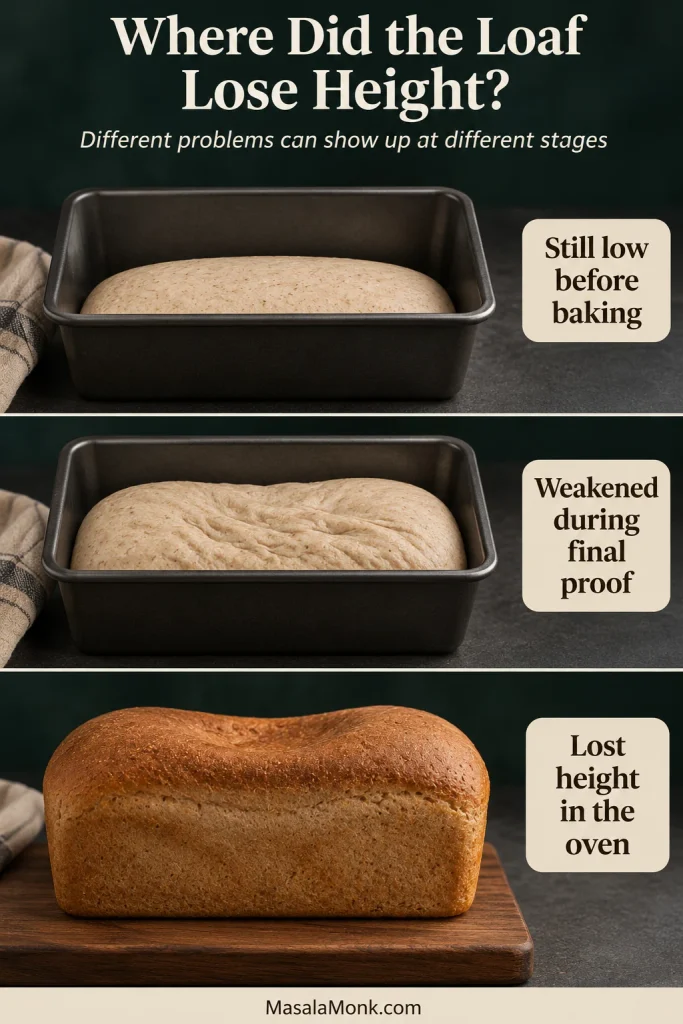
If the loaf repeatedly loses height during its final rise, review the final-proof checkpoints before adjusting the dough formula.
Why Is My Rye Bread Gummy Inside?
A close, slightly moist crumb is normal for rye sandwich bread. A center that remains wet or pasty after complete cooling, sticks heavily to the knife, or looks like raw dough is a different problem.
First check whether the loaf was baked through and cooled for approximately two hours before slicing. A dark crust can hide a center that still needs time. If baking and cooling were adequate, review the dough’s consistency and whether it rose or collapsed abnormally. Don’t automatically reduce the water just because the crumb is moist.
Why Is the Crust Too Dark or Hard?
Tent the loaf loosely with foil if the top browns before the center finishes baking. Use the lower-middle oven rack. A very hard crust can also result from overbaking or from leaving the cooled bread uncovered.
Can You Save a Dense or Dry Rye Loaf?
A fully baked but dense loaf often makes excellent thin toast. Older bread can become croutons or breadcrumbs. Mildly flavored rye is also suitable for our bread pudding recipe; strongly caraway-flavored slices may be less appealing in a sweet pudding.
A genuinely raw center is different from a dense crumb. If discovered while the loaf is still hot, returning it to the oven may help. A persistently raw, wet center in a fully cooled loaf is much harder to correct reliably.
For another attempt, return to the step-by-step recipe with the relevant proofing, baking, or dough-handling adjustment in mind.
Rye Bread FAQs
Can I Refrigerate Rye Bread Dough Overnight?
Yeasted rye dough can be refrigerated, but cold fermentation may require less yeast and a different schedule. This formula is designed for the same day with 7 g instant yeast; use a specifically adapted overnight formula if you want to make the dough ahead.
Can I Make This Loaf With 100% Rye Flour?
Not with the same quantities and method. Pure rye bread needs different hydration, structure, and fermentation management and usually has a denser, moister crumb. Use a recipe designed for high-percentage or 100% rye instead of replacing the bread flour here.
Does Rye Bread Contain Gluten?
Yes. Rye contains gluten, and this recipe also uses wheat bread flour. It isn’t suitable for people with celiac disease. The Celiac Disease Foundation’s guide to gluten identifies rye as a grain to avoid on a gluten-free diet.
Replacing the wheat flour with a gluten-free blend wouldn’t make bread containing rye flour gluten-free.
How to Store, Freeze, and Serve Homemade Rye Bread
How Long Does Homemade Rye Bread Stay Fresh?
Let the bread cool completely before wrapping it. At cool room temperature, it’s generally best eaten within 2–3 days, depending on humidity and storage conditions.
If you expect to finish it the next day, keep it wrapped at room temperature. Freeze portions you won’t use promptly, especially in hot or humid weather. Refrigeration speeds bread staling, so freezing is usually better for longer storage.
Can You Freeze Rye Bread?
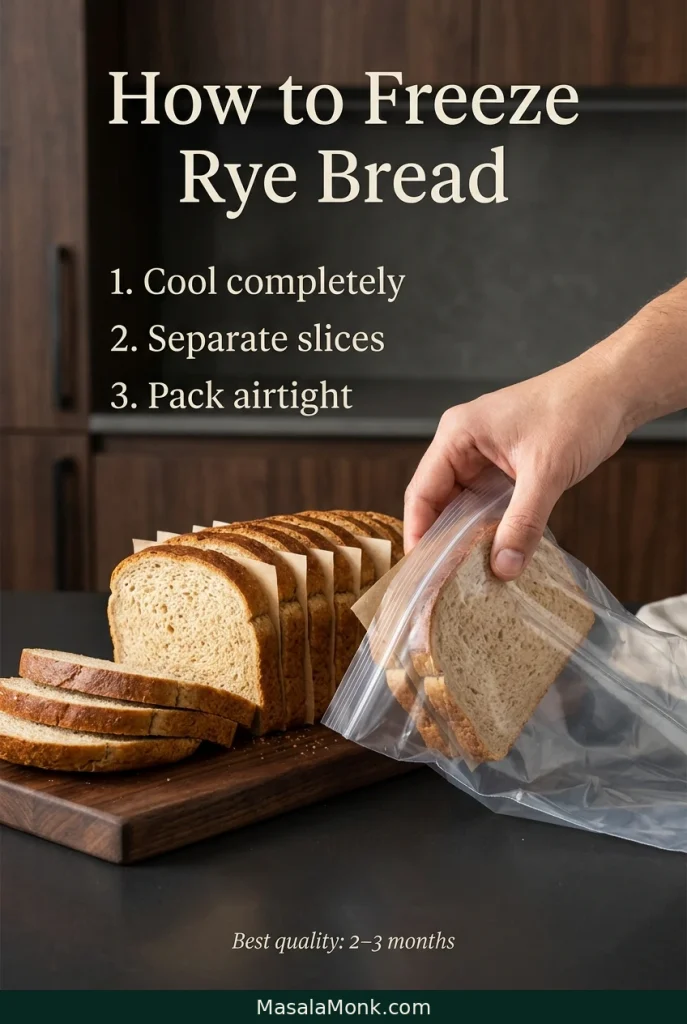
Yes. Slice the cooled loaf, separate slices with parchment if useful, and seal them in a freezer bag or airtight container. For best quality, use within approximately 2–3 months. Slices can go directly into the toaster or thaw at room temperature.
Older slices that are still good to eat also work nicely in our French toast recipe. Rye adds more pronounced grain flavor than white sandwich bread or brioche.
What to Eat With Rye Bread
Rye’s earthy flavor pairs with cheese, mustard, pickles, eggs, cream cheese, smoked meats, roasted vegetables, or simply butter on toast.
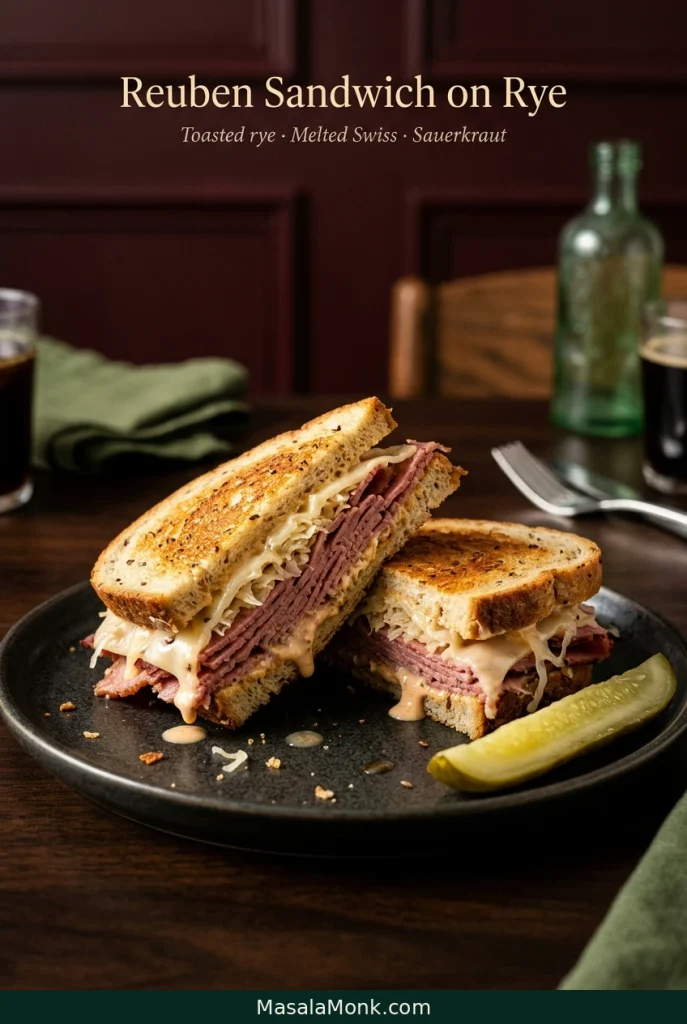
For a classic deli sandwich, try our Reuben sandwich recipe with corned beef, sauerkraut, Swiss cheese, and tangy dressing. The sturdy rye slices hold those fillings well.
For a warm lunch, use toasted slices for a homemade tuna melt. Alternatively, spread a slice with homemade hummus, then add cucumber, tomatoes, or pickled vegetables for a satisfying meat-free sandwich.