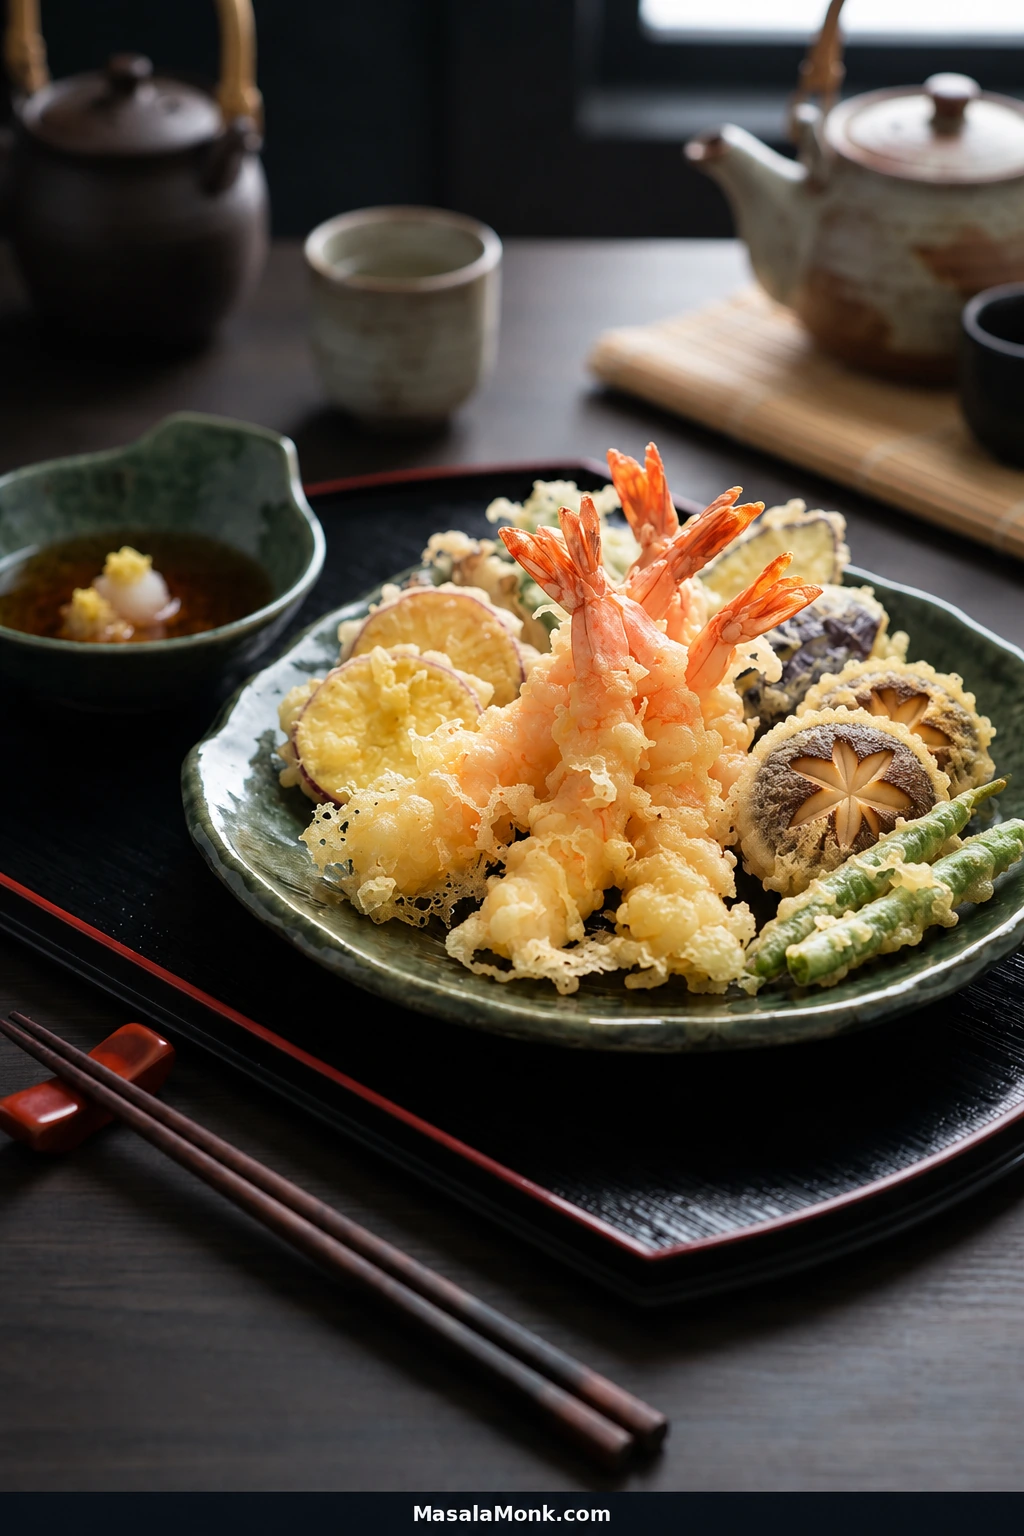
Japanese tempura should crackle delicately when you bite into it. A thin, lacy batter coats juicy shrimp and tender vegetables without turning into a thick, bready shell. This tempura recipe brings both to the table with tentsuyu, a savoury Japanese dipping sauce served warm or at room temperature.
A deep pot and a thermometer are enough for good tempura at home. Most of the work happens before frying: once the ingredients are cut and the batter portions are measured, you can concentrate on the oil and bring each batch to the table while it is crisp.
Need a specific detail? See the ingredient-by-ingredient frying chart or troubleshoot soggy tempura.
Japanese Tempura Recipe: Shrimp, Vegetables & Crispy Batter
Serves: 4 as part of a meal, or 2 generously. Prep: 30–40 minutes. Cooking: about 25–35 minutes, allowing for initial oil heating, small frying batches and temperature recovery. Total: about 55–75 minutes. Oil temperature: 160–180°C (320–356°F), depending on the ingredient. A smaller pot or extra batches may take longer.
Weights are for peeled shrimp and trimmed vegetables. Choose the vegetables you enjoy; what matters most is cutting them evenly, keeping the batter light and frying in small batches. The oil quantity is an estimate—use the safe depth specified in the equipment section.
Ingredients for the Shrimp and Vegetables
- 300 g (10.6 oz) raw shrimp or prawns, peeled, deveined, roughly 12–16 medium-large shrimp, depending on size; leave the tails attached if you like
- 120 g (4.2 oz) sweet potato, cut into 5–6 mm (about ¼-inch) rounds or half-moons
- 120 g (4.2 oz) eggplant/aubergine, cut into thin 5–6 mm slices or shallow fan cuts
- 80 g (2.8 oz) shiitake or king oyster mushrooms, wiped clean; halve large shiitake caps or cut king oyster mushrooms lengthwise into slices about 5–7 mm (¼ inch) thick
- 80 g (2.8 oz) green beans, trimmed, thoroughly dried and left whole if slender; halve very long beans
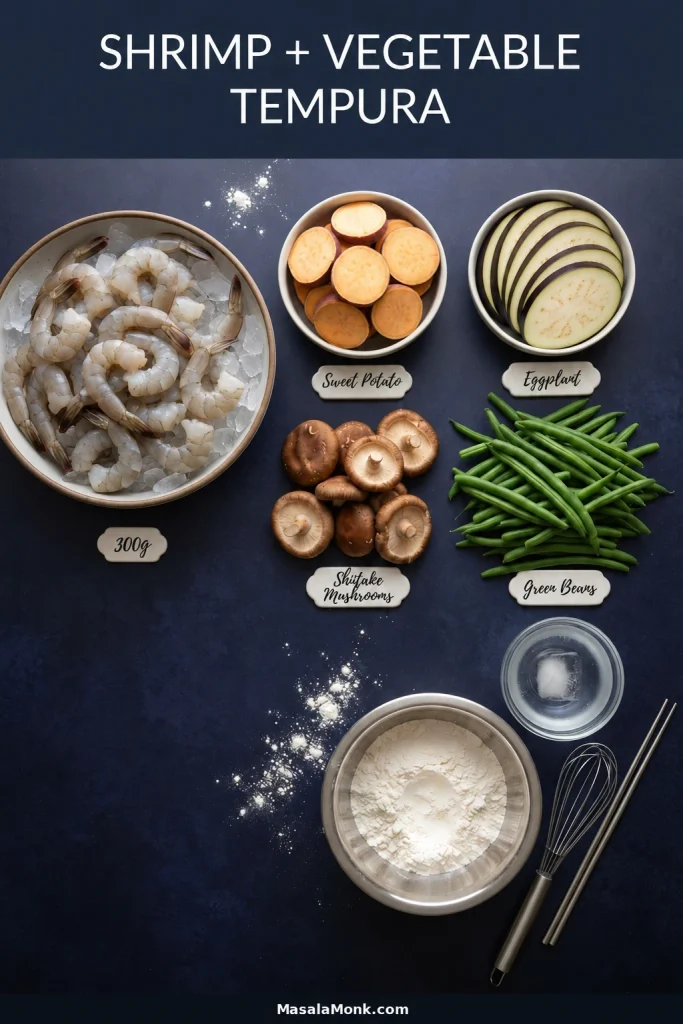
Choose any two, three or all four vegetables, aiming for 400 g altogether. If you use only sweet potato and mushrooms, for example, increase their quantities to reach that total. Kabocha can replace some of the sweet potato; a few shiso leaves make a delicate optional extra rather than part of the 400 g vegetable total. Both have timings in the chart.
Ingredients for the Cold Tempura Batter
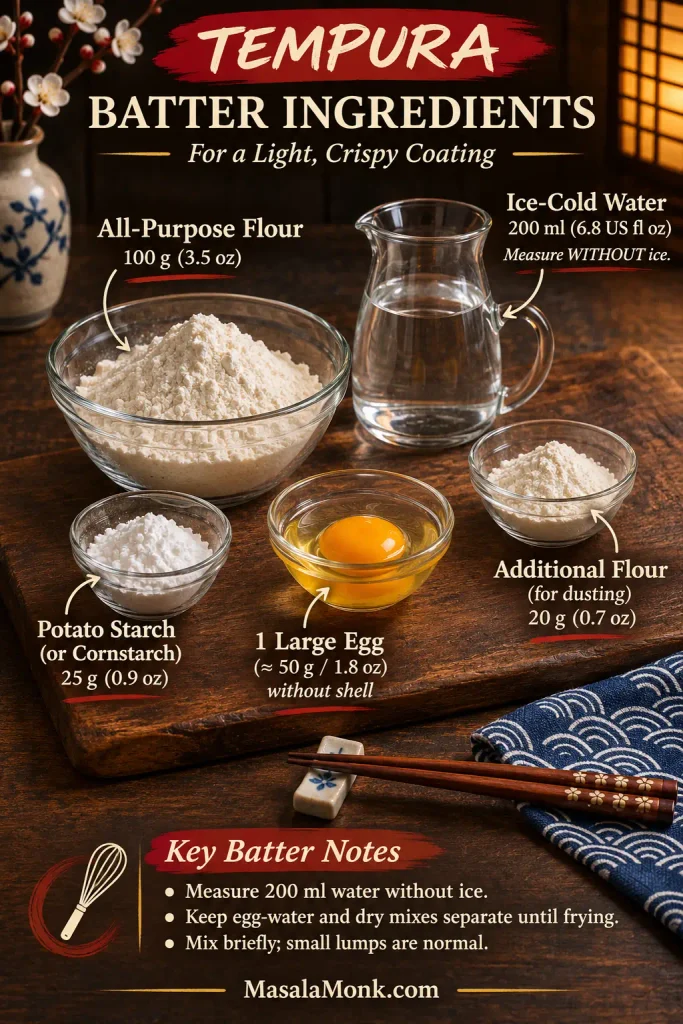
- 100 g (3.5 oz) all-purpose/plain flour, roughly ¾ US cup plus 1 tbsp when spooned and levelled; a scale is more reliable
- 25 g (0.9 oz) potato starch or cornstarch, approximately 3 tbsp, depending on brand
- 1 large egg, approximately 50 g (1.8 oz) without shell
- 200 ml (6.8 US fl oz) ice-cold water, about ¾ cup plus 1½ tbsp; measure without ice
- 20 g (0.7 oz) additional all-purpose flour for light dusting; not all may be needed
- Neutral oil for deep-frying, such as refined canola, sunflower or rice-bran oil; approximately 1–1.2 L (34–41 US fl oz) as a starting estimate for a suitably deep pot; add only enough to reach the safe depth described below
Why Divide the Tempura Batter for Vegetables and Shrimp?
Mixing fresh batter for the shrimp after frying the vegetables keeps the last batch light. This 60:40 division is a convenient plan for this recipe, not a traditional rule you must follow exactly. Whisk the egg with 200 ml cold water; with a roughly 50 g egg, you will have about 250 g of liquid. Divide it into approximately 150 g for vegetables and 100 g for shrimp. Keep the liquids chilled and measure the dry ingredients separately:
- Vegetables: 60 g flour + 15 g starch, with 150 g of the chilled egg-water mixture.
- Shrimp: 40 g flour + 10 g starch, with the remaining 100 g of chilled egg-water mixture.
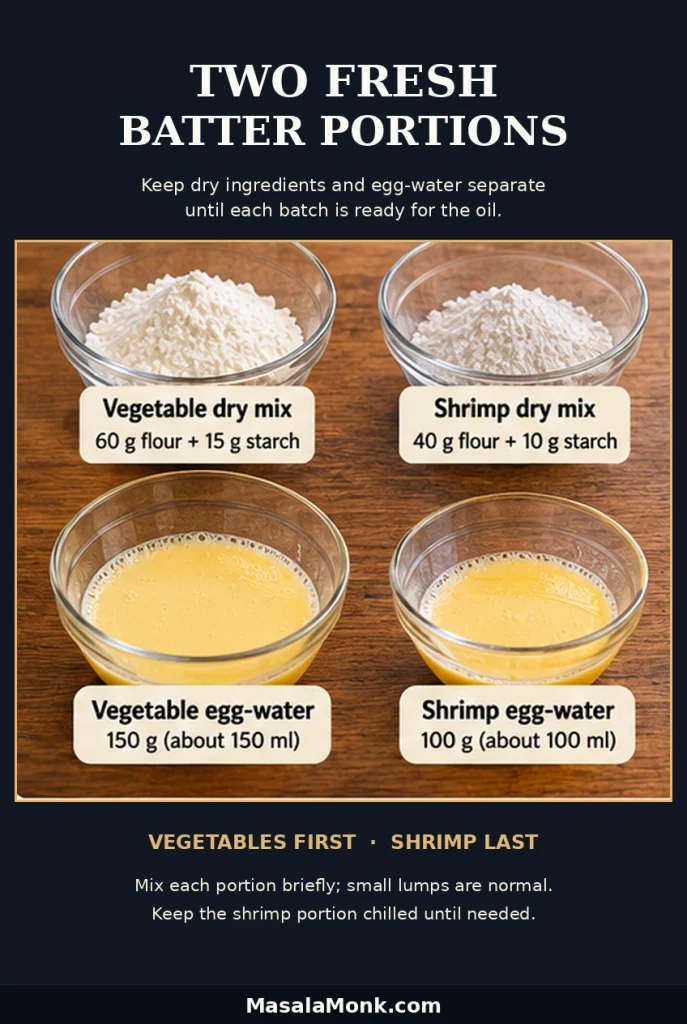
Mix each portion just before frying. Need more vegetable batter? For a much larger platter, make another full batch. For a smaller top-up, whisk one new egg with 200 ml cold water, then combine 50 g flour + 12.5 g starch + 125 g of the new egg-water mixture. Refrigerate and discard the unused liquid rather than pouring it into standing batter. This optional half-size mixture avoids splitting a raw egg. For a visual cue, see how thin the finished batter should be.
Ingredients for the Tempura Dipping Sauce (Tentsuyu)
- 180 ml (6.1 US fl oz) prepared dashi (Japanese stock)
- 30 ml (2 tbsp / 1 US fl oz) Japanese soy sauce
- 30 ml (2 tbsp / 1 US fl oz) mirin
- 4 g (about 1 tsp) sugar, optional, to taste
- Grated daikon and finely grated fresh ginger, optional, to serve
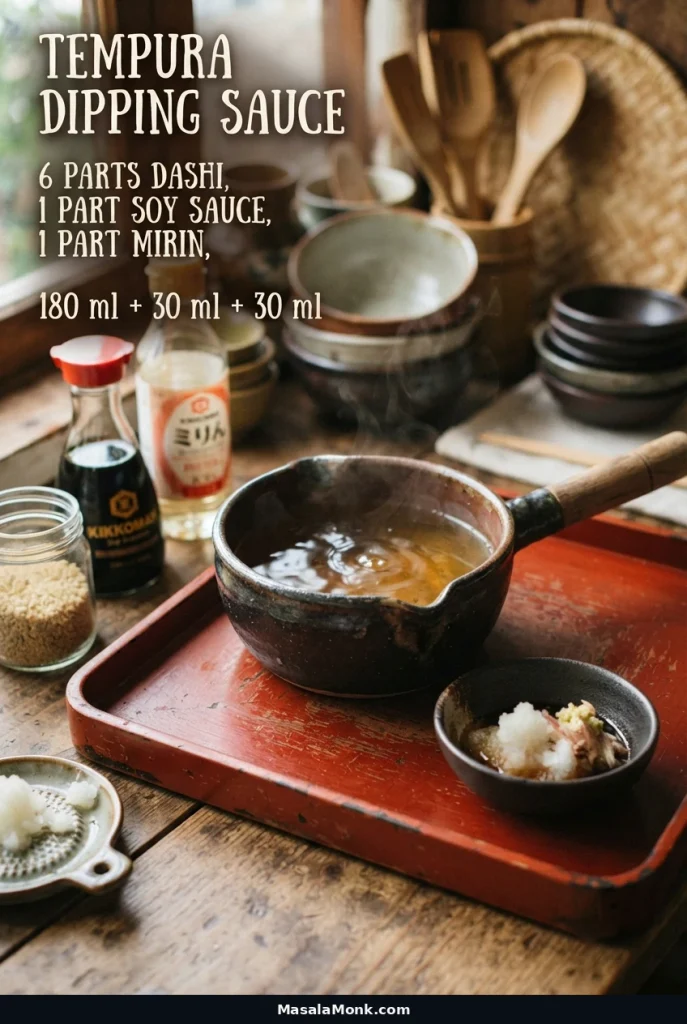
Makes about 240 ml (8.1 US fl oz) of sauce, enough for four small dipping bowls. For a fish-free sauce, use kombu-and-shiitake dashi in place of bonito-based dashi.
Equipment and Frying Setup
A deep, heavy-bottomed pot about 20–22 cm (8–9 inches) across works well. You will also need a frying thermometer, a scale, a mixing bowl, long tongs or cooking chopsticks, a skimmer and a wire rack over a tray. Keep a small saucepan ready for the sauce.
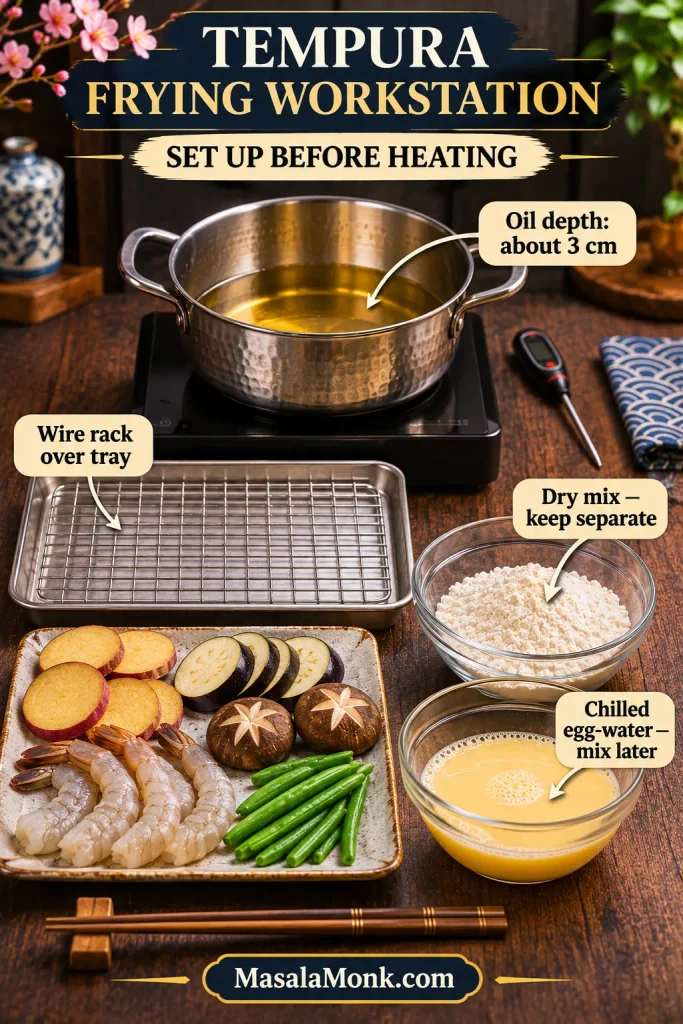
Pour in enough neutral oil for about 3 cm (1.2 inches) depth, leaving plenty of room above it for bubbling. In a straight-sided 20–22 cm pot, that is roughly 950 ml–1.15 L; a curved pot will differ. Check the depth and the pot manufacturer’s safe fill limit rather than relying on the litre estimate.
Safety Checks and Serving Readiness
Before heating the oil: set the pot on a stable burner, clear the area and keep water away from the oil. Use long utensils and stay at the stove. Keep a suitable lid or fire blanket nearby. Never use water on an oil fire. If a fire starts, turn off the heat only if it is safe; otherwise move away and call emergency services.
Keep raw shrimp separate from ready-to-eat food. Thaw frozen shrimp in the refrigerator, then drain, blot and keep chilled until you need it.
Plan to serve as you fry. Set out the rice, sauce and plates before heating the oil. Start with a few pieces of your chosen vegetable; if you have sweet potato, it makes a good first batch. Send vegetables to the table while the shrimp fries rather than waiting for one large platter. Before switching on the stove, review the ingredient-specific frying time and temperature chart.
How to Make Tempura: The Complete Method
- Make the dipping sauce first. Combine 180 ml dashi, 30 ml soy sauce and 30 ml mirin in a small saucepan. Bring to a brief gentle simmer, then remove from the heat. Taste and add up to 4 g sugar if you want a sweeter finish. Set aside; grate daikon and ginger separately. The sauce can be served warm or at room temperature.
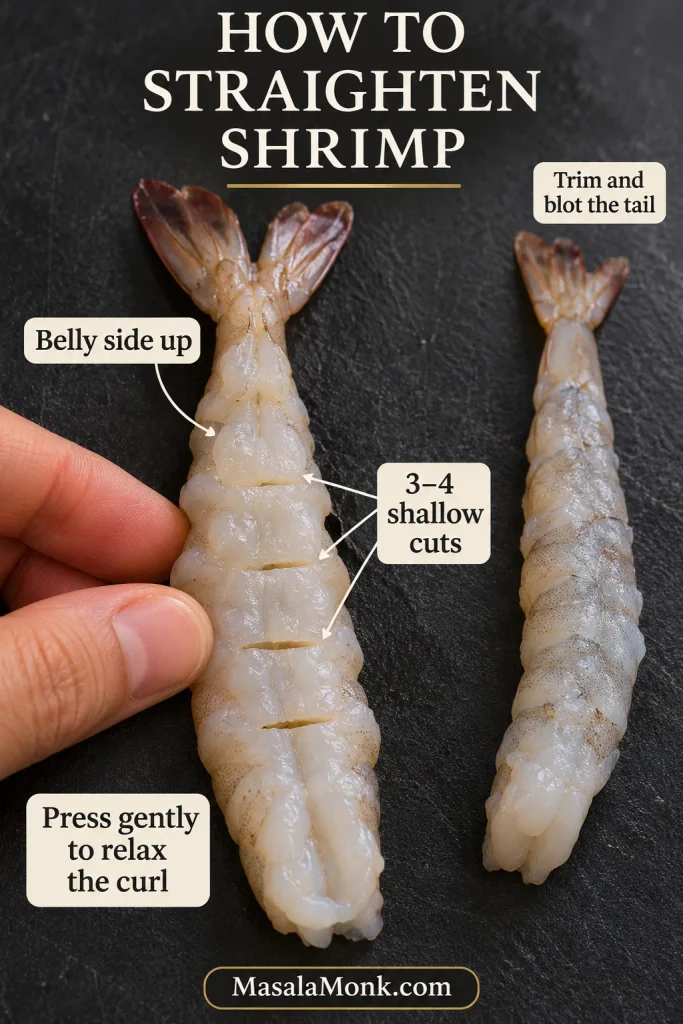
- Prepare the shrimp. Peel and devein, leaving tails on if desired. Trim the pointed tail tip and gently press or blot trapped moisture from the tail. Make three or four shallow cuts across the underside without cutting through the body; press gently along the shrimp to release the curl. Pat dry. Keep refrigerated while you prepare the vegetables.
How to Straighten Shrimp for Tempura
Before coating, check the shrimp’s underside and tail for trapped moisture. The photograph shows how the body is gently straightened; keeping the tail dry also helps reduce splattering as the shrimp enters the oil.
- Cut and dry the vegetables. Slice the sweet potato 5–6 mm (about ¼ inch) thick. Cut the eggplant into thin, even slices or small fans; halve large shiitake caps or slice king oyster mushrooms lengthwise to 5–7 mm; trim green beans, halving only very long ones. Blot wet surfaces. Keep the ingredients separate so each can be fried for its own cooking time.
- Get the batter portions ready. Put 60 g flour and 15 g starch in one bowl, and 40 g flour and 10 g starch in another. Whisk the whole egg into 200 ml ice-cold water, then divide the liquid into about 150 g for vegetables and 100 g for shrimp. Keep both portions chilled and unmixed. Position the thermometer in the oil, clear of the pot bottom, and set a rack over a tray beside the stove.
Start Frying: Vegetable Batter and First Batch
- Heat the oil to 160–170°C (320–338°F), then mix the vegetable batter. Pour the chilled 150 g egg-water portion into the bowl of 60 g flour and 15 g starch. Stir briefly with a fork or chopsticks until most of the flour is damp. Small lumps are fine. Leave the shrimp ingredients separate and cold.
- Fry the first small vegetable batch. Sweet potato is a good place to start if you are using it: dust a few dry 5–6 mm slices lightly, shake off the flour, dip into the batter and let the excess drip away. Lower them carefully into the oil. Fry for about 2–4 minutes, turning gently after the wet coating firms into fine ridges. Lift out a slice and check that the centre is tender. No sweet potato? Begin with a few pieces of your chosen vegetable at its temperature in the frying chart; check its specific doneness cue before moving on.
What to Watch During the First Vegetable Fry
The first batch shows whether your oil and batter are working together. Watch the coating as it enters the oil: it begins glossy, then develops delicate ridges that can hold together when turned.
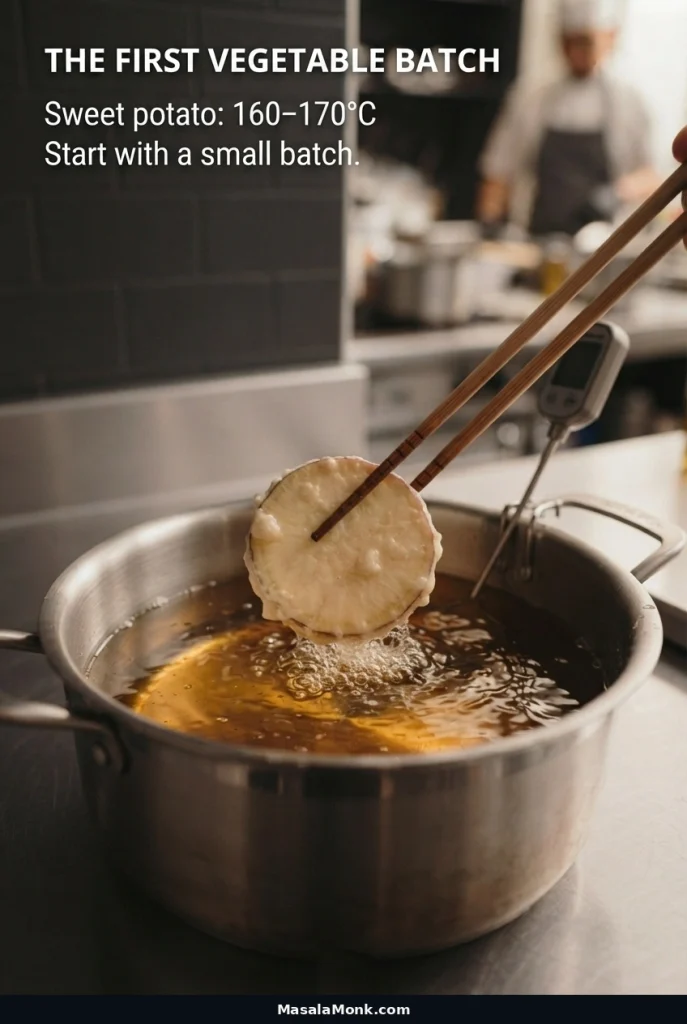
- Check the first piece, then continue. A thin, crisp coating and a properly cooked centre mean the next batch can go in. Irregular edges are normal. Greasy coating? Let the oil recover and fry fewer pieces. Thick coating? Let more batter drip off next time. Batter slipping away? Dry and lightly dust the next piece. One adjustment is generally enough to get back on track. If the same problem persists, consult the tempura troubleshooting table before the next batch.
How to Check the First Tempura Piece
Cut through the middle of the first sweet potato slice and compare its tender centre with the crisp exterior. This checks actual doneness, which the oil temperature alone cannot tell you.
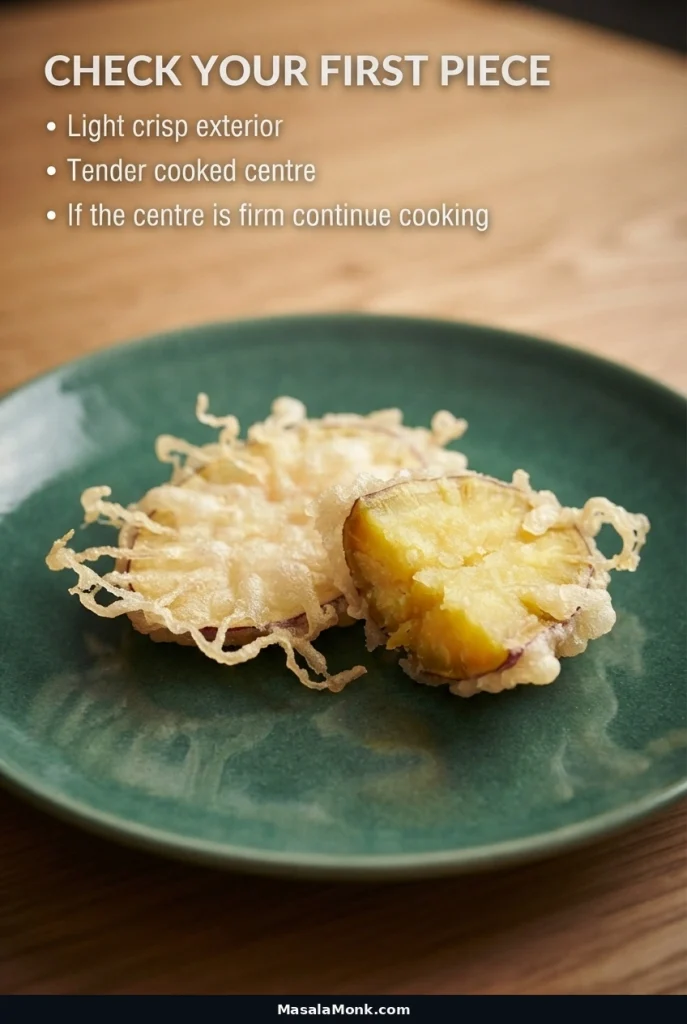
- Fry the other vegetables at their chart temperatures. Continue with whichever vegetables you chose. Eggplant slices and slender beans often take 1–2 minutes around 170°C (338°F); mushrooms may need 1–3 minutes, and thick eggplant fans may take longer. Fry optional kabocha like sweet potato at 160–170°C (320–338°F); fry lightly coated shiso leaves separately for just 15–30 seconds around 170°C (338°F). Keep batches small, skim dark crumbs, and allow the oil to recover. Make extra vegetable batter if needed, leaving the shrimp portion untouched.
- Fry the shrimp last at 175–180°C (347–356°F). Mix: Stir the reserved 100 g chilled egg-water into 40 g flour and 10 g starch just until damp. Coat: Blot the shrimp, dust lightly, shake off excess flour and dip into the fresh batter. Fry: Lower carefully into the oil and turn gently once the coating has set, so both sides cook evenly. Most medium-large shrimp take 2–3 minutes. Check: Cut open one of the larger shrimp; the flesh should be pearly, opaque and cooked through. The crust can still be pale gold.
How to Tell When Shrimp Tempura Is Cooked
Shrimp sizes are rarely identical. If the batch contains noticeably different sizes, fry similar pieces together and check one of the larger shrimp before serving; the comparison below focuses on the flesh inside the crust.
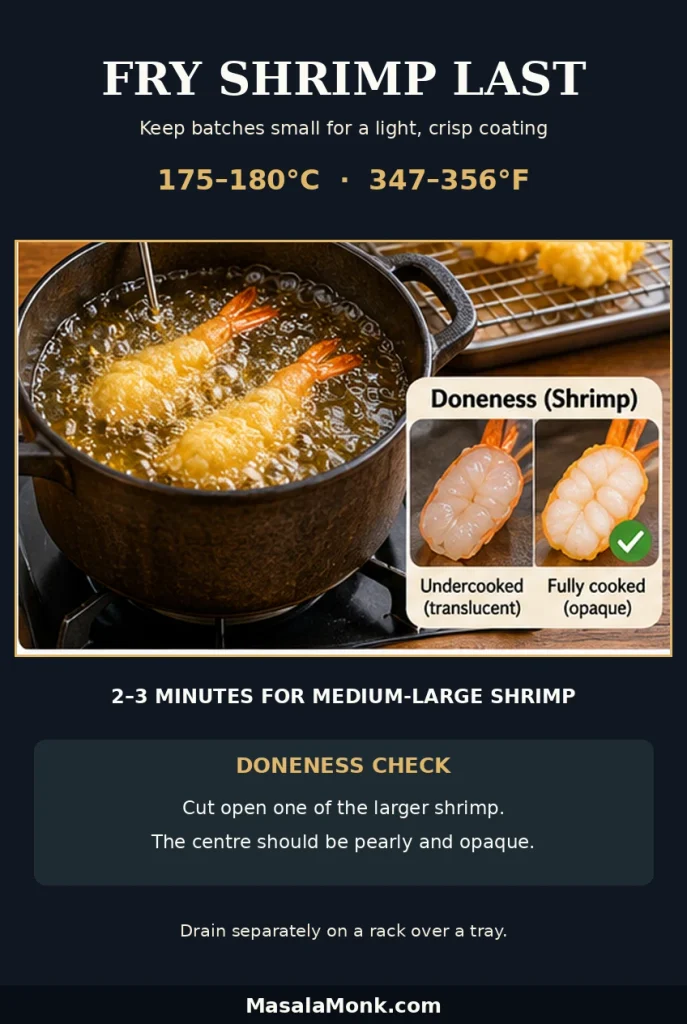
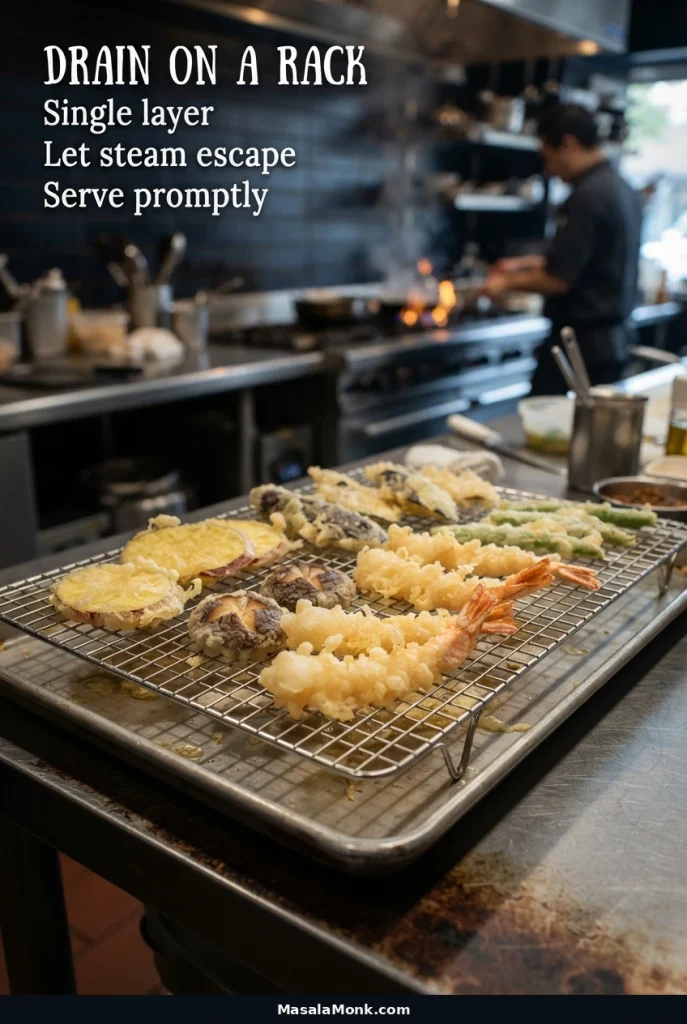
- Drain and serve in waves. Give pieces a moment on the wire rack to shed oil and steam, then bring them to the table promptly with small bowls of tentsuyu and optional grated daikon or ginger. Avoid covered platters, paper-lined piles or keeping everything hot under a lid—the trapped steam softens the coating.
How to Drain Tempura Without Losing Its Crunch
Place the rack over its tray beside the stove, with a clear route to the serving plates. That way, hot pieces can shed excess oil without being piled on top of one another.
Tempura Frying Time and Temperature Chart
| Food and cut | Oil temperature | Approximate total frying time | Check for doneness |
|---|---|---|---|
| Sweet potato, 5–6 mm slices | 160–170°C / 320–338°F | 2–4 min | Knife enters the centre easily |
| Eggplant, 5–6 mm slices; shallow fans | ~170°C / 338°F | 1–2 min for slices; fans may take longer | Flesh tender; crust set |
| Shiitake, halved large caps; king oyster, 5–7 mm slices | ~170°C / 338°F | 1–3 min | Tender and hot through; coating set |
| Green beans, trimmed | ~170°C / 338°F | 1–2 min | Tender-crisp; batter set |
| Medium-large shrimp, prepared | 175–180°C / 347–356°F | 2–3 min | Flesh firm, pearly, opaque |
| Optional kabocha, thin slices | 160–170°C / 320–338°F | 2–4 min | Tender centre |
| Optional shiso leaf, one-side coated | ~170°C / 338°F | 15–30 sec | Thin coating just set |
Times include the whole fry, not each side. Check the centre of thicker vegetables and shrimp; tempura can be fully cooked while still pale.
Need a fix or substitution? See how to make the batter stick, diagnose a failed batch or adapt the dipping sauce.
Why Tempura Batter Turns Light and Crispy
A good tempura crust starts with batter that looks almost unfinished. Stirring just enough to moisten the flour limits gluten development; mixing it until completely smooth can make the coating tougher. Cold liquid helps keep the mixture cool until it reaches hot oil, while starch reduces the proportion of gluten-forming flour. The result should be a light coating that leaves the shrimp and vegetables recognizable. For a different kind of crunch, our coconut shrimp recipe uses coconut and panko instead.
How Thick Should Tempura Batter Be?
Lift a fork or chopsticks from the batter. It should drip back into the bowl freely, leaving a thin, uneven film on the food. Small lumps are normal; there is no need to beat them out. A smooth, stretchy batter usually means it has been worked too much.
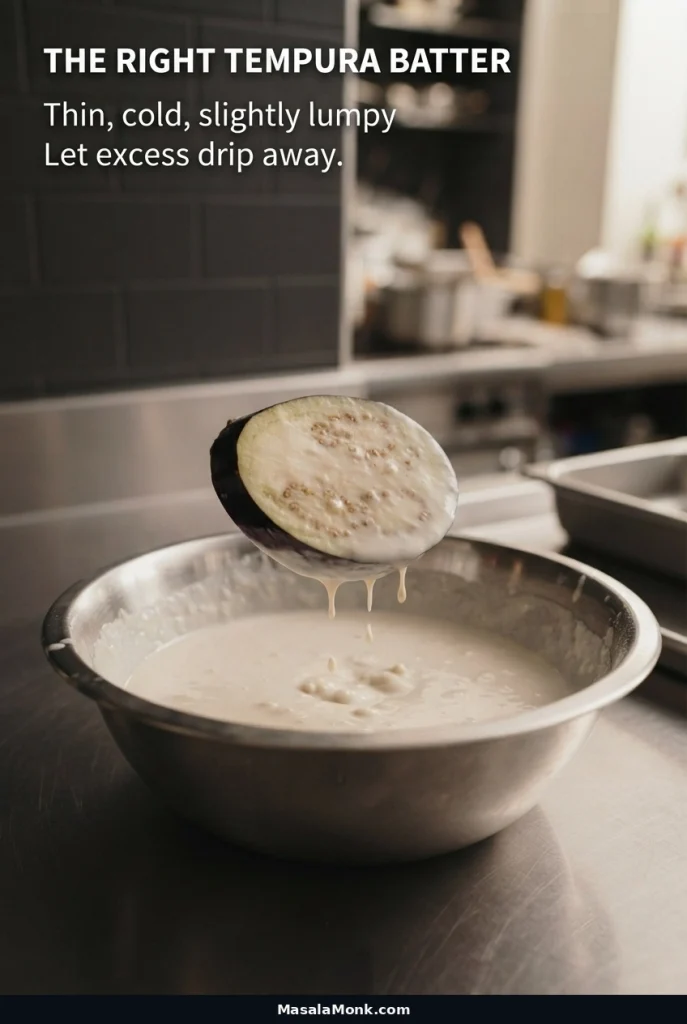
- Thick and gluey: check whether you weighed the flour accurately or stirred too much; if the batter is too thick to drip, add ice-cold water 1 tsp (5 ml) at a time, stirring minimally.
- Runs off completely: first check for moisture on the food and whether it needs a faint dusting of flour. Do not automatically thicken the entire bowl.
- Smooth and elastic: stop stirring; use it promptly and mix a fresh small portion if the later batches become heavy.
Getting Tempura Batter to Stick
Batter grips best when the ingredient surface is dry. A very light flour dusting helps on slippery pieces. Rather than making the whole batter thicker because one vegetable loses its coating, look at that ingredient:
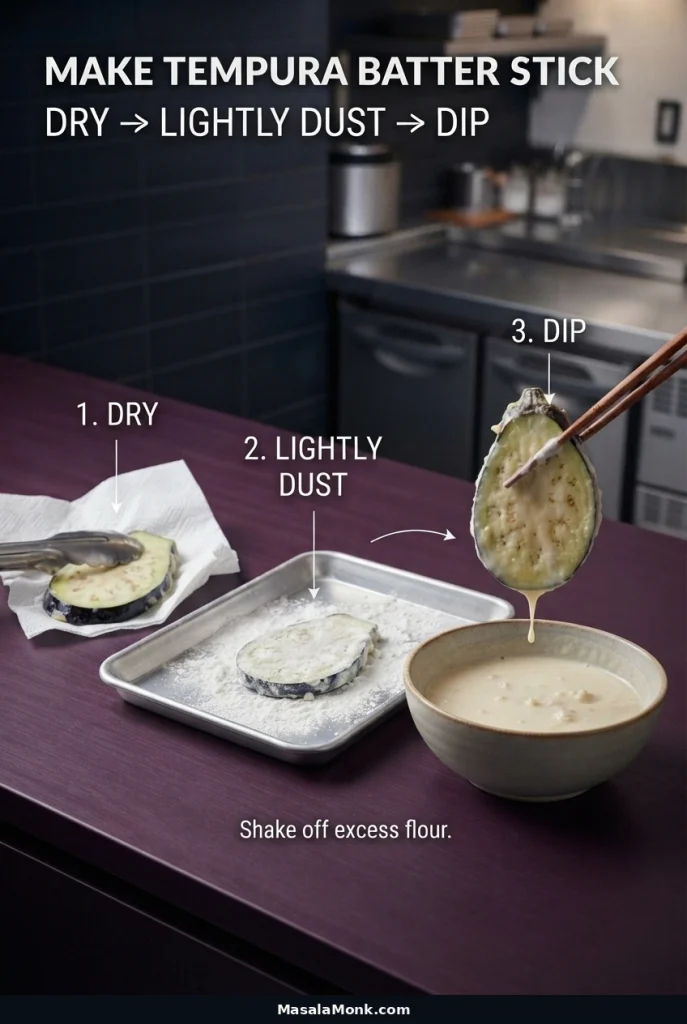
- Shrimp: if the coating slides off despite dusting, check for moisture collecting along the underside or tail.
- Eggplant: dry the slices; the cut flesh holds batter better than smooth skin. Shallow scoring can help on a fan cut.
- Mushrooms: water trapped in the gills or on cut surfaces can loosen the coating; check those areas first.
- Green beans: the smooth skin needs very little batter; a thick layer can slide away.
- Shiso leaves: dip mainly one side so the leaf stays light.
Once a piece goes into the oil, let the coating set before moving it. Pulling at wet batter can strip it right off. When you are ready to resume frying, return to the first batter and frying steps.
For shrimp that still curls or splatters, revisit the illustrated shrimp preparation. Kikkoman’s preparation illustrations also show the underside cuts from another angle.
Vegetable Preparation Guide
| Ingredient | Useful distinction | Watch for |
|---|---|---|
| Sweet potato | Thin, even slices cook more predictably than thick rounds | Crisp crust with a hard centre |
| Eggplant | Slice 5–6 mm thick or make shallow fan cuts | Thicker fans needing more time to soften |
| Shiitake or king oyster | Halve large shiitake caps; slice king oyster lengthwise 5–7 mm | Unevenly cooked, thicker centres |
| Green beans | Leave slender beans whole; halve long ones | Beans remaining raw or too firm |
| Kabocha (optional swap) | Use thin crescents; tender skin may stay on | Firm centre despite browning |
| Shiso (optional extra) | Keep leaves dry and intact; coat one side | Very fast cooking, about 15–30 seconds |
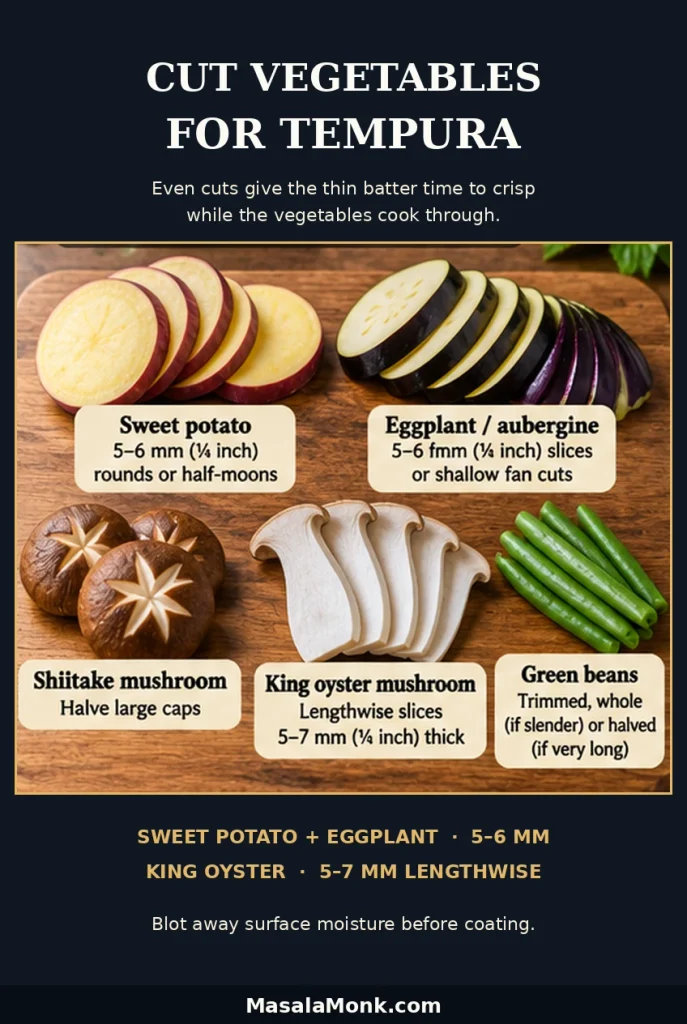
Cut sweet potato and eggplant closer to frying when possible; exposed surfaces can darken while they sit. If you hold cut pieces in water, drain and blot them thoroughly before coating.
How to Control the Oil Temperature
Every batch takes heat from the oil, especially in a small pot. When the temperature stays low, the coating takes longer to set and can absorb more oil. Root vegetables benefit from gentler frying to cook their centres; shrimp gets a hotter, shorter fry. Use the tempura frying chart for specific ingredient targets. For additional technique guidance, see Just One Cookbook’s frying guide.
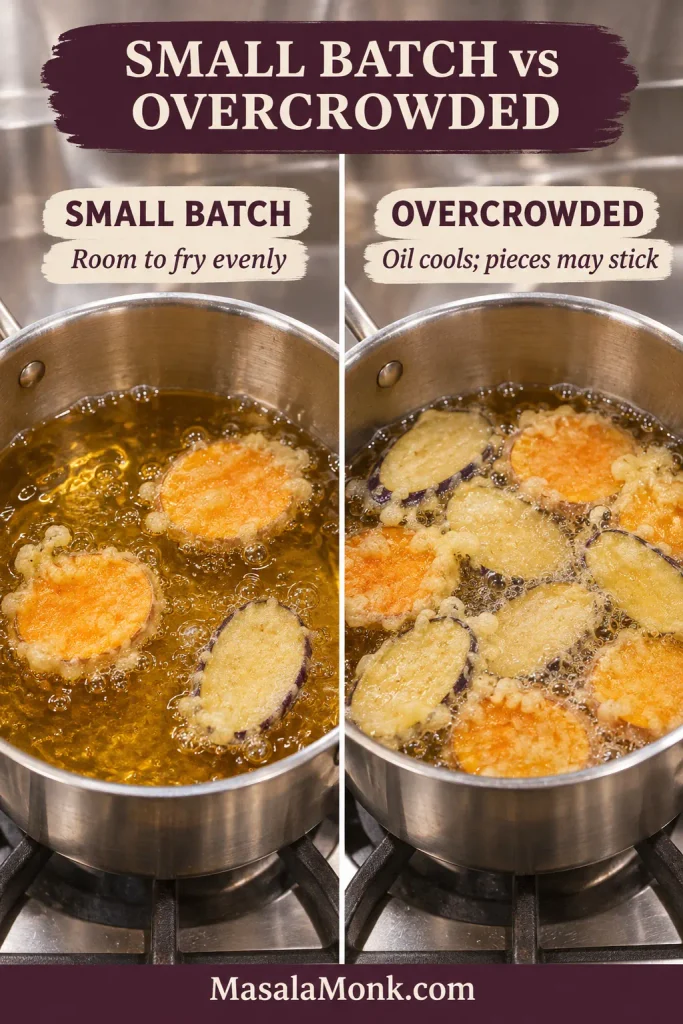
- Before a batch: reach the temperature suitable for that ingredient. In this recipe, begin with lower-temperature sweet potato and finish with higher-temperature shrimp.
- While frying: leave space between pieces. If bubbling slows and the temperature stays low, finish that batch before adding anything else.
- Between batches: let the oil return to the target temperature and skim out darkening crumbs before they burn.
The pale, crisp flakes that float free of the coating are called tenkasu. They also bring crunch to Osaka-style okonomiyaki. Dark or scorched fragments, on the other hand, belong in the skimmer.
Wet batter may stick to a countertop fryer basket. Follow the fryer’s instructions for wet-battered food and lower pieces using long utensils, keeping your fingers away from the oil.
If the oil begins smoking, stop frying and switch off the heat when safe. Let it cool before continuing. After cooking, cool used oil completely before straining or discarding it. Reuse only oil that remains in good condition; dispose of degraded oil responsibly, never down the sink.
Tempura Troubleshooting: Soggy Batter, Greasy Coating & Other Problems
Soggy tempura usually means the oil cooled, the food was wet or steam collected after frying. Find the closest match below and make one change before the next batch.
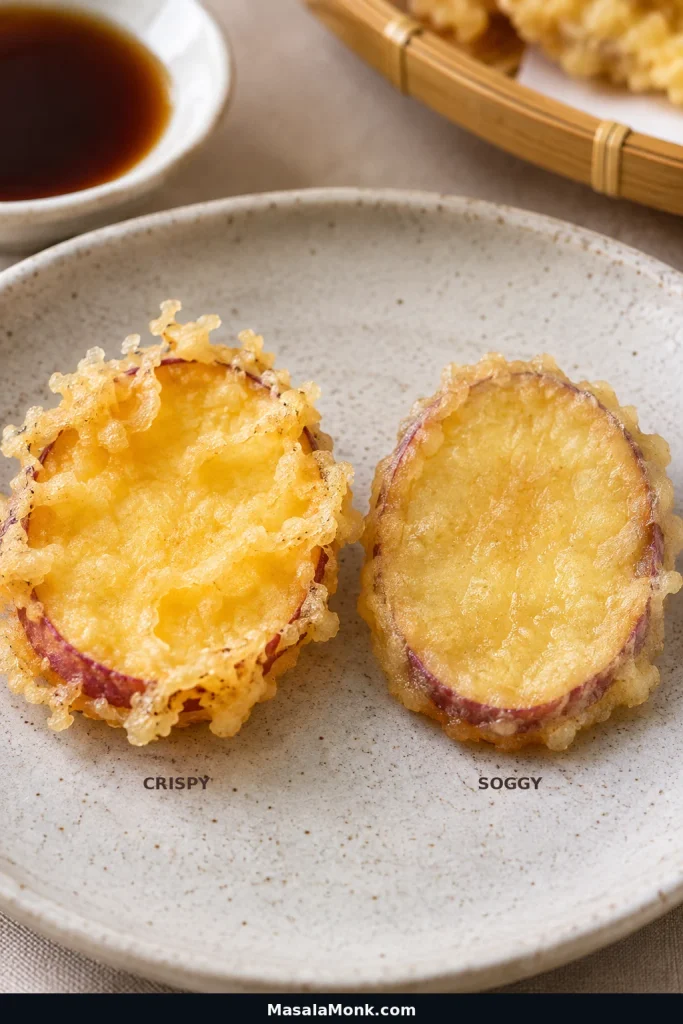
Match the Tempura Problem to Its Likely Cause
| What you see | Likely reason | What to do next |
|---|---|---|
| Greasy, soft coating | Oil too cool, wet food or overcrowding | Dry the next pieces; reduce batch size; let oil recover |
| Thick, cakey crust | Excess batter or too much stirring | Let excess batter drip off; stir less and keep mixture fluid |
| Batter falls off shrimp | Wet surface, insufficient adhesion, or touching too soon | Blot and lightly dust; leave in oil until crust sets |
| Batter slides off vegetables | Wet/smooth surfaces or excessive coating | Dry eggplant or score its cut face; wipe mushrooms; coat leaves on one side |
| Sweet potato crisp outside but hard inside | Too thick a slice or not enough cooking | Cut 5–6 mm slices; verify centre with a knife |
| Shrimp curls tightly | Underside not sufficiently straightened | Make shallow underside cuts and straighten before frying |
| Later batches have black specks | Burned crumbs or excess loose flour | Skim debris; shake off dusting flour before dipping |
| Coating tears on fryer basket | Wet batter stuck to mesh | Use appliance-approved lowering technique and suitable utensils |
| Early batches turn limp | Waiting too long or trapping steam | Serve in waves; drain in one layer on a wire rack |
| Batter gets heavier as you fry | Standing, warming and repeated stirring | Mix a fresh premeasured portion instead of stirring old batter again |
| Tempura tastes bland | Expecting a strongly seasoned fried crust | Serve with balanced tentsuyu, salt or lemon |
Once you have identified the likely cause, return to the frying method and change one variable at a time for the next batch.
Tempura Dipping Sauce and Substitutions
Tentsuyu brings savoury depth without overwhelming the tempura. This lighter, dashi-forward version uses 6 parts dashi, 1 part soy sauce and 1 part mirin (180 ml, 30 ml and 30 ml). Add grated daikon or ginger if you like. For help choosing the seasoning, see our guide to Japanese and other soy sauces.
Prefer a creamy dip with the shrimp? Try homemade spicy mayo as a nontraditional option.
What if I Do Not Have Dashi or Mirin?
No prepared dashi? For a small batch of vegetarian kombu–shiitake dashi, soak about 3 g dried kombu and one small dried shiitake mushroom in 250 ml cold water, covered in the refrigerator for a few hours or overnight. For a quicker infusion, steep them for at least 30 minutes, then warm gently without boiling the kombu. Remove the kombu before the liquid simmers, strain, and measure 180 ml for the sauce. Strength will vary with the ingredients.
Neither kombu nor dried shiitake? Use 180 ml mild vegetable stock and start with 20 ml soy sauce, adding up to the remaining 10 ml after tasting. The sauce will be less distinctly Japanese.
Making vegetarian tempura? Replace the 300 g shrimp with 300 g additional vegetables, giving you about 700 g total, and use fish-free dashi. For that larger vegetable platter, make a second batch of batter or prepare the smaller top-up portion described above; coating needs depend on the cut and surface area.
No mirin? Use 30 ml (2 tbsp) water and 1 tsp (4 g) sugar instead. Warm them with the sauce and taste; add up to another teaspoon of sugar if needed. The dip will be a little simpler and less aromatic, but still savoury. Bottled mentsuyu is another shortcut—dilute it according to its label. To compare with the original sauce, revisit the tentsuyu ingredient amounts.
Allergens: this recipe contains shrimp (shellfish), wheat, egg and soy. Bonito dashi also contains fish, and standard soy sauce commonly contains wheat. For a gluten-free meal, check the flour, soy sauce, other seasonings and frying cross-contact—not just the batter.
Notes on Egg-Free, Gluten-Free and Packaged Mixes
This batter contains both egg and wheat. For an egg-free or gluten-free alternative, choose a formula designed for that purpose with its own liquid-to-flour proportions; simply omitting the egg or replacing the flour gram for gram may change the coating. Sparkling water is an option in some batters, not a requirement for tempura. If you have packaged tempura mix, follow its directions: it may already contain starch, leavening or powdered egg.
Fresh wet tempura batter does not behave like a breadcrumb coating in a standard air fryer. Reheating already-cooked tempura in an air fryer is a different task from cooking wet batter in it.
What to Eat with Tempura
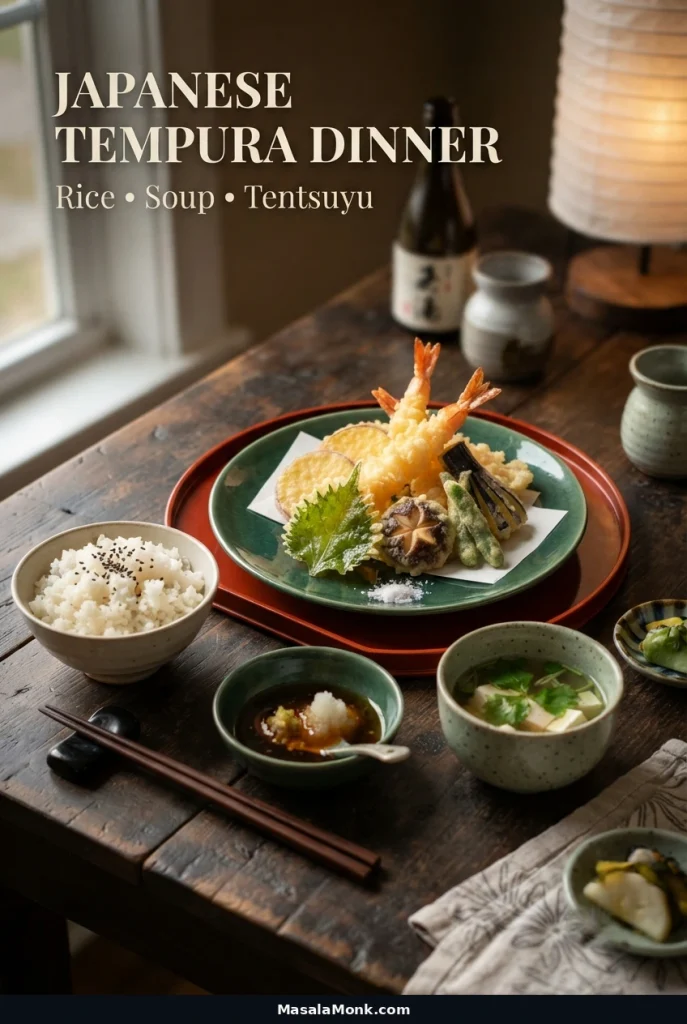
Serve tempura with plain rice and a light soup, or lay a few pieces over udon or a rice bowl. A pinch of salt highlights the natural sweetness of shrimp and sweet potato; tentsuyu brings savoury depth. For another Japanese rice accompaniment, try onigiri rice balls.
Making Tempura for a Crowd, Storing and Reheating
How to Keep Tempura Crispy for Four or More
Get rice, soup and dipping sauce on the table before frying. Bring the food out in small batches; for a larger group, having someone carry each batch from the rack is a big help.
- Cooking for two: enjoy each small batch as it comes off the rack.
- Serving four: bring vegetables to the table first, followed by freshly fried shrimp.
- Feeding six: make about 1½ times the listed shrimp and vegetables (450 g shrimp and 600 g vegetables), prepare 1½ times the sauce (270 ml dashi, 45 ml soy, 45 ml mirin), and make a second batch of batter as needed. Mix batter in smaller portions rather than all at once.
Serve a few pieces at a time instead of keeping a platter covered. Steam trapped around hot tempura quickly softens the crust. For extended hot holding, use equipment that maintains a food-safe temperature; a low oven will not preserve the same fresh crunch.
Can Tempura Be Made Ahead?
Prepare ahead, fry just before eating. Make the sauce, trim the vegetables, prepare the shrimp and measure the dry batter ingredients in advance. Cut sweet potato and eggplant nearer frying to limit discolouration; if held in water, drain and dry them thoroughly. Refrigerate shrimp and other perishables, keeping the wet and dry batter components separate until frying time.
How to Store and Reheat Tempura
To store: Let the steam escape briefly, then refrigerate leftovers in shallow containers within 2 hours—or 1 hour if the temperature is above 32°C (90°F). Use refrigerated leftovers within 3–4 days.
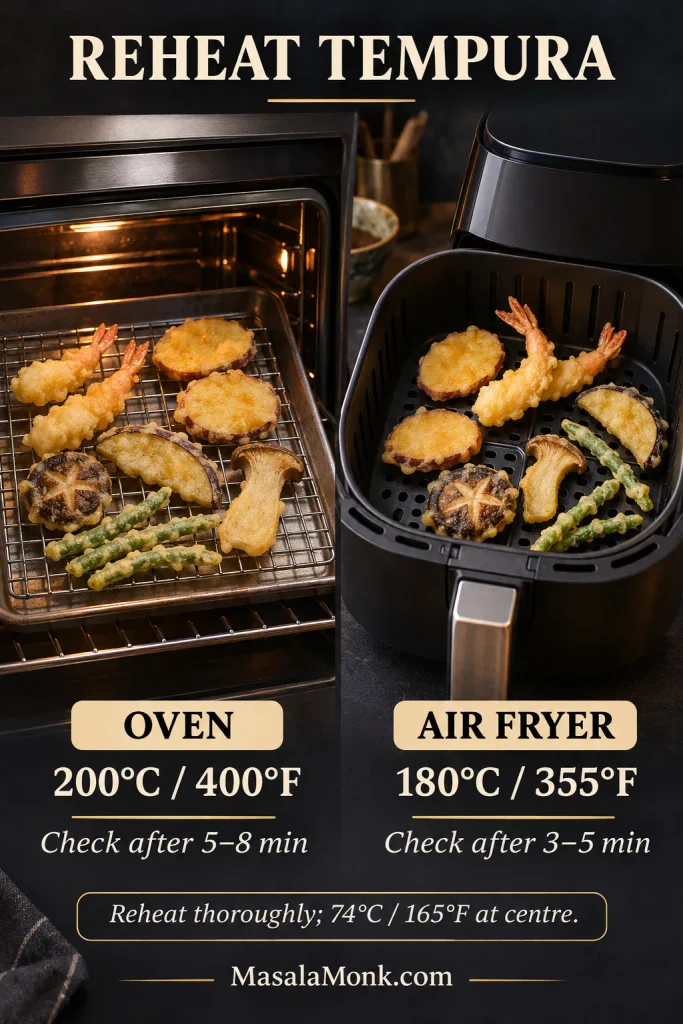
To reheat: Set pieces in one layer in a 200°C (400°F) oven and start checking after 5–8 minutes. Or try an air fryer at approximately 180°C (355°F), checking after 3–5 minutes. Check thicker pieces again if needed, turning them for even heating. Reheat the centre thoroughly to 74°C (165°F). Microwaving usually softens the coating.