
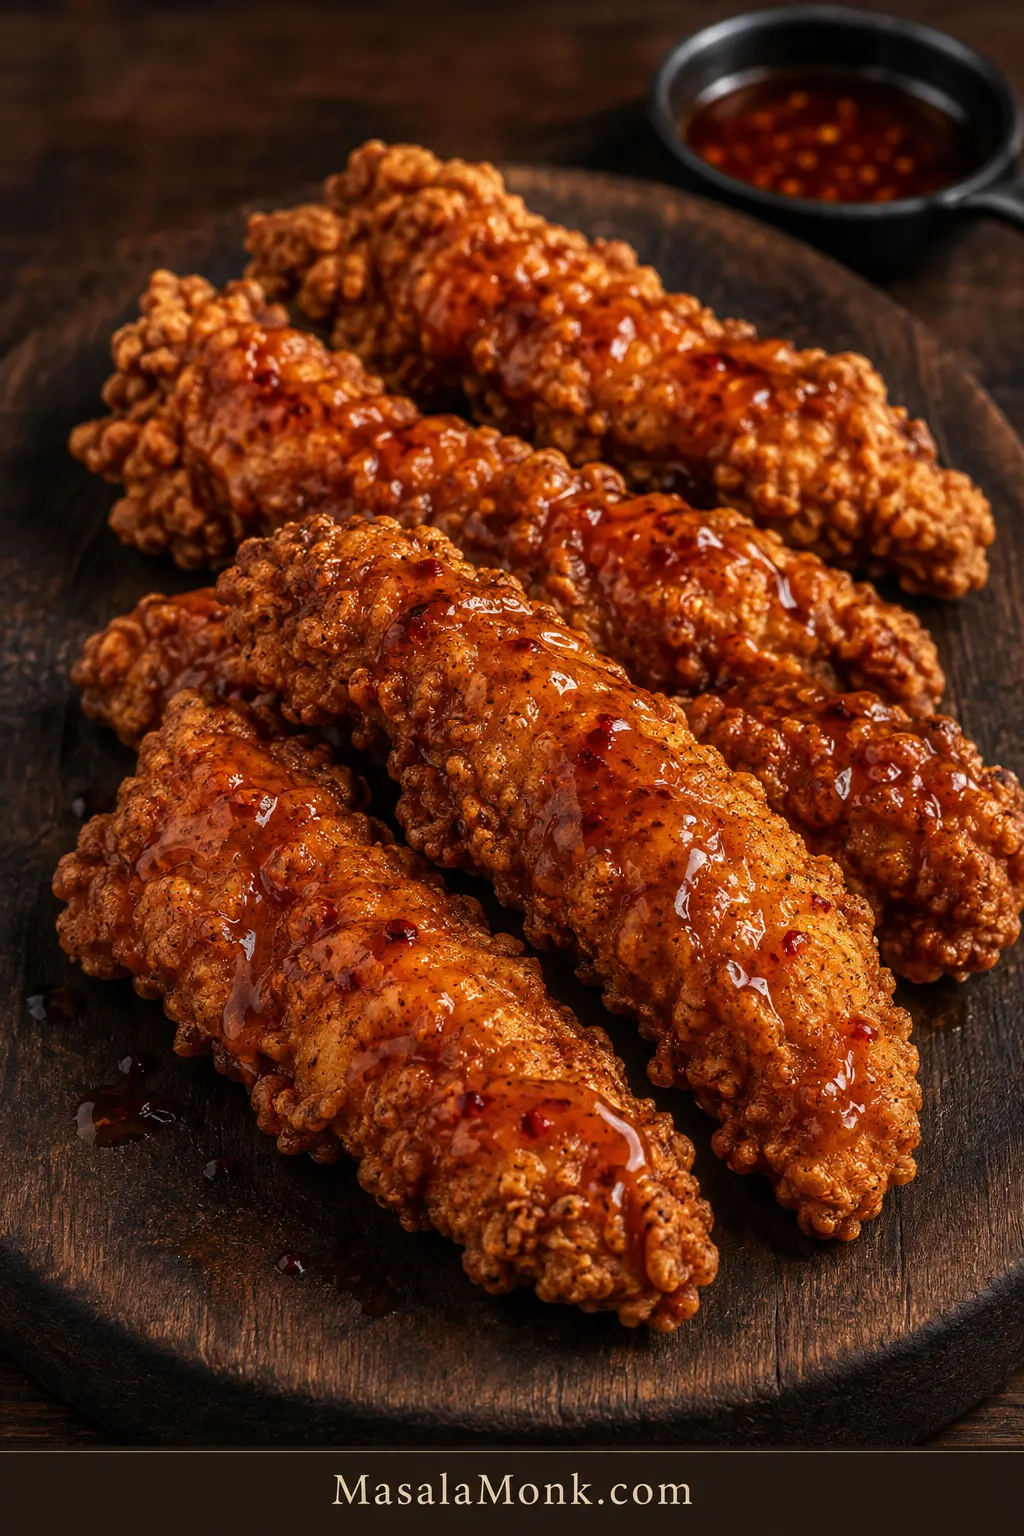
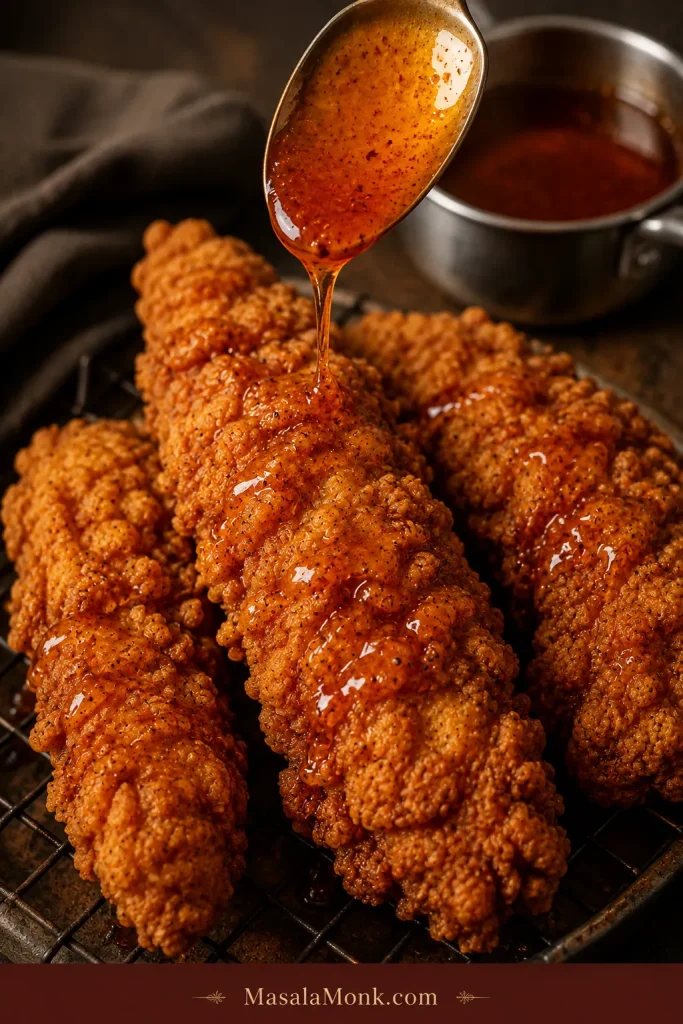
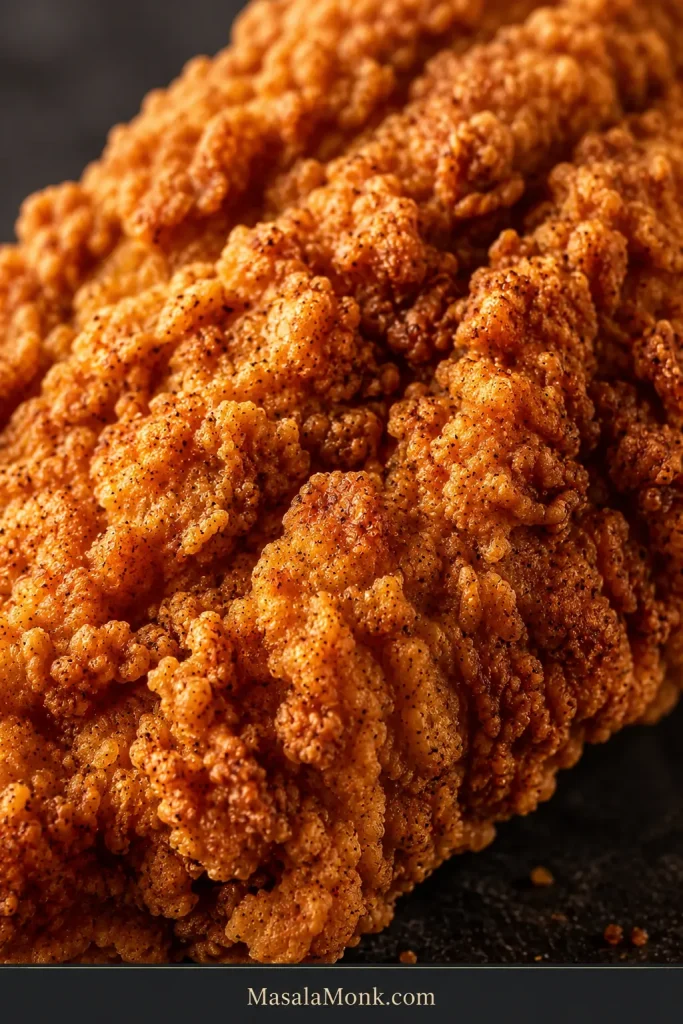
The best hot honey chicken tenders crackle when you bite through the coating, then give way to juicy chicken, sticky honey and a little heat that arrives just after the sweetness. Those rough golden ridges matter—they give the honey somewhere to catch without covering every bit of crunch.
Homemade tenders usually go wrong in a few predictable places. The breading slips off, too much chicken cools the oil, a thick piece stays underdone while the outside darkens, or the hot honey goes on so heavily that a beautiful crust turns soft almost immediately.
This version keeps those trouble spots under control without turning fried chicken into a project. The chicken is seasoned before breading, the coating gets rough little flour flakes for extra crunch, and only a few similarly sized pieces go into the oil at a time. Once the tenders hit the rack, you can drizzle, brush or toss them depending on how much crunch you want to keep.
Quick Answer: How to Make Crispy Hot Honey Chicken Tenders
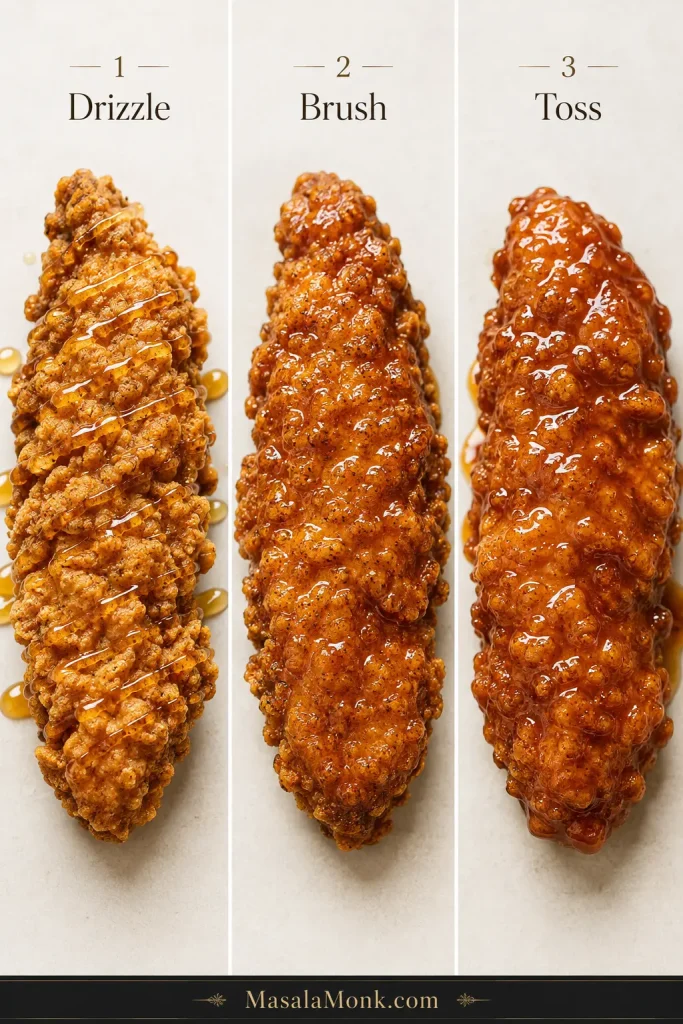
- Marinate: Season 1½ lb (680 g) chicken tenders in buttermilk for at least 30 minutes; 2–4 hours gives the seasoning more time to work.
- Bread: Press the chicken into a flour-cornstarch dredge with small damp flour flakes, then rest the breaded tenders for 10 minutes.
- Fry: Start the oil at 360–365°F (182–185°C), keep it around 340–350°F (171–177°C) while the chicken cooks, and cook the thickest piece to 165°F (74°C).
- Finish: Rest the fried chicken on a wire rack for 2–3 minutes, then add warm hot honey.
Build the crunch before frying, protect it afterward, and add the hot honey last.
Choose Your Hot Honey Finish
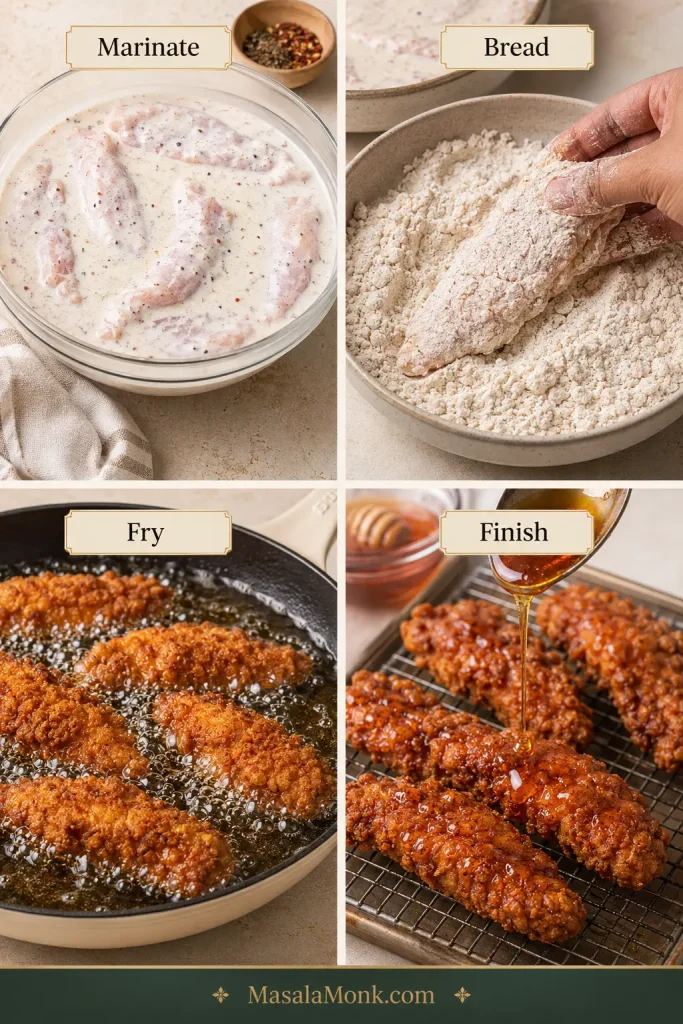
How you add the hot honey changes the bite. A drizzle leaves plenty of golden ridges exposed; a full toss fills almost every crevice with sauce.
| You want | Finish | What to expect |
|---|---|---|
| Maximum crunch | Drizzle | Sweet heat with plenty of crisp breading still exposed. Recommended. |
| More even sauce | Brush | Broader coverage while much of the coating stays crisp. |
| Sticky glazed chicken | Toss | Maximum sauce coverage; eat it right away. |
The main recipe uses the drizzle method.
Hot Honey Chicken Tenders Recipe
Craggy, deeply golden chicken tenders with juicy centers and warm hot honey that catches in the ridges instead of soaking the whole crust.
- Yield: 10–12 tenders
- Serves: about 4
- Hands-on time: about 50 minutes
- Marinate: 30 minutes minimum; 2–4 hours preferred
- Total time: about 1 hour 20 minutes with the 30-minute marinade
- Doubling: double the ingredients, but keep the same small frying batches
Equipment
- 5–6-quart heavy Dutch oven or similarly deep pot
- Deep-fry thermometer or other clip-on oil thermometer
- Instant-read thermometer for the chicken
- Wire rack set over a rimmed tray
You will also need a parchment-lined tray or large plate for the raw breaded chicken, shallow bowls, a small saucepan and tongs or a spider/skimmer. Keep a clean utensil ready for transferring the cooked chicken.
For the Chicken
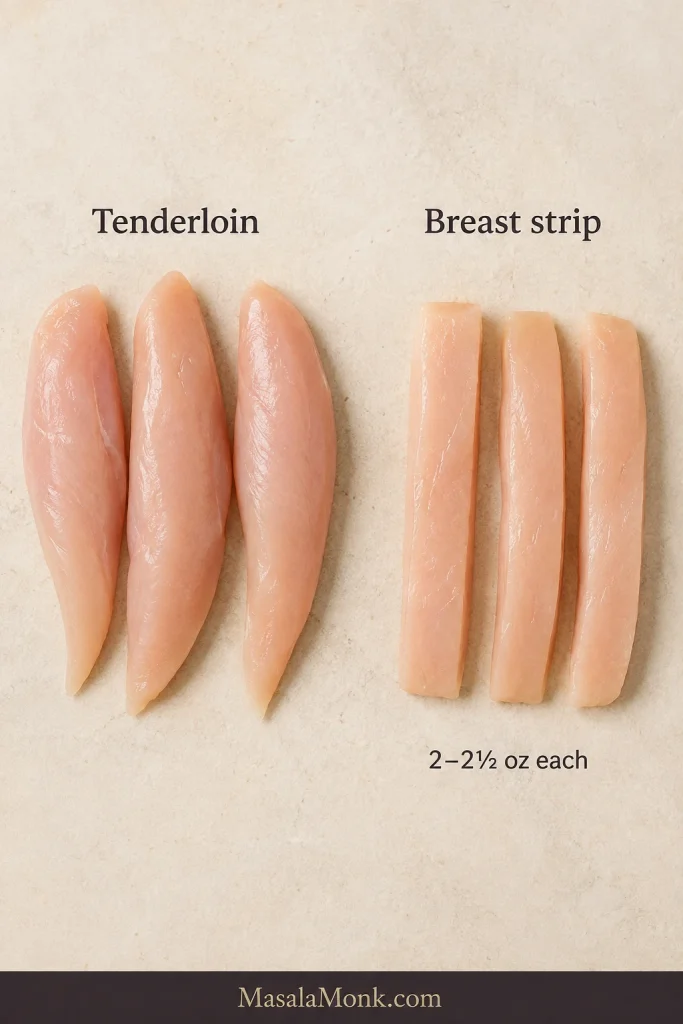
- 1½ lb (680 g) chicken tenderloins, ideally 10–12 similarly sized pieces
- 1 cup (240 ml) buttermilk
- 1 tablespoon (15 ml) cayenne-style hot sauce
- 6 g fine sea salt, about 1 teaspoon
- 1 teaspoon garlic powder
- ½ teaspoon freshly ground black pepper
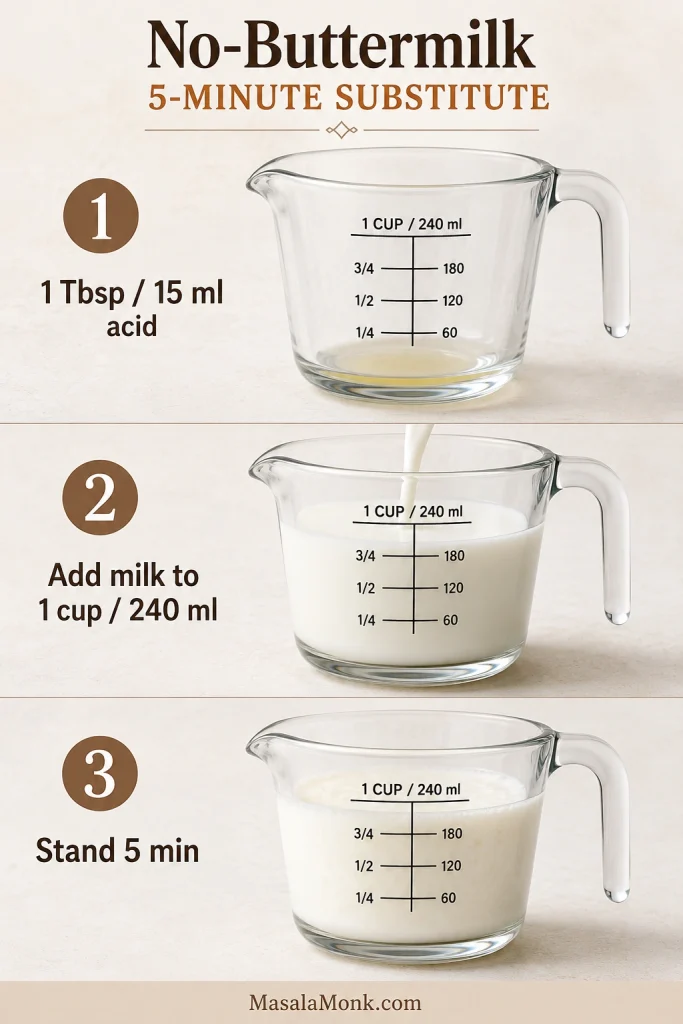
No buttermilk? Put 1 tablespoon (15 ml) lemon juice or white vinegar in a measuring cup, then add enough whole milk to reach 1 cup (240 ml). Stir and let it stand for 5 minutes.
Using chicken breast? Cut it into strips ¾–1 inch (2–2.5 cm) wide and ½–¾ inch (1.25–2 cm) thick. Aim for 2–2½ oz (55–70 g) per strip.
For the Crispy Coating
- 1½ cups (180 g) all-purpose flour
- ½ cup (60–65 g) cornstarch
- 1½ teaspoons baking powder
- 8 g fine sea salt, about 1⅓ teaspoons
- 1 teaspoon garlic powder
- 1 teaspoon onion powder
- 1 teaspoon sweet paprika
- 1 teaspoon freshly ground black pepper
- ¼ teaspoon cayenne pepper, optional
- 3 tablespoons (45 ml) seasoned buttermilk mixture, removed before the raw chicken is added
If you use kosher salt, follow the gram weights rather than the teaspoon estimates because crystal size varies by brand.
For the Medium Hot Honey
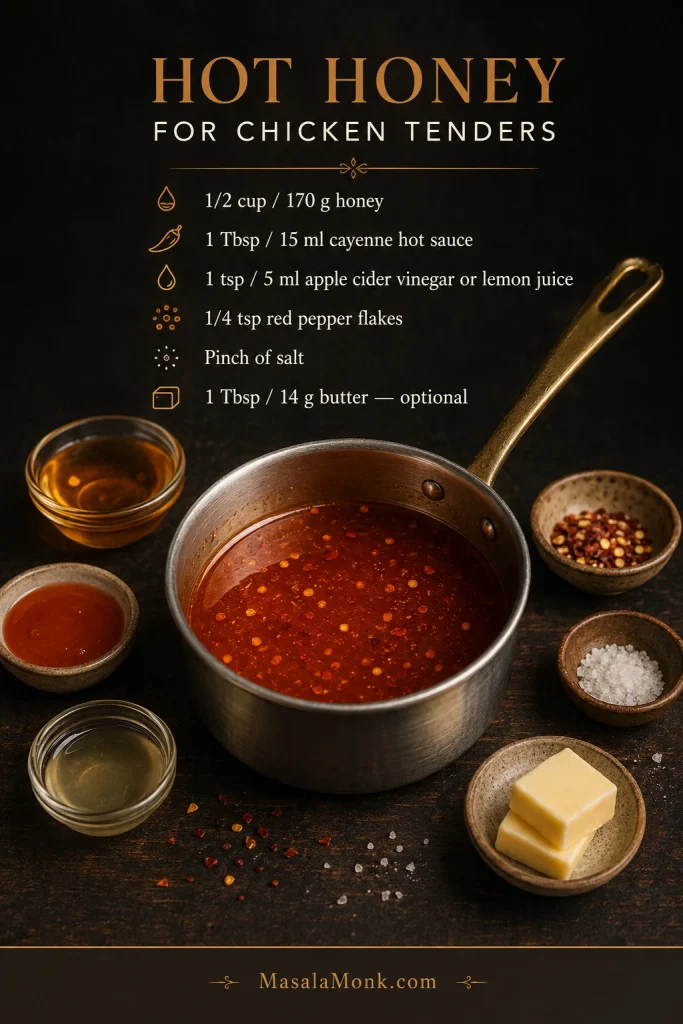
- ½ cup (170 g) honey
- 1 tablespoon (15 ml) cayenne-style hot sauce
- 1 teaspoon (5 ml) apple cider vinegar or fresh lemon juice
- ¼ teaspoon crushed red pepper flakes
- Small pinch fine salt
- 1 tablespoon (14 g) unsalted butter, optional
Use a thin, vinegar-forward cayenne hot sauce here. Thick sriracha, chili crisp and highly concentrated pepper sauces behave differently and are not tablespoon-for-tablespoon substitutes.
Want it milder, hotter or made with bottled hot honey? See the hot honey adjustment table and notes.
For Frying
- 1½–2 quarts (1.4–1.9 L) neutral frying oil, or enough to reach 1¼–1½ inches (3–4 cm) deep in your pot while leaving plenty of empty space above the oil
Peanut, canola, sunflower or standard vegetable oil all work well. Let the depth in your pot determine the exact amount. Fresh oil—or clean, well-filtered oil that still smells neutral—gives the cleanest flavor.
New to deep frying? The USDA deep-fat frying safety guide is worth reading before you heat the oil.
Instructions
Marinate, Make the Hot Honey and Bread
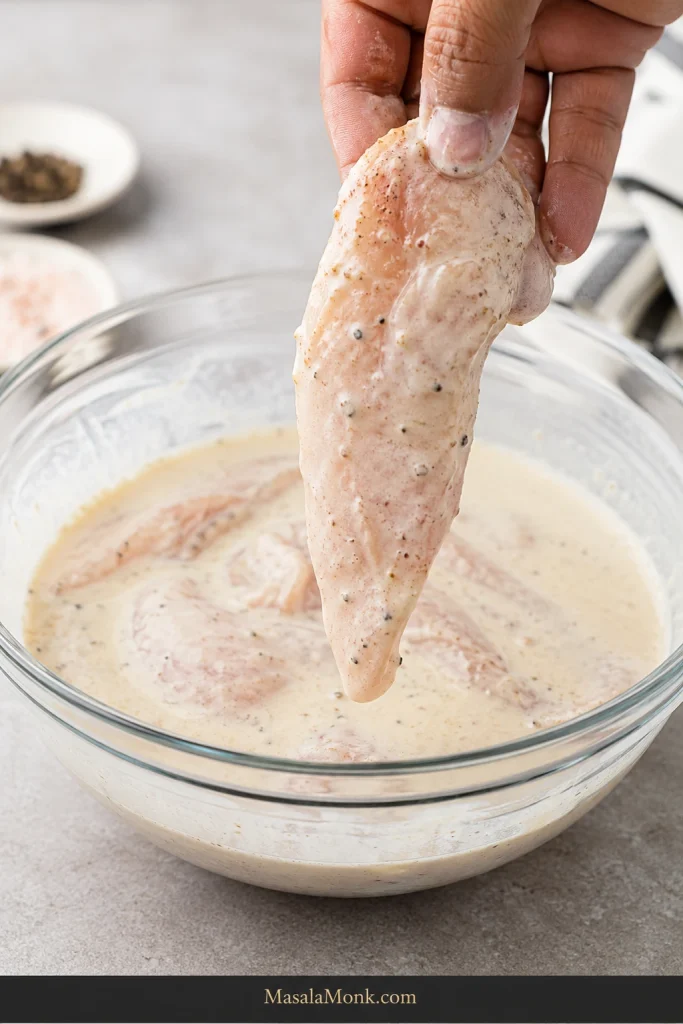
- Season and marinate the chicken. Whisk together the buttermilk, hot sauce, salt, garlic powder and black pepper. Before raw chicken enters the bowl, spoon 3 tablespoons (45 ml) into a separate clean bowl for the dredge. Add the chicken, turn to coat, cover and refrigerate for at least 30 minutes. Two to four hours is ideal; these thin pieces gain little from a much longer soak.
- While the chicken marinates, make the hot honey. Combine the honey, hot sauce, vinegar or lemon juice, red pepper flakes and salt in a small saucepan. Warm over low heat for 1–2 minutes, just until loose and fragrant. Do not boil. Stir in the butter if using, taste and set aside. Rewarm briefly before serving if the sauce thickens.
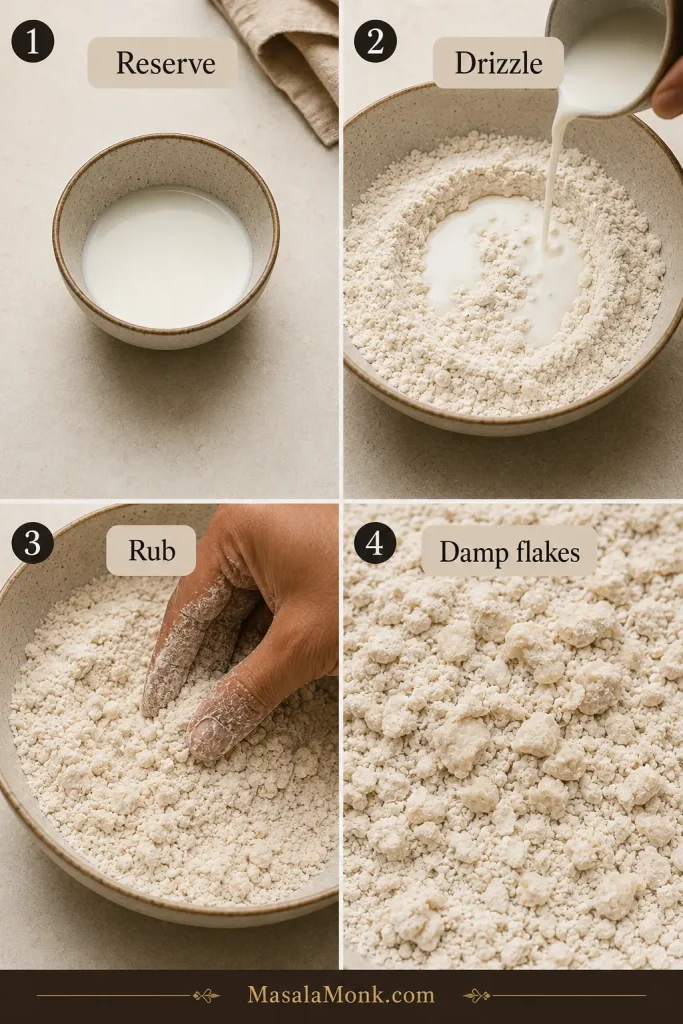
- Mix the dredge while the chicken finishes marinating. Whisk together the flour, cornstarch, baking powder, salt, garlic powder, onion powder, paprika, black pepper and cayenne. Drizzle the clean reserved buttermilk over the flour mixture and rub lightly with your fingertips until small damp flakes and pebbly pieces form. Break apart anything that resembles wet dough.
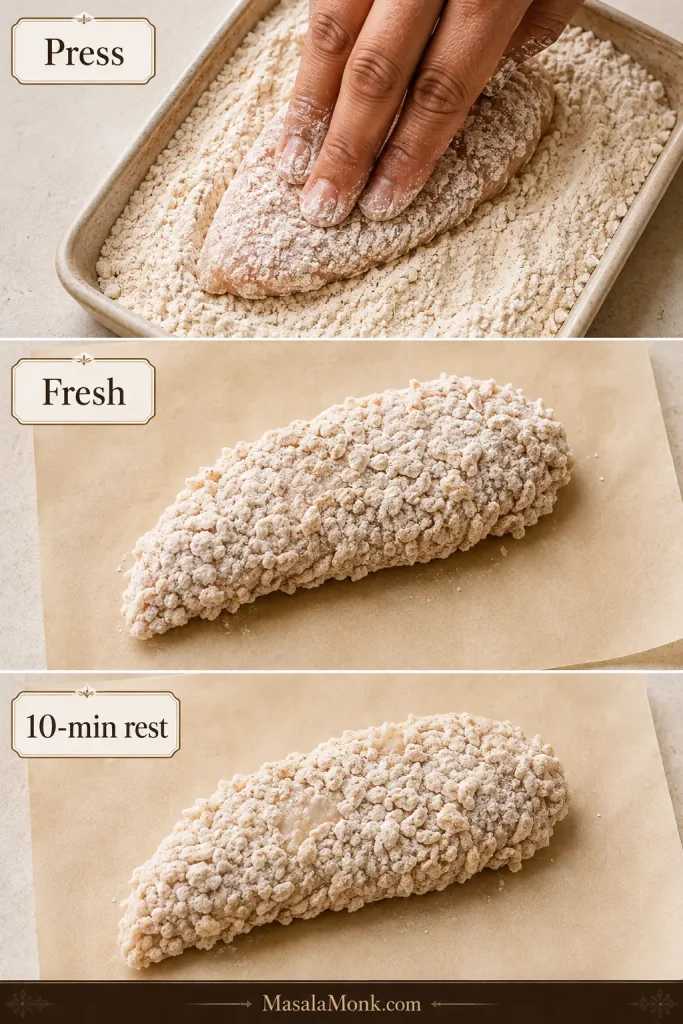
- Bread the chicken. Lift one tender from the marinade and let the excess drip back into the bowl. Do not pat it dry. The surface should stay tacky without dripping in streams. Press the chicken firmly into the dredge on every side, picking up some of the rough flour flakes, then place it on the parchment-lined tray. Repeat with the remaining pieces. Discard the remaining raw-chicken marinade and any dredge that touched raw chicken.
Fry the Chicken
- Rest the breading and start heating the oil. Begin heating the oil to 360–365°F (182–185°C). Let the breaded chicken rest for at least 10 minutes while the oil comes up to temperature. The coating should look shaggy and slightly hydrated in patches. If the oil needs another few minutes, the chicken can simply stay on the tray.
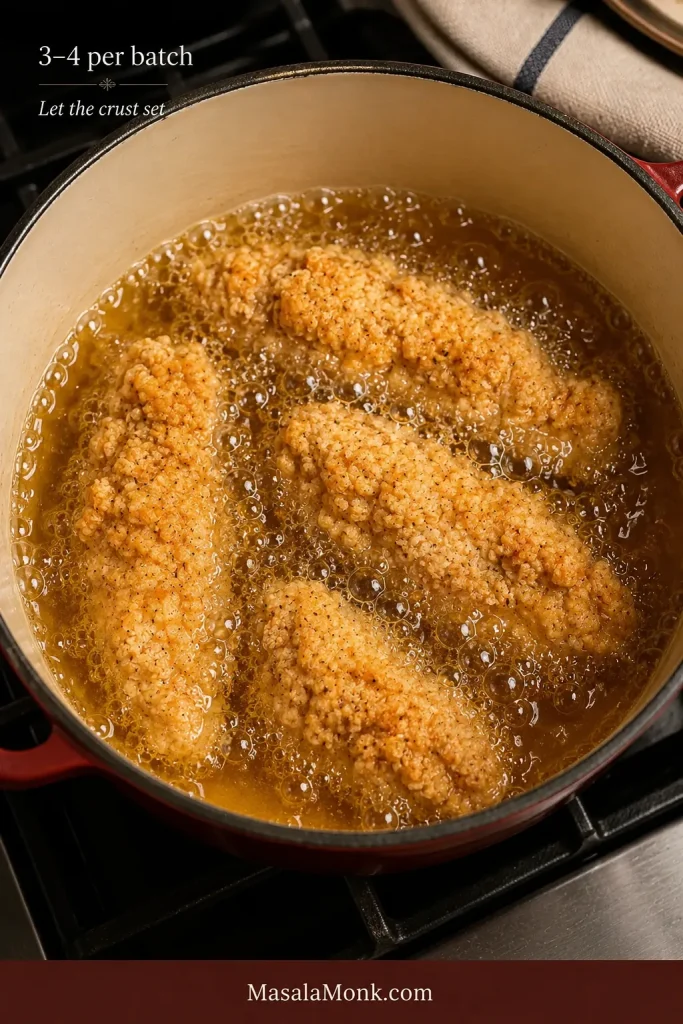
- Fry the first batch and let the coating set. Lower 3–4 tenders gently into the oil, leaving visible space between them. Do not keep nudging or turning them as soon as they land; give the crust time to set. Aim to keep the oil around 340–350°F (171–177°C).
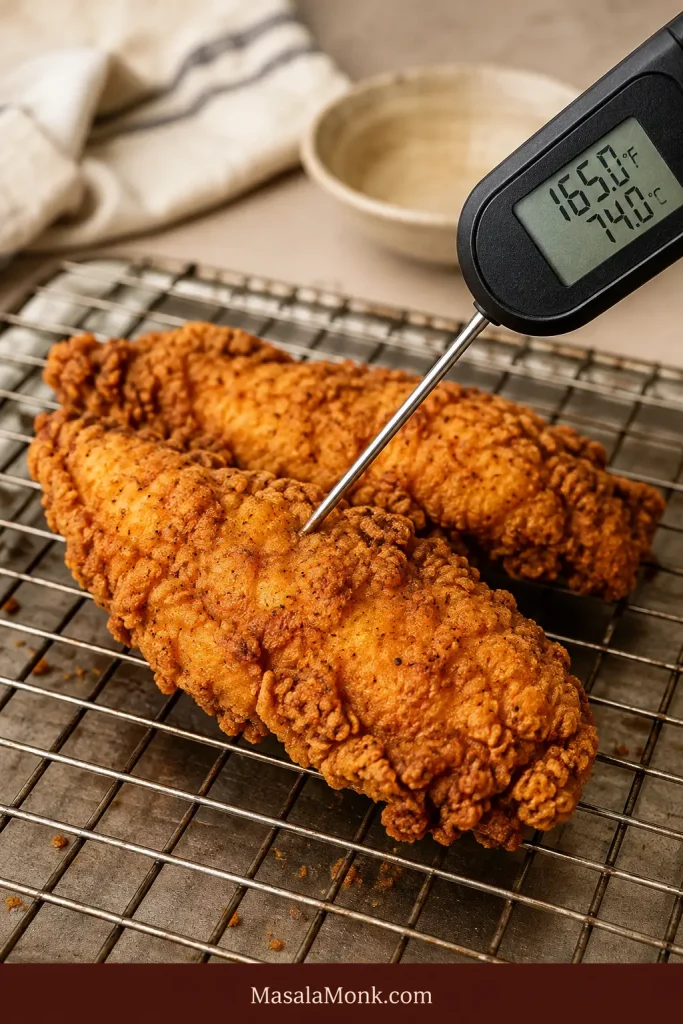
- Cook until deep gold and 165°F. Pieces in the 2–2½ oz (55–70 g) range usually need 5–7 minutes total. Turn once when needed. The bubbling should stay energetic while the ridges move gradually from pale to deep gold. Start checking the largest piece near the early end of the range; poultry should reach 165°F (74°C) in the thickest part.
Once a batch comes out deep gold, crisp at the edges and 165°F (74°C) in the center, you have your pot figured out. The remaining batches are mostly repetition.
Rack, Reset and Finish
- Move the cooked chicken to the rack. Transfer the tenders with clean tongs or a clean spider/skimmer and keep them in one layer so steam can escape underneath.
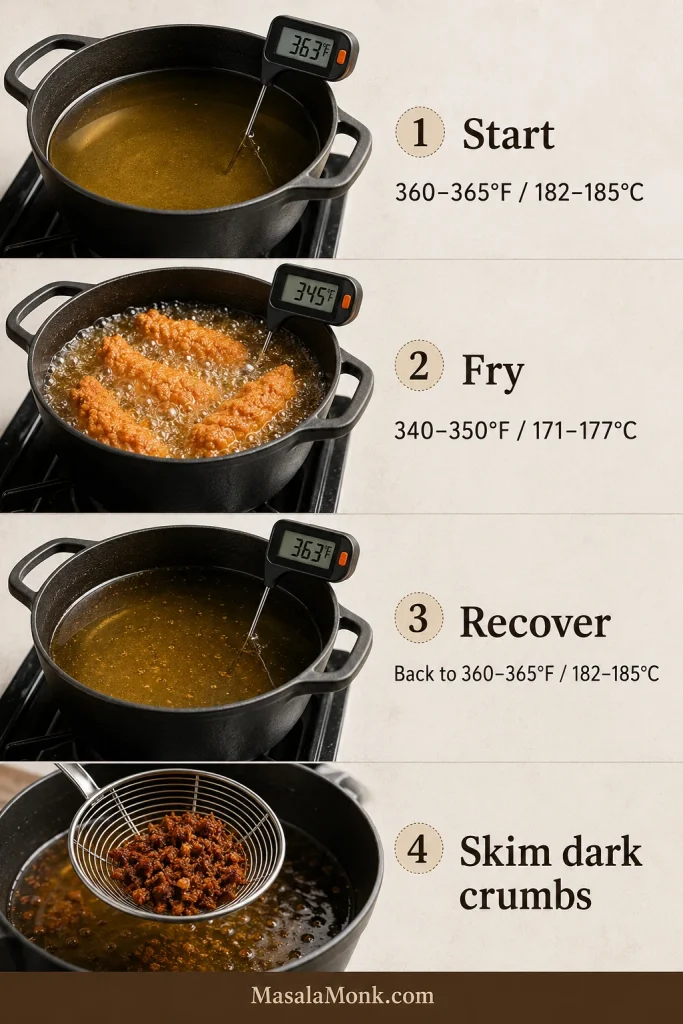
- Reset the oil between batches. Let it return to the starting range before adding more chicken. If recovery is slow, make the next batch smaller. Skim out loose breading once it turns dark so burnt crumbs do not make later batches bitter.
- Add the hot honey last. Give each fried batch 2–3 minutes on the rack, until the strongest steam has eased. Rewarm the sauce if needed, then drizzle it over only the tenders you expect to eat right away. The honey should fall in glossy ribbons and catch on the rough ridges. Keep the rest of the sauce at the table.
Give the steam somewhere to go: the rack keeps the bottom from softening while the crust settles before the hot honey goes on.
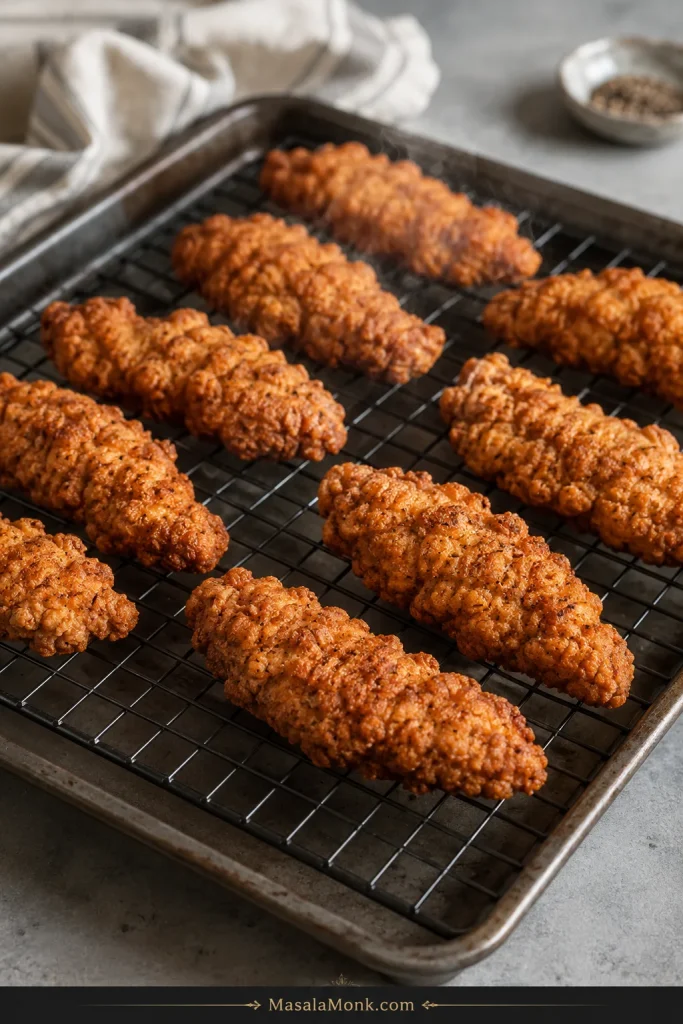
For the first serving, drizzle a few tenders and listen for that first crunch before deciding whether the rest need more honey.
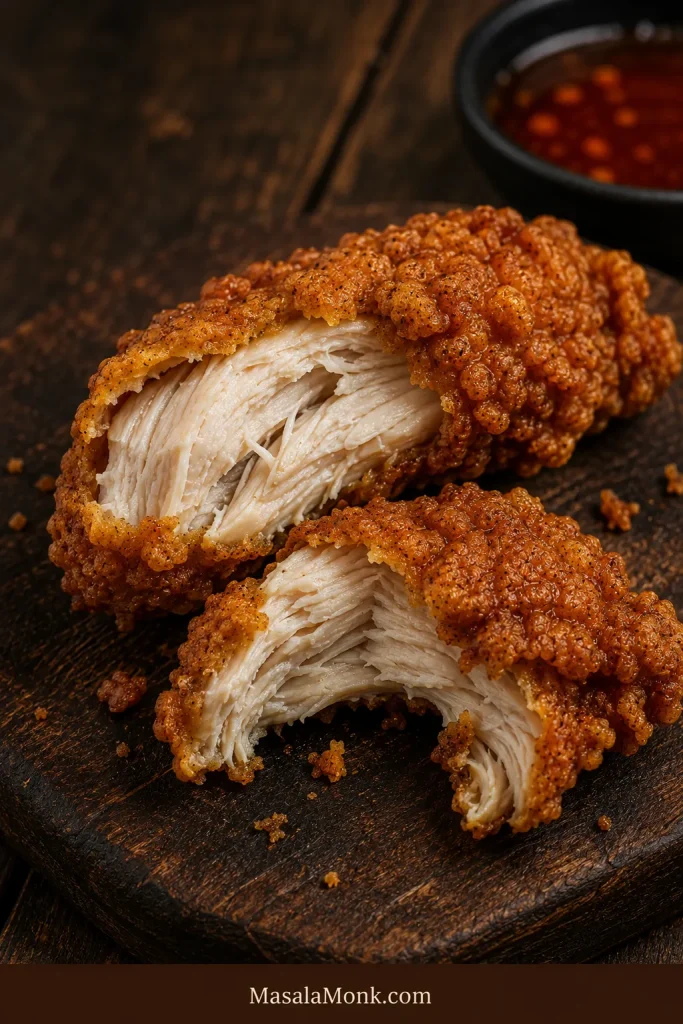
Break one open while it is still hot: the center should be moist white chicken beneath a closely attached craggy crust, not a thick hollow shell.
Need help with a particular part of the recipe? Jump to breading problems, oil temperature, air-fryer and oven methods, hot honey adjustments, troubleshooting or storage and reheating.
Chicken Tenderloins or Chicken Breast Strips?
Tenderloins are already close to the shape you want. Split or gently flatten any unusually thick ones so they finish alongside the rest.
The firm white tendon is harmless. Trim the exposed portion, or grip it with paper towel and gently pull it through the tines of a fork if you prefer to remove more. Stop if the tender begins tearing.
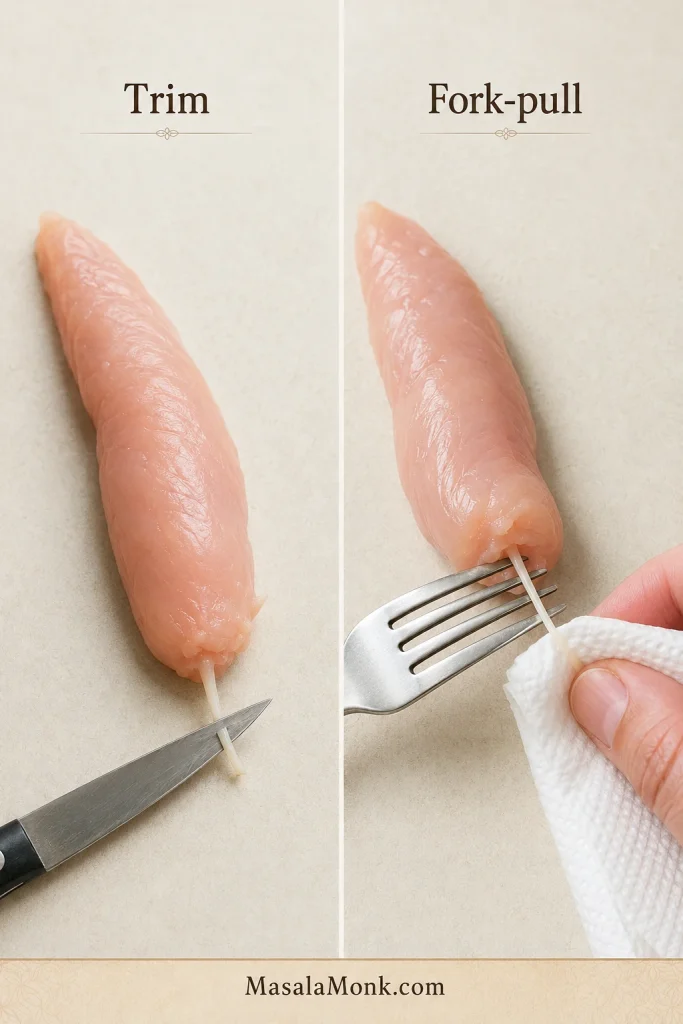
Chicken breast is an easy substitute. Cut it to the size given in the recipe rather than making long, thick strips. Similar-size pieces are what keep the frying time predictable.
If you would rather cook the breasts whole, our baked chicken breast recipe goes deeper into thickness, timing and keeping lean chicken juicy.
Chicken fingers, strips and tenders are often used loosely for the finished dish. Here, size matters more than the label on the package.
The Ingredients That Actually Change the Result
Buttermilk
Buttermilk carries seasoning, adds mild tang and leaves a naturally tacky surface for the flour. The milk-and-acid substitute in the recipe is thinner than cultured buttermilk, but it still gives the coating something to grip.
If the recipe leaves most of a carton behind, save it for flaky Southern buttermilk biscuits. Fried chicken and warm biscuits rarely need much persuasion to share a plate.
Flour, Cornstarch and Baking Powder
Flour gives the coating enough structure to cling to the chicken, while cornstarch keeps the fried edges lighter and crisper. A little baking powder helps keep the surface rough instead of dense and smooth. When the clean reserved buttermilk is rubbed lightly through this mixture, the small damp flakes become the craggy pieces you want the chicken to pick up.
What you are building toward: a fried crust with thin ridges, folds and blisters rather than one thick, smooth shell. Those irregular edges create more crisp surface without burying the chicken in breading.
Seasoning the Chicken and the Coating
Seasoning in the marinade reaches the meat itself; seasoning in the dredge flavors the crust. Once the honey goes on, that distinction matters. Sweet, spicy sauce should finish good fried chicken rather than cover a bland center.
Sweet paprika brings color and mild pepper flavor. Cayenne in the dredge is optional, especially when several people at the table have different ideas about what “hot” means.
How to Keep Breading on Chicken Tenders
Before frying, the coating can tell you a lot. Good breading looks rough and patchy, with some flour hydrated against the chicken and little shaggy ridges still standing up.
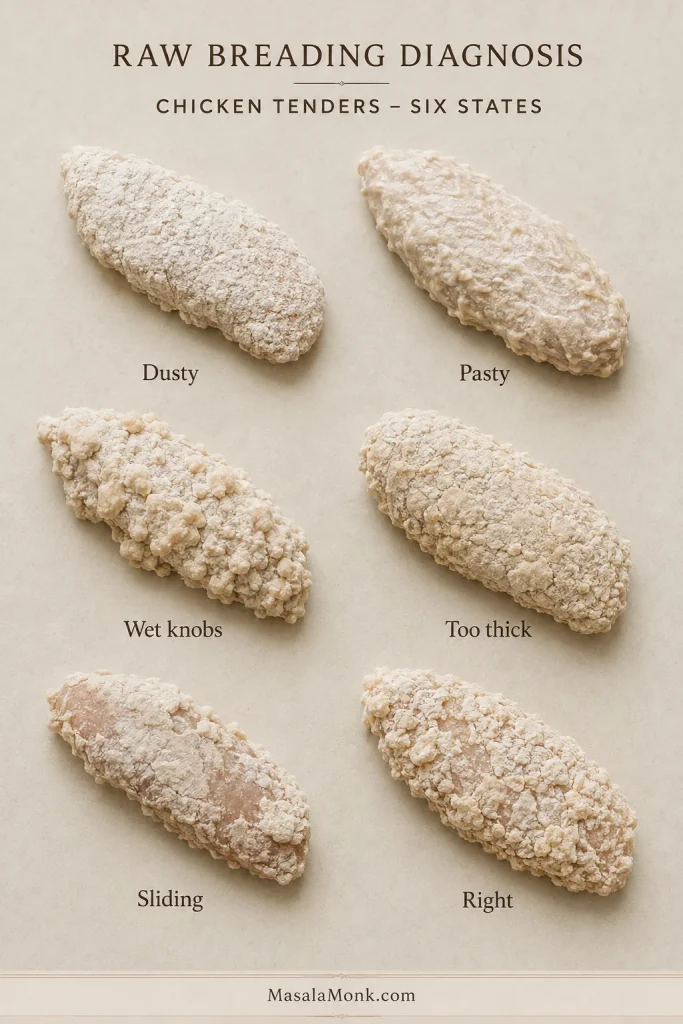
- Still dusty almost everywhere after resting? A few floury spots are fine. On the next tender, let slightly less marinade drip away before dredging; do not try to wet an already breaded piece.
- Smooth and pasty? Too much marinade followed the chicken into the flour. Let the next piece drip a little longer.
- Huge wet knobs? Break the damp flour clumps smaller so they fry into crisp ridges rather than hard chunks.
- A thick shell forming around the meat? The coating is too heavy. One well-pressed dredge is enough for this recipe.
- Coating slides when you lift the tender? Press it on more firmly and give the breading its full resting time.
- Rough, patchy and a little untidy? Good. Leave it alone.
Keeping one hand for wet chicken and the other for dry dredge also prevents the breading process from turning into a bowl full of floury fingerprints.
After the breading rests: the coating should still look rough and shaggy, with only a few slightly hydrated patches. It should not turn uniformly shiny, smooth or wet.
How to Control the Oil Temperature Between Batches
A thermometer makes home frying much less mysterious. The useful number is not only where the oil starts; it is what happens after cold chicken enters the pot.
| Stage | Target | What you want to see |
|---|---|---|
| Before chicken enters | 360–365°F (182–185°C) | Enough stored heat for the initial temperature drop |
| While frying | 340–350°F (171–177°C) | Steady bubbling and gradual golden browning |
| Before the next batch | Back near 360–365°F (182–185°C) | Oil recovered before more cold chicken enters |
Little flour peaks that darken almost immediately mean the oil is running too hot. Pale chicken sitting in weak bubbles points the other way. Small crumbs in the pot are normal, but remove them once they turn dark.
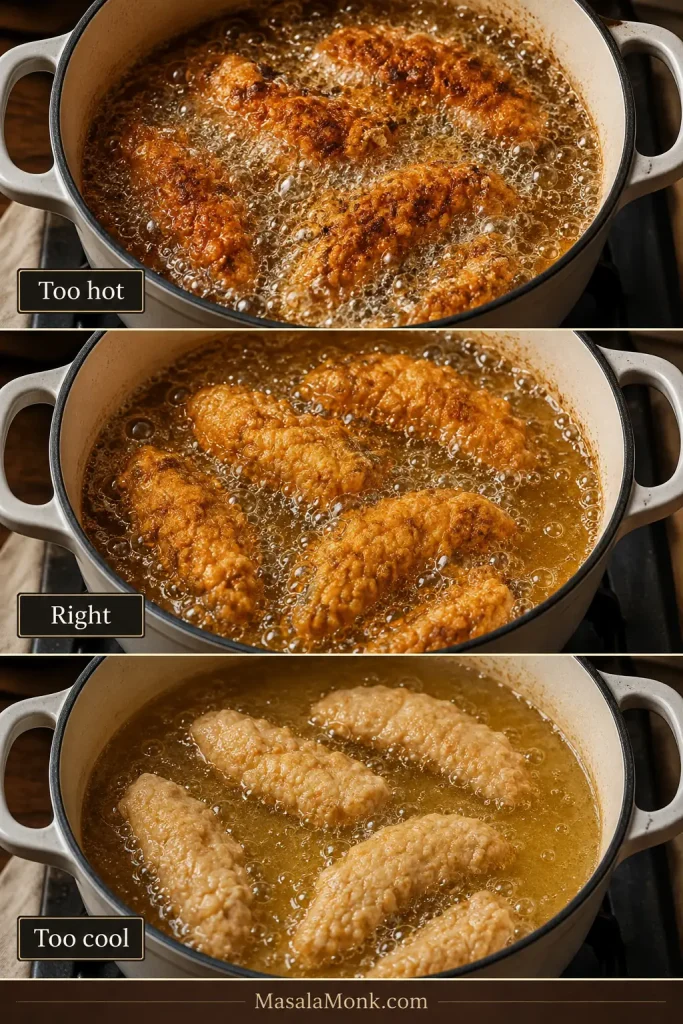
Use the first batch to learn your pot. Once the bubbling and browning settle into the right rhythm, the remaining batches become much easier to repeat.
A deep cast-iron skillet is another good option. A Dutch oven gives you higher sides and a little more protection from splatter. An electric fryer is fine too; resist filling the basket just because there is room.
Use the bubbling as a batch-size check: leave visible oil between the tenders, and if active bubbling weakens sharply after loading the pot, make the next batch smaller rather than squeezing in another piece.
Keep the whole frying cycle in view: start near 360–365°F (182–185°C), let the oil work around 340–350°F (171–177°C), then give it time to recover before the next batch.
From here, choose your cooking path: use the air fryer or oven, or skip to the hot honey adjustments if you are frying.
Air Fryer and Oven Methods
The flour coating used for frying relies on hot oil to set those craggy edges. Dry heat does better with panko. Use the air fryer when you want to avoid a pot of oil; the oven is easier when you need more tenders at once.
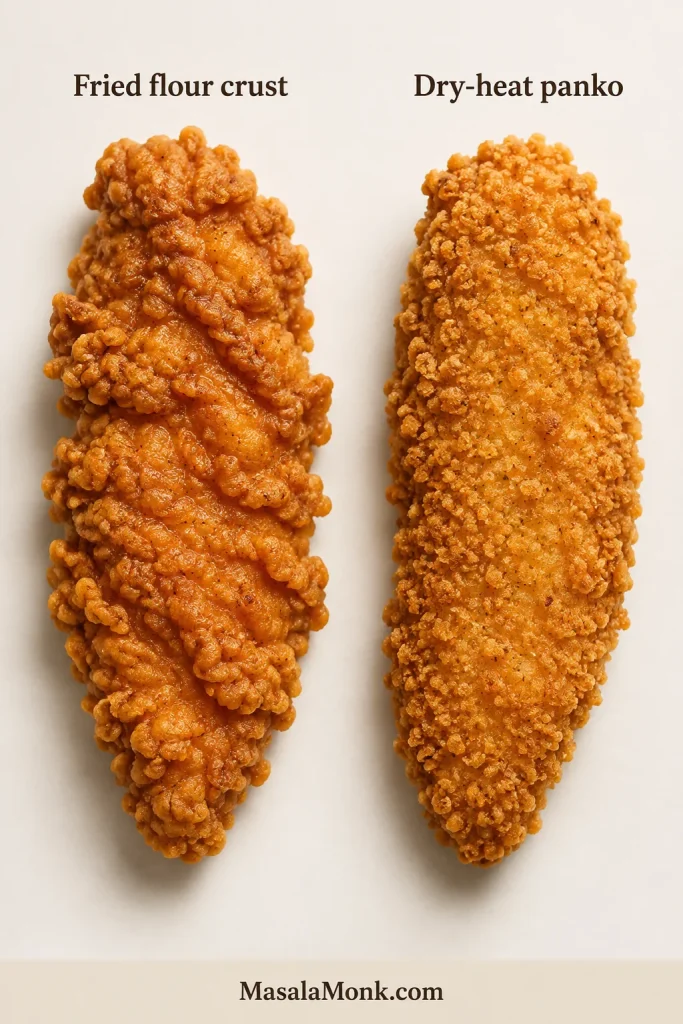
For the cooking times below, use 10–12 similarly sized tenderloins or chicken breast strips around 2–2½ oz (55–70 g) each. Very thick pieces will need longer.
Prepare the same medium hot honey used for the fried version while the chicken marinates, or use the heat-adjustment section for a milder, hotter or bottled version.
Marinade for Air Fryer or Oven Tenders
For 1½ lb (680 g) chicken, use:
- 1 cup (240 ml) buttermilk
- 1 tablespoon (15 ml) cayenne hot sauce
- 6 g fine sea salt, about 1 teaspoon
- 1 teaspoon garlic powder
- ½ teaspoon freshly ground black pepper
Marinate for at least 30 minutes; 2–4 hours is ideal. Unlike the fried version, you do not need to reserve any marinade for the coating.
If you are cooking with dry heat anyway, our honey mustard chicken tenders use a similar panko approach with a tangier finish.
Panko Coating
- ½ cup (60 g) all-purpose flour
- 2 large eggs
- 1½ cups (95 g) panko breadcrumbs
- 1 tablespoon (15 ml) neutral oil
- Oil spray or a little extra neutral oil for the basket, rack and any dry crumb patches
- 6 g fine sea salt, about 1 teaspoon
- 1 teaspoon garlic powder
- 1 teaspoon onion powder
- 1 teaspoon sweet paprika
- ½ teaspoon freshly ground black pepper
- ⅛ teaspoon cayenne, optional
Mix the dry seasonings together. Stir roughly one-third into the flour and the rest into the panko, then work the tablespoon of oil through the crumbs.
Air Fryer
- Let excess marinade drip from the chicken.
- Coat lightly in seasoned flour, dip in beaten egg, then press firmly into the panko.
- Preheat the air fryer to 400°F (205°C) if your model benefits from preheating.
- Lightly oil the basket and arrange the tenders in one layer with space around them. Mist any visibly dry crumb patches.
- Air fry for 8–11 minutes, turning halfway, until golden and 165°F (74°C) in the thickest piece.
- Transfer the tenders to a wire rack and rest for 2–3 minutes, until the initial steam has eased. Drizzle with warm hot honey just before serving.
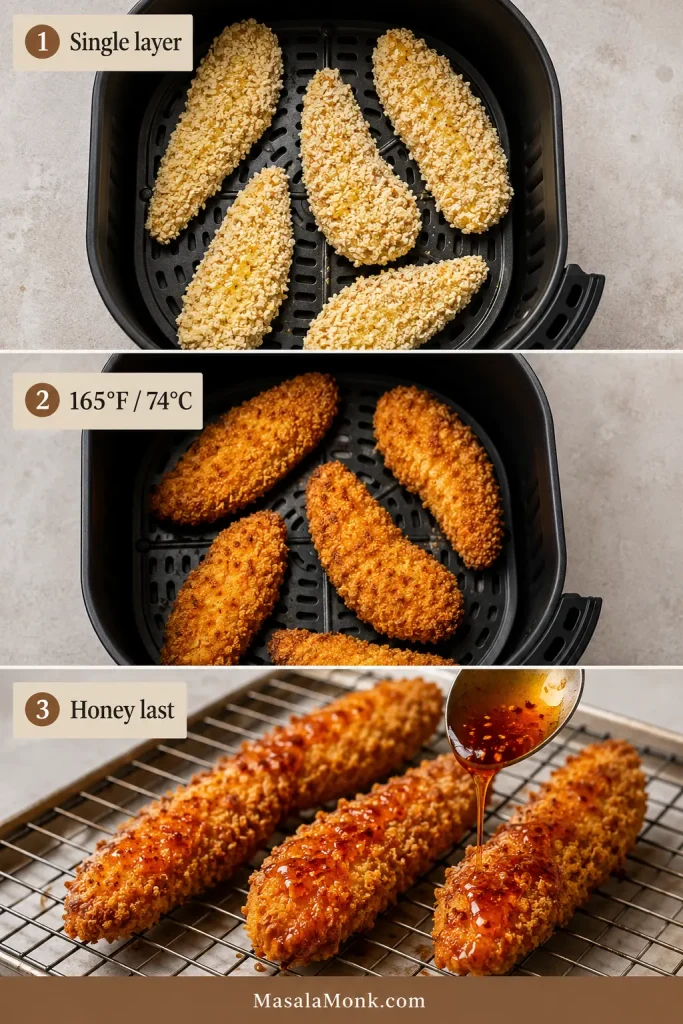
Later batches may finish a little sooner once the air fryer is thoroughly hot.
Oven
- Heat the oven to 425°F (220°C).
- Set a lightly greased wire rack over a rimmed baking sheet.
- Bread the chicken with the panko mixture and arrange the pieces in one layer. Mist any dry-looking crumb patches.
- Bake for 14–18 minutes, depending on thickness, until golden and 165°F (74°C) inside.
- Leave the tenders on the rack for 2–3 minutes, until the initial steam has eased, then drizzle with warm hot honey.
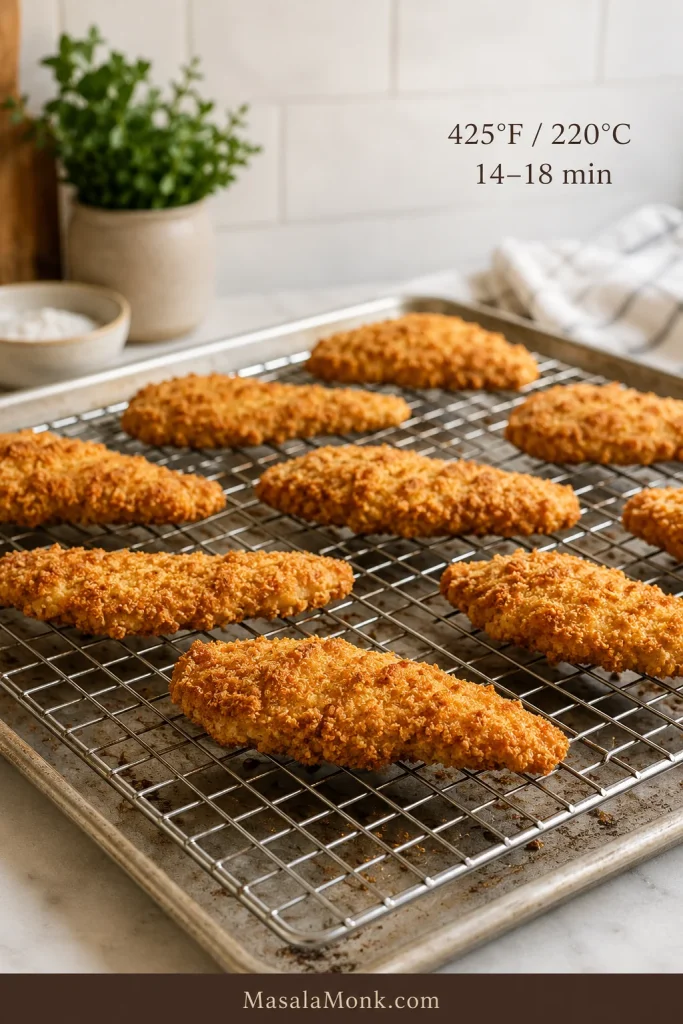
Adjust the Hot Honey: Mild, Medium or Hot
The recipe is medium as written. Keep the ½ cup (170 g) honey, teaspoon of acid and pinch of salt the same, then choose the heat level below.
| Heat level | Use this |
|---|---|
| Mild | 2 teaspoons (10 ml) cayenne hot sauce; no pepper flakes |
| Medium — default | 1 tablespoon (15 ml) cayenne hot sauce + ¼ teaspoon red pepper flakes |
| Hot | 1½ tablespoons (22 ml) cayenne hot sauce + ½ teaspoon red pepper flakes + a small optional pinch of cayenne |
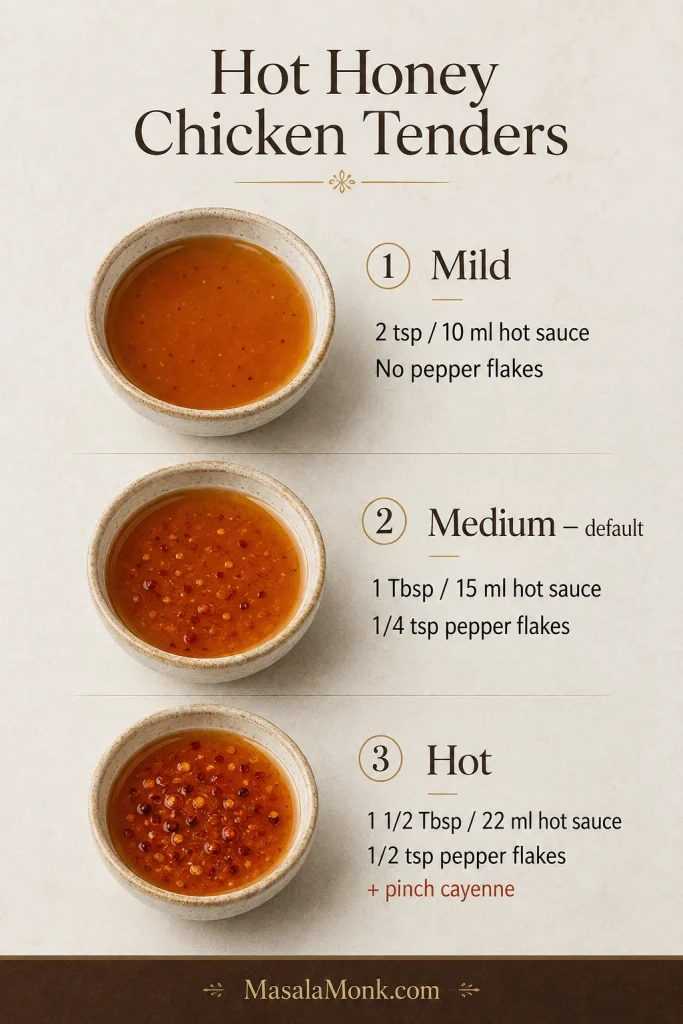
Taste the sauce warm before adding more heat; hot sauces and pepper flakes vary quite a bit.
One batch can easily cover two heat preferences. Divide the warm honey between two bowls and increase the chili in only one; there is no need to make the fried chicken itself aggressively spicy.
Butter is optional. One tablespoon (14 g) makes the glaze richer and slightly softens the heat; keep the sauce over low heat so it stays smooth.
How Much Hot Honey Do You Need?
- Drizzle: start with ¼ cup (60 ml)
- Brush: use roughly ⅓ cup (80 ml)
- Toss: use most or all of the basic sauce batch
Make 1½ batches when you want heavily glazed chicken and extra sauce at the table. The sauce should be warm enough to fall in ribbons, but not thin or watery.
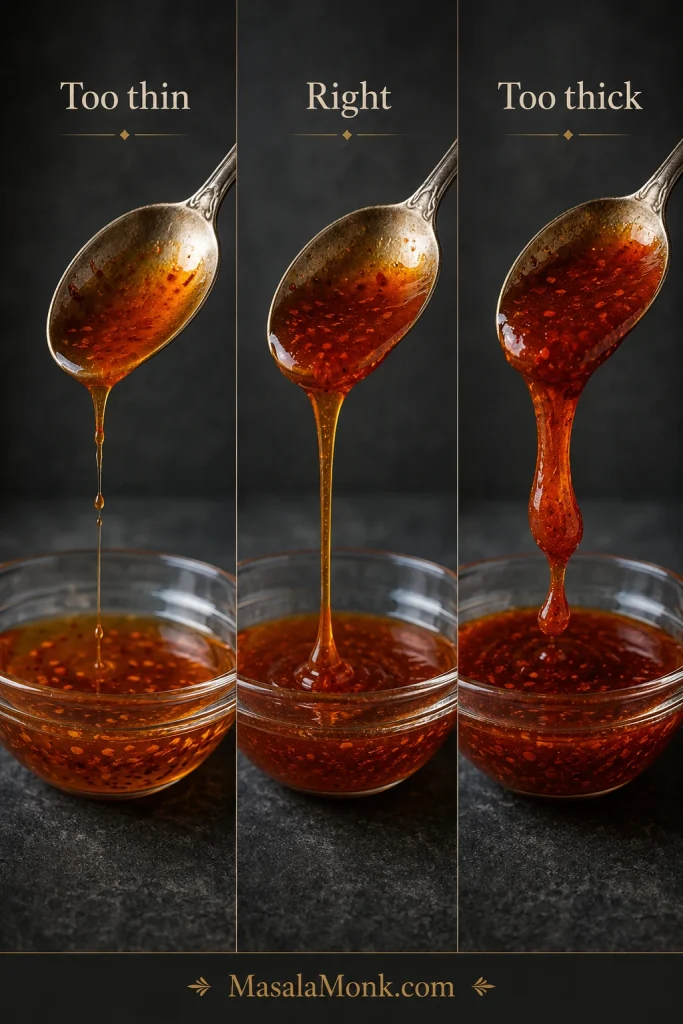
Already have bottled hot honey? Start with ½ cup (120 ml). A few drops of vinegar or lemon juice can sharpen it if the sweetness feels flat.
For more variations on the sauce itself, see our hot honey sauce recipe.
What Went Wrong?
If a batch goes wrong, do not change five things at once. Start with what you can see; the crust, color and oil usually point toward the problem.
Breading and Frying Problems
| What you see | What it means and what to change |
|---|---|
| Breading falls off | Too much marinade, weak pressing or too little resting time. Let excess drip, press firmly and give the coating time to settle. |
| Breading is thick and hard | The wet flour pieces are too large or the dredge is too heavy. Use smaller flakes and one substantial coating. |
| Chicken is pale and greasy | The oil spent too much of the batch too cool. Fry fewer pieces and let it recover before reloading. |
| Outside is dark, center underdone | The oil is too hot or the chicken is too thick. Lower the heat and make the pieces more even. |
| Chicken is dry | It cooked too long. Start checking the largest piece sooner. |
| Bottom turns soft | Steam is trapped underneath. Move cooked tenders to a wire rack in one layer. |
| Later batches taste bitter | Loose breading has burned in the oil. Skim out dark crumbs between batches. |
A pot that starts at 360°F but spends most of the batch near 300°F is still frying too cool. What the thermometer does after the chicken enters matters more than the starting number alone.
Hot Honey and Crispness Problems
| What you see | What it means and what to change |
|---|---|
| Sauce softens the crust quickly | The chicken was sauced too soon or too heavily. Give it a brief rack rest and start with a drizzle. |
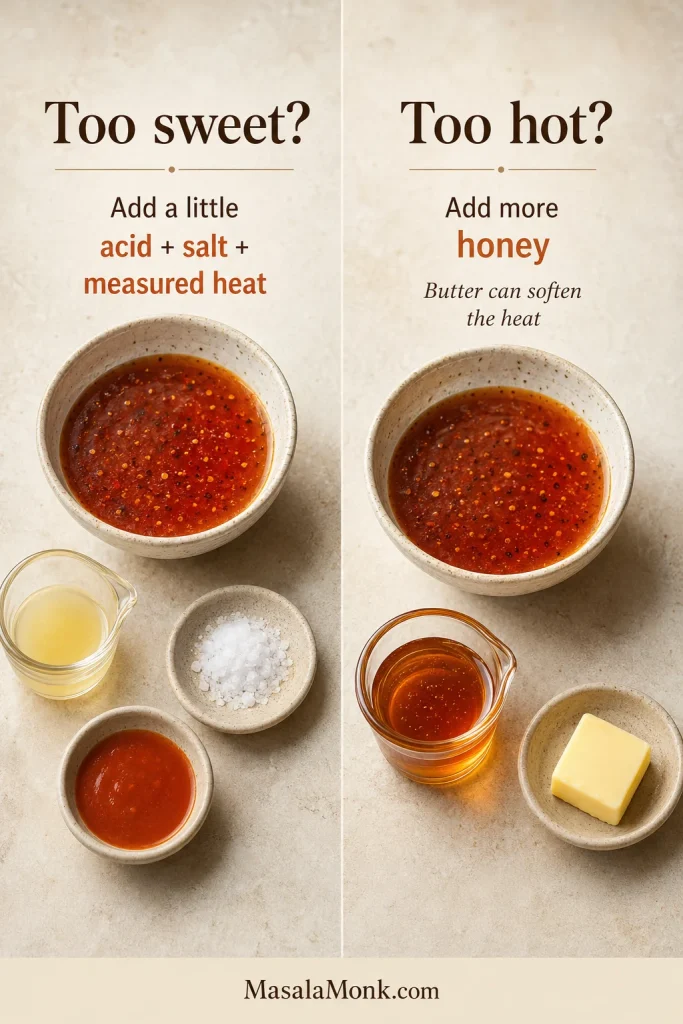
| Hot honey is too sweet or too hot | Too sweet: add a little acid, salt and measured heat. Too hot: stir in more honey; butter can soften the heat too. |
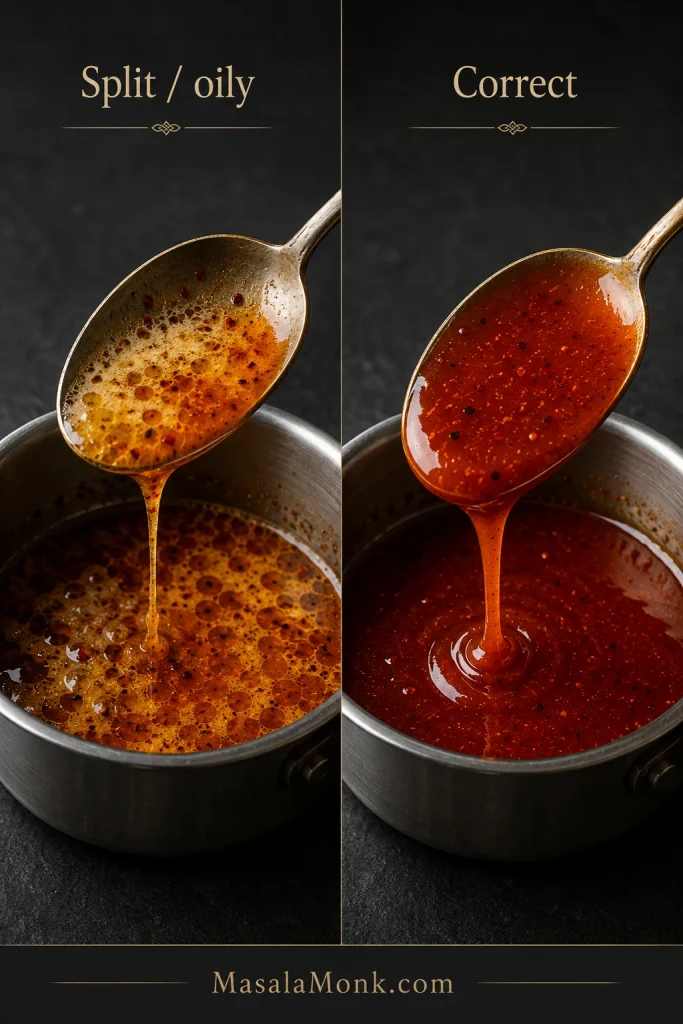
| Hot honey looks oily or split | Butter-containing sauce may have overheated. Take it off the heat, whisk gently and rewarm only over low heat. |
| Sauce runs off | It is too hot or thin. Let it cool until it falls from the spoon in ribbons. |
If buttered hot honey turns oily or streaky: take it off the heat, whisk gently and rewarm only over low heat. The finished sauce should look smooth and cohesive rather than separated.
Correct one thing at a time while the sauce is warm: use a little acid, salt and measured heat when it is too sweet; add more honey when it is too hot. If someone at the table simply wants a gentler creamy option, our easy yum yum sauce gives them another path without changing the whole batch.
Make Ahead, Store and Reheat
Hot honey: Make it up to 1 week ahead, refrigerate it in a covered container and warm it gently before serving. Low heat is especially important when butter is included.
Chicken: Marinate 2–4 hours ahead when convenient. Bread it close to frying; the short 10-minute rest helps the coating settle, while a long breaded hold works against that rough, crisp texture.
If coleslaw is part of dinner, this is a good moment to make it too. Our creamy coleslaw recipe can chill while the chicken marinates.
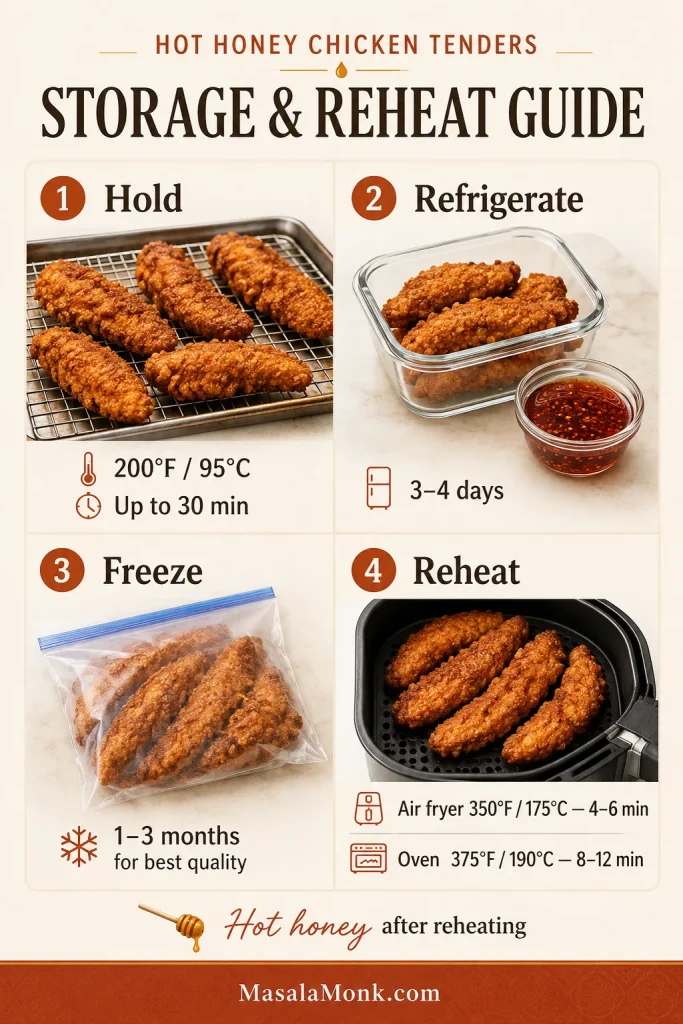
Holding fresh batches: Keep the tenders unsauced on their rack in a 200°F (95°C) oven for up to 30 minutes while you finish frying. A short hold works, but straight from frying is still best.
Leftovers: Refrigerate cooked chicken for 3–4 days, with extra hot honey stored separately whenever possible.
Freezing: Freeze cooked tenders unsauced. For best quality, use them within roughly 1–3 months, then re-crisp before adding fresh hot honey.
- Air fryer: 350°F (175°C) for 4–6 minutes
- Oven: 375°F (190°C) on a rack for 8–12 minutes
- Microwave: quickest, but the coating will be softer
Whichever method you choose, reheat the center of the chicken to 165°F (74°C), then add fresh hot honey.
What to Serve With Hot Honey Chicken Tenders
You do not need an elaborate plate. Something cold and crunchy, creamy, tart or pickled is usually enough to balance rich fried chicken and sticky sweet heat.
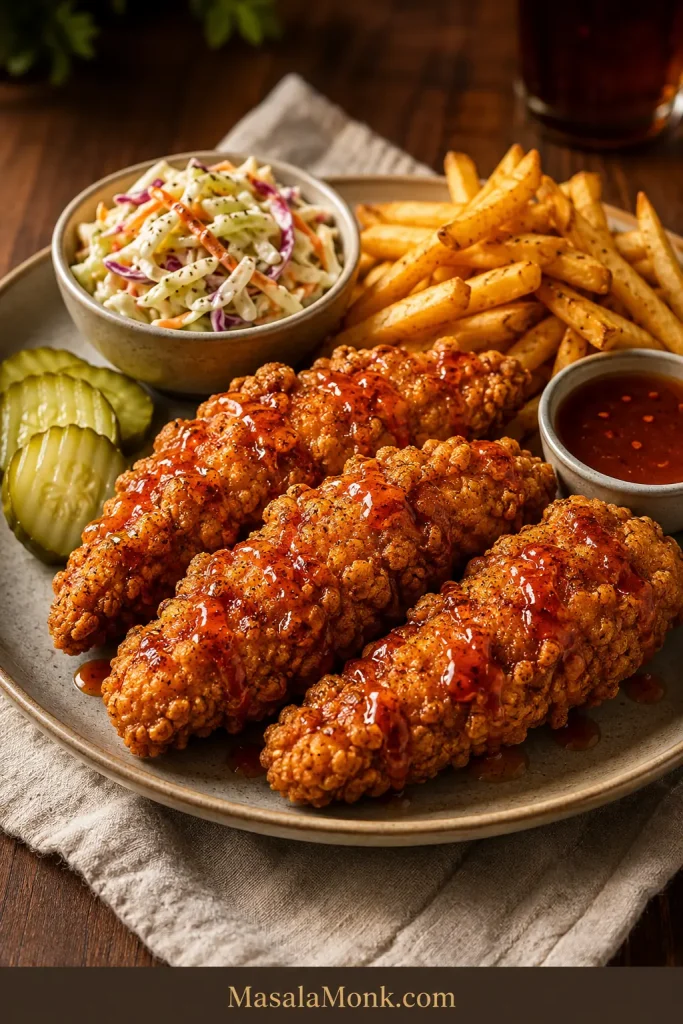
- Classic and crunchy: Add crispy homemade French fries, slaw and plenty of pickles.
- Cold and sharp: A crisp cucumber salad with vinegar and dill cuts through both the frying oil and the honey beautifully.
- Sandwich night: Add slaw, pickles and a little hot honey to a toasted bun. Our chicken sandwich recipes have more ideas for building around crisp chicken.
- Sweet-savory: Pile the tenders onto waffles and drizzle the honey over both while leaving plenty of fried ridges exposed.
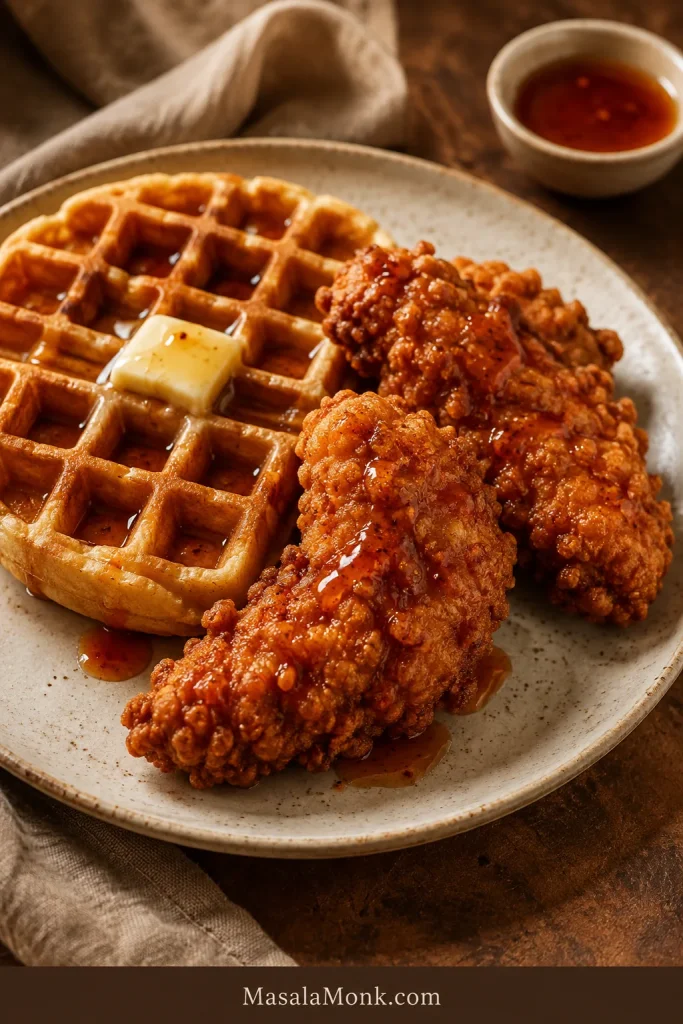
The best plate of these still lets you see rough dark-gold ridges beneath thin glossy streaks of honey. The first bite should give you crunch and juicy chicken, then sweetness, then the chili catching up a moment later.
If you make them, tell us whether you used tenderloins or breast strips, how you cooked them, and whether you drizzled, brushed or tossed the hot honey. Your notes may help the next person standing over a batch of chicken wondering whether theirs looks right.








