
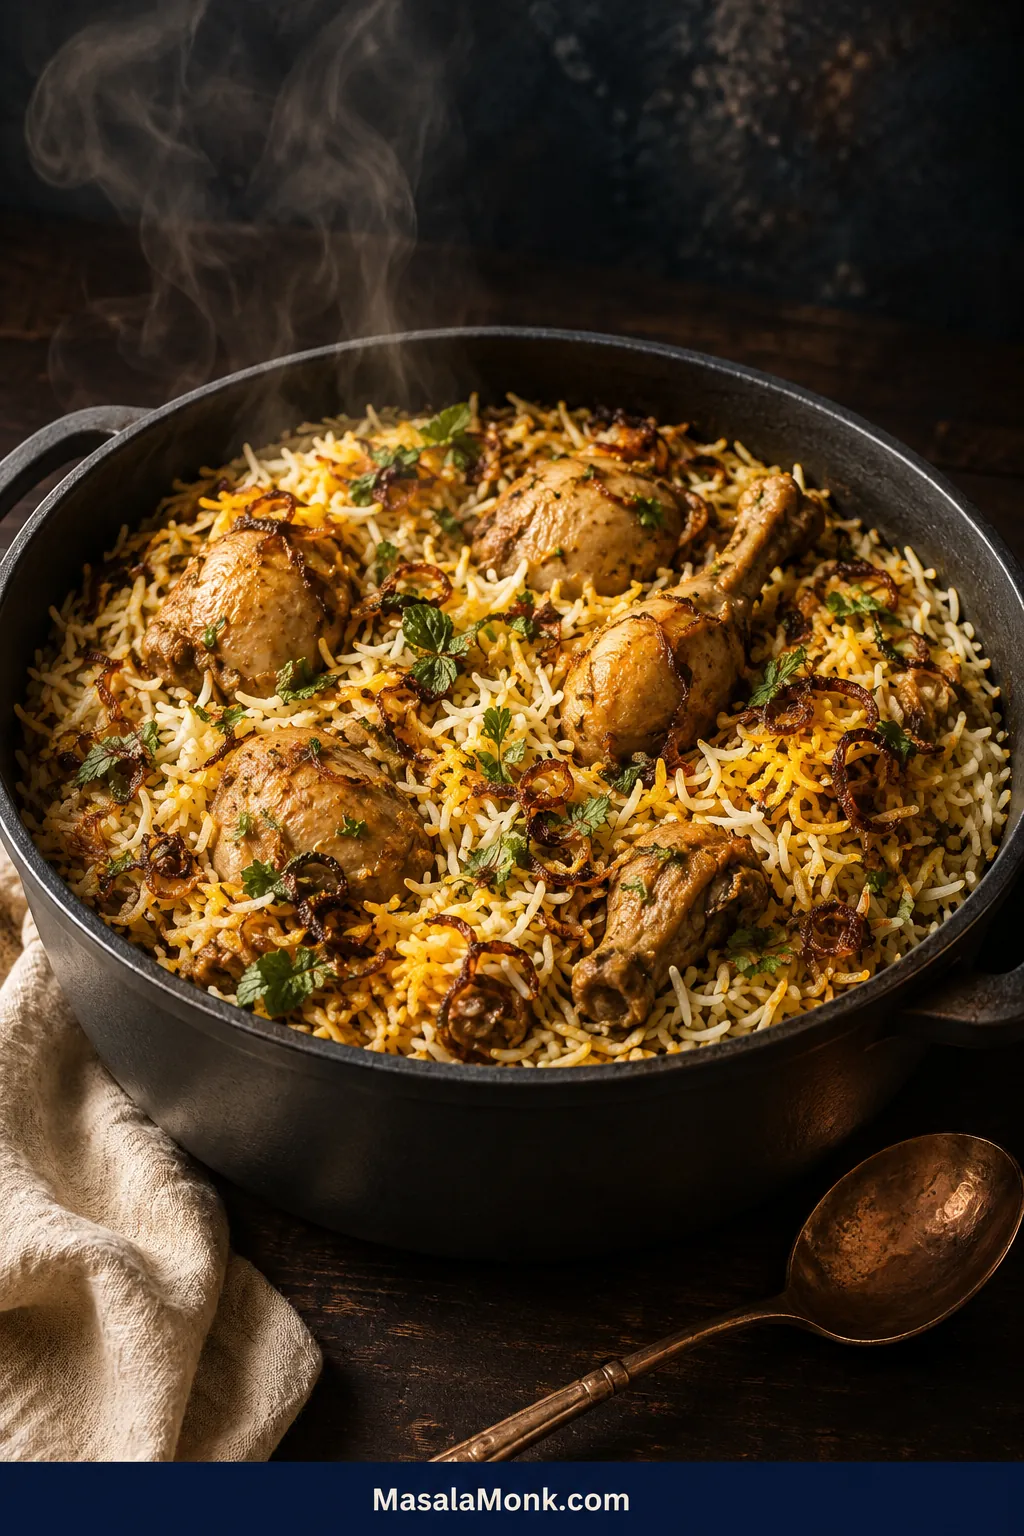
Lift the lid on a good chicken biryani and the first thing you notice is separation. Long grains move apart, browned onion and saffron rise with the steam, and a drumstick underneath stays juicy beside the bone.
A disappointing pot can smell just as promising—until the serving spoon reaches wet rice at the bottom or the largest chicken piece is still tight and undercooked.
This chicken biryani recipe uses a Hyderabadi-style kacchi dum method: raw marinated chicken beneath partially cooked basmati rice. It is not a one-pot shortcut, but most of the elapsed time is marinating or waiting. The few moments that need close attention—the onions, rice and sealed pot—are brief and clearly marked.
The finished biryani is meat-forward and moderately spiced, with separate grains, juicy bone-in chicken, fried-onion sweetness and a rich lower layer.
Fresh herbs and saffron keep the aroma lifted, while patches of pale, golden and darker rice make every serving slightly different. This version leaves out tomatoes, potatoes, nuts and food colour; its richness comes from yogurt, onion, ghee and the chicken itself.
Quick answer
The Chicken Biryani Method in One Minute
- Base batch: 750 g / 1 lb 10 oz bone-in chicken with 400 g / 14 oz aged basmati rice
- Marinate: at least 2 hours; 8–12 hours is better
- Rice: soak 30 minutes, then boil until tender outside but distinctly firm in the centre
- Dum: keep the pot sealed over medium heat until one clear sign—a fine hiss, gentle bubbling or edge condensation—confirms steam is building; then go low and begin checking after about 25 minutes
- Finish: check the largest chicken piece with a thermometer, then rest the sealed pot before lifting servings
Use a wide, heavy 5–6 litre / 5–6 quart pot. The batch serves 5–6 as a substantial main. Raw marinated chicken cooks beneath partially boiled rice, so the rice stage and dum schedule are designed specifically for the kacchi method.
The MasalaMonk rule: stop the rice before it feels ready, establish steam before going low, and let the thermometer decide when the chicken is done.
How this guide was developed: this research-led guide reconciles recurring kacchi-dum methods and makes four often-vague decisions—rice texture, pot width, base moisture and chicken temperature—explicit for home cooks.
Make it now
Chicken Biryani Recipe: Hyderabadi-Style Kacchi Dum
Raw marinated chicken cooks beneath partially boiled basmati rice in a sealed, heavy pot. Fried onion, herbs and saffron remain in fragrant patches, so the finished rice keeps natural variations of colour and flavour.
Total elapsed time: allow about 4 hours with the minimum marinade or up to 14 hours with a longer refrigerated marinade. Soak the rice during the final 30 minutes.
Use a 5–6 litre / 5–6 quart pot, 25–27 cm / 10–11 inches wide. The chicken is done at a minimum of 74°C / 165°F. Weights are primary; 1 US cup equals 240 ml.
Plan the cook
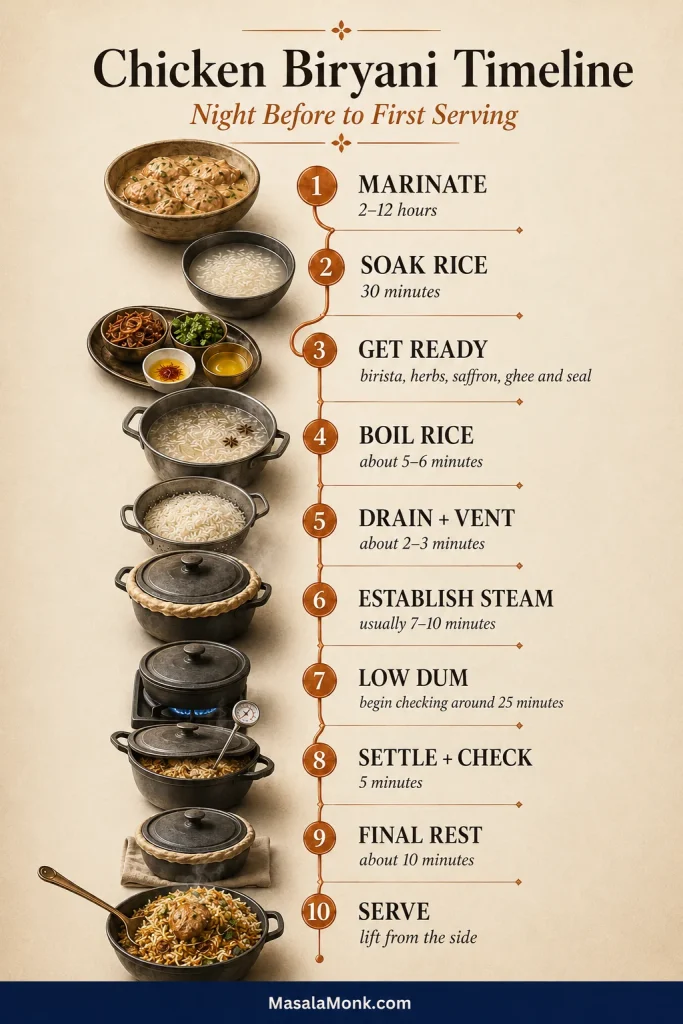
5–6 minutes rice boiling → 2–3 minutes draining and venting → about 7–10 minutes to establish steam → about 25 minutes on low → 5 minutes to settle → check → 10 minutes final rest.
Start the low-heat timer only after steam is established. The pot may become much quieter on low; do not raise the flame merely to keep it audible. Larger chicken pieces, a deeper pot or a weaker burner may need another 5–8 minute cycle.
Fry the onions first, then start the marinade. While the chicken rests, measure the rice spices, wash and dry the herbs, check the pot fit and make the raita if serving it. Begin the rice soak as the marinade enters its final 30 minutes.
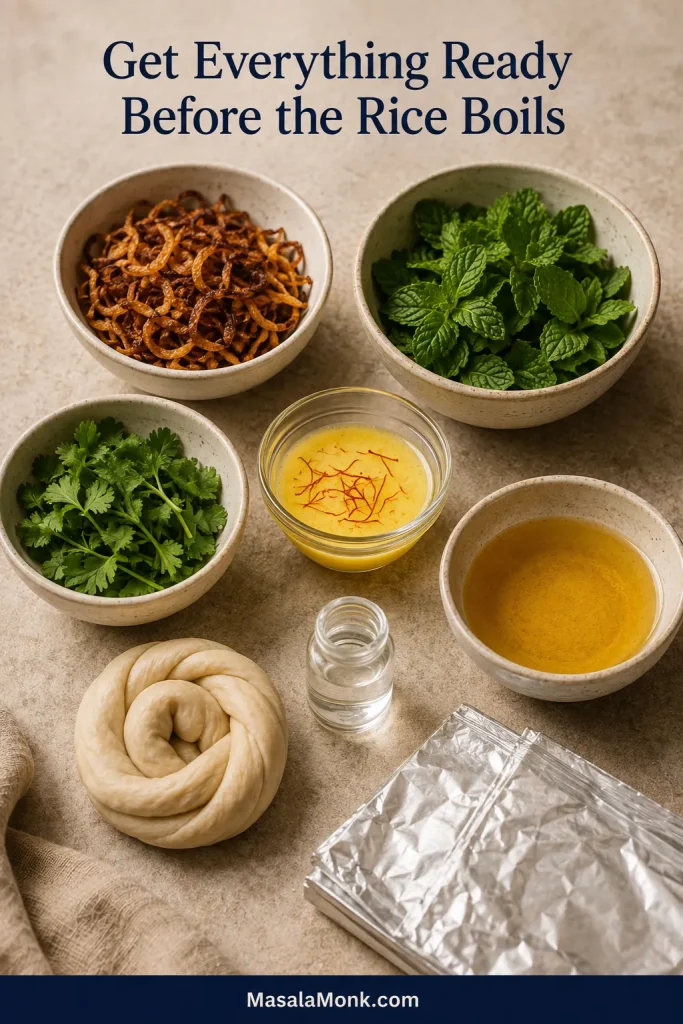
Before the rice boils, place the saffron milk, ghee, herbs, fried onions, colander and sealing material within reach. That keeps the only rushed part of the cook calm.
Equipment
- Wide heavy-bottomed pot with a tight lid, approximately 5–6 litres / 5–6 quarts and 25–27 cm / 10–11 inches across
- Large pot for boiling rice
- Fine-mesh colander
- Heavy tawa, cast-iron skillet or heat diffuser, useful for a thin pot or sharply concentrated flame
- Kitchen scale
- Instant-read thermometer
- Foil or soft dough for improving the seal, if needed
- Flat rice spoon or wide serving spoon
For the fried onions
- 300 g / 10½ oz onions, about 2 large, halved and thinly sliced
- 300 ml / 1¼ cups neutral oil, or enough for the onions to move freely while frying in batches
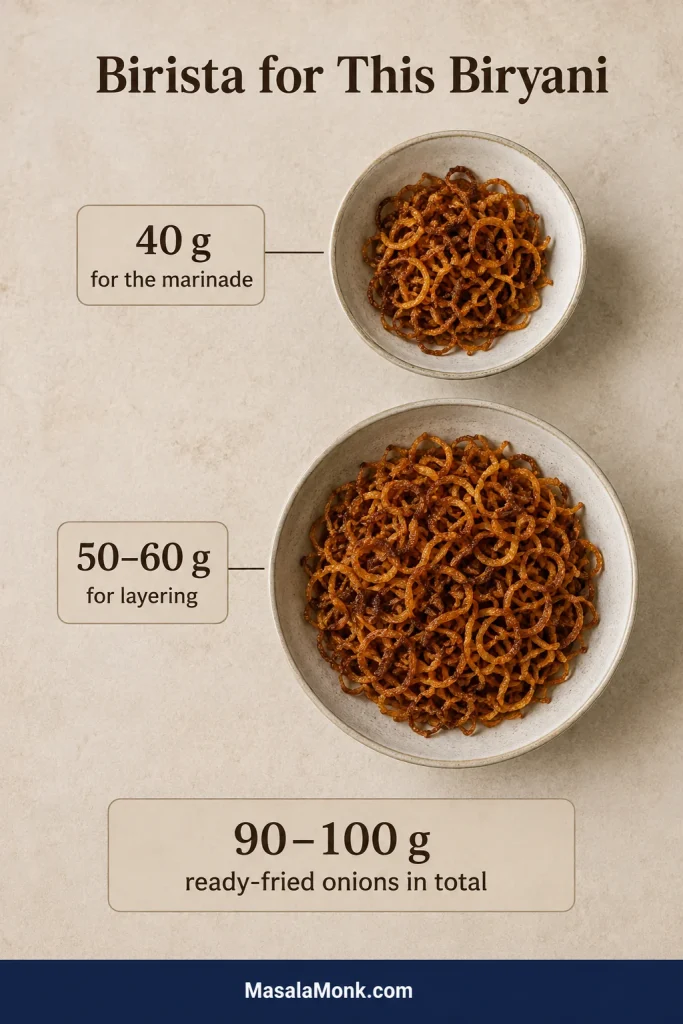
Weigh 40 g fried onions for the marinade and reserve the rest for layering. When using ready-fried onions, have about 90–100 g total: 40 g for the marinade and 50–60 g for layering. Reserve 30 ml / 2 tablespoons of the homemade onion-frying oil for the chicken; only that measured amount goes into the biryani.
For the chicken marinade
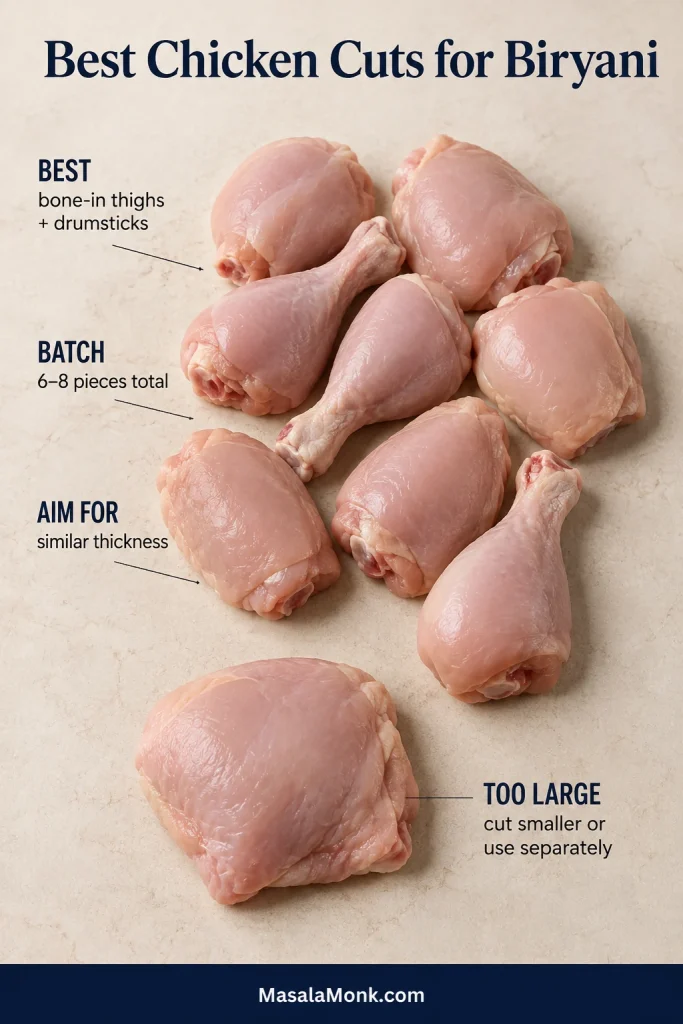
- 750 g / 1 lb 10 oz skinless bone-in chicken, 6–8 small-to-medium thighs and drumsticks of similar thickness; separate leg quarters at the joint and ask the butcher to halve unusually large thighs
- 200 g / 7 oz thick full-fat plain yogurt, about ¾ cup plus 1 tablespoon
- 25 g ginger-garlic paste, about 1½ tablespoons
- 15 ml / 1 tablespoon fresh lemon juice
- 9 g fine sea salt, about 1½ teaspoons
- 4 g Kashmiri chilli powder, about 1½ teaspoons
- 2 g ground coriander, about 1 teaspoon
- 1 g ground cumin, about ½ teaspoon
- 1 g ground turmeric, about ½ teaspoon
- 3 g unsalted biryani masala; use the entire defined blend below or a clearly labelled unsalted blend
- 2–3 green chillies, slit lengthwise; use 2 for moderate heat and 3 for a hotter biryani
- 40 g fried onions, lightly crushed
- 10 g mint leaves, roughly chopped
- 15 g coriander leaves and tender stems, chopped
- 30 ml / 2 tablespoons reserved onion-frying oil
Ground Spice Blend and Heat Level
Defined unsalted blend: combine ½ teaspoon ground black pepper, ¼ teaspoon ground green cardamom, ¼ teaspoon ground cinnamon, ⅛ teaspoon ground cloves, and a small pinch each of ground mace and nutmeg. The mixture makes roughly 3 g; use all of it.
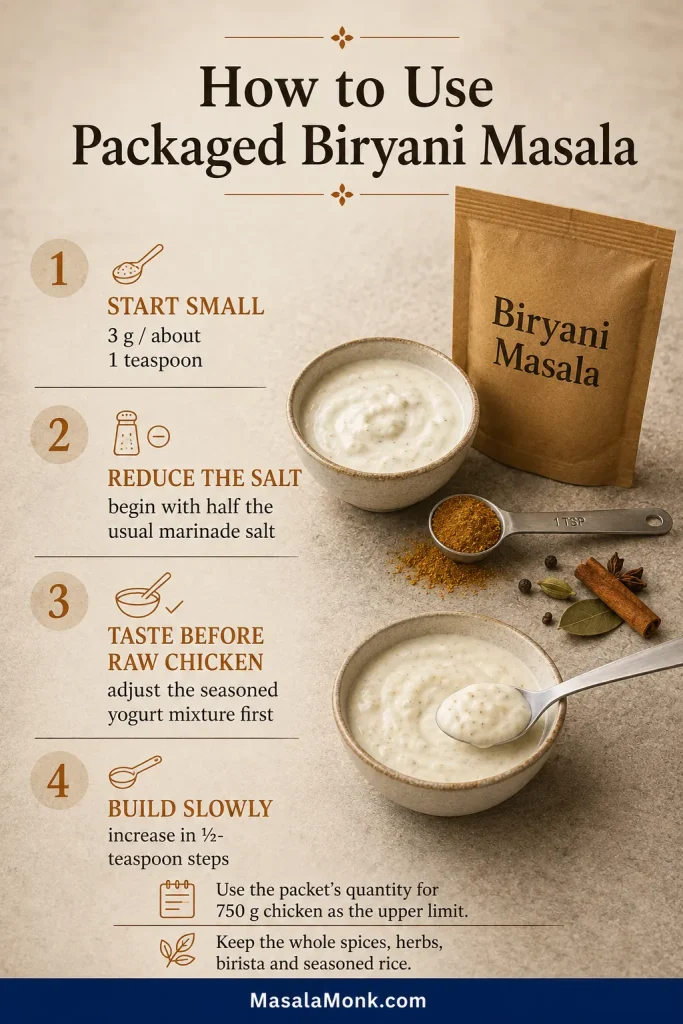
Using a salted packet masala: start with 3 g / about 1 teaspoon in the yogurt, add roughly half the usual marinade salt, and taste the yogurt mixture before adding raw chicken. Add more masala in ½-teaspoon increments only if needed, using the packet’s quantity for 750 g chicken as the upper limit.
Keep the measured herbs, fried onions, whole spices and rice seasoning; the packet replaces only the defined ground blend.
Choose the heat
Kashmiri chilli mainly adds colour and gentle warmth. Use 2 green chillies for a moderately spiced pot or 3 for more heat. When a packaged biryani masala already tastes hot, reduce the green chillies before reducing the Kashmiri chilli.
For the rice
- 400 g / 14 oz aged basmati rice, approximately 2 US cups
- 3.5 litres / about 15 cups water
- 30 g fine sea salt, about 5 teaspoons
- 2 bay leaves
- 6 green cardamom pods, lightly cracked
- 1 black cardamom pod
- 6 cloves
- 1 cinnamon stick, about 5 cm / 2 inches
- Shahi jeera or black cumin, 1 teaspoon
- 1 star anise, optional
For layering and finishing
- Remaining homemade fried onions, or 50–60 g ready-fried onions, for layering
- 10 g mint leaves, roughly torn
- 15 g coriander leaves and tender stems, chopped
- 45 g / 3 tablespoons ghee, melted
- 45 ml / 3 tablespoons warm milk
- A generous pinch saffron
- 2.5 ml / ½ teaspoon kewra water or 1.25 ml / ¼ teaspoon rose water, optional; use one for the first batch
Instructions
Prepare the Components
- Fry the onions. Fry in two or three batches over medium heat until evenly deep golden. Remove before they turn dark brown; they continue colouring as they cool. Drain and let them crisp.
- Marinate the chicken. Mix the yogurt, aromatics, salt, ground spices, green chillies, 40 g fried onions, herbs and 30 ml reserved onion oil. Coat the chicken, cover and refrigerate for at least 2 hours, preferably 8–12.
- Rinse and soak the rice. Rinse gently until the water becomes much clearer, soak in fresh water for 30 minutes, then drain just before boiling.
- Prepare the finishing ingredients. Infuse the saffron in warm milk and measure the ghee, herbs, fried onions and one optional aromatic water before the rice starts cooking.
- Parboil the rice. Boil the drained rice in the salted, spiced water. Start checking at 4 minutes; soaked aged basmati often needs 5–6. Drain when the outside is tender but the centre still resists clearly.
- Drain and vent. Pour into the prepared colander immediately and leave uncovered for 2–3 minutes so surface moisture escapes.
Build, Seal and Finish
- Layer the pot. Arrange the chicken in one even layer, placing the thickest piece near the side for later checking. Spread the rice loosely over it, then distribute the fried onions, herbs, saffron milk, ghee and optional aromatic water.
- Seal the pot. Cover tightly, adding foil or dough beneath the lid only if needed. Put a thin pot or a pot over a concentrated flame on a heavy tawa or diffuser from the beginning.
- Listen, then go low. Heat over medium with the lid closed until one clear sign—a fine hiss, gentle bubbling or edge condensation—confirms steam is building. Reduce to the lowest stable heat and begin checking after about 25 minutes. The pot may become much quieter on low.
- Check the chicken, then rest. Move off heat for 5 minutes and probe the thickest piece without touching bone. It must reach at least 74°C / 165°F and feel yielding rather than tight beside the bone. If needed, reseal and continue in 5–8 minute low-heat cycles. Once done, rest sealed for 10 minutes.
- Lift; do not churn. Open away from your face. Slide a wide spoon down the side and lift from the bottom so each serving receives chicken, pale rice, saffron-tinted rice and some of the richer lower layer.
Recipe notes
- Do not wash raw chicken. The USDA advises that rinsing raw poultry increases cross-contamination risk; pat away excess surface moisture with disposable paper instead.
- The 65–70% rice stage belongs to this raw-chicken kacchi method. Pakki biryani needs more fully cooked rice and a shorter sealed finish.
- Kewra and rose water are optional and powerful. Choose one, measure it, and never pour directly from the bottle.
The recipe above is enough to cook from. Continue with the guide for the few decisions—rice texture, bottom moisture and dum heat—that most affect the finished pot, or jump straight to troubleshooting when something looks different.
Need more detail? See the rice target ↓ · Follow the visual method ↓ · Fix a problem ↓
The timeline below shows where the cook can pause and where it cannot. Read it once before starting so the colander, finishing ingredients and seal are ready when the rice reaches its target.
Explore the Chicken Biryani Guide
Understand the Pot
Adjust, Plan and Serve
Ingredients and Smart Choices
The ingredient list looks long, but each group has one job: bone-in dark meat cooks in one wide layer, thick yogurt seasons without becoming gravy, whole spices perfume the rice water, and herbs and fried onions brighten the finished pot. Measure each group before the rice boils and the method becomes much calmer.
Best chicken for biryani: bone-in thighs and drumsticks
Skinless bone-in thighs and drumsticks are the most forgiving choice for this method. Ask for small-to-medium biryani or curry-cut pieces. Separate leg quarters at the joint, and ask the butcher to halve unusually large thighs. Similar thickness matters more than the exact count.
Supermarket pieces can vary surprisingly within one pack. If one thigh is much thicker than the rest, move it to another meal or have it cut smaller so the pot can finish evenly.
Boneless thighs can be used when bone-in chicken is unavailable, but this formula is calibrated for thighs and drumsticks with the bone. Keep the pieces large and follow the limited thermometer-led guidance in the variations section.
Why aged basmati works better
Aged basmati generally lengthens well and is less likely to turn sticky than very fresh rice. Gentle handling still matters. Rinse with your fingers open, soak for a measured time, and have the colander ready before the rice enters boiling water.
Grams are the dependable measure here. “Two cups” can vary with the cup, the rice and how firmly it is filled, so the recipe is balanced around 400 g. Biryani rice boils in abundant water and is drained; absorption-method ratios belong to a different method.
Chicken biryani marinade: thick enough to cling
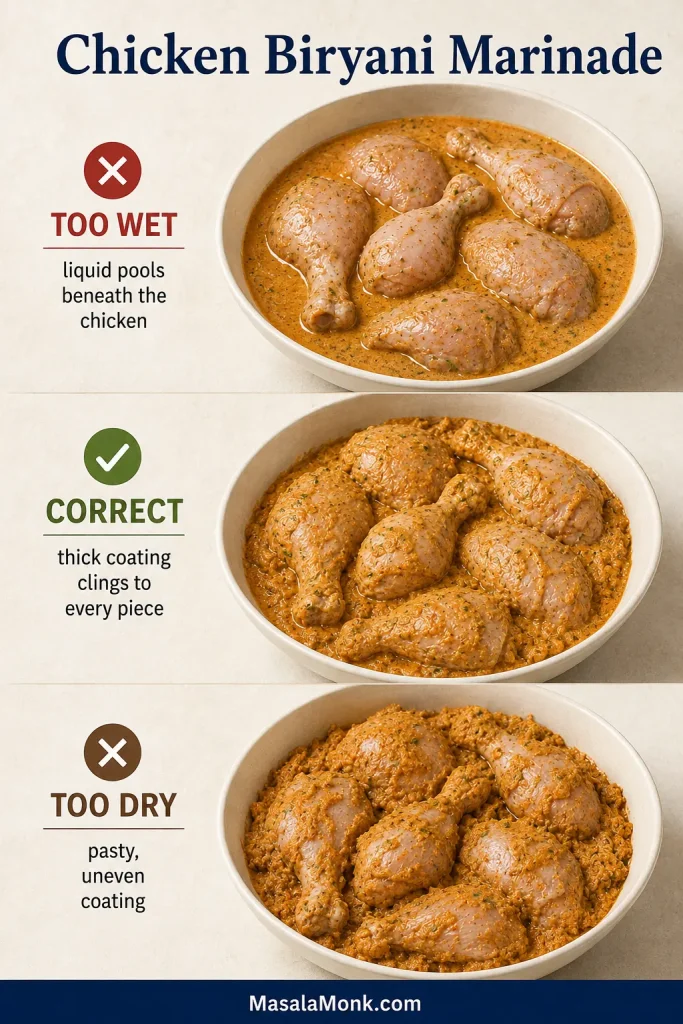
Thick full-fat yogurt gives the marinade body without flooding the pot. Stir it before measuring. Watery yogurt or separated whey needs 20–30 minutes in a fine sieve. The finished marinade should visibly coat the chicken instead of collecting beneath it.
How to make birista for chicken biryani
Birista sweetens the marinade, deepens savoury flavour and leaves concentrated aromatic pockets through the upper rice. The final minute deserves attention: onions that look perfectly dark in the oil often become bitter after carryover browning.
Lift them while they are evenly deep golden, then spread them in a thin layer to cool. A hot heap continues browning in its own heat.
Ready-fried onions are a valid shortcut when their ingredient list is simple and they still smell fresh. Have about 90–100 g total: use 40 g in the marinade and 50–60 g for layering. Commercial onions can be saltier or sweeter than homemade birista, so taste them before adjusting the marinade.
Separate the fried onions before the rice boils: crush the marinade portion lightly, then keep the larger layering portion loose so it remains visible and aromatic in the finished pot.
Spices and where each one goes
Whole spices perfume the rice water, while chilli, coriander, cumin, turmeric and biryani masala season the chicken. Herbs, ghee and saffron finish the upper layer where their aroma can survive.
Dividing the spices across those stages creates complexity without coating every grain in ground masala. Garam masala and biryani masala overlap, but they are not automatically interchangeable; MasalaMonk’s homemade garam masala guide explains the warm-spice backbone.

Saffron, kewra and rose water: finish lightly
Saffron adds a warm floral aroma and creates small patches of golden rice; it does not need to colour the whole pot. Steep a measured pinch in warm milk and spoon it across a few areas.
MasalaMonk’s guide to saffron explains how to recognise and store whole threads. When saffron is unavailable, omit it and let the ghee, herbs and fried onions carry the finish.
Kewra and rose water are optional and far more forceful. For the first batch, choose one: up to ½ teaspoon kewra water or ¼ teaspoon rose water for the whole pot. Measure it before layering. Pouring directly from the bottle is how fragrant biryani turns medicinal.
Equipment and Pot Fit
The pot does not need to be special, but it should be wide enough for one layer of chicken and heavy enough to soften direct heat. Shape matters as much as capacity because a deep stack takes longer to heat and sends steam through more rice.
Choose a wide, heavy pot
For 750 g chicken and 400 g rice, use a 5–6 litre / 5–6 quart pot measuring about 25–27 cm / 10–11 inches across. Heavy stainless steel, an enameled Dutch oven or a sturdy handi works well.
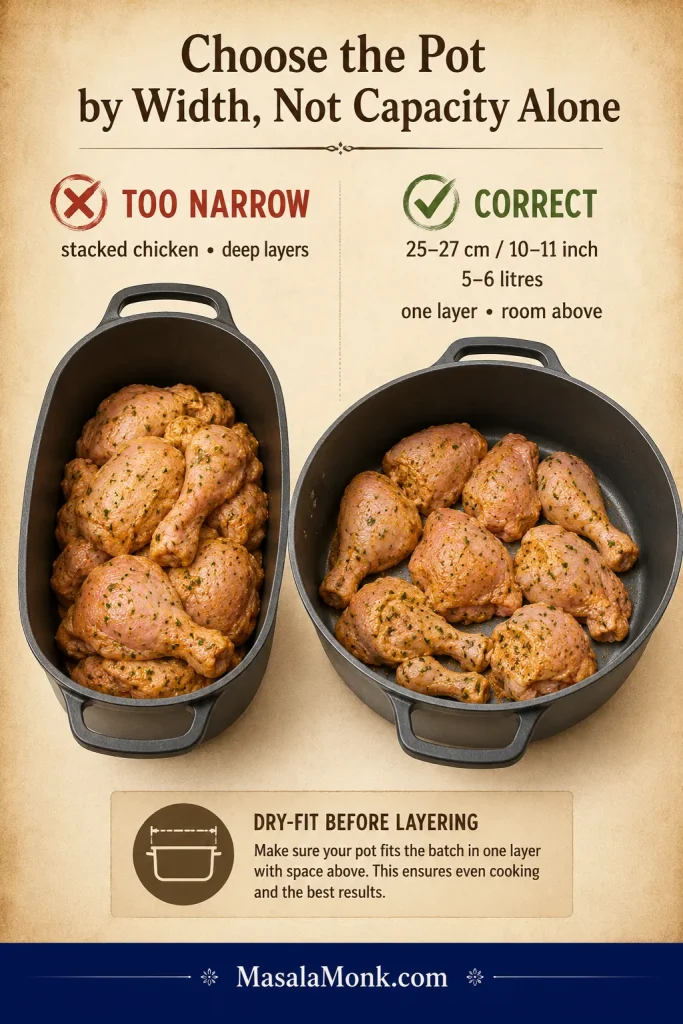
Before marinating, dry-fit the chicken in the pot. The pieces should cover most of the base in one reasonably even layer. A little overlap is fine; a tall central pile will cook less evenly.
Leave room above the rice. After layering, keep clear headroom below the lid. An overfilled pot leaks and compresses the grains; an oversized pot spreads a small batch so thinly that the rice can dry before the chicken finishes.
Check the chicken with a thermometer. Aroma tells you the spices are hot, but it cannot confirm that the largest chicken piece is cooked. An instant-read thermometer lets you stop guessing. Probe the thickest part without touching bone and look for at least 74°C / 165°F, the USDA minimum for poultry.
How Cooked Should Biryani Rice Be?
The rice is the shortest and least forgiving stage, so it helps to understand the target before the water boils.
“Cook the rice to 70%” sounds exact, but a beginner cannot see a percentage. The number only becomes useful when it is tied to the method and to physical signs.
Biryani Rice Before Dum: The Target
| Biryani method | Chicken before layering | Rice before final cooking | Why |
|---|---|---|---|
| Kacchi dum | Raw and marinated | About 65–70% | The rice must survive a longer dum while the chicken cooks. |
| Pakki dum | Mostly or fully cooked | About 80–90% | The final sealed stage is shorter and mainly integrates the layers. |
| One-pot absorption | Raw or partly cooked | Raw soaked rice | Rice cooks in a measured volume of liquid rather than being drained. |
| Rice cooker | Method-dependent | Usually raw soaked rice | The appliance uses an absorption cycle and requires its own liquid ratio. |
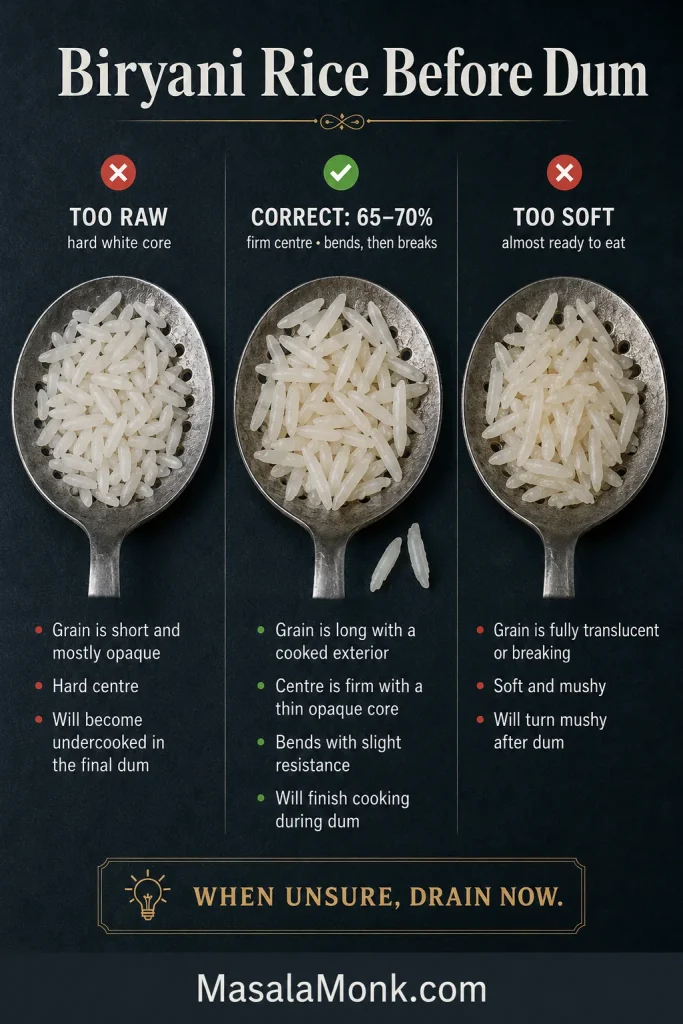
For this recipe, stop when the outside of the grain is tender but the centre is still firm. If you can comfortably eat a bowl of the rice as it is, it has gone too far for the intended dum time.
The boil-and-drain stage belongs specifically to biryani. Plain rice, rice-cooker rice and pressure-cooked rice use different liquid systems, so their absorption ratios should not be transferred to this pot.
How to Make Chicken Biryani, Step by Step
Most of the preparation is forgiving. Watch the onions, feel the rice and listen to the sealed pot; those three moments matter more than following the clock blindly.

1. Fry the onions until deep golden
Slice the onions thinly and evenly. Thick pieces stay soft while very fine pieces burn, so consistency matters more than paper-thin slices. Fry in batches. If using a thermometer, begin around 165–170°C / 330–340°F; otherwise look for active bubbling without smoke or rapid darkening.
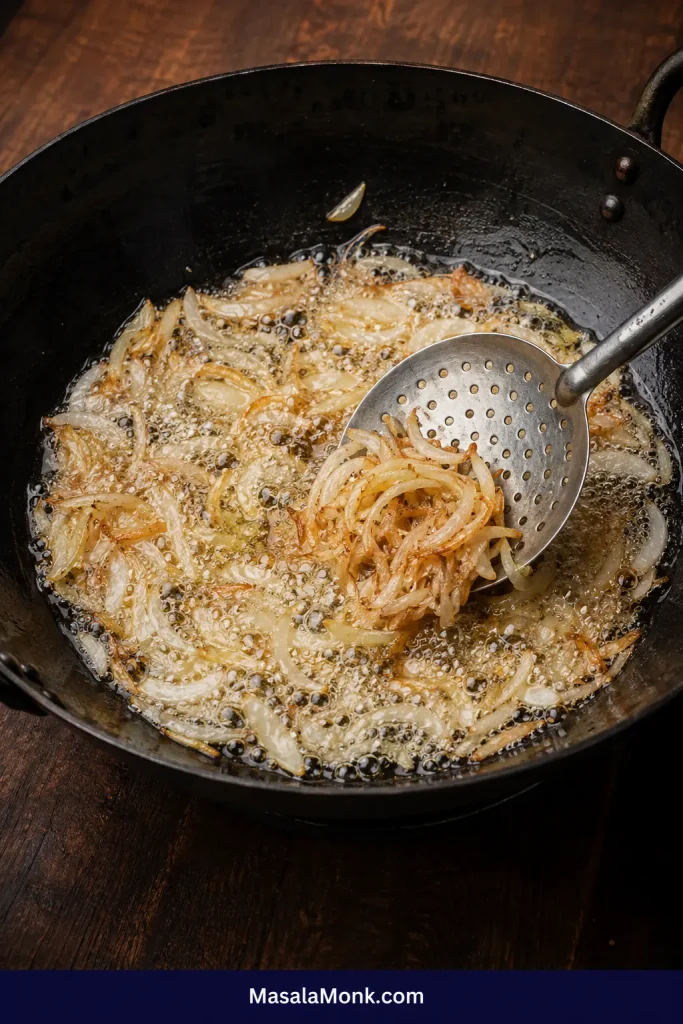
Stir more frequently as the onions lose moisture. Stay close once the colour changes: remove them deep golden with only a few darker edges, then let carryover heat finish the browning. Once cool, they should crumble between your fingers.
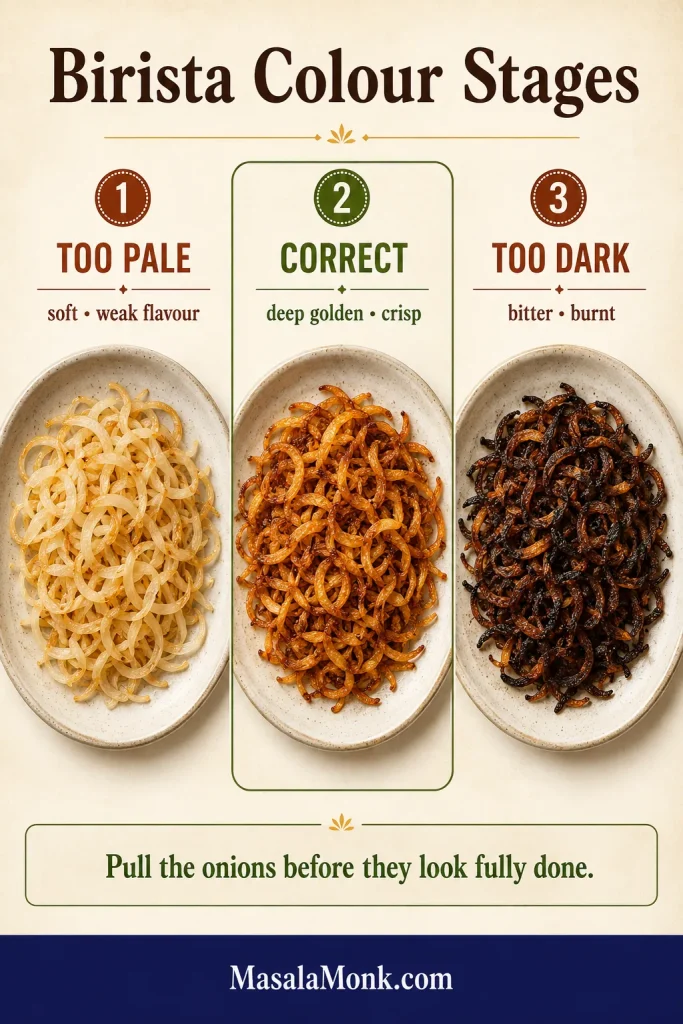
This is usually the first moment the kitchen begins to smell like the biryani to come. Let colour decide when the onions leave the oil; aroma alone can make them seem ready too soon.
If they smell sharp or bitter, do not hide them in the biryani. Burnt birista can dominate an entire pot. It is better to fry another onion than spend hours building flavour around bitterness.
2. Marinate the chicken
Pat the chicken dry so surface water does not thin the yogurt. Mix the marinade completely before adding the pieces; this distributes salt and ground spices more evenly than sprinkling them separately over the chicken.
Properly mixed, the marinade looks thick and slightly coarse from the crushed fried onions and herbs. It should cling to the top and sides of each piece. When the bowl is tilted, a small amount may move, but there should not be a layer of thin liquid running away from the chicken.
| Marinade state | What it looks like | What to do |
|---|---|---|
| Too watery | Thin yogurt or whey pools beneath the chicken. | Drain excess liquid or add a little more crushed fried onion. Do not add dry flour. |
| Correct | The mixture clings and slowly settles around the pieces. | Cover and refrigerate. |
| Too dry | Spices sit in patches and the chicken looks barely coated. | Add 1–2 tablespoons thick yogurt, not plain water. |
Two hours is the practical minimum. Eight to twelve hours gives the salt and aromatics more time to move through the chicken. More lemon is not a substitute for more time; excessive acid can make the exterior soft before the interior is seasoned.
3. Rinse and soak the basmati
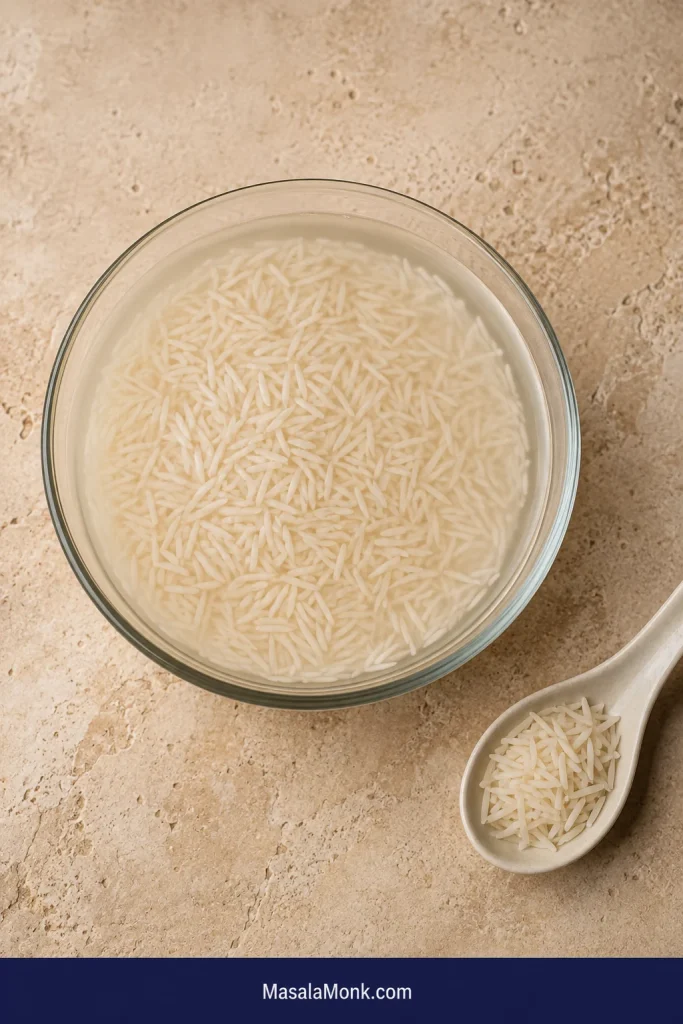
Rinse gently through several changes of cool water until it moves from opaque white to much clearer. Soak for 30 minutes, then drain. Set the colander in the sink before boiling because soaked rice moves quickly once it reaches the water.
4. Prepare every finishing ingredient
Steep the saffron in warm milk, melt the ghee, chop the herbs and measure one aromatic water if using. Keep the remaining fried onions beside the stove. The saffron may colour only parts of the rice, which is exactly what you want.
This small act of organisation matters because the rice will not wait politely while you search for foil or wash coriander. Once it reaches the right stage, it must be drained, vented briefly and layered.
5. Parboil the rice, then stop early
Bring 3.5 litres water to a vigorous boil with the salt and whole spices. Cool a spoonful before tasting: it should be noticeably salty because most of the water will be drained, but never harsh or bitter.
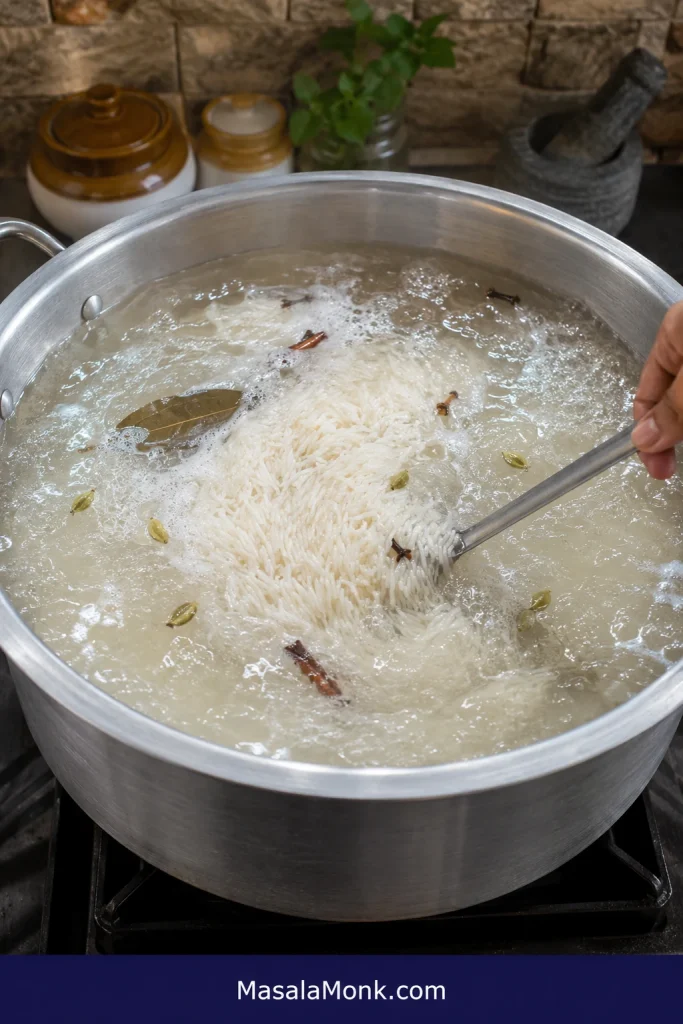
Add the drained rice and stir once gently from the bottom. Start checking at four minutes. Soaked aged basmati often reaches the right stage in five to six minutes, although the brand, grain thickness and return to the boil can shift that window.
Use three rice tests
- Look: the grain has lengthened, but a slightly opaque core remains.
- Bite: the outside is tender while the centre still gives clear resistance.
- Break: the grain breaks when pressed but does not smear into paste.
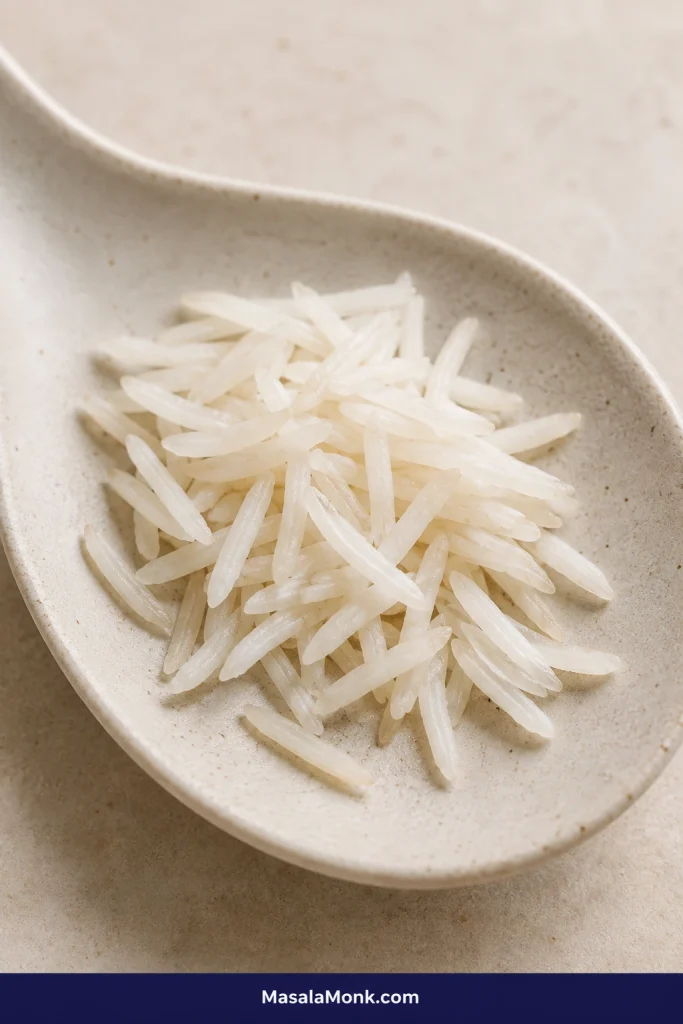
If you are caught between draining now and waiting another minute, drain now. Slightly firm rice can finish under dum; fully cooked rice cannot become firm again.
Rice that already tastes ready to serve has gone too far for this dum. Drain and spread it immediately, use only the measured saffron liquid, and assemble gently. Begin checking the chicken earlier while continuing until it is safely cooked. The rice will be softer, but draining now gives it the best chance.
6. Drain and let surface steam escape
Pour the rice into the prepared colander immediately. Shake gently once or twice, then leave it uncovered for two to three minutes. The brief vent releases surface moisture while the rice remains hot and ready for layering. Trust the firm centre now; the sealed pot will finish it. Handle the elongated grains as little as possible.
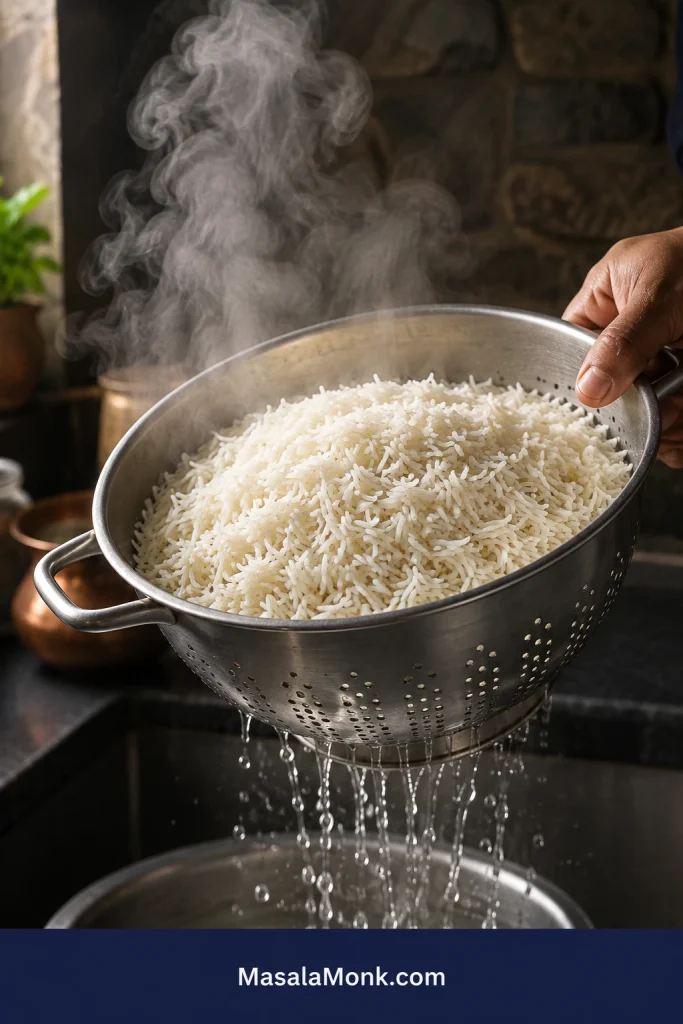
7. Layer the chicken and rice
Spread the marinated chicken across the pot base in one even layer. Give each piece contact with the base and avoid stacking one thigh beneath another. Place the thickest piece near the side so it can be checked later without disturbing the centre.

Distribute the rice loosely without packing or pressing it. Leave small routes for steam rather than compressing the grains into one dense layer.

Scatter the remaining fried onions and herbs across several points, then spoon the saffron milk and ghee over different areas. Small pockets of colour and aroma are better than one orange stripe down the middle.
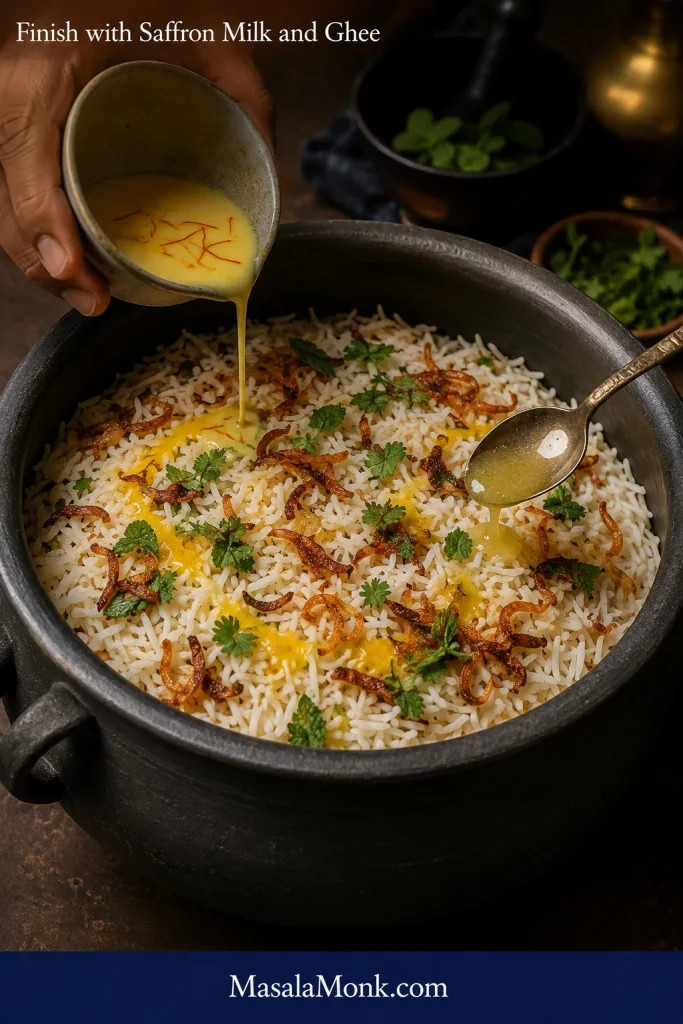
Check the bottom moisture before sealing
The chicken should be surrounded by a thick coating of marinade, not standing in a pale pool. If liquid has separated during marination, stir the chicken first. When there is still obvious excess, leave a few spoonfuls behind rather than pouring all of it into the pot.
| Before sealing | Likely result |
|---|---|
| Chicken almost dry, marinade barely visible | Higher risk of scorching and dry lower rice |
| Thick marinade clings with no broad pool | Best balance of steam, flavour and separation |
| Thin liquid surrounds the pieces | Higher risk of wet, compressed lower rice |
Once the rice and finishing ingredients are in place, clear the counter and close the lid. The busy part of the cook is over.
8. Seal the pot
A heavy lid that fits tightly may be enough. When the lid rocks or leaves gaps, place a sheet of foil across the pot before closing it. A soft dough rope around the rim creates the strongest seal but is not compulsory for a home biryani.

9. Chicken biryani dum time: listen first, then go low
Keep the sealed pot over medium heat and the lid closed. A heavy Dutch oven or thick handi can sit directly over the burner; place a thin pot or a pot over a concentrated flame on a heavy tawa or diffuser from the beginning.
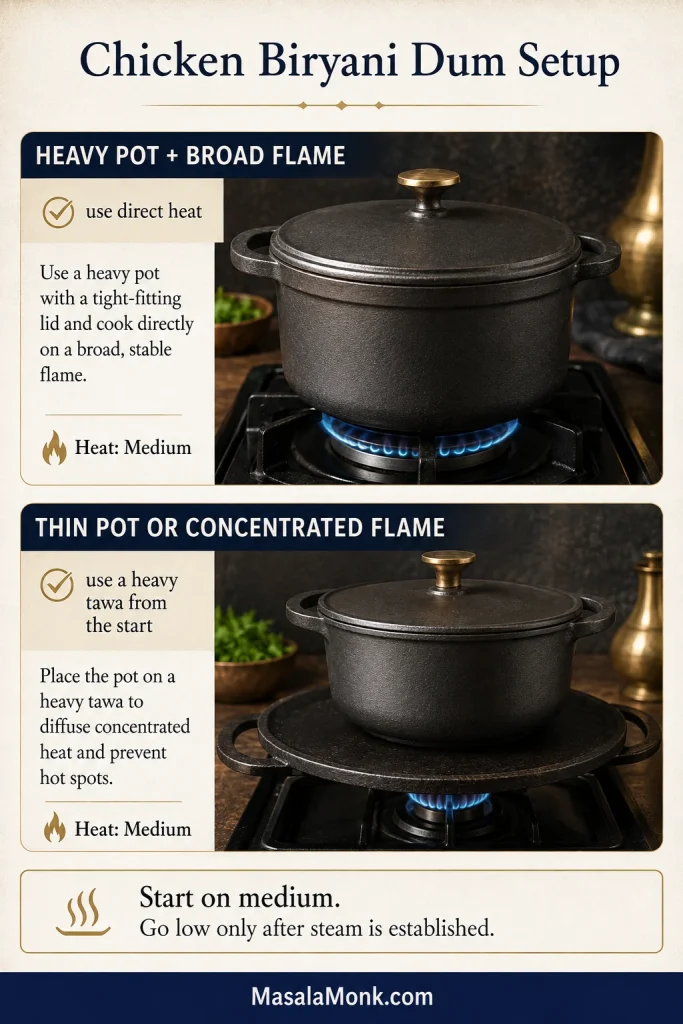
Your job now changes from looking to listening. One clear sign—a fine hiss, gentle bubbling or condensation gathering at the edge—is enough to confirm that steam is building inside. Steam may show only at the weakest edge of the seal. The counter is quiet now; the pot is doing the work behind the lid.

For this batch, those signs often appear in about seven to ten minutes. A cold heavy Dutch oven may take longer; a thin pot on a powerful gas burner may respond much sooner. Follow the pot, not the average.
Once steam is established, reduce to the lowest stable heat. Leave the same tawa or diffuser underneath and begin the low-heat timer. The sound may fade or become intermittent; do not raise the flame merely to keep it audible. Start checking after about 25 minutes.
When the pot behaves differently
- No activity after 10–12 minutes: raise the heat slightly for two or three minutes and inspect the outside edge of the seal without lifting the lid.
- Violent activity after only a few minutes: reduce the heat immediately. When the pot is sitting directly over a concentrated flame, move it off heat briefly, place a heavy tawa underneath, then continue on low.
- Steam escapes heavily from one side: move the pot off the heat and wait for the jet to ease. Wearing oven gloves, reinforce the weak edge with folded foil, then return the pot to the burner. A faint leak is usually manageable.
- A burnt smell appears: move the pot off direct heat immediately. Do not try to overpower it with more steam.
10. Check the chicken, then rest the biryani
After 25 minutes on low, move the pot off the burner and wait five minutes for the first rush of steam to settle. Open one edge carefully and probe the thickest piece near the side without touching bone. The centre must reach at least 74°C / 165°F, and the meat should feel yielding rather than tight beside the bone.

If the chicken is below temperature, reseal and use medium heat only until steam is re-established. Reduce to low for another five to eight minutes, then recheck. Sustained high heat can scorch the base before a large piece catches up.
Once the largest piece reaches temperature, close the lid and rest for another ten minutes. The rice firms slightly and the bottom moisture redistributes. The remaining work is simply patience.
11. Lift; do not churn
Slide a wide spoon down the side and lift from the bottom. Place the first portions on a platter before mixing the entire pot. Each serving should receive pale rice, saffron-tinted rice, a little of the darker lower layer and a piece of chicken.

The first lifted portion reveals more than the top surface. Look for separate grains, cooked chicken, no broad pool of liquid and only light browning at the base. A few caramelised rice grains are welcome; a black crust signals too much direct heat.
Check the result: Troubleshooting ↓ · Recipe card ↑ · Top ↑
Chicken Biryani Troubleshooting
If the first serving is softer, wetter or drier than you hoped, pause before mixing the whole pot. Many biryani problems are uneven, which means part of the pot may still be excellent. Understand the pattern first, then protect the sections that cooked well instead of stirring the problem through them.

Most first-pot problems come back to three things: rice cooked too far, too much moisture at the base, or heat lowered before steam was established. Use the tables to identify which one affected your pot and protect the sections that cooked well.

Fix Rice Texture and Bottom Moisture
| Problem | Likely cause | What to do now | Change next time |
|---|---|---|---|
| Rice is mushy throughout | Rice boiled too far, drained slowly or sat covered while hot. | Spread servings gently and avoid mixing the pot. The texture cannot be fully reversed. | Begin checking earlier, drain immediately and vent uncovered for 2–3 minutes. |
| Lower rice is wet; top is fine | Watery yogurt, excess marinade, too much finishing liquid or heat lowered before steam was established. | Lift the dry upper rice and chicken first. Spread the wet lower rice in a broad dish for a few minutes so excess steam can escape, and keep it separate from the drier grains. | Use thicker yogurt, leave separated liquid behind and wait until steam is established before lowering the heat. |
| Top rice is still firm | Weak seal, insufficient steam or rice entered too raw. | Sprinkle 2–3 tablespoons hot water lightly over the firm areas and reseal. If the chicken is already cooked, steam 5–8 minutes on low; if not, re-establish steam and continue until it is safely cooked. | Use the bite and break tests and strengthen the seal. |
| Rice grains break | Aggressive rinsing, over-soaking, rough stirring or forceful serving. | Stop mixing and lift in larger sections. | Handle gently at every stage and use a wide serving spoon. |
Fix Chicken, Heat and Steam Problems
| Problem | Likely cause | What to do now | Change next time |
|---|---|---|---|
| Chicken is undercooked | Pieces too large, pot too deep, weak heat or dum ended early. | Reseal, re-establish steam briefly over medium heat, then return to low in 5–8 minute intervals until the thickest piece reaches 74°C / 165°F. | Use similar-sized pieces in one layer and start the low-dum timer only after steam is established. |
| Bottom is burnt | Thin pot, concentrated flame, high heat for too long or too little base moisture. | Lift unburnt rice and chicken into another dish without scraping the black layer. | For a thin pot or concentrated flame, use a heavy tawa from the beginning; lower the heat once steam is established and avoid an overly dry marinade. |
| Chicken and upper rice are dry | Lean chicken, weak seal, too little marinade or overlong dum. | Serve with raita or salan and add a little warm ghee to individual portions. | Use thighs and drumsticks, check the seal and shorten the low-heat phase. |
| No sign of steam after 10–12 minutes | Heat too low, pot very cold or seal leaking badly. | Raise to medium for 2–3 minutes and inspect the outside edge without lifting the lid. For a large leak, move off heat, let the steam ease and reinforce the weak edge with folded foil and oven gloves. | Start on medium and move to low only after steam is established. |
Fix Seasoning, Spice and Aroma
| Problem | Likely cause | What to do now | Change next time |
|---|---|---|---|
| Rice tastes bland | Rice water was insufficiently salted or drained rice was rinsed after boiling. | Serve with a well-seasoned raita or salan; avoid sprinkling dry salt over the whole pot. | Weigh the rice-water salt and never rinse cooked rice. |
| Chicken tastes bland | Short marination, uneven salt distribution or very large pieces. | Serve with some of the seasoned lower rice and a sharp raita. | Mix the marinade before adding chicken and marinate for 8–12 hours. |
| The biryani tastes overly perfumed | Too much kewra, rose water, mace, cardamom or packet masala. | Serve with plain rice or a neutral raita to soften the concentration. | Measure aromatic waters and treat them as optional finishing notes. |
| Biryani is too spicy | Hot chilli powder, too many green chillies or a strong packet masala. | Serve with a generous plain cucumber raita and extra unseasoned rice. | Use Kashmiri chilli for colour, taste packet masala and reduce green chillies. |
Make the next pot even better
Jot down the rice brand, chicken-piece size, pot diameter and low-heat dum time while the details are fresh. When you leave a comment, tell us whether the lower rice was dry, moist or wet; those clues make it easier to understand how the method behaved in your kitchen.
Planning another pot? Compare methods ↓ · Scale the batch ↓ · Recipe card ↑
Useful Variations
Different biryanis suit different days. Use the comparison below to choose the style you want, then keep that method’s rice and liquid logic together.
How kacchi dum differs from pakki and one-pot biryani
This version is kacchi dum: raw marinated chicken sits beneath partially cooked rice and finishes in trapped steam. Pakki and one-pot biryanis take different routes to the table.

| Style | How it is built | What it is best for |
|---|---|---|
| Kacchi dum | Raw marinated chicken sits below partially cooked rice and finishes under steam. | Deeply integrated flavour and a classic dum experience. |
| Pakki dum | The chicken is cooked before it is layered with more fully cooked rice. | Easier control over chicken doneness and bottom moisture. |
| One-pot biryani | Raw rice cooks by absorption with chicken and measured liquid. | Weeknight convenience and less washing up. |
| Chicken tikka or Chicken 65 biryani | Separately cooked chicken is combined with biryani masala and layered rice. | Smoky, fried or restaurant-style chicken textures. |
In this kacchi method, raw chicken needs a longer dum, so the rice enters at roughly 65–70% cooked. By contrast, pakki biryani uses already-cooked chicken and can begin with rice closer to 80–90% because its sealed finish is shorter.
Boneless chicken biryani
This recipe is calibrated for bone-in thighs and drumsticks. Boneless thighs can be used as a thermometer-led adaptation, but this article does not provide a complete boneless dum schedule.
Cut them into large 5–6 cm / 2–2½ inch pieces, place the thickest piece near the side and begin checking before the 25-minute bone-in point. Stop at 74°C / 165°F when the meat feels yielding.
Using packaged biryani masala
An unsalted blend can replace the defined 3 g mixture directly. With a salted packet, start with 3 g / about 1 teaspoon and half the usual marinade salt, then adjust the yogurt mixture before adding raw chicken. Keep the packet’s quantity for 750 g chicken as the upper limit.
Keep the whole spices, fried onions, herbs and seasoned rice. Packaged masala supplies one part of the spice blend; it does not replace those other layers.
Chicken biryani without saffron
Omit the saffron and distribute 2–3 tablespoons warm milk or water with the ghee. The biryani will be less floral and colourful, while fried onions and herbs still give the top layer a generous finish.
Chicken-to-Rice Ratios and Pot Sizes
The 750 g recipe above is the fully measured version. Use the ranges below to choose the character of another batch and a pot wide enough to hold it.
Salt across the layers. Biryani is difficult to correct evenly after layering, so the chicken and rice should each taste properly seasoned before they meet in the pot.
- Chicken marinade: 9 g fine sea salt seasons the chicken and the concentrated lower layer.
- Rice water: 30 g fine sea salt in 3.5 litres water seasons the grains; most of the water is drained.
- Salted packet masala: start with about 1 teaspoon masala and half the usual marinade salt, then adjust the yogurt mixture before adding raw chicken.
- After cooking: avoid a routine final addition. Layered biryani is difficult to season uniformly after dum.
Salt crystals vary in size, so gram weights are more dependable than teaspoons. Weigh coarse kosher or flaky salt instead of converting the fine-salt spoon measure directly.
How much rice per kilogram of chicken?
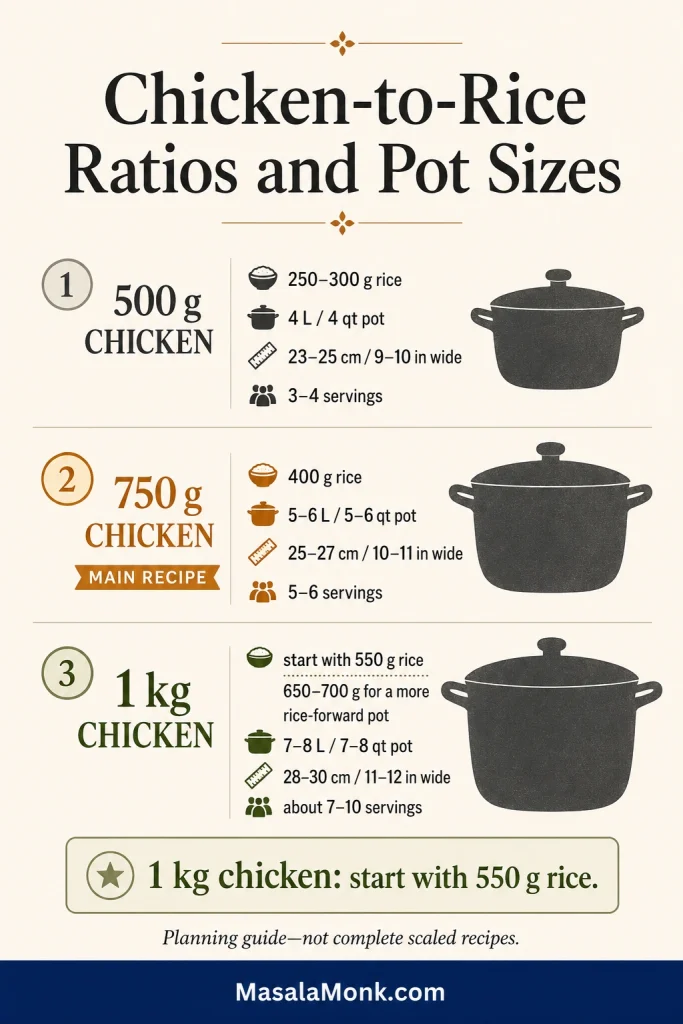
Start with about 550 g raw rice for 1 kg chicken for a meat-forward but balanced home biryani. Move toward 650–700 g when you want a more rice-forward pot or additional servings; one kilogram of chicken does not automatically require one kilogram of rice.
| Style of batch | Approximate raw rice per 1 kg chicken | What the plate feels like |
|---|---|---|
| Meat-forward | 400–500 g | More chicken in each serving; richer lower layer |
| Balanced home biryani | 550–700 g | Chicken and rice remain proportionate |
| Rice-forward crowd batch | 750–1,000 g | Greater cooked yield per kilogram of chicken |
The main recipe works out to about 533 g rice per kilogram, which is why 550 g is the clearest starting point for a 1 kg batch.
Match the Pot to the Chicken and Rice Batch
Choose the pot with the rice amount. The table below is for batch planning, not a second complete recipe. Salt, chilli, yogurt, herbs, aromatic water, serving yield and dum time all shift with the chosen ratio and layer depth.
| Chicken | Raw rice starting point | Suggested pot | Approximate servings |
|---|---|---|---|
| 500 g / 1 lb 2 oz | 250–300 g / 9–10½ oz | About 4 litres / 4 quarts, 23–25 cm wide | 3–4 |
| 750 g / 1 lb 10 oz | 400 g / 14 oz, as used in the recipe | 5–6 litres / 5–6 quarts, 25–27 cm wide | 5–6 |
| 1 kg / 2 lb 3 oz | Start with 550 g / 1 lb 3½ oz; move toward 650–700 g / 1 lb 7 oz–1 lb 9 oz for a more rice-forward pot | About 7–8 litres / 7–8 quarts, 28–30 cm wide | About 7–10, depending on the rice amount |
On a typical home burner, divide more than 1 kg chicken between two wide pots unless you have a broad, heavy handi and experience managing deeper batches.
Make-Ahead Plan
Prepare the parts that improve with time, then leave the rice and final dum for the day you serve. The chicken seasons as it rests, while parboiled rice becomes more fragile the longer it waits.
Done this way, the final hour stays calm: the onions are ready, the chicken is seasoned and only the rice, layering and dum need your attention.
- The evening before: fry the onions, cool them fully and store airtight. Marinate the chicken for up to about 12 hours.
- Several hours ahead: wash and dry the herbs, measure the spices and prepare the cooking equipment.
- Thirty minutes ahead: rinse and soak the rice.
- Just before boiling rice: steep the saffron and melt the ghee.
- Avoid: parboiling rice several hours in advance. Partially cooked rice continues changing as it sits and becomes harder to handle without breakage.
What to Serve with Chicken Biryani
Chicken biryani already brings rice, meat, spice and richness to the plate. Bring the pot or platter to the table before mixing it heavily; the pale, saffron-tinted and darker grains are part of the pleasure of the first serving. The best sides add coolness, acidity or a little extra gravy.
Set aside bay leaves, cinnamon, cardamom pods and other whole spices as they appear on the plate rather than asking diners to eat them.

- Cucumber raita: cool, lightly salted and thick enough to stay beside the rice rather than flooding it.
- Onion raita: sharper and especially useful when the biryani is rich or spicy.
- Mirchi ka salan: a good match when diners want additional sauce without changing the biryani pot.
- Sliced onions and lemon: simple acidity and crunch.
- Green chutney: optional, but a coriander–mint chutney adds a fresh herbal edge for anyone who wants more heat. MasalaMonk’s green chutney recipe includes both coriander-led and mint-led versions.
- A restrained salad: cucumber, onion, tomato and herbs with very little dressing.
Quick cucumber raita for this batch
Stir together 500 g / about 2 cups thick plain yogurt, 180–200 g / 6–7 oz diced or grated cucumber, ½ teaspoon roasted ground cumin, ½ teaspoon fine salt, a pinch of chilli, and 1–2 tablespoons chopped mint or coriander. Drain a watery cucumber first, then chill the raita while the biryani cooks.
This makes enough for 5–6 servings without drowning the plate. For a sharper yogurt-free side, use the MasalaMonk cucumber salad.
How to Store and Reheat Chicken Biryani
How to Store Chicken Biryani
After serving, transfer leftovers to shallow containers so the rice and chicken cool more quickly, then refrigerate within two hours. Use refrigerated biryani within three to four days, following the USDA guidance for leftovers.

How to Reheat Chicken Biryani Without Drying the Rice
Reheat only the portion you plan to eat. A small amount of water, a cover and gentle heat let steam refresh the rice while the remaining biryani stays cold.

Microwave
Place one portion in a microwave-safe bowl, sprinkle with 1–2 teaspoons water, cover loosely and heat in intervals. Turn the chicken piece and lift the rice gently between intervals. Reheat until the centre reaches 74°C / 165°F.
Stovetop
Place the biryani in a small heavy pan with 1–2 tablespoons water per two servings. Cover and heat over a low flame until steaming hot, lifting once from the bottom and leaving the grains otherwise undisturbed.
Oven
Place the biryani in a covered ovenproof dish, add a small splash of water around the edges and warm at 160°C / 325°F until hot throughout. The time depends on portion depth and whether it begins refrigerator-cold.
Reheat only what you plan to eat so the remaining biryani stays cold. Repeated warming and cooling harms the rice and increases the chance of unsafe handling.
Still checking something? Read the FAQ ↓ · Troubleshooting ↑ · Recipe card ↑
Frequently Asked Questions
How much rice should I use for 1 kg chicken?
Start with about 550 g raw rice for 1 kg chicken. Move toward 650–700 g when you want a more rice-forward pot or additional servings; the main recipe works out to about 533 g per kilogram.
What does 70% cooked rice look like?
The grain is tender outside but still resists in the centre. It breaks under finger pressure without smearing and does not yet taste ready to serve on its own.
Can I use store-bought biryani masala?
Yes. Start with about 1 teaspoon and half the usual marinade salt, taste the yogurt mixture before adding raw chicken, and increase only in ½-teaspoon increments. Keep the whole spices, herbs, fried onions and seasoned rice.
Why is my biryani wet at the bottom?
Common causes are watery yogurt, excess separated marinade, too much finishing liquid, or lowering the heat before steam was established.
The First Serving Spoon Tells the Truth
The top should lift in light, fragrant grains. A little deeper, the rice should become richer without turning wet, and the spoon should find chicken that releases cleanly beside the bone. Let everyone see and taste those differences before mixing the remaining pot.
Use the first serving as the final texture check. The grains should remain distinct from top to bottom, even where the lower rice becomes darker and more deeply seasoned.
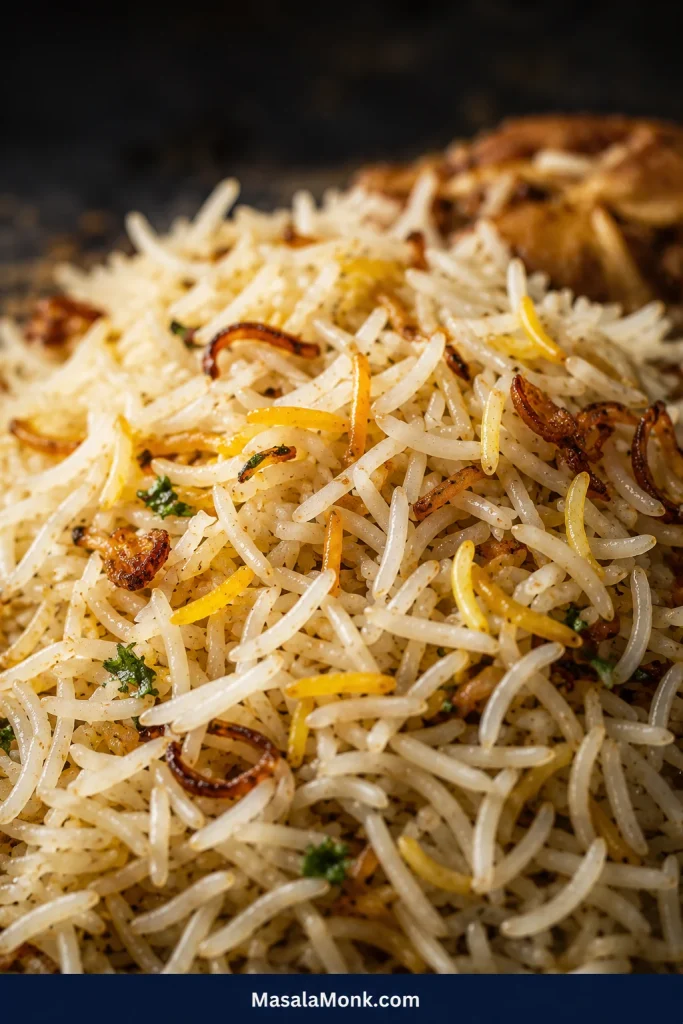
Serve the first plates with some light upper rice, some of the richer lower layer and a piece of chicken. The work of the onions, rice and sealed dum should still be visible in the bowl. Do not stir those layers away; they are the pleasure of the biryani.








