Posted on — Leave a comment

Chana Masala Powder Recipe: Homemade Chole Masala Blend

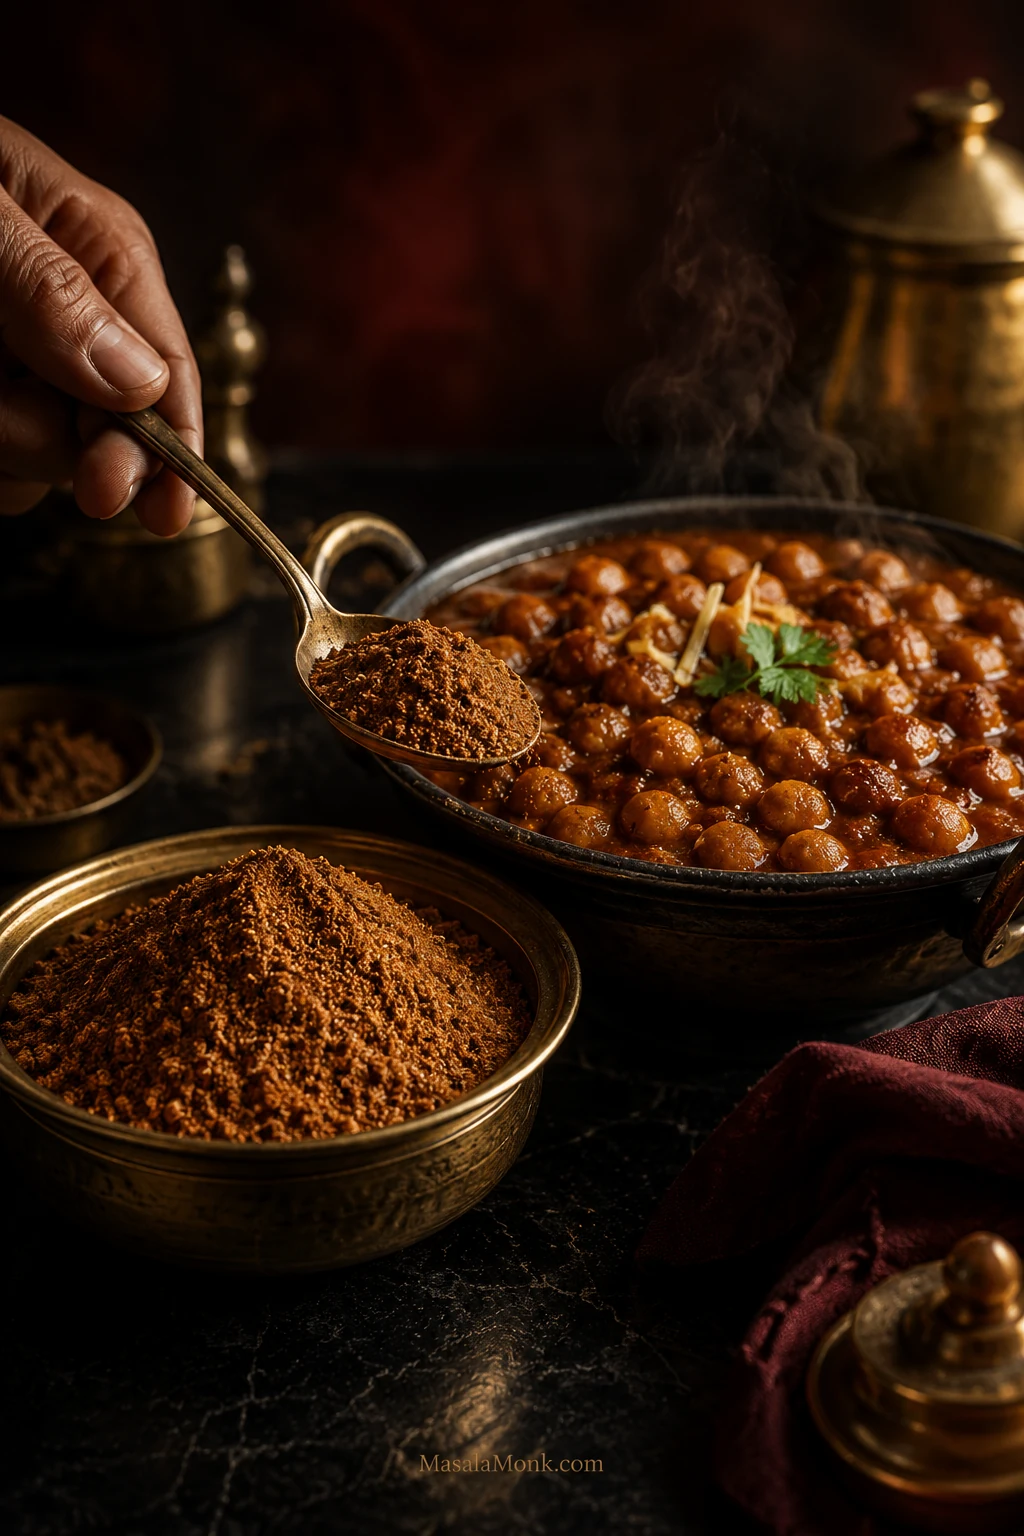
Bowl of rust-brown homemade chana masala powder beside steaming chole, with a spoon carrying the spice blend toward the curry.

Your chole can smell wonderfully spicy and still taste strangely flat. Maybe the first spoonful is mostly tomato and chickpea, then the chilli arrives afterwards. Or perhaps it is plenty hot but somehow doesn’t taste like the chole you were trying to make.

If you’ve already reached for more cumin, another spoonful of garam masala or a hotter chilli, you probably don’t need a mystery ingredient. The balance between the spices you already have matters more.

This homemade chana masala powder recipe, also called chole masala powder, is built for the common “hot but flat” problem. Coriander and cumin get the longer toast, quicker aromatics join later, and amchur stays out of the pan so the blend keeps its depth without letting one note take over.

The result is earthy, tangy and warmly aromatic without letting chilli dominate. Heat is only one dial. Once you separate it from tang, earthiness and aroma, a disappointing pot becomes much easier to understand.

Homemade Chana Masala Powder Recipe

Making the powder is straightforward. Keep the pan gentle and the spices moving; aroma matters more than chasing a darker colour.

  • MakesAbout 90 g / 3.2 oz
  • Active timeAbout 15–20 minutes
  • Cooling10–15 minutes
  • TotalAbout 25–35 minutes
  • Chilli heatMild–medium with Kashmiri/Byadgi chillies
  • Peak aromaBest within 2–3 months

Starting dose: about 5 g per 100 g dried chickpeas, or around 2 g per 100 g cooked or drained chickpeas.

Ingredients

Use the gram weights when you can. Spoon and count measures are rough guides, but chillies, cinnamon sticks, cardamom pods and dried leaves don’t come in standard sizes.
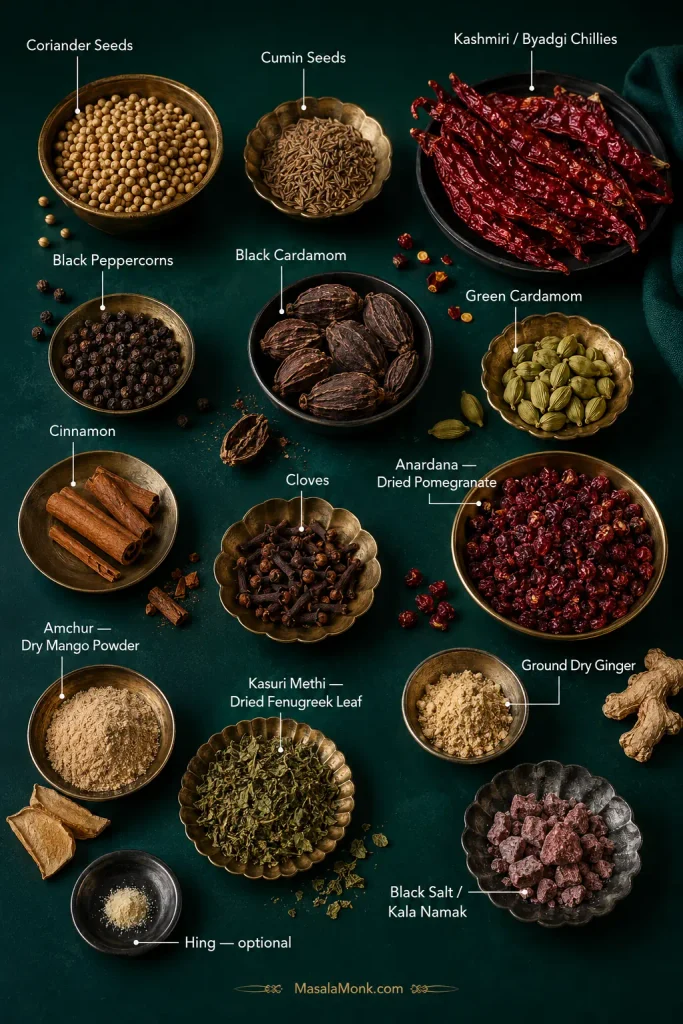
Overhead arrangement of coriander, cumin, dried red chillies, peppercorns, cardamom, cinnamon, cloves, anardana, amchur, kasuri methi, dry ginger, black salt and hing.
A visual guide to the whole blend: identify the less familiar ingredients here, then use the gram-weighted list below for the actual formula.
  • 30 g coriander seeds — about 6 tablespoons
  • 18 g cumin seeds — about 3 tablespoons
  • 8 g Kashmiri or Byadgi dried red chillies, stems removed — roughly 6–10 depending on sizeA hotter chilli needs a smaller amount.
  • 4 g black peppercorns — about 1½ teaspoons
  • 2 g black cardamom — roughly 1–2 large pods or about 2 smaller podsUse the weight if yours are unusually large.
  • 1 g green cardamom — roughly 5 pods
  • 3 g cinnamon — roughly one moderate 2-inch / 5-cm pieceA thin curl and a thick cassia stick can weigh very differently.
  • 2 g cloves — about 1 teaspoon
  • 10 g dried anardana / dried pomegranate seeds — roughly 1–1½ tablespoons
  • 6 g amchur / dry mango powder — about 2½–3 teaspoons
  • 2 g kasuri methi / dried fenugreek leaves — about 1–2 tablespoons, loosely crumbledThis is dried fenugreek leaf, not fenugreek seed.
  • 2 g ground dry ginger — about 1 teaspoon
  • 2 g black salt / kala namak — about ⅓ teaspoon
  • Optional: a tiny pinch of ordinary compounded hing / asafoetida, added after grindingAvoiding gluten? Check the label; some compounded asafoetida contains wheat flour.

Before You Start

Don’t have every last spice? Keep going. The heart of the blend is coriander, cumin, chilli and tang. Black cardamom, kasuri methi and black salt can drop out when necessary and you’ll still have a perfectly workable chole masala. See what you can leave out and what not to substitute.

Turmeric and regular cooking salt are left out deliberately. Both are easier to adjust in the finished chole.

You’ll need a dry skillet or kadai, a cooling plate, a spice grinder or mixer grinder, and a dry airtight jar. A fine sieve helps when cinnamon or anardana refuses to grind cleanly.

Method

For this blend, don’t chase dark colour in the pan. Some chole formulas deliberately roast their spices more deeply, but this recipe uses a gentler roast. For darker Pindi- or chole-bhature-style chickpeas, build the colour while cooking the chickpeas—some methods use dried amla (Indian gooseberry) or black tea—instead of scorching this powder.

Roast the Spices in Stages

  1. Measure everything first. Check the coriander, cumin and anardana for grit, stones or damaged pieces, especially if the spices were bought loose. Remove the chilli stems and keep a cool plate beside the stove.
  1. Heat a dry skillet over low to medium-low heat. Add the coriander and cumin and stir or shake the pan frequently for about 3–4 minutes. They should smell clearly fragrant before they change much colour. Smoke or very dark cumin means the pan is too hot.
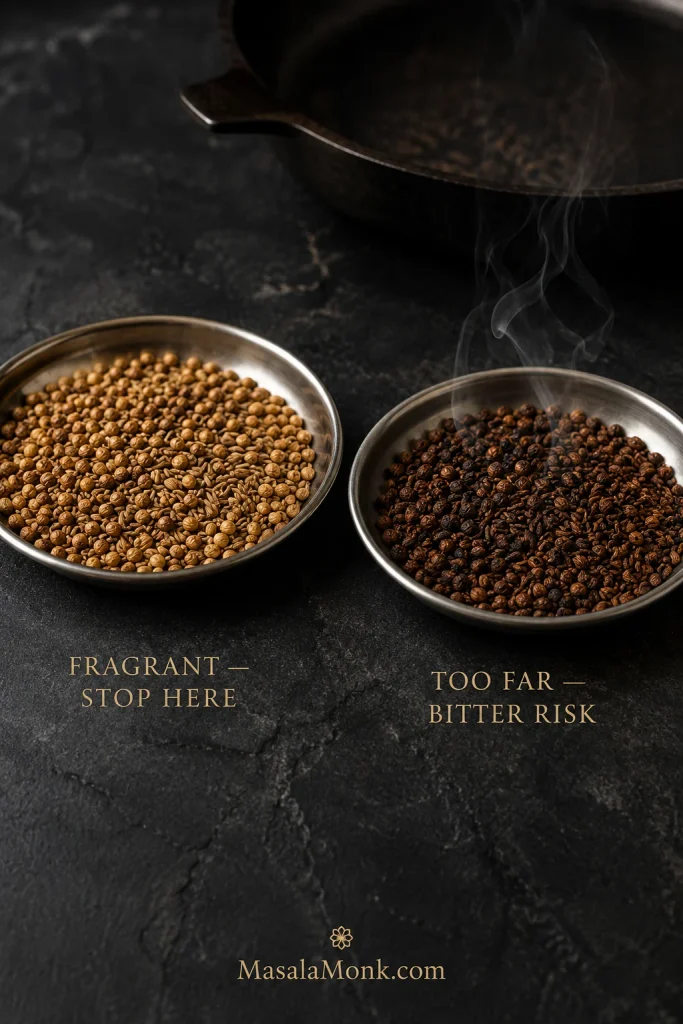
Two steel dishes compare lightly toasted coriander and cumin with much darker over-roasted spices, with smoke rising from the darker side.
Take coriander and cumin off the flame a little earlier than your eyes may suggest. Their stored heat keeps working after they leave the pan, so a fragrant, gently deepened roast gives you more margin than waiting for dramatic browning.
  1. Add the chillies, pepper, black cardamom, green cardamom, cinnamon and cloves. Stir continuously for another 1–2 minutes. The chillies should feel drier and may puff slightly. Once the aroma becomes vivid, tip everything onto the cool plate.
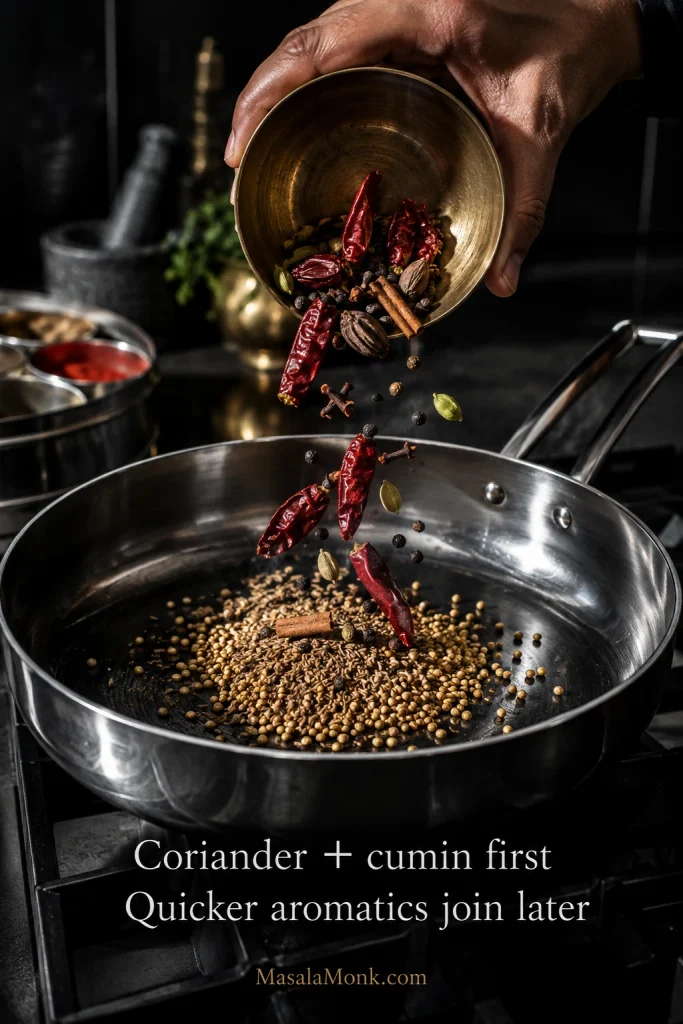
Hand adding dried chillies, peppercorns, cardamom, cinnamon and cloves to a pan that already contains coriander and cumin seeds.
Different spices reach their aromatic peak at different speeds. Coriander and cumin can take the head start; meanwhile, bringing chillies, pepper and the warmer aromatics in later gives them enough heat to bloom without making scorched notes part of the blend.
  1. Check the anardana and kasuri methi. Very dry, brittle anardana can go straight to the grinder. Softer or leathery seeds benefit from a brief warming over low heat so they grind more cleanly. Crisp kasuri methi can go in as-is; softer leaves only need a few seconds of gentle heat. Cool anything you warmed.
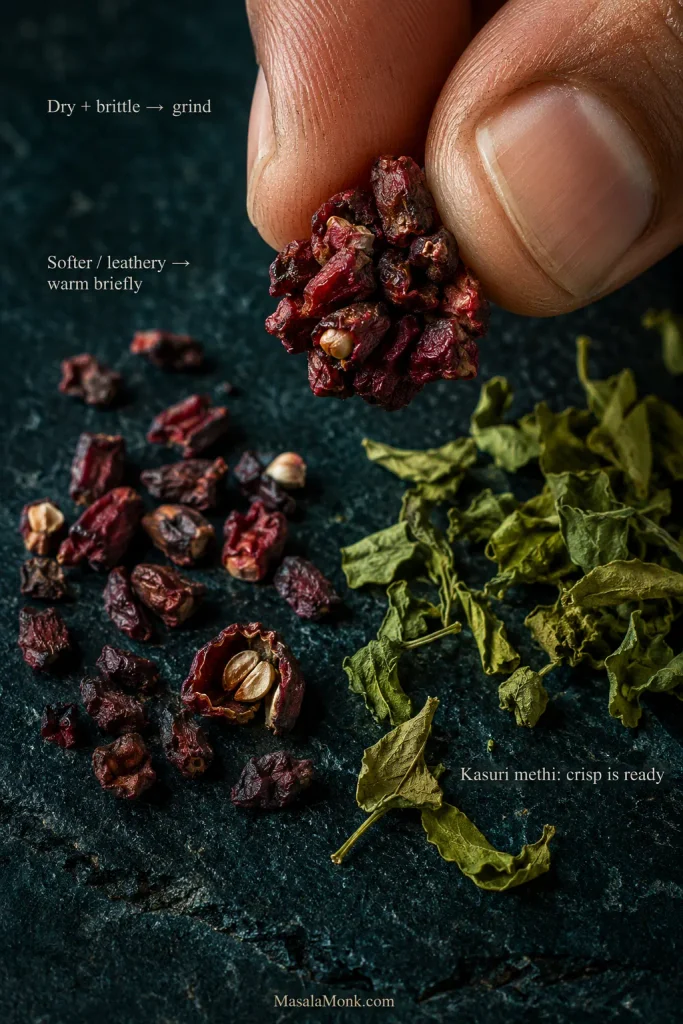
Close view of dried pomegranate arils held between fingers beside loose anardana and crisp dried kasuri methi leaves.
Clean grinding is the goal. Already-brittle anardana and crisp kasuri methi need no extra roasting just for colour.

Cool, Grind and Jar the Blend

  1. Let everything cool completely, usually 10–15 minutes. There shouldn’t be obvious warmth left when you pick up the spices.
  2. Pulse the cooled whole spices until fairly fine. Add the amchur, dry ginger, black salt, cooled kasuri methi and optional hing, then pulse again just until evenly mixed. A noticeably hot grinder needs a break before you continue.
  3. Rub a little powder between your fingers. It should feel fine and loose, never damp or pasty. Tiny flecks are fine; obvious cinnamon or pomegranate pieces need another grind. Let the dust settle for a few seconds before opening the grinder. With hotter chillies, keep your face back, avoid touching your eyes and wash your hands well after handling them; good ventilation helps.
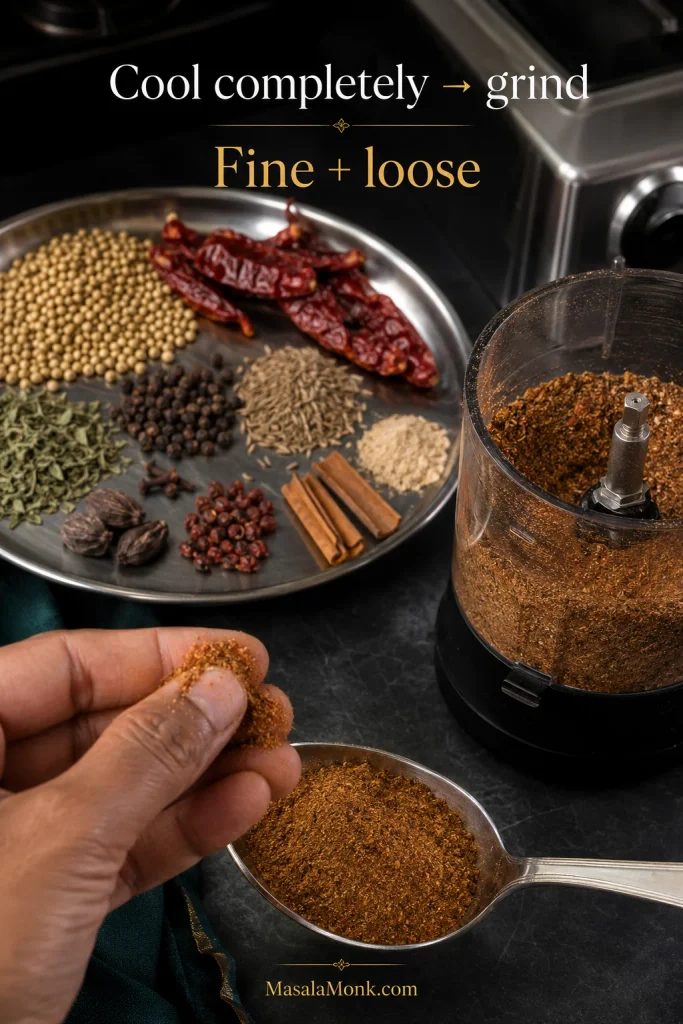
Roasted whole spices beside a grinder, with fingers rubbing a pinch of finely ground chana masala powder over a spoon.
If only a few pieces refuse to grind finely, sieve them out and regrind those fragments rather than repeatedly heating the entire batch. That keeps the finished powder fine while reducing unnecessary grinder heat.
  1. Transfer the completely cool powder to a clean airtight jar. Smell it before you close the lid. Coriander and cumin should come first, followed by fruity anardana, pepper and chilli. Cloves and black cardamom should remain in the background.
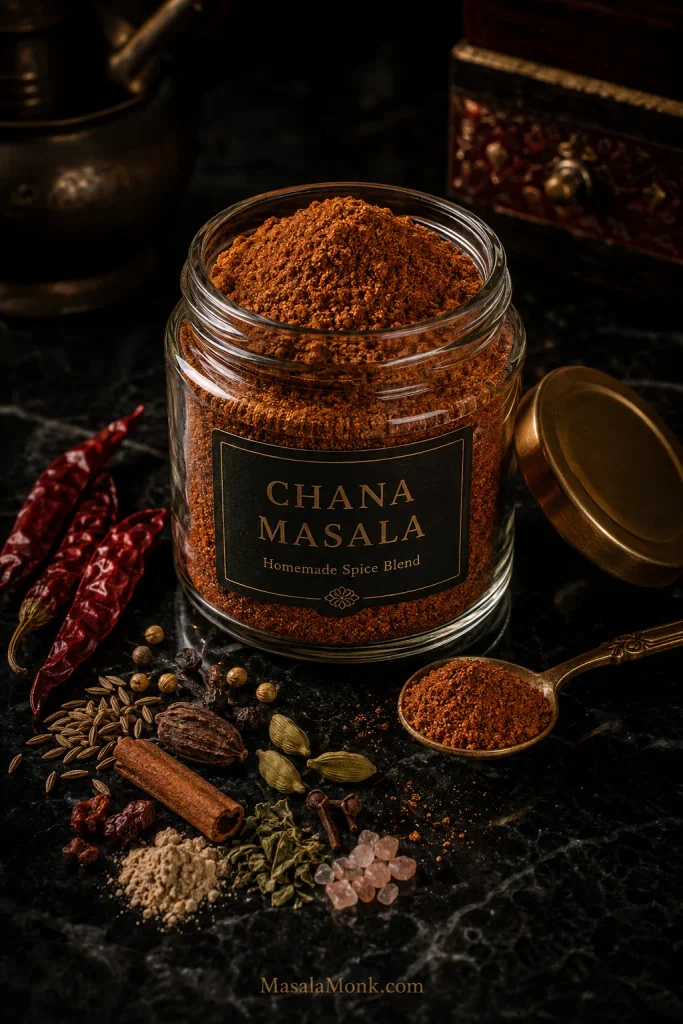
Clear glass jar filled with homemade chana masala powder, labeled Chana Masala Homemade Spice Blend, with a spoon and whole spices nearby.
Give the finished jar one last smell before you put it away. If a small aromatic ingredient such as clove or black cardamom is shouting over the coriander-cumin base, it is easier to rebalance the powder now than after it has seasoned an entire pot.

How Much Chana Masala Powder Should You Use?

Starting Dosage by Chickpea Weight

One recipe tells you to use a couple of teaspoons; another seems to want tablespoons. Both can make sense when the powders themselves aren’t equally concentrated.

For this homemade masala, start with 5 g for every 100 g dried chickpeas, or roughly 2 g for every 100 g cooked or drained chickpeas.

The blend is not your pot’s total salt adjustment. Season the finished chole separately, especially when using canned chickpeas or a packet spice blend.

ChickpeasStart with this blend
Starting with dried chickpeas
100 g / 3.5 oz driedAbout 5 g
200 g / 7 oz dried, roughly 1 cupAbout 10 g
250 g / 8.8 oz driedAbout 12–13 g
Starting with cooked or canned chickpeas
400 g / 14 oz cookedAbout 8 g
About 3 cups cooked, roughly 450–500 gAbout 9–10 g
1 standard 15-oz / 425-g can, about 240–250 g after drainingAbout 5 g
2 standard cans, about 480–500 g drainedAbout 10 g

Calibrate Your Teaspoon

No scale beside the stove? Weigh one level teaspoon from your finished batch once and write that weight on the jar. Grind fineness changes density, so your own teaspoon conversion is more reliable than a universal spoon measure.
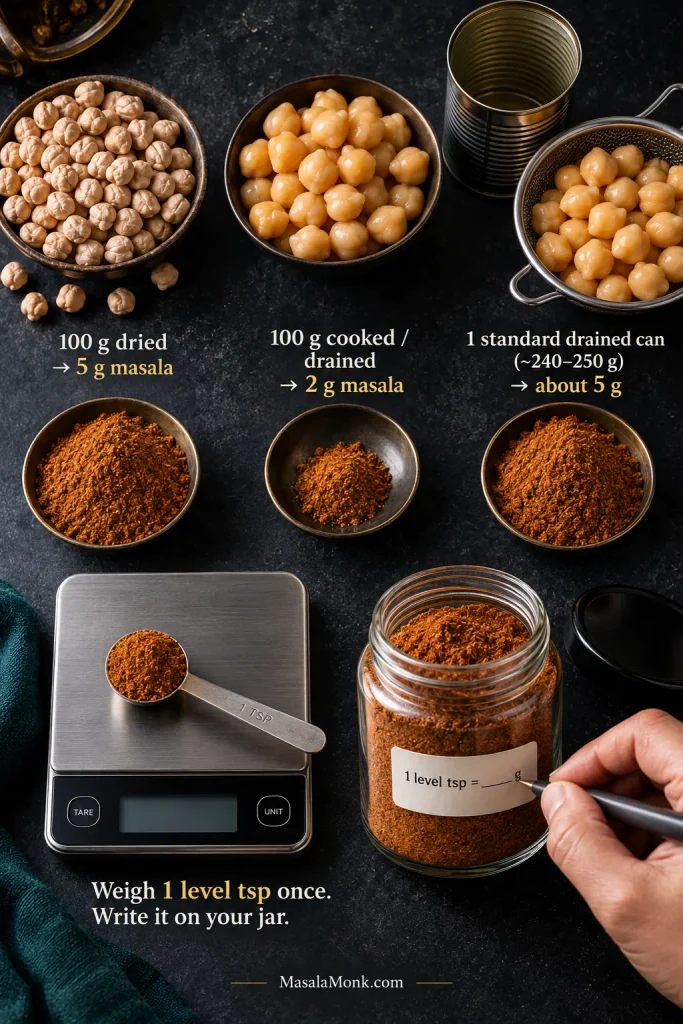
Dosage guide showing dried chickpeas, cooked chickpeas and drained canned chickpeas with measured masala, plus a level teaspoon on a digital scale.
Write your calibrated teaspoon weight on the jar, then recheck it after a major grind or formula change. A finer powder can pack more densely into the same spoon.

Let the first dose simmer into the gravy before deciding it is weak. If the pot really needs salt, a direct adjustment to tang, or a few more minutes of reducing, fix that directly instead of using extra masala as a catch-all.

Using a packet? Follow that packet first. Commercial chole masalas vary enormously in salt, chilli, acidity and concentration, so the table above belongs to this homemade blend. See why packet and homemade measurements don’t transfer directly.

When to Add the Powder

Cook the onion-tomato base until it is thick and no longer smells raw. Lower the heat, stir in most of the masala and give it about 20–30 seconds. A dry pan needs a spoonful of water before the spices catch. Add the chickpeas and cooking liquid straight afterwards.

When the chole tastes balanced but the aroma seems quiet, a small finishing dose works better than another long cook.
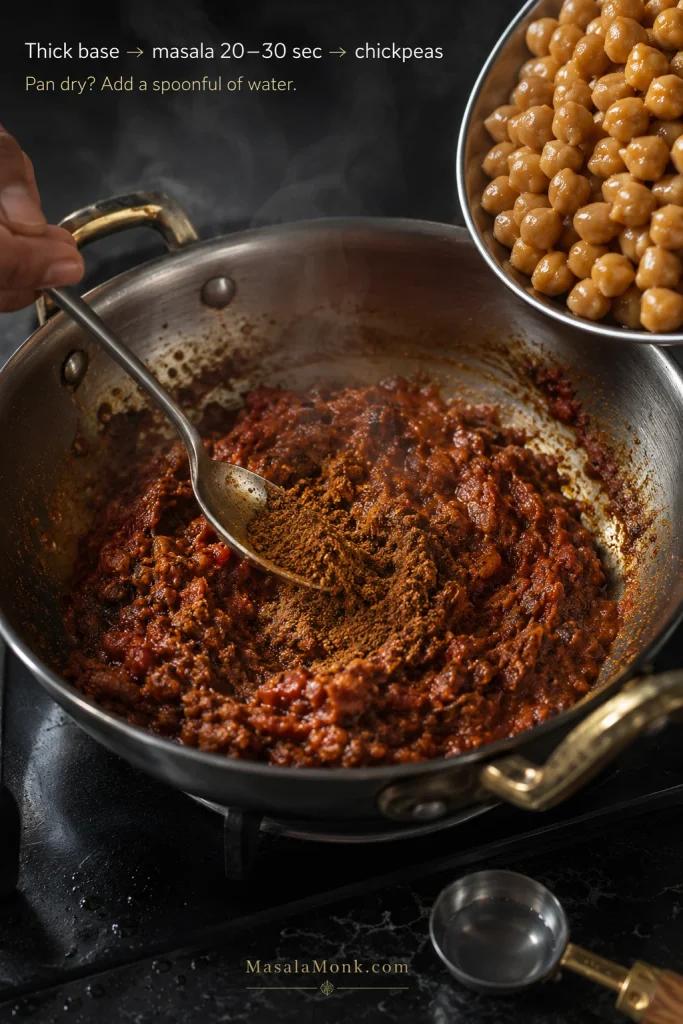
Spoon stirring chana masala powder into a thick cooked onion-tomato base, with chickpeas ready to be added and a small measure of water nearby.
A brief bloom is enough: keep the reduced base moving and get the chickpeas in before the ground spices scorch.

Made the Powder? Here’s Dinner

For an easy everyday chana, soften and lightly brown 1 medium chopped onion, about 120–140 g, in 1–2 tablespoons oil or ghee. Add about 1 teaspoon each of grated ginger and garlic, if using, then about 250 g chopped or puréed tomato. Cook until the tomato has reduced into a thick base.

Lower the heat and stir in 8 g of this chana masala powder for 400 g / 14 oz fully tender cooked chickpeas. Give it 20–30 seconds, adding a spoonful of water when the pan looks dry, then add the chickpeas and enough water or cooking liquid for the consistency you like.
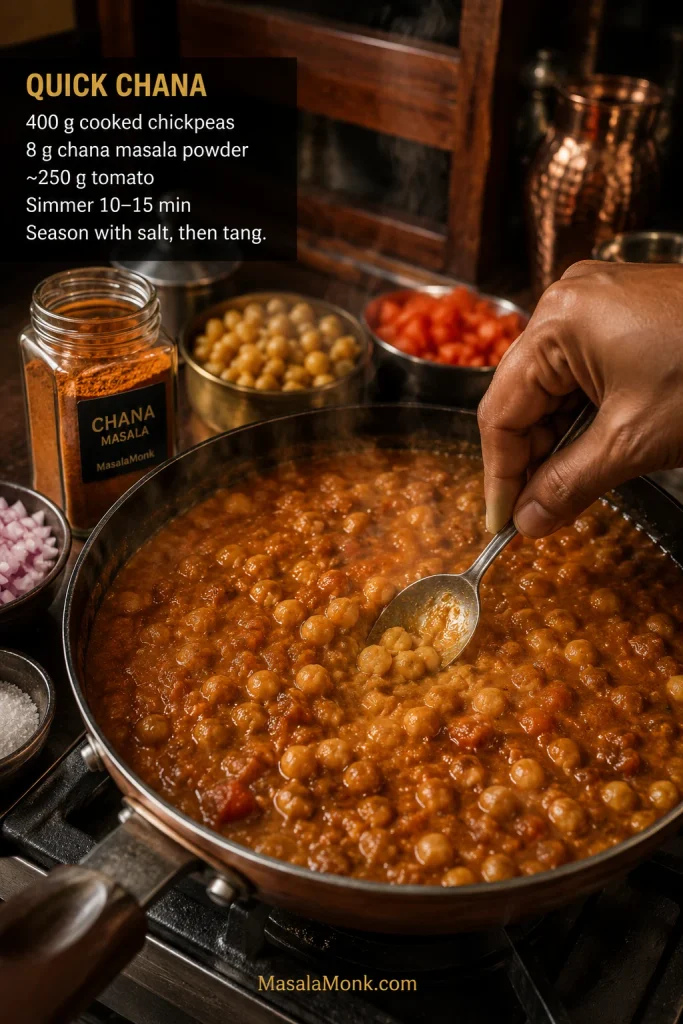
Steaming pan of quick chana being lightly mashed with a spoon, with cooked chickpeas, chopped tomato, onion and a chana masala jar nearby.
Mash only a small portion of the chickpeas while the curry simmers. The released starch gives the gravy extra body, so it coats the remaining whole chickpeas more naturally without needing flour, cream or an unnecessarily long reduction.

Finish the Chole

Simmer for 10–15 minutes and mash a small spoonful of chickpeas into the gravy for body. Season with salt, then taste for tang. Only after those are right should you decide whether the pot needs another little dose of masala.

What are you aiming for? Tender chickpeas coated in gravy that clings instead of pooling around them. The first bite should taste savoury and tangy, and the chilli should warm the finish instead of arriving afterwards as a separate blast.
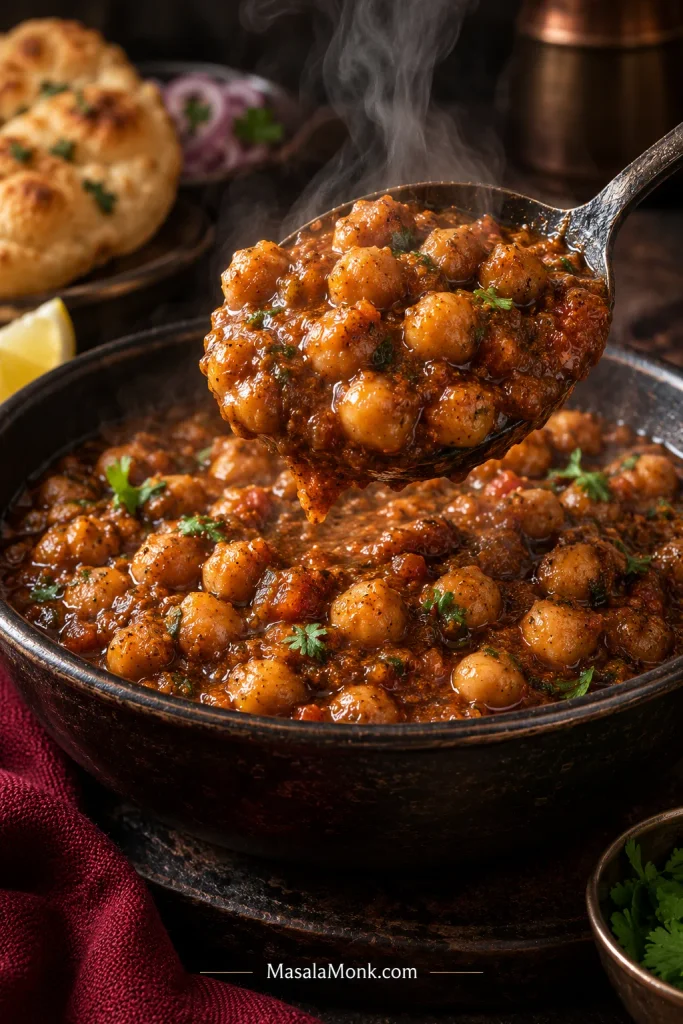
Large spoon lifting steaming chickpeas coated in thick reddish-brown gravy from a dark bowl of chole.
Do not use colour alone as your doneness test. Chole can legitimately finish lighter or darker depending on the method; instead, pay closer attention to whether the chickpeas are fully tender and whether the gravy moves with them rather than separating around them.

That is enough for a dependable everyday chana. The rest of the guide is about understanding the blend and changing it when you want something different.

What Is Chana Masala Powder?

Chana masala powder and chole masala powder usually refer to the same broad family of spice blends made for chickpeas. There is no single fixed formula.

This version leaves onion and garlic for the curry base instead of putting them into the stored powder; some commercial chana masalas include dried garlic.

Chana masala powder is also not besan or chickpea flour. “Chana powder” can sometimes mean ground chickpeas or gram flour; here we’re talking about a spice mixture.

The easiest way to remember the blend is by the job each group does. Coriander and cumin form the earthy base. Chilli and pepper control heat. Anardana and amchur bring tang. Cardamom, cinnamon and cloves supply warm aroma, while black cardamom adds smoke. Most of the salt stays in the curry.
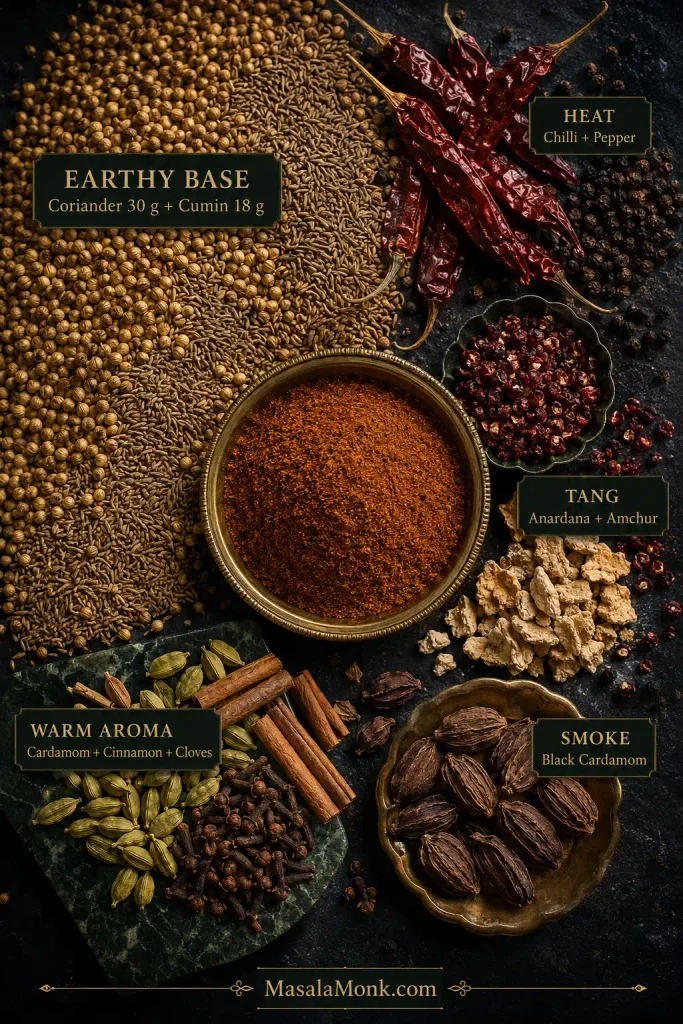
Overhead spice arrangement showing coriander and cumin as the largest group, with separate chilli, tangy spices, warm aromatics and black cardamom around a bowl of chana masala powder.
Use the flavour map when a batch feels “hot but flat”: identify the missing dimension first instead of adding more chilli by reflex.

How the Blend Is Balanced

The 30 g coriander to 18 g cumin ratio keeps coriander in front. It brings a fresh, citrusy earthiness; cumin takes the flavour deeper. Together they give the masala enough body to settle into the gravy instead of leaving only warm spice on top.

Chilli and pepper have different jobs too. Kashmiri or Byadgi chilli carries colour and a broad warmth; pepper catches up later with a sharper heat.

Cardamom, cinnamon and cloves should remain in the background.

Why Chole Masala Recipes Look So Different

Compare five good recipes and you may find five convincing formulas. Some nearly match coriander and cumin. Others lean much harder on coriander. One uses amchur, another anardana, while plenty use both. Kasuri methi, black salt, turmeric, fennel, ajwain, mace and nutmeg come and go.

The grind changes as well. A coarse masala can feel pleasantly rustic; a finer one disappears more easily into gravy and is easier to dose consistently.

Punjabi chole isn’t one rigid template. Pindi and Amritsari styles alone can differ noticeably in method, gravy and seasoning, and family versions move again. One family’s spice tin may smell smokier, another’s fruitier with anardana, and both can taste immediately like chole.

Adjusting the Tang: Anardana and Amchur

Tang is one of the biggest reasons two chole masalas can taste so different. Anardana and amchur aren’t identical: anardana gives a deeper, fruitier tang, while amchur is sharper and hits sooner on the tongue.

This recipe uses 10 g anardana with 6 g amchur so the tang has both depth and lift.
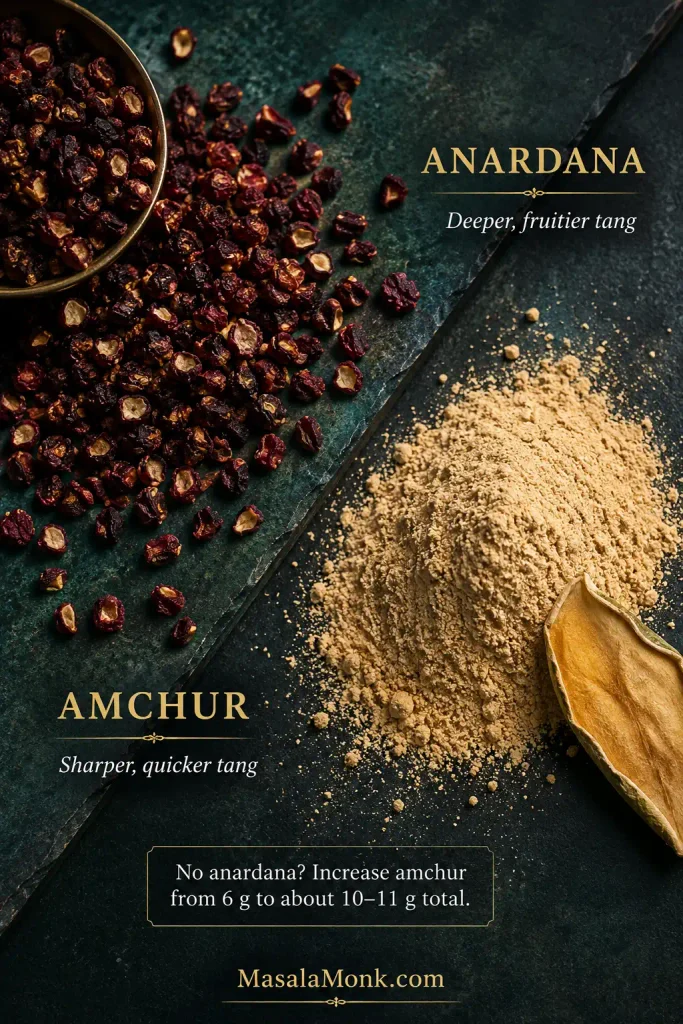
Small dried burgundy anardana seeds beside pale amchur powder on a dark green surface, with a piece of dried mango nearby.
More amchur can replace the acidity of missing anardana, but it will not recreate its fruitiness. Judge the substitute by balance, not by trying to make the two taste identical.

Out of anardana? Skip the 10 g anardana and increase the amchur from 6 g to about 10–11 g total. The blend will taste sharper and less fruity. No amchur? Leave it out and let the anardana carry the dry tang, then finish the cooked chole with lemon if it needs more lift.

Count the sour ingredients already in the pot. Tomato, anardana, amchur, lemon, tamarind and acids in some packet masalas can pile up faster than you expect.

Chana Masala Powder vs Garam Masala

Garam masala can stand in for chana masala powder in a pinch, but it usually needs help from coriander, cumin and something tangy.

The two blends share several warm spices. Garam masala generally leans much more towards aroma, while chole masala usually has a clearer coriander-cumin base and often gets part of its character from anardana or amchur. Chickpeas seasoned only with garam masala can smell wonderful yet miss the earthy, tangy flavour you were chasing.

Our homemade garam masala makes that contrast easy to see ingredient by ingredient.

A Garam Masala Workaround

For about 400 g cooked chickpeas, start with:

  • 1 teaspoon garam masala
  • 1 teaspoon ground coriander
  • ½ teaspoon ground cumin
  • ½ teaspoon amchur
  • ¼ teaspoon anardana powder, optional
  • chilli and black salt to taste

Think of this as a dinner workaround, not a gram-for-gram copy of the blend above. Simmer it into the gravy before deciding whether it needs more; the result will depend on the garam masala you started with. Making dinner now? Jump back to the quick chana method.
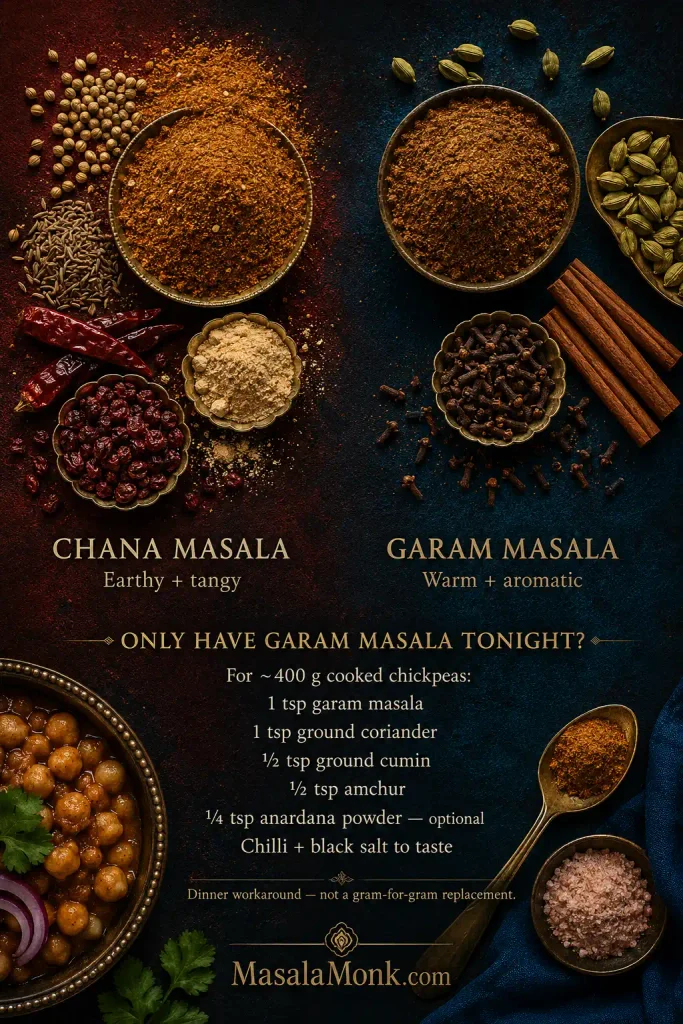
Overhead comparison of chana masala with coriander, cumin, chilli and souring spices beside garam masala with green cardamom, cinnamon and cloves.
If the workaround smells fragrant but the chickpeas still taste flat, rebuild the missing earthy and tangy structure instead of piling on more warm spice.

Using Ground Spices Instead of Whole

For coriander, cumin, pepper and anardana, approximately equal weight is a sensible starting point. Pre-ground spices vary in freshness and strength, so equal weight does not promise identical flavour.

  • 30 g coriander seeds → about 30 g ground coriander
  • 18 g cumin seeds → about 18 g ground cumin
  • 4 g peppercorns → about 4 g ground black pepper
  • 10 g whole anardana → about 10 g anardana powder
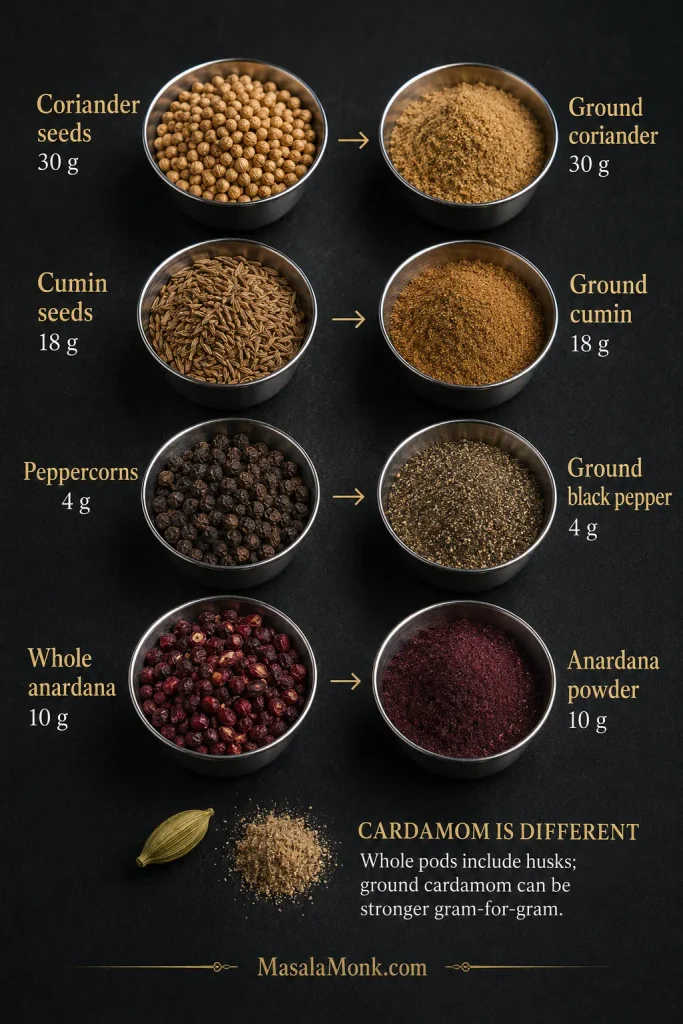
Four pairs compare whole coriander, cumin, peppercorns and anardana with equal-weight ground versions, while cardamom is shown separately as an exception.
Once spices are pre-ground, freshness can matter more than the arithmetic. Equal weight is a starting point, but an old jar may contribute far less aroma than a fresh grind at the same weight.

Pre-ground coriander, cumin and pepper don’t need the same dry-roasting treatment as whole spices. Mix them in unheated when finishing the blend, or toss them for a few seconds in the pan’s residual warmth after taking it off the stove. They scorch quickly.

Old ground cumin or coriander is a different problem. A jar that has been open for months may smell much quieter even at the same weight. Judge the cooked chole before automatically adding more.

Cardamom is the exception to the easy weight swap. Whole pods include husks; ground cardamom may contain mostly seed and can be much stronger gram-for-gram.

What You Can Leave Out

Black cardamom adds a distinctive low smoky note, but the masala works without it. Don’t compensate with extra green cardamom; that takes the blend in a sweeter, more floral direction.

Kasuri methi can go too. Fenugreek seed is much more bitter, so don’t replace the leaf spoon-for-spoon with seed.

No black salt? Salt the finished chole normally.
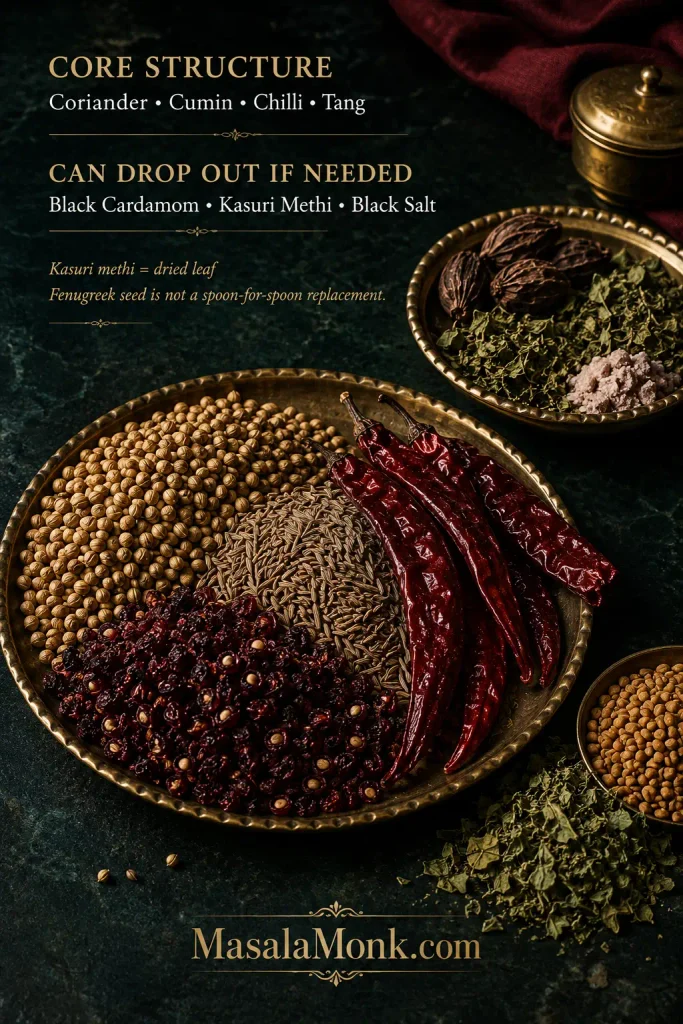
Large tray of coriander, cumin, dried red chillies and anardana beside a smaller dish containing black cardamom, kasuri methi and black salt.
When an accent ingredient is missing, omission is often cleaner than forced substitution. Protect the earthy, hot and tangy foundation first; then decide which smoky, herbal or mineral accents can disappear.

Tune the Next Batch

Changing one part of the blend changes one part of the flavour. More chilli makes the next batch hotter; it doesn’t make it tangier or more aromatic. Change one thing at a time so you know which adjustment actually improved the blend.

When you make the next batch, small changes are enough:

  • Less hot: reduce the chilli or choose a gentler variety.
  • Hotter: keep Kashmiri/Byadgi chilli for colour and add a measured amount of something hotter.
  • Tangier: add another 1–2 g amchur or a little more anardana.
  • More coriander-forward: increase the coriander slightly.
  • Deeper and earthier: increase the cumin modestly.
  • Smokier: add very little black cardamom at a time.
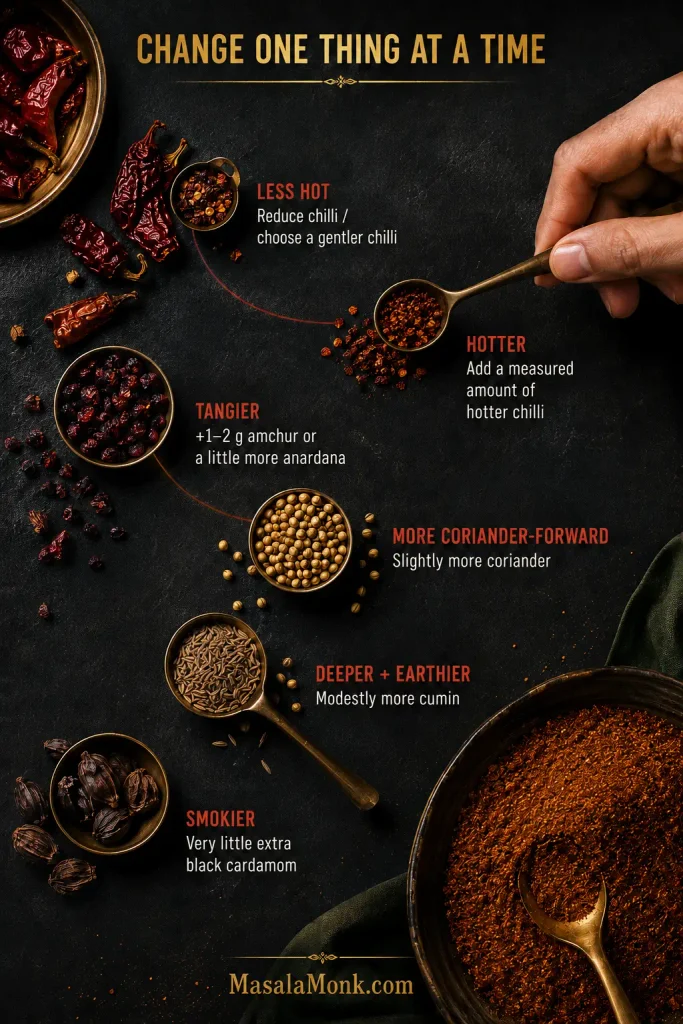
Overhead spice guide showing separate chilli, anardana, coriander, cumin and black cardamom adjustments while a hand moves one unmarked spoon of chilli.
Keep the main formula steady, change one lever, and jot the change on the jar. That turns the next batch into useful feedback instead of guesswork.

A jar that smells more perfumed than appetising already has plenty going on. Check the cloves, cinnamon and cardamom before reaching for more chilli.

Trying to repair this batch rather than change the next one? Go to the powder troubleshooting section.

Homemade vs Packet Chana Masala

Homemade gives you control over chilli, tang and salt. A packet gives you consistency—and sometimes that consistency is exactly what you’re trying to reproduce.

A packet can be part of the flavour memory too.

Shan Chana Masala shows why packet and homemade measurements don’t transfer neatly. Its ingredient list starts with salt and includes dried garlic, and its directions call for 25 g mix with 250 g dried chickpeas. This entire homemade recipe contains only 2 g black salt. Equal spoonfuls clearly aren’t equivalent.

Use the packet’s own directions as your first guide. Draining and rinsing canned chickpeas also gives you more control over salt before the gravy reduces.

If a packet gives you exactly the chole you like, use it. Homemade matters when you want to choose the balance yourself.

My Chana Masala Powder Tastes Wrong

First decide whether the problem is in the jar or in the pot. Taste a tiny pinch of the powder and notice what arrives first: chilli, clove, tang, smoke—or almost nothing. The jar itself can tell you a lot.
Hand hovering between an open jar of chana masala powder and a steaming pan of chole beneath the words “Something tastes wrong? Jar or pot?”
A fast diagnostic question is: would this flaw follow the powder into every pot? If yes, investigate the jar. Otherwise, look harder at cooking variables such as chickpea tenderness, reduction, salt and final acidity before adding another spoonful of masala.

Match the Symptom to the Fix

When a batch needs diluting, make a small fresh portion built mainly around coriander and cumin. Leave out whichever ingredient is dominating, then mix the fresh portion into the original powder gradually, tasting as you go.
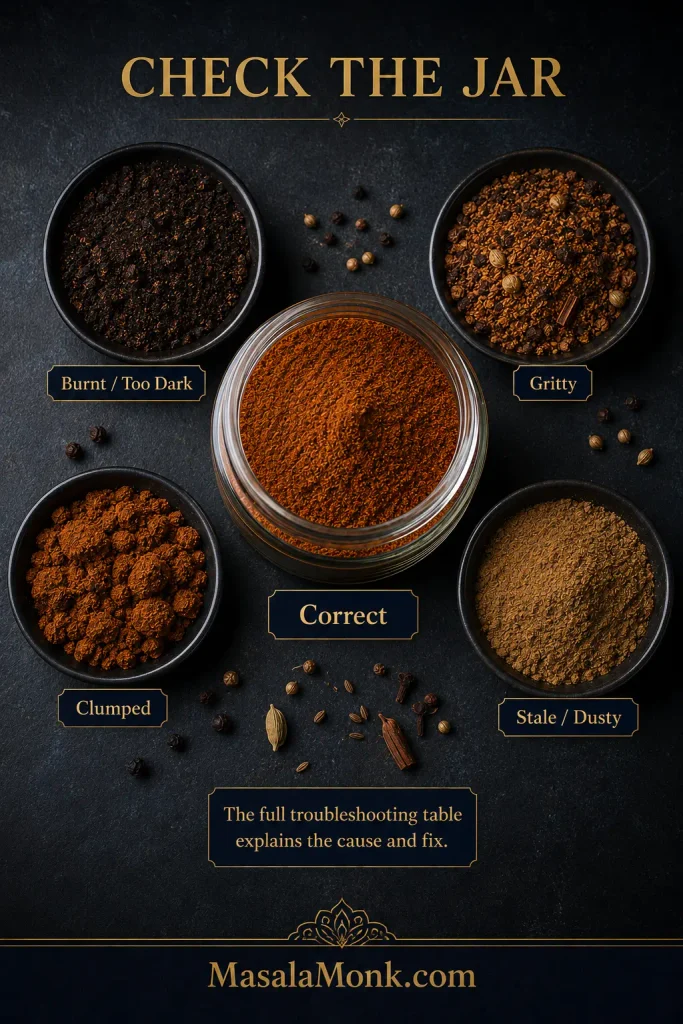
Overhead comparison of correct chana masala powder with separate burnt, gritty, clumped and faded stale-looking spice samples.
Use appearance to decide what to investigate first: darkening, clumps and coarse fragments each point somewhere different. Heat, tang and aromatic balance still need your nose and palate.
ProblemLikely causeTry this
BitterScorched spices, overheated pepper or a hot grinderBurnt: discard. Mild bitterness: add the fresh coriander-cumin-heavy portion gradually.
Hot but flatChilli is too far ahead of the earthy base or tangAdd a chilli-free coriander-cumin-heavy portion, then reassess the tang.
Too tangyToo much anardana or amchurAdd fresh coriander-cumin-heavy masala with no extra souring ingredients.
Too smokyBlack cardamom dominatesAdd the fresh portion with no extra black cardamom. More chilli won’t hide the smoke.
Perfumed or medicinalClove, cinnamon or cardamom is too strongAdd fresh coriander-cumin-heavy masala with no extra clove, cinnamon or cardamom.
Flat or dustyOld spices or prolonged hot grindingA fresh batch will help more than doubling stale powder in the curry.
GrittyAnardana, cinnamon or cardamom husk hasn’t ground finelySieve and regrind the coarse pieces.
ClumpyMoisture, warm powder, a wet spoon or steamFix the storage problem; discard if you see clear signs of spoilage.

Before You Blame the Masala, Check the Chole

And sometimes there is nothing wrong with the jar at all. A perfectly good masala cannot rescue chickpeas that are chalky in the centre or gravy that hasn’t reduced enough.
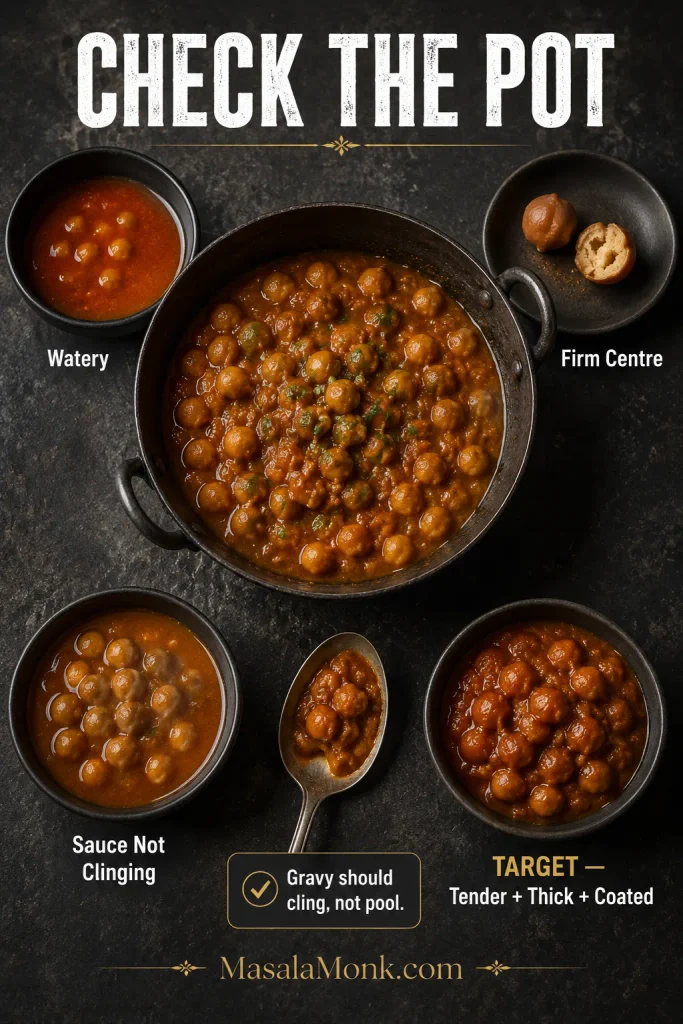
Overhead chole troubleshooting display comparing watery gravy, a split firm chickpea, sauce that does not cling and thick gravy coating tender chickpeas.
Fix the curry’s physical state before chasing seasoning. A spice blend cannot soften an undercooked chickpea, and extra masala will not rescue watery gravy; once texture and concentration are right, seasoning becomes much easier to judge.
Your chole is…More masala?Check first
Bland overallMaybeSalt and gravy concentration
Hot but one-noteUsually noTang, warm-spice balance and salt
WateryNoReduce the gravy; mash a few chickpeas if useful
Chickpeas are firmNoCook them until fully tender
Beans taste separate from the sauceNoSimmer longer; mash a small portion into the gravy
Too tangyNoCount tomato, amchur, anardana, lemon, tamarind and packet acidity together
Bitter or oddly soapyNoCheck scorched aromatics or masala, excess hing, and too much baking soda/alkalinity
Too saltyNoPacket masala, chickpea brine and added cooking salt
Balanced, but aroma is quietA littleAdd a small finishing dose

Press one chickpea between your fingers. A properly tender centre should crush easily instead of feeling chalky or springing back.

If the gravy tastes weak at first but leaves a strong spice aftertaste, it often needs time more than another spoonful. Once the sauce clings and the chickpeas are tender, the seasoning becomes much easier to judge.

If the curry’s texture and seasoning seem right but the powder itself tastes wrong, check the jar instead.

How to Store Chana Masala Powder

For the liveliest aroma, aim to use the powder within about 2–3 months. That is a freshness target, not a hard spoilage deadline. A dry blend kept clean and properly stored may remain usable longer, but coriander, chilli and cardamom gradually lose their lift.

Keep it in an airtight jar in a cool, dark cupboard away from the stove. Jar the powder only when it is completely cool, use a dry spoon, don’t hold the open container over a steaming pan, and date the jar when you make it.

Cook chole only occasionally? Halve the recipe. The full batch seasons roughly 9–11 batches made with about 400–500 g / 14–18 oz cooked chickpeas each, so a half batch is more likely to stay aromatic right to the bottom.

The masala also works with kala chana, aloo chana, pindi chole, chole bhature and other drier chickpea preparations. Start a little lighter when there is less gravy to absorb the tang and spice.

Doubling the recipe? Roast and grind it in two batches so neither the pan nor the grinder is crowded.


Once You Know the Balance

The recipe gives you a dependable place to begin. After a few pots, the useful part isn’t remembering every gram. It’s knowing what you want more of—and what to leave alone.

Then make the chole you remember, the one your family makes, the restaurant bowl you’ve been chasing, or simply the bowl you want tonight.
Posted on — Leave a comment

Himalayan Secret You Didn’t Know Your Kitchen Needed: Jubilant Jakhya Sil Batta Salt

JAKHYA SIL BATTA SALT

In an age of global cuisine and cutting-edge culinary techniques, it’s ironic that some of the most exquisite flavors come not from high-end restaurants or molecular gastronomy labs, but from the humble hearths of Himalayan villages. There, in the lap of the mountains, generations have seasoned their food with ingredients that are simple, pure, and profoundly flavorful.

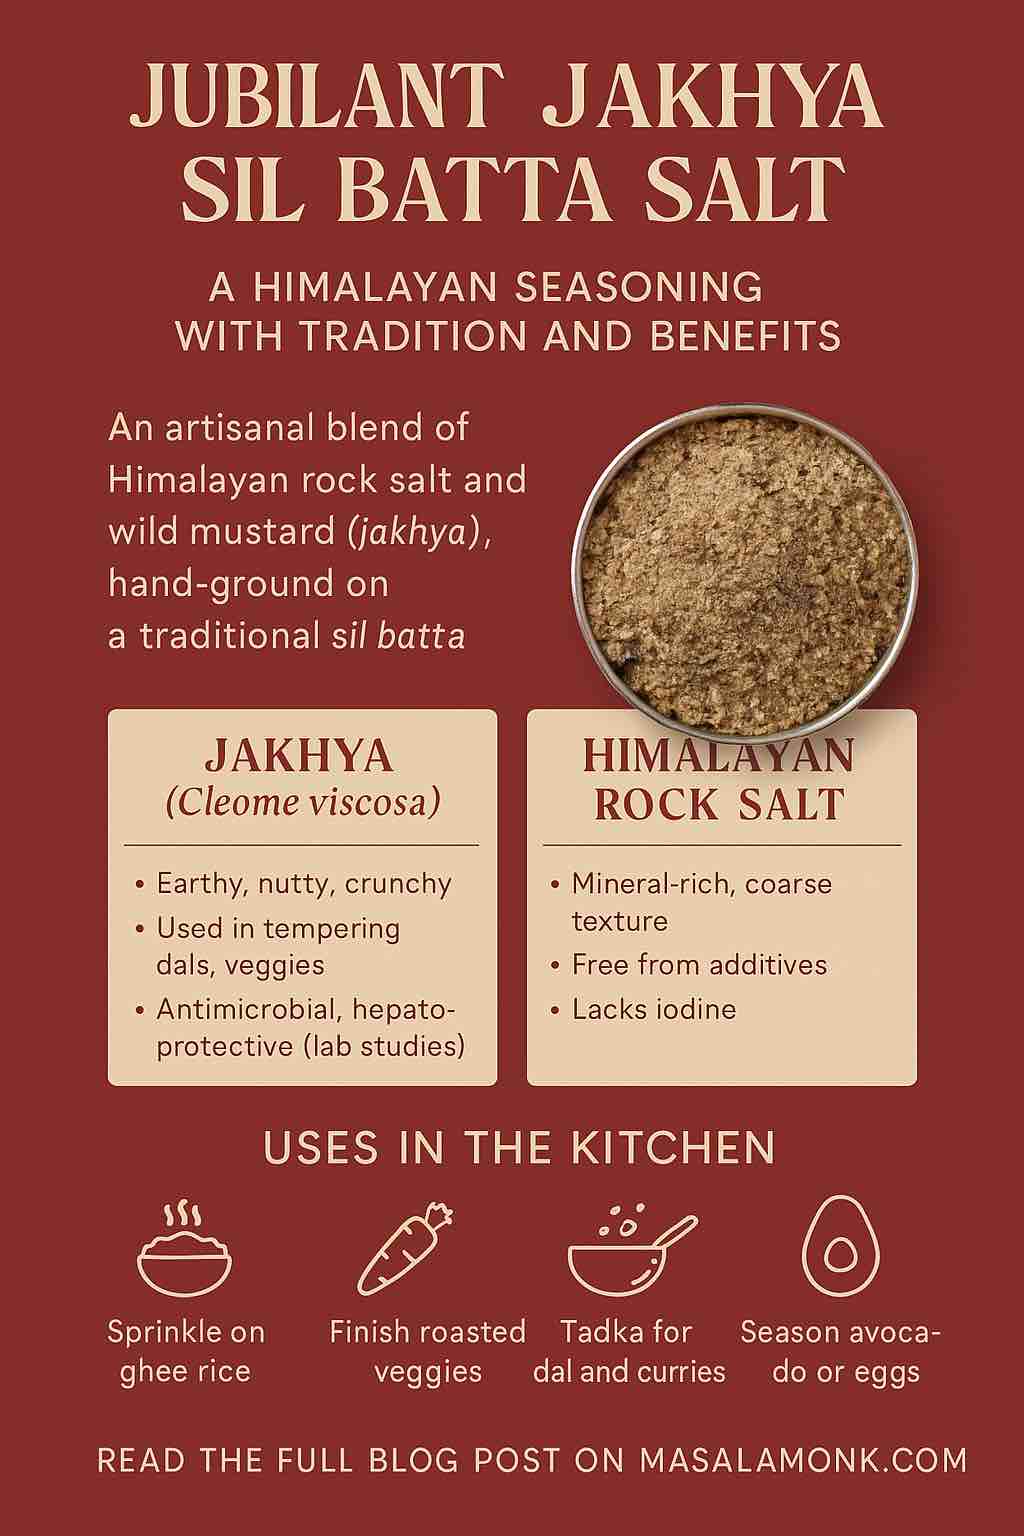
One such secret is now accessible to the modern pantry: Jubilant Jakhya Sil Batta Salt, a handcrafted blend of Himalayan rock salt and the nutty, aromatic spice known as jakhya—prepared using the age-old sil batta grinding technique. Available exclusively at MasalaMonk.com, this artisanal blend is more than just a condiment. It’s a piece of culinary history.

👉 Ready to bring the hills into your kitchen?
Order it from MasalaMonk.com and taste tradition today.

Let’s explore what makes this salt special—its ingredients, benefits, scientific backing, and ways to use it in everyday cooking.


🌿 Ingredient Spotlight 1: Jakhya (Cleome viscosa)

➤ What It Is

Jakhya, also known as wild mustard, is a tiny brown seed native to the Garhwal and Kumaon regions of Uttarakhand. Traditionally used as a tempering spice in regional dishes, it is known for its distinctive crackle and nutty aroma when heated in oil.

Despite its rich cultural legacy, jakhya remains underutilized in mainstream Indian cooking—mostly because it’s hard to find outside the hills. Yet, it’s a spice with remarkable properties that go beyond taste.

➤ Traditional Uses

  • Tempering dals and vegetables: Common in Uttarakhandi kitchens.
  • Preserving food: Thanks to its natural antimicrobial nature.
  • Topical applications: Used in traditional medicine for wounds, insect bites, and skin conditions.

➤ Research-Backed Benefits

  1. Antimicrobial Properties
    Studies in the Journal of Ethnopharmacology and Phytotherapy Research show that jakhya seed extracts possess strong antibacterial activity against common pathogens such as E. coli and Pseudomonas aeruginosa. This explains its historical use in food preservation and traditional medicine.
  2. Liver Protection & Antioxidant Activity
    Research conducted at institutions like the University of Rajasthan and published in Ancient Science of Life confirmed that extracts of Cleome viscosa helped protect liver cells against chemically-induced damage in lab animals. This hepatoprotective effect is believed to come from antioxidant compounds in the seeds.
  3. Anti-inflammatory and Wound-Healing Effects
    A study in the International Journal of Pharmaceutical Sciences and Research showed that a topical gel made from jakhya seeds accelerated wound healing in rats, boosting collagen synthesis and reducing inflammation markers.
  4. Digestive Aid
    Folk medicine has used jakhya to treat indigestion, diarrhea, and bloating. This use is supported by the spice’s role in stimulating gastric secretions and easing gut motility.

🧂 Ingredient Spotlight 2: Himalayan Rock Salt

➤ What It Is

Mined from ancient sea beds deep in the Punjab region of Pakistan, Himalayan rock salt is pink-hued and rich in trace minerals. Unlike industrially refined table salt, it undergoes minimal processing and is free from anti-caking agents and bleaching chemicals.

➤ Common Claims & What the Science Says

While many brands advertise Himalayan salt as a “miracle salt,” it’s important to separate fact from hype.

What It Does Offer:

  • Contains 80+ trace minerals (calcium, magnesium, iron, zinc)
  • Offers natural granulation and texture
  • Provides an unrefined alternative to table salt

What It Doesn’t Do (Despite Claims):

  • There is no robust clinical evidence that Himalayan salt detoxifies the body or balances pH beyond what any natural salt would do.
  • Its trace minerals exist in quantities too small to produce measurable nutritional benefits unless consumed in impractically large amounts (which would be unsafe due to sodium load).
  • It does not reduce blood pressure compared to other salts unless it leads to reduced overall sodium intake.

Nonetheless, its natural mineral content, distinct crunch, and lack of additives make it a preferred choice among chefs and health-conscious cooks alike.


🪨 Why Sil Batta Matters

The sil batta is a traditional grinding slab and roller, made of natural stone, used across India for generations before modern mixers and grinders took over.

➤ Why it’s Important in This Salt:

  • Stone-grinding is slow and cool, which prevents the loss of volatile essential oils—especially from seeds like jakhya.
  • The texture remains coarse and irregular, giving the salt its unique mouthfeel and rustic charm.
  • It honors culinary traditions where touch, smell, and rhythm were integral to food preparation.

🧠 Health & Nutritional Perspective

Let’s tie the two ingredients together:

PropertyJakhya (Cleome viscosa)Himalayan Rock Salt
FlavorNutty, crunchy, earthyMineral-rich, mildly salty
Bioactive BenefitsAntimicrobial, anti-inflammatory, antioxidantContains trace minerals
Digestive SupportStimulates gastric enzymesMay aid electrolyte balance
Traditional Medicine UseLiver health, skin healing, indigestionSinus rinses, cramps (folk uses)
Scientific BackingPreclinical studies validate therapeutic claimsLimited nutritional edge, but minimally processed
Modern Culinary RolePremium tempering seed, finishing spiceGourmet salt for finishing and texture

⚖️ Health, Balanced & Mindful

  • Jakhya contributes bioactive benefits: antimicrobial, antioxidant, healing—backed by preclinical science.
  • Himalayan salt offers texture and trace minerals—but remains a source of sodium requiring mindful consumption.
  • Use it as a finishing touch, not a daily seasoning staple—enjoy its flavor and visual delight without overdoing sodium.

🍽️ How to Use & Celebrate It

1. The Ultimate Rice Upgrade

Cook fluffy rice and drizzle with ghee—then finish with a generous sprinkling. The heat brings out oil in the seeds, locking flavor and aroma.

2. Tadka Magic

Add a dash during dal tempering. Experience the jakhya’s crackle and aroma bloom as the oil heats.

3. Spice Up Eggs & Toast

Sprinkle on boiled eggs or smashed avo-toast right before serving—the coarse texture and nutty burst are game changers.

4. Elevate Roasted Veggies & Paneer

Toss veggies or paneer with this blend after pan-frying or oven-roasting, and taste how it transforms simple ingredients.

5. Herbal Finishing Salt

Combine with crushed sesame/flax seeds for a homemade “sprinkle mix” that brings Himalayan charm to any dish.


🎯 Who Is It For?

  • Home cooks exploring regional flavors
  • Health-conscious eaters wanting artisanal alternatives
  • Chefs looking for texture and aroma
  • Anyone craving something real, rustic, and rooted

🌍 Why MasalaMonk?

MasalaMonk stands out as a marketplace devoted to artisan food treasures like this one:

  • Curated sourcing: Small-scale hill producers maintain traditional processes.
  • Ethical transparency: You know where it comes from, how it’s made.
  • Authentic small batches: No industrial shortcuts, no preservatives.

Ordering the Jubilant Jakhya Sil Batta Salt from MasalaMonk is a vote for flavour, culture, and heritage.

👉 Ready to bring the hills into your kitchen?
Order it from MasalaMonk.com and taste tradition today.


🛒 Where to Buy

The Jubilant Jakhya Sil Batta Salt is available exclusively at:

👉 https://masalamonk.com/product/jubilant-jakhya-sil-batta-salt/

Handmade in small batches. No preservatives. No shortcuts. Just authentic Himalayan flavor.


📜 Final Thoughts: A Jar Full of Legacy

In a world where most salts are lifeless and most masalas are engineered, Jakhya Sil Batta Salt is refreshingly honest. It reminds us that the best flavor doesn’t come from a lab, but from tradition, patience, and respect for ingredients.

It’s a conversation starter. A quiet teacher. And above all, it’s delicious.

Bring home a jar of this magic—and bring a part of the Himalayas into your everyday meals.

FAQs

  1. What is Jakhya, and how is it different from mustard seeds?
    Jakhya is the seed of the Cleome viscosa plant, native to the Himalayan region. While it resembles mustard seeds in size and behavior (it crackles in hot oil), it offers a more earthy and nutty flavor with subtle bitterness. It’s also known for its digestive and medicinal properties.
  2. Is Himalayan rock salt healthier than regular salt?
    Nutritionally, both are primarily sodium chloride. Himalayan salt contains trace minerals like calcium, iron, and magnesium, but in amounts too small to produce significant health effects. Its key benefits are that it is unrefined and additive-free.
  3. Can I use this blend every day?
    Yes, but use it mindfully. This is a finishing or flavor-enhancing salt, not a direct substitute for everyday iodized salt. Since it’s not iodized, make sure you’re getting iodine from other dietary sources (e.g., dairy, seafood).
  4. What dishes does this salt pair best with?
    It’s incredibly versatile. Use it on steamed rice, boiled eggs, roasted vegetables, tadkas, raitas, dal, avocado toast, or even sliced cucumber and fruits. It works best as a finishing salt or during tempering.
  5. How is this salt different from regular masalas?
    This salt isn’t a spice mix—it’s a two-ingredient artisanal blend. It contains pure Himalayan rock salt and wild jakhya seeds, stone-ground using a sil batta to retain oils, aroma, and texture. It’s a seasoning with depth, not just heat or tang.
  6. Is Jakhya scientifically proven to be beneficial?
    Yes, several preclinical studies highlight its antioxidant, antimicrobial, hepatoprotective (liver-supporting), and anti-inflammatory properties. It’s been used in traditional medicine for centuries to treat digestive issues, skin wounds, and fevers.
  7. What is the shelf life and storage advice for this product?
    It typically has a shelf life of 9 months. Store in a cool, dry place away from moisture, ideally in an airtight glass jar to preserve aroma and texture.
  8. Can I cook with it or just use it raw?
    Both! While it shines as a finishing salt, you can also use it during tempering (tadka). The jakhya seeds bloom in hot oil, releasing a rich aroma—perfect for dals, curries, and stir-fries.
  9. Is this product suitable for people with dietary restrictions?
    It’s vegan, gluten-free, and free from additives or preservatives. Just be mindful of total sodium intake if you’re on a salt-restricted diet.
  10. Why buy from MasalaMonk.com?
    MasalaMonk curates small-batch, artisanal products from regional Indian producers. This ensures authenticity, freshness, and a direct connection to the people who make it—with no industrial processing or dilution of tradition.
Posted on — Leave a comment

Lemon Pickle: Exploring Nimbu ka Achar

Galgal Adruk Mirchi Pickle

Greetings, food enthusiasts! 🍽️💕 Today, we’re embarking on a flavorful journey as we delve into the world of Lemon Pickle, also known as Nimbu ka Achar in India. This tangy and versatile condiment is a beloved accompaniment to many meals and is deeply ingrained in the culinary traditions of India. Let’s dive into the tantalizing world of Nimbu ka Achar, exploring its flavors, preparation methods, and cultural significance.

🍋 Nimbu ka Achar: A Culinary Treasure of India 🌶️

Nimbu ka Achar holds a special place in Indian cuisine, with each region having its unique take on this zesty pickle. Known by various names like Limbu Che Lonche (in Gujarati), Elumichai Oorugai (in Tamil), Nimbu ka Khatta Meetha Achar (in Hindi), and more, this tangy delicacy captures the essence of Indian flavors and culinary diversity.

🌿 Flavorful Preparation: The Art of Nimbu ka Achar 🍽️

The preparation of Nimbu ka Achar involves combining freshly squeezed lemon juice with a blend of aromatic spices and other ingredients. The key components may include lemon wedges, mustard seeds, fenugreek seeds, turmeric, red chili powder, salt, and oil. The proportions and variations may differ from one household to another, adding to the uniqueness of each recipe.

In some traditional methods, the lemon wedges are sun-dried before being marinated with the spices, allowing the flavors to infuse and intensify. This meticulous process enhances the taste and texture of the pickle, creating a harmonious balance between tanginess, spiciness, and a hint of sourness.

🍽️ Versatility on Your Plate: Nimbu ka Achar in Various Avatars 🥗

Nimbu ka Achar is an incredibly versatile condiment that can elevate a wide range of dishes. Here are a few popular ways to enjoy the delightful flavors of Nimbu ka Achar:

  1. Accompaniment to Indian Meals: Nimbu ka Achar pairs perfectly with traditional Indian meals, such as dal, rice, roti, and sabzi. It adds a tangy punch and complements the flavors of the main dishes.
  2. Sandwich Spreader: Spread Nimbu ka Achar on bread or toast to add a tangy and zesty twist to your sandwiches. It pairs well with cheese, veggies, and grilled meats.
  3. Rice Enhancer: Mix Nimbu ka Achar with steamed rice for an instant burst of flavor. The tanginess cuts through the richness of the rice and creates a delightful combination.
  4. Salad Dressing: Drizzle Nimbu ka Achar over salads to add a tangy and spicy element. It works particularly well with cucumber, carrot, and onion salads.
  5. Flavor Booster: Use Nimbu ka Achar as a flavor enhancer for curries, stews, and stir-fries. A spoonful of this pickle can transform an ordinary dish into a tangy and aromatic delight.

🌶️ Cultural Significance: Nimbu ka Achar in Indian Cuisine 🌼

Nimbu ka Achar holds cultural significance in Indian households. It is not just a condiment but a symbol of preservation and traditional culinary practices. Many families prepare Nimbu ka Achar during the harvest season when lemons are abundant. The pickle is then stored in ceramic jars or glass containers, allowing it to mature and develop its flavors over time.

In addition to its culinary role, Nimbu ka Achar has a place in Ayurveda, the ancient Indian system of medicine. It is believed to have digestive and cleansing properties, making it a popular choice during meals.

🙏 Credits and Celebrations 🙌

Let us extend our gratitude to the talented creators and homemakers who have preserved the art of making Nimbu ka Achar over generations. Their dedication and love for culinary traditions have enriched our palates and kept the flavors alive.

As we celebrate the diversity of Indian cuisine, let’s honor the cultural heritage of Nimbu ka Achar and its enduring popularity across India. Whether it’s the tangy delight of Gujarat or the spicy notes of Rajasthan, Nimbu ka Achar has left an indelible mark on the culinary landscape of the country.

🍽️ Join the Nimbu ka Achar Enthusiasts! 🌼

If you are captivated by the flavors of Nimbu ka Achar and wish to connect with fellow food enthusiasts, join our vibrant and engaging foodie community on Facebook. Share your experiences, recipes, and discoveries as we embark on a journey to savor the culinary treasures of the world.

🍋🌶️🌼

Posted on — Leave a comment

Exploring the Versatile Uses of Cloves: From Culinary Delights to Natural Remedies

Introduction: 🌿✨ Welcome to another exciting blog post! In this edition, we will explore the versatile uses of cloves. Cloves, known for their aromatic and warm flavor, have been used for centuries in various cuisines and as a natural remedy for various ailments. Join us as we uncover the multitude of ways cloves can enhance your culinary creations and contribute to your well-being.

Culinary Uses of Cloves:

  1. Spice Blends and Seasonings: 🌿🍳 Cloves are a popular spice used in various spice blends and seasonings, adding depth and complexity to dishes. They are often found in spice mixes such as garam masala, pumpkin spice, and mulled wine spice blends. Cloves can be used whole or ground to add a warm and aromatic touch to soups, stews, curries, and baked goods.
  2. Baking and Desserts: 🌿🍰 Cloves are a delightful addition to baked goods and desserts. Ground cloves can be used in cakes, cookies, pies, and fruit compotes, providing a distinct and spicy flavor. They pair exceptionally well with ingredients like cinnamon, nutmeg, and ginger, creating a harmonious blend of flavors.
  3. Hot Beverages: 🌿☕ Cloves are a popular ingredient in warm beverages. They can be added to hot apple cider, chai tea, and spiced coffee to infuse a rich and aromatic flavor. Simply simmer the cloves with other spices and enjoy a comforting and flavorful beverage.
  4. Pickling and Preserving: 🌿🥒 Whole cloves can be used to enhance the flavor of pickles, chutneys, and preserves. They add a unique taste and contribute to the overall complexity of the preserved items.

Natural Remedies and Home Uses of Cloves:

  1. Oral Health and Fresh Breath: 🌿🦷 Cloves have long been used as a natural remedy for oral health. Chewing on a whole clove or using clove-infused products, such as mouthwash or toothpaste, can help freshen breath, alleviate toothache, and provide temporary relief from oral discomfort.
  2. Digestive Aid: 🌿🌱 Cloves are known for their digestive benefits. They can be used in herbal remedies and teas to help alleviate indigestion, bloating, and gas. Clove-infused tea or simply chewing on a clove after a meal can aid in digestion.
  3. Home Fragrance and Potpourri: 🌿🏠 Cloves have a distinct and inviting aroma that can be used to create homemade potpourri or simmering potpourri blends. The warm and spicy fragrance of cloves adds a comforting and cozy ambiance to any space.
  4. Natural Insect Repellent: 🌿🐜 Cloves possess natural insect-repelling properties. Placing cloves in sachets or using clove-infused oils can help deter insects and keep your home free from pests.
  5. Aromatherapy and Relaxation: 🌿🛀 Clove essential oil is used in aromatherapy for its calming and soothing properties. Adding a few drops of clove essential oil to a diffuser or bath can create a relaxing and rejuvenating experience.

Precautions and Considerations: 🌿⚠️ While cloves offer various uses and benefits, it’s important to keep the following points in mind:

  • Moderation: Use cloves in moderation as part of a balanced diet or natural remedy routine. Excessive consumption or use may lead to adverse effects.
  • Allergies and Sensitivities: Some individuals may be allergic or sensitive to cloves. If you experience any adverse reactions, discontinue use and seek medical advice.
  • Pregnancy and Medical Conditions: Pregnant or breastfeeding women, as well as individuals with certain medical conditions or taking medications, should consult with their healthcare provider before using cloves for medicinal purposes.

Conclusion: 🌿✨ Cloves are a versatile spice that can elevate your culinary creations and provide natural remedies for various ailments. From adding flavor and warmth to dishes to promoting oral health, aiding digestion, and serving as a natural insect repellent, cloves have a wide range of uses. Embrace the aromatic and beneficial properties of cloves in your daily life, and discover the many ways they can enhance your well-being.

Posted on — Leave a comment

The Ultimate Summer Chai Party: Refreshing Frozen Chai & Its Exciting Variants

Ah, chai! This cherished beverage, hailing from the vibrant lands of the Indian subcontinent, has captured hearts around the globe. The tantalizing medley of robust tea and warming spices like cardamom, cinnamon, cloves, and ginger, mellowed with a touch of creamy milk and sweetened just right, is a sensory dance few can resist. 🍵💃

But when the sun reigns supreme, and the world dons the colors of summer, sipping on a hot chai might be the last thing on your mind. That’s when frozen chai steps in, transforming the cherished warmth of chai into a frosty, refreshing delight perfect for basking in the summer sun. 🌞🍹

A classic frozen chai is a simple symphony of chai tea, milk, sweetener, and ice, all blended together until smooth. But that’s just the beginning. The realm of frozen chai is as diverse as it is delicious. From lattes and smoothies to vegan delights and even coffee-infused dirty chai, there’s a frosty chai experience waiting for everyone. 🌈🥤

Spices, the soul of chai, play a significant role in these chilly variations. Changing your spices can completely transform your frozen chai, allowing you to explore a new world of flavors. Here are some spice-centric variants that’ll make your frozen chai adventure absolutely thrilling:

  • Vanilla and Cinnamon Frozen Chai: Vanilla’s sweet whispers and cinnamon’s warm undertones bring a comforting depth to the vibrant chai spices. This variant is like a cozy hug on a bright summer day. ☀️🤗
  • Cardamom Frozen Chai: Cardamom, with its unmistakably aromatic and slightly minty notes, shines in this variant. It’s like a cool breeze on a hot day, invigorating and refreshing. 🍃💨
  • Ginger Frozen Chai: For adventurous souls who love a spicy kick, the zing of fresh or steeped ginger is an exhilarating ride. It’s a jolt of excitement in every sip! 🎢⚡
  • Anise Frozen Chai: Star anise, with its unique, licorice-like flavor, offers a mysterious twist to your frozen chai. It’s an unexpected turn on your flavor journey, one that’s worth taking. 🌟🔮
  • Peppercorn Frozen Chai: A sprinkle of ground pepper or whole peppercorns steeped with your chai tea can introduce a spicy, slightly pungent edge. It’s a bold move for the daring chai enthusiasts. 🌶️💥
  • Turmeric Frozen Chai: Turmeric, with its vibrant color and mild, earthy flavor, can transform your chai into a golden elixir. Add in its potential health benefits, and you’ve got a true summer champion. 🏆🌅

Whether you’re a vegan seeking a plant-based summer treat 🌱🥥, a fitness enthusiast looking for a post-workout refresher 🏋️‍♀️💦, or a coffee aficionado aiming to unite your love for coffee and chai ☕❤️, there’s a frozen chai calling your name.

As the days get warmer and the sun shines brighter, it’s the perfect time to embark on your frozen chai adventure. Each sip is a new discovery, a new story, a new delight. So get blending, and let the summer of chai begin! 🌈#

Here are five more ideas for making frozen chai at home:

  1. Basic Frozen Chai: Start with a basic recipe that includes chai tea, milk, sweetener, and ice. Steep a bag of chai tea in hot water, then chill it. Blend the chilled tea with milk, a sweetener like sugar or honey, and a handful of ice until smooth.
  2. Frozen Chai Latte: This is similar to the basic recipe but uses a stronger concentration of chai tea. You can steep two chai tea bags in a small amount of hot water, then blend this concentrated tea with milk, sweetener, and ice. You can top it off with whipped cream for an extra treat.
  3. Frozen Chai Smoothie: For a healthier twist, blend a chai tea concentrate (like in the latte recipe) with a banana, a handful of spinach or kale, a spoonful of honey, and ice. This can make for a nutritious and satisfying breakfast or snack.
  4. Frozen Chai with Espresso (Dirty Chai): This variation is for coffee lovers. Add a shot of espresso or a small amount of strong coffee to your frozen chai for an extra kick.
  5. Vegan Frozen Chai: Use a plant-based milk, like almond milk or oat milk, and a vegan sweetener, like maple syrup or agave nectar, to make a vegan version of frozen chai. Some people also like to add a scoop of vegan protein powder for a post-workout treat.

Remember, the beauty of making frozen chai at home is that you can adjust the ingredients and proportions to suit your taste. Enjoy experimenting with these recipes!