Posted on — Leave a comment

Hummingbird Cake Recipe (Old-Fashioned Southern Classic)

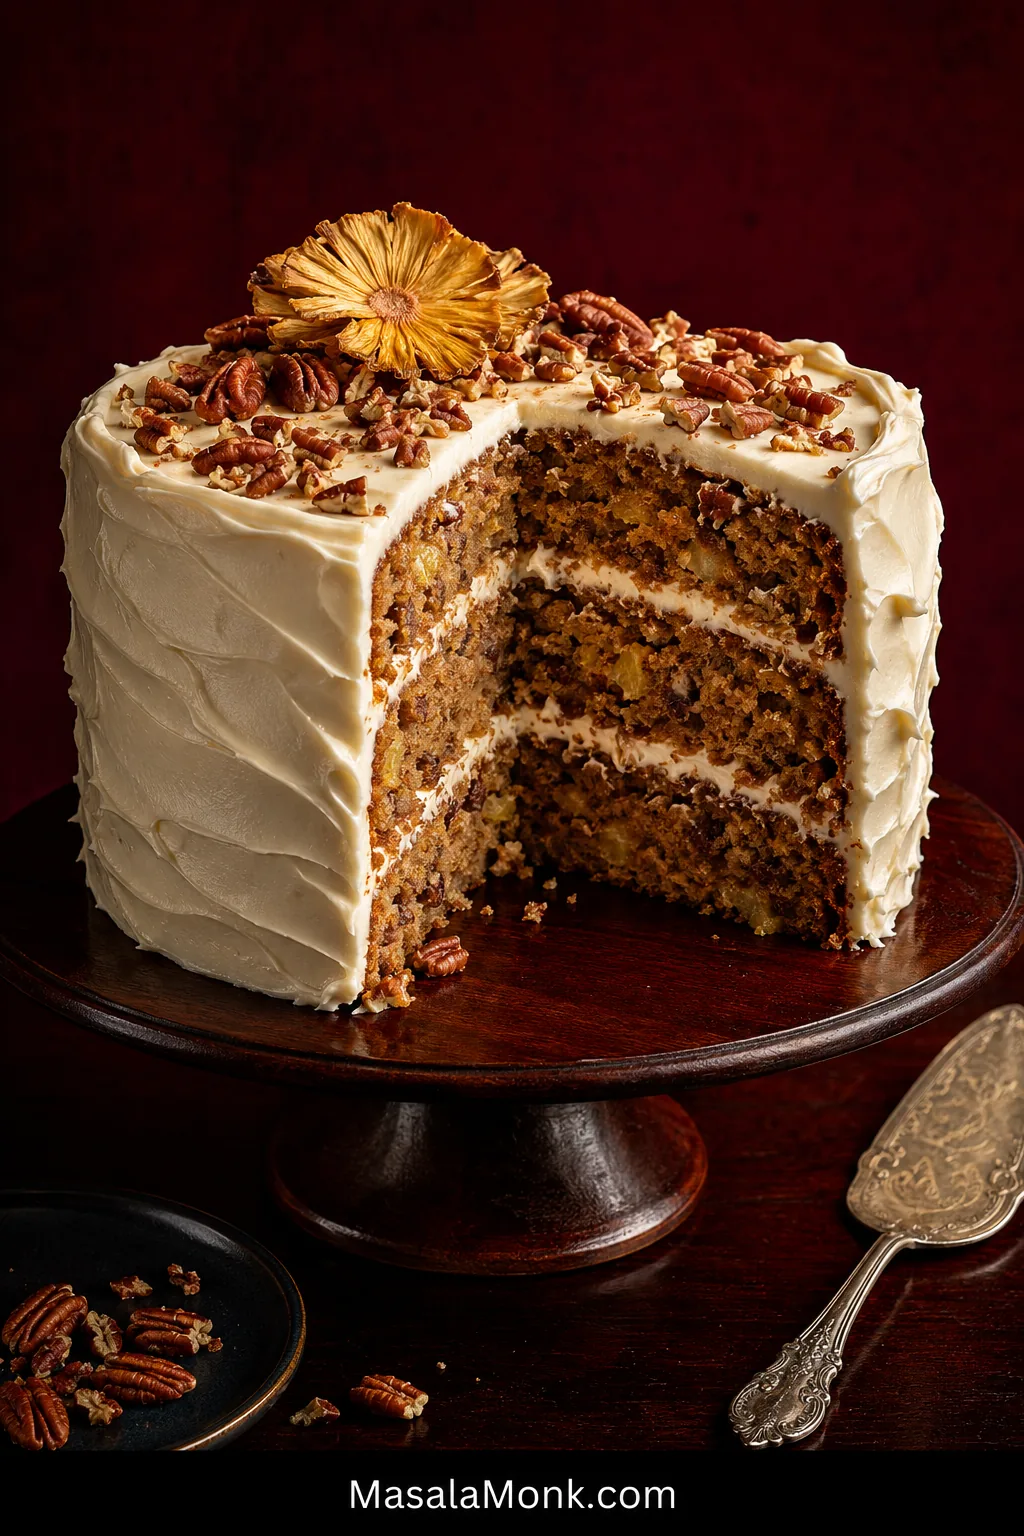
Three-layer Hummingbird Cake with cream cheese frosting and pecans, with a wedge removed to reveal golden fruit-and-nut cake layers.

Hummingbird Cake has a delicate name for a decidedly generous cake. Beneath the cream cheese frosting are three fruit-rich layers where ripe banana leads, pineapple brings a little brightness, and toasted pecans break up the moist crumb with roasted crunch.

All that fruit is part of the appeal. It also leaves less room for guesswork: extra banana, too much free pineapple liquid, very deep pans or an underbaked center can take the crumb from lush to sticky. What you want is an abundant old-fashioned cake that stands tall enough to slice cleanly.

Rich is right. Gummy isn’t.

What Does Hummingbird Cake Taste Like?

Hummingbird Cake is a banana-and-pineapple spice layer cake with pecans and cream cheese frosting, now a Southern classic with roots in Jamaica’s Doctor Bird Cake.

Banana is usually the first flavor you notice, but it shouldn’t flatten everything else. Pineapple gives the crumb a brighter fruitiness, toasted pecans add little pockets of crunch, and cinnamon stays comfortably in the background. Cream cheese frosting brings the tang that keeps a generous slice from feeling simply sweet.

Carrot cake is an easy comparison, although the two eat quite differently. Carrot cake gets much of its character from grated carrot and a stronger spice profile; Hummingbird Cake is fruitier and more tropical, with banana and pineapple doing most of the work. If spice cake is your other reference point, Hummingbird Cake is its fruitier, less spice-led cousin.

Jump to: Recipe · Is it supposed to be dense? · Drain the pineapple? · Fix the frosting · Fix my cake
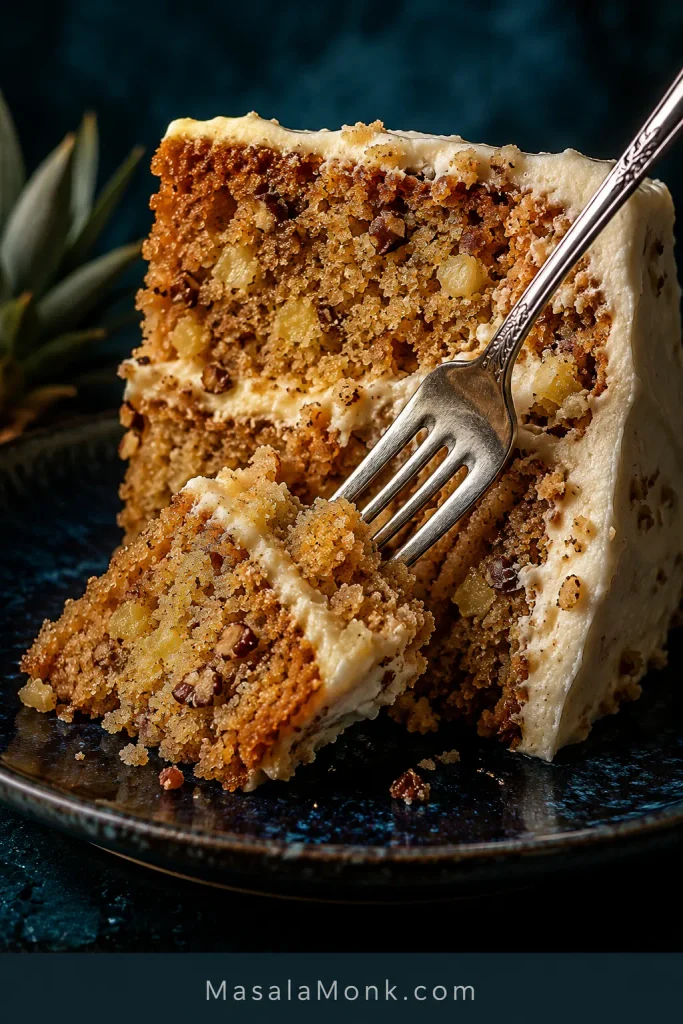
Close-up of a fork cutting into Hummingbird Cake, showing golden crumb, pineapple pieces, pecans and cream cheese frosting between the layers.
A moist pocket beside pineapple is normal; a wet, paste-like center is not. Judge the crumb around the fruit.

The Short Version

Despite the three layers, the cake batter itself is straightforward: two bowls, mixed by hand, no mixer needed. Most of the roughly four-hour total is waiting for the cake to bake, cool and firm up; the hands-on work is much shorter.

Use 360 g mashed very ripe banana, one 8-ounce / 227-g can crushed pineapple with its juice, neutral oil, cinnamon and toasted pecans. Divide the batter between three 8-inch / 20-cm pans and bake at 350°F / 177°C conventional / about 160°C fan. Start checking at 28 minutes; expect a bake somewhere around 28–34 minutes, depending on your pans and oven.

The batter should look thick, rough and visibly full of fruit. Stop folding once the flour disappears. The layers are ready when the centers look set, spring back gently under a fingertip and a skewer comes out without wet batter. Once cool, the crumb should be moist and tender, not glossy, gluey or pudding-like.


Three-Layer Hummingbird Cake: The Recipe

What this version is aiming for: the rich, fruit-heavy character that makes Hummingbird Cake distinctive, with a clear line between deeply moist and gummy. The banana is weighed, one small can of pineapple goes in with its juice, and the batter is spread across three relatively shallow layers. The cream cheese frosting relies on butter and cool handling for much of its structure, so its tang doesn’t have to disappear under a mountain of powdered sugar.

YieldOne three-layer 8-inch / 20-cm cake
Serves12 generous or about 16 smaller slices
Active timeAbout 50 minutes
Bake28–34 minutes; begin checking at 28
Total timeAbout 4 hours, including cooling and chilling
Oven350°F / 177°C conventional / about 160°C fan
Make aheadExcellent prepared a day before serving

Ingredients

Use the gram amounts if you have a kitchen scale. Cup measurements are included for convenience, but flour and mashed banana are both easy to misjudge by volume.

For the Cake

  • 150 g chopped pecans — about 1⅓ cups, divided
  • 375 g all-purpose flour — 3 cups, spooned and leveled
  • 1 teaspoon baking soda
  • 1 teaspoon baking powder
  • ¾ teaspoon fine salt
  • 1½ teaspoons ground cinnamon
  • ¼ teaspoon ground allspice
  • 3 large eggs, preferably at room temperature
  • 1 cup / 240 ml neutral oil, such as vegetable or canola oil
  • 1 cup / 200 g granulated sugar
  • 125 g packed light brown sugar — about ½ cup + 2 tablespoons
  • 2 teaspoons vanilla extract
  • 360 g mashed very ripe banana — about 1½ cups or roughly 3 large bananas after peeling; use bananas that are soft, deeply spotted and fragrant
  • 1 x 8-ounce / 227-g can crushed pineapple in juice, undrained; with a larger can, weigh out 227 g of fruit and juice together

For the Cream Cheese Frosting

  • 300 g unsalted butter — about 1⅓ cups, softened but still cool
  • 300 g confectioners’ / powdered sugar — about 2½ cups, sifted if lumpy
  • 2 teaspoons vanilla extract
  • ¼ teaspoon fine salt
  • 16 ounces / 452 g full-fat block-style cream cheese, chilled and cut into small pieces

The frosting amount is enough for two sensible filling layers and a comfortable rustic coat over the top and sides. Make extra only if you want an unusually thick coat or elaborate piping.

Equipment: three 8-inch / 20-cm round cake pans, parchment, two large bowls, a whisk, flexible spatula, cooling racks and preferably a kitchen scale. The batter is mixed by hand; use a hand or stand mixer for the frosting.
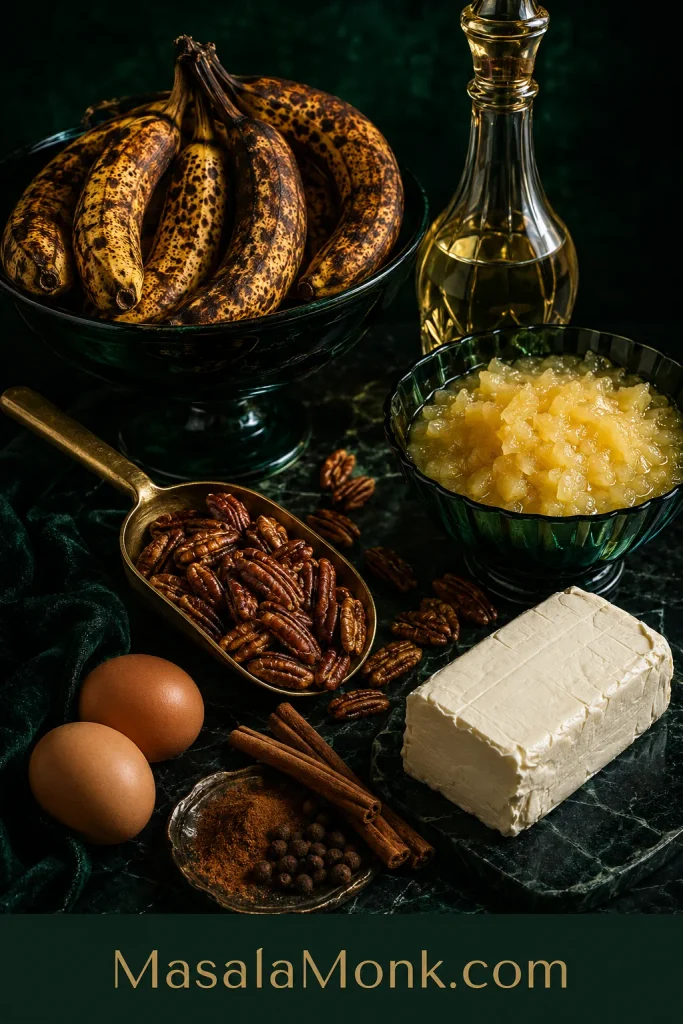
Dark green still life with very ripe bananas, crushed pineapple and juice, toasted pecans, eggs, oil, spices and a block of cream cheese.
Weigh the mashed banana when you can; fruit count varies too much to be a reliable moisture measure.

Method

Prepare the Batter

  1. Heat the oven and prepare the pans. Preheat to 350°F / 177°C conventional / about 160°C fan. Grease three 8-inch / 20-cm round pans, line the bottoms with parchment and lightly grease the parchment.
  2. Toast the pecans. Spread the chopped pecans on a baking sheet and toast for 5–7 minutes, starting to watch closely at 5. Stir or shake the tray once. Take them out when they smell deeply nutty and have darkened slightly. Cool completely. Reserve about 30 g for the finished cake and use the remaining 120 g in the batter.
  3. Mix the dry ingredients. Whisk the flour, baking soda, baking powder, cinnamon, allspice and salt in a large bowl, breaking up any obvious flour lumps.
  4. Mix the wet ingredients. In another large bowl, whisk the eggs and oil together. Add both sugars and the vanilla, then stir in the mashed banana and crushed pineapple with all of its measured juice.
  5. Fold the batter gently. Pour the wet mixture into the flour mixture and fold with a flexible spatula. Add the 120 g toasted pecans while a few dry streaks remain, then stop as soon as the flour disappears. The finished batter should look thick, rough and crowded with fruit.
  6. Divide it evenly. The batch makes roughly 1.8 kg of batter, so aim for about 600 g per pan. Exact grams are not important; similar layer depths are.
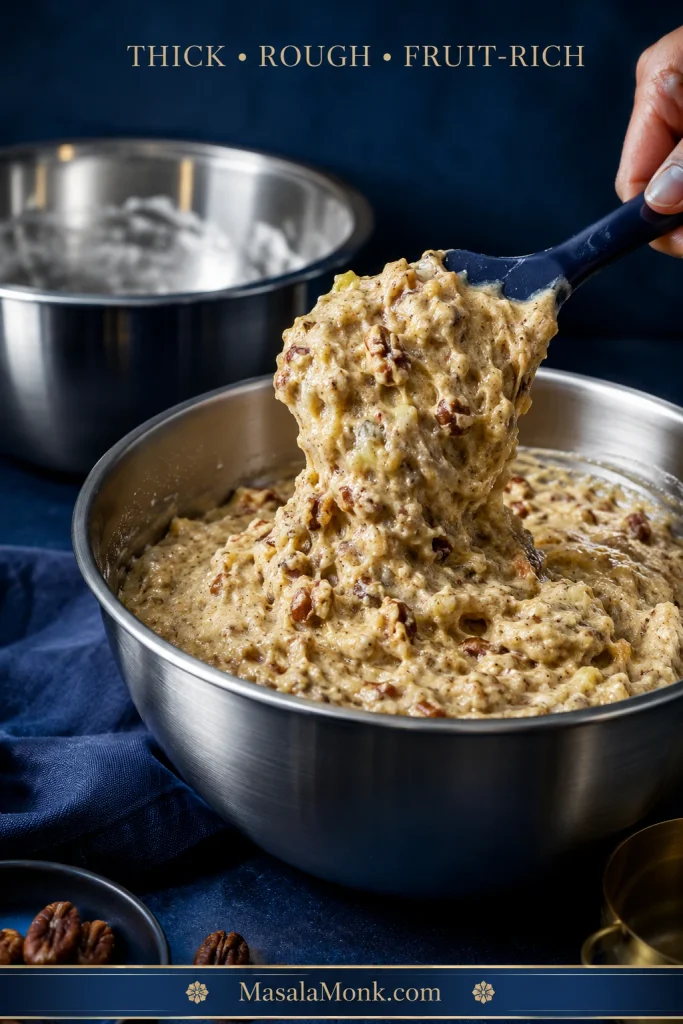
Thick Hummingbird Cake batter lifted on a spatula from a metal bowl, with visible fruit and pecan pieces and a second bowl in the background.
Before the pans go in, scrape the bowl once more. Thick batter can hide dry flour at the bottom.

Bake and Cool the Layers

  1. Bake the layers. Put all three pans on one rack near the center of the oven when they fit with some air around them. Otherwise stagger them across two racks. Begin checking at 28 minutes; expect the bake to fall somewhere around 28–34 minutes.
    Using two racks? Leave the pans alone during the early bake. Once the centers have visibly begun to set, swap the upper and lower pans if your oven is browning unevenly.
    They’re done when: the wet shine in the center has disappeared, a light fingertip press springs back and a thin skewer comes out without wet batter. A few moist crumbs are fine.
  2. Cool completely. Leave the layers in their pans for about 10 minutes, then turn them onto wire racks and peel away the parchment. Let them cool fully before frosting. A 30–60 minute chill afterward can make the layers easier to handle and stack, but it isn’t a substitute for cooling them first.
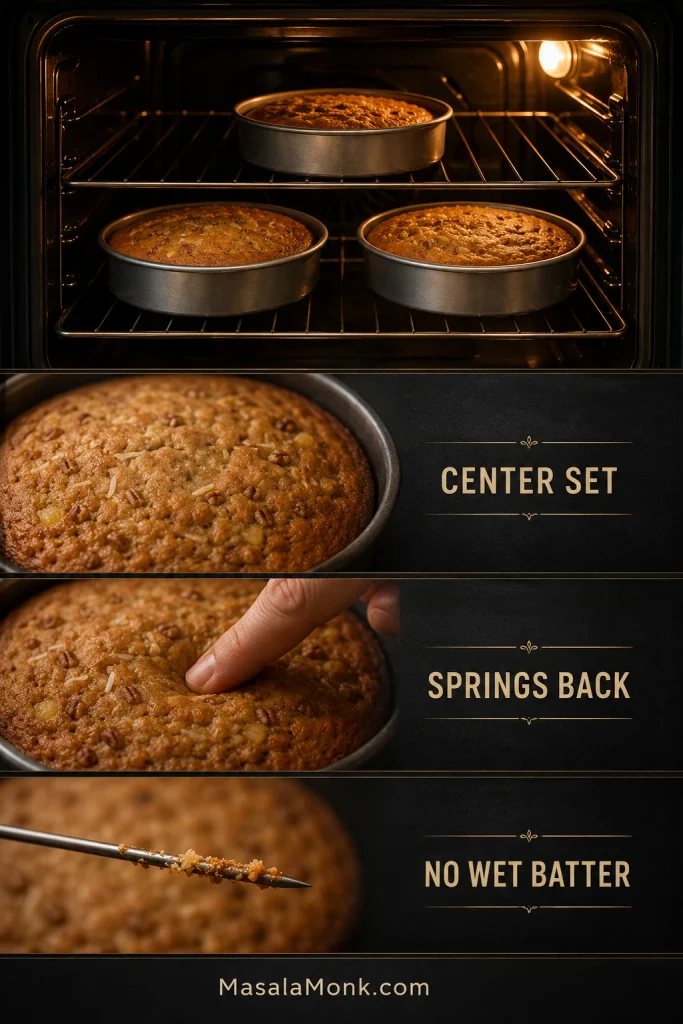
Cake doneness guide showing pans in an oven, a set cake center, a fingertip springback test and a skewer checking the crumb.
Matching pans can finish a few minutes apart. Check each center for set, springback and no wet batter.

Make the Cream Cheese Frosting

  1. Make the frosting base. Beat the slightly cool butter until smooth. Gradually beat in the powdered sugar, then add the vanilla and salt.
  2. Add the cream cheese last. Take the cream cheese from the refrigerator when you begin making the frosting. Add it to the finished butter-sugar base a few pieces at a time on low to medium-low speed. Stop once the frosting is smooth. Longer beating can make cream cheese frosting softer.
  3. Check the consistency. Lift your spatula. A soft peak should hold and a swipe of frosting should stay where you put it. When the frosting slowly slumps, refrigerate it for 20–30 minutes before deciding it needs more sugar.
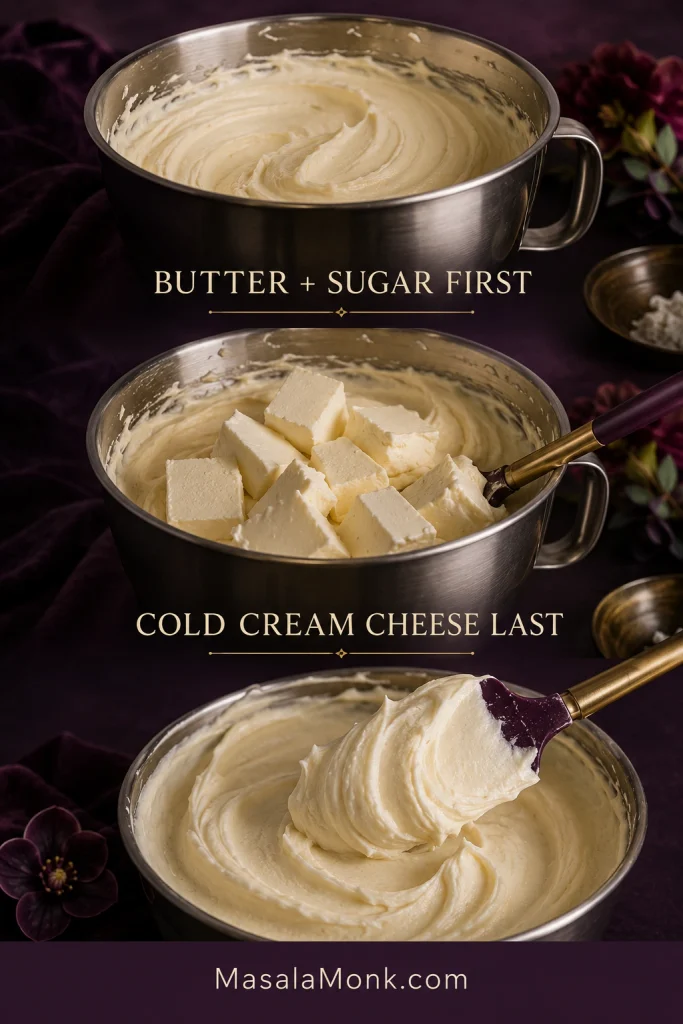
Three-stage cream cheese frosting guide showing butter and powdered sugar first, cold cream cheese pieces added afterward, and finished thick frosting.
Smaller pieces of cold block cream cheese incorporate faster, limiting mixer time and helping the frosting stay thick.

Stack and Finish the Cake

  1. Stack the cake. Put the first layer on a cake plate or board and spread about 170 g frosting over the top. Repeat with the second layer, then add the third. Should the stack begin drifting sideways, refrigerate it for about 20 minutes before continuing.
  2. Frost and finish. Cover the top and sides with the remaining frosting. A relaxed coat suits Hummingbird Cake; nothing has gone wrong because the sides are not ruler-straight. Scatter over the reserved pecans, or add dried pineapple flowers for a more celebratory finish.

Refrigerate the assembled cake for about 20–30 minutes, or until the frosting feels firm enough for a clean first cut. For the best eating texture, give chilled slices about 15–20 minutes at a comfortable room temperature before eating.

Hummingbird Cake blueprint centered on a three-layer cutaway with measurements for banana, pineapple, batter per pan, bake time, frosting and final chilling.
The structural numbers matter most: fruit, batter depth, bake cues and frosting consistency. Perfectly straight sides do not.

If your pans are ready, that’s everything you need to bake the cake. The rest is here for the moment you cut into it and wonder whether the crumb looks right, where the pineapple went, or why the frosting isn’t behaving the way you expected.

Already baked it? Check the crumb · Find the pineapple · Fix the frosting · Troubleshooting


Is Hummingbird Cake Supposed to Be Dense?

Substantial, yes. Stodgy, no. Hummingbird Cake naturally has more heft than a fluffy vanilla butter cake. Banana, pineapple, oil, eggs and pecans all contribute to a richer, closer crumb.

A good slice looks moist without looking shiny. Press a fork through the center and a piece comes away cleanly, with the occasional bit of pineapple or toasted pecan along the way. That’s the texture worth aiming for: generous and substantial, but still unmistakably cake.

A center that smears into paste is different. So is a rubbery, compressed crumb. Wetness usually points back toward bake time, fruit quantity or layers that were too deep; a tight, rubbery texture can point toward excess flour or too much mixing. A substantial layer that slices neatly and tastes good needs no fixing.

That’s the reassuring part of this cake: a layer can look lower and richer than the sponge cakes you may know and be exactly as it should be. The fork should meet cake, not wet paste.
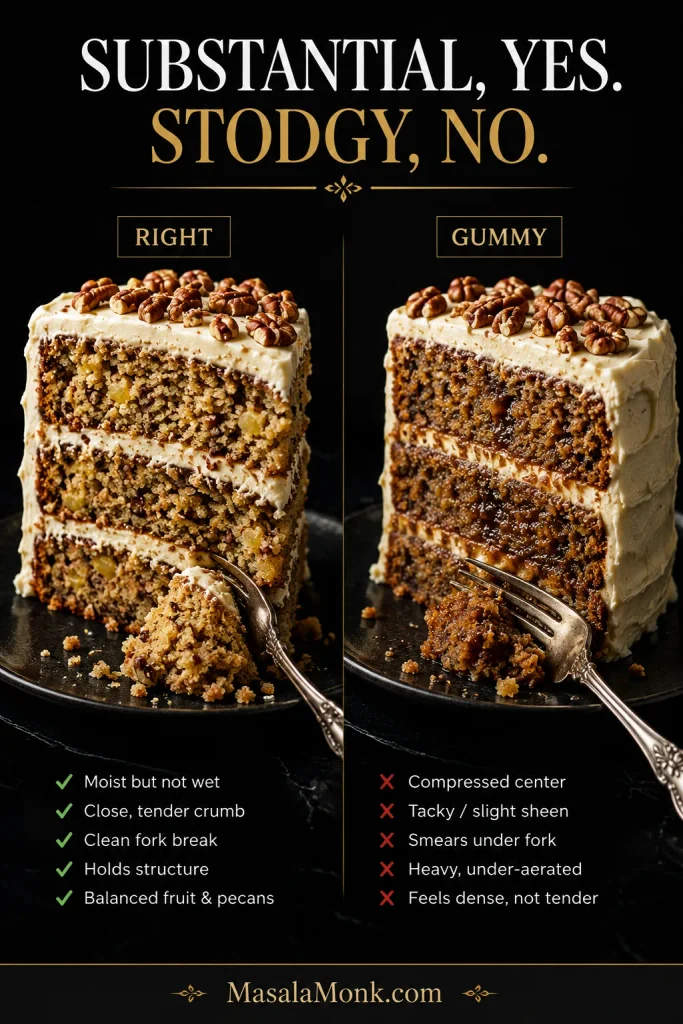
Side-by-side Hummingbird Cake slices comparing a moist structured crumb with a darker, compressed gummy crumb that smears under a fork.
Let the cake cool before diagnosing it. Warm fruit-heavy crumb can feel wetter than the same layer once settled.

Center looks genuinely wet or gummy? Jump to troubleshooting.

Why Does Hummingbird Cake Sometimes Taste Like Banana Bread?

Banana is the loudest fruit in the room. It brings aroma, sweetness, moisture and fruit solids all at once, which makes it easy for the pineapple to disappear into the background.

Hummingbird Cake shouldn’t simply eat like frosted banana bread. A wet or underbaked crumb can push it in that direction even when the banana quantity is reasonable, and extra banana makes the effect stronger.

Weigh the mashed banana and stop at 360 g. Any extra is better used in banana bread, where a strongly banana-forward crumb is exactly the point.

Pineapple in Hummingbird Cake: Drain It or Don’t?

Use all 227 g here, juice included.

That isn’t a universal Hummingbird Cake rule. A wetter formula or one with more fruit may need the pineapple drained.

The stranger problem is putting a whole can of pineapple into a cake and barely tasting it afterward. Choose crushed pineapple that still resembles tiny pieces of fruit instead of smooth pulp. Those fragments have a better chance of surviving the bake as something you can actually notice in a slice.

For stronger pineapple flavor, concentrate it instead of making the batter wetter. A very thin layer of thick pineapple jam or pineapple curd between the layers gives you a brighter burst of fruit. Keep the filling restrained so the layers still stack comfortably.

The pineapple doesn’t need to dominate. Finding a small piece here and there against banana and toasted pecan is enough to keep the slice changing as you eat it.

Fresh pineapple: use it in a recipe designed for it. Chopped fresh pineapple does not bring exactly the same balance of fruit and liquid as canned crushed pineapple with juice, so canned remains the predictable choice for this batter.

Pineapple guide showing crushed pineapple with juice, visible fruit pieces, smoother pineapple pulp and concentrated pineapple filling.
Using a larger can? Stir fruit and juice together before weighing 227 g so the moisture ratio stays consistent.

Ready to bake? Back to the ingredient amounts.

Cream Cheese Frosting Should Taste Like Cream Cheese

Hummingbird Cake is already sweet and fruit-rich, so the frosting needs contrast. Its cream-cheese tang should be obvious when you eat it with the cake.

Runny frosting often sends bakers straight to the powdered-sugar bag. Temperature is a better first lever here. The generous amount of butter and cool cream cheese give the frosting the body it needs for a layer cake while letting the cream-cheese flavor remain clear.

Getting the Consistency Right

  • Too soft: a swipe slowly slumps or the frosting creeps down the bowl. Refrigerate it for 20–30 minutes.
  • Ready: a lifted spatula leaves a soft peak that holds, and the frosting spreads across a cooled layer without tearing it.
  • Too stiff or too sweet: it becomes very firm or grainy and powdered sugar starts drowning out the cream-cheese flavor.
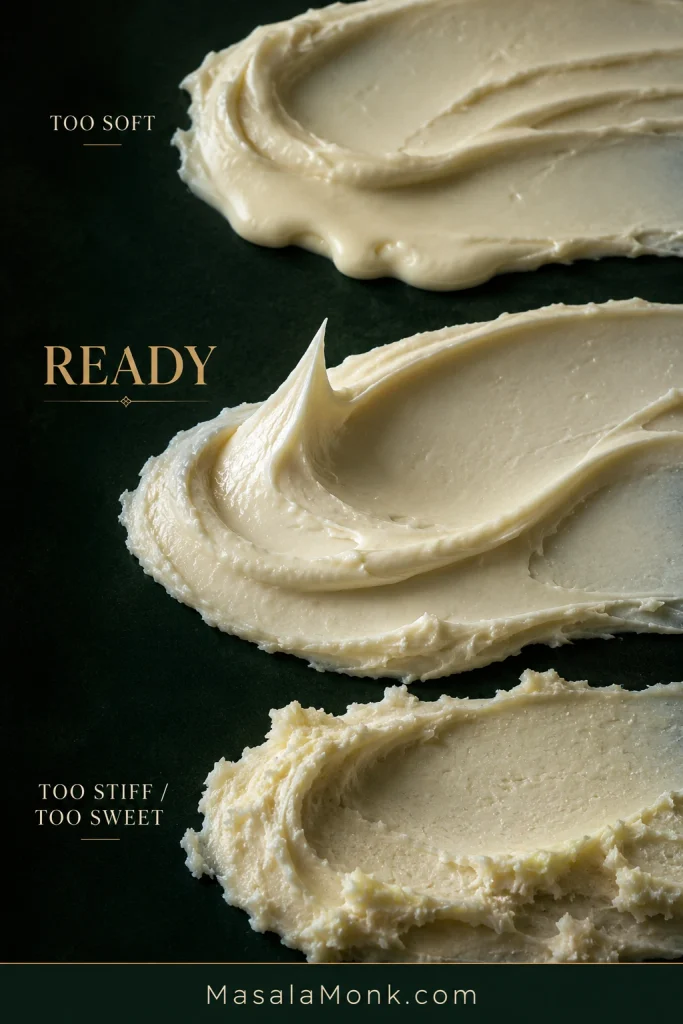
Three swipes of cream cheese frosting labeled Too Soft, Ready, and Too Stiff or Too Sweet, showing their different consistencies.
Ready frosting should spread over a cool layer without tearing crumbs or losing the ridges you leave behind.

Firm American block cream cheese is easiest to work with. Where only softer spreadable cream cheese is available, choose the firmest full-fat version you can find and keep the frosting cool. Sometimes twenty minutes in the refrigerator is all a loose bowl needs.

The finished frosting should feel creamy against the fruit-rich crumb, not like a thick layer of sweetness sitting on top of it. For detailed piping or sharp edges that must hold for a long time at room temperature, a more structured buttercream is the better choice.

Frosting the cake now? Back to the frosting steps · Stack and finish · Troubleshooting

Hummingbird Cake Pan Sizes: Why Layer Depth Matters

Three layers aren’t only about appearance. They keep this fruit-heavy batter relatively shallow, allowing the center to set before the outside has spent too long in the oven.

Pan setupWhat to expect
3 x 8-inch / 20-cm roundsMain recipe. About 600 g batter per pan; begin checking at 28 minutes.
3 x 9-inch / 23-cm roundsThinner layers. Begin checking around 24 minutes and use the same center-set and skewer cues.
2 x 9-inch / 23-cm roundsUse pans at least 2 inches deep. Begin checking around 30–35 minutes and rely on the center-set cues for the endpoint.

A 9×13 sheet cake, Bundt cake, cupcakes or a smaller 6-inch cake changes the layer depth enough to deserve directions written for that format instead of a guessed conversion.

The timer tells you when to start looking. Batter depth and the cake tell you when to stop baking.
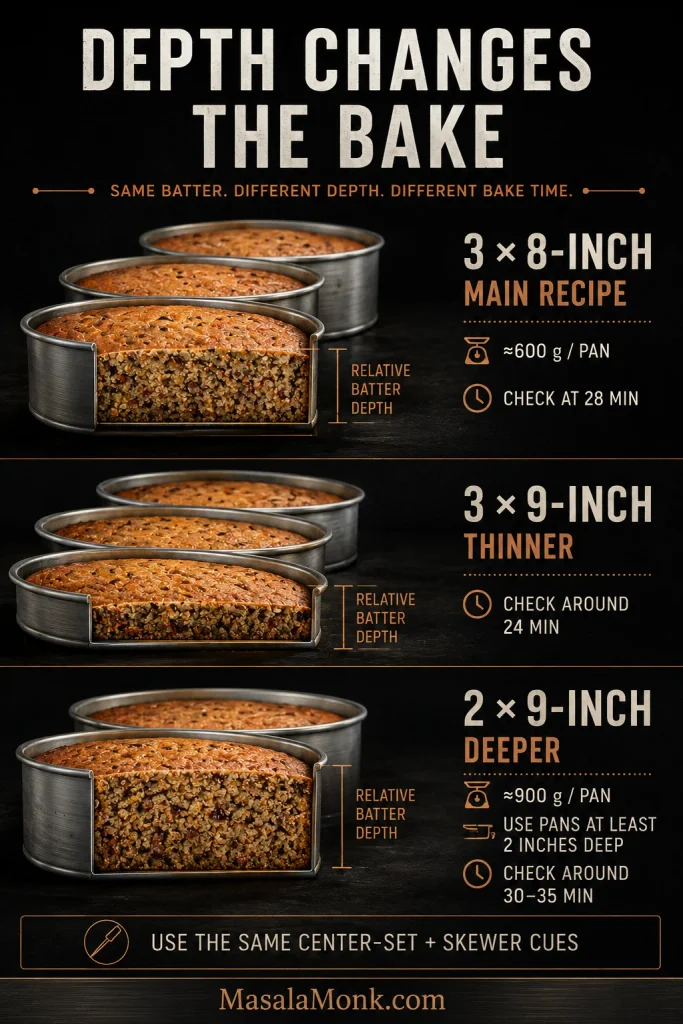
Pan-depth guide comparing three 8-inch cake pans, three shallower 9-inch pans and two deeper 9-inch pans with batter amounts and suggested check times.
When changing pans, compare batter weight and depth—not fill lines alone. Shallower layers usually reach the center sooner.

Using the main three 8-inch pans? Back to baking the layers.

Troubleshooting: What Went Wrong?

If you’ve already cut the cake and something looks wrong, start here. The longer sections explain the details; this table is for the ten-second diagnosis.

ProblemMost likely causeTry this
Tastes like banana breadBanana dominates or crumb is too wetWeigh the banana; choose pineapple with visible fruit pieces
Dense but tenderOften normalJudge the crumb, not the height
Gummy or stodgyUnderbaked, too wet, too deep or overmixedCheck fruit amounts, pan depth and doneness
Wet centerNeeds more baking or batter is too deepKeep baking until the center sets
Dry and heavyToo much flour or oven timeWeigh flour; check earlier
Pineapple disappearsFruit is mild or too finely processedUse visible fruit pieces or concentrated filling
BlandUnripe banana, weak pineapple, untoasted nuts or low seasoningUse deeply spotted bananas and toast the pecans
Tastes too much like carrot cakeSpices are crowding out the fruitKeep secondary spices restrained
Runny frostingWarm/soft cream cheese, warm room or overmixingRefrigerate before adding more sugar
Filling squeezes outToo much loose frostingUse less filling; firm the stack before continuing
Layers slideWarm cake/frosting, domes or overfillingCool, level if needed, then continue
Cake tears while frostingLayers are too warm or delicateCool completely; chill briefly if needed
Outside done, center rawDeep batter or hot ovenCheck pan setup; tent a browning top if needed

Assembly Problems: Fix the Stack First
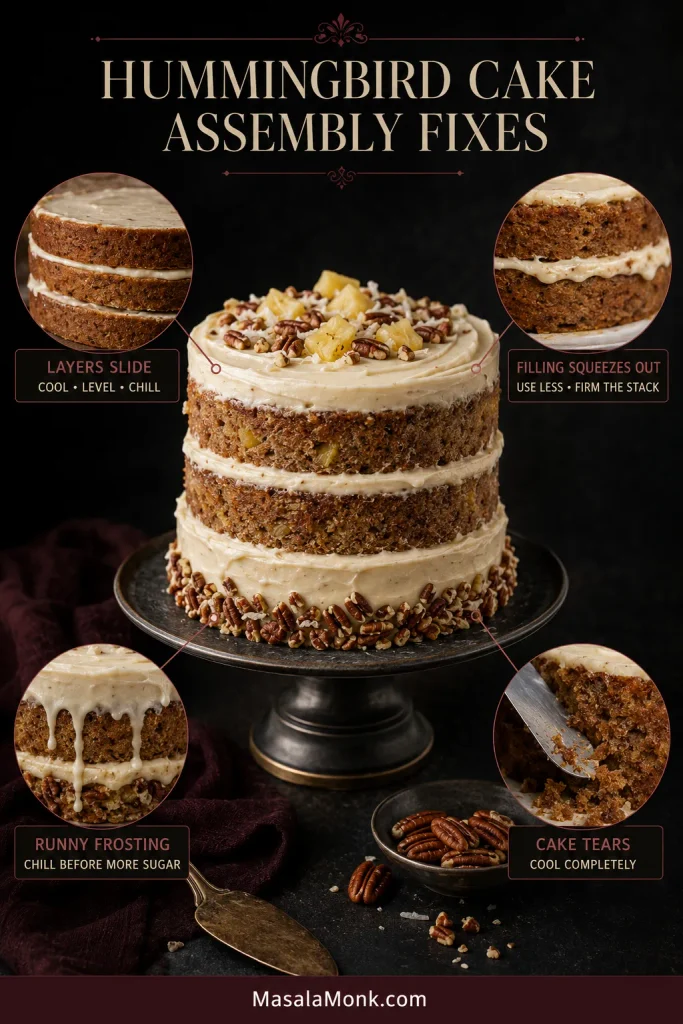
Hummingbird Cake troubleshooting graphic with a central layer cake and close-ups showing sliding layers, squeezed filling, runny frosting and cake tearing.
A warm layer can soften frosting, which squeezes outward and lets the stack slide. Fix the earliest problem first.

Back to the recipe method · Back to top

What You Can Change

  • Walnuts: swap them for the pecans in the same amount and toast them first.
  • No nuts: leave them out. Nothing structural needs replacing.
  • Coconut: common in some versions, but not essential to the classic banana-pineapple-pecan cake.
  • Frozen bananas: thaw completely, mash them with the liquid they release, then weigh out 360 g.
  • Butter instead of oil: use a recipe built around butter or a butter-oil blend. Neutral oil is one reason these refrigerated layers remain moist.
  • More pineapple: put concentrated fruit between the layers instead of another can of liquid-heavy pineapple in the batter.

Gluten-free, vegan and substantially reduced-sugar Hummingbird Cakes change the structure enough to deserve recipes of their own. At some point a substitution list simply becomes a different cake.

Why Hummingbird Cake Recipes Differ

Hummingbird Cake recipes can look surprisingly different because they aren’t all working with the same balance of fruit, fat and liquid. Some old-school versions are exceptionally rich, with more banana, oil and sugar and sometimes no baking powder. Others pull back a little and rise somewhat higher.

The 1978 Hummingbird Cake made famous by Southern Living belongs firmly to that lavish old-school tradition. Modern versions may handle the pineapple, leavening or pans differently because the rest of the recipe changed too.

Keep the formula together. Pineapple handling, leavening, pan depth and bake time only make sense alongside the rest of the recipe they belong to. Borrow one instruction from a very different version and an otherwise sensible piece of advice can suddenly work against you.
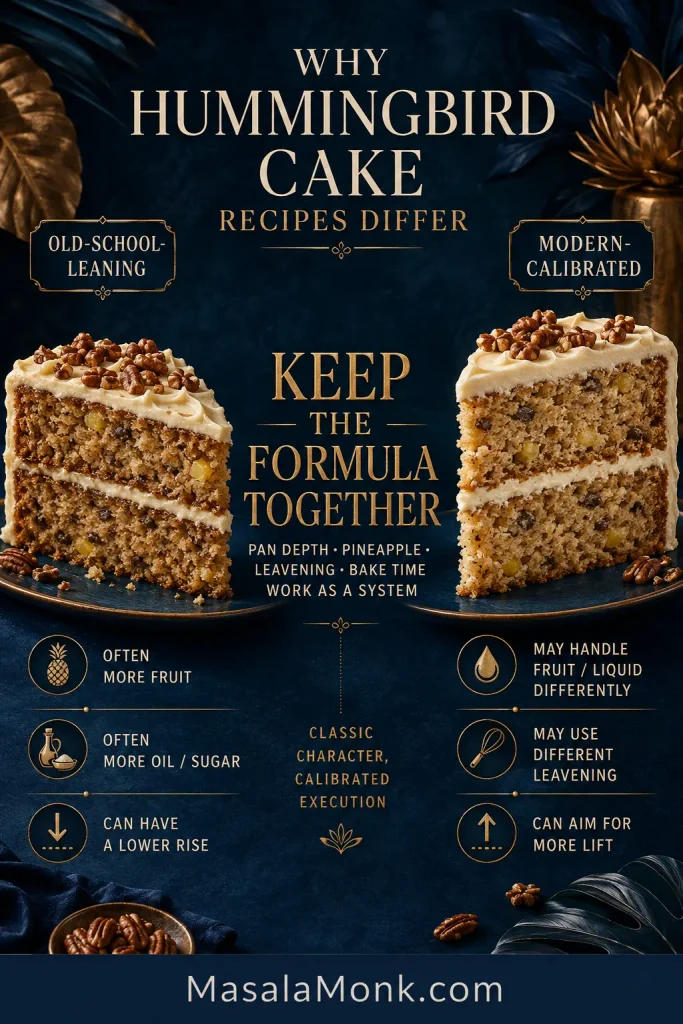
Comparison of old-school-leaning and modern-calibrated Hummingbird Cake formulas with notes about fruit, fat, leavening, pan depth and bake time.
Different pineapple instructions often reflect different formulas. Compare fruit, liquid, flour and batter depth before borrowing one rule.

Bake It Today, Serve It Tomorrow

Hummingbird Cake is unusually friendly for a three-layer celebration cake. The oil and fruit help the crumb stay moist, and an overnight rest does it no harm. That’s useful when the cake is for a birthday, holiday table or gathering and serving day already gives you plenty to think about.

Does Hummingbird Cake need to be refrigerated? Once it is covered with cream cheese frosting, yes. Keep the finished cake refrigerated and give chilled slices about 15–20 minutes at room temperature before serving.

Storage, Freezing and Serving

  • The day before: bake and cool the layers completely, wrap them well and refrigerate. Or assemble and frost the entire cake, cover it and refrigerate overnight.
  • Serving day: keep the cake cool until you need it, especially in a warm room. That short rest before eating brings the crumb and frosting back to a much better texture.
  • Leftovers: cover and refrigerate. For the best texture and flavor, aim to finish the cake within about 4–5 days.
  • Freezing: unfrosted layers are easiest. Cool them, wrap tightly and freeze, then thaw in the refrigerator while still wrapped. Firm chilled slices of frosted cake can also be wrapped and frozen. For best quality, use frozen cake or slices within about 1 month.

This is one of those celebration cakes that does not punish you for getting ahead. There is a great deal to be said for opening the refrigerator the next day and finding the difficult part already done.
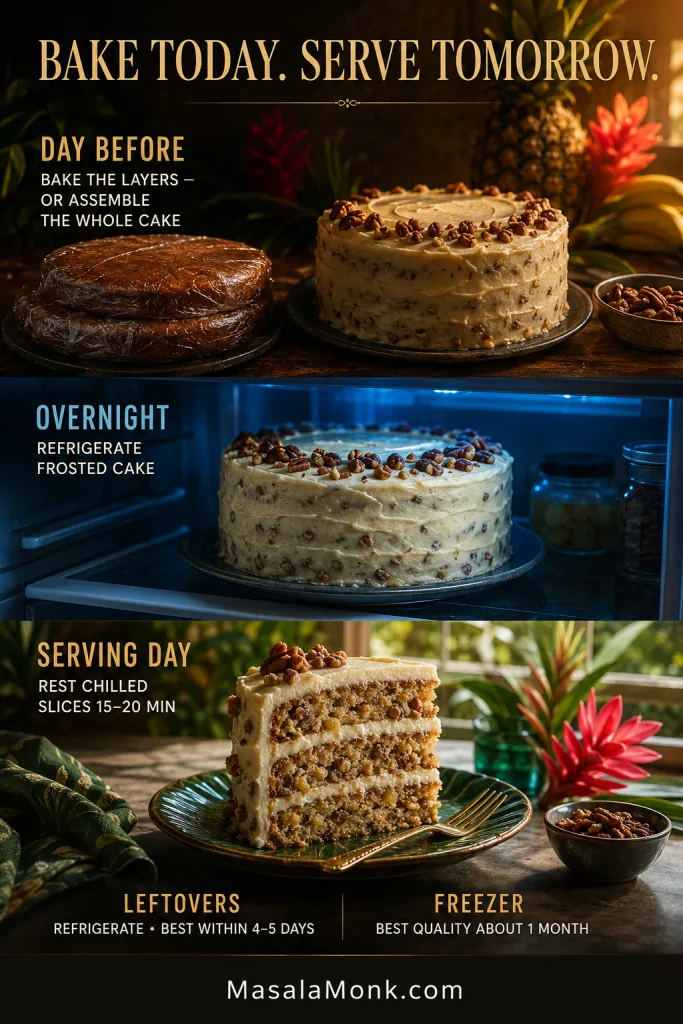
Make-ahead Hummingbird Cake guide showing wrapped cake layers, a frosted cake refrigerated overnight, a serving-day slice and leftover and freezer guidance.
Cold keeps the cake stable; a short room-temperature rest restores a softer crumb and creamier frosting before serving.

Back to the recipe · Back to top

Why Is It Called Hummingbird Cake? The Jamaican Doctor Bird Story

For a cake now so strongly associated with Southern baking, the earlier trail is wonderfully tropical. Its name points back to Jamaica and its national bird, the red-billed streamer-tail hummingbird known as the Doctor Bird.

The Jamaican Doctor Bird Cake

Versions of Doctor Bird Cake were already circulating in Jamaica-related promotional material by the late 1960s. Visit Jamaica’s archival account preserves an Air Jamaica recipe published in The Daily Gleaner on February 4, 1971. The feature covered dishes served on the airline’s in-flight menu, and the cake took its name from the Doctor Bird — both Jamaica’s national bird and a symbol used by Air Jamaica.

That version was described as a rich pineapple-and-banana dessert loaf. It’s a wonderful contrast with the cake many people picture today: the tropical fruit was already there, but the towering American layer cake came later.

The 1978 Southern Living Cake

In 1978, Mrs. L.H. Wiggins of Greensboro, North Carolina, submitted her Hummingbird Cake to Southern Living. The three-layer recipe became one of the magazine’s best-known desserts and helped turn Hummingbird Cake into a fixture of Southern celebration tables.

That gives the cake an identity that is hard to squeeze into one place. Its name and tropical fruit reach back toward Jamaica; the towering cream-cheese-frosted layer cake became deeply Southern. Both histories are sitting in the same slice.

Food-history poster showing Jamaica's Doctor Bird hummingbird, a 1971 Air Jamaica ring-style Doctor Bird Cake and a 1978 Southern three-layer Hummingbird Cake.
The Jamaican Doctor Bird trail predates the Southern layer cake; the tall cream-cheese-frosted version came later.

For a cake named after something as tiny as a hummingbird, there is nothing timid about it. Three generous layers, soft under a fork and sturdy enough to stand proudly on the plate. Then someone cuts the first slice, and suddenly the cake doesn’t look quite so enormous after all.
Posted on — Leave a comment

Shrimp and Grits Recipe: Creamy, Cheesy & Southern-Style

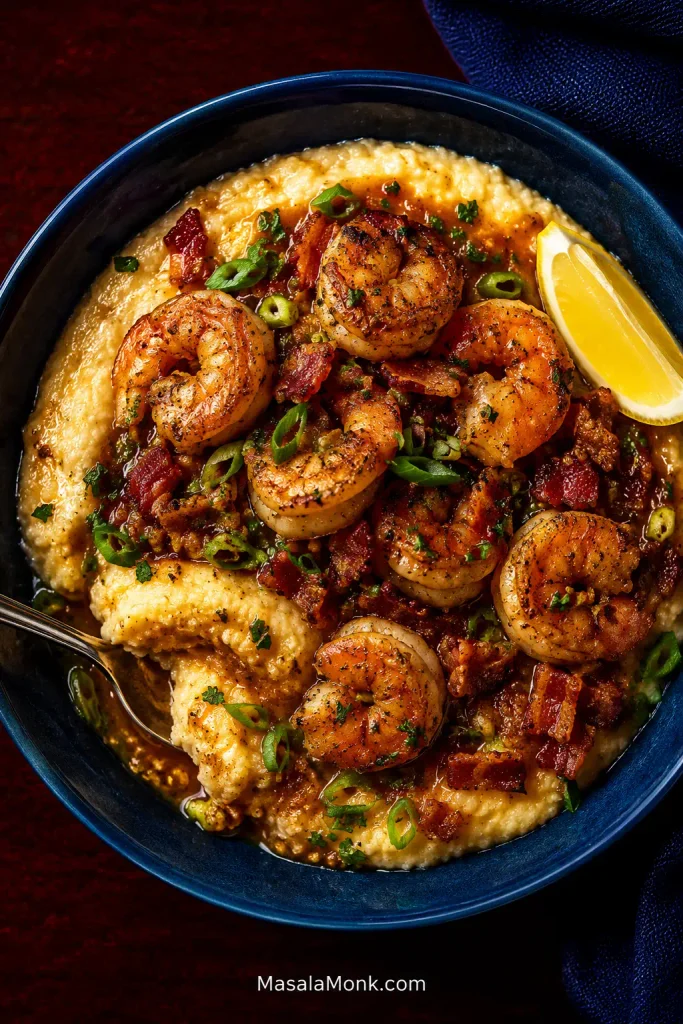
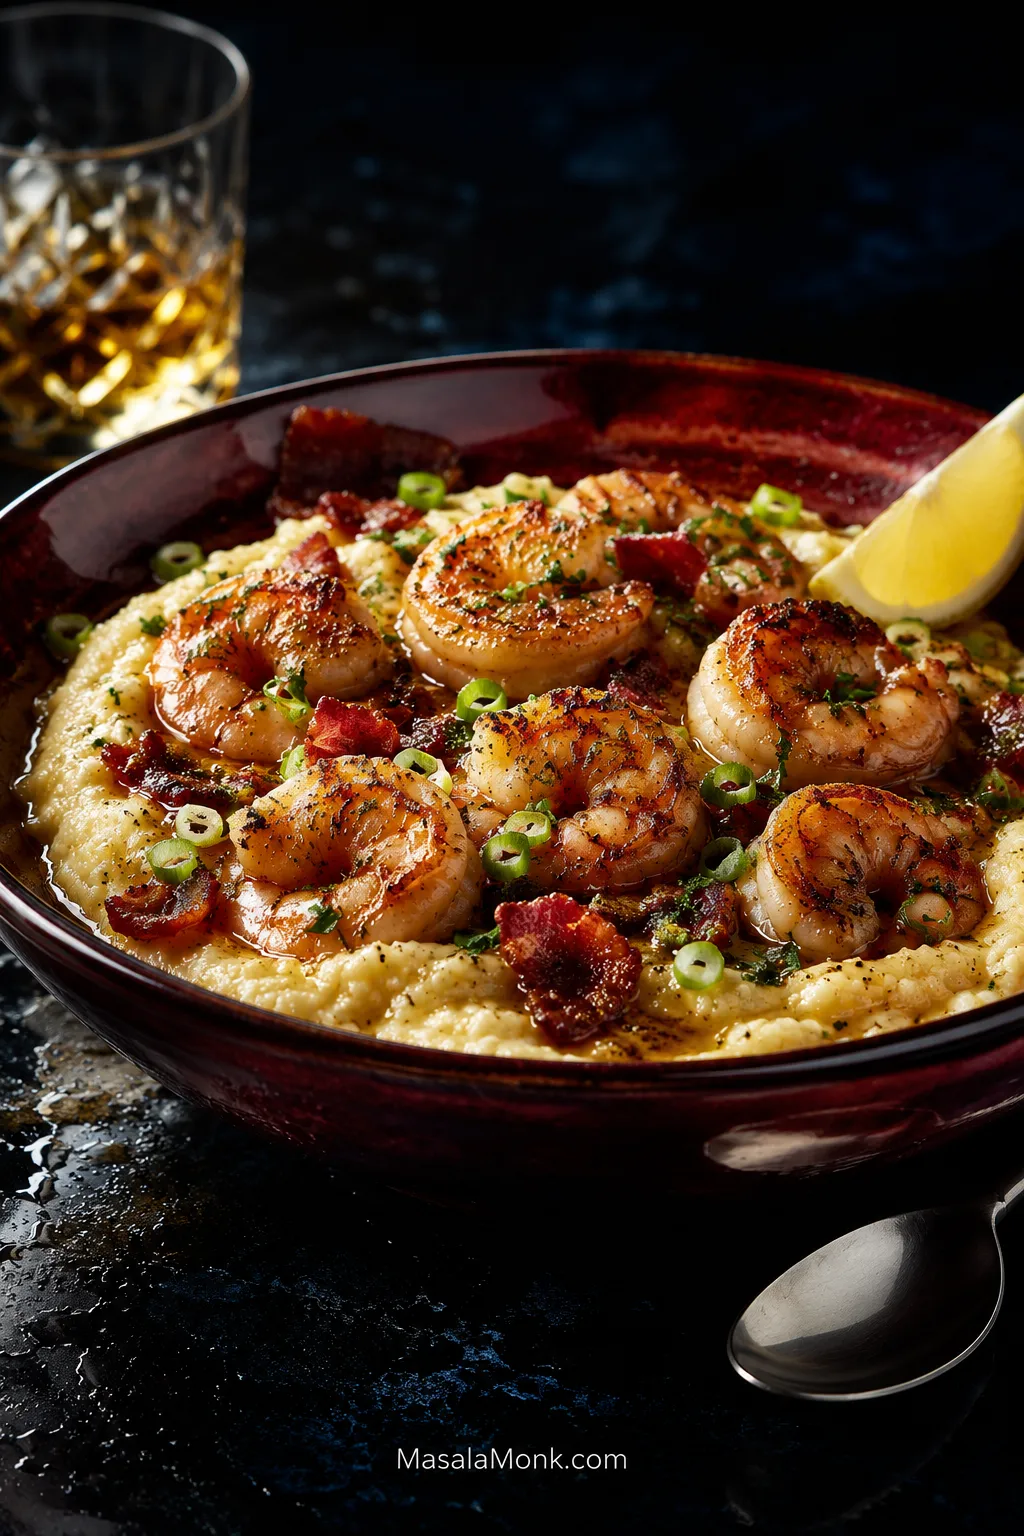
Creamy cheddar grits topped with browned tails-off shrimp, crisp bacon, scallions, parsley, light pan gravy and lemon.

A really good bowl of shrimp and grits comes together on the spoon: creamy grits with clear corn flavor, a plump shrimp, glossy gravy slipping into the surface and, every few bites, crisp bacon. Fresh lemon cuts through the butter and cheese just enough to make you want another bite.

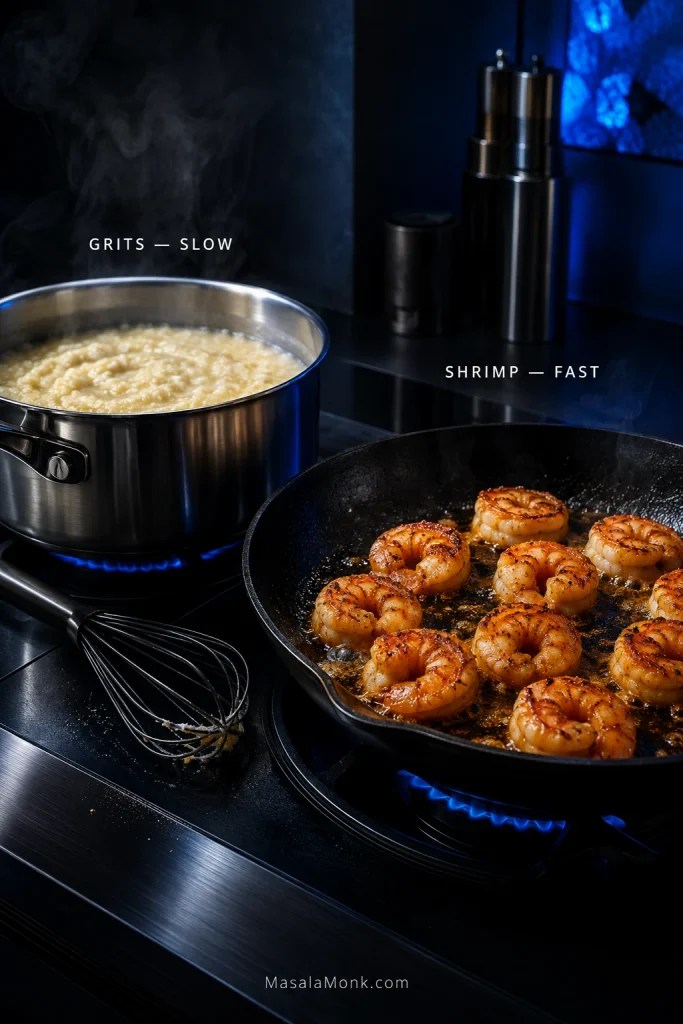
The trick is that grits and shrimp run on opposite clocks. Grits need patience, liquid and time. Shrimp need a hot skillet and a quick exit. The gravy happens in between, picking up the browned, smoky flavor left in the pan and carrying it into the grits.

This recipe leans into the richer modern Southern style—sharp cheddar, bacon and a light bacon-garlic gravy—but none of those additions gets to bury the foundation. The grits should still taste distinctly of corn. The shrimp should still taste like shrimp.

Grits First. Shrimp Last. Gravy in Between.

Serve the grits loose enough to spread gently rather than sit in a stiff mound. Keep the shrimp plump, and let the gravy lightly coat them and streak into the grits instead of pooling around the bowl.

Need the faster route? Use quick grits according to their package liquid ratio and timing, then finish them with the same butter, cream and cheddar. The shrimp and gravy stay the same, bringing dinner closer to about 30–35 minutes.

A saucepan of gently simmering grits beside a hot skillet of searing tails-off shrimp, showing their different cooking speeds.
Let the grits take their time; meanwhile, save the shrimp for the final hot-pan minutes so both reach the bowl at their best.

The Two-Pan Plan

In the grits potIn the skillet
Start the gritsPrep the shrimp, bacon, garlic, scallions and gravy ingredients
Grits gently simmerCrisp the bacon
Grits approach tendernessSear the shrimp in two batches and remove them
Grits finish cookingMake the pan gravy
Add butter, cream and cheddarReturn the shrimp for only 30–60 seconds
Loosen the grits one last timeAdd lemon and herbs, then serve

Shrimp and Grits Recipe

Creamy sharp-cheddar grits topped with seasoned shrimp, crisp bacon and a light Southern-style pan gravy with garlic, lemon and scallions.

Prep: 15 minutes   Cook: about 40 minutes   Total: about 55 minutes   Serves: 4 generously

Heat level: warmly seasoned rather than fiery. Choose a mild Cajun or Creole blend if you prefer less heat; extra hot sauce can stay at the table.

You’ll need: a medium heavy-bottomed saucepan, a 12-inch / 30 cm skillet and a whisk.

Before you start: read through Steps 3–7 once. The grits give you some breathing room at the beginning; once the bacon and shrimp hit the skillet, dinner moves quickly.

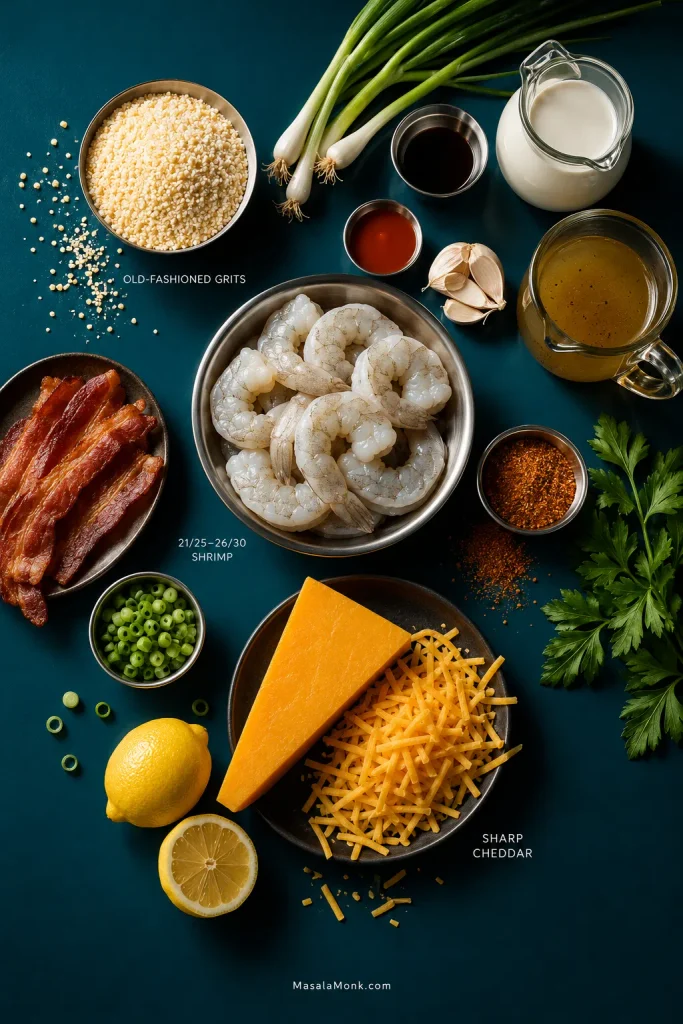
Overhead arrangement of raw tails-off shrimp, old-fashioned grits, sharp cheddar, bacon, lemon, garlic, scallions, cream, broth, seasonings and herbs.
Old-fashioned grits, 21/25–26/30 shrimp and sharp cheddar do most of the structural work, while bacon, lemon and gravy build around them.

For the Creamy Cheddar Grits

  • 1 cup old-fashioned grits — about 165 g; not quick or instant
  • 3 cups water — 720 ml
  • 1 cup low-sodium chicken broth — 240 ml
  • About 1.5 g salt — roughly ½ teaspoon Diamond Crystal kosher, a scant ⅓ teaspoon Morton coarse kosher, or ¼ teaspoon fine/table salt, plus more to taste
  • 2 tablespoons unsalted butter — 28 g
  • ⅓ cup heavy cream — 80 ml
  • 4 oz sharp cheddar, freshly grated — 113 g
  • Freshly ground black pepper, to taste
  • Up to 1 cup additional hot water or chicken broth — 240 ml, only as needed

For the Shrimp and Pan Gravy

  • 1¼ lb raw shrimp — about 570 g, preferably 21/25 or 26/30 count, peeled, deveined and tails removed
  • 1½ teaspoons Cajun or Creole seasoning, preferably a lower-salt blend
  • Freshly ground black pepper, to taste
  • 4 oz bacon — 113 g, chopped
  • 1–2 teaspoons olive oil, only if needed for the skillet
  • 4 scallions, sliced, white/pale-green and dark-green parts separated
  • 3 garlic cloves, finely minced
  • 1 tablespoon all-purpose flour — about 8 g
  • ¾ cup low-sodium chicken broth — 180 ml
  • ¼ cup additional low-sodium chicken broth — 60 ml, held back for adjusting the gravy
  • 2 teaspoons Worcestershire sauce — 10 ml
  • 1 teaspoon hot sauce — 5 ml, plus up to 1 teaspoon more to taste and extra for serving
  • 1 tablespoon fresh lemon juice — 15 ml
  • 2 tablespoons chopped flat-leaf parsley
  • Lemon wedges, for serving

1. Start the Grits

Bring the water, chicken broth and salt to a boil in the saucepan.

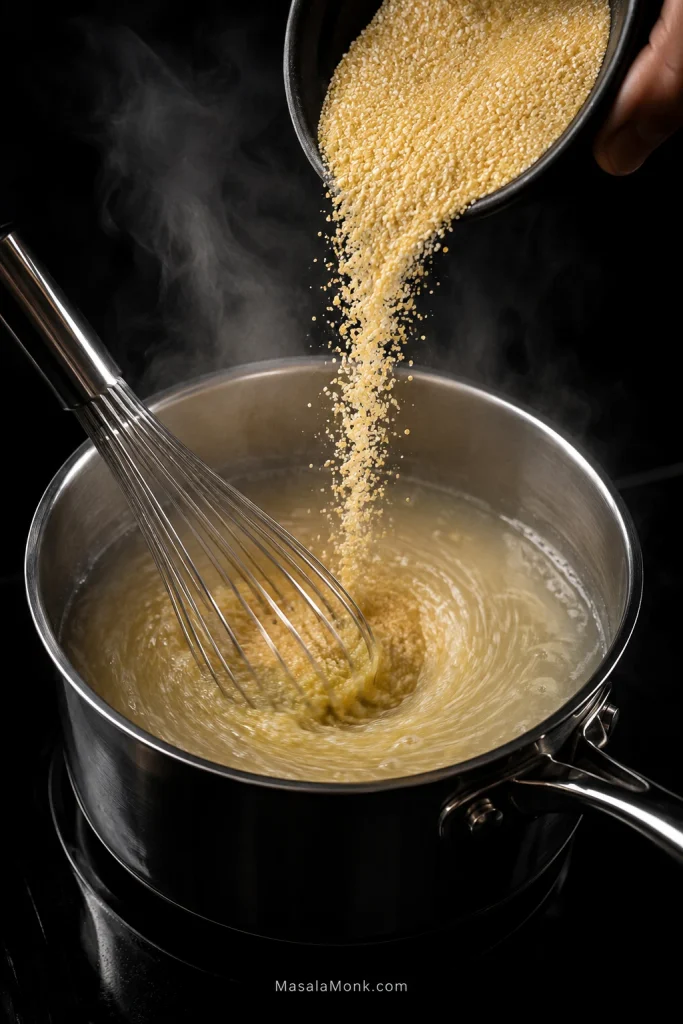
Pour in the grits in a slow, steady stream while whisking. Lower the heat to a gentle simmer once they are incorporated.

Dry grits pouring in a thin stream into simmering liquid while a whisk stirs the pot.
A thin, steady pour while whisking keeps the grains separated early, which is far easier than breaking up cooked clumps later.

Cook, stirring regularly and scraping the bottom and sides, until the grains are tender. Package timing is a sensible place to start; many old-fashioned grits fall somewhere around 15–25 minutes, but brands and grinds vary. If yours need another ten minutes, give them another ten minutes.

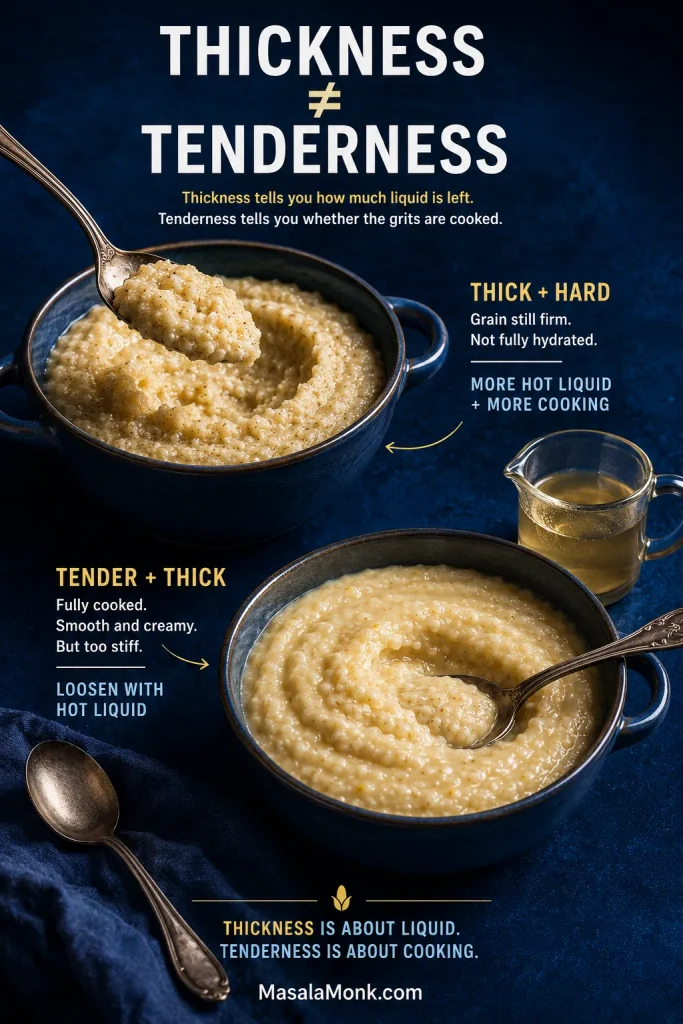
Taste a grain. It can have some corn texture, but there should be no dry, hard or sandy center. A pot may look thick before the corn is ready. Add more hot water or broth ¼ cup / 60 ml at a time and keep cooking.

Thickness tells you how much liquid is left. Tenderness tells you whether the grits are cooked. If that distinction still feels fuzzy, see how to tell when grits are done.

2. Prep While the Grits Cook

Pat the shrimp very dry. Slice the scallions, mince the garlic, chop the bacon, measure the flour and broth, and juice the lemon. Put the Worcestershire and hot sauce beside the stove.

Shrimp have no interest in waiting around while you look for the Worcestershire.

3. Crisp the Bacon

Cook the bacon over medium heat until its fat has rendered and the pieces are deeply browned at the edges. They should be crisp enough to hold their own against the soft grits later.

Transfer the bacon to a plate with a slotted spoon. Spoon off excess fat, leaving about 2 tablespoons in the skillet for the shrimp; if your bacon rendered less, add a little olive oil to make up the difference.

The bacon has done its job in the pan. Keep the pieces out of the gravy and save them for the bowls.

4. Sear the Shrimp in Two Batches

Toss the dry shrimp with the Cajun or Creole seasoning and black pepper. Check the seasoning label before adding extra salt; many blends already contain plenty.

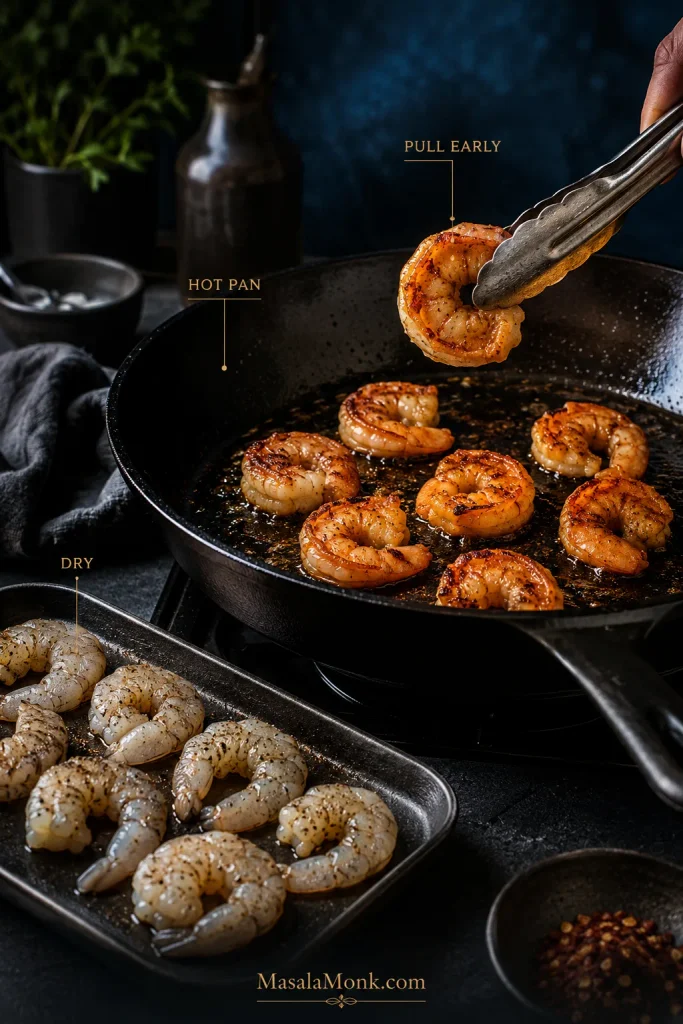
Raise the skillet to medium-high. Divide the shrimp roughly in half and cook them in two batches so the pan stays hot enough to brown them.

For each batch, cook about 1–2 minutes on the first side, then roughly 1 minute on the second. The surface should turn pink and mostly opaque while the thickest centers can remain just shy of finished. Add a teaspoon of olive oil before the second batch only if the skillet has become dry.

Move each batch to a plate as soon as it is ready. The shrimp will get their final few seconds in the gravy.

Dried tails-off shrimp beside shrimp browning in an uncrowded skillet, with one seared shrimp being lifted from the pan.
Dry shrimp and open pan space let surface moisture escape quickly, so browning happens before the centers overcook.

Current federal food-safety guidance for shrimp uses a visual doneness cue: cook until the flesh is pearly or white and opaque. The brief return to the gravy will take the centers there.

5. Make the Pan Gravy

Look at the fat left in the skillet after the shrimp come out. You want roughly 1 tablespoon. Spoon off obvious excess; add a little olive oil if the pan is nearly dry. Reduce the heat to medium, add the white and pale-green scallion pieces and cook for 30–60 seconds. Add the garlic, then stir in the flour about 20–30 seconds later.

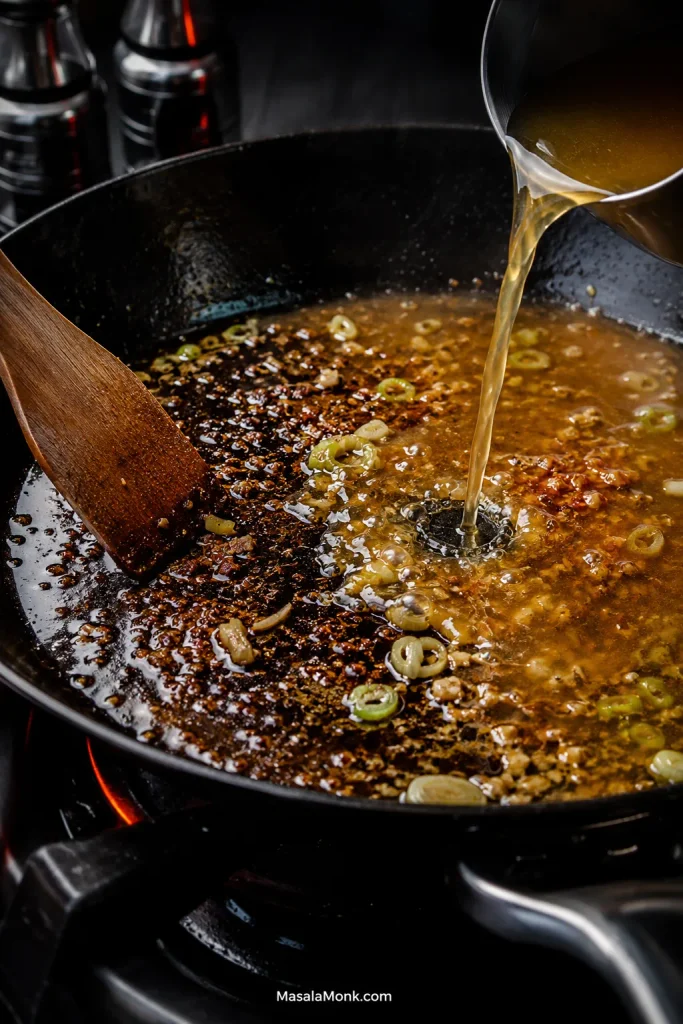
Cook the flour for about 1 minute, then gradually whisk in ¾ cup / 180 ml chicken broth, scraping up the browned bacon-and-shrimp bits. This is when the skillet starts smelling like the dish you came here to make. Stir in the Worcestershire and 1 teaspoon hot sauce.

Broth poured into a skillet with browned fond, garlic and scallions while a spatula scrapes the pan into glossy gravy.
Deglazing lifts the bacon-and-shrimp fond into the gravy, concentrating savory flavor without turning the sauce heavy.

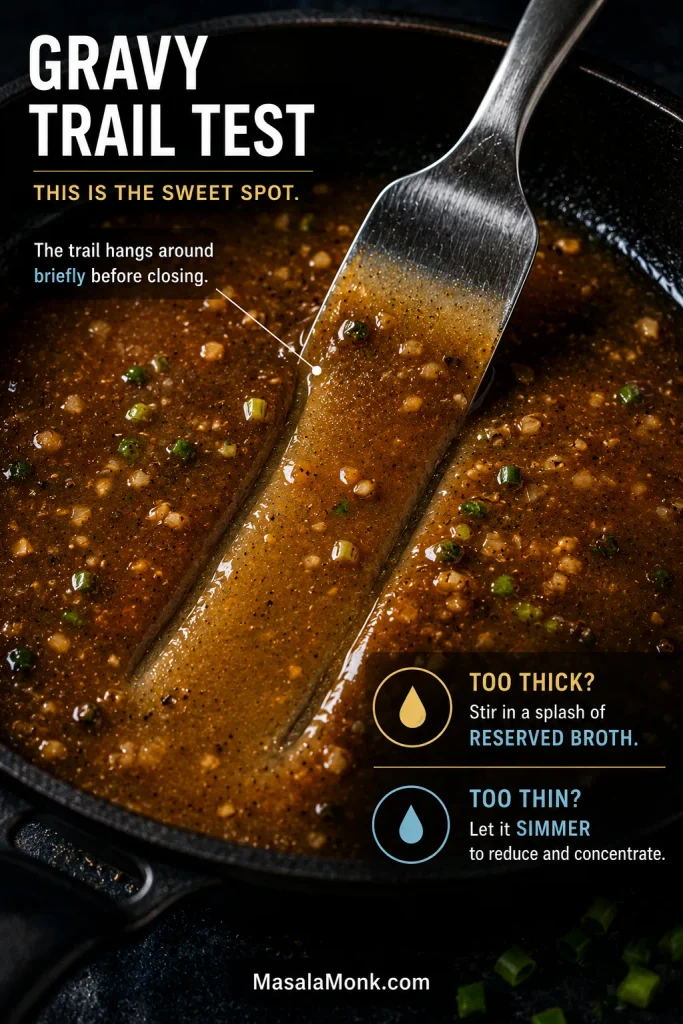
Simmer until the gravy turns glossy and lightly coats a spoon. Drag a spatula through the skillet; the trail should hang around briefly before closing. Add reserved broth a tablespoon or two at a time if the sauce gets too thick. If it is loose, leave the shrimp out and simmer a little longer. If the consistency is still off, see the gravy troubleshooting guide.

6. Finish the Cheddar Grits

Once the corn itself is tender, turn the heat very low or take the pot off the burner. Stir in the butter and cream, then the cheddar.

Give everything 30–60 seconds to melt together before deciding the pot is too thick. The butter and cream loosen the grits first; the cheese then gives them a little more body.

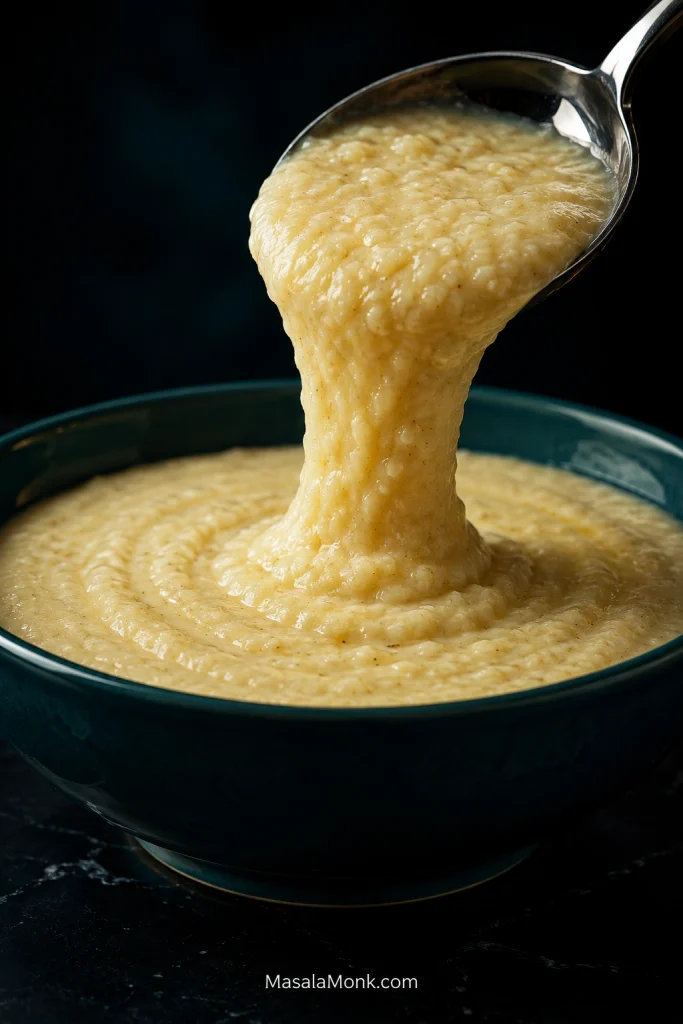
Scoop up some grits. They should fall slowly and spread after they land. Add hot water or broth a splash at a time if they have become too stiff.

Creamy grits falling from a spoon in a broad ribbon and spreading back into a dark teal bowl.
A soft ribbon that relaxes after landing is the visual cue for creamy grits that will stay spoonable at the table.

Taste now, then add salt and black pepper only if the pot needs them.

7. Finish the Shrimp

Return the shrimp and any juices from their plate to the skillet. Toss for only 30–60 seconds, until the centers are opaque and the shrimp are hot.

Turn off the heat. Add the lemon juice, most of the parsley and most of the dark-green scallion tops.

Taste the gravy. Salt, Worcestershire, lemon and hot sauce do different jobs. If everything tastes rich but dull, try lemon first.

8. Build the Bowls

Spoon the grits into warm shallow bowls. Add the shrimp and enough gravy to coat them and run lightly into the grits. Scatter over the bacon, remaining scallion greens and parsley.

Finished shrimp and grits with browned tails-off shrimp, light pan gravy, bacon, scallions, parsley and lemon.
Use enough gravy to gloss the shrimp and streak the grits; keeping the bacon on top preserves the crunch.

Put lemon wedges and hot sauce on the table and serve immediately.

Recipe Notes

  • Frozen or precooked shrimp: raw frozen shrimp work well once completely thawed and dried. Already-cooked shrimp should skip the sear and go into the finished gravy only long enough to heat through.
  • Different grits: quick grits use their package ratio and timing, then get the same butter, cream and cheddar finish. Stone-ground grits vary much more by mill; follow the producer’s directions and keep extra hot liquid nearby. See Choosing the Right Grits for the differences.
  • No bacon: start the skillet with 1 tablespoon butter plus 1 tablespoon olive oil.
  • Salt: bacon, cheese, seasoning, broth, Worcestershire and hot sauce all contribute sodium, so begin conservatively and adjust at the end.
  • Gravy: the extra ¼ cup broth is there in case the sauce needs loosening. Plenty of skillets will not need all of it. For the reasoning behind the sauce, see How the Shrimp and Grits Gravy Works.

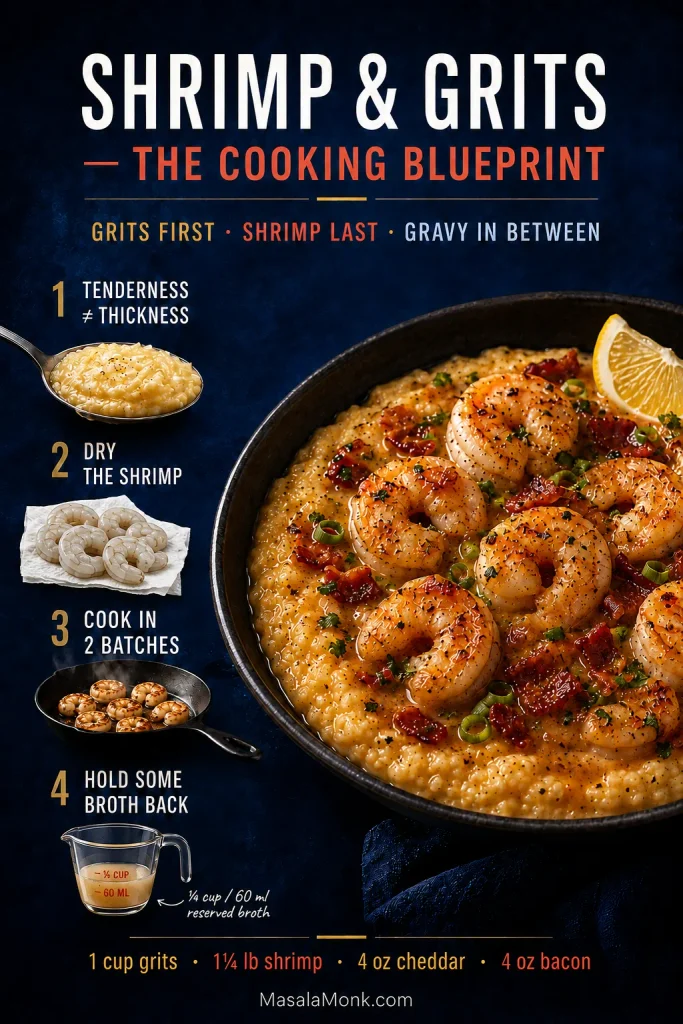
Before the deeper guide: this blueprint condenses the whole recipe into the checkpoints worth remembering.

Cooking blueprint showing tender grits, dried shrimp, two-batch searing, reserved broth and a finished tails-off shrimp-and-grits bowl.
Use this shrimp and grits blueprint as a final workflow check: tender grits, dry shrimp, two batches, reserved broth, then assemble.

Choosing the Right Grits for Shrimp and Grits

Grits are ground corn cooked with liquid until soft enough to spoon. Grind changes texture and cooking time; the corn itself, freshness and milling method have a great deal to do with flavor.

For the deepest corn flavor, good stone-ground grits are hard to beat. Old-fashioned grits are the default here because they still taste distinctly of corn while being easier to find and much easier to fit into a weeknight dinner.

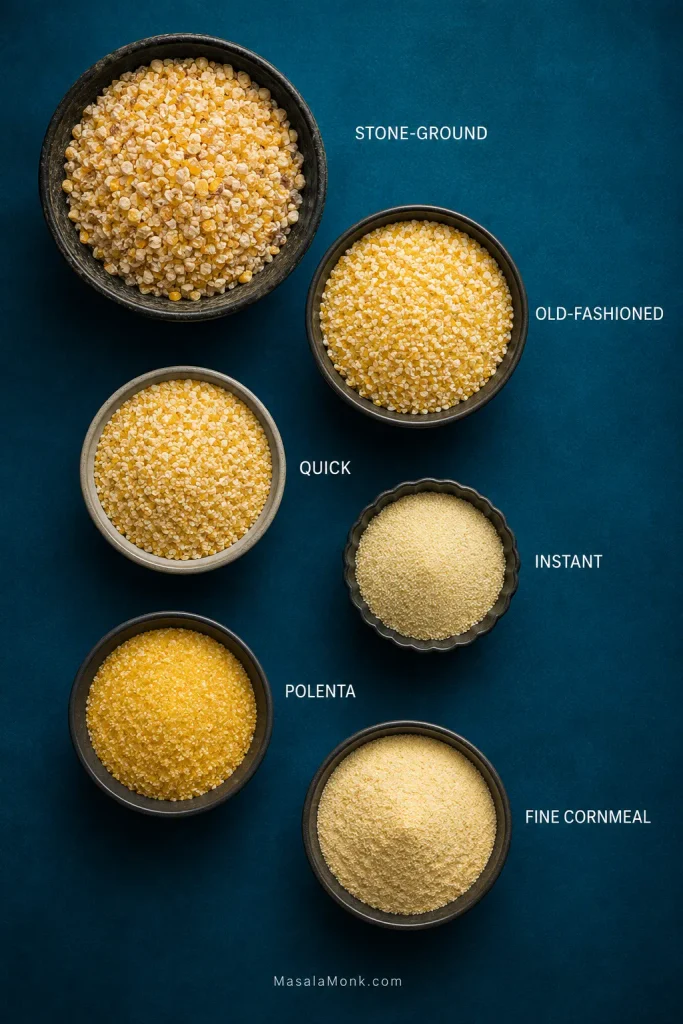
TypeWhat to expectBest fit
Stone-groundPronounced corn character, more texture, longest and most variable cookWhen corn flavor is the priority
Old-fashionedGood corn flavor, creamy texture, manageable timingMain recipe
QuickFiner and softer, with a much shorter cookFastest good shortcut
InstantVery soft texture and mild corn flavorConvenience first
PolentaA close relative with its own grind and cooking directionsCan work in a pinch
Fine cornmealMuch finer than gritsNot a direct substitute
Six bowls showing representative dry textures of stone-ground, old-fashioned, quick and instant grits, polenta and fine cornmeal.
The bowls show the visible grind spectrum—from coarser grits to fine cornmeal—so related corn products are easier to tell apart.

White or yellow? Either works. A fresh, flavorful bag of grits is a more important choice than the color of the corn.

If the bag in your cupboard is fine cornmeal, give it another job—something like Southern cornbread—instead of expecting it to cook like grits.

Stone-Ground Grits Follow the Mill

Stone-ground products vary dramatically. Some mills use a straightforward simmer; others recommend longer cooking, soaking, rinsing or skimming away floating chaff first. Follow the directions on the bag you are actually using and keep hot water nearby.

Some stone-ground grits soften fairly quickly. Others settle in for the better part of an hour. Let them.

Extra cheese can make undercooked grits richer. It cannot finish cooking the corn.

How to Tell When Grits Are Done

Taste first. Properly cooked grits can still have character; the grain should yield instead of crunching around a dry center.

Once the grains are tender, consistency is easy to change. Add hot liquid until the grits fall slowly and spread after serving.

Two bowls comparing thick undercooked grits with tender but overly thick grits and showing their different adjustments.
Both pots can look thick. Hard grits still need liquid and cooking; tender grits only need loosening.

← Back to the recipe · ↑ Back to top

Choosing Shrimp and Cheese

Raw fresh and raw frozen shrimp both work. Frozen shrimp simply need to be fully thawed and thoroughly dried before they see the skillet.

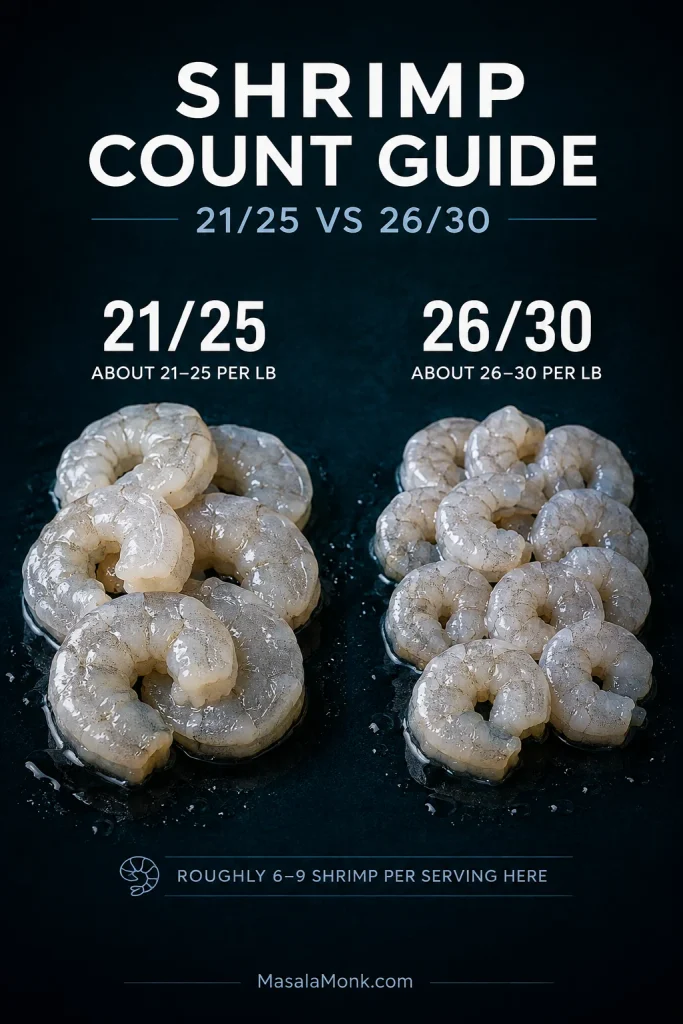
Ignore supermarket adjectives and look for the count. 21/25 or 26/30 gives you substantial shrimp that brown nicely but still show up repeatedly as you eat the bowl. With 1¼ pounds for four people, expect roughly 6–9 shrimp per serving.

Raw peeled tails-off shrimp arranged in 21/25 and 26/30 count groups, with the 21/25 shrimp slightly larger.
21/25 shrimp give fewer, meatier bites; 26/30 shrimp spread more pieces through the bowl while still feeling substantial.

A bowl of grits should be spoon food from first bite to last, so tails-off is the default. The same dry-shrimp, hot-pan, short-cook approach works beautifully in shrimp scampi.

Sharp cheddar works especially well because its tang survives the cream, bacon and gravy without wiping out the corn underneath. White cheddar behaves similarly. Gouda makes the flavor rounder; smoked Gouda shifts the bowl much further toward smoke.

How the Shrimp and Grits Gravy Works

There is no single gravy that defines every bowl of shrimp and grits. Some versions rely on bacon drippings, shrimp juices, butter and lemon. Others bring in flour, tomatoes, cream, sausage, tasso or a substantial roux.

This recipe uses a lighter bacon-garlic pan gravy. Flour gives the broth enough body to cling to the shrimp, Worcestershire reinforces the browned flavor from the skillet, and lemon sharpens the finish.

Start with ¾ cup broth and keep the final ¼ cup beside the stove. Skillet size, heat and evaporation decide how much you actually need.

For a visual check, drag a spatula through the gravy: a trail that lingers briefly before closing means the sauce is ready to coat.

A spatula dragged through glossy amber pan gravy, leaving a trail that stays visible briefly before flowing closed.
A trail that stays open briefly signals coating gravy; instant closure means reduce longer, while a stubborn trail needs reserved broth.

Using shell-on shrimp? Simmer the shells for about 10 minutes in the 1 cup / 240 ml chicken broth intended for the gravy, then strain. Top the infused broth back up to 1 cup / 240 ml with water or additional broth to replace what evaporated. Measure ¾ cup for the skillet and keep the final ¼ cup in reserve.

Shrimp and Grits Troubleshooting

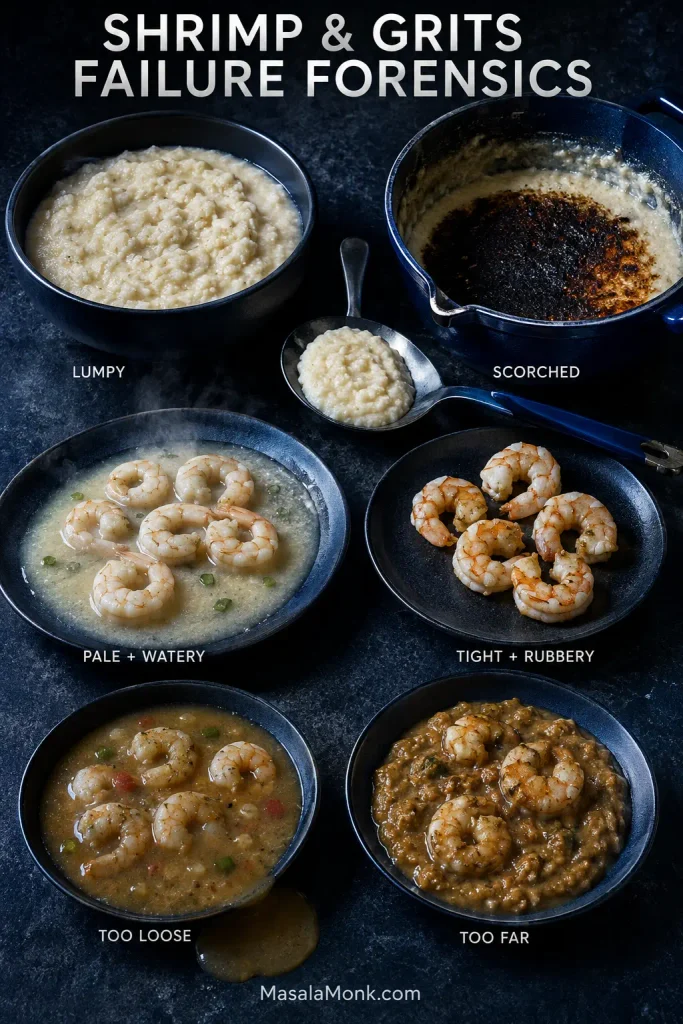
Similar-looking failures can need very different fixes. Diagnose first.

Cooking examples showing lumpy and scorched grits, pale watery and overcooked shrimp, thin gravy and over-reduced gravy.
Match the visual symptom to the component first; the fixes below are deliberately different for grits, shrimp and gravy.

My Grits Are Wrong

Thick but still hard: The corn is undercooked. Add hot liquid and keep cooking.

Tender but too thick: Cooking is finished. Loosen with hot water or broth.

Too loose: Simmer uncovered for a few minutes. They will also thicken slightly as they sit.

Lumpy: Whisk while the grits are still loose; stubborn set lumps may not disappear completely. Next time, pour the grits in gradually while whisking.

Scorched: Transfer the good portion to a clean saucepan and leave the burnt layer behind. Do not scrape it up.

Oily or stringy after cheese: The pot was probably too hot when the cheese went in.

My Shrimp Are Wrong

Pale and watery: Usually too much surface moisture, too little heat or too many shrimp in the pan.

Rubbery or tightly curled: They overcooked. Once shrimp are tough, you cannot uncook them. Get them off the heat sooner next time.

My Gravy Is Wrong

Too thin: Keep the shrimp out and reduce the sauce first.

Too thick: Add reserved broth slowly.

Lumpy: Whisk well; strain if stubborn lumps remain.

Flat: Taste for salt, savory depth and brightness before reaching for more seasoning blend.

Heavy: Try lemon before more cream or cheese.

Too salty: Stop adding salty ingredients and dilute with unsalted liquid if the sauce can tolerate it.

← Back to the recipe · ↑ Back to top

A Few Ways to Change the Bowl

  • Andouille: replace the bacon with 4–6 oz / 113–170 g sliced andouille. Brown it first, remove it, and return it near the end. Add a little butter or olive oil if the sausage leaves too little fat for the shrimp.
  • No cheese: fully cooked grits are still delicious finished with butter and a little cream or milk.
  • A little lighter: reduce the bacon, use whole milk instead of cream and pull back the cheddar.
  • Gluten-free: check the packaged ingredients and replace the all-purpose flour with the same amount of a 1:1 gluten-free all-purpose flour blend.

Lowcountry Roots, Modern Southern Shrimp and Grits

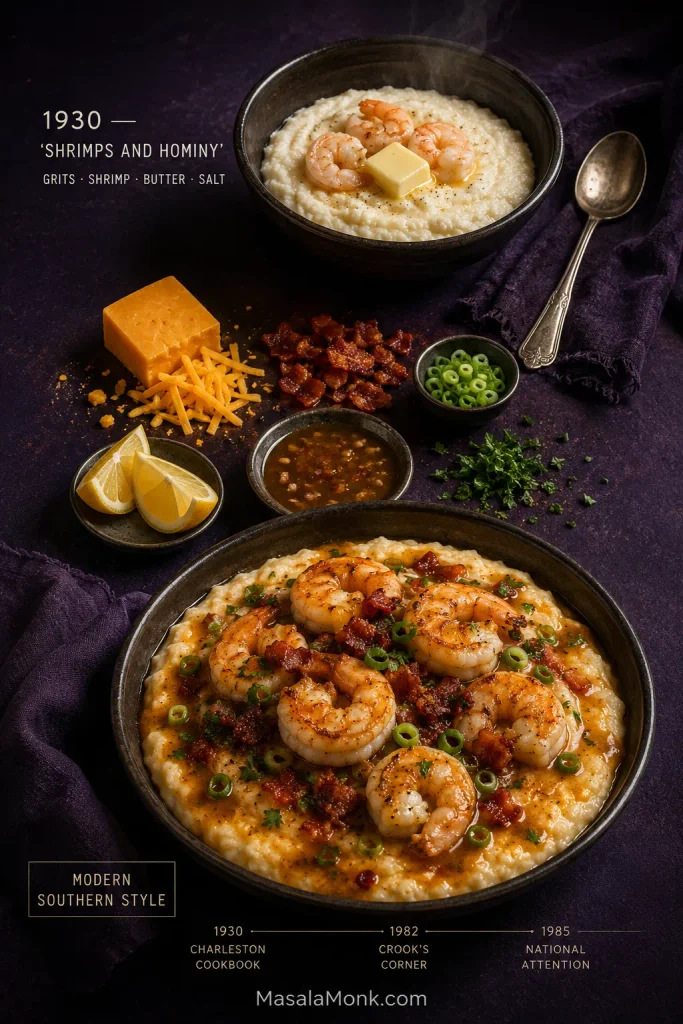
Shrimp and grits is most strongly associated with South Carolina’s Lowcountry, especially Charleston, although there is no single documented moment when the dish began. Smithsonian reporting describes shrimp and grits as an amalgamation of West African and Indigenous American ingredients and methods, a framing that fits the broader Gullah Geechee foodways of the Lowcountry.

One of the most memorable early records appears in the 1930 cookbook Two Hundred Years of Charleston Cooking. The Local Palate identifies the cook credited with “Shrimps and Hominy” as William Deas, the cookbook author’s African American butler. He was said to be 78 and to have eaten the dish every morning during shrimp season for as long as he could remember.

The old recipe was startlingly spare: hot grits, shrimp, butter and salt. Cheese, bacon, sausage, tomatoes, cream and elaborate gravies all came later.

Editorial comparison of a simple early shrimp-and-grits bowl with butter and salt and a modern version with cheddar, bacon, gravy, scallions and lemon.
The 1930 “Shrimps and Hominy” record shows a much sparer bowl; later Southern versions layered in cheese, bacon and gravy.

Bill Neal and Gene Hamer opened Crook’s Corner in Chapel Hill in 1982 and began serving shrimp and grits for dinner. Craig Claiborne’s 1985 New York Times article helped carry the dish far beyond its regional breakfast associations.

Here, the modern additions are cheddar grits, bacon and pan gravy, with Cajun or Creole seasoning bringing warmth. For a Louisiana dish where roux and regional seasoning move much closer to the center, Cajun étouffée makes a useful contrast.

Make-Ahead, Storage and Reheating

Peel the shrimp, chop the bacon and aromatics, grate the cheddar and measure the broth ahead if that makes dinner easier. Cook the shrimp close to serving.

Storing Leftovers

When possible, refrigerate the grits separately from the shrimp and gravy in airtight containers. Use the leftovers within about 3 days.

Reheating the Grits

Cold grits become firm. Warm them over low heat with a splash of water, broth or milk, stirring until creamy again.

Reheating the Shrimp and Gravy

Use gentle heat so the shrimp spend as little extra time cooking as possible, but reheat leftovers thoroughly. Current federal guidance calls for leftovers to reach 165°F / 74°C.

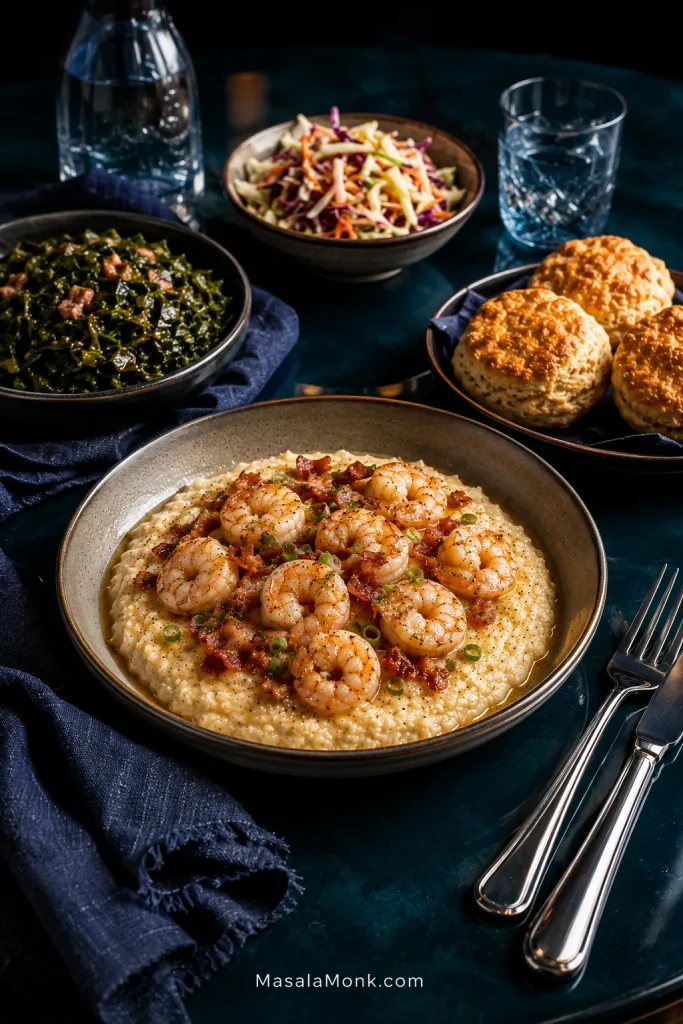
What to Serve With Shrimp and Grits

A rich bowl likes contrast around it. You do not need a long menu.

  • Fresh contrast: crunchy coleslaw, ripe tomatoes or a green salad with a sharp vinaigrette.
  • Green and savory: collard greens, green beans or roasted asparagus.
  • For the gravy: warm Southern buttermilk biscuits.
Shrimp and grits served with crisp slaw, collard greens and warm biscuits on a glossy dark teal dinner table.
Because the bowl already brings starch, richness and sauce, crisp acidity, savory greens and warm biscuits create the most useful contrast.

This version works naturally for brunch or dinner. For an appetizer, use a small cup of grits and one or two shrimp per person.

If you make it, tell us which grits you used—old-fashioned, stone-ground or quick—and whether your gravy needed any of the reserved broth. Those two details vary quite a bit from one kitchen to another.

Then eat it hot. The spoonful worth chasing has corn, a plump shrimp, a little pan gravy and a piece of crisp bacon all at once.

← Back to the recipe · ↑ Back to top

Posted on — Leave a comment

Southern Cornbread Dressing Recipe: Old-Fashioned, Moist & Easy

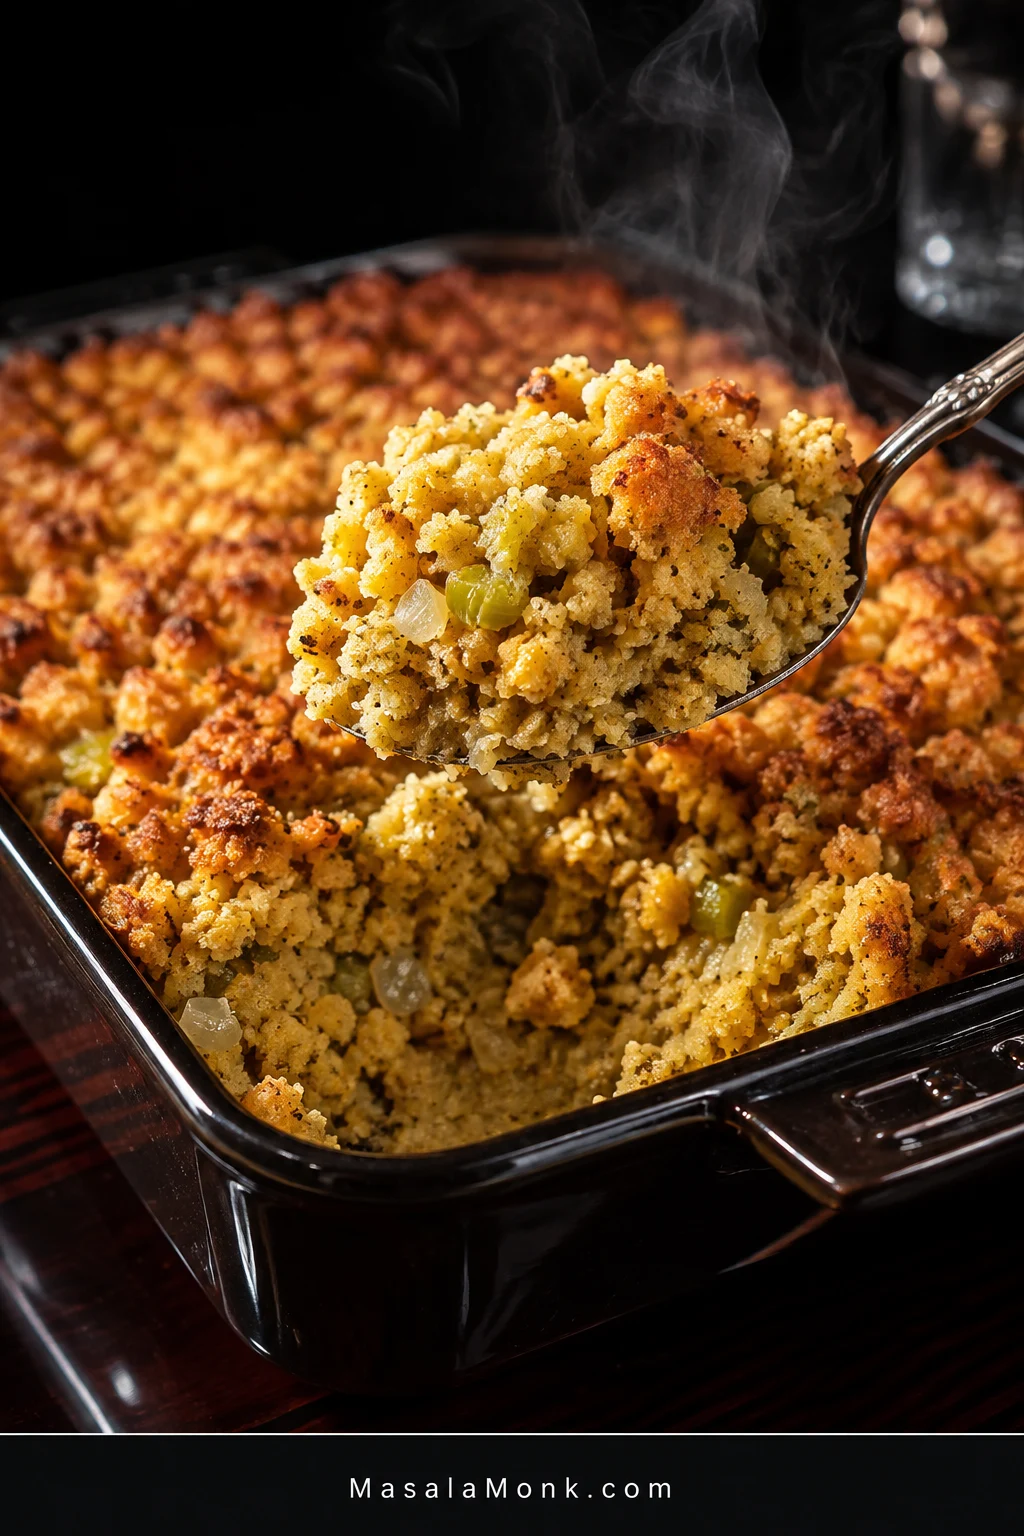
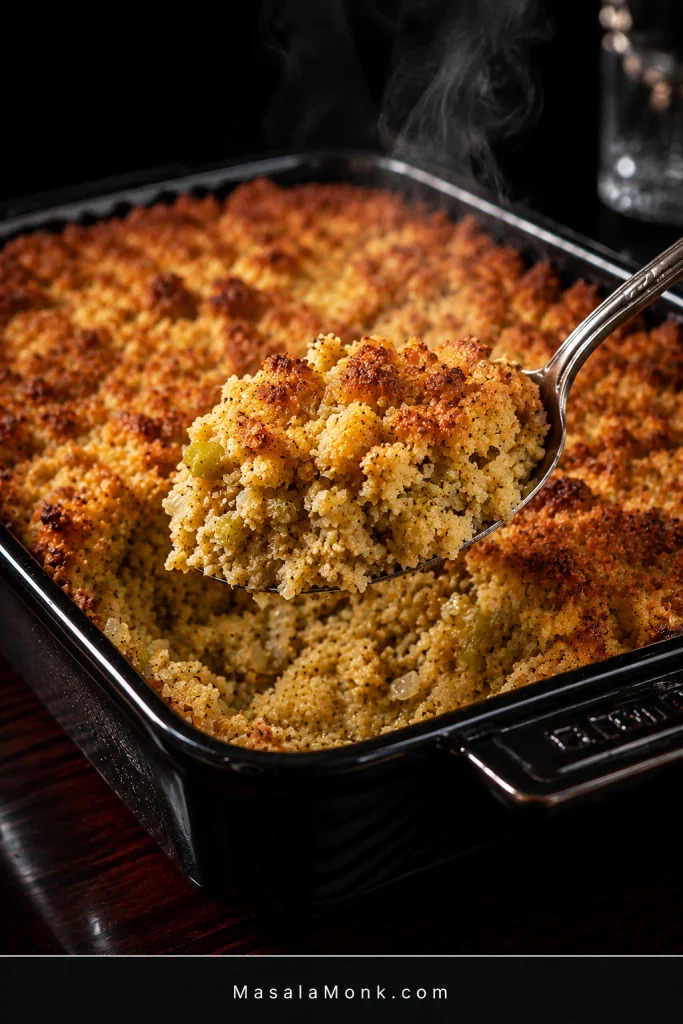
Southern cornbread dressing in a dark baking dish with a serving removed, showing a golden top and soft interior with onion, celery and herbs.

Southern cornbread dressing has a lightly golden top and a soft, moist center that gives easily to a serving spoon and holds together on the way to the plate.

It is also one of those dishes people may cook only once or twice a year, often for a table full of people who already know exactly how they think dressing should taste. That can make the bowl just before baking feel unusually important: Is it wet enough? Too wet? Did I add too much sage?

This one keeps things straightforward—savory homemade cornbread, a little plain bread, tender onion and celery, butter, broth, sage and eggs. Southern families disagree about plenty of the details; here, cornbread leads the flavor and the finished center stays soft, savory and spoonable.

Quick Answer

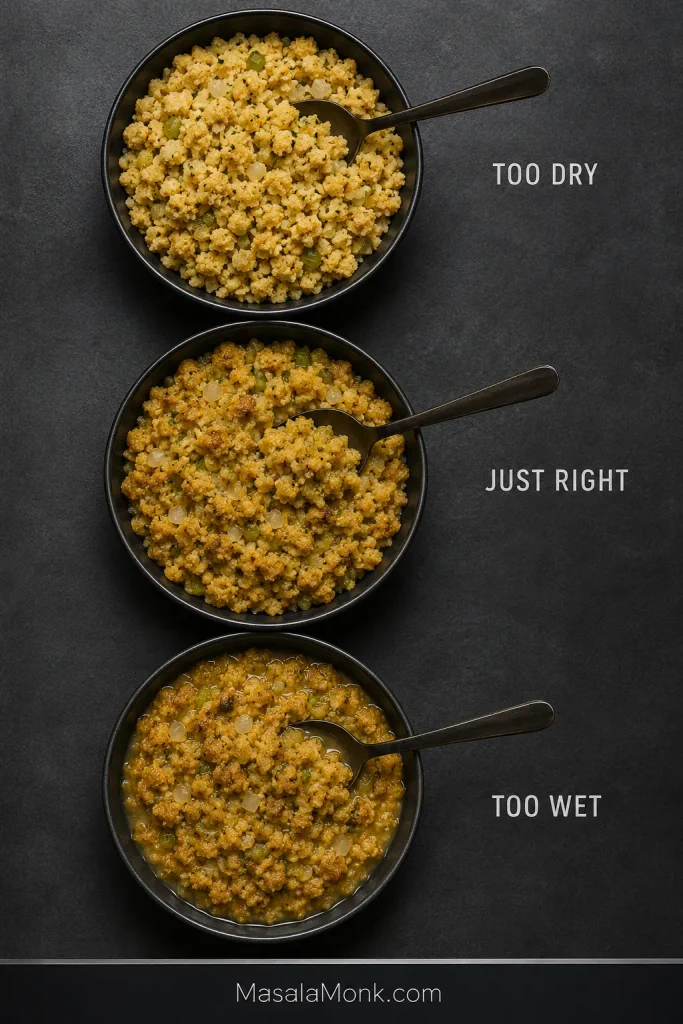
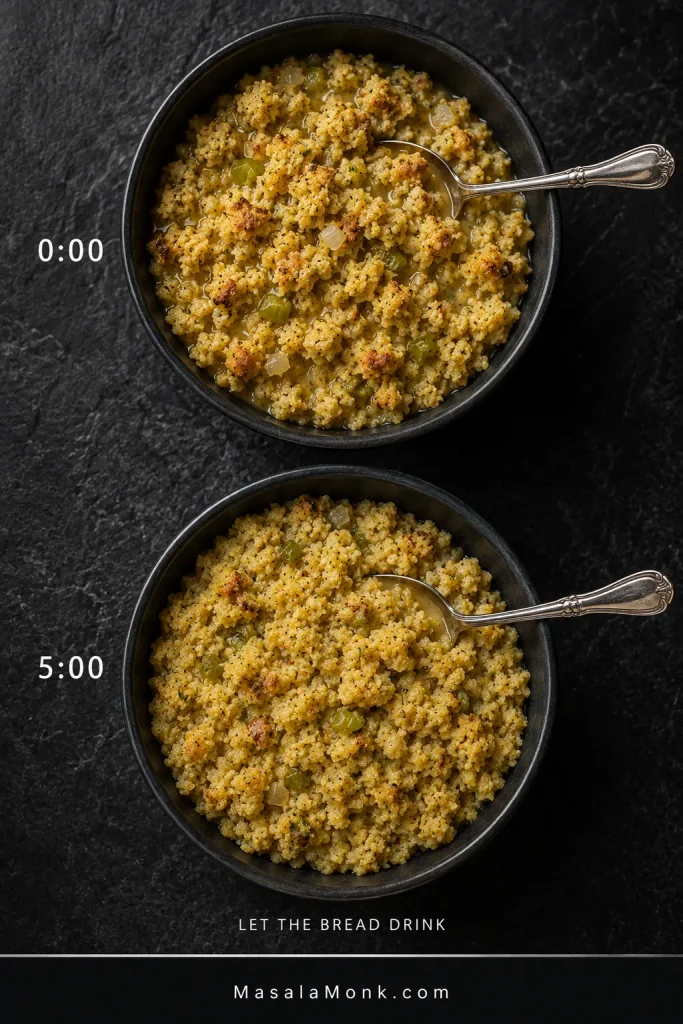
Cornbread dressing should look very moist before baking, with the broth soaked through the bread instead of pooling separately underneath it.

For the cornbread used in this recipe, start with 4 cups / 950 mL warm broth, fold gently and leave the bowl alone for 5 minutes. Dry crumbs or a stiff mound mean it needs more. When a spoonful slowly settles and the broth is absorbed throughout the bread, stop adding liquid. A persistent puddle beneath saturated crumbs means the bowl has gone too wet.

Taste and season before adding the raw eggs. Bake in a 9×13-inch / 23×33 cm dish at 375°F / 190°C until lightly golden, set through the middle and at least 165°F / 74°C.

Pan: 9×13 in / 23×33 cm   •   Serves: 10–12   •   Texture: soft, moist and spoonable

Three bowls compare cornbread dressing that is too dry, correctly moistened, and too wet with broth pooling around saturated crumbs.
After the five-minute rest, the middle bowl can move on to seasoning and eggs; the dry and pooled-liquid versions still need correction.

Southern Cornbread Dressing Recipe

Old-fashioned Southern cornbread dressing with tender onion and celery, sage and a soft, moist center with recognizable pieces of cornbread.

Active prep: about 25 minutes with prepared cornbread   •   Bake: 45–55 minutes   •   Rest: 10–15 minutes   •   Total with prepared cornbread: about 1 hour 20 minutes–1 hour 35 minutes

Starting with freshly baked cornbread? Allow extra time for it to cool and dry before the active prep begins.

Equipment

  • 9×13-inch / 23×33 cm baking dish
  • Large mixing bowl
  • Large skillet
  • Baking sheet if drying the breads the same day
  • Aluminum foil
  • Instant-read thermometer

Ingredients

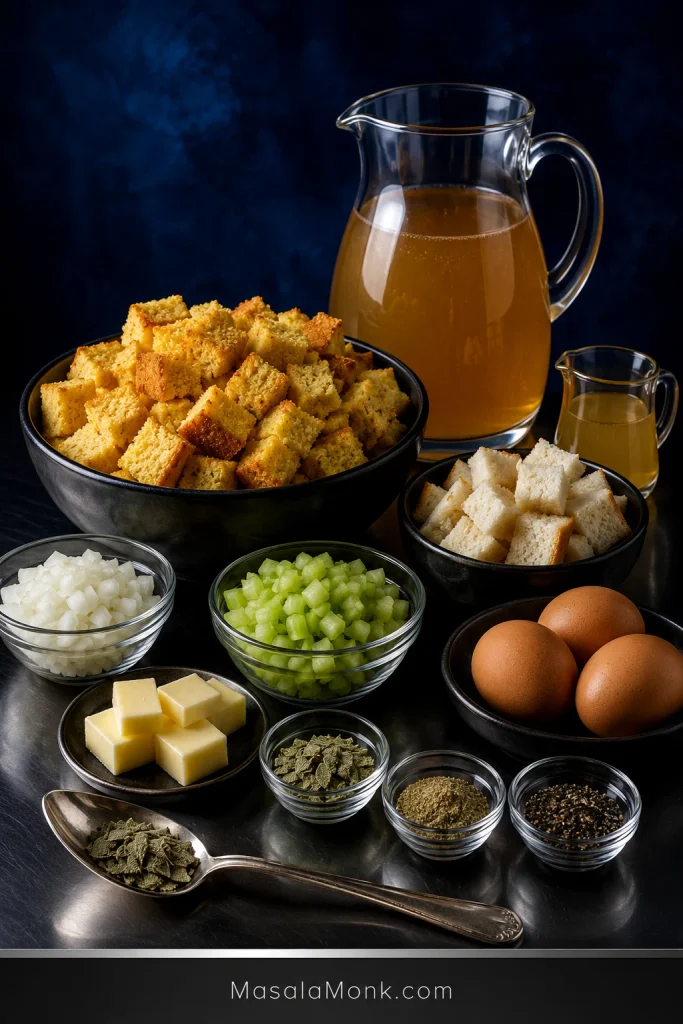
Ingredients for Southern cornbread dressing arranged on a dark blue set: cornbread, white bread, onion, celery, butter, sage, seasoning, eggs and broth.
Cornbread leads; the smaller amount of white bread supports the soft center without turning this into ordinary bread stuffing.

Bread

  • 1 full 10-inch / 25 cm skillet savory Southern cornbread, completely cooled and slightly dried
  • 4 oz / 115 g plain white sandwich bread, about 4–5 standard slices, dried and torn

For the closest match to the method below, use the savory version of MasalaMonk’s Southern Cornbread Recipe. Other homemade and boxed cornbreads can differ in size, sweetness and absorption, so the broth may need to be handled a little differently.

Butter, Onion and Celery

  • 8 tablespoons / 4 oz / 113 g unsalted butter, plus more for the baking dish
  • About 1½ cups / 7 oz / 200 g yellow onion, finely diced
  • About 1½ cups / 6.3 oz / 180 g celery, finely diced

Seasoning

  • 2 teaspoons rubbed sage
  • 1 teaspoon poultry seasoning
  • 1 teaspoon freshly ground black pepper
  • Fine salt, to taste after the first broth soak; broth and cornbread can vary considerably in saltiness

Broth and Eggs

  • Starting broth: 4 cups / 950 mL low-sodium chicken or turkey broth, warmed
  • Reserve broth: up to 1 cup / 240 mL, warmed
  • 3 large eggs

Good homemade turkey broth can replace the chicken broth. Strained juices or drippings from a fully cooked turkey can replace part of it too; use concentrated or salty drippings sparingly.

Think of the last cup of broth as insurance, not a target. Very dry bread may want most of it. Fresher bread may need little or none.

Instructions

1. Dry and Crumble the Breads

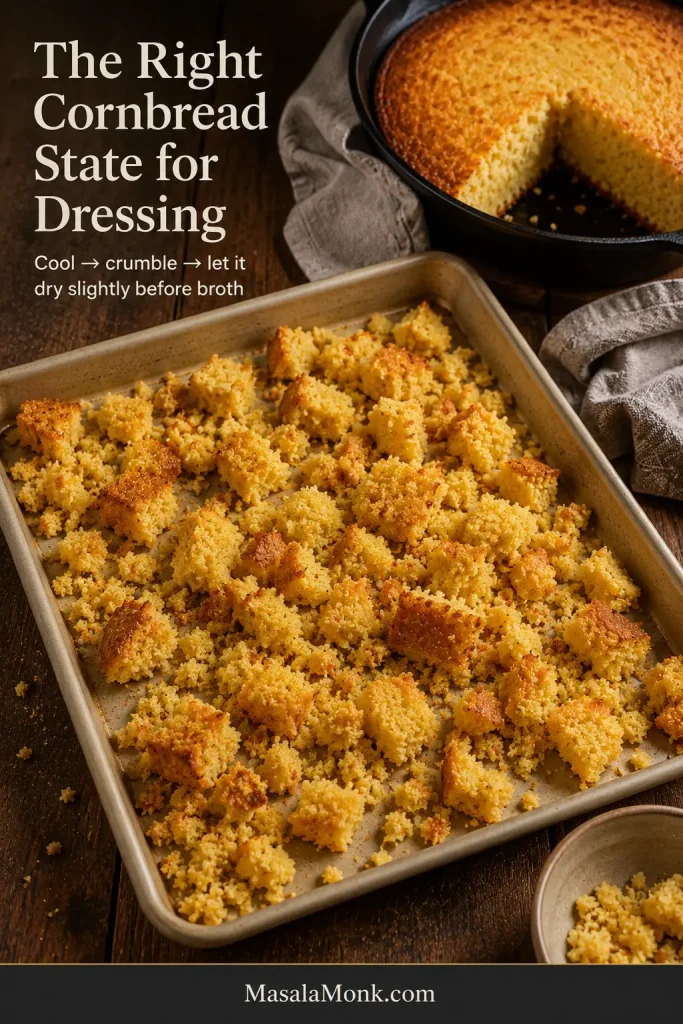
If possible, bake the cornbread a day ahead and cool it completely. Breaking it into large pieces gives some of the fresh-baked moisture a chance to escape.

For same-day dressing, spread the cooled cornbread pieces on a baking sheet and dry them at 250°F / 120°C, turning occasionally and beginning to check around 20 minutes. Add the torn white bread too, watching the thinner pieces because they may dry sooner.

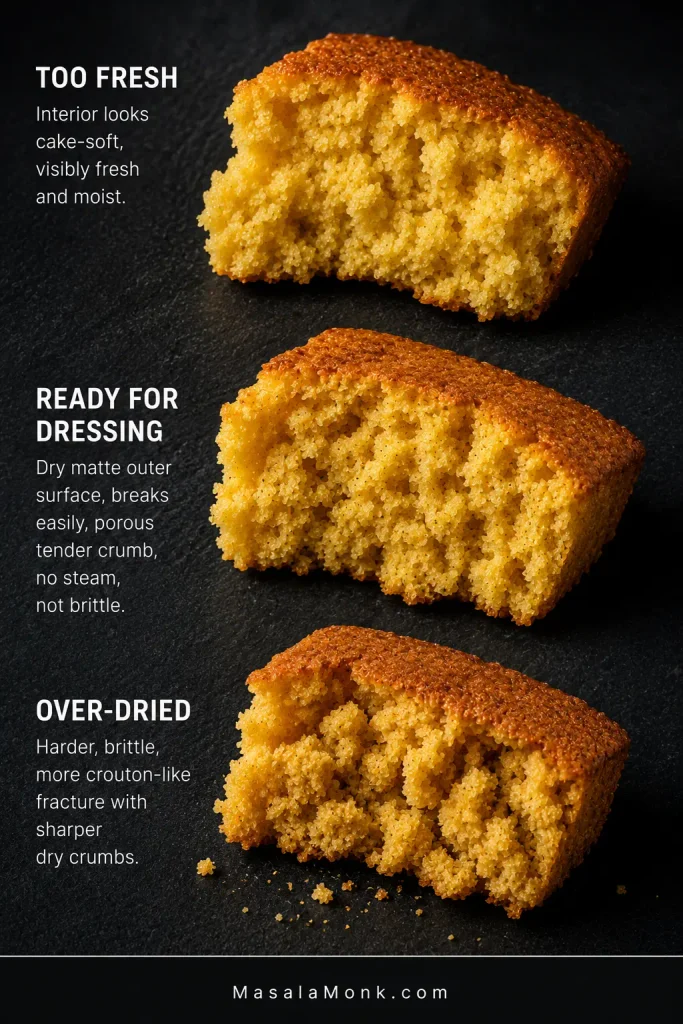
The surface feels dry and the pieces break easily when they are ready. The middle no longer feels steamy or cake-soft. There is no need to turn the bread into hard croutons.

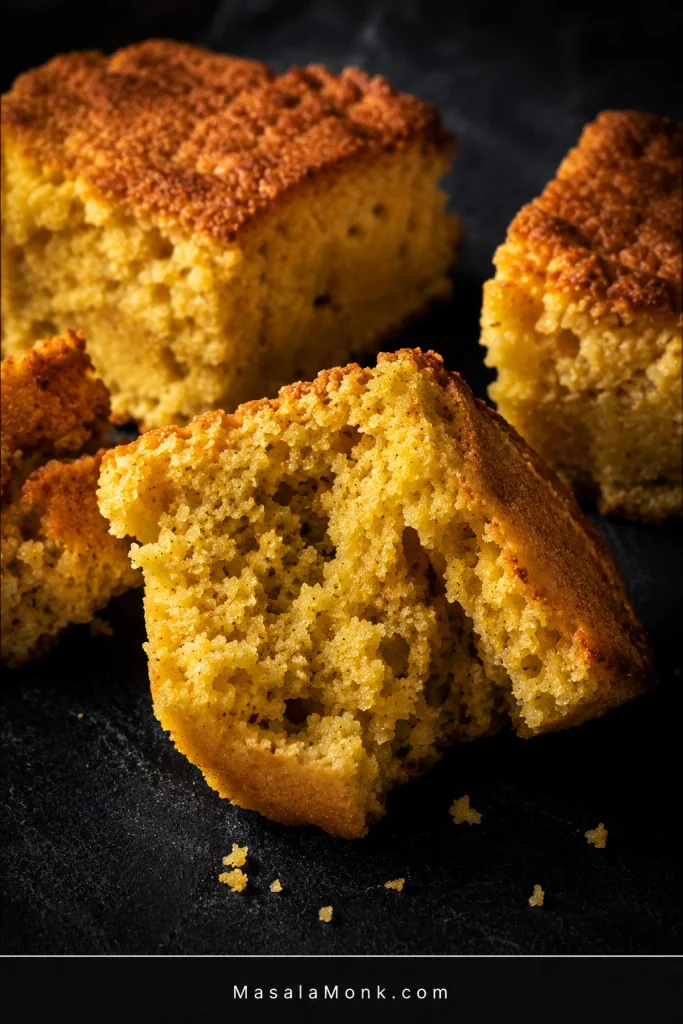
Broken pieces of slightly dried cornbread with a matte exterior and porous, still-tender interior crumb.
Slightly dried cornbread gives you more control over broth without becoming hard or crouton-like.

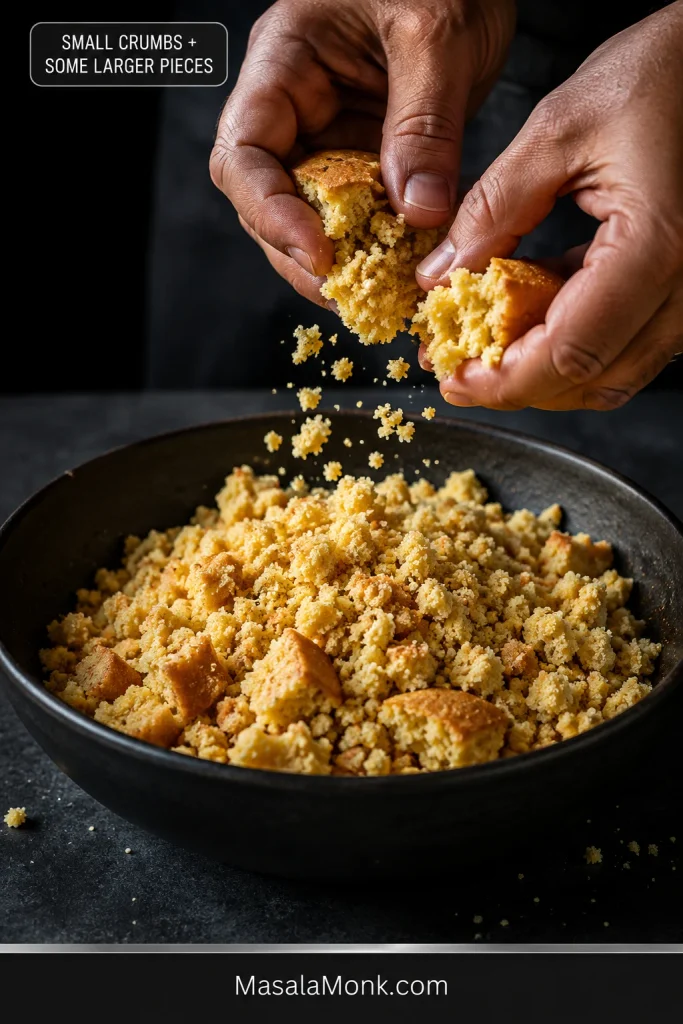
Crumble the cornbread into a large bowl. Most pieces can be small, with a scattering of irregular ½–1 inch / 1–2.5 cm pieces. Uneven crumbs are fine.

Hands crumble cornbread over a bowl, leaving mostly small irregular crumbs with some larger half-inch to one-inch pieces.
Small crumbs absorb and bind; a few larger pieces keep the finished dressing recognizably cornbread.

Raise the oven to 375°F / 190°C when the bread is ready. If you dried it ahead, simply preheat the oven before assembly.

2. Cook the Onion, Celery and Seasonings

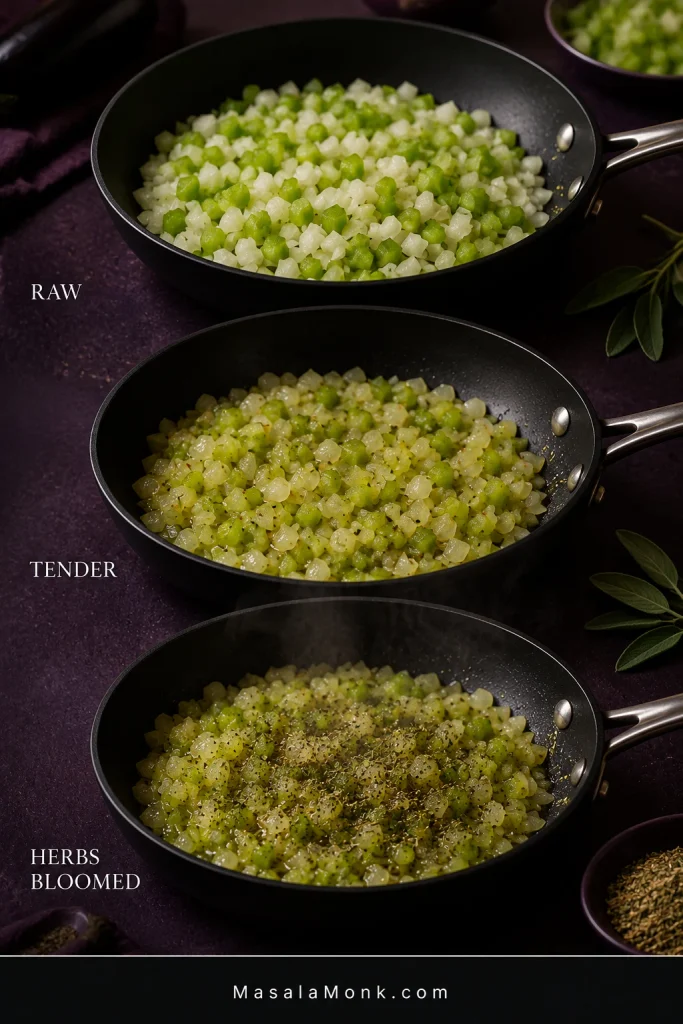
Melt the butter in a large skillet over medium heat. Add the onion and celery and cook for 8–10 minutes, stirring occasionally, until tender and translucent. A little color around the edges is welcome.

Add the rubbed sage, poultry seasoning and black pepper for the final 30–60 seconds. When the herbs hit the warm butter, the skillet should smell unmistakably like dressing. Scrape the vegetables and all of that seasoned butter over the bread.

Three pans show diced onion and celery raw, softened and translucent, then cooked with sage and poultry seasoning in butter.
Tender vegetables will not need to cook inside wet bread, while the brief herb bloom seasons the butter.

3. Add the First Broth

Using the linked cornbread or another similarly sized homemade batch, pour 4 cups / 950 mL warm broth around the bowl and fold gently from the bottom.

Using a noticeably smaller or very different batch of cornbread? Start with less broth and work upward instead of automatically pouring in all 4 cups.

As the broth spreads through the bowl, the crumbs become glossy and heavy with moisture while their cornbread texture remains visible. Fold only enough to distribute the liquid.

4. Leave It Alone for 5 Minutes

This is the point where dressing often looks wrong even when it isn’t. Give the bread time to drink before changing anything.

After 5 minutes, fold once or twice. Pale dry crumbs or a spoonful that sits in a stiff mound mean the bowl wants more broth. Add the reserve ¼ cup / 60 mL at a time.

Two bowls compare cornbread dressing immediately after broth is added and after five minutes, when the bread has absorbed more liquid and thickened.
Five minutes changes the picture: give the bread time to absorb the first broth before deciding whether it needs more.

Stop when the bread is moist all the way through and a spoonful slowly settles back into the bowl. Saturated crumbs with a persistent pool of broth underneath have gone too far.

Trust what the bread is doing more than the amount left in the measuring cup.

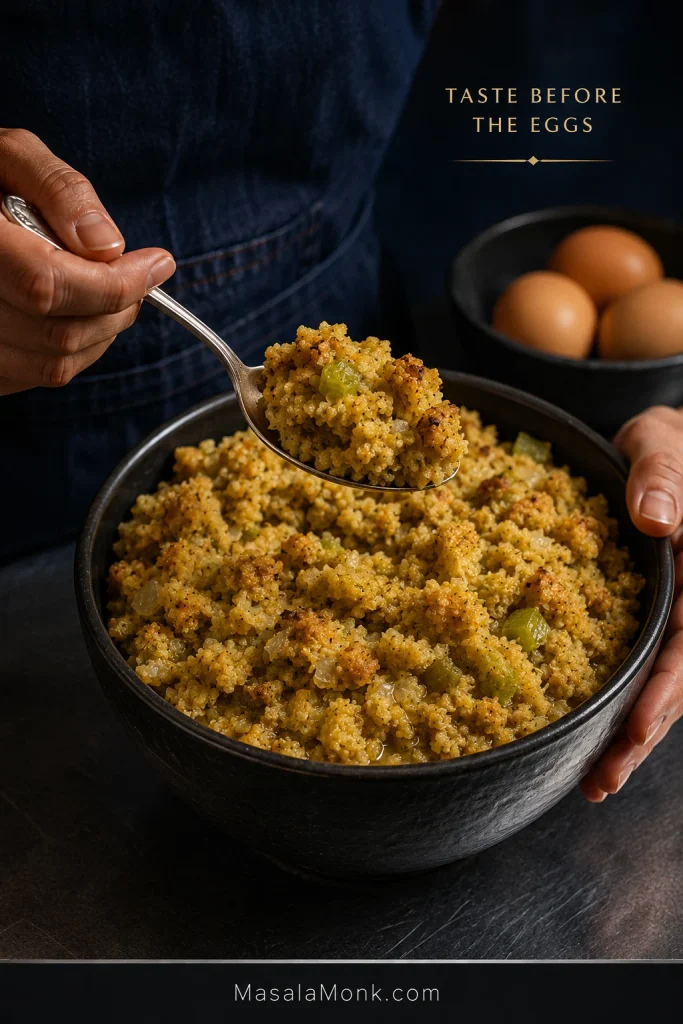
5. Taste, Season, Then Add the Eggs

Taste the dressing before the raw eggs go in. Add salt as needed, then taste for pepper or another small pinch of rubbed sage.

A hand tastes moistened cornbread dressing from a spoon while three whole eggs wait separately in the background.
After hydration, salt and sage register more clearly—making this the best moment for the final seasoning adjustment.

Go carefully with the sage. Adding another pinch is easy; softening an overwhelmingly herbal pan is not.

Whisk the 3 eggs, pour them over the dressing and fold gently until evenly distributed. Stop tasting once the raw eggs are in.

6. Fill the Baking Dish

Butter a 9×13-inch / 23×33 cm baking dish. Spoon in the dressing and spread it evenly without packing it down.

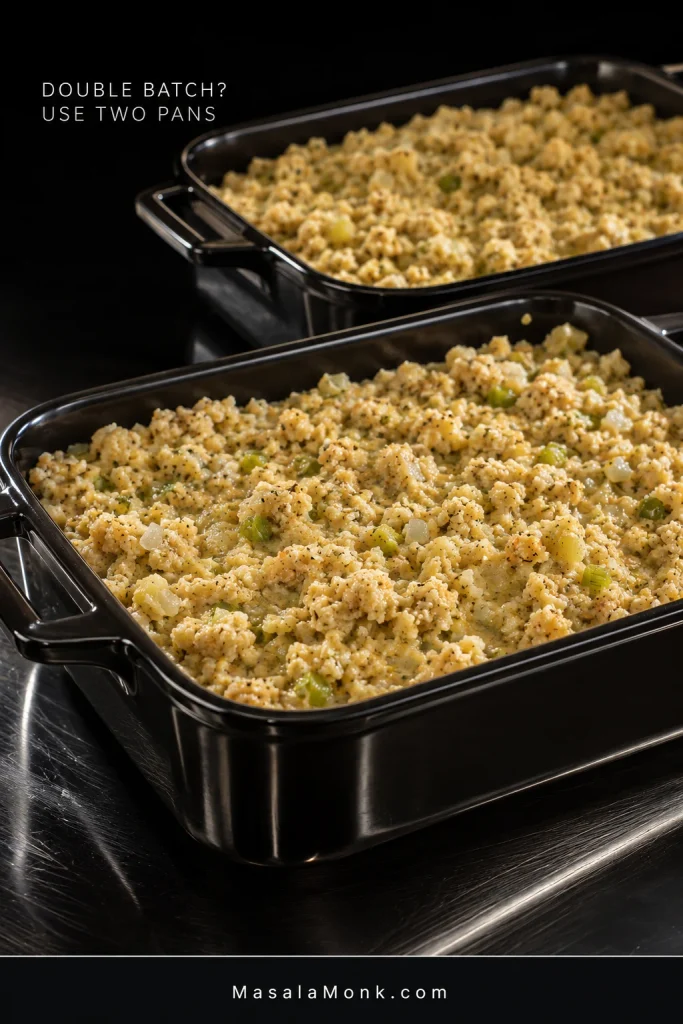
Making a double batch? Use two 9×13 pans. Keeping the layer close to the original depth helps both pans cook evenly.

Two dark baking dishes filled with moist unbaked cornbread dressing, illustrating the use of two pans for a double batch.
Two pans keep a double batch close to the original depth, so the bake behaves more like the single recipe.

7. Bake Covered, Then Uncovered

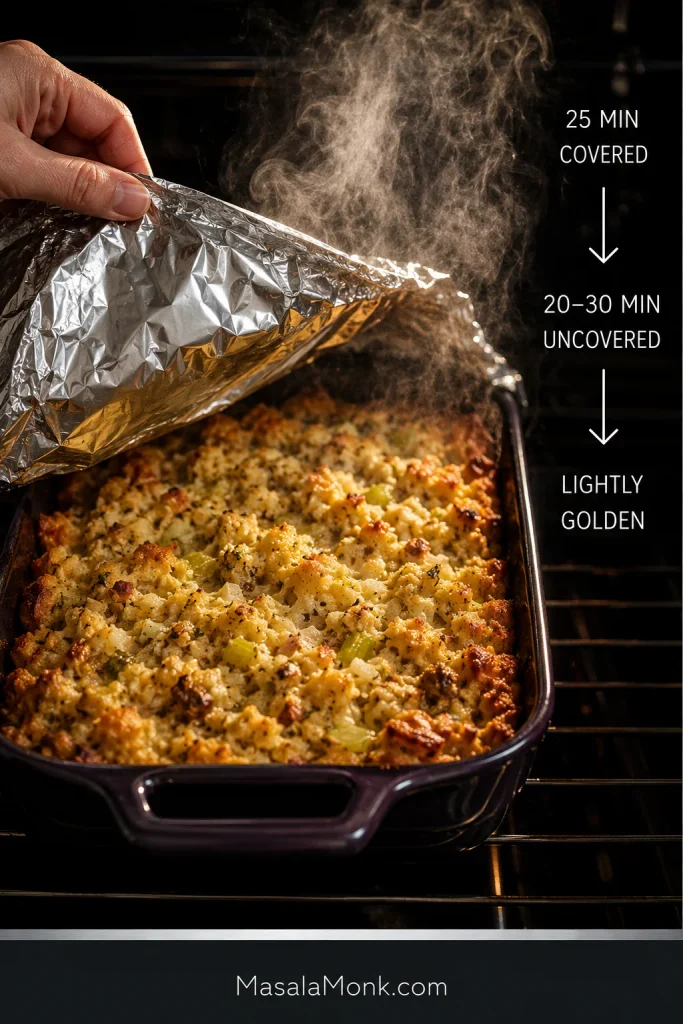
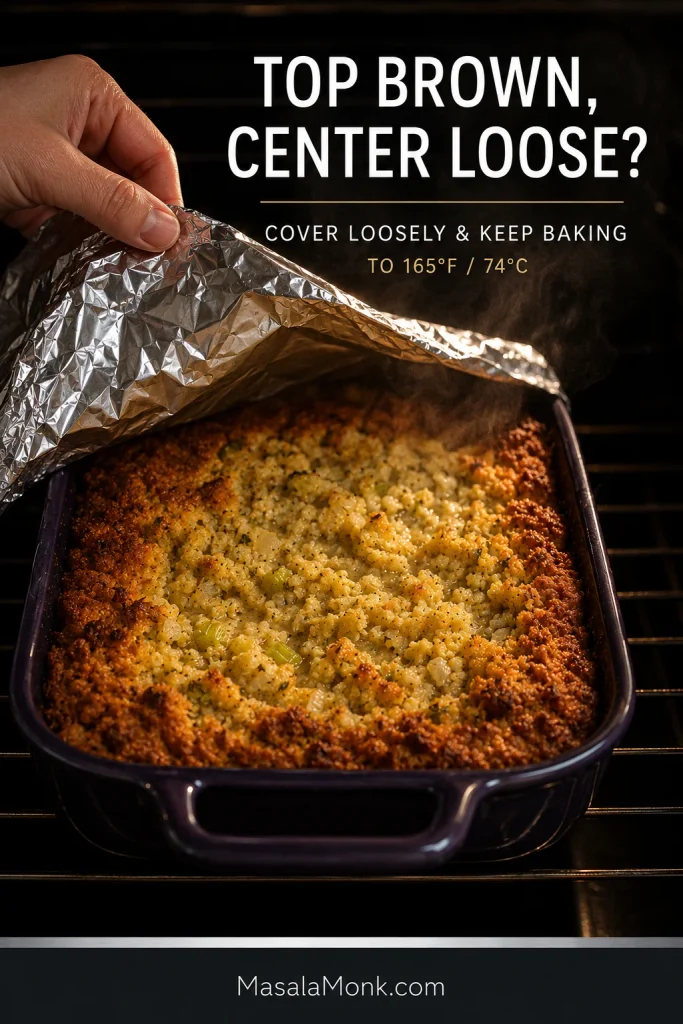
Cover loosely with foil and bake at 375°F / 190°C for 25 minutes. Remove the foil and bake another 20–30 minutes, beginning to look in on it around 20 minutes.

Foil being lifted from a steaming cornbread dressing casserole with instructions for 25 minutes covered, then 20 to 30 minutes uncovered until lightly golden.
Covered first protects the center; uncovering later shifts the oven’s job toward browning the surface.

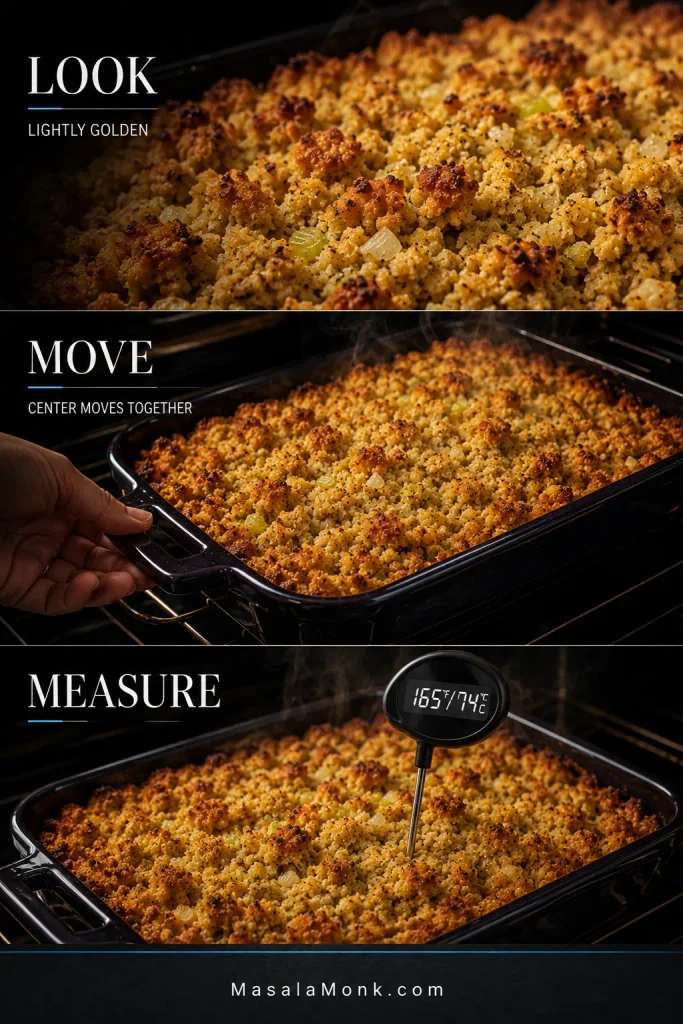
The top turns lightly golden, with deeper toasted patches near some of the edges. Nudge the dish and the middle moves together gently instead of rippling or sloshing like loose batter. The center needs to reach at least 165°F / 74°C.

Take it out while the center still looks moist. The 10–15 minute rest will give it a little more structure.

8. Rest Before Serving

Leave the pan alone for 10–15 minutes. A serving spoon uncovers a moist interior beneath the lightly toasted surface, tender enough to yield and firm enough to reach the plate.

A silver serving spoon lifts rested Southern cornbread dressing from a dark casserole, revealing a soft moist interior beneath the browned top.
The 10–15 minute rest lets the moist center settle without baking away its tenderness.

Serve warm, while the top still has a little toastiness and the center is soft, savory and fragrant with sage and butter.

What Kind of Southern Cornbread Dressing Is This?

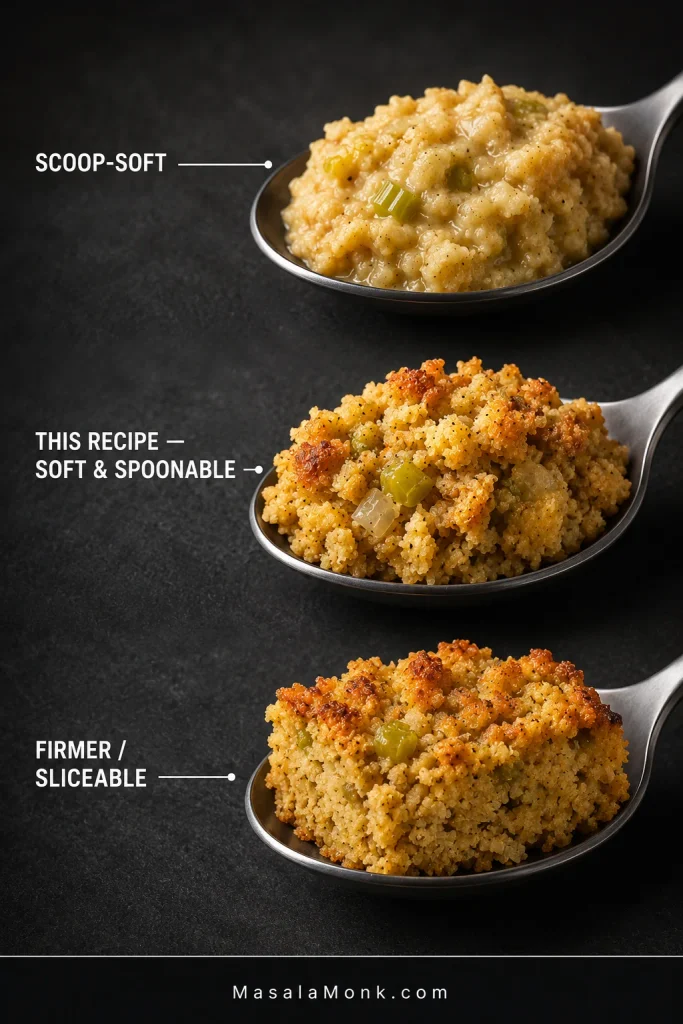
There isn’t one Southern dressing rulebook. One family may love a pan so soft it is almost spoon-pudding tender. Another may expect neat squares. Biscuits, white bread, chicken and condensed soup all appear in different family versions.

Three spoonfuls compare scoop-soft dressing, this recipe’s soft and spoonable texture, and a firmer sliceable style.
Two recipes can both be Southern cornbread dressing and land at very different points on this spectrum. Choose the texture you want before changing broth or bake time.

For a lot of cooks, the real reference point isn’t another written recipe at all. It is the pan they remember from Thanksgiving—the one somebody made largely by feel, adding broth until “it looked right.” The cues here are meant to make that judgment easier to recognize and repeat.
Here, cornbread leads the flavor. Onion and celery soften in butter first, sage stays clearly present, and raw eggs help the moist center set. Chicken, sausage and condensed soup can make excellent dressings too; they change the salt, fat and moisture enough to deserve their own balance.

Dressing vs Stuffing

The words overlap heavily in everyday use. A practical distinction is that dressing is commonly baked in its own casserole dish, while stuffing traditionally cooks inside poultry. This recipe is baked separately.

Which Cornbread Is Best for Dressing?

Slightly dried or day-old savory cornbread is easiest to work with because it has room to take on broth. Fresh cornbread works too; give it some time in the low oven first.

Good dressing bread feels dry at the surface and crumbles easily. It does not need to be brittle. Starting with a very moist, cake-soft pan simply makes the broth harder to control.

Three pieces of cornbread compare too-fresh cake-soft crumb, bread ready for dressing with a dry surface and tender crumb, and brittle over-dried bread.
The middle state gives you the most room to build moisture gradually without starting with cake-soft bread.

Why Add a Little White Bread?

The 4 oz / 115 g white bread is a small supporting part of the bowl. Cornbread supplies the flavor; the plain bread gives the tender center a little extra help holding together.

Some Southern dressings use biscuits for a similar reason. Plain sandwich bread stays deliberately quiet here.

Prefer all cornbread? Replace the white bread with 4 oz / 115 g additional dried cornbread. Let the first broth soak in before reaching for more, since an all-cornbread bowl may absorb differently.

Can I Use Jiffy or Another Corn Muffin Mix?

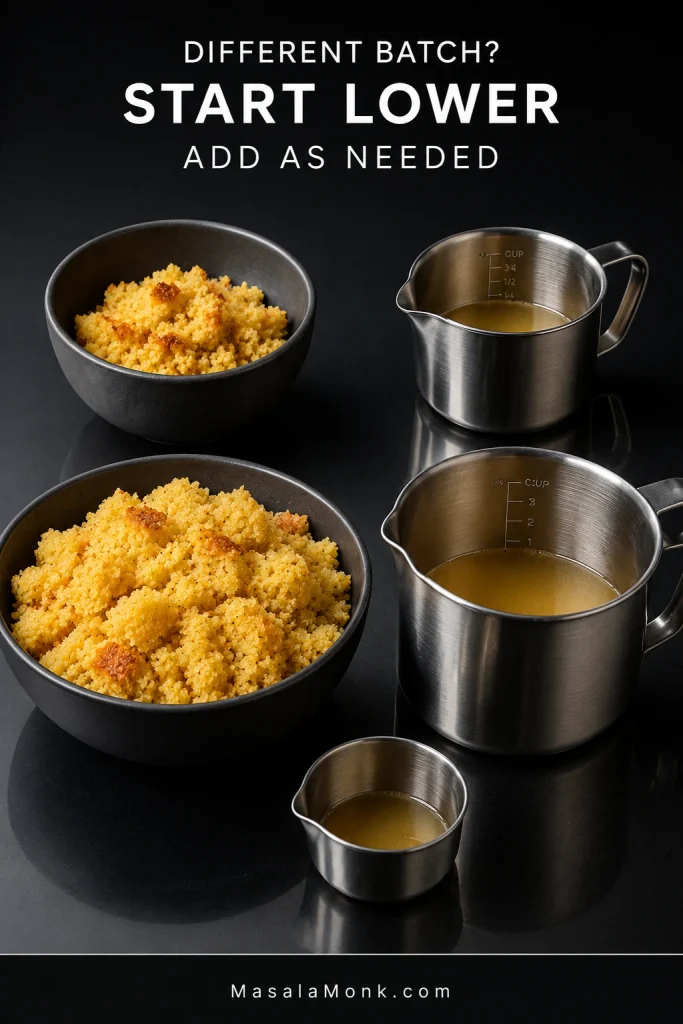
Yes, but expect a sweeter flavor and different absorption. Boxed mixes and other homemade recipes can also produce a smaller or larger amount of cornbread.

When the amount differs noticeably from the linked recipe, add the broth gradually. A smaller batch may need considerably less than 4 cups, while a larger or drier batch may take more.

Two bowls with different amounts of crumbled cornbread beside different starting amounts of broth, illustrating starting lower and adding broth as needed.
Batch size changes absorption capacity. A smaller boxed or homemade cornbread batch should not automatically receive the full broth amount.

How Much Sage—and What Do the Eggs Do?

Start with 2 teaspoons rubbed sage plus 1 teaspoon poultry seasoning. After the broth has soaked into the bread, taste and make any final adjustment before the eggs go in.

Rubbed Sage vs Ground Sage

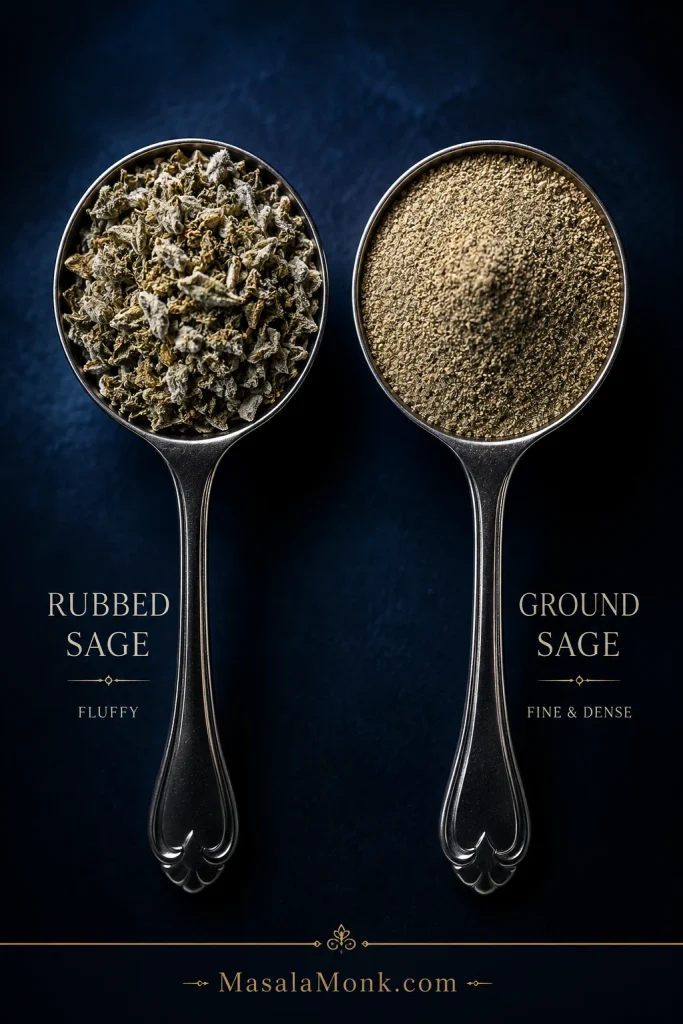
Ground sage is much finer and packs more tightly into a measuring spoon than fluffy rubbed sage. A teaspoon-for-teaspoon swap can therefore taste considerably stronger.

Using ground sage? Begin cautiously. Poultry seasoning often contains sage as well, so check the label if you want a milder sage flavor or need to avoid it altogether.

Two measuring spoons compare fluffy leafy rubbed sage with fine, dense ground sage on a dark blue background.
Ground sage packs more densely than rubbed sage, so start conservatively and adjust after the broth soaks in.

Do You Put Eggs in Cornbread Dressing?

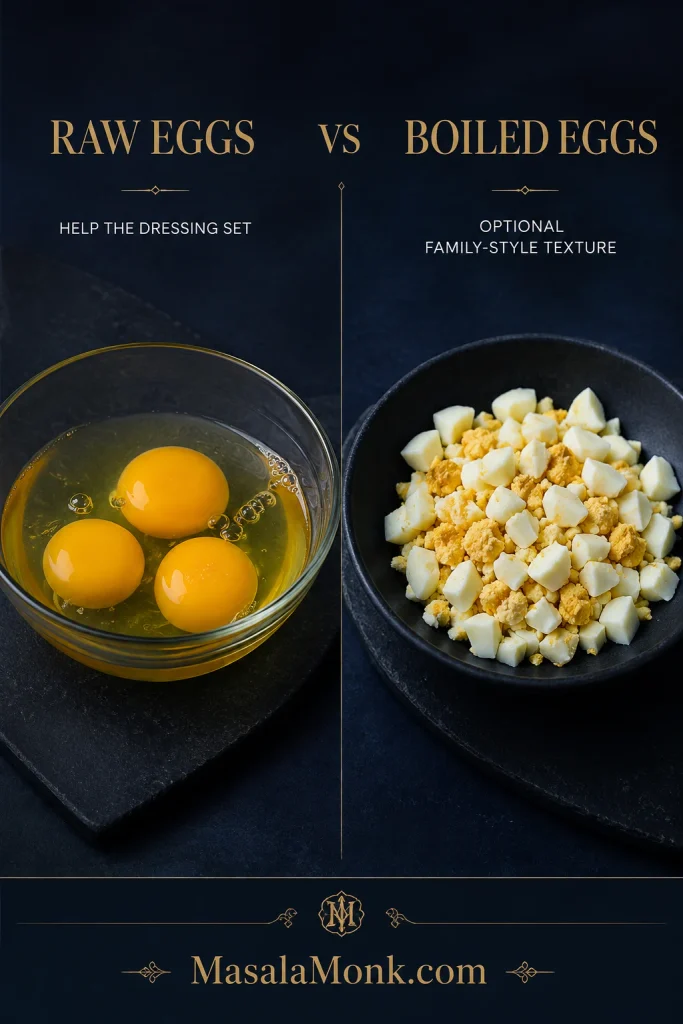
Raw eggs help the very moist dressing set as it bakes. Chopped hard-boiled eggs are a separate family-style addition.

Raw eggs in a glass bowl are labeled as helping dressing set, while chopped hard-boiled eggs are shown as an optional family-style texture addition.
Think structure versus texture: raw eggs help the dressing set; chopped boiled eggs change the bites you encounter.

Using eggs—or not using them—is a family and regional choice, not a test of whether dressing is “really Southern.” Plenty of long-standing versions exist on both sides.

If the dressing you grew up with had chopped boiled eggs, keep them if that’s the version you love. They bring their own flavor and texture; they do not replace the raw eggs used here for structure.

Leaving the raw eggs out entirely changes how this formula sets, so an intentionally eggless dressing is better balanced from the start as its own version.

How Wet Should Cornbread Dressing Be Before Baking?

Very moist and slowly settling is the goal. The bread is moist all the way through, from top to bottom. There are no dry pockets and no free liquid underneath.

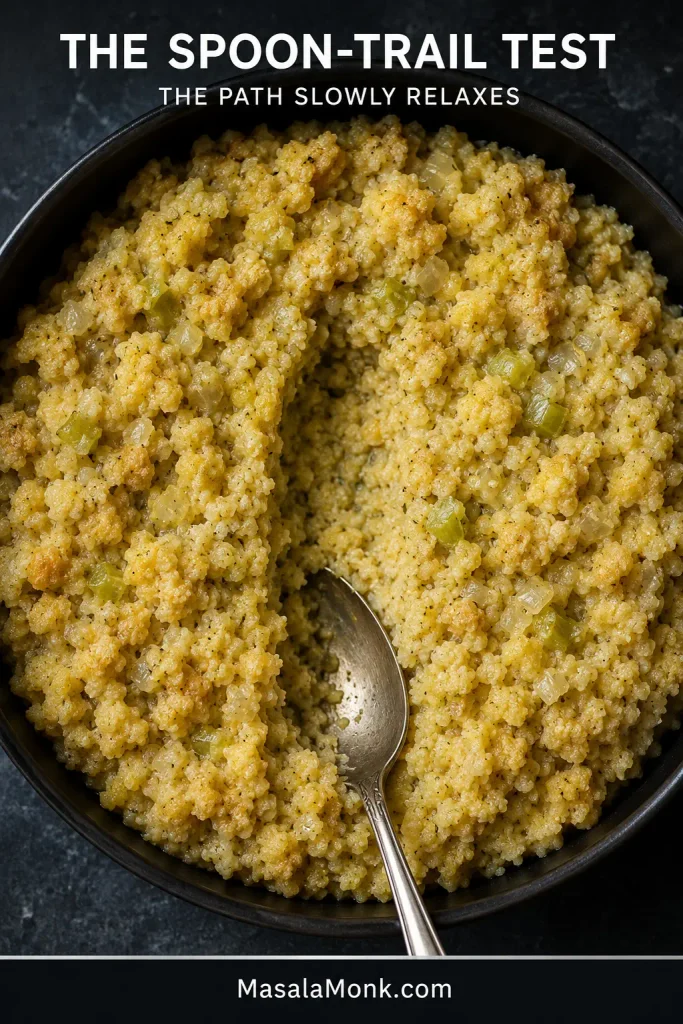
This soft Southern dressing looks considerably wetter than cubed bread stuffing. Draw a serving spoon through the bowl and the path gradually relaxes instead of staying sharply open.

A spoon creates a shallow channel through very moist unbaked cornbread dressing; the soft sides of the trail begin to relax inward without pooled broth.
The groove should be temporary. Correctly moistened dressing slowly relaxes toward the spoon trail; a stiff trench points dry, while liquid collecting in it points too wet.
StateWhat It Looks LikeWhat to Do
Too dryDry crumbs remain and the mixture sits stifflyAdd warm broth ¼ cup / 60 mL at a time
Just rightThe bread is moist through, crumb texture remains, and a spoonful slowly settlesStop adding broth
Too wetThe crumbs are saturated but broth still gathers separately after restingFold in additional dried bread before adding the eggs

Freshly added broth can look alarmingly loose for a few minutes. Let it soak in. What matters is whether free liquid remains after the bread has had a chance to absorb it.

Soft Is the Goal; Paste Is Not

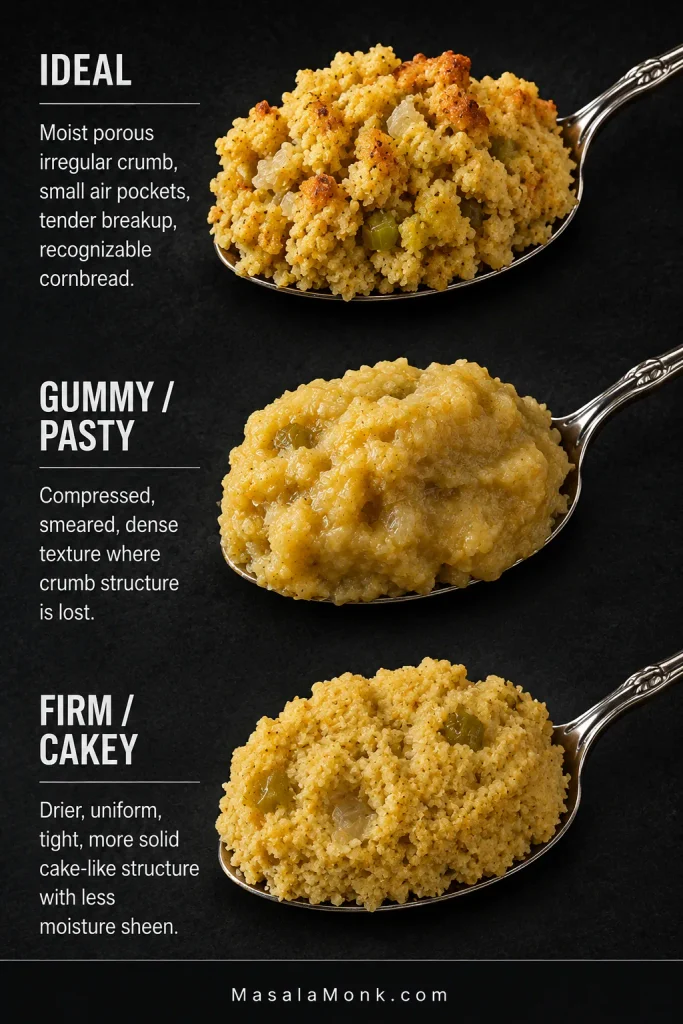
Soft dressing can be extremely tender and still show recognizable pieces of cornbread. Gummy dressing has lost that crumb and feels more like paste.

Very fresh bread, crumbs worked too fine, excess broth and aggressive mixing can all push the bowl in that direction. Extra oven time can remove moisture; it cannot rebuild crumb texture that has already broken down.

Bowl looks right? Back to the recipe. Still unsure? Go to troubleshooting.

Pan Size and Doneness for Cornbread Dressing

A standard 9×13-inch / 23×33 cm dish gives the dressing a comfortable depth for an even bake. Go deeper and the center needs more time; use a shallower dish and the surface browns and dries faster.

Look, Move, Measure

  • Look: the surface is lightly golden, with deeper toasted patches near some of the edges.
  • Move: the center shifts together gently when the dish is nudged; loose batter would ripple or slosh.
  • Measure: the middle reaches at least 165°F / 74°C.
Three-part doneness guide shows lightly golden cornbread dressing, a hand nudging the casserole, and a thermometer reading 165°F / 74°C in the center.
No single doneness cue is enough: browning can get ahead of the center, movement shows the set, and 165°F / 74°C confirms temperature.

Once the top looks right, the middle moves together and the thermometer says 165°F / 74°C, it is done. Don’t leave it in waiting for a firm center; the rest will take care of the final bit of setting.

For a moist dressing like this, gravy is an extra pleasure rather than the only thing keeping the serving from tasting dry.

Cornbread Dressing Troubleshooting

Your best rescue window is before the eggs. Broth, dry bread, salt and herbs are much easier to adjust then. Once the pan is baking, time and foil are your main tools.

Before Baking

Dry and stiff: Let the existing broth soak in first. If dry crumbs remain, add warm broth ¼ cup / 60 mL at a time.

Broth pooling underneath: Saturated bread plus persistent free liquid means the bowl is too wet. Fold in additional dried bread before adding the eggs.

Bland: Add salt, then reassess the pepper and herbs.

Too much sage: Dilute with unseasoned dried bread and enough broth to restore the soft, moist texture.

Crunchy onion or celery: Return the vegetables to the skillet and cook until tender before continuing.

During or After Baking

Center still wet or loose: Keep baking. If the top is already well browned, cover the dish loosely with foil. A deeper casserole may simply need longer through the middle.

A hand loosely covers browned cornbread dressing with foil because the center is still loose, with instructions to continue baking to 165°F / 74°C.
If the top browns first, loose foil protects it while the softer center finishes cooking.

Gummy or pasty: More baking may remove moisture, but it cannot fully restore crumb texture after the bread has been overworked or oversaturated.

Too firm or cakey: The bowl was probably too dry, or the pan stayed in the oven too long. Gravy helps at the table; next time leave the mixture wetter or pull it sooner.

Three spoonfuls compare ideal moist cornbread dressing, gummy pasty dressing with lost crumb structure, and firmer dry cakey dressing.
The crumb often reveals what went wrong: gummy dressing has lost its bread structure, while firm or cakey dressing usually points to a drier mixture or longer bake.

Falls apart: Give it the full 10–15 minute rest first. If it remains very crumbly, the mixture was likely too dry or the center needed more time.

Problem solved? Back to the recipe.

Simple Substitutions

A missing vegetable does not mean Thanksgiving is cancelled.

No celery or onion: Either can simply be left out. Omitting both gives you a plainer dressing, but the recipe still works.

No chicken broth: Turkey broth is the closest substitute. Vegetable broth works too, though it gives the dressing a different savory background.

All-cornbread dressing: Replace the 4 oz / 115 g white bread with the same amount of dried cornbread. Let the bread absorb the broth before adding more; an all-cornbread mixture may not need exactly the same amount.

How Much Cornbread Dressing Do You Need?

One 9×13 pan gives about 10–12 side servings. For a crowd, use more pans rather than building one unusually deep casserole.

Overhead serving guide shows a half batch for 5–6 people, one pan for 10–12, two pans for 20–24, and five pans for about 50 people.
Scale sideways rather than deeper: keeping similar pan depth preserves the recipe’s familiar center-to-edge bake.
PeopleAmountPan Setup
5–6½ batch8×8 in / 20×20 cm or similar; begin checking earlier
10–121 batchOne 9×13 pan
20–242 batchesTwo 9×13 pans
About 50About 5 batchesFive 9×13 pans when several other substantial sides are being served

For very generous servings or planned leftovers at a 50-person meal, make six pans.

Mix one or two batches at a time instead of wrestling with one giant bowl. It is easier to see how the bread is taking up the broth and easier to season evenly.

If you’re trying to match a particular family style before a big holiday, a half batch also gives you an easy way to dial in the moisture and seasoning for the version you remember.

Make-Ahead Southern Cornbread Dressing for Thanksgiving

Yes. Bake and dry the breads and cook the onion and celery ahead, then bring everything together close to baking.

Don’t fully assemble the dressing with broth and raw eggs the night before. Keep the dried breads separate from the refrigerated ingredients, then combine them on bake day.

Make-ahead cornbread dressing components kept separate: dried cornbread and white bread, cooked onion and celery, broth, and three whole eggs, labeled to combine on bake day.
Make-ahead dressing works best when prep does not lock in the final moisture level. Keep the liquid separate so absorption can be judged on bake day.

If you’re responsible for the dressing this year, getting the bread and vegetables out of the way ahead of time takes a lot of pressure off Thanksgiving morning.

WhenWhat to Do
1–2 days aheadBake the cornbread, cool it completely and begin drying it
Day beforeFinish drying both breads. Once completely cool, keep them covered and dry. Cook the onion and celery and refrigerate them. Keep broth and eggs refrigerated separately.
Bake dayCombine bread, vegetables and broth; adjust the moisture and seasoning; add the eggs; bake
Serving timeLet the finished dressing rest 10–15 minutes before serving

This also follows USDA stuffing food-safety guidance, which recommends preparing wet and dry ingredients ahead separately and combining them close to cooking.

If oven space is the bigger Thanksgiving problem, MasalaMonk’s Sweet Potato Casserole is another side that can be largely prepared ahead.

Keeping Dressing Warm Without Drying It Out

Holding it hot for a delayed meal? Keep the dressing at 140°F / 60°C or warmer. Otherwise, refrigerate it within 2 hours.

For a short delay, leave the pan covered so the surface holds onto more of its moisture. That also gives you a little breathing room to finish something best served fresh, such as soft dinner rolls.

Storage, Freezing and Reheating

Refrigerate: Transfer leftovers to reasonably shallow containers and refrigerate within 2 hours. Use refrigerated dressing within 3–4 days.

Freeze: Freeze cooked dressing in practical meal-size or family-size portions. For best quality, use it within about 2–3 months.

Reheat: Cover the dressing so it holds onto steam. A dry-looking portion can take a small splash of broth before reheating. Heat the center to 165°F / 74°C, uncovering near the end if you want a little texture back on top.

For the storage guidance behind those refrigerator and freezer times, see the FoodSafety.gov Cold Food Storage Chart.

The Dressing We Are After

The most important moment arrives before the oven door closes.

The bread is thoroughly moist. You can still see pieces of cornbread. The onion and celery are tender, and the sage smells warm and savory in the butter.

Then the oven takes over. The edges toast, the middle sets softly, and the bowl that looked almost suspiciously wet becomes dressing that gives easily under the spoon.

That is what the measurements and checkpoints are really for: turning “add broth until it looks right” into something you can recognize for yourself.

Hands serve steaming Southern cornbread dressing from a dark casserole onto a blue plate, showing a golden top and soft moist interior with onion and celery.
The payoff: a generous serving holds together on the way to the plate, then gives easily under the fork.

Once you can look at the bowl and know it is ready, Southern cornbread dressing stops feeling like a once-a-year gamble.

Back to top ↑

Posted on — Leave a comment

Southern Cornbread Recipe: Old-Fashioned, Crispy & Moist

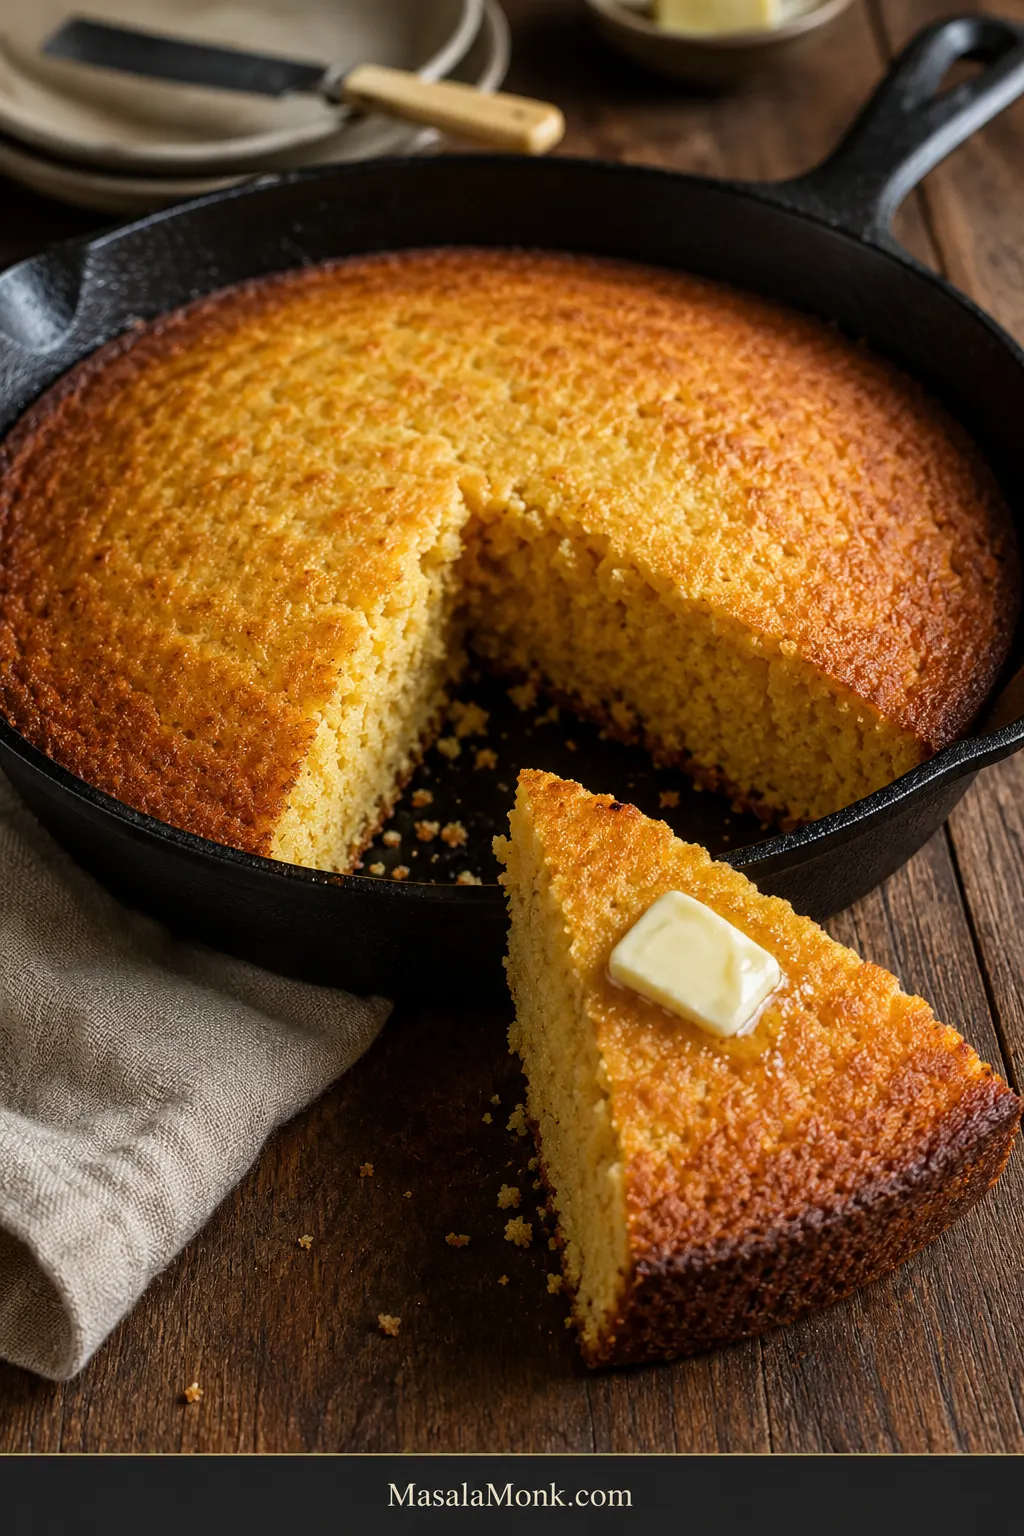
Golden Southern cornbread in a black cast-iron skillet with one wedge removed and a buttered slice in front, showing a browned crust and moist golden crumb.

Good Southern cornbread announces itself twice: first with the sizzle when the batter hits the cast-iron skillet, then with the faint scrape of a knife through the browned bottom crust.

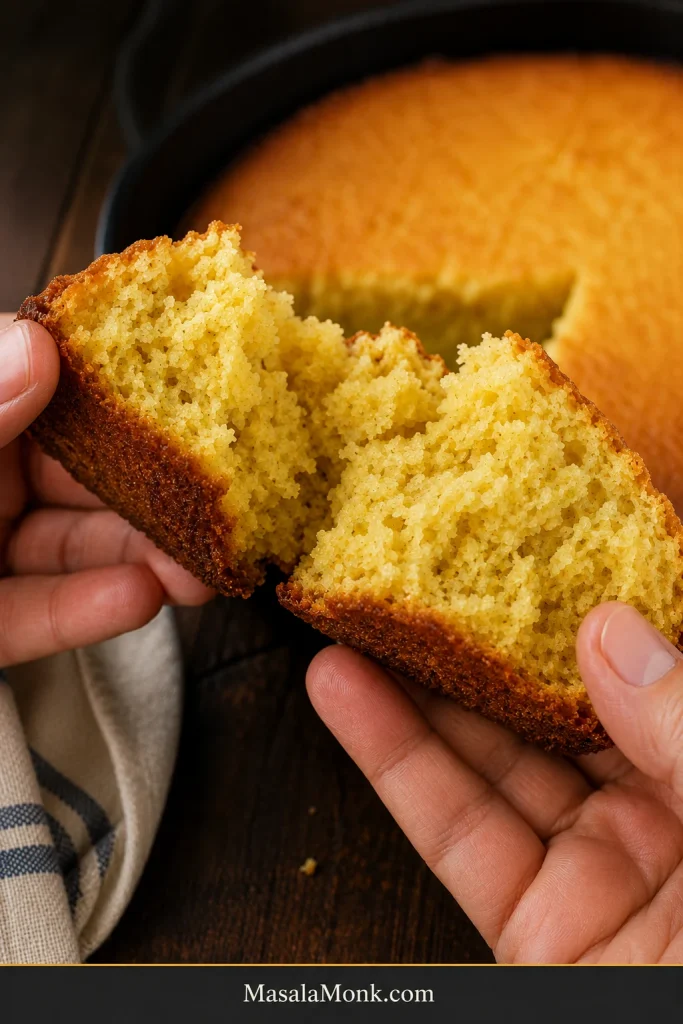
This one is savory and old-fashioned, with plenty of corn flavor, buttermilk for tenderness, and just enough flour and egg to hold the moist crumb together without turning it soft and cakey. The base recipe has no sugar, with measured options if the cornbread you know and love carries a little sweetness.

If the cornbread you came looking for has a deeply browned skillet edge, a tender but slightly rugged middle, and tastes more of corn than sugar, you are in the right place.

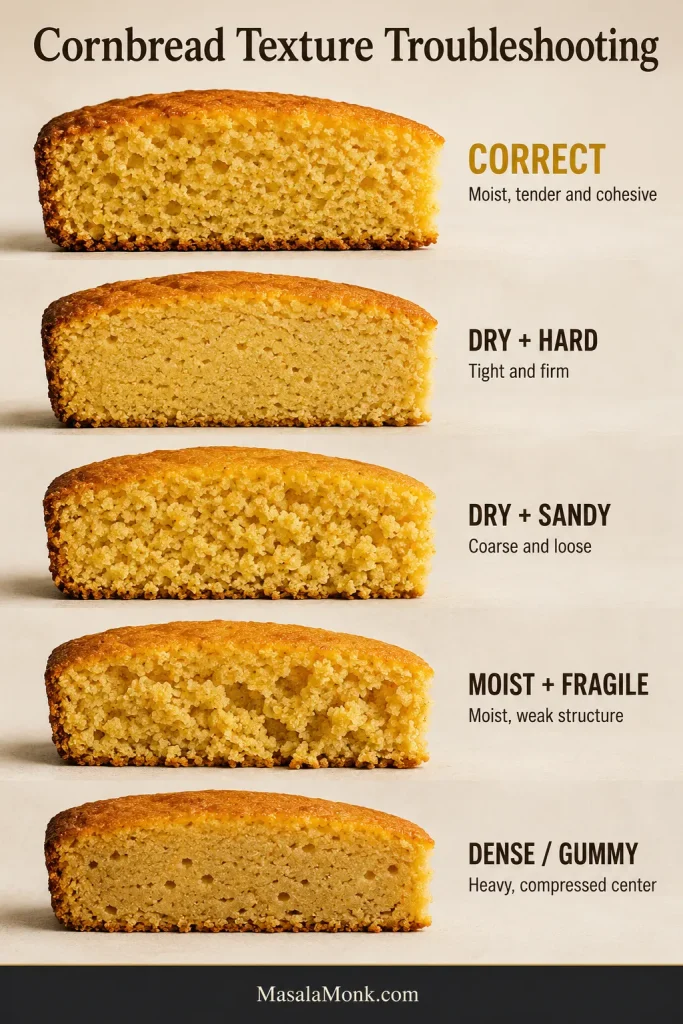
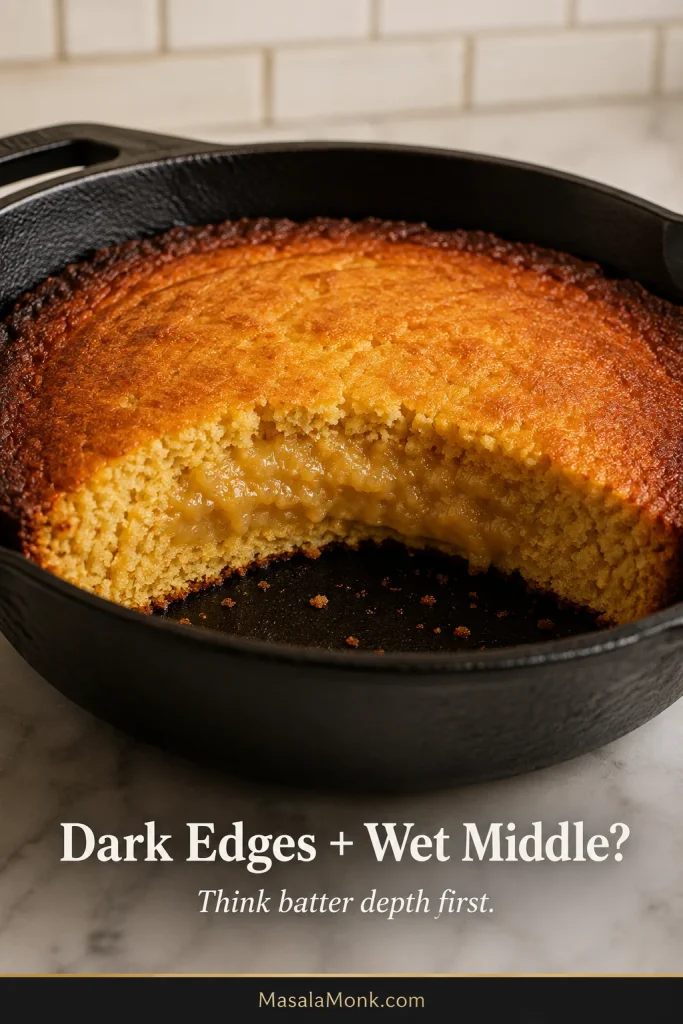
Cornbread itself isn’t fussy. Most batches go right when the skillet is properly hot, the batter isn’t overmixed, and you begin checking before the inside dries out. When a batch behaves differently, the cornmeal, pan and oven usually leave clues.

Jump to Recipe · Choose Your Cornbread · Fix Common Problems

Quick Answer: How Do You Make Southern Cornbread?

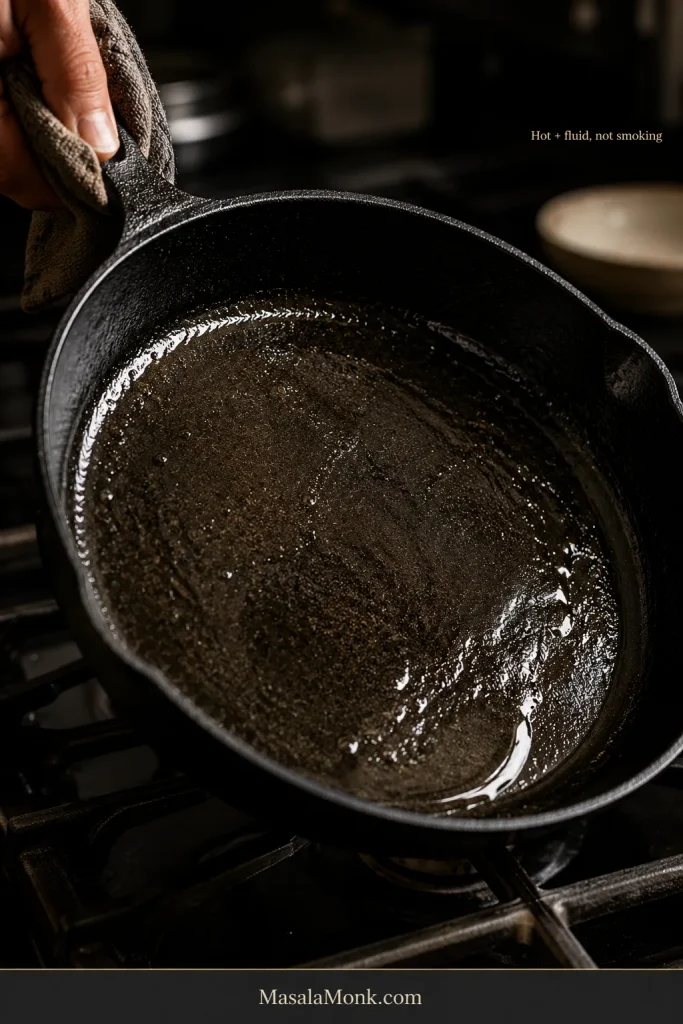
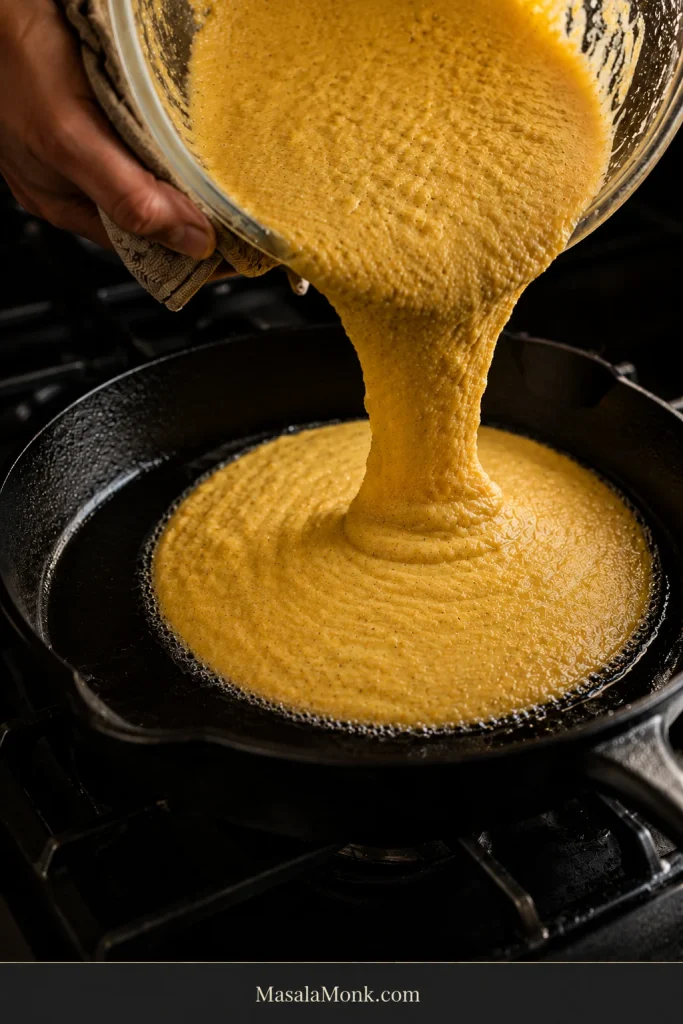
For savory, old-fashioned Southern cornbread, make a cornmeal-heavy batter with buttermilk, eggs and a modest amount of flour, then pour it into a fully heated 10-inch / 25 cm cast-iron skillet coated with hot bacon drippings, oil or shortening.

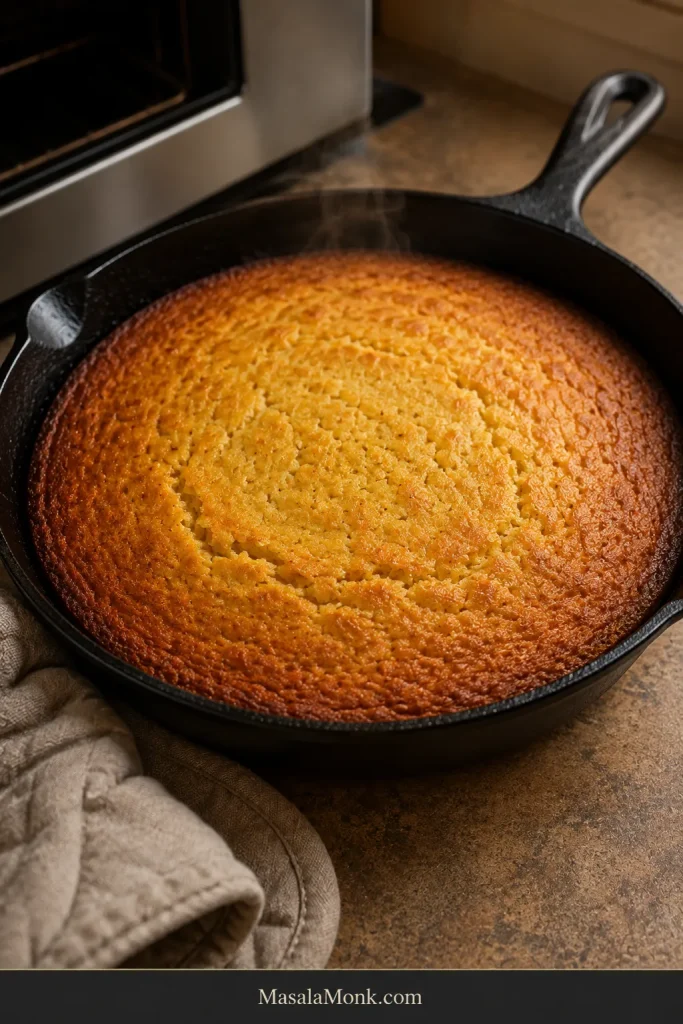
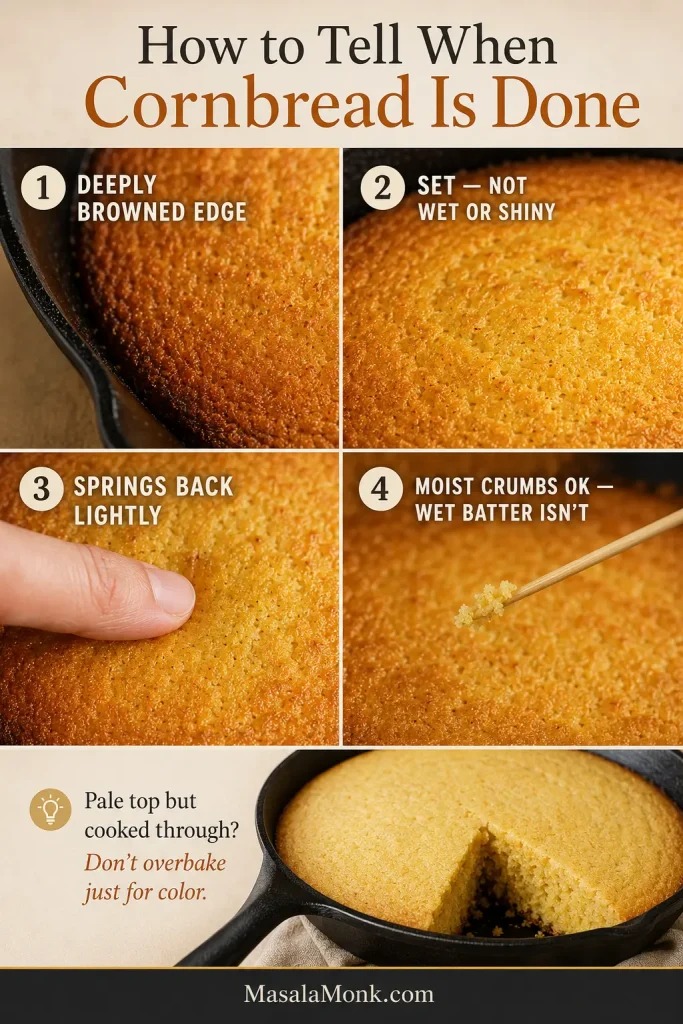
Bake on the center rack at 425°F / 218°C for 18–24 minutes, starting your checks around 18 minutes. The edge should be deeply browned, the middle set and lightly springy, and a tester pushed into the thickest part should come back without wet batter. Rest for 5 minutes before cutting.

Choose Your Cornbread: Savory, Balanced or Lightly Sweet

Southern cornbread traditions do not agree on sugar, and we do not need to settle that argument before dinner. Pick the version that tastes right at your table.

VersionSugarWhat You Get
Savory / base recipe0 gStrong corn flavor with no detectable sweetness
Balanced12–13 g / 1 tbspRounds the corn flavor without making the bread taste sweet
Lightly sweet25 g / 2 tbspA noticeable touch of sweetness while still tasting clearly like skillet cornbread

The main batch below uses no sugar, keeping the corn flavor firmly in front. That also leaves room for sweeter dishes at the table, including saucy baked beans. Honey can always go on the warm piece for anyone who wants sweetness there instead.

With the full 2 tablespoons of sugar, the top and edges may color sooner, so start checking around 18 minutes.

Southern Cornbread Recipe

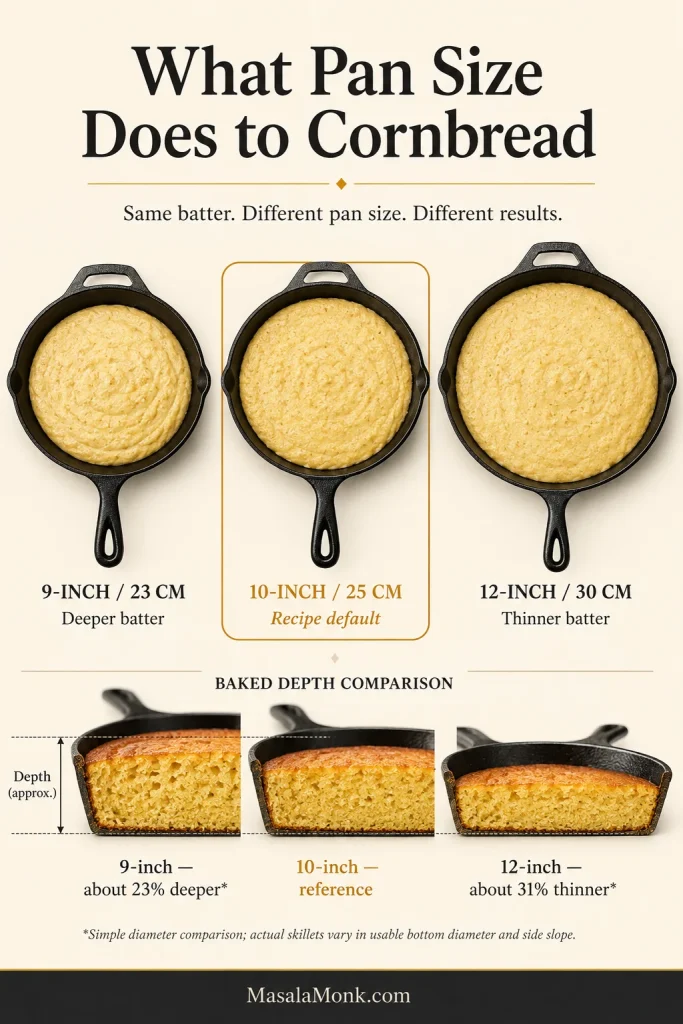
These proportions are built for a 10-inch / 25 cm cast-iron skillet.

Yield8 generous pieces
Skillet10-inch / 25 cm cast iron
Oven425°F / 218°C
PrepAbout 15 minutes
Bake18–24 minutes
Rest5 minutes
StyleSavory, crisp-bottomed and moist inside

Equipment

  • 10-inch / 25 cm cast-iron skillet
  • Large mixing bowl
  • Medium mixing bowl
  • Whisk
  • Flexible spatula or wooden spoon
  • Kitchen scale and/or measuring cups and spoons
  • Toothpick, thin skewer or cake tester

Ingredients

Dry ingredients

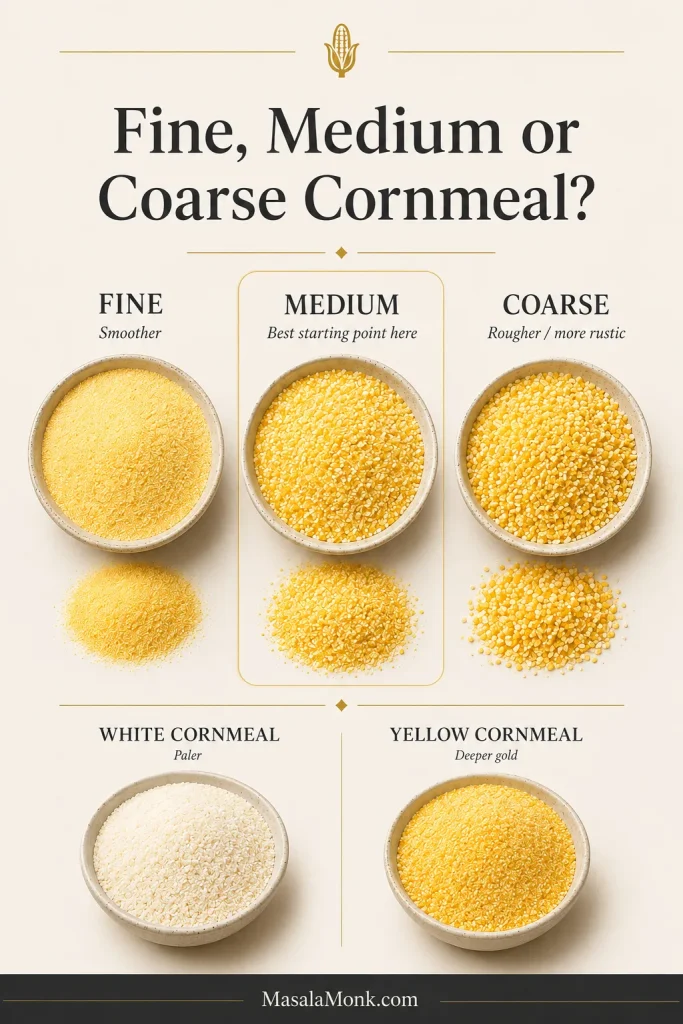
  • 250 g / 8.8 oz medium-grind plain cornmeal, about 1¾ cups; use the weight when possible because brands and grinds vary
  • 80 g / 2.8 oz all-purpose flour, about ⅔ cup
  • 8 g baking powder, about 2 teaspoons
  • 2 g baking soda, about ½ teaspoon
  • 5 g fine or table salt, about ⅞ teaspoon
  • 0–25 g granulated sugar, optional

Wet ingredients

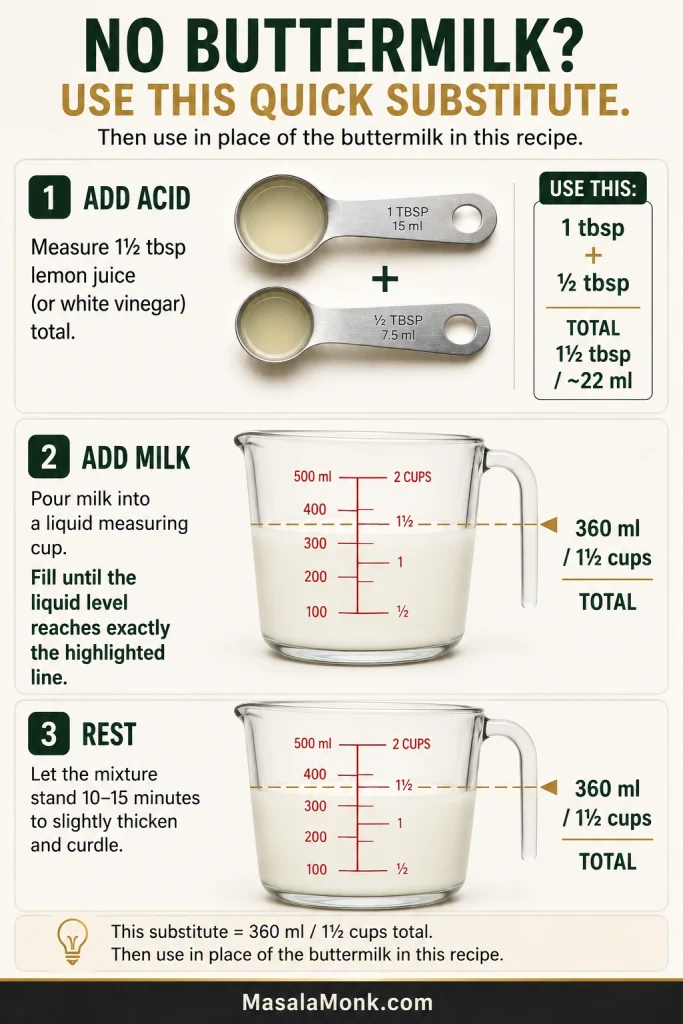
  • 360 ml / 1½ cups cultured buttermilk, plus more only if needed
  • 2 large eggs
  • 56 g / 2 oz unsalted butter, 4 tablespoons, melted and cooled until warm
  • 30 ml / 2 tablespoons neutral oil, such as vegetable or canola

For the skillet

  • 30 ml / 2 tablespoons bacon drippings, vegetable or canola oil, or shortening
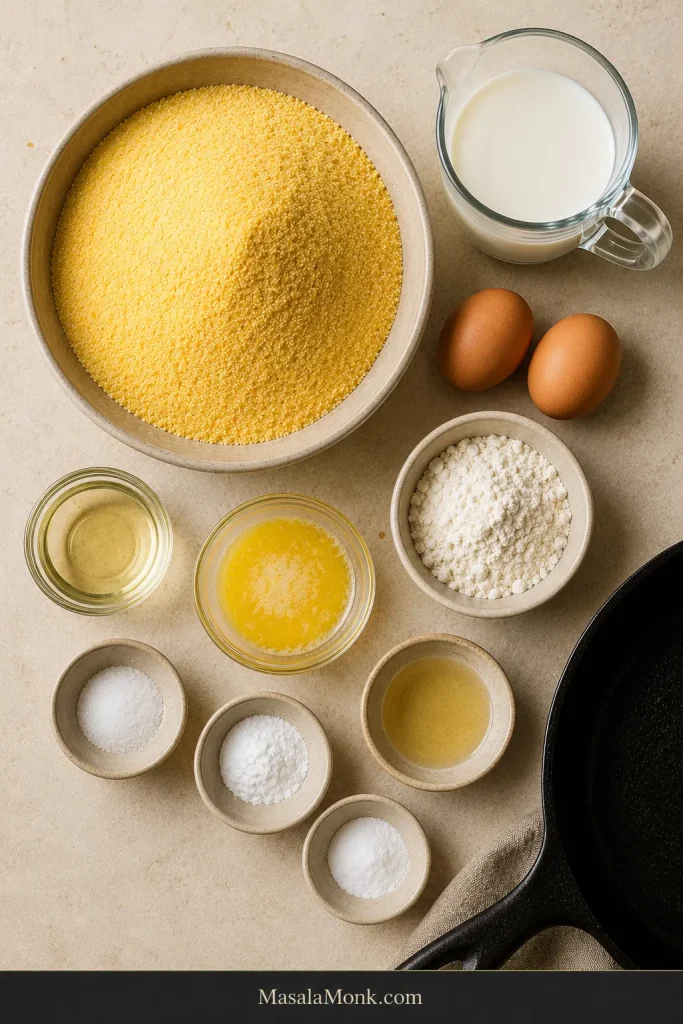
Overhead arrangement of cornmeal, flour, buttermilk, eggs, melted butter, oil, salt and leavening beside a black cast-iron skillet.
Keep the oil for the batter separate from the skillet fat: they do different jobs, and this prevents the hot-pan portion from disappearing into the mixing bowl.

Instructions

  1. Heat the oven and skillet. Put a rack in the center of the oven. Place the empty cast-iron skillet on it and preheat to 425°F / 218°C. Leave the skillet heating while you mix the batter so the iron is thoroughly hot when you are ready to pour.
  2. Mix the dry ingredients. Whisk the cornmeal, flour, baking powder, baking soda, salt and sugar, if using, until evenly combined. Give the bowl a few extra turns so the leaveners are well dispersed.
  3. Mix the wet ingredients. In the second bowl, whisk the buttermilk and eggs until smooth. Whisk in the melted butter and neutral oil. The butter should be warm, not piping hot.

Check the Cornbread Batter Consistency

  1. Bring the batter together. Pour the wet mixture into the dry ingredients and fold just until the dry pockets disappear. Small lumps are fine. The batter should have body but still pour and slowly settle. Batter that stands stiffly like soft dough needs more buttermilk; fold it in 1 tablespoon / 15 ml at a time.
Side-by-side comparison of thick but pourable cornbread batter and overly stiff batter that remains heavily mounded.
Drag the spatula through the batter: the groove should slowly relax toward the center. If a pronounced ridge stays put, the batter is too stiff.

Finish in the Hot Skillet

  1. Coat the hot skillet. Carefully remove the skillet from the oven. Add the bacon drippings, oil or shortening and swirl it across the bottom and partway up the sides. The fat should be hot and fluid; it does not need to smoke.
Hot liquid fat coating the bottom and lower sides of a tilted black cast-iron skillet on a stovetop.
Tilt the skillet before pouring and look for bare patches. A continuous film of hot fat helps the bottom brown evenly and release cleanly.
  1. Pour in the batter. A lively sizzle around the perimeter tells you the skillet was ready. That first contact begins setting the crust immediately.
Thick cornmeal batter pouring into a hot greased cast-iron skillet as bubbles form around the edge where batter meets the pan.
Pour near the center in one steady stream so the batter spreads outward evenly while the hot fat moves around the edge.
  1. Bake. Return the skillet to the center rack and bake for 18–24 minutes. Start checking around 18 minutes. Look for a deeply browned edge, a set interior that springs lightly when touched, and no wet batter on a tester pushed into the thickest part.
  2. Rest for 5 minutes. Give the hot crumb a few minutes to settle before cutting so the first pieces lift more cleanly. Serve while the underside is still crisp and butter melts almost on contact.
Freshly baked Southern cornbread in a black cast-iron skillet with a browned perimeter and small natural cracks across the set top.
A slight pull-away from the skillet edge during the 5-minute rest is normal and can make the first wedge easier to release cleanly.

If your skillet is already in the oven, you have everything you need.

In This Guide

Get the Cornbread Right

Choose, Fix & Serve

What Makes This Old-Fashioned Southern Cornbread?

By old-fashioned here, we mean a savory, cornmeal-led skillet bread made with buttermilk and hot fat. Sugar is optional rather than central, and corn remains the loudest flavor in the pan.

Cornbread traditions get specific quickly: white or yellow meal, sugar or none, flour or no flour, one egg or two or none, bacon drippings or shortening or oil. Southern kitchens have never all made it exactly the same way.

Nobody needs this recipe to prove somebody else’s grandmother wrong. This is simply one savory, skillet-baked branch of a much bigger Southern cornbread family.

Why This Recipe Works

Cornmeal brings the flavor and rustic texture. Flour and eggs give each piece enough structure to hold, buttermilk keeps the inside tender, and hot skillet fat creates the crust.

Hands pulling apart a piece of Southern cornbread to reveal a moist cohesive crumb with small irregular air pockets and browned crust.
Small, irregular holes are normal here. A cohesive cornmeal crumb does not need the uniform, sponge-like pores of a softer cake-style bread.

There is a little over three times as much cornmeal as flour by weight, so wheat never takes over the bread. The eggs help that small amount of flour hold everything together, while buttermilk adds moisture, body and a faint tang that sits naturally beside corn.

Butter flavors the cornbread itself. The hot fat in the skillet is what gives the underside its crust. A warm piece should hold easily in your hand, then break naturally when you pull it apart.

Which Cornmeal Should You Use?

For this recipe, use medium-grind plain cornmeal. It gives you obvious corn character without making every bite aggressively coarse, and it leaves the salt and leavening under your control.

From there, choose by texture rather than worrying about which color or grind is supposed to be “correct.”

Fine, Medium or Coarse?

CornmealWhat the Crumb Is LikeBest For
FineSmoother and tighterIf you dislike noticeable graininess
MediumDistinct cornmeal texture without excessive gritBest starting point here
Coarse / stone-groundRougher and more noticeably grainyIf you genuinely enjoy a rustic crumb
Comparison of fine, medium and coarse cornmeal textures with smaller samples of white and yellow cornmeal.
If the bag does not name the grind, inspect the particles: medium meal shows distinct grains without the large, grit-like fragments of coarse cornmeal.

Choose coarse meal because you enjoy its rougher texture. Sandy, dry-feeling bites usually call for a finer grind, not another ingredient. Stone-ground whole-grain meal can also absorb liquid differently, so an unusually stiff batter may need more buttermilk.

White or Yellow Cornmeal?

Both work comfortably here. White cornmeal is associated with many Southern cornbread traditions and gives a paler crumb. Yellow meal brings the familiar deeper gold and, depending on the corn and milling, can taste more assertive.

Choose the one whose flavor and texture you prefer. Color matters much less here than using the grind that gives you the crumb you actually enjoy eating.

Plain Cornmeal, Self-Rising Cornmeal and Cornmeal Mix

Package SaysWhat It Means Here
Plain cornmealUse the main recipe as written
Self-rising cornmealAlready contains leavening and salt; use proportions intended for that product
Self-rising cornmeal mixOften contains flour as well as leavening and salt
Corn muffin mixA different, usually sweeter convenience product
Masa harinaNixtamalized corn flour; a different ingredient
Ingredient guide comparing plain cornmeal, self-rising cornmeal mix, masa harina and cornstarch.
Check the ingredient list when the package name is vague: plain cornmeal is essentially ground corn; added flour, salt or leaveners signal a prepared product.

Ingredient names can be confusing outside the United States. In some countries, corn flour means the very fine starch Americans call cornstarch; that is not the ingredient needed here. Look for ground dried corn sold as cornmeal. A polenta product can sometimes work when the grind is appropriate, but check what is actually in the package instead of relying on the name alone.

Why weighing helps: cornmeal brands and grinds do not all fill a cup the same way. Use the 250 g amount when you have a scale. With cups, treat 1¾ cups as approximate and watch the batter before it reaches the skillet.

The rest of the bag won’t go to waste: plain cornmeal also gives these Southern-style salmon croquettes their crisp exterior.

Cast Iron, Pan Size & the Crispy Crust

The skillet changes the food, not just the presentation.

Heavy cast iron holds onto heat. When batter reaches the hot, greased pan, the underside begins cooking immediately while the inside is still fluid. That head start is what gives the bottom its distinctive crispness.

Why a 10-Inch Skillet?

A 10-inch / 25 cm skillet gives this amount of batter a good balance between height and crust.

PanWhat Changes
9-inch / 23 cmDeeper batter, taller pieces and generally a longer bake
10-inch / 25 cmRecipe default: balanced crust and moist crumb
12-inch / 30 cmThinner bread, more crust relative to crumb and an earlier doneness check
Infographic comparing cornbread batter in 9-inch, 10-inch and 12-inch skillets, with deeper batter in the smaller pan and thinner batter in the larger pan.
Cast-iron skillets often have sloped sides, so nominal diameter can mislead. Compare the usable interior area and resulting batter depth when changing pan size.

As a simple diameter comparison, the same amount of batter would sit about 23% deeper in a 9-inch round than in a 10-inch one, while a 12-inch round would spread it about 31% thinner. Those numbers are only a rough way to show how much pan size can matter; cast-iron skillets slope differently and do not all have the same usable bottom diameter.

Pale Bottom or Over-Browned Bottom?

Begin on the center rack. A consistently pale underside, even with a thoroughly heated skillet, is a reason to move the pan one rack lower next time. A bottom that darkens well before the inside is ready calls for one rack higher.

Three cornbread wedges showing a pale soft underside, a deep-golden crisp underside and an overly dark bottom crust.
Judge the underside beneath the middle as well as the rim; the darkest perimeter can make the whole bottom seem browner than it really is.

Let your own oven tell you which way to go. There is no prize for putting every skillet on the lowest possible rack.

No Cast Iron?

Use a heavy metal cake pan or another oven-safe metal skillet of similar diameter and preheat it with the oven. A lighter pan can still make excellent cornbread, although the underside will usually be softer and paler because the metal carries less stored heat into the batter.

Metal is the straightforward substitute for this hot-pan method. Skip preheating an empty glass baking dish.

How to Know When It’s Done

Start looking around 18 minutes. By then the kitchen should smell unmistakably of toasted corn.

Four Cornbread Doneness Checks

  1. Look for a deeply browned edge.
  2. The interior should look set, with no wet or shiny batter.
  3. Press the middle gently; it should spring back lightly.
  4. A tester should come back without wet batter; a few moist crumbs are fine.
Cornbread doneness guide showing a browned edge, set center, gentle finger press, tester with moist crumbs and a paler fully cooked example.
Cracks alone do not mean underdone. Look inside them: matte, set crumb is very different from a shiny streak of uncooked batter.

A cooked-through cornbread with a pale top does not need a long extra bake just for color. Unsweetened cornbread often browns less dramatically on top than a sweeter batch. For a darker surface, use a very brief broil and stay close—the change can happen quickly.

Cornbread Rescue at a Glance

Something looks wrong after the skillet comes out? Deal with the pan in front of you first.

What You SeeWhat to Do Now
Middle still wetReturn it to the oven for 3–5 minutes; loosely shield a dark top if needed
Top pale, bread cookedUse a very brief broil instead of extending the whole bake
Breaking apart while hotStop cutting and give it the full 5-minute rest
A little dryServe warm with butter, broth, beans or gravy
Bottom softer than hopedToast buttered slices in a skillet
Leftovers lost their crustUse the oven or skillet instead of relying only on the microwave

Not every rough edge needs rescuing. A rustic crack across the top or some crumble at the cut edge can be completely normal for this style of cornbread.

A slightly dry piece can still be very good beside something deliberately saucy, such as this thick bean stew. The crumb gets to drink up what is in the bowl.

Why Did My Cornbread Turn Out This Way?

Think back to what you saw, felt or heard while you were making it. One clue is often enough.

Five cornbread cross sections comparing correct texture, dry and hard, dry and sandy, moist and fragile, and dense or gummy crumb.
Use touch as well as sight: dry, hard cornbread resists pressure, while a sandy piece sheds loose crumbs readily.

Dry, Hard or Falling Apart?

A dry, firm piece and a dry, sandy piece usually point to different problems.

  • Dry and hard: the cornbread probably baked too long or your oven ran hot.
  • Dry and sandy: the cornmeal may have been unusually coarse or the batter needed more liquid.
  • Moist but fragile: it may have been cut too soon, or the meal may be particularly coarse.
  • Dense and tough: too much mixing becomes a stronger suspect.

A little crumble belongs here. Properly rustic cornbread should still soften readily once warm butter, bean broth or gravy reaches it.

Dark Edges, Wet Middle

Dark edges around a shiny or wet middle usually make batter depth the first suspect. The same amount of batter sits deeper in a smaller skillet, so the outside can finish while the thickest part still needs time.

Cut skillet cornbread with deeply browned outer edges surrounding a visibly sticky, under-set center.
A center that sinks noticeably during the first minutes of cooling, while the browned edge stays firm, is another clue the middle was under-set.

With the intended 10-inch pan, repeated dark-edge/wet-middle batches are a reason to move the skillet one rack higher or check whether the oven runs hotter than its setting suggests.

No Crisp Bottom? Start With the Skillet

Think back to the moment the batter hit the iron. An almost silent pour is a strong clue that the skillet had not stored enough heat.

Check the fat too. You want a visible coating between batter and iron, not a pan that merely looks polished.

Gritty or Sandy Cornbread

A pleasantly coarse crumb and a sandy one are different experiences. Very coarse meal is the first thing to check. Keeping that rough grind may require more buttermilk so the baked crumb stays pleasantly textured instead of dry.

Cornmeal should announce itself. It should not feel as if you accidentally baked sand.

Dense or Gummy Cornbread

A damp, heavy patch through the middle usually means the cornbread needed more time or the batter sat unusually deep in the pan.

Heaviness throughout the whole crumb points more toward old baking powder or too much mixing. Small lumps are harmless. Beating the batter perfectly smooth is not an upgrade.

Bitter, Chemical or Too Salty?

Start with the package label. Self-rising cornmeal and cornmeal mixes may already contain leavening and salt, so adding the full amounts from the main recipe can push both too far.

Salt can also surprise you when measured by spoons. Fine salt and different kosher salts do not pack identically. Weighing 5 g keeps that variable under control; King Arthur’s guide to salt for baking explains why spoon-for-spoon swaps can change the result.

Give old cornmeal or saved bacon drippings a sniff too. Whole-grain meal and cooking fats can turn stale, and sweetness will not hide that flavor.

Stuck or Burned on the Bottom

Sticking sends you back to three things: enough skillet fat, thoroughly heated iron, and reasonably good seasoning.

A burned underside means the bottom received too much heat before the rest of the cornbread was ready. Move the pan one rack higher next time, begin checking earlier, and remember that a sweeter batch can brown faster.

No Buttermilk, Self-Rising Cornmeal & Other Swaps

No Buttermilk? Use Acidified Milk

Put 1½ tablespoons / about 22 ml lemon juice or plain white vinegar into a measuring jug, then add milk until the total reaches 1½ cups / 360 ml.

Let it stand for 10–15 minutes, then use it in place of the buttermilk. It won’t have quite the same cultured tang and may be a little thinner, but the added acid gives the baking soda what it needs to react properly.

Three-step guide showing lemon juice or white vinegar being measured, milk added to a total of 360 ml, and the mixture resting for 10 to 15 minutes.
Acidified milk can stay looser than cultured buttermilk. Do not add more acid; let the finished batter consistency decide whether extra liquid is needed.

A carton of cultured buttermilk is easy to use up elsewhere; the leftovers can go into these fluffy buttermilk pancakes the next morning.

Using Self-Rising Cornmeal

A bag labeled self-rising already contains leavening and salt, so pause before measuring either from the main recipe. Follow the proportions intended for the product in your hand; formulations vary enough that guessing is not worth it.

Using White Lily Self-Rising Cornmeal Mix: For its buttermilk option, White Lily’s official Southern cornbread uses 2 cups mix, 1½ cups / 360 ml buttermilk, 1 egg and ¼ cup / 60 ml oil, plus 1 teaspoon shortening for the pan and optional sugar. It bakes in a preheated 8-inch / 20 cm pan at 425°F / 218°C for 25–30 minutes. Another brand may call for different proportions.

Flourless or Eggless Southern Cornbread?

Flourless: Flourless cornmeal breads belong comfortably within Southern cooking traditions. Removing the 80 g flour changes the balance of this batter, so use proportions designed for a flourless version.

Eggless: Eggless Southern cornbread exists too. Both eggs in this batch help the inside hold together. For an eggless version, start with a recipe designed to work without eggs.

Butter vs Oil in the Skillet

Butter works, but its milk solids brown quickly in a very hot pan. Bacon drippings, vegetable or canola oil, or shortening are more forgiving here. Butter is better used where its flavor is easiest to notice: in the batter and melting over the finished piece.

← Back to the Southern Cornbread Recipe · ↑ Back to top

Using This Cornbread for Dressing

Yes—this cornbread works well for Southern cornbread dressing. Use the savory version and, when practical, bake it a day ahead.

Cooled Southern cornbread broken into larger chunks and smaller crumbs on a tray, with part of the original skillet cornbread behind it.
For dressing, uneven pieces help: smaller crumbs absorb broth quickly, while larger chunks preserve pockets of recognizable cornbread texture after baking.

The small amount of flour helps the crumbled bread absorb broth while keeping some structure. Cool the skillet completely, crumble the cornbread, and give some of its fresh-baked moisture time to escape before adding broth.

Slightly drier cornbread is easier to control. It can soak up broth without beginning the dressing already soft and saturated.

What to Serve With Southern Cornbread

Savory cornbread is happiest beside food with broth, gravy, beans or smoky juices for the crumb to catch.

Dinner plate with a buttered wedge of Southern cornbread beside saucy black-eyed peas, cooked greens and sliced red tomatoes.
Set the cut face near beans or gravy instead of burying the whole wedge, so the crumb can soften while part of the skillet crust stays crisp.

For a cold-weather dinner, put a warm piece beside crockpot chili. The part touching the broth softens while the browned edge stays sturdy enough to scoop with.

Gravy may be an even better excuse. These smothered pork chops come with the kind of onion-rich sauce that settles straight into the cut face of the cornbread.

Barbecue is another natural fit: pair slow cooker pulled pork with something cold and crunchy such as coleslaw on the side.

For a more old-fashioned Southern plate, think field peas or black-eyed peas, cooked greens and sliced summer tomatoes. Those softer, juicier foods are exactly where a crisp piece of skillet cornbread earns its place.

And if crumbled cornbread with cold buttermilk is part of the tradition you know, this savory version fits naturally there too.

It does not need a full meal either. Split a warm piece, add butter, and let it soak into the little cracks. Put honey nearby for anyone who wants it.

How to Store, Freeze & Reheat Cornbread

Cornbread is at its best the day it is baked, when the contrast between crisp crust and tender crumb is strongest. Let it cool completely before wrapping or sealing it; trapped steam softens the crust quickly.

For the same day or overnight, keep the cooled bread well covered at room temperature. For longer keeping, refrigerate it well wrapped or in an airtight container for 3–4 days for best quality.

Reheating Cornbread

Microwave: best when you want one warm piece quickly. Heat in short bursts just until the middle is warm. The crust will soften, so this is the convenience option rather than the crispest one.

Oven: for several pieces, 350°F / 177°C for roughly 10–15 minutes is a useful starting point. Check smaller pieces early. Loosely cover cornbread that is beginning to dry, then uncover near the end if you want the outside to firm again.

Best Leftover Crust: Butter + Skillet

This is the method worth remembering.

  1. Split or slice the cornbread.
  2. Spread butter over the cut surfaces.
  3. Place them cut-side down in a hot skillet.
  4. Toast until browned and crisp outside and hot through the middle.
Cornbread pieces toasting in butter in a cast-iron skillet, with one wedge lifted to show a newly browned flat cut surface.
Let the buttered cut face brown before moving it repeatedly. Moderate, steady heat warms the center without scorching the surface.

The leftover develops a new crust of its own: browned butter against toasted cornmeal with a tender middle underneath.

A second-day piece that has dried slightly is also excellent with something gravy-rich such as slow cooker beef stew. What seemed thirsty on its own becomes very good at catching the sauce.

Freezing Cornbread

Cool the cornbread completely, divide it into useful portions and wrap them well. Freeze for up to 3 months for best quality. Thaw before reheating, then use the oven or skillet if you want some of the crust back.
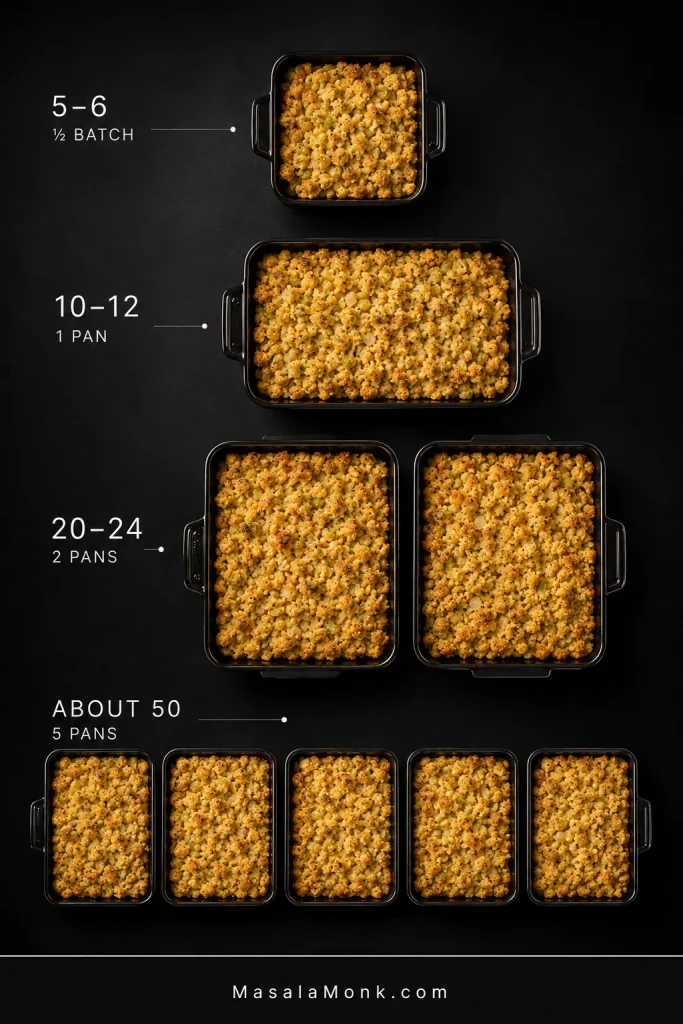
The Cornbread We Are After

The best moment is not when the timer rings.

Low-angle view of a Southern cornbread wedge lifted from a cast-iron skillet, showing a thin deep-golden crisp underside beneath a tender crumb.

It is when the first piece comes free and you can see the contrast: a browned underside and crisp rim surrounding a warm, moist crumb that still looks unmistakably like ground corn.

Butter disappears into the little cracks. The edge is sturdy enough to pick up. The middle breaks rather than bounces. And the savory version is just as comfortable soaking up bean broth and gravy as it is carrying a little honey at the table.

If you make it, tell us which cornmeal you used, your skillet size, whether you added sugar, and how long yours took in the oven. Those details can tell the next cook far more than simply saying it worked.

← Back to the Southern Cornbread Recipe · ↑ Back to top

Posted on — Leave a comment

Tomato Pie Recipe: Southern-Style, Cheesy and Never Soggy

Whole Southern tomato pie with a golden crimped crust, browned cheese topping, fresh basil, and one wedge removed to reveal the red tomato filling.

The first slice tells you whether a tomato pie worked. The tomatoes should still taste unmistakably of summer, the cheese should be creamy and savory, and underneath it all there should be a crust flaky enough to matter—not pale pastry soaking in tomato juice.

This is the kind of pie to make when tomatoes are so ripe and fragrant that dinner can reasonably revolve around them. The aim is to concentrate that ripe tomato flavor while keeping enough water away from the pastry for the first wedge to come out looking—and eating—like a proper slice of pie.

Close side view of a Southern tomato pie wedge showing an intact flaky bottom crust, red tomato layers, and browned creamy cheese topping.
A good slice keeps the flaky crust distinct beneath generous tomato and browned cheese.

So the tomatoes are lightly salted, blotted and roasted. The crust gets a head start in the oven and a thin layer of melted sharp cheddar before the tomatoes ever touch it. On top goes extra-sharp cheddar, Parmesan, fresh basil, Dijon and enough mayonnaise to make everything creamy while the tomatoes still taste like the reason you made the pie.

Jump to: Recipe · Keep It Crisp · Troubleshooting

Quick Answer: How to Make Tomato Pie Without a Soggy Crust

For a standard 9-inch / 23 cm pie, use about 2 lb / 900 g ripe tomatoes. Slice them ⅜–½ inch / 10–13 mm thick, lightly salt and blot them, then roast until slightly wrinkled and no longer wet-looking. Pre-bake the crust until the bottom is dry and lightly golden, then melt a thin layer of cheddar over it.

Arrange the tomatoes over the crust, add the cheese topping, and bake on the lower-third rack at 375°F / 190°C for about 30–35 minutes. Rest at least 30 minutes before slicing; closer to an hour gives cleaner wedges.

There are a few more steps here than in the quickest versions, but none is difficult. With one tomato tray, the tomatoes roast while the crust pre-bakes, so those two jobs finish at almost the same time.

Southern Tomato Pie Recipe With a Crisp Crust

This version keeps the tomatoes front and center: roasted just enough to deepen their flavor, layered over a pre-baked crust, then covered with a sharp, basil-flecked cheese topping that stays creamy without becoming heavy.

Yield: 1 standard 9-inch / 23 cm pie
Serves: 6 generous portions or 8 smaller portions
Hands-on time: about 30 minutes
Prep + bake: about 1¼–1½ hours
Rest: 30–60 minutes
Total time: about 2–2½ hours
Best served: warm or at room temperature
Timing note: Times assume you are starting with a prepared crust ready to blind-bake.

Equipment

  • Standard 9-inch / 23 cm pie plate, if using rolled dough
  • 1–2 large rimmed baking sheets
  • Parchment paper
  • Pie weights or dried beans, for rolled dough
  • Clean kitchen towels or paper towels
  • Wire cooling rack
  • Foil or a pie shield, optional

Ingredients

Ripe red tomatoes, pie crust, cheddar, Parmesan, mayonnaise, Dijon mustard, and fresh basil arranged together for Southern tomato pie.
Tomatoes bring the juiciness and acidity; cheddar, Parmesan and mayo add richness; Dijon and basil keep it bright.

For the Tomatoes

  • 2 lb / about 900 g ripe tomatoes, about 4–6 large tomatoes
  • ¾ teaspoon fine sea salt / about 4 g
  • ½ teaspoon freshly ground black pepper, divided

For the Crust and Bottom Cheese Layer

  • 1 prepared standard 9-inch / 23 cm pie crust, homemade or store-bought; not deep dish
  • 1½ oz / 40 g extra-sharp cheddar, finely grated

And for the Cheese Topping

  • 5½ oz / 160 g extra-sharp cheddar, freshly grated
  • 1 oz / 28 g Parmesan, finely grated; Pecorino Romano also works but is saltier
  • ½ cup / about 115 g mayonnaise
  • 1 teaspoon / 5 ml Dijon mustard
  • ¼ cup loosely packed fresh basil, torn or chopped, plus more for serving
  • Pinch of red-pepper flakes, optional

Shopping note: You need 7 oz / 200 g cheddar total. One standard 8 oz / 227 g block is enough for the whole pie with a little left over.
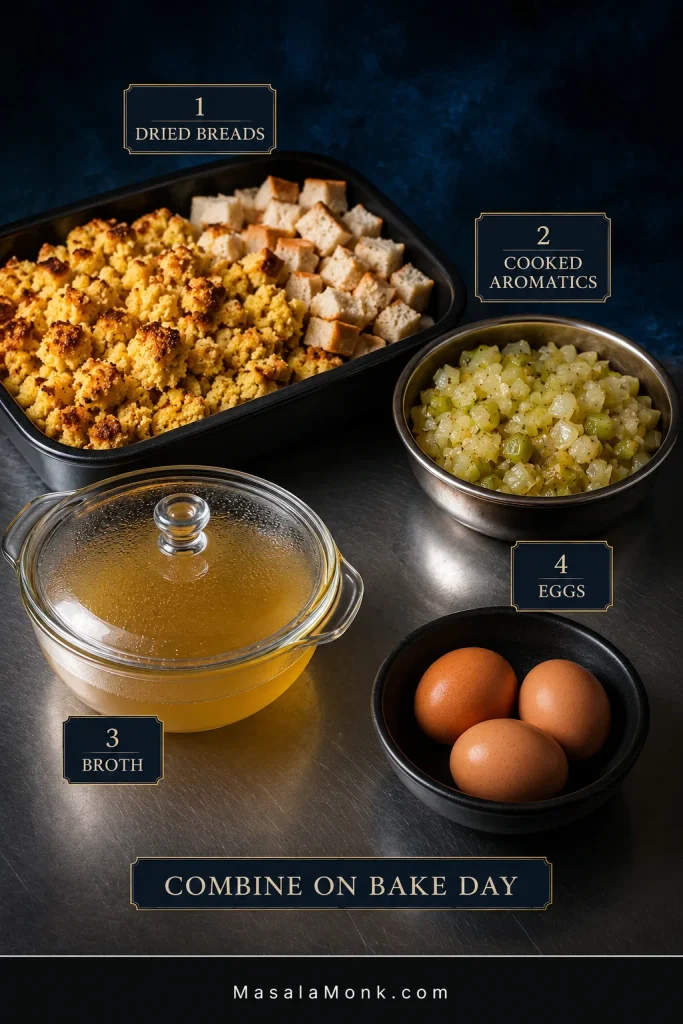
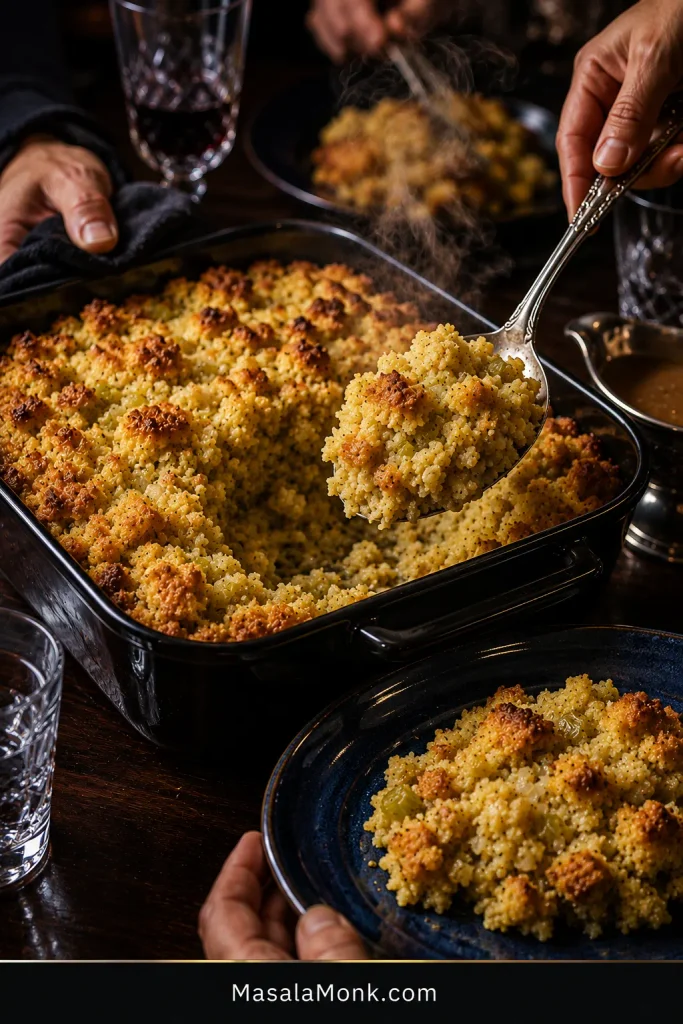
Instructions

Prep the Tomatoes and Crust

  1. Heat the oven. Position one rack in the upper half of the oven and another in the lower third. Heat to 425°F / 220°C conventional. Line a large rimmed baking sheet with parchment.
  2. Slice, salt and blot the tomatoes. Core them and cut into slices about ⅜–½ inch / 10–13 mm thick. Arrange them over clean kitchen towels or several layers of paper towel, sprinkle with the ¾ teaspoon / 4 g salt, and leave for 10–15 minutes. Blot firmly, then season with ¼ teaspoon black pepper. Very large rounds can be halved so the finished pie is easier to portion.
Side view of tomato slices with a measurement guide showing the target thickness of 3/8 to 1/2 inch, or 10 to 13 millimeters.
Aim for ⅜–½ inch / 10–13 mm: thick enough to stay substantial after roasting, but not so thick that moisture lingers.
  1. Prepare the crust and arrange the tomatoes.
    Using rolled dough? Fit it into a standard pie plate, crimp the edge, line it with parchment and fill with pie weights or dried beans.
    Using a preformed frozen shell? Keep it in its supplied pan. Follow its package directions for blind-baking; use weights only if those directions call for them.
    Arrange the blotted tomato slices on the baking sheet in one layer with a little breathing room between them. Avoid heavy overlap.
Two sheet pans compare overlapping tomato slices with tomato slices arranged in a single layer with space between them.
Leave breathing room between slices so steam can escape instead of collecting where tomatoes overlap.
  1. Roast the tomatoes while the crust pre-bakes. With one tomato tray, roast the tomatoes on the upper rack while the crust bakes below.
    Rolled crust: Bake it with the weights for 15–18 minutes.
    Preformed frozen shell: Follow its blind-baking time. It may finish before or after the tomatoes; that is fine.
    Need two tomato trays? Roast them first, rotating the pans if needed, then pre-bake the crust afterward. Giving the tomatoes space matters more than forcing the two jobs to overlap.
Home oven showing a tray of tomatoes roasting on the upper rack while a weighted pie crust blind-bakes on the lower rack at 425 degrees Fahrenheit.
With one tomato tray, use the upper rack for tomatoes and the lower rack for the crust so both jobs can happen at once.

Finish the Crust and Make the Topping

  1. Finish the crust and check the tomatoes.
    Crust: For rolled dough, carefully remove the parchment and weights, then return the empty shell to the lower rack for another 5–7 minutes. For a preformed frozen shell, continue according to its package directions as needed. Whichever crust you use, the base should be dry, set and lightly golden before filling. Pale, shiny or slightly translucent pastry needs more time.
    Tomatoes: Their color should be a little deeper, the edges slightly wrinkled and the cut surfaces more matte than glossy. Very little thin juice should remain on the pan. They should still look juicy, not dried out.
  2. Add the cheddar barrier and lower the oven. Scatter the 40 g cheddar over the hot crust and return it to the oven for about 3–5 minutes, until the cheese melts into a thin layer. Reduce the oven temperature to 375°F / 190°C conventional and keep one rack in the lower third.
Close view inside an empty blind-baked pie shell with a thin layer of melted cheddar coating the bottom crust.
A thin melted cheddar layer adds another buffer between the pastry and the juicy tomato filling.
  1. Mix the topping. Combine the remaining 160 g cheddar, Parmesan, mayonnaise, Dijon, the remaining ¼ teaspoon black pepper and the basil. The mixture should be thick enough to hold its shape. Cheddar, Parmesan and mayonnaise already bring plenty of salt, so taste before adding any more.
Spoon holding a thick mound of cheddar, Parmesan, mayonnaise, Dijon, and basil mixture above a bowl, with no dripping or cheese strands.
The topping should mound on the spoon and stay there—thick, cohesive and easy to dollop.

Assemble, Bake and Rest

  1. Assemble the pie. Arrange the roasted tomatoes over the cheese-lined base with light overlap. Blot any slice that has released a fresh puddle while waiting. Dollop the topping in small spoonfuls over the tomatoes, then gently spread or pat it into an even layer with the back of a spoon.
Three stages of tomato pie assembly showing roasted tomatoes layered in the crust, small spoonfuls of cheese topping added, and the topping gently spread.
Dollop first, then spread gently so the roasted tomato slices stay where you placed them.
  1. Bake until browned and set. Bake on the lower-third rack for about 30–35 minutes, beginning to check around 25 minutes. The crust should be deeply golden, the topping browned in patches, and small bubbles should appear around parts of the filling. Give the dish a gentle nudge. A little movement is fine; the filling should move together instead of sloshing. Shield the rim with foil if it browns before the center is ready.
  2. Rest and serve. Set the pie on a wire rack for at least 30 minutes. For cleaner wedges, give it closer to 45–60 minutes. Finish with a little fresh basil before serving.

Recipe Notes

  • Two-tray timing: Allow roughly another 20–30 minutes because the crust can no longer pre-bake alongside the tomatoes.
  • Using coarse kosher salt? Weigh it if possible; crystal size varies enough between brands to make a direct teaspoon conversion unreliable.
  • Very juicy heirlooms may need longer. Trust the tray rather than forcing every batch to finish at exactly 25 minutes.
  • Fan/convection ovens brown faster. Use your oven’s usual temperature adjustment and begin checking both tomatoes and crust early.
  • For cleaner slices, cut through the tomato skins first. A sharp serrated knife or very sharp chef’s knife helps keep a large slice from pulling the filling out with it.

Need something specific? Best Tomatoes · The Best Crust · Cheese & Mayo · Times & Doneness · Troubleshooting · Variations · Serving · Make Ahead

Why Tomato Pie Gets Soggy—and Five Ways to Keep the Crust Crisp

A soft crust can begin in several places. Too much water may come in with the tomatoes. The pastry may need more time before filling, or the bottom may not be browning strongly enough. Sometimes a well-baked pie is simply sliced while everything inside is still loose and steaming.

The crispest pies do not rely on one heroic trick. A handful of smaller choices add up.

Tomato pie guide showing tomatoes salted and blotted, roasted, crust blind-baked, a thin cheddar barrier, a low-rack bake, and the finished pie resting.
Crispness comes from several small protections working together: blot, roast, pre-bake, add a thin cheese barrier, bake low and rest.
  1. Dry the tomatoes in two stages. A short salt-and-blot step removes easy surface water; roasting then drives off more moisture while concentrating the flavor.
  2. Give the crust a real head start. The base should already have color and structure before the tomatoes arrive.
  3. Add a thin cheese layer. Melted cheddar gives the crust another buffer against the tomato juices.
  4. Bake low in the oven. The lower rack encourages better browning underneath while the filling finishes.
  5. Let the pie rest. Cooling lets steam escape and gives the filling time to settle.

Together, those small choices make the difference between a pie that merely tastes good and one you can confidently lift from the dish and put on somebody’s plate.

Surface water is the easiest moisture to remove: salting draws it out, and blotting takes it away before roasting begins.

Three tomato-preparation stages showing fresh glossy slices, salted slices with beads of moisture, and blotted slices with visibly drier surfaces.
The beads that appear after salting are moisture you can blot away before the tomatoes ever reach the crust.

Best Tomatoes for Tomato Pie

Four groups compare heirloom tomatoes, round slicing tomatoes, Roma or plum tomatoes, and a mixed combination of those tomato types.
Heirlooms bring big flavor but more juice; plum tomatoes are meatier; slicing tomatoes sit comfortably between the two.

For pie, tomato flavor matters—but so does how much water that tomato is carrying. Smell them. If they barely smell like tomatoes before you cut them, roasting will not suddenly give them peak-summer flavor.

TomatoBest ForMoisture RiskWhat to Know
HeirloomBig flavor and beautiful colorHighWonderful in season, but very juicy varieties may need extra roasting time.
Ripe slicing tomatoBest all-round choiceMediumGood balance of flavor, structure and availability.
Roma or plumEasiest moisture controlLowerMeatier flesh makes them forgiving, although flavor varies.
Mixed tomatoesFlavor plus reliabilityMediumMix flavorful heirlooms with firmer slicing or plum tomatoes when you want both character and easier moisture control.

What I Would Buy

If I were shopping specifically for this pie, I would choose ripe but still firm slicing tomatoes unless especially flavorful heirlooms were available.

A hand holds a ripe red tomato near the nose while several firm red tomatoes rest nearby on linen and in a paper produce bag.
Choose tomatoes that smell ripe and give slightly under pressure without feeling soft or collapsed.

Peak-season heirlooms are worth using; just let their juiciness decide the roasting time. Mixing a few with meatier plum tomatoes also works well when you want plenty of flavor with a little less water to manage.

Roasting does more than solve a water problem. As excess juice cooks away, the tomatoes taste sweeter, deeper and more intensely like themselves. That concentrated flavor becomes the heart of the finished pie.

Three roasted tomato states labeled too wet, ready, and overdried, ranging from glossy and juicy to lightly wrinkled and then dark and shrunken.
Ready tomatoes stay red and plump with lightly wrinkled edges and a mostly matte surface—not glossy and watery, browned or shriveled.

If some of your tomatoes are already too soft or juicy to give you neat slices, they may be happier in fresh tomato soup, where their extra liquid can be cooked down instead of fought.

Cherry tomatoes can work, but they behave more like a variation than a direct substitute: once halved, they expose much more cut surface and do not create the same layered filling. Canned tomatoes are better saved for another recipe. This one really wants fresh tomatoes that can be sliced, roasted and layered.

The Best Crust

Use a standard 9-inch / 23 cm flaky pie crust, not deep dish. Homemade dough, refrigerated rolled pastry and a standard preformed frozen shell can all work. The base needs enough color and structure before the tomatoes arrive.

Two crust preparation routes compare rolled dough blind-baked with parchment and weights with a standard preformed frozen pie shell baked in its foil pan.
Rolled dough and a frozen shell can both work; what matters is a dry, well-set base before filling.

If store-bought crust gets tomato pie on the table, use it. The tomatoes matter much more here than whether you made the pastry yourself.

Do You Have to Blind-Bake the Crust?

For this recipe, yes. The shell gets a substantial head start so it is already baked across the bottom before it has to support a juicy filling.

Look underneath. Pale or slightly translucent pastry still needs more time. You want the bottom dry and lightly golden across the base, not just browned around the exposed rim.

Two empty pie shells compared side by side: one pale and slightly glossy, the other dry, opaque, set, and lightly golden.
Look across the center, not just the rim: the base should be dry, opaque, firm and lightly golden, without shiny or translucent patches.

A crust baked this far does not disappear underneath the filling. You can still feel its flaky edge when you cut into the finished pie.

If you want to make the pastry yourself, this flaky homemade pie crust recipe makes enough dough for two single 9-inch crusts, so you can use one here and freeze the second.

Metal, glass and ceramic pie plates can all work. Metal heats quickly. Glass lets you inspect the underside. Thick ceramic usually heats more slowly, so follow the color of the pastry rather than the clock alone.

Best Cheese—and Why Mayo Matters

Extra-sharp cheddar gives the topping plenty of flavor without requiring an especially thick cheese layer. A little melts directly over the crust, while the rest forms the backbone of the topping. Parmesan adds a concentrated savory edge without bringing much extra water.

Pecorino Romano can stand in for Parmesan, but it is saltier. Taste before adding anything else salty, especially if bacon is also going into the pie.

Why Does Southern Tomato Pie Use Mayonnaise?

Bowl of cheddar and mayonnaise topping surrounded by mayonnaise, cheddar, Parmesan, Dijon, and basil, with callouts for fat, acidity, creaminess, and binding.
Mayo is part of the topping’s structure here, not a separate sauce or finishing condiment.

Mayonnaise brings fat, acidity, creaminess and enough binding to help the cheese topping hold together as it bakes. If you prefer making condiments from scratch, this homemade mayonnaise recipe explains the basic emulsion and gives you a classic mayo you can use here.

The creamy layer needs enough tang to sharpen the tomatoes. The topping should frame the filling, not bury it.

For more stretch, choose low-moisture mozzarella rather than fresh mozzarella. Treat it as a texture variation, not an exact cheddar substitution. Fresh mozzarella carries much more water. Gruyère gives the pie a nuttier, more savory character, while fontina melts into a softer, silkier layer.

How Long to Bake Tomato Pie: Times and Readiness Cues

The timer tells you when to start looking. The food tells you when to move on. Tomato variety, crust thickness, pie-dish material and oven calibration all affect the exact timing, so use the clock together with the visual cues below.

Vertical tomato pie timing guide showing roasted tomatoes, blind-baked crust, melted cheddar barrier, baked filled pie, and rested slice with temperatures and cooking times.
When your oven runs faster or slower than expected, these visual cues are the tie-breaker.
StageTemperatureStarting TimeReady When
Tomatoes425°F / 220°C20–25 minSlightly wrinkled, deeper in color, matte rather than wet-looking, very little thin juice
Weighted rolled crust425°F / 220°C15–18 minShell has set and the rim is beginning to color
Unweighted rolled crust425°F / 220°C5–7 minBase looks dry and lightly golden
Preformed frozen shellPer package directionsPer package directionsBase is dry, set and lightly golden
Cheddar barrier425°F / 220°C3–5 minCheese has melted into a thin layer
Filled pie375°F / 190°C30–35 minCrust deeply golden, topping browned in patches, gentle bubbling, center moves together
RestRoom temperature30–60 minFilling has settled enough for the kind of slice you want

By the end of the bake, the tomatoes should smell sweeter, the cheese will have browned in patches and the pastry should look unmistakably baked.

Two views of the same tomato pie during baking: one pale and glossy with a loose center, and one browned in patches with a cohesive, set filling.
A ready center may jiggle, but the filling should move together; loose liquid sloshing independently means it needs more time.

How Long Should It Cool?

The hardest part of this recipe may be leaving it alone once it comes out of the oven.

For a warm, softer wedge, about 30 minutes is enough. For clean slices at the table, give it closer to 45–60 minutes.

Two tomato pie wedges compare a warmer, softer slice after 30 minutes of resting with a cleaner, more firmly set slice after 60 minutes.
As the pie rests, the topping firms and the filling settles, so extra time buys a cleaner slice.

By then the kitchen will smell like toasted pastry, warm tomato, cheddar and basil, and the filling will have settled without going cold.

Tomato Pie Troubleshooting: What Went Wrong?

“Soggy” can mean several different things. Match the fix to what you actually see.

Six-panel tomato pie troubleshooting guide showing watery filling, pale bottom crust, loose filling, greasy topping, a dark rim with loose center, and several salty ingredients combined.
Start with where the problem appears—under the slice, in the filling, on top or around the rim—then match the fix.
What You SeeLikely CauseFix
Watery filling; tomato juice pools around the sliceTomatoes entered the pie too wetGive them more space or roasting time; blot slices that release juice while waiting
Pale, doughy bottom while the filling looks fineCrust needed more pre-baking or stronger bottom heatGive the base more color before filling and keep the filled pie low in the oven
Loose slice without much free liquidThe pie was cut too hotLet the filling settle longer before slicing
Clear or orange fat gathers on topToo many rich ingredients stacked togetherUse pesto modestly, drain bacon well and avoid another heavy cheese layer
Dark rim, loose centerCrust browned faster than the center cookedShield the rim with foil and keep baking
Harsh, overly salty toppingSalt from tomatoes, cheese and additions stacked upMeasure the tomato salt and taste before adding more when using Pecorino or bacon

Juice underneath? Think tomatoes. Oil on top? Think cheese, mayo, bacon or pesto. They can look similar once the pie is cut, but they need completely different fixes.

Close comparison of tomato pie with thin reddish juice pooling beneath a slice and amber oil droplets sitting on top of the browned cheese.
Tomato juice is usually thin and reddish; rendered fat looks clearer and amber-orange, often beading on the cheese first.

Ready to try again? Back to Recipe · Times & Doneness

What Makes This a Southern Tomato Pie?

Ripe fresh tomatoes, pastry and a creamy cheddar-mayo topping put this firmly in the Southern tomato-pie family. Basil, onion, bacon and other cheeses vary from one kitchen to another, but tomatoes, pastry and a rich cheese layer sit at the center of the dish.

The name can be confusing. Trenton/New Jersey and Utica tomato pies belong to pizza traditions, while green tomato pie can mean something entirely different: a sweet, spiced pie made with unripe tomatoes. This recipe is the Southern savory version.

Easy Variations

Every addition brings something besides flavor—especially water, fat or salt. Keep those three in mind and the basic balance of the pie is much easier to preserve.

With Bacon

Add crisp, well-drained bacon between the tomatoes and topping. If you want an easy small-batch method, this crispy air fryer bacon recipe renders the fat well and lets the strips firm up after cooking. Cool and drain the bacon before crumbling it into the pie, and remember that it brings plenty of salt of its own.

Southern tomato pie wedge with red tomato layers, creamy browned topping, flaky crust, basil, and a restrained amount of small crisp bacon pieces.
Scatter bacon so a few bites get a smoky, crisp accent without turning the whole pie heavy.

With Pesto

Use pesto sparingly. A classic basil pesto already contains olive oil, nuts and Parmesan, so a thick layer beneath the cheese topping can make the finished pie greasy. A thin smear is plenty. If what you mainly want is basil aroma, fresh leaves give you that lift with much less added fat.

Southern tomato pie wedge with red tomato layers, browned cheese topping, flaky crust, basil, and a few small green pesto accents in the filling.
A little pesto goes a long way; keep it as a bright basil-garlic accent, not another rich layer.

Two smaller additions: Sautéed onion or shallot adds sweetness while shedding some of its moisture before it reaches the filling. A modest handful of fresh corn adds little bursts of sweetness and texture.

Can You Make It Without Mayo?

Yes, but do not simply leave the mayonnaise out of this recipe. Mayo supplies fat, acidity, creaminess and binding, so a completely mayo-free pie needs a topping formulated around another binder.

If it is mainly the mayo flavor you want to soften, sour cream can be part of a lower-mayo topping. I would not swap it cup for cup here, though; changing the binder changes the way the topping sets. For a completely mayo-free version, use a recipe built specifically for that style.

What to Serve With Tomato Pie

The pie is rich enough that something cool, crisp or sharp alongside it works especially well.

This cucumber salad with vinegar, dill and onion is a particularly good match because the crunch and acidity cut through the creamy cheese topping.

Southern tomato pie wedge served with cucumber salad and an iced lemon drink, with the remaining pie visible in the background under warm afternoon light.
Warm tomato pie, something crisp and cool, and a cold drink—that is summer lunch.
  • Green salad with a sharp vinaigrette
  • Green beans
  • Corn on the cob
  • Grilled chicken
  • Grilled shrimp
  • Fresh fruit or cold watermelon

For brunch, add eggs, fruit and a simple salad. For a summer lunch, a generous wedge and something cold and crunchy alongside it may be all you need.

Make Ahead, Store and Freeze

Make Ahead: What to Prep Early

If I were preparing this a day ahead, I would stop before assembly.

  • Roast the tomatoes and refrigerate them once cool.
  • Blind-bake the crust, let it cool completely and keep it covered.
  • Grate the cheddar and Parmesan and refrigerate them.
  • Stir the mayonnaise and Dijon together if you want one less job later, but leave the fresh basil whole until assembly.
Overhead arrangement of lightly roasted tomato rounds, empty blind-baked crust, grated cheddar, Parmesan, mayo-Dijon mixture, and whole fresh basil kept separately.
Keep the components separate overnight so the crust stays dry and the basil stays fresh until assembly.

When you are ready to bake, take the roasted tomatoes from the refrigerator as you start preheating the oven so they can lose some of their chill. Melt the 40 g cheddar over the pre-baked crust, combine the remaining cheese and freshly cut basil with the mayo-Dijon mixture, then assemble the pie.

If the filling is still quite cold when it goes into the oven, the final bake may take a little longer. Follow the browned topping, gentle bubbling and center-movement cues rather than forcing it to finish at the usual minute mark.

Storing and Reheating Leftovers

After baking, keep the pie at room temperature for no more than 2 hours total, including cooling and serving time. If the surrounding temperature is above 90°F / 32°C, limit that to 1 hour. Refrigerate leftovers promptly, keep them covered and use them within 3–4 days. These timings follow USDA leftover-safety guidance.

For the best crust, warm slices in an oven or toaster oven at about 325–350°F / 165–175°C. Reheated leftovers should reach 165°F / 74°C in the center. A preheated sheet pan underneath the slice can help crisp the base again.

Leftover tomato pie wedge reheating on a metal sheet pan in the oven, with a close view of the thin golden, crisp pastry on the underside.
Reheat on a hot metal sheet pan to give the pastry direct bottom heat and help it crisp again.

The microwave is fine when speed matters, but expect softer pastry.

Freezing

You can freeze the pie, but it would not be my first choice if crust texture matters.

Tomatoes soften after freezing and thawing; Penn State Extension likewise recommends thawed frozen tomatoes for cooked uses rather than expecting fresh tomato texture. The pastry also tends to come back softer than it was freshly baked.

If you know in advance that you will not need the whole pie, preparing the components ahead and baking closer to serving usually gives you the better result.

Useful shortcuts: Back to Recipe · FAQ · Back to Top

FAQ

Do I need to peel the tomatoes? No. Roasting and baking soften the skins, and leaving them on helps the slices retain their shape. Peel them only if your tomatoes have unusually tough skins or you strongly dislike the texture.

Should I remove the seeds? Not routinely. The seed cavities contain plenty of juice, so removing some can help with exceptionally watery tomatoes, but roasting gives you a more consistent way to manage moisture.

Can I make it gluten-free? Yes. Use a reliable gluten-free pie crust and follow the same tomato-drying and pre-baking method. Check the crust manufacturer’s directions because gluten-free pastry can brown and handle differently from wheat-based pastry.

The Slice You Are Looking For

By the time the pie has rested, the cheese should have settled into the tomatoes and the crust underneath should still feel like part of the dish. Run the knife cleanly through the tomato skins and pastry, then lift the first wedge.

The bottom should come with it.

Hand lifting a clean wedge of Southern tomato pie on a server, with the thin flaky bottom crust attached and the remaining pie behind it.
The payoff: a clean wedge that lifts with its flaky bottom crust still attached.

You get flaky pastry underneath, concentrated ripe tomato through the middle, sharp creamy cheese on top and fresh basil cutting through the richness.

Nothing running across the plate. Nothing drowning anything else.

Just a very good Southern tomato pie.

Back to Recipe · Back to Top