The fastest way to enjoy cooking more often isn’t a complicated recipe or a brand-new appliance—it’s having kitchen tools that remove friction from the moment you start. When the board stays put, the knife cuts cleanly, the pan heats predictably, and the utensils feel right in your hand, dinner stops feeling like a task you brace for. Instead, it becomes something you can begin without a deep breath first.
This guide is inspired by Joshua Weissman’s idea that the right tools make cooking smoother and more fun (his original “19 tools” video is here: 19 Tools To Make Cooking Easier). At the same time, what you’re reading is a fresh, independent list—built for real home kitchens, realistic storage, and tools you’ll actually use on a random Tuesday.
Along the way, you’ll also see how to choose between materials—stainless steel, silicone, wood—plus how to avoid the common trap of buying a huge utensil set that looks impressive but spends most of its life in a drawer.
Kitchen tools that earn their space every day
An “essential” isn’t just popular—it earns a permanent spot because it reliably does at least one of these things:
- makes prep faster without making you rush
- improves results in a way you can taste (or see)
- reduces mess and cleanup
- makes cooking safer by improving control
- multitasks so you own fewer items overall
- stays pleasant to use, even after months of washing
So, rather than collecting gadgets, this kitchen tools list focuses on workhorses—items that quietly lift everything you cook.
Also Read: Sourdough Starter Recipe: Make, Feed, Store & Fix Your Starter (Beginner Guide)
Kitchen tools list for prep: quicker chopping, cleaner counters, better flavor
1) A chef’s knife: kitchen tools that make prep feel effortless
A comfortable chef’s knife isRcy feels like an extension of your hand. Once you have that, chopping becomes calmer: onions are neater, herbs slice instead of bruising, and prep stops stealing your energy before cooking even begins.
If you want a practical reference for what makes a chef’s knife “worth it” (balance, handle comfort, blade shape), Epicurious has a helpful test-driven overview. The best chef’s knife (Epicurious)
2) A paring knife: kitchen tools for precise, small cuts
Even with a great chef’s knife, a paring knife is the tool that handles detail work without awkward angles—peeling ginger, trimming strawberries, coring tomatoes, cutting small garnishes, or cleaning up blemishes on produce.
It’s also the knife that helps you slow down and be precise when precision matters.
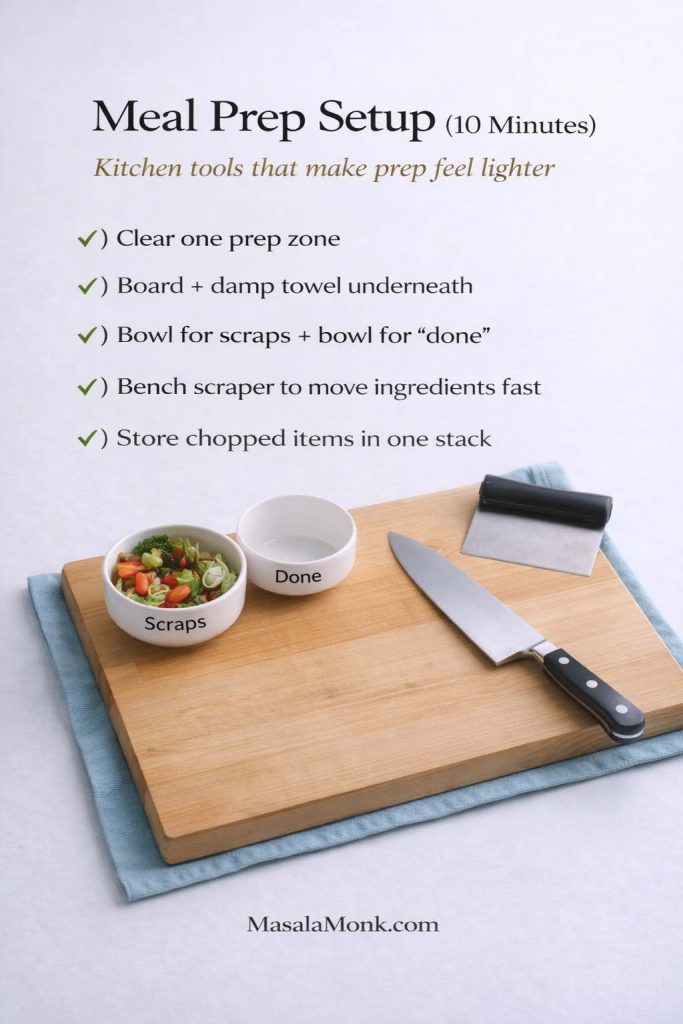
3) A cutting board: kitchen tools that keep prep stable and tidy
A big, stable cutting board makes prep feel organized. It gives you room to keep a “clean side” and a “scrap side,” and it prevents that cramped, messy feeling that happens when you’re constantly sweeping ingredients off the edge.
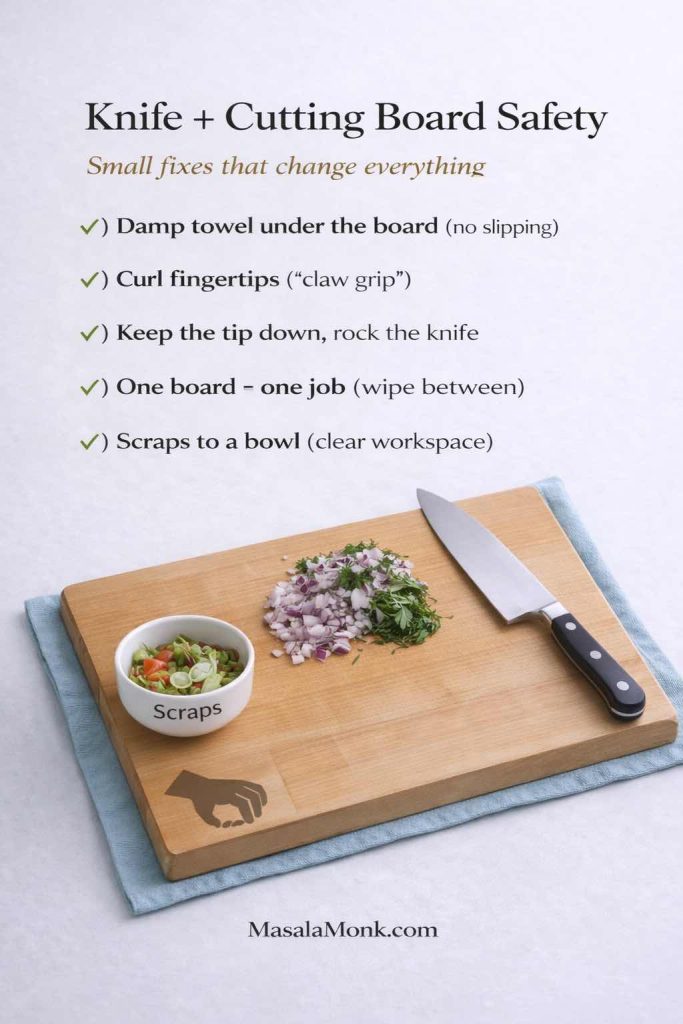
If your board slides, add a damp towel underneath. That tiny change makes chopping more confident immediately.
4) Kitchen shears (cooking shears)
Kitchen shears are the underrated shortcut. You’ll reach for them for herbs, scallions, parchment, packaging, and quick trimming jobs that feel silly to do with a knife. They’re also useful for snipping bacon into pieces, cutting pizza, or trimming poultry skin.
If you’re comparing options, terms like “poultry shears,” “kitchen scissors,” and “kitchen shears” often point to the same category—what matters most is that they feel sturdy and easy to clean.
5) Bench scraper
A bench scraper is the tool that keeps your counter tidy while speeding up prep. Scoop chopped vegetables into a bowl in one clean motion. Scrape flour off the counter. Portion dough. Even if you don’t bake often, it turns “lots of tiny moves” into “one quick move.”
It’s one of those kitchen tools that feels minor until it becomes automatic.
6) Best vegetable peeler (for you)
A good peeler is smooth, fast, and predictable. With the right one, you peel carrots or potatoes without removing half the vegetable. It also makes quick ribbons for salads and garnishes with almost no effort.
You’ll see a few common styles—Y-peelers and swivel peelers are the big two. Whichever you choose, look for the same thing: a peeler that glides without chattering, feels secure in your hand, and doesn’t slip when the veggie is wet.
7) Best cheese grater (and why a box grater wins)
A box grater earns its spot because it does more than cheese. It shreds carrots for salads, potatoes for hash browns, chocolate for desserts, and even onion when you want it to melt into a sauce.
It’s also a reliable “texture tool”—it gives you consistent pieces that cook consistently, which often means better browning and more even seasoning.
8) Microplane / fine grater
If you want big flavor with minimal effort, this is the move. Citrus zest brightens everything. Garlic and ginger become smooth instead of chunky. Hard cheeses melt into dishes without gritty bits. Nutmeg becomes a soft, warm finish rather than a loud spice.
A microplane is one of those kitchen tools that quietly makes your cooking taste more intentional.
9) Best mandoline slicer (with safety first)
A mandoline slicer creates uniform slices quickly. Uniform slices cook at the same rate, which means fewer burnt edges and fewer undercooked centers—especially for potatoes, onions, cucumbers, and slaw vegetables.
Still, this tool has one rule: use the guard (or a cut-resistant glove) every time. Even if you’re careful, complacency is what catches people.
10) Salad spinner
A salad spinner is the difference between crisp salad and watery salad. Dry leaves hold dressing, so flavor clings instead of sliding off. It also helps with herbs: spin them dry, then chop—your cutting board stays cleaner, and your herbs stay brighter.
If you’re building a kitchen tools list that supports healthier, faster meals, this one surprisingly earns its place.
Also Read: How to make No-Bake Banana Pudding: No Oven Required Recipe
Kitchen tools for measuring and consistency: fewer guesses, better repeats
Not every meal needs precision. However, repeatable results—especially for sauces, baking, and “signature dishes”—often come from simple measuring tools.
11) Measuring cups
Measuring cups are foundational kitchen tools because they cover both dry and liquid measuring in everyday cooking. You might not measure everything, but you’ll measure often: rice, flour, sugar, milk, broth, and quick batters.
If you prefer a clean aesthetic, you’ll also notice options like white measuring cups or decorative sets. Style is fine—function matters more: easy to read, easy to wash, and comfortable to hold.
12) Measuring spoons
Measuring spoons control the “small but powerful” ingredients—salt, baking powder, vanilla, spices, vinegar, soy sauce. They’re also how you keep a dish balanced when you’re cooking without a recipe.
Once you get used to accurate spoons, you’ll be surprised how often they rescue a sauce from being too salty or too acidic.
13) Best kitchen scale for baking (and for cooking)
A digital kitchen scale makes baking easier because it removes the biggest variable: inconsistent measuring. Flour isn’t packed differently each time. Recipes are simpler to halve or double. Cleanup is lighter because you can weigh directly into one bowl.
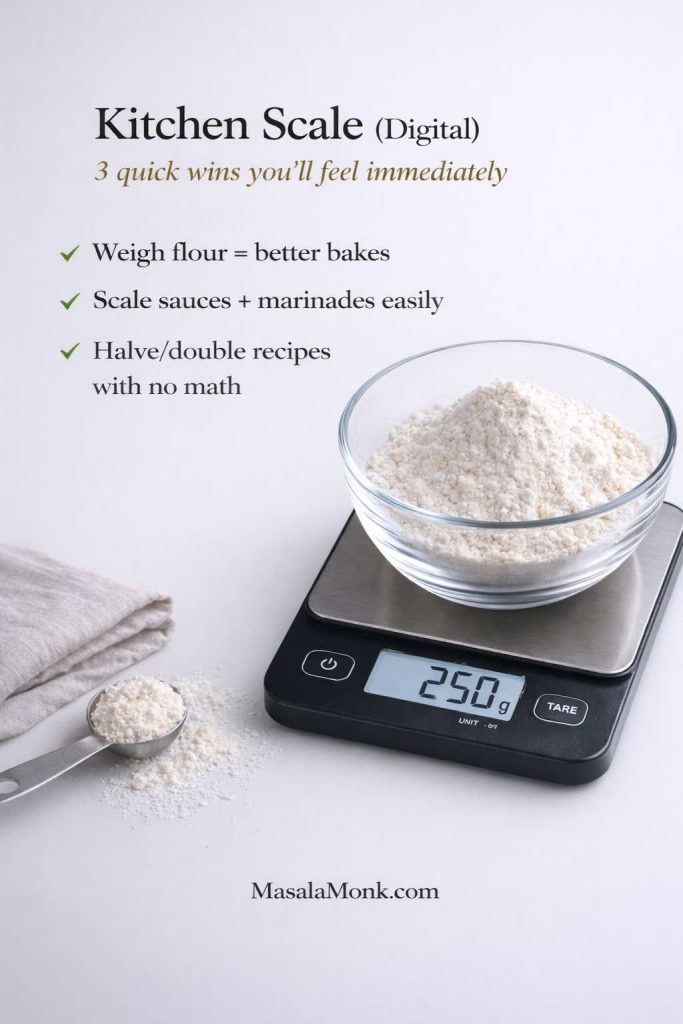
King Arthur has a clear explanation of why a scale changes the way baking feels. Why a digital kitchen scale matters (King Arthur Baking)
If you want a natural way to use a scale more often, bread is perfect for it. This internal guide pairs beautifully with a scale-first approach: Sourdough bread recipes
14) Instant read food thermometer (digital thermometer cooking)
A thermometer is the tool that removes the most anxiety per rupee. Chicken breast stays juicy because you stop guessing. Roasts get pulled at the right moment. Leftovers reheat more confidently. Even oil temperature becomes easier to manage.
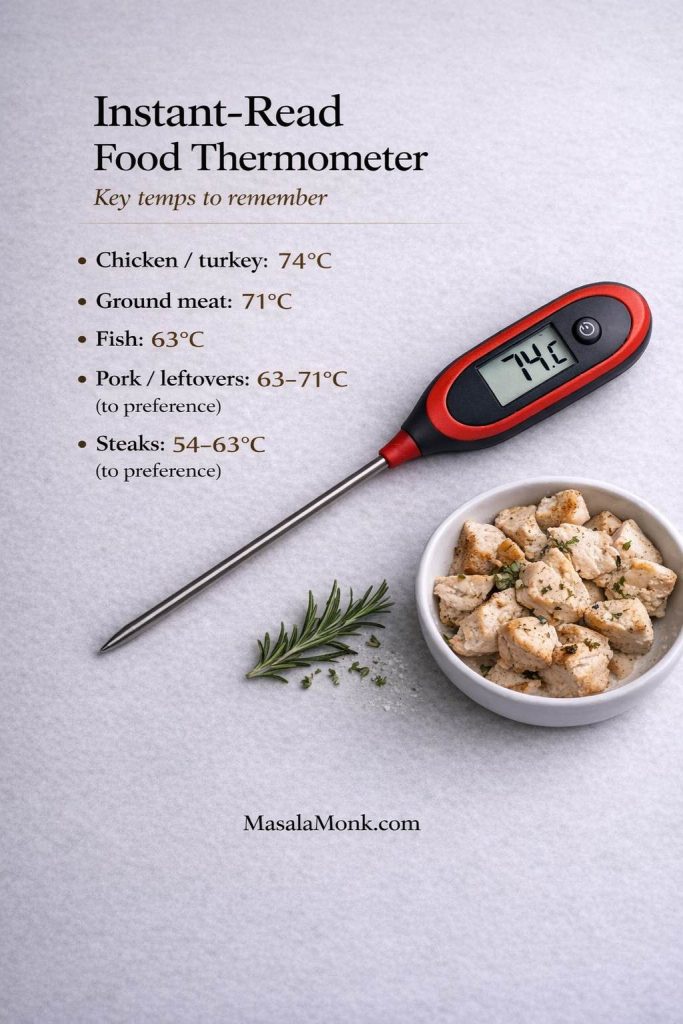
For safe internal temperatures, keep a reliable chart bookmarked: USDA safe temperature chart or FoodSafety.gov internal temperature chart.
Also Read: Chicken Adobo — Step-by-Step Recipe — Classic Filipino Adobong Manok
Kitchen tools and equipment for cooking: buy workhorses, not clutter
Cookware can be the biggest source of frustration in a kitchen—especially when you have too many pieces that don’t do any one job well. Instead, choose a few dependable items and learn them deeply.
15) A skillet that matches how you cook
One great skillet outperforms five “okay” pans. The right choice depends on what you cook most often:
- stainless steel for browning and pan sauces
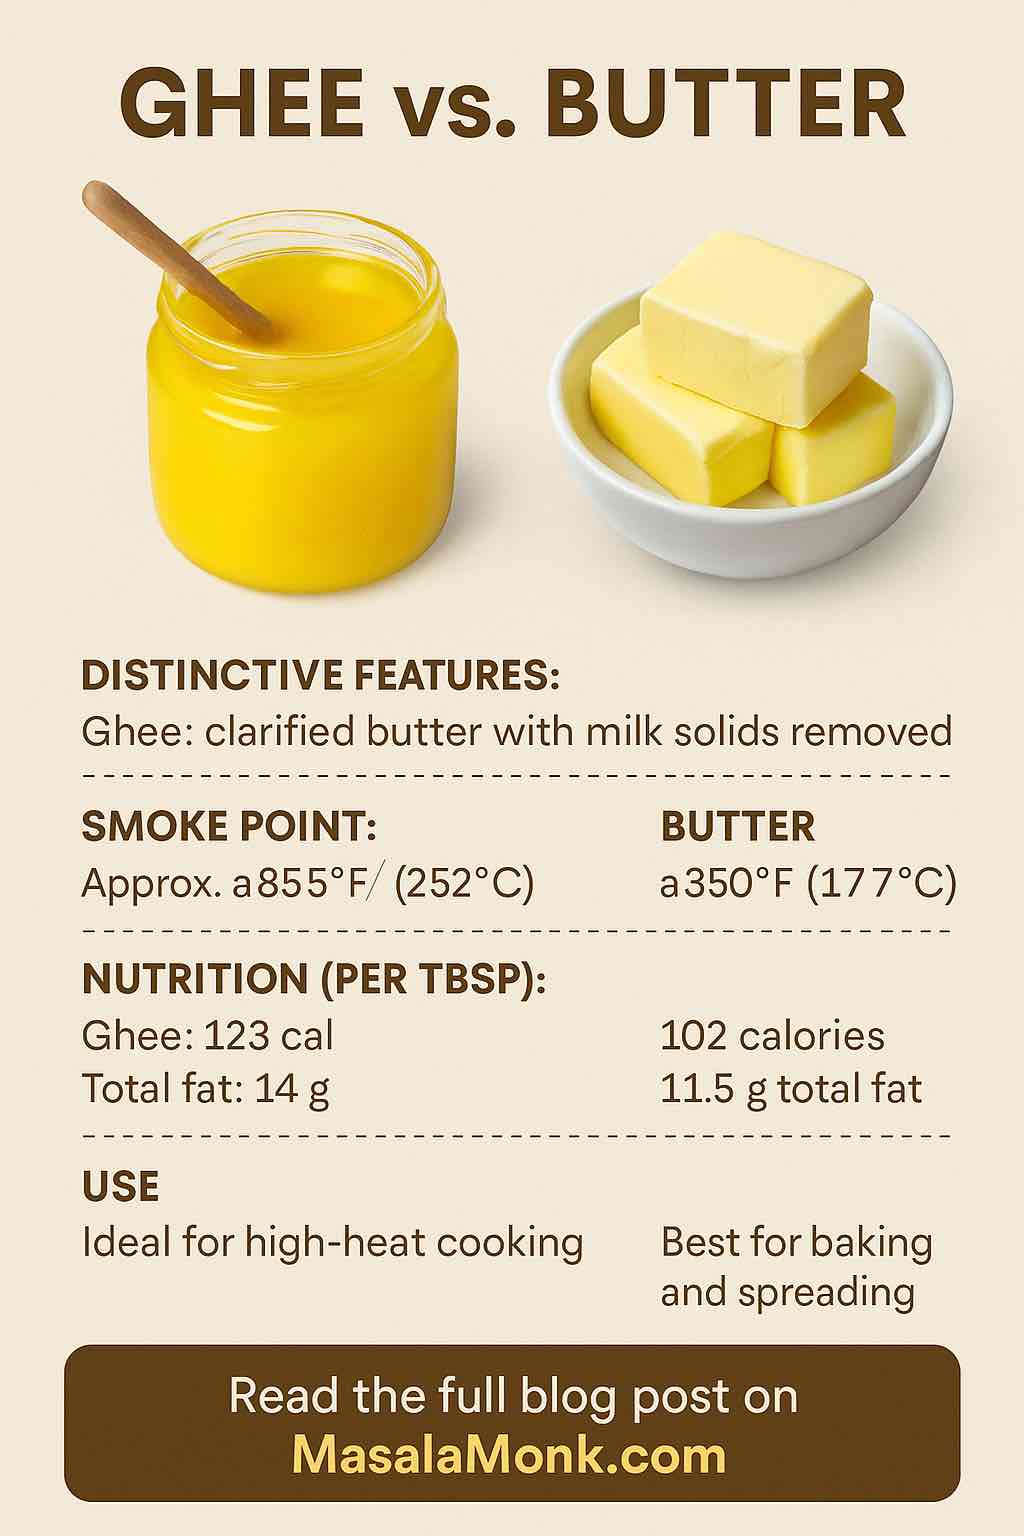
- cast iron or carbon steel for heat retention and long-term durability
- nonstick for easy eggs and delicate food (with the understanding it’s a replaceable item over time)
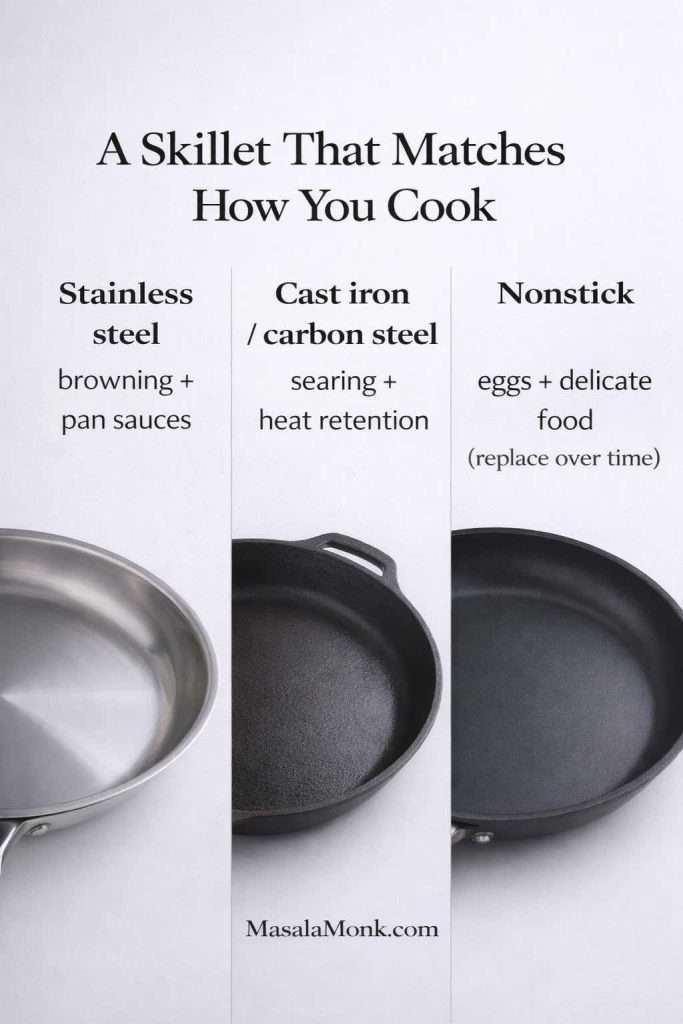
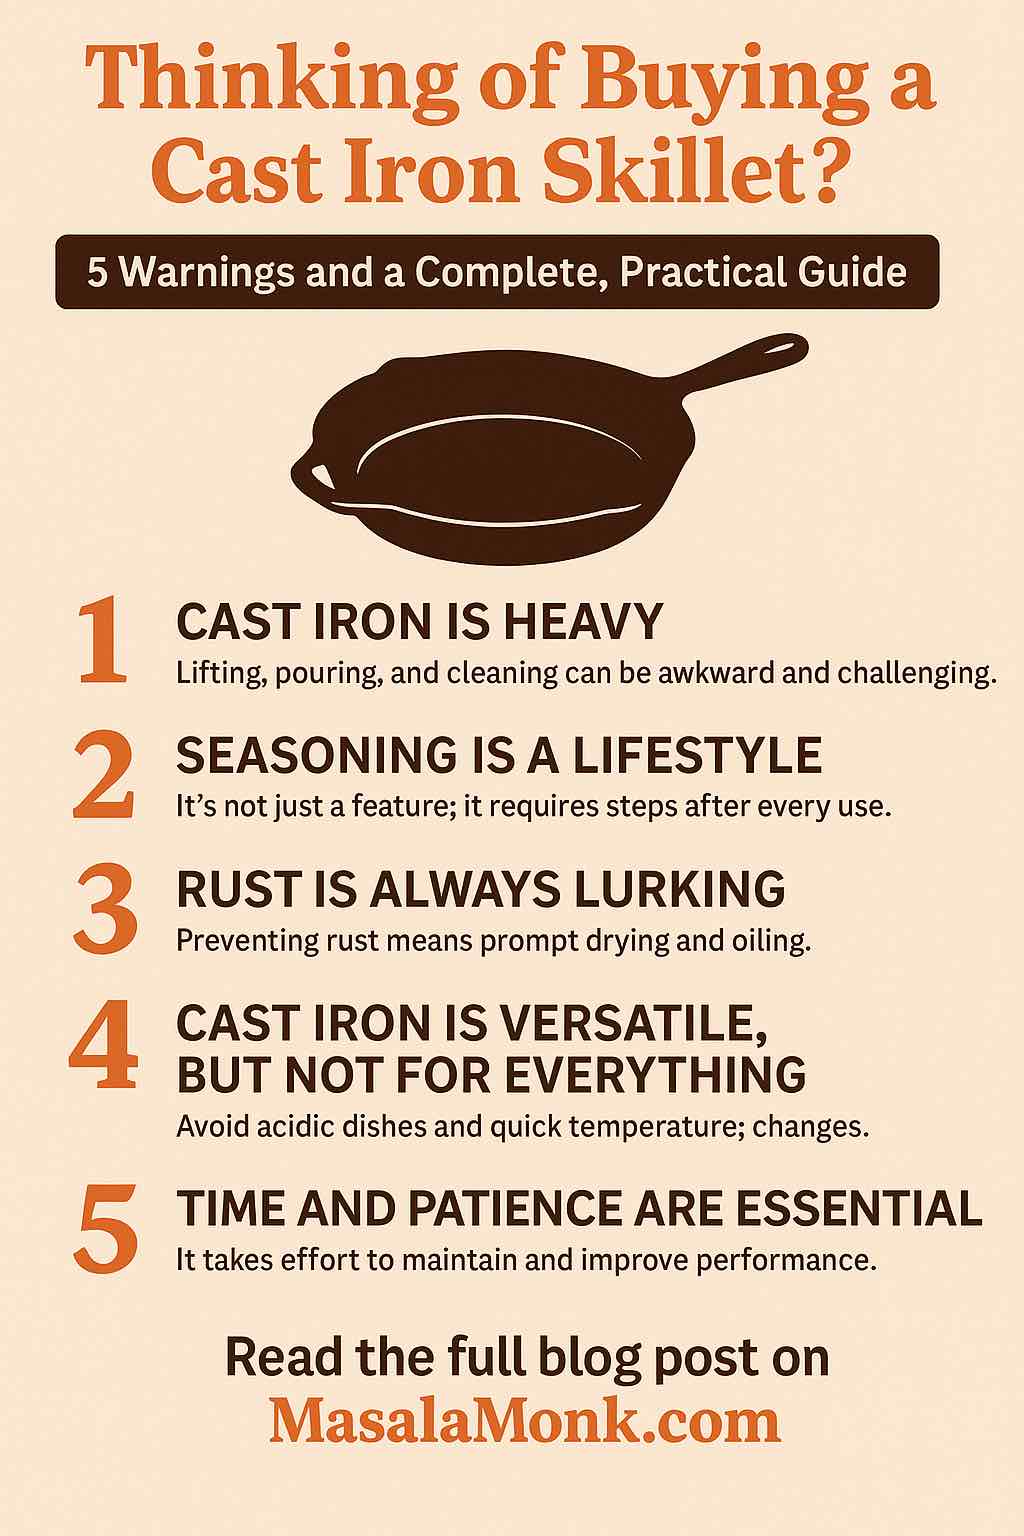
If you’re leaning toward cast iron, this internal post is a strong reality check before you buy: Buying a cast iron skillet? 5 warnings before you invest
If your decision is more about coatings, this breakdown helps: Ceramic vs Teflon (PTFE) cookware
16) A dependable pot (saucepan or Dutch oven)
A good pot is where “real food” happens: dal, rice, pasta, soups, curries, beans, braises, and big batches that turn into leftovers. It also makes sauces calmer because heat is more stable and the bottom is less prone to scorching.
Sauces are the easiest proof that a pot matters. For example: Tomato sauce from fresh tomatoes and Marinara sauce recipe both benefit from steady simmering and easy stirring.
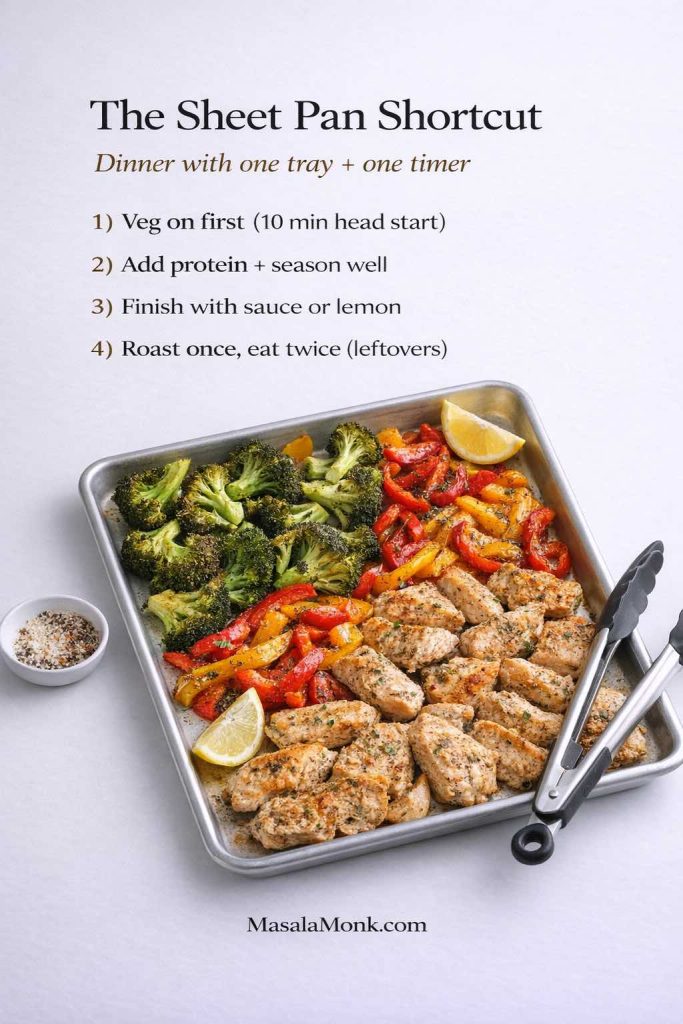
17) Baking tray / rimmed sheet pan
A rimmed sheet pan is one of the most versatile kitchen tools and utensils “adjacent” items you can own. Roast vegetables. Crisp tofu. Bake chicken. Reheat leftovers without turning the stove into a mess. Cook multiple components at once.
If you want a simple one-pan dinner that proves why this tool matters, try: Sheet pan chicken fajitas
18) Mixing bowls (nesting set)
Mixing bowls are a daily-use item that makes everything tidier: toss salad, marinate meat, mix batters, coat vegetables, hold chopped ingredients, and keep your counter organized.
You’ll come across recommendations like “mixing bowls with lids” or “best mixing bowls” in a lot of buying guides. The general idea is the same: bowls that stack neatly, don’t slide around, and wash easily.
19) Wire rack
A wire rack helps food stay crisp by letting steam escape underneath. It also cools baked goods properly, which matters more than people expect—cookies stay snappy, breads don’t turn gummy, and fried foods don’t soften as quickly.
If you want a satisfying use-case, oven bacon is perfect for it: How to cook bacon in the oven
Kitchen tools and utensils you’ll reach for constantly
Cookware handles the heat. Meanwhile, these hand tools handle the workflow—stirring, flipping, scraping, plating, serving, and keeping things clean.
Tongs: the “extra hand”
Tongs are the tool you reach for when you want control without fuss. They flip, toss, grab, and plate without tearing food or poking holes. They’re also excellent for mixing salads, turning roasted vegetables, and serving pasta.
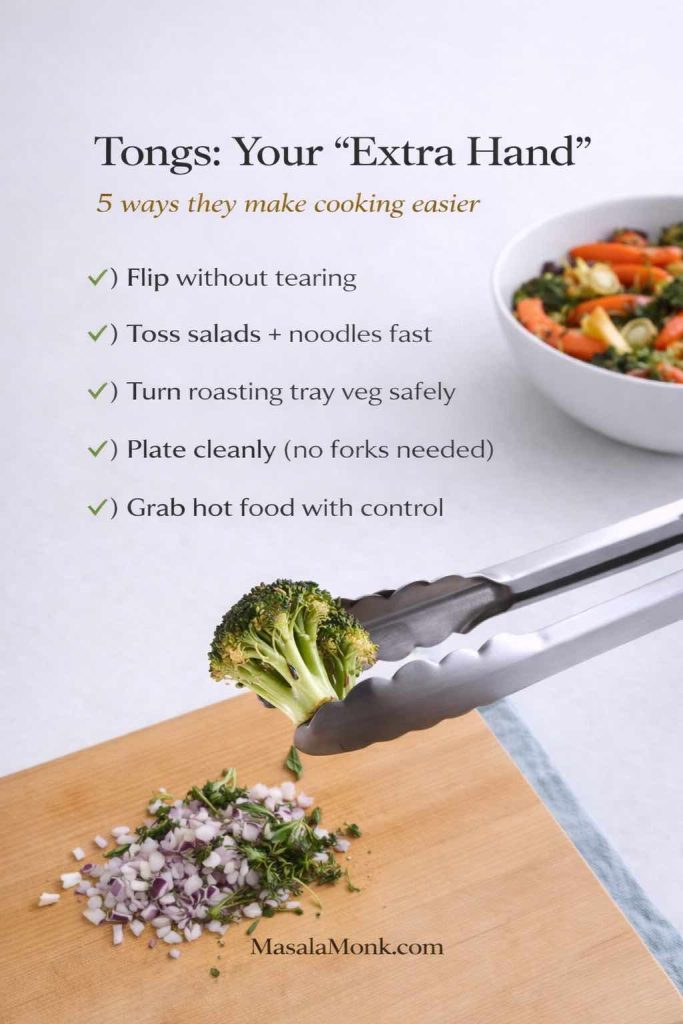
If you see variants like chef tongs, catering tongs, plating tongs, or mini serving tongs, they’re all in the same family. For everyday cooking, choose a pair that feels comfortable and springy, with ends that grip well.
Spatulas: the right one for the job
A spatula is not one thing, which is why kitchens end up with too many. A simpler approach works better:
- a silicone spatula for scraping bowls and pots clean
- a sturdy turner for flipping food confidently
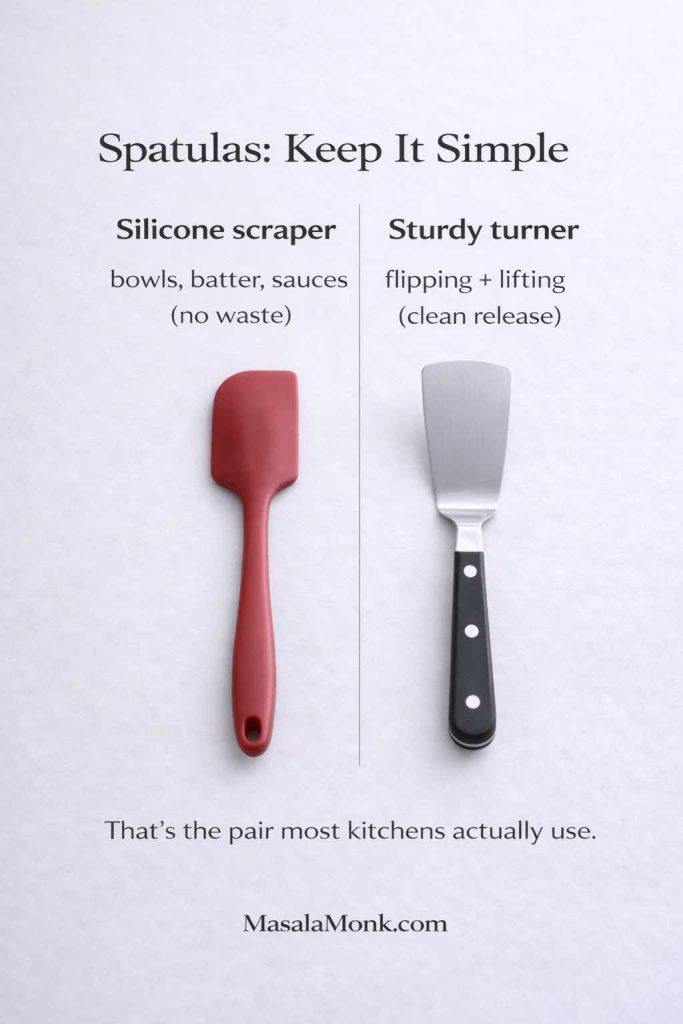
That second category includes slotted turner spatulas, fish spatulas, and thin metal spatulas. The shape matters less than the feeling: it should slide under food easily and feel stable when lifting.
If you cook with nonstick pans, keep a silicone tool for that surface. If you cook with cast iron or stainless steel, a sturdy metal turner can be a joy.
Whisk (including a balloon whisk)
A whisk is a sauce tool as much as it is a baking tool. It smooths gravies, fixes lumpy sauces, emulsifies dressings, and makes eggs more consistent. A balloon whisk is especially helpful when you want volume—whipped cream, airy eggs, or fluffy batters.
This is also where measuring spoons and a whisk pair beautifully: you can build a balanced dressing quickly without dirtying extra gadgets.
Ladle
A ladle is a small tool that instantly makes serving feel cleaner: soups, dal, curry, pasta sauce, stew. It reduces spills and makes portioning simpler, especially when you’re feeding family or serving guests.
Wood ladles, metal ladles, and stainless steel serving utensils all work—choose the material that fits your cookware and how you wash.
Also Read: Sweetened Condensed Milk Fudge: 10 Easy Recipes
Kitchen utensil set: stainless steel, silicone, or wooden cooking utensils?
A kitchen utensil set can be a smart buy, especially when you’re setting up a kitchen or replacing mismatched items. However, the material changes how you cook—and what cookware stays in good shape.
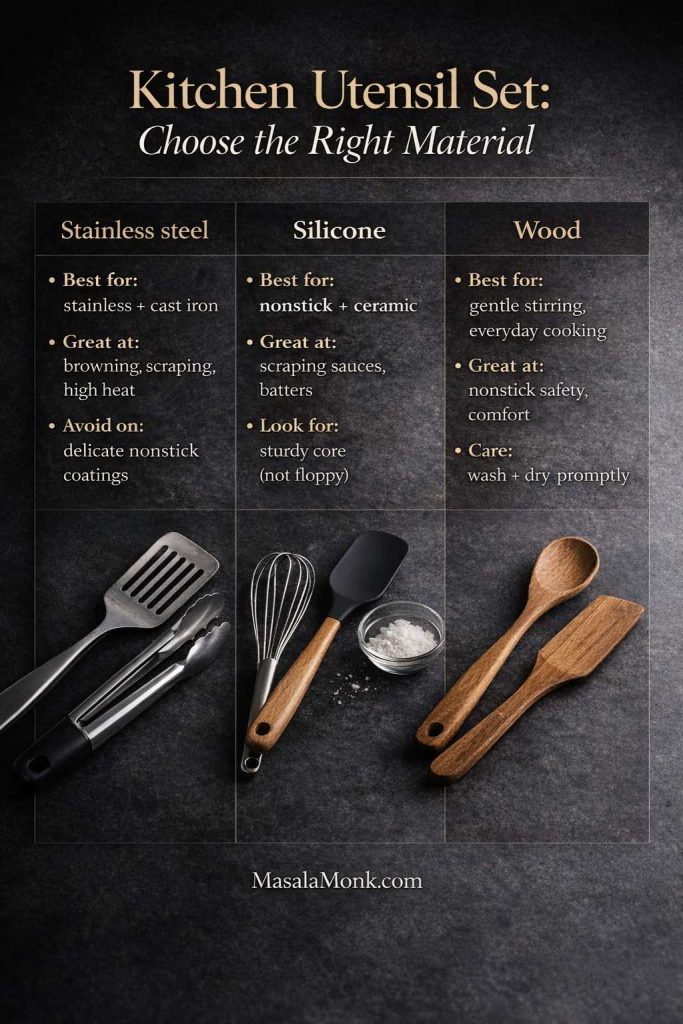
Stainless steel kitchen utensil set
A stainless steel utensil set is durable, easy to clean, and comfortable for high heat. It feels excellent on stainless steel and cast iron. It also looks “professional,” which is why you will often see people looking for high end kitchen utensils.
That said, stainless can scratch coatings, so if you cook mostly on nonstick, you’ll want to be gentle—or choose silicone for those pans.
Silicone kitchen utensils set
A silicone utensil set is kinder to coated pans and great for scraping thick sauces and batters. It’s also a good fit if you’re building toward “non toxic cooking utensils” and want tools that won’t chip, flake, or expose metal edges against delicate surfaces.
The key is sturdiness. A floppy spatula is frustrating, while a well-built silicone tool becomes a favorite.
Wooden utensil set (wooden kitchen utensil set / wooden cooking utensils set)
Wooden utensils feel warm and comfortable in the hand. They’re gentle on cookware, especially on nonstick or ceramic surfaces. They also stay cooler than metal during long stirring sessions.
If you’re shopping for a wooden utensil set—whether it’s a basic spatula-and-spoon combo or a nicer handmade set—aim for pieces that feel dense, smooth, and well-finished. Olive wood utensils and acacia wood utensils are popular because they’re sturdy, though any well-made wood can work if cared for properly.
Wood does ask for a little respect: wash and dry promptly, and don’t leave wooden spoons soaking in water.
If you want a broader cookware overview that connects tools to materials, this internal guide fits naturally here: How to choose the best cookware for your kitchen
Also Read: Peanut Butter Fudge: Recipes & Guide (8 Methods + Easy Variations)
Kitchen tools for healthier cooking and peace of mind
A lot of what people worry about with kitchen tools comes back to “health” and “safety”—non-toxic materials, coatings that hold up, and utensils that won’t chip, flake, or scratch cookware over time. While no single tool guarantees “healthy,” your choices can reduce common headaches.
Choose tools that don’t create avoidable problems
- Use a thermometer so you don’t overcook lean proteins into dryness.
- Use a scale for baking so you’re not adding extra flour and ending up with dense results.
- Use cookware and utensils that fit your heat level, so you’re not accidentally stressing coatings.
- Keep a scraping tool that doesn’t damage pans (silicone is helpful here).
If you want a simple anchor point for safe doneness, the USDA safe temperature chart is worth keeping handy.
Also Read: 10 Vegan Chocolate Cake Recipes (Easy, Moist, & Dairy-Free)
Kitchen tools list for cooking faster: how the right tools change weeknights
Kitchen tools matter most when you’re tired and hungry—when you want dinner without turning your kitchen into a disaster zone.
The sheet pan shortcut
A sheet pan makes “one tray, one timer” cooking possible. Roast vegetables while a protein cooks beside them. Reheat leftovers without babysitting the stove. Crisp things quickly.
If you want a simple starting point, Sheet pan chicken fajitas is a great “proof recipe” because it shows how a single pan can carry a full meal.
The skillet rhythm
A good skillet simplifies cooking because it’s predictable. Once you know how your pan browns onions, you can build meals quickly: sauté aromatics, add vegetables, season well, finish with a sauce or a squeeze of citrus.
Here’s an easy internal skillet example that makes good use of a sturdy pan and tongs: Skillet mushroom and zucchini stir fry
The sauce pot advantage
A dependable pot is what turns “ingredients” into “dinner.” It’s also what makes meal prep feel realistic—one big pot means multiple meals.
If you want sauces that become weekly staples, these internal links are natural fits:
Kitchen planning tools: when layout affects how you cook
Not all “kitchen tools” are handheld. Sometimes, the biggest improvement is planning how your kitchen works—especially if you’re moving into a new home, renovating, or simply reorganizing.
A kitchen planning tool or online kitchen design tool can help you visualize work zones so cooking flows naturally: prep near the sink, cooking near the stove, and storage where you actually need it. If you’ve ever walked across the room five times just to grab salt, you already know why layout matters.
People use different planners depending on region and store—Wickes kitchen planner, Wren kitchen planner, IKEA kitchen planner (including SEKTION), Howdens kitchen planner, and similar cabinet layout planner tools. The brand matters less than the principle: get the triangle (sink–stove–fridge) working, then keep daily tools within arm’s reach of where you use them.
Kitchen mood board: make your tools fit your space
A kitchen mood board sounds aesthetic—and it can be—but it also helps you choose finishes and storage that make your tools accessible. If you love wooden utensils, maybe you want a utensil crock. If you use stainless steel utensils, you might prefer a hanging rail. And if you’re building a clean look, you might choose stackable measuring cups and keep them in one drawer.
Even a small “plan” reduces clutter because you’re buying with intention rather than impulse.
Also Read: Kahlua Drinks: 10 Easy Cocktail Recipes (Milk, Vodka, Coffee)
Commercial stainless steel benches, prep tables, and food prep tables at home
It’s surprisingly common to see home cooks borrow ideas from commercial kitchens—stainless prep tables, workbenches, and simple food-prep stations—because they solve a real problem: easy cleanup and a durable surface for heavy chopping.
You don’t need a restaurant bench to benefit from the concept, though. The home version is simply this: create a dedicated prep surface that stays clear enough to use. Once you have a reliable place to chop, mix, and stage ingredients, cooking feels lighter.
If you have space for a small prep table, it can be transformative. If you don’t, the alternative is a large cutting board that can temporarily turn any counter into a “prep station.”
Also Read: Hot Chocolate Coffee: 3 Easy Recipes (Cocoa, Mix, or Espresso)
Sharpening kitchen knives: the kitchen tool that protects your hands
A sharp knife is safer than a dull knife because you use less force and get more control. That’s why you’ll see so many different sharpening options mentioned—magnetic sharpeners, whetstones, stone sets, guided systems, and classic pull-through sharpeners. The names vary, but the goal is the same: a sharp edge you can maintain consistently.
There are many ways to sharpen. The most important habit is consistency: a little maintenance more often beats a dramatic rescue once a year.
If you want a practical baseline, aim for two habits:
- hone regularly (if you use a honing rod)
- sharpen periodically (stone, system, or professional service)
Once your knife is sharp, everything else becomes easier—especially prep.
Also Read: Cranberry Moscow Mule Recipe: A Festive Holiday Cocktail With Easy Variations
Kitchen tools for baking: simple tools that unlock a lot of recipes
Even if you don’t think of yourself as “a baker,” a few tools make baking approachable—especially if your goal is to make breakfast or desserts without stress.
Scale + bowls + spatula = baking that repeats well
A scale keeps batters consistent. Nesting bowls keep prep tidy. A silicone spatula prevents waste and helps cleanup.
If you’re leaning into breads, this is where a scale becomes addictive: Sourdough bread recipes
Measuring cups and spoons: the calm version of baking
When measuring tools are solid, you stop second-guessing. That matters for pancakes, muffins, quick breads, and cookies.
For a breakfast-friendly recipe set that naturally uses measuring cups, whisk, and a good pan, this internal link fits well: Blueberry pancakes recipes
Professional kitchen essentials at home: what actually translates
It’s tempting to chase “professional chef tools,” “chef recommended kitchen tools,” and “must have kitchen items for chefs.” Some of that is useful; some of it is just marketing.
What genuinely translates from professional kitchens to home kitchens is simplicity and durability:
- fewer items, better items
- predictable work surfaces
- tools that wash easily
- a workflow that doesn’t require ten gadgets
This is why “boring” tools like tongs, a whisk, a good knife, and a stable cutting board often outperform flashy gadgets.
If you want a broader outside reference for what belongs in a starter kitchen, Serious Eats has a solid, practical list. Basic starter kitchen equipment (Serious Eats)
Also Read: Cold Brew Espresso Martini: How to Make It (Step-by-Step Recipe)
Eco kitchen products and sustainable kitchen products: the parts that matter
A lot of home cooks are trying to make their kitchens a little less wasteful—buying fewer things overall, choosing tools that last, and skipping gadgets that end up in a drawer for a month and the trash a year later. The good news is you don’t need a “perfect” eco setup. You just need a few habits that steer your buying in the right direction.
A simple approach helps:
- buy fewer tools (and buy them once)
- choose durable materials
- avoid disposable or single-use gadgets
- pick items that can handle daily washing without warping, cracking, or peeling
Wooden utensils can be a sustainable choice when cared for properly—wash, dry, and don’t leave them soaking. Stainless steel is durable and long-lasting, especially for tools that take heat and pressure. Silicone can be practical for nonstick cookware and for scraping batters and sauces, as long as you choose sturdier pieces that won’t tear at the edges.
If your goal is to reduce waste, the best “eco upgrade” is usually replacing one frustrating, flimsy tool with one you’ll happily use for years—rather than buying a whole new set because it looks nice.
Also Read: Baked Ziti Recipe Collection: 15 Easy Variations
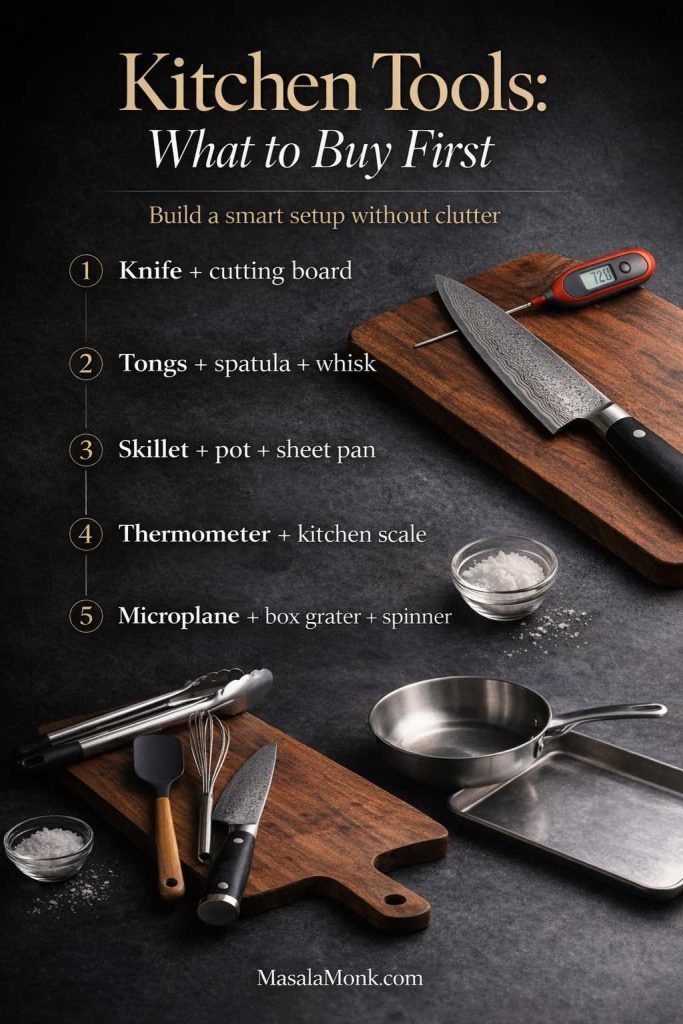
Kitchen tools list: what to buy first so you feel the difference immediately
If you’re upgrading gradually, this order gives the fastest improvement without overwhelming your kitchen.
First wave (instant improvement):
- chef’s knife + large cutting board
- skillet + dependable pot
- tongs + silicone spatula + whisk
- measuring cups + measuring spoons
Second wave (consistency and confidence):
5) instant-read thermometer
6) digital scale
7) sheet pan
Third wave (speed and finishing touches):
8) microplane
9) box grater
10) kitchen shears
11) bench scraper
12) salad spinner
13) mandoline slicer (if you’ll use it weekly)
Once you’ve built that foundation, buying becomes calmer because you’re filling real gaps rather than chasing trends.
Also Read: Sandwich for Breakfast: Breakfast Sandwich Recipe + 10 Variations
A few “skip for now” kitchen tools (unless you know you’ll use them)
A lot of kitchen gadget sets look helpful, yet they create clutter quickly. Unless you’re sure you’ll use them weekly, consider waiting on:
- single-use slicers that only cut one shape
- novelty spatulas that don’t feel good to use
- oversized utensil sets where half the pieces never get touched
- complicated can openers or grinders that are hard to clean
If you do need something specific—like an easy can opener for arthritis or a rechargeable salt and pepper grinder—buy it because it solves a real problem in your kitchen, not because it looks cool.
Also Read: Manhattan Cocktail Recipe (Classic + 6 Variations)
Closing thought: the best kitchen tools make you cook more
The “perfect” kitchen isn’t the one with the most stuff. It’s the one where you can start cooking without resistance—where the tools support you instead of slowing you down.
When your kitchen tools are right, you chop faster, season more confidently, cook with fewer surprises, and clean up without dread. As a result, cooking becomes something you do more often—simply because it’s easier to begin.
And once you’re cooking more often, everything else gets better too: sauces become second nature, weeknights feel lighter, and even simple meals start tasting like you meant them.
If you want a quick next step after this tools list, pick one recipe category that rewards good tools immediately:
- sauces: Tomato sauce from fresh tomatoes
- sheet pan dinners: Sheet pan chicken fajitas
- skillet meals: Skillet mushroom and zucchini stir fry
- baking basics: Blueberry pancakes recipes
- bread progression: Sourdough bread recipes
FAQs
1) What kitchen tools do I need to start cooking at home?
If you’re starting from scratch, focus on kitchen tools that cover prep, heat, and serving. A chef’s knife, a stable cutting board, a skillet, a pot, measuring cups and measuring spoons, a spatula, tongs, and a whisk will handle most meals. After that, add a sheet pan, a kitchen scale, and an instant-read thermometer to improve consistency.
2) What are the most important kitchen tools for beginners?
Beginners benefit most from kitchen tools that reduce effort and mistakes. Start with a sharp knife, a large board, and one reliable pan. Next, add measuring tools for repeatable results. Finally, pick a few utensils that feel comfortable—tongs, a silicone spatula, and a whisk—so cooking stays simple rather than fussy.
3) Is it better to buy a kitchen utensil set or individual utensils?
It depends on your cookware and how you cook. A kitchen utensil set can be convenient when you’re setting up a new kitchen. However, buying individual pieces often gives better quality for the tools you’ll use daily. If you do choose a set, aim for sturdy essentials rather than a large bundle with lots of rarely used items.
4) Which kitchen tools and utensils are best for nonstick pans?
For nonstick cookware, choose kitchen tools made from silicone, wood, or nylon so you don’t scratch the coating. A silicone spatula, silicone spoon, and silicone tongs are especially useful. Even so, avoid sharp-edged metal turners on nonstick, because small scratches add up over time.
5) What are the best kitchen tools for stainless steel cookware?
Stainless steel cookware can handle tougher kitchen tools. Stainless steel utensils, a thin metal spatula or turner, and sturdy tongs work well. Since stainless is often used for browning, tools that scrape and flip confidently can be helpful, especially when you want good sear and clean release.
6) Are wooden cooking utensils a good choice?
Yes—wooden cooking utensils are comfortable, gentle on cookware, and great for stirring sauces and curries. Still, they need basic care: wash promptly, dry well, and don’t soak them. If you want a set, a wooden utensil set with a spoon, flat spatula, and ladle covers most needs.
7) Which is better: silicone kitchen utensils or wooden kitchen utensils?
Silicone kitchen utensils are excellent for scraping batters, stirring thick sauces, and protecting nonstick pans. Wooden kitchen utensils feel natural, stay cooler in the hand, and work well for long simmering dishes. Ultimately, many kitchens do best with both: silicone for scraping and wood for everyday stirring.
8) What kitchen tools are considered “non toxic” or safer for everyday cooking?
Many people choose stainless steel, wood, or high-quality silicone for everyday kitchen tools. Stainless steel is durable and stable, wood is simple and long-lasting with care, and silicone is useful for nonstick cookware. Rather than chasing a label, prioritize tools that don’t flake, chip, or degrade quickly under heat.
9) What’s the best kitchen knife set, or should I buy single knives?
If you cook often, buying a few excellent knives usually beats buying a large knife set. A chef’s knife plus a paring knife covers most tasks. If you prefer a knife set, choose one with fewer pieces and a reputation for comfort and durability, rather than a massive block with duplicates.
10) How do I sharpen kitchen knives at home?
There are several reliable methods: whetstone sharpening, guided sharpening systems, and quality pull-through sharpeners. Whichever method you choose, consistency matters more than complexity. Additionally, keeping knives dry and stored properly helps them stay sharp longer between sharpening sessions.
11) Do I really need a kitchen scale?
A kitchen scale isn’t mandatory, yet it quickly becomes one of the most useful kitchen tools—especially for baking. It helps you measure flour accurately, scale recipes without hassle, and repeat results more easily. Moreover, it can reduce dishes because you weigh ingredients into one bowl.
12) What’s the best instant-read thermometer for cooking?
The best instant-read thermometer is the one you’ll actually use—quick to read, easy to hold, and accurate. Look for a fast response time and a clear display. If you grill, a grill meat thermometer can be useful too, but an instant-read thermometer is still the everyday workhorse.
13) Do I need a mandoline slicer in my kitchen tools list?
A mandoline slicer is optional, but it’s very helpful if you make salads, slaws, chips, or layered bakes. It gives even slices quickly, which helps food cook evenly. That said, safety is non-negotiable—use the guard and slow down, because speed is not worth injuries.
14) What are the best kitchen tools for meal prep?
For meal prep, prioritize kitchen tools that speed up chopping and storage: a large cutting board, a sharp knife, mixing bowls, measuring cups, and sheet pans. Then add tools that reduce repetition, such as a salad spinner, bench scraper, and food storage containers that stack neatly.
15) Are mixing bowls with lids worth it?
Yes, especially if you meal prep or like keeping the counter tidy. Mixing bowls with lids help you store chopped ingredients, marinate without mess, and cover leftovers quickly. As a result, your workflow feels smoother and your fridge stays more organized.
16) What kitchen tools make the biggest difference for healthy cooking?
A few kitchen tools make healthier cooking easier: a sheet pan for roasting, a nonstick-friendly utensil set for quick eggs and vegetables, a thermometer to avoid overcooking lean proteins, and measuring tools to keep portions consistent. Meanwhile, a salad spinner makes it easier to eat more greens because salads taste better.
17) What are the best kitchen tools for small kitchens?
In small kitchens, choose kitchen tools that multitask and store easily: a nesting mixing bowl set, stackable measuring cups, a compact utensil crock, and one excellent skillet and pot. Also, tools like a bench scraper and microplane take very little space while adding a lot of usefulness.
18) Are commercial stainless steel benches or prep tables useful at home?
They can be, particularly if you bake often or do heavy meal prep. A food prep table provides a dedicated, easy-to-clean surface. However, many home cooks get similar benefits by keeping one counter zone clear and using a large cutting board as a portable prep station.
19) What’s the difference between cooking utensils and serving utensils?
Cooking utensils are designed for heat and stirring—spatulas, tongs, whisks, ladles. Serving utensils are designed for plating and presentation—serving spoons, salad tongs, pie servers, and larger ladles. Having both makes hosting easier, yet you can start with cooking tools and add serving pieces later.
20) Which kitchen tools are worth upgrading first?
If you want the fastest improvement, upgrade the tools you touch most: the knife, cutting board, skillet, and tongs. Next, add a kitchen scale and instant-read thermometer for consistency. After that, upgrade comfort tools like mixing bowls, a sturdy spatula, and a reliable peeler.