There are days when you crave something fresh and bright, and there are days when only a deep, steaming bowl of cheesy chicken broccoli rice will do. The kind of bowl you scoop out in generous portions, where the rice is soft and creamy, the chicken is tender, the broccoli is still a little green and crisp, and melted cheese ties everything together in comforting, stretchy strands.
This is that kind of dinner.
And instead of giving you a single rigid recipe, this guide walks you through four different ways to make cheesy chicken broccoli rice:
- a quick stovetop one-pot version,
- an oven-baked casserole,
- a crock pot version that minds itself, and
- an Instant Pot method for when time is tight.
All four are built from the same simple ingredients. Once you understand that base, you can slide the dish toward lighter, richer, more veggie-packed, or more indulgent, depending on the day.
Why Cheesy Chicken Broccoli Rice Works So Well
How cheesy chicken broccoli rice hits every craving
Cheesy chicken broccoli rice works because it brings a bit of everything your body and brain like in one spoonful:
- lean or juicy chicken for protein and savoriness,
- comforting rice for bulk and softness,
- bright, crunchy broccoli for freshness and nutrients,
- melty cheese for salt, richness, and that “ahh, that’s better” feeling.

Broccoli isn’t just filler here. It comes with fiber, vitamins C and K, folate, and plenty of antioxidants. Guides to broccoli nutrition and health benefits highlight its potential role in supporting heart, gut, and immune health.
Rice brings comfort and structure. Long-grain white rice is soft and neutral. Brown rice offers a nutty chew and more fiber. Harvard’s comparison of brown rice versus white rice explains how brown rice keeps its bran and germ, which means extra minerals and fiber, while white rice is milled for softness and speed.
Cheese is the glue. Sharp cheddar gives that familiar broccoli-and-cheddar flavor. Mozzarella adds stretch. Gruyère or fontina deepen the taste. Cottage cheese can even sneak in a bit of extra protein, a trick you see in dishes like MasalaMonk’s cottage cheese lasagna, where creamy doesn’t have to mean heavy.
Put together, you get cheesy chicken broccoli rice: simple ingredients that feel like a hug in a bowl.
Core Ingredients for Cheesy Chicken Broccoli Rice
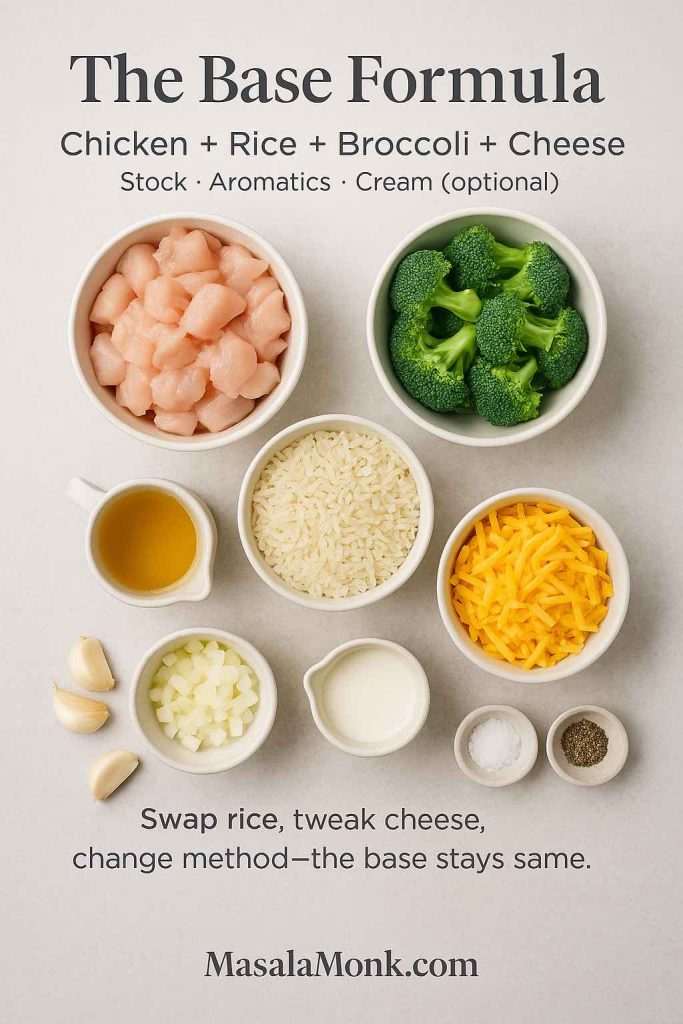
Choosing chicken
You can use either:
- Chicken breasts – lean, tidy cubes, mild flavor.
- Chicken thighs – a little more fat, more flavor, extra juiciness.
Both work in every method here. Just remember one simple safety rule: cooked chicken should reach 165°F (74°C) in the thickest part. That number shows up again and again in official food-safety charts for poultry and casseroles.
Picking rice
You have options:
- Long-grain white rice for classic, soft comfort.
- Basmati if you like distinct, fragrant grains.
- Brown rice when you want more chew and more fiber.
Harvard’s overview of rice and glycemic index explains how different rice types affect blood sugar. Brown rice usually sits lower on the glycemic index than white, which can be useful if you’re watching energy spikes.
If you want to understand water ratios and cooking times a bit better before you start, it’s worth skimming through a practical guide like how to cook rice perfectly, which covers stovetop, cooker, and Instant Pot methods.
Why broccoli belongs in cheesy chicken broccoli rice
Broccoli brings:
- color and freshness,
- a slight crunch if you time it right,
- and a serious nutrient boost.
It is rich in fiber and vitamins, and it’s easy to work with fresh or frozen. If you enjoy exploring broccoli beyond florets, you might like reading about broccoli’s benefits and weight-loss uses or even this guide to broccoli sprouts, which concentrates many of the same helpful compounds in tiny shoots.
Cheese and sauce
Most versions in this guide use:
- cheddar as the base cheese,
- stock and a bit of milk or cream for richness,
- and sometimes cream of chicken soup for a shortcut sauce.
You can keep things lighter with a simple milk-based sauce or go all-in with extra cheese, a spoonful of cream cheese, or even a bit of cottage cheese blended into the sauce.
Also Read: Easy Lemon Pepper Chicken Wings (Air Fryer, Oven & Fried Recipe)
One-Pot Cheesy Chicken Broccoli Rice (Stovetop Skillet)
The skillet version is the one to choose when you’re tired, hungry, and not in the mood to wash more than a single pan. Yet, despite its simplicity, it still delivers all the things you want: tender chicken, soft rice, pockets of green broccoli, and cheese melted into a creamy, spoon-coating sauce.
What makes this one-pot cheesy chicken broccoli rice special
You cook the chicken, rice, and broccoli in the same pan. Every grain of rice sits in flavorful stock. The broccoli steams gently so it stays bright. Cheese goes in at the end and melts into a silky sauce.
It’s fast enough to make after work yet cozy enough to eat slowly on the sofa.
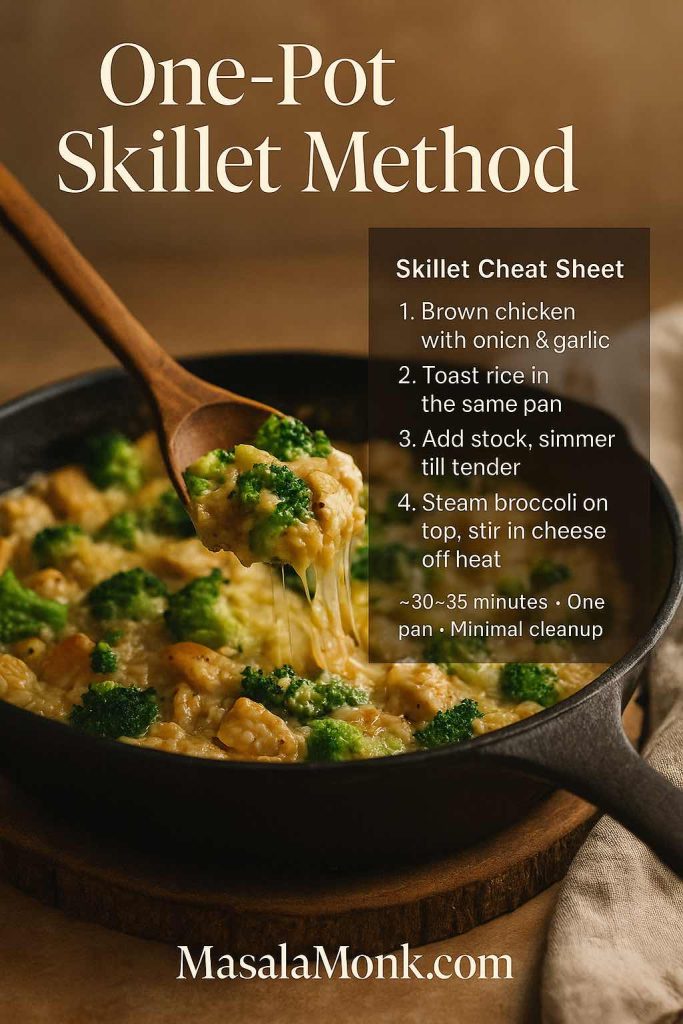
Steps for one-pot cheesy chicken broccoli rice
Step 1: Sear the chicken for flavor
Set a wide, heavy pan over medium heat. Add a little butter or oil. Drop in diced chicken and season it with salt and pepper. Let the pieces sit long enough to brown lightly on one side before you stir them. You want a bit of color; that means flavor.
Add chopped onion and a clove or two of garlic. Stir until the onion softens and you can smell the garlic.
Step 2: Toast the rice in the same pan
Pour the rice straight into the pan. Stir for a minute or two so each grain gets coated in the flavored fat. The rice will look slightly glossy. That quick toast gives your cheesy chicken broccoli rice better texture and taste.
Step 3: Add stock and simmer
Pour in chicken stock. If you like the dish extra creamy, add a small splash of milk or cream. Scrape the bottom of the pan with a spoon to loosen any browned bits. Bring the liquid to a light simmer, then cover the pan and lower the heat.
Let the rice cook gently. If you are not sure about the water-to-rice ratio for the rice you use most often, check the proportions in this rice cooking guide and adjust your stock to match.
Step 4: Steam broccoli on top of the rice
When the rice is almost tender, lift the lid and scatter broccoli florets evenly over the surface. Fresh or frozen both work. Replace the lid and let the steam inside finish cooking the broccoli while the rice absorbs the last of the liquid.
Step 5: Stir in cheese off the heat
Turn off the heat. Sprinkle shredded cheese over the chicken, rice, and broccoli. Fold gently until everything is coated in a smooth, thick sauce. If the cheesy chicken broccoli rice looks a little tight, stir in a spoonful of hot stock or milk. If it seems loose, let it sit uncovered for a few minutes.
Spoon the one-pot cheesy chicken broccoli rice straight from the pan into bowls. On nights when you crave an entire week of cozy dishes, you can plan this skillet dinner one day and MasalaMonk’s macaroni & cheese recipe another day for a double hit of cheese and comfort.
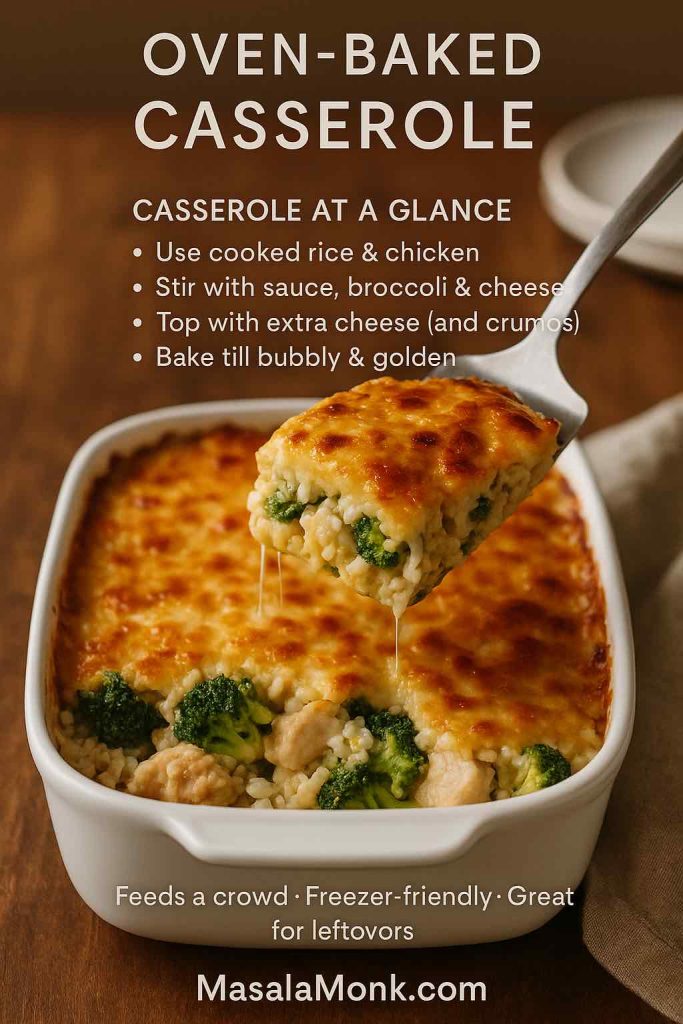
Cheesy Chicken Broccoli Rice Casserole (Oven-Baked)
Sometimes you don’t just want a bowl; you want a casserole you can slice into, a dish that feels festive enough for Sunday lunch or company but still easy enough for a weeknight. That’s where the oven-baked cheesy chicken broccoli rice casserole comes in.
Here, instead of cooking everything in one pot, you assemble cooked components into a baking dish, smother them in a creamy sauce, shower them with cheese, and let the oven do the last stretch of work.
Why bake cheesy chicken broccoli rice as a casserole
Baking turns the same ingredients into a structured dish:
- the rice forms a soft base,
- the chicken and broccoli stay tender in the sauce,
- the top becomes a golden, bubbly crust of cheese and crumbs.
It’s ideal for potlucks, Sunday lunches, or any evening when you want leftovers that reheat beautifully.
Steps for cheesy chicken broccoli rice casserole
Step 1: Cook rice, chicken, and broccoli separately
Cook your rice until just tender. It should still have a little bite, because it will bake further in the oven.
Cook the chicken in a pan or in the oven until the pieces reach 165°F. That way you know they are safe before you tuck them into a creamy sauce.
Blanch or steam the broccoli. Aim for bright green florets that are just tender.
Step 2: Make a creamy sauce
In a saucepan, melt butter. Whisk in flour to form a paste, then slowly pour in stock and milk while whisking. The sauce should thicken enough to coat the back of a spoon.
Season with salt, pepper, and perhaps a pinch of mustard powder. For a shortcut version, you can use stock plus a can of cream of chicken soup instead.
If you like the idea of lighter creaminess, stir in some cottage cheese, just as it is used in MasalaMonk’s cottage cheese lasagna.
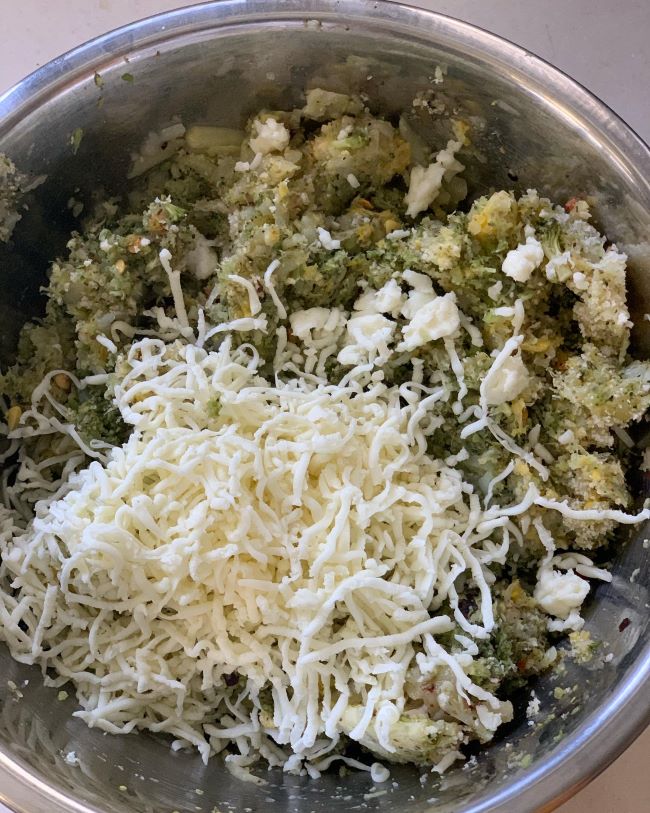
Step 3: Combine everything with cheese
Tip your cooked rice, chicken, and broccoli into a large bowl. Pour the sauce over them. Add a generous amount of shredded cheddar and gently fold until everything is coated.
Taste a spoonful. This is your chance to fix the seasoning before you bake.
Step 4: Add a cheesy topping
Spread the mixture into a buttered baking dish. Sprinkle more cheese over the top. If you enjoy crunch, add breadcrumbs stirred with melted butter.
Step 5: Bake until bubbling and golden
Bake the cheesy chicken broccoli rice casserole until you see bubbles peeking around the edges and the top turns golden brown. Let it rest briefly when it comes out of the oven so it sets enough to slice.
This kind of casserole feels right at home beside another classic oven dish like MasalaMonk’s green bean casserole recipe ideas, which explores different twists on that holiday favorite.
Crock Pot Cheesy Chicken Broccoli Rice
There are also days when the idea of standing at the stove sounds exhausting. You still want cheesy chicken broccoli rice, but you need it to be the kind of meal that minds itself while you work, ferry people around, or just rest. That’s when the slow cooker shines.
Unlike the other versions, this one welcomes a bit of imprecision. It won’t be as meticulously layered or as neatly sliceable as the baked casserole, yet the payoff in ease is immense.
Why crock pot recipe is so forgiving
You add most of the ingredients to the pot, turn it on, and let time do the work. The rice absorbs stock slowly. The chicken turns tender. You finish with broccoli and cheese near the end, and you’re done.
It’s an ideal recipe for busy days, long afternoons, or times when you simply don’t want to hover around the stove.
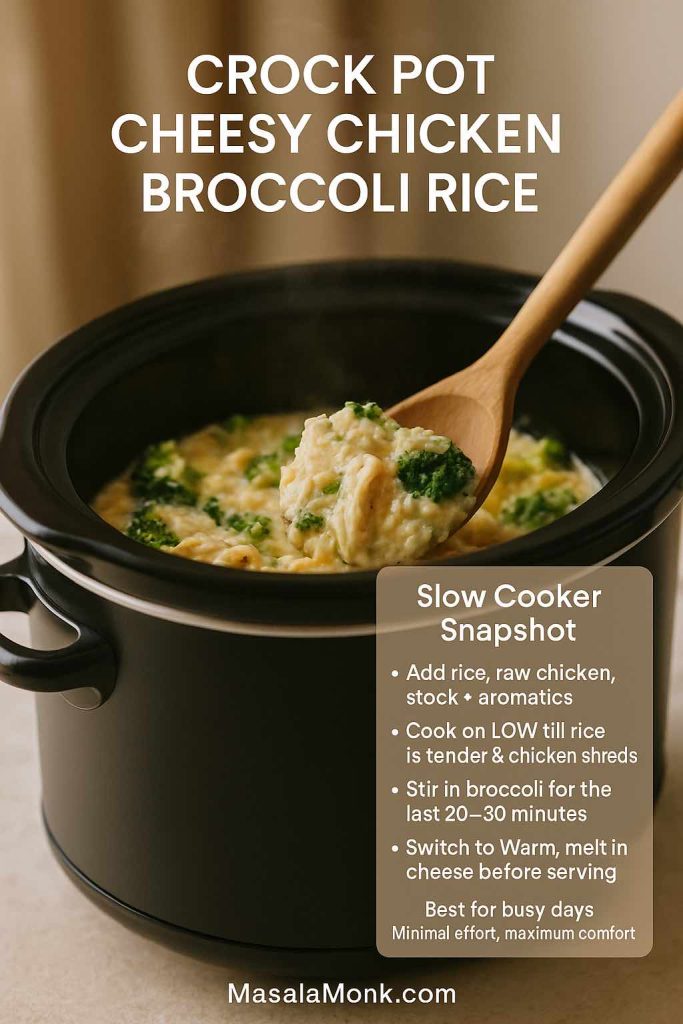
Steps for crock pot cheesy chicken broccoli and rice
Step 1: Add rice, chicken, and stock to the slow cooker
Grease the slow cooker lightly. Add uncooked rice, raw chicken pieces, stock, and any chopped onion or garlic you like. Stir well to make sure the rice is submerged.
Step 2: Cook on Low until tender
Cover and cook on Low. The exact time depends on your slow cooker and how hot it runs. You want chicken that pulls apart easily with a fork and rice that is soft, not chalky.
Step 3: Stir in broccoli near the end
About 20 to 30 minutes before you plan to eat, stir in broccoli florets. Put the lid back on and let them soften gently in the hot liquid. Fresh broccoli will cook quickly. Frozen florets will need a bit more time.
Step 4: Finish with plenty of cheese
Switch the slow cooker to Warm. Add shredded cheese and stir until it melts. If the cheesy chicken broccoli rice looks a little thick, add a splash of stock or milk. If it seems thin, let it sit uncovered for a short while.
Because slow cookers keep food warm for a long time, be mindful about leftovers. Articles on reheating rice safely explain why cooked rice should be cooled and refrigerated promptly and not left out for hours.
If you enjoy this hands-off style of cooking, there is a good chance you will also appreciate MasalaMonk’s crock pot lasagna soup, which uses the same “dump and simmer” approach with pasta, tomato, and cheese instead of rice.
Instant Pot Cheesy Chicken Broccoli Rice
Then there are nights when you walk into the kitchen, realize it’s late, and everyone is already asking when dinner will be ready. In those moments, the Instant Pot version of cheesy chicken broccoli rice is a lifesaver.
Here, the pressure cooker cooks the rice and chicken together rapidly, then you add the broccoli and cheese at the end to keep them fresh and melty.
How Instant Pot cheesy chicken broccoli rice saves time
Pressure cooking allows rice and chicken to cook quickly in the same pot. You then stir in broccoli and cheese at the end to keep them bright and melty. The whole process takes less active time than the oven, yet still gives you a comforting, filling bowl.

Steps for Instant Pot cheesy chicken broccoli rice
Step 1: Sauté onion, garlic, and chicken
Turn the cooker to Sauté. Add oil or butter, then soften chopped onion and garlic. Add chicken pieces and cook until they lose their raw color and pick up a hint of browning.
Step 2: Add rice and stock and deglaze
Stir the rice into the pot so each grain is coated. Pour in stock. Scrape the bottom of the pot with a spoon to loosen any stuck bits. This helps prevent burn warnings later.
Step 3: Cook under pressure
Seal the lid and set the cooker to High Pressure. Cook for a short time, adjusting for the type of rice you’ve chosen. White rice cooks quickly. Brown rice takes longer. When the timer ends, allow a brief natural release, then carefully vent the remaining steam.
If you are new to pressure cooking, the official Instant Pot guide to pressure cooking for beginners explains sealing, venting, and safety steps in a calm, clear way.
Step 4: Use residual heat to cook broccoli
Open the lid and stir in broccoli florets right away. Close the lid again (without turning the cooker back on) and let the trapped heat soften the broccoli for a few minutes.
Step 5: Stir in cheese and season
Open the lid once more. Add shredded cheese and stir until it melts into a thick sauce. Taste and adjust seasoning.
Because everything cooks together, it’s worth checking that the chicken pieces have reached 165°F in the center before serving.
Also Read: Greek Tzatziki Sauce Recipe (1 Master Sauce + 10 Easy Variations)
Lighter and Heartier Twists on Cheesy Chicken Broccoli Rice
Once you’ve made cheesy chicken broccoli rice a few times, you may start thinking about how to bend it to fit different kinds of days.
Lighter cheesy chicken broccoli rice ideas
On days when you want the comfort but not quite as much heaviness, you can:
Use more vegetables
- Increase the amount of broccoli.
- Add peas or corn to the rice.
- Stir a handful of spinach into the hot rice just before serving.
Side dishes help too. A bright salad piled with greens, cucumber, and lemony dressing cuts through the richness without much effort.
Switch up the rice
Swapping in some brown rice or mixing white and brown gives more fiber and texture. Tips on reducing the glycemic impact of rice explain how cooling and reheating rice and choosing different varieties can change how it affects blood sugar.
Balance rich meals with lighter days
If you enjoy big, cheesy dinners some days and lighter eating on others, homemade drinks can help. Instead of packaged sports drinks, you might make your own homemade electrolyte drink with mineral salts and citrus. Or, on fasting days, you can try one of the zero-calorie electrolyte recipes that support hydration without adding calories.
Heartier and extra-cheesy twists
On other days, comfort is the goal, and you’re not worried about keeping things light. On those evenings, you could:
Enrich the sauce
- Use full-fat cheese and be generous.
- Stir a spoonful of cream cheese into the sauce.
- Add a splash of cream instead of some of the milk.
Add crispy toppings
For baked version of this dish, buttery breadcrumbs or crushed crackers on top turn the casserole into something that crackles lightly as you cut into it.
These richer versions sit nicely alongside other favorites such as macaroni & cheese and green bean casserole, letting you build full menus around cozy, baked dishes when the weather or your mood calls for it.
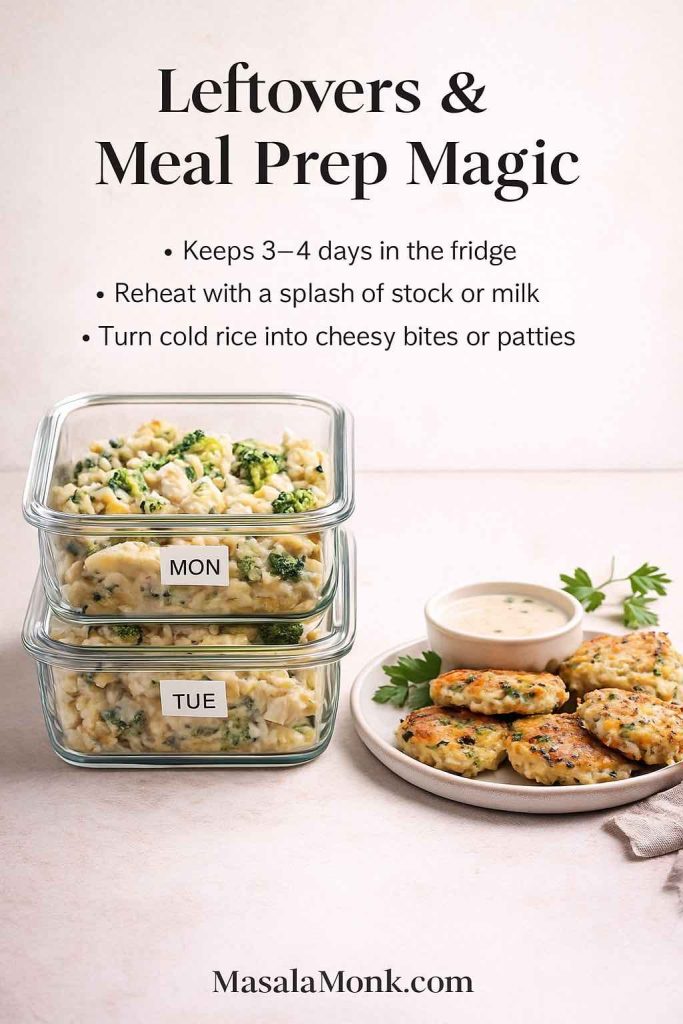
Leftovers, Meal Prep, and Second-Day Magic
Big pans of cheesy chicken broccoli rice often mean leftovers, which is a gift on busy days. However, they need a little care.
How to cool and store cheesy chicken broccoli rice
Once you’ve finished eating, transfer the leftovers into shallow containers. This helps them cool more quickly. Refrigerate as soon as they are no longer steaming.
Guides on storing and reheating rice safely explain that cooked rice should not stay at room temperature for long, because a bacteria called Bacillus cereus can grow and cause food poisoning.
Aim to eat refrigerated leftovers within a few days. When you reheat them, bring the center to a piping-hot temperature again, around 165°F, so both the chicken and the rice are back in the safe zone.
Reheating cheesy chicken broccoli rice so it stays nice
Cold cheesy rice turns firm in the fridge. That’s normal. To bring it back to creamy:
On the stovetop
Place the leftovers in a pan. Add a splash of stock or milk. Warm gently while stirring until the mixture loosens and heats through.
In the oven
Spread the casserole in an oven-safe dish. Cover with foil. Reheat until hot in the center. You can remove the foil for a few minutes at the end to crisp the top again.
In the microwave
Add a spoonful of liquid. Cover loosely. Heat in short bursts, stirring between them so the rice heats evenly and doesn’t dry out at the edges.
Turning leftovers into something new
Leftover cheesy chicken broccoli rice can transform into snacky, fun dishes.
Cheesy rice bites
Chill the mixture until firm. Scoop it into small balls, roll in breadcrumbs, and pan-fry or air-fry until crisp. They make great little appetizers or sides, especially with a simple yogurt dip or tomato sauce.
For more detailed shaping and frying inspiration, you can look at how MasalaMonk turns cold rice into gourmet arancini balls.
Crispy rice squares
Press the leftover rice into a greased dish. Chill until set. Cut into squares and sear them in a little oil until crisp on both sides. Serve with salad for a different take on the same flavors.
If you find you have extra broccoli on its own, not just in the rice, a batch of broccoli, potato & corn tater tots turns it into a playful, kid-friendly side the next day.
Serving Ideas to Go With Cheesy Chicken Broccoli Rice
Simple sides that love cheesy chicken broccoli rice
Cheesy chicken broccoli rice can absolutely stand alone. Still, a few easy sides make the meal feel more complete:
- A crunchy salad with lettuce, cucumber, and lemon vinaigrette.
- Roasted carrots or roasted Brussels sprouts.
- Sliced tomatoes with a pinch of salt and a drizzle of olive oil.
These add freshness and texture without much work, and they help balance the richness in the bowl.

Drinks and desserts for a full cozy night
After a comforting meal like this, it’s nice to linger a bit.
On cold evenings, a mug of homemade hot chocolate with cocoa powder hits the same cozy note as the main dish. That recipe uses simple ingredients to create a rich, velvety drink that feels far more special than a packet.
On nights when you’re hosting and want something playful and bright, a lemon drop martini adds a citrusy, sparkling contrast to the creamy main.
If you decide you do want dessert, homemade churros with a chocolate sauce or caramel dip turn dinner into a full comfort-food celebration. That guide covers shaping, frying, and even some gluten-free ideas if you’re cooking for different needs.
On a different night, you might skip dessert and plan another chicken-and-carb comfort for later in the week, such as chicken katsu curry with rice. With its crisp cutlets, rich curry sauce, and fluffy rice, it belongs to the same cozy universe as cheesy chicken broccoli rice, just with a Japanese twist.
However you choose to cook it—stirred together in one pot, baked into a bubbling casserole, left to simmer in a slow cooker, or rushed through an Instant Pot—cheesy chicken broccoli rice is one of those recipes you can return to over and over. You can keep it simple, you can dress it up, you can stretch it into lunches and leftovers, and you can bend it to fit however you are eating this week.
Most of all, it stays what it has always been: chicken, rice, broccoli, and cheese, turned into something that makes the world feel a little softer for a while.
Also Read: Simple Bloody Mary Recipe – Classic, Bloody Maria, Virgin & More
FAQs About Cheesy Chicken Broccoli Rice
1. How do I make cheesy chicken broccoli rice from scratch?
Start by browning bite-sized chicken pieces with onion and garlic. Then stir in rice and toast it briefly. Next, add broth and let the rice simmer until almost tender. After that, fold in broccoli florets and cook until just soft. Finally, remove from the heat and stir in plenty of shredded cheese until the dish turns creamy and thick.
2. What is the difference between the skillet version and cheesy chicken broccoli rice casserole?
The skillet version cooks everything in one pot on the stove. It stays looser and spoonable. In contrast, the casserole version uses pre-cooked rice and chicken mixed with sauce and cheese, then baked in a dish. The casserole sets up more, slices neatly, and develops a golden, bubbly top.
3. Can I use instant rice in a chicken broccoli rice casserole?
Yes, you can use instant rice in a chicken broccoli rice casserole with good results. Just reduce the liquid slightly because instant rice absorbs less water. In addition, shorten the baking time so the grains do not become mushy. Keep an eye on the texture and remove the casserole once the cheesy chicken broccoli rice looks set and hot in the center.
4. How can I make crock pot cheesy chicken broccoli and rice?
For crock pot cheesy chicken broccoli and rice, place raw chicken, uncooked rice, broth, and seasonings in the slow cooker. Stir everything well and cook on Low until the rice is tender and the chicken shreds easily. Later, add broccoli during the last 20–30 minutes so it stays bright and not overcooked. Right before serving, stir in shredded cheese until the slow cooker cheesy broccoli chicken rice turns smooth and creamy.
5. How do I make Instant Pot cheesy chicken broccoli rice?
To prepare Instant Pot cheesy chicken broccoli rice, first sauté onion, garlic, and chicken in the pot. Then stir in rice and broth, scraping the bottom to remove any browned bits. Cook on high pressure for a short time, using more minutes for brown rice and fewer for white. Once the pressure releases, mix in broccoli and let it steam in the residual heat. Lastly, stir in cheese until the Instant Pot cheesy chicken broccoli rice is thick and velvety.
6. Can I use cream of chicken soup in cheesy chicken broccoli rice?
Absolutely. Cream of chicken soup makes the dish richer and quicker. You can whisk it into the broth for a skillet version or use it as the main sauce for a cheesy chicken broccoli rice casserole recipe. Just remember that the soup is already salty, so taste before adding extra salt.
7. How can I make cheesy chicken broccoli rice healthier?
There are several easy tweaks. First, swap some or all of the white rice for brown rice in your chicken broccoli rice recipe one pot style. Second, increase the amount of broccoli or add extra vegetables like peas or carrots. Third, use a little less cheese in the base and rely on a sharp cheddar on top for strong flavor. With these changes, cheesy chicken broccoli rice still tastes indulgent but feels lighter.
8. Can I freeze cheesy chicken broccoli rice casserole?
Yes, cheesy chicken broccoli rice casserole usually freezes well. Let the casserole cool completely, then portion it into airtight containers. Label and freeze for up to two or three months. When you want it again, thaw in the fridge overnight and reheat in the oven until piping hot and the cheese is melting again.
9. How long do leftovers of cheesy chicken broccoli rice last, and how should I reheat them?
Leftovers of cheesy chicken broccoli rice keep well in the refrigerator for about three to four days. Store them in shallow, sealed containers. For reheating, add a splash of milk or broth and warm gently on the stove or in the microwave, stirring once or twice. In the case of leftover cheesy chicken broccoli rice casserole, cover the dish with foil and reheat in the oven until the center is hot and the top is soft and bubbly again.
10. Can I make cheesy chicken broccoli rice ahead of time for meal prep?
Yes, this dish is excellent for meal prep. You can cook a big batch of one pot cheesy chicken broccoli rice or bake a full casserole, then divide it into containers. Allow it to cool before sealing. During the week, reheat single portions with a spoonful of liquid so the chicken and rice stay moist. This way, you get a ready-to-go cheesy chicken broccoli rice meal that still tastes fresh.