A Cuban sandwich goes into the pan tall and comes out transformed: compact and crisp, hot through the middle, with melted Swiss binding roast pork and ham while mustard and dill pickle cut through the richness.
Browning the outside is the easy part. The real trick is getting the middle hot and the cheese fully melted before the bread gets too dark.
A good Cubano is less about special equipment than getting a few things right: soft bread that will compress, enough filling without building a meat tower, pork that is juicy rather than wet, and steady pressure over moderate heat.
The Cubano in 30 Seconds
A Cuban sandwich (Cubano) is a pressed sandwich of roast pork, ham, Swiss cheese, dill pickles and yellow mustard on Cuban bread, cooked until crisp, compact and melted through. Tampa-style versions traditionally add Genoa salami.
For one roughly 8-inch / 20 cm sandwich, about 3 oz / 85 g each of roast pork and thin ham is plenty. Put some Swiss below the meat and the rest above it, run drained dill pickles along the sandwich, spread the mustard lightly and press over medium to medium-low heat. No panini press? A heavy skillet with another heavy pan on top does the job.
Yield: 4 sandwiches Prep: about 10 minutes Cook: about 6–10 minutes per skillet batch; a sandwich press may be faster Total: about 20 minutes with a large griddle or roomy press; longer if cooking in skillet batches
Equipment: panini or sandwich press or a heavy skillet plus a second heavy skillet, Dutch oven or other broad heat-safe weight; serrated knife
This recipe assumes you already have cooked mojo pork. If you do not, plain cooked roast pork can still make a very good sandwich: warm it gently with a small splash of orange and lime juice—or sour orange if you have it—plus a little garlic and oregano. It will not turn plain pork into a full mojo roast, but it brings the flavor closer without making lunch another multi-hour project.
Cuban Sandwich Ingredients
4 pieces Cuban bread, each about 8 inches / 20 cm long, or a soft thin-crusted French or Italian loaf
12 oz / 340 g cooked mojo roast pork — about 3 oz / 85 g per sandwich, thinly sliced or loosely shredded
12 oz / 340 g plain or lightly sweet deli ham — about 3 oz / 85 g per sandwich, thinly sliced
6 oz / 170 g mild Swiss cheese — about 1½ oz / 42 g per sandwich, thinly sliced
Sour dill or kosher dill sandwich slices, enough to run nearly end-to-end through each sandwich
40 ml yellow mustard — about 2 tablespoons + 2 teaspoons, or 2 teaspoons / 10 ml per sandwich
3 tablespoons / 42 g softened butter, approximately, for the outside
Optional for Tampa-style: 4 oz / 113 g thinly sliced Genoa salami — about 1 oz / 28 g per sandwich
1. Prepare the fillings
Divide the pork, ham and Swiss into four portions. Blot the pickle slices well with paper towels.
If the pork has simply cooled after cooking, warm it gently in a covered skillet with a spoonful of its juices. For refrigerated leftovers, take off the deep chill before assembly rather than cooking the meat hard a second time. The finished reheated sandwich should reach 165°F / 74°C before serving.
2. Split the bread and add the mustard
Split each piece of bread lengthwise. Spread about 2 teaspoons / 10 ml yellow mustard per sandwich in a thin layer. You want its sharpness in the background while the pork still leads the bite.
3. Build the sandwich
Lay half of each sandwich’s Swiss against the bottom bread. Add the ham, then the pork, followed by pickles running along most of the loaf. Add Genoa salami here for the Tampa-style version, then finish with the remaining Swiss.
Keep the stack even and just inside the edges. You want enough filling to feel generous while still yielding easily under your hand. If it already resembles a tall deli sub, take a little out now.
For one 8-inch Cubano, 3 oz / 85 g each of pork and ham is enough. That leaves room for the loaf to flatten without bulging at the edges.
4. Butter and press
Spread a thin coating of softened butter over the outside of the bread. A little rendered pork fat (lard) from the roast can replace part of the butter if you have some.
Heat the sandwich press, griddle or skillet over medium to medium-low heat. If you can measure the cooking surface, roughly 325°F / 160–165°C is a useful starting point.
With a panini press, close the lid firmly and give the sandwich time to flatten. With a skillet, set another heavy skillet, Dutch oven or broad heat-safe pan on top and leave it there. Cook for roughly 3–5 minutes on the first side, flip carefully, replace the weight and cook for another 3–5 minutes.
Leave the pressure broad and steady. Repeatedly smashing the middle with a spatula mostly gives you one flat spot and two tall ends.
Lift the weight and look for a sandwich that is almost surprisingly compact, with deeply golden bread and perhaps a little Swiss beginning to show at the edges.
Without a panini press, a second heavy skillet can supply the pressure. Let it sit flat so the Cubano compresses evenly instead of forcing only the center down.
5. Know when it is ready
Deep golden outside, melted through the middle, dramatically flattened. The center is hot, the Swiss no longer looks like separate slices, and the filling moves with the bread rather than sliding around inside it.
If the crust reaches the color you want before the middle is hot, turn the heat down rather than up. A few minutes in a 300–325°F / 150–165°C oven can finish the center without pushing the bread much darker.
6. Rest, then cut
Let the sandwiches rest for 1–2 minutes, then slice on a long diagonal and serve while the crust still has its snap.
A finished Cubano should hold together at the cut. Melted Swiss binds the pork and ham into a compact stack, while the crust stays crisp enough to crackle without turning hard.
The Bread Has to Give Before It Crisps
The best bread for a Cuban sandwich is Cuban bread: light and soft inside, relatively thin-crusted, and easy to compress. That is what lets it flatten under pressure instead of turning into a hard shell around the filling.
No Cuban bread? Do not overthink the bakery case. A soft supermarket French or Italian loaf can make a better Cubano than the beautiful crusty baguette beside it.
Try the squeeze test
Give the loaf a gentle squeeze. Good bread for this sandwich compresses without much resistance and springs back softly. If the crust cracks loudly in your hand or the loaf feels dense and stubborn, pressing it will usually make it tougher, not better.
Use the squeeze test when bread labels are misleading. Texture matters more than whether the loaf is called French, Italian, ciabatta or sourdough.
Which Bread Substitutes Work Best?
Cuban bread is ideal. Soft French or Italian bread is a very good substitute, and a tender hoagie roll works well too. Airy ciabatta can work if it genuinely gives under pressure; dense ciabatta and hard artisan baguettes usually fight the sandwich all the way to the first bite.
Soft sourdough sandwich bread can work; chewy artisan sourdough usually does not. If you are baking the substitute yourself, the softer sandwich-loaf and hoagie-style options in our sourdough bread recipes are the ones to look at.
Think in terms of pressability: the best substitute yields before it crisps. A rigid crust may brown beautifully yet still make the finished Cubano hard to bite.
If a soft loaf is simply too bulky, pull out a little of the inner crumb. Leave plenty behind; you are only stopping an oversized roll from becoming most of the sandwich.
Pork shoulder or pork butt is the ideal starting point for mojo roast pork. If those butcher-counter names get confusing, this guide to pork shoulder, pork butt and Boston butt explains the cuts in more detail.
The useful visual cue is simpler: the pork should look moist enough to glisten, not wet enough to leave a puddle behind.
Thin slices make a tidy sandwich and warm quickly. Loosely shredded pork is excellent when yesterday’s roast is what you have in the refrigerator. Plain leftover pork can work too; heavily smoked or sweet barbecue-coated pork takes the sandwich somewhere else.
Thin slices warm quickly, while loose shreds work especially well for leftover roast. In either form, the pork should glisten without enough loose juice to soak the Cuban sandwich bread.
Pork loin or tenderloin can work when kept juicy and sliced thin, though both are leaner than shoulder. If tenderloin is what you already have, the temperature and resting guidance in our oven-roasted pork tenderloin is a better fit than treating it like pork butt.
Ham, Swiss, Pickles and Mustard: Getting the Balance Right
You do not need fancy ham. Plain or lightly sweet deli ham, sliced thin, is often exactly what the sandwich needs. Thick slabs slow the middle down, while strongly smoked or heavily cured ham can make an already well-seasoned Cubano taste unnecessarily salty.
Mild Swiss belongs around the meat rather than sitting in one thick clump. Once it melts, the filling stops feeling like separate layers and starts behaving like one sandwich.
Run thin sour dill or kosher dill slices almost end to end. You notice surprisingly quickly when several bites in a row are missing that cold, sour snap. The pickle is doing more than adding acidity—it arrives just when pork, ham and cheese might otherwise begin to feel heavy.
Yellow mustard works the same way. It should sharpen the filling, not become its loudest flavor. For this base version, yellow mustard is enough; a creamy sauce would soften the sharper pork-pickle-mustard balance that keeps the sandwich lively.
The pork, ham, Swiss, pickles and mustard already bring plenty of salt between them. Extra seasoning on the assembled sandwich is rarely what it is missing.
Miami or Tampa?
The recipe above follows the familiar Miami-style combination of roast pork, ham, Swiss, pickles and mustard. A Tampa-style Cuban sandwich traditionally adds Genoa salami, reflecting the Italian influence that became part of Ybor City’s food culture alongside Cuban and Spanish traditions.
Miami and Tampa developed different traditions, and both are worth naming accurately.
For the Tampa-style variation, about 1 oz / 28 g Genoa salami per sandwich is enough. It should join the pork and ham, not bury them.
Cuban Sandwich Troubleshooting
The bread is dense and hard. Choose a softer, thinner-crusted loaf next time. When a pressed crust becomes a rigid shell and the filling shoots out the opposite end, the bread is usually fighting you.
The sandwich is wet or towering. Use pork that glistens rather than drips and take out some filling. A Cubano needs enough room to collapse.
The bread is browning while the cheese stays firm. Turn the heat down. A cold or overly thick middle needs more time, not a hotter pan.
The filling escapes from the sides. The stack is probably too full or the pressure is landing unevenly. Keep the filling just inside the bread’s edges and let the weight sit flat.
The bread is soggy but the pork tastes dry. Those are separate problems. Juicier pork fixes the meat; keeping loose cooking juices and pickle brine away from the loaf fixes the bread.
Everything tastes too salty. Look first at the pork and ham, then the Swiss and pickles. A milder deli ham often does more good than another condiment.
Start with the symptom, then match the fix. Bread choice, filling moisture, heat and pressure can create similar-looking problems for very different reasons.
A small container of leftover roast pork is almost enough reason to make this sandwich by itself. There may not be enough meat for another full dinner, but a few ounces per person is exactly what a Cubano needs.
Keep cooked pork refrigerated with enough of its juices to stay moist, and assemble the sandwiches close to serving time. Properly refrigerated cooked leftovers are generally best used within 3–4 days.
For a finished leftover Cubano, a skillet, sandwich press, air fryer or toaster oven gives the crust a chance to crisp again; the microwave warms it but leaves the bread softer. Reheated refrigerated leftovers should reach 165°F / 74°C internally. The USDA leftovers guidance covers both storage and reheating in more detail.
What to Serve With a Cuban Sandwich
A Cubano already brings plenty of pork, ham, cheese and butter, so simple sides work best. Plantain chips, yuca fries or black beans all sit naturally beside it. Crispy homemade fries work when you want the hot-and-salty route.
For something cooler, choose tangy coleslaw or a crisp cucumber salad with vinegar and dill; either gives the plate a cool, sharp contrast. For an ordinary lunch, though, extra pickles and something crunchy are plenty. A Cubano does not need a crowded plate.
A useful Cuban sandwich pairing rule is one crunchy side plus one sharp or cooling side. That keeps the plate interesting without competing with the Cubano.
When the Cubano is right, the first diagonal cut tells you a lot. The bread gives with a thin crackle instead of shattering. The sandwich is flatter than it looked when it went into the pan. Melted Swiss holds pork and ham together, and the pickle and mustard arrive just as the bite begins to feel rich.
A good rack of lamb comes to the table with deeply browned edges, rosemary and garlic clinging around the fat, and a juicy center revealed when the first chop is cut away.
The awkward part is that the outside and middle do not always become ready together. The fat can still look pale while the meat is moving quickly, or the rack can look beautifully roasted while the thickest part needs a few more minutes. And because rack of lamb is not exactly an everyday cut, that first cut can feel higher-stakes than it should.
This method gets the outside browned first, then lets the oven finish the meat more evenly. An instant-read thermometer handles the last decision instead of asking the clock to guess.
The flavor stays classic: Dijon, fresh rosemary and garlic. They go on after the lamb has browned, when the surface already has color and the garlic is far less likely to scorch.
Before heat enters the picture, three checks prevent most avoidable problems: make sure the rack is fully thawed, sensibly trimmed and ready to measure once it cooks.
Before cooking, use the raw rack to orient yourself: the thick loin runs beneath the ribs, while the outer fat varies from useful to excessive. Clean-looking rib bones are mostly presentation; the more important prep work is on the meat and fat.
Fully Thawed
Check the middle, not just the surface. A partly frozen rack can brown beautifully while the meat around the ribs stays stubbornly cool.
Sensibly Trimmed
Leave some fat over the loin, but trim an unusually thick, hard layer and remove visible silver skin.
Thermometer Within Reach
Keep an instant-read thermometer beside the stove. With so little meat between the browned surface and the ribs, a small change in probe placement can change the reading.
This method is written around a standard 8-rib rack close to 1¾ lb / 800 g. Racks around 1½–2 lb / 680–900 g can use the same approach, but the thickness of the meat matters more than weight alone when it comes to timing.
Garlic-Rosemary Dijon Rack of Lamb
A whole rack browned in a skillet, brushed with Dijon, rosemary and garlic, then roasted until the thick center reaches the doneness you want.
Rack size 8 ribs about 1¾ lb / 800 g
Yield 8 chops serves about 2–4
Oven 400°F / 200°C conventional 180°C fan
Prep About 15 minutes
First temperature check About 12 minutes after searing
Rest About 10 minutes
Ingredients
Rack of lamb: 1 standard 8-rib rack, ideally around 1¾ lb / 800 g
Kosher salt: 4–5 g; about 1 tsp Morton kosher salt or roughly 1½ tsp Diamond Crystal
Black pepper: ¾ tsp freshly ground
Olive oil: 1 tbsp / 15 ml, plus a little more if needed
Dijon mustard: 1½ tbsp / about 22 ml
Garlic: 3 cloves, finely grated or minced
Fresh rosemary: 1 tbsp, finely chopped
Salt by weight if you can. Kosher-salt brands pack differently by volume, which is why the teaspoon amounts are not identical.
The Dijon adds a little tang and gives the rosemary and garlic something to cling to. Rack of lamb is already tender, so this coating is here for flavor rather than tenderizing; there is no need for an overnight wet marinade.
Equipment That Matters
Heavy oven-safe skillet
Instant-read meat thermometer
Tongs
Sharp knife for carving
If your skillet cannot go into the oven, brown the lamb there and transfer it to a small roasting pan or rimmed baking sheet. Start checking at the same point, but expect the oven timing to shift.
Instructions
1. Dry, Trim and Season
Heat the oven to 400°F / 200°C conventional or 180°C fan.
Pat the lamb thoroughly dry. Remove silver skin and trim a very thick or hard layer of fat down to a thinner covering. If the fat cap is especially heavy, score it lightly in a shallow crosshatch without cutting into the meat.
Season all over with salt and pepper. You can salt several hours ahead and refrigerate the rack, or simply season while the oven heats. Make sure the meat is fully thawed; it does not need a long spell on the counter in pursuit of a room-temperature center.
2. Render and Brown the Outside
Heat a heavy oven-safe skillet over medium-high heat and add the olive oil. Lay the rack in fat-side down.
At first the fat may look pale and firm. Give it time. The surface will turn glossier, clear rendered fat will begin collecting in the pan, and the underside should move toward a deep golden brown. That usually takes around 3–5 minutes, depending on the rack.
Next, watch what happens in the skillet rather than chasing color alone. Clear rendered fat collecting around the rack tells you the cap is actually softening; if the surface darkens rapidly while little fat has melted, reduce the heat and give it more time.
A little smoke is not unusual. If the pan starts throwing off thick clouds while the fat is still pale, lower the heat rather than letting the surface scorch.
Turn the rack and brown the meaty side for another 1–2 minutes. Give very pale ends a brief touch against the pan if they need it. Once the outside looks right, move on.
3. Add the Garlic-Rosemary Dijon
Take the skillet off the burner. Mix the Dijon, garlic and rosemary, then spread a thin coating over the fat cap and exposed meaty surfaces. Keep heavy clumps of garlic off the pan-facing underside, where they can scorch against the hot skillet.
Once the sear is finished, Dijon becomes a light binder for the garlic and rosemary. Keep the layer thin enough that the browned lamb still shows through; the goal is to season the crust, not cover it with a heavy herb paste.
4. Roast and Start Checking Early
Put the skillet in the oven with the rack fat-side up.
For a rack around this size, begin checking at about 12 minutes. A thinner rack may already be close. A thicker loin—or a higher target temperature—will take longer.
Slide an instant-read thermometer in from the side toward the thickest meat running along the ribs, avoiding the bones. If the number looks implausible, move the probe slightly and check again.
USDA food-safety guidance for whole cuts of lamb is 145°F / 63°C before removal from the heat, followed by at least a 3-minute rest. Pinker culinary ranges are explained below.
Move the rack to a cutting board and rest it for about 10 minutes. Some carryover cooking is normal, but the exact rise varies from rack to rack.
Finish the sides while it sits, then look at the ribs before you cut. They curve. Guide a sharp knife through the spaces between them, changing the angle as the bones change direction. Hit something hard? Back out slightly and find the gap rather than forcing the blade through the rib.
Then comes the part everyone watches: the first center chop. If it is where you want it, carve the rest. If it is a little too pink, you still have options.
After resting, cut one center chop before carving the entire rack. Because the middle is usually thicker than the ends, that first cut gives you the most useful look at doneness—and leaves the rest of the rack intact if it needs another brief return to the heat.
Rack of Lamb Cooking Time & Internal Temperature
For an 8-rib rack around 1¾ lb / 800 g, begin checking the center after about 12 minutes at 400°F / 200°C once the lamb has been seared. Thickness and the doneness you’re aiming for matter more than a fixed finishing time. If the rack is not there yet, return it to the oven and check again in another 2–3 minutes.
Use time to decide when to start checking. From there, let the meat tell you when it is done.
If you’re roasting two racks, sear them separately so the skillet stays hot, then roast them together with space around each one. Check each rack independently; similar-looking pieces do not always finish together.
That variability becomes even more obvious with a roast leg of lamb, where shape and thickness can differ substantially from one roast to another. The same temperature-first approach matters there too.
Where to Put a Thermometer in Rack of Lamb
The loin is the thick oval of meat that runs along the ribs. Insert the thermometer horizontally from the side so the tip lands near the center of that thickest section.
Too shallow and you can end up reading the hotter browned edge. Too close to a rib and the reading can mislead you in another direction. There is not much room inside a rack, so one suspicious number is worth checking again from a slightly different angle.
For a reliable rack of lamb temperature check, pay attention to where the probe tip finishes, not merely where it enters. If nearby readings change sharply, reposition through the thick loin; the browned edge and a rib can both give you a misleading result.
Rack of Lamb Internal Temperature Guide
The first three rows show temperature ranges commonly associated with pinker lamb. They are not universal temperatures at which you should remove the rack from the oven. The center can continue to warm during the rest, and the amount of carryover varies.
Measured center temperature — not a universal pull target
Common culinary description
USDA context
125–130°F / 52–54°C
Rare / very pink
Below USDA recommendation
130–135°F / 54–57°C
Common medium-rare range
Below USDA recommendation
135–140°F / 57–60°C
Medium to medium-pink
Below USDA recommendation
145°F / 63°C
USDA recommended minimum for whole cuts
Reach 145°F before removal, then rest at least 3 minutes
As rack of lamb internal temperature rises, the center generally shifts from deeply pink toward progressively more cooked shades. Yet color varies with the meat, lighting and cooking conditions, so these examples are visual context—not a replacement for measuring the thickest part.
A rack of lamb is a row of connected rib chops. Seven or eight ribs is common; this recipe is written around an 8-rib rack. If yours has already been separated into individual chops, our lamb chops recipe is a better fit.
Think of rack-of-lamb prep as three separate decisions: Frenching changes presentation, fat and silver skin affect what cooks and how each chop eats, and the chine matters later because it can block a clean knife path between the ribs.
Frenching Changes the Look, Not the Loin
Frenching removes meat and fat from the ends of the ribs to give the rack its familiar clean-bone appearance. The thick loin underneath cooks the same whether those rib ends are spotless or not.
If the exposed bones darken in the oven, that’s harmless. Foil is only useful if you particularly want to keep them pale for presentation.
One less obvious bone matters more. Look along the base of the ribs: if a solid strip of backbone prevents a knife from passing cleanly between them, the chine is still attached. Ask the butcher to remove it before cooking. Carving individual chops is much easier without it.
Know What to Trim
The soft white layer over the loin is fat, and some of it is worth keeping. It turns glossy in the skillet, browns and leaves a rich edge around the finished chop.
Silver skin looks shiny and membrane-like. It doesn’t melt away during roasting, so remove it. Trim a very thick, firm slab of fat down to a thinner layer too; a quick roast does not give a heavy cap much time to render.
If Your Rack Isn’t Behaving Like the Recipe
While the Rack Is Still Cooking
What you see
What’s probably happening
What to do
The first temperature check says the middle is still too cool.
The loin may simply be thicker, or you’re cooking toward a higher final temperature.
Keep roasting and check again in 2–3 minutes.
The outside is dark but the middle still needs time.
The exterior browned faster than the center cooked. A partly frozen middle can make the difference bigger.
Stop chasing more browning in the skillet; let the oven finish the center.
The rack isn’t browning.
The surface may still be damp, or the skillet may have lost too much heat.
Dry the meat well and let the pan recover before continuing.
The fat is pale or rubbery.
The cap may be thicker than this short cook can easily render.
If you notice it during searing, leave the fat side against the skillet a little longer before adding the Dijon-herb coating. If the rack is already coated, don’t press that garlic-covered surface back onto a hot pan; finish the meat to temperature and trim a heavy cap more closely next time.
The garlic is going black.
Garlic has ended up against too much direct heat.
Remove badly burnt loose pieces. Keep the coating on the exposed upper surfaces next time rather than underneath the rack.
After You Check or Carve the First Chop
What you see
What’s probably happening
What to do
The thermometer says done, but the first cut looks much less cooked.
The probe may have stopped near the hot surface or too close to a rib.
Check again from the side and aim for the center of the thick loin meat.
The first center chop is too rare for your table.
The middle simply needed more time.
Return the rack briefly if all of it needs more cooking, or finish only the underdone chops in a hot skillet.
Some people want pink lamb and others don’t.
The thinner end pieces generally cook a little further than the thick middle chops.
Give the more-done end chops to those who want them, then cook individual pieces further only where needed.
A slightly underdone chop is usually easy to fix. An overcooked rack gives you far fewer options.
The ribs curve through the meat. Look at their direction before making the first cut, then guide the knife through the soft gap between two bones. If the blade keeps hitting something hard, change the angle rather than trying to muscle through.
After the rack rests, let the bones determine the portions. Each lamb chop naturally sits between two ribs, so the rib spacing provides the carving map; this is more useful than trying to force perfectly equal, ruler-straight slices.
Once that first chop comes free, you finally see what all the thermometer checking was for: a browned edge, tender meat through the middle, rosemary and garlic around the outside, and a thin rendered strip of fat rather than a waxy slab.
What to Serve With Rack of Lamb
How Many People Does One Rack Feed?
An 8-rib rack makes a generous main course for 2 people, comfortably serves about 3 with sides, or can stretch to 4 as part of a larger meal. For most dinners, that works out to roughly 2–3 chops per person.
Rack of lamb is rich enough that the rest of the plate does not need to compete with it. Garlic mashed potatoes make a natural partner for the lamb and any juices that collect while it rests.
With mash on the plate, skip another heavy starch. Something green and a little crisp does more for the meal. Green beans almondine work particularly well, as do bitter greens or a simple salad.
Then give the lamb something sharp. Mint sauce is traditional; chimichurri goes greener and more garlicky, with enough vinegar to cut through the fat. Lemon and fresh herbs can do the job without another sauce.
Finally, preserve the contrast you worked for. Keep sharp herb sauce beside or partly beneath the lamb instead of flooding the crust; mashed potatoes can catch the resting juices, while green beans bring freshness and texture without adding another heavy side.
You don’t need three starches and five vegetables around a rack that already has plenty of presence.
Make Ahead & Leftovers
If you’re serving the rack to other people, do the trimming and seasoning ahead and refrigerate it. Mix the garlic, rosemary and Dijon separately. Then the only real work near dinner is browning, roasting and resting the meat.
Keep the actual cooking close to serving rather than half-cooking the rack, chilling it and trying to finish the center later.
Refrigerate cooked lamb within 2 hours and use refrigerated leftovers within 3–4 days. USDA guidance is to reheat leftovers to 165°F / 74°C throughout. Its leftovers and food-safety guide covers cooling, storage and reheating in more detail.
That reheating temperature will naturally take pink lamb further. Properly chilled leftover lamb is also very good cold: slice it thin for flatbread, salad or a grain bowl with cucumber, tomato and a spoonful of tzatziki.
Once you know what the fat should look like, where the thermometer needs to go and how the meat behaves as it cooks, that first cut between the ribs stops feeling like a reveal you have to hope for. You already have a good idea what you’re going to find.
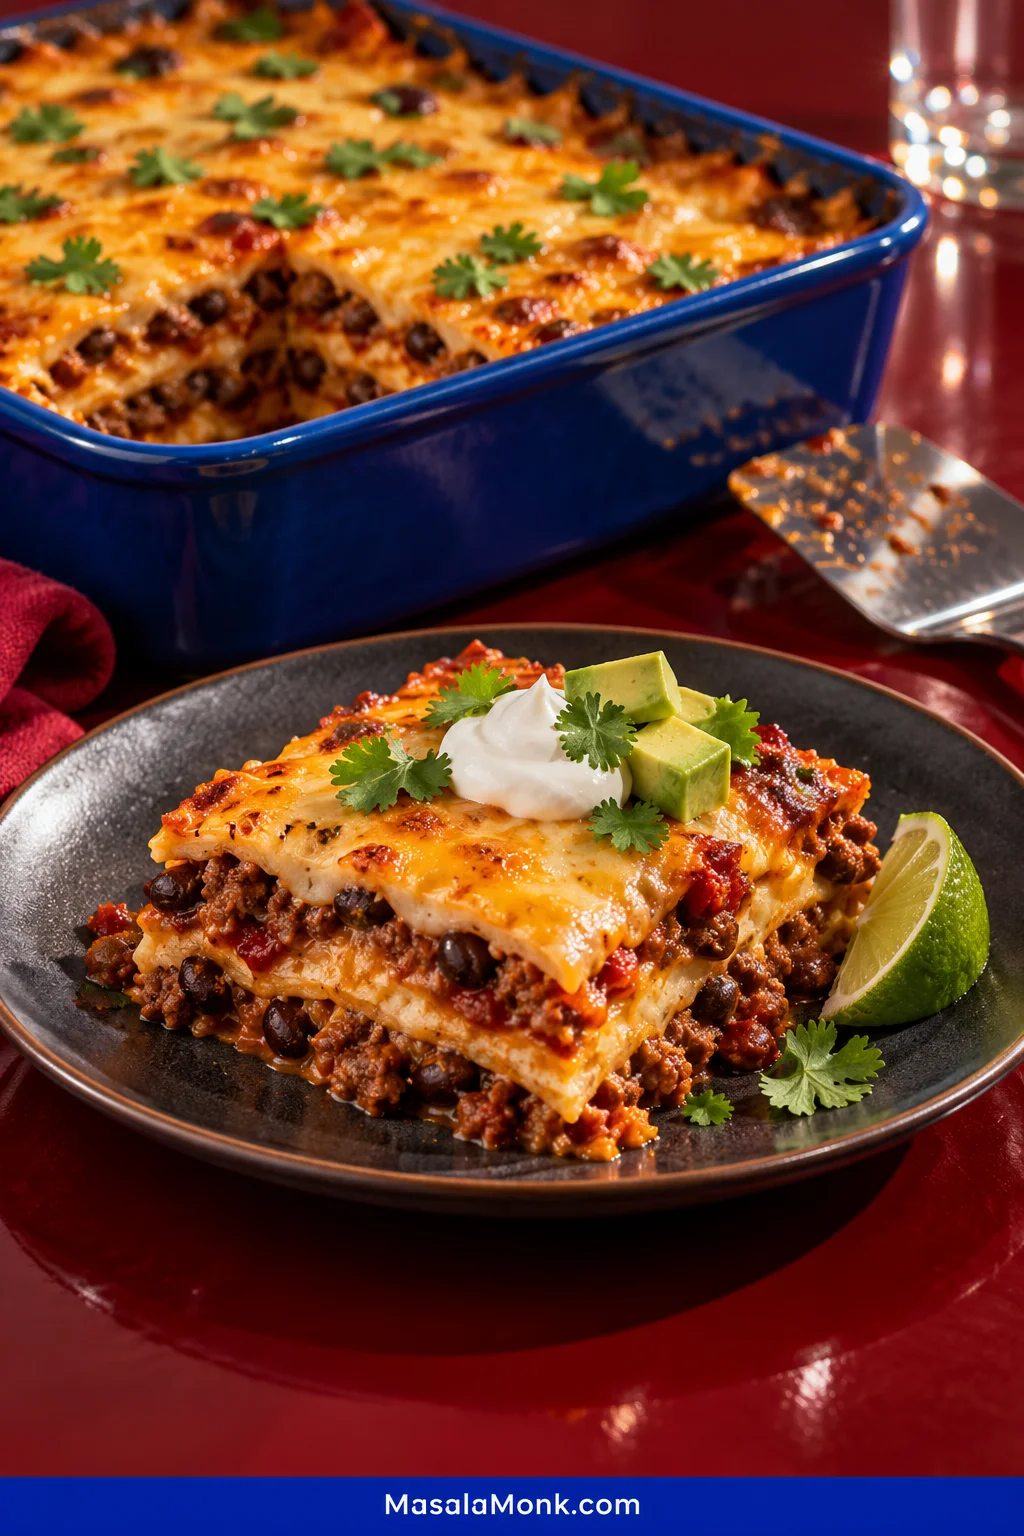
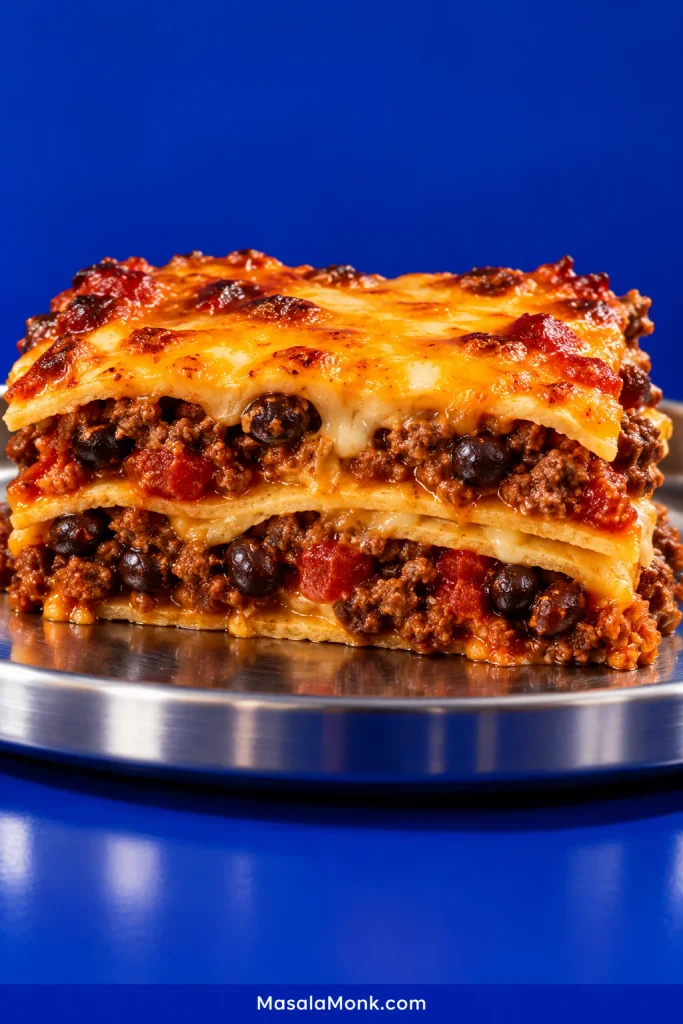
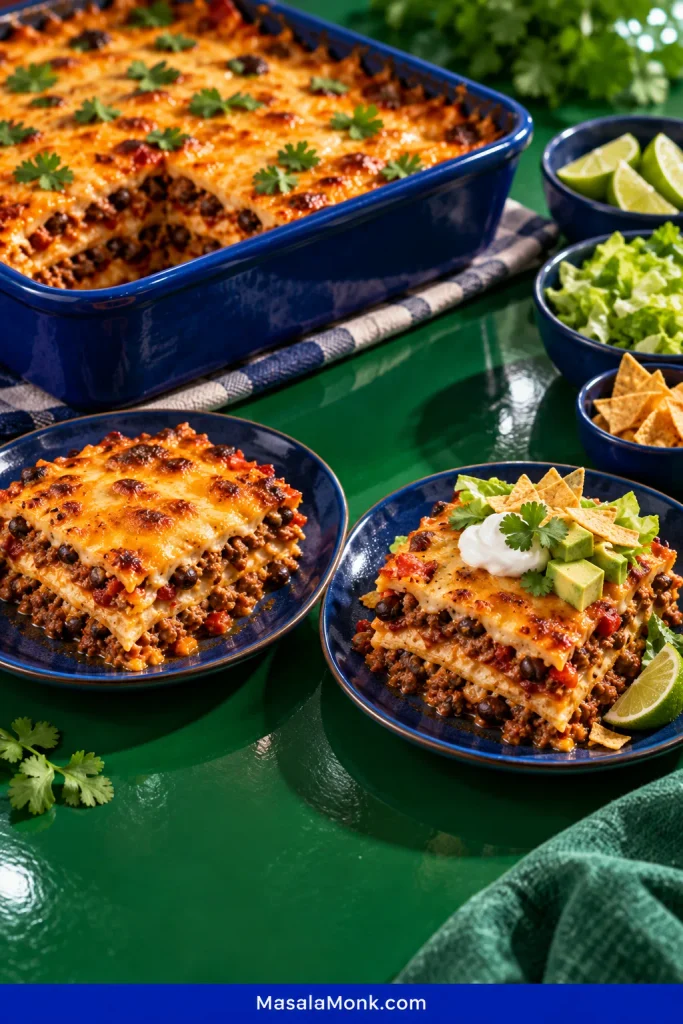
A good taco casserole should still eat like tacos. You should get seasoned beef, tortilla, melted cheese and salsa in the same forkful without everything disappearing into one soft filling.
This is the layered tortilla version: ground beef and black beans stacked with tortillas and cheese in a 9×13-inch dish. Aim for fully melted cheese and visible layers; exposed tortilla edges may toast lightly.
Most of the judgment happens before the casserole reaches the oven. The beef and beans should be juicy and easy to spoon, but not swimming in salsa. Get the skillet right and the rest of the pan is forgiving.
Brown and season the beef, add black beans and thick salsa, and cook until the mixture is thick enough to scoop rather than pour. Build three layers of tortillas, beef-and-bean filling and cheese, then bake uncovered at 350°F / 175°C until the edges bubble and the cheese is fully melted.
Taco Casserole Recipe
Three layers of tortillas with seasoned beef, black beans and melted cheese, baked until bubbling around the edges.
PrepAbout 10–15 minutes
StovetopAbout 12–15 minutes
BakeAbout 20 minutes
Rest5–10 minutes
TotalAbout 50–60 minutes
Yield8 pieces; about 6–8 servings
Pan: 9×13 in / 23×33 cm, roughly 3 qt / 2.8 L.
Ingredients
1 lb / 16 oz / 454 g ground beef, preferably around 85/15 or 90/10
1 medium yellow or white onion, finely diced, about 1 cup / 130–150 g
2 tbsp + 1 tsp / about 19 g MasalaMonk homemade taco seasoning, plus more to taste, or store-bought taco seasoning intended for 1 lb / 454 g beef
16 oz / 454 g thick jarred salsa, mild, medium or hot
1 can black beans, 14–15 oz / 400–425 g before draining, drained and rinsed well
6 large flour tortillas, about 10 inches / 25 cm across
8 oz / 225 g shredded cheese, roughly 2 cups; cheddar, Monterey Jack, Colby Jack or a Mexican-style blend all work
For Serving
Sour cream or plain Greek yogurt
Diced tomato or fresh pico de gallo
Shredded lettuce
Avocado or guacamole
Chopped cilantro or sliced green onion
Lime wedges
Crushed tortilla chips, Fritos or Doritos, if you want extra crunch
Using our homemade taco seasoning? The Taco Seasoning for 1 lb Ground Beef recipe makes about 3 tbsp / 24 g. Start with 2 tbsp + 1 tsp here and keep the remainder nearby. Salsa and cheese bring their own salt, so taste before adding more.
Using a packet? Use the seasoning amount intended for 1 lb of beef, but don’t automatically add the water called for on the packet. The salsa provides the liquid here.
Method
1. Heat the Oven
Heat the oven to 350°F / 175°C. Lightly grease a 9×13-inch / 23×33-cm baking dish.
2. Brown the Beef
Heat a large skillet over medium-high heat. Add the beef and leave some of it against the hot pan long enough to pick up color before you start breaking it apart.
Cook until browned, leaving small crumbles. Add the onion and continue cooking until it softens and the beef reaches 160°F / 71°C.
Drain most of the rendered fat if a noticeable pool collects in the skillet. A light coating on the meat is fine.
3. Add the Seasoning, Salsa and Beans
Stir in the taco seasoning. Give it about 30 seconds in the hot beef and onion, just until the spices smell warmer and more fragrant.
Add the salsa and black beans. Lower the heat to medium and cook for about 4–6 minutes, stirring occasionally.
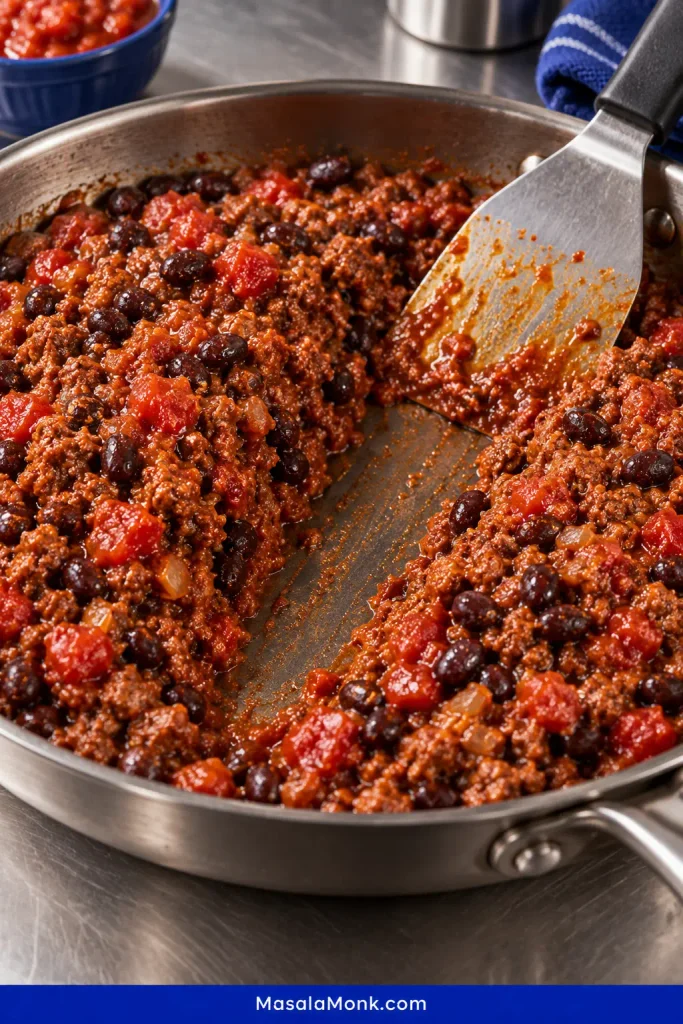
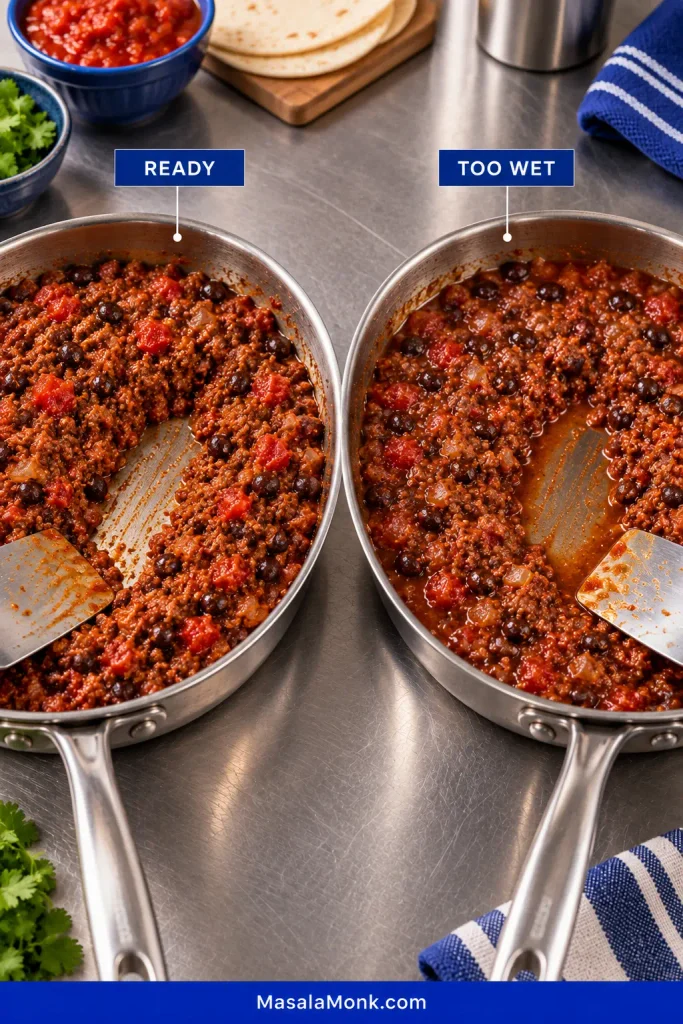
The beef and beans are ready when they slump from the spoon but do not run from it. Pull a spatula through the center of the skillet. The path should remain visible briefly before the mixture settles back.
Salsa can vary surprisingly much from jar to jar. That’s why this brief spatula channel is more useful than the clock: the filling is ready when loose liquid no longer rushes back in.
The meat should look glossy. Dry and crumbly means you’ve gone too far.
Taste before moving on. Add some of the reserved seasoning only if the beef needs it.
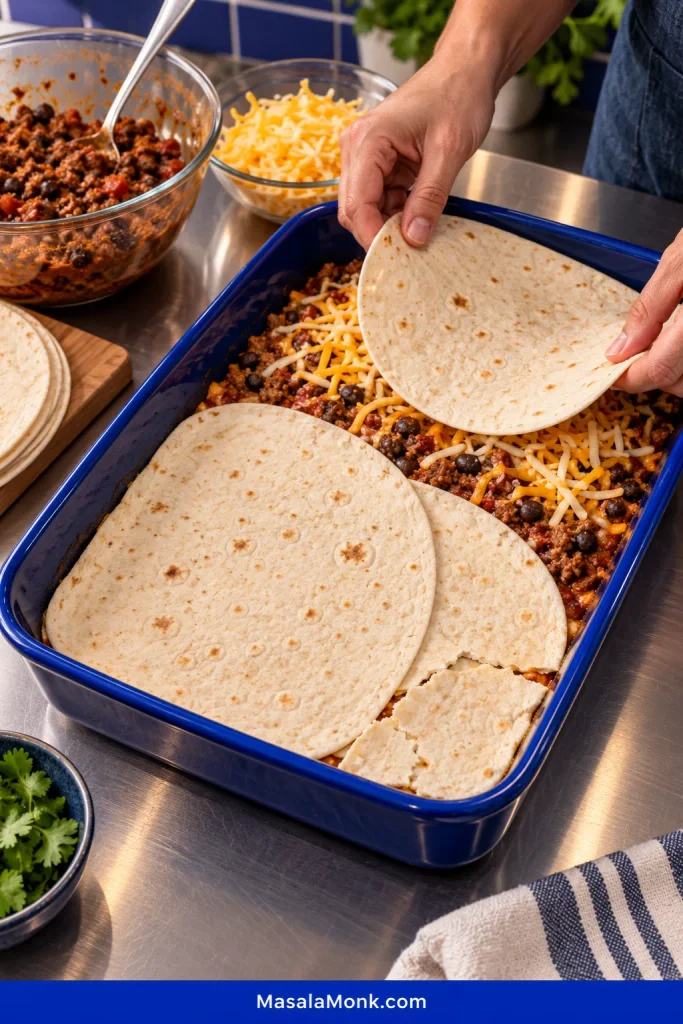
Lay 2 tortillas across the bottom of the dish, overlapping them through the middle. Let the rounded edges curve slightly up the sides. Don’t fuss over perfect coverage. If a large corner is bare, tear off a piece of tortilla, patch it and carry on.
Spread one-third of the beef and beans over the tortillas and add one-third of the cheese.
Add 2 more tortillas, another third of the meat and another third of the cheese.
Finish with the last 2 tortillas, the remaining beef and beans and the rest of the cheese.
The rough overlap disappears once the filling and cheese go on. What matters is avoiding large uncovered areas, not cutting tortillas into perfect rectangles.
Eyeballing the skillet into thirds before you start saves the final layer from getting whatever happens to be left.
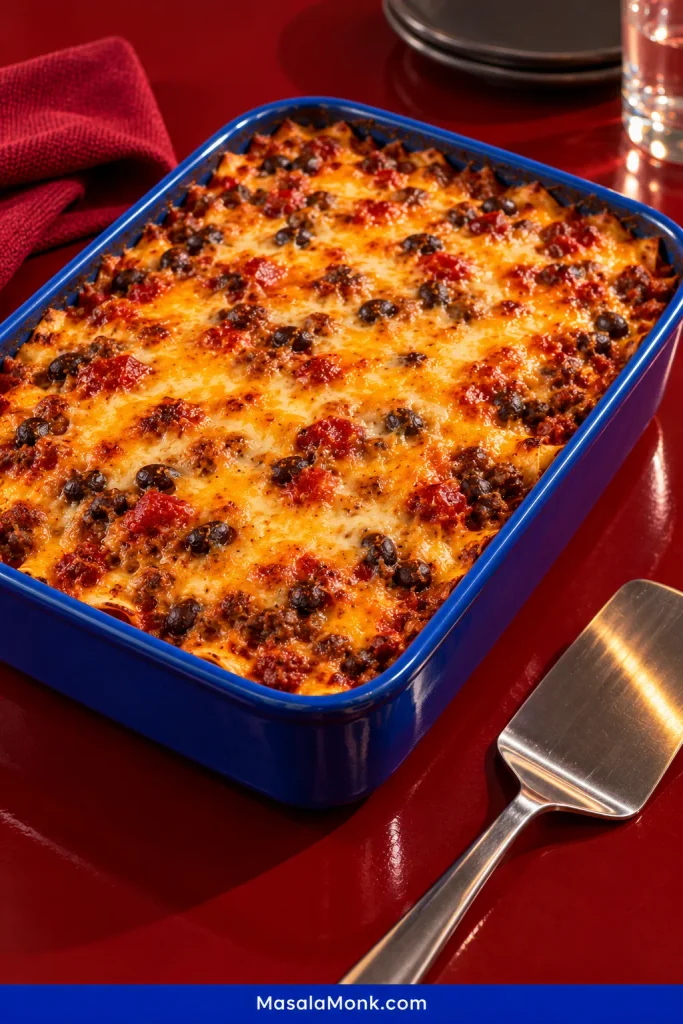
Bake uncovered for about 20 minutes, until several edges are bubbling and the cheese has melted completely. A few browned patches on top are a bonus; exposed tortilla edges may toast slightly.
6. Rest Before Cutting
Let the pan stand for 5–10 minutes. Five minutes works when everyone is ready to eat; closer to ten gives the cheese and meat more time to settle for cleaner pieces.
Cut into 8 squares and add the fresh toppings at the table.
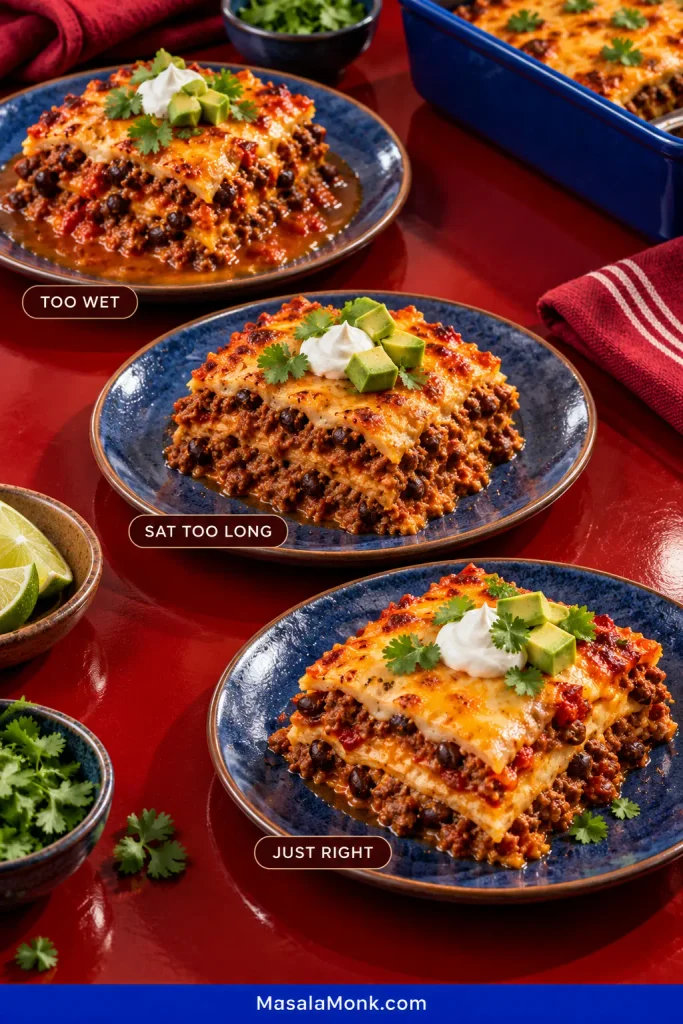
Visible tortilla layers are the proof that the filling stayed juicy without soaking the casserole.
Use thick salsa, drain the beans and any juicy add-ins well, and let loose liquid cook away before you start layering. Soft tortillas are part of the dish. A puddle around the first slice isn’t.
What matters is the liquid around the filling, not how glossy the beef looks. Extra salsa left in the skillet can soak the tortillas and collect around the first slice later.
Fresh pico usually needs more attention than a thick jarred salsa. Drain it well and simmer the beef longer, or keep the pico fresh and spoon it over the finished casserole instead.
The same principle applies to canned tomatoes, corn or vegetables that release water: deal with the excess before the mixture leaves the skillet.
Think saucy beef, not beef sitting in sauce. If liquid runs into a puddle when you tilt the skillet, give it another minute or two.
Corn vs Flour Tortillas
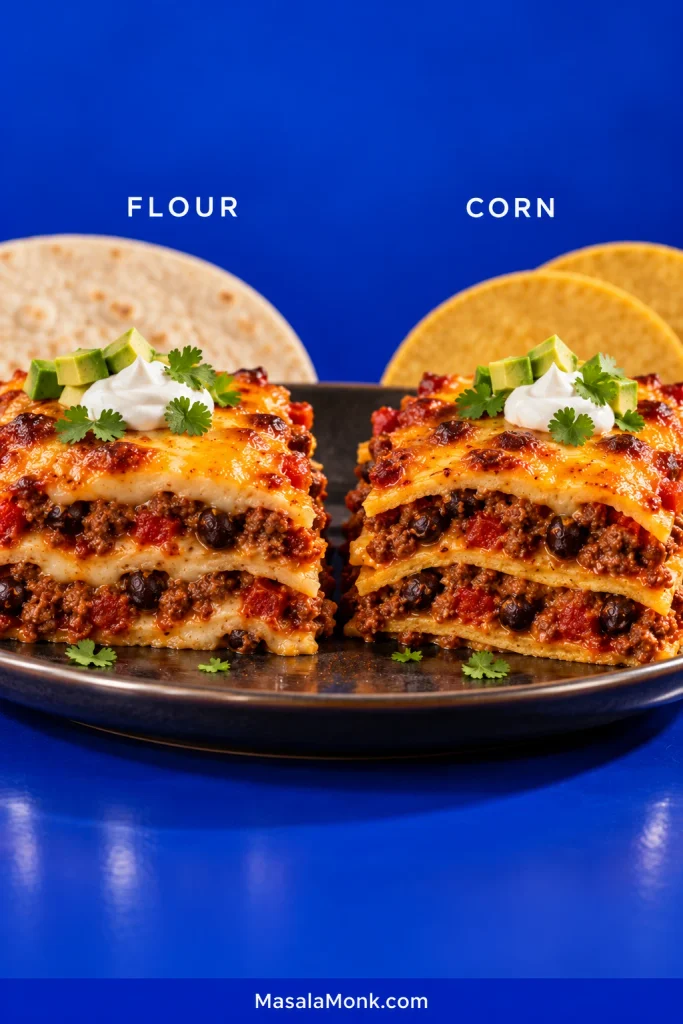
Flour tortillas give softer, more flexible layers; corn tortillas bring stronger corn flavor and usually remain more distinct between the beef and cheese.
Choose flour when you want the softest layers and the easiest fit in a 9×13 pan. Choose corn when stronger corn flavor and more noticeable tortilla layers matter more.
Corn tortillas may stay more noticeable between the layers, but they will not rescue an overly wet filling. The choice is mainly about tortilla texture and corn flavor.
Six large flour tortillas cover the pan easily. Corn tortillas are smaller, so you’ll need roughly 10–12, and warming them first helps them overlap without splitting.
Tortilla
What to expect
Large flour tortillas
A softer forkful and easy pan coverage
Small corn tortillas
More corn flavor and layers that stay more noticeable in each bite
Briefly griddled corn tortillas
A bit more resistance to the sauce, with an extra cooking step
A quick pass across a dry or lightly oiled skillet can give corn tortillas more structure. Stop while they’re pliable enough to overlap.
If you’re making them yourself, our Corn Tortilla Recipe covers masa hydration, pressing and how to keep cooked tortillas flexible.
Already Have Taco Meat? Start Here
Made taco meat yesterday? Use the amount cooked from about one pound of raw ground beef and skip the browning step.
A cup measurement isn’t especially reliable. Cooked ground beef changes volume depending on fat percentage, crumble size and how much sauce is already mixed through it.
Warm the meat with the beans, then add salsa gradually. You may not need the full jar if the leftovers are already saucy. Taste before adding more seasoning.
If those leftovers are headed back into individual tortillas instead, our Ground Beef Tacos Recipe is built for that job.
Taco Casserole Substitutions
You don’t need a different formula for every swap. The changes worth thinking about are the ones that affect moisture, salt or how quickly the meat dries out.
Change
What changes
Ground turkey or chicken
Both work, though lean poultry dries faster. Ground poultry should reach 165°F / 74°C.
Pinto beans
Use them just as you would black beans: drained and rinsed.
Up to 1 cup corn
Drain canned corn well, or thaw and dry frozen corn first.
Canned tomatoes or Rotel
Drain first, then cook until the extra liquid has reduced.
Refried beans aren’t a straight replacement for whole black beans; they make the layers much denser. For this version, I’d keep them on the side. Our Refried Beans from a Can recipe works well there.
Adjusting the Heat
A casserole can be plenty spicy and still taste flat. Before adding more chile, check whether it needs salt or acidity. Lime can do more for a dull bite than another spoonful of hot sauce.
For more heat, use hotter salsa, jalapeño, pepper Jack or hot sauce. Keeping some at the table makes dinner easier when people want different levels of spice. A spoonful of roasted salsa verde gives an individual serving a sharper, greener finish.
Pan Size, Half Batches and Double Batches
Full batch: 9×13-inch pan. Half batch: 8×8-inch pan. Double batch: two 9×13-inch pans.
For a half batch, keep the oven at 350°F and start checking around 15 minutes; a deeper or heavier dish may need closer to 20. For a double batch, two separate pans keep roughly the same layer depth and heat more predictably than one very deep casserole.
Make Taco Casserole Ahead
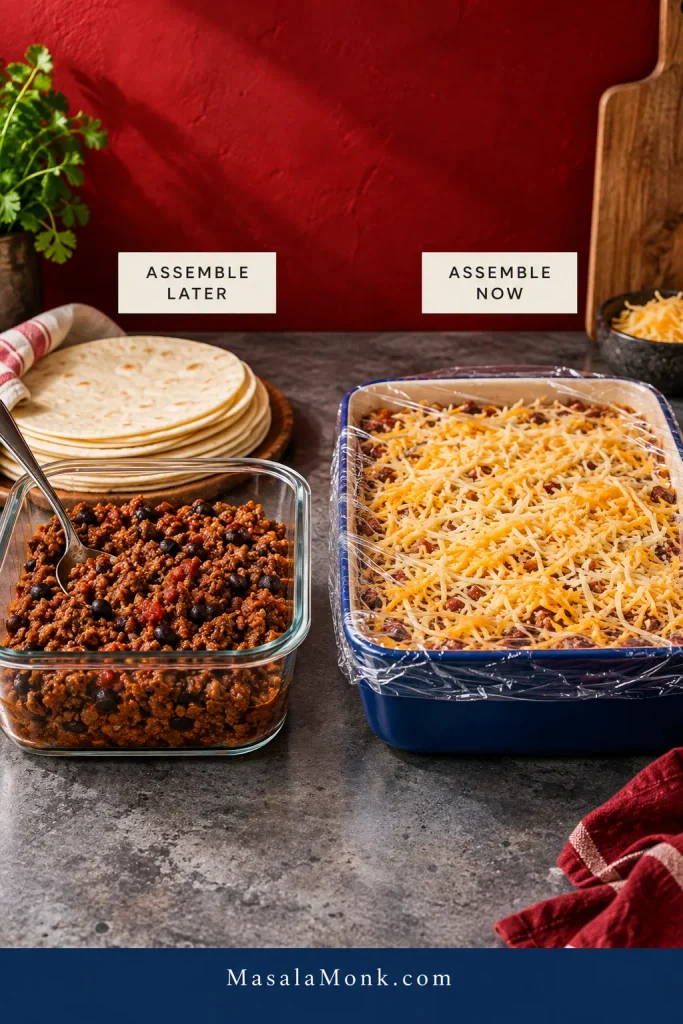
You can make taco casserole ahead, but there is a texture tradeoff. For firmer tortilla layers, cook the beef and beans up to 2 days ahead, cool them promptly and assemble the pan closer to baking.
The whole casserole can also be assembled up to 1 day ahead. It bakes well, but the tortillas will be softer after spending a night against the salsa.
An assembled-ahead pan trades some layer definition for convenience. Keeping the cooked filling separate preserves firmer tortillas without changing the recipe itself.
A refrigerator-cold casserole will take longer than a freshly assembled one. Bake at 350°F / 175°C until it is bubbling and hot through and the center reaches 165°F / 74°C.
Follow the bakeware manufacturer’s guidance before moving refrigerator-cold glass or ceramic into a hot oven.
Taco Casserole Toppings and Serving Ideas
The casserole itself is hot, rich and soft. Cool sour cream, sharp lime, avocado and a few crunchy chips change the whole bite once they meet the melted cheese and seasoned beef.
Use sliced avocado if that’s enough. For a fuller lime-onion-cilantro topping, add a spoonful of fresh guacamole.
Keep chips out of the oven if you want them crunchy. Twenty minutes under hot cheese and steam changes the deal.
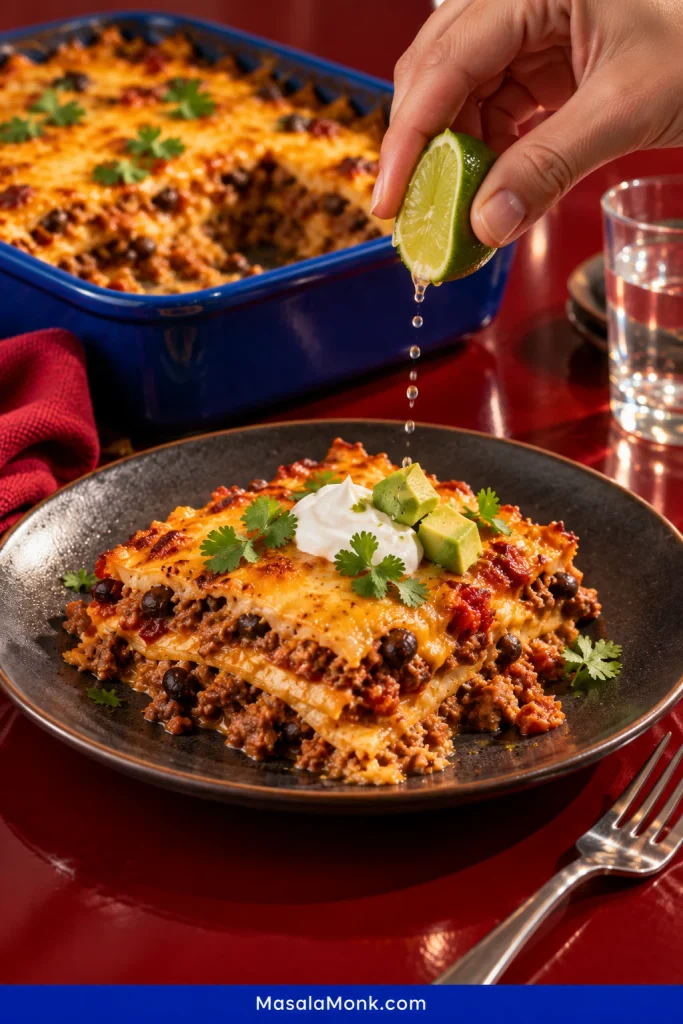
A squeeze of lime is especially useful on a hot first bite: the acidity cuts through the beef and melted cheese without making the casserole itself any heavier.
For the rest of the meal, contrast works better than piling on more richness. A crisp slaw, simple green salad, corn, or rice with plenty of lime all make more sense here than another heavy baked side.
Taco Casserole Troubleshooting
Most problems show up clearly once the first piece comes out. Use what the slice is doing to work backward to the cause.
Give the casserole its resting time before judging the first piece. After that, excess liquid, blurred tortilla layers or a clean, cohesive slice become useful clues rather than normal just-out-of-the-oven messiness.
Common Taco Casserole Problems and Fixes
What happened
Likely cause
What to do
Liquid gathers around the slice
The skillet mixture went into the dish too wet
Reduce it longer next time and use a thicker salsa.
Layers blur together but there isn’t a puddle
The assembled casserole sat too long before baking, so the tortillas absorbed more salsa
Assemble closer to baking when firmer tortilla layers matter.
First slice falls apart
It was cut while very hot
Give the pan 5–10 minutes before cutting. Expect the first piece to be the messiest one.
Casserole feels dry
The skillet reduced too far or the pan baked too long
Stop while the meat is glossy and pull the dish once the edges bubble and the cheese melts.
Beef feels pasty
It was broken very finely or simmered too long in salsa
Leave some small crumbles when browning and shorten the final simmer.
Casserole tastes too salty
Seasoning, salsa and cheese all contributed salt
Taste the skillet before adding more seasoning.
Hot enough but still bland
It may need salt or acidity rather than more chile
Check the salt and add lime at the table.
Chips turned soft
They baked in the steam
Add them after the casserole comes out.
Storage, Freezing and Reheating
How Long Does Taco Casserole Keep?
Refrigerate leftovers promptly and use them within 3–4 days. The tortillas will soften further overnight; that comes with storing a layered casserole.
Can You Freeze Taco Casserole?
Yes. For the best tortilla texture, cool individual portions, pack them airtight and use them within about 2–3 months. If texture matters more than convenience, freeze the cooked beef-and-bean mixture separately and assemble with fresh tortillas later.
How to Reheat Taco Casserole
Microwave: loosely cover an individual portion and reheat until the center reaches 165°F / 74°C.
Oven: cover several portions and reheat at 325–350°F / 165–175°C until the center reaches 165°F / 74°C. Uncover for the last few minutes if you want the cheese on top to dry slightly and melt again.
Add fresh toppings—lettuce, avocado, sour cream and chips—after reheating, not before.
Taco casserole is forgiving once what’s in the skillet is under control. The tortillas don’t have to line up perfectly, and the first square out of the dish may never look quite as tidy as the second.
Cut a generous piece while the cheese is soft, squeeze over a little lime and finish it at the table.
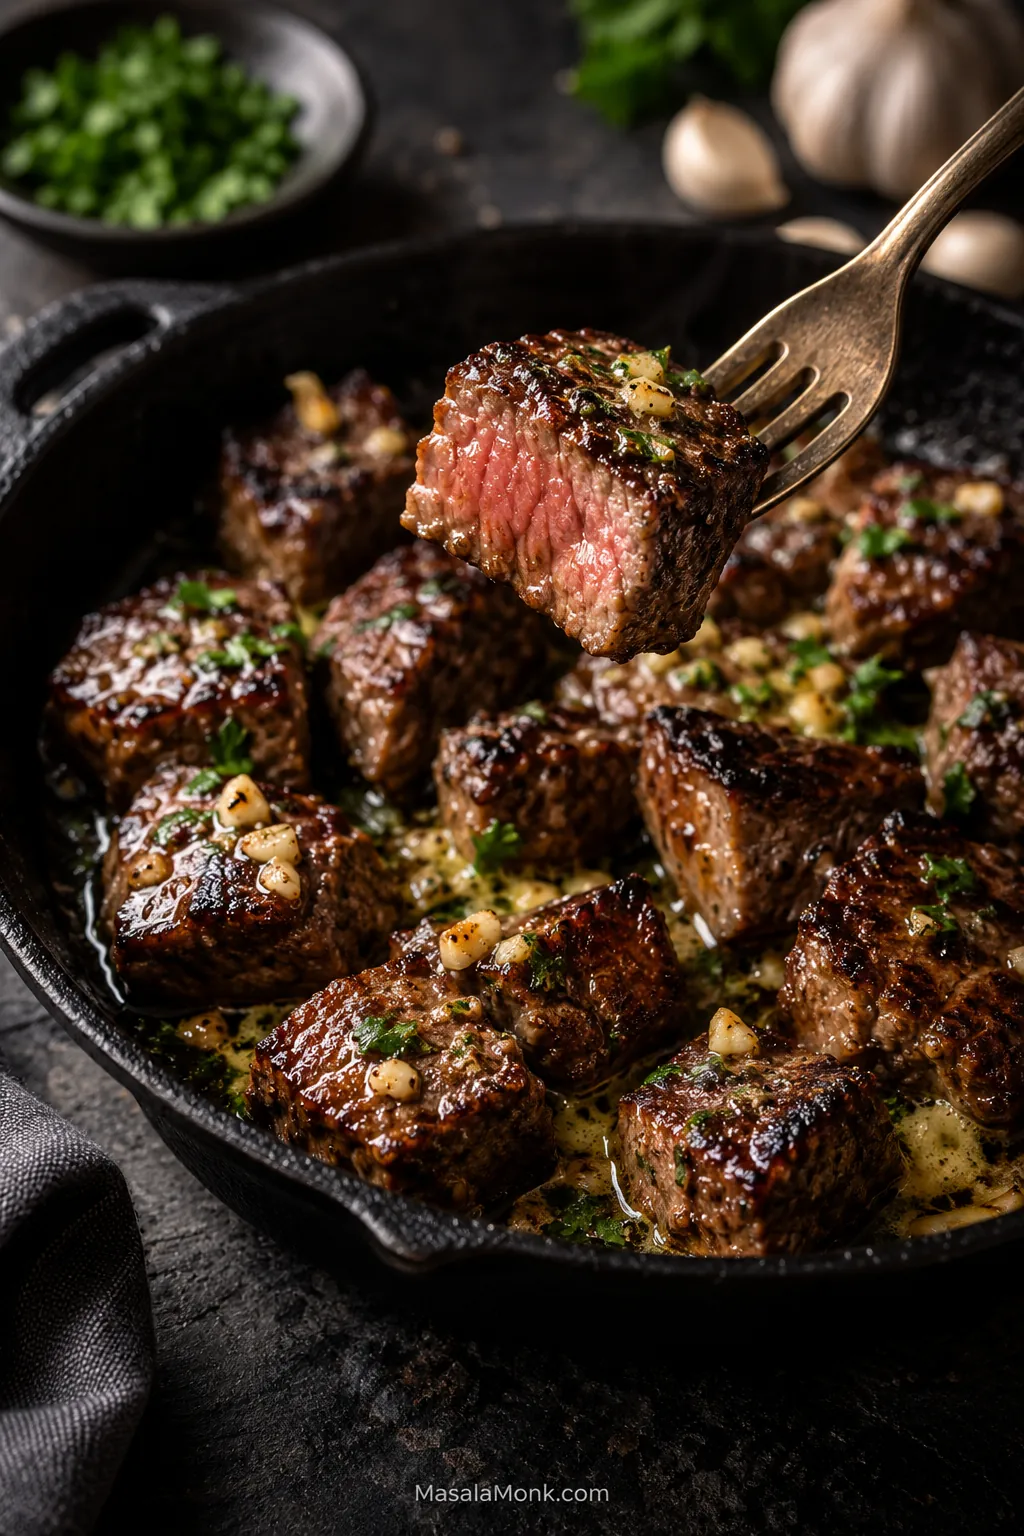
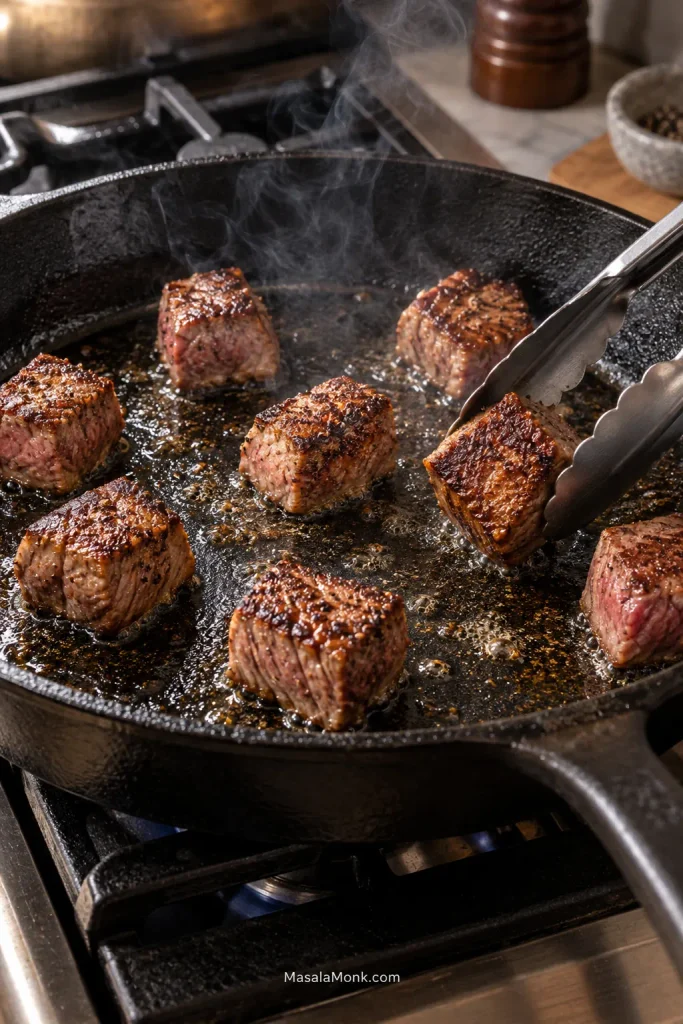
Garlic butter steak bites are really a two-temperature recipe disguised as a one-pan dinner. The beef wants a hot skillet so its cut surfaces can brown while the centers stay juicy. Butter and finely minced garlic want that heat turned down before they ever reach the pan.
Get the handoff right and you get deeply browned, savory edges, a tender center and warm garlic butter glossing the steak instead of drowning it. There is a sharp sizzle at the pan, then that unmistakable smell of garlic hitting melted butter a few minutes later.
Steak is also expensive enough that turning a good piece of sirloin gray or chewy is particularly annoying. Fortunately, most of the risk comes down to one easy rhythm: Sear hot. Steak out. Butter low. There is no marinade to remember hours ahead and no long room-temperature wait.
Hot panDry steak meets shimmering oil and gets a chance to brown.
Steak outMove those small pieces away from the stored heat before they overshoot.
Heat downThe butter should melt and foam, not race straight toward brown.
Quick returnToss the steak through the glossy garlic butter and get dinner onto the plate.
Garlic Butter Steak Bites Recipe
The skillet can preheat while you mince the garlic and chop the parsley, so there is very little dead time. Cut and dry the steak first; season it when the pan is nearly ready.
Yield3 hearty servings or 4 with sides
TotalAbout 15 minutes for one batch
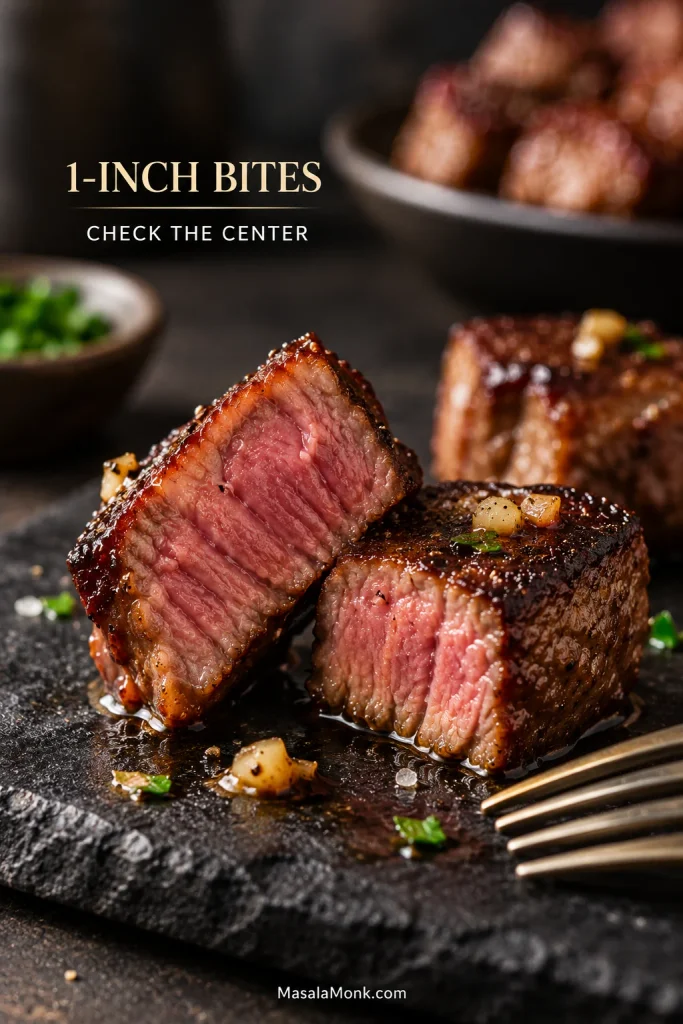
Steak size1 in / 2.5 cm
Pan12 in / 30 cm skillet
First searAbout 1½–2 minutes untouched
Garlic30–45 seconds over low heat
Useful equipment: a 12-inch / 30 cm cast-iron or heavy stainless-steel skillet, sharp knife, cutting board, paper towels and tongs or a sturdy spatula. An instant-read thermometer is useful for checking doneness without cutting into several pieces.
Ingredients
1¼ lb / 20 oz / about 570 g top sirloin steak, preferably about 1 inch / 2.5 cm thick or thicker
¾ tsp / about 4 g fine sea salt, plus more to season at the end if needed
½ tsp freshly ground black pepper
1 tbsp / 15 ml high-smoke-point oil, such as avocado, grapeseed, canola or vegetable oil
3 tbsp / about 42 g unsalted butter
5 large garlic cloves
Small handful fresh parsley leaves, chopped to make about 2 tbsp
Method
Prep the Steak and Pan
Cut and dry the steak. Trim away any hard exterior gristle, then cut the sirloin into reasonably even pieces about 1 inch across. If the grain is obvious, make your last cut across it. A few cubes will inevitably be smaller than the others. Pick one of the largest as your test piece, then pat all of the beef thoroughly dry with paper towels.
Heat the skillet while you finish the prep. Put a 12-inch cast-iron or heavy stainless-steel skillet over medium-high heat. Mince the garlic and chop the parsley while the pan heats. High-heat steak searing can create some smoke, so get the vent hood running or open a nearby window before the pan is fully hot.
Season just before cooking. Sprinkle the dry steak evenly with the salt and black pepper. Add the oil and swirl it around the hot skillet. It should shimmer. Touch one piece of beef to the pan—you want an immediate, energetic sizzle—then add the rest.
Sear and Pull the Steak
Give the first face time to brown. Arrange the steak in a loose single layer with visible space around most of the pieces. If it does not fit comfortably, cook in two batches. Leave the first side alone for about 1½–2 minutes, until the underside has a deep brown crust. Turn or toss and cook for roughly another 1–2 minutes. Start checking that larger cube after about 3 minutes total. Your skillet may move faster or slower, so trust the color and the steak more than the stopwatch. Six perfectly browned faces are not the goal.
At the first turn, pink sides are fine. What matters is the contact face underneath: a dark, dry crust plus visible space around the pieces tells you the pan is searing rather than steaming.
Move the steak to a clean plate. Take the pieces out while they are still slightly shy of the doneness you want; you will check again after the garlic-butter toss. Once the steak is safely off that hot metal, the stressful part is basically over. Cast iron in particular stays fiercely hot even after the burner is turned down.
Finish With Garlic Butter
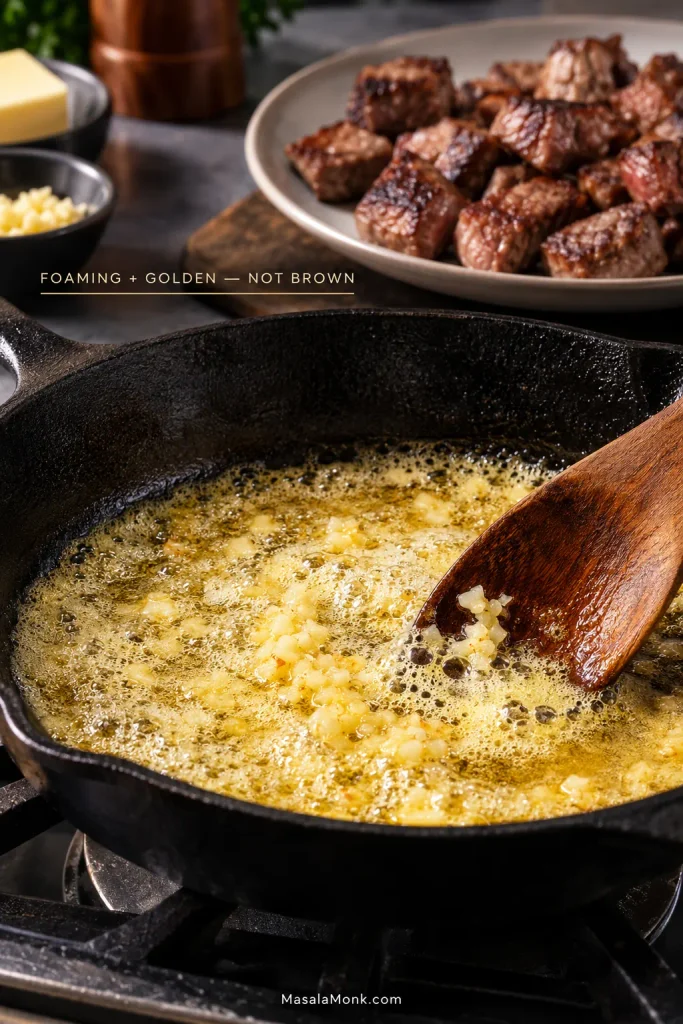
Lower the heat and make the garlic butter. Turn the burner to low and add the butter. It should melt and foam while staying golden. If it starts turning brown almost as soon as it hits the skillet, pull the pan off the heat until things calm down before adding the garlic. Scrape the browned steak bits into the foaming butter, then stir in the garlic for about 30–45 seconds. You want a sweet, fragrant garlic smell and pieces that are pale to lightly golden—not dark brown.
Coat and serve. Return the steak and any juices from the plate. Toss just long enough to gloss the browned surfaces with garlic butter, then take the skillet off the heat. Add the parsley and check that larger cube again. Taste one while everything is hot and add a small pinch of salt if the batch needs it.
Doneness at a glance: use one of the larger cubes for your thermometer check. About 130–135°F / 54–57°C is a common final medium-rare range; roughly 135–140°F / 57–60°C is a common medium range. These are culinary targets; see the USDA guidance below.
Let spacing decide whether you need two batches. A 12-inch pan is a useful starting point, but cooking surfaces vary. If most of the steak cannot sit in one loose layer with visible room around it, split the batch and allow a few extra minutes. Two browned batches beat one steaming pan.
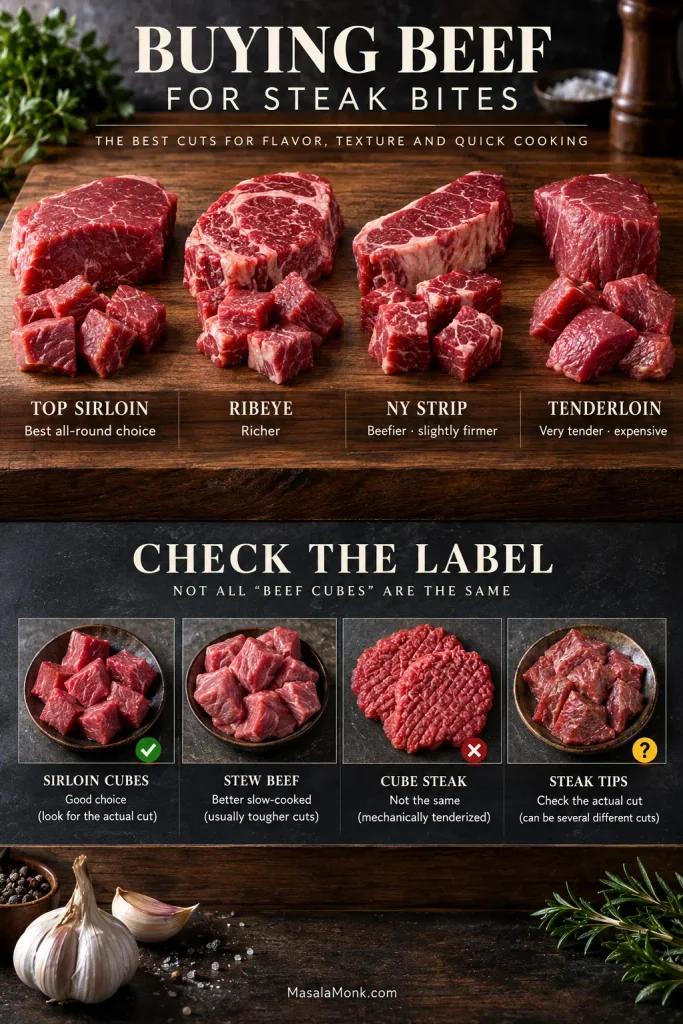
What Is the Best Steak for Steak Bites?
Top sirloin is the practical sweet spot. It is tender enough for a short, hot sear, but it still tastes properly beefy once the garlic butter goes on. You also avoid paying tenderloin or ribeye prices for meat that is about to be cut into small pieces.
Cut
What it gives you
How it works here
Top sirloin
Beefy, reasonably tender, moderately lean and comparatively affordable
The best all-round choice
Ribeye
More marbling, richness and juicy fat
Excellent for a richer batch
New York strip
Strong beef flavor with a slightly firmer texture
Very good
Tenderloin
Very soft, lean and mild
Beautifully tender, but expensive for cubing
Skirt or flank
Pronounced grain and strong flavor
Usually better cooked whole and sliced thinly across the grain
Chuck / stew meat
More connective tissue and a firmer quick-cooked texture
Better suited to long, moist cooking
If you’ve got top sirloin, you can stop thinking about cuts and cook. Flank is usually happier in thin cross-grain slices, as in beef and broccoli. For steak bites, buy something thick enough to make roughly 1-inch cubes.
Before You Buy Pre-Cut Beef, Check the Label
Sirloin cubes can save knife work. Stew beef may contain tougher pieces chosen because they soften during long cooking, and a three- or four-minute sear will not give them that time.
Cube steak is something else again: usually a thin piece of beef that has been mechanically tenderized. “Steak cubes” means steak cut into chunks. By contrast, steak tips is a looser term and can refer to small pieces of steak or particular regional cuts and preparations. Similar names, different beef—check the actual cut on the package when you can.
For quick-cooked steak bites, consistency matters almost as much as tenderness. Top sirloin is easy to cube evenly; mixed stew beef can vary in thickness, grain and connective tissue, so the pieces may finish at different times.
Do Steak Bites Need a Marinade?
No. With top sirloin, salt, pepper, a good sear and the garlic butter are enough. That is part of the appeal: you can decide to make these at dinnertime instead of planning hours ahead.
Marinated steak can still work. Drain it well and pat the surface dry before searing; wet beef spends its first minutes steaming off liquid instead of browning. A salty marinade also means you will need less added salt.
For herbs and acidity without wetting the raw steak, spoon chimichurri over the cooked bites. The cold, bright sauce is excellent against warm beef and garlic butter.
In this 15-minute version, season immediately before searing. Salting ahead can work too; give the steak at least 45 minutes. Serious Eats goes into the timing in detail. For dinner tonight, though, season and cook.
Steak-Bite Doneness Moves Fast
For 1-inch steak bites, expect roughly 3–4 minutes of initial searing in a properly hot skillet, followed by only a brief garlic-butter toss. Pan heat and cube size vary, so treat that window as a guide and use the crust and internal temperature to decide when the steak is ready.
Steak bites have very little runway between pink and overdone. A small cube has only a short distance between its browned surface and its center, so one of the larger pieces makes the most useful thermometer check.
Slide an instant-read thermometer into that cube from the side toward the center. For reference, about 130–135°F / 54–57°C is a common final medium-rare range and roughly 135–140°F / 57–60°C is a common medium range. The garlic-butter toss adds another small burst of heat, so check again afterward.
Once that cube is where you want it, the batch is done. Do not trade the center you wanted for one more patch of crust.
Use one of the larger cubes as your doneness check, but pull smaller pieces sooner if they reach the center you want first.
USDA food-safety guidance for beef steak: cook to at least 145°F / 63°C before removal from heat, followed by a 3-minute rest. Lower steak temperatures commonly used for rare or medium-rare are culinary choices below that recommendation. Count the garlic-butter toss as part of the cooking before beginning that rest.
Cast iron is excellent when you want a hard sear because it hangs onto heat after the cool beef hits the pan. Heavy stainless steel works beautifully too, and it usually responds a little faster when you lower the burner.
The catch with cast iron comes after the steak leaves. Even with the flame low, the skillet itself can still be extremely hot. Butter tells you what the dial cannot: if it melts into a golden foam, you are in much better territory for garlic; if it races straight toward brown, the pan needs more time away from the heat.
When the temperature is right, the browned steak bits loosen into the foaming butter and the garlic stays sweet and fragrant. That is the handoff the whole recipe is built around.
Dark specks can be a good sign when they are browned steak fond loosening into the butter. Watch the garlic instead: it should stay pale to light gold while the butter foams around it.
A large nonstick skillet can do the job in a pinch, though the crust may be less aggressive. Treat it more gently during preheating than cast iron or stainless steel.
Mushrooms with browned beef and garlic butter are a great combination. What they are not good at is sharing the steak’s searing stage: as they soften, they release the water the beef is trying to avoid.
Cook mushrooms first until most of that moisture has disappeared, then move them out and sear the steak. Onions can be softened the same way. Bring either one back when the steak returns to the garlic butter.
For a saucier version, keep the mushrooms in their own cooking stage and serve the beef with creamy mushroom sauce.
Fix My Steak Bites: Tough, Gray, Watery or Burned
A disappointing batch does not always have the same cause. Start with what you can actually see, hear and taste.
What happened
Likely cause
What to do
Gray or watery
Wet beef or crowded pan
Dry well; give the pieces room
No real crust
Moved too soon or pan too cool
Wait for a strong sizzle; leave the first face alone
Brown but dry
Uneven pieces or too much pan time
Cut more evenly; pull smaller cubes sooner
Pink but chewy
Cut, grain or connective tissue
Choose tender steak; cut across grain
Stew meat stays tough
Wrong cut for a quick sear
Use sirloin here; slow-cook stew beef
Garlic tastes bitter
Pan still too hot
Keep the steak out; make the garlic butter again
Butter blackens
Too much heat stored in skillet
Take the pan off heat before starting again
Steak overcooks in garlic butter
Stayed in the hot pan too long
Return only long enough to coat
It tastes flat
Needs more seasoning
Taste hot; add a little salt
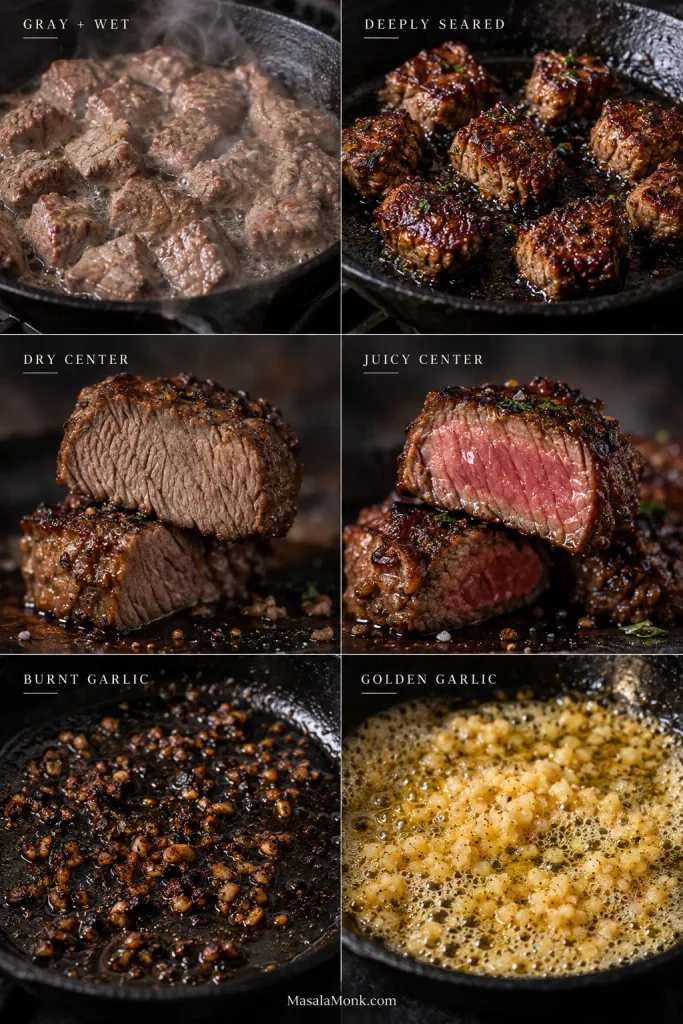
Gray and Wet?
Listen as well as look. Proper searing sounds sharp and energetic. When liquid pools around the beef and the sound softens toward bubbling, the pan is busy boiling water instead of building crust. Dry steak and more space fix most of the problem.
Brown but Dry?
Look at the pieces themselves. If the smallest cubes are dry while the bigger ones are still juicy, size—not seasoning—is probably the problem. Cut the next batch more evenly, and do not be afraid to pull an undersized piece out before the rest.
Pink but Chewy?
Pink does not guarantee tenderness. Cut and grain still matter. A tender piece of sirloin cut across its muscle fibers will eat very differently from a tougher piece cooked to exactly the same temperature.
Garlic or Butter Burned?
If the garlic is already dark and bitter, do not toss the steak through it and hope the beef will hide the taste. Leave the steak on its clean plate, discard the burned garlic butter and let the skillet lose some heat. Then make the garlic butter again. That small reset is a much better trade than giving the whole batch a bitter coating.
Different failures leave different clues: pooled moisture keeps steak pale, extra pan time dries the center, and excess residual heat darkens garlic.
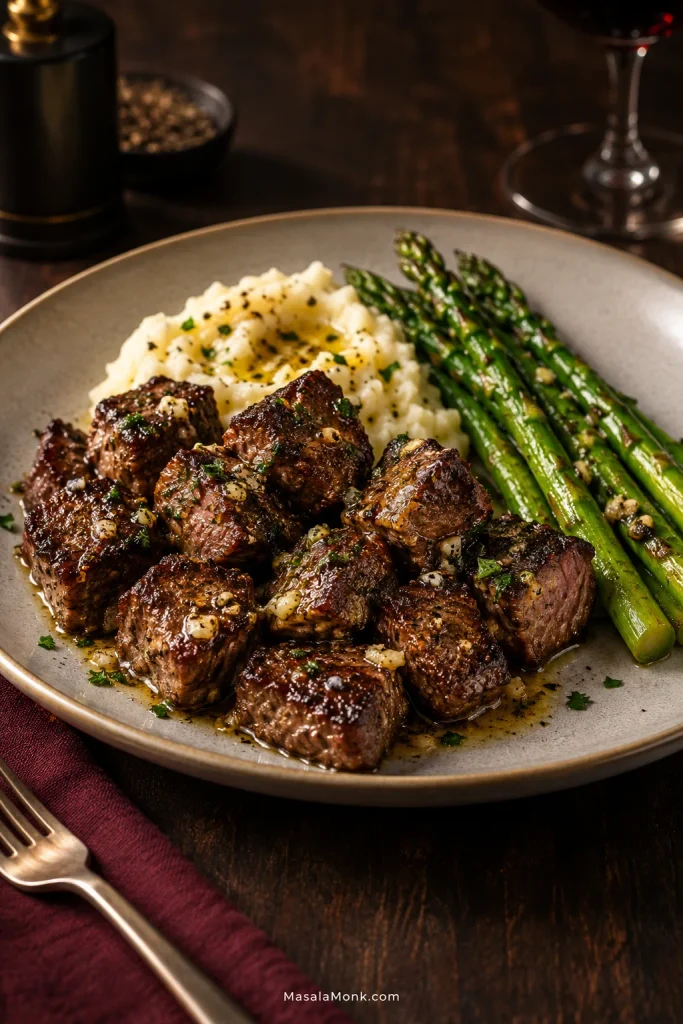
For a steakhouse-style plate, put the bites next to creamy mashed potatoes and something green—beans, asparagus or a simple salad. The potatoes catch the garlicky butter left on the plate particularly well.
On an ordinary weeknight, rice and broccoli are hard to beat. The rice stretches the steak and catches whatever buttery juices reach the bottom of the bowl. Cauliflower mash, zucchini or crisp-edged vegetables make a lighter plate without leaving dinner feeling spare.
They also work well as a warm appetizer. Put out toothpicks and something bright or sharp alongside—chimichurri or horseradish cream is plenty.
A Couple of Good Finishes
For a darker, more steakhouse-like version, lower the heat after the steak comes out. If the skillet is still fiercely hot, move it off the burner for a moment. Splash in a little Worcestershire, let it sizzle down briefly to a thin glaze, then add the butter and continue with the garlic.
A richer option is to leave the skillet method alone and spoon béarnaise over the cooked steak. Tarragon and acidity give you a very different plate without interfering with the sear.
Leftovers: Reheating Cooks the Steak Again
Refrigerate cooked steak bites promptly and use them within about 3–4 days. Planning leftovers? Cook the steak fully the first time rather than deliberately half-cooking it for later.
Reheat the bites in a skillet over medium-low to medium heat with a small knob of butter or a splash of oil. Turn them often and keep the reheating brief. USDA guidance calls for leftovers to reach 165°F / 74°C, which will push the centers further toward well done.
Cold steak is genuinely good rather than a consolation prize. Slice it thin and pile it over a crisp cucumber salad with vinegar, dill and onion, tuck it into a sandwich or wrap, or add it to a leafy salad with something sharp and crunchy.
The best moment is still the first one: steak just out of the garlic butter, browned edges fresh, garlic fragrant and the surface still glossy. Get it onto the plate while that contrast between crust, tender center and warm butter is still there.
A turkey can look finished before it is actually ready. The breast is deeply browned, dinner is getting close, and then the thermometer says one thigh still has a way to go. That mismatch—lean breast attached to slower-cooking dark meat—is most of what makes a whole turkey tricky.
Most of us do not get many practice runs with a whole turkey. It is big, expensive enough that you care about getting it right, and usually the one dish everyone else is waiting for.
This roast turkey recipe keeps the cooking straightforward: roast breast-side up at 325°F / 163°C, keep the skin dry, skip routine basting, and start checking before you expect the bird to be finished. The target is breast meat that still glistens when sliced, tender thighs, bronzed skin with crisp edges, and savory drippings ready for gravy. The turkey here is 12–14 lb / 5.4–6.4 kg; the timing table also covers other common sizes.
Quick Answer: How to Cook a Juicy Turkey in the Oven
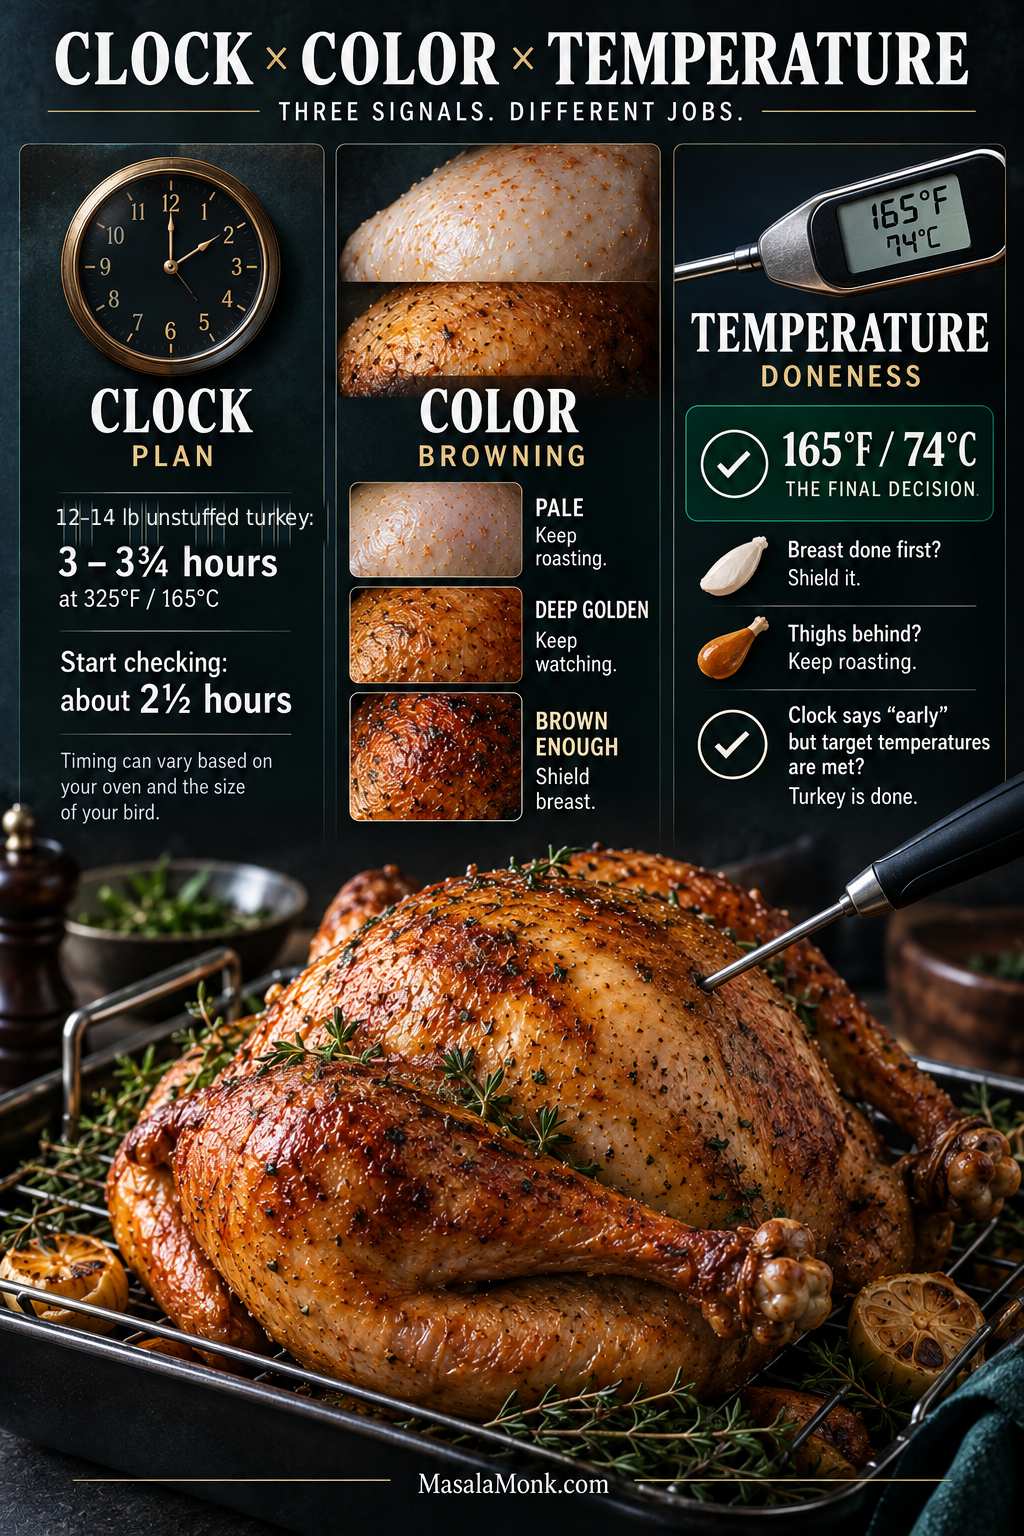
For this roast turkey recipe, cook a 12–14 lb / 5.4–6.4 kg unstuffed turkey at 325°F / 163°C for about 3–3¾ hours. Begin checking around 2½ hours, and remove the turkey only after the thickest breast, inner thigh and inner wing area have each reached at least 165°F / 74°C. Rest for 30–45 minutes before carving.
Start with a fully thawed bird and read the package before adding salt. Pat the turkey dry, season according to how much time you have, spread herb butter beneath the breast skin, and keep the cavity aromatics loose.
Before roasting: thaw completely and check whether the turkey is already salted or enhanced. Position: breast-side up, with room around the legs. Covering: mostly uncovered; foil once the skin has enough color. Basting: optional. Doneness: use the thermometer for the final decision. Rest: 30–45 minutes.
The clock plans dinner. The thermometer decides when the turkey is done.
Even when the timing is not predictable, the basic roast is simple: get the salt right, dry the skin, roast steadily, protect the breast once it is brown enough, and check the temperature in the right places.
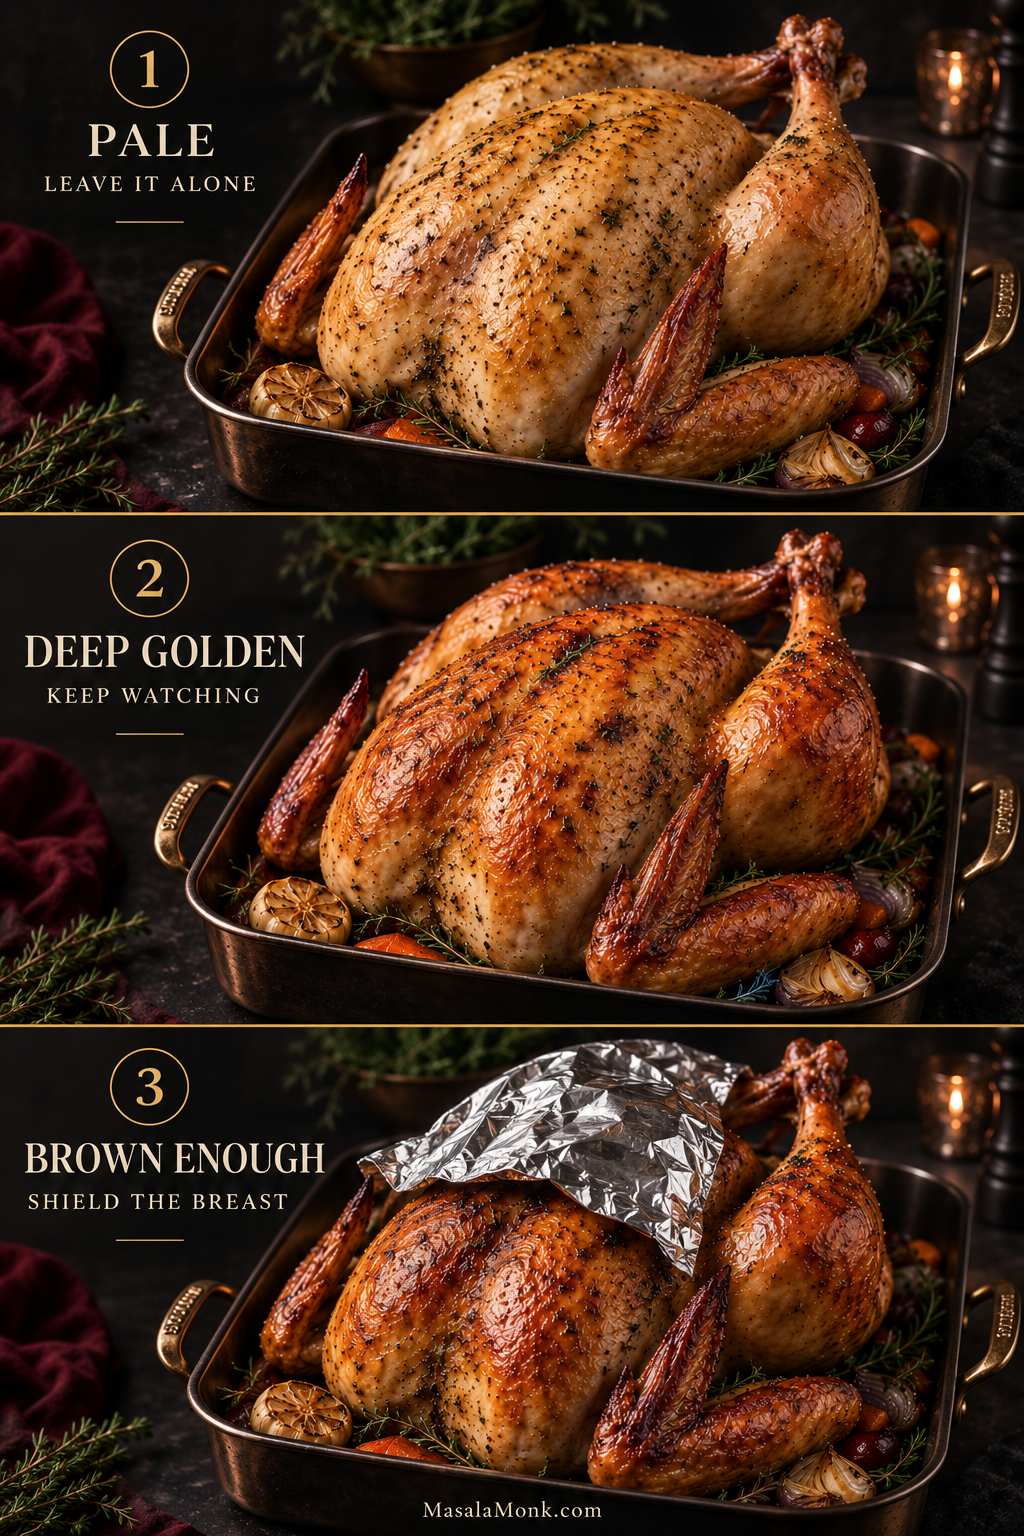
If the breast finishes first, loosely shield it and let the thighs keep cooking.
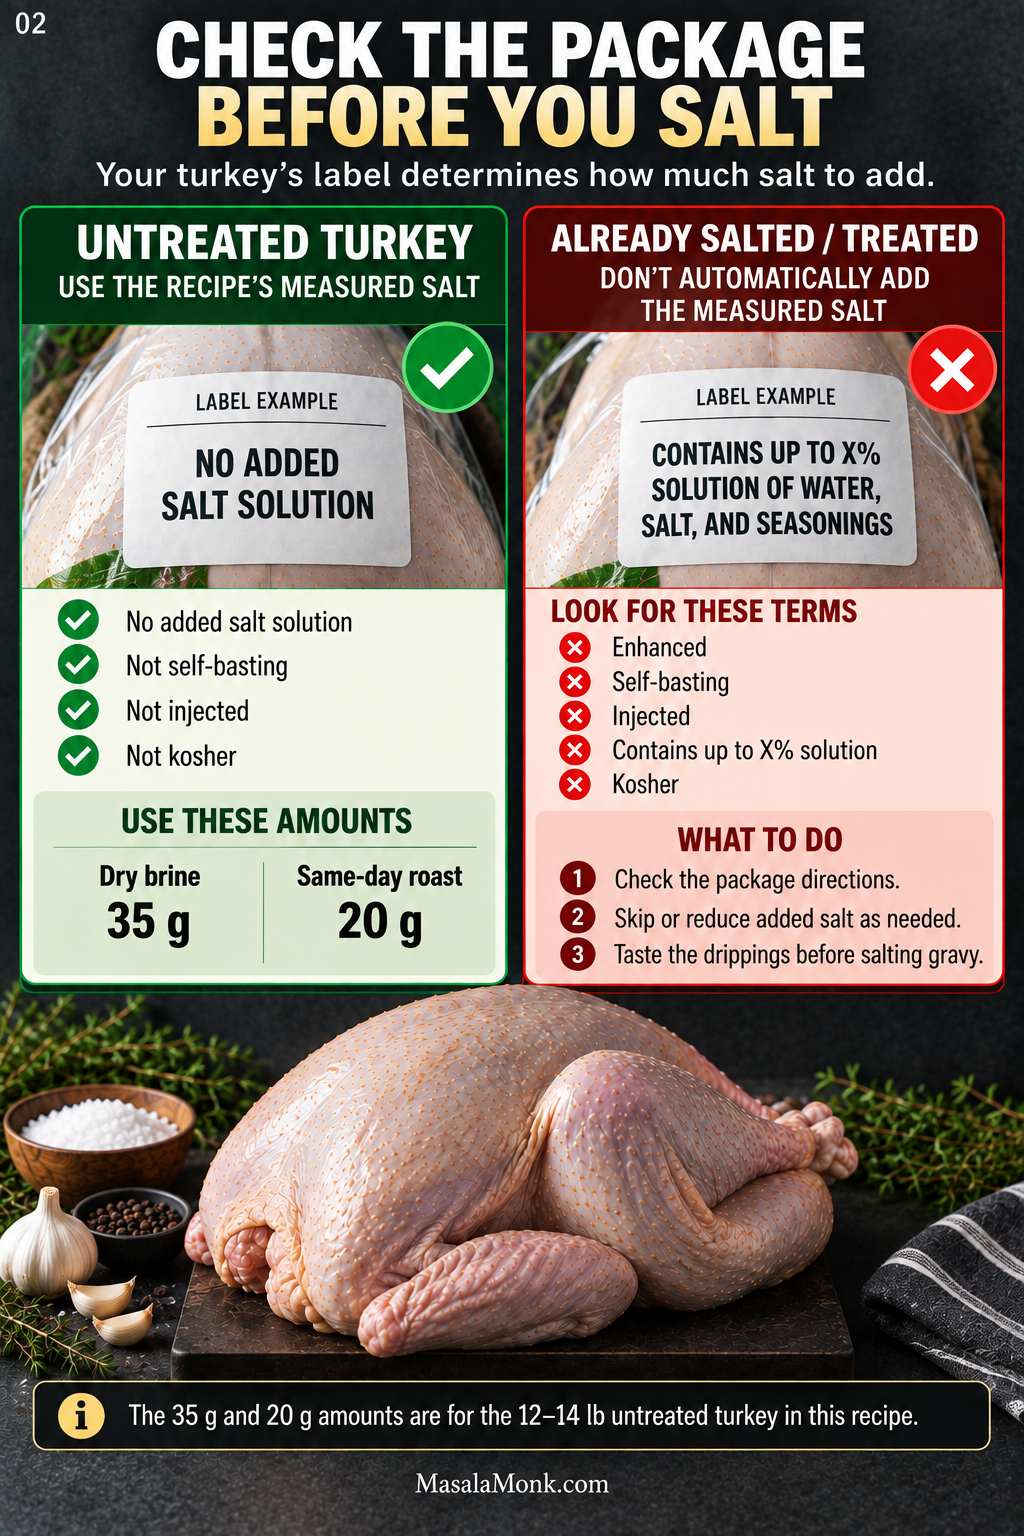
Before You Salt It: Check the Label
Untreated turkey: no added salt solution and not kosher. Use the measured salt amounts in this recipe.
Self-basting, enhanced, injected, or “contains up to X% solution”: salt has already been added during processing.
Kosher turkey: salting is already part of the processing.
Do not use the measured 35 g or 20 g salt amounts on an enhanced, injected, self-basting or kosher turkey unless its package specifically directs you to add more salt. Use the unsalted herb butter, herbs and pepper, then taste the drippings before seasoning the gravy.
A quick label check can prevent the easiest turkey mistake to make: giving the full recipe salt to a bird that was already salted during processing.
Roast Turkey Recipe
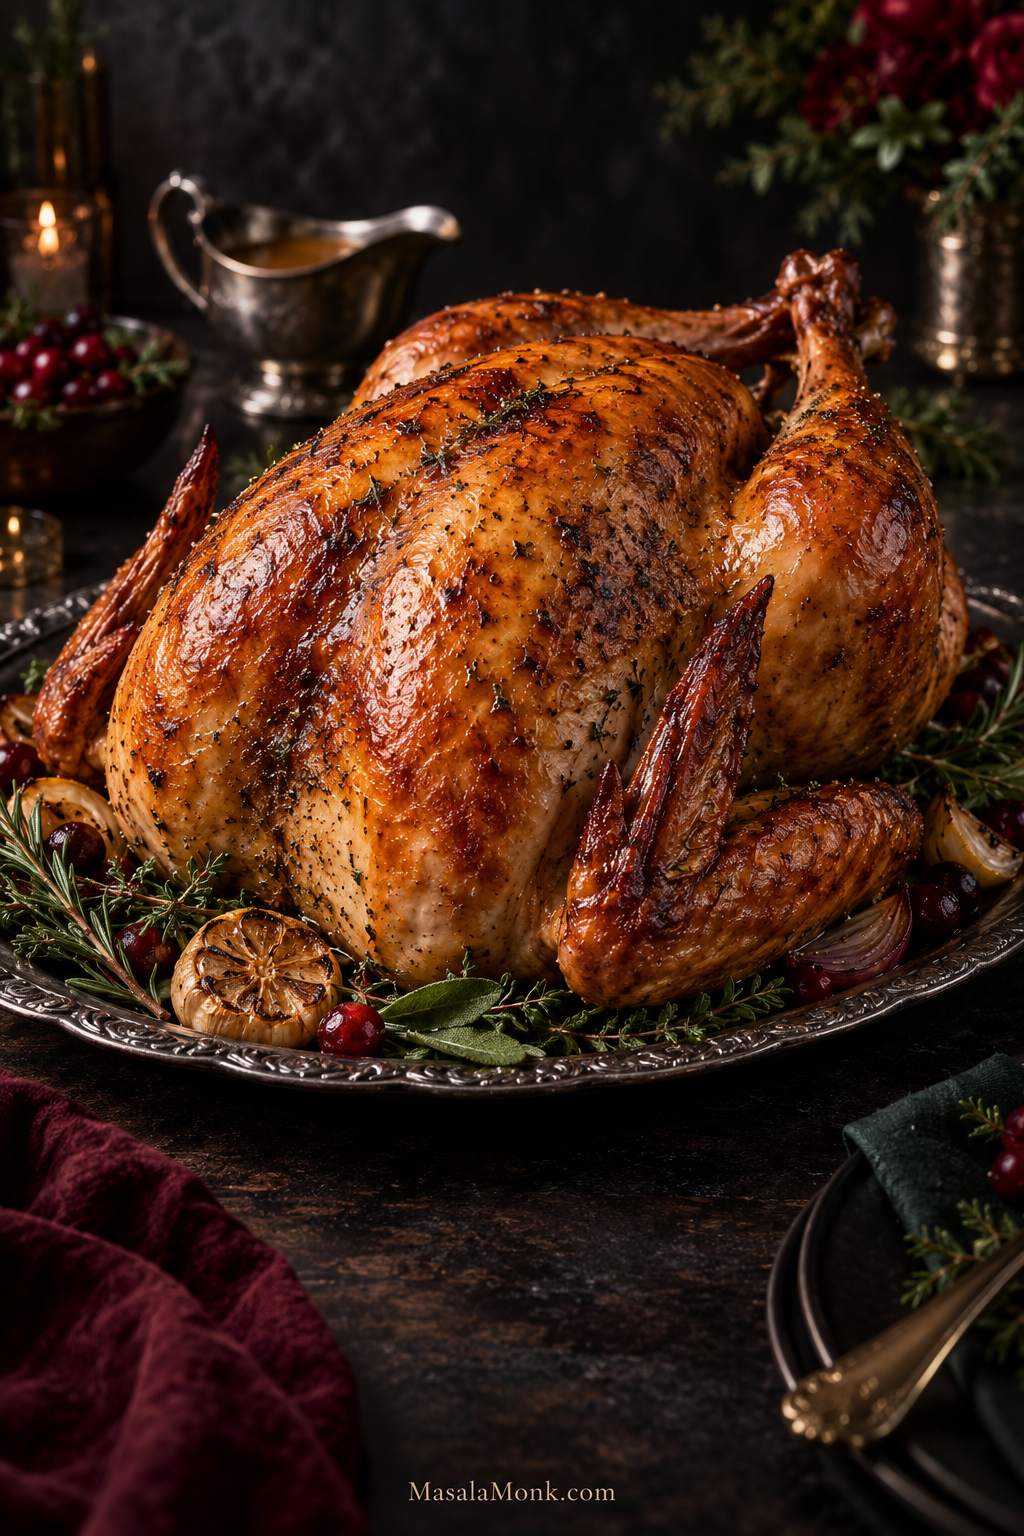
A whole herb-butter turkey with bronzed skin, juicy breast meat, tender dark meat and plenty of flavorful drippings for gravy.
Prep: about 30 minutes Preferred dry brine: 24–48 hours Turkey: 12–14 lb / 5.4–6.4 kg Oven: 325°F / 163°C Approximate roast time: 3–3¾ hours Start checking: about 2½ hours Rest: 30–45 minutes Serves: about 8–12
For dry-brining (12–48 hours; 24–48 preferred): about 35 g kosher salt, for an untreated turkey only
For same-day seasoning: about 20 g kosher salt, for an untreated turkey only
8 tbsp / 4 oz / 113 g unsalted butter, very soft
1 tbsp / 15 ml olive oil or neutral oil
4 garlic cloves, finely grated or minced
1 tbsp finely chopped fresh rosemary
1 tbsp finely chopped fresh thyme
1 tbsp finely chopped fresh sage
1 tsp freshly ground black pepper
1 medium onion, quartered
1 lemon, quartered
½ head garlic, cut crosswise
A few fresh herb sprigs, optional
½ cup / 4 fl oz / 120 ml unsalted turkey or chicken stock, or water, plus more if the pan begins to dry
Using dried herbs? Use about 1 teaspoon dried herb for each 1 tablespoon fresh rosemary, thyme or sage.
The 35 g and 20 g salt amounts are for the 12–14 lb turkey in this recipe. For a substantially larger or smaller bird, do not simply reuse the same amount.
By volume, 35 g is approximately 4 tbsp + ½ tsp Diamond Crystal or 2 tbsp + 1¼ tsp Morton kosher salt. For 20 g, use roughly 2 tbsp + 1 tsp Diamond Crystal or 1 tbsp + 1¼ tsp Morton. A scale is more dependable because kosher salts vary substantially in density.
Instructions
Prepare and Season
Check the label and choose the seasoning. For an untreated turkey, use 35 g kosher salt when you have at least 12 hours to dry-brine; 24–48 hours is preferred. Cooking within the next several hours? Use the lighter 20 g same-day amount. Skip these measured amounts on enhanced, self-basting, injected or kosher birds unless the package says otherwise.
Dry-brine ahead, when time allows. Pat the turkey dry and distribute the 35 g salt over the exterior, beneath the breast skin and lightly around the cavity. Set the bird on a rack over a rimmed tray or roasting pan, keep the refrigerator at 40°F / 4°C or colder, and place the turkey where raw juices cannot drip onto other food.
Prepare the oven and bird. Position the rack so the turkey will sit near the center of the oven and heat to 325°F / 163°C. Remove the neck, giblets, gravy packet and loose packaging from both cavities, then pat the turkey thoroughly dry. There is no need to bring the whole bird to room temperature; keep it refrigerated until you are ready to season and roast it.
Season. Mix the softened butter with garlic, herbs and pepper. For same-day seasoning, distribute the 20 g salt over the exterior, beneath the breast skin and lightly around the cavity first. Loosen the breast skin, spread most of the herb butter underneath, rub the remainder over the legs and lightly oil the exterior.
Roast and Finish
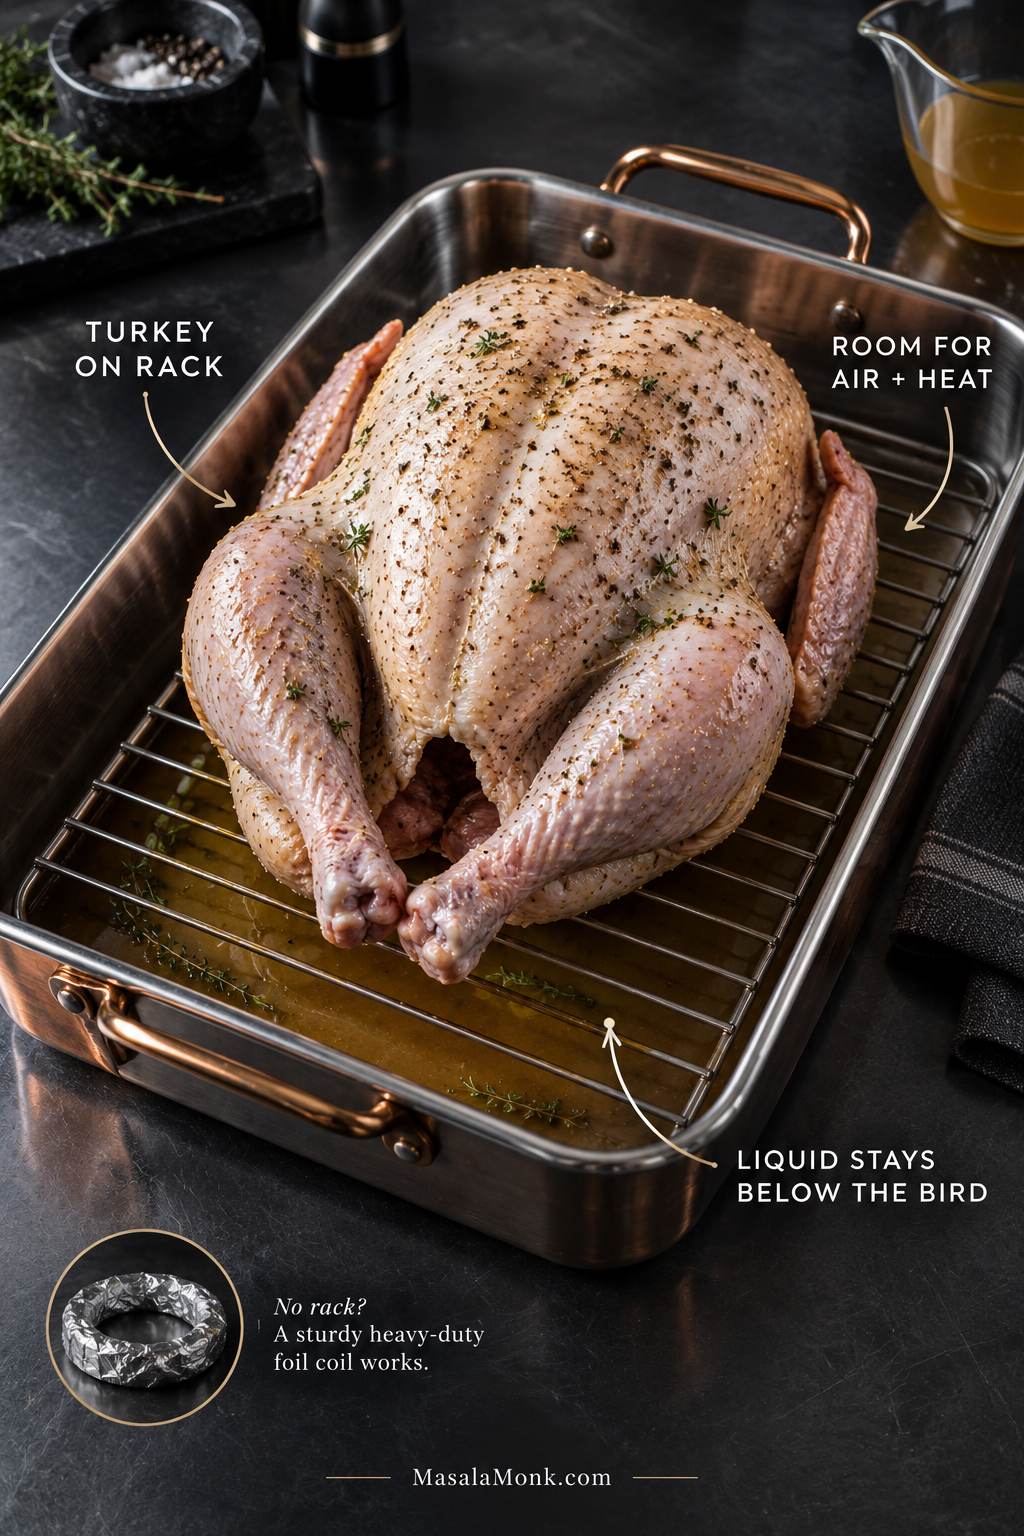
Set it in the pan. Add the onion, lemon, garlic and herbs loosely to the cavity. Tuck the wing tips back, leave the legs fairly loose, place the turkey breast-side up on the rack and pour ½ cup / 120 ml unsalted stock or water into the bottom of the pan. The liquid stays below the rack to keep the drippings from scorching; it is not there to baste or steam the bird.
Roast. Cook mostly uncovered. Once the breast is deeply and evenly bronzed, loosely shield it with foil. Add another ½ cup / 120 ml hot water or unsalted stock if the pan begins to dry or smoke.
Check early. At about 2½ hours, begin checking the thickest breast, thick inner thigh where the leg meets the body, and inner wing area.
Finish and rest. The breast, inner thighs and inner wing areas should all reach at least 165°F / 74°C. When the breast finishes first, shield it while the thighs continue. Rest for 30–45 minutes before carving.
Equipment and Pan Setup
You need a shallow roasting pan, a rack or substitute, a reliable instant-read thermometer, foil, paper towels, sturdy oven mitts and a sharp carving knife. A leave-in probe thermometer, oven thermometer, fat separator, kitchen twine and grooved carving board are useful extras.
What matters here is separation: the turkey stays above the liquid, while the small pool underneath protects the flavorful drippings before they scorch.
No rack? Use a sturdy coil of heavy-duty foil, or make a bed from extra onion, carrot and celery pieces. For a smaller turkey, a strong rimmed sheet pan with an oven-safe rack can work if it can safely contain the drippings.
Check the fit before roast day. The turkey should sit roughly in the vertical center of the oven—usually around the lower third—with clear space above and around it. A 20-pound turkey is a bad time to discover that the pan barely clears the oven door.
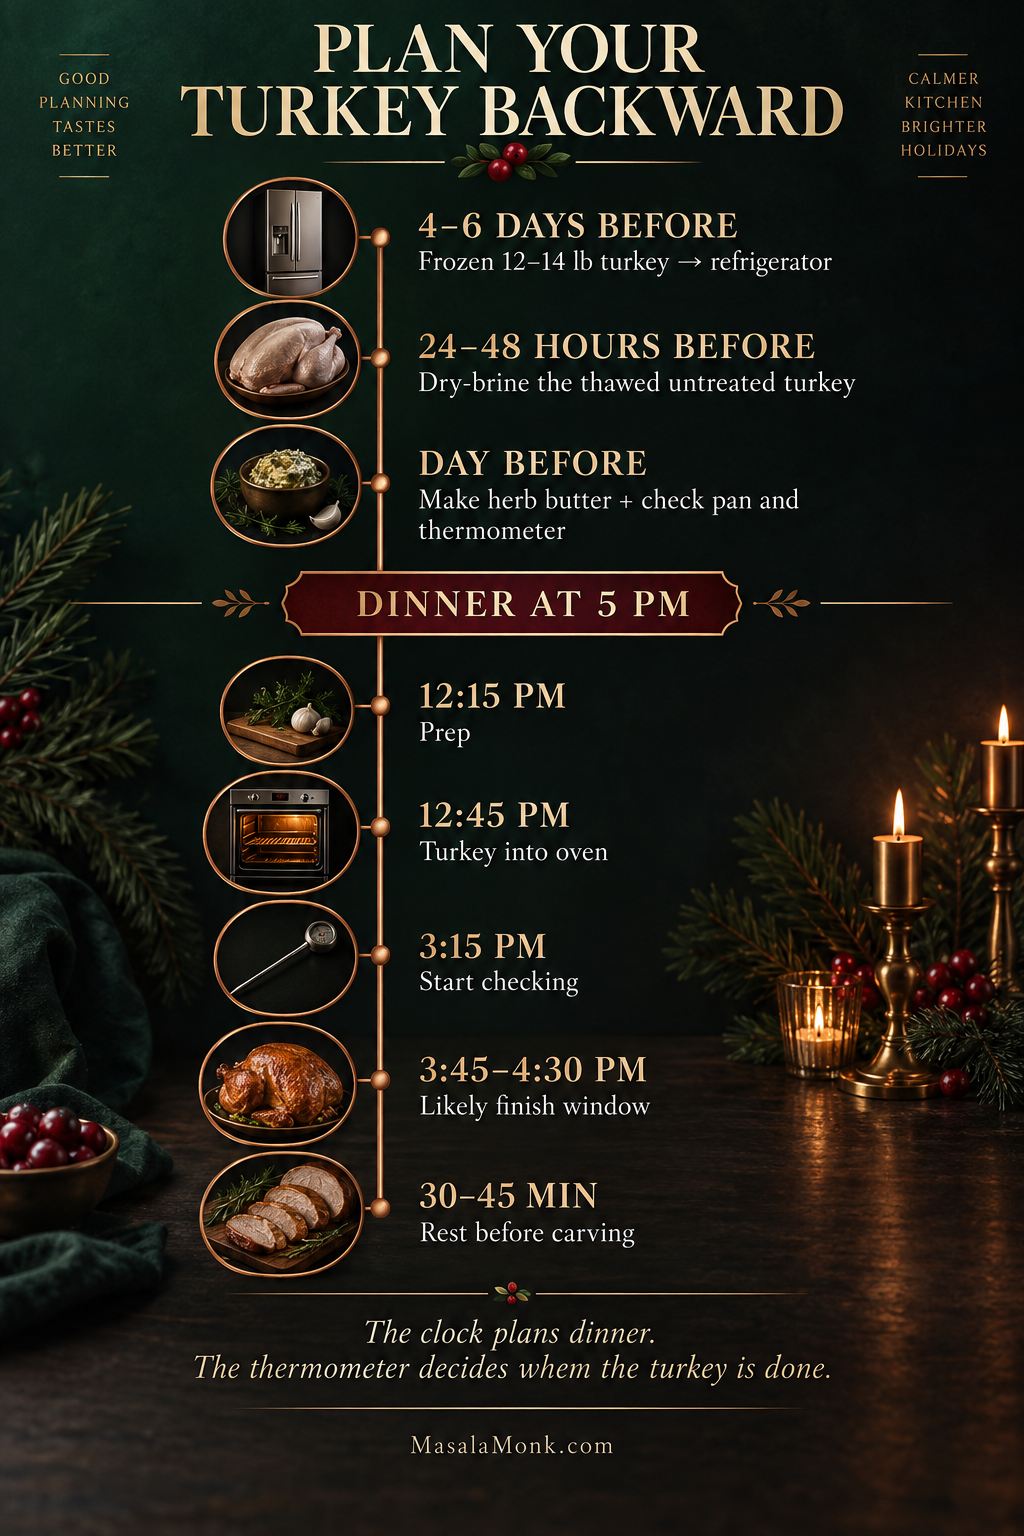
A whole turkey needs more than oven time. It has to thaw, perhaps dry-brine, roast and then rest before carving. Work backward from dinner and leave some room for the bird to surprise you.
If your 12–14 lb turkey starts frozen and you also want the preferred 24–48 hour dry brine, move it to the refrigerator roughly 4–6 days before dinner. Larger birds need longer to thaw, so build that extra day or two into the schedule.
A Simple Turkey-Day Timeline
When
What to Do
4–6 days before
For a frozen 12–14 lb turkey that you want to dry-brine, move it to the refrigerator.
24–48 hours before
Once thawed, dry-brine an untreated turkey. Even 12–24 hours is worthwhile if that is the time you have.
Day before
Make and refrigerate the herb butter, check the roasting pan and thermometer, and finish dishes that can be made ahead.
Roast day
Take the herb butter out early enough to become very soft. Dry and season the bird, set up the pan and roast.
Before the expected finish
Begin checking internal temperature.
30–45 minutes before carving
Rest the turkey while you make gravy and finish the last hot dishes.
Build slack into turkey day before you need it; starting the temperature checks early gives you time to react if the turkey is running behind.
The turkey does not have to carry the entire meal. Move cold sauces and make-ahead dishes off roast day when you can. Cranberry sauce with orange juice is perfectly happy waiting in the refrigerator.
Dinner at 5:00 PM?
For the turkey used here, aim to have it in the oven by about 12:45 PM. Begin prep around 12:15 PM, then start checking the bird around 3:15 PM.
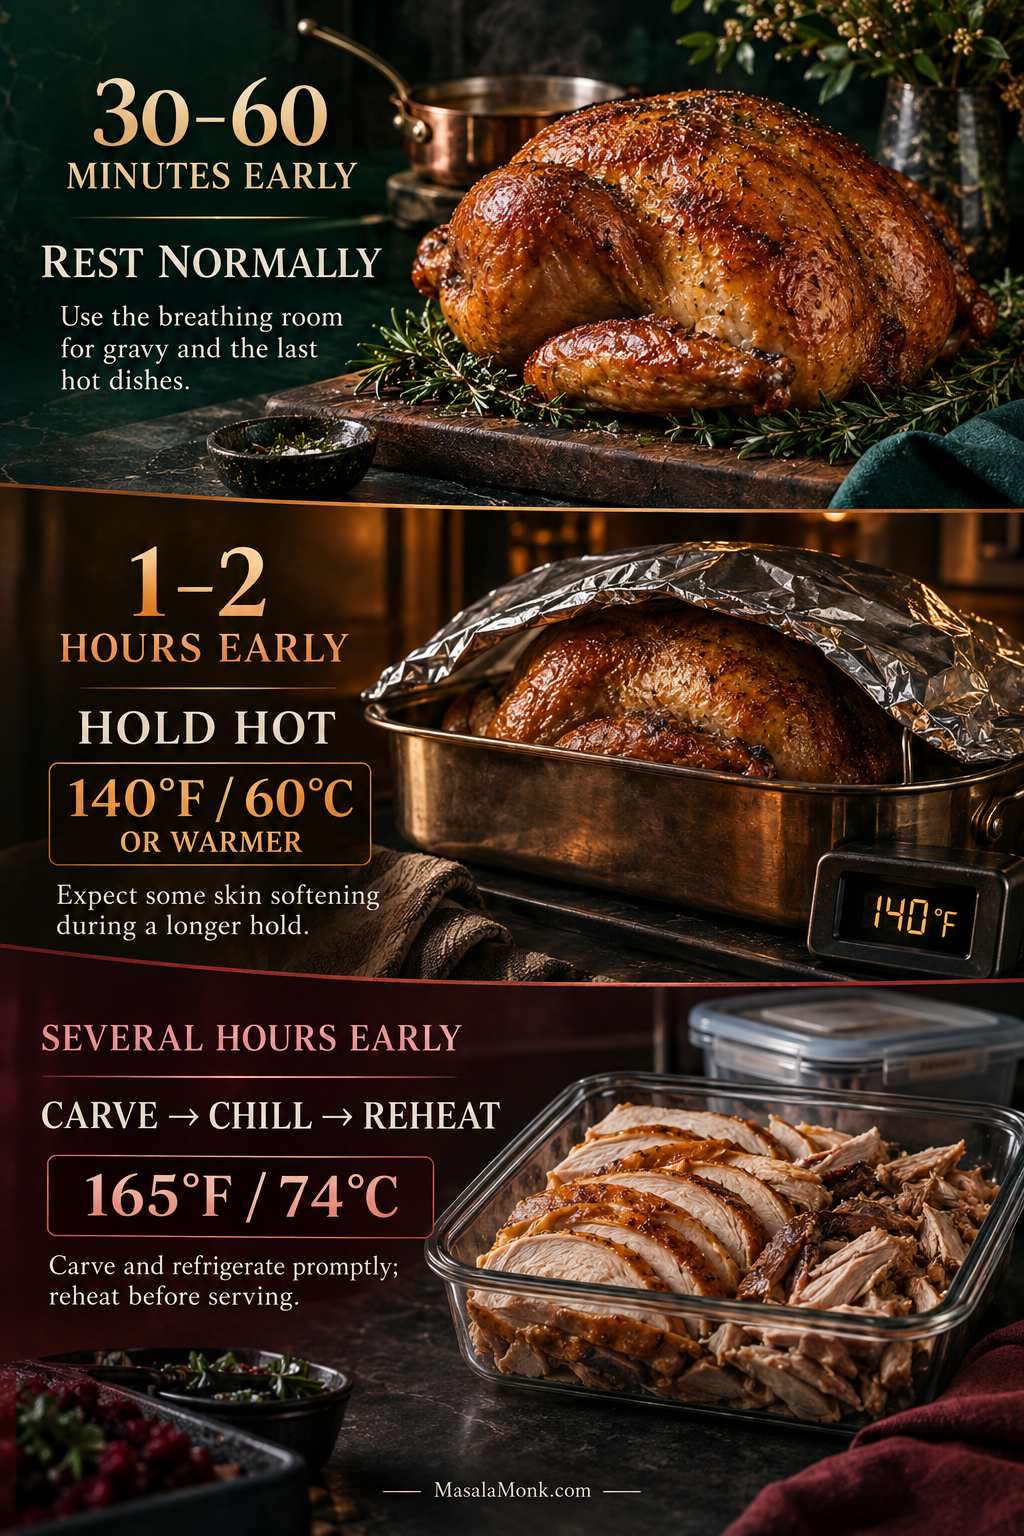
No start time guarantees an exact 30–45 minute rest because the normal roasting range itself spans about 45 minutes. A fast three-hour bird could be ready around 3:45 PM and need the early-finish plan below; a slower one may come out near 4:30 PM and still rest for half an hour.
Starting earlier protects dinner from running late. Starting later reduces the chance of a long hold. Choose which risk matters more for your meal.
For detailed weight-by-weight planning, including larger and stuffed birds, use the full turkey cooking-time guide.
How Much Turkey Do You Need?
About 1–1¼ lb / 454–567 g of whole turkey per person works well for comfortable portions. Move closer to 1½ lb / 680 g per person when leftovers are part of the plan.
Guests
Comfortable Portions
More Leftovers
6–8
10–12 lb / 4.5–5.4 kg
12–14 lb / 5.4–6.4 kg
8–10
12–14 lb / 5.4–6.4 kg
14–16 lb / 6.4–7.3 kg
10–12
14–16 lb / 6.4–7.3 kg
16–18 lb / 7.3–8.2 kg
12–14
16–18 lb / 7.3–8.2 kg
18–20 lb / 8.2–9.1 kg
14–16
18–20 lb / 8.2–9.1 kg
20–24 lb / 9.1–10.9 kg
These are rounded buying ranges for common whole-turkey sizes, not exact portion math. A side-heavy table, several children or a room full of enthusiastic turkey eaters can move the numbers.
Hosting a very large gathering? Two medium turkeys are often easier to thaw, lift and cook evenly than one enormous bird. For a smaller holiday dinner, a turkey tenderloin gives you a much smaller roast without committing to a whole turkey.
Make Sure the Turkey Is Fully Thawed
For refrigerator thawing, allow roughly 24 hours for every 4–5 lb / 1.8–2.3 kg of turkey.
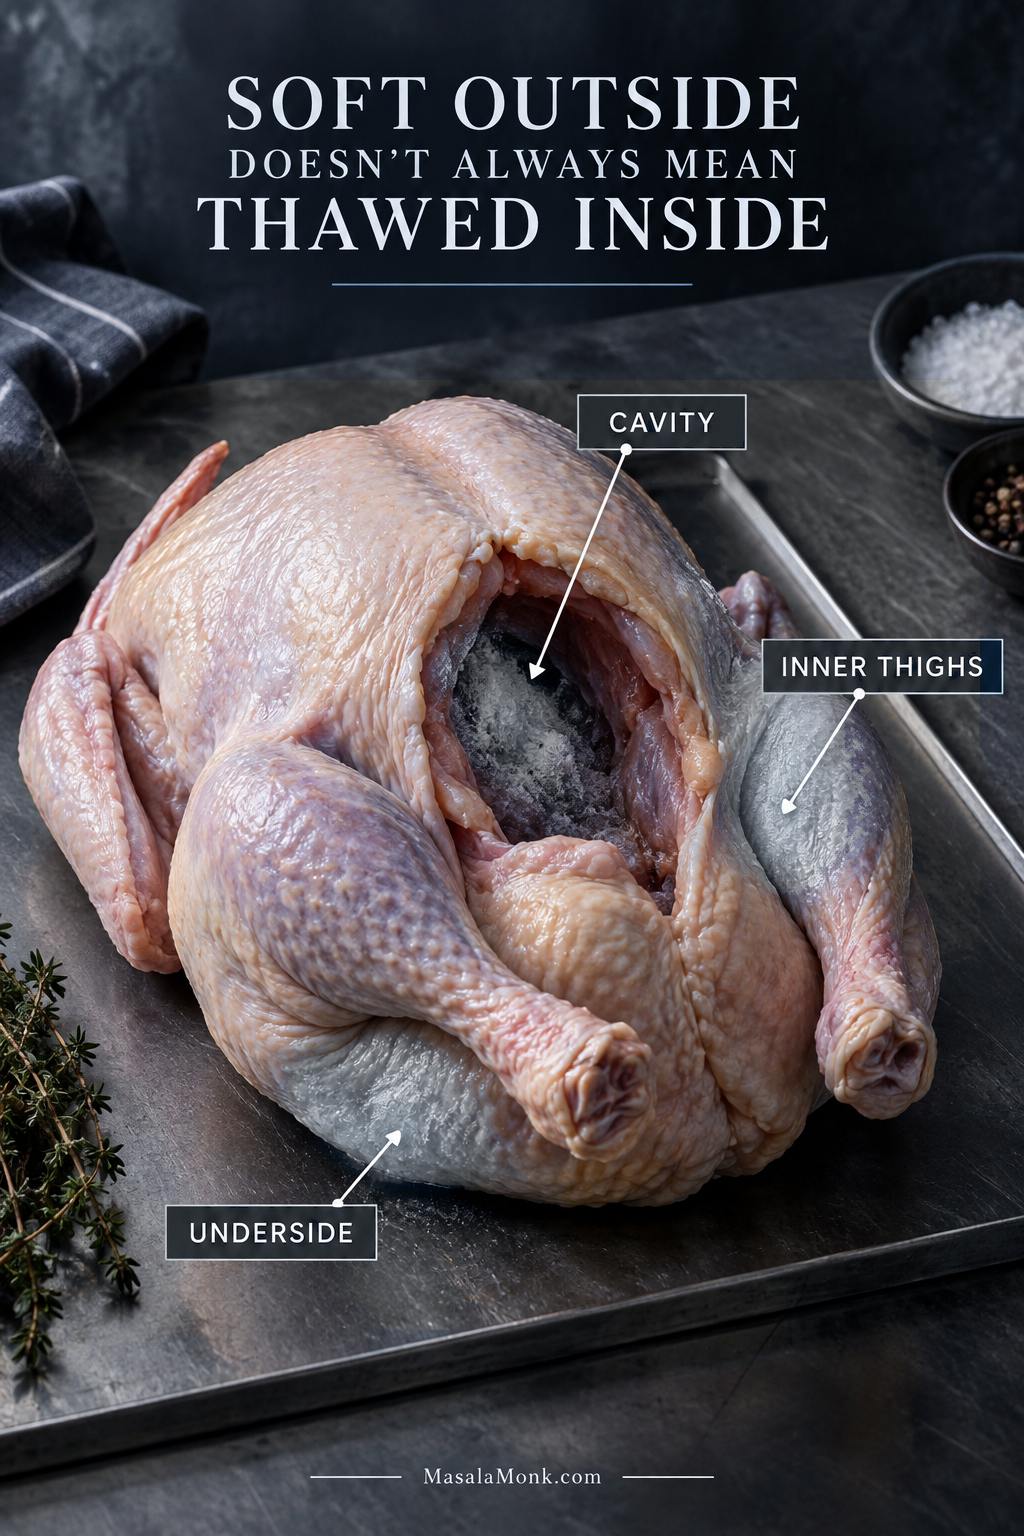
The outside can feel soft while ice still hides around the cavity, underside and inner thighs. That hidden ice can slow the colder parts enough for the breast to seem to race ahead.
Residual ice acts like a cold brake inside the turkey, so the breast can seem to race ahead even when the bird felt thawed from the outside.
Turkey Weight
Approx. Refrigerator Thawing Time
4–12 lb / 1.8–5.4 kg
1–3 days
12–16 lb / 5.4–7.3 kg
3–4 days
16–20 lb / 7.3–9.1 kg
4–5 days
20–24 lb / 9.1–10.9 kg
5–6 days
These ranges follow USDA turkey-thawing guidance. Once thawed in the refrigerator, the turkey can remain there for another 1–2 days before cooking.
Need a Faster Thaw?
Keep the bird in a leakproof package, submerge it in cold water, and change the water every 30 minutes. Allow about 30 minutes per pound and cook it immediately afterward.
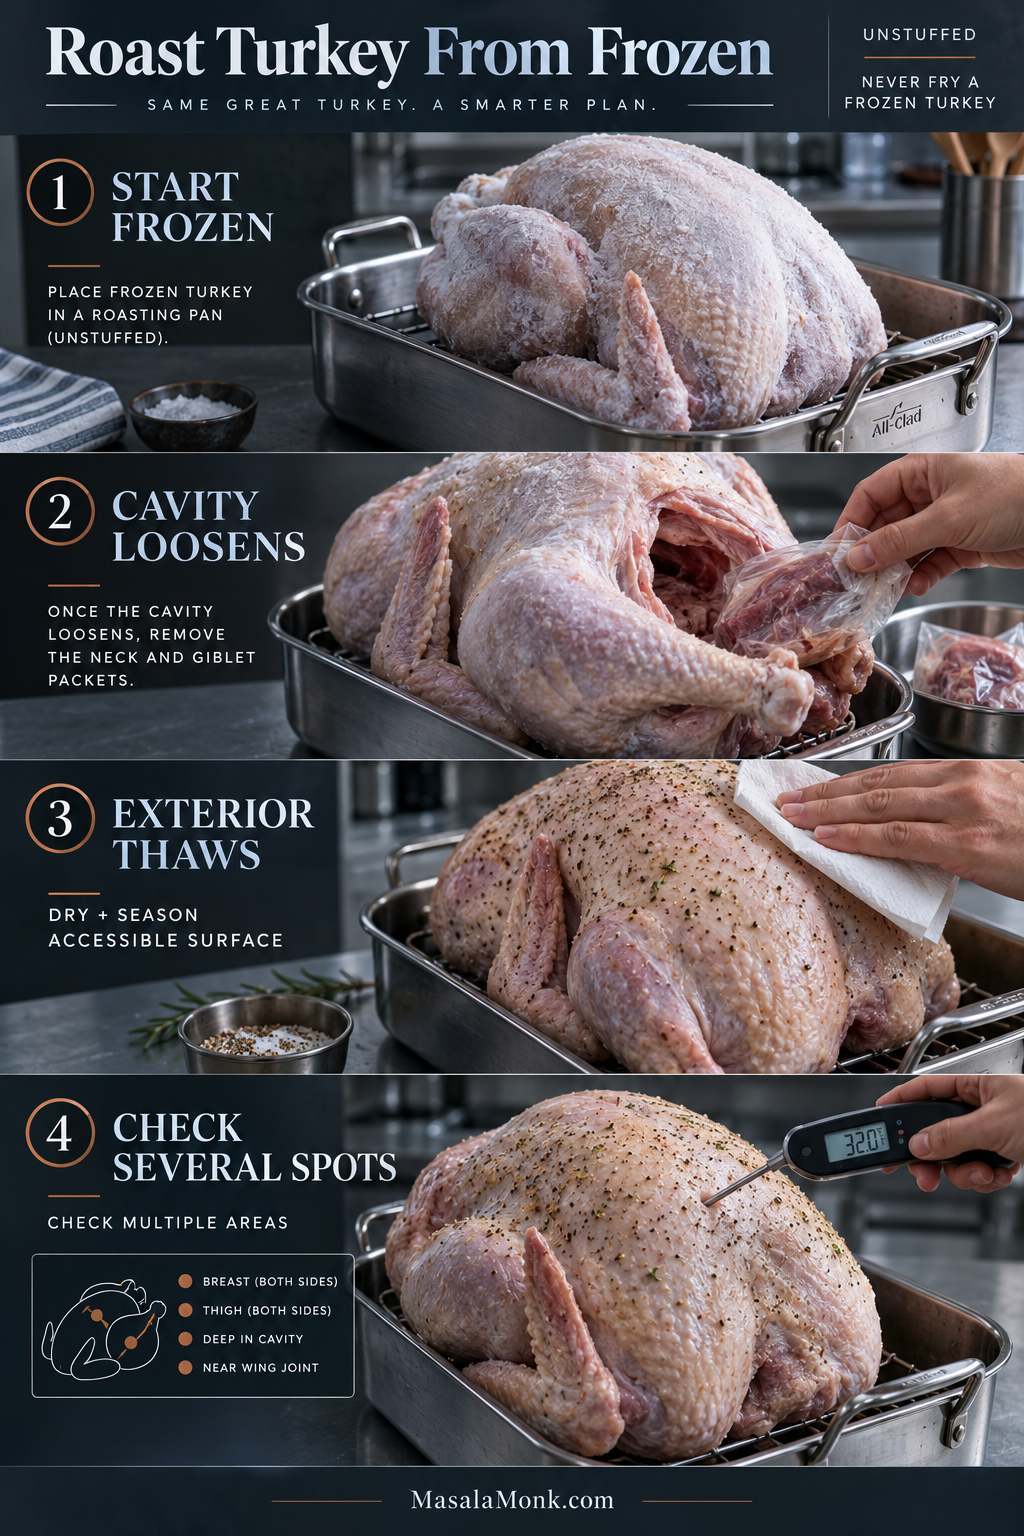
A little ice near the cavity changes the schedule, not the whole dinner. Give the turkey more time and check temperatures carefully. If it is still substantially frozen at roast time, jump to Turkey Still Frozen?
Get the Salt Right
Read the label first. An untreated turkey and a bird injected with salty solution need different seasoning.
Have 24–48 hours? Dry-brine it. That is the preferred method here: the meat seasons while the uncovered skin dries in the refrigerator. Even 12–24 hours is worth doing. Dinner only a few hours away? Use the lighter same-day amount.
Dry-Brining Ahead
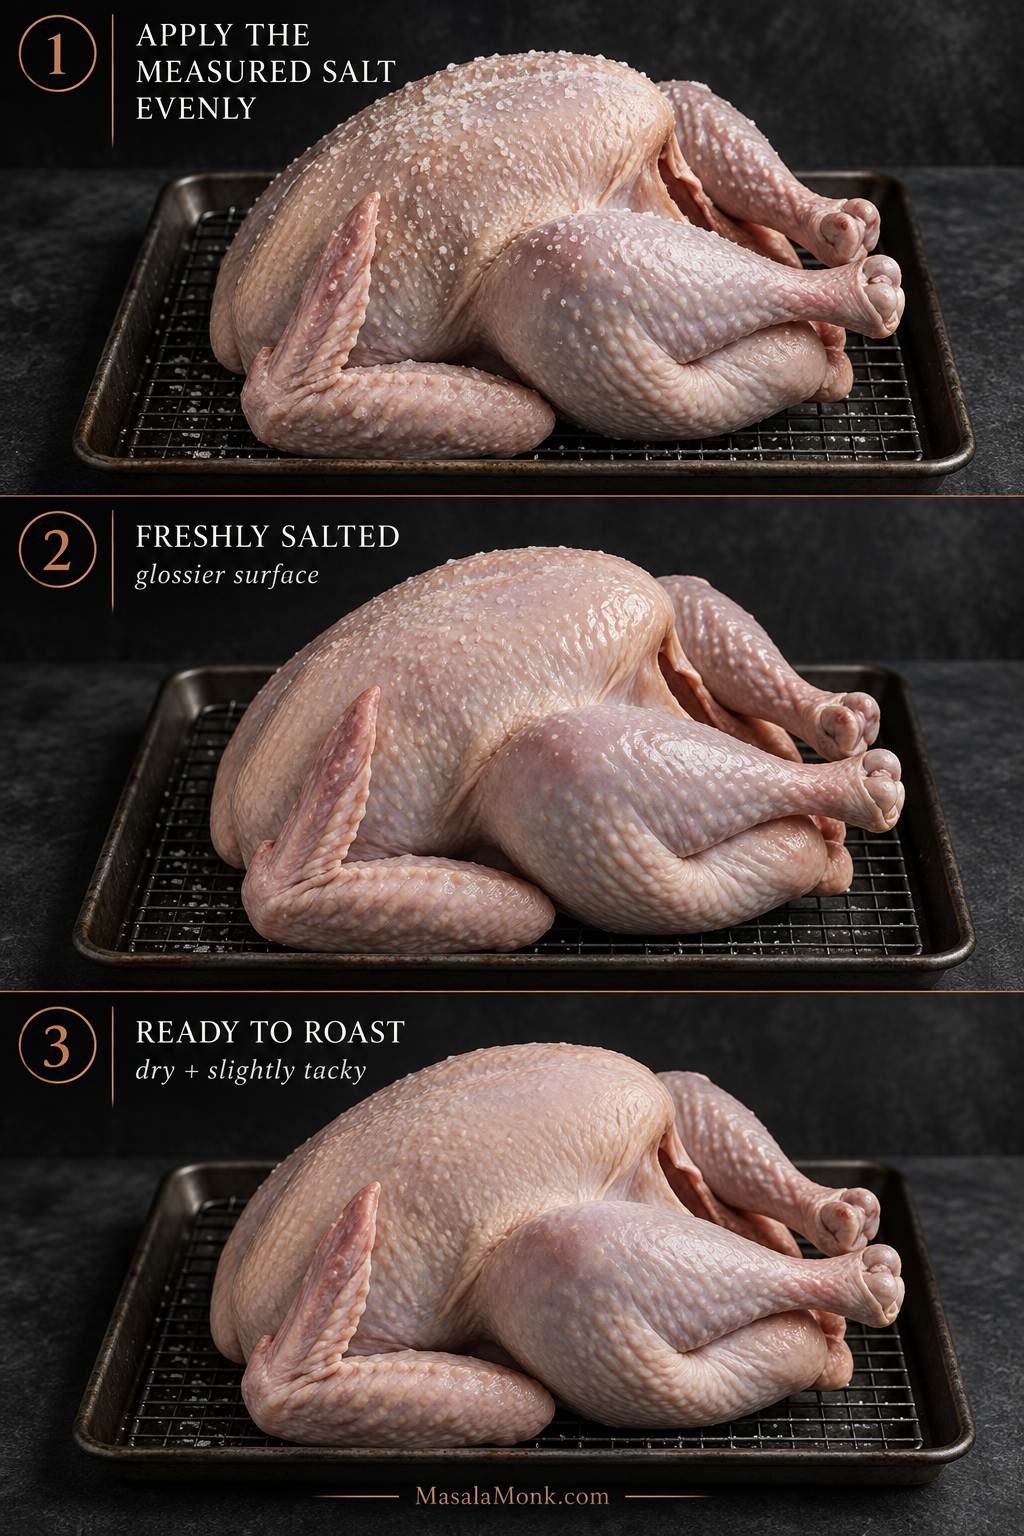
For the untreated turkey used here, distribute about 35 g kosher salt over the skin, beneath the breast skin and lightly around the cavity. Set it on a rack over a rimmed tray or roasting pan, keep the refrigerator at 40°F / 4°C or colder, and place it where accidental drips cannot land on other food.
By roast day, the glossy wet look should be gone. The skin will feel drier and slightly tacky—exactly what you want before it meets the oven.
That drier, slightly tacky skin is not a dried-out turkey; instead, it is the surface condition that helps the oven build better browning.
Seasoning the Turkey the Same Day
For the untreated turkey used here, distribute about 20 g kosher salt over the exterior, beneath the breast skin and lightly around the cavity. Then add the herb butter.
You lose some of the deeper seasoning and skin-drying time of an overnight brine. That’s okay. If dinner is only a few hours away, season the turkey and move on.
Why Dry Brine Instead of Wet Brine?
A wet brine works. It also asks you to find room for a large container of salty liquid in an already crowded refrigerator. Dry brining is cleaner, easier to manage and leaves the skin exposed while the turkey seasons.
Prepare the Turkey for Even Cooking
Get the Bird Ready
Check both cavities. The neck may be tucked into one end while the giblets or gravy packet sit in the other. Save anything useful for stock or gravy.
A manufacturer-installed hock lock or leg clamp may be designed to stay during roasting, so follow the package directions.
Skip rinsing. Pat the turkey thoroughly dry with paper towels; rinsing raw poultry can spread poultry juices around the sink.
Dry skin browns. Wet skin steams.
Add the Herb Butter
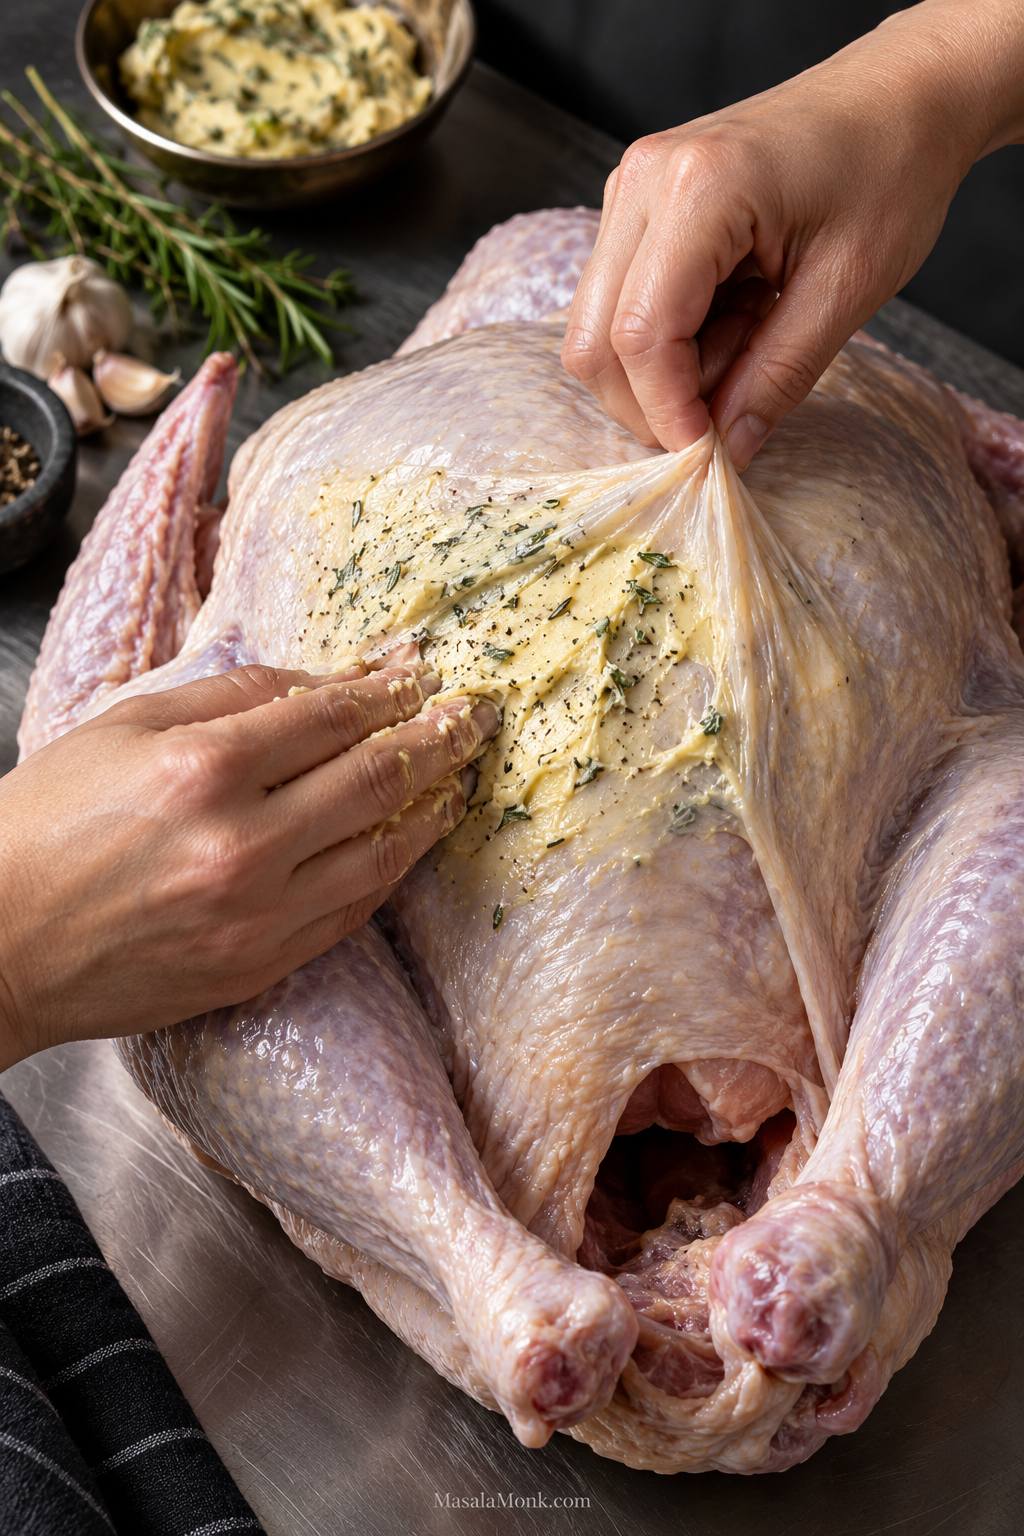
Slide your fingers gently between the breast meat and skin, starting near the cavity opening. Spread most of the garlic-herb butter directly over the breast meat and the remainder over the legs.
The butter should spread easily without dragging or tearing the skin. If it skates over a wet surface, blot again. If it feels stiff, give it a little more time to soften.
Butter beneath the skin puts the herbs and fat directly against the lean breast meat, while the exposed skin can still lose moisture and brown.
Once the herbs and turkey fat start roasting together, the kitchen finally smells like dinner.
Finish the Setup
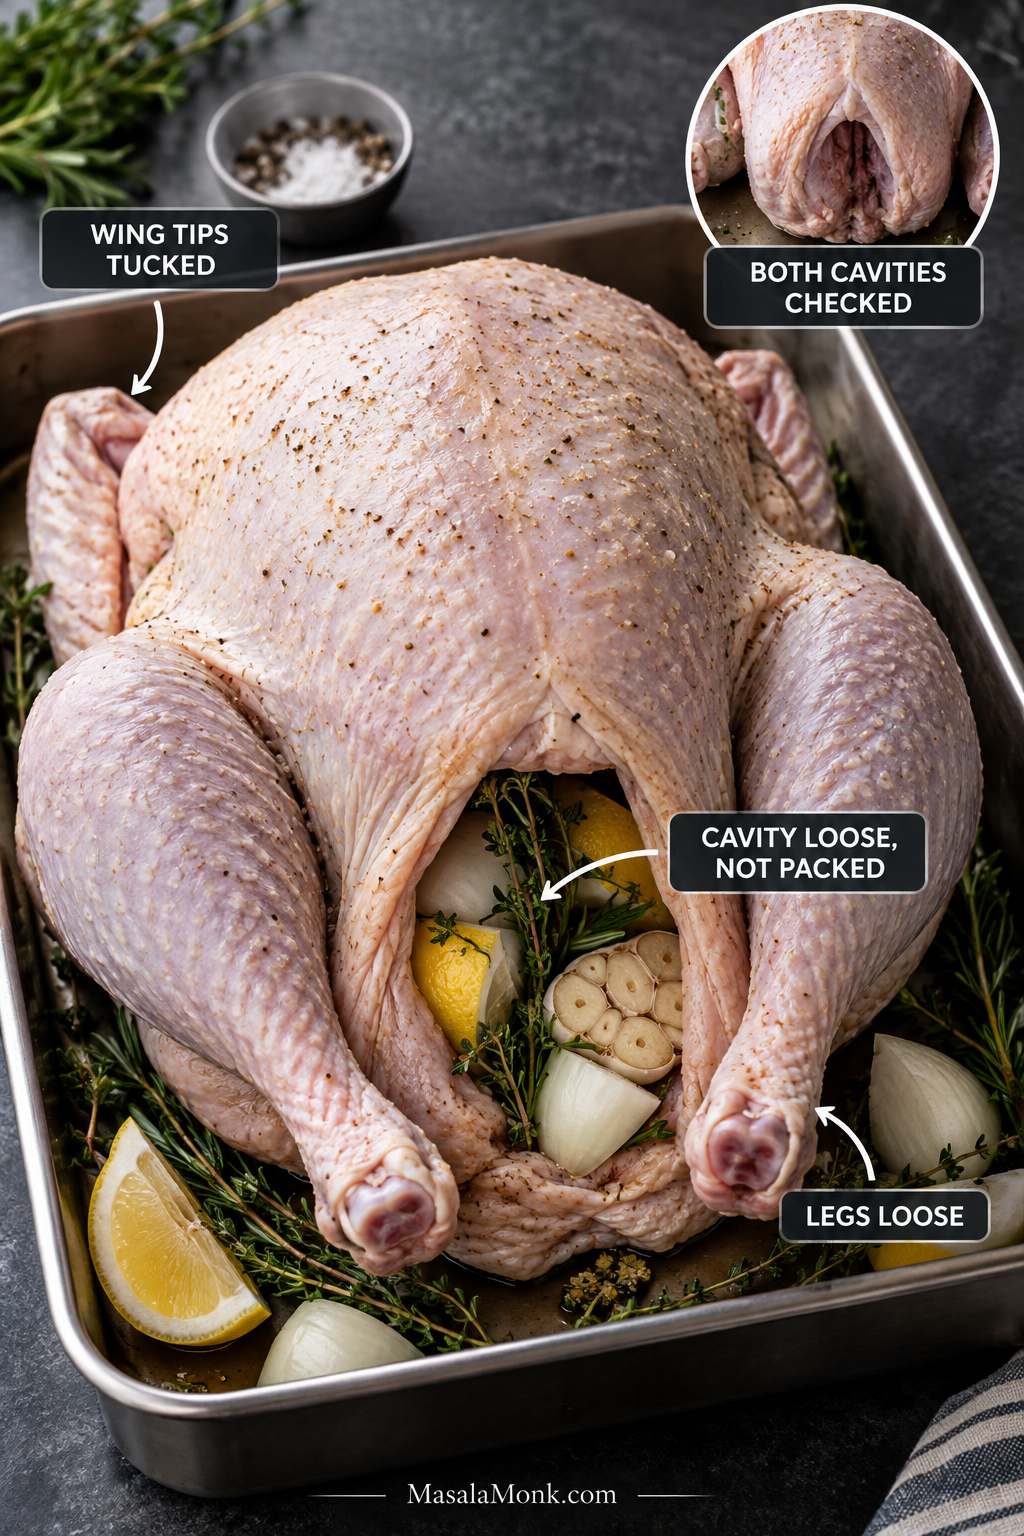
Add the onion, lemon, garlic and herb sprigs with open space around them. The cavity should look occupied, not packed.
Keep the turkey unstuffed for the easiest timing. A separate pan of sausage stuffing gets crisp browned edges while the bird stays on the simpler unstuffed schedule.
Tuck the thin wing tips behind the shoulders and leave some space between the legs so heat can reach the inner thighs. If you use twine, tie it loosely.
Loose aromatics can perfume the cavity without turning it into a dense center that heats more slowly; think fragrance and open space, not stuffing.
Once the pan goes into the oven, most of the hands-on work is over. From here, you are mainly watching two things: color and temperature.
How Long to Cook a Turkey at 325°F
Most 12–14 lb unstuffed turkeys need about 3–3¾ hours at 325°F / 163°C. Start checking before that range because birds do not all cook at the same speed.
You do not need to memorize a minutes-per-pound formula. Use the table to plan your day, then start checking early.
Turkey Weight
Approx. Cooking Time
Start Checking Around
8–12 lb / 3.6–5.4 kg
2¾–3 hours
2¼ hours
12–14 lb / 5.4–6.4 kg
3–3¾ hours
2½ hours
14–18 lb / 6.4–8.2 kg
3¾–4¼ hours
3 hours
18–20 lb / 8.2–9.1 kg
4¼–4½ hours
3½ hours
20–24 lb / 9.1–10.9 kg
4½–5 hours
3¾ hours
The cooking ranges come from USDA conventional-oven turkey guidance. Oven calibration, bird shape, pan depth, incomplete thawing and repeated door opening can all shift the finish.
These times are for an open-pan turkey in a conventional oven. Oven bags, electric roasters, convection ovens and spatchcocked birds follow different timing.
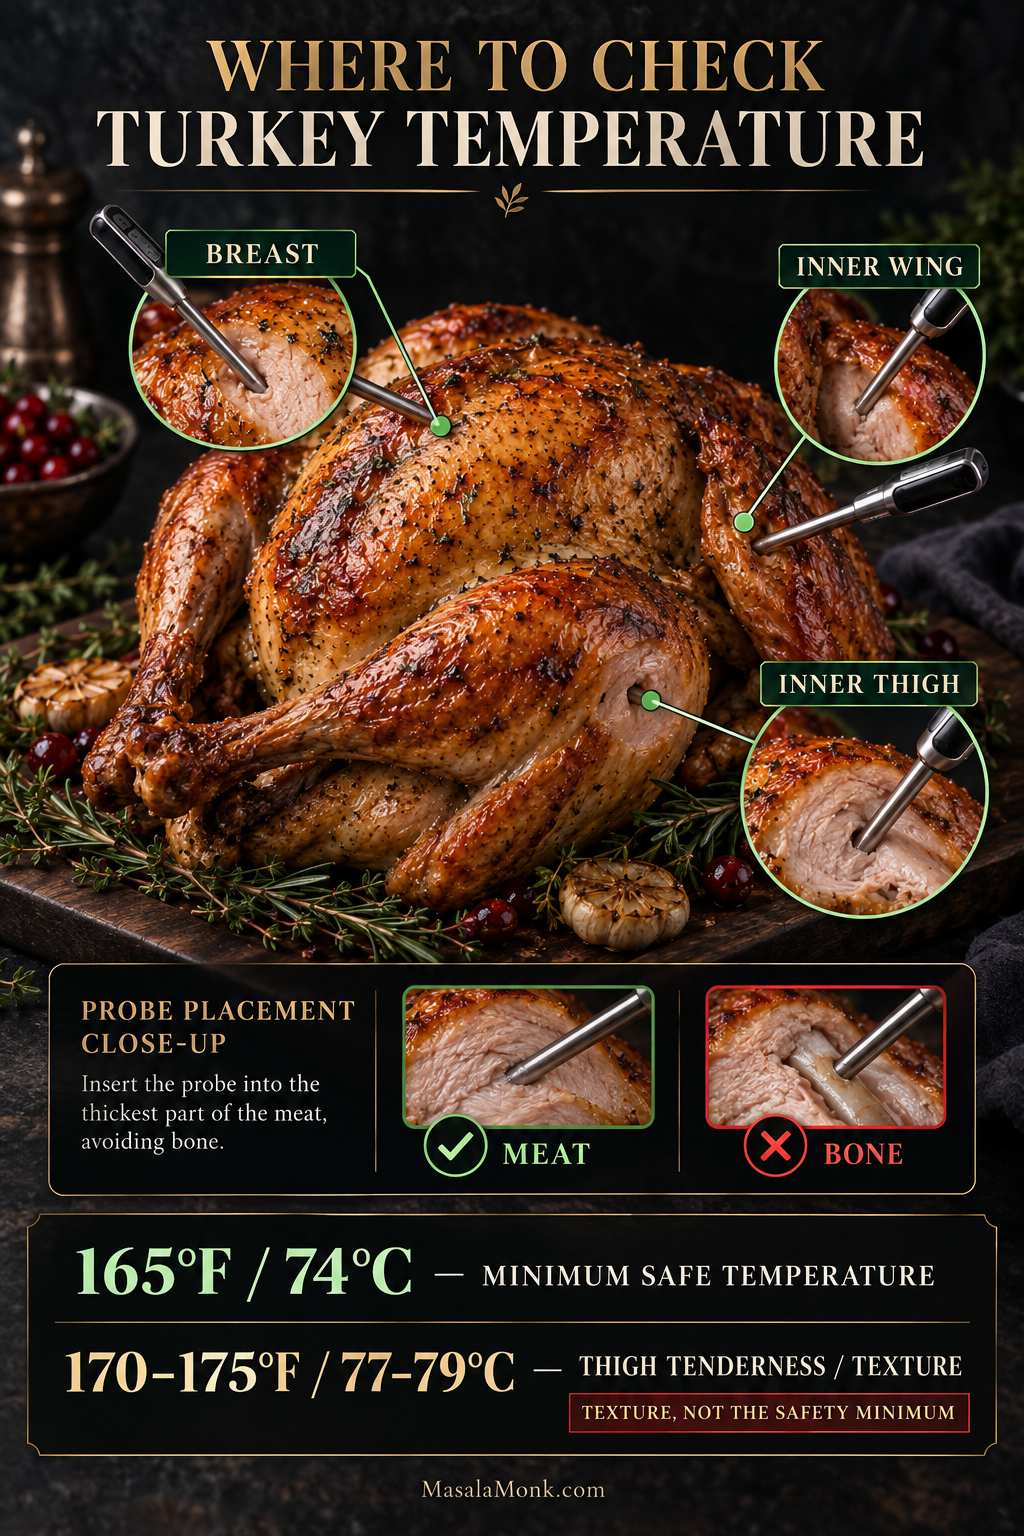
Where to Put the Thermometer
Breast: insert the thermometer into the thickest part without touching the breastbone.
Thigh: slide it into the thick inner thigh where the leg meets the body, stopping short of bone.
Wing: check the thick inner area where the wing joins the body.
One strange turkey temperature does not automatically mean more oven time; first move the probe into nearby meat and rule out bone contact or a thin spot.
A strange reading deserves a second look. If one spot is dramatically colder than another nearby, move the probe, compare both sides and make sure the tip is sitting in meat instead of touching bone.
What Temperature Is Turkey Done?
The minimum safe internal temperature is 165°F / 74°C in the thickest breast, inner thigh and inner wing area.
Dark thigh meat often becomes softer and more yielding around 170–175°F / 77–79°C. When the breast reaches its safe temperature first, shield it while the legs finish.
What If the Meat Looks Pink?
Once the breast, inner thighs and inner wing areas have all reached at least 165°F / 74°C, pink color by itself is not evidence that the turkey is undercooked. If the appearance still worries you, verify another nearby spot before putting the bird back in the oven.
How to Keep the Turkey Juicy While the Skin Browns
Juicy meat and crisp skin are separate jobs. Salt and careful temperature control protect the meat; a dry surface and mostly uncovered heat build the skin. Herb butter adds richness, but it cannot undo an overcooked breast.
Early in the roast, the skin may still look pale and taut. Leave it alone.
Somewhere in the middle, that pale surface begins turning bronze, the herbs darken around the edges, and the juices in the pan look richer and more concentrated. Foil becomes useful once the breast is a deep, even brown and the highest points are approaching the color you would be happy to serve.
Basting Is Optional
You can leave the baster in the drawer. Repeatedly opening the oven loses heat, and watery juices keep wetting the skin. An occasional spoonful of rendered fat is enough if basting is part of your holiday ritual.
Use Foil When the Color Is Right
Once the breast has the color you want, cover it loosely and let the darker meat continue. Individual wing tips or high spots can be shielded separately.
Foil protects color that is already finished: cover the breast when it looks ready to serve, not simply because a certain amount of time has passed.
If the Pan Starts Smoking
Add about ½ cup / 120 ml hot water or unsalted stock around the rack. The liquid protects the concentrated drippings from scorching; keep it below the turkey instead of pouring it over the skin.
Turkey Not Following the Plan? Start Here
This is the part to use when the clock, color and thermometer stop agreeing.
The clock predicts the schedule, color tells you when to protect the skin, and the thermometer tells you whether cooking can actually stop.
What You’re Seeing
What to Do Now
Turkey is cooking much faster than expected
Recheck the breast and both thighs in several spots, then verify the oven temperature. If the readings agree, trust them.
Turkey is running late
Check the actual oven temperature and whether the bird was fully thawed. Protect browned skin and keep cooking to temperature.
Breast is done before the thighs
Loosely cover the breast with foil and continue cooking the dark meat.
One thigh reads much colder
Check both thighs in several locations. Bone contact or a thin spot can distort the reading.
Skin is dark but the meat is not ready
Shield the browned areas. Lower the pan one rack if the turkey sits very close to the top heat.
Meat is done but the skin is pale
Use a brief burst of higher heat or the broiler and watch continuously.
Skin is soft
Uncover the turkey and stop wetting the surface. Let dry heat work while the meat still has cooking room.
Pan drippings are smoking
Add about ½ cup / 120 ml hot water or unsalted stock directly to the pan.
Drippings taste too salty
Leave additional salt out of the gravy and dilute with unsalted liquid as needed.
Turkey finished early
A short lead is easy to manage. Longer delays need hot holding or chilling; use the detailed guidance below.
The Turkey Finished Early
Thirty to sixty minutes early: excellent. Rest it normally and use the breathing room for gravy and the last hot dishes.
One to two hours early: hold the turkey at 140°F / 60°C or warmer. A reliable low or warm oven setting can work; monitor the temperature and expect the skin to soften somewhat during a long hold.
Several hours early: stop treating it as a rest. Carve the turkey, refrigerate the meat promptly in shallow containers, and reheat it to 165°F / 74°C before serving.
Can’t keep it safely hot? Carve and chill it instead.
The longer the gap before dinner, the more the strategy changes: resting becomes hot holding, and eventually safe chilling becomes the better choice.
Once the turkey is resting, the uncertain part is over.
You can stop chasing temperatures and watching the clock. The next 30–45 minutes are for gravy, hot sides and clearing enough room to carve without balancing a huge bird between casserole dishes.
By now the skin should be deeply bronzed and the pan juices dark and savory. Leave the turkey uncovered for the crispest skin, or use a very loose foil tent in a cool kitchen. A tight cover traps steam and softens the surface.
The oven is free again too. A quick high-heat tray such as roasted Brussels sprouts can cook while the turkey rests.
Use the Drippings for Gravy
Taste the drippings before adding salt. Dry-brined, kosher, enhanced and self-basting birds can all leave a saltier pan than an untreated turkey.
Turn the usable fat, browned fond and juices into turkey gravy from the drippings. This is where the roasted herbs, turkey fat and browned pan juices finally come together.
Look for a slight sheen on the breast rather than a matte, fibrous cut surface; crisp skin and glossy pan gravy complete the contrast.
Carve After the Rest
Remove the legs and thighs first, followed by the wings. For cleaner breast slices, take each breast half off the carcass in one piece and slice it crosswise on the cutting board.
Starting at the joints reduces resistance and keeps the breast intact; once that whole breast half is on the board, clean crosswise slices become much easier.
The knife should pass through crisp skin into breast meat that still looks moist, with a little sheen on the cut surface instead of a cottony or fibrous texture. This is where the dry skin, steady roast, early temperature checks and patient rest finally pay off.
If the meat tastes slightly underseasoned, season the slices lightly and let the gravy do some of the work.
Once the breast is sliced and the legs are separated, you’re done managing the turkey. Move everything to a warm platter, bring the gravy, and get dinner to the table.
Special Situations: Frozen, Stuffed or Convection Turkey
Turkey Still Frozen?
Yes—you can roast a whole turkey from frozen in a conventional oven. Cook it unstuffed and allow at least 50% more cooking time than for a fully thawed bird.
Seasoning beneath frozen skin will be difficult at first, and different areas will heat at different speeds. This is the backup method for the day the thaw simply did not finish.
Partially frozen: the exposed breast may heat much faster than icy areas around the cavity and inner thighs. Check several locations and shield anything that gets ahead.
Completely frozen: as the cavity loosens, carefully remove the neck and giblet packets with tongs once you can reach them. Continue roasting until the breast, thighs and inner wing areas have all reached at least 165°F / 74°C.
Once the exterior has thawed enough to handle safely, pat the accessible skin dry and brush it with unsalted butter or oil, herbs and pepper. For an untreated bird, season the exposed surface lightly with salt; enhanced, injected, self-basting and kosher turkeys may already have enough. There is no need to imitate a full dry brine after roasting has begun.
A frozen turkey is mainly a timing problem, not a reason to abandon dinner; keep it unstuffed and expect different parts of the bird to heat unevenly.
Never put a frozen or partially frozen turkey into hot frying oil.
Cooking a Stuffed Turkey
A stuffed 12–14 lb turkey needs roughly 3½–4 hours at 325°F / 163°C. Add the stuffing just before roasting, keep it loose, and make sure the center also reaches at least 165°F / 74°C.
Separate dressing is easier to time and gives you more browned edges. A pan of Southern cornbread dressing also keeps the turkey on the simpler unstuffed schedule.
Using a Convection Oven
Convection cooks and browns turkey faster. USDA guidance allows reducing the conventional oven temperature by 25°F / about 14°C, but not below 300°F / 150°C. Follow your oven manufacturer’s poultry guidance and begin checking substantially earlier.
Make Ahead, Store and Reheat Turkey
Same-day roasting gives you the best skin. If the schedule demands a day-ahead turkey, let it rest, carve it and refrigerate the meat promptly in shallow containers.
How to Reheat Turkey Without Drying It Out
Reheat covered portions with enough unsalted stock or gravy to keep the slices moist until they reach 165°F / 74°C.
A little unsalted stock or gravy adds moisture around the slices while they heat, helping the exposed cut surfaces stay supple instead of drying at the edges.
Storing Leftovers
Refrigerate cooked turkey within 2 hours. Shallow containers help it cool efficiently.
Use refrigerated leftovers within about 3–4 days. For longer storage, freeze cooked turkey for about 3–4 months for best quality. Reheat leftovers to 165°F / 74°C.
Once another plate of sliced turkey has lost its appeal, leftover meat and gravy can become a turkey pot pie under a crisp pastry top.
1. Is It Better to Cook a Turkey at 325°F or 350°F?
Both can work, but 325°F / 163°C is the better fit for this roast turkey recipe because the timing, browning strategy and troubleshooting guidance here are built around it. At 350°F / 177°C, expect faster cooking and browning and begin checking sooner.
2. Do You Cook a Turkey Covered or Uncovered?
Mostly uncovered. Loosely foil the breast or other exposed areas once they are brown enough.
3. Should You Baste a Turkey?
No routine basting is needed. An occasional spoonful of rendered fat is fine if basting is part of your tradition.
4. Can You Roast a Turkey Without a Rack?
Yes. Use a sturdy coil of heavy-duty foil, or extra onion, carrot and celery pieces, to lift the turkey above the bottom of the pan.
5. Should You Cook a Turkey Upside Down?
This method keeps the bird breast-side up throughout. Flipping a large hot turkey is awkward, risks damaging the browned skin and is unnecessary here.
6. Should You Trust the Pop-Up Timer?
No—not as your primary doneness test. Confirm the temperature with a reliable thermometer in the thickest breast, inner thigh and inner wing area.
7. Can You Cook a Turkey the Day Before Thanksgiving?
Yes. Carve the rested turkey, chill it promptly in shallow containers, and reheat covered portions with a little stock or gravy to 165°F / 74°C.