Posted on Leave a comment

Calamondin Orange Marmalade- Simple Quick Recipe

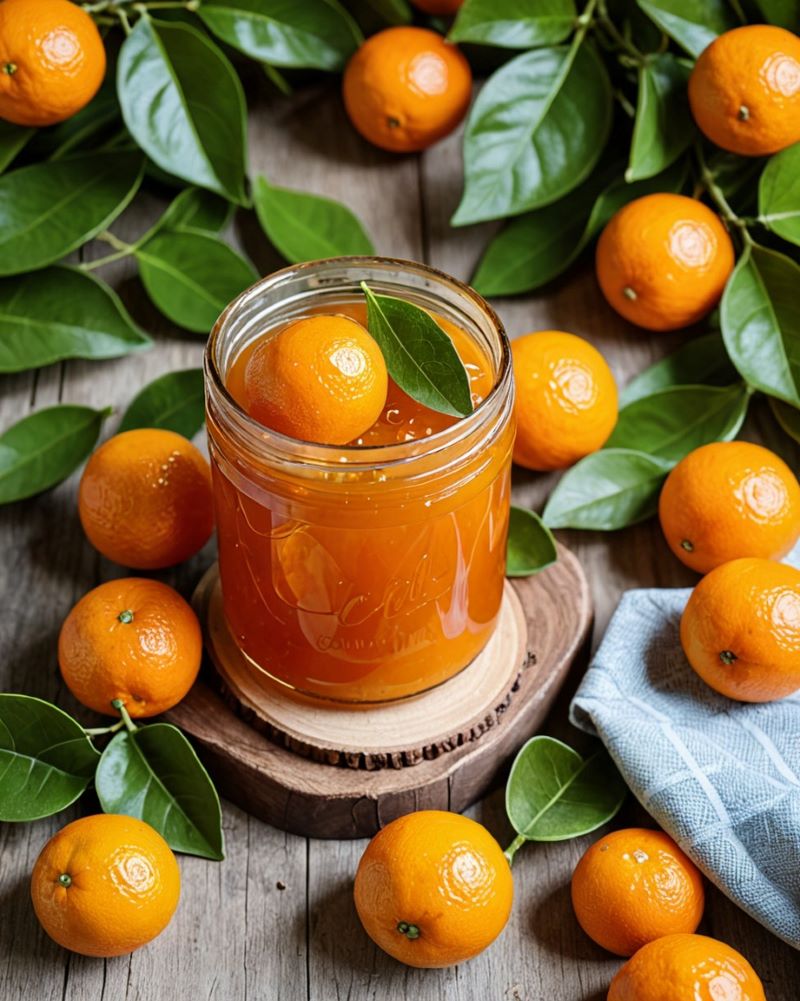
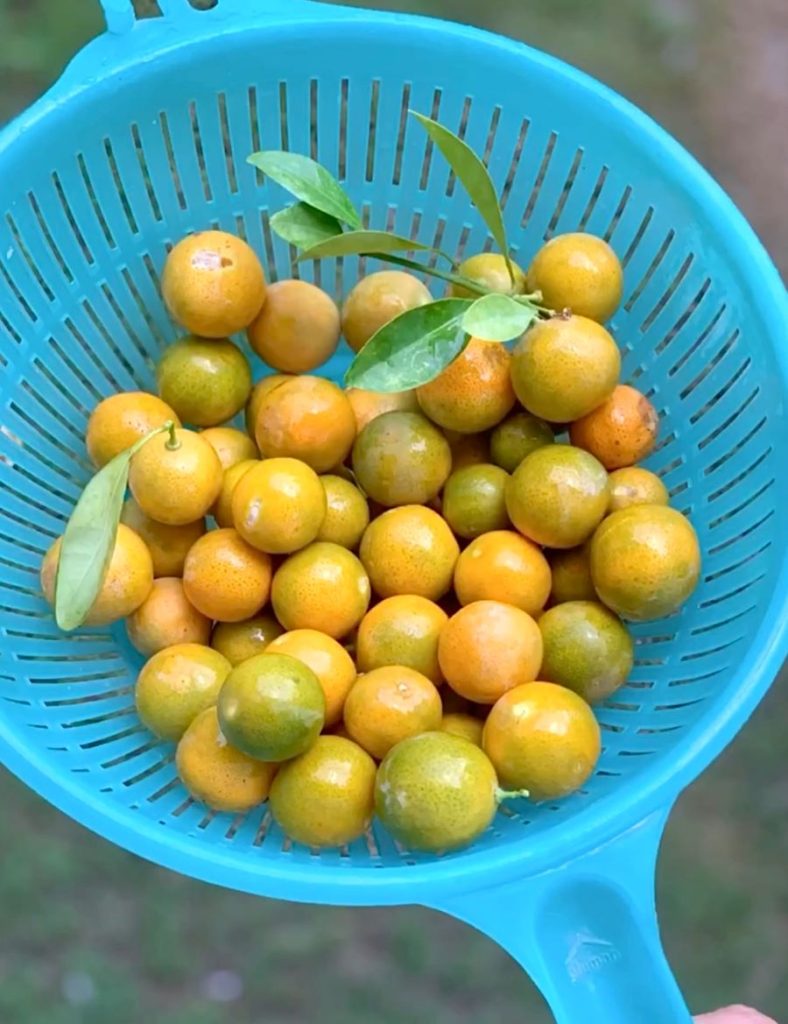
I have a plant of this gorgeous beauty in my garden. I planted calamondin oranges as a mere ornamental beauty. Little did I know that they are a remarkable member of the citrus family. Calamondins originated in China and the Philippines. But this fruit soon gained popularity across the world for its versatility. This fruit is a hybrid between a mandarin orange and a kumquat.

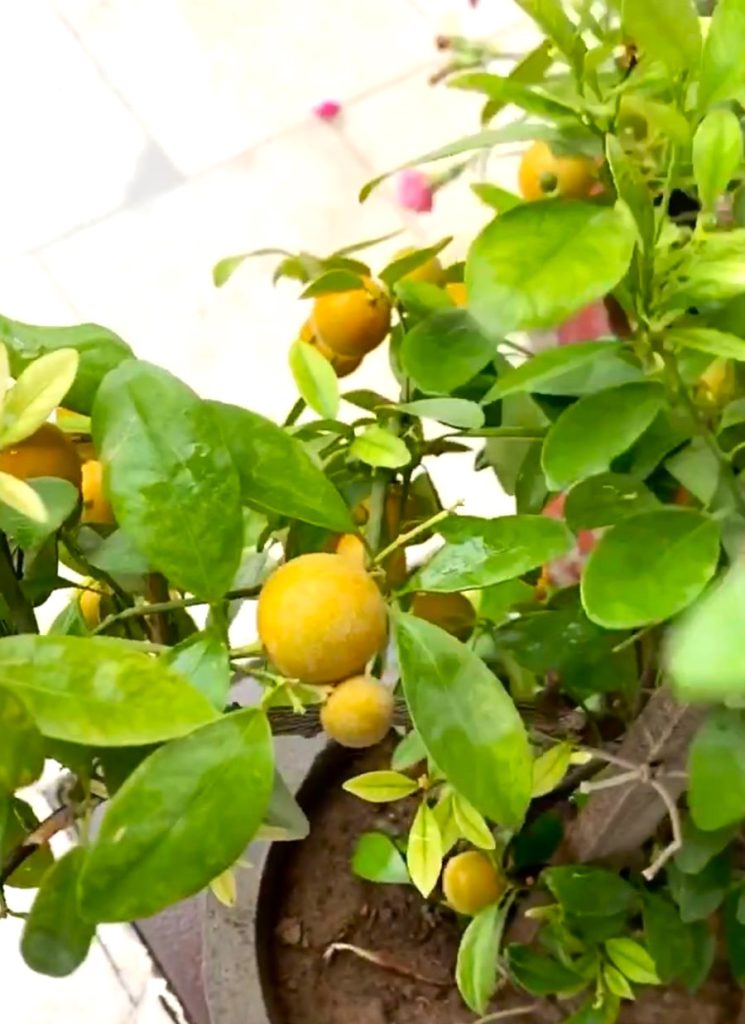
The fruits are sour and slightly sweet, resembling a tarter version of traditional oranges. The peel of this fruit tastes sweet and the inside is sour but very flavorful. Despite its sour taste, the calamondin orange is a culinary delight. It’s widely used in marmalades, jams, and as a flavor enhancer in beverages and desserts. In Southeast Asian cuisine, it’s a common condiment, adding zest to dishes.

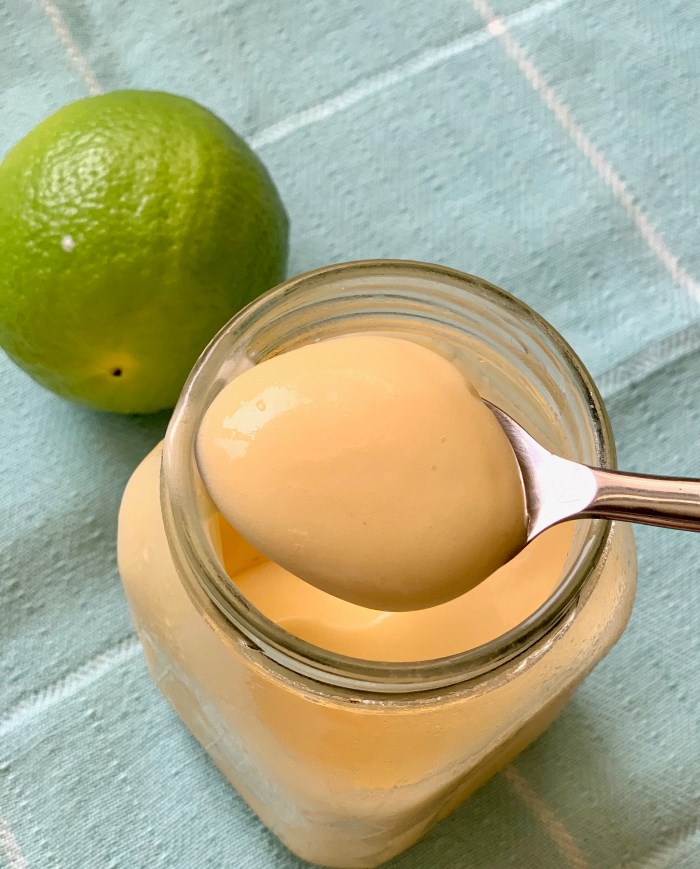
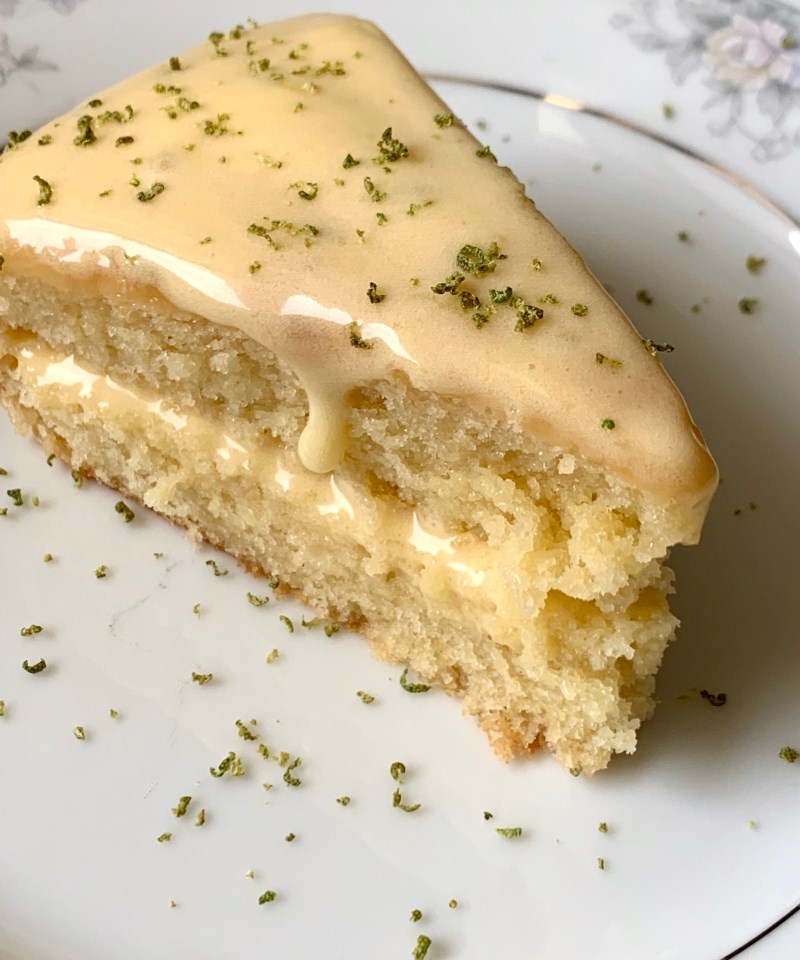
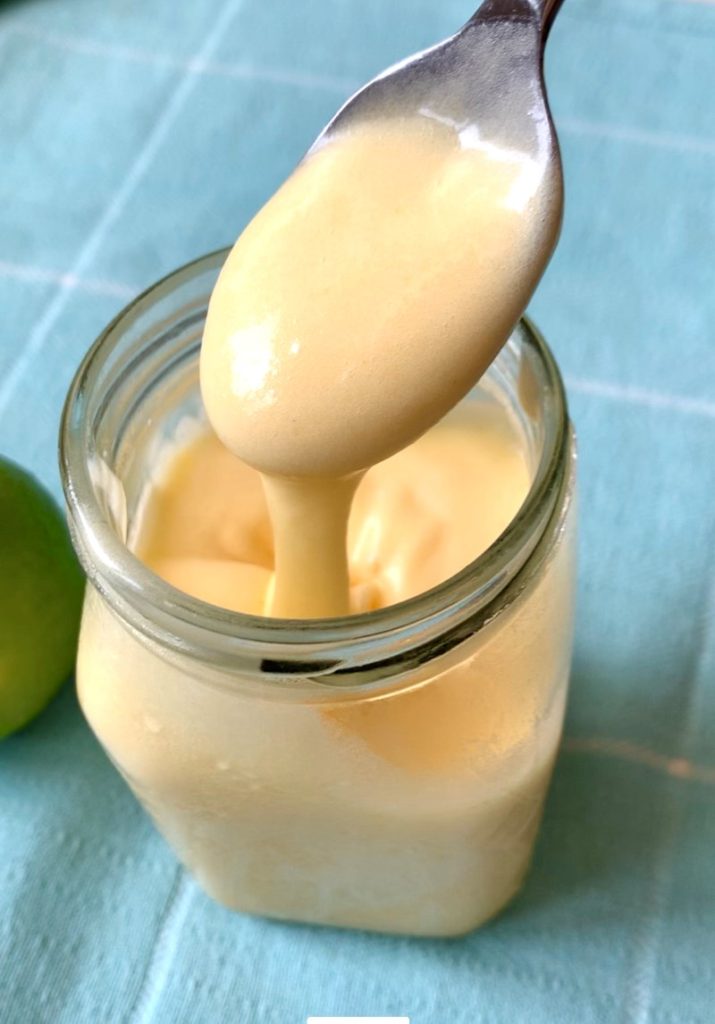
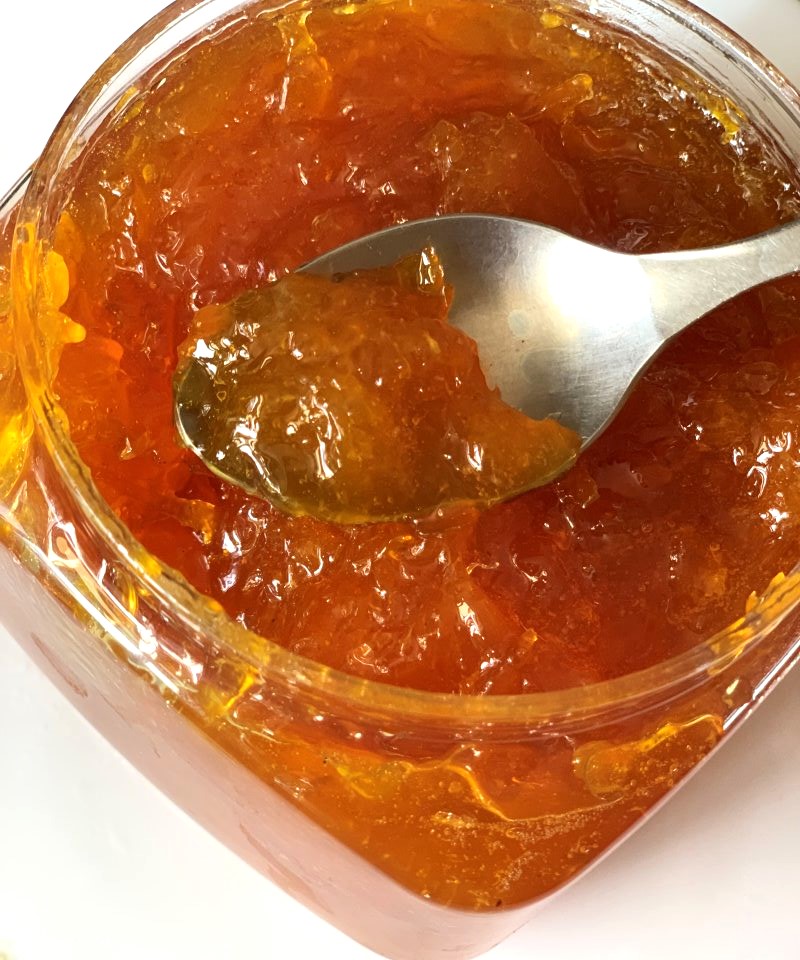
This fruit yields fabulous marmalade. The distinct aroma and sweet taste of the peels makes this marmalade quite different from the regular orange marmalade you had. And dare I say tastes so much better! If you personally ask me, this is best citrus food marmalade I have ever made.

This vital little fruit is also known for it’s healthy benefits. One of the most common applications is in the treatment of respiratory ailments such as coughs and phlegm. The fruit’s juice, when consumed, can help in loosening and expelling phlegm, making it easier to clear congested airways.

The fruit’s acidity can aid in digestion and help alleviate gastrointestinal discomfort such as bloating and indigestion. Its mild laxative effect can also be beneficial in regulating bowel movements.

I think I have given you enough insight about this fruit. Now coming to the recipe. You only need 3 ingredients to make this marmalade. The entire recipe will take you no time since you don’t require much cooking unlike other citrus marmalades because the peels are very soft.

Recipe

Prep time: 15 minutes Cook time: 12 minutes 
Yields: 700 grams

Ingredients

  • 500 grams Calamondin Orange
  • 500 grams sugar
  • 1/2 tsp Salt
  • 1 tbsp Lemon juice
  • 1 tbsp minced Ginger (optional, but adds flavor)

Instructions

  • Before starting the recipe, put a plate in a freezer for later testing the marmalade.
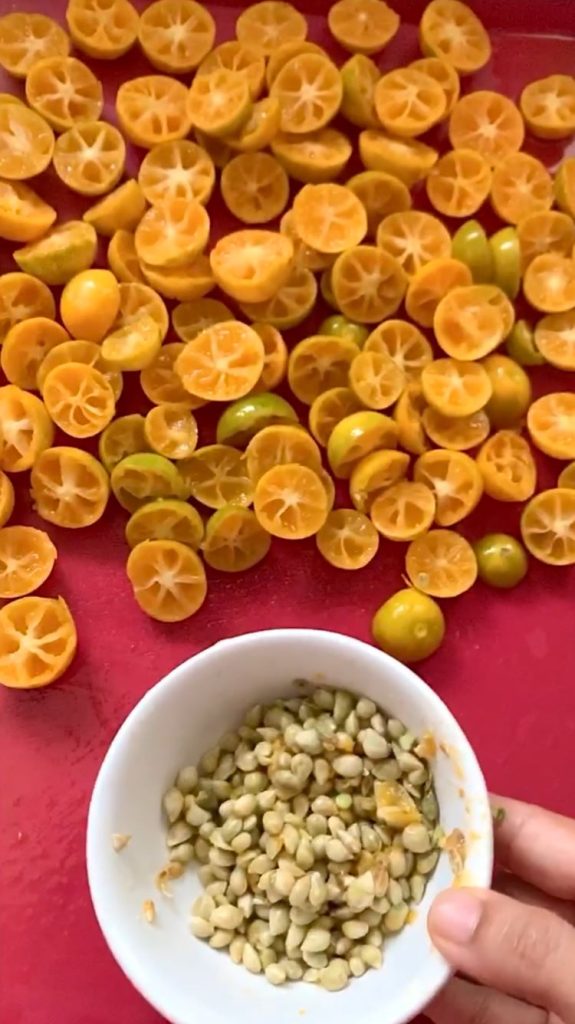
  • Cut the calamondins into half and take out all the seeds. This might take you 10 to 12 minutes but as soon as you are done with this step, this recipe is a piece of cake.
  • Now blend all the calamondins in a blender. 500 grams of this fruit will roughly give you 2 cups pulp.
  • Bring a heavy bottom pan to a medium heat. Add the pulp and cook it for 3-4 minutes.
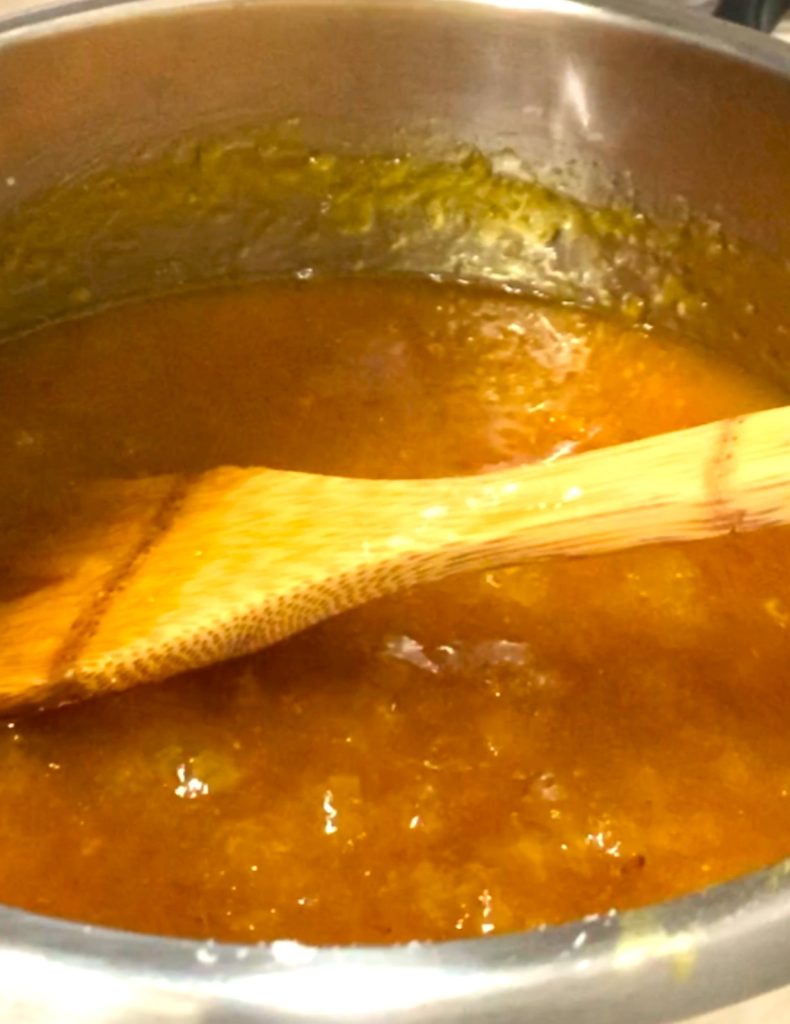
  • Now add sugar and cook the pulp for 7-8 minutes. After 7 minutes of cooking, do the plate test.
  • Pour a tsp of marmalade on a chilled plate and try to wriggle it using your fingers. If the liquid starts getting wrinkles and it resembles a set jelly, you know that your marmalade is ready.
  • Pour the marmalade in a sterilized glass jar. Now add a tbsp of lemon juice and mix well. It will last you months at room temperature. Refrigerate for longer shelf life.

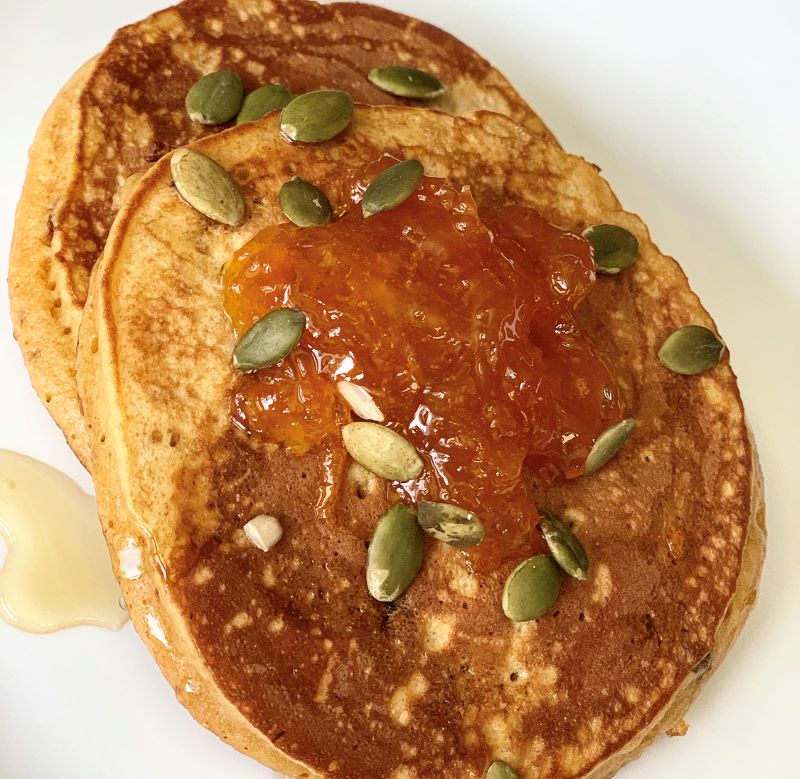
Enjoy this delicious treat!!! 🙂

Notes:

  • Never try to cook this marmalade beyond 10-12 minutes. Do the plate test precisely after 7 minutes. The marmalade might appear loose but as it cools, it will become thick. If you are still unsure, then once the marmalade coats the back of your spoon, it is time to take it off heat. If you keep cooking it beyond that time, your marmalade on cooling will become like a solid mass.
  • Do not reduce the sugar. Since calamondin is a sour fruit, you will have to add equal amount of sugar to balance the tartness.
  • Always take the ripest calamondins for better flavor.
  • Always store the marmalade in a glass jar due to its acidic nature.
Posted on 5 Comments

Wholewheat Carrot Orange Tea Cake- Kid Friendly Easy Recipe

Carrot cake is my and my child’s all time favourite. There’s something so heartwarming about a good carrot cake. As soon as those orange carrots hit the Indian market, this is one thing I crave. 

Why did I add orange to this cake? Well, I think it gives it that special subtle finesse that makes it stand out. Orange flavor goes beautifully with carrots. It gives a burst of citrus flavour along with a bright punch.

One bite of this can even convert those silly people who don’t like carrot cake 😄 Who are these people anyway!

My child loves to carry a slice of cake or a muffin in his school snack box. So I had to make it healthy and equally delicious for my child. This is the recipe that I mastered after a few failed attempts. Well, not exactly failed though. Those failed attempts were edible too but this one comes out to be perfectly soft, moist and fluffy

It is made using Wholewheat flour and Jaggery. Now baking with wholewheat flour can be a little tricky. It can make the texture of the cake dense. To ensure that your cake remains light and fluffy, the trick is to sieve wholewheat flour 3-4 times. This will add more air and the cake will not come out dense.

This recipe is actually so easy to make that anyone who hasn’t tried baking before will be able to crack it. Being a mother I understand how busy days get and trying those time consuming recipes can be quite daunting at times. To save you from all that hassle, all you have to do is put everything in a blender and Viola! Your batter is ready in less than 5 minutes. This will also save you from washing too many bowls which is quite a task when you have to bake.

Do try out this recipe and let me know. Trust me it will not disappoint you. 🙂 You can frost this cake with your favourite cream cheese frosting. This recipe is a make-ahead cake recipe whose taste and texture will not be compromised.

This cake is not overly sweet. I don’t prefer too sweet desserts. Feel free to add more jaggery if you like.

Recipe: cup measurement 250 ml

Prep time: 15 minsCook time: 30 mins


Ingredients

  • 2 medium size Carrots, shredded
  • 3 heaped tbsps Orange Marmalade 
  • 60 grams softened unsalted Butter or any non-fragrant oil
  • 1/2 cup Jaggery powder
  • 1 1/2 cup Wholewheat flour
  • A generous pinch Salt
  • 2 small Eggs
  • 1/2 cup Milk 
  • 1/2 tsp Vanilla extract
  • 1/2 tsp Baking soda
  • 1 tsp Baking powder
  • Handful of Chopped Walnuts (optional)

Method

  • In a blender, add butter, jaggery, lightly beaten eggs, milk, shredded carrots, marmalade & vanilla extract. Blend well on high speed till everything comes together. Take it out in a large bowl.
  • In another bowl, sieve wholewheat flour, baking powder, baking soda and salt. Add walnuts now if using and combine everything well. 
  • Add dry ingredients to wet ingredients in 2 to 3 batches. Gently cut & fold each time till everything incorporates well and there are no lumps. Don’t mix rigorously or over mix the batter. This will lead to a dense cake texture.
  • Preheat oven at 180C 10 minutes prior to baking. Grease a 7 inches diameter round pan or 11x7x2 inches rectangular baking pan with butter and line it with parchment paper or alternatively you can dust it with some flour. 
  • Add the batter. Tap the pan on the shelf 2-3 times to clear out all the air bubbles. Now, bake for 30 minutes on the middle rack of your oven or till a toothpick inserted at the center comes out clean. 
  • Allow it to cool for 15 minutes in the pan and then transfer it on a wire rack to cool completely. If you find that the cake is sticking to the bottom of the pan, leave the cake upside down for sometime and let gravity do it’s thing.

My Pro Tips:

  1. Use fresh baking soda. It looses it potency after 6 months of opening it.
  2. When measuring dry ingredients, level it off using the straight edge of a spoon or a butter knife.
  3. This recipe makes 12 muffins. Bake them for 14 to 18 minutes and allow the muffins to cool completely on wire rack.
  4. You can add cinnamon and ginger powder to this recipe to add a warm touch to it.
  5. If you want this cake to be perfectly moist, use fresh carrots and shred them. DO NOT USE packaged pre-shredded carrots for this recipe. This is the prime moisture for your cake and you don’t want to miss it.
  6. In case you want to bake this cake for yourself and are feeling fancy, I would highly recommend adding Orange Whiskey Marmalade. Orange and whiskey combination can lift your simple cake to something gourmet. You can buy it here-

Substitutes:

  • Eggs: You can either use flaxmeal or 1/4th cup Greek yogurt for every egg. For flaxmeal, take 1 tbsp flaxseeds for every egg. Coarsely ground them. Add 4 tbsps of water and let it sit for 15 minutes. It will become like a slimy gel like mixture. Use this as a substitute for one egg.
  • Orange Marmalade: If you don’t want to use Orange Marmalade, you can use 1/4th cup of freshly squeezed orange juice along with a tsp of orange zest instead. If using orange juice, you might have to adjust sugar accordingly. Add 1 or 2 tbsps of extra jaggery powder.
  • Jaggery: In case you don’t have jaggery powder, you can use any unprocessed sugar like palm sugar, coconut sugar etc.
Posted on 1 Comment

Easy Festive Irish Rum Truffles- The Best Truffles

Irish Rum Truffles are a classic holiday treat. Chocolatey and rich. It is a French confectionery traditionally made with chocolate ganache centre and coated with cocoa powder, coconut or chopped nuts. It’s sweet, slightly bitter, fudgy and of course intensely boozy. These are my favourite indulgent sweets. I am absolutely certain that after trying this recipe, you will ditch the boxed truffles which doesn’t even come close to the homemade ones.

Irish Rum Truffles are quite easy to make. They are perfect when you are craving a treat but don’t want to turn on the oven. 

One of the qualities I find most important in food is the taste it leaves in my mouth. It should leave a memory on my taste buds that makes me want the next one. And, these truffles do exactly that.

My husband and I cut a small cake together at midnight on our anniversary each year. This is our moment together before we celebrate the day with our family and friends. 

So for our 5th anniversary I wanted to treat my husband with something different and not the usual midnight cake. That’s when I thought of making Irish rum truffles. I sat down and scrolled through many recipes, adding and omitting what I like and don’t like and finally came up with this recipe. I had my fingers crossed. 

When the clock struck midnight, I surprised him with these. He had a confused expression on his face because it was not the usual stuff. Skeptically, he took the first bite and the wide eyed expression said it all. 😄

They turned out to be so good. It has been 6 years now since I have been making this. I didn’t realise how good these were until one year I didn’t make them.

Not only are these holiday classics or a perfect gifting treats but you can make them whenever you like. It will lift your mood when you are sad. When you are happy, it will just make you happier. 😊

Although if rum or bailey’s isn’t your favourite liquor, you could try making them with bourbon, cointreau, cognac or kahlúa instead.

The taste will depend on the chocolate you are using. I used a total of 100 grams chocolate. 60 grams was Green & Black Dark Chocolate (70%) and 40 grams was a mix of Lindors and Lindt Milk chocolate. 

Pro Tips:

  • Do not use Chocolate chips or cheap bars because they will not melt in truffle consistency leaving you with grainy bits. Chocolate chips are great for recipes like cookies and tea cakes. 
  • Do not use half-and-half or any other liquid because the truffles won’t set properly.
  • Pure vanilla extract adds exceptional flavor to your chocolate truffles.
  • Coffee will accentuate the taste of the chocolate, so do not skip it. 

Truffles are too firm with less liquid. So stick to this recipe for truffle success!

Recipe: makes 12-13 truffles

Ingredients

Chocolate: 100 gms

Fresh cream: 60 ml (25% fat)

Coconut oil/Unsalted butter: 3 tbsps

Rum: 10 ml

Bailey’s Irish cream: 30 ml

Instant coffee: 1/2 tsp mixed in 1 tbsp water

Vanilla extract: 1/2th tsp

Sieved unsweetened Cocoa powder

Some coarsely crushed nuts. I went with Pistachios. 

Method:

  • Finely chop chocolate and keep aside in a big glass bowl. 
  • Heat cream. DO NOT BOIL IT. Remove from heat just when you see bubbles forming on the edges. Add coconut oil or butter. 
  • Pour the hot cream over the chocolate in batches, mixing well each time so that the chocolate doesn’t split. Use a wire whisk. If the chocolate splits, just add a splash of boiling water. 
  • Now, in goes the rum, bailey’s, instant coffee and vanilla extract.
  • Whisk it well for couple of minutes to incorporate some air and till everything mixes well.
  • Cover it with a cling and put it in the refrigerator for 3 hours to set. 
  • Once set, line a plate with butter paper. 
  • Take one tbsp scoop and scoop out to make small balls. You will have to shape really quickly because the heat from your hand might melt the chocolate. 
  • Keep the topping handy in a plate. 
  • Roll the truffle in the topping of your choice and place it one by one on the butter paper. 
  • Refrigerate for one hour or till it is set. It will last you about 2 weeks in a refrigerator. 

Troubleshooting

  • The chocolate is separating: This is one of the biggest concerns while making truffles. If your chocolate splits then your cream was too hot. So make sure you don’t boil it. 
  • The chocolate doesn’t melt: There can be two issues here, either your cream is too cold or you didn’t chop the chocolate into very small pieces. The finer the chocolate chunks, the quicker it will melt. If the chocolate doesn’t melt, craft a double boiler setting and heat the mixture in a heat proof bowl for a few seconds. 
  • Trying to scoop too-warm ganache: Once the cream and chocolate are whisked together, you will have a thick, smooth mixture known as ganache. You might think that it’s scoopable right out of the bowl, but you’ll need to cool it properly before scooping and rolling. Refrigerate it before scooping. 
Posted on 6 Comments

Silky Smooth Lemon Curd- ( Totally Fool-Proof Method)

Lemon Curd is a rich, soft, buttery and custard like spread or topping that has a deliciously tart yet sweet citrus flavour.

This method of making Lemon Curd is totally fool-proof. It will ensure a perfect velvety smooth lemon curd with no lumps. I discovered this perfect trick to make Lemon Curd after few hits and trials.  It is so easy that I started calling it Fool Proof Lemon Curd Recipe. 

I can bet that you will stop buying it from the market once you use this recipe. Your store bought doesn’t even come close to this. One spoonful of this and you will literally go “mmmmmm”. It’s that good.

The trick to make perfectly smooth lemon curd is whole egg. Most cooks don’t use egg white in Lemon Curd because chances of egg white coagulating is higher but egg white gives a very light, almost custardy texture which I love. The trick to get it right is simple. You just have to whip it well, keep stirring and cook on low flameDO NOT LET IT BOIL!

How to use Lemon Curd?

Well, there are countless ways to use it. While traditionally it was used as a spread for scones. But it makes a delicious filling or topping for tarts, pies, cakes, pancakes, crepes, cheesecakes and the list goes on and on. 

How long does it last?

If stored in a refrigerator in an airtight glass jar, this can last you almost a month. And yes, this freezes well too. Just thaw before using it and it is good to go. 

Points to Remember

  • I like to use Meyer lemon for making this but you can use whatever is easily available.
  • It is always good to weigh the ingredients and not use a rough estimate in recipes like these. 
  • Always use a double boiler for this recipe. If you don’t have a double boiler, make a makeshift double boiler by placing a heatproof glass bowl on top of a larger pot. Just make sure the bottom of the bowl does not touch the water in the larger pot. 

Recipe

Prep time: 5 minsServing: makes 400 ml
Cook time: 15 mins

Ingredients

  • Egg yolks: 2 large
  • Whole egg: 1
  • Castor sugar: 80 gms
  • Cornflour: 1 tbsp
  • Lemon juice: 90 ml
  • Cold Butter: 75 gms (cut in cubes)
  • Salt: 1/4th tsp
  • Lemon zest: 1 tsp

Method

  1. Before starting, keep all the ingredients ready. Keep butter cubes in refrigerator.
  2. Make a double boiler setting. Take a pan and a heat proof bowl. Use either a glass bowl or a stainless steel bowl. No aluminium. Add some water in the pan. The bowl should not be touching the water. 
  3. In the heat proof bowl, add egg yolks, whole egg, cornstarch & sugar. Whip till it becomes light and fluffy and sugar almost melts. This should take 2-3 minutes.
  4. Heat lemons in microwave for 10-15 seconds and squeeze out 90 ml juice. Add lemon zest to the heat proof bowl and then gradually add lemon juice in 2-3 batches, whisking each time. 
  5. While you are whisking, heat the water. Do not let the water boil. Now put the heat proof bowl on top. 
  6. Cook on the lowest flame. Keep stirring continuously till it thickens. This is very important otherwise chances are the eggs will coagulate. It’ll take roughly 15 minutes. 
    In case the water beneath starts boiling, take it off heat for a few seconds then put it back. The idea is to allow it to cook & thicken on low heat.
  7. Take a wooden spoon/spatula and check after 12 minutes. It should coat the back of the spoon. Slide your finger, if the path is clear then it’s cooked. If not or you are unsure, cook it for a few more minutes. 
  8. Once off heat, add cold butter cubes one by one and keep whisking continuously till it incorporates fully. Then sieve it for a smooth lemon curd. Transfer it to an airtight glass jar and refrigerate. It’ll thicken further on cooling.
  9. It tastes much better after 1-2 days. If you plan to make a dessert using lemon curd, make it a couple of days in advance. 
Posted on Leave a comment

How to make Mango Kulfi? 5 Ideas You Might Appreciate

If you’re longing for a decadent frozen treat that captures the tropical essence of mangoes, Mango Kulfi is a perfect choice! This creamy and luscious Indian dessert is similar to ice cream but with a unique flavor and texture that will transport you to the streets of India. In this post, we’ll explore the art of making Mango Kulfi from scratch, guide you through the step-by-step process, share tips on selecting the best mangoes, and offer variations to customize your kulfi experience. Get ready to savor the exotic flavors of Mango Kulfi! 🥭🍦🌿

What is Mango Kulfi? 🥭🍦 Kulfi is a popular frozen dessert that originated in the Indian subcontinent. It is known for its rich and creamy texture, intense flavors, and the use of traditional ingredients like milk, sugar, and cardamom. Mango Kulfi takes this beloved dessert to a whole new level by incorporating the sweet and tangy flavors of ripe mangoes. The result is a heavenly treat that perfectly balances the richness of the kulfi with the tropical freshness of mangoes.

Crafting Homemade Mango Kulfi 🥭🍦🌿 Now, let’s dive into the process of making Mango Kulfi:

Ingredients:

  • 2 cups full-fat milk
  • 1 cup mango pulp (fresh or canned)
  • 1/2 cup condensed milk
  • 1/4 cup sugar (adjust to taste)
  • 1/4 teaspoon cardamom powder
  • 2 tablespoons chopped nuts (such as almonds, pistachios, or cashews), plus extra for garnish
  • Saffron strands (optional, for garnish)

Instructions:

  1. In a heavy-bottomed saucepan, bring the milk to a boil over medium heat. Stir occasionally to prevent the milk from sticking to the bottom of the pan.
  2. Once the milk comes to a boil, reduce the heat to low and simmer for about 45-60 minutes, stirring frequently. The milk will gradually reduce and thicken to about half its original quantity.
  3. Add the condensed milk and sugar to the thickened milk. Stir well until the sugar is dissolved.
  4. Turn off the heat and let the mixture cool completely.
  5. In a blender or food processor, puree the mango pulp until smooth. Add the mango puree, cardamom powder, and chopped nuts to the cooled milk mixture. Stir until well combined.
  6. Pour the mango kulfi mixture into popsicle molds or small individual bowls. If using popsicle molds, insert sticks into each mold. If using bowls, cover them with aluminum foil.
  7. Place the molds or bowls in the freezer and let the kulfi set for at least 6-8 hours, or preferably overnight.
  8. Once the kulfi is completely frozen, remove it from the molds or bowls. If using bowls, dip the bottoms briefly in warm water to help release the kulfi.
  9. Garnish the Mango Kulfi with additional chopped nuts and saffron strands for a touch of elegance.
  10. Serve the Mango Kulfi immediately and enjoy the creamy and irresistible flavors of this delightful dessert.

Creative Variations 🌈🥭🍦 While the classic Mango Kulfi recipe is already divine, you can explore creative variations to customize your kulfi. Here are a few ideas:

  1. Mango Kulfi with Cardamom Infusion: Add a few whole cardamom pods to the milk while simmering to infuse the kulfi with the aromatic flavors of cardamom. Remove the pods before adding the mango puree.
  2. Mango Kulfi with Pistachio Crunch: Mix finely chopped pistachios with a little sugar and sprinkle the mixture into the kulfi molds or bowls before pouring in the mango kulfi mixture. This adds a delightful crunch and enhances the visual appeal.
  3. Mango Kulfi with Coconut Milk: Substitute a portion of the milk with coconut milk for a tropical twist. The coconut milk adds a creamy and subtle coconut flavor to the kulfi.
  4. Mango Kulfi Falooda: Serve your Mango Kulfi with a drizzle of rose syrup, a sprinkling of falooda noodles (thin vermicelli), and a scoop of soaked sabja seeds (basil seeds). This combination creates a popular Indian dessert called Mango Kulfi Falooda, which is a delightful medley of textures and flavors.
  5. Mango Kulfi with Chocolate Swirl: Melt some dark chocolate and drizzle it over the Mango Kulfi before freezing. Swirl the chocolate gently with a toothpick or skewer to create a marbled effect. The combination of mango and chocolate adds a delightful contrast of flavors.

Join Us for More Culinary Adventures! 🍽️🌍 If you’re passionate about exploring new flavors and connecting with fellow food enthusiasts, we invite you to join our vibrant community of foodies! Discover new recipes, share your culinary creations, and engage in conversations about all things food. Join our secret Facebook group, Eatlo, by visiting https://www.facebook.com/groups/eatlo and be a part of a community that celebrates the joy of cooking and the love for delicious food.

Conclusion Mango Kulfi is a delectable frozen dessert that showcases the rich and tropical flavors of mangoes. With its creamy texture, intense taste, and indulgent combination of ingredients, Mango Kulfi is a true delight for all dessert lovers. By following the simple steps outlined in this recipe, you can create your very own Mango Kulfi and experience the blissful flavors of this beloved Indian treat. So, grab some ripe mangoes, gather your ingredients, and savor the richness of Mango Kulfi! 🥭🍦🌿