
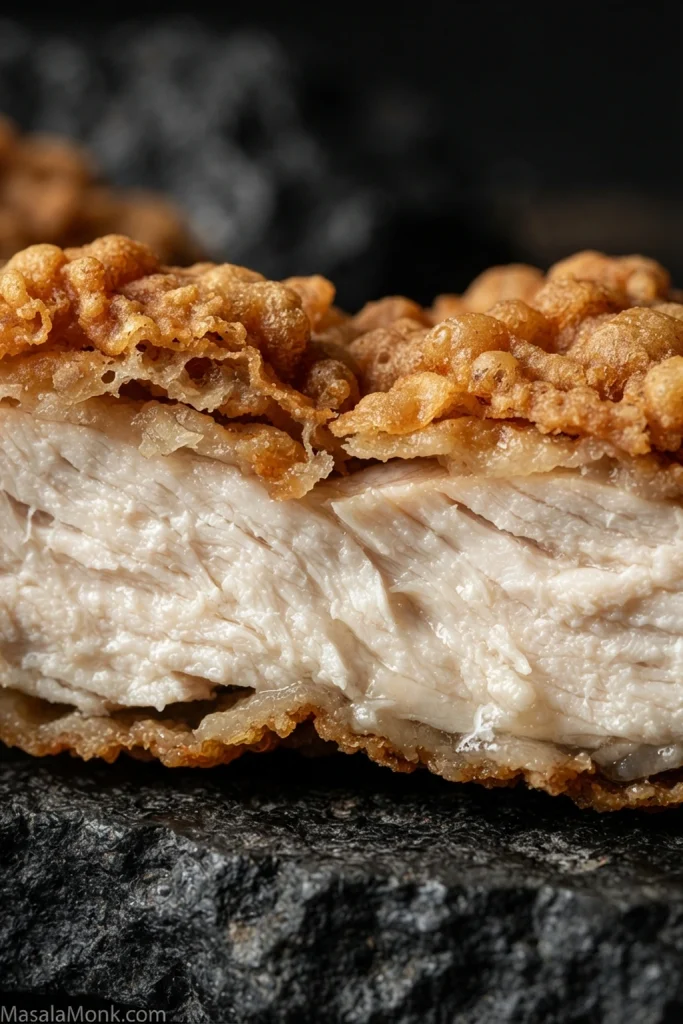
Cut into good chicken fried chicken and the crust should crack before the knife reaches juicy white meat underneath. Spoon over the black-pepper gravy and it should run into some of those craggy edges while enough golden crust stays exposed for the next bite.
Chicken fried chicken is a thin boneless chicken breast breaded in the style of chicken fried steak, fried until crisp and served with creamy country gravy. You may also see similar versions called country fried chicken. You do not need a deep fryer or an overnight marinade; evenly thick cutlets, well-attached breading and gravy made at the right moment matter much more.
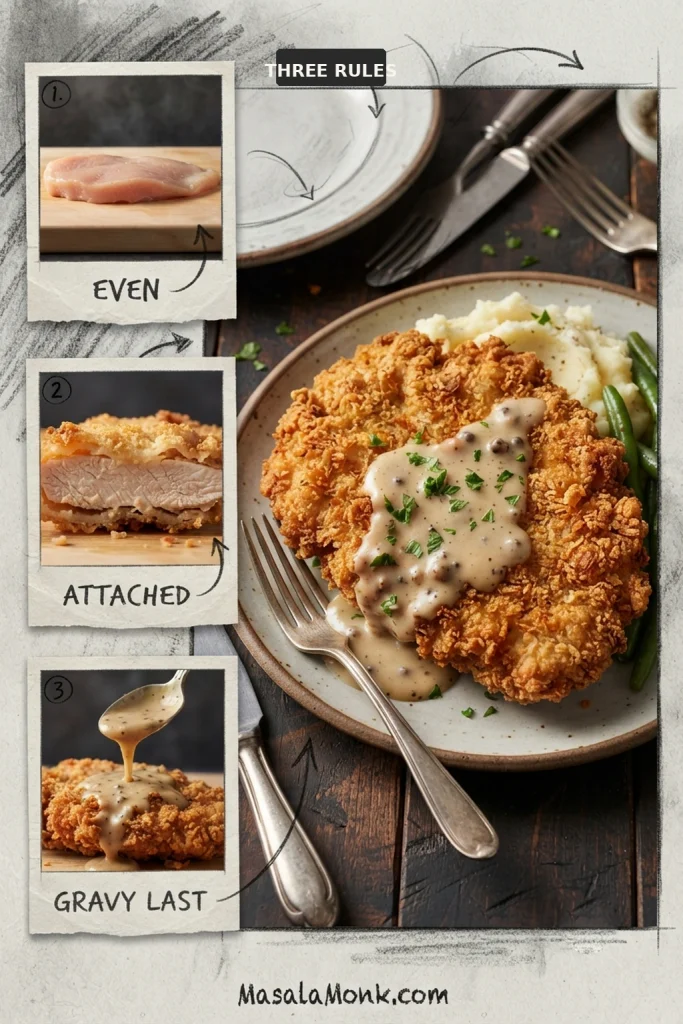
Even Cutlet. Attached Crust. Gravy Last.
Even cutlet: thin the heavy spots so the breast cooks at roughly the same rate from edge to center. Attached crust: drain the wet coating, press on the final dredge and give it a few minutes to settle. Gravy last: finish the chicken first, then whisk the pepper gravy together while the cutlets stay crisp on a rack.
Chicken Fried Chicken Recipe
Recipe at a Glance
- Serves: 4
- Prep: about 20–25 minutes
- Coating rest: 10–15 minutes
- Frying + gravy: about 20–35 minutes, depending on batch size
- Total: roughly 50–75 minutes, excluding the optional 30–60 minute buttermilk rest
- Oil: preheat to about 360°F / 180°C; fry around 350°F / 175°C
- Chicken temperature: 165°F / 74°C at the thickest point
Useful Equipment
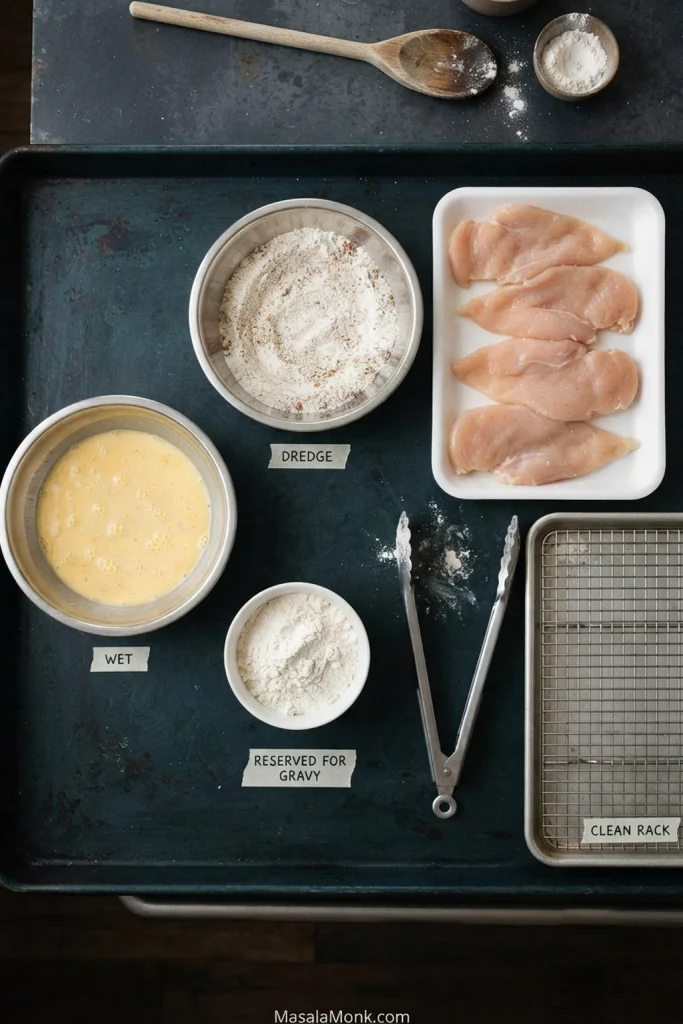
You will need a heavy 10- to 12-inch skillet, two shallow bowls, tongs and a whisk. Have one tray for the breaded uncooked cutlets and a separate clean wire rack and sheet pan for the fried chicken. For temperatures, use a clip-on deep-fry/candy thermometer or another thermometer rated for hot oil, plus an instant-read thermometer for the chicken.
Chicken
- 1¼–1½ lb / 570–680 g boneless skinless chicken breasts, divided into 4 cutlets, roughly 5–6 oz / 140–170 g each
- 1 teaspoon fine sea salt
- ½ teaspoon freshly ground black pepper
- ½ teaspoon garlic powder
- ½ cup / 120 ml additional buttermilk, optional, for a 30–60 minute refrigerated rest
Buttermilk Mixture
- 1 cup / 240 ml fresh buttermilk
- 1 large egg
- 1 tablespoon / 15 ml mild Louisiana-style hot sauce, optional
The hot sauce adds tang and background seasoning more than serious heat at this amount.
Crispy Dredge
- 1½ cups / 180 g all-purpose flour
- ½ cup / 60 g cornstarch
- 1 teaspoon baking powder, optional — use it for a slightly lighter, rougher crust; leave it out for a denser coating
- 1¼ teaspoons fine sea salt
- 2 teaspoons paprika
- 1½ teaspoons garlic powder
- 1 teaspoon onion powder
- 1 teaspoon freshly ground black pepper
- ¼ teaspoon cayenne pepper, or more to taste
For Frying
- Canola, vegetable or peanut oil, enough to reach about ½ inch / 1.25 cm deep in the skillet
Black Pepper Country Gravy
- 2 tablespoons / 28 g unsalted butter
- 1 tablespoon / 15 ml clean strained frying oil, or another tablespoon of butter
- 3 tablespoons / about 24 g all-purpose flour, set aside before breading the chicken
- 2 cups / 480 ml whole milk
- ¾ teaspoon freshly cracked black pepper, plus more to taste
- ½ teaspoon fine sea salt, then adjust to taste
If the gravy needs to cover both the chicken and the sides, make 1½ times the batch.
Salt note: These quantities assume fine sea salt and unsalted butter. Taste the finished gravy before adding more salt.
Prepare the Cutlets
- Do not rinse the chicken. Pat it dry instead. USDA guidance on washing raw poultry explains why rinsing can spread contamination around the kitchen.
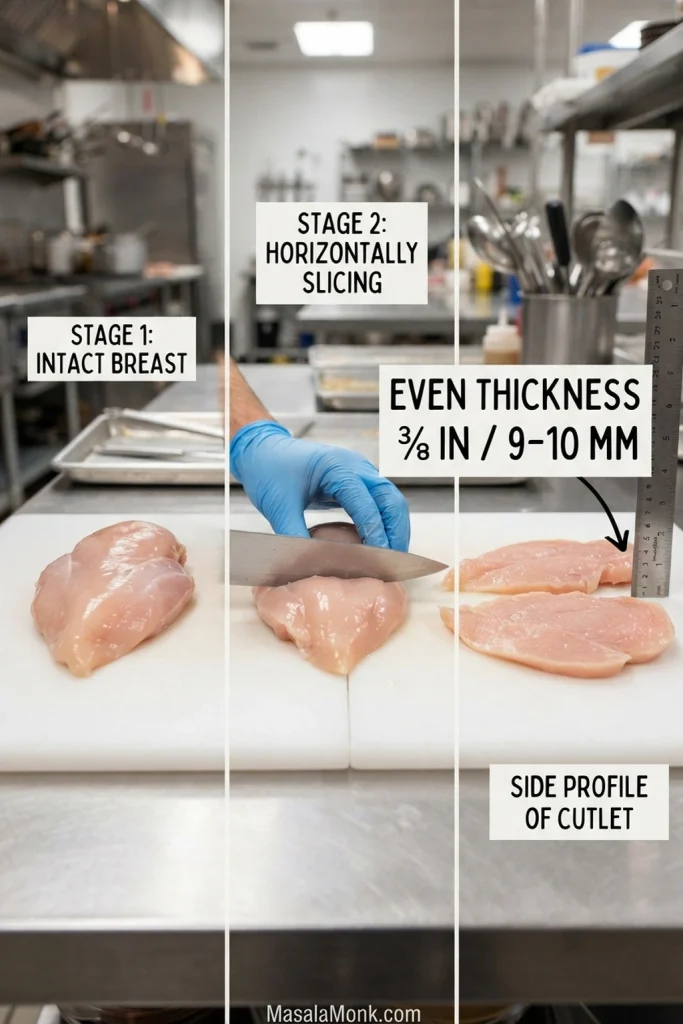
- Slice very thick breasts horizontally before pounding. Place the cutlets between parchment paper or plastic wrap and gently even out the thick areas until each piece is about ⅜ inch / 9–10 mm thick. They do not need to be identical; reasonably even is what matters.
- Season both sides with the salt, black pepper and garlic powder.
- For the optional buttermilk rest, place the seasoned cutlets with the additional ½ cup / 120 ml buttermilk in a small shallow container or zip-top bag. Turn them so the buttermilk coats the meat, refrigerate for 30–60 minutes, then drain well and lightly blot away excess buttermilk before breading. Discard the marinade.
- Heat the oven to 200°F / 95°C. Keep the breaded uncooked cutlets on one tray and reserve a separate clean rack and sheet pan for the chicken after frying.
Bread and Rest
- Measure the 3 tablespoons / about 24 g flour for the gravy into a clean container before breading begins.
- Whisk the fresh buttermilk, egg and hot sauce together in one shallow bowl. Combine the flour, cornstarch, optional baking powder, salt, paprika, garlic powder, onion powder, black pepper and cayenne in the second bowl.
- Drizzle 1–2 tablespoons / 15–30 ml of the buttermilk mixture over one area of the dredge and rub it lightly through the flour with your fingertips. Small clumps are exactly what you want here. Break apart anything large enough to look like wet dough.
- Give each cutlet a light flour coat and shake away the excess. Dip it into the buttermilk mixture, let the excess drip for several seconds, then return it to the dredge.
- Press the flour and some of the craggy crumbs onto both sides, then shake away anything that has not attached.
- Rest the breaded cutlets for 10–15 minutes. Freshly coated chicken looks dry and dusty; by the end of the rest, the flour should look slightly darker, tackier and more settled against the meat.
- Once breading is finished, discard any marinade, wet mixture and remaining dredge that touched uncooked chicken.
Fry the Chicken
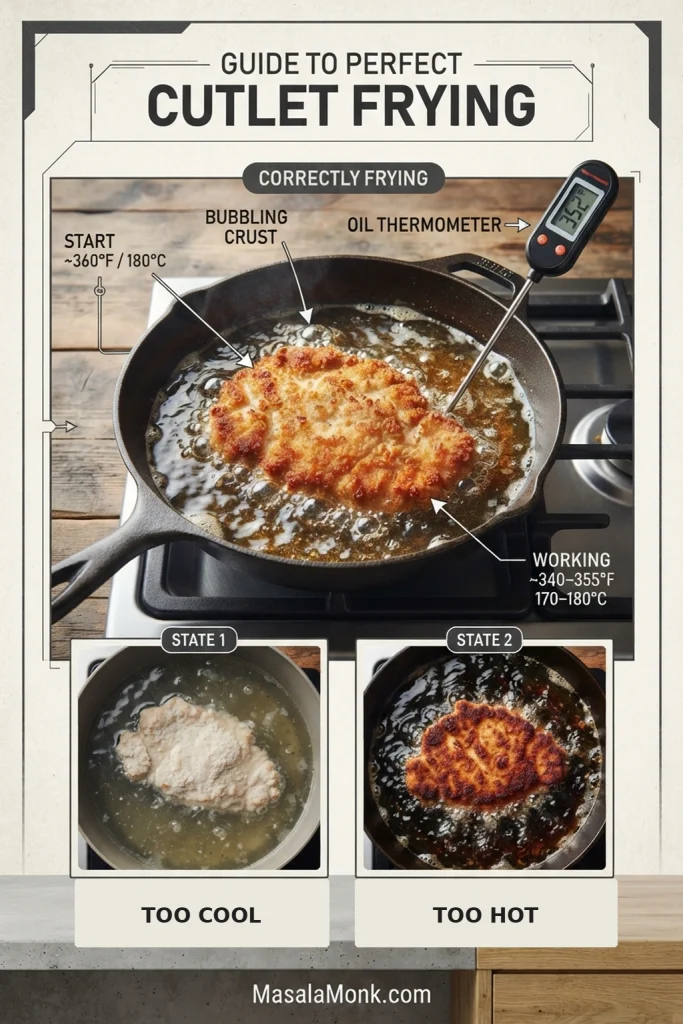
- Pour enough oil into the skillet to reach about ½ inch / 1.25 cm and heat it to around 360°F / 180°C.
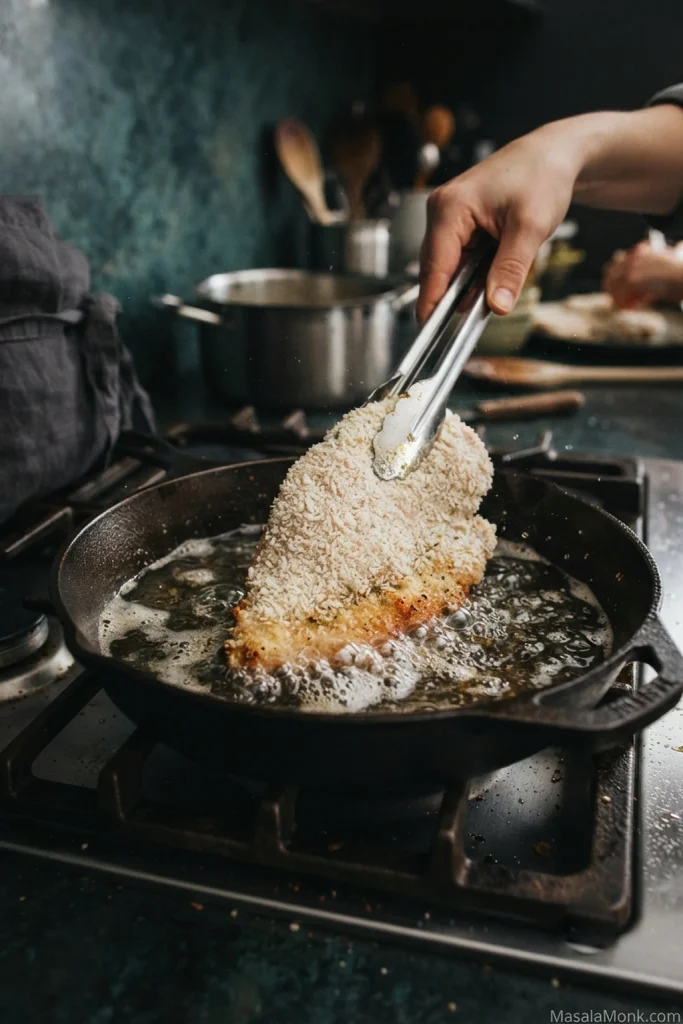
- Carefully lower each cutlet into the oil away from your body. Fry two at a time if they fit comfortably without touching; otherwise cook one at a time.
- The temperature will drop when the chicken goes in. That’s normal. Somewhere around 340–355°F / 170–180°C is a workable frying range, so use small burner adjustments and give the oil time to respond.
- Treat the first cutlet as your read on the pan. If the crust races toward brown, ease the heat before the next batch; if it stays pale, give the oil longer to come back up.
- Leave the first side alone while the crust sets. Begin checking around 3 minutes and turn when the underside is deep golden and releases cleanly.
- Cook the second side, often another 2–4 minutes, until the coating is golden and firm and the thickest part of the chicken reaches 165°F / 74°C.
- For a thin cutlet, slide the thermometer in from the side toward the center so the sensing area stays inside the meat.
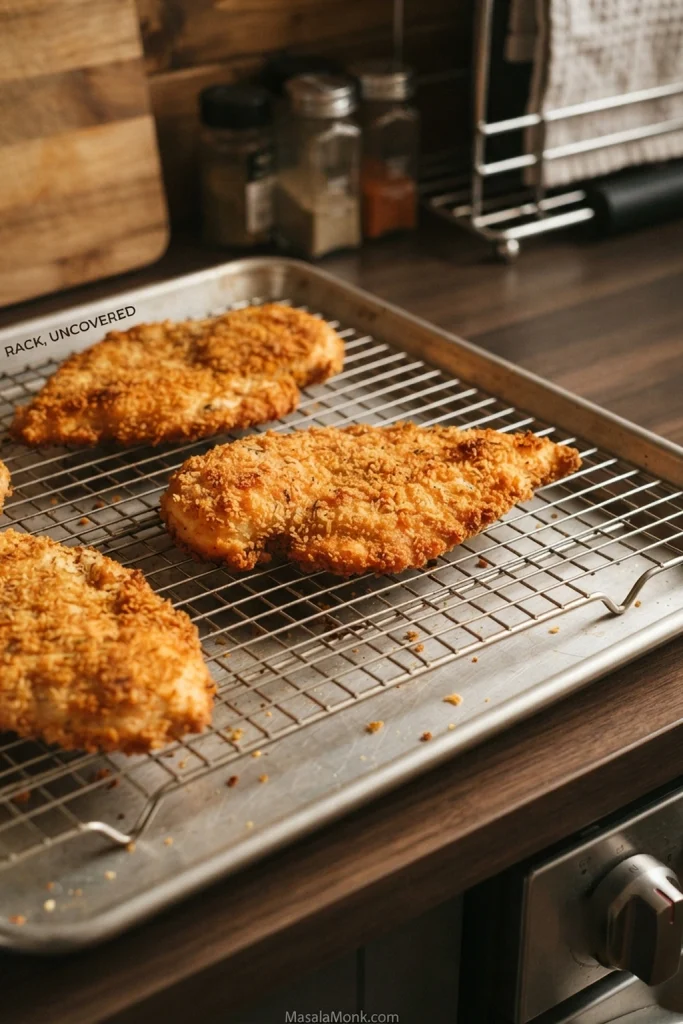
- Transfer cooked cutlets with clean tongs to the clean wire rack. Give the oil time to recover before adding the next batch.
- Use the 200°F / 95°C oven only if you need extra holding time while the remaining cutlets and gravy are finished. Keep the chicken uncovered.
How to Read the Finished Cutlet
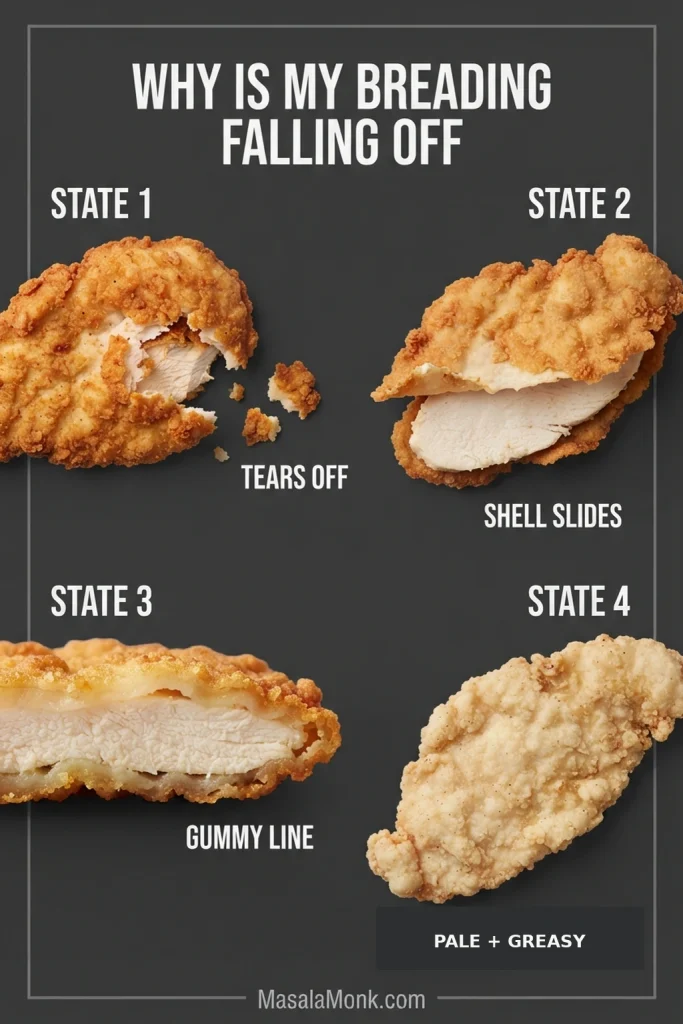
When a cutlet is right, the crust feels firm under the tongs and the ridges around the edges are deeply golden. Cut into it and you should hear that first crisp break before reaching juicy chicken. A gummy flour line or a shell that lifts away from the meat points to a coating that was too wet, too heavy, or never bonded firmly before frying.
Make the Gravy
- Once the last cutlet is out, carefully pour the frying oil from the skillet. Keep 1 tablespoon / 15 ml of clean oil and strain out browned crumbs. Wipe away any blackened flour left in the pan.
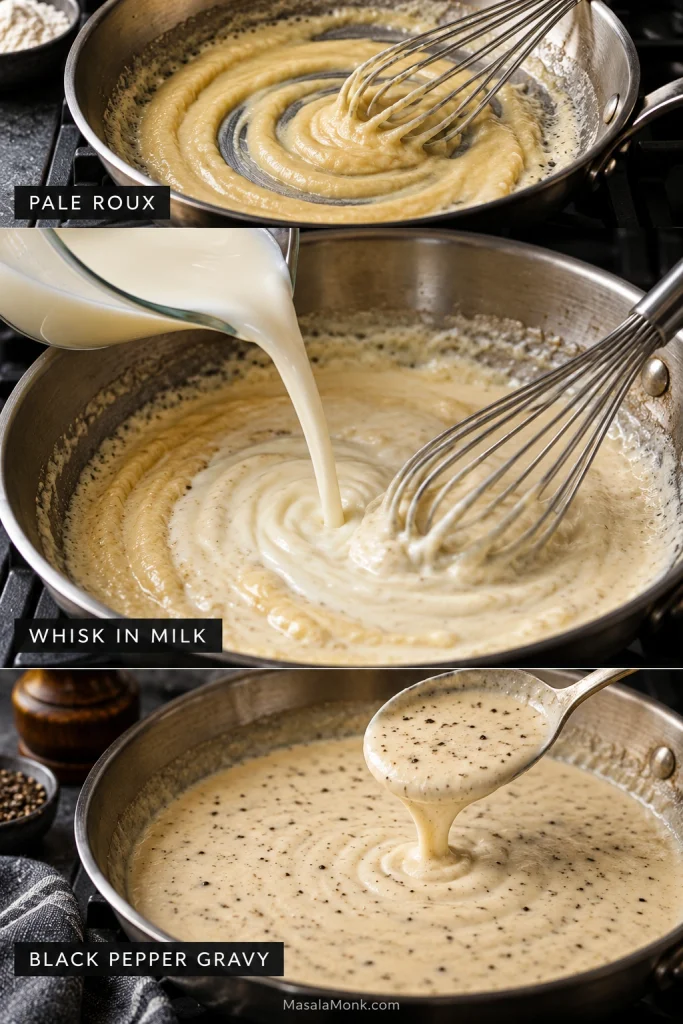
- Add the strained oil and 2 tablespoons / 28 g butter over medium-low heat. Whisk in the reserved flour and cook for about 1½–2 minutes, until the raw-flour smell disappears while the roux remains pale.
- Add the milk gradually, whisking each addition smooth before pouring in more.
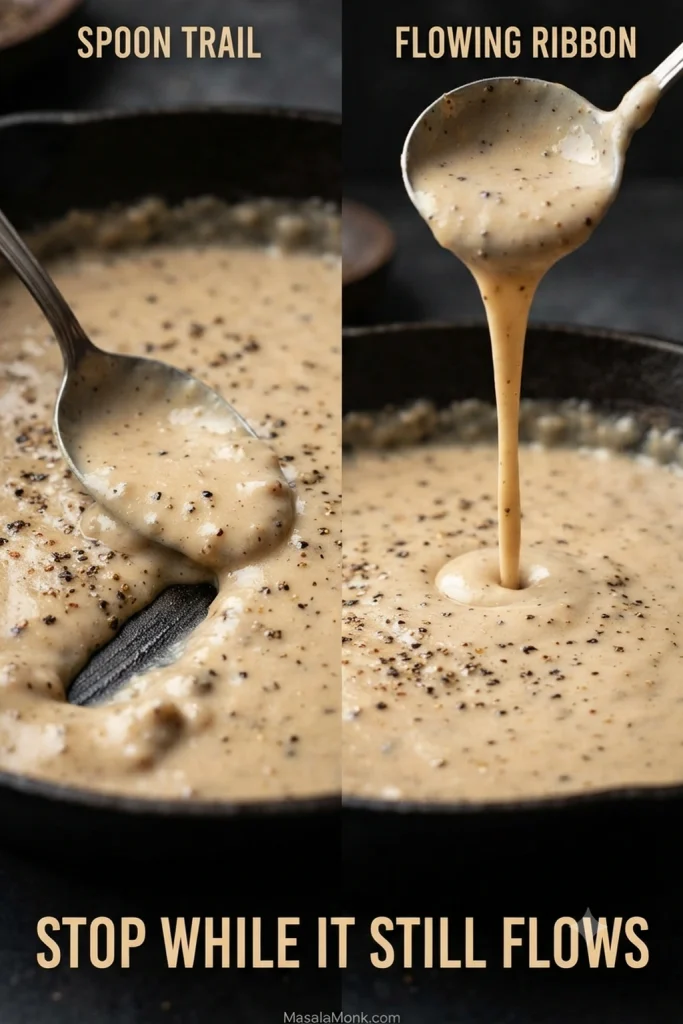
- Bring the gravy to a gentle simmer and cook until it coats the back of a spoon but still falls from it easily.
- Add the black pepper and salt, taste, and remove the skillet from the heat. You should be able to smell the pepper before the gravy reaches the plate.
Optional savory variation: Replace up to ¼ cup / 60 ml of the milk with low-sodium chicken stock.
Serve
Plate the chicken first and spoon over the hot gravy just before eating. Cover part of each cutlet and leave some crisp corners showing. Put the rest of the gravy on the table; anyone who wants the fully smothered version can take it from there.
Keep the Crust Attached · Frying Temperature · Fix a Problem
The method is simple, but a few small choices decide whether the crust and chicken finish together. Cutlet thickness is the first.
A Giant Chicken Breast Is the Wrong Shape for This
Modern chicken breasts can be enormous, which makes “use four chicken breasts” a surprisingly unhelpful instruction. Four cutlets around 5–6 ounces each are much easier to manage. Slice a large breast horizontally first, then gently even out the thick spots until the cutlet is about ⅜ inch thick throughout.
That gives the crust and center a much better chance of finishing together. Leave the breast too thick and the breading may be beautifully browned while the middle still needs time; keep cooking and the outer meat begins to dry.
Buttermilk and Marinating
No overnight marinade is required for these thin cutlets. A 30–60 minute buttermilk rest is optional. If dinner needs to happen, skip it; the short rest adds tang and gives the seasoning more time on the meat, but the recipe does not depend on it.
Drain the cutlets well afterward and always use fresh buttermilk for the breading mixture. No buttermilk? Mix 1 cup / 240 ml milk with 1 tablespoon / 15 ml lemon juice or white vinegar and leave it for 5–10 minutes before using it in the wet coating. It will be thinner than cultured buttermilk, so let the excess drip well before dredging.
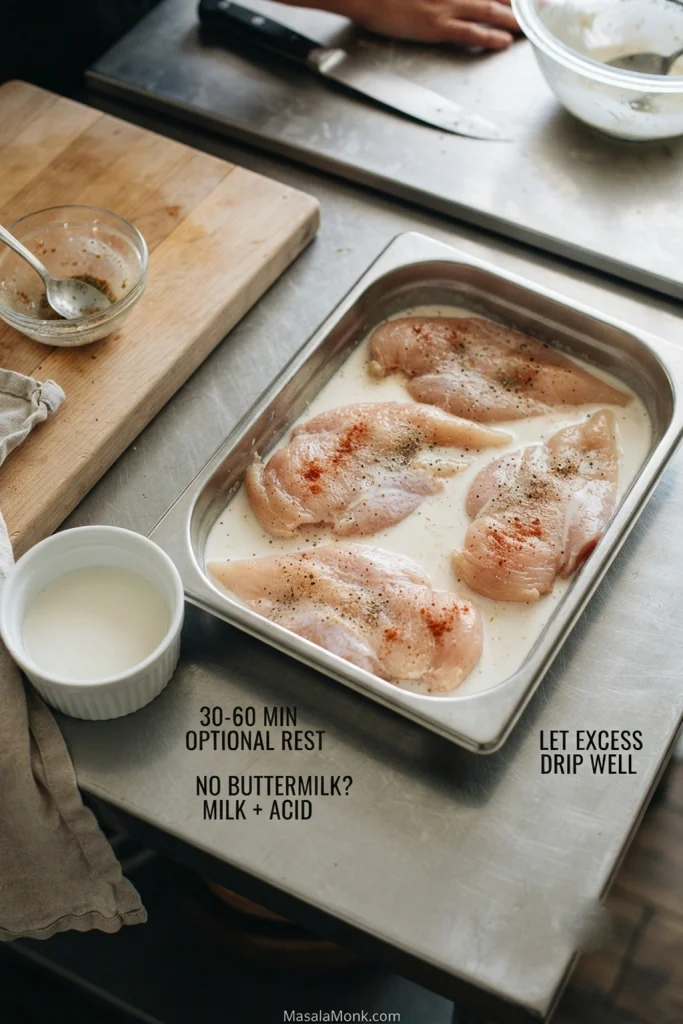
Once the surface is drained, the next job is getting the coating to stay where you put it.
How to Keep the Crust Attached to the Chicken
Breading usually falls off for one of three reasons: too much moisture, a loose or heavy coating, or not enough time for the layers to settle. Moving the chicken before the first side sets can finish the job.
The odd part is that breading can fail in two quite different ways. Sometimes pieces tear away in the skillet. Other times the crust fries beautifully, only to slide off in one sheet when the chicken is cut.
When the Breading Comes Off in the Pan
Start with a dry surface and a light first flour coat. Let the buttermilk drain before the final dredge, press the coating onto the chicken and give it a short rest. Once the cutlet reaches the oil, leave that first side alone long enough for the crust to decide it is staying put.
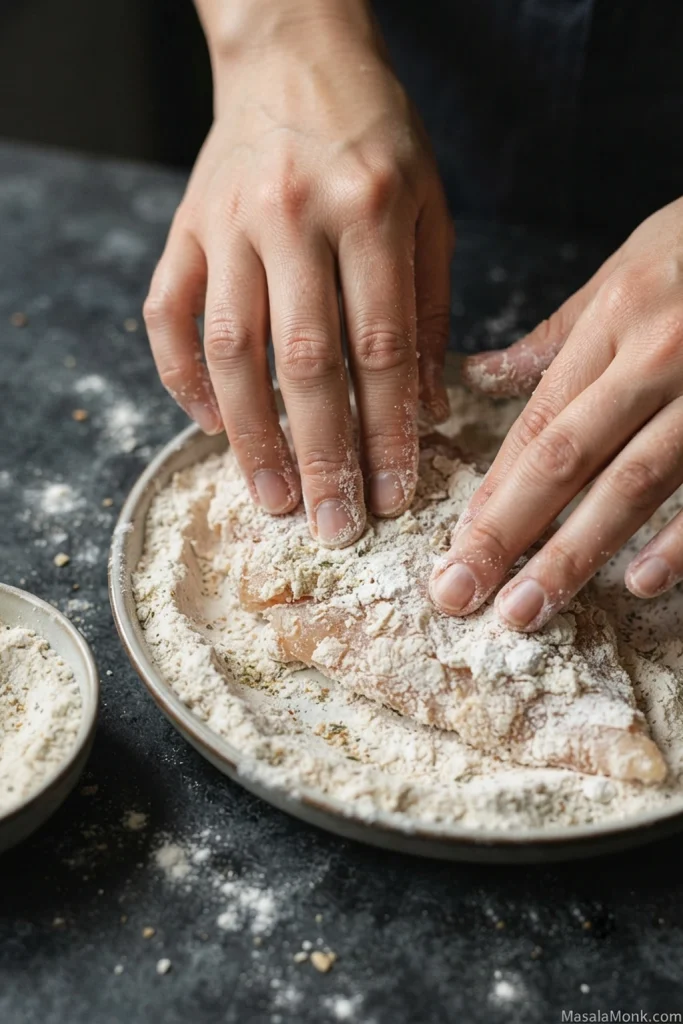
The sequence is easy to remember: Dry → Dust → Dip → Dredge → Press → Rest.
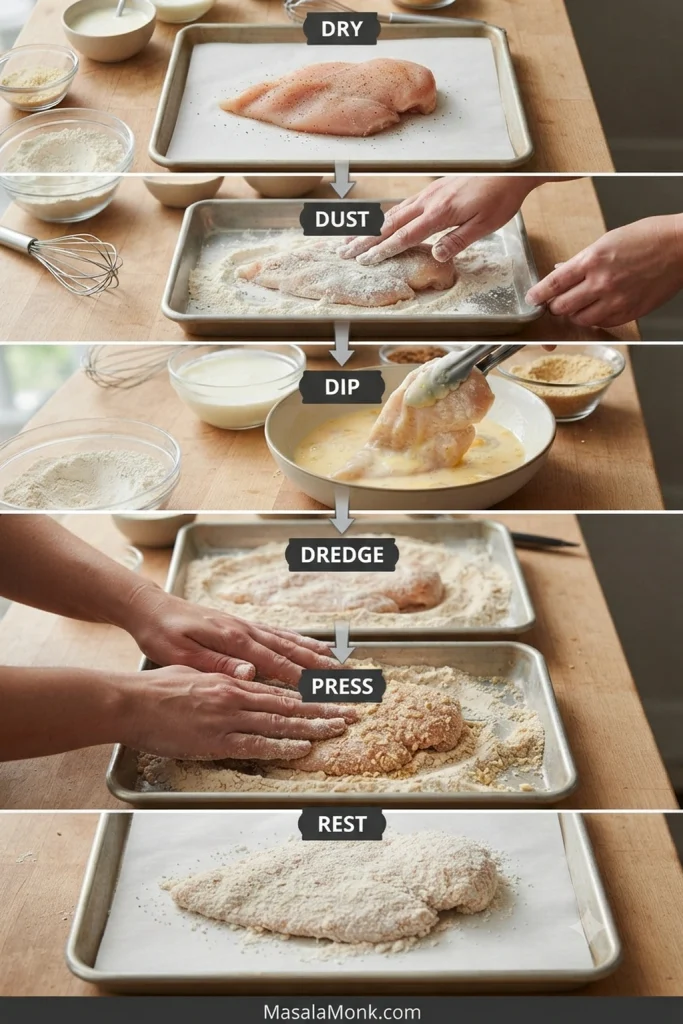
When the Crust Slides Off at the Table
A whole shell sliding away usually points to a coating that was too wet or too heavy, or one that never bonded firmly to the meat. Let the wet layer drip properly, avoid piling on loose dredge and give the finished coating time to settle before frying.
Build Crags, Not Dough
A splash of wet mixture worked into the flour creates the rough bits that become crunchy ridges. Small clumps are useful. A giant wet flour clump is simply dough waiting to fry.
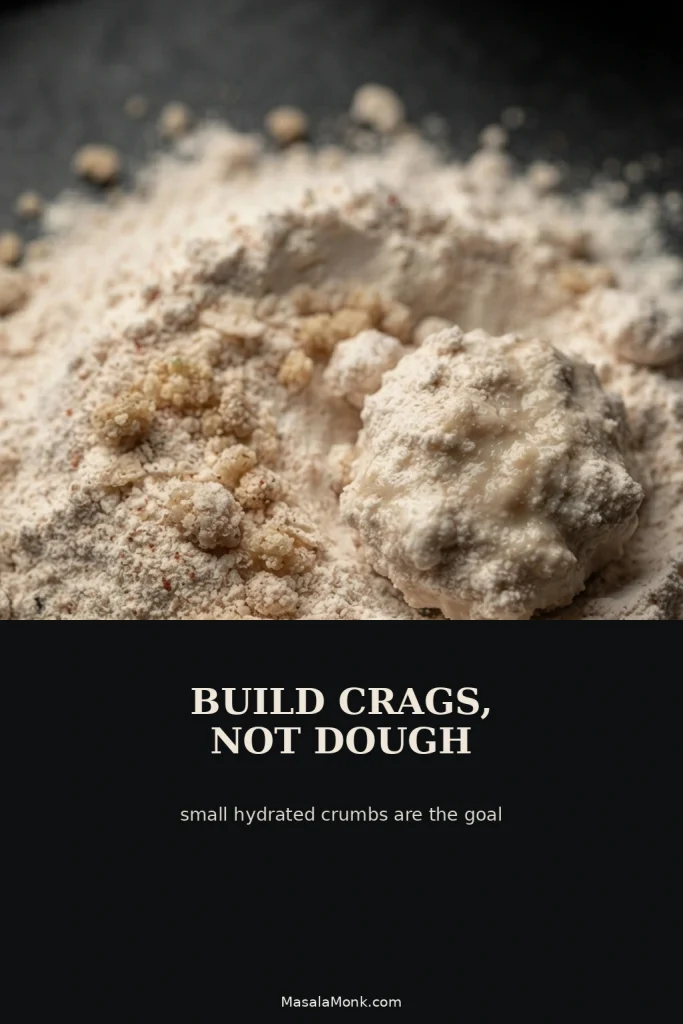
During the rest, the loose flour absorbs moisture from the wet coating. Those dusty layers begin settling together, which helps the breading behave like one crust once it reaches the oil. You are not trying to dry the breading out; you are giving it time to settle against the meat.
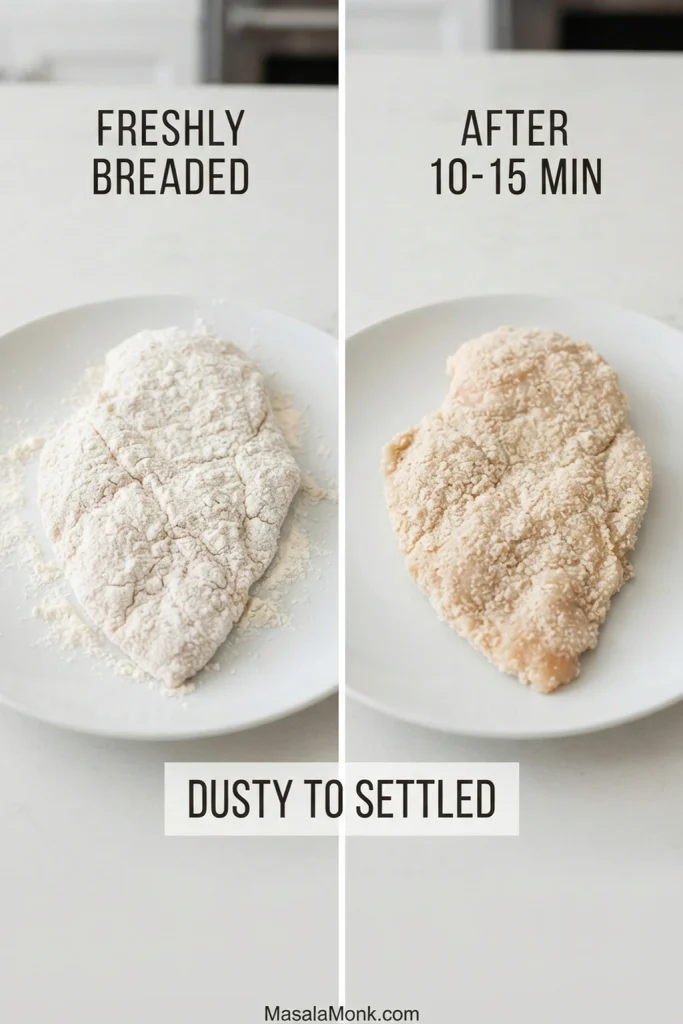
Once the coating looks attached, the next variable is heat.
Frying Temperature
The recipe starts the oil near 360°F / 180°C because the temperature drops as soon as cold chicken enters the skillet. Don’t chase that drop the second it happens. Give the pan a moment, watch what the first cutlet is doing and make small corrections.
Cool oil can leave the coating pale and greasy; excessive heat races the crust toward brown while the chicken is still catching up. A heavy skillet does not react instantly, so a large burner change can create a second problem a minute later.
Never test hot oil by flicking water into it.
Read the Crust and the Chicken Separately
The outside and the center are answering different questions. A firmly attached, deep-golden crust tells you the coating has set. The meat still needs to reach 165°F / 74°C as measured with a food thermometer.
Begin checking the first side around 3 minutes and expect the second side to need roughly another 2–4 minutes. Those are places to start looking, not promises. Thickness, starting temperature and how quickly the oil comes back up can all move the finish line.
For the most reliable reading, slide the thermometer in from the side toward the center. That gives the sensing area more room to remain inside a thin cutlet.
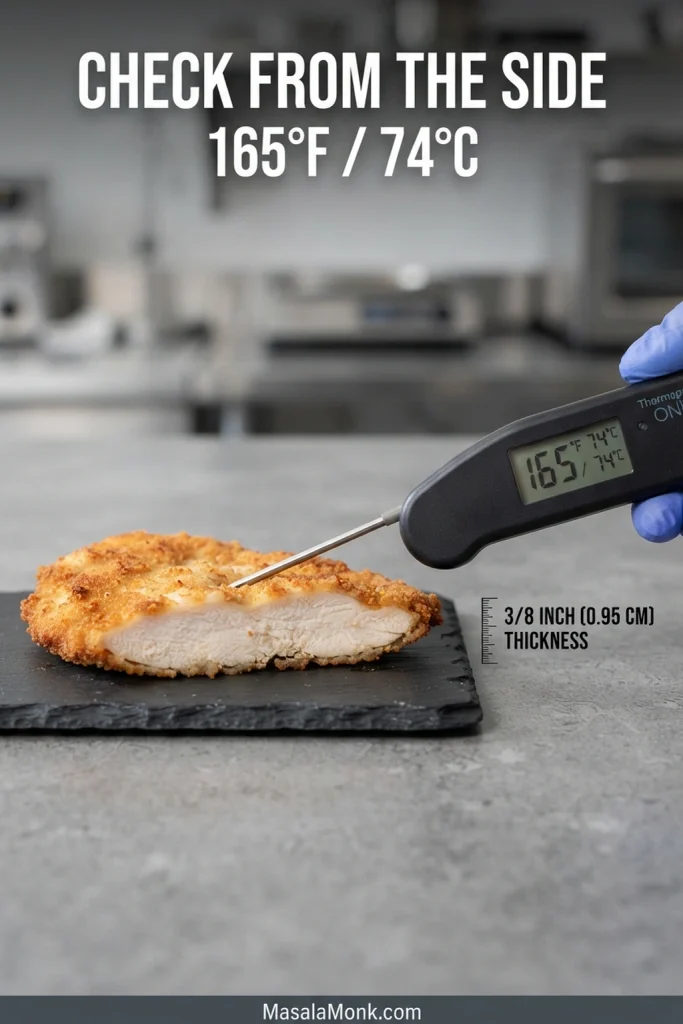
Keep finished cutlets on the clean rack, uncovered, so steam can escape underneath. If the next batch and gravy will take more than a few minutes, move the rack to the 200°F / 95°C oven briefly. Foil traps steam and softens the crust.
Make the Gravy Last
Country gravy starts with a pale flour-and-fat roux, milk and plenty of black pepper, but the important timing decision is simpler: make it after the chicken. The cutlets can wait briefly on a rack; finished milk gravy thickens quickly as it sits.
Reserve the gravy flour before breading begins and strain the frying fat you keep so blackened crumbs do not muddy the sauce. Once the milk goes in, cook only until the gravy has enough body to coat the spoon while still moving easily.
Stop While It Still Flows
Drag a spoon through the skillet. The trail should stay visible for a moment, then begin to close. The gravy should fall from the spoon in a thick ribbon, and at that point you’re done fussing with it.
Spoon the gravy over the chicken just before eating; the longer hot gravy sits on fried breading, the softer that breading becomes.
Fix My Chicken Fried Chicken
Most problems are easier to diagnose by looking at the crust, chicken or gravy than by adding more cooking time and hoping for the best.
Crust & Chicken Problems
| What You See | What to Do |
|---|---|
| Breading comes off in the oil | Dry the surface well, use a light first flour coat, press on the final dredge, let it rest and leave the first side alone until the crust sets. |
| Whole crust slides off when you cut it | Let more buttermilk drip away and avoid piling on loose dredge. A wet or heavy shell may never bond firmly to the meat. |
| Gummy flour under the crust | The wet layer may have been too heavy or the oil too cool. Drain the cutlet well after dipping and keep the frying temperature in range. |
| Pale, greasy crust | The oil probably cooled too far. Fry fewer pieces and let the oil recover between batches. |
| Very dark crust, center still behind | The cutlet is too thick, the oil is too hot, or both. Even out the chicken before frying and watch the oil temperature. |
| Chicken is dry | Check the center with a thermometer instead of waiting for the crust to get darker. |
| Chicken tastes bland under the crust | Season the meat itself before breading. |
| Crust is smooth rather than craggy | Work a small amount of wet mixture into part of the dredge before the final coat. |
Gravy Problems
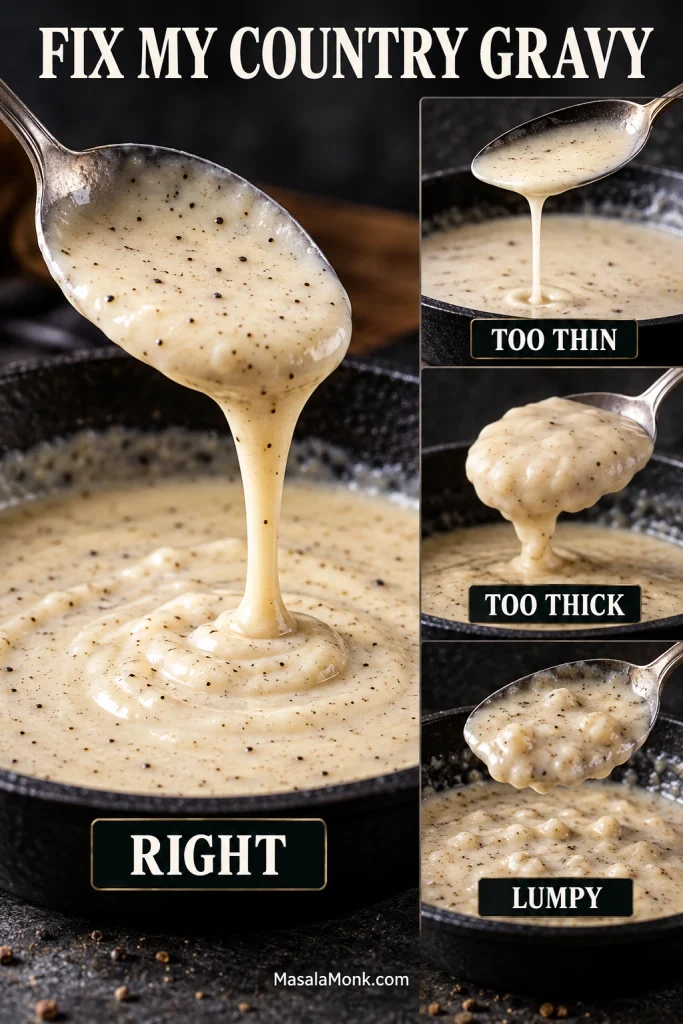
| What You See | What to Do |
|---|---|
| Gravy tastes like thickened milk | Check the salt, then add more freshly cracked black pepper. A small amount of low-sodium chicken stock can add more savory depth. |
| Gravy tastes floury | The roux needed more time. Cook the flour in the fat until the raw smell disappears before adding milk. |
| Gravy is gluey | Whisk in warm milk a little at a time until it loosens. |
| Gravy is too thin | Give it another minute or two at a gentle simmer; it may only need more time to reduce and thicken. |
| Gravy is lumpy | Whisk vigorously. Next time, add the milk in smaller additions. Strain only if necessary. |
| Gravy turned brown or gritty | Keep dark crumbs out of the skillet and avoid browning the roux too far. |
| Gravy was perfect, then became very thick | Take it off the heat slightly looser next time. It continues thickening as it stands. |
Back to Recipe · See the Sides · Back to Top
Build the Plate
Once the chicken is crisp and the gravy is where you want it, the rest of the plate can stay simple. Mashed potatoes are the obvious place for extra pepper gravy to land. Green beans bring a fresher contrast, while collard greens or sweet corn keep the plate firmly in Southern comfort-food territory.
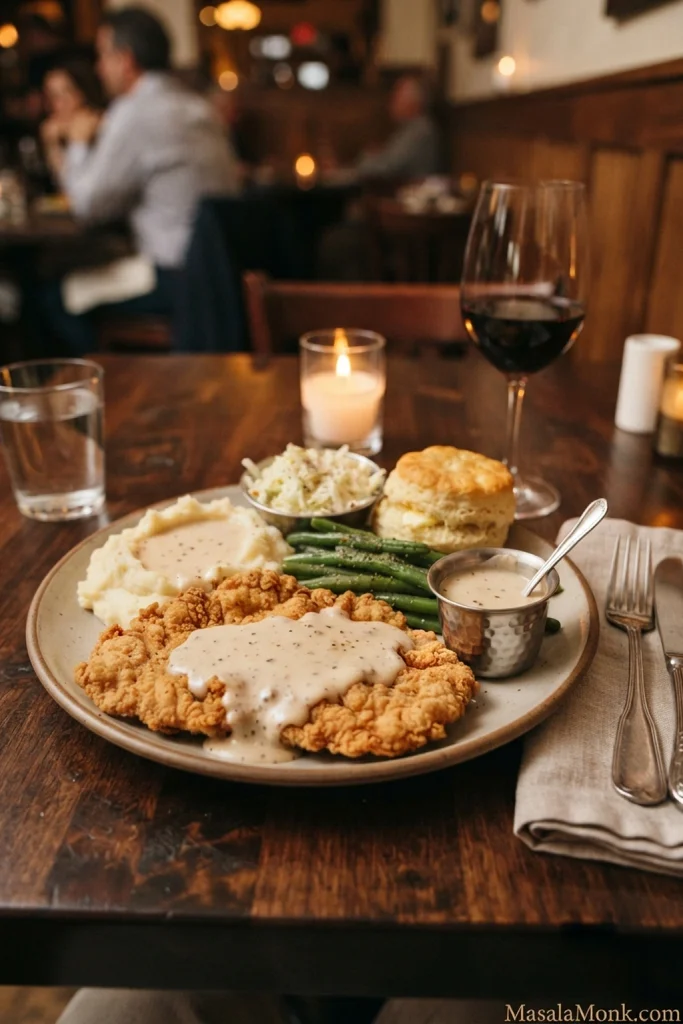
Cold coleslaw brings crunch and tang beside the hot chicken. A batch of Southern Buttermilk Biscuits also gives any extra buttermilk a useful home, and a biscuit has another job entirely: catching whatever pepper gravy is left behind.
Macaroni & Cheese can take the place of the mashed potatoes when you want the plate even richer without stacking two heavy starches together.
Chicken Fried Chicken vs Fried Chicken vs Chicken Fried Steak
The names overlap because chicken fried chicken and chicken fried steak use the same broad bread-and-fry idea. The meat and shape are the easiest way to tell the three dishes apart. You may also encounter white gravy, cream gravy and country gravy as names for the peppery milk gravy served with this style of food; sawmill gravy is a closely related Southern term that can vary by recipe and region.
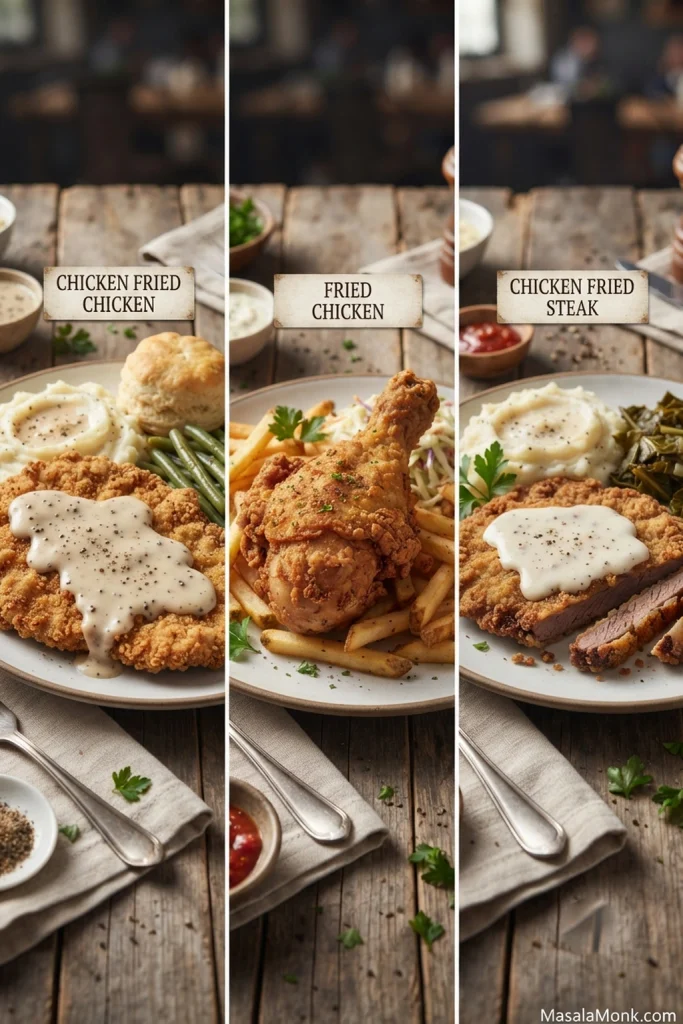
| Dish | What Makes It Different |
|---|---|
| Chicken fried chicken | Thin boneless chicken cutlet, breaded and fried, usually with white country gravy |
| Fried chicken | Usually larger or bone-in chicken pieces; gravy is optional |
| Chicken fried steak | Beef cutlet prepared in a similar style and commonly served with country gravy |
Looking for juicy meat right to the bone beneath a rough golden coating? Our Fried Chicken Recipe is the better fit.
Cracker Barrel-Inspired Chicken Fried Chicken
If the restaurant version you’re thinking of is Cracker Barrel’s, compare the finished plate rather than treating this as an exact copycat. Cracker Barrel serves its Chicken Fried Chicken with Sawmill Gravy; this variation follows that general direction without claiming to reproduce the restaurant’s proprietary recipe.
For this variation, keep the buttermilk coating, let the crust reach a full deep gold and serve the chicken with plenty of peppery gravy. Mashed potatoes, corn, biscuits and green beans all fit naturally beside it.
Air Fryer Chicken Fried Chicken
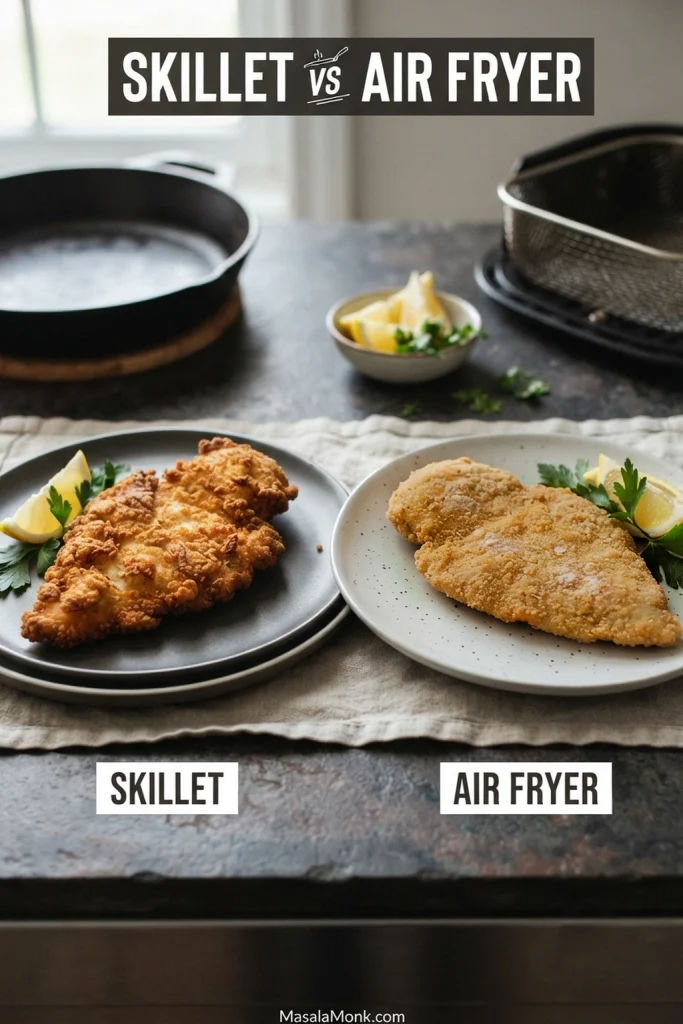
You can make chicken fried chicken in an air fryer, although the crust will be different from the skillet-fried version. Without surrounding hot oil, a heavy flour coating is more likely to leave pale powdery spots or loosen during flipping.
- Prepare the cutlets to the same even thickness.
- Use the same dry → wet → dry sequence, but apply a lighter final flour coat.
- Rest the breaded cutlets for 10–15 minutes before oiling them.
- Preheat the air fryer to about 375°F / 190°C.
- Spray the breading thoroughly with cooking oil, especially any white flour patches.
- Arrange the chicken in one layer without overlapping.
- Let the first side set before flipping, then spray any newly exposed dry flour.
- Begin checking around 8–10 minutes and continue until the coating is browned and the center reaches 165°F / 74°C. Air fryers vary considerably, so treat that as a checking point rather than a guaranteed finish time.
For the classic rough, craggy crust, the skillet still gives the better result. For a breaded breast recipe designed around circulating hot air from the beginning, use our Air Fryer Fried Chicken Breast.
Storage and Reheating
Keep chicken and gravy in separate shallow, covered containers. USDA guidance recommends refrigerating perishable food within 2 hours, or within 1 hour when the temperature is above 90°F / 32°C. Use refrigerated leftovers within 3–4 days.
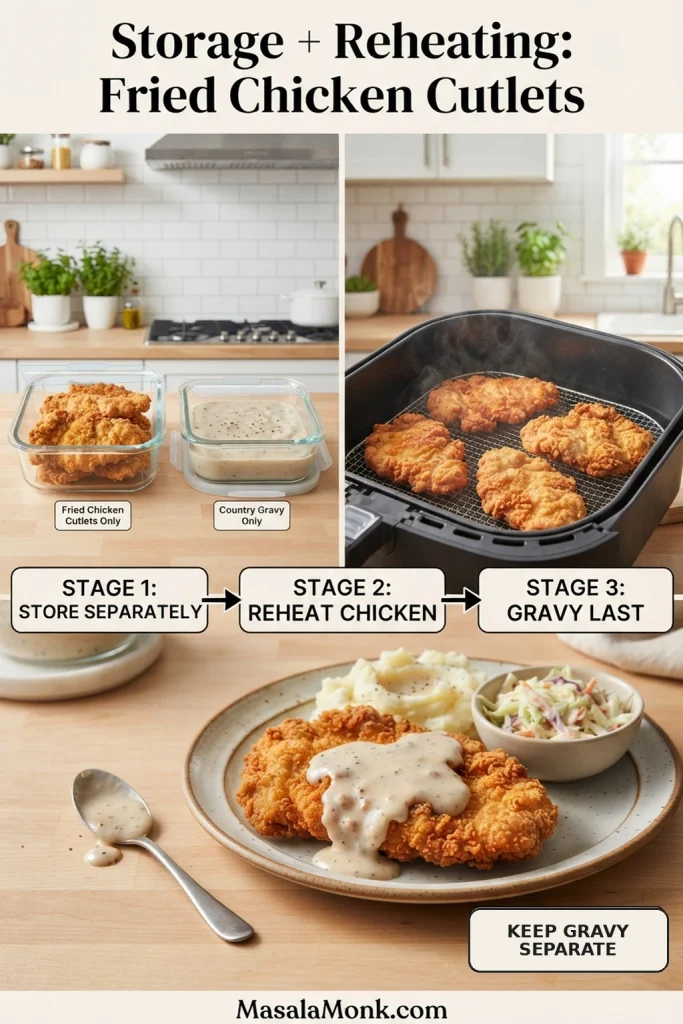
Once gravy sits on the crust overnight, no reheating trick can bring the original texture completely back.
Reheat the Chicken
An oven or air fryer gives the crust its best chance to crisp again. Heat the chicken thoroughly to 165°F / 74°C. Around 375°F works well in the oven; an air fryer can run a little hotter while you check frequently.
The microwave will warm the meat but soften the crust. A re-crisped leftover cutlet also makes a very good lunch; these chicken sandwich ideas give you several ways to use it with slaw, pickles or sauce added after reheating.
Reheat the Gravy
Reheat the gravy over medium-low heat while whisking. Bring it to a boil, then remove it from the heat. Add a splash of milk as needed to restore a smooth, pourable consistency.
Can You Freeze It?
Freeze chicken and gravy separately. Freeze the cutlets in a single layer first before packing them for longer storage, then reheat in an oven or air fryer. For best quality, use frozen cooked chicken within about 4 months. Frozen milk gravy can separate slightly, so expect to whisk it firmly and add some milk as it reheats.
Back to Recipe · Troubleshooting · Back to Top
A Few Remaining Questions
Can I use chicken thighs instead of breasts?
Boneless thighs work well, although chicken breast gives the classic shape and texture associated with chicken fried chicken. Flatten the thighs to an even thickness and cook by internal temperature rather than borrowing the breast timing.
Can I bread the chicken ahead?
The cutlets can be breaded a few hours ahead and kept covered on a tray in the refrigerator until you are ready to fry. A short chilled rest can help the coating settle, but for the best crust, fry them the same day instead of deliberately holding the breaded chicken overnight.
Can I reuse the frying oil?
If the oil has not burned, let it cool completely, strain it well and save it for another compatible savory frying job. Discard oil that smells burned, bitter or rancid, and never pour used cooking oil down the sink.
What matters is the plate in front of you: crisp golden ridges that still crack under the knife, juicy chicken underneath, pepper gravy flowing over the top, and a few crunchy corners left uncovered for the next bite.








