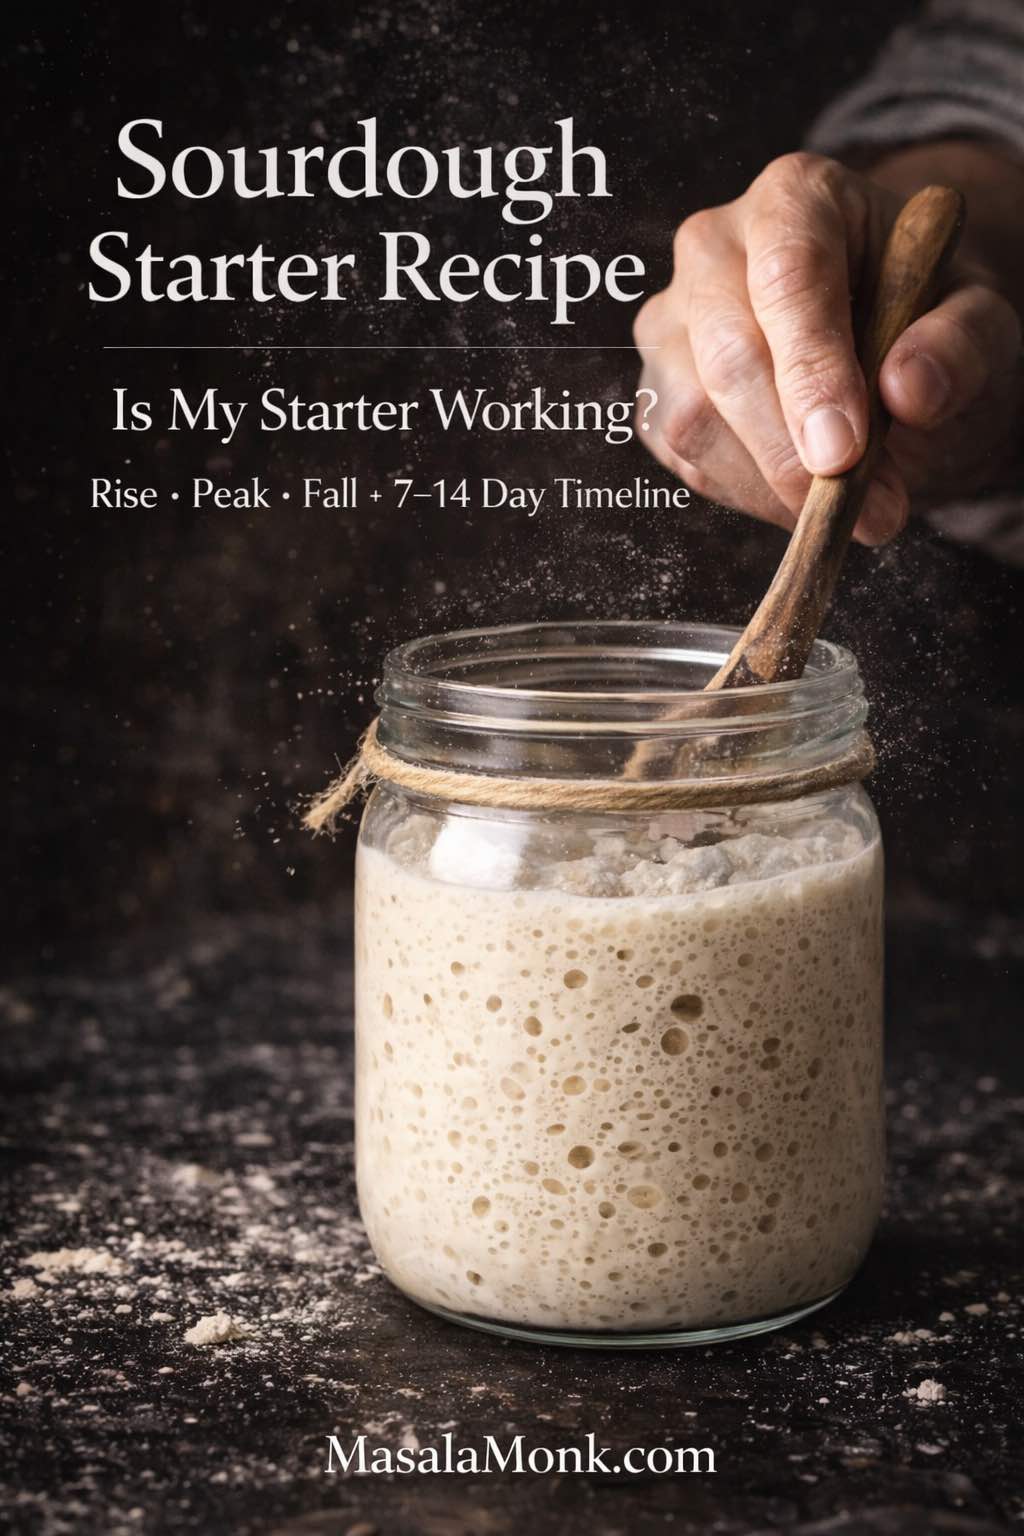
There’s a particular kind of satisfaction that comes from opening a jar, giving it a stir, and watching it wake up—bubbles rising, the surface smoothing out, the aroma turning from plain flour into something gently tangy and alive. A sourdough starter can feel mysterious at first, yet once you learn the rhythm, it becomes one of the most dependable things in your kitchen.
This sourdough starter recipe is designed to be steady rather than fussy. You’ll start with flour and water, build strength over several days, then settle into a feeding routine that fits your real schedule—whether you bake often, only on weekends, or “when life allows.” Along the way, you’ll learn what an active sourdough starter actually looks like, how to feed it without stress, how to manage discarded sourdough starter without wasting it, and how to rescue a jar that seems to have lost its spark.
When your starter is finally ready to bake, you can move seamlessly into your sourdough bread recipes and start turning that jar into loaves, rolls, buns, and more.
Sourdough starter: what it is, and why it’s worth keeping
A sourdough starter is a culture of wild yeast and lactic acid bacteria. Together, they turn flour and water into a living leavening system—one that creates lift, adds flavor, and develops the kind of crust and chew people fall in love with. Even more importantly, it becomes yours: your kitchen’s temperature, your flour choices, your feeding rhythm, and your preferences all shape it.
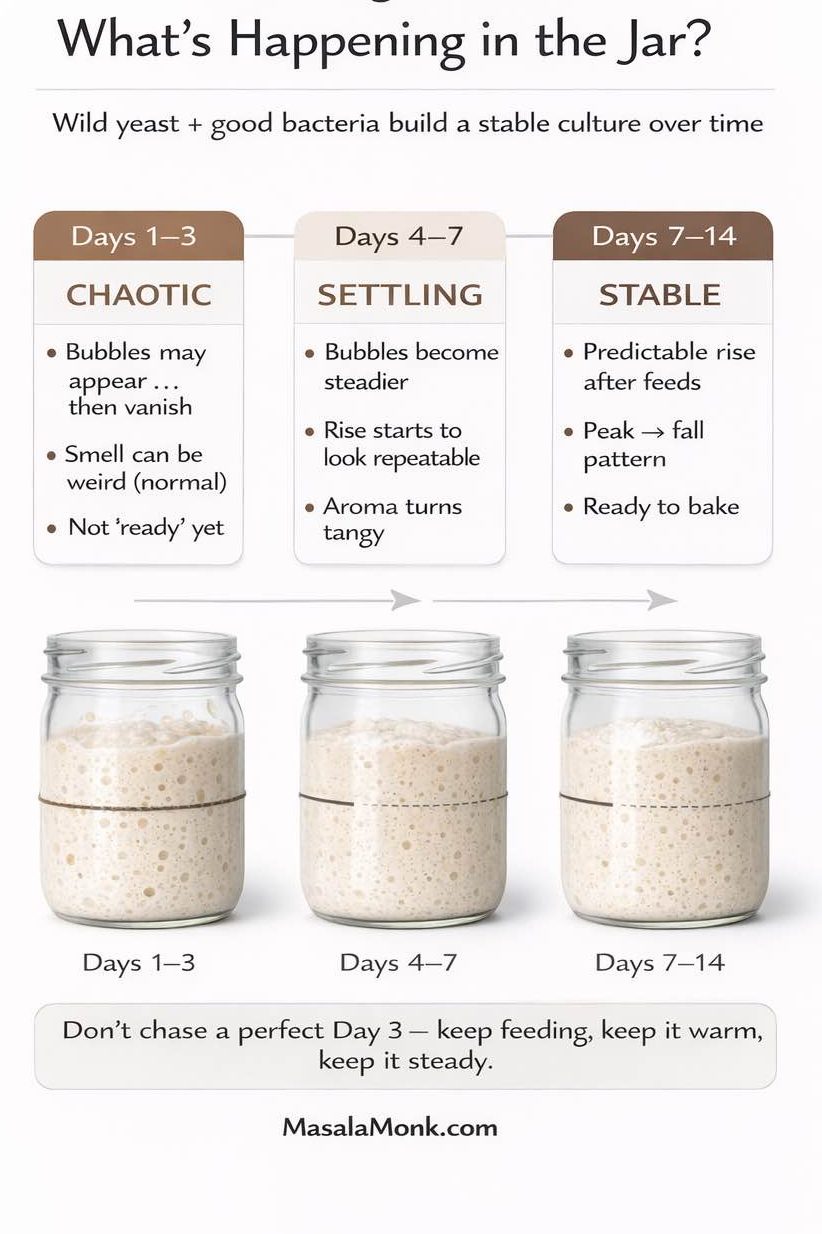
At the beginning, the jar can look chaotic. One day it might surge with bubbles; the next day it might sit quietly, as if it forgot what it was supposed to do. That’s normal. Early activity often comes from a shifting cast of microbes, and it takes time for the stable, sourdough-friendly community to establish itself.
So, instead of expecting perfection on day three, aim for something calmer: repeat the same simple routine, keep conditions steady, and let the starter find its balance.
Also Read: Chicken Adobo — Step-by-Step Recipe — Classic Filipino Adobong Manok
Sourdough starter recipe ingredients
You only need two ingredients, although the choices you make can change how quickly the culture strengthens.
Flour
All-purpose flour works well. Still, many starters develop faster and more reliably with some whole grain flour, because the bran and germ bring extra nutrients and microbes. For that reason, including a portion of whole wheat flour for sourdough starter feeds can be a genuine advantage, especially in the first week.
If you’re using atta or choosing among common Indian wheat flours, you’ll often get better results with fresher flour that smells clean and slightly sweet. If you want a practical reference when you’re deciding what to keep in the pantry, best wheat flour (atta) in India is a useful companion.
Water
Room-temperature water is ideal. Filtered water can help if your tap water is heavily chlorinated. If you only have tap water, letting it sit uncovered for a while can reduce chlorine in some areas, although that depends on local treatment methods.
Simple tools that make life easier
You can begin with a jar and a spoon. However, a small kitchen scale quickly becomes your best ally because it keeps your feeding ratios consistent.
If you like a minimalist “starter kit” setup, think of it like this: jar + scale + spatula. Everything else is optional. Later in this guide, you’ll see what belongs in a sourdough starter kit and what you can skip without losing quality. For a broader kitchen setup that supports fermentation and baking, essential kitchen tools is a helpful internal reference you can explore when you’re ready.
Also Read: Sweetened Condensed Milk Fudge: 10 Easy Recipes
Sourdough starter recipe method: Day 1 to Day 7
This sourdough starter recipe uses a classic approach: equal parts flour and water by weight. It’s straightforward, repeatable, and easy to adjust later.
Day 1: Begin
- Add 50g flour and 50g water to a clean jar.
- Stir until no dry flour remains.
- Scrape down the sides.
- Loosely cover the jar and leave it at room temperature.
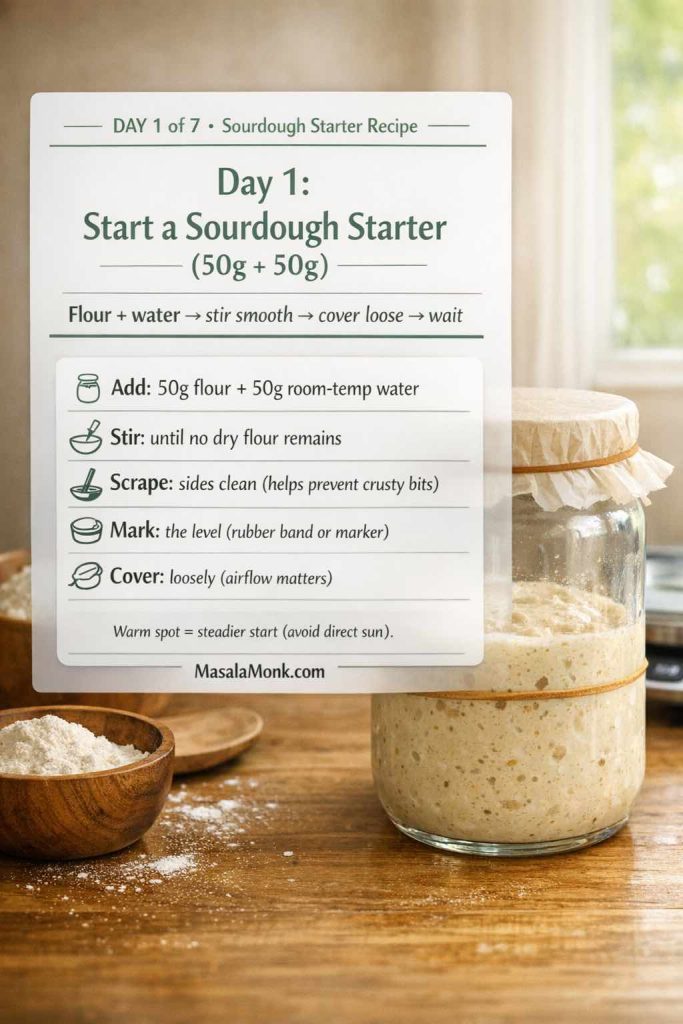
If your kitchen is chilly, place the jar somewhere gently warm—near a router, inside an off oven with the light on, or in a cozy corner away from drafts. Warmth doesn’t force success, although it does encourage steadier fermentation.
Day 2: Stir and observe
Stir once or twice during the day.
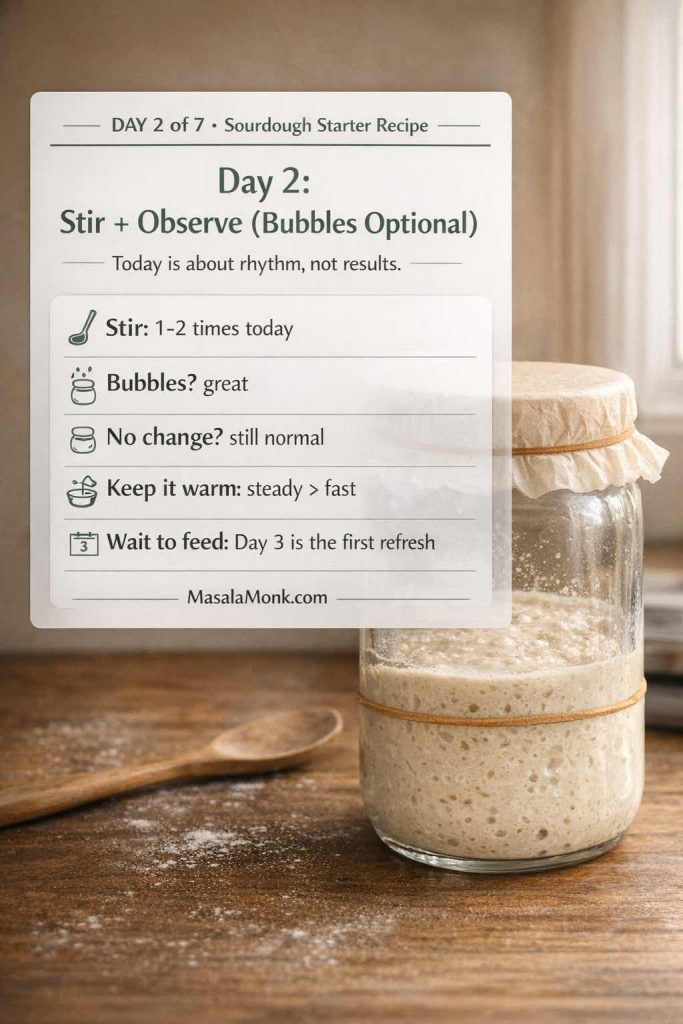
You might see a few bubbles. Alternatively, it might look unchanged. Either way, keep going. Early calm is not failure; it’s simply the quiet part before the culture strengthens.
Day 3: First feed (discard + refresh)
- Discard all but 50g of what’s in your jar.
- Add 50g water and 50g flour.
- Stir thoroughly, then mark the level with a rubber band or marker.
- Cover loosely again.
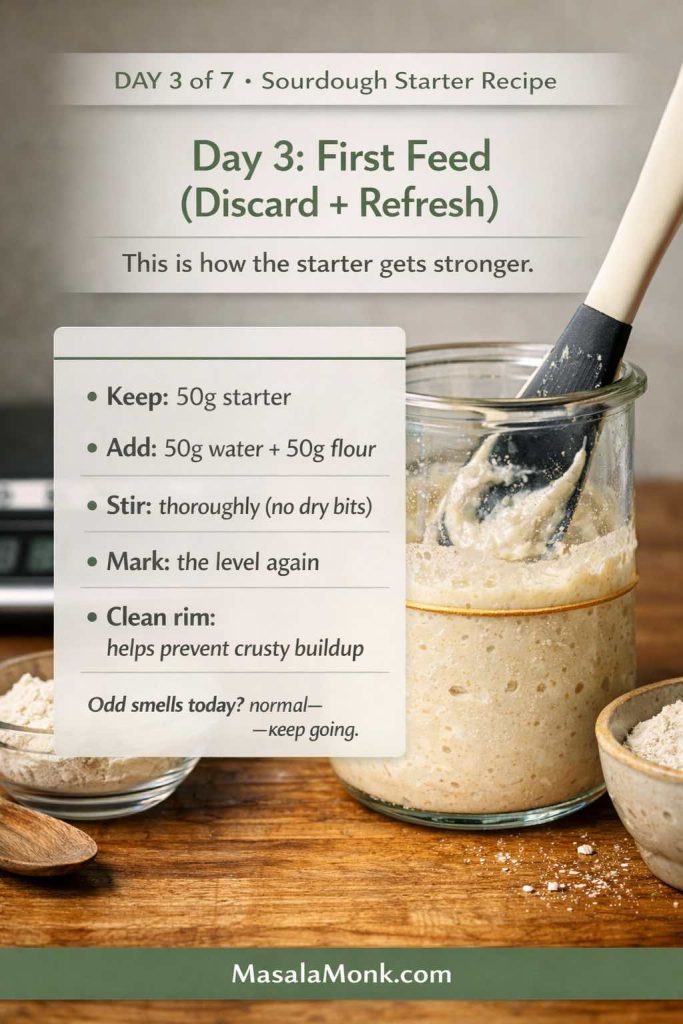
Many starters smell “odd” around day 3 or day 4. That stage passes. Keep your jar clean around the rim, use a clean spoon, and continue.
Day 4: Repeat the feed
Repeat the same discard and feed:
- Keep 50g starter
- Add 50g water + 50g flour
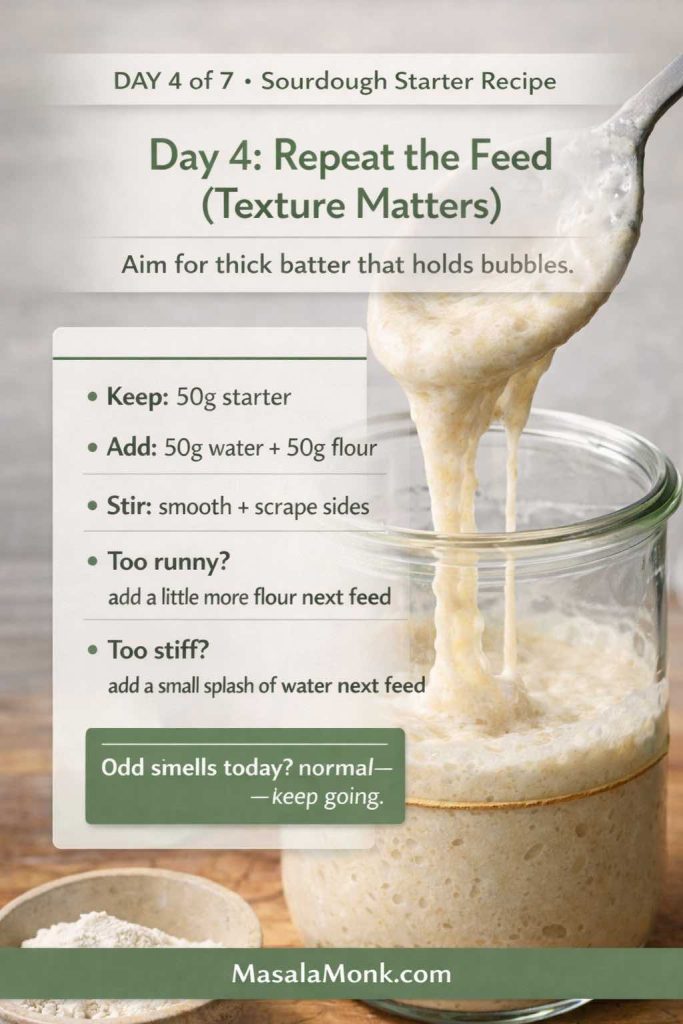
As you stir, notice the texture. You want something like thick batter. If it’s too watery, it won’t trap gas well. On the other hand, if it’s too stiff, fermentation can slow. Adjust gradually rather than dramatically.
Day 5: Shift toward strength
If you see clear bubbling and some rise, strengthen the culture with a slightly higher feed ratio. This helps prevent the starter from becoming overly acidic too quickly.
Try:
- Keep 25g starter
- Add 50g water + 50g flour
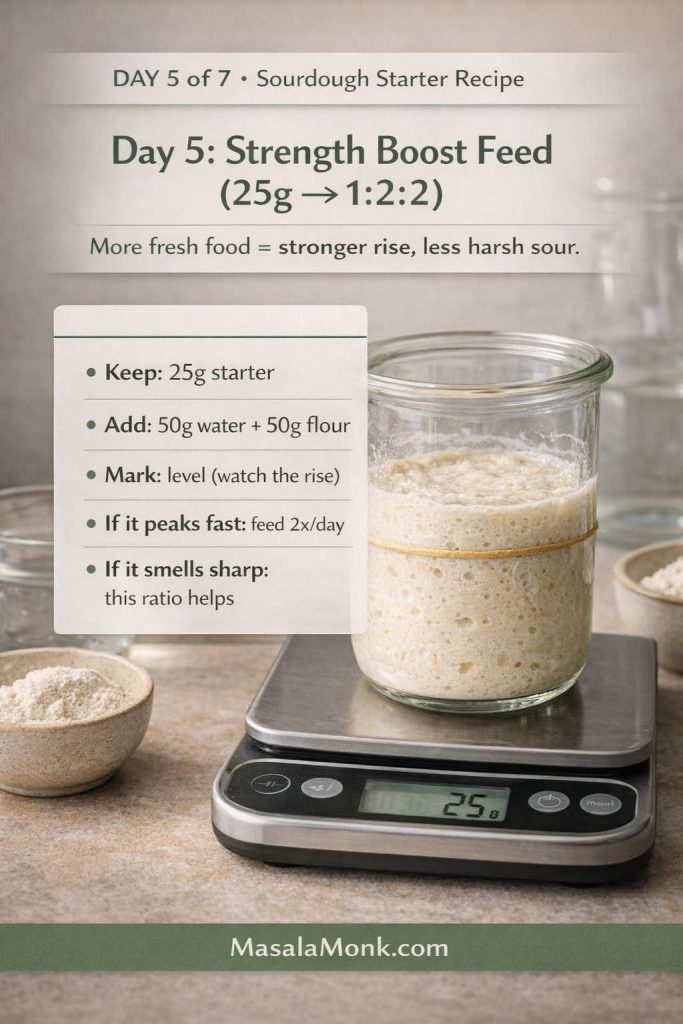
Feed once a day if activity is modest. Feed twice a day if the starter rises and falls quickly or smells hungry and sharp by evening.
For a reliable reference on the logic of feeding and maintaining a starter—especially once you move into predictable routines—this resource on feeding and maintaining a sourdough starter is a solid companion when you want a second set of eyes on ratios and timing.
Day 6: Look for a pattern, not a miracle
By now, the starter should be showing more consistent bubbles. You may also see a clearer rise after feeding, even if it doesn’t double yet.
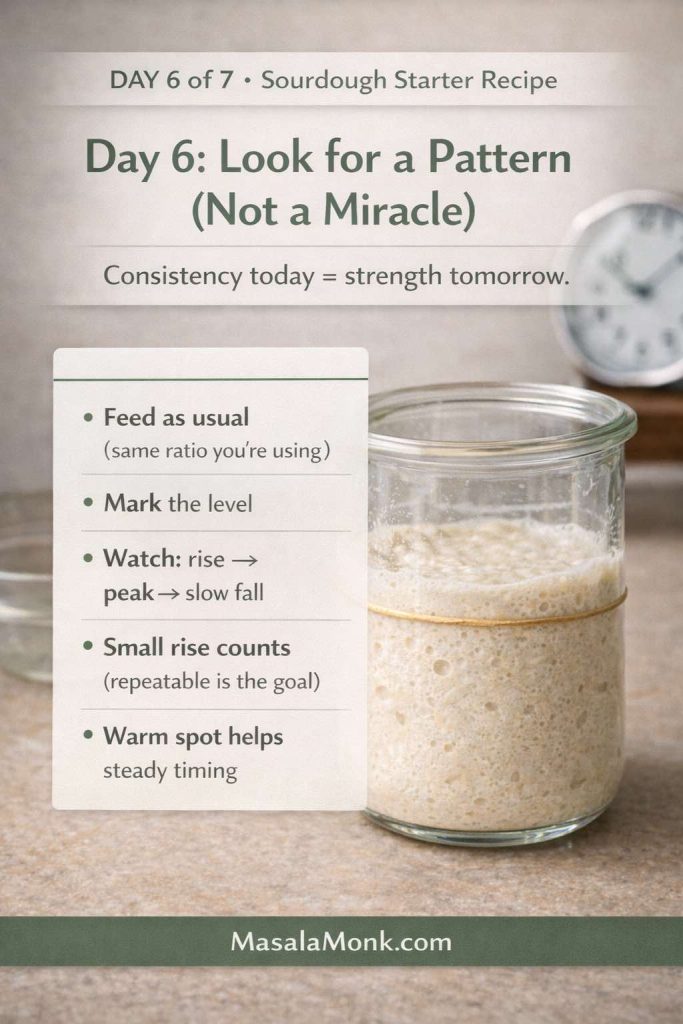
At this stage, the goal is repeatability. One huge rise followed by two flat days can happen early. Still, a starter that rises a little after every feed is moving in the right direction.
Day 7: Active sourdough starter checkpoint
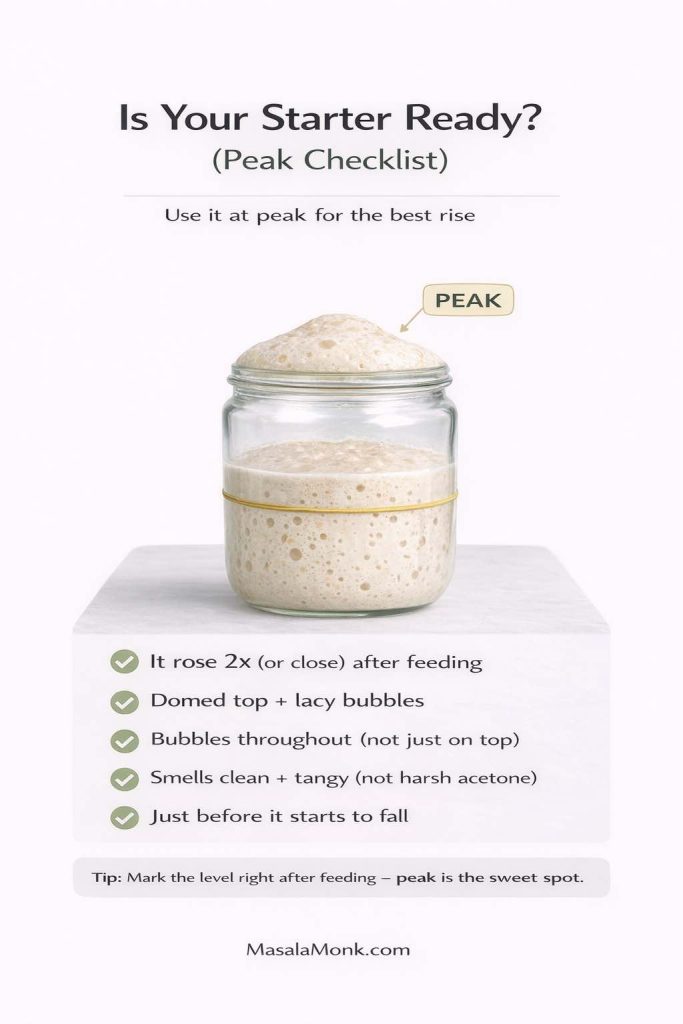
An active sourdough starter usually shows several traits together:
- It rises reliably after feeding (often close to doubling once it matures)
- It smells pleasantly tangy, fruity, or mildly yogurty
- Bubbles appear throughout, not just along the surface
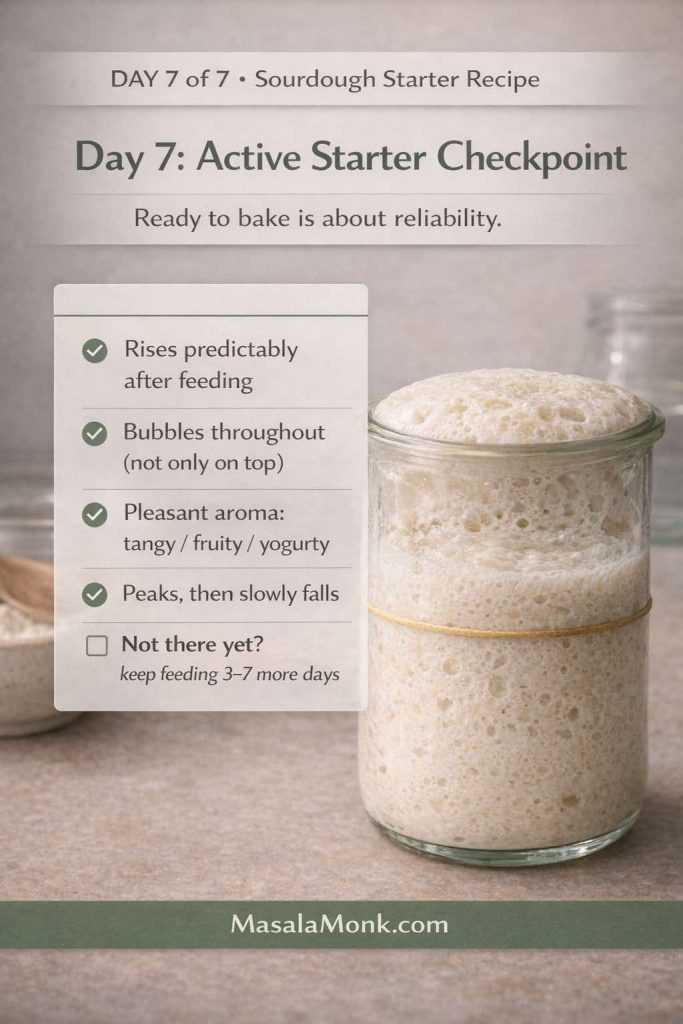
If you’re not there yet, don’t force it. Continue the routine for a few more days. Many starters take 10–14 days to become fully dependable, especially in cooler kitchens or with lower-protein flours.
For a deeper explanation of the “starter at peak” idea—what it looks like and why it matters—this Serious Eats sourdough starter guide is useful when you want to fine-tune timing.
Also Read: Peanut Butter Fudge: Recipes & Guide (8 Methods + Easy Variations)
Making sourdough starter more reliable: what helps most
Once you understand the levers, starter-building becomes much less confusing.
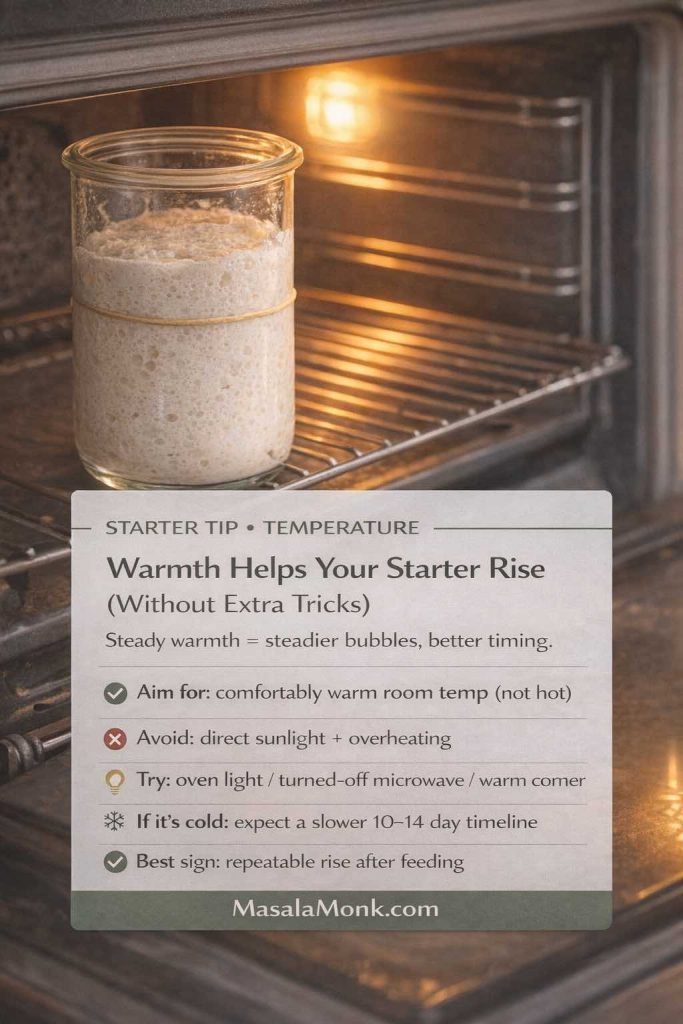
Warmth: your quiet advantage
A cold kitchen slows fermentation. A gently warm spot smooths out the process. Even a small change can help: moving your jar away from a cold window, or keeping it in a turned-off microwave between feeds.
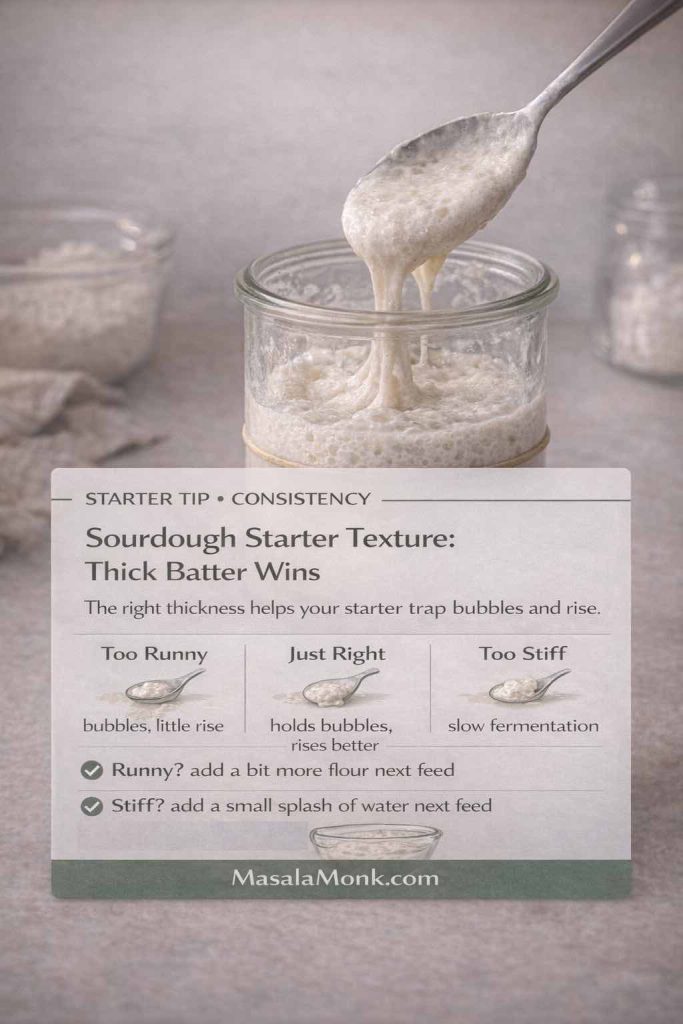
Consistency: aim for thick batter
If your starter pours like milk, it struggles to trap gas. Instead, aim for something thicker—like pancake batter that slowly drops from a spoon. If needed, add a touch more flour at the next feed.
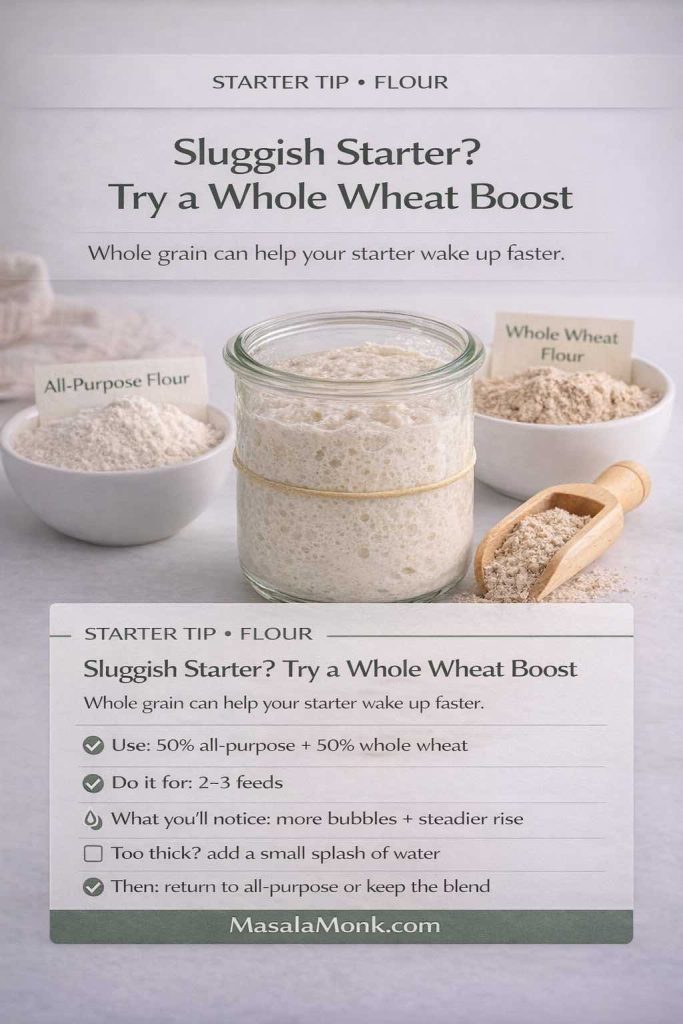
Flour choice: use whole wheat strategically
If the starter seems sluggish, adding whole wheat can help. Many bakers find that whole grain flour gives the culture extra nutrition and speeds up activity, especially early on.
You don’t have to switch permanently. A simple approach works well:
- For 2–3 feeds, use 50% all-purpose + 50% whole wheat
If you’re curious about why different flours behave differently in starters, this best flour for sourdough starters investigation offers a clear breakdown.
Also Read: 10 Vegan Chocolate Cake Recipes (Easy, Moist, & Dairy-Free)
Feeding sourdough starter: daily routine that doesn’t take over your life
Once your starter is established, feeding becomes a small habit rather than a project.
A simple daily feeding ratio
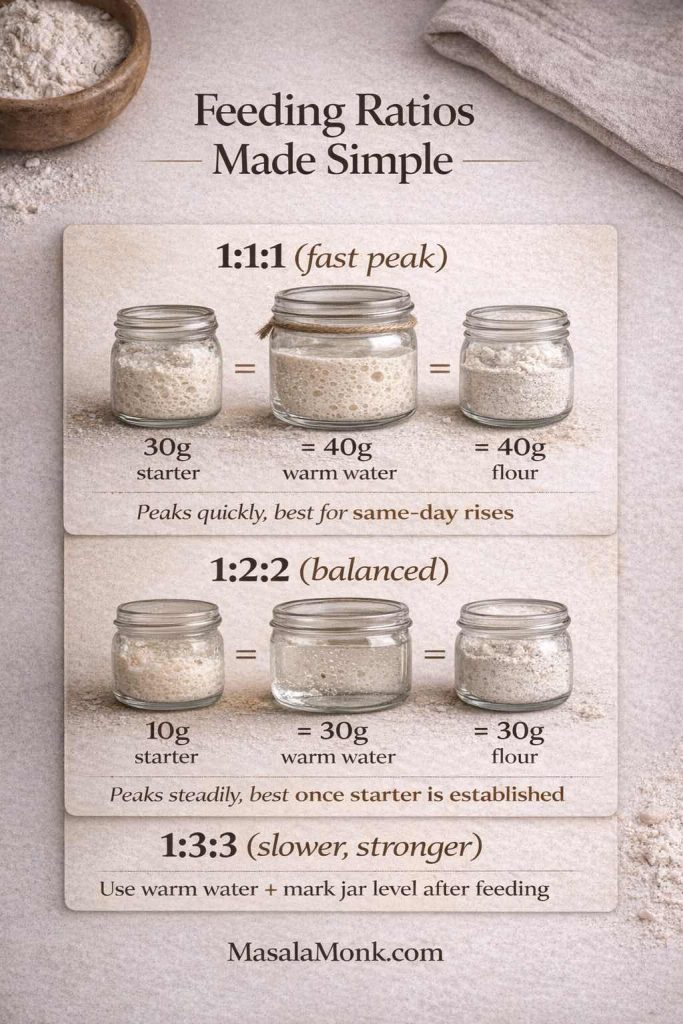
A steady baseline is:
- 1:1:1 (starter : water : flour by weight)
That said, slightly larger feeds can keep the culture stronger and less acidic:
- 1:2:2 or 1:3:3
For example:
- Keep 20g starter
- Add 40g water + 40g flour (1:2:2)
This is a gentle way to support a starter that runs sour or seems weak.
Low-waste maintenance (smaller starter, same power)
If you don’t bake every day, you don’t need a giant jar. Keeping a smaller amount means you discard less, while still maintaining strength.
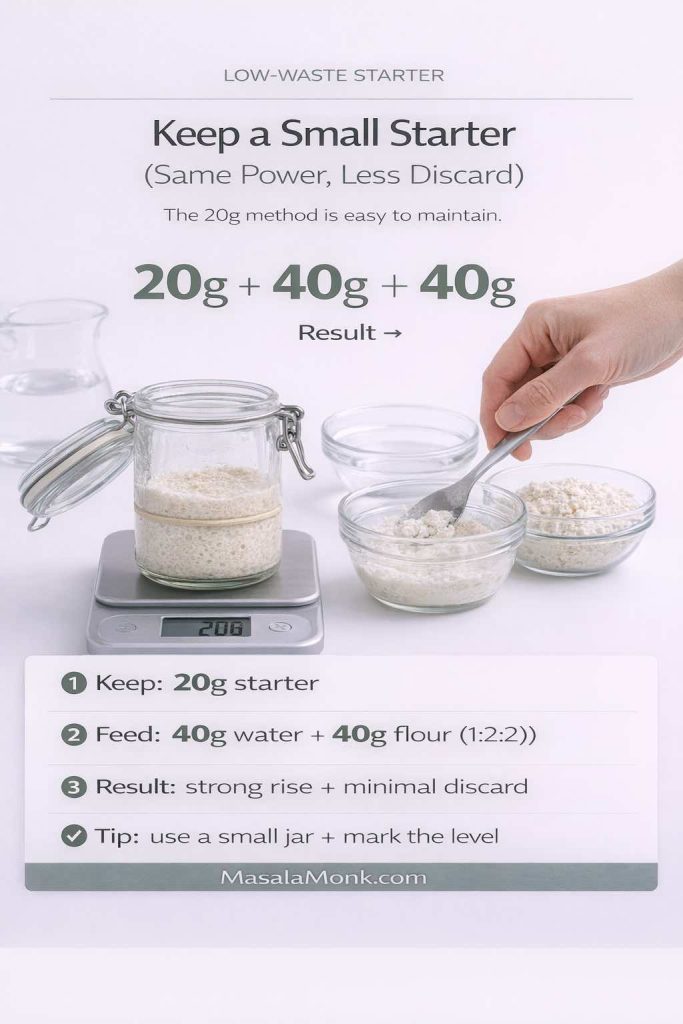
A practical approach:
- Keep 20–30g starter
- Feed 40–60g water + 40–60g flour
If you want a well-explained philosophy around reducing waste while maintaining performance, keeping a smaller sourdough starter to reduce waste is a helpful reference when you’re dialing in your routine.
Also Read: Kahlua Drinks: 10 Easy Cocktail Recipes (Milk, Vodka, Coffee)
Feeding sourdough starter without a scale
Sometimes you’re traveling. Sometimes the scale battery dies. And then sometimes you simply want to keep things simple for a day. You can feed without a scale and still keep a starter healthy, as long as you aim for the right texture.
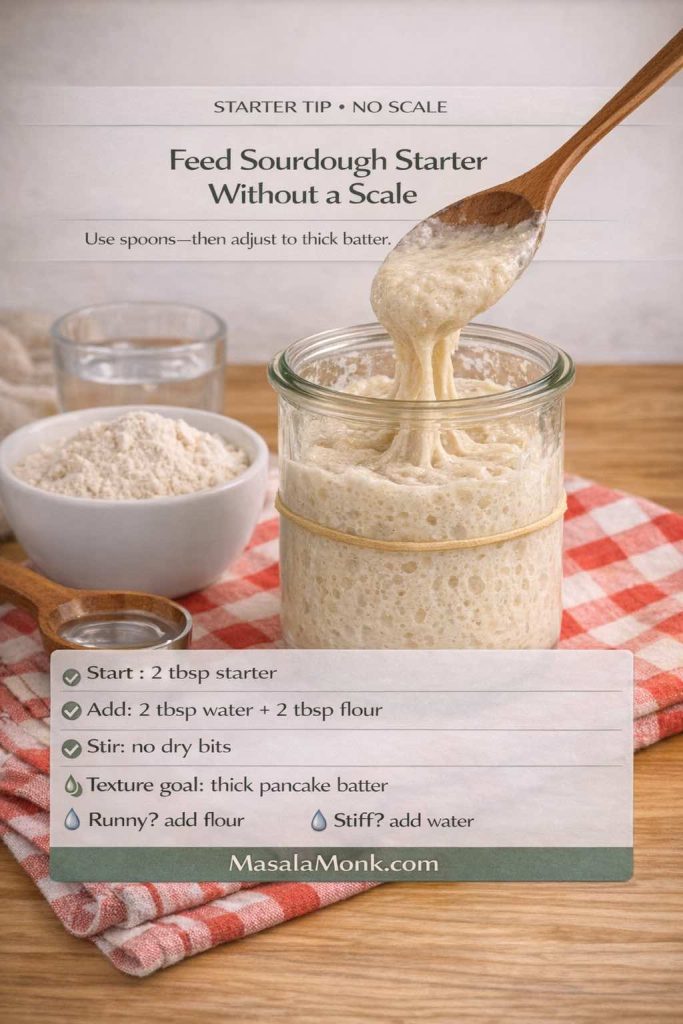
Start with roughly equal spoonfuls of flour and water, then adjust until the mixture looks like thick batter. If it feels thin, add flour. If it feels stiff, add water.
The most important part is consistency across a few feeds. If you change methods every day, the starter can feel unpredictable. Conversely, if you stick to one approach for several days, it settles into a rhythm again.
Also Read: Hot Chocolate Coffee: 3 Easy Recipes (Cocoa, Mix, or Espresso)
Active sourdough starter: how to know it’s ready to bake
A strong starter behaves like a reliable friend: it shows up when it says it will.
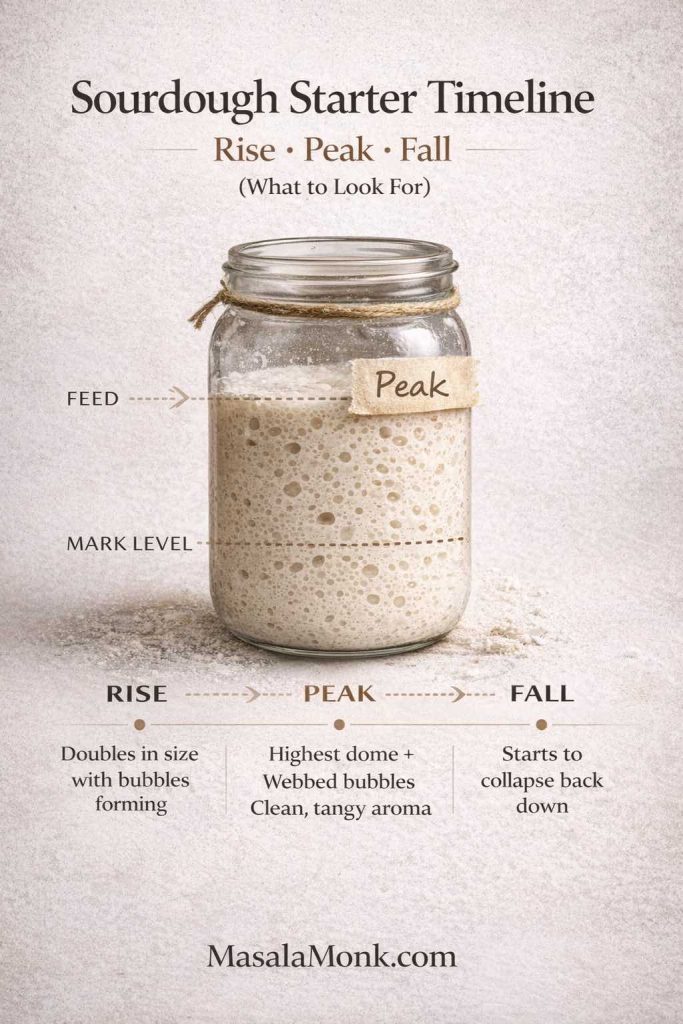
The rise pattern
After feeding, many starters:
- bubble steadily,
- rise and dome slightly,
- then flatten and fall once they’ve peaked.
That “rise and fall” rhythm matters because you generally get best baking performance when the starter is used near peak, when it’s most buoyant and energetic.
The float test (useful, but not absolute)
The float test can be one clue: a spoonful of starter floating in water suggests it’s trapping gas. Still, it’s not a verdict. Hydration and flour type affect results. Use it as a hint, then rely more on the rise pattern and smell.
Also Read: Cappuccino Recipe: How to Make a Perfect Cappuccino at Home
Sourdough starter in the fridge: storing it without losing momentum
If you bake occasionally, refrigeration makes starter life easier.
Feeding refrigerated sourdough starter: a weekly rhythm
Here’s a simple weekly plan:
- Feed your starter.
- Leave it at room temperature until you see early activity (a few bubbles and slight expansion).
- Refrigerate it, loosely covered.
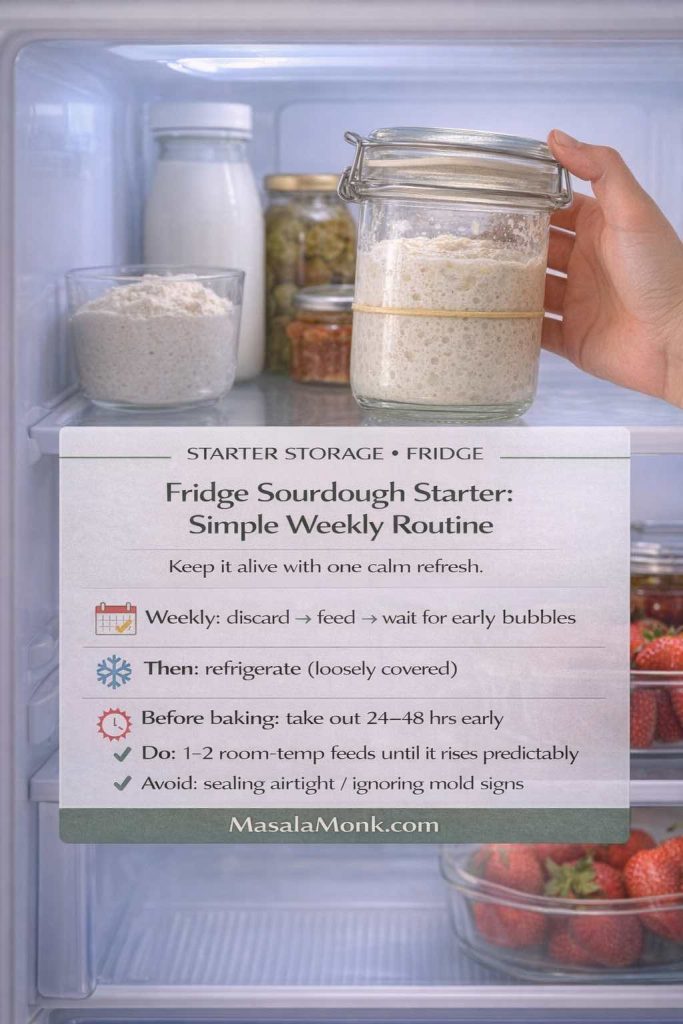
Once a week:
- Take it out
- Discard down to a small amount
- Feed it
- Return it to the fridge after it shows early activity
This method keeps the starter stable without demanding daily attention.
For a clear overview of sourdough basics and starter care, extension resources can be helpful when you want straightforward guidance, such as Colorado State’s sourdough basics.
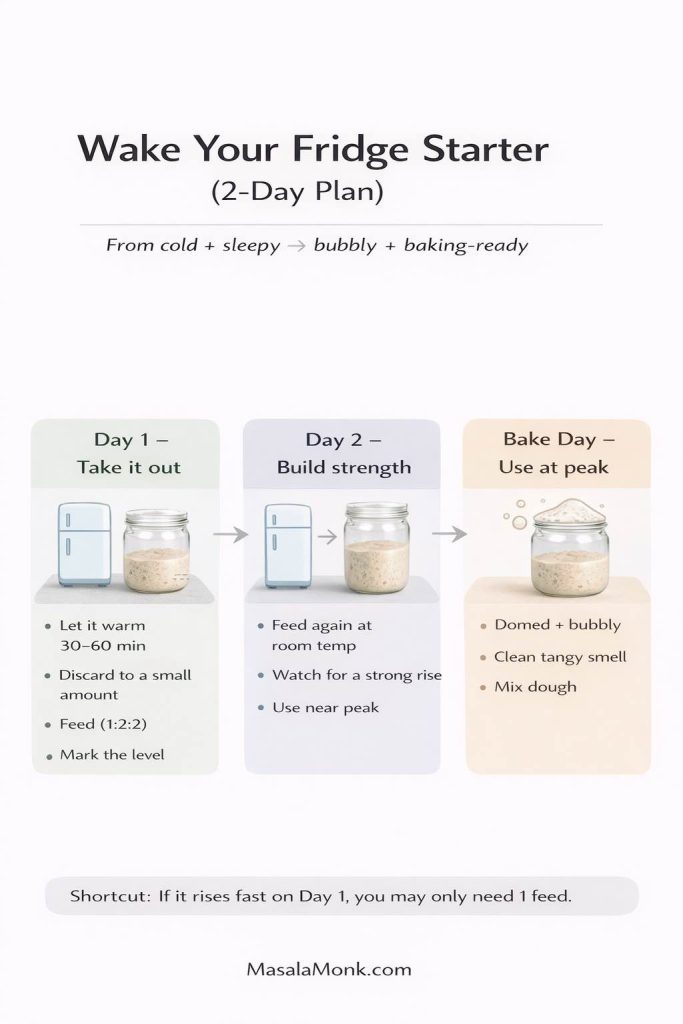
Feeding sourdough starter from the fridge before baking
When you want to bake, give your starter a “wake-up” window:
- Pull it out 24–48 hours before mixing dough
- Feed it, let it rise
- Feed again if needed until it reliably rises on schedule
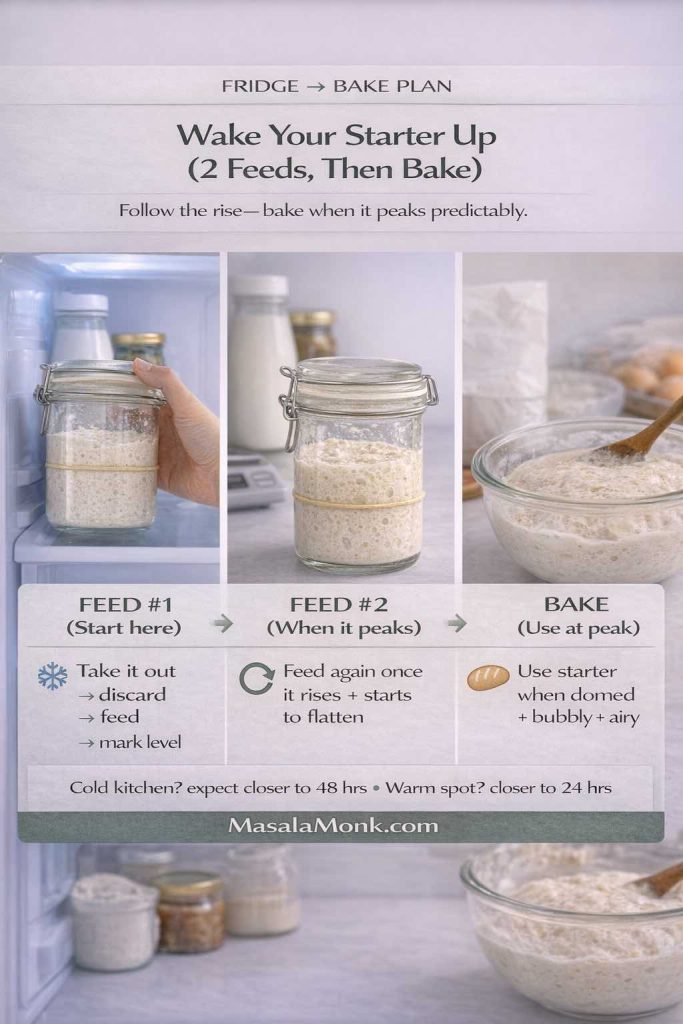
This routine builds strength quickly, especially after longer refrigeration.
Once it’s lively again, you can head into your sourdough bread recipes and choose the bake that matches your mood—boule, sandwich loaf, rolls, or something else.
Also Read: Cold Brew Espresso Martini: How to Make It (Step-by-Step Recipe)
Whole wheat flour for sourdough starter: how to use it well
Talking about whole wheat, it can be a powerful ally, though it behaves a little differently than white flour.
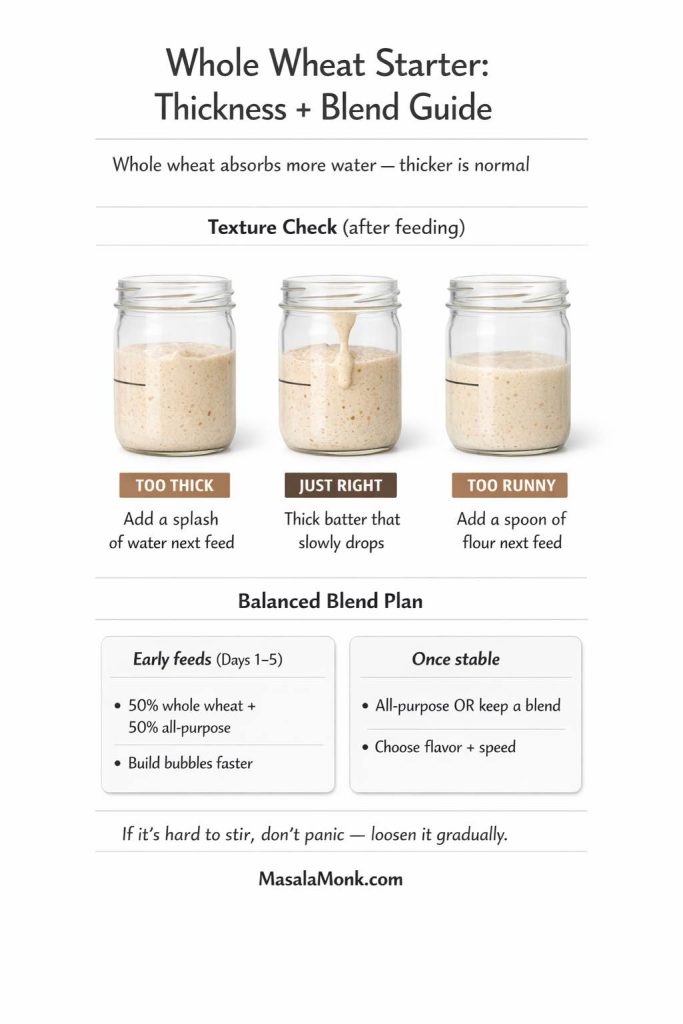
Because whole wheat absorbs more water, it often makes your starter feel thicker. That’s not a problem. In fact, a slightly thicker starter can trap bubbles more effectively. Still, if it becomes difficult to stir, add a small splash of water at the next feed.
A balanced approach tends to work best:
- Use whole wheat in early feeds to build activity
- Then shift to all-purpose once the starter is stable, or keep a blend if you prefer the flavor and speed
If you want to explore gluten and how flour structure affects baking outcomes in general—especially if you’re considering gluten-free routes later—what gluten is and how it works is a useful internal reference.
Also Read: Iced Coffee: 15 Drink Recipes—Latte, Cold Brew, Frappe & More
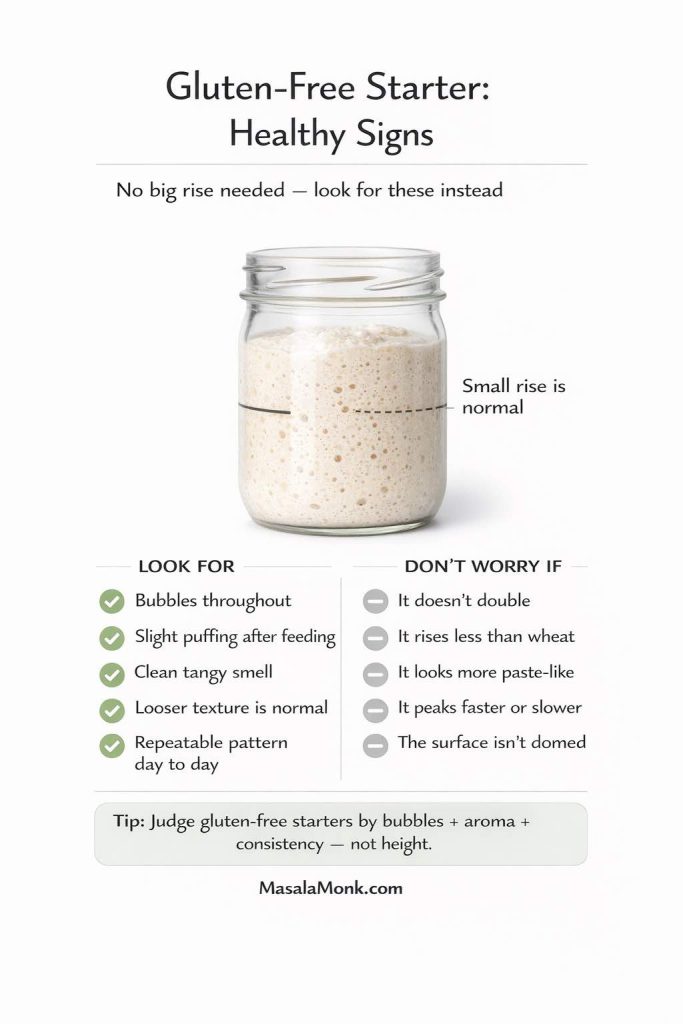
Gluten-free sourdough starter: a simple sidebar
If you’re working with gluten-free flours, the process is similar: flour + water + consistent feeding. However, gluten-free starters often behave differently because they don’t form the same elastic network. As a result, rise can be less dramatic, even when the starter is healthy.
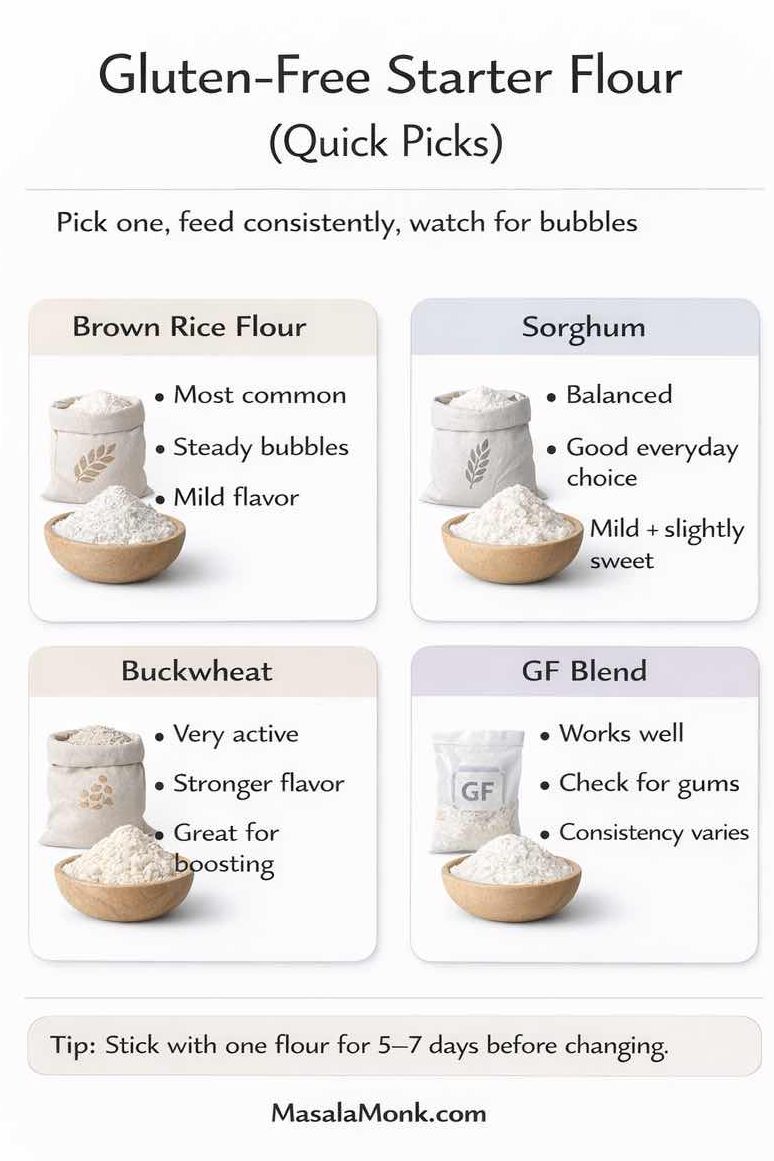
For a detailed gluten-free starter method, King Arthur’s gluten-free sourdough starter recipe is a solid reference. If you’re also exploring alternative flours for different dietary needs, you might find keto-friendly flour options useful as a general internal guide to how non-wheat flours behave in baking.
Also Read: Cranberry Moscow Mule Recipe: A Festive Holiday Cocktail With Easy Variations
Sourdough starter kit: what belongs in it (and what doesn’t)
A starter doesn’t require a shopping spree. Still, some tools genuinely make the process easier, especially if you want consistent results.
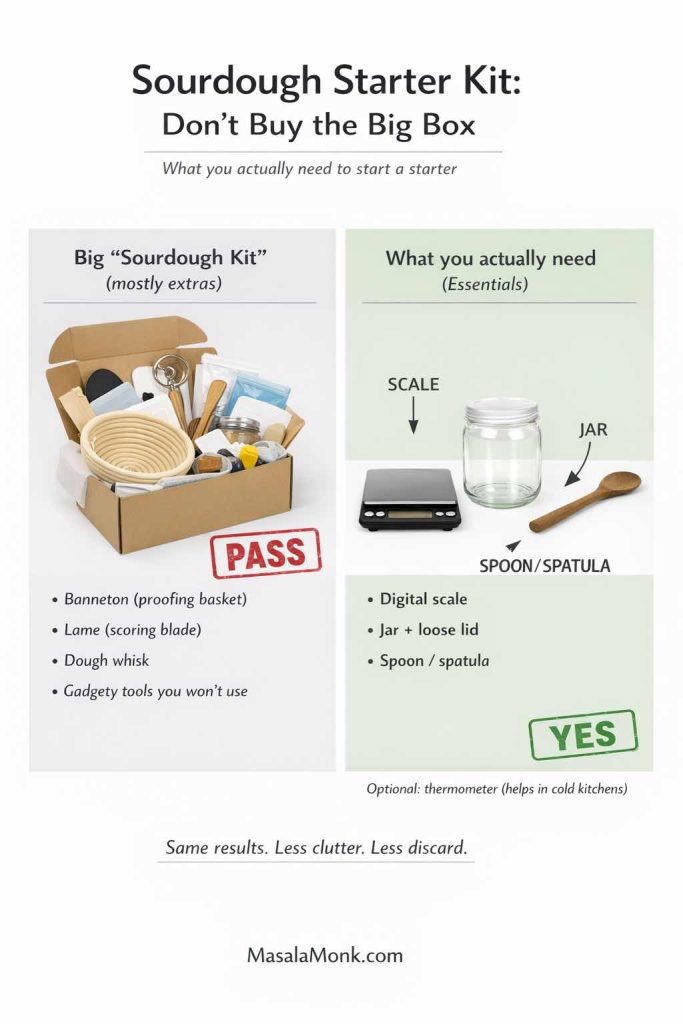
The essentials
- A clear jar (or two, so you can swap to a clean one occasionally)
- A spoon or spatula
- A scale
- A loose cover
That’s enough for most people, even if they never buy a “kit.”
The nice-to-haves
- Extra jars for cleaner maintenance
- A small silicone spatula (it scrapes well)
- A thermometer if you like precision
- A warm spot solution for cold kitchens
If you’re comparing options or considering the idea of a best sourdough starter kit, focus on function rather than brand: jar size, an accurate scale, and a practical tool for stirring and scraping.
Also Read: Baked Ziti Recipe Collection: 15 Easy Variations
Sourdough starter troubleshooting: common problems, calm solutions
Even a good starter has off days. Fortunately, most issues are fixable with small adjustments.
My starter is bubbling but not rising much
Bubbles show fermentation is happening, which is good. Lack of rise can come from thin consistency or weak gluten structure (especially with certain flours).
Try this:
- Thicken slightly at the next feed by adding a touch more flour
- Keep the jar in a warmer spot
- Feed at a slightly higher ratio (1:2:2) for a few cycles
With time, the rise typically improves.
My starter smells too sour or harsh
A sharp smell often means the starter is hungry or overly acidic.

Instead of feeding the same small amount, refresh more generously:
- Keep 20g starter
- Feed 60g water + 60g flour (1:3:3)
Also, feed a little sooner than usual for a day or two. As the acidity balances, the aroma softens.
My starter has liquid on top
That liquid is commonly called hooch. It’s usually a sign of hunger.
You can either stir it in for a stronger tang or pour it off for a milder profile. Then feed.
My starter seems “stuck” after an early burst of activity
That early burst happens to many beginners. Then the jar goes quiet. It’s frustrating, yet it’s also normal.
Keep feeding consistently. Add warmth. Consider using a portion of whole wheat for a couple feeds. In most cases, the starter returns with steadier, healthier activity.
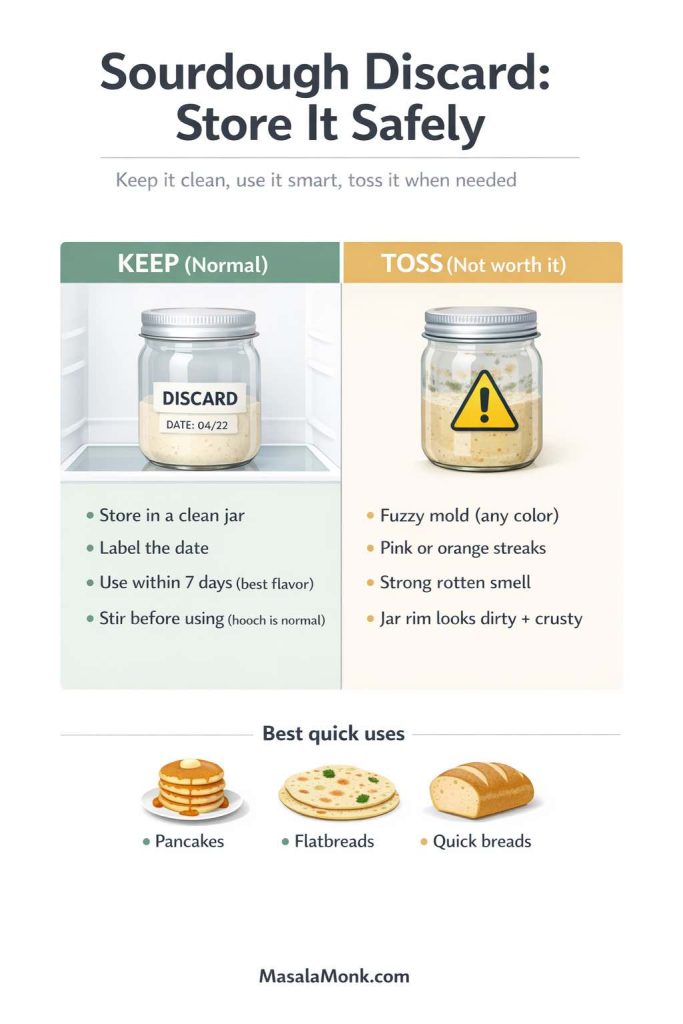
Mold vs hooch: when to discard
Here’s the simple rule: fuzzy mold is not something to negotiate with.
If you see fuzzy growth—especially green, blue, or white fuzz—discard the starter and start again. Food safety guidance explains why mold can be risky, particularly in soft foods where it can spread beyond what you see, such as USDA guidance on molds in food.
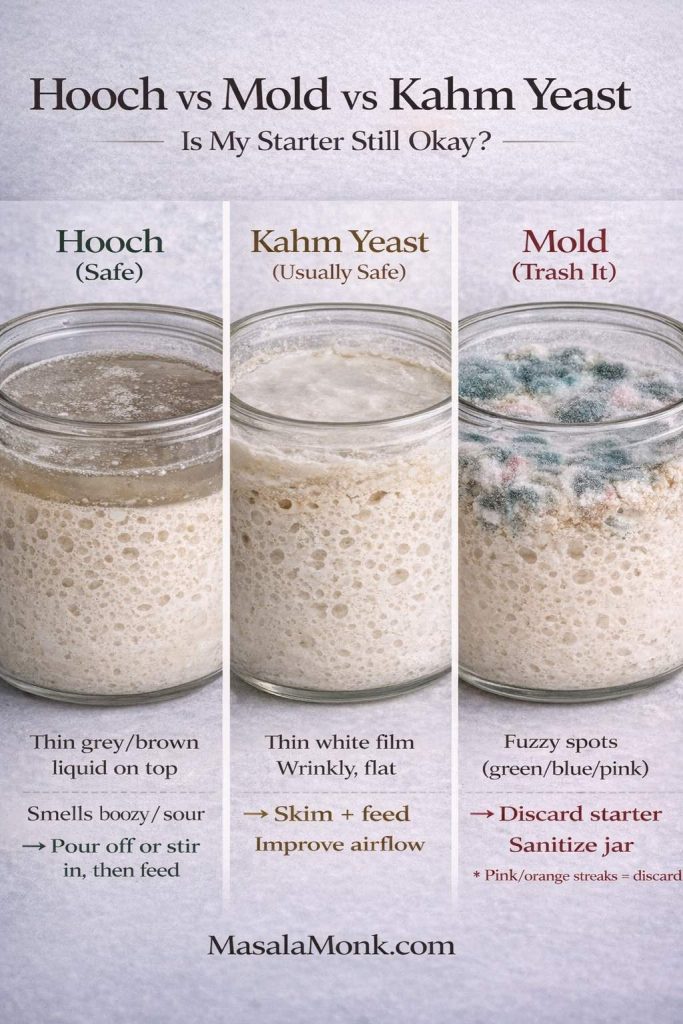
On the other hand, a grayish liquid layer, a sharp smell, or a dark “skin” can happen when a starter is neglected. Those cases usually respond to discarding down to a clean portion and feeding well for a few days.
If you enjoy fermentation projects beyond sourdough—and you want a consistent “clean jar, observe daily, discard if mold” mindset—your internal posts on fermented garlic honey safety and DIY fermented fruit juices pair naturally with the same habits.
Also Read: Manhattan Cocktail Recipe (Classic + 6 Variations)
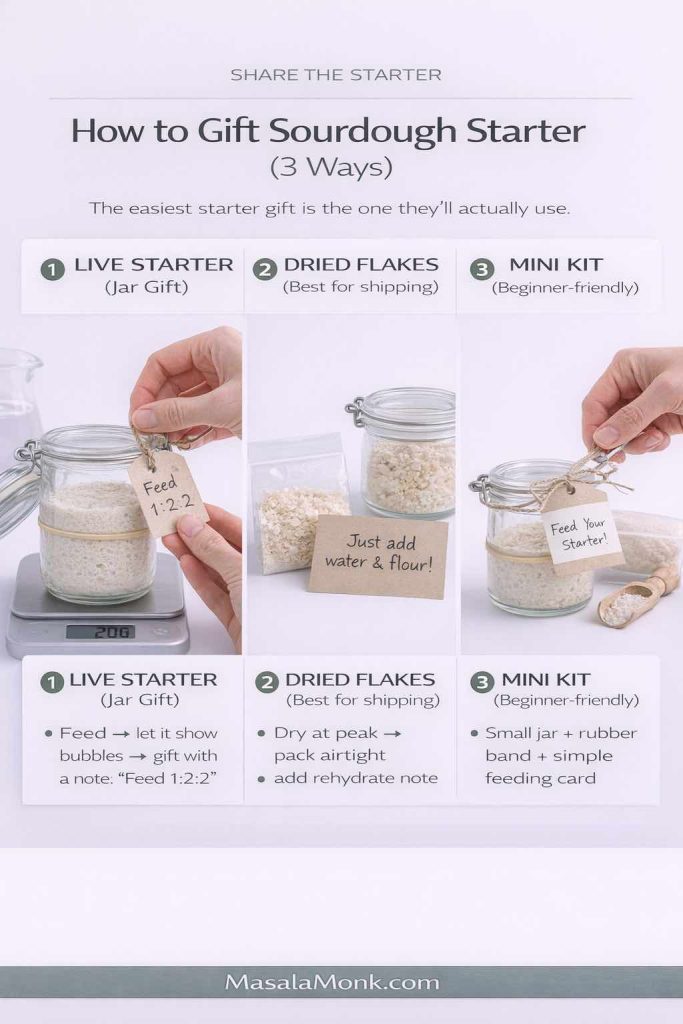
Dried sourdough starter and dehydrated sourdough starter: backup that’s surprisingly easy
Once your starter is strong, drying a small amount is like making a spare key. It’s useful if you travel, want a backup, or plan to share starter with someone else.
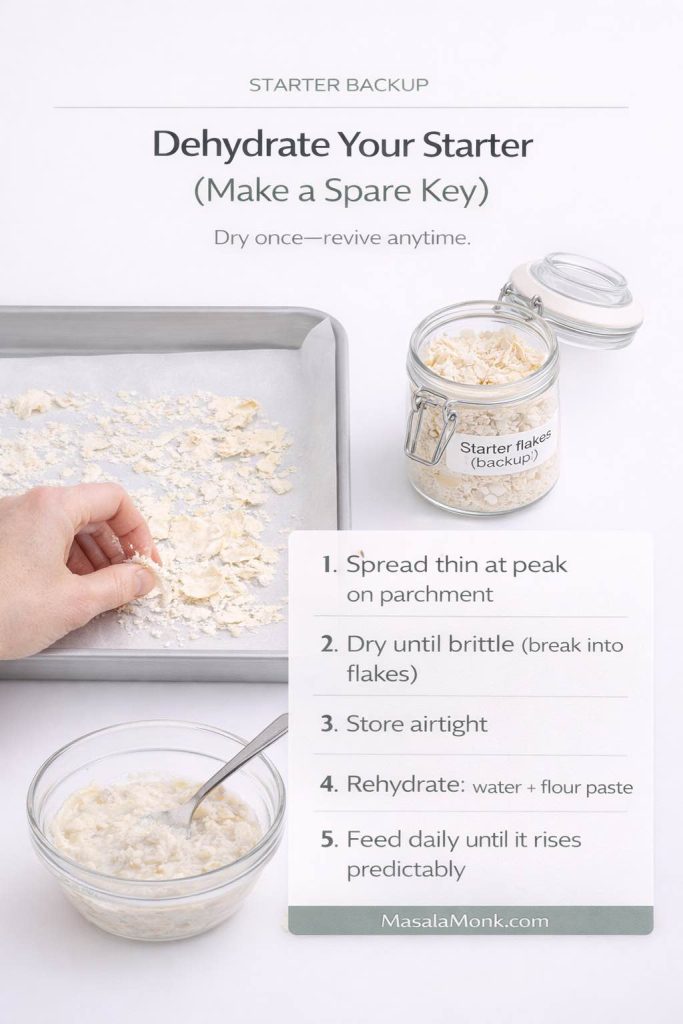
How to make a dehydrated starter
- Feed your starter and let it reach peak activity.
- Spread a thin layer on parchment paper.
- Let it dry completely until it becomes brittle.
- Break it into flakes and store airtight.
Rehydrating dried sourdough starter
To rehydrate:
- Add flakes to a little water and let them soften.
- Stir in flour to create a paste.
- Feed daily until it begins rising consistently again.
Revival can take a few days, so patience matters. Still, it’s very doable. For additional guidance on starter routine and refresh cycles, The Perfect Loaf’s starter maintenance routine is a strong reference when you want deeper context on timing and consistency. Likewise, Breadtopia has practical notes on starter care and reactivation that many home bakers find helpful, such as their starter guidance and revival information.
Also Read: Rob Roy Drink Recipe: Classic Scotch Cocktail (Perfect + Dry + Sweet Variations)
Levain starter recipe: how it fits into your starter routine
Once your starter is established, you’ll often hear the word “levain.” Levain is simply a build: a portion of starter mixed with fresh flour and water to create the amount—and the strength—you want for a specific bake.
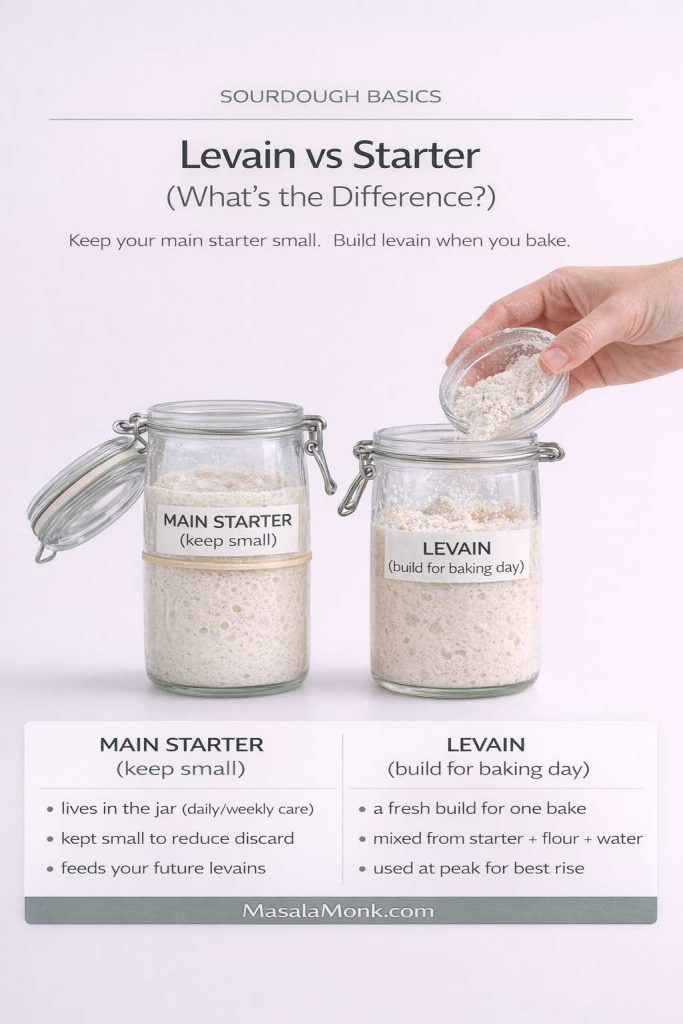
Think of it as a fresh batch made for baking day:
- You keep your main starter small
- You build levain when you need more volume or a particular flavor profile
This approach keeps your everyday maintenance simple while giving you flexibility for different breads.
When you’re ready to use levain in practice, your sourdough bread recipes make a natural next step, because you can match starter strength with a specific loaf method and timeline.
Also Read: Best Vermouth for a Negroni Cocktail Drink Recipe
Discarded sourdough starter: how to use it without feeling like you’re “wasting” anything
Discard can feel annoying at first. Then it starts to feel like a bonus ingredient—tangy, tenderizing, and useful in quick bakes.
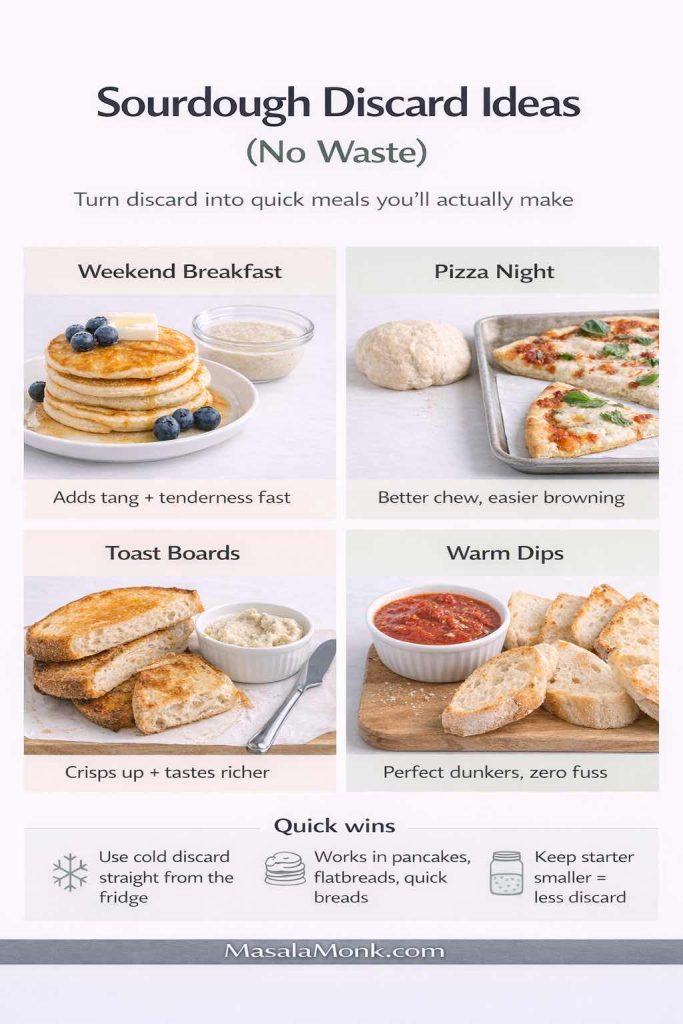
If you keep a smaller starter, you’ll naturally produce less discard. Still, even a little discard can add flavor and softness to pancakes, flatbreads, and quick breads.
- A weekend breakfast rhythm pairs beautifully with blueberry pancakes recipes, especially if you want something cozy yet quick.
- A savory night works well with pizza, where you can pair crust ideas with pizza sauce recipes for variety.
- Toast boards and sandwich nights become more interesting with spreads like pesto recipe variations.
- Warm dips and dunking bread feel effortless alongside marinara sauce.
Meanwhile, if you want a simpler “practice bake” while your starter matures—something that builds confidence without needing perfect timing—your homemade garlic bread loaf and braided coconut and banana bread are friendly, approachable options.
A calm, repeatable routine for long-term starter success
Once the starter is healthy, the best results come from a routine you can actually keep.

You bake often (several times a week)
- Keep the starter at room temperature
- Feed daily (or twice daily if warm and fast-moving)
- Use it near peak activity for baking
If you bake once a week
- Store in the fridge
- Feed weekly
- Wake it up with 1–2 room-temperature feeds before baking
And if you bake rarely
- Keep it in the fridge most of the time
- Refresh every 1–2 weeks
- Plan a couple days of feeds before baking day
This flexibility is what makes sourdough sustainable. You don’t have to serve the jar; the jar can fit your life.
Also Read: Paper Plane Cocktail Recipe + Best Amaro Substitutes & Tips
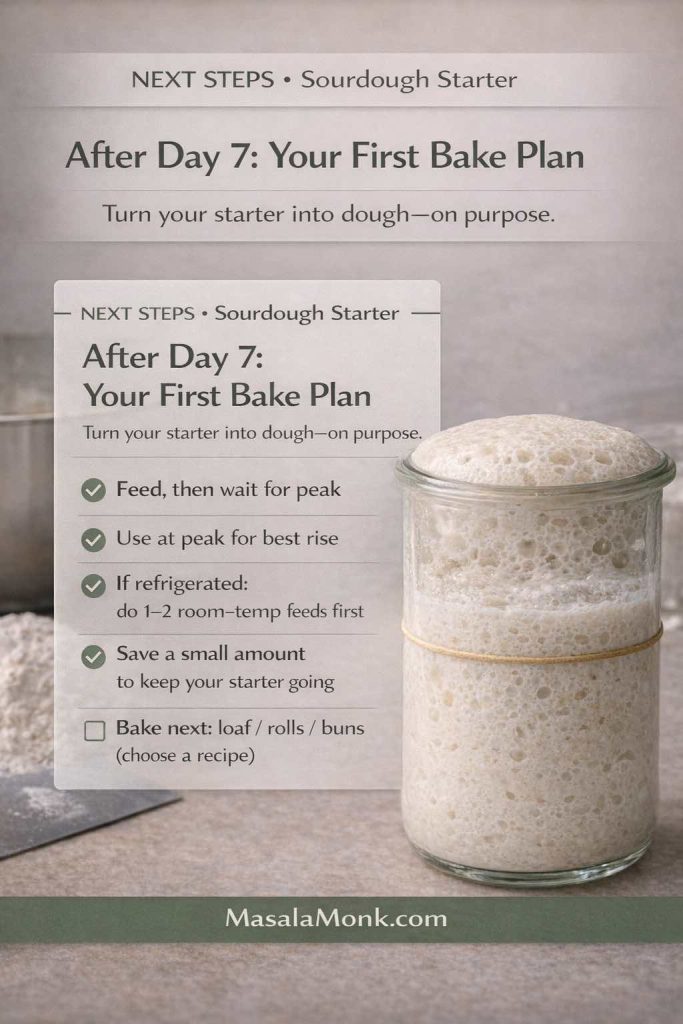
Before you bake: a small ritual that improves consistency
If you want dependable performance, especially when you’re moving from “starter building” into real dough, do this:
- Feed your starter and let it reach a strong rise.
- Feed again if needed until it rises predictably.
- Use it when it looks domed, bubbly, and lively.
Then head into our sourdough bread recipes and choose the bake that suits your day—something quick and forgiving, or something slow and deep in flavor.
A sourdough starter can begin as a jar of floury paste. Still, over time, it becomes a rhythm—one that makes your kitchen feel a little more alive, your baking more personal, and your bread more satisfying. Keep it simple, keep it steady, and let the culture do what it’s built to do.
Also Read: Green Chutney Recipe (Coriander–Mint / Cilantro Chutney)
FAQs
1) How long does a sourdough starter recipe take to work?
Most starters become reliable somewhere between 7 and 14 days. Even so, the exact timing depends on temperature, flour type, and how consistently you feed it. If your kitchen is cool, it may take longer; meanwhile, in warmer conditions it often strengthens faster. Rather than chasing a specific day, watch for a repeatable rise-and-fall pattern after feeding.
2) What’s the difference between sourdough starter and “starter dough for sourdough bread”?
They’re essentially describing the same base culture: flour and water fermented over time. “Starter dough for sourdough bread” is simply a more literal phrase some people use for sourdough starter. In practice, you’re building the same living leaven—one you can maintain indefinitely once it’s active.
3) How do I know when my starter is an active sourdough starter?
Look for consistency more than drama. A truly active sourdough starter rises predictably after feeding, shows bubbles throughout (not only on the surface), and smells pleasantly tangy or lightly fruity. Additionally, it should peak and then slowly begin to recede, which shows it’s completing a full fermentation cycle.
4) Does the float test prove my sourdough starter recipe is ready?
Not always. Although a floating spoonful can suggest good gas retention, hydration and flour type can skew results. Instead, treat it as a bonus sign. For a clearer read, rely on steady doubling (or near doubling), a domed peak, and a balanced aroma after feeding.
5) Why did my starter rise a lot on day 2 or 3, then stop?
That early surge is common. At first, a mix of microbes can create quick activity; afterward, the culture often “resets” while the more stable yeast-and-bacteria community establishes itself. Consequently, a quiet phase doesn’t mean it failed. Keep feeding consistently and it usually returns stronger.
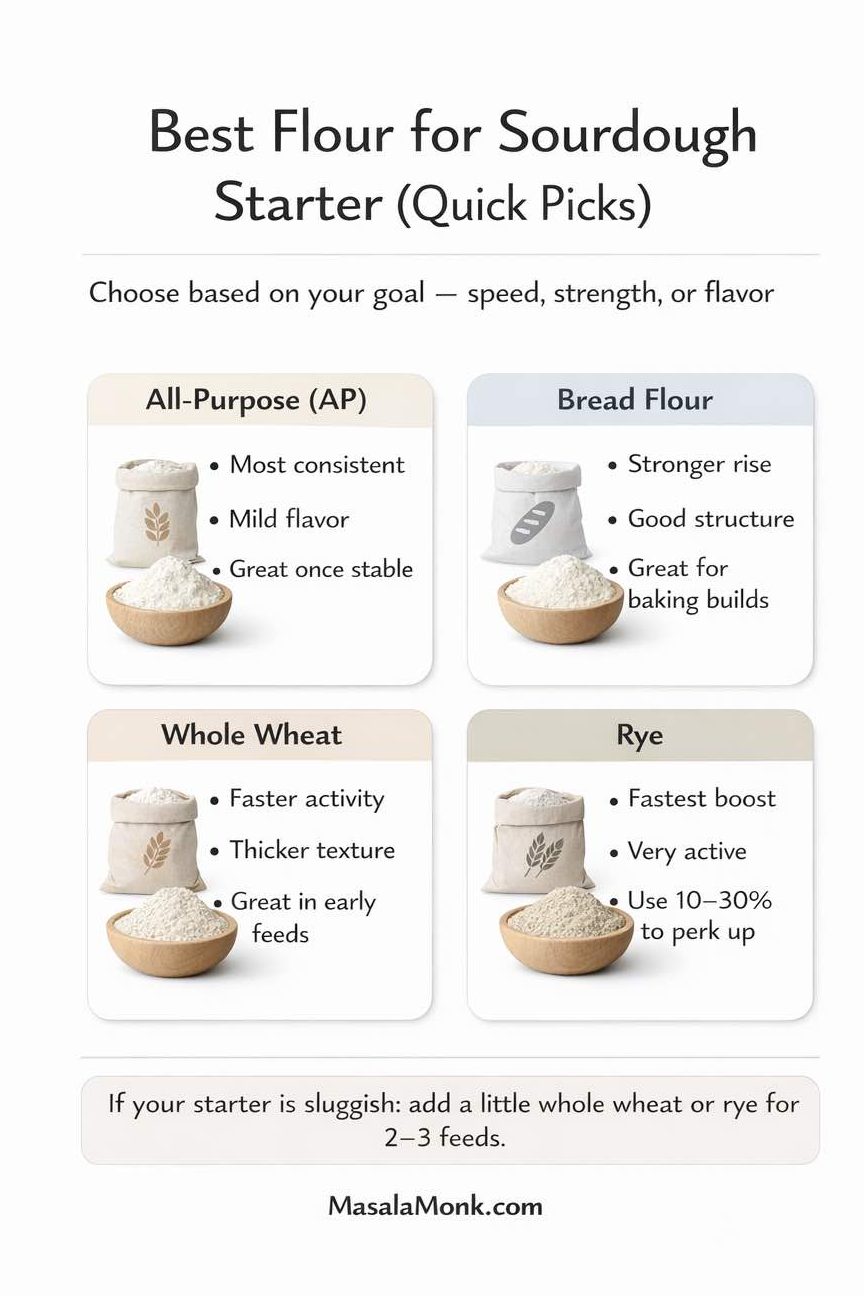
6) What’s the best flour for sourdough starter recipe success?
All-purpose flour works, yet many starters get going faster with whole grain flour, especially whole wheat or rye. Because whole grain flour carries more nutrients, it can boost activity, particularly in the first week. That said, once your starter is stable, you can switch back to all-purpose or keep a blend, depending on flavor and performance.
7) Can I make a sourdough starter with whole wheat flour only?
Yes. In fact, a whole-wheat-only starter often becomes active quickly. However, it may absorb more water, so it can feel thicker. If stirring becomes difficult, add a small splash of water at the next feed until it returns to a thick-batter consistency.
8) What feeding ratio should I use when feeding sourdough starter?
A common everyday ratio is 1:1:1 by weight (starter:water:flour). Still, if your starter turns overly sour or sluggish, larger feeds such as 1:2:2 or 1:3:3 can help. In other words, more fresh flour and water can refresh the culture and improve rise strength.
9) How often should I be feeding sourdough starter at room temperature?
Usually once a day is enough at moderate room temperature. Nevertheless, if your kitchen is warm and the starter peaks quickly, feeding twice daily can keep it steadier. Watch the timing: if it rises, peaks, and falls well before your next feed, it’s probably asking for more frequent refreshment.
10) What if I’m feeding sourdough starter without a scale?
You can still succeed. Begin with roughly equal spoonfuls of flour and water, then adjust until it resembles thick pancake batter. Even better, stay consistent for several feeds in a row. Since cup measures vary, texture becomes your most dependable guide.
11) What does hooch mean, and should I stir it in?
Hooch is the liquid that can collect on top when the starter is hungry. You can stir it in for a sharper flavor, or pour it off for a milder starter. Either way, follow with a feeding. Over time, regular feeds reduce how often hooch appears.
12) How do I store a sourdough starter in the fridge?
Feed it, let it begin to show activity at room temperature, then refrigerate. After that, refresh it weekly if you bake occasionally. When baking day approaches, bring it back to room temperature and feed it once or twice until it rises predictably again.
13) How do I handle feeding refrigerated sourdough starter before baking?
Pull it out 24–48 hours ahead, discard down to a small amount, then feed. Once it rises and peaks, feed again if needed. As a result, you rebuild strength and timing, which tends to improve oven spring and flavor.
14) Why is my starter bubbling but not rising much?
Often it’s either too thin or not strong enough yet. Try thickening the texture slightly at the next feed, keep it warmer, and use a larger feed ratio for a couple of days. Additionally, switching one or two feeds to whole wheat can support stronger activity.
15) Why does my sourdough starter smell very sour, sharp, or like acetone?
That usually points to hunger. In that case, feed more frequently or increase your feed ratio. For example, keep a smaller amount of starter and add more fresh flour and water. After a few refresh cycles, the aroma typically softens.
16) How do I know if it’s mold or just normal starter funk?
Normal starter funk can be tangy, sharp, or even a bit “cheesy” early on, yet it won’t look fuzzy. Mold usually appears as fuzzy patches or colored growth. If you see fuzz or anything unmistakably mold-like, it’s safest to discard the starter and start over with a clean jar.
17) Can I save my starter if I accidentally forgot to feed it?
Often, yes. If there’s no mold, discard down to a small portion from the cleanest area, then feed at a higher ratio (like 1:3:3) for a few days. Meanwhile, keep it warm and consistent. Most neglected starters bounce back surprisingly well.
18) What is a levain starter recipe, and do I need one?
A levain is a build made from your main starter plus fresh flour and water for a specific bake. You don’t need levain to keep a starter alive; rather, levain helps you scale up the amount you need for bread while keeping your main starter small and easy to maintain.
19) What’s the difference between dried sourdough starter and dehydrated sourdough starter?
They’re the same idea: starter that has been fully dried into flakes or powder so it can be stored long-term. “Dehydrated sourdough starter” is simply a more explicit phrase. Either way, you rehydrate it with water, then feed it repeatedly until it becomes active again.
20) How long does reviving dried sourdough starter take?
Usually a few days, although it can take up to a week depending on how dry it was, how warm your kitchen is, and which flour you use. At first, you’ll see small bubbles. Then, with steady feedings, it begins rising more predictably again.
21) How do I rehydrate dried sourdough starter without messing it up?
Start small. Soak the flakes in a little water until softened, stir in flour to form a paste, and let it sit. After that, feed daily at consistent intervals. If it seems weak, use whole wheat for a feed or two and keep it comfortably warm.
22) What should I do with discarded sourdough starter?
Discarded sourdough starter can be used in quick bakes where you want tang and tenderness. For instance, it can enrich pancakes, waffles, crackers, or flatbreads. Alternatively, you can keep discard in the fridge for a short period and use it in batches, as long as it stays clean and mold-free.
23) Can I buy sourdough starter online, and is it better than homemade?
Buying sourdough starter online can be convenient, especially if you want a quick start or a backup culture. However, homemade starter is just as capable once it’s established. Ultimately, the best sourdough starter is the one you can maintain consistently, whether it began at home or arrived in the mail.
24) What makes the best sourdough starter, long term?
Consistency wins. A predictable feeding routine, a stable temperature, and a texture that traps bubbles will take you further than any single trick. Moreover, keeping your starter smaller and feeding at a ratio that matches your schedule reduces stress, which makes it easier to stick with it—and that’s where the real magic happens.


[…] Also Read: Sourdough Starter Recipe: Make, Feed, Store & Fix Your Starter (Beginner Guide) […]
[…] Also Read: Sourdough Starter Recipe: Make, Feed, Store & Fix Your Starter (Beginner Guide) […]
[…] Also Read: Sourdough Starter Recipe: Make, Feed, Store & Fix Your Starter (Beginner Guide) […]
[…] Also Read: Sourdough Starter Recipe: Make, Feed, Store & Fix Your Starter (Beginner Guide) […]
[…] Also Read: Sourdough Starter Recipe: Make, Feed, Store & Fix Your Starter (Beginner Guide) […]
[…] Also Read: Sourdough Starter Recipe: Make, Feed, Store & Fix Your Starter (Beginner Guide) […]
[…] Also Read: Sourdough Starter Recipe: Make, Feed, Store & Fix Your Starter (Beginner Guide) […]
[…] many pizza nights. When you want extra support, you can jump to MasalaMonk’s beginner-friendly sourdough starter recipe to tighten up feeding and starter strength, or browse the broader sourdough lineup in Sourdough […]
[…] many pizza nights. When you want extra support, you can jump to MasalaMonk’s beginner-friendly sourdough starter recipe to tighten up feeding and starter strength, or browse the broader sourdough lineup in Sourdough […]