There are nights when you want a pan of lasagna that slices cleanly, tastes like a hug, and doesn’t swallow your evening. This cottage cheese lasagna is built for exactly those nights. It leans on a silky cottage-cheese layer that bakes up luscious without feeling heavy, embraces a handful of sensible upgrades for jarred marinara, and leaves space for you to pivot into chicken and spinach variations—or fold in a little ricotta—depending on the crowd. As you’ll see, small choices (how you treat the noodles, how you season the cheese, how you nudge the sauce) compound into big results. And yes, everything is weeknight-manageable, even if you’re aiming for company-worthy.
Why cottage cheese lasagna belongs in your rotation
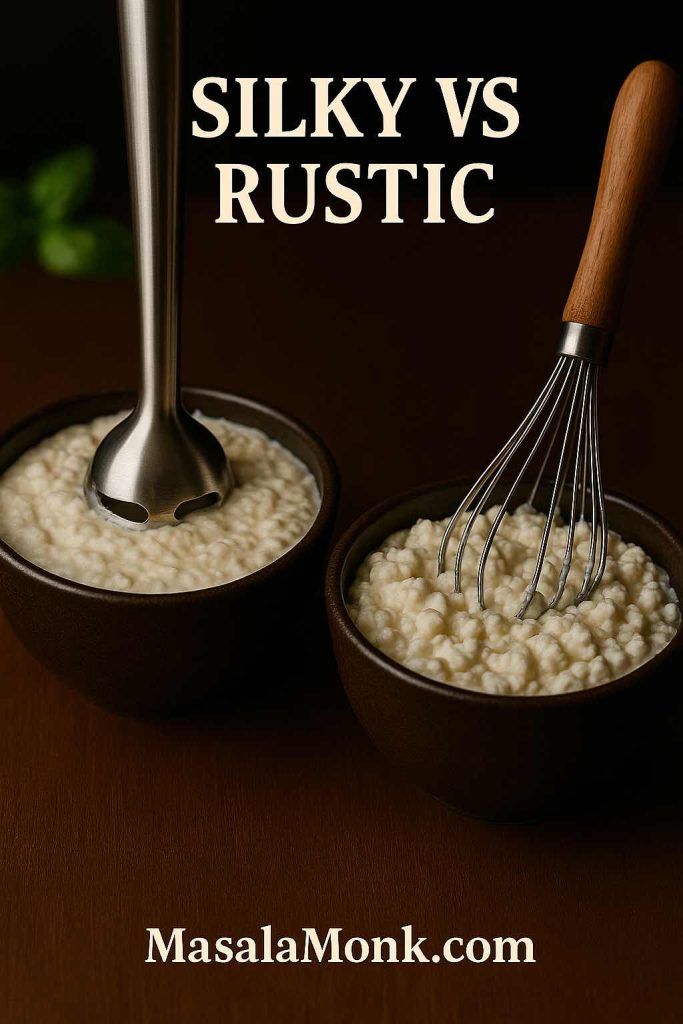
Cottage cheese brings two superpowers to lasagna: protein and flexibility. Where ricotta can read sweet and sometimes grainy, cottage cheese—especially when briefly blended—turns plush and savory, delivering a custardy bite that holds a slice. If you like a touch more texture, you can skip the blender and just whisk; the curds soften in the oven and dot the layers with a pleasant creaminess.
From a nutrition standpoint, cottage cheese is a pragmatic choice many dietitians recommend when you want substantive, satisfying protein without turning to meat in every layer. If you like to skim a bit of background before you cook, you’ll find plain-language context in Cottage Cheese for Breakfast: Fueling Your Day with Protein and Flavor, and for label comparisons, USDA FoodData Central is a reliable place to look up specific brands before you shop.
Just as important: cottage cheese behaves beautifully when you season with intent. A whisper of garlic powder, a pinch of Italian seasoning, and a few twists of black pepper round its edges. If you like nutty depth, grated Parmesan in the filling adds savor and helps the center set like a dream.
Also Read: Lentil Pasta for Weight Loss: Nutrition, Best Brands & 5 Healthy Recipes
Pantry-first lasagna, with smart marinara moves
Great lasagna is as much about approach as it is about ingredients. We’ll build this with pantry-friendly items and a couple of quick upgrades that turn convenience into something that tastes deliberately made.

- Noodles: Regular or oven-ready both work; your technique shifts slightly (more below).
- Sauce: A jar of marinara (24–32 oz) is not a compromise if you season it like you mean it and give it 60 seconds of love on the stove. Editors and chefs consistently point toward clean-label picks—short ingredient lists, tomatoes first, olive oil rather than seed oils, and no added sugar. For a sense of what to scan on the label, peek at EatingWell’s roundup of chef-approved marinara.
- One-minute upgrade: While the sauce warms, finish it with one to two tablespoons of unsalted butter; this simple technique adds body and balances acidity without turning the sauce into cream. The approach is explained neatly in Simply Recipes’ 1-ingredient upgrade for jarred sauce.
- Cheese trio: Cottage cheese (the star), shredded mozzarella for stretch, and Parmesan for salinity and nutty bite.
If you’re the kind of cook who enjoys understanding why textures behave the way they do, a quick skim of Classic vs. Authentic Alfredo: 5 Essential Recipes lays out emulsion logic—how fat, water, and hard cheese play together—which is directly relevant to how your lasagna layers bake into a cohesive slice.
Also Read: How to Make Churros (Authentic + Easy Recipe)
The baseline method: cottage cheese lasagna that slices clean and tastes rich
This is your foundation. Once you’ve made it once, you can riff freely.
Prep and noodle strategy
Preheat the oven to 375°F (190°C). If you’re using oven-ready (no-boil) noodles, give them a short soak in warm water while you mix the filling; this partial hydration prevents brittle edges and helps them finish tender in the oven. The idea—so simple it feels like cheating—has been tested repeatedly; Serious Eats even uses a 15-minute soak to streamline assembly. If you’re using regular noodles, boil them to very al dente (about 2 minutes shy of package time) so they finish in the oven with a pleasant bite.
The cottage-cheese layer
In a large bowl, whisk cottage cheese with a teaspoon of garlic powder, two teaspoons of Italian seasoning, a half-teaspoon of black pepper, and salt to taste. For a plush texture, blend the mixture for 10–20 seconds—just enough to smooth the curds, not so much that it becomes liquid. If you prefer a firmer set, whisk in one or two eggs; if you prefer a softer, spoonable middle, skip them. (Texture tweaks like these show up in other comfort dishes, too; see how curd size changes the bite in Indian Cottage Cheese Jaffles and apply the same idea here.)
Sauce tuning
Warm your marinara in a small pot; add a tablespoon of unsalted butter to round the sauce and a pinch of dried basil or Italian seasoning if your jar reads plain. If you bought a cleaner, tomato-forward jar, that may be all you need. Prefer a touch more umami? You can also swirl in a teaspoon of Worcestershire for depth—this trick plays especially well if your sauce tastes sweet or flat.
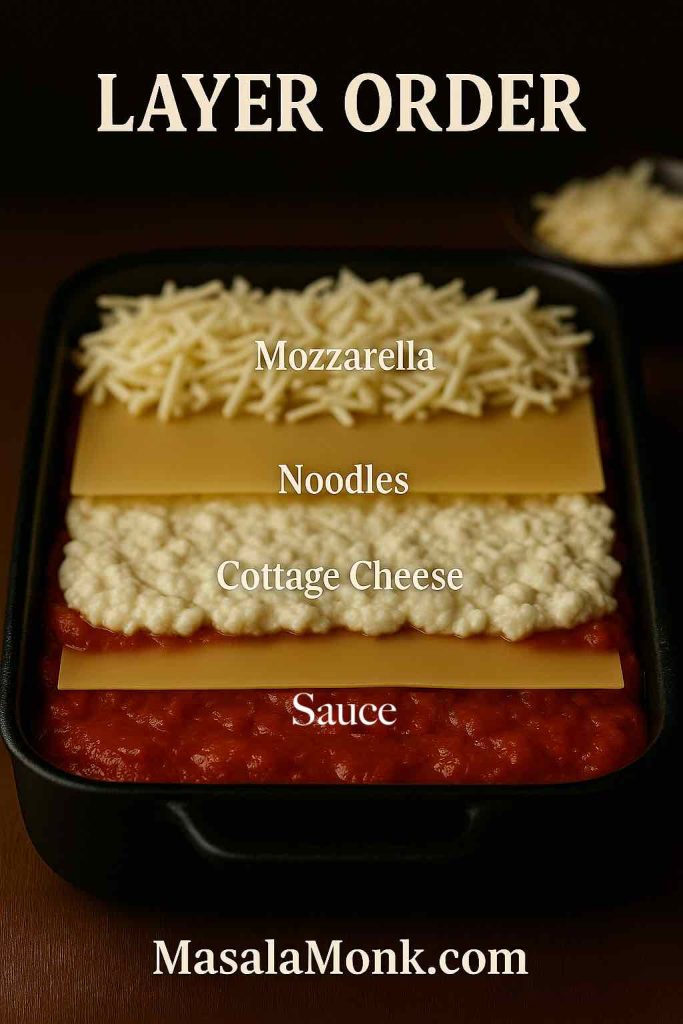
Layer and bake
Spoon a cup of sauce into a 9×13-inch (23×33 cm) baking pan. Layer noodles, a third of the cottage mixture, a generous shower of mozzarella, a little Parmesan, then more sauce. Repeat two more times, finishing with noodles, plenty of sauce, the remaining mozzarella, and a final snowfall of Parmesan. Cover the pan (tent the foil so it doesn’t touch the cheese) and bake for 30 minutes. Uncover and continue baking 15–20 minutes until the edges bubble and the top turns spotty-golden.
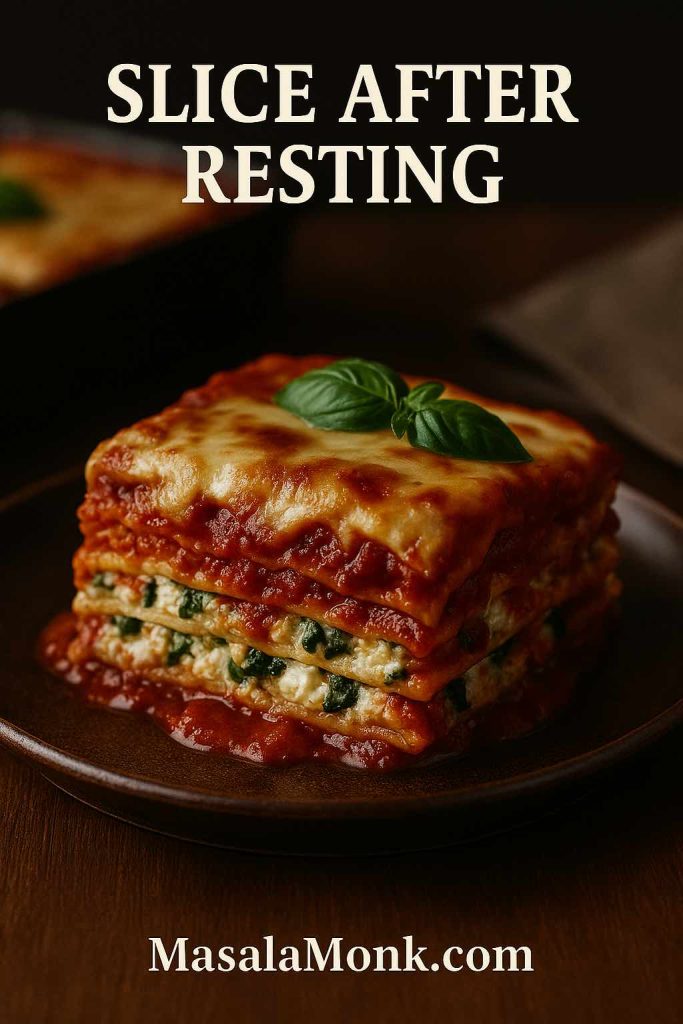
Finally, rest the lasagna 10–15 minutes before slicing. That pause is not optional if you want tidy squares; moisture redistributes, cheese sets, and your patience is rewarded. If you’re a process nerd, there’s more texture wisdom in The Best Spinach Lasagna—pay particular attention to how moisture management and noodle hydration affect structure.
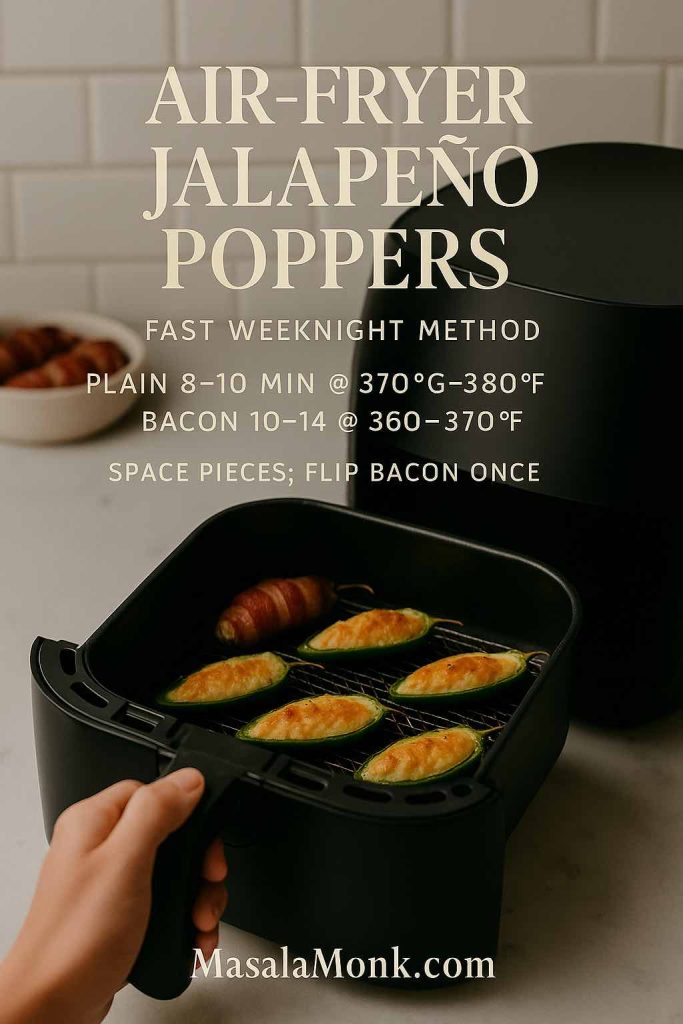
Also Read: How to Cook Bacon in the Oven (Crispy, No-Mess, Crowd-Ready Recipe)
Cottage cheese lasagna with chicken: a protein-forward pivot
Now for the first variation: chicken. Rather than building a separate meat sauce, you’ll toss 2 cups of shredded rotisserie or poached chicken with a ladle of warm marinara and tuck it between layers one through three. The goal is gentle coating, not drowning; you want every bite to register chicken without turning the pan into a casserole of sauce and shreds.
When in doubt about balance, remember the pasta-sauce logic that keeps creamy dishes light: coat, don’t smother. If you want a quick refresher on that equilibrium (and a handful of fast variations you can crib when you’re low on time), browse Chicken Alfredo Pasta, 5 Ways. The same principles—salt early, finish with a touch of fat for sheen, and stop before it gets stodgy—apply directly to chicken in lasagna.
For seasoning, chicken appreciates pepper and a little heat. A pinch of red pepper flakes in the cottage layer wakes things up, especially if you’re using a milder jar of marinara. If your crowd skews comfort-first, keep the spice gentle and let the browned top provide the excitement.
Also Read: French Toast Sticks (Air Fryer + Oven Recipe) — Crispy Outside, Custardy Inside
Cottage cheese lasagna with spinach: green, vibrant, and not watery
Spinach in lasagna is gorgeous when you treat it properly. The core rule is simple: cook and squeeze. Blanch or sauté spinach until just wilted, then wring it dry in a clean towel. Fold the greens into your cottage mixture and taste for salt; spinach can be bland if unseasoned. Because you’ve removed excess water, the lasagna stays cohesive and the slices remain neat.
No-boil sheets pair beautifully with spinach, provided you respect hydration. That brief soak (or a very generous sauce hand) matters because dry corners steal moisture from the filling and punish your layers. If you like to see how pros phrase it, the method notes in this Serious Eats spinach-and-mushroom lasagna explain why soaking sheets for 15 minutes lets you skip boiling while keeping moisture levels consistent from edge to center.
Finally, consider texture play: spinach folded into a lightly blended cottage base gives you a marbled look and a delicate mouthfeel. If you fully puree the cheese, those green ribbons pop even more against the creamy backdrop.
Also Read: 10 Best Chicken Sandwich Recipes (BBQ, Parm, Buffalo & More)
Cottage cheese and ricotta lasagna: the hybrid that pleases both camps
Plenty of readers adore the gentle sweetness of ricotta. If that’s you—or your table is split—try a one-cup swap: replace 1 cup of cottage cheese with 1 cup of ricotta and proceed exactly as written. The blend tilts the filling toward custard while staying sturdy enough to slice. It’s also the right move when you’re pairing the lasagna with something robust (say, garlicky sausage on the side) and want a creamier center to contrast.
If you like to sanity-check macros or sodium when you experiment with blends, USDA FoodData Central lets you compare cottage cheese and ricotta entries by brand and fat percentage. The rough pattern: whole-milk cottage cheese usually brings more protein per gram, ricotta trends slightly sweeter and, depending on brand, a touch saltier. Season your blend like you mean it and let the parmesan sprinkle on top carry the savory note.
Also Read: 10 Best Espresso Martini Recipe Variations (Bar-Tested)

Cottage cheese lasagna, step by step (refined for flow)
While the baseline method above gets dinner on the table, you can squeeze even more consistency from the process with a few gentle refinements:
- Stage your pans and bowls so assembly is rhythmic: sauce pot (still warm), cottage bowl, mozz/parm bowl, noodles within reach. Smooth rhythm means even layers and less overworking.
- Taste the cottage mixture before it ever hits the pan. It should taste a touch saltier than you think ideal; pasta and sauce will absorb the edge.
- Use a light hand with mozzarella inside the lasagna and save your big finish for the top. Too much inside gives you slippage; a generous top gives you picture-perfect pull.
- Run sauce to every corner. Dry edges are the enemy. Even with soaked no-boil sheets, you want a glaze of sauce kissing the perimeter so nothing leeches moisture from the middle.
- Rest on a rack. Elevate the pan for 10–15 minutes and let steam dissipate so the bottom doesn’t over-steam itself into sogginess.
If you’re curious about how professionals layer like engineers—especially with many thin layers—take a look at All-Day Meat Lasagna for perspective. Even if you’re not making a Bolognese today, the notes on moisture balance and noodle handling are worth borrowing.
Also Read: Macaroni & Cheese Recipe: Creamy Stovetop, Baked & Southern
Sauce sense: choose well, then finish like a cook
Jarred marinara isn’t a shortcut; it’s a platform. Choose well, then treat it with the respect you’d give a sauce you simmered yourself.
- Scan for tomatoes first. You want tomatoes, olive oil, onion, garlic, basil—recognizable items. Editors frequently land on clean-label jars for the most “homemade” flavor; EatingWell’s chef survey is a helpful reference point.
- Finish with fat, not sugar. The butter swirl method adds body and mellows acidity without sweetening the sauce. If you need more depth, a teaspoon of Worcestershire gives you umami without heavy-handedness.
- Reseason after warming. Heat changes flavor perception; wait until the sauce is hot, then adjust salt and pepper.
Prefer creamier sauces in general? A few techniques from Alfredo Pasta Reinvented: 5 Indian-Inspired Twists—like blooming spices in fat and balancing dairy with a touch of heat—translate surprisingly well when you want a rosé-style marinara that flatters cottage cheese.
Also Read: Vegan French Toast: 6 Easy Recipes (Pan, Air Fryer, GF & High-Protein)
Texture choices that make your cottage cheese lasagna memorable
What separates a “good enough” lasagna from one people remember? Texture you can see and feel:
- Silky middle, structured slice: One egg in the cottage mixture gives you a neat slice; two eggs make it firmer and more picnic-friendly. No eggs yields a softer, spoonier center that still settles if you let it rest.
- Cheese pull that doesn’t slide: Keep most mozzarella on top; inside, a lighter hand reduces slippage and helps the cottage mixture cling to noodles.
- Edge crisp vs. tender top: Uncovering for the final 15–20 minutes gives you beautiful browning. If your oven runs hot, move the pan down one rack halfway through to avoid scorching.
- Noodle tenderness without mush: Soaked no-boil sheets or very al dente boiled noodles are your guardrails. For more why-it-works geekery, see Serious Eats’ spinach lasagna, which explains hydration and stacking in plain terms.
Also Read: Pumpkin Spice, Your Way: Master Blend, Variations & Real-World Recipes
Cottage cheese lasagna with chicken, spinach, & ricotta—three paths, one pan
Because your table might want different things on different nights, here’s how to navigate the trio of popular pivots without rewriting the recipe:
Cottage cheese lasagna with chicken (rotisserie-friendly)
- How much: 2 cups shredded chicken.
- Where it goes: Scatter a thin layer between each cheese layer so it integrates, not dominates.
- How to keep it juicy: Toss with warm marinara first; moisture on the outside of the meat keeps it from drying in the oven.
- How to season: Pepper and a pinch of red pepper flakes bring the chicken to life without demanding a heavier sauce. If you love creamy profiles, the “coat, don’t drown” approach in Chicken Alfredo Pasta, 5 Ways is the north star.
Spinach version of Cottage cheese lasagna (green ribbons, zero puddles)
- Cook, squeeze, season. Spinach must be dry before it hits the pan. Fold it into the cottage mixture and taste; greens swallow salt.
- Hydration check: Use the warm-water soak for no-boil sheets, or be generous with sauce at the edges. The moisture discussion in this Serious Eats method is worth a read.
- Texture cue: Lightly blended cottage base + chopped spinach = green marbling and a custardy bite.
Cottage cheese and ricotta lasagna (the best of both)
- The swap: Replace 1 cup of cottage cheese with 1 cup of ricotta.
- What changes: Slightly sweeter, more custardlike center; still sliceable.
- Label check: Use USDA FoodData Central to compare sodium and fat across brands if you’re cooking for specific dietary needs.
Also Read: Homemade & DIY Coffee Creamer: 16 Flavor Recipes (French Vanilla, Pumpkin Spice & More)
Make-ahead rhythm, reheating, and freezing (reader-tested flow)
You can assemble the lasagna, cover it tightly, and refrigerate for 24–36 hours. Add roughly 10 minutes to the covered bake time to account for the colder start, then uncover and finish as usual. Resting remains crucial; slices clean best after the center relaxes.
Freezing works, too. Assemble but don’t bake; double-wrap in plastic and foil. Thaw in the refrigerator overnight, bake covered until the center is hot, then uncover to brown. Leftover slices reheat gently at 325°F (165°C), covered, for 10–15 minutes; a splash of water along the pan edge preserves moisture.
If gluten-free eaters are at the table, you can replace part of a layer with zucchini planks or serve the lasagna alongside a gluten-free pasta side. For broader ideas, Finding Pasta Alternatives for the Keto Diet outlines swaps (including almond-flour “pasta”) that give you options without forfeiting comfort.
Also Read: Lemon Drop Martini Recipe (Classic, 3-Ingredient, & More)
Serving ideas that flatter cottage cheese lasagna
Because this dish is rich without being dense, pair it with a crunchy salad and something bright in the dressing—lemon, red wine vinegar, a touch of mustard. If you added chicken, lean into peppery greens or shaved fennel to lift the plate. If you folded in spinach and kept the center custardy, think toasted walnuts and thinly sliced apples on the side for crunch and sweetness. Garlic bread is never wrong, but consider brushing the slices with olive oil whisked with a bit of the warm marinara (before the butter finish) so the flavors echo rather than compete.
Wine-wise, medium-bodied reds with decent acidity (Sangiovese blends, Montepulciano) cut through cheese and amplify tomato. If you prefer white, a Verdicchio or a mineral-driven Pinot Grigio won’t get steamrolled. Non-alcoholic options? A splash of balsamic in sparkling water with ice and lemon peels makes a sharp, palate-resetting spritz that stands up to dairy.
Also Read: Daiquiri Recipe (Classic, Strawberry & Frozen Cocktails)
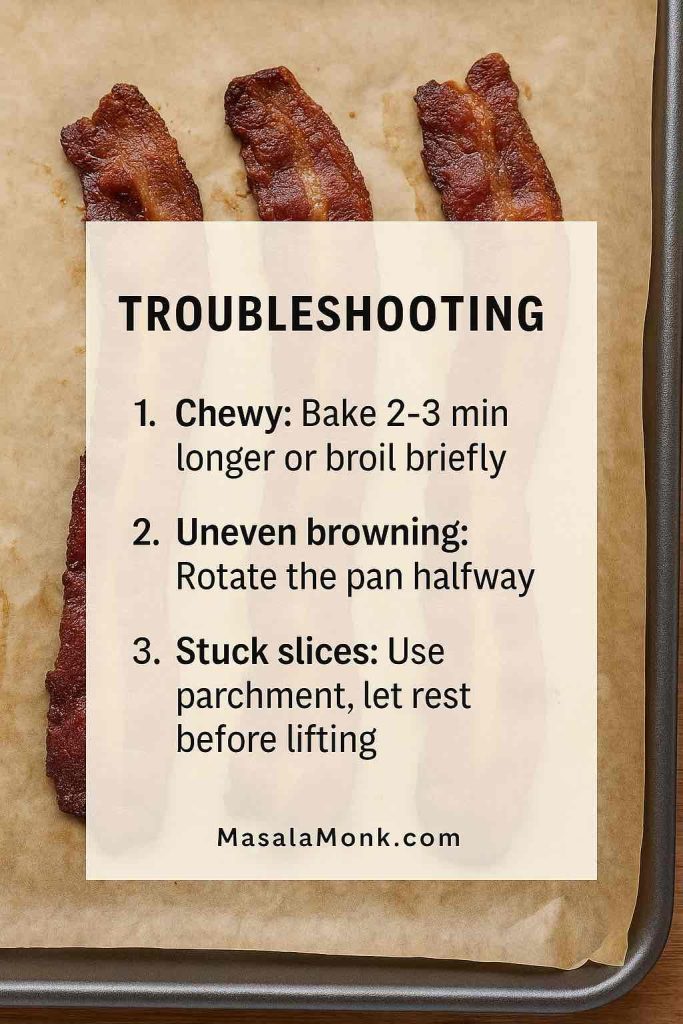
Troubleshooting your cottage cheese lasagna (when something goes sideways)
The top browned before the center set. Your oven likely runs hot or your rack was too high. Next time, start one level down and keep the initial foil tent looser so cheese doesn’t touch. If you need more browning at the end, switch to broil for 60 seconds and watch like a hawk.
The noodles felt stiff at the edges. That’s a hydration or coverage issue. Soak no-boil sheets in warm water while you mix the filling, and make sure sauce touches every corner. The soak-and-stack approach from Serious Eats is your friend here.
The middle slumped when sliced. You either cut too early or skipped eggs in the filling. Rest at least 10 minutes, preferably 15. If you like ultra-clean slices (picnic vibes), use two eggs in the cottage mixture; if you prefer a softer middle, skip them but accept that you must rest the pan longer.
It tasted flat. Season in the bowl, then re-season the warm sauce. A small butter finish helps—here’s the why—and a pinch of red pepper flakes in the cottage layer brightens flavor without heat shock.
Also Read: Piña Colada: Classic Recipe + 10 Variations (Virgin & On the Rocks)
If you want to push flavor further (without extra effort)
- Herbs: Finely chop basil and parsley, but don’t stir fresh herbs into the cottage mixture; their moisture can make the center watery. Instead, scatter herbs between layers or over the top after baking so they stay vivid.
- Citrus: A microplane’s worth of lemon zest into the cottage mixture, especially on spinach nights, brings lift without obvious “lemon flavor.”
- Heat: Aleppo pepper plays beautifully with tomato and dairy—fruity warmth, not aggressive spice.
- Cheese blend: A little pecorino with Parmesan on top sharpens the finish; keep it to a tablespoon or two so it doesn’t dominate.
If the idea of creamier, spicier profiles intrigues you, you’ll find technique you can borrow in Alfredo Pasta Reinvented: 5 Indian-Inspired Twists. Bloomed spices in fat, then folded into dairy, can turn part of your marinara rosy and aromatic without a second pot.
Also Read: Punch with Pineapple Juice: Guide & 9 Party-Perfect Recipes
Cook once, eat twice: repurpose with intent
Leftover cottage cheese lasagna turns into effortless lunches and low-effort dinners if you treat it like an ingredient rather than a reheat. Cube cold slices and warm them in a small skillet with a splash of water, then toss with fresh basil and a drizzle of good olive oil—the edges caramelize a bit and the center returns to creamy. You can also tuck warm cubes into a toasted ciabatta with arugula and a smear of marinara (yes, effectively a lasagna panini). If you went heavy on spinach, slip those cubes over a garlicky bean salad; the contrast of warm, creamy squares and cool, lemony beans is wildly satisfying.
And because cottage cheese is such an adaptable protein, you’ll find it pulling double duty in breakfast and snack contexts as well—if you enjoy that versatility, Cottage Cheese for Breakfast offers ideas you can fold into the week while you finish off the pan.
Also Read: Savoiardi Chocolate Vanilla Pudding- Easy Dessert Recipe
The last word (before you preheat)
Make the baseline pan once, exactly as written. Notice how the butter-finished jar tastes more considered, how a 10-second blend changes mouthfeel, how a short rest protects your slice. Next time, add chicken and watch how those shreds meld into the structure. The time after that, fold in spinach and see how the greens play against a silkier base. When your table splits between cheese camps, do the one-cup ricotta swap and keep everyone happy.
In the end, the promise is simple: cottage cheese lasagna that respects your time, rewards your attention, and adapts to whatever you have on hand. Choose a clean, tomato-forward jar (scan for cues like the ones in this chef survey), finish it like a cook (a little butter goes a long way), handle noodles thoughtfully (a quick soak for no-boil sheets changes everything), and season your cottage layer with confidence. When those choices stack up—literally—you get the kind of lasagna that makes people ask for seconds and the recipe.
FAQs
1) What is cottage cheese lasagna, and why choose it?
Cottage cheese lasagna layers noodles, a seasoned cottage-cheese mixture, mozzarella, and sauce. Moreover, it delivers a creamy, sliceable center with higher protein and a cleaner flavor than many heavy versions.
2) Can I make cottage cheese lasagna with ricotta as well?
Absolutely. Additionally, swap in 1 cup ricotta for 1 cup cottage cheese for a slightly sweeter, custardlike filling while keeping structure.
3) Do I need eggs in cottage cheese lasagna?
Often, yes. Furthermore, one egg helps the middle set for tidy slices; two eggs make it extra firm; zero eggs yield a softer, spoonable center—just let it rest longer.
4) Should I blend cottage cheese for a smoother texture?
Yes, briefly. Meanwhile, a 10–20 second blitz turns curds silky; a whisk-only mix keeps gentle texture. Either way, season boldly.
5) What’s the best jarred sauce style for cottage cheese lasagna?
Tomato-forward marinara. Notably, choose one with recognizable ingredients and adjust at the stove (salt, pepper, a pat of butter) before layering.
6) How do I use oven-ready (no-boil) noodles in cottage cheese lasagna?
Soak sheets in warm water while mixing the filling. Consequently, they hydrate evenly, avoid brittle edges, and finish tender in the oven.
7) Can I use regular noodles instead of no-boil?
Of course. Similarly, boil to very al dente (about 2 minutes shy of package time) so they finish perfectly during baking.
8) What temperature and time work best?
Bake at 375°F (190°C). Thereafter, go 30 minutes covered, then 15–20 minutes uncovered until bubbling and golden; rest 10–15 minutes before slicing.
9) How do I prevent watery cottage cheese lasagna?
Drain or squeeze wet add-ins (like spinach), hydrate noodles properly, and ensure sauce lightly coats every edge. Consequently, layers hold together beautifully.
10) Can I add chicken to cottage cheese lasagna?
Definitely. Moreover, toss 2 cups shredded chicken with warm sauce, then layer lightly so the lasagna stays balanced rather than heavy.
11) What about spinach in cottage cheese lasagna?
Great idea. Likewise, cook and squeeze it dry, fold into the cheese mixture, and season generously for bright green ribbons without puddling.
12) Is beef or sausage good with cottage cheese lasagna?
Yes. Conversely, use a light hand: scatter cooked, drained meat thinly between layers so the cottage filling still shines.
13) Can I make cottage cheese lasagna vegetarian?
Certainly. Instead, skip meat and lean on spinach, zucchini planks, or mushrooms; just keep vegetables dry so texture stays neat.
14) How do I adapt cottage cheese lasagna to an 8×8 pan?
Halve ingredients. Then, shave about 10 minutes off the uncovered bake, watching for bubbling edges and a lightly browned top.
15) What’s the ideal cheese ratio inside vs. on top?
Inside, go modest with mozzarella to reduce slippage. Conversely, finish boldly on top with mozzarella plus a sprinkle of Parmesan for savory lift.
16) Which cottage cheese works best?
Whole-milk versions melt creamier. Nevertheless, low-fat works if you add a touch more seasoning or a teaspoon of olive oil for richness.
17) Can I assemble cottage cheese lasagna ahead?
Yes. Subsequently, refrigerate 24–36 hours, add ~10 minutes to the covered bake, then uncover to finish; rest before cutting.
18) Does cottage cheese lasagna freeze well?
It does. Preferably, assemble unbaked, double-wrap, and freeze up to 3 months. Later, thaw overnight, bake covered until hot, then brown.
19) How should I reheat leftovers?
Gently. Accordingly, cover slices and warm at 325°F (165°C) for 10–15 minutes; add a splash of water around the edges to keep moisture.
20) How can I make cottage cheese lasagna healthier?
Focus on clean sauce, whole-milk cottage cheese in moderate portions, and smart add-ins like spinach or zucchini. Subsequently, keep portions steady and sides fresh.
21) Can I make gluten-free cottage cheese lasagna?
Yes. Alternatively, use gluten-free noodles or substitute some layers with thin zucchini planks while maintaining generous sauce coverage at the edges.
22) What’s the secret to clean slices?
Patience. Consequently, let the pan rest 10–15 minutes so steam settles and the cottage-cheese layer firms into photo-worthy squares.
23) Why does my cottage cheese lasagna taste flat?
Season twice. First, the cheese mixture; then, the warmed sauce. Finally, finish with Parmesan on top for salty, nutty definition.
24) Can I make cottage cheese lasagna in a skillet?
Yes, for a smaller batch. Thereafter, par-cook noodles or use broken oven-ready sheets, layer in a high-sided oven-safe skillet, and bake as directed.
25) Is cottage cheese lasagna suitable without ricotta?
Absolutely. Indeed, the base recipe was designed to shine with cottage cheese alone—creamy, stable, and undeniably comforting.