Posted on — Leave a comment

Gluten-Free Apple Cider Donuts Recipe: Soft, Baked & Cinnamon-Sugar Coated

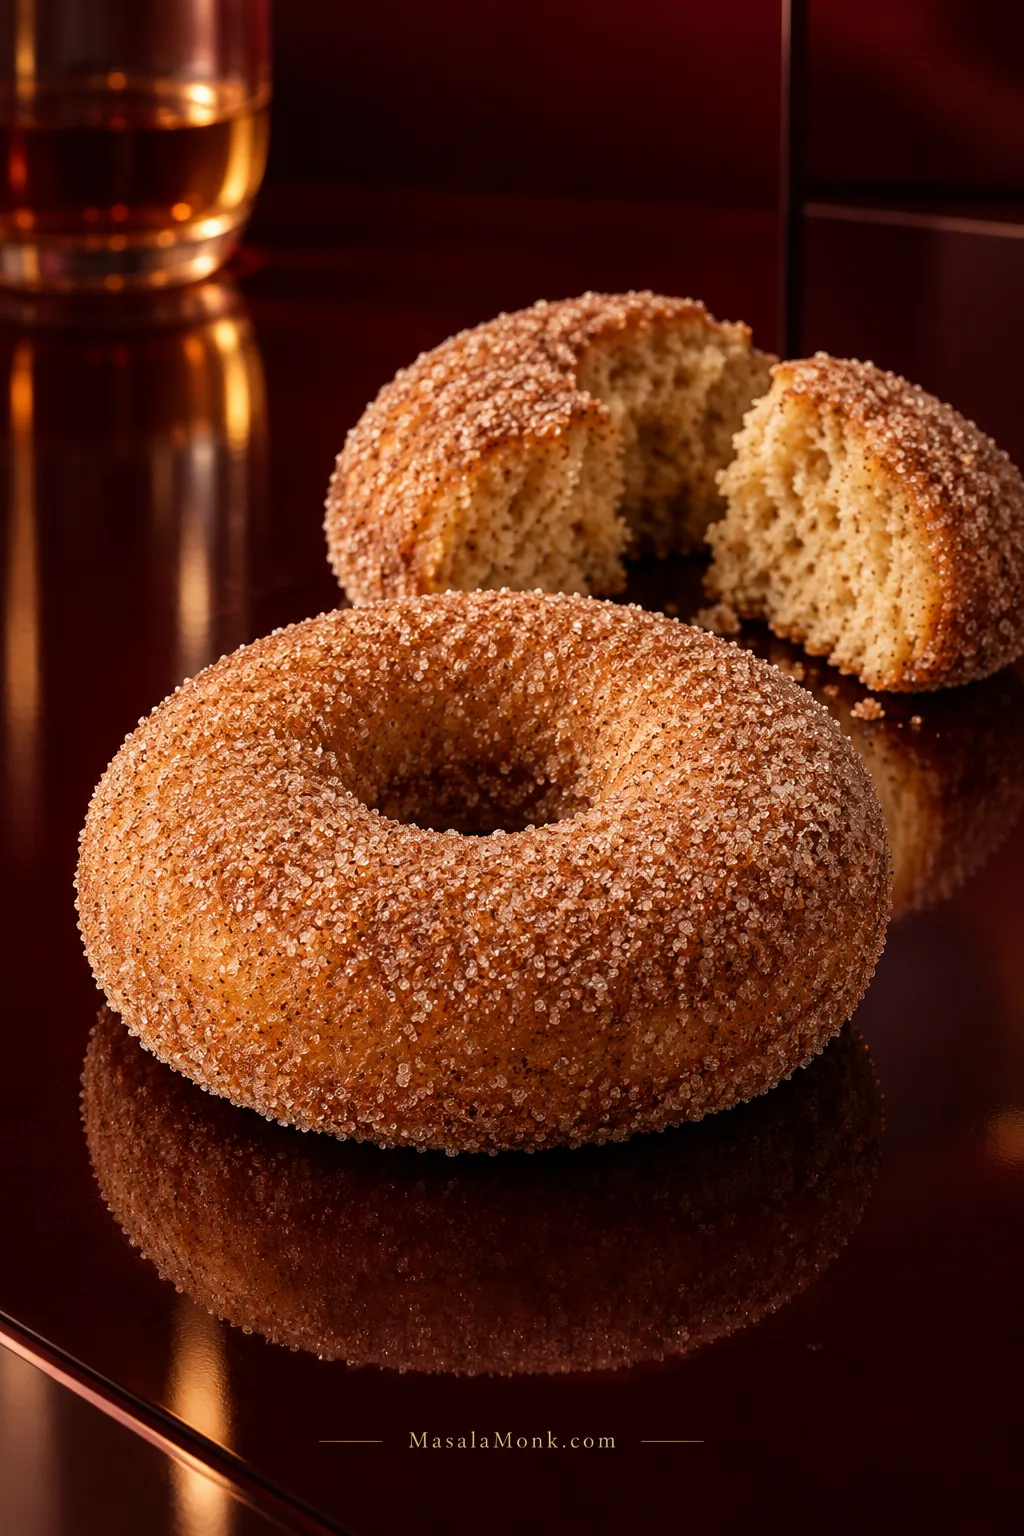
Two cinnamon-sugar baked apple cider donuts on deep burgundy lacquer, with one broken open to reveal the soft cake crumb.

Warm apple cider, cinnamon sugar on your fingers, and a soft cake-donut crumb with enough body to feel like a real donut: going gluten-free should not mean missing the best part of cider-donut season.

If fall usually means passing up the cider donuts at the orchard or bakery, getting the texture right matters just as much as making them gluten-free. The aim here is a good cider donut first, with the gluten-free flour doing its job quietly in the background.

These gluten free apple cider donuts are baked, tender and cider-forward, with a fine cake-donut crumb and a dry cinnamon-sugar finish. Reducing the cider first keeps the apple flavor clear instead of letting the spice do all the talking.

Because they’re baked, you get the familiar cider-donut shape and cinnamon-sugar finish without setting up a fryer or pot of hot oil. If you don’t need the gluten-free formula and want the traditional fried version instead, use our classic apple cider donuts recipe. This baked recipe makes about 12 donuts in roughly 50–60 minutes with two pans, with most of the flavor coming from concentrated cider rather than extra spice.

The batter is thick enough to pipe but loose enough to settle into the pan. Once baked, the donuts stay soft through the middle, lightly firm around the edges and sturdy enough to hold their cinnamon sugar.

Quick answer: These are baked, no-fry cider donuts that make about 12. Reduce 1½ cups (12 fl oz / 360 ml) apple cider to about 7 tablespoons (3½ fl oz / 105 ml) and let it cool. Mix with 250 g gluten-free 1:1 baking flour, two eggs, milk, oil and spices. Pipe into a greased donut pan and bake at 350°F / 175°C for about 10–14 minutes, until the tops spring back and the centers are set. Brush the warm donuts lightly with melted butter and coat with cinnamon sugar.

Make Them Now: Gluten-Free Apple Cider Donuts

You can make the full recipe from this section alone. The rest explains the texture cues, substitutions, troubleshooting and storage.

Yield: about 12 standard donuts
Prep: about 35–40 minutes, including reducing and cooling the cider
Bake: 10–14 minutes per batch
Total: about 50–60 minutes with two pans; longer with one 6-cavity pan
Oven: 350°F / 175°C conventional
Pan: Two standard 6-cavity donut pans, or one used in two rounds
Style: Baked gluten-free cake donut
Finish: Cinnamon sugar

Before You Mix

Use the 1:1 gluten-free baking blend you already trust for cakes or muffins, provided it contains xanthan gum or another suitable binder. Weigh 250 g for the most consistent result; cup volume varies between blends.

Reduce the cider first and let it cool to room temperature or until barely warm before it meets the eggs. Pouring the measured reduction into a small heatproof jug while you gather the other ingredients helps it cool faster.

Grease the donut pan well, including the center posts. Get the cider and batter right before filling the pan; both are easy to correct at that stage and much harder to rescue later.

Apple cider, gluten-free baking flour, two eggs, milk, oil, sugars and spices arranged on an emerald and chrome set.
Cider brings apple flavor; eggs set structure; oil keeps the crumb tender; milk controls flow. Keep cinnamon and nutmeg in the background.

Ingredients

For the Donuts

  • 1½ cups (12 fl oz / 360 ml) nonalcoholic apple cider, meaning the cloudy pressed apple drink, not vinegar; reduce to about 7 tablespoons (3½ fl oz / 105 ml)
  • 250 g gluten-free 1:1 baking flour containing xanthan gum or another binder
  • 2 teaspoons (about 8 g) baking powder
  • 1 teaspoon ground cinnamon
  • ¼ teaspoon ground nutmeg
  • ½ teaspoon fine salt
  • 2 large eggs
  • 65 g light brown sugar, about ⅓ cup packed
  • 55 g granulated sugar, about ¼ cup
  • ¼ cup (2 fl oz / 60 ml) neutral oil
  • 6 tablespoons (3 fl oz / 90 ml) milk
  • 1½ teaspoons vanilla extract

For the Cinnamon Sugar

  • ¾ cup (150 g) granulated sugar
  • 2½ teaspoons ground cinnamon
  • 3 tablespoons (42 g) unsalted butter, melted; you may not need all of it

Method

  1. Reduce the cider. Pour 1½ cups / 360 ml apple cider into a saucepan and bring it to a steady, lively simmer. Reduce to about 7 tablespoons / 105 ml; depending on the pan and heat, this often takes around 15–25 minutes. Start measuring early rather than waiting for the clock. Pour the finished reduction into a small heatproof jug and let it cool to room temperature or until barely warm.
  2. Heat the oven and grease the pans. Heat the oven to 350°F / 175°C with a rack near the center. Grease about 12 standard donut cavities thoroughly, especially around the center posts.
  3. Mix the dry ingredients. Whisk together the gluten-free flour, baking powder, cinnamon, nutmeg and salt.
  4. Mix the wet ingredients. In a larger bowl, whisk the eggs with the brown sugar and granulated sugar. Add the oil, milk, vanilla and cooled cider and whisk again.
  5. Combine. Stir the dry ingredients into the wet mixture until no dry pockets remain. There is no need to keep mixing once the batter is even.
  6. Let the flour hydrate. Leave the batter for 5–10 minutes. It will usually thicken as it sits.

Finish the Batter, Bake & Coat

  1. Check the consistency. The batter should fall in a heavy ribbon and pipe cleanly. If it is genuinely too stiff after resting, add milk 1 tablespoon / 15 ml at a time.
  2. Fill the pan. Transfer the batter to a piping bag or large zip-top bag and snip off a corner. Fill each cavity about three-quarters full, keeping the center post exposed. The rings do not need to look perfectly neat before they bake.
  3. Bake. Start looking at them around 10 minutes. Most standard donuts take roughly 10–14 minutes. The tops lose their wet shine and spring back when pressed lightly. A toothpick through the thickest part should come out without raw batter.
  4. Rest briefly. Leave the donuts in the pan for 3–5 minutes, then loosen them gently and move them to a rack.
  5. Brush and coat. Mix the sugar and cinnamon in a shallow bowl. Brush each warm donut with a thin film of melted butter, then turn it in the cinnamon sugar. The coating should stay sandy rather than glossy. For a lighter finish, coat only the top and outer edge.

Give the sugar a minute to cling, then eat the first one while the center is still warm.

If you remember only three things: Concentrate the cider. Read the batter. Brush, don’t dunk.
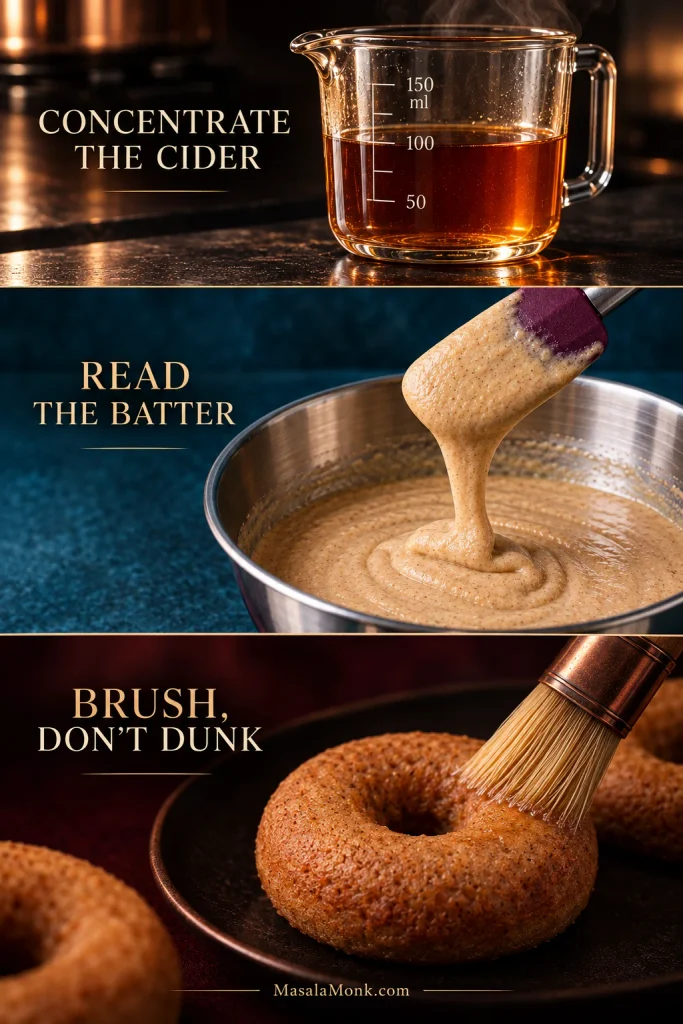
Three photographic bands showing reduced cider, thick donut batter and a pastry brush applying a light coating to a baked donut.
Think flavor → structure → finish: concentrate the cider, read the batter, then use just enough butter for the sugar to cling.

Need help with the result? Check the batter · Check doneness · Troubleshoot a problem

What the Finished Donuts Should Be Like

A good baked cider donut is soft but not fragile, cake-like without slipping into cupcake territory, and moist without feeling gummy. The crumb has fine, fairly even pores and holds together cleanly when you bite into it.

Break one open. The center should look evenly baked, without a wet or glossy streak through the middle. The outside will be slightly firmer than the center, especially from a metal pan.
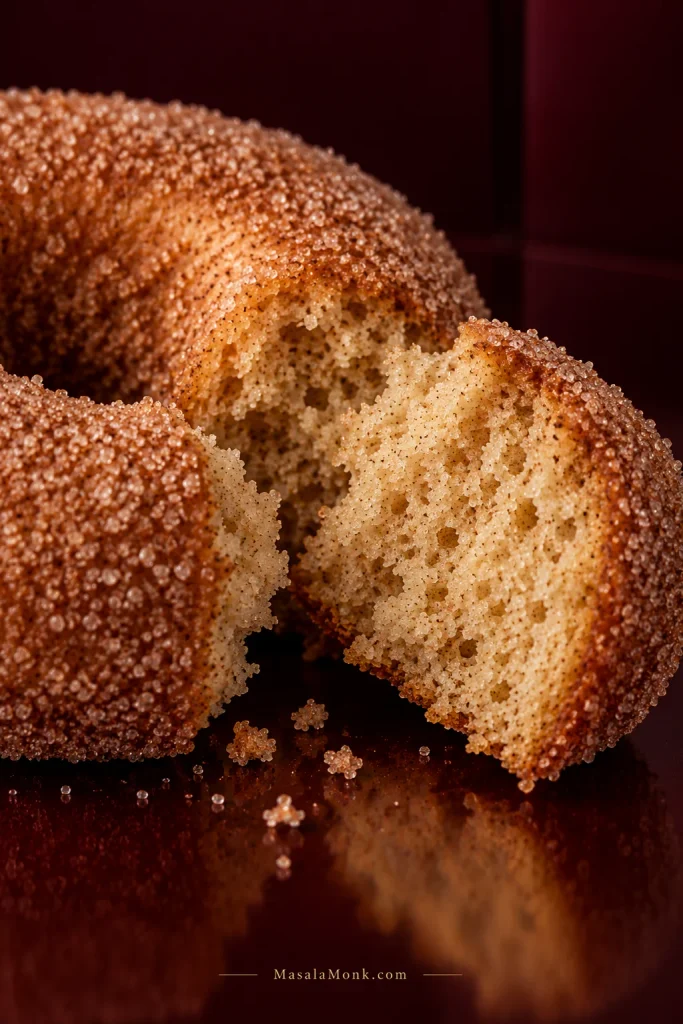
Close-up of a broken cinnamon-sugar donut showing a fine, evenly baked cake crumb and golden outer edge.
A good baked cider donut tears cleanly and looks matte-set inside. Shiny, compressed patches matter more than an occasional larger air pocket.

The coating should stay dry enough for a faint sandy crunch before the soft crumb gives way. Underneath the cinnamon, the apple should still be there.

Reduce the Cider to About 105 ml

Start with 1½ cups / 360 ml cider and simmer until about 7 tablespoons / 105 ml remain. That’s the target; the clock is not.
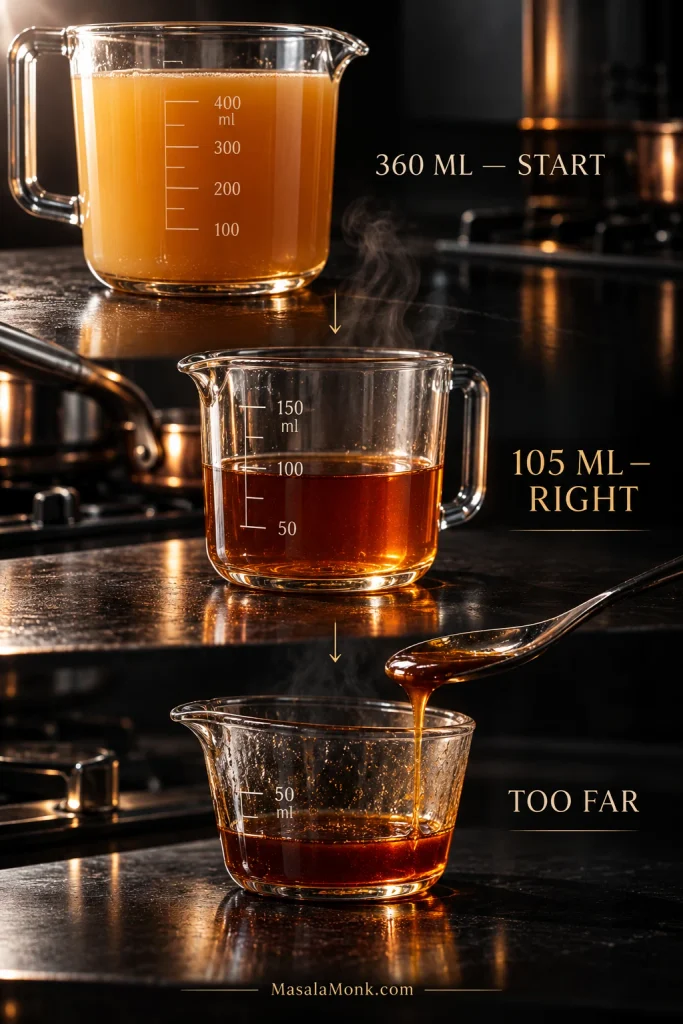
Three stages of apple cider reduction labeled 360 milliliters start, 105 milliliters right, and too far, with the liquid becoming darker and thicker.
Reducing 360 ml to 105 ml concentrates apple flavor while removing enough water to keep the batter balanced.

Pan width and burner strength change the timing. Near the end, the cider darkens, smells intensely of apples and still pours easily. Honey-thick means it has gone farther than this batter needs.

Dark amber reduced apple cider coating a metal spoon above a shallow pan of fluid cider, labeled 105 milliliters right.
Correctly reduced cider should run quickly when the pan tilts. If it creeps or ropes, it has gone too far.

Reduced it too far? Add enough fresh cider to bring the amount back near 105 ml.

Commercial boiled cider is different. It is reduced much further and can become thick like honey, so it should not replace this homemade reduction measure-for-measure. King Arthur’s boiled-cider guide shows how concentrated it can become.

Choose the Right Gluten-Free Flour

Use a 1:1 blend intended for general baking and already containing xanthan gum or another suitable binder. The blend you already trust for cakes or muffins is a good place to start.
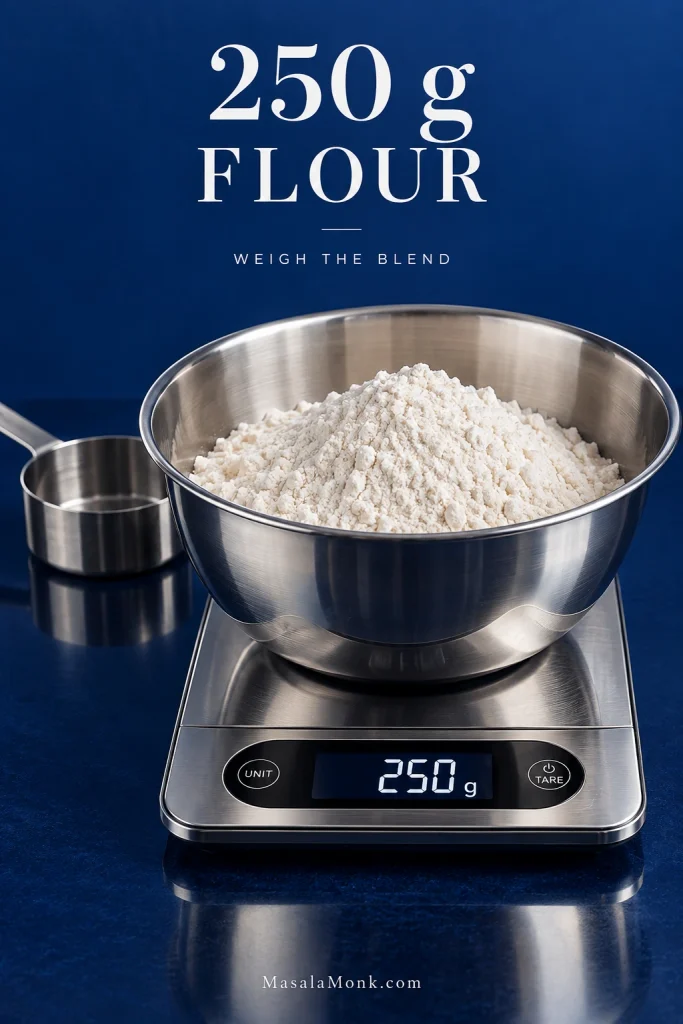
Stainless steel bowl of flour on a digital kitchen scale displaying 250 grams against a deep cobalt background.
Use 250 g as the fixed baseline. Then batter differences are more likely to come from the flour blend than the scoop.

What Different Blends Can Do

Finely milled rice-and-starch blends tend to work well here. Coarse rice flour can leave the crumb gritty, very starch-heavy blends may bake up tackier, and strongly bean-based blends can bring an earthy flavor. If your blend already contains xanthan, don’t add more.

A slightly thicker or softer batter is not automatically a problem; let it rest, then judge how it pipes.

Check Your Batter Before You Pipe It

After the 5–10 minute rest, the batter should be thick, smooth and pipeable. Lift some with a spatula: it should fall in a heavy ribbon and leave a ridge that slowly softens. You’re looking for batter that holds its shape long enough to pipe, then gradually settles into the ring.
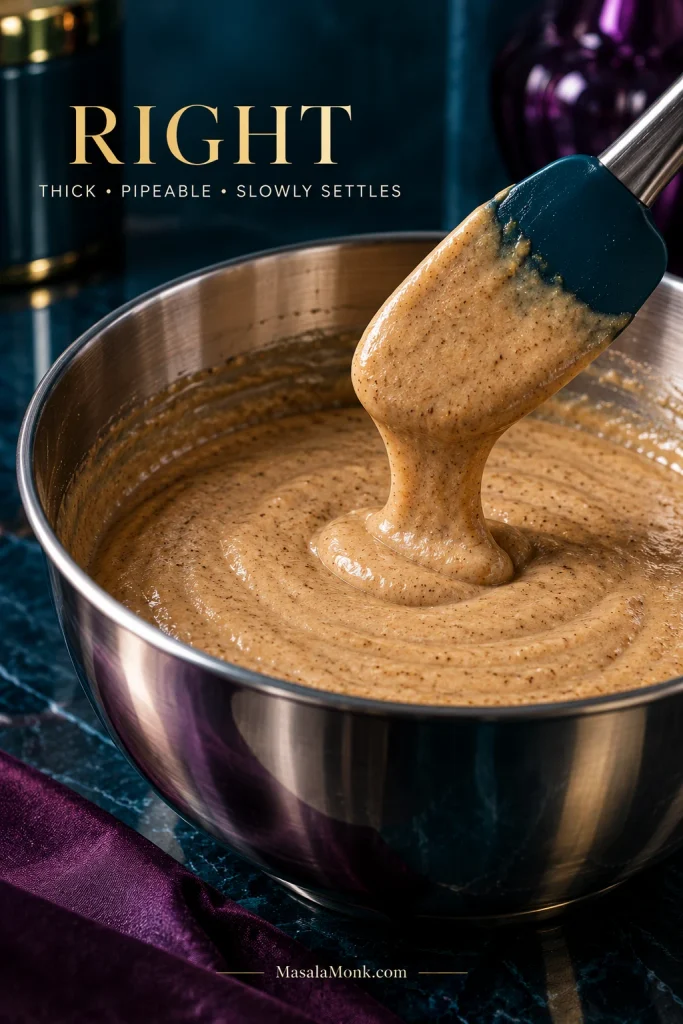
Thick speckled donut batter falling in a short ribbon from a spatula into a stainless steel bowl, labeled right and slowly settles.
After resting, judge batter by movement: it should pipe cleanly and relax gradually, even if it still feels a little sticky.

Batter Too Thick

If it is still too stiff to pipe after the full rest, add milk 1 tablespoon / 15 ml at a time. Stop as soon as it moves easily through the bag.

Batter Too Loose

If it still pours freely after resting, make sure the cider reached 105 ml. Only add flour after you have checked the cider reduction.
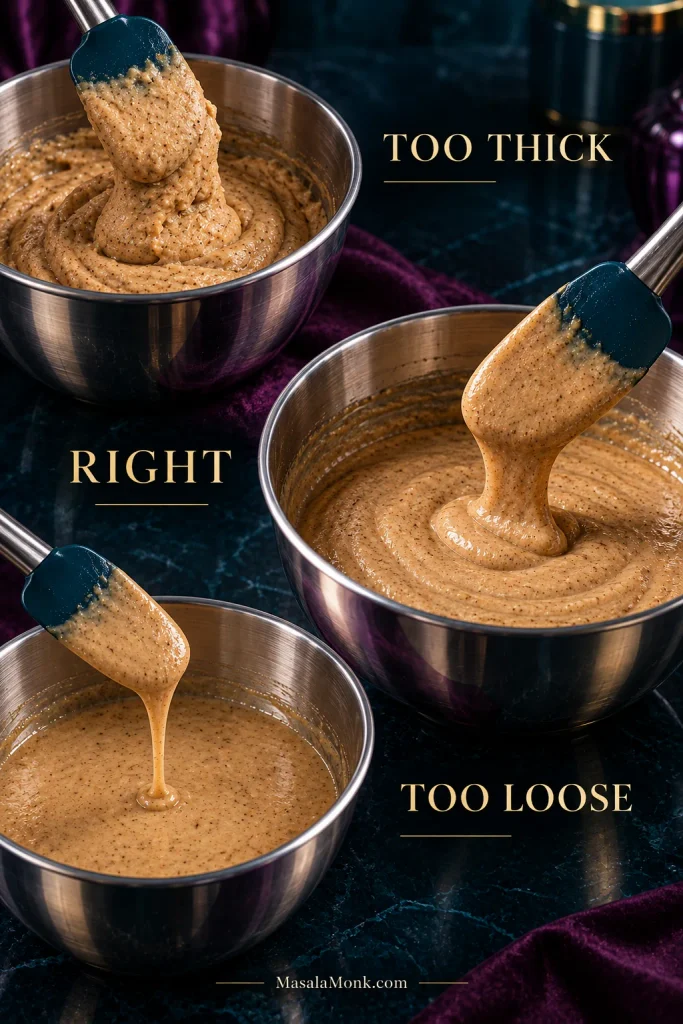
Three bowls of apple cider donut batter labeled too thick, right and too loose, showing progressively thinner consistency.
Stiff batter holds its ridge; correct batter slowly softens; loose batter levels quickly. Movement tells you more than surface smoothness.

Gritty Batter

A short rest can smooth out fine rice flour. If the finished donut still feels gritty, the blend itself is the likely culprit.

Don’t panic over a slightly sticky batter. If it pipes cleanly, you’re in the right neighborhood. Sticky batter, a gummy center and wet cinnamon sugar are three different problems.

Pipe and Fill the Pan

Once the batter is rested and pipeable, transfer it to a piping bag and work around each ring without covering the center post.
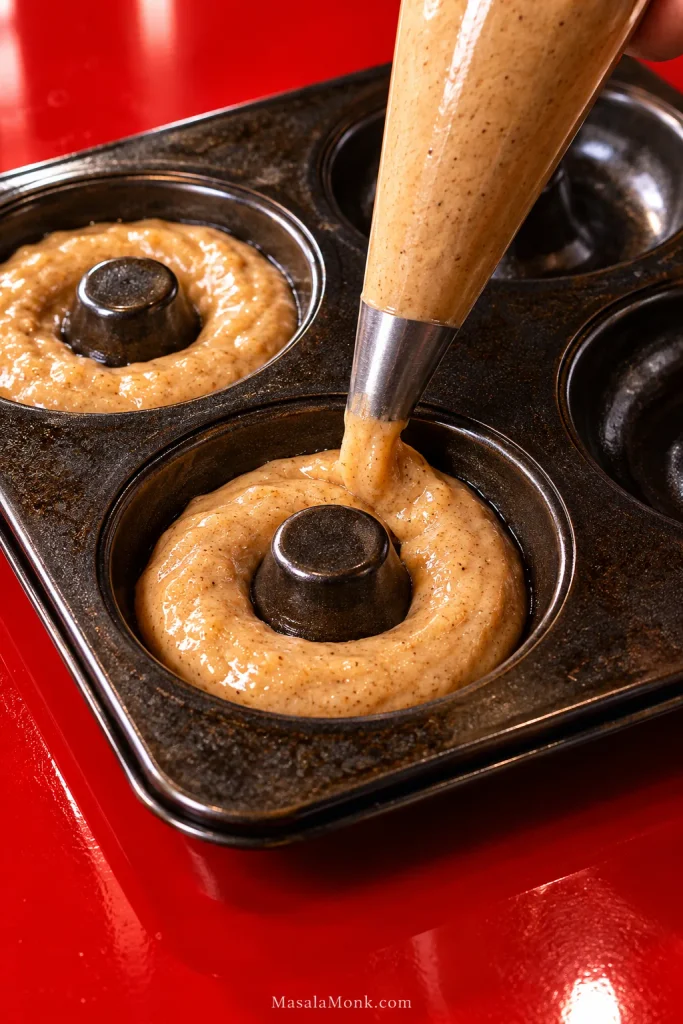
Piping bag filling a dark metal donut pan with thick speckled batter on a glossy red surface.
Keep the ring reasonably even; the batter will soften and settle as the pan heats.

Before the pan goes into the oven, compare the batter height with the center post. About three-quarters full leaves enough room for the ring to rise without crowding the middle.
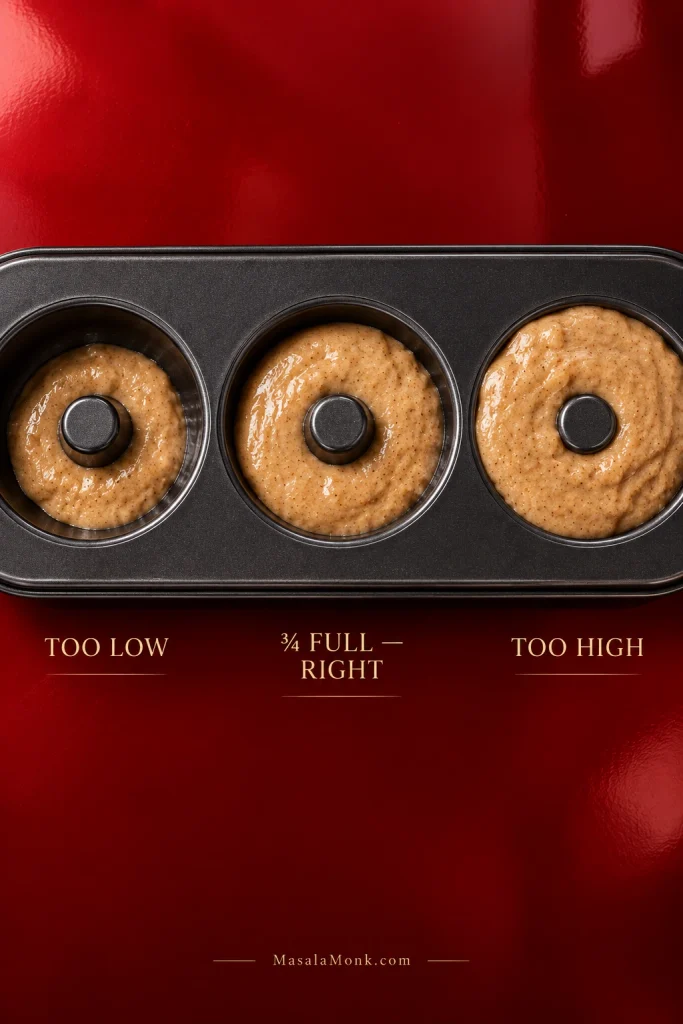
Three donut-pan cavities labeled too low, three-quarters full right, and too high, each containing a different amount of batter.
Use the center post as your gauge: about three-quarters full leaves room for the ring to rise cleanly.

How to Know When They’re Done

Start looking at the donuts around 10 minutes. Color is the least useful cue here.
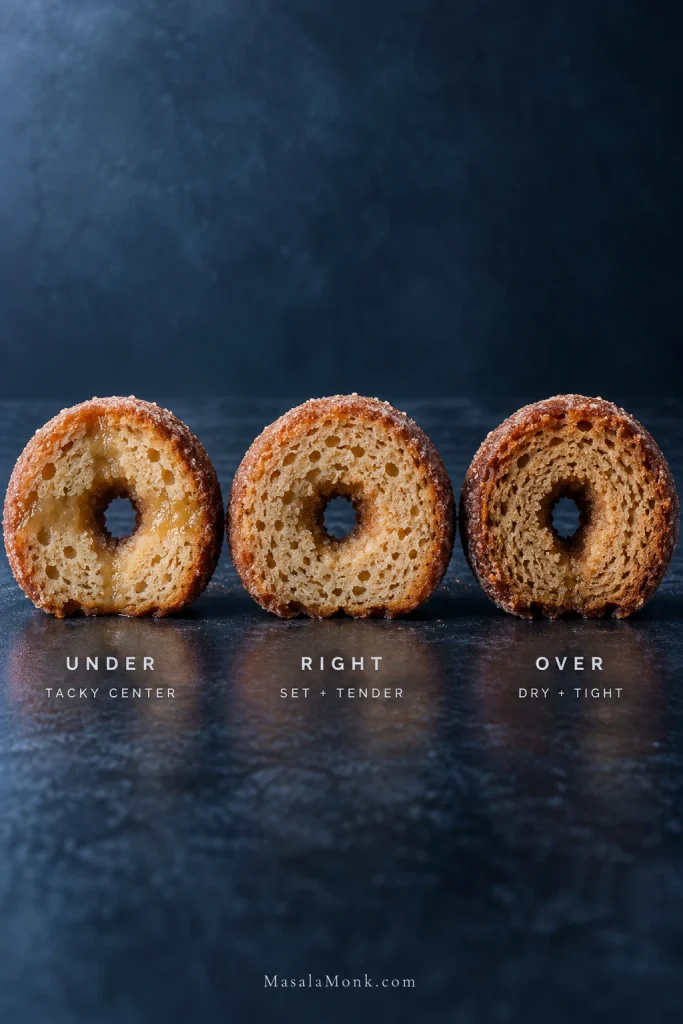
Three cut apple cider donuts labeled under, right and over, showing tacky, tender and dry interior textures.
Similar exteriors can hide different centers. Use crumb set, spring-back and the toothpick together rather than waiting for one shade of brown.
  • The top has lost its wet shine.
  • A gentle press springs back.
  • The edge may begin to release from the pan.
  • A toothpick through a thick section comes out without raw batter.
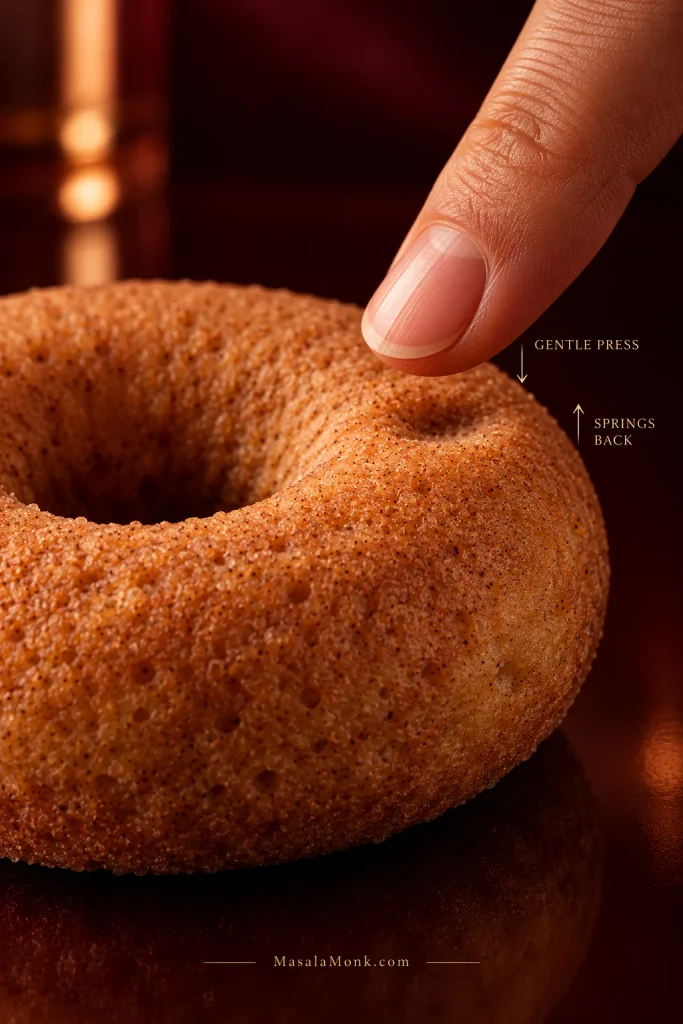
Fingertip gently pressing the surface of a plain baked donut, with arrows indicating gentle press and springs back.
Press the thickest part of the ring. Spring-back there tells you more about the center than pressing the firmer edge.

Silicone pans can stay pale even when the center is ready. A hot oven can do the opposite and brown the outside before the middle is fully set.

If the center springs back and the toothpick shows no raw batter, pull the pan. Don’t wait for extra color just because another oven needed more time.

No Donut Pan? Use Another Small Pan

The batter also works in mini donut and muffin pans. The flavor stays the same; the shape obviously doesn’t. Deeper cavities simply take longer.

Standard donut, mini donut, mini muffin and regular muffin made from the same cinnamon-sugar batter, each labeled by shape.
Depth matters more than pan name: mini shapes bake faster, while a standard muffin needs longer for its deeper center.
PanHow FullFirst Check Around
Standard donut panAbout ¾ full10 minutes
Mini donut panKeep the center post exposed7 minutes
Mini muffin panAbout ⅔–¾ full8 minutes
Standard muffin panAbout ⅔ full14–15 minutes; deeper muffins may need closer to 18

Mini muffins make a handy bite-size option once coated. Treat the times above as checkpoints, not promises; the center still decides when they’re done.

Only One Six-Cavity Pan?

That’s fine. Bake the first six, let the pan cool until it is comfortable to handle, then grease it again before piping the second round. Keep the remaining batter covered at room temperature while the first batch bakes.

Metal or Silicone?

Metal gives the nicest crust here. Silicone molds usually leave the sides paler and softer and may need longer.
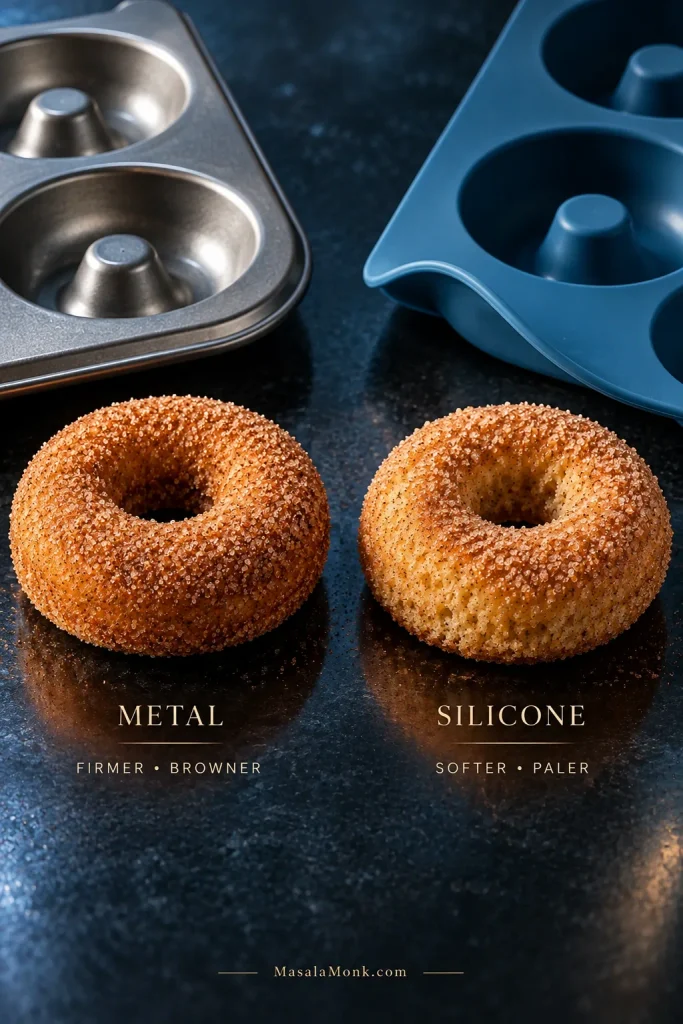
Baked donuts beside a metal donut pan and a blue silicone pan, labeled metal firmer and browner, silicone softer and paler.
Silicone can stay pale even when done; metal browns faster. Treat surface color as context and let the center decide.

Brush, Don’t Dunk

Brush the butter on; don’t dunk the donut in it. The butter is there to make the cinnamon sugar stick. That’s all it needs to do.
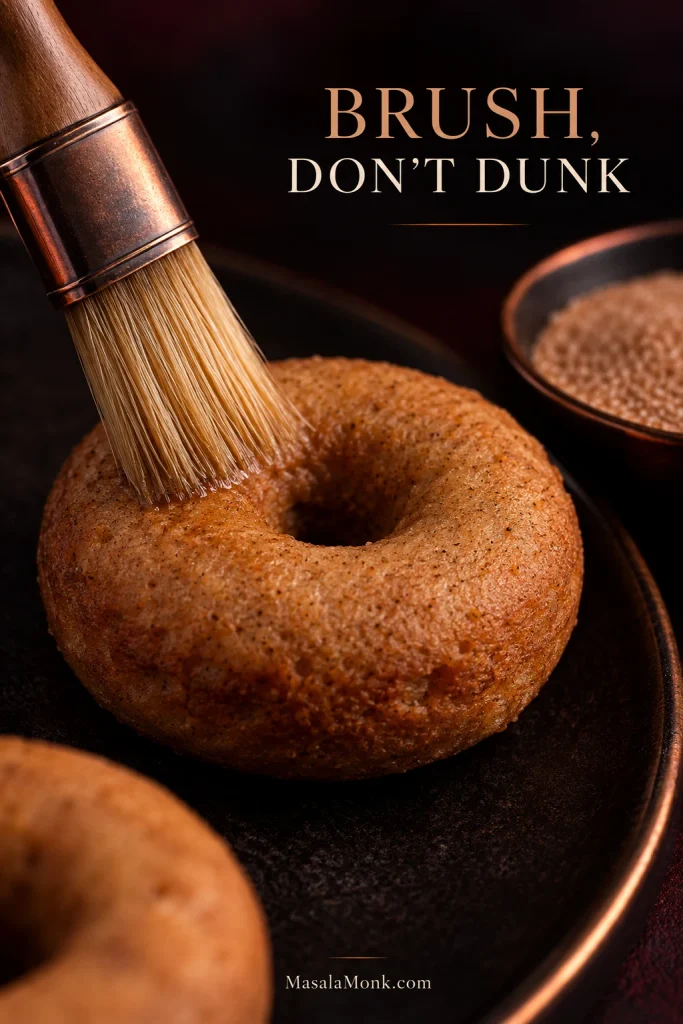
Pastry brush applying a thin layer of butter to a plain baked donut, with a bowl of cinnamon sugar nearby.
Butter is adhesive here, not extra richness. A barely visible film is enough for cinnamon sugar to cling.

A thin film is enough. Too much butter disappears into the cake and leaves the sugar wet instead of sandy.

You should still be able to see and feel individual grains of sugar. That little crunch against the soft center is part of what makes the donut work.

For a Lighter Coating

Coat only the top and outer edge. You still get the cinnamon aroma and texture without a thick layer of sugar around the whole donut.

If the Sugar Turns Sticky

Humidity, too much butter and sealing the donuts before they are completely cool can soften the coating. Saving some for tomorrow? Leave those plain and coat them after reheating.
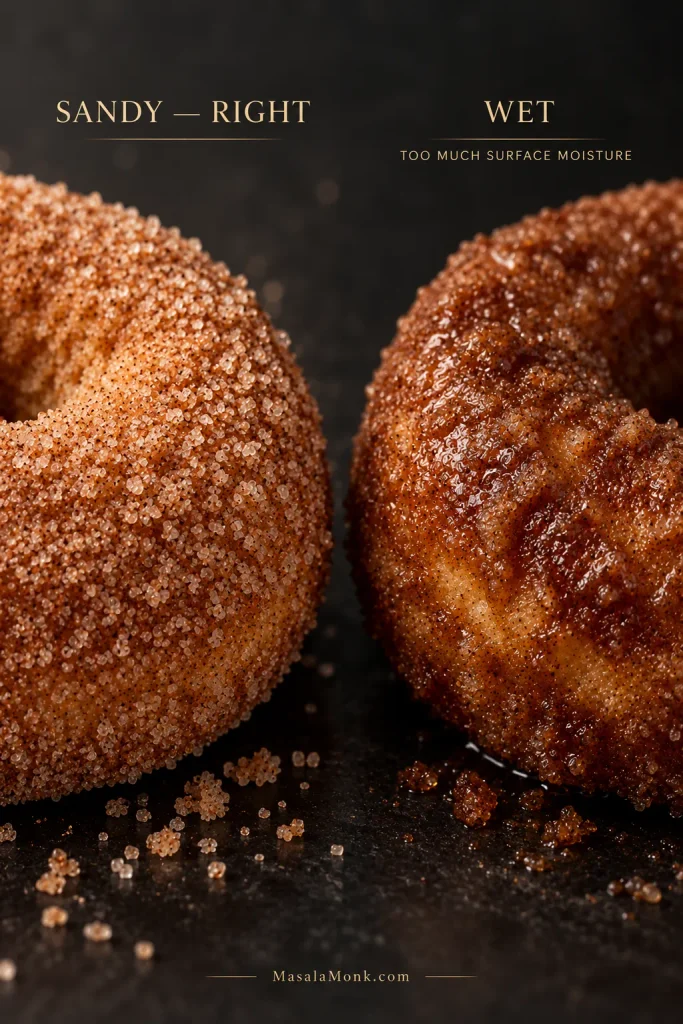
Two cinnamon-sugar donuts labeled sandy right and wet, with one dry and crystalline and the other glossy with partially dissolved sugar.
A glossy coating is a surface problem, not proof the crumb needs more oven time. Fix moisture and butter instead.

For More Cider Flavor, Start With the Cider

A donut can be intensely spiced and still barely taste of cider.

Use a flavorful cider and reduce it properly. Brown sugar brings some caramel depth, while cinnamon and nutmeg should sit behind the apple rather than bury it. A cider donut shouldn’t need a blast of cinnamon to taste like fall.

Glowing amber apple cider, a cinnamon-sugar donut and a small amount of ground cinnamon arranged on a deep cobalt set.
Build apple flavor first. Extra cinnamon can make the aroma stronger, but it cannot replace a weak cider base.

For a more layered spice profile, replace part of the cinnamon and nutmeg with a little homemade apple pie spice. Go easy with clove and allspice; both can take over quickly.

What You Can Substitute

Start with the apple liquid: cider, cloudy apple juice and apple cider vinegar sound related, but they do not play the same role in this recipe.

Three glasses labeled apple cider, cloudy apple juice and apple cider vinegar, showing cloudy amber, lighter golden and clearer pale liquids.
Cloudy apple juice is the closest substitute for cider. Apple cider vinegar is not—it serves a completely different purpose.
IngredientWhat to Do
Dairy milkUse the same amount of unsweetened neutral plant milk.
Butter for coatingUse dairy-free butter if needed.
Apple ciderUnsweetened cloudy apple juice can be reduced to the same amount; the flavor will be milder.
Commercial boiled ciderUse a recipe or conversion designed for it because it is much more concentrated.
Almond flourDo not swap it gram-for-gram for the 1:1 blend; it needs a different formula.
EggsThere is no simple direct swap that gives the same texture.
Apple cider vinegarDo not use it in place of apple cider.

Don’t turn this into a flour experiment. Oat flour, coconut flour and other single flours behave differently enough that they need formulas built around them.

Vegan or Egg-Free

The eggs help the donuts rise and hold together. Applesauce, flax mixtures and commercial egg replacers all change the texture differently. For a reliable egg-free donut, start with a formula designed without eggs. If egg-free is the non-negotiable part and the donut shape is not, this apple crisp recipe keeps the apple-cinnamon direction and also includes gluten-free and dairy-free guidance.

Troubleshooting the Bake & Finished Donuts
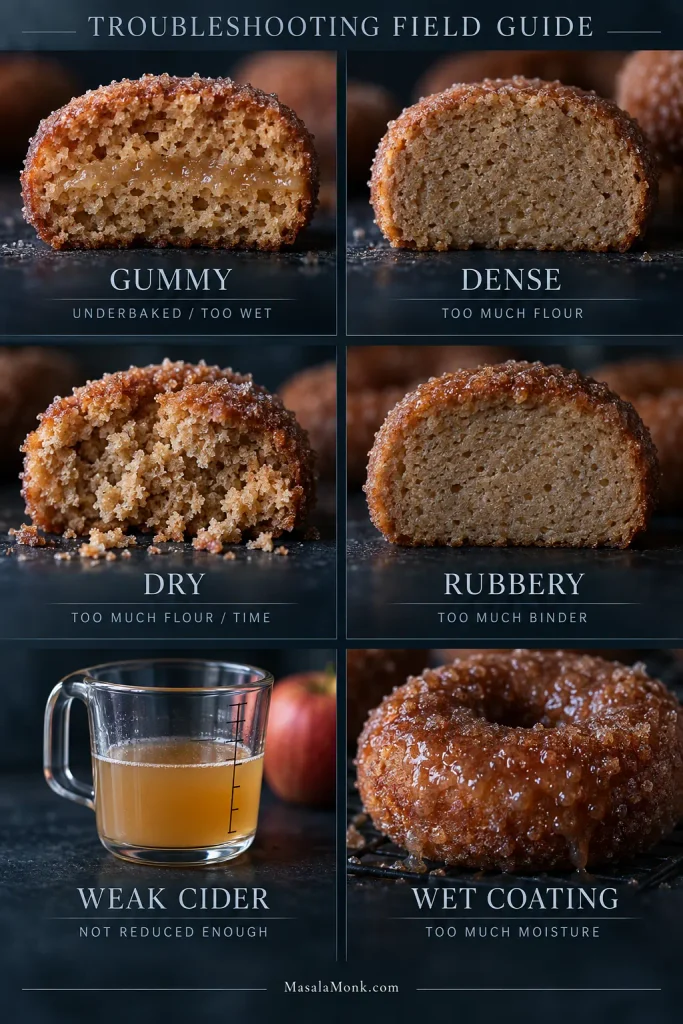
Six-panel donut troubleshooting guide showing gummy, dense, dry and rubbery crumb, weak unreduced cider and a wet cinnamon-sugar coating.
Change one variable at a time. Otherwise, you cannot tell whether flour, cider concentration or bake time actually fixed the problem.

As They Come Out of the Oven

What You SeeWhat It Usually MeansWhat to Do
Center hole has closedThe cavity was filled too highFill the next round lower.
Pale, soft sidesOften a silicone-pan effectJudge the center before adding more time.
Donut tears when liftedIt may be too hot, underbaked or stuckGive it the 3–5 minute pan rest and grease more thoroughly next time.
Center still looks wetIt needs more oven timeReturn it to the oven and look again after 1–2 minutes.

After the First Bite

Gummy Center

Let a very hot donut cool for a few minutes before judging it. Moist is welcome; a wet, tacky streak through the middle is not. If it stays gummy, start with the bake, then the cider amount and flour blend.
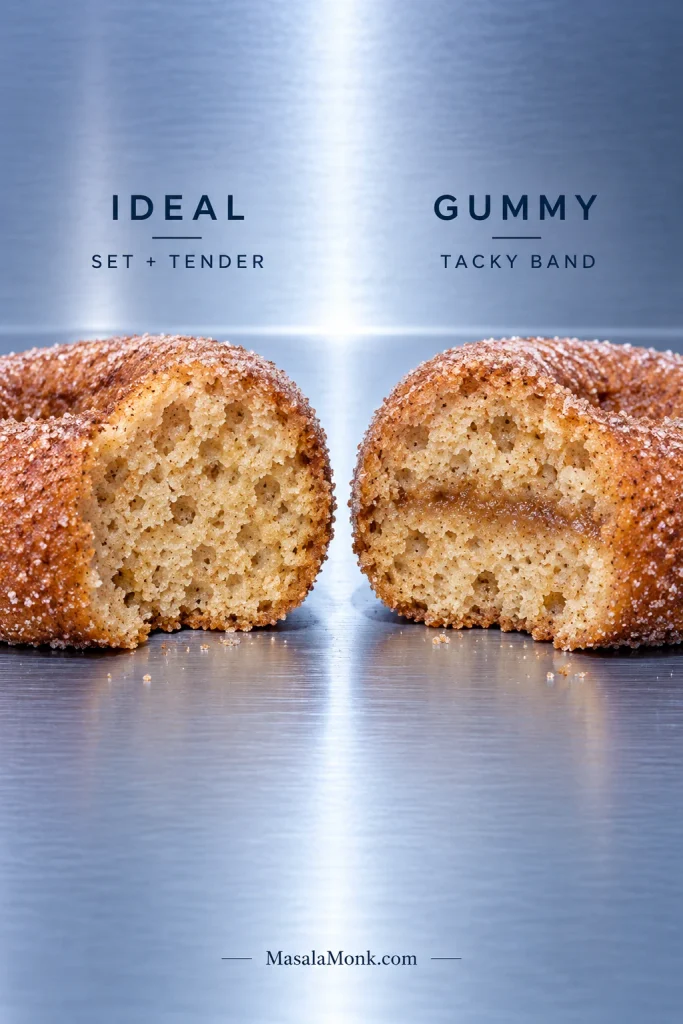
Two broken donuts labeled ideal and gummy, with the gummy donut showing a narrow tacky band through otherwise baked crumb.
A gummy center shows a compressed, tacky band through otherwise baked crumb—not the normal softness of a donut that is still hot.

Dense Crumb

Too much flour is the first place I’d look. A packed measuring cup can add considerably more than intended, which is why 250 g is the safer measure. An especially absorbent blend or old, inactive baking powder can also leave the crumb heavy.

Dry Donuts

Too much flour or too much oven time usually causes it. Look at the donuts around 10 minutes rather than treating 14 as the target.

Rubbery Crumb

The flour label is worth checking. A blend that already contains xanthan usually does not need more. Too much binder can make the crumb unusually elastic.

Weak Cider Flavor

Before adding more spice, go back to the cider. Mild cider gives a milder donut, and reducing it properly matters more than another spoonful of cinnamon.

Bitter or Odd Flavor

  • Bitter or metallic: the baking-powder quantity may be off, or it may not have been mixed evenly.
  • Earthy or bean-like: the flour blend may be contributing a strong flavor.
  • Perfumy or overly intense: pull back on strong spices such as clove, allspice or nutmeg.

The Next Day

Sticky cinnamon sugar usually means surface moisture, not a failed donut. Too much butter, humid air or sealing the donuts before they were cool can soften the coating.

If a donut feels dry the next morning, warm it briefly. That’s often all it needs.

Solved the problem? Back to the recipe · Storage & reheating · Back to top

Storage, Make-Ahead & Reheating

These donuts are best on day one, when the crumb is soft and the cinnamon sugar is dry and granular. For the best texture, let them cool completely, store them airtight at room temperature and use them within 2 days. Coated donuts will keep, but the sugar softens; for planned leftovers, store them plain and coat after reheating.
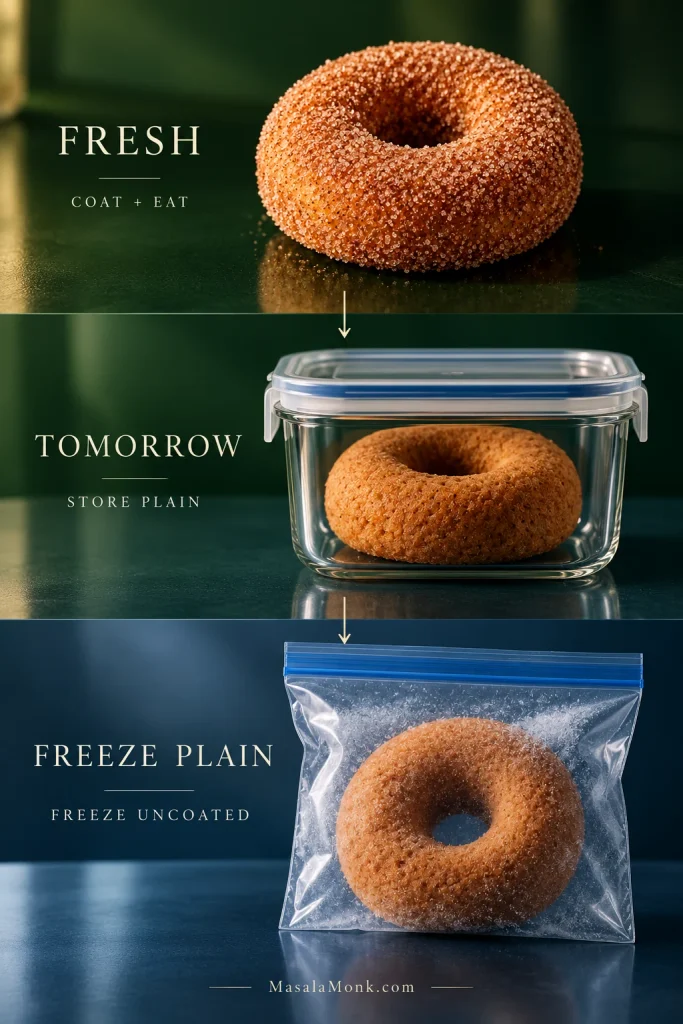
Three-stage storage guide showing a fresh coated donut, a plain donut stored for tomorrow and an uncoated donut prepared for freezing.
The crumb keeps better than the coating. Store planned leftovers plain so you can restore the cinnamon-sugar finish later.

Make Ahead

The reduced cider and dry ingredients can both be prepared up to 2 days ahead. Keep the cider refrigerated and the dry mix airtight at room temperature. Let the chilled cider reduction lose its chill before mixing, and make the complete batter shortly before baking.

If you are choosing a bake specifically because it needs to hold well until tomorrow, a moist applesauce cake is more forgiving overnight than a freshly coated cider donut.

Reheat One

Microwave briefly—about 8–12 seconds in many microwaves—just until slightly warm, or use a 300°F / 150°C oven for 3–5 minutes for a firmer exterior. If the donut was stored plain, coat it after reheating.
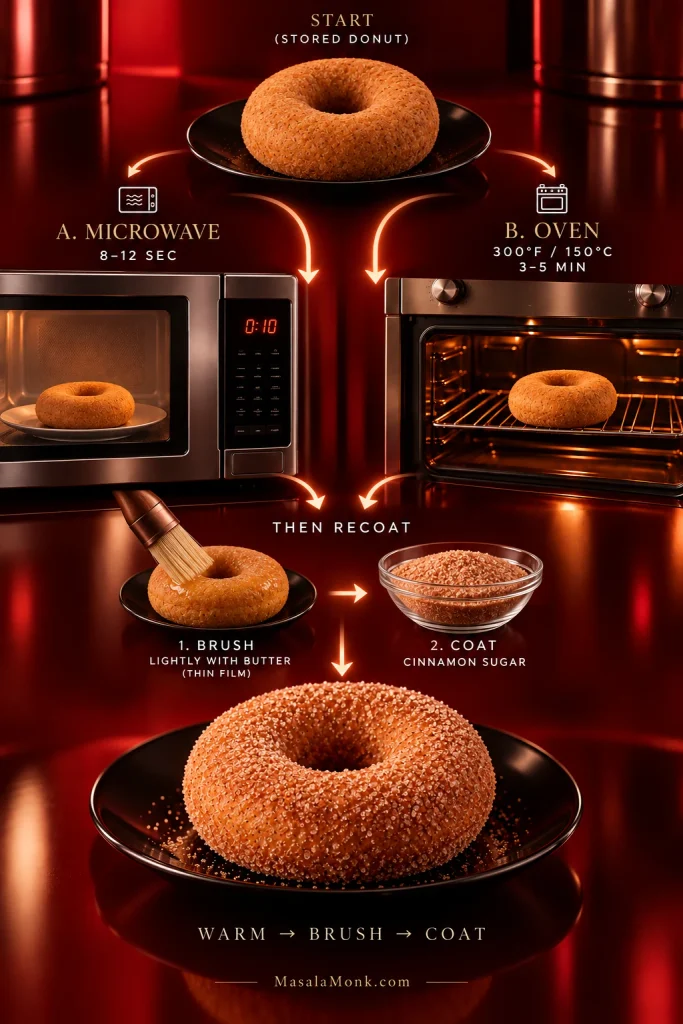
Reheating guide showing a plain stored donut going to a microwave or oven, then being lightly brushed and coated with cinnamon sugar.
Microwave for a softer center; use a low oven for a firmer exterior. Warm first, then add fresh cinnamon sugar.

Freezing

They freeze well enough for leftovers, although the crumb is best fresh. Freeze uncoated for up to about 2 months for best quality, thaw at room temperature, warm briefly, then add the butter and cinnamon sugar.

Questions About Gluten-Free Apple Cider Donuts

1. Are apple cider donuts normally gluten-free?

No. Traditional cider donuts are usually made with wheat flour unless they are specifically made or sold as gluten-free.

2. What does “apple cider” mean here?

The sweet, nonalcoholic cloudy apple drink commonly sold as cider in North America. In places where “cider” usually means alcohol, look for cloudy pressed apple juice.

3. Is apple cider gluten-free?

Plain apple cider is naturally gluten-free, but packaged products can have their own labeling or cross-contact considerations. In the U.S., the FDA explains what a “gluten-free” label is required to mean.

4. Can I use apple cider vinegar?

No. Apple cider vinegar is vinegar and cannot replace the apple drink used in this recipe.

5. Can I use apple juice?

Yes. Reduce unsweetened cloudy apple juice to the same amount. The finished flavor will usually be milder.

6. Why are my gluten-free apple cider donuts gummy?

Gummy centers usually come from underbaking, excess moisture or a flour blend that behaves differently. Let the donuts cool briefly before judging them, then start with the bake, cider reduction and flour quantity.

7. Can I fry these instead of baking them?

Not with this batter. Fried cider donuts need a different dough and cooking method; this recipe is specifically for baking. If you don’t need a gluten-free formula and want a donut method that avoids deep-frying, these air fryer donuts are built for the air-fryer basket instead.

8. Can I make them vegan?

There is no simple egg swap that gives the same texture. For a reliable vegan version, start with a recipe formulated without eggs.

Eat the First One Warm

Coat the donuts while they are still a little warm and eat one before the sugar has had time to soften. That is when they are at their best.
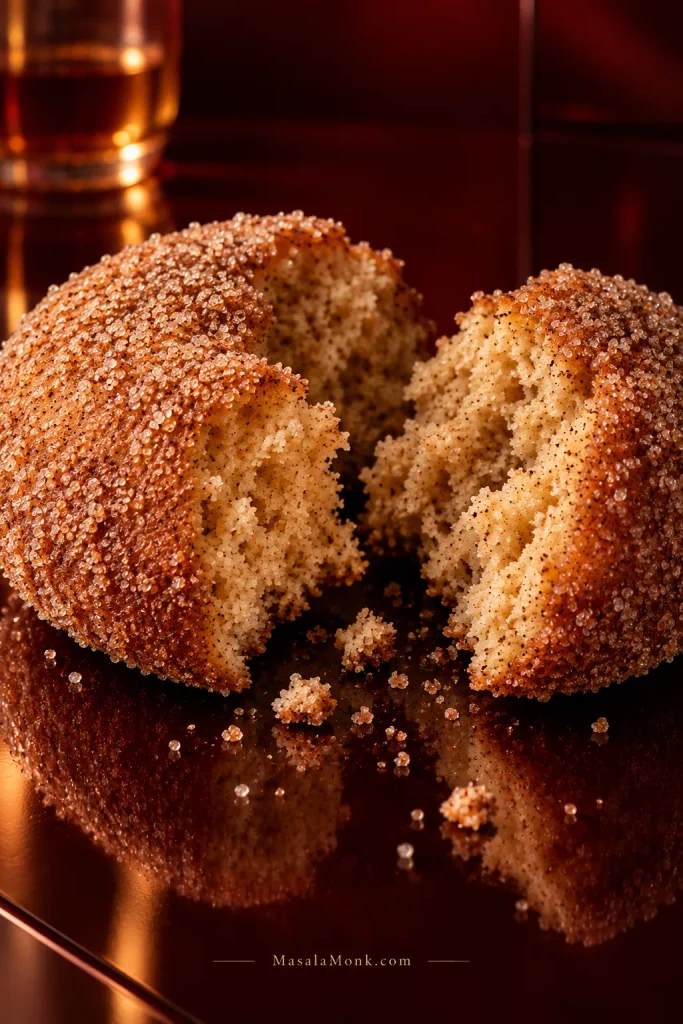
Warm cinnamon-sugar apple cider donut torn open on a glossy burgundy surface, with loose crumbs and the soft interior exposed.
The best contrast is right after coating: warm, soft crumb against dry, granular cinnamon sugar.

Still in an apple-baking mood? For fresh apple pieces and a no-mixer cake, try this easy fresh apple cake.
Back to the recipe · Back to top

Posted on — Leave a comment

Apple Crumble Recipe: Easy, Buttery & Crisp

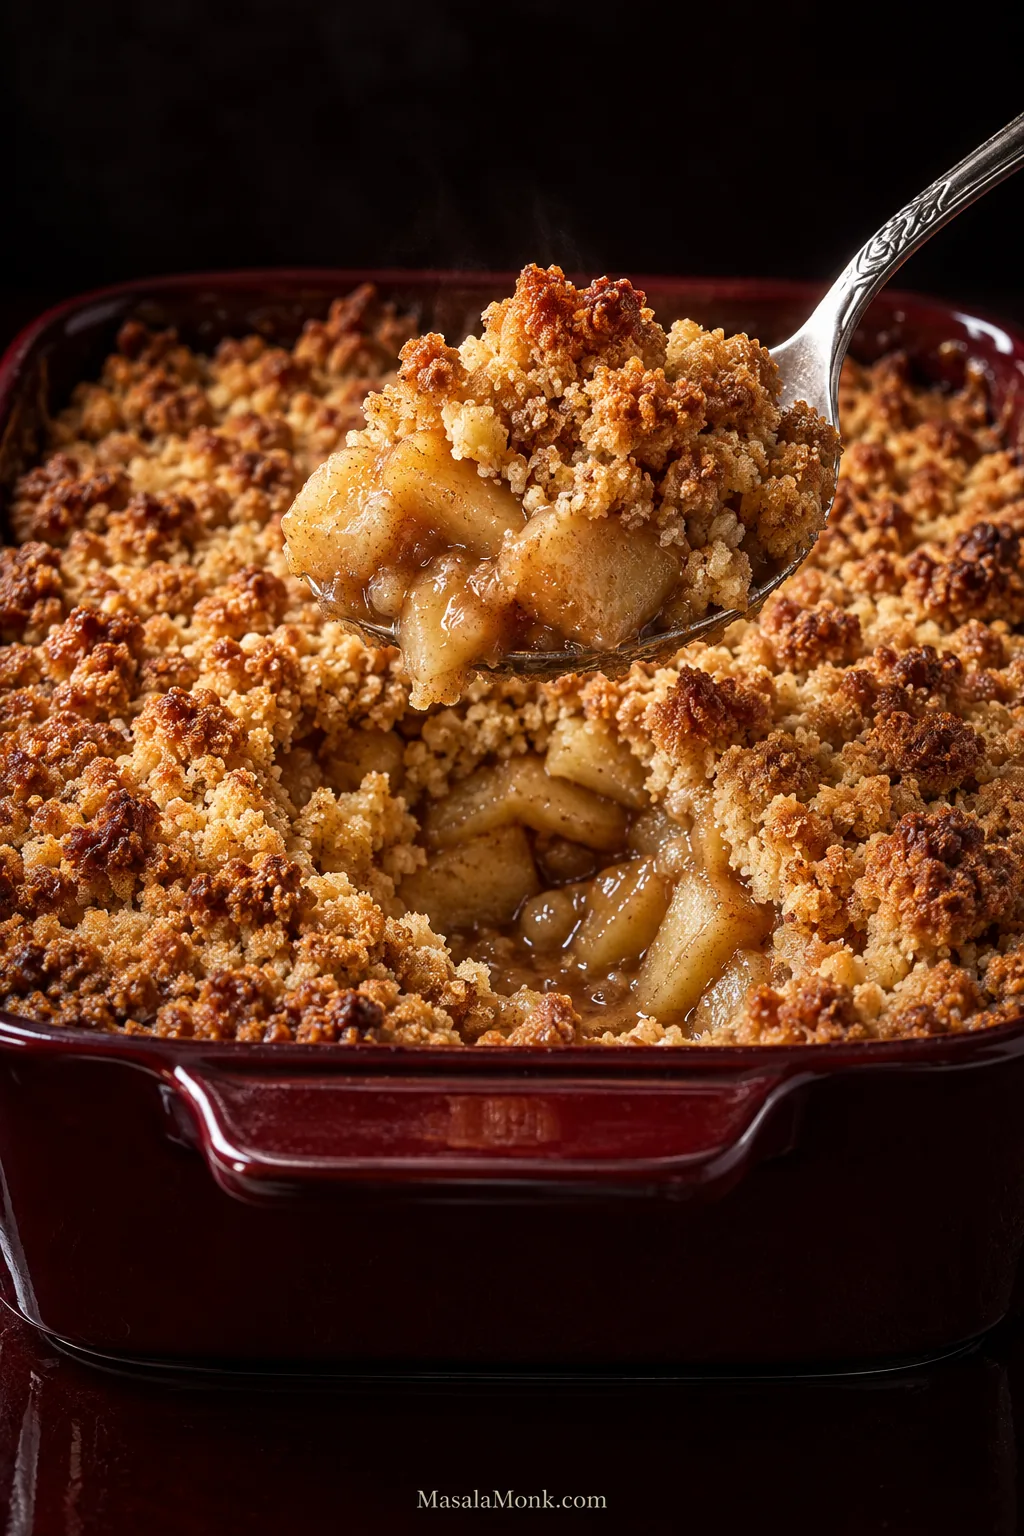
A spoon lifts apple crumble from a dark red baking dish, revealing golden crumb topping, tender apple pieces and lightly thickened cinnamon juices underneath.

The awkward thing about apple crumble is that the top can look completely finished before the apples underneath are ready.

The crumbs are deeply golden. Butter is sizzling at the edges. The kitchen smells like baked apple and cinnamon. Then you push a knife through the middle and hit firm fruit. Or the apples are perfect, but enough steam has worked its way into the topping to take away the crisp rubble you wanted.

Apple crumble is too simple a dessert to deserve that much uncertainty.

This apple crumble recipe is built around getting the fruit and topping to finish together. Underneath, the apples become tender in a light cinnamon-scented sauce. Above them is a generous flour-butter-sugar crumble with crisp edges, fine buttery crumbs and a few larger craggy pieces.

If you want one easy default, a firm-tart apple such as Granny Smith is a good place to start. Bramley gives a softer, more spoonable filling, while Pink Lady, Honeycrisp, Braeburn and ordinary eating apples can all work too. The method is designed to adapt to the apples you actually have.

Apple Crumble Recipe at a Glance

Prep20–25 minutes
Serves6 generously or 8 more modestly
Prepared apples30–32 oz / 850–900 g, peeled and cored
Baking dish8×8 in / 20×20 cm, about 2 qt / 1.9 L
Oven375°F / 190°C conventional / 170°C fan
BakeAbout 45–55 minutes; begin checking around 40
Done whenGolden crumbs + bubbling juice + tender apples
Rest15–20 minutes

Time is only the starting point. The fruit and topping decide when the crumble is ready.

Apple Crumble Recipe

The crumble itself is simple: apples underneath and a four-ingredient topping above. The rest is mostly knowing what to change when your fruit is sweeter, firmer or juicier than expected.

Easy Apple Crumble Recipe

Tender cinnamon apples in their own lightly thickened juices, covered with a generous buttery crumble that bakes crisp at the edges and craggy on top.

Prep: 20–25 minutes Bake: 45–55 minutes Rest: 15–20 minutes Serves: 6 generously or 8 more modestly Dish: 8×8 in / 20×20 cm, about 2 qt / 1.9 L

Apple Filling

  • 30–32 oz / 850–900 g apples, weighed after peeling and coring; buy about 2¼–2½ lb / 1–1.1 kg whole apples
  • ¼ cup / 50 g caster or granulated sugar
  • 1 tbsp / 8–10 g all-purpose/plain flour
  • 2 tsp / 10 ml lemon juice
  • 1 tsp ground cinnamon
  • Pinch of fine salt

Crumble Topping

  • 7 oz / 200 g all-purpose/plain flour
  • 4½ oz / 125 g cold unsalted butter, cut into small cubes
  • 3½ oz / 100 g caster or granulated sugar
  • ¼ tsp fine salt

Instructions

  1. Heat the oven: Preheat to 375°F / 190°C conventional / 170°C fan. Use an 8×8-inch / 20×20 cm baking dish if you have one.
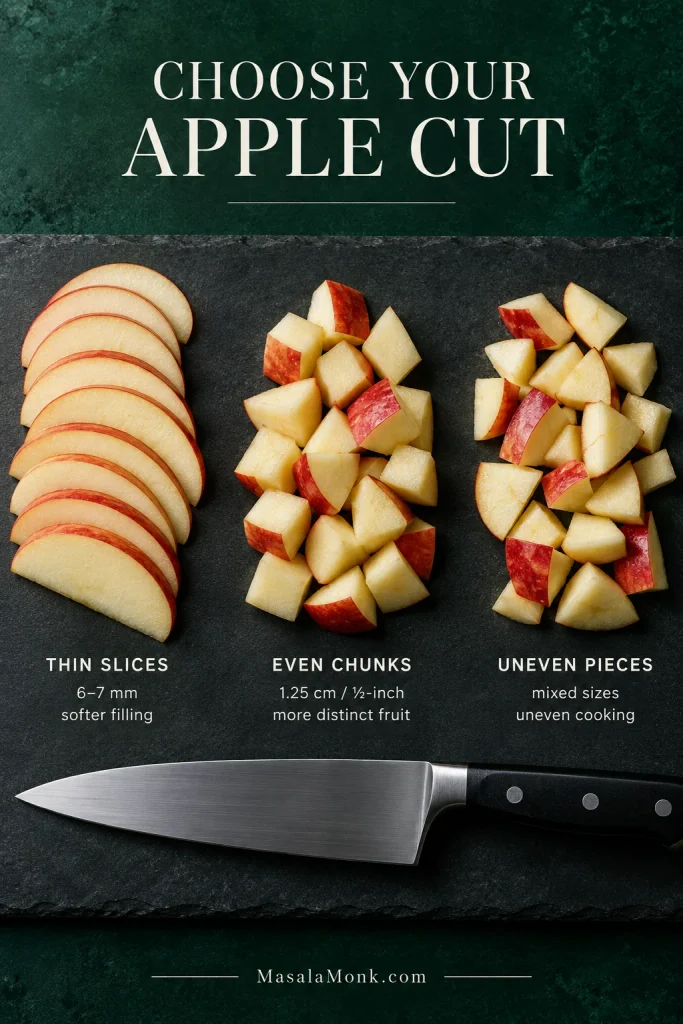
  2. Cut the apples: For a softer, more cohesive filling, slice them about ¼ inch / 6–7 mm thick. For more distinct pieces, cut them into roughly ½-inch / 1.25 cm chunks. Keep the pieces fairly even. Chunkier fruit may need the longer end of the baking range.
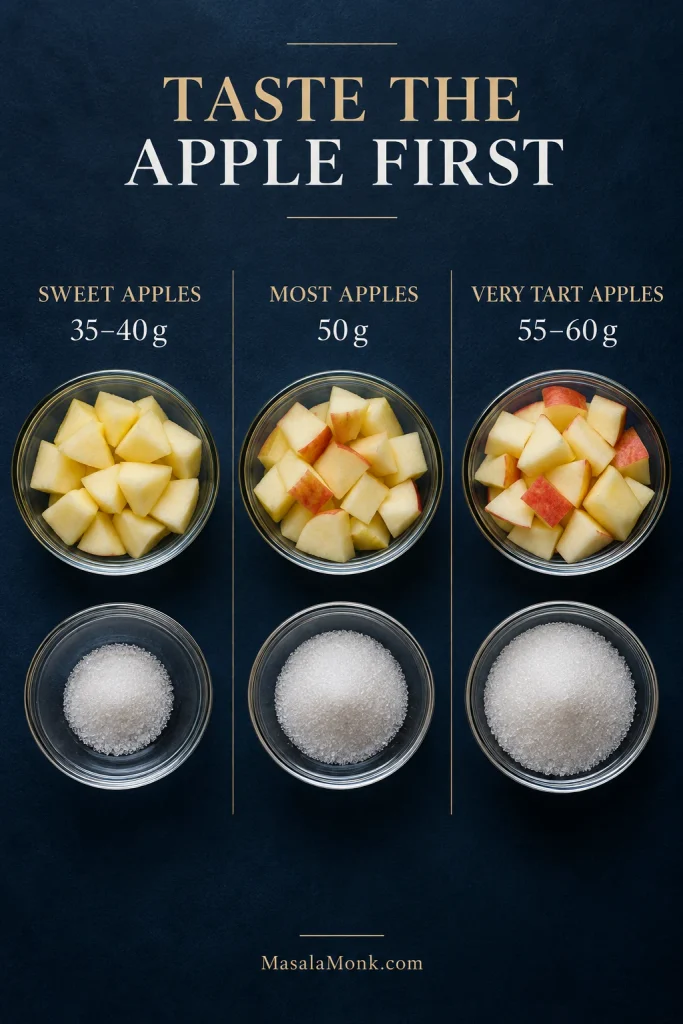
  3. Season the fruit: Toss the apples with the sugar, flour, lemon juice, cinnamon and salt. Use 35–40 g sugar for sweet apples, 50 g for most apples, and 55–60 g for very tart cooking apples. Very tart fruit may need less lemon—or none.
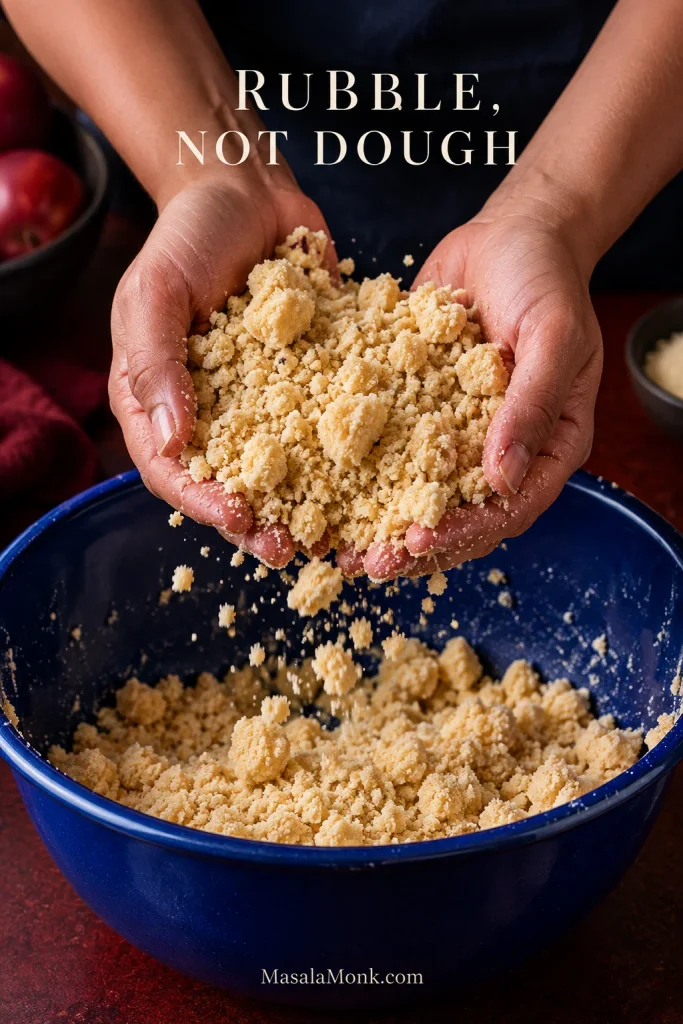
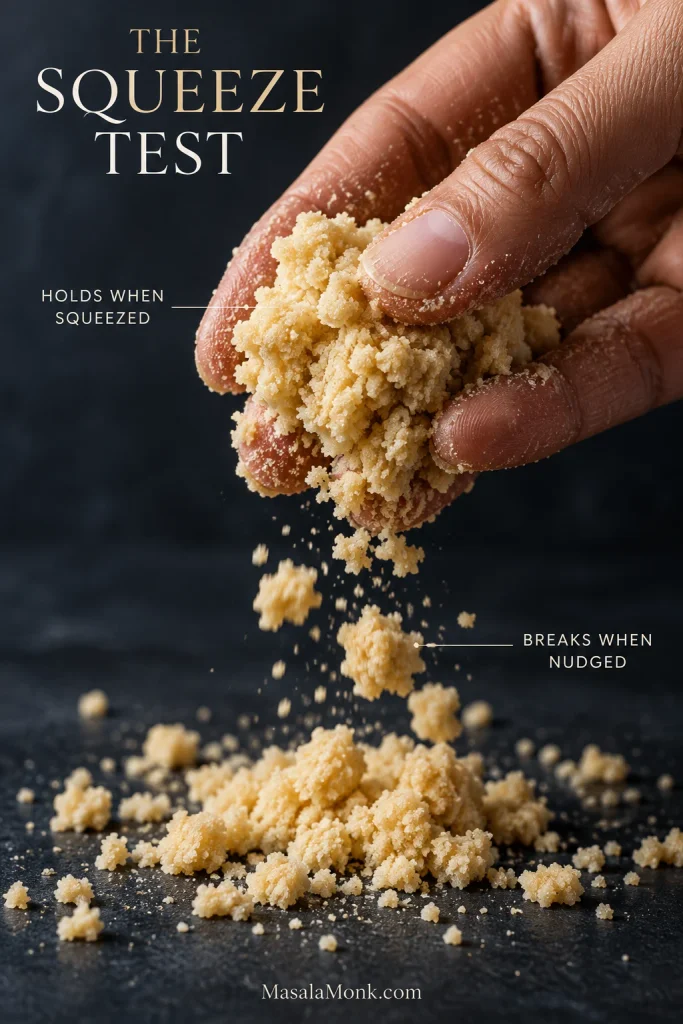
  4. Make the crumble: Mix the flour, sugar and salt. Rub or cut in the cold butter until you have coarse crumbs with plenty of pea-sized buttery pieces and a few larger clumps. Squeeze a handful: it should hold briefly, then break apart when nudged. Think rubble, not dough.
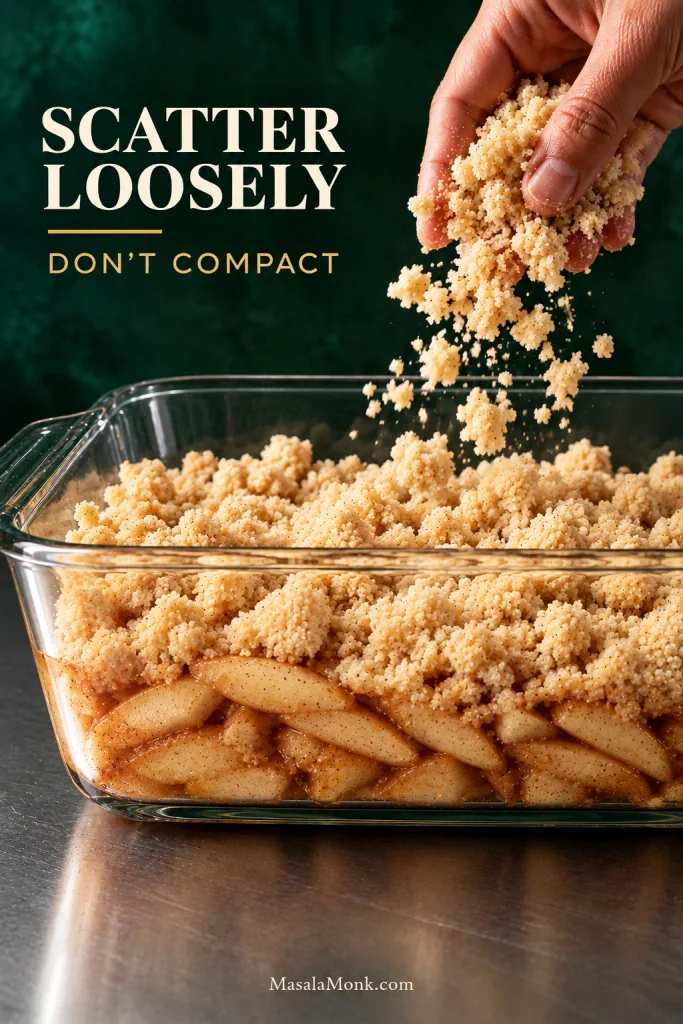
  5. Assemble: Spread the apples evenly in the dish. Scatter the topping loosely over them and keep the surface irregular. Do not press it into a thick, compact blanket.
  6. Leave room to bubble: Leave a little headroom if you can. If the dish looks very full, set it on a rimmed baking sheet or baking tray.
Bake, Check and Rest
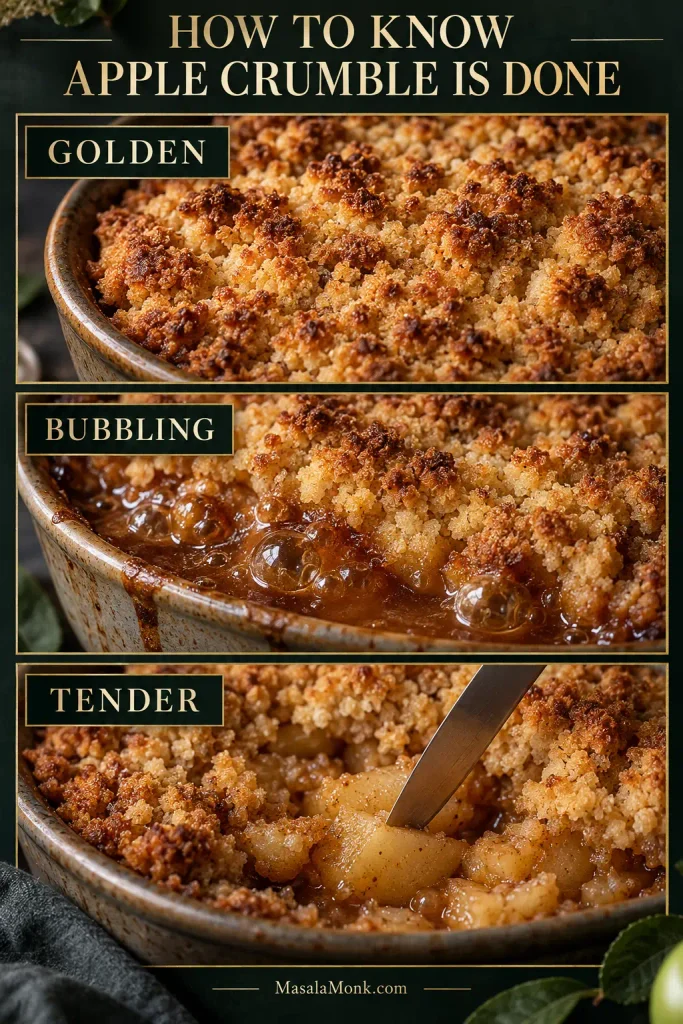
  1. Bake: Bake for about 45–55 minutes, checking from 40 minutes onward. The high spots should be deeply golden and thick apple juice should be bubbling around several edges.
  2. Check the fruit: Slide a thin knife through an open spot near the center. It should pass through the apple with very little resistance.
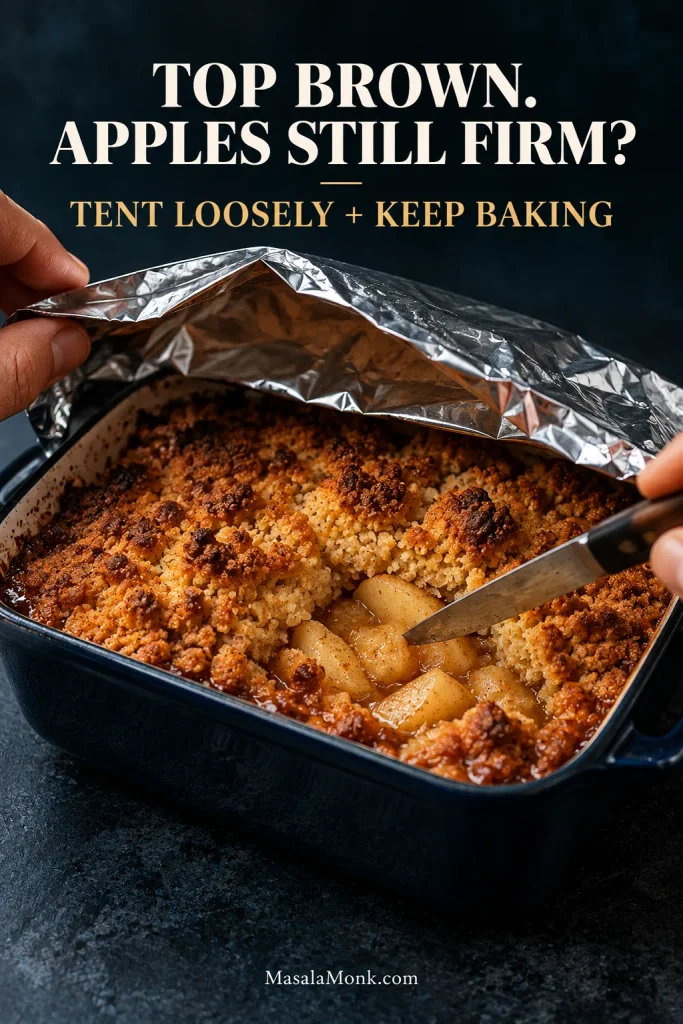
  3. Protect the top if necessary: Crumbs already dark enough? Tent the dish loosely with foil and keep baking until the fruit is tender.
  4. Rest: Leave the crumble for 15–20 minutes before serving. The juices thicken slightly as they settle around the apples.

Recipe Notes

  • Unusually dry apples: add about 1 tbsp / 15 ml water with the filling.
  • With oats: replace 1¾ oz / 50 g of the topping flour with 1¾ oz / 50 g old-fashioned rolled oats.
  • Salted butter: use the same weight and omit the ¼ tsp salt from the topping.
  • Make ahead: the topping is the best part to prepare in advance; refrigerate it overnight or freeze it for longer storage.

The best crumble is not perfectly even. Leave the surface craggy and loose; more exposed edges mean more places to toast.

A hand scatters loose raw crumble over seasoned apple slices in a clear baking dish, showing the fruit layer, irregular topping and space below the rim.
A few low spots and larger crags create more exposed edges for browning than a perfectly level blanket.

Why This Apple Crumble Works

  • Apples: a little flour thickens their juices without making the filling pasty.
  • Topping: the flour-forward ratio stays crumbly rather than baking into a dense cap.
  • Dish: the 8×8 keeps the fruit layer substantial without making the center unnecessarily slow to cook.
  • Doneness: judge the fruit and bubbling juice as well as the color on top.
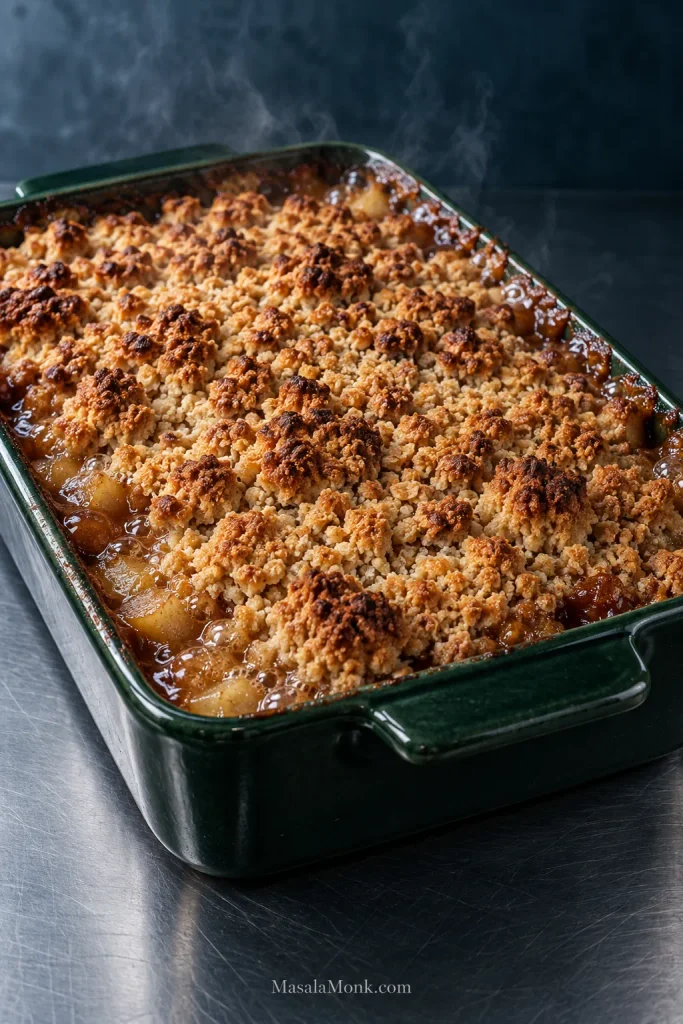
Freshly baked apple crumble in a dark green dish with an irregular golden topping and thick apple juices visibly bubbling around the edges.
Bubbles around several edges are a better cue than one active corner; they show the fruit layer is hot through.

Apple Crumble Guide

The recipe above is enough for an ordinary batch. The rest is for the things that make crumble behave differently: the apples you have, the dish you use and the problems that occasionally show up.

Which Apples Make the Best Crumble?

If you want one easy default, use a firm-tart apple such as Granny Smith. It stays recognizably apple while balancing the sweet topping. Bramley gives a softer, more spoonable filling. Both work well; the main difference is the texture of the finished fruit.

If You Want…Good ChoicesWhat to Expect
Distinct apple piecesGranny Smith, Pink Lady, Braeburn, HoneycrispFruit stays more recognizably apple
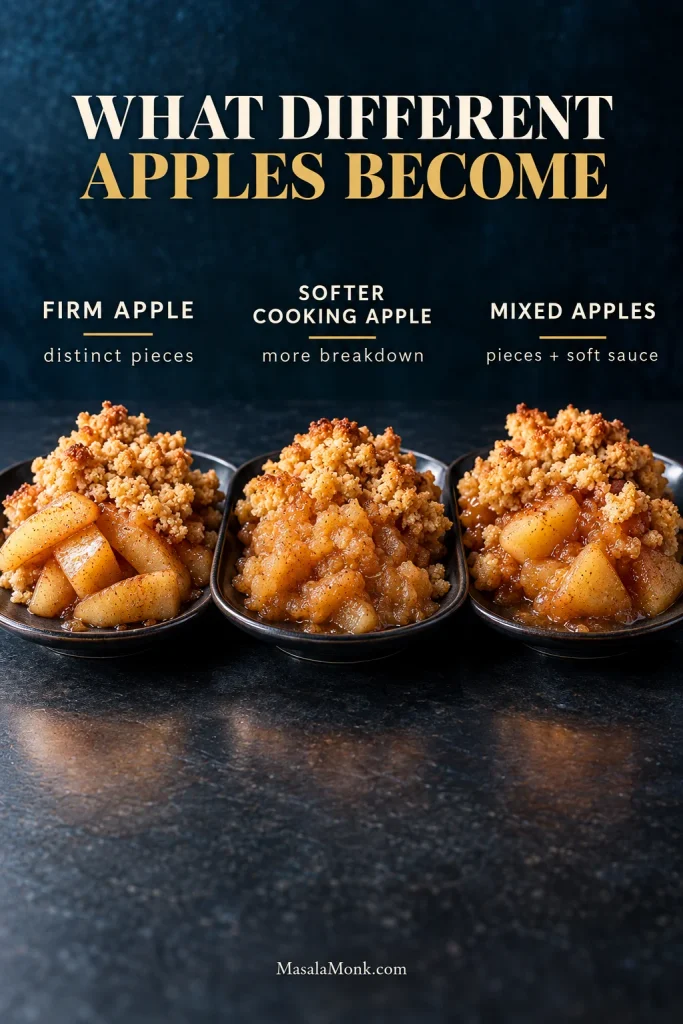
A softer fillingBramley or another cooking appleMore breakdown and a more cohesive sauce
A mix of bothOne firm apple + one softer varietyDifferent textures in the same spoonful
Whatever is already in the fruit bowlAlmost any eating appleTaste first, then adjust sugar and cut
Granny Smith, Pink Lady, Honeycrisp, Braeburn and Bramley apples arranged by whether they hold their shape, soften more or work well mixed together.
Taste an unfamiliar apple first: sweetness guides the sugar, while firmness hints at how much shape it will keep.

If you are working with a variety you do not know well, Penn State Extension has a useful apple chart covering sweetness, tartness, firmness and juiciness.

Use the Apples You Have

Most apples will work. The trick is to notice what you are working with before you season them.

Sweet eating apples need less sugar, while very tart cooking apples can take more. Taste the fruit first, then adjust the sugar in the filling rather than changing the topping.

Three portions of prepared apples with increasing amounts of sugar: 35–40 grams for sweet apples, 50 grams for most apples and 55–60 grams for very tart apples.
These adjustments belong to the fruit layer, so you can correct sweet or tart apples without changing the topping.

For the cut, firmer fruit benefits from even, slightly thinner pieces; softer apples are better in somewhat larger pieces. If the fruit seems unusually dry as you cut it, add about 1 tbsp / 15 ml water with the filling.

Three apple preparations compared on a dark surface: even thin slices, evenly sized chunks and uneven chunks of mixed sizes beside a kitchen knife.
Even sizing matters more than slices versus chunks; mixed thicknesses create different cooking speeds in the same dish.

You do not have to get every variable exactly right. Apple crumble is forgiving once you know what to look for.

For this version, the target is tender apple with a light cinnamon sauce clinging to it. A little breakdown is welcome. Complete collapse only matters when you wanted distinct pieces.

Three finished apple crumble portions compare firm apples with distinct pieces, softer cooking apples with more breakdown and mixed apples with both pieces and soft sauce.
Mixing firm and softer apples gives you both recognizable pieces and a more spoonable filling in the same dish.

How the Apple Juices Turn Into a Light Sauce

The apples do most of the work. Their juices mix with the sugar and cinnamon as the dish bakes, while the small amount of flour thickens them just enough to cling to the fruit rather than run across the bowl.

The flour is not there to create the firm, sliceable texture of pie filling. This should still feel like crumble: soft fruit, a little sauce and plenty of crisp topping.

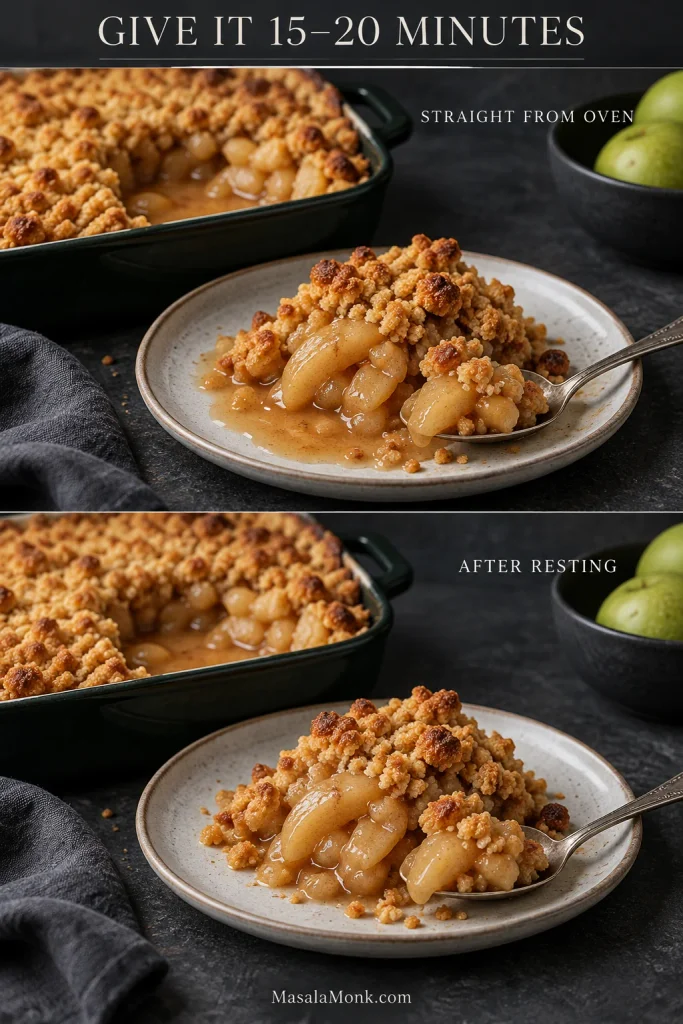
Straight from the oven, do not worry if the sauce still looks a little loose. Give it 15 minutes and it will settle around the apples.

The same apple crumble compared straight from the oven and after resting 15–20 minutes, with loose juice first and thicker sauce clinging to the apples afterward.
Resting thickens loose juices; it cannot soften firm apples. Hard fruit still needs more baking.

For pies, turnovers and other desserts that need a thicker pre-cooked fruit layer, the Apple Pie Filling Recipe uses a different stovetop method.

Get the Crumble Texture You Actually Want

For crisp crumble topping, keep the butter cold and stop while the mixture is still irregular rather than working it into a smooth dough.

The ratio here is 200 g flour, 125 g butter and 100 g sugar. It is flour-forward enough to stay crumbly rather than melting into a dense, cookie-like cap.

Work it a little longer and the crumbs become finer. Stop sooner and you keep more pea-sized buttery pieces. Squeeze a few handfuls together if you want larger clusters.

Hands hold raw flour-butter-sugar crumble above a blue bowl, showing fine crumbs, small pieces and larger irregular clusters falling apart loosely.
Fine crumbs fill gaps; larger buttery clusters create the pieces that crack under the spoon.

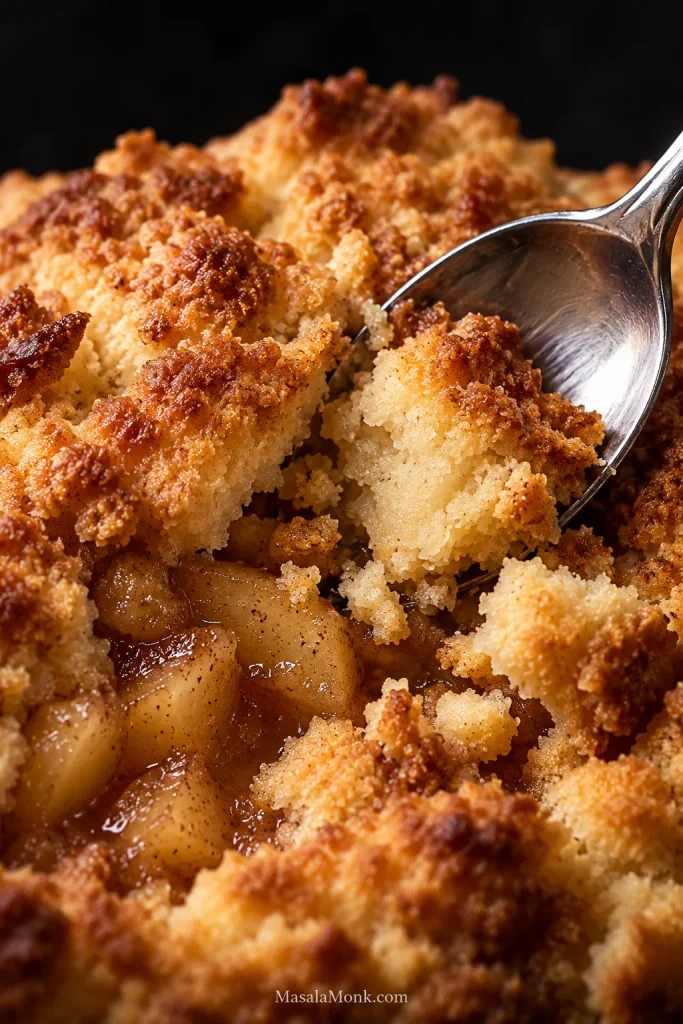
The nicest spoonful has both: tiny toasted crumbs catching a little apple juice and a few buttery pieces big enough to crack under the spoon. Those larger pieces tend to be the bits people go looking for.

A spoon breaks through a deeply golden apple crumble topping, exposing pale buttery crumb inside the crisp clusters and tender cinnamon apples underneath.
The browned surface should snap, while larger clusters can stay paler and buttery inside.

Caster or ordinary granulated sugar keeps the topping crisp and straightforward. Brown sugar gives a deeper caramel flavor and a slightly softer crumb. A little demerara or turbinado over the surface adds extra crunch.

Check the Crumble Topping Before Baking

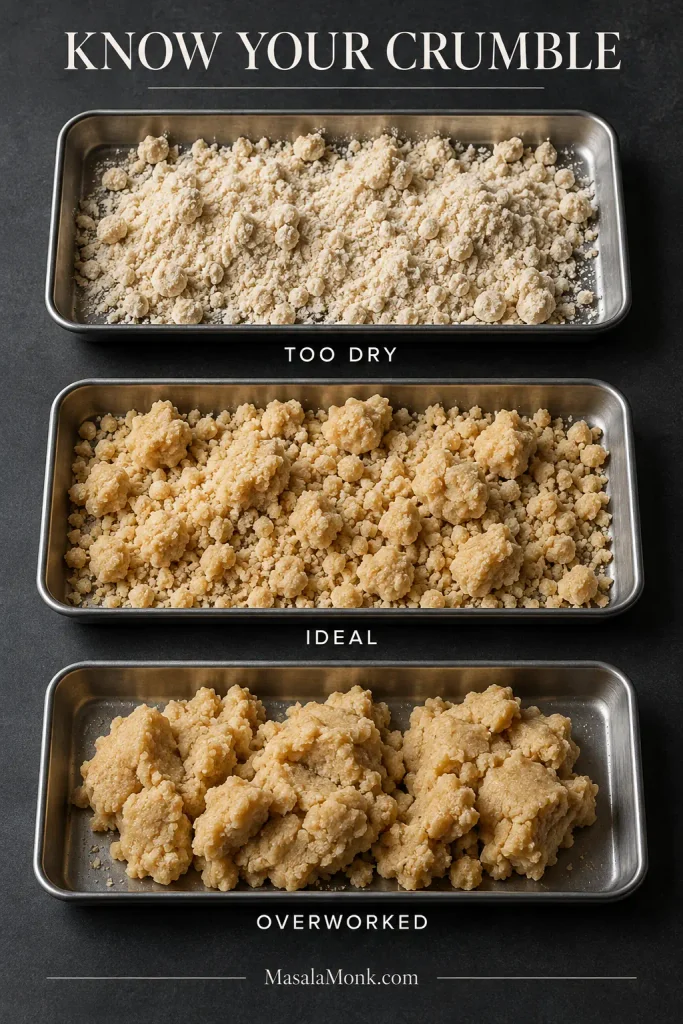
Before it goes into the oven, the mixture should sit between two obvious failures: loose, dusty flour on one side and a smooth, cohesive dough on the other. Aim for irregular crumbs that clump lightly without smearing.

Three raw crumble mixtures labeled too dry, ideal and overworked, ranging from powdery crumbs to irregular clusters to a cohesive dough-like mixture.
Powdery crumbs need better butter distribution; greasy or doughy crumbs usually need cooling before more flour.

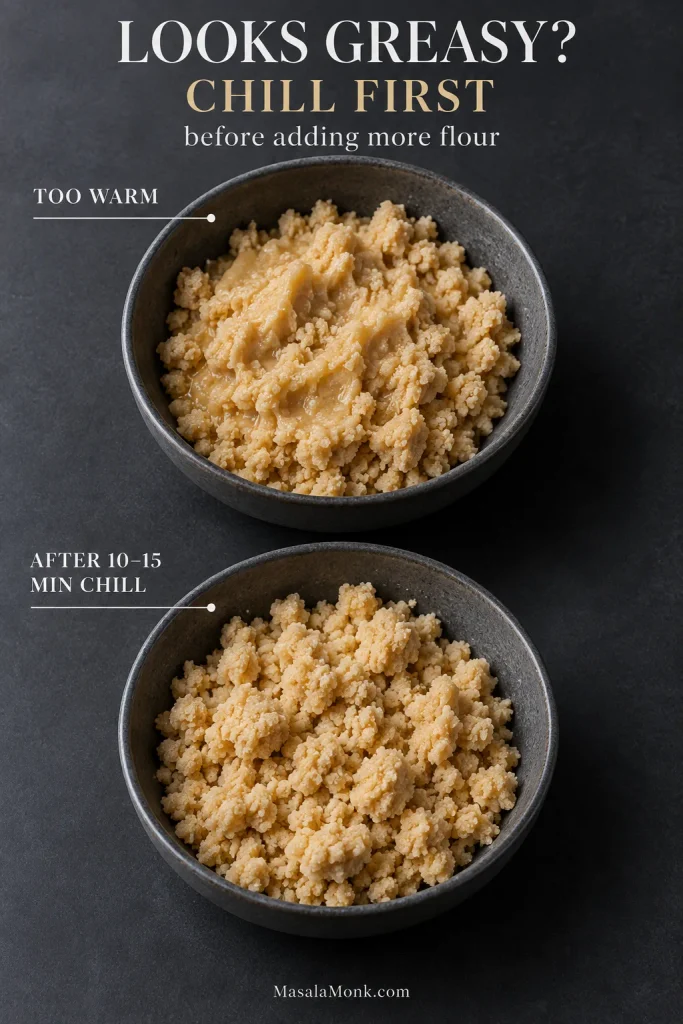
Topping rescue rule: chill first, change the ratio second. Warm butter can make a perfectly good mixture look greasy or doughy. Refrigerate it for 10–15 minutes before deciding it needs more flour.

The same raw crumble mixture shown warm and greasy-looking, then after chilling 10–15 minutes with firmer, more distinct crumbs and clusters.
If chilling restores distinct crumbs, warmth was the problem. If it still smears, overworking is more likely.

A quick squeeze tells you more than appearance alone. The crumbs should hold together briefly in your hand and then fall apart when nudged. Loose flour at the bottom of the bowl needs better butter distribution. Smooth, smearable dough has gone too far.

A hand squeezes raw crumble into a loose clump while pieces fall away, demonstrating that it holds when squeezed but breaks apart when nudged.
A good clump holds briefly under a light squeeze, then breaks apart again with very little pressure.

Cold Butter vs Melted Butter

Cold butter gives the craggy topping used here. Melted butter makes a denser, more cohesive streusel-like crumb. Using a food processor? Pulse only until irregular crumbs appear so the butter stays cold.

Should Apple Crumble Have Oats?

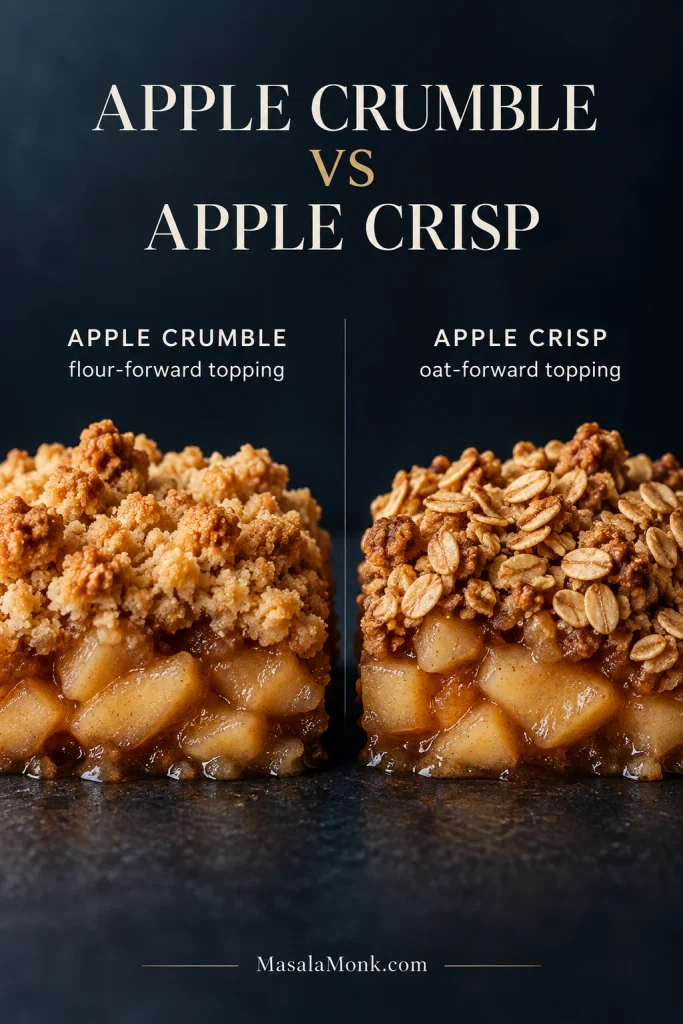
No. Apple crumble does not need oats. Flour, butter and sugar make the classic topping; rolled oats are optional when you want more chew and crunch. In North America, oat-heavy versions are often called apple crisp, although the names overlap.

In practice, the topping matters more than the label. If you want oats to be a major part of every spoonful, the Apple Crisp Recipe is built around that texture from the start.

For just a little oat crunch here, replace 1¾ oz / 50 g flour with 1¾ oz / 50 g old-fashioned rolled oats.

Should You Cook the Apples First?

No, not for this recipe. Raw, evenly cut apples cook through underneath the crumble. Pre-cooking is worth considering only for unusually firm fruit, very thick pieces or a particularly deep baking dish.

Pre-cooking also makes sense when you deliberately want a very soft filling. Let the fruit cool before adding the topping so the butter does not begin melting before the dish reaches the oven.

Can I Use Frozen or Unpeeled Apples?

Peels on: perfectly fine if the skins are thin and you enjoy a little more texture.

Frozen: use sliced apples without fully thawing. They soften more and release extra juice, so expect a little more baking time. Already thawed into a pool of watery liquid? Drain the obvious excess rather than automatically adding extra flour.

Your Baking Dish Changes the Crumble

Use the 8×8-inch / 20×20 cm dish if you have one. It gives this amount of fruit enough depth without making the center unnecessarily slow to cook.

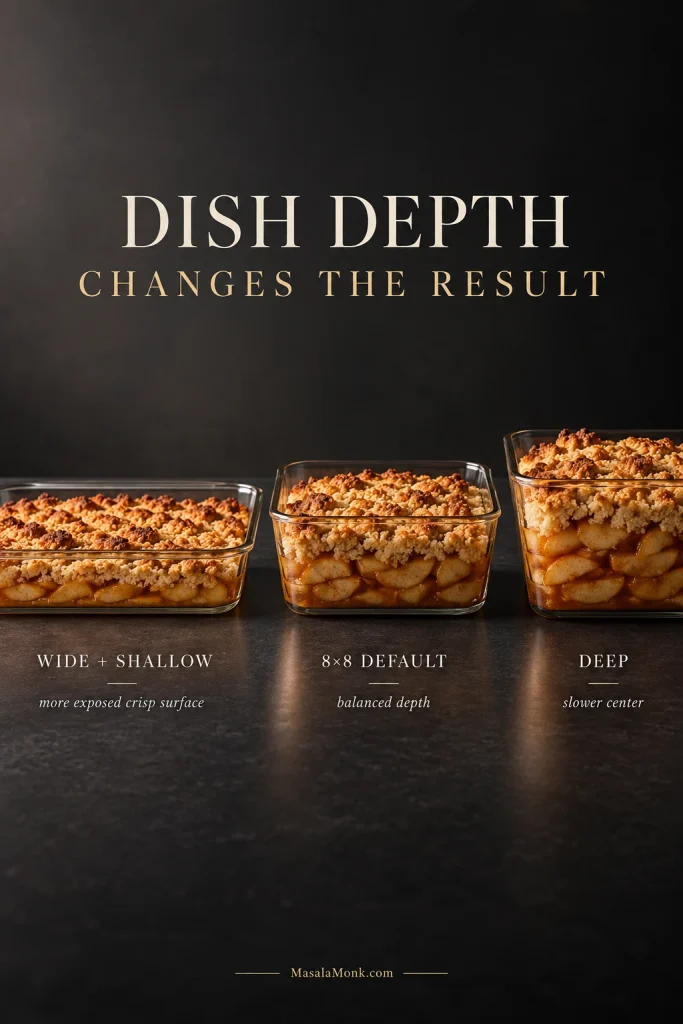
A wide, shallow dish is the easier route to lots of crisp topping. A deep casserole traps more moisture around the fruit and takes longer through the middle.

Three clear dishes of apple crumble show a wide shallow layer, a balanced 8×8-inch depth and a much deeper fruit layer with less exposed surface.
Shallow dishes favor more crisp surface; deeper dishes put proportionally more fruit under each spoonful.

Dish depth matters more than material here, but heavy ceramic usually takes a little longer to heat through than metal. Let the apples, not the clock, make the final decision.

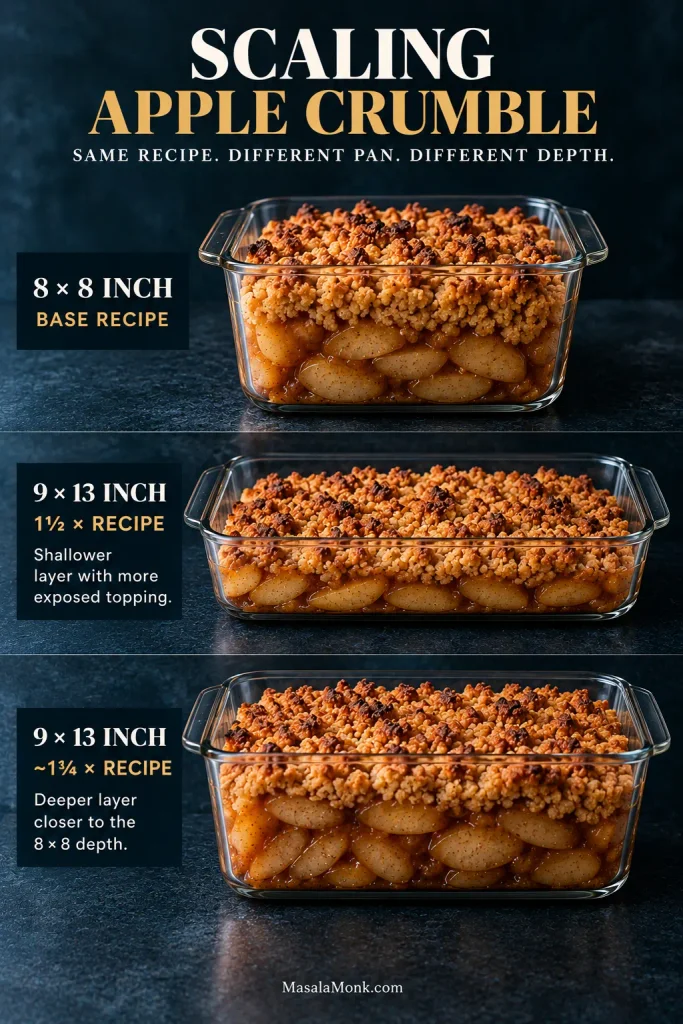
For a 9×13-inch / 23×33 cm dish, use a 1½× batch when you want a shallower crumble with more exposed topping. For something closer to the depth of the 8×8, use about a 1¾× batch.

Clear-sided apple crumbles compare an 8×8 base recipe, a shallow 9×13 pan using 1½ times the recipe and a deeper 9×13 using about 1¾ times.
Use 1½× for a shallower 9×13; move toward 1¾× to preserve more of the original 8×8 balance.

How to Know Apple Crumble Is Actually Done

A brown top is not permission to stop while the apples are still hard.

  • Golden crumbs: the high spots should be richly toasted.
  • Bubbling juice: thick bubbles should appear in several places around the edge.
  • Tender apples: a thin knife inserted near the center should pass through the fruit easily.
Three close-ups show apple crumble doneness cues: deeply golden topping, thick juices bubbling at the edge and a knife sliding into a tender center apple piece.
If only two cues are present, check the missing one: golden, bubbling and tender should agree.

Tender does not have to mean collapsing. A firm apple can still hold its shape while being soft enough to cut with the side of a spoon.

Fix My Apple Crumble

Before It Goes In

Dusty crumbs: loose flour at the bottom of the bowl means the butter needs working through a little more.

The topping turned to dough: don’t reach for more flour yet. Chill it for 10–15 minutes, then break it back into irregular pieces. Too much extra flour can leave the baked topping chalky.

Greasy-looking crumbs: don’t panic and add flour straight away. Chill them first; warm butter can make a perfectly good mixture look much wetter than it really is.

While It Bakes

The topping melted flat: the butter was probably too warm or the mixture was overworked. It will usually still taste good. Next time start colder and stop sooner.

Brown top, hard apples: cover loosely with foil and keep going. Thick pieces, firm varieties and deep dishes are the usual reasons.

A browned apple crumble is loosely covered with foil while a knife checks an apple in the center to see whether the fruit has become tender.
Tent loosely so the apples can finish while steam escapes and the already-crisp topping stays protected.

No juice at the edges yet: check the fruit near the center. Firm apples plus a quiet filling usually means the crumble needs longer; very dry fruit may simply release less visible juice.

After Baking

Watery filling: give it the full 15–20-minute rest first. If it is still thin and the apples are firm, return the crumble to the oven and keep baking until the fruit softens and the juices bubble properly.

Mushy apples: nothing will make them firm again now. Use firmer fruit or slightly larger pieces next time.

Dry fruit with hardly any sauce: add a spoonful of water next time and do not remove nearly all of the filling sugar.

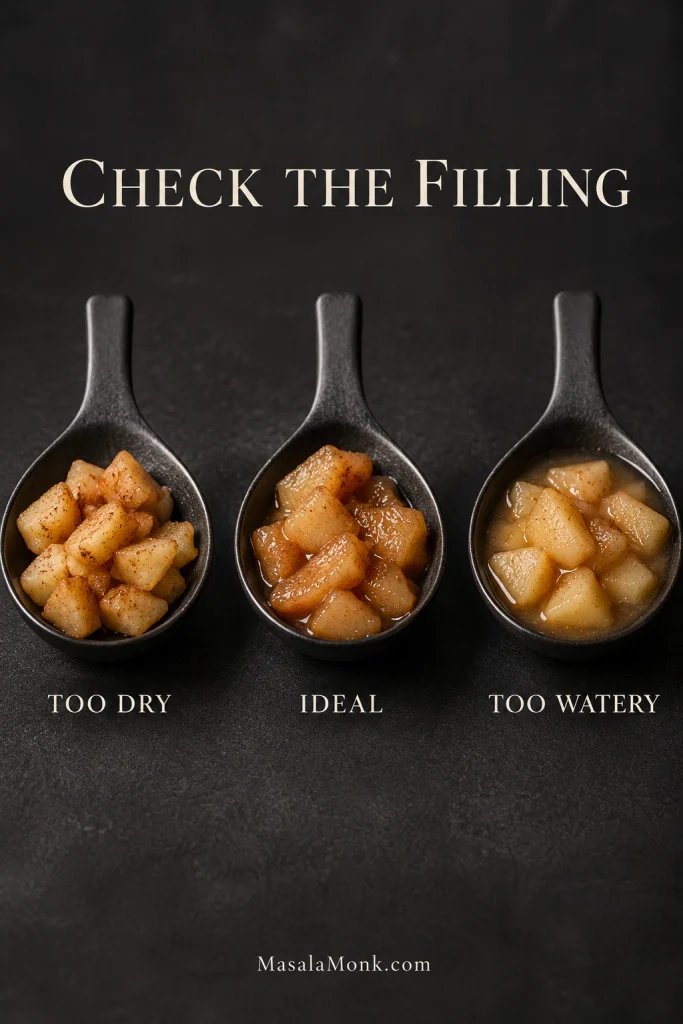
When the problem is the liquid around the apples, look at what remains after a spoonful leaves the dish. Pooled juice points to a loose filling; almost no sauce points to fruit that has cooked dry.

Three spoonfuls of cooked apples compare a dry filling with little sauce, an ideal filling with sauce clinging to the fruit and a watery filling with pooled liquid.
Ideal filling clings to the fruit with little free liquid left behind; runny juice is still too loose.

Too sweet: reduce the sugar in the fruit layer before changing the topping.

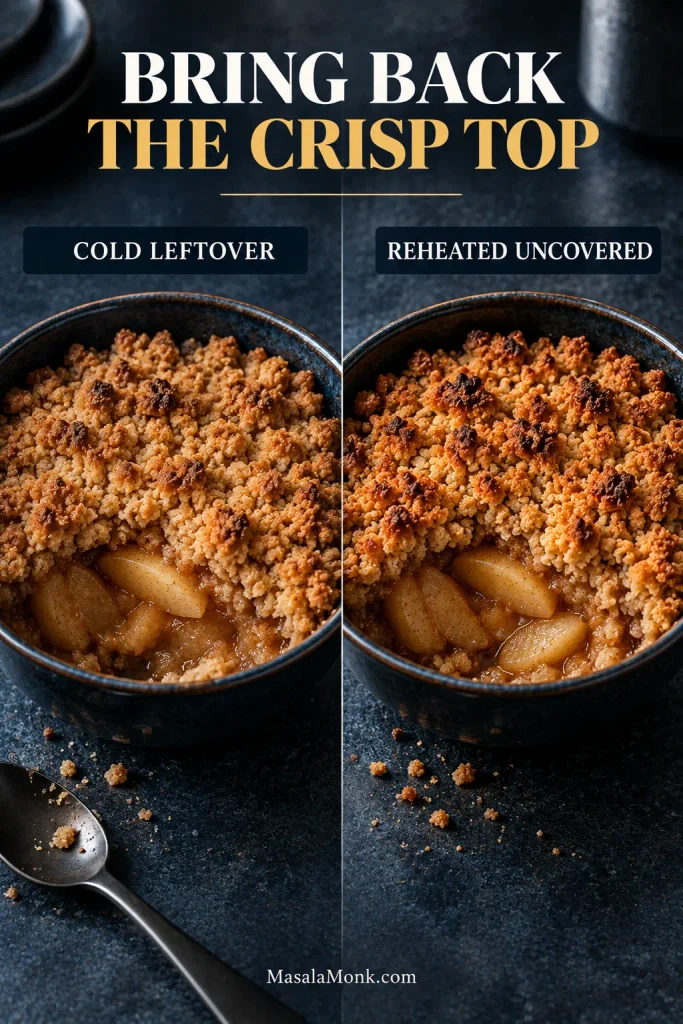
Soft topping the next day: reheat the crumble uncovered so trapped moisture can escape.

Apple Crumble Troubleshooting at a Glance

ProblemWhy It HappensFix NowNext Time
Doughy or greasy crumbsButter got too warm or the mixture was overworkedChill and break the crumbs back upStart colder and stop mixing sooner
Brown top, hard applesFruit is firm or thick, or the dish is too deepCover loosely with foil and keep bakingCut fruit thinner or use a shallower dish
Watery fillingVery juicy fruit, insufficient baking or no resting timeRest first; if fruit is firm and filling stays thin, bake longerBake until the juices are bubbling well
Mushy fruitSoft apples, very small pieces or too much cookingNothing to rescue nowUse firmer apples or larger pieces
Soft leftoversMoisture has moved from the fruit into the toppingReheat uncoveredAvoid covering during reheating

↑ Back to top

Apple Crumble for Two

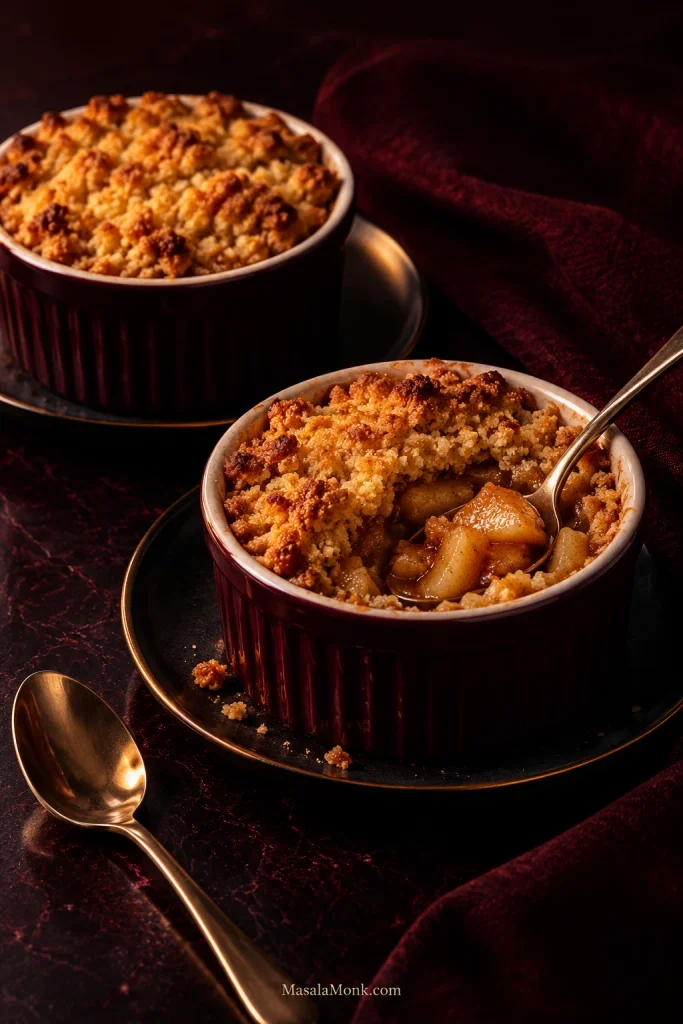
Sometimes the correct amount of crumble is not a family dish. It is two ramekins on a Tuesday night.

Use about 10½ oz / 300 g prepared apples divided between two 8–10 oz / 240–300 ml ramekins, or use one small baking dish of similar capacity.

For the topping, use 2½ oz / 70 g all-purpose/plain flour, 1½ oz / 40 g cold butter and 1¼ oz / 35 g sugar with a pinch of salt. Season the fruit with about a tablespoon of sugar, a teaspoon of flour, a squeeze of lemon and a little cinnamon.

Bake at the same temperature as the full recipe and begin checking around 25 minutes. Most individual crumbles need roughly 25–35 minutes.

Two dark red ramekins of apple crumble on a dark table, with one intact and the other opened to reveal tender cinnamon apples beneath the golden topping.
Ramekins brown fast around the edges, so judge doneness by the fruit at the center.

Air Fryer Apple Crumble

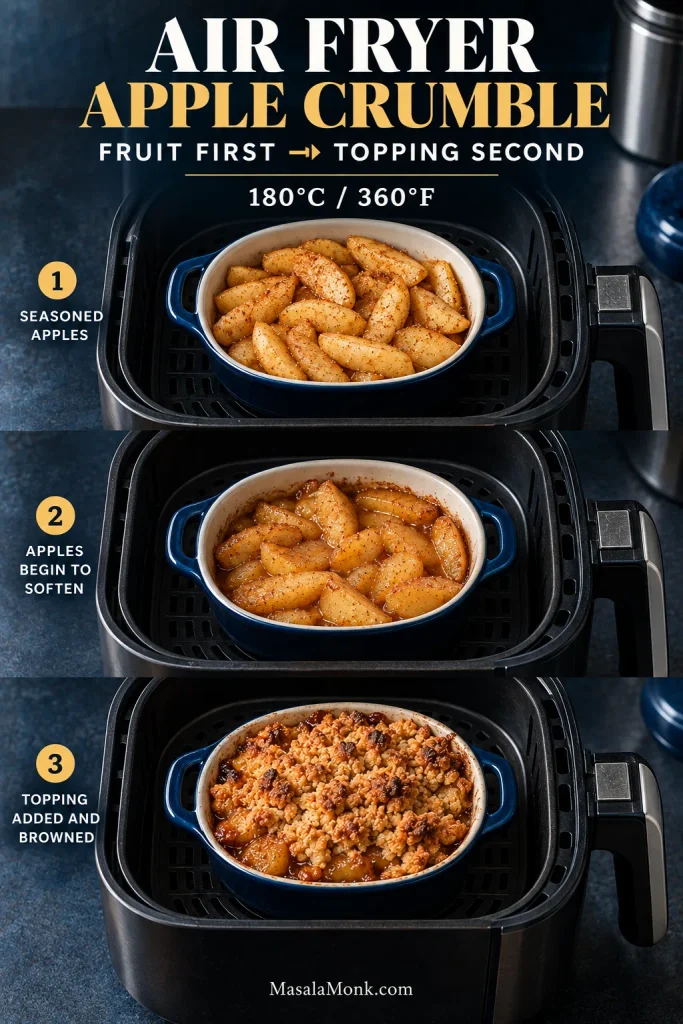
Air fryers brown the topping quickly, so the fruit needs a head start.

The two-portion version fits especially well in a small air-fryer-safe dish. Keep the fruit layer shallow; a heavy ceramic dish may take a little longer than a lighter metal or silicone one.

Cook the seasoned apples at about 360°F / 180°C until they are beginning to soften. Start checking at 10 minutes; depending on the apple, cut and dish, this will usually take about 10–15 minutes.

Add the topping and continue air frying until it is golden and the fruit is hot and tender underneath. Start checking after 8 minutes; many small crumbles need roughly 10–15 minutes more. Air fryers vary considerably, so use the color of the crumbs and tenderness of the apples as the final guide.

Keep it shallow. A deep air-fryer dish makes it much easier for the surface to brown while the center fruit is still firm.

Three stages of air fryer apple crumble show seasoned apples first, partially softened apples next and a finished shallow dish with golden crumble topping at 180°C or 360°F.
A shallow dish helps the apples keep pace with the fast-browning topping in an air fryer.

Easy Variations That Don’t Change the Method

  • Add oats: replace 50 g topping flour with 50 g rolled oats.
  • Make it gluten-free: replace both the topping flour and the tablespoon of flour used with the apples with a 1:1 gluten-free baking blend.
  • Make it dairy-free or vegan: use the same weight of a firm plant-based baking block rather than a soft tub spread. If it is salted, reduce or omit the added topping salt.
  • Add pear: replace up to half the prepared apple weight with firm, not fully ripe pear.
  • Use warmer spice: replace the cinnamon with 1–1½ tsp of homemade apple pie spice.

Blackberries and rhubarb are different. They change the moisture and acidity of the filling enough that they deserve their own balance rather than being treated as a casual handful stirred into this recipe.

Make Apple Crumble Ahead, Freeze It and Reheat It

The topping is the best part to make ahead. Cover it and refrigerate it overnight, then scatter it over freshly prepared apples before baking.

You can also prep the apples ahead. Peel and cut them, toss them with the lemon juice and refrigerate them well covered. Add the sugar, flour, cinnamon and salt closer to baking. Fully seasoned apples can sit overnight, but the sugar will draw out more juice.

Both frozen crumble topping and baked crumble are best used within about 2–3 months for quality.

Freezing Crumble Topping

Freeze the topping as loose crumbs. Spread it on a tray until firm, then transfer it to a freezer bag or airtight container. Scatter it over the apples while still frozen; it may need a little longer in the oven.

Freezing Baked Apple Crumble

Cool the crumble completely, wrap the dish well or divide it into airtight freezer containers, then freeze. Thaw in the refrigerator and reheat uncovered so the top has a chance to crisp again.

Storing Leftovers

Once cooled, cover the crumble and refrigerate it. The USDA’s guidance for cooked leftovers recommends using them within 3–4 days.

For several servings or the whole dish, reheat uncovered at about 300–325°F / 150–165°C until hot through and crisp at the surface, usually around 15–20 minutes. An air fryer works nicely for one or two portions. A microwave reheats the fruit quickly, but the crumbs will soften.

The same apple crumble portion shown cold with a softer golden topping and reheated uncovered with darker, drier and more sharply defined crisp crumbs.
Reheat only until hot and crisp again; extra oven time starts drying the fruit.

What to Serve With Apple Crumble

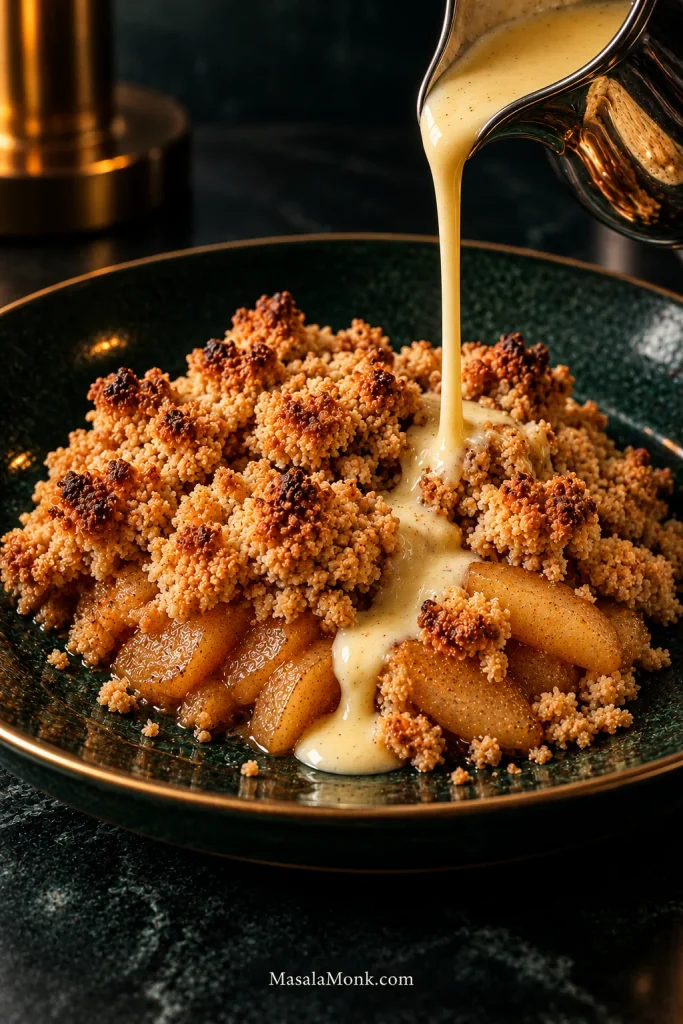
For the classic British finish, serve apple crumble with hot vanilla custard. It slips through the craggy crumbs and gathers around the cinnamon-scented fruit beneath them.

Vanilla custard pours from a silver jug through one section of golden apple crumble on a dark green plate, while much of the crisp topping remains uncovered.
Pour custard after plating so part of the crumble stays dry and crisp in every serving.

For the best hot-and-cold contrast, vanilla ice cream is hard to beat. It starts melting into the hot apples while the exposed topping stays crisp.

Softly whipped cream or cold pouring cream is the quieter choice when you want richness without much extra sweetness.

Whichever you choose, give the crumble its short rest first. You want cinnamon-apple sauce clinging to the spoon, not molten juice racing across the bowl.

Apple Crumble, Apple Crisp, Cobbler or Dutch Apple Pie?

In the simplest terms, crumble has a flour-forward crumb topping, crisp is usually more oat-forward, cobbler uses biscuit or batter, and Dutch apple pie adds pastry underneath.

The names vary between countries and cookbooks, so how the dessert is built is more useful than insisting on one universal definition.

DessertWhat Is on Top?Bottom Crust?
Apple crumbleFlour-forward butter-and-sugar crumbs; oats optionalNo
Apple crispUsually a more oat-forward crumb toppingNo
Apple cobblerBiscuit, dumpling or batter-style toppingNo
Dutch apple pieCrumb toppingYes
Side-by-side apple desserts with similar filling: apple crumble has a flour-based crumb topping, while apple crisp has a visibly oat-heavy topping.
Texture is the clearer distinction: crumble is flour-forward and buttery; crisp usually brings more oat chew.

If what you want is pastry underneath the fruit as well as crumbs above it, the Dutch Apple Pie Recipe is the closer match.

By this point, the target is easy to see: crisp crumble on top, tender apples underneath and just enough sauce to cling between the fruit.

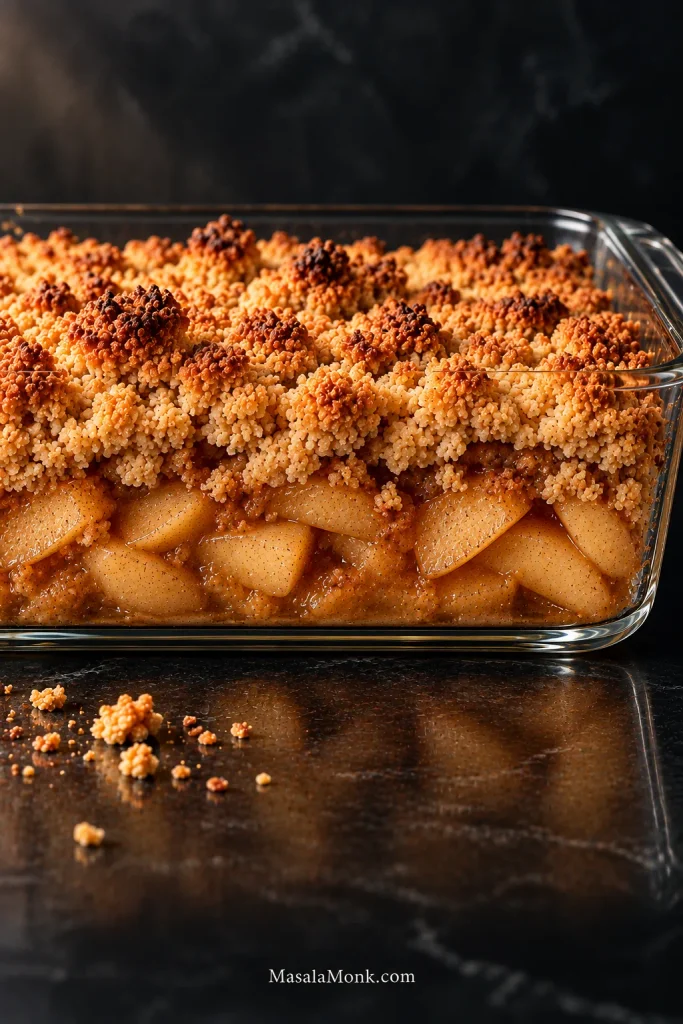
Side view through a clear glass dish shows golden apple crumble topping over a deep layer of tender apple slices with lightly thickened cinnamon sauce between them.
The finished structure should show crisp crumb above tender apples, with lightly thickened cinnamon juices clinging between the fruit.

Apple Crumble Recipe FAQs

1. What Are the Best Apples for Apple Crumble?

A firm-tart apple such as Granny Smith is an easy default when you want distinct pieces. Bramley and other cooking apples give a softer filling. The recipe works well with either style.

2. Can I Make Apple Crumble Without Peeling the Apples?

Yes. Thin apple skins can stay on if you enjoy a little more texture. Peeling gives a softer, more traditional filling.

3. Does Apple Crumble Need Oats?

No. All-purpose/plain flour, butter and sugar are enough for a classic crumble topping. For some oat texture, replace 50 g of the flour with 50 g rolled oats.

4. Why Is My Apple Crumble Watery?

Juicy apples, insufficient baking or serving too soon can all leave the filling thin. Rest it for 15–20 minutes; if the fruit is still firm and the filling stays watery, return it to the oven.

5. Why Is My Crumble Topping Floury?

A floury or powdery topping usually means the butter was not distributed thoroughly enough. Keep working it through until a squeezed handful briefly holds together, then breaks apart.

6. Can I Make Apple Crumble the Night Before?

Yes. Make the topping ahead and refrigerate it separately for the crispest result. Prepare the fruit closer to baking when possible.

7. How Do You Freeze Apple Crumble?

You can freeze either loose crumble topping or a fully baked, cooled crumble. For best quality, use either within about 2–3 months and reheat baked crumble uncovered.

8. Can I Use Frozen Apples?

Frozen apples work too. Use them without fully thawing, expect a softer filling and allow some extra baking time. Drain obvious excess liquid if they have already thawed.

There is no secret ingredient hiding in a good apple crumble. What matters is getting a handful of ordinary things to agree with one another: apples cut for the way they cook, sweetness adjusted to the fruit in front of you, crumbs that stay irregular instead of turning into dough, and enough oven time for the filling to catch up with the top.

Golden crumbs. Bubbling juice. Tender apples.

Once all three are there, bring out the custard.

Posted on — Leave a comment

Baked Tortellini Recipe: Easy, Cheesy & No-Boil

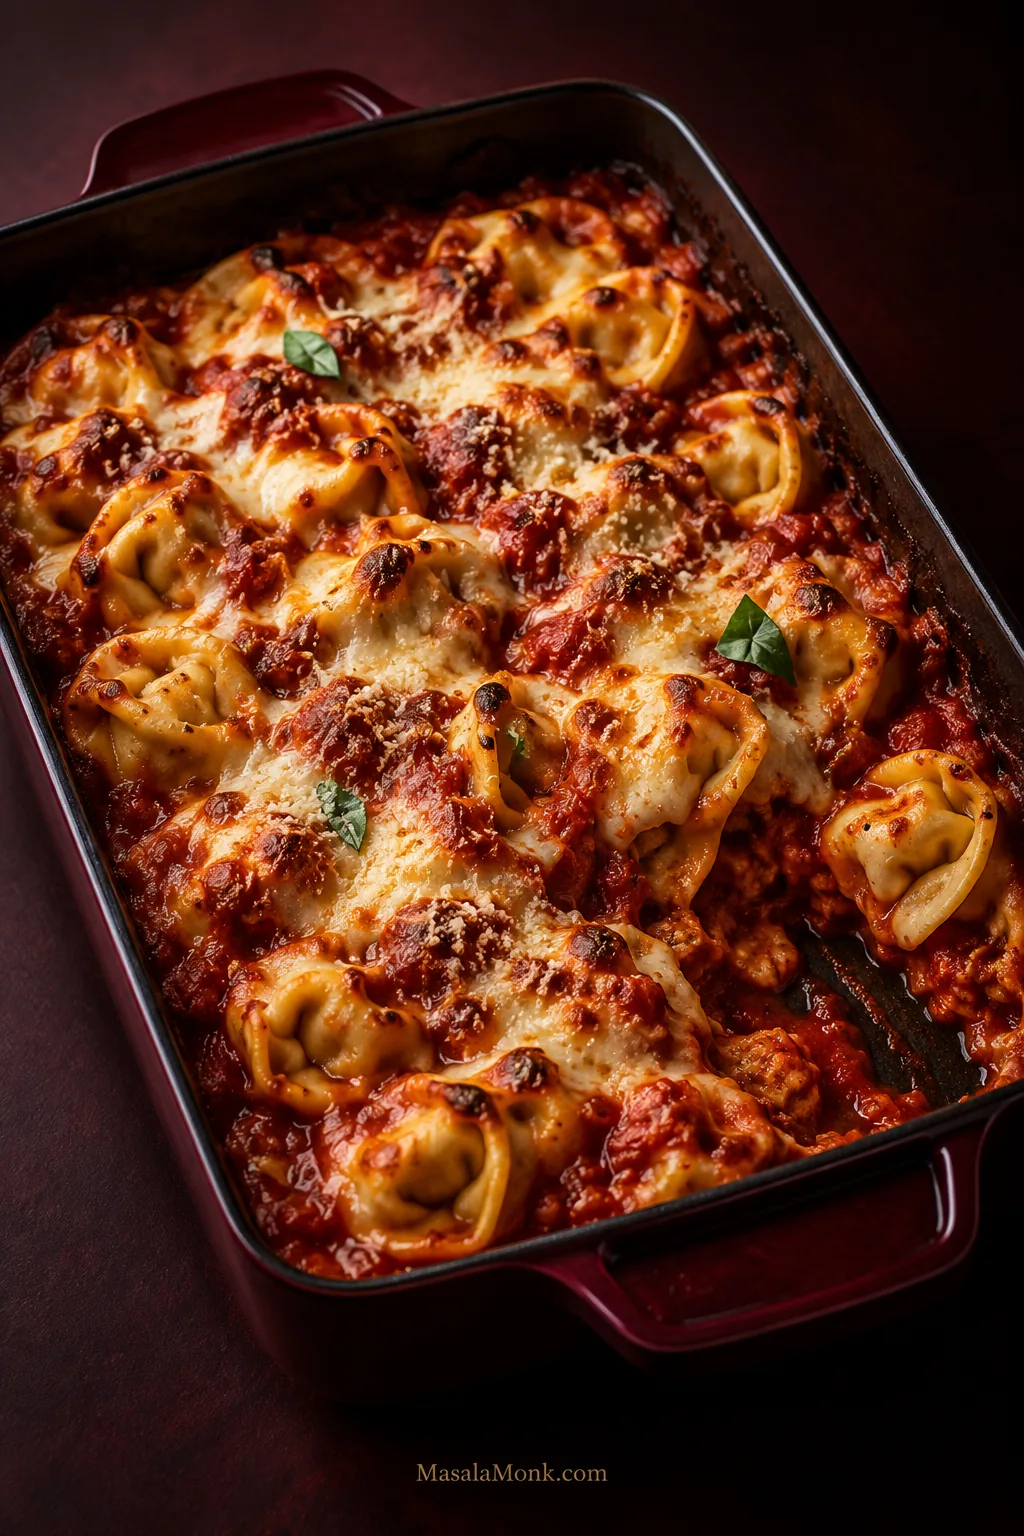
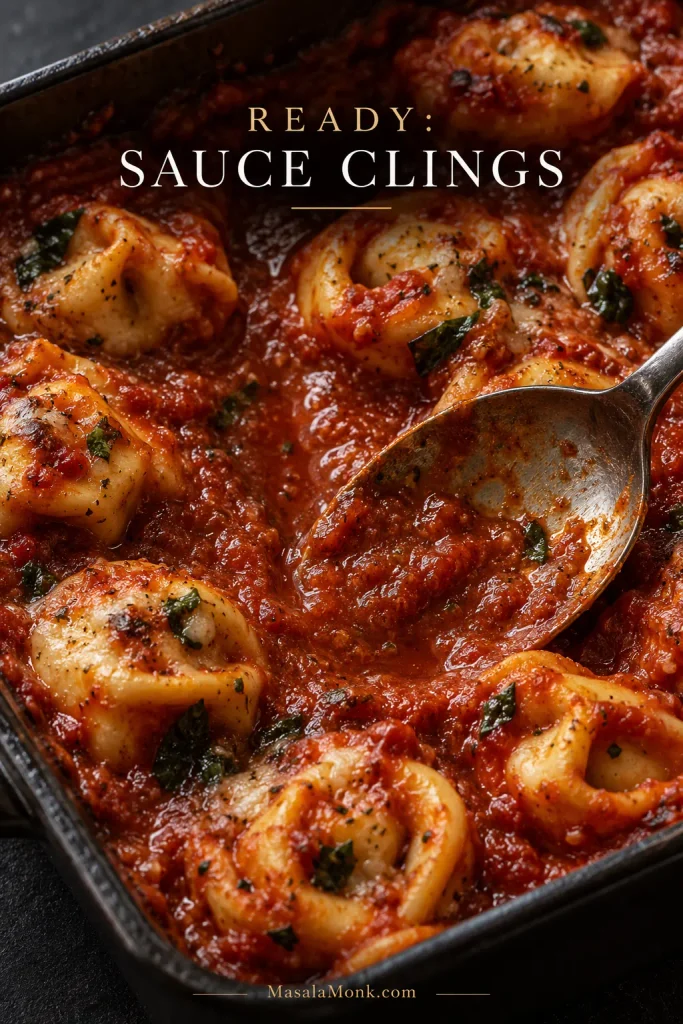
Baked cheese tortellini in red marinara with browned mozzarella and Parmesan in a dark burgundy rectangular baking dish.

A package of refrigerated tortellini, a jar of marinara and some mozzarella can become dinner with about 10 minutes of hands-on work and no separate pot of boiling water. By the time the dish comes out of the oven, the sauce is bubbling around plump cheese-filled pasta and the mozzarella has melted into browned patches across the top.

Sometimes the package of tortellini is the whole dinner plan. That’s enough here.

The one thing worth watching is the pasta underneath the cheese. The folded edges take longer to soften. Pieces left completely above the sauce can also turn dry and chewy even while the bottom of the pan still looks plenty saucy.

The fix is simple: keep the tortellini surrounded by sauce and check one from the middle before you uncover the pan.

This baked tortellini recipe uses refrigerated cheese tortellini straight from the package. Frozen and dried tortellini work differently, so you’ll find those adjustments below along with the variations and fixes that are actually useful.

Quick Answer: Do You Need to Boil Tortellini Before Baking?

No. Refrigerated tortellini needs no pre-boiling here because it is soft enough to finish cooking in sauce. What it needs in the oven is enough sauce around it, trapped steam and time under cover to become tender.

Add it uncooked to marinara thinned with a little water, coat every piece with sauce, cover the dish securely and bake at 400°F / 205°C. Before uncovering, take one from the middle. It should be tender all the way through with no hard or floury center.

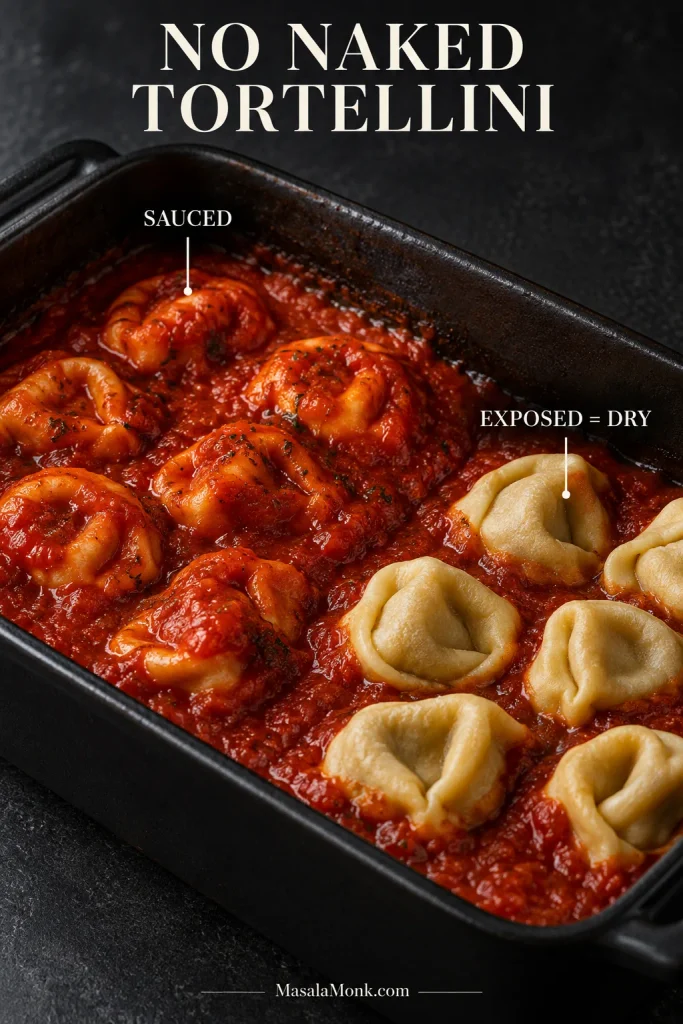
No naked tortellini: pasta left completely above the sauce can dry out while everything underneath cooks normally. Push exposed pieces down or spoon sauce over them before covering the dish.

Baked Tortellini Recipe

The base tortellini casserole is deliberately simple: cheese tortellini, marinara, mozzarella and Parmesan, with garlic and a few seasonings if you want them.

You have about 10 minutes of hands-on work. Most of the rest is oven time and one quick check before the final cheese goes on.

Easy No-Boil Baked Tortellini

Refrigerated cheese tortellini cooks directly in marinara, then finishes uncovered with mozzarella and Parmesan until the sauce bubbles around the pasta and the top is lightly browned.

Recipe at a Glance

Yield6 servings
Hands-on10 minutes
BakeAbout 30–40 minutes
Rest5–10 minutes
Total45–60 minutes
Oven400°F / 205°C
Pan9×13 in / 23×33 cm, about 3 qt / 2.8 L

You’ll need: a 9×13-inch / 23×33-cm baking dish and heavy-duty foil or a tightly fitting oven-safe lid.

Ingredients

  • 20 oz / 567 g refrigerated cheese tortellini, uncooked
  • 24 oz / 680 g marinara sauce
  • ¼–½ cup / 60–120 ml water, depending on sauce thickness
  • 1½ cups / 170 g low-moisture mozzarella, shredded and divided
  • ¼ cup / 25 g Parmesan, finely grated
  • 2 garlic cloves, minced (optional)
  • 1 tsp Italian seasoning (optional)
  • ¼ tsp red pepper flakes (optional)
  • black pepper, to taste
  • fresh basil or parsley (optional)
  • salt, only if needed
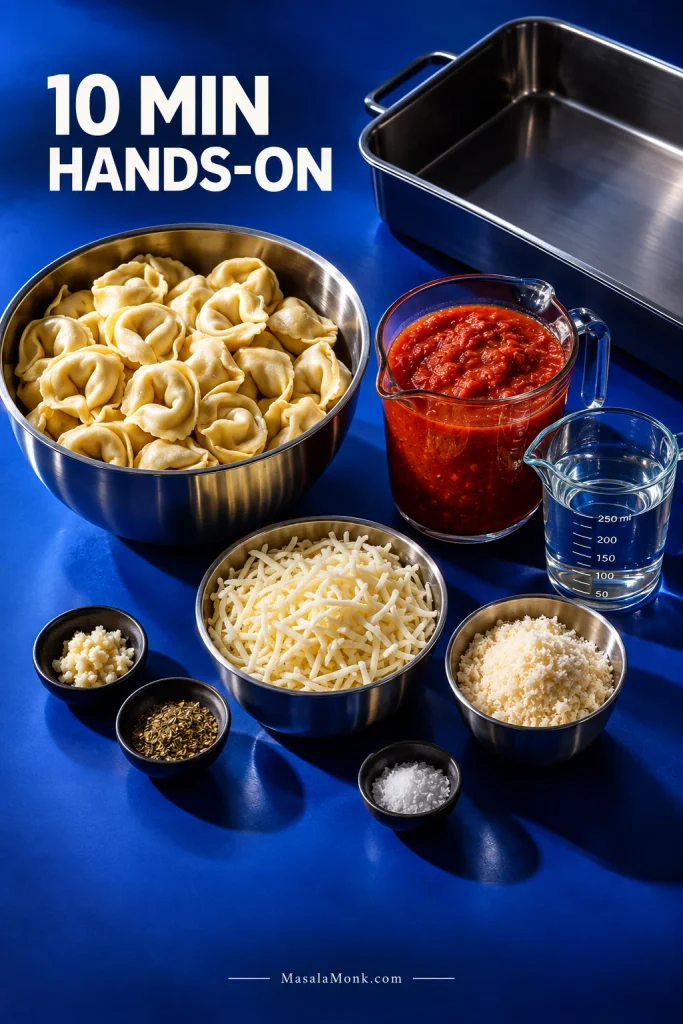
Refrigerated cheese tortellini, marinara, measured water, mozzarella, Parmesan and an empty metal baking dish arranged on a blue surface.
Five ingredients do the structural work: tortellini, marinara, water, mozzarella and Parmesan.

1. Loosen the Marinara

Heat the oven to 400°F / 205°C. Spread a little marinara over the bottom of the baking dish.

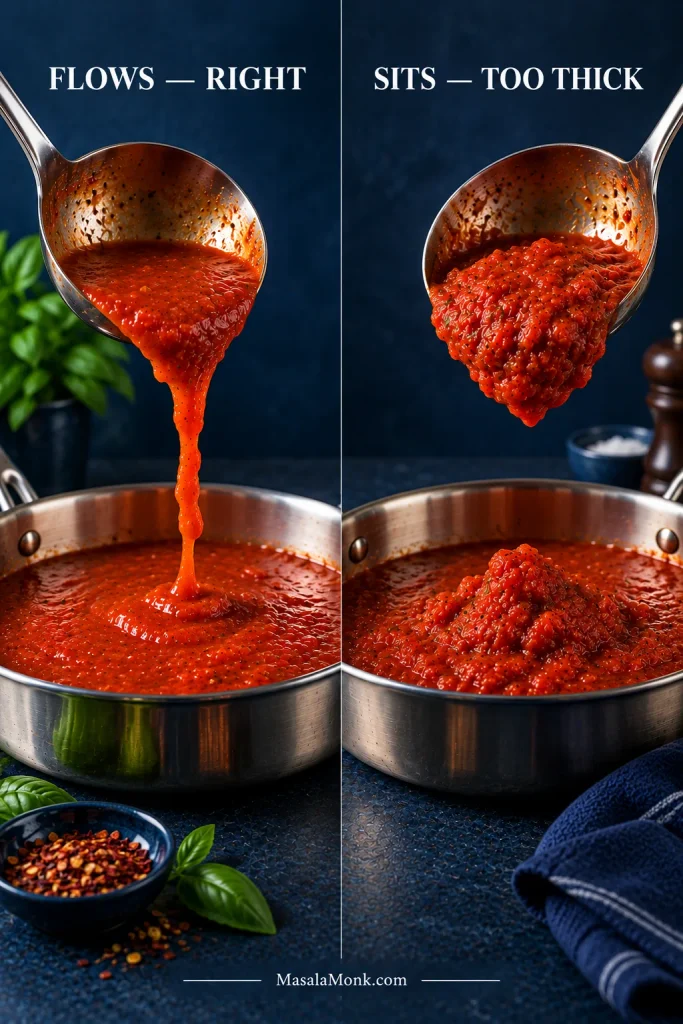
Stir the rest with the garlic, Italian seasoning, black pepper and red pepper flakes, if using. Add ¼ cup / 60 ml water if the sauce already pours easily, or closer to ½ cup / 120 ml if it sits in thick spoonfuls. You want the marinara to flow easily around the tortellini once everything is mixed.

Two ladles compare marinara textures: one sauce flows smoothly while a thicker sauce holds its shape in a mound.
The added water is cooking liquid, not the target final texture. It helps soften the pasta under cover; afterward, the uncovered finish and rest bring the marinara back toward serving consistency.

2. Coat the Tortellini

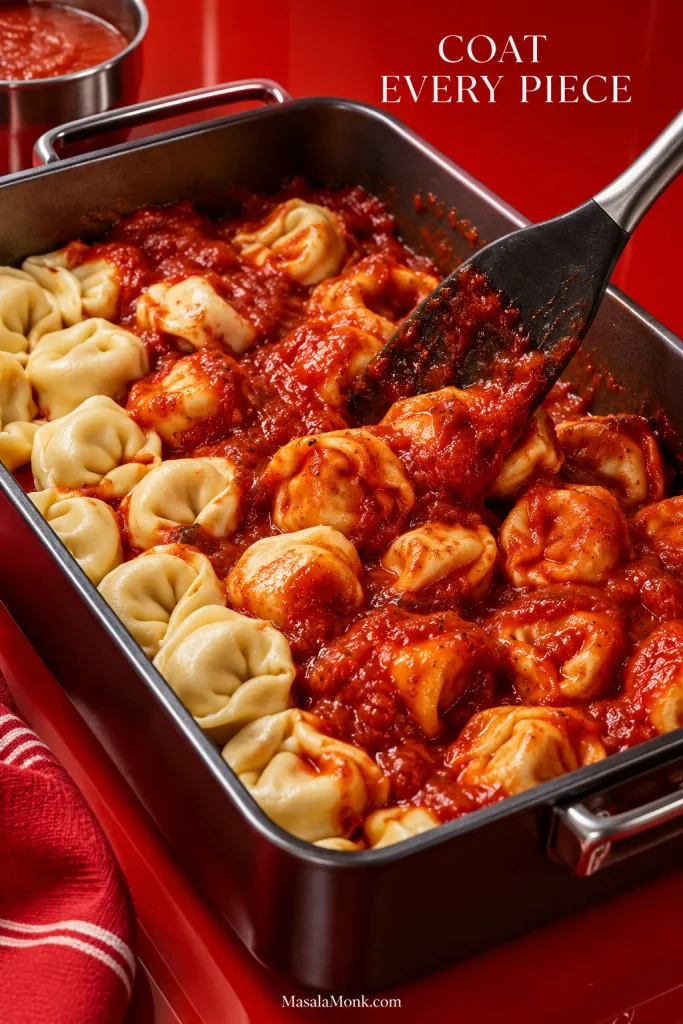
Add the refrigerated tortellini straight from the package. Turn it gently through the marinara until every piece is glossy with sauce, then scatter ½ cup / 57 g mozzarella through the dish.

Uncooked tortellini being folded through red marinara in a baking dish so sauce coats the pasta on all sides.
Every piece should look glossy with sauce before the pan is covered.

Give the top a quick look. Press any pale, exposed pieces down or cover them with another spoonful of sauce.

Comparison of tortellini nestled in marinara beside exposed pale tortellini sitting above the sauce line and beginning to dry.
Dry on top but saucy underneath usually points to a contact problem, not a dry casserole. Before adding more water, get those exposed tortellini back into the sauce and restore the covered cooking environment.

3. Cover and Bake

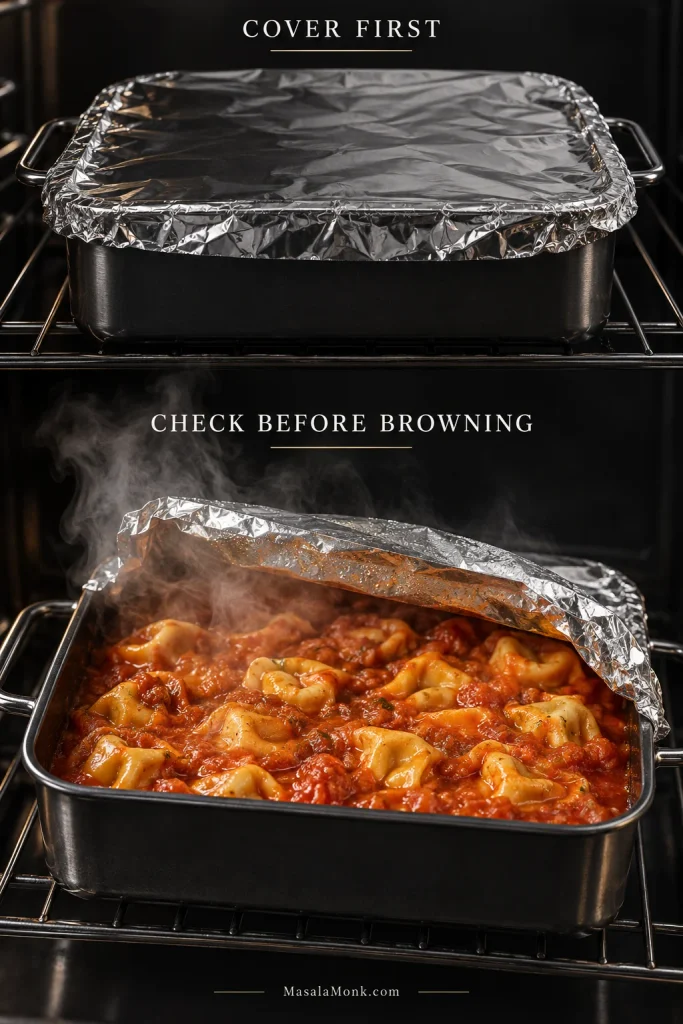
Crimp foil around the rim so steam cannot escape freely. Bake for 20 minutes, then steal a tortellini from somewhere near the middle and check the thick fold.

Two-stage view of a tortellini bake: first tightly covered with foil, then uncovered at the first check with plumped pasta in hot marinara.
A loose foil tent is not the same as a tight cover. Crimp the foil around the rim—or use a snug oven-safe lid—so the steam that softens the tortellini stays in the pan.

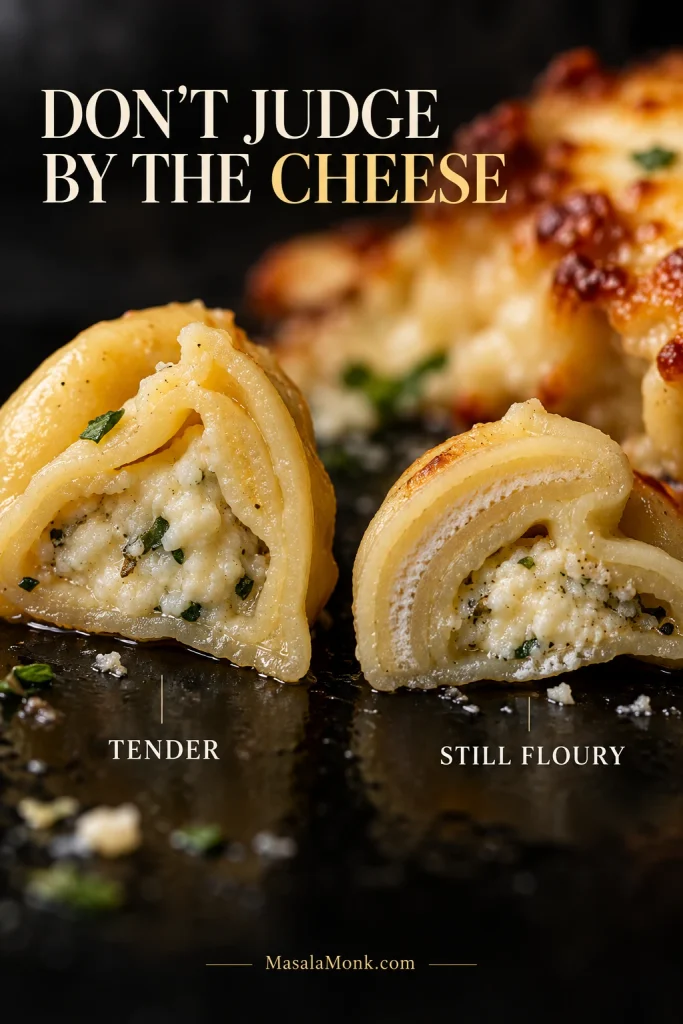
Don’t judge doneness by the cheese. Check a tortellini. The top can look beautifully melted before the filled pasta underneath is ready.

Close-up comparison of cut tortellini showing a tender hydrated pasta fold beside an undercooked fold with a pale floury core.
Sample from near the center, not the hot edge. The outside of a casserole heats sooner, so an edge piece can turn tender while the middle is still catching up.

If it is still hard or floury inside, cover the pan again and give it another 5 minutes. If the sauce has almost disappeared too, add a splash of hot water or warm marinara first.

Once the pasta is tender, look at the sauce rather than the clock. If it is still watery, leave the pan uncovered for 3–5 minutes before adding the final cheese. If it already looks thick enough to cling to the pasta, move straight on.

4. Add the Cheese and Brown

Scatter over the remaining 1 cup / 113 g mozzarella and all of the Parmesan.

Bake uncovered for 8–10 minutes. Look for browned patches of mozzarella with little pockets of tomato sauce still visible between plump tortellini.

Draw a spoon through the pan. The sauce should cling around the pasta instead of immediately flooding the gap. For deeper color, broil for 1–2 minutes at the end. Stay nearby; mozzarella can move from spotted to scorched quickly.

Spoon moving through baked tortellini and thick marinara, leaving a shallow trail while sauce coats the spoon and pasta.
The spoon trail is a better stopping cue than surface bubbling. If the sauce coats the pasta and the gap closes slowly, the bake has enough body; the short rest can finish the settling without extra oven time.

5. Rest Before Serving

Rest for 5–10 minutes so the sauce settles and the tortellini is easier to spoon out cleanly. If the casserole looks a little loose, give it that time before judging it.

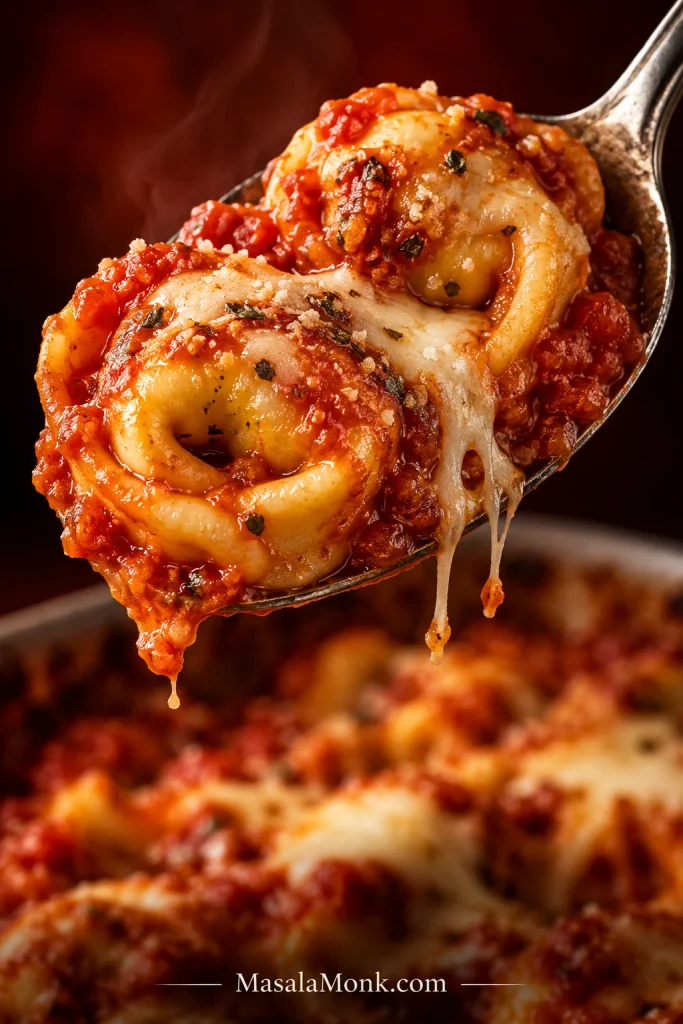
Serving spoon holding several baked tortellini coated in marinara with small strands of melted mozzarella.
After the rest, the sauce should cling while the tortellini still holds its shape.

Finish with torn basil or parsley and another little grating of Parmesan.

A Few Useful Notes

  • Marinara: jarred sauce is ideal here. Making your own? A pourable fresh tomato sauce works too; stop reducing it while it still flows easily around the pasta.
  • Mozzarella: low-moisture mozzarella melts predictably without adding much extra water. Pre-shredded is completely fine. Drain and blot fresh mozzarella well before using it.
  • Salt: taste first. Filled pasta, marinara and Parmesan may already provide enough.

Using refrigerated tortellini? You’re done. Everything below is optional.

Refrigerated, Frozen or Dried Tortellini?

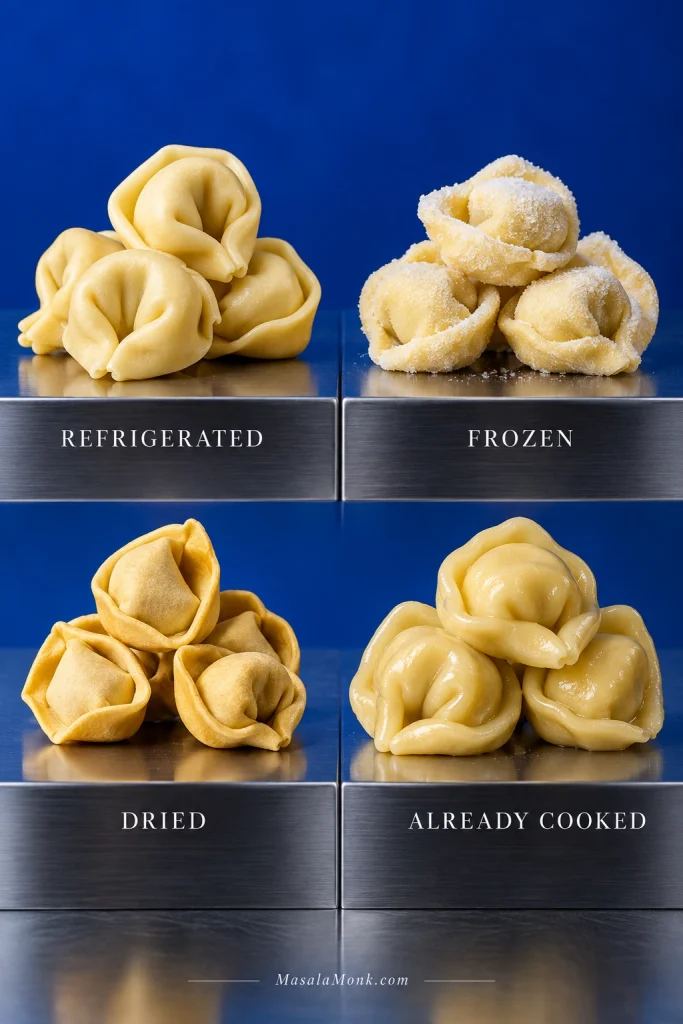
Check the package before you do anything else. The main recipe uses soft refrigerated tortellini from the chilled section—the kind often sold as “fresh.” It can go straight into the dish. Frozen can too, but it needs more water and time. Dried tortellini is where I would stop using the no-boil shortcut.

Four groups of cheese tortellini labeled refrigerated, frozen, dried and cooked, showing the different pasta states used in baked tortellini.
On supermarket packaging, “fresh tortellini” usually refers to the soft pasta sold in the refrigerated case. Check the storage instructions if you are unsure which method applies.
What you haveWhat to do
Refrigerated tortelliniAdd uncooked and use the main recipe
Frozen tortelliniKeep frozen; use more water and a longer covered bake
Dried / shelf-stable tortelliniParboil before assembling the casserole
Already cooked tortelliniSkip extra water and bake only until hot with a browned top

Already cooked? The tortellini only needs to heat through. Skip the extra water and stop once the sauce is bubbling and the cheese has melted.

Frozen Tortellini

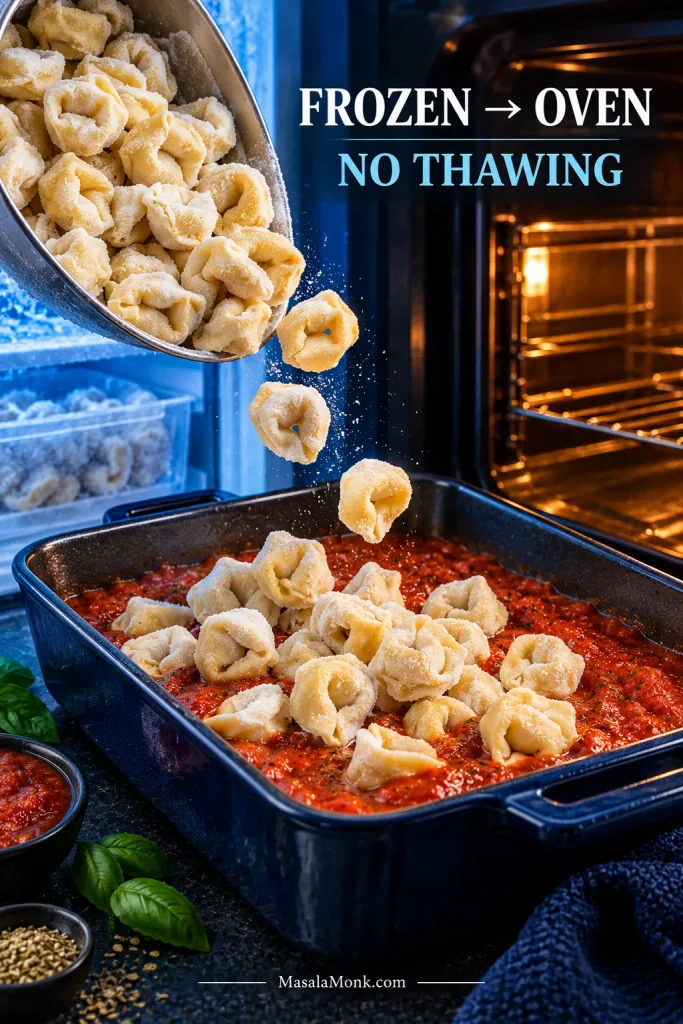
Frozen tortellini can go straight into the dish. Do not thaw it first for this method.

Frosted frozen tortellini being poured directly into marinara beside a warm oven, with text indicating that thawing is not needed.
No thawing also keeps the frozen-tortellini method predictable. The extra liquid and covered bake are designed for pasta going into the dish straight from the freezer.

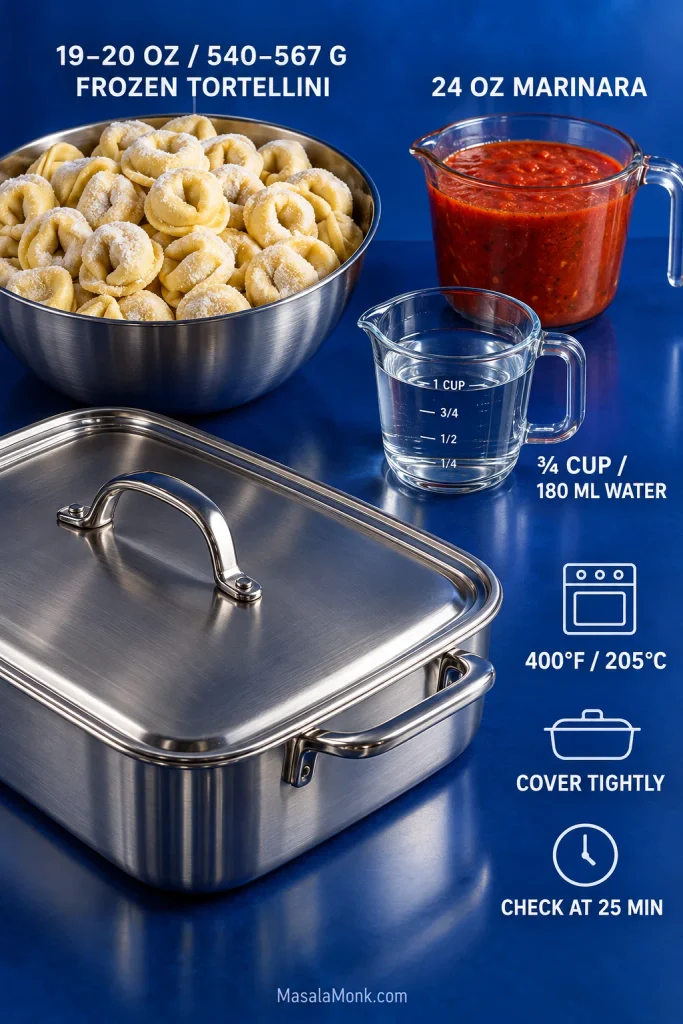
For a 19–20 oz / 540–567 g package, use 24 oz / 680 g marinara and ¾ cup / 180 ml water. Cover securely and bake at 400°F / 205°C, starting your first check around 25 minutes.

Frozen tortellini guide showing 19–20 oz pasta, 24 oz marinara, ¾ cup water, a 400°F / 205°C oven, a tightly covered pan and a first check at 25 minutes.
Treat 25 minutes as the first check, not the finish line. Brand, filling and sauce thickness vary, so a fully tender center piece is a better endpoint than the clock.

Still firm and the sauce is disappearing? Add ¼ cup / 60 ml hot water, cover again and check every 5 minutes until one from the middle is tender. Then add the final cheese and finish uncovered.

Assembling one for later? Jump to freezer prep →

Dried Tortellini

Don’t force dried tortellini into the no-boil method. Boil it until about 2 minutes shy of the package directions, drain it and assemble the casserole without the extra water unless the marinara itself is unusually thick. At that point the oven is finishing the pasta and browning the top, not trying to cook it from dry.

Dried tortellini beside a pot of boiling tortellini with guidance to parboil the pasta about 2 minutes shy of the package directions.
Parboiling dried tortellini is about stopping early, not cooking it twice. Drain it while the pasta still has some bite so the oven can finish the center without pushing the filled edges too far.

For package-specific cooking details, see the tortellini cooking guide.

Which Sauces Work for Baked Tortellini?

Marinara gives you the widest margin for error. It contains enough water for the pasta to cook while the pan is covered, and its acidity keeps all that mozzarella from tasting heavy.

Five sauces for baked tortellini labeled marinara, meat sauce, vodka or pink sauce, Alfredo and pesto, with notes about moisture and suitability.
For no-boil baked tortellini, sauce has a structural job as well as a flavor job. If it cannot move into the gaps between the pasta, loosen it or combine it with a wetter base before it goes under cover.

Vodka or pink sauce can work too—just keep it pourable. A meat sauce is fine as long as it still slips easily between the tortellini rather than sitting in a dense layer.

For a deliberately creamy tomato version, the vodka pasta recipe is a better starting point.

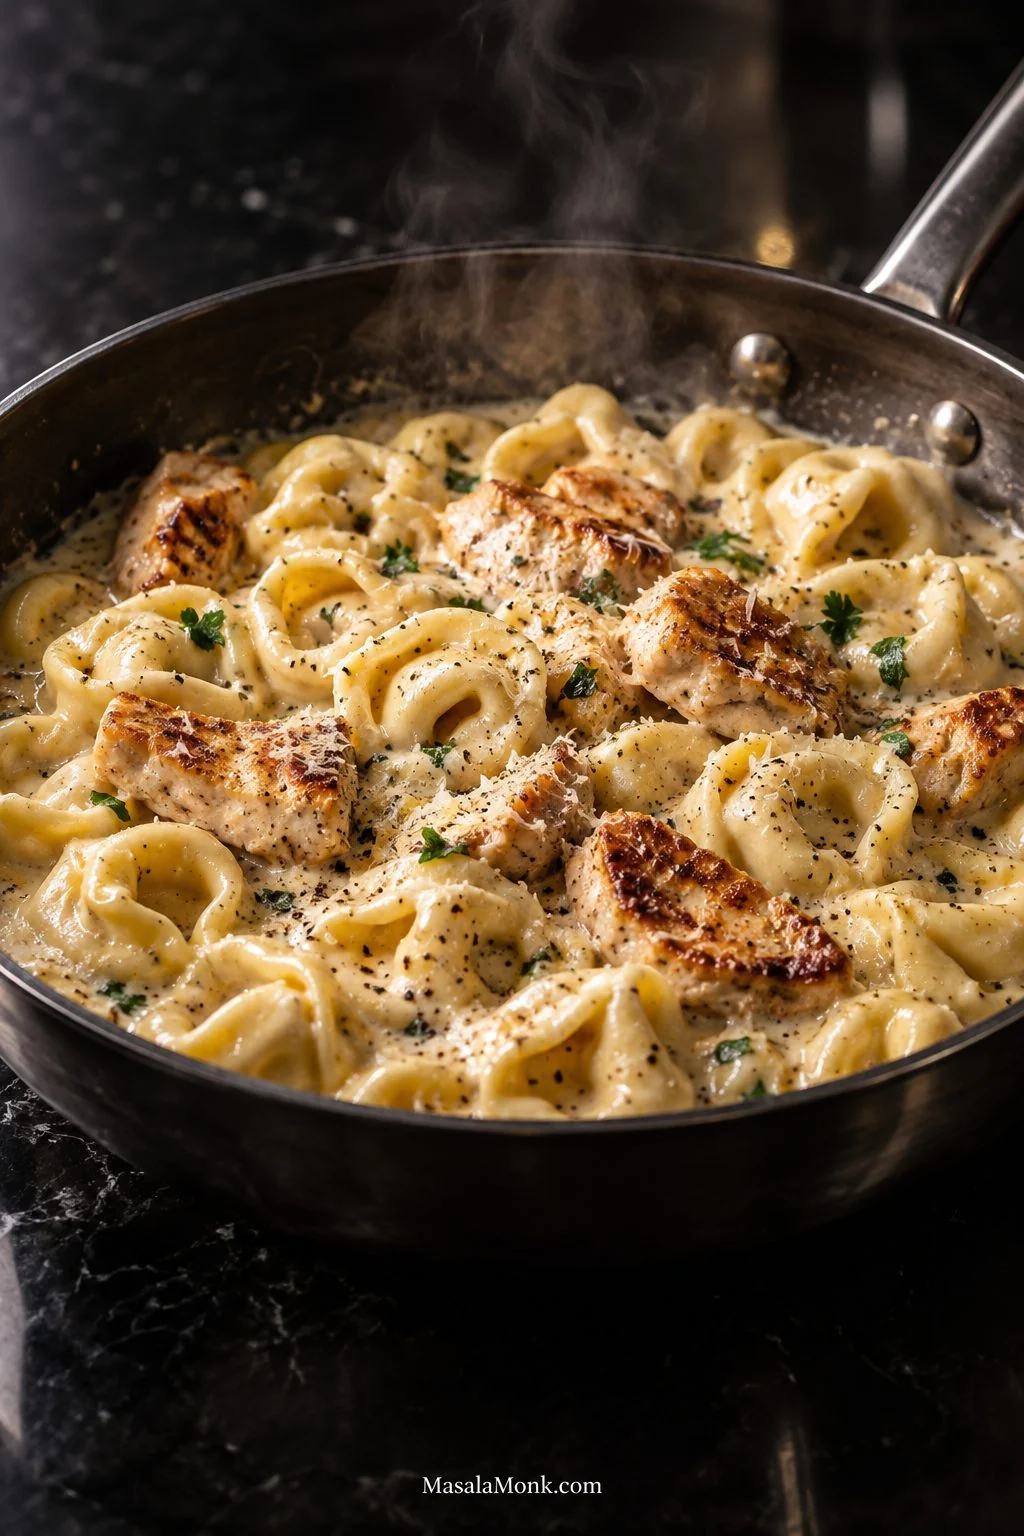
Alfredo is different. A sauce can be rich and creamy without containing enough water to soften uncooked pasta. A no-boil Alfredo version needs milk, broth or another cooking liquid built into the formula from the beginning. If you want the creamy chicken version instead, go straight to our Chicken Tortellini Alfredo.

Creamy is not the same as wet enough to cook pasta. Ricotta, cream cheese and grated cheese bring richness; the tortellini still needs actual sauce or water around it.

I wouldn’t use pesto by itself here. Pair it with tomato sauce, broth, or a cream sauce loosened with enough milk or broth to cook the pasta.

Want a richer, creamier version? See the Million Dollar variation →

Add Sausage or Ground Beef

Sausage is my first choice when you want a heartier dinner without changing the method much. Brown 8 oz / 225 g for a lighter addition or 1 lb / 454 g for a meatier pan, then drain the excess fat. With a full pound, add another ½ cup / 120 ml marinara if the dish starts looking crowded rather than saucy.

Baked tortellini in marinara with browned pieces of sausage, melted mozzarella and Parmesan in a metal baking dish.
Small sausage crumbles distribute more evenly; add the extra marinara if a full pound makes the pan look crowded.

Ground beef works too. Brown and drain up to 1 lb / 454 g lean beef, stir it into the marinara and add enough sauce to keep the tortellini well coated. Taste before adding salt once either meat is in the pan.

Add Spinach or Other Vegetables

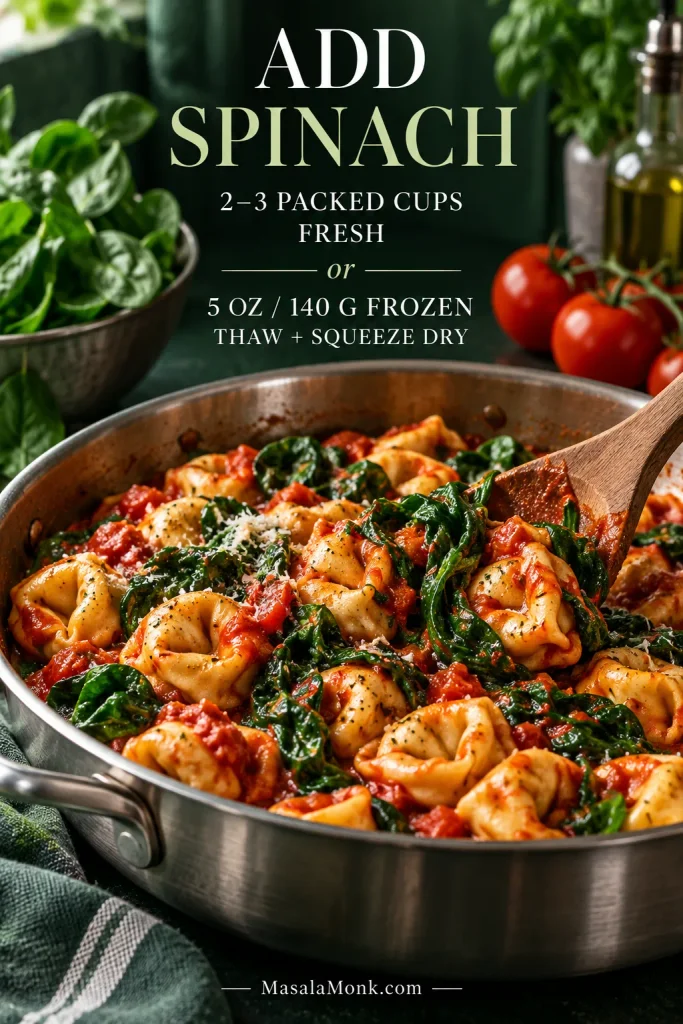
Spinach disappears into this bake with almost no extra work. Fold in 2–3 packed cups / 60–90 g baby spinach; it looks like a lot at first and quickly cooks down around the tortellini.

For frozen spinach, thaw 5 oz / 140 g and squeeze it very dry first. Spinach-and-ricotta tortellini itself can be treated like cheese tortellini unless its package says otherwise.

Cheese tortellini and marinara mixed with wilted spinach, with fresh spinach shown nearby and guidance for fresh or frozen spinach.
Fresh spinach wilts down dramatically; frozen spinach is already concentrated, so the quantities are not interchangeable.

Broccoli can go straight in if you like a little bite; blanch it first for softer florets. Sauté mushrooms first so they lose some of their water, and drain roasted peppers well.

Add More Cheese or a Crisp Topping

Increase the mozzarella to 2 cups / 226 g for a cheesier pan. Put some inside and save the rest for the top so bright tomato sauce still peeks between browned patches of cheese.

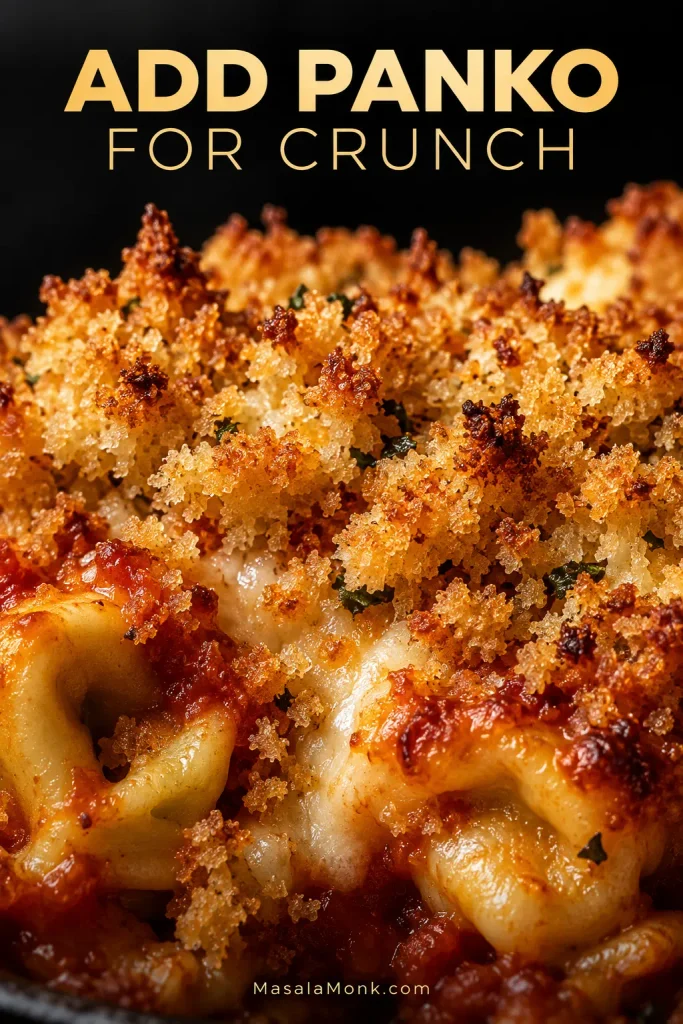
For crunch, mix ¼ cup / 15 g panko with 2 tbsp / 10 g finely grated Parmesan and 1 tbsp olive oil or melted butter. Use up to ½ cup / 30 g panko for a fuller crumb layer.

Close-up of crisp golden panko crumbs over browned cheese, marinara and baked tortellini.
Panko adds crisp contrast without burying the tortellini under another layer of cheese.

Add the crumbs only for the final uncovered bake so they toast instead of steaming.

Using panko on the base recipe? Return to the final browning step →

For an Extra-Creamy “Million Dollar” Version

The “Million Dollar” style adds cream cheese, ricotta or cottage cheese, plenty of mozzarella and often ground meat. It is noticeably richer than the simple marinara version.

For this variation, par-cooking the tortellini first is the simpler route because all that thick dairy leaves less sauce around uncooked pasta. A purpose-built no-boil version can work, but it needs extra cooking liquid from the beginning.

Rich baked tortellini in tomato sauce with creamy white cheese pockets, browned mozzarella and basil in a burgundy baking dish.
This version is richer and thicker, which is why par-cooking the tortellini is the simpler route.

Baked Tortellini Still Hard? Use This Quick Rescue Guide

Something looks wrong when the foil comes off? Check one away from the edges and then look at the sauce before simply adding more time.

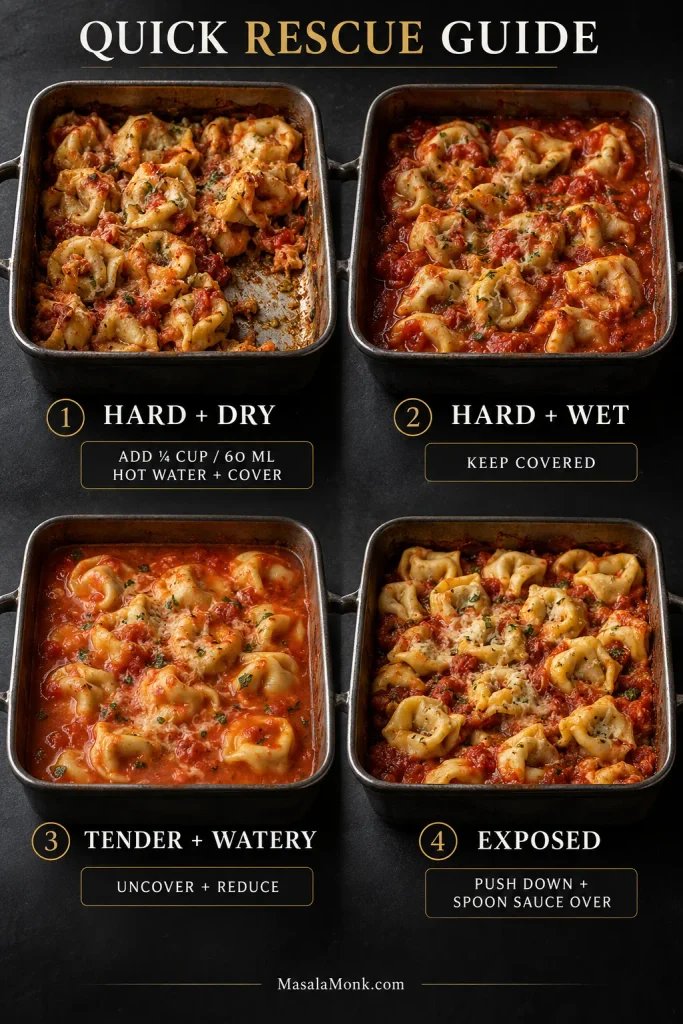
Quick Fixes at a Glance

Four-part baked tortellini troubleshooting guide showing hard and dry, hard and wet, tender and watery, and exposed pasta with the matching fixes.
The same symptom can need opposite fixes. Hard tortellini in a dry pan needs moisture; hard pasta sitting in plenty of sauce usually needs better contact or more covered time.
ProblemLikely causeBest fix
Still hard + dry panNot enough sauce or water remainsAdd ¼ cup / 60 ml hot water or warm marinara, cover and bake 5–10 minutes more
Still hard + sauce underneathThe sauce is not reaching the pasta evenlyPush exposed pieces into the sauce and cover again
Dry or leathery pieces on topThose pieces were exposedSpoon sauce over them, press them down and cover
Tender + watery sauceThe pasta is done but the sauce needs reducingUncover and let the sauce reduce, then rest the casserole
Still firm + watery sauceThe pasta still needs that moistureKeep the pan covered
Brown top + center still firmThe cheese browned before the pasta finishedCover again; add a little hot water or sauce too if the pan is dry
Mushy or split tortelliniThe pasta has cooked too farStop baking. Next time check sooner and don’t fully boil refrigerated tortellini first

Two rows deserve a closer look because the obvious fix is often the wrong one.

There Is Sauce Below but the Pasta on Top Is Hard

If you’re looking at the pan thinking, “There is plenty of sauce—why is the pasta still hard?”, check whether those top pieces are actually touching it.

Push them down, spoon sauce over the dry spots and cover the dish again. More water is not necessarily the answer when plenty is already sitting underneath.

The Sauce Is Watery but the Pasta Is Still Firm

Keep it covered. The tortellini still needs that water. Let the pasta become tender first. Reduce the sauce afterward.

Problem solved? Back to the baked tortellini recipe →

Make Baked Tortellini Ahead

You can assemble the refrigerated-tortellini casserole up to 24 hours ahead and keep it covered in the refrigerator.

The tortellini will soften a little as it sits in the sauce, which is fine overnight but is another reason not to assemble it more than 24 hours ahead.

Keep the marinara pourable when you assemble the dish, and save the final layer of mozzarella and Parmesan for just before baking so the top melts and browns freshly.

Because everything starts refrigerator-cold, expect roughly 5–15 extra minutes under the foil. The edges may bubble first, so test one away from the sides before adding the final cheese.

Freezing instead of refrigerating overnight? Jump to freezer prep →

Store, Freeze and Reheat Baked Tortellini

Cool leftovers promptly and refrigerate them in a covered container for 3–4 days, following USDA leftover-storage guidance.

Tomorrow’s serving will be thicker as the pasta absorbs sauce, so add a little water or marinara when reheating.

Reheating

For one serving, add 1–2 teaspoons water or a spoonful of marinara, cover loosely and microwave in short intervals until hot.

For a larger portion, add a little sauce or water around the pasta, cover and warm at 350°F / 175°C. USDA guidance for leftovers is to reheat them to 165°F / 74°C in the center.

Once it’s hot, stop. More reheating only makes filled pasta softer.

Freezing

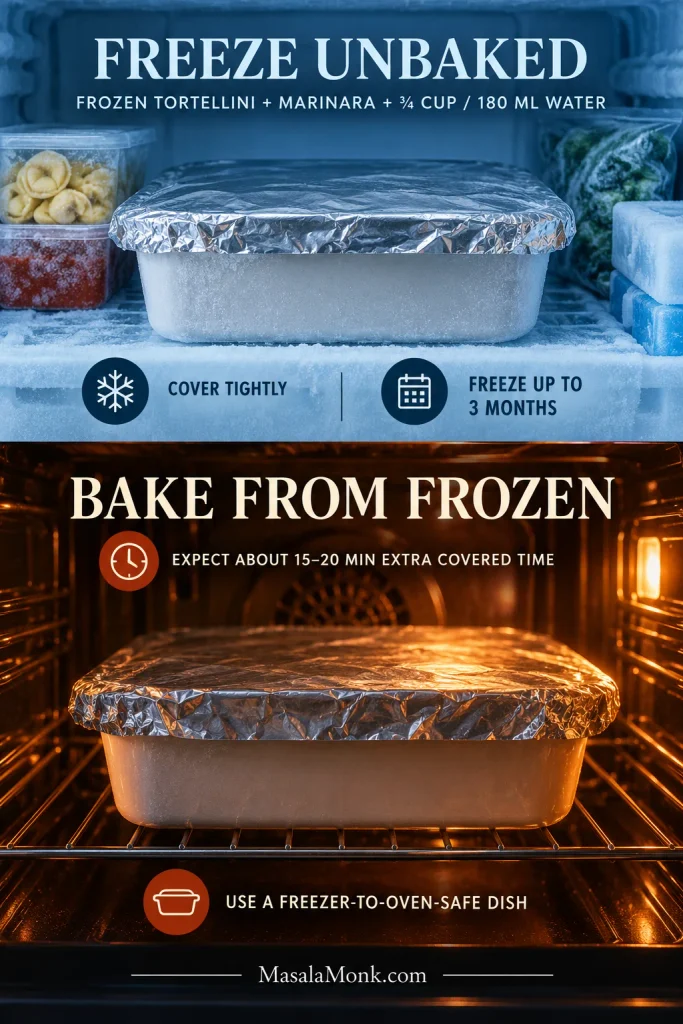
For freezer prep, I’d start with frozen tortellini and bake the assembled casserole straight from frozen.

Combine the frozen tortellini with the marinara and ¾ cup / 180 ml water, cover the unbaked casserole tightly and freeze for up to 3 months.

It will need substantially more covered baking time—often another 15–20 minutes or more. Keep going until one from the center is tender, then add the final cheese and finish uncovered.

If the casserole is frozen in glass or ceramic, make sure the dish is rated to go from freezer to a hot oven. A sudden temperature change can crack some bakeware.

Covered unbaked tortellini casserole shown in a freezer and then in an oven, with guidance to freeze up to 3 months and bake from frozen in a freezer-to-oven-safe dish.
Freezing the casserole unbaked avoids a full cook–freeze–reheat cycle. That usually preserves a firmer tortellini texture than freezing leftovers, which tend to soften after reheating.

Cooked leftovers can be frozen too, but the tortellini will usually be softer after thawing and reheating. If you’ll eat them within 3–4 days, refrigeration gives the better texture.

What to Serve With Baked Tortellini

Because this is already rich and soft, my first choice is something crisp, sharp or green.

Six baked tortellini with marinara, browned cheese and Parmesan arranged on a dark emerald plate beside a fork and green glass.
After its 5–10 minute rest, the casserole should spoon out with sauce clinging around the tortellini.
  • Sharp green salad — cuts through the cheese and tomato sauce
  • Garlic bread or toasted sourdough — useful when there is extra sauce on the plate
  • Roasted broccoli or green beans — an easy warm vegetable side
  • Cucumber or tomato salad — a cool, acidic contrast to the casserole

A cold cucumber salad is particularly good beside a sausage-heavy or extra-cheesy version; the acidity and crunch cut through the melted cheese.

For another tomato-and-cheese pasta bake, baked ziti takes the same comfort-food idea in a different direction.

Frequently Asked Questions

Do you have to boil tortellini before baking?

No. Refrigerated tortellini can go straight into the sauce for this baked tortellini recipe. Keep it covered until one from the middle is tender.

How long does baked tortellini take?

About 30–40 minutes at 400°F / 205°C. Keep it covered until the pasta is tender, then uncover for the final 8–10 minutes to brown the cheese.

Why is my baked tortellini still hard?

It may need more covered time, the exposed pieces may not be touching enough sauce, or the pan may have dried out. If plenty of sauce is already underneath, push the pasta down rather than automatically adding more water.

Can tortellini cook directly in sauce?

Yes. Refrigerated and frozen tortellini can cook directly in sauce when there is enough moisture around them and the dish stays covered. Dried tortellini is better par-cooked first.

Can you bake frozen tortellini without thawing it?

Yes. Don’t thaw it first. For 19–20 oz / 540–567 g frozen tortellini, use 24 oz / 680 g marinara and ¾ cup / 180 ml water, then allow more covered time.

Can you bake dried tortellini?

Yes, but parboil it about 2 minutes shy of the package directions first. Once partly cooked, skip the no-boil water unless the sauce itself needs thinning.

Can I assemble baked tortellini the night before?

Yes. Refrigerate it covered for up to 24 hours. Save the final cheese layer for just before baking and expect a little extra covered oven time because the casserole starts cold.

Can baked tortellini be frozen?

Yes. For freezer prep, I prefer assembling the casserole with frozen tortellini and baking it straight from frozen. Cooked leftovers can also be frozen, although the pasta will usually be softer after reheating.

The next time dinner starts with a bag of tortellini and a jar of sauce, you won’t have to rely on the timer alone. You’ll know what the pasta should feel like, what the sauce should look like and when that bubbling pan is actually ready to come out.

Posted on — Leave a comment

Chicken Tortellini Alfredo Recipe: Creamy, Easy 30-Minute Dinner

A dark skillet filled with cheese tortellini, browned chicken pieces and glossy Alfredo sauce, finished with black pepper, finely grated Parmesan and a small amount of parsley.

A good skillet of Chicken Tortellini Alfredo should reach the table with browned chicken tucked between plump cheese tortellini. Look for plenty of black pepper and glossy garlic-Parmesan sauce caught in the folds.

The sauce keeps changing after the heat is off. Tortellini takes up more moisture as it sits, and Parmesan firms as it cools. Alfredo that looks perfectly thick in the skillet can feel heavy five minutes later while everyone is still getting to the table.

The easiest way to stay ahead of that is to give each ingredient its job at the right time: broth first, cream later, Parmesan last. You do not need a complicated Alfredo technique here; you just need to get the liquid and cheese into the skillet in the right order.

From there, dinner stays simple: one skillet and about 30 minutes. The method still works if you’re starting with frozen tortellini, cooked chicken or a jar of Alfredo.

This is the rich, creamy American-style Alfredo most people expect from restaurant pasta. Traditional Alfredo can be much simpler, built around butter, cheese and pasta water.

Make It Now

The main version uses raw chicken breast, refrigerated cheese tortellini and homemade Alfredo. If that is what you have, cook straight through and come back to the substitutions later.

Tortellini16–18 oz / 454–510 g refrigerated cheese tortellini
Chicken1 lb / 454 g boneless skinless chicken breast
PanDeep 12-inch / 30 cm skillet or sauté pan with lid
Serves4 as a main dish; up to 6 with substantial sides
TimeAbout 30 minutes
MethodOne skillet

Chicken, Tortellini and Alfredo Ingredients

The ingredients doing most of the work are the chicken, tortellini, broth, cream and Parmesan. Everything else is seasoning or finishing, so nothing here needs fussy prep.

Raw chicken pieces, refrigerated cheese tortellini, chicken broth, heavy cream and a wedge of Parmesan arranged on dark surfaces.
Broth handles the cooking moisture; cream brings richness; Parmesan adds body and salt. The tortellini decides how much liquid the skillet ultimately needs.

For the Chicken

  • 1 lb / 454 g boneless skinless chicken breast, cut into roughly ¾-inch / 2 cm pieces
  • 1 tbsp / 15 ml olive oil
  • Seasoning: ½ tsp kosher salt, ½ tsp freshly ground black pepper and ½ tsp Italian seasoning; use a little less salt if your broth or tortellini is already quite salty

For the Tortellini and Alfredo

  • 16–18 oz / 454–510 g refrigerated cheese tortellini
  • 2 tbsp / 28 g unsalted butter
  • 3 medium garlic cloves, about 9–12 g, finely minced
  • 1¼ cups / 300 ml low-sodium chicken broth, divided: 1 cup / 240 ml for cooking and ¼ cup / 60 ml reserved, plus more if needed
  • ¾ cup / 180 ml heavy cream
  • 3 oz / 85 g Parmesan, very finely grated
  • ⅛ tsp ground nutmeg, optional
  • Freshly ground black pepper, to finish
  • 1–2 tsp / 5–10 ml fresh lemon juice, optional
  • Chopped parsley and extra Parmesan, for serving

Before the Skillet Heats Up

Refrigerated cheese tortellini is the best fit. It cooks quickly in a modest amount of liquid and is usually sturdy enough to fold through the sauce without opening at every seam. Package times vary, so check the thick folded edge for tenderness instead of treating the printed time as an exact finish line.

Freshly grated Parmesan melts more smoothly than bagged pre-shredded cheese. A wedge labeled Parmesan works well; Parmigiano Reggiano brings a nuttier, more complex edge. Use the weight when possible.

Parmesan being grated on a fine rasp into thin, feathery strands over a dark bowl; text reads “Fine Enough to Melt.”
Feathery Parmesan melts into residual heat quickly. Coarse shreds take longer and make overheating the Alfredo more likely.

And hold the cream for a few minutes. The tortellini needs water first; the richness comes later.

How to Make Creamy Chicken Alfredo With Tortellini

1. Brown the Chicken

Pat away obvious surface moisture from the chicken, then season it with salt, black pepper and Italian seasoning.

Heat the olive oil in a deep skillet over medium-high heat. Add the chicken in a comfortable single layer. If the pieces are crowded enough to start steaming in their own liquid, brown them in two batches.

Cook until the chicken has color on several sides; with small pieces, that usually takes 3–4 minutes. Move it to a plate before it is fully cooked. A few pale sides are not worth keeping the whole batch in the pan too long.

Metal tongs lift a piece of chicken with deep golden-brown searing from a skillet containing browned and paler chicken pieces.
Deep color on a few faces is more useful than moderate color everywhere. Those paler sides preserve some cooking margin for when the chicken returns to the hot Alfredo.

2. Let the Garlic Hit the Butter

Lower the heat slightly and melt the butter in the same skillet. Add the garlic and stir until it smells ready but is still pale, usually 30–45 seconds.

Pale garlic is what you want. Once it browns deeply, that bitterness is hard to hide in a cream sauce.

Side-by-side skillet comparison of pale minced garlic in butter labeled “Ready” and darker browned garlic labeled “Too Far.”
Hot butter keeps cooking garlic after the heat drops. Stop at ivory to pale gold before carryover heat pushes it darker.

3. Give the Tortellini the Broth First

Pour in the 1 cup / 240 ml broth set aside for cooking and scrape up the browned bits from the bottom. Add the tortellini and fold it through the liquid with a broad spoon or spatula.

Golden chicken broth being poured into a skillet of uncooked cheese tortellini; text reads “Broth First.”
The tortellini does not need to swim. A shallow layer of broth plus a lid supplies enough liquid and steam for the one-skillet method.

Cover and bring the broth to a gentle simmer. Small, steady bubbles around the edges are enough. Give the tortellini one careful turn so pieces sitting higher in the pan trade places with those underneath.

Cheese tortellini gently simmering in shallow broth with small bubbles around the skillet edge; text reads “Watch the Pan as Well as the Clock.”
Look for small edge bubbles, not a boil racing across the pan. Gentler heat limits evaporation and protects the stuffed pasta.

Start checking after about 3 minutes. Bite through the thicker folded edge of one piece. It should be softening while still keeping a little firmness at the center.

One cheese tortellini cut open to show the filling and thick folded seam, with an arrow pointing to the seam and text “Check Here — The Thick Fold.”
The thick fold works as the tortellini’s built-in doneness gauge. If that dense section still has a firm core, the pasta needs more time—even when the thin edges already look soft.

Watch the pan as well as the clock. If the tortellini is still firm and the pan is getting dry, add some of the reserved broth. Should the pan dry again, add another small splash. Some brands simply drink up more liquid than others.

4. Add the Cream and Return the Chicken

When the tortellini is nearly tender, pour in the cream and return the chicken along with any juices collected on the plate.

Heavy cream pouring into a skillet with tortellini, broth and browned chicken, creating pale swirls; text reads “Cream Later.”
Add cream only after the tortellini has mostly softened. That keeps the remaining cook time from becoming extra sauce-reduction time.

Cook uncovered until the pasta is tender and the thickest chicken pieces reach 165°F / 74°C. Use the temperature—not the clock alone—as the endpoint.

FoodSafety.gov lists 165°F / 74°C as the safe minimum internal temperature for chicken and other poultry.

5. Calm the Pan Before the Parmesan

Let the active bubbling stop before the Parmesan goes in. A heavy skillet may keep bubbling for a few seconds even after you turn the burner down, so take it off the heat briefly if needed.

Add the finely grated Parmesan in 2–3 additions, folding each one in before adding the next. Use a broad spoon or flexible spatula so the stuffed pasta is handled gently.

Finely grated Parmesan being sprinkled over creamy chicken tortellini Alfredo in a dark skillet; text reads “Parmesan Last.”

Add the nutmeg, if using, and another grinding of black pepper. The cheese has enough heat now. Let it melt.

6. Stop While the Sauce Is Still a Little Loose

Drag a spatula across the bottom of the skillet. The trail should stay visible for a moment and then slowly fill back in. At the same time, the Alfredo should coat the tortellini while still settling between the pieces.

A spatula dragged through chicken tortellini Alfredo leaves a visible trail in the sauce; text reads “Stop Here” and “Coats the Pasta • Still Settles Between Pieces.”
Read the spatula trail in both directions. If it vanishes immediately, the Alfredo is still thin; if the pan stays exposed, it is already too tight. Slow fill-back is the sweet spot.

If it already looks thick, loosen it with a small splash of warm broth. Taste before adding more salt.

Black pepper may be all it needs. A particularly rich batch can take 1 tsp / 5 ml lemon juice without tasting lemony. Add more only if you want a little extra lift.

Finish with parsley and extra Parmesan. By now the skillet should smell like browned chicken, garlic and warm cheese rather than simply cream.

Do not chase the last bit of thickness. When you wonder whether the Alfredo needs another minute, it often doesn’t. The tortellini will absorb more sauce and the Parmesan will firm as the skillet sits.

Close-up of cheese tortellini and browned chicken lightly coated in glossy Alfredo sauce, with the pasta folds still visible.
A good coating collects in the tortellini’s inner curves and seams while leaving its shape obvious. An opaque blanket of sauce usually means the pasta has more Alfredo than it needs.

Chicken Tortellini Alfredo Recipe

Browned chicken, cheese tortellini and creamy garlic-Parmesan Alfredo in about 30 minutes.

  • Prep: 10 minutes
  • Cook: 15–20 minutes
  • Total: About 30 minutes
  • Yield: 4 main-dish servings; up to 6 with sides
  • Pan: Deep 12-inch / 30 cm skillet or sauté pan with lid

Ingredients

  • 1 lb / 454 g boneless skinless chicken breast, cut into roughly ¾-inch / 2 cm pieces
  • 1 tbsp / 15 ml olive oil
  • Seasoning: ½ tsp kosher salt, ½ tsp freshly ground black pepper, plus more pepper to finish, and ½ tsp Italian seasoning; use less salt if the broth or tortellini is already salty
  • 16–18 oz / 454–510 g refrigerated cheese tortellini
  • 2 tbsp / 28 g unsalted butter
  • 3 medium garlic cloves, finely minced
  • 1¼ cups / 300 ml low-sodium chicken broth, divided: 1 cup / 240 ml for cooking and ¼ cup / 60 ml reserved, plus more if needed
  • ¾ cup / 180 ml heavy cream
  • 3 oz / 85 g Parmesan, very finely grated
  • ⅛ tsp ground nutmeg, optional
  • 1–2 tsp / 5–10 ml fresh lemon juice, optional
  • Chopped parsley and extra Parmesan, for serving

Instructions

  1. Brown the chicken. Season with salt, pepper and Italian seasoning. Brown in the oil until several sides have color, about 3–4 minutes. Transfer to a plate.
  2. Cook the garlic. Melt the butter in the same skillet. Add garlic and cook 30–45 seconds, keeping it pale.
  3. Cook the tortellini. Pour in 1 cup / 240 ml broth and scrape up the browned bits, then add the tortellini. Cover and keep at a gentle simmer. Start checking after about 3 minutes; add reserved broth if the pasta is still firm and the pan looks dry.
  4. Add cream and chicken. When the tortellini is nearly tender, add the cream and return the chicken. Cook until the pasta is tender and the chicken reaches 165°F / 74°C.
  5. Add Parmesan. Let active bubbling stop, then fold in the Parmesan in 2–3 additions. Add nutmeg if using.
  6. Finish. Remove from the heat while the sauce still moves between the tortellini. Loosen if needed and finish with lemon juice, parsley, black pepper and extra Parmesan.

Recipe Notes

  • Frozen tortellini: cook from frozen; expect a little more liquid and time.
  • Dried tortellini: boil separately and drain just before fully tender if it will finish in the sauce.
  • Cooked chicken: use about 280–350 g, roughly 2–2½ cups loosely chopped, and add near the end.

Jump to: Jarred Alfredo Fix the Alfredo Back to Top

Use What You Have

What You HaveBest Approach
Refrigerated cheese tortelliniUse the main skillet method
Frozen tortelliniCook from frozen and keep extra broth nearby
Dried or shelf-stable tortelliniBoil separately
Very fresh handmade tortelliniUsually boil separately and handle carefully
Rotisserie or leftover chickenAdd near the end
Jarred AlfredoLoosen it enough for the tortellini to cook

Frozen, Dried and Very Fresh Tortellini

Four tortellini formats shown side by side: refrigerated for the main skillet method, frozen for more time and broth, dried to boil separately, and very fresh to handle gently.
One rule runs through all four formats. As water needs rise, direct cooking in Alfredo becomes less practical. Dried tortellini is the clearest example.

Frozen tortellini can usually go straight into the skillet. Give it more time than refrigerated pasta and keep additional broth nearby. Check the thick folded edge instead of assuming every frozen brand needs the same extra few minutes.

Dried or shelf-stable tortellini needs much more water, so boil it separately according to the package directions and save some pasta water before draining. If it will finish in the Alfredo, drain it about 1 minute before full tenderness.

Very fresh handmade tortellini can be much more delicate. Unless you already know it holds up well in a skillet sauce, boil it separately and fold it in at the end.

The guide to cooking tortellini goes further into fresh, frozen and dried formats when your package needs a different approach.

If the skillet method is not what you want tonight, baked tortellini takes the same easy-dinner idea in a different direction: sauce, cheese and tortellini baked together until hot and bubbly.

Making It With Jarred Alfredo

Open two different jars of Alfredo and you may get two very different sauces. One pours easily; another barely leaves the spoon. For direct-cooking refrigerated tortellini, start by making the sauce a little looser than you think it needs to be.

Two unbranded jars of Alfredo sauce shown with spoons: one sauce pours in a ribbon and is labeled “Thinner,” while the other holds a mound and is labeled “Very Thick.”
Jar size tells you little about viscosity. Instead, use the spoon test: a flowing ribbon needs less dilution than a sauce that sits in a mound.

For a 15–16 oz / 425–454 g jar, stir in about ½ cup / 120 ml chicken broth. Add the tortellini and keep the pan at a light simmer. A very thick Alfredo may need closer to ¾ cup / 180 ml before the pasta softens.

If sauce is clinging to the empty jar, pour in a little of the measured broth, swirl it around the sides and tip it into the skillet. No sense leaving good Alfredo behind.

If the pasta is still firm when the sauce tightens, add another splash. When the tortellini is boiled separately instead, warm the Alfredo and loosen it with a little pasta water as needed.

Using Rotisserie or Leftover Chicken

Use about 280–350 g cooked chicken, roughly 2–2½ cups loosely chopped. Add it once the tortellini is nearly tender and leave it in the sauce only long enough to heat through.

Baked chicken breast also works when you cook extra chicken for another meal. For a more restaurant-style plate, keep the chicken in larger pieces, let it rest and slice it over the tortellini.

Fastest dinner: with refrigerated tortellini, jarred Alfredo and already-cooked chicken, this shortcut can land on the table in about 15–20 minutes. Loosen the sauce with broth, simmer the tortellini until nearly tender, fold in the chicken and finish with black pepper and fresh Parmesan.

Refrigerated tortellini, prepared Alfredo sauce and cooked chicken arranged above a finished skillet; text reads “15–20 Minute Shortcut” and “Loosen → Simmer → Add Chicken.”

Jump to: Recipe Card Fix the Alfredo Back to Top

Add Vegetables—or Keep Them on the Side

Broccoli is the best all-round addition. Use about 2 cups / 180–200 g. Keep the florets small—roughly ¾–1 inch / 2–2.5 cm—so they become tender on about the same schedule as the pasta.

Creamy chicken tortellini Alfredo with bright green broccoli florets and browned chicken in a glossy blue serving vessel.
Broccoli earns its place beside chicken and tortellini in Alfredo because the crowns catch sauce. Meanwhile, small florets turn tender quickly enough to stay bright green.

Larger florets and thick pieces of stem benefit from a minute or two in the pan before the tortellini. Roasted broccoli gives you darker edges and more chew; fold it through at the end. If you’d rather make broccoli the focus, garlic Parmesan broccoli pasta takes that route.

Fresh spinach is the quickest option: fold 2–3 packed cups / 60–90 g through at the end and let the heat of the Alfredo wilt it. For frozen spinach, thaw it first and squeeze it very dry.

Mushrooms take more time but bring deeper savory flavor; brown about 8 oz / 225 g before any liquid reaches the pan. Peas are sweeter and need only the final couple of minutes. Sun-dried tomatoes work too, though they pull the dish in a sharper, more assertive direction.

Broccoli, spinach, mushrooms, peas and sun-dried tomatoes arranged with labels for best all-round, quickest, deepest savory, sweeter and sharper options.

If dinner is deliberately leaning rich, a homemade garlic bread loaf is very good at finding the last streaks of Alfredo on the plate.

Adjust the Alfredo to Your Taste

Want more sauce? Add another ¼ cup / 60 ml cream, ¼ cup / 60 ml broth and ½–1 oz / 15–28 g Parmesan. That is usually enough; you do not need to double the Alfredo.

Want it lighter? Half-and-half is the easiest swap. Evaporated milk keeps more body, while whole milk gives the softest, lightest sauce and needs the gentlest heat.

  • Half-and-half: use ¾ cup / 180 ml and keep it below a hard boil.
  • Evaporated milk: use the same amount for a lighter sauce that still has good body.
  • Whole milk: use ¾ cup / 180 ml, begin with about ¾ cup / 180 ml broth, and add more only if the pasta needs it.

Want it thicker and tangier? Soften 2–3 oz / 55–85 g cream cheese into the warm cream before the Parmesan. It changes the character of the sauce more noticeably than the lighter swaps.

Already tastes too rich? Grind in more black pepper first. Parsley helps, and a teaspoon of lemon juice can sharpen the whole skillet without turning dinner into lemon pasta.

Creamy tortellini at the center of an Alfredo adjustment guide with options for more sauce, a lighter sauce, a thicker and tangier sauce, or balancing a sauce that tastes too rich.
Change one thing at a time. More dairy is not always the answer; sometimes the skillet needs liquid, pepper or a little lemon instead.

If Your Alfredo Doesn’t Look Right

Alfredo usually gives you clues. Yellow oil around the edges usually means the sauce has been pushed too hard by heat or reduction. Grainy cheese suggests the Parmesan did not melt smoothly. Firm tortellini in a nearly dry pan needs more liquid.

Match the Alfredo Symptom to the Fix

Four Alfredo sauce problem examples labeled thick or gluey, yellow oil pooling, grainy or clumpy, and watery, each with a brief corrective cue.
Oil pooling, graininess, gluey thickness and watery sauce point to different problems. Match the symptom before changing the heat or liquid.
What You SeeLikely CauseWhat to Do
Thick or gluey sauceToo much reduction, standing time or cheese for the liquidFold in warm broth a small splash at a time until the sauce loosens
Yellow oil poolingToo much heat or reductionTake the skillet off the heat and fold in a small splash of warm broth or cream
Grainy or clumpy ParmesanToo much heat, coarse cheese or a sauce that did not come together smoothlyRemove from the heat, add a small splash of warm liquid and fold slowly. Do not boil harder
Watery sauceIt has not thickened yet, or there is a little too much liquidLet it sit off heat another 30–60 seconds first; if it is still loose, use very gentle heat briefly
Heavy or dull AlfredoIt needs contrast, not more richnessTry black pepper, parsley and a teaspoon of lemon juice before adding more cheese

A badly broken sauce may not become perfectly silky again. Early separation often improves away from the heat with a little warm liquid. Once the cheese has severely overheated and turned grainy, aim for better rather than perfect.

If the Tortellini or Chicken Is the Problem

With the sauce behaving, check the pasta and chicken themselves. Split seams, a dry pan, sauce-hungry dried tortellini, swollen pieces and dry chicken point to different problems, so match the symptom before changing the heat or liquid.

Four tortellini problem examples showing split seams, firm pasta in a dry pan, dried tortellini that absorbed most of the sauce, and swollen overcooked tortellini.
Opening seams, a dry pan and swollen tortellini point to different causes. Use the pasta’s shape and the pan’s moisture to decide what to fix.
What You SeeLikely CauseWhat to Do
Tortellini seams splittingToo much heat, rough stirring or overcookingOne or two split pieces will not hurt dinner. If many are opening, stop cooking and handle the rest gently
Firm tortellini, dry panThe pasta needs more liquidAdd a splash of broth, cover and keep cooking until the thick edge is tender
Dried tortellini swallowed the sauceIt was cooked directly in too little liquidAdd enough warm liquid to make dinner workable; next time boil dried tortellini separately
Boiled tortellini turns too softIt was fully cooked before going into the AlfredoNext time drain it about 1 minute early and let the sauce finish the cooking
Dry chickenIt cooked through during browning and then cooked again in the sauceServe it with plenty of Alfredo. Next time take it out sooner

Jump to: Recipe Card Reheat Leftovers Back to Top

Tomorrow’s Alfredo Will Be Thicker

Straight from the refrigerator, leftovers may look almost alarmingly thick even when the sauce was loose and glossy at dinner. That is normal. The Parmesan has firmed up, and the tortellini has spent hours absorbing more moisture.

Three stages of chicken tortellini Alfredo labeled “In the Pan,” “5 Minutes Later” and “Next Day,” showing the sauce becoming progressively thicker.
Use the middle state as the serving target—and the first state as the correct moment to stop cooking. Alfredo needs to leave the burner one step looser than you ultimately want on the plate.

Cool leftovers promptly, cover and refrigerate for about 3–4 days. The USDA gives cooked chicken and cooked chicken dishes a refrigerated window of 3–4 days.

Reheating Leftovers

On the stove: put one serving in a small skillet with about 1 tbsp / 15 ml milk or broth. Warm over low heat and fold the sauce through the pasta as it loosens. Add another splash if it still looks dry, then take it off the heat once hot.

Three-stage reheating guide showing thick cold Alfredo, a 1-tablespoon measure adding milk or broth in a skillet, and glossy reheated chicken tortellini Alfredo.
When reheating Alfredo with chicken and tortellini, let the first tablespoon of milk or broth work before adding more. Once the sauce starts moving again, extra liquid can dilute it faster than expected.

In the microwave: add a small splash of milk or broth and cover loosely. Use reduced power when available and heat in 20–30 second bursts, stirring between rounds. Reheat chicken leftovers thoroughly to 165°F / 74°C.

Freezing Is Possible, but Fresh Is Better

You can freeze the finished dish, but the tortellini will be softer and the sauce less silky when it comes back. Cream-and-Parmesan Alfredo is also more likely to separate during reheating.

For planned freezer meals, freeze cooked chicken separately, keep packaged frozen tortellini frozen and make the Alfredo when you’re ready to eat. It asks a little more of you that night, but the texture is noticeably better.

Chicken Tortellini Alfredo FAQs

1. Can I use chicken thighs instead of chicken breast?

Yes. Use the same weight of boneless skinless chicken thighs. They bring a little more richness and tolerate extra cooking well. Brown them, take them out of the pan and return them near the end.

2. Can I make it ahead?

Yes, although Alfredo and stuffed pasta are best soon after cooking. If you know dinner will be reheated later, leave the sauce a little looser and stop cooking the tortellini as soon as it is tender. Refrigerate promptly, then use the reheating method with a splash of milk or broth.

3. Can I double the recipe?

Yes, but not in the same 12-inch / 30 cm skillet. Use two skillets, a wide braiser or Dutch oven, or boil the tortellini separately so the larger batch has room to cook evenly.

Bring the Skillet to the Table

The tortellini should carry sauce in its folds, and the chicken should still show its browned edges. Black pepper should cut through the cream often enough to keep the next bite interesting.

Something cold and acidic is especially welcome beside it. A crisp cucumber salad with vinegar, dill and onion gives you that contrast without adding another rich element to the plate.

A hand serves steaming chicken tortellini Alfredo from a dark skillet beside a red bowl of pasta, cucumber salad, garlic bread and grated Parmesan on a dark dinner table.
Keep the sides in contrast rather than competition. Cool cucumber salad refreshes after the creamy pasta, while bread gives the remaining Alfredo somewhere useful to go.

This is the kind of dinner that is best eaten while the skillet is still doing its job: the sauce glossy, the tortellini plump and everything properly hot.

Once the skillet is ready, bring it over instead of leaving it idling on a warm burner. The sauce is already where you want it.

Broth first. Cream later. Parmesan last. Once that rhythm makes sense, the recipe becomes much easier to adapt to the chicken, tortellini and Alfredo you actually have in the kitchen.

Posted on — Leave a comment

Refried Beans Recipe: Easy Homemade Refried Beans From Pinto Beans

Creamy refried pinto beans in a dark skillet with a spoon trail through the surface and a warm tortilla beside them on a petrol-blue and oxblood set.

A skillet of whole pinto beans does not look much like refried beans at first. Then the beans hit warm fat and softened onion, the masher breaks them open, and the liquid in the pan turns glossy as their starch thickens it. Within minutes, you have creamy beans with enough body for a spoon to leave a trail through them, but enough liquid to stay soft on the plate.

How far you take them depends on dinner. Leave them loose and silky for a side dish. Give them a few more minutes for tacos and burritos. Cook them down farther for tostadas or molletes, where you need a spread that stays put instead of soaking the base. At the right point, a warm tortilla drags through them easily and the beans spread rather than sit in a stiff mound.

This refried beans recipe works from two starting points: whole canned pintos for the fast route, or dried pintos cooked until completely tender. Once either one reaches the skillet, the same basic method takes over.

Refried Beans Recipe

20–25-Minute Canned-Pinto Route: Soften ½ cup onion in 2 tablespoons lard or neutral oil, stir in 2 minced garlic cloves, then add two cans of whole pinto beans with ½ cup bean liquid, water, or unsalted broth. Mash, simmer gently until creamy and still slightly loose, then season to taste.

If your can already contains prepared refried beans rather than whole pintos, use our refried beans from a can guide instead. Those beans have already been mashed and cooked into their final form, so they need a different kind of help.

Refried beans can be frustrating because the ingredient list is so short. When a homemade batch turns stiff, gritty, or strangely flat, it can feel as though some restaurant secret is missing. Usually the bigger differences are simpler: fully tender beans, enough fat, enough liquid, and reading what the pan is doing.

The same beans can be soft and spoonable one minute, then dense enough to stand on a spoon after a little more cooking. That stopping point matters more than another shake of cumin.

Onion, garlic, cooked pintos, fat, and bean broth or water are the foundation. Add liquid gradually until the beans move the way you want.

Easy Homemade Refried Beans From Pinto Beans

Whole pinto beans mashed and refried with onion, fat, and enough liquid to stay creamy. Keep them loose for a plated side or reduce them farther for tacos, burritos, and tostadas.

Prep
8–10 minutes

Cook
12–15 minutes

Total
20–25 minutes

Yield
About 2½–3 cups

Serves
About 5–6 as a side

The final yield shifts a little depending on how loose or thick you leave the beans.

Ingredients

Whole pinto beans, onion, garlic, cooking fat, bean broth, and cut lime arranged on a cobalt-blue background with polished metal vessels.
A short ingredient list leaves more room for each component to matter: onion builds the base, fat carries richness, and bean liquid controls how the finished mash moves.
  • 2 cans whole pinto beans, 15 oz (425 g) each
  • 2 tbsp (30 ml) lard, avocado oil, or another neutral cooking oil
  • ½ cup (about 75 g) white or yellow onion, finely diced
  • 2 garlic cloves, finely minced
  • ½ cup (120 ml) reserved bean liquid, water, or unsalted broth to start
  • Up to another ½ cup (120 ml) bean liquid, water, or unsalted broth, as needed
  • ¼ tsp fine salt, only if needed, plus more to taste
  • 1–2 tsp (5–10 ml) fresh lime juice, optional

Optional Tex-Mex seasoning: ½ tsp ground cumin plus ¼ tsp Mexican oregano. Add them with the garlic.

How to Make Refried Beans From Canned Pinto Beans

Four-stage process showing softened onion, whole pinto beans with broth, beans being mashed, and finished creamy refried beans.
Because the pintos are already cooked, the skillet is really doing two jobs: building flavor and moving the beans toward the texture you want.

Build the Flavor Base

  1. Drain the beans over a bowl. Taste the reserved liquid. Keep it unless very salty, metallic, or strongly canned; otherwise rinse the beans and use water or unsalted broth.
  2. Soften the onion. Heat the lard or oil over medium heat. Cook the onion for 4–6 minutes, until the sharpness mellows and the pieces are soft enough to disappear into the mash.
  3. Add the garlic. Stir in the garlic and, if using them, the cumin and oregano. Cook for about 30 seconds, just until fragrant.
  4. Add the beans carefully. Lower the heat if the fat is very hot, then add the drained beans close to the surface of the skillet. Wet beans can spit when they meet hot fat.
  5. Add ½ cup (120 ml) reserved bean liquid, water, or broth. Simmer for 1–2 minutes. Beans that still resist the masher need another 3–5 minutes with a splash more before mashing.

Mash and Finish

  1. Mash the beans. Leave some pieces intact for a rustic texture, or keep going until most have broken down.
  2. Turn the heat down to medium-low. Let the mash bubble gently for another 3–5 minutes. Add more bean broth or water only when needed, working 1–2 tbsp (15–30 ml) at a time.
  3. Taste before salting. Canned bean liquid or regular broth may already have seasoned the pan. Add lime if the beans taste rich but flat.
  4. Turn off the heat while the beans still look a touch loose. They keep thickening after the flame is off. A pan that looks right over the heat can feel stiff five minutes later.

Recipe Notes

  • For the richest savory flavor: use lard. Increase it to 3 tbsp (45 ml) for a richer batch.
  • Vegetarian or vegan: avocado oil or another neutral vegetable oil works well. Olive oil adds more flavor of its own.
  • Very smooth beans: mash first, then use an immersion blender briefly while the mixture is loose enough to move freely.
  • Small batch: use one 15 oz (425 g) can and halve the remaining ingredients.
  • Starting from dry: cook about 8 oz (225 g) dried pintos until completely creamy inside, reserve some broth, then measure roughly 3 cups cooked beans into the recipe.
  • Using unsalted home-cooked beans: expect to need more salt than the canned version. Season gradually after mashing; the ¼ teaspoon above is not a target for completely unsalted beans.

Equipment

A 10- to 12-inch (25- to 30-cm) skillet and potato masher do the main work. For a small batch, a sturdy fork works; an immersion blender is optional when you want an especially smooth finish.

Mash. Loosen gradually. Stop early.

Once the beans are mashed, add broth or water a splash at a time until they move the way you want. Gentle frying does the rest.

What the Pan Should Look Like

The clock gets you close; the skillet tells you where you actually are.

Three views of the same skillet showing refried beans just mashed, creamy and loose, and thick and spreadable.
The same pan can move from chunky to silky to spreadable in minutes; the surface changes before the clock does.

Just Mashed

The beans are broken but still noticeably chunky. Some liquid may sit around them, and a spoonful does not quite hold together yet.

A loose-looking skillet at this point is normal. Give it a few minutes before changing anything.

Creamy & Loose

The mixture looks cohesive and glossy. Pull a spatula through the skillet and the trail stays visible briefly before the edges slowly soften back into place.

Stir it and the mash should move as one soft mass—neither sloshing like soup nor sitting stiffly like mashed potatoes.

Thick & Spreadable

The spatula trail stays open much longer. A spoonful holds a soft mound and spreads where you push it instead of flowing back across the skillet.

For a deeper fried flavor, let a very thin film catch lightly on the skillet, then scrape it back into the mash. The aroma turns toastier and nuttier almost immediately; get it up before that edge becomes bitter.

How Thick Should Refried Beans Be?

Thick enough for what? Side-dish beans should be loose and spoonable. A burrito needs enough body that the filling stays inside the tortilla, while a tostada needs a spread that will not soften the crisp base underneath.

What You Are MakingStop WhenTexture
Side-dish beansA spoon trail slowly relaxes backLoose, creamy and spoonable
Nachos or dippingThe beans still move readily when stirredCreamy enough to scoop easily
TacosThe beans hold on a spoon but still spread readilyMedium-thick
BurritosThe trail holds and the beans no longer flowThick enough to stay inside the tortilla
Tostadas or molletesThe beans hold a stable spreadThick enough to protect the crisp base
Make-ahead beansSlightly looser than you want to serve themThey’ll firm more as they chill
Five serving examples showing loose refried beans as a side dish, scoopable beans for nachos, medium-thick beans in a taco, thicker beans in a burrito, and a stable spread on a tostada.
Think of thickness as a job rather than a single ideal: the more the beans need to stay put, the farther you take the pan.

For ground beef tacos, the middle texture is especially forgiving: the beans spread beneath the meat but stay inside the tortilla.

Soft Restaurant-Style Refried Beans

Very smooth restaurant-style beans begin with completely tender pintos. Mash them thoroughly—or briefly use an immersion blender—then add enough bean broth that the beans relax across the plate instead of sitting in a stiff mound. Take the skillet off the heat earlier than you would for burrito or tostada beans.

Lard gives the deepest savory richness. Tender beans, released starch, broth, and that looser stopping point create the texture; dairy is optional rather than necessary.

Very smooth refried pinto beans spread across a deep green glazed plate with a spoon on a dark red surface.
A silky restaurant-style finish starts before the blender or masher: if the pinto beans are not completely tender, no amount of smoothing will make the center creamy.

Starting With Dried Pinto Beans?

Using canned beans? Skip ahead to seasoning.

Soaking shortens the wait, but tenderness decides when dried pintos are ready for the skillet. For smooth refried beans, the centers need to become completely creamy before frying and mashing.

Sort through 8 oz (225 g) dried pintos, discard any stones or badly damaged beans, and rinse them well. Once cooked, you’ll need roughly 3 cups. Any extra can go into another meal, including a simple bean stew.

Do You Need to Soak Pinto Beans?

No. An 8- to 12-hour soak can shorten the cooking time and help pintos cook more evenly, but unsoaked beans work too.

After an overnight soak, drain and rinse the beans, then cook them in fresh water. Forgot to soak them? Keep going—unsoaked beans simply need longer.

Cook Them Until the Centers Are Creamy

Put the pintos in a roomy saucepan or Dutch oven and cover them with fresh water by roughly 2–3 inches (5–7.5 cm). Onion, garlic, or a bay leaf can flavor the pot if you like.
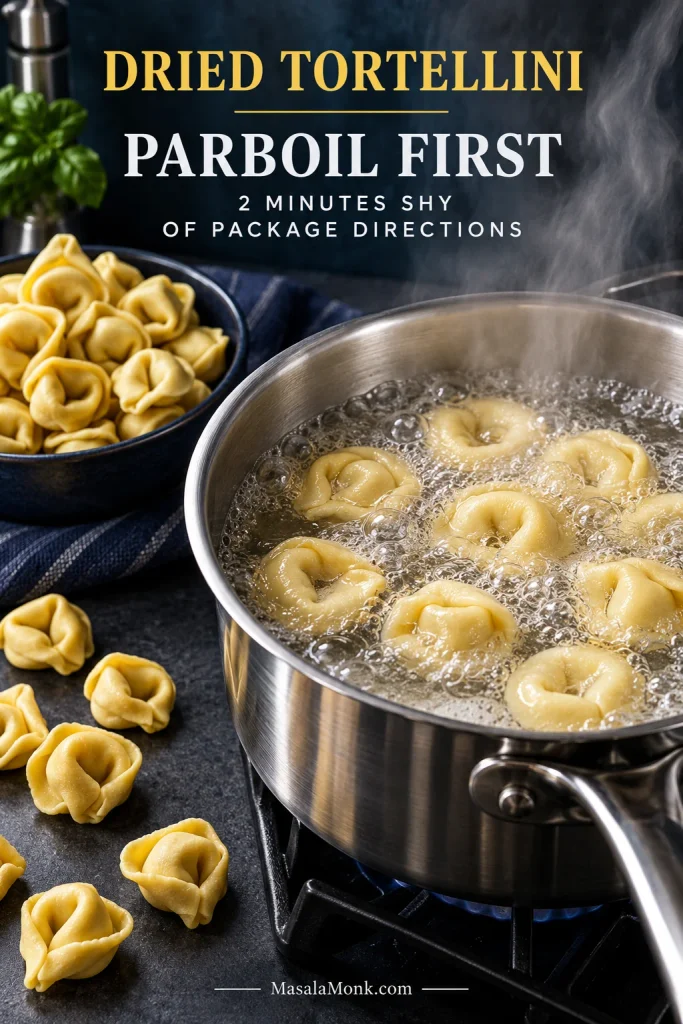
Bring the water to a boil, then reduce it to a gentle simmer. Keep the pintos comfortably submerged and top up with hot water as needed.

Start checking soaked pintos after about 1 hour. Many finish within 1–2 hours; unsoaked beans commonly need closer to 2–3 hours. Old beans can take longer, so tenderness matters more than the clock.

Take one out, let it cool for a few seconds, then crush it between your fingers or press it against the side of the pot with a spoon. It should give way easily and feel creamy all the way through, with no pale, chalky center.

Two split pinto beans in close-up, one with a smooth creamy center labeled ready and one with a pale grainy center labeled keep cooking.
Before draining dried pinto beans, split one open; the center tells you more about readiness than the clock does.

A potato masher can change their shape; it can’t turn a chalky center creamy. Keep cooking until the pintos are genuinely soft.

Before draining them, save plenty of the bean broth. It already carries bean flavor and released starch, so reach for it first when the mash needs loosening later. Remove any bay leaf or large aromatics, then measure about 3 cups cooked pintos for the skillet.

When Dried Beans Refuse to Soften

Dry beans do not read recipe clocks. An old bag of pintos may take much longer than a fresher one, and very hard water can slow softening too. Strongly acidic ingredients such as tomatoes or vinegar are best saved until the beans are tender.

If the beans stay stubbornly firm, don’t assume salt is the culprit. Check bean age, very hard water, acidic ingredients, water level, and whether the pot has maintained a steady simmer.

Diagnostic board showing older dried pinto beans, hard-water cues, acidic ingredients added early, a pot with too little water, and a weak simmer.
Dried pinto beans do not all soften on the same schedule, so stubborn beans are a cue to check age, water, acidity, and simmer before changing course.
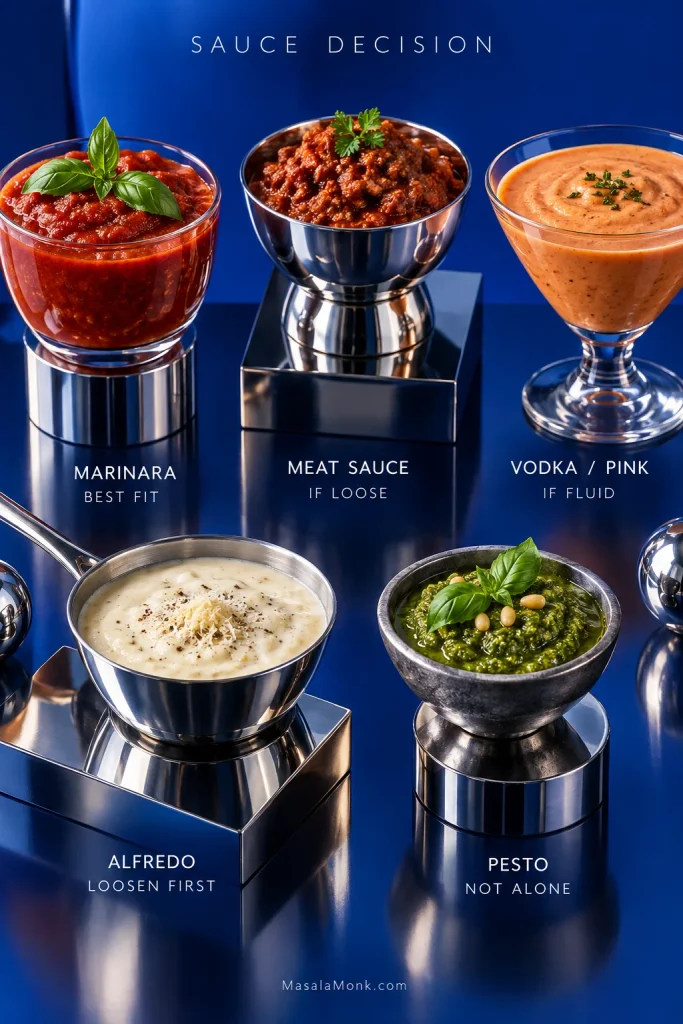
Where hard water repeatedly causes trouble, cooking with softer or distilled water can help. North Dakota State University’s dry-bean guidance also discusses hard water and delaying acidic ingredients until the beans are tender.
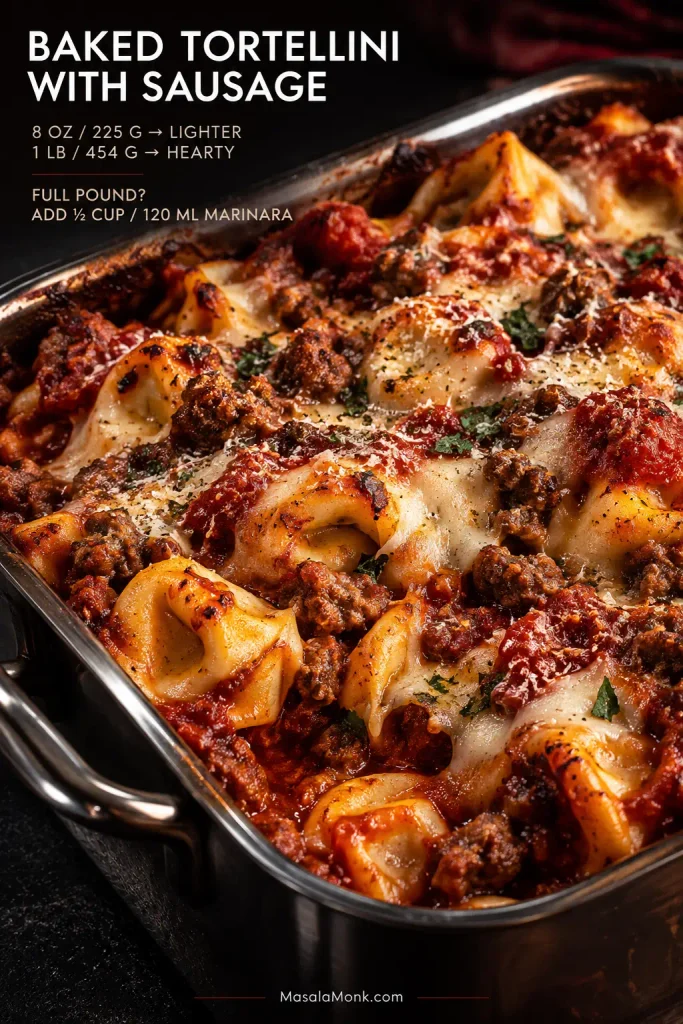
How to Season Refried Beans

Once the beans are genuinely tender, seasoning gets much simpler. Onion, fat, and salt do most of the work. Garlic can join them; cumin, oregano, fresh chile, and lime take the beans in different directions rather than fixing a weak base.

Choose the Fat

Lard gives the deepest savory flavor. Two tablespoons (30 ml) is enough for the base recipe; 3 tablespoons (45 ml) makes the richness more pronounced.

Keeping the beans vegetarian or vegan is simple: use avocado oil or another mild vegetable oil. Olive oil is more noticeable, while bacon drippings take the pan somewhere smokier.

Does This Pan Need More Liquid or More Fat?

Dry-looking beans don’t automatically need more fat. Stiff or crumbly beans usually need liquid. Beans that are already soft and moist but taste thin may need more fat.

Split comparison showing stiff refried beans being loosened with liquid on the left and soft refried beans receiving a small amount of fat on the right.
Look at the bean texture first, then taste: moisture controls movement, while fat changes richness.

Spice, Heat and Brightness

For a Tex-Mex batch, use ½ tsp ground cumin and ¼ tsp Mexican oregano with the garlic. More cumin isn’t automatically the answer to bland beans; salt and properly softened onion matter first.

Fresh heat comes from ½–1 small jalapeño or serrano cooked with the onion. About ½–1 tsp finely chopped chipotle in adobo brings smoke instead.

Or leave the skillet mild and put the heat on the table. Roasted salsa verde brings tomatillo acidity and green-chile heat without changing the whole batch.

Well-salted beans that still taste heavy usually need brightness. Add 1–2 tsp (5–10 ml) lime juice; the next bite should feel livelier rather than overtly citrusy.

If the Canned Beans Are Salty

Drain and rinse them, then use water or unsalted broth in the skillet. Regular broth, bacon drippings, bouillon, cheese, and extra salt can pile up quickly.

For a lower-sodium batch, wait until the beans have reduced before deciding whether they need salt at all.

Why Mexican Refried Beans Vary

Those choices—bean variety, fat, aromatics, chile, and final consistency—change from one kitchen to the next. Refried beans are easiest to understand as another life for beans that are already cooked. In Mexican cooking, pot beans—frijoles de la olla—can be eaten as they are and later become frijoles refritos when they’re cooked with fat and mashed.

Canned whole pintos simply arrive with that first cooking stage already done.

Pintos are common in many northern and border traditions; black beans and numerous other varieties appear across regional Mexican cooking.

Two households can put noticeably different beans on the table and both be making something completely familiar to them. There does not have to be one universal seasoning list or one correct finished texture.

If Your Refried Beans Look Wrong

Most batches are easy to rescue. Watery? Simmer uncovered. Too thick? Add hot liquid a tablespoon at a time. Gritty? Cook longer. Bland? Check the salt first. Greasy? More cooked beans are the most useful fix.

Five refried-bean states showing watery beans, overly thick beans, gritty beans, bland beans, and greasy beans, with a short corrective action for each.
Fix the first problem you can identify, then taste again; otherwise a texture mistake can easily turn into a salt, fat, or seasoning mistake too.
The beans are too loose or soupy

Give them time. Simmer uncovered over gentle heat and stir regularly. Excess water usually cooks away on its own.

The beans are too thick or paste-like

Stir in hot bean broth or water 1–2 tbsp (15–30 ml) at a time. Pause after each addition; the beans need a moment to loosen.

The beans are gritty

Tiny gritty pieces usually mean some of the beans need more cooking. Give them more liquid and more time, then mash again.

The beans taste bland

Check the salt first. If that’s right, taste for richness, fully softened onion, chile heat, or brightness from lime.

The beans are too salty

The strongest fix is more unsalted cooked beans. A looser batch can also take unsalted water or broth, but boiling all of that liquid away simply concentrates the salt again. Plain rice, tortillas, avocado, or other unsalted foods can make a mildly oversalted serving easier to balance on the plate.

When Texture Isn’t the Whole Problem

The beans are soft and moist but still taste thin

This is where more fat helps. Stir in a little lard or oil, let it disappear into the hot mash, then taste again.

The beans look greasy

If the pan is genuinely greasy, broth will not fix the ratio. Add more cooked beans. A small splash of broth can help a slightly oily mash come together, but genuinely excessive fat needs more cooked beans.

They were perfect in the skillet but stiffened on the plate

They went a little too far. Stir in hot broth or water now. Next time, stop while the beans still look slightly softer than you want to eat them.

Heat and Handling Problems

The onion is still crunchy

For the next batch, dice it finely and let it soften fully before the beans go in. Properly cooked onion should disappear into the mash rather than announce itself in every bite.

The bottom of the skillet is scorching

Reduce the heat and add a splash of hot broth or water. Mashed beans expose much more surface to the skillet than whole beans do, so they scorch quickly.

The beans splatter when they hit the fat

Add the wet beans close to the surface of the skillet after lowering the heat briefly. Keep your hands and face back from the first burst of steam and fat.

Leftovers Get Thicker—Here’s How to Bring Them Back

Refried beans keep about 3–4 days in the refrigerator and freeze well for about 3 months. They firm considerably when cold, so reheating usually begins with a splash of water or bean broth.

Refrigerate the beans promptly: cool them, cover, and refrigerate. That firmer next-day texture is handy inside a breakfast burrito, where the filling needs to stay where you spread it.

When freezing: portion the cooled beans into smaller containers or freezer bags rather than one large block. They’ll be easier to thaw and reheat.

To reheat: warm them over medium-low heat on the stove and add water or bean broth 1–2 tbsp (15–30 ml) at a time. In the microwave, cover loosely, heat in short bursts, stir, and add a splash between rounds as needed.

Three-stage image showing cold stiff refried beans, broth being added during reheating, and warm glossy beans steaming in a skillet.
Start with less liquid than you think you need, then add more only after the beans warm through; they loosen gradually and can thicken again as they cool.

The USDA recommends reheating leftovers to 165°F (74°C). Its leftovers and food-safety guidance also covers cooling and refrigeration.

What to Serve With Refried Beans

Spoon them onto a plate next to warm rice and eggs, tuck them beside enchiladas or grilled meat, or bring them to the table with tortillas and something sharp and fresh. Salsa, crisp cabbage, radish, chopped onion, cool avocado, cilantro, and lime all wake up a rich scoop of beans.

A thicker batch works just as well inside quesadillas and burritos. Spread it across warm corn tortillas, or layer it onto a tostada before adding salsa, avocado, cheese, cabbage, or whatever else dinner calls for.

And dinner can be much simpler than that: warm tortillas, a soft scoop of beans, salsa, and something cool or crisp on top.

Dinner scene with refried beans, warm tortillas, salsa, avocado, cabbage, radishes, lime, and a hand holding a filled taco.
Warm tortillas, bright salsa, avocado, lime, and something crisp give creamy beans the contrast that makes a simple dinner feel complete.

For a party, a thick batch makes a sturdy base for an easy 7 layer dip. The beans stay underneath the toppings instead of traveling across the plate with the first scoop.

Frequently Asked Questions

1. What are the best beans for refried beans?

Pinto beans are an easy all-purpose choice because they soften well and mash readily. Black beans and many other varieties also appear in regional Mexican cooking.

2. Can you make refried beans from canned pinto beans?

Yes. Whole canned pintos are the fastest route in this refried beans recipe: cook them with onion and fat, mash, then add enough broth or water to reach the texture your meal needs.

3. Should you drain and rinse canned pinto beans?

Drain them over a bowl first. Keep the liquid unless it is very salty, metallic, or strongly canned; otherwise rinse the beans and use water or unsalted broth.

4. Do refried beans need lard?

No. Lard gives the deepest savory flavor, while neutral oil makes an excellent vegetarian or vegan version.

5. Can you freeze refried beans?

Yes. Freeze cooled beans in practical portions, then thaw and reheat them with a splash of water or bean broth.

6. Does “refried” mean the beans are fried twice?

Not necessarily. Spanish refreír can mean to fry again, but it can also mean to fry something thoroughly or very well. In frijoles refritos, the name does not require the beans to go through two separate frying stages.

Once You Know What to Look For

Once you can recognize a fully tender bean, a mash that needs another splash of broth, and a skillet that’s one minute from becoming too stiff, the measurements stop doing all the work.

Mash. Loosen gradually. Stop early. Once that rhythm makes sense, the recipe stops feeling like a formula; you can look at the pan and know what it needs.