Posted on 3 Comments

What is Wall Pilates?

What Is Wall Pilates?

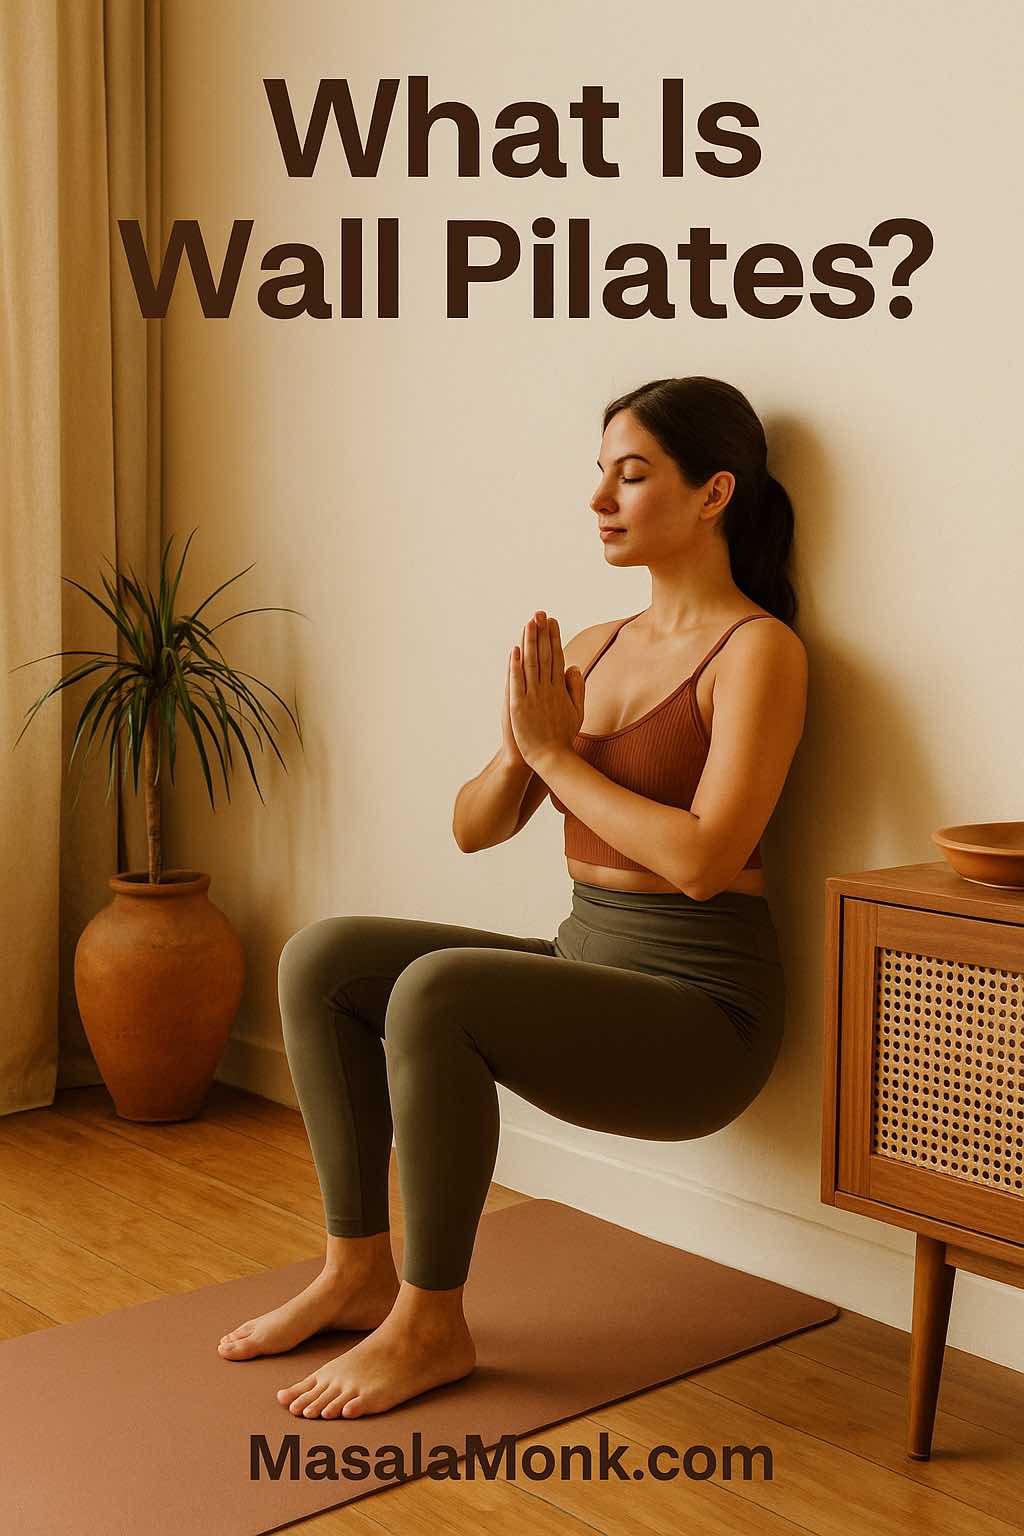
Have you ever looked at Pilates videos online and thought, “That looks amazing, but I don’t have a reformer or fancy studio”? Or maybe you tried Pilates on a mat but found yourself wobbling, unsure if your form was right, or just wishing you had a little more support. If so, you are not alone.

Most of us crave a way to feel stronger, more flexible, and upright in our bodies—without risking injury, spending hours in the gym, or buying expensive equipment. That’s where Wall Pilates comes in: a simple, genius method that turns your wall into the best fitness tool you never knew you had.

Whether you’re an absolute beginner, someone getting back into movement after a long break, or just curious about new ways to move, Wall Pilates offers a safe, gentle, and surprisingly powerful way to build a body you love—right at home.

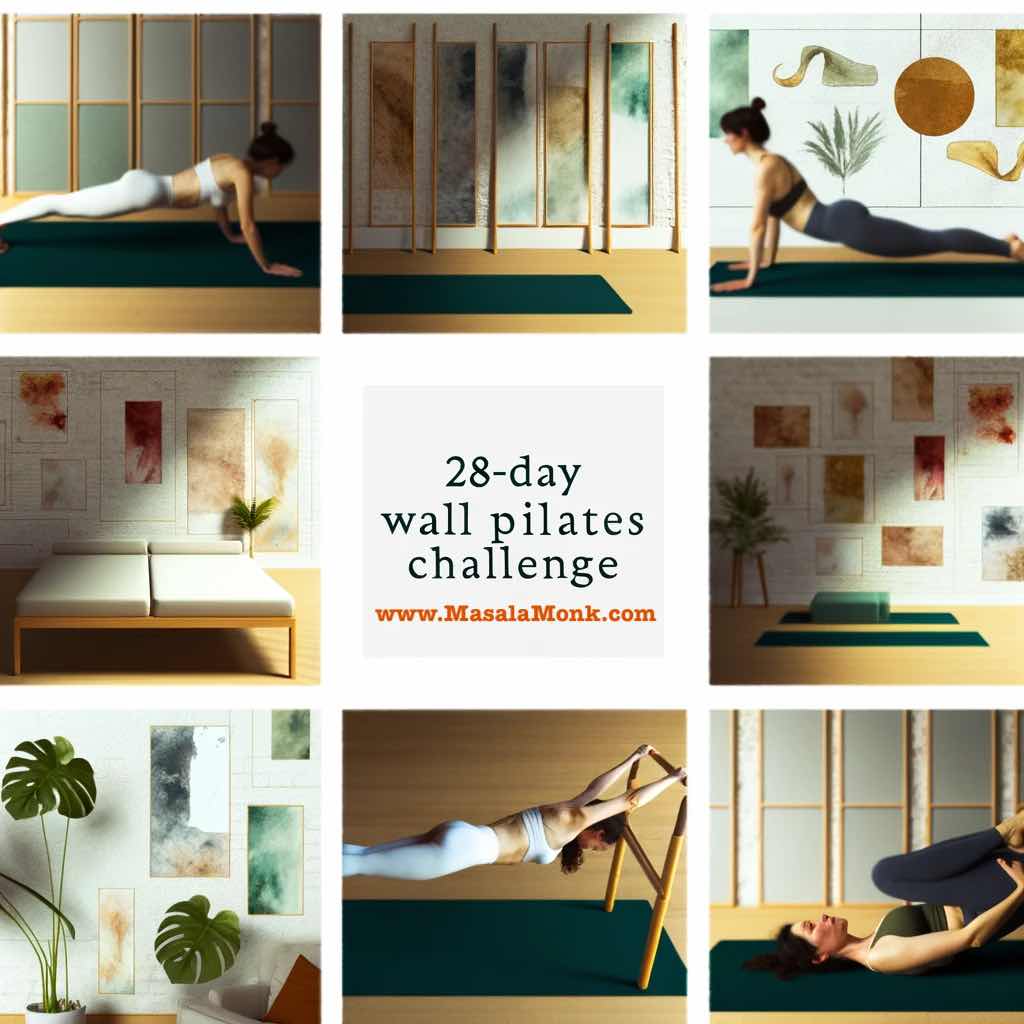
Also Have a look at 28 Days AI-Powered Wall Pilates Challenge


Rediscovering Pilates—With a Wall

To understand Wall Pilates, it helps to know a bit about traditional Pilates first. Invented by Joseph Pilates in the early 20th century, Pilates is all about core strength, mindful movement, and building balanced muscles. The problem? Classic Pilates routines often require either a mat (which can be tough for true beginners) or expensive studio equipment.

Wall Pilates flips the script.
Instead of lying down on the floor and hoping you’re aligned, you use the wall as your guide. Pressing your back, feet, or hands into it, you get instant feedback on your posture—if your back isn’t flush against the wall, you’ll know! This makes learning the exercises safer, more intuitive, and way less intimidating.

Think of the wall as your built-in teacher, gently correcting you as you move.


Why Wall Pilates Is Suddenly Everywhere

You might have seen Wall Pilates popping up on social media or wellness blogs. The reason? It’s actually doable for regular people—no matter your fitness level, age, or body type.

  • Beginner-friendly: The wall keeps you stable, so there’s no fear of falling or “doing it wrong.”
  • Gentle on joints: Moves are low-impact, perfect for sensitive knees, hips, or lower backs.
  • Full-body focus: Expect to feel this in your core, glutes, arms, and even your posture muscles—often from the very first session.
  • Quick results: Many people notice improved posture and a stronger core within just a few weeks.
  • No gear, no excuses: All you need is a clear patch of wall, a mat if you like, and your own body.

If you love the idea of steady progress and variety, check out the 28-Day Wall Pilates Challenge on MasalaMonk. It offers a structured, progressive plan for anyone who wants to build consistency, even if you only have a few minutes a day.


Who Should Try Wall Pilates? (Hint: Almost Everyone)

One of the best things about Wall Pilates is how inclusive it is. You don’t need a dance background, you don’t need to “be flexible first,” and you definitely don’t need expensive activewear.

Wall Pilates is perfect for:

  • Beginners who want support and clear cues
  • Seniors and anyone who wants a gentle approach to movement
  • People returning from injury (with their doctor’s approval)
  • Busy parents, professionals, and students who only have a small window for exercise
  • Anyone in a small apartment or shared space
  • Those looking to boost posture, reduce back pain, or gently build strength

The wall not only supports you, but also “coaches” you to move in a safer, smarter way. That means fewer aches, less guesswork, and more wins for your body.

If you’re brand new to Pilates, check out our Wall Pilates for Beginners: The Ultimate Guide for safety tips, basics, and the best way to start.


How Wall Pilates Works: The Magic of Feedback & Alignment

When you do Pilates on the floor, it can be easy to arch your back, tip your hips, or let your shoulders sneak up toward your ears. With Wall Pilates, the wall acts as a physical boundary. If your back leaves the wall during a squat, you’ll feel it immediately—and you’ll naturally correct your form.

This feedback helps you:

  • Activate the right muscles (especially your core and glutes)
  • Stay in a neutral spine position, protecting your back
  • Get more out of each rep, since you can’t “cheat” the movement
  • Build body awareness that carries over into daily life (like how you sit at your desk or carry groceries)

This focus on alignment makes Wall Pilates a favorite of physiotherapists, yoga teachers, and even personal trainers who want their clients to move better—not just more.


The Transformational Benefits of Wall Pilates

People fall in love with Wall Pilates because the benefits show up fast—and last.

1. Better Posture, Every Day

Many of us spend hours hunched over screens, developing tight hips and rounded shoulders. Wall Pilates exercises stretch the chest, open the hips, and teach your body what upright, healthy posture feels like.
You’ll finish each session taller, lighter, and with a sense of ease in your movement.

2. Core Strength That Really Works

Unlike crunches or planks, Wall Pilates teaches you to engage your core dynamically. The wall provides gentle resistance, asking your abs and back to stabilize you throughout each move.

3. Safe, Joint-Friendly Movement

No jumping, no jarring landings, and no pressure to “keep up” with an instructor. Every move can be modified—great for those with past injuries, arthritis, or simply wanting to move more gently.

4. Increased Body Awareness

Wall Pilates invites you to slow down, listen to your body, and notice which muscles are firing. That mindfulness makes every session a mini stress-relief ritual, not just another workout to check off your list.

5. Full-Body Toning (Not Just Abs!)

Expect to feel your glutes, thighs, shoulders, and even arms working with the right routine. And because you’re using your own body weight, the results are long, lean, and functional—not bulky.

Want to see just how effective a short session can be? Many MasalaMonk readers rave about the 15-Minute Belly Fat Burning Wall Pilates Workout—it’s a great next step if you want to target your core and burn some extra calories, all without leaving your living room.


The Mind-Body Connection: Wall Pilates Beyond Fitness

One of the greatest “secrets” of Pilates (wall or otherwise) is how it ties the body and mind together. Slow, intentional movements demand focus, helping you tune into your breath and shut out distractions.
Wall Pilates can be a moving meditation—a way to reset your mind while strengthening your body.

For even more support on your wellness journey, explore yoga routines like the Good Morning Yoga Routine on MasalaMonk, perfect for warming up, winding down, or finding calm on busy days. And if you’re curious how movement can ease stress and boost emotional resilience, Yoga for Mental Health: A Quick Guide offers simple, science-backed techniques anyone can try.


Getting Started: How to Begin Wall Pilates at Home

You don’t need much to get started:

  • A clean wall (move any pictures, plants, or obstacles)
  • A yoga mat or folded towel if you want a little cushion
  • Comfortable clothes
  • Willingness to listen to your body

Start with a gentle warm-up—walking around, shoulder rolls, or a few deep breaths.
If you need more guidance or want a complete primer before your first session, MasalaMonk’s Wall Pilates for Beginners: The Ultimate Guide breaks everything down step by step, with helpful tips for absolute beginners.

If you find that you’re sitting or standing for long hours (hello, work-from-home life!), complementing your Wall Pilates with postural yoga can make a huge difference. The Yoga for Posture: 7 Yoga Poses for Software Engineers is a great resource for keeping your spine and shoulders healthy in the digital age.


How to Get the Most Out of Wall Pilates

  • Go slow. Rushing leads to poor form and less benefit. Savor each movement.
  • Breathe with intention. Exhale as you press or lift, inhale as you return to start.
  • Stay curious. Notice which muscles activate and which moves feel challenging.
  • Modify when needed. Use the wall as much or as little as you need for balance.
  • Celebrate your wins. Even five minutes counts—progress is progress!

And remember, you don’t have to do it all at once. Even a short, focused routine can bring big results if you stick with it.
If you’re ready to expand your practice, try supplementing with the 10-Minute Love Handles and Lower Belly Fat Workout—another quick, effective routine that pairs well with Wall Pilates.


Try This: 10-Minute Beginner Wall Pilates Routine

Take a few deep breaths. Let this be a break from your day—a time to reconnect with your body and move with intention. Go slowly, notice how you feel, and remember: it’s not about “nailing” every move, but about building awareness and feeling good.


1. Wall Roll Down

How to Do It:

  1. Stand with your back pressed against the wall, feet hip-width apart, about 12–18 inches from the base.
  2. Relax your arms by your sides, palms facing in.
  3. Take a breath in. As you exhale, gently drop your chin to your chest.
  4. Begin to roll your spine down, peeling one vertebra at a time off the wall. Imagine your back “melting” away from the wall, bit by bit, letting your head and arms hang heavy.
  5. Go as far as you comfortably can (maybe your fingertips reach your shins, maybe your toes).
  6. Pause. Breathe here, feeling a gentle stretch in your back and hamstrings.
  7. On your next inhale, press your feet into the floor and slowly stack your spine back up the wall, one vertebra at a time, until you’re standing tall again.
Wall Roll Down
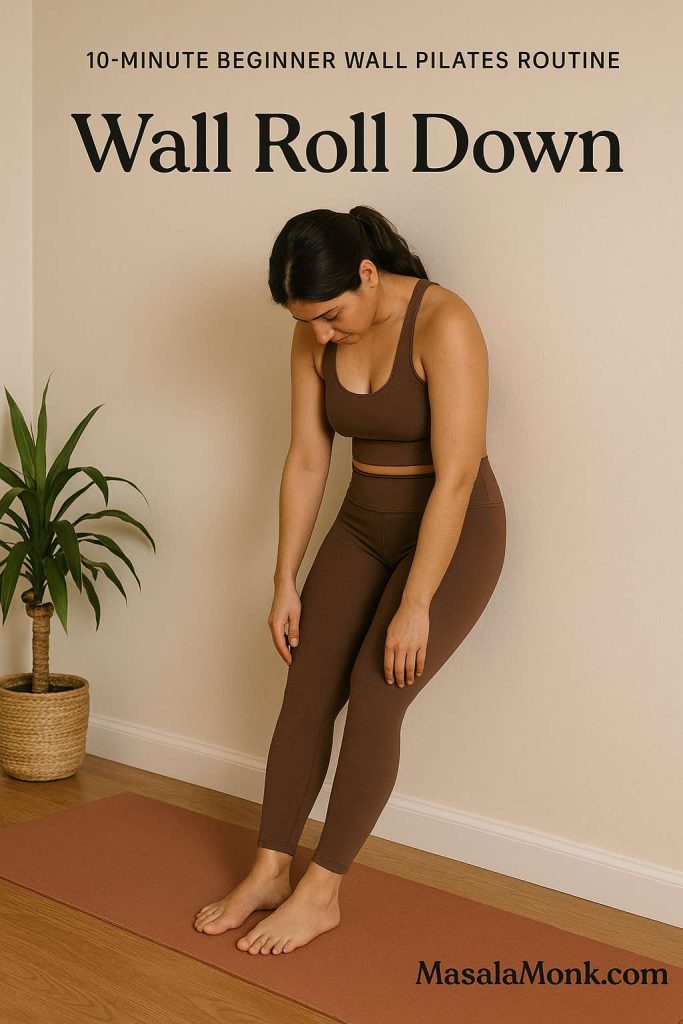
“Roll down the wall, one vertebra at a time, to stretch your spine and wake up your core.”

What to Notice:

  • Feel your back “unfurling,” and your core engaging to help you rise.
  • The wall provides a sense of reference for your spine’s alignment.

Common Mistakes:

  • Rushing: Rolling too quickly, missing the articulation through each vertebra.
  • Locked knees: Keep them soft to avoid straining your lower back.
  • Pulling with the arms: Let gravity, not your hands, guide the descent.

Modifications:

  • Bend your knees more if you have tight hamstrings.
  • Only roll down as far as feels comfortable—don’t force it.
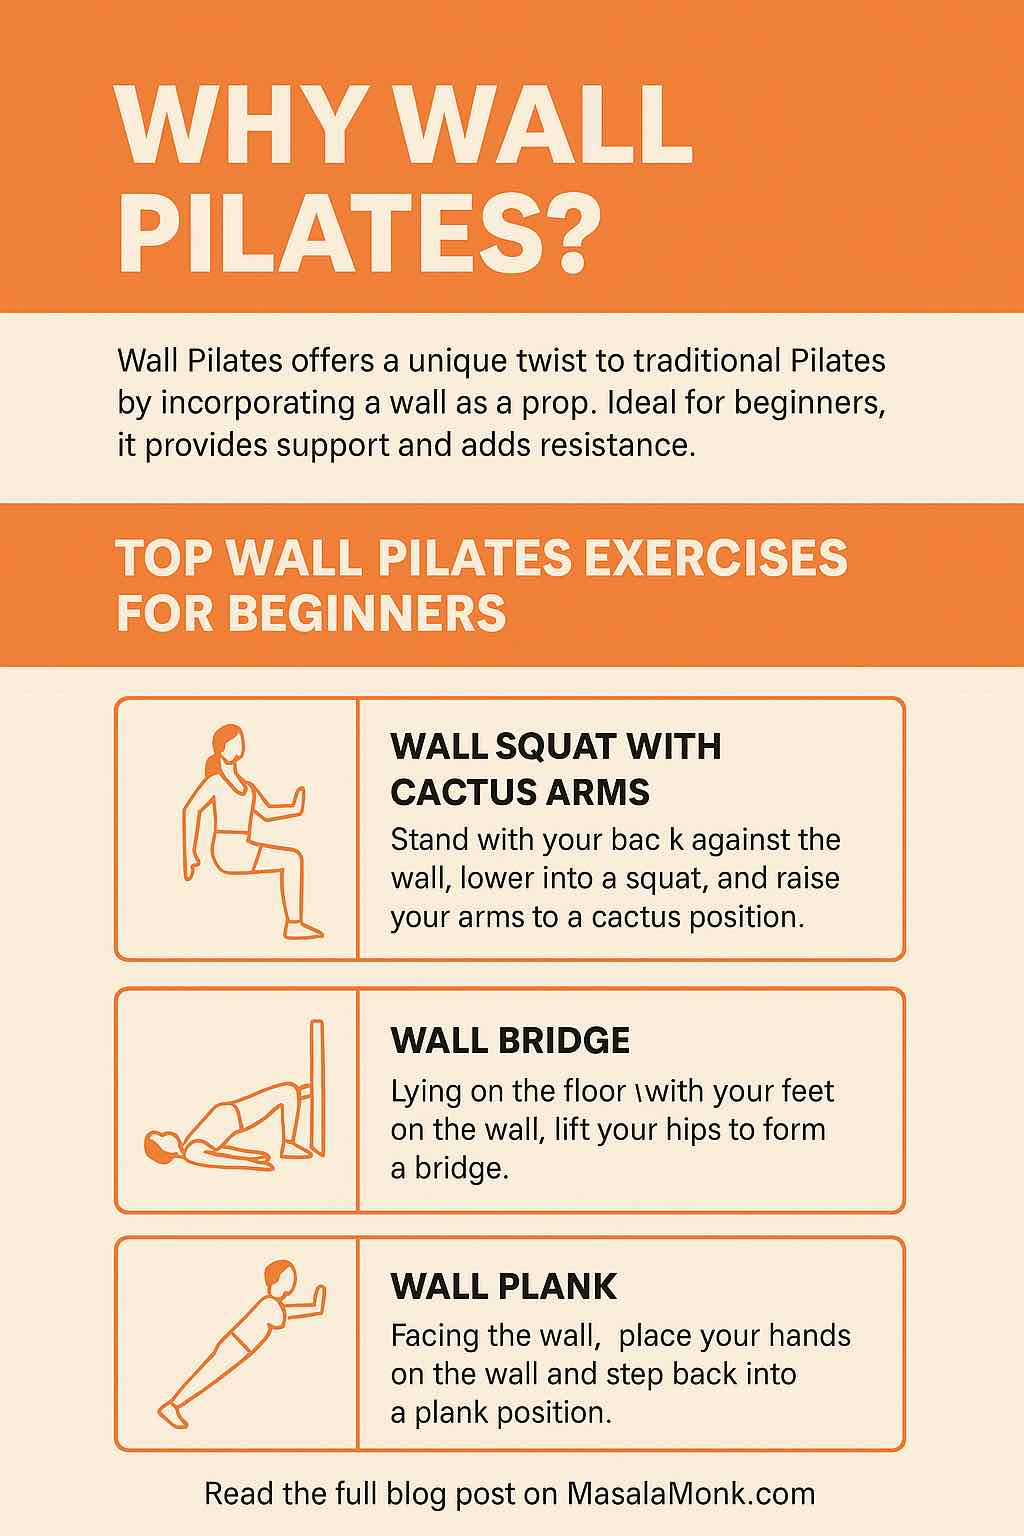
2. Wall Squat

How to Do It:

  1. With your back against the wall, walk your feet forward about two feet, hip-width apart.
  2. Slide your back down the wall until your thighs are parallel to the floor—like sitting in an invisible chair.
  3. Knees should be directly above your ankles, not past your toes.
  4. Press your lower back gently into the wall for support.
  5. Hold here, breathing slowly for 20–30 seconds, then slide back up to stand.
Wall Squat
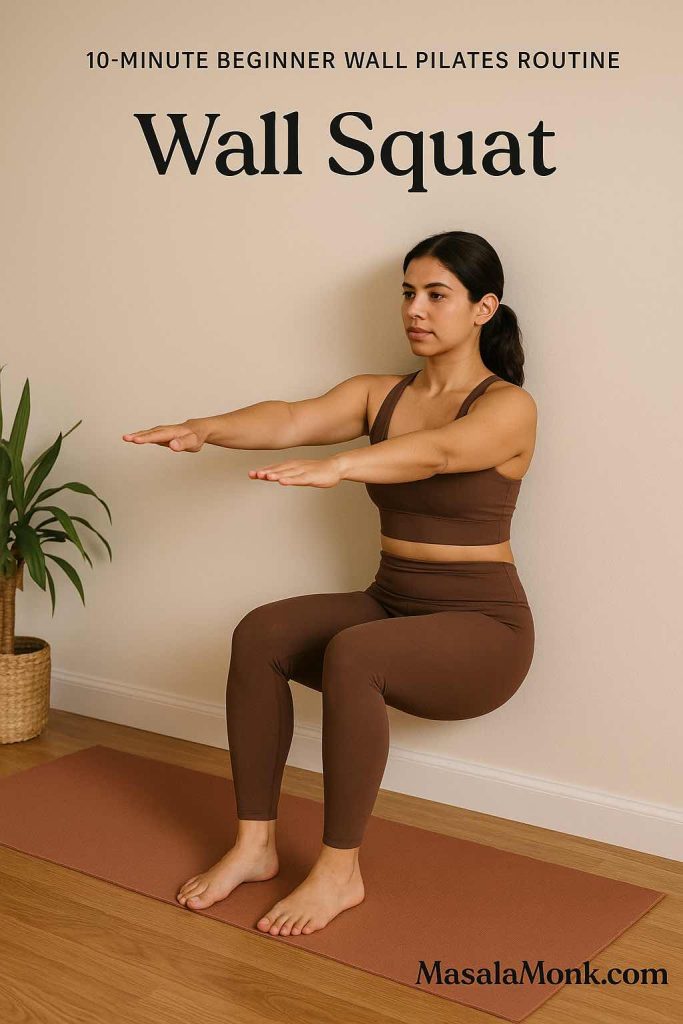
“Sit low in a wall squat—feel the burn in your legs and glutes as you build strength.”

What to Notice:

  • The powerful work in your thighs and glutes as you hold.
  • Your back supported and lengthened by the wall.

Common Mistakes:

  • Knees caving in or drifting too far forward: Adjust your stance so knees are stacked over ankles.
  • Arching your lower back: Press your entire back into the wall to protect your spine.
  • Shoulders tensed up: Keep them relaxed and down.

Modifications:

  • Lower your squat depth if the full position is too intense.
  • Take breaks or hold for less time as needed.

3. Wall Bridge

How to Do It:

  1. Lie on your back with your hips near the wall and your feet pressed flat against it, knees bent about 90 degrees.
  2. Rest your arms by your sides, palms down.
  3. Press into your feet and lift your hips off the mat, forming a diagonal line from knees to shoulders.
  4. Squeeze your glutes at the top, then lower down with control.
  5. Repeat several times, moving with your breath.
Wall Bridge
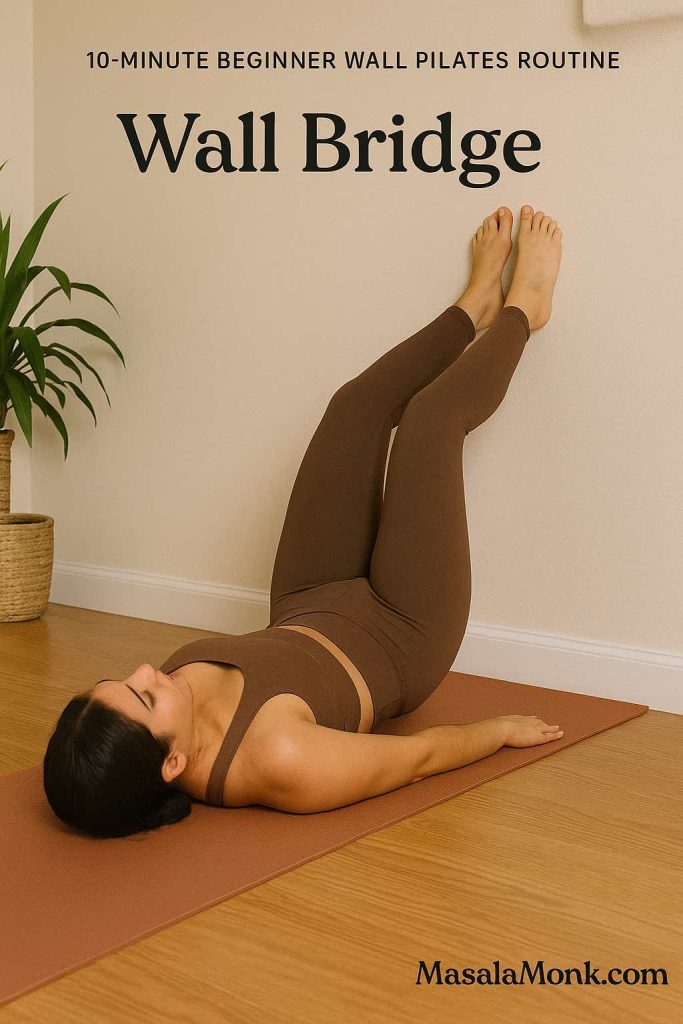
“Lift your hips into a bridge, pressing into the wall to activate your glutes and hamstrings.”

What to Notice:

  • Activation in the glutes and hamstrings as you lift.
  • Your shoulders and arms grounded for support.

Common Mistakes:

  • Feet too high or low on the wall: Aim for a 90-degree angle at your knees.
  • Overarching the back: Only lift as high as you can keep your ribs down and core engaged.
  • Letting knees splay out or in: Keep them tracking straight over your feet.

Modifications:

  • Don’t lift as high if you feel discomfort in your back.
  • Support your lower back with a pillow or folded towel if needed.

4. Wall Push-Up

How to Do It:

  1. Stand facing the wall, feet hip-width and about arm’s length away.
  2. Place your palms flat on the wall at shoulder height, fingers spread wide.
  3. Inhale, bend your elbows, bringing your chest toward the wall—keep your body in a straight line from head to heels.
  4. Exhale, press through your palms to return to standing tall.
Wall Push-Up
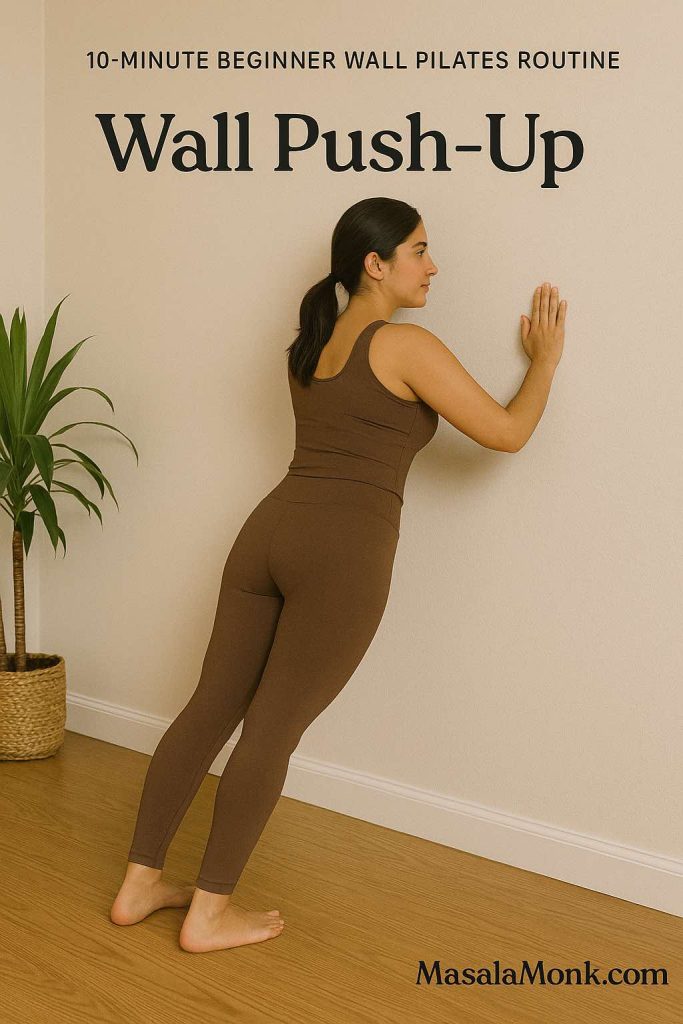
“Press away from the wall with strong arms and a stable core—perfect for building upper body strength.”

What to Notice:

  • Core and chest muscles activating as you move.
  • Smooth, controlled movement—not momentum.

Common Mistakes:

  • Letting elbows flare out too wide: Keep them at about a 45-degree angle for shoulder safety.
  • Sagging or arching your back: Engage your abs to keep your body aligned.
  • Rushing the movement: Slow and steady builds strength.

Modifications:

  • Step closer to the wall for less intensity, or further for more challenge.
  • Try on your knees if standing is too difficult.

5. Wall Leg Slide

How to Do It:

  1. Stand sideways to the wall, one hand gently resting on it for support.
  2. Plant your standing leg firmly; keep your posture tall.
  3. Slowly slide your outside leg up and down along the wall, like a slow-motion side kick.
  4. Keep the movement controlled and your hips steady.
  5. Repeat, then switch sides.
Wall Leg Slide
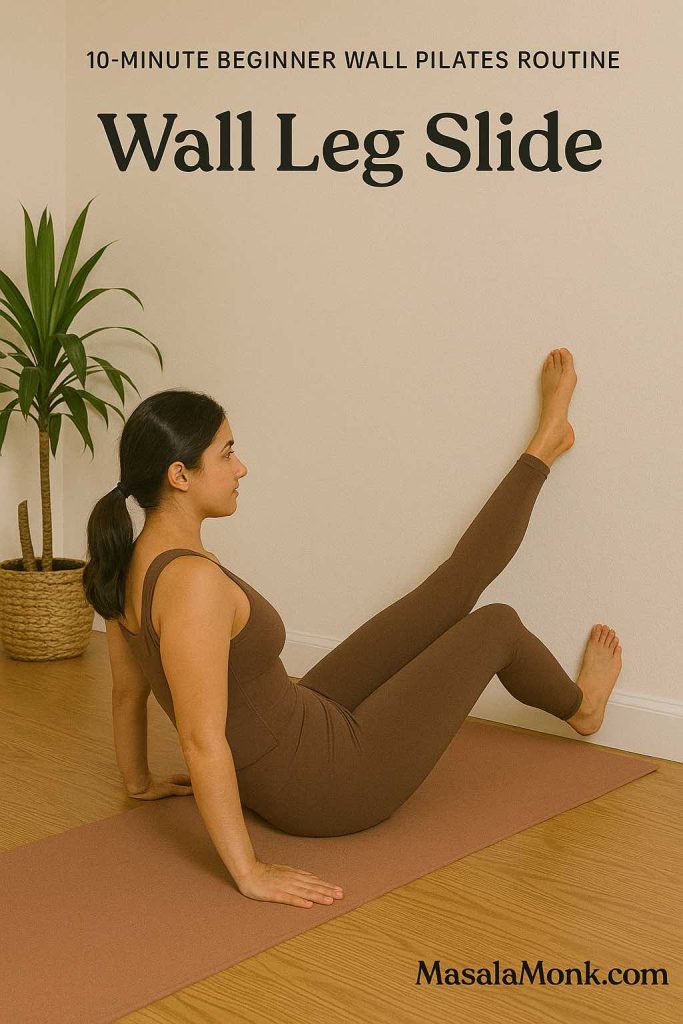
“Slide your leg up and down the wall, firing up your outer hips and improving balance.”

What to Notice:

  • Engagement in the outer hip and thigh.
  • Your core working to keep your torso stable.

Common Mistakes:

  • Leaning into the wall: Use just a fingertip for balance, not to hold your weight.
  • Swinging the leg too fast: Move slowly and with intention.
  • Shrugging shoulders: Relax your neck and upper back.

Modifications:

  • Slide your leg only as high as is comfortable.
  • Hold onto a sturdy chair for additional balance.

6. Wall Angels

How to Do It:

  1. Stand with your back, head, and arms pressed flat against the wall, feet six inches away.
  2. Bend your elbows so your arms form a “W.”
  3. Slowly slide your arms up the wall, reaching overhead as far as you can without losing contact, then slide back down.
  4. Move within a pain-free range, keeping your core engaged.
Wall Angels
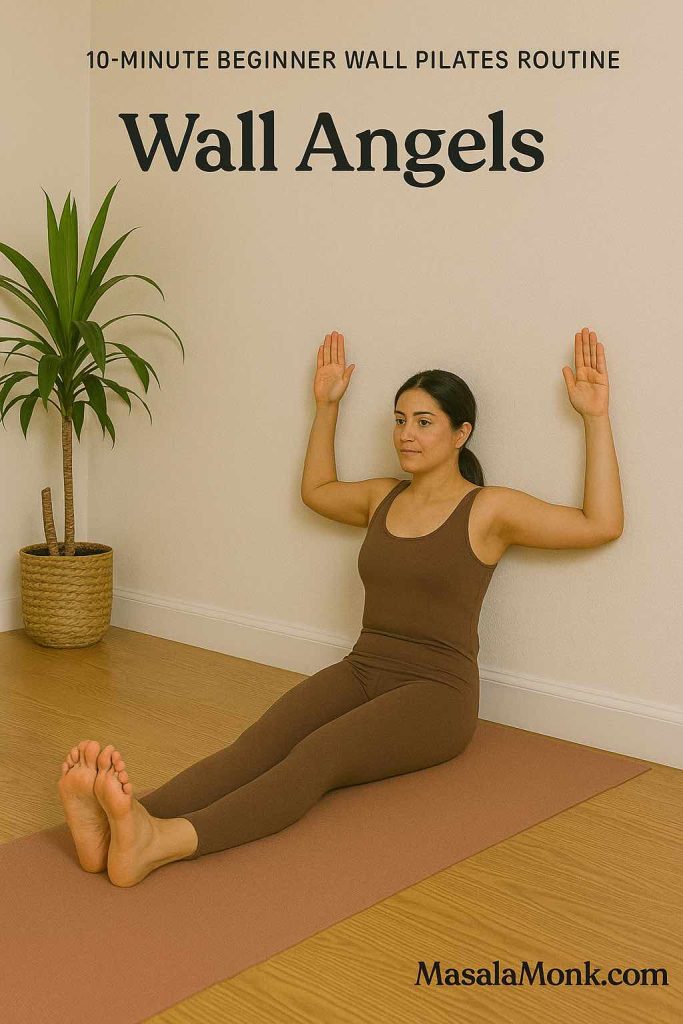
“Glide your arms overhead against the wall, opening your chest and strengthening your shoulders.”

What to Notice:

  • A gentle stretch across your chest and a strengthening in your upper back.
  • The wall helping to keep your shoulders aligned.

Common Mistakes:

  • Arching your lower back: Keep ribs down, abs gently engaged.
  • Losing contact with the wall: Go only as far as you can keep everything touching.
  • Tensing the neck: Let your neck stay relaxed.

Modifications:

  • Perform the move seated if standing is difficult.
  • Decrease range of motion if you have shoulder tightness.

7. Standing Wall March

How to Do It:

  1. Lean your upper back and head gently against the wall, arms relaxed by your sides.
  2. Lift one knee up toward your chest, lower it, then lift the other.
  3. Alternate slowly, marching in place with control.
Standing Wall March
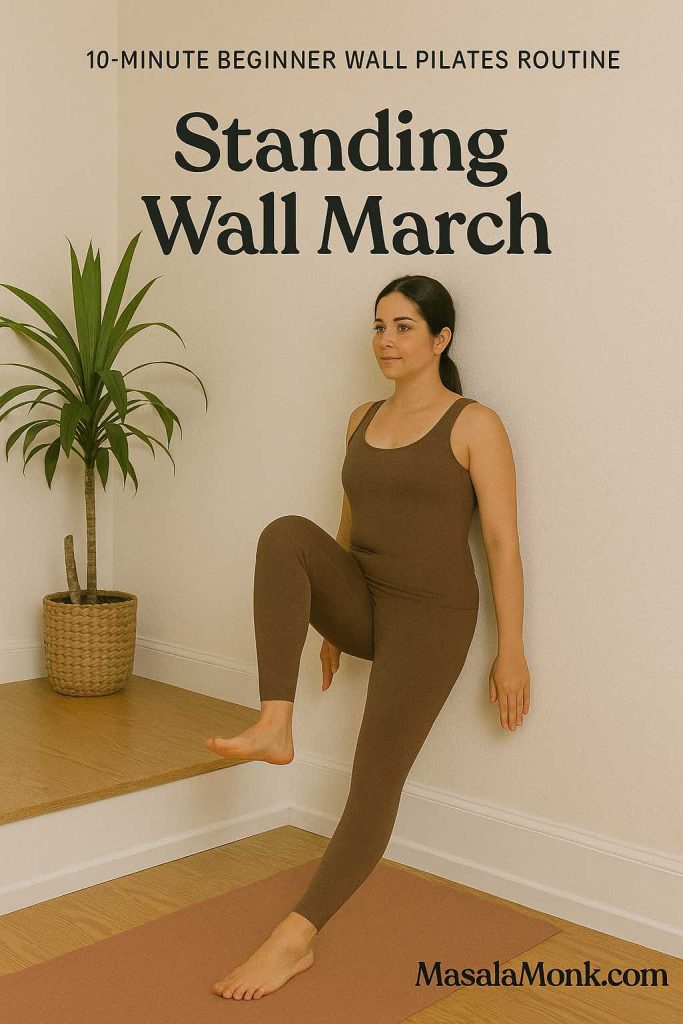
“March in place, leaning on the wall to challenge your balance and core.”

What to Notice:

  • Your core muscles stabilizing your torso.
  • The wall providing support so you can focus on alignment.

Common Mistakes:

  • Letting your back arch away from the wall: Press it gently into the wall.
  • Shrugging shoulders: Keep your upper body relaxed.
  • Marching too quickly: Slow, controlled lifts are more effective.

Modifications:

  • Lift knees only as high as is comfortable.
  • Hold the wall lightly if you need extra balance.

8. Wall Plank

How to Do It:

  1. Start on your hands and knees with your feet near the base of the wall.
  2. Place your hands on the mat, shoulder-width apart.
  3. Carefully walk your feet up the wall, coming into a plank—body in a straight line, shoulders over wrists.
  4. Hold, breathing deeply, and engage your abs and glutes.
Wall Plank
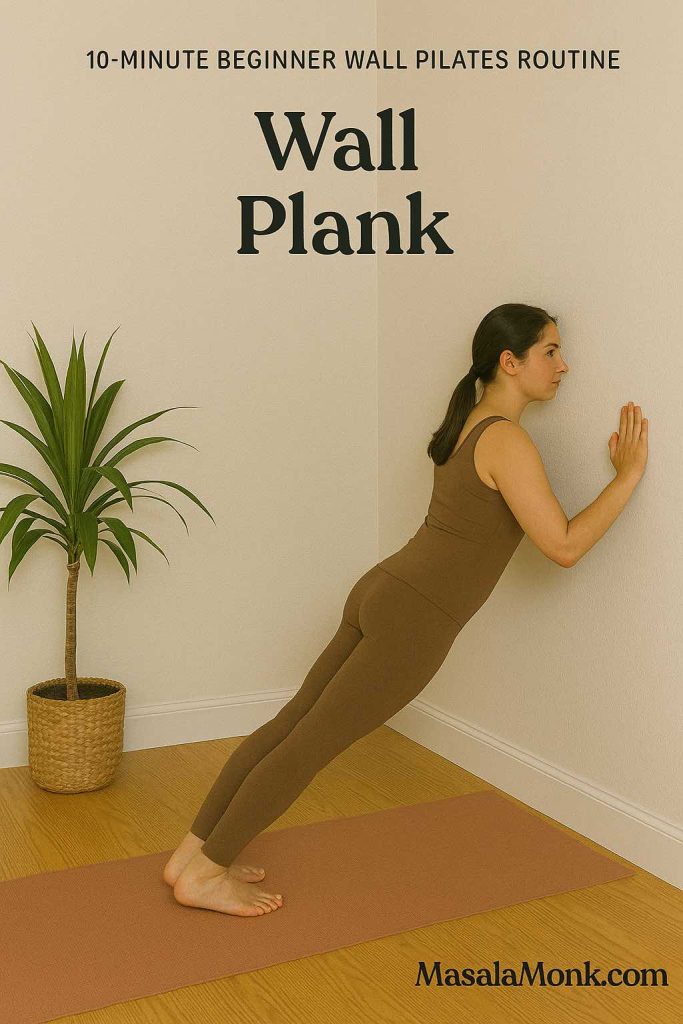
“Hold a plank with feet on the wall, engaging your whole body for stability and strength.”

What to Notice:

  • Full-body activation, especially your core, shoulders, and legs.
  • A sense of length from head to heels.

Common Mistakes:

  • Letting hips sag or pike up: Keep your body in one straight line.
  • Locking elbows: Keep a micro-bend to protect joints.
  • Holding your breath: Keep breathing steadily.

Modifications:

  • Only walk your feet a little up the wall for a gentler angle.
  • Lower to your knees for less intensity.

9. Wall Calf Raise

How to Do It:

  1. Stand facing the wall, fingertips resting on it lightly for balance.
  2. Rise up onto the balls of your feet, lifting your heels as high as possible.
  3. Hold at the top for a breath, then slowly lower back down.
  4. Repeat for several reps.
Wall Calf Raise
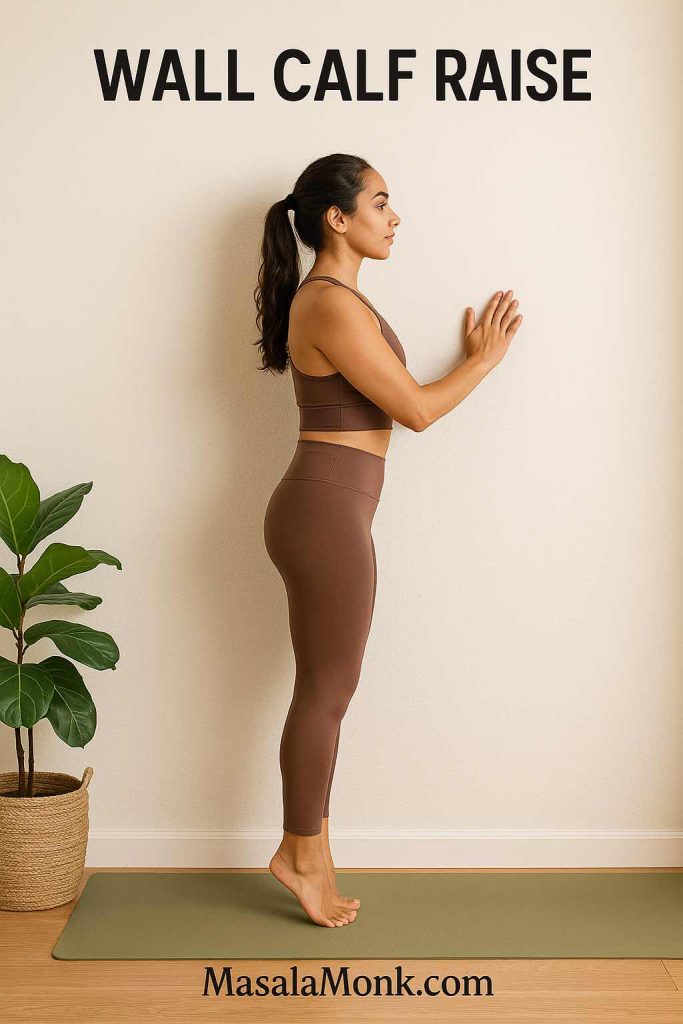
“Rise onto your toes with control, using the wall for balance and sculpting strong calves.”

What to Notice:

  • Activation in your calf muscles and feet.
  • Balance challenge—use the wall as much as needed.

Common Mistakes:

  • Rocking forward: Lift straight up, not forward onto your toes.
  • Bouncing: Control the movement, especially on the way down.
  • Leaning too much into the wall: Use just enough support to stay upright.

Modifications:

  • Hold each raise at the top for longer to increase intensity.
  • Do one foot at a time for an extra challenge.

10. Cool Down Stretch

How to Do It:

  1. Stand with your back to the wall, feet hip-width apart.
  2. Cross your right ankle over your left knee, forming a figure-four.
  3. Slowly sit your hips back, as if sitting in a chair, feeling a stretch in your outer hip.
  4. Hold for 20–30 seconds, breathing deeply, then switch sides.
Cool Down Stretch
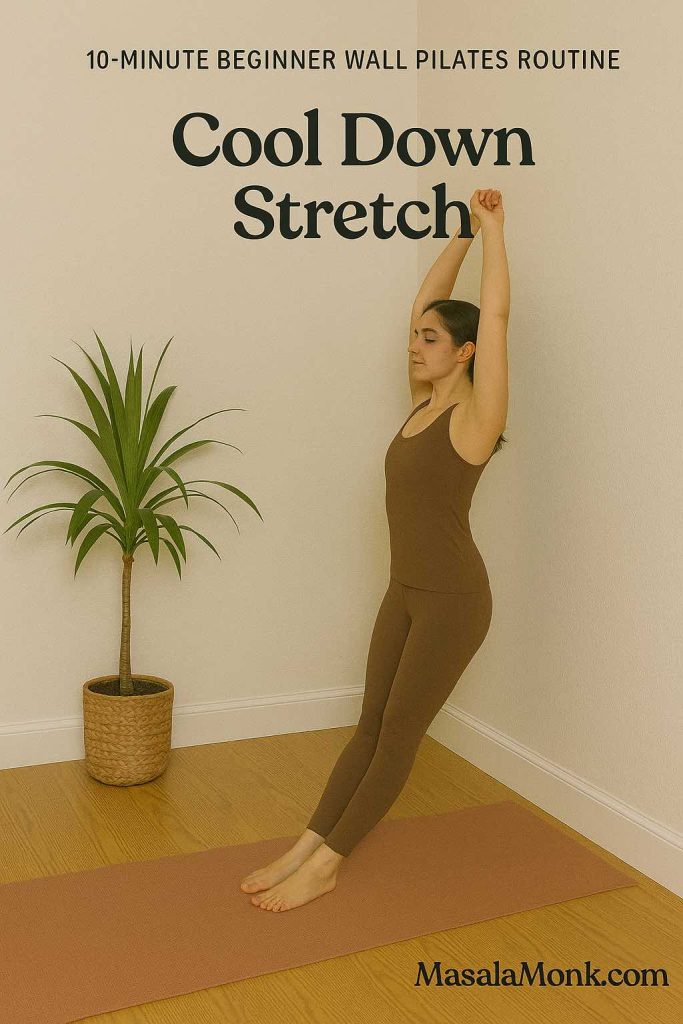
“Cross one ankle over your knee and sit back to stretch and release your hips.”

What to Notice:

  • A gentle, opening stretch through the hip and glute.
  • The support of the wall allowing you to relax deeper.

Common Mistakes:

  • Collapsing the chest forward: Stay upright, using the wall to support your back.
  • Holding your breath: Inhale and exhale slowly to deepen the stretch.
  • Forcing the knee down: Let gravity and breath do the work; don’t push.

Modifications:

  • Keep the stretch higher (don’t squat as deep) for less intensity.
  • Use a chair for extra support if balancing is tough.

Breathe in, breathe out. Smile. You did it!
Take a moment to notice how your body feels—lighter, taller, maybe even a little bit more “awake” all over. Remember, it’s not about perfection; it’s about progress and feeling good in your skin.

Every time you show up for yourself like this, you’re not just working out—you’re building confidence, resilience, and a deeper connection to your body.

If you enjoyed this flow, you can repeat it daily or mix and match your favorite moves. For more ideas and next-level routines, explore the other Pilates and yoga guides on MasalaMonk—your body (and your mind) will thank you.

Routines To Try Next


Looking for Your Next Step?

Building a wellness routine is about more than just exercise—it’s about how you treat yourself all day long. Here are a few ways to keep the positive momentum going:

  • Start your day with gentle movement and deep breathing. The Good Morning Yoga Routine is a wonderful way to wake up your body before breakfast or after a long night’s sleep.
  • Need a break from your screen? Sneak in a few posture-fixing moves from the Yoga for Posture article. Your spine will thank you.
  • Feeling stressed or overwhelmed? Movement is medicine. The Yoga for Mental Health resource on MasalaMonk can guide you through easy practices for mind and mood.
  • Ready to make movement a daily habit? Join the supportive MasalaMonk community and explore challenges, new routines, and more.

Warm-Up, Recovery & Wellness


Final Thoughts: Why Wall Pilates Might Be Exactly What You Need

Wall Pilates is more than just a trending workout—it’s a gentle, empowering approach to feeling stronger, taller, and more at ease in your body.
You don’t need the perfect setup, a special background, or even a lot of time.
All you need is a wall, your breath, and a willingness to begin.

Whether you’re a busy parent, a senior seeking safe movement, or anyone in between, Wall Pilates welcomes you. Every time you show up for yourself—even for a few minutes—you’re making an investment in your health, happiness, and confidence.

So next time you walk past that blank wall at home, see it for what it really is: your new workout buddy, teacher, and source of strength.

Let us know in the comments if you try Wall Pilates—what changed for you? What surprised you? And if you need ideas, support, or just a nudge to get started, we’re always here.


Visuals, stories, and support by MasalaMonk.com. Save or share this post if you found it useful, and keep an eye out for our upcoming 10-minute Wall Pilates routine!

FAQs: Wall Pilates

1. What is Wall Pilates and how is it different from regular Pilates?
Wall Pilates adapts traditional Pilates exercises by using a wall for support and resistance, which helps with alignment, balance, and core engagement—making it more accessible for beginners and those who want extra feedback on their form.

2. Do I need any special equipment for Wall Pilates?
No equipment is required—just a clear wall, a yoga mat (if you like extra comfort), and comfortable clothing.

3. Is Wall Pilates suitable for beginners?
Yes, Wall Pilates is perfect for beginners! The wall acts as your guide, providing support and helping you learn the correct technique with less risk of strain or injury.

4. Can I do Wall Pilates if I have joint pain or am recovering from injury?
Always check with your doctor first, but Wall Pilates is low-impact and can often be adapted for people with joint issues or those in rehabilitation, thanks to the wall’s support and the gentle, controlled movements.

5. How often should I practice Wall Pilates to see results?
Aim for 2–4 sessions per week to build strength and flexibility, though even once a week is beneficial. Consistency matters more than duration!

6. What are the main benefits of Wall Pilates?
Benefits include improved posture, stronger core and glutes, better balance, joint-friendly movement, and greater body awareness.

7. Can I lose weight or tone my body with Wall Pilates?
Wall Pilates can help tone and sculpt your body, improve muscle definition, and support healthy weight loss when combined with good nutrition and regular activity.

8. Is Wall Pilates good for seniors or people with limited mobility?
Yes, it’s very adaptable for seniors or anyone needing extra support. Moves can be modified for different abilities, and the wall makes balance and stability easier to manage.

9. How long does a typical Wall Pilates session last?
A routine can be as short as 10 minutes or up to 30 minutes, depending on your time and fitness level. Even short, focused sessions are effective.

10. Can I combine Wall Pilates with other forms of exercise?
Absolutely! Wall Pilates pairs well with walking, yoga, strength training, or even other Pilates routines, enhancing your overall fitness and flexibility.

Posted on 1 Comment

28 Days AI-Powered Wall Pilates Challenge

Are you ready to embark on a transformative journey that will strengthen your body and invigorate your mind? Look no further! We are thrilled to introduce the FREE 28-Day Wall Pilates Challenge – a comprehensive program designed to help you achieve your fitness goals and unleash your full potential.

Powered by AI, this unique challenge is meticulously crafted to provide you with a holistic Pilates experience. Whether you’re a beginner or a seasoned practitioner, our challenge offers something for everyone. From core strengthening to flexibility enhancement, each day is tailored to target different aspects of your fitness journey.

28-Day Wall Pilates Challenge

28-Day Wall Pilates Challenge

Select the Week to see Day Wise Guides to this AI Designed Challenge.

WEEK WORKOUT DETAILS
Week 1
Week 2
Week 3
Week 4

Why Pilates, you may ask? Pilates is renowned for its ability to improve strength, flexibility, and posture while promoting a sense of balance and well-being. By incorporating Pilates into your daily routine, you'll not only see physical changes but also experience mental clarity and inner harmony.

What sets our challenge apart is its adaptability and accessibility. With just a wall and a few minutes of your time each day, you can participate in the challenge from the comfort of your own home. No fancy equipment or gym membership is required – just a willingness to commit to your health and wellness. This challenge is completely free, so share the love with family and friends without any worry in the world.

Join Our 28-Day Wall Pilates Challenge

Are you ready to embark on a transformative journey to strengthen your body, mind, and spirit through Pilates? Welcome to our 28-day Wall Pilates Challenge, designed to ignite your passion for Pilates and unlock your full potential!

Overview:

  • Duration: 28 days
  • Focus: Core strength, flexibility, balance, endurance, and overall well-being
  • Structure: Each week focuses on specific themes and goals, with daily workouts to guide you through the challenge.

Week 1: Core Foundations

Day 1: Core Foundations - Ignite Your Pilates Journey
Start your journey with foundational Pilates exercises to build a strong core and establish proper alignment.

Day 2: Balance and Alignment - Strengthen Your Core Connection
Focus on improving balance and alignment to enhance core stability and connection.

Day 3: Flexibility Flow - Unlock Your Body's Potential
Enhance flexibility and fluidity in movements to unlock your body's full potential.

Day 4: Power and Stability - Strengthen Your Pilates Foundation
Build power and stability for a solid Pilates foundation with challenging exercises.

Day 5: Endurance Elevation - Embrace the Power Within
Increase endurance and stamina through dynamic Pilates workouts.

Day 6: Harmony in Motion - Cultivating Balance and Coordination
Cultivate balance and coordination for graceful and harmonious movement.

Day 7: Rest and Rejuvenate - Nourishing Your Pilates Journey
Take a day to rest and rejuvenate your body and mind, allowing for optimal recovery.

Week 2: Mindful Movement

Day 8: Mindful Movement - Deepening Your Pilates Practice
Deepen your Pilates practice through mindfulness and focused movement techniques.

Day 9: Strengthen and Lengthen - Unleash Your Inner Warrior
Strengthen muscles while promoting lengthening and flexibility for a balanced body.

Day 10: Core Stability and Balance - Finding Your Center of Strength
Enhance core stability and find your center of strength through targeted exercises.

Day 11: Mobility and Flexibility - Embrace Fluid Movement
Embrace fluid movement by improving mobility and flexibility in your Pilates practice.

Day 12: Alignment and Posture - Discover Your Perfect Balance
Focus on proper alignment and posture to achieve balance and prevent injuries.

Day 13: Strength and Endurance - Building Resilience Within
Build strength and endurance to overcome challenges and build resilience.

Day 14: Rest and Recovery - Nourish Your Body and Mind
Take a well-deserved day of rest and recovery to rejuvenate your body and mind.

Week 3: Full Body Flow

Day 15: Balance and Coordination - Find Your Center of Gravity
Explore balance and coordination exercises to find your center of gravity and enhance stability.

Day 16: Flexibility and Mobility - Embrace Fluidity in Motion
Improve flexibility and mobility to move with grace and ease through dynamic movements.

Day 17: Core Strength and Stability - Ignite Your Power Center
Ignite your power center with core-strengthening exercises for stability and strength.

Day 18: Upper Body Strength and Toning - Sculpt Your Pilates Powerhouse
Sculpt and tone your upper body muscles for improved strength and definition.

Day 19: Balance and Coordination - Find Your Center of Gravity
Continue refining balance and coordination skills to enhance your Pilates practice.

Day 20: Flexibility and Mobility - Unlock Your Body's Potential
Unlock your body's full potential by increasing flexibility and mobility for greater range of motion.

Day 21: Rest and Reflect - Nourish Your Body and Mind
Reflect on your progress and take time to nourish your body and mind with rest and relaxation.

Week 4: Lower Body Strength

Day 22: Lower Body Strength - Building Foundations
Focus on building a strong foundation for lower body strength through targeted exercises.

Day 23: Core Power - Ignite Your Center
Ignite your core power with exercises designed to strengthen and stabilize your center.

Day 24: Full Body Flow - Harmony in Motion
Experience the harmony of full-body movement with flowing Pilates sequences.

Day 25: Lower Body Burn - Sculpt and Strengthen
Sculpt and strengthen your lower body muscles with targeted exercises to feel the burn.

Day 26: Core Strength - Ignite Your Powerhouse
Ignite your powerhouse with core-strengthening workouts for a strong and stable center.

Day 27: Flexibility and Mobility - Embrace Fluidity
Embrace fluidity in movement by enhancing flexibility and mobility in every workout.

Day 28: Final Challenge and Celebration - Embrace Your Triumph
Celebrate your achievements and embrace the final challenge as you complete the 28-Day Wall Pilates Challenge.

We invite you to join us on this exciting journey and share your experiences and feedback. Together, let's fine-tune and improve this challenge to help others achieve their fitness goals. Are you ready to embrace the 28 Days Wall Pilates Challenge? Let's get started!

Don't forget to check out our interactive navigation app above to easily access each day's workout details. Let the challenge begin!

Best regards,

MasalaMonk.com

❓ Frequently Asked Questions (FAQ)

1. What is the 28-Day Wall Pilates Challenge?

The challenge is a free, AI-designed Pilates program tailored for all fitness levels. Over 28 days, you'll engage in targeted workouts that focus on core strength, flexibility, balance, endurance, and overall well-being — all from the comfort of your home using just a wall.


2. Who can join this challenge?

Anyone! Whether you're a complete beginner or a seasoned Pilates enthusiast, the program is designed to adapt to your skill level. The AI recommendations offer helpful tips to modify or intensify exercises as needed.


3. What equipment do I need?

All you need is a stable wall and some open space. No expensive gear, resistance bands, or gym membership is required. Just your body and commitment.


4. How does AI enhance this challenge?

AI personalizes your journey by offering smart recommendations based on exercise flow and intended goals for each week. It ensures a balanced progression, integrates recovery days, and emphasizes proper form and breathwork.


5. How long are the daily workouts?

Most daily sessions are short and efficient — around 15 to 25 minutes — ideal for fitting into your daily schedule without feeling overwhelmed.


6. Is the challenge really free?

Yes! There’s absolutely no cost involved. The full challenge, including access to all guided workouts and AI tips, is completely free to use and share.


7. Can I start anytime?

Yes. Although it's structured over 28 consecutive days, you're free to begin whenever you're ready. You can also pause and resume based on your personal schedule.


8. Where can I find the daily workout links?

Each week on the main challenge page includes a dropdown ("accordion") containing daily workout links. Simply click on a week to expand the list and access individual day-specific guides.


9. How do rest days work?

Rest days (typically Day 7, 14, 21, and 28) are built in to allow your body and mind to recover. These are essential for avoiding burnout and maximizing results.


10. Can I repeat the challenge?

Absolutely! Many users find value in repeating the challenge multiple times to reinforce form, build strength, and progress toward their goals.

Posted on 2 Comments

Wall Pilates for Beginners: The Ultimate Guide

TOP WALL PILATES EXERCISES FOR BEGINNERS

Pilates has long been celebrated for its ability to sculpt the body, improve flexibility, and boost core strength. But have you heard of Wall Pilates? This trending workout utilizes a wall to add resistance and variation to traditional Pilates exercises. If you’re a beginner looking to dive into this innovative workout, you’re in the right place!

Featured Video: Wall Pilates Workout | 30 min beginner’s guide

This enlightening video is presented by Raminara, a dedicated fitness enthusiast and Pilates instructor. In this 30-minute guide, Raminara introduces beginners to the transformative power of Wall Pilates. With her expert instruction and step-by-step demonstrations, viewers will learn how to harness the wall as a support system, enhancing posture, engaging deep core and pelvic floor muscles, and achieving a sculpted physique.

In her own words, Raminara emphasizes the session’s design to empower individuals, regardless of their fitness level, and instill confidence in their Pilates practice. For more insightful fitness tutorials and guides, be sure to like, share, and subscribe to Raminara’s channel.

Why Wall Pilates?

Wall Pilates offers a unique twist to traditional Pilates by incorporating a wall as a prop. This not only adds resistance to the exercises but also provides support and stability, making it ideal for beginners. The wall can help ease the body into some of the more challenging positions and offers a feeling of security.

Top Wall Pilates Exercises for Beginners

  1. Wall Squat with Cactus Arms: This exercise strengthens the quads and glutes while opening up the chest. Stand with your back against the wall, lower into a squat, and raise your arms to a cactus position. Hold for a few breaths and return to the starting position.
  2. Wall Bridge: Lying on the floor with your feet on the wall, lift your hips to form a bridge. This move targets the glutes, hamstrings, and lower back.
  3. Wall Plank: Facing the wall, place your hands on the wall and step back into a plank position. Engage your core and hold.

(For a detailed visual guide, check out this Beginner Wall Pilates Workout Chart.)

Further Reading and Resources

  • 10 Beginner Wall Pilates Exercises To Try At Home: A comprehensive guide by Bustle that provides 10 easy moves for beginners.
  • A 20-Minute Wall Pilates Workout for Beginners: A quick wall Pilates workout guide by livestrong.
  • What Is Wall Pilates? A Guide For The Beginner: An introduction to wall Pilates by BetterMe.

Frequently Asked Questions About Wall Pilates for Beginners

1. Is Wall Pilates Suitable for All Fitness Levels?

Wall Pilates is designed to be inclusive and adaptable. Whether you’re a beginner or an experienced exerciser, you can benefit from wall Pilates. The exercises can be modified to match your current fitness level, making it a versatile choice.

2. Can Wall Pilates Help Improve Core Strength?

Absolutely. Wall Pilates places emphasis on engaging and strengthening the core muscles. By using the wall as a support, you can perform exercises that challenge and enhance your core strength, leading to better stability and posture.

3. What Equipment Do I Need for Wall Pilates?

The beauty of wall Pilates is that it requires minimal equipment. You’ll need a mat, an open wall space, and perhaps a soft cushion for support. The wall itself acts as a prop to add resistance and support.

4. How Can Wall Pilates Benefit Posture?

Wall Pilates encourages awareness of proper alignment and posture. As you perform exercises against the wall, you’ll naturally focus on maintaining good posture, leading to improved body awareness and alignment even outside of your workouts.

5. Can Wall Pilates Help with Flexibility?

Certainly. Many wall Pilates exercises involve gentle stretching and controlled movements that contribute to increased flexibility over time. The wall’s support allows you to safely deepen stretches and improve flexibility.

6. Is Wall Pilates Similar to Traditional Pilates?

While Wall Pilates shares similarities with traditional Pilates, it introduces the element of using a wall for resistance and support. This unique twist adds a new dimension to your Pilates practice, engaging different muscle groups.

7. Are There Any Precautions I Should Take?

As with any exercise regimen, it’s important to listen to your body and avoid overexertion. If you have any existing medical conditions, consult your healthcare provider before starting wall Pilates. Start with beginner-friendly exercises and progress gradually.

8. How Often Should I Practice Wall Pilates?

Consistency is key. Aim for regular practice, whether it’s a few times a week or daily. Start with shorter sessions and gradually increase the duration as your strength and comfort level improve.

9. Can Wall Pilates Help with Postpartum Recovery?

Yes, wall Pilates can be beneficial for postpartum recovery. It offers gentle exercises that focus on core strength and pelvic floor activation, which are important aspects of postpartum rehabilitation. However, it’s advisable to consult a healthcare professional before starting any exercise routine after childbirth.

10. Where Can I Find More Wall Pilates Resources?

In addition to this guide, you can find helpful wall Pilates resources on reputable fitness websites, YouTube channels, and fitness apps. Look for videos, articles, and guides that offer step-by-step instructions and modifications for beginners.


Conclusion

Wall Pilates is an exciting and effective way to enhance your fitness routine. Whether you’re new to exercise or a seasoned Pilates enthusiast, incorporating the wall can bring a fresh perspective to your workouts. Dive in with our featured video and explore the resources to master the art of Wall Pilates!

Posted on Leave a comment

Exploring the Depths of Inner Freedom Through Yoga

“The body is your temple. Keep it pure and clean for the soul to reside in.” – B.K.S. Iyengar

In the realm of self-discovery and inner peace, yoga emerges as a beacon of light, guiding us through the tumultuous waves of life towards a haven of tranquility. The practice of yoga is an ancient art, deeply rooted in the pursuit of ultimate freedom—a freedom that encompasses the body, mind, and soul.

The Philosophy of Yoga: A Path to Liberation

Yoga is not merely a physical exercise but a holistic approach to living. It is the union of the body with the mind and the soul with the universe. This union, as described by the revered yoga teacher B.K.S. Iyengar, is the essence of yoga. It is a means to achieve freedom and the very end in itself.

The sage-like Iyengar, who brought the treasures of yoga to the forefront of the global consciousness, taught that the discipline of yoga is the gateway to liberation. Through the practice of asanas (postures) and pranayama (breath control), one can navigate the journey of life with grace and strength.

A Glimpse into the Mastery of B.K.S. Iyengar

To truly comprehend the transformative power of yoga, one must witness its practice by a master. In a profound demonstration from 1976, B.K.S. Iyengar, the founder of Iyengar Yoga, showcases the depth and breadth of this discipline. His demonstration is not just a display of flexibility or strength but a manifestation of the philosophy of yoga. Watch the full video here.

Credit: Be You Fully on YouTube

In this video, we observe Iyengar’s meticulous attention to alignment and his meditative focus. He speaks of yoga as a healing force, one that brought him back from the clutches of tuberculosis to a state of health and enlightenment. His message is clear: yoga is accessible to all and has the potential to heal and transform lives.

The Art of Alignment: Asanas Demonstrated by B.K.S. Iyengar

In the video, B.K.S. Iyengar meticulously demonstrates a series of asanas, each designed to cultivate balance, strength, and flexibility. Here’s a detailed look at the poses and the wisdom behind them:

Trikonasana (Triangle Pose)

This foundational pose is a testament to balance and extension. Iyengar emphasizes the importance of extending each part of the upper body in various directions while maintaining a connection with the self.

Parivrtta Trikonasana (Revolved Triangle Pose)

In this asana, the spine receives a beneficial lateral movement. Iyengar’s execution of the pose shows the importance of the movement of the back and the stretch it provides.

Parsvakonasana (Extended Side Angle Pose)

Also known as the plank or angular pose, this asana demonstrates how each part of the body, from the knuckles of the toes to the hips and waist, stretches independently yet remains interconnected.

Ardha Chandrasana (Half Moon Pose)

The Half Moon Pose showcases balance and the extension of the entire body, right down to the toes. Iyengar’s precision highlights the importance of engaging even the smallest parts of the body.

Uttanasana (Standing Forward Bend)

This forward bend is crucial for extending the spine. Iyengar points out that in our modern, technology-driven world, we’ve lost the resonance of the spine, leading to common ailments like sciatica and slipped discs.

Adho Mukha Svanasana (Downward-Facing Dog)

Iyengar compares the stretch in this pose to a dog stretching its front legs, emphasizing the lengthening of the spine and the distribution of weight through the hands and feet.

Surya Namaskar (Sun Salutation)

Iyengar demonstrates the dynamic flow of the Sun Salutation, which includes poses like Chaturanga Dandasana (Four-Limbed Staff Pose) and Urdhva Mukha Svanasana (Upward-Facing Dog), highlighting the fluidity and strength required in the practice.

Steps of Surya Namaskar
Steps of Surya Namaskar, Sun Salutation.

Janu Sirsasana (Head-to-Knee Forward Bend)

This asana focuses on stretching the back of the body and requires the head of the knee to be stretched backward, providing a deep stretch to the hamstrings and back.

Parivrtta Janu Sirsasana (Revolved Head-to-Knee Pose)

Offering a lateral stretch, this pose extends the liver and other internal organs, showcasing the detoxifying effects of yoga.

Padmasana (Lotus Pose)

Iyengar demonstrates the Lotus Pose with one leg in the half-lotus position, emphasizing the depth of meditation and concentration that can be achieved in this asana.

Tadasana (Mountain Pose)

The Mountain Pose is a fundamental yoga pose that establishes the basis for all standing poses. It involves standing steady, firm, and upright like a mountain, which Iyengar describes as essential for brain stability.

Parighasana (Gate Pose)

This asana involves a lateral bend that stretches the side body, resembling the crossbar of a gate, hence the name.

Paschimottanasana (Seated Forward Bend)

Iyengar highlights the posterior stretch in this pose, where the energy moves from the heel to the crown of the head, emphasizing the importance of engaging the entire posterior chain of the body.

In each of these asanas, Iyengar’s approach is not just about achieving a physical position but about reaching a state of ultimate freedom where the body, mind, and intellect operate in unison without obstruction. His demonstration serves as a profound reminder of the depth and precision required in the practice of yoga.

The Practice of Yoga in Modern Times

In our contemporary society, where the pace of life accelerates daily, yoga serves as a sanctuary. It offers a space to slow down, to reconnect with our inner selves, and to cultivate a sense of well-being. The teachings of Iyengar remind us that the practice of yoga is a form of self-care that extends beyond the physical body to the mind and spirit.

As we incorporate yoga into our daily routine, we begin to experience its myriad benefits. Our bodies become stronger, our minds clearer, and our hearts more open. We learn to move through life’s challenges with equanimity and to embrace each moment with mindfulness and gratitude.

Embracing the Journey

The journey of yoga is infinite, filled with continuous learning and growth. As we delve deeper into its practice, we uncover layers of our being and discover the boundless potential within. Yoga is a lifelong companion, a source of comfort and strength, and a path to inner freedom.

Let us honor the legacy of B.K.S. Iyengar and the ancient wisdom of yoga by stepping onto the mat with intention and curiosity. Let us explore the depths of our own being and, in doing so, find the peace and freedom that yoga promises.

Credits to the Original video: Yoga Demonstration, BKS Iyengar (1976)

FAQs

  1. What are the health benefits of practicing Trikonasana (Triangle Pose)? Trikonasana is known to stretch and strengthen the thighs, knees, and ankles, while also stimulating the abdominal organs, which can aid in improving digestion. Additionally, it can relieve back pain and stress, offering a holistic approach to wellness.
  2. How does Parivrtta Trikonasana (Revolved Triangle Pose) improve posture? The Revolved Triangle Pose is excellent for providing a deep stretch to the spine, improving balance, and increasing proprioceptive awareness, which collectively contribute to better posture and spinal health.
  3. Can beginners attempt Parsvakonasana (Extended Side Angle Pose), and what should they be aware of? Beginners can certainly practice Parsvakonasana with modifications. It’s important to focus on maintaining a strong base with the feet and engaging the core for stability to prevent any strain.
  4. What is the significance of Ardha Chandrasana (Half Moon Pose) in a yoga sequence? Ardha Chandrasana challenges and promotes balance and concentration. It also strengthens the abdomen, ankles, thighs, buttocks, and spine, making it a significant pose for building core strength and stability.
  5. In what ways does Uttanasana (Standing Forward Bend) counteract the effects of sitting all day? Uttanasana helps to stretch the hamstrings, calves, and hips, which are often tight from prolonged sitting. It also encourages blood flow to the brain, which can alleviate stress and rejuvenate the body.
  6. How does Adho Mukha Svanasana (Downward-Facing Dog) support mental health? This pose is known for its calming effect on the brain, which can help relieve stress, mild depression, and anxiety. It’s also therapeutic for headaches, insomnia, and fatigue.
  7. What is the purpose of including Surya Namaskar (Sun Salutation) in a daily yoga practice? Surya Namaskar is a comprehensive practice that warms up the body, improves circulation, and is a cardiovascular workout that strengthens and tones the body, making it a great all-in-one practice for daily health.
  8. Can Janu Sirsasana (Head-to-Knee Forward Bend) aid in digestion, and if so, how? Yes, by folding forward, this pose massages the abdominal organs, which can stimulate digestion and help alleviate issues such as constipation, while also calming the mind and reducing anxiety.
  9. What are the benefits of Parivrtta Janu Sirsasana (Revolved Head-to-Knee Pose) for internal organs? This twisting pose enhances the massage effect on the abdominal organs, improving the function of the liver, kidneys, and intestines, and can aid in detoxifying the body.
  10. How does practicing Tadasana (Mountain Pose) benefit daily activities? Tadasana helps develop proper posture and body awareness, which can translate into better body mechanics during daily activities, reducing the risk of injury and improving overall physical alignment.

Blog Tags for the Post

yoga, B.K.S. Iyengar, asanas, health and wellness, mindfulness, stress relief, flexibility, strength training, mental health, inner peace, balance, yoga philosophy, yoga practice, yoga benefits, posture improvement, yoga for beginners

Posted on 1 Comment

Day 28: Final Challenge and Celebration – Embrace Your Triumph

Welcome to Day 28, the Final Day of Your Pilates Journey!

Dear Pilates Warriors, today marks the culmination of our 28-Day Wall Pilates Challenge, and what a journey it has been! As we come together for our final session, it’s time to celebrate your dedication, perseverance, and growth. In this special session, we’ll integrate all aspects of our Pilates practice, challenge ourselves with one last burst of energy, and reflect on the transformative power of movement. Let’s embrace this moment of triumph and honor the incredible journey we’ve shared!

Introduction:

Day 28 is not just about reaching the end of our challenge; it’s about celebrating the journey we’ve embarked on together. Over the past four weeks, we’ve pushed our limits, discovered our strengths, and embraced the beauty of movement. Today, we come full circle, uniting mind, body, and spirit in a final burst of energy and joy. So, let’s dive in with gratitude and enthusiasm, knowing that every step we’ve taken has brought us closer to our goals.

Before we start with the day, let us welcome you to the AI-powered 28-Day Free Wall Pilates Challenge! This challenge is designed using modern Artificial intelligence tools. We asked AI to act like a trainer and make a 28-day plan for us. We have put this up as a FREE challenge – do try this and let us know how you feel about it.

28-Day Wall Pilates Challenge

28-Day Wall Pilates Challenge

Select the Week to see Day Wise Guides to this AI Designed Challenge.

WEEK WORKOUT DETAILS
Week 1
Week 2
Week 3
Week 4

Warm-Up: Awakening Body and Mind (5 Minutes)

Sun Salutations (3 Rounds)

  • Execution: Begin standing at the top of your mat with your feet hip-width apart. Inhale as you reach your arms overhead, lengthening through the spine. Exhale as you fold forward, hinging at the hips and reaching towards the floor. Inhale to halfway lift, lengthening your spine and gazing forward. Exhale as you plant your hands on the mat and step back into a plank position. Lower down into a push-up position, then inhale as you press up into upward-facing dog. Exhale as you lift your hips into downward-facing dog. Hold for a breath, then step or jump your feet forward to return to the starting position. Repeat for three rounds, flowing smoothly with your breath.
  • Breathing: Inhale deeply as you reach your arms overhead, exhale as you fold forward. Inhale to halfway lift, exhale as you plant your hands and step back into plank. Inhale to lower down, exhale to press up. Inhale as you lift into upward dog, exhale as you lift into downward dog. Focus on synchronizing movement with breath to enhance flow and awareness.

Dynamic Standing Twists (2 Minutes)

  • Execution: Stand tall with your feet hip-width apart and arms extended out to the sides. Inhale deeply, then exhale as you twist your torso to the right, reaching your left hand towards your right foot and your right hand towards the ceiling. Inhale to return to the center, then exhale as you twist to the left, reaching your right hand towards your left foot and your left hand towards the ceiling. Continue to alternate sides, moving with the rhythm of your breath.
  • Breathing: Exhale deeply as you twist to the right, inhale to return to the center. Exhale as you twist to the left, inhale to return. Focus on smooth, rhythmic breaths to enhance mobility and awareness.

Main Session: Integration and Celebration (25 Minutes)

Flow Sequence (2 Sets)

  • Execution: Begin in a seated position on the mat with your legs extended in front of you. Inhale as you reach your arms overhead, lengthening through the spine. Exhale as you fold forward, reaching towards your toes with a straight spine. Inhale to lengthen the spine once more, then exhale as you transition into a tabletop position. Inhale as you arch your back into cow pose, then exhale as you round your spine into cat pose. Continue to flow smoothly through these movements, syncing each breath with a movement. After two sets, return to a seated position.
  • Breathing: Inhale deeply as you reach your arms overhead, exhale as you fold forward. Inhale to lengthen the spine, exhale as you transition into tabletop. Inhale as you arch into cow pose, exhale as you round into cat pose. Focus on deep, rhythmic breaths to enhance flow and awareness.

Wall Plank Hold (2 Sets, 30 Seconds Each)

  • Execution: Stand facing a wall with your arms extended overhead and palms pressed against the wall. Walk your feet back until your body forms a diagonal line from head to heels, engaging your core and pressing firmly into the wall with your hands. Hold the plank position for 30 seconds, maintaining proper alignment and breathing deeply. After two sets, release and return to a standing position.
  • Breathing: Inhale deeply as you hold the plank position, exhale to engage your core. Focus on steady, rhythmic breaths to enhance stability and control.

Boat Pose with Leg Lowers (2 Sets, 10 Reps)

  • Execution: Sit on the mat with your knees bent and feet flat on the floor. Lean back slightly and lift your feet off the floor, balancing on your sitting bones. Extend your arms straight out in front of you, parallel to the floor. Inhale as you lower your legs towards the mat, keeping your core engaged and back flat. Exhale as you lift your legs back up to the starting position. Repeat for 10 reps, maintaining stability and control. After two sets, release and return to a seated position.
  • Breathing: Inhale as you lower your legs, exhale as you lift them back up. Focus on steady, rhythmic breaths to enhance core engagement and control.

Cooldown: Reflect and Honor (5 Minutes)

Seated Meditation (3 Minutes)

  • Execution: Find a comfortable seated position on the mat with your eyes closed and hands resting on your knees. Take a few moments to settle into the present moment, feeling the support of the earth beneath you and the gentle rise and fall of your breath. Allow your thoughts to come and go without judgment, simply observing the sensations in your body and the rhythm of your breath.
  • Breathing: Inhale deeply through your nose, exhale slowly through your mouth. Focus on deep, steady breaths to enhance relaxation and presence.

Gratitude Journaling (2 Minutes)

  • Execution: Take out your journal or a piece of paper and reflect on the journey you've embarked on over the past 28 days. Write down three things you're grateful for, whether it's newfound strength, a deeper connection with your body, or the support of your fellow Pilates Warriors. Take a moment to honor yourself for showing up, committing to your practice, and embracing the transformation that comes with dedication and perseverance.
  • Breathing: Inhale gratitude for your accomplishments, exhale gratitude for the journey. Focus on cultivating a sense of appreciation and contentment.

Reflection and Gratitude:

Congratulations, Pilates Warriors, on completing the 28-Day Wall Pilates Challenge! You've shown incredible dedication, strength, and resilience throughout this journey, and today, we celebrate your triumph. As you reflect on the progress you've made and the obstacles you've overcome, remember that this is just the beginning of your Pilates journey. Keep exploring, keep growing, and keep embracing the joy of movement. Thank you for sharing your energy, your spirit, and your commitment to wellness. Until we meet again, keep shining bright, and may your journey be filled with endless possibilities.

Join Our 28-Day Wall Pilates Challenge

Are you ready to embark on a transformative journey to strengthen your body, mind, and spirit through Pilates? Welcome to our 28-day Wall Pilates Challenge, designed to ignite your passion for Pilates and unlock your full potential!

Overview:

  • Duration: 28 days
  • Focus: Core strength, flexibility, balance, endurance, and overall well-being
  • Structure: Each week focuses on specific themes and goals, with daily workouts to guide you through the challenge.

Week 1: Core Foundations

Day 1: Core Foundations - Ignite Your Pilates JourneyStart your journey with foundational Pilates exercises to build a strong core and establish proper alignment.

Day 2: Balance and Alignment - Strengthen Your Core ConnectionFocus on improving balance and alignment to enhance core stability and connection.

Day 3: Flexibility Flow - Unlock Your Body's PotentialEnhance flexibility and fluidity in movements to unlock your body's full potential.

Day 4: Power and Stability - Strengthen Your Pilates FoundationBuild power and stability for a solid Pilates foundation with challenging exercises.

Day 5: Endurance Elevation - Embrace the Power WithinIncrease endurance and stamina through dynamic Pilates workouts.

Day 6: Harmony in Motion - Cultivating Balance and CoordinationCultivate balance and coordination for graceful and harmonious movement.

Day 7: Rest and Rejuvenate - Nourishing Your Pilates JourneyTake a day to rest and rejuvenate your body and mind, allowing for optimal recovery.

Week 2: Mindful Movement

Day 8: Mindful Movement - Deepening Your Pilates PracticeDeepen your Pilates practice through mindfulness and focused movement techniques.

Day 9: Strengthen and Lengthen - Unleash Your Inner WarriorStrengthen muscles while promoting lengthening and flexibility for a balanced body.

Day 10: Core Stability and Balance - Finding Your Center of StrengthEnhance core stability and find your center of strength through targeted exercises.

Day 11: Mobility and Flexibility - Embrace Fluid MovementEmbrace fluid movement by improving mobility and flexibility in your Pilates practice.

Day 12: Alignment and Posture - Discover Your Perfect BalanceFocus on proper alignment and posture to achieve balance and prevent injuries.

Day 13: Strength and Endurance - Building Resilience WithinBuild strength and endurance to overcome challenges and build resilience.

Day 14: Rest and Recovery - Nourish Your Body and MindTake a well-deserved day of rest and recovery to rejuvenate your body and mind.

Week 3: Full Body Flow

Day 15: Balance and Coordination - Find Your Center of GravityExplore balance and coordination exercises to find your center of gravity and enhance stability.

Day 16: Flexibility and Mobility - Embrace Fluidity in MotionImprove flexibility and mobility to move with grace and ease through dynamic movements.

Day 17: Core Strength and Stability - Ignite Your Power CenterIgnite your power center with core-strengthening exercises for stability and strength.

Day 18: Upper Body Strength and Toning - Sculpt Your Pilates PowerhouseSculpt and tone your upper body muscles for improved strength and definition.

Day 19: Balance and Coordination - Find Your Center of GravityContinue refining balance and coordination skills to enhance your Pilates practice.

Day 20: Flexibility and Mobility - Unlock Your Body's PotentialUnlock your body's full potential by increasing flexibility and mobility for greater range of motion.

Day 21: Rest and Reflect - Nourish Your Body and MindReflect on your progress and take time to nourish your body and mind with rest and relaxation.

Week 4: Lower Body Strength

Day 22: Lower Body Strength - Building FoundationsFocus on building a strong foundation for lower body strength through targeted exercises.

Day 23: Core Power - Ignite Your CenterIgnite your core power with exercises designed to strengthen and stabilize your center.

Day 24: Full Body Flow - Harmony in MotionExperience the harmony of full-body movement with flowing Pilates sequences.

Day 25: Lower Body Burn - Sculpt and StrengthenSculpt and strengthen your lower body muscles with targeted exercises to feel the burn.

Day 26: Core Strength - Ignite Your PowerhouseIgnite your powerhouse with core-strengthening workouts for a strong and stable center.

Day 27: Flexibility and Mobility - Embrace FluidityEmbrace fluidity in movement by enhancing flexibility and mobility in every workout.

Day 28: Final Challenge and Celebration - Embrace Your TriumphCelebrate your achievements and embrace the final challenge as you complete the 28-Day Wall Pilates Challenge.

We invite you to join us on this exciting journey and share your experiences and feedback. Together, let's fine-tune and improve this challenge to help others achieve their fitness goals. Are you ready to embrace the 28 Days Wall Pilates Challenge? Let's get started!

Don't forget to check out our interactive navigation app above to easily access each day's workout details. Let the challenge begin!

Best regards,

MasalaMonk.com