Posted on 6 Comments

Uses for Castor Oil

A calm South Asian woman, seated on a neutral sofa, rests a flannel castor-oil pack over her lower abdomen with one hand. An amber bottle and ricinus leaf sit on the table in the foreground. Large serif headline reads “Uses for Castor Oil,” with cover lines about pack safety, hair and brows, comfort vs. cure, buyer’s guide, and warnings. MasalaMonk.com appears in the footer.

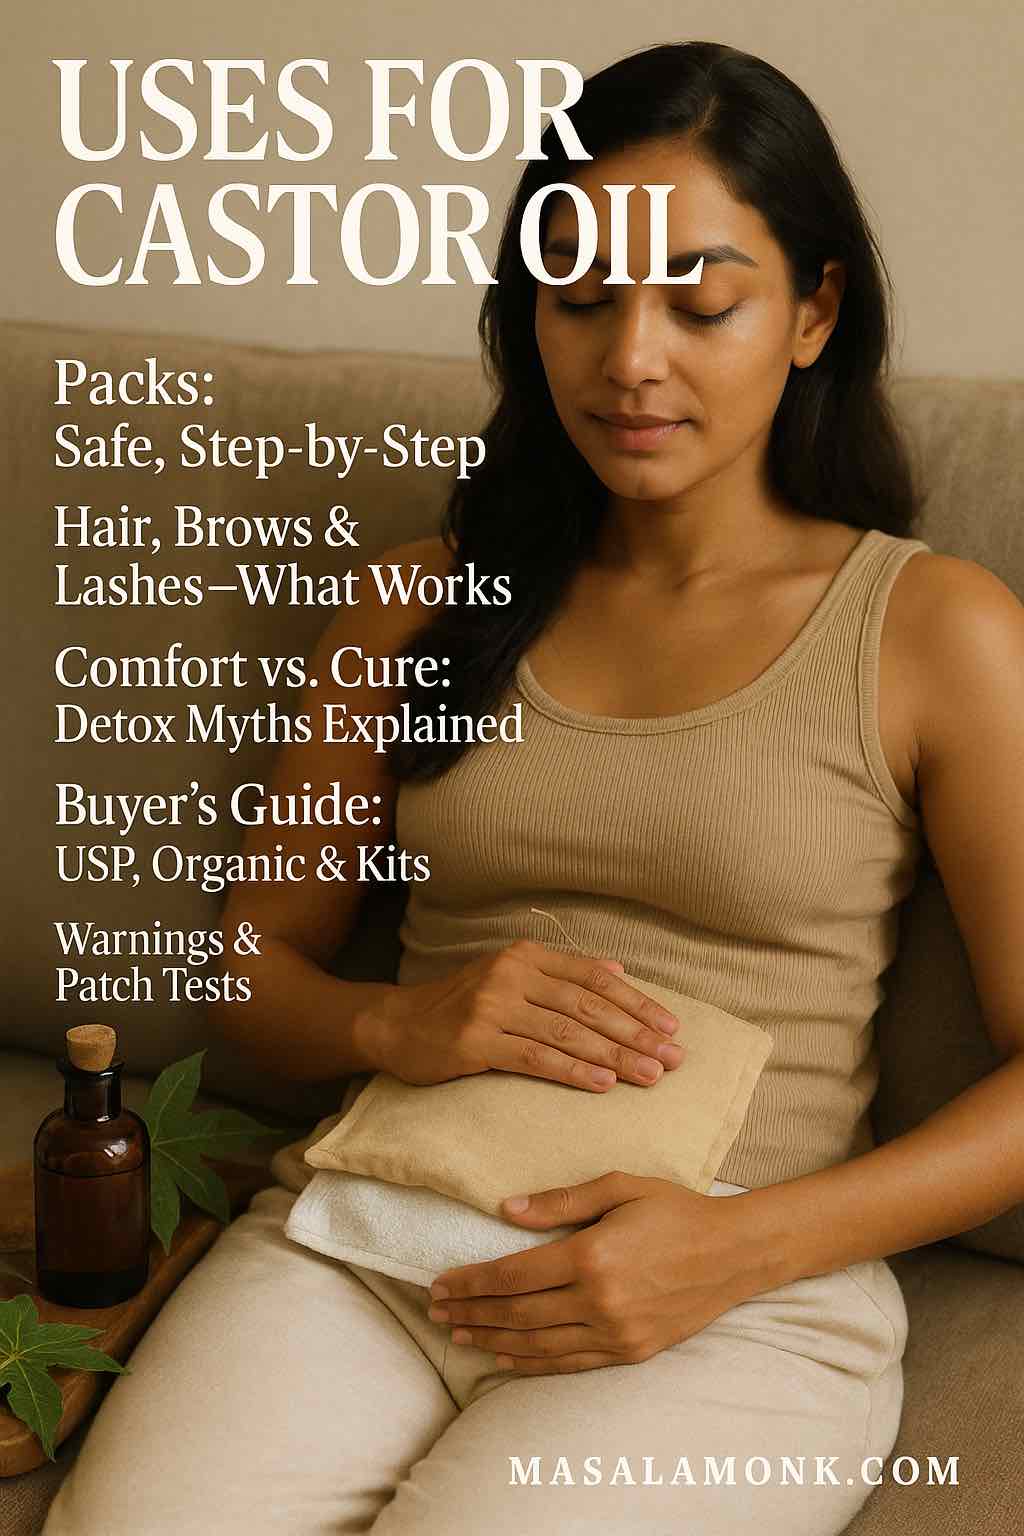
Castor oil has lived in home cabinets for decades. Yet modern wellness trends stretched the uses for castor oil far beyond a simple massage oil—from warm packs for cramps to glossy hair routines and even bold claims about “liver detox.” This guide stays practical and evidence-aware: what castor oil is, where it genuinely helps, how to do a safe pack, what to expect for hair and skin, when ingestion makes sense, how to choose a quality bottle, and when to see a clinician.

⚠️ Medical information only: This article shares general information and practical tips. It is not a diagnosis or a treatment plan and does not replace a consultation with a licensed clinician. Always follow your doctor’s advice for your health, skin, and eyes.


Uses for Castor Oil: Start with What It Is

Castor oil is pressed from the seeds of Ricinus communis (often labeled ricinus oil, ricino oil, eranda oil, or castor seed oil). Its dense slip comes from ricinoleic acid, which also explains its laxative activity. For skin and hair, cold-pressed, hexane-free oils are a sensible default. If a clinician recommends ingestion, USP-grade labeling signals pharmacopoeia-level quality; for a concise medical overview, see the monograph in StatPearls: Castor Oil. For a plain-English safety snapshot, the clinical explainer from Cleveland Clinic is equally useful.

Not every adjective on the label is meaningful. For example, “extra virgin” isn’t regulated for castor oil. Consequently, prioritize extraction method, solvent-free claims, and dark-glass packaging over buzzwords. For style, Jamaican black castor oil is simply a roasted variant; functionally it’s still castor oil—choose by scent and viscosity.


Uses for Castor Oil That Actually Help (and Where Hype Creeps In)

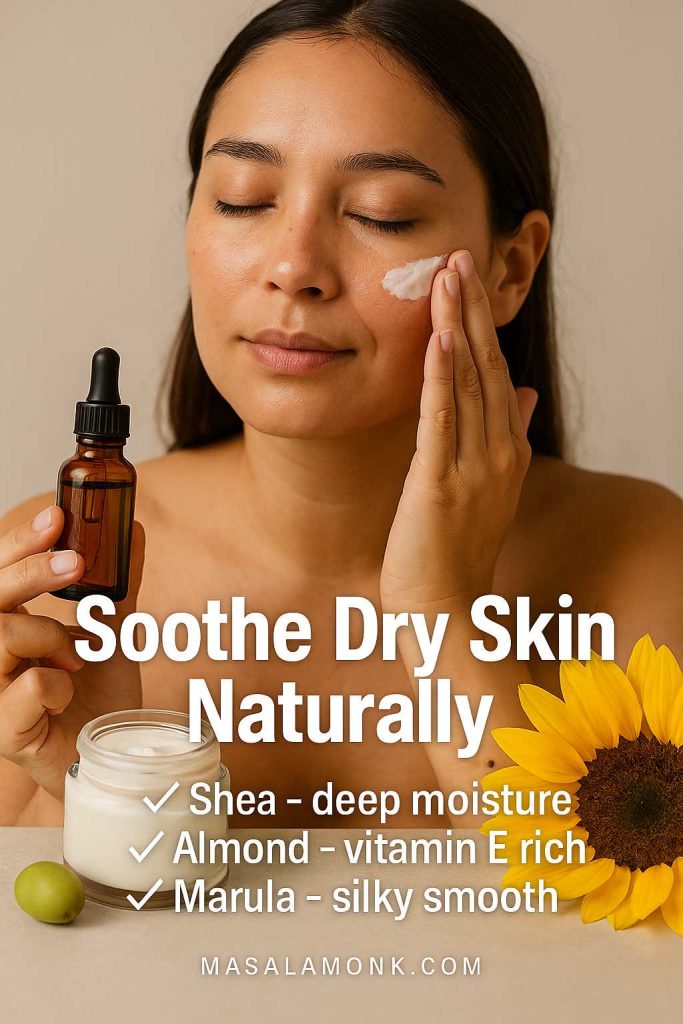
Comfort care and moisturization. As a highly occlusive oil, castor helps seal in moisture on dry skin and along the hair shaft. Therefore, it excels as a pre-wash scalp mask, a cuticle rub, or part of a warm-pack routine.

Occasional constipation (with caution). Ingested castor oil is a stimulant laxative appropriate for occasional use; however, it is not first-line because cramping and diarrhea are common. For clinical context, rely on Cleveland Clinic’s explainer and the medical overview in StatPearls.

Clinic-only wound-care adjunct (not DIY). Ointments that combine Balsam Peru + castor oil (e.g., Venelex) help maintain a moist wound environment and protect delicate edges; these are regulated indications, not home substitutes. If you’re curious about the exact wording, read the label on DailyMed: VENELEX Ointment.

What it does not do: detox. Despite viral claims, there’s no good evidence that castor-oil packs “detox” the liver or purge toxins. For a science-based perspective on detoxes and cleanses in general, see MD Anderson’s detox explainer and the research summary from NCCIH on detoxes and cleanses.


Castor-Oil Packs: How to Use Them Safely

Many readers begin their uses for castor oil with warm packs, so here is a stain-smart, step-by-step method.

You’ll need: cold-pressed castor oil; a cotton/flannel cloth; a wrap (old T-shirt or reusable cover to prevent stains); gentle dry heat (heating pad or hot-water bottle); and a towel.

  1. Patch-test first (inner elbow, 24 hours).
  2. Fold the cloth; saturate it—wet but not dripping.
  3. Place over the target area (lower abdomen for cramps, lower back, or upper chest/neck for comfort).
  4. Cover with the wrap; add low, steady heat.
  5. Relax 45–60 minutes.
  6. Wipe away excess oil. Store the cloth sealed in the fridge; replace when discolored or odorous.
  7. Begin with 1–3 sessions per week and adjust to skin tolerance.
Castor-oil pack instructions: saturate flannel, place, cover, add low heat, relax 45–60 minutes, wipe excess; safety strip shown.
Pack routine at a glance—saturate flannel (not dripping), cover, and use low, steady heat for 45–60 minutes. Patch test first, keep away from eyes/broken skin, and never microwave oily cloths.

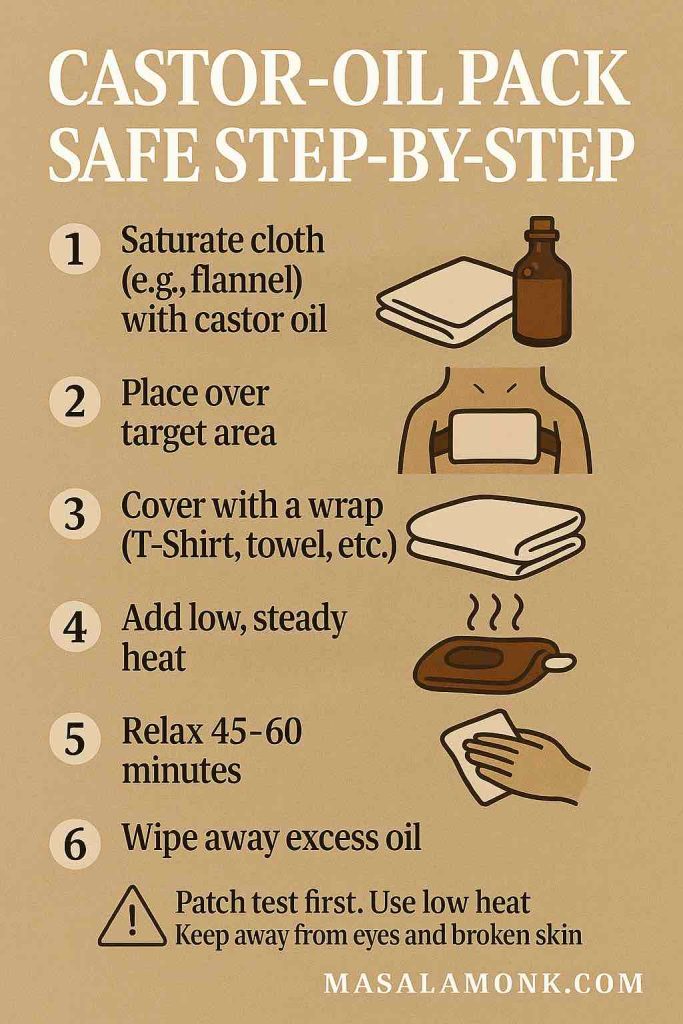
Safety notes. Keep packs away from eyes and broken skin. Moreover, discuss abdominal heat during pregnancy with your clinician; ingestion can stimulate the gut and may affect uterine activity—another reason medical guidance matters (see Cleveland Clinic, as noted earlier). People often describe post-pack comfort due to warmth, gentle pressure, and stillness; nevertheless, comfort is not “detox,” as MD Anderson and NCCIH explain.

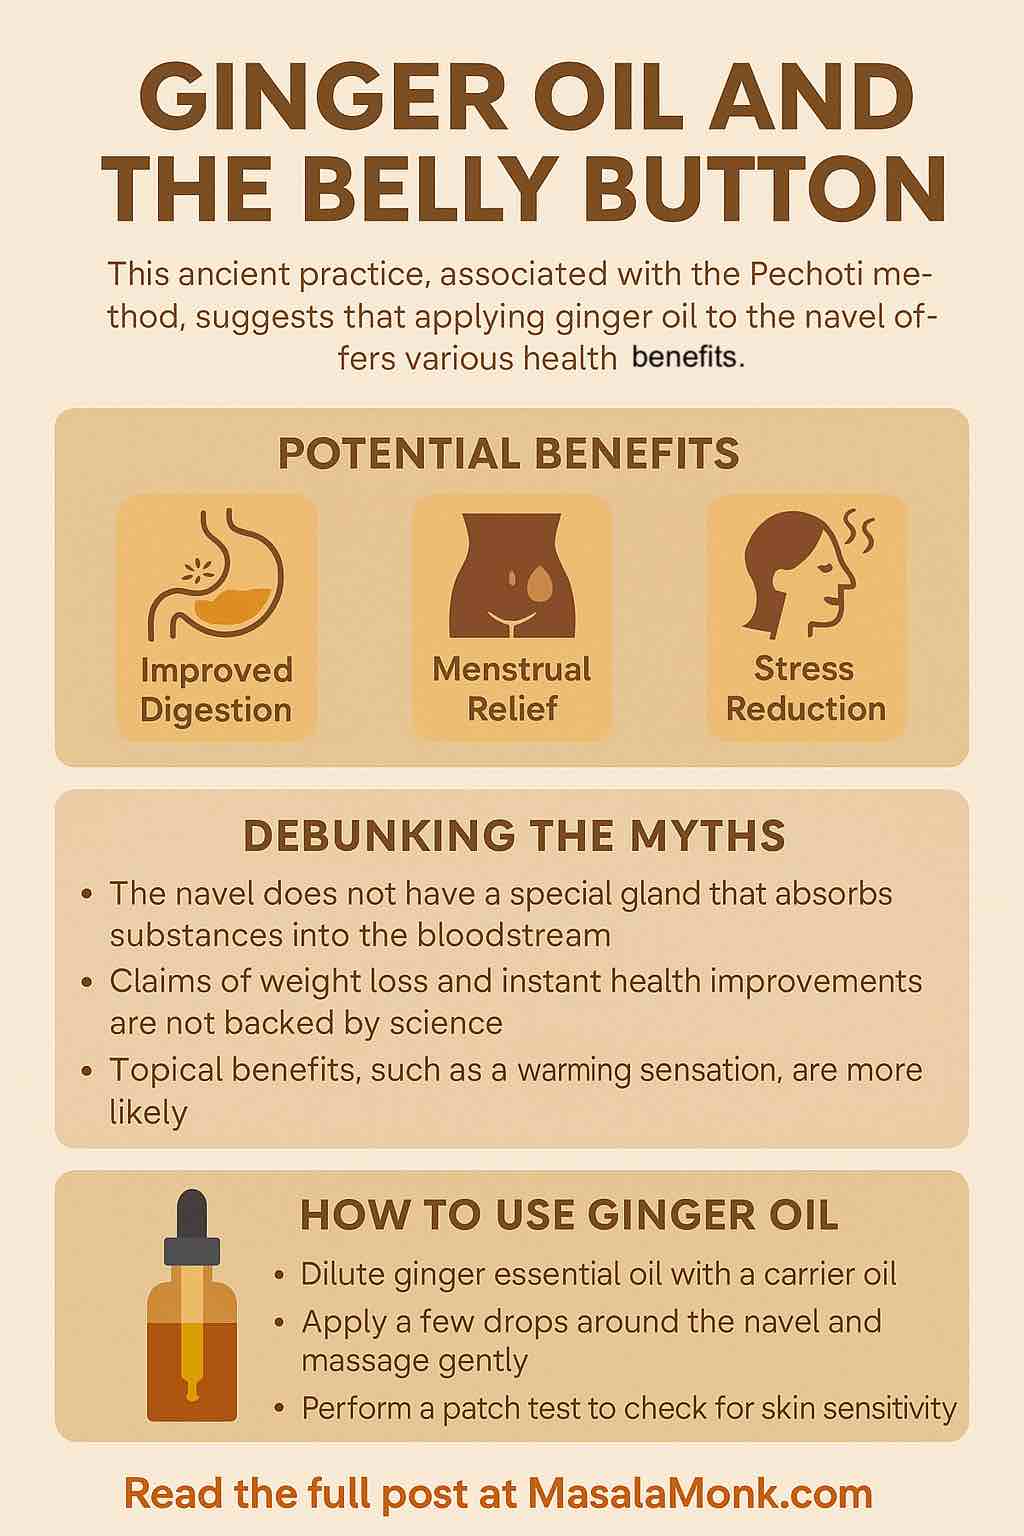
Related reads on MasalaMonk: for pack-style comfort on musculoskeletal issues, see Castor Oil for Back Pain. For myth-busting on belly-button oiling—and how to try it safely if you choose—see Castor Oil in the Belly Button.

⚠️ Education, not prescription: Use the ideas here for learning. For symptoms, medications, or procedures, speak with your clinician first.


Uses for Castor Oil in Hair, Brows, Lashes & Scalp (Realistic and Mess-Smart)

In beauty routines, uses for castor oil center on conditioning—not medically proven regrowth. Dermatology-informed guidance aligns on this: sealing the shaft reduces breakage and boosts shine; robust regrowth evidence is lacking. For a clinician-reviewed stance, Cleveland Clinic (linked earlier) is a good starting point. For consumer safety—including rare tangling incidents—see Verywell Health’s castor oil guide.

How to use it well

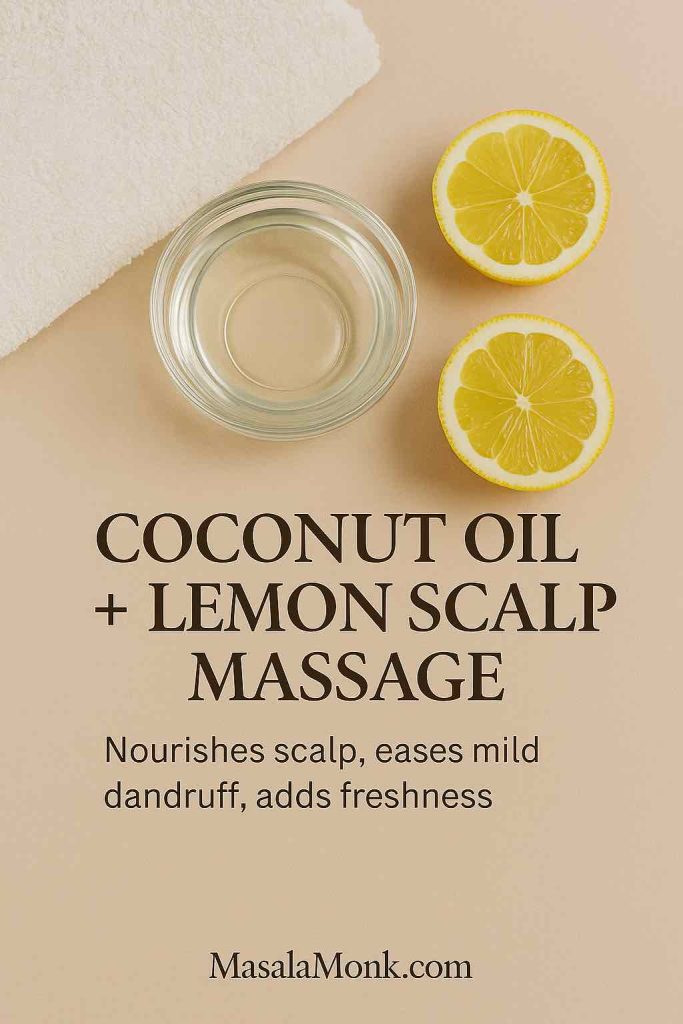
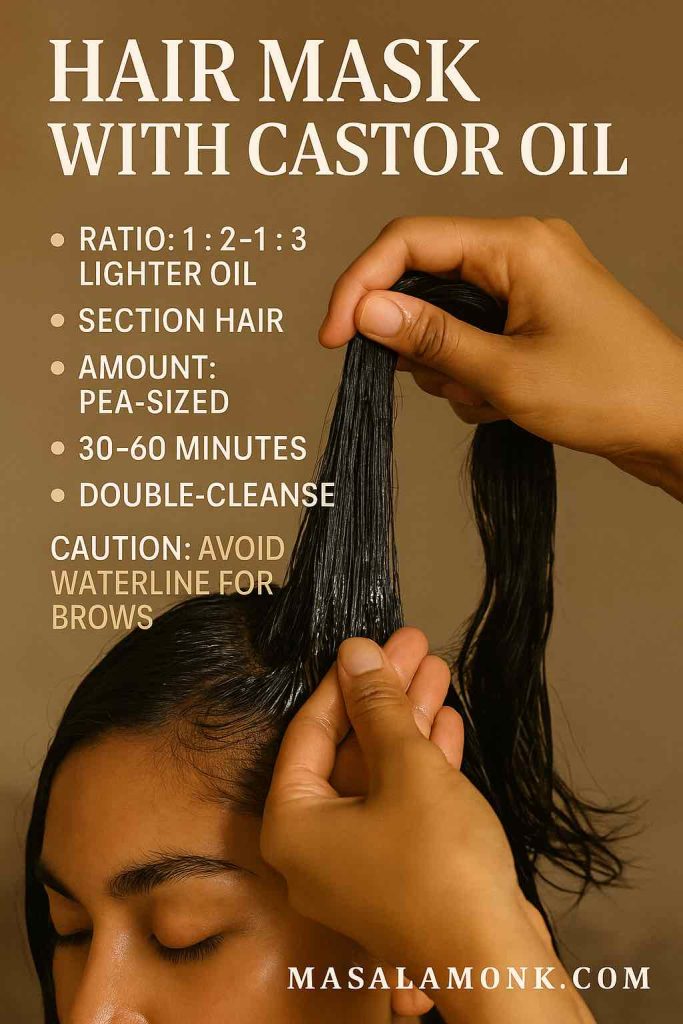
  • Pre-wash scalp mask: mix 1 part castor oil with 2–3 parts a lighter carrier (jojoba/almond) for spreadability and easier wash-out. Massage the scalp and mid-lengths; leave 30–60 minutes; then double-cleanse if needed.
  • Dry ends only: on damp hair, smooth a pea-sized amount through the last few centimeters to reduce friction.
  • Brows & lashes (cosmetic): with a clean spoolie, apply a micro-amount to hairs—not the waterline—and wipe excess.
  • Frequency: start once weekly to avoid buildup.
Applying diluted castor-oil pre-wash mask to scalp; ratio 1:2–1:3 with lighter oil, 30–60 minutes, double-cleanse.
For smoother hair without buildup: mix 1 part castor oil with 2–3 parts lighter oil, apply to scalp/lengths 30–60 min, then double-cleanse. Use a pea-sized amount on ends; for brows/lashes apply a micro-amountnot the waterline.

When to escalate care. If you’re shedding rapidly or noticing widening parts/patches, consult a professional. The American Academy of Dermatology’s hair-loss hub explains diagnosis and evidence-based options; as noted earlier, rely on medical treatments for true regrowth.

Related reads on MasalaMonk: for wrinkle-focused skincare, browse Castor Oil for Face Wrinkles. For scalp-skin questions that overlap with flaking and plaques, compare approaches in Castor Oil for Psoriasis.


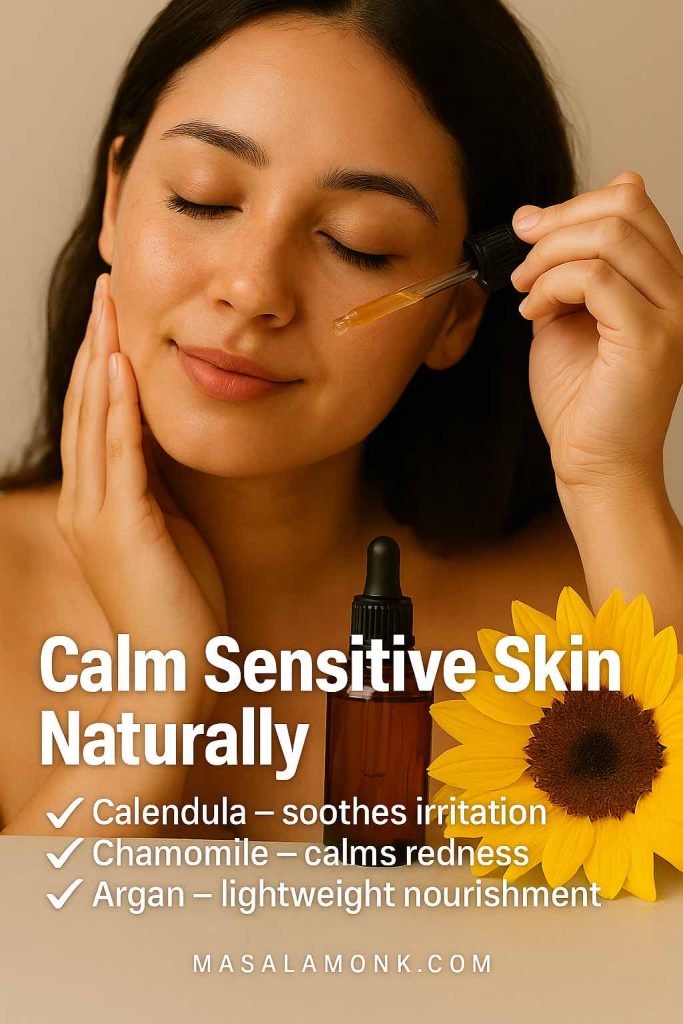
Uses for Castor Oil on Skin & Body (Simple, Satisfying, Non-Hype)

Because castor oil is thick and occlusive, it seals in hydration on very dry areas—heels, elbows, cuticles—and can calm that tight, post-shave feel on intact skin. In clinical settings, regulated formulations that include castor oil (such as Venelex) help maintain a moist healing environment for specific wounds; again, that is a professional indication, not a DIY swap. For exact labeling, see DailyMed (linked earlier).

At-home wins

  • Cuticles & nails: one drop nightly for flexibility and shine.
  • Massage blends: cut with lighter oils for better glide; patch-test if adding essentials.
  • Laundry sanity: designate an “oil towel” and pre-treat stains with dish soap.

Related read on MasalaMonk: if eye comfort is on your mind, review do’s and don’ts in Castor Oil for Eyes, then follow your eye-care professional’s guidance.


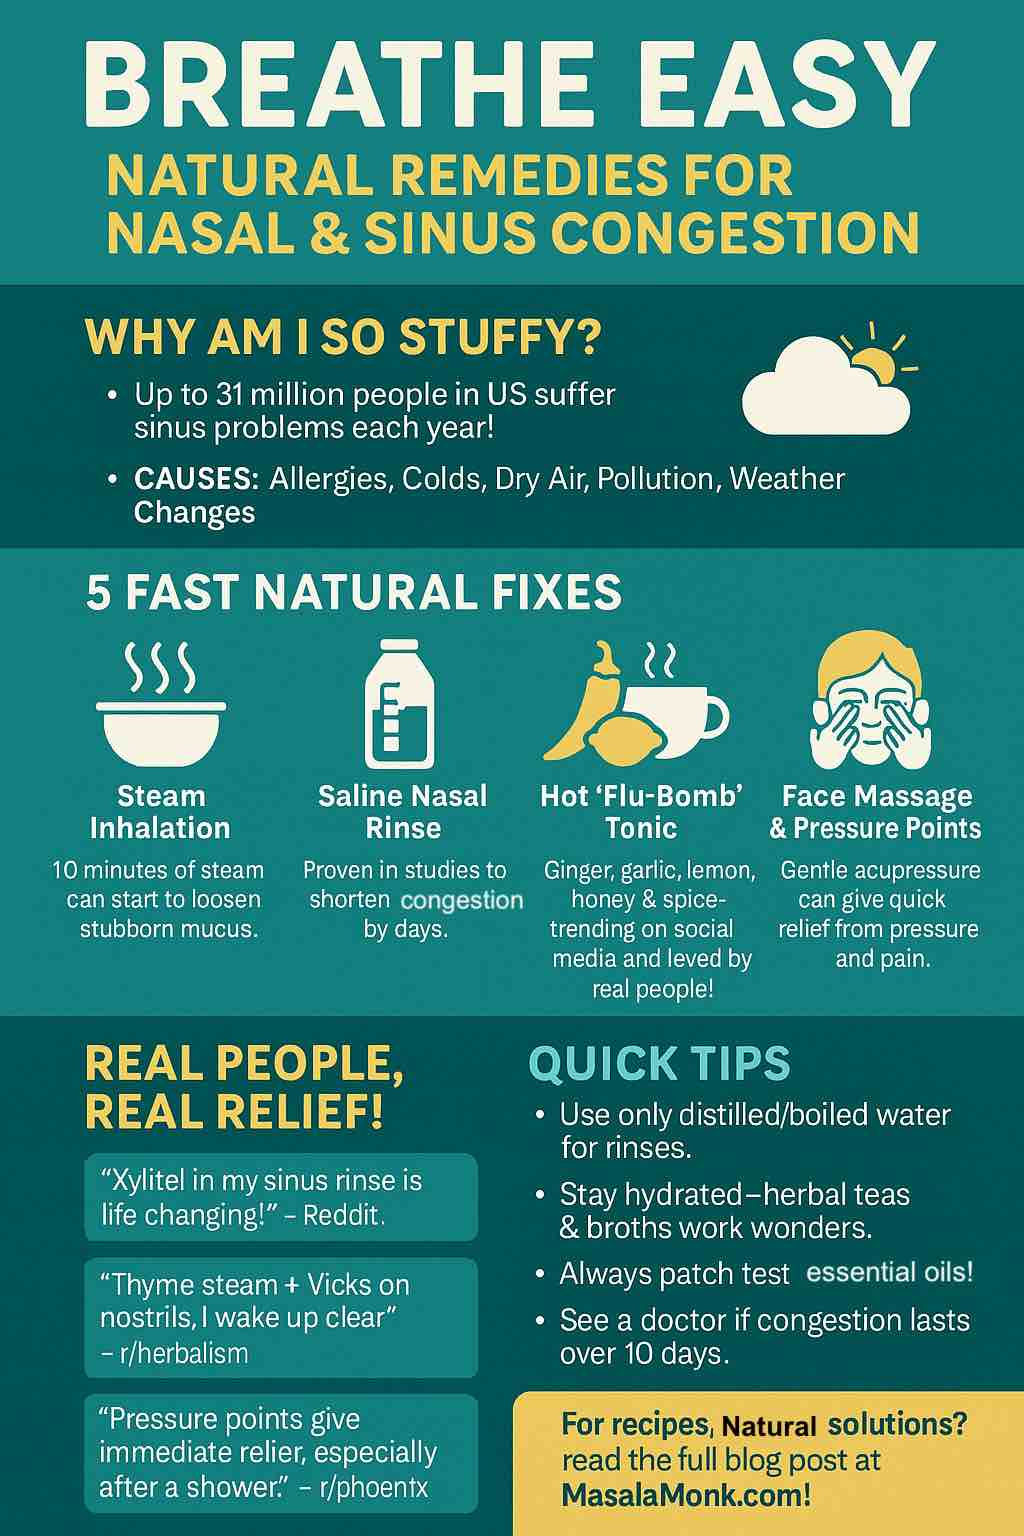
Uses for Castor Oil During Colds & Sore Throats (Comfort-Only)

Castor oil does not treat infections, thin mucus, or shorten illness. Nevertheless, a warm neck or chest pack can feel soothing while you rest, hydrate, and use proven measures. For side-effect and safety basics—including why ingestion isn’t for colds—see Cleveland Clinic as noted earlier. For detox myths that often get bundled into cold-care tips, recall MD Anderson and NCCIH from earlier.

Comfort protocol (non-curative): 45–60 minutes of low, steady heat over an oil-saturated cloth, up to 3×/week. Stop if skin reacts. Seek care for high fever, breathing issues, suspected strep, or symptoms that persist beyond a few days.

⚠️ Heads up: This guide is educational. It isn’t medical advice, a diagnosis, or a treatment plan.


Uses for Castor Oil by Mouth: Constipation Basics & When to Avoid

Here is the straight talk: ingested castor oil works because ricinoleic acid stimulates intestinal smooth muscle; however, side effects are common. Consequently, reserve it for occasional constipation and only as labeled or advised. For dosing cautions, interactions, and who should avoid it, rely on Cleveland Clinic and StatPearls cited earlier. If you prefer a patient-friendly walk-through of timing and cramping, the Verywell Health guide mentioned previously is practical.

Pregnancy & labor (medical territory only)

Evidence on labor induction is mixed and nausea is frequent. A classic synthesis—see the Cochrane review on castor oil for labor induction—judged much of the data low quality; small studies since then suggest it may help initiate labor in select contexts. Even so, this is obstetric care, not a home experiment—discuss it with your own team. I’ll refer back to Cochrane by name where needed.


Buyer’s Guide: Choosing Quality for All Castor-Oil Uses

To support all the uses for castor oil above—especially packs—buy wisely.

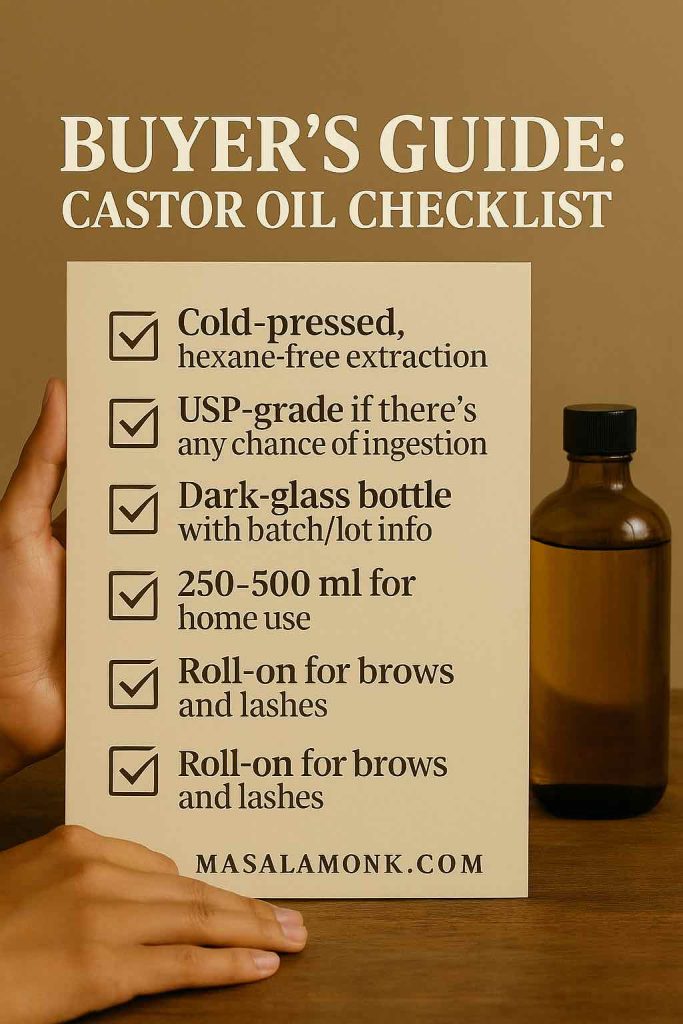
On the label, prioritize:

  • Cold-pressed, hexane-free extraction.
  • USP-grade if there’s any chance of clinician-directed ingestion.
  • Dark-glass bottles with batch/lot info.
  • Sizes: 250–500 ml suits most homes; go bulk only if you truly do frequent packs.
  • Roll-on bottles for brows/lashes to minimize mess.
Castor oil buyer’s checklist card: cold-pressed hexane-free, USP grade, dark-glass bottle, 250–500 ml, roll-on option.
Before you buy: choose cold-pressed, hexane-free oil in a dark-glass bottle. Pick USP-grade if ingestion is clinician-directed, and stick to 250–500 ml for home use; add a roll-on for brows and lashes to reduce mess.

Pack accessories:

  • Washable cotton/flannel pack or a reusable wrap that prevents stains.
  • Heating pad or hot-water bottle with adjustable warmth.
  • A dedicated towel—because oil always finds a way.

Finally, apply a sanity filter to marketing. No kit or bottle turns castor oil into a detoxifier or a hair-growth drug. Anchor expectations to the Cleveland Clinic overview and the detox summaries from MD Anderson or NCCIH referenced earlier.


Storage, Patch-Testing & Cleanup (Everyday Practicalities)

  • Store tightly capped in a cool, dark cabinet; wipe the bottle neck to prevent off smells.
  • Patch-test any new bottle/blend on the inner elbow for 24 hours.
  • Clean up stains by pre-treating with dish soap, then wash warm. Keep one “sacrifice” towel for pack nights.

Myths vs Facts (Quick Reality Checks)

  • “Castor-oil packs detox the liver.” → No evidence. Comfort ≠ detox. (MD Anderson and NCCIH, as noted earlier.)
  • “It regrows hair.” → Not proven. It conditions and reduces breakage; new growth requires evidence-based treatments (Cleveland Clinic and AAD, as noted earlier).
  • “It’s fine to drink regularly.” → No. Occasional use only, if advised; side effects are common (again, Cleveland Clinic and StatPearls).
  • “Kitchen oil works as eye drops.” → Never. Only sterile, formulated eye products belong in eyes.

Bottom Line: Sensible Uses for Castor Oil

In summary, the most sensible uses for castor oil are cozy, soothing packs; simple conditioning for hair and skin; and occasional, clinician-guided help for constipation. Skip detox hype, keep heat gentle, patch-test patiently, and choose quality oil in dark glass. Most importantly, if you notice persistent pain, signs of infection, eye issues, or significant hair loss, step away from DIY and see a clinician—sooner rather than later.

⚠️ Medical information only: This article shares general information and practical tips. It is not a diagnosis or a treatment plan and does not replace a consultation with a licensed clinician. Always follow your doctor’s advice for your health, skin, and eyes.

FAQs

1) What are the most sensible uses for castor oil—quick overview?

Short answer: the most reliable uses for castor oil are (1) comfort packs with gentle heat, (2) conditioning hair/skin (occlusive moisture lock), and (3) occasional clinician-guided help for constipation. For clinical safety basics and side effects, start with this plain-English explainer from Cleveland Clinic.


2) Does castor oil really “detox” the liver?

No. There’s no solid evidence that castor-oil packs “detox” the liver or purge toxins. Therefore, think of packs as comfort care, not cleansing. For a science-based view of “detox” claims, see MD Anderson’s detox explainer and the research summary from NCCIH on detoxes and cleanses.


3) How do I make a castor-oil pack—step by step?

You’ll need: cold-pressed castor oil, cotton/flannel, a wrap (old T-shirt or reusable cover), gentle dry heat (heating pad/hot-water bottle), and a towel.
Steps: patch-test → saturate cloth (not dripping) → place on target area → cover → add low, steady heat → relax 45–60 minutes → wipe excess → store cloth sealed in the fridge and replace when discolored.
Safety: keep away from eyes/broken skin; discuss abdominal heat if pregnant; and never microwave oily cloths. For more pack context on pain comfort, see MasalaMonk: Castor Oil for Back Pain.


4) Can I drink castor oil for constipation?

Sometimes—but sparingly. Castor oil is a stimulant laxative suitable for occasional use only; cramping and diarrhea are common. Therefore, try gentler options first and follow labeled doses if your clinician advises castor oil. For pharmacology and cautions, the medical monograph in StatPearls: Castor Oil is useful.


5) What are the uses for castor oil in hair care—does it regrow hair?

It conditions; it doesn’t reliably regrow. Castor oil can reduce breakage by sealing moisture, making hair look smoother and fuller; however, evidence for new growth is weak. For a clinician-reviewed stance, check Cleveland Clinic (as noted earlier). If you suspect medical hair loss, see the American Academy of Dermatology’s hair-loss hub once.


6) What’s the best way to apply castor oil for hair, brows, and lashes?

Less is more.

  • Pre-wash mask: 1 part castor : 2–3 parts lighter oil (jojoba/almond), massage scalp/lengths 30–60 minutes, then double-cleanse.
  • Dry ends: pea-sized amount on damp tips.
  • Brows/lashes: micro-amount with a clean spoolie; avoid the waterline.
    Tip: start once weekly to prevent buildup. For wrinkle-oriented routines, see MasalaMonk: Castor Oil for Face Wrinkles.

7) Is Jamaican black castor oil different?

Mostly in aroma and color. It’s roasted during processing, so it’s darker and has a toasted scent. Functionally, it’s still castor oil; therefore, choose by texture and smell—not promises. For scalp/skin use, the same uses for castor oil apply.


8) Can castor oil help psoriasis or eczema?

Sometimes for comfort, not cure. Because it’s occlusive, castor oil can reduce transepidermal water loss, which may ease dryness and tightness on intact skin. However, it doesn’t treat immune-driven inflammation. For practical comparisons and routines, see MasalaMonk: Castor Oil for Psoriasis; for general safety and triggers, lean on Cleveland Clinic as noted earlier.


9) Can castor oil help sore throat, cold, cough, or chest congestion?

Only for comfort. A warm neck/chest pack can feel soothing; however, castor oil does not thin mucus, treat infection, or shorten illness. Therefore, rest, fluids, humidified air, and medical care for red-flag symptoms still matter. For risks and side effects, see Cleveland Clinic as noted earlier. If you’re curious about navel-oiling myths that appear in cold season, read MasalaMonk: Castor Oil in the Belly Button.


10) Are there any medical-grade castor oil products?

Yes—clinic-only indications. For example, Balsam Peru + castor oil ointments (e.g., Venelex) maintain a moist wound environment and protect delicate edges; they are not DIY substitutes. If you want the exact labeling, check DailyMed: VENELEX Ointment.


11) Is castor oil safe during pregnancy or for inducing labor?

Only with your obstetric team. Evidence is mixed and nausea is common. A classic synthesis—see the Cochrane review on castor oil for labor induction—judged much of the data low quality. Consequently, this is medical territory, not a home experiment;.


12) Can castor oil help thyroid issues or “support the liver” with packs?

No clinical proof. Although a warm pack can feel relaxing, there’s no evidence it changes thyroid function or detoxifies the liver. Therefore, treat these as comfort rituals and keep taking prescribed meds. For the detox angle, recall MD Anderson or NCCIH as noted earlier.


13) Will castor oil fix ovarian cysts, fibroids, or fertility problems?

No evidence of cure. Some people use packs for pelvic comfort; nevertheless, cysts, fibroids, and fertility concerns require gynecologic evaluation. In short, use packs for relaxation only, and keep your medical plan front and center.


14) Does castor oil help with warts, lipomas, boils, bruises, or cellulite?

Not really. Warts and lipomas need clinical treatments; boils may require antibiotics or drainage; bruises fade with time; and cellulite responds better to lifestyle + targeted procedures. Castor oil may soften surrounding skin, but it doesn’t remove lesions.


15) Can castor oil lighten dark spots or tighten skin?

Expect moisture, not miracles. Occlusion can make skin look smoother and more luminous short-term; however, pigment and laxity respond to evidence-based actives (retinoids, vitamin C, niacinamide) and procedures. Therefore, think of castor oil as a supporting moisturizer, not the main treatment.


16) Is it safe to put castor oil in the eyes for dry eyes or cataracts?

No kitchen oils in eyes. Use only sterile, formulated eye products. Kitchen-bottle oils can irritate or contaminate the ocular surface. For do’s/don’ts and alternatives, review eye safety on Cleveland Clinic as noted earlier, then consult your eye-care professional. Meanwhile, for broader context, see MasalaMonk: Castor Oil for Eyes.


17) What grade, bottle, and size should I buy?

Choose quality to support all the uses for castor oil:

  1. Cold-pressed, hexane-free extraction;
  2. USP-grade if ingestion is clinician-directed;
  3. Dark-glass bottle with batch/lot;
  4. 250–500 ml for most homes; and
  5. Roll-on bottles for brows/lashes to reduce mess.
    As a reminder, “extra virgin” isn’t regulated for castor oil—thus, focus on extraction, solvents, and packaging.

18) How should I store castor oil, and how do I handle stains?

Storage: cool, dark place; cap tightly; wipe the bottle neck to prevent off odors.
Stains: pre-treat with dish soap; then wash warm. Pro tip: keep a dedicated “oil towel” for pack nights.


19) Are there side effects I should watch for?

Yes. Topically, watch for contact dermatitis or pore clogging (use less or dilute). Rarely, heavy oiling + friction can cause severe tangling (aka acute hair felting); if it happens, saturate with conditioner and gently detangle—then pause oils. Orally, expect cramping/diarrhea; do not rely on castor oil chronically (Cleveland Clinic, as noted earlier). If anything feels off—especially eye irritation, severe abdominal pain, fever, or persistent symptoms—see a clinician.


20) Where can I read more specifics on common home myths and routines?

For pragmatic deep dives, try these internal guides on MasalaMonk:

For medical context referenced earlier : Cleveland Clinic, StatPearls, DailyMed, MD Anderson, NCCIH, AAD, and Cochrane.


⚠️ Medical information only: This article shares general information and practical tips. It is not a diagnosis or a treatment plan and does not replace a consultation with a licensed clinician. Always follow your doctor’s advice for your health, skin, and eyes.

Posted on 3 Comments

Lemon for Hair: Growth, Dandruff, Shine & Safe Uses

Photorealistic magazine-style cover image of a South Asian woman with glossy hair, lemon, coconut oil, and lemon water on a vanity table. Text overlay: Lemon for Hair: Growth, Dandruff, Shine & Safe Uses — MasalaMonk.com

We’ve all heard them — the home remedies passed down like sacred secrets. “Rub lemon on your scalp, it will make your hair grow faster.” Or, “Rinse with lemon water after oiling, and your hair will shine like silk.”

For many of us, these aren’t just tips; they’re memories. Of sitting on a charpai on hot afternoons while a grandmother massaged warm coconut oil mixed with a few drops of lemon into our scalp. Of rinsing hair after henna with lemon water, hoping the strands would catch that extra glint of copper under the sun.

Lemon has always had a place in traditional beauty care — across Ayurveda, Unani medicine, and even Western DIY culture. In Ayurveda, lemon (Nimbuka) is described as a cooling, cleansing fruit, balancing excess oil and refreshing the body. In folk rituals, it wasn’t just used for cooking — it was rubbed on oily scalps, applied to lighten mehndi stains, and even added to oils as a “purifier.”

Fast forward to today, and Google is filled with questions like:

  • Is lemon good for hair growth?
  • Can lemon stop dandruff?
  • How do I use lemon juice safely on my scalp?

The good news: lemon really does have benefits for hair. But the truth is also more nuanced than the old wives’ tales. Lemon won’t magically regrow bald spots. It can, however, support scalp health, reduce mild dandruff, add shine, and make your hair feel fresher — if used correctly.

So, let’s explore what science and tradition agree on, what’s hype, and how you can safely use lemon for your hair today.


Is Lemon Good for Hair? What Science and Ayurveda Say

🍋 The Ayurvedic view

In Ayurveda, lemon is known as Nimbuka and is considered “kapha-shamaka” — meaning it balances Kapha, the dosha associated with excess oil, heaviness, and sluggishness. When Kapha is high, you often see greasy scalps, buildup, or dandruff-like flakes. That’s why traditional remedies often involved squeezing lemon juice into hair oils or using lemon rinses after washing — to purify and lighten the scalp.

Ayurvedic texts also describe lemon as shita virya (cooling in potency), which makes it soothing for scalp irritation and itchiness.

🔬 The scientific explanation on Lemon for Hair

From a modern perspective, lemon’s biggest gift to hair is its acidity. Here’s why that matters:

  • Hair and scalp are naturally slightly acidic (pH 4.5–5.5).
  • Many shampoos are alkaline, which raises the hair cuticle (the outer layer), making strands rough, frizzy, and prone to breakage.
  • Acidic rinses — like lemon water — flatten the cuticle, lock in moisture, and make hair shinier (Dias, 2014).

Think of it this way: your hair cuticle is like roof tiles. When alkaline products lift them, the roof leaks — your hair loses moisture, feels rough, and looks dull. When you restore acidity with lemon, those tiles flatten and seal again, keeping everything smooth and reflective.

Macro graphic of two hair strands — one with raised, rough cuticles (frizzy and dull) and one with smooth, flat cuticles (shiny and healthy) — showing how lemon acidity flattens cuticles for shine, MasalaMonk.com.
Why lemon makes hair shine: its natural acidity helps flatten raised cuticles, locking in moisture and creating smooth, light-reflecting strands.

✅ The bottom line

So, is lemon good for hair? Yes — but mainly as a clarifier, shine booster, and scalp balancer.
It won’t give you Rapunzel-like growth overnight, but it will help your hair look and feel healthier when used wisely.


Lemon for Hair Growth: What’s True & What’s Hype

If you search online for “lemon for hair growth”, you’ll find endless blogs, YouTube videos, and Instagram reels promising that a squeeze of lemon will make your hair sprout like grass after rain. The truth? It’s not that simple.

🌱 Why people believe lemon makes hair grow

There are reasons this belief became so popular:

  • The tingling effect: When you apply lemon juice directly to the scalp, it stings a little. That sensation gets mistaken for “stimulation” — people assume if it tingles, it must be working to grow new hair.
  • Mixed remedies: Traditional recipes often combined lemon with coconut oil, onion juice, or castor oil — all of which do support growth or thickness. Over time, lemon became associated with those effects, even though it was more of a supporting player.
  • The “clean scalp = growth” link: A clean, fresh scalp does create a better environment for follicles. So when people used lemon and saw less buildup, they assumed it was directly making hair grow.

🔬 What science actually says about Lemon for Hair

Modern research gives us a more nuanced picture:

  • Citrus compounds like limonin: Lab studies suggest limonin (found in citrus seeds and peels) can activate pathways linked to follicle activity and hair regeneration (Kang, 2022).
  • Citric acid and fiber strength: A 2025 study showed citric acid helps reinforce chemically treated hair fibers, making them stronger and less prone to breakage (Zhang, 2025). Stronger strands can give the appearance of fuller hair, even if no new hair is growing.
  • The cautionary side: Other research has found that disruptions in citric acid metabolism may actually suppress follicle growth and increase inflammation (Shi, 2022). This means using lemon carelessly could backfire — especially if applied too often or too harshly.

✅ So, does lemon regrow hair?

Here’s the straight answer: No, lemon cannot regrow hair on bald patches or reverse genetic hair loss.

What it can do is:

  • Cleanse the scalp and reduce buildup → better follicle environment
  • Strengthen existing strands → less breakage, more thickness retention
  • Support overall scalp health → which indirectly supports natural growth

Think of lemon as a gardener: it cleans and prepares the soil, but it doesn’t plant new seeds. For true regrowth, you’d need proven treatments like minoxidil, microneedling, or rosemary oil. Lemon’s role is supportive, not transformative.

🙋 Common reader questions

  • “Does lemon juice stop hair fall?” → It may reduce breakage and improve scalp condition, but it doesn’t stop hormonal or genetic hair loss.
  • “Can I apply lemon daily to grow hair?” → No. Daily use will irritate and dry out your scalp. Stick to once a week.
  • “Can lemon grow new hair?” → No. It helps maintain the hair you have, not regrow what’s lost.

Lemon and Dandruff: Does It Really Work?

For many people, dandruff is the real reason they reach for lemon. Those embarrassing white flakes on your shoulders, the constant urge to scratch your scalp — it’s frustrating, and the kitchen often feels like the first place to look for a fix. But does lemon really help?

🌿 The traditional wisdom

In South Asian homes, lemon has long been rubbed directly on flaky scalps or squeezed into oils as a quick antidote. Ayurveda describes lemon as cleansing and light, which makes it a natural choice for conditions linked with excess oiliness (Kapha imbalance). Folk wisdom believed that because lemon “cuts through grease,” it could also cut through flakes.

And culturally, it became a go-to “first aid” before weddings, festivals, or social events — whenever you needed your scalp to feel instantly fresher.

🔬 The science behind it

Modern dermatology tells us dandruff is mainly caused by:

  • An overgrowth of a yeast-like fungus called Malassezia.
  • Excess scalp oil (sebum), which feeds the fungus.
  • A sensitive scalp that reacts with irritation and flaking.

Here’s where lemon can help:

  • Citrus oils vs. fungi → Citrus fruits (lime, kaffir lime, lemon) have shown antifungal activity against Malassezia in lab studies (Tadtong, 2025).
  • Human trial evidence → A small clinical study found that a citrus-extract shampoo reduced dandruff and scalp greasiness within four weeks (Lee, 2019).
  • Clarifying action → The acidity of lemon helps strip excess oil and buildup, making the scalp feel lighter and less itchy.

So yes — lemon can help with mild dandruff, especially if your scalp is very oily.

⚠️ But here’s the catch

  • It’s not as strong as medicated shampoos. Ingredients like ketoconazole, selenium sulfide, or zinc pyrithione are proven to fight dandruff more effectively. Lemon is more of a supporting remedy than a standalone cure. If flakes are thick or itchy, and don’t respond to mild remedies, see What’s the Difference Between Dandruff and Psoriasis? to know when it might be something more serious.
  • It can irritate sensitive skin. Overusing lemon — or applying it undiluted — may sting, redden, or even worsen flakes if your scalp barrier is already weak.
  • Results vary. Some people find relief, while others feel more itchy after.

✅ Best way to use lemon for dandruff

  • Always dilute lemon juice with water or mix with oil/yogurt before applying.
  • Use it once a week, not daily.
  • Combine with your regular dandruff shampoo if you have moderate-to-severe flakes.

👉 Think of lemon as a “quick refresher” or mild helper for oily, flaky scalps — not a replacement for proven medical treatments.


Other Benefits of Lemon for Hair (Shine, Strength, Antioxidants)

Even if lemon won’t magically regrow hair, it still brings plenty to the table. Think of it as a natural multi-tasker: part clarifier, part shine-booster, part protector. Here’s how it helps beyond growth and dandruff.

✨ For shine and smoothness

One of the first things you’ll notice after a lemon rinse is how much lighter and shinier your hair feels. That’s not an illusion — it’s chemistry.

Hair is covered in overlapping scales called cuticles. When they lie flat, light reflects smoothly, making hair look glossy. When they lift (as happens with alkaline shampoos or hard water), hair feels rough, looks dull, and tangles easily.

Lemon juice, being acidic, helps flatten those cuticles back down. It’s like sealing tiles on a roof — suddenly the “surface” is smoother, and the shine returns. That’s why women across India and the Middle East traditionally rinsed their hair with lemon water after oiling or henna: it left strands sleeker, softer, and more manageable.

A similar method is using apple cider vinegar and lemon rinses, which are popular for removing buildup and restoring shine.

🛡️ For antioxidant protection

Modern life is tough on hair. Pollution, dust, harsh styling, and UV rays all create oxidative stress, which weakens follicles and makes strands brittle.

Lemon is naturally rich in flavonoids and vitamin C — compounds that act like tiny shields against free radicals. Recent studies confirm citrus extracts help buffer oxidative damage and support healthier tissue (Du, 2024; Klimek-Szczykutowicz, 2020).

While rubbing lemon on your scalp won’t erase years of sun damage, using it occasionally can give your hair an antioxidant “boost” — and consuming lemons in your diet supports both skin and hair health from within.

🧴 For oil control

If your scalp turns greasy within a day of washing, lemon can be a lifesaver. The citric acid cuts through excess sebum, giving you that just-washed freshness without needing another round of shampoo.

That’s why many DIY recipes recommend lemon water rinses for people with oily scalp types. Used sparingly, it can help extend the time between washes, keeping your hair feeling cleaner and lighter.

☀️ For natural lightening

This one is both a benefit and a warning. Lemon juice + sunlight can lighten hair, which is why it became a popular hack among teens in the West. On lighter brown or blonde shades, it creates sun-kissed highlights.

But on darker hair, it often leads to uneven tones, dryness, and even scalp burns if applied carelessly in the sun. So yes, lemon can lighten — but it’s a risky trick best avoided unless you know what you’re doing (and are willing to accept some damage).

🍊 From the inside out

Interestingly, lemon’s benefits aren’t limited to topical use. A 2019 study on mice showed that lemon polyphenols in drinking water helped delay age-related hair thinning and coarseness (Shimizu, 2019).

We can’t directly translate mouse studies to humans, but it does hint at a bigger truth: your diet impacts your hair. Eating a citrus-rich diet supports collagen, immunity, and overall scalp health — all of which reflect in stronger, shinier hair.

For example, Amla, another vitamin-C-rich natural, also supports scalp health and antioxidant protection.


How to Use Lemon for Hair (DIY Recipes That Actually Work)

One of the reasons lemon is so popular is its versatility. You don’t need expensive products — just a fruit you probably already have in your kitchen. But the secret is how you use it. Apply lemon the wrong way (too strong, too often), and you risk dryness and irritation. Use it wisely, and it can become a refreshing, effective part of your routine.

Here are some tried-and-tested ways to use lemon for hair:

1. The Classic Lemon Rinse (for Shine & Oil Control)

Best for: Oily scalps, dull or frizzy hair.

  • How to make it: Mix 1 tablespoon of fresh lemon juice with 1 cup of cool water. After shampooing, pour it slowly over your scalp and hair, massage gently for a minute, then rinse off with plain water.
  • Why it works: The acidity balances scalp pH, flattens cuticles, and cuts through excess oil. You’ll instantly notice softer, shinier strands.
  • Pro tip: Don’t leave lemon water sitting in your hair for long — rinse it off after a minute or two to avoid over-drying.
  • Mistake to avoid: Using concentrated juice directly — it can sting, especially if you have scratches or sensitive skin.

2. Coconut Oil + Lemon Scalp Massage (for Mild Dandruff Relief)

Best for: Oily, flaky scalps with mild dandruff.

Flat-lay of a glass bowl of coconut oil, two halved lemons, and a folded towel on a beige surface. Magazine-style educational image with overlay text: Coconut Oil + Lemon Scalp Massage — Nourishes scalp, eases mild dandruff, adds freshness — MasalaMonk.com.
DIY Coconut Oil + Lemon Scalp Massage: a traditional remedy to nourish the scalp, ease mild dandruff, and leave your hair feeling fresh and balanced.
  • How to make it: Warm 2 tablespoons of coconut oil, add 1 teaspoon of lemon juice, and mix well. Massage gently into the scalp for 10–15 minutes, then wash with a mild shampoo.
  • Why it works: Coconut oil nourishes and moisturizes, while lemon adds antifungal power and clarifies buildup.
  • Pro tip: Wrap your head in a warm towel after applying — it helps the oil penetrate better.
  • Mistake to avoid: Leaving it overnight. Lemon sitting too long on the scalp can irritate.

3. Lemon + Honey + Yogurt Mask (for Softness & Shine)

Best for: Dull, rough, or frizzy hair.

Flat-lay of a halved lemon, a glass bowl of golden honey with a wooden dipper, and a bowl of creamy yogurt on a beige background. Magazine-style DIY image with overlay text: DIY Lemon + Honey + Yogurt Mask — Softens hair, adds shine, nourishes — MasalaMonk.com.
DIY Lemon + Honey + Yogurt Mask: a natural blend that softens hair, boosts shine, and nourishes the scalp for a healthy feel.
  • How to make it: Mix 1 tablespoon lemon juice, 1 tablespoon honey, and 2–3 tablespoons plain yogurt. Apply evenly to scalp and hair. Leave on for 15 minutes, then rinse and shampoo.
  • Why it works: Honey adds moisture, yogurt soothes and nourishes, and lemon clarifies. It’s like a natural spa treatment for your scalp.
  • Pro tip: Apply on damp hair for better spread and absorption.
  • Mistake to avoid: Sitting out in the sun with this mask on — lemon + sunlight can burn skin.

You could also experiment with traditional pairings, like lemon + garlic or fenugreek. See Garlic for Hair and Fenugreek Seeds for Hair for detailed guides on how these work.

4. Aloe Vera + Lemon Soother (for Itchy, Sensitive Scalps)

Best for: Itchy, irritated scalps or people with mild dermatitis.

Flat-lay of a glass bowl of aloe vera gel, a halved lemon, and a fresh aloe leaf on a beige background. Magazine-style DIY image with overlay text: DIY Aloe Vera + Lemon Soother — Calms itchiness, hydrates, balances — MasalaMonk.com.
DIY Aloe Vera + Lemon Soother: a gentle blend to calm itchy scalps, reduce excess oil, and restore balance with refreshing hydration.
  • How to make it: Blend 2 tablespoons of aloe vera gel with 1 teaspoon of lemon juice. Massage gently into scalp, leave for 10 minutes, then rinse.
  • Why it works: Aloe calms and hydrates, while lemon balances oiliness and adds a cooling effect.
  • Pro tip: Use fresh aloe gel (from the plant) if possible — it works better than store-bought.
  • Mistake to avoid: Don’t rub harshly; a gentle massage is enough.

5. Lemon Highlight Hack (Use with Caution)

Best for: Light brown or blonde hair only.

  • How to do it: Dilute lemon juice with water (1:1 ratio), apply with a spray bottle to strands you want to lighten, and sit in the sun for 15–20 minutes. Rinse thoroughly and condition afterward.
  • Why it works: Citric acid reacts with UV light, breaking down melanin and making hair appear lighter.
  • Pro tip: Apply only on sections (like face-framing strands), not your whole head, for a sun-kissed look.
  • Mistake to avoid: Doing this often. It can severely dry out and damage hair. Always deep-condition after.

Side Effects of Applying Lemon on Hair (Read Before You Try)

While lemon has real benefits for hair and scalp, it also comes with risks. The same compounds that make it refreshing and clarifying can be harsh if you overuse them or apply them the wrong way. Here’s what you need to know before squeezing that lemon onto your head.

🍋 1. Dryness & Brittleness

Lemon juice is highly acidic and astringent. While this helps cut grease and balance pH, it can also strip away natural oils if used too often. The result? Dry, brittle strands that snap more easily.

What to do instead: Always dilute lemon juice with water, oil, or yogurt. And never use it more than once a week. If you already have dry or curly hair, pair it with moisturizing ingredients like honey or aloe.

To balance lemon’s drying effect, combine with hydrating ingredients like yogurt or coconut water, or nourishing oils such as almond oil.

🍋 2. Scalp Irritation & Stinging

Have you ever squeezed lemon on a tiny cut and winced at the sting? The same thing happens on your scalp if you have scratches, eczema, or sensitivity. Undiluted lemon juice can cause redness, burning, and even small chemical-like burns.

What to do instead: Always do a patch test first. Apply a little diluted lemon juice behind your ear or on your inner arm — if it stings or causes redness after 10 minutes, don’t use it on your scalp.

🍋 3. Phototoxicity (The “Lime Burn” Problem)

One of the biggest hidden dangers of lemon is phototoxicity — a skin reaction when citrus juice meets sunlight.

Dermatologists even have a name for it: phytophotodermatitis. It happens because compounds in lemon (furanocoumarins) react with UV light, causing redness, dark patches, or even blister-like burns.

It’s so common among bartenders who mix drinks with lime that it’s nicknamed “Margarita Burn.” Case reports have shown severe burns on skin exposed to citrus juice followed by sun (Abugroun et al., 2019).

What to do instead:

  • Never sit in the sun with lemon juice on your scalp or skin.
  • Always rinse your hair thoroughly after a lemon treatment.
  • If you want natural highlights, do it carefully and condition deeply afterward.

🍋 4. Uneven Hair Lightening

While lemon can lighten hair, it does so unpredictably. On darker hair, it often creates brassy, patchy tones instead of golden highlights. And combined with dryness, this can leave hair looking worse than before.

What to do instead: If you want highlights, consider safer options like chamomile tea rinses or professional coloring.

Split-screen educational image showing left side with healthy glossy hair, right side with dry frizzy hair and irritated scalp. A halved lemon with a caution icon sits at the bottom. Overlay text reads: Use Lemon Safely — Dilute, Once a Week, Rinse Before Sunlight — MasalaMonk.com.
Use lemon safely: always dilute, limit use to once a week, and rinse thoroughly before stepping into sunlight to avoid irritation.

✅ Golden Rules for Safe Use

  • Always dilute lemon juice before applying.
  • Use lemon no more than once a week.
  • Patch test before first use.
  • Rinse thoroughly before going out in sunlight.
  • Pair with hydrating ingredients (coconut oil, honey, aloe) to balance dryness.

Final Thoughts on Lemon for Hair

For centuries, lemon has been part of our hair care traditions — whether squeezed into oil, poured as a rinse, or simply rubbed onto the scalp before a big occasion. Our grandmothers didn’t have lab studies, but they noticed the effects: a fresher scalp, shinier strands, and a cleaner feel.

Modern science now helps us understand why those remedies worked:

  • Lemon’s acidity balances scalp pH and smooths the cuticle.
  • Its antioxidants help protect against everyday damage.
  • Its citrus compounds show mild antifungal effects that can ease dandruff.

At the same time, research also shows us where lemon falls short. It doesn’t regrow lost hair, it’s not as effective as medicated dandruff treatments, and careless use can irritate or damage hair.

The sweet spot? Using lemon as a supportive ally — not as a miracle cure. A weekly rinse, a drop in warm oil, or a soothing mask can refresh your scalp and add shine without harm. Pair it with good nutrition, gentle hair care, and proven treatments when needed, and lemon becomes a safe, natural addition to your toolkit.

Minimal flat-lay of a halved lemon, a fresh aloe vera leaf, and a small glass bowl of coconut oil on a beige background. Magazine-style closing image with overlay text: Lemon: A Weekly Ally for Fresh, Shiny Hair — MasalaMonk.com.
Lemon: a gentle weekly ally to keep your scalp balanced, your hair shiny, and your routine rooted in natural care.

So next time you slice a lemon for your salad or chai, remember: that humble fruit carries generations of wisdom, a touch of science, and just enough magic to keep your hair feeling fresh and alive. ✨🍋


FAQs About Lemon for Hair

1. Is lemon good for hair?

Yes — lemon can be good for your hair when used correctly. Its acidity balances scalp pH, reduces excess oil, and adds shine. However, it should always be diluted and not applied daily, otherwise it may dry out or irritate your scalp.

2. Does lemon juice help hair growth?

Not directly. Lemon juice doesn’t regrow new hair, but it can improve scalp health and strengthen strands, which helps reduce breakage. A clean, balanced scalp creates a better environment for natural growth.

3. How do I use lemon for hair growth?

The safest way is to dilute 1 tablespoon of lemon juice in 1 cup of water and use it as a post-shampoo rinse once a week. You can also mix a few drops with coconut oil or aloe vera gel for scalp massages.

4. Can lemon stop hair fall?

Lemon may reduce breakage-related hair fall by strengthening strands and clarifying the scalp. But it does not stop genetic or hormonal hair loss. For persistent hair fall, it’s best to consult a dermatologist.

5. Is lemon good for dandruff?

Yes — lemon has mild antifungal properties that can help with oily, flaky dandruff. Studies show citrus extracts can reduce Malassezia fungus, which is linked to dandruff. Still, it’s less effective than medicated shampoos and works best for mild cases.

6. How do I apply lemon on my scalp safely?

Always dilute lemon juice before applying. Mix it with water, oil, or yogurt, and leave it on for no longer than 10–15 minutes. Then rinse thoroughly. Never apply lemon directly before going out in the sun — it can cause burns.

7. Can drinking lemon water help with hair growth?

Indirectly, yes. Lemon water provides vitamin C and antioxidants that support collagen production and overall scalp health. While it won’t regrow hair by itself, it helps strengthen your body’s foundation for healthy hair.

8. Does lemon lighten hair naturally?

Yes, lemon juice combined with sunlight can lighten hair — especially lighter shades like brown or blonde. But it often leads to uneven tones and dryness. If you want highlights, use this trick carefully and follow with deep conditioning.

9. Can lemon cause side effects on hair?

Yes. Overuse can cause dryness, brittleness, scalp irritation, and even phototoxic burns if exposed to sunlight. That’s why moderation is key — use lemon no more than once a week.

10. Is lemon good for all hair types?

Not really. Lemon works best for oily scalps and straight or wavy hair types. If your hair is already dry, curly, or chemically treated, use lemon with extra caution and always combine it with moisturizing ingredients like honey or aloe vera.

11. Can lemon regrow hair on bald spots?

No — lemon cannot regrow hair on bald patches caused by genetics or conditions like alopecia. It only supports existing hair and scalp health. For baldness, proven treatments like minoxidil or medical therapies are required.

12. How often can I use lemon on hair?

Once a week is enough for most people. Using it daily or even every other day increases the risk of dryness and scalp irritation. Think of lemon as a scalp refresher, not an everyday tonic.

Posted on 3 Comments

Natural Oils for Skin: Benefits, Best Types & How to Use Them

Best Natural Oils for Skin

If you’ve ever stared at a crowded bathroom shelf and thought, there has to be a simpler way, you’re absolutely right. Skincare doesn’t have to be complicated to be effective. In fact, when you pick the right natural oils for skin, you can build a routine that is gentle, affordable, and beautifully minimal. These oils—pressed from seeds, nuts, flowers, and fruit—are rich in fatty acids, vitamins, and antioxidants that soften, soothe, and protect. Moreover, they play nicely with what you already own. Add a few drops after your serum, mix a little into your cream, or massage them onto damp skin post-shower and call it a day.

In this long, friendly guide, we’ll explore why natural oils for skin work so well, how to choose them for different concerns, and exactly how to use them so you feel glowy—not greasy. Along the way, you’ll find tiny recipes, day-to-night routines, and myth-busting tips that keep things honest and practical. Ready? Let’s turn your routine into something softer, calmer, and more you.


Why natural oils for skin often outperform complicated routines

First, a quick primer. Skin loses water to the air all day (that’s transepidermal water loss). Humectants like glycerin pull water in; natural oils for skin help seal it there. In other words, they don’t hydrate on their own—they lock hydration in place and smooth the tiny spaces between skin cells so your barrier feels comfortable again. Consequently, your face looks bouncier, your body feels less itchy, and everything in your routine works better because your barrier isn’t fighting fires. (DermNet — Occlusives reduce evaporative water loss).

Woman applying natural face oil with dropper to highlight why oils outperform complicated skincare routines.
Plant oils seal hydration, support the skin barrier, and bring antioxidants—without a 12-step routine.

Additionally, plant oils bring bonus nutrients. Linoleic-rich options (sunflower, safflower, rosehip) replenish barrier lipids. Antioxidant-heavy picks (sea buckthorn, prickly pear, marula) help skin look brighter and more resilient. Calming macerates (calendula, aloe) visibly quiet down cranky cheeks. And yes, when you choose wisely, they do this without the sting or fragrance burn many people get from complicated formulas.

Most importantly, oils invite a slower pace: palms, breath, pressure. That 30-second massage at night isn’t just skincare; it’s a tiny nervous-system break you’ll actually look forward to.

Do read out latest post on : Turmeric Benefits for Skin and Face


Warning: This is general education article and not medical advice or professionally approved piece, kindly be careful, patch test, or consult qualified professionals before testing out anything you find in this post.


How to pick natural oils for skin by skin type (quick cheat sheet)

  • Dry/tight: shea butter (body), cocoa butter (body), olive, almond, marula, squalane (face).
  • Oily/acne-prone: jojoba, squalane, rosehip, black cumin seed; tea tree diluted for spots.
  • Sensitive/reactive: squalane, sunflower; try calendula macerate and patch test.
  • Eczema-prone: shea (body), sunflower, squalane (face), calendula; lanolin on rough, cracked areas.
  • Dull/uneven tone: rosehip, sea buckthorn, prickly pear; optionally carrot seed (always sunscreen by day).
  • Large pores/shine: jojoba and squalane balance sebum; lightweight textures help makeup sit better.
Woman applying shea butter face cream with avocado and squalane oil for winter dryness rescue skincare.
Winter dryness rescue with Shea for deep moisture, Avocado for nutrients, and Olive Squalane for protection.

We’ll go long on the individual oils next; keep this list handy.

Note: In adults, sunflower preserved barrier and improved hydration, while olive oil damaged barrier with repeated use—so favor olive for cleansing or body only if you tolerate it. (PubMed — Sunflower preserved barrier; olive oil impaired it (Danby 2013)).


Meet the heroes: best natural oils for skin (what they do & how to use them)

Shea Butter — Natural Oil for Deep Moisture & Eczema-Prone Skin

Thick, plush, and soothing, shea butter behaves like a comforting blanket for thirsty skin. Thanks to stearic and oleic acids plus vitamins A and E, it softens rough texture while visibly easing dryness and itch. Because it’s occlusive, it excels on bodies—legs, elbows, heels—and on faces that tolerate richer textures in winter. (DermNet — Occlusives & moisturisers explained).

How to use: After bathing, when skin is still damp, warm a pea-size in your palms and press into dry zones. For a lighter feel, blend 2 parts shea with 1 part jojoba or squalane and whip briefly.
Good for: Dry, ashy limbs; eczema care; hands that wash often.

Also Read: Shea Butter for Scalp Psoriasis


Jojoba Oil — Best Natural Face Oil to Balance Oily or Acne-Prone Skin

Technically a liquid wax, jojoba’s wax-ester profile closely resembles human sebum, which explains its quick, light feel and “balancing” reputation. (NIH/PMC — Jojoba in dermatology (review)). Moreover, it makes a stellar makeup remover and the ideal carrier oil for tea tree oil.

How to use: For daily moisture, press 2–3 drops onto damp skin. For oil cleansing, massage 1 teaspoon over a dry face for 60 seconds, emulsify with damp hands, and remove with a warm cloth.
Good for: Combination and oily skin, congested T-zones, anyone who wants “light but effective.”

Here you might want to read more about Jojoba Oil for Skin.


Squalane — Lightweight Natural Oil for All Skin Types

Plant-derived squalane is the “disappearing act” of natural oils for skin: weightless, elegant, and widely tolerated—even by reactive complexions. It cushions dehydrated skin without a film and layers under sunscreen seamlessly. (NIH/PMC — Squalene/squalane: background & stability).

How to use: Press 2–4 drops over your hydrating serum or gel cream, morning or night.
Good for: Absolutely everyone; especially those who dislike the feel of oil.


Rosehip — Brightening Natural Face Oil for Tone & Texture

This linoleic-rich, quick-absorbing oil supports a more even look over time. With steady use, post-blemish marks soften and fine lines appear less prominent.

How to use: At night, apply 2–3 drops before or after moisturizer.
Pro tip: Pair morning vitamin C (or niacinamide) with evening rosehip for a simple, effective glow plan.

Interested knowing more about Rosehip Oil? Do read our post: Rose Hip Seed Oil: Unlock the Beauty and Wellness Benefits for Your Skin.


Sea Buckthorn — Antioxidant-Rich Plant Oil for Resilient Skin

Naturally orange from carotenoids, sea buckthorn lends that “I sleep and hydrate” glow. It supports elasticity and helps calm visible redness, making complexions look more alive. (NIH/PMC — Sea buckthorn oil: bioactive profile & antioxidants).

How to use: Mix a tiny drop into your night oil or cream (it can stain).
Good for: Dull, wind-exposed, or mature skin; chapped lips.

Learn more about What is Seabuckthorn? All Your Questions Answered.


Prickly Pear Seed — Luxury Natural Oil for Eyes, Fine Lines & Glow

Ultra-high in vitamin E and polyphenols, this silky elixir feels refined, not greasy. Consequently, it’s a favorite for the delicate eye area and for softening the look of fine lines. (NIH/PMC — Opuntia seed oil: tocopherols & phytosterols).

How to use: Pat one drop under each eye; or smooth two drops across the face at night.
Good for: Dehydrated zones that need plushness without weight.


Coconut — Classic Natural Body Oil for Very Dry Skin

Rich in lauric acid, coconut is wonderfully occlusive on the body, sealing in moisture and easing roughness. However, faces prone to clogging may find it too heavy. (PubMed — Virgin coconut oil vs mineral oil in AD).

How to use: After showering, massage a small amount into damp arms and legs; use as a pre-shampoo hair mask when ends feel crispy.
Skip for: Acne-prone facial skin.

Here we should point you towards Coconut Oil for Skin: Frequently Asked Questions


Olive — Heritage Natural Oil for Body Hydration & Oil Cleansing

Extra-virgin olive oil brings antioxidants and a plush feel to organic body oil routines. Additionally, it dissolves makeup beautifully when used as a cleansing step. (PubMed — Olive vs sunflower on adult skin barrier).

How to use: A teaspoon for oil cleansing; a thin sheen on damp shins. If it feels heavy, cut 1:1 with squalane.
Good for: Dry limbs, quick DIY scrubs (olive oil + sugar).

6 Health Benefits of Olive oil for Skin is where we cover more about this one. Do read.


Sweet Almond — Gentle Natural Oil for Sensitive Skin & Massage

Light, smooth, and packed with vitamin E, almond oil is a crowd-pleaser for easily irritated skin. It slides well for facial massage and blends effortlessly with creams.

How to use: Massage 2–3 drops into damp skin; or add a few drops to your body lotion to increase richness.
Note: Avoid if you have nut allergies.

Wanna learn more about Almond Oil for Skin? Do not miss reading our blog post on the same.


Calendula Infused Oil — Soothing Natural Oil for Irritated, Red Skin

Calendula petals macerated in a carrier (like sunflower) create a calm-inducing oil that feels like a sigh of relief. Therefore, it’s perfect after waxing, shaving, or long sun-and-wind days.

How to use: Tap a few drops over areas that look flushed; or blend 20–30% calendula into your daily oil.
Good for: Eczema-prone patches; post-shave sting.


Sunflower Seed — Barrier-Repairing Natural Oil for Eczema & Everyday Use

High in linoleic acid, sunflower supports a resilient skin barrier and rarely feels greasy. It’s baby-safe and deeply versatile across face and body. (PubMed — Sunflower improved hydration; olive impaired)

How to use: For body, a teaspoon on damp skin post-shower; for face, 2–3 drops at night.
Pairs with: Calendula for a simple, fragrance-free comfort blend.

Btw, as it’s a edible oil as well, know more about Sunflower Seeds Benefits for Weight Loss: Harnessing Nature’s Power.


Sesame — Ayurvedic Natural Body Oil for Warmth & Circulation

A traditional favorite for abhyanga (self-massage), sesame feels grounding and restorative. It’s slightly heavier, yet deeply nourishing.

How to use: Warm a small pool between palms; apply long strokes toward the heart. Shower or towel-blot after if you prefer a lighter finish.
Good for: Night rituals, colder seasons, tight shoulders.

Liquid Gold: 5 Benefits of Sesame Oil for Skin Care is where we explore more about Sesame Oil and its role in skin care.


Marula — Silky Natural Oil for Smooth Makeup Days

Marula offers slip without shine, so foundation glides on and clings better. It also softens flaky spots that sabotage base products.
How to use: One or two drops pressed in before sunscreen and makeup.
Good for: Normal to dry skin that wants a refined, non-greasy glow.


Babassu — Breathable Natural Oil for Summer & Combo Skin

Think of babassu as coconut’s airy cousin—melts on contact but leaves less residue. As a result, it suits faces that dislike heavy occlusives.
How to use: Swap for coconut anywhere you want a lighter touch; lovely for summer body care.
Good for: Combo skin; humid climates.


Black Cumin Seed — Clarifying Natural Oil for Blemish-Prone Skin

With thymoquinone and an earthy profile, this plant oil brings a calming, balancing vibe to fussy pores and flaky scalps. Emerging evidence—including an RCT—suggests topical Nigella sativa preparations can help mild-to-moderate acne. (PubMed — Topical black seed oil helpful in acne).

How to use: Blend one drop into jojoba or squalane and smooth a thin layer at night; can also be massaged into the scalp before washing.
Good for: Oil-heavy T-zones, stubborn little bumps.


Pumpkin Seed — Fortifying Natural Oil for Transitional Seasons

Mid-weight and quietly nourishing, pumpkin seed oil offers vitamin E comfort without heaviness. It’s a reliable “shoulder season” pick when skin can’t decide.

How to use: Mix 1 drop pumpkin with 2 drops squalane for a balanced finish.
Good for: Normal/combination skin; autumn and spring.

Learn more about The Benefits of Pumpkin Seeds for Weight Loss and Blood Sugar Control.


Lanolin (or Lanolin Oil) — Natural Occlusive for SOS Dry Spots

Although not a plant oil, lanolin earns a place in natural oils for skin routines for its unrivaled moisture-locking power. (DermNet — Contact reactions to lanolin).

How to use: Over damp skin, tap a grain-of-rice amount on cracked knuckles, lips, or heels; leave overnight.
Note: Not vegan; patch test if sensitive.


Cocoa Butter — Natural Body Butter for Long-Lasting Protection

Firm at room temp, cocoa butter melts into a rich, protective layer. It’s a winter workhorse and a classic in stretch-mark care. A classic occlusive seal—great over damp skin in winter. (DermNet — Occlusives & moisturisers explained).

How to use: Melt between palms and press onto damp skin. For a lighter whip, blend with babassu.
Good for: Legs that drink lotion and still ask for more.


Carrot Seed (Essential) — Antioxidant Natural Oil Add-In (Always Diluted)

Carrot seed essential oil is potent and best viewed as an add-in, not a base. It lends subtle radiance over time when used sparingly.

How to use: Keep face leave-ons at 0.5–1% (≈1–2 drops per 2 tsp carrier oil).
Important: Despite the rumors, it’s not a sunscreen. Wear broad-spectrum SPF 30+. (American Academy of Dermatology — How to select a sunscreen).


Tea Tree (Essential) — Antimicrobial Natural Oil Add-In for Blemish Spots

Tea tree is the classic plant extract for targeted blemish care. Nevertheless, it’s strong—so dilution is non-negotiable. A randomized trial supports 5% tea tree gel for mild–moderate acne; always dilute and use only on spots. (PubMed — 5% tea tree gel improved acne).

How to use: For tiny spots only: 1 tablespoon jojoba + 6 drops tea tree; dab once daily max.
Skip for: Broken skin or undiluted use on the face.

Read about Tea Tree Oil for Scalp Eczema and Psoriasis.


Aloe Infused Oil — Cooling Natural Oil for Post-Sun & Sensitivity

An aloe macerate brings a gentle, cooling glide to natural face oil blends. It doesn’t replace aloe gel; instead, it adds comfort to oils that might otherwise feel too plain.
How to use: Add 10–20% aloe macerate to jojoba or sunflower; press onto warm, damp skin after a day outdoors.
Good for: Mild after-sun care, fussy cheeks.


Vitamin E Oil — Antioxidant Booster for Any Natural Face Oil

Think of vitamin E as your blend’s bodyguard and soft-focus filter. It helps stabilize oils and adds a hint of cushion.
How to use: Add just 0.5–1% to DIY blends; more can feel tacky.
Good for: Extending freshness of rosehip/sea buckthorn mixes.


Argan — Everyday Natural Oil for Shine, Softness & Frizz Control

Beloved for hair, argan is also a steady everyday face oil: not too heavy, not too light.
How to use: 2 drops for face at night; smooth a half-drop across hair ends to tame frizz.
Good for: Normal/dry skin, multitaskers who want one bottle for face + hair.


Kukui — Lightweight Natural Oil for Sun-Parched Skin

Hawaiian kukui absorbs quickly and comforts skin that feels tight after sun or wind.
How to use: Press 2–3 drops on damp skin; mix with rosewater first for a soft, cushiony finish.
Good for: Travelers, beachgoers, anyone in dry wind.


Concern-Based Picks: Best Natural Oils for Skin by What’s Bugging You

Because skin behaves differently under stress, it helps to match natural oils for skin to the exact problem you’re seeing. Below, you’ll find, step-by-step routines (AM/PM), easy blends, timing expectations, and gentle do’s/don’ts.

Patch-test new products first using an open-application method. (DermNet — Open application (ROAT) test).


Eczema, Dermatitis, or “My Skin Is Mad at Me” (Calm + Repair)

When flares hit, natural oils for skin should be barrier-first and fragrance-free. Think comfort over excitement.

Why these help (briefly):

  • Sunflower seed oil (linoleic-rich) supports the lipid matrix, so moisture stays in.
  • Squalane cushions without sting or heaviness.
  • Calendula infused oil visibly soothes the look of redness and itch.
  • Lanolin locks in water on tiny cracked zones.

AM flow (gentle and quick):

  1. Rinse with lukewarm water only (no foaming cleansers on flare days).
  2. Mist or pat on a hydrating toner (optional but helpful).
  3. Press 2–3 drops squalane (face) or sunflower (face/body) onto still-damp skin.
  4. Finish with your unscented cream if you need more cushion; then SPF.

PM flow (comfort ritual):

  1. Short, warm—not hot—shower.
  2. Pat skin barely dry; leave it dewy.
  3. Mix 4 parts sunflower seed oil + 1 part calendula in your palm; press over face/body.
  4. Finally, dot lanolin only on cracks (lips, knuckles, heels). Pajamas on. Sleep.

Tiny weekly rhythm:

  • Nightly oils for 7 days → assess. Often the “angry” look softens by day 4–5.
  • Afterwards, maintain with PM oils 3–5 nights/week.

Do / Don’t:

  • Do keep formulas bland for now.
  • Don’t use undiluted essential oils on the face during a flare.
  • Do patch test wrist or behind ear first.
  • Don’t over-exfoliate “to smooth flakes”—you’ll poke the bear.

Quick blend (fragrance-free): 8 mL sunflower + 6 mL squalane + 6 mL calendula macerate. Shake; press 3–5 drops where needed.

Suggested read to understand: Eczema vs Psoriasis vs Dermatitis


Oily, Shiny, or Skincare for Large Pores (Balance + Clarity)

It feels counterintuitive, yet a touch of the right natural face oil can tell overactive sebaceous glands to relax.

Woman applying jojoba, squalane, and rosehip oils to balance oily skin naturally.
Balance oily skin naturally with Jojoba (mimics sebum), Squalane (weightless hydration), and Rosehip (tone & clarity).

Why these help:

  • Jojoba oil mimics sebum, which often reduces midday shine.
  • Squalane hydrates weightlessly, so skin doesn’t overcompensate.
  • Rosehip oil supports smoother look and tone over time.
  • Tea tree essential oil (diluted) is for spot duty only.

AM flow (keep it light):

  1. Cleanse with a gentle gel.
  2. Optional niacinamide serum.
  3. Press 1–2 drops jojoba or squalane over damp skin.
  4. Matte-friendly SPF.

PM flow (balanced and simple):

  1. Cleanse; on 2–3 nights/week, use a BHA (salicylic) after cleansing.
  2. Press 2 drops squalane all over;
  3. Then tap 1 drop rosehip across areas with uneven tone.
  4. Dab a pin-prick of tea tree in carrier directly on a blemish (never neat).

Seven-day expectations:

  • Day 3: T-zone looks less glassy at noon.
  • Week 2: Fewer “sticky” clogged areas; makeup sits better.

Do / Don’t:

  • Do apply oils on damp skin so they spread sheer.
  • Don’t layer heavy butters on the T-zone.
  • Do stick to pea-sized amounts—more is not better.
  • Don’t chase every new active while you’re testing oils; change one thing at a time.

Spot blend (safe, tiny): 1 Tbsp jojoba + 6 drops tea tree. Shake; dab with a cotton tip on the blemish once daily max.


Dullness, Uneven Tone, or “I Miss My Vacation Glow” (Radiance + Elasticity)

To revive a flat complexion, combine antioxidants by day and replenishing natural oils for skin at night.

Woman applying rosehip oil with dropper for glowing skin alongside prickly pear and sea buckthorn oils.
Rosehip, Prickly Pear, and Sea Buckthorn—antioxidant-rich oils to restore glow and elasticity.

Why these help:

  • Rosehip gently supports tone/texture.
  • Sea buckthorn brings carotenoids for a healthy, cushy glow.
  • Prickly pear seed delivers silk and bounce around eyes and fine lines.

AM flow (bright but calm):

  1. Cleanse or rinse.
  2. Vitamin C or niacinamide serum.
  3. 1 drop squalane for slip; then SPF.
  4. Optional: mix ½ drop prickly pear into concealer for a smoother under-eye laydown.

PM flow (glow routine):

  1. Cleanse.
  2. Press 2 drops rosehip all over.
  3. Add the tiniest smear of sea buckthorn (a pin head) into your rosehip in the palms for cheeks; it stains, so go slow.
  4. Pat 1 drop prickly pear under each eye.

Timeline you can feel:

  • Week 2: less “chalky” look; makeup needs less highlighter to come alive.
  • Week 4: tone appears more even; fine lines look cushioned.

Do / Don’t:

  • Do keep sea buckthorn microscopic—just enough to tint your blend.
  • Don’t skip sunscreen; radiance work without SPF is two steps forward, two back.
  • Do give it 2–4 weeks; brightness is cumulative.

Glow blend (night): 6 mL rosehip + 3 mL prickly pear + 1 mL sea buckthorn. Two drops max; protect your pillowcase.


Very Dry Body Skin That “Drinks Lotion and Still Wants Dessert” (Seal + Soften)

For thirsty limbs, the secret is layering water, then natural body oil, then a seal. Consequently, you wake up satin-soft.

Woman moisturizing with shea butter and almond oil while holding marula oil dropper bottle.
Shea, Almond, and Marula oils—classic trio to soothe and soften very dry skin.

Why these help:

  • Sunflower seed oil spreads easily and feeds the barrier.
  • Shea or cocoa butter lock in the comfort for hours.
  • Lanolin rescues cracks overnight.

After-shower flow (takes 90 seconds):

  1. End with warm—not hot—water.
  2. Pat so skin is damp, not dripping.
  3. Palm-mix 1 tsp sunflower and sweep over legs, arms, torso.
  4. Follow with a thin veil of shea or cocoa over the driest zones.
  5. Dab lanolin on heels, cuticles, or knuckles. Pajamas on.

Weekly rhythm that works:

  • Do the full stack nightly for 5–7 nights.
  • Then maintain 3–4 nights/week, or just on cold/windy days.

Do / Don’t:

  • Do switch to cotton or bamboo PJs—they help oils stay on you, not your sheets.
  • Don’t scald skin in the shower; heat steals moisture.
  • Do exfoliate gently (washcloth or soft mitt) once weekly so oils can sink in.

Body butter cloud (easy DIY): Equal parts melted shea + cocoa + a splash of babassu; whip as it cools. Apply on damp legs for a velvet finish.


Sensitive Souls Who React to Everything (Reset + Rebuild)

When your skin side-eyes every product, simplicity is medicine. Therefore, reach for the most boring, elegant natural oils for skin and give your barrier two quiet weeks.

Woman using calendula and chamomile infused oil with argan oil to calm sensitive, irritated skin.
Calendula, Chamomile, and Argan—gentle oils that calm redness and soothe sensitive skin naturally.

Why these help:

  • Squalane is famously inert and comfy.
  • Sunflower is light, baby-safe, and barrier-friendly.
  • Calendula can be introduced later for extra calm.

Two-week reset (yes, it’s minimal):

  • AM: Lukewarm rinse → 2 drops squalane on damp skin → SPF.
  • PM: Gentle cleanse → 2–3 drops sunflower (or squalane again) → optional bland cream.

After week 2:

  • If skin is steadier, add calendula at 20% into sunflower every other night.
  • If things stay calm, test a single new step (like niacinamide) for another two weeks.

Do / Don’t:

  • Do patch test new oils behind the ear for two nights first.
  • Don’t stack fragrance or essential oils on the face during a reset.
  • Do log changes (what/when), so you can spot patterns.
  • Don’t judge your skin in overhead office lighting—no one looks good there.

Comfort blend (ultra-simple): 9 mL squalane + 9 mL sunflower. Shake; use 2–3 drops AM/PM.


Quick Reference: Matching Concerns to Natural Oils for Skin

  • Eczema/dermatitis: sunflower, squalane, calendula; lanolin on cracks.
  • Oily/large pores: jojoba, squalane, rosehip; tea tree (diluted) for spots.
  • Dull/uneven tone: rosehip + a whisper of sea buckthorn; prickly pear under eyes.
  • Very dry body: sunflower base + shea/cocoa seal; lanolin on heels/hands.
  • Ultra-sensitive: squalane or sunflower for two quiet weeks; add calendula later.

These aren’t strict rules; they’re starting points. Your skin will tell you what it likes—especially when you change just one thing at a time.


Little Nudge

Because routines only work when you actually do them, choose one concern and one tiny change from above. For example, try jojoba at night for shine control, or go all-in on that sunflower-plus-shea stack for body softness. Then, reassess in a week. If you’re calmer, softer, or glowier, you’re winning.


Exactly how to apply natural oils for skin so they feel like a treat (not a film)

  1. Add water first. Mist, toner, or just leave skin slightly damp from cleansing.
  2. Use the “pea test.” Start with 2–4 drops for the face, a teaspoon for the body.
  3. Press, don’t rub. Warm between your palms, then press over cheeks, forehead, chin.
  4. Layer logically. Serums → cream → oil at night. In the morning, oil first, then wait a minute before SPF.
  5. Mix when you want. If straight oil feels heavy, blend 1–2 drops into your moisturizer for a “custom oil-in-cream.”

Moreover, if makeup pills over oil, shift your oil to nights only or reduce the amount. A single drop mixed into foundation can add glow without slip.


Oil cleansing (the five-minute reset)

Makeup heavy day? Sunscreen layered? Here’s a gentle reset that doesn’t strip:

  • Massage 1 tsp jojoba or olive over your dry face for a full 60 seconds.
  • Wet hands and keep massaging to lightly emulsify.
  • Remove with a warm, wrung-out cloth.
  • Optionally follow with a tiny amount of your regular cleanser (double cleanse).
  • Finish with a mist + your favorite light oil (squalane is perfect).

You’ll feel clean, soft, and strangely peaceful.


Tiny recipes (fast, safe, easy to love)

  • Balancing face drops: 6 mL squalane + 6 mL jojoba + 3 mL rosehip (optional +3 mL prickly pear).
  • Comfort oil for red cheeks: 8 mL sunflower + 6 mL squalane + 6 mL calendula macerate.
  • Body butter cloud: Equal parts melted shea + cocoa + a splash of babassu; whip as it cools.
  • Spot-only blemish dab: 1 Tbsp jojoba + 6 drops tea tree (~1%): dab once daily max. For essential-oil safety, keep face leave-ons around 0.5–1%; body up to ~2%; and spot treatments up to ~5% on tiny areas. (Tisserand Institute — Essential-oil dilution chart).

Patch test new mixes behind the ear or on inner forearm for 2–3 nights. If it stays quiet, you’re good. (DermNet — Open application (ROAT) test)


Safety & smart habits (because “natural” still needs nuance)

Dilution matters: Follow conservative essential-oil dilutions; be mindful that expressed citrus oils (e.g., lemon/lime) can be phototoxic on sun-exposed skin unless below thresholds or furanocoumarin-free. (Tisserand Institute — Phototoxicity: essential oils, sun & safety; IFRA/RIFM — Guidance for IFRA Standards)

SPF is non-negotiable: Use a broad-spectrum SPF 30+ daily; oils are not sunscreen. (American Academy of Dermatology — How to select a sunscreen)

Lanolin & nut oils: Excellent occlusives, but patch-test if you’re sensitive or allergic. (DermNet — Lanolin contact reactions).


Troubleshooting (real skin, real fixes)

  • Still dry? Add a water step before oil (mist or hydrating serum), then consider sealing with a cream on top.
  • Too shiny? Cut your amount in half and switch to squalane or jojoba. Apply on damp skin so it spreads thin.
  • Breaking out? Pause heavier oils (coconut, butters). Use squalane solo for two weeks, then reintroduce one oil at the perimeter first.
  • Makeup won’t sit? Keep oils for night; by day, use one drop mixed into foundation or apply oil 10–15 minutes before SPF.
  • Eczema flare? Simplify. Sunflower + calendula on damp skin; tiny dot of lanolin where cracked. Give it consistent nights for a week.

Routines you can copy (AM/PM, one week to calmer skin)

The Minimalist (all skin types):

  • AM: Rinse → serum (if you like) → 2 drops squalane → SPF.
  • PM: Gentle cleanse → 2 drops rosehip or marula → cream if needed.

The Balancer (oily/large pores):

  • AM: Cleanse → niacinamide → 2 drops jojoba → SPF.
  • PM: Cleanse → BHA 2–3x/week → 2 drops squalane → spot tea tree diluted if needed.

The Comforter (sensitive/eczema-prone):

  • AM: Lukewarm water → 2 drops squalane → SPF.
  • PM: Short shower → sunflower + calendula on damp face/body → lanolin dot on cracks.

The Glow Seeker (dull/uneven):

  • AM: Cleanse → vitamin C → 1 drop squalane → SPF.
  • PM: Cleanse → 2 drops rosehip + a whisper of sea buckthorn → cream.

Myths, kindly debunked (and why they matter)

  • “Oil replaces moisturizer.” Sometimes, but not always. Oils seal; moisturizers hydrate. Dry-dehydrated skin often loves both.
  • “All oils clog pores.” Not true. Jojoba, squalane, and rosehip are generally friendly; coconut and thick butters can be risky on acne-prone faces.
  • “Carrot seed oil is sunscreen.” It is not. It’s an antioxidant add-in, not UV protection. Wear SPF.
  • “Natural means safe for everyone.” Also not true. Nature is potent. Patch testing keeps you in the “ahh” zone, not the “oh no” zone.

Extra credit: thoughtful add-ons & pairings

  • Rosewater (organic) + oil: Mist first, then oil. The glow is immediate yet soft.
  • Beeswax (for balms): Add a small amount to create a salve for elbows and heels; it locks in oil and reduces rub-off.
  • Lavender essential oil (skin): Pleasant but optional; keep it low if you’re sensitive, or skip entirely.
  • Lemon/orange peel oils: Smell lovely yet can irritate; keep to body products at low percentages, and avoid sun post-application on exposed areas.
  • Kumkumadi lepam: An Ayurvedic classic featuring saffron; if you try it, patch test and reserve for night to keep things gentle.
Woman enjoying sun while holding natural face oils like raspberry seed, jojoba, rosehip, and sea buckthorn for summer glow.
Summer glow protection with Raspberry Seed (UV supportive), Jojoba (balancing), Sea Buckthorn (antioxidant-rich), and Rosehip (repairs sun damage).

The gentle bottom line on natural oils for skin

You don’t need a 12-step routine to have happy skin. Instead, choose one or two natural oils for skin that fit your current season and your current mood. Maybe it’s squalane in the morning for a weightless, makeup-friendly finish. Perhaps it’s rosehip at night for tone and texture. Or possibly it’s sunflower for the body right after a shower, followed by a little shea or cocoa on the driest spots. Layer water first, then a few drops of oil, then breathe.

Consistency wins. So does kindness. And while this guide covered a lot of ground, your best routine will be the one you’ll actually do—calm, quick, and quietly effective. If you want, tell me your skin type, climate, and what’s already on your shelf; I’ll sketch a 7-day AM/PM plan that uses exactly what you have and plugs in just the right oils.

Your skin will thank you—softly, steadily, and in its own time.

Posted on 3 Comments

Ginger Oil and the Belly Button: Benefits, Myths, and How to Use

GINGER OIL AND THE BELLY BUTTON

In recent years, wellness practices rooted in ancient traditions have gained significant attention. One such practice that has sparked curiosity is the application of ginger oil to the belly button, often referred to as the “Pechoti method.” This technique, believed to have its origins in Ayurvedic medicine, suggests that the navel is a central point for health and wellness, offering a gateway for oils and other substances to enter the body. But is there any truth to these claims? Can ginger oil really offer health benefits when applied to the belly button? Let’s dive deep into the science, benefits, myths, and practical guidance surrounding this unique wellness practice.


What Is the Pechoti Method?

The Pechoti method is a traditional practice rooted in Ayurveda, an ancient system of medicine from India. According to this method, the belly button is seen as a vital point in the body, a hub of energy and health. It’s believed to have direct connections to various organs and systems, and applying oils or medicinal substances here can promote overall well-being.

While this idea might sound unconventional, the theory is that the belly button serves as a “portal” to internal systems—perhaps due to the historical importance of the umbilical cord. In Ayurveda, the navel is thought to help absorb and distribute beneficial properties of essential oils to the entire body, supporting everything from digestion to hormone balance.


Ginger Oil: A Powerful Natural Remedy

Ginger oil is derived from the root of the ginger plant, which has been used for centuries for its medicinal properties. It contains powerful compounds like gingerol, shogaol, and zingiberene, known for their anti-inflammatory, antioxidant, and analgesic effects. These properties make ginger oil a popular choice for soothing muscle pain, reducing inflammation, and even alleviating nausea and digestive discomfort.

When applied topically, ginger oil can provide a warming sensation that helps to increase blood circulation in the area, which may offer localized pain relief. This makes ginger oil particularly beneficial for muscle aches, joint pain, and even conditions like indigestion.

But does the belly button really enhance these effects? Let’s explore the potential benefits of this practice in detail.


The Potential Benefits of Ginger Oil in the Belly Button

Although modern science has not fully validated the claims surrounding the Pechoti method, many users swear by the practice. Below are some of the benefits commonly attributed to applying ginger oil to the belly button:

1. Improved Digestion

One of the most common benefits reported by users is improved digestion. Ginger is well-known for its ability to ease nausea, reduce bloating, and promote healthy digestion. Applying ginger oil to the belly button might help soothe digestive discomfort by stimulating circulation and supporting the digestive organs.

In fact, some believe that the belly button’s connection to the digestive system makes it an ideal point for ginger oil to be absorbed and enhance digestive health. While there’s no scientific evidence to support this claim, anecdotal evidence suggests that many individuals experience reduced bloating and improved gut health after incorporating this practice.

2. Menstrual Relief

Many women experience discomfort during their menstrual cycle, including cramps, bloating, and fatigue. Ginger, known for its anti-inflammatory and pain-relieving properties, has been used for centuries to alleviate menstrual pain.

Applying ginger oil to the belly button may help reduce menstrual cramps and discomfort by improving blood flow to the pelvic area and reducing inflammation. Some users on platforms like Reddit and TikTok have shared their personal experiences of feeling significant relief from cramps after using ginger oil in this way.

3. Stress Relief and Relaxation

The process of applying oil to the belly button can also be incredibly calming. This practice encourages mindfulness and relaxation, and the warming sensation of ginger oil may provide comfort and stress relief. Many users report feeling more grounded and relaxed after incorporating this practice into their daily routine.

Furthermore, ginger oil’s soothing aroma can have a calming effect, helping to reduce anxiety and promote mental clarity. The navel is considered an energy center in Ayurveda, so focusing on this area may help balance and center the body’s energy.

4. Skin Health

Applying ginger oil to the belly button might also have positive effects on skin health. Ginger oil is rich in antioxidants, which help protect the skin from oxidative stress caused by free radicals. These compounds may contribute to healthier, more radiant skin.

In some cases, users report that the area around their belly button feels softer and more hydrated after using ginger oil. While this effect is largely anecdotal, it’s worth noting that regular use of diluted ginger oil might help reduce dryness or irritation in the skin.


Debunking the Myths: What Does Science Say?

While the traditional use of ginger oil in the belly button is rooted in ancient practices, modern science has not fully validated these claims. Here’s a look at some of the common myths and the scientific evidence (or lack thereof) that supports or refutes them:

1. The Belly Button as a “Magic Portal” for Absorption

One of the most significant myths associated with this practice is the idea that the belly button acts as a direct gateway for oils and substances to enter the bloodstream. The concept of a “Pechoti gland” in the belly button, responsible for absorbing substances, is not supported by scientific evidence. The skin in this area is like the skin elsewhere on the body, and it doesn’t have any special mechanisms for absorbing oils into the bloodstream.

While oils applied to the skin can be absorbed through the epidermis, this process happens gradually and is local to the area where the oil is applied. Therefore, applying ginger oil to the belly button is unlikely to have systemic effects on the body in the way that some proponents of the practice suggest.

2. Ginger Oil for Weight Loss

Another claim associated with the belly button and ginger oil is weight loss. Some wellness influencers claim that ginger oil can help reduce belly fat or boost metabolism when applied to the belly button. However, there is no scientific evidence supporting these claims.

While ginger is known to have some digestive benefits and may help reduce bloating, weight loss requires a combination of factors such as a balanced diet, regular physical activity, and overall calorie expenditure. Ginger oil alone is not a magic solution for weight loss.

3. Instant Health Benefits

Another myth is that applying ginger oil to the belly button will provide instant health benefits. While ginger oil is a powerful remedy, it’s unlikely to produce immediate, dramatic results. Many of the reported benefits, such as improved digestion or reduced cramps, are often cumulative and require regular use over time.


How to Use Ginger Oil on the Belly Button

If you’re interested in trying the Pechoti method, here’s how you can safely incorporate ginger oil into your wellness routine:

1. Dilute the Ginger Oil

Essential oils are highly concentrated and can cause skin irritation if used undiluted. Always dilute ginger essential oil with a carrier oil like coconut, jojoba, or olive oil. A general rule of thumb is to use 3-5 drops of essential oil per tablespoon of carrier oil.

2. Perform a Patch Test

Before applying ginger oil to your belly button, it’s essential to conduct a patch test. Apply a small amount of the diluted oil to a small area of your skin (such as the inside of your wrist) and wait for 24 hours to ensure there are no allergic reactions.

3. Apply to the Belly Button Area

Once you’ve diluted the oil and performed a patch test, you can apply a few drops of the oil mixture around your belly button. Gently massage the oil into your skin in a circular motion. You can also use this time for relaxation and mindfulness, as the aroma and warmth of the oil can help soothe the mind.

4. Repeat Regularly

For the best results, you should repeat this practice regularly. Many users report positive effects after consistent use, such as improved digestion, relief from cramps, and enhanced relaxation.


Conclusion

The practice of applying ginger oil to the belly button, while rooted in ancient wisdom, has become increasingly popular in modern wellness circles. While scientific evidence does not fully support the claims of the Pechoti method, anecdotal reports suggest that many people experience benefits such as improved digestion, menstrual relief, and stress reduction.

If you’re interested in trying this practice, make sure to do so safely by diluting the oil and performing a patch test. Remember, wellness is a personal journey, and what works for one person may not work for another. As with any new health practice, it’s important to listen to your body and consult a healthcare professional if you have any concerns.

Embrace the ritual with an open mind, and you may just find that the ancient practice of applying ginger oil to the belly button adds a sense of calm and balance to your daily routine.

FAQs About Ginger Oil and the Belly Button Practice

1. What is the Pechoti method?

The Pechoti method is an ancient practice, primarily from Ayurvedic traditions, that involves applying oils to the belly button. It is believed that the navel is a key energy center connected to various organs, and that oils applied to this area can be absorbed and support overall health.

2. Does applying ginger oil to the belly button really work?

While there is no scientific evidence supporting the claim that ginger oil directly enters the bloodstream through the belly button, many people report anecdotal benefits, such as improved digestion, relief from menstrual cramps, and enhanced relaxation.

3. What are the benefits of using ginger oil on the belly button?

Common benefits reported include improved digestion, relief from menstrual cramps, reduced bloating, enhanced skin hydration, and stress reduction. The warming effect of ginger oil is believed to promote blood circulation in the area.

4. Can ginger oil help with weight loss when applied to the belly button?

There is no scientific evidence to suggest that applying ginger oil to the belly button can promote weight loss. Effective weight loss requires a balanced diet and regular exercise. Ginger oil may help with bloating and digestion, but it is not a weight-loss solution.

5. How should I apply ginger oil to my belly button?

Dilute ginger essential oil with a carrier oil, such as coconut or jojoba oil, and apply a few drops around your belly button. Gently massage in a circular motion. Be sure to conduct a patch test before using the oil on a larger area.

6. Is it safe to use ginger oil on the belly button?

Yes, it is generally safe to use ginger oil on the belly button when diluted with a carrier oil. However, it’s important to perform a patch test to avoid any allergic reactions and to consult a healthcare provider if you are pregnant or have existing health conditions.

7. How often should I apply ginger oil to the belly button?

For the best results, apply ginger oil to the belly button regularly, such as once or twice a day. However, listen to your body and adjust based on how your skin responds.

8. Can ginger oil help with menstrual cramps?

Yes, ginger oil may provide relief from menstrual cramps. The anti-inflammatory properties of ginger, combined with the warming effect of the oil, can help soothe pain and discomfort in the abdominal area.

9. Are there any side effects to using ginger oil on the belly button?

Potential side effects include skin irritation or an allergic reaction if the oil is not properly diluted. Always perform a patch test and consult a healthcare professional if you have sensitive skin or other health concerns.

10. Can I use other essential oils in the belly button, or is it only ginger oil?

You can use other essential oils like lavender, peppermint, or frankincense for different benefits. However, always ensure that the oils are diluted with a carrier oil and perform a patch test to ensure they’re safe for topical use.

Posted on Leave a comment

Natural Remedies for Nasal and Sinus Congestion

NATURAL REMEDIES FOR NASAL & SINUS CONGESTION

Struggling to breathe through your nose? Foggy head, throbbing pressure, and a tissue box as your new best friend? You’re not alone. Millions battle nasal and sinus congestion from allergies, colds, weather changes, or just that mysterious seasonal gunk. But you don’t always need to run for the pharmacy—nature, ancient wisdom, and real-life hacks can offer serious relief.

Below you’ll find a deep dive into proven natural remedies—including practical “how-tos,” science-backed facts, and direct experiences from real people. Ready to breathe easy again? Let’s get started.


Why Natural Remedies?

Conventional decongestants and sprays work, but they can come with downsides—rebound congestion, drowsiness, or even raising your blood pressure. Natural methods, on the other hand, focus on gently supporting your body’s own healing and clearing pathways, often with fewer side effects.

Best of all? Most remedies below use items you already have in your kitchen or bathroom.


1. Steam: The Classic Sinus Opener

Why it works: Steam moistens dry nasal passages, thins mucus, and helps everything drain out. Warmth can also ease pressure and sinus pain.

How to do it:

  • Fill a large bowl with steaming hot water (not boiling!).
  • Drape a towel over your head, lean in, and breathe slowly for 5–10 minutes.
  • For an extra boost, add a few drops of eucalyptus or peppermint oil (optional).
  • Repeat 1–2 times a day as needed.

Community tip:

“A thyme steam before bed, followed by Vicks on my nostrils, is a game-changer. Usually, I wake up clear the next morning.” — Reddit user, r/herbalism

Bonus: Take a hot, steamy shower if you’re short on time or privacy!


2. Saline Nasal Irrigation: Flush It Out

Why it works: Saltwater rinses clear mucus, allergens, and germs from your nasal passages. Studies show regular saline rinses shorten sinusitis and allergy flares by days.

How to do it:

  • Use a neti pot, squeeze bottle, or pre-made saline spray.
  • Make your own solution: ½ teaspoon salt + ½ teaspoon baking soda dissolved in 2 cups distilled, boiled (then cooled), or sterile water.
  • Lean over the sink, tilt your head sideways, and gently pour or squeeze the solution into one nostril. Let it drain out the other side or your mouth.
  • Repeat on the other side. Blow your nose gently.

Tips & Cautions:

  • Always use distilled/boiled/sterile water! Tap water can rarely contain dangerous germs.
  • Some people add a pinch of xylitol or a drop of apple cider vinegar (test for irritation first).

Real-life hack:

“Xylitol in my sinus rinse is life changing. I’m blowing stuff out that feels like it’s been stuck forever.” — r/Sinusitis user


3. Herbal & Spicy Remedies: Mother Nature’s Decongestants

Hot “Flu-Bomb” Tonic

Viral on social media and forums, this spicy-sour shot is a natural mucus-thinner and immune-booster.

Recipe:

  • 1 tbsp apple cider vinegar
  • 1 tsp grated fresh ginger
  • 1 clove crushed garlic
  • 1 tsp honey
  • Pinch of cayenne pepper
  • Juice of ½ lemon
  • (Optional: turmeric, black pepper)

Mix in a glass, add hot water if desired, and sip or “shot” it back.

What people say:

“Garlic, ginger, honey, and ACV flu-bomb clears me out every time. Burns a bit, but works.” — NY Post viral trend


Spicy Foods & Teas

  • Hot peppers, wasabi, and horseradish can momentarily open up nasal passages.
  • Herbal teas (peppermint, ginger, chamomile, nettle) are soothing and anti-inflammatory.

Tip: Chewing peppermint gum or sipping nettle tea before bed is now recommended by some sleep experts for allergy-related stuffiness.


4. Essential Oils & Aromatherapy

Why it works: Eucalyptus and menthol create a cooling sensation, which can make breathing feel easier.

How to use:

  • Add a few drops to your steam inhalation.
  • Use a diffuser in your room (never apply essential oils directly inside your nose).
  • Rub diluted peppermint or menthol balm (like Vicks) on your chest, not in nostrils.

Caution: Essential oils can irritate or trigger allergies for some people. Always patch test.


5. Face Massage, Acupressure & Warm Compresses

  • Warm compress: Place a warm, wet cloth across your nose and cheeks for 10–15 minutes.
  • Facial massage: Gently massage under your cheekbones and along your brows, pressing in circular motions.
  • Pressure points: Pinch the area between your eyebrows, or massage the roof of your mouth with your tongue for 20–30 seconds for fast drainage.

Community tip:

“Pressure points give me immediate relief, especially when combined with hot showers.” — r/phoenix user


6. Hydration & Anti-Inflammatory Diet

  • Drink plenty of water, herbal teas, and broths.
  • Cut down on alcohol and caffeine (which can dry you out).
  • Eat anti-inflammatory foods: garlic, ginger, turmeric, berries, leafy greens, and fatty fish.
  • Some people find reducing dairy lessens mucus, but results vary.

Supplements getting buzz in 2024–2025:

  • Quercetin & bromelain: For allergies and swelling
  • Stinging nettle: A natural antihistamine
  • Butterbur: Shown in studies to help some allergy sufferers

7. Lifestyle: Humidity, Sleep, and Clean Air

  • Use a humidifier in your bedroom (clean it regularly!).
  • Elevate your head with an extra pillow to encourage sinus drainage overnight.
  • Keep your environment free of dust, smoke, and strong fragrances.

Parent tip:

“Humidifiers, Gua Sha face massage, and neti pots—our go-to for the whole family.” — r/moderatelygranolamoms


8. What to Watch Out For

  • Always use clean water for nasal rinses.
  • Start slow with strong spices or essential oils—more is not always better!
  • Herbal supplements can interact with medications. Check with a healthcare provider, especially if you’re pregnant, nursing, or have chronic health issues.
  • If symptoms last more than 10 days, worsen, or include fever, facial swelling, or vision changes, see a doctor—sometimes antibiotics or other interventions are needed.

In Summary: Find What Works for You

No one remedy fits all—but combining steam, hydration, gentle saline rinses, and herbal supports can make a huge difference for most people. Start simple. Tweak your routine. Don’t be afraid to experiment (safely!). And remember: your body, your pace.

Have a favorite home remedy, a trick you swear by, or a question about your sinus struggles? Share in the comments or drop me a line—I’d love to hear your story and help you breathe easier!


Breathe deep. Relief is closer than you think.

FAQs

1. What’s the safest way to do a saline nasal rinse at home?
Answer:
Always use distilled, sterile, or previously boiled and cooled water. Mix ½ teaspoon of non-iodized salt and ½ teaspoon baking soda in 2 cups of water. Use a clean neti pot or squeeze bottle, and rinse thoroughly after each use.


2. Can steam inhalation help with all types of nasal congestion?
Answer:
Steam works best for congestion caused by thick mucus, colds, or mild sinus infections. It may not be as effective for severe allergies or structural issues like a deviated septum.


3. Are essential oils safe for sinus relief?
Answer:
Eucalyptus and peppermint oil can offer temporary relief, but never apply undiluted oils directly inside your nose. Always dilute and use in steam or diffusers. Some people may experience irritation or allergic reactions.


4. What natural remedies are best for allergy-related congestion?
Answer:
Try saline rinses, stinging nettle tea, quercetin, local honey, and anti-inflammatory foods (garlic, ginger, turmeric). HEPA air purifiers and regular cleaning also help reduce allergens indoors.


5. How long should I try natural remedies before seeing a doctor?
Answer:
If congestion lasts more than 7–10 days, worsens, or is accompanied by high fever, severe headache, facial swelling, or vision changes, consult a healthcare provider promptly.


6. Can dietary changes really reduce sinus congestion?
Answer:
Yes. Many people report less mucus and congestion when they reduce dairy, processed foods, and increase anti-inflammatory foods like leafy greens, berries, and fatty fish.


7. Is it safe to use apple cider vinegar or xylitol in nasal rinses?
Answer:
Some users report benefits, but these additions can cause irritation in sensitive noses. If you try them, start with very small amounts and stop if you notice burning or discomfort.


8. What’s the quickest way to relieve sinus pressure at home?
Answer:
Apply a warm compress to your face, use steam inhalation, try acupressure on your cheekbones and brow, and use a saline rinse. Over-the-counter NSAIDs like ibuprofen can also help reduce swelling.


9. Are there risks with frequent nasal rinsing?
Answer:
Rinsing 1–2 times a day is generally safe. Over-rinsing may cause dryness or mild irritation. Always use clean water and sterile equipment.


10. What natural remedies are safe for kids?
Answer:
Saline nasal sprays or drops, humidifiers, steamy bathrooms (not hot water bowls), and plenty of fluids are safest. Avoid essential oils, spicy remedies, and supplements in young children unless approved by a pediatrician.