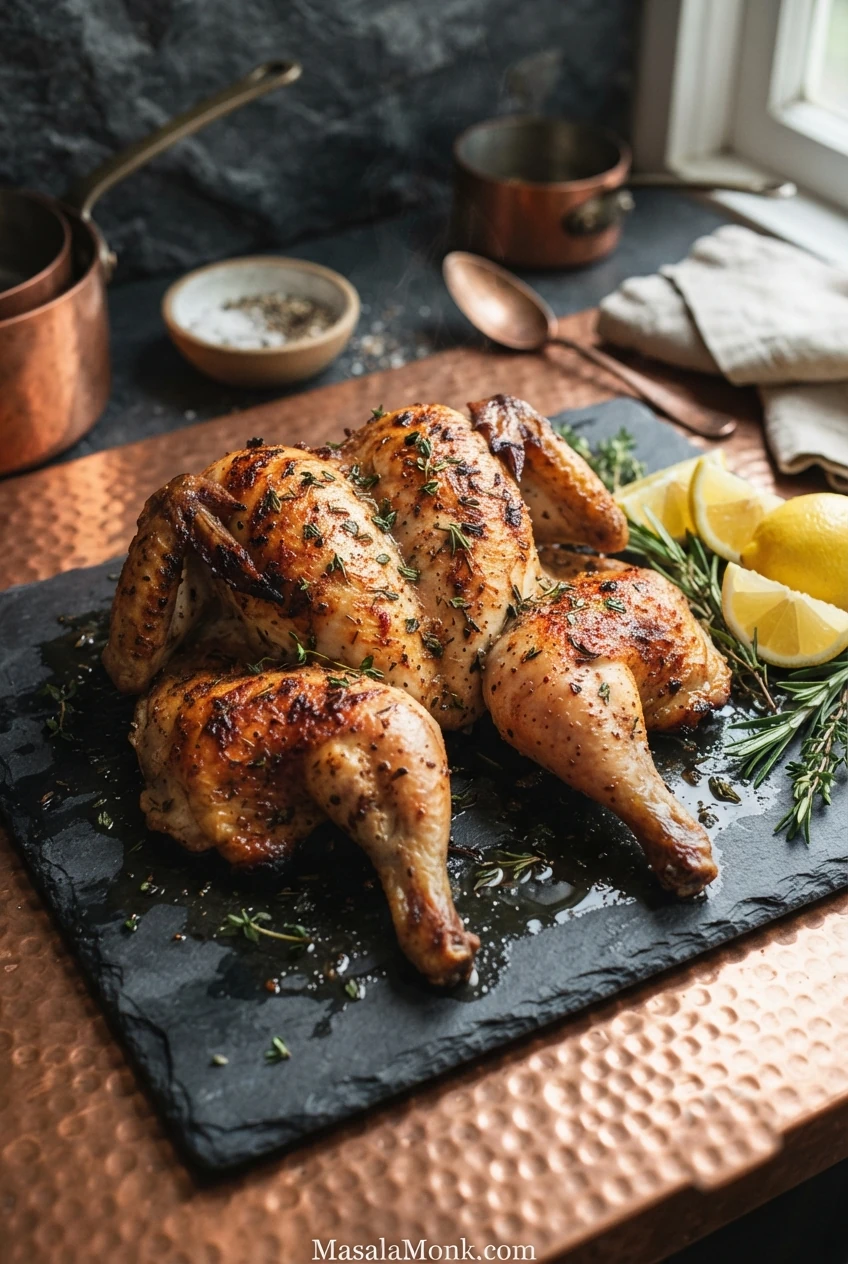
A good spatchcock chicken has golden skin over the breast, darker edges around the legs and meat that is easy to carve. Removing the backbone lets the bird open wide, so more of its skin faces the hot oven instead of folding beneath the body.
Spatchcocking—also called butterflying—means cutting out the backbone and pressing the breastbone down. Sturdy poultry shears make the job more manageable than trying to force a knife through bones. The finished chicken can look a little uneven; what matters is that it lies flat and fits the roasting tray.
This spatchcock chicken recipe uses a 4–4½ lb (1.8–2 kg) plain, unbrined chicken, olive oil, garlic, paprika, thyme and rosemary. Roast at 425°F (220°C) conventional for approximately 40–60 minutes, checking from about 35 minutes. The thick breast, innermost thigh and wing areas must reach 165°F (74°C); colour alone is not a doneness test.
Jump to the recipe · Step-by-step instructions · Cooking times · Troubleshooting
Spatchcock Chicken at a Glance
| Chicken | 4–4½ lb (1.8–2 kg), fully thawed, plain and unbrined |
|---|---|
| Oven | 425°F (220°C) conventional, or 200°C (about 400°F) fan |
| Preparation | 20–25 minutes; allow longer on your first attempt |
| Roasting | Approximately 40–60 minutes |
| Start checking | Around 35 minutes |
| Safe internal temperature | 165°F (74°C) in the required thick areas |
| Resting | 10–15 minutes, uncovered |
| Total same-day time | Approximately 70–100 minutes, with preheating overlapping preparation |
| Servings | 4 generous portions, or up to 6 with substantial sides |
Spatchcock Chicken Recipe
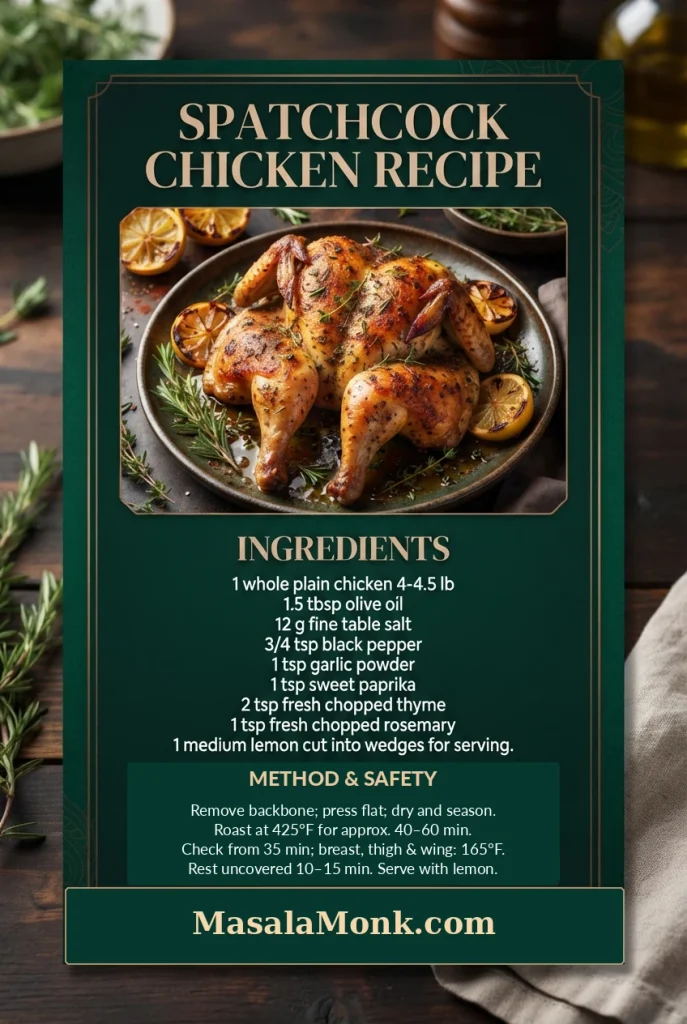
This is a lightly seasoned roast rather than a sticky, marinated chicken. The visual recipe card is a quick reference; use the written steps below for the full cutting technique, salt decisions and temperature checks.
Ingredients
- 1 whole chicken, 4–4½ lb (1.8–2 kg), fully thawed, plain and unbrined
- 1½ tablespoons (22 ml) olive oil
- 12 g fine table salt, approximately 2 level teaspoons; weighing is preferred
- ¾ teaspoon freshly ground black pepper
- 1 teaspoon garlic powder, not garlic salt
- 1 teaspoon sweet paprika
- 2 teaspoons finely chopped fresh thyme, or about ⅔ teaspoon dried thyme
- 1 teaspoon finely chopped fresh rosemary, or about ⅓ teaspoon dried rosemary
- 1 medium lemon, cut into wedges for serving
Keep the spices separate until you check the labels: garlic salt would add unplanned salt, while hot chilli powder changes the flavour and heat of this garlic-herb roast.
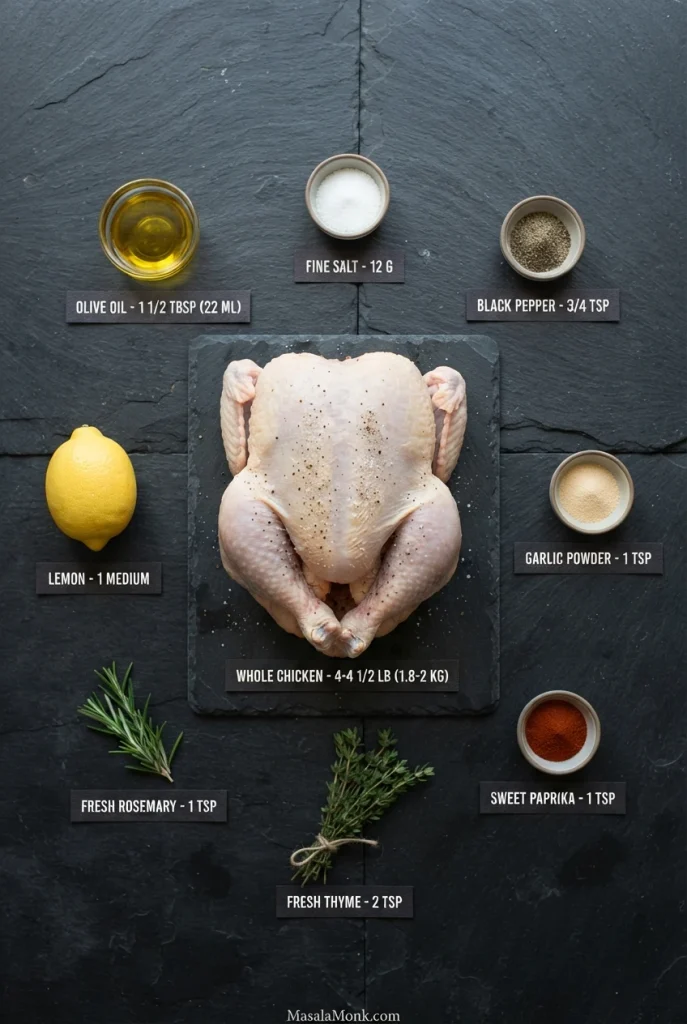
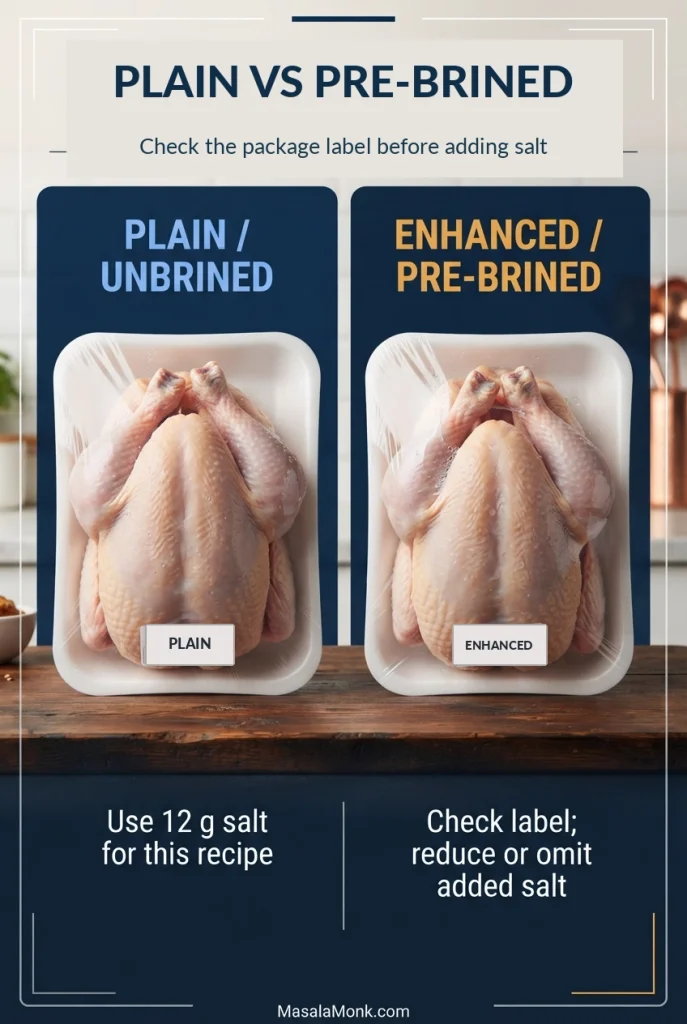
Check the chicken label before salting. The 12 g salt quantity is for a plain bird without an added salt solution. If the package says enhanced, injected, self-basting, pre-brined, or seasoned, reduce or omit the additional salt as appropriate. Different salts weigh differently by the teaspoon, so use grams when switching salt types.
Equipment
- Sturdy poultry shears
- A stable, easy-to-clean cutting board
- A rimmed baking sheet, ideally around 13 × 18 inches (33 × 46 cm), if the bird fits
- An oven-safe wire rack that fits the tray, if available
- An instant-read food thermometer
- Paper towels, a small bowl, and a carving knife
The shears should open comfortably through a full cutting stroke, and the rimmed tray must hold the flattened bird without overhanging legs or wings.
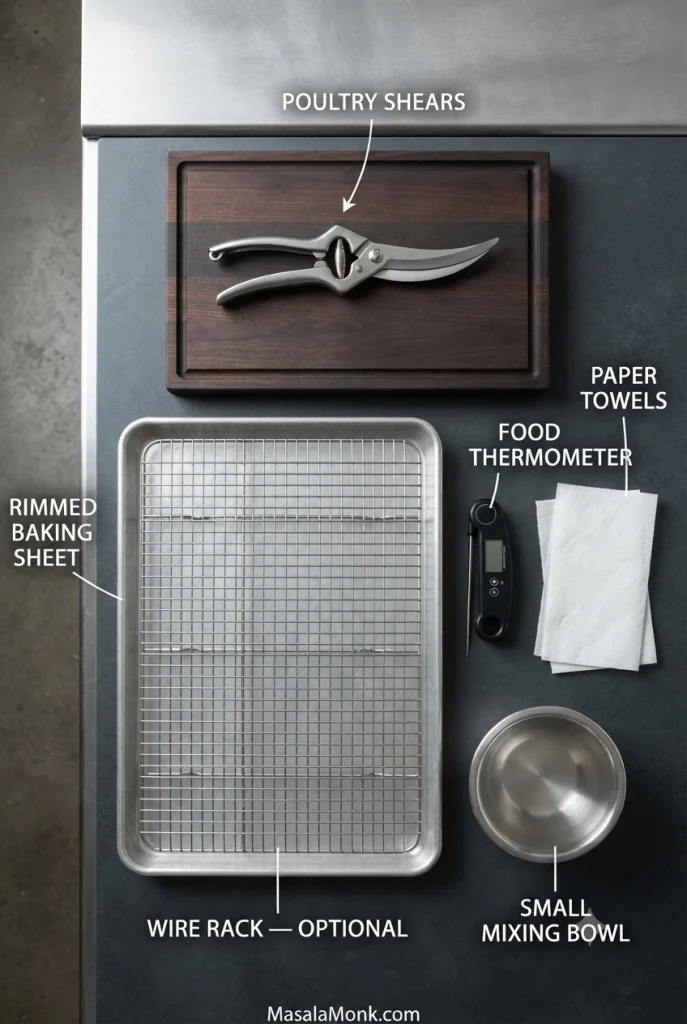
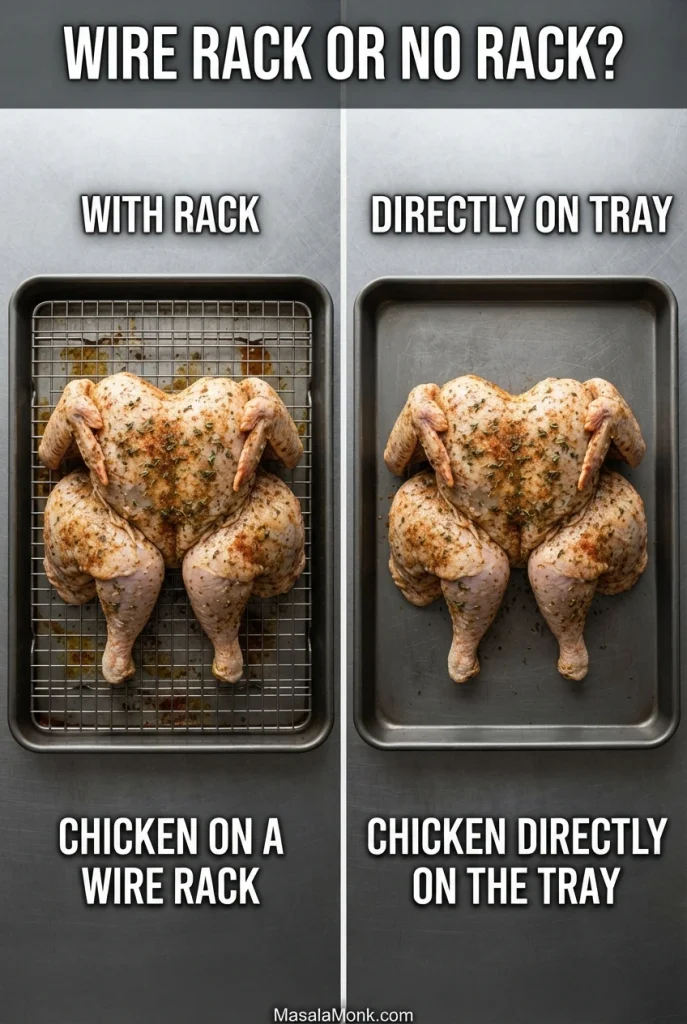
No wire rack? Roast directly on the rimmed sheet. A rack keeps the underside above the drippings but isn’t essential for browning the exposed upper skin. No poultry shears? Ask a butcher to remove the backbone and flatten the chicken rather than struggling with an unsuitable knife.
Cooking Today or Dry Brining Overnight?
Cooking today: Follow all seven steps below. Thoroughly dry the bird and season it before roasting. You do not need an overnight dry brine to use this recipe.
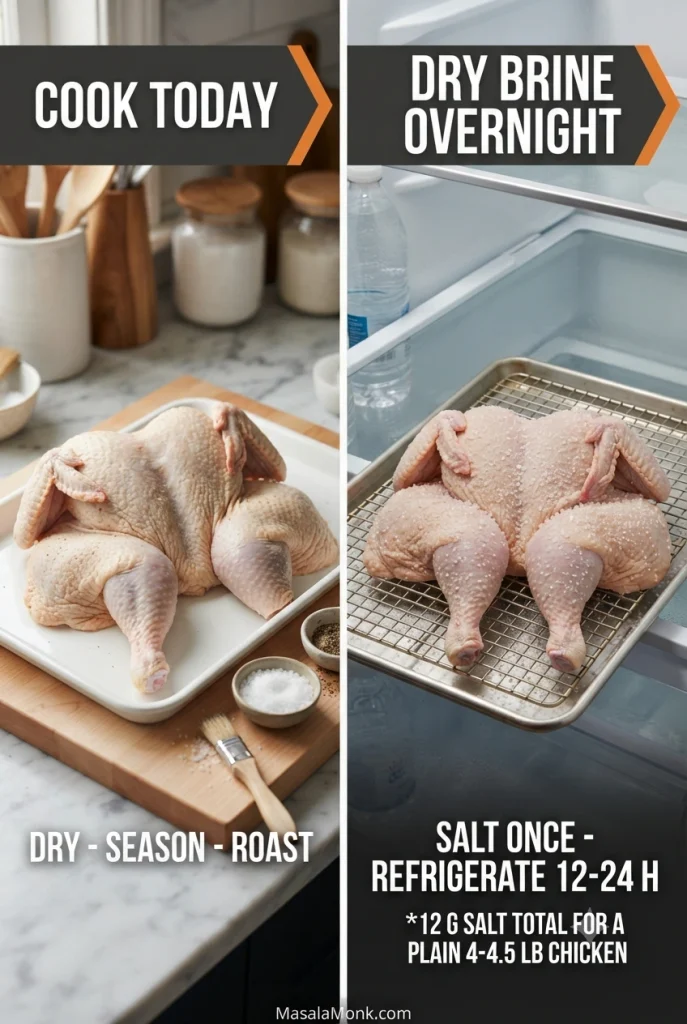
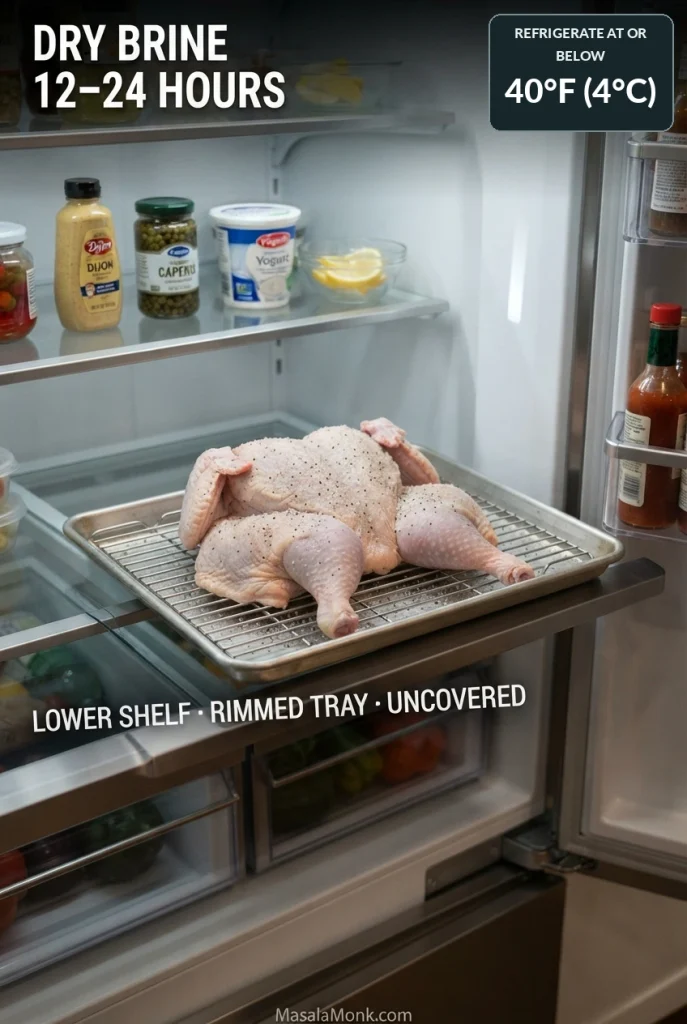
Cooking tomorrow: Remove the backbone, flatten the bird, and spread the entire 12 g salt allocation over both sides. Refrigerate it uncovered on a rack above a rimmed tray for 12–24 hours at or below 40°F (4°C). Place it on a lower refrigerator shelf away from ready-to-eat foods so raw juices cannot drip onto them. The salt seasons the meat ahead of time while the uncovered rest helps dry the skin.
Already dry-brined? Start at Step 1 to preheat, then go directly to Step 4 to oil and season. Your bird is already cut, flat and salted; leave salt out of the remaining spice mix.
How to Make Spatchcock Chicken in the Oven
1. Preheat the Oven
Preheat to 425°F (220°C) in a conventional oven, or 200°C (about 400°F) in a fan oven. Place a shelf near the middle, with enough clearance above the chicken.
Fit the wire rack inside the rimmed baking sheet if using one. Otherwise, prepare the tray alone. The flattened chicken should fit without its wings or legs hanging beyond the edges.
2. Remove the Backbone
Remove the chicken from its packaging, take out any giblets, and pat the surface dry with paper towels. Don’t rinse raw poultry; splashing water can spread bacteria around the sink.
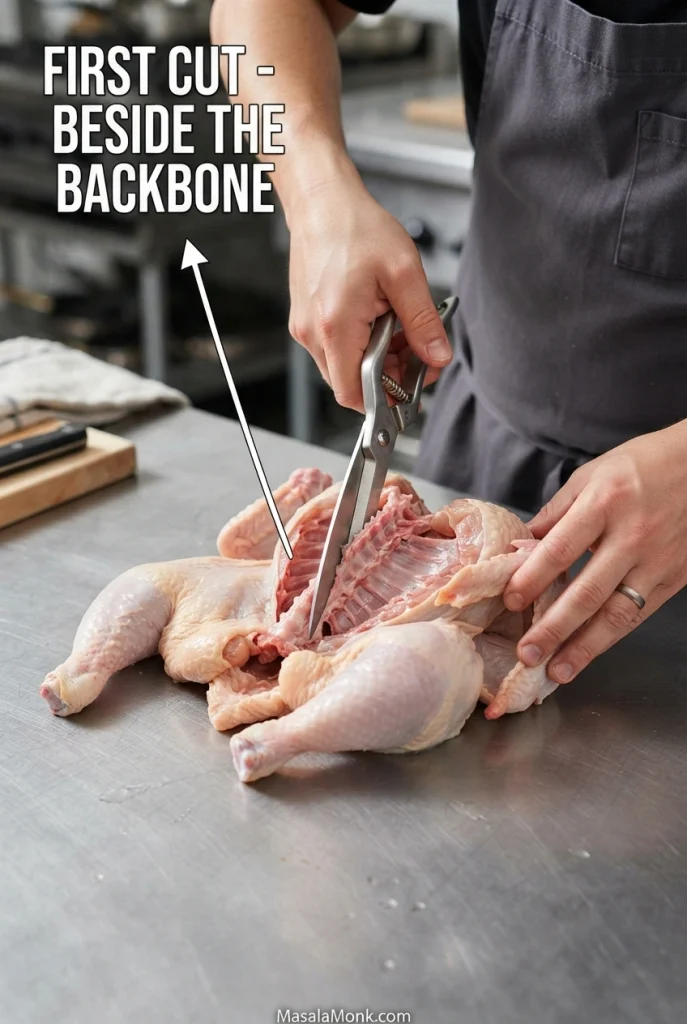
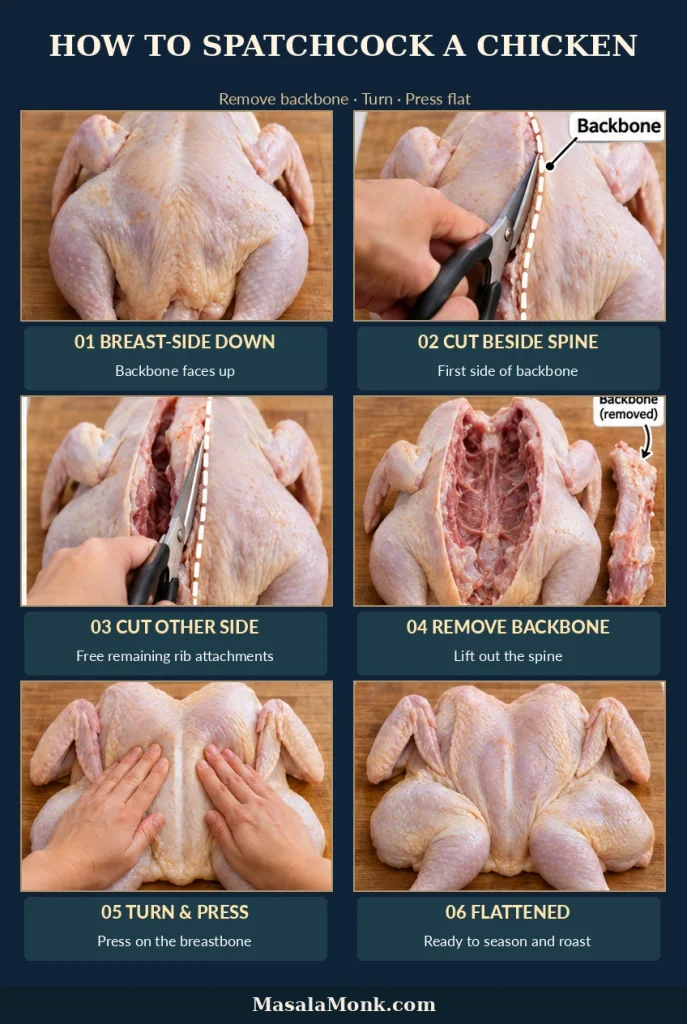
Place the bird breast-side down on a stable cutting board with its tail toward you. Locate the backbone running from tail to neck. Starting at the tail, use sturdy poultry shears to cut through the rib attachments beside one side of the backbone. Work toward the neck, then repeat on the other side and lift out the backbone.
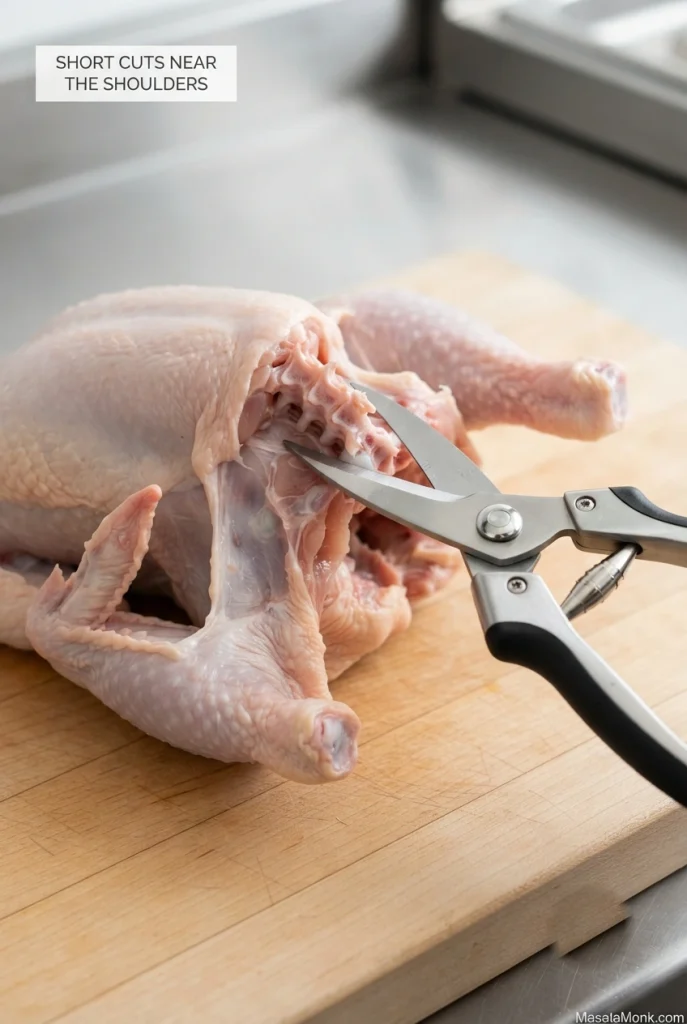
The cuts are usually toughest near the shoulders. If the shears stop moving easily, reposition the blades beside the spine and make short cuts through the ribs. Don’t force them through the thick backbone itself. Watch for sharp bone edges.
Find the Backbone and Make the First Cut
Before cutting, identify the raised backbone running along the centre of the exposed back, from the tail toward the neck. The fuller breast is against the board.
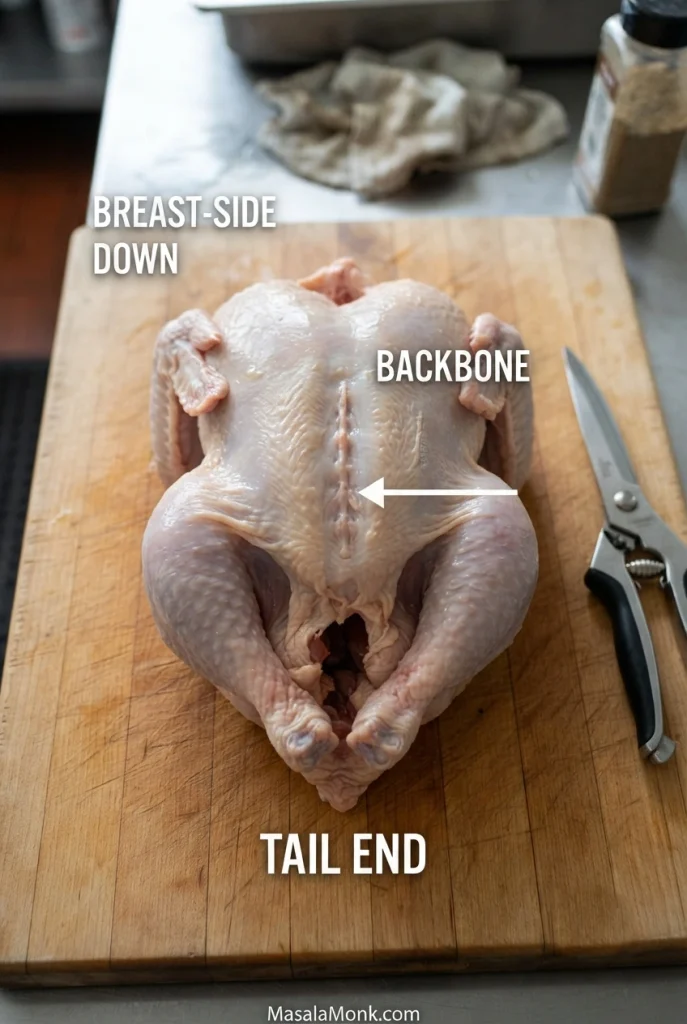
The first opening follows the rib attachments alongside the spine, leaving the central vertebrae intact in the strip that will be removed.
Finish Both Cuts and Lift Out the Backbone
After opening one side, reposition the chicken so the remaining row of rib connections is visible. The second cut should free the same narrow backbone strip.
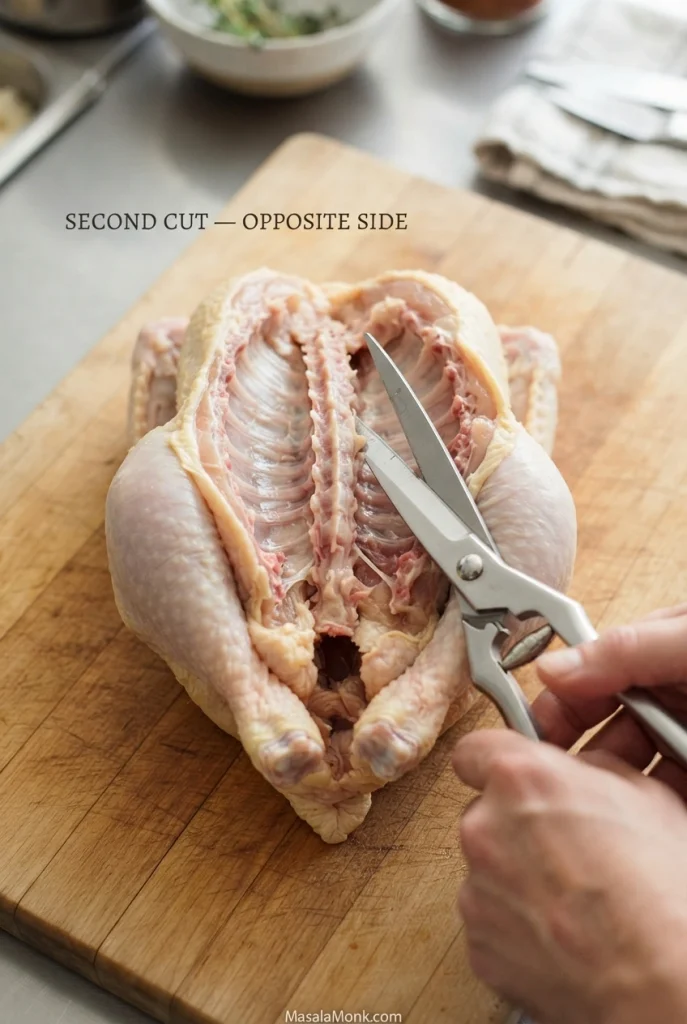
The shoulder end can resist the shears more than the tail end. Locate the next attachment before each short cut, keeping your supporting hand clear.
The removed strip should contain the backbone, not a broad strip of breast meat. Release any remaining tissue with a final snip.
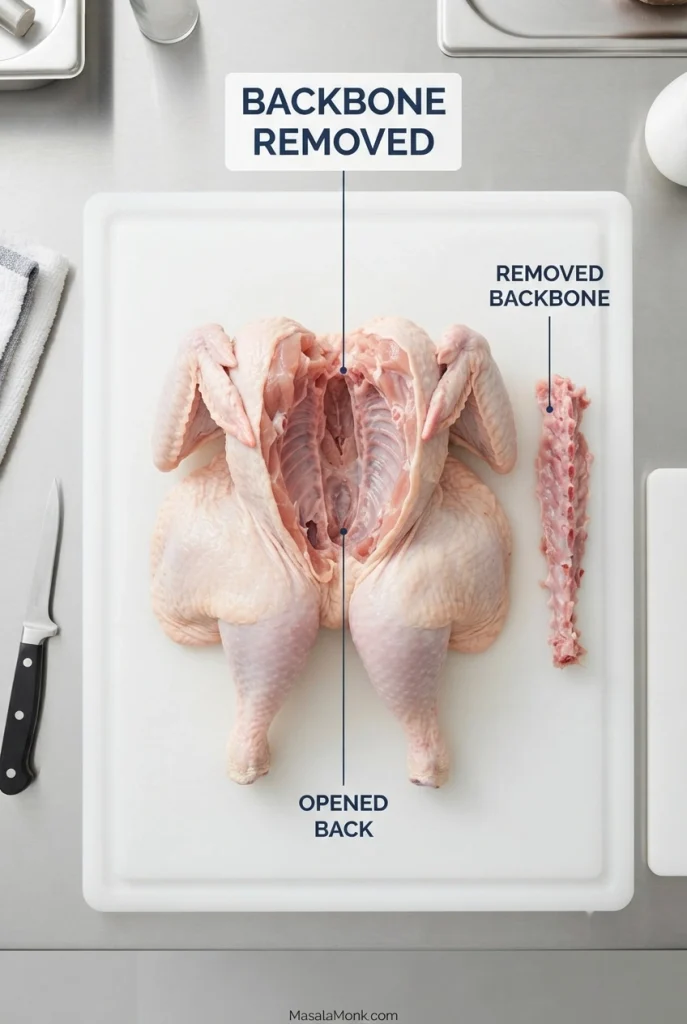
Set the backbone aside for stock if you like. Keep raw chicken and its juices away from other food, and wash your hands before touching clean utensils or ready-to-eat ingredients. Keep the raw-poultry tools separate from clean serving utensils.
3. Flatten the Chicken
Turn the chicken breast-side up and open the legs to either side. Place both palms over the centre of the breastbone and press firmly until it settles closer to the board; a crack from the cartilage is normal.
Tuck the wing tips behind the breasts if the joints move comfortably. The bird need not be symmetrical, but the leg quarters should be opened outward and all parts should fit within the rimmed pan.
Press through the breastbone rather than pushing outward on the wings or legs. The aim is to lower the central ridge while keeping the bird intact.
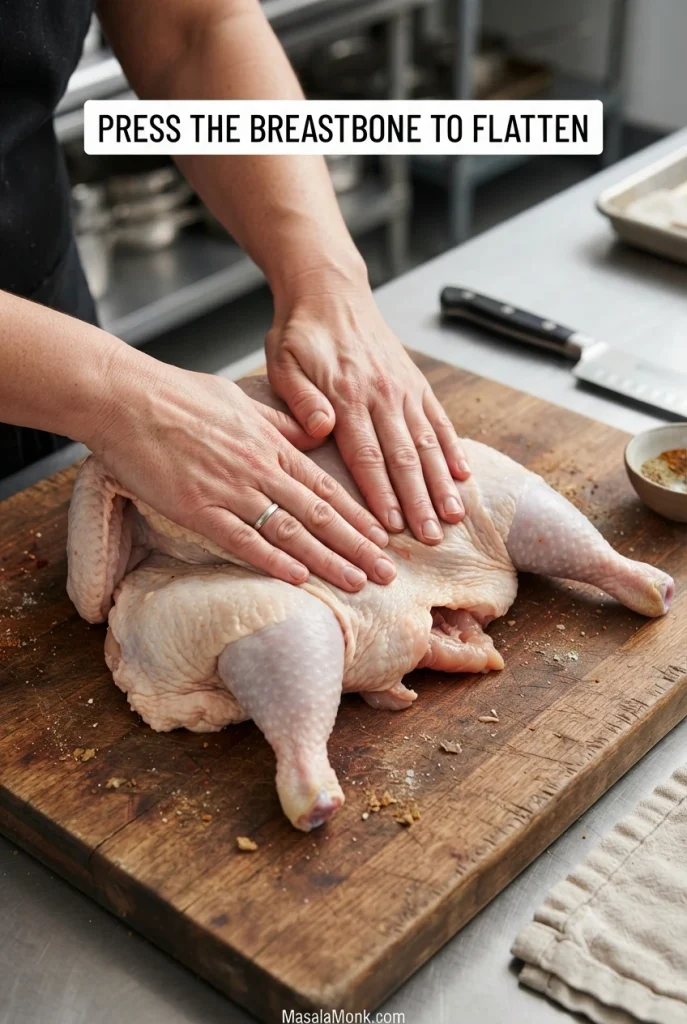
The finished raw bird should form one broad connected piece. Check that neither leg nor wing tip will hang beyond the roasting tray.
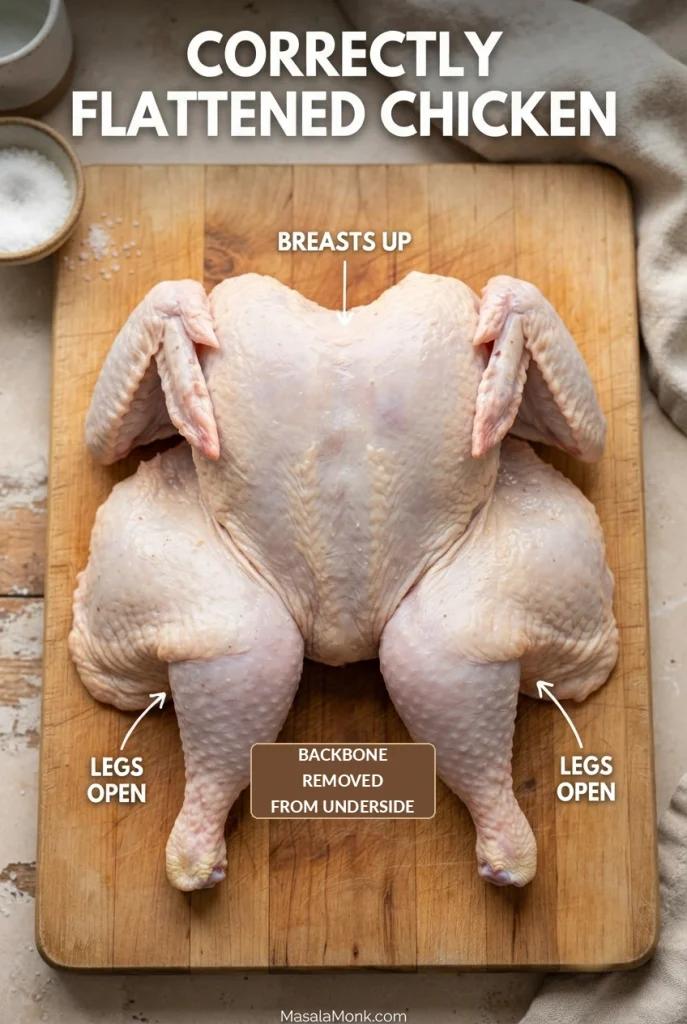
Spatchcock Chicken Technique: Final Shape Check
Use this six-panel recap to compare the start and end states: backbone up during cutting, breast up during pressing, then one wide bird ready to season.
4. Oil and Season Both Sides
Pat a freshly prepared chicken dry, particularly around the thighs and beneath the wings. If it was salted overnight, gently blot any visible surface moisture without rubbing away the salt.
Mix the pepper, garlic powder, paprika, thyme, and rosemary in a small bowl. Crush coarse dried rosemary needles so they spread evenly. For same-day cooking, mix in the full 12 g salt. Leave the salt out if you dry-brined the chicken.
With the chicken breast-side down, oil and lightly season the underside. Turn it breast-side up, spread the remaining oil thinly over the skin, and distribute the rest of the seasoning over the upper surface. The coating should look even, without thick piles of herbs or spices.
Oil and season the inside-facing surfaces lightly before turning the bird over. Work into accessible folds, but avoid thick pockets of spice.
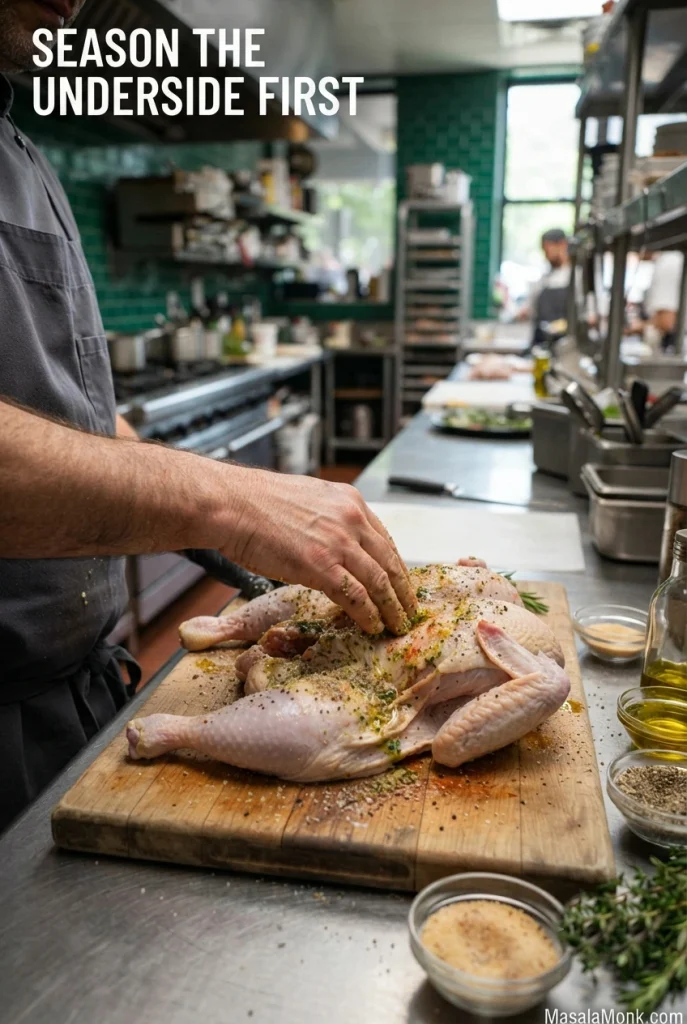
After turning the chicken breast-side up, spread oil over the broad skin surfaces before adding the final seasoning. Keep thick clumps off the wing tips.
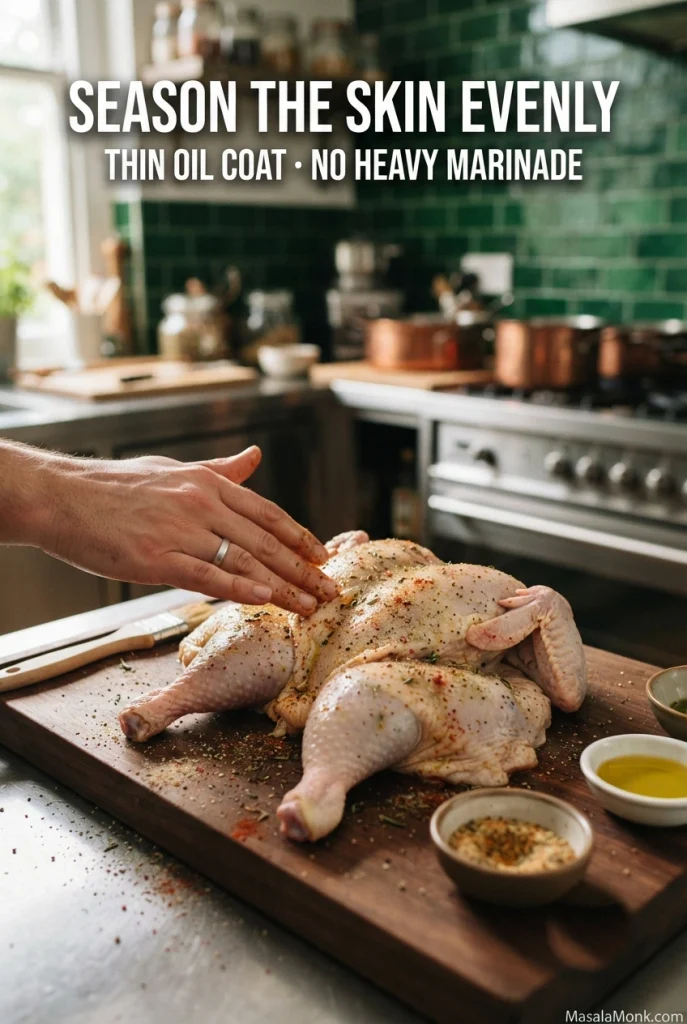
Place the seasoned chicken skin-side up on its prepared rack or rimmed baking sheet. Now thoroughly wash and sanitize the board, shears, utensils, and work surfaces that touched raw poultry, and wash your hands before handling clean equipment or ready-to-eat food.
5. Roast Skin-Side Up
Slide the prepared tray into the fully heated oven. For a 4–4½ lb (1.8–2 kg) chicken, roast for approximately 40–60 minutes at 425°F (220°C). Start checking the internal temperature around 35 minutes.
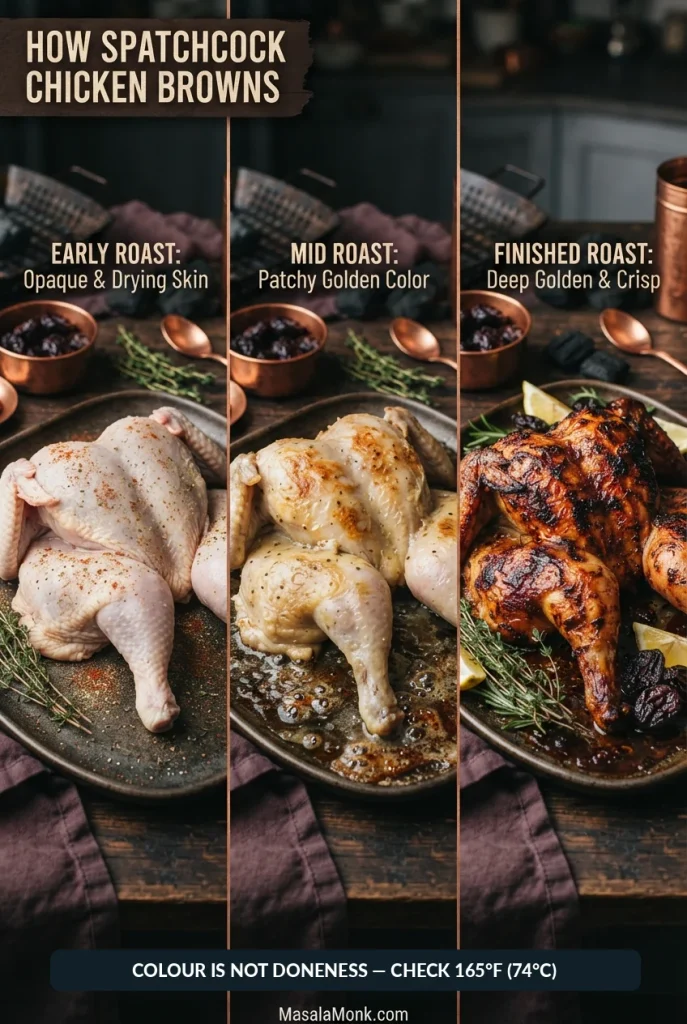
As the skin tightens and browns, the exposed leg edges may darken before the broad breast area. That’s normal. Rotate the tray if one side browns noticeably faster, and loosely shield any patch getting too dark while the meat finishes. Keep the bird skin-side up; there’s no need to flip or repeatedly baste it.
6. Check the Internal Temperature
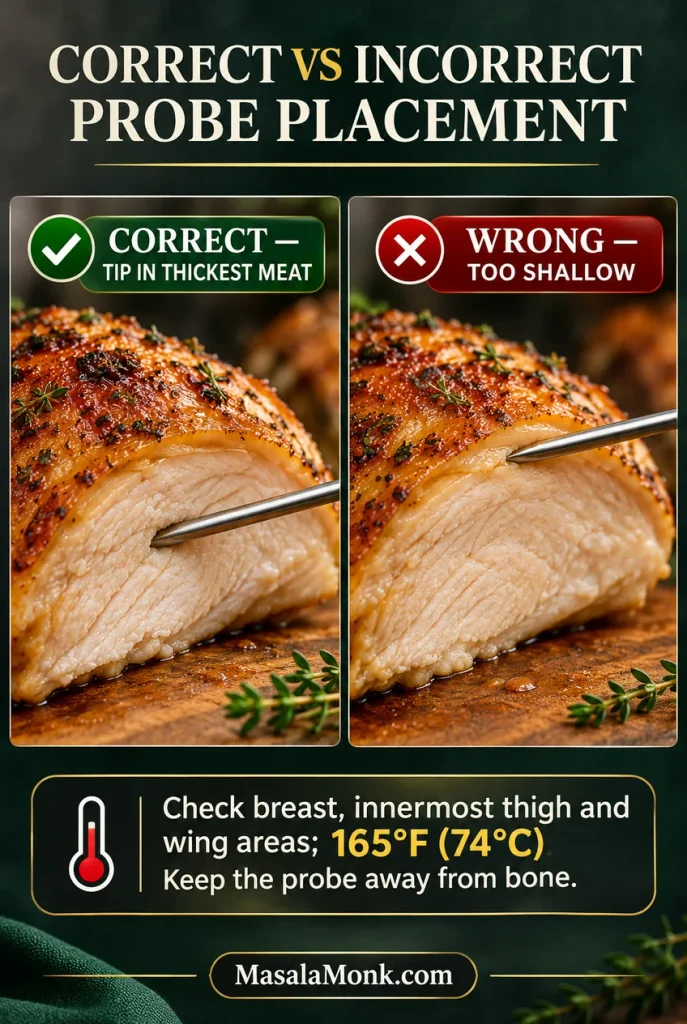
Insert an instant-read thermometer into the centre of the thickest part of each breast, avoiding bone. Also check the innermost thigh near the body and the innermost wing areas. The sensing tip must be surrounded by meat rather than resting against bone, skin or the roasting pan.
For a flattened breast, a sideways or angled approach can keep the sensing tip surrounded by thick meat instead of touching the pan or ribs.
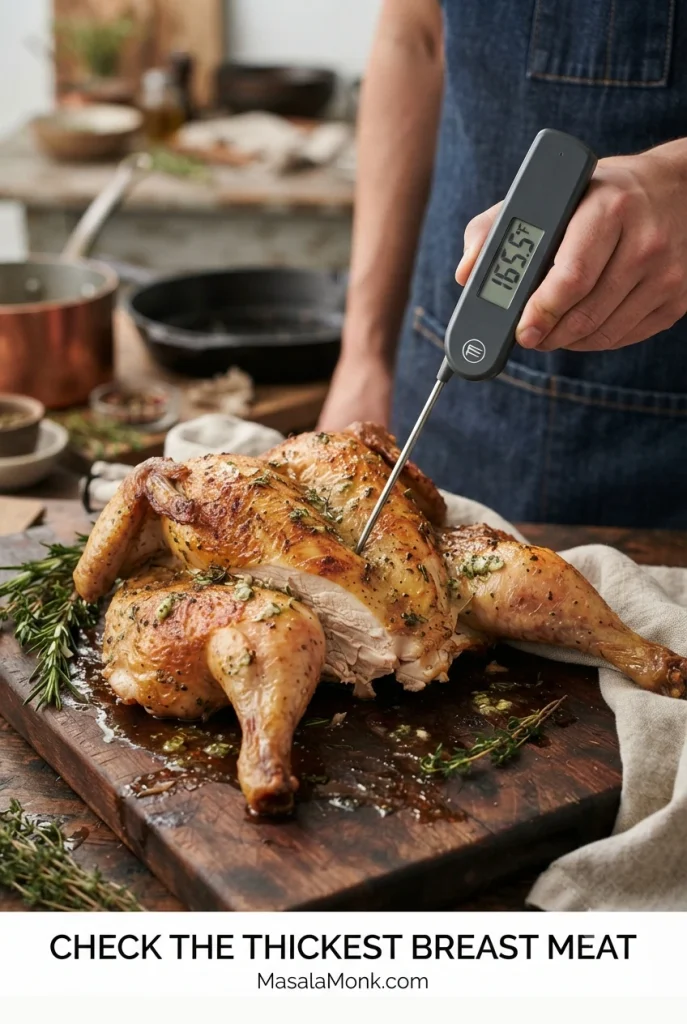
Before serving, check that the thickest part of each breast and the innermost thigh and wing areas have reached 165°F (74°C). If any required location remains below that temperature, continue roasting and check again after a few minutes.
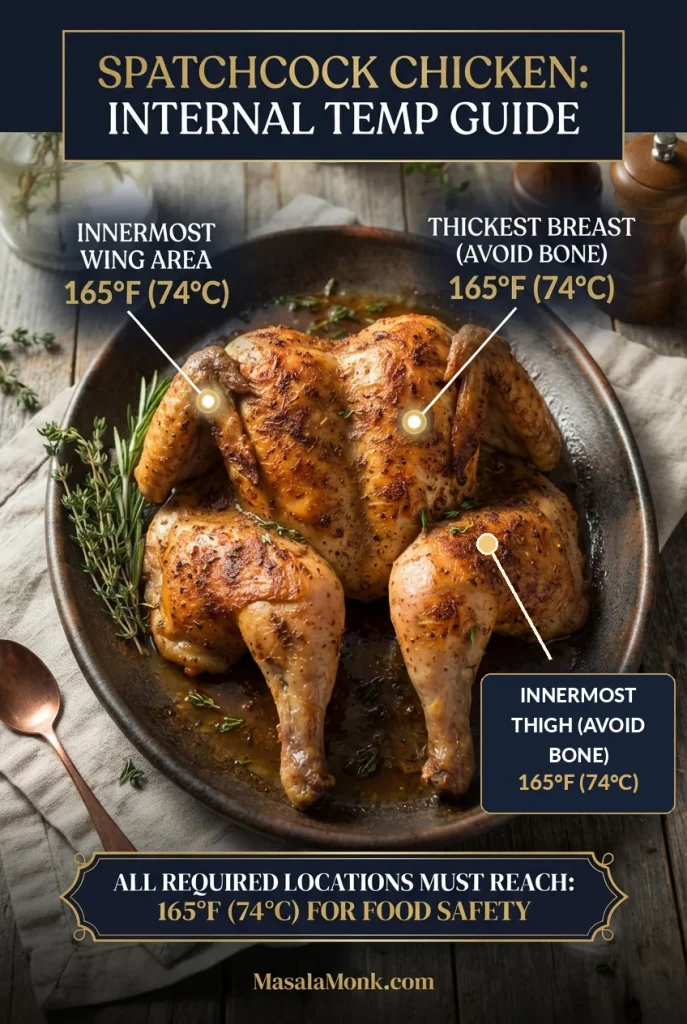
Unexpectedly high or low reading? Move the probe to another thick spot. Its tip may be against bone, too close to the skin, or through the meat. Clean and sanitize a probe that has touched undercooked poultry before using it on ready-to-eat food. The FoodSafety.gov poultry roasting chart confirms the safe temperature and recommended checking locations.
7. Rest, Carve, and Serve
Move the cooked chicken to a clean board or rack and let it rest uncovered for 10–15 minutes. This prevents steam from collecting beneath foil and softening the skin.
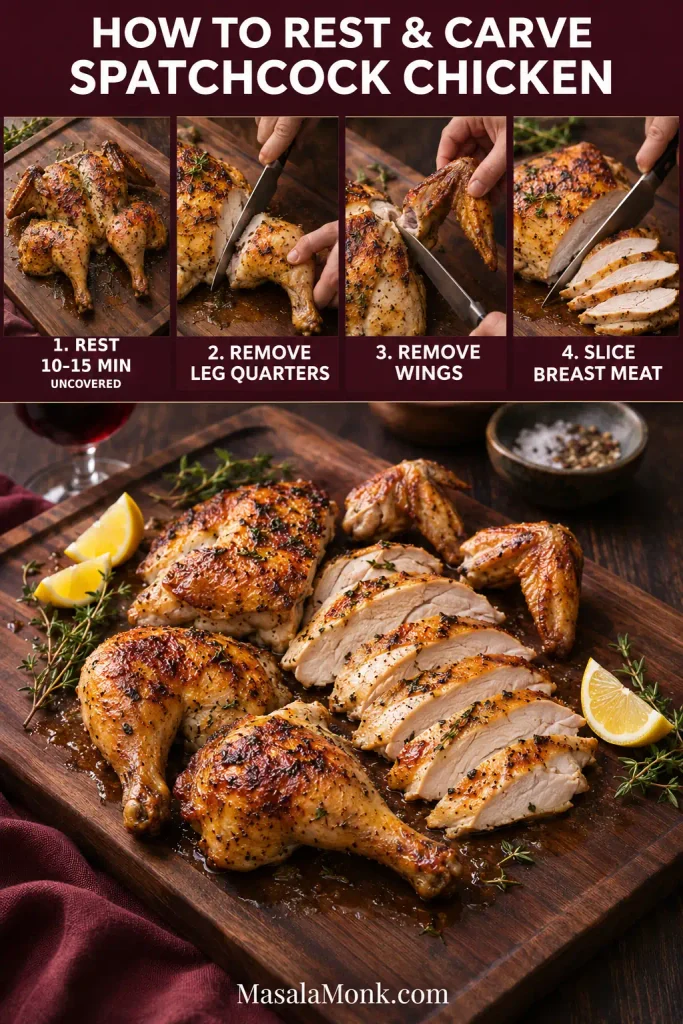
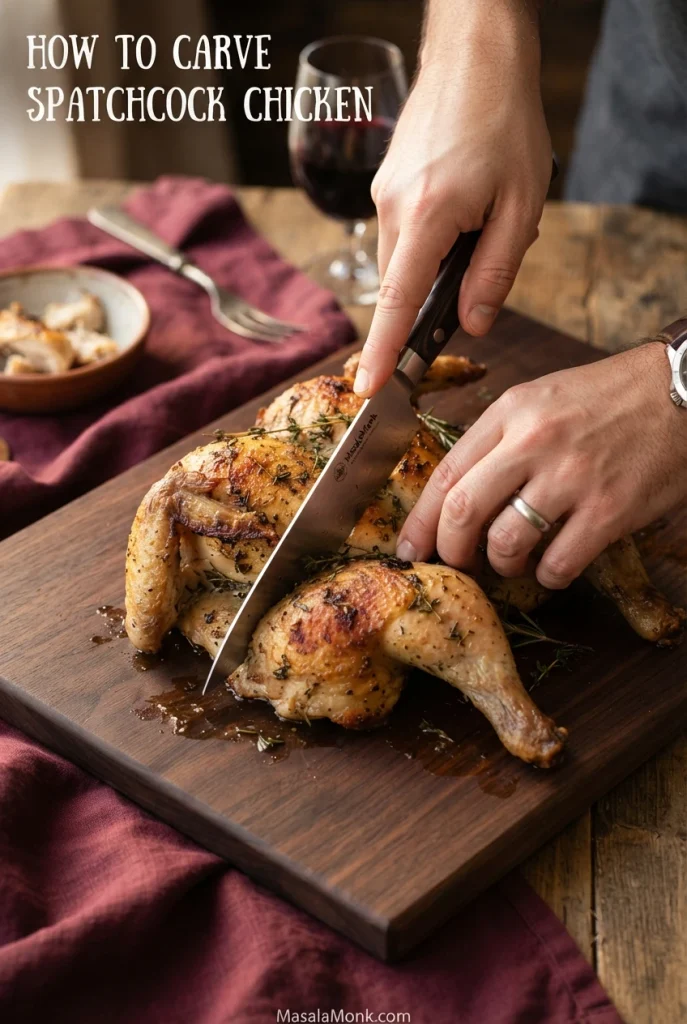
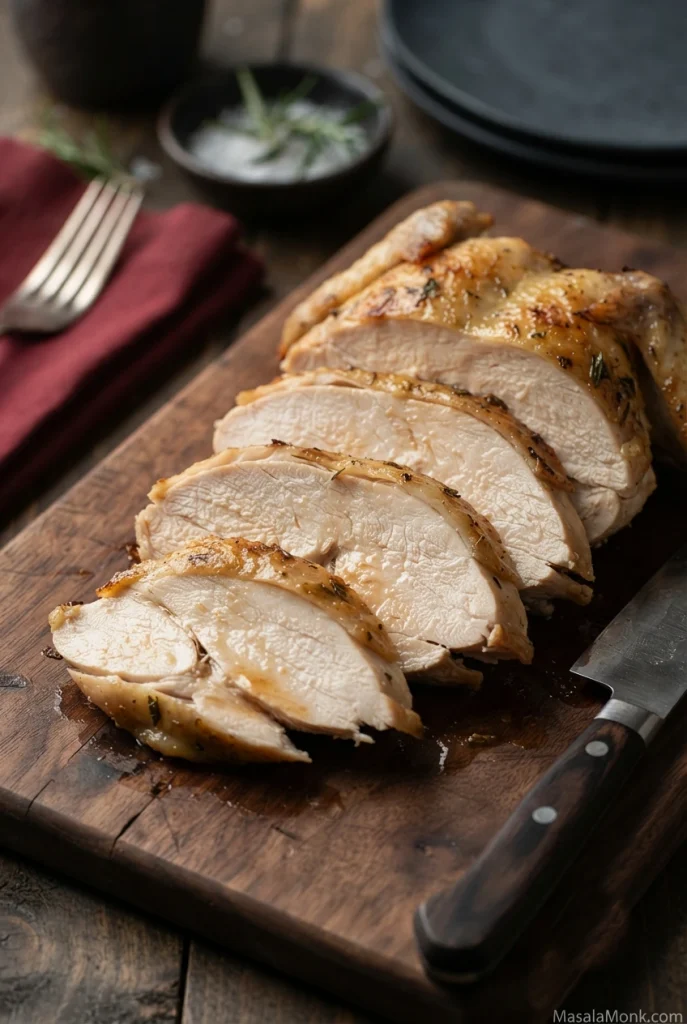
Cut through the hip joints to remove the legs, separating thighs and drumsticks if you like. Take off the wings, then run a sharp knife along the breastbone and rib cage to release each breast. Slice across the breast meat, keeping the browned skin attached where possible. Serve while the skin is still warm, with lemon wedges to squeeze over individual portions.
Gently pull the leg outward to expose the hip joint. The knife should follow the joint, not hack through a hard bone.
After releasing the breast from the rib cage, slice it across the meat with a sharp knife. Keep the browned skin attached wherever possible and transfer the pieces to a clean platter.
Spatchcock Chicken Cooking Time and Oven Temperature
For a 4 lb (1.8 kg) spatchcock chicken, plan on approximately 40–60 minutes at 425°F (220°C). Thickness matters as well as weight: a broad, well-flattened bird may finish ahead of one with thicker breasts and legs.
Spatchcock Chicken Cooking Time by Weight
| Chicken weight | Check from | Approx. roasting time |
|---|---|---|
| Small: 2½–3½ lb (1.1–1.6 kg) | 30 min | 35–50 min |
| Standard: over 3½–4½ lb (1.6–2 kg) | 35 min | 40–60 min |
| Large: over 4½–6 lb (2–2.7 kg) | 40–45 min | Often 55–75 min or longer |
These are planning estimates for flattened chickens in a conventional 425°F oven, not guaranteed finish times. Start checking at the recommended time, then use a thermometer to decide whether more roasting is necessary. Make sure larger birds also fit comfortably on the tray.
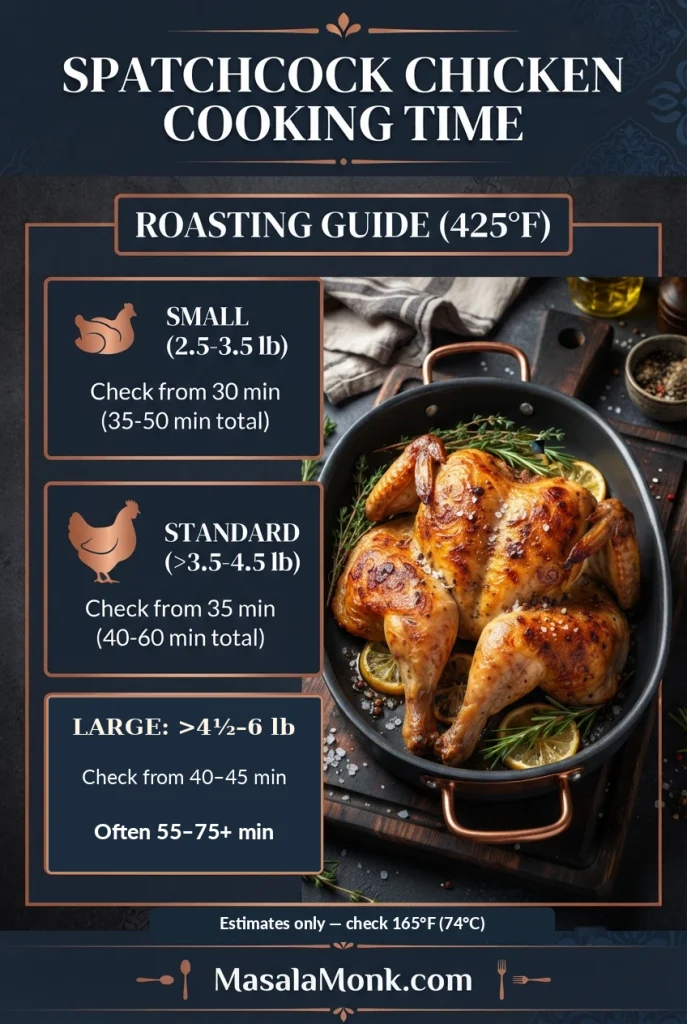
For actual doneness, use the internal-temperature checking instructions. Cooking time alone cannot establish whether every thick section is safely cooked.
400°F, 425°F, or 450°F: Which Oven Temperature Is Best?
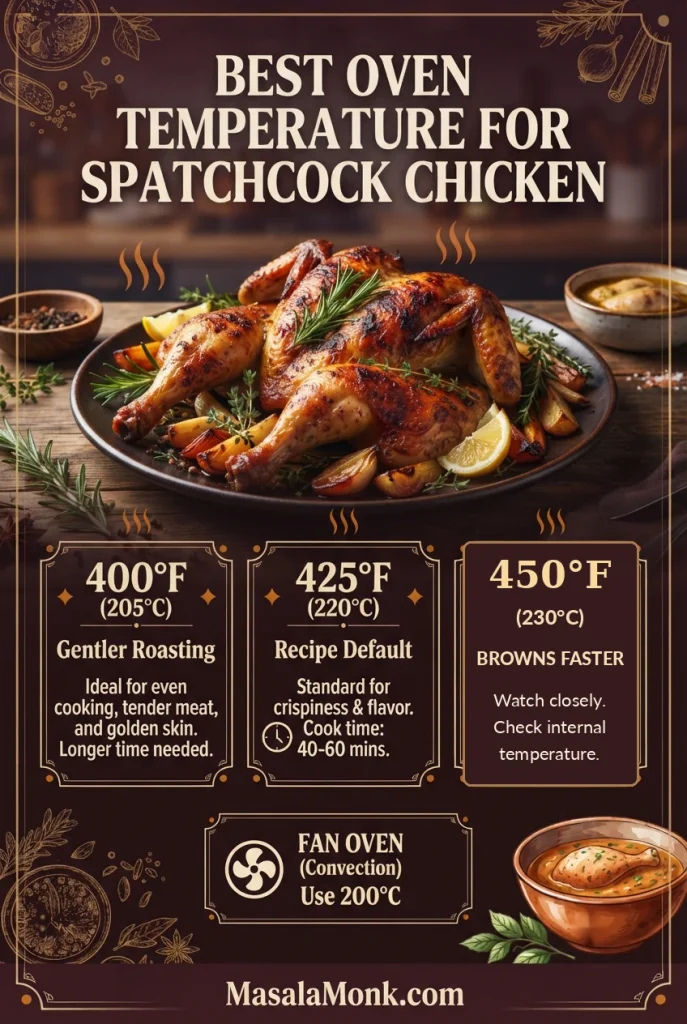
Use 425°F (220°C) conventional or 200°C (about 400°F) fan for this recipe. A conventional 400°F (approximately 205°C) roast is a little gentler, while 450°F (230°C) browns the surface faster and calls for closer attention. Fan ovens circulate hot air and can brown the chicken more quickly, so check early rather than assuming one fixed roasting time.
What If the Breast Is Done Before the Thighs?
Breast meat is leaner than thigh meat, and the two may finish at different times. If the breast reaches 165°F (74°C) while the thighs are slightly below that temperature, continue roasting and loosely shield breast skin that’s getting too dark.
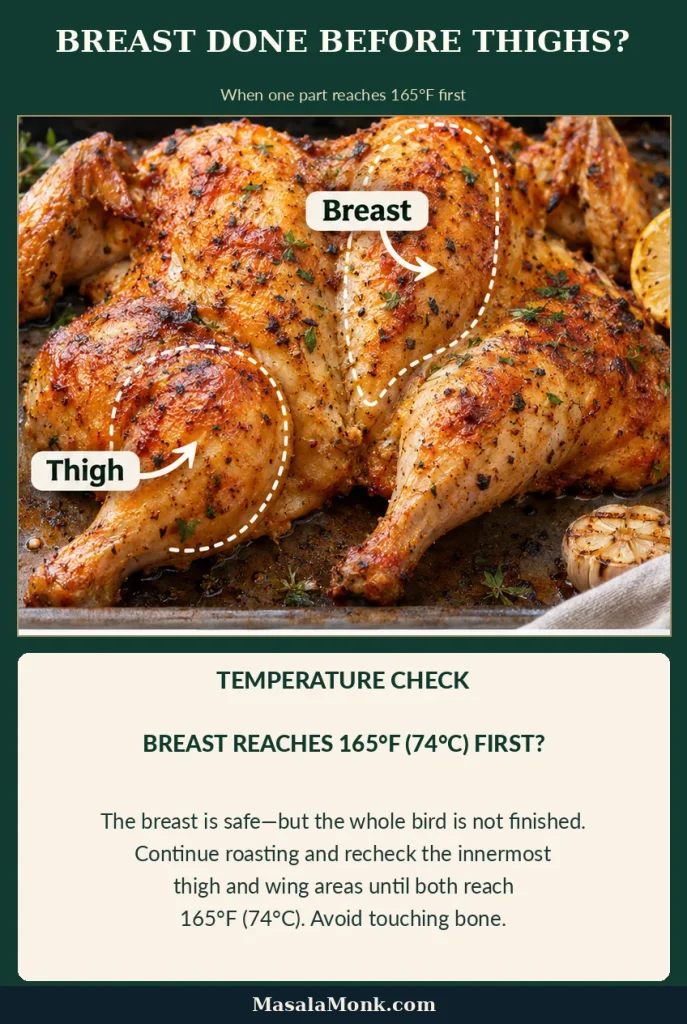
If the temperature difference is substantial, you can finish the legs separately. Move the partly cooked bird to a cutting board for undercooked poultry, carefully remove the leg quarters, and return them to the oven. Transfer the safely cooked breast portions to a separate clean plate, avoiding contact with undercooked juices, tools, and surfaces. Check that the thighs reach 165°F (74°C) before serving.
Dark meat often stays tender at temperatures above that minimum. For more on cooking lean breast meat, see our baked chicken breast recipe.
How to Get Crispy Spatchcock Chicken Skin
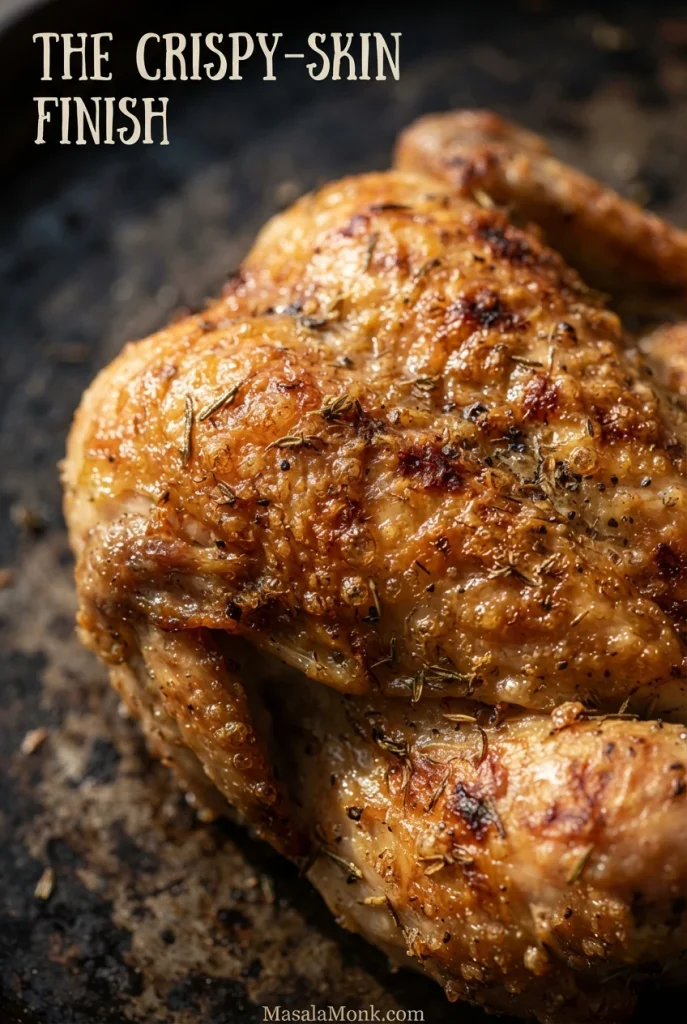
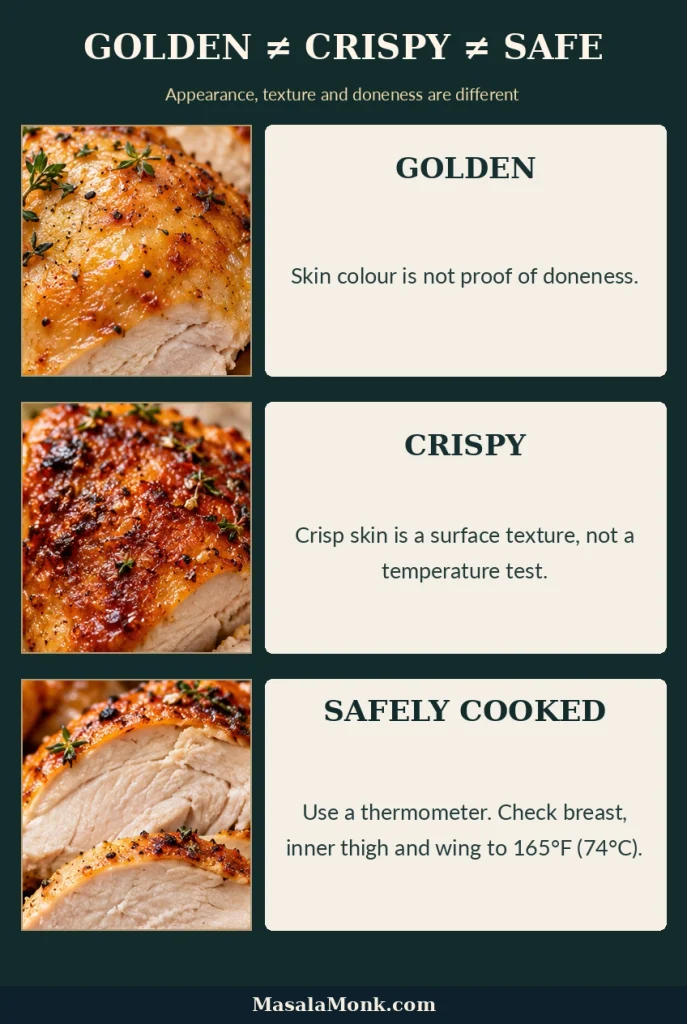
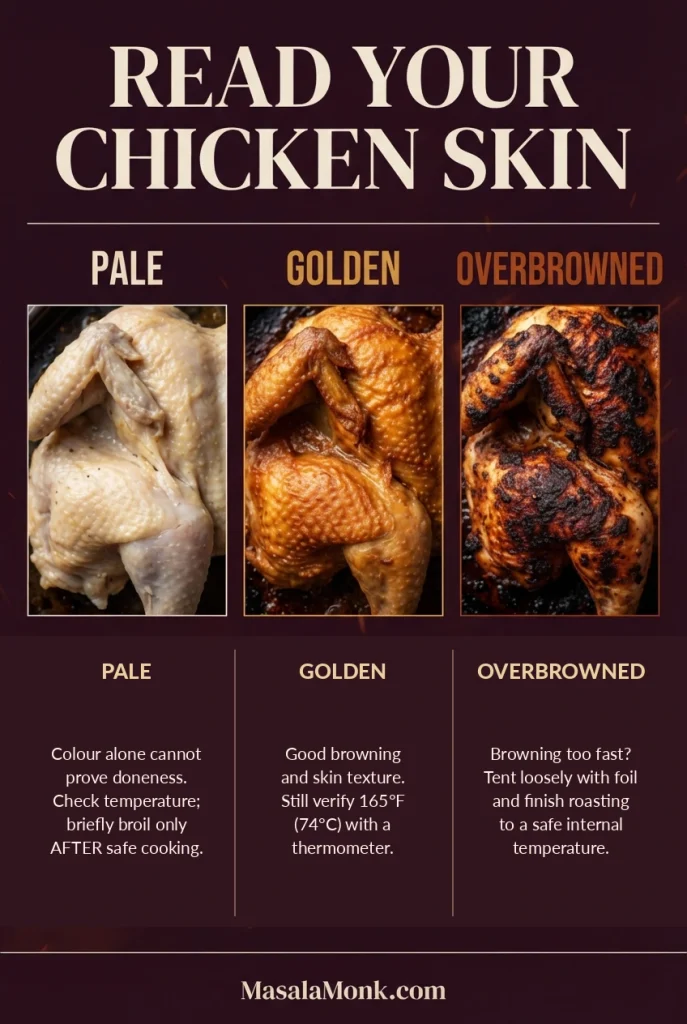
For crispier skin, start with a dry surface, use a light coating of oil, and roast without repeatedly basting. Rest the chicken uncovered afterward. Browning, crispness, and doneness are different: golden skin describes colour, a crisp bite describes texture, and the thermometer establishes whether the meat is safely cooked.
This close-up shows the fine blisters and uneven amber ridges that can develop under dry oven heat.
Think of colour, bite and safety as separate tests. The graphic compares these qualities rather than treating a golden finish as proof of doneness.
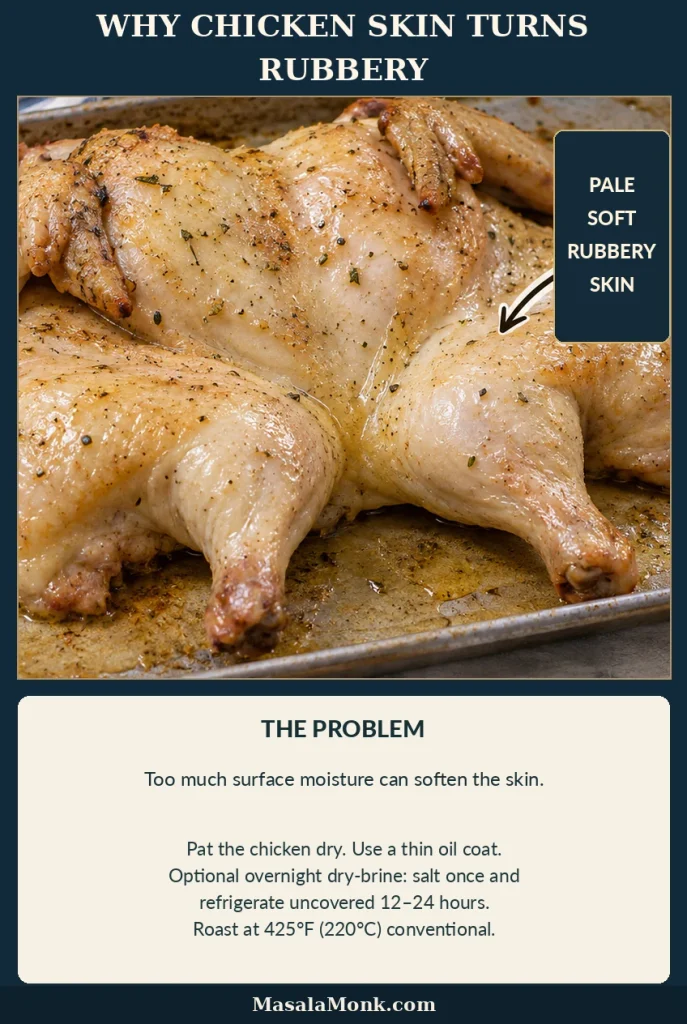
Why Does Chicken Skin Turn Rubbery?
A thick wet coating can delay surface drying, while skin resting in pooled drippings softens quickly. Folds near the thighs may remain more flexible than the broad breast skin even when the chicken has browned well. If you plan ahead, an uncovered dry brine helps reduce surface moisture; for a same-day roast, thorough drying before seasoning is the practical choice.
Dry Brine or Wet Marinade?
For this roast, choose dry seasoning or the overnight dry brine rather than a thick wet coating. Yogurt- or citrus-based marinades can be excellent, but they’re better suited to a different style of chicken, such as chicken shawarma.
Can You Broil the Skin at the End?
If the chicken is safely cooked but its skin remains pale, a very brief broiler or grill finish may improve the colour. Use only cookware rated for broiler heat, with enough clearance from the heating element. An ordinary oven-safe wire rack may not be broiler-safe. Watch continuously: the skin and herbs can darken quickly, and extra heat can dry out the breast.
Spatchcock Chicken Troubleshooting
Check the internal temperature first. If the meat is undercooked, it needs more heat. If it’s safely cooked, address browning, texture, or seasoning without unnecessarily extending the roast.
Uneven Cooking and Thermometer Problems
| Problem | What to do now |
|---|---|
| Breast or thigh below 165°F (74°C) | Continue roasting and check the thick area again before serving. |
| Breast cooked, thigh underdone | Shield overly dark breast skin with loose foil. For a large temperature gap, finish the legs separately as described above. |
| Thermometer readings vary widely | Reposition the tip in thick meat away from bone. Check the thermometer’s accuracy if the readings remain implausible. |
| Meat near a joint is undercooked | Continue cooking that portion and verify that it reaches 165°F (74°C). |
Skin and Browning Problems
| Problem | What to do now |
|---|---|
| Pale skin, meat still underdone | Continue roasting while monitoring the internal temperature. |
| Pale skin, meat fully cooked | Avoid prolonged roasting just for colour. A brief broiler finish is optional with suitable cookware. |
| Golden but chewy skin | Keep the chicken uncovered and away from pooled drippings. Don’t overcook the meat trying to crisp every patch. |
| Skin softens during resting | Remove tight foil and keep the bird off wet drippings. |
| One side browns too quickly | Rotate the tray and loosely shield the darkest area if needed. |
Skin colour can help diagnose browning, but it does not tell you whether the meat is safe. Check internal temperature before changing the oven setting or broiling.
If thermometer readings seem inconsistent, review correct probe placement. For the basic cooking method, return to the recipe.
Too Salty, Smoking, or Unusually Tough?
Too salty? Serve with unsalted potatoes, rice, or vegetables. Next time, check the label and weigh the salt.
Burned herbs or spices? Shield dark patches while the meat finishes. Use a thinner coating next time and avoid exposed minced garlic, which can scorch.
Heavy oven smoke? Scorching drippings or residue in the oven may be responsible. Turn off the heat if safe. If you suspect a fire, keep the door closed and follow appropriate fire-safety procedures. Never pour water onto a grease fire.
Unusually wet or tough breast meat? Confirm that it reached a safe temperature. Texture depends partly on the raw chicken itself, and extra roasting won’t necessarily improve it.
Flavour Variations
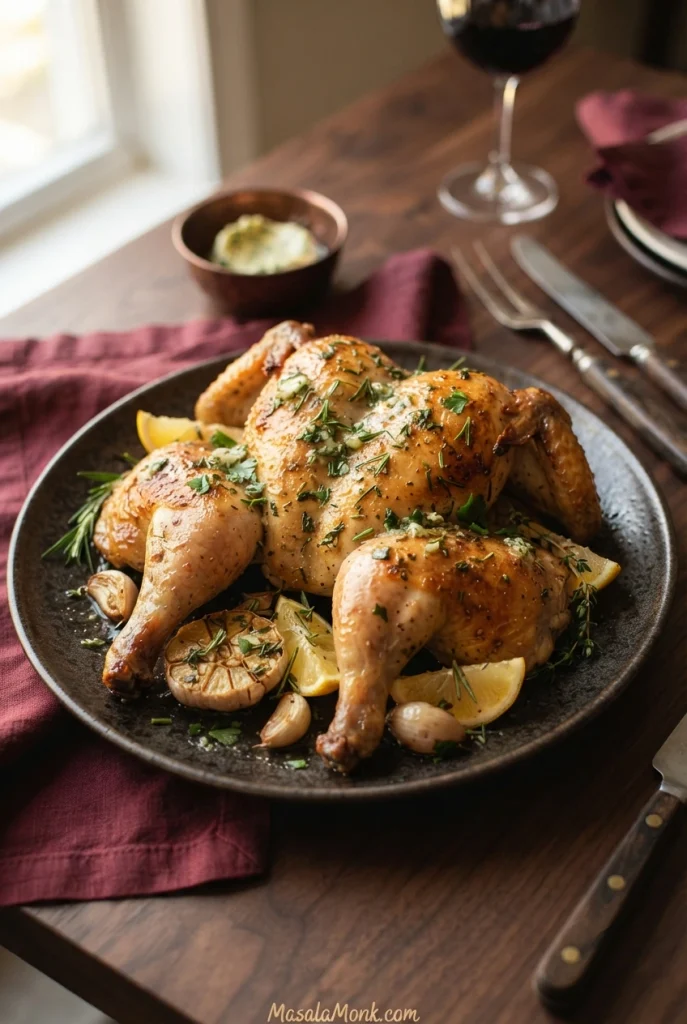
Garlic-herb butter: Replace the olive oil with 2 tablespoons (28 g) softened unsalted butter. Mix it with the garlic powder, thyme, and rosemary, then spread a thin layer over the skin and gently beneath the breast skin where accessible. Keep the paprika, black pepper, and appropriate salt allocation unchanged. Butter’s milk solids brown more quickly than oil, so watch the exposed areas.
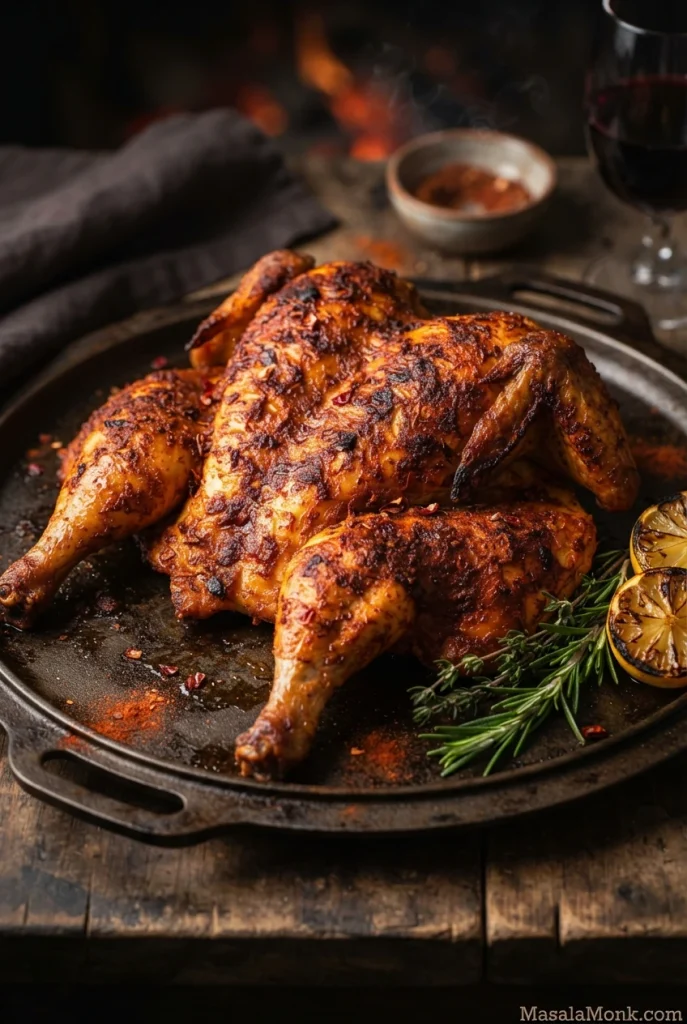
Smoky paprika and chilli: Swap the sweet paprika for 1 teaspoon smoked paprika and add ¼–½ teaspoon cayenne pepper. Keep the other seasonings as written.
Fresh sauce: Serve a little chimichurri alongside the carved chicken. Its herbs, garlic, and vinegar contrast with the roast without changing the cooking method.
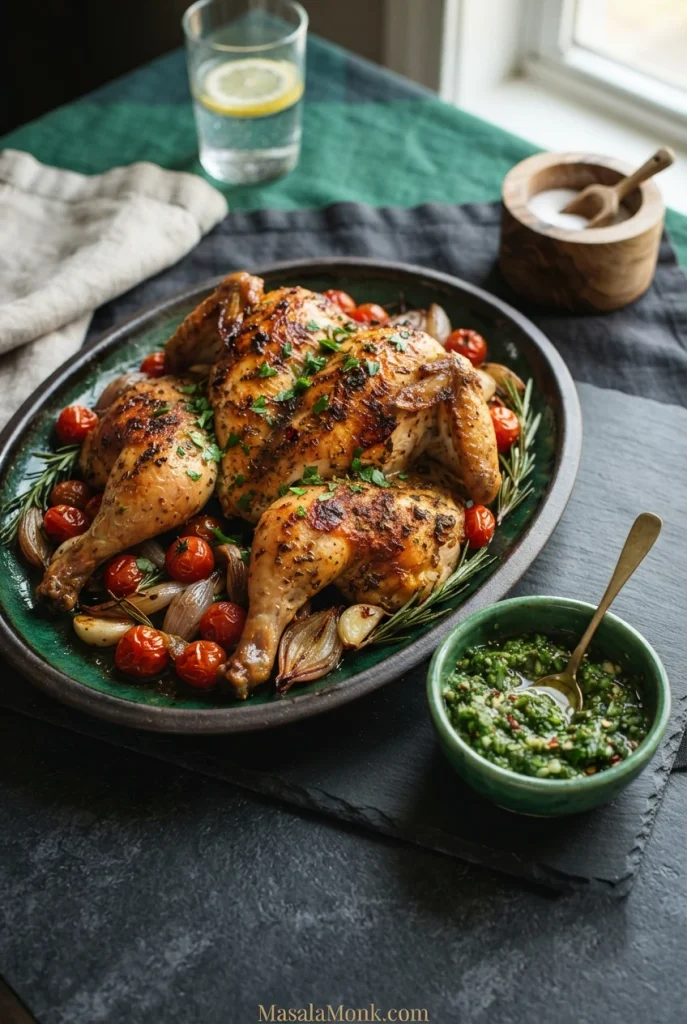
What to Serve With Spatchcock Chicken
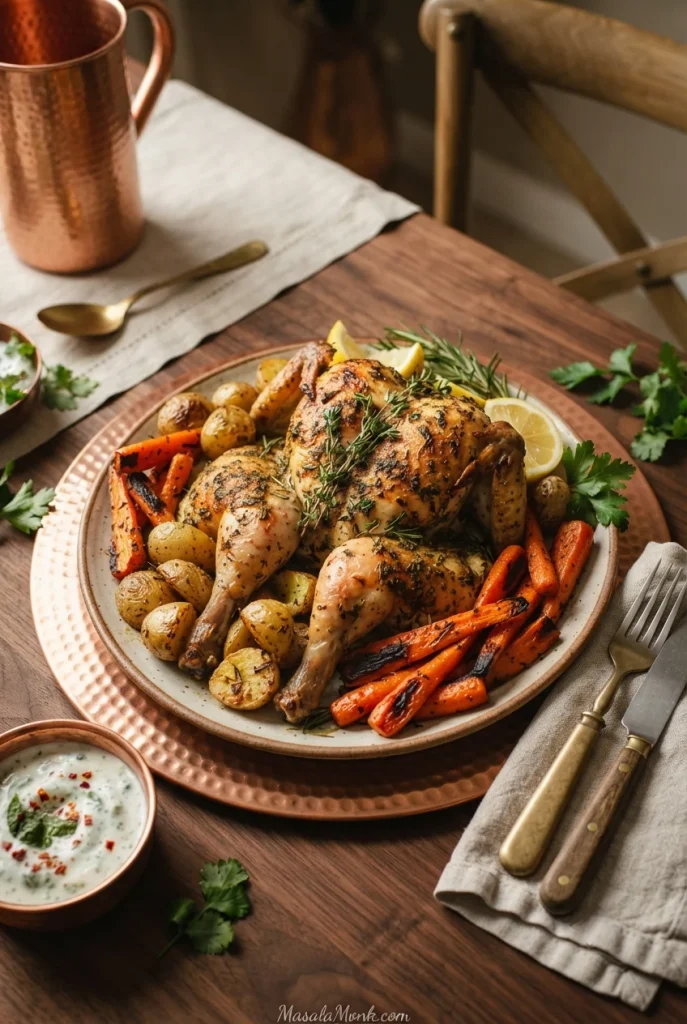
Potatoes, rice, green vegetables, and fresh salads all suit this garlic-herb chicken. If you have room for two trays, roast potatoes and carrots alongside it; otherwise, keep the oven free for the bird and make a stovetop or cold side.
Optional Roast Potatoes and Carrots
Cut 1½ lb (680 g) potatoes and ¾–1 lb (340–450 g) carrots into roughly 1-inch (2.5 cm) pieces. Toss with 2 tablespoons (30 ml) olive oil, ½ teaspoon fine salt, and black pepper. Spread in a single layer on a large rimmed tray and roast at 425°F (220°C) for approximately 35–50 minutes, turning once. Take them out when browned and fork-tender, even if the chicken needs longer.
Both trays can roast together if your oven has room for airflow, but monitor them separately; a fuller oven may change browning and cooking times. Don’t overcrowd the vegetables, or they’ll steam instead of brown. For a more involved potato method with crunchy edges, see these crispy roasted potatoes.
Garlic mashed potatoes are a practical stovetop side when the oven is busy. A cool cucumber salad offers a fresh contrast.
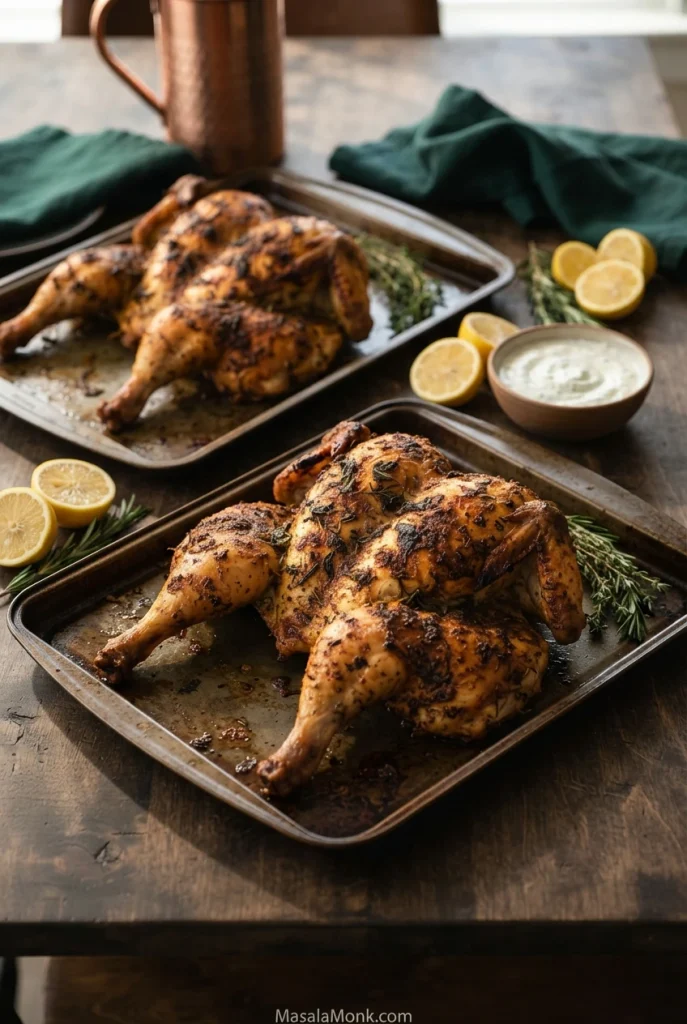
Can You Roast Two Spatchcock Chickens at Once?
Yes, if both flattened birds fit with space for hot air to circulate. Use separate rimmed baking sheets where practical and double the ingredients for two similarly sized, plain and unbrined chickens. Cooking time won’t double, but a fuller oven can brown less evenly. Rotate trays if needed and check each chicken separately. For guests, a chilled side such as homemade coleslaw can be prepared ahead.
Storing, Reheating, and Using Leftover Chicken
Refrigerate cooked chicken promptly in shallow containers. Don’t leave it at room temperature for more than two hours, or more than one hour when the temperature exceeds 90°F (32°C).
Store at or below 40°F (4°C) and use within 3–4 days, or freeze for longer storage. Reheat leftovers to 165°F (74°C). The FoodSafety.gov cold food storage chart provides further guidance.
Reheating larger pieces uncovered in the oven can preserve some of the skin’s texture, though it may not be as crisp as on roasting day.
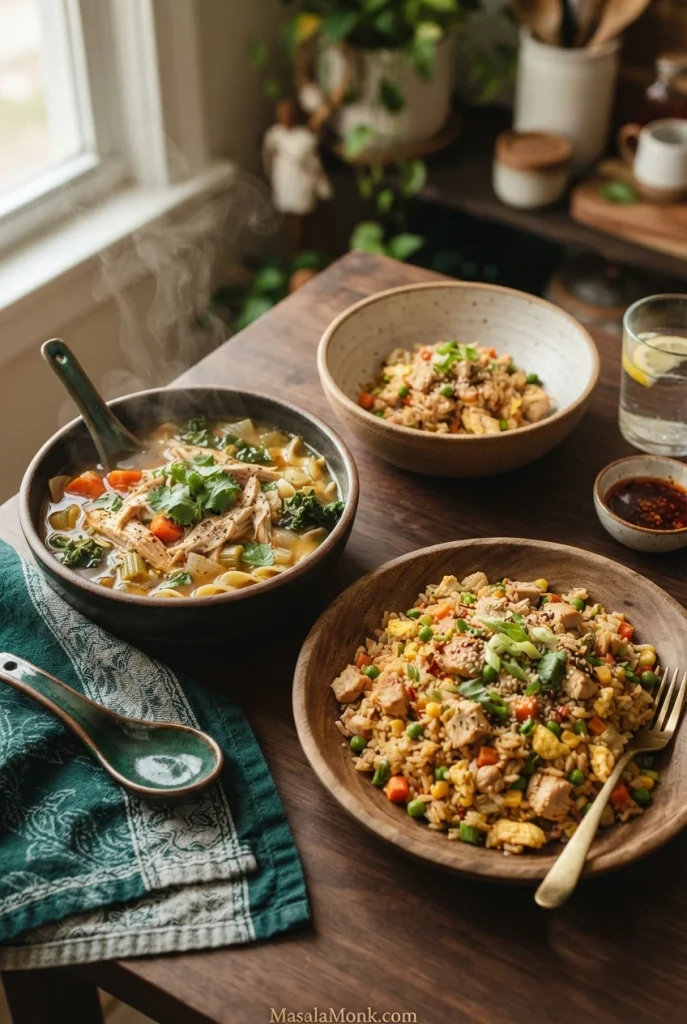
Shred leftover chicken for chicken and rice soup, adding the cooked meat near the end. Or dice it for chicken fried rice, heating it thoroughly with the rice and vegetables.