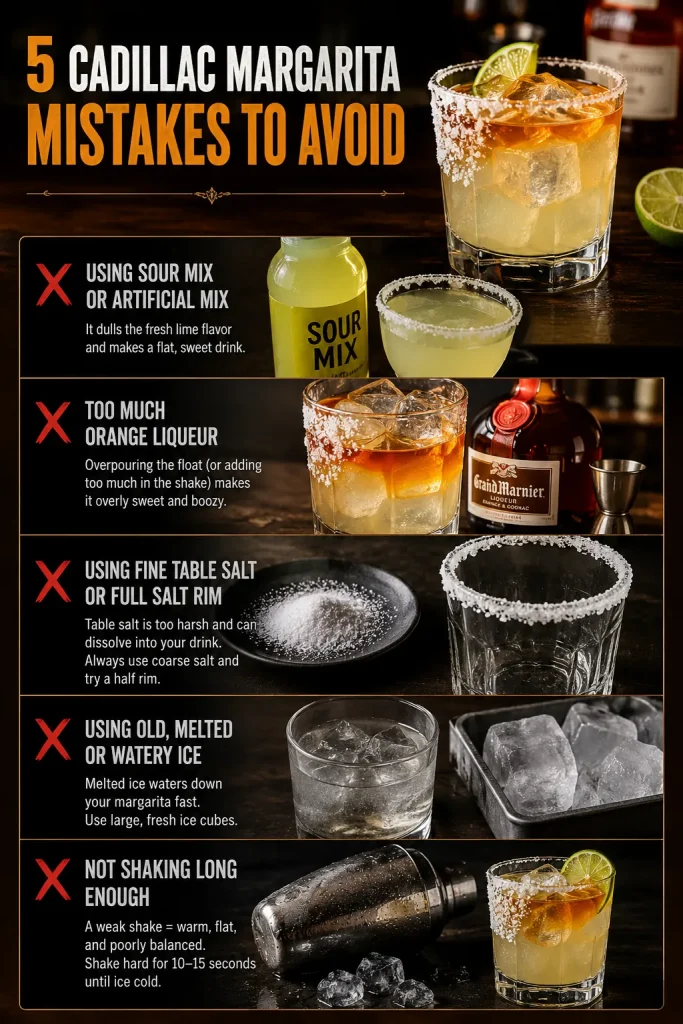
You want a creamy garlic sauce for fries, burgers, sandwiches, seafood, or roasted vegetables, and then the internet immediately turns it into an argument: traditional garlic and oil, garlic mayo, or the restaurant version that calls itself “real.” The useful answer is simpler. The word can mean different things depending on the kitchen, so this recipe gives you the easy creamy version first, then shows you the traditional version too.
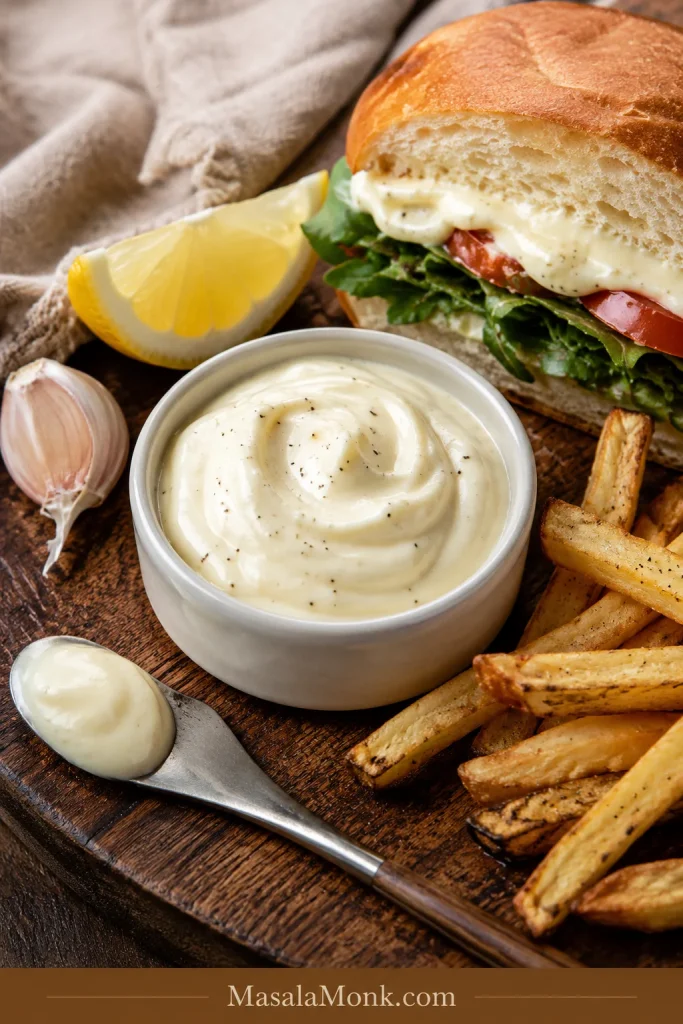
This easy garlic aioli recipe starts with mayonnaise, fresh garlic, lemon juice, Dijon mustard, and salt, but what you really get is the cool, creamy dip you want beside hot fries, the garlicky swipe that makes a burger taste finished, and the lemony sauce that wakes up seafood. For the older, sharper, more classic style, there is also a traditional garlic-and-oil method later in the post.
No need to shame either style. Mayo aioli is fast, stable, and weeknight-friendly; traditional aioli is sharper, more technical, and more olive-oil-forward. Choose the one that fits the food, then adjust from there.
The aioli rule is simple: it should taste bright first, garlicky second, and creamy all the way through.
Make It Now · Full Recipe · Which Version? · Garlic Control · Traditional Aioli · Vegan & Eggless · Flavor Variations · What to Serve It With · Troubleshooting
Make It Now
Need the sauce now? Mix this version first, then use the rest of the post only if you want to adjust the garlic, make it vegan, try a flavor variation, or go traditional from scratch.
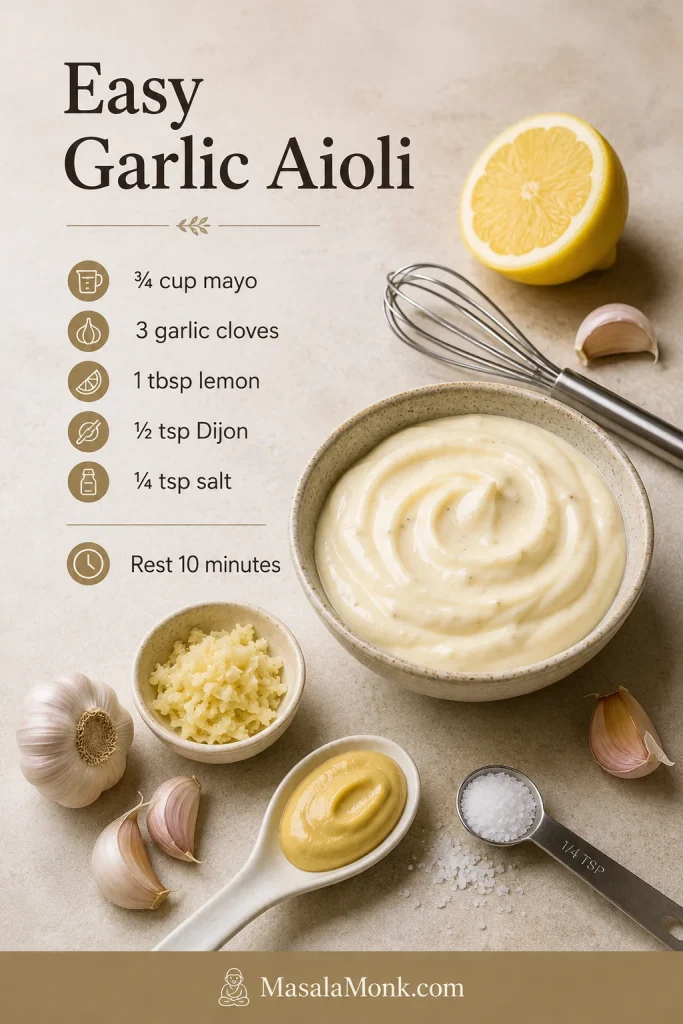
Fast Garlic Aioli Ratio
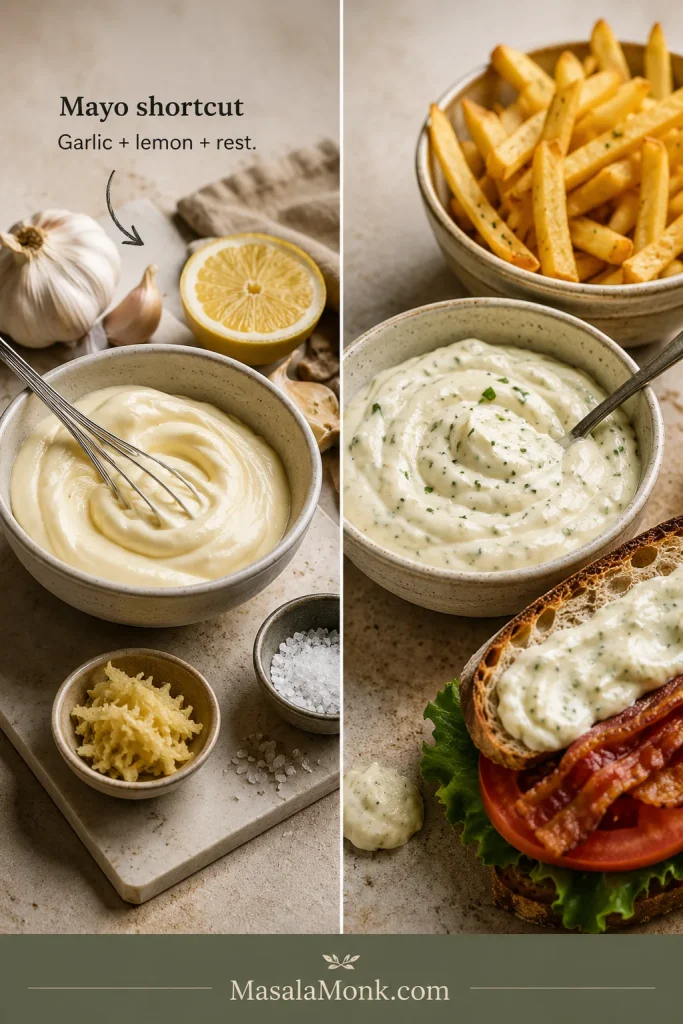
Fast ratio: ¾ cup mayo + 3 grated garlic cloves + 1 tablespoon lemon juice + ½ teaspoon Dijon mustard + ¼ teaspoon salt.
Rest 10 minutes, then taste. Brighten with lemon if it feels heavy, soften the bite with more mayo if the garlic is too sharp, and add salt if it tastes flat.
Using it for fries? Go a little bolder. On sandwiches, keep it smoother and milder. With seafood, let lemon lead before the garlic takes over. A small bowl of this can make plain fries, leftover chicken, roasted vegetables, or a simple sandwich feel intentional.
Need a different path? Jump to garlic control, vegan and eggless options, flavor variations, or traditional aioli.
Quick Answer: What Is Aioli?
Aioli is a garlic sauce. Traditionally, it is garlic and oil emulsified with salt and sometimes lemon. In modern recipe use, garlic aioli often means a creamy sauce made by stirring garlic, lemon, and seasonings into mayonnaise.
Both meanings are common. Traditional aioli tastes sharper and more olive-oil-forward; mayo aioli tastes creamier, milder, and more familiar. For fries, burgers, sandwiches, seafood, roasted vegetables, and party dips, the easy mayo version is the best place to start.
Most fixes are simple: acid lifts, mayo softens, salt sharpens, rest settles, and roasted garlic mellows.
Still deciding which style fits your food? The version guide makes that choice easier.
Which Aioli Version Should You Make?
Use this as a decision guide, not a rulebook. For everyday fries, burgers, and sandwiches, the mayo version is the easiest answer. When garlic and oil should be the star, choose traditional aioli. Egg-free, vegan, smoky, spicy, and mellow paths are there when the table needs them.
| Choose this | When you want | Best with |
|---|---|---|
| Easy garlic aioli with mayo | Fast, creamy, reliable garlic sauce | Fries, burgers, sandwiches, seafood, wraps |
| Traditional aioli | Sharper garlic-and-oil flavor | Artichokes, grilled vegetables, roasted potatoes, seafood |
| Vegan mayo aioli | Fast egg-free creamy dip | Fries, sandwiches, wraps, party platters |
| Soy-milk or aquafaba aioli | Plant-based sauce from scratch | Bowls, vegetables, vegan sandwiches |
| Roasted garlic aioli | Sweeter, softer garlic | Sandwiches, potatoes, grilled cheese, vegetables |
| Chipotle or sriracha aioli | Smoky or spicy heat | Tacos, burgers, fries, shrimp |
| Lemon-dill aioli | Brighter seafood finish | Salmon, crab cakes, shrimp, fish tacos |
Easy Garlic Aioli Recipe
Start with this version. It gives you the creamy garlic sauce people expect with fries, burgers, sandwiches, and seafood, but with enough lemon and garlic control to keep it from tasting heavy or harsh. This is the one to make when the fries are already hot and you just need a dip that tastes intentional.
Perfect technique is not the point here. Good garlic, enough lemon, and a few minutes of patience matter more. The first bite should feel cool and creamy, then bright with lemon, then warm with garlic.
Here is the key move: let grated garlic sit with lemon juice and salt before you whisk in the mayonnaise. During that short rest, the raw edge softens and the flavor spreads through the bowl. After 10 minutes, the garlic should taste rounder but still present. If it tastes perfect immediately after mixing, remember that it may taste stronger later.
Start with 3 cloves for balance, 5 for a bolder dip, or roasted garlic for something sweeter and softer. If your cloves are very large, begin with 2 to 3 and add more after tasting.
Recipe Details
- Prep time: 5 to 8 minutes
- Garlic rest: 10 to 15 minutes
- Optional chill: 20 to 30 minutes
- Total time: 15 to 20 minutes without chilling; about 40 minutes with optional chill
- Yield: scant 1 cup
- Servings: 12 to 16 tablespoons
- Equipment: small bowl, whisk or spoon, microplane or garlic press, optional fine mesh strainer
Garlic Aioli Ingredients
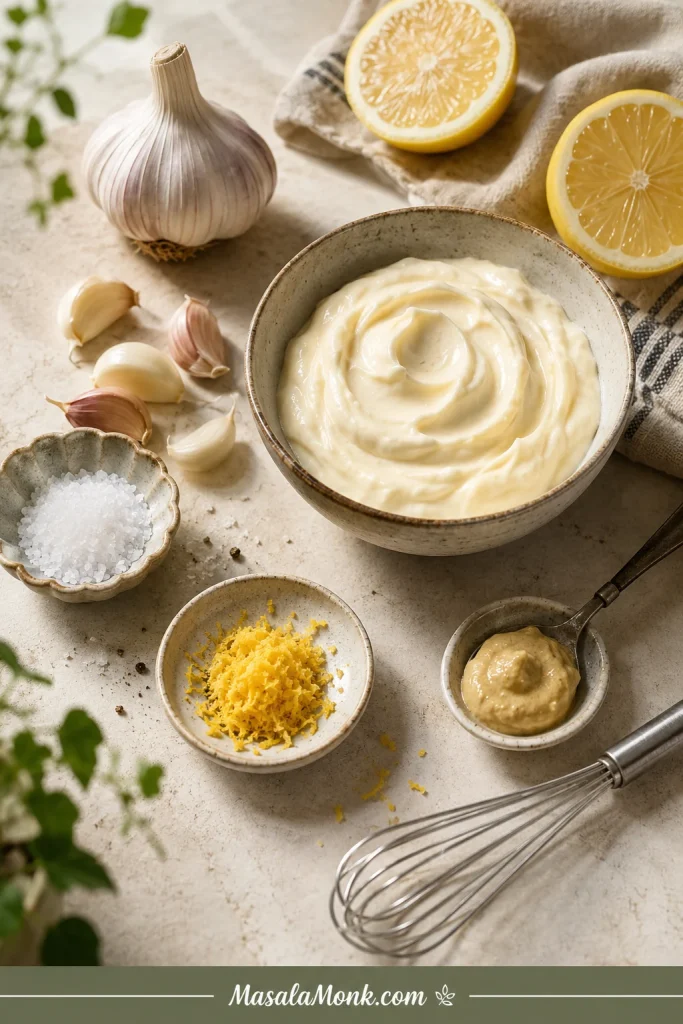
| Ingredient | US amount | Metric amount |
|---|---|---|
| Mayonnaise | ¾ cup | about 180 ml / 165 to 170 g |
| Fresh garlic, grated or pressed | 3 to 5 small-to-medium cloves | about 9 to 15 g |
| Fresh lemon juice | 1 tablespoon, plus more to taste | 15 ml |
| Dijon mustard | ½ teaspoon, optional | 2.5 ml |
| Fine salt | ¼ teaspoon to start | about 1.5 g |
| Black pepper | ⅛ teaspoon | a small pinch |
| Lemon zest | ½ teaspoon, optional | optional |
| Olive oil | 1 teaspoon, optional | 5 ml |
Method
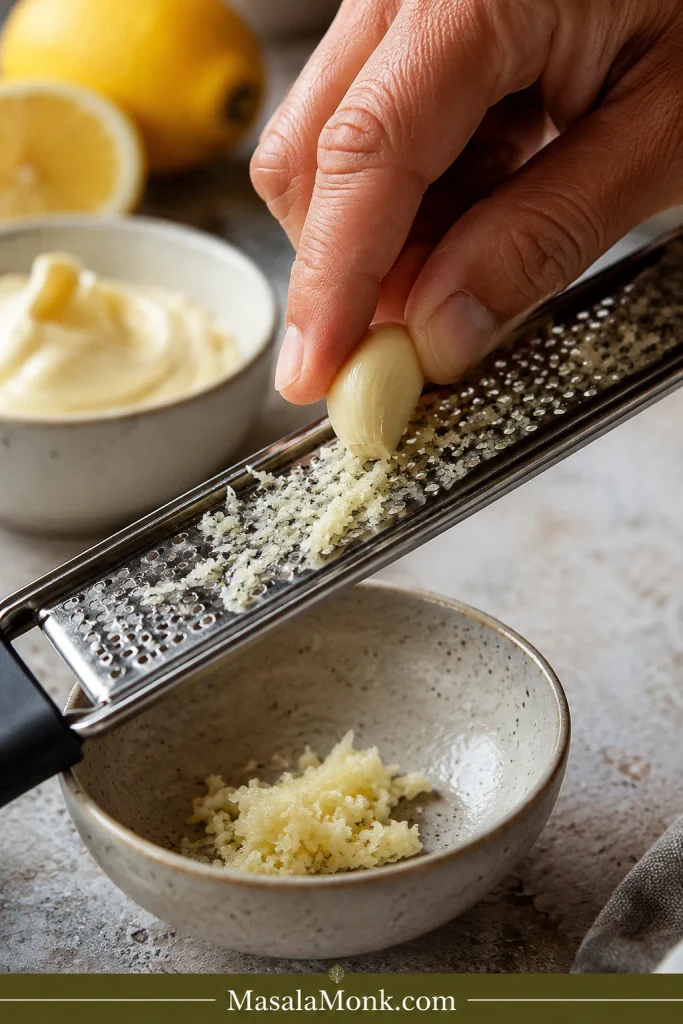
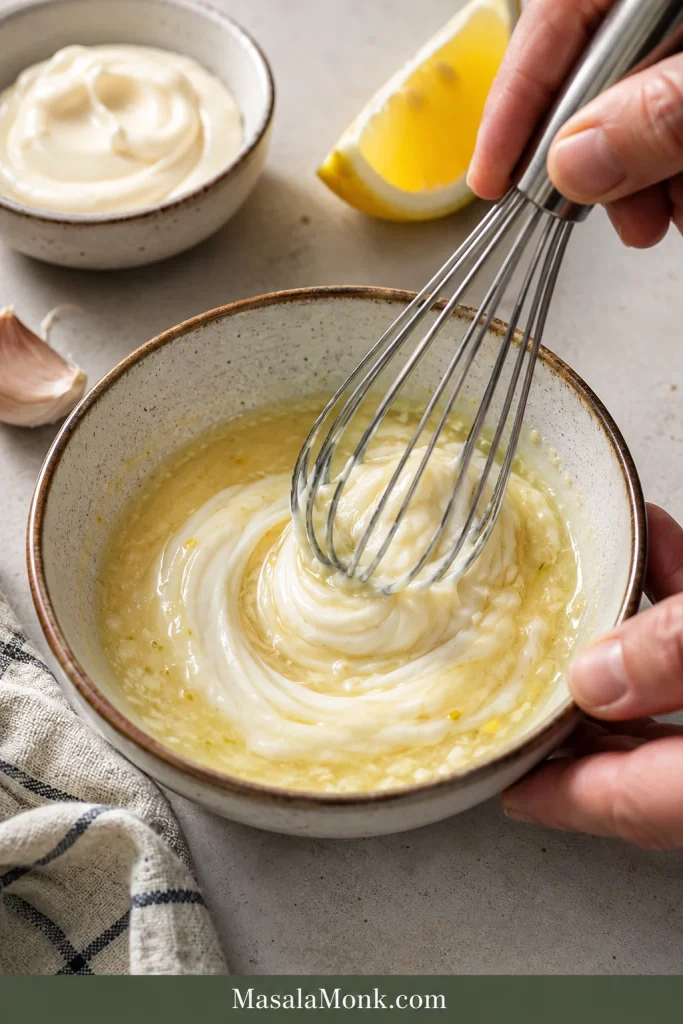
Step 1: Grate or press the garlic
Grate, press, or very finely paste the garlic. Smoother garlic makes a smoother sauce and gives the finished aioli a cleaner bite.
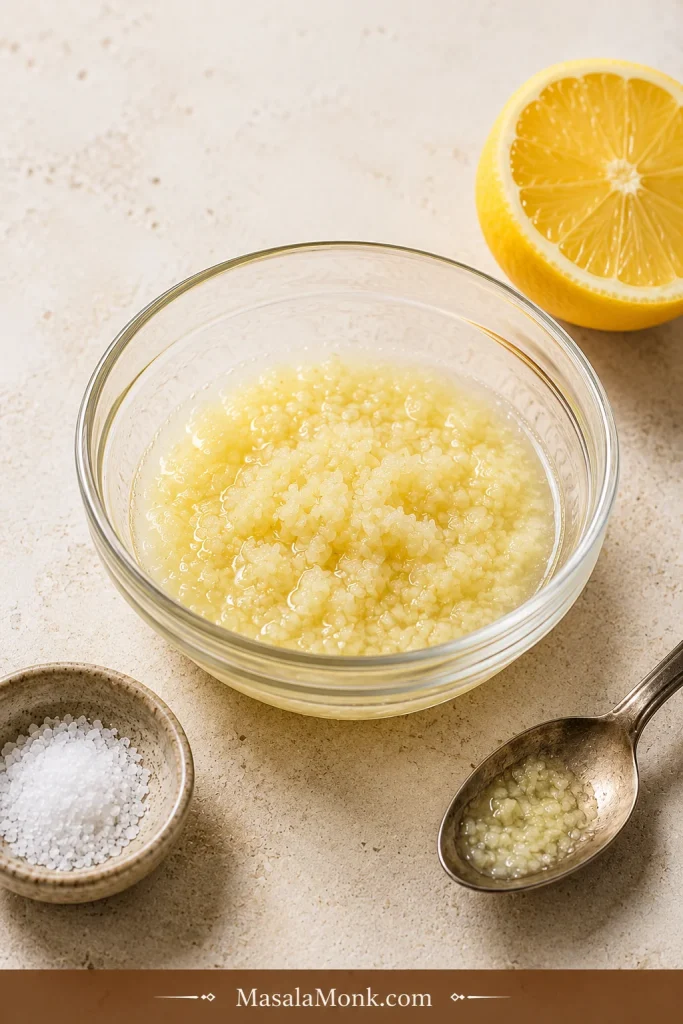
Step 2: Mix the garlic, lemon, Dijon, and salt
Add the garlic, lemon juice, Dijon mustard, and salt to a small bowl. This is where the raw garlic starts turning into a balanced sauce base.
Step 3: Rest the garlic mixture
Let the mixture rest for 10 to 15 minutes so the lemon can soften the raw bite before the mayonnaise goes in.
Step 4: Whisk in the mayonnaise
Whisk in the mayonnaise until the dip looks smooth and creamy. Scrape the sides of the bowl so the garlic and lemon flavor spreads evenly.
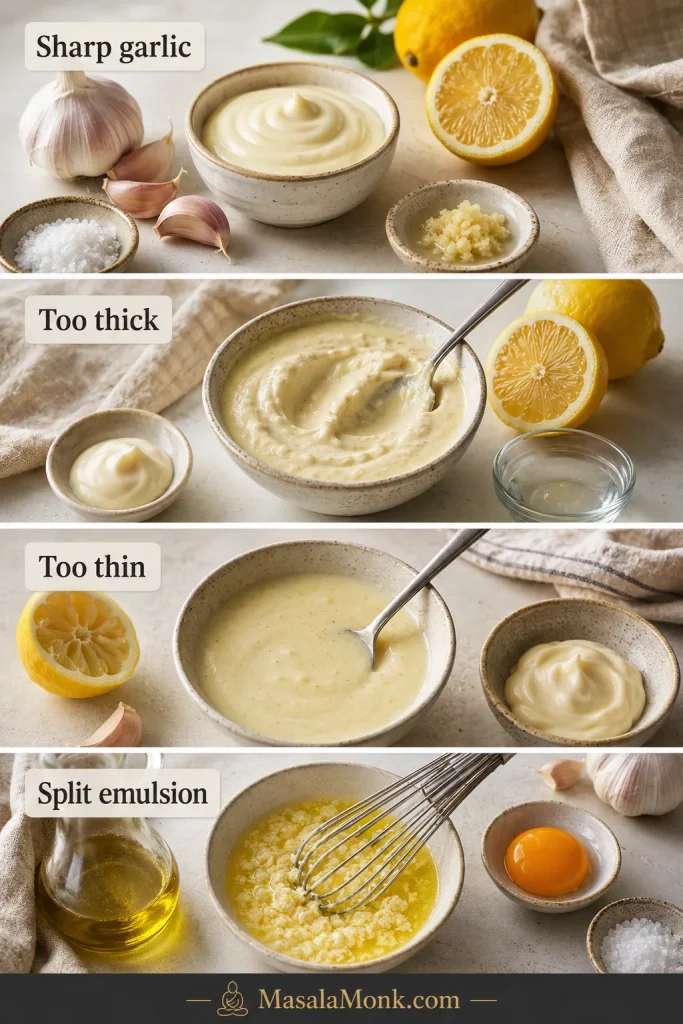
Finished Garlic Aioli Texture
Before you chill or serve it, check the texture. The sauce should look creamy and thick enough to hold its shape on a spoon.
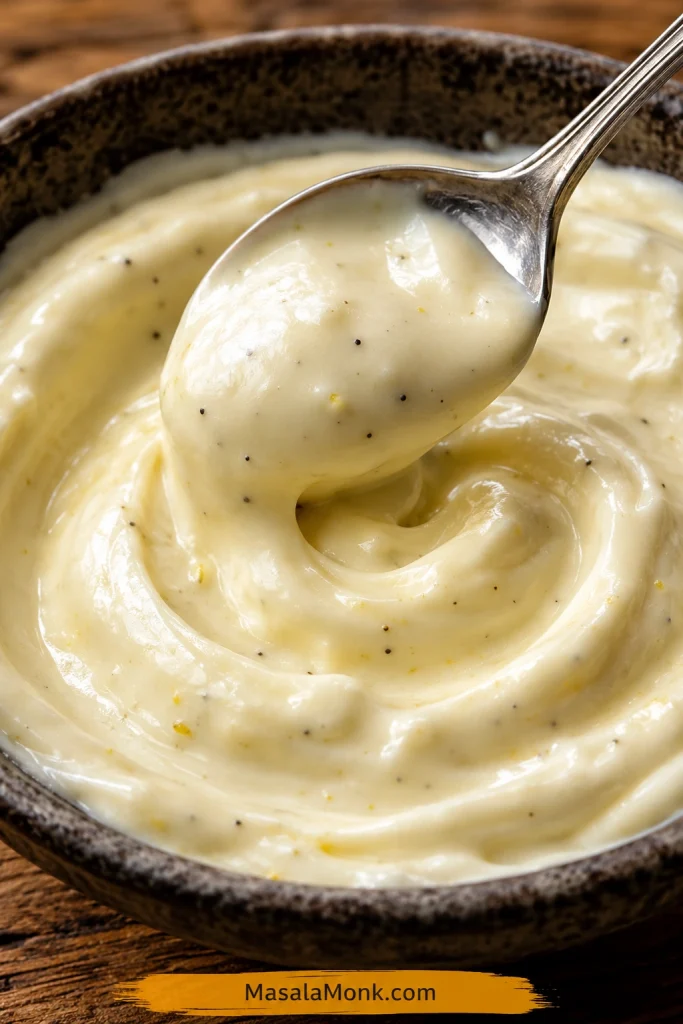
Step 5: Taste and adjust
Taste after resting. Brighten with more lemon, round it out with more mayo, or sharpen the flavor with another pinch of salt.
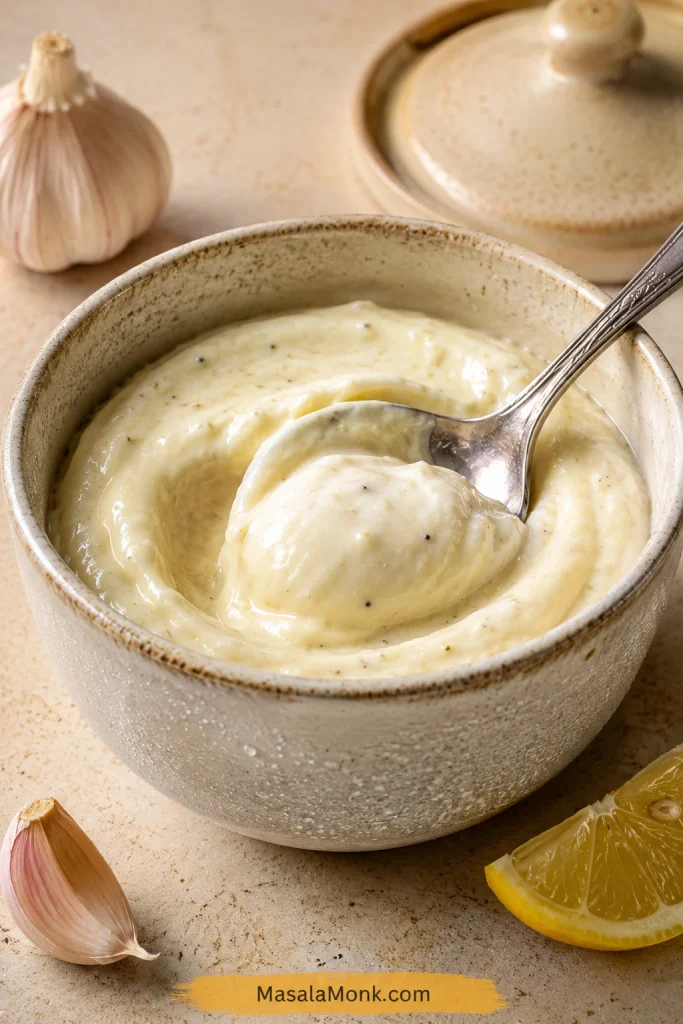
Step 6: Chill or serve
Serve right away, or chill for 20 to 30 minutes for a thicker, rounder texture.
Chilled Garlic Aioli Texture
After chilling, the dip will thicken slightly and usually taste less sharp. If you are making it ahead, err slightly mild on the garlic and adjust again before serving.
To make it milder and extra smooth, strain the garlic-lemon mixture before whisking the flavored lemon juice into the mayonnaise. You will still get garlic flavor, but without little garlic pieces or a strong raw bite.
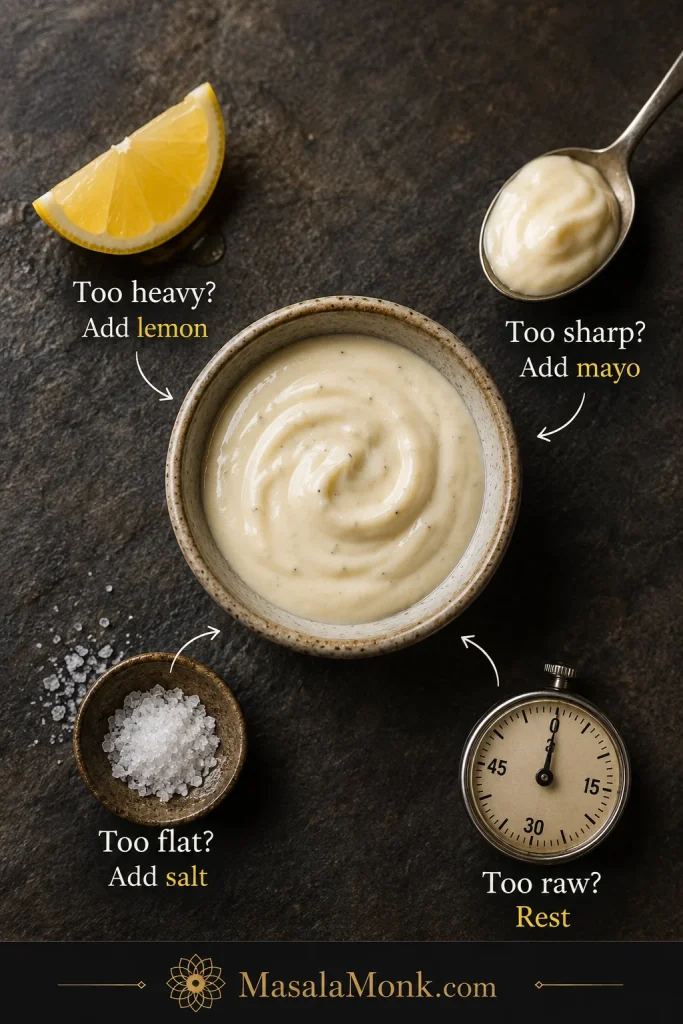
Taste and Adjust
Taste after the 10-minute rest, not before. Garlic gets louder as it sits, so a sauce that feels gentle at first can become bolder by the time it reaches the table. Serving guests? Start with 3 cloves and build up only after tasting.
- Sharp garlic bite: soften it with more mayo or a longer rest.
- Heavy finish: wake it up with lemon juice a few drops at a time.
- Sour edge: round it out with another spoonful of mayo.
- Flat flavor: season with salt, Dijon, or a tiny bit more garlic.
- Thick texture: loosen with water or lemon juice ½ teaspoon at a time.
- Mild flavor: add more grated garlic or lemon zest.
How to Adjust Garlic Aioli
Use small changes and taste between each one. A little lemon, mayo, salt, or rest can change the whole bowl.
Maximum garlic is not the goal. You want a dip bright enough to cut through rich food, creamy enough to cling, and garlicky enough that it has a reason to exist.
How to Control the Garlic Bite
This sauce is simple, but garlic decides whether it tastes balanced, bold, sweet, sharp, or too aggressive. Garlic is the one ingredient here that can make the sauce sing or take over the room, so choose the style that fits how you plan to serve it.
Raw, Roasted, Grated, or Pasted Garlic
Different garlic prep changes the same aioli base quickly, so pick the garlic style before adding more cloves.
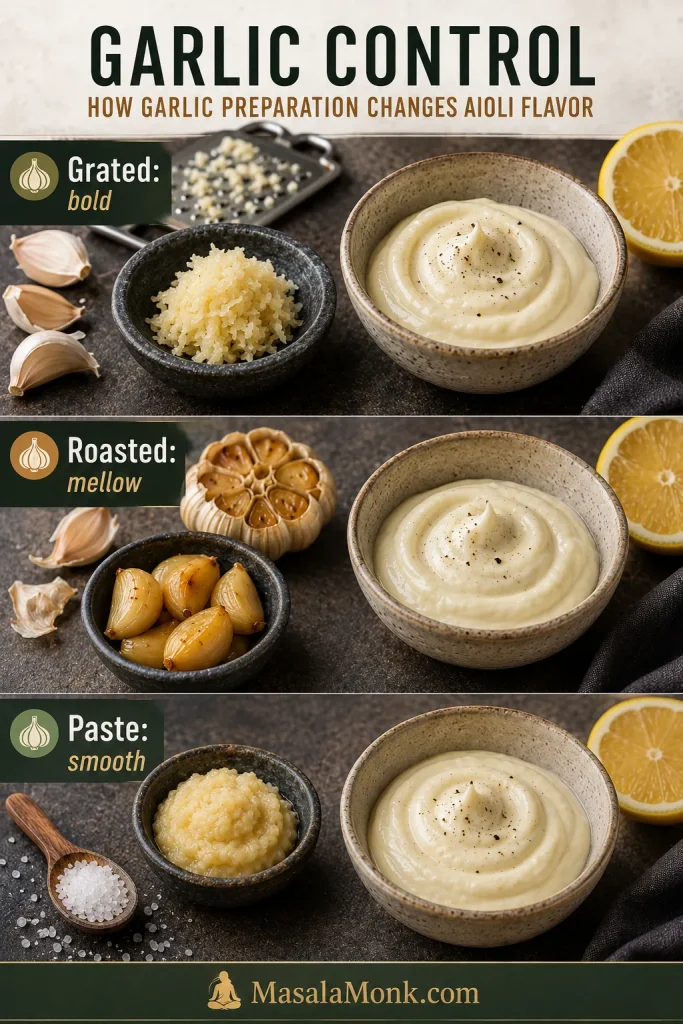
Mild vs Bold Garlic Aioli
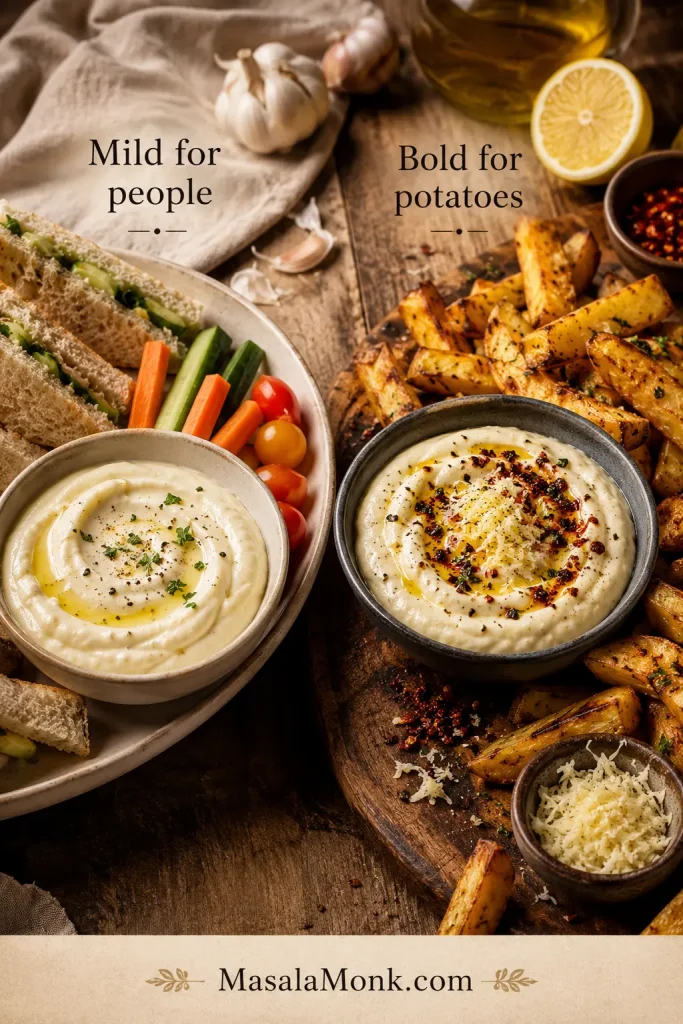
Start mild for people, bold for potatoes. Fries and roasted potatoes can handle strong garlic. Sandwiches, burgers, wraps, and fish tacos usually need a gentler spread. Serving a shared dipping bowl? Keep the base gentle and put hot sauce, chili crisp, extra lemon, or grated garlic on the side. If you want a brighter herb-driven dip instead of a creamy garlic one, MasalaMonk’s green chutney recipe gives you that cilantro-mint-lime direction.
- Balanced sauce: start with 3 garlic cloves.
- Bolder dip: use 5 cloves and grate them finely.
- Mellow flavor: rest raw garlic in lemon juice for 10 to 15 minutes.
- Smooth garlic taste: strain the garlic-lemon mixture before adding mayo.
- Sweeter sauce: use roasted garlic instead of raw garlic.
- Seafood version: let lemon and herbs lead before raw garlic power.
Why This Aioli Works
This aioli works because it treats garlic like a powerful ingredient, not just a flavoring. Freshly cut garlic can be hot, sharp, and harsh. Lemon and salt tame that raw edge before the mayo goes in, so the final dip tastes like one smooth sauce instead of mayonnaise with garlic stirred through it.
Dijon mustard fills the gap between sharp and creamy. You should not taste mustard first; you should just notice that the sauce feels finished. A short chill thickens the dip and gives the flavors time to settle.
- Lemon rest: softens raw garlic and spreads the flavor.
- Mayo base: gives stable body without building an emulsion from scratch.
- Dijon and salt: make the dip taste complete instead of just creamy.
Ingredient Notes and Smart Swaps
With only a few ingredients, there is nowhere for tired garlic or bland mayo to hide. The base gives creaminess, the garlic gives identity, the lemon gives lift, and the salt pulls the whole thing together.
Mayonnaise
Choose a mayonnaise you already like. This is not the place for a mayo you tolerate but never enjoy; the base flavor follows you into every bite. Full-fat mayo gives the richest garlic aioli and the best dipping texture. Light mayo works, though the result may taste tangier and less full. To build the base from scratch, start with MasalaMonk’s homemade mayo recipe, then add garlic, lemon, Dijon, and salt.
Garlic
Fresh garlic gives the cleanest flavor, but the way you prepare it changes the result. The same three cloves can taste mellow, sharp, or almost spicy depending on how you cut them. Grated garlic tastes strongest and blends smoothly. Pressed garlic is easy and punchy. Minced garlic gives a more rustic texture. Roasted garlic turns the sauce sweeter and softer. Garlic powder works in an emergency, but it will not taste as fresh.
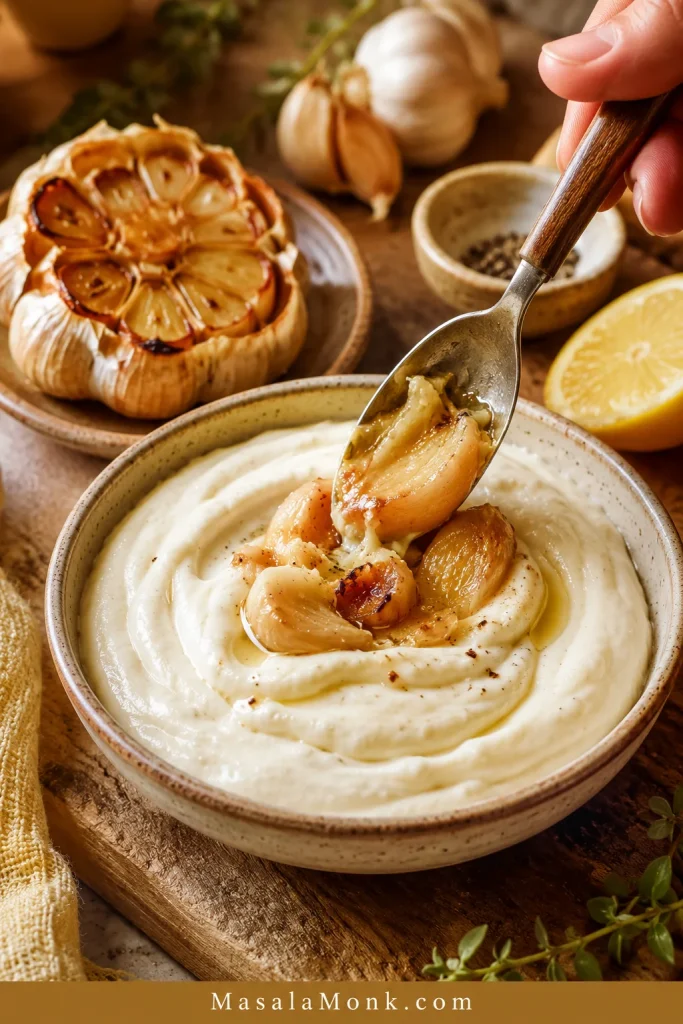
Roasted Garlic Aioli
Roasted garlic makes aioli sweeter and rounder, but it can also make the sauce feel less bright. After adding it, taste for lemon again before deciding the sauce is finished.
| Garlic form | Best for | Flavor result |
|---|---|---|
| Grated garlic | Classic garlic aioli | Strong, smooth, bold |
| Pressed garlic | Quick aioli | Punchy and easy |
| Minced garlic | Rustic dip | Chunkier, less smooth |
| Roasted garlic | Sandwiches, potatoes, vegetables | Sweet, mellow, less sharp |
| Garlic powder | Emergency shortcut | Milder, less fresh |
Lemon Juice
Fresh lemon juice is best because it tastes bright without becoming harsh. The lemon should lift the sauce, not turn it sour. Vinegar can work when lemon is not available, but start with less because vinegar can make the sauce sharper.
Dijon Mustard
Dijon mustard is optional, but useful. It adds depth and helps the sauce taste more complete. Use just enough to support the garlic and lemon. The dip should not taste like mustard unless you are making a mustard variation.
Olive Oil
A teaspoon of olive oil adds a little restaurant-style richness. A heavy pour can make the dip greasy, especially when the mayonnaise is already rich. Keep it small unless you are making the traditional garlic-and-oil version.
Small-Batch Garlic Aioli
Need enough for one burger, one sandwich, one small plate of fries, or one snack bowl? Mix ¼ cup mayo, ¼ to ½ teaspoon grated or pressed garlic, 1 teaspoon lemon juice, a tiny dab of Dijon, salt, and pepper. Let it sit for 5 to 10 minutes before tasting.
This is useful for a quick sandwich spread, a breakfast sandwich, a grilled cheese upgrade, or a dipping sauce when leftovers are not needed.
Using Store-Bought Mayo
Store-bought mayo is the fastest path to restaurant-style garlic aioli. Use the same base ratio from the main recipe, then adjust after the 10-minute rest: more garlic for a bolder dip, lemon for lift, or another spoonful of mayo if the bite feels too sharp.
This is the easiest way to upgrade a sandwich, burger, wrap, or dipping platter without buying a separate bottle of aioli.
Traditional Aioli from Scratch
Choose traditional aioli when you want garlic and oil to be the star: sharper, richer, more Mediterranean, and more technique-driven. Choose the mayo version when you want a fast, stable dip or spread for everyday food.
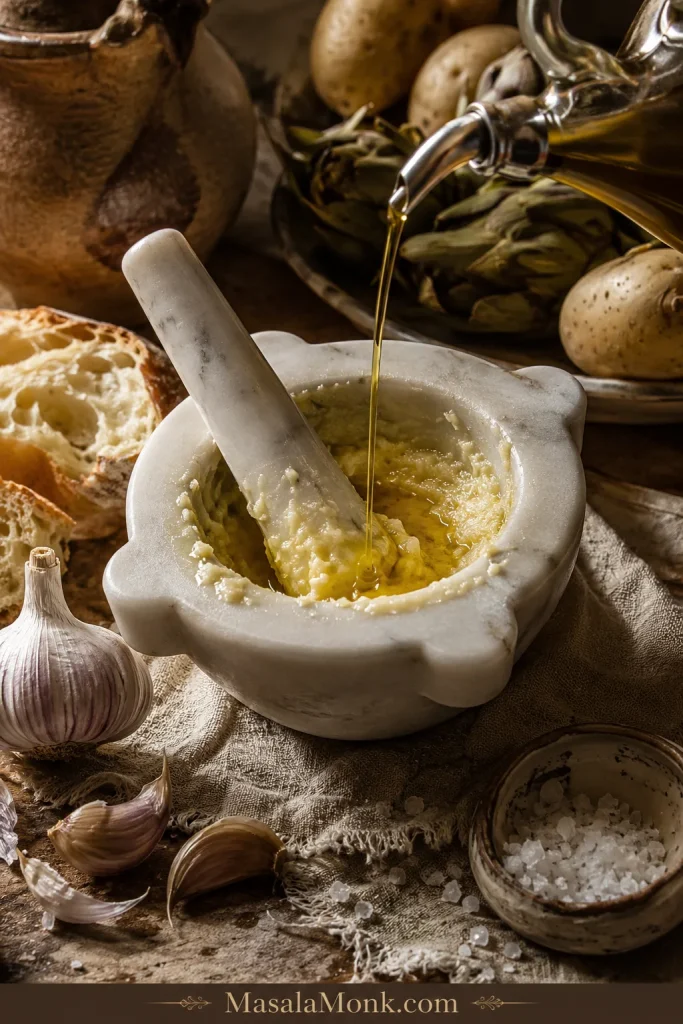
The classic version is not simply garlic mayonnaise. At its most basic, it is garlic and oil emulsified into a thick sauce, often with salt and lemon juice. Some home versions use egg yolk to make the emulsion more stable and easier to whisk.
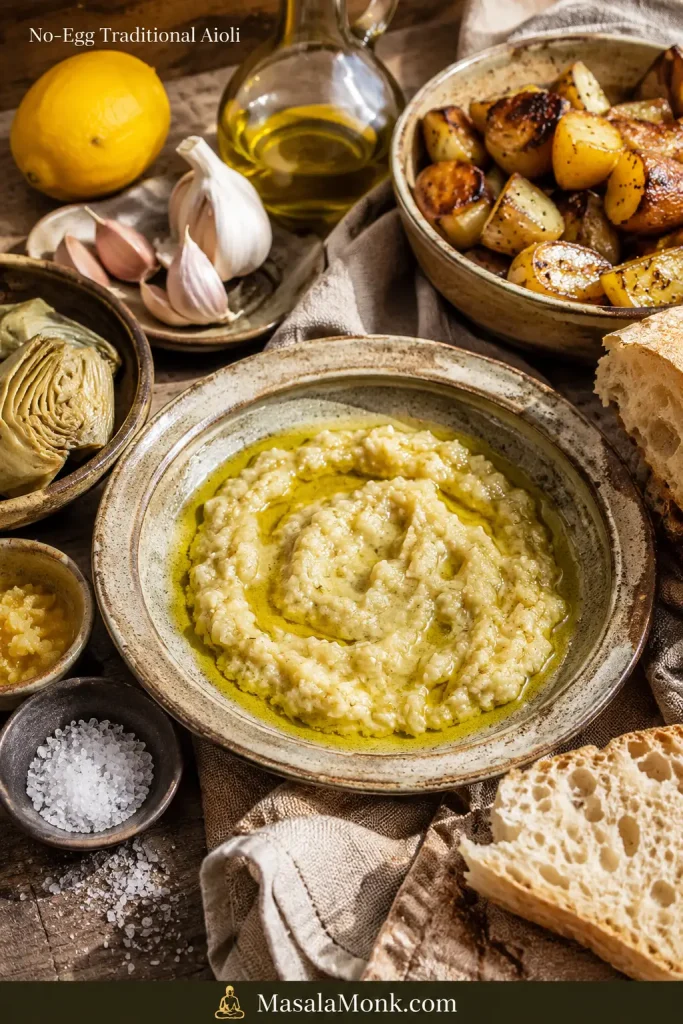
The garlic-and-oil path is less forgiving because you are building the sauce, not seasoning an already-stable base. Its flavor is sharper, more garlicky, more olive-oil-forward, and less creamy than the easy mayo path. It works beautifully with grilled vegetables, artichokes, seafood, roasted potatoes, or a Mediterranean-style plate.
This is the version to make when you want the sauce to feel like part of a Mediterranean platter, not just a creamy dip on the side.
Traditional Aioli Mortar and Pestle
The mortar-and-pestle method makes the garlic and oil feel more direct than the mayo shortcut, so expect a sharper and more rustic sauce.
If you enjoy sauce technique, the same patience with fat, acid, and emulsion shows up in MasalaMonk’s béarnaise sauce recipe, though that sauce uses butter and egg yolk instead of garlic and oil.
Easier Traditional-Style Aioli with Egg Yolk
This is not the oldest purist version, but it is the easiest traditional-style path for most home cooks. The egg yolk helps the garlic and oil emulsify into a thicker, glossier sauce.
Egg-Yolk Aioli Ingredients
| Ingredient | US amount | Metric amount |
|---|---|---|
| Garlic | 2 cloves | about 6 g |
| Salt | ¼ teaspoon | about 1.5 g |
| Egg yolk | 1 large | about 18 g |
| Lemon juice | 1 to 2 teaspoons | 5 to 10 ml |
| Dijon mustard | ½ teaspoon, optional | 2.5 ml |
| Mild extra-virgin olive oil | ¼ cup | 60 ml |
| Neutral oil | 3 tablespoons | 45 ml |
| Water | A few drops as needed | As needed |
If raw egg is a concern, anyone avoiding it — including children, pregnant people, older adults, or immunocompromised guests — should choose the mayo-based version, vegan mayo version, or no-egg path.
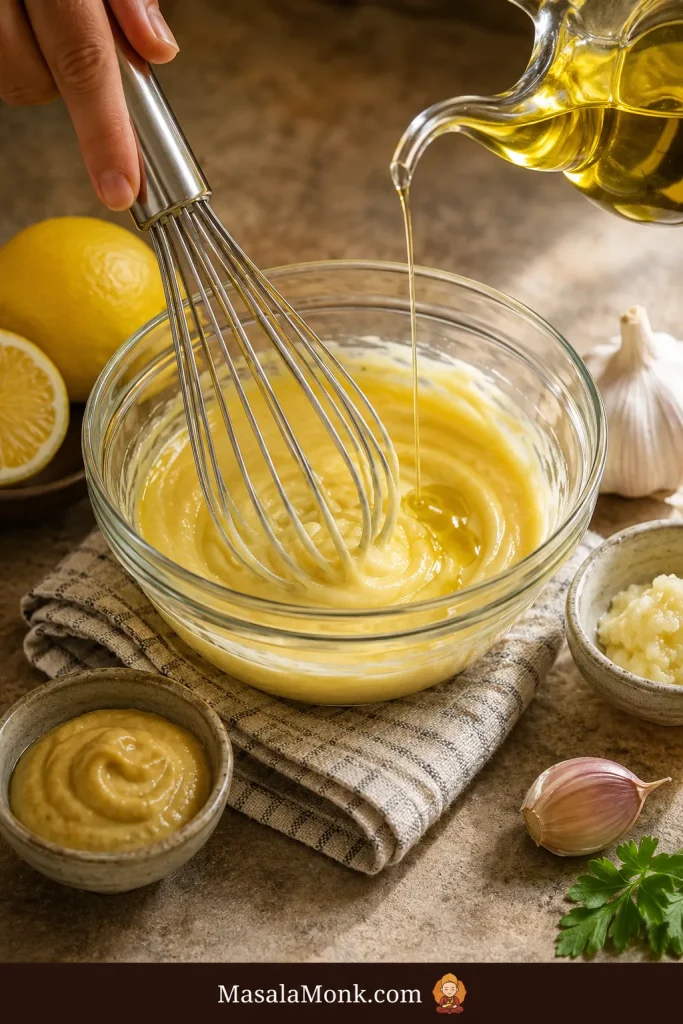
Method
- Mash or grate the garlic with salt until it forms a paste. A mortar and pestle is traditional, but a microplane and bowl also work.
- Whisk in the egg yolk, lemon juice, and Dijon mustard if using.
- Start adding the oil drop by drop while whisking constantly. Do not rush the first few tablespoons.
- Once the mixture thickens and looks glossy, add the remaining oil in a very thin stream.
- When the sauce gets too thick, whisk in a few drops of water or lemon juice.
- Taste and adjust with salt, lemon, or a few more drops of oil.
The first oil addition is the most important part. Too much oil too quickly can split the emulsion. A damp kitchen towel wrapped into a ring under the bowl helps keep it steady while you whisk. Using a measuring cup with a spout also makes slow pouring easier.
The sauce should turn glossy and thicker as the oil goes in. If it starts looking loose or greasy, stop adding oil and whisk until it tightens before continuing.
No-Egg Traditional Aioli
To make no-egg traditional aioli, mash 3 to 4 garlic cloves with a generous pinch of salt until you have a sticky paste. Add mild olive oil very slowly, drop by drop at first, while grinding or whisking constantly. As the paste tightens, use a few drops of lemon juice or water to loosen it and help the sauce come together.
This older-style method is sharper and more garlic-forward than the egg-yolk path. It may look thicker, rougher, or less glossy than mayo aioli, especially on the first try. That is normal. If it refuses to thicken, turn it into a rustic garlic oil dip instead of forcing it; it will still be delicious with bread, potatoes, grilled vegetables, or seafood.
For a milder classic sauce, use a mix of mild olive oil and neutral oil. Strong extra-virgin olive oil can taste bitter or peppery, especially when blended aggressively. With an immersion blender, blend the neutral oil first and stir in the olive oil by hand at the end.
Vegan, Eggless, No-Mayo, and Lighter Options
Choose this section when regular mayo does not fit the people at your table. You can still make a creamy garlic dip, a sharper no-mayo sauce, or a lighter bowl drizzle without losing the main garlic-lemon idea.
These versions are about hospitality, not compromise. Regular mayonnaise usually contains egg. Vegan mayo is egg-free. Greek yogurt is lighter, but it is not dairy-free. Traditional egg-yolk aioli contains raw egg, while no-egg traditional aioli and vegan versions avoid egg entirely. For a dedicated egg-free creamy base, use MasalaMonk’s eggless mayonnaise recipe and follow the same garlic-lemon balance.
Best Eggless Aioli Base to Use
If you are using vegan mayo, follow the same fast aioli ratio and swap the base. If you want no mayo at all, use the traditional aioli section as your starting point.

- Closest to the main recipe: vegan mayo.
- From-scratch vegan emulsion: unsweetened soy milk.
- Creamy bowl sauce: cashews.
- No-egg traditional path: garlic, salt, oil, and patience.
Use this table to pick the right base, not to make every version.
Vegan Aioli Base Ratios
| Option | Quick ratio | Best use |
|---|---|---|
| Vegan mayo shortcut | ¾ cup vegan mayo + 3 garlic cloves + 1 tbsp lemon + salt | Fast vegan dip or spread |
| Soy-milk vegan aioli | ½ cup unsweetened soy milk + 1 cup oil + garlic + lemon or vinegar + salt | From-scratch vegan emulsion |
| Aquafaba aioli | 3 tbsp aquafaba + ½ to ¾ cup neutral oil + garlic + lemon or vinegar + mustard | Eggless aioli-style sauce |
| Cashew aioli-style sauce | 1 cup soaked cashews + ½ to ¾ cup water + garlic + lemon + salt | Creamy vegan bowl sauce |
| Lightened garlic aioli | ½ cup Greek yogurt + ¼ cup mayo + garlic + lemon + Dijon + salt | Lighter dip for vegetables, chicken, potatoes, wraps, and bowls |
| No-mayo traditional aioli | Garlic paste + salt + slow olive oil + lemon or water | Sharper traditional-style sauce |
Plain unsweetened soy milk matters here. Sweetened or flavored plant milk will pull the sauce in the wrong direction before the garlic even has a chance. Vegan mayo tastes closest to the main recipe. Soy milk and aquafaba behave more like emulsions. Cashew aioli is creamy and bowl-friendly, but less like classic aioli.
The Greek yogurt version is tangier and less rich than classic garlic aioli. It works especially well as a dip or bowl sauce. For another cool, garlicky yogurt-based sauce, MasalaMonk’s Greek tzatziki sauce recipe is a better fit when you want cucumber, dill, and a lighter Mediterranean finish.
Aioli Flavor Variations
Once the base tastes right, the variations should feel easy, not like twelve new recipes. You are giving the same sauce a new mood: smoky for tacos, lemony for seafood, mustardy for burgers, herby for vegetables, spicy for fries.
Best Aioli Variations to Start With
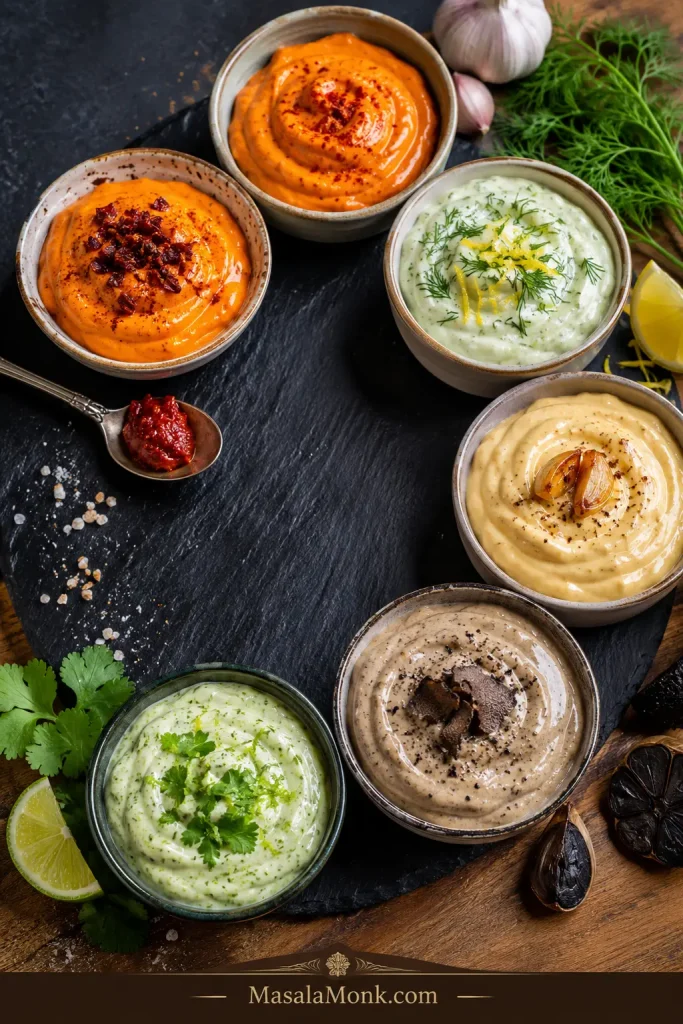
If you only try three, make chipotle aioli for tacos and fries, lemon-dill aioli for seafood, and roasted garlic aioli for sandwiches and potatoes. Those three cover smoky, bright, and mellow.
Aioli Variation Ratios
| Variation | Add to 1 cup base | Good with |
|---|---|---|
| Chipotle aioli | 1 tbsp adobo or 1 to 2 tsp chipotle powder + 1 tbsp lime | Tacos, burgers, fries |
| Sriracha aioli | 2 tbsp sriracha + 1 tbsp lime | Shrimp, chicken, fries |
| Spicy aioli | 1 to 2 tsp hot sauce, chili paste, or chili crisp | Wraps, sandwiches, fries |
| Dill aioli | 1 to 2 tbsp fresh dill + ½ tsp lemon zest | Salmon, crab cakes, potatoes |
| Lemon garlic aioli | ½ to 1 tsp lemon zest + 1 tsp lemon juice | Seafood, asparagus, chicken |
| Black garlic aioli | 3 to 5 mashed black garlic cloves | Burgers, fries, roasted vegetables |
| Mustard aioli | 1 to 2 tbsp Dijon or whole-grain mustard | Sandwiches, burgers, potatoes |
| Truffle aioli | ¼ to ½ tsp truffle oil or 1 to 2 tsp truffle paste | Fries, burgers, mushrooms |
| Cilantro lime aioli | 2 tbsp cilantro + 1 tbsp lime + ½ tsp lime zest | Fish tacos, grain bowls, wraps |
| Roasted garlic aioli | 1 to 2 tbsp roasted garlic paste | Potatoes, sandwiches, vegetables |
| Salsa aioli | ¼ cup well-drained salsa + 1 tsp lime | Tacos, nachos, burgers |
| Calabrian chili aioli | 1 to 2 tbsp chopped Calabrian chilies or paste + lemon | Sandwiches, fries, grilled vegetables |
Chipotle and sriracha both get stronger after a short rest, so begin with less heat and build from there. For fruitier heat, borrow the sweet-hot idea from MasalaMonk’s mango habanero sauce recipe and add it lightly to the aioli base.
Drain salsa first so salsa aioli does not turn watery. If you already have a bright mango salsa, drain it well before folding a spoonful into aioli. For truffle aioli, use a light hand; too much can overpower the garlic and lemon.
Once you pick a flavor, the serving chart will help match it to fries, burgers, seafood, vegetables, or bowls.
What Tastes Best with Aioli?
Start with the food in front of you. Fries want a thick, bold aioli that clings to the crispy edges. Burgers want a smooth spread that does not fight the meat. Seafood wants lemon first, garlic second. Roasted vegetables can handle deeper flavors like black garlic, roasted garlic, herbs, or chili.
What to Serve with Garlic Aioli

Best Aioli Pairings by Food
Use this as a flavor-matching chart, not a rulebook.
| Food | Serve with | Why it works |
|---|---|---|
| French fries | Garlic, truffle, spicy | Clings to salty fries and cuts through the crunch |
| Sweet potato fries | Chipotle, sriracha | Balances sweetness with smoke or heat |
| Burgers | Garlic, mustard, chipotle | Adds the creamy layer that makes the burger feel finished |
| Fish tacos | Chipotle, cilantro lime | Brings creaminess, acid, and fresh heat |
| Salmon | Lemon dill | Cuts through rich fish without hiding it |
| Shrimp | Lemon garlic, sriracha | Gives cool brightness against sweet shrimp |
| Crab cakes | Lemon dill | Adds a creamy seafood-friendly finish |
| Artichokes | Traditional, lemon | Turns each leaf into a rich, garlicky bite |
| Chicken sandwich | Garlic, spicy | Turns a dry sandwich into a finished one |
| Grilled cheese | Garlic, roasted garlic | Adds savory depth without needing another filling |
| Breakfast sandwich | Garlic herb | Works with eggs, cheese, and toasted bread |
| BLT | Roasted garlic | Soft garlic plays well with tomato and bacon |
| Roasted vegetables | Black garlic, herb | Adds depth to sweet, browned edges |
| Potato salad | Garlic aioli mixed with mayo or yogurt | Makes creamy salads taste brighter and less flat |
| Deviled eggs | Garlic aioli in place of some mayo | Deepens the filling without making it heavy |
| Grain bowls | Vegan, cilantro lime | Turns grains and vegetables into a real meal |
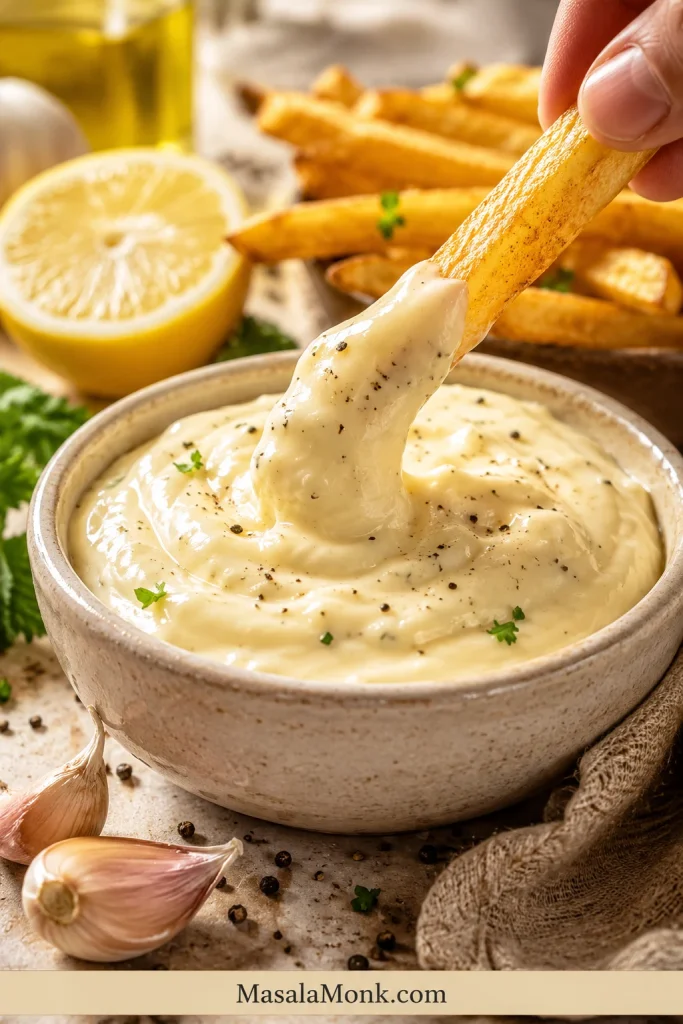
Garlic Aioli for Fries
Classic garlic aioli is the safest first batch for fries because it is thick, creamy, and bold enough to cling to crisp edges.
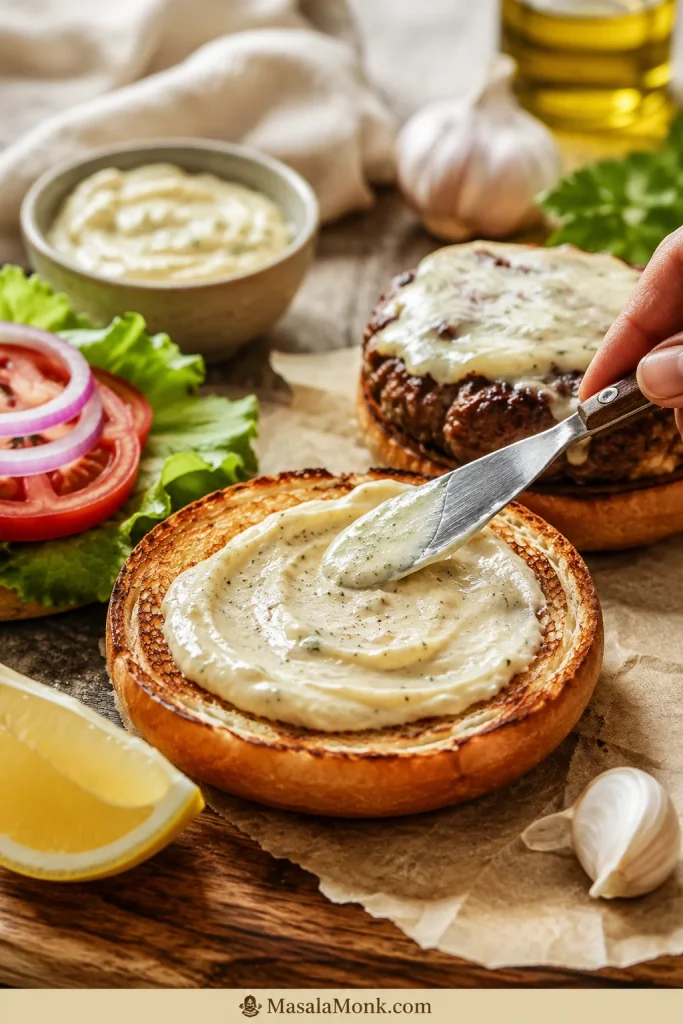
Garlic Aioli for Burgers
For burgers, a thick garlic, mustard, or chipotle version works especially well with a simple burger patty recipe.
Use the same base with crispy homemade French fries, roasted potatoes, burgers, grilled chicken, or sandwiches.
Chicken and seafood both love this sauce, but in different ways. On chicken, use it as the creamy layer in one of these chicken sandwich recipes, especially with spicy, roasted garlic, or mustard variations. For tacos, the chipotle and cilantro-lime versions fit naturally with MasalaMonk’s shrimp tacos recipe.
Seafood usually wants the lemony side of aioli. Lemon dill aioli is a natural dip for salmon croquettes. Fried fish can go either way: aioli gives you the garlicky option, while MasalaMonk’s tartar sauce recipe gives you the classic pickle-caper direction.
Dip, Spread, or Drizzle
The same sauce can work as a dip, spread, or drizzle with small texture changes. Fries need enough thickness to drag through crispy edges. Seafood tastes better when lemon arrives before the garlic. Sandwiches need a smooth spread, not a garlic bomb.
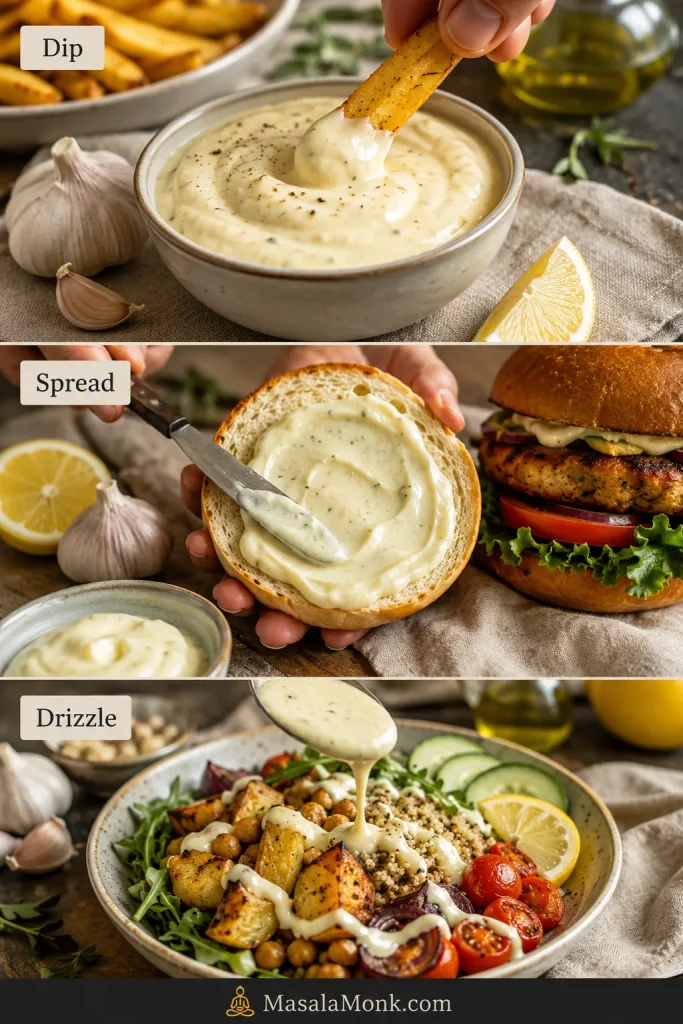
- Dip: use the aioli as written and chill it before serving.
- Sandwich spread: keep it thick, smooth, and not too garlicky.
- Drizzle: add water or lemon juice ½ teaspoon at a time.
- Bowl sauce: loosen with lemon juice, water, or yogurt.
- Burger sauce: keep it thick and add mustard, chipotle, black garlic, or roasted garlic.
Thin aioli slowly. A little liquid changes the texture quickly. If the sauce looks loose after thinning, stop adding liquid and let it chill before fixing again. When the creamy version gets too loose, stir in more mayonnaise. With traditional aioli, add more oil only when the emulsion is stable. For a lighter dipping plate, thick garlic aioli works with crunchy vegetables or MasalaMonk’s crispy zucchini chips.
Need to reset the base? Go back to the main garlic aioli recipe. If the texture has already gone too far, use the troubleshooting table.
How to Store Aioli Without Losing Freshness
A short rest improves the flavor, but storage depends on the base. Aioli should still taste fresh, cold, and awake — not like something forgotten at the back of the fridge. Mayo-based garlic aioli is easiest to make ahead. Traditional raw egg aioli is more delicate. No-egg traditional aioli tastes best fresh.
Best Storage Window by Version
| Version | Storage guidance |
|---|---|
| Mayo-based garlic aioli | Best within 2 to 4 days for fresh garlic flavor; some versions may keep up to about a week if handled cleanly and kept cold |
| Homemade raw egg/yolk aioli | Use pasteurized eggs when available; refrigerate and use within 3 to 4 days |
| No-egg traditional aioli | Best fresh; use within 24 hours for best texture |
| Vegan soy-milk aioli | Refrigerate airtight for 4 to 7 days |
| Cashew-style vegan aioli | Refrigerate for about 1 week; re-blend if needed |
| Mayo or egg emulsion | Do not freeze when texture matters |
Keep aioli refrigerated until serving. Stir before using because garlic, lemon, and oil can settle slightly. At parties, keep the main container cold and refill a smaller bowl as needed; the sauce tastes better that way, and it is safer.
As a general safety habit, do not leave aioli at room temperature for more than 2 hours, and shorten that window when the room is very warm. FoodSafety.gov explains the 2-hour rule for perishable foods. Freezing is not recommended for mayo-based or egg-based aioli because the emulsion can break when thawed. Cashew-style vegan aioli handles freezing better, but the texture may still need a quick blend after thawing.
Troubleshooting Aioli
Most aioli problems are fixable. Decide what is wrong first: sharp garlic, flat flavor, loose texture, or a broken emulsion. Then fix only that problem. Mayo-based aioli is forgiving; the traditional garlic-and-oil path needs slower oil, steadier whisking, and more patience.
Aioli Troubleshooting Guide
Quick Fixes for Common Aioli Problems
| Problem | Fix |
|---|---|
| Sharp garlic bite | Rest longer, add more mayo, use roasted garlic next time, or strain the garlic-lemon mixture |
| Flat flavor | Add salt, lemon juice, Dijon, or a tiny bit more garlic |
| Salt pushed too far | Add more mayo, yogurt, or a small splash of lemon when it also tastes heavy |
| Texture too thick | Add lemon juice or water a few drops at a time |
| Texture too thin | Add more mayo for the creamy version; for traditional aioli, keep emulsifying slowly |
| Traditional aioli split | Stop adding oil, whisk hard, or start with a new yolk and slowly whisk the broken sauce into it |
| Olive oil tastes bitter | Use milder olive oil or blend with neutral oil; avoid high-speed blending with strong extra-virgin olive oil |
| Bitter even without olive oil | Check for old garlic, sprouted garlic, too much raw garlic, or too much lemon pith/zest |
| Vegan aioli will not thicken | Use unsweetened soy milk, keep oil and milk at a similar temperature, and blend in a narrow cup |
| Garlic chunks are unpleasant | Grate, press, paste, or strain the garlic before mixing |
When traditional aioli breaks, do not throw it away immediately. Start with a fresh egg yolk in a clean bowl, then slowly whisk the broken sauce into the yolk as if it were the oil. Add it gradually and stop when the texture begins to loosen too much.
FAQs
Is aioli just garlic mayonnaise?
Traditional aioli is not garlic mayonnaise. It is a garlic-and-oil emulsion. Many modern garlic aioli recipes use mayonnaise as a shortcut because it is fast, creamy, stable, and familiar.
What is the difference between aioli and mayo?
Traditional aioli is built around garlic and oil, while mayonnaise is usually made from oil, egg yolk, and acid. Mayo-based garlic aioli combines mayonnaise with garlic, lemon, and seasonings to create a quick modern version. Real Simple has a useful explainer on aioli vs mayo.
How do you turn mayo into aioli?
Stir grated garlic, lemon juice, Dijon mustard, salt, and pepper into mayonnaise, then let it rest for 10 to 15 minutes. Start with ¾ cup mayo, 3 garlic cloves, 1 tablespoon lemon juice, ½ teaspoon Dijon, and ¼ teaspoon salt.
How much garlic should you use in aioli?
Use 3 small-to-medium cloves for balanced garlic aioli, 5 cloves for a bold dip, and 1 to 2 cloves for a milder sandwich spread. Resting the garlic in lemon juice helps soften the raw bite.
Do you need egg to make aioli?
No. Some traditional methods use only garlic and oil. Many from-scratch home versions use egg yolk because it helps the sauce emulsify more easily. Vegan aioli can be made with vegan mayo, soy milk, aquafaba, or cashews.
Can you make aioli without mayo?
Yes. Make traditional aioli by emulsifying garlic with oil, salt, and lemon, with or without egg yolk. Vegan no-mayo versions can use soy milk, aquafaba, or cashews as the base.
How long does homemade aioli last?
Mayo-based garlic aioli is best within 2 to 4 days for fresh garlic flavor, though some versions may keep longer when refrigerated and handled cleanly. Traditional raw egg aioli is best used within 3 to 4 days. No-egg traditional aioli tastes best fresh.
Why did my traditional aioli split?
Traditional aioli usually splits when oil is added too quickly or the emulsion is not stable yet. Add oil drop by drop at the beginning, whisk constantly, and repair a broken sauce by slowly whisking it into a fresh yolk.
Why does aioli taste bitter?
Bitterness can come from strong olive oil, high-speed blending, old or sprouted garlic, too much raw garlic, or lemon pith. Choose milder oil, fresh garlic, and a smaller garlic amount for a smoother sauce.
How do you make garlic aioli less strong?
Use fewer cloves, rest the garlic in lemon juice, add more mayo, or strain the garlic out. Roasted garlic gives the mildest, sweetest result, especially for sandwiches or shared dipping bowls.
What is the best aioli for fries?
Classic garlic aioli is the safest first choice for fries because it is thick, creamy, and bold enough to cling. For sweet potato fries or loaded fries, chipotle, sriracha, truffle, or spicy aioli works especially well.
Make the mayo version once, then pay attention to the bite: more lemon for seafood, more garlic for fries, roasted garlic for sandwiches, herbs for vegetables, heat for tacos. Once you learn that balance, aioli stops being a recipe you look up and becomes the sauce you know how to make.