There’s something wonderfully comforting about a big bowl of potato salad. It fits in almost anywhere: summer barbecues, winter potlucks, Eid spreads, Christmas dinners, brunch tables, even quiet weekday lunches with leftovers. Some days you crave a classic creamy potato salad recipe with egg and mayo; on others, a tangy German potato salad, a rich Russian salad (Olivier salad), a colourful beet and potato salad, or a lighter Greek yogurt or vegan potato salad with a fresh, herby vinaigrette feels just right.
Because there are so many versions, it makes sense to begin with one reliable, easy potato salad recipe and treat that as your base. From there, you can branch out into the styles you love—warm potato salad with bacon, dill potato salad, Japanese potato salad, cold sweet potato salad, chicken potato salad, vegan potato salad, even the occasional Amish-style or Filipino potato salad. As you’ll see in this guide, once you understand the basic potato salad ingredients and procedure, you can turn that simple foundation into countless potato salad recipes without much extra effort.
Why Potato Salad Is More Than “Just a Side”
Before we make the first bowl, it’s worth answering a simple question: is potato salad just comfort food, or can it actually fit into a balanced way of eating?
Potatoes: What’s Really Inside
A medium potato (about 5.3 oz) brings around 110 calories, almost no fat, and useful amounts of vitamin C, potassium and vitamin B6. Resources like PotatoGoodness’ nutrition breakdown, describe potatoes as nutrient-dense complex carbohydrates, not empty calories.

Furthermore, when you cool cooked potatoes – which is exactly what happens in a cold potato salad – some starch turns into resistant starch. Many nutrition writers and dietitians point out that resistant starch digests more slowly and may support better blood sugar and gut health than freshly mashed, steaming potatoes.
If you like digging into the details, MasalaMonk’s article “The Potato Debate: White vs Sweet” compares white potatoes and sweet potatoes in terms of glycemic index, calories and context on how to use both wisely.
Why Dressing and Portion Size Matter
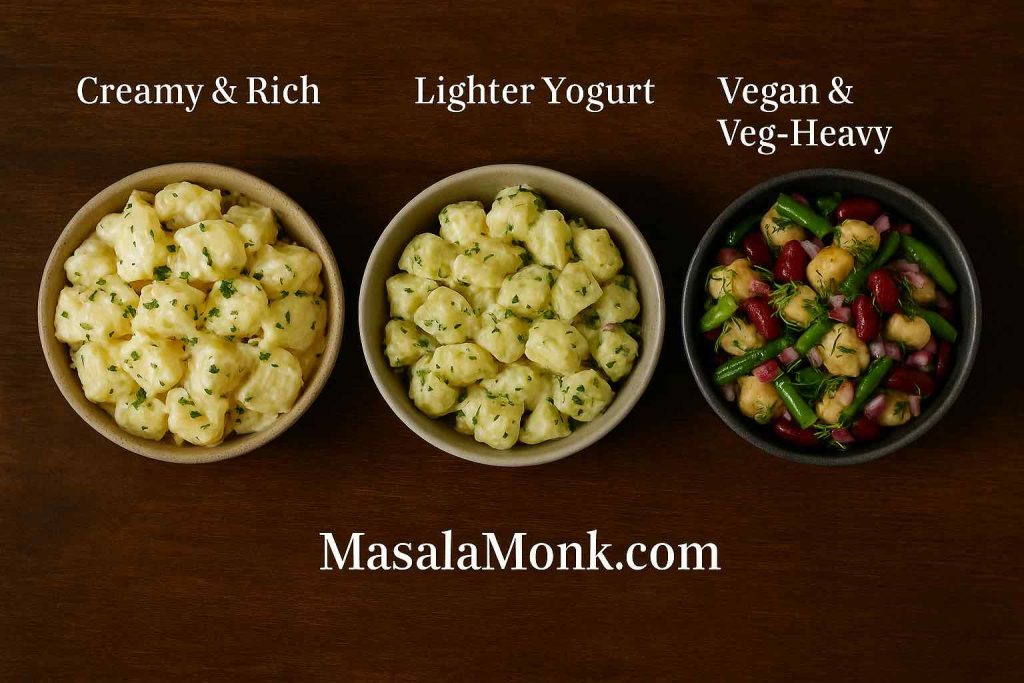
Of course, the dressing can change everything. A heavy potato salad mayonnaise dressing with bacon, cheese and extra sugar is not the same as a simple potato salad with yogurt and herbs. Nevertheless, both still start from the same base ingredient.
Because of that, you can easily slide along a spectrum:
- From classic southern potato salad with eggs, mustard, mayo and relish
- To a healthy potato salad with olive oil, lemon, herbs and lots of vegetables
- To a vegan potato salad recipe built with eggless mayo and beans
Thought the focus on this post is on potato salad recipe, but behind that phrase you actually have a whole library of possibilities.
Also Read: Upma Recipe: 10+ Easy Variations (Rava, Millet, Oats, Semiya & More)
Choosing Potatoes and Other Essentials
Now that you know potatoes themselves are not the villain, you can choose the right type and the best supporting cast.

Best Potatoes for Potato Salad
Different potato salad recipes favour different potatoes:
Starchy potatoes (like russets)
- Great for softer, slightly mashed potato salad
- Good in old-fashioned potato salad recipe versions
Waxy potatoes (like red or new potatoes)
- Hold their shape in chunky potato salad
- Ideal for German potato salad, red potato salad recipe and warm potato salad
All-purpose potatoes
- Sit in the middle
- Excellent for an easy potato salad recipe or basic potato salad recipe with egg and mayo
You can use potatoes with skins for a rustic potato salad with skins, or peel them for a smoother traditional potato salad recipe. For pretty bowls, people often love new potato salad or red skin potato salad, because the small potatoes look good simply halved with dressing.
Other Potato Salad Building Blocks
Besides potatoes, most versions share a few key building blocks that you can mix and match to create anything from a simple potato salad to the best potato salad recipe with bacon and dill.
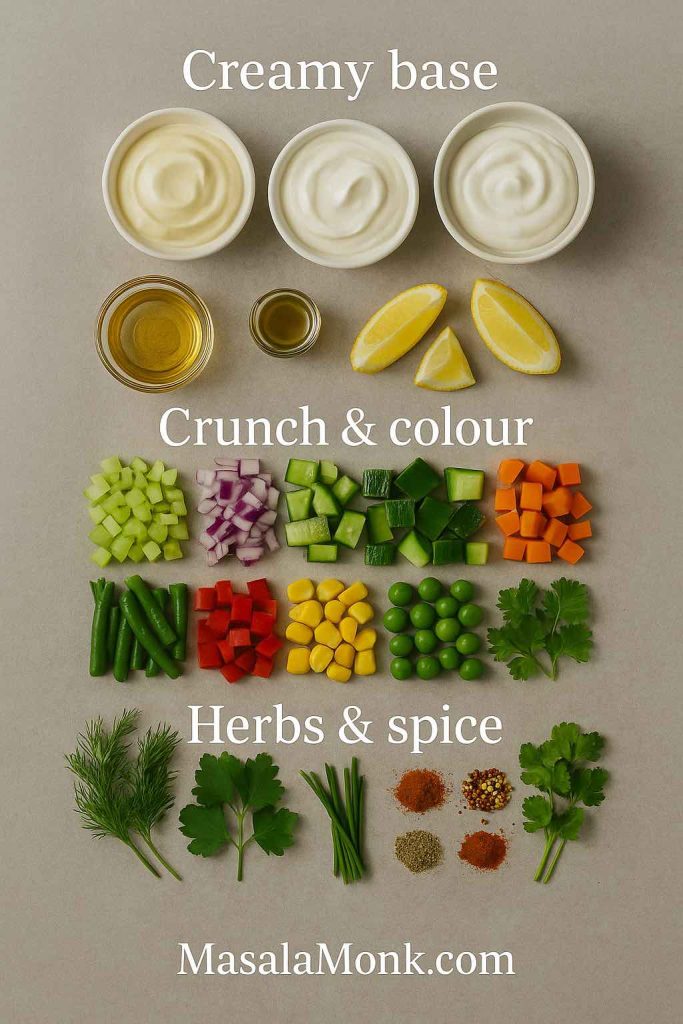
Creamy base
- Mayonnaise
- Sour cream or hung curd
- Greek yogurt
- Any combination of these
Acid and tang
- Vinegar (white, apple cider or wine vinegar)
- Pickle brine or gherkin juice
- Lemon juice
- Yellow, Dijon or wholegrain mustard
Crunch and colour
- Celery
- Onions (red, white or spring onions)
- Cucumbers
- Bell peppers
- Green beans
- Corn
- Peas
- Carrots
Herbs and spices
- Dill
- Parsley
- Chives
- Coriander (cilantro)
- Paprika or smoked paprika
- Cayenne or chilli flakes
- Cajun seasoning
- Garlic or garlic powder
Once these simple elements live in your kitchen, it becomes very easy to move from a basic, simple potato salad to richer ideas like a creamy dill potato salad, a bacon and egg potato salad, or even a colourful beet and potato salad with hardly any extra effort.
Also Read: Whole Chicken in Crock Pot Recipe (Slow Cooker “Roast” Chicken with Veggies)
Core Potato Salad Procedure (The Backbone of Almost Every Version)
Almost every potato salad recipe, from classic American to German salad potato dishes, follows the same simple flow. Once you memorise this, you’ll never feel lost.
Step 1: Prep and Boil the Potatoes
First, scrub or peel the potatoes. Cut them into even chunks. For small potato salad, keep them smaller; for chunky potato salad, keep them slightly larger.
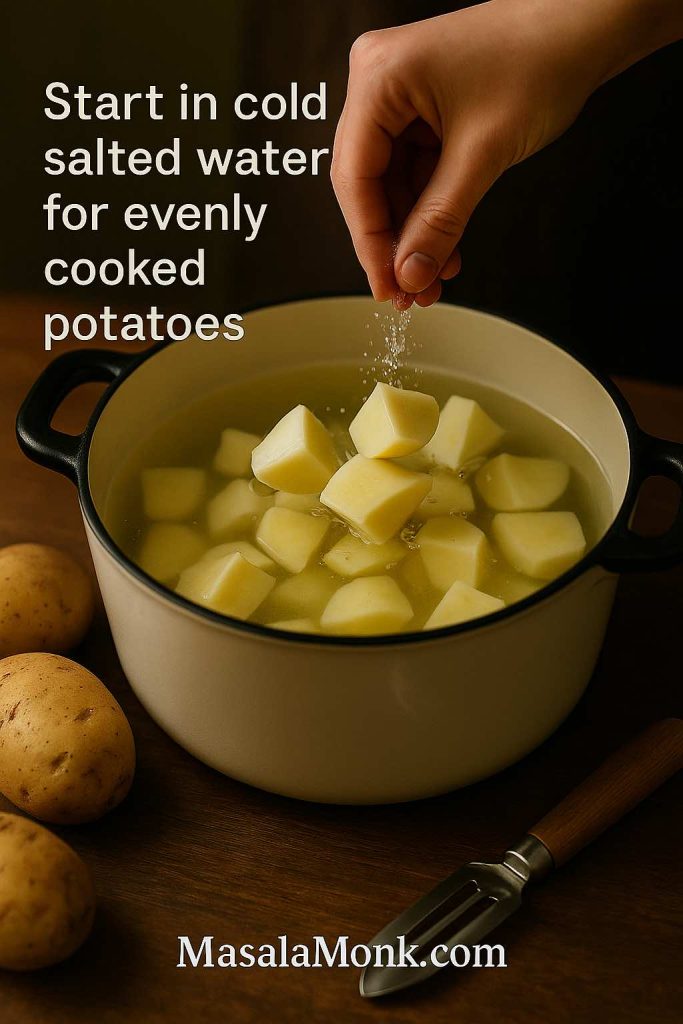
Place the potatoes in cold, salted water. Then bring the pot to a gentle boil. Simmer until the potatoes are just tender when pierced with a knife. Try not to let them fall apart, otherwise you’ll land in mashed potato salad territory.
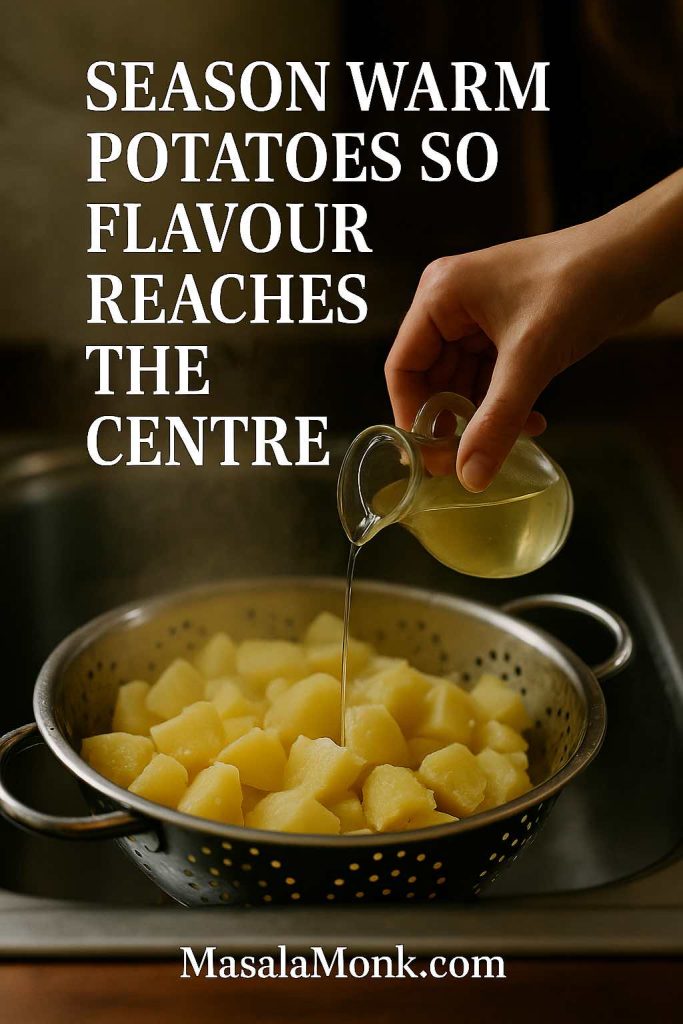
Step 2: Drain and Season While Warm
Next, drain the potatoes well and leave them in the colander to steam dry. While they’re warm, you can sprinkle them with a spoonful of vinegar or pickle brine. That trick – also used in recipes like Serious Eats’ classic potato salad – lets the potatoes absorb flavour all the way to the centre.
Step 3: Make the Dressing
Meanwhile, mix your dressing in a large bowl:
- Start with mayonnaise or a mix of mayo and sour cream.
- Add mustard, vinegar or lemon juice and seasonings.
- Stir in chopped onion, celery and pickles.
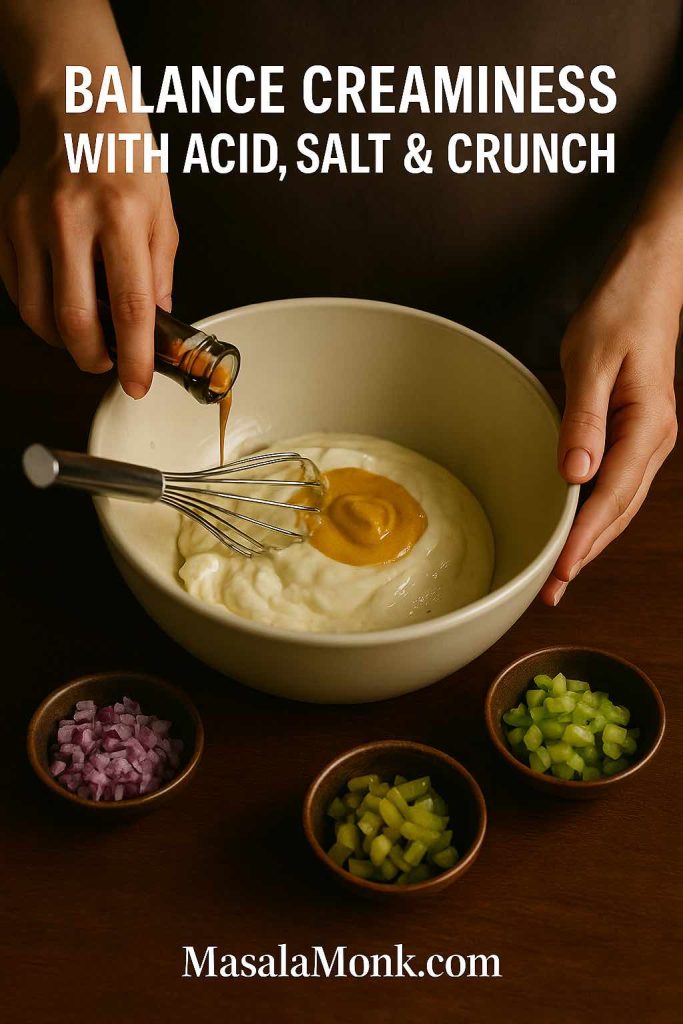
This is the moment where a Hellmann’s potato salad recipe, a Best Foods potato salad recipe or a German potato salad recipe warm start to part ways. The brand of mayo matters less than the balance between creaminess, tang and salt.
Step 4: Fold Everything Together
After that, tip the warm potatoes into the bowl with the dressing. Fold gently until every piece is coated. If you’re making potato salad with egg, fold in chopped hard-boiled eggs at the end so they don’t break down too much.

Because this step is gentle, it also works when you add bacon, chopped chicken, canned tuna, green beans, beetroot or even canned potatoes for potato salad.
Step 5: Chill or Serve Warm
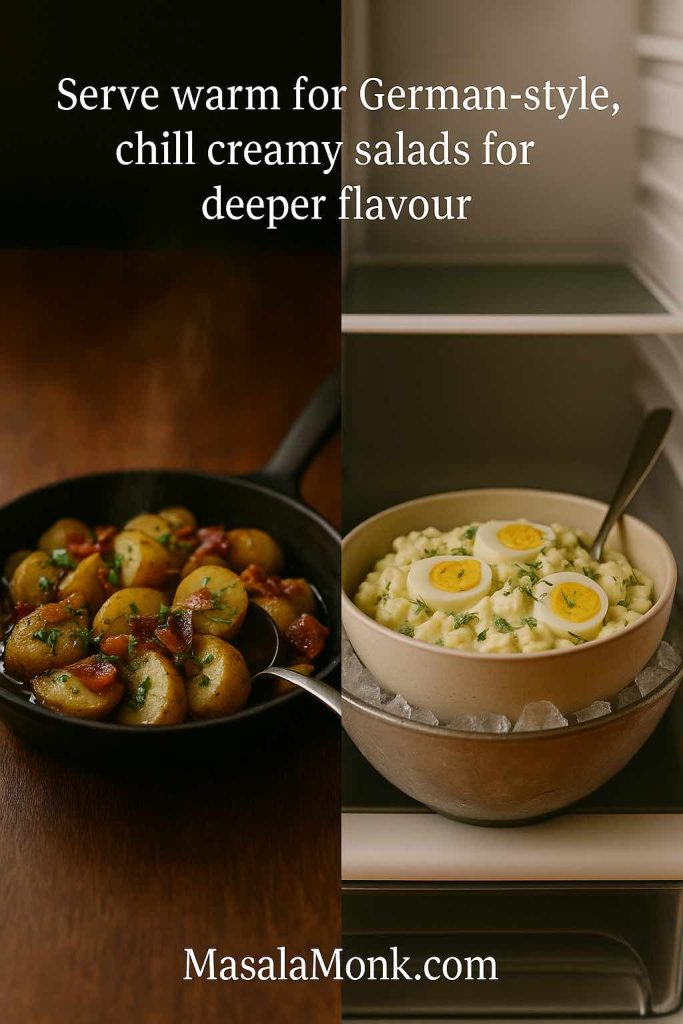
Finally, decide whether you want a warm potato salad or a chilled one.
- For German potato salad and some mustard potato salad styles, serve the dish slightly warm.
- For classic potato salad, Russian salad, Amish potato salad, Hawaiian potato salad or Filipino potato salad, chill the bowl for a few hours so the flavours marry.
Once you understand this structure, you can handle almost any potato salad ingredients and procedure list you see online.
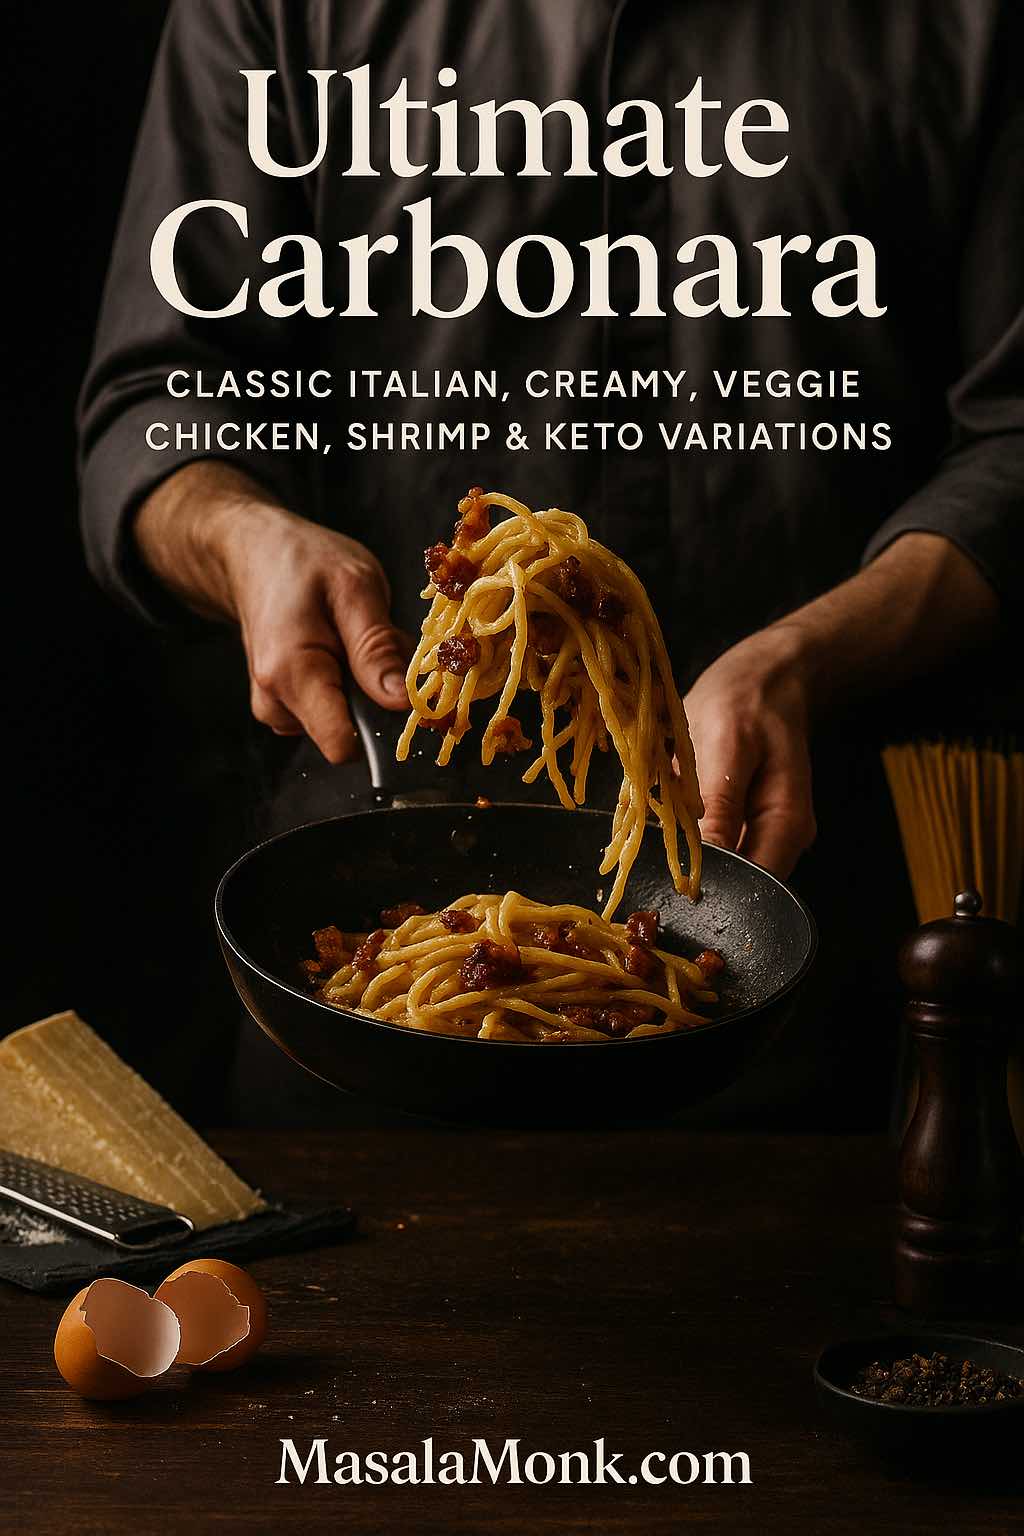
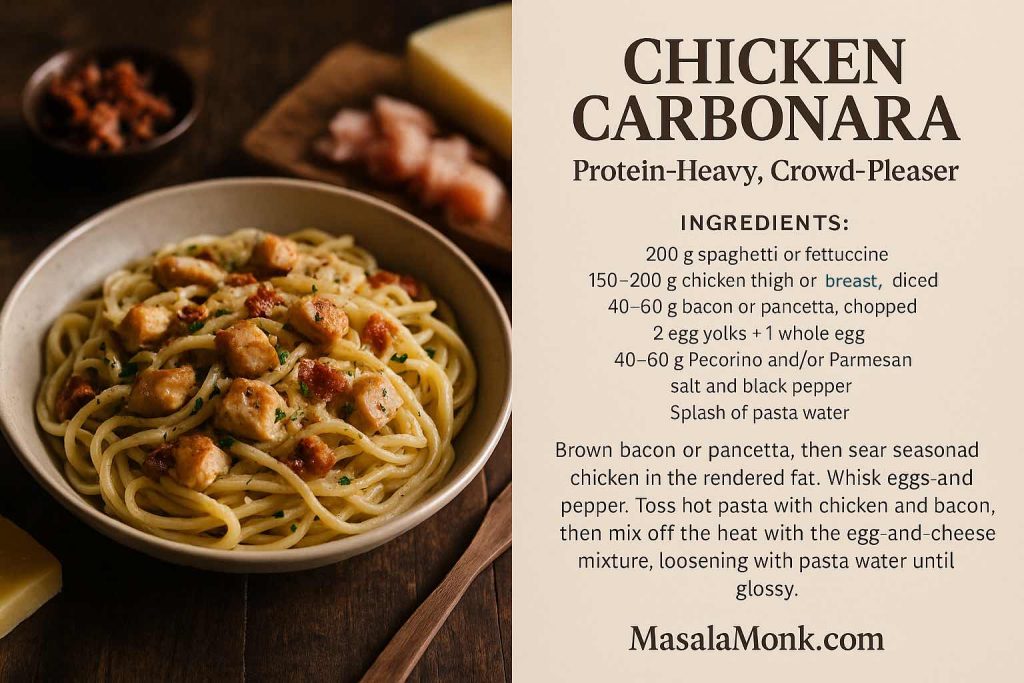
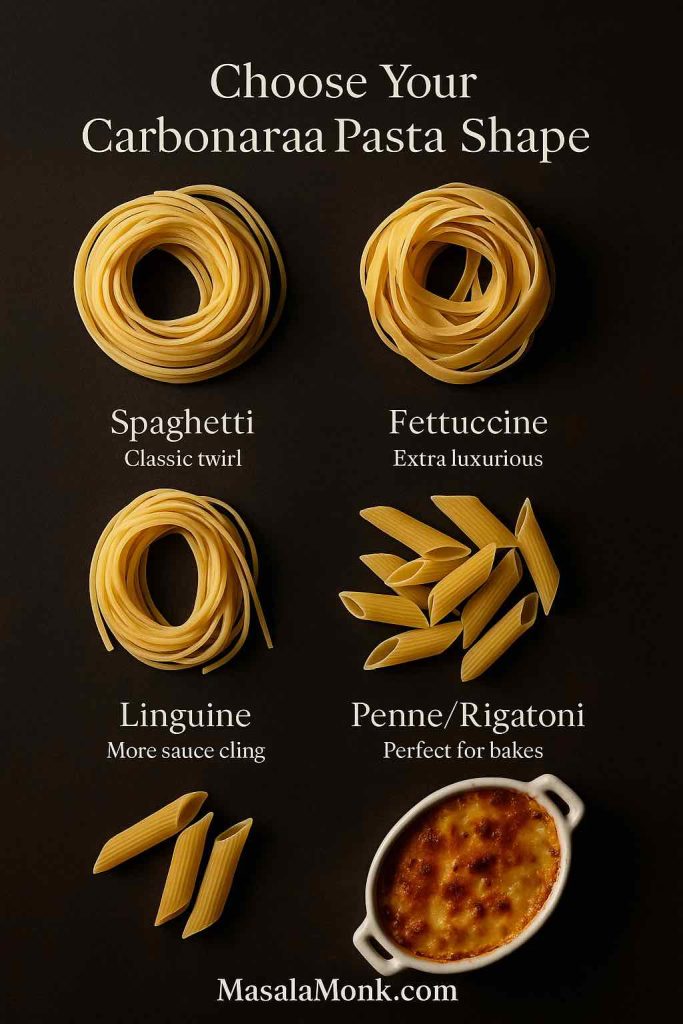
Also Read: Carbonara Recipe: Italian Pasta (Creamy, Veggie, Chicken, Shrimp, Tuna & Keto)
Master Classic Potato Salad Recipe (Easy, Reliable, Adaptable)
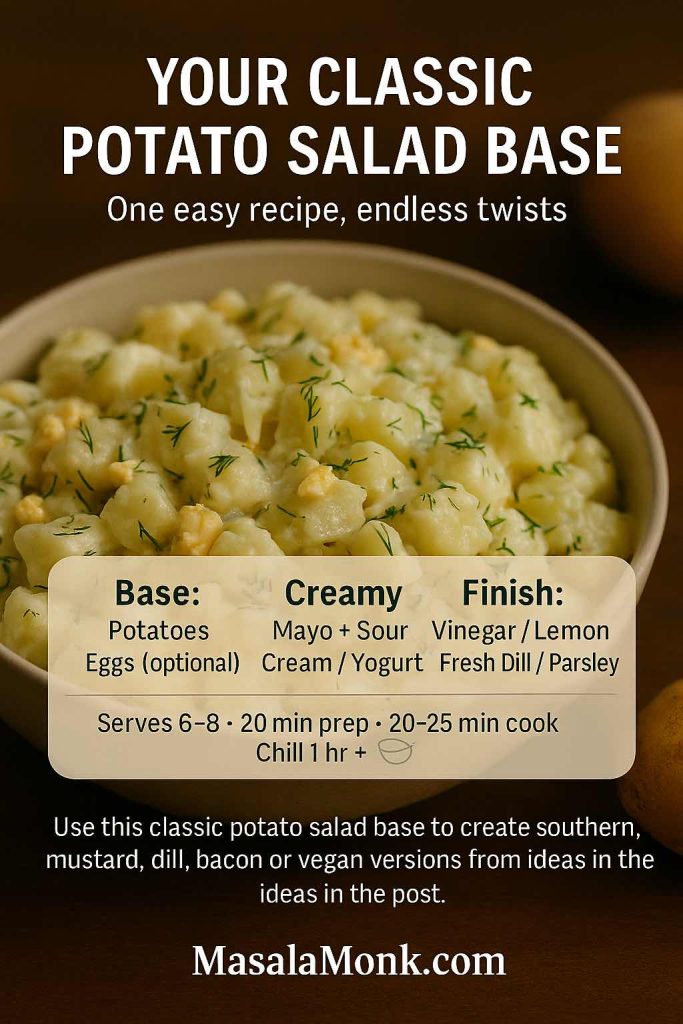
Let’s anchor everything with one classic creamy potato salad recipe. You can make it exactly as written or use it as your “mother recipe” for dozens of variations.
Ingredients (Serves 6–8)
- 1 kg potatoes, peeled or scrubbed
- 3 large eggs (omit for potato salad recipe no egg)
- ½ cup mayonnaise
- ¼ cup sour cream or thick yogurt
- 1–2 tablespoons mustard (yellow or Dijon)
- 2–3 tablespoons chopped dill pickles or relish
- 2–3 tablespoons finely chopped red onion or spring onion
- 2 tablespoons finely chopped celery
- 1–2 tablespoons vinegar or lemon juice
- ½ teaspoon sugar (optional)
- Salt and black pepper to taste
- A handful of chopped dill or parsley
If you prefer an eggless creamy base, you can swap the mayo for an egg-free option. For instance, MasalaMonk sells several eggless mayonnaises, and these work well in a vegan potato salad or a potato salad vegetarian version.
Method
- Cut the potatoes into even chunks and place them in a pot of cold, salted water.
- Bring to a gentle boil and cook until just tender. Drain and let them steam dry in the colander for a few minutes.
- At the same time, hard-boil the eggs. Cool them in cold water, peel and chop into pieces. For an easy way to prep eggs, you can also use the air fryer method from MasalaMonk’s air fryer hard-boiled eggs guide.
- In a large mixing bowl, whisk together mayonnaise, sour cream or yogurt, mustard, vinegar or lemon, sugar, salt and pepper. Stir in onion, celery and pickles.
- Add the warm potatoes to the bowl and fold gently so they’re coated in dressing.
- Fold in the chopped eggs and herbs. Taste and adjust seasoning.
- Chill the potato salad for at least an hour before serving.
This simple base already gives you a good potato salad recipe. However, with tiny adjustments you can pivot towards classic southern potato salad, mustard potato salad, dill red potato salad, creamy potato salad with bacon, and several more.
Also Read: One-Pot Chicken Bacon Ranch Pasta (Easy & Creamy Recipe)
Classic Twists: Old-Fashioned, Southern, Mustard and Dill
Once you’ve tried the master bowl a couple of times, you can turn the dial in different directions without starting over.
Old-Fashioned Potato Salad Recipe with Egg
An old-fashioned potato salad feels soft, comforting and a bit nostalgic.
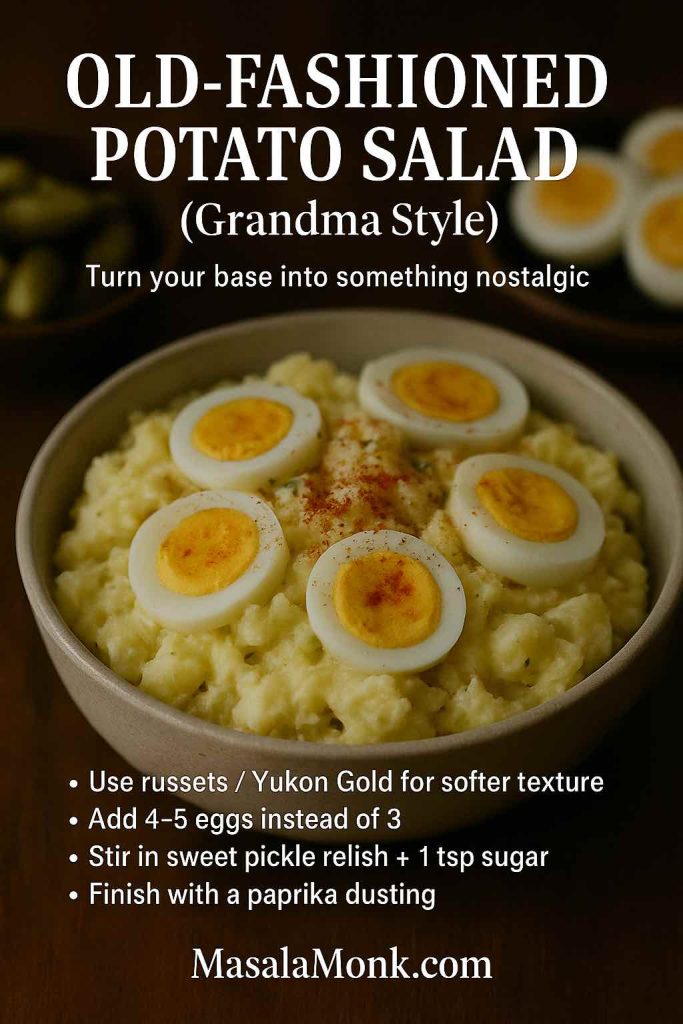
To get that feel:
- Use potatoes that break down a little, such as russets or Yukon Gold.
- Increase the eggs to four or five.
- Use sweet pickle relish and a spoon of sugar.
- Sprinkle paprika on top.
The result is close to many “grandma’s potato salad” styles. It also scales well as potato salad for a crowd at weddings, church suppers and long family lunches.
Southern Potato Salad and Mustard Potato Salad
Southern potato salad often leans into mustard and sweetness.

To take your master recipe there:
- Use a generous spoon of yellow mustard.
- Add a teaspoon or two of sugar.
- Keep relish, celery and egg.
Because of the sweetness and mustard, this kind of potato salad recipe sits beautifully next to fried chicken, ribs, collard greens and cornbread. If you like Hidden Valley–style flavours, you can even echo that profile and make a Hidden Valley ranch potato salad recipe by adding ranch seasoning and herbs.
Dill Potato Salad and Dill Pickle Potato Salad
If you love dill, the easiest way to celebrate it is inside potato salad.
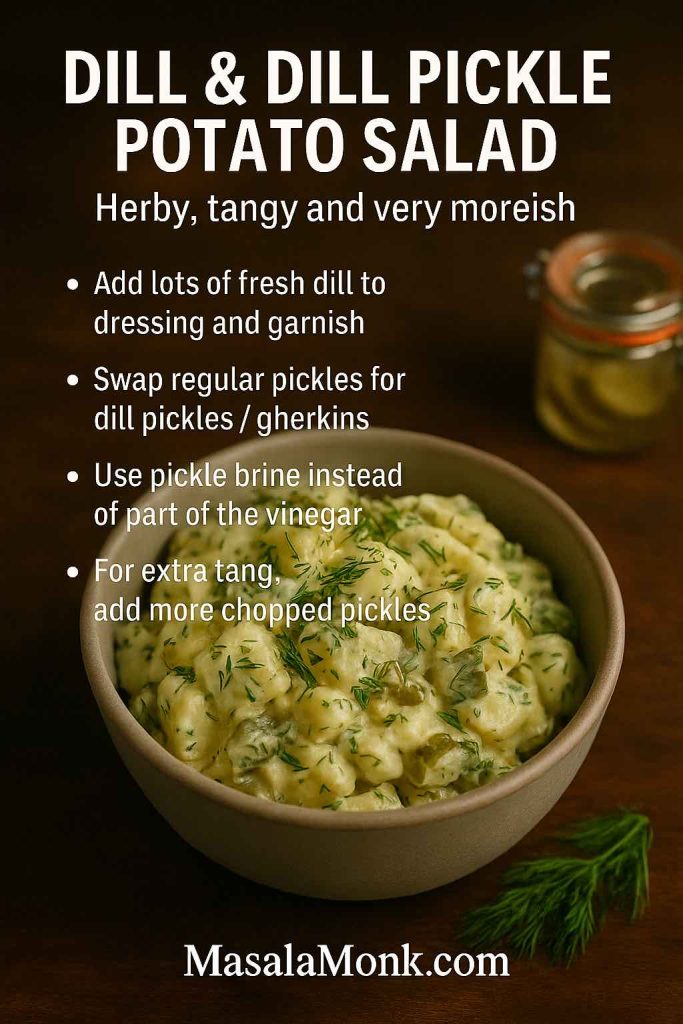
Simply:
- Add plenty of chopped fresh dill to your dressing.
- Use dill pickles or gherkins instead of regular pickles.
- Splash in some pickle brine for extra tang.
In that way you land on a classic dill potato salad. If you push the pickles even more, you end up with a dill pickle potato salad that’s sharply tangy and very moreish.
Also Read: Authentic Louisiana Red Beans and Rice Recipe (Best Ever)
Protein-Packed Potato Salad: Egg, Bacon, Tuna and Chicken
Sometimes you want potato salad to carry the whole meal. In that case, protein turns the bowl into something hearty and satisfying.
Potato and Egg Salad / Egg and Potato Salad Recipe
You already have a potato and egg salad if you keep the three boiled eggs in the master recipe. Yet you can go further.
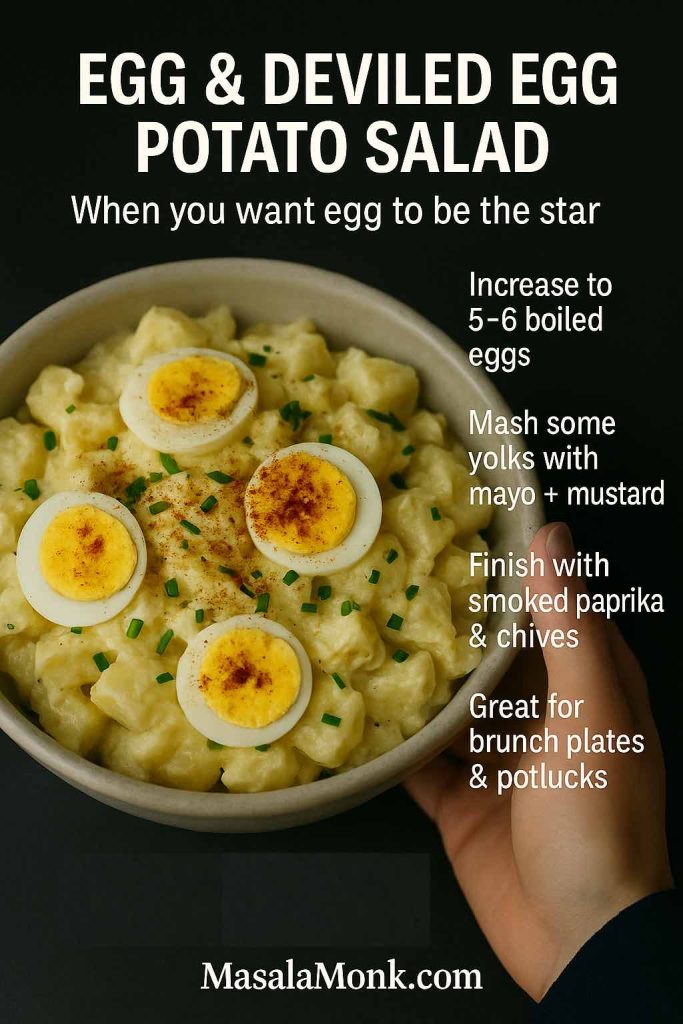
For an egg-forward version:
- Increase eggs to five or six.
- Mash a couple of yolks with mustard and mayo.
- Sprinkle the top with smoked paprika and chives.
This starts to feel like a deviled egg potato salad. If you’d like more inspiration, MasalaMonk’s deviled egg recipe post shows deviled egg fillings that also work nicely as potato salad flavour ideas.
Bacon Potato Salad, Bacon Ranch Potato Salad and Bacon Egg Potato Salad
Bacon transforms potato salad quickly.

To make a bacon and potato salad:
- Cook bacon until crisp, then crumble.
- Fold some pieces into the salad and use the rest as a garnish.
For bacon egg potato salad or bacon and egg potato salad, combine bacon with chopped eggs. The trio of potato, egg and bacon gives you a rich, almost brunch-level bowl.
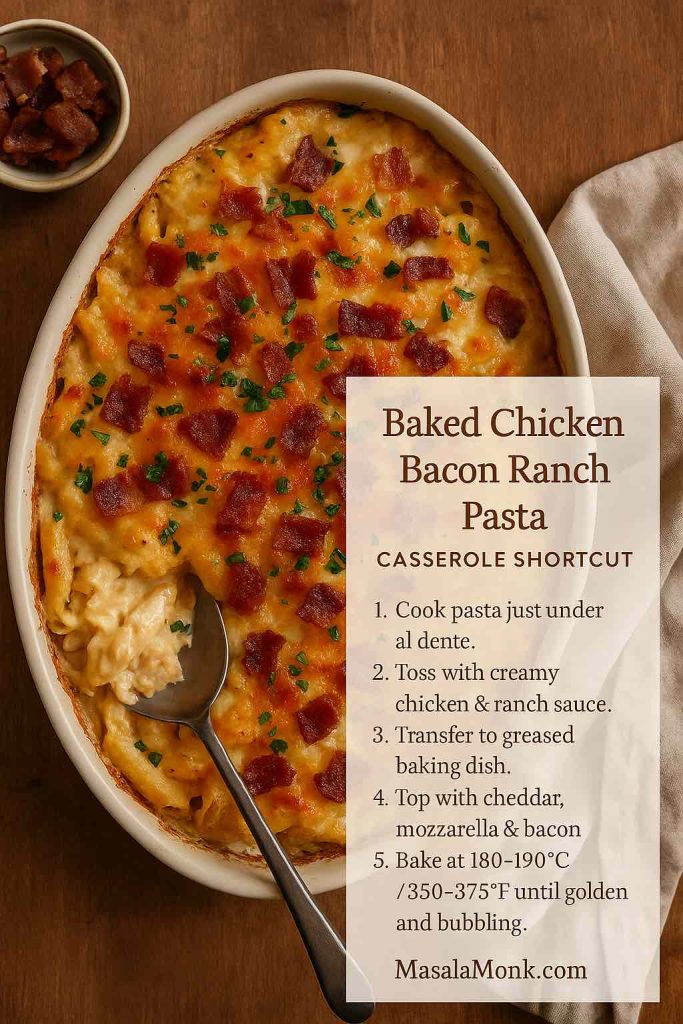
If you enjoy ranch flavours, stir in herbs, garlic and onion powder to create a bacon ranch potato salad. You can also echo the flavours from MasalaMonk’s one-pot chicken bacon ranch pasta and bring those same notes into a cold salad version.
Tuna Potato Salad and Potato Salad Tuna
Tuna potato salad is a smart way to use pantry staples.
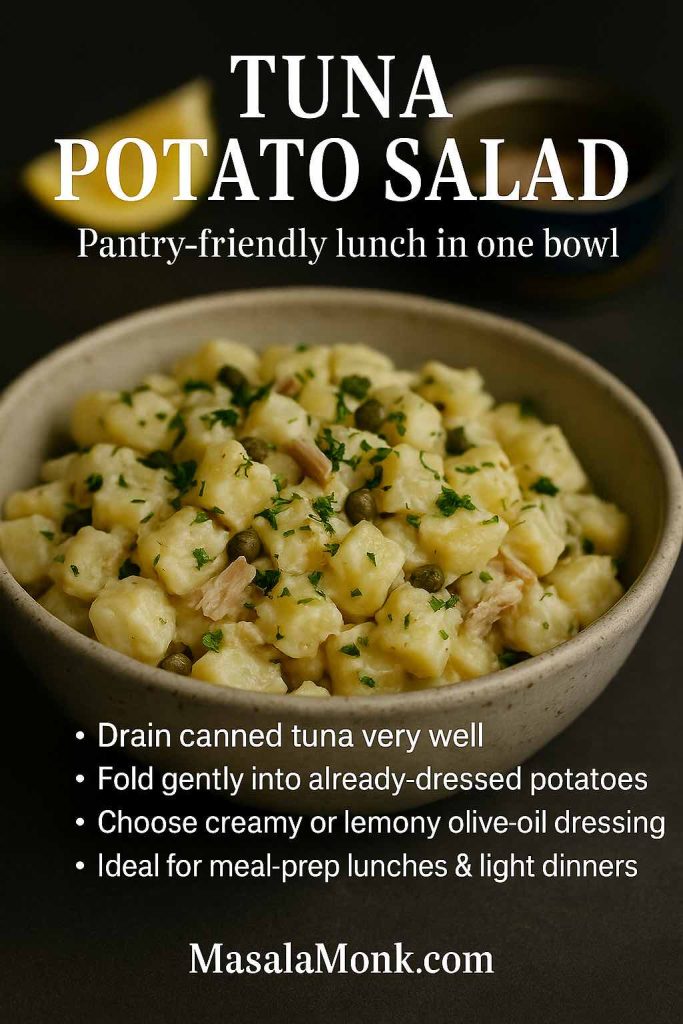
To make it:
- Drain canned tuna very well.
- Flake it gently and fold it into the dressed potatoes.
You can keep the dressing creamy or switch to a lemony olive oil one. Either way, you get a complete potato salad tuna bowl that works well for lunches.
Chicken Potato Salad and Chicken and Potato Salad Recipe
Chicken potato salad turns leftovers into something new.

For a simple chicken and potato salad:
- Add shredded roast chicken or grilled chicken pieces.
- Keep the dressing a little lighter by using more yogurt.
- Toss in peas or green beans for colour.
This style pairs well with green salad, fresh bread and cold drinks, creating a full meal from one big mixing bowl.
Also Read: Cheesy Chicken Broccoli Rice – 4 Ways Recipe (One Pot, Casserole, Crockpot & Instant Pot)
Lighter, Healthier and Vegan Potato Salad Ideas
Even though creamy salad is comforting, there are days when you want something that sits more lightly. Fortunately, potato salad adapts well.
Potato Salad Recipe Without Mayo
A potato salad recipe without mayo usually uses a vinaigrette.
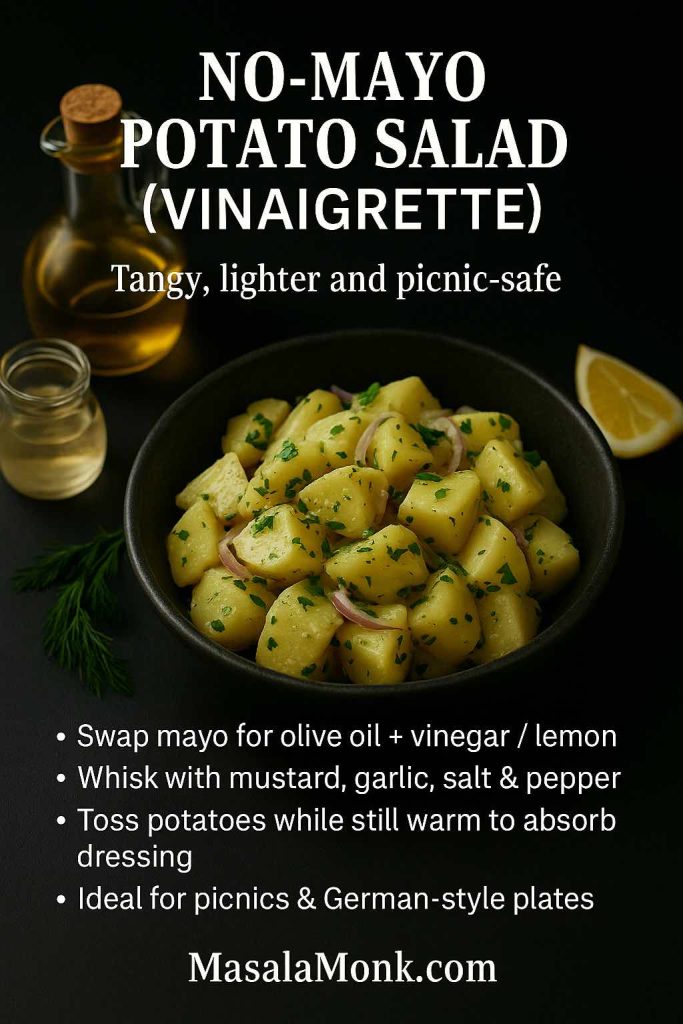
You can whisk together:
- Olive oil
- Vinegar or lemon juice
- Mustard
- A little garlic
- Salt, pepper and herbs
Then you toss warm potatoes in this dressing. This style echoes many German salad potato recipes and Austrian kartoffelsalat. For a reference point, look at Serious Eats’ Erdäpfelsalat recipe, which uses onions, vinegar and mustard in a light sauce.
Because there is no mayo, this salad feels tangy and bright. It also works well for picnics where you want to reduce the risk of a heavy mayo-based dish sitting out too long.
Greek Yogurt Potato Salad and Potato Salad with Sour Cream
If you still want creaminess, but with a fresher feeling, Greek yogurt potato salad and potato salad with sour cream are ideal.

For a simple version:
- Replace half the mayo with Greek yogurt or sour cream.
- Add lemon, garlic and herbs.
This is similar to the approach The Kitchn suggests in their classic potato salad tutorial and their later testing of different dressing bases with yogurt and sour cream. The combination keeps things creamy and tangy, yet a bit lighter than pure mayo.
You can also lean into Greek flavours by starting with the Greek tzatziki sauce recipe from MasalaMonk and turning it into a potato salad dressing. That instantly gives you a Greek potato salad or Greek salad potato salad vibe: potatoes, cucumber, garlic, yogurt and dill.
Vegan Potato Salad and Vegetarian Potato Salad
For a vegan potato salad recipe, you simply ensure that:
- The dressing uses vegan mayo or an eggless mayonnaise.
- You skip bacon, eggs and cheese.
- You add plant proteins such as chickpeas, lentils or tofu.
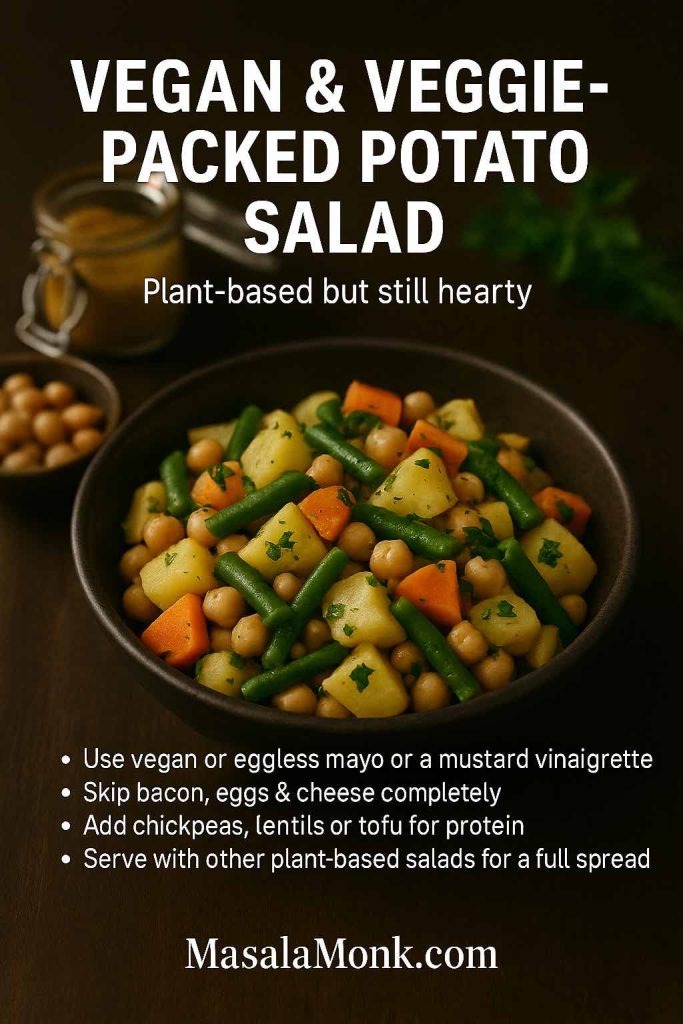
A bowl of potatoes, green beans, chickpeas and a mustard vinaigrette becomes a sturdy vegan potato salad that feels complete. To round out a fully plant-based spread, you can pair it with MasalaMonk’s Vegan Som Tam raw papaya salad and their lentil salad recipes for weight loss.
A vegetarian potato salad, on the other hand, might still include eggs and dairy while avoiding meat. Classic potato salad with egg, a potato salad with sour cream, or even a cream cheese potato salad all fit comfortably into that category.
Also Read: Whiskey Sour Recipe: Classic Cocktail, Best Whiskey & Easy Twists
International Potato Salad Styles
As soon as you look beyond your own kitchen, you realise that “potato salad” changes character completely from one region to another. However, the basic boiled potato remains the star.
Russian Salad (Olivier Salad)
Russian salad, also known as Olivier salad, is a beloved party dish in many countries. It usually includes:
- Diced potatoes
- Carrots and peas
- Pickles
- Often chicken, ham or sausage
- A generous amount of mayonnaise
For a deeper dive into its origins and variations, you can read the Olivier salad article on Wikipedia, which traces the dish back to a 19th-century restaurant in Moscow.
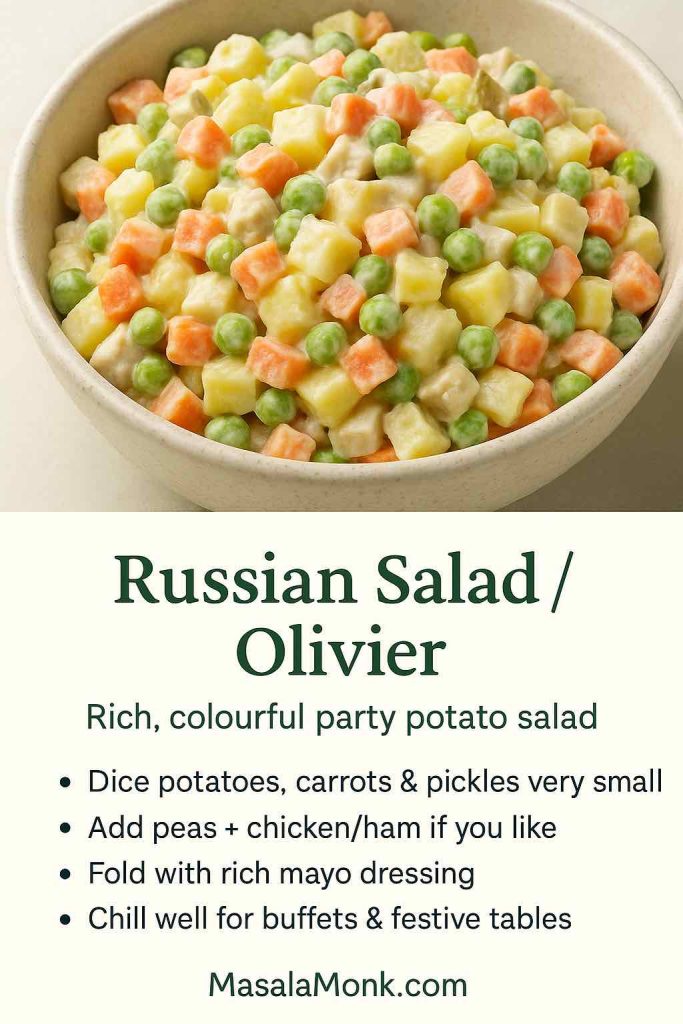
To make a simple Russian salad at home:
- Dice potatoes, carrots and pickles into small cubes.
- Cook potatoes and carrots until tender.
- Mix with peas, pickles and a rich mayo dressing.
- Chill thoroughly before serving.
Because it is rich and colourful, Russian salad works beautifully on festive tables and buffets.
German Potato Salad and Austrian Kartoffelsalat
German potato salad and Austrian potato salad (kartoffelsalat) tend to skip mayo and instead use a warm dressing.
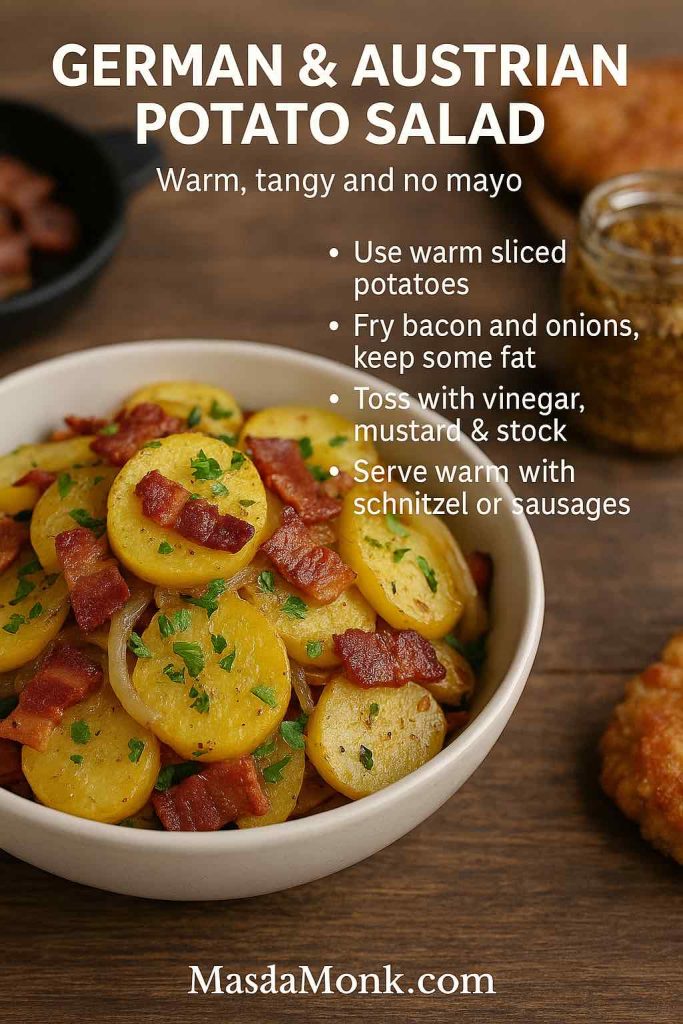
Typically they feature:
- Warm sliced potatoes
- Bacon and bacon fat
- Onions
- Vinegar and mustard
- Herbs like parsley and chives
For a lighter Austrian-style example, see Serious Eats’ Erdäpfelsalat, which uses onions, vinegar and mustard in a light sauce. This kind of salad is excellent alongside schnitzel, sausages and grilled meats.
Japanese Potato Salad
Japanese potato salad is creamier and softer than many Western versions. It often feels like a cross between mashed potatoes and chunky salad.

A typical bowl includes:
- Potatoes, boiled and partly mashed
- Very thin slices of cucumber and carrot
- Sometimes ham, corn or egg
- Japanese mayo and a little rice vinegar
Because part of the potato is mashed, the dressing clings to every bite. This style makes a great side for katsu curry, karaage or bento boxes.
Greek and Mediterranean Potato Salad
Greek potato salad and broader Mediterranean potato salad recipes focus on olive oil, lemon and herbs rather than heavy mayo.
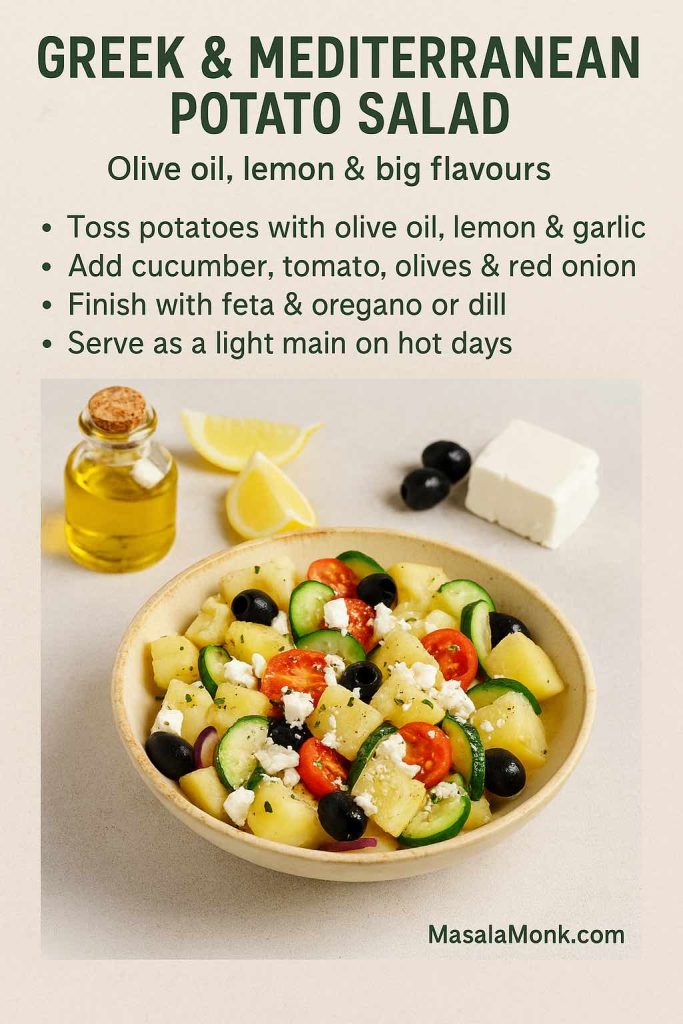
You might:
- Toss potatoes with olive oil, lemon juice, garlic and oregano.
- Add cucumbers, olives, tomatoes and red onion.
- Crumble feta cheese on top.
This style becomes even fresher if you use a yogurt-based tzatziki dressing, like the one in MasalaMonk’s Greek tzatziki master recipe. In that case, you end up with a potato salad with yogurt dressing that works as a light main dish on hot days.
Hawaiian, Filipino and South African Potato Salad
Elsewhere, potato salad leans into sweetness or special local ingredients.

- Hawaiian potato salad often mixes macaroni and potatoes with mayo and grated carrot.
- Filipino potato salad or pinoy potato salad typically includes condensed milk, apples or fruit cocktail, raisins, eggs and mayo.
- Potato salad South Africa sometimes appears as a condensed milk potato salad or a creamy potato salad served at braais.
Even though the flavours feel very different from German salad or Japanese potato salad, the base technique remains the same: boil potatoes, mix dressing, combine and chill.
Also Read: Katsu Curry Rice (Japanese Recipe, with Chicken Cutlet)
Colourful Vegetable Potato Salads
Once you’ve mastered the base, adding more vegetables turns potato salad into a full meal in a bowl.
Beet and Potato Salad / Beetroot Potato Salad
Beet and potato salad looks stunning because beetroot tints everything pink.

You can make it by:
- Roasting or boiling beetroot until tender, then dicing it.
- Mixing beets with potatoes and a light dressing.
- Adding dill, onion and perhaps walnuts for crunch.
This gives you beet and potato salad, beet potato salad or beetroot and potato salad, depending on how much beet you use. It looks especially good on festive and holiday tables.
Sweet Potato Salad and Mixed Potato Salad
Sweet potato salad recipes highlight natural sweetness and go well with tangy dressings or spices.
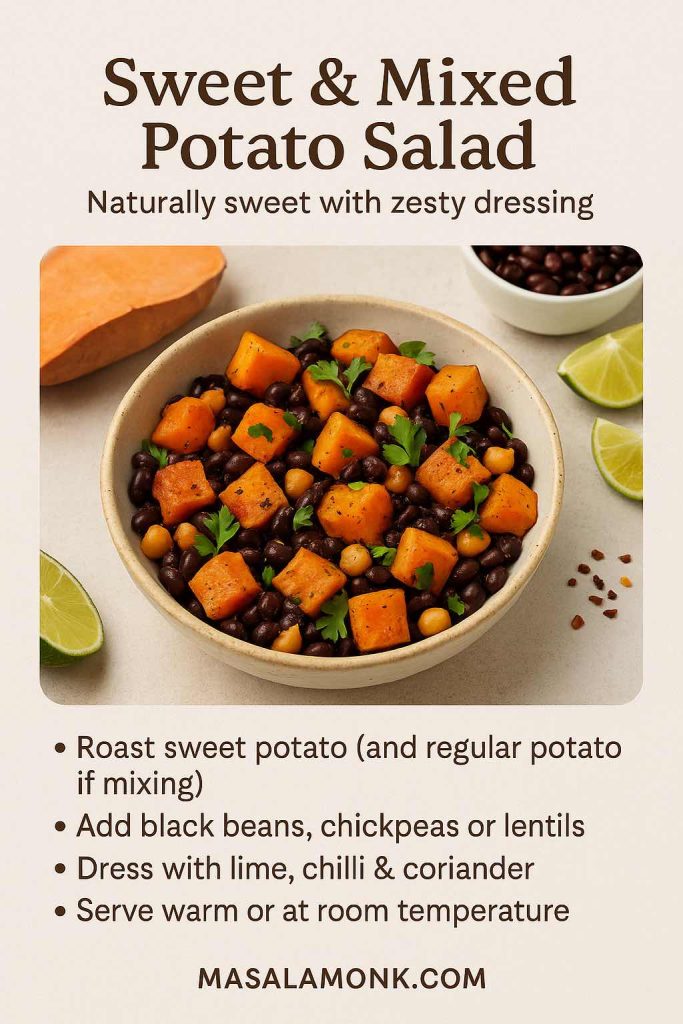
For example, you might:
- Roast sweet potato chunks with olive oil.
- Toss them with black beans, chickpeas or lentils.
- Dress them in lime, chilli and coriander.
You can also combine regular potatoes and sweet potatoes in one bowl. That yields a potato and sweet potato salad or even a potato marble salad when you mix different colours.
If you want to understand sweet potato nutrition more deeply, MasalaMonk’s sweet potato nutrition breakdown explains calories, carbohydrates and macros for both 100 g portions and whole potatoes.
Green Bean Potato Salad, Corn Potato Salad and Cauliflower Potato Salad
Beyond beets and sweet potatoes, other vegetables also work beautifully.
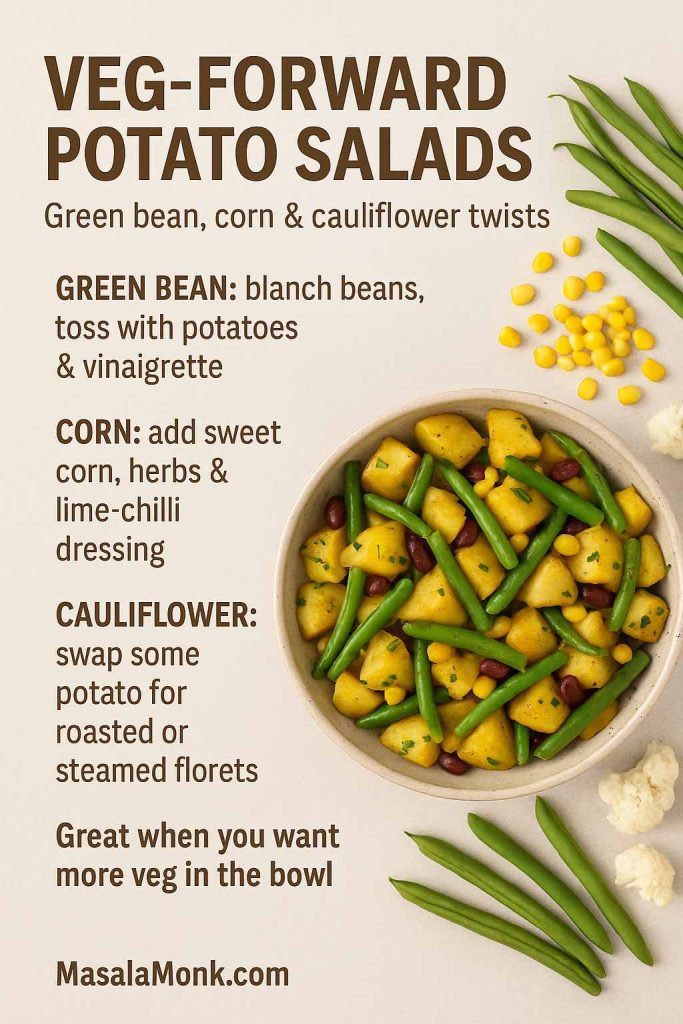
- Green bean potato salad: Blanch green beans until crisp-tender, cool them and toss with potatoes and a vinaigrette.
- Corn and potato salad: Mix boiled or roasted potatoes with sweet corn kernels, herbs and perhaps a lime-chilli dressing.
- Cauliflower potato salad: Replace some potatoes with steamed or roasted cauliflower florets to lower the carb load while keeping the general feel.
If you feel like a hot dish instead, MasalaMonk’s easy aloo gobi recipe shows how potatoes and cauliflower pair up in a spiced, comforting way rather than as a cold salad.
Small Batch, Big Batch and Store-Bought Shortcuts
Real life doesn’t always match recipe yields. Sometimes you just need potato salad for 2. Other times you need a huge tub.
Potato Salad for 2 and Small Potato Salad Bowls
For potato salad for two people, you can:
- Use about 250–300 g potatoes.
- Scale the dressing to two or three tablespoons.
- Use one egg instead of three.
Consequently, you get a small potato salad that fits into one bowl. You can also treat it as a potato salad bowl meal by topping it with extra vegetables, seeds or a fried egg.
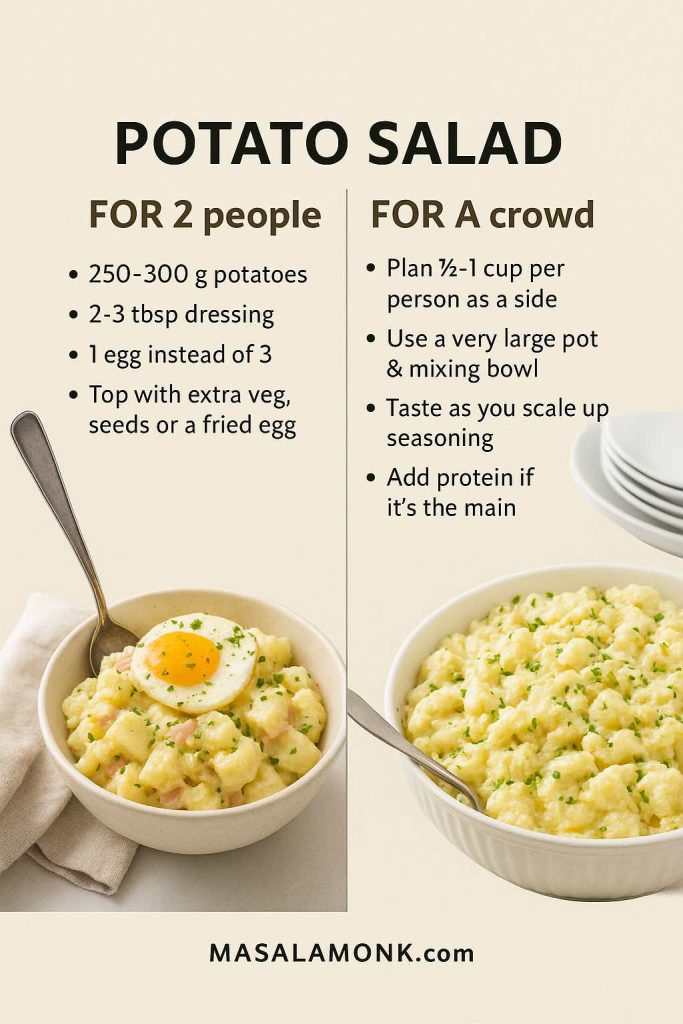
Potato Salad for a Crowd
For potato salad for a crowd, simply multiply the master recipe.
A rough guide:
- As a side dish, plan ½–1 cup per person.
- For a main dish, allow more, especially if there’s plenty of protein mixed in.
The potato salad ingredients and procedure stay exactly the same. However, you will need a larger pot and mixing bowl, and you should taste as you go to balance the seasoning.
Canned Potatoes and Instant Shortcuts
When time is tight, you may look at canned potatoes for potato salad or canned German potato salad.
You can still make a decent bowl if you:
- Rinse and drain the canned potatoes thoroughly.
- Cut them into bite-sized pieces if necessary.
- Handle them gently when folding in the dressing.
It won’t match the texture of freshly boiled potatoes, but it can rescue last-minute meals.
Store-Bought Potato Salad
Finally, there are days when you just buy potato salad.
Supermarkets and delis often sell:
- Classic creamy potato salad
- Deviled egg potato salad
- German potato salad
- Dill potato salad
- Loaded or bacon ranch potato salad
Big-box stores might offer potato salad bulk tubs (similar to what you see when people say “potato salad at Sam’s Club” or “Costco potato salad”). Local chains sometimes have their own styles, like “Kroger potato salad”, “Safeway potato salad”, “Vons potato salad” or “Sainsbury’s potato salad”.
These options are convenient. However, if you find yourself constantly searching for “best potato salad near me”, “Russian salad near me” or “German potato salad near me” and feeling disappointed, it may be time to trust your own cooking. With a simple potato salad recipe in hand, you’ll often do better at home.
Also Read: Green Bean Casserole Recipe Ideas (Classic, Cheesy, Dairy-Free & More)
Safety, Storage and Make-Ahead Tips
Potato salad is delicious, yet it can turn dangerous if left out too long. The good news is that you only need a few simple rules.
How Long Can Potato Salad Sit Out?
Food safety experts repeat one guideline: potato salad should not sit at room temperature for more than two hours. If the temperature is above 32°C / 90°F, limit it to one hour.
Articles like Allrecipes’ guide on potato salad safety and Food & Wine’s explanation emphasise that the real risk is not just the mayonnaise. Instead, cooked potatoes, eggs and cut vegetables form a perfect environment for bacteria in the “danger zone” between 4°C and 60°C.
Therefore:
- Keep potato salad in the fridge until just before serving.
- Nest the serving bowl in a larger bowl filled with ice at outdoor events.
- Refrigerate leftovers promptly.
How Long Does Potato Salad Last in the Fridge?
Refrigerated potato salad generally stays safe for about three to five days. When you store it:
- Use shallow, covered containers so it chills quickly.
- Keep it at a consistent fridge temperature.
- Stir gently and taste before serving leftovers.
Guides like Allrecipes’ and Southern Living’s discussions of how long potato salad can sit out and keep in the fridge explain this window clearly. In short, if you’re not sure about a container that’s been lurking for a week, it’s better to throw it away.
Can You Make Potato Salad Ahead?
Yes, you can. In fact, many people feel a classic potato salad recipe tastes better the next day.
To make it ahead:
- Boil and dress the potatoes as usual.
- Chill the salad overnight.
- Add fresh herbs and any crispy toppings (like bacon) just before serving.
If you want to prep even further ahead, you can boil potatoes and store them plain in the fridge for one or two days, then dress them on the day of serving. That approach helps maintain a good texture.
Also Read: Mimosa Recipe: 10 Easy Versions from Classic to Caramel Apple
What to Serve with Potato Salad
Potato salad is rarely alone on the table. It almost always sits next to something grilled, baked or roasted.

Picnic, Cookout and BBQ Ideas
For a picnic or barbecue, potato salad fits perfectly next to grilled meats and vegetables.
You can build a spread with:
- Grilled chicken, sausages, burgers or paneer
- A big bowl of classic potato salad
- One or two fun potato snacks, for example from MasalaMonk’s 10 potato appetizer ideas
- Crispy bites like their broccoli, potato and corn tater tots
- A rich dip from their spinach dip recipe collection
For extra freshness, you can also drizzle green salads with something like MasalaMonk’s sweet and spicy mango salad dressing, which balances nicely against creamy potato salad.

Brunch and Holiday Menus
Potato salad also feels comfortable on brunch tables.
For instance, you might serve:
- A potato and egg salad or deviled egg potato salad
- A platter of deviled eggs (inspired by MasalaMonk’s deviled egg ideas through Classic Deviled Eggs post)
- A green salad and some roasted vegetables
- Brunch drinks or mocktails for a relaxed weekend
During holidays, Russian salad or Olivier salad, beetroot potato salad, German salad and condensed milk potato salad styles often appear next to roasts, pies, stuffed vegetables and desserts.
Easy Desserts That Pair Well
Because potato salad can be rich, dessert doesn’t need to be complicated.
You can keep things simple with:
- A tray of fruit and nuts
- Brownies or blondies
- A batch of double chocolate chip cookies using MasalaMonk’s “one dough, seven variations” approach
Light fruit-based desserts and cookies both balance a heavier bacon ranch potato salad or German potato salad recipe warm from the stove.
Bringing It All Together
By now, you’ve walked through a whole world of potato salad. You started with a master potato salad recipe and then wandered through:
- Old-fashioned potato salad recipe with egg
- Classic southern potato salad and mustard potato salad
- Dill potato salad and dill pickle potato salad
- Bacon and egg potato salad, bacon ranch potato salad and tuna potato salad
- Chicken potato salad and chicken and potato salad recipe ideas
- Vegan potato salad, potato salad recipe without mayo and potato salad with yogurt dressing
- International styles like Russian salad, German potato salad, Japanese potato salad, Greek potato salad, Hawaiian and Filipino potato salad
- Colourful versions such as beetroot potato salad, beet and potato salad, sweet potato salad, potato and sweet potato salad, green bean potato salad and cauliflower potato salad
- Practical notes on potato salad for 2, potato salad for a crowd, canned potatoes and store-bought shortcuts
- Safety and storage tips so your potato salad stays delicious and safe
Not only that, you’ve also seen how quickly you can shift from a creamy potato salad recipe with egg and mayo to a lighter, Mediterranean-style salad, or even to a fully vegan potato salad recipe with lentils and beans.

Conclusion
In the end, the best potato salad recipe is simply the one you actually enjoy making and eating. Once you’ve cooked this dish a few times, played with different potatoes, swapped in Greek yogurt or sour cream, tried dill and mustard, added bacon or chickpeas and maybe experimented with beetroot and sweet potatoes, you’ll inevitably find your own favourite version.
That version will be the one friends ask you to bring “every time”, the one that disappears first from the table, and the one that quietly proves that a humble potato salad recipe can be as interesting and satisfying as any main course.
Also Read: French 75 Cocktail Recipe: 7 Easy Variations
FAQs
1. What is a classic potato salad recipe?
A classic potato salad recipe usually starts with boiled potatoes, hard-boiled eggs, mayonnaise, mustard, vinegar or lemon juice, and a few crunchy vegetables like celery and onion. After cooking the potatoes until just tender, you drain them well and gently fold them into a creamy potato salad dressing while they’re still warm, then chill everything so the flavours meld. This simple potato salad is the base you can turn into countless variations later.
2. How can I make an easy potato salad recipe with few ingredients?
For an easy potato salad recipe, you only really need potatoes, mayo, a little mustard, salt, pepper and one crunchy element such as onion or cucumber. Just boil the potatoes, cool them slightly, then stir in the dressing and your chosen vegetable. This kind of quick potato salad is perfect when you want a basic potato salad recipe on the table fast without a long ingredient list.
3. What goes into a traditional potato salad recipe with egg and mayo?
In a traditional potato salad recipe with egg and mayo, the potatoes are combined with chopped hard-boiled eggs, mayonnaise, mustard, vinegar, celery, onion and sometimes sweet pickle relish. Typically, this kind of creamy potato salad is seasoned with salt, pepper and a sprinkle of paprika on top. The result is a classic potato salad recipe that tastes like the one many people remember from family gatherings.
4. How do I make a potato salad recipe no egg?
If you prefer a potato salad recipe no egg, you can simply leave the eggs out and increase the crunch and herbs instead. For example, you might add extra celery, cucumber, dill or parsley to keep the texture interesting. In this way, the potato salad still feels satisfying and familiar, just without the egg component.
5. How do I make a potato salad recipe without mayo?
To create a potato salad recipe without mayo, you can swap the creamy base for a vinaigrette. Mix olive oil, vinegar or lemon juice, mustard, garlic, salt and pepper, then toss the warm potatoes in this dressing. That gives you a lighter, tangier potato salad recipe without mayo that works well as a side for grilled meats, fish or tofu.
6. What is the difference between potato salad, Russian salad and Olivier salad?
Potato salad usually focuses on potatoes, eggs and a simple dressing, while Russian salad and Olivier salad add more small diced vegetables like carrots, peas and pickles, plus extra richness. Often, Olivier salad also includes chicken, ham or sausage along with a generous amount of mayonnaise. As a result, Russian salad feels like a dressed-up potato salad recipe with more colour, texture and party vibes.
7. How is German potato salad different from classic creamy potato salad?
German potato salad is usually served warm or at room temperature and relies on a vinaigrette made with vinegar, mustard, onions and sometimes bacon, instead of a heavy mayonnaise base. Classic creamy potato salad, on the other hand, is chilled and built around mayo, sour cream or yogurt. Consequently, German potato salad tastes sharper and lighter, while traditional American potato salad tastes richer and softer.
8. How can I make a healthy potato salad or lighter version?
To turn a regular potato salad recipe into a healthy potato salad, you can reduce the mayonnaise and bring in Greek yogurt, sour cream or a simple olive-oil dressing. Then, add plenty of vegetables such as cucumbers, green beans, peas, corn, bell peppers or herbs. Suddenly, your potato salad becomes a balanced bowl with more fibre, less fat and a brighter flavour.
9. How do I make vegan potato salad?
For a vegan potato salad, you need to replace any animal products with plant-based options. Instead of eggs and regular mayonnaise, use egg-free mayo or an olive-oil vinaigrette, and skip bacon or dairy. Additionally, you can add chickpeas, lentils, beans, nuts or seeds so the vegan potato salad recipe feels filling enough to stand on its own.
10. What are some good flavour variations like dill potato salad or bacon potato salad?
Once you master a basic potato salad recipe, you can customise the bowl in many directions. For dill potato salad, fold in fresh dill and dill pickles; for dill pickle potato salad, add extra pickle brine and chopped gherkins. If you want potato salad with bacon, simply stir in crisp bacon pieces and a little extra mustard. Likewise, you can create red potato salad, sweet potato salad, or crunchy potato salad by switching the potato type and adding more vegetables or toppings.
11. How much potato salad do I need for 2 people or for a crowd?
If you’re planning potato salad for 2 people, about 250–300 g of potatoes plus dressing is usually enough as a side. By contrast, potato salad for a crowd often needs ½ to 1 cup per person, depending on what else you’re serving and whether the salad is a side dish or the main part of the meal. Scaling up or down is straightforward once you know roughly how many potatoes you cook per person.
12. How long does potato salad last in the fridge, and can it sit out?
Generally, homemade potato salad lasts about three to five days in the fridge when stored in a covered container. Nevertheless, it should not stay at room temperature for more than two hours, or one hour in very hot weather, because bacteria can grow quickly. Therefore, always chill potato salad promptly after serving and avoid leaving it on the table for the entire party.
13. How do I fix potato salad if it’s too dry, too runny or bland?
If your potato salad seems too dry, gently stir in more dressing or a spoonful of mayo, yogurt or olive oil until it loosens. Conversely, when a potato salad turns out too runny, you can add extra potatoes or chopped vegetables, then chill it so it firms up. If it tastes bland, simply adjust the salt, acid (vinegar or lemon), mustard and herbs until the flavours pop.
14. What can I serve with potato salad to make a complete meal?
Potato salad pairs well with grilled chicken, sausages, kebabs, burgers, roasted vegetables, baked fish and even hearty bean dishes. Moreover, you can serve it alongside green salads, coleslaw, corn on the cob or simple tomato salads to round out the plate. With those extras, a classic potato salad recipe, a German potato salad or a vegan potato salad can easily anchor a full, satisfying meal.