I recently stumbled upon a fascinating image on Reddit, showcasing a restaurant menu with a list of sushi etiquette tips. As someone who loves sushi and appreciates the intricacies of Japanese culture, I found these guidelines both insightful and essential for anyone looking to enjoy sushi the way it’s meant to be savored. In this post, I’ll share some common knowledge about sushi etiquette, delve into the specific tips from the restaurant menu, and discuss why these practices are important.
Common Sushi Etiquette
Sushi is more than just food; it’s an art form that reflects Japanese culture and traditions. Here are some commonly known etiquette practices:
- Use Your Hands or Chopsticks: Sushi can be eaten with your hands or chopsticks, but avoid using forks.
- Eat in One Bite: Sushi pieces are designed to be consumed in one bite to experience the full blend of flavors.
- Dip Fish Side in Soy Sauce: When using soy sauce, dip the fish side, not the rice, to prevent the rice from absorbing too much sauce.
- Clean Your Palette with Ginger: Pickled ginger is meant to cleanse your palate between different pieces of sushi.
- Respect the Chef: Acknowledge the chef’s craftsmanship and avoid making unnecessary changes to the sushi.
Restaurant Menu Etiquette Tips
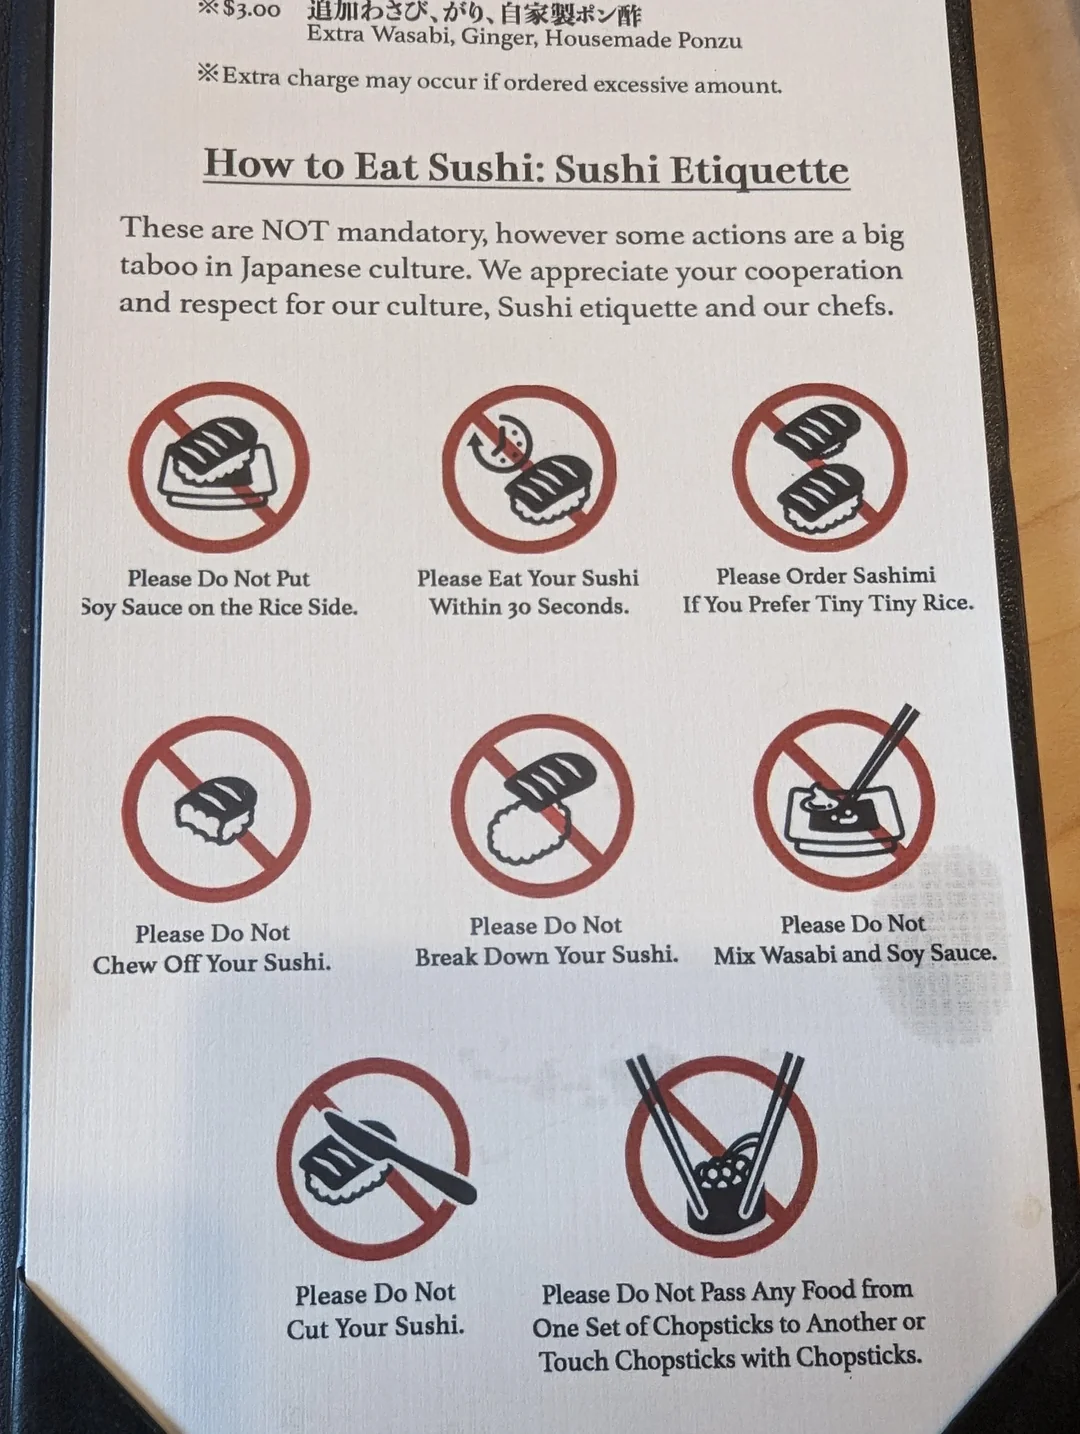
The menu I found on Reddit provides a detailed list of dos and don’ts that highlight some key aspects of sushi etiquette. Here’s what it says:
- Please Do Not Put Soy Sauce on the Rice Side
- Traditionally, soy sauce should only touch the fish to prevent the rice from becoming too salty and falling apart.
- Please Eat Your Sushi Within 30 Seconds
- Freshly made sushi is best enjoyed immediately to experience the optimal texture and flavor.
- Please Order Sashimi If You Prefer Tiny Tiny Rice
- For those who prefer less rice, sashimi, which is just slices of fish without rice, is a better option.
- Please Do Not Chew Off Your Sushi
- Sushi should be eaten in one bite to maintain the intended flavor profile and presentation.
- Please Do Not Break Down Your Sushi
- Sushi is crafted to provide a balanced taste, and breaking it down disrupts this balance.
- Please Do Not Mix Wasabi and Soy Sauce
- Mixing wasabi with soy sauce can overpower the delicate flavors. Instead, place a small amount of wasabi on the sushi, if needed.
- Please Do Not Cut Your Sushi
- Cutting sushi can be seen as disrespectful to the chef’s craftsmanship. Each piece is designed to be consumed whole.
- Please Do Not Pass Any Food from One Set of Chopsticks to Another or Touch Chopsticks with Chopsticks
- This action resembles a funeral custom in Japan and is considered bad manners at the dining table.
Why These Practices Matter
Respecting sushi etiquette is not just about following rules; it’s about appreciating the cultural heritage and culinary artistry that goes into each piece of sushi. These practices ensure that you enjoy sushi in the way it was intended, preserving the flavors and textures that the chef has carefully crafted.
Moreover, adhering to these guidelines shows respect for the chef and the culture, enhancing your dining experience and fostering a deeper connection with the cuisine. It’s a small but meaningful way to honor the tradition and effort behind this beloved Japanese food.
Conclusion
Next time you enjoy sushi, keep these etiquette tips in mind. They will not only enhance your dining experience but also show your respect for the rich cultural traditions that make sushi so special. Have you encountered any unique sushi etiquette practices or have a story to share? Join the conversation and share your thoughts in the comments below!
Also Read:
Sushi and Pregnancy
How to reduce the Glycemic Impact (GI) of Rice?