Posted on 1 Comment

Castor Oil for Eyes: Dry Eyes, Under-Eye Bags, Styes, Eczema & Ayurveda

Portrait cover: South Asian woman with natural makeup holds an amber castor-oil dropper beside a castor leaf; headline reads ‘Castor Oil for Eyes’; MasalaMonk.com footer—guide to dry eyes, under-eye bags, styes, eczema & Ayurveda.

If you’ve heard that castor oil for eyes is a cure-all—good for dry eyes, eye bags, stye, chalazion, even eczema and “vision improvement”—you’re not alone. Social posts make it look simple: a few drops, a quick massage, and everything’s better. But eyes are delicate, and what you put on or near them matters. So let’s slow down, compare what’s actually known to what’s rumored, and map out a routine that’s gentle, safe, and realistic.

You’ll see where castor oil eye drops might fit (and where they absolutely don’t), how castor oil under eyes can soften the look of puffiness, what to do for stye and chalazion, how to handle eczema around eyes, and how to approach Ayurveda without crossing safety lines. We’ll keep transitions smooth, the tone warm, and the advice practical—because the goal is confidence, not confusion. If you’re exploring the topic more broadly, here are thoughtful uses for castor oil beyond eye care. Curious about traditional rituals? Learn how to try castor oil in the belly button safely and mindfully.

Medical information only: This article shares general information and skincare tips for the eye area. It is not a diagnosis or a treatment plan and does not replace a consultation with an ophthalmologist, optometrist, or dermatologist. Always follow your clinician’s advice for your eyes and skin.

⚠️ Heads up: This guide is for education. It isn’t medical advice or a diagnosis.


First Things First: Safety Before Shortcuts

Let’s set a clear guardrail at the very beginning: do not put non-sterile, kitchen castor oil directly into your eye. The ocular surface needs sterile, pH-balanced, purpose-built formulas. Non-sterile oils can irritate the cornea, destabilize your tear film, and raise infection risk. If you want a friendly, trustworthy starting point for what’s safe in eye care, bookmark the American Academy of Ophthalmology — Eye Health. For a bigger picture on dryness, causes, and treatments, the National Eye Institute’s dry eye overview is excellent.

Castor Oil for Eyes safety graphic showing a green-check sterile eye-drop bottle and a red circle-slash over a kitchen castor-oil bottle with ‘Skin only — do not instill.’
Castor Oil for Eyes—safety first: sterile eye drops are engineered for the ocular surface; kitchen castor oil is skin-only and must not be instilled.

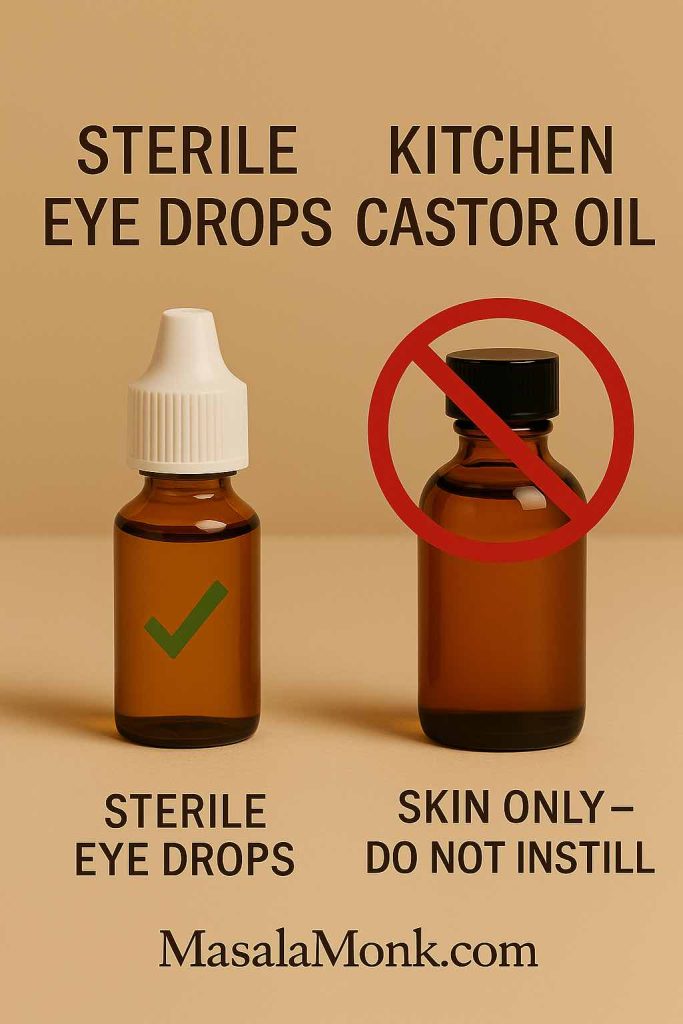
Hold on to that rule as we go: kitchen oils are for skin care, not for the eyeball. When we talk about castor oil eye drops, we’re referring to sterile, commercially formulated emulsions designed for the eye—very different from a bottle of cosmetic oil. If your eyelids are irritated or reactive, start with these eyelid dermatitis strategies before adding anything new around the eyes.

Do not instill oils: Do not put non-sterile, kitchen castor oil or any cosmetic oil into your eyes. Only sterile, commercially formulated eye drops belong on the ocular surface.


Castor oil for dry eyes (and castor oil eye drops): what the science actually says

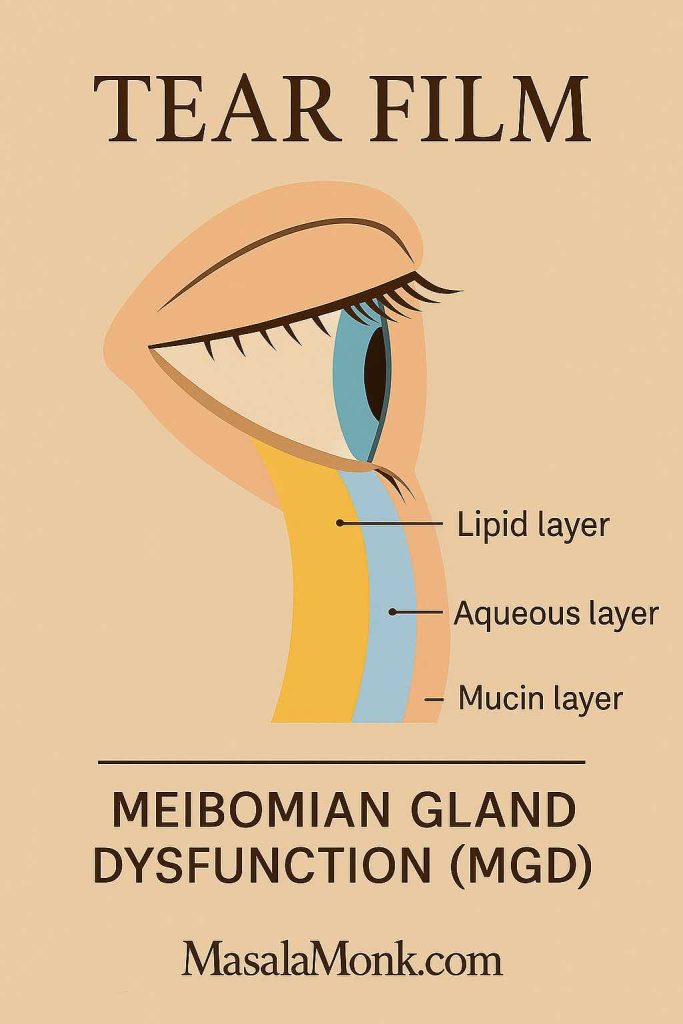
So, is castor oil for dry eyes actually helpful? The nuanced answer is sometimes, and only as part of sterile, clinically formulated eye-drop emulsions—most relevant for meibomian gland dysfunction (MGD), a common cause of evaporative dry eye.

Diagram of tear film layers—lipid, aqueous, mucin—with arrows showing reduced evaporation in MGD; educational visual for Castor Oil for Eyes article.
In evaporative dry eye/MGD, supporting the lipid layer helps slow tear evaporation—why some clinician-approved lipid drops (not raw oils) can aid Castor Oil for Eyes discussions.

Where castor oil shows up in research

Some lipid-based artificial tears aim to stabilize the tear film’s oily layer, which slows evaporation. In this context, researchers have studied low-concentration, homogenized castor-oil emulsions (again, these are sterile eye-drop formulations) and found improvements in tear stability and symptoms for certain patients with MGD. If you like to read primary sources and reviews, a good jumping-off point is a curated PubMed search for this topic: PubMed — castor oil emulsion dry eye MGD. For patient-friendly context on dry eye types and treatment tiers, the NEI dry eye guide (National Eye Institute) is clear and current.

If you like evidence-first takes on oils, our guide to oil pulling for dental health separates benefits from hype.

Translating that into real-life choices

If your dryness is mainly evaporative—burning, fluctuating vision, relief right after you blink—your eye-care professional may recommend a sterile, lipid-containing tear. Some brands use castor-derived lipids; others rely on different lipids to accomplish the same tear-film support. The key is sterility and suitability, not the presence of “castor oil” on the label. If you want to understand why formulation matters so much, the American Academy of Ophthalmology explains ocular-safe product design in plain language.

Special groups: Contact-lens wearers, people who are pregnant/breastfeeding, and children should avoid experimenting around the eyes and seek personalised guidance from a qualified clinician.

For a castor-forward routine outside the eye, see how it performs on facial texture in castor oil for face wrinkles.

What this does not mean

Eye-drop studies do not validate dripping raw castor oil into the eye. Clinical emulsions are engineered to be sterile, isotonic, and friendly to the ocular surface. Kitchen oils are not. So while castor oil eye drops can have a role in a clinician-guided plan for MGD-related dry eye, DIY eye instillation is unsafe.

About “castor oil eye drops”: In research and clinical practice, “castor oil eye drops” refers to sterile, formulated emulsions made for eyes—not bottled cosmetic oil. If a product isn’t sterile and labelled for ocular use, don’t use it in your eyes.

A practical plan for dry eye

  1. Confirm the cause. Dry eye isn’t one thing. Your clinician can check for MGD (evaporative) versus aqueous-deficient dry eye or a combination.
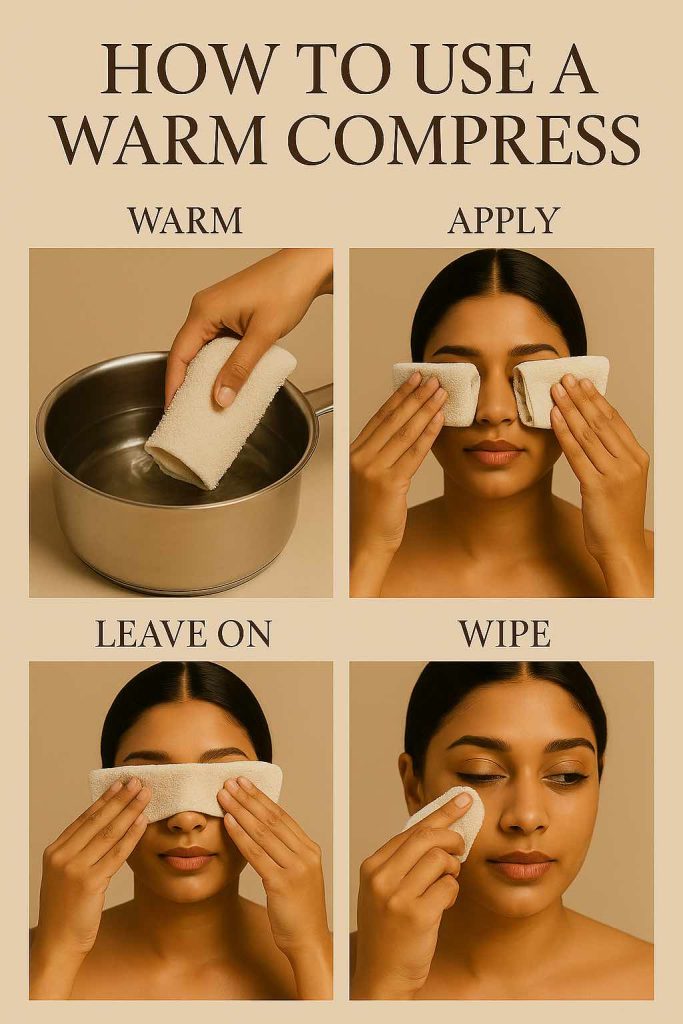
  2. Start with the basics. For MGD, warm compresses (5–10 minutes) melt the thick meibum; gentle lid hygiene keeps gland openings clear. These two steps alone often help more than expected.
  3. Add a sterile lubricant if advised. Ask about lipid-based tears fitted to MGD. Whether those lipids are castor-derived or not, the key is that the drops are sterile and designed for eyes.
  4. Keep cosmetic castor oil on skin only. If you like the feel of castor oil, use it around the eyes, not in them—details just ahead.

For more on dry eye types and treatment ladders (including when to escalate care), skim the National Eye Institute – NEI dry eye page after this article.

Four photos demonstrating warm compress and gentle lid hygiene sequence for MGD: warm, apply, leave on, wipe—supporting Castor Oil for Eyes guidance.
The biggest wins often come from basics: 5–10 minutes of warm compress, then gentle lid hygiene—foundation steps before any Castor Oil for Eyes skin-only routine.

Castor oil under eyes for eye bags, puffy eyes & dark circles: what it can (and can’t) do

Now, let’s change gears to eye bags, puffy eyes, and dark circles. Here, castor oil under eyes behaves like other occlusive moisturizers. It seals in water, making thin under-eye skin look smoother and feel cushioned. That can soften fine lines and make mild puffiness look a bit less obvious—especially when used at night on slightly damp skin.

The genuine upside

  • Immediate comfort and softness. As an occlusive, castor oil reduces transepidermal water loss (TEWL) and keeps hydration where you want it.
  • Smoother texture. Hydrated skin reflects light more evenly, so lines and crepiness look less pronounced.
  • Pairs well with de-puffers. A tiny amount at night works nicely with a caffeine gel in the morning and a cool compress when you need quick de-puffing.

If you want a dermatology-oriented refresher on moisturizers and barrier support (not specific to castor oil but totally relevant to the under-eye), the American Academy of Dermatology’s moisturizer guide is a good primer.

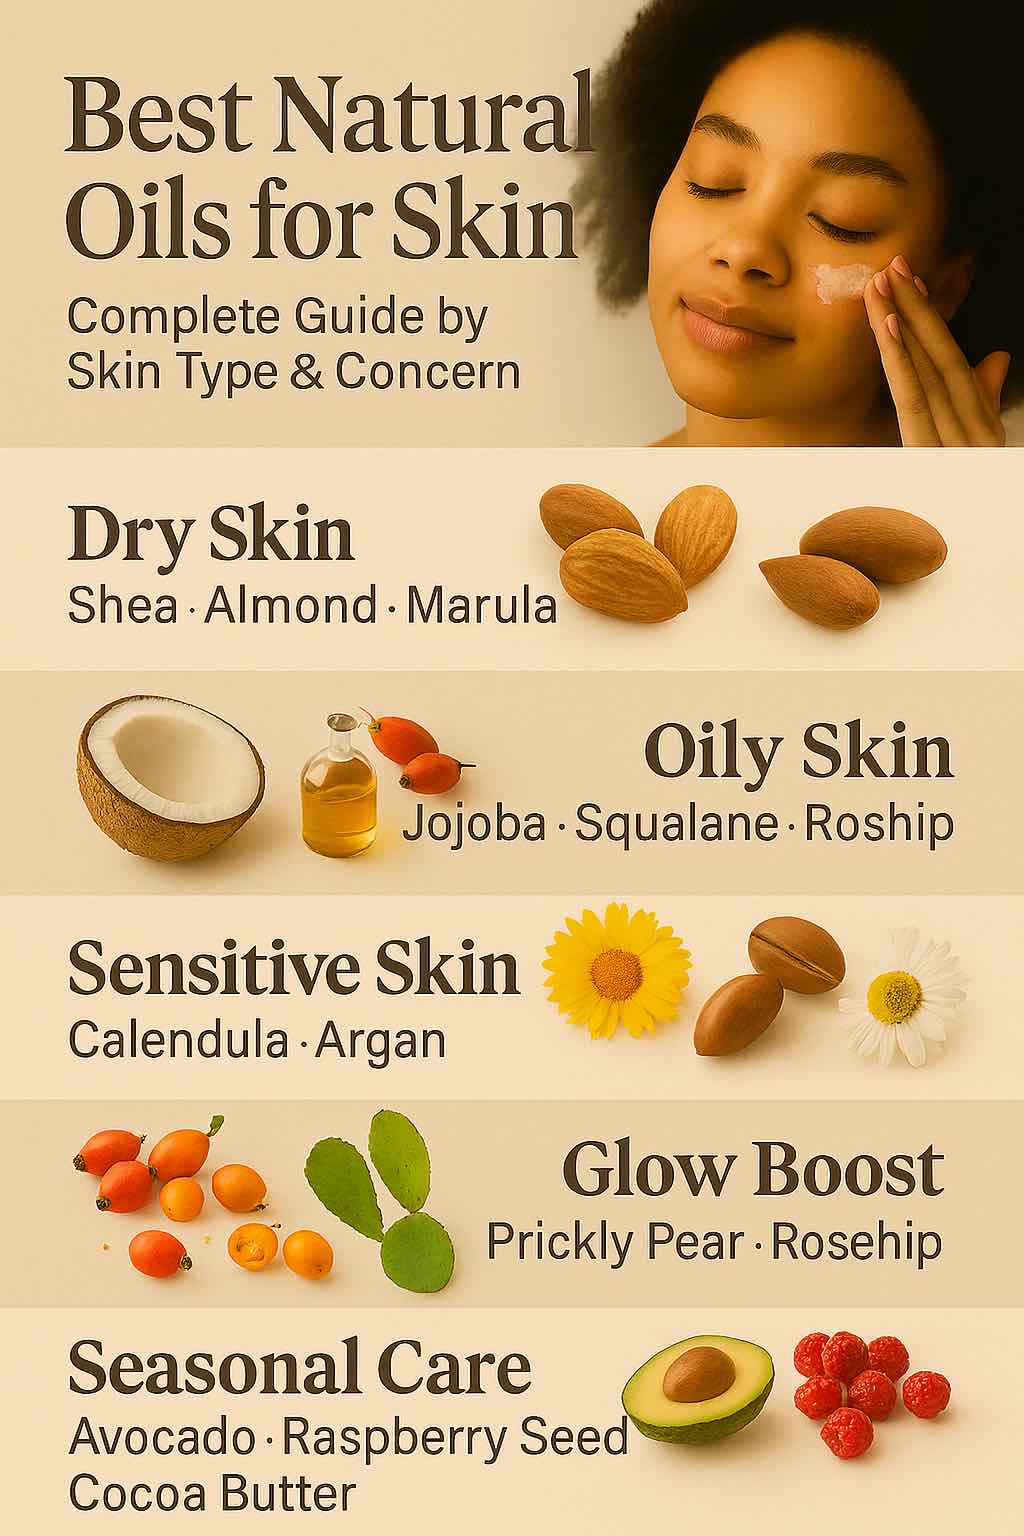
Not sure if castor’s texture is your match? This post on natural oils for skin compares lighter options you can use under the eyes.

Hard limits (and why they matter)

Castor oil won’t dissolve fat pads, correct fluid retention from salt or allergies, change bone structure, or erase vascular/pigment dark circles. It’s a cosmetic helper, not a surgical alternative. Setting expectations clearly makes results feel better.

A simple, skin-only routine

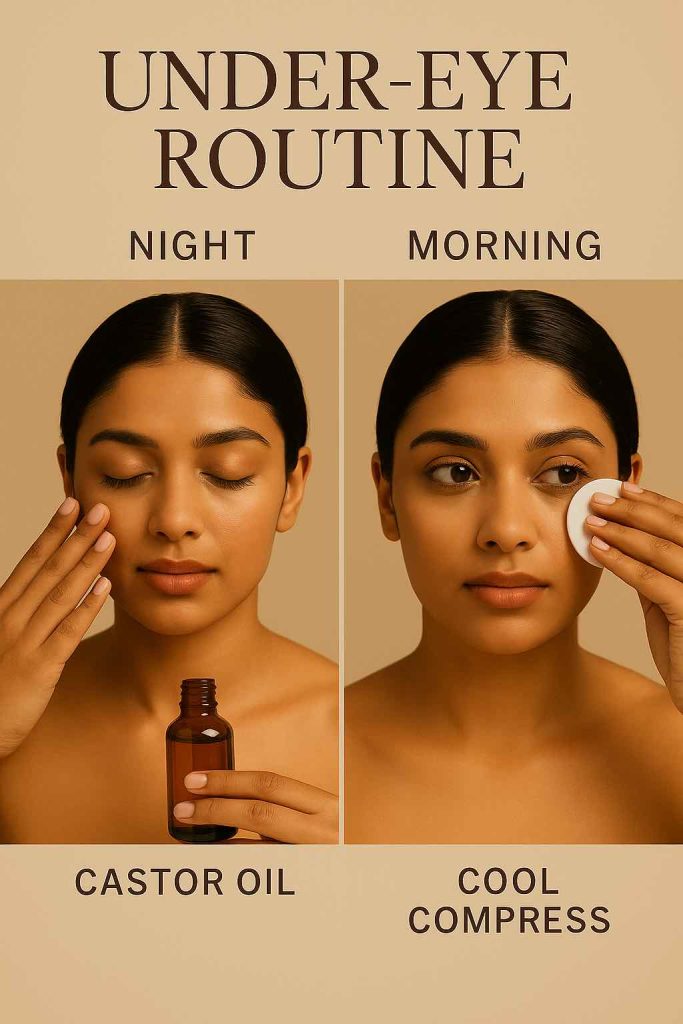
  • Night (texture & comfort): cleanse → optional hydrating serum → while skin is slightly damp, tap a rice-grain amount of castor oil under each eye. Stay below the lash line; avoid the waterline. If you’re milia-prone, use even less or skip entirely.
  • Morning (de-puff & protect): cool rinse → caffeine gel or a light eye cream → sunscreen. A cold compress for 3–5 minutes helps on puffy mornings. Prefer a softer morning step? Try rose water on the face overnight to wake up calmer skin.
  • Lifestyle nudges: steadier sleep, gentler evening salt, and allergy control will do more for puffy eyes than any topical.

Patch-test first: The eyelid/under-eye area is thin and reactive. Apply a speck to a small patch of intact skin for 48 hours before regular use. Skin-only application—keep oils away from the waterline and ocular surface. Stop immediately if you notice stinging, redness, or swelling.

⚠️ Gentle reminder: Everything here is for learning. For your eyes and skin, follow the plan you make with a qualified clinician.

Diptych for Castor Oil for Eyes skin-only routine—nighttime tiny oil application below lash line and morning cool-compress with caffeine gel.
Skin-only approach: at night, tap a rice-grain of castor oil below the lash line for comfort; in the morning, pair caffeine gel with a cool compress to reduce puffiness.

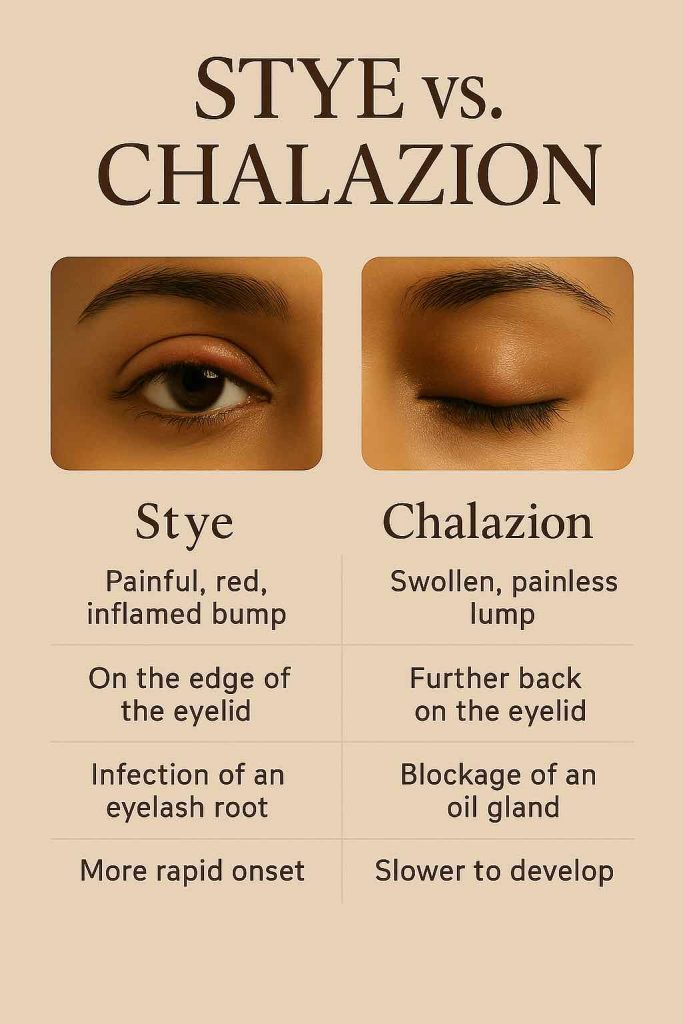
Castor oil and stye or chalazion: where it fits (and where it doesn’t)

If you’ve got a stye (hordeolum) or a chalazion, you’ll hear the same advice from every clinician: warm compresses and gentle lid hygiene are first-line. Most cases settle with patient, consistent care. If you prefer quick, credible summaries (including red flags), see Mayo Clinic: Stye or the shorter NHS: Stye.

If lid skin is inflamed or itchy, these eyelid dermatitis strategies can make warm-compress care more comfortable.

Where does castor oil belong here? At most, on the skin as part of a soothing routine—not inside the eye. There’s no robust evidence that castor oil on its own treats a chalazion or stye. If swelling worsens, pain escalates, or vision changes, it’s time to be seen promptly.

Castor Oil for Eyes context chart comparing stye and chalazion with photos and bullet differences plus red-flag reminders.
Stye = tender, edge-of-lid, faster onset. Chalazion = firmer, usually painless, develops slowly. Both respond to warm compresses; seek care if red-flag symptoms occur.

Castor oil for eczema around eyes (eyelid/periocular eczema): a gentle, safe approach

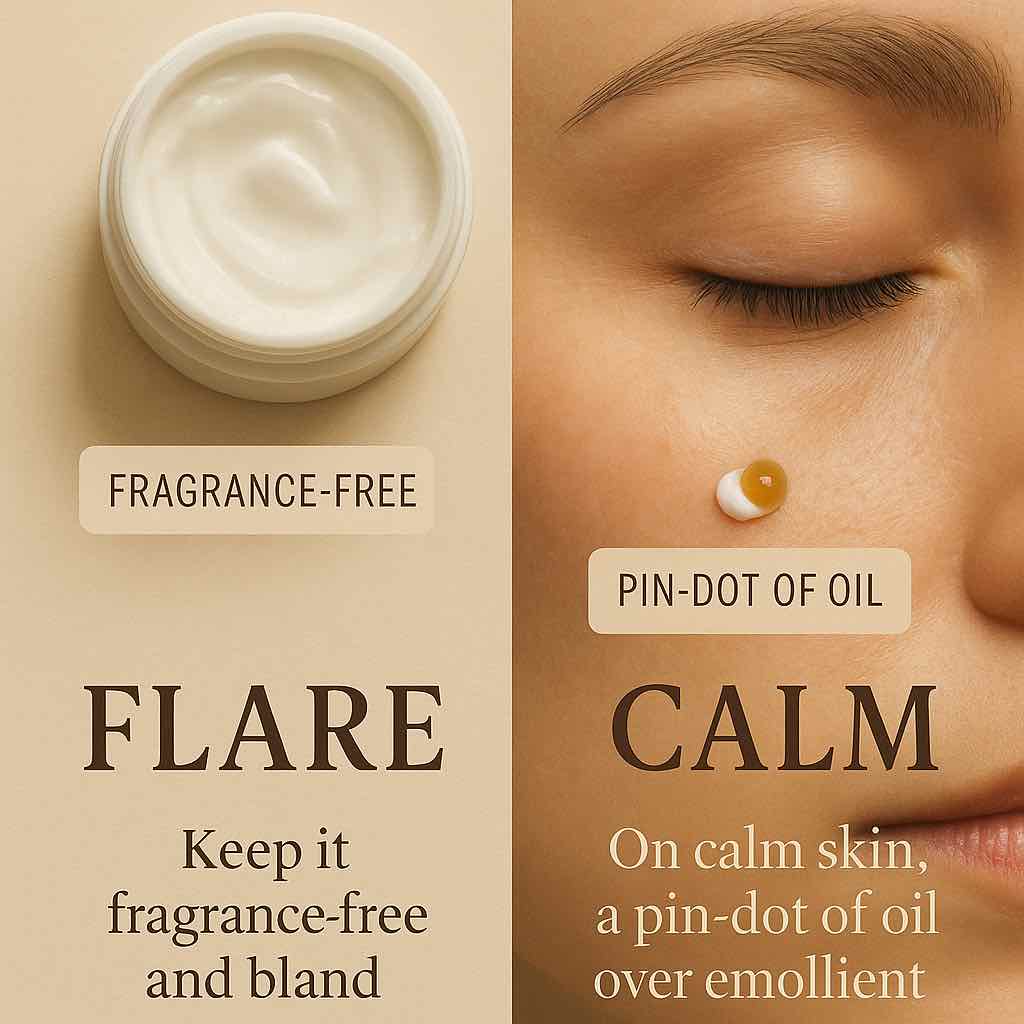
Eczema around eyes is common, and the skin here is thin and reactive. Some people find that a pin-dot of castor oil on intact, non-weeping skin feels soothing because it seals in moisture. Others flare with oils and need something blander.

Can castor oil calm eyelid eczema symptoms?

Sometimes, a pin-dot of castor oil on intact, non-weeping skin can feel soothing because it’s an occlusive that helps seal in moisture. However, eyelid skin is thin and reactive, and eyelid eczema often has triggers: fragrance, preservatives, certain cosmetics, even nail polish or hair products that transfer to the lids. That’s why the first meaningful wins come from simplifying products and using bland emollients. A practical, patient-friendly overview lives here: National Eczema Society — Eczema around the eyes. Another useful Q&A on what typically helps and what to avoid is the National Eczema Association’s eyelid eczema advice.

Eyelid eczema: During flares, prioritise fragrance-free routines and bland emollients as advised by your clinician. Oils (including castor oil) may irritate active eczema; consider them only on calm, intact skin after a patch test.

Better first-line options for eyelid dermatitis

Dermatology and hospital guides typically suggest fragrance-free, dye-free routines and petrolatum-based ointments during flares, alongside trigger avoidance. When needed, clinicians may prescribe a short, cautious course of a mild topical steroid or a non-steroidal anti-inflammatory tailored for eyelids. For a mainstream baseline, see NHS: Atopic eczema. If you want a hospital leaflet focused on the eye area, this PDF is practical and plain-spoken: Leicester Hospitals — Treating eczema around your eyes (periocular dermatitis). Adults with eczema should also watch for eye-related problems and get evaluated early; see American Academy of Dermatology — Adults with eczema: watch for eye problems.

For broader context on triggers and routines, explore our 8 types of eczema overview.

Eyelid dermatitis care, flare vs calm: ointment-only during flares; on calm skin a tiny, skin-only layer of castor oil below the lash line.
During flares, keep it fragrance-free and bland; when skin is calm, a pin-dot of oil (skin-only) can seal in moisture—an important nuance in Castor Oil for Eyes discussions.

Where to place castor oil in an eczema-friendly routine

  • Patch test first. Dab a speck along the outer orbital bone for two nights and wait. If there’s no redness or stinging, continue.
  • Use it sparingly. Keep castor oil around eyes (skin only) as a comfort step on intact skin, preferably over a bland emollient layer.
  • Back off during flares. Inflamed, weeping, or intensely itchy skin is more reactive—save the oil until things are calmer, and lean on your clinician’s treatment plan.
  • Ask for help early. Adults with eczema should keep an eye on eye-related problems and get evaluated promptly; see the American Academy of Dermatology — Adults with eczema: watch for eye problems.

Managing systemic eczema too? See foods to avoid for eczema for diet patterns that may help.

If you’re curious about evidence specifically linking castor oil to eczema relief, it’s fair to say that research is limited and mixed; some people find it soothing, others find it irritating on active eczema. Two plain-English summaries make this clear: Medical News Today — Castor oil for eczema: research is limited and HealthCentral — Castor Oil for Eczema.


Ayurveda and castor oil for eyes: a balanced, modern take

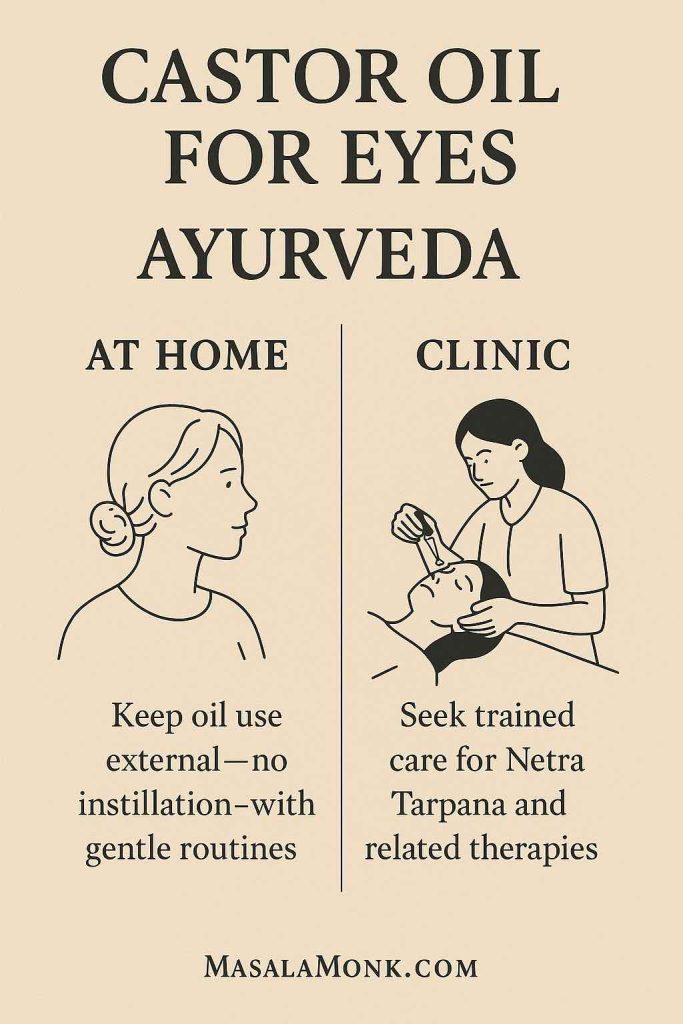
Classical Ayurvedic practice describes Netra Tarpana and related netra therapies using medicated ghee or oils. In tradition, these are clinic procedures performed by trained practitioners with strict hygiene and individualized assessment. They are not home remedies. If an Ayurvedic flavor appeals to you, it’s possible to honor that lens and keep safety first:

  • Keep at-home oils external: castor oil under eyes for skin comfort can be fine for some, but not instilled into the eye.
  • Blend whole-person habits—regular sleep, gentle breath work, steady daily rhythm—with evidence-based dry-eye care.
  • For supervised, traditional therapies, look to credible portals and practitioners rather than random blogs. Two orientation points: the Ministry of AYUSH (Govt. of India) and the AYUSH Research Portal.
Ayurveda visual comparing at home external skin-only oil vs clinic-only netra therapies—safety boundary for Eyes.
Honor tradition safely: keep at-home oils external; reserve netra therapies for trained clinics—a key boundary in Eye care

If you enjoy ritual practices, this guide to ginger oil and the belly button separates myths from mindful use.

Ayurvedic eye procedures: Therapies like Netra Tarpana are clinic procedures under trained practitioners. They are not DIY. At home, keep any oil use external and never instilled into the eye.


How to use castor oil around the eyes (skin-only), step by step

Because “how much?” and “how exactly?” matter just as much as what to buy, here’s a simple routine you can follow tonight.

Patch test (don’t skip)

Apply a speck along the outer orbital bone once nightly for two consecutive nights. If there’s no redness, itching, or burning by day three, proceed. If you react, stop.

Night routine (comfort and texture)

  1. Cleanse with something your skin already tolerates well.
  2. Apply a hydrating serum if you use one and give it a minute.
  3. Warm a pin-dot of castor oil between fingertips.
  4. Gently tap under the eye, keeping a finger’s width away from the lash line.
  5. If your skin is milia-prone or oily, use even less—or skip. Thicker isn’t better here.

Morning routine (de-puff & protect)

  1. Cool rinse to calm swelling.
  2. Caffeine gel or a light eye cream to nudge fluid along.
  3. Sunscreen every morning—end of story.

Product pointers

  • Choose cold-pressed, hexane-free castor oil labeled for cosmetic use.
  • Avoid fragrance near the eyes.
  • Cap tightly and store at room temperature; replace if the oil smells “off.”

Prefer something silkier? See when avocado for skin makes sense around the eye (and when to avoid direct contact).

Remember, this is skin care, not treatment for medical eye disease. For stubborn dryness, a clinician-guided plan with lipid-based tears (when appropriate) will help more than any amount of DIY oil. For a clear overview, see the NEI dry eye page.


Myths to retire (so you don’t waste time or take risks)

Let’s be direct about a few common claims:

  • “Castor oil cures cataracts/glaucoma/floaters.” There’s no high-quality clinical evidence for these promises. Be skeptical of viral “hacks.” When in doubt, check the American Academy of Ophthalmology — Eye Health and talk to your ophthalmologist.
  • “If it’s natural, it’s safe to put in your eyes.” Sterility, pH, and formulation matter more than buzzwords. The ocular surface is not the place for kitchen experiments.
  • “More is better.” With castor oil under eyes, more is usually just… greasier. Use a rice-grain amount at most.

For a simple, non-miracle refresh, try rose water for skin care as a quick under-eye pick-me-up.

If something seems magical, press pause. Your vision is too important to gamble on trends.


When to see a professional—today, not “someday”

Seek urgent care if you develop severe pain, light sensitivity, vision changes, pus/discharge, trauma, or chemical exposure, or if swelling does not improve after 48–72 hours of warm compresses.

Please book an exam if you notice sharp pain, light sensitivity, blurred or fluctuating vision, pus, trauma, chemical exposure, or swelling that isn’t easing after a few days of warm compresses. If you’re considering castor oil eye drops, treat them like any other eye medicine: choose only sterile, commercially formulated products on your clinician’s advice. For a sensible, patient-friendly foundation, revisit the NEI dry eye guide and the AAO Eye Health hub.


Putting it all together (and why this plan works)

By now, the pattern is clear:

  • For dry eye: basics first (warm compresses, lid hygiene), then sterile, lipid-based tears if appropriate. Castor oil eye drops can fit here only when they are formulated for eyes.
  • For under-eye bags and puffiness: castor oil under eyes can help the skin look smoother and feel cushioned, but it won’t change anatomy. Pair it with morning caffeine gel, a cold compress, and steady sleep.
  • For stye and chalazion: warm compresses and time do the heavy lifting; see a clinician if it worsens or lingers.
  • For eczema around eyes: keep routines fragrance-free, use bland emollients during flares, and treat castor oil as a cautious, skin-only comfort step on calm skin.
  • For Ayurveda lovers: keep at-home oils external; seek qualified care for any procedure-style therapy.

This slower, steadier plan tends to perform better for readers because it meets each search intent in plain language, shows real empathy, and draws a bright, safe line between skin care and ocular medicine.


⚠️ Educational use only: This article shares general information to help you understand options and risks. It does not replace care from an ophthalmologist, optometrist, or dermatologist.


Sources & further reading

FAQs

1) Does castor oil for eyes actually work for dry eyes?

Yes—and no. Castor oil eye drops can help evaporative dry eye when they’re sterile, professionally formulated emulsions designed for the ocular surface. However, kitchen castor oil should not go into your eye. Instead, talk to your clinician about lipid-based artificial tears while you continue warm compresses and lid hygiene.

2) Can I use castor oil under eyes for eye bags and puffy eyes?

Generally, yes—on skin only. Because castor oil is an occlusive, it can soften the look of the under-eye by sealing in moisture. Yet, it won’t remove fat pads or fix fluid retention. For quicker de-puffing, pair a tiny nighttime application with morning caffeine gel and a cool compress.

3) How do I apply castor oil around the eyes safely?

First, patch-test on intact skin for 48 hours. Then, at night, cleanse, optionally use a hydrating serum, and tap a rice-grain amount of oil below the lash line—never on the waterline. Finally, stop if you notice stinging, redness, or swelling.

4) Is castor oil good for stye or chalazion?

It can feel soothing on the eyelid skin, but the first-line treatment is still warm compresses and gentle lid hygiene. Because evidence for castor oil as a cure is limited, avoid getting oil in the eye. If the lump worsens or vision changes, see a clinician.

5) What about castor oil for eczema around eyes (eyelid/periocular eczema)?

Sometimes, a pin-dot on calm, non-weeping skin can feel comforting. However, during flares, eyelids are reactive, so stick to fragrance-free basics and bland emollients as advised by your dermatologist. Oils, including castor, can irritate active eczema—so go slow and patch-test.

6) Are “castor oil eye drops” the same as bottled cosmetic castor oil?

No. Castor oil eye drops in studies are sterile, isotonic emulsions formulated for eyes. By contrast, bottled cosmetic oils are not sterile and shouldn’t be instilled. Therefore, if a product isn’t clearly labelled and approved for ocular use, keep it off the eyeball.

7) How long until I see results under the eyes?

It depends. With castor oil under eyes, some people notice softer texture within days because hydration improves light reflection. But for puffiness from sleep, salt, or allergies, improvements hinge more on habits (sleep, sodium, antihistamines if appropriate) than on any topical.

8) Can I use castor oil for eyes if I wear contact lenses?

Preferably, remove lenses before any eye-area routine. Although you’re not putting oil in your eye, residue can migrate. If you use sterile lipid-based artificial tears, follow lens-safe directions from your eye-care professional.

9) Is castor oil safe during pregnancy or while breastfeeding?

Because the eyelid area is sensitive and circumstances vary, it’s best to ask your clinician first. If approved, keep application external, minimal, and on intact skin only—and avoid any non-sterile instillation into the eye.

10) How much castor oil should I use under eyes?

Less is more. Warm a pin-dot between clean fingertips and tap it in; a heavy layer is unnecessary and may lead to milia or clogged pores. Moreover, using it every other night often works as well as nightly for many skin types.

11) Which is better for dry eyes—castor oil eye drops or plain artificial tears?

It depends on the type of dry eye. For evaporative dry eye/MGD, lipid-based sterile tears (some include castor-derived lipids) can be beneficial. For aqueous-deficient dry eye, other tear types or prescriptions may be preferred. So, start with a proper diagnosis, then choose accordingly.

12) Are there side effects from castor oil around the eyes?

Occasionally, yes. Some people experience stinging, redness, milia, or itch—especially on sensitive or eczematous skin. Hence, always patch-test, keep to skin-only use, and discontinue if irritation appears.

13) What are good alternatives if castor oil under eyes doesn’t suit me?

You have options. For hydration, try hyaluronic-acid serums or petrolatum. For puffiness, use caffeine gel and cool compresses. And for texture over time, a gentle peptide or ceramide product may help, provided it’s fragrance-free and eye-area appropriate.

14) Where does Ayurveda fit with castor oil for eyes?

At home, keep any oils external and focus on rhythm—rest, breath, gentle routines. Meanwhile, clinic-based therapies (like Netra Tarpana) belong with trained practitioners using medical-grade materials. Safety first; tradition and modern care can complement each other.

15) When should I stop home care and see a professional?

Right away if you develop severe pain, light sensitivity, vision changes, pus/discharge, trauma, or chemical exposure. Likewise, if a stye/chalazion doesn’t improve after several days of warm compresses—or if dry-eye symptoms persist despite basics—book an appointment.

Related Reading

Before you move on, these gentle, eye-area-friendly reads can help you fine-tune your routine:

  • Next, explore broader ways to use castor oil:
    Discover practical tips (and myths to ignore) in uses for castor oil—a helpful overview if you’re curious beyond eye care.
  • Also, calm fussy eyelids the smart way:
    If your lids feel irritated or reactive, start with eyelid dermatitis strategies—simple, fragrance-free steps that play nicely with sensitive skin.
  • If you prefer a castor-forward face routine:
    See texture tips, layering ideas, and “how much is enough” in castor oil for face wrinkles—useful even if you only apply near (not on) the eye area.
  • Meanwhile, try a lighter refresh for mornings:
    A quick, soothing spritz can perk up tired skin; here’s how to use rose water for skin care without overdoing it.
  • If under-eye oils feel too heavy:
    Compare textures and find gentler options in this primer on natural oils for skin—handy when you want slip without greasiness.
  • And if eczema is part of the picture:
    Small diet shifts can support calmer skin—start with foods to avoid for eczema and note what changes actually help you.
Posted on 3 Comments

Natural Oils for Skin: Benefits, Best Types & How to Use Them

Best Natural Oils for Skin

If you’ve ever stared at a crowded bathroom shelf and thought, there has to be a simpler way, you’re absolutely right. Skincare doesn’t have to be complicated to be effective. In fact, when you pick the right natural oils for skin, you can build a routine that is gentle, affordable, and beautifully minimal. These oils—pressed from seeds, nuts, flowers, and fruit—are rich in fatty acids, vitamins, and antioxidants that soften, soothe, and protect. Moreover, they play nicely with what you already own. Add a few drops after your serum, mix a little into your cream, or massage them onto damp skin post-shower and call it a day.

In this long, friendly guide, we’ll explore why natural oils for skin work so well, how to choose them for different concerns, and exactly how to use them so you feel glowy—not greasy. Along the way, you’ll find tiny recipes, day-to-night routines, and myth-busting tips that keep things honest and practical. Ready? Let’s turn your routine into something softer, calmer, and more you.


Why natural oils for skin often outperform complicated routines

First, a quick primer. Skin loses water to the air all day (that’s transepidermal water loss). Humectants like glycerin pull water in; natural oils for skin help seal it there. In other words, they don’t hydrate on their own—they lock hydration in place and smooth the tiny spaces between skin cells so your barrier feels comfortable again. Consequently, your face looks bouncier, your body feels less itchy, and everything in your routine works better because your barrier isn’t fighting fires. (DermNet — Occlusives reduce evaporative water loss).

Woman applying natural face oil with dropper to highlight why oils outperform complicated skincare routines.
Plant oils seal hydration, support the skin barrier, and bring antioxidants—without a 12-step routine.

Additionally, plant oils bring bonus nutrients. Linoleic-rich options (sunflower, safflower, rosehip) replenish barrier lipids. Antioxidant-heavy picks (sea buckthorn, prickly pear, marula) help skin look brighter and more resilient. Calming macerates (calendula, aloe) visibly quiet down cranky cheeks. And yes, when you choose wisely, they do this without the sting or fragrance burn many people get from complicated formulas.

Most importantly, oils invite a slower pace: palms, breath, pressure. That 30-second massage at night isn’t just skincare; it’s a tiny nervous-system break you’ll actually look forward to.

Do read out latest post on : Turmeric Benefits for Skin and Face


Warning: This is general education article and not medical advice or professionally approved piece, kindly be careful, patch test, or consult qualified professionals before testing out anything you find in this post.


How to pick natural oils for skin by skin type (quick cheat sheet)

  • Dry/tight: shea butter (body), cocoa butter (body), olive, almond, marula, squalane (face).
  • Oily/acne-prone: jojoba, squalane, rosehip, black cumin seed; tea tree diluted for spots.
  • Sensitive/reactive: squalane, sunflower; try calendula macerate and patch test.
  • Eczema-prone: shea (body), sunflower, squalane (face), calendula; lanolin on rough, cracked areas.
  • Dull/uneven tone: rosehip, sea buckthorn, prickly pear; optionally carrot seed (always sunscreen by day).
  • Large pores/shine: jojoba and squalane balance sebum; lightweight textures help makeup sit better.
Woman applying shea butter face cream with avocado and squalane oil for winter dryness rescue skincare.
Winter dryness rescue with Shea for deep moisture, Avocado for nutrients, and Olive Squalane for protection.

We’ll go long on the individual oils next; keep this list handy.

Note: In adults, sunflower preserved barrier and improved hydration, while olive oil damaged barrier with repeated use—so favor olive for cleansing or body only if you tolerate it. (PubMed — Sunflower preserved barrier; olive oil impaired it (Danby 2013)).


Meet the heroes: best natural oils for skin (what they do & how to use them)

Shea Butter — Natural Oil for Deep Moisture & Eczema-Prone Skin

Thick, plush, and soothing, shea butter behaves like a comforting blanket for thirsty skin. Thanks to stearic and oleic acids plus vitamins A and E, it softens rough texture while visibly easing dryness and itch. Because it’s occlusive, it excels on bodies—legs, elbows, heels—and on faces that tolerate richer textures in winter. (DermNet — Occlusives & moisturisers explained).

How to use: After bathing, when skin is still damp, warm a pea-size in your palms and press into dry zones. For a lighter feel, blend 2 parts shea with 1 part jojoba or squalane and whip briefly.
Good for: Dry, ashy limbs; eczema care; hands that wash often.

Also Read: Shea Butter for Scalp Psoriasis


Jojoba Oil — Best Natural Face Oil to Balance Oily or Acne-Prone Skin

Technically a liquid wax, jojoba’s wax-ester profile closely resembles human sebum, which explains its quick, light feel and “balancing” reputation. (NIH/PMC — Jojoba in dermatology (review)). Moreover, it makes a stellar makeup remover and the ideal carrier oil for tea tree oil.

How to use: For daily moisture, press 2–3 drops onto damp skin. For oil cleansing, massage 1 teaspoon over a dry face for 60 seconds, emulsify with damp hands, and remove with a warm cloth.
Good for: Combination and oily skin, congested T-zones, anyone who wants “light but effective.”

Here you might want to read more about Jojoba Oil for Skin.


Squalane — Lightweight Natural Oil for All Skin Types

Plant-derived squalane is the “disappearing act” of natural oils for skin: weightless, elegant, and widely tolerated—even by reactive complexions. It cushions dehydrated skin without a film and layers under sunscreen seamlessly. (NIH/PMC — Squalene/squalane: background & stability).

How to use: Press 2–4 drops over your hydrating serum or gel cream, morning or night.
Good for: Absolutely everyone; especially those who dislike the feel of oil.


Rosehip — Brightening Natural Face Oil for Tone & Texture

This linoleic-rich, quick-absorbing oil supports a more even look over time. With steady use, post-blemish marks soften and fine lines appear less prominent.

How to use: At night, apply 2–3 drops before or after moisturizer.
Pro tip: Pair morning vitamin C (or niacinamide) with evening rosehip for a simple, effective glow plan.

Interested knowing more about Rosehip Oil? Do read our post: Rose Hip Seed Oil: Unlock the Beauty and Wellness Benefits for Your Skin.


Sea Buckthorn — Antioxidant-Rich Plant Oil for Resilient Skin

Naturally orange from carotenoids, sea buckthorn lends that “I sleep and hydrate” glow. It supports elasticity and helps calm visible redness, making complexions look more alive. (NIH/PMC — Sea buckthorn oil: bioactive profile & antioxidants).

How to use: Mix a tiny drop into your night oil or cream (it can stain).
Good for: Dull, wind-exposed, or mature skin; chapped lips.

Learn more about What is Seabuckthorn? All Your Questions Answered.


Prickly Pear Seed — Luxury Natural Oil for Eyes, Fine Lines & Glow

Ultra-high in vitamin E and polyphenols, this silky elixir feels refined, not greasy. Consequently, it’s a favorite for the delicate eye area and for softening the look of fine lines. (NIH/PMC — Opuntia seed oil: tocopherols & phytosterols).

How to use: Pat one drop under each eye; or smooth two drops across the face at night.
Good for: Dehydrated zones that need plushness without weight.


Coconut — Classic Natural Body Oil for Very Dry Skin

Rich in lauric acid, coconut is wonderfully occlusive on the body, sealing in moisture and easing roughness. However, faces prone to clogging may find it too heavy. (PubMed — Virgin coconut oil vs mineral oil in AD).

How to use: After showering, massage a small amount into damp arms and legs; use as a pre-shampoo hair mask when ends feel crispy.
Skip for: Acne-prone facial skin.

Here we should point you towards Coconut Oil for Skin: Frequently Asked Questions


Olive — Heritage Natural Oil for Body Hydration & Oil Cleansing

Extra-virgin olive oil brings antioxidants and a plush feel to organic body oil routines. Additionally, it dissolves makeup beautifully when used as a cleansing step. (PubMed — Olive vs sunflower on adult skin barrier).

How to use: A teaspoon for oil cleansing; a thin sheen on damp shins. If it feels heavy, cut 1:1 with squalane.
Good for: Dry limbs, quick DIY scrubs (olive oil + sugar).

6 Health Benefits of Olive oil for Skin is where we cover more about this one. Do read.


Sweet Almond — Gentle Natural Oil for Sensitive Skin & Massage

Light, smooth, and packed with vitamin E, almond oil is a crowd-pleaser for easily irritated skin. It slides well for facial massage and blends effortlessly with creams.

How to use: Massage 2–3 drops into damp skin; or add a few drops to your body lotion to increase richness.
Note: Avoid if you have nut allergies.

Wanna learn more about Almond Oil for Skin? Do not miss reading our blog post on the same.


Calendula Infused Oil — Soothing Natural Oil for Irritated, Red Skin

Calendula petals macerated in a carrier (like sunflower) create a calm-inducing oil that feels like a sigh of relief. Therefore, it’s perfect after waxing, shaving, or long sun-and-wind days.

How to use: Tap a few drops over areas that look flushed; or blend 20–30% calendula into your daily oil.
Good for: Eczema-prone patches; post-shave sting.


Sunflower Seed — Barrier-Repairing Natural Oil for Eczema & Everyday Use

High in linoleic acid, sunflower supports a resilient skin barrier and rarely feels greasy. It’s baby-safe and deeply versatile across face and body. (PubMed — Sunflower improved hydration; olive impaired)

How to use: For body, a teaspoon on damp skin post-shower; for face, 2–3 drops at night.
Pairs with: Calendula for a simple, fragrance-free comfort blend.

Btw, as it’s a edible oil as well, know more about Sunflower Seeds Benefits for Weight Loss: Harnessing Nature’s Power.


Sesame — Ayurvedic Natural Body Oil for Warmth & Circulation

A traditional favorite for abhyanga (self-massage), sesame feels grounding and restorative. It’s slightly heavier, yet deeply nourishing.

How to use: Warm a small pool between palms; apply long strokes toward the heart. Shower or towel-blot after if you prefer a lighter finish.
Good for: Night rituals, colder seasons, tight shoulders.

Liquid Gold: 5 Benefits of Sesame Oil for Skin Care is where we explore more about Sesame Oil and its role in skin care.


Marula — Silky Natural Oil for Smooth Makeup Days

Marula offers slip without shine, so foundation glides on and clings better. It also softens flaky spots that sabotage base products.
How to use: One or two drops pressed in before sunscreen and makeup.
Good for: Normal to dry skin that wants a refined, non-greasy glow.


Babassu — Breathable Natural Oil for Summer & Combo Skin

Think of babassu as coconut’s airy cousin—melts on contact but leaves less residue. As a result, it suits faces that dislike heavy occlusives.
How to use: Swap for coconut anywhere you want a lighter touch; lovely for summer body care.
Good for: Combo skin; humid climates.


Black Cumin Seed — Clarifying Natural Oil for Blemish-Prone Skin

With thymoquinone and an earthy profile, this plant oil brings a calming, balancing vibe to fussy pores and flaky scalps. Emerging evidence—including an RCT—suggests topical Nigella sativa preparations can help mild-to-moderate acne. (PubMed — Topical black seed oil helpful in acne).

How to use: Blend one drop into jojoba or squalane and smooth a thin layer at night; can also be massaged into the scalp before washing.
Good for: Oil-heavy T-zones, stubborn little bumps.


Pumpkin Seed — Fortifying Natural Oil for Transitional Seasons

Mid-weight and quietly nourishing, pumpkin seed oil offers vitamin E comfort without heaviness. It’s a reliable “shoulder season” pick when skin can’t decide.

How to use: Mix 1 drop pumpkin with 2 drops squalane for a balanced finish.
Good for: Normal/combination skin; autumn and spring.

Learn more about The Benefits of Pumpkin Seeds for Weight Loss and Blood Sugar Control.


Lanolin (or Lanolin Oil) — Natural Occlusive for SOS Dry Spots

Although not a plant oil, lanolin earns a place in natural oils for skin routines for its unrivaled moisture-locking power. (DermNet — Contact reactions to lanolin).

How to use: Over damp skin, tap a grain-of-rice amount on cracked knuckles, lips, or heels; leave overnight.
Note: Not vegan; patch test if sensitive.


Cocoa Butter — Natural Body Butter for Long-Lasting Protection

Firm at room temp, cocoa butter melts into a rich, protective layer. It’s a winter workhorse and a classic in stretch-mark care. A classic occlusive seal—great over damp skin in winter. (DermNet — Occlusives & moisturisers explained).

How to use: Melt between palms and press onto damp skin. For a lighter whip, blend with babassu.
Good for: Legs that drink lotion and still ask for more.


Carrot Seed (Essential) — Antioxidant Natural Oil Add-In (Always Diluted)

Carrot seed essential oil is potent and best viewed as an add-in, not a base. It lends subtle radiance over time when used sparingly.

How to use: Keep face leave-ons at 0.5–1% (≈1–2 drops per 2 tsp carrier oil).
Important: Despite the rumors, it’s not a sunscreen. Wear broad-spectrum SPF 30+. (American Academy of Dermatology — How to select a sunscreen).


Tea Tree (Essential) — Antimicrobial Natural Oil Add-In for Blemish Spots

Tea tree is the classic plant extract for targeted blemish care. Nevertheless, it’s strong—so dilution is non-negotiable. A randomized trial supports 5% tea tree gel for mild–moderate acne; always dilute and use only on spots. (PubMed — 5% tea tree gel improved acne).

How to use: For tiny spots only: 1 tablespoon jojoba + 6 drops tea tree; dab once daily max.
Skip for: Broken skin or undiluted use on the face.

Read about Tea Tree Oil for Scalp Eczema and Psoriasis.


Aloe Infused Oil — Cooling Natural Oil for Post-Sun & Sensitivity

An aloe macerate brings a gentle, cooling glide to natural face oil blends. It doesn’t replace aloe gel; instead, it adds comfort to oils that might otherwise feel too plain.
How to use: Add 10–20% aloe macerate to jojoba or sunflower; press onto warm, damp skin after a day outdoors.
Good for: Mild after-sun care, fussy cheeks.


Vitamin E Oil — Antioxidant Booster for Any Natural Face Oil

Think of vitamin E as your blend’s bodyguard and soft-focus filter. It helps stabilize oils and adds a hint of cushion.
How to use: Add just 0.5–1% to DIY blends; more can feel tacky.
Good for: Extending freshness of rosehip/sea buckthorn mixes.


Argan — Everyday Natural Oil for Shine, Softness & Frizz Control

Beloved for hair, argan is also a steady everyday face oil: not too heavy, not too light.
How to use: 2 drops for face at night; smooth a half-drop across hair ends to tame frizz.
Good for: Normal/dry skin, multitaskers who want one bottle for face + hair.


Kukui — Lightweight Natural Oil for Sun-Parched Skin

Hawaiian kukui absorbs quickly and comforts skin that feels tight after sun or wind.
How to use: Press 2–3 drops on damp skin; mix with rosewater first for a soft, cushiony finish.
Good for: Travelers, beachgoers, anyone in dry wind.


Concern-Based Picks: Best Natural Oils for Skin by What’s Bugging You

Because skin behaves differently under stress, it helps to match natural oils for skin to the exact problem you’re seeing. Below, you’ll find, step-by-step routines (AM/PM), easy blends, timing expectations, and gentle do’s/don’ts.

Patch-test new products first using an open-application method. (DermNet — Open application (ROAT) test).


Eczema, Dermatitis, or “My Skin Is Mad at Me” (Calm + Repair)

When flares hit, natural oils for skin should be barrier-first and fragrance-free. Think comfort over excitement.

Why these help (briefly):

  • Sunflower seed oil (linoleic-rich) supports the lipid matrix, so moisture stays in.
  • Squalane cushions without sting or heaviness.
  • Calendula infused oil visibly soothes the look of redness and itch.
  • Lanolin locks in water on tiny cracked zones.

AM flow (gentle and quick):

  1. Rinse with lukewarm water only (no foaming cleansers on flare days).
  2. Mist or pat on a hydrating toner (optional but helpful).
  3. Press 2–3 drops squalane (face) or sunflower (face/body) onto still-damp skin.
  4. Finish with your unscented cream if you need more cushion; then SPF.

PM flow (comfort ritual):

  1. Short, warm—not hot—shower.
  2. Pat skin barely dry; leave it dewy.
  3. Mix 4 parts sunflower seed oil + 1 part calendula in your palm; press over face/body.
  4. Finally, dot lanolin only on cracks (lips, knuckles, heels). Pajamas on. Sleep.

Tiny weekly rhythm:

  • Nightly oils for 7 days → assess. Often the “angry” look softens by day 4–5.
  • Afterwards, maintain with PM oils 3–5 nights/week.

Do / Don’t:

  • Do keep formulas bland for now.
  • Don’t use undiluted essential oils on the face during a flare.
  • Do patch test wrist or behind ear first.
  • Don’t over-exfoliate “to smooth flakes”—you’ll poke the bear.

Quick blend (fragrance-free): 8 mL sunflower + 6 mL squalane + 6 mL calendula macerate. Shake; press 3–5 drops where needed.

Suggested read to understand: Eczema vs Psoriasis vs Dermatitis


Oily, Shiny, or Skincare for Large Pores (Balance + Clarity)

It feels counterintuitive, yet a touch of the right natural face oil can tell overactive sebaceous glands to relax.

Woman applying jojoba, squalane, and rosehip oils to balance oily skin naturally.
Balance oily skin naturally with Jojoba (mimics sebum), Squalane (weightless hydration), and Rosehip (tone & clarity).

Why these help:

  • Jojoba oil mimics sebum, which often reduces midday shine.
  • Squalane hydrates weightlessly, so skin doesn’t overcompensate.
  • Rosehip oil supports smoother look and tone over time.
  • Tea tree essential oil (diluted) is for spot duty only.

AM flow (keep it light):

  1. Cleanse with a gentle gel.
  2. Optional niacinamide serum.
  3. Press 1–2 drops jojoba or squalane over damp skin.
  4. Matte-friendly SPF.

PM flow (balanced and simple):

  1. Cleanse; on 2–3 nights/week, use a BHA (salicylic) after cleansing.
  2. Press 2 drops squalane all over;
  3. Then tap 1 drop rosehip across areas with uneven tone.
  4. Dab a pin-prick of tea tree in carrier directly on a blemish (never neat).

Seven-day expectations:

  • Day 3: T-zone looks less glassy at noon.
  • Week 2: Fewer “sticky” clogged areas; makeup sits better.

Do / Don’t:

  • Do apply oils on damp skin so they spread sheer.
  • Don’t layer heavy butters on the T-zone.
  • Do stick to pea-sized amounts—more is not better.
  • Don’t chase every new active while you’re testing oils; change one thing at a time.

Spot blend (safe, tiny): 1 Tbsp jojoba + 6 drops tea tree. Shake; dab with a cotton tip on the blemish once daily max.


Dullness, Uneven Tone, or “I Miss My Vacation Glow” (Radiance + Elasticity)

To revive a flat complexion, combine antioxidants by day and replenishing natural oils for skin at night.

Woman applying rosehip oil with dropper for glowing skin alongside prickly pear and sea buckthorn oils.
Rosehip, Prickly Pear, and Sea Buckthorn—antioxidant-rich oils to restore glow and elasticity.

Why these help:

  • Rosehip gently supports tone/texture.
  • Sea buckthorn brings carotenoids for a healthy, cushy glow.
  • Prickly pear seed delivers silk and bounce around eyes and fine lines.

AM flow (bright but calm):

  1. Cleanse or rinse.
  2. Vitamin C or niacinamide serum.
  3. 1 drop squalane for slip; then SPF.
  4. Optional: mix ½ drop prickly pear into concealer for a smoother under-eye laydown.

PM flow (glow routine):

  1. Cleanse.
  2. Press 2 drops rosehip all over.
  3. Add the tiniest smear of sea buckthorn (a pin head) into your rosehip in the palms for cheeks; it stains, so go slow.
  4. Pat 1 drop prickly pear under each eye.

Timeline you can feel:

  • Week 2: less “chalky” look; makeup needs less highlighter to come alive.
  • Week 4: tone appears more even; fine lines look cushioned.

Do / Don’t:

  • Do keep sea buckthorn microscopic—just enough to tint your blend.
  • Don’t skip sunscreen; radiance work without SPF is two steps forward, two back.
  • Do give it 2–4 weeks; brightness is cumulative.

Glow blend (night): 6 mL rosehip + 3 mL prickly pear + 1 mL sea buckthorn. Two drops max; protect your pillowcase.


Very Dry Body Skin That “Drinks Lotion and Still Wants Dessert” (Seal + Soften)

For thirsty limbs, the secret is layering water, then natural body oil, then a seal. Consequently, you wake up satin-soft.

Woman moisturizing with shea butter and almond oil while holding marula oil dropper bottle.
Shea, Almond, and Marula oils—classic trio to soothe and soften very dry skin.

Why these help:

  • Sunflower seed oil spreads easily and feeds the barrier.
  • Shea or cocoa butter lock in the comfort for hours.
  • Lanolin rescues cracks overnight.

After-shower flow (takes 90 seconds):

  1. End with warm—not hot—water.
  2. Pat so skin is damp, not dripping.
  3. Palm-mix 1 tsp sunflower and sweep over legs, arms, torso.
  4. Follow with a thin veil of shea or cocoa over the driest zones.
  5. Dab lanolin on heels, cuticles, or knuckles. Pajamas on.

Weekly rhythm that works:

  • Do the full stack nightly for 5–7 nights.
  • Then maintain 3–4 nights/week, or just on cold/windy days.

Do / Don’t:

  • Do switch to cotton or bamboo PJs—they help oils stay on you, not your sheets.
  • Don’t scald skin in the shower; heat steals moisture.
  • Do exfoliate gently (washcloth or soft mitt) once weekly so oils can sink in.

Body butter cloud (easy DIY): Equal parts melted shea + cocoa + a splash of babassu; whip as it cools. Apply on damp legs for a velvet finish.


Sensitive Souls Who React to Everything (Reset + Rebuild)

When your skin side-eyes every product, simplicity is medicine. Therefore, reach for the most boring, elegant natural oils for skin and give your barrier two quiet weeks.

Woman using calendula and chamomile infused oil with argan oil to calm sensitive, irritated skin.
Calendula, Chamomile, and Argan—gentle oils that calm redness and soothe sensitive skin naturally.

Why these help:

  • Squalane is famously inert and comfy.
  • Sunflower is light, baby-safe, and barrier-friendly.
  • Calendula can be introduced later for extra calm.

Two-week reset (yes, it’s minimal):

  • AM: Lukewarm rinse → 2 drops squalane on damp skin → SPF.
  • PM: Gentle cleanse → 2–3 drops sunflower (or squalane again) → optional bland cream.

After week 2:

  • If skin is steadier, add calendula at 20% into sunflower every other night.
  • If things stay calm, test a single new step (like niacinamide) for another two weeks.

Do / Don’t:

  • Do patch test new oils behind the ear for two nights first.
  • Don’t stack fragrance or essential oils on the face during a reset.
  • Do log changes (what/when), so you can spot patterns.
  • Don’t judge your skin in overhead office lighting—no one looks good there.

Comfort blend (ultra-simple): 9 mL squalane + 9 mL sunflower. Shake; use 2–3 drops AM/PM.


Quick Reference: Matching Concerns to Natural Oils for Skin

  • Eczema/dermatitis: sunflower, squalane, calendula; lanolin on cracks.
  • Oily/large pores: jojoba, squalane, rosehip; tea tree (diluted) for spots.
  • Dull/uneven tone: rosehip + a whisper of sea buckthorn; prickly pear under eyes.
  • Very dry body: sunflower base + shea/cocoa seal; lanolin on heels/hands.
  • Ultra-sensitive: squalane or sunflower for two quiet weeks; add calendula later.

These aren’t strict rules; they’re starting points. Your skin will tell you what it likes—especially when you change just one thing at a time.


Little Nudge

Because routines only work when you actually do them, choose one concern and one tiny change from above. For example, try jojoba at night for shine control, or go all-in on that sunflower-plus-shea stack for body softness. Then, reassess in a week. If you’re calmer, softer, or glowier, you’re winning.


Exactly how to apply natural oils for skin so they feel like a treat (not a film)

  1. Add water first. Mist, toner, or just leave skin slightly damp from cleansing.
  2. Use the “pea test.” Start with 2–4 drops for the face, a teaspoon for the body.
  3. Press, don’t rub. Warm between your palms, then press over cheeks, forehead, chin.
  4. Layer logically. Serums → cream → oil at night. In the morning, oil first, then wait a minute before SPF.
  5. Mix when you want. If straight oil feels heavy, blend 1–2 drops into your moisturizer for a “custom oil-in-cream.”

Moreover, if makeup pills over oil, shift your oil to nights only or reduce the amount. A single drop mixed into foundation can add glow without slip.


Oil cleansing (the five-minute reset)

Makeup heavy day? Sunscreen layered? Here’s a gentle reset that doesn’t strip:

  • Massage 1 tsp jojoba or olive over your dry face for a full 60 seconds.
  • Wet hands and keep massaging to lightly emulsify.
  • Remove with a warm, wrung-out cloth.
  • Optionally follow with a tiny amount of your regular cleanser (double cleanse).
  • Finish with a mist + your favorite light oil (squalane is perfect).

You’ll feel clean, soft, and strangely peaceful.


Tiny recipes (fast, safe, easy to love)

  • Balancing face drops: 6 mL squalane + 6 mL jojoba + 3 mL rosehip (optional +3 mL prickly pear).
  • Comfort oil for red cheeks: 8 mL sunflower + 6 mL squalane + 6 mL calendula macerate.
  • Body butter cloud: Equal parts melted shea + cocoa + a splash of babassu; whip as it cools.
  • Spot-only blemish dab: 1 Tbsp jojoba + 6 drops tea tree (~1%): dab once daily max. For essential-oil safety, keep face leave-ons around 0.5–1%; body up to ~2%; and spot treatments up to ~5% on tiny areas. (Tisserand Institute — Essential-oil dilution chart).

Patch test new mixes behind the ear or on inner forearm for 2–3 nights. If it stays quiet, you’re good. (DermNet — Open application (ROAT) test)


Safety & smart habits (because “natural” still needs nuance)

Dilution matters: Follow conservative essential-oil dilutions; be mindful that expressed citrus oils (e.g., lemon/lime) can be phototoxic on sun-exposed skin unless below thresholds or furanocoumarin-free. (Tisserand Institute — Phototoxicity: essential oils, sun & safety; IFRA/RIFM — Guidance for IFRA Standards)

SPF is non-negotiable: Use a broad-spectrum SPF 30+ daily; oils are not sunscreen. (American Academy of Dermatology — How to select a sunscreen)

Lanolin & nut oils: Excellent occlusives, but patch-test if you’re sensitive or allergic. (DermNet — Lanolin contact reactions).


Troubleshooting (real skin, real fixes)

  • Still dry? Add a water step before oil (mist or hydrating serum), then consider sealing with a cream on top.
  • Too shiny? Cut your amount in half and switch to squalane or jojoba. Apply on damp skin so it spreads thin.
  • Breaking out? Pause heavier oils (coconut, butters). Use squalane solo for two weeks, then reintroduce one oil at the perimeter first.
  • Makeup won’t sit? Keep oils for night; by day, use one drop mixed into foundation or apply oil 10–15 minutes before SPF.
  • Eczema flare? Simplify. Sunflower + calendula on damp skin; tiny dot of lanolin where cracked. Give it consistent nights for a week.

Routines you can copy (AM/PM, one week to calmer skin)

The Minimalist (all skin types):

  • AM: Rinse → serum (if you like) → 2 drops squalane → SPF.
  • PM: Gentle cleanse → 2 drops rosehip or marula → cream if needed.

The Balancer (oily/large pores):

  • AM: Cleanse → niacinamide → 2 drops jojoba → SPF.
  • PM: Cleanse → BHA 2–3x/week → 2 drops squalane → spot tea tree diluted if needed.

The Comforter (sensitive/eczema-prone):

  • AM: Lukewarm water → 2 drops squalane → SPF.
  • PM: Short shower → sunflower + calendula on damp face/body → lanolin dot on cracks.

The Glow Seeker (dull/uneven):

  • AM: Cleanse → vitamin C → 1 drop squalane → SPF.
  • PM: Cleanse → 2 drops rosehip + a whisper of sea buckthorn → cream.

Myths, kindly debunked (and why they matter)

  • “Oil replaces moisturizer.” Sometimes, but not always. Oils seal; moisturizers hydrate. Dry-dehydrated skin often loves both.
  • “All oils clog pores.” Not true. Jojoba, squalane, and rosehip are generally friendly; coconut and thick butters can be risky on acne-prone faces.
  • “Carrot seed oil is sunscreen.” It is not. It’s an antioxidant add-in, not UV protection. Wear SPF.
  • “Natural means safe for everyone.” Also not true. Nature is potent. Patch testing keeps you in the “ahh” zone, not the “oh no” zone.

Extra credit: thoughtful add-ons & pairings

  • Rosewater (organic) + oil: Mist first, then oil. The glow is immediate yet soft.
  • Beeswax (for balms): Add a small amount to create a salve for elbows and heels; it locks in oil and reduces rub-off.
  • Lavender essential oil (skin): Pleasant but optional; keep it low if you’re sensitive, or skip entirely.
  • Lemon/orange peel oils: Smell lovely yet can irritate; keep to body products at low percentages, and avoid sun post-application on exposed areas.
  • Kumkumadi lepam: An Ayurvedic classic featuring saffron; if you try it, patch test and reserve for night to keep things gentle.
Woman enjoying sun while holding natural face oils like raspberry seed, jojoba, rosehip, and sea buckthorn for summer glow.
Summer glow protection with Raspberry Seed (UV supportive), Jojoba (balancing), Sea Buckthorn (antioxidant-rich), and Rosehip (repairs sun damage).

The gentle bottom line on natural oils for skin

You don’t need a 12-step routine to have happy skin. Instead, choose one or two natural oils for skin that fit your current season and your current mood. Maybe it’s squalane in the morning for a weightless, makeup-friendly finish. Perhaps it’s rosehip at night for tone and texture. Or possibly it’s sunflower for the body right after a shower, followed by a little shea or cocoa on the driest spots. Layer water first, then a few drops of oil, then breathe.

Consistency wins. So does kindness. And while this guide covered a lot of ground, your best routine will be the one you’ll actually do—calm, quick, and quietly effective. If you want, tell me your skin type, climate, and what’s already on your shelf; I’ll sketch a 7-day AM/PM plan that uses exactly what you have and plugs in just the right oils.

Your skin will thank you—softly, steadily, and in its own time.

Posted on Leave a comment

Unmasking the Magic of Papaya for Your Skin: The Myths, the Marvels, and Five Recipes for Radiant Skin

Papaya for Your Skin

When you think of papaya, you probably imagine a juicy tropical fruit, a breakfast side, or maybe a smoothie ingredient. But did you know this humble orange fruit is a skincare powerhouse? Across generations and continents, papaya has been celebrated as a secret ingredient for glowing, healthy skin—praised in home remedies and even spotlighted by dermatologists.

But what’s real, what’s hype, and what’s the best way to get papaya’s magic working for you? Let’s separate the facts from fiction and unlock five science-backed, easy-to-make papaya recipes for your most radiant skin yet.


Papaya & Your Skin: Unpacking the Marvels

1. Enzymatic Exfoliation—Nature’s Gentle Touch

Papaya contains an enzyme called papain. Think of papain as a microscopic cleaning crew, gently dissolving the dead skin cells that dull your glow. Unlike harsh physical scrubs, papain is gentle—making it safe for most skin types, even sensitive or acne-prone skin.

Why it matters:
Regular exfoliation (done right) reveals fresher, smoother skin, unclogs pores, and lets your serums and moisturizers penetrate deeper.

2. Brightening & Even-Toned Complexion

Papaya is loaded with vitamin C, beta-carotene, and natural AHA (alpha hydroxy acids). These nutrients fight free radicals, fade dark spots, help even out pigmentation, and boost overall skin brightness.

3. Soothing & Anti-Inflammatory Benefits

Both papaya fruit and its leaves have anti-inflammatory properties. This means papaya can calm irritated, sun-stressed, or inflamed skin—a big win for those with redness or mild breakouts.

4. Antioxidant & Anti-Aging Boost

Papaya’s antioxidants—including lycopene, flavonoids, and vitamins A & C—neutralize damaging free radicals, slow down the formation of fine lines, and help keep skin youthful.

5. Hydration & Nourishment

Papaya is 88% water and contains natural sugars and B vitamins. Masks made with papaya leave skin feeling hydrated and plump—never stripped.


Myths vs. Science: What Papaya Can’t Do

With all this magic, it’s tempting to think papaya is a cure-all. But let’s be clear about what the science says:

  • Myth: Papaya dramatically whitens skin.
    Fact: It can lighten dark spots and hyperpigmentation over time, but it will not bleach your natural skin tone.
  • Myth: Papaya is too harsh for sensitive skin.
    Fact: Papain is gentler than scrubs, but always patch-test, especially if you have allergies or sensitive skin.
  • Myth: Papaya instantly heals scars or wounds.
    Fact: Some medical studies support papaya’s role in wound care, but it’s no miracle fix—don’t skip medical treatment for serious wounds.
  • Myth: Eating papaya offers no skin benefit.
    Fact: Regularly eating papaya supports skin health from the inside—thanks to hydration, antioxidants, and vitamins.

Reader Alert: Who Should Avoid Papaya Masks?

  • People with latex allergies (latex-fruit syndrome): Papaya may trigger reactions.
  • Anyone with a history of fruit allergies: Always patch-test.
  • Pregnant or breastfeeding women: Unripe papaya has been linked to uterine contractions (topical ripe papaya is generally safe, but always consult your doctor).

How to Use Papaya Safely and Effectively

  • Frequency: 1–2 times per week is plenty. Overuse can irritate.
  • Application: Always start with clean skin.
  • Patch Test: Dab a small amount on your jawline. Wait 24 hours.
  • Sun Protection: Freshly exfoliated skin is sun-sensitive. Always use SPF.

Five DIY Papaya Recipes for Radiant Skin

Ready to unlock papaya’s power at home? These five tried-and-tested recipes suit a variety of skin needs. All you need is ripe papaya, a few pantry staples, and 20 minutes!


1. Papaya & Honey Hydration Mask

Best for: Dry, dull, or mature skin

  • ½ cup ripe papaya (mashed)
  • 1 tablespoon raw honey
  • Optional: 1 teaspoon lemon juice for extra brightening

How to use:
Mix into a smooth paste, apply to face and neck, leave on for 15–20 minutes, rinse with lukewarm water.

Why it works:
Papain exfoliates, honey hydrates and soothes, lemon helps fade spots.


2. Papaya & Yogurt Gentle Exfoliation Mask

Best for: Oily, acne-prone, or congested skin

  • ¼ cup ripe papaya (mashed)
  • 2 tablespoons plain yogurt
  • 1 teaspoon honey

How to use:
Combine and blend well. Spread on skin, leave for 15 minutes, rinse.

Why it works:
Yogurt contains lactic acid for extra exfoliation and calming.


3. Papaya, Cucumber & Banana Balancing Mask

Best for: Sensitive, combination, or summer-stressed skin

  • 2 cubes papaya
  • 2 slices cucumber
  • 2 slices ripe banana

How to use:
Blend until smooth, apply, relax for 15–20 minutes, rinse.

Why it works:
Cucumber cools, banana nourishes, papaya exfoliates and brightens.


4. Papaya & Egg White Pore-Tightening Mask

Best for: Enlarged pores, dull skin, pre-event glow

  • ½ cup ripe papaya (mashed)
  • 1 egg white
  • 1 teaspoon honey

How to use:
Whisk together, apply, leave for 15 minutes, rinse with cool water.

Why it works:
Egg white firms, papain smooths, honey hydrates.


5. Papaya & Sugar Glow Scrub

Best for: Rough patches, elbows, or body exfoliation

  • 3–4 chunks ripe papaya
  • 2 tablespoons sugar (brown or white)

How to use:
Mash papaya, add sugar, and gently scrub in circles (avoid face if sensitive). Rinse thoroughly.

Why it works:
Double exfoliation: enzyme + sugar removes stubborn dead cells.


Pro Tips for Every Papaya DIYer

  • Don’t over-blend: A little texture is good for mild scrubbing.
  • Store leftovers: Keep unused mask in the fridge (use within 48 hours).
  • Add-ons: Try a drop of tea tree oil for acne, or aloe vera gel for extra soothing.
  • Relax: Use mask time to meditate, breathe, or listen to music—skincare should be self-care!

Conclusion: Is Papaya the Secret to Radiant Skin?

Papaya isn’t a miracle, but it’s a multitasking marvel—gently exfoliating, brightening, hydrating, and calming. Whether you’re a skincare minimalist or love a good pamper session, papaya deserves a spot in your glow-up toolkit.

So, why not pick up a ripe papaya this week and treat yourself to one of these easy recipes? Your skin—and your senses—will thank you.


Want More?

Looking for tailored recipes, more ingredient combos, or help with specific skin concerns? Drop your questions in the comments—let’s get glowing, together!


References:

Frequently Asked Questions (FAQs)

1. Can I use papaya on my face every day?
No. Papaya masks should be used 1–2 times per week. Overuse can lead to irritation or disrupt your skin barrier.

2. Do I need to use ripe or unripe papaya for skincare?
Always use ripe papaya for face masks. Unripe papaya is harsher and can cause irritation or allergies.

3. Will papaya lighten my skin tone?
Papaya can help fade dark spots and pigmentation, but it won’t bleach or drastically lighten your natural skin color.

4. How long should I leave a papaya mask on?
Leave the mask on for 15–20 minutes, then rinse with lukewarm water. Longer is not better, and could increase the risk of irritation.

5. Is it safe to use papaya on sensitive skin?
Generally yes, because papain is gentler than scrubs. But always patch-test first, as some people may still react.

6. Can I use papaya masks if I have acne?
Yes, papaya can help with mild acne thanks to its exfoliating and anti-inflammatory properties. Avoid using on broken or severely irritated skin.

7. Are there any side effects to using papaya on skin?
Possible side effects include redness, itching, or allergy—especially if you have latex or fruit allergies. Always do a patch test.

8. Should I apply moisturizer or sunscreen after a papaya mask?
Yes! Always follow up with moisturizer to rehydrate your skin and sunscreen if you’ll be exposed to sunlight, as fresh skin is more sun-sensitive.

9. Can I store leftover papaya mask?
Yes, refrigerate leftovers in a sealed container and use within 48 hours for best results.

10. What should I do if I get a rash or burning after using papaya?
Rinse immediately with cool water, avoid further use, and apply a gentle moisturizer. If symptoms persist or are severe, consult a dermatologist.

Posted on 3 Comments

Liquid Gold: 5 Benefits of Sesame Oil for Skin Care

Why Sesame Oil Should Be in Your Skin Care Routine

For centuries, sesame oil has been a hidden gem in wellness traditions—prized in Ayurveda, ancient Egyptian rituals, and East Asian beauty practices. But as modern science shines a light on its powerful benefits, it’s easy to see why beauty insiders now call it “liquid gold.”

From fighting wrinkles to calming irritated skin, sesame oil is having a major skincare moment. Let’s unpack the latest research, the practical benefits, and how you can use this humble oil for healthy, radiant skin—whatever your skin type.


1. Potent Antioxidant Protection—Your Anti-Aging Ally

What the science says:
Sesame oil is packed with natural antioxidants, especially sesamol, sesamin, and vitamin E. New studies published in 2024 reveal that sesamol not only neutralizes free radicals (which cause skin aging and dullness) but may also protect collagen and reduce damage from daily UV exposure.

Why it matters:

  • Shields skin from environmental stress and pollution
  • Softens the look of fine lines and wrinkles
  • Keeps your skin looking fresh and vibrant

Pro tip:
Use sesame oil as a nighttime face oil. Massage a few drops into clean, damp skin before bed—wake up to a healthier, glowing complexion.


2. Deep Moisturization & Barrier Repair

What the science says:
Sesame oil contains over 80% unsaturated fatty acids, mainly oleic and linoleic acids, which are essential for locking in moisture and repairing the skin barrier. Recent clinical studies have shown that one application of sesame oil can boost skin hydration by as much as 30%.

Why it matters:

  • Ideal for dry, flaky, or winter-stressed skin
  • Restores the skin’s natural barrier, preventing water loss
  • Leaves skin feeling soft—not greasy

How to use:
Apply 3-5 drops to your face and body after showering, when skin is still damp. You can also add a few drops to your favorite body lotion for an extra moisture boost.


3. Anti-Inflammatory & Soothing for Sensitive Skin

What the science says:
Recent randomized clinical trials (2023–24) and meta-analyses found sesame oil reduced inflammation and irritation in hospital patients—most notably, it helped prevent and soothe phlebitis (vein inflammation) at IV catheter sites.

Why it matters:

  • Calms redness, itching, and minor rashes
  • Supports healing for burns, wounds, and eczema
  • Great for sensitive or reactive skin types

How to use:
For irritated or inflamed areas, dab a little sesame oil on a cotton pad and gently apply to the skin. For all-over soothing, use it as a massage oil after sun exposure or during harsh weather.


4. Natural—But Mild—Sun Protection

What the science says:
While not a substitute for sunscreen, in vivo research from 2024 confirms sesame oil provides mild shielding against visible and infrared light, thanks to its unique lignans and antioxidants.

Why it matters:

  • Adds another layer of protection from daily environmental stress
  • Boosts the efficacy of your usual sunscreen
  • May help prevent some forms of UV-related aging

How to use:
Layer a few drops of sesame oil under your regular broad-spectrum SPF for enhanced antioxidant defense. Remember: never use oils as your only sun protection.


5. Supports Wound Healing & Fights Bacteria

What the science says:
Comprehensive reviews in 2024 highlight sesame oil’s value for wound healing. In one study, burns treated with sesame oil healed significantly faster and with less scarring than those treated with vaseline or left untreated. Its natural antimicrobial properties also help prevent infection.

Why it matters:

  • Useful for cuts, scrapes, and mild burns
  • Reduces risk of infection on minor wounds
  • Can be added to DIY balms and ointments

How to use:
Clean the affected area, then gently apply a drop or two of sesame oil. Cover with a sterile bandage if necessary.


How to Choose & Use Sesame Oil Safely

Tips for the best results:

  • Go for cold-pressed, unrefined oil. This keeps the antioxidants and nutrients intact.
  • Patch test first, especially if you have allergies or sensitive skin.
  • Store in a cool, dark place to prevent oxidation.
  • Check the label: Cosmetic-grade oil is best for facial use, as it’s more purified and less likely to clog pores.

Comedogenic rating:
Refined sesame oil rates “1” (low), unrefined rates “3” (moderate). If you have acne-prone skin, start with refined oil and spot test before full use.


Real-World Ways to Use Sesame Oil in Your Routine

  1. Nighttime Facial Oil
    After cleansing, apply 2-3 drops to your face and neck.
  2. Body Moisturizer
    Use on damp skin post-shower for deep hydration and a healthy glow.
  3. Soothing Massage Oil
    Warm slightly and massage into tense muscles or dry patches.
  4. Gentle Makeup Remover
    Massage into the skin to dissolve makeup, then wipe off with a warm, damp cloth.
  5. Spot Treatment for Irritations
    Dab onto bug bites, minor burns, or eczema patches.

💡 Practical Applications of Sesame Oil

Use CaseHow to Use
MoisturizerMassage 3–5 drops into damp skin post‑shower for hydration and softness.
Soothing treatmentDab on irritated patches or minor burns; contains anti‑inflammatory and healing agents.
Makeup removerPerform oil cleansing by gently massaging into skin and rinsing.
Natural SPF boosterLayer under sunscreen or mix into carrier-based SPF for extra antioxidant support.
Spot treatmentApply to wounds, eczema, or dry patches to leverage antimicrobial and healing effects.

The Bottom Line: Is Sesame Oil Right for You?

Modern science now backs what traditional medicine has known for centuries: sesame oil is a true multitasker for healthy, resilient skin.
Its ability to hydrate, soothe, heal, and protect makes it a smart addition to nearly any routine—especially if you’re looking for natural, multi-benefit skincare.

Remember:
Always pair sesame oil with a balanced regimen—gentle cleansing, broad-spectrum SPF, and hydration tailored to your skin’s needs.


Ready to try liquid gold for yourself?
Let us know your results—or favorite sesame oil skincare hacks—in the comments!

10 Frequently Asked Questions (FAQs) About Sesame Oil for Skin Care

1. Is sesame oil safe for all skin types?

Yes, sesame oil is generally safe for most skin types, including dry, normal, and mature skin. If you have oily or acne-prone skin, start with a small amount or opt for refined sesame oil, which is less likely to clog pores. Always patch test before regular use.

2. Can sesame oil clog pores or cause breakouts?

Sesame oil has a moderate comedogenic rating (1 for refined, 3 for unrefined), meaning it’s less likely to clog pores than coconut oil. If you’re acne-prone, use refined oil and patch test. Discontinue if you notice any breakouts.

3. How does sesame oil compare to coconut or olive oil for skin?

Sesame oil is lighter and absorbs faster than coconut oil, making it less greasy. It’s also less comedogenic than coconut oil and contains unique antioxidants not found in olive oil, making it excellent for barrier repair and antioxidant support.

4. Can I use sesame oil as a sunscreen?

No, sesame oil provides only mild natural sun protection (SPF 2–4) and should never replace a broad-spectrum sunscreen. Use it under or alongside SPF for added antioxidant benefits.

5. Is sesame oil suitable for sensitive or eczema-prone skin?

Yes, many people with sensitive, irritated, or eczema-prone skin benefit from sesame oil’s soothing and anti-inflammatory properties. Always patch test on a small area first.

6. How should I store sesame oil for skin care?

Store sesame oil in a cool, dark place away from heat and sunlight. Use within six months of opening to ensure potency and freshness.

7. Can sesame oil help with scars or wound healing?

Emerging research supports sesame oil’s ability to speed up wound healing and reduce scarring thanks to its antioxidants and fatty acids. Use on clean, minor wounds; for serious injuries, always consult a doctor.

8. Is it safe to use sesame oil on children or babies?

Sesame oil is used in baby massage in many cultures and is generally safe, but always use pure, food-grade, cold-pressed oil. Do a patch test first and avoid use on open wounds or broken skin.

9. Does sesame oil have any scent?

Unrefined sesame oil has a light, nutty aroma. Refined oil has little to no scent, making it better for those sensitive to fragrances.

10. Can I use sesame oil with other skin care products?

Absolutely! Sesame oil can be layered under or over most moisturizers, serums, and SPFs. It also mixes well with essential oils (for massage) and can be added to DIY masks or creams.

Posted on Leave a comment

The Soothing Touch: 5 Benefits of Sandalwood for Skin Care

Sandalwood for Skin Care

If you’re a skincare enthusiast—or even just someone who wants to take better care of their skin—you’ve likely heard the buzz about sandalwood. This age-old ingredient is more than just a fragrant wood: it’s a skincare powerhouse backed by centuries of traditional use and, increasingly, modern clinical research.

But what makes sandalwood truly special? How can you use it in your routine, and what does the latest science say about its effectiveness?

Let’s take a deep dive into the proven benefits of sandalwood for skin, along with practical ways to incorporate it into your daily routine.


1. Calms Inflammation & Soothes Sensitive Skin

Why It Works:

Sandalwood contains natural compounds—like α-santalol and β-santalol—that have potent anti-inflammatory effects. Research shows that sandalwood oil can reduce redness, swelling, and irritation by blocking the same inflammatory pathways targeted by some prescription treatments. It’s especially helpful for conditions like acne, eczema, and sunburn【1】【2】.

Practical Use:

  • DIY Mask for Redness: Mix 1 tsp sandalwood powder with rose water to form a paste. Apply to clean skin, leave for 15–20 minutes, and rinse off.
  • Spot Treatment: Dab a drop of diluted sandalwood oil (always use a carrier oil) onto irritated spots to quickly calm inflammation.

Pro Tip:

Always patch-test sandalwood oil on your wrist or behind your ear before applying to your face, especially if you have sensitive skin.


2. Naturally Fights Acne & Breakouts

Why It Works:

Sandalwood isn’t just soothing—it’s a natural antimicrobial agent. Clinical studies show that sandalwood oil can inhibit the growth of acne-causing bacteria (Cutibacterium acnes and Staphylococcus aureus), making it an excellent addition to acne-prone skin routines【3】【4】.

Practical Use:

  • Overnight Pimple Paste: Combine a pinch of sandalwood powder with a drop of honey and a drop of lemon juice. Dab onto blemishes and rinse off in the morning.
  • Gentle Cleanser: Add a few drops of sandalwood oil to your regular face wash for a purifying boost.

Pro Tip:

For best results, use sandalwood formulations at 1–10% concentration, as proven in clinical studies. Too much can irritate; too little may not be effective.


3. Deeply Hydrates & Supports the Skin Barrier

Why It Works:

Unlike many essential oils, sandalwood is hydrating and non-comedogenic (it won’t clog pores). It helps your skin retain moisture and strengthens the skin barrier, making it ideal for dry or combination skin types【5】.

Practical Use:

  • Moisturizing Mask: Mix 1 tsp sandalwood powder with 1 tsp milk or yogurt. Apply for 10–15 minutes, then rinse.
  • Hydration Booster: Add 1–2 drops of sandalwood oil to your regular moisturizer.

Pro Tip:

Layer sandalwood under a ceramide-rich moisturizer at night for maximum barrier repair, especially in dry or harsh climates.


4. Brightens Skin & Fades Dark Spots

Why It Works:

Sandalwood’s compounds help inhibit the enzyme tyrosinase, which drives melanin production (the cause of dark spots and hyperpigmentation). Used regularly, sandalwood can even out your complexion and brighten dull skin【6】.

Practical Use:

  • Brightening Mask: Mix sandalwood powder with turmeric and a bit of milk. Apply to areas of pigmentation twice weekly.
  • Night Spot Serum: Blend a few drops of sandalwood oil with a carrier like jojoba oil and apply to dark spots at night.

Pro Tip:

Consistency is key. Natural skin brightening takes weeks to show results, so use sandalwood masks or oils regularly.


5. Protects Against Aging & Environmental Damage

Why It Works:

Sandalwood is loaded with antioxidants—even outperforming vitamin E in recent lab studies for fighting blue light and pollution-induced skin damage. It helps neutralize free radicals, reduce fine lines, and preserve skin’s youthful glow【7】【8】.

Practical Use:

  • Sunscreen Companion: Mix 1–2 drops of sandalwood oil into your daily sunscreen or moisturizer.
  • After-Sun Mask: Mix sandalwood powder with aloe vera gel for a soothing, reparative treatment after sun exposure.

Pro Tip:

Look for products or DIY blends with other antioxidant-rich ingredients (like vitamin C or niacinamide) to boost anti-aging effects.


Latest Innovations: Sandalwood in 2025

  • Sunshield Creams: New clinical trials show sandalwood oil–infused sunscreens offer broad-spectrum UV protection with added soothing and hydrating benefits【9】.
  • Luxury Blends: Brands now combine sandalwood with sustainable carrier oils and even tallow for high-performance, eco-conscious creams.
  • Blue Light Defense: Sandalwood’s ability to counteract pollution and digital stress is making it a top pick for modern, urban skincare routines.

How to Choose & Use Sandalwood Safely

  • Source Matters: Look for ethically sourced, GC/MS-tested sandalwood (preferably Santalum album from plantations) to avoid adulteration.
  • Essential Oil Safety: Always dilute sandalwood oil before applying to skin. Use carrier oils like jojoba, almond, or grapeseed.
  • Patch Test: Even natural ingredients can cause reactions. Always patch-test new products.

Final Thoughts: Is Sandalwood Worth the Hype?

Science and tradition agree: sandalwood is more than just a fragrant luxury—it’s a practical, multi-purpose ingredient that fits beautifully into modern skincare. Whether you’re fighting acne, calming inflammation, fading spots, or simply seeking a more radiant complexion, sandalwood is a gentle yet effective solution.

So why not add a little sandalwood to your routine and see what the “soothing touch” can do for you?


References

  1. Planta Medica Journal
  2. Frontiers in Pharmacology, 2018
  3. Anokha Skincare, Sandalwood Research
  4. Journal of Clinical and Aesthetic Dermatology, 2018
  5. MDPI Cosmetics, 2022
  6. Lelior, Aromatherapy Blog, 2025
  7. Verywell Health: Essential Oils for Inflammation
  8. MDPI Cosmetics, 2021
  9. Journal of Neonatal Surgery, 2025

10 FAQs About Sandalwood for Skin Care

1. What is the best way to use sandalwood for acne?
Answer:
Mix sandalwood powder with rose water to make a thick paste and apply it directly to affected areas. Leave it on for 15–20 minutes and rinse. Alternatively, use a drop of diluted sandalwood essential oil as a spot treatment. Always patch-test before full use.


2. Can sandalwood help with sensitive or eczema-prone skin?
Answer:
Yes! Sandalwood’s anti-inflammatory properties can soothe itching, redness, and irritation. Use a mild paste (sandalwood powder + aloe vera gel) or look for creams with 1–10% sandalwood oil concentration, proven safe in clinical studies.


3. Is sandalwood safe for daily use on the face?
Answer:
Generally, yes, especially when diluted. Avoid applying undiluted essential oil directly to skin. If you use masks or serums with sandalwood, 2–3 times per week is ideal; moisturizers or cleansers can be used daily if tolerated.


4. Can sandalwood help fade dark spots or pigmentation?
Answer:
Regular use can gradually lighten dark spots thanks to sandalwood’s ability to inhibit melanin production. Consistent application (2–3 times per week) is key for visible results over 4–8 weeks.


5. Are there any side effects of using sandalwood oil?
Answer:
Some people may experience allergic reactions or skin sensitivity. Always dilute sandalwood oil with a carrier and do a patch test. If irritation occurs, discontinue use and consult a dermatologist.


6. What’s the difference between sandalwood powder and sandalwood essential oil?
Answer:
Sandalwood powder is made from finely ground sandalwood and is used for masks and pastes. Essential oil is highly concentrated, steam-distilled from the heartwood, and is best for serums or diluted spot treatments. Both are effective but have different applications.


7. How do I know if my sandalwood product is authentic?
Answer:
Check for “Santalum album” as the ingredient, certification of ethical or plantation sourcing, and GC/MS (gas chromatography/mass spectrometry) purity testing. Authentic sandalwood is often more expensive and has a sweet, woody scent.


8. Can sandalwood be used on all skin types?
Answer:
Yes, but with adjustments. Oily/acne-prone skin may benefit from powder masks, while dry or sensitive skin can use hydrating sandalwood creams. Always monitor your skin’s response.


9. Does sandalwood protect against pollution and blue light?
Answer:
Recent research confirms sandalwood’s antioxidant effects help neutralize oxidative stress caused by pollution and blue light, making it ideal for urban or digital lifestyles.


10. Is sandalwood oil safe during pregnancy?
Answer:
Topical use in low concentrations is generally considered safe, but consult with your healthcare provider before using any essential oils during pregnancy or breastfeeding.