Posted on Leave a comment

Keto Cheesecake Recipe

Finished keto cheesecake with one slice removed, showing creamy filling and a golden almond flour crust with berries nearby.

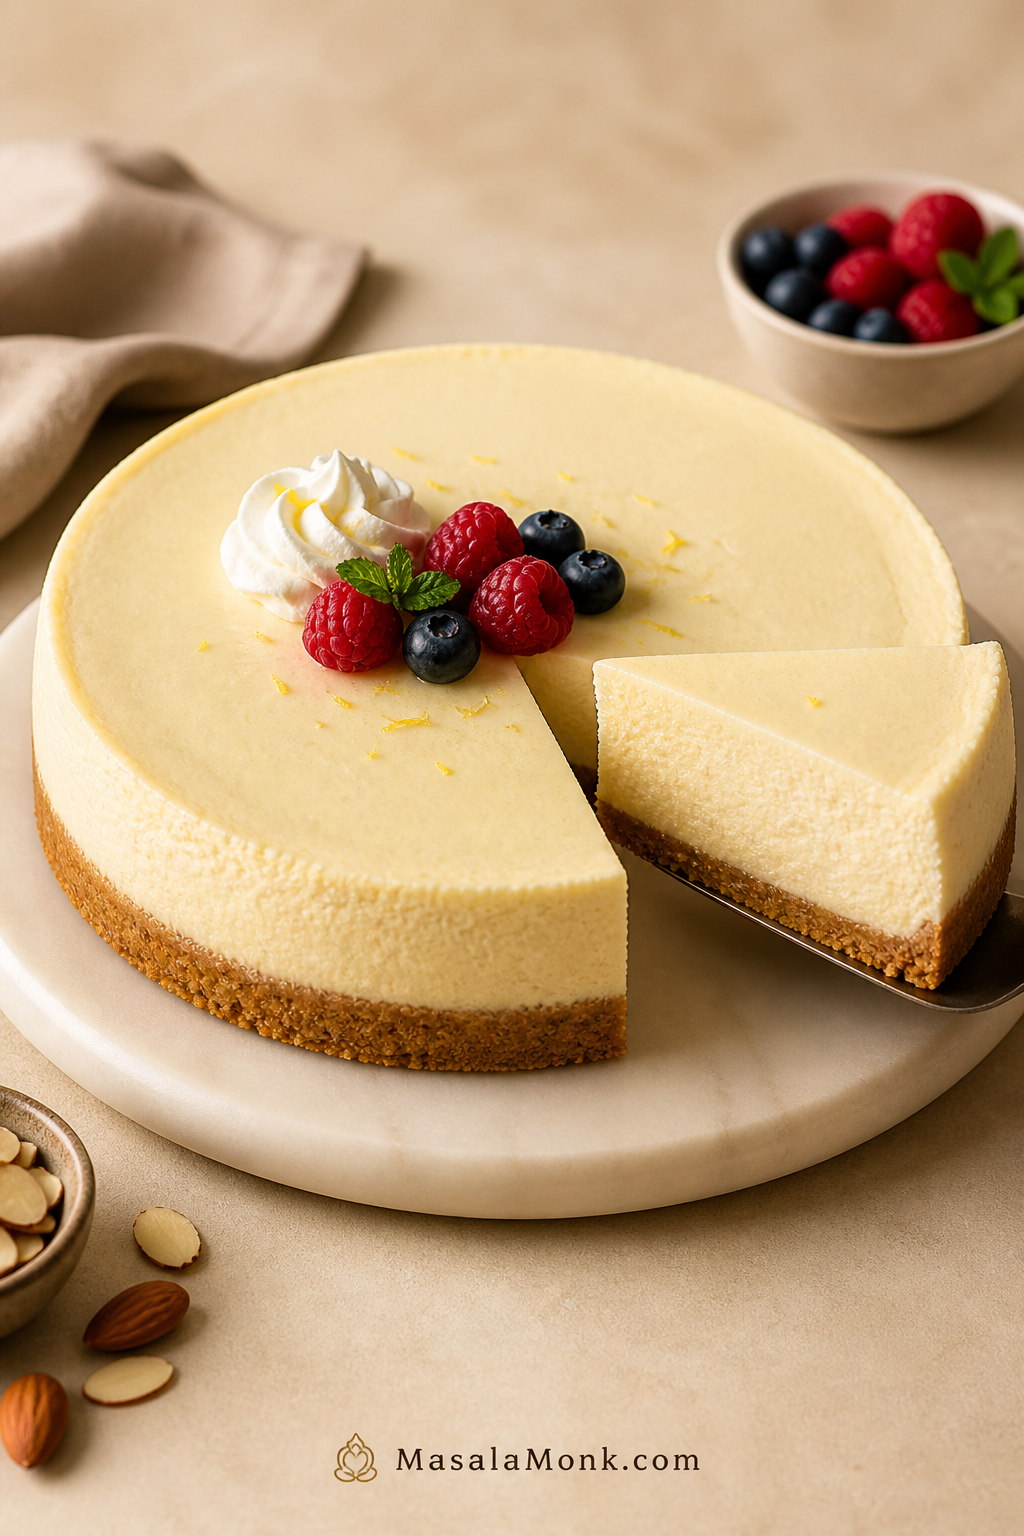
This keto cheesecake recipe gives you the kind of slice people actually want from cheesecake: cool, creamy, rich, smooth, and firm enough to cut cleanly. It has a buttery almond flour crust, a full-fat cream cheese filling, and a slow-cooling method that helps prevent cracks without needing a complicated water bath.

The flavor is classic first and keto second. You get the tang of cream cheese and sour cream, the warmth of vanilla, a little brightness from lemon juice, and a low-carb crust that feels much closer to a traditional cheesecake base than a dry “diet dessert” crust.

Use this as your classic baked cheesecake base. You will also find a crustless option, a no-bake option, sweetener guidance, pan-size help, storage tips, and fixes for common problems like cracks, grainy filling, soggy crust, and a runny center.

Quick Answer: The Best Keto Cheesecake Recipe

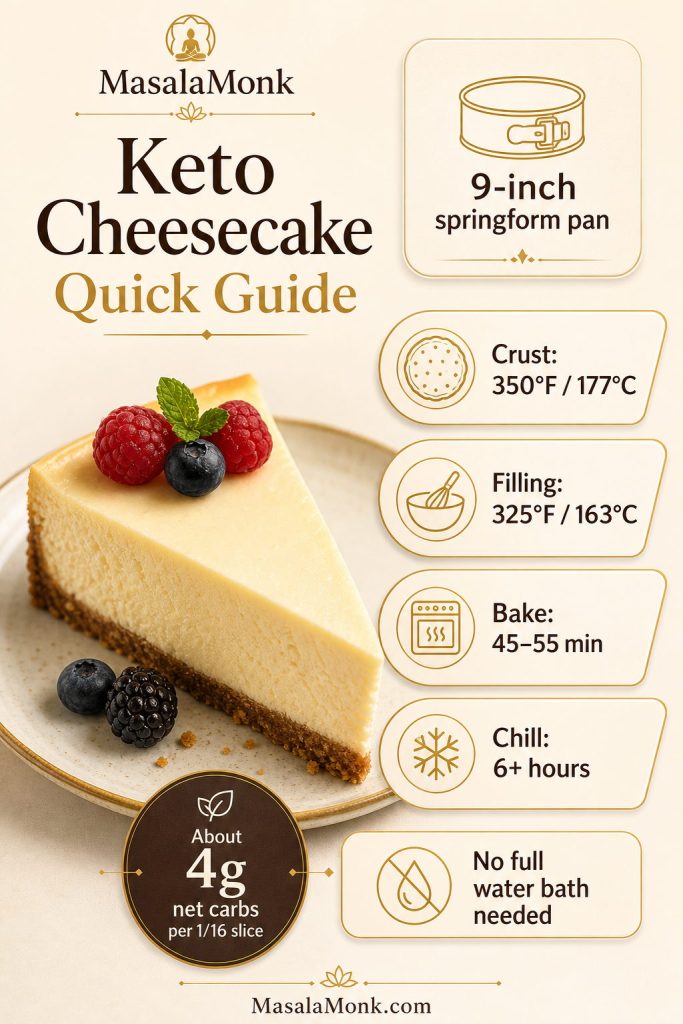
For the best keto cheesecake, make a baked full-fat cream cheese filling in a 9-inch springform pan with a pre-baked almond flour crust. Bake the crust at 350°F / 177°C for 10–12 minutes, then lower the oven to 325°F / 163°C and bake the cheesecake for 45–55 minutes, until the edges are set and the center still has a soft jiggle.

Let it cool slowly, then chill for at least 6 hours or overnight before slicing. A powdered allulose or monk fruit/allulose blend gives the smoothest texture because it dissolves better than coarse granulated sweeteners.

Pan 9-inch springform pan
Crust Almond flour crust
Crust Bake 350°F / 177°C for 10–12 minutes
Filling Bake 325°F / 163°C for 45–55 minutes
Chill Time 6 hours minimum, overnight best
Yield 12 generous or 16 smaller slices
Net Carbs About 4g per 1 of 16 slices
Water Bath Not required
Texture Cool, creamy, dense, and sliceable
Keto cheesecake quick guide showing a cheesecake slice with baking temperature, pan size, chill time, and net carb notes.
Start here if you want the main numbers before baking: pan size, oven temperature, chill time, and approximate net carbs all shape the final keto cheesecake texture.

Need the full formula? Jump to recipe card · Back to guide

Before you start: Soften the cream cheese fully, bring the eggs and sour cream to room temperature, line the springform pan with parchment, use powdered sweetener for the filling, and plan for at least 6 hours of chilling. These five details matter more than any fancy technique.
Texture tip: The cheesecake should not look fully firm when it comes out of the oven. If the center is completely set in the oven, it is more likely to be overbaked after chilling.

Why This Keto Cheesecake Works

A good keto cheesecake has to solve three problems at once: it needs to taste like classic cheesecake, avoid a gritty sweetener texture, and hold together without flour or sugar. This version uses full-fat brick cream cheese for structure, sour cream for a smooth tangy finish, eggs for setting, and powdered keto sweetener so the filling stays creamy.

The almond flour crust is pre-baked before the filling goes in. That gives it a warmer, nuttier flavor and helps it hold together under the cheesecake layer. The filling bakes low and slow at 325°F / 163°C, then cools gradually so the center can finish setting without a dramatic temperature shock.

That slow method is what makes this sugar free cheesecake more reliable. You do not need a full water bath, but you do need room-temperature ingredients, gentle mixing, and enough chill time.

Close-up of a creamy keto cheesecake slice with smooth dense filling and a visible almond flour crust.
This is the texture goal: creamy, dense, and cleanly cut. If the filling looks grainy, the issue usually starts with cold cream cheese or coarse sweetener.

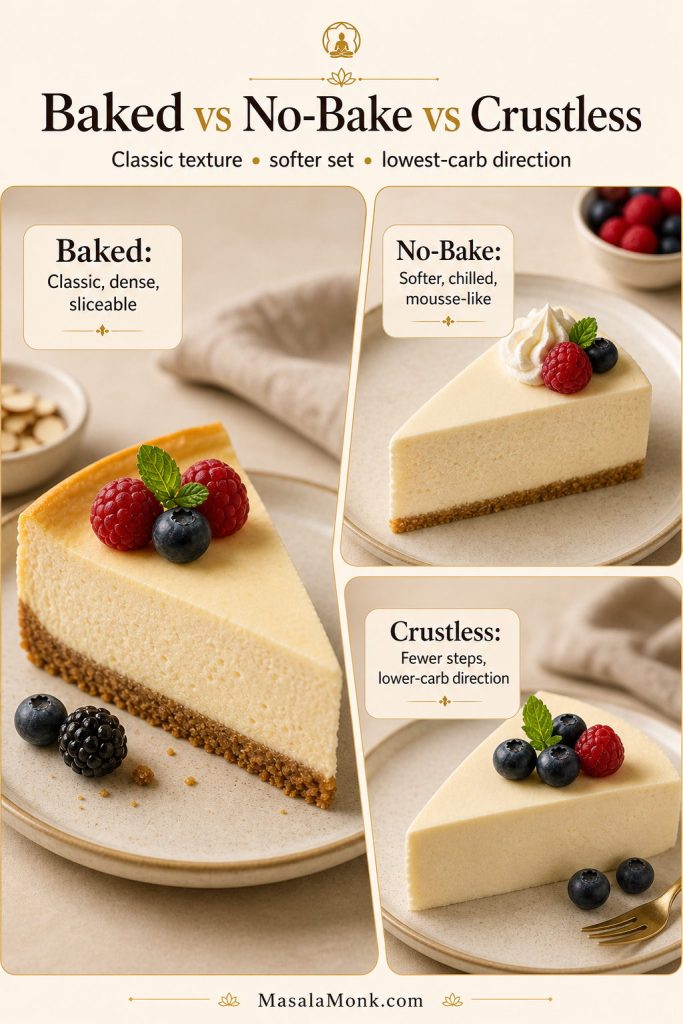
Baked vs No-Bake vs Crustless Versions

Before you start, choose the right style. A baked cheesecake gives the most classic texture, a no-bake version is easier and lighter, and a crustless cheesecake is the simplest way to reduce carbs and skip the almond flour crust.

Comparison board showing baked keto cheesecake, no-bake keto cheesecake, and crustless keto cheesecake slices with texture notes.
Before choosing a method, decide what texture you want. Baked keto cheesecake is classic, no-bake cheesecake is softer, and crustless cheesecake keeps things simpler.
Version Best For Texture Main Watch-Out
Baked keto cheesecake Classic cheesecake flavor and clean slices Dense, creamy, rich Do not overbake; cool slowly to prevent cracks
No-bake keto cheesecake Easy summer dessert or oven-free prep Lighter, softer, mousse-like Needs enough chill time to set properly
Crustless keto cheesecake Lower carbs, fewer steps, no almond flour Creamy and simple Pan lining matters so it releases cleanly

The baked version is the focus here because it gives the most traditional cheesecake texture. The crustless and no-bake sections below show how to adapt the base without turning the main recipe into three different desserts at once.

Is Keto Cheesecake Low Carb or No Carb?

Keto cheesecake is low carb, but it is usually not truly zero carb. Cream cheese, sour cream, eggs, almond flour, lemon juice, and even some keto sweeteners can contribute small amounts of total carbs depending on the brands you use.

Think of this as a low carb cheesecake or sugar free cheesecake, not a misleading zero-carb dessert. If you want the lowest-carb version, make the crustless option and cut the cheesecake into 16 smaller slices. That gives you the creamy filling with fewer carbs from the almond flour crust.

Lowest-carb direction: Make it crustless, use a powdered sweetener that fits your carb target, and keep toppings simple. Fresh berries are usually a better choice than thick sauces if you are watching carbs closely.

If you like make-ahead low-carb desserts, this keto chia pudding with almond milk is another easy no-sugar option with simple net-carb math.

Equipment You Need

You do not need complicated bakery equipment, but a few tools make this cheesecake much easier and cleaner.

  • 9-inch springform pan: The best standard size for this recipe.
  • Parchment paper: Helps the crust release and makes slicing easier.
  • Mixing bowls: One for the crust and one large bowl for the filling.
  • Hand mixer or stand mixer: Helps make the filling smooth without lumps.
  • Rubber spatula: Useful for scraping the bowl and smoothing the top.
  • Flat-bottom cup or measuring cup: Presses the almond flour crust firmly into the pan.
  • Baking sheet: Makes the springform pan easier to move in and out of the oven.
  • Sharp knife: For clean slices after the cheesecake is fully chilled.
Optional but helpful: Place a pan of hot water on the lower oven rack while the cheesecake bakes. This is not a full water bath, but it adds a little humidity and can help the cheesecake bake more gently.

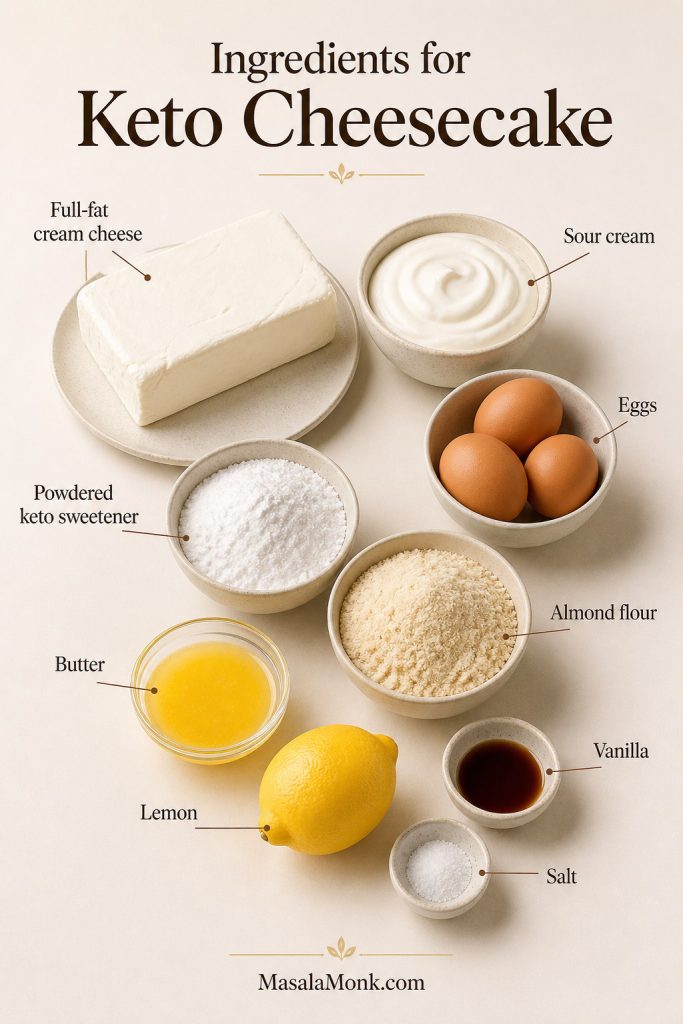
Ingredients for Keto Cheesecake

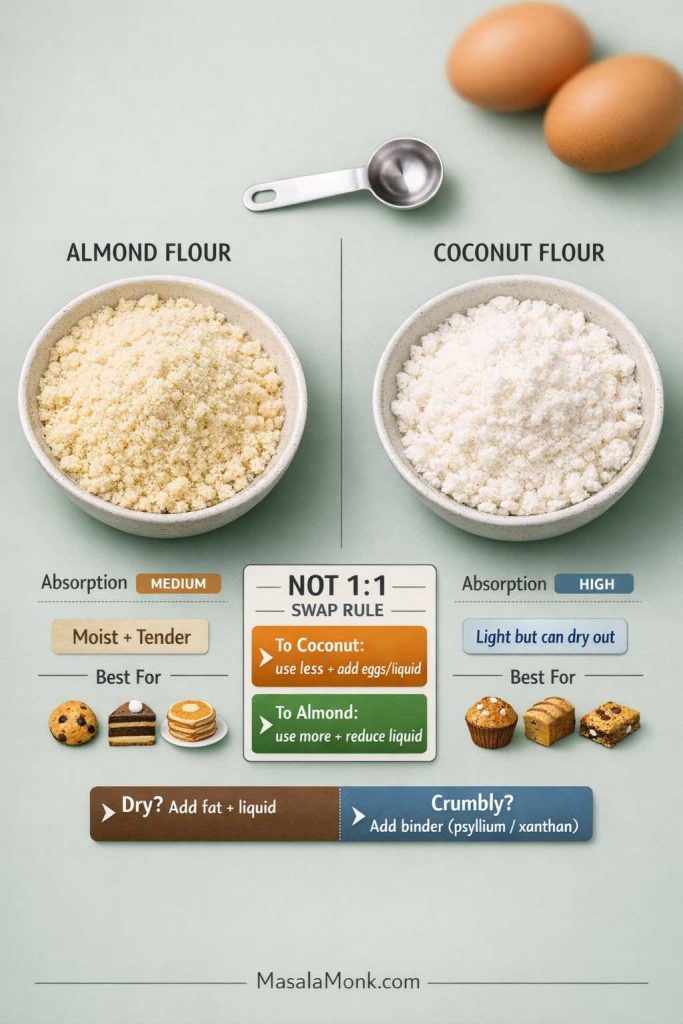
The ingredient list is simple, but the details matter. For the smoothest low carb cheesecake, use full-fat dairy, room-temperature ingredients, almond flour for the crust, and a powdered sweetener rather than a coarse granulated one.

Labeled keto cheesecake ingredients including cream cheese, sour cream, eggs, powdered sweetener, almond flour, butter, lemon, vanilla, and salt.
Keto cheesecake uses simple ingredients, but they need to behave well together. Therefore, full-fat dairy, powdered sweetener, and room-temperature eggs matter more than extra add-ins.

Next step: choose sweetener · make the crust

Cream Cheese

Use 32 oz / 907 g full-fat brick cream cheese, softened to room temperature. Brick-style cream cheese gives the cheesecake body and structure. Tub-style spreadable cream cheese is usually softer and can make the filling looser.

The cream cheese should be soft enough to beat smoothly, but not melted or oily. If it is too cold, the filling can turn lumpy. If it is too warm, the batter can become loose and overmixed.

Sour Cream

Sour cream adds a classic tang and softens the richness of the cream cheese. Use 1/2 cup / 120 g sour cream at room temperature. Full-fat sour cream works best here because low-fat versions can make the texture thinner and less creamy.

Eggs

Use 3 large eggs, also at room temperature. Eggs help the cheesecake set, but they should be mixed in gently. Once the eggs go in, do not whip the batter aggressively. Too much air can make the cheesecake puff up in the oven and crack as it cools.

Sweetener

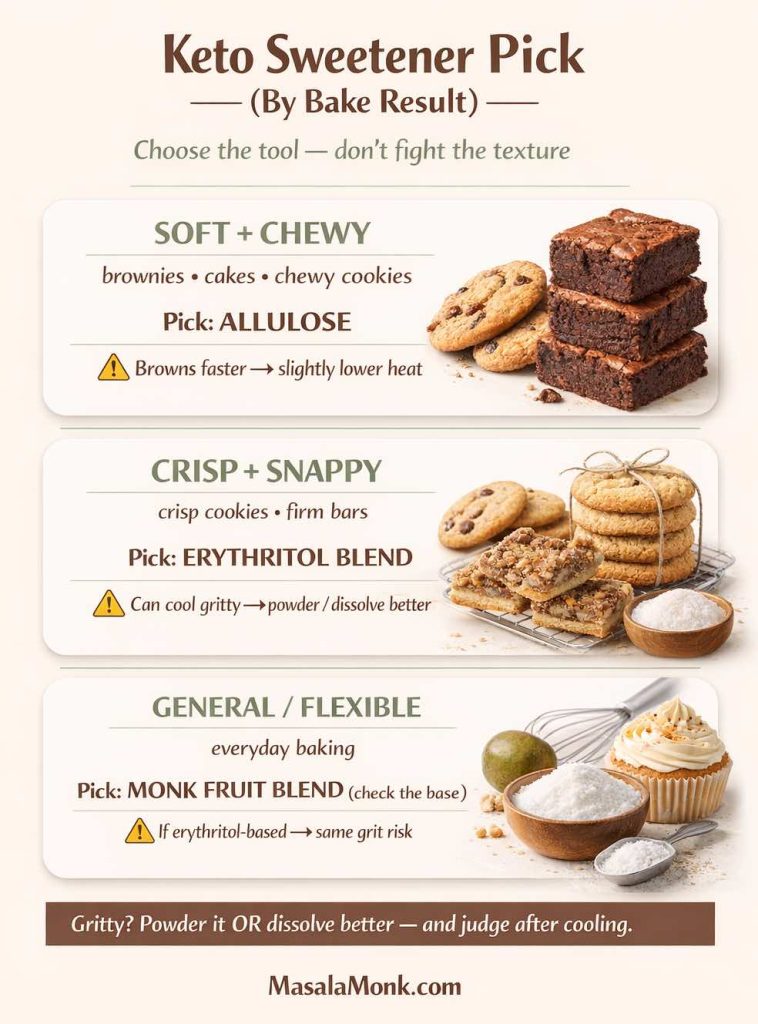
Use 1 cup to 1 1/4 cups powdered keto sweetener. The exact amount depends on how sweet you like cheesecake and how sweet your specific sweetener tastes. A powdered allulose or monk fruit/allulose blend gives the smoothest texture.

If you use a strong erythritol-heavy sweetener, the cheesecake may have a cooling finish. If you use a coarse granulated sweetener, the filling can taste slightly grainy.

Lemon Juice, Vanilla, and Salt

Fresh lemon juice brightens the filling and makes the cheesecake taste more classic. Vanilla rounds out the sweetness, while salt keeps the flavor from tasting flat.

  • Lemon juice: 1 tablespoon fresh lemon juice
  • Vanilla extract: 2 teaspoons
  • Fine salt: 1/4 teaspoon

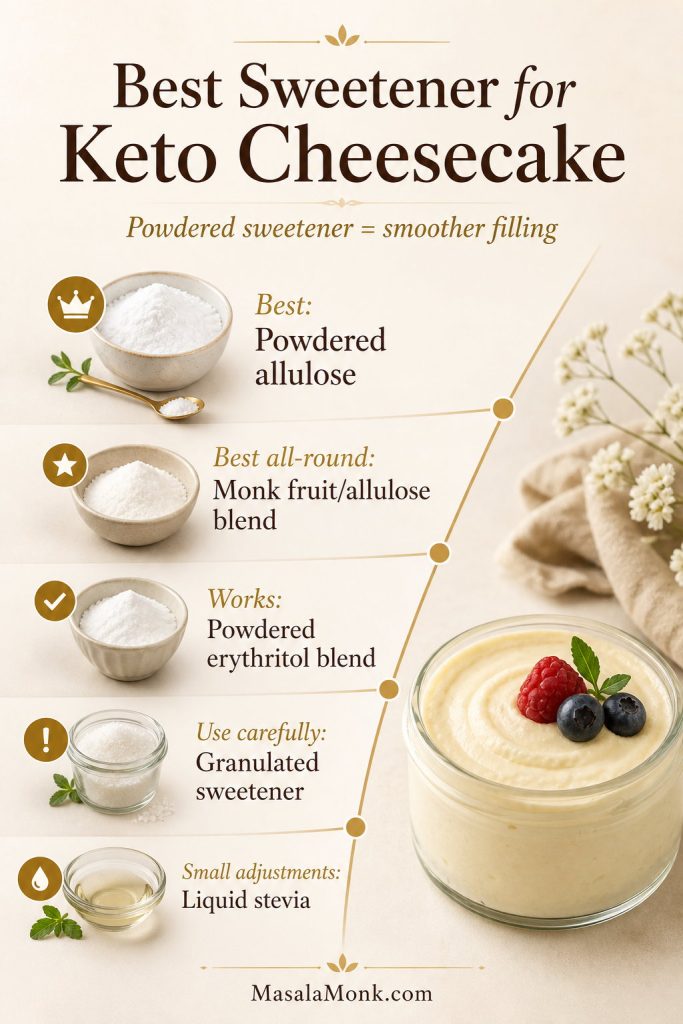
Best Sweetener for a Smooth Cheesecake Filling

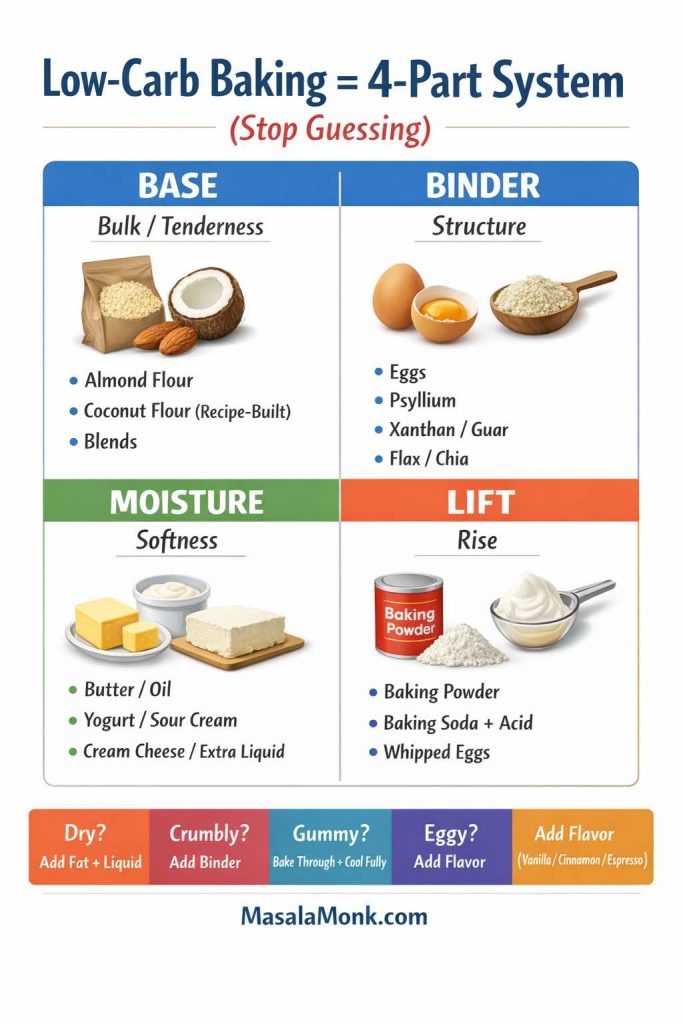
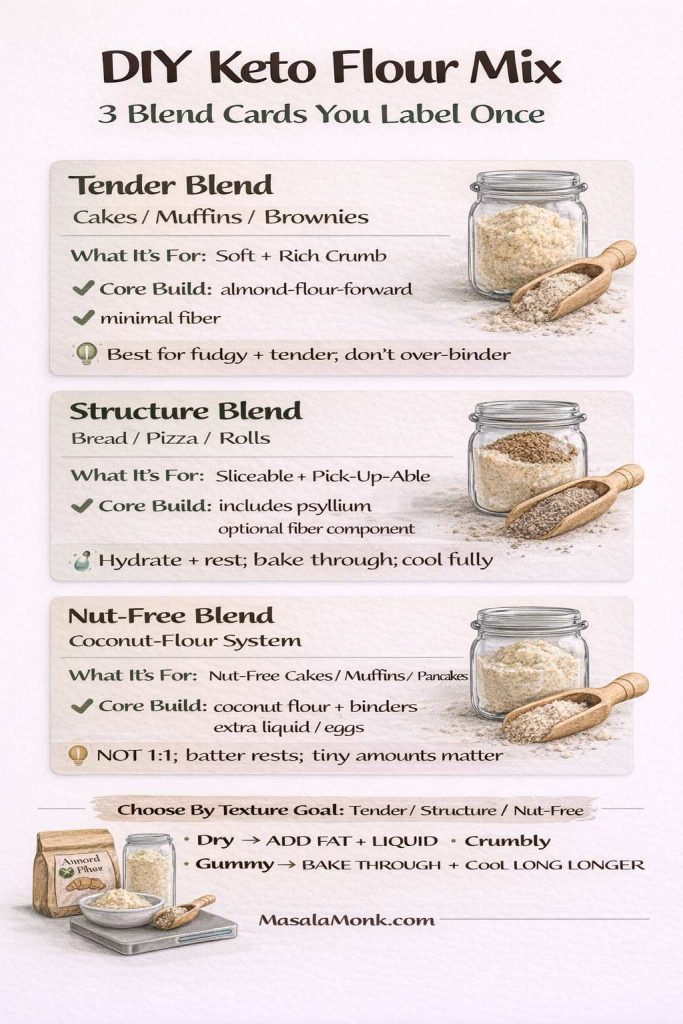
The best sweetener for keto cheesecake is one that dissolves smoothly and does not leave the filling gritty. Powdered sweetener is usually better than granulated sweetener for the filling because it blends more evenly into the cream cheese. For a broader baking overview, this low-carb baking guide explains why ingredient choice can affect texture, browning, and aftertaste.

The sweetener matters even more after chilling. Some erythritol-heavy blends can recrystallize in cold desserts, which is why a cheesecake may taste smooth on day one but slightly gritty after a night in the fridge.

Keto cheesecake sweetener guide comparing powdered allulose, monk fruit allulose blend, erythritol blend, granulated sweetener, and liquid stevia.
The best sweetener for keto cheesecake is not only about sweetness. Powdered allulose or a monk fruit/allulose blend helps the filling stay smoother after chilling.

Using the right sweetener? Continue to crust · fix grainy texture

Sweetener Best Use What to Know
Powdered allulose Smoothest filling texture Less likely to taste grainy; may brown slightly faster in some baked goods
Powdered monk fruit/allulose blend Best all-round choice Good sweetness and smooth texture when powdered
Powdered erythritol blend Works if you like the taste Can leave a cooling effect or slight crystallized texture
Granulated keto sweetener Better for crust than filling Can make the filling grainy unless blended very well
Liquid stevia Small sweetness adjustment Does not add bulk; too much can taste bitter
Best choice for this recipe: Use powdered allulose or a powdered monk fruit/allulose blend in the filling. For the crust, powdered or finely granulated keto sweetener both work.

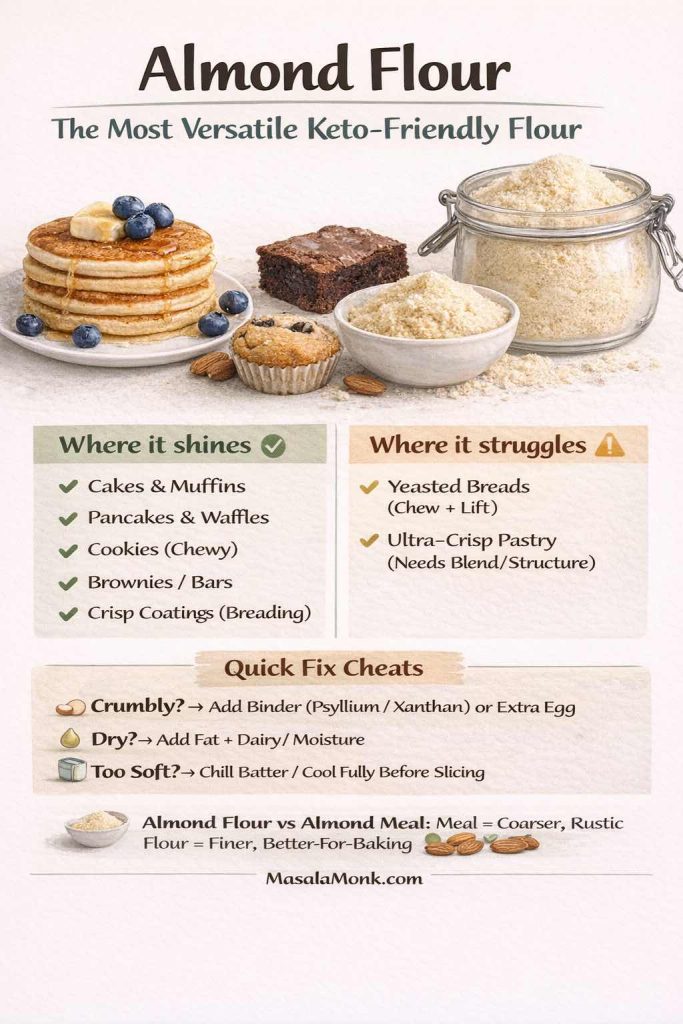
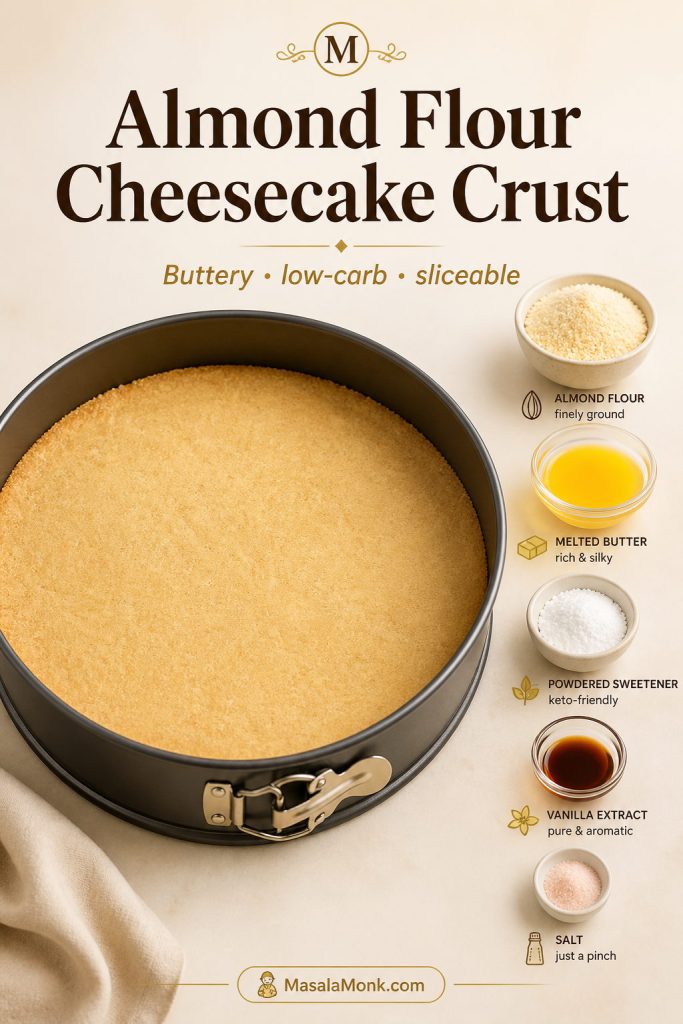
Almond Flour Cheesecake Crust

The almond flour cheesecake crust is one of the most important parts of this recipe. A good cheesecake crust with almond flour should still taste buttery, hold together under the filling, and slice cleanly after chilling.

It replaces the usual graham cracker crust with a gluten-free, low-carb base that still feels like a real cheesecake crust.

Pressed almond flour cheesecake crust in a springform pan with almond flour, melted butter, powdered sweetener, vanilla, and salt.
A good almond flour cheesecake crust should feel compact before it goes into the oven. Pressing firmly helps the low-carb crust bake into a sliceable base.

Need sizing help? See crust ratios · continue to method

For the crust, use:

  • 2 cups / about 224 g blanched almond flour
  • 1/3 cup / 75 g unsalted butter, melted
  • 2 tablespoons powdered keto sweetener
  • 1 teaspoon vanilla extract
  • 1/4 teaspoon fine salt

Mix everything until the almond flour looks evenly moistened. It should feel like damp sand and hold together when pressed. Press it firmly into the bottom of a parchment-lined 9-inch springform pan, then bake at 350°F / 177°C for 10–12 minutes, until lightly golden and fragrant.

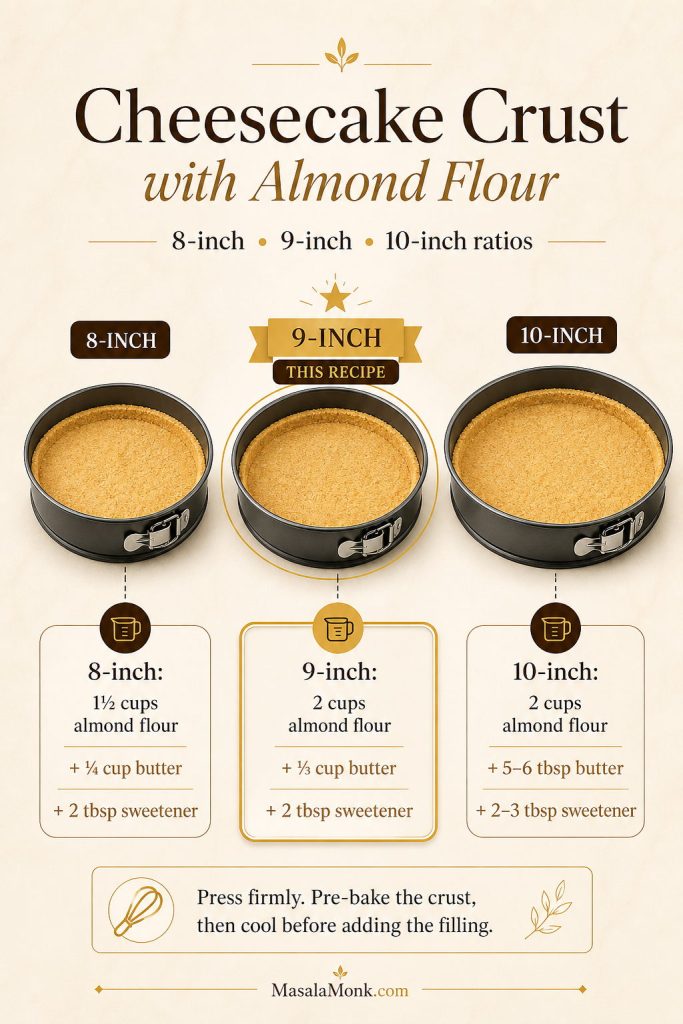
Almond Flour Crust Ratio Guide

The same almond flour cheesecake crust does not behave the same in every pan. A smaller pan makes the crust feel thicker, while a wider pan spreads the mixture thinner and may need a little more butter to stay sliceable.

Use the 9-inch ratio for this keto cheesecake recipe as written. If you change pan size, press the crust firmly, pre-bake it until lightly golden, and let it cool before adding the filling.

Pan Size Almond Flour Butter Sweetener Best Use
8-inch 1 1/2 cups / about 168 g 1/4 cup / 57 g 2 tbsp Thicker cheesecake or smaller batch
9-inch 2 cups / about 224 g 1/3 cup / 75 g 2 tbsp This recipe as written
10-inch 2 cups / about 224 g 5–6 tbsp / 70–85 g 2–3 tbsp Thinner, wider cheesecake
Almond flour cheesecake crust ratio guide for 8-inch, 9-inch, and 10-inch pans with butter and sweetener amounts.
When making cheesecake crust with almond flour, pan size changes everything. As a result, the right butter-to-flour ratio keeps the crust from turning greasy or crumbly.

Crust ready? check pan size · start the method

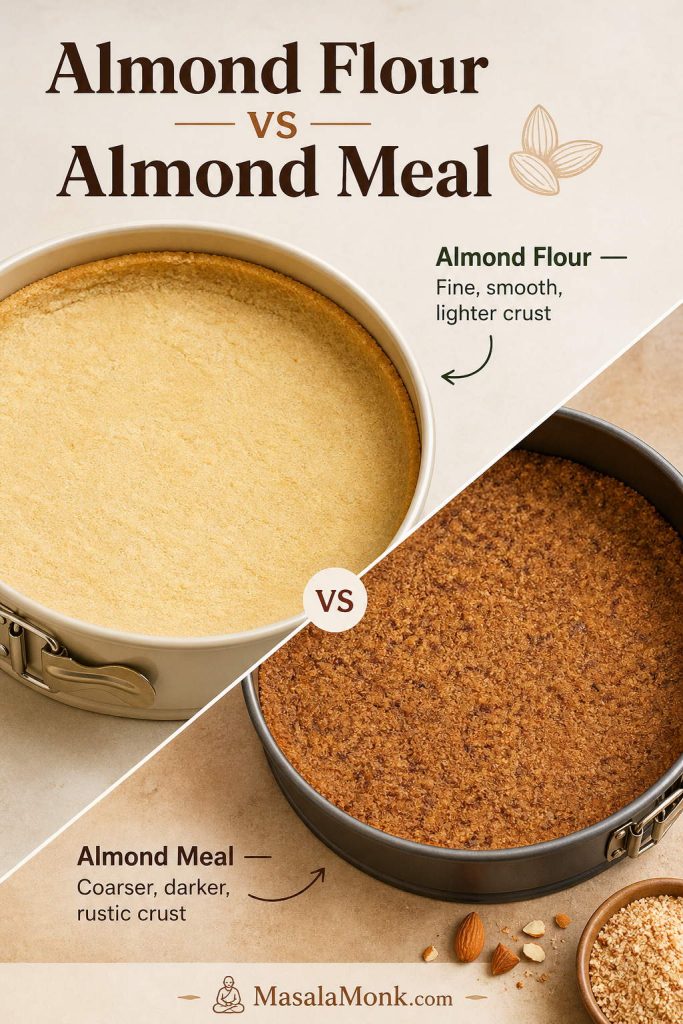
Almond Flour vs Almond Meal

Blanched almond flour gives the neatest crust because it is finer and lighter. Almond meal can work, but it is usually coarser and may make the crust more rustic or crumbly. For a smooth, classic cheesecake look, use fine blanched almond flour.

If you are searching for an almond meal crust for cheesecake, the same basic idea works, but the texture will be darker, coarser, and more rustic. Fine blanched almond flour gives a smoother shortbread-style crust, while almond meal gives a nuttier, more graham-cracker-like look.

Comparison of almond flour cheesecake crust and almond meal cheesecake crust, showing a smoother lighter crust and a darker coarser crust.
Almond flour and almond meal are not identical in cheesecake crust. Almond flour gives a smoother finish, while almond meal creates a darker, more rustic bite.

Chosen your flour? Check crust ratios · jump to recipe

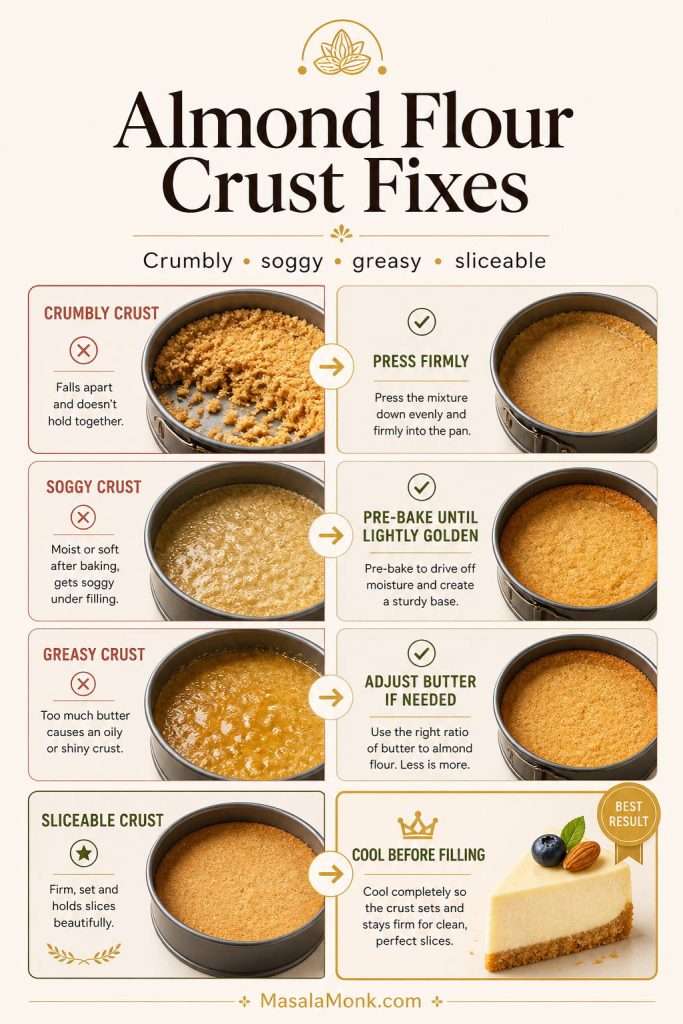
How to Keep the Crust from Crumbling

A crumbly keto cheesecake crust usually means one of three things: not enough butter, not enough pressing, or not enough baking. The crust should be pressed firmly with the bottom of a cup, especially around the edges. After baking, let it cool for a few minutes before adding the filling.

If the crust still seems loose, add 1 extra tablespoon melted butter next time. If it seems greasy, reduce the butter slightly or bake the crust a minute or two longer.

How to Avoid a Soggy Almond Flour Crust

Pre-baking is the easiest fix. A lightly golden crust holds up better under the filling than a raw almond flour crust. You should also avoid pouring very warm or loose filling onto the crust. The cream cheese filling should be smooth and room temperature, not runny.

Cheesecake Crust Without Almond Flour

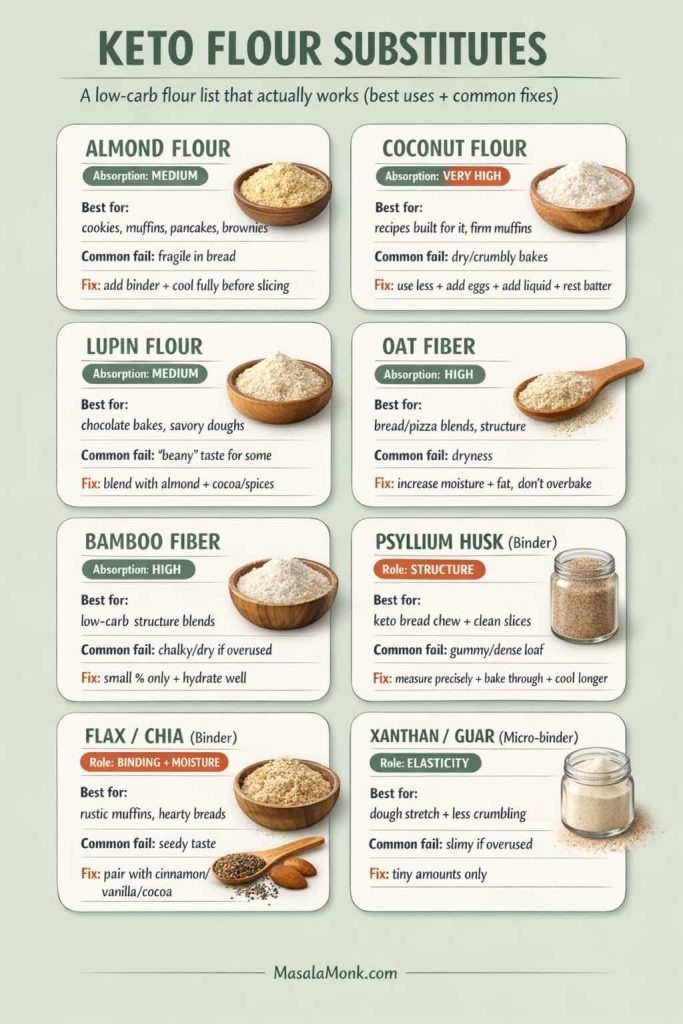
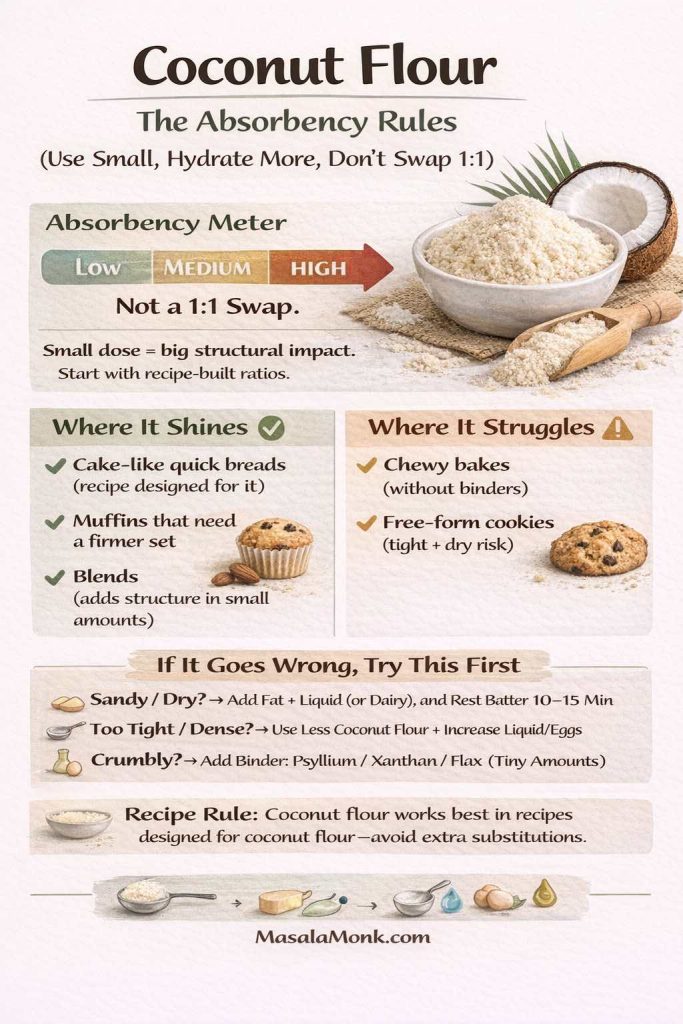
You can make the crust without almond flour, but do not swap coconut flour 1:1. Coconut flour absorbs much more liquid and will make the crust dry and dense if used in the same amount.

For a nut-free direction, use a tested sunflower seed flour crust or skip the crust completely and make the crustless option below.

Springform Pan Size Guide

This recipe is designed for a 9-inch springform pan. Different pan sizes change the height, bake time, and texture, so use the table below if you need to adjust.

Springform pan size guide for keto cheesecake showing 6-inch, 7-inch, 8-inch, 9-inch, and 10-inch pan options.
A 9-inch springform pan is the safest standard for this keto cheesecake recipe. Smaller pans create more height, while larger pans bake thinner and faster.

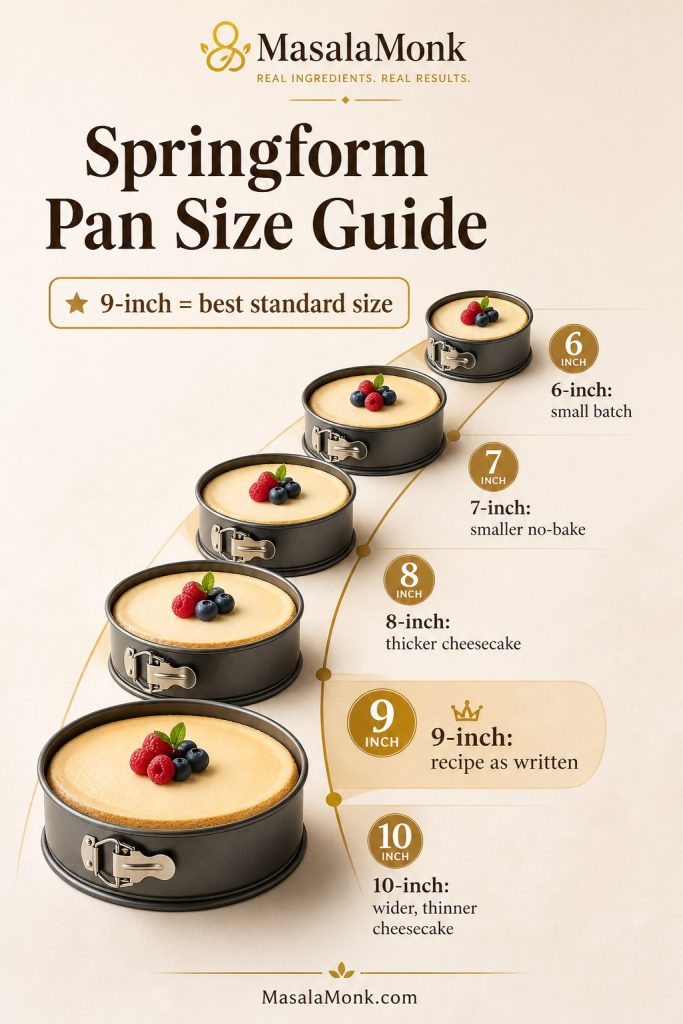
Using a 9-inch pan? Start baking · see exact recipe

Pan Size Best Use What Changes
6-inch Small batch or shortcut cheesecake Use a scaled-down recipe; bake time will be shorter
7-inch Taller no-bake cheesecake Works well for smaller no-bake versions
8-inch Thicker baked cheesecake May need a little more bake time because the filling is deeper
9-inch Best standard size Use the recipe as written
10-inch Wider, slightly thinner cheesecake May bake faster; watch the center jiggle carefully

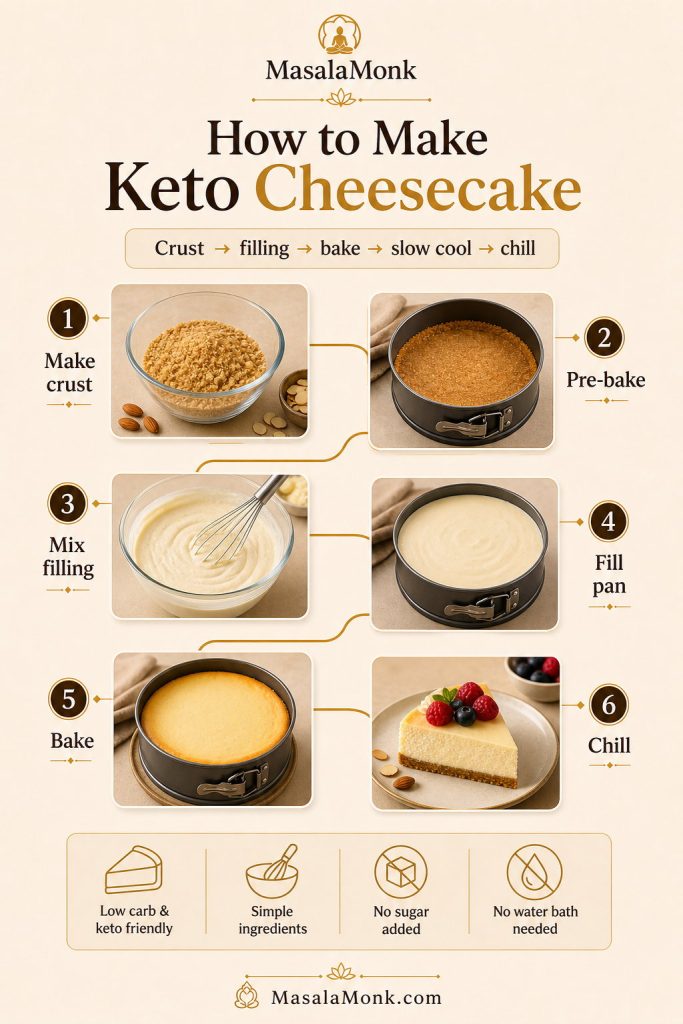
How to Make Keto Cheesecake

The method is simple, but the order matters. Make the crust first, reduce the oven temperature, mix the filling gently, then cool the cheesecake slowly.

Step-by-step keto cheesecake guide showing crust mixing, pre-baking, filling, baking, cooling, and chilling.
The best keto cheesecake method is not rushed. First build the crust, then mix the filling gently, bake until softly set, cool slowly, and chill before slicing.

Mixing the filling? check texture cues · see doneness

Step 1: Prepare the Pan

Line the bottom of a 9-inch springform pan with parchment paper. Lightly grease the sides. If your springform pan is older or tends to leak butter, place it on a baking sheet before it goes into the oven.

Step 2: Make the Almond Flour Crust

In a bowl, stir together almond flour, melted butter, sweetener, vanilla, and salt. The mixture should look like damp crumbs. Press it firmly into the bottom of the prepared pan. Use a flat-bottom cup to compact it evenly.

Bake the crust at 350°F / 177°C for 10–12 minutes, until it smells nutty and looks lightly golden at the edges. Remove it from the oven and let it cool slightly while you make the filling.

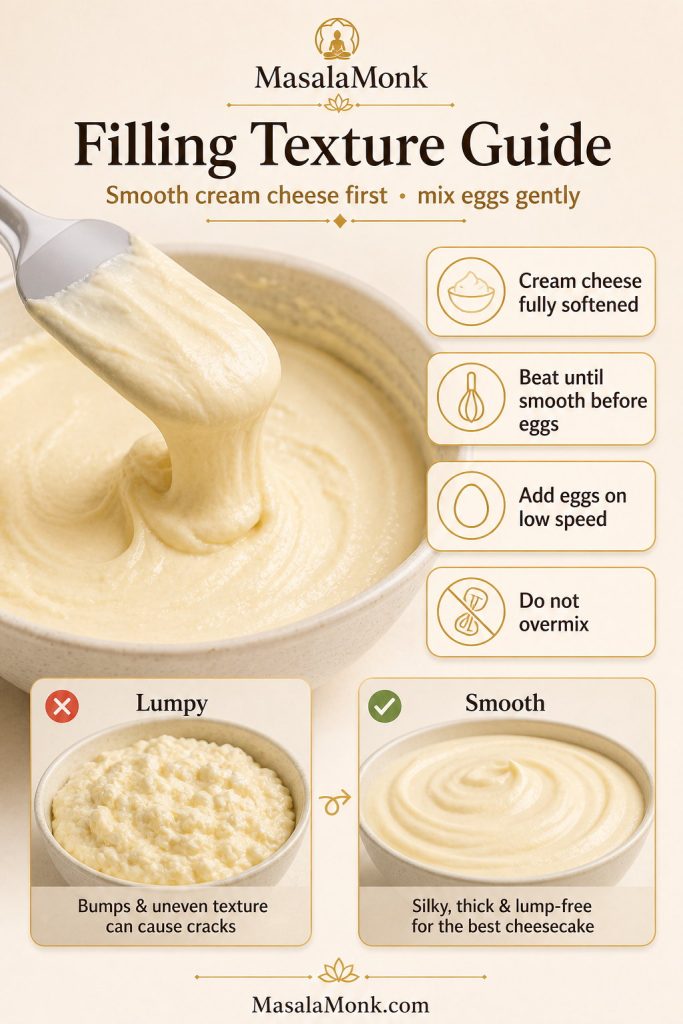
Step 3: Mix the Cheesecake Filling

Lower the oven to 325°F / 163°C. Beat the softened cream cheese on medium-low speed until smooth. Add the powdered sweetener and beat again until combined. Scrape the bowl well so no dense pockets of cream cheese remain.

Add the sour cream, lemon juice, vanilla, and salt. Mix until smooth. Add the eggs one at a time, mixing on low speed just until each egg disappears into the batter.

Keto cheesecake filling texture guide showing smooth batter, lumpy filling, and reminders to soften cream cheese and mix eggs gently.
Smooth cheesecake filling starts before the eggs are added. Once the cream cheese is fully beaten, switch to gentle mixing so the batter does not trap excess air.

Ready to bake? check doneness · avoid cracks

Do not overmix after adding eggs. Extra air can make the cheesecake rise too much in the oven and crack as it cools.

Step 4: Fill the Pan

Pour the filling over the cooled almond flour crust. Smooth the top with a spatula. Tap the pan gently on the counter once or twice to release large air bubbles, but do not bang it aggressively.

Step 5: Bake Low and Slow

Bake at 325°F / 163°C for 45–55 minutes. The edges should look set and slightly puffed, while the center should still wobble gently when the pan is nudged.

If the center looks liquid and sloshes, bake for another 5 minutes and check again. If the entire cheesecake looks fully firm in the oven, it is likely overbaked.

Step 6: Cool Slowly

Turn off the oven. Crack the oven door open and leave the cheesecake inside for 20–30 minutes. Then move it to the counter and let it cool to room temperature.

Once cool, cover and refrigerate for at least 6 hours. Overnight chilling gives the cleanest slices and best texture.

How to Know When the Cheesecake Is Done

The most reliable doneness cue is the jiggle test. The outer 2–3 inches should look set, while the center should still wobble like soft gelatin. It should not look wet, soupy, or liquid, but it should not be completely firm either.

Cheesecake keeps setting as it cools. That is why a slightly jiggly center is correct. If you bake until the center is completely firm, the final chilled cheesecake can turn dense, dry, or cracked.

Doneness guide showing underbaked, just right, and overbaked keto cheesecake centers with a soft jiggle cue.
A softly jiggly center is not a mistake. Instead, it means the cheesecake can finish setting as it cools, which helps prevent a dry or cracked texture.

Center still jiggly? cool without cracks · store it right

What You See What It Means What to Do
Edges set, center softly jiggles Done Turn off oven and begin slow cooling
Center sloshes like liquid Underdone Bake 5 more minutes, then check again
Top is puffed and fully firm Likely overbaked Cool slowly; serve with topping if cracked
Top has deep cracks before cooling Too much heat, air, or bake time Use troubleshooting tips next time

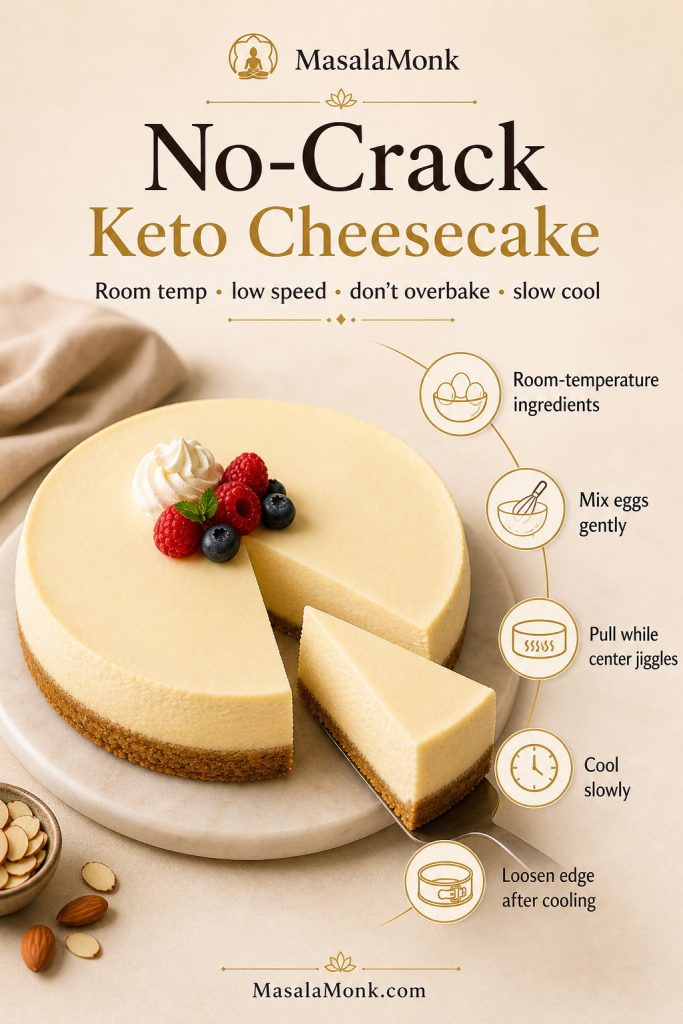
How to Prevent Cracks

Cracks do not ruin cheesecake, but they are easy to reduce. Most cracks come from cold ingredients, overmixing, overbaking, or cooling too quickly.

  • Use room-temperature ingredients: Cold cream cheese creates lumps, and cold eggs can make the batter harder to mix evenly.
  • Mix gently after adding eggs: Eggs trap air quickly. Too much air makes the cheesecake puff and collapse.
  • Do not overbake: The center should still jiggle softly when the cheesecake comes out.
  • Cool gradually: Leave the cheesecake in the turned-off oven with the door cracked before moving it to the counter.
  • Loosen the edge: After cooling slightly, run a thin knife around the edge so the cheesecake does not pull against the pan as it contracts.
No-crack keto cheesecake guide with a smooth cheesecake top and tips for room-temperature ingredients, low-speed mixing, and slow cooling.
No-crack keto cheesecake depends on temperature control. Room-temperature ingredients, low-speed mixing, and slow cooling give the filling a better chance to settle evenly.

Want extra insurance? compare water bath options · fix common issues

No water bath required: This recipe is written to work without a full water bath. If your oven runs hot or you want extra insurance, place a pan of hot water on the lower rack for gentle humidity.

Water Bath or No Water Bath?

You do not need a full water bath for this keto cheesecake recipe. The slow bake at 325°F / 163°C, room-temperature ingredients, gentle mixing, and gradual cooling are enough for a smooth cheesecake in most ovens.

A full water bath can help cheesecakes bake gently, but it also adds extra steps and can leak into a springform pan if the wrapping is not secure. King Arthur Baking explains that a water bath can help reduce cracks, but for this recipe the easier option is to place a pan of hot water on the lower oven rack. It adds a little humidity without putting the cheesecake pan directly in water.

Water bath comparison for keto cheesecake showing no water bath, hot water pan, and full water bath baking setups.
You can make this keto cheesecake without a full water bath. However, a hot water pan on the lower rack can add humidity if your oven tends to run dry.

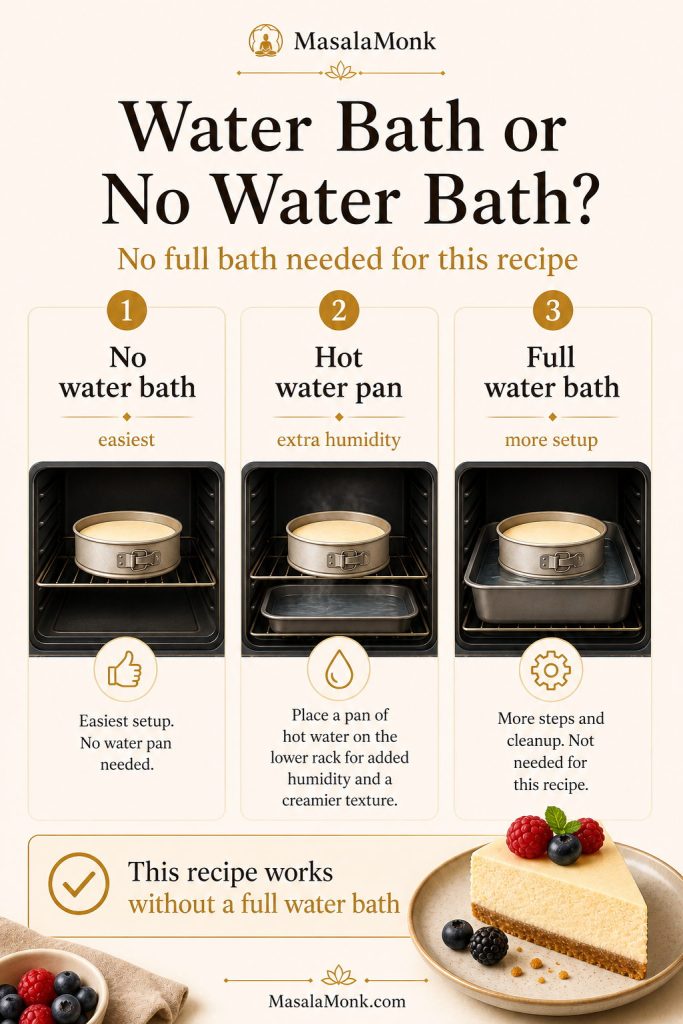
No full bath needed? Use the recipe card · check doneness cues

Method Best For Downside
No water bath Simplest method; works well with slow cooling Needs careful bake time and cooling
Pan of hot water on lower rack Easy extra insurance against drying Still not a guarantee if the cheesecake is overbaked
Full water bath Very gentle baking More setup; springform pans can leak

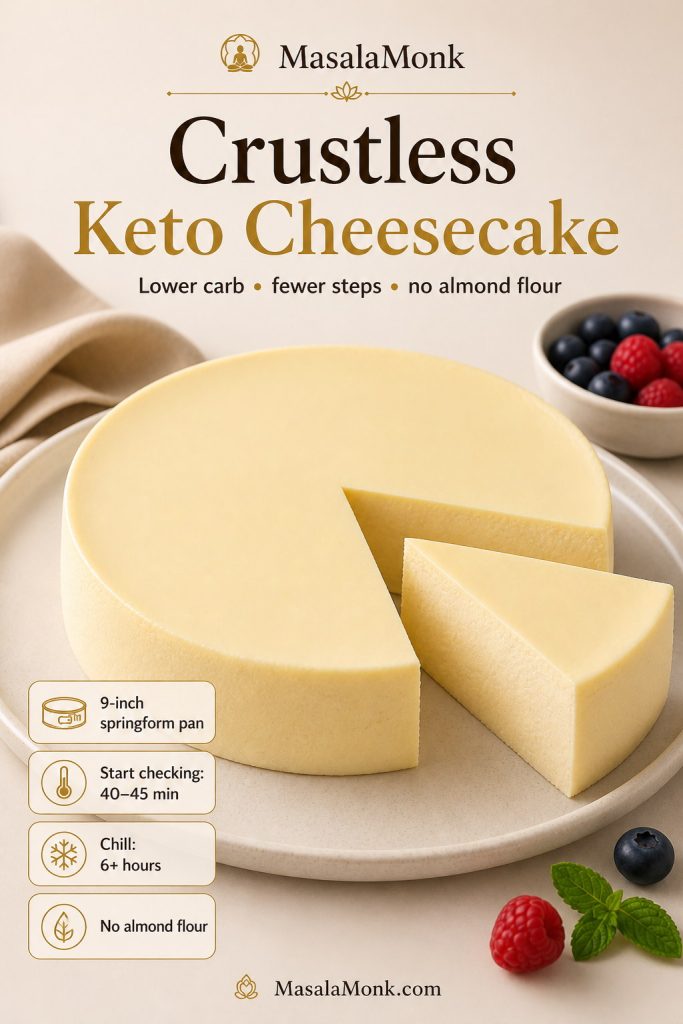
Crustless Keto Cheesecake Option

You can make this cheesecake without the almond flour crust. A crustless keto cheesecake is slightly lower in carbs, simpler to prepare, and useful if you are avoiding nuts.

To make it crustless, skip the crust ingredients and line the bottom of the springform pan with parchment. Grease the sides well. Pour the filling directly into the pan and bake at 325°F / 163°C until the edges are set and the center still jiggles softly.

The bake time may be slightly shorter because there is no crust layer. Start checking around 40–45 minutes. Chill completely before slicing, because crustless cheesecake needs time to firm up for clean edges.

Crustless keto cheesecake with a clean slice removed, smooth filling, and notes for checking bake time and chilling.
Crustless keto cheesecake removes the almond flour base, so the pan matters more. Line it well, chill fully, and slice cold for the cleanest edges.

Skipping crust? adapt the recipe · chill and store properly

Best crustless tip: Do not skip the parchment. Without a crust, the filling sits directly against the pan, so lining and chilling are what help the slices release cleanly.

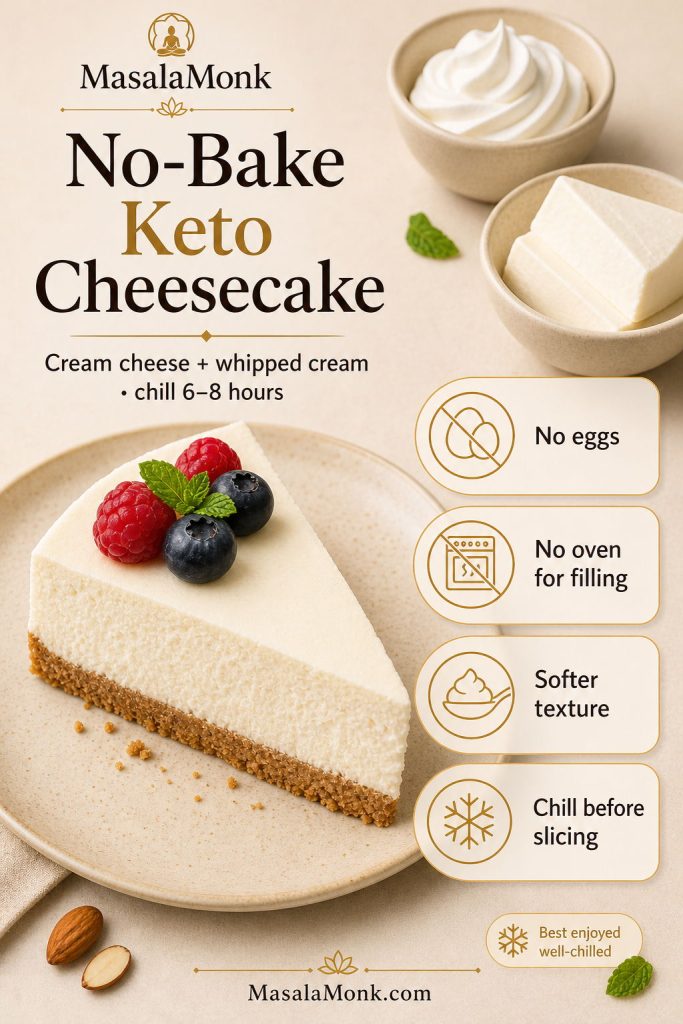
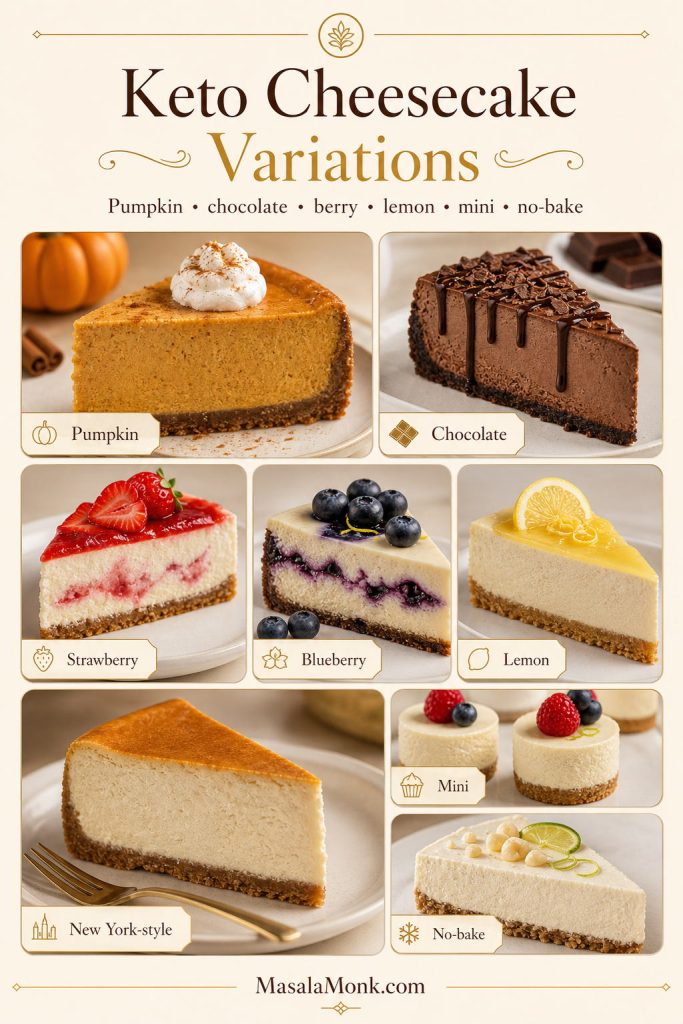
No-Bake Keto Cheesecake Option

A no-bake keto cheesecake is a different style of cheesecake. It is lighter, softer, and more mousse-like because it sets in the refrigerator instead of baking with eggs.

For a 9-inch no-bake keto cheesecake, use the almond flour crust as written, then chill or briefly bake the crust before adding the filling. For the filling, beat 24 oz / 680 g softened full-fat cream cheese with 3/4 to 1 cup powdered keto sweetener, 2 teaspoons vanilla, 1 tablespoon lemon juice, and a pinch of salt until smooth. In a separate bowl, whip 1 cup / 240 ml heavy cream to soft peaks, then fold it into the cream cheese mixture.

No-bake keto cheesecake slice with cream cheese, whipped cream, chilling time, and no-egg filling notes.
No-bake keto cheesecake is a separate style, not just an unbaked version of the main filling. It relies on whipped cream and long chilling instead of eggs.

Making it no-bake? choose pan size · compare with baked recipe

This makes a slightly lower 9-inch no-bake cheesecake. For a taller no-bake keto cheesecake, use an 8-inch springform pan and chill it overnight before slicing.

8-Inch vs 9-Inch No-Bake Keto Cheesecake

No-bake cheesecake height depends heavily on pan width because the filling sets in the refrigerator instead of rising or firming in the oven. An 8-inch pan gives a taller, more bakery-style slice, while a 9-inch pan gives a wider cheesecake with a slightly lower profile.

Both pan sizes work, but the chilling time matters more in the taller version. If you use an 8-inch pan, chill overnight before slicing so the center has enough time to set cleanly.

Comparison of 8-inch and 9-inch no-bake keto cheesecakes showing a taller cheesecake and a lower wider cheesecake.
For no-bake keto cheesecake, pan width changes the look of the slice. An 8-inch pan gives height, while a 9-inch pan gives a lower, wider cheesecake.

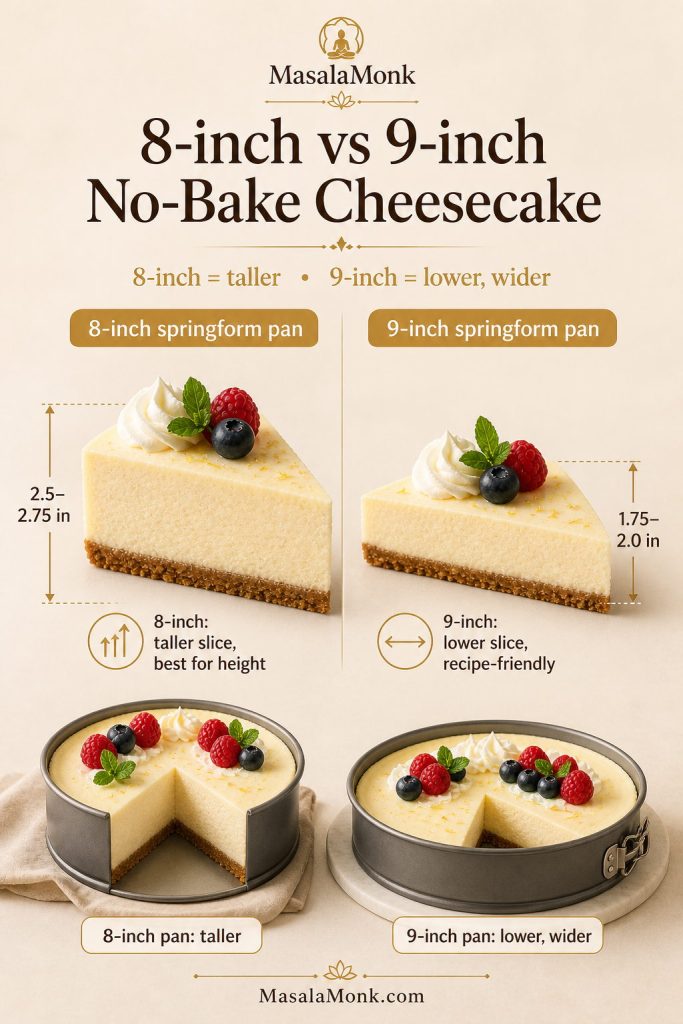
Picked your pan? return to no-bake method · see variations

Spread the filling over the crust, smooth the top, cover, and refrigerate for at least 6–8 hours. Overnight is better. If the cheesecake is sliced too soon, it can look soft or collapse at the edges.

Important: Do not use the baked filling from the recipe card for the no-bake version. The baked filling relies on eggs and oven heat to set. The no-bake version needs whipped cream and long chilling instead.

If you want the classic non-keto version with a sweeter filling and regular crumb crust, use this no bake cheesecake recipe instead.

Best use: Choose baked keto cheesecake when you want classic dense cheesecake texture. Choose the no-bake version when you want an easier, lighter, oven-free dessert.

Keto Cheesecake Variations

Once you understand the base, you can use it for other low carb cheesecake flavors. Keep the structure the same, then adjust carefully so the filling still sets properly. In most cases, toppings are safer than mix-ins because they add flavor without loosening the cheesecake.

Keto cheesecake variations board with pumpkin, chocolate, strawberry, blueberry, lemon, New York-style, mini, and no-bake cheesecake options.
Keto cheesecake variations work best when the base stays stable. Therefore, toppings and small flavor accents are safer than adding too much liquid to the filling.

Need a classic slice first? Jump to recipe · see New York-style

Keto Pumpkin Cheesecake

Pumpkin cheesecake needs pumpkin puree, pumpkin pie spice, and a little cinnamon in the filling. Since pumpkin adds moisture, it works better as a dedicated variation than as a casual stir-in. With this base cheesecake, a spoonful of pumpkin spice whipped cream on top gives you the flavor without changing the bake.

Keto Chocolate Cheesecake

A chocolate version works best with melted sugar-free chocolate or cocoa powder in the filling. Chocolate changes both sweetness and texture, so taste the filling before adding eggs and adjust the sweetener if needed. If you want a separate creamy chocolate dessert instead, this avocado chocolate mousse stays in the same rich, spoonable dessert lane.

Keto Strawberry Cheesecake

The cleanest strawberry version keeps the filling vanilla and adds a sugar-free strawberry topping after baking. Fresh berry toppings are easier to control than mixing watery fruit into the batter. Cooked and cooled strawberry sauce gives stronger flavor without making the cheesecake soft.

Keto Blueberry Cheesecake

A thick low-carb blueberry sauce works best as a topping or light swirl. If using a swirl, keep it concentrated and spoon it lightly over the top before baking. Too much fruit sauce can make the center loose.

Keto Lemon Cheesecake

To make the cheesecake brighter, add lemon zest to the filling. Zest gives strong lemon flavor without adding much liquid. Avoid adding too much extra lemon juice because excess liquid can soften the filling.

Mango Cheesecake and Keto Limits

Mango is not usually the easiest strict-keto cheesecake flavor because it brings natural sugar and extra moisture. If you are not keeping the dessert strictly keto and want a fruit-forward no-bake version, this no bake mango cheesecake recipe is the better fit.

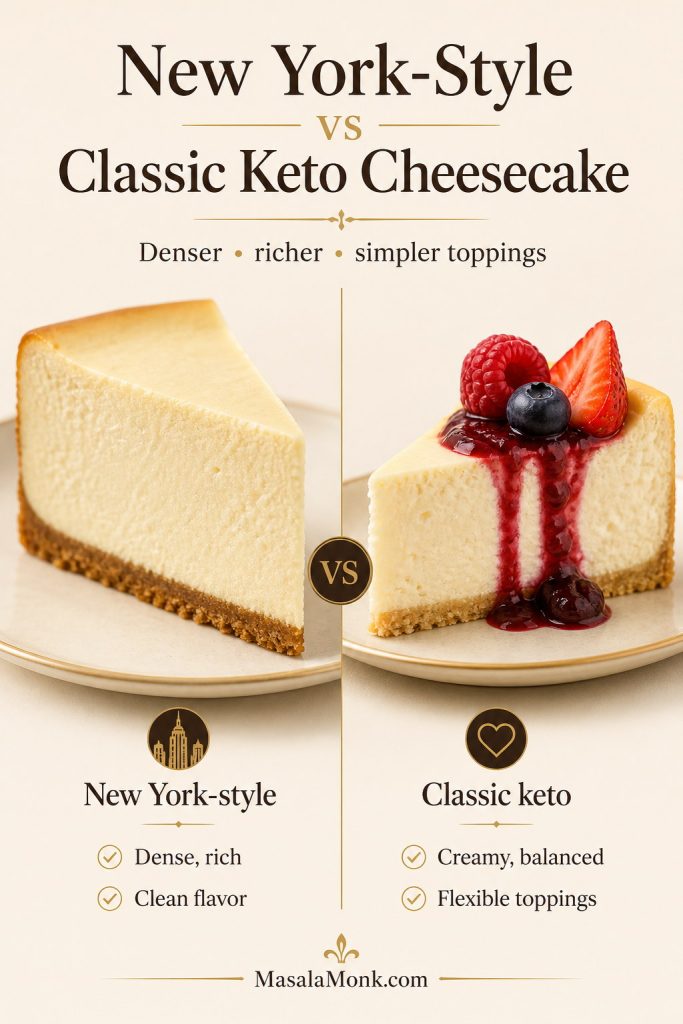
Keto New York Cheesecake

For a New York-style keto cheesecake, keep the flavor simple and focus on a dense, creamy texture. Use full-fat brick cream cheese, sour cream, eggs, vanilla, lemon juice, and the almond flour crust. Avoid fruit puree or chocolate in the filling because those move it away from the classic New York-style profile.

The biggest difference is texture. A New York-style keto cheesecake should feel rich, smooth, and slightly dense rather than fluffy. Chill it overnight before slicing, and serve toppings on the side so the clean cheesecake flavor stays central.

Comparison of New York-style keto cheesecake and classic keto cheesecake slices, showing a denser plain slice and a berry-topped slice.
New York-style keto cheesecake should feel denser and cleaner, while classic keto cheesecake is more flexible. Keep toppings lighter if you want that rich bakery-style texture.

Prefer smaller portions? See mini cheesecakes · return to recipe

Keto Ricotta Cheesecake

Ricotta gives keto cheesecake a lighter, slightly more Italian-style texture. It is less dense than an all-cream-cheese filling and can taste a little grainier unless blended very smooth. Use full-fat ricotta, drain excess liquid if it looks wet, and blend it with cream cheese rather than using ricotta alone.

For the most reliable result, treat ricotta cheesecake as a separate variation rather than a direct one-for-one swap. If you are experimenting, replace only part of the cream cheese with smooth ricotta and keep the eggs, lemon, vanilla, and sweetener balanced so the cheesecake still sets.

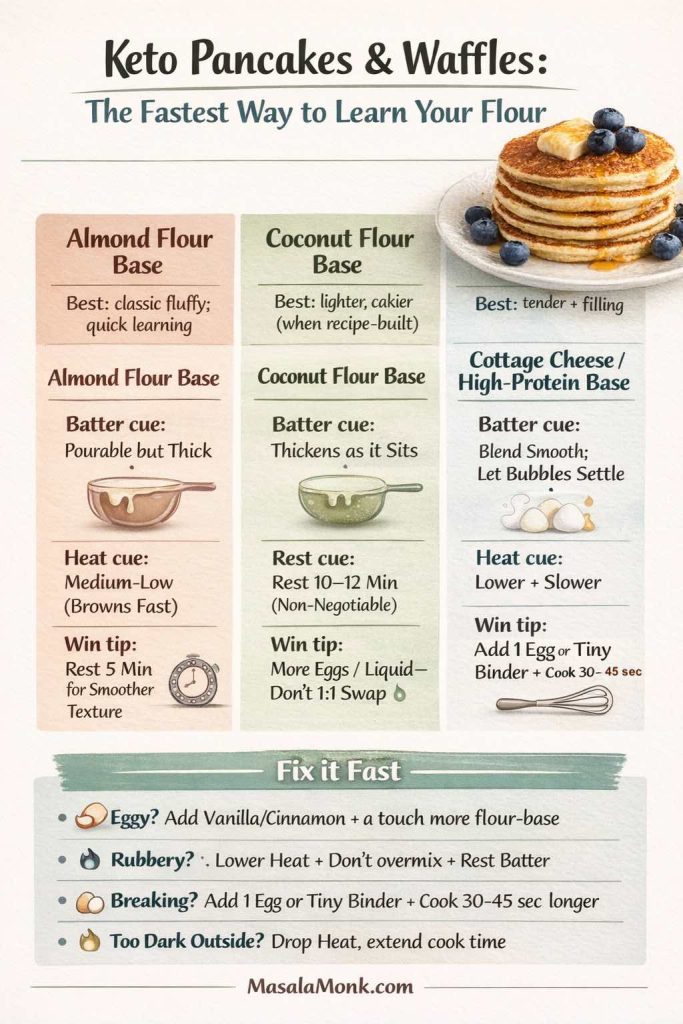
High-Protein Keto Cheesecake

For a higher-protein direction, cottage cheese, Greek yogurt, ricotta, or protein powder can be used in separate cheesecake styles. For a breakfast-style version of that idea, these high-protein low-carb pancakes use similar cottage cheese and low-carb logic.

Protein powder needs care in cheesecake because it can make the filling dry, chalky, or rubbery if added casually. If using cottage cheese, blend it completely smooth before adding it to a cheesecake filling. A high-protein low carb cheesecake works best as its own tested variation rather than a direct swap inside this classic baked version.

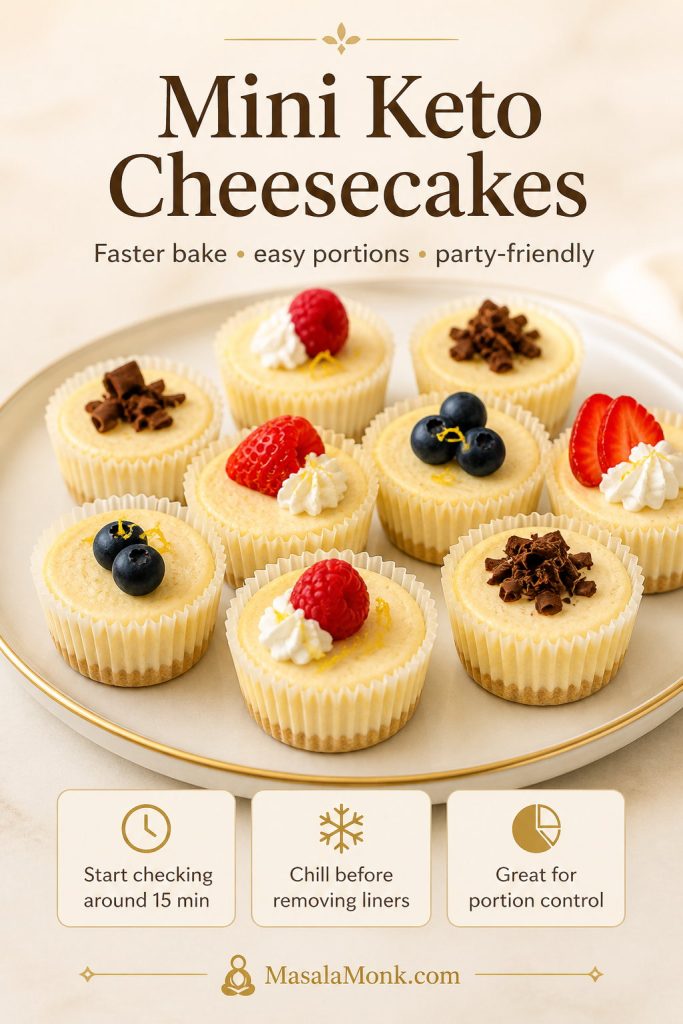
Mini Keto Cheesecakes, Cups, and Bites

You can turn the same flavor idea into mini keto cheesecakes by baking the crust and filling in a lined muffin pan. Mini versions bake faster, chill faster, and are easier to portion for parties, lunch boxes, or meal prep.

Start checking mini cheesecakes around 15 minutes. They are done when the edges look set and the centers still have a slight wobble. Chill them fully before removing the liners. For true keto cheesecake bites or fat bombs, use a separate no-bake cream cheese mixture instead of this baked filling.

Mini keto cheesecakes in paper liners topped with berries, whipped cream, lemon zest, and chocolate shavings.
Mini keto cheesecakes are great for portion control, but they still need proper chilling. Since they bake faster, start checking early and let them set before serving.

Baking minis? use the same doneness cues · store leftovers

3 Ingredient Keto Cheesecake Shortcut

A 3 ingredient keto cheesecake is usually a no-bake shortcut made with cream cheese, keto sweetener, and another creamy ingredient such as whipped cream, Greek yogurt, or keto vanilla yogurt. It is useful for a quick dessert, but it will not have the same baked cheesecake texture as this full recipe.

Keto Cheesecake Troubleshooting

Most keto cheesecake problems are easy to diagnose. Use this table to fix the current cheesecake if possible and prevent the issue next time.

Keto cheesecake troubleshooting board showing cracked top, grainy filling, runny center, dry texture, stuck pan, and sweetener aftertaste fixes.
Troubleshooting keto cheesecake is easier when you match the problem to the cause. Cracks, graininess, runny centers, and stuck slices each need a different fix.

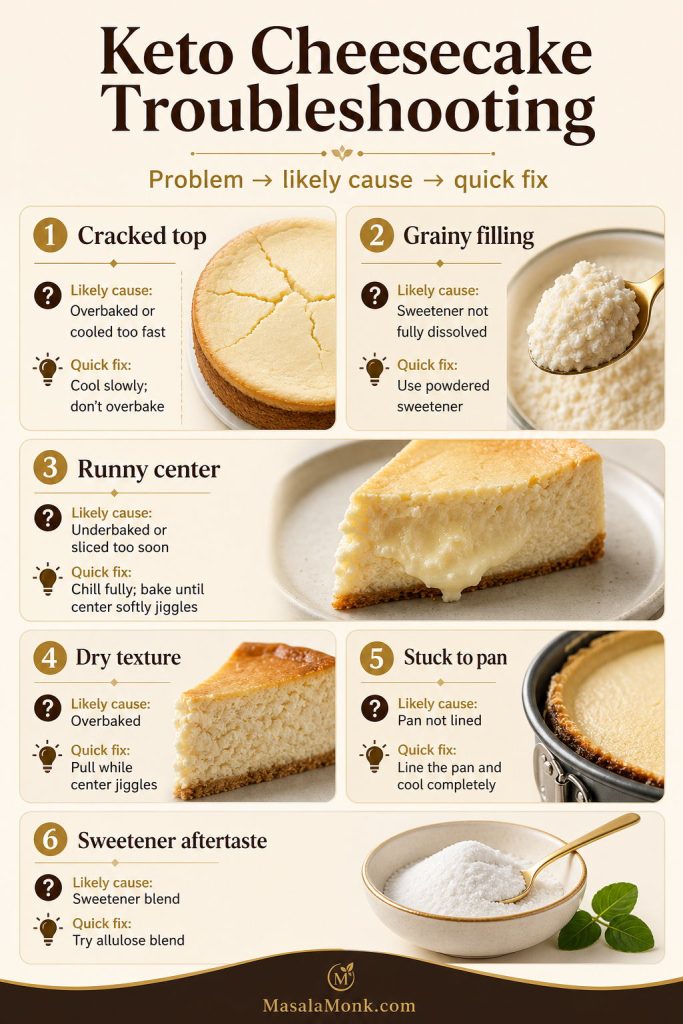
Need a crust fix too? See crust fixes · retry with recipe card

Problem Likely Cause Fix
Cracked top Overbaking, too much air, or fast cooling Cool slowly next time; serve current cheesecake with whipped cream or berry topping
Lumpy filling Cream cheese was too cold Use fully softened cream cheese and beat it smooth before adding eggs
Grainy texture Coarse sweetener or crystallizing sweetener Use powdered allulose or powdered monk fruit/allulose blend
Soggy crust Crust was not pre-baked enough or filling was too loose Pre-bake crust until lightly golden and let it cool before filling
Crumbly crust Not enough butter or not pressed firmly Add 1 extra tablespoon melted butter next time and press with a flat-bottom cup
Runny center Underbaked or sliced too soon Bake until softly jiggly, then chill at least 6 hours before slicing
Dry texture Overbaked cheesecake Pull it from the oven while the center still jiggles
Cheesecake stuck to pan No parchment or not enough chilling Line the pan and chill fully before removing the springform ring
Sweetener aftertaste Sweetener blend does not suit your taste Try allulose or a monk fruit/allulose blend; add lemon and vanilla for balance

Almond Flour Crust Fixes

Almond flour crust problems usually come from pressure, butter balance, or bake time. If the crust crumbles, it often needed firmer pressing or a touch more butter. If it turns soggy, it usually needed a longer pre-bake or more cooling time before the filling went in.

The goal is a crust that feels compact, lightly golden, and sturdy enough to lift with the cheesecake slice. Fixing the crust separately is useful because the filling can be perfect while the base still needs adjustment.

Almond flour crust fixes board showing crumbly, soggy, greasy, and sliceable cheesecake crust results with correction tips.
Almond flour crust problems usually come down to pressure, butter, or baking time. Press firmly, pre-bake until lightly golden, and cool before adding filling.

Crust sorted? continue method · jump to recipe

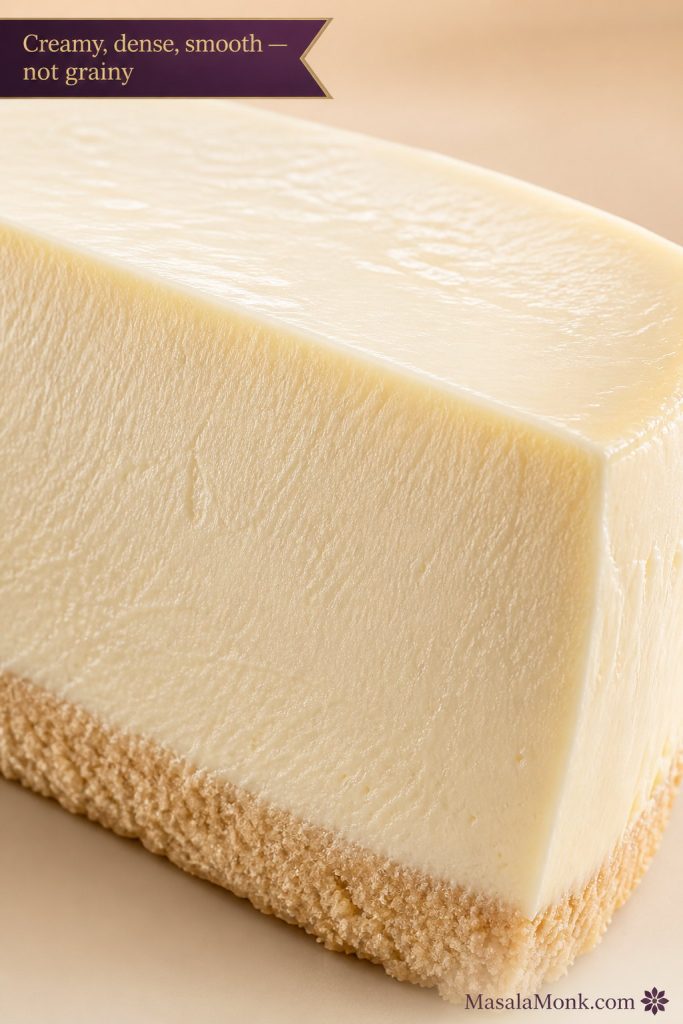
What the Finished Cheesecake Should Be Like

After chilling, the cheesecake should slice cleanly, hold its shape on a plate, and feel dense but creamy when you cut through it. The center should not be runny, the filling should not taste grainy, and the almond flour crust should stay firm enough to lift with the slice.

The flavor should be rich and tangy, not flat or overly sweet. If your cheesecake tastes slightly muted when cold, let slices sit at room temperature for 10–15 minutes before serving.

Storage and Freezing

Keto cheesecake is an excellent make-ahead dessert because the texture improves after chilling. Keep it covered in the refrigerator until ready to serve. For food safety, the USDA recommends using refrigerated leftovers within 3–4 days or freezing them for longer storage.

Storage guide showing covered keto cheesecake in the refrigerator, wrapped slices, frozen slices, and a thawed slice ready to serve.
Keto cheesecake is one of the better make-ahead desserts. For the best texture, refrigerate covered, freeze slices individually, and thaw overnight before serving.

Serving later? slice cleanly · add toppings

  • Refrigerator: Store covered for 3–4 days for the best balance of texture and food safety.
  • Freezer: Freeze slices or the whole cheesecake for up to 2 months for best quality.
  • Thawing: Thaw overnight in the refrigerator for the best texture.
  • Serving: Slice cold, then let slices sit at room temperature for 10–15 minutes if you prefer a softer texture.

For freezing, place chilled slices on a parchment-lined tray until firm, then wrap individually. This keeps the slices from sticking together and makes it easier to thaw only what you need.

How to Slice Cheesecake Cleanly

For clean slices, chill the cheesecake fully before cutting. Use a sharp knife, dip it in hot water, wipe it dry, then cut one slice. Wipe the knife between cuts so the filling stays smooth and the almond flour crust does not drag through the slice.

Clean cheesecake slicing guide showing a hot knife, wiping the blade, cutting cold cheesecake, and a neat slice on a plate.
Clean cheesecake slices come from cold cheesecake and a warm knife. Wipe between cuts so the creamy filling and almond flour crust stay neat.

Ready to serve? see toppings · save the recipe
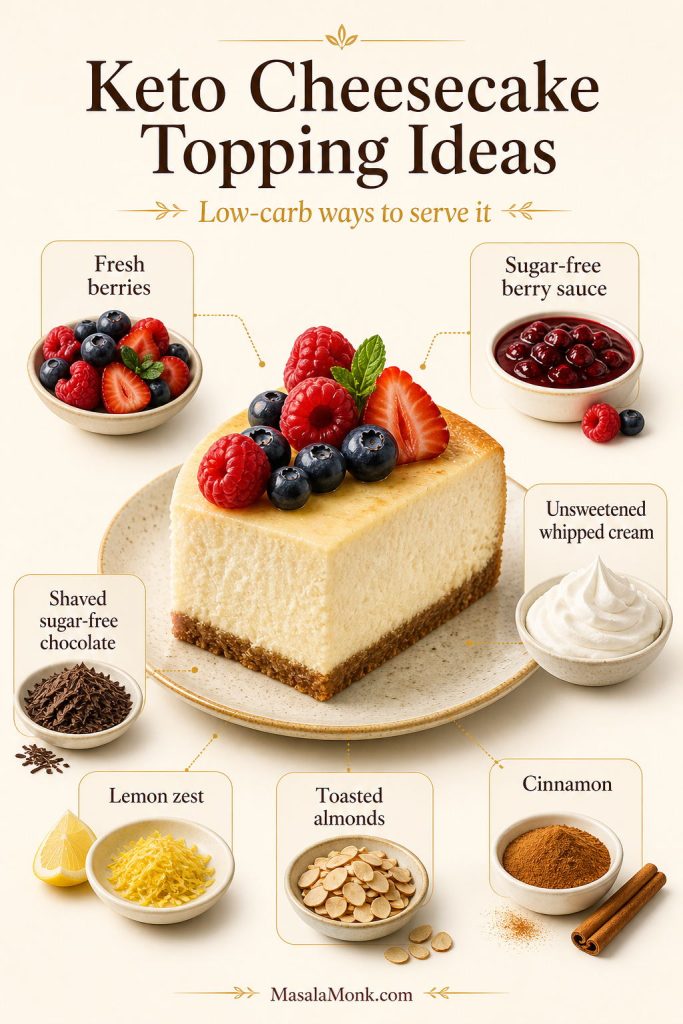
Serving Ideas

This keto cheesecake is rich enough to serve plain, but toppings can make it feel more special without adding much sugar.

  • Fresh strawberries, raspberries, or blueberries
  • Sugar-free berry sauce
  • Unsweetened whipped cream
  • Shaved sugar-free chocolate
  • Lemon zest
  • Toasted sliced almonds
  • A light dusting of cinnamon for a warmer flavor
Keto cheesecake topping ideas with fresh berries, sugar-free berry sauce, whipped cream, shaved chocolate, lemon zest, toasted almonds, and cinnamon.
Low-carb toppings should support the cheesecake, not bury it. Fresh berries, whipped cream, lemon zest, shaved chocolate, toasted almonds, and cinnamon all keep the flavor balanced.

Want exact amounts? Jump to recipe card · check FAQs

Keep toppings simple if you want the cheesecake texture to stay the focus. Watery fruit sauces should be cooked down and cooled before adding.

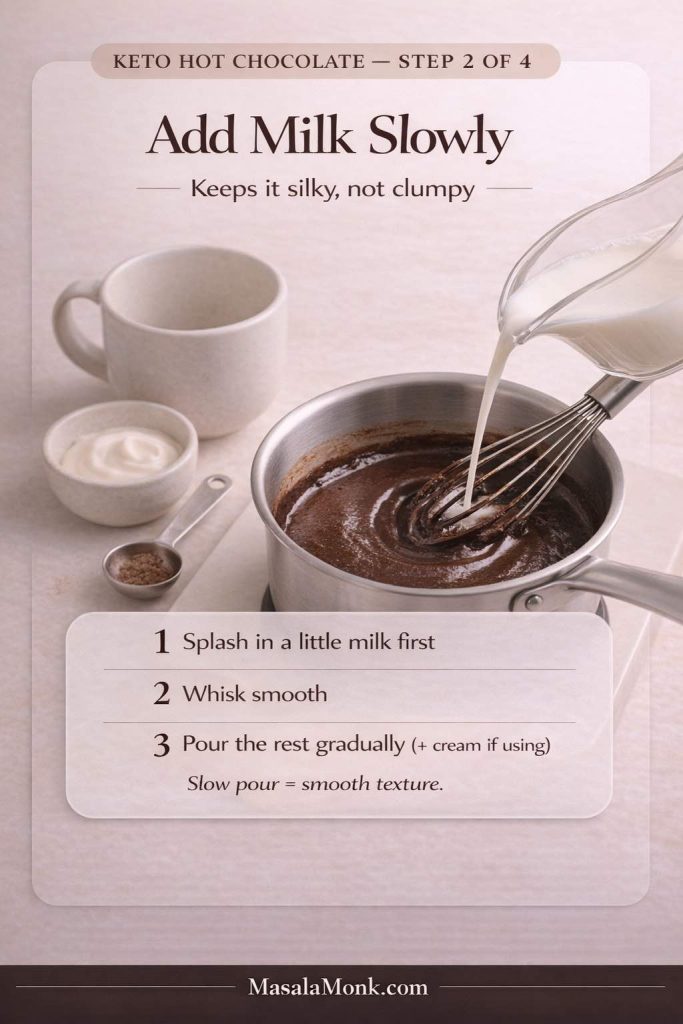
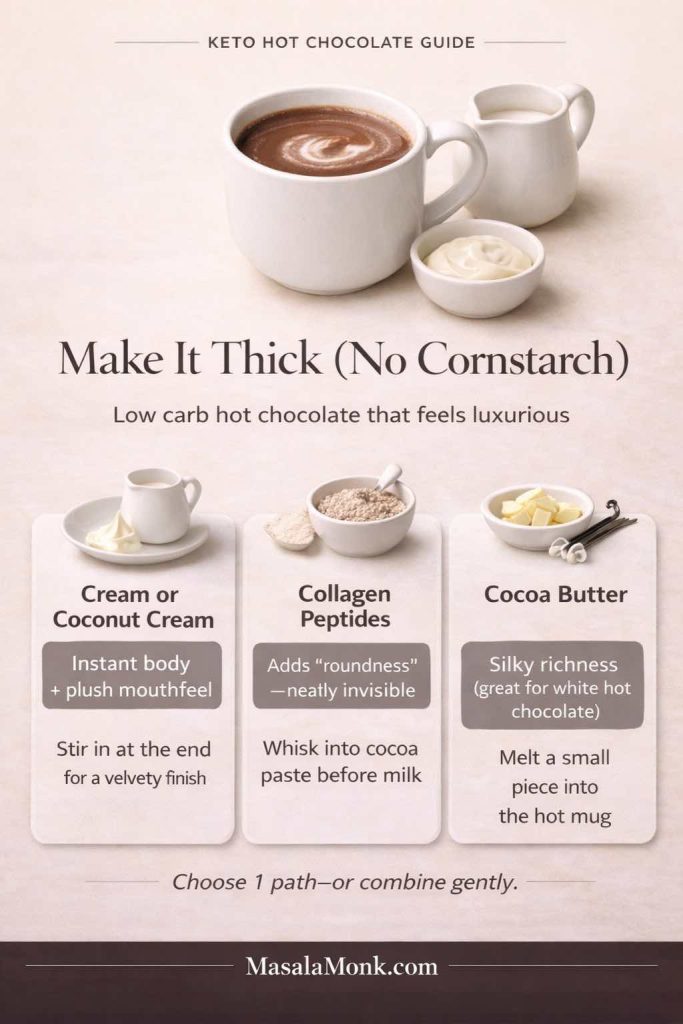
For a cozy pairing, serve a small slice with keto hot chocolate instead of a sugary drink.

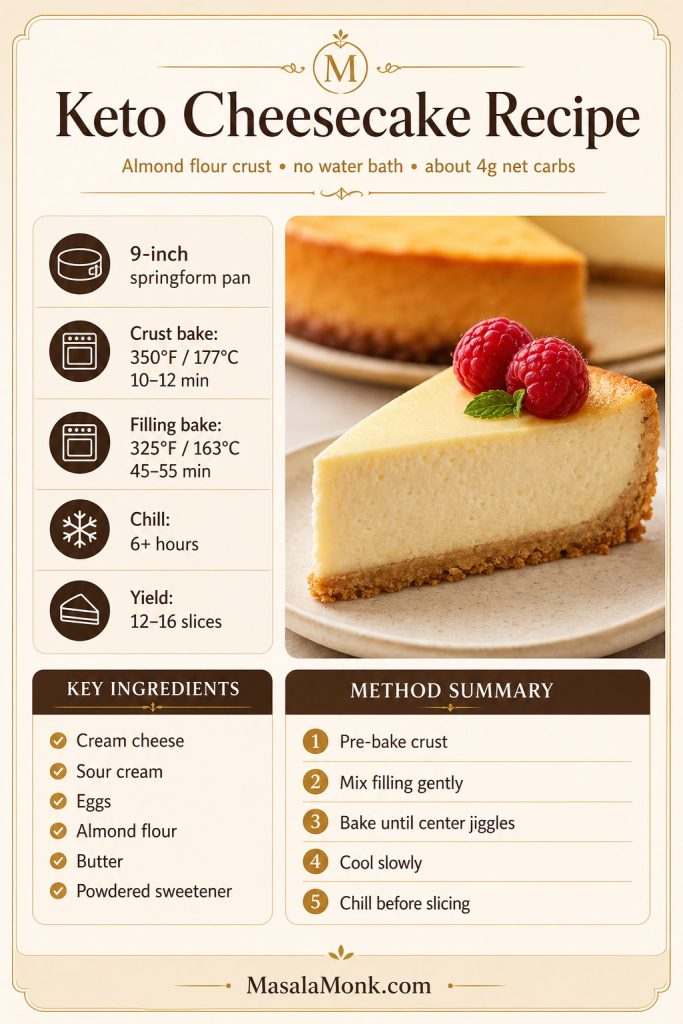
Keto Cheesecake Recipe Card

This creamy keto cheesecake has a buttery almond flour crust, smooth sugar-free cream cheese filling, and a slow-cooling method that helps prevent cracks. It is rich, low carb, gluten-free, and made without a water bath.

Prep Time 25 minutes
Crust Bake 10–12 minutes
Cheesecake Bake 45–55 minutes
Cooling Time 1½–2 hours
Chill Time 6 hours minimum, overnight best
Total Time About 9 hours, plus overnight chill if preferred
Yield 12–16 slices
Pan 9-inch springform
Net Carbs About 4g per 1 of 16 slices
Water Bath Not required
Method Baked cheesecake
Difficulty Easy with slow cooling

Ingredients

For the Almond Flour Crust

  • 2 cups / about 224 g blanched almond flour
  • 1/3 cup / 75 g unsalted butter, melted
  • 2 tablespoons powdered keto sweetener
  • 1 teaspoon vanilla extract
  • 1/4 teaspoon fine salt

For the Cheesecake Filling

  • 32 oz / 907 g full-fat brick cream cheese, softened
  • 1 cup to 1 1/4 cups powdered keto sweetener, preferably allulose or monk fruit/allulose blend
  • 1/2 cup / 120 g sour cream, room temperature
  • 3 large eggs, room temperature
  • 1 tablespoon fresh lemon juice
  • 2 teaspoons vanilla extract
  • 1/4 teaspoon fine salt

Instructions

  1. Prepare the pan. Line the bottom of a 9-inch springform pan with parchment paper and lightly grease the sides.
  2. Heat the oven for the crust. Preheat the oven to 350°F / 177°C.
  3. Make the crust. Stir almond flour, melted butter, sweetener, vanilla, and salt until the mixture looks like damp crumbs.
  4. Press and bake the crust. Press the crust firmly into the pan using the bottom of a cup. Bake for 10–12 minutes, until lightly golden. Let it cool slightly.
  5. Lower the oven temperature. Reduce the oven to 325°F / 163°C.
  6. Beat the cream cheese. In a large bowl, beat softened cream cheese until smooth. Scrape the bowl well.
  7. Add sweetener. Add 1 cup powdered keto sweetener and beat until smooth. Taste before adding eggs and add up to 1/4 cup more sweetener if you prefer a sweeter cheesecake.
  8. Add sour cream and flavorings. Mix in sour cream, lemon juice, vanilla, and salt until smooth.
  9. Add eggs gently. Add eggs one at a time on low speed, mixing only until each egg is incorporated. Do not overmix.
  10. Fill the pan. Pour the filling over the cooled crust and smooth the top.
  11. Bake. Bake at 325°F / 163°C for 45–55 minutes, until the edges are set and the center still jiggles softly.
  12. Cool slowly. Turn off the oven, crack the door open, and leave the cheesecake inside for 20–30 minutes.
  13. Cool at room temperature. Move the cheesecake to the counter and cool completely.
  14. Chill. Cover and refrigerate for at least 6 hours, preferably overnight.
  15. Slice and serve. Run a thin knife around the edge before releasing the springform ring. Slice cold with a sharp knife.

Recipe Notes

  • For the smoothest filling, use powdered sweetener rather than coarse granulated sweetener.
  • Do not overbake. The center should still wobble gently when the cheesecake comes out of the oven.
  • For a crustless version, skip the crust, line and grease the pan well, and start checking the bake around 40–45 minutes.
  • For a more New York-style texture, chill the cheesecake overnight and serve toppings on the side rather than mixing fruit into the filling.
  • For the lowest-carb version, make the cheesecake crustless and slice it into 16 smaller portions.
  • Nutrition will vary by brand of sweetener, cream cheese, sour cream, and almond flour.

Approximate Nutrition

Approximate per 1 of 16 slices: 330–360 calories, 7–9 g protein, 32–35 g fat, and about 4 g net carbs. For 12 larger slices, net carbs are closer to about 5 g per slice. Exact values depend on the brands used.

Keto cheesecake recipe card with a cheesecake slice, almond flour crust, no water bath note, baking temperatures, chill time, and key ingredients.
Save this keto cheesecake recipe card for the key numbers: almond flour crust, 9-inch pan, gentle bake, slow cooling, and at least 6 hours of chilling.

Still deciding? Read FAQs · Back to guide

FAQs

Is cheesecake keto?

Traditional cheesecake is usually not keto because the filling contains sugar and the crust is often made with graham crackers. This version uses an almond flour crust and keto sweetener to keep the carbs low.

Is keto cheesecake zero carb?

No. It is usually low carb, not zero carb. Dairy, eggs, almond flour, lemon juice, and some sweeteners can all add small amounts of carbs. For the lowest-carb version, make it crustless and keep toppings simple.

How many net carbs are in keto cheesecake?

This recipe has about 4 g net carbs per slice if cut into 16 slices, or about 5 g net carbs if cut into 12 larger slices. The exact number depends on the almond flour, cream cheese, sour cream, and sweetener brands you use.

What can I use instead of almond flour?

The easiest option is to make the crustless version. You can also use a tested nut-free crust, but coconut flour should not be swapped 1:1 for almond flour because it absorbs much more moisture.

How do I make keto cheesecake no crust?

For keto cheesecake no crust, skip the almond flour base, line the pan with parchment, grease the sides well, and pour the filling directly into the pan. Start checking the cheesecake a little earlier because there is no crust layer.

How is no-bake keto cheesecake different?

A no-bake version uses a different filling structure. It usually sets with whipped cream and long chilling instead of eggs and baking, so the texture is softer and more mousse-like.

Do I need a water bath for keto cheesecake?

A full water bath is not required. This recipe uses room-temperature ingredients, gentle baking at 325°F / 163°C, careful mixing after the eggs go in, and slow cooling. For extra insurance, place a pan of hot water on the lower oven rack.

What is the best sweetener for keto cheesecake?

Powdered allulose or a powdered monk fruit/allulose blend gives the smoothest filling. Coarse granulated sweeteners can taste gritty, and some erythritol-heavy blends can leave a cooling finish.

Why did my keto cheesecake crack?

Cracks usually happen because the filling was overmixed, the cheesecake was overbaked, or it cooled too quickly. Use room-temperature ingredients, mix gently after adding eggs, pull it from the oven while the center still jiggles, and cool it slowly.

Why is my cheesecake grainy?

Grainy cheesecake often comes from coarse sweetener or a sweetener that crystallizes as it chills. Use powdered sweetener in the filling and avoid overmixing once the eggs are added.

Does coconut flour work for the crust?

Not as a direct swap. Coconut flour is much more absorbent than almond flour, so it needs a different ratio of fat and liquid. For this recipe, almond flour is the better choice unless you are using a tested coconut flour crust.

Ricotta vs cottage cheese: do they work?

Both can work in separate cheesecake styles, but the texture will be different. Ricotta gives a lighter, slightly grainier cheesecake, while cottage cheese needs blending until completely smooth. For this classic version, brick cream cheese gives the best result.

How long do mini keto cheesecakes bake?

Mini cheesecakes usually bake faster than a full cheesecake, often around 15–22 minutes depending on size. Use a muffin pan with liners, watch for set edges and slightly wobbly centers, then chill well before serving.

How do you freeze keto cheesecake?

Freeze it only after the cheesecake has chilled completely. Wrap slices individually or freeze them on a parchment-lined tray first, then store them in an airtight container. Thaw overnight in the refrigerator for the best texture.

Posted on 12 Comments

Keto Hot Chocolate Recipe (Sugar-Free Hot Cocoa) + Best Homemade Mix

Blog cover image for “Keto Hot Chocolate Recipe” showing a creamy mug of sugar-free hot cocoa with cinnamon on a white saucer, alongside a jar of homemade keto hot chocolate mix with scoop and cocoa paste tools, highlighting dairy-free, protein, bulletproof, and Mexican options.

Some cravings don’t show up as hunger. They arrive as mood, as temperature, as memory—and that’s exactly why keto hot chocolate can feel like such a small, perfect reset.

One minute you’re fine, and the next you want a warm mug in your hands—something chocolatey, soothing, and faintly indulgent. Not a sad substitute. Not a watery brown drink that tastes like “diet.” You want the kind of hot cocoa that feels like it belongs to your evening.

That’s where keto hot chocolate earns its place. When it’s made with the right method, it’s smooth and glossy, the chocolate flavor is deep, and the sweetness is dialed in instead of screaming. Even better, the same base can become a keto hot chocolate mix, a keto protein hot chocolate, a dairy free keto hot chocolate, a bulletproof keto hot chocolate, or a cozy Mexican hot chocolate—without turning your kitchen into a science project.

Why most “low carb hot cocoa” disappoints

Before we get into variations, it helps to name the real enemy: grit. Almost every disappointing mug of low carb hot cocoa fails because the cocoa never truly dissolves and the cup never gets body. The fix is surprisingly simple, and once you learn it, you’ll stop thinking of this as a “keto recipe” and start thinking of it as your new default.

Infographic explaining why low carb hot cocoa gets gritty, showing a “gritty” mug with undissolved cocoa versus a “silky” mug made by creating a cocoa paste first, with quick steps to make smooth keto hot chocolate.
If your low carb hot cocoa tastes gritty, it’s usually because cocoa doesn’t dissolve—it hydrates. This quick guide shows the fix: make a glossy cocoa paste first, then add milk slowly and warm gently for silky keto hot chocolate every time. Save it for your next mug.

Along the way, we’ll keep things grounded in what matters: ingredients, technique, and comfort. We’ll also sprinkle in a few credible references where they genuinely help—like what cocoa is, why labels can be confusing, and where carb counts come from—using sources such as the USDA nutrition database and straightforward label guidance from the FDA. For a broader cocoa primer, you can also check MasalaMonk’s guide to cacao vs chocolate vs dark chocolate.

What you’re really building here is a ritual you can repeat. The first time you make it, you might measure. The second time, you’ll start adjusting by instinct. By the third or fourth mug, you’ll know exactly how rich you like it, what sweetener tastes best to you, and which “finish” makes the whole thing feel like a treat rather than just a warm drink.

Also, it’s worth saying out loud: hot chocolate doesn’t have to be loud to be good. A perfectly balanced cup can be subtle—deep cocoa, gentle sweetness, and enough creaminess to feel comforting without becoming heavy. That kind of cup is often the one you keep coming back to, especially when you want something warming but still want to sleep well afterward.

Also Read: 10 Low Carb Chia Pudding Recipes for Weight Loss (Keto, High-Protein, Dairy-Free)


Keto Hot Chocolate: The “No-Grit” Recipe That Changes Everything

Let’s start with the mug you’ll make most often: classic keto hot chocolate (or keto hot cocoa, if you grew up calling it that). The goal is a creamy, sugar free hot chocolate that feels like the real thing—because it is, just built differently.

There are two small moves that make a big difference:

  1. Make a cocoa paste first.
  2. Add body on purpose, not by accident.

When cocoa hits liquid the wrong way, it forms dry floating clumps that never truly disappear. You can whisk forever and still end up with that sandy finish at the bottom of the mug. On the other hand, when you hydrate cocoa into a paste before adding your milk, the drink turns silky almost immediately. It’s a small step, yet it’s the reason some cups taste café-level and others taste like regret.

Photoreal recipe card for keto hot chocolate (no-grit method) showing a steaming mug on a saucer with cinnamon stick and cream pitcher, plus ingredients and steps for creamy sugar-free hot cocoa.
Creamy keto hot chocolate, the no-grit way: whisk cocoa into a glossy paste first, then add milk and warm gently for smooth sugar-free hot cocoa every time. Save this quick recipe card for cozy low carb hot chocolate nights.

Here’s the other subtle win: once the cocoa is hydrated properly, you can use less sweetener and still feel satisfied. That’s because the flavor reads fuller. In contrast, a gritty cup almost demands extra sweetness to “cover” the bitterness—yet it rarely works. So the paste method doesn’t just improve texture; it also makes the whole drink easier to balance.

Another quiet detail: the temperature you serve it at matters. Too hot, and you’ll taste bitterness and sweetener edges more sharply. Slightly cooler—still steaming, still cozy—and the chocolate tastes rounder. It’s a small shift, yet it’s one of those things you notice once you’ve had a truly good cup.

Ingredients for Keto Hot Cocoa (1 big mug)

You can keep this simple or customize it. Start with the basics:

  • 1 to 1½ tablespoons unsweetened cocoa powder
  • sweetener of choice (powdered blends dissolve the smoothest)
  • a pinch of salt
  • milk of choice (dairy or unsweetened almond milk are common)
  • optional: a little heavy cream or coconut cream for richness
  • optional: vanilla for a finished flavor

If you’re someone who likes tight carb math, the simplest approach is to track the cocoa and any dairy you use. For a reliable reference point, the USDA FoodData Central database is a solid baseline for cocoa powder nutrition and similar staples.

Now, let’s talk taste. Cocoa can read bitter if sweetness isn’t shaped, and sweetener can read “sharp” if cocoa isn’t supported. The little pinch of salt is what makes it taste like hot chocolate instead of chocolate water. It doesn’t make it salty; it makes it complete.

To make this even more forgiving, think of your ingredients in three roles:

  • Cocoa = the backbone. This is your “chocolate identity.”
  • Sweetener = the contour. It doesn’t have to dominate; it just smooths the edges.
  • Fat/creaminess = the body. This is what turns cocoa into cocoa.

Once you see it that way, you can tweak without fear. If your cup tastes thin, it’s usually body, not cocoa. If your cup tastes harsh, it’s often salt, vanilla, or the sweetener choice—not that you “did it wrong.”

A quick note on cocoa powder choices: natural cocoa tends to be brighter and sometimes fruitier, while Dutch-process often reads smoother and deeper. Either can be perfect. The “best” one is whichever makes you want a second sip.

Also Read: Keto Chips: Best Low-Carb Snacks (For Salsa, Dips & Nachos)

How to Make Keto Hot Chocolate (Step-by-Step Recipe)

Step 1: Make the cocoa paste (this is the whole secret)

Add cocoa powder, sweetener, and a pinch of salt to a small saucepan. Then pour in 2–3 tablespoons of hot water (or hot milk) and whisk until you get a smooth, glossy paste.

Step 1 of 4 recipe card for keto hot chocolate showing a whisk making glossy cocoa paste in a saucepan with cocoa powder, sweetener, and salt, plus instructions to add 2–3 tablespoons hot water and whisk until smooth to prevent gritty hot cocoa.
Step 1 is the make-or-break move for silky keto hot chocolate: whisk cocoa, sweetener, and salt into a glossy paste with a few tablespoons of hot water before you add milk. This quick step prevents gritty low carb hot cocoa and makes every mug taste smoother—save it for next time.

You’re looking for a texture that resembles chocolate syrup—thick, shiny, and uniform. This step matters because cocoa doesn’t “dissolve” the way sugar does; it needs to be hydrated. When you turn it into a paste first, you prevent the floating cocoa clumps that make low carb hot cocoa taste gritty.

If the paste feels stubborn at the start, keep going. Cocoa often takes a few extra seconds to fully drink in the liquid. If needed, add one teaspoon more hot water and whisk again. The goal is something that moves like satin, not something stiff like dough.

Step 2: Loosen the paste with a splash of milk

Once the paste is smooth, add a small splash of milk while whisking constantly. This step bridges the gap between thick paste and silky drink. When you do it slowly, the cocoa stays emulsified, and the texture stays uniform.

Step 2 of 4 keto hot chocolate recipe card showing milk being poured into a saucepan of cocoa paste while whisking, with instructions to splash in a little milk first, whisk smooth, then pour the rest gradually for silky low carb hot cocoa.
Step 2 is where keto hot chocolate turns from paste to a smooth mug: add milk slowly while whisking so the cocoa stays silky and never clumps. Save this step card for creamy sugar-free hot cocoa that tastes café-level every time.

After that first splash, add the rest of the milk in a steady stream. If you’re using cream or coconut cream for extra body, add it here as well so it warms through and blends in.

At this point, you can choose the mood of your cup:

  • For a richer, more “drinking chocolate” feel, go heavier on cream.
  • For a lighter, more sippable mug, use more milk and skip extra fat.

Both versions can still be keto hot chocolate; they simply land differently.

Step 3: Warm gently until steaming (never boiling)

Place the saucepan over low to medium heat and warm the mixture until it’s steaming and completely smooth. Keep whisking occasionally, especially around the edges, where cocoa can cling.

Step 3 of 4 keto hot chocolate instruction card showing a saucepan of smooth hot cocoa being gently heated with steam rising and a whisk, with text advising to warm on low-medium and avoid boiling for better flavor.
Step 3 keeps keto hot chocolate tasting rich instead of harsh: warm the cocoa gently until it’s steaming, whisk occasionally, and stop before it boils. This simple move protects the chocolate flavor and keeps sugar-free hot cocoa smooth—save this step card for consistent results.

Avoid boiling. Boiling can flatten the chocolate aroma and make certain sweeteners taste sharper than they should. Moreover, gentle heat keeps dairy tasting fresh instead of “cooked,” which is especially noticeable in a simple sugar free hot chocolate where there’s nowhere for off-flavors to hide.

As it warms, you’ll see the texture change—first thinner, then suddenly velvety once everything is fully integrated. That’s your cue that the cup is ready.

Step 4: Finish, taste, and adjust with intent

Turn off the heat and stir in vanilla (if you’re using it). Then taste immediately, while it’s still warm, because sweetness and bitterness show up differently as the drink cools.

Step 4 of 4 keto hot chocolate guide card showing a mug of hot cocoa being stirred with vanilla nearby, plus quick fixes to adjust sugar-free hot cocoa: add salt if flat, sweetener if bitter, cream if thin, or more milk if too strong.
Step 4 is how keto hot chocolate becomes “perfect for you”: taste, then tweak—pinch of salt for flat, a touch more sweetener for bitter, cream for body, or a splash of milk if it’s too strong. Save this step card for consistently smooth, sugar-free hot cocoa.

Use these small, targeted fixes rather than big swings:

  • If it tastes flat: add a tiny extra pinch of salt.
  • If it tastes too bitter: add a touch more sweetener.
  • If it’s too thin: add a spoon of cream or coconut cream and whisk smooth.
  • If it’s too intense: add a splash more milk to soften it.

Once it tastes right, that’s your foundation. From here, the drink moves into “best keto hot chocolate” territory—not by piling on more cocoa, but by polishing the cup with aroma and structure.

Make it feel “finished” (then add a tiny flourish)

This is the moment to decide what kind of hot cocoa you want to drink tonight. If you want it darker and more intense, keep it simple and cocoa-forward. Then if you want it softer and more dessert-like, add a whisper of vanilla or a little extra cream. And if you want it to feel like a café mug, focus on texture—whisk a bit longer, or froth it briefly. That tiny choice—intense vs cozy, clean vs creamy—changes the experience more than any complicated ingredient ever will.

Once it tastes right, add a finishing touch that feels luxurious without changing the whole drink: a light dusting of cinnamon on top, a few drops of vanilla stirred in at the very end, or a small swirl of cream poured in last so it ribbons through the mug. It’s not about making it fancy; it’s about making it feel like yours.

A small note for cocoa lovers: darker chocolate products tend to be richer in cocoa solids than milk chocolate versions. If you enjoy a quick overview of why dark chocolate is typically the “stronger cocoa” choice, Harvard’s nutrition news has a readable explainer on dark chocolate and cocoa compounds.

Also Read: Garlic & Paprika Cabbage Rolls (Keto-Friendly Recipes) – 5 Bold Savory Twists


Sweetness Without the Weird Aftertaste (Monk Fruit, Allulose, and Friends)

A lot of people land on monk fruit because they want a sugar free keto hot chocolate that doesn’t feel like compromise. Monk fruit can work beautifully—especially in blends—but the experience depends on what it’s paired with.

Here’s the practical truth: some sweeteners dissolve better, and some sweeteners taste better. Occasionally, the one that dissolves beautifully tastes slightly different than what you expect. That’s not failure; it’s just chemistry and palate.

In practice, you’re aiming for a sweetness that feels like warmth, not candy. If your cup tastes sweet but not comforting, it’s often missing vanilla, salt, or body. On the flip side, if your cup tastes rich but a little too bitter, a smaller adjustment to sweetener can fix it without needing to rebuild the whole drink.

Photoreal infographic titled “Keto Hot Chocolate Sweetener Guide” comparing monk fruit blend, allulose, erythritol, and stevia for sugar-free hot cocoa, with notes on taste, texture, and which options dissolve best in hot drinks.
Not all sweeteners behave the same in keto hot chocolate. Use this quick guide to pick by taste and texture—monk fruit for clean sweetness, allulose for a softer sugar-like feel, erythritol if you pair it with vanilla/cream, and stevia when you use less. Save it for smoother sugar-free hot cocoa every time.

Hot Chocolate With Monk Fruit: How to Make It Taste Natural

If you’re using monk fruit, choose a powdered blend if possible. Powder dissolves quickly, while granulated sweeteners can leave a faint texture. If your monk fruit blend includes erythritol, it may cool slightly on the tongue. That cooling effect can be minimized by:

  • warming gently instead of boiling,
  • adding vanilla,
  • rounding the cup with a spoon of cream or coconut cream,
  • and using the cocoa paste method so the drink is smooth to begin with.

Allulose is another option that can give a softer sweetness and a more “classic” hot cocoa vibe. Meanwhile, stevia can work, though it usually benefits from vanilla and a richer base.

If you’re experimenting, do it in small changes. Add half the sweetener you think you need, taste, then decide. Because once cocoa is balanced, the cup often needs less sweetness than you expect.

Instead of chasing “perfect,” build the cup you want: a cozy low carb hot chocolate that tastes like chocolate first and sweet second.

Also Read: 10 Low Carb Chia Pudding Recipes for Weight Loss (Keto, High-Protein, Dairy-Free)


Keto Hot Chocolate Mix: A Homemade Powder You’ll Actually Keep on Hand

Now for the part that makes this feel easy: the jar. A homemade keto hot chocolate mix (or low carb cocoa mix) turns a craving into a one-minute ritual.

This approach is also ideal if you like the idea of hot chocolate packets, but you want something cleaner and more customizable. It’s the same comfort, just made at home and adjusted to your taste.

The real joy here is that you can build a mix that matches your personality:

  • a darker, less-sweet mix you use most nights,
  • a “holiday” mix with cinnamon and vanilla,
  • or a richer blend for weekends when you want the mug to feel like dessert.
Photoreal recipe card for keto hot chocolate mix (DIY powder) showing a jar of cocoa mix with scoop and a mug of hot cocoa, plus dry mix ingredients, per-mug directions, and storage notes for low carb hot chocolate.
Make-ahead keto hot chocolate mix you can keep in the pantry: whisk cocoa, sweetener, and salt into a DIY powder, then scoop 2 tablespoons per mug for quick, creamy sugar-free hot cocoa anytime. Save this recipe card for easy low carb hot chocolate all winter.

Homemade Keto Hot Chocolate Mix (Recipe for 10–20 Servings)

In a bowl, whisk together:

  • 1 cup unsweetened cocoa powder
  • ¾ to 1 cup powdered sweetener (adjust to preference)
  • 1½ teaspoons fine salt
  • optional: cinnamon, instant espresso, vanilla powder
  • optional for extra body: collagen peptides

Once it’s evenly mixed, pour it into a dry jar with a tight lid.

If you want the jar to feel extra “instant,” you can split your mix into two layers: a base cocoa blend and a second “finishing” blend (like vanilla powder and cinnamon). Then you can scoop either one depending on what mood you’re in. It’s a small move, yet it keeps the ritual fun.

How Much Keto Hot Cocoa Mix Per Mug?

Start with 2 tablespoons per mug. Then adjust:

  • 1½ tablespoons for a lighter cup
  • 2½ to 3 tablespoons for a richer cup

To keep it silky, use the same trick as the fresh version: stir the mix with a splash of hot water to form a paste, then add hot milk.

If you prefer a lighter drink, use more milk and less mix. If you prefer a deeper “drinking chocolate” feeling, use more mix and a slightly richer base. Either way, the paste step keeps the experience smooth.

When You Want “No Carb Hot Chocolate Mix” Results

People often say “no carb hot chocolate” or “zero carb hot chocolate,” yet cocoa itself contains carbohydrates. The realistic aim is “very low net carbs,” not literal zero.

That said, you can keep it extremely low by:

  • using water + a bit of cream (instead of a full mug of milk),
  • choosing a sweetener that works for you,
  • and using cocoa strategically rather than excessively.

When labels get confusing, it helps to understand how “added sugars” appear on packaging. The FDA has a clear explanation of added sugars on the Nutrition Facts label. Even if you mostly make your own mix, that knowledge helps when you’re comparing store options.

Also Read: Keto Flour: Guide to Low-Carb Flours That Bakes Like the Real Thing


Low Carb Hot Chocolate That Feels Thick and Luxurious (Without Cornstarch)

Traditional hot chocolate mixes often rely on starches for body. Keto versions usually don’t. That’s why some cups taste thin.

If you want a low carb low sugar hot chocolate that feels like dessert in a mug, add thickness intentionally. Here are a few easy paths:

Photoreal infographic titled “Make It Thick (No Cornstarch)” showing a mug of low carb hot chocolate and three ways to add body—cream or coconut cream, collagen peptides, and cocoa butter—with short tips for thick, luxurious sugar-free hot cocoa.
Want low carb hot chocolate that feels thick and luxurious without cornstarch? Use one of these easy paths: cream or coconut cream for instant body, collagen peptides for smooth “roundness,” or cocoa butter for silky richness (especially for sugar-free white hot chocolate). Save this guide for dessert-level hot cocoa texture.

1) Cream or Coconut Cream

A spoonful of cream makes a dramatic difference. Coconut cream does the same for dairy-free cups.

If you like your cup extra velvety, add the cream at the end rather than at the beginning. That way the flavor stays bright and the texture feels plush without tasting overly “cooked.”

2) Collagen Peptides

Collagen is nearly invisible in hot cocoa and adds a subtle “roundness” without making it chalky. It’s also an easy bridge into a high protein low carb hot chocolate.

To make collagen blend smoothly, stir it into your cocoa paste before the milk goes in. That way it’s hydrated and hidden within the chocolate base.

3) Cocoa Butter (Especially for White Hot Chocolate)

Cocoa butter adds richness and a smooth mouthfeel. It’s especially helpful when you’re chasing a sugar free white hot chocolate that tastes like a real white cocoa instead of vanilla milk.

A little goes a long way. Even a small amount can shift the drink from “nice” to “silky.”

Also Read: Almond Flour Pancakes (Easy Recipes) Fluffy, High-Protein, Keto & More


Keto Protein Hot Chocolate (High-Protein, Low-Carb, and Still Cozy)

If you’ve ever tried to stir protein powder into hot liquid and watched it turn into a lumpy mess, you’re not alone. Protein hot chocolate can be fantastic, but it needs a gentler approach.

The goal is a keto protein hot chocolate that’s warm, filling, and smooth—almost like a mug you could have after dinner when you want something comforting but also want to stay on track.

You can also choose the vibe here. If you want it to feel more like a dessert, increase richness and keep sweetness moderate. If you want it to feel more like a post-workout drink, keep it lighter and focus on smooth mixing.

Photoreal recipe card for keto protein hot chocolate showing three mugs of hot cocoa, a bowl of protein powder with spoon, and a frother, with ingredients and steps for a smooth high-protein low-carb hot chocolate using the slurry-first method.
Keto protein hot chocolate that stays smooth: make a quick cocoa paste, then whisk your protein into a warm slurry before pouring—so you get high-protein, low-carb hot cocoa with zero clumps. Save this recipe card for an easy post-workout or cozy night-in mug.

The Easy Anti-Clump Method

Instead of adding protein directly to hot cocoa, do this:

  1. Add your protein powder to a mug.
  2. Stir in a small splash of warm liquid to form a smooth slurry.
  3. Then pour the hot chocolate in slowly while whisking.

This works for whey isolate, casein, and many vegan blends.

If your protein powder tends to taste “plain,” vanilla matters even more here. A touch of vanilla makes chocolate read more chocolatey and makes sweetener taste less sharp. Additionally, a pinch of salt can make protein flavors taste smoother, especially in chocolate drinks.

If you like the idea of building a high-protein morning routine, pairing a warm protein cocoa with something prep-friendly can feel surprisingly satisfying. For example, MasalaMonk’s high protein overnight oats can work as a broader “macro” companion, even if you personally keep the oats version for higher-carb days.

Also Read: Keto pancakes that actually taste like pancakes


Dairy Free Keto Hot Chocolate (Almond Milk and Beyond)

Dairy-free doesn’t have to mean disappointing. In fact, a dairy free keto hot chocolate can be one of the smoothest versions—especially if you build body thoughtfully.

If you’ve ever made almond milk hot cocoa and thought, “It’s good, but it feels a bit thin,” you’re not imagining it. Almond milk is naturally lighter. Once you know that, you can compensate in a way that still tastes clean.

Photoreal recipe card for dairy-free keto hot chocolate made with unsweetened almond milk and coconut cream, showing a steaming mug with almond milk bottle and coconut cream, plus ingredients and steps for creamy sugar-free hot cocoa without dairy.
Dairy-free keto hot chocolate that still tastes creamy: almond milk hot cocoa made silky with a cocoa paste and finished with coconut cream for café-level body. Save this recipe card for an easy sugar-free, low carb hot drink on cozy nights.

Almond Milk Hot Chocolate Keto Style

Unsweetened almond milk is a common base because it’s light and easy to find. However, almond milk alone can taste thin in hot cocoa. To fix that:

  • add coconut cream,
  • or add a touch of cocoa butter,
  • or blend briefly to create a richer mouthfeel.

For an especially smooth dairy-free cup, warm your almond milk gently and avoid boiling. Almond milk can taste slightly “toasted” if overheated, which can make cocoa taste harsher.

Macadamia milk can be wonderfully creamy as well, and coconut milk beverage offers a naturally fuller texture.

For plant-forward dessert direction that still feels aligned with this cozy theme, you might also enjoy a gentle internal hop into something like MasalaMonk’s keto vegan dessert ideas—especially if you’re leaning into coconut-based sweets and warm spices.

Also Read: Eggless Yorkshire Pudding (No Milk) Recipe


Bulletproof Keto Hot Chocolate (Frothy, Filling, and Surprisingly Comforting Recipe)

Sometimes you don’t just want hot cocoa—you want something that sticks with you. Bulletproof hot chocolate is that version.

It’s still keto hot chocolate, but it leans into satiety and warmth. It’s the mug you make when you want a steady, cozy feeling, not a sugar spike.

This version also tends to feel more “luxurious” than you expect because blending creates a café-style foam. When it’s done well, the texture is almost like a hot chocolate latte.

Photoreal recipe card for bulletproof keto hot chocolate showing a frothy mug of hot cocoa with butter, a small bottle of MCT oil, and a frother, plus ingredients and steps for a creamy low carb hot drink that blends smooth with no oily layer.
Bulletproof keto hot chocolate for extra-cozy mornings: start with a strong cocoa base, add butter (and optional MCT), then blend until frothy for a creamy, filling sugar-free hot cocoa that stays emulsified. Save this recipe card for a warm low carb hot drink that actually keeps you satisfied.

Bulletproof Hot Chocolate Formula (One Mug)

Start with a slightly stronger base (so it doesn’t get diluted by fat):

  • make keto hot cocoa using water plus a splash of milk,
  • then add butter or ghee,
  • optionally add a small amount of MCT oil,
  • blend until frothy.

Blending is the key. Otherwise, you’ll get an oil slick that feels unpleasant.

A helpful trick: start small with fats, especially MCT oil. You can always add more next time. The most satisfying cup is often the one that feels creamy and stable rather than overly rich.

When you blend it for even 10–15 seconds, the drink becomes foamy and luxurious—almost like a café drink that happens to be low carb.

Also Read: Crock Pot Chicken Breast Recipes: 10 Easy Slow Cooker Dinners (Juicy Every Time)


Keto Mexican Hot Chocolate (Warm Spice, Deep Cocoa, Zero Fuss)

Mexican hot chocolate isn’t about heat for heat’s sake. It’s about warmth and aroma. The spice should feel like a soft glow behind the cocoa.

Photoreal recipe card for keto Mexican hot chocolate showing a mug of hot cocoa with a cinnamon stick and small bowls of cinnamon and chili powder, with ingredients and steps for a warm spiced low carb hot cocoa (cinnamon + a touch of chili).
Keto Mexican hot chocolate is all about warmth, not heat: cinnamon deepens the cocoa, while a tiny pinch of chili makes the flavor feel richer and more festive. Save this recipe card for a cozy, sugar-free hot cocoa twist that’s perfect for cold nights.

To make keto Mexican hot chocolate, add:

  • cinnamon
  • a tiny pinch of chili or cayenne
  • vanilla
  • optionally a tiny pinch of nutmeg

You can also add these to your jar mix and create a second flavor jar for easy variety.

If you want the spice to feel more rounded, cinnamon plus vanilla is the core. Chili is optional, and it should be used with restraint. One tiny pinch can be enough to make the cocoa taste deeper without tasting “spicy.”

This version is especially good on nights when you want something different but don’t want to think too hard.

Also Read: Sourdough Starter Recipe: Make, Feed, Store & Fix Your Starter (Beginner Guide)


White Hot Chocolate Sugar Free (The Cozy Vanilla-Chocolate Recipe)

White hot chocolate is a special case. It doesn’t rely on cocoa powder. Instead, it relies on cocoa butter and milk solids in traditional versions.

A sugar free white hot chocolate aims to mimic that creamy, vanilla-forward richness without sugar.

Because it’s not cocoa-powder-based, it tastes softer and more fragrant. It’s the mug you make when you want comfort but don’t necessarily want “dark chocolate energy.”

Photoreal recipe card for sugar-free white hot chocolate showing a creamy mug topped with spice, cocoa butter pieces, sweetener, and vanilla, with ingredients and steps for a vanilla-rich keto-friendly white hot cocoa.
Sugar-free white hot chocolate that tastes like the cozy café version: warm milk, melt in cocoa butter, then finish with vanilla and a pinch of salt for a creamy keto-friendly white hot cocoa. Save this recipe card for an easy low carb hot drink when you want something lighter than classic cocoa.

Simple Sugar-Free White Hot Chocolate (One Mug)

  • warm milk (dairy or unsweetened almond milk)
  • melt in cocoa butter
  • sweeten to taste
  • add vanilla and a pinch of salt
  • whisk until glossy

If you’re going dairy-free, coconut cream can help bring the richness back.

This is also one of the moments where “labels” matter if you’re buying cocoa butter chips or similar ingredients. Even when something says sugar free, it’s worth understanding how sugars are listed and what’s being used for bulk. The FDA’s guidance on added sugars can be surprisingly clarifying.

Also Read: Peanut Butter Fudge: Recipes & Guide (8 Methods + Easy Variations)


Low Glycemic Hot Chocolate: What That Actually Means in Practice

“Low glycemic” can mean different things depending on who’s using the phrase. If you’re looking for a low glycemic hot chocolate, what you’re often trying to do is avoid ingredients that behave like quick sugar in the body.

Low glycemic hot chocolate isn’t a magic ingredient—it’s a practical approach: start with an unsweetened base, sweeten in a way that suits you, and skip packaged “mystery fillers.” Save this guide for low glycemic hot cocoa choices that keep your mug cozy and your decisions simple.

Instead of turning this into a lecture, it’s enough to understand two basics:

  • Glycemic index refers to how carbohydrate-containing foods affect blood sugar.
  • Glycemic load considers portion size as well.

If you want a clear, neutral explanation, Oregon State’s Linus Pauling Institute offers a helpful overview of glycemic index and glycemic load.

For a printable reference that can support your broader meal planning, MasalaMonk also has a low glycemic index foods list. It’s a handy resource if your “warm drink” habit tends to connect with snack choices afterward.

In daily life, “low glycemic hot cocoa” usually comes down to three practical choices:

  • keep your base unsweetened (cocoa and milk choices matter),
  • sweeten with something that suits your body and preferences,
  • and avoid mystery fillers that can sneak into packaged mixes.

Homemade versions make this easy because you control the whole story.

Also Read: Manhattan Cocktail Recipe (Classic + 6 Variations)


When You’re Craving Chocolate but Don’t Want a “Dessert Spiral”

This is where keto hot chocolate becomes more than a recipe. It becomes a tool.

Sometimes you want chocolate because you’re tired, bored, cold, or simply craving comfort. A warm mug can satisfy that desire in a way that a random snack often can’t. Still, what you pair it with matters. Not in a perfectionist way—just in a “how do I want to feel after this?” way.

Infographic showing keto hot chocolate pairing ideas to avoid a dessert spiral, with a mug of hot cocoa and three options: warm chocolate syrup drizzle, salty crunchy seaweed snack, or a cookie for a cozy companion.
When you’re craving chocolate, a keto hot chocolate can satisfy the comfort without turning into a snack spiral. Use this pairing guide to choose your vibe: dessert-like with a warm drizzle, a crunch reset with something salty, or a cozy companion cookie. Save it for low carb hot cocoa nights when you want the craving to feel “finished.”

If you want something truly dessert-like

A drizzle can turn the mug into a café drink. If you enjoy that idea, MasalaMonk’s 3-minute homemade chocolate syrup is a useful technique reference for getting a smooth, glossy chocolate finish. Even if you adapt the sweetener to suit your style, the method itself is gold.

If you want to take it one step further without making it fussy, warm the syrup slightly before drizzling. That way it ribbons through the mug instead of sinking. It’s a small sensory upgrade that makes the drink feel intentional.

If you want something crunchy to balance the sweetness

A savory bite can be the reset button. It sounds odd until you try it. Something like MasalaMonk’s guide to seaweed snacks as a keto-friendly option can offer a surprisingly satisfying contrast after a warm, chocolatey drink.

The contrast works because it changes the direction of your palate. Sweetness can spark more sweetness cravings; salt and crunch often calm them.

If you want something warm-and-cozy that stays in the chocolate lane

A cookie pairing is classic. If you want a chocolate-on-chocolate moment without repeating the same flavor in the mug, MasalaMonk’s double chocolate cookie variations can be a fun companion for weekends or holidays.

Also Read: Baked Ziti Recipe Collection: 15 Easy Variations


Turning Keto Hot Chocolate Into a “Make-Once, Use-All-Week” Ritual

One reason hot cocoa habits stick is repetition: the same comfort, night after night. That’s why the jar mix is so useful. Still, you can make it even easier by deciding on two or three “default versions” ahead of time.

Infographic for a keto hot chocolate weekly ritual showing a “cocoa station” setup (jar of cocoa mix, sweetener, cinnamon, vanilla, whisk/frother) and six default versions: weeknight classic, protein, dairy-free, bulletproof, Mexican, and sugar-free white hot chocolate.
Turn keto hot chocolate into a make-once, use-all-week ritual: set up a simple cocoa station (mix jar, sweetener, cinnamon, vanilla, whisk) and pick 2–3 default mugs—classic, protein, dairy-free, bulletproof, Mexican, or vanilla-rich white. Save this guide to make low carb hot cocoa feel automatic on busy nights.

Here are a few combinations that feel distinct without requiring extra work:

1) Classic Keto Hot Cocoa (Weeknight Default)

  • cocoa paste method
  • almond milk or dairy milk
  • vanilla + pinch of salt

2) Keto Protein Hot Chocolate (When You Want It to Hold You)

  • base cocoa
  • collagen or whey isolate
  • blend or slurry method

3) Dairy Free Keto Hot Chocolate (Plant-Forward Comfort)

  • almond milk + coconut cream
  • cinnamon + vanilla
  • optional cocoa butter for richness

4) Bulletproof Hot Chocolate (When You Want Extra Cozy)

  • slightly strong base
  • butter/ghee
  • blend until frothy

5) Keto Mexican Hot Chocolate (When You Want Something Different)

  • cinnamon + tiny pinch chili
  • vanilla
  • slightly richer base

6) White Hot Chocolate Sugar Free (When You Want Vanilla-Rich Comfort)

  • cocoa butter + milk
  • vanilla + salt
  • whisk until glossy

Once you’ve made these once or twice, they feel automatic. Moreover, because the method is the same—paste, whisk, warm, finish—you don’t need to “learn” six separate recipes. You’re just nudging the mug in a different direction.

If you want to make the routine even smoother, set up your pantry like a tiny cocoa station:

  • a jar of cocoa mix,
  • your preferred sweetener,
  • cinnamon and vanilla,
  • and a small whisk or frother.

That way the “decision fatigue” disappears. When you want a low carb hot drink, it’s just a few familiar motions.

Also Read: Cranberry Moscow Mule Recipe: A Festive Holiday Cocktail With Easy Variations


A Small Cocoa Reality Check (Because It Helps You Choose Better)

If you’ve ever wondered why one cocoa powder tastes rich and another tastes thin, it often comes down to cocoa solids, processing, and personal preference. Darker cocoa products tend to bring stronger flavor, and that’s why many people prefer them for hot cocoa.

Infographic titled “Cocoa Powder Reality Check” comparing natural cocoa, Dutch-process cocoa, and dark/black cocoa for keto hot chocolate, showing three bowls of cocoa powder with notes on flavor and how each type affects low carb hot cocoa richness.
Not all cocoa powders taste the same in keto hot chocolate. This quick reality-check compares natural cocoa (brighter), Dutch-process (smoother and often richer in hot cocoa), and dark/black cocoa (intense—best blended). Save it to choose cocoa that matches the mood of your low carb hot drink.

Harvard’s overview on dark chocolate and cocoa flavonoids is a readable reference if you enjoy the “why” behind your ingredients. Meanwhile, for strict numbers, the USDA FoodData Central database is a useful baseline for cocoa powder nutrition data.

The point isn’t to chase the “perfect” cocoa powder. The point is to understand that your ingredients shape your mug, and once your technique is right, your cup becomes reliably good.

If you’re curious about how cacao differs from cocoa and chocolate in everyday use, MasalaMonk’s breakdown of cacao vs chocolate vs dark chocolate is a helpful rabbit hole—especially if you like knowing what you’re actually tasting.


Making a Low Carb Hot Drink Feel Like a Treat (Even When It’s Simple)

A hot keto drink doesn’t need a dozen ingredients to feel special. Often, it’s one small detail that creates the “treat” feeling:

  • a dusting of cinnamon on top
  • a tiny pinch of salt that unlocks the cocoa
  • a splash of vanilla that makes it taste finished
  • a frothy blend that feels café-level
  • or a richer base that makes it feel like dessert
Infographic titled “Make It Feel Like a Treat” showing a mug of keto hot chocolate with cinnamon, salt, vanilla, a frother, and a richer base option, listing five easy upgrades to make low carb hot cocoa feel café-level without extra fuss.
A low carb hot drink can feel like a treat with one small upgrade: cinnamon for cozy aroma, a pinch of salt for deeper cocoa, vanilla to make it taste finished, a quick froth for café texture, or a richer base for dessert-mug vibes. Save this keto hot chocolate guide for easy sugar-free hot cocoa upgrades anytime.

That’s also why this ritual can work even if you don’t drink it every day. You can reserve it for the moments when you want comfort and you want it without the after-feel of sugar.

If you’re in a phase where you’re exploring more low carb drinks beyond hot cocoa, MasalaMonk’s keto mocktails can be a fun branch-off for weekends—different vibe, same “drink that feels like an event” energy.

And if you ever want your mug to feel like it came from a café without changing ingredients at all, try this: pour it back and forth once between mug and measuring cup. It aerates the drink slightly and wakes up the aroma. It’s not necessary, yet it adds a little softness to the experience.

Also Read: Iced Coffee: 15 Drink Recipes—Latte, Cold Brew, Frappe & More


A Cozy Way to Use Leftover Cocoa Mix (So Nothing Goes Stale)

If you make a jar of keto hot chocolate mix and it’s sitting there, you can use it beyond mugs. One gentle, low-effort idea is turning it into a chilled dessert cup.

Recipe card for “Cocoa Mix Chia Pudding Cup” showing a glass of chocolate chia pudding made with keto hot chocolate mix, chia seeds, and unsweetened milk, with steps to whisk, stir, chill overnight, and finish with a pinch of salt.
Don’t let your keto hot chocolate mix sit and go stale—turn it into a chilled dessert cup instead. This cocoa mix chia pudding uses unsweetened milk, chia seeds, and 1–2 tablespoons of mix for a simple low carb pudding that sets overnight and tastes extra chocolatey with a tiny pinch of salt on top. Save it for easy make-ahead comfort.

Chia pudding is especially friendly to cocoa flavors. You can stir a spoonful of cocoa mix into your liquid before adding chia, then let it set overnight. If you want a broader inspiration lane, MasalaMonk has a versatile roundup of chia pudding recipes. It’s a simple way to keep the chocolate comfort going without always making a hot drink.

If you’re doing this in a more keto-leaning way, keep the liquid unsweetened and let the cocoa mix provide the sweetness. Then finish with a little pinch of salt on top right before eating. That pinch makes “chocolate pudding” flavor pop in exactly the same way it does in hot cocoa.

Also Read: Kahlua Drinks: 10 Easy Cocktail Recipes (Milk, Vodka, Coffee)


Why This Works So Well When You’re Staying Low Sugar

One of the sneakiest parts of cutting sugar is realizing how much “comfort” you used to outsource to it. Dessert wasn’t just dessert; it was punctuation. It was a pause. It was a way to turn the day off.

A creamy sugar free hot chocolate gives you a gentle replacement that still feels like care. It’s warm. It’s sensory. And it’s slow enough that your brain gets the message. Meanwhile, because you’re building the sweetness and richness on purpose, you’re not stuck in the cycle of “not enough flavor → add more → want more.”

If you’re ever unsure about how “sugar free” products define themselves, it’s worth understanding the basics of what labels mean. The FDA’s explanation of added sugars on the nutrition label is surprisingly useful, even if you mostly make your own drinks.

Photoreal “Sugar-Free Hot Chocolate: Label Check” guide showing a nutrition facts sheet with magnifying glass and a mug of hot cocoa, highlighting serving size, added sugars, and total carbs to help choose low carb hot chocolate mixes.
Not every “sugar-free” packet is truly low carb. Use this label-check card to scan serving size, added sugars, and total carbs fast—so your low carb hot cocoa stays keto-friendly without surprise fillers. Save it for grocery trips and winter drink season.

Also, there’s something quietly powerful about making the mug the “event.” When the drink tastes good and feels complete, you don’t need to keep grazing afterward. That’s often the difference between feeling deprived and feeling satisfied.

Also Read: 19 Essential Kitchen Tools That Make Cooking Easier


Your “Pick-a-Mood” Shortcut: Choose Your Keto Hot Chocolate Style Tonight

If you want the simplest decision tree imaginable, use this:

  • Want the classic? Make keto hot cocoa with the paste method and finish with vanilla.
  • Want it to keep you full? Make keto protein hot chocolate and use the slurry method.
  • Want it dairy-free? Use almond milk and add coconut cream for body.
  • Want it extra cozy? Make bulletproof keto hot chocolate and blend it frothy.
  • Want it spicy-warm? Make keto Mexican hot chocolate with cinnamon and a whisper of chili.
  • Want vanilla-rich comfort? Make sugar free white hot chocolate with cocoa butter.
Pinterest-style “Keto Hot Chocolate: Pick Your Mood” guide showing seven variations—Classic, DIY Mix, Protein, Dairy-Free, Bulletproof, Mexican, and White—with a base-method note for making smooth sugar-free low carb hot cocoa.
Pick your mug based on the moment: this keto hot chocolate guide shares 7 easy variations—classic no-grit, DIY mix, protein, dairy-free, bulletproof, Mexican spice, and sugar-free white hot chocolate—built from one simple base method. Save it for quick low carb hot cocoa choices all winter.

None of these require more time than the others once you’ve done them once. In fact, after a week, it starts to feel like brewing tea: you know what you like, you know what the mug needs, and you stop thinking about it.

If you want one more option that fits neatly inside the same framework, try a “mint night” version: stir in a tiny drop of peppermint extract at the very end (seriously, tiny). It turns the mug into a wintery treat without pushing it into toothpaste territory. Paired with a cookie or enjoyed alone, it can feel like a holiday mug on a random Tuesday.

Also Read: How to Cook Tortellini (Fresh, Frozen, Dried) + Easy Dinner Ideas


A Final Note: Comfort Doesn’t Need to Be Loud

A good mug doesn’t announce itself. It just changes your evening.

That’s the quiet power of a well-made keto hot chocolate. It’s not trying to be a substitute. It’s just a better habit: warm, chocolatey, low carb, and tailored to the way you actually live.

So make the cocoa paste. Add the pinch of salt. Choose your milk. Pick your mood. Then take the first sip slowly—because that’s the whole point.

Photoreal “Fix Your Keto Hot Cocoa” troubleshooting infographic showing a mug of hot cocoa with cocoa powder, sweetener, salt, and whisk, plus quick fixes for gritty, bitter, too thin, too sweet, and protein clumps in sugar-free low carb hot chocolate.
Hot cocoa not tasting right? Use this quick troubleshooting guide to fix keto hot chocolate fast—make a cocoa paste for gritty texture, add sweetener + vanilla for bitterness, use cream for body, balance sweetness with more cocoa, and prevent protein clumps with a warm slurry. Save it for smoother sugar-free hot cocoa every time.

FAQs

1) Is keto hot chocolate actually keto-friendly?

Yes—when you build it with unsweetened cocoa (or cacao), a keto-approved sweetener, and a low-carb liquid like unsweetened almond milk or a measured amount of dairy. The biggest swing factor is usually the milk choice and any add-ins, so keeping those intentional is what makes a mug reliably keto-friendly.

2) What’s the difference between keto hot chocolate and keto hot cocoa?

In everyday use, they’re the same idea: a low carb, sugar free hot chocolate-style drink. Some people use “hot cocoa” to mean cocoa powder-based, while “hot chocolate” can imply melted chocolate. On keto, both can work—the cocoa powder version is simpler, and the melted-chocolate version can taste richer if you’re using low carb baking chocolate or keto-friendly chocolate chips.

3) How do I make sugar free keto hot chocolate taste like the real thing?

Focus on three things: fully hydrating the cocoa (the paste method), adding a pinch of salt, and giving the cup some body (a little cream, coconut cream, or cocoa butter). After that, vanilla and gentle heat do the rest—because when the drink is smooth and balanced, it automatically tastes more “classic.”

4) Why does my low carb hot cocoa turn out gritty or chalky?

Most grit comes from cocoa not being hydrated properly. Start by whisking cocoa, sweetener, and salt with a small splash of hot water to form a glossy paste, then add milk gradually. Chalkiness can also come from certain sweeteners or protein powders, so switching to a powdered sweetener blend—or mixing protein as a slurry first—usually fixes it.

5) What sweetener works best for hot chocolate with monk fruit?

Monk fruit blends are popular because they can taste clean and sweet, but the best results usually come from powdered versions that dissolve quickly. If your blend includes erythritol and you notice cooling, adding vanilla and a bit of creaminess can round it out. Alternatively, allulose often gives a softer sweetness that feels more like traditional hot cocoa.

6) Can I make keto hot chocolate with almond milk?

Absolutely. Almond milk keto hot chocolate is one of the easiest versions to keep low carb. Still, almond milk is naturally lighter, so adding a tablespoon or two of cream (or coconut cream for dairy-free) helps it feel fuller and more satisfying.

7) How do I make dairy free keto hot chocolate creamy, not thin?

Choose a richer plant milk if you like, then add body with coconut cream or a small amount of cocoa butter. Another option is blending briefly to emulsify everything, which creates a smoother texture that feels more like a café drink.

8) What is keto hot chocolate mix, and how is it different from the drink?

Keto hot chocolate mix is the dry, pantry-ready version—basically your cocoa powder, sweetener, and salt pre-combined so you can make a mug fast. The drink is what you get after you mix it with hot liquid. In practice, the mix saves time, while the “from scratch” version lets you adjust more precisely in the moment.

9) How many tablespoons of keto hot chocolate powder should I use per mug?

Usually 2 tablespoons per mug is a strong starting point. However, if you want a lighter low carb drinking chocolate, use 1½ tablespoons; conversely, if you want something closer to a deep cocoa, try 2½ to 3 tablespoons and add a richer liquid.

10) Can I make keto hot chocolate packets at home?

Yes. If you make a dry keto hot cocoa mix, you can portion it into small containers or pouches for grab-and-go convenience. Just keep it dry, and include a note for yourself on how much liquid to add per serving.

11) What’s the best keto hot chocolate recipe for a really rich, “dessert” mug?

Use the cocoa paste method, then build richness with cream (or coconut cream), plus vanilla and a pinch of salt. If you want it extra luxurious, add a tiny bit of cocoa butter, or blend the finished drink for a foamy, café-style texture.

12) How do I make high protein low carb hot chocolate without clumps?

Instead of dumping protein powder into hot liquid, make a slurry first: mix the protein with a few tablespoons of warm liquid until smooth, then pour in the hot cocoa while whisking. This approach works for keto protein hot chocolate with whey isolate, casein, collagen, and many vegan blends.

13) Is bulletproof keto hot chocolate the same as regular keto hot cocoa?

It starts the same, then adds fat (usually butter or ghee, sometimes MCT oil) and gets blended until frothy. As a result, bulletproof hot chocolate keto-style tends to feel more filling and can replace a snack for some people.

14) How do I keep bulletproof hot chocolate from getting oily on top?

Blending is the difference. Use a blender, stick blender, or frother so the fat emulsifies into the drink. Also, start with smaller amounts of butter/MCT and increase only if you love the texture.

15) What is keto Mexican hot chocolate?

It’s a spiced version of keto hot chocolate, typically with cinnamon and a tiny pinch of chili or cayenne, plus vanilla. The idea is warmth and depth, not intense heat—so the spice stays in the background and makes the cocoa taste richer.

16) How do I make white hot chocolate sugar free?

White hot chocolate is usually cocoa butter-based rather than cocoa-powder-based. For sugar free white hot chocolate, melt cocoa butter into warm milk (dairy or almond milk), then add sweetener, vanilla, and a pinch of salt. For a fuller texture, a spoon of cream or coconut cream helps.

17) What does “low glycemic hot chocolate” mean?

Typically it means using unsweetened cocoa and choosing sweeteners and liquids that don’t behave like fast sugar for you. That might involve avoiding added sugars and starchy thickeners, then focusing on a balanced recipe that’s still satisfying.

18) Why do some mixes claim “0 carb hot chocolate” or “no carb hot cocoa”?

Often it’s a mix of serving sizes, rounding rules, and how labels handle sugar alcohols or fiber. In real kitchens, cocoa itself contains some carbs, so “very low carb” is usually the more realistic expectation. If you’re strict, measure your ingredients and calculate based on the exact products you use.

19) How can I make a lower calorie low carb hot cocoa recipe?

Use unsweetened almond milk (or a lighter dairy option), keep added fats minimal, and rely on cocoa, vanilla, and salt for satisfaction rather than extra cream. Even so, you can still make it feel indulgent by blending it frothy or adding a spice note like cinnamon.

20) Can I make keto hot chocolate ahead of time?

Yes. You can prep the dry keto hot chocolate mix for instant mugs all week, or you can make the drink itself and reheat gently. If reheating, warm it slowly and whisk as it heats so the cocoa stays smooth and the texture stays consistent.

Posted on 4 Comments

Keto Flour: Guide to Low-Carb Flours That Bakes Like the Real Thing

A reliable keto flour isn’t one ingredient—it’s the right flour (or blend) for the job. Use this guide to choose low-carb flours that behave like “real” flour in the oven, so bread slices clean, bakes stay tender, and pie crust holds together without turning dry or crumbly.

There’s a moment in low carb baking that feels almost universal: you pull something warm from the oven—maybe a tray of brownies, maybe a “simple keto bread,” maybe a batch of cookies—and the first bite tells you the truth. Keto flour can still deliver something genuinely delicious, yet the texture often feels different at first. Drier than you hoped. More fragile than you expected. Sometimes oddly eggy. Occasionally too dense, as if the batter never learned how to lift.

That moment isn’t failure. It’s feedback.

Regular flour is predictable because gluten does so much of the heavy lifting. Keto flour, on the other hand, asks you to be a little more intentional. Once you understand what each flour brings—bulk, tenderness, moisture, chew, browning—your results get calmer and more repeatable. In fact, you can go from “random experiments” to a pantry that reliably turns out low carb brownies, keto pancakes, keto pie crust, muffins, and even sandwich-style bread that doesn’t crumble into confetti.

So think of this as your reset: not a lecture, not a set of rules, but a cooking-minded guide to choosing a keto flour substitute that actually works.

Also Read: A Guide to Keto Diet for Beginners


Keto flour basics: why low carb baking plays by different rules

Traditional wheat flour is a whole system. When it meets liquid and mixing, gluten forms a stretchy network that traps air, holds moisture, and gives bread that familiar tear. Consequently, even a “just okay” recipe can still turn out fine because gluten forgives a lot.

Keto flour cheat sheet comparing almond flour and coconut flour for baking. Shows two bowls labeled almond flour and coconut flour with guidance for brownies, pancakes, pie crust, bread, and pizza. Notes almond flour works well for fudgy brownies and easy-start pancakes, while coconut flour is best only in recipes built for it. Reminds flours aren’t one-bag-fits-all and gives fixes: dry add fat/liquid, crumbly add binder like psyllium or xanthan.
Choosing keto flour gets easier when you pick by texture, not the label. This cheat sheet shows when almond flour shines (fudgy brownies, easiest-start pancakes, buttery pie crust) and when coconut flour should only be used in recipes designed for it. It also covers the “structure first” mindset for bread and the crisp vs foldable decision for pizza. Keep the bottom fixes handy too: if it turns dry, add fat + liquid; if it crumbles, add a binder like psyllium or xanthan. Save this for your next bake.

Keto flour alternatives rarely have that safety net. Instead, low carb baking is built from smaller pieces that you assemble on purpose:

  • A base for bulk and tenderness (almond flour, coconut flour, some wheat-based keto blends, or a low carb all purpose flour mix)
  • A binder for structure (eggs, psyllium husk, flax, xanthan/guar)
  • A moisture plan (fat, dairy, extra liquid, or a sweetener that helps retain softness)
  • A lift plan (fresh baking powder, baking soda plus acid, or whipped egg whites)
Infographic titled “Low-Carb Baking = 4-Part System (Stop Guessing).” A 2x2 grid explains the keto flour “system”: Base (almond flour, coconut flour—recipe-built, blends) for bulk/tenderness; Binder (eggs, psyllium, xanthan/guar, flax/chia) for structure; Moisture (butter/oil, yogurt/sour cream, cream cheese/extra liquid) for softness; Lift (baking powder, baking soda + acid, whipped eggs) for rise. Bottom strip shows quick fixes for dry, crumbly, gummy, and eggy results. MasalaMonk.com footer.
Low-carb baking gets way easier when you stop treating “keto flour” like one magic bag. Think in four parts: a base for tenderness, a binder for structure, a moisture plan to keep bakes soft, and a lift plan so they don’t turn dense. The bottom row is your rescue kit for the most common problems (dry, crumbly, gummy, eggy). Save this as your “preheat-the-oven checklist” before brownies, muffins, pancakes, pie crust, or keto bread.

That’s why one “keto flour” doesn’t do everything. A flour that makes an incredible cookie can make a sad loaf. Similarly, a bread-focused mix can feel tough in brownies. Once you accept that each bake wants a slightly different toolkit, your kitchen gets easier.

Also Read: The Must-Have Condiment for Keto: Mustard – Flavorful, Low-Carb, and Versatile


Keto flour labels: how to read carbs on mixes, tortillas, and “net carb” claims

Low carb packaged products—especially tortillas, wraps, and baking mixes—often lean on “net carbs.” Net carbs can be a useful shorthand, but it isn’t a standardized number on the Nutrition Facts label. The label gives you total carbohydrate, and under that, it breaks down fiber and sugars; your “net” number is a calculation people do from the label.

A “Net Carbs Checklist (Keto Baking + Tortillas)” infographic showing a checklist: start with serving size, read total carbs, check fiber, check sugar alcohols, and choose your net-carb rule. A nutrition label example and a simple formula are shown: total carbs minus fiber minus sugar alcohols equals net carbs. MasalaMonk.com is printed at the bottom.
Net carbs look simple… until you flip the package around. This checklist is a quick way to read tortillas, baking mixes, and “keto” cookies without getting tricked by the front label. Start with serving size, then total carbs, then fiber and sugar alcohols — but here’s the key: net carbs aren’t officially standardized, and sugar alcohols aren’t all the same (maltitol often hits harder than erythritol). When in doubt, check the ingredient list + type of sugar alcohol, and trust the full nutrition panel over the bold claims. Save this for your next grocery run. MasalaMonk.com

The FDA explains how to interpret the Nutrition Facts label and why serving size matters, because every number on the label is tied to that serving size. That alone changes the story more than most people realize. See: How to understand and use the Nutrition Facts label.

Meanwhile, the American Diabetes Association notes that net carbs are commonly calculated by subtracting fiber and sugar alcohols from total carbohydrate; however, that calculation isn’t always accurate because different fibers and sugar alcohols can be partially absorbed and still affect blood glucose in some people. See: ADA: Get to know carbs.

If you’re counting carbs for any reason—keto goals, blood sugar management, or simple preference—this is the practical takeaway:

Use the label as the source of truth, then decide how you personally interpret it. Don’t let marketing language do the math for you.

For additional clarity, the FDA’s Interactive Nutrition Facts Label PDF on “Total Carbohydrate” breaks down what that line includes and how fiber fits into the definition: Interactive Nutrition Facts Label: Total Carbohydrate (PDF).

Also Read: How to make No-Bake Banana Pudding: No Oven Required Recipe


Best keto flour for baking: a quick chooser by what you’re making

Before you choose any low carb flour substitute, pick the result you want. Then you can choose the flour that behaves that way.

Infographic titled “Best Keto Flour for Baking: Quick Chooser.” Four panels: Brownies & bars (almond flour = fudgy; blends = cakey); Pancakes & waffles (almond flour easiest; coconut flour only in recipes built for it); Pie crust & cookies (almond flour tender; coconut flour in small doses; binders add structure); Bread & pizza (use a flour system with binders). Bottom fixes: dry add fat+liquid; crumbly add binder; gummy bake through+cool longer. MasalaMonk.com footer.
This “pick your result first” cheat sheet is the fastest way to stop guessing with keto flour. Choose the quadrant that matches what you’re baking (brownies & bars, pancakes & waffles, pie crust & cookies, or bread & pizza), then follow the one-line rule for the texture you want. The bottom strip is your rescue plan: dry = add fat + liquid, crumbly = add a binder (psyllium/xanthan/flax), gummy/dense = bake through + cool longer. Save it to your keto baking board so the next batch turns out calm and repeatable.

Brownies and bars: fudgy vs cakey

Brownies are where keto baking can feel either magical or tragic.

  • If you want fudgy brownies, you typically want a flour that stays tender and doesn’t drink every drop of moisture. Almond flour often shines here.
  • If you want a more cakey brownie, you’ll usually need more structure—either from a blend designed to mimic wheat flour, or from careful binder choices (and sometimes a touch of coconut flour).
When keto brownies turn out too dry, too crumbly, or weirdly dense, it’s usually a flour-system issue—not “bad baking.” This quick chooser helps you decide fudgy vs cakey first, then pick the right approach: almond-flour-forward for tender/fudgy brownies, or a more structured blend for cakey, clean-slice bars. The bottom “quick fixes” strip is the real lifesaver: dry = add fat + a splash of liquid; crumbly = add a tiny binder (psyllium/xanthan); too dense = reduce binder and cool fully before judging texture.

If you’re using a keto brownies mix or low carb brownie mix, the best question isn’t “Is it good?” but “What kind of flour system is it?” Almond-based mixes and wheat-style keto blends can both work, yet they produce different textures.

Pancakes and waffles: the fastest way to learn your flour

Waffles & Pancakes are a low-risk training ground: quick feedback, easy to tweak, forgiving enough to repeat.

Infographic titled “Keto Pancakes & Waffles: The Fastest Way to Learn Your Flour” comparing three bases: almond flour (pourable but thick; medium-low heat; browns fast), coconut flour (thickens as it sits; rest 10–12 minutes; not a 1:1 swap; needs more eggs/liquid), and cottage cheese/high-protein (blend smooth; lower, slower heat; add 1 egg or tiny binder). Includes “Fix it fast” tips for eggy, rubbery, breaking, and too-dark results. MasalaMonk.com footer.
Pancakes (and waffles) are the quickest way to “feel” how keto flour behaves—because you get instant feedback. This one-page guide helps you choose the right base (almond, coconut, or cottage-cheese/high-protein), spot the key batter cues, and cook with the right heat so you don’t end up with an eggy, rubbery stack. Keep the “Fix it fast” strip in mind too: it gives simple, realistic tweaks for the most common failures—breaking, over-browning, or a texture that tightens up as it cools.

If you want a gentle on-ramp, start with a dependable keto approach like Keto Pancakes: almond flour, coconut flour, and cottage cheese methods.
Then, if you want a broader “this is how pancakes behave with different bases” baseline, Blueberry Pancakes (6 recipes + homemade pancake mix) gives you a useful reference point for batter rest, browning, and texture.

Pie crust and cookies: crisp vs tender

A keto pie crust needs to slice cleanly, so structure matters. On the cookie side, you may want crisp edges and a tender middle, or you may want chewy softness. Those are different jobs.

  • Almond flour tends to give a tender, rich crumb.
  • Coconut flour can firm and tighten texture, but it can also dry things out if you push it too far.
  • Psyllium husk and certain fibers can help crusts hold together, although too much can make things gummy.

Bread and pizza: structure first, tenderness second

Bread is where low carb baking stops being “swap flour, hope for the best” and becomes “choose a system.” Keto bread usually needs binders, hydration control, and a flour blend that can hold gas.

For a reminder of how much structure matters in conventional bread, Sourdough Bread Recipes: 10 easy bread bakes (loaves, rolls & bagels) is a helpful example of how fermentation, hydration, and timing shape the crumb—even if you’re not baking sourdough on keto.

Also Read: Chicken Adobo — Step-by-Step Recipe — Classic Filipino Adobong Manok


Keto flour substitutes: the low carbohydrate flour list that actually earns its space

You’ll see endless “low carb flour” lists online. The problem is that many of them treat these flours as interchangeable. They aren’t.

Here’s the kitchen-reality version—what each keto flour does well, what it does poorly, and how to use it without wasting a weekend.

Keto flour substitutes infographic comparing almond flour, coconut flour, lupin flour, oat fiber, bamboo fiber, psyllium husk, flax/chia, and xanthan/guar. Each card lists absorption or role, best uses, common baking failures (dry, crumbly, gummy, strong taste), and quick fixes like adding eggs/liquid, resting batter, measuring binders carefully, and cooling fully before slicing. MasalaMonk.com footer.
Keto baking gets easier when you stop forcing one “keto flour” to do every job. Save this cheat sheet for the moment a bake turns dry, crumbly, or gummy—it shows what each option is best for (brownies, muffins, bread, pizza, doughs) and the simplest fix to try next (rest the batter, add moisture, use a binder, cool longer). Coconut flour is powerful but picky, almond flour is the easiest all-rounder, and psyllium/xanthan are the quiet heroes for clean slices and structure. Full keto flour guide on MasalaMonk.com.

Almond flour: the most versatile keto friendly flour

Almond flour is popular for a reason: it’s forgiving. It browns nicely, tastes rich, and tends to produce tender baked goods without advanced technique.

Where it shines

  • Cakes, muffins, pancakes, waffles
  • Cookies (especially chewy styles)
  • Brownies, bars, crumb toppings
  • Coating and breading jobs (especially when you want a crisp outside)

Where it struggles

  • Yeasted breads that need chew and lift
  • Ultra-crisp pastry unless you blend for more structure
Infographic titled “Almond Flour: The Most Versatile Keto-Friendly Flour.” Shows almond flour in a jar and bowl with keto bakes (pancakes, brownie, muffin). Lists where almond flour shines: cakes and muffins, pancakes and waffles, chewy cookies, brownies and bars, crisp breading/coatings. Lists where it struggles: yeasted breads needing chew and lift, ultra-crisp pastry needing added structure. Includes quick fixes: if crumbly add binder (psyllium or xanthan) or extra egg; if dry add fat plus dairy/moisture; if too soft chill batter and cool fully before slicing. Notes almond flour vs almond meal: meal is coarser and rustic; flour is finer and better for baking. MasalaMonk.com at bottom.
Almond flour is usually the easiest “starter” keto flour because it browns well, tastes rich, and stays tender—especially in pancakes, muffins, cookies, and brownies. Use this card as a quick chooser: if your bake turns crumbly, add a binder (psyllium/xanthan) or an extra egg; if it turns dry, add fat + dairy/moisture; if it’s too soft, chill the batter and let the bake cool completely before slicing. Bottom reminder: almond flour vs almond meal matters—meal is coarser and rustic, while fine almond flour is smoother and more reliable for baking.

If you want a practical internal guide that frames almond flour in everyday cooking (including a diabetes/blood sugar perspective), Almond Flour and Diabetes: a low-carb swap for better blood sugar is a relevant read.

And if you want a straightforward “make it taste good fast” use case, Almond Flour Pancakes is an easy entry point for batter thickness, browning control, and fluffiness without turning it into a science project.

A note on almond flour vs almond meal
Almond meal is coarser, which can make bakes feel heavier or more rustic. Sometimes that’s exactly what you want. Other times, it’s the reason your cookie feels gritty. When in doubt, choose almond flour for baking and save almond meal for breading and hearty muffins.

Two bowls on a sage background labeled “Almond Flour” and “Coconut Flour.” Almond flour shows medium absorption and “moist + tender”; coconut flour shows high absorption and “light but can dry out.” Center box says “Not 1:1 swap rule” with tips for swapping between them. Bottom tips: “Dry? add fat + liquid” and “Crumbly? add binder (psyllium/xanthan).” MasalaMonk.com footer.
Almond flour vs coconut flour in keto baking isn’t a 1:1 swap—this quick guide shows why coconut flour absorbs far more, how that changes texture, and what to fix when bakes turn dry or crumbly. Use it as a fast reference before making low carb brownies, muffins, pancakes, or pie crust.

Coconut flour: extremely absorbent, powerful in small doses

Coconut flour is one of the most misunderstood keto flour alternatives. People love it because it’s compact and can be very low net carb in small quantities. Then they treat it like all-purpose flour and wonder why everything turns to sand.

Coconut flour is high in fiber, which means it absorbs a lot of liquid during baking. Bob’s Red Mill emphasizes that you should follow coconut flour recipes closely and not make additional substitutions, because dough will often be much thicker than expected—and the absorbency changes everything. See: Bob’s Red Mill on coconut flour baking.

Iowa State University Extension notes that coconut flour shouldn’t be substituted 1:1 for wheat flour and can hold up to four times its weight in liquid, which helps explain why “just swap it” usually fails. See: Coconut flour (Iowa State Extension PDF).

Infographic titled “Coconut Flour: The Absorbency Rules” explaining that coconut flour is highly absorbent and not a 1:1 swap. Shows an absorbency meter (high), a bowl of coconut flour, where it shines (cake-like quick breads, firmer muffins, small amounts in blends), where it struggles (chewy bakes without binders, free-form cookies), and quick fixes for sandy/dry, dense, or crumbly results. MasalaMonk.com footer.
Coconut flour is powerful because it’s extremely absorbent—so the biggest mistake is treating it like all-purpose flour. This quick card shows when coconut flour works best (recipe-built quick breads, firmer muffins, and small amounts in blends), when it tends to disappoint (chewy bakes without binders, free-form cookies), and the first fixes to try if your batter turns sandy, tight, or crumbly. Use it as a “before you bake” reference so your results feel intentional.

Where coconut flour shines

  • “Cake-like” quick breads when the recipe is designed for it
  • Muffins that need a firmer set
  • Blends, where a small amount adds structure

Where coconut flour struggles

  • Anything you want chewy unless you pair it with the right binders
  • Free-form cookies (it can over-tighten and dry)

If you love coconut flour, treat it like a concentrated ingredient. Use it with intention, not as a general-purpose low carb flour replacement.

Lupin flour: protein-forward structure with a distinct personality

Lupin flour can be a useful keto flour substitute because it brings protein and structure. It can also bring a flavor that some people notice more than others, especially in lightly flavored bakes.

Where lupin flour shines

  • Chocolate bakes (the flavor hides well)
  • Savory bakes and crackers
  • Blends designed for more structure

Where lupin flour struggles

  • Delicate cakes unless blended thoughtfully
  • Light, buttery cookies where you want clean sweetness

Oat fiber, bamboo fiber, and other fiber flours: bulk without traditional starch

If you’ve seen “0 carb flour,” “zero net carb flour,” or “carb free flour substitute,” it’s often tied to fiber-heavy ingredients. These can be helpful, particularly in bread and pizza systems where you want bulk and structure without starch. Still, they can also turn baked goods dry if you overdo them.

Fiber choices vary widely, and not all “added fiber” behaves the same. If you want a grounded, label-oriented reminder that fiber type matters, it’s useful to keep the ADA’s note about net carb calculations in mind: ADA: net carbs aren’t always fully accurate.

Where fiber flours shine

  • Bread and pizza systems when paired with binders and hydration
  • Thick batters (mug cakes, pancakes) where you can control moisture

Where fiber flours struggle

  • Cookies and cakes when they’re used as the primary “flour”
  • Anything where you want a soft, bouncy crumb without gumminess

Psyllium husk: the binder that makes keto bread behave like bread

Psyllium isn’t “flour” in the classic sense, yet in keto baking it functions like architecture. It can provide elasticity, moisture retention, and a more bread-like chew, especially when paired with eggs and the right hydration.

Vertical infographic titled “Psyllium Husk: The Binder That Makes Keto Bread Slice.” Shows what psyllium does (elasticity, moisture retention, structure), common fails with fixes (crumbly: add a tiny bit more binder + rest; gummy/dense: reduce binder slightly + bake through + cool longer; purple/gray tint: try different brands/types), best uses (bread, rolls, pizza dough, tortillas/flatbreads), and a reminder that cooling sets the crumb before slicing. MasalaMonk.com footer.
If keto bread keeps crumbling or turning gummy, psyllium husk is usually the missing “structure” piece. This quick card shows exactly what it does (elasticity + moisture retention), where it works best (bread, rolls, pizza dough, tortillas), and the fastest fixes when things go wrong—especially the underrated step: cool fully before slicing. Save it as your binder reference the next time a loaf feels fragile.

The trick is balance. Too little and your loaf crumbles. Too much and the texture can turn dense or slightly gummy. When it’s right, though, it’s one of the main reasons keto bread can slice.

Flax meal and chia: binding, moisture, and a rustic crumb

Flax and chia add structure and moisture control. They also add flavor, so they’re often better in spiced bakes, nutty muffins, and hearty breads than in a delicate vanilla cake.

Flax + chia gel binder infographic for keto baking. Shows how to make a flax/chia “egg” (1 tbsp ground flax or chia + water, rest 5–10 minutes), best uses (muffins, quick breads, pancakes; rustic cookies/hearty loaves), and common fails with fixes (gritty = grind finer, dense = add lift/whip eggs, crumbly = pair with egg or a touch of psyllium). MasalaMonk.com footer.
Flax and chia aren’t “flour,” but they’re powerful structure tools in low carb baking—especially when you want moisture + binding without turning a batter into rubber. Use this card as a quick reference: gel your flax/chia first, then choose the right bake (pancakes, muffins, rustic cookies). If the result goes gritty, dense, or crumbly, the bottom fixes tell you what to adjust next—so you don’t waste a whole batch.

“Pork rind flour” and seed crumbs: the crunch category

Sometimes you don’t need flour at all—you need texture. For breading, coating, and crisp topping jobs, pork rind crumbs and crushed seeds can do what flour would do, without pretending to be something else.

That’s how you keep keto cooking satisfying: by choosing the tool that matches the task.

Also Read: Keto Mocktails: 10 Low-Carb Recipes for Guilt-Free Happy Hour Indulgence


Keto all purpose flour: what it can do, and what it can’t

A keto all purpose flour sounds like a dream: one bag, every bake, no guesswork. In practice, it depends on what that “all purpose” blend is made to mimic.

Some blends aim to behave like wheat flour in a one-to-one swap. Others aim for a gluten-free style. Some focus on fiber bulk. Each approach can work. The only problem is expecting a cookie blend to behave like a bread blend.

Infographic titled “Keto All-Purpose Flour System” showing 3 jars: Tender Jar (best for brownies, muffins, cookies, pancakes; almond flour base + minimal fiber; common fail fragile slices; fix add small binder or chill + cool fully), Structure Jar (best for bread, pizza, rolls; blend + psyllium + optional fiber; common fail gummy/dense; fix reduce binder or bake through + cool longer), and Nut-Free Jar (best for nut-free cakes, muffins, pancakes; coconut flour system + eggs + extra liquid; common fail dry/crumbly; fix use less flour + add liquid + rest batter). Bottom: dry add fat+liquid; crumbly add binder; gummy bake through + cool longer. MasalaMonk.com footer.
If you’ve ever bought a “keto flour” and still ended up with dry muffins, crumbly slices, or a gummy loaf—this is the shortcut. Instead of chasing one magic bag, build three simple jars based on the texture you want: Tender (brownies/cookies/pancakes), Structure (bread/pizza/rolls), and Nut-Free (coconut-flour bakes made recipe-built). The bottom strip is your quick fix: dry = add fat + liquid, crumbly = add a binder, gummy = bake through + cool longer. Save this for your next bake.

Store-bought wheat-style keto blends (the “1:1” promise)

A well-known example is King Arthur’s Keto Wheat Flour, described as a 1:1 swap for recipes calling for all-purpose flour, with a traditional wheat taste and low net carbs per serving. See: King Arthur Keto Wheat Flour.

That kind of flour can be appealing if you want wheat-like structure for bread, rolls, or yeasted bakes, and you’re not aiming for gluten-free baking.

DIY low carb flour mix: why it’s often better

Even if you love a store blend, it’s worth having a simple DIY approach, because your baking goals change. Some days you want brownies that stay fudgy. Other days you want a pizza crust that can be picked up. Those are different recipes, so it helps to have different “default blends.”

DIY Keto Flour Mix infographic showing three labeled blend cards: “Tender Blend” for cakes/muffins/brownies (almond-flour-forward, minimal fiber), “Structure Blend” for bread/pizza/rolls (includes psyllium, optional fiber; hydrate + rest; bake through; cool fully), and “Nut-Free Blend” coconut-flour system (coconut flour + binders, extra liquid/eggs; not 1:1; batter rests; tiny amounts matter). Bottom notes: choose by texture goal; dry add fat + liquid; gummy bake through + cool longer. MasalaMonk.com footer.
If “keto flour” keeps giving you random results, this is the fix: stop chasing one magic bag and build three simple blends you label once—Tender (brownies/muffins/cakes), Structure (bread/pizza/rolls), and Nut-Free (coconut-flour recipes built for absorbency). Use it like a decision card: pick the texture goal first, then choose the blend that behaves that way. And keep the bottom strip handy—dry = add fat + liquid, gummy = bake through + cool longer—because most keto baking “fails” are just hydration + structure mismatches.

A practical way to think about DIY blends is:

  • Tender blend for cakes, muffins, and brownies: almond flour-forward, minimal fiber
  • Structure blend for bread and pizza: includes psyllium and/or fiber components, with careful hydration
  • Nut-free blend when needed: coconut flour plus binders, used in recipes designed around its absorbency

Once you label your jars that way—tender, structure, nut-free—you stop expecting one bag to do everything. Then your baking suddenly feels easier.

Also Read: Creamy Cauliflower Soup—Keto-Friendly, Ultra-Comforting (Vegan Option)


Keto baking mixes and keto flour blends: what changes in the bake

Keto baking products have expanded quickly. There are keto baking mixes for brownies, pancakes, biscuits, cakes, and even “shake and bake” style coatings. You’ll also see brand-specific products such as Atkins bake mixes, Carbquik baking mix, Lakanto baking mix, and specialty companies offering cookies and brownie mixes.

Vertical infographic titled “Keto Baking Mix Decoder” with a keto flour bag illustration and the subtitle “4 Things to Check Before You Buy/Bake.” Four numbered panels explain: (1) Primary flour system—almond-based = tender, coconut-based = firms fast, wheat-style = more breadlike; (2) What provides structure—fiber/gums need rest time; egg-heavy can taste eggy unless flavored; (3) Sweetener profile—affects aftertaste, browning, moisture, and “stays soft” factor; (4) Serving size reality check—net carbs depend on serving size plus fiber/sugar alcohols. Bottom “Fix It Fast” strip: Dry add fat/dairy; Gritty rest batter longer; Eggy add vanilla + salt + cocoa/espresso; Dense bake through + cool fully. MasalaMonk.com at the footer.
Keto mixes can be great—when the mix matches the texture you want. Use this “decoder” before you bake: identify the primary flour system, how the mix gets structure, what the sweetener is likely to do, and whether the serving size makes the “net carb” claim feel realistic. The bottom “Fix It Fast” strip is your quick rescue guide for the most common outcomes (dry, gritty, eggy, dense) so you can adjust once and get a better second bake.

These products can be helpful, especially when you want consistency or when you’re new to low carb baking. Still, mixes vary hugely in results, so it helps to evaluate them using a simple lens:

  1. What’s the primary flour system?
    Almond flour-based mixes tend to be tender. Coconut flour-based mixes tend to firm quickly. Wheat-style keto blends tend to mimic flour-like structure.
  2. What’s providing structure?
    If the mix relies on added fiber and gums, it may need extra resting time for hydration. If it relies heavily on egg, it may risk an eggy finish unless flavor is boosted.
  3. What’s the sweetener profile?
    Sweetener choice affects aftertaste, browning, moisture, and how soft the bake stays after cooling.
  4. How is “serving size” defined?
    The FDA’s label guidance is useful here because serving sizes can make products look more “carb friendly” than they feel in real life. See: FDA Nutrition Facts Label basics.

If you’ve tried a few mixes and felt disappointed, it’s often not because keto baking is doomed. Instead, it’s because the mix wasn’t designed for the texture you wanted.

Also Read: Green Tea for Weight Loss: The No-Hype, Done-For-You Guide


Keto flour for brownies: how to get that rich, not-dry finish

Brownies are the emotional center of keto baking. They’re what people want to feel “normal” again. The good news is that brownies are also one of the easiest places to win—provided you choose the right flour approach.

Vertical infographic titled “Keto Brownie Mix Makeover.” Shows a brownie pan photo and three columns: Flavor Boosters (vanilla + pinch of salt, espresso powder ½–1 tsp, extra cocoa), Moisture Boosters (1–2 tbsp melted butter/oil, 2 tbsp sour cream or Greek yogurt, optional chopped nuts), and Texture Control (rest batter 10–15 min, don’t overbake, cool fully). Bottom section lists doneness cues and quick fixes.
If your keto brownie mix turns out dry, eggy, or dense, this quick “makeover” card gives you the simplest upgrades that actually change texture. Use vanilla + a pinch of salt for a fuller chocolate flavor, add a little espresso powder for depth, and boost moisture with a small spoon of butter/oil or sour cream/Greek yogurt. Then control texture the smart way: rest fiber-heavy batters, pull brownies when the edges are set but the center is still slightly soft, and cool fully for clean, fudgy slices. (Save-worthy, but also meant to be used mid-bake.)

Pick your brownie style first

A “best keto brownies” goal can mean three different things:

  • Fudgy and dense (almost truffle-like)
  • Soft and cakey (more like a snack cake)
  • Chewy with crisp edges (classic pan brownie energy)

Each style wants a different flour strategy.

The fudgy path: almond flour plus moisture control

Almond flour tends to be your friend here because it stays tender. To keep brownies from drying out, focus on:

  • Enough fat (butter, coconut oil, or a neutral oil)
  • A sweetener that doesn’t turn the crumb dusty
  • Not overbaking—pull them when the center is set but still soft

If you like learning by contrast, it can help to taste a conventional brownie and pay attention to what flour contributes: structure, yes, but also how it holds moisture in place. Keto brownies replicate that by balancing almond flour with eggs and fat, then keeping bake time gentle.

The “clean slice” path: tiny amounts of coconut flour or fiber support

If your almond flour brownies feel too soft or fall apart, you can add a small amount of coconut flour or a touch of fiber/binder support. This is where restraint matters. Coconut flour is powerful; too much turns brownies dry. Used lightly, it tightens the structure and helps slices hold.

Mixes: how to make a keto brownie mix taste homemade

A low carb brownie mix can be excellent, although it often benefits from a few simple upgrades:

  • Add a pinch of salt if it tastes flat
  • Add vanilla or espresso powder for depth
  • Add extra fat if the mix bakes up dry
  • Rest the batter briefly if it includes fiber-heavy ingredients

In other words, treat the mix like a base. You’re still the baker.

Also Read: A Guide to Choosing Keto-Friendly Milk Alternatives: Exploring Nutritional Profiles and Tips for Selection


Keto flour for pie crust: the butter + structure balance

Pie crust is the place where people chase unicorns: “no carb pie crust,” “sugar free low carb pie crust,” “keto pie crust that tastes like bakery pastry.” You can get close, but only if you accept what makes classic crust work.

Classic crust is about fat layers, controlled hydration, and just enough structure to hold a slice.

Keto crusts often use almond flour because it tastes good and handles butter well. However, almond flour crust can be fragile, particularly when warm. That fragility is not a flaw; it’s a clue that you need a bit more structure.

Vertical infographic titled “Keto Pie Crust Blueprint” with subtitle “Butter + Structure = Clean Slices (No Crumble).” Shows a slice of pie and a crisp vs tender finish toggle. Explains almond flour for tenderness, butter for flake and flavor, plus structure helpers: egg for cleaner slices, psyllium for strongest hold, and a tiny amount of coconut flour to firm quickly. Includes crisp (cookie-like) vs tender (pastry-like) tips, best-use notes, and troubleshooting: crumbly add structure or chill and press; dry add butter/dairy and don’t overbake; too soft bake longer and cool fully; flat add salt. MasalaMonk.com footer.
If your keto pie crust tastes great but falls apart the moment you slice it, this is the fix: almond flour for tenderness + butter for flavor + a small “structure helper” for clean slices. Use the crisp vs tender guide to match your crust to the filling (cookie-like for creamy pies, pastry-like for fruit/custard), then lean on the quick troubleshooting strip when something turns crumbly, dry, or too soft. Bookmark this “keto pie crust blueprint” before your next bake.

A reliable keto pie crust strategy

  • Almond flour for tenderness and richness
  • Butter for flavor and flake-like feel
  • A small structure helper for sliceability (egg, psyllium, or a small amount of coconut flour, depending on your preferred texture)
  • Salt, always—otherwise the crust tastes like “health food,” even when it isn’t

Crisp vs tender crust: choose your finish

If you want a crisp, cookie-like crust, you can lean more toward almond flour plus sweetener and bake it like a shortbread base. On the other hand, if you want a more pastry-like crust, you’ll usually prefer a less sweet, more structured approach that can be rolled or pressed without cracking.

This is also where your sweetener choice matters. Some sweeteners keep crusts softer; others crisp more readily. Either can be good—it just depends on what you’re making.

Also Read: Navigating Beans on the Keto Diet: Which Varieties Are Suitable?


Keto flour for muffins, banana bread, and “quick breads” that stay moist

Muffins and banana bread are deceptively tricky on keto because the classic versions rely on sugar and starch for moisture retention. When you remove both, you need a new plan.

The win here is simple: build moisture on purpose, then choose a flour that supports it.

Vertical infographic titled “Keto Quick Breads That Stay Moist.” Shows a sliced keto quick bread loaf and a “Moisture Map” with three levers: moisture builders (Greek yogurt/sour cream, cream cheese, butter/coconut oil, extra yolk), flour behavior (almond flour is tender; coconut flour absorbs and works best in recipe-built batters), and bake + cool rules (don’t overbake, rest batter 10–15 minutes, cool fully, wrap after cooling). Bottom troubleshoot boxes: dry, eggy, gritty, crumbly.
Keto quick breads stay tender when you treat moisture like a plan, not a hope. Use this “Moisture Map” to choose the right add-ins (yogurt, cream cheese, extra yolk), match the flour to the texture you want (almond flour for tender crumb, coconut flour only in recipe-built batters), and follow the two rules that matter most: don’t overbake and cool fully before slicing. If your loaf turns dry, eggy, gritty, or crumbly, the bottom strip gives the fastest fix to try next.

Almond flour muffins: soft, rich, forgiving

Almond flour muffins tend to stay tender, especially if they include yogurt, sour cream, or a bit of cream cheese. They also reheat well, which matters more than you’d think. Warmed muffins taste fresher; chilled muffins can taste drier than they are.

Coconut flour muffins: light, structured, but easy to dry out

Coconut flour muffins can be excellent when the recipe is designed for them, because they can set into a neat crumb and feel pleasantly cakey. The danger is treating coconut flour as a 1:1 substitute. As Bob’s Red Mill notes, coconut flour absorbs a lot of liquid and requires careful recipe adherence; it also often calls for more eggs to compensate. See: Bob’s Red Mill coconut flour baking guidance.

Banana bread on keto: pick your “banana” strategy

“Keto banana bread” usually means one of two things:

  • A banana-flavored bread with extracts/spices (banana without the carbs)
  • A low-carb “banana-ish” bread that uses a small amount of banana, portioned carefully

Either can work. The point is to decide what you mean by “banana bread” first: aroma and comfort, or literal banana content.

A non-keto but useful comparison: why “no refined flour” baking still teaches you something

Even when you’re staying keto, it can be useful to look at how other styles of baking build sweetness and moisture without relying on refined ingredients. For example, Easy and healthy cookies (no sugar, no butter, no refined flour) uses a whole-food approach to sweetness and softness—different macros, yes, but still a reminder that texture is often created by technique and ingredient roles, not just flour.

Also Read: 5 Keto-Friendly Salami Dishes That Promote Weight Loss


Keto pancakes and low carb pancakes: how to avoid the eggy, rubbery trap

Pancakes are where people either fall in love with keto baking or swear it off forever. The main complaint is usually the same: “Why does this taste like an omelet pretending to be breakfast?”

That eggy taste happens when the batter is built mainly from eggs and dairy without enough flour-like bulk and flavor support.

A strong approach is to choose a base that actually behaves like a flour system, then cook with gentler heat so the pancake sets without overbrowning. Both Keto Pancakes and Almond Flour Pancakes lean into practical texture cues like resting batter, controlling browning, and choosing the right thickness.

Why almond flour pancakes brown faster

Almond flour has fat and fine particles that brown quickly. That’s why a medium-low heat approach often gives better results: slower setting inside, less overbrowning outside. The almond flour pancakes guide calls this out directly as a common issue and solution.

“Keto Pancake Success Map” infographic showing a stack of keto pancakes with butter and syrup. It explains 3 key dials: batter thickness (too thick = dry/crumbly, too thin = wet center; aim for slow ribbon), rest time (10–15 minutes; coconut flour needs more), and pan heat (medium-low; flip when bubbles form and edges set). Includes troubleshoot fixes for eggy, rubbery, crumbly, and gritty pancakes. MasalaMonk.com.
Fluffy keto pancakes come down to three controllable dials: batter thickness, rest time, and pan heat. Use this quick map to avoid the usual traps—eggy flavor, rubbery texture, crumbly edges, or gritty coconut-flour batter. The bottom troubleshooting row is your fast fix when a batch goes sideways, and the flipping cue (bubbles + set edges) is the simplest “don’t guess” rule. Save it as your weekday pancake reference.

Why coconut flour pancakes need a different mindset

Coconut flour pancakes can be excellent, yet they often want more resting time because hydration changes the batter dramatically. If you cook too soon, the batter can feel grainy or tight. If you rest, it smooths out and sets more evenly.

A quick way to keep pancakes interesting without turning them into dessert

One of the most practical ways to stick with low carb baking is to keep flavors rotating. Berries, citrus zest, cinnamon, and vanilla all pull attention away from “this is a substitute” and toward “this is breakfast.”

If you want a general pancake playground (keto or not), Blueberry Pancakes (6 variations) is useful for mix upgrades and batter handling tips.

Also Read: Katsu Curry Rice (Japanese Recipe, with Chicken Cutlet)


Keto flour for bread: how to build lift, chew, and clean slices

Bread is the most emotionally loaded category in keto baking, and understandably so. Bread isn’t just food; it’s a format—sandwiches, toast, grilled cheese, wraps, “something you can hold.”

To make bread without traditional flour, you need a structure plan.

Keto Bread Structure Plan infographic showing a sliced keto sandwich loaf and a simple framework for better texture: three bread jobs (trap gas for rise, hold moisture to prevent crumble, set crumb for sliceable loaf after cooling). Includes a structure toolkit (base flour systems like almond/fiber/wheat-style keto blends; binders such as psyllium, flax, eggs; hydration with rest time; bake through and cool 60–120 minutes). Bottom troubleshooting strip covers crumbly, dry, gummy, and dense/flat loaves with quick fixes. MasalaMonk.com.
Bread is the toughest “keto flour” test because it needs rise, moisture retention, and a crumb that sets cleanly when cooled. Use this structure plan as your quick reference: pick a base flour system, build structure with binders (psyllium/flax/eggs), expect thicker dough and let it rest, then bake fully and cool before slicing. If your loaf turns crumbly, dry, gummy, or dense, the bottom strip gives the fastest fix to try next.

The three bread jobs your flour must do

A good bread flour system—keto or not—must do these things:

  1. Trap gas so the loaf rises
  2. Hold moisture so it doesn’t crumble
  3. Set into a sliceable crumb when cooled

Gluten does all three in wheat bread. Keto bread recreates them through binders and careful hydration.

That’s why a conventional bread roadmap like Sourdough Bread Recipes: 10 easy bakes is still useful as a learning lens: it reinforces that bread texture is shaped by hydration, timing, and structure—not just ingredients.

The “crumbly loaf” fix: binders and patience

If your keto loaf crumbles, it’s usually one of these:

  • Not enough binder support (psyllium/flax/eggs)
  • Too dry (coconut flour pushed too far, or fiber flours without enough hydration)
  • Overbaked (keto breads dry out quickly)
  • Sliced too early (cooling sets the crumb)

Cooling is underrated. Even wheat bread slices better once it’s fully cooled. Keto bread often needs that time even more.

Wheat-style keto flour blends for bread and yeasted bakes

If you’re using a wheat-style keto blend like King Arthur Keto Wheat Flour, the promise is that you can swap 1:1 for all-purpose flour while keeping a more traditional wheat taste and texture.

That may be attractive if you’re aiming for a more classic bread feel and gluten-free isn’t your goal. Even then, treat it like any flour: test once, adjust once, then keep notes. Bread rewards repetition.

Also Read: Beyond Chicken: 5 Tofu-Tastic Keto-Friendly Dinner Meal Prep Ideas, Chicken-Free and Protein-Rich


Keto pizza flour and crusts: crisp edges, tender center, sturdy slice

Pizza is another category where “best keto flour” depends entirely on the style you want.

Keto Pizza Crust Identity infographic comparing two styles. Left: CRISP/THIN crust with best flour mix (almond flour + fiber flour like oat or bamboo fiber, psyllium or xanthan, optional whey protein isolate), binder/hydration tips, and hot bake strategy with par-bake and cooling for crisp. Right: SOFT/FOLDABLE crust with wheat-style keto flour blend (1:1 style) or almond flour + psyllium, higher hydration, rest time, and moderate bake approach. Footer: MasalaMonk.com.
If your keto pizza crust keeps “failing,” it’s usually a style mismatch—you’re judging a crisp thin base like it should fold, or expecting a foldable slice to snap. This quick visual shows the two best keto pizza crust paths (CRISP/THIN vs SOFT/FOLDABLE), the flour system that fits each one, plus the bake strategy that makes the texture actually happen. Save it as your “pizza reset” card—then pick your crust identity first and your results get way more consistent.
  • If you want a thin, crisp crust, you’ll likely choose a structure-heavy approach (often with binders and a bake-hot strategy).
  • If you want a soft, foldable slice, you’ll usually lean into a more bread-like system with moisture and chew.

In either case, the same principle applies: choose your crust identity first. Otherwise, you’ll keep judging a “crisp cracker crust” as if it was a Neapolitan base, and nothing will feel right.

Also Read: Carbs in Cheese: Keto Diet Perspective


Keto flour tortillas and low carb flour tortillas: how to make the section genuinely useful

Tortillas and wraps are where “low carb” becomes everyday. A tortilla can be breakfast, lunch, dinner, and a quick snack format—so it makes sense to include a real section that isn’t just a brand list.

Infographic checklist for choosing low carb flour tortillas: check serving size, total carbs per tortilla, fiber amount and type, sugar alcohols if present, and ingredient list (added fibers/gums) to compare wraps realistically.
Use this 5-point label check when buying low carb tortillas: start with serving size, compare total carbs per tortilla, review fiber and sugar alcohols, then scan the ingredients (added fibers/gums change texture and how filling a wrap feels). Save this quick guide for your next grocery run.

Store-bought low carb wraps: what actually matters

If you’re using packaged low carb tortillas, focus on:

  • Serving size (and how many you actually eat)
  • Total carbohydrate and fiber (then decide how you interpret net carbs)
  • Sugar alcohols, if present
  • Ingredient list, especially added fibers

The FDA’s label guidance is the clearest reference point for serving size and how numbers are presented: How to understand and use the Nutrition Facts label.
Additionally, the ADA notes that net carb math can be imperfect because fiber and sugar alcohol absorption varies: ADA: Get to know carbs.

In practical terms, that means one “mission carb balance tortilla” style product may feel different from another depending on fiber type and serving size, even when the front label looks similar.

Make tortillas useful even when you don’t want to rely on packaged wraps

The easiest way to keep this part of the guide valuable is to offer wrap-format meal ideas that work whether you use low carb tortillas, lettuce wraps, or bowls.

For example, Sheet Pan Chicken Fajitas is a perfect “build-your-own” filling that adapts to any wrap format.

In other words, even if your tortilla choice changes week to week, the meal stays consistent.

Also Read: Keto Indulgence: Decadent Cheesecake Fat Bombs with Irresistible Spice Variations!


Keto baking sweeteners: how to choose a keto sugar substitute for baking without ruining texture

Flour gets most of the attention, yet sweetener can make or break low carb baking. Sweeteners affect:

  • Moisture retention (soft brownies vs dry brownies)
  • Browning (some brown faster)
  • Crispness (cookies that snap vs cookies that bend)
  • Aftertaste and flavor clarity
“Keto Sweetener Pick (By Bake Result)” infographic showing three choices for low carb baking: Allulose for soft and chewy bakes like brownies, cakes, and chewy cookies (browns faster—use slightly lower heat); Erythritol blend for crisp, snappy cookies and firm bars (can cool gritty—powder or dissolve better); Monk fruit blend for general baking (check the base—if erythritol-based, same grit risk). Bottom tip: fix grittiness by powdering or dissolving better and judge texture after cooling.
Keto sweeteners change texture as much as flour does. Use this quick picker based on the result you want: allulose for softer, chewier brownies/cakes, erythritol blends for crisp cookies and firmer bars, and monk fruit blends for everyday baking (always check what it’s blended with). If a bake turns gritty, the fix is usually simple: powder the sweetener or dissolve it better — and judge texture only after cooling.

Stevia blends, erythritol blends, and “baking” sweeteners

If you’ve used a sweetener that left your cookies gritty or your brownies dry, you’re not imagining it. Some sweeteners recrystallize as they cool, which can change mouthfeel.

For a general reference on what Truvia is and how it compares, What is Truvia sweetener? offers a clear overview of common formulations and comparisons.

If you’re choosing between stevia and aspartame in a broader sugar-free context, Stevia vs Aspartame provides a readable comparison and notes key considerations (including PKU cautions for aspartame).

Allulose: why bakers like it

Allulose is often discussed as a sugar-like option because it can behave more like sugar in recipes. Cleveland Clinic explains what allulose is and why people use it as a sugar substitute, including for diets that aim to reduce sugar intake. See: Cleveland Clinic: What is allulose?.

Oregon State University Extension also describes allulose as about 70% as sweet as sugar with far fewer calories and notes it’s relatively new on the market with limited research on long-term health effects: OSU Extension: Sweeteners (allulose section).

From a baking standpoint, the practical note is this: allulose can brown faster and keep things softer, which is great in some recipes and requires slight temperature awareness in others.

Also Read: Mozzarella: A Keto-Friendly Cheese Powerhouse for Your Low-Carb Journey


Keto baking powder, lift, and why “resting batter” matters more with low carb flour

Keto baking often leans on baking powder because it creates lift in batters that don’t have gluten. Two simple habits improve results dramatically:

  1. Use fresh baking powder. Old leavening gives flat, dense results, and you’ll blame your flour when it wasn’t the flour.
  2. Let fiber-heavy batters rest. Resting allows hydration to stabilize thickness, which improves rise and prevents a grainy finish.
Infographic titled “Keto Lift Checklist” showing two fixes for flat, dense keto bakes: test baking powder freshness with ½ tsp baking powder plus 2 tbsp hot water (fast foam = good; weak bubbles = replace) and rest fiber-heavy batters 10–15 minutes (coconut flour often 15–20) so batter thickens and rises better with less grainy texture. Includes a quick diagnose strip: flat, gritty, dense, dry.
Keto Lift Checklist: If your low-carb muffins, pancakes, or quick breads keep baking up flat, dense, or gritty, it’s usually not “bad keto flour.” Start with two high-impact habits: (1) use fresh baking powder (quick foam test) and (2) rest fiber-heavy batters 10–15 minutes so hydration stabilizes thickness for a better rise. This is especially helpful with coconut flour and fiber-forward blends.

This rest-and-hydrate approach shows up in practical pancake guidance too—both in keto pancake methods and in broader pancake mix handling tips.

Also Read: Are Lentils Keto-Friendly?


Putting it into a kitchen rhythm: a simple way to stop guessing

Once you’ve read enough about keto flour, the real win is building a routine you can repeat. Here’s a calm, practical way to get there:

Keto Baking Rhythm infographic showing a repeatable routine: choose 2 anchor bakes (fast: pancakes/mug cake/cookies; slow: bread/pizza crust/pie crust), build two default flour jars (Tender Jar: almond flour-forward, minimal fiber; Structure Jar: binder + fiber support for bread/pizza), and keep flavor boosters ready (vanilla, cinnamon, espresso powder, citrus zest, pinch of salt). Includes a simple loop: anchor bake → adjust once → repeat → write it down.
Stop guessing with a simple keto baking routine: repeat two “anchor bakes,” keep two default flour systems on hand (a Tender Jar for soft bakes and a Structure Jar for bread/pizza), and rely on a small set of flavor boosters (vanilla, cinnamon, espresso, citrus zest, salt) to make low-carb baking taste complete. Use this as your quick reference whenever you’re testing a new keto flour blend or troubleshooting texture.

Step 1: Choose two “anchor bakes” you’ll repeat until they’re easy

Pick:

  • One fast bake (pancakes, mug cake, or simple cookies)
  • One slow bake (bread, pizza crust, or pie crust)

For pancakes, use Keto Pancakes and/or Almond Flour Pancakes as your baseline so you’re not reinventing the wheel every time.

Step 2: Build a “tender jar” and a “structure jar”

  • Tender jar: almond flour-forward, minimal fiber
  • Structure jar: includes psyllium and/or fiber support, tuned for bread/pizza

Even if you still buy a keto baking mix now and then, these jars give you control when you want it.

Step 3: Keep flavor boosters ready

Low carb baking tastes better when flavor is intentional. Cinnamon, vanilla, espresso powder, citrus zest, and a pinch of salt are not optional extras—they’re how you make the bake taste complete.

Also Read: Keto Vegan Indulgences: 5 Dessert Recipes with Hemp Seeds, Walnuts, and Ginger


A broader, useful perspective: flour choices that aren’t strictly keto, but teach you technique

A strong guide doesn’t pretend only one eating style exists. It gives you perspective.

If you bake for a household where not everyone eats keto all the time, it’s helpful to understand how other flour systems behave—because it sharpens your intuition. Oat-based pancakes, for example, teach you about batter hydration and tenderness in a way that directly carries over to almond and coconut flour batters. See: Oat Pancakes Recipe (healthy oatmeal pancakes + variations).

Technique Transfer (Beyond Keto) infographic showing how non-keto flour systems teach keto baking skills: oat pancakes teach hydration and tenderness (batter thickness, rest, moisture strategy), wheat/buttermilk pancakes teach gluten bounce and structure (structure creates rise, don’t overmix), and no-refined-flour cookies teach moisture and method (softness from fat/binders, cooling changes texture). Bottom line: hydrate → rest → structure → cool → judge. MasalaMonk.com
Other flour systems sharpen keto instincts: oats teach hydration and resting, wheat pancakes teach structure and the cost of overmixing, and “no refined flour” cookies remind you that method + moisture often matter as much as ingredients. Translate the skills: hydrate → rest → build structure → cool → judge.

Likewise, a classic wheat-flour pancake recipe highlights how gluten and starch create a certain bounce, which is exactly what you’re rebuilding in keto baking through different tools. See: Fluffy Buttermilk Pancakes.

And if you want the “whole-food sweetness” approach (different macros, but helpful technique), Easy and healthy cookies (no refined flour) is a reminder that texture often comes from method and moisture strategy, not just flour choice.

Also Read: Celery: The Keto Superfood You Didn’t Know About! Boosting Nutrition, Flavor, and Versatility


The quiet truth about “no carb flour,” “0 carb flour,” and “carb free flour”

It’s tempting to chase a mythical flour with zero carbs that behaves like wheat. In practice, “no carb flour” language usually points to fiber-heavy ingredients or specialized blends. Those can be useful, particularly in bread and pizza systems, yet they can also create digestive discomfort for some people, and they don’t behave like wheat flour in every recipe.

Infographic titled “No-Carb Flour Reality Check” explaining what “0 carb flour” usually means (fiber-heavy ingredient or blend), a 60-second label check (serving size, total carbs + fiber, sugar alcohols), and how to use it (best for bread/pizza structure mixes, rest 10–20 minutes, start small). Includes rule: chase taste, texture, and your tolerance.
“0 carb flour” and “carb free flour” claims usually mean fiber-heavy blends—useful for keto bread and keto pizza crust structure, but not a perfect wheat 1:1 in every recipe. Save this quick label-check cheat sheet: start with serving size, then total carbs + fiber, and note sugar alcohols if present (net carbs can vary by fiber type). Best move: use these blends in structure recipes, rest the dough/batter 10–20 minutes to hydrate, and start small.

This is where label literacy matters again. Total carbohydrate and fiber are defined on the label, and what counts as “fiber” can vary by type. The FDA’s Interactive Nutrition Facts Label on total carbohydrate is a grounded reference point for what that line means: Interactive Nutrition Facts Label: Total Carbohydrate (PDF).
Meanwhile, the ADA’s note about net carb calculations explains why subtracting fiber and sugar alcohols isn’t always perfectly accurate across products: ADA: Get to know carbs.

So rather than chasing a slogan, chase results: a flour system that tastes good, bakes well, and fits your preferences.

Also Read: is Aspartame Keto Friendly? Aspartame and Ketosis


A simple “starter kit” pantry for keto baking that actually covers real life

If you want a keto pantry that makes you feel capable on a random Tuesday, not just inspired on a Sunday, aim for a kit that supports multiple outcomes.

Infographic titled “Keto Baking Starter Kit Pantry” showing a simple pantry checklist: base flours (almond flour, coconut flour), binders/structure (psyllium husk, optional flax meal, optional xanthan or guar), moisture and flavor (butter or coconut oil, vanilla, cinnamon, unsweetened cocoa, salt), and lift (fresh baking powder). Bottom line: “What you can bake with this kit—pancakes, brownies, muffins, cookies, crusts (pizza/pie).” MasalaMonk.com.
A “random Tuesday” keto baking pantry that actually makes you capable, not just inspired: almond flour + coconut flour, psyllium (plus optional flax/xanthan), everyday flavor builders (vanilla, cinnamon, cocoa, salt), and fresh baking powder for lift. With this kit you can reliably make pancakes, brownies, muffins, cookies, and simple pizza/pie crusts—without waiting on a specialty mix. Save this checklist, then use it alongside the full keto flour guide above, in this post.

Base flours

  • Almond flour (fine, for baking)
  • Coconut flour (for recipes designed around it; small doses in blends)

Binders and structure

  • Psyllium husk
  • Flax meal (optional, but useful)
  • Xanthan or guar gum (optional, in tiny amounts)

Moisture and flavor

  • Butter or coconut oil
  • Vanilla
  • Cinnamon
  • Unsweetened cocoa
  • Salt (always)

Lift

  • Fresh baking powder

Flexible add-ons

  • Sugar-free chocolate options for baking (choose based on your sweetener preference)
  • Nuts, seeds, and shredded coconut for texture

When you have that kit, the question “What can I bake?” becomes practical. You’re no longer waiting for a specialized product to arrive. You can make pancakes, brownies, and a basic crust without drama.

Also Read: How to Keto – 5 Ways Butter Chicken can be Made Keto-Friendly


If keto bakes feel inconsistent, use this Keto Bake Notes Card like a tiny experiment log. Track your flour system (tender vs structure), sweetener, binder, rest time, and bake settings—then change one variable next time. This is the fastest way to dial in clean slices, better lift, and better texture with almond flour, coconut flour, and fiber-heavy blends.

Closing: keto flour gets easier when you stop asking it to be one thing

Keto baking feels hard when you keep asking one flour to behave like every flour. It becomes surprisingly approachable when you treat keto flour as a set of tools:

  • Almond flour for tenderness and comfort
  • Coconut flour for structure, used carefully
  • Psyllium and binders for bread-like results
  • Thoughtful sweeteners for moisture and flavor
  • Good label reading habits so products don’t confuse you

Start with one bake you’ll repeat—pancakes are perfect for that—and let the results teach you what your flour wants. From there, move into brownies, crusts, and bread with a calmer hand. If you want a strong baseline for that first step, Keto Pancakes and Almond Flour Pancakes are both reliable starting points.

And when you’re choosing packaged foods or mixes, keep the label grounding close. The FDA’s Nutrition Facts label guide and the ADA’s net carb explanation we have linked earlier in this ost – are two references worth returning to whenever something feels “too good to be true.”

Also Read: Pepperoni: The Keto-Friendly Pizza Topping You Love

Infographic titled “Keto Baking Decision Card” showing a 3-step flow: pick bake outcome (soft/chewy, crisp/snappy, bread-like, tender crumb), choose flour system (tender jar almond-forward, structure jar with binder/fiber, coconut flour recipe-built, wheat-style 1:1 keto blend), then run 3 checks—rest 10–20 minutes if fiber-heavy, test baking powder for lift if flat, and judge only when fully cooled. MasalaMonk.com.
Stop guessing with keto flour: pick your desired texture first, then match the right flour system (tender jar vs structure jar), and run the 3 checks that fix most fails—rest, lift, cool. Save this card for your next batch so you only change one thing at a time and get consistent results.

FAQs

1) Is keto flour the same as low carb flour?

Not always. “Keto flour” usually implies a flour or blend that can fit stricter carb targets, while “low carb flour” can include options that are lower than wheat flour yet still too high for many keto plans. Because labels and serving sizes vary, it helps to treat them as overlapping categories rather than identical ones.

2) Can you eat flour on keto?

Yes—if it’s a keto-friendly flour substitute. Instead of regular wheat flour, many people use almond flour, coconut flour, or a keto all purpose flour blend. Even so, the best choice depends on what you’re baking and how you count carbs.

3) What flour has the least carbs?

There isn’t one universal winner. Some fiber-forward “carb free flour” style products can be extremely low net carb per serving, whereas almond flour and coconut flour are low-carb staples with more predictable baking behavior. Rather than chasing a single “0 carb flour,” aim for the option that gives you the best texture for the bake you’re making.

4) Is there a true zero carb flour?

In practical kitchen terms, “zero carb flour” is usually shorthand for fiber-heavy ingredients or specialty blends that calculate very low net carbs per serving. However, those ingredients may behave differently than regular flour, so results can range from excellent to oddly dry if the recipe isn’t designed for them.

5) What is the best keto flour for baking overall?

If you want one starting point, almond flour is often the easiest because it’s forgiving and produces tender cakes, cookies, muffins, and pancakes. That said, coconut flour can be fantastic when used correctly, while blends can outperform both for bread-like structure.

6) What’s the best keto flour substitute for all-purpose flour?

A keto all purpose flour blend is usually the closest substitute, especially if it’s designed for 1:1 swapping. Still, “closest” depends on the recipe: brownies want tenderness, whereas bread wants structure, so a single substitute won’t be perfect in every bake.

7) Almond flour vs coconut flour: which is better for keto baking?

Almond flour tends to be richer and more tender, so it shines in brownies, cookies, muffins, and pancakes. Coconut flour, on the other hand, is much more absorbent, which means it can create a lighter, cake-like crumb when the liquid and eggs are adjusted properly.

8) Why does coconut flour make recipes dry?

Because coconut flour absorbs a lot of moisture. Consequently, recipes that use coconut flour usually need more eggs, more liquid, and often a short resting time so the batter can hydrate fully before baking.

9) Can I swap coconut flour for almond flour 1:1?

Usually not. Coconut flour is far more absorbent, so a direct swap often leads to a stiff batter and a dry final bake. Instead, use coconut flour recipes as written, or use it in small amounts to help firm up a blend.

10) Why does my keto bread crumble?

Most often, it’s a structure issue. Either the loaf needs more binder support (like psyllium or flax), more moisture, or a gentler bake. Additionally, slicing too soon can make the crumb fall apart, so cooling fully can help a lot.

11) What is keto bread and pastry flour used for?

Keto bread and pastry flour blends are typically designed to mimic flour-like structure in doughs and batters. As a result, they’re often used for sandwich-style loaves, rolls, pizza crust, and bakes where you want a more “traditional” bite.

12) What’s the best keto flour for bread?

Bread usually benefits from a blend that prioritizes structure, not just tenderness. For that reason, many bakers use a keto flour mix that includes binders such as psyllium, plus a base flour that supports a sliceable crumb.

13) What is a low carb flour mix?

A low carb flour mix is a blended “system” meant to behave more predictably than a single flour. Typically, it combines a base flour (for bulk), a binder (for structure), and sometimes fiber ingredients (for texture and lower net carbs).

14) What’s the best keto flour for brownies?

For fudgy brownies, almond flour is often the easiest path because it stays tender and rich. If you prefer a more cake-like brownie, a more structured keto flour blend—or a tiny amount of coconut flour used carefully—can help the bars set neatly.

15) Are keto brownies mix products worth it?

They can be, especially if you want convenience. Even so, mixes vary in texture depending on whether they’re almond-based, coconut-based, or built from a more flour-like blend. Therefore, it’s smart to pick a mix that matches your preferred brownie style.

16) What’s the difference between low carb brownie and keto brownie?

Often, it’s about how strict the carb target is and how the product is labeled. In practice, both can be made with similar ingredients, yet serving size and sweetener choice can change the final numbers dramatically.

17) What’s the best flour for keto pie crust?

Almond flour is the classic choice for a tender, buttery crust. However, if you want cleaner slices and less crumbling, a small amount of binder or a carefully measured blend can make the crust sturdier without making it tough.

18) Can you make a sugar free low carb pie crust?

Yes. Many low carb pie crusts use almond flour plus butter, then rely on a keto baking sweetener only if you want a sweeter, cookie-like base. Otherwise, you can keep it savory and let the filling provide sweetness.

19) Is there a no carb pie crust?

Some “no carb” claims refer to fiber-heavy crust approaches or very small serving-size calculations. Even if a crust is extremely low net carb, it still needs a solid texture plan; otherwise, it can turn either brittle or gummy.

20) What’s the best keto sugar substitute for baking?

It depends on the bake. Some sweeteners create crisp cookies but drier cakes, while others keep brownies softer yet brown faster. Accordingly, it helps to match your sweetener to your goal—crisp, chewy, cakey, or fudgy.

21) Why do keto cookies sometimes turn out gritty?

That grit usually comes from a sweetener that recrystallizes as the cookies cool. If that happens, try a different sweetener blend, adjust baking time slightly, or use recipes designed for that sweetener’s behavior.

22) What are keto baking chips and do they melt like chocolate?

Keto baking chips vary based on sweetener and fat composition. Some melt smoothly, while others soften but hold their shape more. If you want gooey pockets, choose chips known for melting well; if you want defined chips, pick a variety that stays intact.

23) Can I use keto baking chocolate in brownies and frosting?

Yes, although the sweetness level and texture can vary. For brownies, it can deepen flavor without adding extra sweetness. For frosting, it helps to balance with enough fat so the finish stays smooth rather than stiff.

24) What is carbquik and how is it used?

Carbquik is a low carb baking mix often used for biscuit-style doughs and quick bakes. Since mixes differ by formula, results can range from fluffy to dense depending on liquid ratios and baking time.

25) Where can I buy keto bread mixes or low carb bread mixes?

Keto bread mix and low carb bread mixes are commonly sold online and at larger grocery retailers. Still, before buying, compare serving sizes and ingredients to make sure the mix matches your preferences for taste, texture, and carbs.

26) Are keto baked goods from an online keto bakery always low carb?

Not automatically. “Keto bakery online” offerings vary in ingredients and portion sizes, so it’s worth checking how they calculate carbs, what sweeteners they use, and how large each serving is.

27) Are low carb flour tortillas keto friendly?

Sometimes, yes—depending on serving size, fiber content, and how you count net carbs. Because wraps can be easy to overeat, it helps to decide in advance whether you’re having one tortilla, two, or building a bowl instead.

28) What are Mission Carb Balance tortillas and how many carbs do they have?

Mission Carb Balance tortillas are marketed as reduced net-carb tortillas, yet the exact carbs depend on the variety and serving size. Therefore, check the label for the specific package you’re buying rather than assuming all versions match.

29) Are “no carb tortillas” or “zero net carb wraps” too good to be true?

They can be very low net carb on paper; however, fiber type and portion size still matter. If you feel better with a conservative approach, treat them as an occasional convenience rather than an unlimited staple.

30) Can I make keto flour tortillas at home?

Yes. Homemade versions often use almond flour, coconut flour, or binder-based doughs that roll and cook like tortillas. The main advantage is control: you can tune thickness, softness, and flavor to your liking.

31) What can I use instead of flour for keto bread crumbs?

Almond flour, almond meal, crushed seeds, and pork rind crumbs are popular substitutes. Depending on the dish, each can deliver crispness, although seed-based crumbs add a nuttier flavor.

32) What’s the best low carb flour substitute for thickening sauces?

Instead of wheat flour, many people use small amounts of xanthan gum, psyllium, or even a reduced cream-based approach. The key is to add slowly, because a little goes a long way and can thicken quickly.

33) Is lupin flour keto friendly?

Often, yes, and it can add helpful structure because it’s protein-forward. Still, taste varies by person, so it’s usually best to try it first in chocolate bakes or blended recipes.

34) What is bamboo flour keto baking used for?

Bamboo fiber-style ingredients are typically used to add bulk and help reduce net carbs in certain blends. Since they can be drying, they usually work best when paired with enough moisture and binders.

35) Is there a keto alternative to wheat flour for chapati or roti?

Many people try low carb atta blends or nut-and-fiber based doughs. Results vary, though, because chapati texture depends heavily on gluten. A more realistic goal is a soft flatbread that satisfies the role of roti, even if it isn’t identical.

36) Why does keto cake sometimes sink in the middle?

This can happen when batter is under-structured, over-leavened, or baked at too high a temperature. Additionally, opening the oven early can cause a fragile keto cake to collapse before it sets.

37) How do I store keto baked goods so they don’t dry out?

Because low carb bakes can lose moisture quickly, store them tightly wrapped. Also, many keto breads and muffins taste better after a brief rewarm, since heat softens fats and improves texture.

38) What’s the best way to start keto baking if I’m new?

Begin with a simple bake that teaches you how the flour behaves—pancakes or brownies are ideal. Then, once you understand your preferred base flour and sweetener, move into pie crust and bread with more confidence.

39) Can keto baking be nut-free?

Yes. Coconut flour is the most common nut-free keto flour option, and some blends avoid nuts entirely. Even so, nut-free keto baking often requires more careful moisture and binder balance to avoid dryness.

40) What’s the “ultimate guide to keto baking” mindset?

Think in systems, not swaps. Choose the flour and binder that fit the bake, control moisture on purpose, and treat texture as feedback. Over time, keto baking becomes less experimental and far more reliable.

Posted on Leave a comment

Navigating Keto-Friendly Snacks: Delicious Options for Satisfying Cravings


When following a keto diet, finding satisfying snacks that fit within your low-carb, high-fat lifestyle can be a challenge. In this post, we’ll guide you through a variety of keto-friendly snack options that are not only delicious but also help keep you on track with your dietary goals. From savory to sweet, we’ve got you covered with tasty treats that won’t derail your ketogenic journey.


The Importance of Keto-Friendly Snacks 🍿🥜🧀

Snacking plays a significant role in our daily lives, providing energy and satisfying cravings between meals. On a keto diet, it’s essential to choose snacks that align with your nutritional goals and keep you in a state of ketosis. Keto-friendly snacks are low in carbohydrates, moderate in protein, and high in healthy fats. These snacks can provide sustained energy, help prevent blood sugar spikes, and keep you feeling full and satisfied.

Snacking can also be a way to add variety to your diet and prevent feelings of deprivation or monotony. By incorporating keto-friendly snacks, you can enjoy a range of flavors and textures while staying within the bounds of your dietary plan.


Savory Keto-Friendly Snack Options 🧀🥓🥜

  1. Cheese Crisps: Bake or pan-fry slices of cheese until crispy for a satisfying and crunchy snack. Cheddar, Parmesan, and Gouda are excellent choices for making delicious cheese crisps. You can also experiment with adding herbs or spices like rosemary, paprika, or garlic powder for extra flavor.
  2. Keto-Friendly Jerky: Look for jerky made from grass-fed beef or free-range poultry, without added sugars or preservatives. Beef, turkey, or chicken jerky can be a protein-packed snack to satisfy your cravings. Just be mindful of the sodium content and choose options with minimal added ingredients.
  3. Nuts and Seeds: Enjoy a handful of almonds, macadamia nuts, walnuts, or pumpkin seeds for a nutritious and filling snack. Nuts and seeds are rich in healthy fats and provide a good source of fiber. They also offer a satisfying crunch and can be seasoned with spices like cinnamon, cayenne pepper, or smoked paprika for added flavor.
  4. Avocado Deviled Eggs: Combine mashed avocado with hard-boiled egg yolks, mustard, and spices like cumin or smoked paprika to create a creamy and satisfying snack. The combination of healthy fats from avocado and protein from eggs makes for a perfect keto-friendly snack.
  5. Stuffed Mini Peppers: Fill mini bell peppers with cream cheese or a mixture of cream cheese and crumbled bacon for a flavorful and bite-sized snack. These stuffed peppers are not only delicious but also provide a dose of vitamins and fiber. You can even experiment with adding other ingredients like diced jalapeños or shredded cheddar cheese for a spicy twist.
  6. Crispy Zucchini Fries: Slice zucchini into thin strips, dip them in beaten eggs, coat with a mixture of almond flour, Parmesan cheese, and spices, then bake until crispy. These zucchini fries offer a satisfying crunch without the excess carbs found in traditional potato fries.
  7. Cauliflower Buffalo Bites: Coat cauliflower florets in a mixture of almond flour, spices, and buffalo sauce, then bake until crispy. Serve with a side of keto-friendly ranch or blue cheese dressing for a tasty and satisfying appetizer or snack. These cauliflower buffalo bites provide a spicy kick and are a great alternative to traditional buffalo wings.

Sweet Keto-Friendly Snack Options 🍫🍓🥥

  1. Dark Chocolate: Choose dark chocolate with a high cocoa content (70% or higher) and minimal added sugars. Enjoy a few squares of dark chocolate for a rich and satisfying treat. You can also add some nuts or nut butter to make a delicious and keto-friendly chocolate bark.
  2. Berries and Whipped Cream: Enjoy a handful of berries, such as strawberries, blueberries, or raspberries, with a dollop of freshly whipped cream. Berries are relatively low in carbs and provide essential vitamins, while whipped cream adds a touch of indulgence. You can also sprinkle some crushed almonds or unsweetened coconut flakes on top for added texture.
  3. Coconut Fat Bombs: Make homemade fat bombs using coconut oil, unsweetened shredded coconut, and a keto-friendly sweetener. These small, high-fat treats can provide a quick energy boost and satisfy your sweet tooth without derailing your keto goals. Experiment with different flavors like chocolate, almond, or matcha to find your favorite combination.
  4. Keto-Friendly Smoothies: Blend unsweetened almond milk or coconut milk with low-carb fruits like berries, avocado, and a scoop of keto-friendly protein powder. You can add a dash of vanilla extract or cinnamon for extra flavor. Smoothies are a refreshing and satisfying snack option that can be customized to your liking. You can also add a tablespoon of nut butter or a scoop of MCT oil to increase the healthy fat content.
  5. Chia Pudding: Mix chia seeds with unsweetened almond milk or coconut milk and let it sit in the refrigerator overnight. In the morning, you’ll have a creamy and nutritious pudding-like snack. Add your favorite keto-friendly sweetener and toppings like nuts or berries for extra flavor and texture.

Conclusion 💡

Having a variety of keto-friendly snacks on hand can make a significant difference in staying on track with your dietary goals. The key is to choose snacks that are low in carbohydrates, moderate in protein, and high in healthy fats. By incorporating savory options like cheese crisps, jerky, nuts, and stuffed mini peppers, as well as sweet treats like dark chocolate, berries, and fat bombs, you can satisfy your cravings while maintaining ketosis. Experiment with different flavors and combinations to find your favorite keto-friendly snacks and enjoy the benefits of snacking without compromising your ketogenic lifestyle. 🍿🥜🧀