Posted on 2 Comments

No Equipment Calisthenics at Home: Beginner Workout & 4-Week Plan

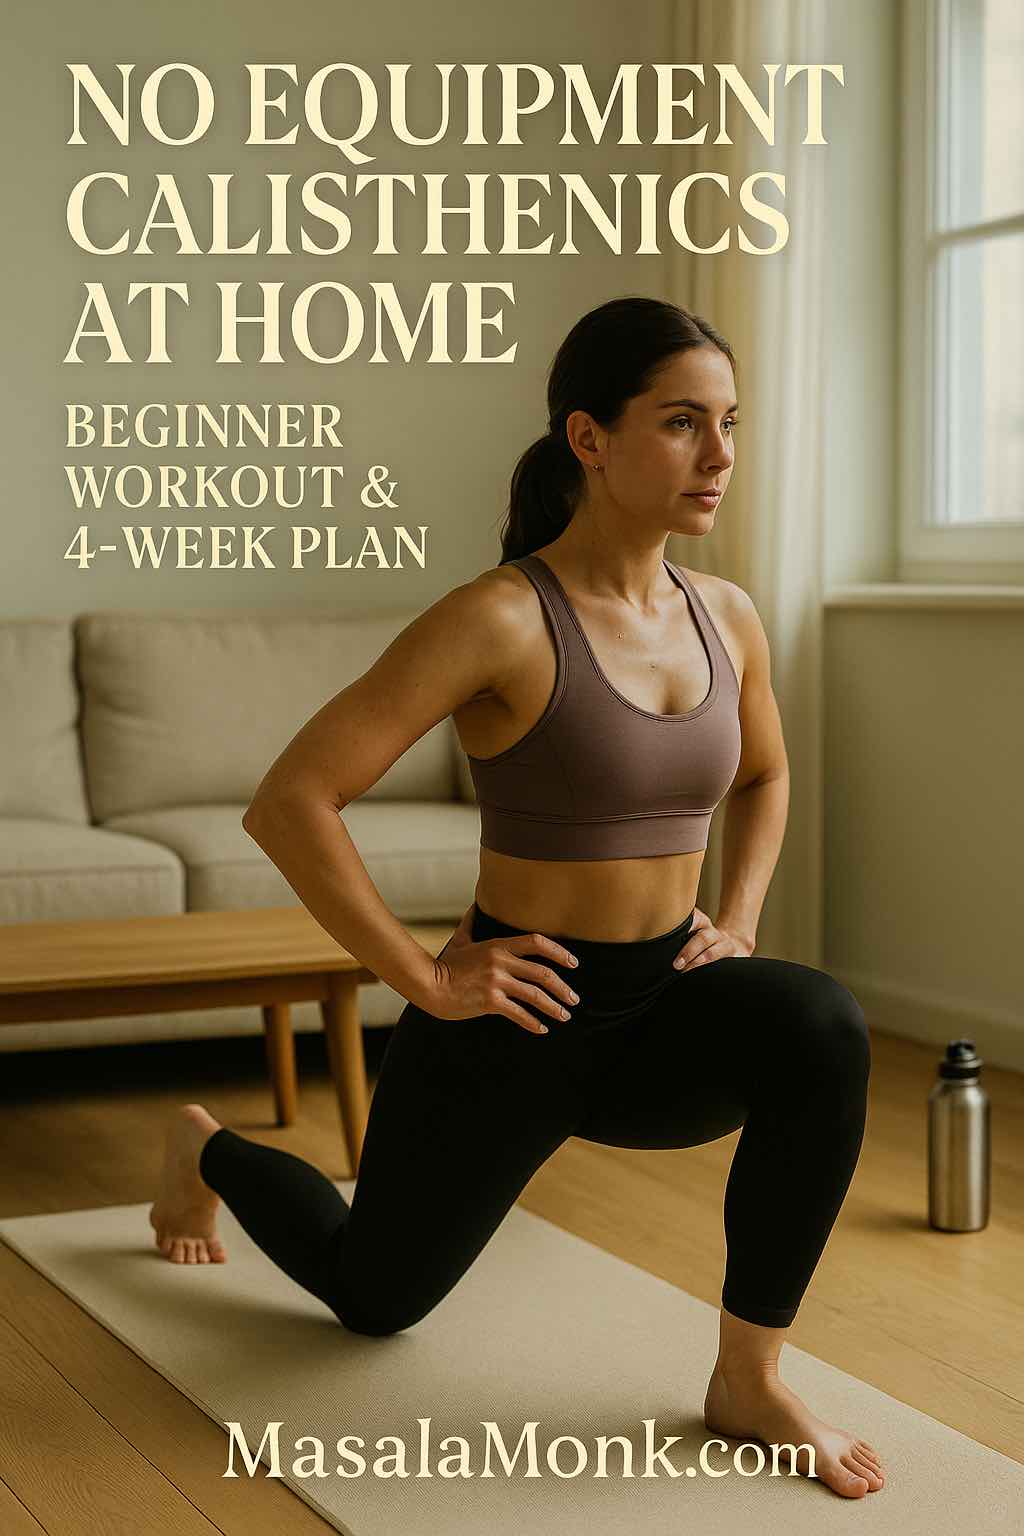
no equipment calisthenics at home—beginner performing a reverse lunge on a yoga mat in a bright living room

You don’t need a gym to get stronger. With no equipment calisthenics at home, you can build practical strength, steadier balance, and genuine confidence using movements that scale to your current level. All you need is a few square feet of floor, a stable surface, and a plan you can actually follow. This guide gives you a crisp exercise list, two plug-and-play routines, and a four-week progression that fits real life. Moreover, the structure aligns with public-health guidance—roughly 150 minutes of weekly activity plus two or more days of muscle-strengthening work—so you’ll improve health markers while you get stronger. For the official language, see the WHO physical activity fact sheet and the CDC guidelines for adults.

Why No Equipment Calisthenics at Home Works—And Keeps Working

To begin with, it’s accessible. You can start today with zero purchases and minimal setup. Next, it’s scalable. You’ll begin with friendly variations—knee push-ups, table rows, and short planks—then progress toward tougher versions at a pace that feels sustainable. Furthermore, it’s habit-friendly. Because the barrier to entry is tiny, workouts actually happen; consistency follows almost automatically. Consequently, progress arrives earlier than you expect.

Beyond convenience, no equipment calisthenics at home is evidence-aligned. Short sessions accumulated across the week help you reach those activity targets without rearranging your life. If you’re unsure what “counts,” the CDC’s plain-English explainer on what counts as activity confirms that practical movement, done consistently, matters. In turn, strength work at home checks the “muscle-strengthening” box while sharpening coordination and control.

Moreover, this approach supports more than muscle. Short sessions accumulate toward those weekly movement targets without overhauling your schedule. If you like gentle, low-impact options on off days, try wall-assisted mobility and core activation to stay in the groove without fatigue.

Fast Setup With Minimal Friction

First, clear a small rectangle of floor so you can step forward, back, and sideways without bumping into furniture. Then choose a sturdy table, countertop, or door frame—you’ll use it for supported rows or hands-elevated push-ups. Afterward, put down a mat or towel for traction, place water within reach, and cue a short playlist. That’s your entire gym. Additionally, link training to an existing habit—after coffee, during lunch, or just before dinner—so the decision to move becomes automatic. As a result, you’ll start more often and finish more sessions.

When you need a low-impact stand-in, swap a session for this standing Pilates workout—no floor work, still a full-body feel.

No Equipment Calisthenics at Home — Beginner Exercise List

Rather than memorize dozens of exercises, master five movement families that cover the whole body. From there, you’ll progress by adjusting leverage, tempo, or range of motion. When you want visual cues, jump to reputable references for a quick form check—or borrow ideas from focused sessions like Lower Body Strength (Day 22) or Core Power (Day 23) to sharpen form.

Squat → Reverse Lunge

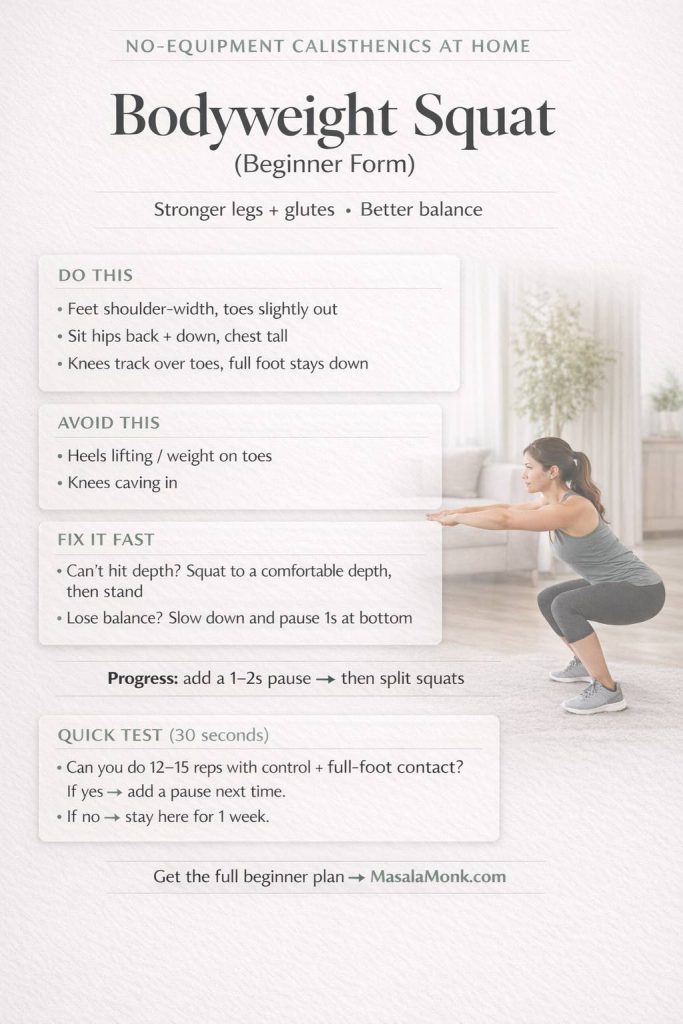
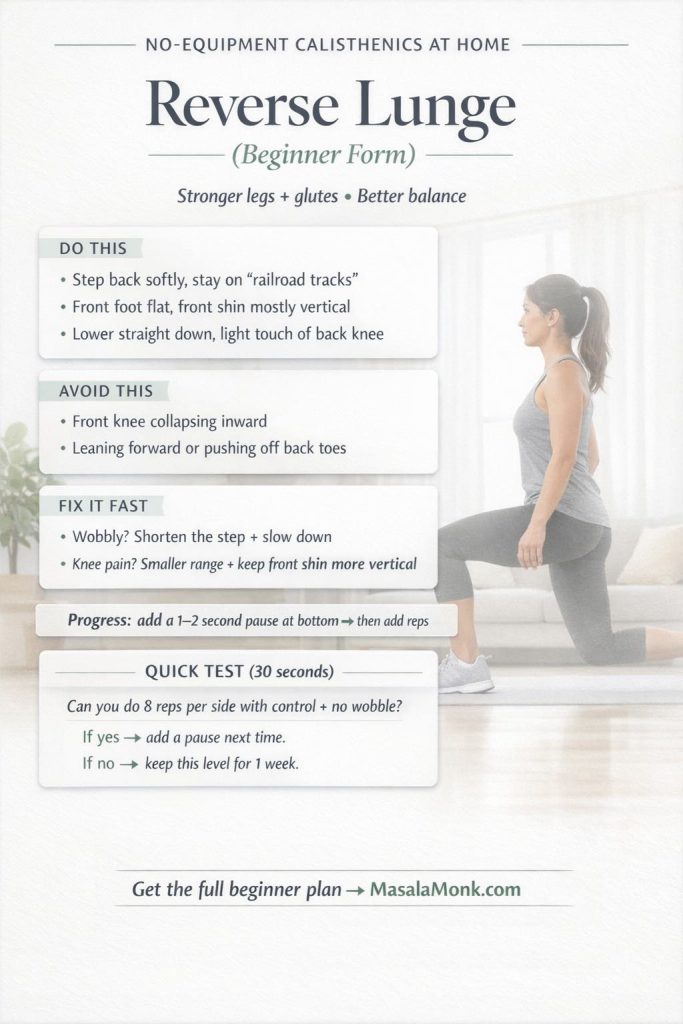
Sit the hips back, keep the chest tall, and press through the whole foot. Pause for one second at the bottom to build control. Subsequently, introduce reverse lunges to train one leg at a time and improve balance.

Knee Push-Up → Push-Up

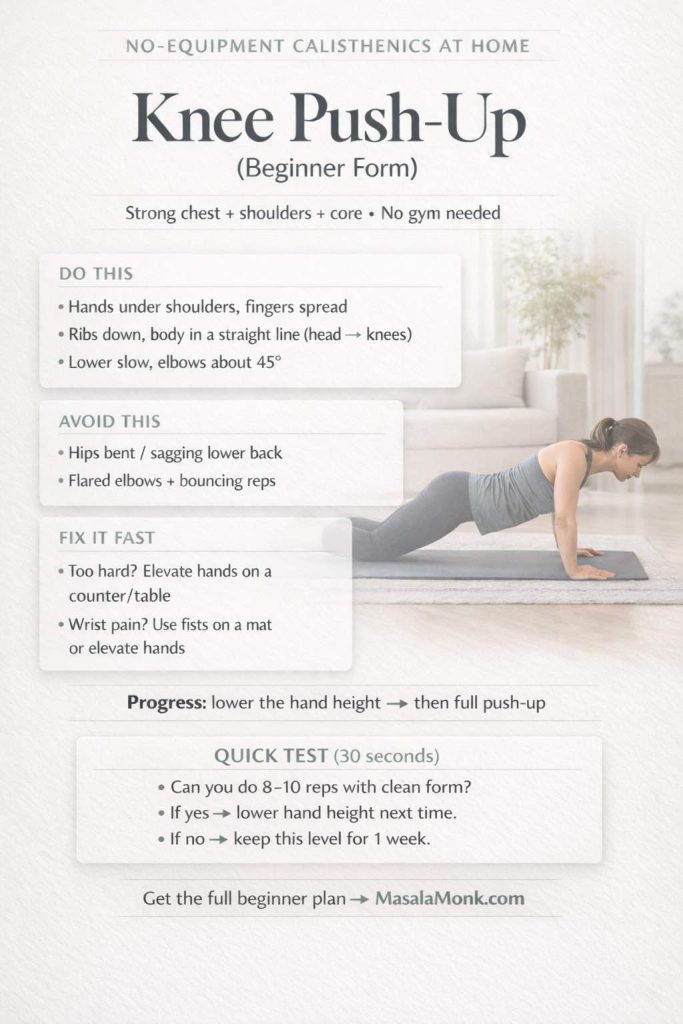
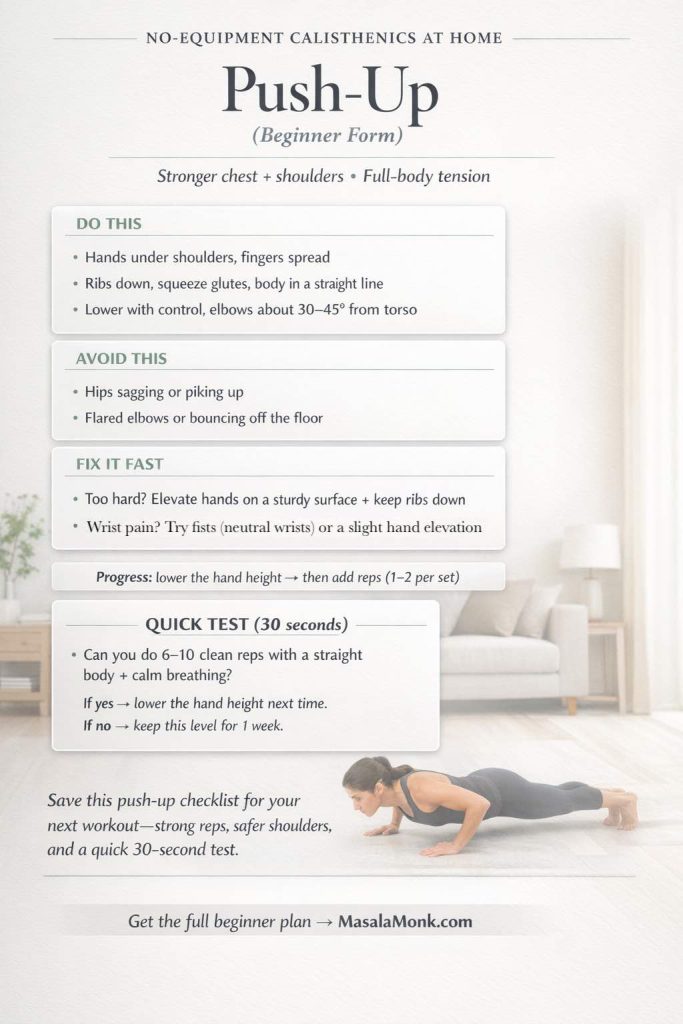
Begin on knees or elevate the hands on a table or countertop. Lower smoothly with elbows about 45 degrees from your sides and keep ribs down. For a concise walkthrough, skim this bent-knee push-up guide from ACE. Afterwards, reduce the elevation, then move to full floor reps once sets feel tidy.

On days you prefer a gentler push pattern, lean against a wall and follow cues from our Wall Pilates for Beginners.

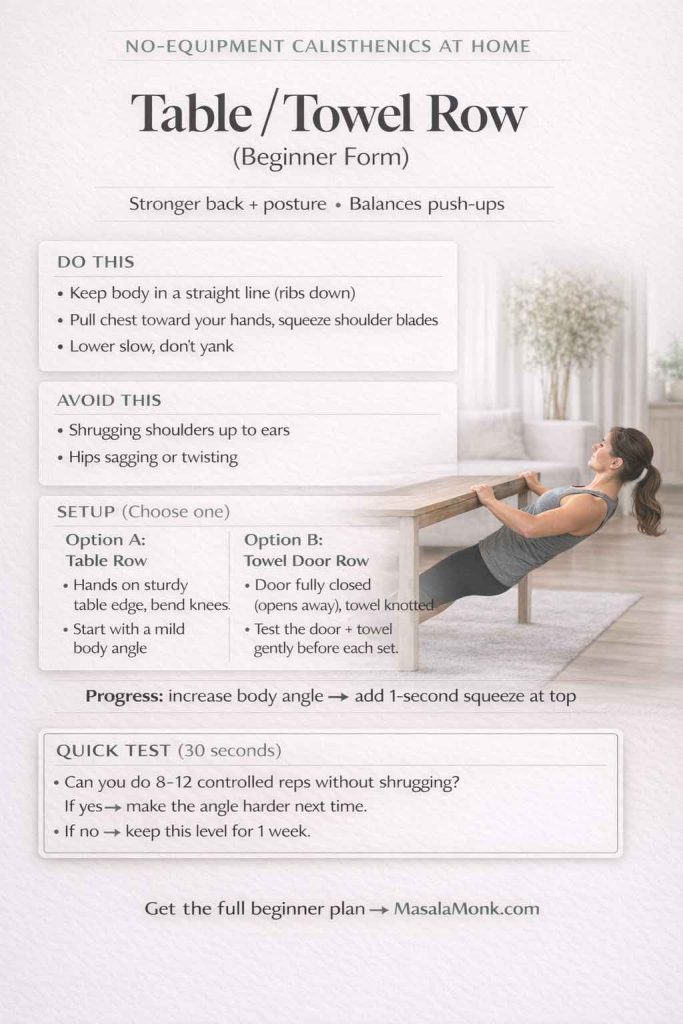
Table / Towel Row

Use a sturdy table for a light inverted row, or loop a towel through a door and pull your chest toward the anchor. Notably, always test the setup before each set. Start with a mild body angle and bent knees; then, as strength improves, walk your feet forward to increase the challenge.

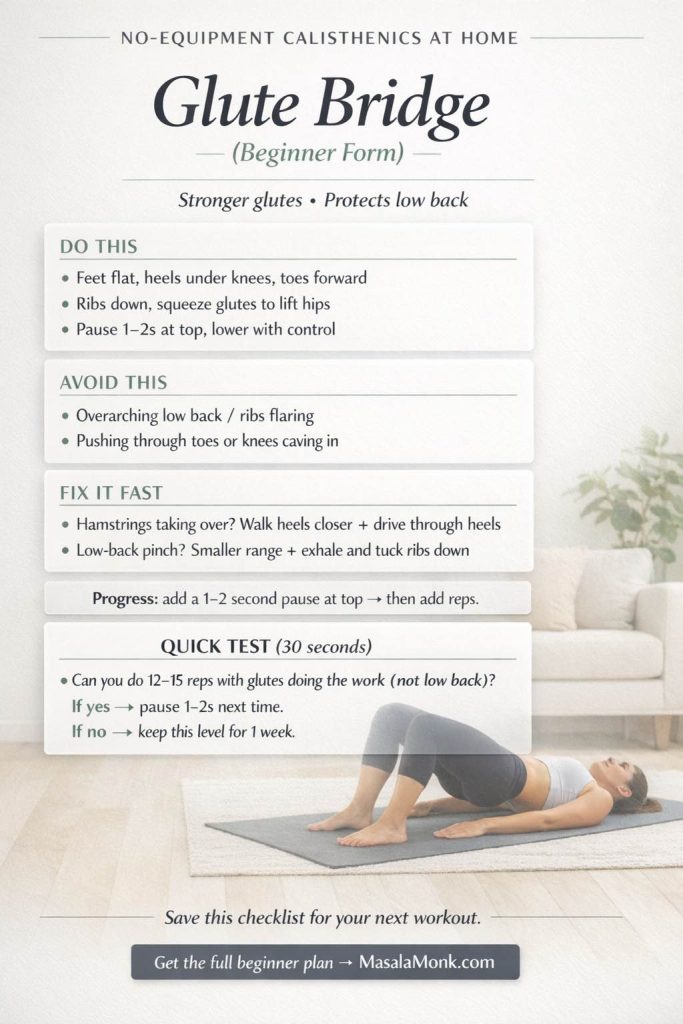
Glute Bridge

Lie on your back, set feet flat, and drive through the heels. Squeeze at the top without arching the lower back. Hence, think “hips up, ribs down.” If you want more tension without extra gear, add a two-second pause at the top.

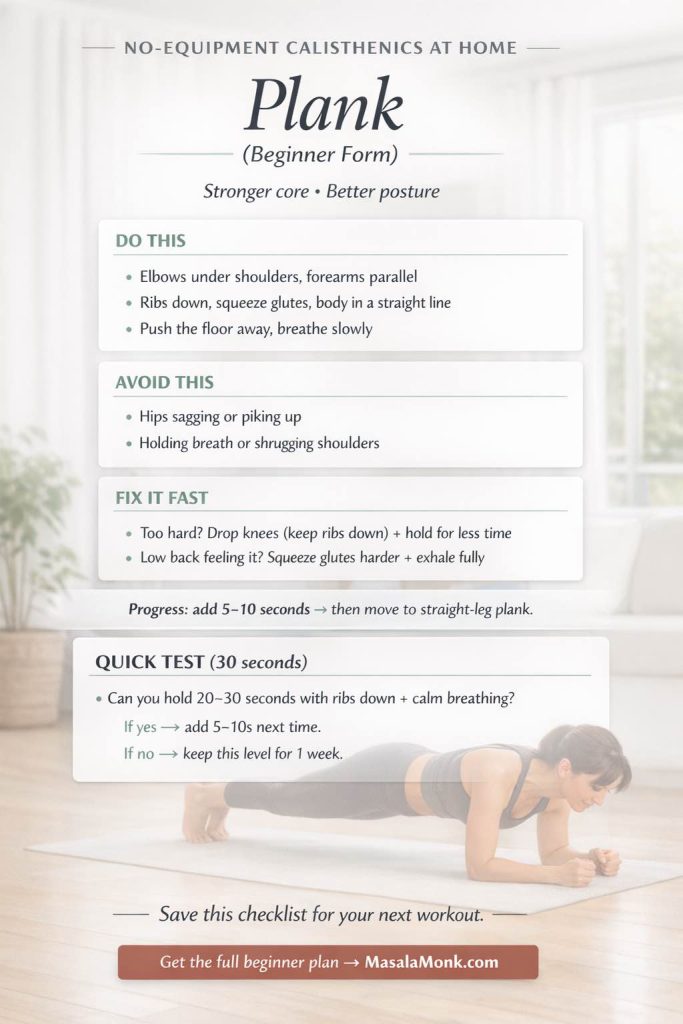
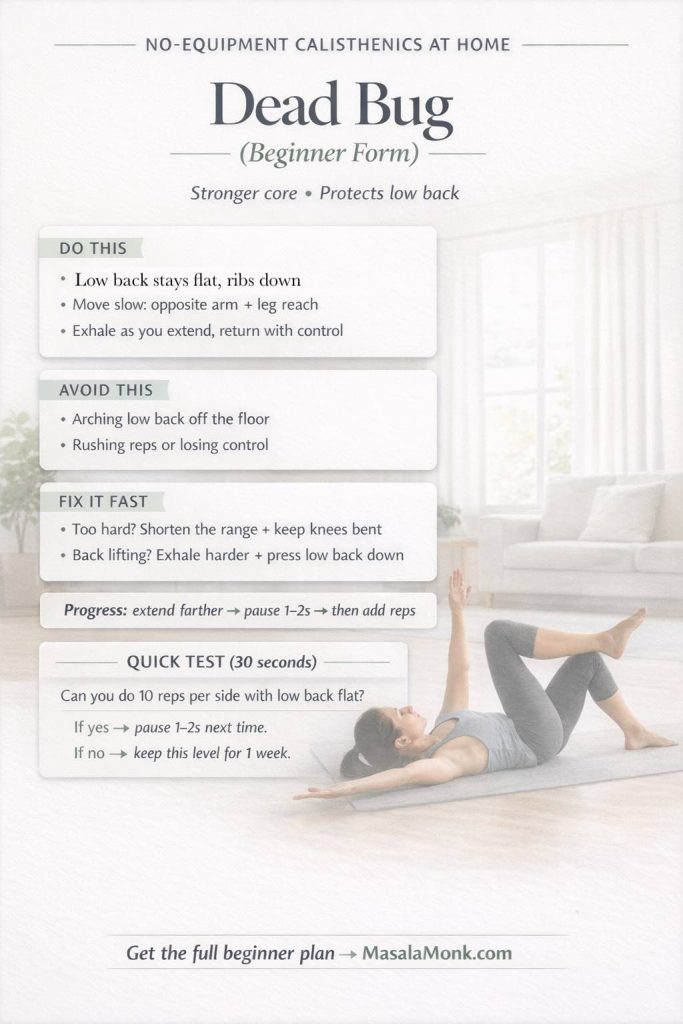
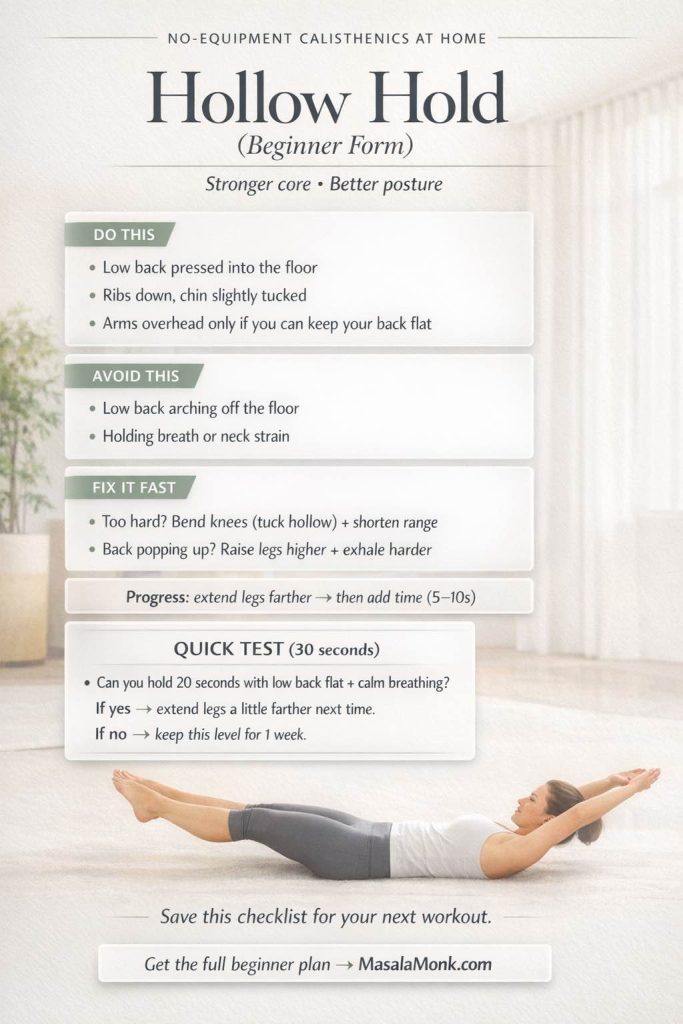
Plank → Dead Bug → Hollow Hold

Brace the torso while breathing calmly. Keep the spine neutral. Initially, use short, repeatable holds. Later, progress to dead bug for anti-extension strength and then to hollow body positioning for deeper control.

If you prefer gentler options or chair-friendly progressions, the NHS provides home-friendly strength exercises and short strength & resistance videos. Conversely, if you enjoy variety, these clips pair well with off days.

Smart Warm-Up and Steady Cool-Down

Start with three to five minutes: ankle rocks, hip circles, arm swings, and two slow squats. Importantly, the warm-up should make the first set feel better—not drain energy. After finishing, cool down with unhurried breathing and light mobility. For instance, try cat-camel, gentle thoracic rotations, and an easy forward fold. Ultimately, these bookends keep joints happy and mark the session complete.

No Equipment Calisthenics at Home — Two Beginner Routines

Train three days per week at the start. Alternate these sessions. Keep the moves familiar so your body learns positions and patterns quickly. However, if a movement feels shaky, step back one progression and reclaim clean form.

Routine A — 20-Minute Circuit (Full Body)
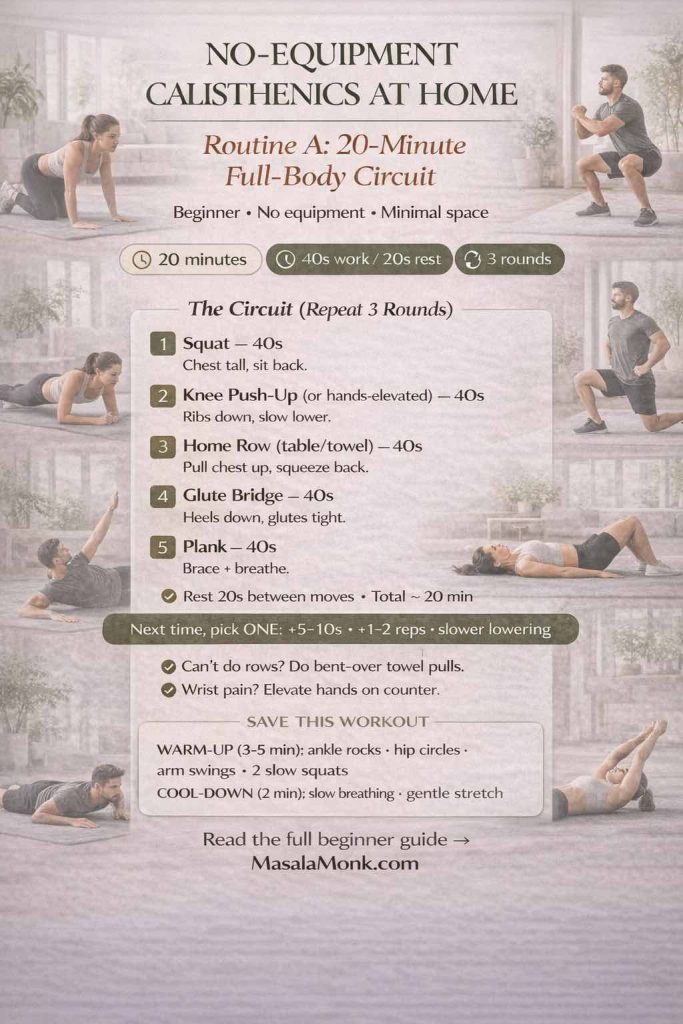
  • Squats — 40 seconds work / 20 seconds rest
  • Knee Push-Ups (or hands-elevated push-ups) — 40 / 20
  • Table / Towel Rows — 40 / 20
  • Glute Bridges — 40 / 20
  • Plank — 40 / 20

Complete 3 rounds. Progress by adding five to ten seconds per hold, slipping in one or two extra reps, or slowing the lowering phase. In essence, tiny changes create new stimulus without crushing recovery.

Routine B — 30-Minute Sets × Reps (Full Body)
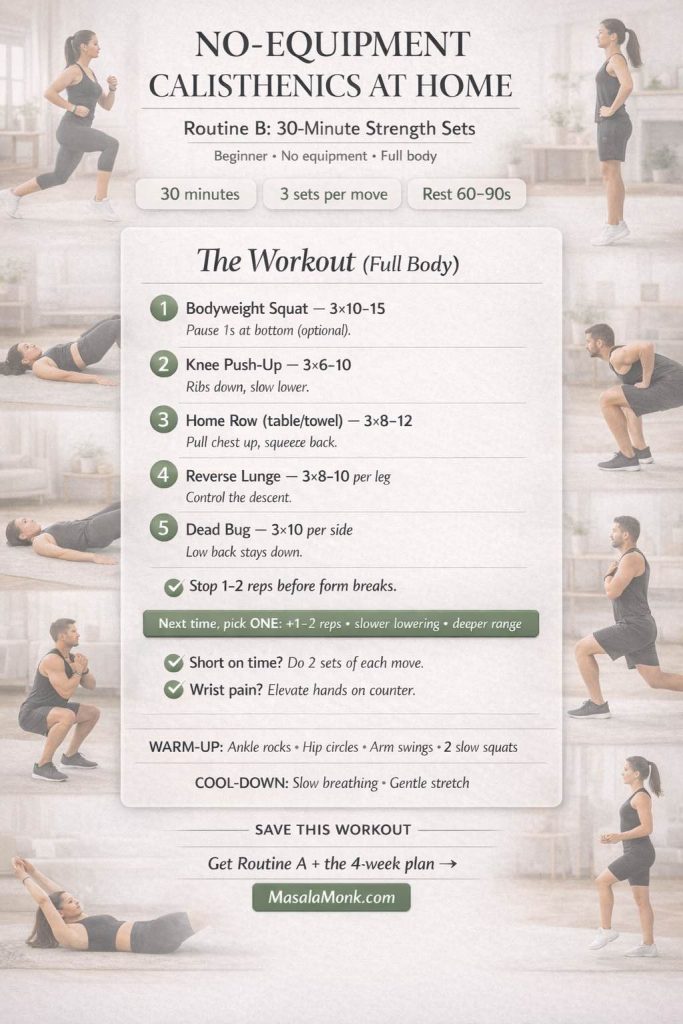
  • Bodyweight Squat — 3×10–15
  • Knee Push-Up — 3×6–10
  • Table / Towel Row — 3×8–12
  • Reverse Lunge — 3×8–10 per leg
  • Dead Bug — 3×10 per side

Rest 60–90 seconds between sets. If everything feels easy, add a slow three-second descent or a one-second pause at the hardest point. Conversely, if form breaks, trim each set by two reps and rebuild next time. For dependable technique photos and simple regressions, browse the ACE no-equipment exercise library.

Brief reminder: short, regular sessions help you satisfy both the “muscle-strengthening” target and a sizable portion of your weekly movement minutes. Consequently, the payoff compounds when you keep the plan simple.

No Equipment Calisthenics at Home — 4-Week Beginner Plan

You’ll now plug the two routines into a clear calendar. The plan is brief, progressive, and repeatable. Crucially, you’ll leave a little in the tank so the rest of the day still feels good.
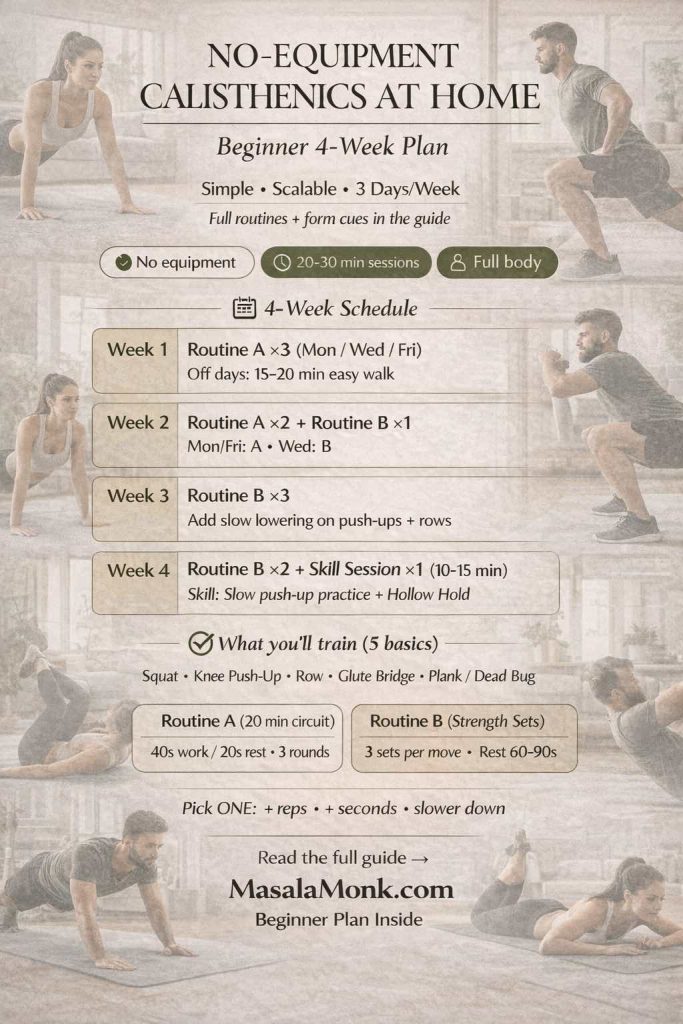
  • Week 1 — Routine A ×3 (e.g., Mon / Wed / Fri). On off days, walk 15–20 minutes at a conversational pace.
  • Week 2 — Routine A ×2 + Routine B ×1 (Mon / Fri = A, Wed = B). Keep tempo calm and crisp.
  • Week 3 — Routine B ×3. Add slow negatives on push-ups and rows; hold planks five seconds longer than last week.
  • Week 4 — Routine B ×2 + one short skill session (10–15 minutes): practice push-up technique for 2–3 sets of 3–5 slow reps, then finish with hollow holds (3×20–30 seconds).

When you want a day-by-day map with built-in momentum, step into our beginner-friendly 30-day calisthenics challenge. It turns intention into action with small, specific tasks you can actually complete.

Progressions That Prevent Plateaus

After four weeks, you’ll feel steadier. At that point, nudge difficulty without changing everything. Adjust leverage, pace, or range—then write down what you did. Subsequently, add a little more next time.

  • Squat family
    Add a two-second pause at the bottom to build control. Later, switch to split squats for unilateral strength and balance. Eventually, try reverse lunges with a slower descent for extra time under tension.
  • Push-ups
    Reduce hand elevation week by week, moving from countertop to table to floor. Then, once full reps feel honest, elevate the feet slightly for more load. Notably, keep the body line rigid and the ribcage tucked.
  • Rows
    When using a towel, step farther from the door to steepen the angle. Or, under a sturdy table, place the feet forward so the torso is closer to horizontal. Squeeze the shoulder blades together at the top and pause briefly. If you later add gear, short finishers from battle rope workouts can complement your pull days.
  • Core
    Shift from forearm plank to high plank. Introduce hollow body holds in short, deliberate sets. Meanwhile, breathe quietly through the nose so the torso stays braced.

Small tweaks deliver real changes. Clean reps now beat sloppy “PRs” you can’t repeat later. Therefore, build conservatively and let momentum accumulate.

Cardio That Complements Strength

The routines above tick the “muscle-strengthening” box. To approach the 150-minute activity goal, add short, easy cardio that doesn’t complicate your day. For instance, take brisk walks, cycle casually, or dance in the living room. Spread it out: several 20-minute bouts, or daily 10–15-minute chunks. If time is scarce, climb stairs for five minutes and count it. On the other hand, if you prefer structured ideas, the CDC’s page on what counts as activity offers helpful examples. Ultimately, the mission is simple: collect minutes without turning life upside down.

When you crave gentle variety, rotate in a day from the 28-day wall Pilates challenge to blend cardio-style movement with core-friendly strength.

Troubleshooting: Smooth Fixes for Common Hiccups

Wrists ache during push-ups
Use hands-elevated push-ups on a countertop to reduce wrist extension. Alternatively, make fists and place knuckles on a mat so the wrists stay neutral. Add light wrist circles and palm lifts before the first set.

Rows feel awkward with a towel
Fold the towel thick, close the door on the knot, and test the anchor with a gentle lean. Initially, use a small angle with bent knees. Gradually walk the feet forward to increase challenge. If uncertainty lingers, switch to table rows until the groove feels natural.

Out of breath too soon
Slow the tempo. Rest 60–75 seconds between sets. Temporarily skip long end-range holds. Even so, keep showing up—your engine adapts quickly when the plan is simple and repeatable.

Short on time
Run two rounds of Routine A and call it a win. Next day, do two sets of squats, push-ups, and rows. Consistency compounds; perfection does not.

Motivation dips
Lay the mat out the night before. Pair training with a favorite playlist or podcast. Promise five minutes. Frequently, a five-minute start becomes twenty once you begin.

Optional Add-Ons After Four Weeks (Low Cost, Big Payoff)

Although no equipment calisthenics at home will take you far, a few inexpensive tools unlock new progressions and keep training fresh.

  • Resistance band
    Perfect for face pulls, band-assisted rows, and pull-apart patterns that build the upper back. Additionally, bands make tempo work natural and joint-friendly.
  • Doorway pull-up bar
    Begin with passive hangs and scapular pull-ups. Over time, progress to full pull-ups. Incidentally, hangs also decompress the shoulders after desk hours.
  • Yoga mat
    Comfort matters. When floor work feels good, you’ll do more of it. A mat improves traction on planks and hollow holds.

For a practical breakdown—what’s worth buying, what to skip, and how to set up a minimalist corner—see our essential equipment for home & office workout. The list stays focused so purchases remain intentional.

Recovery, Sleep, and Food—Without Complexity

Strength gains arrive between sessions. Sleep accelerates them. Aim for a consistent bedtime and a dark, cool room. Walk after meals when possible. Drink water. Eat enough protein to support recovery, but avoid chasing perfection. Whole foods most of the time is more than fine. If soreness lingers, reduce total volume slightly next session and polish technique. Then, re-add sets once you feel fresh.

If you want an easy on-ramp, try beginner meal prep to automate lunches, or follow a Mediterranean-style template most days.

Meanwhile, consider micro-recovery during the day: stand up every hour, stretch the hips for thirty seconds, and take a minute of slow breathing when stress climbs. Individually, these moments feel small; collectively, they stabilize energy and improve readiness for the next session.

Also Read: The Science of Protein: Maximizing Muscle Growth and Recovery

Mindset: Make the Habit Obvious, Easy, and Satisfying

Habits stick when they’re visible and rewarding. Therefore, leave your mat where you’ll see it. Schedule sessions as you would a meeting. Keep a tiny log—date, routine, one note. Celebrate small wins: a first full push-up, a longer plank, or a week with three sessions done. Likewise, set “minimums” for hectic days: one round of the circuit, or two sets of squats and rows. Even minimal effort maintains identity—I’m someone who trains—and that identity keeps momentum alive.

If you enjoy structure and accountability, join our beginner-friendly 30-day calisthenics challenge. It provides daily prompts and sensible progressions, which, in practice, means fewer decisions and more done sessions.

Curious about tailoring cardio or calories to your body type? Skim our endomorph, ectomorph, and mesomorph guides for quick orientation. They’re optional, but useful if you’re experimenting.

Form Support When You Want It

Every so often, you’ll want visual confirmation that a setup is right. On those days, pull a single cue from a dependable source rather than doom-scrolling. For clear step-by-step photos, explore the ACE exercise library by body part. If you prefer gentle follow-alongs, the NHS offers short strength & resistance videos that pair well with off days. Prefer written checklists? The NHS strength exercises page includes simple progressions you can print or save.

No Equipment Calisthenics at Home — Bringing It All Together

Let’s connect the dots. You now have a simple system: two reliable routines that hit every major muscle group, a four-week plan that respects time and energy, and progressions that don’t require gear. Along the way, short walks or easy cardio help you reach the weekly movement target recommended by the WHO and the CDC. For technique check-ins, the ACE no-equipment exercise library remains a dependable reference. For gentle options or guided clips, the NHS has you covered with strength exercises and short strength & resistance videos.

Ultimately, no equipment calisthenics at home is enough to start, enough to progress, and enough to feel better in your body. Choose a routine. Set a tiny timer. Move with intent. Then, the next day, do it again.

Next Step: Pick Your Line and Go

If you’re brand new, start with Routine A tomorrow and keep the rests honest. For those who have trained before, begin at Week 2 and run the 30-minute plan once. People who prefer a daily program with crystal-clear prompts, can jump into the 30-day calisthenics challenge. And if a minimalist setup with two or three smart tools sounds appealing, the essential equipment guide will keep purchases focused and effective.

FAQs

1. What is “no equipment calisthenics at home” and who is it for?

No equipment calisthenics at home means full-body strength training using only your bodyweight. Moreover, it suits beginners, busy professionals, and anyone returning to exercise who wants scalable, joint-friendly workouts without buying gear.

2. How do I start calisthenics at home as a beginner?

Begin with five basics: squats, knee push-ups, table/towel rows, glute bridges, and planks. Additionally, train three days per week, keep 1–2 reps in reserve, and record sets so you can progress gradually.

3. Can I build muscle with no equipment calisthenics at home?

Yes. Consequently, you’ll grow by increasing reps, time under tension (slow eccentrics, pauses), and range of motion over weeks. Furthermore, aim for consistent sleep and adequate protein to support recovery.

4. How many days per week should I train?

Start with 3 days weekly. Subsequently, add a fourth day once sets feel tidy and recovery stays solid. Likewise, sprinkle easy walks on non-lifting days to maintain momentum.

5. What’s a simple beginner routine I can follow today?

Try 3 rounds of: squats 40s, knee push-ups 40s, table/towel rows 40s, glute bridges 40s, plank 40s; rest 20s between moves. Notably, keep breathing steady and stop one rep before form breaks.

6. Do I need cardio in addition to no equipment calisthenics at home?

Ideally, yes. Hence, add short, conversational-pace walks or light cycling on off days to reach weekly activity targets while still recovering between strength sessions.

7. What’s the best way to progress if I can’t do full push-ups yet?

Use hands-elevated push-ups on a stable surface; thereafter, lower the surface over time until you reach the floor. Importantly, keep a straight line from head to heels and control the descent.

8. How do I make rows at home without equipment?

Anchor a sturdy towel in a closed door or use a solid table for light inverted rows. Alternatively, bend the knees and reduce the angle first; then, as strength improves, walk the feet forward to increase difficulty.

9. How long should a beginner session last?

Generally 20–30 minutes. Thus, you’ll complete warm-up, 5 movements, and a brief cool-down without draining energy for the rest of the day.

10. What if I’m short on time?

Do one condensed circuit: squats, push-ups, rows—two rounds only. Even so, this mini-workout maintains habit strength while still nudging progress.

11. Which muscles does no equipment calisthenics at home train?

Specifically: legs (squats, lunges), chest and shoulders (push-ups), back and biceps (rows), and core (planks, dead bugs, hollow holds). Akin to gym sessions, these cover every major area.

12. How soon will I see results?

Beginners often feel better coordination within 1–2 weeks. Thereafter, visible strength changes typically appear in 4–6 weeks, provided you train consistently and recover well.

13. What if my wrists hurt during push-ups?

Switch to hands-elevated push-ups or use knuckles on a mat. Additionally, warm up with gentle wrist circles and palm lifts to prepare the joints.

14. Is equipment ever necessary for progress?

Not inherently. Nevertheless, a resistance band or doorway bar later on allows extra variations. For now, prioritize crisp technique and small weekly improvements.

15. How do I avoid plateaus with no equipment calisthenics at home?

Rotate one variable at a time: add reps, extend holds, slow eccentrics, or deepen range. Moreover, log sessions so you can nudge a single metric upward each week.

16. What’s a safe rep range for beginners?

Aim for 6–12 reps on strength moves and 20–40 seconds on core holds. Consequently, you’ll balance challenge with form and recover faster between sessions.

17. Should I train full body or split days?

Full body works best at first. Subsequently, once you’re consistent, you may alternate push/pull/legs days; however, keep volume moderate to protect recovery.

18. How do I warm up quickly at home?

Perform 3–5 minutes of ankle rocks, hip circles, arm swings, and two slow squats. Likewise, finish with one easy set of your first exercise to groove the pattern.

19. What’s the right rest time between sets?

For beginners, 60–90 seconds is sufficient. Thus, you’ll preserve quality without letting the session drag.

20. How can I keep motivation high?

Set a tiny “minimum”—five minutes. Importantly, celebrate small wins (first clean push-up, longer plank). Subsequently, string together weeks, not heroic days.

Posted on 1 Comment

Mesomorph Body Type: Diet, Workouts & Weight Loss (Female & Male)

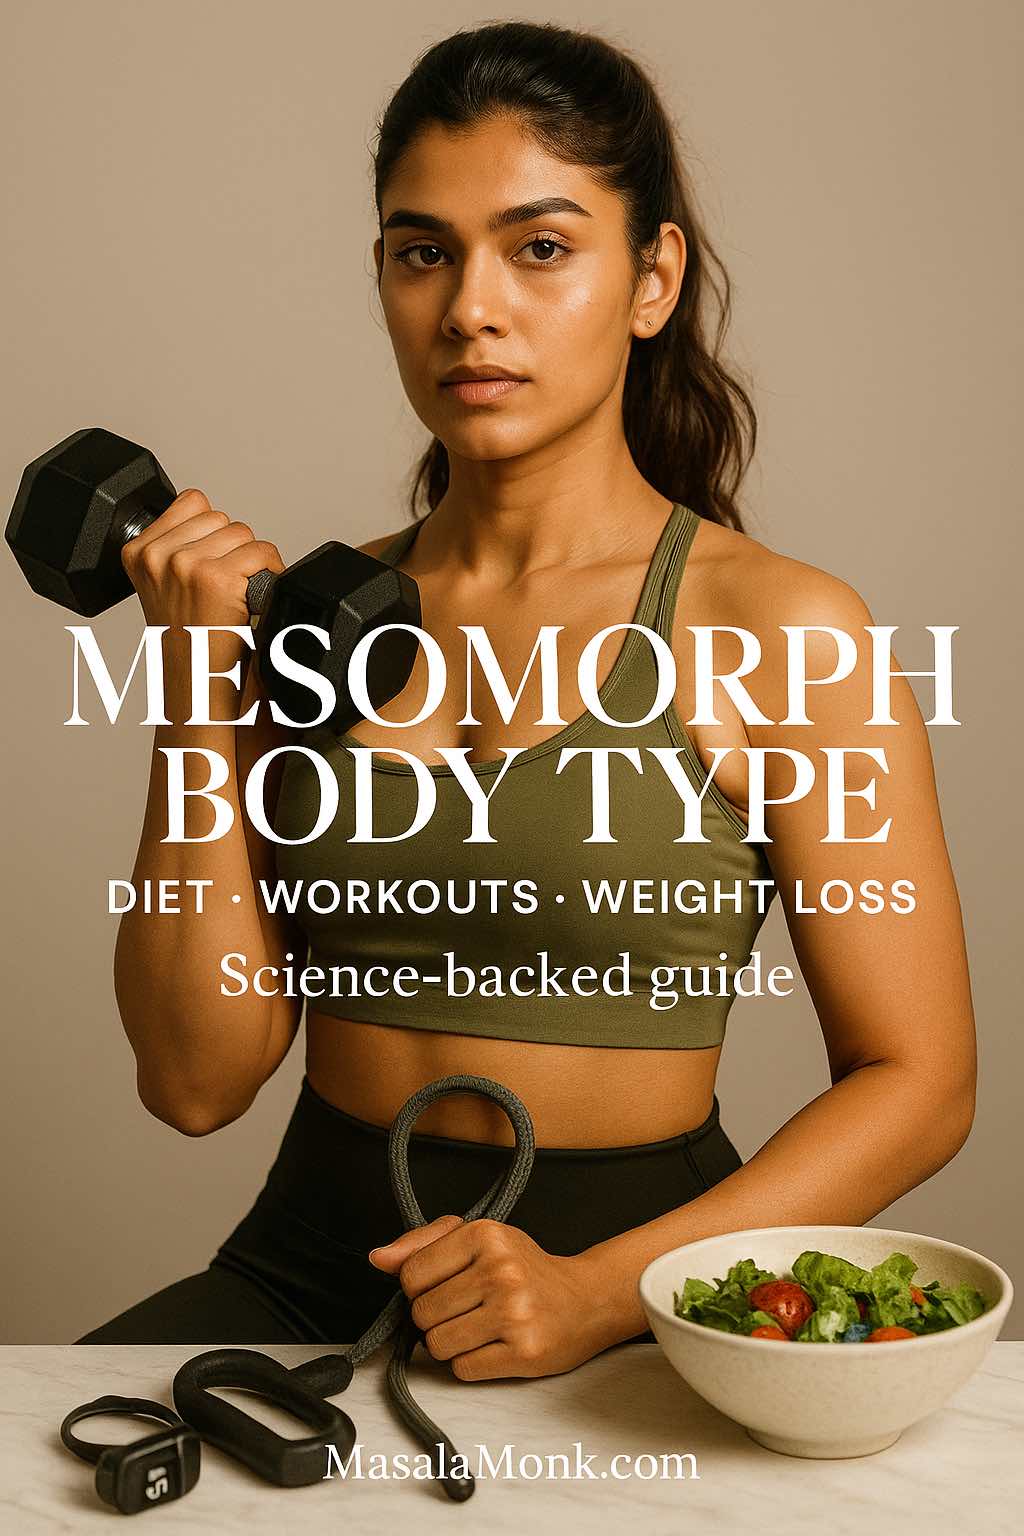
Mesomorph body type—female portrait lifting a dumbbell beside a salad and jump rope; science-backed guide to diet, workouts and weight loss.

The mesomorph body type is often described as naturally athletic—broader shoulders, a relatively narrow waist, and a frame that seems to “take” to training. Nevertheless, body-type labels are tendencies, not destinies. If you want a concise orientation to how these categories are typically described, this primer on somatotypes sets the scene; then, rather than overfitting rules to a label, build progress using the evidence-led ACSM progression models. With that perspective in mind, below you’ll find a complete, practical playbook tailored to the mesomorph body type—including nutrition, training templates, cardio, recovery, and troubleshooting for plateaus.

The two other body types you might want to read more about are:


What the Mesomorph Body Type Looks Like (and Why It’s Only a Starting Point)

Typically, people who align with the mesomorph body type present a solid, muscular build, make steady strength gains with sensible programming, and tolerate both training volume and dietary carbohydrate reasonably well. Even so, many readers identify as blends—“ecto-meso” or “endo-meso.” That’s perfectly fine. Because the methods here are grounded in outcomes, not identity labels, they work across that spectrum. Moreover, we’ll show you exactly how to adjust when progress stalls, so your plan remains responsive rather than rigid.

Also read: 3 Somatotypes: Ectomorph, Mesomorph, Endomorph


Nutrition for the Mesomorph Body Type: Targets, Food Matrix & Adherence

Start With Calories, Then Iterate Intelligently

First, set calories to match your goal and adjust every two weeks based on trends:

  • Fat loss: body weight (lb) × 10–12
  • Recomp/maintenance: × 12–14
  • Muscle gain: × 15–17

To make those numbers concrete right away, run them through our macro calculator and save your initial targets. After a fortnight, evaluate the trend—not a single weigh-in—and nudge only one variable at a time.

Also Read: The Science of Protein: Maximizing Muscle Growth and Recovery

Lock Protein First, Then Shape Carbs and Fats Around Training

Protein protects lean mass in a deficit and supports growth in a surplus. A large synthesis suggests roughly 1.6 g/kg/day covers the hypertrophy benefit for most lifters before returns diminish; see this landmark meta-analysis. Meanwhile, during more aggressive cuts in lean, resistance-trained folks, higher intakes relative to fat-free mass (≈ 2.3–3.1 g/kg FFM) better defend muscle, as shown by Helms et al..

Day to day, keep protein convenient and consistent. Eggs, Greek yogurt, tofu/tempeh, fish, poultry, lean beef, and lentils cover most scenarios. For quick, real-world anchors, check the protein in two boiled eggs or compare with three scrambled eggs.

Carbs vs Fats for the Mesomorph Body Type: Fuel the Work

Keep protein steady, then flex carbs and fats to hit your calories. On lifting days, place more of your carbs before and after workouts; on rest or easy-cardio days, slide carbs down and nudge fats up slightly. Pragmatically, that’s the spirit of periodized nutrition: fuel the work that matters while keeping overall intake aligned with your goal.

Also Read: How to Eat 100 Grams of Protein a Day

The Mesomorph Food Matrix (Female & Male)

  • Proteins: eggs, Greek yogurt, cottage cheese, tofu/tempeh, fish, chicken, lean beef, lentils
  • Carbs (mostly high-fiber): oats, potatoes, rice, quinoa, whole-grain wraps/bread, beans, fruit
  • Fats: extra-virgin olive oil, avocado, nuts/seeds, fatty fish
  • Veg: leafy greens, crucifers, and colorful mixed veg for volume and micronutrients

For adherence—and, importantly, satiety—a modest daily handful of nuts can help; this guide to high-impact nuts for weight management is a useful reference while you build shopping lists.


Sample Meal Templates for the Mesomorph Body Type (Scale Portions to Your Calories)

Female—fat-loss day (~1,700–1,900 kcal)
Breakfast: Greek yogurt (~200 g) with oats (~40 g) and berries
Snack: Apple with ~25 g almonds
Lunch: Chicken–quinoa–veg bowl (~120 g cooked chicken; ~120 g cooked quinoa)
Pre-workout: Banana plus 20–25 g whey
Dinner: Salmon (120–150 g), potatoes (~200 g), large salad with olive-oil dressing

Male—recomp day (~2,400–2,600 kcal)
Breakfast: 3 eggs + 2 whites, whole-grain toast, spinach
Snack: Cottage cheese (~200 g) with pineapple
Lunch: Lean beef & rice bowl (150–180 g beef; ~200 g cooked rice; veg)
Pre-workout: Oats (~60 g) with 25–30 g whey
Dinner: Chicken (180–200 g), sweet potato (~250 g), broccoli with olive oil

Additionally, track more than the scale. In practice, waist measurements, weekly photos, and gym numbers tell a clearer story. This concise body-fat guide helps calibrate expectations as the mesomorph body type changes composition.


Training for the Mesomorph Body Type: Principles, Progression & Templates

Principles First: What Drives Results Reliably

Progressive overload—small, steady jumps in load or reps with tidy technique—remains the backbone, precisely as recommended by the ACSM progression models. Most people with a mesomorph body type thrive on four lifting days per week, accumulating 8–15 hard sets per muscle across those sessions. Session length of 60–75 minutes is plenty when rests are purposeful and assistance work stays efficient.

Mesomorph Body Type—Female 8-Week Template (Strength + Shape)

Split: Upper A / Lower A / Upper B / Lower B (+ optional accessory circuit)

  • Upper A: Horizontal press, row, overhead press, pulldown, lateral raises, core
  • Lower A: Squat pattern, RDL, split squat, leg curl, calf raise, core
  • Upper B: Incline press, chest-supported row, push-ups, single-arm row, face pulls, core
  • Lower B: Deadlift or trap-bar pull, hip thrust, step-ups, leg press, ham curl, core

Progression:
Weeks 1–4 → 3–4×8–12; add ~2.5–5% when you hit the top of the range with crisp form
Weeks 5–8 → 4×6–10 on primaries; accessories 10–15 reps with 60–75 s rests

If you’re training at home, begin with basics; this streamlined home-gym checklist covers the essentials. On minimalist days, rotate sessions from our calisthenics beginner’s guide or this structured 30-day plan.

Mesomorph Body Type—Male 8-Week Template (Strength-Forward)

Split: Push / Pull / Legs / Upper (strength)

  • Push: Bench, incline DB press, overhead press, dips, triceps pressdowns
  • Pull: Deadlift or RDL, pull-ups, barbell row, rear-delts, curls
  • Legs: Squat, leg press, lunges, ham curls, calves
  • Upper (strength): Bench 5×5, row 5×5, weighted chins (3–5 reps), then accessories 8–12

Progression:
When all sets are clean, add 2.5–5 kg on main lifts; for accessories, chase reps first, then load. Consequently, you keep momentum without compromising form.


Cardio for the Mesomorph Body Type: Build an Engine, Keep the Muscle

Aim for two to three cardio sessions weekly. For base fitness and recovery, prioritize Zone 2 at a conversational pace for 30–45 minutes; this practical Zone 2 guide explains how it improves endurance without beating up your legs. When time is tight, add a brief interval dose—say 10×1 minute hard with 1–2 minutes easy—since a well-cited review suggests intervals can match steady cardio for body-comp outcomes with less total time.

To target intensity precisely, set your numbers with the in-house heart-rate zone calculator or follow this straightforward Apple Watch how-to. For variety, sprinkling in finishers from these battle-rope workouts keeps conditioning lively without monopolizing your schedule.

From a broader health standpoint, respect the baseline volumes in the WHO 2020 guidelines: 150–300 minutes of moderate or 75–150 minutes of vigorous aerobic activity per week, with muscle-strengthening on two or more days.


Recovery, Sleep & Stress—Hidden Levers for the Mesomorph Body Type

Even the best plan falters if recovery is neglected. Therefore, set minimums and protect them like appointments:

  • Sleep: 7–9 hours nightly; anchor bedtime and wake time whenever possible
  • Steps: 7k–10k per day for general health and appetite regulation
  • Deloads: every 6–8 weeks or whenever form, mood, and motivation degrade together
  • Hydration: 30–40 ml/kg/day as a broad starting point (increase modestly in heat or high-sweat sessions)
  • Mobility: 10–15 minutes on rest days—hips, thoracic spine, and ankles tend to pay dividends

Additionally, if you’re struggling with late-night snacking or poor sleep quality, front-load protein and vegetables earlier, keep a consistent pre-sleep routine, and dim screens at least 30–60 minutes before bed. Small lifestyle changes compound quickly for the mesomorph body type because the training stimulus is usually not the limiting factor—recovery is.


Mesomorph Weight Loss: A Step-by-Step Playbook That Actually Works

  1. Pick your calorie target (using the multipliers above) and track a weekly average of 3–4 morning weigh-ins.
  2. Aim for ~0.5–0.8% body-weight loss per week. Faster drops risk lean-mass losses; keeping protein high, as outlined by Helms et al., helps defend FFM.
  3. Lift four days per week, nudging loads or reps gradually in line with the ACSM progression guidance.
  4. Do cardio two or three times weekly, leaning mostly on Zone 2 with a single interval session for punch.
  5. Fuel hard sessions with more carbs before and after lifting; that aligns with the practical logic behind periodized fueling.
  6. If you stall for 14+ days, change only one variable: trim 150–250 kcal/day or add one 30–40-minute Zone 2 session. Keep protein and lifting volume steady; don’t pile on extra HIIT at once.
  7. Reassess every two weeks. If trends match the goal, hold steady; otherwise, implement a small, single adjustment and re-evaluate.

Female-Specific Notes for the Mesomorph Body Type (Brief but Crucial)

Two micronutrients deserve special attention: iron and calcium. A food-first approach remains the default; however, if intake is low—or symptoms suggest a shortfall—use the practitioner sheets for iron and calcium to set targets before considering supplements. Furthermore, many women report higher energy and better training “feel” around ovulation; if that’s you, placing a slightly higher-carb meal near those peak sessions can improve performance without overcomplicating the week.


A Week That Works for the Mesomorph Body Type (Female or Male)

  • Mon: Upper/Push (60–70 min)
  • Tue: Zone 2 cardio (30–40 min)
  • Wed: Lower/Pull (60–75 min)
  • Thu: Rest or mobility
  • Fri: Upper/Legs (60–70 min)
  • Sat: Intervals (10×1 min hard / 1–2 min easy) or a short circuit
  • Sun: Optional easy cardio or complete rest

If you’re training outside a commercial gym, start with basics—dumbbells, an adjustable bench, and a couple of bands—and add pieces only as consistency demands. For simplicity, skim this concise equipment checklist and build from there.


Common Mesomorph Body Type Mistakes (and Simple Fixes)

Over-reliance on HIIT: Because the mesomorph body type often “handles” intensity well, it’s tempting to chase more high-intensity intervals. Yet, recovery is finite. Cap HIIT at one or two short sessions weekly and keep most conditioning in Zone 2; your lifts will thank you.

Under-eating protein: Hitting calories without nailing protein is a classic stall point. Consequently, structure each meal around a protein anchor (e.g., Greek yogurt at breakfast, fish at dinner) and backfill carbs/fats to taste.

Skipping deloads: If loads stall, joints grumble, and motivation dips simultaneously, it’s time for a deload. Drop volume by ~30–40% for a week, keep intensity moderate, and return refreshed.

All-or-nothing dieting: Rapid, unsustainable deficits backfire. Instead, treat fat loss like a multi-block project: two to three weeks of steady deficit, followed by a maintenance week to consolidate habits, then repeat.


Bringing the Mesomorph Body Type Plan Together

Start with calories, lock protein, and train four days with progressive overload. Thread in two or three cardio sessions—mostly Zone 2—and fuel your hardest sessions with a touch more carbohydrate. Meanwhile, protect sleep, hydration, and steps; they quietly power consistency. As you adapt, refine targets using the macro calculator, calibrate expectations with the body-fat guide, and pace conditioning via the HR zone calculator. Ultimately, the mesomorph body type thrives on simple, repeatable behaviors executed with patience—and this framework is designed to make that consistency not only achievable, but sustainable.

FAQs

1) What is the mesomorph body type and how do I know if I am one?

The mesomorph body type generally presents a naturally athletic frame—broader shoulders, a relatively narrow waist, and noticeable responsiveness to training. Moreover, if you build muscle at a steady pace and maintain moderate body fat with ordinary effort, you likely lean mesomorphic (even if you’re a blend).

2) What’s the best diet for the mesomorph body type?

Prioritize protein, set calories to match your goal, and then balance carbs and fats around training. Furthermore, keep protein near 1.6–2.2 g/kg body weight daily, choose fiber-rich carbs most of the time, and anchor each meal with lean protein plus colorful vegetables.

3) How many calories should a mesomorph body type eat to lose fat?

Typically, start around body weight (lb) × 10–12. Additionally, monitor a two-week average of scale weight, waist, and gym performance; then adjust by small steps rather than overhauling everything at once.

4) Which macro split suits the mesomorph body type?

Set protein first, then allocate carbs higher on lift days and modestly lower on rest days, while fats fill the remainder. Consequently, you fuel performance without overshooting total calories.

5) What foods should a mesomorph body type emphasize?

Lean proteins (eggs, fish, poultry, tofu), slow-digesting carbs (oats, potatoes, rice, legumes, fruit), and healthy fats (olive oil, avocado, nuts) work beautifully. Likewise, a large portion of non-starchy vegetables at most meals improves satiety.

6) What is the best workout split for the mesomorph body type?

A four-day split tends to excel—e.g., Upper/Lower/Upper/Lower or Push/Pull/Legs/Upper. Importantly, aim for 8–15 hard sets per muscle each week and progress loads or reps gradually.

7) What exercises should a mesomorph body type prioritize?

Compound lifts first: squats, deadlifts or RDLs, bench and overhead press, rows, and pull-ups. Subsequently, add accessories (lunges, hip thrusts, face pulls, lateral raises) to round out weak points.

8) How should a mesomorph body type use cardio without losing muscle?

Keep two to three sessions weekly. Notably, most work should be Zone 2 (easy-moderate), while one short interval session adds efficiency. Place intervals away from heavy lower-body days to preserve strength.

9) What’s the best way for a mesomorph body type to lose weight quickly yet safely?

Target a weekly drop of ~0.5–0.8% of body weight, maintain high protein, lift four days, and keep cardio consistent. Conversely, avoid extreme deficits that sabotage recovery and training quality.

10) Does carb cycling help the mesomorph body type?

Yes—pragmatically. Higher carbs on training days (especially pre/post workout) and slightly lower on rest days can improve adherence and performance. Nevertheless, total weekly calories still drive results.

11) How can a mesomorph body type break a fat-loss plateau?

After 14 days with no change, either reduce daily calories by 150–250 or add one 30–40-minute Zone 2 session. Furthermore, hold protein steady and keep lifting volume consistent to defend lean mass.

12) What is a good weekly schedule for the mesomorph body type?

For example: Mon Upper, Tue Zone 2, Wed Lower, Thu Rest/Mobility, Fri Upper or Legs, Sat Intervals or circuits, Sun Optional easy cardio. Consequently, you balance stimulus and recovery across the week.

13) How should a female mesomorph body type modify the plan?

Calorie targets will differ, and exercise selection may prioritize glutes and shoulders more often. Additionally, track energy across the menstrual cycle and consider slightly higher carbs on peak-effort days if performance improves.

14) What supplements suit the mesomorph body type?

Focus on fundamentals first—diet quality, protein intake, strength progression, sleep. Thereafter, consider basic, well-researched options (e.g., creatine monohydrate, vitamin D if deficient) based on personal needs and professional advice.

15) How much rest should a mesomorph body type take between sets?

Generally, 2–3 minutes for heavy compounds and 60–90 seconds for accessories. Moreover, longer rests on main lifts often yield better performance and progression.

16) How quickly should the mesomorph body type expect results?

Strength improvements can appear within weeks; body-composition changes typically show across 6–12 weeks. Crucially, consistency beats intensity—steady adherence compounds over time.

17) Is HIIT necessary for the mesomorph body type?

Not strictly. HIIT is efficient, yet Zone 2 builds a durable aerobic base with less fatigue. Accordingly, many mesomorphs thrive on one brief interval session paired with mainly Zone 2.

18) Can the mesomorph body type gain muscle and lose fat simultaneously?

Under certain conditions—new lifters, returning trainees, or those with higher body fat—recomposition happens. Nevertheless, most intermediate lifters progress faster by focusing on one goal at a time.

19) What recovery habits best support the mesomorph body type?

Aim for 7–9 hours of sleep, 7k–10k daily steps, regular hydration, and a deload every 6–8 weeks. Additionally, brief mobility work on rest days maintains range of motion and training quality.

20) How should a mesomorph body type track progress beyond the scale?

Use a trio: weekly average weight, waist measurements, and gym numbers. Likewise, periodic photos in similar lighting reveal changes that numbers can miss.

Posted on 3 Comments

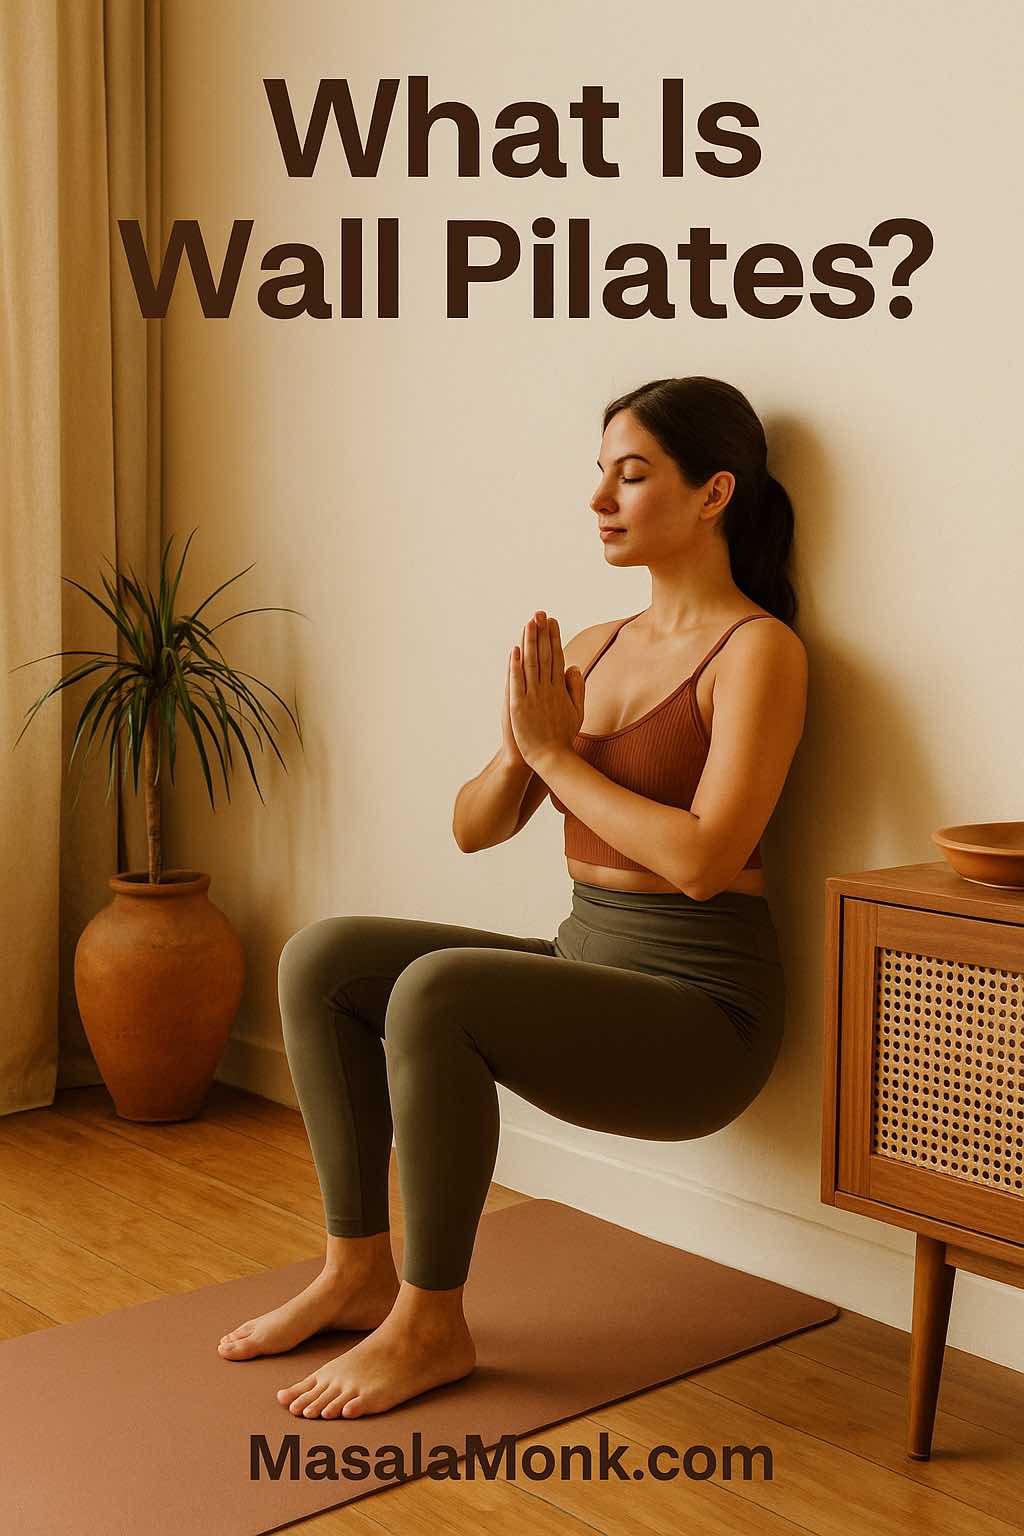
What is Wall Pilates?

What Is Wall Pilates?

Have you ever looked at Pilates videos online and thought, “That looks amazing, but I don’t have a reformer or fancy studio”? Or maybe you tried Pilates on a mat but found yourself wobbling, unsure if your form was right, or just wishing you had a little more support. If so, you are not alone.

Most of us crave a way to feel stronger, more flexible, and upright in our bodies—without risking injury, spending hours in the gym, or buying expensive equipment. That’s where Wall Pilates comes in: a simple, genius method that turns your wall into the best fitness tool you never knew you had.

Whether you’re an absolute beginner, someone getting back into movement after a long break, or just curious about new ways to move, Wall Pilates offers a safe, gentle, and surprisingly powerful way to build a body you love—right at home.

Also Have a look at 28 Days AI-Powered Wall Pilates Challenge


Rediscovering Pilates—With a Wall

To understand Wall Pilates, it helps to know a bit about traditional Pilates first. Invented by Joseph Pilates in the early 20th century, Pilates is all about core strength, mindful movement, and building balanced muscles. The problem? Classic Pilates routines often require either a mat (which can be tough for true beginners) or expensive studio equipment.

Wall Pilates flips the script.
Instead of lying down on the floor and hoping you’re aligned, you use the wall as your guide. Pressing your back, feet, or hands into it, you get instant feedback on your posture—if your back isn’t flush against the wall, you’ll know! This makes learning the exercises safer, more intuitive, and way less intimidating.

Think of the wall as your built-in teacher, gently correcting you as you move.


Why Wall Pilates Is Suddenly Everywhere

You might have seen Wall Pilates popping up on social media or wellness blogs. The reason? It’s actually doable for regular people—no matter your fitness level, age, or body type.

  • Beginner-friendly: The wall keeps you stable, so there’s no fear of falling or “doing it wrong.”
  • Gentle on joints: Moves are low-impact, perfect for sensitive knees, hips, or lower backs.
  • Full-body focus: Expect to feel this in your core, glutes, arms, and even your posture muscles—often from the very first session.
  • Quick results: Many people notice improved posture and a stronger core within just a few weeks.
  • No gear, no excuses: All you need is a clear patch of wall, a mat if you like, and your own body.

If you love the idea of steady progress and variety, check out the 28-Day Wall Pilates Challenge on MasalaMonk. It offers a structured, progressive plan for anyone who wants to build consistency, even if you only have a few minutes a day.


Who Should Try Wall Pilates? (Hint: Almost Everyone)

One of the best things about Wall Pilates is how inclusive it is. You don’t need a dance background, you don’t need to “be flexible first,” and you definitely don’t need expensive activewear.

Wall Pilates is perfect for:

  • Beginners who want support and clear cues
  • Seniors and anyone who wants a gentle approach to movement
  • People returning from injury (with their doctor’s approval)
  • Busy parents, professionals, and students who only have a small window for exercise
  • Anyone in a small apartment or shared space
  • Those looking to boost posture, reduce back pain, or gently build strength

The wall not only supports you, but also “coaches” you to move in a safer, smarter way. That means fewer aches, less guesswork, and more wins for your body.

If you’re brand new to Pilates, check out our Wall Pilates for Beginners: The Ultimate Guide for safety tips, basics, and the best way to start.


How Wall Pilates Works: The Magic of Feedback & Alignment

When you do Pilates on the floor, it can be easy to arch your back, tip your hips, or let your shoulders sneak up toward your ears. With Wall Pilates, the wall acts as a physical boundary. If your back leaves the wall during a squat, you’ll feel it immediately—and you’ll naturally correct your form.

This feedback helps you:

  • Activate the right muscles (especially your core and glutes)
  • Stay in a neutral spine position, protecting your back
  • Get more out of each rep, since you can’t “cheat” the movement
  • Build body awareness that carries over into daily life (like how you sit at your desk or carry groceries)

This focus on alignment makes Wall Pilates a favorite of physiotherapists, yoga teachers, and even personal trainers who want their clients to move better—not just more.


The Transformational Benefits of Wall Pilates

People fall in love with Wall Pilates because the benefits show up fast—and last.

1. Better Posture, Every Day

Many of us spend hours hunched over screens, developing tight hips and rounded shoulders. Wall Pilates exercises stretch the chest, open the hips, and teach your body what upright, healthy posture feels like.
You’ll finish each session taller, lighter, and with a sense of ease in your movement.

2. Core Strength That Really Works

Unlike crunches or planks, Wall Pilates teaches you to engage your core dynamically. The wall provides gentle resistance, asking your abs and back to stabilize you throughout each move.

3. Safe, Joint-Friendly Movement

No jumping, no jarring landings, and no pressure to “keep up” with an instructor. Every move can be modified—great for those with past injuries, arthritis, or simply wanting to move more gently.

4. Increased Body Awareness

Wall Pilates invites you to slow down, listen to your body, and notice which muscles are firing. That mindfulness makes every session a mini stress-relief ritual, not just another workout to check off your list.

5. Full-Body Toning (Not Just Abs!)

Expect to feel your glutes, thighs, shoulders, and even arms working with the right routine. And because you’re using your own body weight, the results are long, lean, and functional—not bulky.

Want to see just how effective a short session can be? Many MasalaMonk readers rave about the 15-Minute Belly Fat Burning Wall Pilates Workout—it’s a great next step if you want to target your core and burn some extra calories, all without leaving your living room.


The Mind-Body Connection: Wall Pilates Beyond Fitness

One of the greatest “secrets” of Pilates (wall or otherwise) is how it ties the body and mind together. Slow, intentional movements demand focus, helping you tune into your breath and shut out distractions.
Wall Pilates can be a moving meditation—a way to reset your mind while strengthening your body.

For even more support on your wellness journey, explore yoga routines like the Good Morning Yoga Routine on MasalaMonk, perfect for warming up, winding down, or finding calm on busy days. And if you’re curious how movement can ease stress and boost emotional resilience, Yoga for Mental Health: A Quick Guide offers simple, science-backed techniques anyone can try.


Getting Started: How to Begin Wall Pilates at Home

You don’t need much to get started:

  • A clean wall (move any pictures, plants, or obstacles)
  • A yoga mat or folded towel if you want a little cushion
  • Comfortable clothes
  • Willingness to listen to your body

Start with a gentle warm-up—walking around, shoulder rolls, or a few deep breaths.
If you need more guidance or want a complete primer before your first session, MasalaMonk’s Wall Pilates for Beginners: The Ultimate Guide breaks everything down step by step, with helpful tips for absolute beginners.

If you find that you’re sitting or standing for long hours (hello, work-from-home life!), complementing your Wall Pilates with postural yoga can make a huge difference. The Yoga for Posture: 7 Yoga Poses for Software Engineers is a great resource for keeping your spine and shoulders healthy in the digital age.


How to Get the Most Out of Wall Pilates

  • Go slow. Rushing leads to poor form and less benefit. Savor each movement.
  • Breathe with intention. Exhale as you press or lift, inhale as you return to start.
  • Stay curious. Notice which muscles activate and which moves feel challenging.
  • Modify when needed. Use the wall as much or as little as you need for balance.
  • Celebrate your wins. Even five minutes counts—progress is progress!

And remember, you don’t have to do it all at once. Even a short, focused routine can bring big results if you stick with it.
If you’re ready to expand your practice, try supplementing with the 10-Minute Love Handles and Lower Belly Fat Workout—another quick, effective routine that pairs well with Wall Pilates.


Try This: 10-Minute Beginner Wall Pilates Routine

Take a few deep breaths. Let this be a break from your day—a time to reconnect with your body and move with intention. Go slowly, notice how you feel, and remember: it’s not about “nailing” every move, but about building awareness and feeling good.


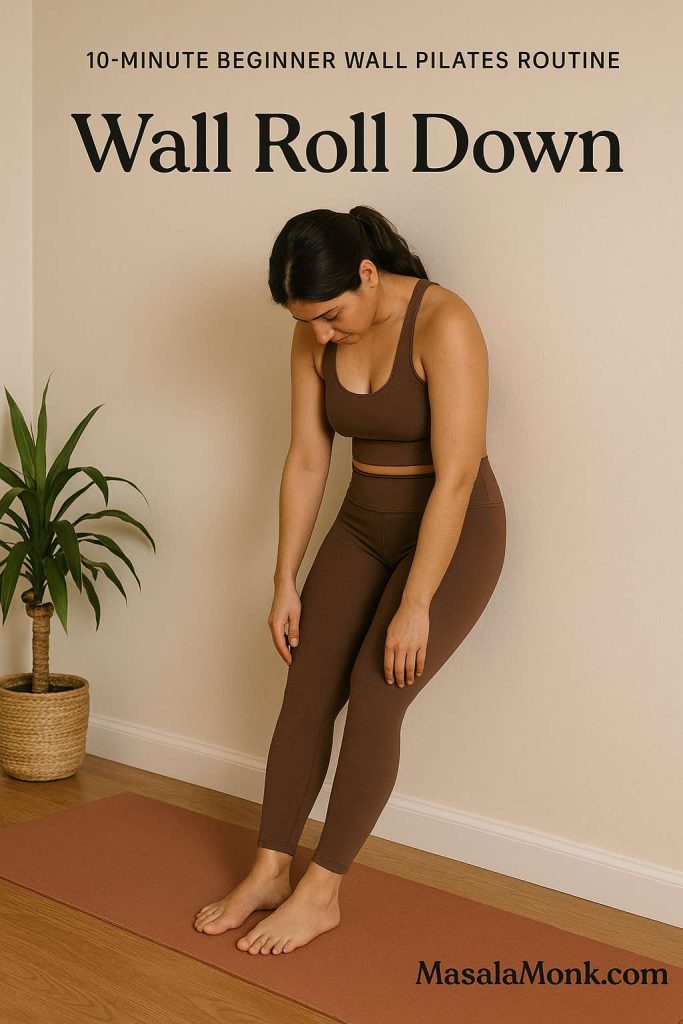
1. Wall Roll Down

How to Do It:

  1. Stand with your back pressed against the wall, feet hip-width apart, about 12–18 inches from the base.
  2. Relax your arms by your sides, palms facing in.
  3. Take a breath in. As you exhale, gently drop your chin to your chest.
  4. Begin to roll your spine down, peeling one vertebra at a time off the wall. Imagine your back “melting” away from the wall, bit by bit, letting your head and arms hang heavy.
  5. Go as far as you comfortably can (maybe your fingertips reach your shins, maybe your toes).
  6. Pause. Breathe here, feeling a gentle stretch in your back and hamstrings.
  7. On your next inhale, press your feet into the floor and slowly stack your spine back up the wall, one vertebra at a time, until you’re standing tall again.
Wall Roll Down
“Roll down the wall, one vertebra at a time, to stretch your spine and wake up your core.”

What to Notice:

  • Feel your back “unfurling,” and your core engaging to help you rise.
  • The wall provides a sense of reference for your spine’s alignment.

Common Mistakes:

  • Rushing: Rolling too quickly, missing the articulation through each vertebra.
  • Locked knees: Keep them soft to avoid straining your lower back.
  • Pulling with the arms: Let gravity, not your hands, guide the descent.

Modifications:

  • Bend your knees more if you have tight hamstrings.
  • Only roll down as far as feels comfortable—don’t force it.

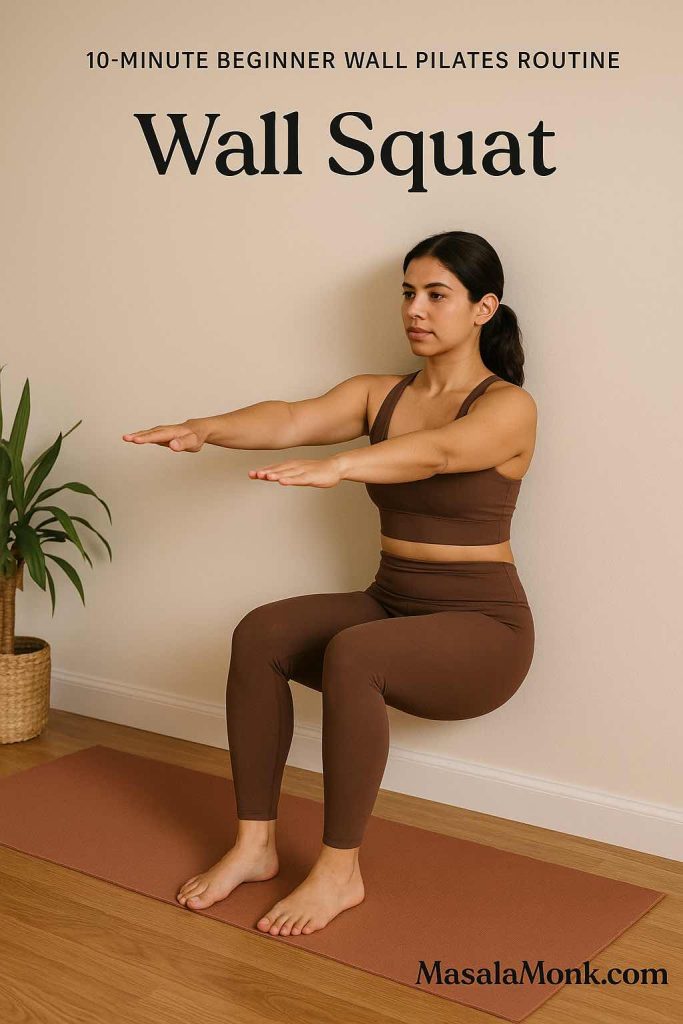
2. Wall Squat

How to Do It:

  1. With your back against the wall, walk your feet forward about two feet, hip-width apart.
  2. Slide your back down the wall until your thighs are parallel to the floor—like sitting in an invisible chair.
  3. Knees should be directly above your ankles, not past your toes.
  4. Press your lower back gently into the wall for support.
  5. Hold here, breathing slowly for 20–30 seconds, then slide back up to stand.
Wall Squat
“Sit low in a wall squat—feel the burn in your legs and glutes as you build strength.”

What to Notice:

  • The powerful work in your thighs and glutes as you hold.
  • Your back supported and lengthened by the wall.

Common Mistakes:

  • Knees caving in or drifting too far forward: Adjust your stance so knees are stacked over ankles.
  • Arching your lower back: Press your entire back into the wall to protect your spine.
  • Shoulders tensed up: Keep them relaxed and down.

Modifications:

  • Lower your squat depth if the full position is too intense.
  • Take breaks or hold for less time as needed.

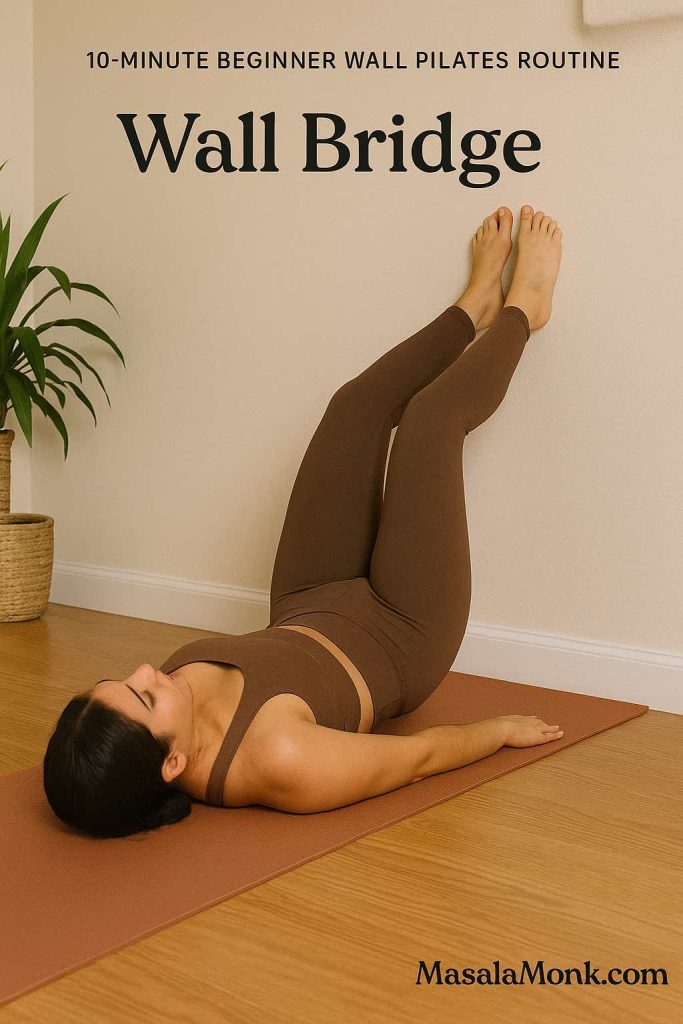
3. Wall Bridge

How to Do It:

  1. Lie on your back with your hips near the wall and your feet pressed flat against it, knees bent about 90 degrees.
  2. Rest your arms by your sides, palms down.
  3. Press into your feet and lift your hips off the mat, forming a diagonal line from knees to shoulders.
  4. Squeeze your glutes at the top, then lower down with control.
  5. Repeat several times, moving with your breath.
Wall Bridge
“Lift your hips into a bridge, pressing into the wall to activate your glutes and hamstrings.”

What to Notice:

  • Activation in the glutes and hamstrings as you lift.
  • Your shoulders and arms grounded for support.

Common Mistakes:

  • Feet too high or low on the wall: Aim for a 90-degree angle at your knees.
  • Overarching the back: Only lift as high as you can keep your ribs down and core engaged.
  • Letting knees splay out or in: Keep them tracking straight over your feet.

Modifications:

  • Don’t lift as high if you feel discomfort in your back.
  • Support your lower back with a pillow or folded towel if needed.

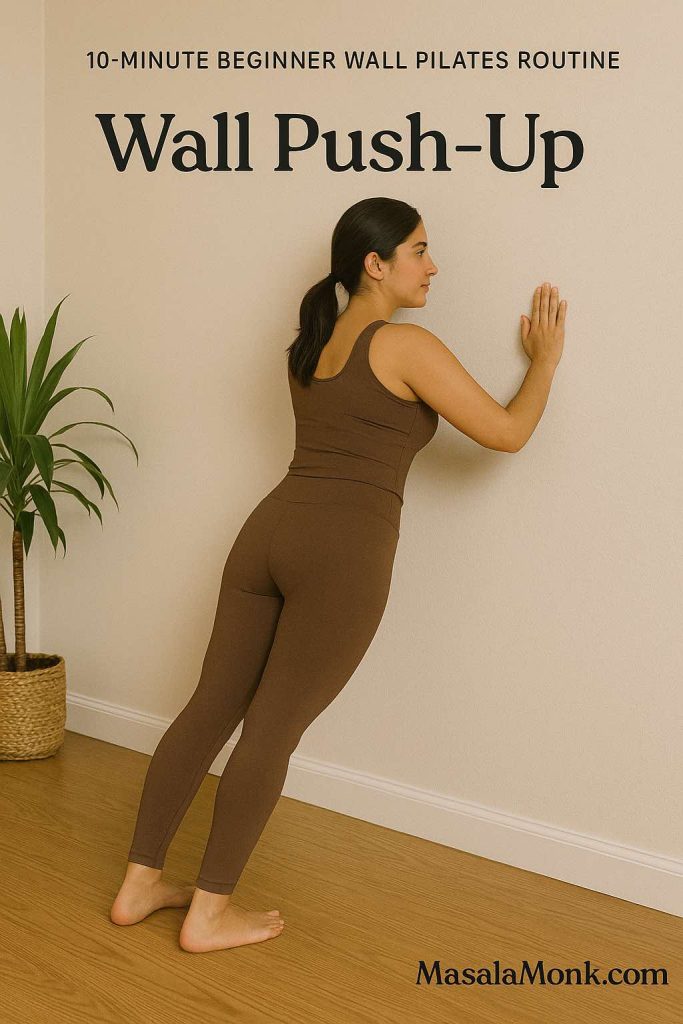
4. Wall Push-Up

How to Do It:

  1. Stand facing the wall, feet hip-width and about arm’s length away.
  2. Place your palms flat on the wall at shoulder height, fingers spread wide.
  3. Inhale, bend your elbows, bringing your chest toward the wall—keep your body in a straight line from head to heels.
  4. Exhale, press through your palms to return to standing tall.
Wall Push-Up
“Press away from the wall with strong arms and a stable core—perfect for building upper body strength.”

What to Notice:

  • Core and chest muscles activating as you move.
  • Smooth, controlled movement—not momentum.

Common Mistakes:

  • Letting elbows flare out too wide: Keep them at about a 45-degree angle for shoulder safety.
  • Sagging or arching your back: Engage your abs to keep your body aligned.
  • Rushing the movement: Slow and steady builds strength.

Modifications:

  • Step closer to the wall for less intensity, or further for more challenge.
  • Try on your knees if standing is too difficult.

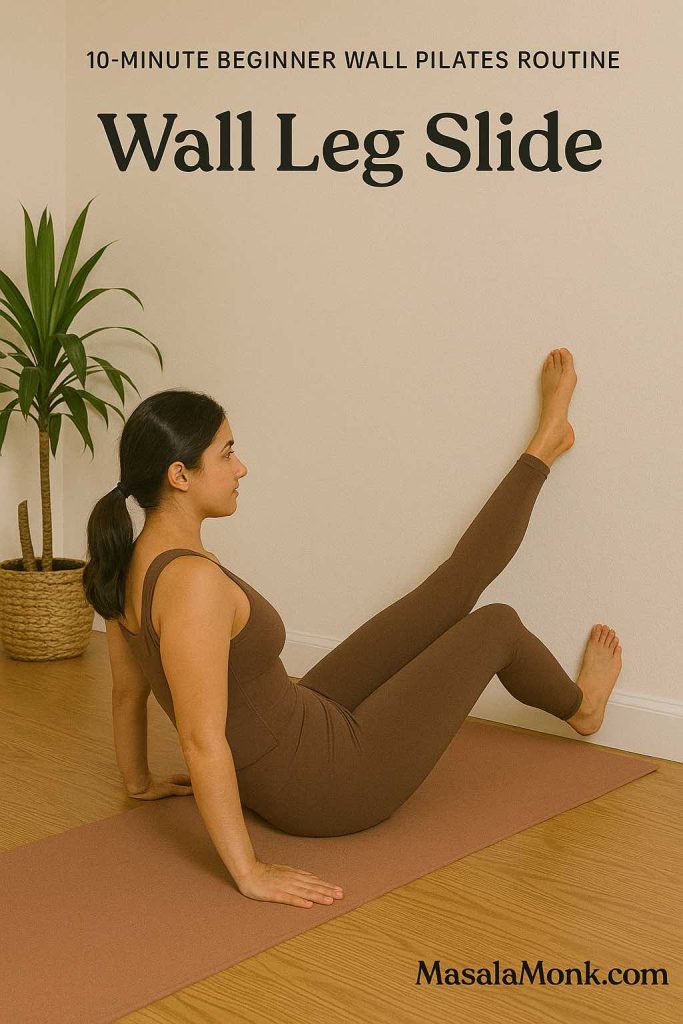
5. Wall Leg Slide

How to Do It:

  1. Stand sideways to the wall, one hand gently resting on it for support.
  2. Plant your standing leg firmly; keep your posture tall.
  3. Slowly slide your outside leg up and down along the wall, like a slow-motion side kick.
  4. Keep the movement controlled and your hips steady.
  5. Repeat, then switch sides.
Wall Leg Slide
“Slide your leg up and down the wall, firing up your outer hips and improving balance.”

What to Notice:

  • Engagement in the outer hip and thigh.
  • Your core working to keep your torso stable.

Common Mistakes:

  • Leaning into the wall: Use just a fingertip for balance, not to hold your weight.
  • Swinging the leg too fast: Move slowly and with intention.
  • Shrugging shoulders: Relax your neck and upper back.

Modifications:

  • Slide your leg only as high as is comfortable.
  • Hold onto a sturdy chair for additional balance.

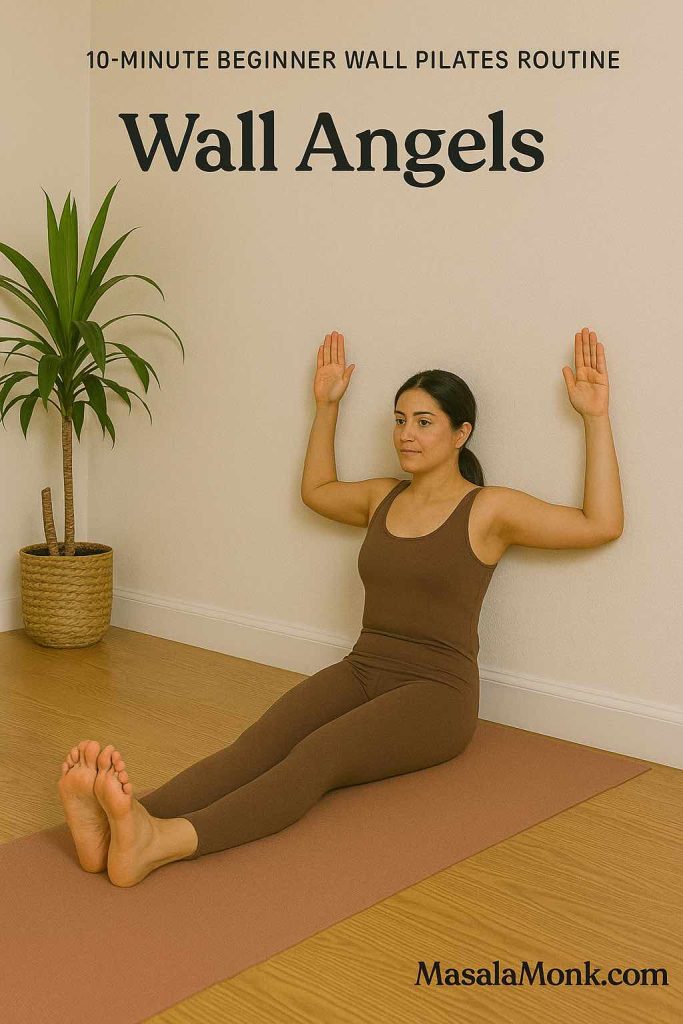
6. Wall Angels

How to Do It:

  1. Stand with your back, head, and arms pressed flat against the wall, feet six inches away.
  2. Bend your elbows so your arms form a “W.”
  3. Slowly slide your arms up the wall, reaching overhead as far as you can without losing contact, then slide back down.
  4. Move within a pain-free range, keeping your core engaged.
Wall Angels
“Glide your arms overhead against the wall, opening your chest and strengthening your shoulders.”

What to Notice:

  • A gentle stretch across your chest and a strengthening in your upper back.
  • The wall helping to keep your shoulders aligned.

Common Mistakes:

  • Arching your lower back: Keep ribs down, abs gently engaged.
  • Losing contact with the wall: Go only as far as you can keep everything touching.
  • Tensing the neck: Let your neck stay relaxed.

Modifications:

  • Perform the move seated if standing is difficult.
  • Decrease range of motion if you have shoulder tightness.

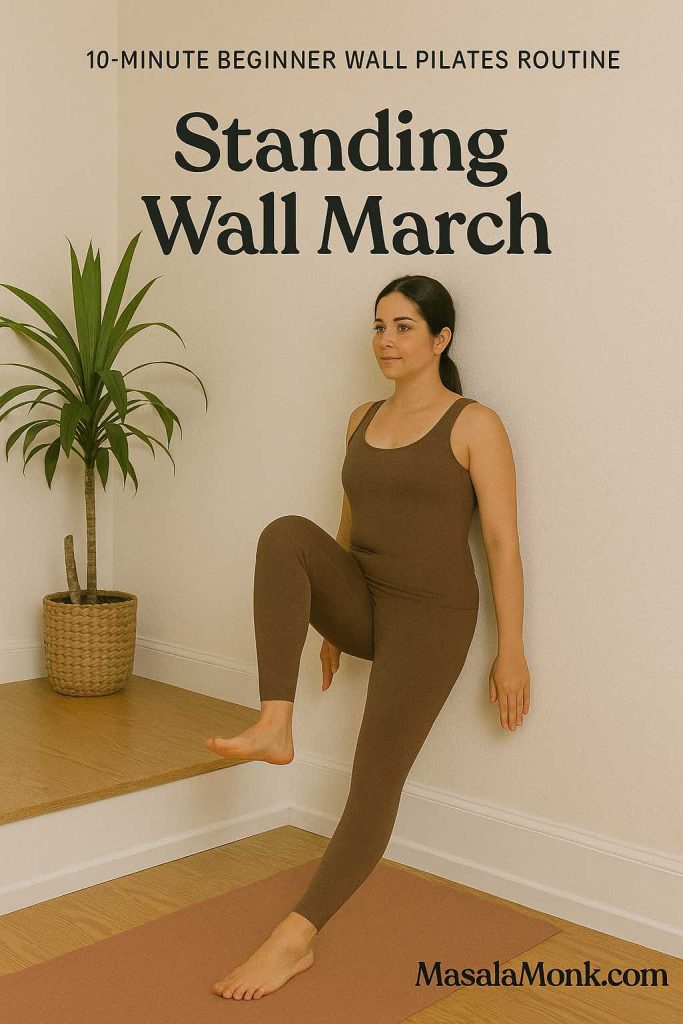
7. Standing Wall March

How to Do It:

  1. Lean your upper back and head gently against the wall, arms relaxed by your sides.
  2. Lift one knee up toward your chest, lower it, then lift the other.
  3. Alternate slowly, marching in place with control.
Standing Wall March
“March in place, leaning on the wall to challenge your balance and core.”

What to Notice:

  • Your core muscles stabilizing your torso.
  • The wall providing support so you can focus on alignment.

Common Mistakes:

  • Letting your back arch away from the wall: Press it gently into the wall.
  • Shrugging shoulders: Keep your upper body relaxed.
  • Marching too quickly: Slow, controlled lifts are more effective.

Modifications:

  • Lift knees only as high as is comfortable.
  • Hold the wall lightly if you need extra balance.

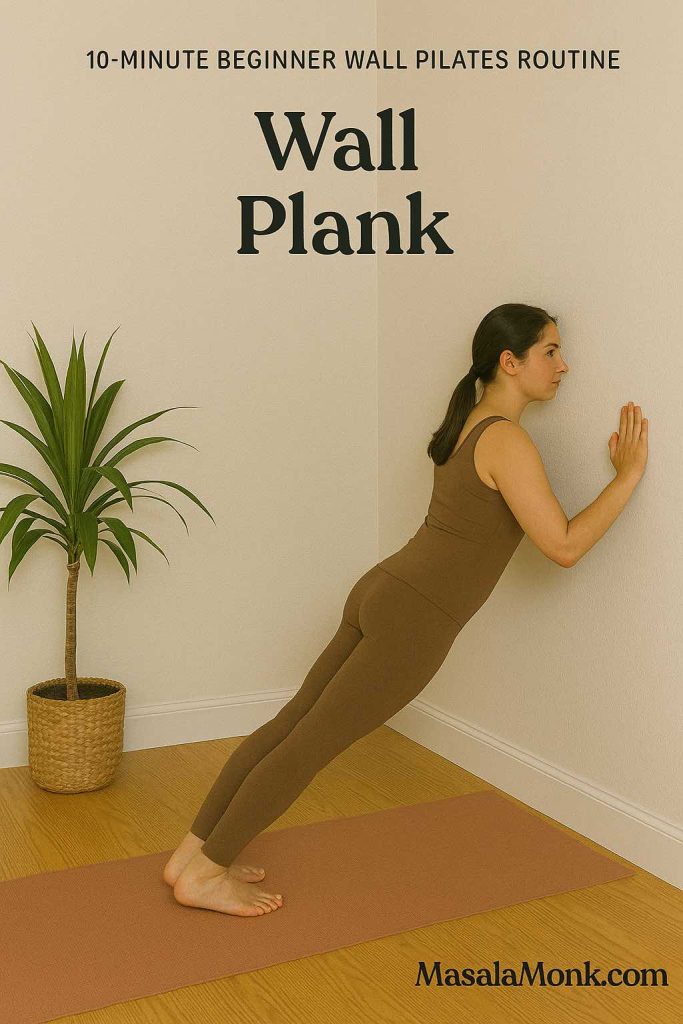
8. Wall Plank

How to Do It:

  1. Start on your hands and knees with your feet near the base of the wall.
  2. Place your hands on the mat, shoulder-width apart.
  3. Carefully walk your feet up the wall, coming into a plank—body in a straight line, shoulders over wrists.
  4. Hold, breathing deeply, and engage your abs and glutes.
Wall Plank
“Hold a plank with feet on the wall, engaging your whole body for stability and strength.”

What to Notice:

  • Full-body activation, especially your core, shoulders, and legs.
  • A sense of length from head to heels.

Common Mistakes:

  • Letting hips sag or pike up: Keep your body in one straight line.
  • Locking elbows: Keep a micro-bend to protect joints.
  • Holding your breath: Keep breathing steadily.

Modifications:

  • Only walk your feet a little up the wall for a gentler angle.
  • Lower to your knees for less intensity.

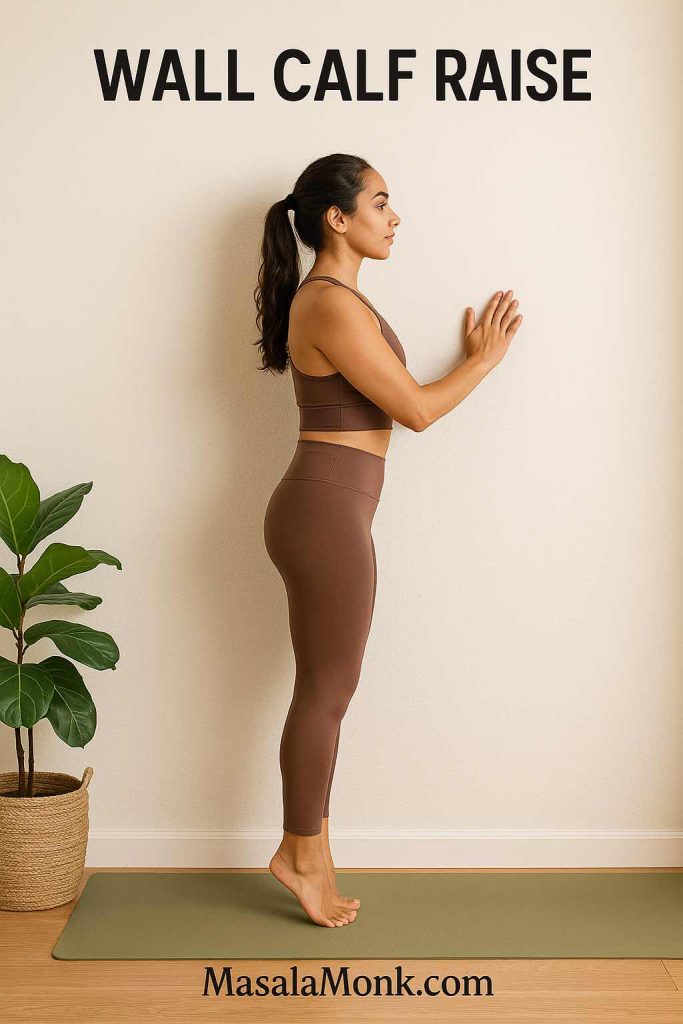
9. Wall Calf Raise

How to Do It:

  1. Stand facing the wall, fingertips resting on it lightly for balance.
  2. Rise up onto the balls of your feet, lifting your heels as high as possible.
  3. Hold at the top for a breath, then slowly lower back down.
  4. Repeat for several reps.
Wall Calf Raise
“Rise onto your toes with control, using the wall for balance and sculpting strong calves.”

What to Notice:

  • Activation in your calf muscles and feet.
  • Balance challenge—use the wall as much as needed.

Common Mistakes:

  • Rocking forward: Lift straight up, not forward onto your toes.
  • Bouncing: Control the movement, especially on the way down.
  • Leaning too much into the wall: Use just enough support to stay upright.

Modifications:

  • Hold each raise at the top for longer to increase intensity.
  • Do one foot at a time for an extra challenge.

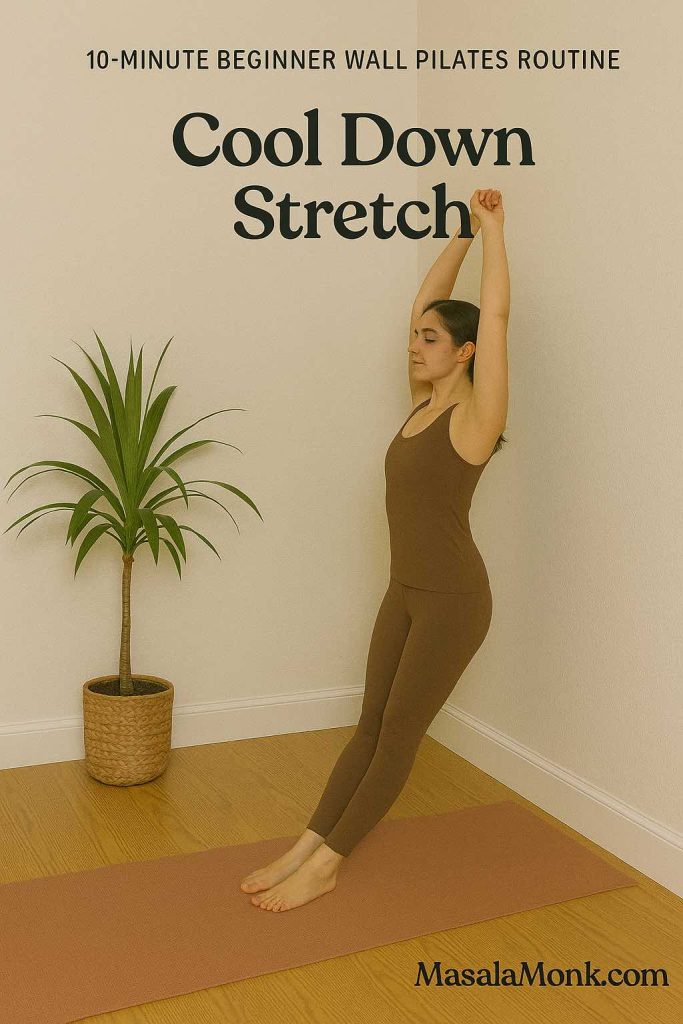
10. Cool Down Stretch

How to Do It:

  1. Stand with your back to the wall, feet hip-width apart.
  2. Cross your right ankle over your left knee, forming a figure-four.
  3. Slowly sit your hips back, as if sitting in a chair, feeling a stretch in your outer hip.
  4. Hold for 20–30 seconds, breathing deeply, then switch sides.
Cool Down Stretch
“Cross one ankle over your knee and sit back to stretch and release your hips.”

What to Notice:

  • A gentle, opening stretch through the hip and glute.
  • The support of the wall allowing you to relax deeper.

Common Mistakes:

  • Collapsing the chest forward: Stay upright, using the wall to support your back.
  • Holding your breath: Inhale and exhale slowly to deepen the stretch.
  • Forcing the knee down: Let gravity and breath do the work; don’t push.

Modifications:

  • Keep the stretch higher (don’t squat as deep) for less intensity.
  • Use a chair for extra support if balancing is tough.

Breathe in, breathe out. Smile. You did it!
Take a moment to notice how your body feels—lighter, taller, maybe even a little bit more “awake” all over. Remember, it’s not about perfection; it’s about progress and feeling good in your skin.

Every time you show up for yourself like this, you’re not just working out—you’re building confidence, resilience, and a deeper connection to your body.

If you enjoyed this flow, you can repeat it daily or mix and match your favorite moves. For more ideas and next-level routines, explore the other Pilates and yoga guides on MasalaMonk—your body (and your mind) will thank you.

Routines To Try Next


Looking for Your Next Step?

Building a wellness routine is about more than just exercise—it’s about how you treat yourself all day long. Here are a few ways to keep the positive momentum going:

  • Start your day with gentle movement and deep breathing. The Good Morning Yoga Routine is a wonderful way to wake up your body before breakfast or after a long night’s sleep.
  • Need a break from your screen? Sneak in a few posture-fixing moves from the Yoga for Posture article. Your spine will thank you.
  • Feeling stressed or overwhelmed? Movement is medicine. The Yoga for Mental Health resource on MasalaMonk can guide you through easy practices for mind and mood.
  • Ready to make movement a daily habit? Join the supportive MasalaMonk community and explore challenges, new routines, and more.

Warm-Up, Recovery & Wellness


Final Thoughts: Why Wall Pilates Might Be Exactly What You Need

Wall Pilates is more than just a trending workout—it’s a gentle, empowering approach to feeling stronger, taller, and more at ease in your body.
You don’t need the perfect setup, a special background, or even a lot of time.
All you need is a wall, your breath, and a willingness to begin.

Whether you’re a busy parent, a senior seeking safe movement, or anyone in between, Wall Pilates welcomes you. Every time you show up for yourself—even for a few minutes—you’re making an investment in your health, happiness, and confidence.

So next time you walk past that blank wall at home, see it for what it really is: your new workout buddy, teacher, and source of strength.

Let us know in the comments if you try Wall Pilates—what changed for you? What surprised you? And if you need ideas, support, or just a nudge to get started, we’re always here.


Visuals, stories, and support by MasalaMonk.com. Save or share this post if you found it useful, and keep an eye out for our upcoming 10-minute Wall Pilates routine!

FAQs: Wall Pilates

1. What is Wall Pilates and how is it different from regular Pilates?
Wall Pilates adapts traditional Pilates exercises by using a wall for support and resistance, which helps with alignment, balance, and core engagement—making it more accessible for beginners and those who want extra feedback on their form.

2. Do I need any special equipment for Wall Pilates?
No equipment is required—just a clear wall, a yoga mat (if you like extra comfort), and comfortable clothing.

3. Is Wall Pilates suitable for beginners?
Yes, Wall Pilates is perfect for beginners! The wall acts as your guide, providing support and helping you learn the correct technique with less risk of strain or injury.

4. Can I do Wall Pilates if I have joint pain or am recovering from injury?
Always check with your doctor first, but Wall Pilates is low-impact and can often be adapted for people with joint issues or those in rehabilitation, thanks to the wall’s support and the gentle, controlled movements.

5. How often should I practice Wall Pilates to see results?
Aim for 2–4 sessions per week to build strength and flexibility, though even once a week is beneficial. Consistency matters more than duration!

6. What are the main benefits of Wall Pilates?
Benefits include improved posture, stronger core and glutes, better balance, joint-friendly movement, and greater body awareness.

7. Can I lose weight or tone my body with Wall Pilates?
Wall Pilates can help tone and sculpt your body, improve muscle definition, and support healthy weight loss when combined with good nutrition and regular activity.

8. Is Wall Pilates good for seniors or people with limited mobility?
Yes, it’s very adaptable for seniors or anyone needing extra support. Moves can be modified for different abilities, and the wall makes balance and stability easier to manage.

9. How long does a typical Wall Pilates session last?
A routine can be as short as 10 minutes or up to 30 minutes, depending on your time and fitness level. Even short, focused sessions are effective.

10. Can I combine Wall Pilates with other forms of exercise?
Absolutely! Wall Pilates pairs well with walking, yoga, strength training, or even other Pilates routines, enhancing your overall fitness and flexibility.

Posted on 1 Comment

Embark on a Calisthenics Journey with This 30-Day Workout Guide

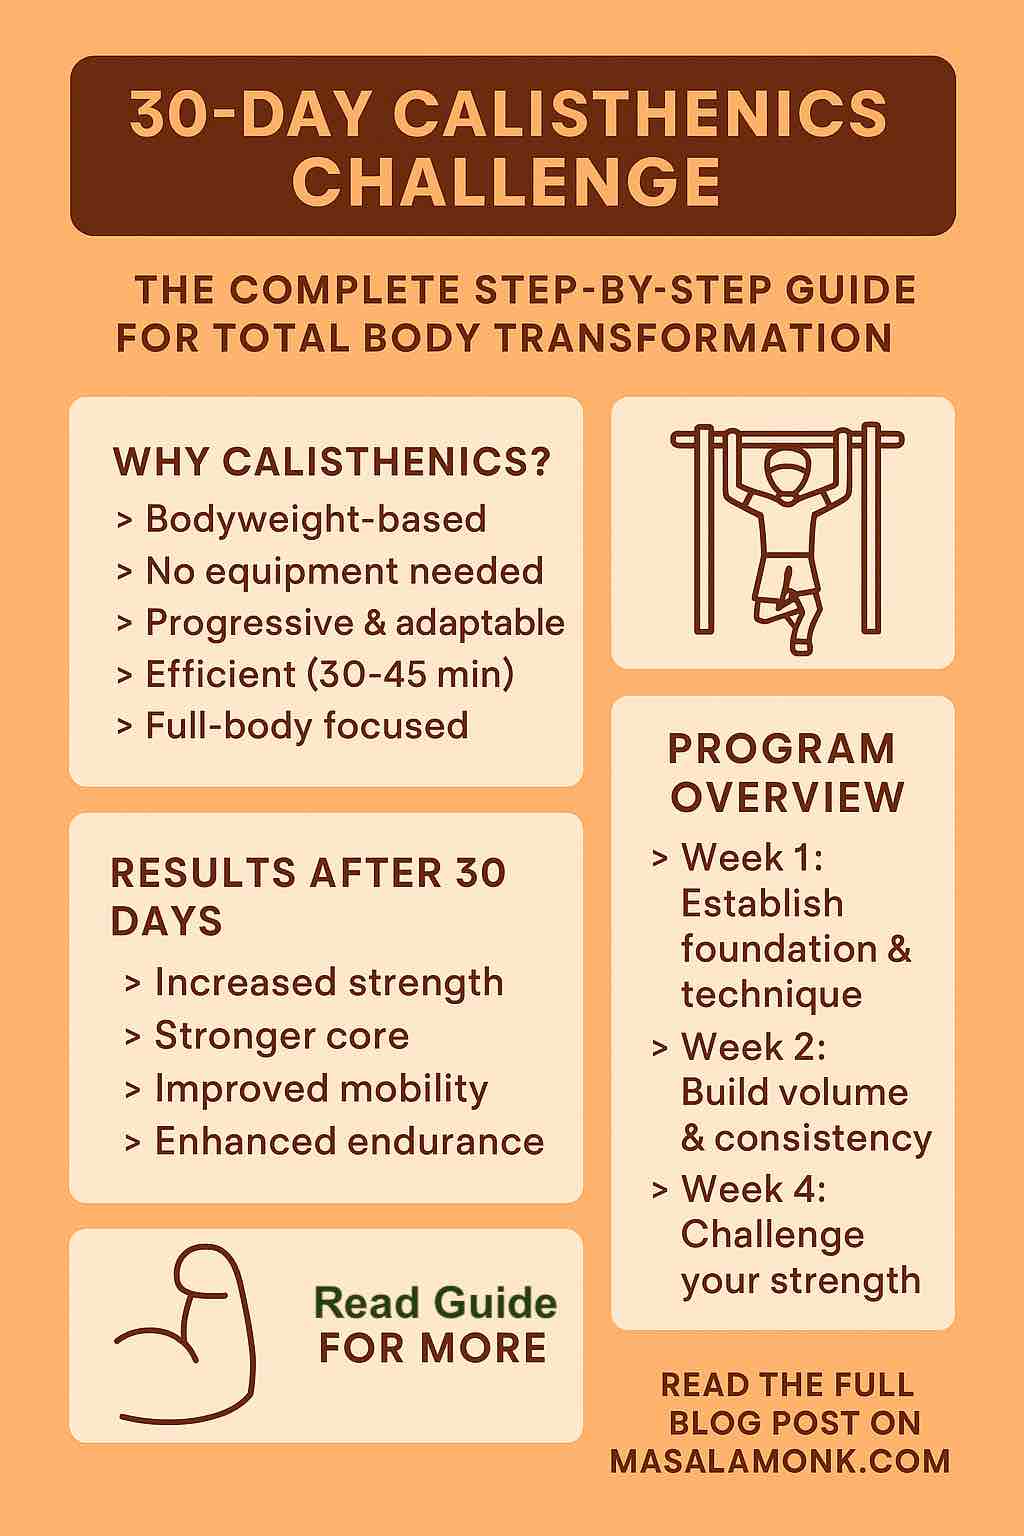
30-DAY CALISTHENICS CHALLENGE

When you start looking for ways to build strength, mobility, and endurance without the need for expensive equipment or complicated routines, calisthenics stands out as one of the most effective methods available.

And if you’re like thousands of others searching for:

  • “30 day calisthenics challenge”
  • “30 day calisthenics workout plan”
  • “calisthenics 30 day program for beginners”

— this guide is exactly for you.

In this post, we’ll walk through a complete, practical, and detailed 30-day calisthenics workout challenge, designed specifically for beginners to intermediate practitioners who want to see real results in just one month.


Why Choose a 30 Day Calisthenics Challenge?

Before we dive into the program, it’s important to understand why calisthenics works so well for body transformation:

  • Bodyweight-Based: You’re training with your own body weight, which promotes balanced muscle development, joint health, and functional strength.
  • No Equipment Needed: You can start right now — no gym, no machines, no excuses.
  • Progressive & Adaptable: The exercises grow with you. As you build strength, you’ll naturally progress to more advanced variations.
  • Efficient: Sessions can be completed in 30-45 minutes, making it easy to fit into a busy schedule.
  • Full-Body Focused: You’ll target every major muscle group, while also improving flexibility and endurance.

Now, let’s get practical.


The Structure of the 30 Day Calisthenics Challenge

The program follows a progressive overload model, which means each week builds on the previous one — gradually increasing intensity, volume, and difficulty.

We’ll divide your 30 days into 4 weeks:

  • Week 1 — Establish foundation & technique
  • Week 2 — Build volume & consistency
  • Week 3 — Introduce progressions
  • Week 4 — Challenge your strength

Each week includes:

  • 4 workout days
  • 1 optional active rest day
  • 2 full rest days

Weekly Breakdown

WEEK 1: The Foundation Phase

Focus: Learn proper form, engage muscles, avoid injury.

Workout Days: Full-Body Routine

Warm-up (5 mins):

  • Jumping jacks (30 sec)
  • Arm circles (30 sec)
  • Leg swings (10 per leg)
  • Dynamic lunges (10 reps)
  • Wrist mobility (30 sec)

Main Workout (3 rounds):

  • Push-Ups: 8-10 reps (knees or full)
  • Bodyweight Squats: 15 reps
  • Plank: 20-30 sec
  • Glute Bridges: 15 reps
  • Superman Hold: 20 sec
  • Wall Push-Ups or Incline Push-Ups: 10 reps
  • Bird Dog: 10 per side

Cool-down (5 mins):

  • Forward fold (30 sec)
  • Hip flexor stretch (30 sec per side)
  • Chest opener (30 sec)

WEEK 2: Volume & Endurance Phase

Focus: Start adding volume to stimulate strength gains.

Workout Days: Full-Body Split

Day 1 & 3 – Upper Focus

  • Standard Push-Ups: 10-12 reps
  • Assisted Pull-Ups or Rows: 5-8 reps
  • Pike Push-Ups: 8-10 reps
  • Triceps Dips (bench or floor): 10-12 reps
  • Side Plank: 20 sec per side
  • Leg Raises: 10-15 reps

Day 2 & 4 – Lower & Core Focus

  • Bodyweight Squats: 20 reps
  • Lunges: 10 per leg
  • Glute Bridges: 20 reps
  • Calf Raises: 25 reps
  • Plank Shoulder Taps: 10 per side
  • Russian Twists: 20 reps

Cool-down: Same as Week 1.


WEEK 3: Progression & Strength Phase

Focus: Introduce slightly more challenging variations.

Workout Days: Upper/Lower Split

Day 1 & 3 – Upper Body Strength

  • Decline Push-Ups: 10 reps
  • Negative Pull-Ups or Full Pull-Ups: 4-6 reps
  • Pike Push-Ups: 10 reps
  • Dips (more range): 10-12 reps
  • Hollow Body Hold: 20-30 sec
  • Side Plank Reach Through: 10 reps

Day 2 & 4 – Lower Body Strength

  • Bulgarian Split Squats: 10 per leg
  • Jump Squats: 10 reps
  • Glute Bridges (single leg if possible): 10 reps
  • Calf Raises (weighted if possible): 20 reps
  • Plank with Arm Lift: 30 sec
  • Reverse Crunches: 15 reps

Cool-down: Extend stretches to 1 min holds.


WEEK 4: Max Effort & Skill Phase

Focus: Test limits, increase strength, refine form.

Workout Days: Advanced Full-Body

Day 1 & 3 – Strength & Control

  • Diamond Push-Ups: 12-15 reps
  • Pull-Ups: 5-8 reps
  • Elevated Pike Push-Ups: 8-10 reps
  • Triceps Dips: 12-15 reps
  • Hollow Body Rocks: 20 reps
  • Side Plank with Leg Raise: 10 per side

Day 2 & 4 – Power & Mobility

  • Pistol Squats (assisted): 5-8 per leg
  • Jump Squats: 15 reps
  • Glute Marches: 20 reps
  • Wall Handstand Hold (against wall): 10-20 sec
  • Plank to Elbow: 15 reps
  • V-Ups: 15 reps

Cool-down: Full body stretching routine, 10 minutes.


What to Expect After 30 Days

By the end of this challenge, you can expect:

✅ Increased upper and lower body strength
✅ Stronger core and better posture
✅ Improved mobility and flexibility
✅ Boosted stamina and work capacity
✅ Solid foundation for advanced calisthenics skills


Realistic Notes Before You Start

  • You won’t become an elite calisthenics athlete in 30 days — but you will build the foundation that makes advanced training possible.
  • Progress will depend on your starting point — beginners will see more noticeable gains in strength, coordination, and endurance.
  • Consistency is king. Missing workouts will slow down progress. Stick to the plan.

Common Mistakes to Avoid

  • Rushing progressions before mastering form.
  • Skipping rest days and overtraining.
  • Poor nutrition and inadequate hydration.
  • Not tracking reps and sets to monitor improvement.

After The 30 Days: What’s Next?

  • Skill Work: Start learning handstands, L-sits, muscle-ups.
  • Strength Progressions: Move to harder push-up, pull-up, and squat variations.
  • Mobility Work: Incorporate regular stretching and joint mobility drills.
  • Join a Community: Calisthenics communities online can keep you motivated.

Inspiration Credit

This 30-day calisthenics challenge is inspired by tried-and-tested protocols, including insights from the Calisthenic Movement 30-Day Program. You can check out their excellent video guide here for demonstrations and additional instruction.


Final Thoughts

The 30 Day Calisthenics Challenge isn’t a gimmick or quick-fix — it’s a structured approach to get stronger, move better, and build confidence in your body. With proper technique, consistency, and patience, you’ll be amazed at how far you can progress using just your bodyweight.

👉 Bookmark this page, print the workouts, track your progress — and let’s get started.

🔥 10 FAQs for 30-Day Calisthenics Challenge


1️⃣ Is this 30-day calisthenics challenge suitable for complete beginners?

Yes. This program is specifically designed for beginners, starting with basic movements and gradually increasing intensity each week. It emphasizes learning proper form before progressing to more advanced variations.


2️⃣ Do I need any equipment to complete this challenge?

No equipment is required to start. However, having access to a pull-up bar or resistance bands can be helpful for certain pulling exercises, but you can substitute with bodyweight rows or assisted movements.


3️⃣ How long will each workout take?

Most workouts will take 30 to 45 minutes, including warm-up and cool-down. As you advance in the later weeks, sessions may extend slightly depending on rest time between sets.


4️⃣ Can I modify the workouts if I find them too easy or too hard?

Absolutely. The program is designed to be scalable. If exercises feel too easy, increase reps, sets, or use more advanced variations. If too difficult, reduce reps or substitute with regressions to match your current ability.


5️⃣ Will this challenge help me lose weight?

Yes — if combined with proper nutrition. Calisthenics burns calories, builds lean muscle, and improves metabolism, but weight loss primarily depends on maintaining a calorie deficit through balanced diet and exercise.


6️⃣ Can I repeat the 30-day challenge after completing it?

Yes, repeating the challenge is a great idea. On your second round, you can push for harder variations, more reps, or reduced rest periods to continue progressing.


7️⃣ What if I can’t do pull-ups or push-ups yet?

That’s normal for many beginners. You can start with assisted pull-ups (bands, chair support, or rows under a table) and incline or knee push-ups to build strength progressively.


8️⃣ What should I eat during the challenge?

Focus on whole foods: lean protein (chicken, fish, tofu), complex carbs (rice, oats, quinoa), healthy fats (avocados, nuts), and plenty of vegetables. Stay hydrated and avoid processed, high-sugar foods.


9️⃣ Will this challenge help me build muscle?

Yes — especially for beginners, calisthenics is highly effective at building functional, lean muscle across the entire body. Over time, progressive overload will continue to drive muscle growth.


🔟 Can I do this challenge alongside other forms of exercise?

Yes, but monitor your recovery. Light cardio, yoga, or mobility work can complement the program. Avoid heavy weightlifting or intense workouts that might cause overtraining during this challenge.

Posted on Leave a comment

15-Minute BELLY FAT BURNING Wall Pilates Workout

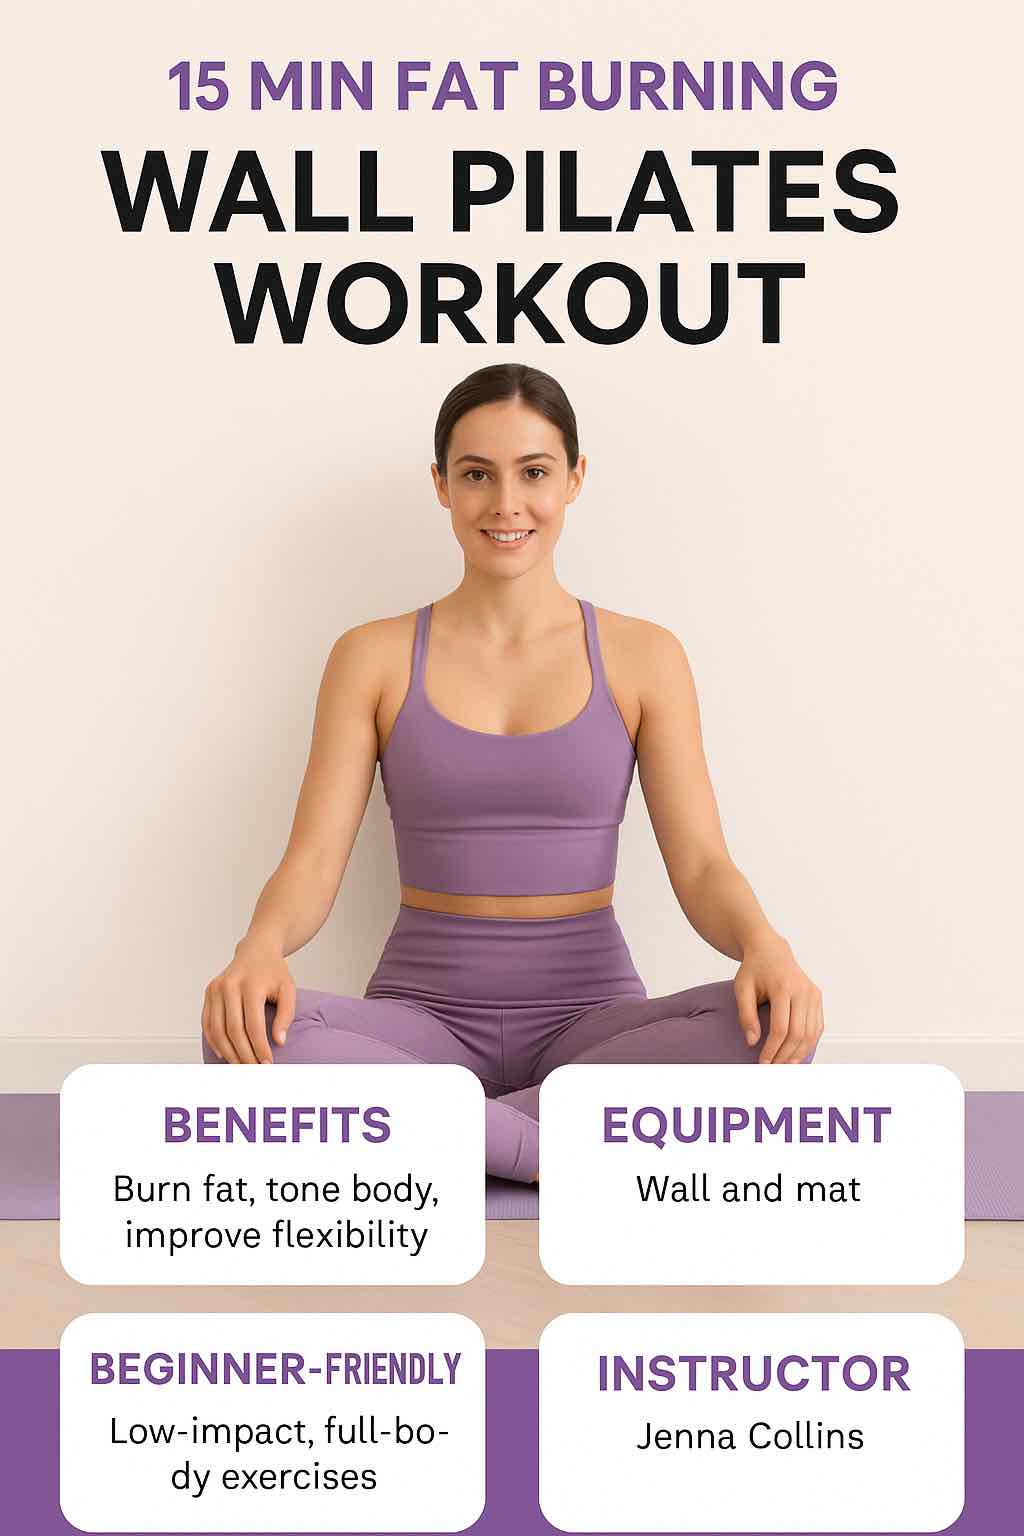
15 MIN FAT BURNING WALL PILATES WORKOUT

Pilates is a fantastic way to tone, strengthen, and improve flexibility. But did you know that you can utilize a simple wall to enhance your Pilates routine? Jenna Collins from Jenna Collins Fitness introduces a 15-minute beginner-friendly fat-burning wall Pilates workout that’s designed to engage your entire body.

Watch and learn from video here : 15 Min FAT BURNING Wall Pilates Workout (Beginner Friendly)

About the Workout:

This unique Pilates routine uses the wall as a prop to intensify the exercises. It’s a low-impact, full-body workout that aims to burn fat and tone the entire body using just the wall and your body weight. Whether you’re new to Pilates or looking for a fresh way to spice up your routine, this session is perfect for you.

Key Highlights:

  • Duration: A concise 15-minute session that’s packed with effective exercises.
  • Focus: The workout emphasizes full-body engagement, targeting everything from the legs and core to the arms and back.
  • Accessibility: Suitable for all fitness levels, especially beginners. All you need is a wall and a mat.
  • Benefits: Regular practice can help burn fat, improve muscle tone, and enhance overall flexibility.

A Glimpse into the Workout:

The session begins with foundational Pilates exercises adapted for the wall. Expect movements that challenge your balance, strength, and flexibility. Jenna guides you through each exercise, ensuring proper form and alignment.

Conclusion:

Pilates is known for its ability to transform the body, and this 15-minute wall Pilates session by Jenna Collins is no exception. It’s a refreshing take on traditional Pilates, offering a unique challenge that promises results. Commit to the routine, and you’ll be on your way to a toned and fit physique in no time.

Credit: This workout and video content are created by Jenna Collins from Jenna Collins Fitness.


Frequently Asked Questions: Wall Pilates with Jenna Collins

1. What is Wall Pilates, and how is it different from regular Pilates?
Wall Pilates is a variation of traditional Pilates that incorporates a wall for support and resistance. It helps improve alignment, balance, and strength—especially useful for beginners or those recovering from injury.

2. Can a 15-minute workout really burn fat?
Absolutely! While short, high-quality workouts like Jenna Collins’ Wall Pilates session can effectively kickstart fat burning by engaging multiple muscle groups and boosting your heart rate in a low-impact way.

3. Is this workout suitable for complete beginners?
Yes! This session is designed specifically for beginners. Jenna provides clear, easy-to-follow instructions that help you maintain proper form and avoid injury.

4. What equipment do I need for this workout?
All you need is a flat wall, a yoga mat or soft surface for floor work, and a little bit of space. No additional equipment is required!

5. Which muscles does this workout target?
This full-body session targets the core, glutes, thighs, arms, and back. The wall adds resistance and helps deepen muscle engagement in each move.

6. Is this workout safe for people with joint issues?
Yes, it’s a low-impact workout, making it gentler on the joints. However, if you have chronic joint problems or injuries, it’s best to consult a healthcare professional before starting.

7. How often should I do this workout to see results?
For best results, aim to do this workout 3–5 times a week. Consistency is key, and as you build strength, you can increase the duration or combine it with other routines.

8. Can Wall Pilates help with weight loss?
While Pilates alone won’t lead to drastic weight loss, it helps build lean muscle and improve metabolism. Combined with a balanced diet and other forms of cardio, it can contribute to overall fat loss.

9. Can I do this workout if I’m not flexible?
Yes, flexibility is not a prerequisite. In fact, regularly practicing Wall Pilates can improve your flexibility over time by gently stretching and lengthening muscles.

10. Where can I find more of Jenna Collins’ workouts?
You can follow Jenna Collins on her YouTube channel, Jenna Collins Fitness, for more Pilates tutorials, fitness tips, and beginner-friendly routines.