Posted on Leave a comment

Garlic and Honey: A Dynamic Duo for Health and Healing

GARLIC AND HONEY

In a world flooded with synthetic health remedies, more people are turning to ancient, natural solutions that have withstood the test of time. One such powerful combination making waves across modern wellness circles is the duo of garlic and honey. This seemingly simple pairing is garnering attention not only from holistic health enthusiasts but also from scientists exploring its medicinal potential. Let’s dive into why fermented garlic and honey could be your next kitchen remedy powerhouse.


The Science Behind the Power Combo

Both garlic and honey are well-known individually for their health-promoting properties:

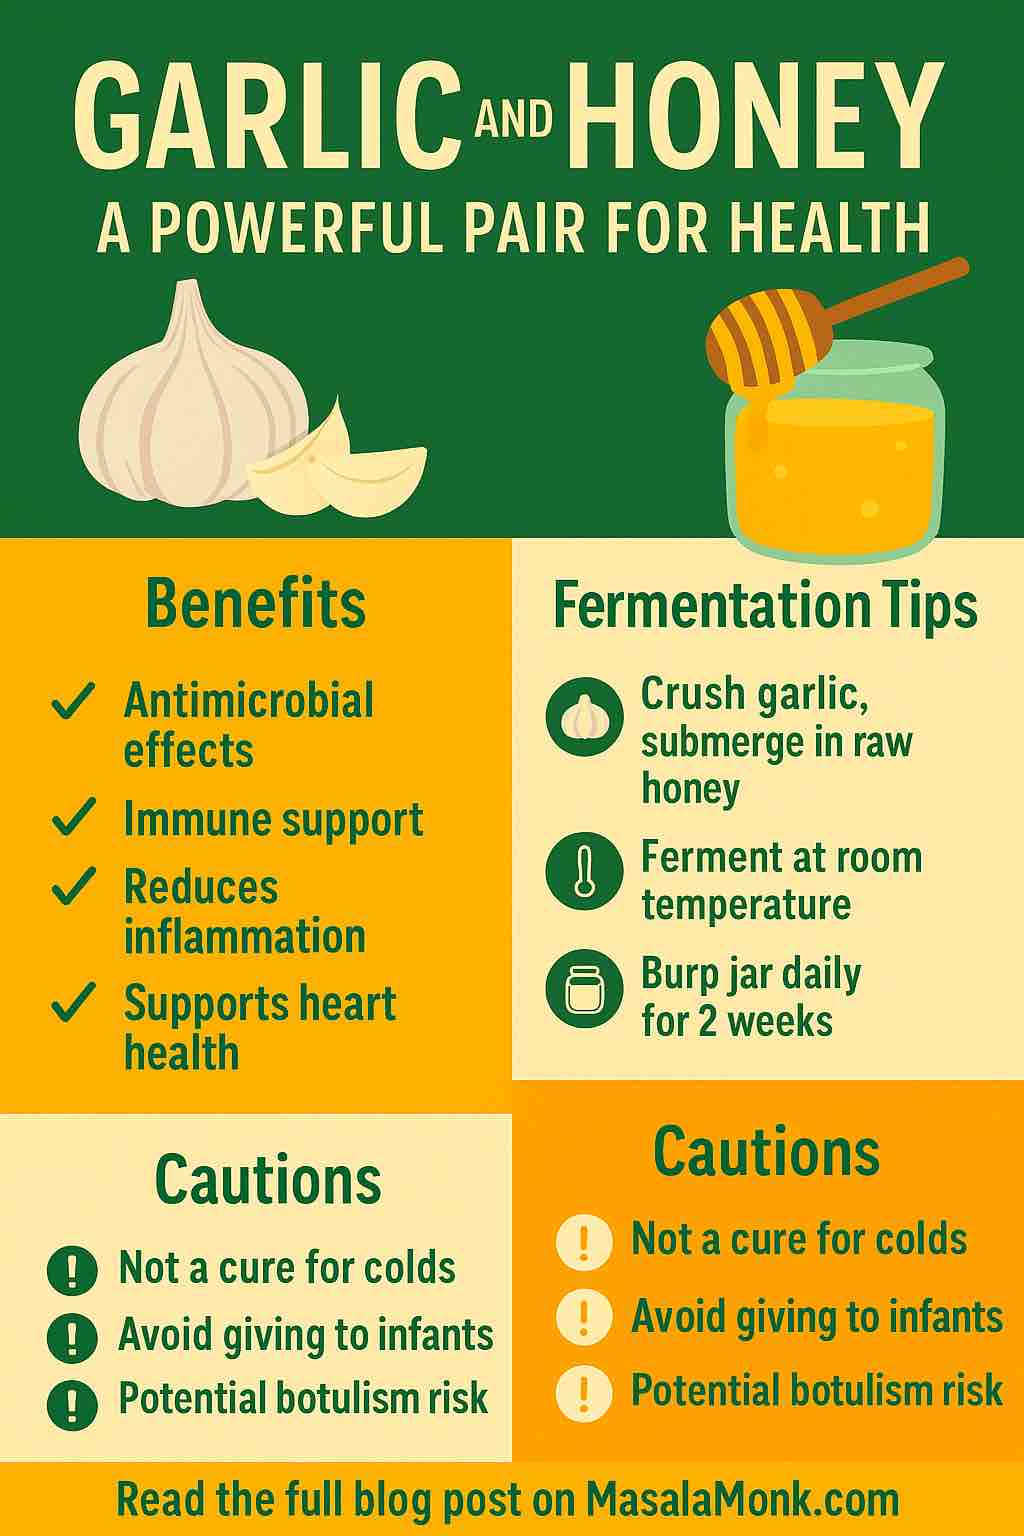
  • Garlic is packed with sulfur-containing compounds like allicin, known for its antimicrobial, anti-inflammatory, and heart-protective properties.
  • Honey (especially raw or Manuka) offers potent antibacterial and antioxidant benefits, thanks to enzymes, phenolic acids, and flavonoids.

But when combined, these two ingredients don’t just add their benefits—they enhance each other’s effects through a synergistic relationship.

1. Immune System Support

Recent studies (2023-2025) reveal that fermented garlic honey boosts immune cell activity, particularly macrophages, which help the body fight infections. Regular consumption during cold and flu season may reduce the frequency and duration of respiratory infections.

2. Antimicrobial Powerhouse

Lab studies show the garlic-honey combo outperforms either ingredient alone against bacteria like E. coli, S. aureus, and Streptococcus pneumoniae. Adding ingredients like black cumin oil further enhances this antimicrobial effect.

3. Cardiovascular Benefits

Garlic lowers blood pressure and LDL cholesterol, while honey improves vascular function via antioxidants. Taken daily, fermented garlic honey can support heart health, reduce inflammation markers like CRP, and even modulate blood sugar levels.

4. Wound Healing and Skin Health

When used topically, honey and garlic mixtures promote wound healing, reduce infection, and support tissue regeneration. Manuka honey infused with garlic has shown improved outcomes in healing infected wounds in preliminary studies.


How to Make Fermented Garlic Honey at Home

Making your own batch is easy, but it requires some patience and attention to hygiene.

You’ll Need:

  • 1 cup raw, unfiltered honey (Manuka or organic recommended)
  • 10–20 peeled garlic cloves
  • A clean glass jar with an airtight lid

Steps:

  1. Slightly crush each garlic clove to activate allicin.
  2. Place them in the jar and cover with honey.
  3. Leave some headspace for bubbling (fermentation).
  4. Seal the jar and place it in a dark, cool place.
  5. Every day, open the jar briefly (“burp it”) to release gases.
  6. Fermentation is noticeable within a week and ready to use in 3–4 weeks.

Tips:

  • Garlic may turn blue/green—this is safe and due to sulfur compound reactions.
  • Stir or flip the jar gently every few days.

How to Use It Practically

Daily Wellness:

  • Take one garlic clove with a spoonful of honey each morning.

At First Sign of Cold:

  • Take 1–2 cloves every 4–6 hours to soothe symptoms and support immunity.

Topical Use:

  • Mix with aloe or coconut oil and apply to minor wounds (test first on skin).

Culinary:

  • Drizzle over roasted vegetables, mix into dressings, or stir into herbal teas.

Cautions and Considerations

  • Not for infants: Honey should never be given to babies under 1 year due to botulism risk.
  • Monitor blood sugar: While honey has medicinal properties, it’s still high in sugars.
  • Medication interactions: Garlic can interact with blood thinners and some medications—consult your doctor.
  • Fermentation safety: Use clean jars and raw honey; watch for mold or strange smells and discard if uncertain.

Final Thoughts: More Than a Folk Remedy

Garlic and honey aren’t just ingredients in grandma’s cold remedy—they are a scientifically supported, synergistic duo that offers a multitude of health benefits when used correctly. Whether you ferment it yourself or use it raw, this combination deserves a place in your wellness routine. With emerging studies confirming its efficacy and safety, garlic and honey have stepped beyond folklore into functional nutrition.

So why not take a cue from nature and start a jar today? Your future self might thank you with fewer colds, better heart health, and a stronger immune system.

FAQs

1. Is fermented garlic honey safe to consume daily?
Yes, in moderate amounts. Most adults can safely consume 1–2 teaspoons per day. However, those on blood-thinning medications or with allergies should consult a healthcare provider first.

2. How long does fermented garlic honey last?
Stored properly in a sealed jar in a cool, dark place, it can last up to 12 months. Always check for off smells, mold, or bubbling that doesn’t subside after the fermentation period.

3. Can I use cooked garlic or paste instead of raw garlic?
No. Raw garlic is essential because cooking destroys allicin, the compound responsible for most of garlic’s medicinal properties. Use fresh, crushed cloves for best results.

4. Is it necessary to burp the jar daily during fermentation?
Yes. Burping releases gases produced during fermentation, preventing pressure build-up and potential leakage or spoilage. Do this daily for the first 2 weeks.

5. What if my garlic turns blue or green? Is it safe?
Yes, this is a natural reaction between sulfur compounds in garlic and acidic elements in honey. It’s harmless and safe to consume.

6. Can children consume fermented garlic honey?
Children over 1 year can take small amounts (¼ to ½ tsp). Never give honey to infants under 1 due to the risk of infant botulism.

7. Does it help with sore throats and coughs?
Yes. Anecdotal and lab evidence supports its use for soothing sore throats, easing coughs, and reducing upper respiratory symptoms.

8. Can I refrigerate it?
It’s not necessary, and refrigeration may slow or halt fermentation. Room temperature storage (cool, dark spot) is ideal.

9. What kind of honey is best to use?
Raw, unfiltered honey is best. Manuka or local organic honey offers stronger antibacterial properties. Avoid pasteurized or processed honey.

10. Can I take it if I have diabetes?
While honey has medicinal value, it’s high in natural sugars. Diabetics should consult a doctor before using it regularly, and consider very small doses only.

Posted on Leave a comment

The Art of Fermented Fruit Juices: 5 DIY Recipes to Try at Home

fermented fruit juices, home fermentation, probiotic drinks, lactic acid bacteria, water kefir, tepache, kanji, fruit kvass, gut health, DIY fermentation, fermented beverages, kombucha alternatives, natural probiotics, food preservation, fermentation recipes

Fermenting fruit juices is both an ancient craft and a modern wellness trend. By harnessing the natural power of beneficial microbes, you can create flavorful, probiotic-rich beverages right in your kitchen. These fermented drinks are not only delicious but also offer numerous health benefits — from improved digestion to a stronger immune system. In this guide, we’ll explore the science behind fermentation and share 5 detailed, practical recipes you can start today.


🧬 The Science of Fermentation — Simplified

At its core, fermentation is a natural process where microorganisms such as bacteria and yeast consume sugars and convert them into acids, gases, and sometimes alcohol.

  • Lactic Acid Bacteria (LAB) – produce lactic acid, enhancing the sour taste and providing probiotics.
  • Yeasts – produce alcohol and carbonation, adding complexity to the flavor.
  • Wild Microbes – naturally present on fruits and in the environment, contribute unique flavors and textures.

Key benefits of fermented fruit juices:

  • Increased bioavailability of nutrients
  • Enhanced antioxidant levels
  • Gut-friendly probiotics
  • Natural preservation
  • Unique and complex flavors

⚠️ Basic Safety Rules for Home Fermentation

Before we dive into recipes, remember these crucial safety tips:

  • Sanitize all jars, utensils, and surfaces.
  • Use clean, fresh produce — preferably organic.
  • Always use non-chlorinated, filtered water.
  • Ferment at room temperature (68–75°F / 20–24°C).
  • Monitor for off-smells or visible mold; discard if found.
  • If in doubt, trust your senses — fermented juices should smell pleasantly sour or fruity, never rotten or foul.

🧪 5 DIY Fermented Fruit Juice Recipes to Try at Home


1️⃣ Water Kefir with Fruit Juice — Dairy-Free Probiotic Delight

Why this works:
Water kefir grains (Tibicos) contain a symbiotic culture of bacteria and yeast that ferment sugars into a lightly fizzy, probiotic-rich beverage.

You’ll need:

  • ¼ cup water kefir grains
  • ¼ cup organic sugar (cane or raw sugar works best)
  • 1 quart filtered water
  • 1–2 cups fruit juice (apple, grape, pomegranate, or orange)

Instructions:

First Ferment:

  1. Dissolve sugar in filtered water.
  2. Add water kefir grains to the sugar water.
  3. Cover with a breathable cloth and ferment for 24–48 hours at room temperature.

Second Ferment (Flavoring Stage):
4. Strain out kefir grains (reuse for next batch).
5. Add your choice of fruit juice to the strained liquid.
6. Pour into bottles with tight-fitting lids.
7. Ferment an additional 24 hours at room temperature for carbonation.
8. Refrigerate and enjoy chilled.

Tip:
Always open bottles carefully — pressure can build up!


2️⃣ Pineapple Tepache — Wild Ferment with Tropical Vibes

Why this works:
Pineapple skin naturally hosts wild yeasts and LAB, making tepache one of the easiest ferments for beginners.

You’ll need:

  • 1 ripe pineapple (peels and core)
  • ¾ to 1 cup brown sugar or piloncillo
  • 6–8 cups filtered water
  • Optional: 1 cinnamon stick, 3–4 cloves

Instructions:

  1. Rinse pineapple gently to remove dirt but keep natural microbes intact.
  2. Slice off skin and core, place in large glass jar.
  3. Dissolve sugar in water, pour over pineapple.
  4. Add spices if desired.
  5. Cover jar with cloth or coffee filter secured with rubber band.
  6. Ferment for 2–5 days at room temperature.
  7. Taste daily: when tangy with light fizz, strain and refrigerate.

Tip:
The longer you ferment, the tangier and slightly more alcoholic (~1-2% ABV) it becomes.


3️⃣ Indian Beetroot Kanji — Fermented Root Juice

Why this works:
Beets and carrots naturally ferment with salt and mustard seeds, producing a vibrant probiotic drink loaded with antioxidants.

You’ll need:

  • 3 medium beets, peeled and chopped
  • 2 carrots, peeled and chopped
  • 1 tbsp black mustard seeds
  • 1½ tbsp sea salt
  • 8 cups filtered water

Instructions:

  1. Combine all ingredients in a large glass jar.
  2. Stir until salt dissolves.
  3. Cover with cloth, ferment at room temperature for 5–7 days.
  4. Stir daily and taste; once pleasantly tangy, strain and refrigerate.

Tip:
Serve chilled with meals to aid digestion.


4️⃣ Fruit Kvass — Quick Lactic Acid Ferment

Why this works:
Using whey or probiotic capsules introduces LAB directly into the juice, speeding up fermentation.

You’ll need:

  • 2 cups chopped fruit (berries, apples, mango, etc.)
  • 2 tbsp sugar (optional)
  • 1 quart filtered water
  • 2 tbsp whey (from yogurt) or 1 probiotic capsule (Lactobacillus strains)

Instructions:

  1. Place fruit in a sanitized jar.
  2. Add sugar and water, stir to dissolve.
  3. Add whey or probiotic powder.
  4. Cover loosely with lid or cloth.
  5. Ferment 2–4 days at room temp.
  6. Taste daily; once tart and slightly fizzy, refrigerate.

Tip:
Kvass is very forgiving and can be flavored endlessly.


5️⃣ Instant Probiotic Fruit Juice — No Fermentation Needed

Why this works:
Scientific studies show that adding probiotic powder to fresh juice can deliver immediate benefits without waiting for fermentation.

You’ll need:

  • 1 cup fresh fruit juice (orange, pomegranate, or berry mix)
  • 1 probiotic capsule (10+ billion CFUs, Lactobacillus and Bifidobacteria)
  • Optional: 1 tsp inulin or fiber powder

Instructions:

  1. Mix juice, probiotic powder, and fiber thoroughly.
  2. Consume immediately or refrigerate for up to 24 hours.

Tip:
Perfect for those new to fermentation who want quick probiotic benefits.


🏅 Health Benefits Backed by Science

  • Digestive support: Probiotics balance gut flora.
  • Antioxidant boost: Fermentation enhances bioactive compounds.
  • Immune modulation: LAB strains can support immune function.
  • Mood improvement: Emerging studies link gut health to better mood and sleep.

Studies from 2024 confirm that fermented juices deliver live probiotic counts above 10⁷ CFU/mL and increase antioxidant activity dramatically.


🧭 Troubleshooting Common Fermentation Issues

ProblemCauseSolution
MoldContaminationSanitize equipment; discard batch
Rotten smellUndesirable bacteriaUse fresher produce, better sanitation
No bubblesToo cold, no sugarMove to warmer area, add more sugar
Too sourOverfermentedShorten fermentation time

🧰 Basic Fermentation Gear for Home

  • Glass jars (32 oz or larger)
  • Plastic or wooden stirring spoons
  • Coffee filters or cloth for covers
  • Rubber bands
  • Fine mesh strainer
  • pH strips (optional for safety)

🌎 Why Ferment at Home?

Home fermentation is empowering. You:

  • Control ingredients (no preservatives or additives)
  • Customize flavors
  • Save money compared to store-bought probiotics
  • Connect to ancient culinary traditions

🎯 In Conclusion

Fermenting fruit juices at home is accessible, rewarding, and deeply rooted in both tradition and modern science. Whether you prefer wild ferments like tepache, controlled probiotic kvass, or the instant convenience of probiotic powders, you’re unlocking a world of flavor and wellness with every batch.

🔎 FAQs: The Art of Fermented Fruit Juices


1️⃣ Is it safe to ferment fruit juices at home?

Yes, if you follow proper sanitation and use clean equipment, fresh ingredients, and non-chlorinated water. Monitor your ferment daily, and if you see mold, smell rot, or notice unusual colors (besides the natural changes), discard the batch.


2️⃣ Can fermented fruit juices turn alcoholic?

Mild fermentation (2–5 days) produces very low alcohol (typically <0.5–2% ABV). Longer ferments or wild ferments (like tepache) may develop slightly higher alcohol but are still far below traditional wine or cider levels.


3️⃣ How long do fermented fruit juices last in the fridge?

Properly fermented and refrigerated juices last about 2–3 weeks. Always smell and taste before drinking. Over time, flavors may become more sour or fizzy.


4️⃣ Do I need special equipment to start?

No. Basic home fermentation needs only sanitized glass jars, clean utensils, breathable covers (cloth or coffee filters), and sometimes bottles for second fermentation. Optional: pH strips for extra safety.


5️⃣ Which fruits are best for fermentation?

Fruits with moderate sugar content work best: apples, grapes, berries, mangoes, pineapples, and pomegranates. Avoid citrus as the acidity can inhibit some microbes unless using specialized cultures.


6️⃣ What starter cultures can I use?

  • Water kefir grains (for kefir-style ferment)
  • SCOBY (for kombucha-style ferment)
  • Whey or probiotic capsules (for kvass-style ferment)
  • Wild fermentation (no starter needed for tepache, kanji)

7️⃣ Can I use store-bought juice?

Yes, but choose 100% pure juice without preservatives like potassium sorbate or sodium benzoate, as these inhibit fermentation. Fresh-pressed juice is ideal.


8️⃣ How do I know if fermentation is working?

You’ll see small bubbles, light fizz, or slight cloudiness as microbial activity increases. The taste becomes tangy or lightly sour, and the aroma is pleasantly fruity or yeasty.


9️⃣ Can children drink fermented fruit juices?

Yes, most short ferments (2–3 days) are suitable for kids as alcohol levels remain very low. However, monitor batches carefully and consult a healthcare professional if in doubt, especially for very young children.


🔟 Can I flavor fermented juices after fermentation?

Absolutely. After primary fermentation, you can infuse with herbs, spices, or extra fruit during a second ferment for added complexity and carbonation.

Posted on Leave a comment

Crafting Probiotic Richness: The Art of Fermenting Carrots

In a delightful exploration of the art of fermentation, Clean Food Living brings to the forefront a meticulous process of crafting probiotic-rich fermented carrots. This culinary journey is not merely about preserving carrots but enhancing their nutritional value and flavor through fermentation, enriching them with probiotics that are beneficial for gut health.

Video: PROBIOTIC FERMENTED CARROTS with dill, garlic & ginger – YUMMY!
Credits: Clean Food Living

Caption: Dive into the art of fermenting carrots, a process meticulously curated to enhance their nutritional value and enrich them with probiotics.

Ingredients and Preparation

The recipe begins with fresh, raw carrots, peeled to remove the slightly bitter skin. Accompanying the carrots are fresh dill, peeled garlic cloves, and optional ginger slices. A pivotal ingredient is salt, specifically without anti-caking agents, to ensure the success of the fermentation process.

Crafting the Fermentation

The carrots are cut into sticks or slices, ensuring they fit comfortably within the fermentation jar. The addition of dill, garlic, and optional ginger brings a symphony of flavors, enhancing the carrots’ natural sweetness. The ingredients are tightly packed into the jar, leaving minimal gaps to ensure a successful fermentation process.

The Brine

A saltwater brine is meticulously crafted, acting as a protective barrier that fosters the growth of beneficial bacteria while inhibiting the proliferation of harmful pathogens. The brine is poured over the packed carrots, ensuring they are submerged, creating an anaerobic environment conducive to fermentation.

The Fermentation Journey

The fermentation journey is marked by transformation. The vibrant colors of the carrots subtly mute, and the brine becomes cloudy, indicating the active proliferation of beneficial bacteria. Bubbles of carbon dioxide gracefully rise, a sign of the lively microbial activity taking place within the jar.

Monitoring and Maintenance

Vigilance is key in the fermentation process. Regular checks are essential to ensure that the fermentation is progressing healthily. Any signs of mold or unusual odors are addressed promptly, ensuring the integrity of the ferment.

The Probiotic Harvest

After a period of patient waiting and careful monitoring, the fermented carrots are ready to be unveiled. They emerge as a probiotic-rich delicacy, tangy and vibrant with enhanced flavors and nutritional benefits. The carrots maintain a delightful crunch, embodying the success of the fermentation journey.

Conclusion: A Culinary Celebration of Fermentation

Clean Food Living’s guide to fermenting carrots is a celebration of the culinary art of fermentation. It is a journey marked by patience, meticulous care, and a profound appreciation for the transformative power of fermentation in enhancing the nutritional richness and flavor profile of simple ingredients.

FAQs

  1. What are the key ingredients in making probiotic fermented carrots?
    Crafting probiotic fermented carrots involves using fresh, raw carrots paired with ingredients like dill, garlic, and optional ginger. A crucial component is a meticulously prepared saltwater brine, which acts as a protective barrier during the fermentation process.
  2. How does the fermentation process enhance the nutritional value of carrots?
    The fermentation process transforms carrots into a probiotic-rich delicacy, enhancing their natural sweetness and enriching them with beneficial bacteria essential for gut health. This culinary transformation not only elevates the flavor but also boosts the nutritional profile of the carrots.
  3. What signs indicate a healthy fermentation process?
    A healthy fermentation process is marked by subtle changes such as the muting of the carrots’ vibrant colors and the development of a cloudy brine. The emergence of carbon dioxide bubbles also indicates active microbial activity, signifying a successful fermentation journey.
  4. How should the fermented carrots be stored for optimal preservation?
    For optimal preservation, the fermented carrots should be stored in a refrigerator after the fermentation process is complete. This storage method helps maintain their probiotic richness, flavor, and overall quality, ensuring they remain a delightful addition to various meals.
  5. What are some common issues to watch out for during the fermentation of carrots?
    During the fermentation process, it’s essential to be vigilant for signs such as mold development or unusual odors. Regular checks and maintenance, such as ensuring the carrots remain submerged in the brine, are crucial for preventing these issues and ensuring the success of the fermentation process.

Blog Tags

Fermentation, Probiotic Richness, Fermented Carrots, Clean Food Living, Nutritional Enhancement, Culinary Art, Gut Health, DIY Fermentation, Healthy Eating, Probiotic Foods