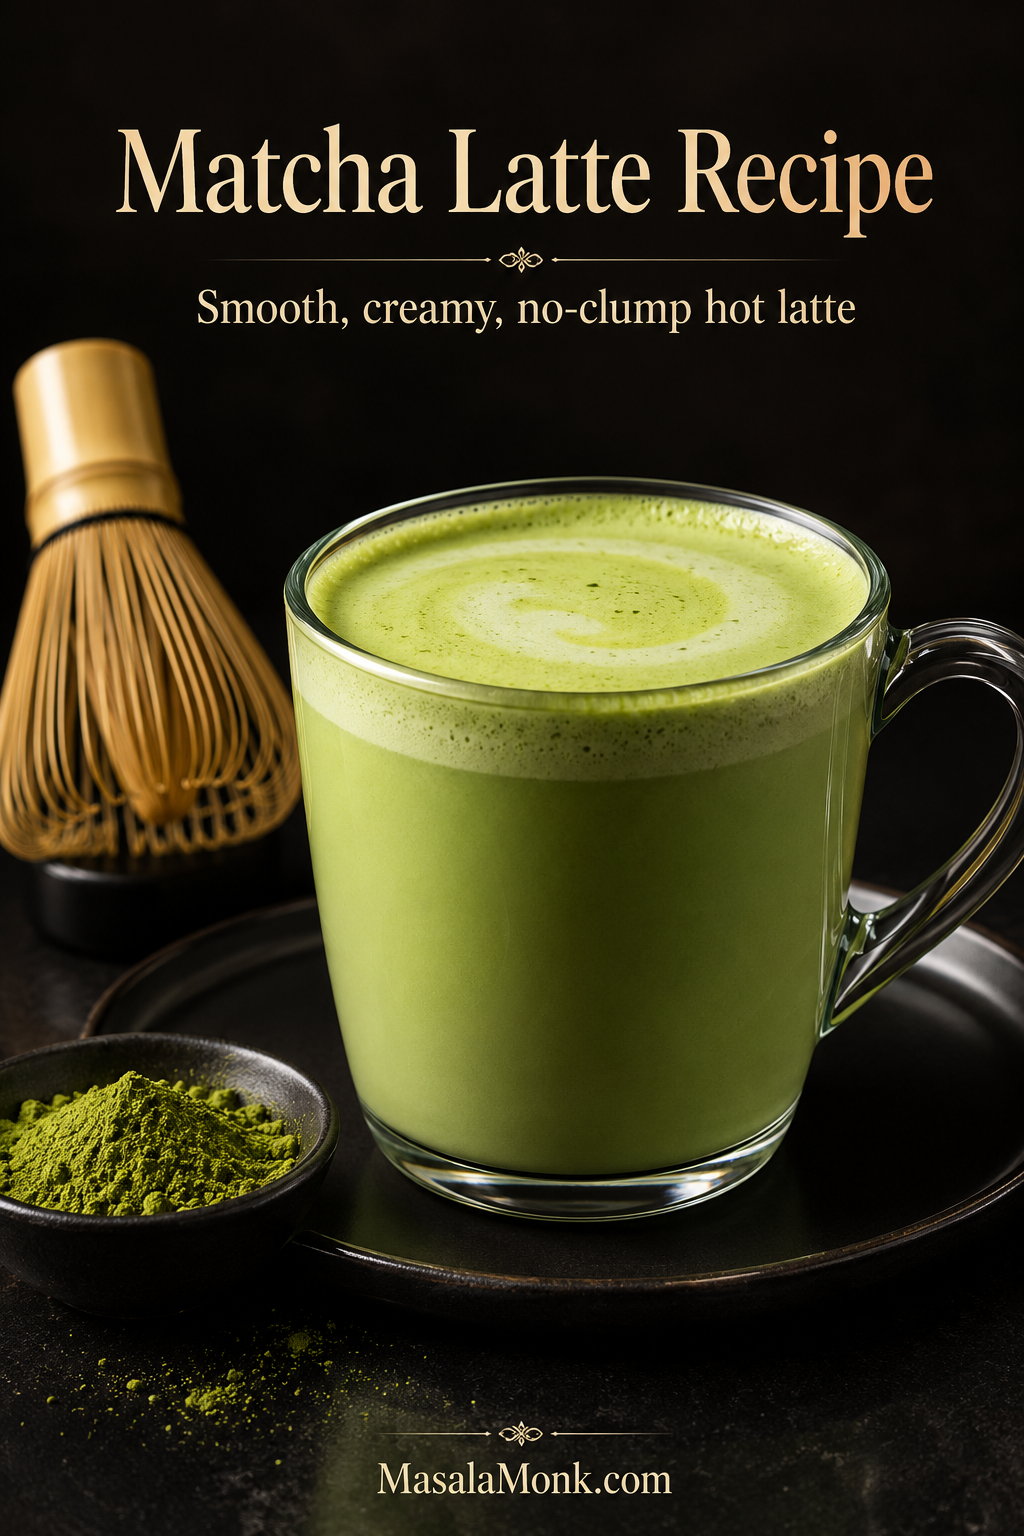
A good matcha latte recipe should give you a cup that tastes smooth, creamy, and gently earthy — not bitter, chalky, or full of green clumps. If your first homemade version tasted like warm milk with powder at the bottom, the problem probably was not you. Matcha simply needs a little help before the milk goes in.
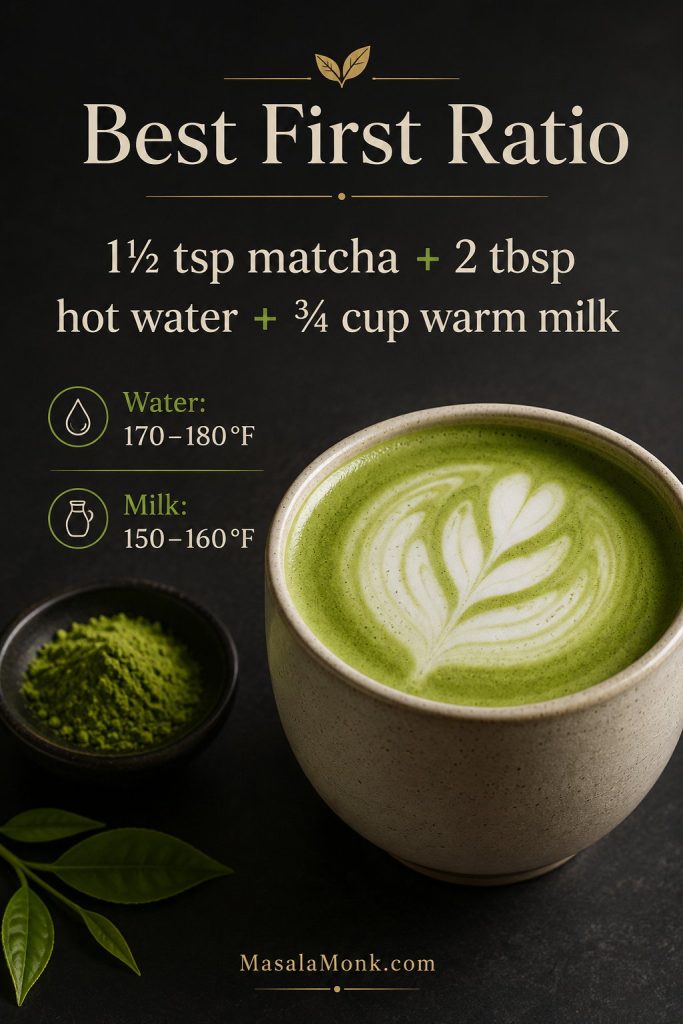
This is a no-clump, no-bitter, ratio-first hot matcha latte for the problems most homemade cups run into: weak flavor, harsh bitterness, and powder settling at the bottom. Start with 1½ teaspoons matcha, 2 tablespoons hot water, and ¾ cup warm milk, then adjust from a clear baseline instead of guessing.
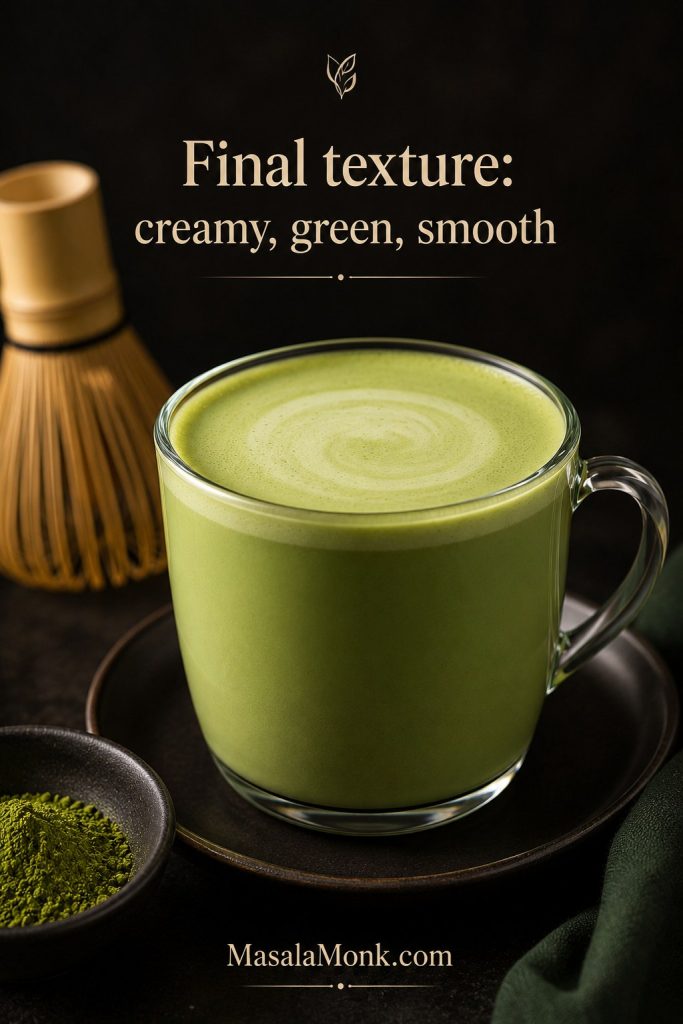
The finished cup should taste creamy enough to feel like a treat, but green enough that the tea still shows up. The trick is simple: sift the matcha, whisk it with a small amount of hot water, and only then add the milk.
This guide focuses on the hot, creamy homemade version. For the full cold version, use our iced matcha latte recipe.

Table of Contents
Start Here
Method & Tools
Variations, Fixes & Recipe
Quick Answer: Best Matcha Latte Ratio
For one balanced hot matcha latte, whisk 1½ teaspoons / about 3 grams matcha with 2 tablespoons / 30 ml hot water, then add ¾ cup / 170–180 ml warm milk. Sweeten with 1 teaspoon sugar, honey, maple syrup, or simple syrup if you like a lightly sweet cup.
Too mild usually means the tea is being drowned by milk. A harsh or bitter first sip usually points to water that was too hot, matcha that was old, or a ratio that needs a little more milk before it needs more sugar.
Want a larger drink? Use the 16 oz café-size version. If your cup is clumpy, bitter, or too weak, jump to the troubleshooting guide.
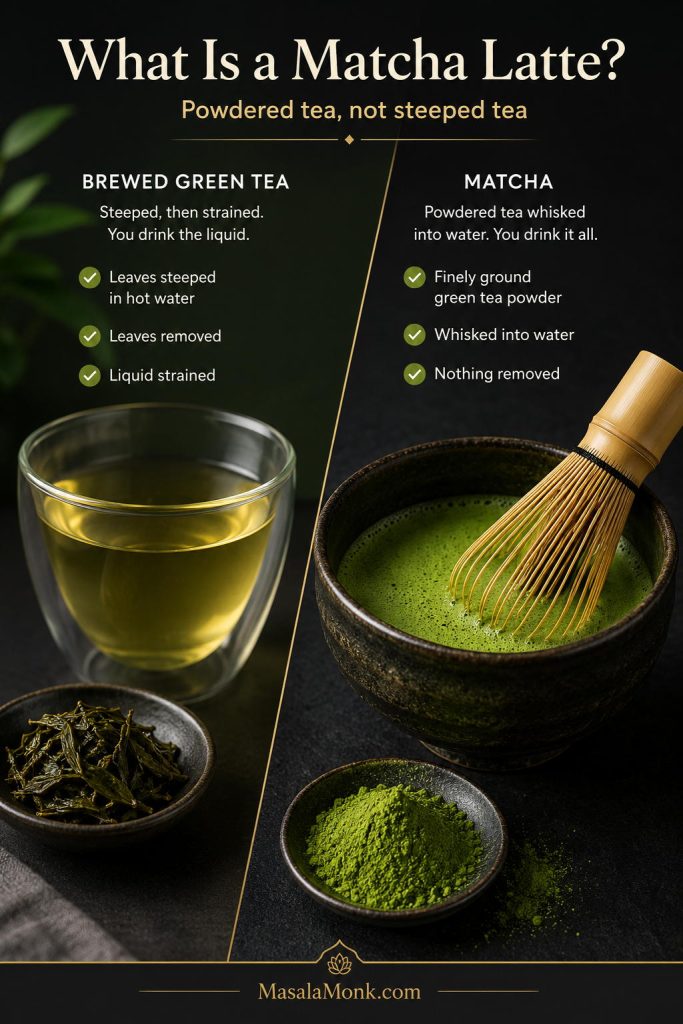
What Is a Matcha Latte?
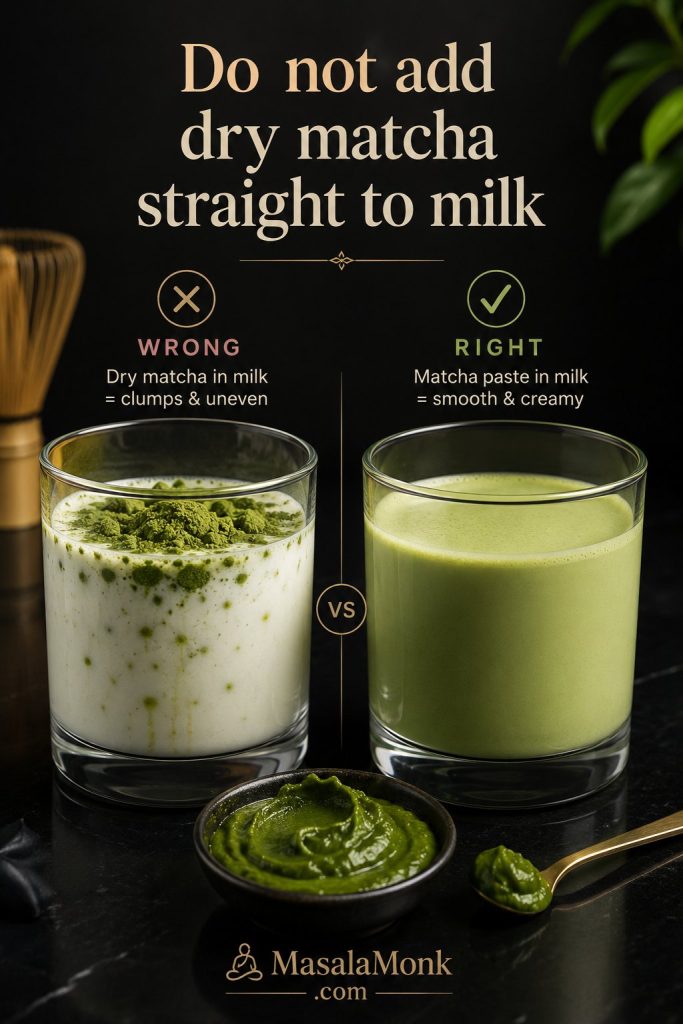
A matcha latte is made by whisking powdered green tea with water, then adding milk. Unlike regular green tea, matcha is not steeped and removed. The whole powdered tea stays in the cup, which is why the texture depends so much on how you mix it.
Because you are drinking the whole powdered tea, a good matcha latte feels fuller than brewed green tea with milk — richer, greener, and more textured. That is also why the drink can taste creamy and smooth one day, then grainy and bitter the next if the powder is rushed.
For a more traditional reference point, Ippodo also whisks matcha with warm water before adding milk. Their matcha latte method starts with 3 grams matcha and warm 80°C / 176°F water; this recipe uses less water for a thicker latte paste before the milk goes in. You can read their guide here: Ippodo matcha latte recipe.
Ingredients You Need
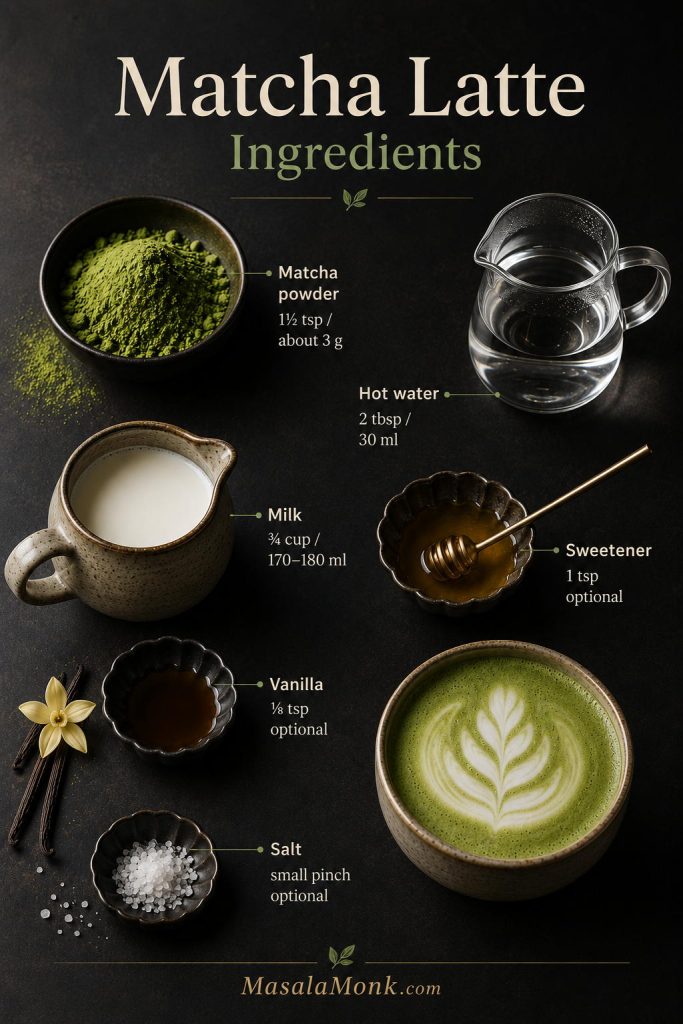
Matcha powder
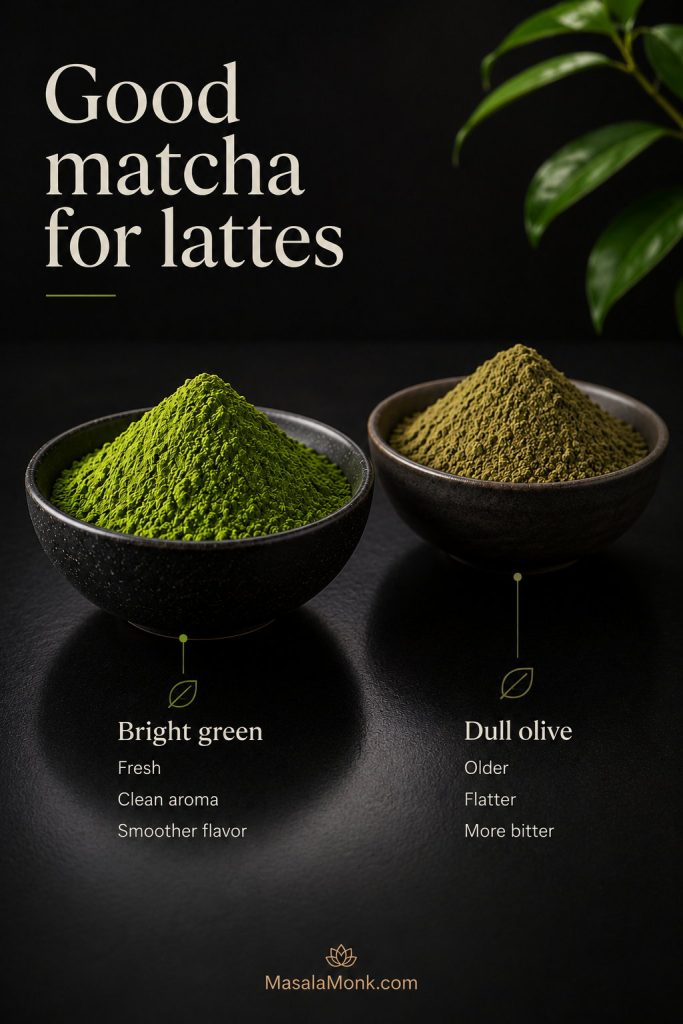
Fresh matcha gives the best color and flavor. For lattes, use ceremonial, premium culinary, or latte-grade matcha that looks bright green and smells clean. Very dull olive powder often tastes flatter and more bitter, even with milk.
You do not need the most expensive ceremonial tin for a milk drink. However, very cheap or stale powder can make the cup taste harsh. Old matcha can smell flat, dusty, or hay-like. If that is the tin you have, use the balanced latte ratio, add a little vanilla or sweetener, and do not judge all matcha by that one cup.
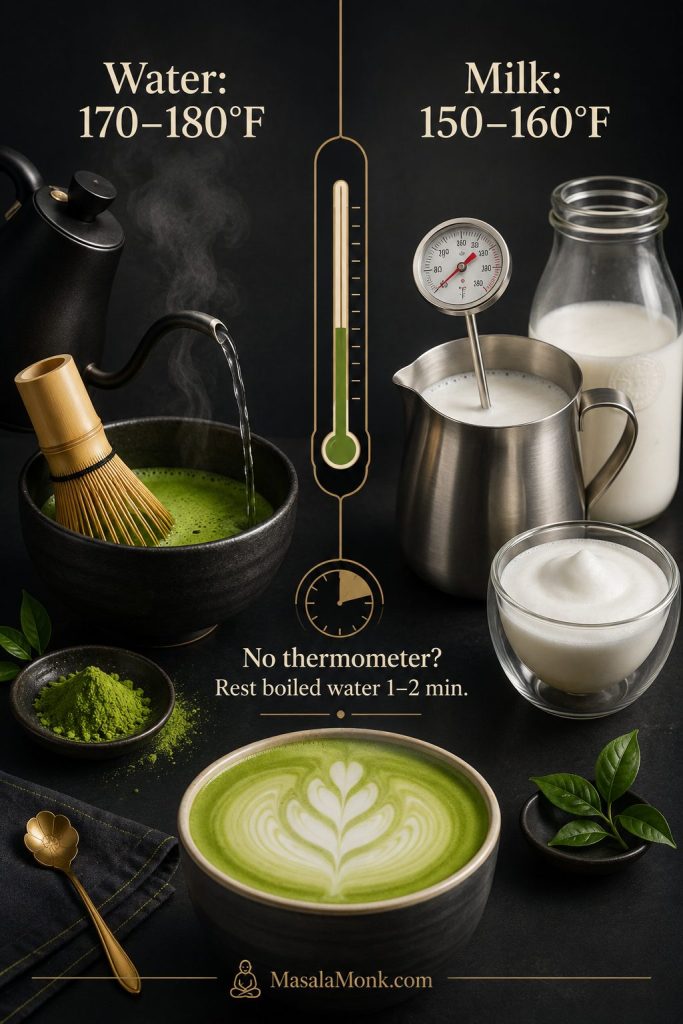
Hot water
Use hot water around 170–180°F / 76–82°C. It should be hot and steaming, not boiling. Without a thermometer, boil the water, let it stop bubbling, then rest it for about 1–2 minutes before using it.
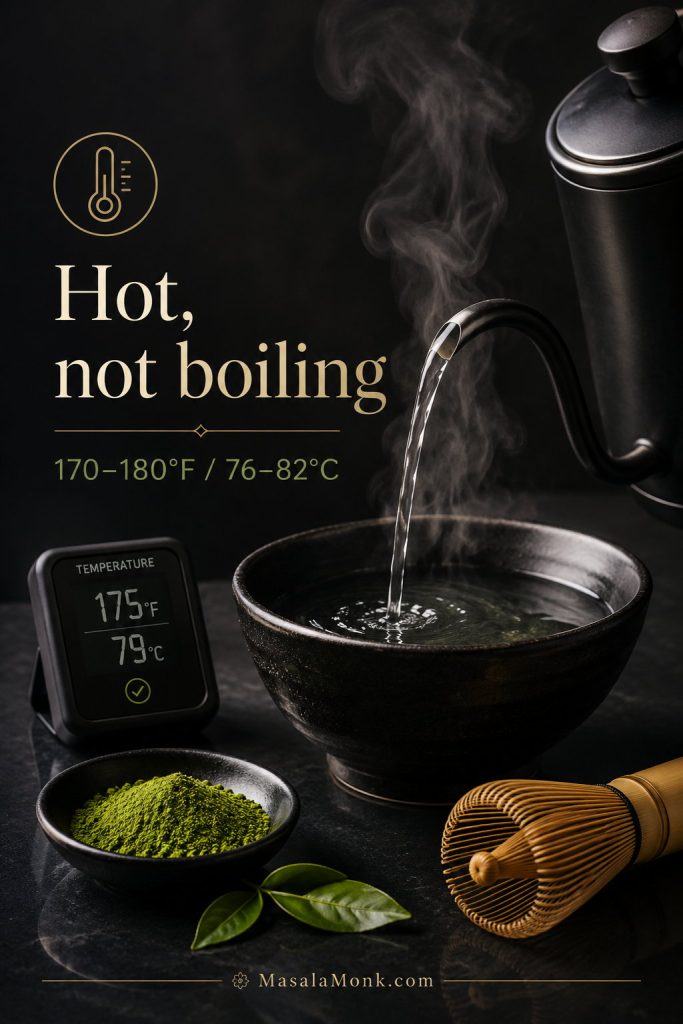
For a fuller breakdown, see the water and milk temperature guide later in the post.
Milk
Milk changes the latte as much as the tea does. Whole milk gives the richest body, oat milk is the easiest creamy dairy-free choice, almond milk makes a lighter cup, coconut milk tastes richer but can take over, and soy milk gives a stable coffee-shop texture.
Sweetener
Sweetener is optional. Sugar, honey, maple syrup, simple syrup, vanilla syrup, monk fruit, and stevia can all work. For a hot drink, granulated sugar can dissolve in the paste. For an iced version, syrup blends more smoothly than sugar crystals.
Optional vanilla or salt
A tiny splash of vanilla gives the drink a softer coffee-shop finish. A small pinch of salt can also round out bitterness, especially if your matcha is strong or your milk is unsweetened.
Best Ratio for a Creamy Cup
The best ratio depends on whether you want a mild beginner cup, a balanced café-style drink, or a stronger green tea flavor. Choose the gentle version if you are new to matcha, the balanced version if you want the best first cup, and the strong version if you want the tea to stay bold through the milk.
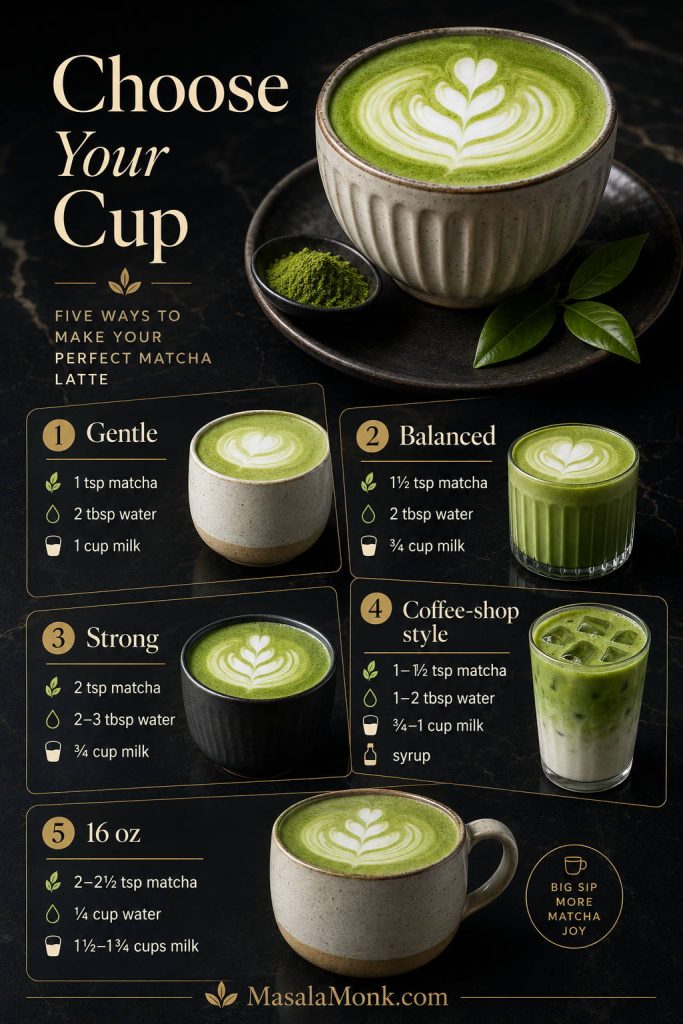
| Style | Matcha | Water | Milk | Sweetener | Best For |
|---|---|---|---|---|---|
| Gentle beginner | 1 tsp / about 2 g | 2 tbsp / 30 ml | 1 cup / 240 ml | Optional | Mild, creamy, less grassy |
| Balanced café-style | 1½ tsp / about 3 g | 2 tbsp / 30 ml | ¾ cup / 170–180 ml | 1 tsp | Best first version |
| Strong matcha | 2 tsp / about 4 g | 2–3 tbsp / 30–45 ml | ¾ cup / 180 ml | 1–2 tsp | Bold, less milky |
| Starbucks-style sweet | 1–1½ tsp / about 2–3 g | 1–2 tbsp / 15–30 ml | ¾–1 cup / 180–240 ml | 1 tbsp syrup | Sweeter café feel |
| 16 oz café-style | 2–2½ tsp / about 4–5 g | ¼ cup / 60 ml | 1½–1¾ cups / 360–420 ml | 1 tbsp syrup | Large drink |
If the paste feels too thick to whisk, add 1 extra tablespoon of water. Try not to turn the paste into a thin tea before the milk goes in, or the finished latte can taste watery.
Start with the balanced ratio, then adjust one variable at a time: more matcha for stronger flavor, less milk for a bolder cup, or a little syrup if the tea tastes sharp.
Equipment You Need
You do not need a full tea setup. A strainer helps prevent clumps, a wide mug gives you room to whisk, and a bamboo whisk or handheld frother makes the paste smoother.
No bamboo whisk? Skip ahead to the no-whisk methods.
| Tool | Use |
|---|---|
| Fine-mesh strainer | Sifts matcha so the powder does not clump. |
| Bamboo whisk / chasen | Best traditional tool for smooth foam. |
| Wide mug or small bowl | Easier than whisking in a narrow mug. |
| Handheld frother | Easiest daily method if you do not have a bamboo whisk. |
| Milk frother | Heats and froths milk for a café-style finish. |
| Small saucepan | Good for heating milk on the stovetop. |
| Blender | Useful no-whisk option for a very smooth cup. |
| Jar with lid | Best for iced matcha or quick shaking. |
If the milk-frothing part is what you want to improve most, MasalaMonk’s cappuccino recipe breaks down café-style foam with and without a machine.
How to Make a Hot Matcha Latte
This method gives you the silkiest result because the matcha is fully hydrated before milk is added. The key order is simple: make the paste, add the milk, then adjust sweetness at the end.
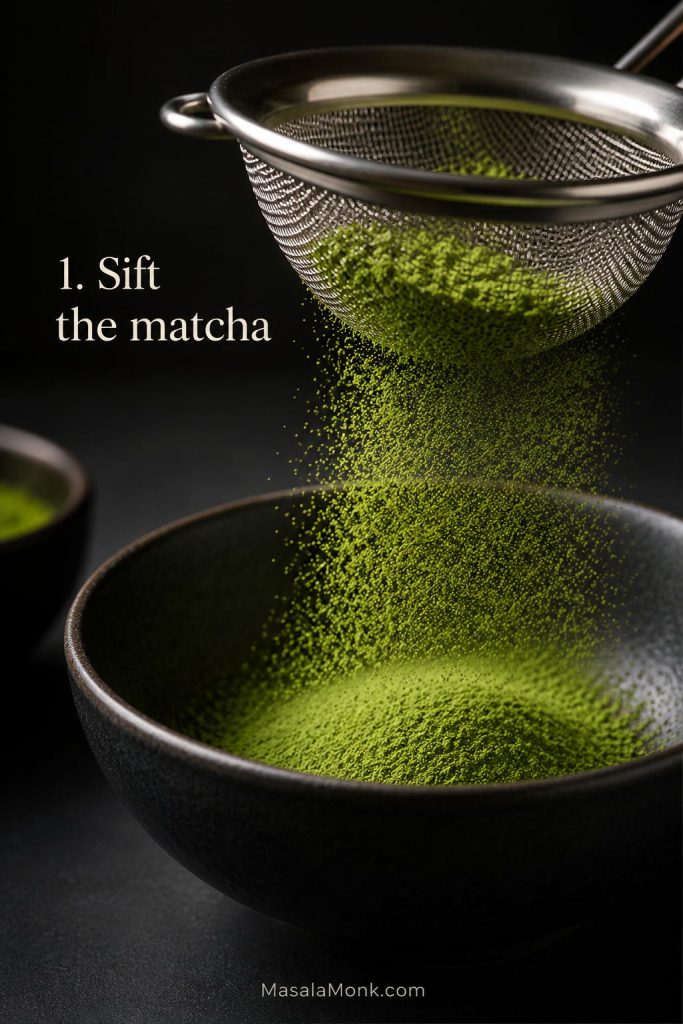
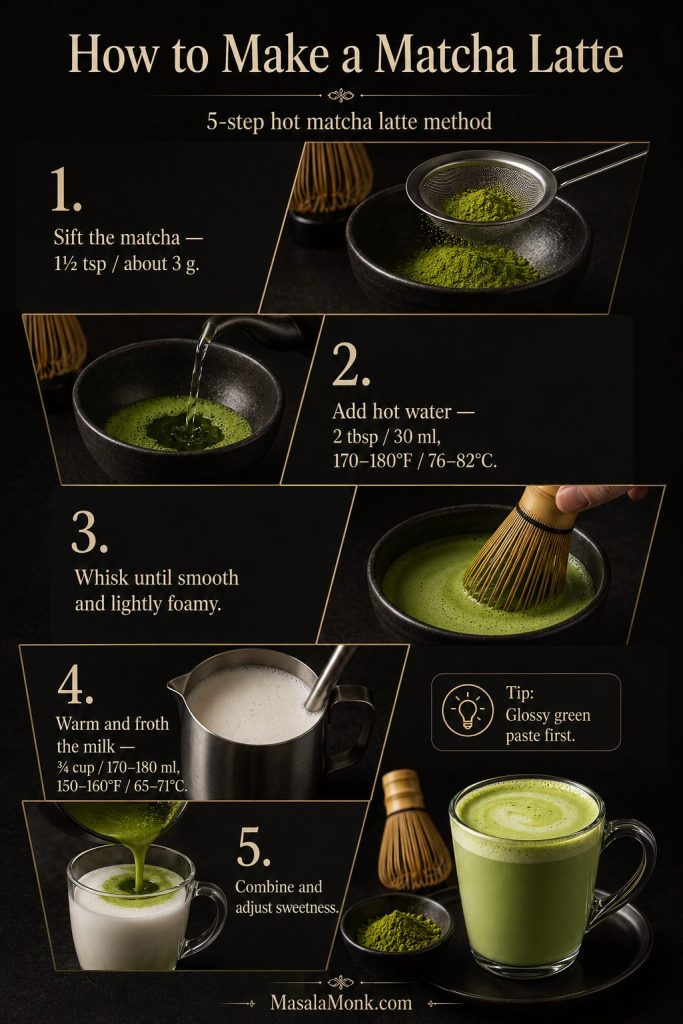
1. Sift the matcha
Add 1½ teaspoons / about 3 grams matcha to a fine-mesh strainer and sift it into a wide mug or small bowl. Matcha naturally forms tiny clumps in the tin, so this quick step is the easiest way to avoid a grainy texture.
If your matcha is very fresh and you are using a strong frother or blender, you may get away without sifting, but sifting is still the safest route for a clump-free cup.
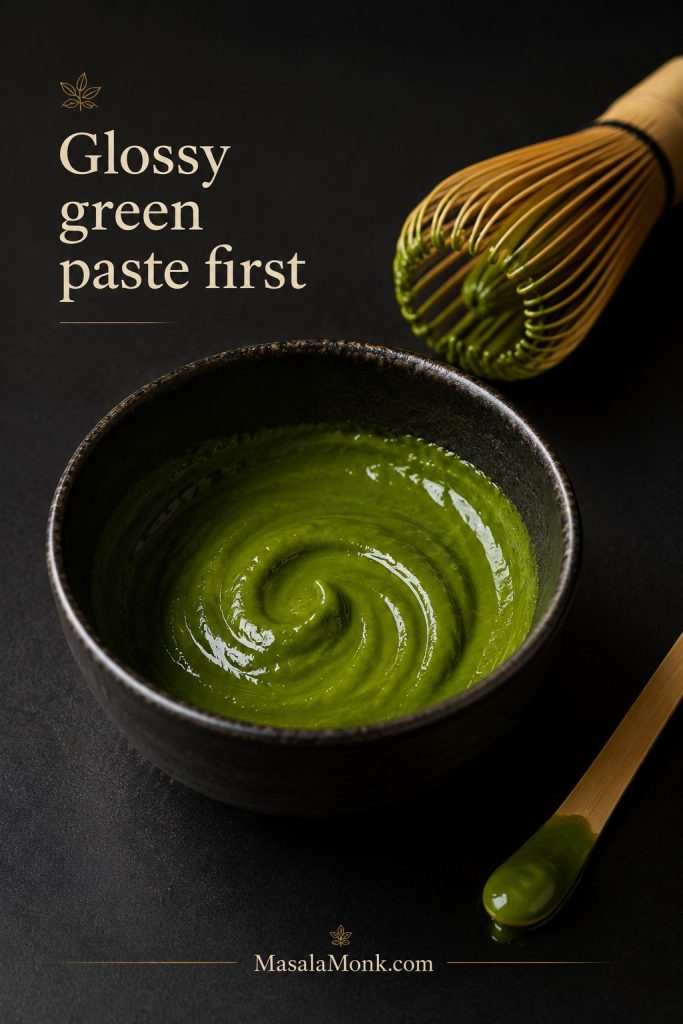
2. Add hot water and make a paste
Add 2 tablespoons / 30 ml hot water. The water should be around 170–180°F / 76–82°C, hot but not boiling. Stir or whisk until the mixture looks like a glossy green paste with no dry pockets.
Think glossy green paste, not sandy sludge. If it looks dry or grainy, keep whisking before the milk goes in.
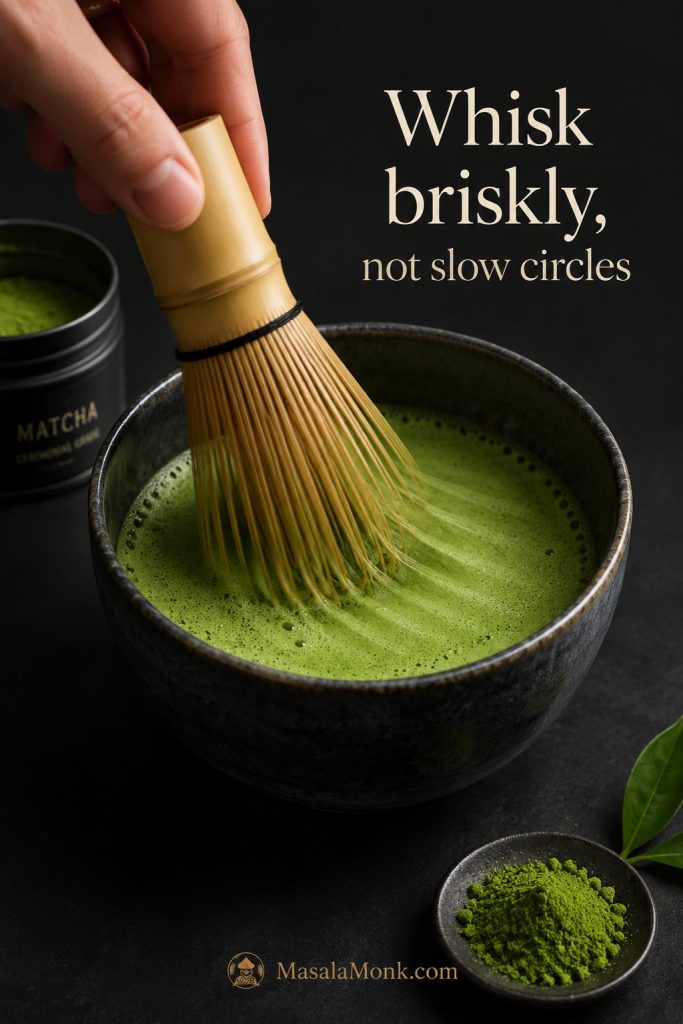
3. Whisk until smooth and lightly foamy
Whisk briskly in a W, M, or zig-zag motion for 20–45 seconds. Avoid slow circles, which tend to push the tea around instead of suspending it evenly. The paste should look even and lightly foamy.
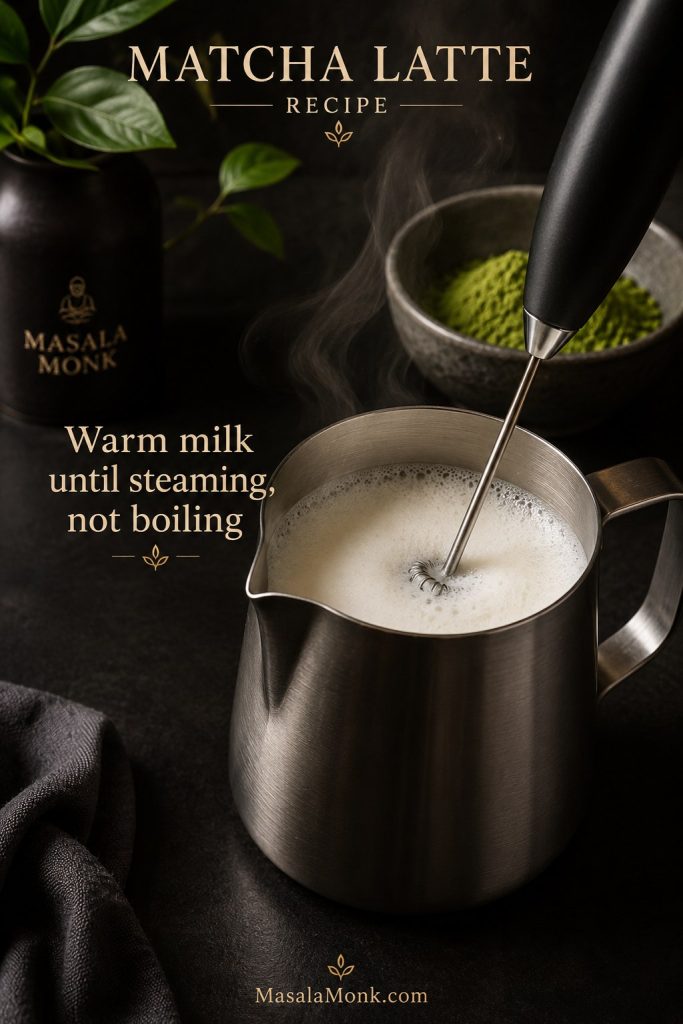
4. Heat and froth the milk
Warm ¾ cup / 170–180 ml milk until steaming, ideally around 150–160°F / 65–71°C. Froth it with a milk frother, handheld frother, whisk, or blender. If you are heating milk in a saucepan, keep the heat gentle and do not let it boil.
A microwave also works. Heat the milk in short bursts until steaming, then froth or whisk it before adding it to the matcha.
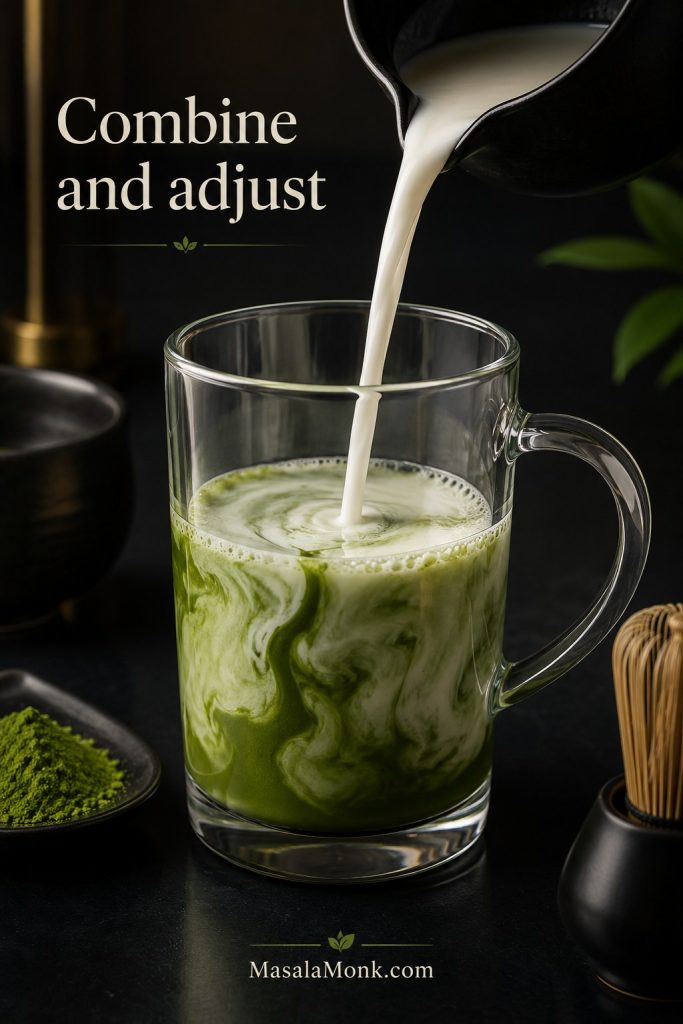
5. Combine and adjust
Pour the warm milk into the matcha paste. Stir gently, then taste. Add 1 teaspoon sweetener if you want it lightly sweet, or use vanilla syrup for a more coffee-shop finish.
At this point, the latte should look creamy and softly green, with no dry specks riding on top.
Water and Milk Temperature
Temperature is where a good cup can quietly go wrong. Water that is too hot can make matcha harsh; milk that is overheated can taste flat or slightly scorched.
For the paste, aim for water around 170–180°F / 76–82°C. For the milk, aim for 150–160°F / 65–71°C, or heat it just until steaming.
No Bamboo Whisk? Use These Methods
A bamboo whisk gives the cleanest foam, but it is not required for a smooth cup. You just need another way to help the powder and water meet properly before the milk goes in.
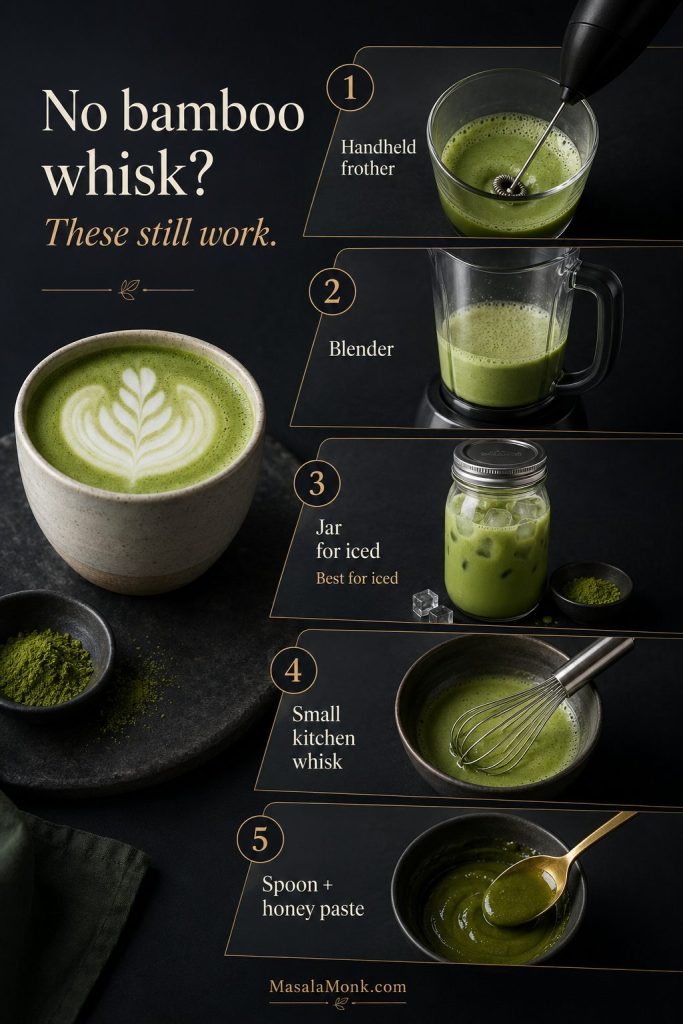
Handheld frother method
Sift the matcha into a mug, add hot water, then use a handheld frother to blend the paste until smooth. Add warm milk and froth again briefly. This is the easiest everyday method for most home kitchens.
Blender method
Add warm milk, sweetener, and the matcha paste to a blender. Blend briefly until smooth and foamy. This is a good choice if clumps are your main issue, but do not overblend hot liquid in a sealed blender.
Jar method
The jar method works best for iced matcha. Shake the powder with a small amount of water first, then add milk and shake again. For hot drinks, use only a heat-safe jar and be careful with steam pressure.
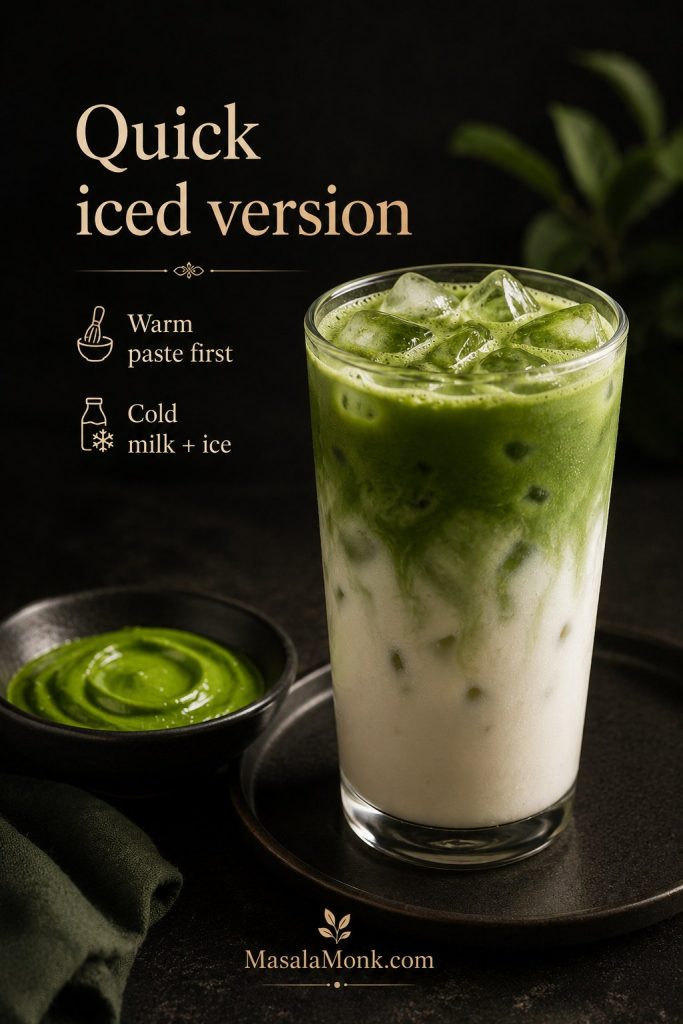
If you are making it cold, the quick iced version is the best place to use the jar method.
Small kitchen whisk method
A regular mini whisk can work if you use a wide bowl or mug. Whisk quickly back and forth rather than stirring in circles.
Spoon + honey paste method
In a pinch, mix matcha with honey or maple syrup first, then add a little hot water and stir until smooth. It will not foam like a whisked latte, but the sticky sweetener helps loosen small clumps.
Best Milk to Use
Milk decides whether the cup tastes plush, light, sharp, or sweet. Whole milk gives the roundest body, oat milk is the easiest creamy dairy-free choice, almond milk keeps things lighter, coconut milk tastes richer but can dominate, and soy milk gives a stable coffee-shop texture.
If oat milk is your favorite matcha base, MasalaMonk’s homemade oat milk guide is useful when you want a simple DIY version that does not turn slimy.
| Milk | Best Use | Notes |
|---|---|---|
| Whole milk | Classic café texture | Foams well and gives a round, creamy body. |
| 2% milk | Everyday latte | Lighter than whole milk but still balanced. |
| Oat milk | Best dairy-free default | Creamy, slightly sweet, and good at softening bitterness. Barista-style oat milk usually froths better. |
| Almond milk | Lighter cup | Can make matcha taste sharper, especially if unsweetened. |
| Coconut milk | Rich variation | Sweet and full-bodied, but it can dominate the tea. |
| Soy milk | Stable café-style plant milk | Creamy, reliable, and usually froths better than many nut milks. |
| Cashew or macadamia milk | Premium creamy variation | Soft, rich, and smooth, but less common. |
There is no single correct milk here. The best choice is the one that lets the tea taste balanced instead of hidden.

Once you choose your milk, the variation ideas show how to take the same base sweeter, colder, fruitier, or bolder.
Popular Matcha Latte Variations
Once the base is smooth, choose the version by what you want from the cup: sweeter, stronger, colder, fruitier, or bolder with espresso.
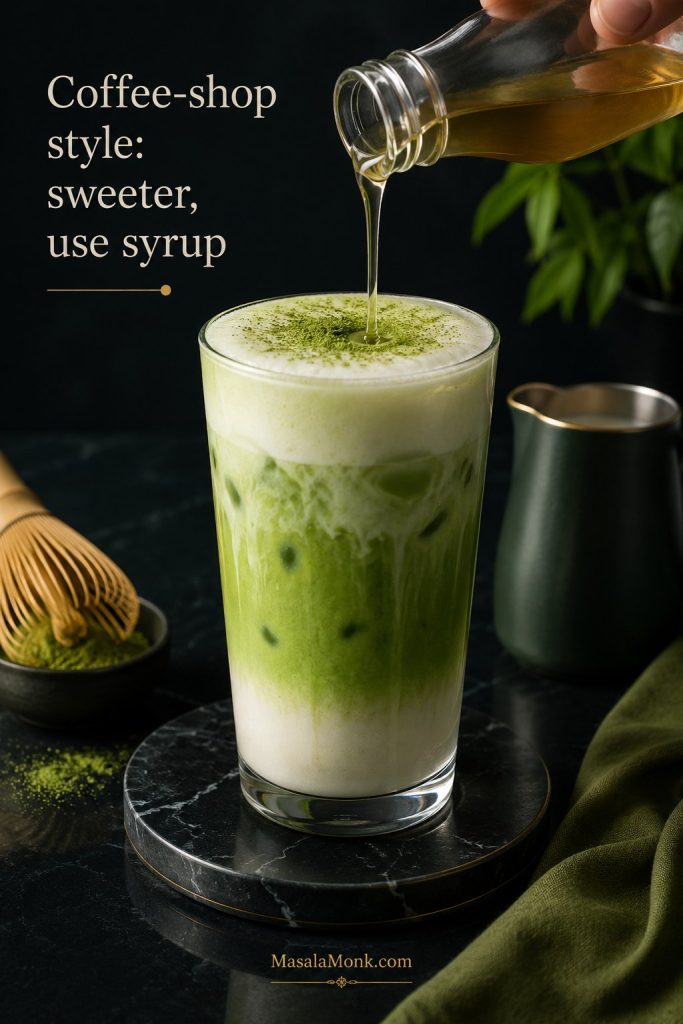
Starbucks-style at home
On Starbucks’ official menu, the hot Matcha Latte is described with matcha, milk, and classic syrup; the iced version adds ice. You can see the official Starbucks menu listing here: Starbucks Matcha Latte.
For a Starbucks-style cup at home, the main difference is sweetness. Use simple syrup or vanilla syrup instead of granulated sugar, because syrup blends smoothly into both hot and iced drinks.
For a homemade Starbucks-style hot drink, use 1–1½ teaspoons matcha, 1–2 tablespoons hot water, ¾–1 cup milk, and 1 tablespoon simple syrup or vanilla syrup. Keep the matcha paste slightly concentrated so the tea does not disappear under the milk.
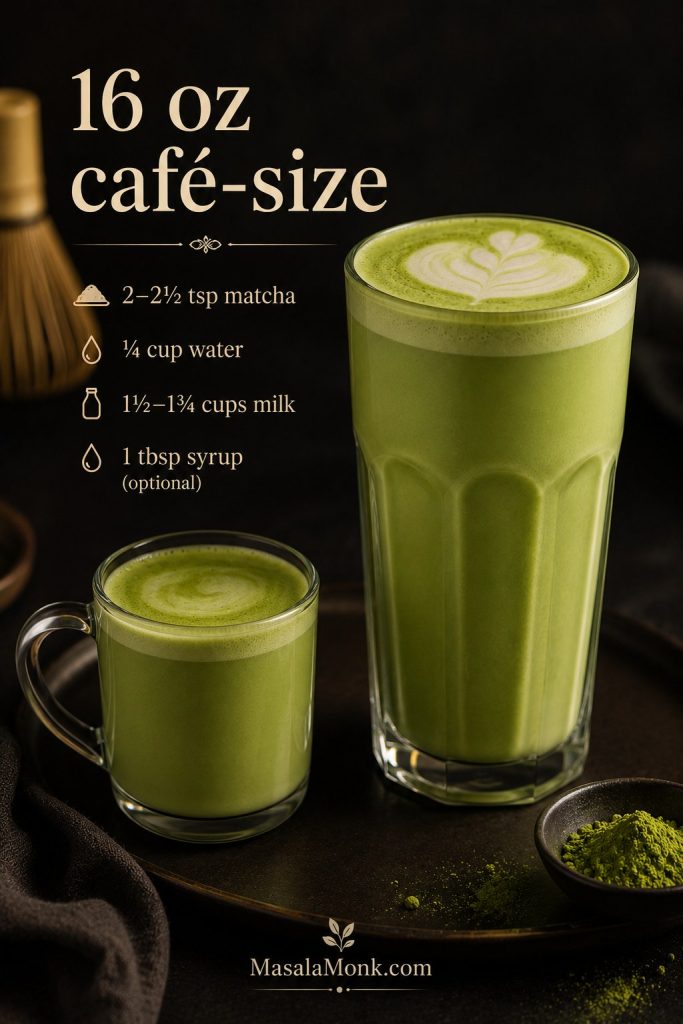
16 oz café-size version
A 16 oz café cup needs more matcha than a small mug. Use the lower milk amount if you want room for foam, or the higher amount if you want a fuller 16 fl oz drink.
| Ingredient | 16 oz Café-Style Hot Amount |
|---|---|
| Matcha | 2–2½ tsp / about 4–5 g |
| Hot water | ¼ cup / 60 ml |
| Milk | 1½–1¾ cups / 360–420 ml |
| Sweetener | 1 tbsp syrup, or to taste |
Quick iced version
To make a quick iced version, whisk 1–1½ teaspoons matcha with 2 tablespoons warm water, then pour it over ice with ¾–1 cup cold milk and syrup to taste.
This is only the shortcut. For the full cold method, Starbucks-style iced version, no-clump tips, and watery-fix notes, use the full iced matcha latte recipe.
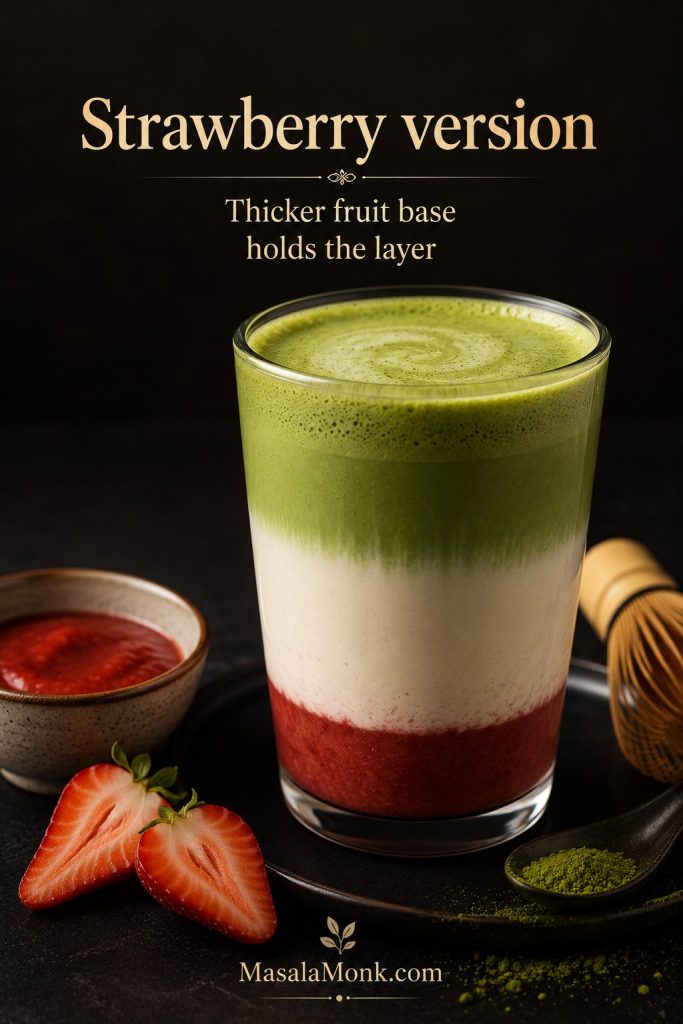
Strawberry version
For a strawberry version, spoon strawberry puree, strawberry syrup, or a quick strawberry jam base into the bottom of the glass, add milk, then pour matcha over the top. The layered look works best when the strawberry base is thicker than the milk.
For the full layered fruit drink, use our strawberry matcha latte recipe.
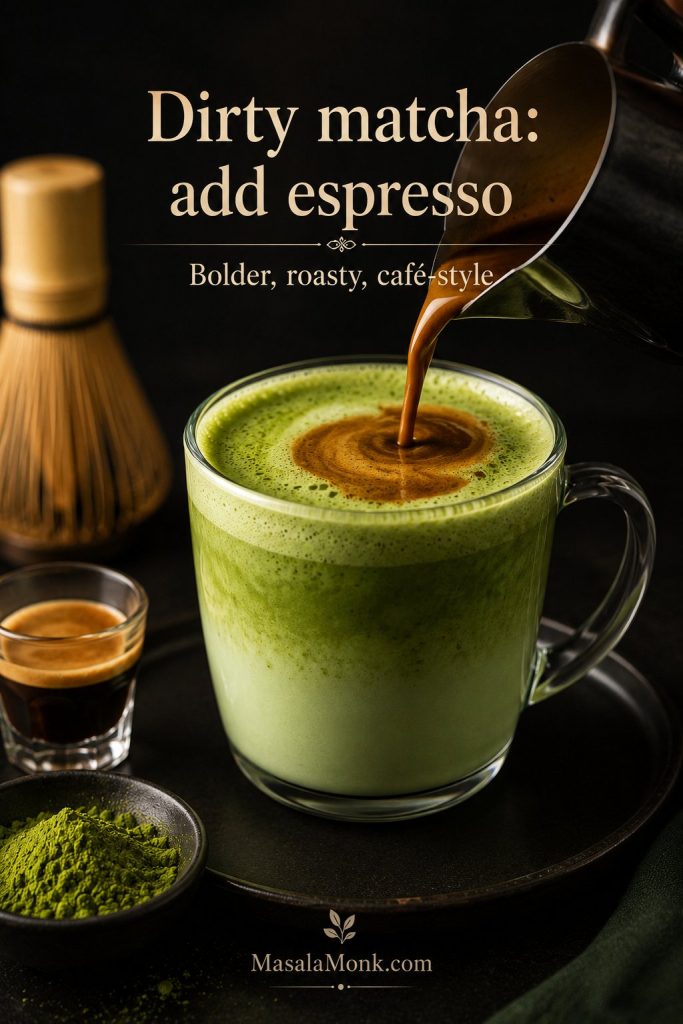
Dirty matcha / matcha with espresso
A dirty matcha adds espresso or strong coffee to the matcha-milk base. It tastes bolder, slightly roasty, and more like a coffee-shop drink than a pure green tea latte.
Use 1 teaspoon matcha, 2 tablespoons / 30 ml hot water, ¾ cup / 180 ml milk, 1 shot espresso or 2 oz strong coffee, and 1–2 teaspoons sweetener. For a hot dirty matcha, add the espresso after combining the matcha and milk. For an iced dirty matcha, pour the espresso over ice and milk, then add the green tea layer.
If you are still figuring out espresso strength, MasalaMonk’s quick espresso guide can help you choose coffee that stands up to the green tea flavor instead of disappearing into the milk.
More flavor ideas
- Vanilla: add 1–2 teaspoons vanilla syrup when you want the soft coffee-shop version.
- Honey: sweeten the paste with honey before adding milk for a rounder, floral sweetness.
- Maple: use maple syrup when you want a warmer, deeper sweetness.
- Oat milk: use barista-style oat milk for the creamiest dairy-free version.
- Almond milk: use almond milk for a lighter drink; add vanilla if it tastes sharp.
- Coconut: use light coconut milk or coconut beverage for a richer, slightly tropical version.
- Protein: blend the finished latte with vanilla protein powder, or use a protein milk.
- Unsweetened: skip the sweetener, but use a creamy milk so the cup still tastes round rather than sharp.
Fixes for Clumps, Bitterness, and Weak Flavor
A bad matcha latte usually announces the problem quickly: clumps on top, bitterness on the first sip, weak milkiness, or powder at the bottom. Use the symptom first, then fix the cause.
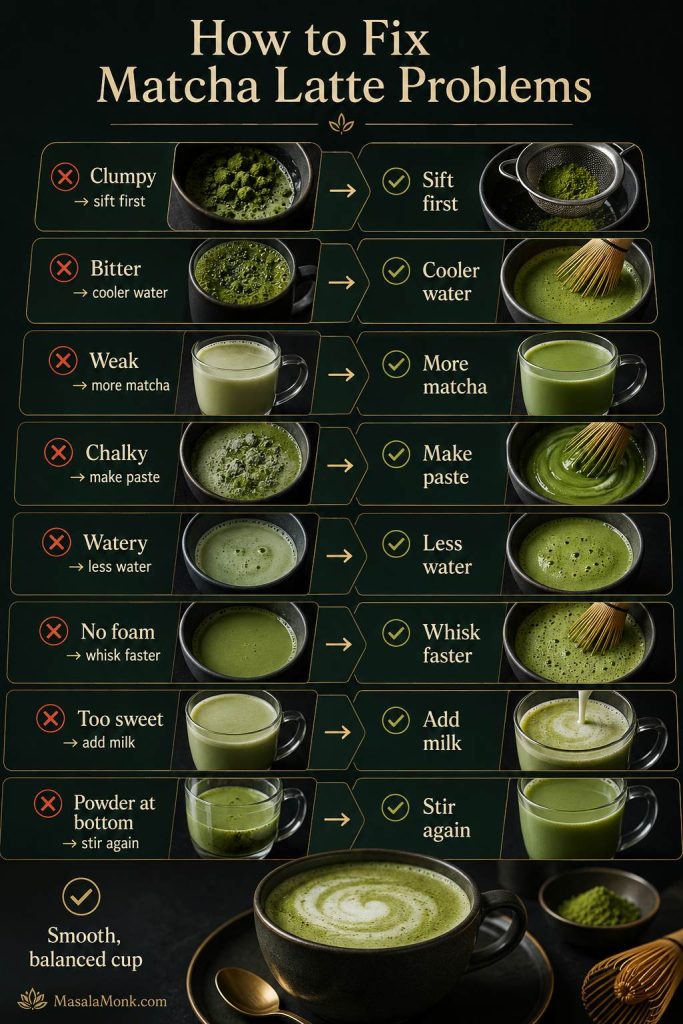
Most fixes trace back to three steps: sifting, making a paste, and using the right temperature.
| Problem | Likely Cause | Fix |
|---|---|---|
| Clumpy | Matcha was not sifted or was added straight to milk. | Sift first, then make a paste with hot water. |
| Bitter | Water was too hot, matcha was old, or too much powder was used. | Use 170–180°F water, reduce matcha slightly, or add milk/sweetener. |
| Weak / too milky | Too much milk or not enough matcha. | Use 1½ tsp / about 3 g matcha per ¾ cup milk. |
| Chalky | Matcha was not hydrated before milk was added. | Whisk with 2 tbsp hot water first. |
| Watery | Too much water or melted ice. | Use a concentrated paste and reduce extra water. |
| Not foamy | Slow stirring or unfrothed milk. | Use a W/M whisking motion and froth the milk separately. |
| Too sweet | Too much syrup was added at the start. | Start with 1 tsp sweetener, then add more after tasting. |
| Powder at bottom | Matcha settled as the drink sat. | Stir again before drinking. Matcha is a suspended powder, so some settling is normal. |
A bitter cup, a weak cup, and a clumpy cup do not need the same solution. That is why fixing the symptom works better than hiding everything with extra syrup.
Recipe Card
Matcha Latte Recipe
This hot matcha latte is creamy, lightly grassy, and built around a no-clump paste method. Sift the matcha, whisk it with hot water, then add warm milk and sweeten to taste.
Equipment
- Fine-mesh strainer
- Bamboo whisk, handheld frother, or small whisk
- Wide mug or small bowl
- Milk frother, microwave-safe cup, or small saucepan
Ingredients
- 1½ tsp / about 3 g matcha powder
- 2 tbsp / 30 ml hot water, around 170–180°F / 76–82°C
- ¾ cup / 170–180 ml milk of choice
- 1 tsp sugar, honey, maple syrup, or simple syrup, optional
- ⅛ tsp vanilla extract or a tiny splash of vanilla syrup, optional
- Small pinch of salt, optional
Instructions
- Sift the matcha. Sift 1½ tsp / about 3 g matcha into a wide mug or small bowl.
- Make the paste. Add 2 tbsp / 30 ml hot water and whisk until smooth.
- Whisk until foamy. Use a W, M, or zig-zag motion for 20–45 seconds.
- Heat and froth the milk. Warm ¾ cup / 170–180 ml milk until steaming, then froth if desired.
- Combine and adjust. Pour the milk into the matcha paste, stir gently, taste, and sweeten if needed.
Notes
- For a milder drink, use 1 tsp / about 2 g matcha and 1 cup / 240 ml milk.
- For a stronger drink, use 2 tsp / about 4 g matcha and keep the milk around ¾ cup / 180 ml.
- A microwave works for warming milk; heat in short bursts until steaming, then froth or whisk before combining.
- For a Starbucks-style version, use simple syrup or vanilla syrup and make it sweeter.
- For an iced version, use the dedicated iced matcha latte recipe for the full method.
Storage and Make-Ahead Tips
A hot matcha latte is best when the milk is freshly warmed and the foam is still light. Think of make-ahead here as prep, not storage: measure the matcha, keep the sweetener ready, and warm the milk fresh.
If you make the paste ahead, stir or froth it again before adding milk because the tea can settle. Do not store hot frothed milk for long; the foam collapses, and reheated milk can taste flat.
FAQs
How much matcha do you use for one latte?
For a balanced café-style latte, start with 1½ teaspoons / about 3 grams matcha. Use 1 teaspoon for a milder beginner drink or 2 teaspoons for a stronger green tea flavor.
What temperature should water be for matcha?
Aim for 170–180°F / 76–82°C. Boiling water can make matcha taste more bitter, so let freshly boiled water cool slightly before using it.
Why does it taste bitter?
Bitter matcha usually means the water was too hot, the powder was old, or the ratio was too strong. Lower the water temperature before adding extra sugar.
Why are there clumps?
Clumps usually mean the matcha met too much milk too soon. Sift it first, then whisk it with a small amount of hot water before adding milk.
What milk tastes best?
Whole milk is best for classic richness. Oat milk is the best dairy-free default. Almond milk is lighter, soy is stable, and coconut milk is rich but more noticeable.
Is it better hot or iced?
The hot version tastes warmer, creamier, and more soothing. Iced matcha tastes brighter and more refreshing. The best version depends on whether you want a cozy drink or a cold café-style one.
Does matcha latte have caffeine?
Yes. Matcha is powdered green tea, so it contains caffeine. The amount varies by brand and serving size; check your matcha package if caffeine is a concern.
Do I need a bamboo whisk?
Not necessarily. A bamboo whisk gives the best traditional texture, but a handheld frother, blender, jar, or small kitchen whisk can also work if you make a paste first.
How do I make a 16 oz version?
For a 16 oz drink, start with 2–2½ teaspoons / about 4–5 grams matcha, ¼ cup / 60 ml water, 1½–1¾ cups / 360–420 ml milk, and about 1 tablespoon syrup if you want it sweet.
Should I use ceremonial or culinary matcha?
Ceremonial or latte-grade matcha usually tastes smoother in drinks. Culinary matcha can work if you are adding milk and sweetener, but it is usually better for baking, smoothies, or recipes where matcha is not the only main flavor.
How do I make it Starbucks-style?
Use matcha, milk, and simple syrup or vanilla syrup. Make it sweeter than the basic recipe, then adjust the syrup to taste. For an iced version, syrup works better than granulated sugar because it blends smoothly.
Why does powder settle at the bottom?
Matcha is a powdered tea suspended in liquid, not a brewed tea that fully dissolves. Some settling is normal if the cup sits for a while. Stir or froth it again before drinking.
Final Tips
The whole method comes back to one order: make a smooth paste, add milk, then adjust sweetness. If the drink tastes weak, use a little more matcha or a little less milk next time. If it tastes bitter, lower the water temperature before reaching for extra sugar.
From there, every version gets easier: stronger, sweeter, oat milk, iced, dirty, or strawberry — all built from the same glossy paste and balanced milk base.
What the final texture should look like
The final cup should look softly green, lightly foamed, and fully blended, with no dry specks floating through the drink and no powder layer sitting at the bottom.