Managing diabetes doesn’t mean giving up flavor—or healthy fats. If you’re looking for a delicious, nutrient-rich addition to your diabetes-friendly diet, almond butter might be your perfect match.
But is almond butter truly diabetic-friendly? Or is it just another trendy health food?
Let’s dig deep into the science, timing, benefits, and smart ways to enjoy almond butter for blood sugar control—without overdoing it.
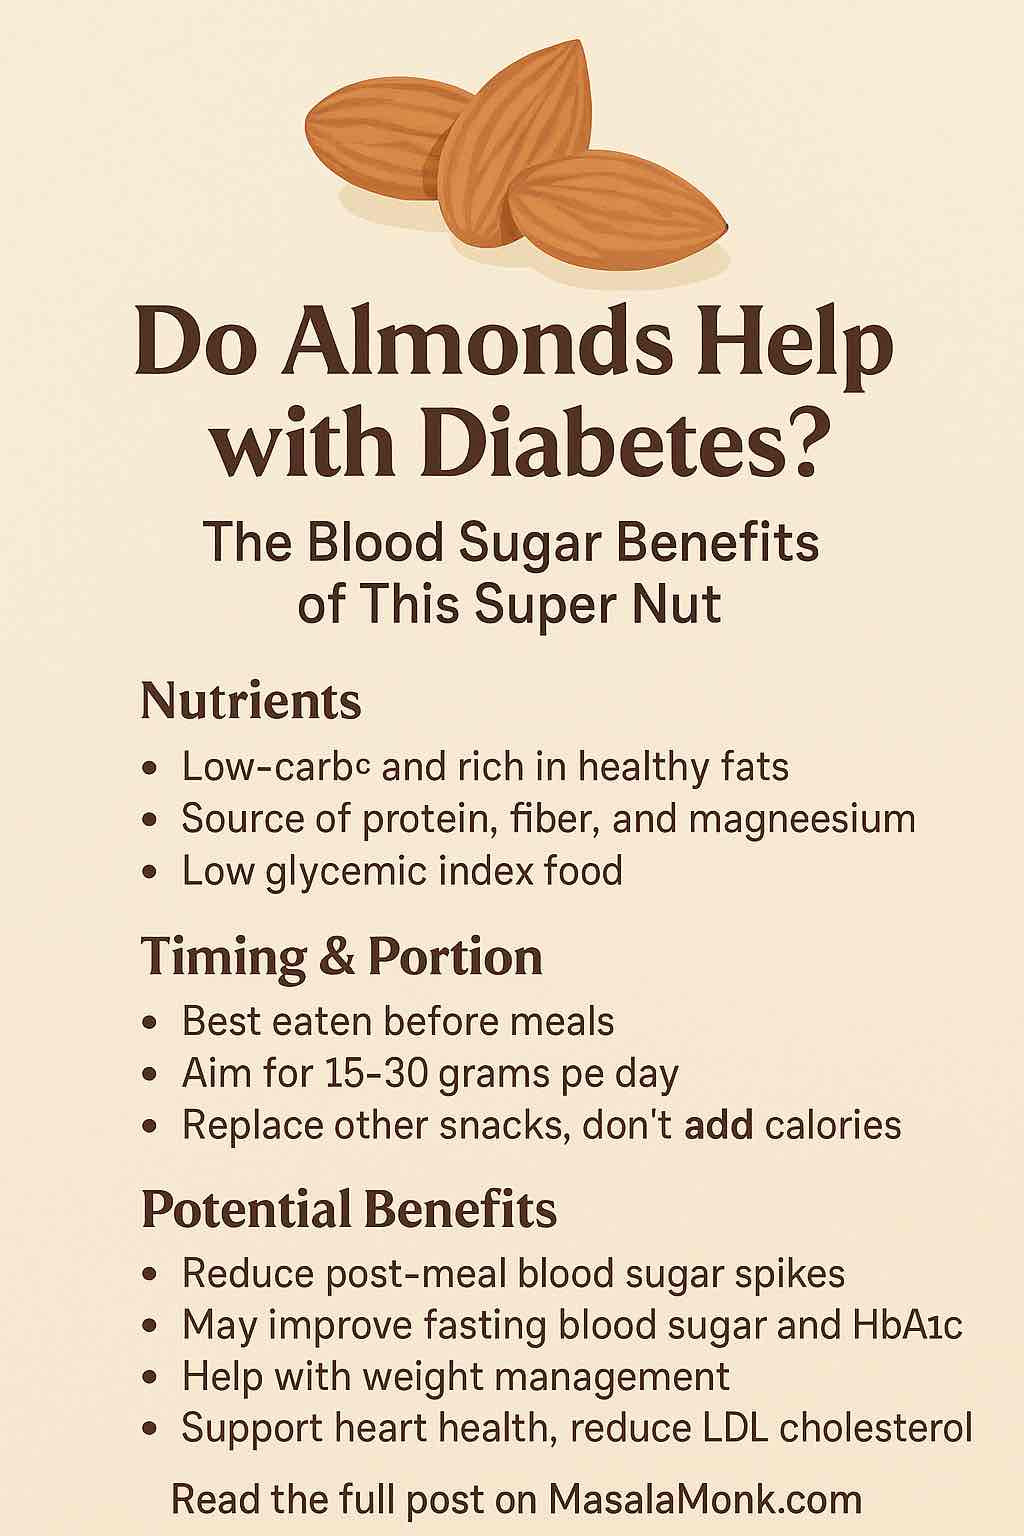
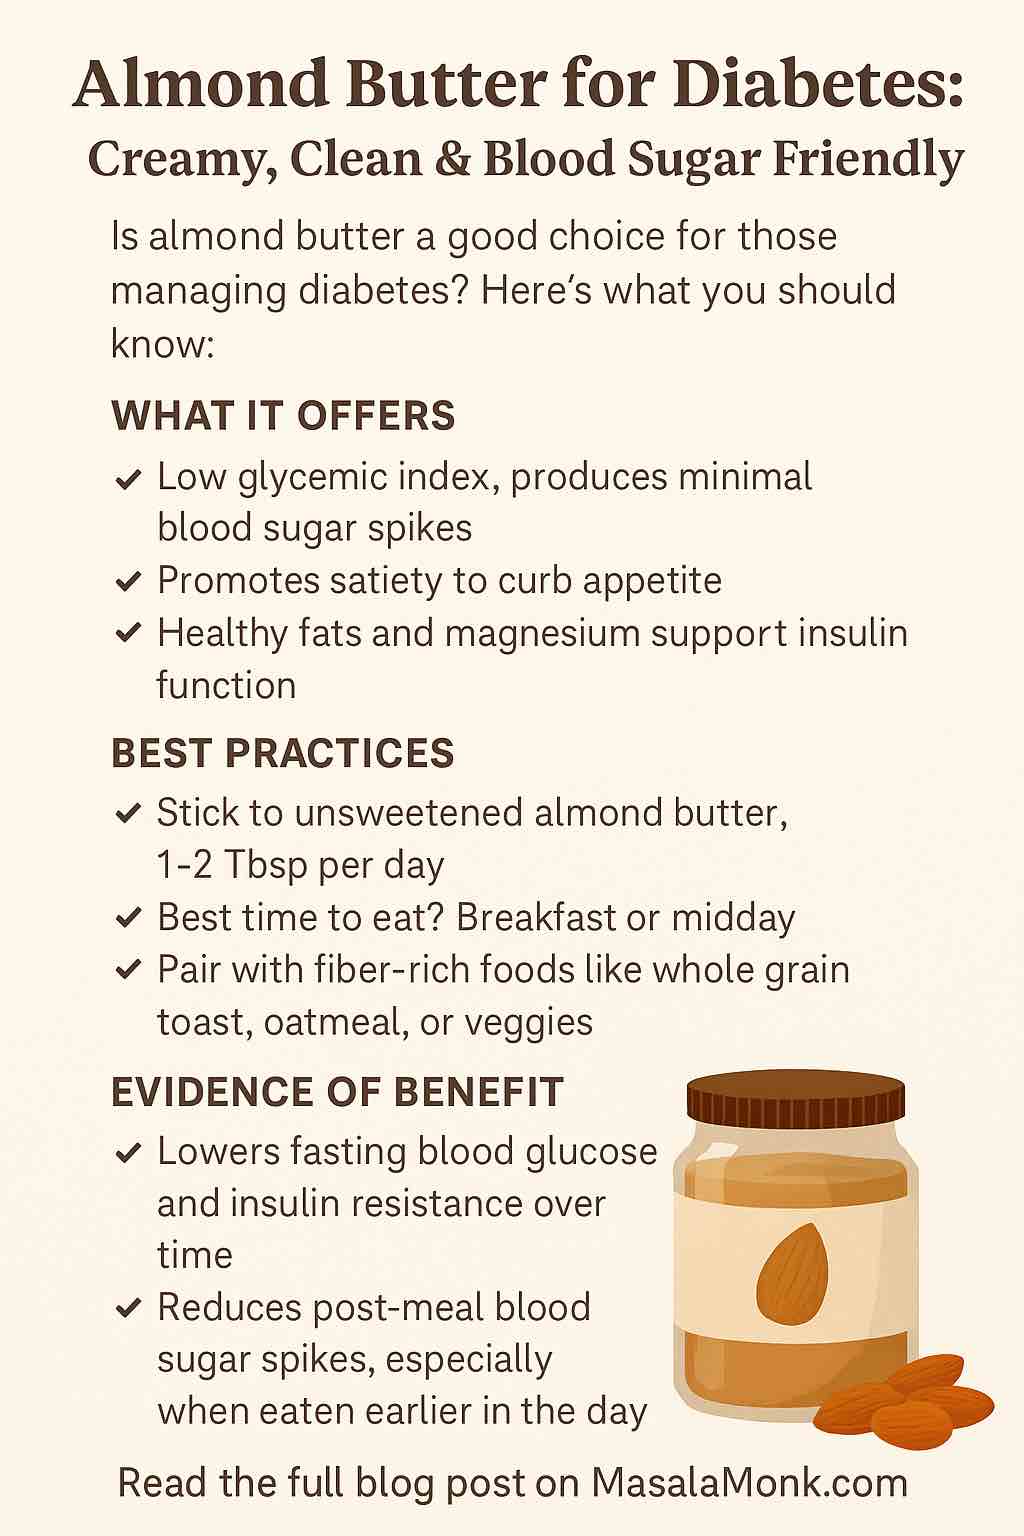
🧬 What Makes Almond Butter a Good Fit for Diabetics?
Almond butter is simply ground almonds turned into a rich, creamy paste—without the sugar spike that many conventional spreads (like jam or chocolate spreads) bring to the table.
Here’s why it earns a gold star for diabetes:
| Nutrient (per 1 Tbsp) | Benefit |
|---|---|
| Protein (3.5g) | Slows digestion, supports satiety |
| Healthy Fats (9g) | Mostly monounsaturated; stabilizes glucose |
| Fiber (~1.5g) | Slows glucose absorption |
| Magnesium (~45mg) | Helps insulin sensitivity |
| Low GI (~15) | Minimal impact on blood sugar |
And—when it’s unsweetened—it contains no added sugars or refined carbs.
🔬 What the Science Says: Almond Butter & Blood Sugar
✅ Morning Wins for Glucose Control
A controlled study found that adding almond butter to breakfast improved post-meal glucose and reduced hunger at lunch. The healthy fats and protein slowed glucose absorption and improved fullness—key for avoiding blood sugar dips and cravings.
📌 Best used early in the day for maximum effect.
⚠️ Evening Use? Still Under Study
In a 2-week pilot study, people with type 2 diabetes ate 2 tablespoons of almond butter at night. The result? No major change in overnight or fasting glucose—but researchers noticed interesting trends in blood sugar stability.
📌 Conclusion: Evening use isn’t harmful, but benefits are less clear vs. morning use.
🩺 Long-Term Use May Improve Insulin Resistance
When 20% of daily calories came from almonds (whole or butter), participants with type 2 diabetes saw improvements in:
- Fasting blood glucose
- Fasting insulin
- HOMA-IR (insulin resistance marker)
📌 Longer-term almond inclusion may support deeper metabolic changes.
⚙️ How Almond Butter Works in Your Body
It’s all about slowing things down. Almond butter’s fiber + protein + fat combo:
- Delays carb breakdown in the stomach
- Promotes fullness (via hormones like GLP-1 and peptide YY)
- Supports smoother glucose uptake
- Reduces cravings for high-GI foods later
👉 This helps maintain stable blood sugar, especially after meals.
⏱️ Best Time to Eat Almond Butter for Diabetics
| Time of Day | Effect | Pro Tip |
|---|---|---|
| Morning (Breakfast) | Best for reducing glucose spikes | Add to oats or toast |
| Mid-Morning/Afternoon Snack | Curbs hunger and stabilizes energy | Pair with apple or cucumber |
| Evening (before bed) | No proven blood sugar benefit yet | Try if you’re prone to night cravings |
🎯 Ideal portion: 1–2 tablespoons (15–30g)
🚫 What to Avoid: Almond Butter Pitfalls
Not all almond butters are created equal. Here’s what to watch out for:
| Bad Ingredient | Why Avoid |
|---|---|
| Added sugar | Spikes blood sugar, reduces benefit |
| Palm or hydrogenated oils | May increase inflammation |
| Salt (in excess) | Risky for diabetics with hypertension |
✅ Best choice: “Ingredients: Almonds.” That’s it.
🥄 Smart & Delicious Ways to Use Almond Butter
Here’s how to make almond butter part of your diabetes-friendly routine:
1. Almond Butter + Oats
- 1/4 cup steel-cut oats
- 1 Tbsp almond butter
- Cinnamon, chia seeds, water/milk
📈 Slow-digesting combo perfect for breakfast
2. Veggie Dip
- Use as a dip for carrot or cucumber sticks
- Add lemon or crushed garlic for flavor
🥕 Great low-carb, high-fiber snack
3. Almond Butter Smoothie
- 1 Tbsp almond butter
- 1/2 cup unsweetened almond milk
- 1/4 cup Greek yogurt
- 1/4 banana (optional)
🥤 Filling, protein-rich, and smooth
4. Stuffed Dates (Occasional treat)
- 1 date (optional for those with stable sugar)
- Fill with 1/2 tsp almond butter
🥄 Use rarely; good for controlled cravings
✅ Final Takeaways
Is almond butter good for diabetics? Yes—but with the right approach.
🟢 Do:
- Choose unsweetened, natural almond butter
- Eat 1–2 Tbsp/day, ideally at breakfast or midday
- Pair with fiber-rich carbs or veggies
- Use as a replacement, not an addition, to calorie-dense foods
🔴 Don’t:
- Choose sugary or flavored varieties
- Eat mindlessly straight from the jar
- Assume it’s a free food—it’s still calorie-dense
💬 Real Talk
Almond butter isn’t a miracle cure—but when used smartly, it’s a tasty, nutrient-dense ally in your diabetes journey. Whether you’re managing type 2 diabetes or watching your blood sugar, this creamy spread can play a big role in stabilizing your day.
📣 Want More?
👉 Head over to MasalaMonk.com for the full post with FAQs, product tips, and recipes!
Read Now:
🔗 https://masalamonk.com/do-almonds-help-with-diabetes-the-blood-sugar-benefits-of-this-super-nut
🔍 FAQs – Almond Butter & Diabetes
1. Is almond butter safe for diabetics?
Yes, almond butter is safe and beneficial for diabetics when it’s unsweetened and consumed in controlled portions. Its low glycemic index and healthy fat profile help stabilize blood sugar.
2. How much almond butter can a diabetic eat per day?
Most people with diabetes can safely consume 1–2 tablespoons (15–30g) of almond butter per day as part of a balanced diet. Portion control is key due to its calorie density.
3. Does almond butter raise blood sugar levels?
Not significantly. Almond butter has a low glycemic index (~15) and tends to slow glucose absorption when paired with carbohydrates. However, flavored or sweetened varieties may spike sugar levels.
4. What’s the best time to eat almond butter for blood sugar control?
Morning or midday is ideal. Studies show almond butter eaten with or before breakfast can help lower post-meal blood glucose and improve satiety.
5. Can almond butter help with insulin resistance?
Yes. Long-term studies suggest that incorporating almond-based foods like almond butter may improve fasting insulin levels and HOMA-IR, particularly in people with type 2 diabetes.
6. Is almond butter better than peanut butter for diabetics?
Both are good options if unsweetened. However, almond butter tends to have more magnesium, less saturated fat, and a lower glycemic load, making it a slightly better choice for diabetes.
7. Can I eat almond butter at night?
You can, but studies show limited glucose-lowering benefit at night. Stick to a small portion if using almond butter as an evening snack to avoid unnecessary calorie load.
8. What ingredients should I avoid in almond butter?
Avoid almond butters with added sugar, salt, palm oil, or hydrogenated fats. The label should ideally list only “almonds” as the ingredient.
9. Can almond butter be part of a weight loss plan for diabetics?
Yes, when eaten in moderation. Almond butter promotes satiety, which can help control appetite and prevent overeating—supporting healthy weight loss, which is key in managing type 2 diabetes.
10. How can I include almond butter in a diabetes-friendly diet?
Use almond butter as a spread on whole grain toast, mix into oats or smoothies, or dip veggies into it. Just be mindful of portion size and added calories.