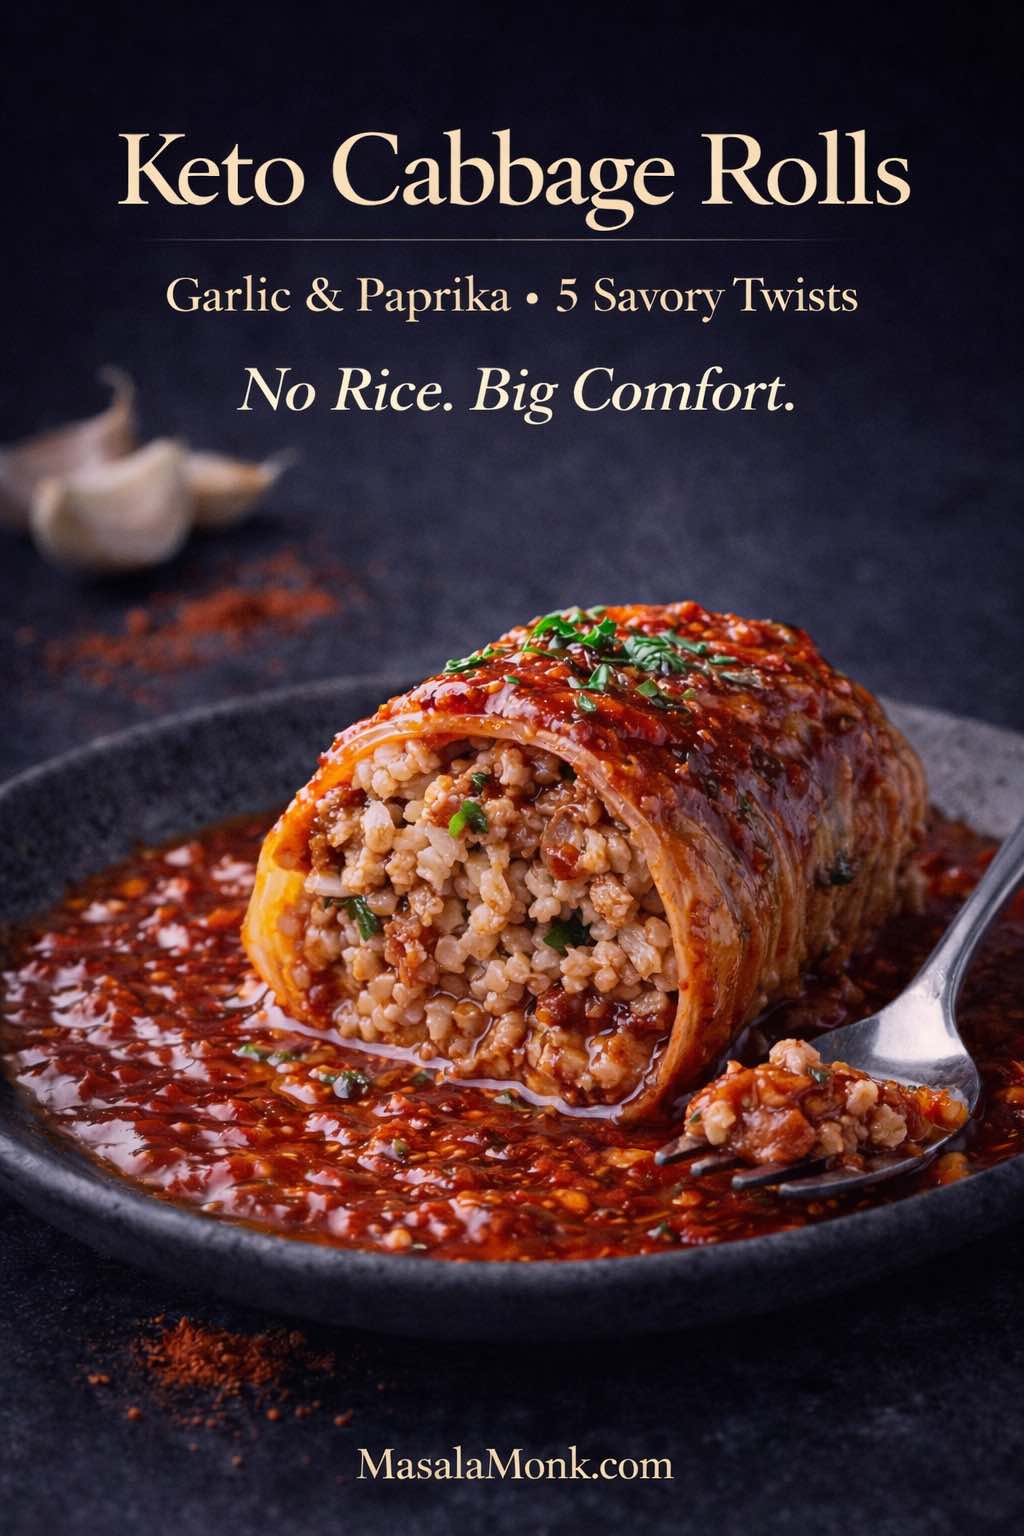
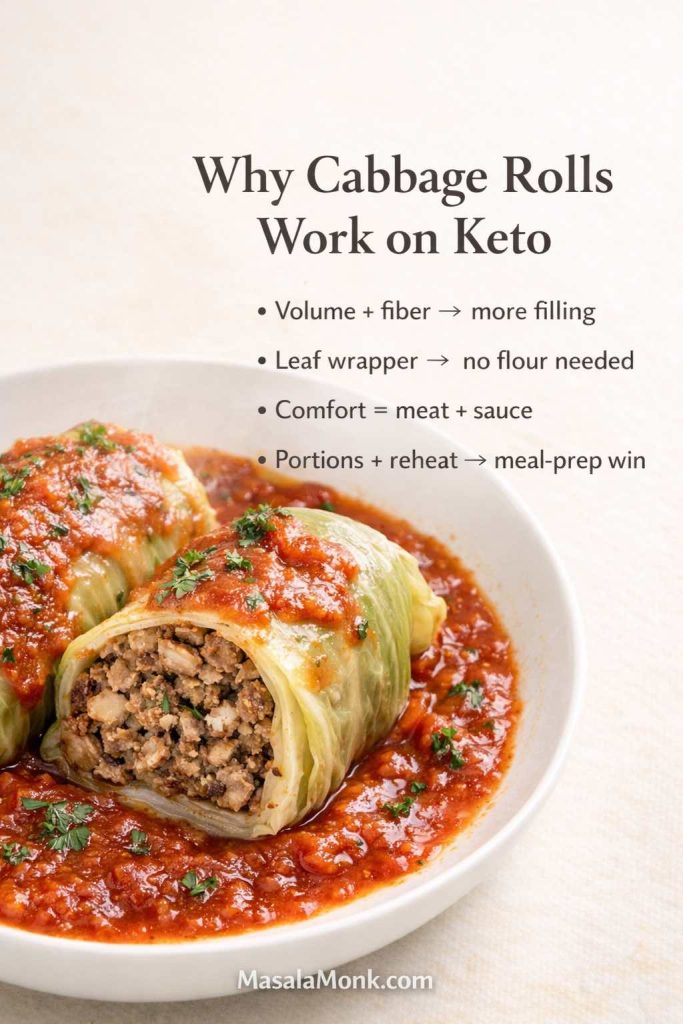
Stuffed cabbage rolls, keto or not keto – have a way of making a kitchen feel calm. Even before the oven is hot, the process itself—softening cabbage leaves, mixing a savory filling, rolling everything into neat parcels—turns dinner into something deliberate. Once the sauce bubbles and the cabbage goes silky at the edges, the whole dish tastes like it belongs on a table where people linger.
The classic version is famous for a reason. It’s hearty, tender, and deeply satisfying. It’s also often built around rice, which is exactly why cabbage rolls can feel tricky on a low carb diet. Still, the comfort isn’t coming from rice alone. It’s coming from the structure—cabbage wrapped around seasoned meat—plus a sauce that sinks into every fold and seam.
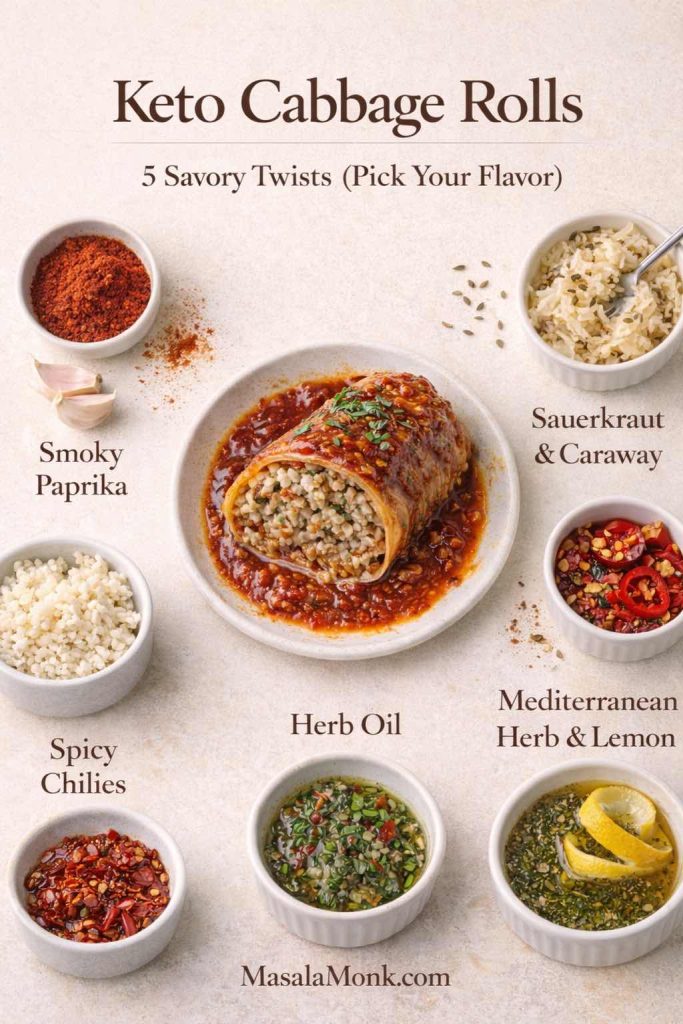
Keto Cabbage Rolls
That’s where these keto cabbage rolls shine. They keep everything that matters: the cozy, homey feel; the fork-tender cabbage; the rich tomato-forward sauce; the filling that tastes better the next day. The only difference is that instead of rice, the filling uses lower-carb “bulk” that still holds moisture and texture. More importantly, the flavor leans hard into garlic and paprika, so the rolls never feel like a compromise.
This is also not a one-note recipe. Cabbage rolls are a template, and once you have the core method, you can push them in completely different directions—smoky and deep, tangy with sauerkraut, bright and herb-forward, spicy, or Mediterranean-leaning. Each twist still tastes like cabbage rolls, yet each one feels like its own dinner.
If you’re easing into keto or simply trying to eat fewer carbs without feeling deprived, it can help to understand the bigger picture of how low-carb swaps work. MasalaMonk’s guide to keto for beginners lays out the basics in a simple way. Even if you’re already comfortable with low carb eating, it’s a useful reminder that sustainable dinners come from repeatable patterns—structure, flavor, and satisfaction—rather than strict perfection.
Why cabbage rolls work so well when you’re keeping it low carb
Cabbage is one of those ingredients that behaves like a built-in plan. It gives you volume without heaviness, structure without flour, and a gentle sweetness that plays well with savory seasonings. Because it’s naturally sturdy, it holds up to long cooking times, which is why old-fashioned cabbage rolls show up across cuisines—Polish gołąbki (often spelled golabki), Ukrainian-style cabbage rolls, Hungarian cabbage roll recipes, Jewish stuffed cabbage, German cabbage rolls (including kohlrouladen), and Balkan sarma rolls.
Why the format stays satisfying even without rice
Even when spice blends change, the concept stays consistent: cabbage leaves stuffed with something rich, then cooked in a flavorful sauce until everything melds. That’s exactly the kind of dish that adapts beautifully to keto-friendly cooking, because the original structure doesn’t rely on breading or flour. Instead, you’re mostly adjusting the filling and the sauce while keeping the comfort intact.
From a nutrition standpoint, cabbage is also a practical base. It’s low calorie and fiber-rich, and it tends to make meals feel more filling—useful if you’re aiming for weight loss without feeling like you’re eating tiny portions. Cleveland Clinic’s overview of cabbage highlights its fiber and nutrient profile and explains why it can support a healthier eating pattern when used in satisfying meals: the health benefits of cabbage.
Meanwhile, cabbage rolls also make sense for meal prep. They portion cleanly, reheat well, and often taste even better after a rest. If you’re the kind of person who does better with a plan, they’re the sort of anchor dinner that makes the rest of the week easier.
Cabbage is one of the easiest low-carb staples to build meals around, and it does more than just “fill space.” If you want to go deeper on the nutrition side—fiber, nutrients, and why it works so well in everyday keto cooking—here’s a fuller guide on why cabbage is a staple in the keto kitchen.
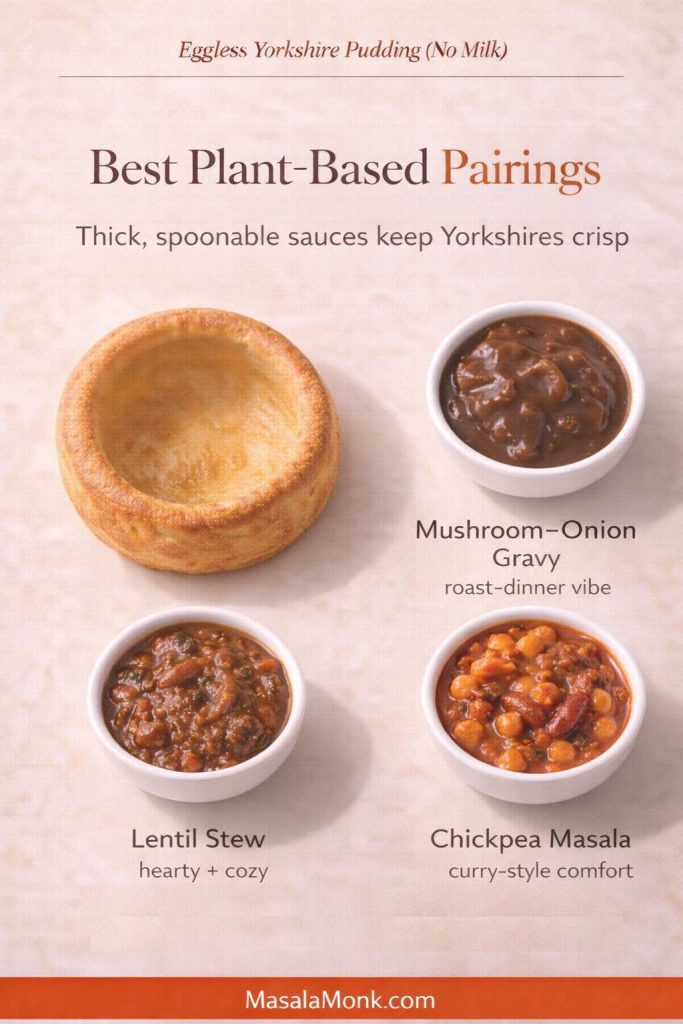
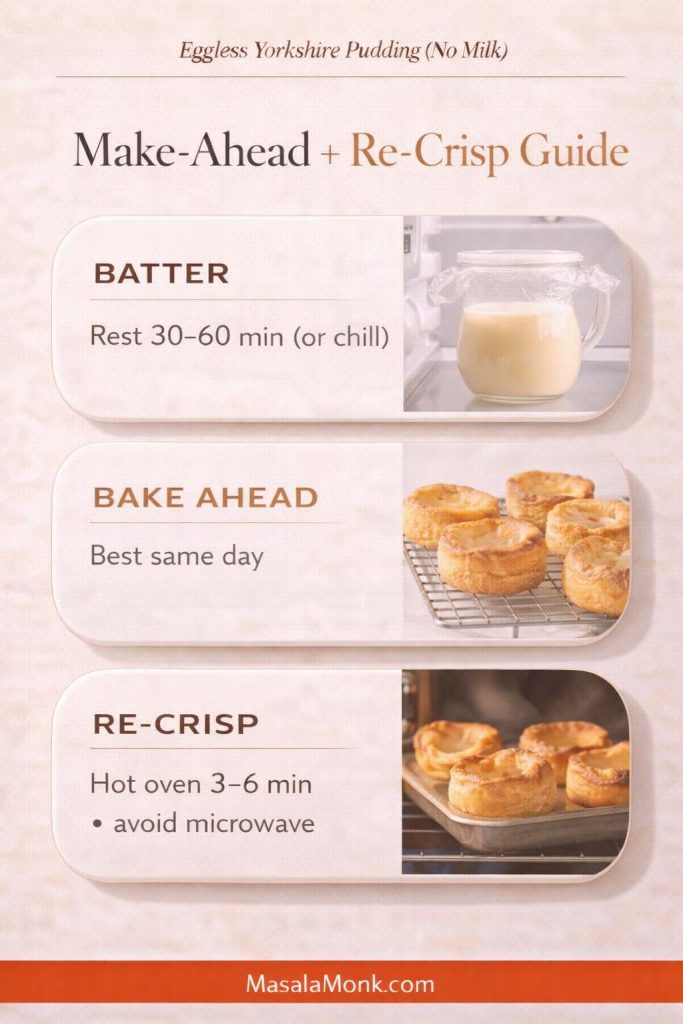
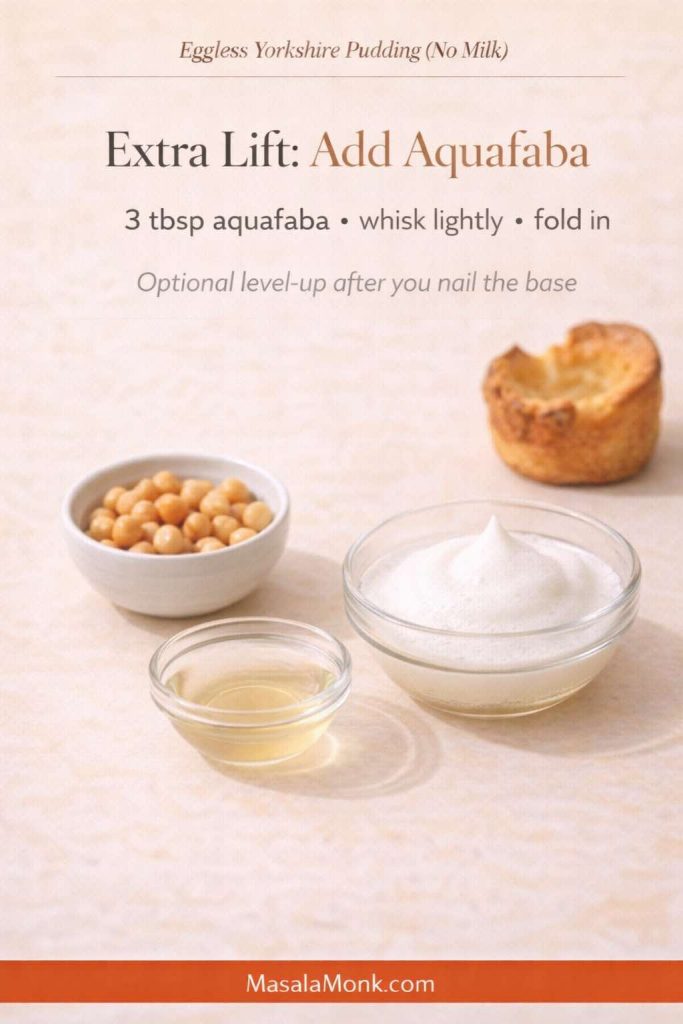
Also Read: Eggless Yorkshire Pudding (No Milk) Recipe
Keto cabbage rolls versus cabbage rolls with rice: the swap that keeps the comfort
Traditional stuffed cabbage rolls with rice are built around a familiar equation: meat + rice + seasonings + cabbage + tomato sauce. Sometimes the rice goes in uncooked, sometimes it’s partially cooked first. Either way, rice is there for bulk and to absorb juices.
However, rice is not the heart of cabbage rolls. The heart is the combination of tender cabbage and savory filling, plus the sauce that soaks into everything. So the strategy here is simple: keep what matters, replace what doesn’t.
To be clear, there’s nothing wrong with classic stuffed cabbage rolls with ground beef and rice if that’s how you cook. They’re a classic stuffed cabbage recipe for a reason. Yet if you want cabbage rolls that are keto compatible, you’re looking for a filling that stays moist, holds together, and doesn’t taste “substitution-y.”
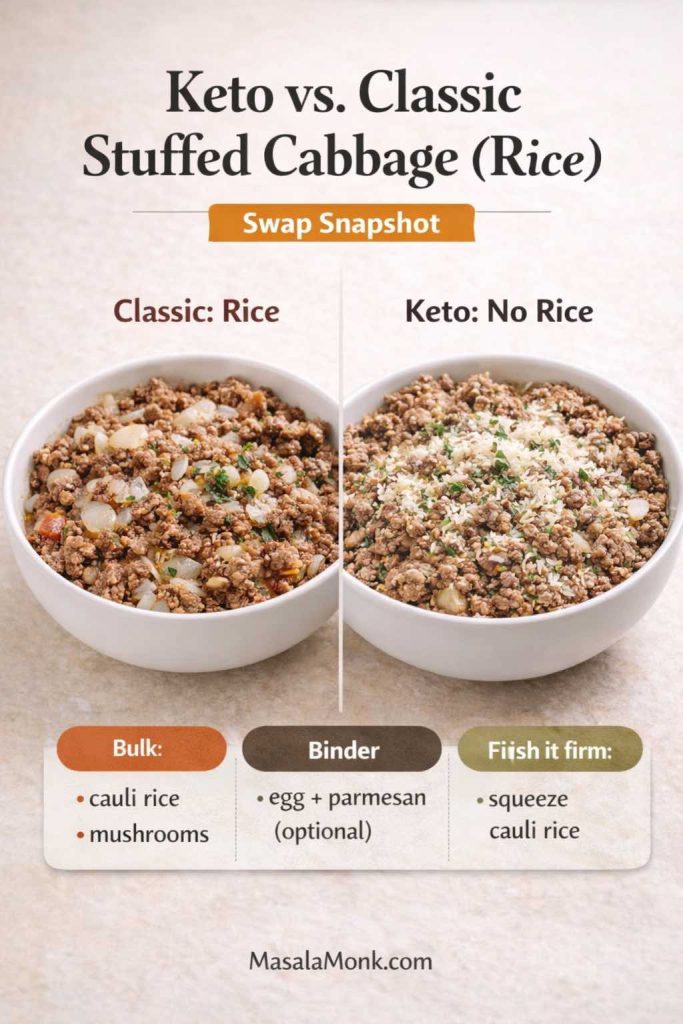
What replaces rice in keto-friendly cabbage rolls?
You have a few excellent options, and you can mix them depending on what you like:
- Cauliflower rice is the closest texture match. It bulks the filling without bringing carbs, and it disappears into the meat once baked.
- Finely chopped mushrooms bring moisture and umami. They make the filling taste deeper, almost like it simmered longer.
- Riced broccoli or finely shredded zucchini can work too, although zucchini needs to be squeezed well so it doesn’t water out the filling.
- A small amount of grated parmesan or other hard cheese adds richness and helps bind.
Rice is mostly there for bulk and to soak up juices, not because it’s the “main flavor.” If you want a clearer sense of how rice compares to other options—and why swapping it out doesn’t change the comfort of the dish—this quick breakdown of quinoa vs rice and lower-carb alternatives
The point isn’t to mimic rice perfectly. Instead, it’s to build a filling that feels right: juicy, savory, substantial, and not crumbly. Once you do that, you’re no longer “making keto cabbage rolls.” You’re simply making cabbage rolls—ones that happen to be low carb.
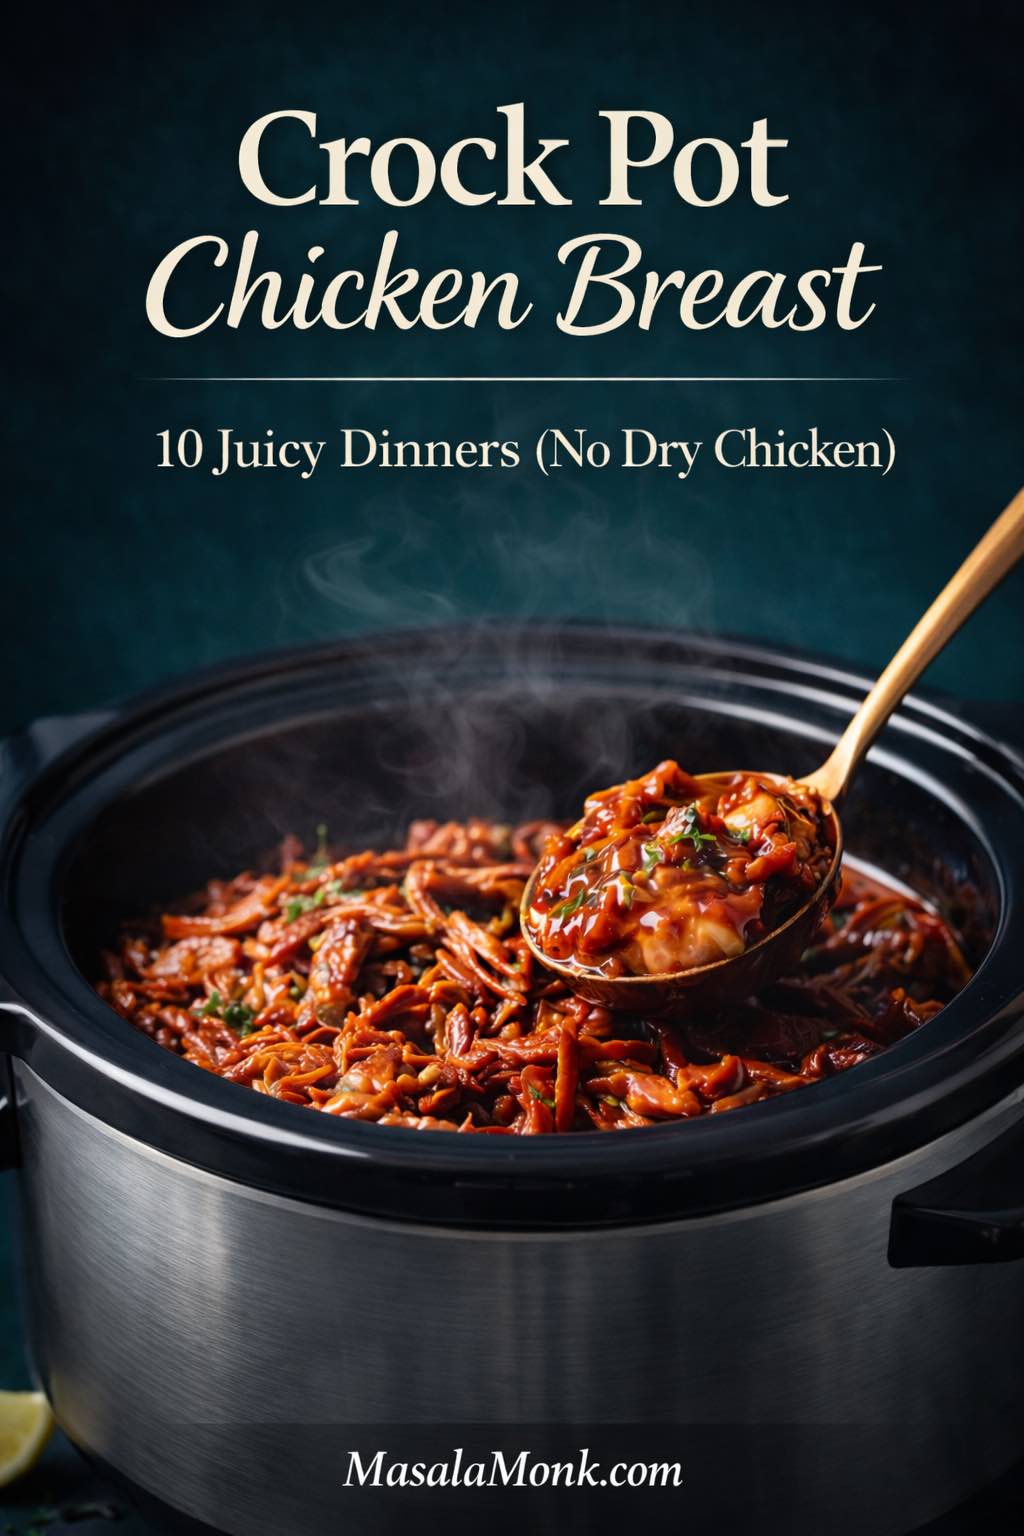
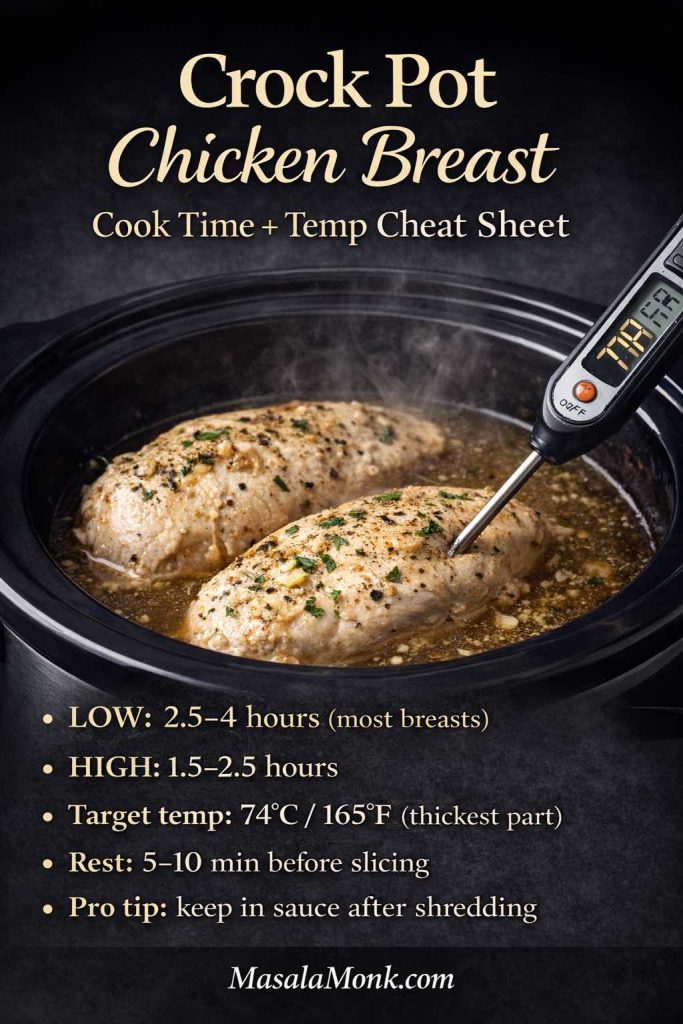
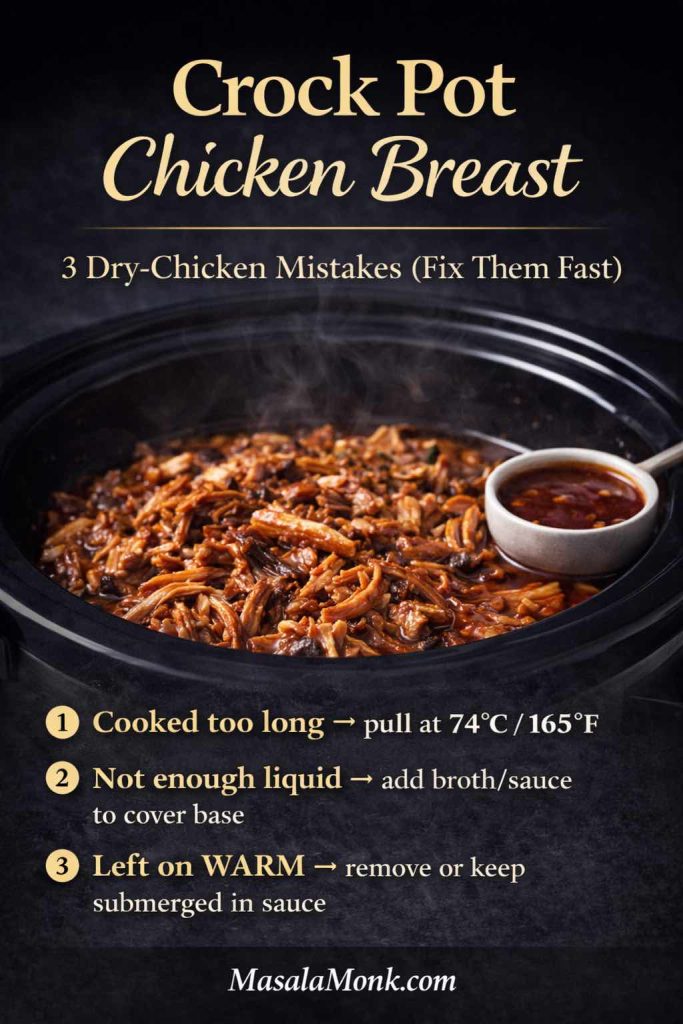
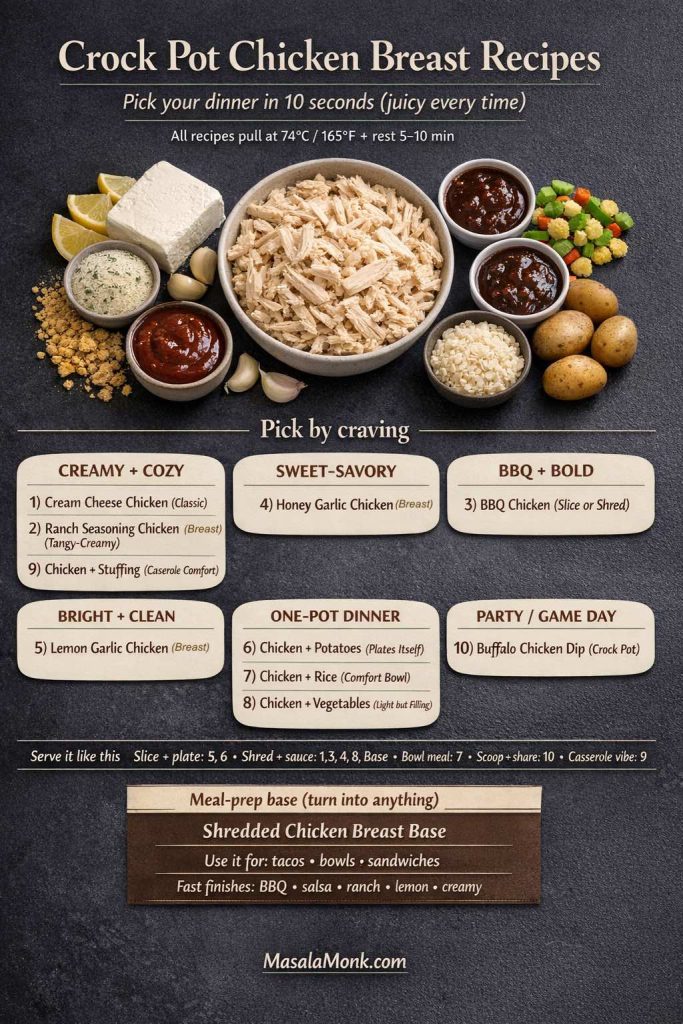
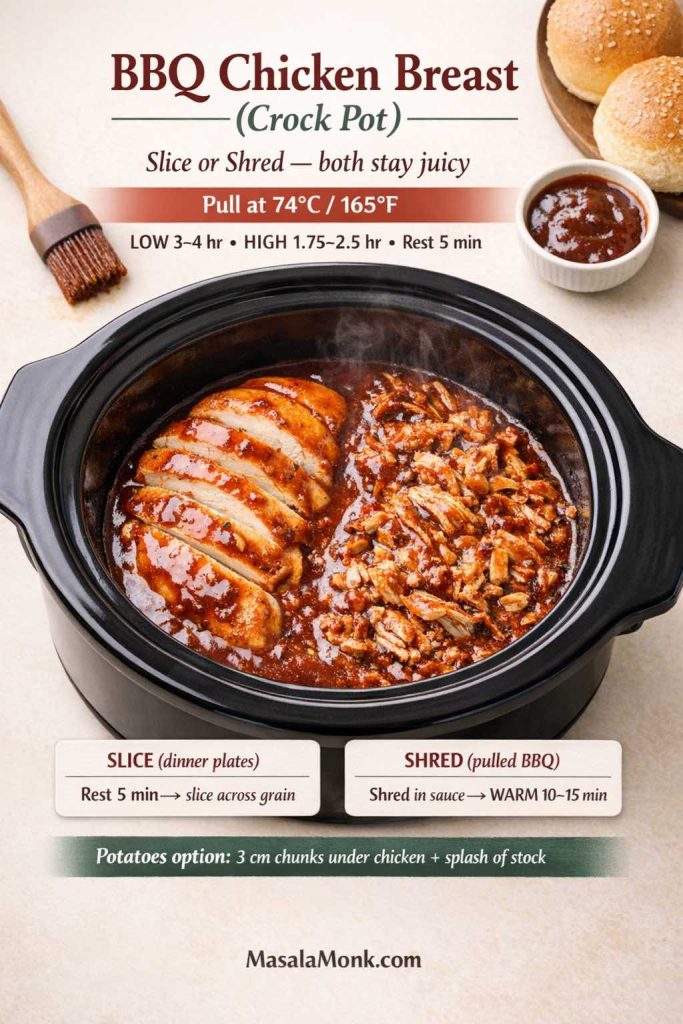
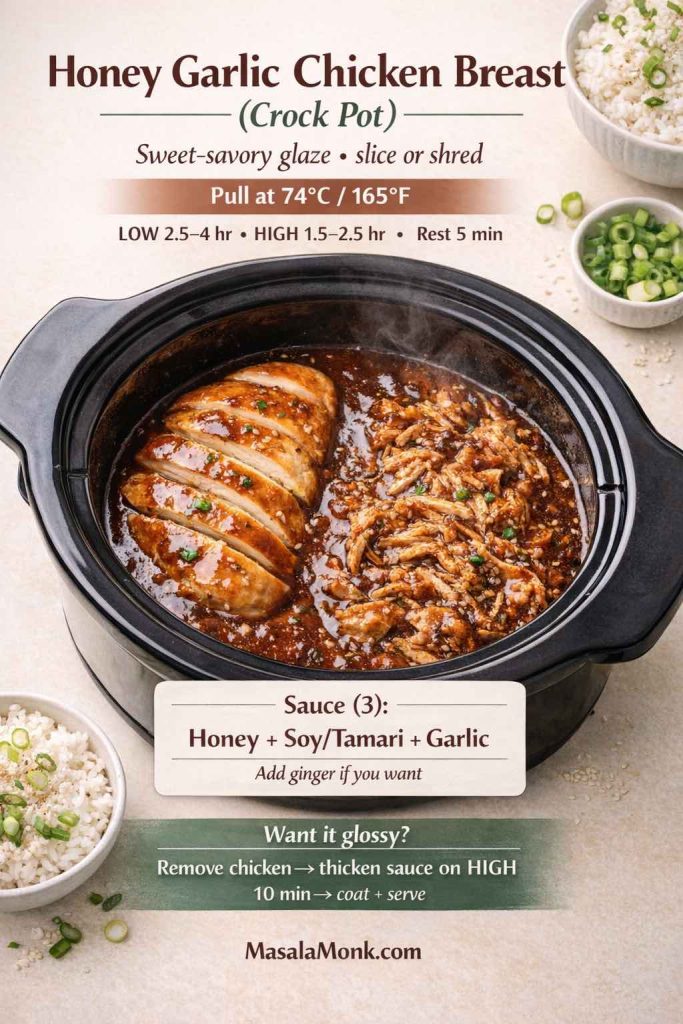
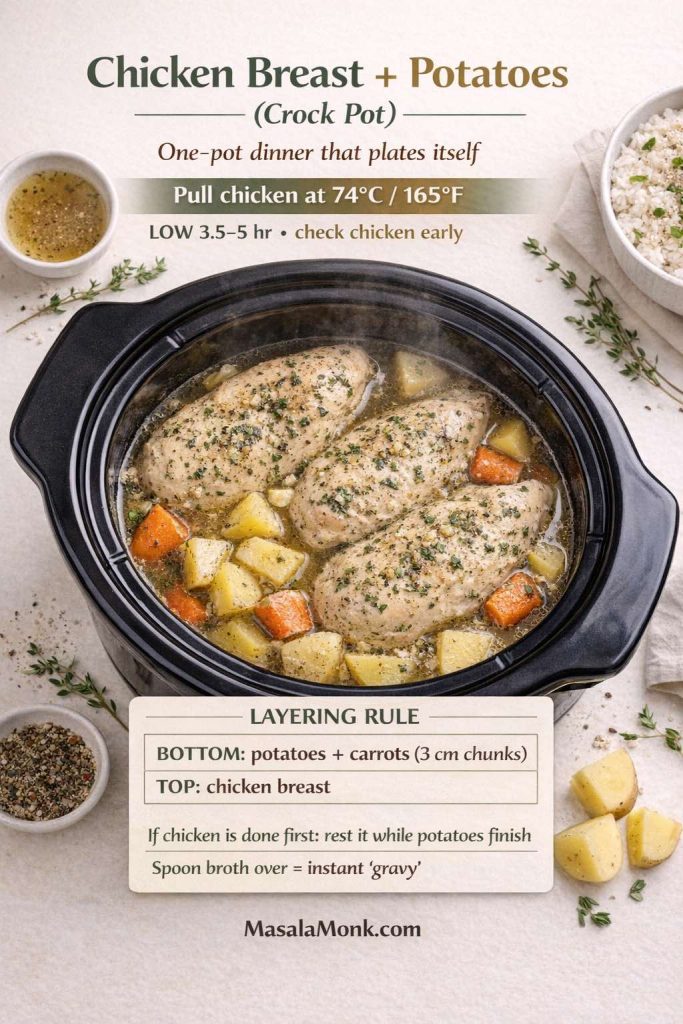
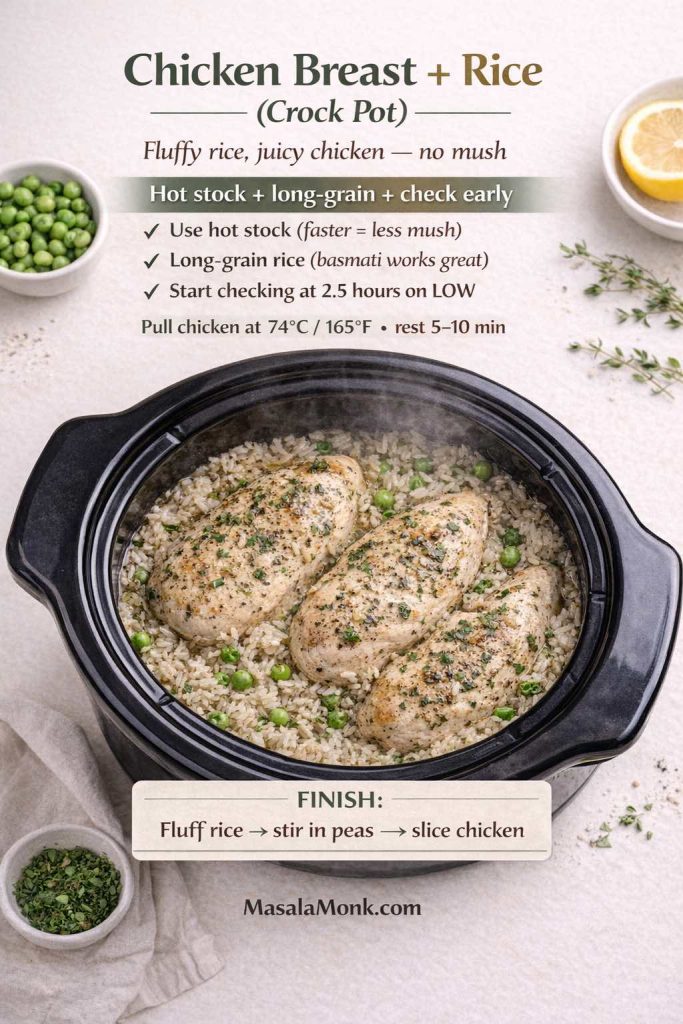
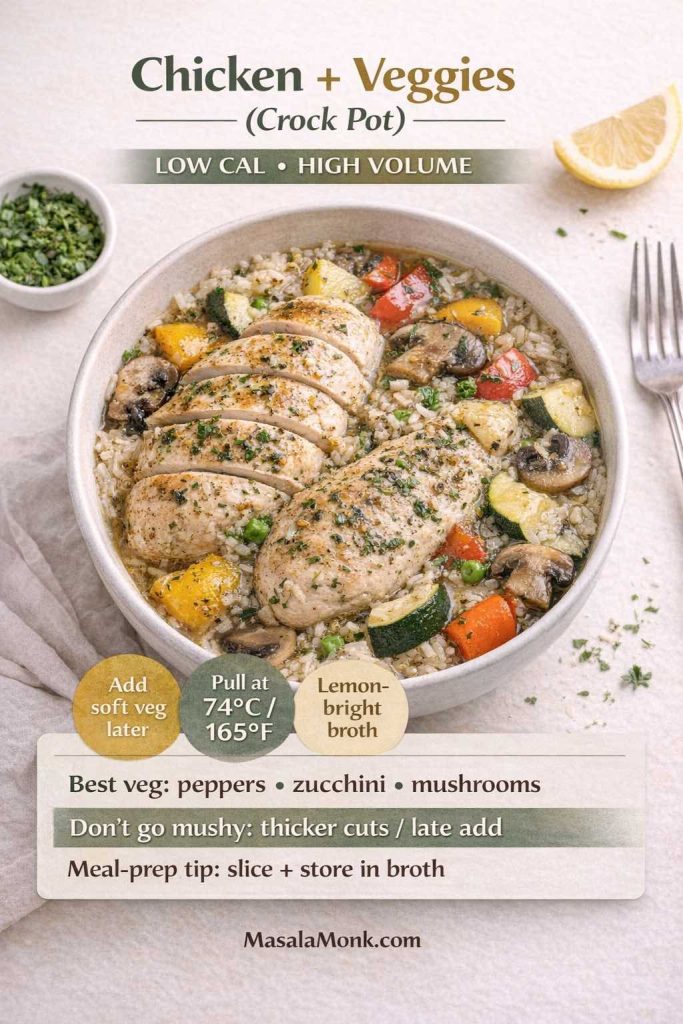
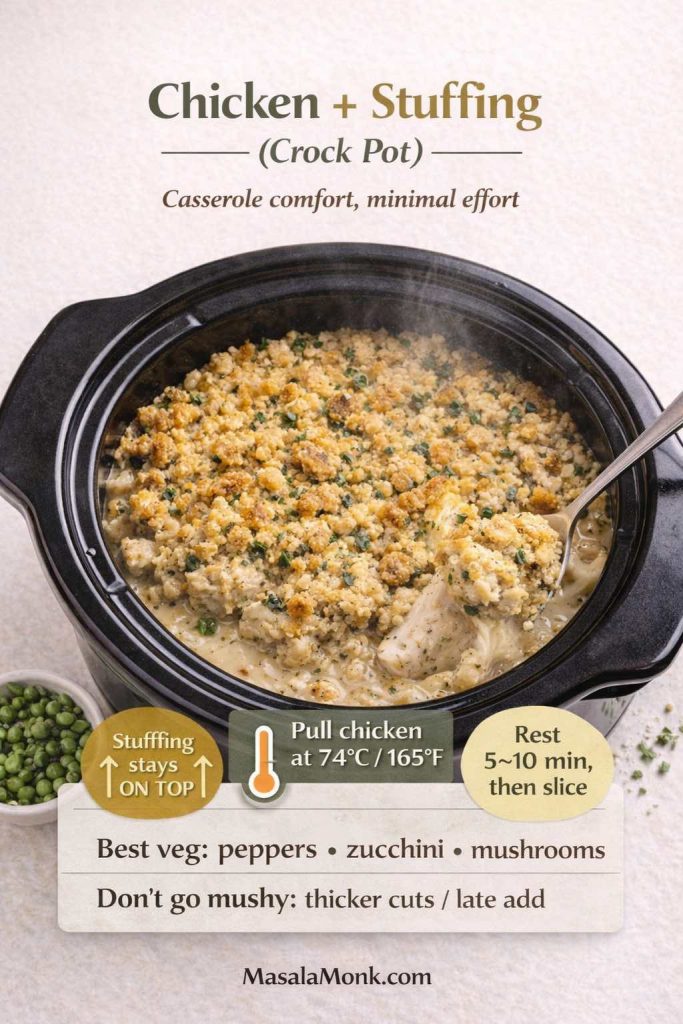
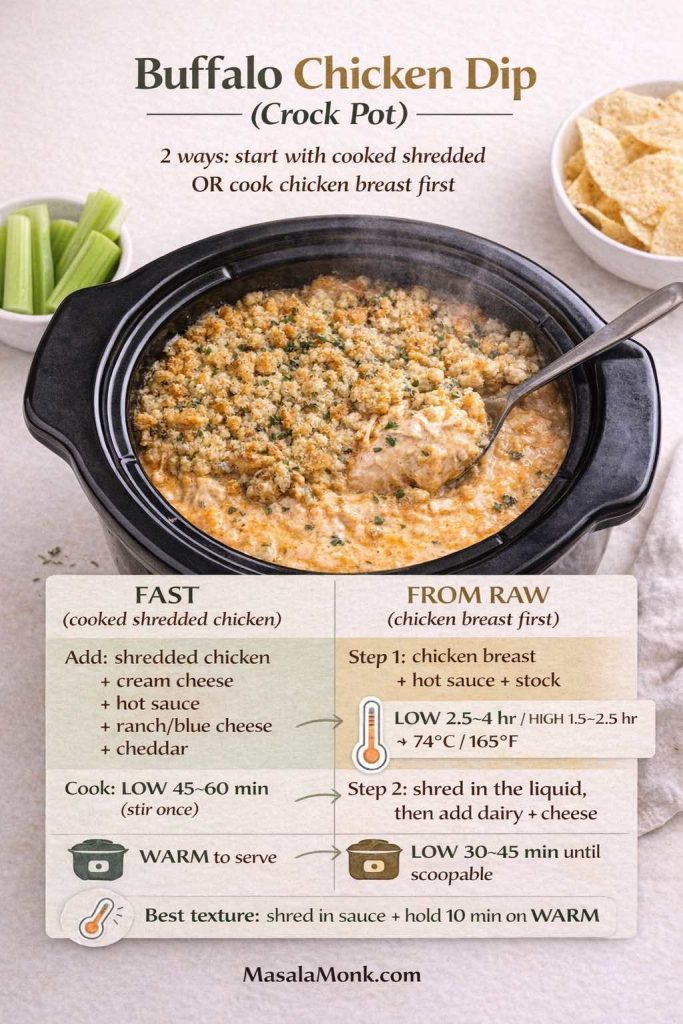
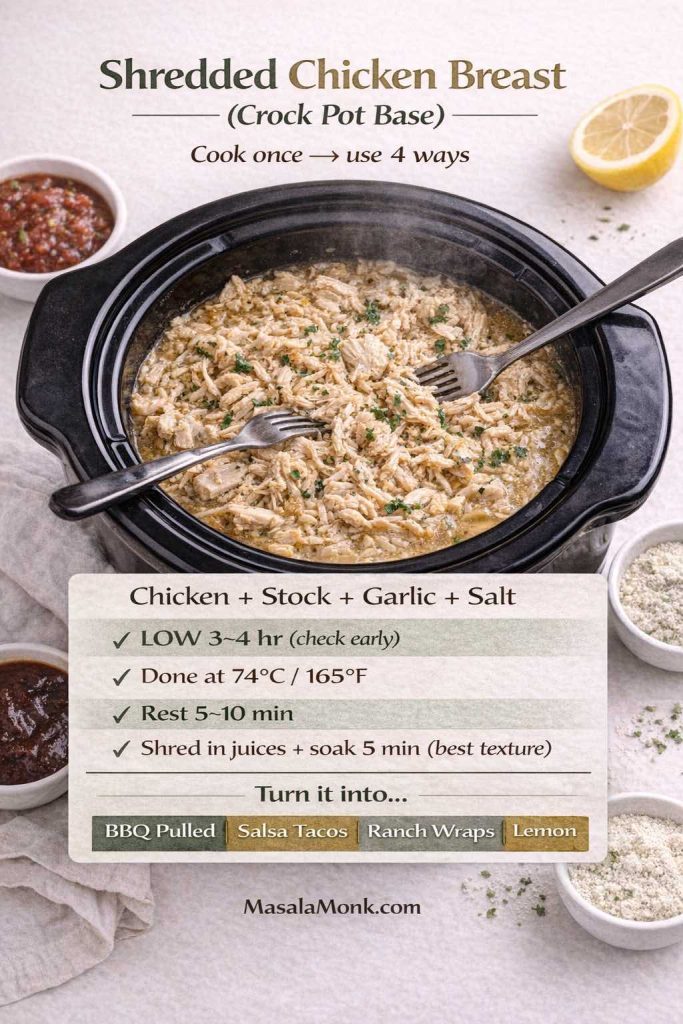
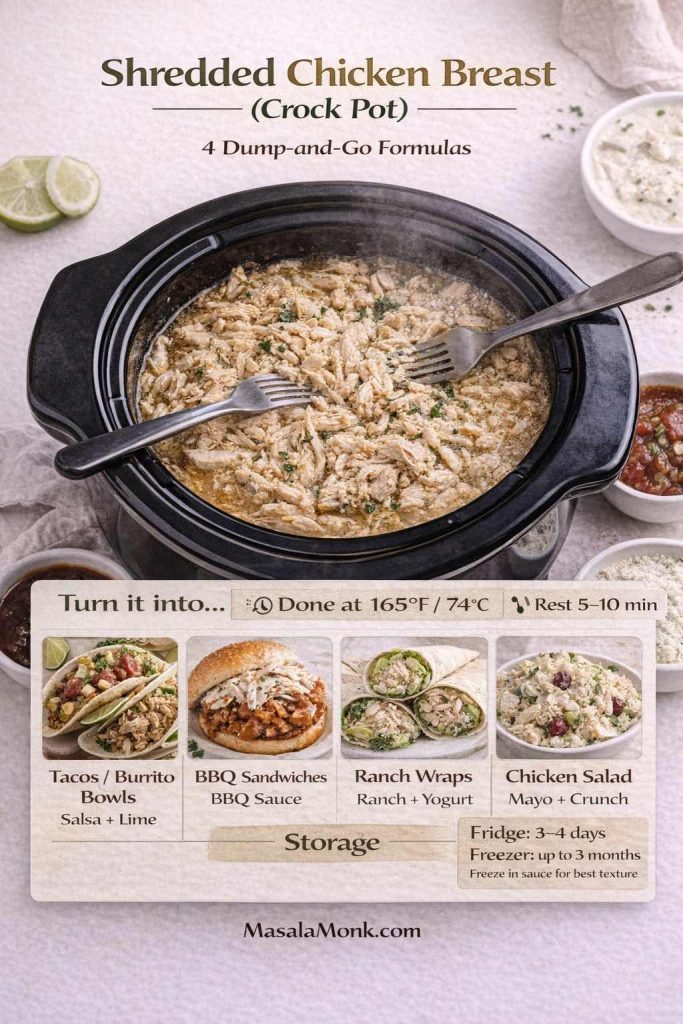
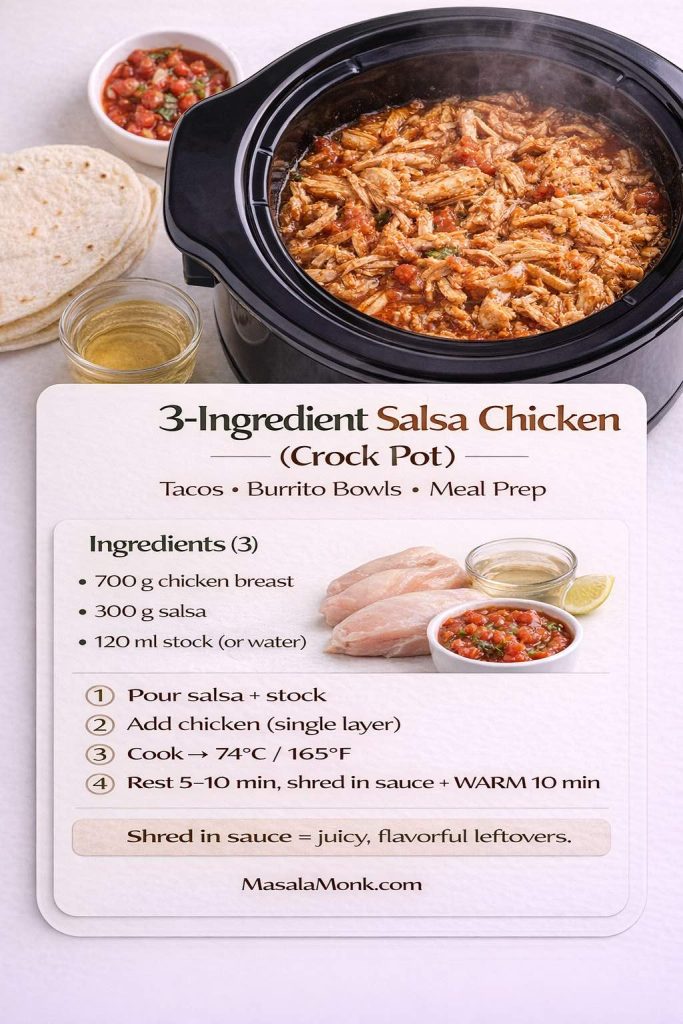
Also Read: Crock Pot Chicken Breast Recipes: 10 Easy Slow Cooker Dinners (Juicy Every Time)
Ingredients for tender, flavorful keto-friendly cabbage rolls
Before the steps, it helps to understand what each ingredient is doing. That’s what makes these rolls reliable, even if you swap meats or choose a different twist.
The cabbage (and the best cabbage for cabbage rolls)
Most cabbage roll recipes start with green cabbage, and it’s still the most forgiving choice.
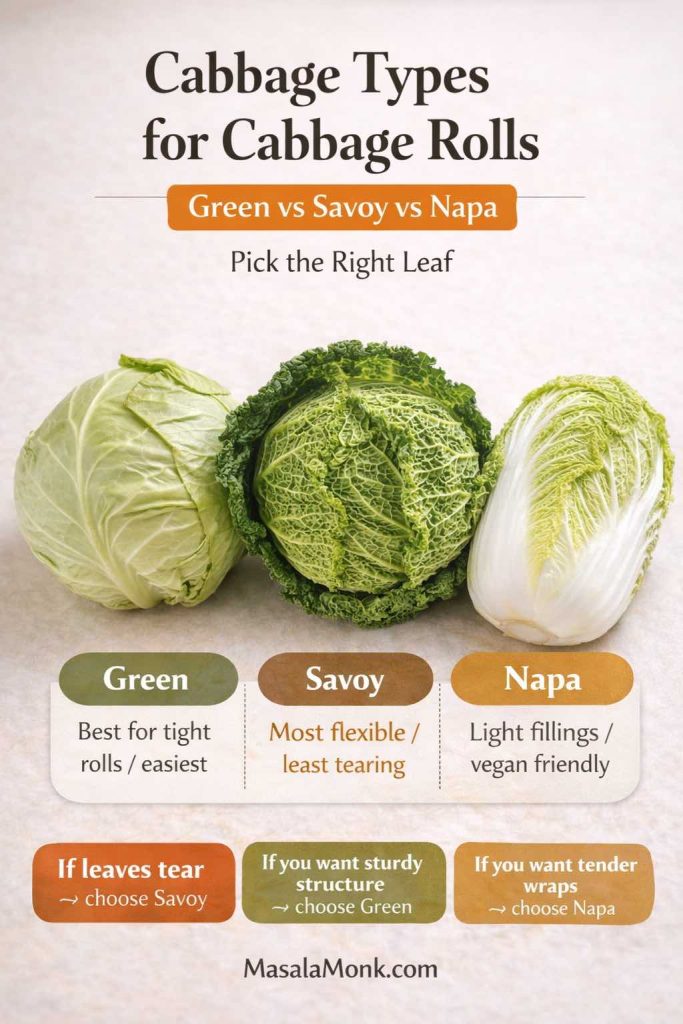
- Green cabbage: sturdy leaves, easy to roll, holds up well in oven or slow cooker.
- Savoy cabbage: softer leaves that bend easily; it’s great if you want less wrestling while rolling.
- Napa cabbage: thinner and more delicate; it’s especially good for vegan cabbage rolls or lighter fillings, though it can tear if overcooked.
If you’ve ever been frustrated by cabbage leaves splitting, savoy is often the answer. On the other hand, if you want maximum structure for a pan of stuffed cabbage in a thick sauce, green cabbage is the steady classic.
The filling (protein and flavor)
This recipe works with different meats, and each one gives a slightly different result:
- Ground beef: richest flavor, most forgiving texture, classic “stuffed cabbage” taste.
- Ground turkey: lighter but still satisfying; it benefits from extra fat and bold seasoning.
- Ground pork: juicy and savory; paprika and garlic love pork.
- Beef + pork blend: especially good for a more traditional European feel.
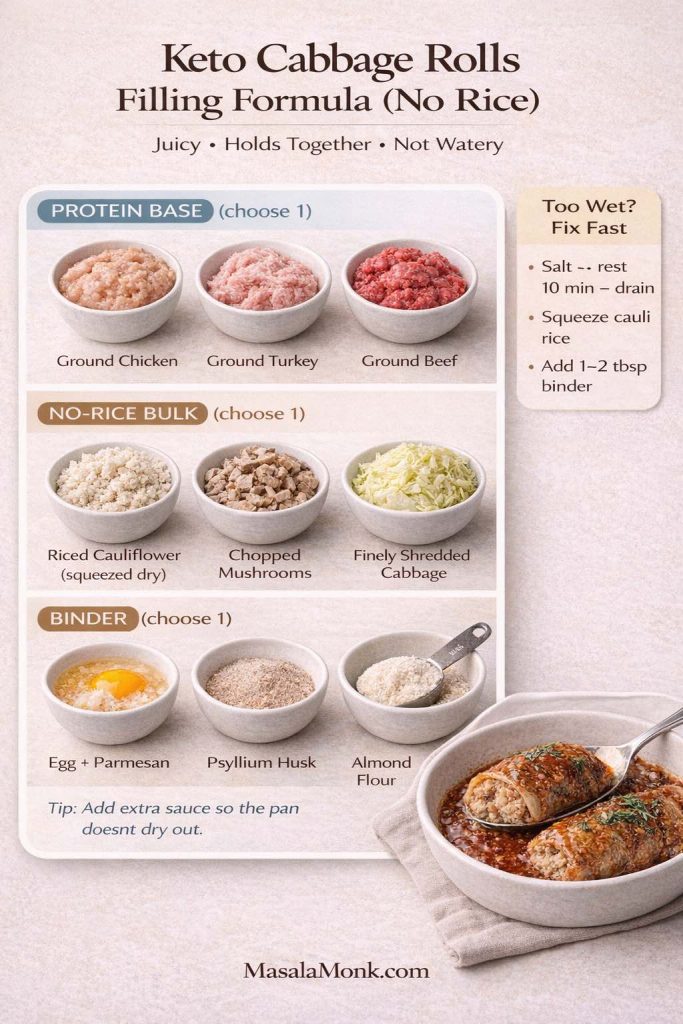
To keep the filling cohesive without rice, you’ll use:
- Egg as a binder (optional but helpful)
- Cauliflower rice and/or chopped mushrooms for bulk
- Garlic and paprika as the core flavor signature
- Salt and pepper for structure (salt does more than people think here)
Meat choice changes the whole feel of cabbage rolls. Beef and pork tend to stay richer and more satisfying, while turkey usually needs a little extra fat and bold seasoning to keep the filling juicy. If you’ve noticed fattier meats keep you full longer, there’s a real reason for that—here’s a deeper look at beef and the keto diet.
The sauce (tomato comfort without the sugar reliance)
Many classic cabbage rolls rely on a sweet-leaning tomato sauce. On keto, you can still use tomatoes; the trick is building depth with garlic, paprika, broth, and fat rather than sugar. When done well, the sauce tastes like the cozy “cabbage rolls in tomato soup” style people love—round, mellow, and comforting.
Also Read: Sourdough Starter Recipe: Make, Feed, Store & Fix Your Starter (Beginner Guide)
How to soften cabbage leaves: three practical methods
This is where cabbage rolls either feel easy or feel impossible. The truth is that softening cabbage leaves is straightforward once you choose the method that fits your life.
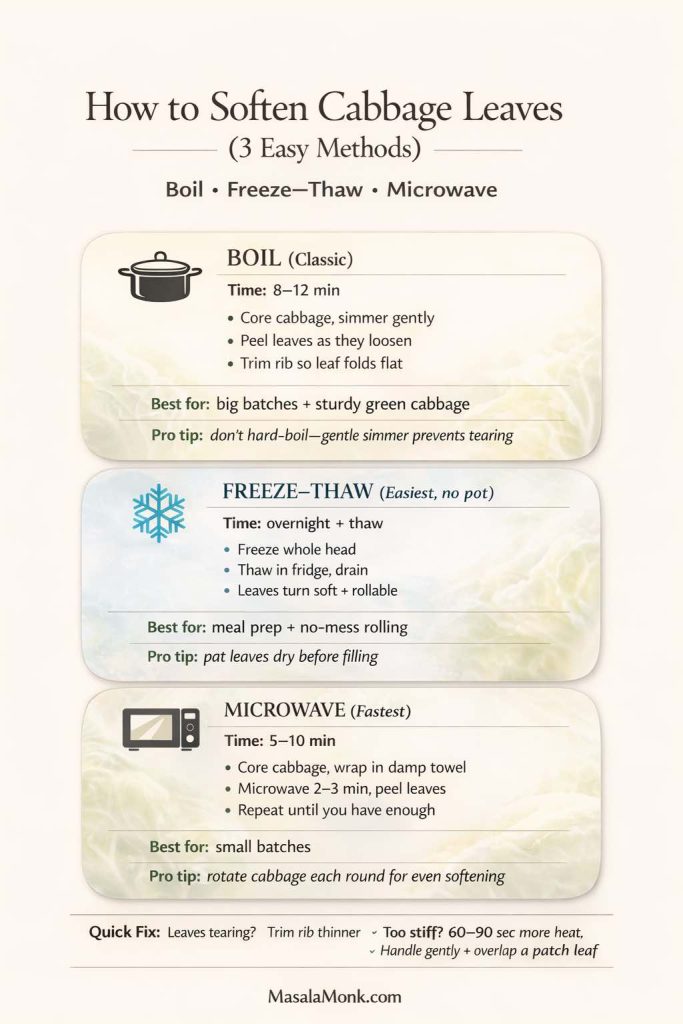
Method 1: Boiling (the classic approach)
Bring a large pot of water to a gentle boil. Core the cabbage, then lower the whole head into the water. After a few minutes, the outer leaves will loosen. Use tongs to peel them off as they soften.
Once you have enough leaves, trim the thick rib at the base of each leaf. Rather than cutting it out completely (which can weaken the leaf), slice it down so the leaf lies flatter and rolls more easily.
Boiling is reliable, and it works with any cabbage variety. Still, it requires a big pot and a little patience.
Method 2: Freeze and thaw (quietly the easiest way to make cabbage rolls)
If you want the easiest way to make cabbage rolls without boiling water, freeze the whole head of cabbage overnight, then thaw it in the fridge. The freezing breaks down cell walls, which means the leaves become flexible and rollable once thawed.
This method is also excellent if you’re doing cabbage rolls for freezing later, because you’re already in a meal prep mindset. It feels like a small trick, yet it changes everything: the leaves soften without a pot of water, and you can prep when you have time rather than when you’re hungry.
Method 3: Microwave (the fastest shortcut)
Core the cabbage, wrap it in a damp towel, and microwave for a few minutes. Peel off softened leaves, then repeat until you have enough.
Microwave softening is quick and surprisingly effective. It’s also helpful if you’re making a small batch and don’t want to boil a huge pot of water.
If you’re newer to low carb cooking and want quick clarity on what counts as keto-friendly (and what doesn’t), these keto diet FAQs
Also Read: How to make No-Bake Banana Pudding: No Oven Required Recipe
The base keto cabbage rolls recipe (oven baked)
This is the core method. After you make it once, the twists become easy, because you’re no longer learning how to roll—you’re simply changing the flavor.
Ingredients (base)
For the cabbage rolls
- 1 large green cabbage (or savoy)
- 680 g / 1.5 lb ground beef (or turkey or pork)
- 3–5 cloves garlic, finely minced or grated
- 2 teaspoons paprika (sweet or smoked)
- 1 teaspoon salt, plus more as needed
- 1/2 teaspoon black pepper
- 1 1/2 cups cauliflower rice (fresh, or thawed and squeezed dry)
- 1/2 cup finely chopped mushrooms (optional but recommended for juiciness)
- 1 egg (optional binder)
- 1/3 cup grated parmesan (optional, helps bind and adds richness)
- 2 tablespoons chopped parsley (optional)
For the sauce
- 2 cups crushed tomatoes or tomato passata
- 1 cup broth (beef or chicken)
- 1 tablespoon tomato paste (optional, for deeper tomato flavor)
- 1–2 tablespoons olive oil or butter
- 1 teaspoon paprika
- 1/2–1 teaspoon garlic powder (or another clove of garlic, minced)
- Salt and pepper to taste
- Optional: a splash of vinegar for balance
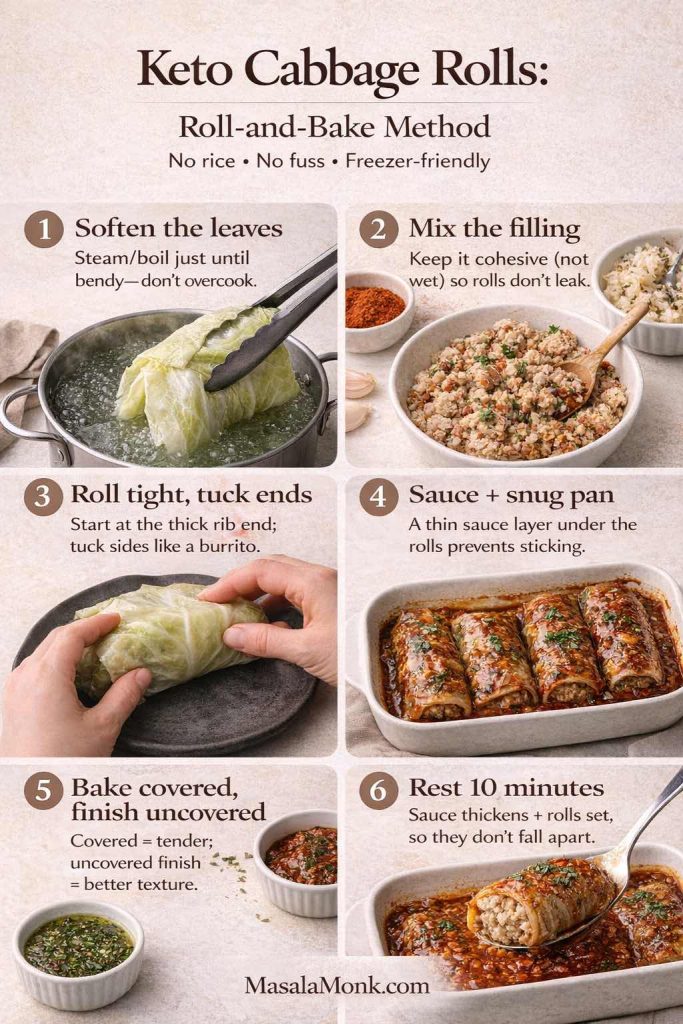
Step 1: Prep the cabbage leaves
Use one of the softening methods above. Once the leaves are pliable, trim the thick rib near the base so each leaf rolls without cracking.
Set leaves aside while you make the filling.
Step 2: Make the filling
In a large bowl, combine ground meat, garlic, paprika, salt, pepper, cauliflower rice, mushrooms (if using), egg (if using), and parmesan (if using). Mix gently until combined.
Mixing too aggressively can make the filling dense. Instead, fold everything together until it looks even, then stop.
Step 3: Roll
Lay a cabbage leaf flat. Place a portion of filling near the base. Fold the sides in, then roll up tightly. Place seam-side down in a baking dish.
Continue until you’ve used your leaves and filling. If you have extra small or torn leaves, tuck them around the rolls in the dish—those bits often become the best parts after baking.
Step 4: Make the sauce
In a bowl or measuring jug, whisk crushed tomatoes, broth, tomato paste, olive oil or butter, paprika, garlic, salt, and pepper. Taste it. You want it slightly stronger than you think you need, because it will mellow as it cooks.
Pour sauce over the rolls. Cover the dish tightly with foil.
Step 5: Bake
Bake at 190°C / 375°F until the cabbage is tender and the filling is cooked through. The time will vary based on roll size and meat choice, but 55–75 minutes is common for oven cabbage rolls.
For a thicker sauce, uncover the dish for the last 10–15 minutes to let it reduce slightly.
Food safety, written in a way that doesn’t interrupt dinner
Because these are rolls made with ground meat, safe internal temperature matters. USDA guidance for ground beef food safety recommends cooking ground beef to 160°F / 71°C. For ground turkey and other poultry, USDA’s turkey safe cooking guidance points to 165°F / 74°C. A thermometer makes this effortless, and it removes the guesswork.
If you’re cooking once and reheating during the week, USDA’s notes on leftovers and food safety reinforce reheating leftovers to 165°F / 74°C. That’s especially useful for soup and casserole versions, where it’s easy to assume the middle is hot when it isn’t.
Also Read: Chicken Adobo — Step-by-Step Recipe — Classic Filipino Adobong Manok
The sauce that tastes like “tomato soup” cabbage rolls—without leaning on sugar
Some cabbage roll casseroles and soups are famous for tasting like tomato soup, even when they’re not made with canned soup. That flavor comes from a few details working together: enough tomato concentration, a savory broth backbone, paprika’s gentle sweetness, and fat to round out acidity.
If your sauce tastes too sharp, a small splash of vinegar can actually help, because it adds a clean acidity that makes tomato taste more “complete.” Meanwhile, finishing with olive oil or a little butter can soften everything so the sauce tastes rich rather than harsh.
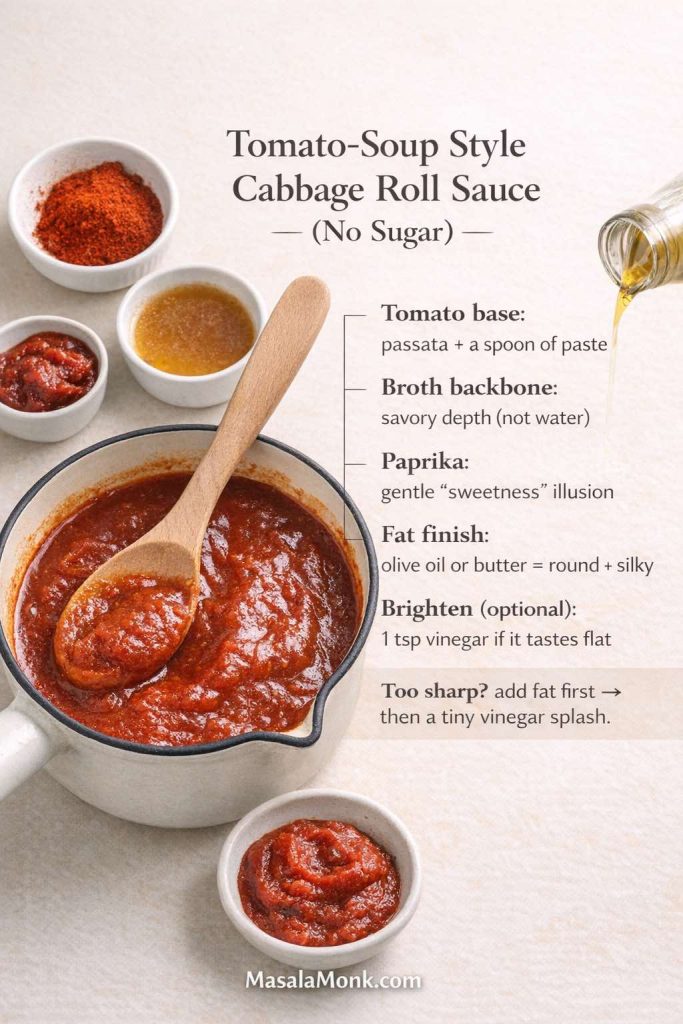
If you want a credible external reference on why olive oil is often considered a strong everyday fat choice, Harvard Health’s article on extra-virgin olive oil offers a balanced take. For a broader “what fats matter most” reference, Harvard’s Nutrition Source overview of types of dietary fats is a solid citation that avoids fad language while still supporting a keto-friendly approach that focuses on quality.
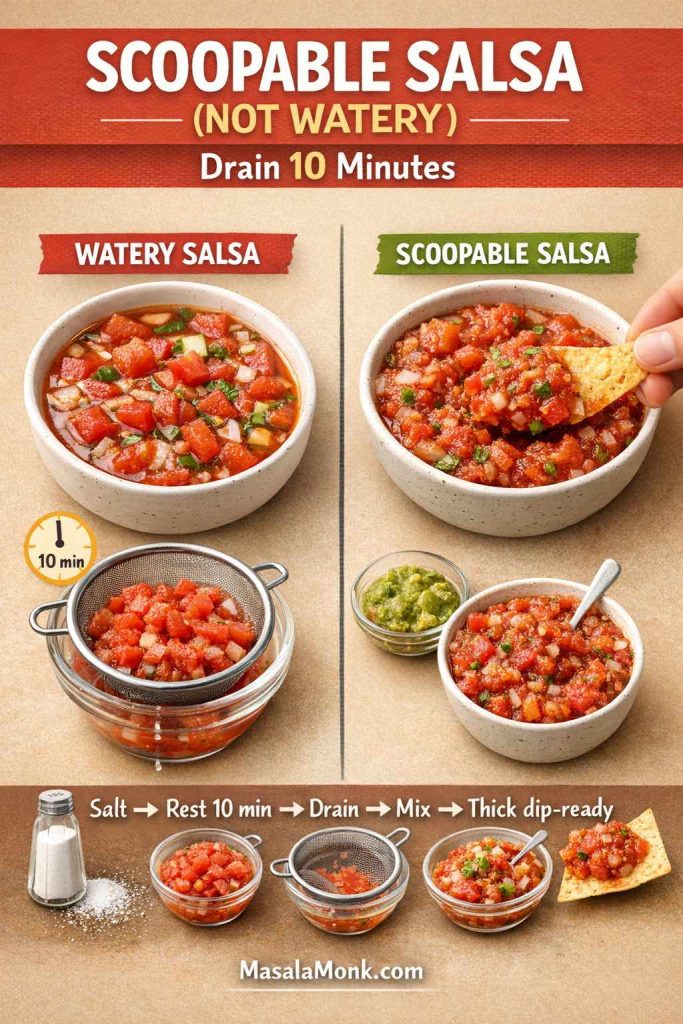
When you’re serving cabbage rolls, something crunchy on the side is always welcome. A quick slaw is a natural pairing, and if you want a creamy base without fuss, MasalaMonk’s eggless mayonnaise makes a useful recipe – if you want want a simple dressing foundation and if you are not avoiding eggs, then have a look at Mayo Recipe: 15+ Homemade Mayonnaise Variations.
Five savory garlic and paprika twists (same method, different dinner)
Now for the fun part. Each of these twists starts from the base keto-friendly cabbage rolls recipe above. In other words, you’re not learning five different recipes. You’re choosing one flavor direction, then making small changes to the filling and sauce.
Because the base is already bold, the twists don’t need many extra ingredients. The goal is to keep the dish cohesive: cabbage, savory filling, tomato-based sauce, and one clear flavor identity.
Twist 1: Smoky garlic and paprika (deep, cozy, and bold)
If you like cabbage rolls that taste almost grilled—dark, savory, and rich—this is the direction.
Best meat choice: ground beef or ground pork
Add to the filling:
- 1 teaspoon smoked paprika (in addition to the base paprika)
- 1/2 teaspoon cumin
- Optional: 1 teaspoon mustard (Dijon works well)
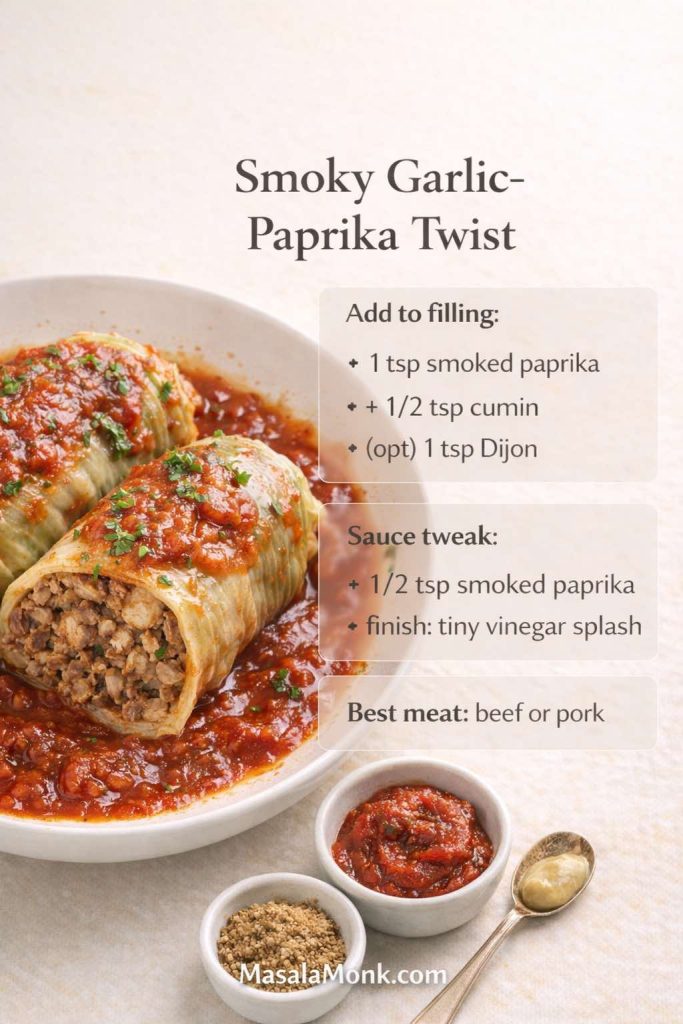
Adjust the sauce:
- Add another 1/2 teaspoon smoked paprika
- Finish with a small splash of vinegar
Smoked paprika adds a “slow-cooked” illusion. Meanwhile, vinegar keeps the sauce from feeling heavy. This twist is particularly good if you’re someone who likes robust flavors and wants a dish that still tastes exciting on day three.
If you’re in the mood for more hearty, high-protein keto dinners that reheat well, you’ll probably like these beef recipes for a weight loss keto plan.
Twist 2: Tangy sauerkraut garlic paprika rolls (a nod to Polish comfort)
Sauerkraut turns cabbage rolls into a different kind of comfort—bright, tangy, and deeply savory. This twist is inspired by the flavors people love in cabbage rolls with sauerkraut, stuffed cabbage and sauerkraut bakes, and many traditional Polish-style cabbage rolls, without trying to claim one strict “authentic” blueprint.
Best meat choice: beef + pork blend, or pork alone
Add to the baking dish:
- 1 to 1 1/2 cups sauerkraut, rinsed and squeezed dry
- Optional: a pinch of caraway seed
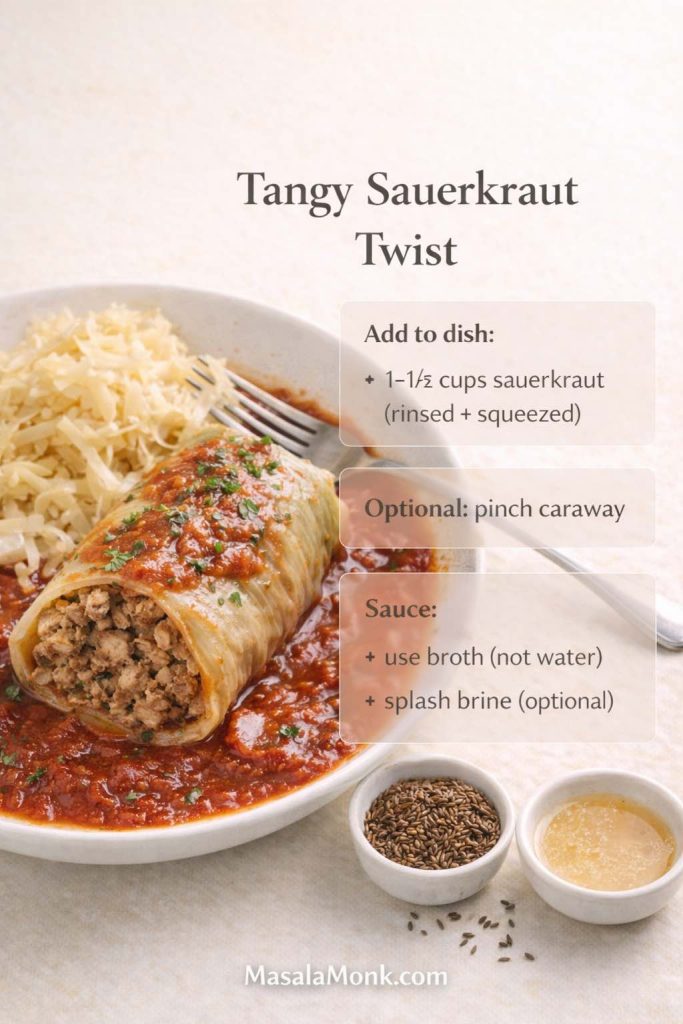
Adjust the sauce:
- Use broth rather than water so the tang stays balanced
- Add a splash of sauerkraut brine for more bite, if you like
Sauerkraut makes the whole dish taste brighter. It’s also a smart trick if someone in your house thinks cabbage rolls can taste “one-note.” This version is anything but.
Twist 3: Sour cabbage leaves and “sarma-inspired” flavor (bright, savory, addictive)
Sarma rolls often use sour cabbage leaves, which brings a tang that feels uniquely satisfying with meat. If you can find sour cabbage leaves, use them. If not, you can mimic the effect by brushing softened cabbage leaves with a little vinegar and salt, then letting them rest briefly before filling.
Best meat choice: pork or turkey
Add to the filling:
- Extra garlic (one more clove)
- Optional: dried dill, mint, or parsley
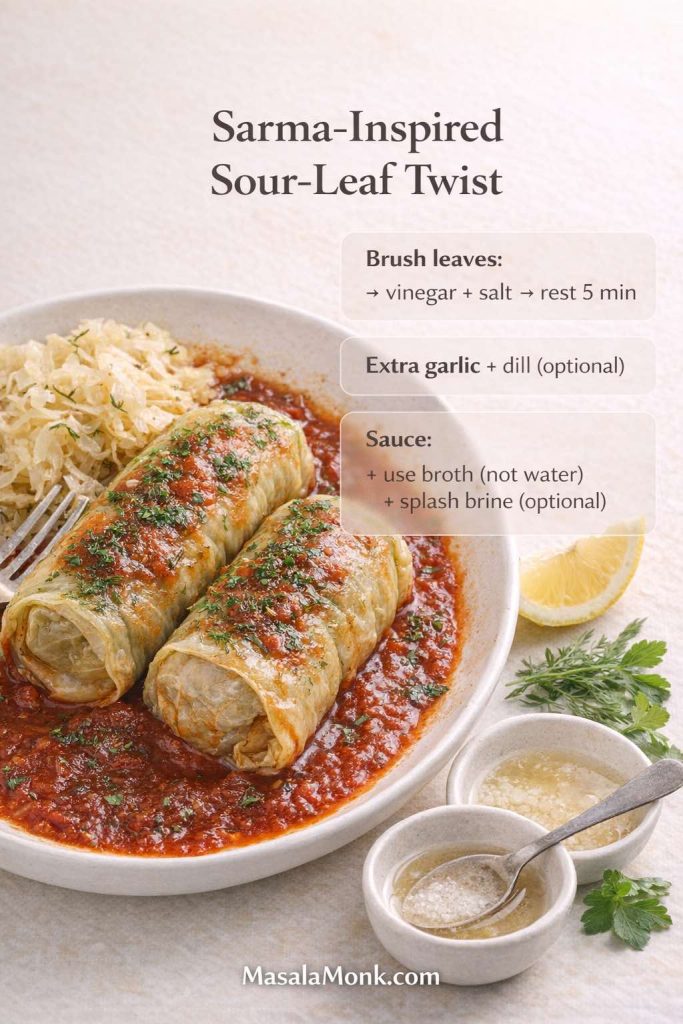
Adjust the sauce:
- Keep the sauce slightly looser; it will reduce as it bakes
- Finish with a small squeeze of lemon if you want a brighter edge
The result is tangy without being sharp. It also feels lighter than a pure beef version, which makes it a strong option if you want keto cabbage rolls that don’t sit too heavy.
Twist 4: Spicy garlic paprika rolls (for heat lovers)
If your goal is to make cabbage rolls that feel energizing rather than sleepy, add heat. Spicy cabbage rolls can still be comforting; they just also happen to be exciting.
Best meat choice: beef or turkey
Add to the filling:
- 1/2 to 1 teaspoon cayenne (start small)
- 1 teaspoon chili flakes
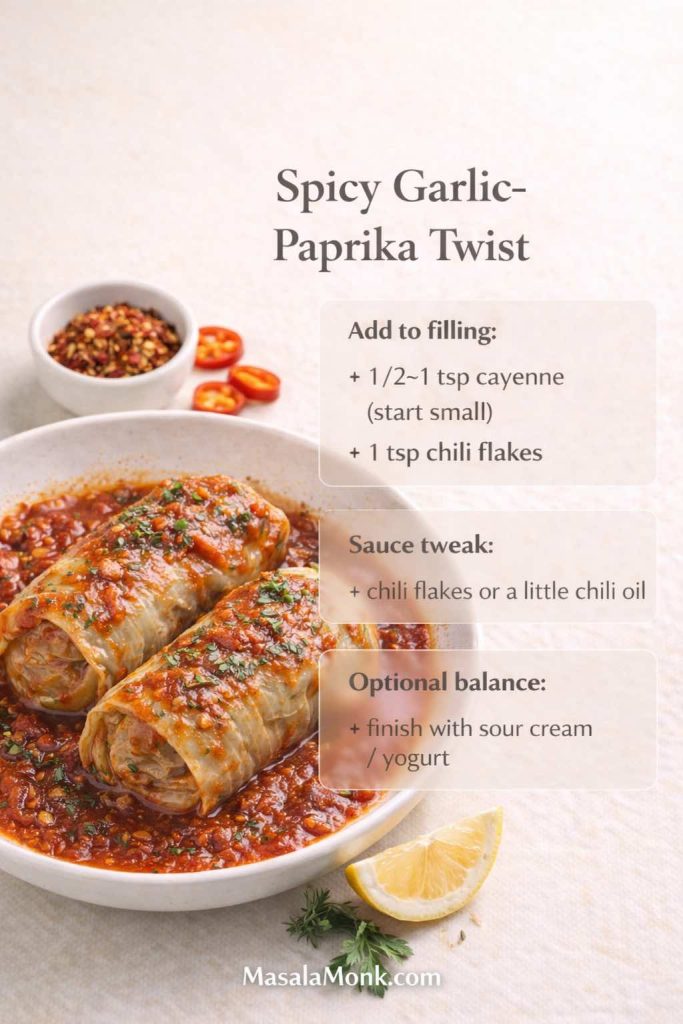
Adjust the sauce:
- Add chili flakes or a little chili oil
- Keep garlic forward
This variation is also useful when you’re eating low carb and you miss “snacky” flavors. Heat and spice create the kind of satisfaction that helps you forget you’re even thinking about carbs.
Twist 5: Mediterranean herb garlic paprika rolls (fresh, fragrant, still cozy)
This twist leans into herbs rather than tang or smoke. It’s still tomato-based and still boldly seasoned, but the finish feels brighter and more fragrant.
Best meat choice: ground turkey (or lean beef)
Add to the filling:
- 2 teaspoons oregano
- 1 teaspoon thyme
- Optional: lemon zest
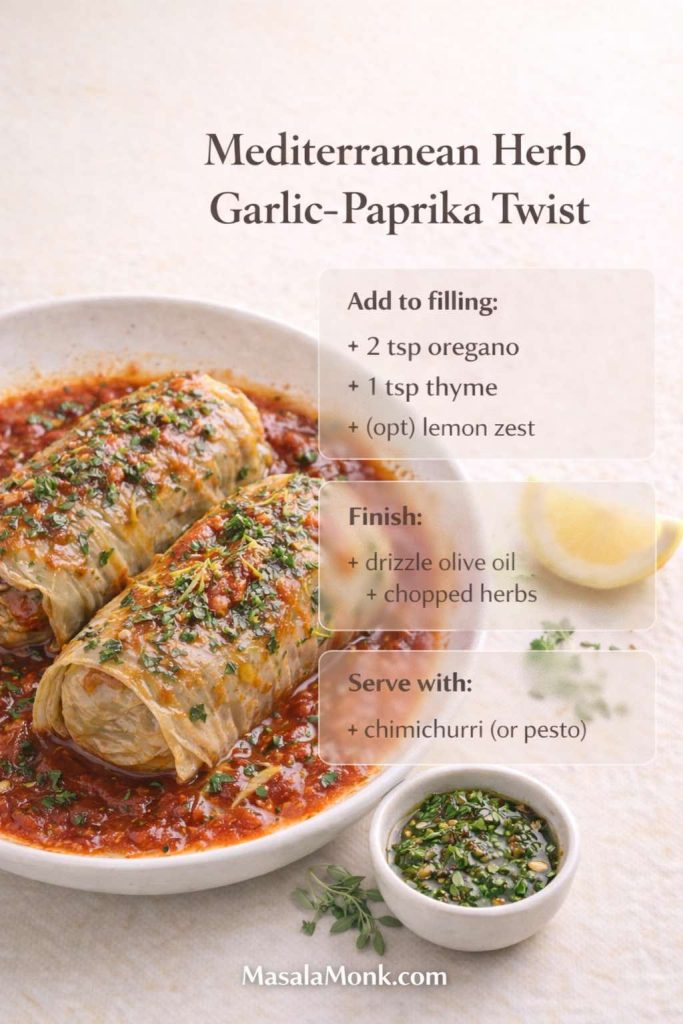
Adjust the sauce:
- Finish with a drizzle of olive oil and chopped herbs
For a punchy finishing sauce that fits perfectly here, a spoon of chimichurri on the side is almost unfairly good—garlic, herbs, acidity, and brightness, all in one. It’s especially helpful if you want the rolls to feel a bit more “dinner party” without changing the main recipe.
Herb-forward sauces are especially good with this version. If you like that kind of bright, garlicky finish, these pesto recipes are a great match alongside cabbage rolls.
Also Read: Sourdough Recipe: 10 Easy Bread Bakes (Loaves, Rolls & Bagels)
Cabbage roll soup and unstuffed cabbage roll soup (same flavors, easier weeknights)
Some nights, rolling feels like therapy. Other nights, it feels like too much. That’s where the soup version steps in.
Unstuffed cabbage roll soup—sometimes called unrolled cabbage soup, stuffed cabbage roll soup, or simply cabbage roll soup—is essentially the same recipe expressed differently. You still get garlic, paprika, tomato, tender cabbage, and savory meat. You’re just skipping the wrapping.
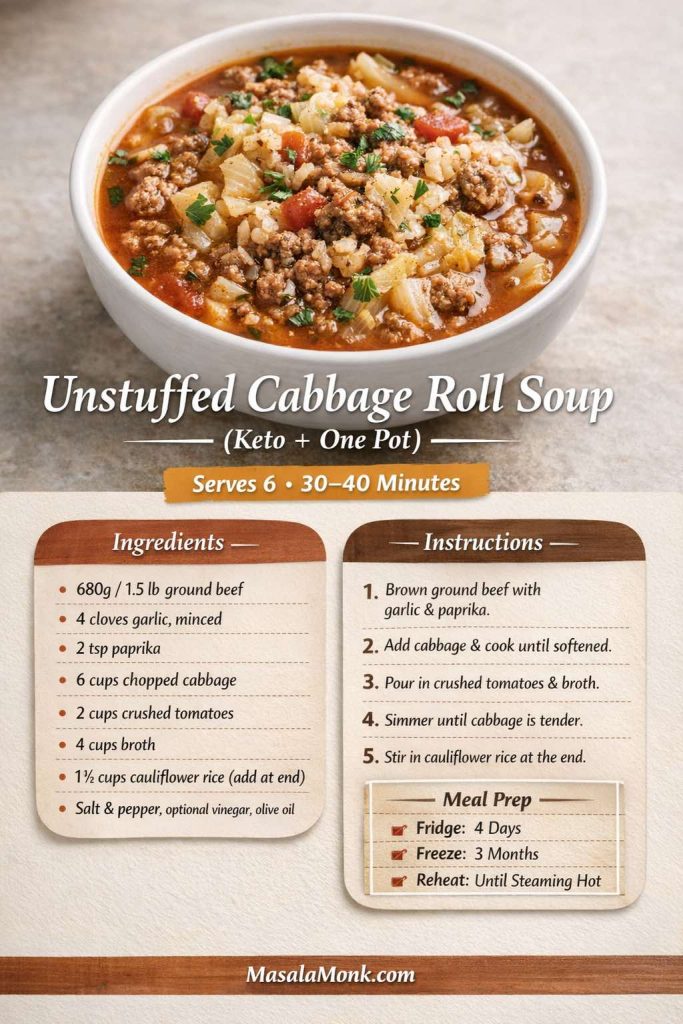
Unstuffed cabbage roll soup (keto-friendly method)
What you’ll do:
- Brown ground beef, turkey, or pork in a pot with garlic, paprika, salt, and pepper.
- Add chopped cabbage and stir until it begins to soften.
- Pour in crushed tomatoes and broth.
- Simmer until the cabbage is tender.
- Stir in cauliflower rice near the end, so it stays pleasantly textured rather than mushy.
Because this is a soup roll in spirit—cabbage roll flavors in a bowl—it works beautifully as a high-protein meal prep option. It also freezes well.
If you like cooking once and coasting for a few days, you might also enjoy these crock pot chicken breast recipes.
When you store soup for the week, safe reheating matters. FoodSafety.gov’s chart of safe minimum internal temperatures supports the common recommendation to reheat leftovers to 165°F / 74°C, which is especially relevant for meat-based soups.
Also Read: Peanut Butter Fudge: Recipes & Guide (8 Methods + Easy Variations)
Cabbage roll casserole: deconstructed, layered, and effortless
Cabbage roll casserole is the lazy cousin of stuffed cabbage rolls, and it’s a gift. It gives you the same taste profile without the rolling step. That’s why you’ll see it described as unrolled cabbage casserole, deconstructed cabbage roll casserole, or even “cabbage roll in a pan.”
This is also the format that best captures cravings for “easy cabbage casserole recipes” and “cabbage casserole with hamburger meat,” while staying firmly in keto-friendly territory.
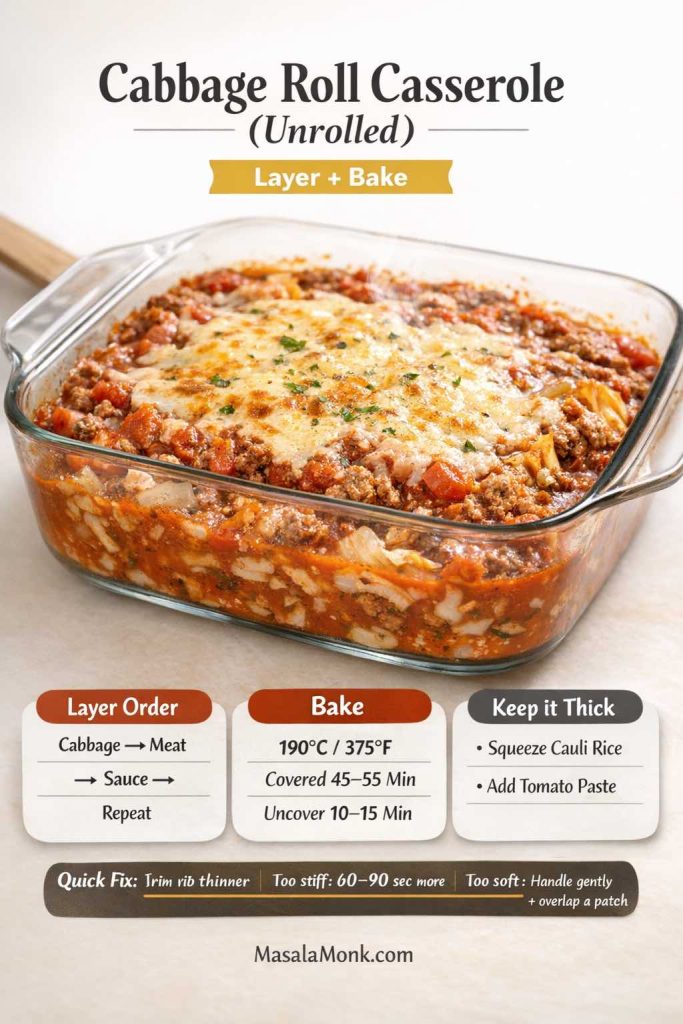
Keto cabbage roll casserole method (unrolled)
- Brown your ground meat with garlic, paprika, salt, and pepper.
- Stir in cauliflower rice and mushrooms (if using).
- In a baking dish, layer chopped cabbage and the meat mixture.
- Pour sauce over the top.
- Cover and bake until the cabbage is tender.
- Uncover near the end so the sauce thickens.
If you love a richer casserole, you can add cheese on top for a “cabbage rolls with cheese” feel—still very much in the spirit of cheese stuffed cabbage rolls, just without the fiddly wrapping.
Also Read: Best Vermouth for a Negroni Cocktail Drink Recipe
Skillet cabbage rolls and “cabbage roll in a bowl” (fast comfort)
Sometimes you want “stuffed cabbage” flavor in under 30 minutes. Skillet cabbage rolls—also described as cabbage roll in a skillet, cabbage roll skillet recipe, or cabbage roll in a bowl—deliver exactly that.
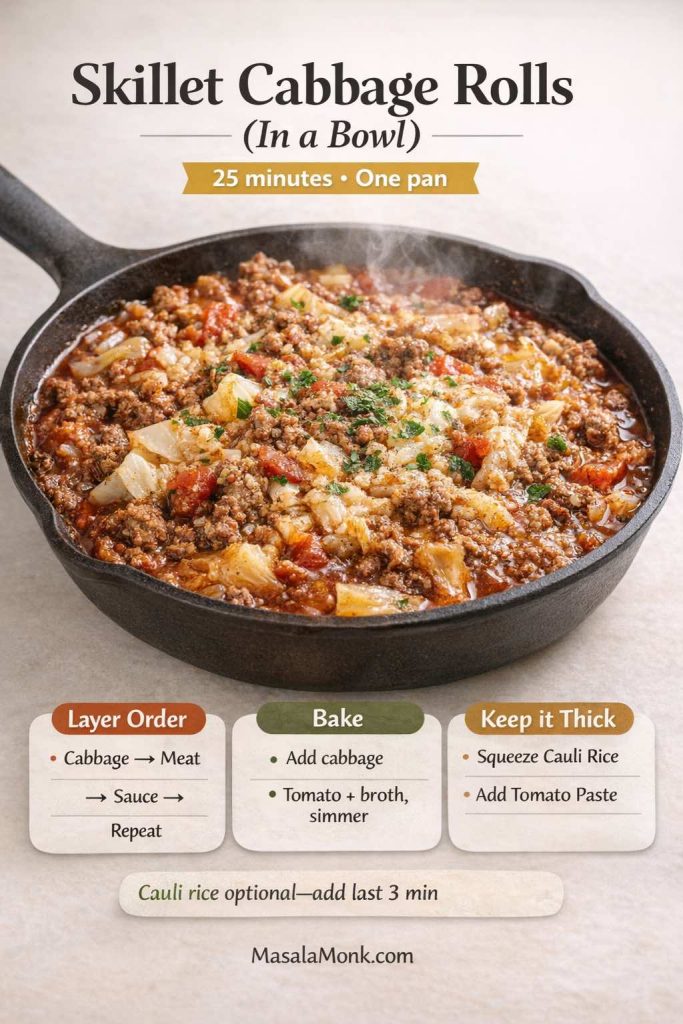
The method is simple: brown meat with garlic and paprika, add shredded cabbage, pour in tomato and broth, then simmer until everything turns saucy and tender. You can finish with olive oil, sour cream, or parmesan, depending on your mood.
This is also one of the most forgiving versions if you’re using lean meat. Because the dish is saucy, you can adjust richness right at the end.
Also Read: Keto Flour: Guide to Low-Carb Flours That Bakes Like the Real Thing
Slow cooker cabbage rolls and crock pot cabbage roll casserole
Cabbage rolls in a slow cooker feel like a different kind of comfort. The cabbage becomes extra tender, the sauce sinks deeper into the filling, and the whole dish tastes like it spent the day becoming itself.
If you’re making cabbage roll crock pot style, the main difference is liquid management. Slow cookers trap moisture, so sauces tend to thin out unless they start thicker.
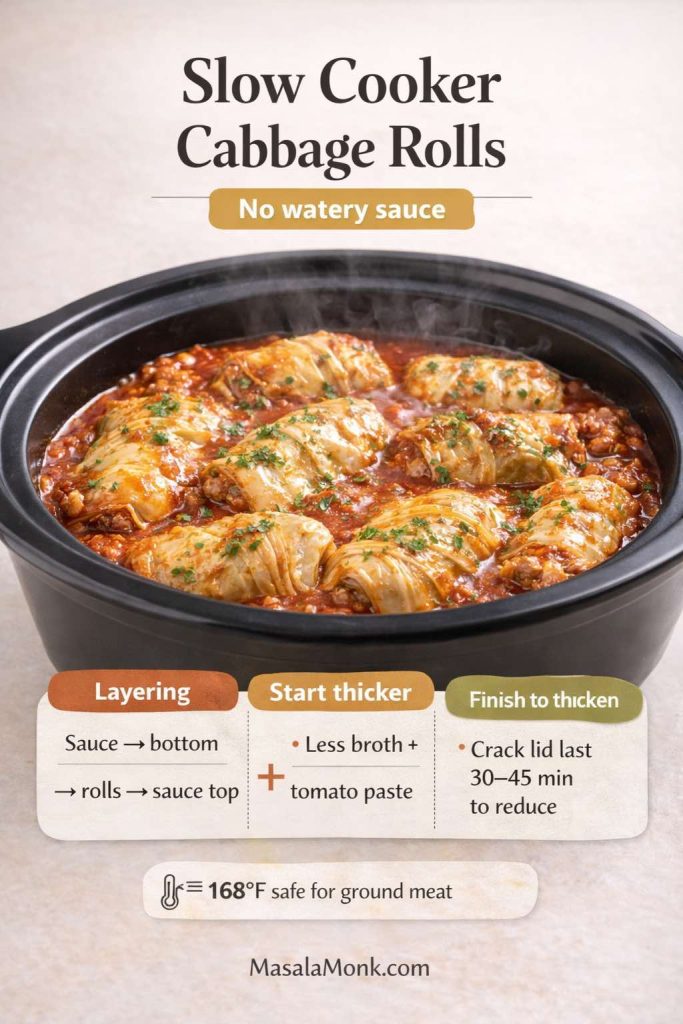
Slow cooker stuffed cabbage rolls (keto-friendly)
- Make and roll the cabbage rolls as usual.
- Layer sauce on the bottom, then rolls, then more sauce.
- Cook on low until the cabbage is very tender and the filling is safely cooked through.
Crock pot cabbage roll casserole (unstuffed)
- Layer chopped cabbage, browned filling, and sauce in the slow cooker.
- Cook on low until tender.
- If the sauce is too thin, crack the lid for the final stretch or stir in a small amount of tomato paste near the end.
Again, safe internal temperature guidance matters, especially when cooking ground meat. USDA’s references for ground beef and poultry/ground turkey are good citations to keep the recipe grounded.
Also Read: Whole Chicken in Crock Pot Recipe (Slow Cooker “Roast” Chicken with Veggies)
Freezing cabbage rolls, freezing cabbage for cabbage rolls, and meal prep that actually works
Cabbage rolls are one of the best “cook once, eat twice” dinners. They’re also one of the best “cook once, eat six times” dinners if you freeze them.
That matters, because meal prep is often where a low carb diet either becomes easy or becomes exhausting. When you have a freezer-friendly high-protein option that you genuinely enjoy, it’s much easier to stay consistent.
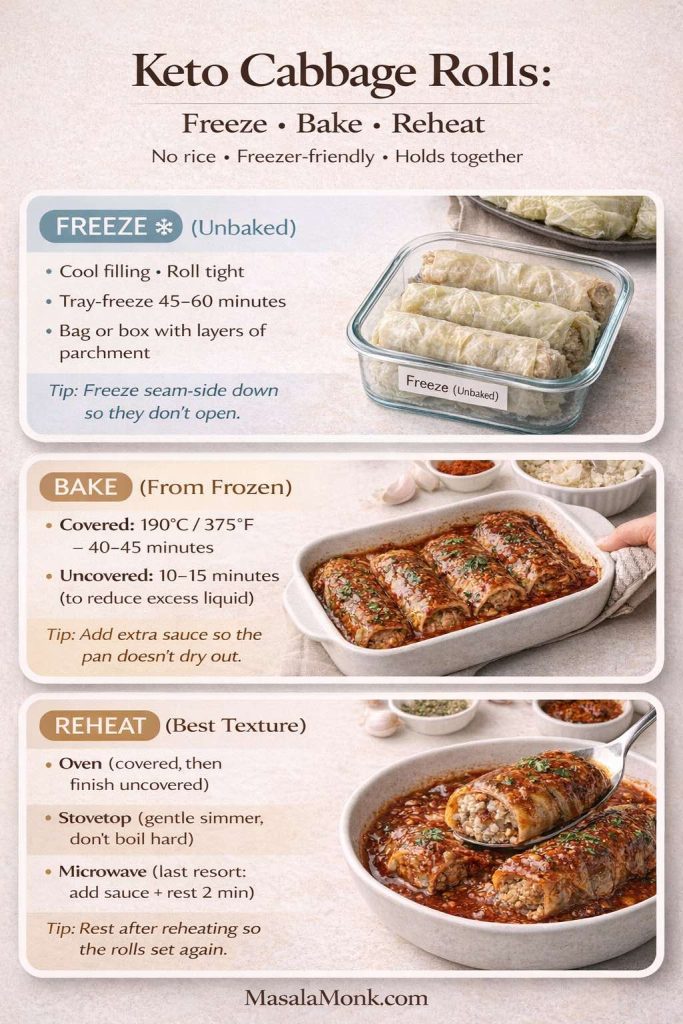
Freeze the cabbage (a simple prep trick)
If you haven’t tried it, freezing cabbage for cabbage rolls is one of the easiest prep hacks available. Freeze the whole head, thaw it, and the leaves become pliable. You can prep leaves on a calm day, then roll and cook later when you’re busy.
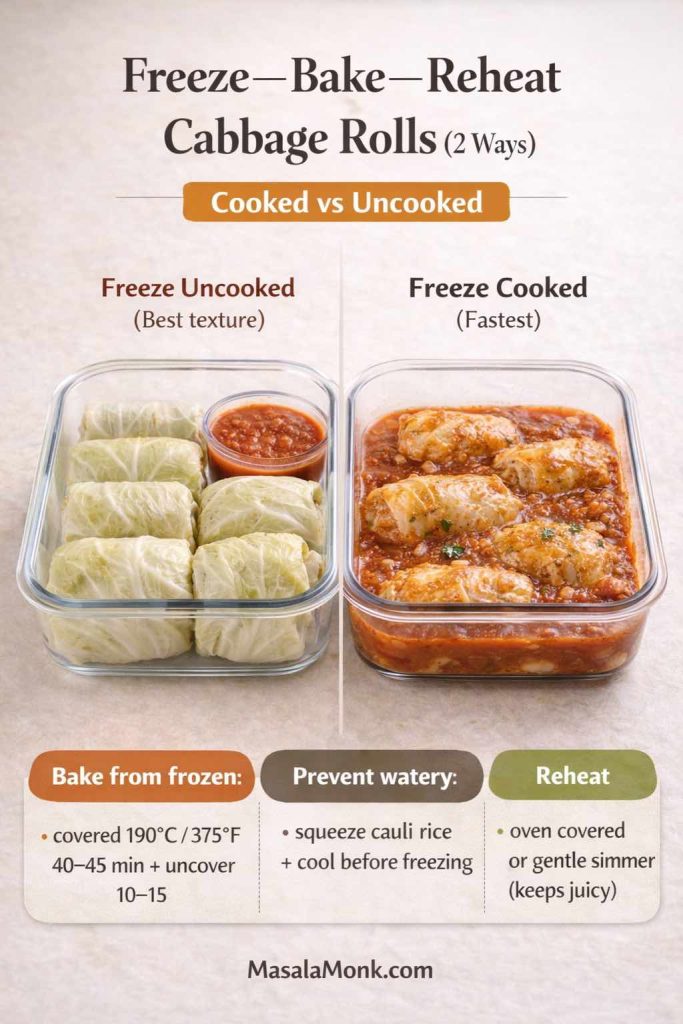
Freezing stuffed cabbage rolls (uncooked)
Freezing uncooked rolls often gives the best texture because everything cooks fresh later.
- Assemble the rolls in a freezer-safe dish.
- Pour sauce over.
- Wrap tightly.
- Freeze.
When you bake, you can cook from frozen, simply allowing extra time. Keep the dish covered so the sauce doesn’t evaporate too quickly before the center heats.
Freezing cabbage rolls (cooked)
Freezing cooked cabbage rolls is the convenience route:
- Let rolls cool fully.
- Portion with sauce.
- Freeze in containers.
To reheat, warm gently so the filling stays juicy rather than drying out. USDA’s guidance on leftovers and food safety and FoodSafety.gov’s temperature chart both support reheating leftovers to 165°F / 74°C for safety.
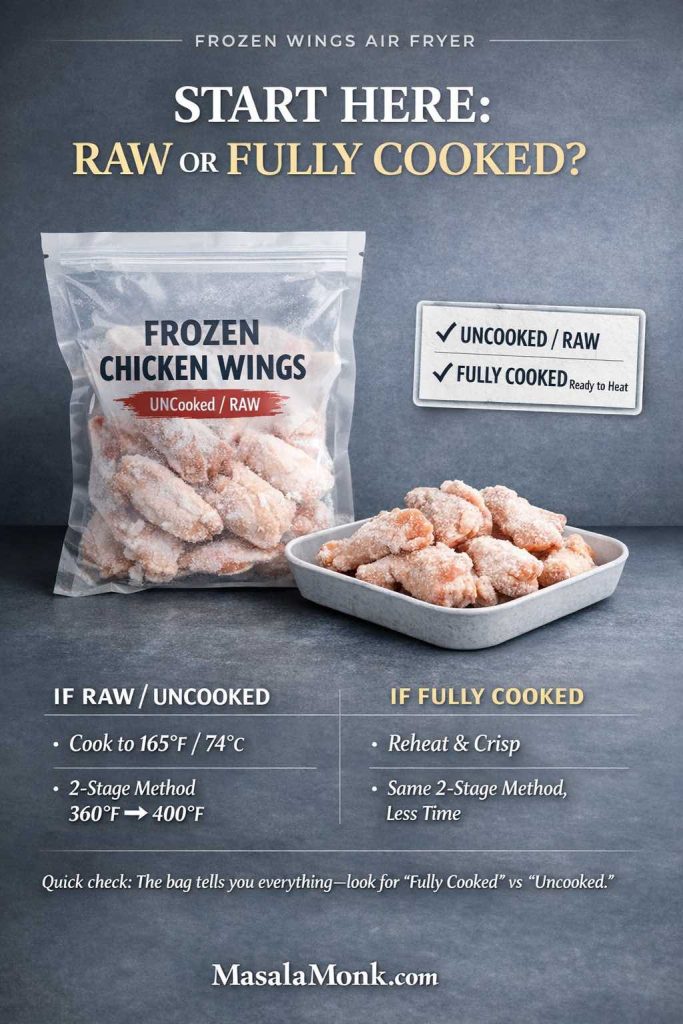
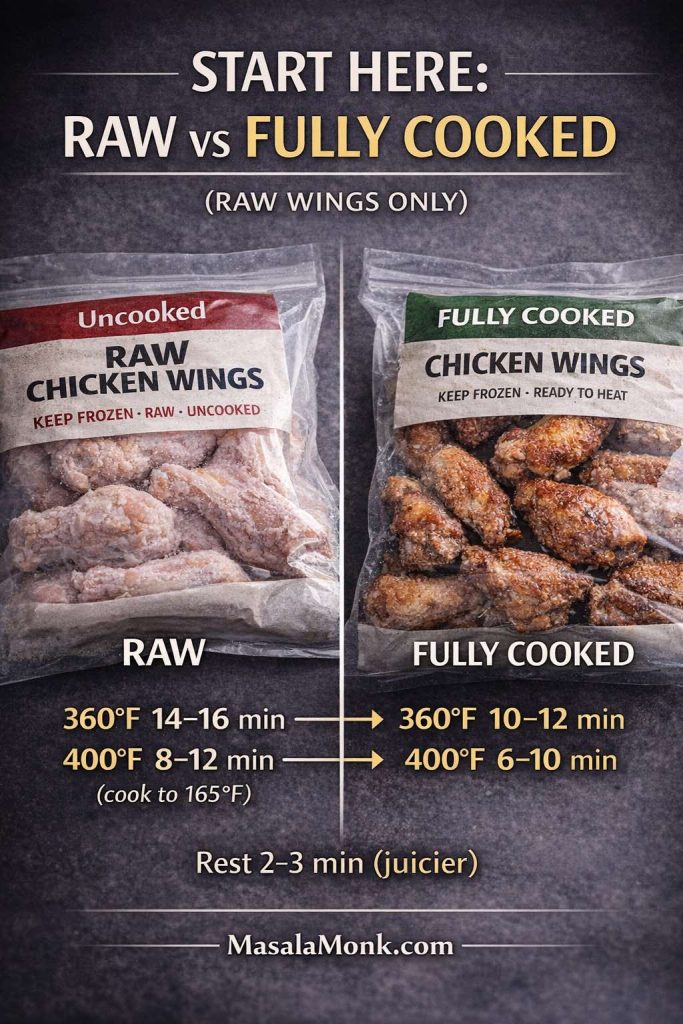
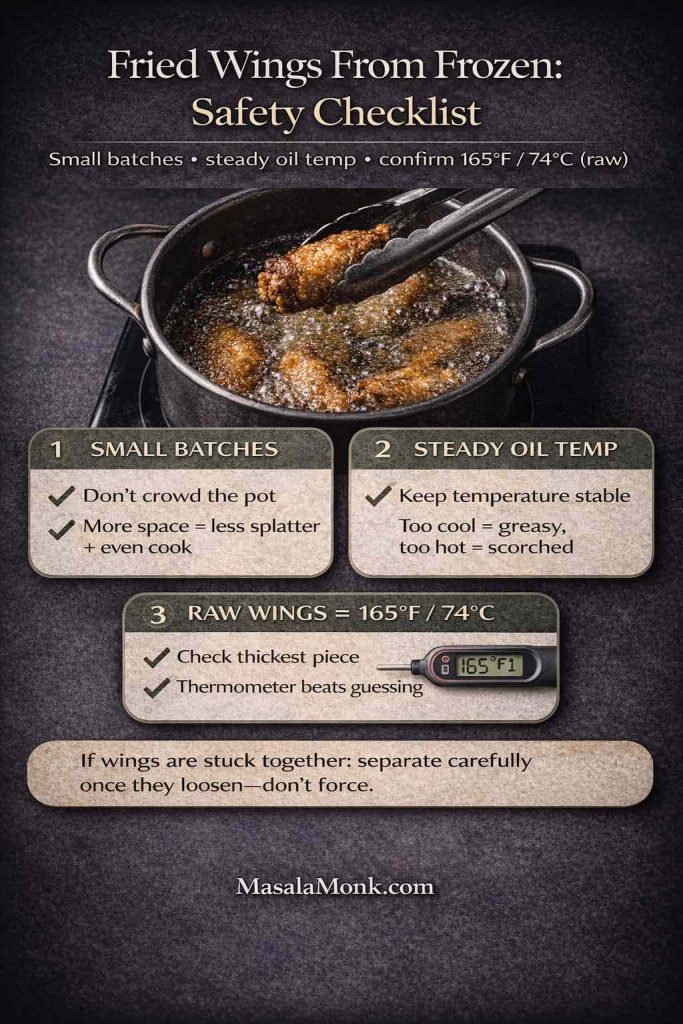
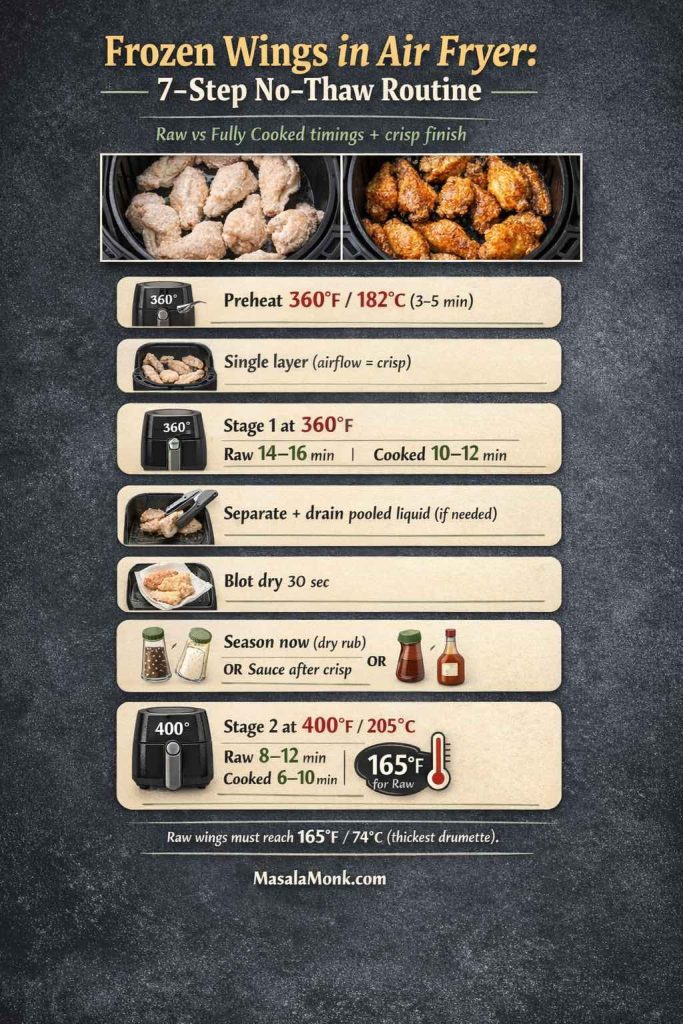
Also Read: Frozen Chicken Wings in Air Fryer (No Thaw) — Crispy From Frozen + Time & Temp
Vegan cabbage rolls, vegetarian cabbage rolls, and meatless stuffed cabbage that still feels hearty
Even though this post is built around keto cabbage rolls, it’s useful to include an option for households that mix diets. Maybe you’re eating low carb, while someone else wants a meatless version. Maybe you want a “lighter day” dinner that still has cabbage-roll comfort.
Vegan cabbage rolls and vegetarian cabbage rolls work especially well with napa cabbage or savoy cabbage, because the leaves are tender and the filling can be softer.

A vegan, cabbage-roll-style filling that works
For a plant-forward approach, the goal is to create a filling that’s savory and satisfying:
- Finely chopped mushrooms (for depth)
- Crumbled tofu (for protein)
- Cauliflower rice (for bulk)
- Garlic and paprika (for continuity with the main recipe)
- A binder such as ground flax mixed with water, if needed
You can bake these the same way, using the tomato sauce method above.
If you’re trying to keep a few plant-based, high-protein options in rotation, this list of plant-based protein sources for high-protein meal prep is full of practical ideas.
Cabbage wraps, cabbage roll ups, and “cabbage wrap meat” shortcuts
Not everyone wants full baked cabbage rolls. Sometimes you want something quicker—something closer to a cabbage wrap recipe than a casserole. That’s where cabbage wraps come in.
You can think of cabbage wraps as a lighter, fresher cousin to baked cabbage rolls. Instead of cooking the rolls in sauce for an hour, you’re wrapping a cooked filling in softened leaves, then serving with a spoonable sauce.
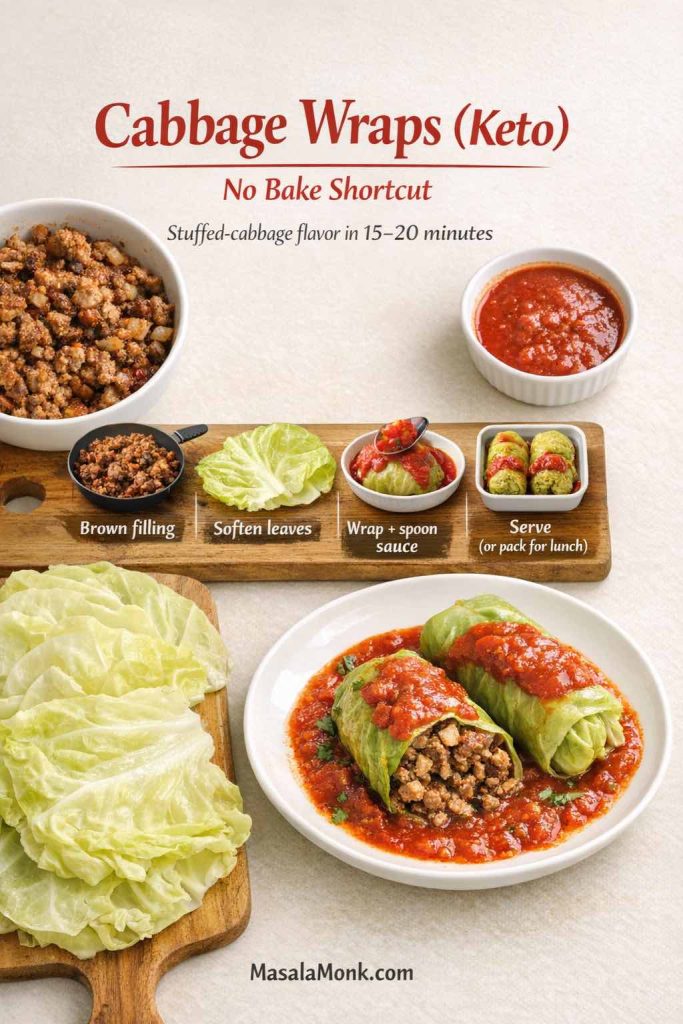
Quick cabbage wraps (keto-friendly)
- Brown ground beef with garlic and paprika.
- Make a quick sauce in the same pan (tomato + broth + paprika + olive oil).
- Spoon filling into softened cabbage leaves.
- Wrap and serve with sauce over top.
This gives you the comfort without committing to a baking dish. It’s also a great lunch format because the wraps hold together well in containers.
Also Read: Keto Fiesta: Spicing up Your Meals with Flavorful Taco Pie and Creative Toppings!
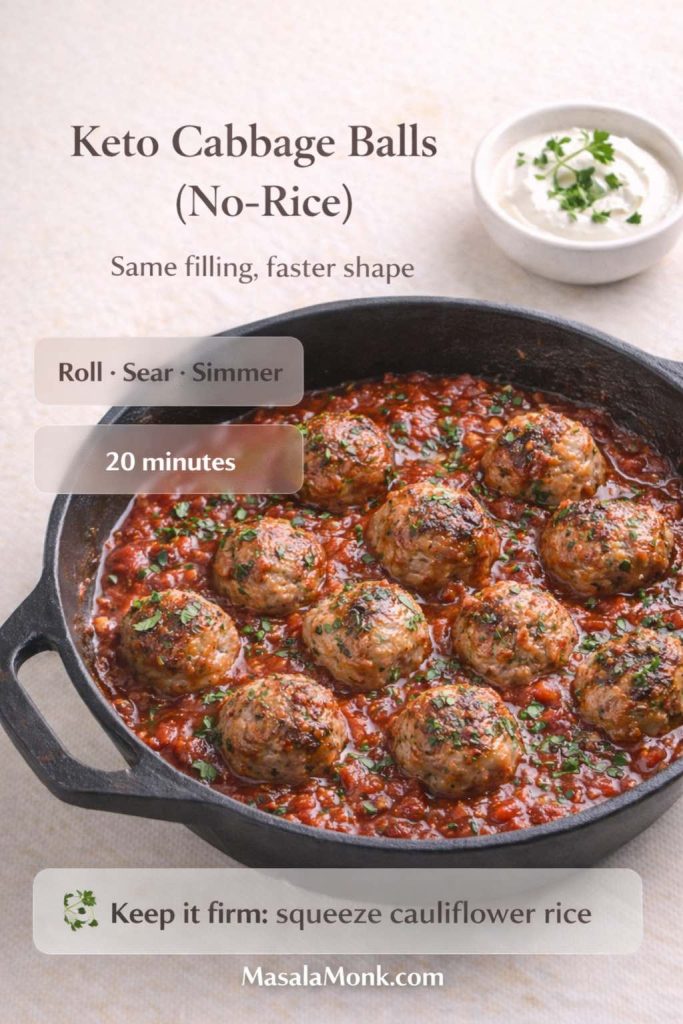
A note on “cabbage balls” and stuffed cabbage balls (when you want bite-sized comfort)
Cabbage balls show up in a few different traditions, and they’re essentially cabbage roll filling expressed as a small ball, sometimes wrapped partially in cabbage or simmered in sauce.
For a keto-friendly cabbage balls recipe approach, you can do this:
- Make the same garlic paprika filling.
- Roll it into small balls.
- Brown them quickly, then simmer in the tomato sauce until cooked through.
It’s the same flavor story, just a different shape. The advantage is speed: no leaf-by-leaf rolling. The tradeoff is that you lose some of the classic cabbage roll structure. Still, if someone loves the filling more than the wrap, cabbage balls can be a satisfying variation.
Also Read: Air Fryer Hard-Boiled Eggs (No Water, Easy Peel Recipe)
Making cabbage rolls taste “traditional” without being stuck in one tradition
Cabbage rolls are one of those foods where families are fiercely loyal to what they grew up with. One home might swear by sweet-and-sour Jewish stuffed cabbage. Another might prefer a paprika-forward Hungarian stuffed cabbage rolls recipe. Someone else might love sauerkraut-heavy Polish cabbage rolls. Meanwhile, German cabbage rolls and kohlrouladen recipes often lean into deeper, darker savory notes.
This garlic and paprika foundation sits comfortably in that broader family of flavors. Garlic shows up everywhere. Paprika bridges sweet and smoky. Tomato sauce ties the whole dish to the “stuffed cabbage” comfort zone.
So if you’ve been chasing a version that feels familiar—old fashioned cabbage rolls, traditional stuffed cabbage, classic cabbage roll recipe—this approach can scratch the same itch. It doesn’t claim to replace any one grandmother’s method. Instead, it gives you a dependable base with enough flexibility to feel personal.
Also Read: Baked Jalapeño Poppers (Oven) — Time, Temp & Bacon Tips
Serving ideas that keep cabbage rolls satisfying (and keto-friendly)
A pan of cabbage rolls is already a complete meal, yet the right side can elevate it:
- A crunchy slaw with a creamy dressing (again, eggless mayonnaise is handy as a base)
- A spoon of herb sauce like chimichurri for brightness
- A drizzle of olive oil and fresh herbs for the Mediterranean twist
- A sprinkle of parmesan or feta for richness
Keeping one good red sauce around makes weeknight dinners easier—cabbage rolls, skillet cabbage, meatballs, and more. If you like having options ready in the fridge, these pizza sauce recipes are worth saving.
Troubleshooting Cabbage Rolls that are Keto Friendly
Even with a solid recipe, cabbage rolls can go sideways if a few details are off. The fixes are straightforward, though, and once you know them, you rarely run into the same problem twice.
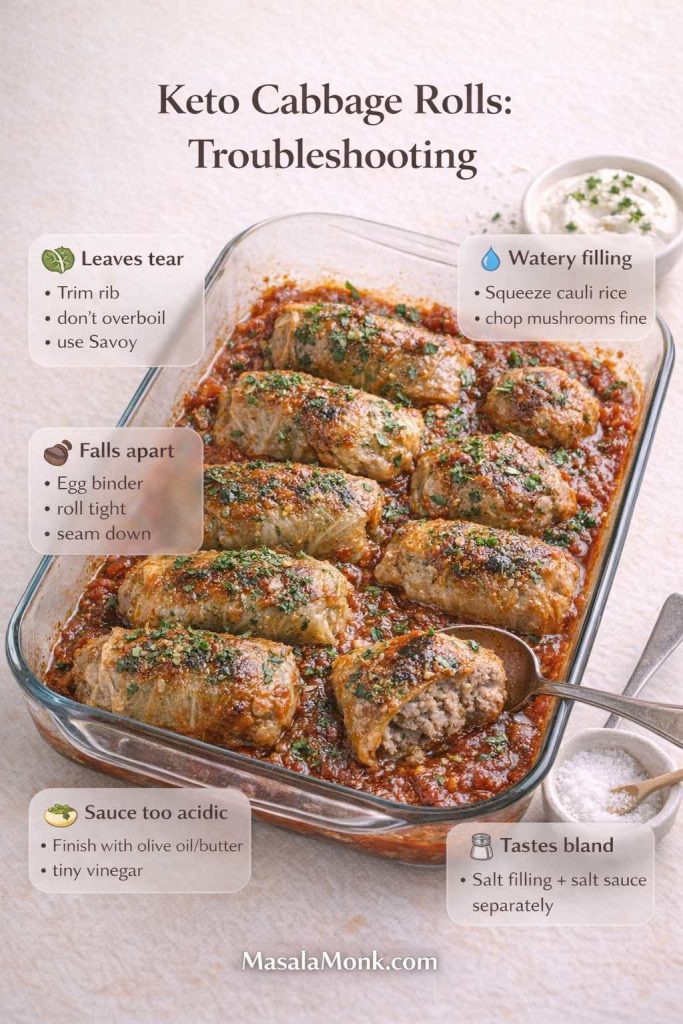
If your cabbage leaves tear
The rib is usually the culprit. Trim it thinner so the leaf lies flat. Also, don’t overboil; overcooked leaves tear easily. If tearing keeps happening, switch to savoy cabbage, which folds more gently.
If your filling turns watery
Frozen cauliflower rice often holds water. Thaw and squeeze it dry. Mushrooms can also release liquid, so chop them finely and mix them with the meat so they cook evenly inside the roll.
If your rolls fall apart
Use an egg binder, roll tightly, and always place seam-side down. If you’re making a casserole or soup version, this is less of a concern, which is one reason unstuffed cabbage roll casserole is so forgiving.
If the sauce tastes too acidic
Finish with olive oil or butter, and consider a small splash of vinegar to balance. It sounds counterintuitive, yet it often makes tomato taste smoother rather than sharper. If you want a citation that supports the choice of olive oil as a staple fat, Harvard Health’s piece on extra-virgin olive oil is a useful reference.
If the dish tastes bland
Salt is not optional here. Cabbage is mild, and meat needs seasoning to taste “finished.” Season the filling well, then season the sauce separately. Paprika also needs enough salt to taste like something rather than like colored dust.
Also Read: Keto Mocktails: 10 Low-Carb Recipes for Guilt-Free Happy Hour Indulgence
Bringing it all together: one template, many dinners
Once you’ve made the base recipe, you’ve effectively unlocked multiple meals:
- Oven baked keto cabbage rolls with garlic and paprika
- Unstuffed cabbage roll soup for weeknights
- Deconstructed cabbage roll casserole when you want comfort without rolling
- Skillet cabbage rolls when time is short
- Slow cooker cabbage rolls when you want hands-off cooking
- Freezer-friendly cabbage rolls for meal prep
- A vegan or vegetarian cabbage roll variation for mixed-diet households
- Sauerkraut and sour cabbage leaf styles when you want tang
- Spicy cabbage rolls when you want heat
- Mediterranean cabbage rolls when you want herbs and brightness
That’s the hidden power of this dish. It isn’t just a recipe for stuffed cabbage rolls; it’s a repeatable system. You’re learning how to cook cabbage leaves, how to build a filling that stays juicy without rice, and how to make a tomato sauce that tastes like comfort without relying on sweetness.
And because these rolls are so satisfying, they also make it easier to stick with low carb eating without feeling like you’re losing your favorite foods.
If you want to keep building a keto dinner rhythm after this, it can feel natural to explore other high-protein, low carb anchors—MasalaMonk’s beef recipes for a weight loss keto plan is a solid next stop, especially if you like dinners that reheat well and feel filling without being complicated.
Also Read: Keto pancakes that actually taste like pancakes
Full printable-style recipe (base + quick twist guide)
Garlic & Paprika Keto Cabbage Rolls (Base Recipe)
Serves: 6–8
Prep time: 30–45 minutes (depending on cabbage method)
Cook time: 55–75 minutes
Ingredients
- 1 large green cabbage (or savoy)
- 680 g / 1.5 lb ground beef (or turkey or pork)
- 3–5 cloves garlic, minced or grated
- 2 teaspoons paprika
- 1 teaspoon salt
- 1/2 teaspoon black pepper
- 1 1/2 cups cauliflower rice (squeezed dry if previously frozen)
- 1/2 cup finely chopped mushrooms (optional)
- 1 egg (optional)
- 1/3 cup grated parmesan (optional)
Sauce
- 2 cups crushed tomatoes or passata
- 1 cup broth
- 1 tablespoon tomato paste (optional)
- 1–2 tablespoons olive oil or butter
- 1 teaspoon paprika
- Garlic powder or an extra clove of garlic
- Salt and pepper
- Optional: splash of vinegar
Method
- Soften cabbage leaves using boiling, freeze-thaw, or microwave. Trim ribs so leaves fold easily.
- Mix filling ingredients gently until combined.
- Roll filling in leaves; place seam-side down in a baking dish.
- Whisk sauce and pour over rolls. Cover tightly.
- Bake at 190°C / 375°F until tender and cooked through. Uncover at the end for a thicker sauce, if desired.
- Rest briefly before serving so the rolls hold together better.
Safety note: USDA guidance recommends cooking ground beef to 160°F / 71°C and poultry/ground turkey to 165°F / 74°C—see USDA ground beef safety and USDA poultry safety. Leftovers should be reheated to 165°F / 74°C as referenced in USDA’s leftovers guidance and FoodSafety.gov’s temperature chart.
Quick twist guide (additions only)
- Smoky: add smoked paprika + cumin; finish sauce with vinegar
- Sauerkraut: layer rinsed, squeezed sauerkraut in the dish; optional caraway
- Sour-leaf style: brush leaves lightly with vinegar + salt; add dill or mint
- Spicy: add chili flakes + cayenne; finish with chili oil
- Mediterranean: add oregano + thyme; finish with olive oil, herbs, and optionally chimichurri or pesto
Also Read: How to Make Churros (Authentic + Easy Recipe)
FAQs
1) What are keto cabbage rolls?
Keto cabbage rolls are stuffed cabbage rolls made without rice or other high-carb fillers. Instead, the filling relies on meat, seasonings, and low-carb “bulk” like cauliflower rice or mushrooms, then everything bakes or simmers in a savory sauce until the cabbage turns tender and the filling stays juicy.
2) Can cabbage rolls be keto friendly even with tomato sauce?
Yes. Tomato-based sauce can still work for cabbage rolls that are keto compatible, especially when the flavor comes from garlic, paprika, broth, and fat—not added sugar. In practice, the sauce tastes comforting and rich without needing sweetness to feel complete.
3) What replaces rice in keto-friendly cabbage rolls?
Cauliflower rice is the closest stand-in for the texture of rice stuffed cabbage rolls. Meanwhile, finely chopped mushrooms add moisture and depth, almost like the filling simmered longer. Additionally, riced broccoli can work, and shredded zucchini can too—just squeeze it well so it doesn’t water out the filling.
4) Can I make cabbage rolls with uncooked rice on keto?
Not really. Cabbage rolls with uncooked rice (or cooked rice) are typically not low carb. If you love the “classic stuffed cabbage rolls with ground beef and rice” style, the keto approach is to keep the same seasonings and sauce while swapping rice for cauliflower rice or mushrooms.
5) Which meat works best for keto cabbage rolls: ground beef, turkey, or pork?
Ground beef gives the richest, most classic stuffed cabbage flavor and stays forgiving when baked. Ground pork turns especially juicy and savory, and paprika loves it. And then ground turkey is lighter, yet it usually benefits from extra fat and bolder seasoning so the filling doesn’t taste dry.
6) How do I keep keto cabbage rolls from falling apart?
First, roll tightly and place the rolls seam-side down. Next, trim the thick cabbage rib so the leaf folds smoothly. Also, using an egg binder can help, particularly if your filling is very lean or you’re using extra vegetables like mushrooms or zucchini.
7) What’s the easiest way to soften cabbage leaves for cabbage rolls?
Freeze-and-thaw is quietly one of the easiest methods: freeze the whole cabbage head, thaw it, and the leaves become pliable. Otherwise, boiling works reliably, and the microwave method is fast for smaller batches. Either way, trimming the rib makes rolling far easier.
8) Can I make cabbage rolls with frozen cabbage?
Yes. Cabbage rolls with frozen cabbage work well if the cabbage is thawed fully and the leaves are handled gently. In fact, freezing cabbage for cabbage rolls is a common prep trick because it softens the leaves without a big pot of water.
9) Are cabbage rolls healthy?
They can be, especially when the filling is high-protein and the sauce is balanced. Cabbage rolls healthy versions often focus on leaner meat, more vegetables, and a sauce that isn’t sugar-heavy. Even so, richer versions can still fit well in a low carb or keto diet when portions are sensible.
10) How long do cabbage rolls cook in the oven?
Cabbage rolls in oven typically take around 55 to 75 minutes at 375°F / 190°C, depending on roll size, cabbage thickness, and the meat used. If you make smaller rolls or use thinner leaves, they may finish sooner.
11) Can I make stuffed cabbage rolls in the oven ahead of time?
Absolutely. Assemble the rolls, cover tightly, and refrigerate. Then bake when needed. Because the flavors deepen after resting, homemade stuffed cabbage rolls often taste even better the next day.
12) What is unstuffed cabbage roll soup?
Unstuffed cabbage roll soup is the same comfort flavor—cabbage, meat, garlic, paprika, and tomato—without rolling. It’s also called stuffed cabbage roll soup, cabbage roll soup recipe, unrolled cabbage soup, or simply cabbage roll soup, depending on how people describe it.
13) How do I make easy cabbage roll soup recipe style but keto-friendly?
Brown ground meat with garlic and paprika, add chopped cabbage, then pour in crushed tomatoes and broth. Simmer until tender. Finally, stir in cauliflower rice near the end so it keeps a pleasant bite instead of turning mushy.
14) What is a cabbage roll casserole?
Cabbage roll casserole is a deconstructed version of stuffed cabbage—everything layered or mixed in one dish. You’ll also see it called unrolled cabbage casserole, stuffed cabbage roll casserole recipe, cabbage rolls casserole layered, or deconstructed cabbage roll casserole.
15) Can I make cabbage roll casserole crock pot style?
Yes. Slow cooker stuffed cabbage casserole is a popular option because it’s hands-off. Brown the meat first for better flavor, then layer cabbage, filling, and sauce in the crock pot. Since slow cookers trap moisture, start with a slightly thicker sauce.
16) What’s the fastest “cabbage roll in a bowl” method?
Skillet cabbage rolls—often called cabbage roll in a skillet or cabbage roll in a bowl—are the quick route. Brown meat with garlic and paprika, add shredded cabbage, stir in tomato and broth, then simmer until everything becomes saucy and tender.
17) Can I freeze cabbage rolls for meal prep?
Yes, cabbage rolls for freezing are one of the best meal-prep moves. You can freeze them cooked or uncooked. Cooked rolls are convenient for quick reheating, whereas uncooked rolls often give the best texture after baking.
18) How do I freeze stuffed cabbage rolls without getting watery?
Squeeze moisture from cauliflower rice and any watery vegetables like zucchini. Cool cooked rolls fully before freezing. Also, freeze portions with sauce so the filling stays juicy instead of drying out.
19) Can I cook frozen cabbage rolls without thawing?
Yes. Frozen cabbage rolls can bake from frozen; they simply need extra time. Keep them covered so the sauce doesn’t reduce too quickly before the center heats through.
20) What are cabbage balls, and are they keto friendly?
Cabbage balls are basically stuffed cabbage filling shaped into bite-sized portions, then simmered or baked in sauce. For a keto-friendly cabbage balls recipe, keep the same garlic-paprika filling and skip rice, using cauliflower rice or mushrooms for bulk instead.
21) Are there vegetarian cabbage rolls or vegan cabbage rolls that still feel hearty?
Yes. Vegetarian cabbage rolls and cabbage rolls vegan versions often use mushrooms for depth, cauliflower rice for bulk, and a protein base like tofu or a mix of nuts and seeds. The sauce and seasonings do a lot of the “comfort” work, so the result can still feel satisfying.
22) What’s the difference between sarma rolls, gołąbki, and galumpkis?
They’re all cabbage roll traditions with regional differences. Sarma rolls often use sour cabbage leaves and can have a tangier profile. Gołąbki refers to Polish cabbage rolls, commonly with meat and rice. Galumpkis is another name used for Polish-style stuffed cabbage rolls, especially in North American kitchens.
23) What are German cabbage rolls and kohlrouladen?
German cabbage roll recipes often lean savory and rich, and the term kohlrouladen usually refers to cabbage leaves stuffed with meat, then braised until tender. Even when the seasoning style differs, the method overlaps closely with classic stuffed cabbage.
24) What makes “old fashioned cabbage rolls” taste like the classic version?
Classic cabbage roll recipes usually rely on well-seasoned meat, tender cabbage, and a sauce that simmers long enough to meld everything. Even when you remove rice for keto-friendly cabbage rolls, keeping the same garlic, paprika, onion, and tomato comfort notes preserves that traditional feel.
25) Why do some cabbage roll recipes taste like tomato soup?
That “cabbage rolls in tomato soup” flavor happens when tomato, broth, and fat balance each other. Tomato gives sweetness and acidity, broth adds savory backbone, and fat rounds off sharpness so the sauce tastes smooth and comforting.
26) How do I make cabbage wraps instead of baked cabbage rolls?
Cabbage wraps are a quicker approach: cook the filling first, soften leaves, then wrap and serve with sauce spooned over top. It’s a useful shortcut when you want cabbage wrap meat style comfort without a long bake.
27) What’s the best cabbage for stuffed cabbage rolls?
Green cabbage is the most forgiving and sturdy for rolling. Savoy cabbage is more flexible and easier to fold, which helps if tearing is a problem. Napa cabbage is tender and great for vegan cabbage rolls, although it can be more delicate.
28) Why are my cabbage rolls bland, even with paprika?
Cabbage is mild, so seasoning has to be strong enough to carry through. Salt matters more than most people expect, and paprika needs salt to taste like something rather than just color. Also, season both the filling and the sauce separately for the best result.
29) Can I make “best cabbage roll recipe ever” style flavor on keto?
Yes—because “best stuffed cabbage recipe ever” usually means juicy filling, tender cabbage, and a sauce that tastes deep and balanced. You can keep that same goal while swapping rice for low-carb bulk and leaning into garlic and paprika for bold flavor.
30) How do I make keto cabbage rolls feel more filling for weight loss?
Prioritize protein, include enough fat to keep the filling satisfying, and don’t skimp on sauce because it prevents dryness. Also, pairing cabbage rolls with a crunchy low-carb side (like slaw) can make the meal feel larger without adding many carbs.