Have you ever felt tired for no clear reason? Or noticed your bones and joints feeling weaker than they should at your age? Many of us brush these off as “just aging” or “too much work stress.” But more often than we realize, the culprit is Vitamin D deficiency.
In India, this is becoming a silent epidemic — despite having plenty of sunlight, lifestyle, pollution, and diet habits mean up to 70–80% of Indians are deficient in Vitamin D. And the scary part? The deficiency doesn’t just affect bones — it’s tied to immunity, mood, skin, and even heart health.
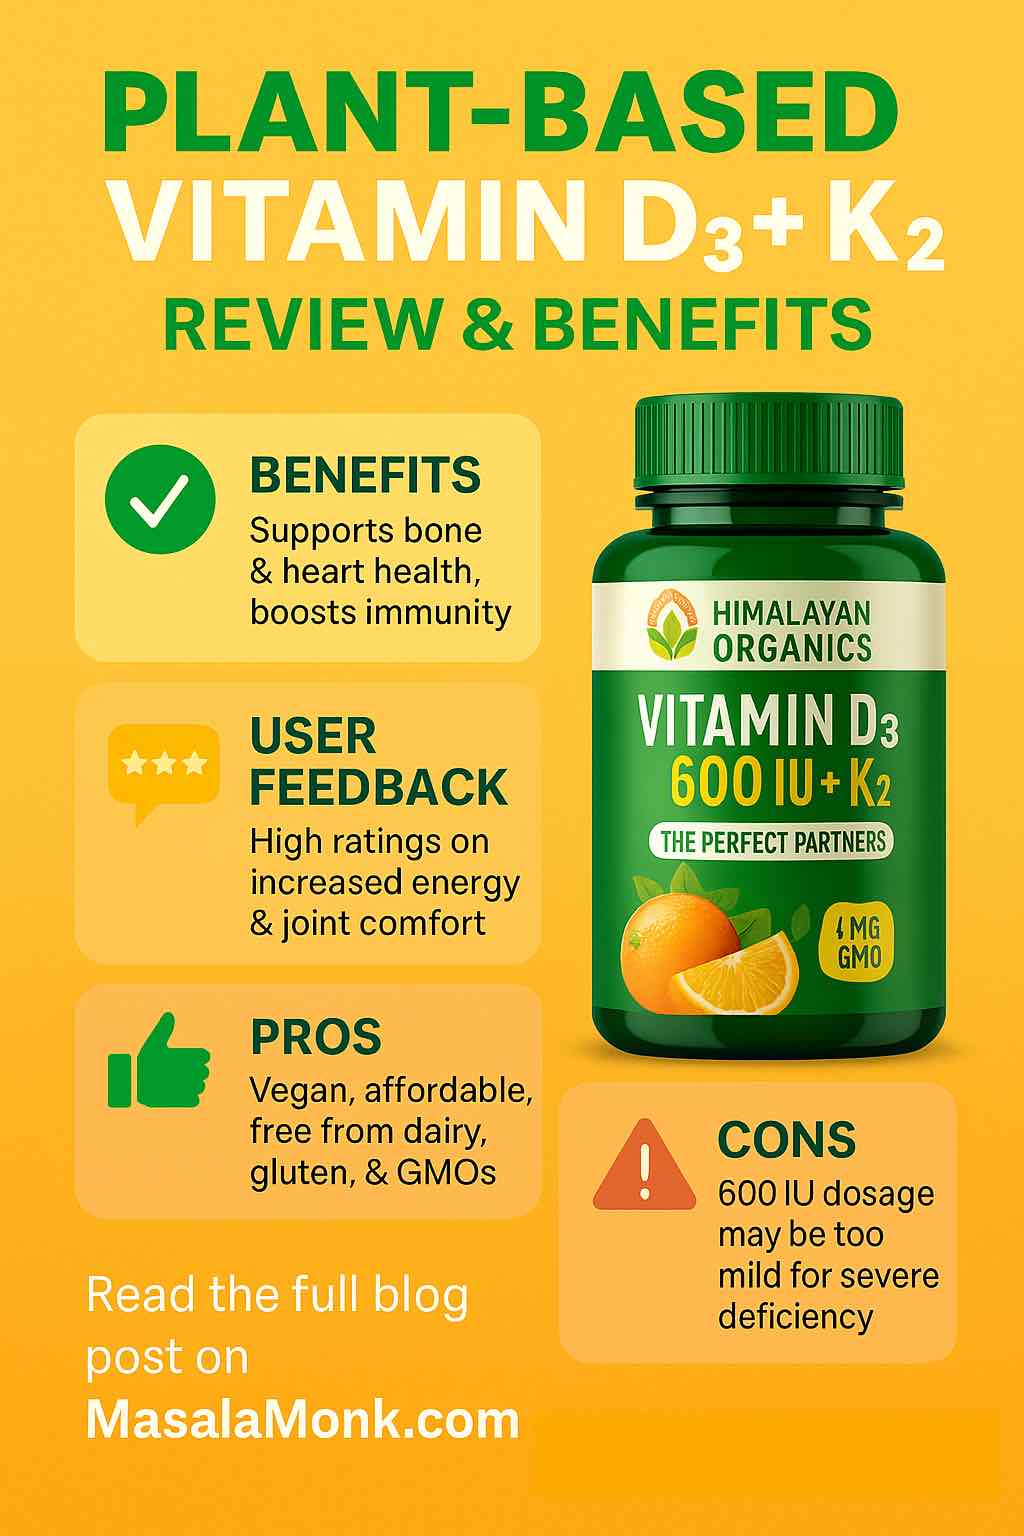
That’s where Vitamin D supplements come in. But choosing the right one is not simple. This is why today, we’re breaking down one of the most popular vegan-friendly options on Amazon India: Vlado’s Himalayan Organics Vitamin D₃ + K₂ (MK-7).
Unlike most standalone Vitamin D capsules, this one combines:
Vitamin D₃ (600 IU) – supports calcium absorption and immunity
Vitamin K₂ (MK-7) – helps calcium reach your bones (instead of clogging your arteries)
This is important. Without K₂, extra calcium absorbed by D₃ may end up in places you don’t want — like arteries and kidneys. Together, D₃ + K₂ act like teammates: one brings calcium in, the other sends it to the right place.
On top of that, Himalayan Organics markets this as:
We dug through dozens of reviews on Amazon India, Nykaa, and Flipkart, and here’s the reality:
⭐ 4.7/5 stars overall (very high for supplements)
✅ People love it for:
Feeling less tired and more energetic
Easing joint stiffness and mild bone pain
Being vegan-friendly and affordable compared to imported brands
⚠️ The not-so-great bits:
A few people felt the 600 IU dose was too mild if they had a clinically diagnosed deficiency (they needed stronger prescriptions).
Rare side effects like mild rashes or stomach upset — though not common.
One review summed it up well:
“I sit in an office all day, and my doctor told me my Vitamin D was low. After 3 months on this, I feel lighter, less tired, and my knees don’t ache when I climb stairs. It’s not magic, but it works.”
The Bigger Picture: Why This Supplement Stands Out
What we liked most is that this is not just another “Vitamin D pill.” The fact that it combines D₃ with K₂ makes it a smarter, safer, and more effective choice — especially for long-term use.
It’s not about quick fixes. It’s about keeping your body strong, resilient, and future-proofed against the hidden dangers of deficiency.
Final Verdict
If you’re someone who:
Wants a vegan-friendly, safe, daily supplement
Struggles with low energy, bone/joint weakness, or limited sunlight
Is looking for prevention and maintenance rather than high-dose treatment
1. What makes Vitamin D₃ and K₂ a good combination?
Vitamin D₃ improves calcium absorption, while K₂ directs that calcium into bones and teeth instead of arteries or soft tissues. Together, they prevent calcium buildup in the wrong places and improve bone strength.
Yes, it is 100% plant-based and vegan-friendly, free from dairy, gluten, soy, and GMOs.
3. How much Vitamin D₃ does this supplement provide?
Each tablet provides 600 IU of Vitamin D₃, which is suitable for daily maintenance but may not be enough for people with severe deficiency.
4. Who should consider taking this supplement?
It’s best for:
Vegans and vegetarians
People with limited sunlight exposure (office workers, students, homemakers)
Middle-aged and elderly individuals for bone/joint support
Anyone looking for long-term, safe supplementation
5. Can I take this supplement if I already consume calcium tablets?
Yes, but be cautious. Since Vitamin D₃ improves calcium absorption, consult your doctor if you are already on calcium supplements to avoid excessive intake.
6. How long does it take to see results?
Most users report noticeable improvements in energy, mood, and joint comfort within 6–12 weeks of consistent use.
7. Are there any side effects?
Side effects are rare, but a few users have reported mild stomach upset or rashes. Always take with meals and avoid doubling up with other Vitamin D supplements.
8. Is this supplement enough for severe Vitamin D deficiency?
No. Severe deficiencies (serum Vitamin D < 10 ng/ml) often require high-dose Vitamin D (2000–5000 IU) prescribed by a doctor. This supplement works best for maintenance and prevention.
9. What’s the best time to take this supplement?
Take it with a meal containing healthy fats (like nuts, seeds, or dairy alternatives) for better absorption. Morning or afternoon is ideal.
10. Can I take this supplement long-term?
Yes, it’s designed for safe, long-term daily use. Regular blood tests every 6–12 months can help track your Vitamin D levels.
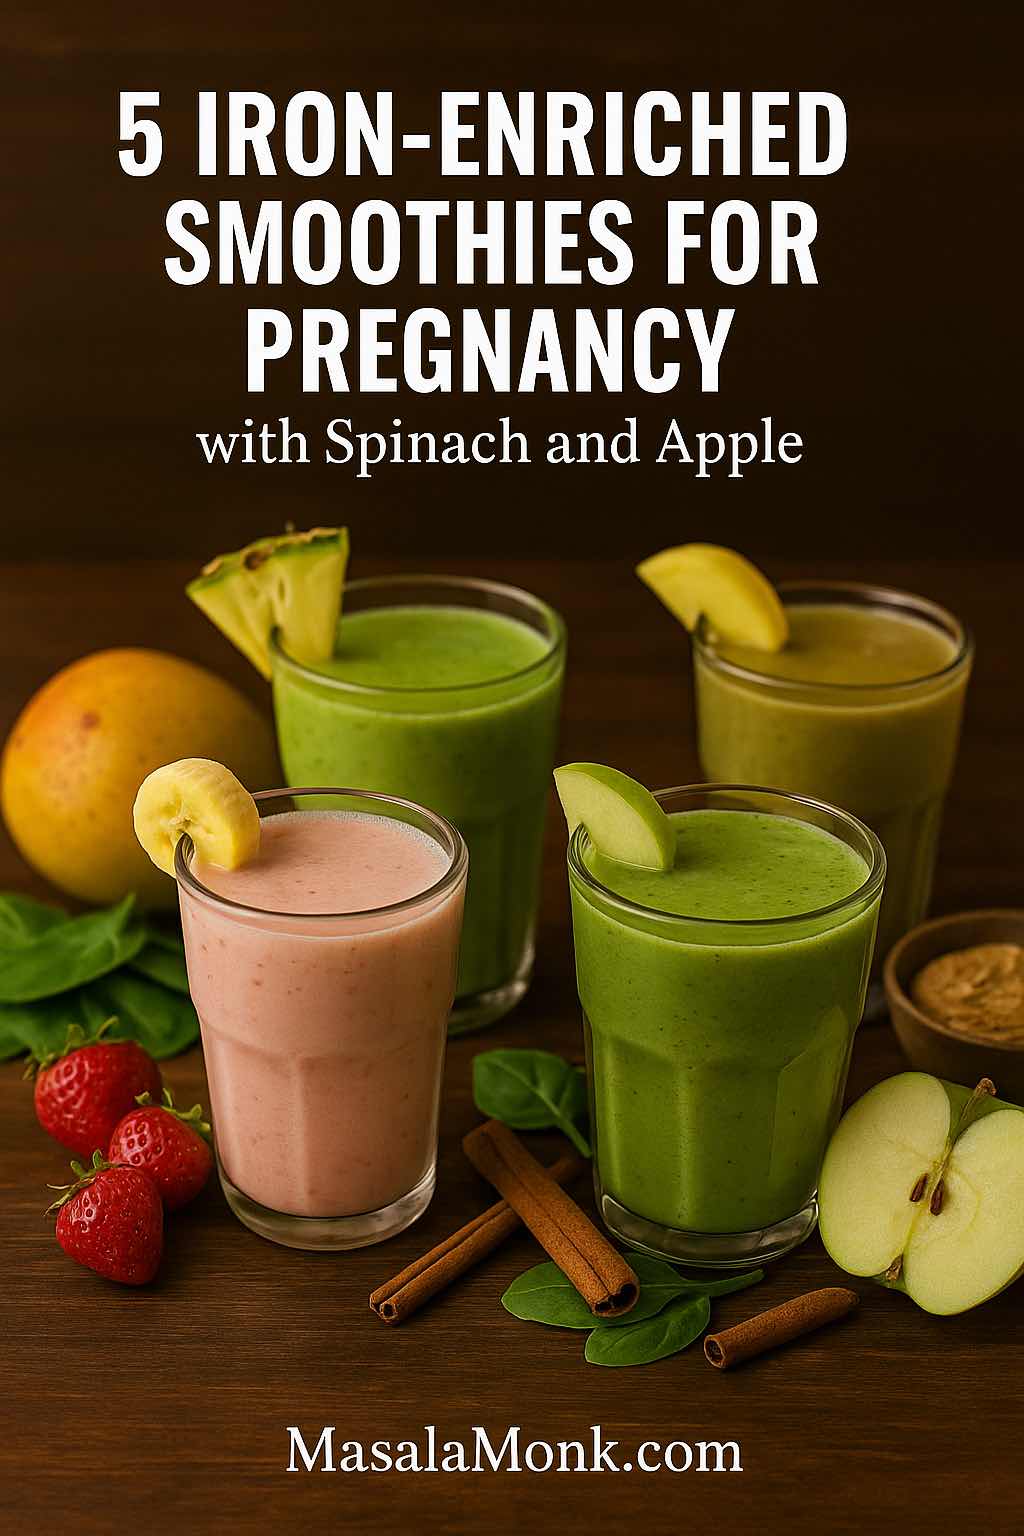
Delicious, nutrient-dense blends to nourish you and your baby
The Pregnancy Iron Story: Why It’s More Than Just a Mineral
Pregnancy is often described as a journey, but your body might think of it as a construction project — and building a brand-new human takes a lot of materials. One of the most important? Iron.
By the time you reach the second trimester, your blood volume has increased by up to 50%. This means your body is producing more hemoglobin (the protein in red blood cells that carries oxygen), and that process depends on iron. Without enough of it, your energy dips, your immune system weakens, and you may find yourself dealing with iron-deficiency anemia — a common challenge in pregnancy.
The good news? You don’t have to choke down dry spinach leaves or chew on plain beets to meet your needs. Smoothies are a fast, flavorful, and very pregnancy-friendly way to boost your daily intake.
The Science of Iron Absorption — and How to Hack It in a Smoothie
Iron comes in two forms:
Heme iron — from animal sources, easily absorbed.
Non-heme iron — from plant sources (like spinach), a little trickier for your body to use.
Since these recipes focus on plant-based sources, the key is to pair your iron with vitamin C. Vitamin C acts like a VIP pass for iron, helping your body absorb more of it. Think oranges, strawberries, kiwi, mango, pineapple — all smoothie-friendly ingredients.
Smart smoothie hacks for better iron uptake:
Add citrus juice, berries, or tropical fruit to every green smoothie.
Skip tea, coffee, and large doses of dairy for at least an hour before and after your smoothie (tannins and calcium block absorption).
Don’t be afraid of flavor — sweet fruits, nut butters, cocoa powder, and spices can transform greens into crave-worthy blends.
Why Spinach and Apple Make the Perfect Iron-Boosting Duo
Spinach — rich in non-heme iron, folate (critical for early brain development), vitamin K, and antioxidants. Baby spinach is especially mild and blends into smoothies without a strong “green” taste.
Apple — a natural source of vitamin C, fiber for digestion, and gentle sweetness. Apples also pair well with almost any fruit or spice, making them a versatile smoothie base.
Together, they create a nutritional foundation that’s easy to build on with pregnancy-friendly boosters like chia seeds, tofu, beets, or oats.
From real moms’ stories and nutrition experts’ tips, we’ve learned that these smoothies aren’t just about hitting nutrient goals — they can feel like little moments of relief in your day.
Morning sickness helper: Cold, fruity blends can be easier to handle when warm meals feel overwhelming.
Energy lifter: Iron + complex carbs + healthy fats = more steady energy for long workdays or active toddlers.
Digestive support: The fiber and hydration in smoothies help keep things moving — a big deal during pregnancy.
Mood boost: There’s something satisfying about sipping a colorful, delicious drink you know is nourishing your baby.
What We Learned from Real Pregnant Women
In pregnancy forums, women rave about certain smoothie combos that made a difference for them:
“The chocolate peanut one got me through my first trimester.” “Frozen mango and pineapple make spinach disappear — tastes like vacation.” “Adding a squeeze of lemon made my green smoothies taste brighter and boosted my iron.”
These aren’t just tasty — they’re practical. Real experiences show that when a smoothie tastes good, you’ll actually want to drink it every day, which is the secret to making nutrition a habit.
5 Iron-Enriched Smoothies for Pregnancy with Spinach & Apple
Flavor-packed recipes to nourish you and your baby every day
These smoothies aren’t just iron-rich — they’re designed for real life in pregnancy. That means easy prep, no weird aftertastes, and ingredients you can find in a regular grocery store. Each one pairs spinach’s plant-based iron with vitamin C boosters for maximum absorption, while balancing flavor, energy, and digestion needs.
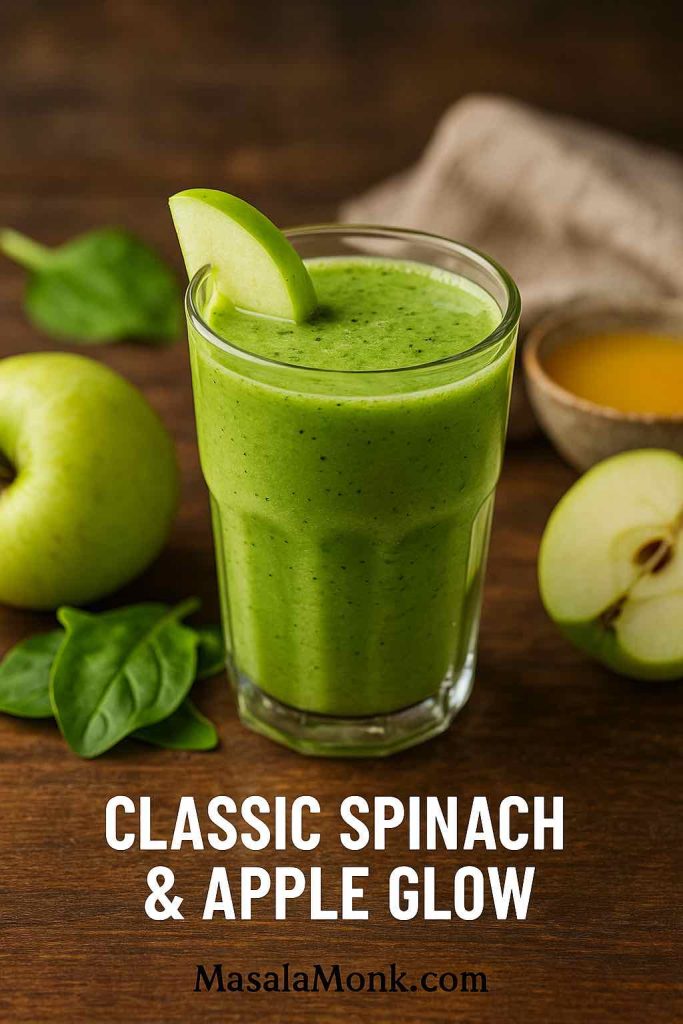
1. Classic Spinach & Apple Glow
Bright, crisp, and easy to drink — even if you’re feeling queasy.
Ingredients
1 cup fresh baby spinach (washed)
1 green apple, cored and chopped (keep the peel for extra fiber)
½ banana (for creaminess and vitamin B6, which may help with morning sickness)
½ cup fresh orange juice (vitamin C for iron absorption)
½ cup water or unsweetened almond milk
Ice, as needed
“Glow from within with the Classic Spinach & Apple Glow — a crisp, refreshing green smoothie packed with fiber, antioxidants, and detox-friendly goodness.”
Method
Add the spinach and liquid to your blender first — this helps break down the greens completely.
Toss in the apple, banana, and orange juice.
Blend until smooth, adding ice if you prefer it chilled and slightly thicker.
Pregnancy pro tips:
If citrus is too strong for your stomach early in pregnancy, swap orange juice for pineapple juice — still high in vitamin C but a bit gentler.
Make freezer packs of spinach + chopped apple + banana so you can just pour in juice and blend.
Why it works: This is the “starter” green smoothie — mild flavor, gentle on the stomach, and a good balance of iron, folate, and fiber. The vitamin C from the orange juice helps your body use the iron from spinach more effectively.
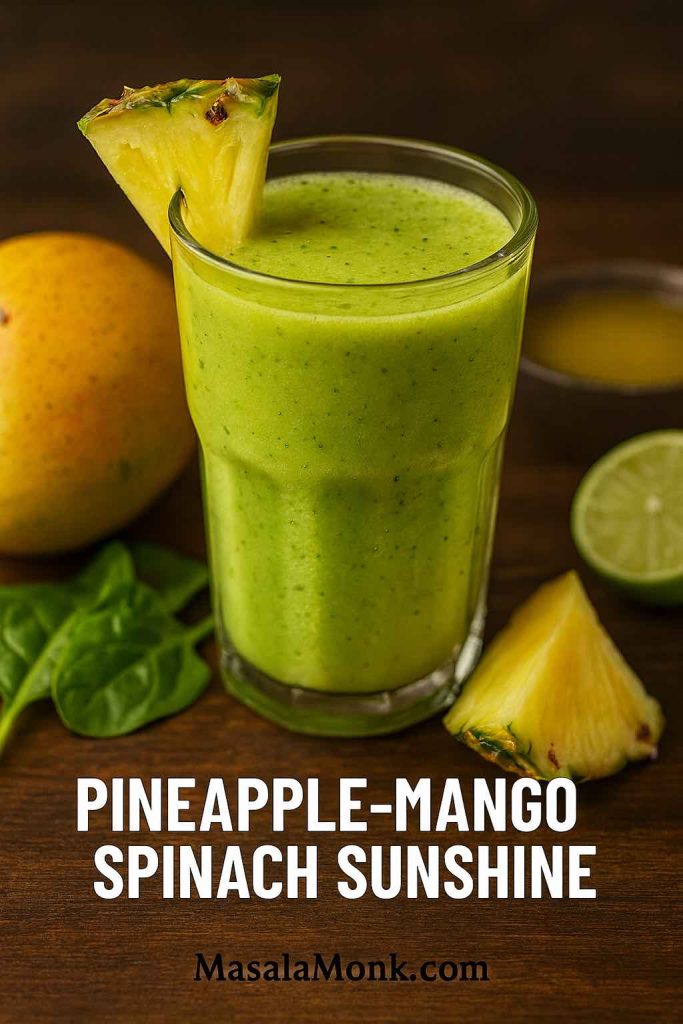
A tropical energy boost that hides every trace of spinach.
Ingredients
1 cup baby spinach
1 cup frozen mango chunks (vitamin C powerhouse)
½ cup pineapple chunks (extra vitamin C + bromelain for digestion)
Juice of ½ lime
½ cup coconut water (hydrating electrolytes)
“Brighten your morning with a tropical Pineapple-Mango Spinach Sunshine smoothie — bursting with vitamin C, leafy greens, and natural sweetness.”
Method
Blend spinach and coconut water first for a smoother texture.
Add mango, pineapple, and lime juice.
Blend until thick, creamy, and sunshine-yellow.
Pregnancy pro tips:
Frozen fruit keeps the smoothie icy without watering it down.
Add 1–2 tbsp chia seeds if you want extra omega-3s and fiber to help with pregnancy constipation.
Why it works: This is the “I can’t taste the greens” smoothie. It’s ideal for days when your taste buds are picky but you still want an iron-rich, vitamin-packed drink. The tropical sweetness also feels refreshing during hot afternoons or post-walk cooldowns.
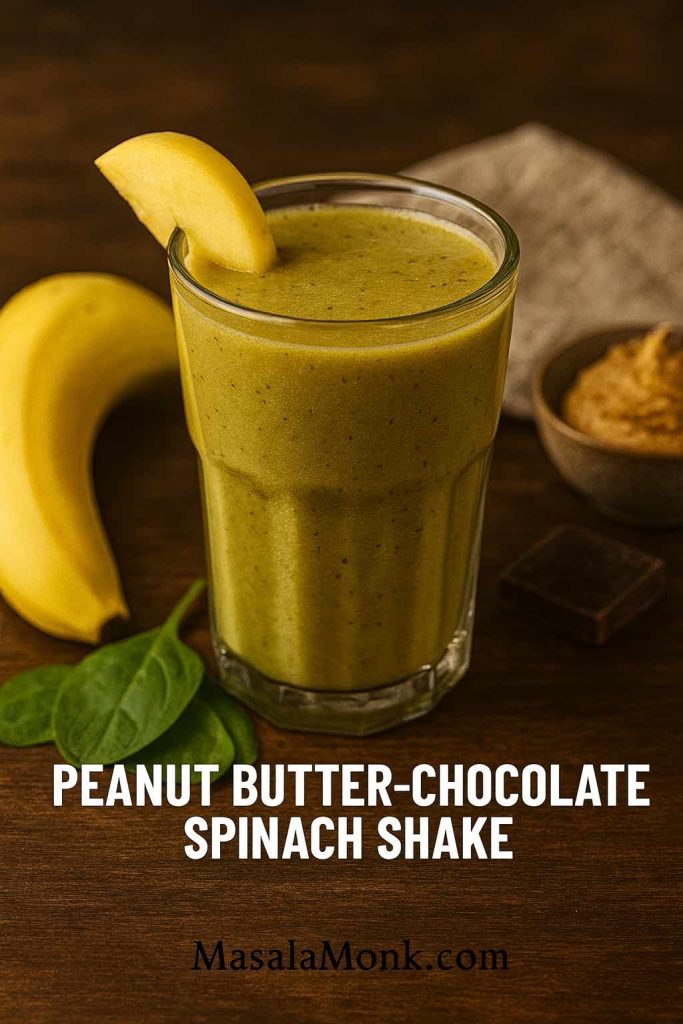
1 tsp unsweetened cocoa powder (iron-rich and antioxidant-packed)
¾ cup oat milk or almond milk
“Fuel your day with a creamy Peanut Butter-Chocolate Spinach Shake — packed with protein, greens, and rich chocolate flavor for a deliciously healthy energy boost.”
Method
Add spinach and milk to blender, blitz until smooth.
Add banana, peanut butter, and cocoa powder.
Blend until thick and milkshake-like.
Pregnancy pro tips:
If you need more calories in the second or third trimester, add 1–2 dates for sweetness and extra iron.
A sprinkle of cinnamon on top can help balance blood sugar.
Why it works: The cocoa and peanut butter completely hide the spinach flavor. You get iron from the spinach and cocoa, plus sustained energy from protein and healthy fats — perfect as a mid-morning or post-nap pick-me-up.
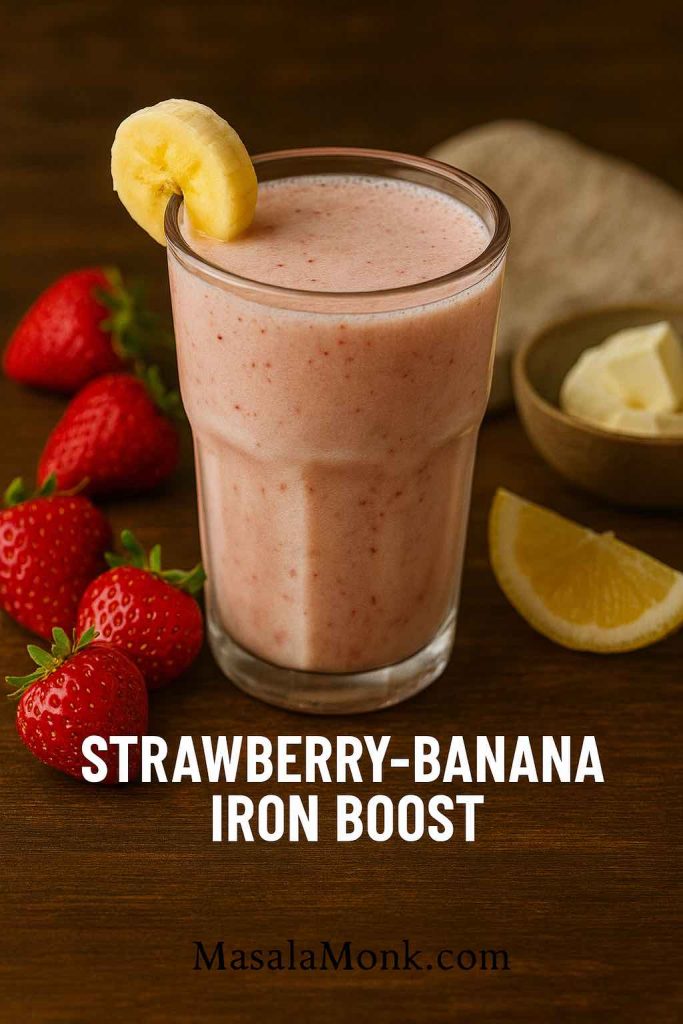
Smooth, protein-rich, and gentle for sensitive tummies.
Ingredients
1 cup strawberries (fresh or frozen — both are high in vitamin C)
1 banana
½ cup silken tofu (plant-based protein + iron)
Juice of ½ lemon
½ cup almond milk
“Refresh and recharge with this Strawberry-Banana Iron Boost — a naturally sweet, vitamin-rich smoothie that supports energy and healthy iron levels.”
Method
Blend all ingredients until silky smooth.
Adjust sweetness with a drizzle of honey or a date if needed.
Pregnancy pro tips:
Silken tofu blends invisibly, adding creaminess without altering taste.
Keep frozen strawberries on hand for easy prep and a frostier texture.
Why it works: This is a perfect breakfast smoothie — it’s filling, rich in iron and protein, and the lemon juice keeps flavors fresh while improving iron absorption. Great for days when you want something mild but nutrient-dense.
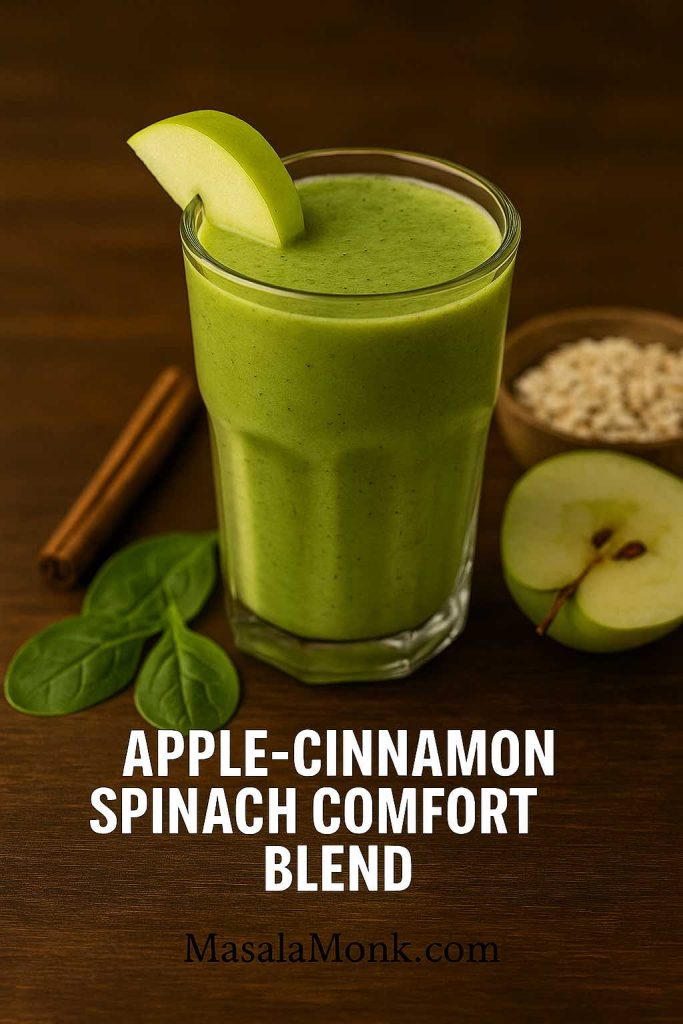
Cozy, spiced, and perfect for cooler mornings or post-dinner cravings.
Ingredients
1 cup spinach
1 apple, chopped (leave the peel for more fiber)
½ tsp cinnamon (balances blood sugar and adds warmth)
½ cup unsweetened applesauce (natural sweetness + extra apple flavor)
½ cup water or oat milk
“Cozy up with the Apple-Cinnamon Spinach Comfort Blend — a warm, spiced green smoothie rich in fiber, iron, and antioxidants, perfect for cooler days.”
Method
Blend spinach with your liquid until smooth.
Add apple, applesauce, and cinnamon.
Blend again until creamy; warm slightly on the stove if you want a “warm smoothie” for winter mornings.
Pregnancy pro tips:
For extra iron, toss in 1–2 tsp blackstrap molasses — a natural, pregnancy-safe source of iron with a rich flavor.
Add oats if you want a thicker, more filling version.
Why it works: Sometimes you just want something that tastes like comfort food. This smoothie delivers cozy flavors while sneaking in greens and iron.
Note: These are estimates for educational purposes. Actual values may vary depending on exact ingredients, brand, and portion sizes.
1. Classic Spinach & Apple Glow
Nutrient
Approx. Amount
Why It Matters in Pregnancy
Iron
~3.1 mg
Supports hemoglobin production and oxygen delivery
Vitamin C
~70 mg
Enhances non-heme iron absorption
Folate
~75 mcg
Crucial for neural tube development
Fiber
~5 g
Supports digestion and helps prevent constipation
Calories
~130 kcal
Light yet energizing for mornings
2. Pineapple-Mango Spinach Sunshine
Nutrient
Approx. Amount
Why It Matters in Pregnancy
Iron
~2.8 mg
Maintains healthy red blood cells
Vitamin C
~85 mg
Boosts iron absorption significantly
Folate
~70 mcg
Supports baby’s brain and spinal cord development
Fiber
~4 g
Helps keep digestion regular
Calories
~140 kcal
Refreshing, hydrating, and energizing
3. Peanut Butter-Chocolate Spinach Shake
Nutrient
Approx. Amount
Why It Matters in Pregnancy
Iron
~3.6 mg
From spinach + cocoa powder
Protein
~8 g
Supports baby’s growth and maternal muscle health
Healthy Fats
~7 g
Nourishes brain development and keeps you fuller longer
Fiber
~5 g
Aids digestion
Calories
~210 kcal
Satisfying snack or mini-meal
4. Strawberry-Banana Iron Boost (with Tofu)
Nutrient
Approx. Amount
Why It Matters in Pregnancy
Iron
~4.0 mg
Tofu + spinach offer plant-based iron
Protein
~9 g
Plant protein supports tissue repair and growth
Vitamin C
~65 mg
Helps absorb the iron in tofu and spinach
Folate
~80 mcg
Supports early pregnancy development
Calories
~180 kcal
Balanced breakfast or midday fuel
5. Apple-Cinnamon Spinach Comfort Blend
Nutrient
Approx. Amount
Why It Matters in Pregnancy
Iron
~3.2 mg
Spinach + optional molasses enrich iron intake
Fiber
~6 g
Helps with pregnancy-related constipation
Vitamin C
~35 mg
From apple, boosts iron absorption
Antioxidants
High
Cinnamon + apple support immune health
Calories
~150 kcal
Comforting yet nutrient-dense
💡 Iron Boosting Tips for Pregnancy Smoothies
Make every sip count for you and your baby.
Pregnancy nutrition isn’t just about what you eat — it’s also about how your body uses it. These simple, pregnancy-safe hacks will help you get the most iron from your daily smoothie habit:
1. Pair Iron with Vitamin C Every Time
Plant-based (non-heme) iron from spinach, tofu, or cocoa gets absorbed more efficiently when you team it up with vitamin C-rich ingredients like oranges, pineapple, strawberries, kiwi, or lemon juice.
Think of vitamin C as your iron’s “best friend” — it makes sure more of it actually gets into your system.
2. Skip Iron Blockers Before & After
Tea, coffee, and large amounts of calcium (from milk, yogurt, or supplements) can interfere with iron absorption. Try to wait at least an hour before or after your smoothie to enjoy them.
3. Sneak in Plant-Based Protein
Smoothies with tofu, hemp seeds, chia seeds, or nut butters not only add protein and healthy fats, but also contribute a little extra iron. This combination helps with steady energy levels and supports your baby’s growth.
4. Frozen Fruit = Better Texture & Tolerance
Frozen mango, berries, or bananas give smoothies a creamier, thicker texture — and can make them more refreshing during pregnancy, especially if you’re battling morning sickness.
5. Add “Hidden Iron” Boosters
Blackstrap molasses, pumpkin seeds, and unsweetened cocoa powder are surprisingly iron-rich and blend in without overpowering flavor.
6. Make It a Habit, Not a Chore
Iron levels improve over time with consistency. A daily smoothie is an easy, tasty way to keep up with increased pregnancy iron needs — and to support your energy, mood, and digestion along the way.
Make It a Habit, Not a Hassle
Smoothies should make your life easier, not add to your to-do list. Here’s how to make these blends part of your daily rhythm:
Batch prep: Freeze fruit and greens in single-serve bags. In the morning, just add liquid and blend.
Mix and match: Swap spinach for kale, apple for pear, or almond milk for coconut water depending on your mood.
Double up: Make extra and store in a mason jar for an afternoon snack — just shake before sipping.
Pregnancy can make even the simplest health goals feel complicated. But an iron-enriched smoothie — cool, flavorful, and ready in minutes — can be one of the easiest ways to nourish yourself and your growing baby. With the right flavors and a few smart tweaks for absorption, you’ll have a daily ritual that’s as delicious as it is beneficial.
Frequently Asked Questions
1. Can I drink spinach smoothies every day during pregnancy? Yes — baby spinach and similar greens are safe in moderate amounts during pregnancy, and they’re a great source of iron, folate, and vitamin K. Just wash greens thoroughly to remove any dirt or bacteria.
2. How much iron do I need while pregnant? Most pregnant women need about 27 mg of iron per day (according to WHO and ACOG guidelines). Smoothies can help you meet part of this goal, but you may still need iron-rich meals and/or supplements if your doctor advises.
3. What is the best time of day to drink an iron-rich smoothie? Mid-morning or mid-afternoon is ideal — it keeps your energy steady and avoids competing with high-calcium meals (like dairy-rich breakfasts) that can block iron absorption.
4. Can I use frozen spinach instead of fresh? Absolutely. Frozen spinach is usually flash-frozen at peak freshness, which helps lock in nutrients. It’s convenient, lasts longer, and blends well in smoothies.
5. Which fruits boost iron absorption the most? Fruits highest in vitamin C — such as oranges, strawberries, kiwi, mango, and pineapple — are the best partners for spinach in smoothies.
6. Are dairy-based smoothies less effective for iron absorption? Calcium can interfere with plant-based iron absorption, so if you’re focusing on iron, consider non-dairy options like almond milk, oat milk, or coconut water. You can still enjoy dairy, but try to have it at a different time.
7. How can I make my smoothies more filling? Add protein and healthy fats: nut butters, chia seeds, hemp seeds, oats, or silken tofu all make smoothies more satisfying and help stabilize blood sugar.
8. Can these smoothies help with pregnancy fatigue? Yes. Low iron is a common cause of pregnancy fatigue. Combining iron-rich greens with vitamin C, plus some protein and complex carbs, can support better energy levels over time.
9. Is it safe to add supplements or protein powders to these smoothies? Only if approved by your healthcare provider. Some protein powders contain herbs or additives not recommended during pregnancy. Look for clean, pregnancy-safe options.
10. What if I have pregnancy-related anemia? If you’ve been diagnosed with anemia, these smoothies can be a helpful part of your nutrition plan, but they should complement — not replace — any supplements or treatments prescribed by your doctor.
Pregnancy is a time of joy, anticipation, and — for many women — a crash course in reading food labels and counting carbs. If you’ve been diagnosed with gestational diabetes (GDM), you’re not alone. In India, studies suggest that between 10–14% of pregnancies are affected by GDM, and numbers are rising as lifestyles and diets change.
The good news? With the right approach, you can keep your blood sugar within target, nourish your growing baby, and still enjoy food you genuinely look forward to eating. The American Diabetes Association (ADA) and UK NICE guidelines continue to recommend a balanced diet that provides enough carbohydrates for your baby’s brain development (around 175 g/day), spread evenly through the day, while prioritizing low glycemic index (GI) carbs, adequate protein, and plenty of non-starchy vegetables
What’s new in 2024–2025 is that research has started focusing on how we eat as much as what we eat:
Vegetable–Protein–Carb sequencing at meals can reduce post-meal sugar spikes by up to 11% — a simple plating trick that costs nothing.
Millet swaps (like ragi, foxtail, or barnyard millet) for polished rice or maida-based foods can modestly improve post-meal glucose control in Indian diets.
Chili peppers and certain spices may support insulin sensitivity (and make meals far from boring).
There’s also growing caution around artificial sweeteners — especially sucralose — with some studies linking high intake to increased GDM risk.
In Indian cooking, we’re lucky — our traditional flavors, whole grains, pulses, and spices align beautifully with modern medical nutrition therapy for GDM. This means you don’t need to live on bland “diet food” or imported “superfoods.” You can work with paneer, dals, fresh vegetables, curd, millets, and whole spices to create vibrant, satisfying meals that check every box for blood sugar balance.
The following five gestational diabetes friendly recipes are designed using the latest science, easy-to-find Indian ingredients, and everyday cooking techniques. Each one comes with:
Per-serving carb and protein counts so you can track your intake.
Low-GI swaps to stabilize blood sugar.
A “how to plate/order bites” tip to get the most from your meal.
Flavors that make you feel you’re enjoying a home-cooked celebration, not a medical prescription.
1. Paneer-Stuffed Besan Chilla with Mint Raita
Why this Recipe works in Gestational Diabetes:
Besan (chickpea flour) is a low-GI pulse flour with slow-digesting carbs and high protein, which keeps post-meal spikes in check.
Paneer adds high-quality protein, essential in GDM for controlling glycemia and supporting fetal growth.
Mint raita introduces probiotics from curd, which emerging research suggests may support insulin sensitivity.
“High-protein and low-GI, this Paneer-Stuffed Besan Chilla with creamy mint raita is the perfect gestational diabetes-friendly breakfast. Packed with fiber-rich chickpea flour, fresh vegetables, and soft paneer, it’s a healthy Indian recipe that keeps blood sugar stable and taste buds happy.”
Ingredients (2 servings)
1 cup besan (100 g)
200 g low-fat paneer, grated
½ cup onion + capsicum, finely chopped
Spices: turmeric, ajwain, chili
½ cup mint + coriander, blended with 200 g plain dahi for raita
Method
Whisk besan with water, spices, and chopped veg to form a batter.
Spread thin on a non-stick pan, cook lightly on both sides.
Fill with paneer, fold, and serve with mint raita.
Per serving: ~38 g carbs | 28 g protein Plating tip: Eat a cucumber-onion salad first, then chilla, then raita.
2. Foxtail Millet–Moong Khichdi with Veg Tempering
Why is it one of the Gestational Diabetes Recipes:
Millets like foxtail have a lower GI than white rice and were shown in a 2024 Indian RCT to modestly reduce post-prandial glucose.
Moong dal is gentle on digestion and provides plant protein, iron, and folate.
“Wholesome, comforting, and blood sugar-friendly — this Foxtail Millet-Moong Khichdi with vegetable tempering is rich in fiber, plant protein, and essential nutrients. A smart millet-based swap for rice, perfect for gestational diabetes meal plans.”
Ingredients (2 servings)
½ cup foxtail millet (90 g)
½ cup split yellow moong dal (100 g)
1 cup mixed vegetables (carrot, beans, peas)
Spices: cumin, turmeric, ginger
Method
Rinse and soak millet + dal for 1 hr.
Pressure cook with veggies, turmeric, and 3 cups water.
Temper cumin, ginger in 1 tsp ghee, mix in.
Per serving: ~42 g carbs | 17 g protein Plating tip: Have sautéed spinach or cucumber raita first, then khichdi.
Ragi is rich in calcium, fiber, and antioxidants, making it a nutrient-dense, low-GI millet.
Egg or paneer bhurji boosts protein, slowing the glucose rise from the dosa carbs.
Sambar adds more lentils and vegetables for fiber.
“Crispy ragi dosa paired with protein-packed egg or paneer bhurji and fiber-rich sambar — a nutrient-dense, low-GI Indian meal for expectant mothers managing gestational diabetes. A delicious way to add millets and protein to your diet.”
Ingredients (2 servings)
1 cup ragi dosa batter (fermented)
4 eggs or 200 g paneer
1 cup mixed veg for sambar + dal base
Method
Cook dosas on a hot tawa.
Prepare bhurji with onion, tomato, turmeric, green chili.
Serve with warm sambar.
Per serving: ~40 g carbs | 25 g protein Plating tip: Eat a small bowl of sautéed greens before dosa.
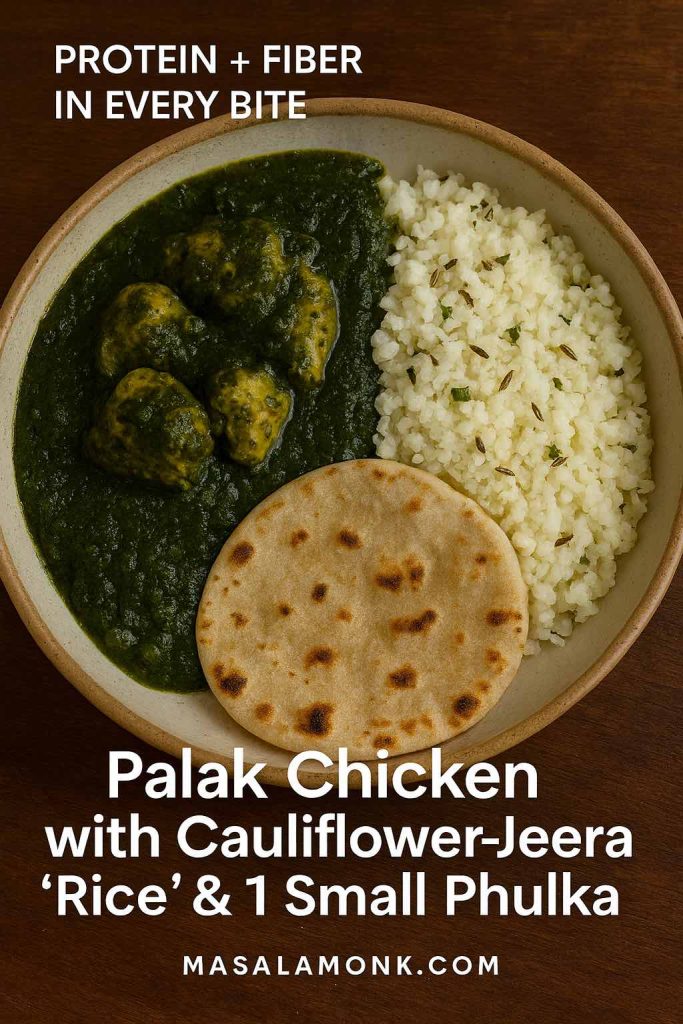
4. Palak Chicken (or Tofu) with Cauliflower-Jeera “Rice” & 1 Small Phulka
Why is it one of the Gestational Diabetes Recipes:
Spinach provides iron and folate — critical nutrients in pregnancy.
Cauliflower “rice” reduces total meal carbs while adding fiber.
Controlled portion of whole wheat roti delivers steady energy without spiking sugar.
“A nourishing iron-rich spinach curry made with chicken or tofu, served alongside low-carb cauliflower-jeera rice and one whole wheat phulka — the perfect balance of carbs, protein, and greens for healthy blood sugar levels during pregnancy.”
Ingredients (2 servings)
200 g chicken breast or firm tofu
2 cups spinach puree
Spices: garlic, cumin, garam masala
2 cups grated cauliflower, steamed with jeera
2 small whole wheat phulkas (40 g each)
Method
Cook chicken/tofu with garlic, onion, spices; add spinach puree, simmer.
Serve with cauliflower rice and 1 phulka.
Per serving: ~32 g carbs | 30 g protein Plating tip: Have a small bowl of cucumber-carrot salad before main plate.
Pulses like kala chana are rich in soluble fiber and plant protein, both linked to improved post-meal glucose control.
Dahi adds a probiotic component, which 2024 research suggests may aid insulin sensitivity in GDM.
“Protein-packed kala chana chaat tossed with fresh cucumber, onion, tomato, and zesty lemon, served with probiotic-rich plain dahi. A quick, no-cook Indian snack perfect for gestational diabetes management and healthy pregnancy snacking.”
Ingredients (2 servings)
1 cup boiled kala chana (150 g)
½ cup chopped cucumber, tomato, onion
Green chili, lemon juice, coriander
200 g plain low-fat dahi
Method
Toss chana with veg, chili, lemon, coriander.
Serve with dahi on the side.
Per serving: ~28 g carbs | 18 g protein Plating tip: Eat as is—protein + fiber in every bite.
Emerging 2024 research shows vegetable → protein → carb order can lower post-meal sugar by 6–11%. Apply this with every meal above for an extra layer of glucose control.
Spice is fine — green chili, herbs, whole spices add flavor without carbs.
Always consult your doctor/dietitian for individualized carb targets and supplement use (like myo-inositol or probiotics).
Frequently Asked Questions (FAQ)
1. What is the target blood sugar level during pregnancy with gestational diabetes? Most guidelines recommend keeping fasting glucose below 95 mg/dL and 1-hour post-meal below 140 mg/dL (or 2-hour below 120 mg/dL). Your doctor will personalize targets for you.
2. How many carbs should I eat per day with gestational diabetes? The ADA recommends a minimum of 175 g of carbohydrates per day during pregnancy, distributed across meals and snacks. This supports fetal brain development while avoiding spikes.
3. Why do you suggest millets in these recipes? Millets like ragi, foxtail, and barnyard have a lower glycemic index than white rice or refined wheat, and a 2024 Indian study showed they can help reduce post-meal glucose levels.
4. Can I eat fruits if I have gestational diabetes? Yes — choose low to medium GI fruits like berries, guava, apple, pear, or papaya, and eat them with a protein or fat source (e.g., nuts, yogurt) to slow sugar absorption.
5. Are artificial sweeteners safe in pregnancy? Some, like sucralose, have been linked in recent studies to higher GDM risk. It’s best to limit artificial sweeteners and use small, counted amounts of natural sweeteners (jaggery, dates, honey) within your carb limit.
6. What is the “vegetable–protein–carb” eating order you mention? It’s a meal sequencing strategy where you eat non-starchy vegetables first, then protein, then carbohydrates. Studies show it can lower post-meal blood sugar by 6–11%.
7. How do I handle festive meals or eating out? Prioritize protein and vegetable dishes, keep carb portions small, avoid sugary drinks, and start your meal with a salad or vegetable starter.
8. Do I need to avoid all spicy foods in pregnancy? Not necessarily. If you tolerate spice, moderate chili and spices are fine, and early research even suggests chili may support better insulin sensitivity.
9. How many meals and snacks should I have daily? Aim for 3 main meals and 2–3 snacks spread through the day to avoid big blood sugar swings.
10. Can these recipes work for postpartum or type 2 diabetes too? Yes — they’re balanced, low-GI, and nutrient-rich, making them suitable beyond pregnancy, especially if you’re managing blood sugar or aiming for weight control.
If you live in low-sunlight areas, wear sunscreen daily, or have confirmed deficiency, supplements may be the most reliable way to restore healthy levels.
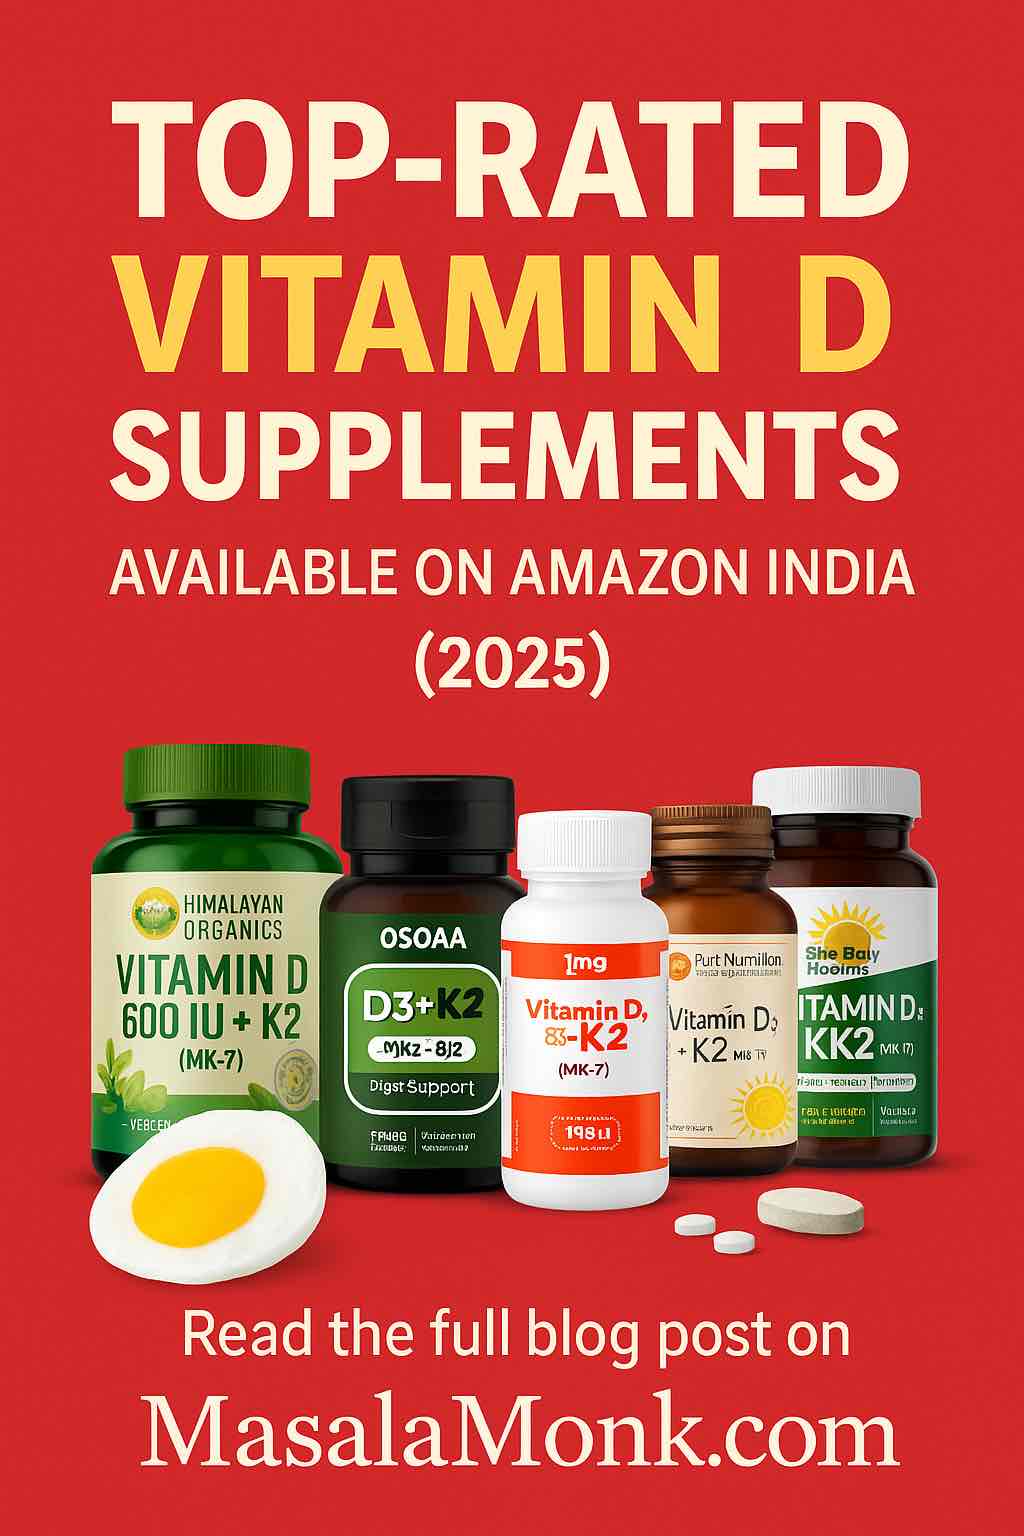
💊 Top Vitamin D Supplements in India (2025)
We reviewed the best-rated Vitamin D₃ + K₂ supplements on Amazon India to help you choose wisely.
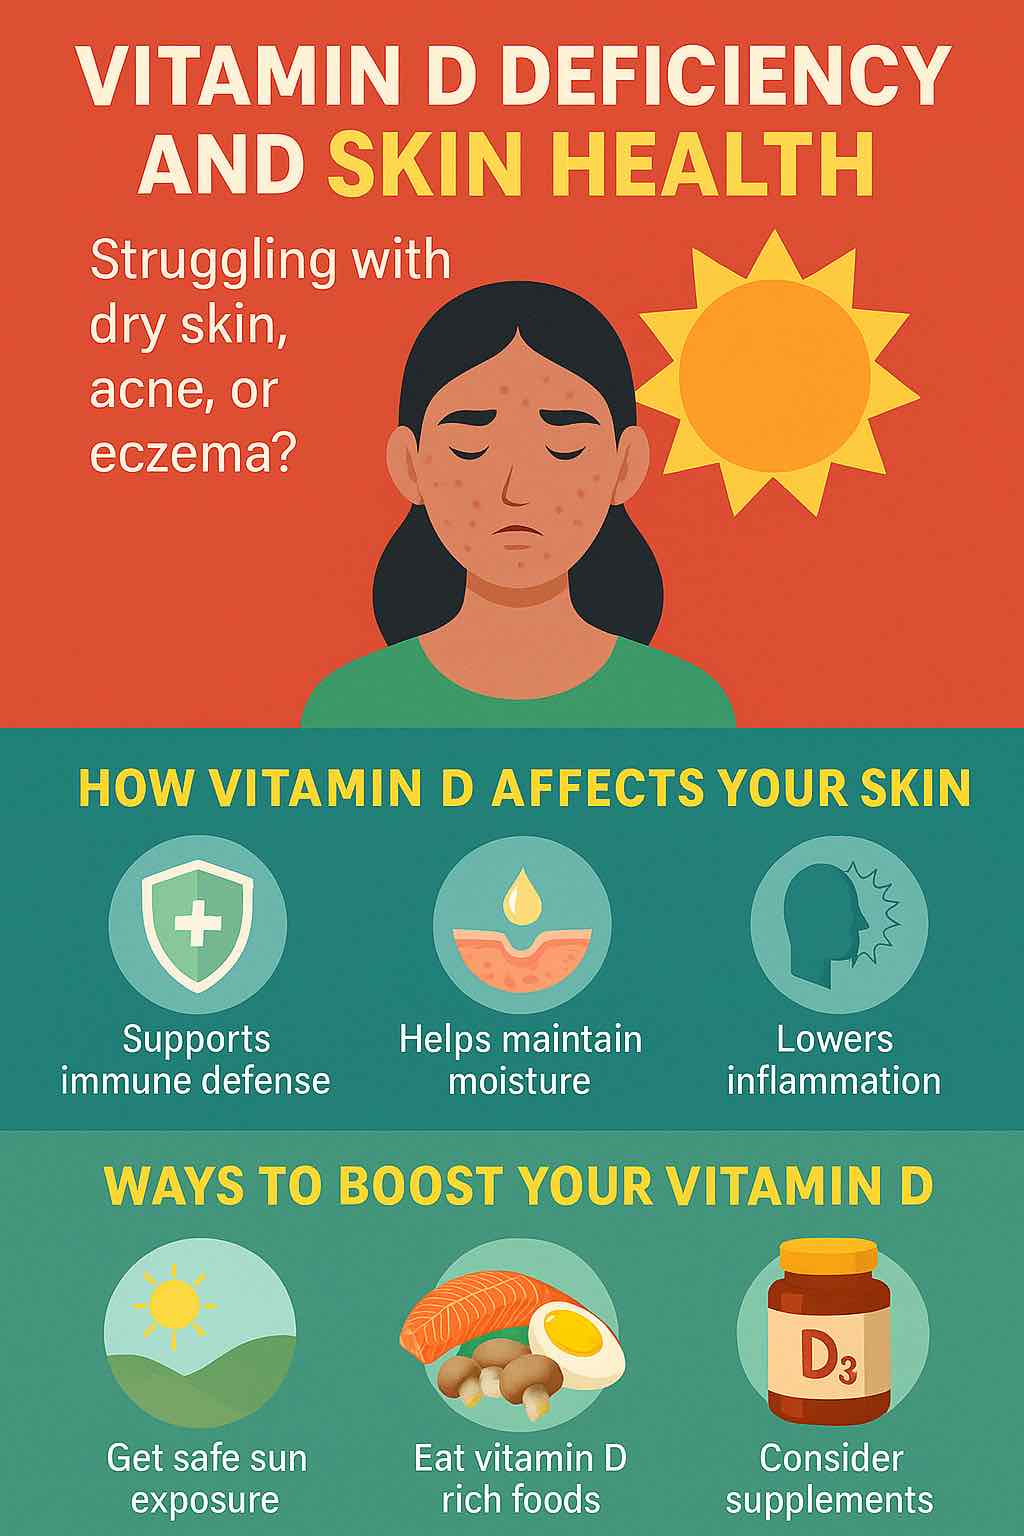
Vitamin D deficiency is more than a bone health issue — it’s a skin health disruptor. If you’re experiencing stubborn skin problems, it may be worth checking your Vitamin D levels and taking a proactive approach through diet, sunlight, and supplements.
Your skin will thank you for it.
FAQs — Vitamin D Deficiency & Skin Health
1. Can Vitamin D deficiency cause skin problems? Yes. Low Vitamin D levels can weaken the skin barrier, increase inflammation, and slow wound healing, leading to issues like dryness, eczema, psoriasis, acne, and dullness.
2. What skin conditions are linked to Vitamin D deficiency? Conditions like psoriasis, eczema, vitiligo, acne, and rosacea have been linked to low Vitamin D levels, according to recent studies (2024–2025).
3. How do I know if my skin issues are due to Vitamin D deficiency? If you have persistent dryness, frequent inflammatory skin flare-ups, slow healing wounds, or dull skin tone along with fatigue or muscle weakness, it’s worth getting your Vitamin D levels tested.
4. Does Vitamin D help with acne? Yes. Vitamin D’s anti-inflammatory properties can help reduce acne flare-ups and redness, especially when combined with a healthy diet and skincare routine.
5. How does Vitamin D protect the skin from aging? Vitamin D supports collagen production, helps repair UV-induced damage, and reduces oxidative stress, slowing down photo-aging and fine lines.
6. How much Vitamin D do I need for healthy skin? Most adults need around 600–1,000 IU per day, but people with deficiency may require higher doses under medical supervision.
7. Can I get enough Vitamin D from sunlight alone? Possibly, if you have regular exposure to morning sunlight (10–20 minutes daily). But factors like skin tone, sunscreen use, pollution, and indoor lifestyles can limit production.
8. What foods are rich in Vitamin D for skin health? Fatty fish, egg yolks, fortified milk/plant milk, and UV-exposed mushrooms are good dietary sources.
9. Should I take Vitamin D₂ or D₃ supplements? Vitamin D₃ (cholecalciferol) is more effective at raising and maintaining blood levels than D₂, and is generally preferred.
10. Do Vitamin D supplements also help hair and nails? Yes. Adequate Vitamin D supports hair follicle cycling and nail strength by aiding calcium metabolism and reducing inflammation.
Vitamin D is more than just the “sunshine vitamin”. It plays a role in bone strength, immunity, muscle performance, heart health, and even mood regulation. But in India, vitamin D deficiency is incredibly common due to:
Long indoor working hours
Air pollution reducing UVB penetration
Sunscreen use blocking synthesis
Limited intake of vitamin D-rich foods
That’s why high-quality Vitamin D supplements are such a game-changer — but the market is crowded with confusing options.
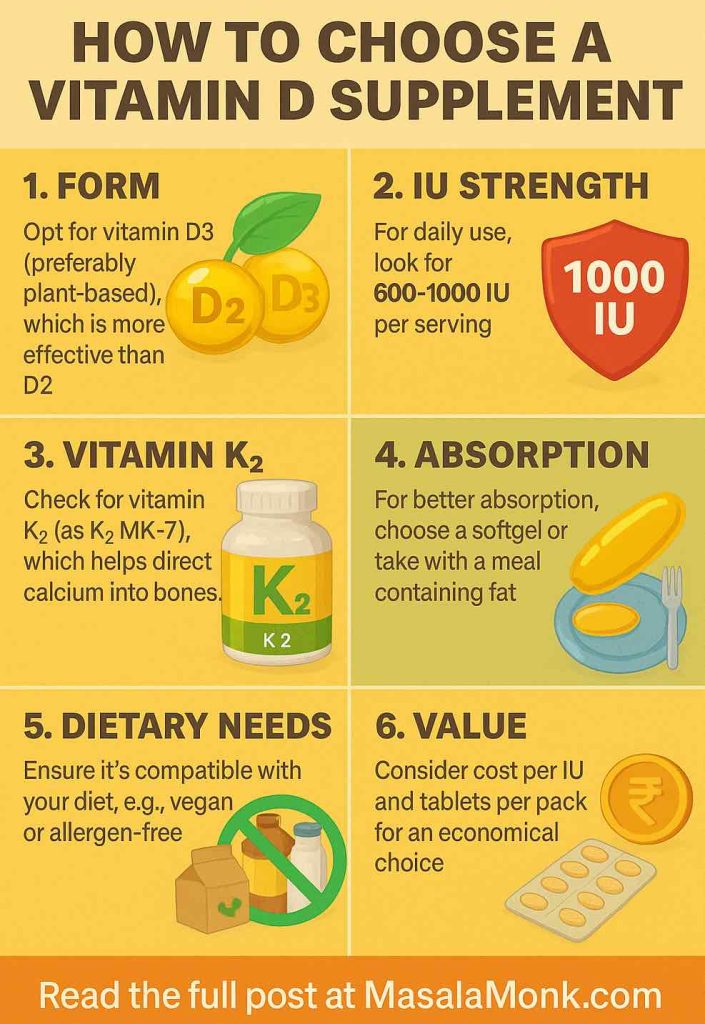
How to Choose the Right Vitamin D Supplement in India
Before clicking “Add to Cart,” it’s worth understanding the technical factors that separate an average supplement from an effective one.
1. Vitamin D Form — D₂ vs D₃
Vitamin D₂ (ergocalciferol): Usually plant-based, but less effective at raising blood vitamin D levels.
Vitamin D₃ (cholecalciferol): The preferred, more bioavailable form — can be sourced from animals (lanolin) or plants (lichen).
For vegetarians/vegans, look for “plant-based D₃ from lichen” in the label. 💡 All products in our list above use D₃, making them more effective than many generic brands.
2. IU Strength (Potency)
IU = International Units, a measure of vitamin D content.
400–800 IU: Maintenance dose for healthy adults with normal levels.
1,000–2,000 IU: For mild deficiency or higher needs (less sun exposure, older age, darker skin).
5,000 IU+: Often for severe deficiency, usually under doctor supervision. 💡 The products here mostly offer 600 IU per serving — safe for daily use without risk of toxicity.
3. The Role of Vitamin K₂
Vitamin D helps absorb calcium, but without K₂, that calcium can end up in arteries instead of bones.
K₂ MK-7 is the most bioactive form and works longer in the body. 💡 Every supplement in our list includes K₂ MK-7 — a big plus over plain vitamin D products.
4. Absorption Factors
Vitamin D is fat-soluble, meaning it needs dietary fat to be absorbed.
Supplements in softgel form often contain an oil base (like coconut or olive oil), which boosts absorption.
If in tablet form, take it with a meal that includes healthy fat. 💡 Some supplements (like OSOAA) pair D₃ with B₁₂ and other nutrients for better metabolic synergy.
5. Dietary & Lifestyle Fit
Vegetarian/Vegan: Choose plant-based D₃ from lichen.
Lactose-intolerant or gluten-sensitive: Look for allergen-free claims.
Minimalists: Choose a pure D₃ + K₂ formula.
Multitaskers: Choose a D₃ combo with other nutrients (like OSOAA’s B₁₂).
6. Brand Transparency & Testing
Look for brands that:
List the exact form of D₃ and K₂ used.
Mention 3rd-party testing for purity and potency.
Have consistent positive customer feedback over years.
7. Value for Money
Compare cost per IU and tablets per pack rather than just MRP.
Bulk packs (like 120 tablets) are usually more economical for long-term use.
How to Choose right Vitamin D supplement supplement for your needs?
After analyzing Amazon India’s bestsellers, reading hundreds of verified customer reviews, and comparing formulations, we’ve narrowed it down to the 5 best Vitamin D supplements for 2025 — and exactly who each one is best for.
Balanced daily dose (600 IU) of plant-based D₃ paired with K₂ MK-7 for optimal calcium utilization.
Vegetarian-friendly, gentle on digestion.
Trusted Himalayan Organics brand, known for consistent quality.
Who Should Choose This: ✅ Everyday wellness seekers — If you’re looking for a safe, moderate daily dose to maintain healthy vitamin D levels without risk of overdosing. ✅ Bone & heart health focus — K₂ helps prevent calcium from depositing in arteries while directing it to bones. ✅ Vegetarians — Plant-based D₃ from lichen.
User Voices:
“This plant-based D3 + K2 is a game-changer! More energy & faster recovery.”
Pros: Balanced dosage, vegetarian, reputable brand. Cons: Not ideal for those needing rapid correction of severe deficiency.
Unique triple-nutrient combo: D₃, K₂, and Vitamin B₁₂ (often low in vegetarians).
120-tablet pack = 4 months supply.
Vegan-friendly with plant-based D₃.
Who Should Choose This: ✅ Vegetarians & vegans — Covers both vitamin D and B₁₂, two nutrients often lacking in plant-based diets. ✅ Energy & mood support — B₁₂ helps with nerve function and energy metabolism. ✅ Budget-conscious supplementers — 3-in-1 formula saves buying separate products.
User Voices:
“Plant-based formula… boosts my energy. Great value for money!”
Pros: Multi-benefit formula, vegan-friendly, cost-effective. Cons: Newer brand compared to Tata or Vlado’s, so less brand familiarity.
Backed by Tata’s healthcare division — strong trust factor.
Balanced 600 IU D₃ + K₂ blend for bone and heart support.
Lichen-derived vegetarian D₃.
Who Should Choose This: ✅ First-time supplement users — Trusted Indian brand, moderate dosage. ✅ People who prefer local brands — Easy to find and recognized nationwide. ✅ Bone health maintenance — Ideal for those looking to maintain healthy levels, not aggressively raise them.
User Voices:
“Drastic change in energy levels and sleep… stress and anxiety reduced.”
Pros: Affordable, widely trusted brand, clean label. Cons: A rare user experienced allergic reaction (possible ingredient sensitivity).
Potent D₃ + K₂ pairing for optimal bone density and cardiovascular support.
Well-reviewed for improving joint and muscle pain.
Who Should Choose This: ✅ People with mild joint pain — Many reviewers report reduced aches. ✅ Those okay with smaller pack sizes — Good for short-term supplementation or trying before committing.
User Voices:
“Helped improve my bone pain within weeks… simple and effective.”
Pros: Strong formula, trusted reviews. Cons: Fewer tablets per pack = less value for long-term users.
⚠ Note: Always get your vitamin D levels tested before starting supplements. For severe deficiency, your doctor might recommend a higher IU dose or prescription formula.
Disclosure: This post contains Affiliate links, we might make a small commision if you buy through them, without impacting the cost or price you pay for the same.
Frequently Asked Questions about Vitamin D Supplements in India
1. Why do I need a Vitamin D supplement if I get sunlight? Even in sunny countries like India, factors like pollution, indoor work, sunscreen use, and skin tone can reduce vitamin D synthesis. Supplements help maintain optimal levels year-round.
2. What’s the difference between Vitamin D₂ and D₃? Vitamin D₃ (cholecalciferol) is more effective at raising and maintaining blood vitamin D levels. All the top products we listed use D₃, some from plant sources like lichen for vegetarians and vegans.
3. How much Vitamin D should I take daily? For general maintenance, 600–800 IU daily is recommended. If you have a deficiency, your doctor may prescribe higher doses for a short period. Our list mostly features safe daily doses around 600 IU.
4. Why is Vitamin K₂ included in these supplements? K₂ helps direct calcium to bones and teeth while preventing it from depositing in arteries. It works in synergy with Vitamin D₃ for better bone and heart health.
5. Are these supplements vegetarian or vegan? Yes — all the products in our list are vegetarian, and many (like OSOAA and The Body Reserve) are vegan with plant-based D₃ from lichen.
6. Can I take Vitamin D supplements on an empty stomach? Vitamin D is fat-soluble, so it’s best absorbed with a meal containing healthy fats. If taking on an empty stomach, choose a softgel in oil base for better absorption.
7. How long will it take to see results? It varies — some people notice energy and mood improvements within weeks, but bone density and immunity benefits take longer. Always recheck your blood levels after 8–12 weeks.
8. Can I take Vitamin D supplements with other vitamins or medicines? Generally yes, but certain medications (like steroids or weight-loss drugs) can affect absorption. Always consult your doctor before starting if you’re on long-term medication.
9. What’s the risk of taking too much Vitamin D? Excess vitamin D can cause high calcium levels, leading to kidney damage. Stick to the recommended dose unless under medical supervision.