If you’ve scrolled through social media lately, chances are you’ve stumbled upon the bright green-gold glass of pineapple, cucumber & ginger juice being hailed as the ultimate weight-loss drink. Some posts promise “Drop 7 pounds in a week!” while others call it a “miracle detox.”
The truth? Well, let’s sip our way through both science and stories — because this drink is refreshing, nutrient-packed, and digestion-friendly, but also surrounded by myths that need busting.
💬 What People Are Saying
One reason this juice has gone viral is because it feels healthy — it’s vibrant, tangy, and light. But what do real people say after trying it?
“Pineapple cucumber sounds delicious though.” — r/loseit community member
“Cucumber is high in water and low in calories… Its cool flavor can make the juice taste better and be more fun to drink.” — r/weightlossdiets user
“I make a big batch every Sunday and drink it throughout the weekend in the morning. This recipe is the best!” — Layla, recipe commenter
“The only way you will [lose weight] is by taking in fewer calories than you use.” — r/loseit user
These voices tell us something important:
- People love the taste and hydrating feel.
- Some notice digestive comfort.
- But no one credible claims it works in isolation — sustainable weight loss is still about balance.
🥭 The Ingredients: What Science Says
Pineapple — Sweet, Tangy & Enzyme-Rich
- Low-calorie (about 82 calories per cup) and offers ~2.3 g fiber.
- Rich in vitamin C (for immunity and skin) and bromelain (an enzyme that supports digestion and may reduce inflammation).
- Verywell Health (2024) suggests eating pineapple with protein or fiber for better blood sugar control.
- Bonus: Some studies note pineapple’s potential to improve sleep quality when consumed in moderation at night.
Might like to read: Benefits of Pineapple Juice
Cucumber — Nature’s Hydration Hero
- Around 95% water, so it’s an excellent hydrator.
- Contains vitamin K, potassium, and silica — supports bone, skin, and connective tissue health.
- Can help reduce water retention and puffiness.
Also read: The Cucumber – Nutrition, Benefits, and 5 Practical Ways for Weight Loss
Ginger — Warming & Soothing
- Known for anti-inflammatory and digestive benefits.
- May slightly boost metabolism and reduce bloating.
- Gingerol compounds may help reduce oxidative stress.
Check this one as well: Ginger for Heartburn and Acid Reflux: Natural Relief or Digestive Myth?
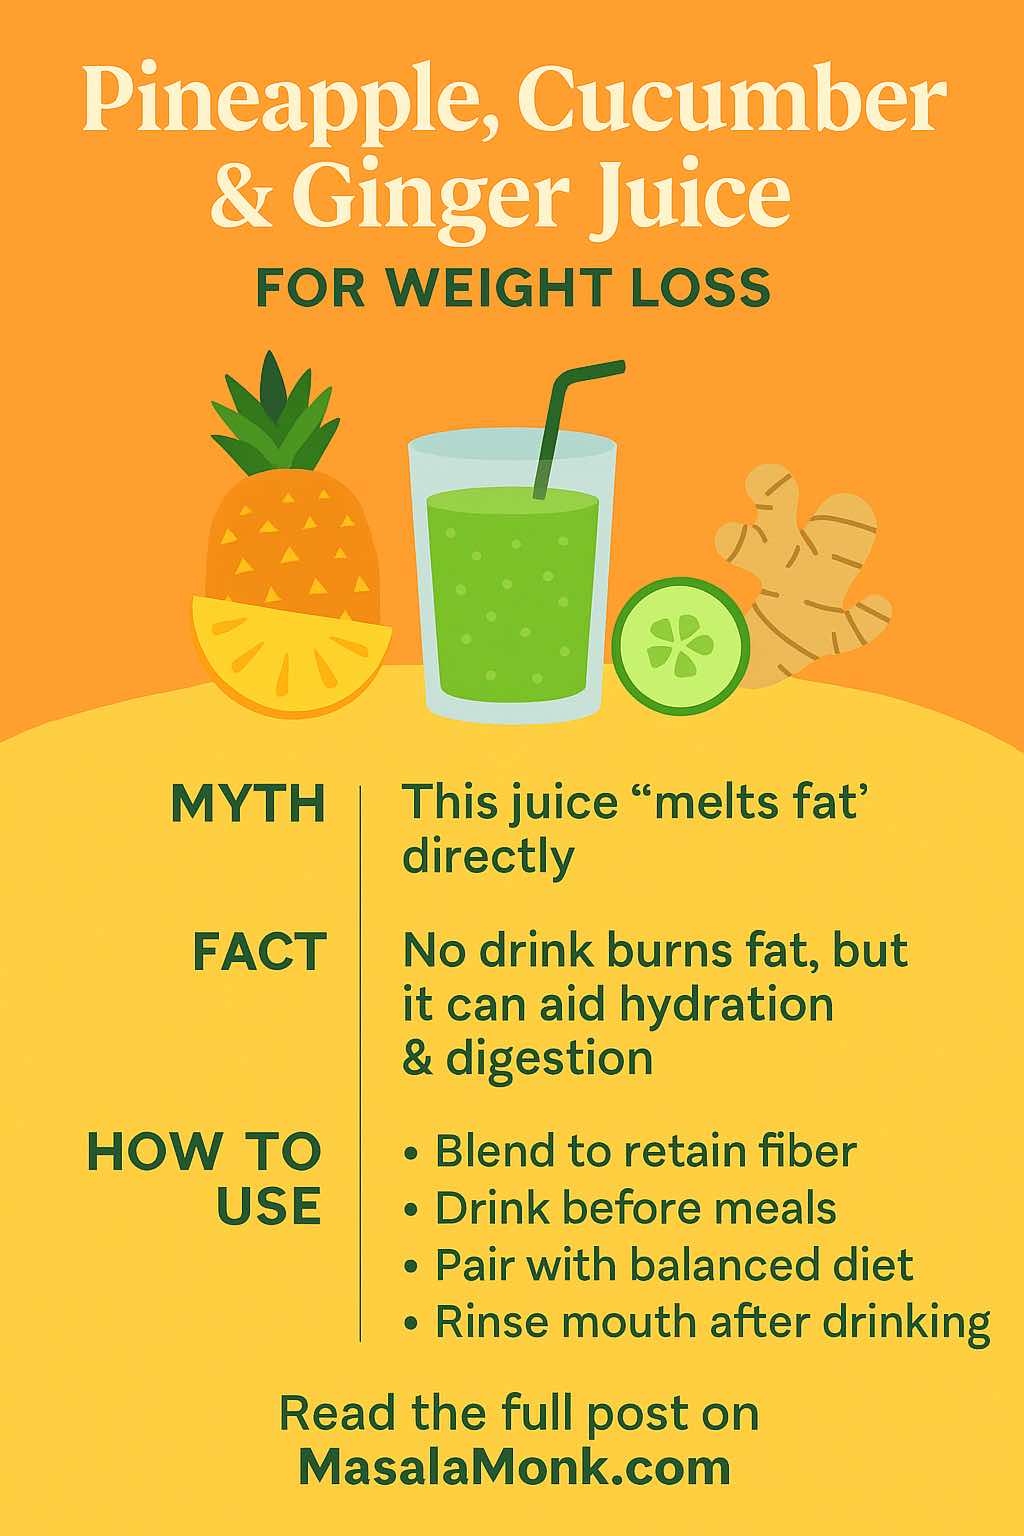
🚫 Myth vs. Fact
| Myth | Reality |
|---|---|
| “This juice melts belly fat overnight.” | No drink can burn fat directly. It can support hydration and digestion — two helpful but indirect factors. |
| “If I drink this daily, I can eat anything.” | Weight management is still about overall calorie intake and nutrient balance. |
| “Juicing is always better than eating whole fruits.” | Juicing often removes fiber, which helps control hunger and blood sugar. Blending is better if you want fiber benefits. |
🧪 What’s New in the Research
- Daniel’s Plate (Feb 2025) — This juice is rich in antioxidants, hydrating compounds, and digestive enzymes; works best alongside whole-food meals.
- BetterMe (Jan 2025) — Juicing boosts nutrient intake but strips fiber; whole produce is nutritionally superior.
- Fact-Check (THIP Media) — Claims of extreme weight loss in days are “mostly false.”
- Phytochemical Study (2015) — A cucumber–pineapple–ginger blend contains flavonoids, saponins, tannins, and terpenoids — compounds linked to gut health and antioxidant effects.
Also Read: What is Protein?
🕒 When & How to Drink It
Best Times to Enjoy It:
- Morning: Boosts hydration and nutrient absorption.
- Pre-meal: May help curb appetite.
- Post-workout: Replaces fluids, refreshes, and aids digestion.
Tips for Smarter Sipping:
- Blend instead of juicing to keep fiber.
- Pair with protein (like nuts or yogurt) to stabilize blood sugar.
- Avoid over-sweetening — pineapple is naturally sweet enough.
- Rinse your mouth afterward to protect enamel.
🔗 Related Reads on MasalaMonk
If you enjoyed this guide, you might also love:
- Benefits of Pineapple and Cucumber Juice — Deep dive into hydration, digestion & skin perks.
- Optimize Digestion with These 5 Fruit Juice Recipes — More refreshing blends for gut comfort.
- The Best Fruit Juice for Weight Loss: 5 Options to Aid Your Journey — Pineapple stars alongside other tasty, healthy drinks.
- The Lime – Nutrition, Benefits, and 5 Practical Ways for Weight Loss — Perfect if you like citrus in your juice.
- The Ultimate Nutrition Cheat Code — Simple food habits that make healthy living easier.
🍹 A Simple Recipe to Try
Ingredients:
- 1 cup fresh pineapple chunks
- ½ cucumber
- ½ inch fresh ginger
- ½ lemon (optional)
- ½ cup water or coconut water
Instructions:
- Add all ingredients to a blender.
- Blend until smooth (strain if you prefer a lighter texture).
- Serve chilled, ideally without added sugar.
❤️ Final Sip
This drink won’t replace a balanced diet or regular exercise, but it can make healthy living more enjoyable. It’s refreshing, nutrient-packed, and can become part of a daily ritual that encourages better hydration, digestion, and mindful eating.
So the next time you see it on Instagram, you’ll know the truth:
It’s not a miracle — but it is a delicious, health-supporting choice worth adding to your glass.
🍍 Pineapple, Cucumber & Ginger Juice — FAQs
1. Does pineapple, cucumber & ginger juice really help with weight loss?
It can support your weight-loss journey by hydrating you, improving digestion, and reducing bloating, but it’s not a magic solution. Weight loss still depends on calorie control, balanced nutrition, and physical activity.
2. Can I drink it every day?
Yes, most people can enjoy it daily if it fits into a balanced diet. Just be mindful of sugar content from pineapple if you have diabetes or are watching your sugar intake.
3. What’s the best time to drink it?
Morning on an empty stomach for a nutrient boost, before meals to curb appetite, or post-workout to rehydrate and refresh.
4. Is it better to blend or juice?
Blending keeps the fiber, which supports satiety and blood sugar control. Juicing is lighter but removes much of the fiber.
5. Are there any side effects?
Possible side effects include mild digestive discomfort (due to bromelain in pineapple), blood sugar spikes if overconsumed, and enamel erosion from acidity. Rinse your mouth after drinking.
6. Can I make it ahead of time?
Yes, you can store it in an airtight container in the fridge for up to 24–36 hours, but the flavor and nutrient content are best when fresh.
7. Can I use canned pineapple instead of fresh?
Fresh pineapple is best for maximum nutrients and no added sugar. If using canned, choose one packed in juice, not syrup.
8. Can I add lemon or mint to the recipe?
Absolutely! Lemon adds vitamin C and a tangy kick, while mint enhances freshness and digestion support.
9. Will this juice detox my body?
Your liver and kidneys already detox your body naturally. This juice can support the process by providing hydration and antioxidants, but it doesn’t “flush fat” or replace your body’s detox systems.
10. How many calories are in a glass?
A standard 250 ml glass (with no added sugar) contains roughly 80–100 calories, depending on the ratio of pineapple to cucumber.