Brisket asks for most of a day, so uncertainty near the end can feel bigger than it does with an ordinary roast. One piece is broad and relatively thin. Another is tied into a thick, compact joint. Both may weigh the same, yet one can become tender noticeably earlier than the other.
This slow cooker brisket is built for the result that suits gravy best: beef that feels deeply tender when sliced but holds together when lifted. The browned bits from the skillet deepen the cooking liquid, which is reduced into rich onion gravy rather than served as thin broth.
By the time the lid comes off, the onions should have softened into the dark cooking juices and the brisket should hold its shape. Dinner should smell as though the beef was fussed over all day, even though the slow cooker handled the long middle stretch.
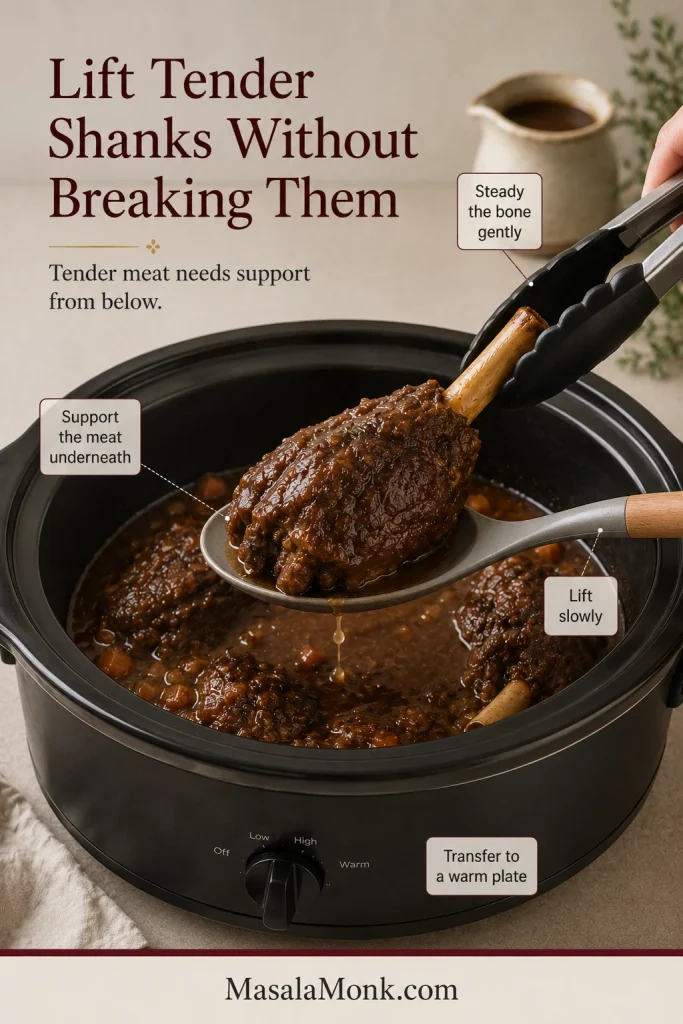
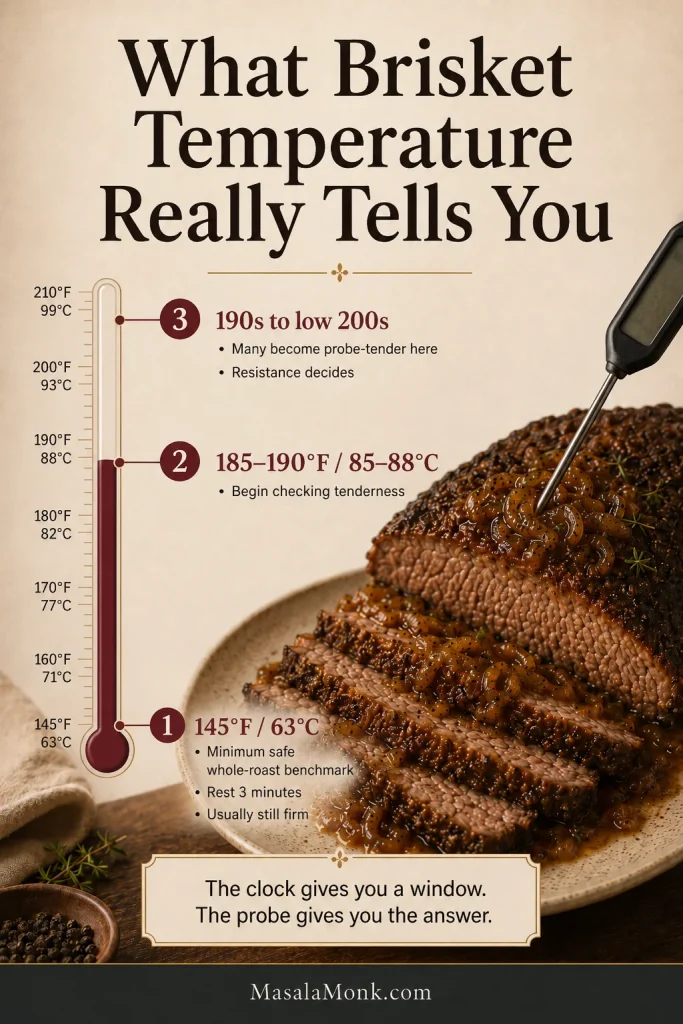
The key moment comes near the end. A probe that felt springy half an hour earlier begins to slide into the thickest part with very little resistance, yet the brisket still lifts in one piece. The clock gives you a window; the probe gives you the answer. Aim for beef that is tender enough to yield, yet structured enough to slice.
Quick Answer: How to Make Tender Slow Cooker Brisket
Use a 3–3½ lb (1.4–1.6 kg) fresh, uncured brisket flat that fits comfortably in a 5–6 quart (about 5–6 L) slow cooker. Brown the beef and soften the onions in the same skillet, then add 1 cup (240 ml) low-sodium beef stock plus ½ cup (120 ml) red wine, dark ale, or more stock.
Cook on LOW for about 7½–9 hours, making the first tenderness check at 7 hours. Remove the brisket when a probe enters the thickest section easily and the meat holds together when lifted.
Rolled-joint guidance, LOW versus HIGH timing, and pull-apart and no-sear variations appear below.
The three decisions that matter most: judge the brisket by thickness as well as weight, keep the starting liquid controlled, and reduce the cooking juices for flavor before using starch for texture.
Choose Your Version
Decide whether you want neat slices, pull-apart meat, or less hands-on preparation. You can always cook sliceable brisket longer for pulling, but once it begins falling apart, it will not return to neat slices.
| Your goal | How to make it |
|---|---|
| Recommended for neat slices | Use a flat-cut brisket, brown it first, cook on LOW, and remove it while it remains intact enough to slice. |
| Rolled brisket joint | Leave the string on, allow for the thick center, and check it later than you would a thin flat. |
| Pull-apart brisket | Continue cooking until the fibers separate readily, then shred and moisten with finished gravy. |
| No-sear shortcut | Skip the skillet work, combine everything in the slow cooker, and give the finished liquid a longer stovetop reduction. |
The recipe below follows the neat-slice version.
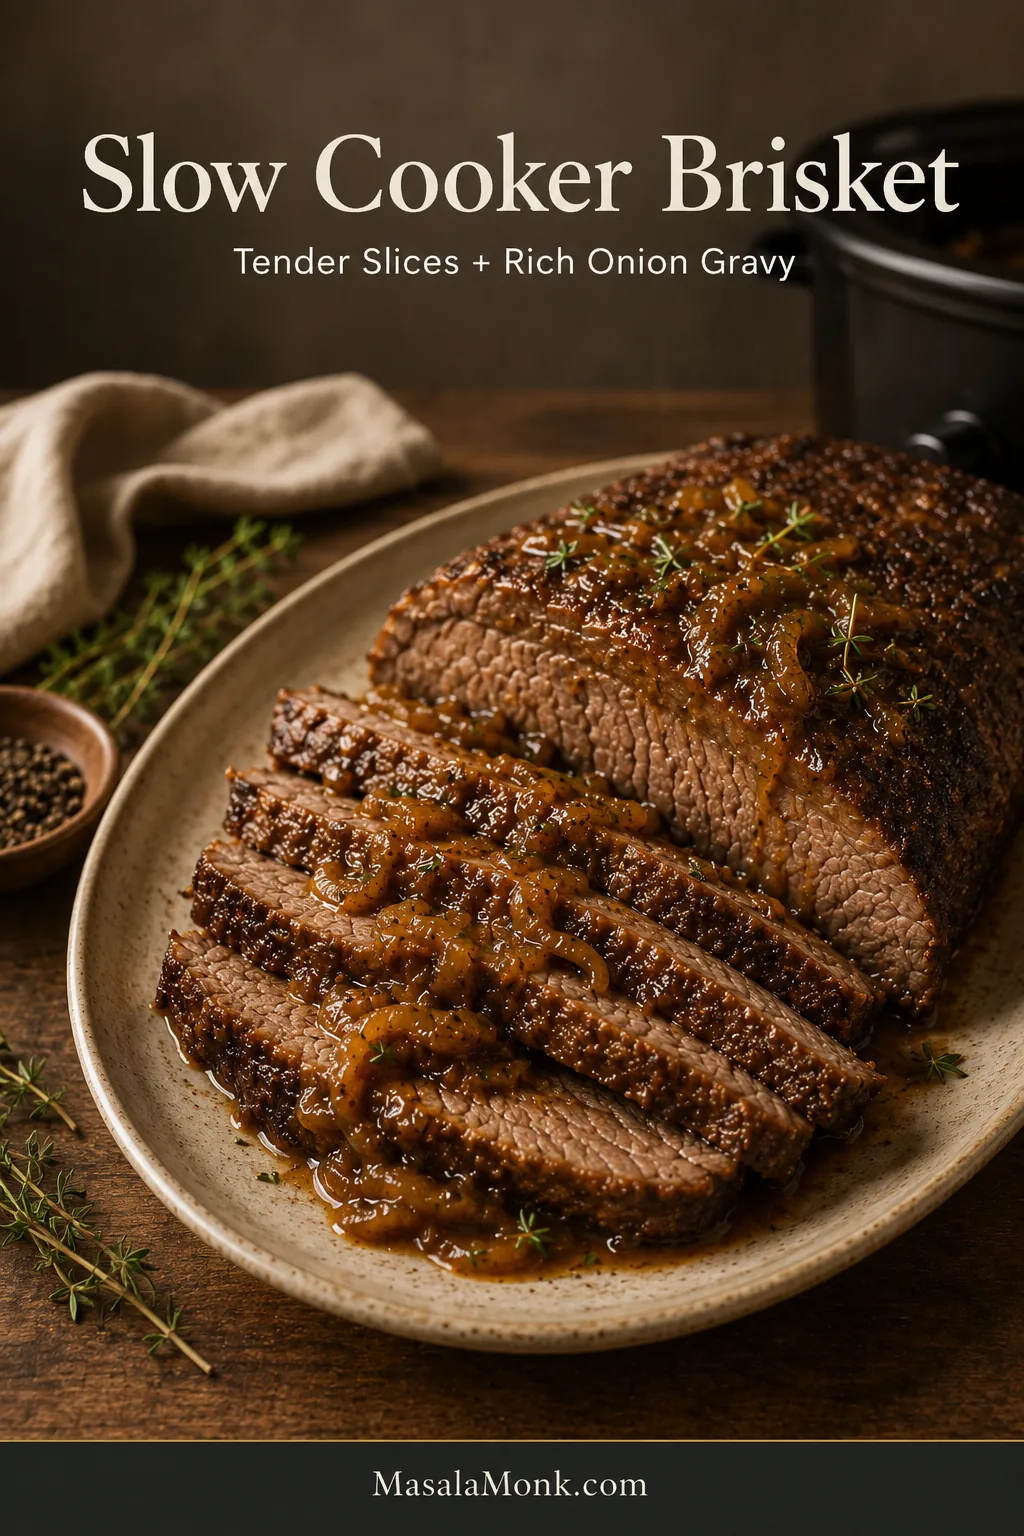
Slow Cooker Brisket With Rich Onion Gravy
A savory brisket cooked over browned onions, garlic, stock, and herbs until tender but still sliceable. The cooking liquid is skimmed and reduced before thickening, giving you deeply flavored onion gravy instead of diluted slow cooker broth.
| Prep Time | 25 minutes |
|---|---|
| Skillet Time | 25 minutes |
| Slow Cooker Time | 7½–9 hours on LOW |
| Resting Time | 15–20 minutes |
| Gravy Time | 10–20 minutes |
| Hands-On Time | 1–1¼ hours |
| Total Time | 9–10½ hours |
| Servings | 6 generous or 8 moderate servings |
| Cooker Size | 5- to 6-quart (about 5–6 L) oval slow cooker or Crock-Pot |
| Texture and Finish | Tender and sliceable, with rich onion gravy |
Equipment
Use an oval slow cooker or Crock-Pot, a large heavy skillet, tongs, two broad spatulas, and an instant-read thermometer. You will also need a cutting board, a sharp slicing knife, a wide saucepan, and a whisk.
A thin metal skewer helps assess resistance, but only a thermometer verifies temperature. A reliable sear or sauté function can replace the separate skillet. For the gravy, a spoon is enough to skim the fat; a separator, sieve, or immersion blender is optional.
Ingredients
For the Brisket
- 3–3½ lb / 1.4–1.6 kg fresh, uncured beef brisket, preferably a flat or first cut for neat slices; a rolled joint also works, while a fattier point is better suited to pull-apart meat
- 2 teaspoons fine salt, about 10–12 g, divided
- 1 teaspoon coarsely ground black pepper
- 2 tablespoons / 30 ml neutral cooking oil, divided
For the Onion Braising Base
- 3 medium-large yellow or brown onions, about 16–19 oz / 450–550 g, sliced from root to tip
- 5 large garlic cloves, finely chopped or crushed
- 2 tablespoons / 34 g tomato paste
- ½ cup / 120 ml dry red wine, dark ale, or additional low-sodium beef stock
- 1 cup / 240 ml low-sodium beef stock
- 1½ tablespoons / 22 ml Worcestershire sauce
- 2 teaspoons / 10 g Dijon mustard
- 1 teaspoon dried thyme or 6–8 fresh thyme sprigs
- 2 bay leaves
And for Finishing the Gravy
- Red wine vinegar: 1–2 teaspoons / 5–10 ml, as needed
- Dark brown sugar: ¼–1 teaspoon, only if the reduced gravy tastes too sharp
- Cornstarch: 1–2 tablespoons / 8–16 g, divided
- Cold water: 1–2 tablespoons / 15–30 ml, divided
- Additional salt and black pepper, as needed
Instructions
Prepare and Build the Braising Base
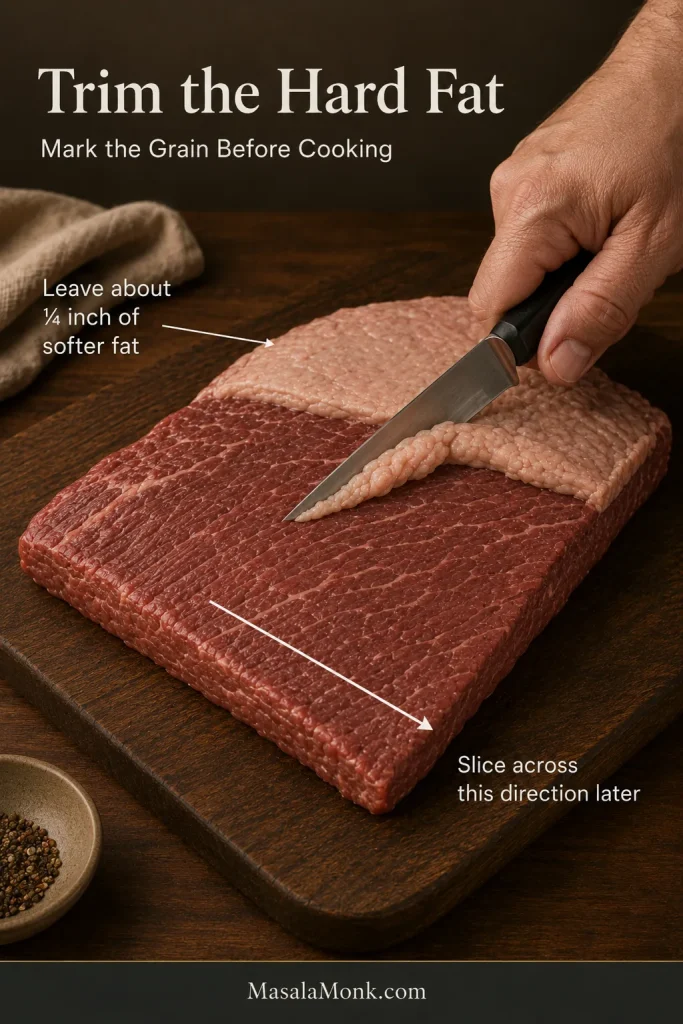
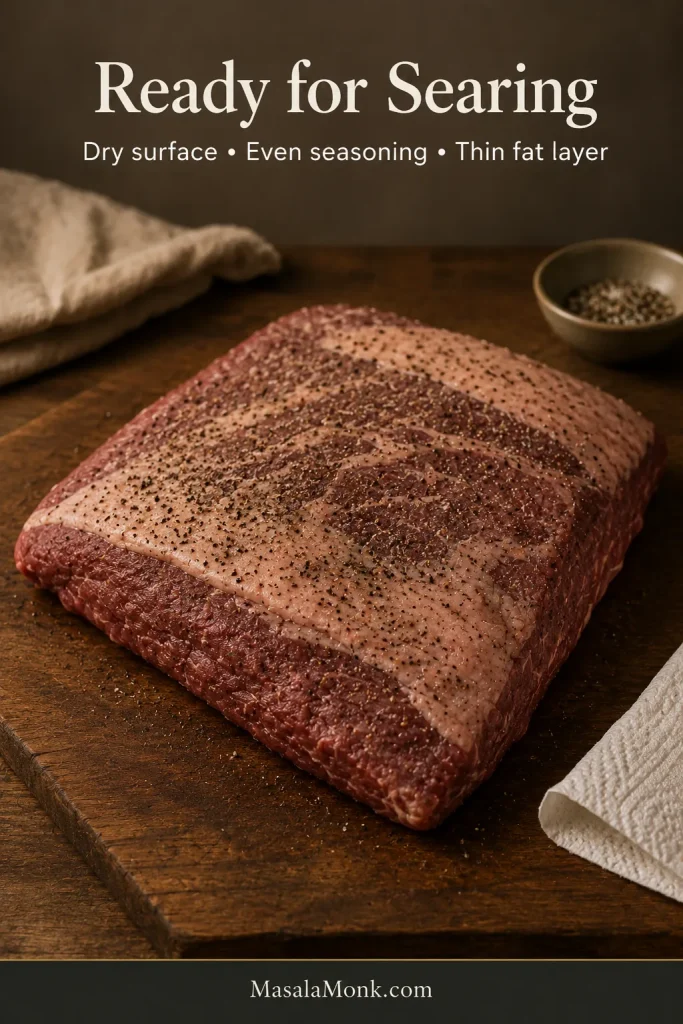
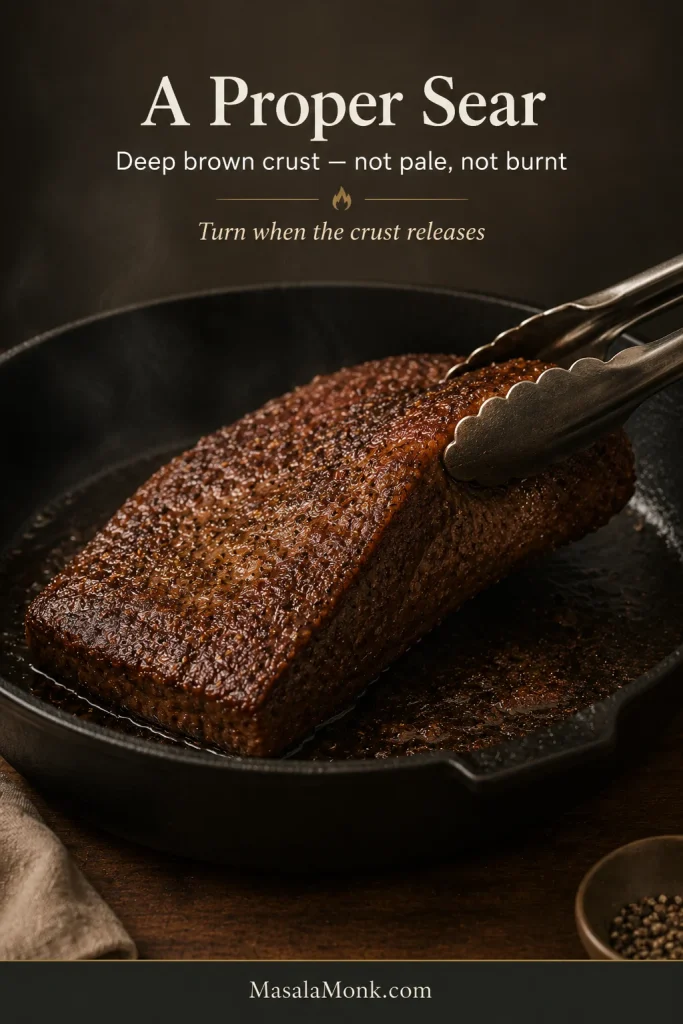
- Mark, trim, and season. Note the direction of the grain with a photo or shallow corner notch. Remove hard exterior fat and reduce any very thick fat cap to about ¼ inch / 6 mm. Pat the brisket dry, then season all sides with 1½ teaspoons of the salt and all the black pepper.
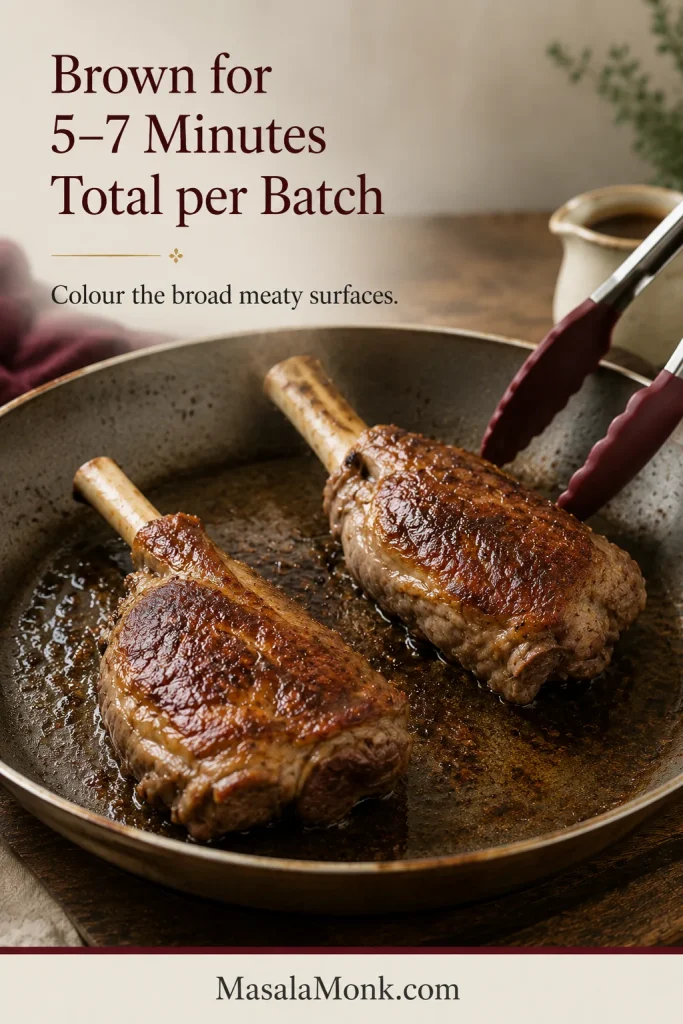
- Sear the brisket. Heat 1 tablespoon oil in a large skillet over medium-high heat. Brown the broad sides for 4–5 minutes each and the thick edges briefly, then transfer the brisket to a tray.
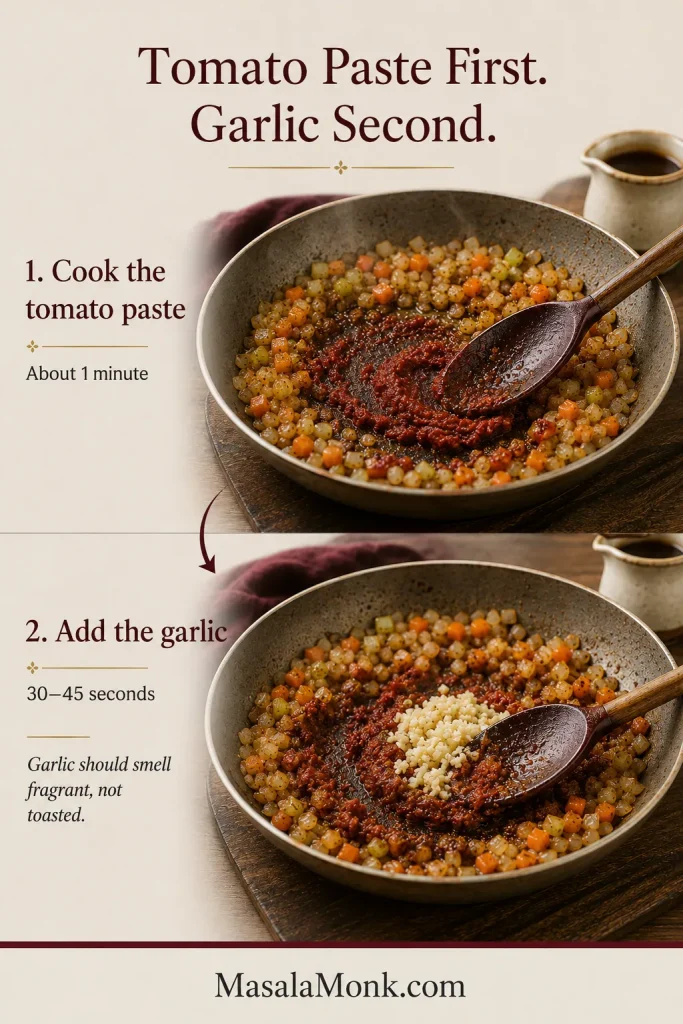
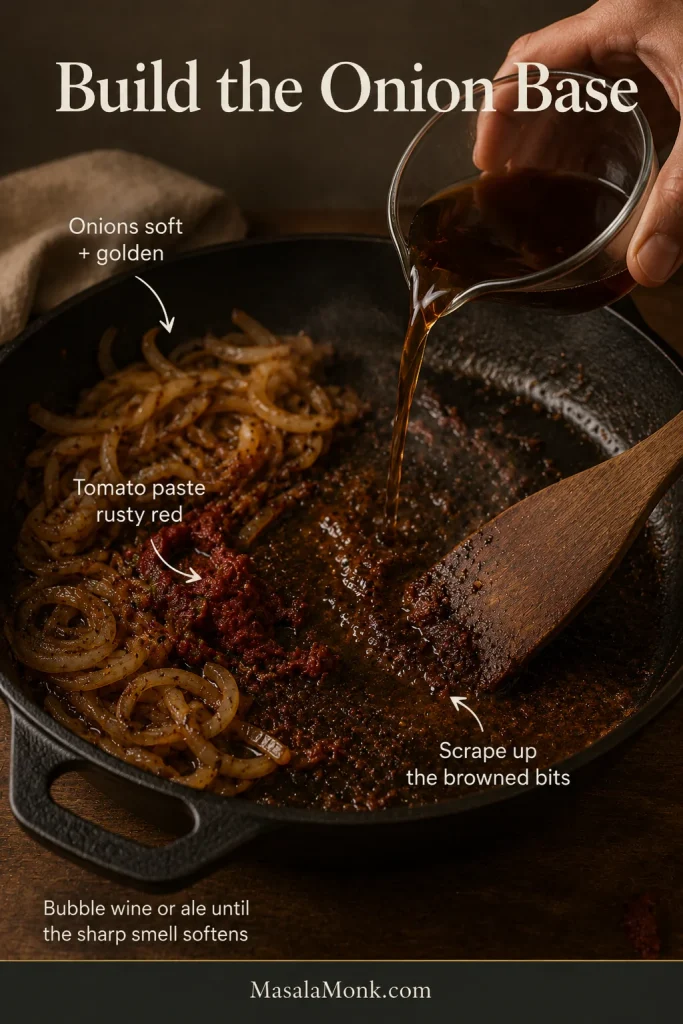
- Brown the onion base. Reduce the heat to medium. Add the remaining oil if needed, followed by the onions and up to the remaining ½ teaspoon salt; hold some back if the stock or Worcestershire tastes salty. Cook for 8–10 minutes until softened with golden edges. Add the garlic for 30 seconds, then cook the tomato paste for 1–2 minutes until it deepens to a rusty red.
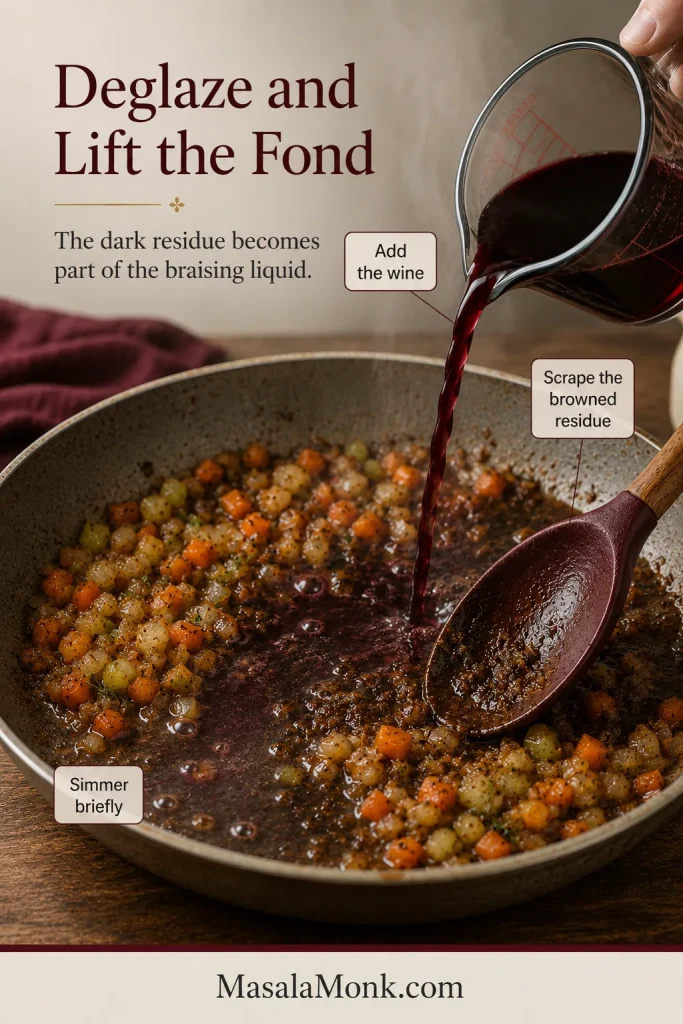
- Deglaze and season the liquid. Add the wine, ale, or extra stock and scrape up the browned residue. If using wine or ale, let it bubble for 1–2 minutes. Stir in the 1 cup / 240 ml stock, Worcestershire sauce, Dijon, thyme, and bay leaves.
Slow Cook and Test for Tenderness
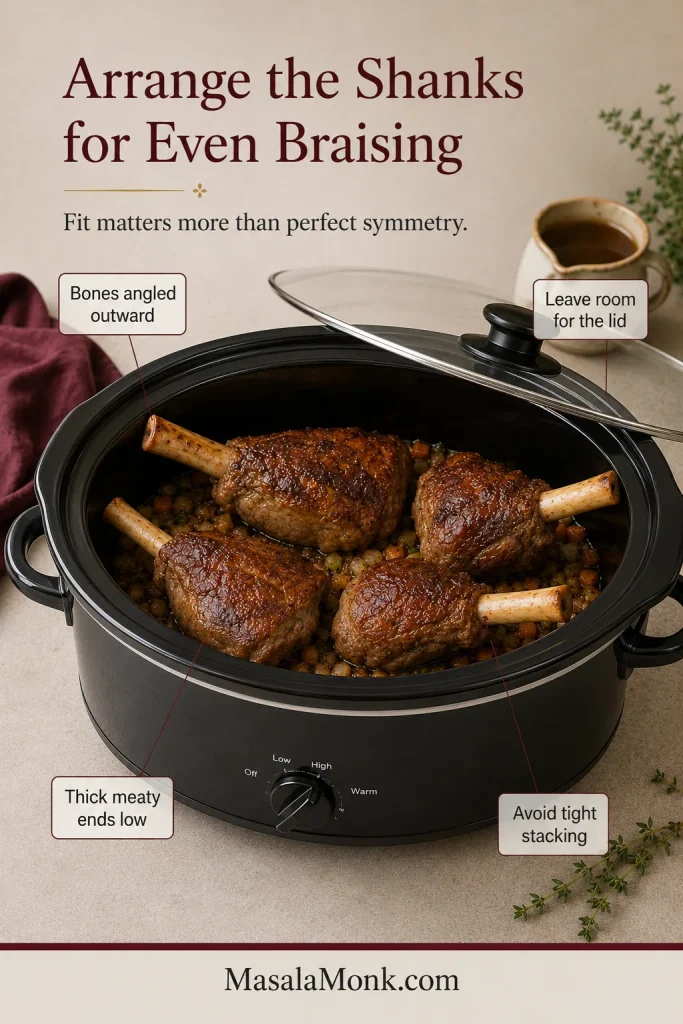
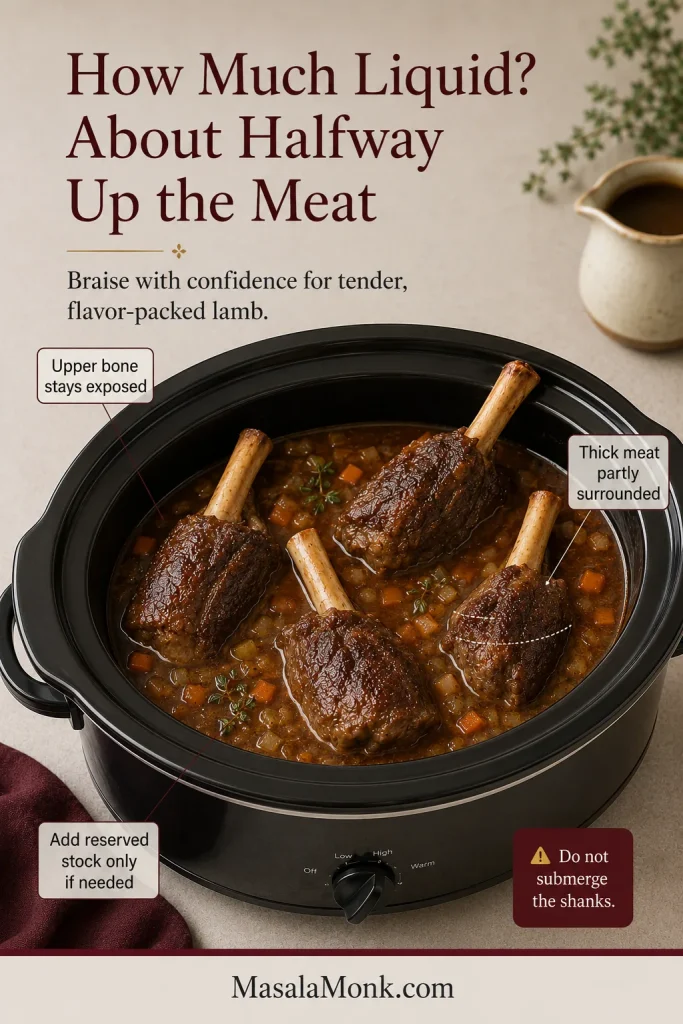
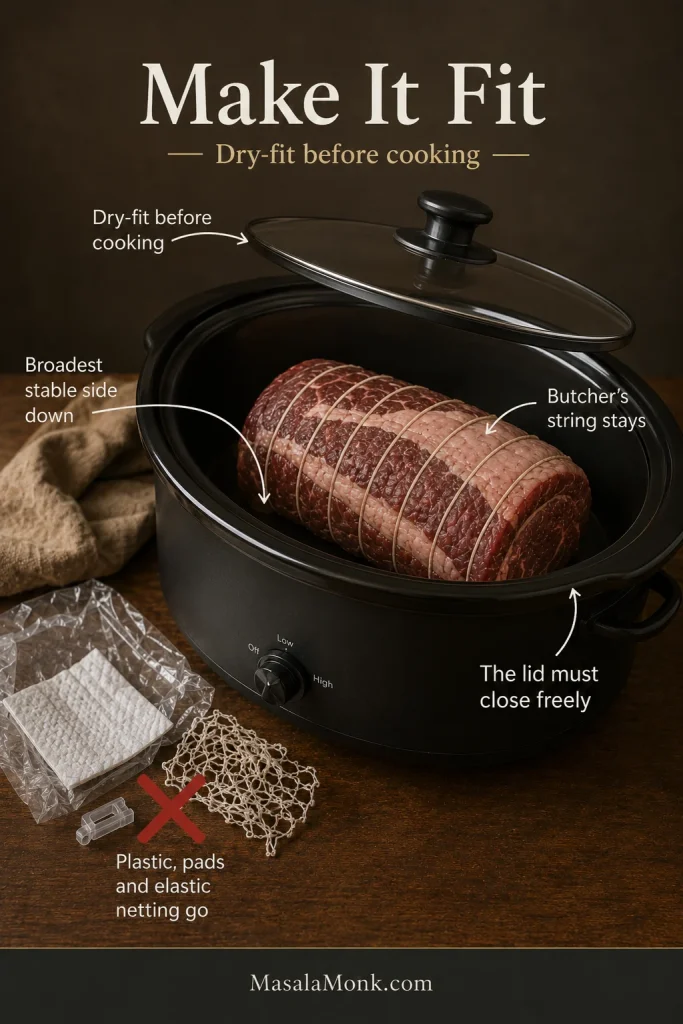
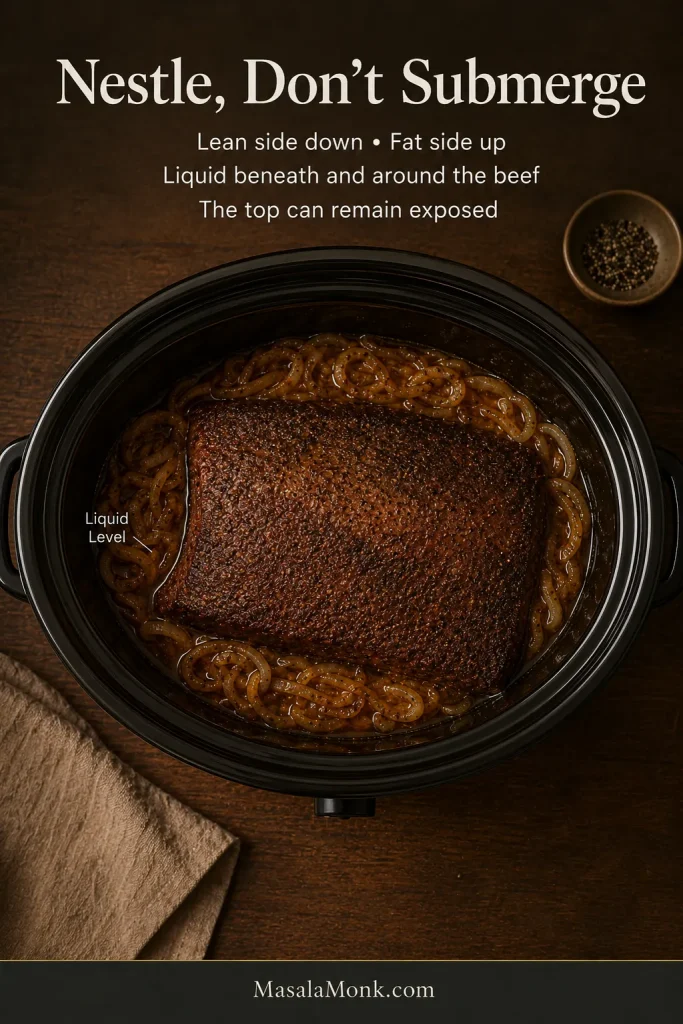
- Load the slow cooker. Transfer the onions and liquid to the cooker. For a flat: nestle it into the mixture with the lean underside down and fat side up. For a rolled joint: set it on its broadest stable side and leave heat-safe butcher’s string in place. Remove plastic wrapping, absorbent pads, clips, and non-heat-safe elastic netting. The top can remain exposed; don’t add extra stock simply to submerge the meat.
- Cook on LOW. Cover and cook a standard 3–3½ lb / 1.4–1.6 kg flat for about 7½–9 hours. Make the first tenderness check at 7 hours. For a tightly rolled joint, start checking around 7 hours; many finish between 7½ and 9 hours, although an especially thick joint or cooler-running cooker may need closer to 10 hours.
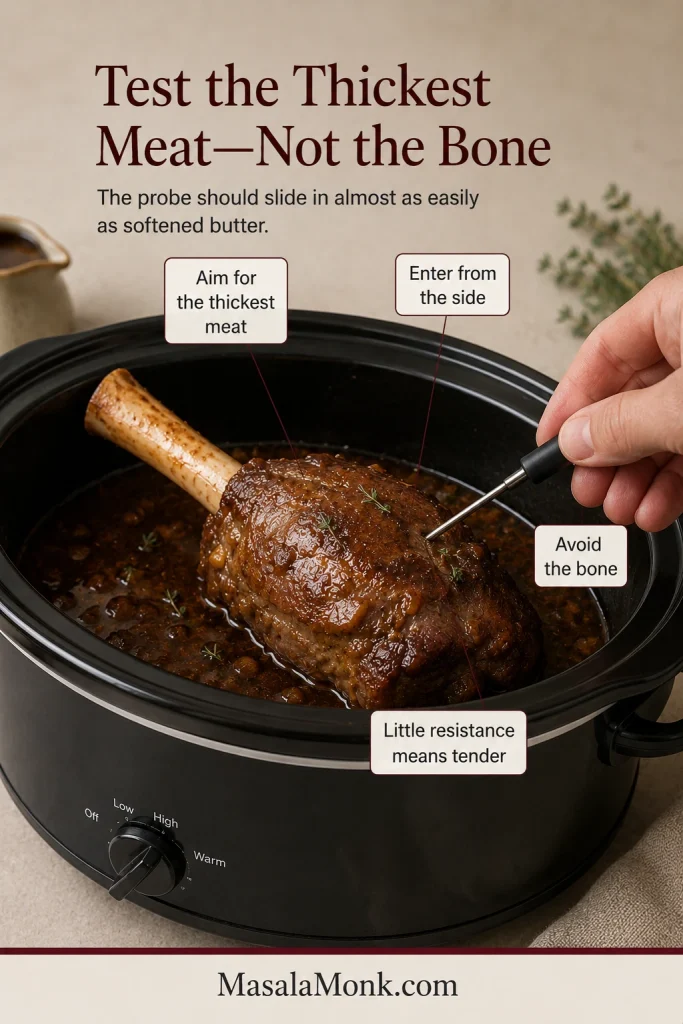
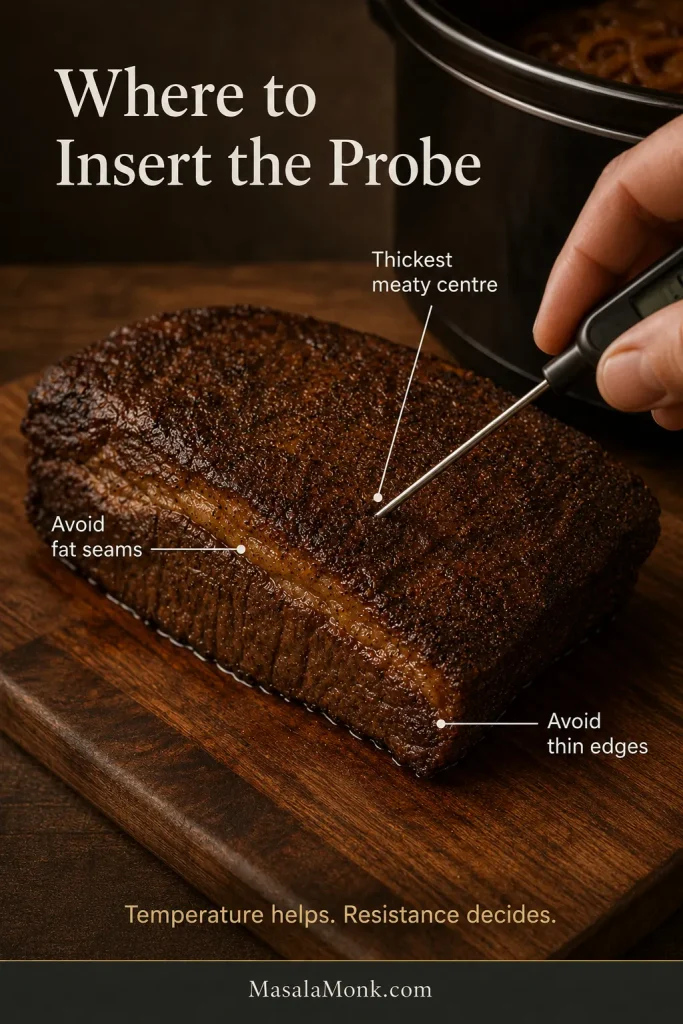
- Check the texture. Insert the thermometer probe—or a thin metal skewer if you are checking texture only—into the thickest section. Only the thermometer verifies temperature. If the meat feels firm and springy, close the lid and cook for another 30–45 minutes. The brisket is ready for slicing when the probe or skewer enters easily and the roast keeps its shape as you lift it.
Rest, Finish the Gravy, and Serve
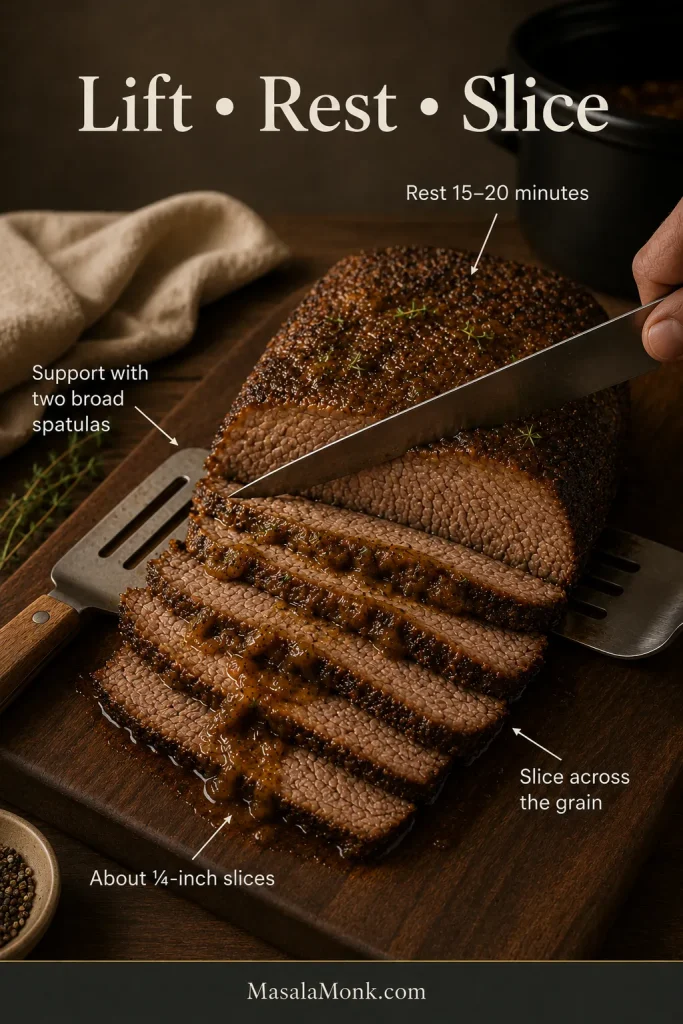
- Rest the brisket. Move it to a cutting board with two broad spatulas, tent loosely with foil, and rest for 15–20 minutes.
- Finish the gravy. Remove the bay leaves and thyme stems, skim excess fat, and transfer the onions and liquid to a wide saucepan. Blend with an immersion blender or strain if desired, then simmer for about 10–20 minutes, until the liquid tastes richer, looks glossier, and briefly parts behind the spoon. Once the liquid tastes concentrated, taste the gravy. Add 1 teaspoon red wine vinegar if it tastes flat or heavy, then add more only if needed. Add a small pinch of brown sugar only if it tastes harsh or sharp, and adjust the salt and pepper. If the flavor is right but the gravy remains too thin, mix 1 tablespoon cornstarch with 1 tablespoon cold water. Whisk it in gradually and simmer for 1–2 minutes. If the gravy remains too thin, mix another tablespoon of cornstarch with another tablespoon of cold water and add only as much as needed.
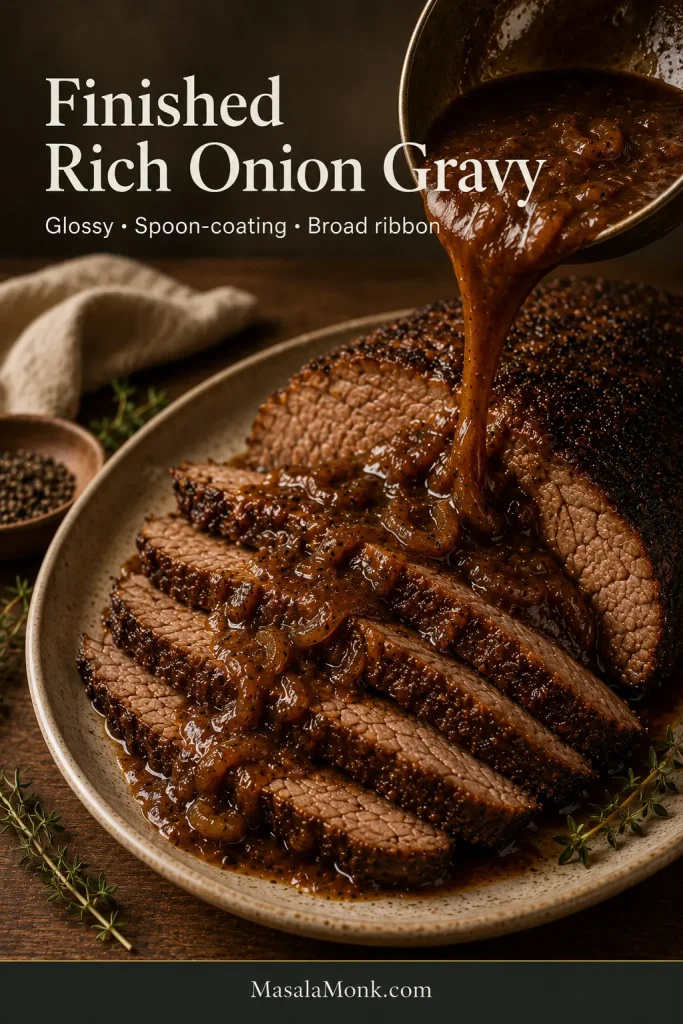
- Slice and serve. Remove the string from a rolled joint. Cut the brisket about ¼ inch / 6 mm thick across the grain. Spoon over enough gravy to keep the slices glossy and serve the rest at the table.
Recipe Notes
- For a 1⅔–2¼ lb / 750 g–1 kg flat: make the first check at about 6 hours on LOW. Many pieces finish around 7–8 hours, although a very thin flat may be ready sooner.
- For HIGH: start testing the 3–3½ lb brisket around 4 hours and expect about 4½–6 hours.
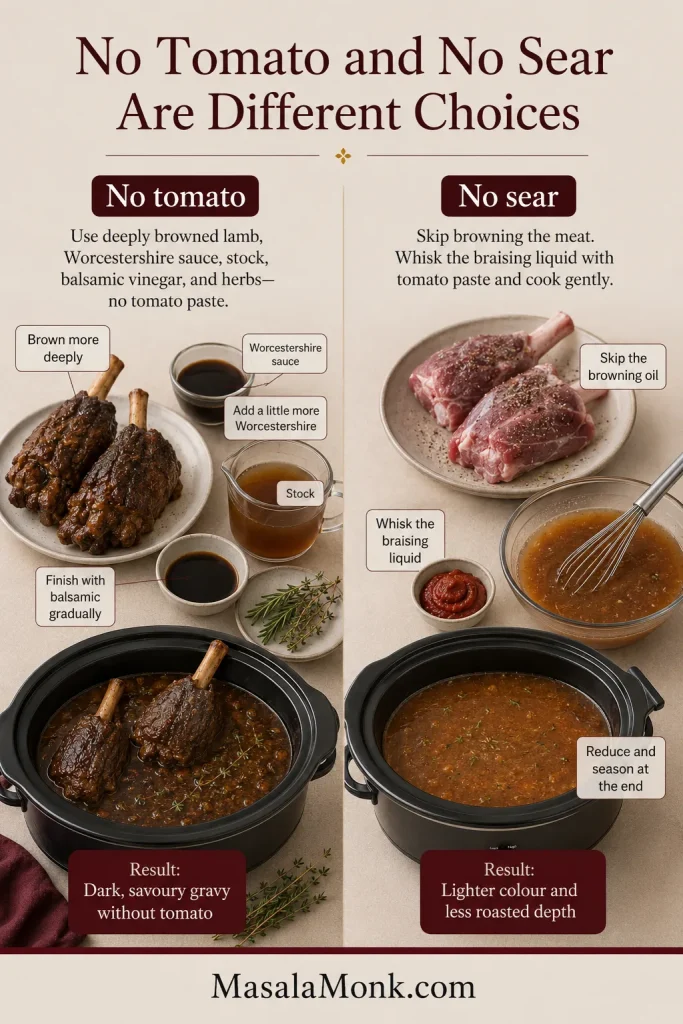
- For a no-sear version: omit the oil. Place the onions and seasoned beef directly in the cooker, whisk together the remaining braising ingredients, and pour them over the beef. Skipping the skillet saves about 25 minutes of active work, but the gravy will taste lighter and need a longer stovetop reduction.
Food-safety note: Fully thaw the brisket before slow cooking. See the USDA slow-cooker guidance for safe handling.
Need Help With Your Brisket?
Choose and Cook the Beef
- Why the method works
- Flat, point, joint, or rolled brisket
- Trimming, seasoning, grain, and fit
- Ingredient guidance
- What brisket should look and feel like
- Cooking times and doneness
Finish, Fix, and Serve
Why This Slow Cooker Brisket Method Works
A slow cooker surrounds brisket with gentle heat and moisture, but it can’t create a dark sear or concentrate gravy. Browning the beef, softening the onions, and cooking the tomato paste in a skillet build the roasted flavor the covered cooker cannot.
The starting liquid stays restrained because the beef and onions release more moisture as they cook. Meanwhile, gentle heat gives the brisket’s dense collagen time to soften into gelatin. Once that work is complete, continued cooking can dry the lean muscle fibers even while the meat becomes softer.
Remove the brisket as soon as it is tender enough to slice, then finish the cooking liquid separately. That lets you remove excess fat, evaporate water, and deepen the gravy without pushing the meat beyond its best slicing point.
How quickly it reaches that point depends heavily on the shape and thickness of the cut; use the cooking-time guide to decide when checking should begin.
Which Brisket Cut Should You Buy?
If the labels at the butcher counter are confusing, look at the shape before worrying about the name. Use fresh, uncured beef brisket—not corned beef brisket, which has already been cured in salty brine. A broad, even flat gives you the cleanest slices; a compact rolled joint simply needs more patience at the center.
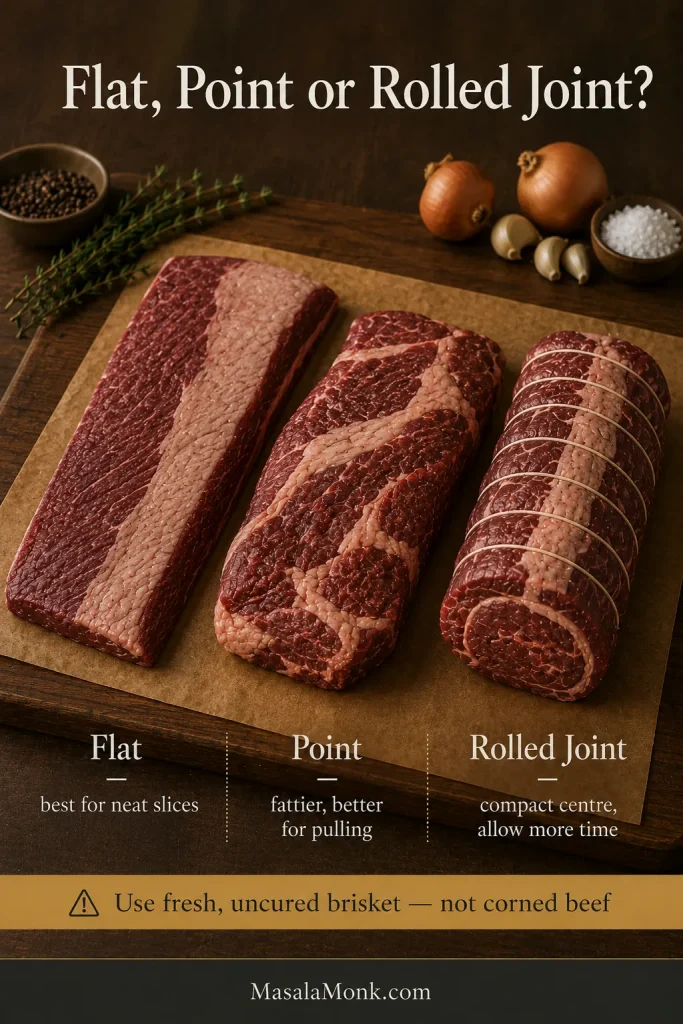
Flat Cut Versus Point Cut
Choose a flat or first cut for neat gravy-covered slices. It is broad and comparatively lean, so remove it once the probe glides in easily and the roast holds together.
Choose a point cut for richer, fattier meat or a pull-apart finish. Trim heavy exterior fat and skim the cooking liquid carefully.
Brisket Joint or Rolled Brisket
A tightly rolled joint may take longer than a heavier flat because heat must reach its thick center. Leave heat-safe butcher’s string in place while it cooks.
If the joint will not fit beneath the lid, unroll it or divide it into two large pieces and begin checking sooner.
Whole packer brisket: It contains both the flat and point and is usually too large for a household slow cooker. Use a smoker or oven method instead.
If the label says shoulder roast, chuck shoulder, arm roast, or shoulder clod, use the beef shoulder roast crock pot guide. Those cuts behave more like pot roast than brisket.
Brisket or Pot Roast?
Choose brisket for distinct slices and a narrower finish between firm and falling apart. Chuck breaks into soft chunks more readily; brisket keeps a visible grain and rewards slicing across it. For forgiving chuck roast with potatoes and carrots in the cooker, use MasalaMonk’s slow cooker pot roast recipe.
How Much Brisket per Person?
Allow about ½ lb (225 g) raw boneless brisket per adult with substantial sides. This recipe serves six generously or eight moderately; buy extra when leftovers are part of the plan.
Prepare the Brisket Before It Goes Into the Cooker
Remove only the hard excess fat, mark the grain while it is visible, and make sure the brisket fits beneath the lid.
Trim the Fat and Mark the Grain
Remove hard, waxy lumps and heavy edge deposits. Leave a reasonably even layer—about ¼ inch (6 mm) where practical—especially on a lean flat.
Photograph the direction of the raw muscle fibers or make a shallow notch across one corner. After cooking, slice perpendicular to those fibers so each bite is easier to chew.
Does Brisket Need a Rub or Marinade?
No marinade is needed for tenderness; the long cook softens the connective tissue. The browned onions, garlic, Worcestershire, Dijon, and herbs provide enough seasoning for this gravy-based version. You may season several hours or a day ahead, but a sweet barbecue rub moves the dish toward a different style.
Make It Fit and Position It Correctly
The lid should close fully without resting on the meat, and the brisket should not be folded tightly against the sides. If necessary, cut it across its width into two large pieces, arrange them with little overlap, and begin checking at the standard-flat time; thinner pieces may finish first.
Set a flat fat-side up with the lean side nearer the onions and liquid. Place a rolled joint on its broadest stable side; secure placement and a closed lid matter more than exact fat-cap orientation.
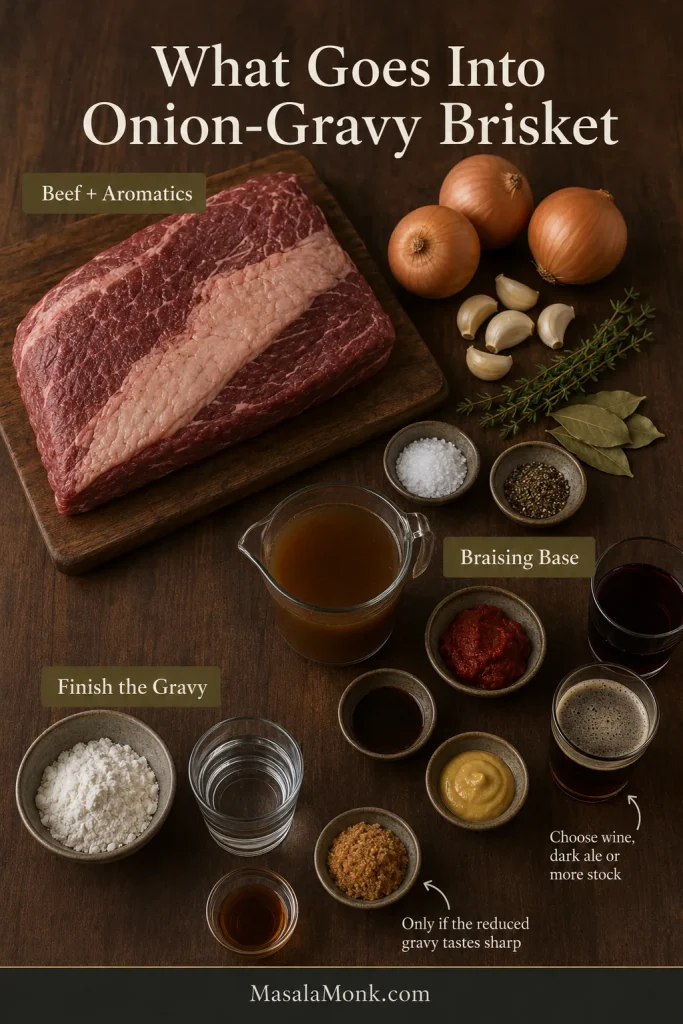
Ingredients That Build the Brisket and Gravy
Three onions look generous in the skillet, but they collapse into the cooking liquid and give the finished gravy much of its body. Tomato paste adds depth, low-sodium stock leaves room for reduction, and Worcestershire, Dijon, and herbs round out the sauce without needing a packet mix.
Onions, Stock, and Tomato Paste
Slice the onions from root to tip so some texture remains through the long cook.
Low-sodium stock gives you room to reduce the gravy without making it harsh. Resist adding more simply because the top of the brisket remains exposed; the beef and onions will release additional moisture beneath the closed lid.
Tomato paste adds color, savory depth, and a little body without making the gravy taste tomato-heavy. Cook it until it darkens slightly so it loses its raw edge.
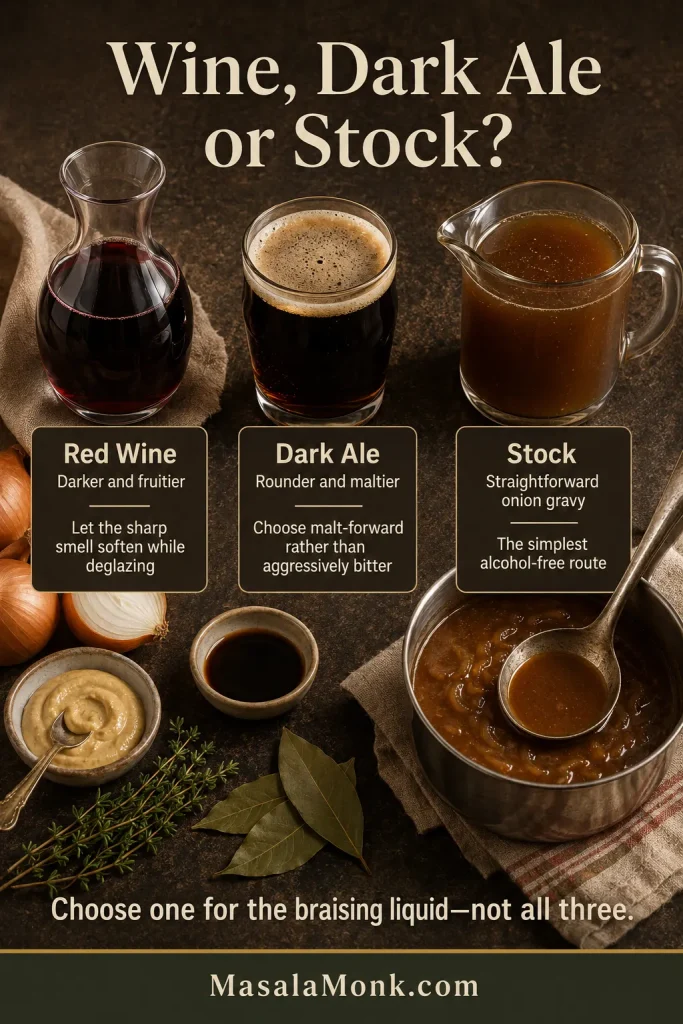
The Braising Liquid
Red wine gives the gravy darker fruit and acidity. Ale adds a rounder maltiness, while extra beef stock creates the most straightforward onion gravy. Keep the amount restrained: the wine or ale should deepen the sauce without becoming its main flavor.
Worcestershire brings savory depth and gentle acidity, while Dijon rounds the liquid without making the gravy taste strongly mustardy. Both become more concentrated during reduction, so taste again before serving.
Cornstarch adds body only after reduction has concentrated the flavor. Add it gradually so the gravy stays glossy rather than becoming pasty.
What Slow Cooker Brisket Should Look and Feel Like
The cues below show what each stage should look and feel like, especially when the clock cannot tell you enough.
The Crust and Onion Base
Pat the surface dry, then leave each broad side in the hot skillet until a deep crust forms and the meat releases more easily. Cook the onions until their raw smell softens and their edges turn golden.
Stir in the tomato paste until it changes from bright red to rusty red and begins sticking lightly to the pan. Pour in the wine, ale, or stock and scrape up the browned layer—those sticky bits belong in the gravy. If using wine or ale, let it bubble until its sharp alcoholic smell softens, then nestle the brisket into the onions.
The Tenderness Change to Watch For
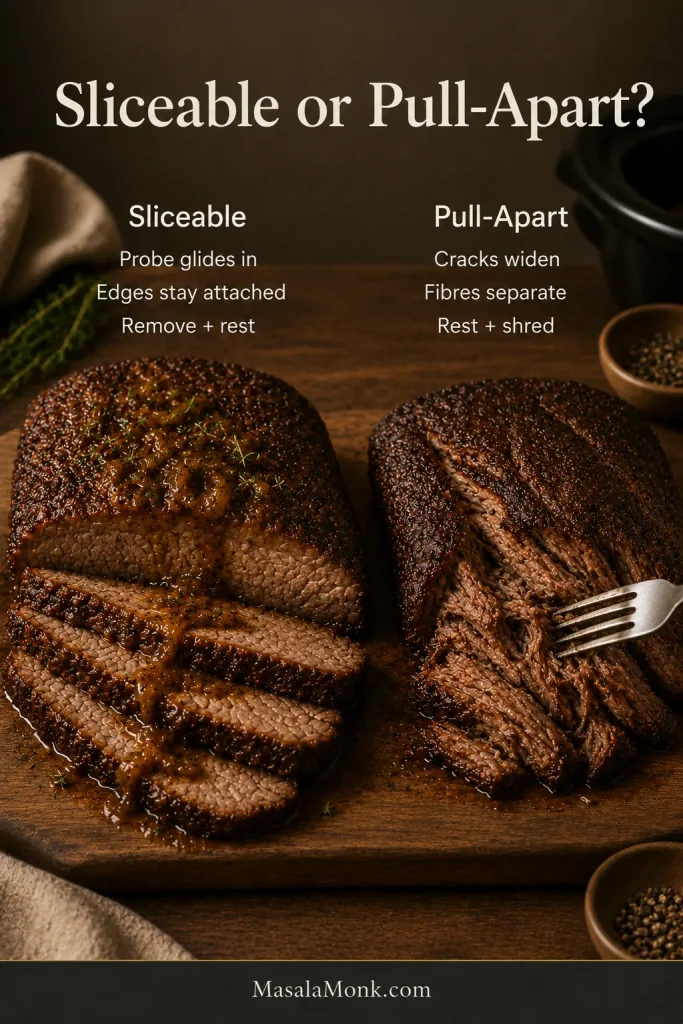
The first tenderness check is often the least encouraging one. At the sliceable stage, the roast flexes when lifted, its edges remain attached, and any surface cracks stay narrow. As it moves toward pull-apart tenderness, those cracks widen and the fibers begin separating under light pressure.
How Soft Brisket Should Slice
Support the softened brisket with two broad spatulas and rest it for 15–20 minutes. Slice across the grain; the first piece should bend without crumbling. Cut exceptionally soft meat a little thicker.
The slow cooker brisket timing chart tells you when to begin looking for those changes.
How Long to Cook Brisket in a Slow Cooker
For a 3–3½ lb (1.4–1.6 kg) brisket flat, cook on LOW for about 7½–9 hours or HIGH for about 4½–6 hours. Begin checking at 7 hours on LOW or 4 hours on HIGH.
Cooking time changes with thickness, shape, fat content, starting temperature, cooker size, and how hot your slow cooker runs. A small rolled joint may take longer than a heavier broad flat because heat has farther to travel through its tightly rolled center.
There is no dependable minutes-per-pound or hours-per-kilogram formula for slow cooker brisket. Use the chart to decide when to make the first check, then let the resistance of the meat decide when to stop.
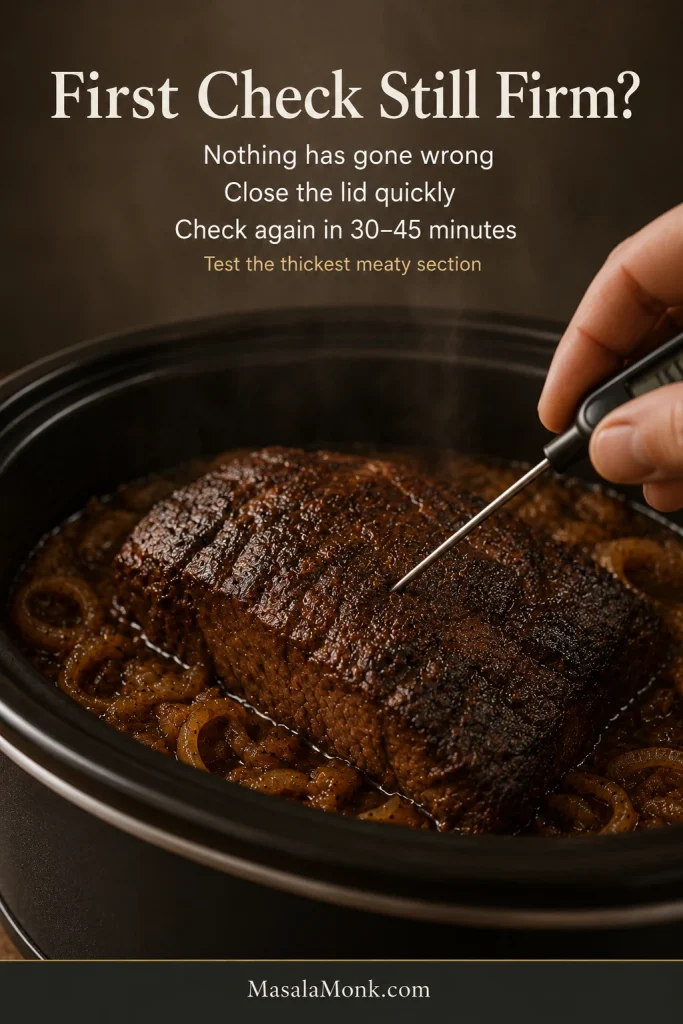
Open the lid briefly, test one or two places in the thickest section, and close it again quickly if the meat resists. Check again after another 30–45 minutes.
All times are approximate. Use the “Begin checking” column for your first tenderness test.
On a phone, swipe sideways to see all columns in the timing table.
| Brisket | Setting | Begin checking | Likely window |
|---|---|---|---|
| Thin or small flat, 1⅔–2¼ lb / 750 g–1 kg | LOW | 6 hours | 7–8 hours |
| Thin or small flat, 1⅔–2¼ lb / 750 g–1 kg | HIGH | 3½ hours | 4–5 hours |
| Compact or rolled joint, 2¼–3⅓ lb / 1–1.5 kg | LOW | 7 hours | 7½–9 hours; a very thick joint may need closer to 10 hours |
| Compact or rolled joint, 2¼–3⅓ lb / 1–1.5 kg | HIGH | 4½ hours | 5–6½ hours |
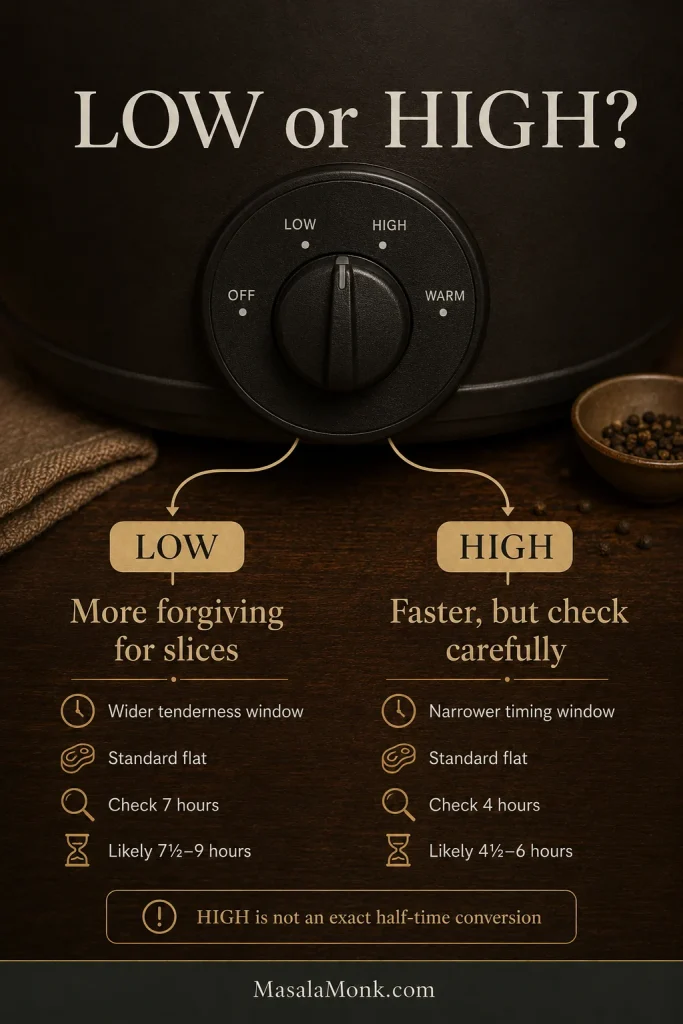
| Recommended standard flat, 3–3½ lb / 1.4–1.6 kg | LOW | 7 hours | 7½–9 hours |
| Standard flat, 3–3½ lb / 1.4–1.6 kg | HIGH | 4 hours | 4½–6 hours |
For a 4–5 lb (1.8–2.3 kg) brisket: use a 7–8 quart cooker and begin checking at about eight hours on LOW. Many thick whole briskets need roughly 9–11 hours. If you divide the brisket into thinner pieces, begin near the standard-flat window and remove each piece separately when tender.
What the Probe Is Telling You
| What you feel | What it means | What to do |
|---|---|---|
| Firm resistance as the probe enters | Needs longer | Close the lid and check again in 30–45 minutes |
| The probe glides into the thickest section | Tender and sliceable | Remove the brisket and let it rest |
| The meat separates around the probe | Pull-apart stage | Lift carefully, rest briefly, and shred |
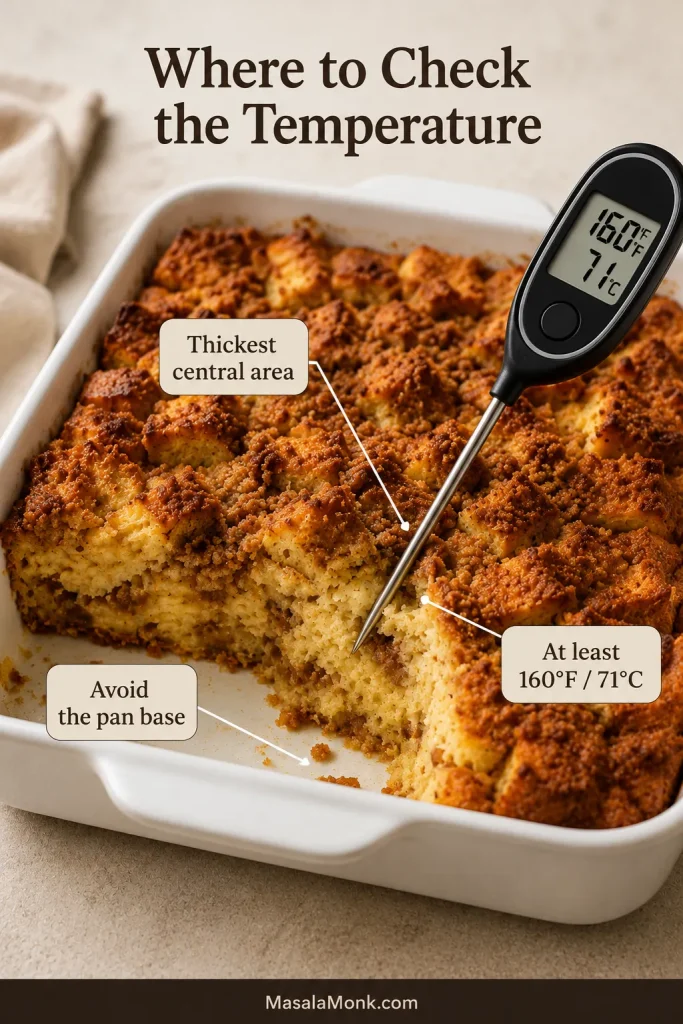
Where to Place the Probe
Is LOW Better Than HIGH?
LOW is the more forgiving setting because it gives a lean flat a wider window between firm and overly soft. HIGH can produce good brisket when dinner needs to happen sooner, but it isn’t an exact half-time conversion.
What Internal Temperature Is Slow Cooker Brisket Done?
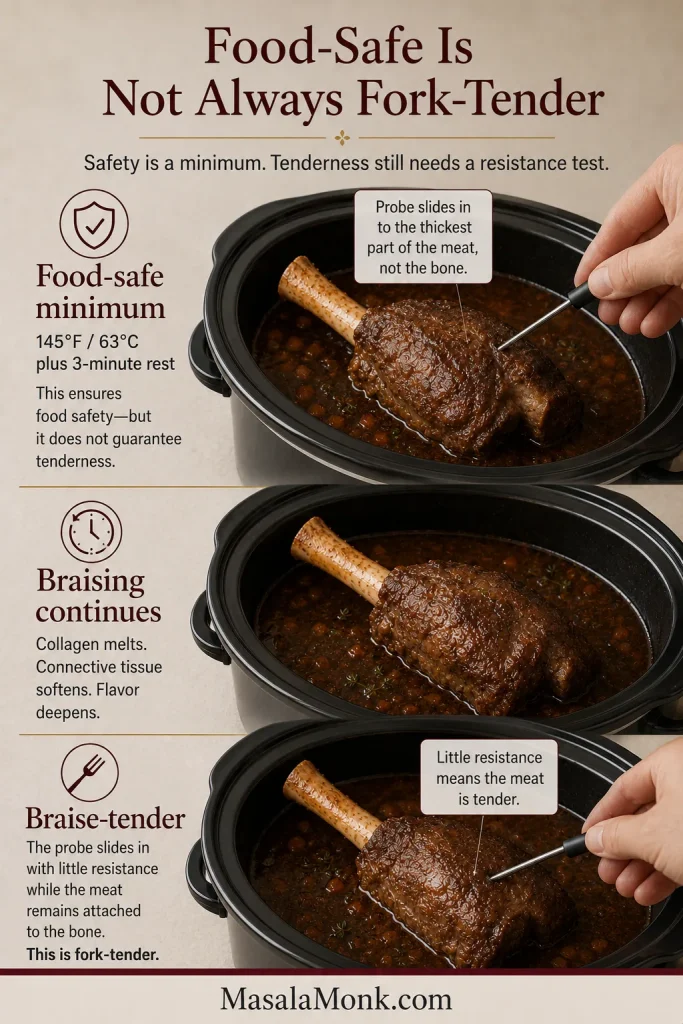
Begin checking brisket for tenderness around 185–190°F (85–88°C). Many pieces become probe-tender in the 190s to low 200s, but resistance—not temperature alone—decides when to remove them.
Whole beef roasts reach the USDA minimum safety benchmark at 145°F (63°C) followed by a three-minute rest. Brisket is normally still firm at that point because its connective tissue hasn’t softened enough.
Can You Overcook Brisket in a Slow Cooker?
Yes. A brisket can become softer while its lean fibers become drier. Watch for these signs:
- The brisket splits before it can be lifted from the cooker.
- The fibers separate as soon as the surface is pressed.
- Slices crumble into short strands instead of bending.
- A lean flat feels soft but dry or cottony in the mouth.
- The edges break down before you can carve the center.
An over-soft brisket works well shredded, moistened with finished gravy, and served in rolls, baked potatoes, or rice bowls.
Save the Slow Cooker Brisket Timing Guide
Prefer one visual reference for later? This chart brings together the first-check and likely cooking windows for flats and rolled joints on LOW or HIGH. Save it as a starting point, then let probe resistance decide the actual finish.
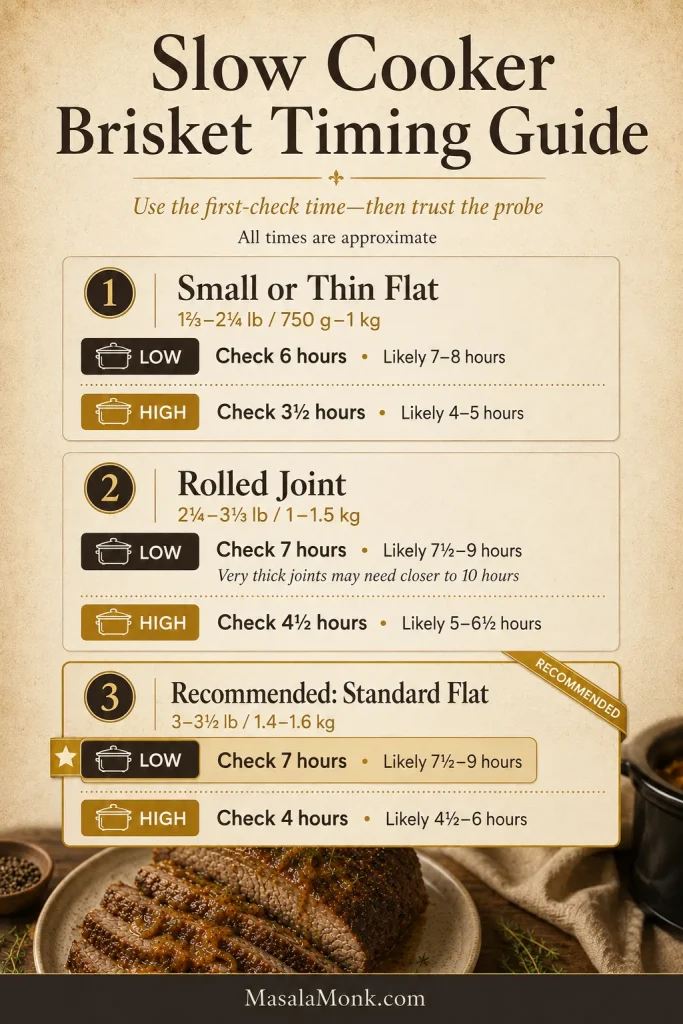
Open the full-size brisket timing chart, then save it to your phone or computer for future cooks.
Once the probe gives you the answer, remove the brisket and finish the cooking juices as rich onion gravy.
How to Turn the Cooking Juices Into Rich Gravy
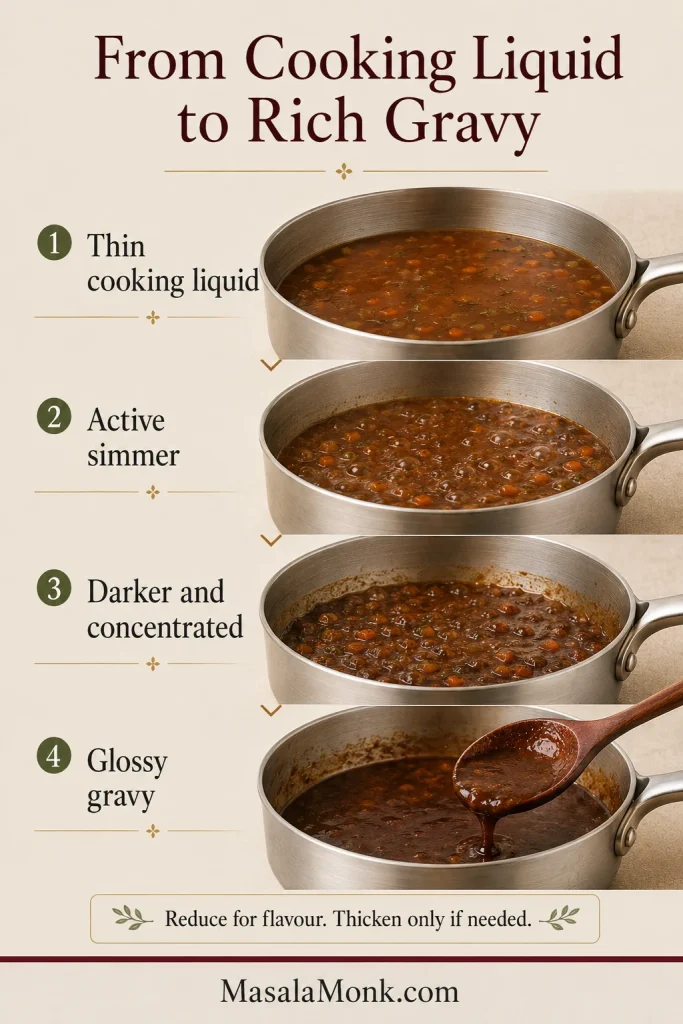
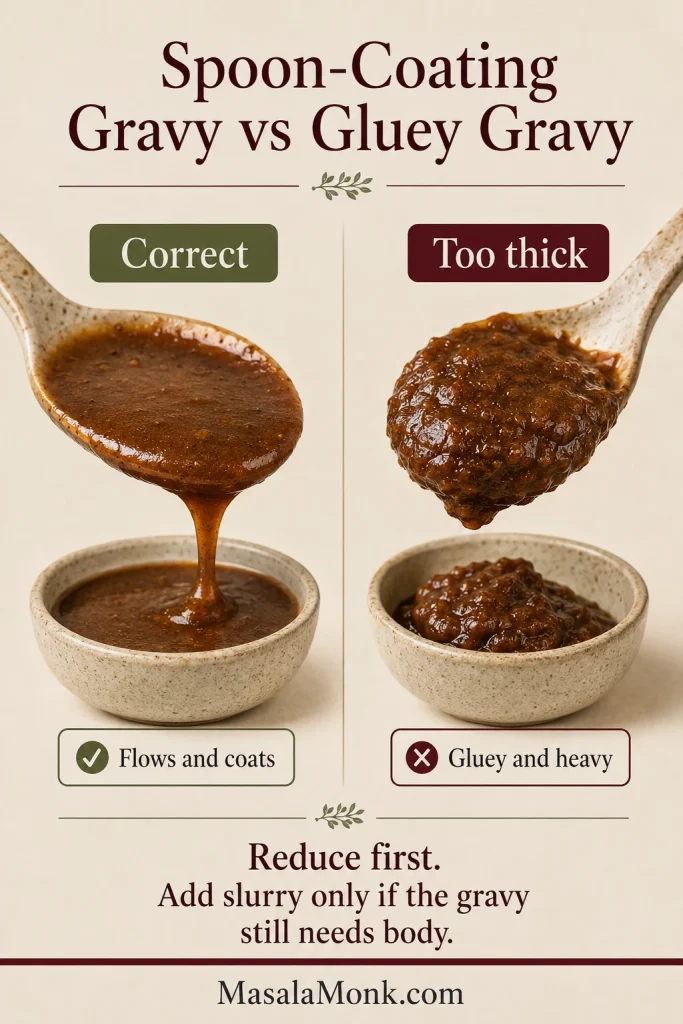
The liquid will probably look thinner than finished gravy when the lid first comes off. That is expected. It may already smell deeply savory, but its flavor and body develop in the saucepan.
Reduce for flavor. Thicken for texture. Reduction concentrates the beef and onions. Cornstarch changes only how the sauce flows.
Why Slow Cooker Brisket Juices Look Thin
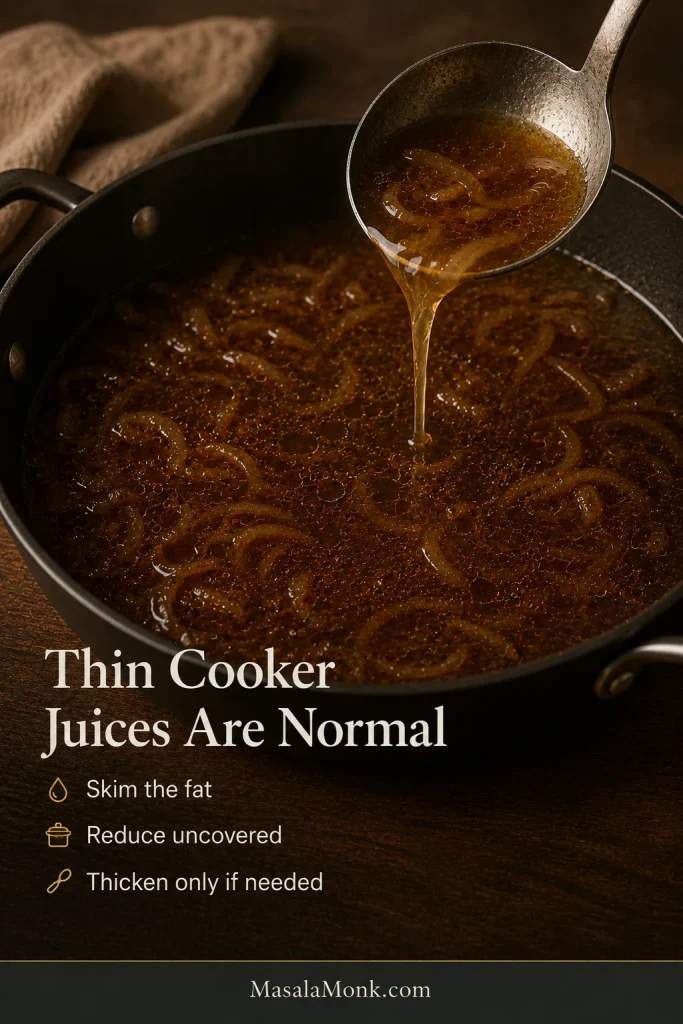
Remove the Fat and Choose the Texture
Let the liquid settle briefly, then spoon away the glossy fat or use a separator. A point cut or heavily capped brisket may need more attention than a lean flat. When the brisket is cooked a day ahead, the chilled fat lifts away especially cleanly.
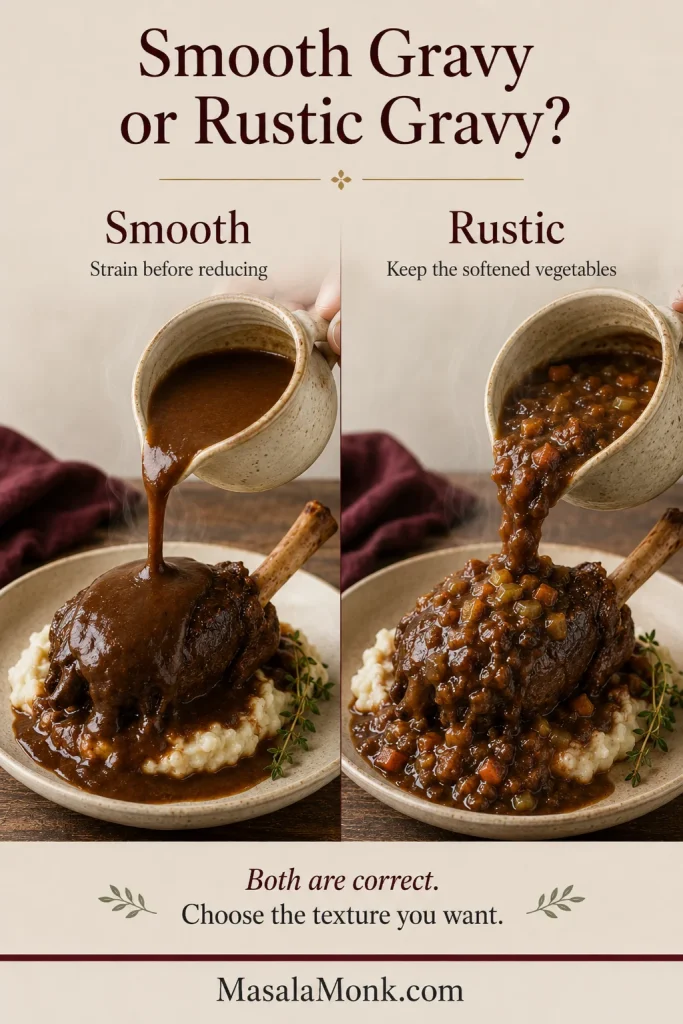
Keep the softened onions for rustic gravy, blend them into the liquid with an immersion blender for a smooth sauce, or strain them out for a clearer finish.
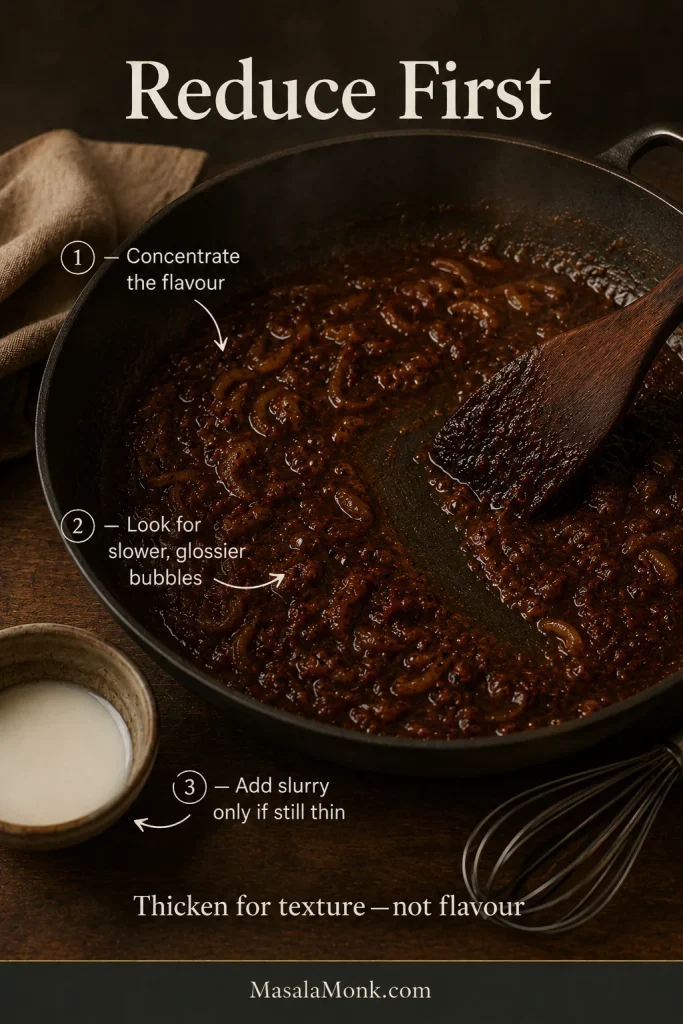
Reduce Before You Thicken
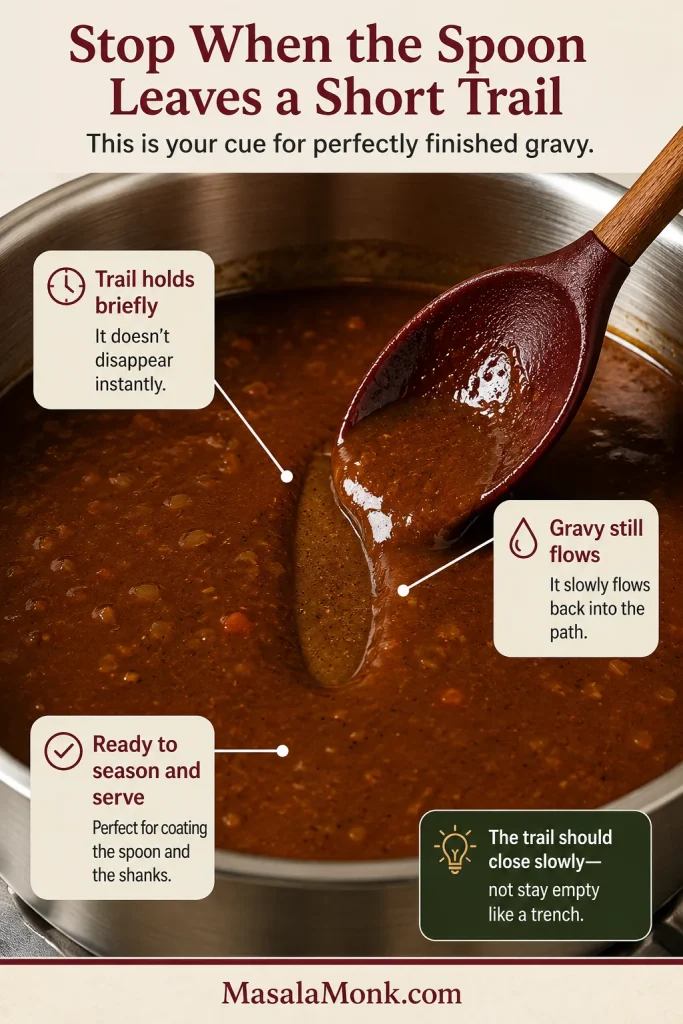
Pour the liquid into a wide saucepan and simmer uncovered. At first it may taste savory but diluted. Start tasting after about 10 minutes. As the beef and onion flavors concentrate, the bubbles turn slower and glossier. The spoon also begins leaving a brief trail across the pan.
Stop when the gravy tastes deeply beefy and onion-rich, even if it looks slightly thinner than you want. Mix 1 tablespoon cornstarch with 1 tablespoon cold water, whisk it in gradually, and simmer for 1–2 minutes. If it remains too thin, mix another tablespoon of cornstarch with another tablespoon of cold water and add only as much as needed. The finished gravy should coat the back of a spoon and fall in a broad ribbon.
What Finished Onion Gravy Should Look Like
Balance the Finished Gravy
| If the gravy tastes… | Try this |
|---|---|
| Flat or heavy | Add 1 teaspoon red wine vinegar, taste, then add more only if needed. It should lift the richness without tasting vinegary. |
| Not savory enough | Add a small splash of Worcestershire or a pinch of salt. |
| Overly salty | Stop reducing and dilute with unsalted stock or water. |
| Too sweet | Add acidity and a little additional stock. |
| Harsh or sharp | Add more stock or a very small pinch of brown sugar. |
| Greasy | Separate more fat before making any other adjustment. |
| Rich but too thin | Add more slurry gradually. |
| Overly thick | Whisk in warm stock a little at a time. |
| Not enough gravy | Add warm unsalted stock, simmer briefly to integrate it, and taste again before serving. |
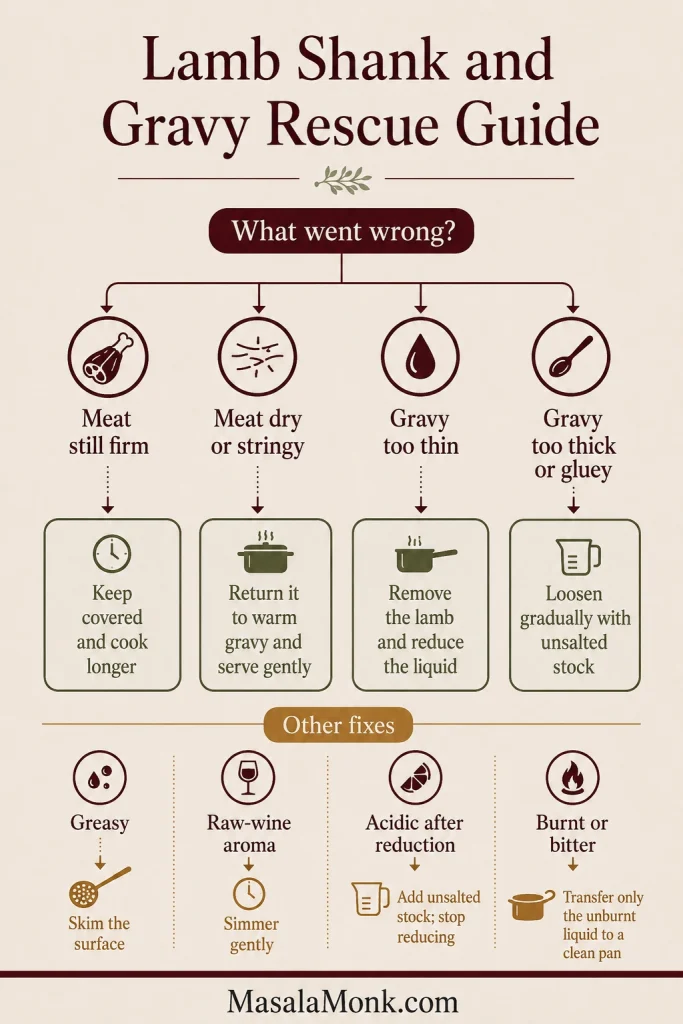
Slow Cooker Brisket Troubleshooting
Most brisket problems fall into two groups: the meat needs more time, or the cooking liquid needs finishing. Even an over-soft brisket can become an excellent pull-apart dinner.
Brisket Rescue at a Glance
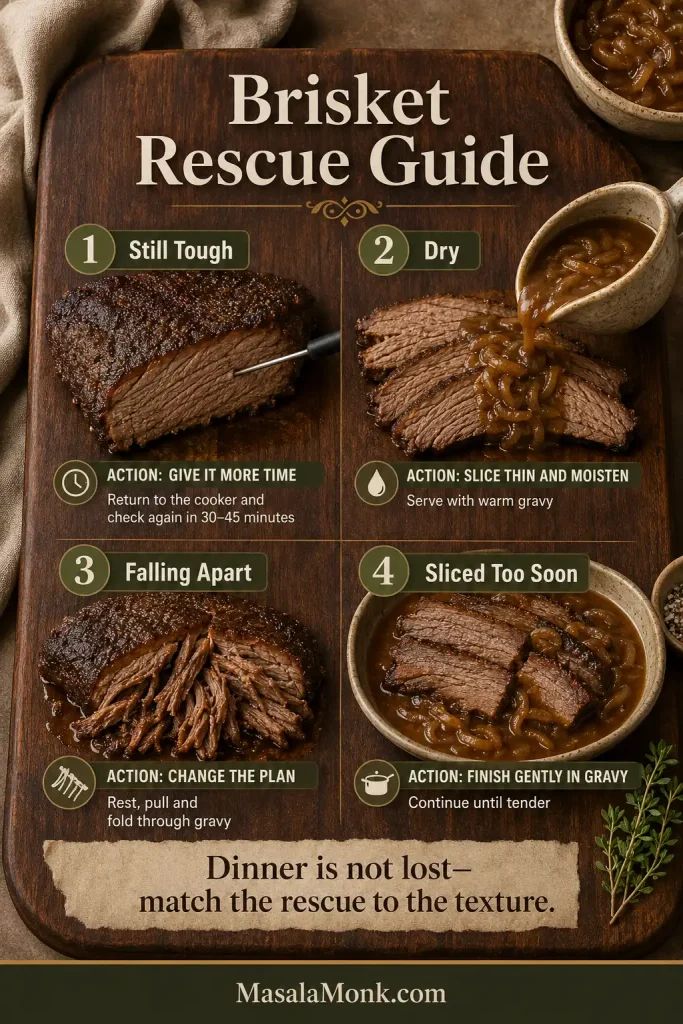
My Brisket Is Still Tough
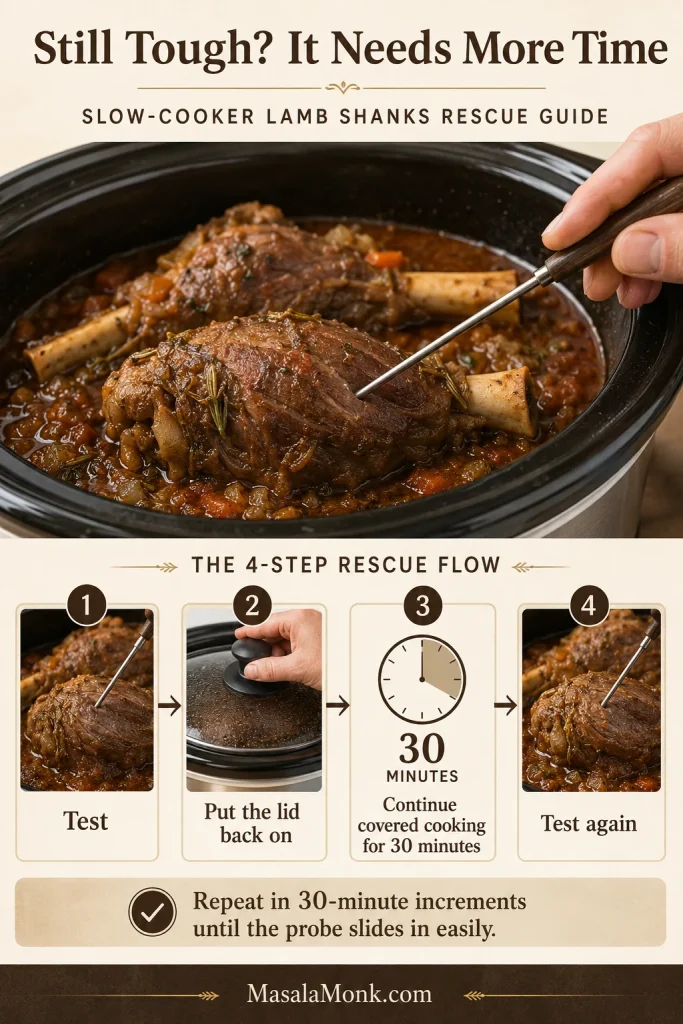
If your brisket still feels moist but the probe pushes back, nothing has gone wrong. Keep it whole, replace the lid, and cook for another 30–45 minutes. Test the thickest center, not a soft edge or a seam of fat.
If the brisket has just been sliced and is still hot, arrange the slices snugly in a covered baking dish with hot gravy or cooking liquid. Continue cooking gently at 300°F (150°C) and check every 20–30 minutes. For refrigerated brisket, use the reheating guidance below instead.
My Brisket Is Dry
Dryness can come from a very lean flat, cooking past the ideal window, or reheating uncovered. Beef can overcook even while surrounded by liquid because the muscle fibers still tighten and release their own moisture.
Spoon generous gravy over the slices or chop the meat and fold it into the sauce. The beef cannot absorb all the lost moisture again, but thicker pieces and plenty of gravy can make a satisfying dinner.
It Fell Apart Before I Could Slice It
If the brisket breaks as you lift it, dinner isn’t lost—it has simply moved from sliceable to pull-apart. Remove any large deposits of fat, shred the beef, and add enough finished gravy to coat the fibers.
When presentation matters, let the meat cool before handling. Chilled brisket firms up, making it easier to portion cleanly than delicate hot meat.
Gravy Troubleshooting at a Glance
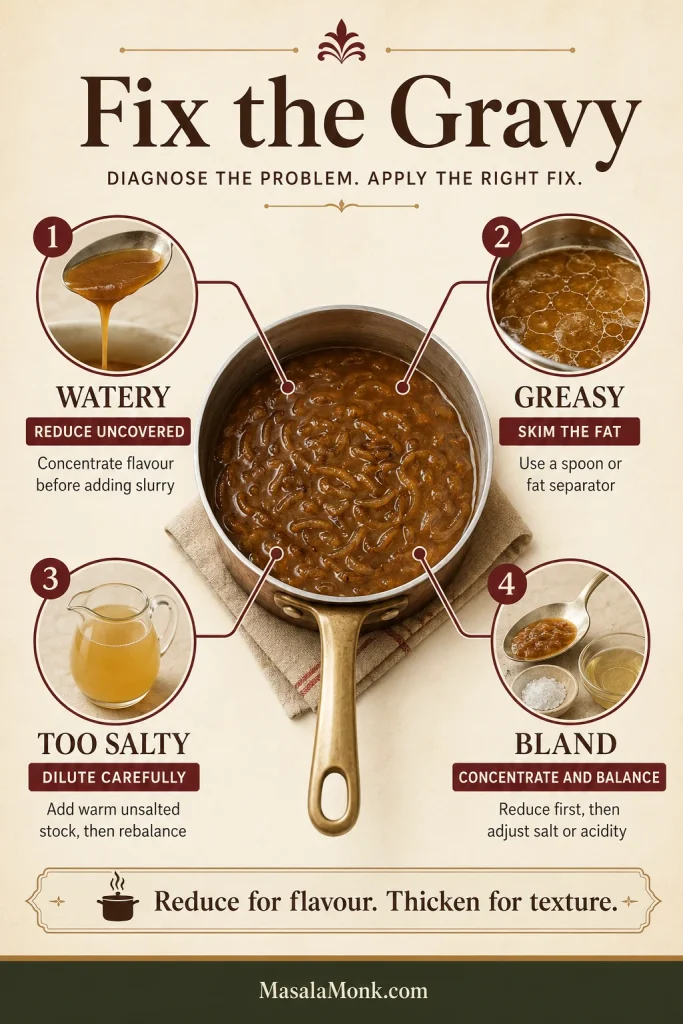
The Gravy Is Watery
The liquid may look disappointingly thin when you first open the cooker. That is often normal; it has not been reduced yet. Move it to a wide pan and simmer uncovered until the flavor concentrates, then use a slurry only if it still needs more body.
The Gravy Is Greasy
A point cut, thick fat cap, or heavy internal seams can release more fat than the sauce can comfortably hold. Let the liquid settle and skim it, use a separator, or chill it and remove the hardened layer.
The Gravy Is Too Salty
Reduction intensifies salt from stock, Worcestershire, seasoning mixes, and the beef itself. Stop reducing and add unsalted stock or water. If that makes the gravy too thin, restore its body with a little slurry rather than concentrating the salt again.
The Brisket Tastes Bland
Skipping the sear, using weak stock, beginning with too much liquid, or forgetting to taste before serving can all leave the sauce muted. Reduce it first, then taste for salt, savory depth, and acidity. A little Worcestershire or red wine vinegar can wake it up quickly.
Dinner Timing: Running Late or Finished Early
If dinner is running late and the brisket is fully hot but still tough, switch from LOW to HIGH and check again in 30 minutes.
If it finishes early, remove it from the cooker rather than letting it continue for hours. For a short delay, keep it whole and safely hot at 140°F (60°C) or above, with a little hot cooking liquid.
A long stay on WARM can soften and dry a lean flat. If safe hot holding is not practical, refrigerate the brisket within two hours and reheat the slices in gravy.
Slow Cooker Brisket Variations
Whichever version you make, stop cooking when the brisket reaches the texture you want.
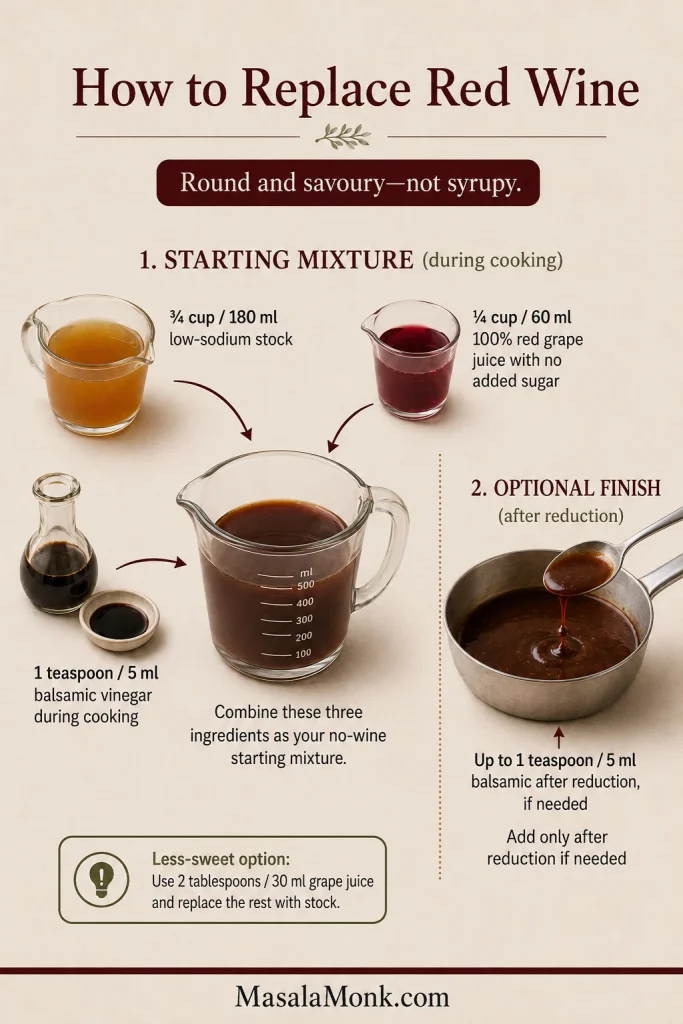
Choose Wine, Ale, or Stock—and Add Balsamic if You Like
Red wine: Use ½ cup (120 ml) dry red wine for deglazing. Cabernet Sauvignon, Merlot, or another dry medium-to-full-bodied red suits the dark onion gravy. Keep the amount restrained so the reduced sauce doesn’t become sharp.
Ale or stout: Replace the wine with ½ cup (120 ml) dark ale or stout. Choose a round, malt-forward beer rather than a heavily bitter one, because bitterness becomes more noticeable as the gravy reduces.
Balsamic: Add 1 tablespoon (15 ml) balsamic vinegar to the braising liquid. Omit the final red wine vinegar unless the reduced gravy still needs brightness.
Do You Have to Sear Brisket Before Slow Cooking?
No. Skipping the skillet saves about 25 minutes, although the meat and gravy will have less browned depth. Follow the no-sear method in the recipe notes.
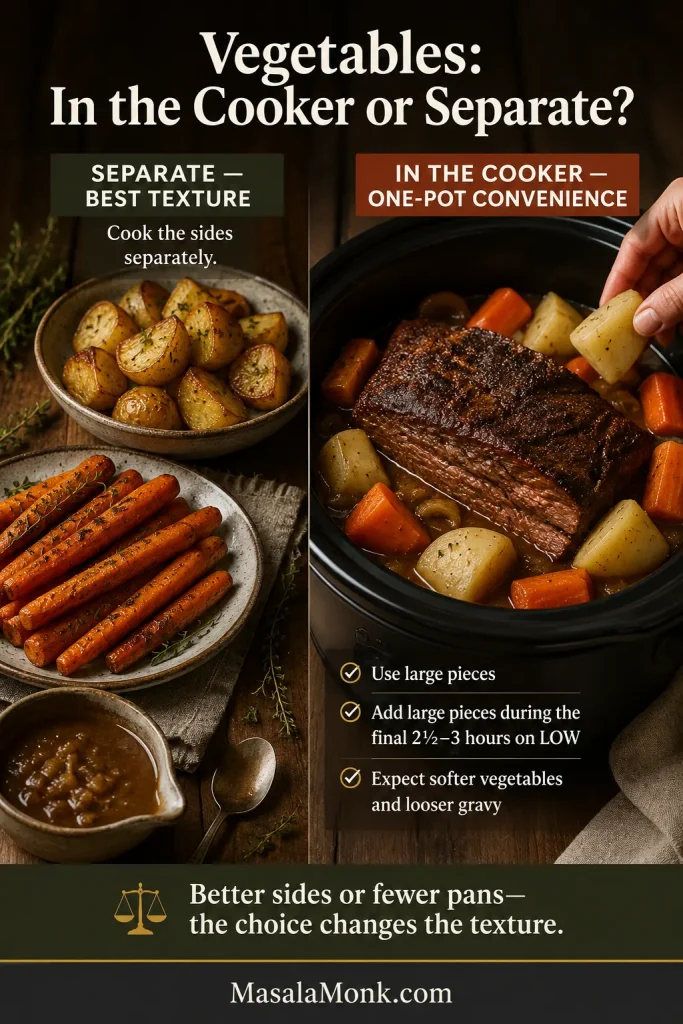
Brisket With Potatoes and Carrots
The most dependable approach is to keep the cooker focused on beef and onions, then prepare the vegetables separately. A tray of roasted carrots can cook while the brisket finishes.
If the cooker has room, add up to 12 oz (340 g) waxy potatoes and 8 oz (225 g) carrots. Cut them into 1½–2 inch (4–5 cm) pieces and add them for the final 2½–3 hours on LOW.
The vegetables will be softer, take up valuable cooker space, and release extra water, so expect a longer gravy reduction.
How to Make It Pull-Apart
Continue cooking until the fibers separate readily when pressed. Rest the brisket for about 10 minutes, remove any large pockets of fat, then pull it into broad strands. Fold through enough finished gravy to coat the meat without drowning it.
What to Serve With Slow Cooker Brisket
Brisket with gravy wants something soft enough to catch the sauce or crisp enough to balance the richness. Spoon the gravy over the cut face of the beef so it settles between the slices and reaches the potatoes beneath.
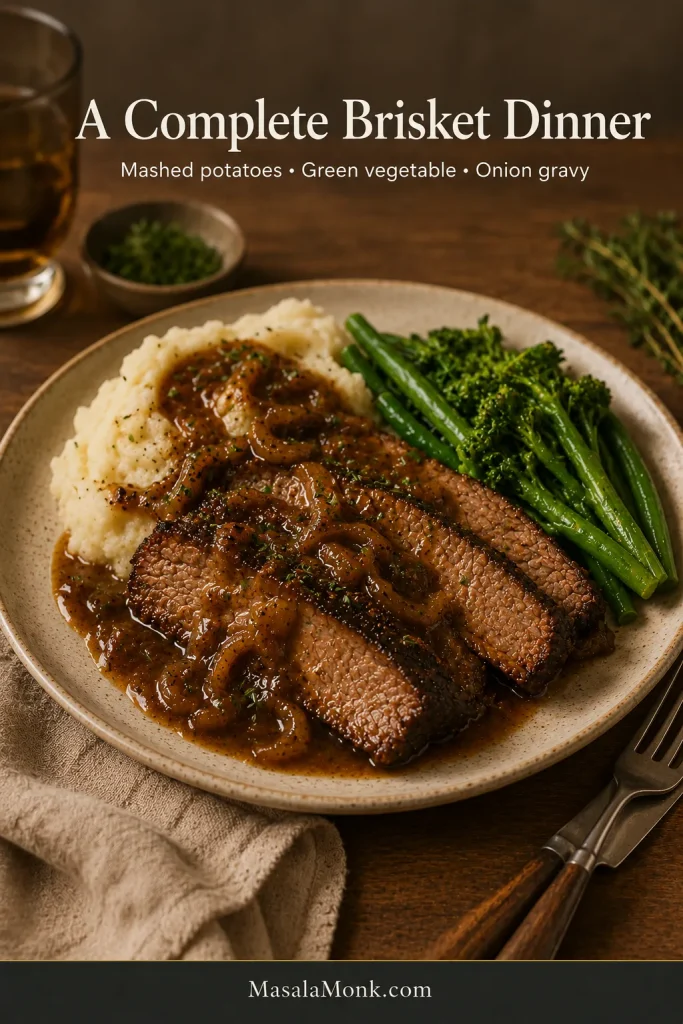
Classic Brisket and Gravy Dinner
- Creamy or fluffy mashed potatoes for catching the onion gravy
- Roasted or buttered carrots
- Green beans or peas
- Buttered cabbage
- Yorkshire puddings
- Soft dinner rolls for the remaining gravy
A spoonful of onion gravy, mashed potatoes, and one green vegetable are enough. The brisket brings all the richness the plate needs.
For an egg-free and dairy-free roast-dinner option, use these eggless Yorkshire puddings without milk.
A Lighter Plate
A classic wedge salad brings cold crunch and sharpness beside the warm beef and gravy, keeping the plate from feeling too soft or heavy.
- Cauliflower mash
- Steamed or sautéed greens
- Crisp cabbage salad
- Roasted broccoli or Brussels sprouts
- Green beans finished with lemon
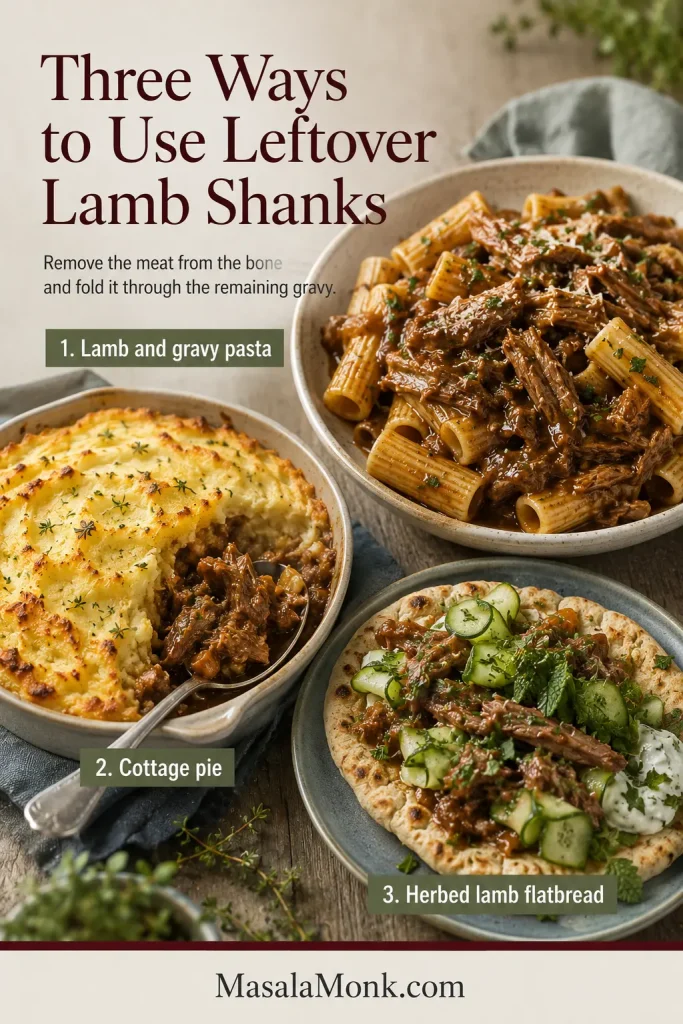
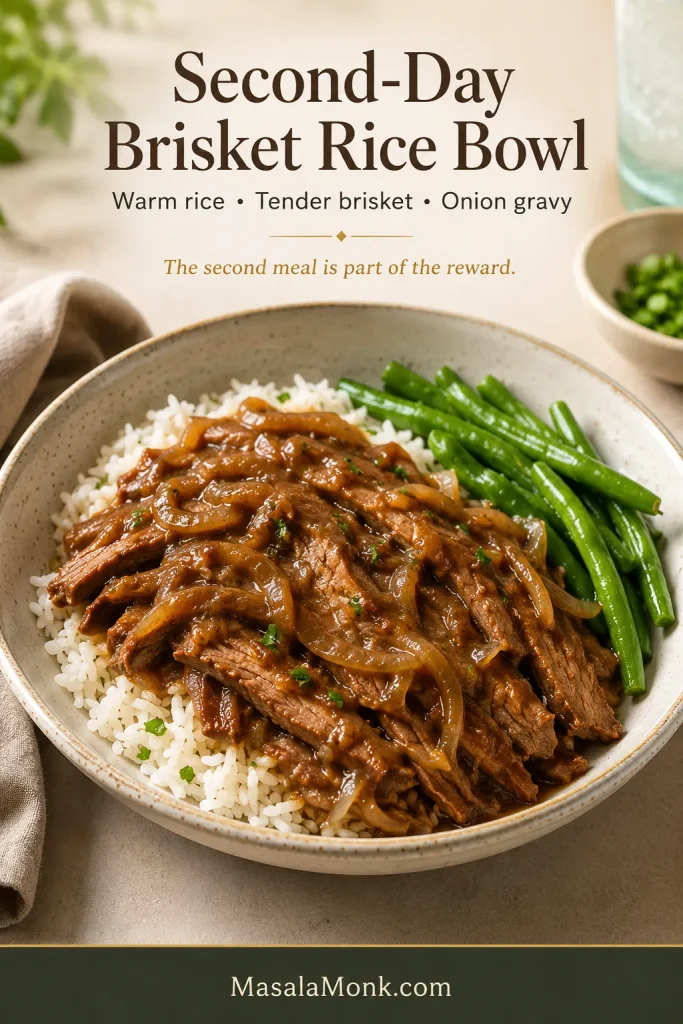
Ways to Use Leftover Brisket
The second meal is one of the rewards of cooking a full brisket.
- Open-faced brisket sandwiches with hot gravy
- Brisket and gravy over polenta
- Baked potatoes filled with chopped brisket
- Rice bowls with onions and greens
- Brisket hash with potatoes and eggs
Leftover brisket also works beautifully in rice bowls; use the guide to cooking fluffy rice so the grains stay separate enough to catch the gravy without turning wet or gummy.
When serving the brisket later—or tomorrow—keep the meat with enough gravy to protect the cut surfaces. The full make-ahead, storage, and reheating guidance follows below.
Make-Ahead, Storage, Freezing, and Reheating
Brisket can be served the day it cooks, but making it a day ahead is often the calmer choice for guests. The fat lifts away cleanly, the chilled meat slices neatly, and reheating it in gravy removes the pressure of timing dinner to the minute.
The Best Make-Ahead Brisket Method
- Cook the brisket until tender but still intact.
- Transfer it promptly from the hot cooker with enough cooking liquid to keep the surface moist.
- If the brisket is especially thick, divide it into two or three large portions, then refrigerate the meat and liquid in shallow covered containers within two hours.
- Lift away the solidified fat the following day.
- Slice the cold brisket across the grain.
- Finish or loosen the gravy as needed.
- Reheat the slices gently in the gravy until the center reaches 165°F / 74°C, following one of the methods below.

If the side dish also needs to be prepared ahead, these garlic mashed potatoes include make-ahead and gentle reheating guidance that fits the same dinner plan.
Refrigerating Leftovers
Refrigerate cooked brisket within two hours and use it within 3–4 days. Keep sliced meat covered with gravy or cooking liquid so the exposed surfaces don’t dry out.
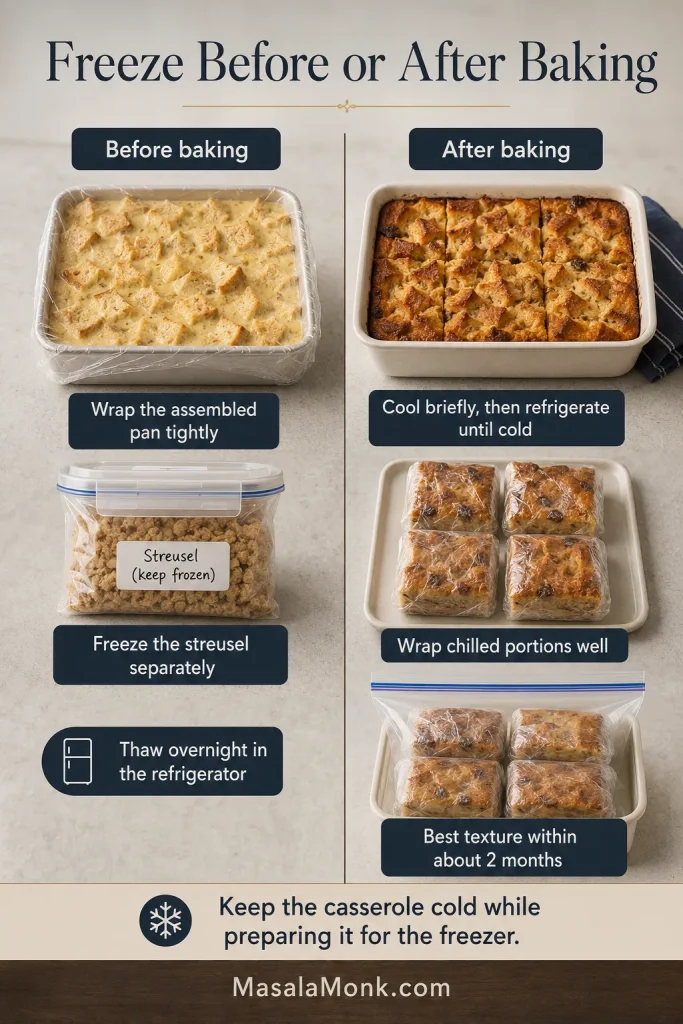
Freezing Brisket
Freeze meal-size portions of sliced or chopped brisket with enough gravy to coat and protect the meat. For the best texture and flavor, use it within about three months.
Thaw frozen brisket in the refrigerator before reheating.
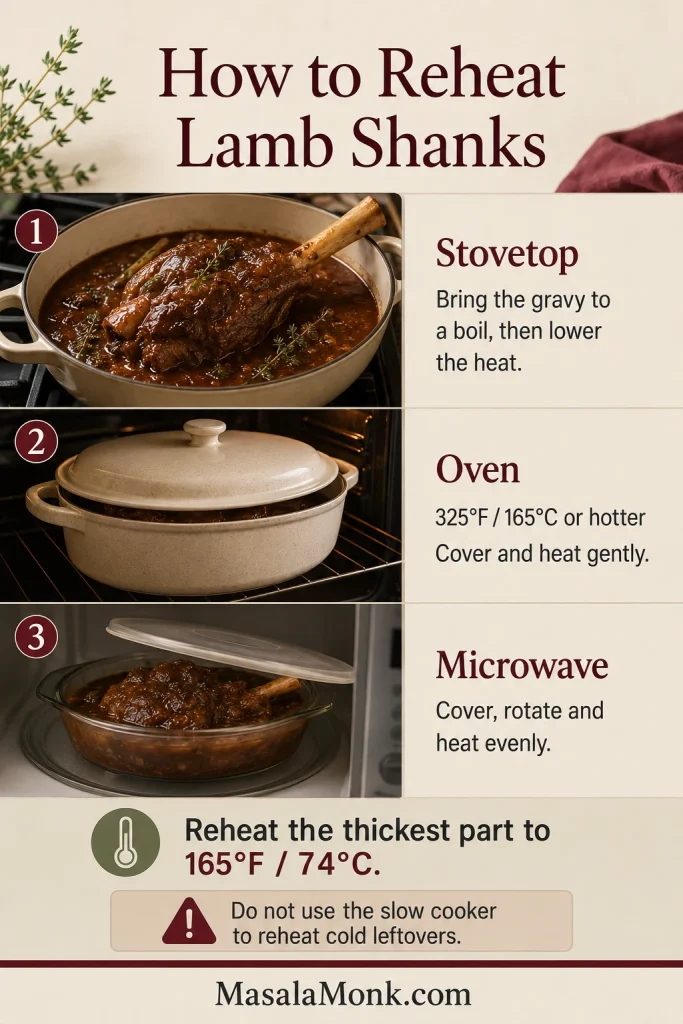
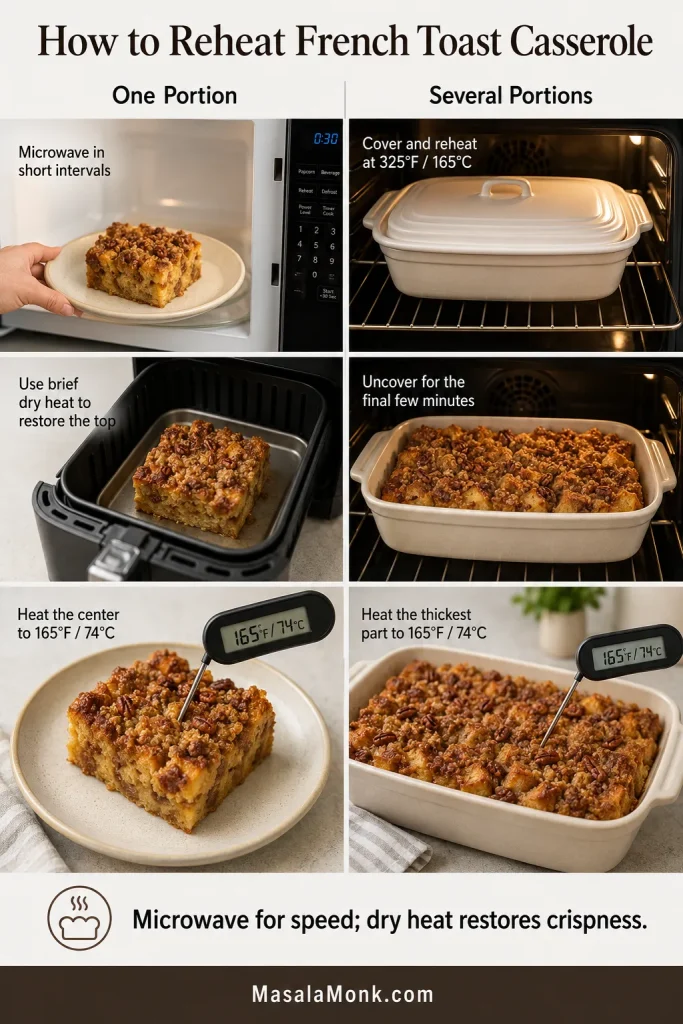
How to Reheat Brisket Without Drying It Out
Whichever method you use, reheat the center to 165°F (74°C). Do not use a slow cooker to warm refrigerated brisket gradually from cold.
Covered oven: Arrange the slices in a baking dish with gravy, cover tightly, and reheat at 325°F (165°C).
Stovetop: Warm the brisket gently in gravy over low heat. Avoid a hard boil, which can break soft slices apart.
Microwave: Place an individual portion in a covered microwave-safe dish with gravy. Heat in short intervals and rearrange the slices as needed.
Frequently Asked Questions
Does Brisket Need to Be Covered With Liquid?
No. The top can remain exposed because the beef and onions release moisture beneath the closed lid. The measured stock carries the browned flavor and becomes the gravy.
How Long Does a 1 kg / 2.2 lb Brisket Take?
A thin flat often takes about 7–8 hours on LOW; check around 6 hours. A 2 lb (900 g) flat may finish sooner when unusually thin, while a rolled joint can take longer.
Can I Cook Brisket on HIGH Instead of LOW?
Yes. For the 3–3½ lb brisket, start testing around 4 hours and expect roughly 4½–6 hours. LOW gives a lean flat a wider tenderness window.
Can Frozen Brisket Go Straight Into a Slow Cooker?
No. Fully thaw it in the refrigerator first; a large frozen center can warm too slowly in a slow cooker.
Do I Leave the String on a Rolled Brisket?
Leave heat-safe butcher’s string on until after resting. Remove plastic, absorbent pads, clips, and non-heat-safe elastic netting before cooking.
Can I Make Slow Cooker Brisket a Day Ahead?
Yes. Chill it with some cooking liquid, remove the hardened fat, slice the meat cold, and reheat it in the finished gravy.
The Brisket Is Ready When It Stops Resisting
Once the probe slides in easily and the brisket holds together, the uncertain part is over. Move it to the board, let it rest, and finish the gravy while the meat settles.
Slice across the grain, spoon the onion gravy over the warm cut face, and bring the rest to the table. The first slice should bend without crumbling.
Was yours a flat, point, or rolled joint—and did it stay sliceable or move toward pulled beef? Share the cut, weight, setting, and approximate cooking time, especially if the result surprised you. Your experience may help the next cook recognize a brisket that looks like theirs.