Posted on Leave a comment

Sugar Withdrawal: Symptoms, Timeline, and How to Cope

Portrait cover showing a woman with lemon water beside chia pudding, nuts and pickles—illustrating sugar withdrawal symptoms, timeline and relief strategies.

Giving up added sugar can feel deceptively hard. At first, cravings spike, patience thins, and energy dips; soon after, things begin to settle. While researchers debate whether sugar itself is “addictive” in humans, what most people describe during the first week is a cluster of short-lived sugar withdrawal symptoms—headaches, brain fog, irritability, sleep hiccups, and fluctuating appetite. Rather than treating this like a mysterious syndrome, it helps to view it as a predictable adjustment period: your routines, taste expectations, and reward cues are changing, and your body is recalibrating. Moreover, when you manage caffeine, hydration, protein, fiber, movement, and sleep in tandem, the rough edges smooth out quickly. For context on the science debate, see this measured review on sugar addiction in humans and why the strongest “withdrawal-like” signals come from patterns with highly palatable or ultra-processed foods rather than sugar alone.

What Sugar Withdrawal Feels Like (and Why It’s Brief)

Initially, sugar withdrawal symptoms often show up as a one-two punch: powerful cravings coupled with a mild, band-like headache. Soon after, fatigue can creep in; concentration may feel patchy; mood can wobble for a day or two. Interestingly, these discomforts rarely persist beyond a couple of weeks when daily habits are dialed in. Notably, part of the experience reflects routine disruption—snack times change, sweet tastes recede, and cues (like scrolling, commuting, or finishing dinner) no longer trigger the same behaviors. Consequently, your brain’s prediction system flags the mismatch, which you experience as urge or restlessness; once the new pattern stabilizes, those alarms quiet.

The Caffeine Overlap Most People Miss

Equally important, many people consume sugar with caffeine—sweet tea or coffee, soft drinks, or energy beverages. If you stop both at once, you can provoke classic caffeine withdrawal on top of dietary change. As a rule of thumb, caffeine withdrawal begins 12–24 hours after cutting intake, peaks ~20–51 hours, and fades over the next few days. Therefore, easing caffeine rather than slamming on the brakes tends to be kinder to your head and your mood. For a quick primer on the timing and symptoms, skim the StatPearls overview on caffeine withdrawal.

Sugar Withdrawal Symptoms: Headache, Brain Fog, Irritability, and Beyond

Headache. When sweetened drinks disappear, the headache window often reflects caffeine changes rather than sugar alone. Pragmatically, switch to half-caf for several days, move caffeine to earlier in the day, and sip water regularly. If you usually add multiple teaspoons of sugar to beverages, step down a teaspoon a week; simultaneously, swap one sweet drink for sparkling water with lemon or a chilled herbal infusion to lower the sweetness “set point” without feeling deprived.

Brain fog & fatigue. Early on, some readers simply under-fuel. A breakfast anchored in protein + fiber steadies the morning—think eggs on whole-grain toast, Greek yogurt with nuts and seeds, or a make-ahead jar of chia pudding ideas. For variety, this keto chia pudding—no added sugar and this mango-chia riff without added sugar keep texture and flavor interesting while the palate readjusts.

Irritability. Mood is exquisitely sensitive to sleep debt and erratic meals. Consequently, go for consistent mealtimes, add a short walk after lunch or dinner, and keep caffeine away from late afternoon. If you wake up edgy, check last night’s bedtime rather than blaming breakfast.

Sore throat or dry mouth. Occasionally, people report a scratchy throat—usually from dehydration, room-dryness, or substituting very acidic drinks. Therefore, prioritize plain water first; if you’re craving “something extra,” rotate in a lightly flavored electrolyte beverage that isn’t sugar-packed. For inspiration, you can pull low-sugar ideas from DIY electrolyte posts and spiced electrolyte recipes.

Cravings. Urges are normal and, usefully, they reveal cues. Notice the trigger—boredom, stress, or the late-afternoon lull—and prepare savory swaps so you’re not negotiating with sweets. For a tangy, salt-forward alternative that resets expectations, explore The Art of Making Pickles and keep a small portion with meals or snacks.

A Realistic Timeline (Without the Drama)

Now, timelines vary—prior intake, sleep, and caffeine all matter—yet there’s a common arc. During days 1–3, cravings roar loudest and headaches are most likely if caffeine drops abruptly. During days 4–7, urges taper; sleep and mood begin to stabilize. By week 2, the background noise quiets; cravings become situational rather than constant. Interestingly, this shape echoes what self-report instruments find when people reduce highly processed foods: a short peak followed by rapid improvement. If you’re curious, the Highly Processed Food Withdrawal Scale (ProWS) describes how adults report transient symptoms when cutting back.

Anchor Your Goals with Clear Limits (So “Less Sugar” Means Something)

To avoid ambiguity, use simple anchors. First, the World Health Organization recommends keeping free sugars below 10% of energy and ideally below 5%; free sugars include added sugars plus the sugars in honey, syrups, fruit juice, and juice concentrates. The wording matters, because a glass of juice, while natural, still counts toward the limit. You can skim the full WHO sugars guideline or its NCBI book version for definitions and context. In parallel, the American Heart Association suggests no more than 6% of calories from added sugars—about 25 g/day for most women and 36 g/day for most men—a plain-language target you can remember quickly; see the AHA overview on added sugars or their How Much Is Too Much? explainer. Meanwhile, NHS guidance advises limiting fruit juice and smoothies to about 150 ml/day, nudging people toward whole fruit—details in this NHS page on cutting down sugar.

What Actually Helps (Simple, Repeatable, and Kind to Your Brain)

Start with breakfast. Front-load 20–30 g protein + fiber to reduce mid-morning scavenging. For instance, swirl protein into chia pudding, top Greek yogurt with nuts and seeds, or do eggs with sautéed veg. As your taste recalibrates, sweetness thresholds drop naturally.

Taper sweetened drinks first. Because the largest single source of added sugar for many people is beverages, downsizing them yields outsized benefits. Replace one soda with sparkling water and citrus; ask for unsweetened iced tea and add lemon; nudge your coffee from two teaspoons of sugar toward one and, subsequently, none. Moreover, teen studies show that even three days without sugary drinks can change how people feel—more headaches and cravings at first—underscoring why gradual swaps are humane. For a short read on that trial, check this adolescent sugary-drink cessation study and the plain-English UC Davis news brief.

Read the label once, then automate. The modern Nutrition Facts panel lists Added Sugars (grams + %DV). As a quick heuristic, 5% DV or less is low; 20% DV or more is high. After you compare two or three go-to products, just buy them on repeat to reduce decision fatigue. If you want a refresher, the FDA’s “Added Sugars” page and this printable cheat sheet are straightforward.

Swap, don’t just stop. Because habits favor substitutes, pre-position alternatives: keep sparkling water with citrus cold in the fridge, pair plain yogurt with whole fruit for a creamy-sweet finish, and stock nuts or roasted pulses for crunch. Btw, here we would like to point you towards our post on 20 Signs You’re Eating Too Much Sugar for broader awareness.

Walk and sleep like you mean it. A 10–20 minute walk after meals improves how your body uses glucose; a reliable sleep window curbs next-day cravings and irritability. Furthermore, consistent light movement acts like a pressure valve for stress, which often masquerades as hunger.

Hydrate intelligently. Thirst often dresses up as a sugar urge. Keep water visible; when variety helps, rotate light, low-sugar DIY electrolyte ideas such as these hangover electrolyte recipes or spiced electrolyte twists. Even so, avoid turning hydration into a back-door sugar source; the NHS note on limiting juice to ~150 ml/day is a useful guardrail.

Use “urge surfing.” When a craving hits, set a 10-minute timer and do anything mildly absorbing (dishes, inbox triage, a quick call). Because most urges crest and fall like a wave, this buys time for the peak to pass. Subsequently, eat a protein-plus-fiber snack if you’re genuinely hungry.

Sugar Withdrawal Symptoms & Caffeine: Untangling the Knot

Let’s zoom in on the common culprit pair. Sweet coffee, sweet tea, colas, and energy drinks marry sugar with caffeine—two reinforcers that work differently but travel together. If you remove both on Monday, you set up a 48-hour window where you might feel headachy, foggy, and irritable; by Thursday, you’ll likely feel markedly better. Consequently, a staggered plan is gentler:

  • Days 1–3: keep caffeine earlier in the day; move from two sugars to one.
  • Days 4–7: keep the earlier caffeine; drop to half-caf; shift to zero sugar in one beverage.
  • Week 2: hold caffeine timing; go unsweetened in all daily drinks.

Because the expected course of caffeine withdrawal is well mapped—onset around a day, peak around two, resolution within a week—you’ll know if you’re dealing with caffeine or something else. For details, the NIH/NCBI review on caffeine withdrawal is concise and clinician-vetted.

Is It “Addiction,” Habit, or Both?

People often ask whether their rough week proves that sugar is addictive. Here, nuance matters. Addiction frameworks center on loss of control, continued use despite harm, tolerance, and withdrawal. In laboratory animals, intermittent access to highly palatable sweet foods can produce withdrawal-like behaviors. However, leading human reviews find limited evidence that sugar alone meets addiction criteria in people; the more compelling pattern involves ultra-processed foods and intermittent, cue-driven eating. Hence the practical takeaway: regardless of labels, you can engineer your environment—substitute savory options, reduce cue exposure, stabilize meals—and feel the difference rapidly. For a balanced view, see “Sugar addiction: the state of the science”, which explains why the human data diverge from the animal models.

“Flush Sugar from the Body”? Here’s the Straight Answer

Metabolically, there’s no instant “flush.” Your body regulates blood glucose continuously through insulin, liver glycogen, and muscular uptake. Dramatic cleanses are neither necessary nor particularly helpful. Instead, the fundamentals are surprisingly potent: drink water, walk after meals, set a steady sleep window, and eat protein + fiber at regular intervals. Meanwhile, anchor your daily cap with an authoritative yardstick—WHO’s free-sugars guideline or the AHA’s added-sugar limits—and use the FDA’s Added Sugars label to make lower-sugar choices automatic.

Putting It All Together: A Gentle, 14-Day Reset

Days 1–3: stabilize and notice.
Begin with breakfast you can repeat without friction—Greek yogurt with seeds, eggs and greens, or a no-sugar chia base. Shift one sweet drink to an unsweetened or lightly flavored option, and, crucially, move caffeine earlier. Keep water visible; if plain water bores you, rotate a cucumber electrolyte.

Days 4–7: taper and swap.
Cut another teaspoon of sugar from beverages. Swap a dessert for yogurt + nuts or fruit + nut butter. Add a 10–20 minute post-meal walk most days. If headaches appear, consider whether caffeine timing changed; adjust to half-caf temporarily, then keep stepping down.

Week 2: refine and automate.
Settle on three “default” breakfasts and two “go-to” snacks; stock them so decisions are easy. Choose your favorite sparkling water + citrus combo and keep it cold. Re-read the labels on two regular pantry items and pick the lower Added Sugars %DV versions; after that, stop re-checking and simply reorder the winners.

Throughout the fortnight, keep an eye on cravings as information, not as a verdict. If late-night urges persist, move dinner 30–60 minutes earlier, front-load protein at breakfast, and block blue light in the last hour of the evening. Ultimately, predictability is soothing to both physiology and psychology.

When You Want More Depth (and Where to Link It)

Want more depth? For a broader primer on how sugar interacts with metabolism and mood over time, read effects of sugar on the body. For context beyond sugar—especially how ultra-processed foods influence appetite and cravings—see the overview on UPFs and health. And if you’re wondering whether intake has crept up lately, 20 signs you’re eating too much sugar offers a quick self-check.

Closing Thought: Short Discomfort, Long Payoff

Yes, sugar withdrawal symptoms can feel uncomfortably real for a handful of days; nevertheless, they’re not a life sentence. With protein-forward meals, steady hydration, a sensible caffeine taper, light movement, and better sleep, most people feel clearer and calmer by the end of the first week and noticeably steadier by week two. Perhaps most encouragingly, your tastes recalibrate—desserts taste sweeter, fruit tastes brighter, and everyday foods need less embellishment. From there, momentum builds: fewer impulse snacks, more deliberate choices, and a routine that supports your goals without constant negotiation.


FAQs on Sugar Withdrawal Symptoms

1) What are sugar withdrawal symptoms?

Generally, people describe intense cravings, dull headaches, irritability, low energy, and concentration dips after cutting added sugar. Moreover, sleep can wobble for a few days. Typically, these sugar withdrawal symptoms are short-lived and ease as meals, hydration, and daily routines stabilize.

2) How long do sugar withdrawals last?

Typically, the first three to five days feel hardest, then discomfort declines. Furthermore, many notice steadier energy by the end of week one and clearer focus by week two. Ultimately, the exact duration depends on prior intake, sleep quality, caffeine habits, and how balanced your meals are.

3) What does sugar withdrawal feel like day by day?

Commonly, days 1–3 bring the strongest cravings and headache risk; days 4–7 show gradual improvement; week 2 feels calmer with only situational urges. Notably, this arc reflects routine readjustment: taste expectations shift, cues weaken, and sugar withdrawal symptoms naturally diminish.

4) Can you go through withdrawal from sugar?

Strictly speaking, definitions vary; nevertheless, many people experience withdrawal-like effects when removing highly sweet foods and drinks. Consequently, brief headaches, mood changes, and cravings can appear, then settle with adequate protein, fiber, hydration, movement, and consistent sleep.

5) Are sugar withdrawals a thing or just a myth?

Yes, withdrawal-type experiences are commonly reported, even if terminology is debated. Importantly, much of the discomfort stems from habit change and blood-glucose swings—so practical strategies work. Hence, focusing on structured meals and gradual beverage changes usually shortens the rough patch.

6) What causes sugar withdrawal headaches?

Often, headaches come from cutting sweetened caffeinated drinks rather than sugar alone. Additionally, dehydration and under-eating can contribute. Therefore, taper caffeine, drink water regularly, and include a protein-rich breakfast to blunt that early headache window while sugar withdrawal symptoms settle.

7) Why do I feel brain fog or fatigue when I stop sugar?

Sometimes, breakfast lacks protein or overall calories drop too sharply. Consequently, your energy and focus dip. Aim for protein and fiber at each meal, keep meal timing steady, and add light activity after eating. Subsequently, most people notice clarity return within days.

8) Can sugar withdrawal cause anxiety or irritability?

Brief mood shifts are common as routines and cues change. Moreover, short sleep, high stress, or abrupt caffeine cuts can amplify irritability. Thus, protect your sleep window, take short walks, and normalize meals. Thereafter, mood usually stabilizes as sugar withdrawal symptoms recede.

9) Do sugar withdrawal symptoms include a sore throat?

Occasionally, people report scratchiness or dryness, typically linked to low fluid intake or very acidic substitutes. Accordingly, prioritize water, choose gentler beverages, and maintain comfortable indoor humidity. Soon, that throat sensation tends to resolve as hydration and routines improve.

10) How do I deal with sugar withdrawal cravings in the moment?

Firstly, pause for ten minutes—urges crest and fall like waves. Secondly, have a ready snack combining protein and fiber. Additionally, change context: step outside, stretch, or take a brief walk. Finally, resume your plan; each repetition weakens the old cue-craving loop.

11) Is it better to quit sugar cold turkey or wean off?

Both can work. However, if your main source is sweetened coffee, tea, or sodas, tapering sugar (and caffeine) typically reduces headaches and improves adherence. Conversely, if sweets are occasional but intense, a faster reset with structured swaps might feel simpler.

12) What helps most with sugar withdrawal symptoms?

Consistently, the fundamentals matter: protein-forward meals, fiber at each sitting, steady hydration, earlier-day caffeine, post-meal walks, and reliable sleep. Furthermore, plan substitutions you genuinely enjoy. Consequently, the early dip shrinks and energy smooths out faster.

13) Can caffeine make sugar withdrawal worse?

Indirectly, yes—if you remove sugar and caffeine together, you may stack headaches and fatigue. Therefore, shift caffeine earlier and taper gradually while lowering sweetness. Subsequently, many notice fewer symptoms and an easier adjustment to new routines.

14) Do I need to “flush sugar from the body” to feel better?

No. Your body regulates glucose continuously; drastic cleanses aren’t required. Instead, emphasize water, movement, and balanced meals. Importantly, whole foods with protein and fiber support steadier energy, and, with time, sugar withdrawal symptoms fade without extreme measures.

15) What are the signs I’m improving?

Cravings become less urgent, headaches fade, and energy feels more even across the day. Additionally, you’ll notice sweeter taste sensitivity returning—desserts taste richer, and fruit seems brighter. Ultimately, reduced grazing and calmer appetite signal genuine momentum.

16) Why do I crave sweets after quitting alcohol?

Sometimes alcohol provided quick calories and shaped reward expectations. So, when it’s removed, sweet cravings can surge temporarily. Accordingly, schedule regular meals, build protein-plus-fiber snacks, and add light activity. Soon, that urge typically softens as routines stabilize.

17) Do sugar detox symptoms differ from carb withdrawal symptoms?

Overlap exists—many sweet foods are also refined carbs. Nevertheless, the focus here is added sugar and highly sweet items. Practically, the same tools apply: balanced plates, hydration, gentle movement, and sleep. Consequently, both sets of symptoms usually improve on a similar timeline.

18) Will fruit make sugar withdrawal symptoms worse?

Whole fruit contains fiber and water, which slow absorption and support satiety. Conversely, fruit juice lacks fiber and can behave more like a sweetened beverage. Therefore, choose whole fruit portions with meals or snacks while limiting juices during the initial reset.

19) How do I manage social events while reducing sugar?

Plan ahead. Firstly, eat a balanced mini-meal before you go. Secondly, choose options you like that aren’t overly sweet. Moreover, drink water between courses, share desserts if desired, and decide in advance what “enough” looks like. Thus, you stay in control without feeling deprived.

20) How can I prevent relapse after the first two weeks?

Set defaults. Furthermore, keep three breakfasts, two snacks, and a couple of easy dinners on repeat. Stock your environment for success, maintain earlier-day caffeine, and keep short walks in the routine. Hence, cravings remain manageable and your new baseline holds.

21) Do kids or teens experience sugar withdrawal symptoms differently?

They may report headaches, cravings, or mood changes when sugary drinks are removed abruptly. Additionally, growth, sleep, and activity patterns influence how intense that feels. Consequently, gradual swaps, structured meals, and consistent bedtimes tend to ease the transition.

22) What if my sugar withdrawal symptoms aren’t improving?

Firstly, review caffeine timing, hydration, and breakfast protein. Secondly, check sleep consistency. Additionally, consider whether total calories dropped too low. If headaches or mood changes persist beyond a reasonable period, consult a qualified clinician to rule out other causes and tailor the approach.

23) Do artificial sweeteners help during the transition?

Experiences differ. Some people find them useful to step down from sugary drinks; others notice continued cravings for very sweet tastes. Accordingly, use them strategically, then reassess after the first couple of weeks. Ultimately, the goal is enjoying foods that don’t keep sweetness constantly high.

24) What’s the simplest daily checklist to reduce sugar withdrawal symptoms?

Morning: protein-rich breakfast and water. Midday: balanced plate plus a brief walk. Afternoon: earlier-day caffeine only; planned snack if needed. Evening: fiber-forward dinner and a consistent bedtime. Finally, track two swaps you’re proud of—progress compounds quickly.

Posted on 1 Comment

No Equipment Calisthenics at Home: Beginner Workout & 4-Week Plan

no equipment calisthenics at home—beginner performing a reverse lunge on a yoga mat in a bright living room

You don’t need a gym to get stronger. With no equipment calisthenics at home, you can build practical strength, steadier balance, and genuine confidence using movements that scale to your current level. All you need is a few square feet of floor, a stable surface, and a plan you can actually follow. This guide gives you a crisp exercise list, two plug-and-play routines, and a four-week progression that fits real life. Moreover, the structure aligns with public-health guidance—roughly 150 minutes of weekly activity plus two or more days of muscle-strengthening work—so you’ll improve health markers while you get stronger. For the official language, see the WHO physical activity fact sheet and the CDC guidelines for adults.

Why No Equipment Calisthenics at Home Works—And Keeps Working

To begin with, it’s accessible. You can start today with zero purchases and minimal setup. Next, it’s scalable. You’ll begin with friendly variations—knee push-ups, table rows, and short planks—then progress toward tougher versions at a pace that feels sustainable. Furthermore, it’s habit-friendly. Because the barrier to entry is tiny, workouts actually happen; consistency follows almost automatically. Consequently, progress arrives earlier than you expect.

Beyond convenience, no equipment calisthenics at home is evidence-aligned. Short sessions accumulated across the week help you reach those activity targets without rearranging your life. If you’re unsure what “counts,” the CDC’s plain-English explainer on what counts as activity confirms that practical movement, done consistently, matters. In turn, strength work at home checks the “muscle-strengthening” box while sharpening coordination and control.

Moreover, this approach supports more than muscle. Short sessions accumulate toward those weekly movement targets without overhauling your schedule. If you like gentle, low-impact options on off days, try wall-assisted mobility and core activation to stay in the groove without fatigue.

Fast Setup With Minimal Friction

First, clear a small rectangle of floor so you can step forward, back, and sideways without bumping into furniture. Then choose a sturdy table, countertop, or door frame—you’ll use it for supported rows or hands-elevated push-ups. Afterward, put down a mat or towel for traction, place water within reach, and cue a short playlist. That’s your entire gym. Additionally, link training to an existing habit—after coffee, during lunch, or just before dinner—so the decision to move becomes automatic. As a result, you’ll start more often and finish more sessions.

When you need a low-impact stand-in, swap a session for this standing Pilates workout—no floor work, still a full-body feel.

No Equipment Calisthenics at Home — Beginner Exercise List

Rather than memorize dozens of exercises, master five movement families that cover the whole body. From there, you’ll progress by adjusting leverage, tempo, or range of motion. When you want visual cues, jump to reputable references for a quick form check—or borrow ideas from focused sessions like Lower Body Strength (Day 22) or Core Power (Day 23) to sharpen form.

Squat → Reverse Lunge

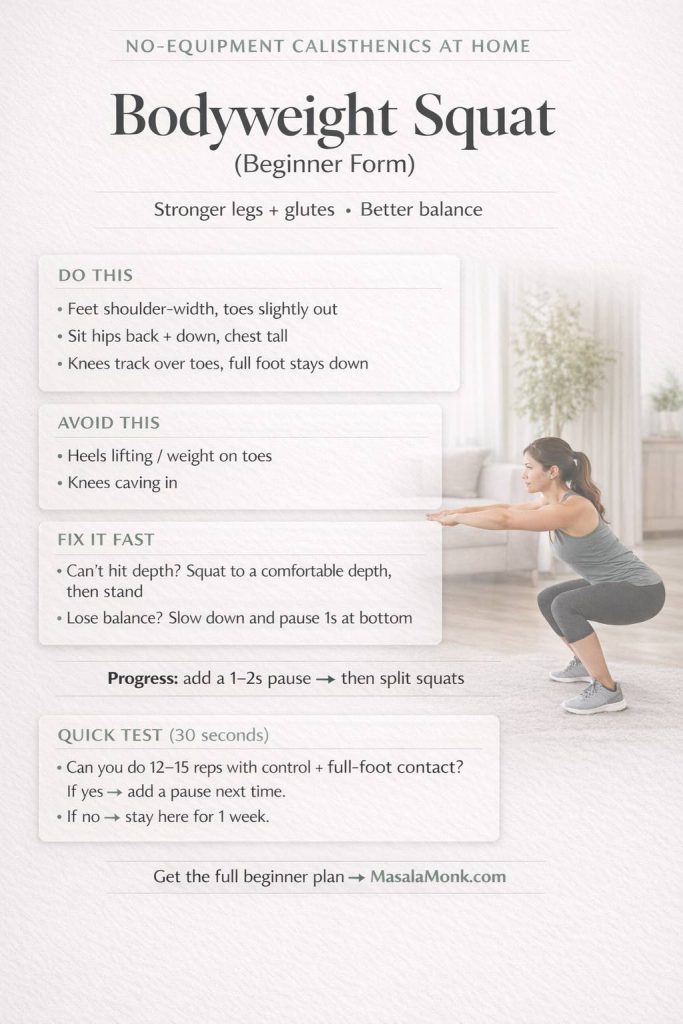
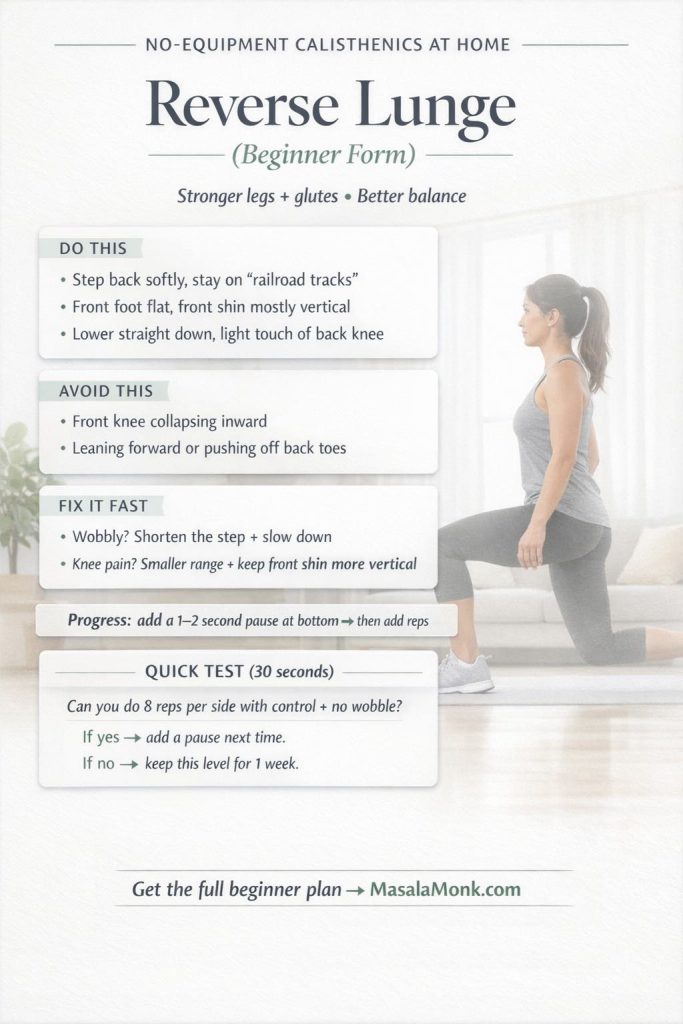
Sit the hips back, keep the chest tall, and press through the whole foot. Pause for one second at the bottom to build control. Subsequently, introduce reverse lunges to train one leg at a time and improve balance.

Knee Push-Up → Push-Up

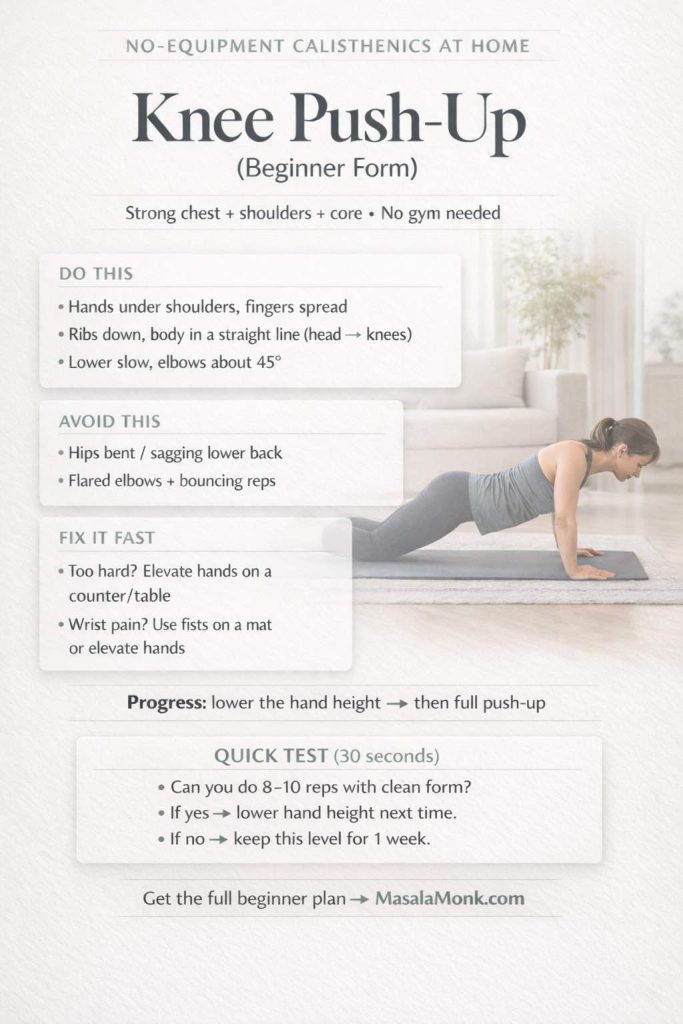
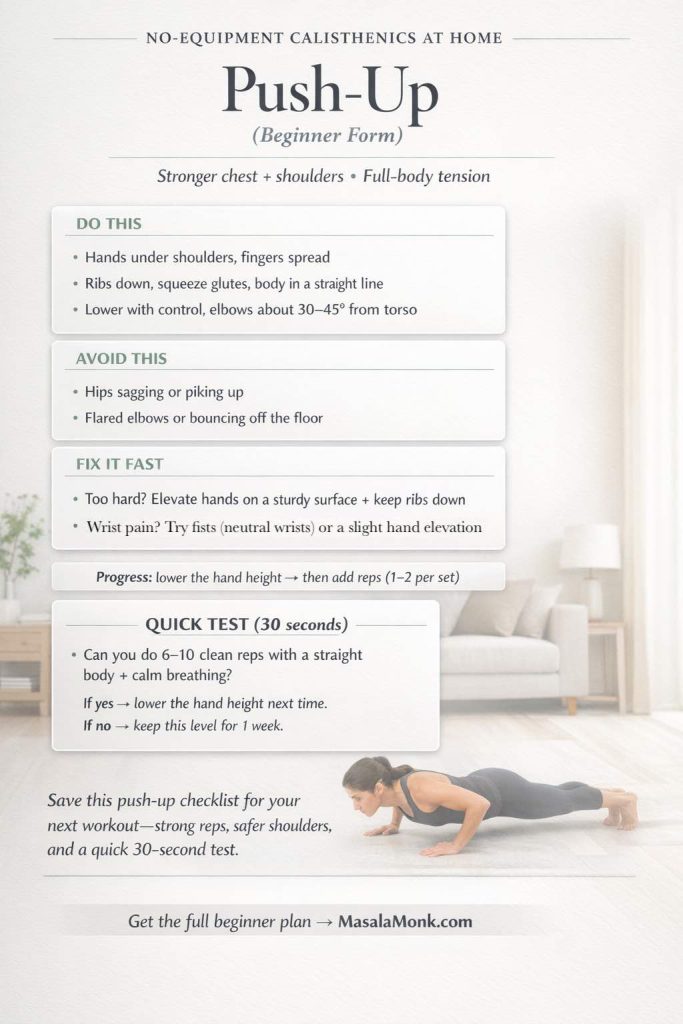
Begin on knees or elevate the hands on a table or countertop. Lower smoothly with elbows about 45 degrees from your sides and keep ribs down. For a concise walkthrough, skim this bent-knee push-up guide from ACE. Afterwards, reduce the elevation, then move to full floor reps once sets feel tidy.

On days you prefer a gentler push pattern, lean against a wall and follow cues from our Wall Pilates for Beginners.

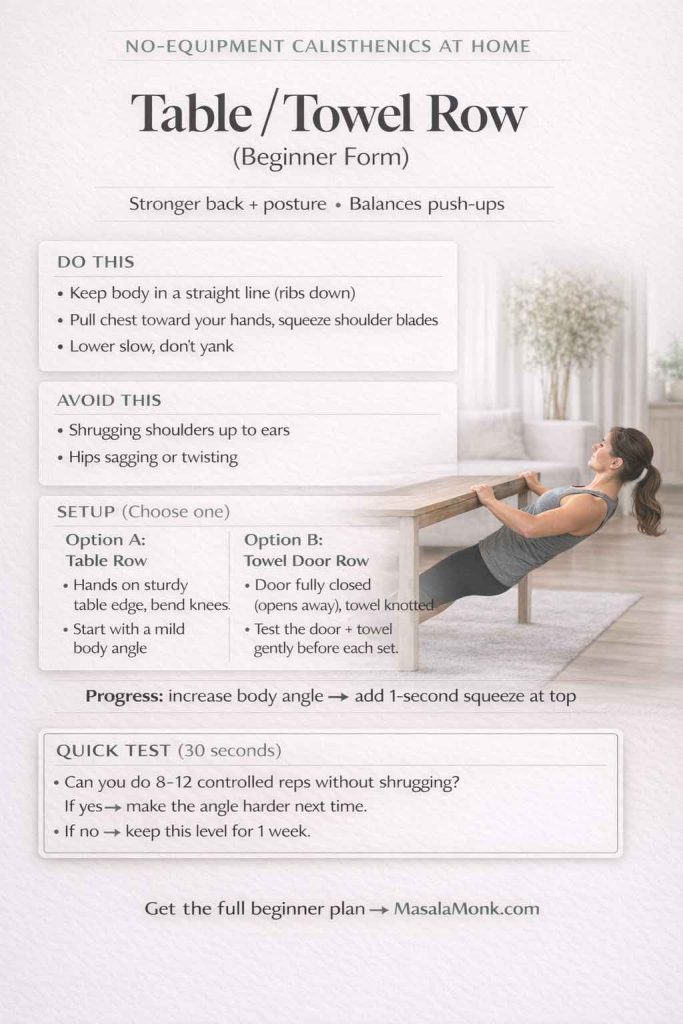
Table / Towel Row

Use a sturdy table for a light inverted row, or loop a towel through a door and pull your chest toward the anchor. Notably, always test the setup before each set. Start with a mild body angle and bent knees; then, as strength improves, walk your feet forward to increase the challenge.

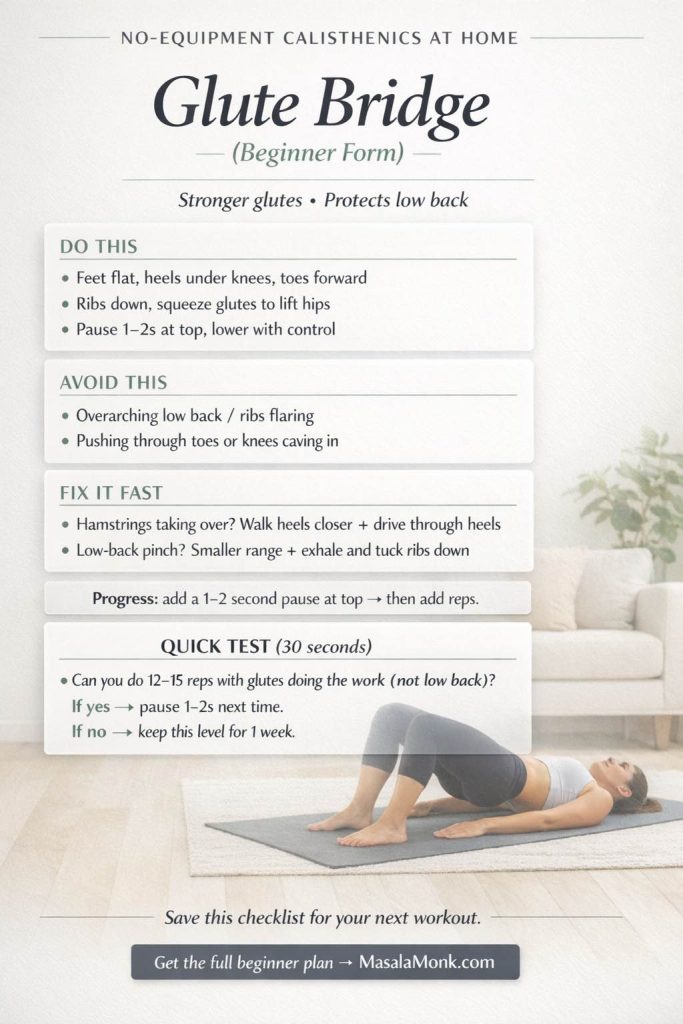
Glute Bridge

Lie on your back, set feet flat, and drive through the heels. Squeeze at the top without arching the lower back. Hence, think “hips up, ribs down.” If you want more tension without extra gear, add a two-second pause at the top.

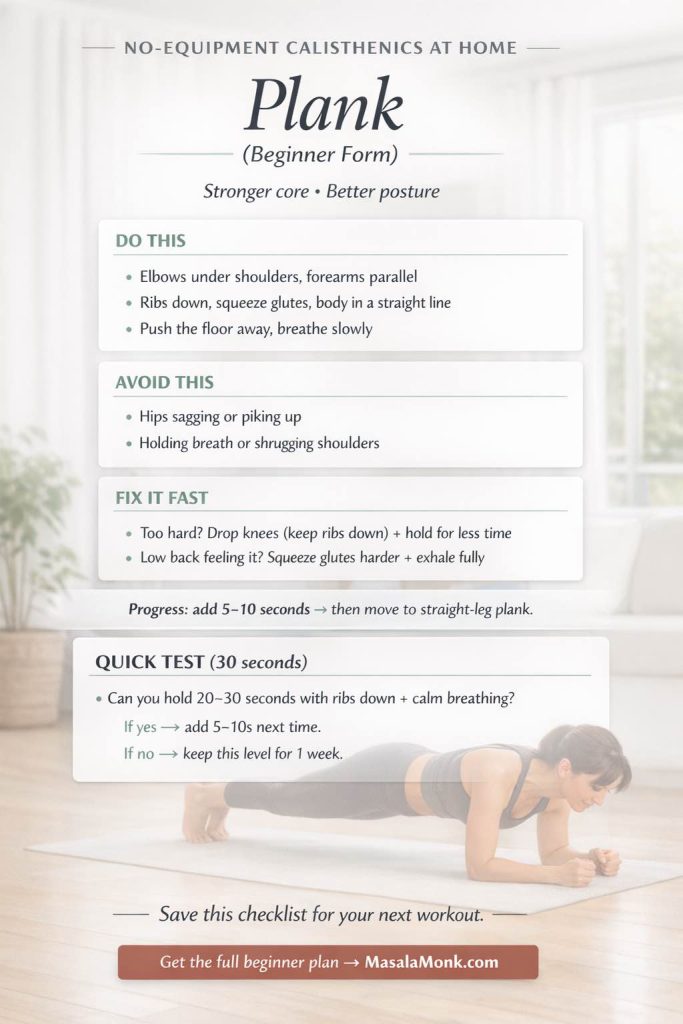
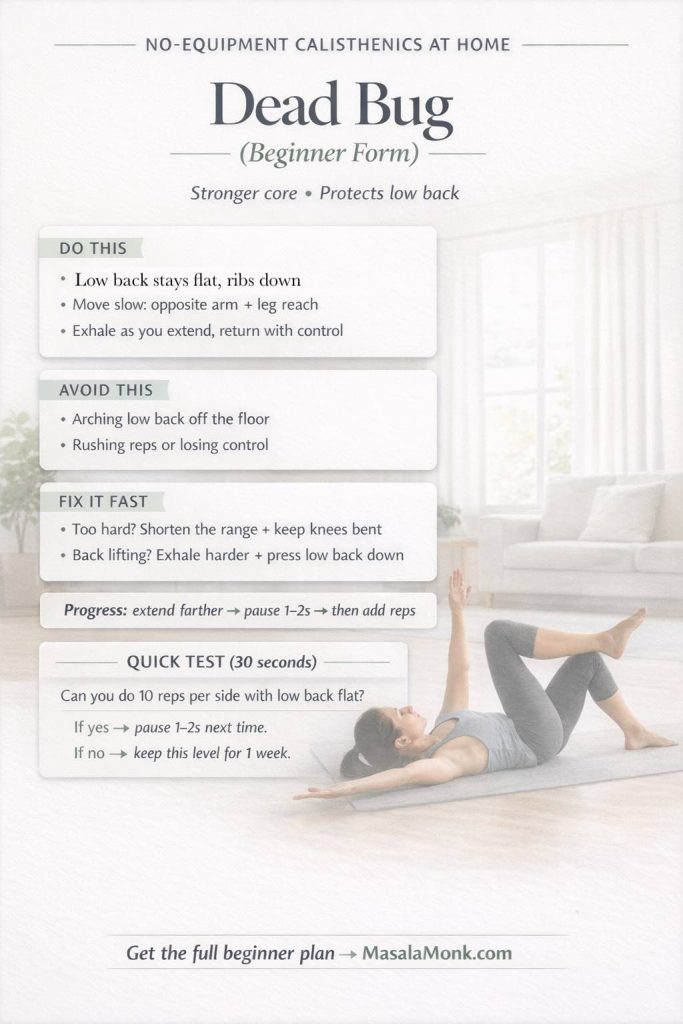
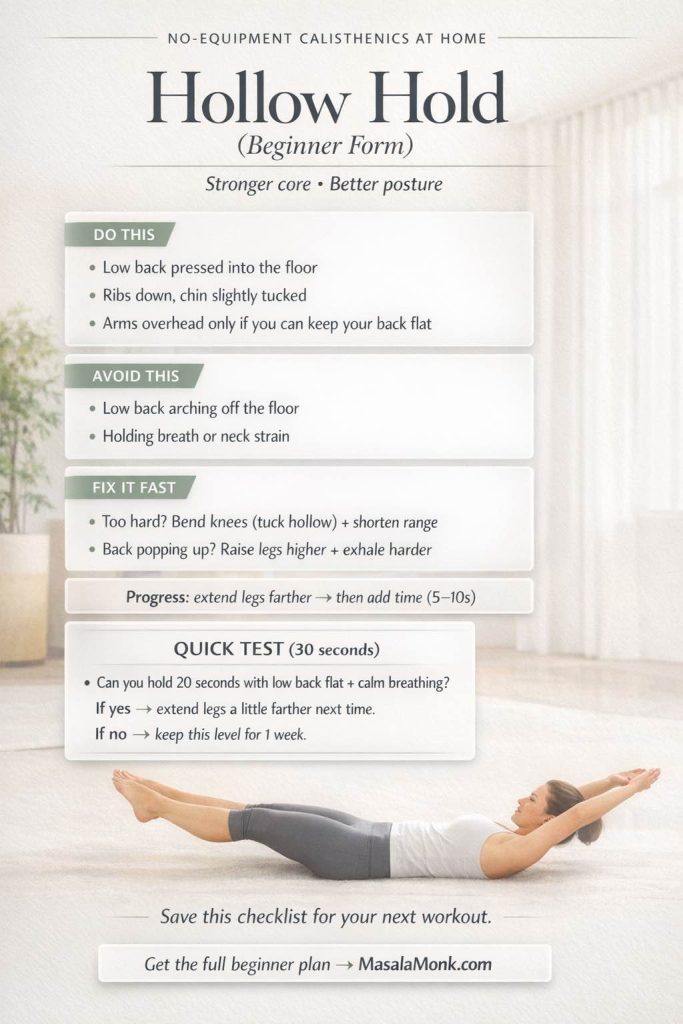
Plank → Dead Bug → Hollow Hold

Brace the torso while breathing calmly. Keep the spine neutral. Initially, use short, repeatable holds. Later, progress to dead bug for anti-extension strength and then to hollow body positioning for deeper control.

If you prefer gentler options or chair-friendly progressions, the NHS provides home-friendly strength exercises and short strength & resistance videos. Conversely, if you enjoy variety, these clips pair well with off days.

Smart Warm-Up and Steady Cool-Down

Start with three to five minutes: ankle rocks, hip circles, arm swings, and two slow squats. Importantly, the warm-up should make the first set feel better—not drain energy. After finishing, cool down with unhurried breathing and light mobility. For instance, try cat-camel, gentle thoracic rotations, and an easy forward fold. Ultimately, these bookends keep joints happy and mark the session complete.

No Equipment Calisthenics at Home — Two Beginner Routines

Train three days per week at the start. Alternate these sessions. Keep the moves familiar so your body learns positions and patterns quickly. However, if a movement feels shaky, step back one progression and reclaim clean form.

Routine A — 20-Minute Circuit (Full Body)
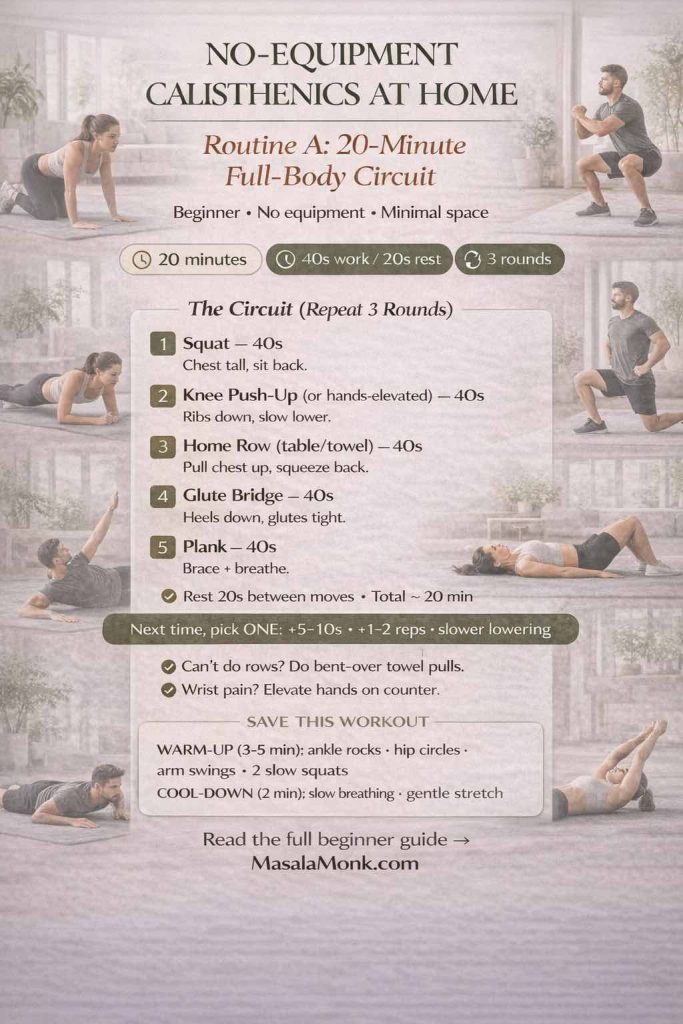
  • Squats — 40 seconds work / 20 seconds rest
  • Knee Push-Ups (or hands-elevated push-ups) — 40 / 20
  • Table / Towel Rows — 40 / 20
  • Glute Bridges — 40 / 20
  • Plank — 40 / 20

Complete 3 rounds. Progress by adding five to ten seconds per hold, slipping in one or two extra reps, or slowing the lowering phase. In essence, tiny changes create new stimulus without crushing recovery.

Routine B — 30-Minute Sets × Reps (Full Body)
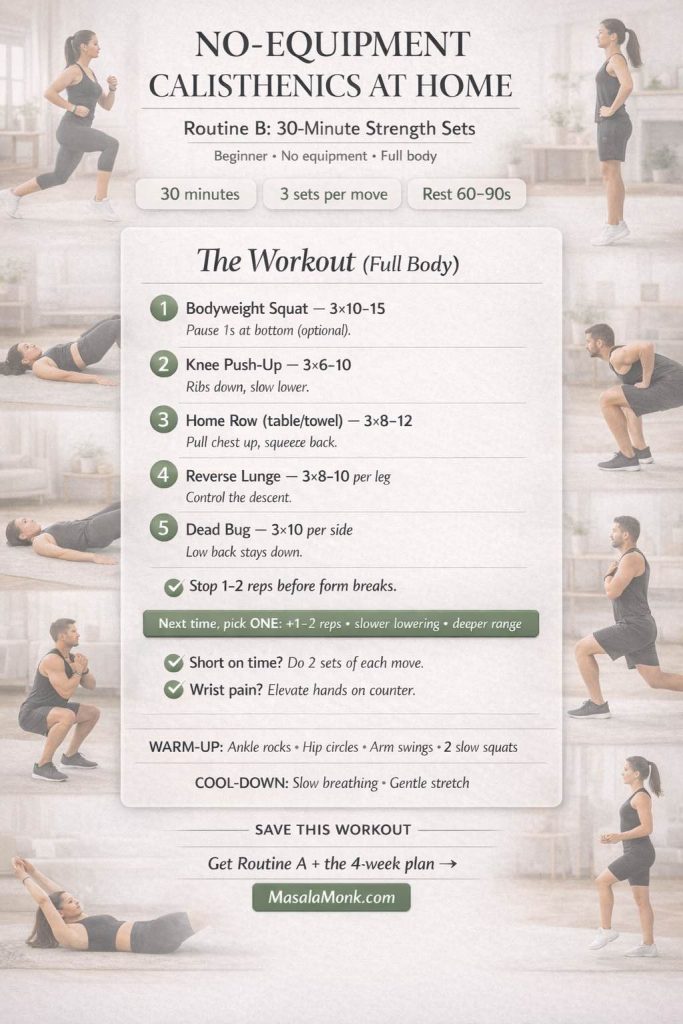
  • Bodyweight Squat — 3×10–15
  • Knee Push-Up — 3×6–10
  • Table / Towel Row — 3×8–12
  • Reverse Lunge — 3×8–10 per leg
  • Dead Bug — 3×10 per side

Rest 60–90 seconds between sets. If everything feels easy, add a slow three-second descent or a one-second pause at the hardest point. Conversely, if form breaks, trim each set by two reps and rebuild next time. For dependable technique photos and simple regressions, browse the ACE no-equipment exercise library.

Brief reminder: short, regular sessions help you satisfy both the “muscle-strengthening” target and a sizable portion of your weekly movement minutes. Consequently, the payoff compounds when you keep the plan simple.

No Equipment Calisthenics at Home — 4-Week Beginner Plan

You’ll now plug the two routines into a clear calendar. The plan is brief, progressive, and repeatable. Crucially, you’ll leave a little in the tank so the rest of the day still feels good.
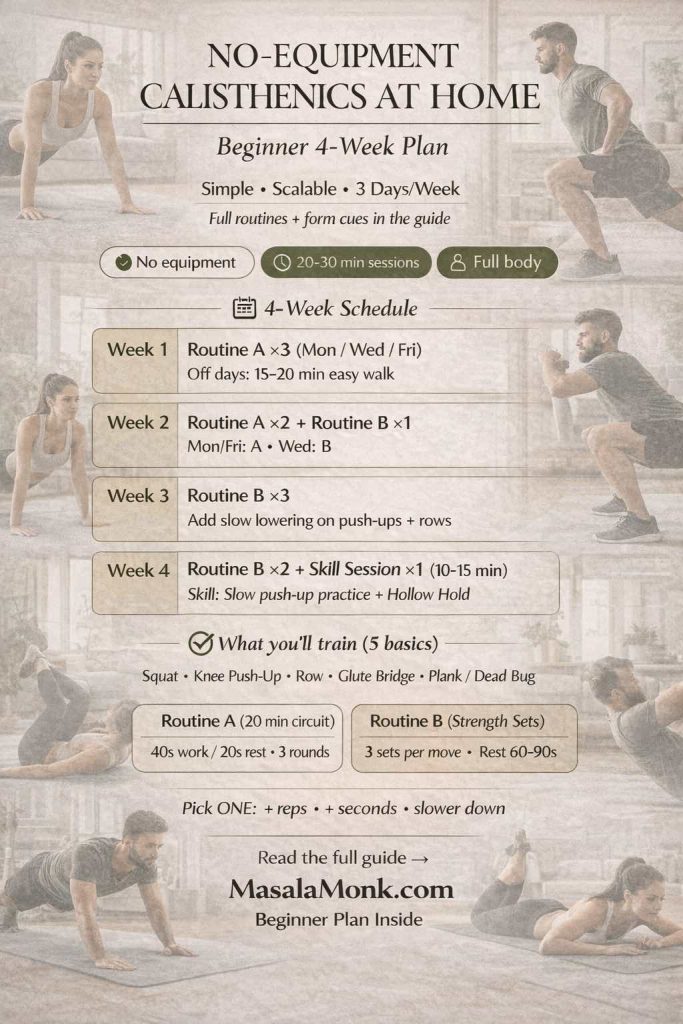
  • Week 1 — Routine A ×3 (e.g., Mon / Wed / Fri). On off days, walk 15–20 minutes at a conversational pace.
  • Week 2 — Routine A ×2 + Routine B ×1 (Mon / Fri = A, Wed = B). Keep tempo calm and crisp.
  • Week 3 — Routine B ×3. Add slow negatives on push-ups and rows; hold planks five seconds longer than last week.
  • Week 4 — Routine B ×2 + one short skill session (10–15 minutes): practice push-up technique for 2–3 sets of 3–5 slow reps, then finish with hollow holds (3×20–30 seconds).

When you want a day-by-day map with built-in momentum, step into our beginner-friendly 30-day calisthenics challenge. It turns intention into action with small, specific tasks you can actually complete.

Progressions That Prevent Plateaus

After four weeks, you’ll feel steadier. At that point, nudge difficulty without changing everything. Adjust leverage, pace, or range—then write down what you did. Subsequently, add a little more next time.

  • Squat family
    Add a two-second pause at the bottom to build control. Later, switch to split squats for unilateral strength and balance. Eventually, try reverse lunges with a slower descent for extra time under tension.
  • Push-ups
    Reduce hand elevation week by week, moving from countertop to table to floor. Then, once full reps feel honest, elevate the feet slightly for more load. Notably, keep the body line rigid and the ribcage tucked.
  • Rows
    When using a towel, step farther from the door to steepen the angle. Or, under a sturdy table, place the feet forward so the torso is closer to horizontal. Squeeze the shoulder blades together at the top and pause briefly. If you later add gear, short finishers from battle rope workouts can complement your pull days.
  • Core
    Shift from forearm plank to high plank. Introduce hollow body holds in short, deliberate sets. Meanwhile, breathe quietly through the nose so the torso stays braced.

Small tweaks deliver real changes. Clean reps now beat sloppy “PRs” you can’t repeat later. Therefore, build conservatively and let momentum accumulate.

Cardio That Complements Strength

The routines above tick the “muscle-strengthening” box. To approach the 150-minute activity goal, add short, easy cardio that doesn’t complicate your day. For instance, take brisk walks, cycle casually, or dance in the living room. Spread it out: several 20-minute bouts, or daily 10–15-minute chunks. If time is scarce, climb stairs for five minutes and count it. On the other hand, if you prefer structured ideas, the CDC’s page on what counts as activity offers helpful examples. Ultimately, the mission is simple: collect minutes without turning life upside down.

When you crave gentle variety, rotate in a day from the 28-day wall Pilates challenge to blend cardio-style movement with core-friendly strength.

Troubleshooting: Smooth Fixes for Common Hiccups

Wrists ache during push-ups
Use hands-elevated push-ups on a countertop to reduce wrist extension. Alternatively, make fists and place knuckles on a mat so the wrists stay neutral. Add light wrist circles and palm lifts before the first set.

Rows feel awkward with a towel
Fold the towel thick, close the door on the knot, and test the anchor with a gentle lean. Initially, use a small angle with bent knees. Gradually walk the feet forward to increase challenge. If uncertainty lingers, switch to table rows until the groove feels natural.

Out of breath too soon
Slow the tempo. Rest 60–75 seconds between sets. Temporarily skip long end-range holds. Even so, keep showing up—your engine adapts quickly when the plan is simple and repeatable.

Short on time
Run two rounds of Routine A and call it a win. Next day, do two sets of squats, push-ups, and rows. Consistency compounds; perfection does not.

Motivation dips
Lay the mat out the night before. Pair training with a favorite playlist or podcast. Promise five minutes. Frequently, a five-minute start becomes twenty once you begin.

Optional Add-Ons After Four Weeks (Low Cost, Big Payoff)

Although no equipment calisthenics at home will take you far, a few inexpensive tools unlock new progressions and keep training fresh.

  • Resistance band
    Perfect for face pulls, band-assisted rows, and pull-apart patterns that build the upper back. Additionally, bands make tempo work natural and joint-friendly.
  • Doorway pull-up bar
    Begin with passive hangs and scapular pull-ups. Over time, progress to full pull-ups. Incidentally, hangs also decompress the shoulders after desk hours.
  • Yoga mat
    Comfort matters. When floor work feels good, you’ll do more of it. A mat improves traction on planks and hollow holds.

For a practical breakdown—what’s worth buying, what to skip, and how to set up a minimalist corner—see our essential equipment for home & office workout. The list stays focused so purchases remain intentional.

Recovery, Sleep, and Food—Without Complexity

Strength gains arrive between sessions. Sleep accelerates them. Aim for a consistent bedtime and a dark, cool room. Walk after meals when possible. Drink water. Eat enough protein to support recovery, but avoid chasing perfection. Whole foods most of the time is more than fine. If soreness lingers, reduce total volume slightly next session and polish technique. Then, re-add sets once you feel fresh.

If you want an easy on-ramp, try beginner meal prep to automate lunches, or follow a Mediterranean-style template most days.

Meanwhile, consider micro-recovery during the day: stand up every hour, stretch the hips for thirty seconds, and take a minute of slow breathing when stress climbs. Individually, these moments feel small; collectively, they stabilize energy and improve readiness for the next session.

Also Read: The Science of Protein: Maximizing Muscle Growth and Recovery

Mindset: Make the Habit Obvious, Easy, and Satisfying

Habits stick when they’re visible and rewarding. Therefore, leave your mat where you’ll see it. Schedule sessions as you would a meeting. Keep a tiny log—date, routine, one note. Celebrate small wins: a first full push-up, a longer plank, or a week with three sessions done. Likewise, set “minimums” for hectic days: one round of the circuit, or two sets of squats and rows. Even minimal effort maintains identity—I’m someone who trains—and that identity keeps momentum alive.

If you enjoy structure and accountability, join our beginner-friendly 30-day calisthenics challenge. It provides daily prompts and sensible progressions, which, in practice, means fewer decisions and more done sessions.

Curious about tailoring cardio or calories to your body type? Skim our endomorph, ectomorph, and mesomorph guides for quick orientation. They’re optional, but useful if you’re experimenting.

Form Support When You Want It

Every so often, you’ll want visual confirmation that a setup is right. On those days, pull a single cue from a dependable source rather than doom-scrolling. For clear step-by-step photos, explore the ACE exercise library by body part. If you prefer gentle follow-alongs, the NHS offers short strength & resistance videos that pair well with off days. Prefer written checklists? The NHS strength exercises page includes simple progressions you can print or save.

No Equipment Calisthenics at Home — Bringing It All Together

Let’s connect the dots. You now have a simple system: two reliable routines that hit every major muscle group, a four-week plan that respects time and energy, and progressions that don’t require gear. Along the way, short walks or easy cardio help you reach the weekly movement target recommended by the WHO and the CDC. For technique check-ins, the ACE no-equipment exercise library remains a dependable reference. For gentle options or guided clips, the NHS has you covered with strength exercises and short strength & resistance videos.

Ultimately, no equipment calisthenics at home is enough to start, enough to progress, and enough to feel better in your body. Choose a routine. Set a tiny timer. Move with intent. Then, the next day, do it again.

Next Step: Pick Your Line and Go

If you’re brand new, start with Routine A tomorrow and keep the rests honest. For those who have trained before, begin at Week 2 and run the 30-minute plan once. People who prefer a daily program with crystal-clear prompts, can jump into the 30-day calisthenics challenge. And if a minimalist setup with two or three smart tools sounds appealing, the essential equipment guide will keep purchases focused and effective.

FAQs

1. What is “no equipment calisthenics at home” and who is it for?

No equipment calisthenics at home means full-body strength training using only your bodyweight. Moreover, it suits beginners, busy professionals, and anyone returning to exercise who wants scalable, joint-friendly workouts without buying gear.

2. How do I start calisthenics at home as a beginner?

Begin with five basics: squats, knee push-ups, table/towel rows, glute bridges, and planks. Additionally, train three days per week, keep 1–2 reps in reserve, and record sets so you can progress gradually.

3. Can I build muscle with no equipment calisthenics at home?

Yes. Consequently, you’ll grow by increasing reps, time under tension (slow eccentrics, pauses), and range of motion over weeks. Furthermore, aim for consistent sleep and adequate protein to support recovery.

4. How many days per week should I train?

Start with 3 days weekly. Subsequently, add a fourth day once sets feel tidy and recovery stays solid. Likewise, sprinkle easy walks on non-lifting days to maintain momentum.

5. What’s a simple beginner routine I can follow today?

Try 3 rounds of: squats 40s, knee push-ups 40s, table/towel rows 40s, glute bridges 40s, plank 40s; rest 20s between moves. Notably, keep breathing steady and stop one rep before form breaks.

6. Do I need cardio in addition to no equipment calisthenics at home?

Ideally, yes. Hence, add short, conversational-pace walks or light cycling on off days to reach weekly activity targets while still recovering between strength sessions.

7. What’s the best way to progress if I can’t do full push-ups yet?

Use hands-elevated push-ups on a stable surface; thereafter, lower the surface over time until you reach the floor. Importantly, keep a straight line from head to heels and control the descent.

8. How do I make rows at home without equipment?

Anchor a sturdy towel in a closed door or use a solid table for light inverted rows. Alternatively, bend the knees and reduce the angle first; then, as strength improves, walk the feet forward to increase difficulty.

9. How long should a beginner session last?

Generally 20–30 minutes. Thus, you’ll complete warm-up, 5 movements, and a brief cool-down without draining energy for the rest of the day.

10. What if I’m short on time?

Do one condensed circuit: squats, push-ups, rows—two rounds only. Even so, this mini-workout maintains habit strength while still nudging progress.

11. Which muscles does no equipment calisthenics at home train?

Specifically: legs (squats, lunges), chest and shoulders (push-ups), back and biceps (rows), and core (planks, dead bugs, hollow holds). Akin to gym sessions, these cover every major area.

12. How soon will I see results?

Beginners often feel better coordination within 1–2 weeks. Thereafter, visible strength changes typically appear in 4–6 weeks, provided you train consistently and recover well.

13. What if my wrists hurt during push-ups?

Switch to hands-elevated push-ups or use knuckles on a mat. Additionally, warm up with gentle wrist circles and palm lifts to prepare the joints.

14. Is equipment ever necessary for progress?

Not inherently. Nevertheless, a resistance band or doorway bar later on allows extra variations. For now, prioritize crisp technique and small weekly improvements.

15. How do I avoid plateaus with no equipment calisthenics at home?

Rotate one variable at a time: add reps, extend holds, slow eccentrics, or deepen range. Moreover, log sessions so you can nudge a single metric upward each week.

16. What’s a safe rep range for beginners?

Aim for 6–12 reps on strength moves and 20–40 seconds on core holds. Consequently, you’ll balance challenge with form and recover faster between sessions.

17. Should I train full body or split days?

Full body works best at first. Subsequently, once you’re consistent, you may alternate push/pull/legs days; however, keep volume moderate to protect recovery.

18. How do I warm up quickly at home?

Perform 3–5 minutes of ankle rocks, hip circles, arm swings, and two slow squats. Likewise, finish with one easy set of your first exercise to groove the pattern.

19. What’s the right rest time between sets?

For beginners, 60–90 seconds is sufficient. Thus, you’ll preserve quality without letting the session drag.

20. How can I keep motivation high?

Set a tiny “minimum”—five minutes. Importantly, celebrate small wins (first clean push-up, longer plank). Subsequently, string together weeks, not heroic days.

Posted on 1 Comment

Mesomorph Body Type: Diet, Workouts & Weight Loss (Female & Male)

Mesomorph body type—female portrait lifting a dumbbell beside a salad and jump rope; science-backed guide to diet, workouts and weight loss.

The mesomorph body type is often described as naturally athletic—broader shoulders, a relatively narrow waist, and a frame that seems to “take” to training. Nevertheless, body-type labels are tendencies, not destinies. If you want a concise orientation to how these categories are typically described, this primer on somatotypes sets the scene; then, rather than overfitting rules to a label, build progress using the evidence-led ACSM progression models. With that perspective in mind, below you’ll find a complete, practical playbook tailored to the mesomorph body type—including nutrition, training templates, cardio, recovery, and troubleshooting for plateaus.

The two other body types you might want to read more about are:


What the Mesomorph Body Type Looks Like (and Why It’s Only a Starting Point)

Typically, people who align with the mesomorph body type present a solid, muscular build, make steady strength gains with sensible programming, and tolerate both training volume and dietary carbohydrate reasonably well. Even so, many readers identify as blends—“ecto-meso” or “endo-meso.” That’s perfectly fine. Because the methods here are grounded in outcomes, not identity labels, they work across that spectrum. Moreover, we’ll show you exactly how to adjust when progress stalls, so your plan remains responsive rather than rigid.

Also read: 3 Somatotypes: Ectomorph, Mesomorph, Endomorph


Nutrition for the Mesomorph Body Type: Targets, Food Matrix & Adherence

Start With Calories, Then Iterate Intelligently

First, set calories to match your goal and adjust every two weeks based on trends:

  • Fat loss: body weight (lb) × 10–12
  • Recomp/maintenance: × 12–14
  • Muscle gain: × 15–17

To make those numbers concrete right away, run them through our macro calculator and save your initial targets. After a fortnight, evaluate the trend—not a single weigh-in—and nudge only one variable at a time.

Also Read: The Science of Protein: Maximizing Muscle Growth and Recovery

Lock Protein First, Then Shape Carbs and Fats Around Training

Protein protects lean mass in a deficit and supports growth in a surplus. A large synthesis suggests roughly 1.6 g/kg/day covers the hypertrophy benefit for most lifters before returns diminish; see this landmark meta-analysis. Meanwhile, during more aggressive cuts in lean, resistance-trained folks, higher intakes relative to fat-free mass (≈ 2.3–3.1 g/kg FFM) better defend muscle, as shown by Helms et al..

Day to day, keep protein convenient and consistent. Eggs, Greek yogurt, tofu/tempeh, fish, poultry, lean beef, and lentils cover most scenarios. For quick, real-world anchors, check the protein in two boiled eggs or compare with three scrambled eggs.

Carbs vs Fats for the Mesomorph Body Type: Fuel the Work

Keep protein steady, then flex carbs and fats to hit your calories. On lifting days, place more of your carbs before and after workouts; on rest or easy-cardio days, slide carbs down and nudge fats up slightly. Pragmatically, that’s the spirit of periodized nutrition: fuel the work that matters while keeping overall intake aligned with your goal.

Also Read: How to Eat 100 Grams of Protein a Day

The Mesomorph Food Matrix (Female & Male)

  • Proteins: eggs, Greek yogurt, cottage cheese, tofu/tempeh, fish, chicken, lean beef, lentils
  • Carbs (mostly high-fiber): oats, potatoes, rice, quinoa, whole-grain wraps/bread, beans, fruit
  • Fats: extra-virgin olive oil, avocado, nuts/seeds, fatty fish
  • Veg: leafy greens, crucifers, and colorful mixed veg for volume and micronutrients

For adherence—and, importantly, satiety—a modest daily handful of nuts can help; this guide to high-impact nuts for weight management is a useful reference while you build shopping lists.


Sample Meal Templates for the Mesomorph Body Type (Scale Portions to Your Calories)

Female—fat-loss day (~1,700–1,900 kcal)
Breakfast: Greek yogurt (~200 g) with oats (~40 g) and berries
Snack: Apple with ~25 g almonds
Lunch: Chicken–quinoa–veg bowl (~120 g cooked chicken; ~120 g cooked quinoa)
Pre-workout: Banana plus 20–25 g whey
Dinner: Salmon (120–150 g), potatoes (~200 g), large salad with olive-oil dressing

Male—recomp day (~2,400–2,600 kcal)
Breakfast: 3 eggs + 2 whites, whole-grain toast, spinach
Snack: Cottage cheese (~200 g) with pineapple
Lunch: Lean beef & rice bowl (150–180 g beef; ~200 g cooked rice; veg)
Pre-workout: Oats (~60 g) with 25–30 g whey
Dinner: Chicken (180–200 g), sweet potato (~250 g), broccoli with olive oil

Additionally, track more than the scale. In practice, waist measurements, weekly photos, and gym numbers tell a clearer story. This concise body-fat guide helps calibrate expectations as the mesomorph body type changes composition.


Training for the Mesomorph Body Type: Principles, Progression & Templates

Principles First: What Drives Results Reliably

Progressive overload—small, steady jumps in load or reps with tidy technique—remains the backbone, precisely as recommended by the ACSM progression models. Most people with a mesomorph body type thrive on four lifting days per week, accumulating 8–15 hard sets per muscle across those sessions. Session length of 60–75 minutes is plenty when rests are purposeful and assistance work stays efficient.

Mesomorph Body Type—Female 8-Week Template (Strength + Shape)

Split: Upper A / Lower A / Upper B / Lower B (+ optional accessory circuit)

  • Upper A: Horizontal press, row, overhead press, pulldown, lateral raises, core
  • Lower A: Squat pattern, RDL, split squat, leg curl, calf raise, core
  • Upper B: Incline press, chest-supported row, push-ups, single-arm row, face pulls, core
  • Lower B: Deadlift or trap-bar pull, hip thrust, step-ups, leg press, ham curl, core

Progression:
Weeks 1–4 → 3–4×8–12; add ~2.5–5% when you hit the top of the range with crisp form
Weeks 5–8 → 4×6–10 on primaries; accessories 10–15 reps with 60–75 s rests

If you’re training at home, begin with basics; this streamlined home-gym checklist covers the essentials. On minimalist days, rotate sessions from our calisthenics beginner’s guide or this structured 30-day plan.

Mesomorph Body Type—Male 8-Week Template (Strength-Forward)

Split: Push / Pull / Legs / Upper (strength)

  • Push: Bench, incline DB press, overhead press, dips, triceps pressdowns
  • Pull: Deadlift or RDL, pull-ups, barbell row, rear-delts, curls
  • Legs: Squat, leg press, lunges, ham curls, calves
  • Upper (strength): Bench 5×5, row 5×5, weighted chins (3–5 reps), then accessories 8–12

Progression:
When all sets are clean, add 2.5–5 kg on main lifts; for accessories, chase reps first, then load. Consequently, you keep momentum without compromising form.


Cardio for the Mesomorph Body Type: Build an Engine, Keep the Muscle

Aim for two to three cardio sessions weekly. For base fitness and recovery, prioritize Zone 2 at a conversational pace for 30–45 minutes; this practical Zone 2 guide explains how it improves endurance without beating up your legs. When time is tight, add a brief interval dose—say 10×1 minute hard with 1–2 minutes easy—since a well-cited review suggests intervals can match steady cardio for body-comp outcomes with less total time.

To target intensity precisely, set your numbers with the in-house heart-rate zone calculator or follow this straightforward Apple Watch how-to. For variety, sprinkling in finishers from these battle-rope workouts keeps conditioning lively without monopolizing your schedule.

From a broader health standpoint, respect the baseline volumes in the WHO 2020 guidelines: 150–300 minutes of moderate or 75–150 minutes of vigorous aerobic activity per week, with muscle-strengthening on two or more days.


Recovery, Sleep & Stress—Hidden Levers for the Mesomorph Body Type

Even the best plan falters if recovery is neglected. Therefore, set minimums and protect them like appointments:

  • Sleep: 7–9 hours nightly; anchor bedtime and wake time whenever possible
  • Steps: 7k–10k per day for general health and appetite regulation
  • Deloads: every 6–8 weeks or whenever form, mood, and motivation degrade together
  • Hydration: 30–40 ml/kg/day as a broad starting point (increase modestly in heat or high-sweat sessions)
  • Mobility: 10–15 minutes on rest days—hips, thoracic spine, and ankles tend to pay dividends

Additionally, if you’re struggling with late-night snacking or poor sleep quality, front-load protein and vegetables earlier, keep a consistent pre-sleep routine, and dim screens at least 30–60 minutes before bed. Small lifestyle changes compound quickly for the mesomorph body type because the training stimulus is usually not the limiting factor—recovery is.


Mesomorph Weight Loss: A Step-by-Step Playbook That Actually Works

  1. Pick your calorie target (using the multipliers above) and track a weekly average of 3–4 morning weigh-ins.
  2. Aim for ~0.5–0.8% body-weight loss per week. Faster drops risk lean-mass losses; keeping protein high, as outlined by Helms et al., helps defend FFM.
  3. Lift four days per week, nudging loads or reps gradually in line with the ACSM progression guidance.
  4. Do cardio two or three times weekly, leaning mostly on Zone 2 with a single interval session for punch.
  5. Fuel hard sessions with more carbs before and after lifting; that aligns with the practical logic behind periodized fueling.
  6. If you stall for 14+ days, change only one variable: trim 150–250 kcal/day or add one 30–40-minute Zone 2 session. Keep protein and lifting volume steady; don’t pile on extra HIIT at once.
  7. Reassess every two weeks. If trends match the goal, hold steady; otherwise, implement a small, single adjustment and re-evaluate.

Female-Specific Notes for the Mesomorph Body Type (Brief but Crucial)

Two micronutrients deserve special attention: iron and calcium. A food-first approach remains the default; however, if intake is low—or symptoms suggest a shortfall—use the practitioner sheets for iron and calcium to set targets before considering supplements. Furthermore, many women report higher energy and better training “feel” around ovulation; if that’s you, placing a slightly higher-carb meal near those peak sessions can improve performance without overcomplicating the week.


A Week That Works for the Mesomorph Body Type (Female or Male)

  • Mon: Upper/Push (60–70 min)
  • Tue: Zone 2 cardio (30–40 min)
  • Wed: Lower/Pull (60–75 min)
  • Thu: Rest or mobility
  • Fri: Upper/Legs (60–70 min)
  • Sat: Intervals (10×1 min hard / 1–2 min easy) or a short circuit
  • Sun: Optional easy cardio or complete rest

If you’re training outside a commercial gym, start with basics—dumbbells, an adjustable bench, and a couple of bands—and add pieces only as consistency demands. For simplicity, skim this concise equipment checklist and build from there.


Common Mesomorph Body Type Mistakes (and Simple Fixes)

Over-reliance on HIIT: Because the mesomorph body type often “handles” intensity well, it’s tempting to chase more high-intensity intervals. Yet, recovery is finite. Cap HIIT at one or two short sessions weekly and keep most conditioning in Zone 2; your lifts will thank you.

Under-eating protein: Hitting calories without nailing protein is a classic stall point. Consequently, structure each meal around a protein anchor (e.g., Greek yogurt at breakfast, fish at dinner) and backfill carbs/fats to taste.

Skipping deloads: If loads stall, joints grumble, and motivation dips simultaneously, it’s time for a deload. Drop volume by ~30–40% for a week, keep intensity moderate, and return refreshed.

All-or-nothing dieting: Rapid, unsustainable deficits backfire. Instead, treat fat loss like a multi-block project: two to three weeks of steady deficit, followed by a maintenance week to consolidate habits, then repeat.


Bringing the Mesomorph Body Type Plan Together

Start with calories, lock protein, and train four days with progressive overload. Thread in two or three cardio sessions—mostly Zone 2—and fuel your hardest sessions with a touch more carbohydrate. Meanwhile, protect sleep, hydration, and steps; they quietly power consistency. As you adapt, refine targets using the macro calculator, calibrate expectations with the body-fat guide, and pace conditioning via the HR zone calculator. Ultimately, the mesomorph body type thrives on simple, repeatable behaviors executed with patience—and this framework is designed to make that consistency not only achievable, but sustainable.

FAQs

1) What is the mesomorph body type and how do I know if I am one?

The mesomorph body type generally presents a naturally athletic frame—broader shoulders, a relatively narrow waist, and noticeable responsiveness to training. Moreover, if you build muscle at a steady pace and maintain moderate body fat with ordinary effort, you likely lean mesomorphic (even if you’re a blend).

2) What’s the best diet for the mesomorph body type?

Prioritize protein, set calories to match your goal, and then balance carbs and fats around training. Furthermore, keep protein near 1.6–2.2 g/kg body weight daily, choose fiber-rich carbs most of the time, and anchor each meal with lean protein plus colorful vegetables.

3) How many calories should a mesomorph body type eat to lose fat?

Typically, start around body weight (lb) × 10–12. Additionally, monitor a two-week average of scale weight, waist, and gym performance; then adjust by small steps rather than overhauling everything at once.

4) Which macro split suits the mesomorph body type?

Set protein first, then allocate carbs higher on lift days and modestly lower on rest days, while fats fill the remainder. Consequently, you fuel performance without overshooting total calories.

5) What foods should a mesomorph body type emphasize?

Lean proteins (eggs, fish, poultry, tofu), slow-digesting carbs (oats, potatoes, rice, legumes, fruit), and healthy fats (olive oil, avocado, nuts) work beautifully. Likewise, a large portion of non-starchy vegetables at most meals improves satiety.

6) What is the best workout split for the mesomorph body type?

A four-day split tends to excel—e.g., Upper/Lower/Upper/Lower or Push/Pull/Legs/Upper. Importantly, aim for 8–15 hard sets per muscle each week and progress loads or reps gradually.

7) What exercises should a mesomorph body type prioritize?

Compound lifts first: squats, deadlifts or RDLs, bench and overhead press, rows, and pull-ups. Subsequently, add accessories (lunges, hip thrusts, face pulls, lateral raises) to round out weak points.

8) How should a mesomorph body type use cardio without losing muscle?

Keep two to three sessions weekly. Notably, most work should be Zone 2 (easy-moderate), while one short interval session adds efficiency. Place intervals away from heavy lower-body days to preserve strength.

9) What’s the best way for a mesomorph body type to lose weight quickly yet safely?

Target a weekly drop of ~0.5–0.8% of body weight, maintain high protein, lift four days, and keep cardio consistent. Conversely, avoid extreme deficits that sabotage recovery and training quality.

10) Does carb cycling help the mesomorph body type?

Yes—pragmatically. Higher carbs on training days (especially pre/post workout) and slightly lower on rest days can improve adherence and performance. Nevertheless, total weekly calories still drive results.

11) How can a mesomorph body type break a fat-loss plateau?

After 14 days with no change, either reduce daily calories by 150–250 or add one 30–40-minute Zone 2 session. Furthermore, hold protein steady and keep lifting volume consistent to defend lean mass.

12) What is a good weekly schedule for the mesomorph body type?

For example: Mon Upper, Tue Zone 2, Wed Lower, Thu Rest/Mobility, Fri Upper or Legs, Sat Intervals or circuits, Sun Optional easy cardio. Consequently, you balance stimulus and recovery across the week.

13) How should a female mesomorph body type modify the plan?

Calorie targets will differ, and exercise selection may prioritize glutes and shoulders more often. Additionally, track energy across the menstrual cycle and consider slightly higher carbs on peak-effort days if performance improves.

14) What supplements suit the mesomorph body type?

Focus on fundamentals first—diet quality, protein intake, strength progression, sleep. Thereafter, consider basic, well-researched options (e.g., creatine monohydrate, vitamin D if deficient) based on personal needs and professional advice.

15) How much rest should a mesomorph body type take between sets?

Generally, 2–3 minutes for heavy compounds and 60–90 seconds for accessories. Moreover, longer rests on main lifts often yield better performance and progression.

16) How quickly should the mesomorph body type expect results?

Strength improvements can appear within weeks; body-composition changes typically show across 6–12 weeks. Crucially, consistency beats intensity—steady adherence compounds over time.

17) Is HIIT necessary for the mesomorph body type?

Not strictly. HIIT is efficient, yet Zone 2 builds a durable aerobic base with less fatigue. Accordingly, many mesomorphs thrive on one brief interval session paired with mainly Zone 2.

18) Can the mesomorph body type gain muscle and lose fat simultaneously?

Under certain conditions—new lifters, returning trainees, or those with higher body fat—recomposition happens. Nevertheless, most intermediate lifters progress faster by focusing on one goal at a time.

19) What recovery habits best support the mesomorph body type?

Aim for 7–9 hours of sleep, 7k–10k daily steps, regular hydration, and a deload every 6–8 weeks. Additionally, brief mobility work on rest days maintains range of motion and training quality.

20) How should a mesomorph body type track progress beyond the scale?

Use a trio: weekly average weight, waist measurements, and gym numbers. Likewise, periodic photos in similar lighting reveal changes that numbers can miss.

Posted on Leave a comment

Apple Cider Vinegar & Cayenne Pepper: Weight Loss, Benefits, and Results

Woman holding an apple cider vinegar and cayenne pepper drink in a modern kitchen—magazine-style Pinterest cover.

If you’ve been wondering whether mixing apple cider vinegar and cayenne pepper is actually worth doing, you’re not alone. The tart-meets-spicy combo pops up in kitchen lore, wellness routines, and the occasional bottled “cleanse.” However, beyond the buzz, there’s a slower, steadier story to tell—one about repeatable habits that make meals feel calmer, appetite feel friendlier, and energy feel a little more even. This guide gives you a simple ACV + cayenne drink, several variations you’ll genuinely enjoy, and a grounded explanation of what the research suggests (and what it doesn’t). It also folds in safety tips that protect your teeth and your gut, plus practical day-by-day ideas so the habit sticks.

Take a breath. Instead of chasing miracles, let’s build a ritual you’ll actually repeat.


Why people mix apple cider vinegar and cayenne pepper

To set the stage, it helps to know what’s in the glass. Apple cider vinegar (ACV) contains acetic acid, which in controlled settings can slow gastric emptying and blunt post-meal glucose spikes. Consequently, some people experience steadier energy and an easier time stopping at comfortable portions. Cayenne pepper, for its part, brings capsaicin and related capsinoids, compounds associated with a small thermogenic bump and, in several trials, a gentle reduction in perceived appetite. None of this makes the drink a magic bullet; nevertheless, it can become a before-meal cue that nudges you toward mindful pacing and balanced plates.

Taste matters, too. The sip is tangy and gently hot, which many find satisfying. As a result, they approach the next meal more calmly—often enough to shift portions down a notch without white-knuckling.


The everyday apple cider vinegar and cayenne pepper drink (base recipe)

Serves: 1 | Time: 2 minutes

  • 250 ml (1 cup) warm or room-temperature water
  • 1–2 tsp (5–10 ml) raw, unfiltered apple cider vinegar (with the “mother”)
  • A pinch (1/16–1/8 tsp) ground cayenne pepper
  • Optional: 1–2 Tbsp fresh lemon juice; 1–2 tsp honey or maple; a few thin slices of fresh ginger; a pinch of turmeric; or 1/8 tsp cinnamon

Method:
Pour the water first. Then add ACV, sprinkle in cayenne, and stir. Finally, fold in any add-ins and sip before or with a meal. Begin with 1 tsp ACV for a few days and notice how you feel.

Why this version works:
It’s fast, repeatable, and flexible. Moreover, it’s simple to tailor—more lemon on warm afternoons, a whisper of cinnamon when evenings cool, or ginger when you want something soothing yet bright.


Apple cider vinegar and cayenne pepper for weight loss: realistic expectations

Let’s keep this honest. Drinks don’t melt fat. Even so, certain sips can change how you approach food, and that’s where the leverage lives. Taken just before or with a meal, apple cider vinegar and cayenne pepper may help you feel satisfied sooner; consequently, portions often shrink gently without a sense of deprivation. Additionally, ACV’s acetic acid can smooth post-meal glucose waves—something many notice as fewer energy dips and less frantic snacking. Meanwhile, capsaicin’s heat adds a small thermogenic nudge.

That said, the effects are modest in the literature. Meta-analyses and randomized trials suggest that ACV and capsaicin can support small improvements across weight or waist measures over several weeks, particularly when the rest of the day—protein, fiber, movement, sleep—pulls in the same direction. If you want receipts, here are two plain-English starting points: a systematic review on ACV and body metrics in the journal Nutrients (systematic review on ACV) and a meta-analysis on capsaicin and weight outcomes in the British Journal of Nutrition (capsaicin meta-analysis).


When to sip the ACV and cayenne pepper drink (and how often)

Rituals stick when they’re simple. Many people sip the drink 10–15 minutes before lunch; others prefer it with a meal. Start with 1 tsp (5 ml) ACV in a full glass of water plus a tiny pinch of cayenne, once daily. After a week—if everything feels fine—move to 2 tsp (10 ml); later, if you wish, try 1 Tbsp (15 ml). Consistency matters more than bravado.

If an empty stomach feels harsh, place the drink alongside a meal. Comfort drives adherence; adherence shapes results.


Variations people actually stick with (since taste keeps habits alive)

Apple cider vinegar and cayenne pepper with lemon

When you want freshness, add 1–2 Tbsp lemon juice to the base. The flavor brightens immediately, and the sip begins to feel almost like a wellness mocktail. For a deeper dive into this duo—timing, tweaks, and flavor ideas—see Apple Cider Vinegar and Lemon Juice for Weight Loss.

Apple cider vinegar and cayenne pepper with honey

Sometimes, a touch of sweetness makes the ritual inviting. Stir in 1–2 tsp honey, taste, and adjust. It’s smoother and easier for beginners. Nevertheless, measure the honey so the drink stays light. For balanced, non-hype guidance, read Lemon, Cayenne Pepper, and Honey for Detox.

“Bragg-style” at home

Prefer the bottled vibe—ACV + lemon + cayenne + honey—but want control? Make it yourself. The ingredient lineup on Bragg Honey Cayenne Wellness Cleanse provides a useful taste map; afterward, dial sweetness to your preference and keep the drink well-diluted. For a quick check, here are straightforward ingredient references: Bragg’s product page and a neutral retailer listing like Good Eggs.

Ginger–turmeric comfort

On cooler evenings, add a few ginger slices and a pinch of turmeric; let it steep for three to five minutes so the aromatics bloom. If you want to understand how turmeric and ACV fit together more broadly, explore Turmeric and Apple Cider Vinegar for Weight Loss.

Cinnamon whisper

When you crave warmth without extra heat, whisk in 1/8 tsp cinnamon. Stir well—cinnamon clumps. For more spice-led kitchen tweaks, browse 10 Metabolism-Boosting, Fat-Burning, Weight-Loss Inducing Spices.


A day built around apple cider vinegar and cayenne pepper (without diet drama)

Morning: Hydrate first. If you already love warm lemon water, keep it; then slide your ACV drink closer to lunch.

Before lunch: Sip your apple cider vinegar and cayenne pepper drink. Build your plate around protein (eggs, curd/Greek yogurt, paneer/tofu, legumes, fish, or chicken) plus vegetables and fiber-rich carbs. Furthermore, season generously; flavor makes restraint easier.

After lunch: Take a short walk—ten to twenty minutes resets energy more than you’d expect.

Dinner: If appetite swells at night, begin with a salad dressed in an ACV vinaigrette to echo the theme while slowing the meal’s pace. On days you want variety, try switchel (a vinegar-ginger classic); the tradition feels old-school, yet it fits perfectly in modern kitchens.

Evening: Rinse with plain water after acidic drinks and wait 30–60 minutes before brushing so enamel can re-harden. Dental organizations and clinicians consistently recommend this timeline; for quick reads, see Mayo Clinic’s brushing-after-acid advice and a concise ADA newsroom explainer.


Apple cider vinegar and cayenne pepper benefits (tempered, practical, and honest)

Since nuance matters, here are the main points, calmly stated:

  • Satiety & portions: With meals, ACV can help some people feel content with slightly less; over time, that can gently reduce calorie intake.
  • Post-meal steadiness: By smoothing glucose spikes, ACV often translates to fewer crashes and steadier focus. For background, skim a short clinical overview of vinegar’s effect on postprandial glucose and a nutrition review abstract.
  • Thermogenic nudge: Capsaicin’s heat effect is small yet real, especially with balanced meals and regular movement. For perspective, here’s a broad capsaicin review in addition to the meta-analysis above.
  • Habit stack: Most importantly, the drink becomes a cue for better choices—protein, vegetables, and reasonable pacing. In practice, that’s where sustainable change comes from.

Safety first: how to enjoy ACV and cayenne while protecting teeth and digestion

ACV is acidic and cayenne is spicy; dilution is non-negotiable. In addition, consider a straw and always rinse with plain water afterward. Crucially, wait at least 30 minutes (up to an hour) before brushing so saliva can buffer acids and enamel can re-harden—guidance echoed by clinicians and dental groups (see the Mayo Clinic note and the ADA item once more).

If you have reflux, ulcers, or a sensitive stomach, place the drink with food, reduce the ACV amount, or skip the cayenne entirely. Moreover, if you use diuretics or diabetes medications, or you manage kidney disease, talk to your clinician about ACV’s potassium and glycemic effects. Personal thresholds vary; prudence keeps the habit comfortable.


Apple cider vinegar and cayenne pepper drink: recipes you’ll actually repeat

Although one size never fits all, the following options cover most palates:

Everyday base (unsweetened)

Water 250 ml + ACV 1–2 tsp + tiny pinch cayenne. Optionally, add lemon. Sip before or with a meal.

Gentle honey-lemon

Base + 1–2 tsp honey + 1–2 Tbsp lemon. Still dilute, still simple, noticeably smoother. For balancing sweetness and spice, here’s the internal guide: Lemon, Cayenne Pepper, and Honey for Detox.

Ginger-turmeric steam

Base + fresh ginger slices + pinch turmeric; let it sit three to five minutes. For broader context, read Turmeric and Apple Cider Vinegar for Weight Loss.

Cinnamon comfort

Base + 1/8 tsp cinnamon; whisk well to avoid clumps. For more spice-first strategies, skim Metabolism-Boosting Spices.


Beyond the glass: simple ways to make apple cider vinegar and cayenne pepper work in real life

  • Lead with protein. Breakfasts built around eggs, yogurt, paneer/tofu, or dal steady appetite; evenings feel far less chaotic.
  • Add fiber and color. Vegetables, pulses, whole grains, and fruit deliver fullness on fewer calories; as a result, the day feels more even.
  • Walk after meals. Even brief strolls improve post-meal glucose; consequently, energy steadies.
  • Keep rituals flexible. If mornings are rushed, move the drink to lunch. Conversely, if lunch is unpredictable, sip before dinner.
  • Swap when needed. On days the drink doesn’t appeal, toss a salad with a bright ACV vinaigrette; the theme remains, the texture changes.

If you want a wider beverage bench, these sit nicely alongside your ACV habit: 5 Green Tea & Spice Infusions for Weight Loss and a friendly intro to switchel, the classic vinegar-ginger refresher.


What about bottled blends, pills, or gummies?

Convenience tempts everyone. Bottled ACV + lemon + cayenne + honey tastes familiar and travels well. Nevertheless, homemade versions let you adjust acidity and sweetness, which can be kinder to teeth and digestion, and they’re typically cheaper. For quick ingredient snapshots, cross-check the Bragg Honey Cayenne Wellness Cleanse or a neutral retailer page like Good Eggs.

As for pills or gummies, doses vary and labels aren’t standardized. Furthermore, some people report throat irritation from capsules. For these reasons, many prefer the drink for control and timing—especially when pairing it with meals rather than taking it in isolation.


Apple cider vinegar and cayenne pepper with lemon: where it shines

When brightness motivates you, the lemon variation really sings. Lemon’s aroma wakes the palate; you often pace yourself at the next meal. Additionally, vitamin C adds a small perk. For recipes and nuance, head to Apple Cider Vinegar and Lemon Juice for Weight Loss. If you enjoy morning rituals, pair that with The Morning Ritual: Warm Lemon Water—no need to force ACV on an empty stomach if that doesn’t suit you.


Apple cider vinegar and cayenne pepper with honey: when smoothness keeps you consistent

Not everyone loves sharp, unsweetened drinks. If a teaspoon or two of honey keeps you showing up, that’s a win. Measure it, taste, and adjust. Sustainability beats perfection every time. For more mix-and-match ideas, revisit Lemon, Cayenne Pepper, and Honey for Detox.


Bottom line

At the end of the day, apple cider vinegar and cayenne pepper can be a low-effort, high-consistency ritual. It’s quick to mix, easy to personalize, and grounded enough to respect your body’s pace. As you keep it diluted, sip it before or with meals, and give your teeth a little care, you may notice that meals feel calmer and energy feels steadier. From there, it’s much easier to make choices you’re proud of—day after day.

Ultimately, the habit is the hero. The drink is just how you start.


External sources

FAQs

1) Can I mix cayenne pepper with apple cider vinegar?

Absolutely. However, always dilute the combo in water. Start with 250 ml water + 1 tsp ACV + a tiny pinch of cayenne. Consequently, you’ll reduce enamel/gut irritation while keeping the flavor pleasant. If it’s too spicy, alternatively scale the cayenne down to a “dusting.”

2) Apple cider vinegar and cayenne pepper for weight loss—does it actually help?

Yes, but modestly. Moreover, the real benefit arrives when you pair the drink with protein-rich meals, fiber, movement, and sleep. Therefore, treat it as a helpful ritual, not a miracle.

3) What are the benefits of apple cider vinegar and cayenne pepper?

In brief: potential appetite control, smoother post-meal energy, and a small thermogenic nudge. Additionally, the habit itself cues mindful eating. Nonetheless, results build gradually over weeks, not days.

4) How to drink cayenne pepper for weight loss (timing and dose)?

Sip 10–15 minutes before a main meal (or with it). Begin with 1 tsp ACV in 250 ml water + a tiny pinch of cayenne once daily. Subsequently, if you tolerate it well after a week, increase to 2 tsp, and, if desired, later to 1 Tbsp.

5) Apple cider vinegar and cayenne pepper drink—what’s the simplest recipe?

Mix 250 ml water + 1–2 tsp raw ACV + a pinch of cayenne. Optionally, add lemon (1–2 Tbsp) or honey (1–2 tsp). Consequently, you’ll get a bright, sippable base you can repeat daily.

6) Apple cider vinegar, lemon and cayenne pepper—any extra advantages?

Lemon adds freshness and vitamin C; meanwhile, the core effects remain modest. Importantly, this variation tends to improve adherence because it tastes better, which ultimately matters most.

7) Apple cider vinegar, cayenne pepper and honey—is honey OK?

Yes—in moderation. However, honey adds calories, so measure 1–2 tsp. Alternatively, swap honey for a zero-calorie sweetener if you’re strictly counting.

8) What is the benefits of apple cider vinegar with lemon and cayenne pepper (as searched)?

Primarily, a tastier apple cider vinegar and cayenne pepper base with similar satiety and post-meal steadiness; plus, lemon’s aroma can slow your pace at meals. Nevertheless, keep expectations realistic.

9) Can this drink burn belly fat or “spot-reduce”?

No drink can target belly fat specifically. Instead, think whole-body change: consequently, consistent meals, steps, sleep, and this pre-meal ritual together move the needle.

10) Apple cider vinegar weight-loss recipe with cayenne pepper—what’s a friendly starter?

Try 250 ml water + 1 tsp ACV + a tiny pinch of cayenne + 1 Tbsp lemon. Subsequently, as tolerance grows, move up to 2 tsp ACV. If needed, 1 tsp honey can smooth the edges.

11) Apple cider vinegar and cayenne pepper drink with lemon—morning or night?

Either. However, if your stomach is sensitive in the morning, alternatively place it before lunch. Consistency, therefore, beats perfect timing.

12) ACV and cayenne vs pills/capsules—what’s better?

The drink is easier to titrate and pair with meals; moreover, it avoids some throat irritation reported with capsules. Capsules, meanwhile, are convenient but vary in dose/quality. Ultimately, choose what you’ll repeat.

13) Can I take apple cider vinegar and cayenne while fasting?

Plain ACV + water is very low-calorie; some fasting styles allow it. Honey, however, breaks a fast. Consequently, follow the rules of your chosen protocol.

14) Side effects of apple cider vinegar and cayenne pepper?

Undiluted ACV can affect enamel and the throat; cayenne can irritate reflux-prone stomachs. Therefore, always dilute, consider a straw, rinse with water afterward, and wait 30 minutes before brushing. Additionally, if you have GERD, ulcers, kidney disease, or take diuretics/diabetes meds, consult your clinician first.

15) ACV and cayenne pepper drink—can I use warm water?

Yes. In fact, slightly warm (not hot) water helps flavors meld. Nevertheless, avoid boiling water; it’s unnecessary and may taste harsh with ACV.

16) Apple cider vinegar and cayenne pepper with cinnamon—worth trying?

Definitely, if you enjoy warmth without extra heat. Add 1/8 tsp cinnamon; whisk well so it doesn’t clump. Alternatively, swap cinnamon for fresh ginger slices.

17) ACV, turmeric and cayenne pepper—is that combo fine?

Yes—start with a pinch of turmeric plus ginger slices. Meanwhile, let it steep 3–5 minutes for aroma. Consequently, many find this evening-friendly and soothing.

18) Apple cider vinegar and cayenne pepper drink—how long until results?

Give it 3–8 weeks alongside balanced plates and regular steps. Importantly, track appetite, portions, and energy rather than only the scale; progress, therefore, feels more obvious.

19) Can I mix apple cider vinegar and cayenne pepper with lemon water I already drink?

Sure. Moreover, it’s an easy habit stack: keep your lemon water ritual and, subsequently, fold ACV + a tiny pinch of cayenne into one serving per day.

20) How much cayenne is too much in an ACV drink?

Stay at a pinch (about 1/16–1/8 tsp). If you feel throat or gut irritation, consequently cut it in half—or skip cayenne and keep only ACV + lemon.

21) Apple cider vinegar and cayenne pepper drink recipe—can I batch-prep?

You can pre-mix ACV + water in a bottle (refrigerated) for 24 hours. However, add lemon, cayenne, or honey right before drinking; flavors and potency hold better that way.

22) ACV and cayenne pepper for weight loss—should I take it twice a day?

Once daily is sufficient for most. Nevertheless, if tolerance is good, you could split your usual ACV amount across two small pre-meal drinks. Ultimately, let comfort and consistency guide you.

23) Apple cider vinegar and cayenne pepper drink—does brand matter?

Choose raw, unfiltered ACV with the “mother.” As for cayenne, any reputable, fresh, bright-red ground cayenne works. Additionally, check best-by dates for potency.

24) Apple cider vinegar, cayenne pepper and lemon—can I sweeten without honey?

Yes. Alternatively, use a few drops of stevia/monk fruit, or even a thin apple slice muddled in the glass. Consequently, you’ll keep calories low while softening the tang.

25) Vinegar and cayenne pepper for weight loss—can I use white vinegar?

Technically yes, though apple cider vinegar is the focus here and tends to be gentler in flavor. If you swap, subsequently start at an even smaller dose and assess taste/tolerance.

26) Apple cider vinegar and cayenne—is a “shot” better than a drink?

No—avoid straight shots. Instead, always dilute in a full glass of water. Consequently, you’ll protect teeth and reduce throat discomfort while getting the same practical effect.

27) How do I scale the recipe without overdoing acid or heat?

Keep a simple ratio: per 250 ml water, use 1–2 tsp ACV + a pinch of cayenne. Moreover, if you want a larger glass (500 ml), simply double the water and lemon first; then, cautiously increase ACV.

28) Apple cider vinegar and cayenne pepper—which meal is best?

Whichever meal you overeat most. For many, that’s lunch. Alternatively, use it before dinner if evenings are your challenge. Therefore, align timing with the moment of highest payoff.

29) Apple cider vinegar and cayenne pepper benefits—will this affect my workouts?

Possibly. Some experience steadier energy and fewer cravings post-workout. Conversely, if spicy drinks bother you before training, simply have it with a different meal.

30) Final guide: what’s the smartest starting plan?

Week 1: 250 ml water + 1 tsp ACV + tiny pinch cayenne once daily before a main meal. Week 2: if comfortable, 2 tsp ACV. Meanwhile, keep meals protein-forward with veggies and fiber; add lemon for taste, and honey only if needed. Ultimately, consistency beats intensity.

Posted on 4 Comments

What is Metamucil? Best Time to Take, Side Effects, and More

Glass of orange Metamucil drink with headline text about best time to take Metamucil, brand footer MasalaMonk.com

When to Take Metamucil: Morning, Night, or With Meals

If you’re bringing Metamucil into your day, you’re usually chasing one of three wins: easier, more regular bathroom trips; a little extra fullness that helps with portions; or a nudge in the right direction for LDL cholesterol. The good news is that Metamucil is simple, flexible, and forgiving. You don’t need a perfect schedule—you need a consistent one, a full glass of water, and a couple of smart guardrails around bedtime and other medicines.

Metamucil’s active ingredient is psyllium husk (also called ispaghula), a soluble, gel-forming fiber (learn more about psyllium husk benefits and side effects; quick refresher on the health benefits of fiber, plus food examples of soluble vs insoluble fiber in foods). Mixed with enough liquid, it swells into a soft gel that helps bulk and soften stool and, with daily use, can support healthier cholesterol levels. For a neutral primer on what psyllium is and how it behaves in your gut, see MedlinePlus. For product formats and serving examples (powders, capsules, gummies), browse the brand’s pages at Metamucil.

⚠️ Disclaimer: This material is for educational and informational purposes only and not a substitute for professional medical advice, diagnosis, or treatment. Don’t ignore or delay professional care because of something you read here. Always talk with your doctor or pharmacist about whether Metamucil (psyllium) is appropriate for you, how to time it with your other medicines, and the right dose for your situation. If you think you may be experiencing a medical emergency, call your local emergency number immediately.


Ground rules that never change

Water is non-negotiable. Every labeled dose should be mixed with at least 8 oz (≈240 ml) of liquid and drunk promptly. Over-the-counter Drug Facts for Metamucil and other psyllium products also note that bulk-forming laxatives typically “produce a bowel movement in 12–72 hours.” You can see those instructions on official label listings at DailyMed—for example, Metamucil “Therapy for Regularity” powder entries spell out the 8-oz mixing rule, choking warning, and expected onset window. If label jargon is new to you, here’s a plain guide on how to read nutrition labels.

Glass of diluted psyllium with large text “Mix with ≥8 oz water; drink promptly”.
Water is non-negotiable: mix each labeled dose with ≥ 8 oz (240 ml) liquid and drink promptly.

Give other medicines some space. Psyllium can reduce or delay absorption of certain oral meds. The simple rule: leave a 2-hour buffer (other meds two hours before or after your Metamucil dose). Administration and interaction notes are laid out clearly on Drugs.com and the capsule monograph at Drugs.com.

Why the water rule really matters. A safety bulletin described a fatal choking incident when psyllium was taken with applesauce instead of a full glass of liquid—an avoidable tragedy that underlines why we always use enough fluid and drink right after mixing. See ISMP Canada and the consumer explainer at ISMP Canada.

Also Read: Side Effects of Taking Metamucil Every Day: What You Should Know


Quick orientation: match timing to your goal

  • Regularity (constipation, travel, everyday rhythm): pick any time you’ll remember and stay consistent. Expect effects in 12–72 hours as per label language compiled on DailyMed.
  • Satiety/portion control (weight-management helper): take Metamucil 15–30 minutes before meals so the gel forms before food arrives. Practical around-mealtime framing appears in Harvard Health.
  • Cholesterol (LDL): the clock matters less than your daily total. Aim for roughly ~10 g/day of psyllium (from your Metamucil servings) for 3+ weeks. Evidence summaries are outlined at Harvard Health and Harvard Health. The authorized U.S. health claim for soluble fiber from psyllium husk sits in 21 CFR §101.81.

We’ll unpack each of these in detail next.

For bigger-picture meal planning, pairing fiber with protein can help—see our posts on high-protein, high-fiber for weight management and food-first options like soluble vs insoluble fiber in foods.


Metamucil for regularity: consistency beats the clock

Your gut loves rhythm. If your aim is smoother, more predictable bathroom habits, there’s no “magic hour”—there’s the hour you won’t forget. Some people like their first big glass of water in the morning; others prefer late afternoon or early evening. Stick to one slot for a few days before you judge results. Bulk-forming fibers typically “work” in 12–72 hours—that’s why day one doesn’t tell you much, but day three usually does. Those expectations and directions are set out on DailyMed.

Make it stick (real-world tips):

  • Pour water first, dose second. It’s a tiny ritual that prevents dry scoops and half-sips.
  • Pair it with a habit. Kettle on → mix → drink → brew tea.
  • Start low, go slow. Gas/bloating usually settle if you build up gradually and split doses.
  • Prefer food-first adds on top of your supplement? Consider easy extras like flax seeds for digestion and regularity or even fruit options such as kiwi for constipation relief.

Metamucil before meals: a head start for fullness

If you’re using Metamucil as a satiety helper, timing it 15–30 minutes before meals gives the fiber a head start to gel in your stomach. That often means you feel “that’s enough” a bit sooner and naturally rein in portions without much effort. Many people choose lunch and dinner (the meals where portions creep). This practical around-mealtime approach is discussed at Harvard Health. For a dietary combo that plays nicely with this routine, see high-protein, high-fiber for weight management, and consider fiber-rich staples like millets for fiber and weight loss.

Close-up of Metamucil in a glass with spoon and text “Before meals: a head start for fullness”.
For appetite control, take Metamucil 15–30 minutes before meals so the gel forms before food arrives.

A simple routine that works: set a quiet reminder 20 minutes before the meal you tend to overeat, mix your Metamucil with a full glass of water, drink, then plate your food. If you’re brand-new to fiber supplements, try one pre-meal dose daily for a week, then add the second once your gut gives the thumbs-up.


Metamucil for cholesterol: daily grams and consistency win

When LDL is the goal, dose + streak matter far more than the hands on the clock. Summaries pooling dozens of trials report that around 10 g/day of psyllium (from Metamucil servings) taken for at least ~3 weeks lowers LDL cholesterol. You’ll see that dose-plus-consistency theme across multiple articles at Harvard Health and Harvard Health. A classic meta-analysis of controlled trials reported reductions in total and LDL cholesterol with psyllium added to a heart-healthy diet: American Journal of Clinical Nutrition (Anderson et al.). And if you’re wondering whether morning vs evening changes the cholesterol result, one randomized trial found no meaningful time-of-day effect: BMC (Van Rosendaal et al.).

Two easy ways to hit the target without overthinking it:

  • Split doses (e.g., 5 g with breakfast + 5 g with dinner).
  • One larger dose if your product allows and your gut is comfortable—at the meal you never skip.

For the regulatory backdrop on heart-health language around psyllium, see 21 CFR §101.81.

A simple food partner to psyllium is oats—rich in beta-glucan—see our post on healthy oat protein bars for easy ways to get them in.

⚠️ This page provides general education about Metamucil (psyllium). It isn’t medical advice, diagnosis, or treatment. Always consult your doctor or pharmacist about timing, dose, and potential interactions.


Morning or night? Either—just avoid right before bed

Morning is convenient and pairs naturally with your first big glass of water. Night can work too—with one caution: avoid taking Metamucil right before bed. UK patient guidance recommends leaving about an hour before lying down and, as always, drinking a full glass of water; your gut naturally slows overnight, and a thickening gel plus not-enough fluid isn’t a combo you want. You’ll see that advice in the NHS guide and a practical UK hospital leaflet – for fybogel, another ispaghula husk brand & make, not much different from Metamucil.

Bedside table with Metamucil glass and alarm clock, text advising to avoid dosing right before sleep
Night is fine—just avoid right-before-bed dosing; leave ~1 hour before lying down and hydrate well.

Comfortable evening routine: after dinner and dishes, mix your Metamucil with a full glass of water while you prep tomorrow’s lunch. By the time you’re winding down, you’ve left a healthy buffer before sleep. (If you’d rather lean on foods in the evening, fiber-forward grains like millets for fiber and weight loss can help round out dinner.)


Before or after meals?

Match timing to the job you want Metamucil to do:

  • Before meals (15–30 minutes) when the priority is satiety/portion control—you want the gel “in place” before the food arrives. (Mealtime framing at Harvard Health.)
  • With meals when consistency is the main challenge or when you’re targeting cholesterol and simply need to hit your daily grams. (Evidence overview at Harvard Health.)
  • Any consistent time for regularity, with adequate fluid. The onset window is 12–72 hours, reflected on label directions compiled at DailyMed.

Across all three, the golden rule is the same: mix with at least 8 oz of liquid and drink promptly so it doesn’t set up in the glass. That instruction lives on the Drug Facts labels at DailyMed. For brand-specific serving formats and flavors, check Metamucil.


How long does Metamucil take to work?

Let’s set expectations so you don’t quit too early.

Close-up of orange psyllium drink with bold text “12–72 hour timeline”
For regularity, bulk-forming fibers typically work within 12–72 hours—judge results after a few days.
  • For regularity: bulk-forming laxatives generally “produce a bowel movement in 12–72 hours,” according to label language compiled at DailyMed.
  • For cholesterol: think in weeks, not days. Summaries at Harvard Health describe meaningful LDL changes after ~3 or more weeks of steady daily intake—often pegged around 10 g/day. The legal framing of the heart-health claim around psyllium is in 21 CFR §101.81.

A friendly shorthand: bowel effects in days, cholesterol effects in weeks.

⚠️ Educational content, not medical advice. If you have a condition, take prescription medicines, or are pregnant/breastfeeding, ask your clinician or pharmacist before using fiber supplements.


Exactly how to take Metamucil (powder, capsules, gummies)

Formats vary, but a few principles make any version work better.

Powder

  • Mixing: put the labeled serving in an empty glass, add ≥ 8 oz water (or permitted liquid), stir briskly, and drink right away—it thickens quickly.
  • Frequency: most OTC labels allow adults to take it up to three times daily as needed.
  • Why the hurry? You want the gel forming in you, not in the glass. These instructions are standard on Drug Facts at DailyMed. For flavor/format specifics, see Metamucil.

Comfort tips: colder water goes down easier; a shaker bottle avoids clumps; unflavored powder into lightly flavored water works if you dislike sweetness.

Pitcher pouring water over psyllium powder in a glass with instructional overlay text.
Water first, dose second. Stir briskly and drink right away so the gel forms in you, not in the glass.

Capsules

  • How to take: swallow the labeled number one at a time with a full glass of cool water—don’t dry-swallow and don’t try to gulp a handful with a sip.
  • Why so specific? Capsules still swell; you want enough liquid to help them slide down and disperse safely. Administration and spacing advice are laid out at Drugs.com. For capsule product details, see Metamucil.

Gummies

  • How to take: follow your pack’s serving and hydrate afterward. They’re convenient for taste/texture, but water still matters for a comfortable transit.

Give your other medicines some space

Psyllium can bind or slow the absorption of certain medicines and supplements. Unless your prescriber says otherwise, keep a 2-hour buffer—other oral meds two hours before or after your Metamucil dose. The spacing rule (along with “full glass of cool water” and “swallow capsules one at a time”) is spelled out at Drugs.com and the capsule monograph Drugs.com.

Blister pack of capsules beside an analog clock with text “Give other meds 2-hour buffer”
Give other oral medicines a 2-hour buffer before or after Metamucil to avoid reduced absorption.

If you take time-sensitive meds (e.g., certain thyroid drugs or diabetes medicines), ask your pharmacist to sanity-check your plan. The buffer is usually enough—but a quick chat prevents guesswork.

For basics readers often ask about, here’s our post on probiotics and gut health.

⚠️ Informational only. Psyllium can affect absorption of other medicines. Confirm timing and spacing with your doctor or pharmacist, especially for time-sensitive drugs (e.g., thyroid or diabetes meds).


Safety, side effects, and sensible precautions

Most people tolerate Metamucil well. Early on, gas or mild bloating can show up as your gut microbes adjust to the extra fermentable fiber. That usually settles if you build up gradually, split the daily amount into smaller servings, and keep fluids generous.

Non-negotiables to keep it safe and comfortable:

  • Always mix with at least 8 oz of liquid and drink promptly. Those aren’t suggestions; they’re label directions on DailyMed.
  • Avoid right-before-bed dosing. Leave about an hour before lying down and hydrate well, per the NHS and this UK hospital leaflet – (for fybogel, another ispaghula husk brand).
  • Keep a 2-hour gap from other oral medicines, per Drugs.com.
  • Know why water matters. Safety alerts from ISMP Canada are a clear reminder to use a full glass of liquid, not thick purees.
  • Want more context from our site? See side effects of taking Metamucil every day and a broader look at side effects of Metamucil.
Man pouring water into a glass with overlay reminding to dilute Metamucil to avoid choking
Safety first: always dilute thoroughly—don’t take psyllium with thick foods; use a full glass of liquid.

Who should check with a clinician first?
Anyone with difficulty swallowing, a history of strictures or bowel obstruction, or complex medication schedules that can’t easily be spaced from fiber. If you’re pregnant, bulk-forming fibers have minimal systemic absorption and are generally considered compatible; still, confirm your plan with your own provider. For a neutral overview, see MedlinePlus.

⚠️ Educational content. Bulk-forming fibers are generally considered compatible in pregnancy, but confirm with your clinician if you’re pregnant, planning pregnancy, or breastfeeding.


Troubleshooting (so you don’t quit on day three)

“I feel bloated.”
Check two basics first: how much water you’re using and how fast you ramped up. Mix with a full 8–12 oz, sip a little extra water afterwards, and split your total into two smaller servings at different times. The “full glass + prompt drinking” instruction is straight from Drug Facts on DailyMed.

“It’s not doing anything.”
Bulk-forming fibers aren’t instant. The expected window for a bowel movement is 12–72 hours. If nothing’s happening, make sure your day includes adequate fluids, a bit of movement, and consistent dosing. That 72-hour window is pulled from label directions on DailyMed. If loose stools show up as you tweak routines, these are helpful electrolytes for diarrhea: best natural drinks & remedies.

“The texture makes me gag.”
Try colder water, use a shaker, and drink right after mixing before it thickens. If powder still isn’t your friend, capsules are an option—just remember the full glass of cool water and the “one at a time” rule at Drugs.com.

“Can I take it at night?”
Yes—just not right before bed. Leave about an hour, hydrate, and you’re fine. That buffer is the exact patient advice in the NHS guide and reiterated in a UK hospital leaflet.

“I’m on several medications.”
Use the 2-hour spacing rule by default and ask your pharmacist to double-check any special cases. The interaction overview is easy to scan at Drugs.com.


Two ready-to-use daily plans (pick the one that fits your life)

Plan A — The “Before Meals” routine (satiety + cholesterol friendly)

  • Lunch: set a reminder 20 minutes before; mix Metamucil with a full glass of water, drink, then plate your food.
  • Dinner: repeat the same pattern.
  • Weekly check-in: are portions a bit smaller? Any gas? If yes, split the amounts or add an extra half-cup of water. Practical mealtime timing appears in Harvard Health.
Metamucil canister beside a bowl of oats with text about daily grams and 3+ week timeline.
For LDL support, ~10 g psyllium/day for 3+ weeks beats clock time—consistency wins.

Plan B — The “With Meals” routine (cholesterol + consistency)

  • Breakfast: first serving with your meal.
  • Dinner: second serving with your meal.
  • Target: make sure your day adds up to ~10 g psyllium (from your Metamucil servings), since Harvard Health reviews show LDL benefits after ~3+ weeks at that total. The authorized claim framework sits in 21 CFR §101.81.

Also Read: Top 10 Foods for Gut Health.


The bottom line

  • Regularity: take Metamucil whenever you’ll remember, with a full 8-oz glass of liquid, and give it 12–72 hours—the plain-English, label-level guidance compiled on DailyMed.
  • Satiety: go 15–30 minutes before meals so the gel’s ready when the food arrives—see the mealtime framing at Harvard Health.
  • Cholesterol: aim for ~10 g/day for 3+ weeks; consistency beats clock time—summarized at Harvard Health and supported by pooled data in the American Journal of Clinical Nutrition; time-of-day differences aren’t meaningful per BMC.
  • Safety: avoid right-before-bed dosing, keep a 2-hour buffer from other oral meds, and always use enough water—patient guidance via the NHS (for fybogel, another ispaghula husk brand), administration/interaction details at Drugs.com, safety alerts from ISMP Canada, and product context from Metamucil.

Choose your goal, pick a time you’ll stick with, pour your water first, and let Metamucil be quietly good to you.

⚠️ Disclaimer: This material is for educational and informational purposes only and not a substitute for professional medical advice, diagnosis, or treatment. Don’t ignore or delay professional care because of something you read here. Always talk with your doctor or pharmacist about whether Metamucil (psyllium) is appropriate for you, how to time it with your other medicines, and the right dose for your situation. If you think you may be experiencing a medical emergency, call your local emergency number immediately.

A quick guide or infographic on when to take or best time to take Metamucil.

FAQs

1) What’s the best time to take Metamucil?

First, remember that consistency beats the clock. For regularity, take it at the time of day you’ll actually remember; then, give it 12–72 hours to show up in your routine (as covered earlier). Finally, stick with one slot for a few days before judging results.

2) Morning or night—does it actually matter?

In general, both can work. However, if you take it in the evening, leave about an hour before lying down and drink a full glass of water (as explained above). Meanwhile, mornings pair naturally with that first big glass of water.

3) Is it bad to take Metamucil right before bed?

Short answer: not ideal. Because your gut slows overnight and the fiber gels, it’s smarter to leave about an hour before you lie down. That way, you stay comfortable and still reap the benefits.

4) Should I take Metamucil before or after meals?

It depends on the job you want it to do. For satiety/portion control, take it 15–30 minutes before meals so the gel forms first; for cholesterol or general regularity, taking it with meals often makes consistency easier (as noted above). In short, match timing to your goal.

5) How long does Metamucil take to work?

Typically, bathroom regularity improves within 12–72 hours. For cholesterol, however, think in weeks—steady daily intake over ~3+ weeks is the realistic horizon we outlined earlier. So, be patient and keep the routine.

6) What’s the best time to take Metamucil for weight loss or appetite control?

For fullness, take it 15–30 minutes before the meals where you tend to overeat. That way, the gel is “ready” when food arrives. Also, start with one pre-meal dose daily, then add a second once your gut feels settled.

7) Can I take Metamucil every day?dl

Yes—daily use is common. That said, always follow your product’s serving directions, mix with a full 8 oz (≈240 ml) of liquid, and ramp up gradually if you’re new to fiber (as the label guidance above emphasizes). Over time, your gut usually adapts.

8) How many times a day can I take it?

Most labels allow up to three times daily as needed. Even so, begin low and go slow; then, increase only if you still need more support. Ultimately, let comfort guide the frequency.

9) How much should I take per day?

Serving sizes vary by product (powder, capsules, gummies). Start with the labeled serving, observe how you feel for a few days, and then—if LDL support is your target—work toward ~10 g/day (often split), as summarized earlier. Meanwhile, keep hydration steady.

10) Can I take Metamucil with my other medications?

Usually yes—just keep a 2-hour buffer (other meds two hours before or after your dose). This spacing helps avoid absorption issues mentioned above. When in doubt, ask your pharmacist.

11) Is Metamucil safe to take at night?

Yes—simply avoid right before bed. Leave about an hour, hydrate well, and you’re good. In practice, an after-dinner routine works nicely.

12) Does Metamucil help with diarrhea as well as constipation?

Interestingly, yes. Because it’s bulk-forming, it absorbs water and helps normalize stool consistency both ways (as the overview earlier explains). Therefore, it can be useful on either side of irregularity.

13) What if Metamucil makes me bloated or gassy?

Early on, that can happen. However, easing in, splitting the total into two smaller servings, and drinking extra water usually fixes it within a few days. If not, step back the dose and build again slowly.

14) Can I take Metamucil with vitamins or probiotics?

Generally, yes—just keep the 2-hour spacing to be safe. Moreover, if you take time-sensitive meds (like certain thyroid or diabetes drugs), confirm timing with your clinician or pharmacist. Better safe than sorry.

15) What’s the best way to take capsules?

Swallow them one at a time with a full glass of cool water. Otherwise, gulping a handful with a tiny sip risks discomfort. So, slow and steady wins here.

16) Can I mix Metamucil into yogurt, applesauce, or smoothies?

Prefer drinkable fluids you can consume right away. Because psyllium swells, thick foods aren’t ideal; plus, you want the gel forming in you, not in the cup. Therefore, mix, drink promptly, and then carry on.

17) How long should I keep taking Metamucil?

For regularity, use it as long as it helps and feels comfortable. For cholesterol, give it at least 3+ weeks of steady daily intake before you judge results. After that, reassess with your clinician if needed.

18) Does the time of day change Metamucil’s cholesterol effect?

Not meaningfully in available research. Instead, dose and consistency matter most. Consequently, pick times that ensure you actually hit your daily grams.

19) Is Metamucil safe in pregnancy?

Bulk-forming fibers have minimal systemic absorption and are generally considered compatible; nevertheless, confirm your plan with your own clinician. As always, your personal context matters.

20) What’s the best time to drink Metamucil for constipation?

Whenever you’ll remember—consistency beats the clock. To that end, pair it with a daily habit, drink at least 8 oz of liquid, and allow 12–72 hours (per the label guidance already covered).

21) Does Metamucil expire?

Yes—check the expiration date and store it as directed. And if you’re unsure, follow the packaging instructions you’ve already seen referenced.

22) Can I take Metamucil twice a day? Three times?

If your label allows, yes—many products permit up to three times daily. That said, don’t chase speed; instead, build gently and listen to your gut.

23) Is it okay to take Metamucil before bed if I drink extra water?

Even with extra water, it’s still wiser to leave about an hour before lying down. In the end, that small buffer keeps things comfortable and aligns with the bedtime caution above.

24) How soon before a meal should I take it for fullness but not discomfort?

A sweet spot for most people is about 20 minutes before eating. It’s long enough for the gel to start forming, but not so long that it thickens uncomfortably. Plus, it’s easy to remember.

25) If I miss a dose, should I double the next one?

No—just take the next scheduled dose. Doubling up isn’t necessary and can feel uncomfortable; instead, prioritize getting back to your normal rhythm.